

Page 1

BALANZA DE COCINA
BILANCIA DA CUCINA
KOMPERNASS GMBH · BURGSTRASSE 21 · D-44867 BOCHUM
www.kompernass.com
ID-Nr.: KH1157-10/08-V2
KH 1157
BALANZA DE COCINA
Instrucciones de uso
BILANCIA DA CUCINA
Istruzioni per l'uso
KITCHEN SCALES
Operating instructions
KÜCHENWAAGE
Bedienungsanleitung
Page 2
KH 1157
q
w
e
r
tyui
Page 3
ÍNDICE PÁGINA
Uso previsto 2
Datos técnicos 2
Indicaciones de seguridad 2
Elementos de mando 3
Volumen de suministro 3
Puesta en servicio 3
Ajustar la hora ..................................................................................................................................3
Colocación........................................................................................................................................3
Manejo 3
Ajuste de la unidad de medida ......................................................................................................3
Pesar ..................................................................................................................................................4
Adición al producto que se pesa (función tara)...........................................................................4
Retirar el producto que se pesa......................................................................................................4
Ajustar el cronómetro.......................................................................................................................4
Indicación de temperatura ..............................................................................................................5
Desconectar la función de pesaje..................................................................................................5
Eliminación de fallos 5
Cambio de pilas 5
Conservación 6
Limpieza 6
Evacuación 6
Importador 6
Garantía y servicio 7
¡Guardar estas instrucciones para preguntas posteriores – e, igualmente entregar éstas, en caso de dar el
aparato a terceras personas!
- 1 -
Page 4

BALANZA DE COCINA
KH 1157
Uso previsto
La báscula de cocina sirve para pesar líquidos no
corrosivos, agresivos ni abrasivos (especialmente
agua y leche) y productos sólidos en el hogar.
No se considera conforme a lo previsto el pesaje
de medicamentos o sustancias no autorizadas.
Datos técnicos
Rango de pesaje: 1 g-5000 g, en pasos
de 1
Indicación de temperatura: 0 °C - 40 °C, en pasos
de 0,5 °C; con ± 2 °C
tolerancia
Alimentación de tensión: 2 pilas de litio de 3 V
CR 2032
Indicaciones de seguridad
¡Peligro de lesiones!
• No permita utilizar el aparato a personas (incluidos
los niños) cuyas facultades físicas, sensoriales o
mentales, así como su falta de conocimientos o
de experiencia, les impida hacer un uso seguro
del mismo si no están bajo vigilancia o han sido
instruidos correctamente.
• Vigile a los niños para asegurarse de que no
juegan con el aparato.
Atención!
Tenga en cuenta las siguientes indicaciones de seguridad. La no observancia de las mismas, puede
dañar la báscula y pueden anularse los derechos
de garantía.
• Al introducir las pilas tenga en cuenta la polaridad
correcta y no aplique demasiada fuerza al hacerlo.
• No coloque más de 5 kg sobre la báscula.
• Asegúrese de que no entre ningún líquido en
la báscula.
• Evite el contacto con disolventes y con productos
de limpieza corrosivos o abrasivos.
• Coloque la báscula únicamente sobre una
superficie plana y sólida.
• No coloque nada sobre la pantalla.
• No presione los campos de los sensores con
fuerza o con objetos puntiagudos.
• No exponga la báscula a altas temperaturas
o a campos magnéticos.
• Evite carga o descarga electrostática. De otro
modo puede provocar indicaciones erróneas
o bien la desconexión repentina de la báscula.
Nota acerca de la manipulación
de las pilas
El aparato utiliza pilas.Tenga en cuenta lo siguiente
a la hora de manipular pilas:
¡Riesgo de explosión!
• No arroje las pilas al fuego. No vuelva a cargar
las pilas.
• No abra las pilas, no estañe ni suelde las pilas
nunca.
¡Existe riesgo de explosión y de lesiones!
• Compruebe periódicamente las pilas. Las pilas
gastadas pueden ocasionar daños al aparato.
• Cuando no vaya a utilizar un aparato durante
un periodo prolongado, extraiga las pilas.
• Si las pilas han perdido líquido, utilice guantes
de protección. Limpie el compartimiento de las
pilas y los contactos de las pilas con un paño
seco.
• Los niños no deben tener acceso a las pilas. Los
niños pueden meterse las pilas en la boca y
atragantarse. En caso de ingestión de una pila
consulte inmediatamente con un médico.
- 2 -
Page 5

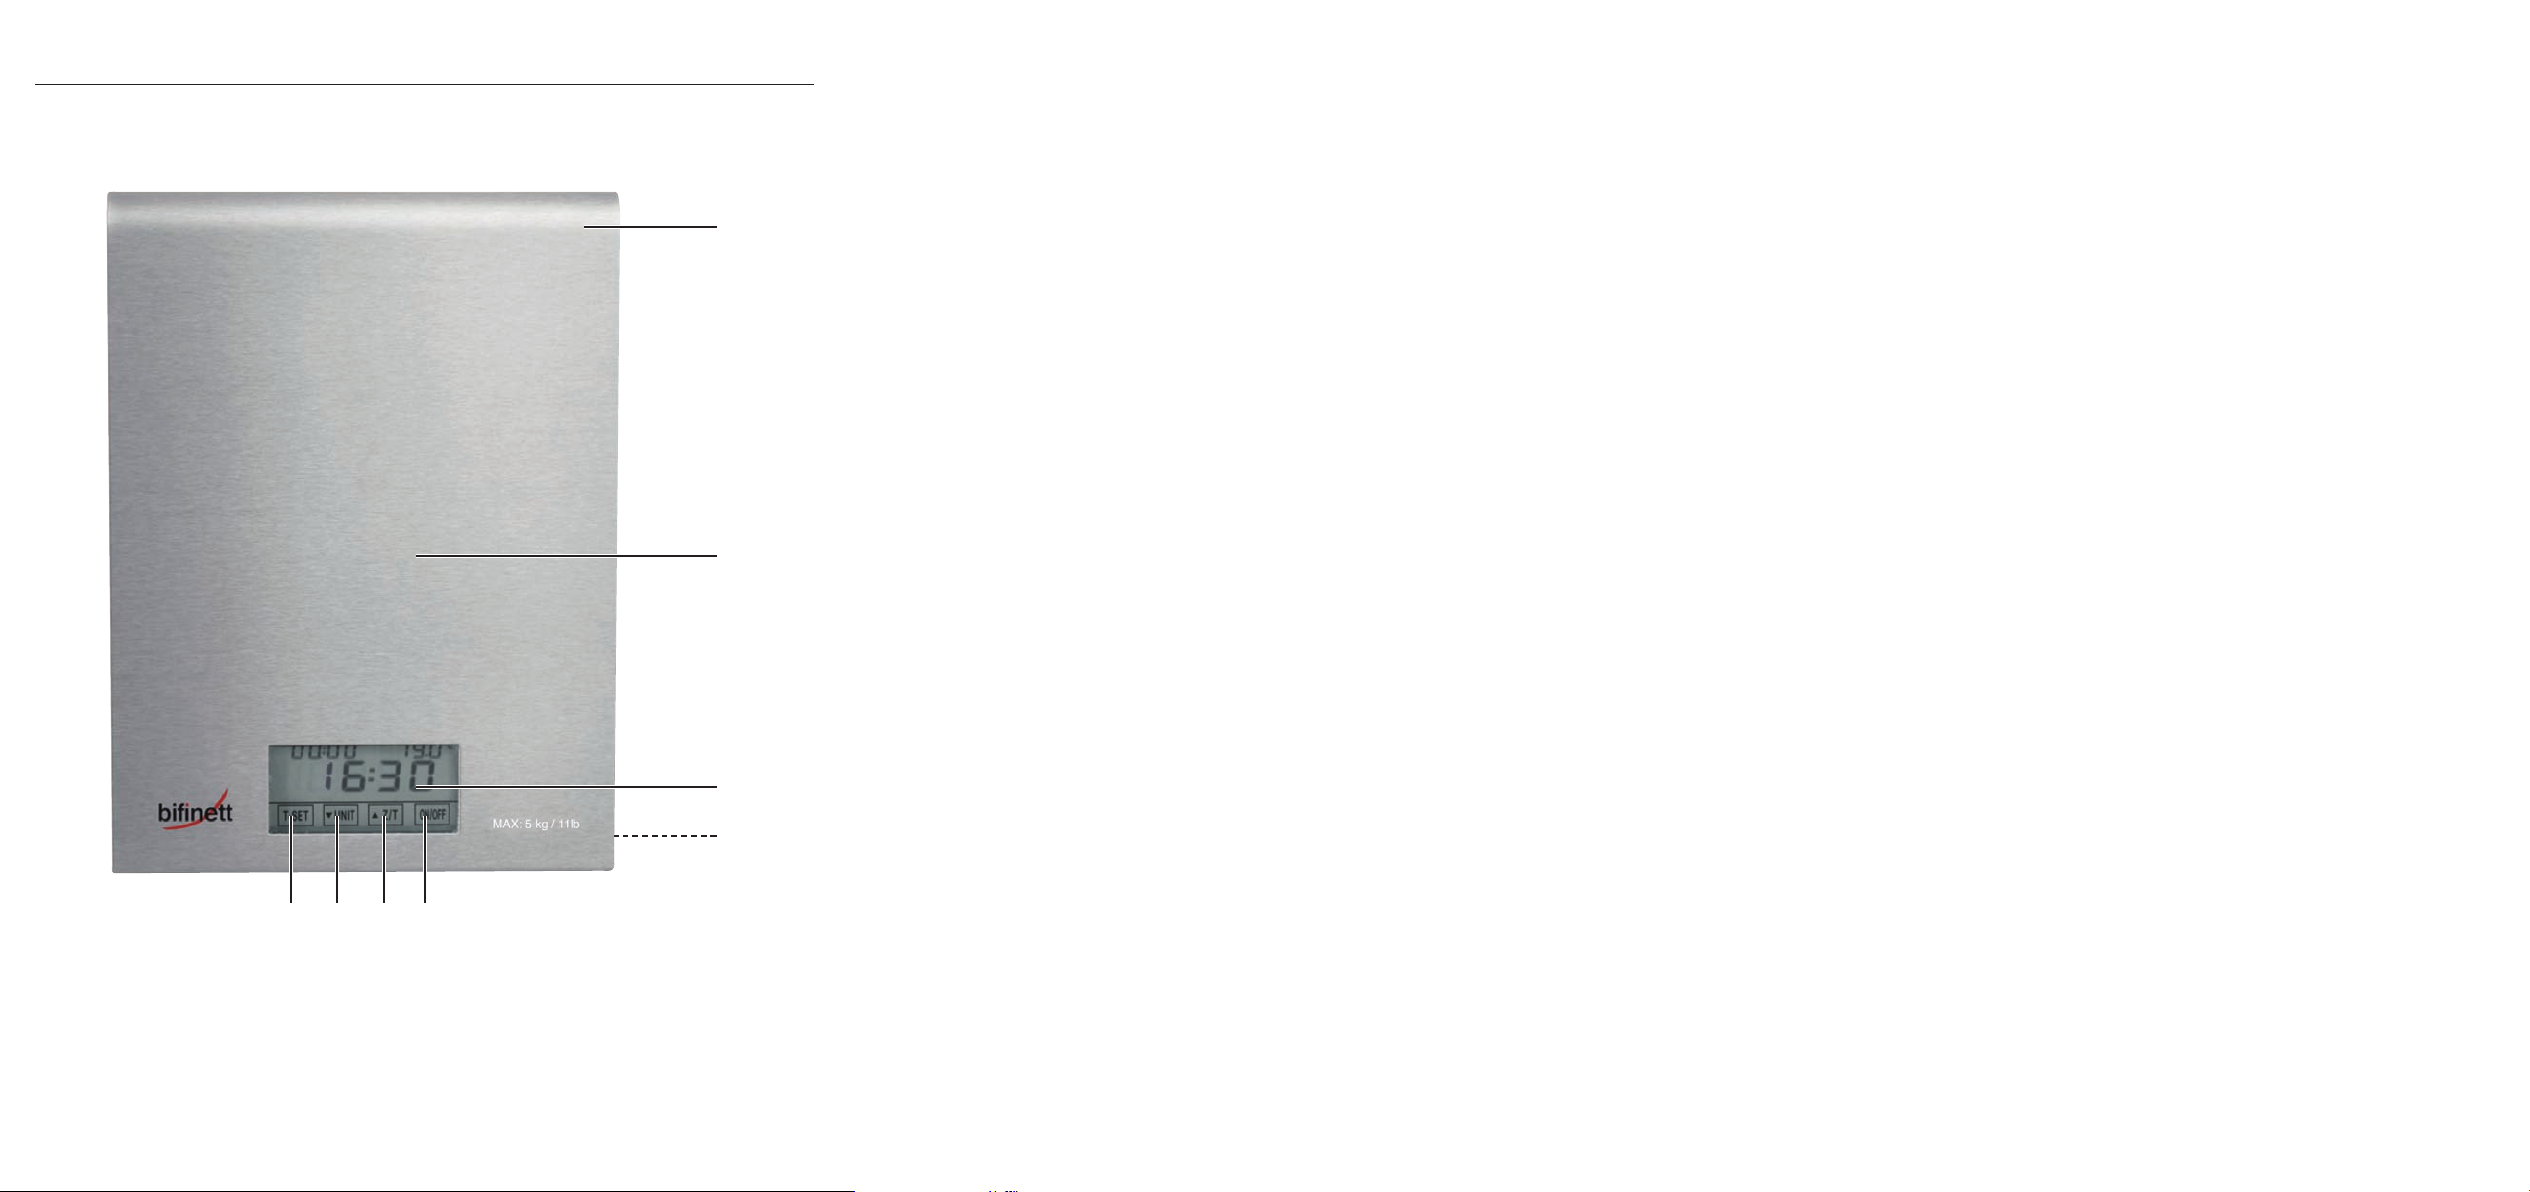
Elementos de mando
Colgador
q
Zona de pesaje
w
Pantalla
e
Compartimiento de pilas
r
Campo de sensor ON/OFF
t
(encendido/apagado)
Campo de sensor L Z/T (ZERO/TARA)
y
Campo de sensor M UNIT
u
(convertidor de unidades)
Campo de sensor T-SET
i
(ajuste del cronómetro/reloj)
³ Presione el campo de sensor L Z/T
M la tecla UNIT
do los minutos.
³ Presione el campo de sensor T-SET
La hora está ahora ajustada.
Si posteriormente usted desea modificar la hora,
pulse y mantenga presionado el campo de sensor
T-SET
hasta que el indicador de las horas parpadee.
i
Proceda de la manera descrita anteriormente.
, hasta que se hayan ajusta-
u
i
y
o bien
.
Colocación
Coloque la báscula sobre una superficie plana y
no deslizante.
Volumen de suministro
• Báscula de cocina
• 2 pilas de litio CR 2032
• Instrucciones de uso
Puesta en servicio
³ Abra el compartimiento de pilas ren la parte
inferior de la báscula.
³ Extraiga la lámina protectora del compartimento
de las pilas
³ Cierre la tapa del compartimento de la pilas
hasta que quede encajada.
La báscula se encuentra en el modo hora y está
lista para el funcionamiento.
Ajustar la hora
En la primera puesta en funcionamiento o después
de un cambio de pilas, será necesario ajustar la
hora.
³ En cuanto coloque las pilas, parpadeará el indi-
cador de las horas. Presione sobre el campo de
sensor L Z/T
se ajuste la hora.
³ Presione el campo de sensor T-SET
al indicador de minutos.
.
r
o bien M UNIT u, hasta que
y
i
para cambiar
Este aparato incorpora patas antideslizantes. Ya
que las superficies de los muebles están compuestas
de los materiales más diversos y son tratadas con
todo tipo de productos de limpieza, no puede asegurarse que alguna de estas sustancias no contenga
componentes que debiliten y reblandezcan las patas
del aparato. Coloque en su caso una base antideslizante debajo de las patas del aparato.
Manejo
Ajuste de la unidad de medida
Puede elegir entre el sistema métrico y el angloamericano. De 0g a 999g se muestra la unidad
en g/on y a partir de 999g en KG/LB y g/on.
También puede medir líquidos.
Con el sistema métrico:
• Milímetros (ml) de agua (Water)
• Milímetros (ml) de leche (Milk).
Con el sistema angloamericano:
• Onzas de líquido (fl´oz) de agua (Water)
• Onzas de líquido (fl´oz) de leche (Milk).
- 3 -
Page 6

³ Pulse sobre el campo de sensor ON/OFF t.
La báscula se encuentra ahora en el modo pe-
sar. La unidad ajustada aparecerá debajo o a
la derecha de la indicación del peso en la pan-
talla
.
e
³ Para elegir entre el sistema métrico y el anglo-
sajón, pulse y mantenga presionado el campo
de sensor UNIT
dad de medida.
³ Para cambiar en un sistema métrico entre
g/kg - ml de agua - ml de leche
oz/lb:oz - fl´oz de agua - fl´oz de leche
pulse brevemente el campo de sensor UNIT
hasta que aparezca en la pantalla ela unidad
de medida deseada.
, hasta que se cambie la uni-
u
o
u
Pesar
³ Presione el campo de sensor ON/OFF t, para
encender la báscula (modo pesar).
³ Ajuste la unidad de medida deseada (véase ca-
pítulo "Ajuste de la unidad de medida").
La báscula mostrará el peso "0". En la pantalla
a la izquierda, aparecerá "O".
³ Coloque un recipiente sobre la báscula y presione
el campo de sensor Z/T
a mostrar "0" y no tendrá en cuenta el peso del
recipiente.
³ Introduzca en el recipiente el producto que quiere
pesar.
. La báscula volverá
y
e
Adición al producto que se pesa
(función tara)
Para la adición de otras cantidades parciales, puede
poner la báscula a "0".
³ Para ello, pulse una vez el campo de sensor Z/T
. En la pantalla eaparecerá a la izquierda
y
"TARE". La báscula mostrará de nuevo "0" gramos.
³ Introduzca en el recipiente el producto que quie-
re pesar.
En la pantalla
añadido.
se mostrará el peso del producto
e
Puede repetir varias veces este paso. Sin embargo
no deberá colocar sobre la báscula ningún
peso que supere los 5 kg.
Si saca todo el producto de la báscula y presiona el campo de sensor Z/T
a la izquierda de la pantalla
e
y
"O".
Retirar el producto que se pesa
³ Pulse una vez el campo de sensor Z/T y. En la
pantalla
La báscula mostrará de nuevo "0" gramos.
³ Extraiga la cantidad del producto deseada.
La indicación de peso del producto a pesar retirado
aparece como valor negativo en la pantalla
, a la izquierda, aparecerá "TARE".
e
Puede repetir varias veces este paso.
Si saca todo el producto de la báscula y presiona
el campo de sensor Z/T y, se mostrará a la
,
izquierda de la pantalla
e
"O".
Ajustar el cronómetro
Se puede usar el cronómetro tanto en el modo hora
como el en modo pesar.
El cronómetro le permite ajustar un lapso de tiempo,
después del cual suena una señal de aviso. El tiempo
ajustado transcurre como una cuenta atrás.
³ Pulse una vez el campo de sensor T-SET
la pantalla
pana , arriba a la izquierda.
aparecerá el símbolo de la cam-
e
Puede ajustar el tiempo incluso con segundos.
Al mantener pulsado el campo de sensor L
Z/T
o bien M UNIT u, las cifras avanzan
y
más rápido.
³ A través del campo de sensor L Z/T yo bien
M UNIT
adas.
, ajuste las decenas de minutos dese-
u
, se mostrará
.
e
. En
i
- 4 -
Page 7

³ Pulse una vez el campo de sensor T-SET i.
A través del campo de sensor L Z/T
M UNIT
de-seados.
³ Pulse una vez el campo de sensor T-SET
A través del campo de sensor L Z/T
M UNIT
deseadas.
³ Pulse una vez el campo de sensor T-SET
A través del campo de sensor L Z/T
M UNIT
deseados.
³ Presione el campo de sensor T-SET
iniciar el cronometraje.
Puede reposicionar el cronómetro
³ Presione el campo de sensor T-SET
reiniciar el cronómetro.
Una vez transcurrido el tiempo ajustado, sonará
una señal acústica. Puede apagar esta señal acústica
presionando el campo del sensor que prefiera.
, ajuste los minutos individuales
u
, ajuste las decenas de segundos
u
, ajuste los segundos individuales
u
i
i
o bien
y
i
o bien
y
i
o bien
y
, para
, para
.
.
Indicación de temperatura
Si la báscula está encendida, se muestra la temperatura en °C en la parte superior derecha de la
pantalla
e
.
Desconectar la función de pesaje
Si durante aprox. 2 minutos no pesa nada, se activará la desconexión automática al modo hora.
³ Para cambiar al modo hora manualmente, pulse
la tecla ON/OFF
t
.
Eliminación de fallos
³ Si en la pantalla eaparece "Err", la báscula
está sobrecargada. Retire el producto a pesar.
È No coloque sobre la báscula ningún peso que
supere los 5 kg.
³ Si en la pantalla
no se puede conectar el modo pesar, la báscula
está sobrecargada. Retire el producto a pesar
de la báscula y conecte de nuevo el modo pesar.
Coloque menos de 5 kg sobre la báscula.
³ Si en la pantalla
gastadas.Cambie las pilas.
aparece brevemente "Err" y
e
aparece "Lo", las pilas están
e
La indicación "Lo" aparece sólo en el modo
pesar.
³ Si en la pantalla eaparece "- - - -", espere unos
segundos.
³ Si la báscula no funcionase como debe, cambie
las pilas. Si con ello no se solucionase el error,
póngase en contacto con el servicio de asistencia
técnica (véase "Garantia y asistencia técnica“).
Cambio de pilas
¡Advertencia!
Al cambiar las pilas tenga en cuenta la polaridad
correcta. Si se cambian las pilas de forma inadecuada
existe peligro de explosión.
Cambie las pilas únicamente por otras de tipo idéntico
o equivalentes. Para cambiar las pilas derramadas,
utilice guantes de protección y limpie el compartimiento de pilas con un paño seco.
Peligro de toxicidad!
Los niños pueden tragarse las pilas, provocando
perjuicios para su salud. Guarde las pilas de
manera que sean inaccesibles para los niños.
³ Para cambiar las pilas, abra la tapa del comparti-
miento de las pilas, en la parte inferior de la
báscula.
³ Presione hacia afuera la pestaña metálica del
soporte de las pilas, de manera que la pila salga
hacia afuera.
³ Retire la pila y coloque una nueva. Tenga en
cuenta la polaridad correcta: la parte de la pila
identificada con "+" debe colocarse hacia arriba.
- 5 -
Page 8
Conservación
Cuando no utilice la báscula puede colgarla, por
ejemplo en un listón de cocina, gracias al colgador
integrado
q
.
Limpieza
Atención!
Asegúrese de que no entre ningún líquido en la
báscula. Los líquidos que penetran pueden destruir
la báscula.
Limpie la báscula con un paño ligeramente humedecido con agua jabonosa suave, o utilice un producto
de limpieza especial para el acero. No utilice ningún
disolvente abrasivo.
Limpie la pantalla
humedecido y séquela con un paño seco sin pelusa.
sólo con un paño ligeramente
e
Evacuación
¡Evacuación de las pilas!
Las pilas no deben evacuarse en la basura doméstica. Por lo tanto, retire siempre las pilas/baterías de
los aparatos antes de su evacuación. Cada usuario
está obligado por ley de evacuar o entregar las/os
pilas/acumuladoresen un centro de recogida de su
ayuntamiento/barrio o en el comercio. Esta obligación tiene el objetivo de que las pilas puedan eliminarse de forma ecológica. Devuelva las pilas/acumula-dores sólo en estado sin carga.
El material de embalaje debe desecharse
de forma respetuosa con el medio
ambiente.
Importador
KOMPERNASS GMBH
BURGSTRASSE 21
D-44867 BOCHUM
www.kompernass.com
En ningún caso deberá tirar el aparato
a la basura doméstica. Este producto
está sometido a la directiva europea
2002/96/EC.
Elimine el aparato a través de una empresa de
evacuación de basuras autorizada o por medio del
centro de evacuación de basuras municipal.
Tenga en cuenta las normativas actuales en vigor.
En caso de duda póngase en contacto con el
centro de evacuación de basuras.
- 6 -
Page 9
Garantía y servicio
Con este aparato recibe usted 3 años de garantía
desde la fecha de compra. El aparato ha sido fabricado cuidadosamente y ha sido probado antes de
su entrega. Guarde el comprobante de caja como
justificante de compra. Si necesitara hacer uso de
la garantía, póngase en contacto por teléfono con
su punto de servicio habitual. Éste es el único
modo de garantizar un envío gratuito.
La garantía cubre los defectos de fabricación o del
material, pero no las piezas sujetas a desgaste y
los daños sufridos por las piezas frágiles. Este producto ha sido diseñado exclusivamente para el uso
particular y no para el uso industrial.
En caso de manipulación indebida e incorrecta, uso
de la fuerza y en caso de abrir el aparato personas
extrañas a nuestros centros de asistencia técnica
autorizados, la garantía pierde su validez. Esta garantía no reduce en forma alguna sus derechos
legales.
Kompernass Service España
C/Invención 7
Polígono Industrial Los Olivos
28906 Getafe – Madrid
Tel.: 902/884663
Fax: 91/6652551
e-mail: support.es@kompernass.com
- 7 -
Page 10

- 8 -
Page 11

INDICE PAGINA
Destinazione d'uso 10
Dati tecnici 10
Avvertenze di sicurezza 10
Elementi di comando 11
Fornitura 11
Messa in funzione 11
Impostazione dell'ora....................................................................................................................11
Installazione....................................................................................................................................11
Funzionamento 11
Impostazione dell'unità di misura.................................................................................................11
Pesatura...........................................................................................................................................12
Pesare il prodotto (funzione taratura)..........................................................................................12
Rimuovere il prodotto pesato........................................................................................................12
Impostazione Timer........................................................................................................................12
Visualizzazione della temperatura...............................................................................................13
Disattivazione della funzione di pesatura...................................................................................13
Soluzioni in caso di malfunzionamenti 13
Sostituzione delle pile 13
Conservazione 13
Pulizia 14
Smaltimento 14
Importatore 14
Garanzia & assistenza 14
Conservare le presenti istruzioni per consultarle in futuro; in caso di cessione dell'apparecchio a terzi,
consegnare anche le istruzioni!
- 9 -
Page 12

BILANCIA DA CUCINA
KH 1157
Destinazione d'uso
La bilancia da cucina è destinata alla pesatura di
liquidi non corrosivi, aggressivi o abrasivi (in particolare acqua e latte) e solidi in ambiente domestico
privato. La pesatura di medicinali e sostanze illegali
non è conforme alla destinazione d'uso.
Dati tecnici
Campo di pesatura: 1 g-5000 g, in passi da
1 grammo
Indicatore di temperatura: 0° C - 40° C, in passi
da 0,5° C; con ± 2° C
di tolleranza
Tensione alimentata: 2 x 3 V pile al litio
CR 2032
Avvertenze di sicurezza
Pericolo di lesioni!
• Questo apparecchio non è indicato per l'uso da
parte di persone (inclusi bambini) con limitate
capacità fisiche, sensoriali o mentali o prive dell'esperienza e/o della conoscenza necessaria, a
meno che tali persone non vengano sorvegliate
da un responsabile per la sicurezza o abbiano
ricevuto indicazioni sull'impiego dell'apparecchio.
• Sorvegliare i bambini per assicurarsi che non
giochino con l'apparecchio.
Attenzione!
Rispettare scrupolosamente le seguenti avvertenze
di sicurezza. La mancata osservanza può causare
danni alla bilancia e l'annullamento della garanzia.
• Fare attenzione alla polarità corretta delle pile e
non esercitare alcuna forza all'atto dell'inserimento.
• Non collocare sulla bilancia più di 5 kg di peso.
• Impedire la penetrazione di liquidi nella bilancia.
• Evitare il contatto con solventi e detergenti corrosivi o abrasivi.
• Collocare la bilancia solo su un piano orizzontale
e stabile.
• Non collocare alcunché sul display.
• Non premere sui tasti sensori con violenza o con
oggetti appuntiti.
• Non esporre la bilancia a temperature eccessive
o a campi magnetici.
• Evitare cariche elettrostatiche. Esse possono dare
luogo a indicazioni errate o a un improvviso spegnimento della bilancia.
Avvertenze relative all'uso delle
pile
L'apparecchio funziona con le pile. Per il corretto
uso delle pile osservare quanto segue:
Pericolo di esplosione!
• Non gettare mai le pile nel fuoco. Non ricaricare le pile.
• Non aprire, saldare o sciogliere le pile.
Pericolo di esplosione e lesioni!
• Controllare periodicamente le pile. Le pile deteriorate possono causare danni all'apparecchio.
• Se non si utilizza un apparecchio per lungo tempo, rimuovere le pile.
• Se le pile sono deteriorate, indossare guanti di
protezione. Pulire il vano batterie e i contatti della batteria con un panno asciutto.
• Le pile devono essere tenute lontano dalla portata dei bambini, i quali potrebbero portarle alla
bocca e ingerirle. In caso di ingestione di pile, ricorrere immediatamente al soccorso medico.
- 10 -
Page 13

Elementi di comando
Sospensione
q
Campo di pesatura
w
Display
e
Vano pile
r
Tasto sensore ON/OFF (acceso/spento)
t
Tasto sensore L Z/T (ZERO/TARA)
y
Tasto sensore M UNIT (commutatore unità)
u
Tasto sensore T-SET (impostazione timer/ora)
i
Fornitura
• Bilancia da cucina
• 2 x pile al litio CR 2032
• Istruzioni per l'uso
Se successivamente si desidera modificare l'ora,
premere e tenere premuto il tasto sensore T-SET
fino a quando l'indicazione dell'ora lampeggia.
Procedere come descritto precedentemente.
i
Installazione
Collocare la bilancia su una superficie piana e
antisdrucciolo.
Il presente apparecchio è dotato di piedini antisdrucciolo. Poiché le superfici dei mobili sono costituite da
diversi materiali e vengono trattate con i più svariati
prodotti per la cura, non è possibile escludere completamente che alcune di queste sostanze contengano
componenti in grado di aggredire e deteriorare i piedini di gomma. Collocare eventualmente un supporto
antisdrucciolo sotto i piedini dell'apparecchio.
Messa in funzione
³ Aprire il vano pile rsul lato inferiore della
bilancia.
³ Rimuovere la pellicola protettiva dal vano pile
.
r
³ Chiudere correttamente il vano pile fino all'inseri-
mento.
La bilancia si trova in modalità ora ed è pronta per
l'uso.
Impostazione dell'ora
Nella prima messa in funzione o dopo la sostituzione
delle pile è necessario impostare l'ora.
³ Il display con l'indicazione delle ore lampeggia
non appena vengono inserite le pile. Premere
il tasto sensore L Z/T
impostare l'ora.
³ Premere il tasto sensore T-SET
alla visualizzazione dei minuti.
³ Premere il tasto sensore L Z/T
fino a ottenere l'impostazione dei minuti.
³ Premere il tasto sensore T-SET
L'ora è stata così impostata.
o M UNIT u, fino a
y
per passare
i
o M UNIT u,
y
.
i
Funzionamento
Impostazione dell'unità di misura
Si può scegliere fra il sistema metrico decimale e
quello angloamericano. Da 0 g - 999 g l'unità viene
visualizzata in g/oz e da 999 g in kg/LB e g/oz.
È inoltre possibile pesare liquidi.
Nel sistema metrico:
• millilitri (ml) acqua (Water)
• millilitri (ml) latte (Milk).
Nel sistema americano:
• once liquide (fl´oz) acqua (Water)
• once liquide (fl´oz) latte (Milk).
³ Premere il tasto sensore ON/OFF
si trova ora in modalità di pesatura. L'unità impostata compare in basso o a destra accanto
all'indicazione del peso nel display
³ Per passare dal sistema metrico decimale a quello
angloamericano e viceversa, premere e mantenere premuto il tasto sensore UNIT
passare da un sistema all'altro.
. La bilancia
t
.
e
, fino a
u
- 11 -
Page 14

³ Per passare nell'ambito dello stesso sistema di
misura da
g/kg - ml Water - ml Milk
o
oz/lb:oz - fl´oz Water - fl´oz Milk
e viceversa, premere brevemente sul tasto sensore
UNIT
, fino a visualizzare nel display el'unità di
u
misura desiderata.
Pesatura
³ Premere sul tasto sensore ON/OFF t, per
accendere la bilancia (modalità di pesatura).
³ Impostare l'unità di misura desiderata (v. capitolo
„Impostazione dell'unità di misura“).
La bilancia indica il peso "0". A sinistra nel display
viene visualizzato „O”.
e
³ Collocare sulla bilancia un contenitore idoneo
e premere sul tasto sensore Z/T y. La bilancia
indica nuovamente lo „0“ e non calcola il peso
del contenitore.
³ Versare il prodotto da pesare nel contenitore.
Rimuovere il prodotto pesato
³ Premere ancora una volta il tasto sensore Z/T
. A sinistra nel display eviene visualizzato
y
„TARE".
La bilancia indica nuovamente "0" grammi.
³ Prelevare la quantità desiderata di prodotto da
pesare.
Sul display
sarà visualizzato come valore negativo.
il peso del prodotto pesato rimosso
e
Questa fase può essere ripetuta più volte.
Se si preleva tutto il prodotto dalla bilancia e
si preme sul tasto sensore Z/T y, a sinistra nel
display
Impostazione Timer
Il timer può essere utilizzato in modalità ora e in
modalità di pesatura.
Il timer permette di impostare un periodo di tempo
allo scadere del quale viene emesso un segnale
acustico. Il tempo impostato scorre a ritroso.
verrà visualizzato „O”.
e
Pesare il prodotto (funzione taratura)
Per pesare altre quantità parziali è possibile posizionare la bilancia su "0".
³ A tale scopo premere ancora una volta il tasto
sensore Z/T
re „TARE“. La bilancia indica nuovamente "0"
grammi.
³ Versare la quantità parziale di prodotto da pe-
sare nel contenitore.
Nel display
. Nel display ea sinistra compa-
y
viene visualizzato il peso del prodotto.
e
Questa fase può essere ripetuta più volte.
Non collocare comunque mai più di 5 kg sulla
bilancia.
Se si preleva tutto il prodotto dalla bilancia e
si preme sul tasto sensore Z/T
display
verrà visualizzato „O”.
e
, a sinistra nel
y
³ Premere una volta il tasto sensore T-SET
display
compare il simbolo della campanella
e
in alto a sinistra.
È possibile impostare l'orario con precisione al
secondo. Tenendo premuto il tasto sensore L
Z/T
o M UNIT u, i numeri scorrono più
y
velocemente.
³ Con il tasto sensore L Z/T yo M UNIT
impostare la decina di minuti desiderata.
³ Premere una volta il tasto sensore T-SET
il tasto sensore L Z/T
l'unità di minuti desiderata.
³ Premere una volta il tasto sensore T-SET
il tasto sensore L Z/T
la decina di secondi desiderata.
³ Premere una volta il tasto sensore T-SET
il tasto sensore L Z/T
l'unità di secondi desiderata.
- 12 -
o M UNIT uinserire
y
o M UNIT uinserire
y
o M UNIT uinserire
y
i
i
i
i
. Nel
u
. Con
. Con
. Con
Page 15

³ Premere sul tasto sensore T-SET i, per avviare
la misurazione del tempo.
Il timer può essere azzerato.
qualche secondo.
³ Se la bilancia non funziona come dovrebbe,
sostituire le pile. Se l'errore non viene eliminato
dopo tale procedura, contattare l'assistenza
(v. „Garanzia e assistenza“).
³ Premere sul tasto sensore T-SET
timer.
Se il tempo impostato è scaduto, viene emesso un
segnale acustico. Questo segnale acustico può essere
disattivato tramite la pressione di un qualsiasi tasto
sensore.
, per riazzerare il
i
Visualizzazione della temperatura
Con la bilancia accesa, il display emostra la temperatura in °C in alto a destra.
Disattivazione della funzione di pesatura
Se non si pesa niente per ca. 2 minuti, l'automatismo di
disattivazione passa alla modalità ora.
³ Per passare manualmente alla modalità ora,
premere il tasto ON/OFF
t
.
Soluzioni in caso di
malfunzionamenti
³ Se il display emostra il messaggio „Err“, significa
che la bilancia è sovraccarica. Rimuovere il prodotto da pesare. Non pesare mai più di 5 kg sulla
bilancia.
³ Se il display
„Err“ e la modalità di pesatura non viene attivata,
significa che la bilancia è in sovraccarico. Rimuovere il prodotto da pesare dalla bilancia e riattivare la modalità di pesatura. Posizionare meno
di 5 kg sulla bilancia.
³ Se il display
significa che le pile sono scariche. Sostituire le pile.
Il messaggio „Lo“ appare solo in modalità di
pesatura.
³ Se nel display
mostra brevemente il messaggio
e
visualizza il messaggio „Lo“,
e
compare „- - - -“, attendere
e
Sostituzione delle pile
Avvertenza!
Fare attenzione alla corretta polarità delle pile, all'atto della loro sostituzione. In caso di sostituzione non
conforme delle pile sussiste il pericolo di esplosione.
Sostituire le pile solo con altre pile identiche o dello
stesso tipo. In caso di fuoriuscita di acidi dalle pile,
indossare guanti protettivi e ripulire il vano pile con
un panno asciutto.
Pericolo di avvelenamento!
Le pile potrebbero essere ingoiate dai bambini, provocando danni alla salute. Tenere le pile fuori dalla
portata dei bambini.
³ Per sostituire le pile, aprire il coperchio del vano
pile sul lato inferiore della bilancia.
³ Premere verso l'esterno la linguetta metallica del
supporto delle pile, per ottenere la fuoriuscita
delle pile.
³ Prelevare le pile scariche e inserire le nuove.
Rispettare la polarità corretta: il lato della pila
contrassegnato con „+“ deve essere rivolto
verso l'alto.
Conservazione
Se non si utilizza la bilancia, tramite l'apposito dispositivo di sospensione integrato
sospenderla, per esempio a una barra della cucina.
è possibile
q
- 13 -
Page 16

Pulizia
Attenzione!
Impedire la penetrazione di liquidi nella bilancia.
I liquidi infiltrati potrebbero danneggiare la bilancia.
Pulire la bilancia con un panno leggermente inumidito
con una soluzione delicata o utilizzare un detergente
speciale per l'acciaio inox. Non utilizzare agenti
abrasivi o solventi.
Pulire il display
midito e asciugarlo con un panno privo di pelucchi.
solo con un panno leggermente inu-
e
Smaltimento
Non gettare per alcun motivo l’apparecchio insieme ai normali rifiuti
domestici. Questo prodotto sottostà
alla direttiva europea 2002/96/EC.
Smaltire l’apparecchio presso un’azienda autorizzata o presso l’ente comunale di smaltimento.
Rispettare le norme attualmente in vigore. In caso di
dubbi, contattare l’azienda di smaltimento
competente.
Importatore
KOMPERNASS GMBH
BURGSTRASSE 21
D-44867 BOCHUM
www.kompernass.com
Garanzia & assistenza
Questo apparecchio è garantito per tre anni a partire dalla data di acquisto. L'apparecchio è stato
prodotto con cura e debitamente collaudato prima
della consegna. Conservare lo scontrino come prova d'acquisto. Nei casi contemplati dalla garanzia,
mettersi in comunicazione telefonicamente con il
centro di assis-tenza più vicino. Solo in questo
modo è possibile garantire una spedizione gratuita
della merce.
La prestazione della garanzia vale solo per difetti
del materiale o di fabbricazione. Il prodotto è destinato esclusivamente all'uso domestico e non a quello commerciale.
La garanzia decade in caso di impiego improprio o
manomissione, uso della forza e interventi non eseguiti dalla nostra filiale di assistenza autorizzata.
Pile
Non gettare assolutamente le pile insieme ai normali rifiuti domestici. Rimuovere pertanto sempre le
pile/accumulatori dagli apparecchi, prima dello
smaltimento.
Le pile possono contenere sostanze tossiche dannose per l'ambiente. Smaltire pertanto le pile unicamente in conformità alle leggi vigenti.
Smaltire tutti i materiali d’imballo in conformità alle norme per il rispetto dell’ambiente.
Kompernass Service Italia
Corso Lino Zanussi 11
33080 Porcia (PN)
Tel.: 0434/1851001
Fax: 0434/1851001
e-mail: support.it@kompernass.com
- 14 -
Page 17

CONTENT PAGE
Intended use 16
Technical data 16
Safety information 16
Operating Elements 17
Items supplied 17
Commissioning 17
Setting the time...............................................................................................................................17
Setup ...............................................................................................................................................17
Operation 17
Setting the units of measurement..................................................................................................17
Weighing ........................................................................................................................................18
Adding & Weighing (Tare Function)............................................................................................18
Removing Weighed Items .............................................................................................................18
Setting the Timer.............................................................................................................................18
Temperature Display......................................................................................................................19
Switching the weighing function off .............................................................................................19
Troubleshooting 19
Changing the batteries 19
Storage 19
Cleaning 19
Disposal 20
Importer 20
Warranty & Service 20
Read the operating instructions carefully before using the appliance for the first time and preserve this
booklet for later reference. Pass the manual on to whomsoever might acquire the appliance at a later date.
- 15 -
Page 18

KITCHEN SCALES
KH 1157
Intended use
These kitchen scales are intended for use in weighing
non-caustic, unaggressive and non-abrasive liquids
(especially water and milk) and solid materials in
domestic households. The weighing of medications
and non-permitted materials is considered to be improper use.
Technical data
Weighing Range: 1 g-5000 g, in 1 gram
steps
Temperature Display: 0 °C - 40 °C,
in 0,5 °C steps; with a
tolerance of ± 2 °C
Power supply: 2 x 3 V CR 2032
Lithium batteries
Safety information
Risk of personal injury!
• This appliance is not intended for use by individuals
(including children) with restricted physical, physiological or intellectual abilities or deficiences in
experience and/or knowledge unless they are
supervised by a person responsible for their safety
or receive from this person instruction in how the
appliance is to be used.
• Children should be supervised to ensure that
they do not play with the appliance.
Attention!
Observe the following safety notices exactly. Failure
to comply with them could damage the scales and
possibly nullify your claims under the warranty provisions.
• Ensure that the batteries are inserted with the
correct polarity and do not apply excessive force
when inserting them.
• Never place more than 5 kg on the scale.
• Ensure that no fluids can enter the scale.
• Avoid contact with solvents and with corrosive
or abrasive cleaning materials.
• Only use the scale on level and firm surfaces.
• Do not place anything on the display.
• Do NOT press on the sensor areas with excessive
force or sharp objects.
• Do not subject the scale to high temperatures or
powerful magnetic fields.
• Avoid electrostatic charging and discharging.
These can cause erroneous displays and/or the
sudden deactivation of the scales.
Information regarding the interac-
tion with batteries
The device uses batteries. In regard to interaction
with batteries, please observe the following:
Risk of explosion!
• Do not throw batteries into a fire. Do not recharge the batteries.
• Never open batteries, never solder or weld batteries.
The risk of explosions and injuries exists!
• Regularly check the condition of the batteries.
Leaking batteries can cause damage to the device.
• If you do not intend to use the device for an extended period, remove the batteries.
• If the batteries have leaked, to avoid the risk of
injury through chemical burns put on a pair of
protective gloves before removing the batteries.
Clean the battery compartment and the battery
contacts with a dry cloth.
• Keep batteries out of the reach of children. Children can put batteries into their mouths and
swallow them. If a battery is swallowed, medical
assistance must be sought IMMEDIATELY.
- 16 -
Page 19

Operating Elements
Suspension frame
q
Weighing area
w
Display
e
Battery compartment
r
Sensor area ON/OFF
t
Sensor area L Z/T (ZERO/TARE)
y
Sensor area M UNIT (Measurement unit switch)
u
Sensor area T-SET (Timer/Clock adjustment)
i
Items supplied
• Kitchen scales
• 2 x CR 2032 Lithium batteries
• Operating Instructions
If you need to re-adjust the time display (e.g. for
Summer/Winter Time) press and hold the T-SET
button
ceed as described above.
until the hour indicator blinks. Then pro-
i
Setup
Place the kitchen scales on a level and slip-free
surface.
This appliance is equipped with non-slip rubber feet.
As furniture surfaces may be made of a variety of
materials and are treated with many different types
of cleaning agents, it cannot be completely ruled
out that some substances contain ingredients which
may corrode the rubber rests and soften them.
If possible place an anti-slip material under the feet
of the appliance.
Commissioning
³ Open the battery compartment ron the under-
side of the scales.
³ Remove the protection foil from the battery com-
partment
³ Close the battery compartment cover, until it locks
in place.
The scale is now in clock mode and ready for use.
Setting the time
On commissioning and on a change of batteries the
time must be set resp. adjusted.
³ As soon as the batteries have been inserted the
hour indicator blinks. Press on the sensor area
L Z/T
hour indicator.
³ Press the sensor area T-SET
the minute indicator.
³ Press the sensor area L Z/T
button
³ Press the sensor area T-SET
The time display is now programmed.
.
r
or M UNIT uto adjust and set the
y
to switch over to
i
or the M UNIT
y
to adjust and set the minute indicator.
u
.
i
Operation
Setting the units of measurement
You can choose between the metric and the AngloAmerican (Imperial) system. From 0g to 999g the
unit is shown in g/oz and from 999g in kg/lbs and
g/oz.
Additionally, you can weigh liquids.
In the metric system:
• Milliliter (ml) water
• Milliliter (ml) milk.
In the Anglo-American system:
• Fluid ounces (fl´oz) water
• Fluid ounces (fl´oz) milk.
³ Press the sensor area ON/OFF
now in the weighing mode. The programmed
adjustment appears under or to the right of the
weight indication in the display
³ To switch between the metric and the Anglo-
American weighing systems, press and hold a
finger on the sensor area UNIT
used for measuring has changed.
. The scale is
t
.
e
until the unit
u
- 17 -
Page 20

³ To switch within a measurement system,
g/kg - ml water - ml milk
or
oz/lb:oz - fl´oz water - fl´oz milk
briefly press the sensor area UNIT
desired measurement unit appears in the display
.
e
u
until the
Weighing
³ Press the sensor area ON/OFF tto switch the
scales on (weighing mode).
³ Programme in the desired measurement unit
(see chapter "Setting the units of measurement").
Removing Weighed Items
³ Press the sensor area Z/T yonce. "TARE" is
indicated in the left of the display
The scales indicate a weight of "0" again.
³ Remove the desired amount of material.
The weight value of the removed material appears
in the display
as a negative value.
e
e
.
You can repeat this procedure several times.
When you take all of the weighed items from the
scales and press on the sensor area Z/T
"O" is indicated in the left of the display
e
y
.
,
The scales indicate a weight of "0". In the left of the
display
³ Place a suitable receptacle on the scales and
³ Place the item(s) to be weighed in the receptacle.
a "O" is indicated.
e
press the sensor area Z/T y. The scales once
again show "0", it does not take account of the
weight of the receptacle.
Adding & Weighing (Tare Function)
You can repeatedly set the scale back to "0" in order
to weigh additional partial quantities.
³ Press the sensor area Z/T yonce. In the left of
the display
cate a weight of "0" again.
³ Place the additional item(s) to be weighed in the
receptacle.
The weight of the newly inserted item(s) is shown in
the display
appears „TARE“. The scales indi-
e
.
e
You can repeat this procedure several times.
However, never place more than 5 kg on the
scale.
When you take all of the weighed items from the
scales and press on the sensor area Z/T
"O" is indicated in the left of the display
y
e
,
.
Setting the Timer
The timer can be used in both a clock and weighing
mode.
The timer enables you to set the clock for a specific
period of time, at the end of which a signal tone
sounds. The preset time runs as in a countdown
³ Press the sensor area T-SET
play
the bell symbol appears at above-
e
left.
once. In the dis-
i
You can adjust the time accurately to the second.
If you hold your finger on the sensor area L
Z/T
or M UNIT u, the time-indicators run
y
through faster.
³ Using the sensor areas L Z/T yor M UNIT
programme in the desired ten-minute setting.
³ Press the sensor area T-SET
sensor areas L Z/T
in the desired single-minute setting.
³ Press the sensor area T-SET
sensor areas L Z/T
in the desired ten-second setting.
³ Press the sensor area T-SET
sensor areas L Z/T
in the desired single-second setting.
³ Press the sensor area T-SET
down.
y
y
y
once. Using the
i
or M UNIT uprogramme
once. Using the
i
or M UNIT uprogramme
once. Using the
i
or M UNIT uprogramme
to start the count-
i
u
- 18 -
Page 21

You can reset the timer.
Changing the batteries
³ Press the sensor area T-SET
As soon as the programmed time has expired, an
acoustic signal sounds. This signal can be switched
off by pressing on any sensor area.
to re-set the timer.
i
Temperature Display
When the scale is switched on, the display
shows the temperature in °C at the top right.
e
Switching the weighing function off
If you do not weigh anything for ca. 2 minutes the
scale automatically switches into the clock mode.
³ To switch over to the clock mode manually, press
the sensor area ON/OFF
t
.
Troubleshooting
³ If the display eshows "Err", the scale is overbur-
dened. Remove material from the scale. Never
place more than 5 kg on the scale.
³ If the display
the weighing mode cannot be switched on, the
scale is overburdened. Remove the items to be
weighed from the scale and then switch the scale on again. Place less than 5 kg on the scale.
³ If the display
scharged. Replace the batteries.
shows "Err" for a short time and
e
shows "Lo", the batteries are di-
e
Warning!
Pay attention to the correct polarity when exchanging batteries. Incorrect battery exchange could
lead to the danger of an explosion.
Only exchange batteries for identical or equivalent
types. Should the batteries leak, wear protective
gloves and clean the battery compartment with a
dry cloth.
Poison Hazard!
Batteries can be swallowed by children and cause
impairment of health. Keep batteries out of the reach
of children.
³ To change the batteries, open the battery com-
partment cover on the underside of the scales.
³ Press the metal loop on the battery retainer out-
wards so that the batteries are released.
³ Remove the old batteries and replace them with
new ones. Take note of the correct polarity: The
side of the battery marked with a "+" must show
to the top.
Storage
When the kitchen scale is not in use it can be hung
up by means of the integrated suspension
example on a kitchen ledge.
q
, for
The notification "Lo" appears only in weighing
mode.
³ Should „- - - -“ appear in the display
few seconds.
³ If your scale does not function as expected, re-
place the batteries. Should the malfunction not be
eliminated with these steps please make contact
with our Service Centre (see "Warranty and
Service“).
e
, wait a
Cleaning
Attention!
Ensure that no fluids can enter the scale. Permeating
liquids can damage the scale.
- 19 -
Page 22

Wipe the scale clean with a cloth lightly moistened
by a mild detergent solution or use a special stainless steel cleaner. Do not use abrasive or solvent
cleaners.
Clean the display
cloth and then wipe it dry with a lint-free towel.
only with a lightly moistened
e
Disposal
Do not dispose of the appliance in your
normal domestic waste. This product is
subject to the European guideline
2002/96/EC.
Dispose of the appliance through an approved disposal centre or at your community waste facility.
Observe the currently applicable regulations.
In case of doubt, please contact your waste disposal
centre.
Battery disposal!
Batteries may not be disposed of with normal
domestic waste. Therefore always remove the batteries/cells from the appliances before disposing of
them. All consumers are statutorily obliged to dispose of batteries at the collection point in their community/district or with the original supplier.
The purpose of this obligation is to ensure that
batteries can be disposed of in an environmentally
friendly manner. Only dispose of batteries when
they are fully discharged.
Dispose of all packaging materials in an
environmentally responsible manner.
Importer
KOMPERNASS GMBH
BURGSTRASSE 21
D-44867 BOCHUM
Warranty & Service
The warranty for this appliance is for 3 years from
the date of purchase. The appliance has been manufactured with care and meticulously examined before
delivery. Please retain your receipt as proof of purchase. In the case of a warranty claim, please make
contact by telephone with our service department.
Only in this way can a post-free despatch for your
goods be assured.
The warranty covers replacements for material or
manufacturing faults only, not for normal wearing
parts or damage to fragile parts. The appliance is
intended solely for private domestic use, not for
commercial applications.
If this product has been subjected to improper or inappropriate handling, abuse, or modifications not
carried out by one of our authorised sales and service
outlets, the warranty will be considered void. Your
statutory rights are not restricted in any way by this
warranty.
DES Ltd
Units 14-15
Bilston Industrial Estate
Oxford Street
Bilston
WV14 7EG
Tel.: 0870/787-6177
Fax: 0870/787-6168
e-mail: support.uk@kompernass.com
Irish Connection
Harbour view
Howth
Co. Dublin
Tel: 00353 (0) 87 99 62 077
Fax: 00353 18398056
e-mail: support.ie@kompernass.com
www.kompernass.com
- 20 -
Page 23

INHALTSVERZEICHNIS SEITE
Verwendungszweck 22
Technische Daten 22
Sicherheitshinweise 22
Bedienelemente 23
Lieferumfang 23
Inbetriebnahme 23
Uhrzeit einstellen............................................................................................................................23
Aufstellen.........................................................................................................................................23
Bedienen 23
Einstellen der Maßeinheit..............................................................................................................23
Wiegen ...........................................................................................................................................24
Wiegegut zuwiegen (Tarierfunktion) ...........................................................................................24
Wiegegut entnehmen ....................................................................................................................24
Timer einstellen...............................................................................................................................24
Temperaturanzeige........................................................................................................................25
Wiegefunktion ausschalten...........................................................................................................25
Fehlfunktionen beseitigen 25
Batterien wechseln 25
Aufbewahrung 26
Reinigen 26
Entsorgen 26
Importeur 26
Garantie & Service 27
Lesen Sie die Bedienungsanleitung vor der ersten Verwendung aufmerksam durch und heben Sie diese für
den späteren Gebrauch auf. Händigen Sie bei Weitergabe des Gerätes an Dritte auch die Anleitung aus.
- 21 -
Page 24

KÜCHENWAAGE
KH 1157
Verwendungszweck
Achtung!
Beachten Sie die folgenden Sicherheitshinweise genau. Bei Nichtbeachtung kann die Waage beschädigt werden und Ihre Gewährleistungsansprüche
können erlöschen.
Die Küchenwaage dient zum Wiegen von nicht
ätzenden, aggressiven oder scheuernden Flüssigkeiten (speziell Wasser und Milch) und Feststoffen
in privaten Haushalten. Das Wiegen von Medikamenten und nicht zugelassenen Stoffen ist nicht
bestimmungsgemäß.
Technische Daten
Wiegebereich: 1 g-5000 g,
in 1 Gramm-Schritten
Temperaturanzeige: 0 °C - 40 °C, in
0,5 °C- Schritten;
mit ± 2 °C Toleranz
Spannungsversorgung: 2 x 3 V CR 2032
Lithium Batterien
Sicherheitshinweise
Verletzungsgefahr
• Dieses Gerät ist nicht dafür bestimmt, durch Per-
sonen (einschließlich Kinder) mit eingeschränkten physischen, sensorischen oder geistigen Fähigkeiten oder mangels Erfahrung und/oder
mangels Wissen benutzt zu werden, es sei denn,
sie werden durch eine für ihre Sicherheit zuständige Person beaufsichtigt oder erhielten von ihr
Anweisungen, wie das Gerät zu benutzen ist.
• Kinder sollten beaufsichtigt werden, um sicherzu-
stellen, dass sie nicht mit dem Gerät spielen.
• Achten Sie beim Einlegen der Batterie auf die
richtige Polarität und wenden Sie keine Gewalt
an, wenn Sie die Batterien einlegen.
• Stellen Sie nie mehr als 5 kg auf die Waage.
• Stellen Sie sicher, dass keine Flüssigkeiten in die
Waage gelangen.
• Vermeiden Sie den Kontakt mit Lösungsmitteln
und mit ätzenden oder scheuernden Reinigungsmitteln.
• Stellen Sie die Waage nur auf ebenem und
festem Untergrund auf.
• Stellen Sie nichts auf das Display.
• Drücken Sie nicht mit Gewalt oder mit spitzen
Gegenständen auf die Sensorfelder.
• Setzen Sie die Waage nicht hohen Temperaturen oder Magnetfeldern aus.
• Vermeiden Sie Elektrostatische Auf- bzw.
Entladung. Anderenfalls kann es zu fehlerhaften
Anzeigen bzw. plötzlichem Ausschalten der
Waage kommen.
Hinweise zum Umgang mit Batterien
Das Gerät verwendet Batterien. Für den Umgang
mit Batterien beachten Sie bitte Folgendes:
Explosionsgefahr!
• Werfen Sie keine Batterien ins Feuer. Laden Sie
Batterien nicht wieder auf.
• Öffnen Sie die Batterien niemals, Löten oder
Schweißen Sie nie an Batterien. Es besteht Explosions- und Verletzungsgefahr!
• Überprüfen Sie regelmäßig die Batterien. Auslaufende Batterien können Beschädigungen am
Gerät verursachen.
• Wenn Sie ein Gerät längere Zeit nicht benutzen,
entnehmen Sie die Batterien.
- 22 -
Page 25

• Bei ausgelaufenen Batterien, ziehen Sie Schutzhandschuhe an. Reinigen Sie das Batteriefach
und die Batteriekontakte mit einem trockenen
Tuch.
• Batterien dürfen nicht in die Hände von Kindern
gelangen. Kinder könnten Batterien in den Mund
nehmen und verschlucken. Sollte eine Batterie
verschluckt worden sein, muss sofort medizinische Hilfe in Anspruch genommen werden.
Bedienelemente
Aufhängung
q
Wiegefeld
w
Display
e
Batteriefach
r
Sensorfeld ON/OFF (An/Aus)
t
Sensorfeld L Z/T (ZERO/TARA)
y
Sensorfeld M UNIT (Einheiten-Umschalter)
u
Sensorfeld T-SET (Timer-/Uhr-Einstellung)
i
Lieferumfang
• Küchenwaage
• 2 x CR 2032 Lithium Batterien
• Bedienungsanleitung
Inbetriebnahme
³ Öffnen Sie das Batteriefach rauf der Untersei-
te der Waage.
³ Entfernen Sie die Schutzfolie aus dem Batterie-
fach
.
r
³ Schließen Sie den Batteriefachdeckel, bis er
einrastet.
Die Waage befindet sich nun im Uhr-Modus und ist
betriebsbereit.
Uhrzeit einstellen
Bei der ersten Inbetriebnahme oder nach einem Batteriewechsel muss die Uhrzeit eingestellt werden.
³ Sobald die Batterien eingesetzt werden, blinkt
die Stundenangabe. Drücken Sie auf das Sensorfeld L Z/T
de eingestellt ist.
³ Drücken Sie das Sensorfeld T-SET
nuten-Anzeige zu wechseln.
³ Drücken Sie auf das Sensorfeld L Z/T
M UNIT-Taste
sind.
³ Drücken Sie auf das Sensorfeld T-SET
Die Uhrzeit ist nun eingestellt.
Wenn Sie zu einem späteren Zeitpunkt die Uhrzeit
ändern wollen, drücken und halten Sie auf das Sensorfeld T-SET
hen Sie so vor, wie zuvor beschrieben.
bzw. M UNIT u, bis die Stun-
y
um zur Mi-
i
y
, bis die Minuten eingestellt
u
i
bis die Stunden-Anzeige blinkt. Ge-
i
bzw.
.
Aufstellen
Stellen Sie die Waage auf eine ebene und rutschfeste Fläche.
Dieses Gerät ist mit rutschfesten Füßen ausgestattet.
Da die Möbeloberflächen aus den verschiedensten
Materialien bestehen und mit unterschiedlichsten
Pflegemitteln behandelt werden, kann es nicht völlig
ausgeschlossen werden, dass manche dieser Stoffe
Bestandteile enthalten, die die Füße angreifen und
aufweichen. Legen Sie gegebenenfalls eine rutschfeste Unterlage unter die Füße des Gerätes.
Bedienen
Einstellen der Maßeinheit
Sie können zwischen dem metrischen und dem
angloamerikanischen System wählen. Von
0 g - 999 g wird die Einheit in g/oz und ab 999 g
in kg/LB und g/oz angezeigt.
Zusätzlich können Sie Flüssigkeiten wiegen.
Im metrischen System:
- 23 -
Page 26

• Milliliter (ml) Wasser (Water)
• Milliliter (ml) Milch (Milk).
Im angloamerikanischen System:
• Flüssigunze (fl´oz) Wasser (Water)
• Flüssigunze (fl´oz) Milch (Milk).
³ Drücken Sie dazu einmal auf das Sensorfeld Z/T
. Im Display eerscheint links „TARE“. Die
y
Waage zeigt wieder „0“ Gramm an.
³ Füllen Sie die zu wiegende Teilmenge in das Ge-
fäß.
³ Drücken Sie auf das Sensorfeld ON/OFF
Die Waage befindet sich nun im Wiege-Modus.
Die eingestellte Einheit erscheint unter oder
rechts neben der Gewichtsangabe im Display
.
e
³ Um zwischen dem metrischen und dem anglo-
amerikanischen System zu wählen, drücken und
halten Sie solange den Finger auf das Sensorfeld UNIT
³ Um innerhalb eines Maßeinheitensystems zwi-
schen
zu wechseln, drücken Sie kurz auf das Sensorfeld
UNIT
u
Display
, bis die Maßeinheit wechselt.
u
g/kg - ml Water - ml Milk
oder
oz/lb:oz - fl´oz Water - fl´oz Milk
, bis die gewünschte Maßeinheit im
erscheint.
e
t
.
Wiegen
³ Drücken Sie auf das Sensorfeld ON/OFF t,
um die Waage einzuschalten (Wiege-Modus).
³ Stellen Sie die gewünschte Maßeinheit ein
(siehe Kapitel „Einstellen der Maßeinheit“).
Die Waage zeigt das Gewicht „0“ an. Links im
Display
³ Stellen Sie ein geeignetes Gefäß auf die Waage
³ Füllen Sie das zu wiegende Gut in das Gefäß.
wird „O” angezeigt.
e
und drücken Sie auf das Sensorfeld Z/T y. Die
Waage zeigt wieder „0“ an und wiegt das Gewicht des Gefäßes nicht mit.
Wiegegut zuwiegen (Tarierfunktion)
Für das Zuwiegen weiterer Teilmengen können Sie
die Waage auf „0“ stellen.
Im Display
Wiegegutes angezeigt.
wird das Gewicht des zugeschütteten
e
Diesen Schritt können Sie mehrmals wiederho-
len. Stellen Sie jedoch nie mehr als 5 kg auf
die Waage.
Wenn Sie das gesamte Wiegegut von der
Waage nehmen und auf das Sensorfeld Z/T
drücken, wird im links im Display e„O”
y
angezeigt.
Wiegegut entnehmen
³ Drücken Sie einmal auf das Sensorfeld Z/T y.
Links im Display
Die Waage zeigt wieder „0“ Gramm an.
³ Entnehmen Sie die gewünschte Menge Wiege-
gut.
Die Gewichtsangabe des entnommenen Wiegegutes erscheint als negativer Wert im Display
wird „TARE“ angezeigt.
e
e
.
Diesen Schritt können Sie mehrmals wiederholen.
Wenn Sie das gesamte Wiegegut von der
Waage nehmen und auf das Sensorfeld Z/T
drücken, wird im links im Display e„O”
y
angezeigt.
Timer einstellen
Der Timer kann im Uhr-Modus, sowie im WiegeModus genutzt werden.
Der Timer ermöglicht es Ihnen eine Zeitspanne einzustellen, nach deren Ablauf ein Signal ertönt. Die
eingestellte Zeit läuft wie ein Countdown ab.
³ Drücken Sie einmal auf das Sensorfeld T-SET
Im Display
links oben.
erscheint das Glocken-Symbol
e
i
.
- 24 -
Page 27

Sie können die Zeit sekundengenau einstellen.
Wenn Sie das Sensorfeld L Z/T
UNIT
schneller durch.
³ Stellen Sie mit dem Sensorfeld L Z/T ybzw. M
UNIT
³ Drücken Sie einmal auf das Sensorfeld T-SET
Stellen Sie mit dem Sensorfeld L Z/T
M UNIT
³ Drücken Sie einmal auf das Sensorfeld T-SET
Stellen Sie mit dem Sensorfeld L Z/T
M UNIT
ein.
³ Drücken Sie einmal auf das Sensorfeld T-SET
Stellen Sie mit dem Sensorfeld L Z/T
M UNIT
ein.
³ Drücken Sie auf das Sensorfeld T-SET
Zeitmessung zu starten.
Sie können den Timer zurücksetzen.
³ Drücken Sie auf das Sensorfeld T-SET
den Timer zurückzusetzen.
Ist die eingestellte Zeit abgelaufen, ertönt ein Signalton. Diesen Signalton können Sie durch Drücken
eines beliebigen Sensorfeldes abschalten.
gedrückt halten, laufen die Zahlen
u
die gewünschten Zehner-Minuten ein.
u
die gewünschten Einer-Minuten ein.
u
die gewünschten Zehner-Sekunden
u
die gewünschten Einer-Sekunden
u
Temperaturanzeige
Wenn die Waage eingeschaltet ist, zeigt das
Display
rechts oben die Temperatur in °C an.
e
Wiegefunktion ausschalten
Wenn Sie ca. 2 Minuten nichts wiegen, schaltet die
Abschaltautomatik in den Uhr-Modus.
y
bzw. M
bzw.
y
bzw.
y
bzw.
y
, um die
i
, um
i
i
i
i
Fehlfunktionen beseitigen
³ Wenn das Display e„Err“ anzeigt, ist die Waa-
ge überlastet. Entnehmen Sie Wiegegut. Stellen
Sie nie mehr als 5 kg auf die Waage.
³ Wenn das Display
Wiege-Modus nicht eingeschaltet werden kann,
ist die Waage überlastet. Nehmen Sie das Wie-
.
gegut von der Waage und schalten Sie den
Wiege-Modus erneut ein. Stellen Sie weniger als
5 kg auf die Waage.
.
³ Wenn das Display
terien verbraucht. Erneuern Sie die Batterien.
.
Die Anzeige „Lo“ erscheint nur im Wiege-
Modus.
³ Wenn im Display
einige Sekunden.
³ Wenn Ihre Waage nicht wie erwartet funktionie-
ren sollte, erneuern Sie die Batterien. Sollte die
Fehlfunktion damit nicht beseitigt sein, wenden
Sie sich bitte an den Service (siehe „Garantie
und Service“).
kurz „Err“ anzeigt und der
e
„Lo“ anzeigt, sind die Bat-
e
„- - - -“ erscheint, warten Sie
e
Batterien wechseln
Warnung!
Beachten Sie beim Austauschen der Batterien die
korrekte Polarität. Bei unsachgemäßem Auswechseln der Batterien besteht Explosionsgefahr.
Tauschen Sie die Batterien nur gegen einen
identischen oder gleichwertigen Typ aus. Bei ausgelaufenen Batterien, ziehen Sie Schutzhandschuhe
an und reinigen Sie das Batteriefach mit einem
trockenen Tuch.
³ Um manuell in den Uhr-Modus zu wechseln,
drücken Sie die ON/OFF-Taste
t
.
Vergiftungsgefahr!
Batterien können von Kindern verschluckt werden
und zu gesundheitlicher Beeinträchtigung führen.
Bewahren Sie Batterien für Kinder unzugänglich
auf.
- 25 -
Page 28

³ Um die Batterien zu wechseln, öffnen Sie den
Batteriefachdeckel auf der Unterseite der Waage.
³ Drücken Sie die Metalllasche an der Batteriehal-
terung nach außen, so dass die Batterie heraus
springt.
³ Entnehmen Sie die Batterie und setzen Sie eine
neue ein. Beachten Sie die korrekte Polarität: die
mit „+“ gekennzeichnete Seite der Batterie muss
nach oben zeigen.
Aufbewahrung
Wenn Sie die Waage nicht benutzen, können Sie
diese mit der integrierten Aufhängung
spiel an einer Küchenleiste aufhängen.
q
zum Bei-
Reinigen
Achtung!
Stellen Sie sicher, dass keine Flüssigkeiten in die
Waage gelangen. Eindringende Flüssigkeiten können die Waage beschädigen.
Entsorgen
Werfen Sie das Gerät keinesfalls in den
normalen Hausmüll. Dieses Produkt
unterliegt der europäischen Richtlinie
2002/96/EC.
Entsorgen Sie das Gerät über einen zugelassenen
Entsorgungsbetrieb oder über Ihre kommunale
Entsorgungseinrichtung.
Beachten Sie die aktuell geltenden Vorschriften.
Setzen Sie sich im Zweifelsfall mit Ihrer Entsorgungseinrichtung in Verbindung.
Batterien entsorgen
Batterien dürfen nicht im Hausmüll entsorgt werden.
Entfernen Sie die Batterien/Akkus daher immer aus
den Geräten, bevor Sie diese entsorgen. Jeder Verbraucher ist gesetzlich verpflichtet, Batterien/Akkus
bei einer Sammelstelle seiner Gemeinde / seines
Stadtteils oder im Handel abzugeben.
Diese Verpflichtung dient dazu, dass Batterien
einer umweltschonenden Entsorgung zugeführt
werden können. Geben Sie Batterien/Akkus nur
im entladenen Zustand zurück.
Wischen Sie die Waage mit einem leicht mit milder
Seifenlauge befeuchteten Tuch ab oder benutzen
Sie spezielle Edelstahlreinigungsmittel. Benutzen Sie
keine Scheuer- oder Lösungsmittel.
Reinigen Sie das Display
angefeuchteten Tuch und wischen Sie es mit einem
fusselfreien Tuch trocken.
nur mit einem leicht
e
Führen Sie alle Verpackungsmaterialien
einer umweltgerechten Entsorgung zu.
Importeur
KOMPERNASS GMBH
BURGSTRASSE 21
D-44867 BOCHUM
www.kompernass.com
- 26 -
Page 29

Garantie & Service
Sie erhalten auf dieses Gerät 3 Jahre Garantie ab
Kaufdatum. Das Gerät wurde sorgfältig produziert
und vor Anlieferung gewissenhaft geprüft. Bitte
bewahren Sie den Kassenbon als Nachweis für
den Kauf auf. Bitte setzen Sie sich im Garantiefall
mit Ihrer Servicestelle telefonisch in Verbindung.
Nur so kann eine kostenlose Einsendung Ihrer Ware
gewährleistet werden.
Die Garantieleistung gilt nur für Material- oder
Fabrikationsfehler, nicht aber für Verschleißteile
oder für Beschädigungen an zerbrechlichen Teilen.
Das Produkt ist lediglich für den privaten und nicht
für den gewerblichen Gebrauch bestimmt.
Bei missbräuchlicher und unsachgemäßer Behandlung, Gewaltanwendung und bei Eingriffen, die
nicht von unserer autorisierten Service-Niederlassung vorgenommen wurden, erlischt die Garantie.
Ihre gesetzlichen Rechte werden durch diese
Garantie nicht eingeschränkt.
Schraven
Service- und Dienstleistungs GmbH
Gewerbering 14
47623 Kevelaer, Germany
Tel.: +49 (0) 180 5 008107
(14 Ct/Min. aus dem dt. Festnetz ggf. abweichende Preise
aus den Mobilfunknetzen)
Fax: +49 (0) 2832 3532
e-mail: support.de@kompernass.com
Kompernaß Service Österreich
Rittenschober KG
Gmundner Strasse 10
A-4816 Gschwandt
Tel.: +43 (0) 7612 6260516
Fax: +43 (0) 7612 626056
e-mail: support.at@kompernass.com
- 27 -
 Loading...