

Page 1
5
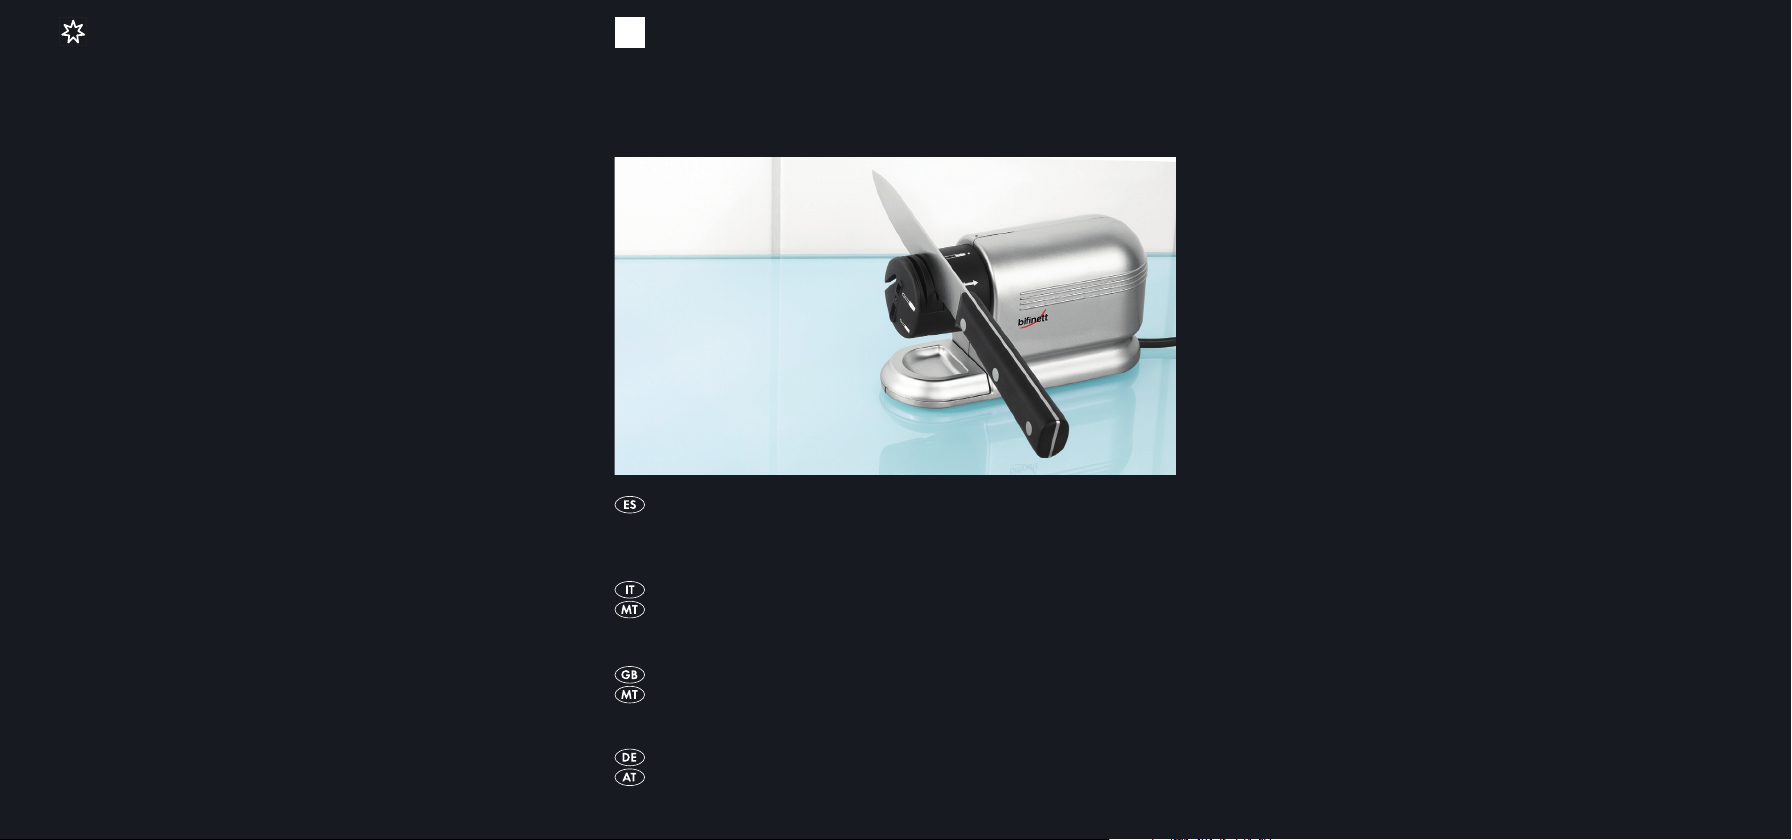
AFILADOR DE CUCHILLOS ELÉCTRICO
AFFILATRICE ELETTRICA PER COLTELLI
KH 1143
AFILADOR DE CUCHILLOS ELÉCTRICO
Instrucciones de uso
AFFILATRICE ELETTRICA PER COLTELLI
Istruzioni per l'uso
KOMPERNASS GMBH · BURGSTRASSE 21 ·
D-44867 BOCHUM
www.kompernass.com
ID-Nr.: KH1143-03/08-V3
ELECTRO KNIFE SHARPENER
Operating instructions
ELEKTRO-MESSERSCHÄRFER
Bedienungsanleitung
Page 2
KH 1143
w
r
t
q
e
y
i
u
Page 3

ÍNDICE PÁGINA
Finalidad de uso 4
Volumen de suministro 4
Datos técnicos 4
Descripción de aparatos 5
Instrucciones de seguridad 5
Desembalar 6
Emplazamiento 7
Ajuste 7
Afilado 7
Limpieza y mantenimiento 9
Mantenimiento 9
Evacuación 10
Importador 10
Garantía y asistencia técnica 11
Lea atentamente este manual de instrucciones antes del primer uso y consérvelo para
posteriores utilizaciones. Entréguelo en caso de traspasar el aparato a terceros.
- 3 -
Page 4

Finalidad de uso
Este producto está previsto para el afilado de cuchillos, destornilladores y
tijeras en el uso privado. Este producto no está indicado para el uso comercial
o industrial.
Volumen de suministro
1 x Afilador de cuchillos eléctrico
1 x Manual de instrucciones
Datos técnicos
Consumo de potencia: 20 W máx.
Tensión de red: 230 V ~50 Hz
Revoluciones: 3000 r.p.m.
Clase de protección: II
Tiempo KB: 3 min.
Con el periodo KB (funcionamiento por un corto periodo de tiempo) se indica
durante cuánto tiempo puede funcionar un aparato sin que el motor se sobrecaliente ni se dañe. Tras el periodo KB indicado deberá desconectarse
el aparato hasta que el motor se haya enfriado a temperatura ambiente
(aprox. 30 minutos).
- 4 -
Page 5

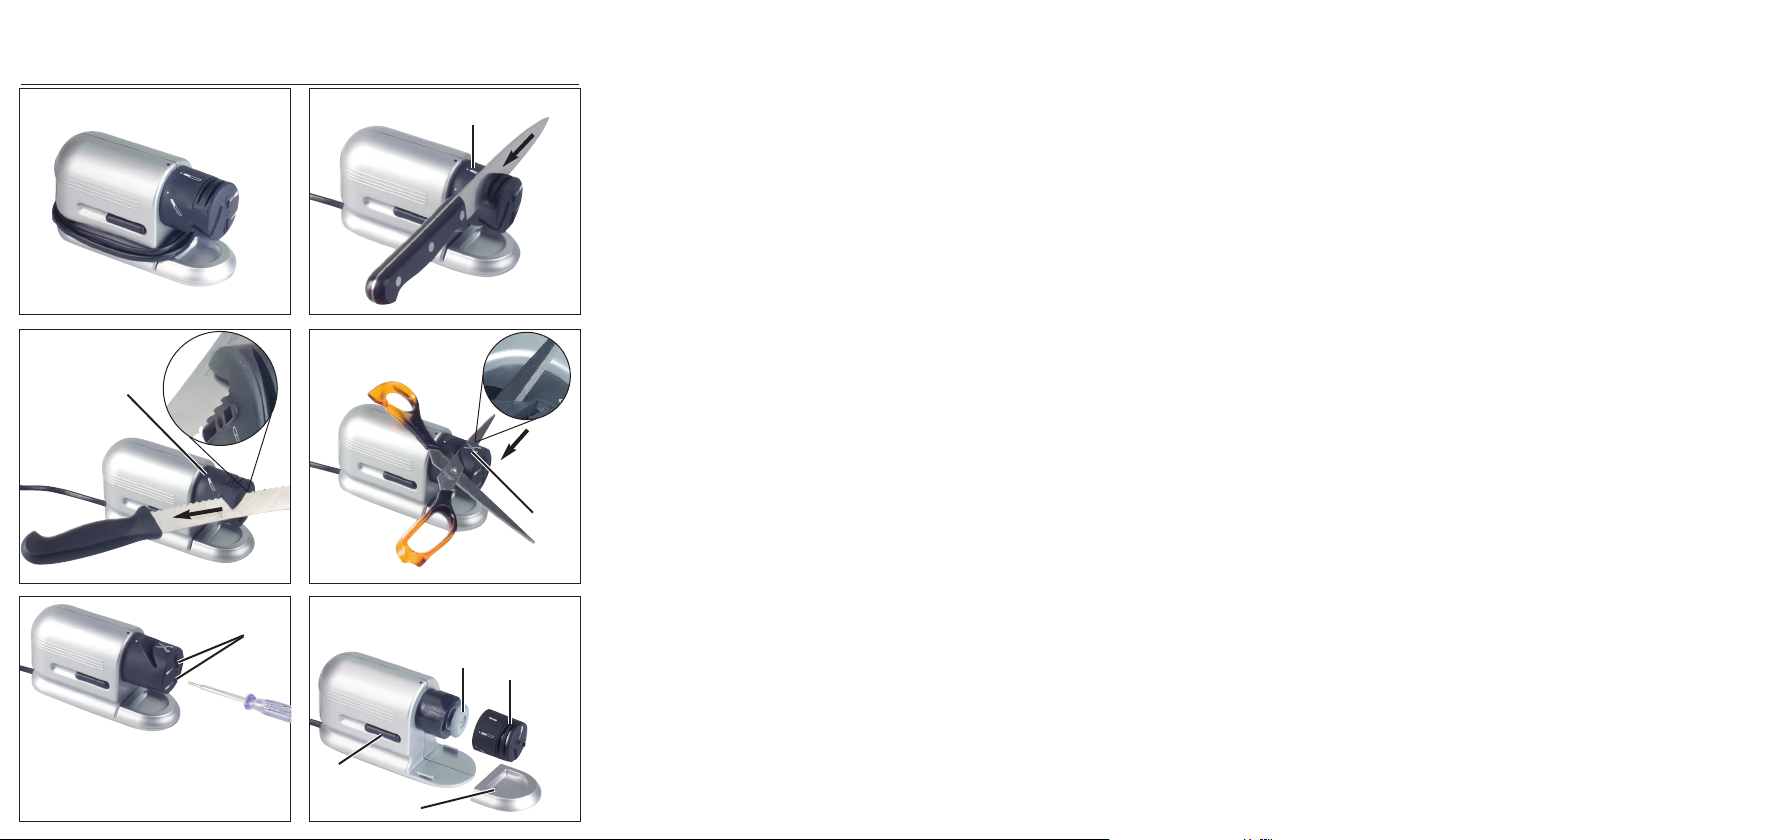
Descripción de aparatos
Función “cuchillos con filo liso”
q
Función “cuchillos con filo ondulado”
w
Función “filo de tijeras”
e
Orificios de afilado para filos de destornilladores
r
Piedra de afilar
t
Tapa de función y protección
y
Bandeja de polvo
u
Interruptor
i
Instrucciones de seguridad
Para el evitar peligro de descarga eléctrica:
• Proteja el producto contra la humedad. Utilícelo sólo en locales secos,
no es apto para la intemperie ni para su uso en ambientes húmedos.
• Tenga cuidado de que el cable de red no pueda resultar dañado durante
el funcionamiento, especialmente con las hojas de cuchillos o tijeras afiladas.
• Si el cable de red o la clavija de red están defectuosos, deje que el servicio
técnico los cambie antes de seguir utilizando el producto, con el fin de
evitar riesgos.
• No abra nunca ninguna parte del aparato, si no se indica aquí.
• Después del uso o en caso de ausencia retire siempre la clavija de red de
la base de enchufe. Mientras la clavija de red se encuentre en la base de
enchufe, el producto tendrá tensión de red.
• Procure de que la clavija quede accesible en todo momento y en caso
de peligro poder extraerla rápidamente de la base de enchufe.
- 5 -
Page 6

Para evitar el riesgo de accidentes y de lesiones:
• Antes de cada uso compruebe que el aparato se encuentra en perfecto
estado. Si puede percibir daños, no debe utilizar el aparato. Por seguridad,
deje que el servicio de atención al cliente lo compruebe.
• Tenga cuidado de que el pelo, la ropa suelta o partes del cuerpo no puedan
entrar en contacto con la piedra de afilar
• Utilice guantes de protección para evitar lesionarse con las hojas afiladas,
o si utiliza el afilador de cuchillos sin la tapa de función
• Este producto no está diseñado para que sea utilizado por personas (incluidos
niños) con capacidades físicas, sensoriales o mentales limitadas o bien falta
de experiencia y/o falta de conocimiento, a no ser que sean supervisadas
por una persona responsable de su seguridad o hayan obtenido instrucciones
sobre cómo utilizar el producto. Los niños deberán estar siempre bajo vigilancia
con el fin de asegurar que no jueguen con el producto.
en rotación.
t
y
.
Desembalar
• Compruebe que el producto está completo y se encuentra en perfecto
estado y sin daños.
• Retire todos los componentes del embalaje y restos de embalaje del
producto.
• Conserve el embalaje para guardar en él el aparato si no lo utiliza o
para poder reenviarlo para su reparación.
• Limpie todas las piezas antes del primer uso como se describe en el
capítulo “Limpieza y mantenimiento”.
- 6 -
Page 7

Emplazamiento
• Coloque el aparato sobre una base estable no deslizante.
• Inserte a continuación la clavija de red en el enchufe.
Ajuste
• Girando la tapa de función y seleccione la función de afilado
deseada, hasta que note que la tapa encaja.
e
• Con el ajuste
correspondiente en el orificio de afilado – la tapa encaja en el punto.
• Mantenga el interruptor
que vuelva a soltar el interruptor
“cuchillos con filo ondulado” se muestra el símbolo
w
pulsado. La piedra de afilar tgirará hasta
i
.
i
q w
Afilado
• Coloque la hoja cuando la piedra de afilar thaya empezado a girar.
• Deslice los cuchillos y tijeras siempre desde el borde del mango con un
movimiento uniforme, sin retroceso ni vaivenes – de otro modo el afilado
será irregular.
• No ejerza demasiada presión y afile siempre sólo hojas limpias para evitar el
desgaste prematuro de la piedra de afilar.
• Afile cuchillos y tijeras siempre de modo que la cuchilla forme un ángulo
agudo con la piedra de afilar (como se indica con la forma del orificio).
El afilado con un ángulo inadecuado puede estropear las cuchillas.
• Después del afilado retire los posibles restos de polvillo de la hoja con
un paño húmedo.
- 7 -
Page 8

Si ha seleccionado la posición q“cuchillos con hoja lisa”:
• Afile los cuchillos con filo liso siempre por ambos lados – para ello dispone
de una guía de afilado
• Mantenga el cuchillo en la guía izquierda tan inclinado hacia la izquierda
como pueda e inclinado hacia la derecha en la guía derecha mientras
desliza la hoja.
izquierda y otra derecha.
q
Si ha seleccionado la posición
• Afílelos sólo por el lado de la ondulación – la dirección hacia la que debe
deslizar el cuchillo depende del lado donde se encuentre la ondulación.
• Los filos ondulados sólo se pueden volver a afilar con limitaciones. No es
necesario afilar los cuchillos de sierra de diente fino (p. ej. los cuchillos
de mesa).
Si ha seleccionado la posición
• Afile una tras otra las dos hojas de las tijeras. Para ello abra las tijeras
y deslice una tras otra las dos hojas por la guía (véase reverso).
Si desea afilar el filo de un destornillador
• Puede hacerlo con cualquier posición de la tapa de función
introduzca el filo del destornillador según su anchura en uno de los dos
orificios
frontal del destornillador se afilará de forma recta y lisa.
Algunas cuchillas se pueden afilar mejor sin tapa de función, directamente
en la piedra de afilar
• Gire la tapa de función
Ahora puede retirar la tapa de función.
• Para volver a colocar la tapa de función
flecha vuelva a situarse arriba. Ahora puede mover la tapa
y bloquearla girándola hacia la izquierda o la derecha.
delanteros de la tapa de función (véase reverso). La superficie
r
: Para ello se puede retirar la tapa de función:
t
“cuchillos con filo ondulado”:
w
“filo de tijeras”:
e
plano:
r
y
, hasta que la flecha se sitúe arriba.
y
sujétela de manera que la
y
. Para ello
- 8 -
Page 9

Limpieza y mantenimiento
Para evitar el riesgo de accidentes y daños:
• Antes de realizar cualquier trabajo en el aparato, en primer lugar extraiga la
clavija de red de la base de enchufe.
• No sumerja nunca el aparato en agua ni líquidos. Esto podría dañar
las piezas del aparato. También puede suponer peligro de muerte por
descarga eléctrica si la humedad alcanza las piezas eléctricas.
Limpieza del aparato:
• Gire la tapa de función
Ahora puede retirar la tapa de función y limpiar la zona en torno a la
piedra de afilar
• Retire la bandeja de polvo
con un paño ligeramente humedecido.
• Limpie el resto del aparato también con un paño ligeramente humedecido, no
con productos de limpieza abrasivos o agresivos. Esto podría dañar las
superficies.
• Para volver a colocar la tapa de función
flecha vuelva a situarse arriba. Ahora puede mover la tapa y
bloquearla girándola hacia la izquierda o la derecha. Para finalizar
vuelva a introducir la bandeja de polvo
t
, hasta que la flecha se sitúe arriba.
y
con un pincel seco.
y límpiela con un pincel y, si es necesario,
u
, sujétela de manera que la
y
en el aparato.
u
Mantenimiento
• El aparato no necesita mantenimiento. No está previsto que el usuario
realice ningún trabajo en o sobre el aparato. En caso de funciones de
fallo o daños apreciables, contacte el servicio de atención al cliente.
• Para guardar el cable de red enróllelo alrededor de la carcasa del aparato.
- 9 -
Page 10
Evacuación
En ningún caso deberá tirar el aparato con la basura doméstica.
Evacue el aparato en un centro de evacuación autorizado a través de las
instalaciones de evacuación comunitarias. Este producto está sujeto a la
directiva europea 2002/96/CE. Preste atención a las normas en vigor.
En caso de duda póngase en contacto con las instalaciones municipales de
evacuación de residuos.
El material de embalaje debe desecharse de forma respetuosa con
el medio ambiente.
Importador
KOMPERNASS GMBH
BURGSTRASSE 21
D-44867 BOCHUM
www.kompernass.com
- 10 -
Page 11

Garantía y asistencia técnica
A este producto se le otorgan 3 años de garantía a partir de la fecha de
compra. El producto ha sido fabricado cuidadosamente y ha sido probado
antes de su entrega. Guarde el comprobante de caja como justificante de
compra. Si necesitara hacer uso de la garantía, póngase en contacto por
teléfono con su punto de servicio habitual. Éste es el único modo de garantizar
un envío gratuito.
La garantía cubre sólo fallos de material o fabricación, pero no cubre las
piezas sometidas a desgaste o daños en las piezas frágiles, como p. ej. interruptores o baterías. Este producto ha sido diseñado exclusivamente para el
uso particular y no para el uso industrial. En caso de manipulación indebida
e incorrecta, uso de la fuerza y en caso de abrir el aparato personas extrañas
a nuestros centros de asistencia técnica autorizados, la garantía pierde su validez.
Esta garantía no reduce en forma alguna sus derechos legales.
Kompernass Service España
C/Invención 7
Polígono Industrial Los Olivos
28906 Getafe – Madrid
Tel.: 902/430758
Fax: 91/6652551
e-mail: support.es@kompernass.com
- 11 -
Page 12

- 12 -
Page 13

INDICE PAGINA
Destinazione d'uso 14
Fornitura 14
Dati tecnici 14
Descrizione dell'apparecchio 15
Avvertenze di sicurezza 15
Disimballaggio 16
Montaggio 17
Impostazione 17
Molatura 17
Pulizia e cura 19
Manutenzione 19
Smaltimento 20
Importatore 20
Garanzia e assistenza 21
Leggere attentamente le istruzioni per l'uso prima del primo utilizzo e conservarle per
l'uso futuro. In caso di cessione dell'apparecchio a terzi, consegnare anche le istruzioni.
- 13 -
Page 14

Destinazione d'uso
Questo prodotto è previsto per l'affilatura di coltelli, cacciaviti e forbici in ambito
domestico privato. Questo prodotto non è destinato a fini commerciali o industriali.
Fornitura
1 x Affilatrice elettrica
1 x Manuale di istruzioni
Dati tecnici
Potenza assorbita: 20 W max
Tensione di rete: 230 V ~ 50 Hz
Giri: 3000 min
Classe di protezione: II
Funzionamento continuato: 3 min.
Il tempo di funzionamento continuato indica il tempo di funzionamento dell'apparecchio senza pericolo di surriscaldamento e di guasti al motore.
Trascorso questo periodo di tempo, spegnere l'apparecchio fino al raffreddamento del motore a temperatura ambiente (per circa 30 minuti).
-1
- 14 -
Page 15

Descrizione dell'apparecchio
Funzione “Coltello con lama piatta”
q
Funzione “Coltello con lama ondulata"
w
Funzione “Affilatura forbici”
e
Aperture della mola per cacciavite a lama
r
Mola
t
Cappuccio di funzione e di protezione
y
Vaschetta per la polvere
u
Interruttore
i
Avvertenze di sicurezza
Per evitare il pericolo di scossa elettrica:
• Proteggere il prodotto dall'umidità. Utilizzarlo solo in ambienti asciutti,
non all'aperto o in ambiente umido.
• Fare attenzione a non danneggiare il cavo di rete durante l'uso dell'apparecchio, soprattutto con lame affilate di coltelli o forbici.
• In caso di danni al cavo o alla spina di rete, farli sostituire dal servizio
assistenza clienti prima di continuare a utilizzare l'apparecchio, al fine di
evitare pericoli.
• Non aprire mai alcun elemento dell'alloggiamento, a meno che non vi
siano chiare istruzioni al riguardo.
• Dopo l'uso o in caso di assenza, staccare sempre la spina dalla presa di
rete. La tensione di rete è presente nel prodotto fino a quando la spina
è collegata alla presa di rete.
• Fare in modo che la spina sia sempre raggiungibile per consentirne la
rapida estrazione dalla presa in caso di pericolo.
- 15 -
Page 16

Per evitare incidenti e lesioni:
• Prima di ogni impiego controllare che l'apparecchio sia in condizioni
perfette. In presenza di danni riconoscibili smettere di utilizzare l'apparecchio. Farne prima controllare la sicurezza dal servizio di assistenza.
• Tenere lontano dalla mola
o le parti del corpo.
• Indossare guanti protettivi per evitare lesioni da taglio o se si utilizza
l'affilatrice senza il cappuccio di funzione
• Questo apparecchio non è indicato per l'uso da parte di persone (inclusi
bambini) con limitate capacità fisiche, sensoriali o mentali o prive dell'esperienza e/o della conoscenza necessaria, a meno che tali persone
non vengano sorvegliate da un responsabile per la sicurezza o abbiano
ricevuto indicazioni sull'impiego dell'apparecchio. Sorvegliare i bambini
per assicurarsi che non giochino con l'apparecchio.
in movimento i capelli, gli abiti pendenti
t
.
y
Disimballaggio
• Controllare la completezza e l'integrità del prodotto.
• Rimuovere tutte le parti di imballaggio e i resti di imballaggio dal prodotto.
• Conservare l'imballaggio, per potervi riporre l'apparecchio in caso di non
utilizzo o restituirlo in caso di necessità di riparazioni.
• Pulire tutti gli elementi prima del primo impiego, così come descritto al
capitolo “Pulizia e cura”.
- 16 -
Page 17

Montaggio
• Collocare l'apparecchio su una base stabile e antisdrucciolevole.
• Inserire quindi la spina nella presa di corrente.
Impostazione
• Ruotando il cappuccio di funzione y selezionare la funzione di molatura
q w e
• In posizione
apertura di molatura, mentre il cappuccio si inserisce accanto a tale punto.
• Tenere premuto l'interruttore
rilascia l'interruttore
desiderata, fino all'inserimento udibile del cappuccio.
“Coltello con lama ondulata”, il simbolo indica la relativa
w
. La mola truota fino a quando non si
i
.
i
Molatura
• Inserire la lama solo quando la mola tgira.
• Inserire lame e forbici sempre dalla base della lama, con un movimento
uniforme, senza spostarle avanti e indietro, altrimenti il risultato sarà una
molatura difforme.
• Non esercitare una forte pressione e affilare solo lame pulite, per evitare
l'usura precoce della mola.
• Affilare lame e forbici sempre con la lama collocata in modo da formare
un angolo acuto rispetto alla mola (come indicato dalla forma dell'apertura).
Affilando con l'angolo errato si distrugge il filo della lama.
• Dopo la molatura, rimuovere eventuali resti di lavorazione dalla lama con
un panno umido.
- 17 -
Page 18

Se è stata selezionata la posizione q“Coltello con lama piatta”:
• Affilare il coltello con lama piatta sempre da entrambi i lati; a tale scopo
sono a disposizione una guida
• Tenere il coltello nella guida a sinistra il più possibile rivolto verso sinistra,
e nella guida a destra il più possibile rivolto a destra nell'inserire la lama.
a destra e una a sinistra.
q
Se è stata selezionata la posizione
• Affilare il coltello solo dal lato con la lama ondulata; la direzione di
inserimento della lama dipende dal lato dell'ondulazione.
• Le lame ondulate possono essere riaffilate in genere solo parzialmente.
I coltelli con seghettatura fine (ad es. da tavola) non necessitano di
affilatura.
Se è stata selezionata la posizione
• Affilare entrambe le lame delle forbici, una dopo l'altra. Per farlo, aprire
le forbici e inserire le lame, una dopo l'altra, nella guida (v. pagina apribile).
Se si desidera affilare un cacciavite a lama
• lo si può fare in qualsiasi posizione del cappuccio di funzione
scopo, inserire il cacciavite a lama in una delle due aperture
al cappuccio di funzione (v. pagina apribile), in base alla larghezza del
cacciavite. La punta a lama del cacciavite verrà così affilata in piano.
Determinate punte possono essere affilate meglio senza cappuccio di funzione,
direttamente sulla mola
funzione:
• Ruotare il cappuccio di funzione
l'alto.
Ora è possibile rimuovere il cappuccio di funzione.
• Per ricollocare il cappuccio di funzione
sia nuovamente rivolta verso l'alto. A tal punto è possibile inserire
il cappuccio e bloccarlo, ruotandolo verso sinistra o destra.
: a tale scopo è possibile rimuovere il cappuccio di
t
“Coltello con lama ondulata”:
w
“Affilatura di forbici”:
e
:
r
y
r
, fino a rivolgere la freccia verso
y
, orientarlo in modo che la freccia
y
- 18 -
. A tale
davanti
Page 19

Pulizia e cura
Per evitare rischi di infortuni e danni:
• Disinserire la spina dalla presa di rete prima di cominciare qualunque
lavoro di manutenzione all'apparecchio.
• Non immergere mai l'apparecchio in acqua o liquidi. Le parti dell'apparecchio potrebbero altrimenti danneggiarsi. Può sussistere il rischio di morte per scossa elettrica in caso di penetrazione di umidità sulle componenti
elettriche.
Pulizia dell'apparecchio:
• Ruotare il cappuccio di funzione
verso l'alto. A tal punto è possibile rimuovere il cappuccio di funzione
e pulire l'area intorno alla mola
• Estrarre la vaschetta per la polvere
eventualmente con un panno leggermente inumidito.
• Pulire il resto dell'apparecchio con un panno leggermente inumidito, e
non utilizzare detergenti abrasivi o aggressivi. Essi potrebbero attaccare
le superfici.
• Per ricollocare il cappuccio di funzione
freccia sia nuovamente rivolta verso l'alto. Ora è possibile inserire
il cappuccio e bloccarlo, ruotandolo verso sinistra o destra. Per finire,
spingere nuovamente la vaschetta per la polvere
, fino a rivolgere la freccia
y
con un pennello asciutto.
t
e pulirla con un pennello ed
u
, orientarlo in modo che la
y
u
nell'apparecchio.
Manutenzione
• L'apparecchio non necessita di manutenzione. Non sono stati previsti lavori
da effettuare su o all'interno dell'apparecchio da parte dell'utente. In caso di
malfunzionamenti o danni visibili, rivolgersi al servizio di assistenza ai clienti.
• Per riporre l'apparecchio, avvolgere il cavo di rete attorno all'alloggiamento.
- 19 -
Page 20

Smaltimento
Non smaltire per alcun motivo l'apparecchio insieme ai
normali rifiuti domestici.
Smaltire l'apparecchio presso un'azienda autorizzata o presso l'ente comunale di
smaltimento. Questo prodotto è conforme alla direttiva europea 2002/96/CE.
Rispettare le prescrizioni attualmente in vigore. In caso di dubbio, mettersi
in contatto con l'ente di smaltimento competente.
Smaltire tutti i materiali dell'imballaggio in modo ecologicamente
conforme.
Importatore
KOMPERNASS GMBH
BURGSTRASSE 21
D-44867 BOCHUM, GERMANY
www.kompernass.com
- 20 -
Page 21

Garanzia e assistenza
Questo apparecchio è garantito per tre anni a partire dalla data di acquisto.
L'apparecchio è stato prodotto con cura e debitamente collaudato prima della
consegna. Conservare lo scontrino come prova d'acquisto. Nei casi contemplati
dalla garanzia, mettersi in comunicazione telefonicamente con il centro di
assistenza più vicino. Solo in tal modo è possibile garantire una spedizione
gratuita della merce.
La garanzia copre solo i difetti del materiale o di fabbricazione. Il prodotto
è destinato esclusivamente all'uso domestico e non a quello commerciale.
La garanzia decade in caso di impiego improprio o manomissione, uso della
forza e interventi non eseguiti dalla nostra filiale di assistenza autorizzata.
Questa garanzia non costituisce alcun limite ai diritti legali del consumatore.
Kompernass Service Italia
Corso Lino Zanussi 11
33080 Porcia (PN)
Tel.: 0434/1851001
Fax: 0434/1851001
e-mail: support.it@kompernass.com
- 21 -
Page 22

- 22 -
Page 23

INDEX PAGE
Intended use 24
Items supplied 24
Technical data 24
Appliance description 25
Safety instructions 25
Unpacking 26
Placement 27
Adjustment 27
Sharpening 27
Cleaning and Care 29
Maintenance 29
Disposal 30
Importer 30
Warranty and Service 31
Read these operating instructions carefully before using the appliance for the first time
and preserve this booklet for later reference. Additionally, pass this booklet on to
whoever might acquire the appliance at a future date.
- 23 -
Page 24

Intended use
This appliance is intended for the sharpening of knives, screwdrivers and scissors
in domestic households. This appliance is not intended for commercial or industrial applications.
Items supplied
1 x Electrical Knife Sharpener
1 x Operating Instructions
Technical data
Power consumption : 20 W max.
Mains voltage: 230 V ~50Hz
Revolutions: 3000 min
Protection class: II
C.O. Time: 3 min.
The C.O. Time (Continuous Operation) details how long an appliance may be
used without the motor overheating and being damaged. When the specified
C.O. Time has been reached, the appliance must be switched off until the
motor has cooled itself down to room temperature (approx. 30 minutes).
-1
- 24 -
Page 25

Appliance description
Function “Knife with smooth edge”
q
Function “Knife with serrated edge”
w
Function “Scissor sharpening”
e
Grinder openings for slot-screwdrivers
r
Grindstone
t
Function and protective cap
y
Abrade collector
u
Switch
i
Safety instructions
To avoid potentially fatal electric shocks:
• Protect the appliance against moisture. Use it only in dry rooms, do not
use it outdoors or in damp areas.
• Ensure that the power cable cannot be damaged when the appliance is
in use, particularly not by sharpened knife or scissor blades.
• In order to avoid potentially fatal risks, should the power cable and/or the
plug become damaged, arrange for it/them to be replaced by Customer
Services before continuing to use the appliance.
• NEVER open any housing components, other than those specified herein.
• After use or during extended absences, ALWAYS remove the plug from
the power socket. For as long as the plug is inserted in the wall socket
the appliance itself is under electrical power.
• Ensure that the power plug is at all times easily accessible, so that it can
be quickly and easily removed in the event of potential danger or risk.
- 25 -
Page 26

To
avoid the risks of accidents and personal injuries:
• Always check to ensure that the appliance is in a serviceable condition
before taking it into use. If there is recognisable damage to the appliance
it may not be used. Arrange for it to be safety-checked by Customers
Services before using it again.
• Take steps to ensure that hair, loose clothing and parts of the body do
not come into contact with the revolving grindstone
• Wear protective gloves so as to avoid injury from sharp blades, or, if you
are operating the knife sharpener with the function cap
• This appliance is not intended for use by individuals (including children)
with restricted physical, physiological or intellectual abilities or deficiences
in experience and/or knowledge unless they are supervised by a person
responsible for their safety or receive from this person instruction in how the
appliance is to be used. Children should be supervised to ensure that they
do not play with the appliance.
t
.
y
removed.
Unpacking
• Check that all items listed are available and that they show no signs of
visible damage.
• Remove all parts from the packaging and all packaging remnants from
the items.
• Retain the packaging, either for storing the appliance or for reuse in the
event of posting it to Customer Services for repair.
• Before the first usage thoroughly clean all component parts as described
in the section "Cleaning and care".
- 26 -
Page 27

Placement
• Place the appliance on a stable and slip-free surface.
• Then insert the plug into the power socket.
Adjustment
• To select the required sharpening function
cap
until the cap perceptibly engages.
y
• In the position
to the grinder opening – however, the cap engages at that point.
• Hold the switch
ly until the switch
“Knife with serrated edge” the relevant symbol points
w
pressed down. The grindstone trevolves continuous-
i
is released.
i
q w e
, turn the function
Sharpening
• First present the blade when the grindstone tis revolving.
• Always draw the knife or scissors back, from the blade stop, in an even
movement, not in a repetitive back and forth movement – otherwise the
result will be an uneven sharpening.
• Do not apply any great pressure and always sharpen only clean blades,
so as to avoid a premature wearing-out of the grindstone.
• Always sharpen knives and scissors so that the blade is at an acute angle
to the grindstone (as alluded to in the shape of the opening). Sharpening
at the false angle can destroy any blade.
• After sharpening, remove any possible grinding remnants that may be on
the blade with a moist cloth.
- 27 -
Page 28

If you have selected the setting "Knife with smooth edge" q:
• Always sharpen knives with a smooth edge on both sides – for this, left
and right side sharpening guides
• In the left guide hold the knife inclined to the left, and in the right guide
inclined to the right, whilst drawing the blade through.
are available.
q
If you have selected the setting "Knife with serrated edge"
• Sharpen these only on the side with the serration – the draw through direction for the knife is dependant on which side of the blade this is on.
• In general, serrated blades can only be sharpened up to a point. Knifes
with a fine sawtoothing (e.g. table knives) do not require sharpening.
If you have selected the setting "Scissor sharpening"
• Sharpen both scissor blades one after the other. For this, open the scissors
out and draw both blades, one after the other, through the guide (see
fold-out page).
Should you wish to grind a slot-screwdriver
• This is possible in every position of the function cap
width, insert the screwdriver through one of the two grinding openings
on the front of the function cap (see fold-out side). The end face of the
screwdriver will now be ground level and flat.
Certain edges can possibly be more easily sharpened directly on the grindstone
, without the function cap: For these cases, the function cap is re-
t
movable:
• Turn the function cap
You can now take off the function cap.
• To replace the function cap
again at the top. You can now push the cap on and secure it by turning
it to the left or right.
until the arrow is at the top.
y
, hold it so that the arrow is once
y
r
flat:
:
w
:
e
. Appropriate to its
y
r
- 28 -
Page 29

Cleaning and Care
To avoid risks of personal injury and damage:
• Before carrying out any maintenance work, first remove the plug from the
wall socket.
• NEVER submerse the appliance in water or other liquids! These could
damage the appliance. Additionally, there is a potentially fatal risk of
electric shock should moisture come into contact with electrical components.
Cleaning the appliance:
• Turn the function cap
remove the function cap and clean the area around the grindstone
with a dry brush.
• Dismantle the abrade collector
necessary, a lightly moistened cloth.
• Clean the remaining parts of the appliance also with a lightly moistened
cloth, not with abrasive or aggressive detergents. They can damage the
surfaces.
• To replace the function cap
again at the top. You can now push the cap on and secure it by turning
it to the left or right. To conclude, reassemble the abrade collector
into the appliance.
, until the arrow is at the top. You can now
y
and clean it with a brush and, if
u
, hold it so that the arrow is once
y
t
u
Maintenance
• The appliance is maintenance-free. No form of maintenance, either on
or in the appliance, is intended for execution by the user. In the event of
malfunction or apparent damage, make contact with Customer Services.
• For storage, wrap the power cable around the appliance housing.
- 29 -
Page 30

Disposal
Do not dispose of the appliance in your normal domestic waste.
Dispose of the appliance through an approved disposal centre or at your
community waste facility. This device is subject to the European Guidelines
2002/96/EC. Observe the currently applicable regulations. In case of
doubt, please contact your waste disposal centre.
Dispose of all packaging materials in an environmentally friendly
manner.
Importer
KOMPERNASS GMBH
BURGSTRASSE 21
D-44867 BOCHUM
www.kompernass.com
- 30 -
Page 31

Warranty and Service
This product comes with a 3-year warranty as of the date of purchase. This
appliance has been manufactured with care and meticulously examined before delivery. Please retain your receipt as proof of purchase. In the case of
a warranty claim, please make contact by telephone with our service department. Only in this way can a post-free despatch for your goods be assured.
The warranty covers only claims for material and maufacturing defects, not
for worn parts or for damage to fragile components, e.g. buttons or batteries.
This product is for private use only and is not intended for commercial use.
The warranty becomes void in the case of abusive and improper handling,
use of force and internal tampering not carried out by our authorized service
branch. Your statutory rights are not restricted in any way by this warranty.
DES Ltd
Units 14-15
Bilston Industrial Estate
Oxford Street
Bilston
WV14 7EG
Tel.: 0870/787-6177
Fax: 0870/787-6168
e-mail: support.uk@kompernass.com
Irish Connection
Harbour view
Howth
Co. Dublin
Tel: 00353 (0) 87 99 62 077
Fax: 00353 18398056
e-mail: support.ie@kompernass.com
- 31 -
Page 32

- 32 -
Page 33

INHALTSVERZEICHNIS SEITE
Verwendungszweck 34
Lieferumfang 34
Technische Daten 34
Gerätebeschreibung 35
Sicherheitshinweise 35
Auspacken 36
Aufstellen 37
Einstellen 37
Schleifen 37
Reinigung und Pflege 39
Wartung 39
Entsorgen 40
Importeur 40
Garantie und Service 41
Lesen Sie die Bedienungsanleitung vor der ersten Verwendung aufmerksam durch und
heben Sie diese für den späteren Gebrauch auf. Händigen Sie bei Weitergabe des
Gerätes an Dritte auch die Anleitung aus.
- 33 -
Page 34

Verwendungszweck
Dieses Produkt ist vorgesehen zum Schärfen von Messern, Schraubenziehern
und Scheren im privaten Hausgebrauch. Dieses Produkt ist nicht vorgesehen
für gewerbliche oder industrielle Zwecke.
Lieferumfang
1 x Elektrischer Messerschärfer
1 x Bedienungsanleitung
Technische Daten
Leistungsaufnahme: 20 W max.
Netzspannung: 230 V ~50Hz
Umdrehungen: 3000 min
Schutzklasse: II
KB-Zeit: 3 min.
Die KB-Zeit (Kurzzeitbetrieb) gibt an, wie lange man ein Gerät betreiben
kann, ohne dass der Motor überhitzt und Schaden nimmt. Nach der angegebenen KB-Zeit muss das Gerät solange ausgeschaltet werden, bis sich der
Motor auf Raumtemperatur abgekühlt hat (ca. 30 Minuten).
-1
- 34 -
Page 35

Gerätebeschreibung
Funktion “Messer mit glattem Schliff”
q
Funktion “Messer mit Wellenschliff”
w
Funktion “Scherenschliff”
e
Schleiföffnungen für Schlitz-Schraubenzieher
r
Schleifstein
t
Funktions- und Schutzkappe
y
Staubmulde
u
Einschalter
i
Sicherheitshinweise
Um Gefahr durch elektrischen Schlag zu vermeiden:
• Schützen Sie das Produkt vor Feuchtigkeit. Verwenden Sie es nur in trocke-
nen Räumen, nicht im Freien oder in feuchter Umgebung.
• Achten Sie darauf, dass im Betrieb das Netzkabel nicht beschädigt wer-
den kann, insbesondere nicht durch scharfe Messer- oder Scherenklingen.
• Sollte das Netzkabel oder der Netzstecker beschädigt sein, lassen Sie
diese erst durch den Kundendienst ersetzen, bevor Sie das Produkt weiter
verwenden, um Gefährdungen zu vermeiden.
• Öffnen Sie niemals irgendwelche Gehäuseteile, soweit nicht hier dazu an-
geleitet wird.
• Ziehen Sie nach Gebrauch oder bei Abwesenheit immer den Netzstecker
aus der Steckdose. Es liegt Netzspannung im Produkt an, solange der
Netzstecker in der Steckdose steckt.
• Sorgen Sie dafür, dass der Stecker jederzeit erreichbar ist, um ihn bei Ge-
fahr schnell aus der Steckdose ziehen zu können.
- 35 -
Page 36

Um Unfall- und Verletzungsgefahren zu vermeiden:
• Kontrollieren Sie vor jeder Verwendung das Gerät auf einwandfreien Zu-
stand. Wenn Schäden daran erkennbar sind, dürfen Sie das Gerät nicht
weiter einsetzen. Lassen Sie es dann erst vom Kundendienst auf Sicherheit
überprüfen.
• Achten Sie darauf, dass nicht Haare, lose Kleidung oder Körperteile in
Berührung mit dem drehenden Schleifstein
• Tragen Sie Schutzhandschuhe, um Verletzungen durch scharfe Klingen zu
vermeiden, oder wenn Sie den Messerschärfer mit abgenommener
Funktionskappe
• Dieses Produkt ist nicht dafür bestimmt, durch Personen (einschließlich Kin-
der) mit eingeschränkten physischen, sensorischen oder geistigen Fähigkeiten oder mangels Erfahrung und/oder mangels Wissen benutzt zu werden,
es sei denn, sie werden durch eine für ihre Sicherheit zuständige Person beaufsichtigt oder erhielten von ihr Anweisungen, wie das Produkt zu benutzen
ist. Kinder sollten beaufsichtigt werden, um sicher zu stellen, dass sie nicht
mit dem Produkt spielen.
y
betreiben.
t
kommen.
Auspacken
• Überprüfen Sie das Produkt auf Vollständigkeit und einwandfreien unbe-
schädigten Zustand.
• Entfernen Sie alle Teile von der Verpackung und Verpackungsrückstände
vom Produkt.
• Heben Sie die Verpackung auf, um das Gerät darin bei Nichtgebrauch
aufbewahren oder bei Reparaturen zurücksenden zu können.
• Reinigen Sie alle Teile vor dem ersten Gebrauch, wie im Kapitel
“Reinigung und Pflege” beschrieben.
- 36 -
Page 37

Aufstellen
• Stellen Sie das Gerät auf eine stabile rutschfeste Unterlage.
• Stecken Sie dann den Netzstecker in die Steckdose.
Einstellen
• Wählen Sie durch Drehen an der Funktionskappe y die gewünschte
Schleiffunktion
• Bei der Stellung
Symbol auf die Schleif-Öffnung – die Kappe rastet jedoch an dem Punkt
ein.
• Halten Sie den Einschalter
lange, bis Sie den Einschalter
q w e
w
, bis die Kappe spürbar einrastet.
“Messer mit Wellenschliff” zeigt das entsprechende
gedrückt. Der Schleifstein tdreht sich so-
i
wieder loslassen.
i
Schleifen
• Legen Sie die Klingen erst an, wenn sich der Schleifstein tdreht.
• Ziehen Sie die Messer und Scheren immer vom Schaftanschlag in gleich-
förmiger Bewegung weg, nicht wieder zurück oder hin und her – das
Schleifergebnis wird sonst ungleichmäßig.
• Üben Sie keinen starken Druck aus und schleifen Sie stets nur saubere
Klingen, um vorzeitige Abnutzung des Schleifsteins zu vermeiden.
• Schleifen Sie Messer und Scheren immer so, dass die Schneide im spitzen
Winkel zum Schleifstein steht (wie durch die Form der Öffnung vorgegeben). Schleifen im falschen Winkel kann jede Schneide zerstören.
• Entfernen Sie nach dem Schleifen eventuelle Schleifstaubrückstände auf
den Klingen mit einen feuchten Tuch.
- 37 -
Page 38

Wenn Sie die Stellung q“Messer mit glattem Schliff” gewählt haben:
• Schärfen Sie Messer mit glattem Schliff stets beidseitig – hierfür stehen
eine linke und eine rechte Schleifführung
• Halten Sie das Messer in der linken Führung möglichst nach links geneigt,
und in der rechten Führung nach recht geneigt, während Sie die Klinge
durchziehen.
zur Verfügung.
q
Wenn Sie die Stellung
• Schärfen Sie diese nur auf der Seite mit dem Wellenschliff – je nachdem,
wo sich dieser befindet, ergibt sich die Durchzugsrichtung für das Messer.
• Wellenschliff lässt sich generell nur bedingt nachschärfen. Messer mit fein-
verzahntem Sägeschliff (z.B. Tafelmesser) benötigen kein Nachschärfen.
Wenn Sie die Stellung
• Schärfen Sie nacheinander beide Scherenklingen. Hierzu klappen Sie die
Schere auf, und ziehen nacheinander beide Klingen durch die Führung
(siehe Ausklappseite).
Wenn Sie einen Schlitz-Schraubenzieher
• Dies geht in jeder Stellung der Funktionskappe
Schlitz-Schraubenzieher entsprechend seiner Breite durch eine der beiden
Schleiföffnungen
Die Stirnfläche von dem Schraubenzieher wird nun eben und plan geschliffen.
Bestimmte Schneiden kann man evtl. besser ohne Funktionskappe direkt am
Schleifstein
• Drehen Sie die Funktionskappe
Nun können Sie die Funktionskappe abnehmen.
• Um die Funktionskappe
der Pfeil wieder oben steht. Nun können Sie die Kappe
aufschieben und durch Drehen nach links oder rechts verriegeln.
schleifen: Hierzu ist die Funktionskappe abnehmbar:
t
“Messer mit Wellenschliff” gewählt haben:
w
“Scherenschliff” gewählt haben:
e
plan schleifen möchten:
r
. Hierzu stecken Sie den
y
vorne an der Funktionskappe (siehe Auklappseite).
r
, bis der Pfeil oben steht.
y
wieder aufzusetzen, halten Sie diese so, dass
y
- 38 -
Page 39

Reinigung und Pflege
Um Unfallgefahren und Schäden zu vermeiden:
• Ziehen Sie erst den Netzstecker aus der Steckdose, bevor Sie irgendwel-
che Arbeiten an dem Gerät vornehmen.
• Tauchen Sie niemals das Gerät in Wasser oder in Flüssigkeiten. Dies kann
diese Geräteteile beschädigen. Auch kann Lebensgefahr durch elektrischen Schlag bestehen, wenn Feuchtigkeit an elektrische Teile gelangt.
Gerät reinigen:
• Drehen Sie die Funktionskappe
können Sie die Funktionskappe abnehmen und den Bereich um den
Schleifstein
• Ziehen Sie die Staubmulde
und ggf. einem leicht angefeuchteten Tuch.
• Reinigen Sie das übrige Gerät ebenfalls mit einem leicht angefeuchteten
Tuch, nicht mit scheuernden oder aggressiven Reinigungsmittel. Das kann
die Oberflächen angreifen.
• Um die Funktionskappe
der Pfeil wieder oben steht. Nun können Sie die Kappe aufschieben und durch Drehen nach links oder rechts verriegeln. Schieben Sie
zum Schluss auch die Staubmulde
mit einem trockenen Pinsel säubern.
t
y
, bis der Pfeil oben steht. Nun
y
ab und reinigen Sie diese mit einem Pinsel
u
wieder aufzusetzen, halten Sie diese so, dass
wieder in das Gerät.
u
Wartung
• Das Gerät ist wartungsfrei. Es sind keinerlei Arbeiten am oder im Gerät
durch den Verwender vorgesehen. Wenden Sie sich bei Fehlfunktionen
oder erkennbaren Schäden an den Kundendienst.
• Wickeln Sie das Netzkabel zur Aufbewahrung um das Gerätegehäuse.
- 39 -
Page 40

Entsorgen
Werfen Sie das Gerät keinesfalls in den normalen Hausmüll.
Entsorgen Sie das Gerät über einen zugelassenen Entsorgungsbetrieb oder
über Ihre kommunale Entsorgungseinrichtung. Dieses Produkt unterliegt der
europäischen Richtlinie 2002/96/EG. Beachten Sie die aktuell geltenden
Vorschriften. Setzen Sie sich im Zweifelsfall mit Ihrer Entsorgungseinrichtung
in Verbindung.
Führen Sie alle Verpackungsmaterialien einer umweltgerechten Entsorgung zu.
Importeur
KOMPERNASS GMBH
BURGSTRASSE 21
D-44867 BOCHUM
www.kompernass.com
- 40 -
Page 41

Garantie und Service
Sie erhalten auf dieses Produkt 3 Jahre Garantie ab Kaufdatum. Das Produkt
wurde sorgfältig produziert und vor Anlieferung gewissenhaft geprüft. Bitte
bewahren Sie den Kassenbon als Nachweis für den Kauf auf. Bitte setzen Sie
sich im Garantiefall mit Ihrer Servicestelle telefonisch in Verbindung. Nur so
kann eine kostenlose Einsendung Ihrer Ware gewährleistet werden.
Die Garantieleistung gilt nur für Material- oder Fabrikationsfehler, nicht aber
für Verschleißteile oder für Beschädigungen an zerbrechlichen Teilen, z. B.
Schalter oder Akkus. Das Produkt ist lediglich für den privaten und nicht für
den gewerblichen Gebrauch bestimmt.
Bei missbräuchlicher und unsachgemäßer Behandlung, Gewaltanwendung
und bei Eingriffen, die nicht von unserer autorisierten Service-Niederlassung
vorgenommen wurden, erlischt die Garantie. Ihre gesetzlichen Rechte werden durch diese Garantie nicht eingeschränkt.
Schraven
Service- und Dienstleistungs GmbH
Gewerbering 14
D-47623 Kevelaer
Tel.: +49 (0) 180 5 008107
(14 Ct/Min. aus dem dt. Festnetz, ggf. abweichende Preise aus dem Mobilfunknetz)
Fax: +49 (0) 2832 3532
e-mail: support.de@kompernass.com
Kompernaß Service Österreich
Rittenschober KG
Gmundner Strasse 10
A-4816 Gschwandt
Tel.: +43 (0) 7612 6260516
Fax: +43 (0) 7612 626056
e-mail: support.at@kompernass.com
- 41 -
 Loading...