

Page 1

5
JUEGO PARA BATIDORA DE MANO
SETI SBATTITORE
KOMPERNASS GMBH · BURGSTRASSE 21 · D-44867 BOCHUM
www.kompernass.com
ID-Nr.: KH1132-03/08-V2
KH 1132
JUEGO PARA BATIDORA DE MANO
Instrucciones de uso
SETI SBATTITORE
Istruzioni per l'uso
HAND MIXER SET
Operating instructions
HANDMIXER-SET
Bedienungsanleitung
Page 2
KH 1132
q
o
i
w
e
u
r
t
y
afs
d
Page 3

ÍNDICE PÁGINA
Uso conforme al previsto 2
Datos técnicos 2
Indicaciones de seguridad importantes 2
Volumen de suministro 3
Descripción de las piezas 3
Desembalar 3
Emplazamiento 3
Graduaciones de velocidad 4
Manejo 4
Amasar y mezclar ............................................................................................................................4
Batir....................................................................................................................................................5
Limpieza 6
Evacuación 6
Garantía y asistencia técnica 6
Importador 6
¡Guardar estas instrucciones para preguntas posteriores – e, igualmente entregar éstas, en caso de dar el
aparato a terceras personas!
- 1 -
Page 4
JUEGO PARA
BATIDORA DE MANO
KH 1132
Uso conforme al previsto
Este robot de cocina está diseñado para amasar,
mezclar líquidos (p. ej. zumos de fruta), montar
nata y para batir frutas. Está sólo indicado para tratar
alimentos. Cualquier uso distinto o modificación no
se considera conforme al previsto y puede entrañar
riesgo de accidentes considerables. El fabricante
no se responsabiliza de los daños derivados por un
uso no conforme al previsto. No apropiado para
uso industrial.
Datos técnicos
Tensión nominal: 230-240V~50Hz
Potencia nominal: 300W
Clase de protección: II /
Tiempo KB:
Batidora: 5 Min.
Varilla para purés: 1 Min.
Periodo KB
Con el periodo KB (funcionamiento por un corto
periodo de tiempo) se indica durante cuánto tiempo
puede funcionar un aparato sin que el motor se
sobrecaliente ni se dañe. Tras el periodo KB indicado
deberá apagarse el aparato hasta que el motor se
haya enfriado.
Indicaciones de seguridad
importantes
Advertencia:
• No permita utilizar el aparato a personas (incluidos
los niños) cuyas facultades físicas, sensoriales o
mentales, así como su falta de conocimientos o
de experiencia, les impida hacer un uso seguro
del mismo si no están bajo vigilancia o han sido
instruidos correctamente.
• Vigile a los niños para asegurarse de que no
juegan con el aparato.
• No utilice el robot de cocina al aire libre. El aparato
está concebido exclusivamente para el uso
doméstico y en el interior de la casa.
• Extraiga después de cada uso y antes de cualquier
limpieza, la clavija de red con el fin de evitar un
encendido involuntario.
• Antes de cambiar los accesorios desconecte
siempre el aparato.
• Compruebe el aparato y todas las piezas si
presentan daños visibles. El concepto de seguridad
del aparato sólo funcionará en estado correcto.
• No utilice el aparato bajo ningún concepto si
alguna pieza falla o está dañada. De otro
modo se puede producir algún accidente.
• Todas las reparaciones deberán ser llevadas a
cabo exclusivamente por personal especializado.
Diríjase en este caso al Centro de servicio técnico
asociado en su país.
No sumerja nunca la varilla batidora en agua.
Lave bajo el agua únicamente la parte inferior donde se encuentra la cuchilla. De otro
modo podría estropear el aparato de forma
irreparable.
- 2 -
Page 5

• En caso de una clavija de red dañada o cable
de red dañado, encomiende su sustitución a
personal técnico autorizado o al servicio de
posventa con el fin de evitar riesgos.
Peligro de lesiones:
• Durante el funcionamiento no toque las varillas
de molinillo, el gancho amasador ni la cuchilla
de la varilla batidora. La cuchilla de la varilla
batidora está afilada. Por ello manipule la varilla
batidora con cuidado. No deje que un pelo largo,
una bufanda ni otro elemento cuelgue por encima
de los cabezales.
• Intente no montar nunca al mismo tiempo cabezales con diferentes funciones.
¡Peligro de descarga eléctrica!
• El cable de red no debe encontrarse nunca cerca,
ni ponerse en contacto con las superficies calientes
del aparato, ni cualquier otra fuente de calor.
Nunca coloque el cable sobre bordes o esquinas.
• No doble ni aplaste el cable de red.
Volumen de suministro
Descripción de las piezas
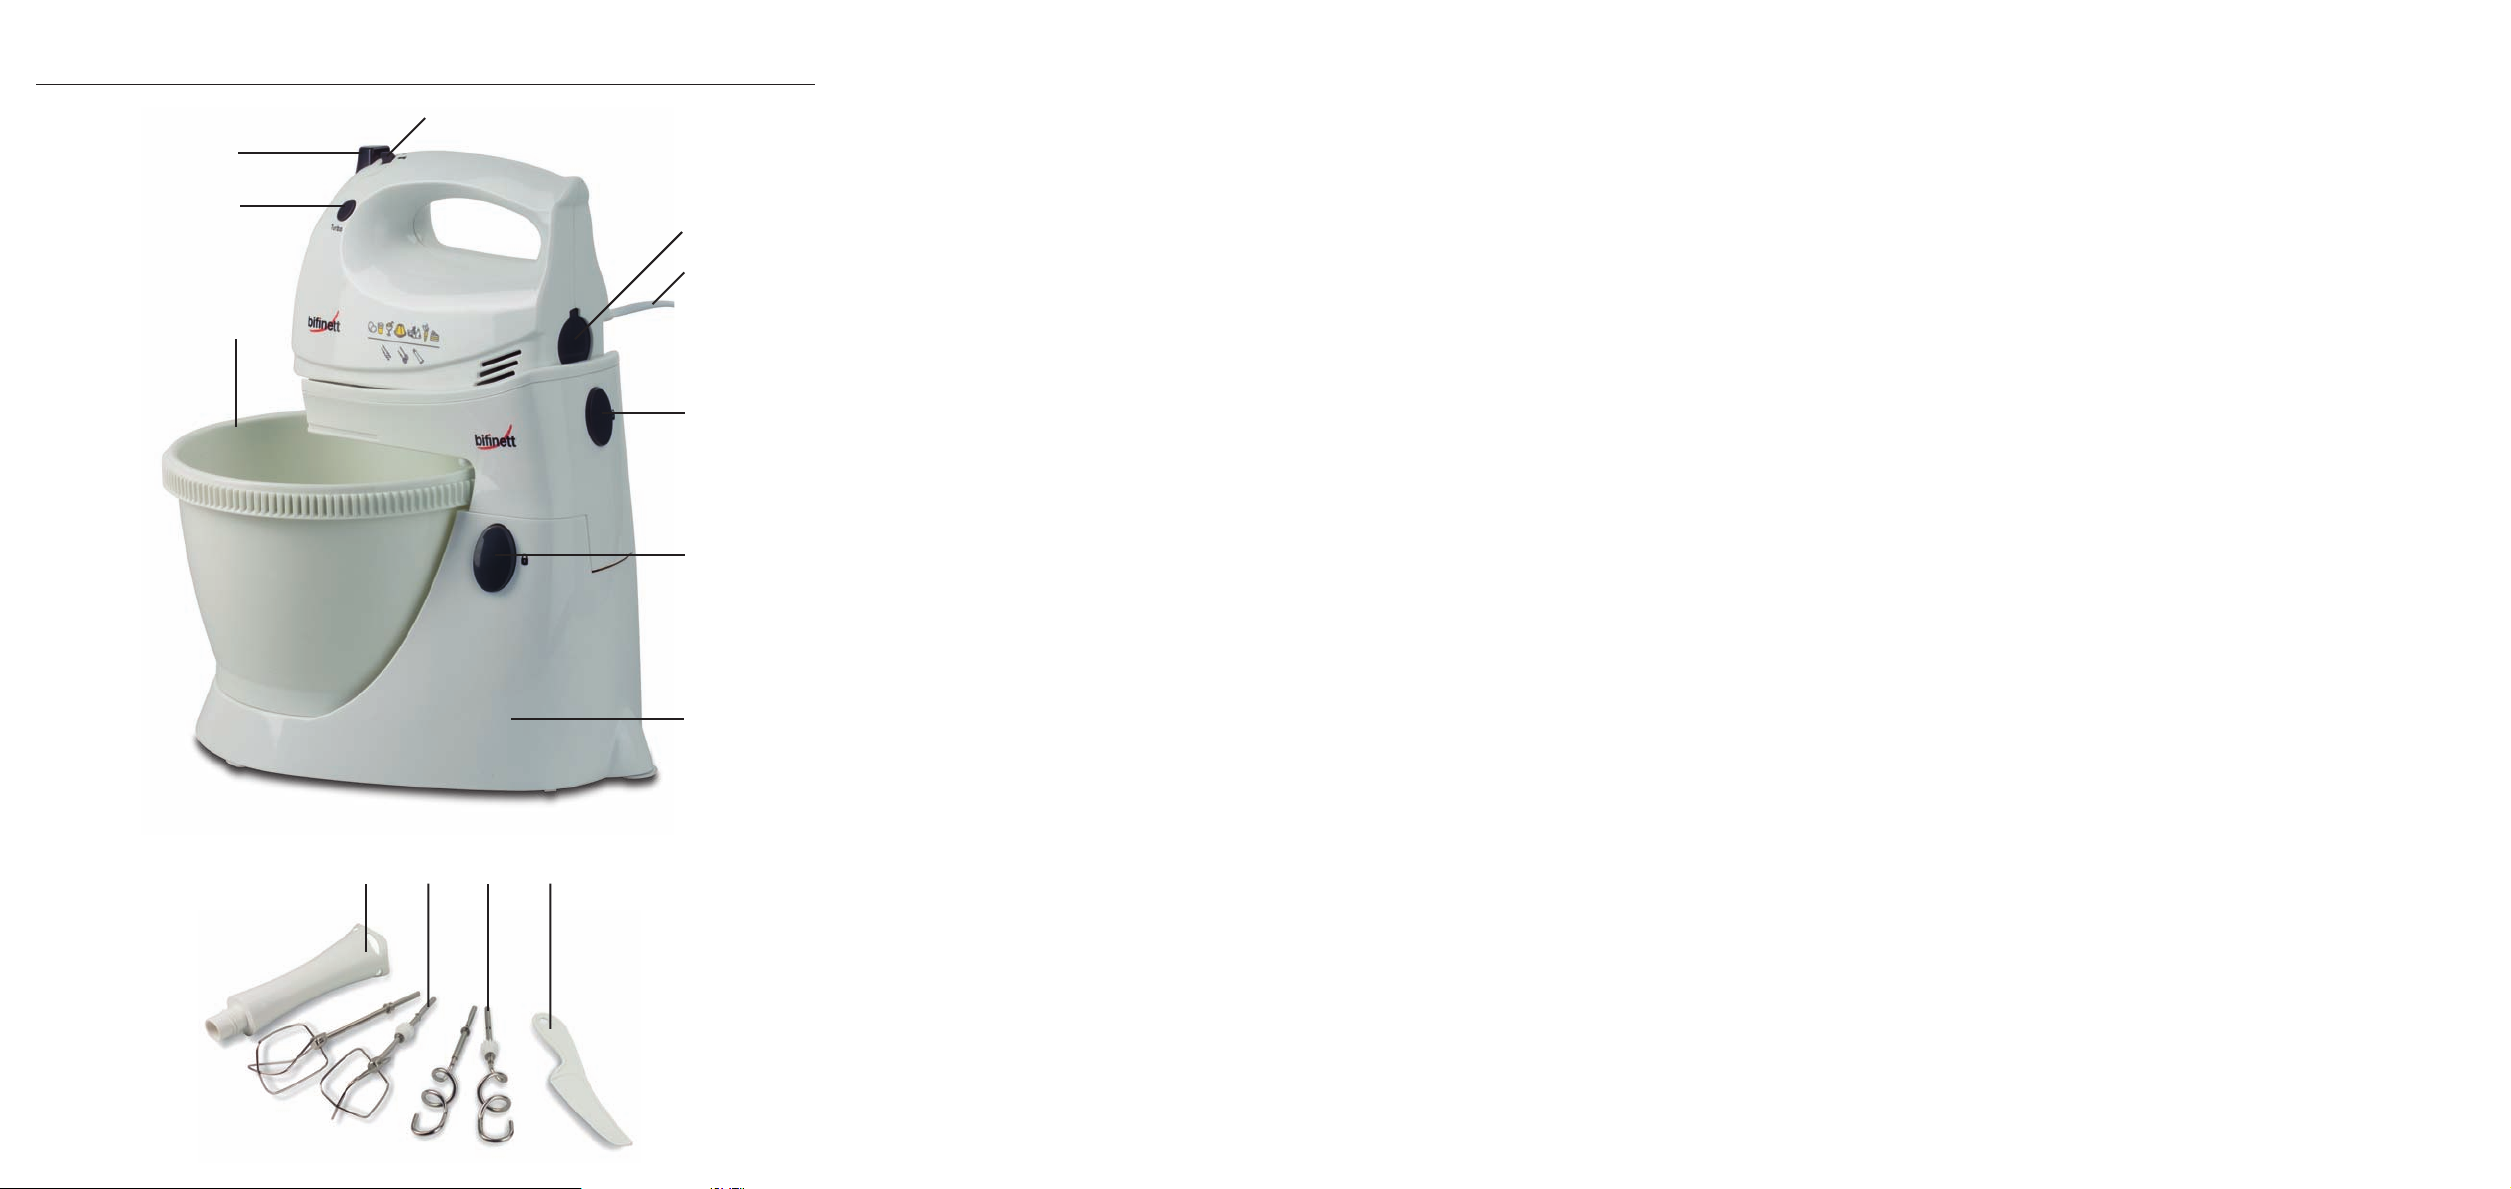
1 interruptor de velocidad
2 dispositivo de ajuste de la varilla batidora con
cierre de seguridad
3 Cable de alimentación con clavija de red
4 botón de desbloqueo para el robot de cocina
5 botón de desbloqueo
6 soporte para mezclar
7 bol para mezclar
8 tecla turbo
9 tecla de expulsión
0 varilla batidora
q varillas de molinillo de acero inoxidable
w ganchos amasadores de acero inoxidable
e paleta raspadora
Desembalar
• Saque todas las piezas del embalaje.
• Retire todos los materiales de embalaje y seguridad
del transporte.
• Compruebe que el volumen de suministro se
encuentra completo y si presenta daños.
1 robot de cocina
1 soporte para mezclar
1 bol para mezclar
2 ganchos amasadores
2 varillas de molinillo
1 varilla batidora
1 paleta raspadora
Instrucciones de uso
Emplazamiento
• Coloque el soporte para mezclar 6 sobre una
superficie plana. En la parte inferior del soporte
para mezclar 6 hay tres ventosas que evitan el
deslizamiento durante el funcionamiento.
• Procure que la base de enchufe utilizada sea
fácilmente accesible.
- 3 -
Page 6
Graduaciones de velocidad
0 el aparato está apagado
1 velocidad de salida buena para ingredientes
”blandos” como harina, mantequilla, etc.
2 la mejor velocidad para la mezcla de ingredien-
tes líquidos
3 óptima para las masas de bizcocho y pan
4 para batir de forma esponjosa mantequilla,
azúcar, para platos dulces, etc.
5 para montar claras a punto de nieve, glasea-
dos, batir patatas cocidas, montar nata, etc.
Para el funcionamiento de la varilla batidora:
Sólo utilizable en combinación con la tecla tur-
bo.
turbo:
• misma velocidad que el nivel „5“
• esta tecla le permite disponer inmediatamente
de la potencia total del aparato.
• para el funcionamiento de la varilla batidora
Manejo
Amasar y mezclar
1. Antes del primer uso limpie los cabezales (0,q,w)
y el bol para mezclar 7.
2. Deslice las varillas de molinillo q o los ganchos
amasadores w en el interior del aparato, hasta
que encajen con seguridad y de forma perceptible.
Introduzca los ganchos amasadores w o las
varillas de molinillo q con la rueda dentada
siempre en la abertura destinada para ello
(identificada con una rueda dentada) en el
robot de cocina.
3. Desbloquee el dispositivo fijador del robot pul-
sando el botón de desbloqueo 5 y abata el
dispositivo fijador del robot hacia arriba.
4. Retire el bol para mezclar 7 y añada los ingredientes según la cantidad que desee preparar.
Atención:
Al introducir los ingredientes no supere nunca la
marca Max (aprox. 2,5 l) del bol para mezclar 7.
De otro modo los ingredientes sobrepasarán el borde
durante el funcionamiento.
5. Vuelva a colocar el bol para mezclar 7 sobre
el soporte para mezclar 6.
6. Pulse el botón de desbloqueo 5 y baje el
dispositivo fijador.
7. Coloque el robot de cocina sobre el dispositivo
fijador, de manera que encaje.
Así podrá utilizar el robot de cocina también sin soporte para mezclar 6. Especialmente con cantida-
des reducidas de líquidos es aconsejable utilizar el
robot de cocina sin el soporte para mezclar 6. De
otro modo el líquido quedará retenido y no se mezclará bien.
8. Introduzca la clavija de red 3 en una base de
enchufe.
9. Para poner en funcionamiento el robot, deslice
el interruptor de velocidad 1 hasta la graduación
de velocidad deseada.Puede elegir entre 5
graduaciones de velocidad o la tecla turbo 8
(v. capítulo „Graduaciones de velocidad“).
Advertencia:
No utilice la batidora durante más de 5 minutos de
forma continua. Haga una pausa después de 5 minutos hasta que se haya vuelto a enfriar el aparato.
Indicación:
Si los ingredientes quedan adheridos al borde del bol
para mezclar 7 y no son alcanzados por los ganchos
amasadores w/varillas de molinillo q, apague el
robot de cocina. Con la ayuda de la paleta raspadora e vuelva a llevar los ingredientes que han
quedado adheridos al centro del bol para mezclar 7.
Vuelva a encender el robot de cocina.
- 4 -
Page 7

10. Si quiere sacar el contenido del recipiente,
apague el robot de cocina. Pulse el botón de
desbloqueo 5, abata hacia arriba el dispositivo
fijador y retire el bol para mezclar 7 del soporte
para mezclar 6.
Indicación:
Si se introducen cantidades mayores en el bol para
mezclar 7 se recomienda retirar primero el robot
del dispositivo fijador.
11. Pulse el botón de desbloqueo 4 para soltar
el robot de cocina y la tecla de expulsión 9
para desmontar las varillas de molinillo q o
los ganchos amasadores w.
Atención:
Utilice siempre el bol para mezclar 7 para mezclar o
amasar. No utilice bajo ningún concepto recipientes
de cristal u otros materiales que se puedan romper
con facilidad.Estos recipientes pueden resultar
dañados y provocar lesiones.
3. Para evitar el rebose, deberá llenar el recipiente
para batir sólo hasta 2⁄3. Seleccione para ello
un recipiente suficientemente grande.
Nota:
• Para garantizar la mezcla efectiva de los ingredientes la preparación debería cubrir al menos
la parte inferior de la varilla 0.
• Encienda el robot de cocina únicamente cuando
haya introducido la varilla batidora 0 en la
mezcla.
4. Deslice el interruptor de velocidad 1 hasta la
posición „batidora“ (v. capítulo „Graduaciones
de velocidad“) y pulse la tecla turbo 8. Mantenga pulsada la tecla turbo 8 durante el uso.
El aparato se parará tan pronto como la suelte.
Advertencia:
No utilice la varilla para purés 0 durante más de
un minuto de forma continua. Haga una pausa hasta que se haya vuelto a enfriar el aparato.
Batir
Advertencia:
Nunca utilice la varilla batidora 0 con alimentos
duros, como p. ej.: granos de café, cubitos de hielo,
azúcar, cereales, chocolate, verduras muy duras,
etc. Esto provocaría daños en el aparato.
1. Abra el dispositivo de ajuste de la varilla batidora
con cierre de seguridad 2 y retenga el cierre
de seguridad 2.
Advertencia:
La varilla batidora 0 sólo se puede colocar si no
hay instalada ninguna varilla de molinillo q o gancho
amasador w.
2. Deslice la varilla batidora 0 hasta que encaje
y apriétela girándola.
5. Cuando haya terminado de usar la varilla batidora 0, coloque el interruptor de velocidad 1
en la posición „0“ y extraiga al clavija de red.
6. Para limpiar la varilla batidora 0 gírela para
sacarla del dispositivo de ajuste 2.
Atención:
Limpie sólo la parte inferior de la varilla batidora
0 bajo un chorro de agua. No debe penetrar
agua en el interior de la varilla batidora 0. Ello
podría dañar el aparato.
- 5 -
Page 8
Limpieza
Atención:
Antes de cada limpieza extraiga la clavija de red.
¡Existe riesgo de descarga eléctrica!
• Limpie el soporte para mezclar sólo con un
paño húmedo y si es necesario con un producto
de limpieza suave.
• Puede lavar la varilla de molinillo q o los ganchos
amasadores w bajo un chorro de agua o en
lavavajillas.
Atención:
Limpie sólo la parte inferior de la varilla batidora 0
bajo un chorro de agua. No debe penetrar agua
en el interior de la varilla batidora 0. Ello podría
dañar el aparato.
• Le recomendamos limpiar los cabezales justo
después de su uso. Así se evitará que queden
residuos de alimentos y se reducirá la posibilidad de que aparezcan bacterias.
• Limpie el bol para mezclar y la paleta raspadora
en agua templada con lavavajillas.
Evacuación
En ningún caso deberá tirar el aparato
con la basura doméstica. Este producto
está sujeto a la directiva europea
2002/96/CE.
Evacue el aparato en un centro de evacuación
autorizado a través de las instalaciones de evacuación
comunitarias.
Preste atención a las normas en vigor.
En caso de dudas póngase en contacto con su centro
de evacuación.
Garantía y asistencia técnica
Este aparato tiene 3 años de garantía desde la
fecha de compra. El aparato ha sido fabricado
cuidadosamente y ha sido probado antes de su
entrega. Guarde el comprobante de caja como
justificante de compra. Si necesitara hacer uso de
la garantía, póngase en contacto por teléfono con
su punto de servicio habitual. Éste es el único modo
de garantizar un envío gratuito.
La garantía cubre los defectos de fabricación o del
material, pero no las piezas sujetas a desgaste y
los daños sufridos por las piezas frágiles (p. ej. el
interruptor o las pilas). Este producto ha sido diseñado exclusivamente para el uso particular y no
para el uso industrial.
En caso de manipulación indebida e incorrecta, uso
de la fuerza y en caso de abrir el aparato personas
extrañas a nuestros centros de asistencia técnica
autorizados, la garantía pierde su validez. Esta
garantía no reduce en forma alguna sus derechos
legales.
Kompernass Service España
C/Invención 7
Polígono Industrial Los Olivos
28906 Getafe – Madrid
Tel.: 902/430758
Fax: 91/6652551
e-mail: support.es@kompernass.com
Importador
KOMPERNASS GMBH
BURGSTRASSE 21
44867 BOCHUM, (ALEMANIA)
www.kompernass.com
El material de embalaje debe desecharse
de forma respetuosa con el medio ambiente.
- 6 -
Page 9

INDICE PAGINA
Uso conforme 8
Dati tecnici 8
Importanti indicazioni di sicurezza 8
Fornitura 9
Definizioni dei componenti 9
Disimballaggio 9
Montaggio 9
Livelli di velocità 10
Uso 10
Impastare e frullare........................................................................................................................10
Ridurre in purea .............................................................................................................................11
Pulizia 12
Smaltimento 12
Garanzia e assistenza 12
Importatore 12
Conservare le presenti istruzioni per consultarle in futuro; in caso di cessione dell'apparecchio a terzi,
consegnare anche le istruzioni!
- 7 -
Page 10

SETI SBATTITORE
KH 1132
Importanti indicazioni di sicurezza
Uso conforme
Questo set è idoneo per lavorare impasti, miscelare
liquidi (ad es. succhi di frutta), montare la panna e
frullare la frutta. Esso è utilizzabile unicamente con
gli alimenti. Qualunque altro impiego o modifica dell'apparecchio è da considerarsi non conforme alla
destinazione e comporta gravi rischi di infortunio.
Il produttore non si assume alcuna responsabilità
per i danni derivanti da un utilizzo non conforme.
Non indicato per l'uso commerciale.
Dati tecnici
Tensione nominale: 230-240 V~50 Hz
Potenza nominale: 300W
Classe di protezione: II /
Funzionamento continuato:
mixer: 5 min.
barra del mixer: 1 min.
Tempo di funzionamento abbreviato
Il tempo di funzionamento abbreviato indica il tempo
di funzionamento dell'apparecchio senza pericolo
di surriscaldamento e di guasti al motore. Dopo l'uso
per il tempo di funzionamento abbreviato, l'apparecchio dev'essere spento fino al completo raffreddamento del motore.
Attenzione:
• questo apparecchio non è indicato per l'uso da
parte di persone (inclusi bambini) con limitate
capacità fisiche, sensoriali o mentali o prive dell'esperienza e/o della conoscenza necessaria, a
meno che tali persone non vengano sorvegliate
da un responsabile per la sicurezza o abbiano
ricevuto indicazioni sull'impiego dell'apparecchio.
• Sorvegliare i bambini per assicurarsi che non
giochino con l'apparecchio.
• Non utilizzare il mixer all'aperto. L'apparecchio
è destinato all'utilizzo privato in ambiente domestico.
• Dopo ogni utilizzo e prima di ogni pulizia, staccare l'apparecchio dalla presa di corrente, al
fine di evitare accensioni accidentali.
• Spegnere sempre l'apparecchio prima della sostituzione degli accessori.
• Controllare che l'apparecchio e tutti gli accessori
non abbiano danni visibili. La sicurezza dell'apparecchio è garantita solo se esso è in perfetto stato.
• Non mettere in funzione l'apparecchio in caso di
danni ai componenti o componenti mancanti.
Ciò potrebbe dare luogo a gravi rischi di infortunio.
• Fare eseguire tutte le riparazioni esclusivamente
da personale specializzato. In tal caso rivolgersi
al partner di assistenza della propria nazione.
Non immergere la barra del mixer in acqua.
Ripulire con acqua corrente solo la parte inferiore provvista del coltello. In caso contrario,
l'apparecchio potrebbe danneggiarsi irreparabilmente.
- 8 -
Page 11

• Fare sostituire immediatamente la spina o il cavo
di rete danneggiato da personale specializzato
autorizzato o dal centro di assistenza ai clienti,
per evitare possibili pericoli.
Pericolo di lesioni:
• Durante il funzionamento non toccare le fruste, i
ganci da impasto o il coltello dell'asta frullatrice.
Il coltello dell'asta frullatrice è affilato. Maneggiare
l'asta frullatorice con cautela. Evitare accuratamente di sospendere capelli lunghi, sciarpe o
altri oggetti simili sull'apparecchio.
• Non montare mai contemporaneamente accessori dalle funzioni diverse.
Pericolo di scossa elettrica!
• Non collocare il cavo di rete vicino o a contatto
con parti surriscaldate dell'apparecchio o altre
fonti di calore. Non posizionare il cavo di rete
su spigoli o angoli.
• Non piegare o schiacciare il cavo di alimentazione.
Fornitura
Definizioni dei componenti
1 Commutatore di velocità
2 Dispositivo di inserimento dell'asta frullatrice
con blocco di sicurezza
3 Cavo di rete con spina di rete
4 Pulsante di sbloccaggio per il mixer
5 Pulsante di sbloccaggio
6 Base
7 Ciotola
8 Tasto Turbo
9 Tasto di espulsione
0 Asta frullatrice
q Fruste di acciaio inox
w Ganci di acciaio inox
e Spatola
Disimballaggio
• Rimuovere tutti i componenti dalla confezione.
• Rimuovere tutti i fissaggi del trasporto e i materiali
di imballaggio.
• Controllare la fornitura in relazione alla sua
completezza e integrità.
1 mixer
1 base
1 ciotola
2 ganci da impasto
2 fruste
1 asta frullatrice
1 spatola
Istruzioni per l'uso
Montaggio
• Collocare la base 6 su una superficie piana.
Sul fondo della base 6 sono presenti tre ventose
per impedire lo scivolamento durante l'uso.
• Utilizzare una presa di corrente facilmente raggiungibile in caso di guasti.
- 9 -
Page 12

Livelli di velocità
0 Apparecchio spento
1 buona velocità di uscita per mescolare ingre-
dienti „morbidi”, come farina, burro, ecc.
2 velocità ottimale per mescolare ingredienti liquidi
3 ottimale per lavorare impasti per dolci e panifi-
cazione
4 per montare a neve burro, zucchero, dolci, ecc.
5 per montare a neve gli albumi, le glasse, per
ridurre in purea le patate lesse, per montare la
panna, ecc.
· per l'utilizzo dell'asta frullatrice:
utilizzabile solo in combinazione con il tasto
Turbo.
Turbo:
• velocità uguale al livello „5“
• questo tasto consente di avere a disposizione immediatamente tutta la potenza dell'apparecchio.
• per l'uso dell'asta frullatrice
Uso
Impastare e frullare
1. Prima del primo impiego pulire gli accessori
(0,q,w) e la ciotola 7.
2. Spingere le fruste q o i ganci da impasto w
nell'apparecchio fino all'inserimento udibile.
Inserire i ganci da impasto w o le fruste q con
la ruota dentata sempre nell'apertura appositamente prevista (e contrassegnata con il simbolo
della ruota dentata) sul mixer.
3. Sbloccare il supporto del mixer premendo il pulsante di sbloccaggio 5 e ribaltare il supporto
del mixer verso l'alto.
4. Prelevare la ciotola 7 e inserire gli ingredienti
a seconda delle quantità previste dalla ricetta.
Attenzione:
non inserire mai una quantità di ingredienti superiore
a quanto indicato dalla marcatura Max (ca. 2,5 l)
nella ciotola 7. In caso contrario, gli ingredienti
fuoriusciranno durante la lavorazione.
5. Ricollocare la ciotola 7 sulla base 6.
6. Premere il tasto di sbloccaggio 5 e piegare il
supporto verso il basso.
7. Collocare il mixer sul supporto in modo da ottenerne l'inserimento.
Il mixer può essere utilizzato anche senza la base 6.
In particolare per piccole quantità di liquidi, è consigliabile utilizzare il mixer senza la base 6. In caso
contrario, il liquido non verrà lavorato e mescolato
correttamente.
8. Inserire la spina di rete 3 in una presa di rete.
9. Per mettere in funzione il mixer, spingere il commutatore di velocità 1 sul livello di velocità desiderato. In tal caso è possibile scegliere fra i 5
livelli di velocità o il tasto Turbo 8 (v. capitolo
„Livelli di velocità“).
Attenzione:
Non azionare il mixer per oltre 5 minuti sul pezzo.
Dopo 5 minuti, fare una pausa fino al raffreddamento dell'apparecchio.
Avvertenza:
se gli ingredienti si attaccano ai lati della ciotola 7
e non riescono a essere lavorati dai ganci w/fruste
q, spegnere il mixer. Con l'aiuto della spatola e
riportare gli ingredienti nel centro della ciotola 7.
Riaccendere il mixer.
- 10 -
Page 13

10. Per prelevare il contenuto della ciotola, spegnere il mixer. Premere il pulsante di sbloccaggio
5, ribaltare il supporto verso l'alto e prelevare
la ciotola 7 dalla base 6.
3. Per evitare che gli alimenti trabocchino, riempire
il contenitore per la frullatura solo fino a 2⁄3.
Selezionare al riguardo un contenitore sufficientemente grande.
Avvertenza:
in presenza di grandi quantità di alimenti nella ciotola 7 si consiglia di prelevare prima il mixer dal
supporto.
11. Premere il pulsante di sbloccaggio 4, per prelevare il mixer e il tasto e il tasto di espulsione 9,
per sganciare le fruste q o i ganci w.
Attenzione:
utilizzare comunque sempre la ciotola 7 per me-
scolare o impastare. Non utilizzare in alcun caso
contenitori di vetro o altri materiali fragili. Questi
contenitori possono rovinarsi e arrecare lesioni.
Ridurre in purea
Attenzione:
Non utilizzare mai l'asta frullatrice 0 per alimenti
duri come ad esempio: chicchi di caffè, cubetti di
ghiaccio, zucchero, cereali, cioccolata, verdure
molto dure, ecc. Ciò arrecherebbe danni all'apparecchio.
1. Aprire il dispositivo di inserimento dell'asta frulla-
trice con il blocco di sicurezza 2 e tenere fermo
il blocco di sicurezza 2.
Suggerimento:
L'asta frullatrice 0 può essere utilizzata solo se non
sono state installate fruste q o ganci w.
Suggerimenti:
• Per garantire l'efficace miscelazione degli ingredienti, gli alimenti da elaborare devono coprire
almeno la parte inferiore dell'asta frullatrice 0.
• Accendere il mixer solo dopo aver inserito l'asta
frullatrice 0 nell'alimento da frullare.
4. Spostare il commutatore di velocità 1 nella po-
sizione „Asta frullatrice“ (v. capitolo „Livelli
di velocità“) e premere il tasto turbo 8. Tenere
premuto il tasto Turbo 8 durante l'uso. Non appena lo si rilascia, l'apparecchio si fermerà.
Attenzione:
Non azionare la barra del mixer 0 per oltre un minu-
to sul pezzo. Dopo un minuto, fare una pausa fino al
raffreddamento dell'apparecchio.
5. Dopo aver terminato di utilizzare l'asta frullatrice
0, impostare il commutatore di velocità 1 in
posizione „0“ ed estrarre la spina di rete.
6. Per la pulizia dell'asta frullatrice 0 estrarla dal
dispositivo di inserimento 2.
Attenzione:
Pulire solo la parte inferiore dell'asta frullatrice 0 sotto
l'acqua corrente. Nell'interno dell'asta frullatrice 0
non deve penetrare acqua. Ciò potrebbe causare
danni all'apparecchio.
2. Spingere l'asta frullatrice 0 fino a ottenerne
l'inserimento e avvitarla quindi saldamente.
- 11 -
Page 14

Pulizia
Attenzione:
prima di pulire l'apparecchio, staccare sempre la
spina dalla presa di corrente. Sussiste il pericolo di
una scarica elettrica!
• Ripulire la base solo con un panno umido ed
eventualmente con un detergente delicato.
• Le fruste q o i ganci w possono essere lavati
sotto acqua corrente o in lavastoviglie.
Attenzione:
Pulire solo la parte inferiore dell'asta frullatrice 0 sotto
acqua corrente. Nell'interno dell'asta frullatrice 0
non deve penetrare acqua. Ciò potrebbe causare
danni all'apparecchio.
• Consigliamo di pulire gli accessori immediatamente dopo l'uso. In tal modo è possibile rimuovere i resti di alimenti, riducendo la possibilità di
formazione di batteri.
• Pulire la ciotola e la spatola in acqua calda con
detersivo.
Garanzia e assistenza
Questo apparecchio è garantito per tre anni a partire dalla data di acquisto. L'apparecchio è stato
prodotto con cura e debitamente collaudato prima
della consegna. Conservare lo scontrino come prova d'acquisto. Nei casi contemplati dalla garanzia,
mettersi in comunicazione telefonicamente con il
centro di assistenza più vicino. Solo in tal modo è
possibile garantire una spedizione gratuita della
merce.
La garanzia copre solo i difetti del materiale o di
fabbricazione. Il prodotto è destinato esclusivamente
all'uso domestico e non a quello commerciale.
La garanzia decade in caso di impiego improprio
o manomissione, uso della forza e interventi non
eseguiti dalla nostra filiale di assistenza autorizzata.
Questa garanzia non costituisce alcun limite ai diritti
legali del consumatore.
Kompernass Service Italia
Corso Lino Zanussi 11
33080 Porcia (PN)
Tel.: 0434/550833
Fax: 0434/550833
e-mail: support.it@kompernass.com
Smaltimento
Non gettare per alcun motivo l'apparecchio insieme ai normali rifiuti domestici.
Il presente prodotto è conforme alla
direttiva europea 2002/96/CE.
Smaltire l'apparecchio attraverso un'azienda di smaltimento autorizzata o attraverso l'ente di smaltimento
comunale competente.
Rispettare le prescrizioni attualmente in vigore.
In caso di dubbio mettersi in contatto con l'ente di
smaltimento competente.
Smaltire tutti i materiali dell'imballaggio in
modo ecologicamente conforme.
Importatore
KOMPERNASS GMBH
BURGSTRASSE 21
44867 BOCHUM, GERMANY
www.kompernass.com
- 12 -
Page 15

CONTENT PAGE
Intended use 14
Technical Data 14
Important safety instructions 14
Items supplied 15
Description of Components 15
Unpacking 15
Placement 15
Speed levels 15
Operation 16
Kneading and Whisking ...............................................................................................................16
Blending..........................................................................................................................................16
Cleaning 17
Disposal 17
Warranty and Service 18
Importer 18
Read the operating instructions carefully before using the appliance for the first time and preserve this
booklet for later reference. Pass the manual on to whomsoever might acquire the appliance at a later date.
- 13 -
Page 16

HAND MIXER SET
KH 1132
Intended use
This Handmixer set is suitable for kneading dough,
mixing liquids (e.g. fruit juices), whipping cream and
pureeing fruit. It is only suitable for foodstuffs. All other
usages or modifications are regarded as contrary
to the operating instructions and bear a great risk
of accidents. The manufacturer declines to accept
responsibility for damage(s) arising out of usage
that is contrary to the instructions specified below.
Not for commercial use.
Technical Data
• Children should be supervised to ensure that
they do not play with the appliance.
• Do not use the hand mixer outdoors. The appliance
is intended exclusively for domestic use indoors.
• To prevent the appliance from switching itself on
inadvertently, unplug the power cable after use
and before cleaning it.
• ALWAYS switch the appliance off before changing
accessories.
• Check the appliance and all parts for visible
damage. The safety concept can work only if
the appliance is in a faultless condition.
• Under NO circumstances should you use the
appliance if parts are damaged or missing. If
you do, there will be an increased risk of accidents.
• Arrange for all repairs to be carried out only by
specialists. If need be, approach our Service
Partner responsible for your country.
Power rating: 230-240V~50Hz
Nominal power: 300W
Protection class: II /
Continuous operation: mixer: 5 Min.
blender: 1 Min.
CO Time
The C.O. Time (Continuous Operation) details how
long an appliance may be used without the motor
overheating and being damaged. After the appliance
has run for for this period it must be switched off until
the motor has cooled itself down.
Important safety instructions
Warning:
• This appliance is not intended for use by individuals
(including children) with restricted physical,
physiological or intellectual abilities or deficiences
in experience and/or knowledge unless they are
supervised by a person responsible for their safety
or receive from this person instruction in how the
appliance is to be used.
Do not submerge the blender in water. If necessary, clean the lower part with the blade under
running water. The appliance could become
irreparably damaged.
• Arrange for defective power plugs and/or
cables to be replaced at once by qualified technicians or our Customer Service Department.
Danger of Injuries:
• During use, do not come into contact with the
whisk, the kneading hooks or the knife on the
blender. The blade of the blender is sharp.
Therefore, ALWAYS handle the blender with
care. Do not allow long hair, scarves and such
like to hang over the mixing attachments.
• NEVER attempt to assemble ancillaries with
differing functions at the same time.
Risk of electrical shocks.
• The power cable must never come into close
contact with hot parts of the appliance or other
sources of heat. Do not allow the power cable
to lie on sharp rims or edges.
• Do not fold or crush the power cable.
- 14 -
Page 17

Items supplied
Placement
1 Hand mixer
1 Mixing stand
1 Mixing bowl
2 Kneading hooks
2 Whisks
1 Blender
1 Spatula
Instructions for use
Description of Components
1 Speed switch
2 Fixture for the blender, with safety cover
3 Power cable with power plug
4 Unlocking button for the handmixer
5 Unlocking button
6 Mixing stand
7 Mixing bowl
8 Turbo button
9 Tool-release button
0 Blender
q Whisk made of stainless steel
w Kneading hooks made of stainless steel
e Spatula
Unpacking
• Take all components out the packaging.
• Remove all packaging materials and transport
restraints.
• Check that all of the items listed are present and
that they do not show signs of damage.
• Place the mixer stand 6 onto a level surface.
Three suction discs have been fixed to the base
of the mixer stand 6 to prevent it sliding during
operation.
• Ensure that the wall power socket is easily accessible in the event of a risk situation.
Speed levels
0 Appliance is switched off
1 Good starting speed for mixing "soft" ingredients
such as flour, butter, etc.
2 Best speed for blending liquid ingredients
3 Optimum speed for mixing cake and bread
dough
4 For whipping butter to form a fine foam, sugar,
for desserts etc.
5 For whipping egg whites, cake, decorative jelly,
pureeing of boiled potatoes, whipping cream,
etc.
For operating the blender:
Only usable in combination with the turbo button.
Turbo:
• same speed as level 5
• this button allows you to have the full power of
your appliance immediately at your disposal.
• for operating the blender
- 15 -
Page 18

Operation
Kneading and Whisking
1. Before using them for the first time, clean the
ancillaries (0,q,w) and the mixing bowl 7.
2. Push the whisk q or the kneading hooks w into
the appliance until they safely and audibly engage.
Always insert the kneading hook w or the whisk q
with the cogged wheel into the predetermined
opening (marked with a cog wheel) on the
handmixer.
3. Release the mixer holder by pressing the release
button for tilting 5 and lift the mixer holder
upwards.
4. Remove the mixing bowl 7 and fill it with the
quantities of ingredients to be prepared.
Warning:
Do not operate the mixer for more than 5 minutes at
a time. After 5 minutes pause long enough to allow
the device to cool off.
Note:
If ingredients become stuck to the side of the mixing
bowl 7 and they cannot be captured with the
kneading hooks w/whisks q, switch the hand mixer
off. Use the pastry spatula e to push them back into
the middle of the mixing bowl 7. Switch the hand mixer back on.
10. To remove the bowl contents, switch the appliance
off. Press the release button for tilting 5, lift the
holder upwards and remove the mixing bowl 7
from the mixing stand 6.
Warning:
NEVER fill the mixing bowl 7 beyond the Max
marking (ca. 2.5 l) with ingredients. If you do, there
is a risk they could spill over the edge during operation.
5. Replace the mixing bowl 7 onto the mixing
stand 6.
6. Press the release button for tilting 5 and lower
the holder downwards.
7. Place the hand mixer on the holder so that it firmly
engages.
You can also use the hand mixer without the mixing
stand 6. Especially with minor amounts of liquids
you are advised to use the hand mixer without the
mixing stand 6. Otherwise, the liquid may not be
completely captured and thus not mixed thoroughly.
8. Insert the power plug 3 into a wall power socket.
9. To set the mixer to work, push the speed switch
1 to the desired speed setting. You can select
between 5 speed settings or the turbo button 8
(see section "Speed levels“).
Note:
In the case of larger amounts in the mixing bowl 7,
it is to be recommended that you first remove the
mixer from the holder.
11. Press the release button 4 to remove the hand
mixer and the ejection button 9 to loosen the
whisks q or the kneading hooks w.
Warning:
Always use the mixing bowl 7 for mixing and
kneading. Under no circumstance should you use
receptacles made of glass or other very fragile/
easily breakable materials. These containers can
be damaged and then cause potentially serious
injuries.
Blending
Warning:
Never use the blender 0 for hard foodstuffs such
as: coffee beans, ice cubes, sugar, cereals, chocolate,
raw/hard vegetables etc. They could cause serious
damage to the appliance.
- 16 -
Page 19

1. Open the fixture for the blender 2 and hold the
safety cover 2 firmly.
Cleaning
Note:
The blender 0 can only be utilised when the whisks
q or the kneading hooks w are not installed.
2. Push the blender 0 in until it engages and then
twist it firmly tight.
3. To avoid overflows, the container used for blending
should only be filled to 2/3rds of its capacity.
Select a sufficiently large container.
Tips:
• To ensure an effective mixing of the ingredients,
the foodstuffs to be processed should cover at
least the lower section of the blender 0.
• First switch the hand mixer on when the blender 0
has been inserted into the ingredients to be blended.
4. Push the speed switch 1 into the position "Blender" (s. chapter "Speed levels“) and press the
Turbo button 8. Keep the Turbo button 8 pressed
down during the whole procedure. The appliance
stops as soon as it is released.
Warning:
Do not operate the blender 0 for longer than one
minute at a time. After one minute pause long
enough to allow the device to cool off.
5. When you have finished working with the
blender 0, place the speed switch 1 back
into the position "0" and remove the plug from
the wall power socket.
6. To clean the blender 0, remove it from the retaining
fixture 2 by turning it.
Warning:
Clean only the lower section of the blender 0 under
running water. Under no circumstances may water
permeate into the blender 0. This could result in
damage to the appliance.
Warning:
Always remove the power plug before cleaning the
appliance. There is a danger of electric shock!
• Clean the mixing stand only with a moist cloth
and, if required, with a mild cleaning detergent.
• The whisks q and the kneading hooks w can
be cleaned under running water or in the dishwashing machine.
Warning:
Clean only the lower section of the blender 0 under
running water. Under no circumstances may water
permeate into the blender 0. This could result in
damage to the appliance.
• We recommend cleaning the ancillaries directly
after use. Food remnants are then immediately
removed, greatly reducing the risks of bacterial
contamination.
• Clean the mixing bowl and the pastry spatula in
warm water and detergent.
Disposal
Do not dispose of the appliance in your
normal domestic waste. This product is
subject to the European directive
2002/96/EG.
Dispose of the appliance through an approved
disposal centre or at your community waste facility.
Observe the currently applicable regulations.
In case of doubt, please contact your waste disposal
centre.
Dispose of all packaging materials in an
environmentally friendly manner.
- 17 -
Page 20

Warranty and Service
Importer
The warranty for this appliance is for 3 years from
the date of purchase. The appliance has been
manufactured with care and meticulously examined
before delivery. Please retain your receipt as proof
of purchase. In the case of a warranty claim, please
make contact by telephone with our service department.
Only in this way can a post-free despatch for your
goods be assured.
The warranty covers only claims for material and
maufacturing defects, not for wearing parts or for
damage to fragile components, e.g. buttons or
batteries. This product is for private use only and is
not intended for commercial use.
The warranty is void in the case of abusive and improper hadling, use of force and internal tampering
not carried out by our authorized service branch.
Your statutory rights are not restricted in any way
by this warranty.
DES Ltd
Units 14-15
Bilston Industrial Estate
Oxford Street
Bilston
WV14 7EG
Tel.: 0870/787-6177
Fax: 0870/787-6168
e-mail: support.uk@kompernass.com
KOMPERNASS GMBH
BURGSTRASSE 21
44867 BOCHUM, GERMANY
www.kompernass.com
Irish Connection
Harbour view
Howth
Co. Dublin
Tel: 00353 (0) 87 99 62 077
Fax: 00353 18398056
e-mail: support.ie@kompernass.com
- 18 -
Page 21

INHALTSVERZEICHNIS SEITE
Bestimmungsgemäßer Gebrauch 20
Technische Daten 20
Wichtige Sicherheitshinweise 20
Lieferumfang 21
Teilebezeichnungen 21
Auspacken 21
Aufstellen 21
Geschwindigkeits-Stufen 22
Bedienen 22
Kneten und Quirlen........................................................................................................................22
Pürieren ...........................................................................................................................................23
Reinigen 24
Entsorgen 24
Garantie und Service 24
Importeur 25
Lesen Sie die Bedienungsanleitung vor der ersten Verwendung aufmerksam durch und heben Sie diese für
den späteren Gebrauch auf. Händigen Sie bei Weitergabe des Gerätes an Dritte auch die Anleitung aus.
- 19 -
Page 22

HANDMIXER-SET
KH 1132
Bestimmungsgemäßer
Gebrauch
Dieses Handmixer-Set ist zum Kneten von Teig,
Mixen von Flüssigkeiten (z.B. Fruchtsäften), Sahneschlagen und zum Pürieren von Früchten geeignet.
Es ist nur für Lebensmittel geeignet. Jede andere Verwendung oder Veränderung gilt als nicht bestimmungsgemäß und birgt erhebliche Unfallgefahren.
Für aus bestimmungswidriger Verwendung entstandene Schäden übernimmt der Hersteller keine
Haftung. Nicht für gewerblichen Einsatz.
Technische Daten
Nennspannung: 230-240V~50Hz
Nennleistung: 300W
Schutzklasse: II/
KB-Zeit: Mixer: 5 Min.
Pürierstab: 1 Min.
KB-Zeit
Die KB-Zeit (Kurzzeitbetrieb) gibt an, wie lange
man ein Gerät betreiben kann, ohne dass der Motor überhitzt und Schaden nimmt. Nach der angegebenen KB-Zeit muss das Gerät solange ausgeschaltet werden, bis sich der Motor abgekühlt hat.
Wichtige Sicherheitshinweise
Warnung:
• Dieses Gerät ist nicht dafür bestimmt, durch
Personen (einschließlich Kinder) mit eingeschränkten physischen, sensorischen oder
geistigen Fähigkeiten oder mangels Erfahrung
und/oder mangels Wissen benutzt zu werden,
es sei denn, sie werden durch eine für ihre
Sicherheit zuständige Person beaufsichtigt oder
erhielten von ihr Anweisungen, wie das Gerät
zu benutzen ist.
• Kinder sollten beaufsichtigt werden, um sicherzustellen, dass sie nicht mit dem Gerät spielen.
• Verwenden Sie den Handmixer nicht im Freien.
Das Gerät ist ausschließlich für den Haushaltsgebrauch und innerhalb des Hauses bestimmt.
• Ziehen Sie nach jedem Gebrauch und vor jeder
Reinigung den Netzstecker, um ein unbeabsichtigtes Einschalten zu vermeiden.
• Schalten Sie vor dem Auswechseln von Zubehör
immer das Gerät aus.
• Prüfen Sie das Gerät und alle Teile auf sichtbare
Schäden. Nur in einwandfreiem Zustand kann
das Sicherheitskonzept des Gerätes funktionieren.
• Nehmen Sie das Gerät auf keinen Fall in Betrieb, wenn Teile beschädigt sind oder fehlen.
Andernfalls kann erhebliche Unfallgefahr bestehen.
• Lassen Sie alle Reparaturen ausschließlich von
Fachpersonal ausführen. Wenden Sie sich in diesem Fall an den jeweiligen Servicepartner in
Ihrem Land.
- 20 -
Tauchen Sie den Pürierstab nicht in Wasser.
Reinigen Sie lediglich den unteren Teil mit
Messer unter fließendem Wasser. Ansonsten
kann das Gerät irreparabel beschädigt werden.
Page 23

• Lassen Sie beschädigte Netzstecker oder Netzkabel sofort von autorisiertem Fachpersonal
oder dem Kundenservice austauschen, um
Gefährdungen zu vermeiden.
Verletzungsgefahr:
• Berühren Sie während des Betriebs nicht die
Quirle, Knethaken oder das Messer des Pürierstabs. Das Messer des Pürierstabs ist scharf.
Handhaben Sie den Pürierstab deshalb mit Vorsicht. Lassen Sie kein langes Haar, keine Schals
o.ä. über die Aufsätze hängen.
• Versuchen Sie nie Aufsätze mit unterschiedlichen
Funktionen gleichzeitig zu montieren.
Gefahr durch elektrischen Schlag!
• Das Netzkabel darf nie in die Nähe oder Berührung mit heißen Teilen des Geräts oder anderen
Wärmequellen kommen. Lassen Sie das Netzkabel nicht auf Kanten oder Ecken aufliegen.
• Knicken oder quetschen Sie das Netzkabel
nicht.
Lieferumfang
Teilebezeichnungen
1 Geschwindigkeits-Schalter
2 Einsatz-Vorrichtung für Pürierstab mit Sicherheits-
verschluss
3 Netzkabel mit Netzstecker
4 Entriegelungs-Knopf für Handmixer
5 Entriegelungs-Knopf
6 Rührständer
7 Rührschüssel
8 Turbo-Taste
9 Auswurf-Taste
0 Pürierstab
q Quirle aus Edelstahl
w Knethaken aus Edelstahl
e Teigschaber
Auspacken
• Entnehmen Sie alle Teile aus der Verpackung.
• Entfernen Sie sämtliche Verpackungsmaterialien
und Transportsicherungen.
• Prüfen Sie den Lieferumfang auf Vollständigkeit
und Beschädigungen.
1 Handmixer
1 Rührständer
1 Rührschüssel
2 Knethaken
2 Quirle
1 Pürierstab
1 Teigschaber
Bedienungsanleitung
Aufstellen
• Stellen Sie den Rührständer 6 auf eine ebene
Fläche. An der Unterseite des Rührständers 6
sind drei Saugnäpfe angebracht, um das Verrutschen während des Betriebes zu verhindern.
• Achten Sie darauf, dass die verwendete Netzsteckdose im Fehlerfall gut zu erreichen ist.
- 21 -
Page 24

Geschwindigkeits-Stufen
0 Gerät ist ausgeschaltet
1 gute Ausgangsgeschwindigkeit zum Mischen
von „weichen” Zutaten, wie Mehl, Butter etc.
2 beste Geschwindigkeit für das Mixen flüssiger
Zutaten
3 Optimal für das Mischen von Kuchen- und Brot-
teigen
4 Zum Schaumigschlagen von Butter, Zucker, für
Süßspeisen etc.
5 Zum Schlagen von Eischnee, Kuchenguss, Pürie-
ren von gekochten Kartoffeln, Sahneschlagen
etc.
Zur Bedienung des Pürierstabs:
Nur in Kombination mit der Turbo-Taste verwendbar.
Turbo:
• gleiche Geschwindigkeit wie Stufe „5“
• diese Taste erlaubt es Ihnen, sofort die gesamte
Leistung Ihres Gerätes zur Verfügung zu haben.
• zur Bedienung des Pürierstabs
Bedienen
Kneten und Quirlen
1. Reinigen Sie vor dem ersten Gebrauch die Aufsätze (0,q,w) und die Rührschüssel 7.
2. Schieben Sie die Quirle q oder Knethaken w
soweit in das Gerät, bis diese sicher und hörbar
einrasten.
Stecken Sie den Knethaken w oder den Quirl
q mit dem Zahnrad immer in die dafür vorgesehene (mit einem Zahnrad gekennzeichnete) Öffnung am Handmixer.
3. Entriegeln Sie die Mixer-Halterung durch
Drücken des Entriegelungs-Knopfes 5 und klap-
pen Sie die Mixer-Halterung nach oben.
4. Entnehmen Sie die Rührschüssel 7 und füllen
Sie die Zutaten je nach zuzubereitender Menge
ein.
Achtung:
Füllen Sie nie mehr Zutaten als bis zur Max-Markierung (ca. 2,5 l) in die Rührschüssel 7. Die Zutaten
laufen sonst während des Betriebes über den Rand.
5. Setzen Sie die Rührschüssel 7 wieder auf den
Rührständer 6.
6. Drücken Sie den Entriegelungs-Knopf 5 und
klappen Sie die Halterung nach unten.
7. Setzen Sie den Handmixer auf die Halterung, so
dass dieser einrastet.
Sie können den Handmixer auch ohne den Rührständer 6 verwenden. Insbesonders bei geringen
Flüssigkeitsmengen ist es ratsam, den Handmixer
ohne den Rührständer 6 zu benutzen. Ansonsten
wird die Flüssigkeit nicht vollständig erfasst und
nicht richtig durchgemischt.
8. Stecken Sie den Netzstecker 3 in eine Netzsteckdose ein.
9. Um den Mixer in Betrieb zu nehmen, schieben
Sie den Geschwindigkeits-Schalter 1 auf die ge-
wünschte Geschwindigkeits-Stufe. Sie können dabei zwischen 5 Geschwindigkeits-Stufen oder
der Turbo-Taste 8 auswählen (s. Kapitel „Ge-
schwindigkeits-Stufen“).
Warnung:
Betreiben Sie den Mixer nicht länger als 5 Minuten
am Stück. Machen Sie nach 5 Minuten solange
eine Pause, bis sich das Gerät abgekühlt hat.
Hinweis:
Wenn Zutaten am Rand der Rührschüssel 7 haften
und diese nicht von den Knethaken w/Quirlen q er-
fasst werden, schalten Sie den Handmixer aus. Schieben Sie mit Hilfe des Teigschabers e die hängen ge-
bliebenen Zutaten wieder in die Mitte der Rührschüssel
7. Schalten Sie den Handmixer wieder ein.
- 22 -
Page 25

10. Um den Schüsselinhalt zu entnehmen, schalten
Sie den Handmixer aus. Drücken Sie den Entriegelungs-Knopf 5, klappen Sie die Halterung nach oben und nehmen Sie die Rührschüssel 7 vom Rührständer 6.
Hinweis:
Bei größeren Füllmengen in der Rührschüssel 7
empfiehlt es sich, zuerst den Mixer aus der Halterung zu nehmen.
11. Drücken Sie den Entriegelungs-Knopf 4, um
den Handmixer abzunehmen und die AuswurfTaste 9, um die Quirle q oder Knethaken w
zu lösen.
Achtung:
Verwenden Sie trotzdem immer die Rührschüssel 7
zum Mixen oder Kneten. Benutzen Sie auf keinen
Fall Gefäße aus Glas oder anderen leicht zerbrechlichen Materialien. Diese Gefäße können beschädigt werden und Verletzungen hervorrufen.
Pürieren
Warnung:
Benutzen Sie den Pürierstab 0 nie für harte Lebens-
mittel, wie etwa: Kaffeebohnen, Eiswürfel, Zucker,
Getreide, Schokolade, sehr hartes Gemüse etc. Das
führt zu Beschädigungen am Gerät.
1. Öffnen Sie die Einsatzvorrichtung für den Pürier-
stab mit Sicherheitsverschluss 2 und halten Sie
den Sicherheitsverschluss 2 fest.
Hinweis:
Der Pürierstab 0 kann nur eingesetzt werden,
wenn keine Quirle q oder Knethaken w installiert
sind.
3. Um ein Überlaufen zu verhindern, sollten Sie das
Püriergefäß nur zu 2⁄3 befüllen. Wählen Sie
hierzu ein ausreichend großes Gefäß.
Hinweise:
• Um ein wirksames Vermischen der Zutaten zu
garantieren, sollte das zuzubereitende Gut mindestens den Unterteil des Pürierstabs 0
bedecken.
• Schalten Sie den Hand-Mixer erst ein, wenn Sie
den Pürierstab 0 in das Püriergut geführt ha-
ben.
4. Schieben Sie den Geschwindigkeits-Schalter 1
in die Stellung „Pürierstab“ (s. Kapitel „Geschwindigkeits- Stufen“) und drücken Sie die Turbo-Taste 8. Halten Sie die Turbo-Taste 8 wäh-
rend des Einsatzes gedrückt. Sobald Sie diese
lösen, wird das Gerät gestoppt.
Warnung:
Betreiben Sie den Pürierstab 0 nicht länger als
eine Minute am Stück. Machen Sie nach einer Minute solange eine Pause, bis sich das Gerät abgekühlt hat.
5. Wenn Sie mit dem Einsatz des Pürierstabs 0 fer-
tig sind, stellen Sie den Geschwindigkeits-Schalter 1 auf die Position „0“ und ziehen Sie den
Netzstecker.
6. Zur Reinigung des Pürierstabs 0 drehen Sie ihn
aus der Einsatz-Vorrichtung 2 heraus.
Achtung:
Reinigen Sie nur den unteren Teil des Pürierstabs 0
unter fließendem Wasser. Es darf kein Wasser ins
Innere des Pürierstabs 0 gelangen. Das führt zu
Beschädigungen am Gerät.
2. Schieben Sie den Pürierstab 0 so weit ein, bis
dieser einrastet und drehen Sie ihn dann fest.
- 23 -
Page 26

Reinigen
Achtung:
Ziehen Sie vor jeder Reinigung den Netzstecker. Es
besteht die Gefahr eines elektrischen Schlages!
• Reinigen Sie den Rührständer nur mit einem
feuchten Tuch und gegebenenfalls mit einem milden Reinigungsmittel.
• Die Quirle q oder Knethaken w können Sie unter fließendem Wasser oder in der Spülmaschine
reinigen.
Achtung:
Reinigen Sie nur den unteren Teil des Pürierstabs 0
unter fließendem Wasser. Es darf kein Wasser ins
Innere des Pürierstabs 0 gelangen. Das führt zu
Beschädigungen am Gerät.
• Wir empfehlen die Aufsätze direkt nach Gebrauch zu säubern. So werden Nahrungsmittelrückstände beseitigt und die Möglichkeit einer
Bakterienbildung reduziert.
• Reinigen Sie die Rührschüssel und den Teigschaber in warmen Wasser mit Spülmittel.
Entsorgen
Werfen Sie das Gerät keinesfalls in den
normalen Hausmüll. Dieses Produkt
unterliegt der europäischen Richtlinie
2002/96/EG.
Entsorgen Sie das Gerät über einen zugelassenen
Entsorgungsbetrieb oder über Ihre kommunale
Entsorgungseinrichtung.
Beachten Sie die aktuell geltenden Vorschriften.
Setzen Sie sich im Zweifelsfall mit Ihrer Entsorgungseinrichtung in Verbindung.
Garantie und Service
Sie erhalten auf dieses Gerät 3 Jahre Garantie ab
Kaufdatum. Das Gerät wurde sorgfältig produziert
und vor Anlieferung gewissenhaft geprüft. Bitte bewahren Sie den Kassenbon als Nachweis für den
Kauf auf. Bitte setzen Sie sich im Garantiefall mit
Ihrer Servicestelle telefonisch in Verbindung. Nur so
kann eine kostenlose Einsendung Ihrer Ware
gewährleistet werden.
Die Garantieleistung gilt nur für Material- oder Fabrikationsfehler, nicht aber für Verschleißteile oder
für Beschädigungen an zerbrechlichen Teilen, z. B.
Schalter oder Akkus. Das Produkt ist lediglich für
den privaten und nicht für den gewerblichen
Gebrauch bestimmt.
Bei missbräuchlicher und unsachgemäßer Behandlung, Gewaltanwendung und bei Eingriffen, die
nicht von unserer autorisierten Service-Niederlassung vorgenommen wurden, erlischt die Garantie.
Ihre gesetzlichen Rechte werden durch diese Garantie nicht eingeschränkt.
Schraven
Service- und Dienstleistungs GmbH
Gewerbering 14
47623 Kevelaer, Germany
Tel.: +49 (0) 180 5 008107
(14 Ct/Min. aus dem dt. Festnetz ggf. abweichende Preise
aus dem Mobilfunknetz)
Fax: +49 (0) 2832 3532
e-mail: support.de@kompernass.com
Kompernaß Service Österreich
Rittenschober KG
Gmundner Strasse 10
A-4816 Gschwandt
Tel.: +43 (0) 7612 6260516
Fax: +43 (0) 7612 626056
e-mail: support.at@kompernass.com
Führen Sie alle Verpackungsmaterialien
einer umweltgerechten Entsorgung zu.
- 24 -
Page 27

Importeur
KOMPERNASS GMBH
BURGSTRASSE 21
44867 BOCHUM, GERMANY
www.kompernass.com
- 25 -
 Loading...