

Page 1
Desono
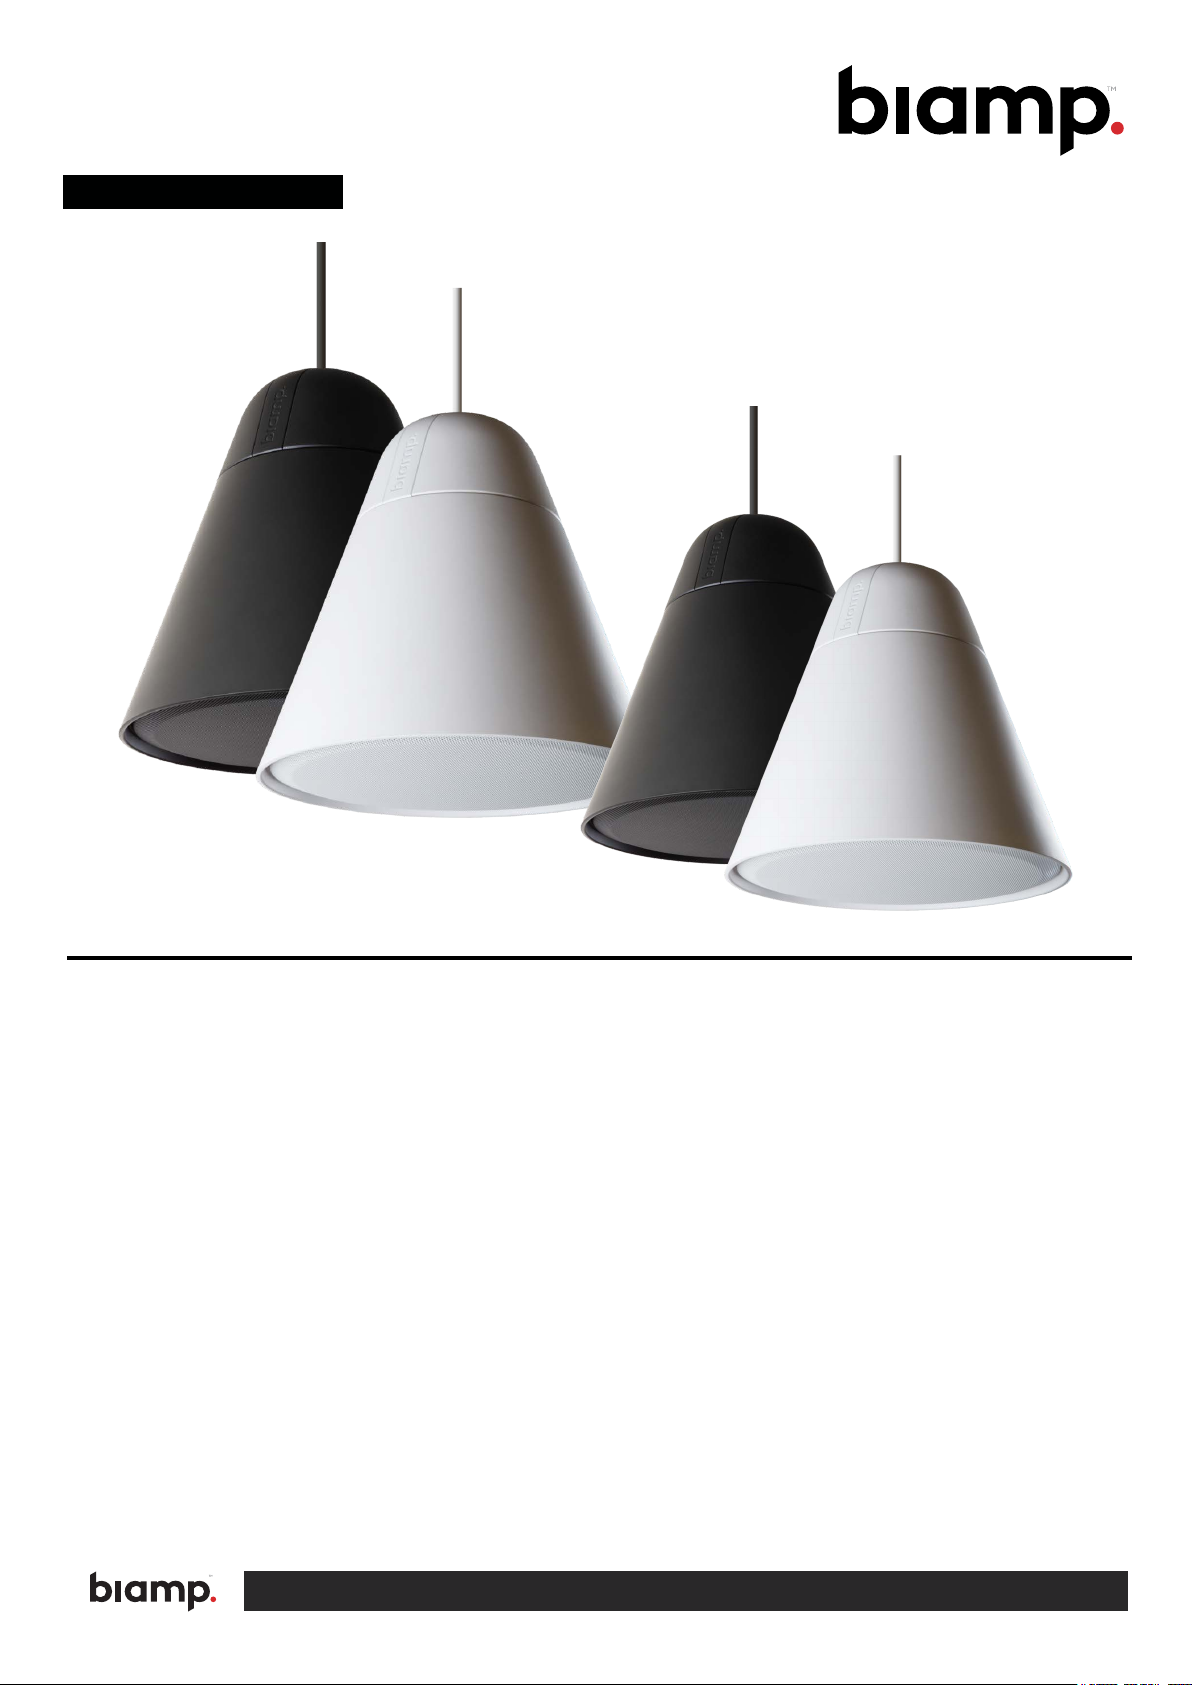
P30DT & P60DT Pendant Loudspeakers
Installation Guide
Models
P60DT-BL
P60DT-W
P30DT-BL
P30DT-W
PRODUCT DESCRIPTION
The P30DT (4.25”) and P60DT (6.5") two-way, pendant
loudspeakers bring exceptional dispersion to areas and
rooms with open ceilings, while offering a clear speech
and musical purity. Available in black or white, both
Biamp P30DT and P60DT are suitable for a wide range of
background and foreground sound applications.
The dual Gripple™ wire suspension system, euroblock
in/out connector, loudspeaker cables and 70/100 volt
power rotary with 16 ohms connectivity can be hidden
after installation by the innovatively designed end-cap.
The attractive aesthetics and ease-of-installation make this
product an industry standard.
NOTES:
• These loudspeakers are designed for indoor use only.
• Operational temperature range: 0° to +35°C (32° to 95°F)
FEATURES
• High performance, attractive aesthetics, and ease of
installation
• Installer-friendly end cap with cut-out slot and
integrated magnetic fixing, hiding the power selector
and cable connections can be installed after the
loudspeaker is hung
• Two Gripples and snaphook wire suspension cables
are included for a safe and secure, fast and simple
installation
• Handy euroblock connector with permanent passthrough allows for a quick install and easy daisychaining of multiple loudspeakers
• Easily accessible rotary tap switch to select 70/100
volt power or low impedance (16 ohms) operation
• Tuned bass reflex port for optimised low frequency
performance
• High intelligibility while retaining perfect music
reproduction quality
• Available in black or white
A: 9300 S.W. Gemini Drive Beaverton, OR 97008 USA W: www.biamp.com
Page 2
IMPORTANT INSTRUCTIONS
CONTENTS
Read and follow the Safety information included in the carton.
IMPORTANT: This loudspeaker is designed for indoor use only,
and should not be installed in wet or damp environments, or in
locations where moisture or water may enter the loudspeaker.
Refer all servicing to qualified service personnel. Servicing is
required when the loudspeaker has been damaged in any way,
such as liquid has gotten into the device, the loudspeaker does
not operate normally, or has been dropped.
The terms CAUTION, WARNING, and DANGER may be
used in this manual to alert the reader to important safety
considerations. If you have any questions or do not understand
the meaning of these terms, do not proceed with installation.
Contact your local dealer, distributor, or call Biamp directly for
assistance. These terms are defined as:
CAUTION: describes an operating condition or user
action that may expose the equipment or user to
potential damage or danger.
WARNING: describes an operating condition or user
action that will likely cause damage to the equipment
or injury to the user or to others in the vicinity.
DANGER: describes an operating condition or user
action that will immediately damage the equipment
and/or be extremely dangerous or life threatening to
the user or to others in the vicinity.
These installation instructions are for use by qualified personnel
only. To reduce the risk of fire or electric shock do not perform
any servicing other than that contained in the operating
instructions unless you are qualified to do so.
Each carton contains the following:
• Loudspeaker (x1)
• End cap with integrated cable cover (x1)
• Gripple snaphook cable 5m (x2)
• Gripple express locking device (x2)
• Important safety instructions (x1)
Loudspeaker wiring not included
IMPORTANT: Biamp is not responsible for damages
resulting from the negligent installation of any
loudspeaker.
WARNING: Please make sure that the mounting
structure is capable of safely supporting the
loudspeaker’s weight.
UNPACKING / INSPECTION
The loudspeakers are engineered and manufactured to be
rugged and they are carefully packed in sturdy cartons. However,
it is recommended to thoroughly inspect each unit after it has
been removed from the packaging, as damage could occur
during shipping.
Please note that once the shipment has left your dealer or the
factory, the responsibility for damage is always borne by the
freight company. If damage has occurred during shipping, you
must file a claim directly with the freight company. It’s very
important to contact the freight company as soon as possible
after receiving your shipment, as most freight companies have
a short time limit within which they will investigate claims. Make
sure to save the carton and the packing material, as most claims
will be denied if these materials are not retained. Your Biamp
dealer and the factory will try to help in any way they can, but it
is the responsibility of the party receiving the shipment to file the
damage claim.
CAUTION: Installation of these loudspeakers should only
professional structural engineer approve the mounting. It is
essential that all installation work involving the suspension of these
loudspeaker products be performed by competent, knowledgeable
persons who understand safe rigging practices. Severe injury and/
or loss of life may occur if this product is improperly installed.
page 2 Installation Guide Model P30DT, P60DT
Page 3
LOUDSPEAKER INSTALLATION
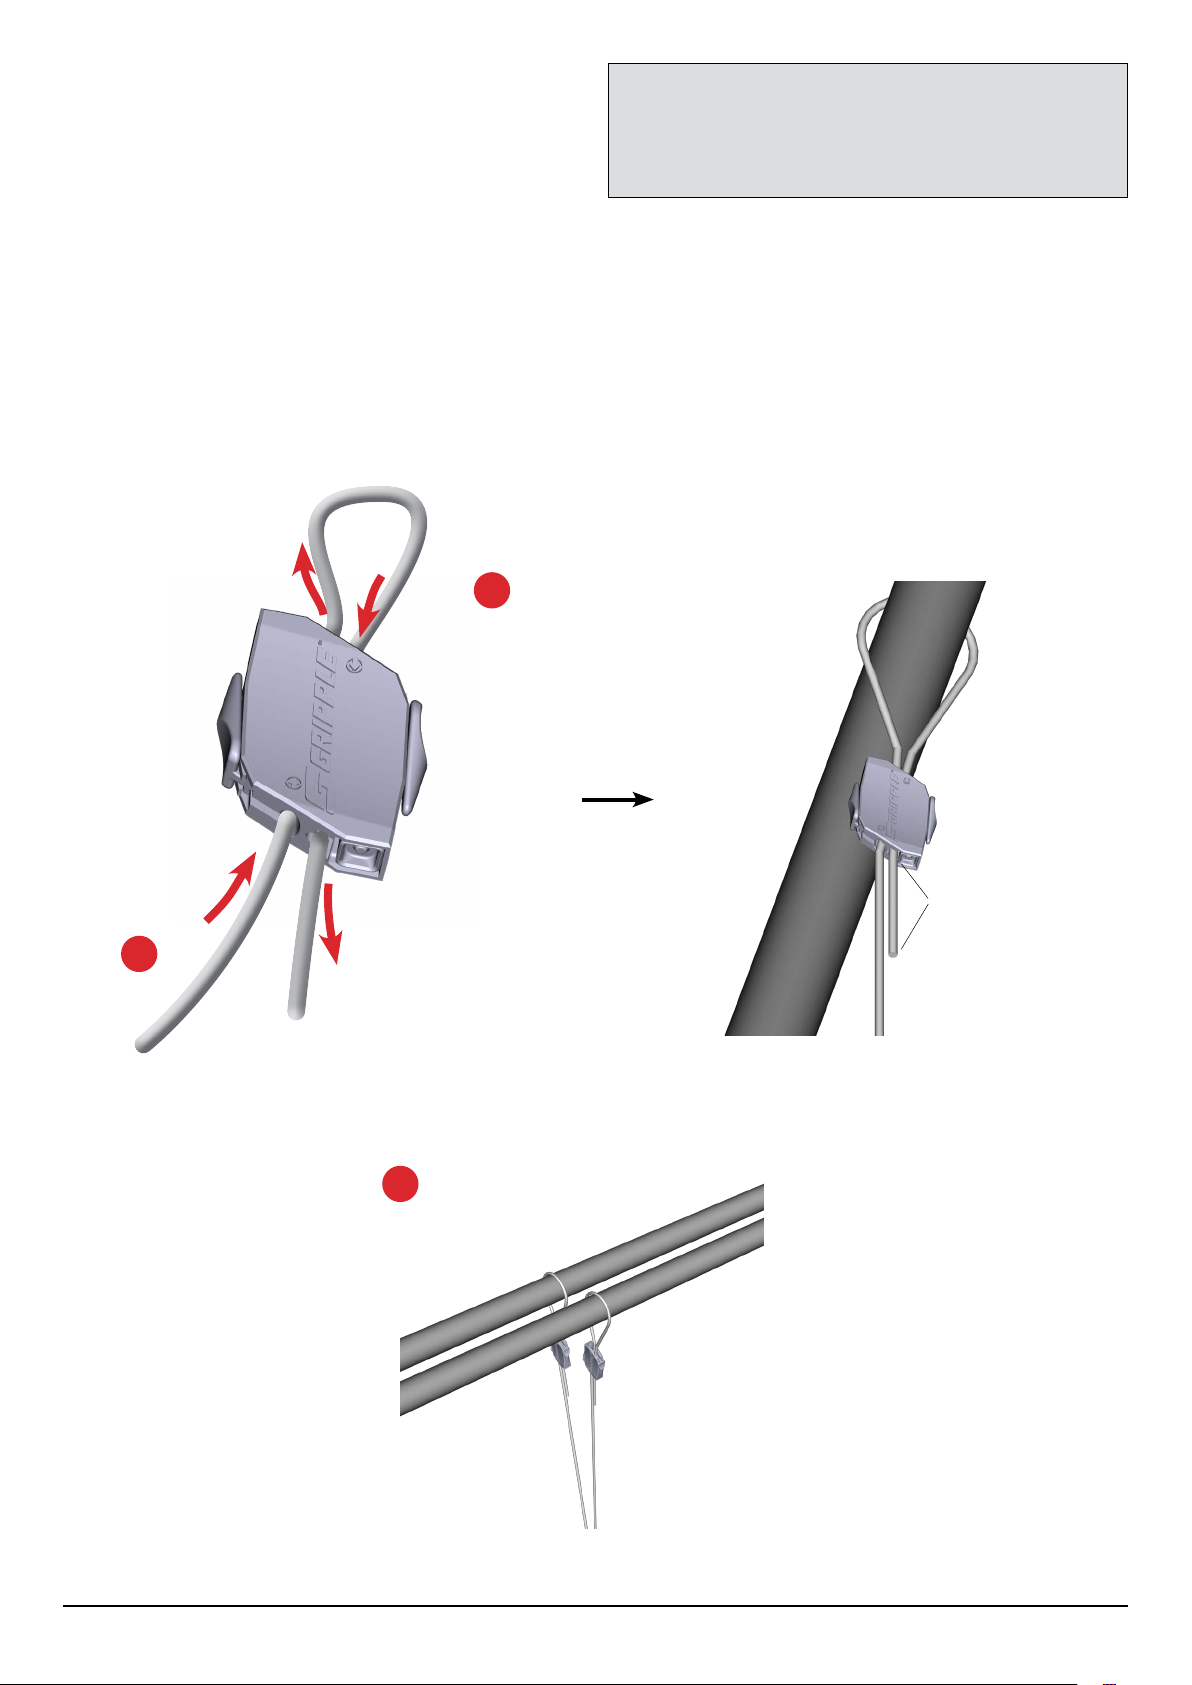
To install the pendant loudspeaker, do the steps
that follow:
1. Thread the snaphook cable through the opening in
the locking device (Gripple) in the direction of the
arrow shown on the unit.
2. Loop the snaphook cable over or through a secure
structure, and pass the cable back through the
Gripple, using the closest opening (2). Pressing
the appropriate button will allow the cable to move
through that side of the device.
3. Repeat steps 1 and 2 for both the primary and
secondary suspension cables.
2
Note: Loudspeaker images shown in this
manual are of the P30DT, but installation is
the same for the larger P60DT.
Push button to
release tension /
unlock cable
1
Insert cable in the Gripple,
over or through support and
back through Gripple
3
Push button to
release tension /
unlock cable
A minimum of 3"
(75 mm) of cable must
protrude from Gripple
Support cable with Gripple attached
correctly
Model P30DT, P60DT Installation Guide page 3
Page 4
INSTALLATION (continued)
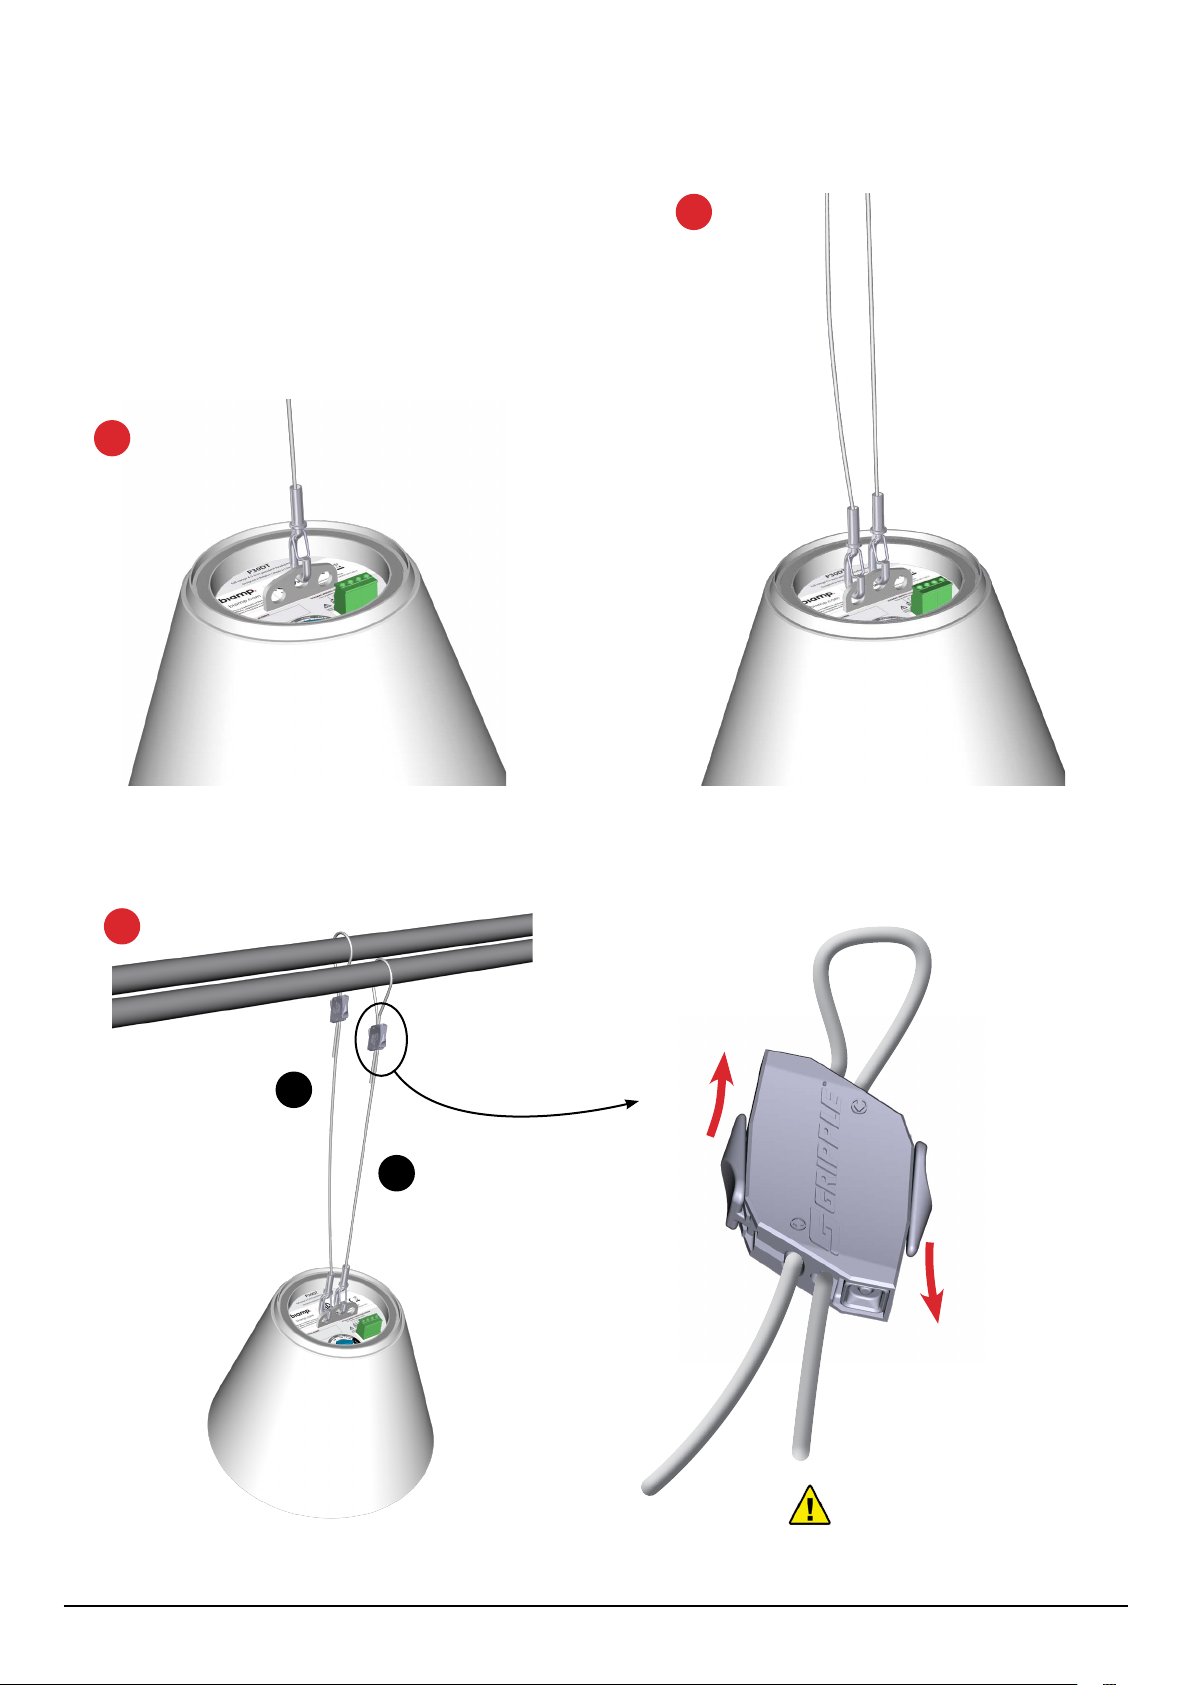
4. Connect the snaphook on the primary cable through
the central mounting point on the loudspeaker.
5. Connect the snaphook on the secondary safety cable
through one of the remaining mounting points.
6. Adjust the length of the primary cable so the
loudspeaker hangs at the desired height as shown
(a). Adjust the length of the secondary safety cable,
allowing some slack (b) so the loudspeaker hangs
straight on the primary cable.
4
5
Attach primary cable snaphook in
center hole
6
b
Attach secondary (safety) cable snaphook
in a different bracket hole
Push buttons to release
tension and adjust cable
a
IMPORTANT: When adjusting the
length, always leave a minimum
Allow slack in secondary cable (b) so
pendant hangs straight
of 3" (75mm) of cable protruding
from the locking device.
page 4 Installation Guide Model P30DT, P60DT
Page 5
INSTALLATION (continued)
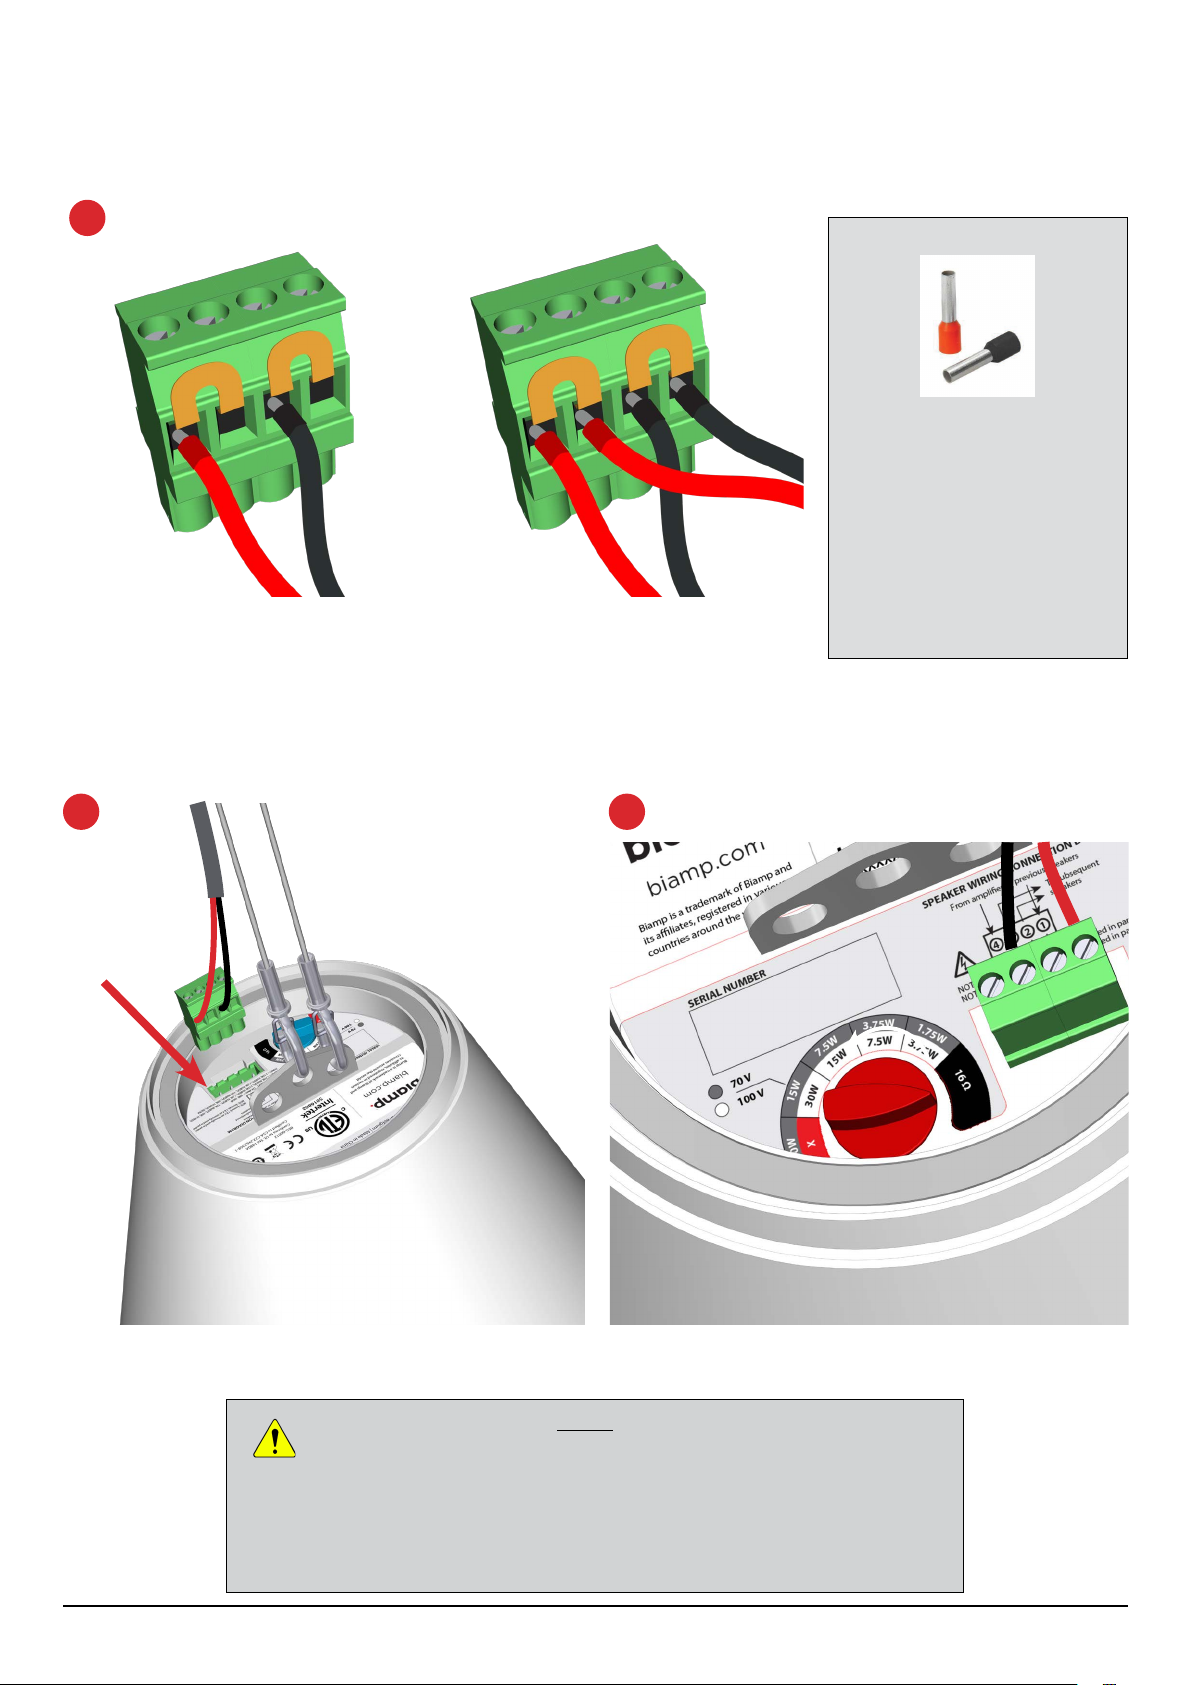
7. Attach the loudspeaker cables according to whether
you are connecting a single loudspeaker or daisy
chaining more than one.
7
+ + – –
8. Press the wired euroblock onto the corresponding
male euroblock connector on the top of the
loudspeaker.
+ + – –
Daisy chain multiple loudspeakersWire single loudspeaker
8 9
Note: It is strongly
recommended to use wire
ferrules with stranded wire.
Recommended wire size:
0.5 mm2 - 2.5mm
Use the appropriate gauge
and length of wire to avoid
appreciable signal loss based on
the number of devices per run.
9. Rotate knob to select the appropriate power tap
setting on the top surface of the loudspeaker.
Install euroblock Tap knob detail
WARNING: Set the power tap prior to applying audio and only change the
power supply.
WARNING: The 16 ohm setting is not compatible with 70 volt or 100 volt line
WARNING: The highest 70 volt power setting is not compatible with 100 volt line
Model P30DT, P60DT Installation Guide page 5
Page 6
INSTALLATION (continued)
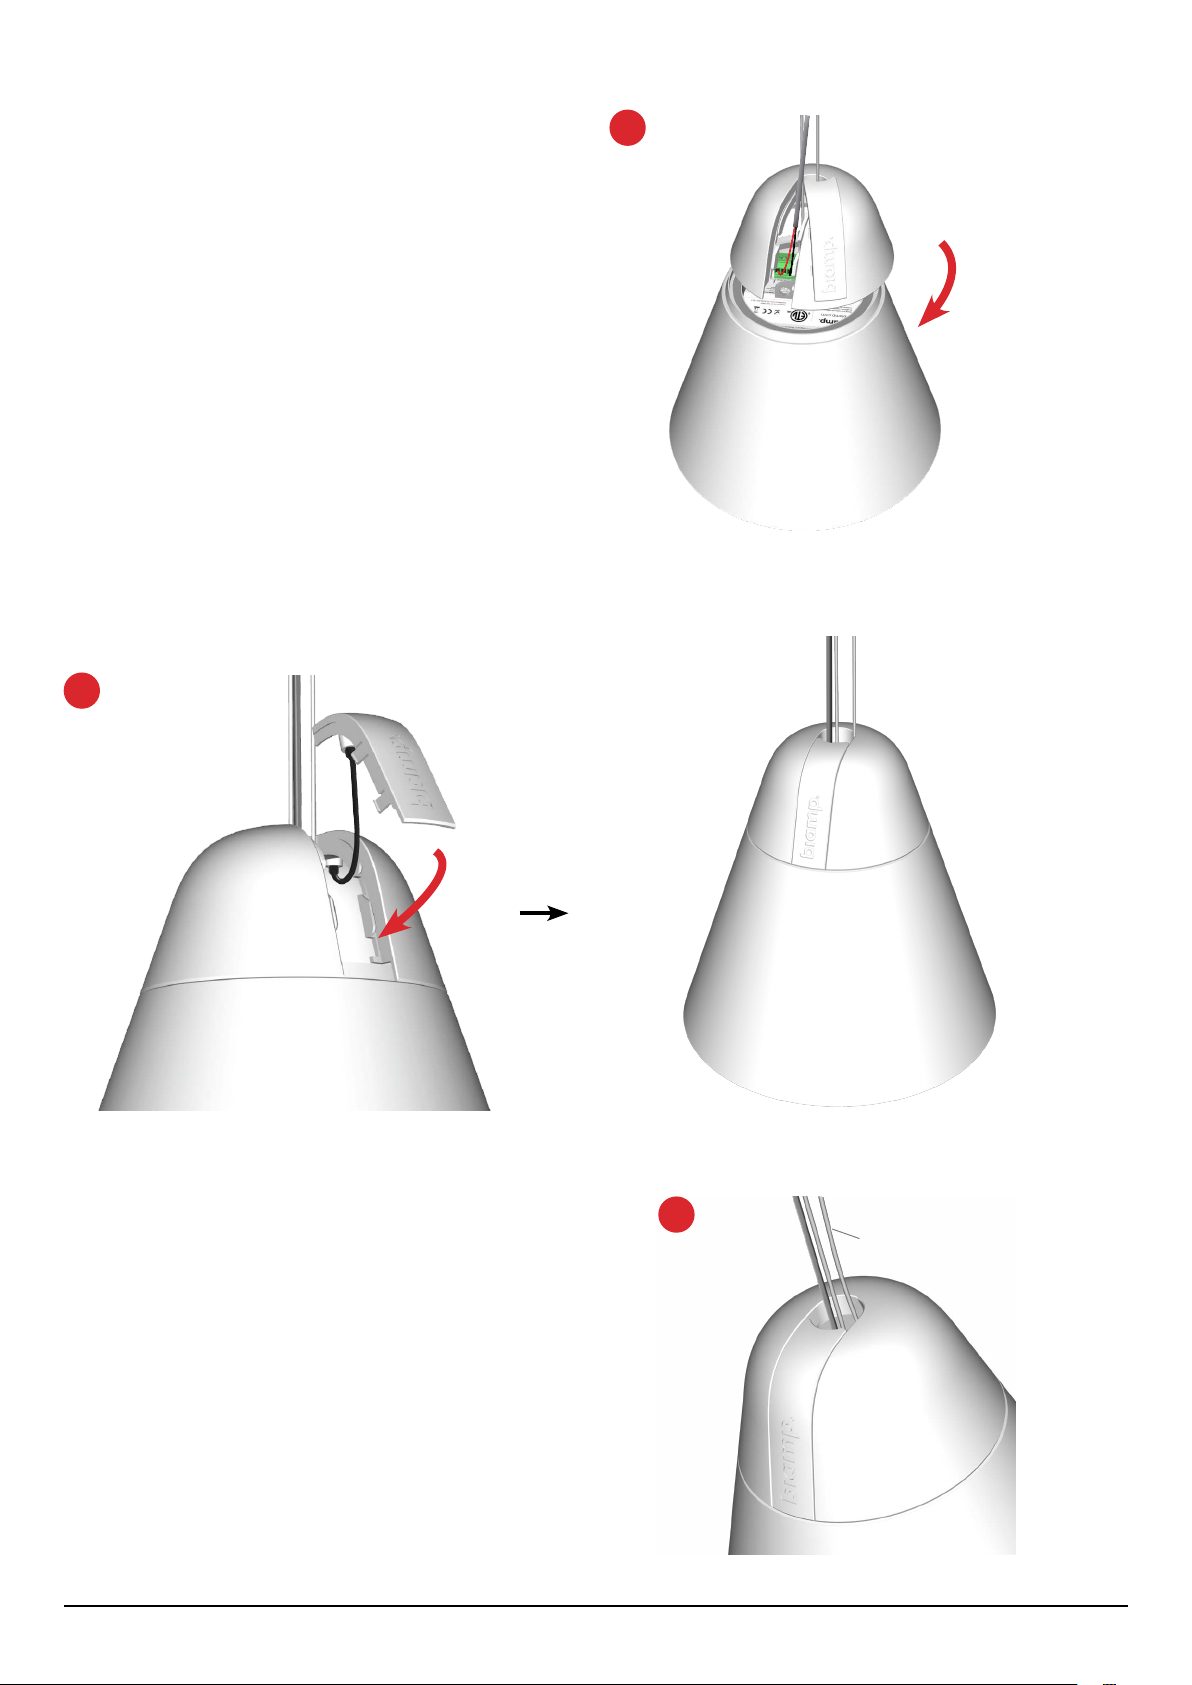
10. Attach the end cap by placing it around the
suspension and loudspeaker cables. Make sure the
11. Ensure the tether is securely inserted in the cable
cover and end cap sockets. Clip the cover into the end
cap.
11
10
12. Rotate the end cap so that the secondary cable does
not press against the cable cover. There should be
enough slack in the secondary cable that it doesn't
rub against either the end cap or cable cover.
12
Secondary cable
page 6 Installation Guide Model P30DT, P60DT
Page 7
DIMENSIONS
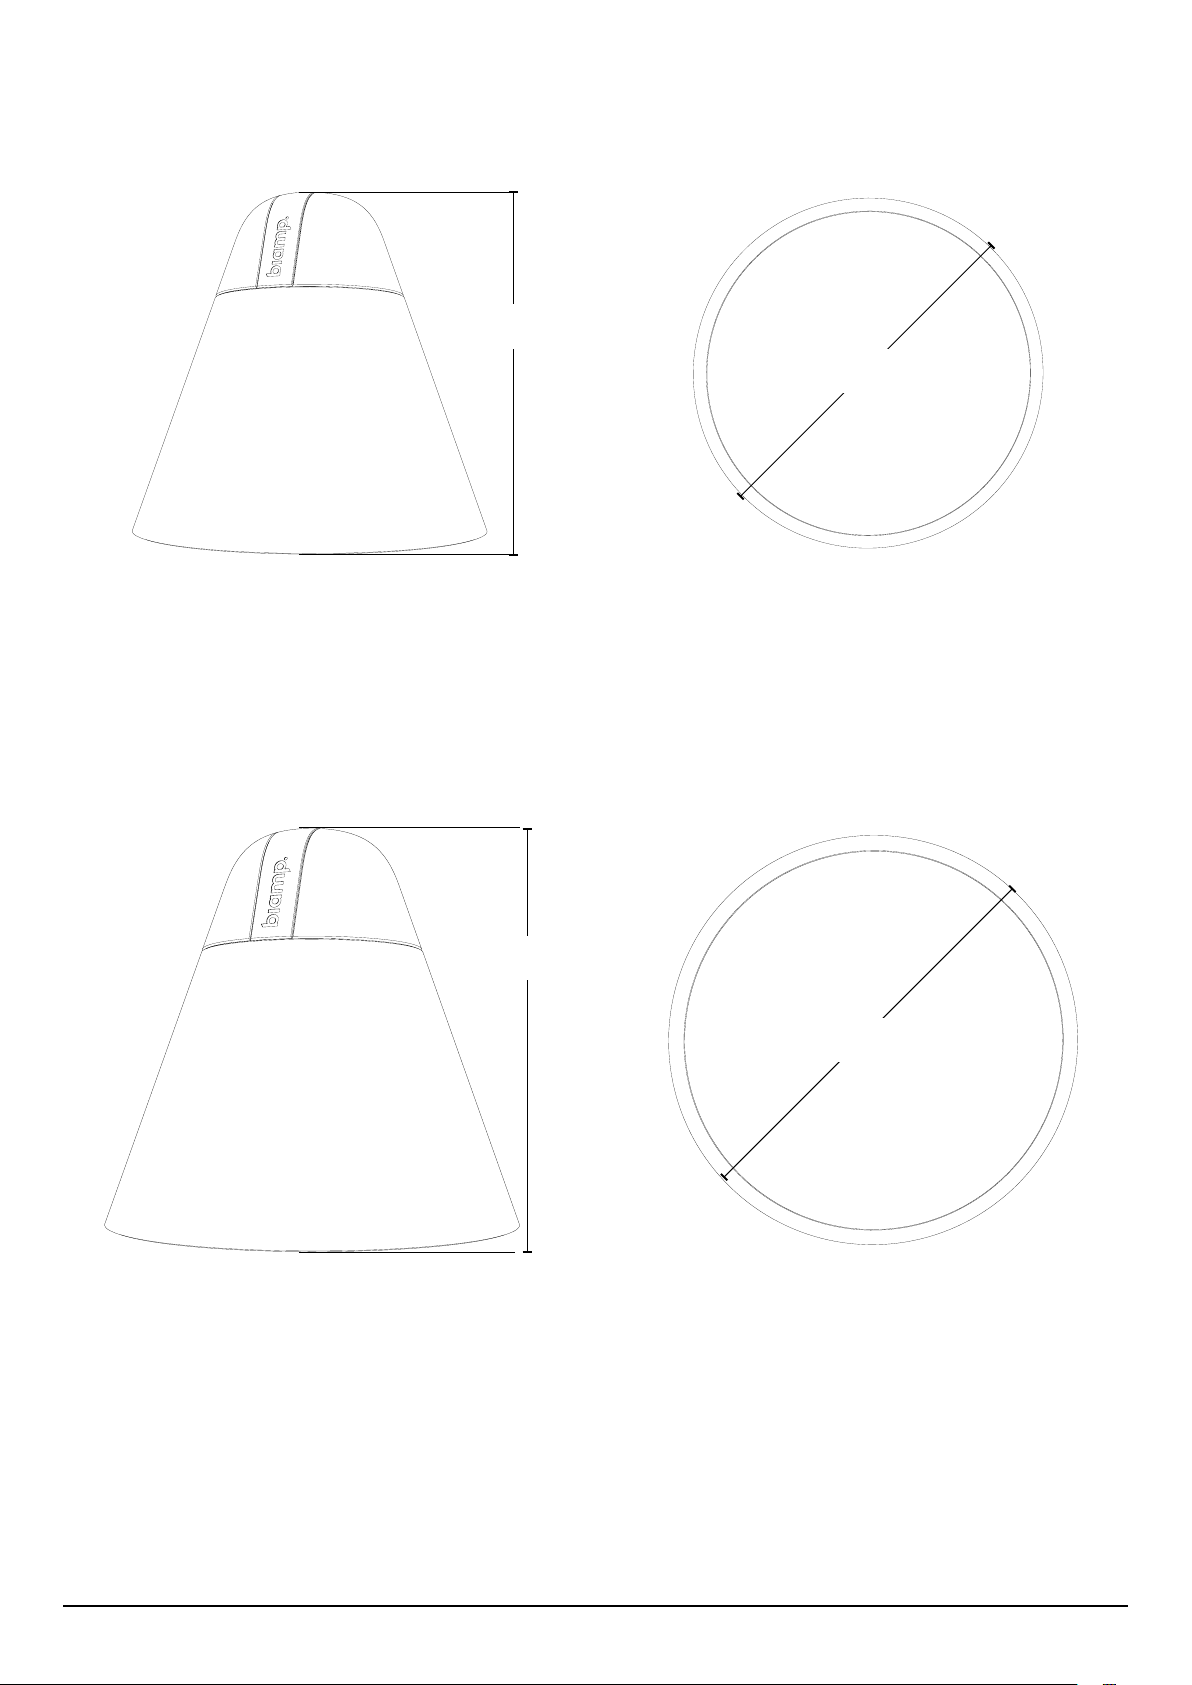
P30DT
223 mm
8.78"
233 mm
9.15"
P60DT
264 mm
10.41"
276 mm
10.85"
Model P30DT, P60DT Installation Guide page 7
Page 8

CONTACT US
Email: [email protected]
Web: support.biamp.com
Warranty: biamp.com/legal/warranty-information
Safety & Compliance: biamp.com/compliance
A: 9300 S.W. Gemini Drive Beaverton, OR 97008 USA W: www.biamp.com
11FEB2025
 Loading...