

Page 1
JBY 93
D BABYPHONEGebrauchsanweisung ............................... 2 - 18
G BABY MONITORInstructions for use ........................... 19 - 33
F BABYPHONEMode d’emploi ......................................... 34 - 49
E
INTERCOMUNICADOR PARA BEBÉS
I BABYPHONEIstruzioni per l'uso .................................. 67 - 82
T BEBEK TELSİZİKullanım kılavuzu ................................ 83 - 97
r РАДИОНЯНЯИнструкция по применению ............. 98 - 117
Q ELEKTRONICZNA NIANIAInstrukcja obsługi .......... 118 - 134
Instrucciones de
Beurer GmbH
Söflinger Straße 218
89077 Ulm, GERMANY
Tel.: 0049 (0)731 3989-0
www.beurer.de
uso
.. 50 - 66
Page 2

Deutsch
Inhalt
1 Zum Kennenlernen ................. 3
2 Zeichenerklärung ................... 3
3 Bestimmungsgemäßer
Gebrauch ............................... 4
4 Hinweise ................................ 4
5 Gerätebeschreibung .............. 7
6 Inbetriebnahme ...................... 8
7 Bedienung ............................ 10
8 Einstellungen........................ 12
Lieferumfang
• Babyphone bestehend aus Babyeinheit und Elterneinheit
• Armband für Elterneinheit
• Janosch Sticker
• 2 Steckernetzteile
• diese Gebrauchsanweisung
Sehr geehrte Kundin, sehr geehrter Kunde,
wir freuen uns, dass Sie sich für ein Produkt unseres Sortimentes entschieden haben. Unser Name steht für hochwertige und eingehend geprüfte
Qualitätsprodukte aus den Bereichen Wärme, Gewicht, Blutdruck, Körpertemperatur, Puls, Sanfte Therapie, Massage und Luft. Bitte lesen Sie diese
Gebrauchsanweisung aufmerksam durch, bewahren Sie sie für späteren
Gebrauch auf, machen Sie sie anderen Benutzern zugänglich und beachten
Sie die Hinweise.
Mit freundlicher Empfehlung
Ihr Beurer-Team
2
9 Wissenswertes rund ums
Babyphone........................... 12
10 Batteriewechsel/Akku laden 13
11 Aufbewahrung und Pflege ... 13
12 Entsorgen ............................. 14
13 Technische Daten ................ 15
14 Was tun bei Problemen? ..... 16
15 Garantie und Service ........... 18
Page 3
1 Zum Kennenlernen
Funktionen des Babyphones
Dieses Babyphone ermöglicht Ihnen, Tätigkeiten in anderen Räumen bzw.
im Garten nachzugehen und währenddessen Ihr Baby zu überwachen.
Die FHSS-Technologie gewährleistet eine störungsfreie und abhörsichere
Verbindung.
Das Gerät verfügt über folgende Funktionen:
• 2-Wege-Kommunikation
• Mobilteilsuche - Paging-Funktion
• Lautstärkenregulierung bei der Eltern- und der Babyeinheit
• Reichweite 250 m bei freier Sicht
• Warnung bei Überschreiten der Reichweite oder Störungen in der
Verbindung
2 Zeichenerklärung
Folgende Symbole werden in der Gebrauchsanweisung verwendet.
Warnung Warnhinweis auf Verletzungsgefahren oder Gefahren
für Ihre Gesundheit
Achtung Sicherheitshinweis auf mögliche Schäden am Gerät/
Zubehör
Hinweis Hinweis auf wichtige Informationen
3
Page 4
3 Bestimmungsgemäßer Gebrauch
• Verwenden Sie das Gerät nur zum Überwachen Ihres Babys, wenn Sie
Ihr Baby nicht direkt beaufsichtigen können. Es ist kein Ersatz für Ihre
persönliche verantwortungsvolle Aufsicht!
• Das Gerät ist nur für den Einsatz im häuslichen/privaten Umfeld bestimmt, nicht im gewerblichen Bereich.
• Dieses Gerät ist nicht dafür bestimmt, durch Personen (einschließlich
Kinder) mit eingeschränkten physischen, sensorischen oder geistigen
Fähigkeiten oder mangels Erfahrung und/oder mangels Wissen benutzt
zu werden, es sei denn, sie werden durch eine für ihre Sicherheit zuständige Person beaufsichtigt oder erhielten von ihr Anweisungen, wie das
Gerät zu benutzen ist.
• Kinder sollten beaufsichtigt werden, damit sie nicht mit dem Gerät spielen.
• Jeder unsachgemäße Gebrauch kann gefährlich sein.
4 Hinweise
Sicherheitshinweise
Warnung:
• Platzieren Sie das Gerät und die Zuleitung nie in Reichweite
des Kindes. Durch die Zuleitung kann es zu Strangulation
und Verletzungen des Kindes kommen.
• Halten Sie Kleinteile außerhalb der Reichweite von Kindern
(Verschluckgefahr).
• Halten Sie Kinder vom Verpackungsmaterial fern
(Erstickungsgefahr).
• Stellen Sie die Babyeinheit niemals in das Kinderbett oder in
Reichweite Ihres Kindes.
4
Page 5
• Platzieren Sie die Babyeinheit in einer Entfernung von 1,5 m
zu Ihrem Baby, um eine mögliche Elektrosmog-Belastung und
eine Geräuschstörung zu minimieren.
• Achten Sie darauf, dass Kabel nicht in Reichweite Ihres Kindes
sind (Stromschlaggefahr).
• Überzeugen Sie sich vor dem Einsatz der Geräte von deren
einwandfreiem Funktionieren und davon, dass die Geräte bei
Batteriebetrieb mit ausreichend geladenen Batterien versehen
sind.
• Verwenden Sie nur die im Lieferumfang enthaltenen Netzteile
(Brand-, Stromschlaggefahr).
• Der minimale Abstand zwischen der Elterneinheit von JBY 93
(20dBm) und dem Kopf bzw. Körper des Verwenders muss
mindestens 0,025m betragen.
• Die Batterien / Akkus dürfen nicht starker Hitze wie Sonne,
Feuer oder ähnlichem ausgesetzt werden.
Achtung: Um Schäden am Gerät zu vermeiden, beachten Sie
• Tauchen Sie die Geräte niemals in Wasser. Spülen Sie sie
niemals unter fließendem Wasser ab.
• Benutzen Sie die Geräte niemals in feuchter Umgebung.
• Ziehen Sie das Steckernetzteil nicht am Kabel aus der
Steckdose.
• Trennen Sie das Steckernetzteil vom Netz, wenn das Gerät
nicht in Gebrauch ist.
• Das Gerät und das Steckernetzteil dürfen nicht mit heißen
Oberflächen oder scharfkantigen Gegenständen in Berührung
kommen.
5
Page 6
• Verwenden Sie keine Zusatzteile, die nicht vom Hersteller empfohlen bzw. als Zubehör angeboten werden.
Hinweise zum Umgang mit Batterien
Warnung:
• Batterien können bei Verschlucken lebensgefährlich sein.
Bewahren Sie Batterien für Kleinkinder unerreichbar auf. Wurde
eine Batterie verschluckt, nehmen Sie sofort medizinische Hilfe
in Anspruch.
• Batterien dürfen nicht geladen oder mit anderen Mitteln reaktiviert, nicht auseinandergenommen, in Feuer geworfen oder
kurzgeschlossen werden.
• Batterien können Giftstoe enthalten, die die Gesundheit und die
Umwelt schädigen. Entsorgen Sie die Batterien deshalb unbedingt entsprechend der geltenden gesetzlichen Bestimmungen.
Werfen Sie die Batterien niemals in den normalen Hausmüll.
Achtung:
• Wechseln Sie schwächer werdende Batterien rechtzeitig aus.
• Auslaufende Batterien können Beschädigungen am Gerät
verursachen. Wenn Sie das Gerät längere Zeit nicht benutzen,
nehmen Sie die Batterien aus dem Batteriefach.
• Wenn eine Batterie ausgelaufen ist, ziehen Sie Schutzhandschuhe an und reinigen Sie das Batteriefach mit einem trockenen
Tuch.
6
Page 7
Allgemeine Hinweise
• Reparaturen dürfen nur vom Kundendienst oder autorisierten
Händler durchgeführt werden. Sie selbst dürfen das Gerät
keinesfalls önen oder reparieren, da sonst eine einwandfreie
Funktion nicht mehr gewährleistet ist. Bei Nichtbeachten
erlischt die Garantie.
• Sollten Sie noch Fragen zur Anwendung unserer Geräte
haben, so wenden Sie sich bitte an Ihren Händler oder an den
Kundenservice.
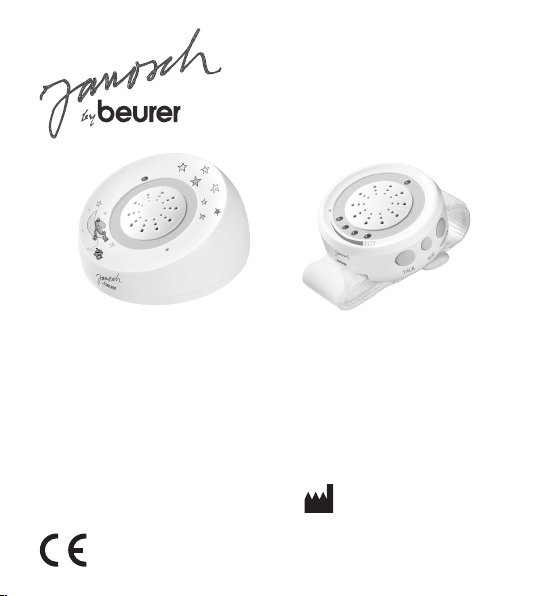
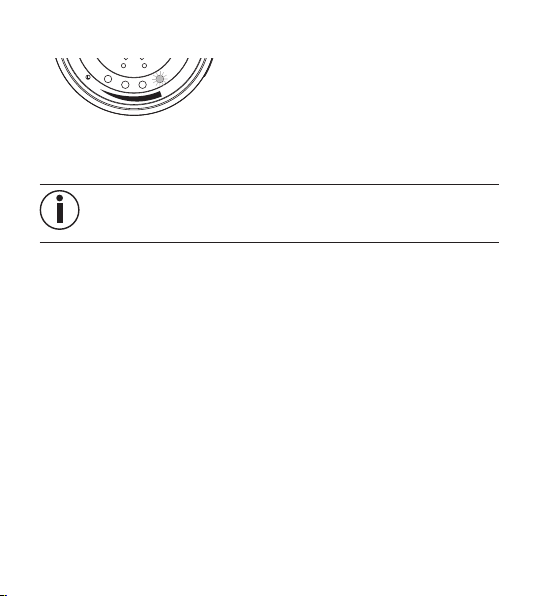
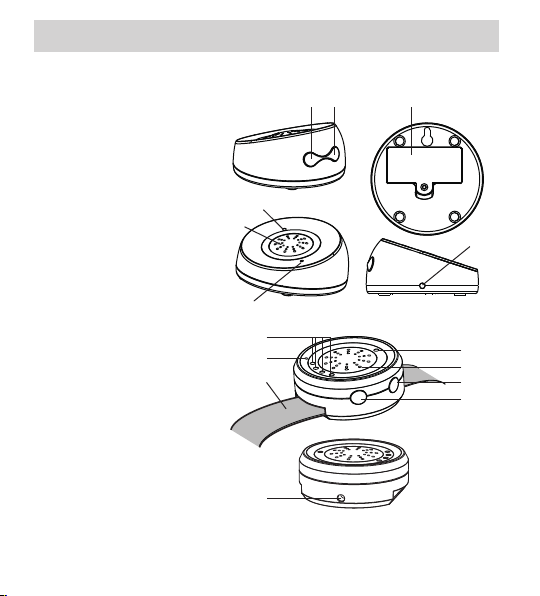
5 Gerätebeschreibung
Übersicht
Babyeinheit
1 POWER/VOL-Taste
2 PAGE -Taste
3 Power-LED
4 Lautsprecher
5 Mikrofon
6 Batteriefach
7 Netzteilbuchse
3
4
5
1
2
6
7
7
Page 8
Elterneinheit
1 Lautstärke-LEDs
2 Power-LED
3 Lautsprecher
4 POWER/VOL-Taste
+
5 ECO
Taste
1
7
8
2
3
4
5
6
6 TALK-Taste
7 Mikrofon
8 Armband
9
9 Netzteilbuchse
6 Inbetriebnahme
Babyeinheit
Sie können die Babyeinheit mit Batterien oder mit dem mitgelieferten
Netzteil betreiben.
Betrieb mit Batterien
1. Lösen Sie die Schraube im Batteriefachdeckel und ziehen Sie diesen ab.
2. Legen Sie zwei hochwertige Batterien 1,5 V, Typ AAA gemäß der Polung
ein.
3. Schließen Sie den Batteriefachdeckel und schrauben Sie ihn wieder zu.
8
Page 9
Das Verschrauben dient der Sicherheit Ihres Kindes.
Während des Ladevorgangs blinkt die Power-LED rot. Sobald der
Akku vollgeladen ist, leuchtet sie rot. Bitte beachten Sie, dass nur
Akkus des folgenden Typs
können. Der Minuspol der Akkus muss ca. 5 mm abgemantelt
(= ohne Isolation) sein.
im Gerät geladen werden
5 mm
Betrieb mit Netzteil
Schließen Sie die Babyeinheit mit dem Steckernetzteil an eine Steckdose an.
Elterneinheit
Betrieb mit Akku - Ladevorgang
Der Akku muss vor erstmaliger netzunabhängiger Benutzung des Gerätes
mindestens 10 Stunden aufgeladen werden, währenddessen können Sie
das Gerät bereits betreiben. Während des Ladevorgangs blinkt die PowerLED rot. Sobald der Akku vollgeladen ist, leuchtet sie rot.
Wird die Babyeinheit netzunabhängig genutzt, beginnt bei niedrigem Batterieladezustand die Power-LED zu flimmern. Zudem ertönt bei der Elterneinheit
alle 4 Sekunden ein Piepton als Warnhinweis.
Bei niedrigem Akkuladezustand der Elterneinheit blinkt deren Power-LED und
es ertönt alle 4 Sekunden ein Piepton. Werden die Geräte nicht an eine Steckdose angeschlossen, schalten sie sich automatisch nach kurzer Zeit aus.
Wenn die Geräte mit Netzteil betrieben werden und es zu einem Stromausfall
kommt, wechselt die Elterneinheit in den Akku-Betrieb. Hierbei ist die Standby-Zeit abhängig vom Ladezustand des Akkus.
9
Page 10

Wurden in die Babyeinheit keine Batterien eingesetzt, schaltet sie
sich bei Stromausfall aus und es erfolgt eine akustische Warnung an
der Elterneinheit.
Entladen der Elterneinheit
Nach 300 Ladevorgängen sollte der Akku entladen werden. Lassen
Sie hierzu das Gerät so lange eingeschaltet, bis es sich automatisch ausschaltet.
7 Bedienung
1. Stellen Sie die Babyeinheit so auf, dass sie dabei an einer erhöhten
Position und nicht in der Nähe von anderen evtl. störenden Geräten
steht. Schalten Sie die Babyeinheit mit der Taste POWER/VOL ein. Die
Power-LED der Babyeinheit leuchtet.
2. Befestigen Sie die Elterneinheit an Ihrem Arm oder platzieren Sie sie in
dem Raum, in dem Sie sich aufhalten.
3. Schalten Sie die Elterneinheit mit der Taste POWER/VOL ein. Die Power-
LED der Elterneinheit leuchtet.
Besteht zwischen den Geräten keine Verbindung (Babyeinheit nicht
eingeschaltet oder außerhalb der Reichweite), ertönt ein akusti-
sches Warnsignal an der Elterneinheit (2Pieptöne).
10
Page 11
+
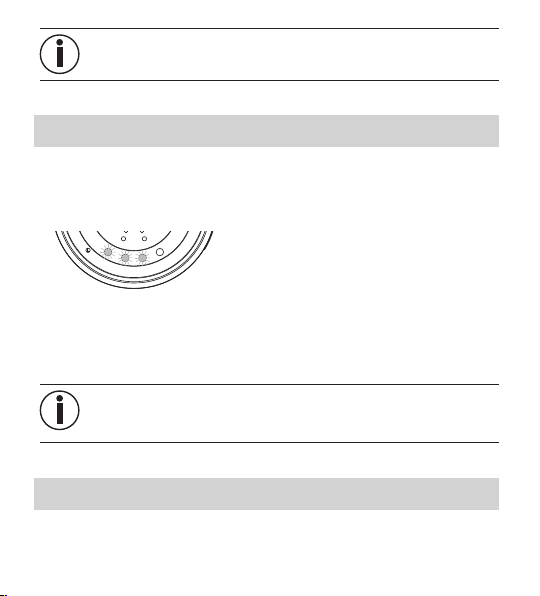
Einstellung ECO
Mode
Um in den ECO+ Mode zu
O
C
E
gelangen drücken Sie den ECO
Knopf. Die LED 4 leuchtet Rot und
signalisiert Ihnen diesen Modus.
Zum Ausschalten erneut den ECO
Knopf drücken.
Im ECO Mode ist die Reichweitenkontrolle nicht aktiv. Achten Sie
daher darauf, dass Sie beim Aktivieren des ECO Modus innerhalb
der Reichweite sind und auch bleiben.
Einstellung der Sensitivität
Sobald Sie das Gerät Einschalten ist es immer auf eine hohe Sensitivität
eingestellt. Die LED (1) erlischt. Um Sie auf „niedrig (Low)“ zu ändern, halten
Sie den ECO-Knopf gedrückt und bestätigen Sie den TALK-Knopf. Die LED
(1) beginnt zu leuchten. Beim erneuten Drücken ist sie wieder auf „hoch“.
Talk-Funktion
Dieses Babyphone verfügt über eine 2-Wege-Kommunikation.
Drücken Sie die Taste TALK und halten Sie sie gedrückt, solange Sie mit
Ihrem Baby sprechen.
Mobilteilsuche - Paging-Funktion
Falls Sie die Elterneinheit verlegt oder verdeckt haben, können Sie sie durch
Drücken der Taste PAGE an der Babyeinheit anhand eines akustischen
Signals orten.
11
Page 12
Diese Funktion steht nur dann zur Verfügung, wenn die Eltern einheit
eingeschaltet ist.
8 Einstellungen
Drücken Sie die Taste POWER/VOL an der Elterneinheit, um die Lautstärke in 4 Stufen zu erhöhen oder nach der höchsten Einstellung wieder auf
die niedrigste zu setzen.
Die Anzahl der dabei aufleuchtenden LEDs zeigt die jeweilige
Lautstärken-Stufe an.
Drücken Sie die Taste POWER/VOL an der Babyeinheit, um die Lautstärke
zu erhöhen oder zu verringern. Die Lautstärke des dabei ertönenden Pieptons entspricht der jeweiligen Einstellung.
Die Intensität der Geräuschübertragung wird zusätzlich durch ein LEDLichtband an der Elterneinheit abgebildet, wodurch das Gerät auch für
Schwerhörige oder Gehörlose verwendbar ist.
9 Wissenswertes rund ums Babyphone
• Der Betrieb des Babyphones mit Batterie oder Akku minimiert Elektrosmog durch elektrische und magnetische Wechselfelder.
• Sie können die Reichweite eines Babyphones erhöhen, indem Sie die
12
Page 13
Babyeinheit in der Nähe einer Tür oder eines Fensters sowie möglichst
weit oben platzieren und sicherstellen, dass die Batterien nicht zu
schwach sind.
• Andere Funkwellen können die Übertragung des Babyphones evtl. stören.
Stellen Sie das Babyphone deshalb nicht in der Nähe von Geräten, wie
zum Beispiel Mikrowelle, WLAN etc., auf.
• Folgende weitere Faktoren können die Übertragung des Babyphones
stören bzw. die Reichweite verkürzen: das Verdecken der Geräte, Möbel,
Wände, Häuser, Bäume, Umwelteinflüsse (z. B. Nebel, Regen)
10 Batteriewechsel/Akku laden
Falls die Batterien oder der Akku zu schwach sind, schalten sich die Geräte
automatisch aus. Die Batterien müssen dann ausgetauscht bzw. der Akku
neu geladen werden (siehe Inbetriebnahme).
• Verwenden Sie bei jedem Batteriewechsel Batterien gleichen
Typs, gleicher Marke und gleicher Kapazität.
• Wechseln Sie alle Batterien immer gleichzeitig.
• Verwenden Sie schwermetallfreie Batterien.
11 Aufbewahrung und Pflege
Die Lebensdauer der Geräte hängt vom sorgfältigen Umgang ab:
13
Page 14

Achtung:
• Nehmen Sie die Batterien bei der Babyeinheit heraus, wenn das
Gerät längere Zeit nicht in Gebrauch ist.
• Sie erhalten eine maximale Kapazität des Akkus, wenn Sie den
Akku mindestens alle 6 Monate entladen. Trennen Sie dazu das
Gerät vom Netz und entleeren Sie den Akku durch normale Benutzung. Laden Sie den Akku danach wieder vollständig auf.
• Die maximale Kapazität des Akkus wird erst nach mehreren
Ladevorgängen erreicht und ist von mehreren Faktoren abhängig
(Akkuzustand, Umgebungstemperatur, Art und Weise und Häufigkeit des Ladevorgangs usw.)
• Schützen Sie die Geräte vor Stößen, Feuchtigkeit, Staub,
Chemikalien, starken Temperaturschwankungen, elektromagnetischen Feldern und zu nahen Wärmequellen (Öfen,
Heizungskörper).
• Wischen Sie ein verschmutztes Gerät mit einem weichen,
trockenen Tuch ab.
• Reinigen Sie die Geräte mit einem trockenen Tuch. Verwenden
Sie keine scheuernden Reinigungsmittel.
12 Entsorgen
Im Interesse des Umweltschutzes dürfen die Geräte am Ende ihrer Lebensdauer nicht mit dem Hausmüll entfernt werden. Die Entsorgung kann über
entsprechende Sammelstellen in Ihrem Land erfolgen. Befolgen Sie die
örtlichen Vorschriften bei der Entsorgung der Materialien.
14
Page 15
Entsorgen Sie das Gerät gemäß der Elektro- und ElektronikAltgeräte EG-Richtlinie 2002/96/EC – WEEE (Waste Electrical and
Electronic Equipment).
Bei Rückfragen wenden Sie sich an die für die Entsorgung zuständige kommunale Behörde.
13 Technische Daten
• FHSS-Technologie
• Frequenz 2,4 GHz
• 69 digitale Kanäle
• 2-Wege-Kommunikation
• Maße: Babyeinheit: Ø 78 x 39 mm, Elterneinheit: Ø 57 x 24 mm
• Gewicht: Babyeinheit: ~ 50 g Elterneinheit: 62 g
• Reichweite: 250 m bei freier Sicht
Betrieb Babyeinheit: 2 Batterien 1,5 V,
Typ AAA
oder beigelegtes Netzteil
(6 V DC / 650 mA)
Elterneinheit: NI-MH-Batterie
(1 x 2,4V / 500 mAh) oder beigelegtes
Netzteil (6 V DC / 650 mA)
15
Page 16
Batterielebensdauer (abhängig
von den verwendeten Batterien)
Akkulebensdauer (abhängig
von Akkuzustand, Umgebungstemperatur, Art und Weise und
Häufigkeit des Ladevorgangs
usw.)
Babyeinheit: 1 - 2 Tage
(mit Alkaline Batterien)
Elterneinheit: 1 - 2 Tage
14 Was tun bei Problemen?
Fehler Maßnahmen
Power-LED leuchtet
nicht nach dem
Einschalten
An der Elterneinheit
ertönt ein akustisches
Signal
16
Prüfen Sie, ob
• das jeweilige Steckernetzteil richtig eingesteckt ist.
• die Batterien voll sind bzw. der Akku geladen
werden muss oder beschädigt ist.
Prüfen Sie, ob
• die maximale Reichweite überschritten ist.
• das Steckernetzteil der Babyeinheit richtig
eingesteckt ist.
• die Babyeinheit eingeschaltet ist.
• die Batterien voll sind bzw. der Akku geladen
werden muss oder beschädigt ist.
Page 17

Signal ist schwach,
die Verbindung bricht
immer wieder ab oder
Störungen treten auf
Gerätesignale aufeinander abstimmen
Wenn keinerlei
Übertragung möglich
ist haben Sie die
Möglichkeit die Gerätesignale neu digital
aufeinander abzustimmen = Pairing
An der Elterneinheit
ertönt kein akustisches Signal
• Befindet sich ein anderes technisches Gerät
wie zum Beispiel eine Mikrowelle im Pfad
zwischen der Baby- und der Elterneinheit,
entfernen Sie das Gerät oder schalten Sie
es aus.
• Prüfen Sie, ob andere Faktoren wie zum
Beispiel Bäume o. Ä. im Pfad zwischen den
Geräten liegen, und platzieren Sie Ihre Geräte
entsprechend um, bis die Elterneinheit eine
Verbindung signalisiert.
• Prüfen Sie, ob sich Baby- und Elterneinheit
innerhalb des jeweiligen Empfangsbereichs
befinden.
Baby und Elterneinheit nebeneinander aufstellen.
1. Beide Geräte anschalten
2. „POWER“ und „TALK“ Knopf der Elterneinheit
für 2 Sekunden gedrückt halten. Die PowerLED der Elterneinheit blinkt orange.
3. „POWER“ und „PAGE“ Knopf der Babyeinheit
für 2 Sekunden gedrückt halten. Die PowerLED der Babyeinheit blinkt orange.
4. Ein akustisches Signal ertönt und beide Power
LED‘s wechseln in grün um zu signalisieren,
das das Pairing zwischen beiden Einheiten
erfolgreich war.
• Passen Sie die Lautstärke an der Eltern einheit
an.
17
Page 18
Ein Gerät schaltet
sich aus
Wir garantieren hiermit, dass dieses Produkt der europäischen R&TTE
Richtlinie 1999/5/EC entspricht.
Kontaktieren Sie bitte die genannte Serviceadresse, um detailliertere Angaben – wie zum Beispiel die CE-Konformitätserklärung – zu erhalten.
• Tauschen Sie die Batterien aus bzw. laden Sie
den Akku neu.
15 Garantie und Service
Sie erhalten 3 Jahre Garantie ab Kaufdatum auf Material- und Fabrikationsfehler des Produktes. Die Garantie gilt nicht:
• im Falle von Schäden, die auf unsachgemäßer Bedienung beruhen
• für Verschleißteile (z.B. Batterien)
• für Mängel, die dem Kunden bereits bei Kauf bekannt waren
• bei Eigenverschulden des Kunden
Die gesetzlichen Gewährleistungen des Kunden bleiben durch die Garantie
unberührt. Für Geltendmachung eines Garantiefalles innerhalb der Garantiezeit ist durch den Kunden der Nachweis des Kaufes zu führen.
Die Garantie ist innerhalb eines Zeitraumes von 3 Jahren ab Kaufdatum
gegenüber der
Beurer GmbH
Söflinger Straße 218
89077 Ulm
Germany
geltend zu machen. Der Kunde hat im Garantiefall das Recht zur Reparatur
der Ware bei unseren eigenen oder bei von uns autorisierten Werkstätten.
Weitergehende Rechte werden dem Kunden (aufgrund der Garantie) nicht
eingeräumt.
18
Page 19

English
Contents
1 Getting to know your
instrument ............................ 20
2 Signs and symbols .............. 20
3 Intended use ........................ 21
4 Notes ................................... 21
5 Unit description.................... 24
6 Initial use .............................. 25
7 Operation ............................. 26
8 Settings ................................ 28
Included in delivery
• Baby monitor consisting of baby unit and parent unit
• Wrist band for parent unit
• Janosch sticker
• 2 power supply units
• These instructions for use
Dear customer,
Thank you for choosing one of our products. Our name stands for highquality, thoroughly tested products for applications in the areas of heat,
weight, blood pressure, body temperature, pulse, gentle therapy, massage
and air. Please read these instructions for use carefully and keep them for
later use, be sure to make them accessible to other users and observe the
notes they contain.
With kind regards,
Your Beurer team
9 Good to know about the baby
monitor ................................. 29
10 Replacing/charging the
batteries ............................... 29
11 Storage and maintenance .... 29
12 Disposal ............................... 30
13 Technical data ..................... 31
14 What if there are problems? 32
19
Page 20
1 Getting to know your instrument
Functions of the baby monitor
This baby monitor enables you to monitor your baby at all times whilst you
pursue activities in other rooms or in the garden. The FHSS technology
ensures an interference-free and tap-proof connection.
The device has the following functions:
• Two-way communication
• Mobile handset search – paging function
• Volume control on the parent and baby units
• 250 m range with a clear view
• Warning when the range is exceeded or if there are interferences to the
connection
2 Signs and symbols
The following symbols appear in these instructions.
Warning Warning instruction indicating a risk of injury or
Important Safety note indicating possible damage to the unit/
Note Note on important information
20
damage to health
accessory
Page 21
3 Intended use
• Only use the device to monitor your baby when you cannot mind your
baby directly. It is not a substitute for your own personal, responsible
supervision!
• The device is only intended for domestic/private use, not for commercial use.
• This device is not intended for use by people (including children) with
restricted physical, sensory or mental skills or a lack of experience and/
or a lack of knowledge, unless they are supervised or instructed, for
their own safety, by a person who is familiar with the device.
• Children should be supervised around the device to ensure they do not
play with it.
• Every improper use can be dangerous.
4 Notes
Safety notes
Warning:
• Always position the device and power cord out of the
reach of children. the power cord may cause strangulation
or injury to children.
• Keep small parts out of the reach of children (risk of swallowing).
• Keep packaging material away from children (risk of
suocation).
• Never place the baby unit in the cot or within the reach of your
child.
• Place the baby unit 1.5 m away from your baby, in order to
minimise the possibility of electrosmog pollution and noise
pollution.
21
Page 22
• Make sure that cables are out of the reach of your child (risk of
electric shock).
• Always make sure that the devices are fully functioning before
use and check that the devices have suciently charged batteries when on battery operation.
• Only use the power supply units included with the delivery (risk
of fire and electric shock).
• The minimum separation distance between the 20dBm parent
unit of JBY93 and the head and body of the user shall be at
least 0.025m.
• The batteries shall not be exposed to excessive heat such as
sunshine, fire or the like.
Warning: To avoid damage to the device, please observe the
following:
• Never submerge the devices in water. Never rinse them in
running water.
• Never use the devices in a damp environment.
• Do not use the cable to pull the adapter plug out of the socket.
• Disconnect the adapter plug from the mains when the device
is not in use.
• The device and the adapter plug should not come into contact
with hot surfaces or sharp-edged objects.
• Do not use any additional parts that are not recommended by
the manufacturer or oered as equipment.
22
Page 23
Notes on handling batteries
Warning:
• Swallowing batteries can be extremely dangerous. Keep batteries out of the reach of small children. Should a battery be
swallowed, seek medical assistance immediately.
• Batteries must not be recharged, taken apart, thrown into an
open fire or short circuited.
• Batteries can contain toxins that are harmful to health and the
environment. Always dispose of batteries in accordance with
applicable legal regulations. Do not dispose of batteries with the
normal household waste.
Warning:
• Replace weak batteries before they discharge completely.
• Leaking batteries may damage the device. If you do not intend
to use the device for longer periods, remove the batteries from
the battery compartment.
• If a battery has leaked, put on protective gloves and clean the
battery compartment with a dry cloth.
General notes
• Repairs must only be carried out by Customer Services or authorised suppliers. Under no circumstances should you open
or repair the device yourself, as faultless functionality could no
longer be guaranteed thereafter. Failure to comply will result in
voiding of the warranty.
• If you should have any questions about using our devices,
please contact either your retailer or Customer Services.
23
Page 24
5 Unit description
Overview
Baby unit
1 POWER/VOL button
2 PAGE button
3 Power LED
4 Speaker
+
5 ECO
button
6 Microphone
7 Battery compartment
8 Power supply jack
Parent unit
1 Volume LEDs
2 Power LED
3 Speaker
4 POWER/VOL button
5 TALK button
6 Microphone
7 Wrist band
8 Power supply jack
24
1
2
6
3
4
7
5
1
6
7
2
3
4
5
8
Page 25
6 Initial use
Baby unit
You can either use the baby unit with batteries or with the supplied power
supply unit.
Battery operation
1. Loosen the screw in the battery compartment lid and remove the lid.
2. Insert two high-quality 1.5 V AAA batteries the correct way round.
3. Close the battery compartment lid and screw it back on.
The screw is a child safety feature.
Whilst charging, the power LED flashes red. As soon as the battery
is fully charged, it glows red. Please note that only the following
types of battery can be charged in the device.
The negative battery terminal must be stripped to approx. 5 mm
(= without insulation).
5 mm
Mains operation
Using the power supply unit, connect the baby unit to a socket.
Parent unit
Battery operation – charging
The battery must be charged for at least 10 hours before the device can be
first used independently of the mains; you may use the device during this
period. Whilst charging, the power LED flashes red. As soon as the battery
is fully charged, it glows red.
25
Page 26
If the baby unit is used independently of the mains, the power LED begins
to flicker when the battery is low. Moreover, a beep sounds as a warning on
the parent unit every 4 seconds.
When the battery in the parent unit is low, the unit's power LED flashes
and the unit beeps every 4 seconds. If the devices are not connected to a
socket, they will switch o automatically after a short period.
If the devices are operated using the power supply unit and there is a power
cut, the parent unit switches to battery operation. For this reason, the
standby time is dependent on the battery charge status.
If no batteries were inserted in the baby unit, it switches o in the
event of a power cut and there is an acoustic warning on parent
unit.
Discharging the parent unit
The battery should be discharged after being charged 300 times.
To do so, leave the unit switched on until it switches itself o
automatically.
7 Operation
1. Position the baby unit so that it is in an elevated position and is not in
proximity to any other devices that may cause interference. Switch the
baby unit on with the POWER/VOL button. The power LED of the baby
unit lights up.
2. Fasten the parent unit to your arm or position it in the room in which you
are located.
3. Switch the parent unit on with the POWER/VOL button. The power LED
of the parent unit lights up.
26
Page 27
If there is no connection between the devices (baby unit not
switched on or out of range), an acoustic warning will sound on the
parent unit (2 beeps).
+
ECO
MODE setting
To access the ECO+ mode, press
O
C
E
the ECO button. LED 4 glows red
and indicates this mode. To switch
it o, press the ECO button again.
Range control is not enabled in ECO mode. Therefore, when
activating the ECO mode, ensure that you are and that you stay
within range.
Sensitivity setting
When you switch on the device, it is always set to high sensitivity. The LED
(1) goes o. To change to “low” press and hold the ECO button and confirm
with the TALK button. The LED (1) comes on. Pressing again will return it to
“high”.
Talk function
This baby monitor features a two-way communication function.
Press the TALK button and keep it pressed while you are talking to your
baby.
27
Page 28
Mobile handset search – paging function
If you have mislaid or accidentally hidden the parent unit, you can locate it
via an acoustic signal by pressing the PAGE button on the baby unit.
This function is available only if the parent unit is switched on.
8 Settings
Press the POWER/VOL button on the parent unit to increase the volume in
4 steps or, after the highest setting, to return to the lowest setting again.
The number of lit LEDs indicates
the respective volume level.
Press the POWER/VOL button on the baby unit to increase or decrease the
volume. The volume of the output beep indicates the respective setting.
The sound intensity is also indicated using an LED light band on
the parent unit, so that the device can also be used for the hard of
hearing or the deaf.
28
Page 29
9 Good to know about the baby monitor
• Battery operation of the baby monitor minimises electrosmog from
electrical and magnetic alternating fields.
• You can increase the range of the baby monitor by positioning the baby
unit as high up as possible near a door or window and ensuring that the
batteries are not too weak.
• Other radio waves may possibly interfere with the transmission of the
baby monitor. Therefore, do not position the baby monitor near devices
such as microwaves, WLAN, etc.
• The following additional factors can interfere with the baby monitor's
transmission or shorten its range: covering the units, furniture, walls,
houses, trees, environmental factors (such as fog, rain)
10 Replacing/charging the batteries
If the batteries are too flat, then the units will switch o automatically. The
batteries must then be replaced or recharged (see Initial use).
• When changing the batteries, use batteries of the same type,
make and capacity.
• Always replace all batteries at the same time.
• Use batteries free from heavy metals.
11 Storage and maintenance
The service life of the devices depends on careful use:
29
Page 30

Warning:
• Remove the batteries from the baby unit if the unit is not in use
for an extended period.
• You will get the maximum capacity from your battery if you
run down the battery at least once every 6 months. To do this,
disconnect the device from the mains and run the battery down
through normal use. Then fully charge the battery up again.
• The maximum battery capacity can only be reached after it has
been charged several times and is dependent on many factors
(battery state, ambient temperature, means and frequency of
charging, etc.).
• Protect the devices from knocks, damp, dust, chemicals, drastic changes in temperature, electromagnetic fields and nearby
sources of heat (ovens, heaters).
• If dirty, wipe the device with a soft, dry cloth.
• Clean the device with a dry cloth. Do not use any abrasive
cleaning products.
12 Disposal
For environmental reasons, do not dispose of the devices in the household
waste at the end of their useful life. Dispose of the unit at a suitable local
collection or recycling point. Observe the local regulations for material
disposal.
30
Page 31

Dispose of the unit in accordance with EC Directive 2002/96/EC –
WEEE (Waste Electrical and Electronic Equipment).
If you have any questions, please contact the local authorities
responsible for waste disposal.
13 Technical data
• FHSS technology
• 2.4 GHz frequency
• 69 digital channels
• Two-way communication
• Dimensions: Baby unit: Ø 78 x 39 mm, parent unit: Ø 57 x 24 mm
• Weight: Baby unit: ~ 50 g, Parent unit: 62 g
• Range: 250 m range with a clear view
Operation Baby unit: 2 batteries 1.5 V,
Battery life (dependent on batteries used)
type AAA or power supply unit
(6 V DC/650 mA)
Parent unit: NI-MH battery
(1 x 2.4 V/500 mAh) or power supply
unit (6 V DC/650 mA)
Baby unit: 1 - 2 days
(with alkaline batteries)
Rechargeable battery life
(dependent on battery state,
ambient temperature, means
and frequency of charging, etc.)
Parent unit: 1 - 2 days
31
Page 32

14 What if there are problems?
Faults Actions
Power LED does
not light up after
switch-on
An acoustic signal
comes from the parent unit
The signal is weak,
the connection keeps
breaking up or there is
interference
32
Check whether
• the relevant power supply unit is correctly
connected.
• the batteries are full or the rechargeable battery needs charging or is damaged.
Check whether
• the maximum range has been exceeded.
• the power supply unit for the baby unit is cor-
rectly connected.
• the baby unit is switched on.
• the batteries are full or the rechargeable bat-
tery needs charging or is damaged.
• If another technical device such as a microwave is in the area between the parent and
baby units, remove the device or switch it o.
• Check whether other factors, such as trees or
anything else, are in the area between the devices, and change the position of the devices
until the parent unit signals a connection.
• Check whether the baby and parent units are
inside the respective receiving range.
Page 33

Tuning the device
signals.
If no transmission is
possible, you have the
option to retune the
device signals digitally
= pairing
No acoustic signal
comes from the parent unit
A unit switches itself o• Change the batteries or recharge the battery.
We hereby guarantee that this product complies with the European R&TTE
Directive 1999/5/EC.
Please contact the specified service address to obtain further information,
such as the CE-Declaration of Conformity.
• Place the baby and parent units next to each
other.
1. Switch on both units.
2. Press and hold the “POWER” and “TALK”
buttons on the parent unit for 2 seconds. The
power LED on the parent unit flashes orange.
3. Press and hold the “POWER” and “PAGE”
buttons on the baby unit for 2 seconds. The
power LED on the baby unit flashes orange.
4. An acoustic signal sounds and both power
LEDs turn green to indicate that the pairing
between the two units was successful.
• Adjust the volume on the parent unit.
33
Page 34

Français
Sommaire
1 Familiarisation avec
l’appareil .............................. 35
2 Symboles utilisés ................. 35
3 Utilisation conforme aux
recommandations ................ 36
4 Remarques........................... 36
5 Description de l’appareil ...... 39
6 Mise en service .................... 40
7 Utilisation ............................. 41
8 Réglages .............................. 43
Contenu
• Babyphone composé de l’unité bébé et de l’unité parents
• Bracelet pour l’unité parents
• Autocollant Janosch
• 2 adaptateurs secteur
• le présent mode d’emploi
Chère cliente, cher client,
Nous vous remercions d’avoir choisi l’un de nos produits. Notre société
est réputée pour l’excellence de ses produits et les contrôles de qualité
approfondis auxquels ils sont soumis, dans les domaines suivants: chaleur,
contrôle de poids, diagnostic de pression artérielle, mesure de température
du corps et du pouls, thérapies douces, massage et purification d’air. Lisez
attentivement cette notice, conservez-la pour un usage ultérieur, mettez-la à
la disposition des autres utilisateurs et suivez les consignes qui y figurent.
Sincères salutations,
Votre équipe Beurer
34
9 Tout ce qu’il faut savoir à
propos du babyphone ......... 44
10 Changement de piles/charger
la batterie ............................. 44
11 Stockage et entretien ........... 45
12 Élimination ........................... 46
13 Données techniques ............ 46
14 Que faire en cas de
problème? ........................... 47
Page 35

1 Familiarisation avec l’appareil
Fonctions du babyphone
Ce babyphone vous permet d’eectuer des activités dans d’autres pièces
ou dans le jardin tout en surveillant votre bébé. La techno logie FHSS garantit une connexion sécurisée sans interférences.
L’appareil dispose des fonctions suivantes:
• communication bilatérale
• fonction de recherche de combiné mobile - bipage
• réglage du volume sonore sur l’unité parents et bébé
• portée de 250 m sans obstacle
• avertissement en cas de dépassement de la portée ou d’inter férences
sur la connexion
2 Symboles utilisés
Voici les symboles utilisés dans la notice d’utilisation:
Avertissement Ce symbole vous avertit des risques de bles-
sures ou des dangers pour votre santé.
Attention Ce symbole vous avertit des éventuels
dommages au niveau de l’appareil ou d’un
accessoire.
Remarque Ce symbole indique des informations
importantes.
35
Page 36

3 Utilisation conforme aux recommandations
• N’utilisez l’appareil que pour surveiller votre bébé lorsque vous ne
pouvez pas le voir directement. Il ne remplace pas votre surveillance
personnelle responsable!
• L’appareil ne doit être utilisé que dans un environnement domestique/
privé et pas dans un cadre professionnel.
• Cet appareil n’est pas conçu pour être utilisé par des personnes
(enfants y compris) dont les capacités physiques, sensorielles ou intellectuelles sont limitées ou n’ayant pas l’expérience et/ou les connaissances nécessaires, à moins que la personne en question, pour sa
sécurité, soit surveillée par une personne compétente ou reçoive d’elle
les consignes d’utilisation de l’appareil.
• Surveillez les enfants afin de les empêcher de jouer avec l’appareil.
• Toute utilisation inappropriée peut être dangereuse.
4 Remarques
Instructions de sécurité
Avertissement:
• Ne laissez jamais l’appareil et l’alimentation à portée des
enfants. l’alimentation pourrait causer l’étranglement ou
des blessures aux enfants.
• Gardez les petites pièces hors de portée des enfants (risque
d’ingestion).
• Éloignez les enfants du matériel d’emballage (risque
d’étouement).
• Ne placez jamais l’unité bébé dans le lit d’enfant ou à portée
de votre enfant.
36
Page 37

• Placez l’unité bébé à une distance de 1,5m de votre bébé
afin de réduire les conséquences négatives éventuelles de la
pollution électromagnétique et les perturbations sonores.
• Assurez-vous que le câble n’est pas à portée de main de votre
enfant (risque de choc électrique).
• Avant la mise en service des appareils, assurez-vous qu’ils
fonctionnent sans problèmes et qu’ils sont équipés de piles
assez chargées en cas de fonctionnement sur piles.
• Utilisez uniquement les adaptateurs secteur fournis à la livraison (risque d’incendie et de choc électrique).
• La distance minimale à respecter entre l’unité parents du JBY 93
(20 dBm) et la tête ou le corps de l’utilisateur est de 0,025 m.
• Les piles / batteries doivent être tenues à l’abri des rayons du
soleil, du feu et de toute autre source de chaleur.
Attention: Pour éviter d’endommager l’appareil, respectez les
instructions suivantes
• N’immergez jamais les appareils. Ne les rincez jamais sous
l’eau courante.
• N’utilisez jamais les appareils dans un environnement humide.
• Ne sortez pas la fiche de la prise en tirant sur le câble.
• Débranchez la fiche du secteur si l’appareil n’est pas utilisé.
• L’appareil et la prise ne doivent pas être mis en contact avec
une surface chaude ou des objets tranchants.
• N’utilisez aucun élément supplémentaire non recommandé ou
proposé comme accessoire par le fabricant.
37
Page 38

Remarques relatives aux piles
Avertissement:
• Les piles sont extrêmement dangereuses si elles sont avalées.
Conservez les piles hors de portée des enfants en bas âge. En
cas d’accident, consultez immédiatement un médecin!
• Les piles ne doivent être ni rechargées, ni réactivées par d’autres
méthodes, ni démontées, ni jetées au feu, ni court-circuitées.
• Les piles peuvent contenir des produits toxiques qui sont
nuisibles pour la santé et l’environnement. Éliminez les piles
conformément aux dispositions légales en vigueur. Ne jetez
jamais les piles avec les ordures ménagères.
Attention:
• Remplacez à temps les piles usagées.
• Des piles qui fuient peuvent endommager l’appareil. Si vous
n’utilisez pas l’appareil pendant une période prolongée, retirez
les piles du compartiment à piles.
• En cas de fuite, enfilez des gants protecteurs et nettoyez le
compartiment à piles avec un chion sec.
Recommandations générales
• Seul le service client ou un opérateur autorisé peut procéder à
une réparation. Vous ne devez en aucun cas ouvrir ou réparer
l’appareil vous-même; le bon fonctionne ment de l’appareil ne
serait plus assuré. Nepas respecter ceci annulerait la garantie.
• Pour toute question concernant l’utilisation de nos appareils,
adressez-vous à votre revendeur ou à notre service clients.
38
Page 39

5 Description de l’appareil
Aperçu
Unité bébé
1 Touche POWER/VOL
2 Touche PAGE
3 LED d’alimentation
4 Haut-parleur
5 Touche ECO
6 Microphone
7 Compartiment à piles
8 Prise pour adaptateur
secteur
Unité parents
1 LED de volume
2 LED d’alimentation
3 Haut-parleur
4 Touche POWER/VOL
5 Touche TALK
6 Microphone
7 Bracelet
8 Prise pour adaptateur
secteur
+
3
4
5
1
6
7
8
1
2
6
7
2
3
4
5
39
Page 40

6 Mise en service
Unité bébé
Vous pouvez utiliser l’unité bébé avec des piles ou avec l’adaptateur secteur
fourni.
Utilisation avec des piles
1. Desserrez la vis du couvercle du compartiment à piles et retirez-le.
2. Insérez deux piles AAA 1,5 V de haute qualité en respectant la
polarisation.
3. Replacez le couvercle du compartiment à piles et refermez-le avec la vis.
Les vis sont employées pour la sécurité de votre enfant.
La LED d’alimentation clignote en rouge pendant la charge. Elle
est allumée en continu en rouge dès que la batterie est entièrement chargée. Veuillez noter que seules des batteries de type
peuvent être rechargées dans l’appareil.
Le fil relié au pôle négatif de la batterie doit être dénudé sur 5mm
environ (= sans isolation).
5 mm
Utilisation avec l’adaptateur secteur
Connectez l’unité bébé à une prise avec l’adaptateur secteur.
Unité parents
Utilisation avec la batterie - Charge
Avant la première utilisation hors secteur de l’appareil, la batterie doit être
chargée au moins 10 heures. Vous pouvez déjà utiliser l’appareil pendant
40
Page 41

ce temps. La LED d’alimentation clignote en rouge pendant la charge. La
LED d’alimentation clignote en rouge pendant la charge. Elle est allumée en
continu en rouge dès que la batterie est entièrement chargée.
Si l’unité bébé est utilisée hors secteur, la LED d’alimentation commence à
scintiller en cas de charge faible des piles. De plus, un bip est émis toutes
les 4 secondes sur l’unité parents en guise d’avertissement.
En cas de faible charge de la batterie de l’unité parents, sa LED d’alimentation clignote et un bip est émis toutes les 4 secondes. Si les appareils ne
sont pas branchés à une prise, ils s’éteignent automatiquement après un
court moment.
Si les appareils sont utilisés avec l’adaptateur secteur et qu’une panne de
courant se produit, l’unité parents passe en mode batterie. Dans ce cas, le
temps de stand-by dépend de la charge de la batterie.
Si aucune pile n’a été insérée dans l’unité bébé, celle-ci s’éteint en
cas de panne de courant et un avertissement sonore est émis sur
l’unité parents.
Décharge de l’unité parents
La batterie doit être déchargée après 300 charges. Pour cela, laissez l’appareil allumé jusqu’à ce qu’il s’éteigne automatiquement.
7 Utilisation
1. Placez l’unité bébé à un endroit surélevé et non à proximité d’autres
appareils pouvant provoquer des interférences. Allumez l’unité bébé
avec la touche POWER/VOL. La LED d’alimentation de l’unité bébé
s’allume.
41
Page 42

2. Fixez l’unité parents à votre bras ou placez-la dans la pièce dans laquelle
vous vous trouvez.
3. Allumez l’unité parents avec la touche POWER/VOL. La LED d’alimenta-
tion de l’unité parents s’allume.
Si aucune connexion ne se produit entre les appareils (l’unité bébé
n’est pas allumée ou hors de portée), un signal d’avertissement
sonore retentit sur l’unité parents (2bips).
Réglage MODE ECO
+
Pour accéder au mode ECO+, ap-
O
C
E
puyez sur la touche ECO. La LED
4 devient rouge et vous signale ce
mode. Pour le désactiver, appuyez
de nouveau sur la touche ECO.
Le contrôle de la portée est désactivé en mode ECO. Assurez-vous
donc que vous êtes et restez dans la portée lorsque vous activez le
mode ECO.
Réglage de la sensibilité
Dès que vous allumez l‘appareil, il est toujours réglé sur une sensibilité élevée. La LED (1) s‘éteint. Pour passer sur « bas (Low) », maintenez la touche
ECO enfoncée et confirmez avec la touche TALK. La LED (1) commence à
briller. Lorsque vous appuyez de nouveau dessus, elle repasse sur « haut ».
42
Page 43

Fonction Talk
Ce babyphone dispose d’une communication bilatérale.
Appuyez sur la touche TALK et maintenez-la enfoncée tant que vous parlez
à votre bébé.
Fonction de recherche de combiné mobile - bipage
Si vous avez égaré ou recouvert l’unité parents, vous pouvez la localiser à
l’aide d’un signal sonore en appuyant sur la touche PAGE sur l’unité bébé.
Cette fonction est uniquement disponible quand l’unité parents
est allumée.
8 Réglages
Appuyez sur la touche POWER/VOL sur l’unité parents pour augmenter
le volume en 4 étapes ou pour le régler sur le paramètre le plus bas après
le plus haut.
Le nombre de LED qui s’allument
indique le niveau duvolume
sonore.
Appuyez sur la touche POWER/VOL sur l’unité bébé pour augmenter ou
réduire le volume. Le volume du bip émis correspond au réglage établi.
L’intensité de la transmission du bruit est également représentée par
une bande lumineuse LED sur l’unité parents. Ainsi, l’appareil peut
aussi être utilisé par les personnes sourdes et malentendantes.
43
Page 44

9 Tout ce qu’il faut savoir à propos du babyphone
• Le fonctionnement du babyphone avec des piles ou une batterie réduit
la pollution électromagnétique grâce à des champs alternatifs électriques et magnétiques.
• Vous pouvez augmenter la portée d’un babyphone en plaçant l’unité
bébé à proximité d’une porte ou d’une fenêtre et aussi haut que possible ainsi qu’en vous assurant que les piles ne sont pas trop faibles.
• D’autres ondes radioélectriques peuvent éventuellement perturber la
transmission du babyphone. Ne placez donc pas le babyphone à proximité d’appareils tels qu’un micro-onde ou d’un réseau sans fil, etc.
• Les facteurs suivants peuvent aussi perturber la transmission du babyphone ou en réduire la portée: recouvrement des appareils, meubles,
murs, maisons, arbres, influences environnementales (par ex. brouillard,
pluie).
10 Changement de piles/charger la batterie
Si les piles ou la batterie sont trop faibles, les appareils s’éteignent automatiquement. Les piles doivent alors être changées ou la batterie rechargée
(voir Mise en service).
• Lors de chaque changement de piles, utilisez des piles de
même type, marque et capacité.
• Changez toujours toutes les piles en même temps.
• Utilisez des piles sans métaux lourds.
44
Page 45

11 Stockage et entretien
La durée de vie des appareils dépend du soin que vous en prenez:
Attention:
• Retirez les piles de l’unité bébé lorsque l’appareil n’est pas
utilisé pendant une période prolongée.
• Vous obtenez une capacité maximale de la batterie lorsque
vous la déchargez au moins tous les 6 mois. Pour cela,
déconnectez l’appareil de l’alimentation électrique et laissez
la batterie se vider en utilisation normale. Ensuite, rechargez
complètement la batterie.
• La capacité maximale de la batterie est atteinte seulement
après plusieurs processus de charge et dépend de plusieurs
facteurs (état de la batterie, température ambiante, manière et
fréquence du processus de charge, etc.).
• Protégez les appareils contre les chocs, l’humidité, la poussière,
les produits chimiques, les fortes variations de température,
les champs électromagnétiques et les sources de chaleur trop
proches (four, radiateur).
• Si l’appareil est sale, essuyez-le avec un chion doux et sec.
• Nettoyez les appareils avec un chion sec. N’utilisez pas de
produits nettoyants abrasifs.
45
Page 46

12 Élimination
Afin de respecter l’environnement, ne jetez pas les appareils dans les
ordures ménagères, une fois ceux-ci devenus inutilisables. L’élimination
doit se faire par le biais des points de collecte compétents dans votre
pays. Respectez les réglementations locales en matière d’élimination de
matériaux.
Éliminez l’appareil conformément à la directive européenne
2002/96/EC – WEEE (Waste Electrical and Electronic Equip ment)
relative aux appareils électriques et électroniques usagés.
Pour toute question, adressez-vous aux collectivités locales responsables de l’élimination et du recyclage de ces produits.
13 Données techniques
• Technologie FHSS
• Fréquence 2,4GHz
• 69 canaux numériques
• Communication bilatérale
• Dimensions: Unité bébé: Ø 78 x 39mm,
Unité parents: Ø 57 x 24mm
• Poids: Unité bébé: ~ 50g Unité parents : 62g
• Portée: 250m sans obstacle
46
Page 47

Fonctionnement Unité bébé: 2 piles AAA 1,5V
Durée de fonctionnement
des piles (dépend des piles
utilisées)
Autonomie de la batterie
(dépend de l’état de la batterie,
de la température ambiante, de
la manière et de la fréquence
de la charge, etc.)
ou l’adaptateur secteur fourni
(6V CC / 650mA)
Unité parents: batterie NI-MH
(1 x 2,4V / 500mAh) ou l’adaptateur
secteur fourni
(6V CC / 650mA)
Unité bébé: 1 - 2 jours
(avec des piles alcalines)
Unité parents: 1 - 2 jours
14 Que faire en cas de problème?
Problème Mesures
La LED d’alimentation ne s’allume
plus après la mise en
marche
Vérifiez si
• l’adaptateur secteur correspondant est bien
branché.
• les piles sont pleines ou si la batterie doit être
chargée ou est endommagée.
47
Page 48

Problème Mesures
Un signal sonore
retentit sur l’unité
parents
Coordonner les
signaux des appareils entre eux.
Si aucune transmission n’est possible,
vous pouvez à
nouveau coordonner
numériquement les
signaux des appareils entre
eux = appariement
48
Vérifiez si
• la portée maximale a été dépassée.
• l’adaptateur secteur de l’unité bébé est bien
inséré.
• l’unité bébé est allumée.
• les piles sont pleines ou si la batterie doit être
chargée ou est endommagée.
Placer les unités bébé et parents l’une à côté de
l’autre.
1. Allumer les deux appareils
2. Maintenir enfoncées les touches « POWER » et
« TALK » de l’unité parents pendant 2 secondes.
La LED d’alimentation de l’unité parents clignote
en orange.
3. Maintenir enfoncées les touches « POWER »
« PAGE » de l’unité bébé pendant 2 secondes.
La LED d’alimentation de l’unité bébé clignote
en orange.
4. Un signal sonore retentit et les deux LED d’ali-
mentation passent au vert afin d’indiquer que
l’appariement entre les deux unités a réussi.
et
Page 49

Le signal est faible,
la connexion est
toujours interrompue
ou des interférences
se produisent
Aucun signal sonore
ne retentit sur l’unité
parents
Un appareil s’éteint • Changez les piles ou rechargez la batterie.
Nous garantissons par la présente que ce produit est conforme à la directive européenne R&TTE 1999/5/CE.
Veuillez contacter l’adresse du SAV indiquée afin d’obtenir de plus amples
détails, comme par exemple la déclaration de conformité CE.
• Si un autre appareil technique tel qu’un
micro-onde se trouve dans la trajectoire entre
l’unité bébé et parents, retirez l’appareil ou
éteignez-le.
• Vérifiez si d’autres facteurs tels que des arbres
ou autres se trouvent sur la trajectoire entre les
appareils et placez vos appareils en fonction
jusqu’à ce que l’unité parents signale une
connexion.
• Vérifiez si les unités bébé et parents se
trouvent dans la portée de réception.
• Adaptez le volume de l’unité parents.
49
Page 50

Español
Índice
1 Presentación ........................ 51
2 Explicación de los símbolos 51
3 Uso correcto ........................ 52
4 Indicaciones ......................... 52
5 Descripción del aparato ....... 55
6 Puesta en funcionamiento ... 56
7 Manejo ................................. 58
8 Ajustes ................................ 60
9 Información importante sobre
el intercomunicador ............. 61
Volumen de suministro
• Intercomunicador que consta de unidad para bebés y unidad para
padres
• Pulsera para la unidad para padres
• Pegatina de Janosch
• Dos bloques de alimentación
• Estas instrucciones de uso
Estimada clienta, estimado cliente:
Nos alegramos de que haya decidido adquirir un producto de nuestra
colección. Nuestro nombre es sinónimo de productos de alta y comprobada
calidad en el sector de energía térmica, peso, tensión sanguínea, temperatura corporal, pulso, tratamiento suave, masaje y aire. Lea detenidamente
estas instrucciones de uso, consérvelas para su futura utilización, póngalas
a disposición de otros usuarios y respete las indicaciones.
Atentamente,
Su equipo Beurer
50
10 Cambio de pilas/carga
de la batería ......................... 61
11 Conservación y cuidado ...... 62
12 Eliminación de residuos ....... 62
13 Datos técnicos ..................... 63
14 ¿Qué hacer si surge un
problema? ............................ 64
Page 51

1 Presentación
Funciones del intercomunicador para bebés
Este intercomunicador le permite realizar actividades en otras habitaciones
o en el jardín sin dejar de estar pendiente de su bebé. La tecnología FHSS
garantiza una conexión sin interferencias a prueba de escuchas.
El aparato dispone de las siguientes funciones:
• Comunicación bidireccional
• Función de búsqueda de componentes del móvil y de localización
• Regulación del volumen en la unidad para bebés y para padres
• Alcance de hasta 250m sin obstáculos
• Aviso al exceder el alcance o si se producen interferencias en la
conexión
2 Explicación de los símbolos
En estas instrucciones de uso se utilizan los símbolos siguientes.
Advertencia Indicación de advertencia sobre peligro de lesio-
Atención Indicación de seguridad sobre posibles fallos en
Indicación Aviso sobre información importante
nes o para su salud
el aparato/accesorios
51
Page 52

3 Uso correcto
• Utilice el intercomunicador sólo para estar en contacto continuo con su
bebé cuando no pueda vigilarlo en persona. No obstante, recuerde que
este aparato no le exime de sus responsabilidades como padre o madre.
• Este aparato sólo está diseñado para el uso privado/en el hogar y no
para el uso industrial.
• Este aparato no debe ser utilizado por personas (incluidos los niños)
de facultades físicas, sensoriales o mentales limitadas, ocon poca
experiencia y/o conocimientos, a no ser que los vigile una persona
responsable de su seguridad o dicha persona les indique cómo se debe
utilizar el aparato.
• Se deberá vigilar que los niños no jueguen con el aparato.
• Todo uso inadecuado puede ser peligroso.
4 Indicaciones
Indicaciones de seguridad
Advertencia:
• Coloque el dispositivo y el cable fuera del alcance de los
niños, dado que pueden lesionarse o estrangularse con el
cable.
• Mantenga las piezas pequeñas fuera del alcance de los niños
(peligro de atragantamiento).
• Mantenga a los niños alejados del material de embalaje (peligro de asfixia).
• Nunca deje la unidad para bebés en la cuna del niño o al
alcance del niño.
52
Page 53

• Coloque la unidad para bebés al menos a un metro y medio
de distancia de su bebé para reducir el nivel de contaminación
electromagnética y las interferencias, en caso de que se dieran.
• Asegúrese de que tampoco haya cables al alcance de su hijo
(peligro de descarga eléctrica).
• Antes de usar el aparato asegúrese de que funcione correctamente y de que las pilas tengan carga suficiente, si lo va usar
con las pilas.
• Utilice el aparato únicamente con las fuentes de alimen tación
con las que ha sido suministrado (peligro de incendio y de
descarga eléctrica).
• La distancia mínima entre la unidad para padres del JBY93
(20 dBm) y la cabeza o el cuerpo del usuario debe ser de
0,025m como mínimo.
• Las pilas o baterías no pueden exponerse a fuentes de calor
intenso, como el sol, el fuego o elementos similares.
Atención: Para evitar daños en el aparato tenga en cuenta las
siguientes indicaciones.
• No sumerja nunca el aparato en agua. No lo lave nunca bajo
el grifo.
• No lo use en un ambiente húmedo.
• No desenchufe la fuente de alimentación tirando del cable.
• Desconecte el aparato cuando no esté en uso.
53
Page 54

• El aparato y el bloque de alimentación no deben entrar en
contacto con superficies calientes ni objetos afilados.
• No utilice piezas adicionales no recomendadas por el fabricante ni ofrecidas como accesorio.
Indicaciones para el manejo de pilas
Advertencia:
• Las pilas pueden resultar mortales si se ingieren. Guarde las
pilas fuera del alcance de niños pequeños. En caso de tragarse
una pila, acuda de inmediato al médico.
• Las pilas no pueden cargarse ni reactivarse con otros medios,
no pueden desmontarse, tirarse al fuego ni cortocircuitarse.
• Las pilas pueden contener sustancias tóxicas perjudiciales para
la salud y el medio ambiente. Por tanto, debe desecharlas siguiendo las disposiciones legales pertinentes. No deseche pilas
junto con la basura doméstica normal.
Atención:
• Cambie las pilas que tengan poca carga con la debida
antelación.
• Las baterías o pilas caducadas pueden ocasionar daños al
aparato. Si no va a usar el aparato durante mucho tiempo, saque
las pilas de su compartimento.
• Si se derrama el líquido de una pila, póngase guantes protectores y limpie el compartimento para pilas con un paño seco.
54
Page 55

Indicaciones generales
• Las reparaciones sólo deben ser realizadas por el servicio
de atención al cliente o distribuidores autorizados. No debe
bajo ningún concepto abrir ni reparar usted mismo el aparato;
de hacerlo ya no se garantiza su funcionamiento correcto. El
incumplimiento de esta norma anula la garantía.
• Si todavía tiene dudas sobre cómo usar nuestros dispositivos,
póngase en contacto con su distribuidor o con el servicio de
atención al cliente.
5 Descripción del aparato
Sinopsis
Unidad para bebés
1 Tecla de encendido/
volumen
2 Tecla de localización
3 LED de corriente
4 Altavoz
5 Tecla ECO
+
6 Micrófono
7 Compartimento de las
pilas
8 Entrada del conector
de red
3
4
5
1
2
6
7
55
Page 56

Unidad de padres
1 LED de volumen
2 LED de corriente
3 Altavoz
4 Tecla de encendido/
volumen
5 Tecla para hablar
6 Micrófono
7 Pulsera
8 Entrada del conector
de red
1
6
7
8
2
3
4
5
6 Puesta en funcionamiento
Unidad para bebés
La unidad para bebés funciona con pilas o con la fuente de alimentación
suministrada.
Funcionamiento con pilas
1. Afloje el tornillo del compartimento de las pilas y extráigalo.
2. Coloque dos pilas de alta calidad, 1,5 V y tipo AAA según la polaridad
indicada.
3. Cierre la tapa del compartimento de las pilas y atorníllelo de nuevo.
56
Page 57

El compartimento debe atornillarse por la seguridad de su hijo.
Durante el proceso de carga el LED de encendido parpadea en
rojo. En cuanto la batería está completamente cargada, se queda
iluminado en rojo. Tenga en cuenta que solo deben cargarse
baterías del tipo en el aparato.
El polo negativo de las pilas tiene que estar sin aislamiento aprox.
5 mm.
5 mm
Funcionamiento con cable
Enchufe la unidad para bebés a una toma de corriente a través de un
bloque de alimentación.
Unidad de padres
Funcionamiento con batería/proceso de carga
La batería debe cargarse durante al menos diez horas antes de utilizar el
aparato sin conexión a la red eléctrica, pero, entretanto, puede usar el aparato. Durante el proceso de carga el LED de encendido parpadea en rojo.
Durante el proceso de carga el LED de encendido parpadea en rojo. En
cuanto la batería está completamente cargada, se queda iluminado en rojo.
Si se utiliza la unidad para bebés sin conexión a la red eléctrica, cuando
el nivel de carga de las pilas es bajo, el LED de encendido comienza a
centellear. Además, en la unidad para padres suena un pitido cada cuatro
segundos como indicación de aviso.
Si el nivel de carga de la batería es bajo, el LED de encendido de la unidad
para padres parpadea y emite un pitido cada cuatro segundos. Si los
57
Page 58

aparatos no están conectados a una toma de corriente, se desconectan
automáticamente tras un breve periodo.
Cuando los aparatos funcionan con una fuente de alimentación y se
produce un fallo del suministro de eléctrico, la unidad para padres cambia
al funcionamiento con pilas. En este caso, el tiempo de funcionamiento en
espera depende del nivel de carga de la batería.
Si no se introducen pilas en la unidad para bebés, se desconecta si
se produce algún fallo en el suministro eléctrico y se emite un aviso
acústico en la unidad para padres.
Descarga de la unidad para padres
Tras 300 procesos de carga, la batería debería descargarse.
Para ello, deje el aparato conectado hasta que se desconecte
automáticamente.
7 Manejo
1. Coloque la unidad para bebés de tal modo que tenga se encuentre
a bastante altura y no se esté cerca de otros aparatos que puedan
causarle interferencias. Encienda la unidad para bebés con la tecla de
encendido/volumen. El LED de encendido de la unidad para bebés se
ilumina.
2. Póngase la unidad para padres en el brazo o colóquela en la habitación
en la que se encuentre.
3. Encienda la unidad para padres con la tecla de encendido/volumen. El
LED de encendido de la unidad para padres se ilumina.
58
Page 59

Si entre los dos aparatos no hay conexión (la unidad para bebés no
se enciende o está fuera del alcance), se emite una señal de aviso
acústica a la unidad para padres (dos pitidos).
Ajuste Modo ECO
+
Para activar el modo ECO+ es
O
C
E
necesario pulsar el botón ECO. El
LED 4 se enciende en rojo para
indicar que el modo está activo.
Pulse de nuevo el botón ECO para
desactivar este modo.
En el modo ECO el control de alcance no está activo. Por lo que al
activar el modo ECO se debe prestar atención a que se permanece
dentro del radio de alcance.
Ajuste de la sensibilidad
Siempre que se enciende el aparato se ajusta a una sensibilidad alta. El LED
(1) se apaga. Para cambiar a “baja (Low)”, es necesario mantener el botón
ECO pulsado y confirmar con el botón TALK. El LED (1) empieza a brillar. Al
pulsar de nuevo vuelve a ajustarse en “alta”.
Función para hablar
Este intercomunicador para bebés dispone de comunicación bidireccional.
Pulse y mantenga pulsada la tecla para hablar, siempre que hable con su
bebé.
59
Page 60

Función de búsqueda de componentes del móvil y de localización
En caso de que la unidad para padres haya quedado cubierta por algún objeto o se extravíe, puede localizarla a través de una señal acústica pulsando
la tecla de localización de la unidad para bebés.
Esta función solo se encuentra disponible cuando la unidad para
padres está encendida.
8 Ajustes
Pulse la tecla de encendido/volumen de la unidad para padres para subir
el volumen en cuatro niveles o para volver a fijar el ajuste más bajo tras
usar el ajuste más alto.
El número de LED que se encienden al hacerlo indica el nivel de
volumen pertinente.
Pulse la tecla de encendido/volumen de la unidad para bebés para subir o
bajar el volumen. El volumen del pitido que se emite se corresponde con el
ajuste respectivo.
La intensidad de la transmisión de ruido se refleja además por
medio de una banda luminosa de LED situada en la unidad para
padres, lo que permite a las personas que sufren sordera total o
parcial usar el aparato.
60
Page 61

9 Información importante sobre el
intercomunicador
• Utilice el intercomunicador con pilas o con la batería para reducir la
contaminación producida por los campos electromagnéticos.
• Coloque la unidad para bebés cerca de una puerta o ventana, ya la
mayor altura posible, para aumentar el alcance del intercomunicador.
Asegúrese de que las pilas estén cargadas.
• Tenga en cuenta que las ondas electromagnéticas de otros aparatos
pueden alterar el funcionamiento del intercomunicador. Por este motivo,
no lo coloque cerca de microondas, receptores WLAN, etc.
• Hay otros factores que pueden provocar un mal funcionamiento del
intercomunicador o la reducción de su alcance: que el aparato esté
cubierto por algo; obstáculos como muebles, paredes, casas y árboles;
o factores medioambientales (como la niebla ola lluvia).
10 Cambio de pilas/carga de la batería
Si las pilas se degastan o la batería se descarga, el aparato se apagará
automáticamente y tendrá que cambiar las pilas o volver a cargar la batería
(vea el capítulo de puesta en funcionamiento).
• Cada vez que tenga que cambiar las pilas, hágalo por unas del
mismo tipo y de la misma marca y capacidad.
• Cambie todas las pilas de una vez.
• Utilice pilas sin metales pesados.
61
Page 62

11 Conservación y cuidado
La vida útil del aparato depende del cuidado con que se utilice:
Atención:
• Si no va a utilizar el aparato durante un periodo de tiempo
prolongado, saque las pilas de la unidad para bebés.
• Conseguirá el máximo rendimiento de la batería si la deja descargarse completamente al menos cada seis meses. Desconecte el aparato y deje que la batería se descargue con el uso;
una vez descargada, cárguela de nuevo completamente.
• Para conseguir el máximo rendimiento de una batería es necesario llevar a cabo el proceso de carga en varias ocasiones.
Además, influyen otros factores como el estado de la batería, la
temperatura ambiente o la frecuencia y el modo de carga de la
batería, por citar algunos.
• Proteja el aparato de golpes, humedad, polvo, sustancias químicas, grandes cambios de temperatura, campos electromagnéticos y de la cercanía de fuentes de calor (hornos, radiadores).
• Elimine la suciedad con un trapo suave y seco.
• Limpie el aparato con un trapo seco. No use productos abrasivos.
12 Eliminación de residuos
Para la protección del medio ambiente no se debe desechar el aparato al final de su vida útil junto con la basura doméstica. Se puede desechar en los
puntos de recogida adecuados de su país. Siga las disposiciones locales
para la eliminación de materiales.
62
Page 63

Deseche el aparato según la Directiva europea 2002/96/CE sobre
residuos de aparatos eléctricos y electrónicos (RAEE).
Si tiene alguna duda o consulta le rogamos que se ponga en contacto con el organismo responsable de su municipio.
13 Datos técnicos
• Tecnología FHSS
• Frecuencia de 2,4 GHz
• 69 canales digitales
• Comunicación bidireccional
• Dimensiones: unidad para bebés: Ø 78 x 39 mm, unidad para padres: Ø
57 x 24 mm
• Peso: unidad para bebés: ~ 50 g, unidad para padres: 62 g
• Alcance: 250 m sin obstáculos
Funcionamiento Unidad para bebés: 2 pilas de 1,5 V,
tipo AAA o el fuente de alimentación
suministrada (6 V CC/650 mA)
Unidad de padres: una batería
NI-MH (2,4 V/500mAh) o la fuente de
alimentación suministrada
(6 V CC/650 mA)
63
Page 64

Duración con funcionamiento
con pilas (depende de las pilas
utilizadas)
Duración con funcionamiento
con batería (depende del estado de la batería, la temperatura
ambiente, el modo de carga de
la batería, etc.)
Unidad para bebés: 1 - 2 días
(con pilas alcalinas)
Unidad de padres: 1 - 2 días
14 ¿Qué hacer si surge un problema?
Error Medidas
El LED de encendido
no se ilumina al encender el aparato.
En la unidad para padres suena una señal
acústica.
64
Compruebe:
• que los respectivos bloques de alimentación
estén bien conectados, y
• que las pilas estén totalmente cargadas o
mire si es necesario cargar la batería o si esta
está averiada.
Compruebe:
• que no se haya sobrepasado el radio de
alcance,
• que el bloque de alimentación de la unidad
para bebés esté bien conectado,
• que la unidad para bebés esté encendida, y
• que las pilas estén totalmente cargadas o
mire si es necesario cargar la batería o si esta
está averiada.
Page 65

La señal es débil,
la conexión se
interrumpe una y otra
vez o se producen
interferencias.
Armonización de las
señales del aparato.
Cuando no se puede
hacer ninguna transmisión tiene la posibilidad de armonizar
de nuevo digitalmente
las señales de los
aparatos = Pairing
• Si hay otro aparato tecnológico, como un
microondas, entre la unidad para padres
y la unidad para bebés, retire el aparato o
desconéctelo.
• Compruebe si hay otros elementos, como
árboles u otros objetos entre los aparatos y
mueva los aparatos hasta que la unidad para
padres indique que hay conexión.
• Compruebe que la unidad para bebés y la
unidad para padres se encuentran dentro del
radio de alcance pertinente.
Coloque la unidad para bebés y la unidad para
padres la una junto a la otra.
1. Encienda ambos aparatos
2. Pulse los botones „POWER“ y „TALK“ de la
unidad para padres durante 2 segundos. El
LED de encendido de la unidad para padres
parpadea en naranja.
3. Pulse los botones „POWER“ y „PAGE“ de la
unidad para bebés durante 2 segundos. El LED
de encendido de la unidad para bebés parpadea en naranja.
4. Sonará una señal acústica y ambos LED de
encendido cambiarán a verde para indicar
que ambas unidades se han armonizado
correctamente.
65
Page 66

En la unidad para
padres no suena ninguna señal acústica.
Un aparato se apaga. • Cambie las pilas o vuelva a cargar la batería.
Deseche el aparato según la Directiva europea 2002/96/CE sobre residuos
de aparatos eléctricos y electrónicos (RAEE).
Si tiene alguna duda o consulta le rogamos que se ponga en contacto con
el organismo responsable de su municipio.
66
• Ajuste el volumen en la unidad para padres.
Page 67

Italiano
Indice
1 Introduzione ......................... 68
2 Spiegazione dei simboli ....... 68
3 Uso conforme ...................... 69
4 Avvertenze ........................... 69
5 Descrizione dell'apparecchio 72
6 Messa in funzione ................ 73
7 Funzionamento .................... 74
8 Impostazioni......................... 76
9 Informazioni importanti sul
babyphone ........................... 77
Fornitura
• Babyphone composto da unità bambino e unità genitore
• Bracciale per l'unità genitore
• Adesivi di Janosch
• 2 alimentatori con spina
• le presenti istruzioni per l'uso
Gentile cliente,
siamo lieti che Lei abbia scelto un prodotto del nostro assortimento. Il nostro marchio è garanzia di prodotti di elevata qualità, controllati nei dettagli,
relativi ai settori calore, peso, pressione, temperatura corporea, pulsazioni,
terapia dolce, massaggio e aria. Leggere attentamente questo manuale
d’uso, conservarlo per un eventuale utilizzo futuro e tenerlo alla portata di
chiunque utilizza l’apparecchio. Rispettare le istruzioni.
Cordiali saluti
Il Beurer Team
10 Caricamento/Sostituzione delle
batterie ................................. 77
11 Conservazione e cura .......... 78
12 Smaltimento ......................... 79
13 Dati tecnici ........................... 79
14 Che cosa fare in caso di
problemi? ............................. 80
67
Page 68

1 Introduzione
Funzioni del babyphone
Questo babyphone consente di tenere sempre il bambino sotto sorveglianza
mentre si svolgono attività in locali (o ad es. in giardino) diversi da quello in
cui riposa. La tecnologia FHSS garantisce un collegamento non disturbato
che consente di percepire ogni rumore.
L'apparecchio dispone delle seguenti funzioni:
• Comunicazione a due vie
• Funzione di ricerca parte mobile
• Regolazione del volume sia nell'unità genitore sia nell'unità bambino
• 250 m in campo libero
• Segnalazione acustica in caso di superamento della distanza o di distur-
bi nel collegamento
2 Spiegazione dei simboli
Nelle istruzioni d'uso sono utilizzati i seguenti simboli.
Pericolo Segnalazione di rischi di lesioni o pericoli per la
Attenzione Segnalazione di rischi di possibili danni
Avvertenza Indicazione di importanti informazioni.
68
salute.
all'apparecchio.
Page 69

3 Uso conforme
• Utilizzare l'apparecchio solo per sorvegliare il bambino quando non è
possibile controllarlo direttamente. La responsabilità ultima della supervisione del bambino rimane in ogni caso a carico dei genitori.
• L'apparecchio è destinato solo a uso domestico/privato e non
industriale.
• L'apparecchio non deve essere utilizzato da persone (compresi bambini)
con ridotte capacità fisiche, percettive o intellettive o non in possesso
della necessaria esperienza e/o conoscenza, se non sotto la supervisione di una persona responsabile per la loro sicurezza o che fornisca loro
le indicazioni per l'uso dell'apparecchio.
• Controllare che i bambini non utilizzino l'apparecchio per gioco.
• Qualsiasi uso non conforme comporta un pericolo.
4 Avvertenze
Norme di sicurezza
Pericolo:
• Tenere l’apparecchio e l’alimentatore lontano dalla portata
dei bambini per evitare il rischio di strangolamento e
lesioni.
• Tenere le parti piccole fuori dalla portata dei bambini (pericolo
di ingestione).
• Tenere lontani i bambini dal materiale d'imballaggio (pericolo di
soocamento).
• Non posizionare mai l'unità bambino nel lettino o a portata di
mano del bambino.
69
Page 70

• Posizionare l'unità bambino a 1,5 metri dal bambino per
proteggerlo il più possibile dall'elettrosmog e ridurre al minimo
eventuali disturbi sonori.
• Accertarsi che i cavi siano fuori dalla portata del bambino
(pericolo di scossa elettrica).
• Prima di utilizzare l'apparecchio, assicurarsi sempre che
funzioni in modo corretto e, in caso di utilizzo di batterie, che le
stesse siano sucientemente cariche.
• Utilizzare esclusivamente gli alimentatori compresi nella fornitura (pericolo di incendio, pericolo di scossa elettrica).
• La distanza minima consentita tra l’unità genitore di JBY93 (20
dBm) e la testa/corpo dell’utilizzatore è di0,025 m.
• Non esporre le batterie a fonti di calore intenso, quali sole,
fuoco o simili.
Avvertenza: per evitare danni all'apparecchio, rispettare le
seguenti istruzioni:
• Non immergere mai gli apparecchi in acqua. Non sciacquarli
mai sotto l'acqua corrente.
• Non impiegare mai gli apparecchi in ambiente umido.
• Non tirare il cavo per estrarre l'alimentatore dalla presa.
• Scollegare l'alimentatore dalla rete quando l'apparecchio non
è in uso.
• L’apparecchio e l’alimentatore non devono venire a contatto
con superfici calde o con oggetti con spigoli vivi.
• Non utilizzare moduli aggiuntivi non raccomandati dal produttore o non proposti come accessori.
70
Page 71

Avvertenze sull'uso delle batterie
Pericolo:
• Se ingoiate, le batterie rappresentano un pericolo mortale. Tenerle lontane dalla portata dei bambini. In caso di ingestione di una
batteria, richiedere immediatamente assistenza medica.
• Le batterie non devono essere ricaricate o riattivate con altri mezzi;
inoltre non devono essere aperte, gettate nel fuoco o cortocircuitate.
• Le batterie possono contenere sostanze nocive per la salute e
l'ambiente. Quindi devono essere smaltite correttamente, nel
rispetto delle norme di legge vigenti. Non gettare mai le batterie
nei normali rifiuti domestici.
Avvertenza:
• Sostituire in tempo utile le batterie quasi scariche.
• La fuoriuscita di liquido dalle batterie può danneggiare l'ap-
parecchio. Se l'apparecchio non venisse utilizzato per lunghi
periodi, togliere le batterie dall'apposito scomparto.
• Se una batteria presenta una perdita di liquido, indossare guanti
protettivi e pulire lo scomparto con un panno asciutto.
Indicazioni generali
• Le riparazioni possono essere eettuate solo dal Servizio
clienti o da rivenditori autorizzati. Non aprire o riparare personalmente l'apparecchio per non comprometterne il corretto
funzionamento. In caso contrario la garanzia decade.
• Per ulteriori domande sull'utilizzo delle apparecchiature Beurer,
rivolgersi al proprio rivenditore o al Servizio clienti.
71
Page 72

5 Descrizione dell'apparecchio
Panoramica
Unità bambino
1 Pulsante POWER/VOL
2 Pulsante PAGE
3 LED ON/OFF
4 Altoparlanti
5 Pulsante ECO
+
6 Microfono
7 Vano batterie
8 Presa alimentatore
Unità genitore
1 LED Volume
2 LED ON/OFF
3 Altoparlanti
4 Pulsante POWER/VOL
5 Pulsante TALK
6 Microfono
7 Cinturino
8 Presa alimentatore
72
4
5
2
3
1
6
7
8
1
6
7
2
3
4
5
Page 73

6 Messa in funzione
Unità bambino
È possibile utilizzare l'unità bambino con le batterie o con l'alimentatore
fornito in dotazione.
Funzionamento a batterie
1. Svitare il coperchio del vano batterie e rimuoverlo.
2. Inserire due batterie di alta qualità da 1,5 V, tipo AAA rispettando la
polarità.
3. Chiudere il coperchio del vano batterie e riavvitarlo.
La chiusura con la vite garantisce una totale sicurezza per il
bambino.
Durante il caricamento il LED ON/OFF lampeggia di colore rosso.
Appena la carica è completa la spia si illumina di rosso. Tenere
presente che è possibile utilizzare esclusivamente le batterie
ricaricabili del tipo .
Il polo negativo della batteria ricaricabile deve essere spelato di
ca. 5 mm (= senza isolamento).
5 mm
Funzionamento con alimentatore
Collegare l'unità bambino con l'alimentatore a una presa di corrente.
Unità genitore
Funzionamento a batterie - Processo di carica
Le batterie, prima di utilizzare l'apparecchio per la prima volta senza essere
73
Page 74

collegato alla presa, devono essere caricate per minimo 10 ore, durante le
quali è già possibile utilizzare l'apparecchio. Durante il caricamento il LED ON/
OFF lampeggia di colore rosso. Durante il caricamento il LED ON/OFF lampeggia di colore rosso. Appena la carica è completa la spia si illumina di rosso.
Se l'unità bambino viene impiegata senza essere collegata alla presa quando il livello della carica delle batterie diventa basso il LED ON/OFF inizia
a lampeggiare. Inoltre ogni 4 secondi l'unità genitore emette un segnale
acustico di avvertimento.
In caso di livello di batteria basso dell'unità genitore il LED ON/OFF di
quest'ultima lampeggia ed emette un segnale acustico ogni 4 secondi.
Se gli apparecchi non sono collegati ad una presa, dopo poco tempo si
spengono automaticamente.
Se gli apparecchi vengono utilizzati con l'alimentatore e si verifica un black
out della corrente l'unità genitore passa al funzionamento a batteria. La
durata della modalità standby dipende da quanto le batterie sono cariche.
Se nell'unità bambino non sono inserite le batterie, in caso di black
out si spegne e nell'unità genitore viene emesso un segnale di
avvertimento acustico.
Batteria scaricata nell'unità genitore
Dopo 300 cariche la batteria dovrebbe essere scaricata. Tenere acceso l'apparecchio fino a quando non si spegne automaticamente.
7 Funzionamento
1. Posizionare l'unità bambino in modo che si trovi in una posizione elevata
e distante da altri apparecchi che possono disturbare la trasmissione.
74
Page 75

Accendere l'unità bambino con il pulsante POWER/VOL. Il LED ON/OFF
dell'unità bambino si illumina.
2. Fissare l'unità genitore al polso o posizionarla nel locale in cui ci si trova.
3. Accendere l'unità genitore con il pulsante POWER/VOL. Il LED ON/OFF
dell'unità genitore si illumina.
Se le due unità non sono collegate tra loro (perché l'unità bambino
non è accesa o si trova al di fuori della portata), l'unità genitore
emette un doppio segnale acustico di avvertimento.
Impostazione modalità ECO
+
Per inserire la modalità ECO+ pre-
O
C
E
mere il pulsante ECO+. Il LED 4 si
illumina di rosso e segnala questa
modalità. Per disattivarla premere
nuovamente il tasto ECO+.
In modalità ECO+ il controllo di portata non è attivo. Verificare che
attivando la modalità ECO+ ci si trovi entro il raggio di azione della
portata e che non si esca mai da tale area.
Impostazione della sensibilità
All‘accensione l‘apparecchio è sempre impostato su una sensibilità alta. Il
LED (1) viene spento. Per passare a una sensibilità „bassa (Low)“, tenere
premuto il pulsante ECO e confermare il pulsante TALK. Il LED (1) inizia a
illuminarsi. Premendo un‘ulteriore volta si imposta nuovamente su „elevata“.
75
Page 76

Funzione Talk
Questo babyphone consente anche la comunicazione da genitore a bambino.
Premere il pulsante TALK e tenerlo premuto per tutto il tempo in cui si parla
con il bambino.
Funzione di ricerca parte mobile
Nel caso in cui non l'unità genitore sia nascosta o coperta, premendo il
tasto PAGE sull'unità bambino, l'unità genitore emette un segnale acustico
che ne facilita la localizzazione.
Questa funzione è attiva solo se l'unità genitore è accesa.
8 Impostazioni
Premere il pulsante POWER/VOL sull'unità genitore per aumentare il volume di 4 livelli o, una volta raggiunto il più alto, per impostarlo nuovamente
sui livelli più bassi.
Il numero dei LED che si illuminano
corrisponde al livello di volume
impostato.
Premere il pulsante POWER/VOL sull'unità bambino per aumentare o
diminuire il volume. Il volume dei segnali acustici emessi corrisponde alle
impostazioni scelte.
76
Page 77

L'intensità della trasmissione dei rumori viene visualizzata anche
tramite una serie di LED sull'unità genitore, in modo che l'apparecchio possa essere utilizzato anche da persone con problemi di udito
o non udenti.
9 Informazioni importanti sul babyphone
• Il funzionamento del babyphone a batterie/batterie ricaricabili riduce
al minimo l'elettrosmog provocato dai campi alternativi elettrici e
magnetici.
• È possibile aumentare la portata del babyphone posizionando l'unità
bambino vicino a una porta o a una finestra il più in alto possibile e
assicurandosi che le batterie siano sucientemente cariche.
• La trasmissione del babyphone può essere disturbata da altre onde
radio, pertanto è opportuno evitare di posizionare il babyphone vicino
ad apparecchi quali forno a microonde, dispositivi WLAN, ecc.
• Altri elementi che possono disturbare la trasmissione del babyphone o
ridurne la portata sono mobili, pareti, case, alberi, condizioni ambientali
(ad es. nebbia, pioggia) o se gli apparecchi vengono coperti.
10 Caricamento/Sostituzione delle batterie
Quando le batterie sono completamente scariche, gli apparecchi si spengono automaticamente. Le batterie devono quindi essere cambiate o ricaricate
(vedi Messa in funzione).
77
Page 78

• A ogni sostituzione delle batterie, utilizzare batterie ricaricabili
dello stesso tipo, della stessa marca e della stessa capacità.
• Sostituire sempre tutte le batterie contemporaneamente.
• Utilizzare preferibilmente batterie prive di metalli pesanti.
11 Conservazione e cura
La durata dell'apparecchio dipende dall'uso corretto.
Avvertenza:
• Se l'apparecchio non viene utilizzato per un lungo periodo,
estrarre le batterie/batterie ricaricabili dall'unità bambino.
• Per sfruttare al meglio la capacità delle batterie ricaricabili, scaricarle almeno ogni 6 mesi. A tale scopo, staccare l'apparecchio
dall'alimentazione e far scaricare le batterie con il normale uso.
Ricaricare quindi le batterie completamente.
• La capacità massima delle batterie ricaricabili si raggiunge solo
dopo diverse cariche e dipende da numerosi fattori (stato della
batteria, temperatura ambiente, modalità e frequenza di ricarica,
ecc.).
• Non esporre gli apparecchi a urti, umidità, polvere, prodotti
chimici, forti sbalzi di temperatura, campi elettromagnetici e
fonti di calore troppo vicine (forni, caloriferi).
• Se l’apparecchio è sporco, pulirlo con un panno morbido e
asciutto.
• Pulire gli apparecchi con un panno asciutto. Non utilizzare
detergenti abrasivi.
78
Page 79

12 Smaltimento
A tutela dell'ambiente, al termine del suo utilizzo l'apparecchio non deve essere smaltito nei rifiuti domestici. Lo smaltimento va eettuato negli appositi
centri di raccolta. Seguire le norme locali vigenti per lo smaltimento.
Smaltire l'apparecchio rispettando le norme previste dalla Direttiva
CE sui rifiuti di apparecchi elettrici ed elettronici 2002/96/CE –
WEEE (Waste Electrical and Electronic Equipment).
Per eventuali chiarimenti, rivolgersi alle autorità comunali competenti per lo smaltimento.
13 Dati tecnici
• Tecnologia FHSS
• Frequenza 2,4 GHz
• 69 canali digitali
• Comunicazione a due vie
• Dimensioni: unità bambino: Ø 78 x 39 mm,
unità genitore: Ø57x 24 mm
• Peso: unità bambino: ~ 50 g, unità genitore: 62 g
• Portata: 250 m in campo libero
Alimentazione Unità bambino: 2 batterie da 1,5 V,
tipo AAA o alimentatore incluso
(6 V CC / 650 mA)
Unità genitore: batteria Ni-MH (1x2,4V
/ 500 mAh) o alimentatore incluso (6 V
CC / 650 mA)
79
Page 80

Durata delle batterie (a seconda
delle batterie utilizzate)
Durata delle batterie ricaricabili
(dipende dallo stato della batteria, dalla temperatura ambiente,
dalla modalità e frequenza di
carica, ecc.)
Unità bambino: 1 - 2 giorni
(con batterie alcaline)
Unità genitore: 1 - 2 giorni
14 Che cosa fare in caso di problemi?
Errore Misure da adottare
Il LED ON/OFF non
si illumina dopo
l'accensione
L'unità genitore
emette un segnale
acustico
80
Verificare se:
• la spina dell'alimentatore è inserita
correttamente;
• le batterie sono cariche o le batterie ricaricabili sono da caricare o sono danneggiate.
Verificare se:
• non è stata superata la portata massima;
• la spina dell'alimentatore dell'unità bambino è
inserita correttamente;
• l'unità bambino non è accesa;
• le batterie sono cariche, sono da caricare o
sono danneggiate.
Page 81

Il segnale è debole,
il collegamento si
interrompe sempre o
ci sono interferenze
Armonización de las
señales del aparato.
Cuando no se
puede hacer ninguna
transmisión tiene la
posibilidad de armonizar de nuevo digitalmente las señales de
los aparatos = Pairing
• Se ad esempio tra l'unità bambino e l'unità
genitore si trova un altro apparecchio, come
ad esempio un microonde, allontanare l'apparecchio o spegnerlo.
• Verificare se tra le due unità ci sono altri elementi di disturbo, come ad es. alberi o altro, e
posizionate l'apparecchio di conseguenza in
modo che il segnale di collegamento giunga
fino all'unità genitore.
• Verificare se l'unità bambino e l'unità genitore
si trovano nel raggio di azione l'una dell'altra.
Coloque la unidad para bebés y la unidad para
padres la una junto a la otra.
1. Encienda ambos aparatos
2. Pulse los botones “POWER” y “TALK” de la
unidad para padres durante 2 segundos. El
LED de encendido de la unidad para padres
parpadea en naranja.
3. Pulse los botones “POWER” y “PAGE” de la
unidad para bebés durante 2 segundos. El LED
de encendido de la unidad para bebés parpa
dea en naranja.
4. Sonará una señal acústica y ambos LED de
encendido cambiarán a verde para indicar
que ambas unidades se han armoniza-do
correctamente.
81
Page 82

L'unità genitore non
emette alcun segnale
acustico
Un apparecchio si
spegne
Con la presente garantiamo che il prodotto è conforme alla direttiva (CE)
R&TTE 1999/5/CE.
Per ulteriori informazioni, ad esempio per richiedere la dichiarazione di
conformità CE, rivolgersi al servizio di assistenza indicato.
82
• Adattare il volume dei segnali acustici all'unità
genitore.
• Cambiare le batterie o ricaricare le batterie.
Page 83

Türkçe
İçindekiler
1 Ürün Özellikleri ..................... 84
2 İşaretlerin açıklaması ........... 84
3 Amacına uygun kullanım ...... 85
4 Yönergeler............................ 85
5 Cihaz açıklaması .................. 88
6 Çalıştırma ............................. 89
7 Kullanım ............................... 90
8 Ayarlar .................................. 92
Teslimat kapsamı
• Bebek telsizi bebek ünitesi ve ebeveyn ünitesinden oluşur
• Ebeveyn birimi için bileklik
• Janosch etiketi
• 2 fişli adaptör
• bu kullanım kılavuzu
Değerli Müşterimiz,
Ürünlerimizden birini seçtiğiniz için teşekkür ederiz. Isı, ağırlık, kan basıncı,
vücut sıcaklığı, nabız, yumuşak terapi, masaj ve hava konularında değerli
ve titizlikle test edilmiş kaliteli ürünlerimiz, dünyanın her tarafında tercih
edilmektedir. Lütfen bu kullanım kılavuzunu dikkatle okuyun, ileride kullanmak üzere saklayın, diğer kullanıcıların erişebilmesini sağlayın ve içindeki
yönergelere uyun.
Yeni cihazınızı iyi günlerde kullanmanızı dileriz
Beurer Ekibiniz
9 Bebek telsizi hakkında
önemli bilgiler ....................... 93
10 Pil değişimi/şarj edilebilir pilin
şarj edilmesi ......................... 93
11 Saklama ve bakım ................ 94
12 Elden çıkarma ...................... 94
13 Teknik veriler ........................ 95
14 Sorunların giderilmesi .......... 96
83
Page 84

1 Ürün Özellikleri
Bebek telsizinin işlevleri
Bu bebek telsizi evin diğer odalarında veya bahçesinde bulunduğunuzda
bebeğinizi her zaman duymanıza olanak sağlar. FHSS teknolojisi, parazitsiz
ve başkalarının dinleyemeyeceği bir bağlantı sağlar.
Cihaz aşağıdaki işlevleri içerir:
• 2 yönlü iletişim
• Mobil üniteyi arama - Çağrı işlevi
• Ebeveyn ve bebek ünitelerinde ses düzeyini ayarlama
• Açık alanda 250 m çekim mesafesi
• Çekim mesafesinin aşılması veya bağlantıda parazit olması durumunda
uyarı
2 İşaretlerin açıklaması
Kullanım kılavuzunda aşağıdaki semboller kullanılacaktır.
Uyarı Yaralanma tehlikelerine veya sağlığınızla ilgili tehlike-
Dikkat Cihazla/aksesuarlarıyla ilgili olası hasarlara yönelik
Not Önemli bilgilere yönelik notlar
84
lere yönelik uyarılar
güvenlik uyarıları
Page 85

3 Amacına uygun kullanım
• Cihazı yalnızca bebeğinizi doğrudan denetleyemediğiniz durumlarda
kontrol etmek için kullanın. Cihaz, kişisel sorumluluğunuzla kendi yaptığınız denetimin yerini tutamaz!
• Aygıt ticari kullanım için değil, yalnızca evde/kişisel amaçlarla kullanılmak üzere tasarlanmıştır.
• Fiziksel, algısal ve akli becerileri nedeniyle ya da tecrübesizlik ve/veya
bilgisizliklerinden dolayı cihazı kullanamayacak durumda olan kişiler
(çocuklar dahil), cihazı yetkili bir kişinin gözetimi ve direktifleri olmadan
kullanmamalıdır.
• Çocuklar cihazla oynamamaları için gözetim altında tutulmalıdır.
• Amacına uygun olmayan her türlü kullanım tehlikeli olabilir.
4 Yönergeler
Güvenlik yönergeleri
Uyarı:
• Cihazı ve besleme kablosunu asla çocukların erişebileceği
yerlerde bulundurmayın. Besleme kablosu çocuğun boğulmasına veya yaralanmasına yol açabilir.
• Küçük parçaları çocukların ulaşamayacağı bir yerde saklayın
(yutma tehlikesi).
• Çocukları ambalaj malzemesinden uzak tutun (boğulma tehlikesi).
• Bebek ünitesini kesinlikle çocuğunuzun yatağına veya ulaşabi-
leceği bir yere koymayın.
• Olası bir elektrosmog etkisini ve gürültünün vereceği rahatsızlığı en aza indirmek için bebek ünitesini bebeğinize 1,5 m
mesafede yerleştirin.
85
Page 86

• Kablonun çocuğun ulaşamayacağı bir yerde olmasına dikkat
edin (elektrik çarpma tehlikesi).
• Bebek telsizini kullanmadan önce her zaman cihazların kusursuz çalıştığından emin olun ve pil ile çalıştırıldığında pillerin
yeterli derecede şarj edilmiş olmasına dikkat edin.
• Sadece teslimat kapsamı dahilinde verilen elektrik adaptörünü
kullanın (yangın, elektrik çarpma tehlikesi).
• Ebeveyn ünitesi JBY 93 (20dBm) ve kullanıcının başı ya da
gövdesi arasındaki mesafe en az 0,025m olmalıdır.
• Piller veya şarj edilebilir piller güneş, alev veya yüksek sıcaklığa
neden olan başka faktörlere maruz bırakılmamalıdır.
Dikkat: Cihazın zarar görmesini önlemek için aşağıdakilere
dikkat edin:
• Cihazı kesinlikle suya daldırmayın. Cihazı kesinlikle akan suyun
altında yıkamayın.
• Cihazı kesinlikle nemli ortamda kullanmayın.
• Fişi kablosundan tutarak prizden çekmeyin.
• Cihazı kullanmadığınızda fişli adaptörü prizden çekin.
• Cihaz veya fişli adaptör, sıcak yüzeylere ya da keskin kenarlı
nesnelere temas etmemelidir.
• Üretici tarafından tavsiye edilmeyen veya aksesuar olarak
sunulmayan ek parçalar kullanmayın.
86
Page 87

Pillerle temas etme durumu için uyarılar
Uyarı:
• Yutma durumunda piller hayati tehlikeye neden olabilir. Pilleri çocukların ulaşamayacağı yerlerde saklayın. Pil yutulduysa hemen
tıbbi yardım alınmalıdır.
• Piller yeniden şarj edilmemeli veya başka maddelerle yeniden
aktif hale getirilmemeli, içindeki maddeler çıkartılmamalı, ateşe
atılmamalı ve kısa devre yaptırılmamalıdır.
• Piller sağlığa ve çevreye zarar veren zehirli maddeler içerebilir. Bu
yüzden pilleri mutlaka yürürlükteki yasalara uygun şekilde elden
çıkarın. Pilleri kesinlikle ev çöpünüze atmayın.
Dikkat:
• Zayıflayan pilleri hemen değiştirin.
• Sızıntı yapan piller cihazınızda hasara yol açabilir. Cihazı uzun bir
süre kullanmayacağınız zaman pilleri cihazdan çıkartın.
• Eğer bir pil akmışsa koruyucu eldiven takın ve pil yuvasını kuru
bir bezle temizleyin.
Genel yönergeler
• Tamir işlemleri yalnızca müşteri hizmetleri veya yetkili satıcılar
tarafından yapılabilir. Aygıtı kesinlikle açmayın veya tamir etmeyin, aksi halde kusursuz çalışması garanti edilemez. Bu husus
dikkate alınmadığı takdirde garanti geçerliliğini yitirir.
• Cihazlarımızın kullanımıyla ilgili hala sorularınız varsa, satıcınıza
veya belirtilen müşteri hizmetlerine başvurun.
87
Page 88

5 Cihaz açıklaması
Genel bakış
Bebek ünitesi
1 POWER/VOL (AÇMA/
SES) düğmesi
2 PAGE (ÇAĞRI) düğmesi
3 Güç ışığı
4 Hoparlör
+
5 ECO
tuşu
6 Mikrofon
7 Pil bölmesi
8 Adaptör girişi
Ebeveyn ünitesi
1 Ses düzeyi ışıkları
2 Güç ışığı
3 Hoparlör
4 POWER/VOL (AÇMA/
SES) düğmesi
5 TALK (KONUŞ)
düğmesi
6 Mikrofon
7 Bileklik
8 Adaptör girişi
88
1
2
6
3
4
7
5
1
6
7
2
3
4
5
8
Page 89

6 Çalıştırma
Bebek ünitesi
Bebek ünitesini pillerle veya teslimat kapsamı dahilinde verilen elektrik
adaptörü ile çalıştırabilirsiniz.
Pil ile çalıştırma
1. Pil yuvası kapağındaki vidayı sökün ve kapağı çekerek çıkarın.
2. Verilen iki adet 1,5 V, Tip AAA pili, kutuplarına uygun şekilde yerleştirin.
3. Pil yuvası kapağını kapatın ve vidalayın.
Vidalama işlemi çocuğunuzun güvenliği için gereklidir.
Şarj işlemi sırasında güç için olan LED lambası kırmızı renkte yanıp
söner. Şarj edilebilir pil tamamen şarj olduğunda LED lambası
kırmızı renkte yanacaktır. Cihazda sadece tip pillerin şarj
edilebildiğine dikkat edin.
Şarj edilebilir pillerin eksi kutbu yaklaşık 5 mm sıyrılmış
(= izolasyonsuz) olmalıdır.
5 mm
Elektrik adaptörü ile çalıştırma
Bebek ünitesini fişli adaptörle prize takın.
Ebeveyn ünitesi
Şarj edilebilir pille çalıştırma - Şarj işlemi
Cihazın elektrik şebekesine bağlı olmadan ilk kullanımından önce şarj edilebilir pil en az 10 saat şarj edilmelidir. Bu sırada istenirse cihaz kullanılabilir.
Şarj işlemi sırasında güç ışığı kırmızı renkte yanıp söner. Şarj işlemi sırasında
89
Page 90

güç için olan LED lambası kırmızı renkte yanıp söner. Şarj edilebilir pil tamamen şarj olduğunda LED lambası kırmızı renkte yanacaktır.
Bebek ünitesi elektrik şebekesine bağlanmadan kullanıldığında pil zayıflarsa
güç ışığı titremeye başlar. Ayrıca ebeveyn ünitesinde uyarı amaçlı olarak her
4 saniyede bir bip sesi duyulur.
Ebeveyn ünitesinin şarj edilebilir pilinin şarjı azaldığında güç ışığı yanıp
sönmeye başlar ve her 4 saniyede bir bip sesi duyulur. Cihazlar prize takılmadığında kısa bir süre içinde kendiliğinden kapanır.
Cihaz elektrik şebekesine bağlı çalışırken elektrik kesintisi olursa, ebeveyn
ünitesi şarj edilebilir pil ile kullanıma geçer. Bu durumda bekleme süresi şarj
edilebilir pilin şarj durumuna bağlıdır.
Bebek ünitesine pil takılı değilken elektrik kesintisi olursa, ünite
kapanır ve bu durum ebeveyn ünitesinde sesli bir uyarıyla duyurulur.
Ebeveyn ünitesinin boşaltılması
300 şarj işlemi sonunda şarj edilebilir pil boşaltılmalıdır. Bunun için
cihazı kendiliğinden kapanana kadar açık bırakın.
7 Kullanım
1. Bebek ünitesini yüksek bir konumda ve zarar verme olasılığı bulunan
başka nesnelerin uzağında duracak şekilde yerleştirin. Bebek ünitesini
POWER/VOL (GÜÇ/SES) düğmesi ile açın. Bebek ünitesinin güç ışığı
yanar.
2. Ebeveyn ünitesini kolunuza takın veya içinde oturduğunuz odada
bulundurun.
90
Page 91

3. Ebeveyn ünitesini POWER/VOL (GÜÇ/SES) düğmesi ile açın. Ebeveyn
ünitesinin güç ışığı yanar.
Cihazlar arasında bağlantı kurulamazsa (bebek ünitesi açılmamış
veya çekim mesafesinin dışında kalmış ise), ebeveyn ünitesinden
sesli bir uyarı duyulur (2bip sesi).
+
ECO
MODU ayarı
ECO+ moduna geçmek için
O
C
E
ECO+ düğmesine basın. LED 4
kırmızı yanarak size bu modun
etkinleştirildiğini gösterir. Bu modu
devre dışı bırakmak için tekrar
ECO+ düğmesine basın.
ECO+ modunda çekim mesafesi kontrolü etkin değildir. Bu yüzden,
ECO+ modunu etkinleştirirken çekim mesafesinde olmaya ve orada
kalmaya dikkat edin.
Hassasiyetin ayarlanması
Cihaz, çalıştırılır çalıştırılmaz daima yüksek bir hassasiyete ayarlanmıştır.
LED (1) söner. Hassasiyeti “düşük” (Low)“ olarak ayarlamak için ECO tuşunu
basılı tutun ve TALK (konuş) tuşunu onaylayın. LED (1) yanmaya başlar. Tuşa
tekrar bastığınızda hassasiyet yeniden “yüksek” olarak ayarlanır.
Talk (Konuş) işlevi
Bebek telsizi iki yönlü iletişim sağlar.
TALK (KONUŞ) tuşuna basın ve bebeğinizle konuştuğunuz sürece basılı
tutun.
91
Page 92

Mobil üniteyi arama - Çağrı işlevi
Ebeveyn ünitesi ortalıkta görünmüyorsa bebek ünitesi üzerinde bulunan
PAGE (ÇAĞRI) düğmesine basmak suretiyle sesli sinyal yardımı ile yerini
tespit edebilirsiniz.
Bu işlev sadece ebeveyn ünitesi açık olduğunda kullanılabilir.
8 Ayarlar
Sesi 4 kademede yükseltmek veya en yüksekten en düşük seviyeye getirmek için ebeveyn ünitesindeki POWER/VOL(GÜÇ/SES) düğmesine basın.
Bu sırada yanan ışıklar o anki ses
düzeyini gösterir.
Sesi yükseltmek veya kısmak için bebek ünitesindeki POWER/VOL (GÜÇ/
SES) düğmesine basın. Bu sırada duyulan bip sesinin düzeyi o anki ses
ayarına bağlıdır.
Ayrıca ses seviyesi ebeveyn ünitesindeki ışıklı bantlarla da gösterilir.
Böylece ağır işitenler veya işitme engelliler de cihazı kullanabilir.
92
Page 93

9 Bebek telsizi hakkında önemli bilgiler
• Bebek telsizi pil veya şarj edilebilir pil ile çalıştırıldığında elektrosmog
değişken elektriksel ve manyetik alanlar aracılığıyla minimize edilir.
• Bebek ünitesini kapıya veya cama yakın ve mümkün olduğunca yüksek
bir yere koyarsanız ve pillerin dolu olduğuna dikkat ederseniz, bebek
telsizinin çekim mesafesini artırabilirsiniz.
• Diğer radyo dalgaları bebek telsizinin aktarımını bozabilir. Bu nedenle bebek
telsizini mikrodalga, kablosuz İnternet ortamları gibi yerlere yakın tutmayın.
• Aşağıdaki faktörler bebek telsizinin iletme kabiliyetini etkileyebilir veya
çekim mesafesini azaltabilir: Cihazın üstünün örtülmesi, mobilyalar,
duvarlar, evler, ağaçlar, çevre koşulları (örn. sis, yağmur).
10 Pil değişimi/şarj edilebilir pilin şarj edilmesi
Piller veya şarj edilebilir pil çok zayıfladığında cihaz otomatik olarak kapanır.
Bu durumda piller değiştirilmeli veya şarj edilebilir pil tekrar şarj edilmelidir
(bkz. Kullanım)
• Her pil değişiminde aynı tip, aynı marka ve kapasitede pilleri kullanın.
• Bütün pilleri daima aynı zamanda değiştirin.
• Ağır metalsiz piller kullanın.
93
Page 94

11 Saklama ve bakım
Cihazın ömrü, özenli bir şekilde kullanılmasına bağlıdır:
Dikkat:
• Cihazı uzun bir süre kullanmadığınızda, bebek ünitesinin pillerini
çıkartın.
• En az 6 ayda bir şarj edilebilir pilleri tamamen boşaltırsanız,
maksimum pil kapasitesini elde edersiniz. Bunun için cihazı
prizden çekin ve normal şekilde kullanarak şarj edilebilir pilleri
boşaltın. Daha sonra tamamen şarj olana kadar şarj edilebilir
pilleri tekrar şarj edin.
• Şarj edilebilir piller ancak bir kaç şarj işleminden sonra maksimum kapasitesine ulaşır ve bu bir çok faktöre bağlıdır (şarj
edilebilir pilin durumu, ortam sıcaklığı, nasıl ve ne kadar sıklıkla
şarj edildiği, vb.)
• Cihazı darbelerden, nemden, tozdan, kimyasallardan, aşırı
sıcaklık değişikliklerinden, elektromanyetik alanlardan ve çok
yakın ısı kaynaklarından (soba, kalorifer radyatörü) koruyun.
• Kirlenen cihazı yumuşak, kuru bir bezle silin.
• Cihazları kuru bir bezle temizleyin. Aşındırıcı temizlik maddesi
kullanmayın.
12 Elden çıkarma
Çevreyi korumak için, ömrü dolan cihazlar ev atıklarıyla birlikte elden çıkarılmamalıdır. Cihaz, ülkenizdeki uygun atık toplama merkezleri üzerinden elden
çıkarılabilir. Malzemelerin atılması sırasında yerel yönetmeliklere uyunuz.
94
Page 95

Cihazı elektrikli ve elektronik eski cihazlarla ilgili AB Standardı
2002/96/EC – WEEE'ye (Waste Electrical and Electronic Equipment)
uygun şekilde elden çıkarın.
Atma işlemiyle ilgili sorularınız için yetkili yerel makamlarla irtibat kurun.
13 Teknik veriler
• FHSS teknolojisi
• Frekans 2,4 GHz
• 69 dijital kanal
• 2 Yönlü iletişim
• Ölçüler: Bebek ünitesi: Ø 78 x 39 mm,
Ebeveyn ünitesi: Ø 57 x 24 mm
• Ağırlık: Bebek ünitesi: ~ 50 g Ebeveyn ünitesi: 62 g
• Çekim mesafesi: Açık alanda 250 m
Çalıştırma Bebek ünitesi: 2 pil 1,5 V, Tip AAA veya
Pilin dayanma süresi (kullanılan
pillere bağlıdır).
Şarj edilebilir pilin dayanma
süresi (şarj edilebilir pilin durumu, ortam sıcaklığı, nasıl ve ne
kadar sıklıkla şarj edildiği, vb.
faktörlere bağlıdır)
verilen adaptör (6 V DC / 650 mA)
Ebeveyn ünitesi: NI-MH pil
(1 x 2,4V / 500 mAh) veya verilen adaptör (6 V DC / 650 mA)
Bebek ünitesi: 1 - 2 gün
(alkalin pillerle)
Ebeveyn ünitesi: 1 - 2 gün
95
Page 96

14 Sorunların giderilmesi
Arıza Önlemler
Power (güç) ışığı
cihaz açıldıktan sonra
yanmıyor.
Ebeveyn ünitesinden
akustik bir sinyal
duyuluyor.
Sinyal zayıf, bağlantı
tekrar tekrar kopuyor
ve arıza meydana
geliyor.
96
Şunları kontrol edin:
• Fişli adaptör doğru şekilde takıldı mı?
• Piller dolu mu, şarj edilebilir pil şarj edilmeli mi
veya hasarlı mı?
Şunları kontrol edin:
• Maksimum çekim mesafesi aşılmış mı?
• Bebek ünitesinin fişli adaptörü doğru şekilde
takıldı mı?
• Bebek ünitesi açık mı?
• Piller dolu mu, şarj edilebilir pil şarj edilmeli mi
veya hasarlı mı?
• Bebek ve ebeveyn ünitelerinin arasında
örneğin mikrodalga gibi başka bir teknik cihaz
bulunuyorsa, cihazı uzaklaştırın veya kapatın.
• Cihazların arasında ağaçlar veya benzer
başka faktörler olup olmadığını kontrol edin ve
buna göre ebeveyn cihazının bağlantı sinyalini
alacağı şekilde cihazları yerleştirin.
• Bebek ve ebeveyn ünitelerinin kapsama
alanında olup olmadıklarını kontrol edin.
Page 97

Cihaz sinyallerini
birbirine uyarlayın.
Herhangi bir aktarım
mümkün değil ise
cihaz sinyallerini
yeniden dijital olarak
birbirine uyarlama
imkanına sahipsiniz =
Eşleştirme
Ebeveyn ünitesinden
akustik bir sinyal
duyulmuyor.
Cihaz kendiliğinden
kapanıyor.
Bu ürünün Avrupa R&TTE Yönetmeliği 1999/5/EC’ye uygun olduğunu garanti
ederiz.
Detaylı bilgilere (örneğin CE – Uygunluk Beyanı) ulaşmak için lütfen belirtilen
servis adresine başvurun.
Bebek ve ebeveyn ünitesini yan yana koyun.
1. Her iki cihazı da çalıştırın.
2. Ebeveyn ünitesindeki “POWER” (güç) ve
“TALK” (konuş) düğmelerini 2 saniye basılı
tutun. Ebeveyn ünitesinin güç ışığı turuncu
yanıp söner.
3. Bebek ünitesindeki “POWER” (güç) ve “PAGE”
(çağır) düğmelerini 2 saniye basılı tutun. Bebek
ünitesinin güç ışığı turuncu yanıp söner.
4. Akustik bir sinyal duyulur ve iki güç ışığı da, her
iki ünitenin birbiri ile eşleştirilmesinin başa-rılı
olduğunu göstermek için yeşil yanar.
• Ebeveyn ünitesinde ses seviyesini ayarlayın.
• Pilleri değiştirin veya şarj edilebilir pili tekrar
şarj edin.
97
Page 98

Русский
Оглавление
1 Для ознакомления.............. 99
2 Пояснения к символам ...... 99
3 Использование по
назначению ....................... 100
4 Указания ........................... 101
5 Описание прибора ........... 105
6 Ввод в эксплуатацию ....... 106
7 Обслуживание .................. 108
8 Настройки ......................... 110
9 Познавательная информация
орадионяне ...................... 111
Объем поставки
• Радионяня, состоящая из блока для ребенка и блока для родителей.
• Наручный ремешок для блока для родителей.
• Наклейки от Яноша
• Два сетевых адаптера.
• Инструкция по применению.
Уважаемый покупатель,
мы благодарим Вас за выбор продукции нашей фирмы. Мыпроизводим современные, тщательно протестированные, высококачественные
изделия для измерения массы, артериального давления, температуры
тела, пульса, для легкой терапии, массажа и очистки воздуха. Внимательно прочтите данную инструкцию по применению, сохраните ее
для последующего использования, храните ее в месте, доступном для
других пользователей, и следуйте ее указаниям.
С уважением,
компания Beurer
98
10 Смена батареек/зарядка
аккумулятора .................... 111
11 Хранение и уход ............... 112
12 Утилизация ....................... 113
13 Технические
характеристики ................ 113
14 Что делать при
возникновении проблем? 114
15 Гарантия ........................... 117
Page 99

1 Для ознакомления
Функции радионяни
Благодаря радионяне Вы сможете следить за своим ребенком, находясь в другой комнате или в саду и не отвлекаясь от своих занятий.
Технология FHSS гарантирует бесперебойное соединение, защищенное
от подслушивания.
Прибор оснащен следующими функциями:
• Двусторонняя связь;
• Поиск блоков – функция пейджинговой связи;
• Настройка громкости на блоке для родителей и блоке для ребенка;
• Радиус действия 250 м при свободной видимости;
• Предупреждение при превышении радиуса действия или возникно-
вении помех связи.
2 Пояснения к символам
В инструкции по применению используются следующие символы.
Предостережение
Внимание Указывает на возможные повреждения прибора/
Указание Отмечает важную информацию.
Предупреждает об опасности травмирования или
ущерба для здоровья.
принадлежностей.
99
Page 100

3 Использование по назначению
• Прибор предназначен только для наблюдения за младенцем в тот
момент, когда Вы не можете следить за ним непосредственно. Он
не сможет заменить Ваше личное присутствие ине снимает с Вас
ответственности!
• Прибор предназначен для домашнего/частного использования, использование прибора в коммерческих целях запрещено.
• Данный прибор не предназначен для использования лицами (включая детей) с ограниченными психическими, сенсорными или душевными способностями, с недостаточными знаниями или опытом, за
исключением случаев, когда за ними осуществляется надлежащий
надзор или если они получат от вас инструкцию по использованию
прибора.
• Необходимо следить за детьми, чтобы они не играли сприбором.
• Любое применение не по назначению может быть опасным.
100
 Loading...