

Page 1

IH 21
D
Inhalator
Gebrauchsanweisung ............ 2 – 10
G
Nebuliser
Instructions for use ...............11 – 18
F
Inhalateur
Mode d’emploi ...................... 19 – 27
E
Inhalador
Manual de instrucciones ...... 28 – 36
I
Inalatore
Istruzioni per l’uso ................ 37 – 45
Beurer GmbH • Söflinger Str. 218 • 89077 Ulm, Germany
Tel.: +49 (0)731 / 39 89 -144 • Fax: +49 (0)731 / 39 89 - 255
www.beurer.com • Mail: [email protected]
T
r
Q
ELECTROMAGNETIC COMPATIBILITY
INFORMATION
Inhalatör
Kullanım kılavuzu .................. 46 – 53
Ингалятор
Инструкция по
применению ......................... 54 – 63
Inhalator
Instrukcja obsługi ................. 64 – 72
......................................73-76
0483
Page 2
DEUTSCH
Inhalt
1. Kennenlernen.......................................................2
2. Zeichenerklärung .................................................2
3. Warn- und Sicherheitshinweise ...........................2
4. Geräte- und Zubehör beschreibung .....................4
5. Inbetriebnahme ...................................................5
6. Bedienung ...........................................................5
7. Filterwechsel ........................................................7
8. Reinigung und Desinfektion ................................7
9. Entsorgen ............................................................8
10. Problemlösung ....................................................9
11. Technische Angaben ...........................................9
12. Garantie und Service .........................................10
Lieferumfang
Siehe Geräte- und Zubehörbeschreibung Seite 4.
•
Inhalator
•
Vernebler
•
Druckluftschlauch
•
Mundstück
•
Erwachsenenmaske
•
Kindermaske
•
Nasenstück
•
Ersatzfilter
•
Diese Gebrauchsanweisung
1. Kennenlernen
Sehr geehrte Kundin, sehr geehrter Kunde,
wir freuen uns, dass Sie sich für ein Produkt unseres
Sortimentes entschieden haben. Unser Name steht für
hochwertige und eingehend geprüfte Qualitätsprodukte
aus den Bereichen Wärme, Gewicht, Blutdruck, Körpertemperatur, Puls, Sanfte Therapie, Massage und Luft.
Bitte lesen Sie diese Gebrauchsanweisung aufmerksam durch, bewahren Sie sie für späteren Gebrauch
auf, machen Sie sie anderen Benutzern zugänglich und
beachten Sie die Hinweise.
Mit freundlicher Empfehlung
Ihr Beurer-Team
Anwendungsbereich
Dieser Inhalator ist ein Inhalationsgerät zur Verneblung von Flüssigkeiten und flüssigen Medikamenten
(Aerosolen) und für die Behandlung der oberen und
unteren Atemwege.
Durch Verneblung und Inhalation des vom Arzt verordneten bzw. empfohlenen Medikaments können Sie Erkrankungen der Atemwege vorbeugen, deren Begleiterscheinungen mildern und die Heilung beschleunigen.
Weitere Auskünfte über die Einsatzmöglichkeiten erfahren Sie durch Ihren Arzt oder Apotheker.
Das Gerät ist für die Inhalation zu Hause geeignet.
Die Medikamenteninhalation sollte nur nach ärztlicher
Anweisung erfolgen. Nehmen Sie die Inhalation ruhig
und entspannt vor und atmen Sie langsam und tief ein,
damit das Medikament bis in die feinen, tief liegenden
Bronchien gelangen kann. Atmen Sie normal aus.
Das Gerät ist nach Aufbereitung für den Wiedereinsatz geeignet. Die Aufbereitung umfasst den Austausch
sämtlicher Zubehörteile inklusive Vernebler und Luftfilter sowie eine Geräteoberflächendesinfektion mit
einem handelsüblichen Desinfektionsmittel.
2. Zeichenerklärung
Folgende Symbole werden in der Gebrauchsanweisung
verwendet.
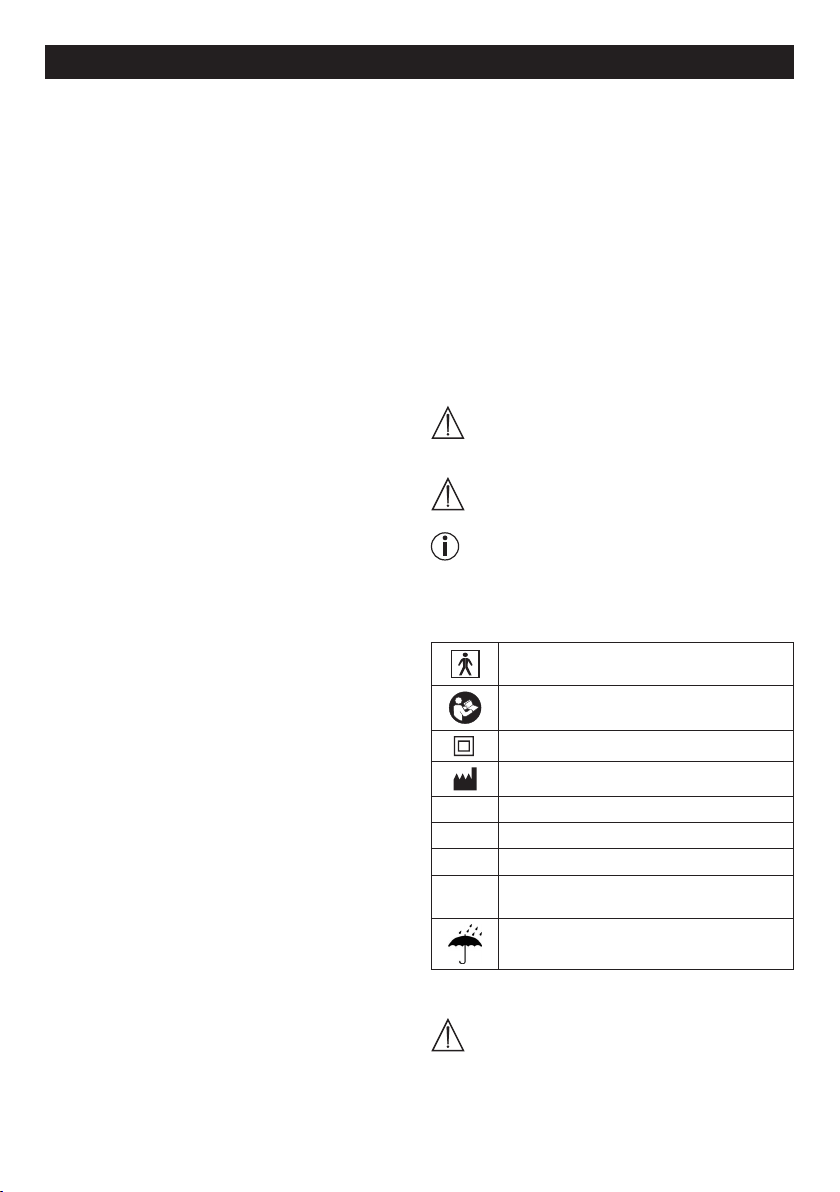
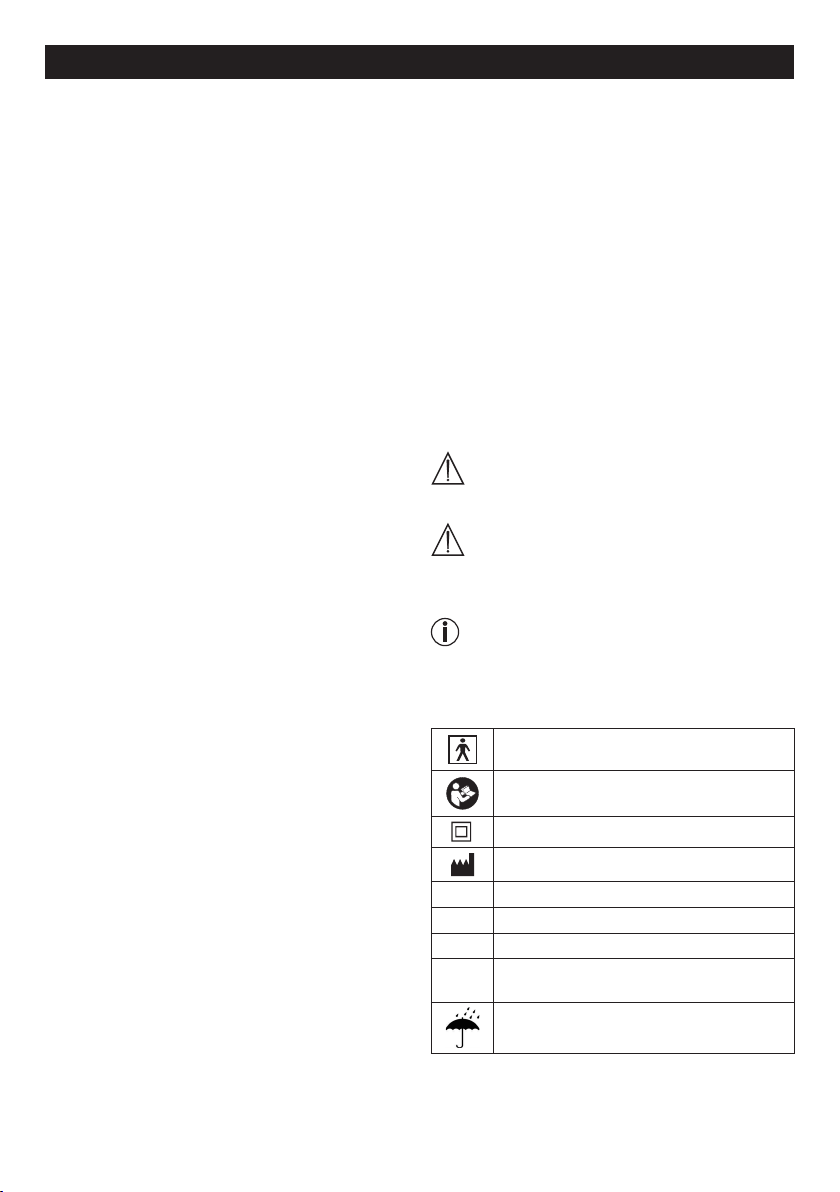
Warnung Warnhinweis auf Verletzungs-
gefahren oder Gefahren für Ihre
Gesundheit.
Achtung Sicherheitshinweis auf mögliche
Hinweis
Auf der Verpackung und auf dem Typenschild des
Gerätes und des Zubehörs werden folgende Symbole
verwendet.
I
O
SN
30 ON /
30 OFF
Schäden am Gerät/Zubehör.
Hinweis auf wichtige Informationen.
Anwendungsteil Typ BF
Gebrauchsanweisung beachten
Gerät der Schutzklasse 2
H
ersteller
Ein
Aus
Seriennummer
30 Minuten Betrieb, anschließend 30 Minu-
ten Pause vor erneutem Betrieb.
Vor Nässe schützen
3. Warn- und Sicherheitshinweise
Warnung
•
Vor dem Gebrauch ist sicherzustellen, dass das
Gerät und Zubehör keine sichtbaren Schäden aufweisen. Benutzen Sie es im Zweifelsfall nicht und
2
Page 3
wenden Sie sich an Ihren Händler oder an die ange
gebene Kundendienstadresse.
•
Bei Störungen des Geräts bitte im Kapitel "10. Pro-
blemlösung" nachschauen.
•
Eine Anwendung des Gerätes ersetzt keine ärztliche
Konsultation und Behandlung. Befragen Sie bei jeder Art von Schmerz oder Krankheit deshalb immer
zunächst Ihren Arzt.
•
Bei gesundheitlichen Bedenken irgendwelcher Art
konsultieren Sie Ihren Hausarzt!
•
Beachten Sie beim Einsatz des Verneblers die allge-
meinen Hygienemaßnahmen.
•
Für den Typ des zu verwendenden Medikamentes,
die Dosierung, die Häufigkeit und die Dauer der Inhalation sind immer die Anweisungen des Arztes zu
befolgen.
•
Verwenden Sie nur Medikamente, die von Ihrem Arzt
oder Apotheker verordnet oder empfohlen wurden.
Bitte beachten:
Für die Behandlung nur die vom Arzt entsprechend
der Krankheitslage angegebenen Teile verwenden.
•
Auf dem Beipackzettel des Medikaments kontrollie-
ren, ob Gegenanzeigen für den Gebrauch mit den
üblichen Systemen für Aerosoltherapie bestehen.
•
Sollte das Gerät nicht korrekt funktionieren, sich Un-
wohlsein oder Schmerzen einstellen, brechen Sie die
Anwendung sofort ab.
•
Halten Sie das Gerät während des Gebrauchs von Ih-
ren Augen entfernt, der Medikamentennebel könnte
schädigend wirken.
•
Betreiben Sie das Gerät nicht bei Vorhandensein von
brennbaren Gasen und hoher Sauerstoffkonzentration.
•
Dieses Gerät ist nicht dafür bestimmt, durch Kinder
oder Personen mit eingeschränkten physischen,
sensorischen (z.B. Schmerzunempfindlichkeit) oder
geistigen Fähigkeiten oder mangels Erfahrung und/
oder mangels Wissen benutzt zu werden. Es sei
denn, sie werden durch eine für Ihre Sicherheit zuständige Person beaufsichtigt oder erhielten von ihr
Anweisungen, wie das Gerät zu benutzen ist.
•
Vor jedem Reinigungs- und/oder Wartungseingriff
muss das Gerät ausgeschaltet und der Stecker abgezogen werden.
•
Halten Sie Kinder vom Verpackungsmaterial fern
(Erstickungsgefahr).
•
Zur Vermeidung der Gefahr des Verfangens und der
Strangulation, die Kabel und Luftleitungen außerhalb
der Reichweite von kleinen Kindern aufbewahren.
•
Benutzen Sie keine Zusatzteile, die nicht vom Her-
steller empfohlen werden.
•
Das Gerät darf nur an die auf dem Typschild ange-
gebene Netzspannung angeschlossen werden.
-
•
Tauchen Sie das Gerät nicht in Wasser und verwen-
den Sie es nicht in Nassräumen. Es dürfen keinesfalls
Flüssigkeiten in das Gerät eindringen.
•
Schützen Sie das Gerät vor stärkeren Stößen.
•
Fassen Sie die Netzleitung niemals mit nassen Hän-
den an, Sie könnten einen Stromschlag erleiden.
•
Den Netzstecker nicht an der Netzleitung aus der
Steckdose herausziehen.
•
Die Netzleitung nicht einklemmen, knicken, über
scharfkantige Gegenstände ziehen, nicht herunterhängen lassen sowie vor Hitze schützen.
•
Wir empfehlen, das Versorgungskabel vollständig
abzurollen, um ein gefährliches Überhitzen zu vermeiden.
•
Wenn die Netzanschlussleitung dieses Gerätes be-
schädigt wird, muss sie durch den Hersteller oder
seinen Kundendienst oder einer ähnlich qualifizierten
Person ersetzt werden, um Gefährungen zu vermeiden.
•
Beim Öffnen des Gerätes besteht die Gefahr eines
elektrischen Schlages. Die Trennung vom Versorgungsnetz ist nur gewährleistet, wenn der Netzstecker aus der Steckdose gezogen ist.
•
Wenn das Gerät heruntergefallen ist, extremer Feuch-
tigkeit ausgesetzt wurde oder anderweitige Schäden
davongetragen hat, darf es nicht mehr benutzt werden. Setzen Sie sich im Zweifelsfall mit dem Kundenservice oder Händler in Verbindung.
•
Der IH 21 Inhalator darf nur mit dafür passenden
Beurer Verneblern und mit entsprechendem Beurer
Zubehör betrieben werden. Die Verwendung von
Fremdverneblern und -Zubehör kann zur Beeinträchtigung der Therapieeffizienz führen und gegebenenfalls das Gerät beschädigen.
Achtung
•
Stromausfall, plötzliche Störungen bzw. andere un-
günstige Bedingungen könnten zur Betriebsunfähigkeit des Geräts führen. Deshalb wird empfohlen,
über ein Ersatzgerät bzw. ein (mit dem Arzt abgesprochenes) Medikament zu verfügen.
•
Sollten Adapter oder Verlängerungen erforderlich
sein, müssen diese den geltenden Sicherheitsvorschriften entsprechen. Die Stromleistungsgrenze
sowie die auf dem Adapter angegebene Maximalleistungsgrenze dürfen nicht überschritten werden.
•
Das Gerät und das Versorgungskabel darf nicht in
der Nähe von Wärmequellen aufbewahrt werden.
•
Das Gerät darf nicht in Räumen verwendet werden,
in denen zuvor Sprays verwendet wurden. Vor der
Therapie sind diese Räume zu lüften.
•
Keine Gegenstände in die Kühlungsöffnungen ge-
langen lassen.
3
Page 4
•
4
Das Gerät nie verwenden, wenn es ein anormales
Geräusch verursacht.
•
Es ist aus hygienischen Gründen unbedingt erfor-
derlich, dass jeder Benutzer sein eigenes Zubehör
verwendet.
•
Nach dem Gebrauch immer den Netzstecker ziehen.
•
Das Gerät an einem vor Witterungseinflüssen ge-
schützten Ort aufbewahren. Das Gerät muss bei den
vorgesehenen Umgebungsverhältnissen aufbewahrt
werden.
SICHERUNG
•
Im Gerät befindet sich eine Überstromsicherung.
Diese darf nur vom autorisierten Fachpersonal gewechselt werden.
Allgemeine Hinweise
Achtung
•
Verwenden Sie das Gerät ausschließlich:
– am Menschen,
– für den Zweck, für den es entwickelt wurde (Aero-
solinhalation) und auf die in dieser Gebrauchsanweisung angegebene Art und Weise.
•
Jeder unsachgemäße Gebrauch kann gefährlich
sein!
•
Bei akuten Notfällen hat die Erste Hilfe Vorrang.
•
Verwenden Sie neben den Medikamenten nur de-
stilliertes Wasser bzw. eine Kochsalzlösung. Andere
Flüssigkeiten führen unter Umständen zu einem Defekt des Inhalators bzw. Verneblers.
•
Dieses Gerät ist nicht für den gewerblichen oder kli-
nischen Gebrauch bestimmt, sondern ausschließlich
zur Eigenanwendung im privaten Haushalt!
Vor Inbetriebnahme
Achtung
•
Vor Gebrauch des Gerätes ist jegliches Verpackungs-
material zu entfernen.
•
Schützen Sie das Gerät vor Staub, Schmutz und
Feuchtigkeit, decken Sie das Gerät auf keinen Fall
während des Betriebes ab.
•
Betreiben Sie das Gerät nicht in stark staubbelasteter
Umgebung.
•
Schalten Sie das Gerät sofort aus, wenn es defekt
ist oder Betriebsstörungen vorliegen.
•
Der Hersteller haftet nicht für Schäden, die durch
unsachgemäßen oder falschen Gebrauch verursacht
wurden.
Reparatur
Hinweis
•
Sie dürfen das Gerät keinesfalls öffnen oder repa-
rieren, da sonst eine einwandfreie Funktion nicht
mehr gewährleistet ist. Bei Nichtbeachten erlischt
die Garantie.
•
Wenden Sie sich bei Reparaturen an den Kunden-
service oder an einen autorisierten Händler.
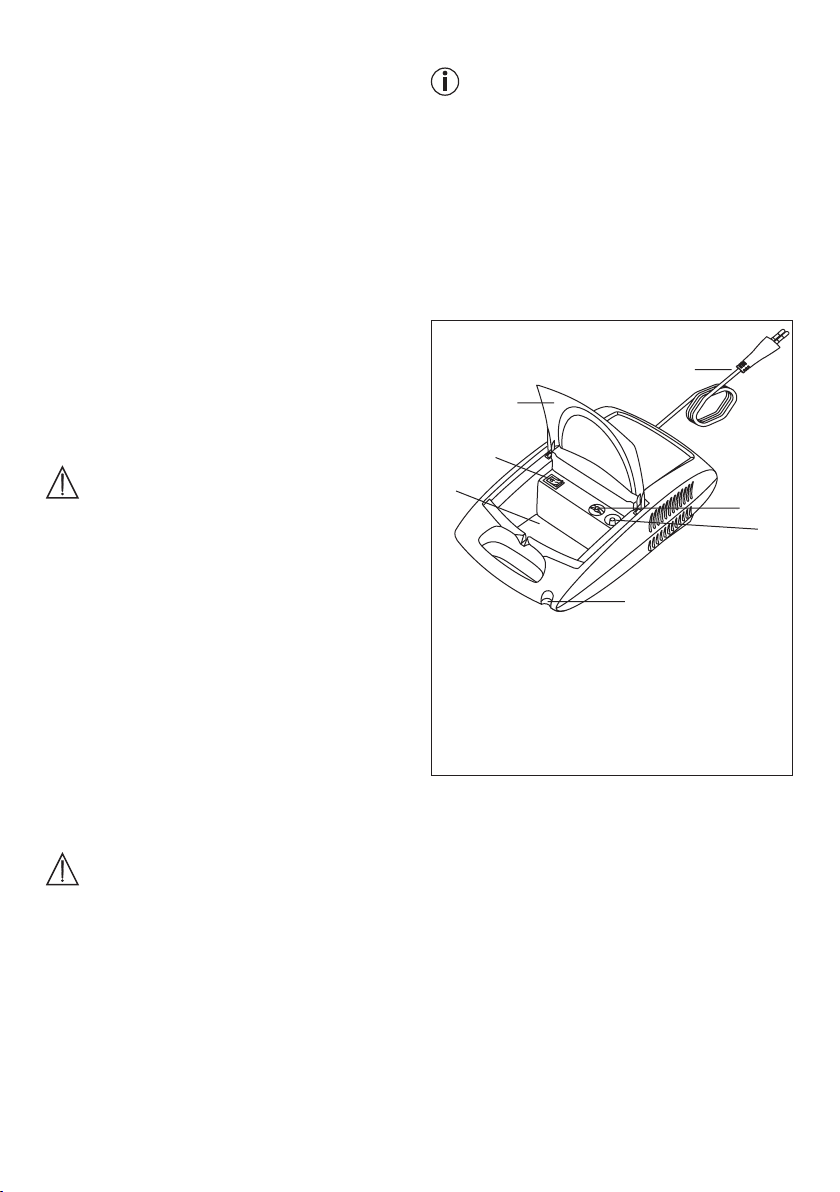
4. Geräte- und Zubehörbeschreibung
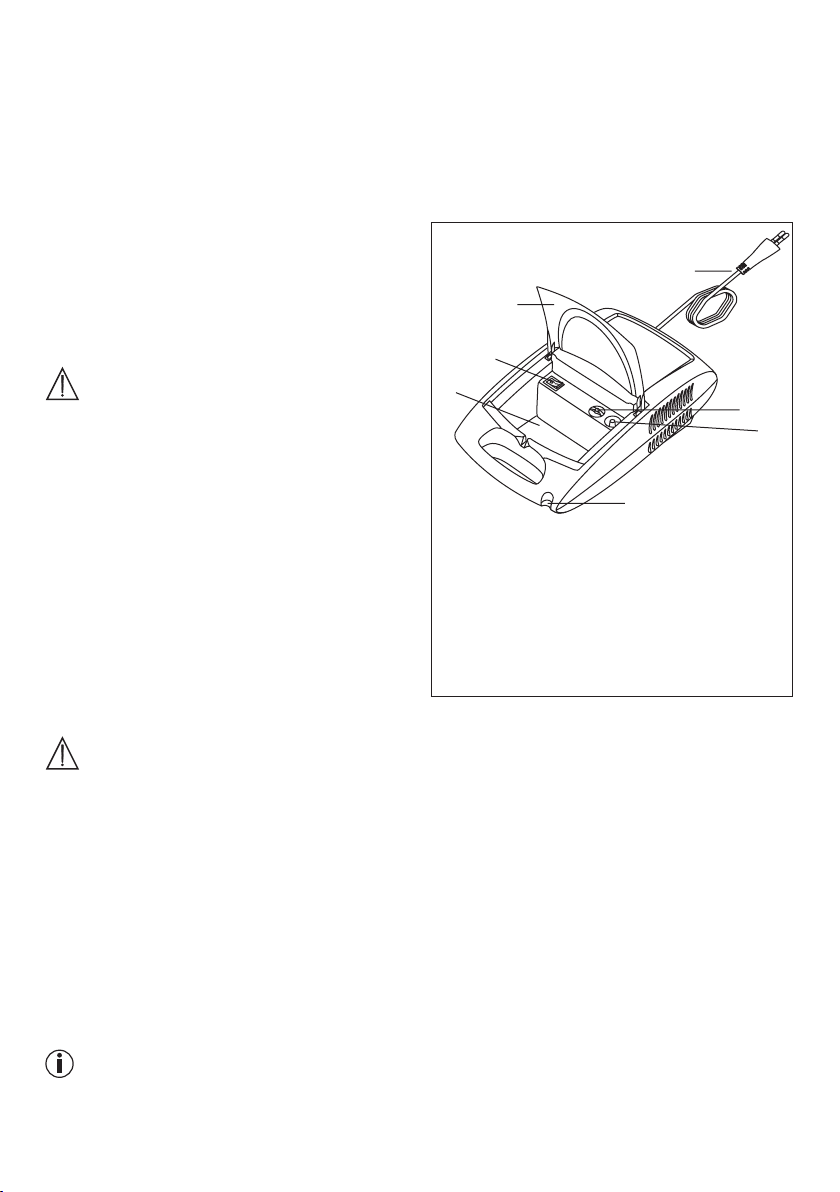
Übersicht Inhalator
1
2
3
5
7
1 Netzanschlusskabel
2 Deckel
3 Ein-/Aus-Schalter
4 Fach für Zubehör
5 Filterkappe mit Filter
6 Schlauchanschluss
7 Halterung für Vernebler
6
4
Page 5

Übersicht Vernebler und Zubehör
9
11
8
10
12
13
14
•
Stecken Sie das andere Ende des Schlauchs [8] mit
leichter Drehung in den Schlauchanschluss [6] des
Inhalators.
8 Druckluftschlauch
9 Vernebler
10 Verneblereinsatz
11 Ventil
12 Medikamentenbehälter
13 Mundstück
14 Erwachsenenmaske
15 Kindermaske
16 Nasenstück
17 Ersatzfilter
15
16
17
5. Inbetriebnahme
Aufstellen
Entnehmen Sie das Gerät der Verpackung.
Stellen Sie es auf einer ebenen Fläche auf.
Achten Sie darauf, dass die Lüftungsschlitze frei sind.
Klappen Sie den Deckel [2] auf, um an die Zubehörteile
zu gelangen.
Vor der ersten Verwendung
Hinweis
•
Vor der ersten Nutzung sollte der Vernebler und das
Zubehör gereinigt und desinfiziert werden. Siehe
hierzu „Reinigung und Desinfektion“ Seite 7.
•
Stecken Sie den Druckluftschlauch [8] unten an den
Medikamentenbehälter [12].
Netzanschluss
Das Gerät nur an die auf dem Typschild angegebene
Netzspannung anschließen.
•
Stecken Sie den Netzstecker des Netzkabels [1] in
eine geeignete Steckdose.
•
Zur Netzverbindung den Stecker vollständig in die
Steckdose stecken.
Hinweis
•
Achten Sie darauf, dass sich eine Steckdose in der
Nähe des Aufstellplatzes befindet.
•
Verlegen Sie das Netzkabel so, dass niemand darü-
ber stolpern kann.
•
Zur Trennung des Inhalators vom Stromnetz nach
der Inhalation schalten Sie zuerst das Gerät aus und
ziehen Sie dann den Netzstecker aus der Steckdose.
6. Bedienung
Achtung
•
Aus hygienischen Gründen ist es unbedingt erforder-
lich den Vernebler [9] sowie das Zubehör nach jeder
Behandlung zu reinigen und nach der täglich letzten
Behandlung zu desinfizieren.
•
Die Zubehörteile dürfen nur von einer Person benutzt
werden; vom Gebrauch durch mehreren Personen
wird abgeraten.
•
Sollten bei der Therapie mehrere verschiedene Medi-
kamente nacheinander inhaliert werden, so ist zu
beachten, dass der Vernebler [9] nach jeder Anwendung unter warmem Leitungswasser durchgespült
wird. Siehe hierzu „Reinigung und Desinfektion“ auf
Seite 7.
•
Beachten Sie die Hinweise zum Filterwechsel in die-
ser Anleitung!
•
Überprüfen Sie vor jeder Verwendung des Gerätes
den festen Sitz der Schlauchanschlüsse am Inhalator
[6] und am Vernebler [9].
5
Page 6
•
Prüfen Sie vor der Benutzung das Gerät auf ord-
nungsgemäße Funktion, hierfür schalten Sie den
Inhalator (samt angeschlossenem Vernebler, aber
ohne Medikamente) für einen kurzen Moment ein.
Wenn hierbei Luft aus dem Vernebler [9] kommt,
funktioniert das Gerät.
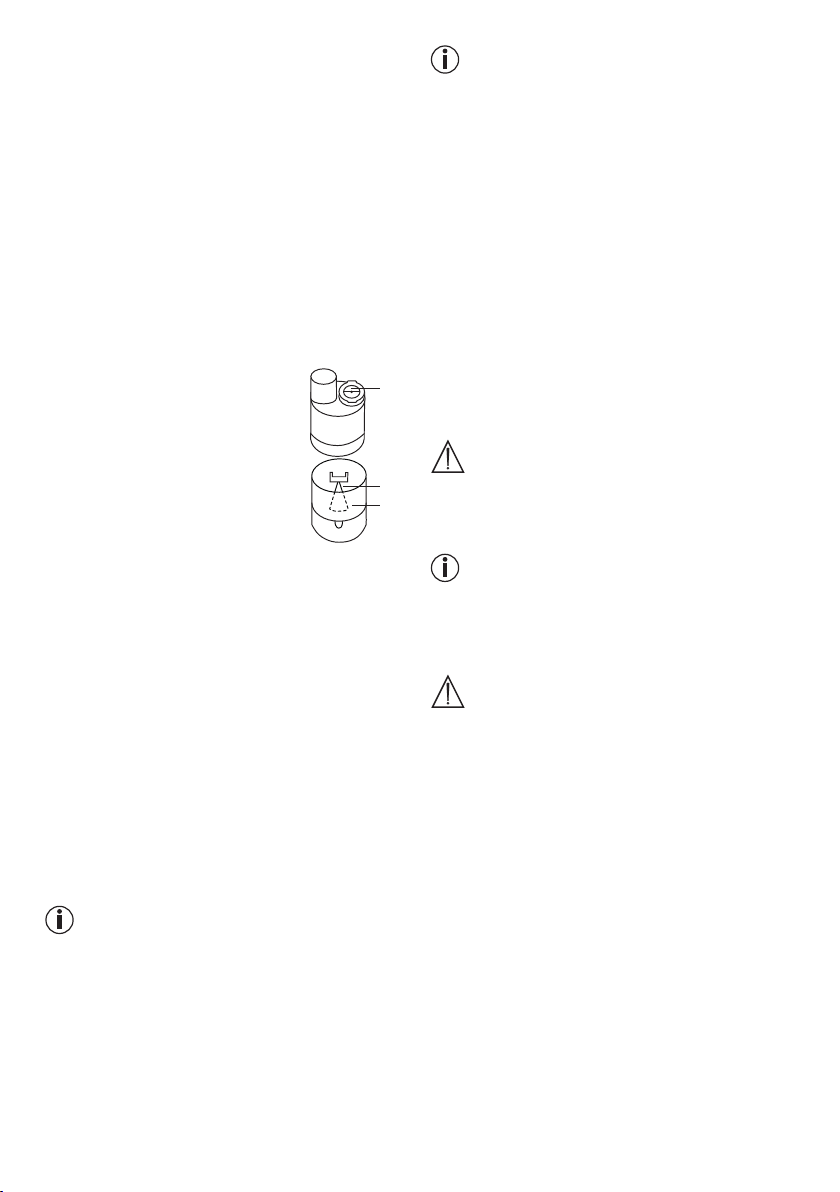
1. Düsenaufsatz einsetzen
• Öffnen Sie den Vernebler [9], indem Sie das Oberteil
im Gegenuhrzeigersinn gegen den Medikamentenbehälter [12] drehen. Setzen Sie den Düsenaufsatz
[10] in den Medikamentenbehälter [12] ein.
• Stellen Sie sicher, dass der Kegel für die Medikamentenführung gut auf dem Kegel für die Luftführung im
Innern des Zerstäubers aufsitzt.
2. Vernebler befüllen
• Füllen Sie eine isotonische Kochsalzlösung oder das Medikament
direkt in den Medikamentenbehälter [12]. Vermeiden Sie eine Überfüllung! Die maximal empfohlene
Füllmenge beträgt 8 ml !
• Verwenden Sie Medikamente nur
auf Anweisung Ihres Arztes und
fragen Sie nach der für Sie angemessenen Inhalationsdauer und
-menge!
• Liegt die vorgegebene Menge des Medikamentes
bei weniger als 2 ml, füllen Sie diese Menge mit
isotonischer Kochsalzlösung auf mind. 4 ml auf. Eine Verdünnung ist bei zähflüssigen Medikamenten
ebenfalls notwendig. Achten Sie auch hier auf die
Anweisung Ihres Arztes.
11
10
12
3. Vernebler schließen
• Schließen Sie den Vernebler [9], indem Sie das Oberteil im Uhrzeigersinn gegen den Medikamentenbehälter [12] drehen. Achten Sie auf korrekte Verbindung!
4. Ventil einsetzen
• Drücken Sie das blaue Ventil [11] in die dafür vorgesehene Öffnung an der Oberseite des Verneblers [9].
Hinweis
Das Ventilsystem gewährleistet eine verbesserte Lungengängigkeit des Medikaments. Das Ventil [11] nur
mit dem Mundstück [13] verwenden, niemals mit den
Masken [14,15] oder dem Nasenstück [16] verwenden.
5. Zubehör mit Vernebler verbinden
• Vernebler [9] mit gewünschtem Zubehör (Mundstück
[13], Erwachsenenmaske [14], Kindermaske [15] oder
Nasenstück [16]) verbinden.
Hinweis
Die Inhalation mit dem Mundstück ist die wirksamste
Form der Therapie. Der Gebrauch der Maskeninhala
tion wird nur empfohlen, wenn die Verwendung eines
Mundstücks nicht möglich ist (z.B. bei Kindern die
noch nicht mit dem Mundstück inhalieren können).
• Ziehen Sie den Vernebler vor der Behandlung nach
oben aus der Halterung [7] heraus.
• Starten Sie den Inhalator mit dem Ein-/Aus-Schalter [3].
• Das Ausströmen des Sprühnebels aus dem Vernebler
zeigt den einwandfreien Betrieb.
-
6. Behandlung
•
Während des Inhalierens aufrecht und entspannt an
einem Tisch und nicht in einem Sessel sitzen, um
die Atemwege nicht zusammenzudrücken und so
die Wirksamkeit der Bahandlung zu Beeinträchtigen.
•
Atmen Sie das zerstäubte Medikament tief ein.
Achtung
Das Gerät ist nicht für Dauerbetrieb geeignet, nach
30 Minuten Betrieb muss es 30 Minuten abgeschaltet
werden.
Hinweis
Halten Sie den Vernebler während der Behandlung gerade (senkrecht), da ansonsten die Zerstäubung nicht
funktioniert und eine einwandfreie Funktion nicht ge
währleistet ist.
-
Achtung
Ätherische Heilpflanzenöle, Hustensäfte, Lösungen zum
Gurgeln, Tropfen zum Einreiben oder für Dampfbäder
sind grundsätzlich ungeeignet für die Inhalation mit In
halatoren. Diese Zusätze sind oft zähflüssig und können
die korrekte Funktion des Gerätes und damit die Wirksamkeit der Anwendung nachhaltig beeinträchtigen.
Bei einer Überempfindlichkeit des Bronchialsystems
können Medikamente mit ätherischen Ölen unter Umständen einen akuten Bronchospasmus (eine plötzliche
krampfartige Einengung der Bronchien mit Atemnot)
auslösen. Fragen Sie dazu Ihren Arzt oder Apotheker!
-
7. Inhalation beenden
Tritt der Nebel nur noch unregelmäßig aus oder verändert sich das Geräusch bei der Inhalation können Sie
die Behandlung beenden.
•
Schalten Sie den Inhalator nach der Behandlung mit
dem Ein-/Aus-Schalter [3] aus und trennen Sie ihn
vom Stromnetz.
•
Setzen Sie den Vernebler [9] nach der Behandlung
wieder zurück in seine Halterung [7].
6
Page 7

8. Reinigung durchführen
Siehe „Reinigung und Desinfektion“ auf Seite 7.
7. Filterwechsel
Bei normalen Benutzungsbedingungen ist der Luftfilter nach etwa 500 Betriebsstunden bzw. einem Jahr
auszutauschen. Kontrollieren Sie den Luftfilter bitte
regelmäßig (nach 10-12 Zerstäubungsvorgängen).
Ist er stark verschmutzt oder verstopft, wechseln Sie
den gebrauchten Filter aus. Sollte der Filter feucht
geworden sein, muss er ebenfalls gegen einen neuen
Filter ausgewechselt werden.
Achtung
•
Versuchen Sie nicht, den gebrauchten Filter zu rei-
nigen und wieder zu verwenden!
•
Benutzen Sie ausschließlich den Original-Filter des
Herstellers, da ansonsten Ihr Inhalator beschädigt
werden könnte oder keine ausreichend effektive Therapie sichergestellt werden kann.
•
Der Luftfilter darf nicht repariert oder gewartet wer-
den, während er bei einer Person im Einsatz ist.
•
Gerät niemals ohne Filter betreiben.
Zum Auswechseln des Filters gehen Sie folgendermaßen vor:
Achtung
•
Gerät erst ausschalten und vom Netz trennen.
•
Gerät abkühlen lassen.
1. Filterkappe [5] nach oben
abziehen.
Hinweis
Falls der Filter nach Abziehen der Kappe im Gerät verbleibt, entfernen Sie den Filter, z.B. mit einer Pinzette
oder Ähnlichem, aus dem Gerät.
2. Filterkappe [5] mit neuem Filter wieder einsetzen.
3. Festen Sitz prüfen.
8. Reinigung und Desinfektion
Vernebler und Zubehör
Warnung
Befolgen Sie nachfolgende Hygienevorschriften, um
eine Gesundheitsgefährdung zu vermeiden.
•
Vernebler [9] und Zubehör sind für eine Mehrfach-
verwendung vorgesehen. Bitte beachten Sie, dass
für die unterschiedlichen Anwendungsbereiche
verschiedene Anforderungen an die Reinigung und
hygienische Wiederaufbereitung gestellt werden.
Hinweise:
•
Eine mechanische Reinigung des Verneblers sowie
des Zubehörs mit Bürsten oder der Gleichen, muss
unterbleiben, da hierbei irreparable Schäden die Folge sein können und ein gezielter Behandlungserfolg
nicht mehr gewährleistet ist.
•
Die zusätzlichen Anforderungen bezüglich der not-
wendigen hygienischen Vorbereitung (Handpflege,
Handhabung der Medikamente bzw. der Inhalationslösungen) bei Hochrisikogruppen (z.B. Mukoviszidosepatienten) erfragen Sie bitte bei Ihrem Arzt.
•
Achten Sie auf ausreichende Trocknung nach jeder
Reinigung, Desinfektion. Eine Restfeuchtigkeit bzw.
Restnässe kann ein erhöhtes Risiko für Keimwachstum darstellen.
Vorbereitung
•
Direkt nach jeder Behandlung
müssen alle Teile des Verneblers
[9] sowie das benutzte Zubehör
von Medi kamentenresten und
Verunreinigungen gereinigt wer
den.
•
Hierfür zerlegen Sie den Vernebler
[9] in seine Einzel teile.
•
Ziehen Sie das Mundstück [13],
die Maske [14, 15] oder das Nasenstück [16] vom Vernebler ab.
• Zerlegen Sie den Vernebler, indem Sie das Oberteil
im Gegenuhrzeigersinn gegen den Medikamenten
behälter [12] drehen.
•
Entfernen Sie den Düsenaufsatz [10] aus dem
Medikamentenbehälter [12].
• Entfernen Sie das Ventil [11] indem Sie es aus dem
Vernebler [9] heraus ziehen.
• Der Zusammenbau erfolgt später sinngemäß in
umgekehrter Reihenfolge.
-
11
10
12
-
Reinigung
Achtung
Vor jeder Reinigung muss das Gerät ausgeschaltet,
vom Netz getrennt und abgekühlt sein.
Der Vernebler sowie das benutzte Zubehör wie Mund-
stück, Maske, Düsenaufsatz usw. müssen nach jeder
Anwendung mit heißem nicht kochendem Wasser ge
reinigt werden. Trocknen Sie die Teile sorgfältig mit
einem weichen Tuch ab. Setzen Sie die Teile, wenn
diese vollständig getrocknet sind, wieder zusammen
und legen Sie die Teile in ein trockenes, abgedichtetes
Behältnis oder führen Sie die Desinfektion durch.
Vergewissern Sie sich bei der Reinigung, dass jegliche
Rückstände entfernt werden. Verwenden Sie dabei auf
keinen Fall Substanzen, die bei der Berührung mit der
-
7
Page 8
Haut oder den Schleimhäuten, verschluckt oder inha
liert potenziell giftig sein könnten.
Benutzen Sie zur Reinigung des Gerätes ein weiches,
trockenes Tuch und ein nicht scheuernds Reinigungsmittel.
Benutzen Sie keine scharfen Reinigungsmittel und halten Sie das Gerät niemals unter Wasser.
-
Achtung
•
Achten Sie darauf, dass kein Wasser in das Geräte-
innere gelangt!
•
Gerät und Zubehör nicht in der Spülmaschine reini-
gen!
•
Das Gerät darf im angeschlossenen Zustand nicht
mit feuchten Händen angefasst werden; es darf kein
Wasser auf das Gerät spritzen. Das Gerät darf nur im
vollständig trockenen Zustand betrieben werden.
•
Sprühen Sie keine Flüssigkeit in die Lüftungsschlitze!
Eingedrungene Flüssigkeiten können eine Beschädigung der Elektrik sowie anderer Inhalatorteile verursachen und zu einer Funktionsstörung führen.
Kondenswasser, Schlauchpflege
Je nach Umgebungsbedingungen kann sich im
Schlauch Kondenswasser absetzen. Um Keimwachstum vorzubeugen und eine einwandfreie Therapie zu
gewährleisten, ist die Feuchtigkeit unbedingt zu entfernen. Gehen Sie dazu folgendermaßen vor:
•
Ziehen Sie den Schlauch [8] vom Vernebler [9] ab.
•
Lassen Sie den Schlauch inhalatorseitig [6] einge-
steckt.
•
Nehmen Sie den Inhalator so lange in Betrieb, bis
die Feuchtigkeit durch die durchströmende Luft
beseitigt ist.
•
Bei starken Verschmutzungen ersetzen Sie den
Schlauch.
Desinfektion
Bitte folgen Sie den unten aufgeführten Punkten sorgfältig, um Ihren Vernebler und das Zubehör zu desinfizieren. Es wird empfohlen die Einzelteile spätestens
nach der täglich letzten Benutzung zu desinfizieren.
(Sie benötigen hierzu lediglich ein wenig farblosen
Essig und destilliertes Wasser!)
• Reinigen Sie zunächst den Vernebler und das Zubehör wie unter „Reinigung“ beschrieben.
• Den zerlegten Zerstäuber, das Mundstück und das
Nasenstück 5 Minuten lang in kochendes Wasser
legen.
• Für das übrige Zubehör benutzen Sie eine Essigmi
schung bestehend aus ¼ Essig und ¾ destilliertem
Wasser. Stellen Sie sicher, dass die Menge ausrei
chend ist, dass die Teile wie Vernebler, Maske und
Mundstück vollständig darin eingetaucht werden
können.
-
-
• Belassen Sie die Teile für 30 Minuten in der Essigmischung.
• Spülen Sie die Teile mit Wasser aus und trocknen
Sie diese sorgfältig mit einem weichen Tuch ab.
Achtung
Masken und Luftschlauch nicht abkochen oder autoklavieren.
• Setzen Sie die Teile wenn diese vollständig getrocknet sind wieder zusammen und legen Sie die Teile in
ein trockenes, abgedichteten Behältnis.
Hinweis
Bitte beachten Sie, dass die Teile nach der Reinigung
vollständig getrocknet werden, da an sonsten hier das
Risiko von Keimwachstum erhöht ist.
Sterilisierung
•
Kaltsterilisierungslösungen gemäß Herstelleranwei-
sung benutzen.
Trocknung
•
Legen Sie die Einzelteile auf eine trockene, saubere
und saugfähige Unterlage und lassen Sie sie vollständig trocknen (mindestens 4 Stunden).
Materialbeständigkeit
•
Vernebler und Zubehör unterliegen bei häufiger
Anwendung und hygienischer Wiederaufbereitung,
wie jedes andere Kunststoffteil auch, einer gewissen Abnutzung. Dies kann im Laufe der Zeit zu einer
Veränderung des Aerosols und somit auch zu einer
Beeinträchtigung der Therapieeffizienz führen. Wir
empfehlen deshalb den Vernebler nach einem Jahr
auszuwechseln.
•
Bei der Wahl der Reinigungs- bzw. Desinfektions-
mittel ist folgendes zu beachten: Verwenden Sie nur
ein mildes Reinigungsmittel oder Desinfektionsmittel,
welches Sie nach Herstellerangaben dosieren.
Aufbewahrung
•
Nicht in Feuchträumen (z.B. Badezimmer) lagern und
zusammen mit feuchten Gegenständen transportieren.
•
Vor anhaltender direkter Sonneneinstrahlung ge-
schützt lagern und transportieren.
•
Die Zubehörteile können im Zubehörfach [4] sicher
verstaut werden. Das Gerät an einem trockenen
Platz, am besten in der Verpackung, aufbewahren.
9. Entsorgen
Im Interesse des Umweltschutzes darf das
Gerät nicht mit dem Hausmüll entsorgt werden.
8
Page 9
Bitte entsorgen Sie das Gerät gemäß der Elektro- und
Elektronik Altgeräte EG-Richtlinie – WEEE (Waste Electrical and Electronic Equipment).
Bei Rückfragen wenden Sie sich bitte an die für die
Entsorgung zuständige kommunale Behörde.
10. Problemlösung
Probleme/
Fragen
Der Vernebler
erzeugt kein
oder zu wenig
Aerosol.
Der Ausstoß
ist zu gering.
Welche
Medikamente
kann man
inhalieren?
Es bleibt
Inhalations
lösung im
Vernebler
zurück.
Was ist bei
Babys und
Kindern zu
beachten?
Mögliche Ursache/Behebung
1. Zuviel oder zuwenig Medikament
im Vernebler.
Minimum: 2 ml,
Maximum: 8 ml.
2. Düse auf Verstopfung prüfen.
Gegebenenfalls Düse reinigen
(z.B. durch Ausspülen). Ver
nebler danach erneut in Betrieb
nehmen.
ACHTUNG: die feinen Bohrungen
nur von der Düsenunterseite vor
sichtig durchstechen.
3. Vernebler nicht senkrecht
gehalten.
4. Ungeeignete Medikamentenflüssigkeit zum Vernebeln eingefüllt
(z.B. zu dickflüssig).
Die Medikamentenflüssigkeit sollte
vom Arzt vorgegeben werden.
Geknickter Schlauch, verstopfter
Filter, zu viel Inhalationslösung.
Bitte fragen Sie hierzu Ihren Arzt.
Grundsätzlich können alle Medikamente, die für eine Geräte-Inhalation geeignet und zugelassen sind,
inhaliert werden.
Dies ist technisch bedingt und
normal. Beenden Sie die Inhalation,
sobald Sie ein deutlich verändertes
Verneblergeräusch hören.
1. Bei Babys sollte die Maske
Mund und Nase abdecken
um eine effektive Inhalation zu
gewährleisten.
2. Bei Kindern sollte ebenfalls
die Maske Mund und Nase
abdecken. Eine Verneblung
neben schlafenden Personen ist
wenig sinnvoll, da hierbei nicht
genügend des Medikaments in
die Lunge gelangen kann.
-
-
Probleme/
Mögliche Ursache/Behebung
Fragen
Hinweis: es sollte nur unter
Aufsicht und mit Hilfe einer er
wachsenen Person inhaliert werden
und das Kind nicht allein gelassen
werden.
Die Inhalation
mit der Maske
dauert län
ger?
Dies ist technisch bedingt. Durch
die Maskenlöcher atmen Sie pro
Atemzug weniger Medikament
ein als über das Mundstück. Das
Aerosol wird über die Löcher mit
Raumluft vermischt.
Warum soll
der Vernebler
regelmäßig
ausgewech
selt werden?
Dafür gibt es zwei Gründe:
1. Um ein therapeutisch wirksames
Teilchenspektrum zu gewähr
-
leisten, soll die Düsenbohrung
einen bestimmten Durch
messer nicht überschreiten.
Bedingt durch mechanische
und thermische Beanspru
chung unterliegt der Kunststoff
einem gewissen Verschleiß. Der
Düsenaufsatz [10] ist besonders
sensibel. Damit kann sich auch
die Tröpfchenzusammensetzung
des Aerosols verändern, was
unmittelbar die Effektivität der
Behandlung beeinflusst.
2. Zudem wird ein regelmäßiger
Wechsel des Verneblers aus hy
gienischen Gründen empfohlen.
Benötigt
jeder seinen
Aus hygienischer Sicht ist dies
unbedingt notwendig.
eigenen
Vernebler?
11. Technische Angaben
Model
Type
Abmessungen
(BxHxT) 300 x 180 x 100 mm
Gewicht
Arbeitsdruck ca. 0,8 - 1,45 bar
Füllvolumen
Vernebler
Medikamenten
fluss ca. 0,3 ml/min.
Schalldruck max. 52 dBA
Netzanschluss 230 V~; 50 Hz; 230 VA
IH 21
IH 21/1
1,65 kg
max. 8 ml
min. 2 ml
-
(gem. DIN EN 13544-1 Abschnitt 26)
UK: 240 V~; 50 Hz; 240 VA
-
-
-
-
-
9
Page 10
Betriebsbedingungen
Lager-und Trans
portbedingungen
Aerosol
Eigenschaften
Temperatur: +10 °C bis +40 °C
Relative Luftfeuchte: 10% bis 95%
-
Temperatur: 0 °C bis +60 °C
Relative Luftfeuchte: 10% bis 95%
Umgebungsdruck: 500 bis 1060 hPa
1) Durchfluss: 5,3 l/min
2) Aerosolabgabe: 0,216 ml
3) Aerosolabgaberate: 0,112 ml/min
4) Partikelgröße (MMAD): 3,85 µm
Sie unter der angegebenen Kundenservice-Adresse
anfordern oder am Ende der Gebrauchsanleitung nachlesen. Das Gerät entspricht den Anforderungen der
europäischen Richtlinie für Medizinprodukte 93/42/EC,
dem Medizinproduktegesetz.
ELEKTROMAGNETISCHE KOMPATIBILITÄT
•
Technische Änderungen vorbehalten.
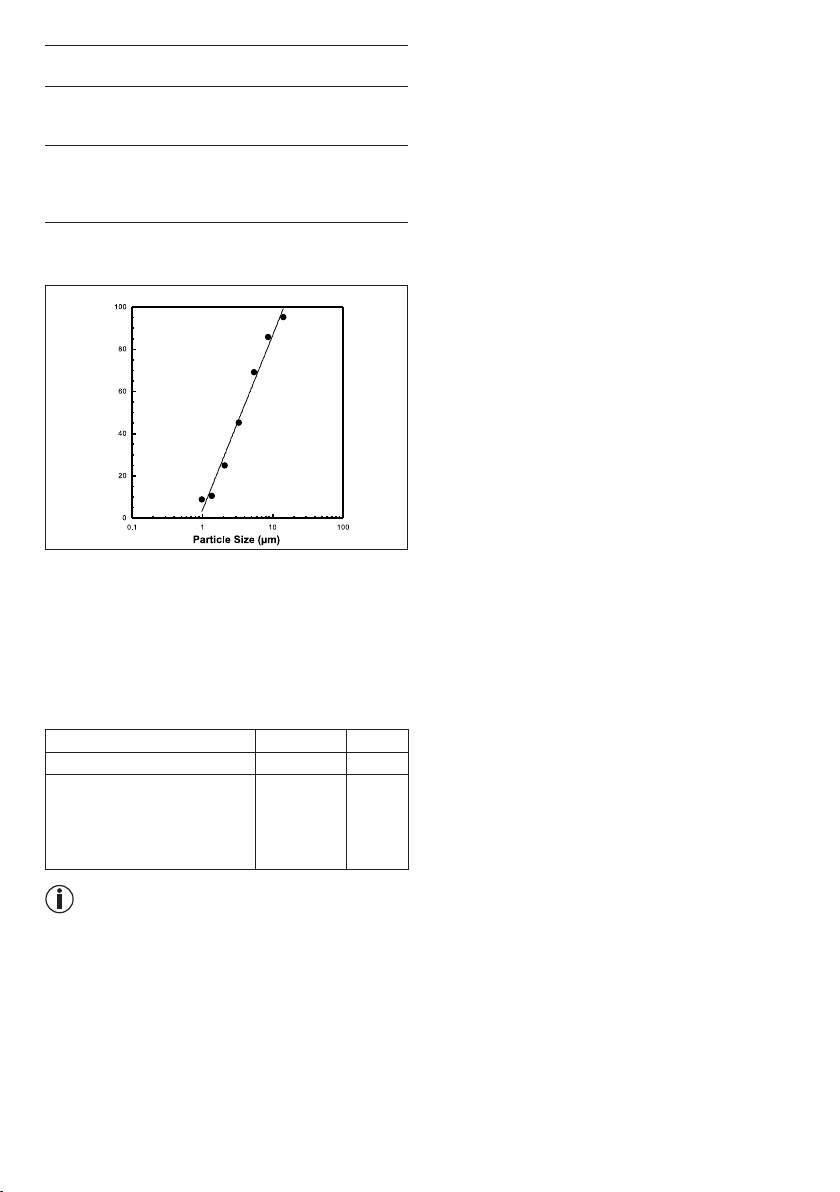
Diagramm Partikelgrößen
•
•
12. Garantie und Service
Wir gewähren 3 Jahre Garantie auf Material und Fabri-
Die Messungen wurden mit einer Natrium-FluoridLösung mit einem "Next Generation Impactor" (NGI)
durchgeführt.
Das Diagramm ist möglicherweise so nicht auf Suspensionen oder sehr zähflüssige Medikamente anwendbar.
Nähere Informationen dazu können Sie vom jeweiligen
Medikamentenhersteller erfahren.
Nachkaufartikel
Bezeichnung Material REF
Vernebler-Stopper PP
Yearpack (enthält Mundstück,
Nasenstück, Erwachsenenmaske, Kinder maske,
Vernebler, Druckluftschlauch,
Filter)
PP/ PVC 601.22
162.819
Hinweis
Bei Verwendung des Gerätes außerhalb der Spezifikation ist eine einwandfreie Funktion nicht gewährleistet! Technische Änderungen zur Verbesserung und
Weiterentwicklung des Produktes behalten wir uns
vor. Dieses Gerät und dessen Zubehör entspricht den
europäischen Normen EN60601-1 und EN60601-1-2
sowie EN13544-1 und unterliegt besonderen Vorsichtsmaßnahmen hinsichtlich der elektromagnetischen Verträglichkeit. Bitte beachten Sie dabei, dass tragbare
und mobile HF-Kommunikationseinrichtungen dieses
Gerät beeinflussen können. Genauere Angaben können
kationsfehler des Produktes.
Die Garantie gilt nicht:
•
•
•
•
Die gesetzlichen Gewährleistungen des Kunden blei
ben durch die Garantie unberührt.
Für Geltendmachung eines Garantiefalles innerhalb der
Garantiezeit ist durch den Kunden der Nachweis des
Kaufes zu führen.
Die Garantie ist innerhalb eines Zeitraumes von 3 Jahren ab Kaufdatum gegenüber der Beurer GmbH, Söflinger Straße 218, 89077 Ulm, Deutschland, geltend
zu machen. Der Kunde hat im Garantiefall das Recht
zur Reparatur der Ware bei unserem eigenen oder bei
von uns autorisierten Werkstätten. Weitergehende
Rechte werden dem Kunden (aufgrund der Garantie)
nicht eingeräumt.
Das Gerät entspricht den zur Zeit geltenden Vor-
schriften in Bezug auf die elektromagnetische Kompatibilität und ist geeignet für die Verwendung in
sämtlichen Gebäuden, einschließlich derjenigen, die
für private Wohnzwecke bestimmt sind. Die Radiofrequenzemissionen des Geräts sind äußerst niedrig
und verursachen mit größter Wahrscheinlichkeit keine Interferenzen mit anderen Geräten in der Nähe.
Es empfiehlt sich auf jeden Fall, das Gerät nicht über
oder nahe bei anderen Geräten aufzustellen. Sollte es
mit Ihren Elektrogeräten zu Interferenzen kommen,
verstellen Sie es oder schließen Sie es an eine andere
Steckdose an.
Funkgeräte könnten den Betrieb des Geräts beein-
flussen.
im Falle von Schäden, die auf unsachgemäßer Be-
dienung beruhen,
für Verschleißteile (z.B. Vernebler, Filter, Druckluft-
schlauch etc.),
für Mängel, die dem Kunden bereits bei Kauf bekannt
waren,
bei Eigenverschulden des Kunden.
-
10
Page 11
ENGLISH
Contents
1. Getting to know your instrument .......................11
2. Signs and symbols ............................................11
3. Safety information and warnings .......................11
4. Description of device and accessories..............13
5. Initial use............................................................13
6. Operation ...........................................................14
7.Changing the filter ..............................................15
8. Cleaning and disinfection ..................................15
9. Disposal .............................................................17
10. Troubleshooting .................................................17
11. Technical specifications ....................................18
Included in delivery
For details of the delivery scope, see description of the
device and accessories on page 13.
•
Nebuliser
•
Atomiser
•
Compressed air hose
•
Mouthpiece
•
Adult mask
•
Child mask
•
Nosepiece
•
Spare filter
•
These instructions for use
1. Getting to know your instrument
Dear customer
Thank you for choosing one of our products. Our name
stands for high-quality, thoroughly tested products for
applications in the areas of heat, weight, blood pressure, body temperature, pulse, gentle therapy, massage and air.
Please read these instructions for use carefully and
keep them for later use, be sure to make them accessible to other users and observe the information
they contain.
With kind regards
Your Beurer team
Area of application
This nebuliser is a device used for the nebulisation
of liquids and liquid medication (aerosols) and for the
treatment of the upper and lower respiratory tract.
The nebulisation and inhalation of medication prescribed or recommended by a doctor can prevent
against diseases of the respiratory tract, treat the side
effects of these disorders and accelerate healing.
For more information on possible applications, consult
your doctor or pharmacist.
The device is suitable for inhalation at home. Medicines
should only be inhaled when instructed by a doctor.
Inhalation should be performed in a calm and relaxed
atmosphere. Inhale slowly and deeply to enable the
medicine to reach the small bronchi deep into the
lungs. Exhale normally.
Once prepared, the device is suitable for reuse. The
preparation includes the replacement of all accessory
parts including atomiser and air filter, as well as disin
fection of the surfaces of the device with a standard
disinfectant.
-
2. Signs and symbols
The following symbols appear in these instructions.
Warning Warning instruction indicating a
Important Safety note indicating possible
Note
The following symbols are used on the packaging and
on the nameplate of the device and accessories.
I
O
SN
30 ON /
30 OFF
risk of injury or damage to health.
damage to the unit/accessory.
Note on important information.
Type BF applied part
Read the instructions for use
Device in protection class 2
M
anufacturer
On
Off
Serial number
30 minute operation, followed by a 30
minute break before operation continues.
Protect from moisture
3. Safety information and warnings
Warning
•
Before use, ensure that there is no visible damage to
the unit or accessories. When in doubt, do not use
the unit and contact your dealer or the customer
service address provided.
• In the event of device faults, please see Chapter "10.
Troubleshooting".
11
Page 12

•
Using the unit is not a substitute for consultation with
or treatment from a physician. Whenever you have
any pain or illness, always contact your physician
first.
•
If you have health concerns of any kind, contact your
general practitioner!
•
When using the atomiser, always follow the basic
hygiene procedures.
•
Always follow your doctor’s instructions regarding
the type of medicine to be used and the dose, frequency, and duration of inhalation.
•
Only use medicines that have been prescribed or
recommended by your doctor or pharmacist.
Please note:
For treatment, only use parts indicated by your doc-
tor according to the particular diagnosis.
• Check whether there are contraindications for use
with the usual systems for aerosol therapy on the
medication instruction leaflet.
•
If the unit does not function correctly or if you begin
to feel unwell or feel pain, stop using the unit immediately.
•
During use, hold the unit away from the eyes, as
some nebulised medicines may cause damage to
the eyes.
•
Do not operate the unit in the presence of flammable
gases.
•
This device is not intended to be used by children
or persons with restricted physical, sensory (e.g.
insensitivity to pain) or mental abilities or persons
lacking in the required experience or knowledge for
safe operation of the device, unless supervised or
instructed by a person responsible for their safety.
• The device must be switched off and the plug pulled
out before every cleaning and/or maintenance procedure.
•
Keep children away from packaging materials (risk
of suffocation).
• To avoid the risk of entanglement and strangulation,
store cables and air lines out of the reach of small
children.
•
Do not use attachments that are not recommended
by the manufacturer.
•
Connect the unit only to the mains voltage listed on
the type plate.
•
Do not dip the unit into water and do not use it in wet
rooms. Do not allow any liquid to penetrate the unit.
•
Protect the unit from strong impacts.
•
Never touch the mains cable with wet hands, this
can cause an electric shock.
•
Do not pull the mains plug from the socket by the
cord.
•
Do not pinch or bend the mains cable, pull it over
sharp objects, or allow it to hang freely, and protect
it against sources of heat.
•
We recommend that the power cable is completely
unrolled to avoid dangerous overheating.
•
If the mains connection cable of this device is dam-
aged, it must be replaced by the manufacturer, its
customer service department or a simi-larly qualified
person to avoid any risk.
•
Opening the unit carries a risk of electric shock. Dis-
connection from the mains supply is only guaranteed
if the mains plug has been removed from the socket.
•
Do not use the unit if it has fallen or been dropped
on the floor, been exposed to extreme humidity or
is otherwise damaged. In case of doubt, contact our
customer service department or your local dealer.
•
The IH 21 nebuliser must only be used with suitable
atomisers and with the appropriate accessories. The
use of other atomisers and accessories can impair
therapeutic efficiency and may damage the device.
Important
•
Power cuts, sudden faults or other unfavourable
conditions may render the unit unusable. You are
therefore recommended to keep a spare device or
replacement medicine (as agreed with the doctor).
•
If adapters or extensions are required, these must
comply with the applicable safety regulations. The
electrical capacity and the maximum capacity specified on the adapter must not be exceeded.
•
The unit and the mains cable must be stored away
from sources of heat.
•
Do not use the unit in a room in which a spray has
previously been used. If this is the case, ventilate the
room before commencing treatment.
•
Do not allow any objects to enter or obstruct the
ventilation openings.
•
Do not use the device if you notice an unusual noise.
•
For hygiene reasons, each user must use his own
accessories.
•
Always disconnect from the mains after use.
•
Store the device in a location protected against en-
vironmental influences. The device must be stored
in the specified ambient conditions.
FUSE
•
The device contains an overload protection fuse.
This must only be changed by authorised specialist
personnel.
General notes
Important
•
Use the unit only:
–
On humans,
–
for its intended purpose (aerosol inhalation) and in
the manner described in these instructions for use.
• Any improper use can be dangerous!
12
Page 13

•
4
In acute emergencies, first aid takes priority.
•
Apart from the medication, use only distilled water or
a saline solution in the unit. Other liquids may cause
defects to the nebuliser or atomiser.
•
This unit is not intended for commercial or clinical
use, but only for individual, private household use!
Before using the unit for the first time
Important
•
Before you use the unit for the first time, remove all
packaging materials.
•
Protect the unit against dust, dirt and moisture.
Never cover the unit during operation.
•
Do not use the unit in very dusty environments.
•
Switch the unit off immediately if it is defective or
malfunctioning.
•
The manufacturer shall not be held liable for damage
or injuries caused by improper or incorrect use.
Repairs
Note
• Never open or attempt to repair the unit yourself, as
otherwise proper function is no longer guaranteed. Failure to observe this regulation shall void the warranty.
•
If you need to have the unit repaired, contact cus-
tomer service or an authorised dealer.
4. Description of device and
accessories
Overview of the nebuliser
1
2
3
5
6
Overview of atomiser and accessories
9
11
10
13
14
8
12
8 Compressed air hose
9 Atomiser
10 Atomiser insert
11 Valve
12 Medicine container
13 Mouthpiece
14 Adult mask
15 Child mask
16 Nosepiece
17 Replacement filter
15
16
17
5. Initial use
Setup
Remove the unit from the packaging. Place it on a flat
surface.
Ensure that the ventilation slits are free.
Fold open the lid [2] to access the accessories.
Before using the unit for the first time
Note
•
The atomiser and accessories must be cleaned and
disinfected before they are used for the first time. For
information about this, see “Cleaning and disinfection” on page 15.
•
Attach the compressed-air hose [8] at the bottom of
the medicine container [12].
1 Mains cable
2 Lid
3 On/off switch
4 Compartment for accessories
5 Filter cap with filter
6 Hose connection
7 Holder for atomiser
7
13
Page 14
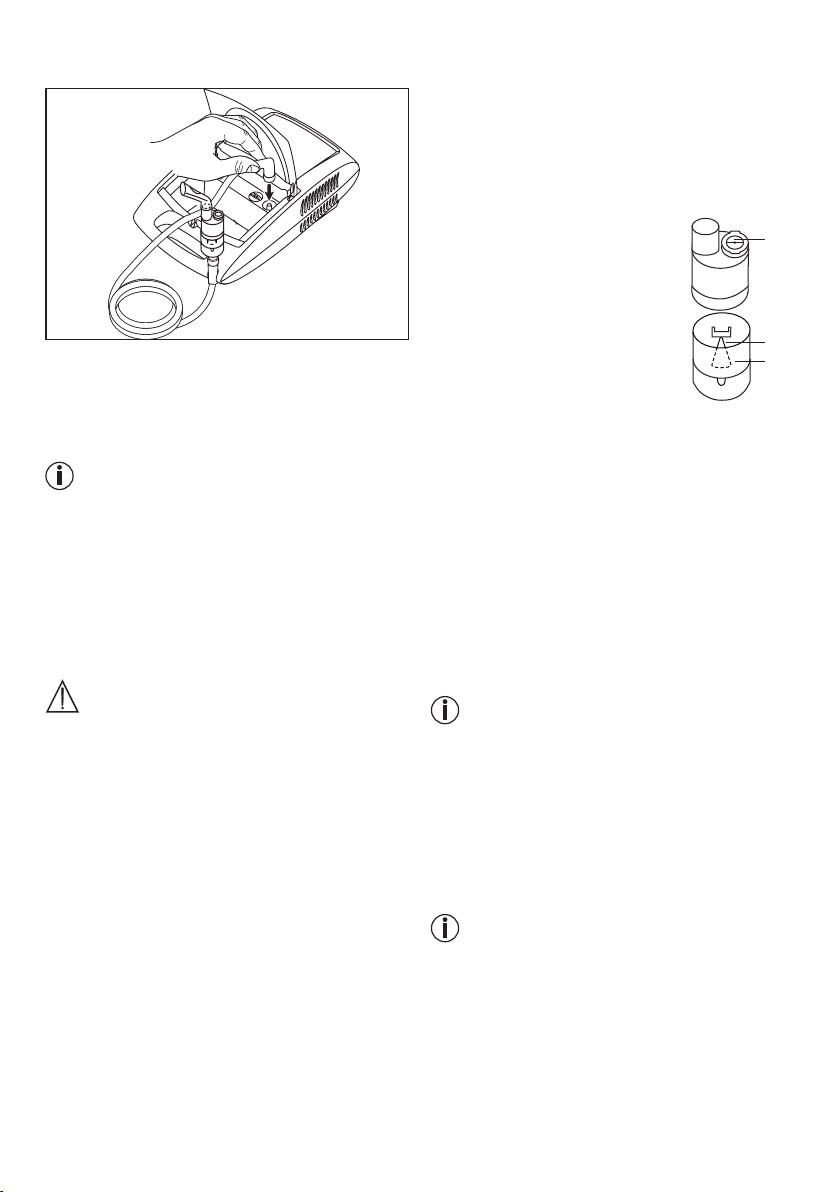
•
Connect the other end of the hose [8] to the hose
connector [6] on the nebuliser by lightly turning it.
Mains connection
Connect the unit only to the mains voltage listed on
the type plate.
• Insert the mains cable plug [1] into a suitable socket.
•
Push the plug completely into the mains socket.
Note
•
Ensure that there is a socket near to where the unit
will stand.
•
Lay the mains cable in such a way that no one can
trip over it.
•
To disconnect the nebuliser from the mains after use,
first switch off the device and then remove the plug
from the socket.
6. Operation
Caution
•
For hygiene reasons, the atomiser [9] and the ac-
cessories must be cleaned after each treatment and
disinfected after the last treatment of the day.
•
The accessories may be used only by one person;
use by several people is not recommended.
•
If several different medicines are to be inhaled in suc-
cession during therapeutic use, the atomiser [9] must
be rinsed under warm tap water after each use. For
information about this, see “Cleaning and disinfec
tion” on page 15.
•
Follow the instructions for changing the filter con-
tained in these instructions.
•
Before each use, check that the hose connections
on the nebuliser [6] and the atomiser [9] are tight.
•
Before use, check that the device is functioning cor-
rectly. To do this, switch on the nebuliser (including
the connected atomiser, but without any medication)
for a short time. If the atomiser [9] expels air, the
device is functioning correctly.
-
1. Inserting the nozzle attachment
• To open the atomiser [9], twist the upper section anticlockwise against the medicine container [12]. Place
the nozzle attachment [10] in the medicine container
[12].
• Ensure that the cone for administering medication fits
well on the cone for the air duct inside the nebuliser.
2. Filling the atomiser
• Pour an isotonic saline solution
or the medicine directly into the
medicine container [12]. Do not
overfill! The maximum recom
mended fill level is 8 ml !
• Use medication only on the advice
of a physician, and check the appropriate inhalation duration and
quantity for your needs.
•
If the required volume of medication is less than 2 ml, top up this quantity to at
least 4 ml using an isotonic saline solution. Viscous
medicines may also require dilution. Always follow
the instructions of your doctor.
-
11
10
12
3. Closing the atomiser
• To close the atomiser [9], twist the upper section
clockwise against the medicine container [12]. Ensure the parts are connected correctly.
4. Inserting the valve
• Press the blue valve [11] into the opening intended
for this purpose on the upper side of the atomiser
[9].
Note
The valve system ensures better delivery of the medication to the lungs. Only use the valve [11] with the
mouthpiece [13], never with the masks [14, 15] or the
nosepiece [16].
5. Connecting the accessories to the atomiser
•
Connect the required accessory part (mouthpiece
[13], adult mask [14], child mask [15] or nosepiece
[16]) to the atomiser [9].
Note
The most effective form of nebulisation is by using the
mouthpiece. Nebulisation using a mask is only recommended if it is not possible to use a mouthpiece (e.g.
for children who are not yet able to inhale medication
using a mouthpiece).
•
Before commencing treatment, pull the atomiser
upwards out of its holder [7].
•
Start the nebuliser using the on/off switch [3].
14
Page 15
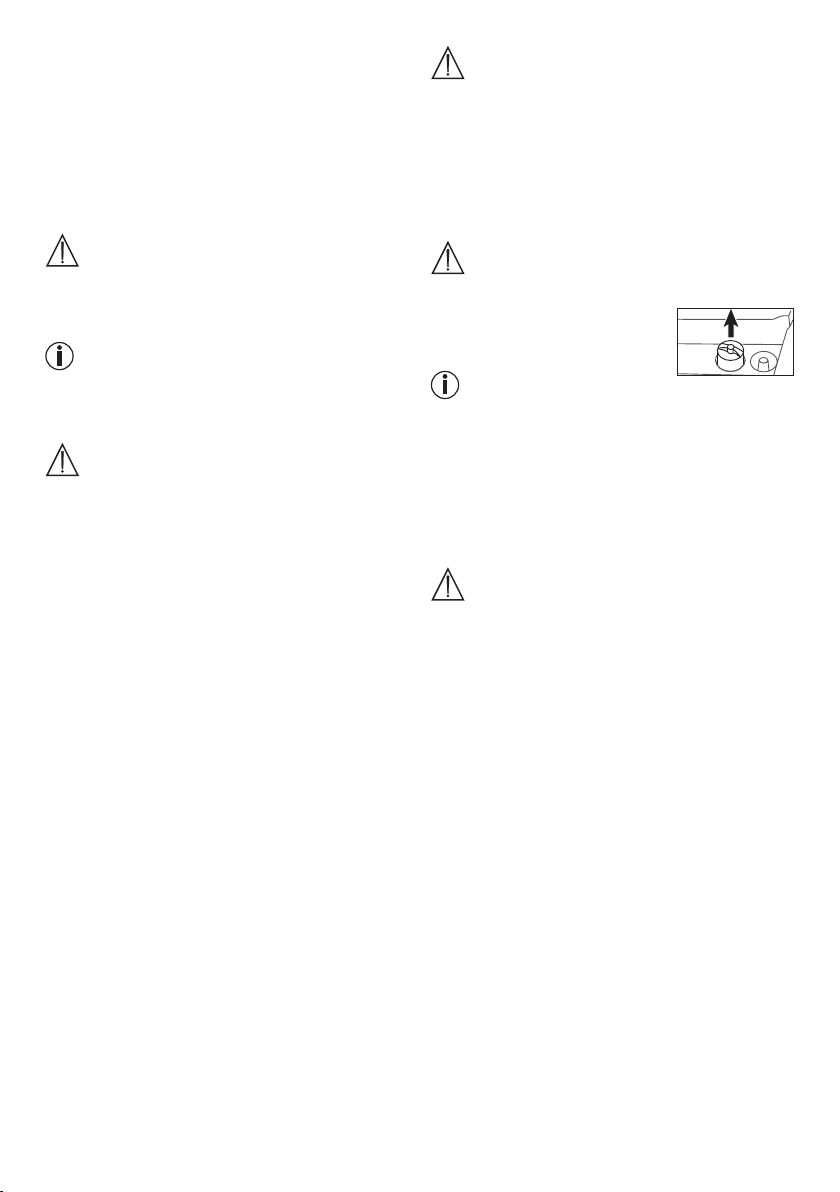
•
A flow of spray from the atomiser indicates that the
device is functioning properly.
6. Treatment
• When inhaling, sit upright and relaxed at a table and
not in an armchair to avoid compressing the airways
and therefore impairing the effectiveness of the treatment.
•
Inhale the nebulised medicine deeply.
Important
The device is not suitable for continuous operation;
after 30 minutes of operation it must be switched off
for 30 minutes.
Note
During treatment, hold the atomiser straight (verti
cal), otherwise the atomisation does not work and
correct function cannot be guaranteed.
Important
Essential oils, cough medicines, solutions designed
for gargling, and drops for application to the skin or
for use in steam baths are wholly unsuitable for inhalation using a nebuliser. These substances are often
highly viscous and can impair the correct function of
the device and hence affect the effectiveness of its
application in the long term.
In the case of oversensitivity of the bronchial system,
medicines containing essential oils can sometimes
cause acute bronchiospasm (a sudden, cramp-like
tightening of the bronchi accompanied by breathlessness). Always ask your doctor or pharmacist for advice!
7. End of inhalation
If the spray is only output sporadically or if the noise
changes during inhalation, you can end the treatment.
• Switch off the nebuliser after treatment using the on/
off switch [3] and disconnect it from the mains.
•
After use, replace the atomiser [9] in its holder [7].
8. Clean the device
For information about this, see “Cleaning and disinfection” on page 15.
7.Changing the filter
In normal operating conditions, the air filter must be
replaced after approx. 500 operating hours or one year.
Please check the air filter regularly (after 10-12 nebulisation procedures).
If the filter is very contaminated or blocked, replace the
used filter. If the filter has become wet, it must also be
replaced with a new one.
Caution
•
Do not try to clean and re-use the used filter!
•
Only use original filters supplied by the manufacturer.
Otherwise, your nebuliser may become damaged or
effective therapy can no longer be guaranteed.
• Do not repair or maintain the air filter while it is in use.
•
Never operate the device without a filter.
To replace the filter, proceed as follows:
Caution
•
First switch off the unit and unplug it.
•
Allow the unit to cool down.
1. Remove filter cap [5] upwards.
Note
If the filter remains in the unit when the cap is removed,
remove the filter from the unit using tweezers or similar.
2. Replace the filter cap [5] containing the new filter.
3. Check that the filter cap is firmly in place.
8. Cleaning and disinfection
Atomiser and accessories
Warning
Observe the following hygiene instructions in order to
avoid any health risks.
•
The atomiser
multiple use. Please note that cleaning requirements
differ according to the different application areas.
Notes:
•
The atomiser and accessories must not be me-
chanically cleaned with brushes or similar as this
can cause irreparable damage and the success of
the treatment can no longer be guaranteed.
•
For additional requirements regarding the necessary
hygienic preparations (hand washing, handling of
medicines or inhalation solutions) in high-risk groups
(e.g. cystic fibrosis patients), contact your doctor.
•
Ensure that all parts are properly dried following all
cleaning and disinfection. Residual moisture or water
droplets can result in an increased risk of bacterial
growth.
Preparation
•
Directly following each treatment, all parts of the
atomiser [9] and any accessories used must be
cleaned of medicine residues and contamination.
•
To do this, dismantle the atomiser [9] into its com-
ponent parts.
[9] and accessories are intended for
15
Page 16
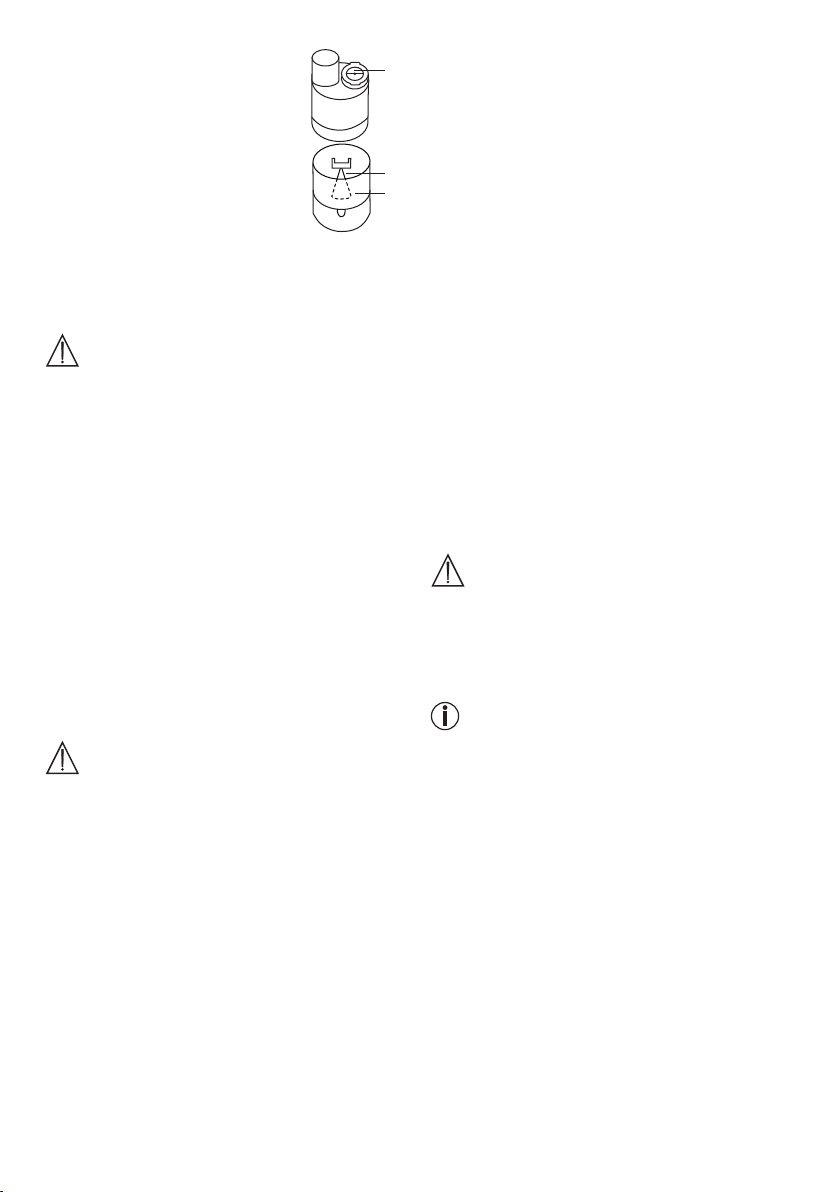
•
Remove the mouthpiece [13], mask
[14,15] or nosepiece [16] from the
atomiser.
•
Dismantle the atomiser by twisting
the upper section anti-clockwise
against the medicine container
[12].
•
Remove the nozzle attachment [10]
from the medicine container [12].
• Remove the valve [11] by pulling
it out of the atomiser [9].
•
The nebuliser is later reassembled in the reverse or-
der.
•
11
•
•
Disinfection
10
Follow the steps listed below carefully in order to disin-
12
fect your atomiser and the accessories. It is advisable
to disinfect the individual components after the last
time they are used each day at the latest.
(For disinfection, you will simply require a small amount
of clear vinegar and distilled water).
•
Cleaning
Important
Before you clean the unit, always switch it off, unplug
it and let it cool off.
The atomiser and the used accessories such as the
mouthpiece, mask, nozzle attachment, etc. must be
washed with hot but not boiling water after each use.
Carefully dry all components using a soft cloth. Once
all components are fully dry, reassemble the atomiser
and place the components in a dry, sealed container
or carry out disinfection.
When cleaning, ensure that all residues are removed.
Never use any substances that may be poisonous
when in contact with the skin or mucous membranes,
or when swallowed or inhaled.
Use a soft, dry cloth and non-abrasive cleaning prod
ucts to clean the device.
Do not use abrasive detergents and never immerse
the unit in water.
Important
•
Ensure that no water penetrates inside the unit!
•
Do not put the device or accessories in a dishwasher.
•
Do not touch the unit with wet hands while it is
plugged in; do not allow any water to be sprayed
onto the unit. The unit must be operated only when
it is completely dry.
•
Do not spray any liquids into the ventilation slots. Any
liquid that penetrates into the unit can damage the
electrical parts or other components of the nebuliser
and impair the function of the device.
Condensation, care of the hose
Depending on the environmental conditions, condensation may collect in the hose. To prevent against
bacterial growth and to ensure effective therapeutic
use, this moisture must always be removed. To remove
moisture from the hose, proceed as follows:
•
Remove the hose [8] from the atomiser [9].
• Place the disassembled nebuliser, mouthpiece and
• For the remaining accessories,
•
• Rinse the parts with water and dry carefully with a
Do not boil or autoclave the masks and air hose.
•
-
Ensure that all parts are thoroughly dried during, and
in particular after cleaning, otherwise there is an increased risk of bacterial growth.
Sterilisation
•
Drying
•
Material resistance
•
Leave the hose plugged into the nebuliser [6].
Run the nebuliser until all the moisture has been dis-
placed by the flow of air.
In the event of significant contamination, replace the
hose.
First clean the atomiser and the accessories as de-
scribed under “Cleaning”.
nosepiece in boiling water for five minutes.
use a vinegar solution
consisting of ¼ vinegar and ¾ distilled water. Make
sure that the volume is sufficient to fully submerge
the parts in the solution.
Leave the components in the vinegar solution for 30
minutes.
soft cloth.
Important
Once all components are fully dry, reassemble the
atomiser and place the components in a dry, sealed
container.
Note
Use the cold sterilisation solutions according to the
manufacturer's instructions.
Place the individual components on a dry, clean and
absorbent surface and allow to dry completely (for
at least 4 hours).
As with all plastic components, frequent use and
cleaning of the atomiser and the accessories can
lead to a certain amount of wear. Over time, this can
alter the aerosol properties and may eventually affect
the efficiency of therapy. We therefore recommend
that you replace the atomiser once a year.
16
Page 17

•
When choosing a cleaning or disinfecting agent, note
the following: Only use mild cleaning or disinfectant agents in the quantities recommended by the
manufacturer.
Storage
•
Do not store the nebuliser in a damp atmosphere
(e.g. in the bathroom) or transport it together with
damp objects.
•
Store and transport the nebuliser away from direct
sunlight.
•
The accessories can be safely stored in the acces-
sories compartment [4]. Store the device in a dry
place, if possible in its original packaging.
9. Disposal
In the interest of environmental protection, do not dispose of the device in household waste.
Please dispose of the device in accordance with
EC Directive – WEEE (Waste Electrical and Electronic Equipment).
If you have any queries, please contact the ap
propriate local authorities.
-
10. Troubleshooting
Problem/Question
The atomiser
produces
little or no
aerosol.
Output is too
low.
Which
medicines are
suitable for
inhalation?
Possible Cause/Remedy
1. Too much or too little medicine
in the atomiser.
Minimum: 2 ml,
Maximum: 8 ml.
2. Check that the nozzles are not
blocked If necessary, clean
the nozzle (e.g. by rinsing).
Use the atomiser again.
CAUTION: Only poke imple
ments through the fine holes
from the underside of the
nozzle.
3. The atomiser is not held in an
upright position.
4. The medicine solution is
unsuitable for nebulising (e.g.
too thick).
The medicine solution should
be specified by the doctor.
Hose kinked, filter blocked, too
much inhalation solution.
Consult your doctor.
Essentially all medicines that
are suitable and approved for
device-based inhalation can be
inhaled.
-
Problem/Question
Some inhalation
solution
remains in the
atomiser.
What special
steps should be
taken for babies
and children?
Inhalation with
the mask takes
longer.
Why do I need
to replace the
atomiser at
regular inter
vals?
Does each per
son need their
own atomiser?
-
-
Possible Cause/Remedy
This is normal and occurs for
technical reasons. Stop inhala
tion if you hear a notable difference in the noise of the atomiser.
1. In babies, the mask should
cover the mouth and nose to
guarantee effective inhalation.
2. In children, the mask should
also cover the mouth and
nose. Nebulisation next to a
sleeping person is not suitable
because insufficient medicine
reaches the lungs.
Note: Children should only use
the device with help and under
supervision of an adult. Never
leave a child alone with the
nebuliser.
This is for technical reasons.
Less medicine is inhaled per
breath through the mask holes
than using the mouthpiece. The
aerosol is mixed with ambient air
through the holes in the mask.
There are two reasons for this:
1. To guarantee a therapeutically
effective particle spectrum,
the nozzle holes should not
exceed a certain diameter.
Due to the thermal and me
chanical stresses, the plastic
is subjected to a certain
amount of wear. The nozzle
attachment [10] is particularly
susceptible to this wear. This
can also cause changes to
the droplet composition of the
aerosol, which has a direct effect on the effectiveness of the
treatment.
2. You are also recommended
to replace the atomiser on
a regular basis for hygiene
reasons.
This is absolutely necessary for
hygiene reasons.
-
-
17
Page 18
11. Technical specifications
Model IH 21
Type IH 21/1
Dimensions
(WxHxD) 300 x 180 x 100 mm
Weight 1.65 kg
Operating
pressure approx. 0.8 - 1.45 bar
Atomiser fill
volume
Medicine flow ca. 0.3 ml/min.
Sound pressure max. 52 dBA
Mains
connection
Operating
conditions
Storage and
transport
conditions
Aerosol
Properties
Subject to technical modifications.
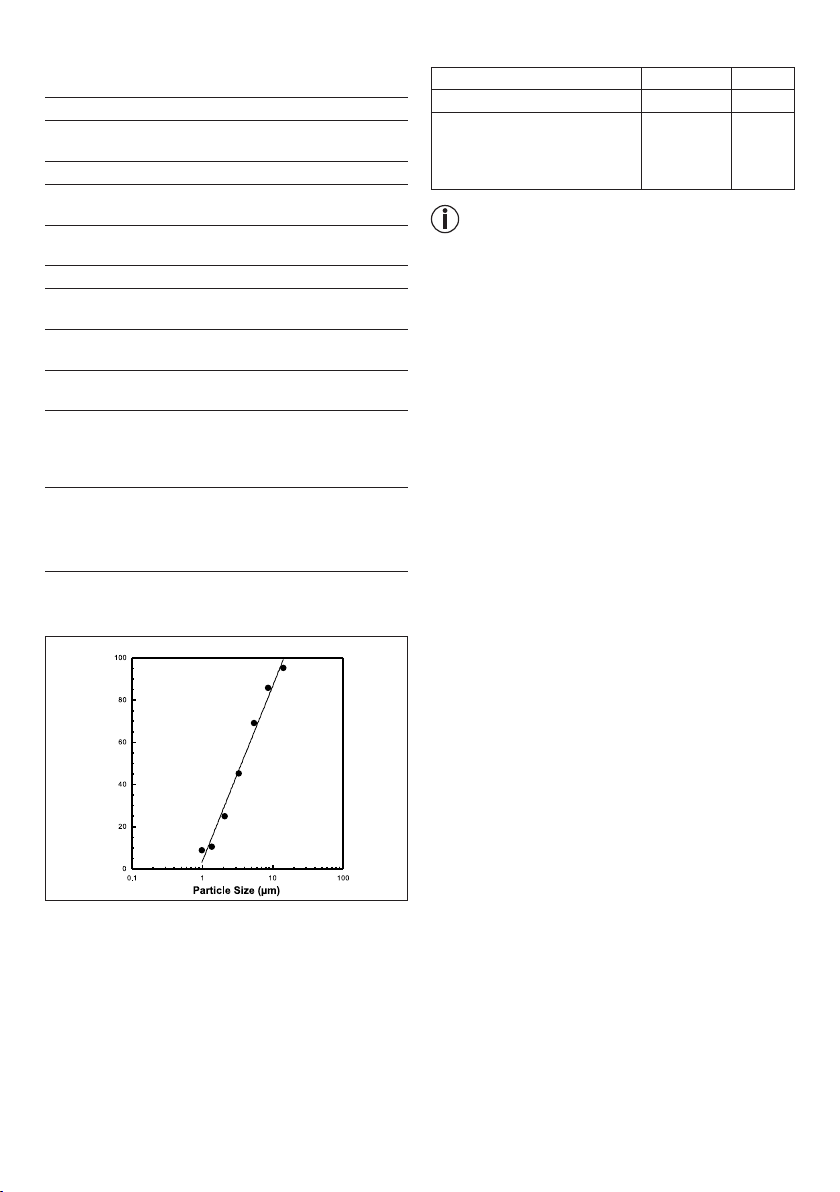
Particle size diagram
max. 8 ml
min. 2 ml
(acc. to DIN EN 13544-1 section 26)
230 V~; 50 Hz; 230 VA
UK: 240 V~; 50 Hz; 240 VA
Temperature: +10 °C to +40 °C
Relative humidity: 10% to 95%
Temperature: 0 °C to +60 °C
Relative humidity: 10% to 95%
Atmospheric pressure:
500 to 1060 hPa
1) Flow: 5.3 l/min
2) Aerosol delivery: 0.216 ml
3)
Aerosol delivery rate: 0.112 ml/min
4) Particle size (MMAD): 3.85 µm
Spare parts
Designation Material REF
Nebulisation stopper PP
Yearpack (contains Mouth-
piece, Nosepiece, Adult mask,
Child mask, Atomiser, Compressed air hose, Filter)
PP/ PVC 601.22
162.819
Note
If the unit is used outside of the specifications, proper
function is no longer guaranteed!
We reserve the right to make technical changes to im
prove and further develop the product.
This device and its accessories comply with European
standards EN60601-1 and EN60601-1-2, as well as
EN13544-1, and is subject to special safety measures
in terms of electromagnetic tolerance. Note that port
able and mobile RF communication equipment can
affect this unit. More details can be requested from
the stated Customer Service address or found at the
end of the instructions for use. The unit conforms to
the requirements of the European Directive for Medical
Products 93/42/EC, the MPG (German Medical units
Act).
ELECTROMAGNETIC COMPATIBILITY
•
The device complies with current specifications with
regard to electromagnetic compatibility and is suitable for use in all premises, including those designated for private residential purposes. The radio
frequency emissions of the device are extremely low
and in all probability do not cause any interference
with other devices in the proximity.
•
It is recommended that you do not place the device
on top of or close to other devices. Should you notice
any interference with other electrical devices, move
the unit or connect it to a different socket.
•
Radio equipment may affect the operation of this
device.
Measurements were performed using a sodium
fluoride solution with a "Next Generation Impactor" (NGI).
This diagram may not be applicable for suspensions
or highly viscous medicines. More information can be
obtained from the relevant medicine manufacturer.
18
Page 19
FRANÇAIS
Sommaire
1. Apprendre à connaître .......................................19
2. Symboles utilisés ...............................................19
3. Consignes d’avertissement et de sécurité ........20
4. Description de l’appareil et des accessoires .....21
5. Mise en service ..................................................22
6. Utilisation ...........................................................22
7. Changement du filtre .........................................24
8. Nettoyage et désinfection .................................24
9. Mise au rebut .....................................................25
10. Dépannage ........................................................26
11. Caractéristiques techniques ..............................26
Eléments fournis
Voir la description de l’appareil et des accessoires
page 21.
•
Inhalateur
•
Nébuliseur
•
Flexible à air comprimé
•
Embout buccal
•
Masque pour adulte
•
Masque pour enfant
•
Embout nasal
•
Filtre de rechange
•
Notice d’utilisation
1. Apprendre à connaître
Cher cliente, cher client,
Nous vous remercions d’avoir choisi l’un de nos produits. Notre société est réputée pour l’excellence de
ses produits et les contrôles de qualité approfondis
auxquels ils sont soumis, dans les domaines suivants :
chaleur, contrôle du poids, diagnostic de pression artérielle, mesure de température du corps et du pouls,
thérapies douces, massage et purification d’air.
Lisez attentivement cette notice, conservez- la pour un
usage ultérieur, mettez-la à la disposition des autres
utilisateurs et suivez les consignes qui y figurent.
Sincères salutations,
votre équipe Beurer
Domaine d’application
Cet inhalateur est un appareil servant à la nébulisation
de liquides et de médicaments liquides (aérosols) et
au traitement des voies respiratoires supérieures et
inférieures.
La nébulisation et l’inhalation d’un médicament prescrit
ou recommandé par le médecin permet de prévenir les
maladies des voies respiratoires, de limiter leurs effets
secondaires et d’accélérer la guérison. Consultez votre
médecin ou pharmacien pour en savoir plus sur les
possibilités d’utilisation.
L’appareil est conçu pour l’inhalation à domicile. L’in
halation de médicaments ne doit s’effectuer que sur
avis médical. Soyez calme et détendu pour procéder
à l’inhalation. Inspirez lentement et profondément afin
que le médicament parvienne jusqu’aux bronches les
plus fines et les plus lointaines. Expirez normalement.
Après préparation, l’appareil est approprié pour une
réutilisation. La préparation comprend le remplacement
de tous les accessoires, y compris du nébuliseur et
du filtre à air, ainsi qu’une désinfection de la surface
de l’appareil à l’aide d’un désinfectant d’usage dans
le commerce.
-
2. Symboles utilisés
Voici les symboles utilisés dans la notice d’utilisation :
Avertissement Ce symbole vous avertit des
Attention Ce symbole vous avertit des
Remarque
Voici les symboles utilisés sur l’emballage et sur la
plaque signalétique de l’appareil et des accessoires :
Partie d’application, type BF
Lire la notice d’utilisation
Appareil de classe 2
F
abricant
Marche
I
Arrêt
O
Numéro de série
SN
30 ON /
30 OFF
après 30minutes d’utilisation, il doit être
arrêté pendant 30minutes
Protéger contre l’humidité
risques de blessures ou des
dangers pour votre santé.
éventuels dommages au
niveau de l’appareil ou d’un
accessoire.
Ce symbole indique des informations importantes.
19
Page 20

3. Consignes d’avertissement et de
sécurité
Avertissement
•
Avant l’utilisation, assurez-vous qu’aucun dommage
apparent n’est visible sur l’appareil et les accessoires. En cas de doute, n’utilisez pas l’appareil et
adressez-vous à votre revendeur ou à votre service
aprèsvente.
•
En cas de panne de l'appareil, consultez le chapitre
«10. Solutions aux problèmes».
• L’usage de l’appareil ne se substitue pas à une
consultation chez le médecin, ni à un traitement.
Par conséquent, en cas de douleur ou de maladie
de toute nature, consultez toujours d’abord votre
médecin.
•
En cas de doutes de quelque nature que ce soit
concernant votre santé, consultez votre médecin
traitant.
•
Respectez les mesures générales d’hygiène pour
l’utilisation du nébuliseur.
•
Conformez-vous aux indications du médecin pour ce
qui est du type de médicament à utiliser, du dosage,
de la fréquence d’administration et de la durée de
l’inhalation.
•
Utilisez uniquement les médicaments qui ont été
prescrits ou recommandés par votre médecin ou
pharmacien.
Attention
Pour le traitement, n'utilisez que les pièces recom
mandées par le médecin, correspondant à l'évolution
de la maladie.
• Vérifiez sur la notice du médicament qu'il n'existe
pas de contre-indication à une utilisation avec les
systèmes habituels de thérapie par aérosols.
•
En cas de fonctionnement erratique de l’appareil, de
malaise ou de douleurs, interrompez immédiatement
le traitement.
•
Tenez l’appareil loin de vos yeux pendant l’utilisation
pour les protéger du nuage de médicament.
•
Ne faites pas fonctionner l’appareil en présence de
gaz inflammables.
• Cet appareil n’est pas conçu pour être utilisé par
des enfants ou des personnes dont les facultés physiques, sensorielles (par ex. insensibilité à la douleur)
ou psychiques sont limitées ou manquant d’expérience et/ou des connaissances nécessaires. Elles
peuvent toutefois s’en servir à condition de le faire
sous la surveillance d’une personne responsable de
leur sécurité ou de suivre les directives de cette der
nière.
• Avant chaque nettoyage et/ou chaque entretien,
l'appareil doit être éteint et débranché.
•
Ne laissez pas l’emballage à la portée des enfants
(risque d’étouffement).
-
-
20
• Pour éviter tout risque d'empêtrement et d'étranglement, conservez les câbles et les conduites d'air
hors de portées des jeunes enfants.
•
N’utilisez pas de pièces supplémentaires ou d’acces-
soires non recommandés par le fabricant.
•
L’appareil doit uniquement être raccordé à la tension
secteur indiquée sur la plaque signalétique.
•
N’immergez pas l’appareil sous l’eau et ne l’utilisez
pas dans des locaux humides. Aucun liquide ne doit
pénétrer dans l’appareil.
•
Protégez l’appareil contre les chocs importants.
•
Ne touchez jamais le câble d’alimentation avec les
mains humides, vous risquez de recevoir une décharge électrique.
•
Ne débranchez pas la fiche secteur de la prise de
courant en tirant sur le câble.
•
Ne pincez pas le câble, ne le pliez pas, ne le tendez
pas sur des objets à arêtes vives, ne le laissez pas
pendre et protégez- le de la chaleur.
• Nous recommandons de dérouler entièrement le
câble d'alimentation pour éviter toute surchauffe
dangereuse.
•
Si le câble d’alimentation électrique de l’appareil
est endommagé, il doit être remplacé par le fabricant, son service clients ou toute autre personne
qualifiée afin d’éviter tout danger.
•
Un risque de choc électrique existe si vous ouvrez
le corps de l’appareil. La déconnexion du réseau
d’alimentation n’est garantie que si la fiche secteur
est débranchée de la prise de courant.
•
Si l’appareil est tombé, a été soumis à une humidité
importante ou garde des séquelles de sa chute, il
ne doit plus être utilisé. En cas de doute, contactez
votre service après-vente ou votre revendeur.
•
L’inhalateur IH 21 ne peut être utilisé qu’avec
des nébuliseurs et accessoires adaptés. L’utilisation de nébuliseurs et d’accessoires d’une autre
marque peut nuire à l’efficacité du traitement et,
dans certains cas, endommager l’appareil.
Attention
•
Une coupure de courant, des perturbations ou
d’autres conditions défavorables peuvent entraîner
une indisponibilité de l’appareil. Il est par conséquent
recommandé de disposer d’un appareil de remplacement ou d’un médicament (prescrit par le médecin).
•
Si des adaptateurs ou des rallonges sont néces-
saires, ils doivent satisfaire aux consignes de sécurité qui s’appliquent. La tension d’alimentation maximale et la puissance électrique maximale indiquée
sur l’adaptateur ne doivent pas être dépassées.
•
L’appareil et le câble d’alimentation ne doivent pas
être conservés à proximité de sources de chaleur.
Page 21
•
4
L’appareil ne doit pas être utilisé dans des pièces où
des aérosols ont été utilisés auparavant. Ces pièces
doivent être aérées avant de procéder au traitement.
•
Aucun objet ne doit venir obstruer les ouvertures
d’aération.
•
N’utilisez jamais l’appareil s’il émet un bruit anormal.
•
Pour des raisons hygiéniques, il est indispensable
que chaque utilisateur utilise ses propres accessoires.
•
Retirez systématiquement la fiche secteur après
avoir utilisé l’appareil.
•
Conservez l’appareil dans un endroit à l’abri des
aléas météorologiques. Les conditions atmosphériques préconisées pour son stockage doivent être
respectées.
DISPOSITIF DE SECURITE
•
Une protection de surintensité est intégrée dans
l’appareil. Celle-ci ne peut être remplacée que par
un personnel qualifié et autorisé.
Remarques générales
Attention
•
L’appareil doit être uniquement utilisé :
– sur l’homme,
– pour l’usage auquel il est destiné (inhalation d’aéro-
sols) et selon la méthode décrite dans cette notice
d’utilisation.
•
Toute utilisation inappropriée peut s’avérer dan-
gereuse !
•
En cas de situation d’urgence, effectuez les gestes
de premiers secours.
•
Outre les médicaments, utilisez uniquement de l’eau
distillée ou une solution de chlorure de sodium.
D’autres liquides peuvent endommager dans certains cas l’inhalateur ou le nébuliseur.
•
Cet appareil n’est pas destiné à un usage profes-
sionnel ou clinique, il est réservé exclusivement à
un usage domestique.
Avant la mise en service
Attention
•
Avant d’utiliser l’appareil, retirez tous les matériaux
d’emballage.
•
Protégez l’appareil de la poussière, de la saleté et
de l’humidité, ne couvrez en aucun cas l’appareil
lorsqu’il fonctionne.
•
N’utilisez pas l’appareil dans un environnement trop
poussiéreux.
•
Eteignez immédiatement l’appareil en cas de défauts
ou de dysfonctionnements.
•
Le fabricant décline toute responsabilité quant aux
dommages résultant d’une utilisation inappropriée
ou incorrecte de l’appareil.
Réparation
Remarque
• Vous ne devez en aucun cas ouvrir ou réparer l’appareil, faute de quoi le fonctionnement de l’appareil ne
serait plus garanti. En cas de non-respect de ce point,
la garantie est annulée.
•
Pour toute réparation, adressez-vous au service
après-vente ou à un revendeur agréé.
4. Description de l’appareil et des
accessoires
Aperçu de l’inhalateur
1
2
3
5
6
7
1 Cordon d’alimentation secteur
2 Couvercle
3 Interrupteur de marche/arrêt
4 Compartiment pour accessoires
5 Bouchon-filtre avec filtre
6 Raccord du flexible
7 Support du nébuliseur
21
Page 22

Aperçu du nébuliseur et des accessoires
9
11
10
13
14
8
12
•
Enfichez l’autre extrémité du flexible [8] dans le
raccord de flexible [6] de l’inhalateur, en le tournant
légèrement.
8 Flexible à air comprimé
9 Nébuliseur
10 Système de nébulisation
11 Soupape
12 Récipient à médicaments
13 Embout buccal
14 Masque pour adulte
15 Masque pour enfant
16 Embout nasal
17 Filtre de rechange
15
16
17
5. Mise en service
Installation
Retirez l’appareil de l’emballage.
Placez-le sur une surface plane.
Veillez à bien dégager les ouvertures d’aération.
Ouvrez le couvercle [2] pour accéder aux accessoires.
Avant la première utilisation
Remarque
•
Le nébuliseur et les accessoires devraient être net-
toyés et désinfectés avant leur première utilisation.
Voir à cet égard le chapitre « Nettoyage et désinfection », page 25.
•
Branchez le flexible à air comprimé [8] en bas sur le
récipient à médicaments [12].
Raccordement au secteur
L’appareil doit uniquement être raccordé à la tension
secteur indiquée sur la plaque signalétique.
•
Branchez la fiche du câble d’alimentation [1] dans
une prise adéquate.
•
Pour le raccordement au secteur, enfoncez la fiche
complètement dans la prise de courant.
Remarque
•
Veillez à ce qu’une prise de courant se trouve à proxi-
mité de l’emplacement de l’appareil.
•
Disposez le câble d’alimentation de telle sorte que
personne ne puisse trébucher.
•
Avant de débrancher l’inhalateur du réseau élec-
trique après le processus d’inhalation, éteignez tout
d’abord l’appareil, puis débranchez la fiche secteur
de la prise de courant.
6. Utilisation
Attention
•
Pour des raisons hygiéniques, il est indispensable de
nettoyer le nébuliseur [9] ainsi que les accessoires
après chaque traitement, et de les désinfecter après
le dernier traitement quotidien.
•
Les accessoires ne doivent être utilisés que par une
seule personne; leur utilisation par plusieurs personnes est déconseillé.
•
Si plusieurs médicaments différents devaient être
inhalés successivement lors d’une thérapie, le nébuliseur [9] doit être rincé à l’eau de robinet chaude
après chaque application. Voir à cet égard le chapitre
„Nettoyage et désinfection“, page 25.
•
Respectez les instructions de cette notice relatives
au changement du filtre !
•
Contrôlez avant chaque utilisation de l’appareil la
bonne fixation des raccords du flexible sur l’inhalateur [6] et sur le nébuliseur [9].
22
Page 23
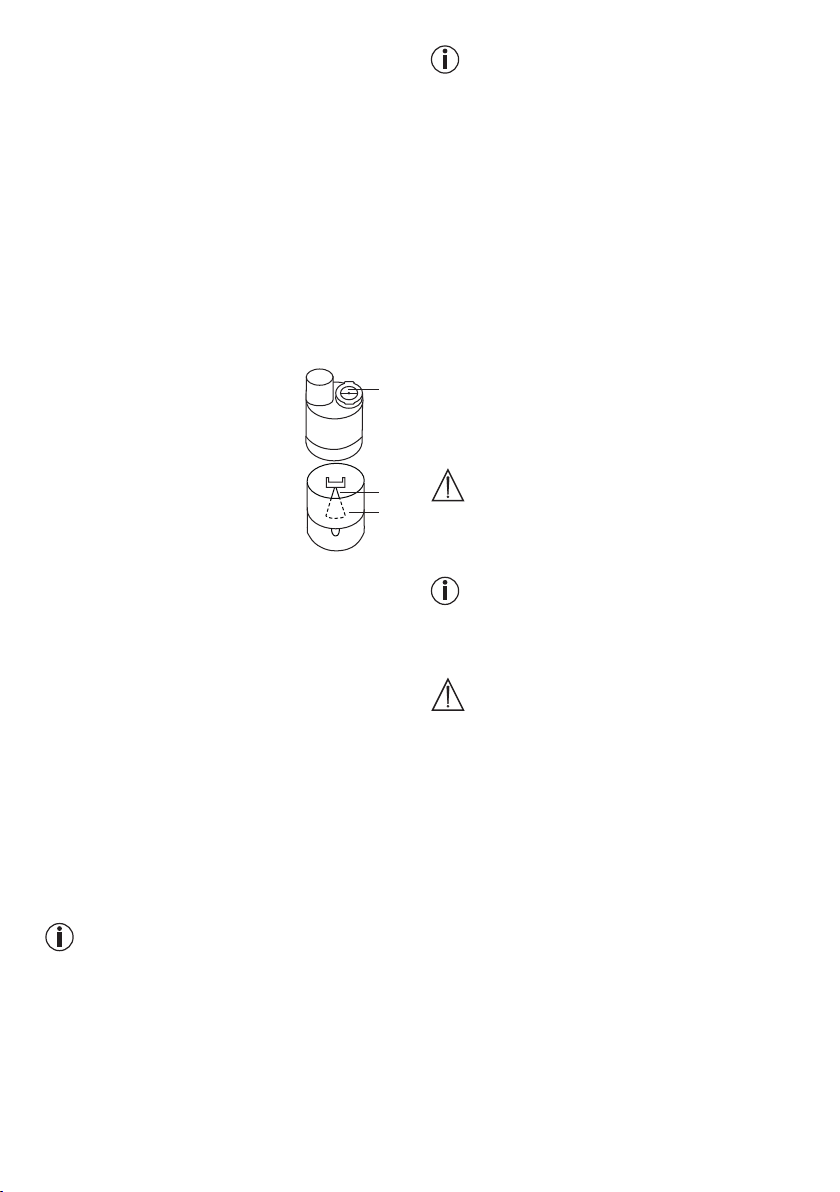
•
Contrôlez le fonctionnement correct de l’appareil
avant de l’utiliser ; pour ce faire, mettez brièvement
l’inhalateur en marche (avec le nébuliseur raccordé
mais sans médicaments). L’appareil fonctionne correctement si, à cette occasion, de l’air sort du nébuliseur [9].
1. Montage de la buse
•
Ouvrez le nébuliseur [9] en tournant la partie supé-
rieure dans le sens inverse des aiguilles d’une montre
par rapport au récipient à médicaments [12]. Insérez
la buse [10] dans le récipient à médicaments [12].
• Assurez-vous que le cône d'arrivée de médicaments
est bien en place sur le cône du conduit d'air à l'intérieur de l'atomiseur.
2. Remplissage du nébuliseur
•
Remplissez directement le réci-
pient à médicament [12] avec une
solution de chlorure de sodium
isotonique ou avec le médica
ment. Attention à ne pas trop le
remplir ! La quantité maximale de
remplissage recommandée est de
8 ml !
•
Utilisez uniquement des médica-
ments prescrits par votre médecin
et demandez la durée et la dose d’inhalation adaptées à vos besoins !
•
Si la dose de médicament prescrite est inférieure à
2 ml, remplissez cette quantité avec une solution de
chlorure de sodium isotonique jusqu’à un minimum
de 4 ml. La dilution est également nécessaire pour
les médicaments visqueux. Conformez-vous aux
indications de votre médecin.
-
11
10
12
3. Fermeture du nébuliseur
•
Fermez le nébuliseur [9] en tournant la partie supé-
rieure dans le sens des aiguilles d’une montre par
rapport au récipient à médicaments [12]. Assurezvous de la fermeture correcte !
4. Insérer la soupape
• Appuyez sur la soupape bleue [11] dans l'ouverture
prévue à cet effet sur le dessus du nébuliseur [9].
Note
Le système de soupape assure un meilleur dépôt du
médicament dans les poumons. N'utilisez la soupape
[11] qu'avec l'embout buccal [13] et jamais avec le
masque [14,15] ni l'embout nasal [16].
5.
Raccordement des accessoires au nébuliseur
•
Relier le nébuliseur [9] à l’accessoire souhaité (em-
bout buccal [13], masque pour adulte [14], masque
pour enfant [15] ou embout nasal [16]).
Remarque
L'inhalation avec l'embout buccal est la forme la plus
efficace de la thérapie. L'utilisation du masque d'inhalation n'est recommandée que lorsque l'utilisation d'un
embout buccal n'est pas possible (par exemple, chez
les enfants qui ne peuvent pas encore inhaler dans
l'embout buccal).
•
Retirez le nébuliseur de son support [7] en le tirant
vers le haut avant de commencer le traitement.
•
Démarrez l’inhalateur au moyen de l’interrupteur
marche/arrêt [3].
•
Le brouillard de pulvérisation qui s’échappe du nébu-
liseur indique que l’appareil fonctionne parfaitement.
6. Traitement
• Pendant l'inhalation, restez debout et détendu à côté
d'une table et non assis sur une chaise, pour ne
pas compresser les voies respiratoires et risquer de
compromettre l'efficacité du traitement.
•
Inspirez profondément le médicament nébulisé.
Attention
L'appareil n'est pas adapté pour être utilisé pendant
une longue durée: après 30minutes d'utilisation, il doit
être arrêté pendant 30minutes.
Remarque
Tenez le nébuliseur droit (vertical) pendant l’inhalation ;
autrement, la nébulisation ne fonctionne pas et l’appareil ne peut plus fonctionner correctement.
Attention
Les huiles essentielles à base de plantes médicinales,
les sirops contre la toux, les gargarismes, les gouttes
pour frictions ou pour bains de vapeur sont impropres
à l’inhalation avec des inhalateurs. Ces produits ajoutés sont bien souvent visqueux et peuvent entraver
le fonctionnement de l’appareil et ainsi l’efficacité du
traitement. En cas d’hypersensibilité des bronches,
les médicaments contenant des huiles essentielles
peuvent dans certains cas entraîner un bronchos
pasme aigu (diminution du calibre des bronches par
constriction pulmonaire avec respiration difficile).
Demandez conseil à votre médecin ou pharmacien !
-
7. Fin de l’inhalation
Si le nuage de pulvérisation ne s’échappe plus que
de façon irrégulière ou si le bruit change au cours de
l’inhalation, vous pouvez arrêter l’inhalation.
• Après utilisation, éteignez l'inhalateur à l'aide de
l'interrupteur Marche/Arrêt [3] et débranchez-le du
secteur.
•
Après le traitement, remettez le nébuliseur [9] dans
son support [7].
23
Page 24
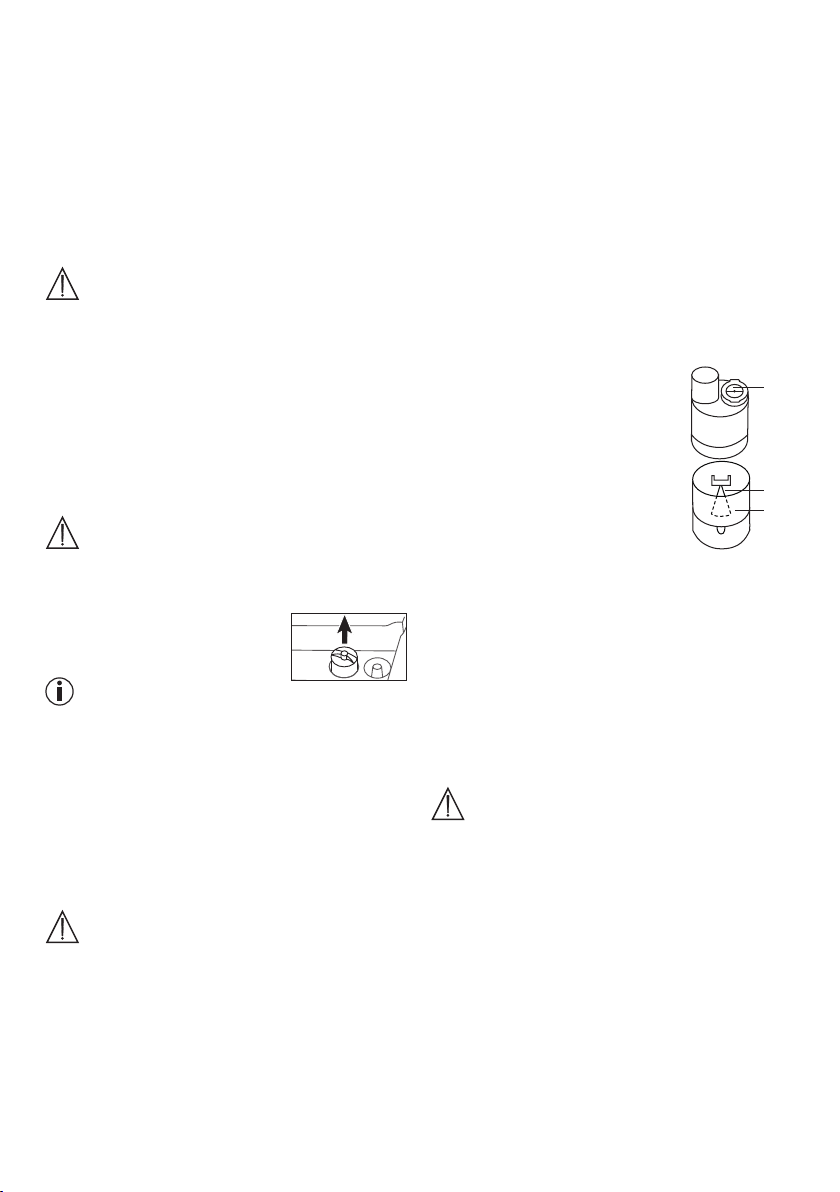
8. Nettoyez l’appareil
Voir „Nettoyage et désinfection“, page 24.
7. Changement du filtre
Dans des conditions d'utilisation normales, le filtre à air
est prévu pour être changé après environ 500heures
d'utilisation ou une année. Vérifiez l'état du filtre à air
régulièrement (toutes les 10 à 12atomisations).
S’il est fortement encrassé ou bouché, remplacez-le.
Si le filtre est humide, il doit également être remplacé
par un filtre neuf.
Attention
•
N’essayez pas de nettoyer et de réutiliser le filtre
usagé !
•
Utilisez exclusivement le filtre d’origine du fabricant,
votre inhalateur risquant autrement d’être endommagé ou le traitement de ne pas être assez efficace.
• Le filtre à air ne doit pas être réparé ou entretenu
alors qu'une personne est en train d'utiliser l'appareil.
•
N’utilisez en aucun cas l’appareil sans filtre.
Procédez comme suit pour changer le filtre :
Attention
•
Eteignez tout d’abord l’appareil, puis débranchez-le
du secteur.
•
Laissez refroidir l’appareil.
1. Tirer le capuchon du filtre [5]
vers le haut.
Remarque
Si le filtre reste dans l’appareil après le retrait du bouchon-filtre, retirez-le, par exemple avec une pince ou
un objet similaire.
2. Replacez le bouchon-filtre [5] avec le nouveau filtre
dans l’appareil.
3. Vérifiez qu’il est bien mis.
8. Nettoyage et désinfection
Nébuliseur et accessoires
Avertissement
Respectez les prescriptions suivantes en matière
d’hygiène, afin d’éviter tout risque pour votre santé.
•
Le nébuliseur [9] et les accessoires sont destinés à
un usage multiple. Différentes exigences en matière
de nettoyage et de préparation hygiénique existent
pour les différents domaines d’application.
Remarques :
•
Le nébuliseur ainsi que les accessoires ne doivent
pas faire l’objet d’un nettoyage mécanique avec des
brosses ou autres objets similaires, étant donné qu’à
cette occasion il pourrait en résulter des dommages
irréparables et que par conséquent le succès du traitement n’est plus garanti.
•
Demandez conseil à votre médecin pour connaître
les exigences supplémentaires en matière de préparation hygiénique requise (manucure, manipulation
des médicaments ou des solutions à inhaler) pour
les groupes à risques (par exemple patients atteints
de mucoviscidose).
•
Veillez à bien sécher le nébuliseur et les accessoires
après chaque nettoyage ou désinfection. L’humidité
résiduelle peut fortement favoriser la prolifération de
bactéries.
Préparation
•
Toutes les pièces du nébuliseur [9]
ainsi que les accessoires utilisés
doivent être nettoyés immédiatement après chaque traitement,
afin d’éliminer les résidus médicamenteux et les impuretés.
•
A cet égard, désassemblez le
nébuliseur [9] pour séparer tous
les composants.
•
Retirez l’embout buccal [13] le
masque [14,15] oul’embout nasal
[16] du nébuliseur.
• Désassemblez le nébuliseur en tournant la partie supérieure dans le sens inverse des aiguilles d’une montre
par rapport au récipient à médicaments [12].
•
Retirez la buse [10] du récipient à médicaments [12].
• Retirez la soupape [11] du nébuliseur [9] en la
tirant.
•
Procédez dans l’ordre inverse lorsque vous remon-
trez le nébuliseur.
11
10
12
Nettoyage
Attention
Avant tout nettoyage, l’appareil doit être éteint, déconnecté du secteur et refroidi.
Le nébuliseur et l'accessoire utilisé comme l'embout
buccal, le masque, l'embout de buse, etc. doivent être
nettoyés à l'eau chaude, mais pas bouillante, après
chaque utilisation. Séchez soigneusement les pièces
avec un chiffon doux. Après le séchage complet,
assemblez à nouveau les composants et déposezles dans un récipient sec et étanche ou effectuez la
désinfection.
Assurez-vous que tous les résidus ont été éliminés
lors du nettoyage. N’utilisez pour ce faire en aucun
cas des substances qui peuvent être toxiques en cas
de contact avec la peau ou des muqueuses, en cas
d’ingestion ou d’inhalation.
24
Page 25
Pour nettoyer l'appareil, utilisez un chiffon sec doux
et un détergent doux.
N’utilisez pas de produits de nettoyage agressifs et
n’immergez jamais l’appareil dans l’eau.
Attention
•
Veillez à ce qu’il ne s’infiltre pas d’eau dans l’intérieur
du boîtier !
•
Ne passez pas l’appareil ni les accessoires au lave-
vaisselle !
•
A l’état branché, l’appareil ne doit pas être saisi avec
les mains humides ; il ne doit pas y avoir de projection d’eau sur l’appareil. L’appareil doit uniquement
être utilisé à l’état entièrement sec.
•
Ne vaporisez aucun liquide dans les ouvertures
d’aération ! La pénétration de liquides peut occasionner un endommagement du circuit électrique et
des autres composants de l’inhalateur, et engendrer
par conséquent un dysfonctionnement de l’appareil.
Eau de condensation, entretien du flexible
De l’eau de condensation peut se former dans le
flexible en fonction des conditions atmosphériques.
Pour éviter toute prolifération de bactéries et garantir
l’efficacité du traitement, il faut impérativement éliminer
l’humidité. Voici comment procéder :
•
Retirez le flexible [8] du nébuliseur [9].
•
Laissez le flexible branché côté inhalateur [6].
•
Faites fonctionner l’inhalateur jusqu’à ce que l’humi-
dité soit éliminée par l’air qui circule.
•
En cas d’encrassements tenaces, remplacez le
flexible.
Désinfection
Veuillez suivre scrupuleusement les points mentionnés ci-dessous pour désinfecter votre nébuliseur et
les accessoires. Il est recommandé de désinfecter les
composants au plus tard après la dernière utilisation
quotidienne (seuls un peu de vinaigre incolore et de
l’eau distillée sont nécessaires à cet égard !).
•
Nettoyez tout d’abord le nébuliseur et les accessoires, comme décrit au chapitre «Nettoyage».
• Démontez l'atomiseur et l'embout buccal et laissez-les tremper 5minutes dans de l'eau bouillante.
• Pour nettoyer les autres accessoires,
mélange composé d'¼ de vinaigre et de ¾ d'eau
distillée. Assurez-vous que la quantité est suffisante
pour que les pièces sont complètement immergées.
•
Laissez les pièces pendant 30 minutes dans le mélange de vinaigre.
• Rincez les pièces à l'eau et séchez-les soigneusement avec un chiffon doux.
utilisez un
Attention
Ne pas faire bouillir ni autoclaver le masque et le tuyau
d'air.
•
Après le séchage complet, assemblez à nouveau
les pièces et déposez-les dans un récipient sec et
étanche.
Remarque
Assurez-vous du séchage complet des pièces lors
du nettoyage, ou tout particulièrement après le net
toyage, afin d’éviter le risque accru de prolifération de
bactéries.
-
Stérilisation
•
Utiliser les solutions de stérilisation à froid conformément aux recommandations du fabricant.
Séchage
•
Disposez les pièces sur un support sec, propre et
absorbant et laissez-les sécher entièrement (au moins 4 heures).
Résistance des matériaux
• Le nébuliseur et les accessoires sont soumis à une
certaine usure en cas d’utilisation fréquente et de préparation hygiénique, comme toute pièce plastique.
Avec le temps, cela peut entraîner une modification
de l’aérosol et par conséquent entraver l’efficacité du
traitement. Pour cette raison, nous recommandons de
remplacer le nébuliseur après une durée d’un an.
•
Respectez ce qui suit pour le choix du produit de
nettoyage ou du désinfectant : utilisez uniquement
un produit de nettoyage ou désinfectant doux que
vous doserez selon les consignes du fabricant.
Stockage
•
Ne rangez pas l’appareil et les accessoires dans
des pièces humides (par ex. salle de bains) et ne les
transportez pas avec des objets humides.
•
Rangez et transportez l’appareil et les accessoires à
l’abri des rayons directs du soleil.
•
Les accessoires peuvent être rangés en toute sécu-
rité dans le compartiment d’accessoires [4]. Conserver l’appareil dans un endroit sec, de préférence
dans l’emballage.
9. Mise au rebut
Afin de respecter l’environnement, l’appareil ne doit
pas être éliminé avec les ordures ménagères.
Veuillez éliminer l’appareil conformément à la
directive européenne – WEEE (Waste Electrical
and Electronic Equipment) relative aux appareils
électriques et électroniques usagés.
Pour toute question, adressez-vous aux collectivités
locales responsables de l’élimination et du recyclage
de ces produits.
25
Page 26
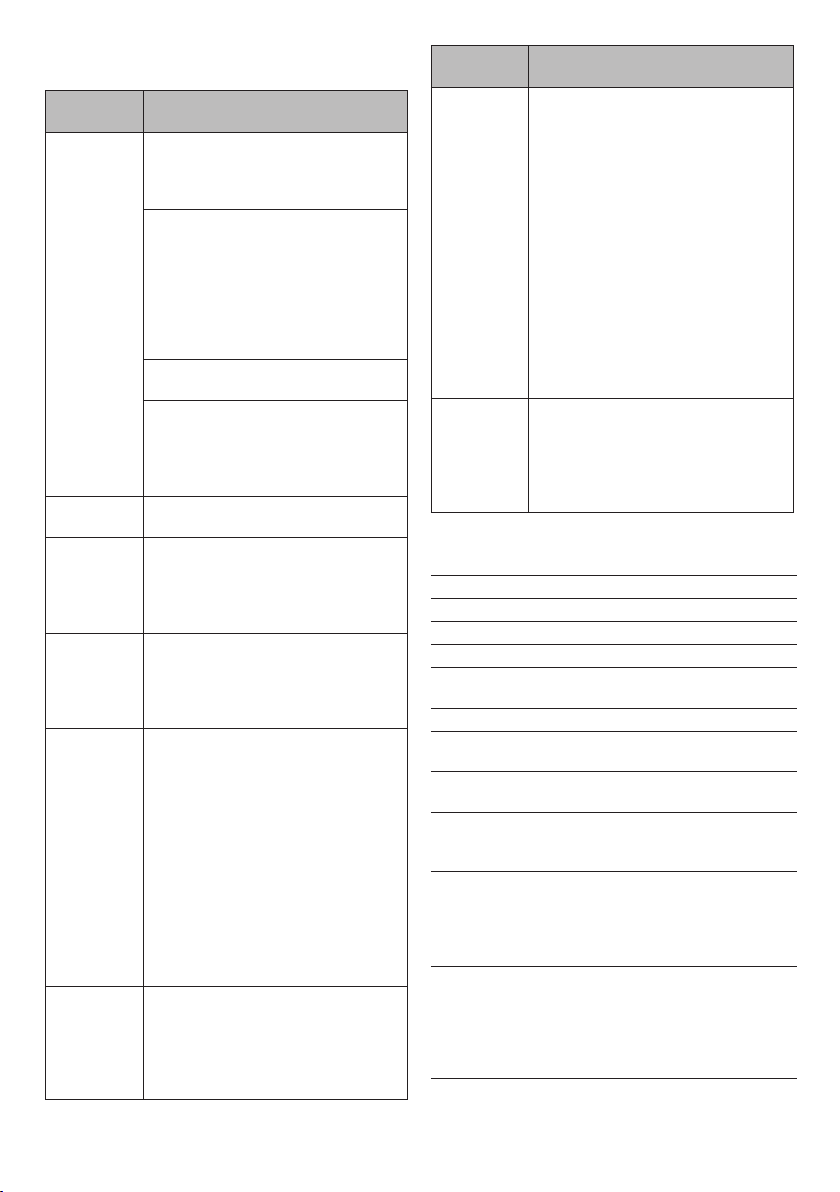
10. Dépannage
Problèmes/
questions
Le nébu
liseur ne
laisse pas
passer
d’aérosol ou
pratique
ment pas.
Le débit est
trop faible
Quels médi
caments
peut-on
inhaler ?
Il reste de
la solution à
inhaler dans
le nébuli
seur.
A quoi fautil veiller pour
les bébés et
les enfants ?
L’inhalation
avec le
masque
dure-t-elle
plus long
temps ?
Cause possible/solution
1. Trop ou pas assez de médica
ments dans le nébuliseur.
Minimum : 2 ml,
maximum : 8 ml.
2. Contrôler si la buse est éven
-
tuellement bouchée Nettoyer le
cas échéant la buse (p. ex. par
rinçage). Faites ensuite à nouveau
fonctionner le nébuliseur.
ATTENTION : percez avec précau
tion uniquement les petits trous du
côté inférieur de la buse.
3. Tenez le nébuliseur en position
verticale.
Le liquide médicamenteux rempli
4.
est inapproprié pour la nébulisation
(p. ex. trop visqueux). Le liquide
médicamenteux doit être prescrit
par le médecin.
Flexible coudé, filtre bouché, trop de
solution d’inhalation.
-
Consultez votre médecin.
En général, tous les médicaments
qui sont autorisés et propres à
l’inhalation avec un appareil peuvent
être inhalés.
C’est tout à fait normal du point de
vue technique. Arrêtez l’inhalation
dès que vous entendez un bruit
-
nettement différent en provenance
du nébuliseur.
1. Chez les bébés, le masque doit
recouvrir la bouche et le nez pour
garantir l’efficacité de l’inhalation.
Chez les enfants le masque devrait
2.
également recouvrir la bouche et
le nez. Une nébulisation à côté de
personnes endormies est sans
effet, le médicament ne pouvant
pas suffisamment pénétrer dans
les poumons.
Remarque : l’inhalation ne doit
s’effectuer que sous la surveillance
et avec l’aide d’un adulte et l’enfant
ne doit pas rester seul.
Oui, la raison en est technique. Avec
les trous sur le masque, vous inspi
rez moins de médicament qu’avec
l’embout buccal. L’aérosol se
-
mélange à l’air ambiant en passant
par les trous.
Problèmes/
Cause possible/solution
questions
Pourquoi
faut-il rem
-
placer régulièrement le
nébuliseur ?
Il existe deux raisons pour cela :
-
1. Pour garantir un spectre de
particules efficace d’un point de
vue thérapeutique, l’alésage de
la buse ne doit pas dépasser un
diamètre donné. En raison des
-
sollicitations mécaniques et ther
miques, le plastique est soumis
-
à une certaine usure. La buse
[10] est particulièrement sensible.
La composition des gouttes de
-
l’aérosol peut alors se modifier,
ce qui a une incidence directe sur
l’efficacité du traitement.
2. En outre, il est recommandé de
changer régulièrement le nébuli
-
seur pour des raisons d’hygiène.
Le
nébuliseur
C’est impératif, du point de vue de
l’hygiène.
doit-il être
utilisé par
une seule
personne ?
11. Caractéristiques techniques
Modèle IH 21
Type IH 21/1
Dimensions (l x H x P) 300 x 180 x 100 mm
Poids 1,65 kg
Pression de service
Volume de remplissage
nébuliseur
Débit de médicaments
Pression acoustique
Raccordement au
secteur
Conditions de service Température : +10 °C à +40 °C
Conditions de stockage
et de transport
Caractéristiques de
l'aérosol
-
ca. 0,8 - 1,45 bar
max. 8 ml
min. 2 ml
ca.
0,3 ml/mn.
max. 52
dBA (selon
DIN NE 13544-1)
230 V~; 50 Hz; 230 VA
UK: 240 V~; 50 Hz; 240 VA
Humidité relative de l’air :
10% à 95%
Température : 0 °C à +60 °C
Humidité relative de l’air :
10% à 95%
Pression ambiante:
500 à 1 060 hPa
1) Débit: 5,3l/min
2) Distribution: 0,216ml
3) Débit de distribution:
0,112ml/min
4) Taille des particules
(MMAD): 3,85µm
Sous réserve de modifications techniques.
26
Page 27
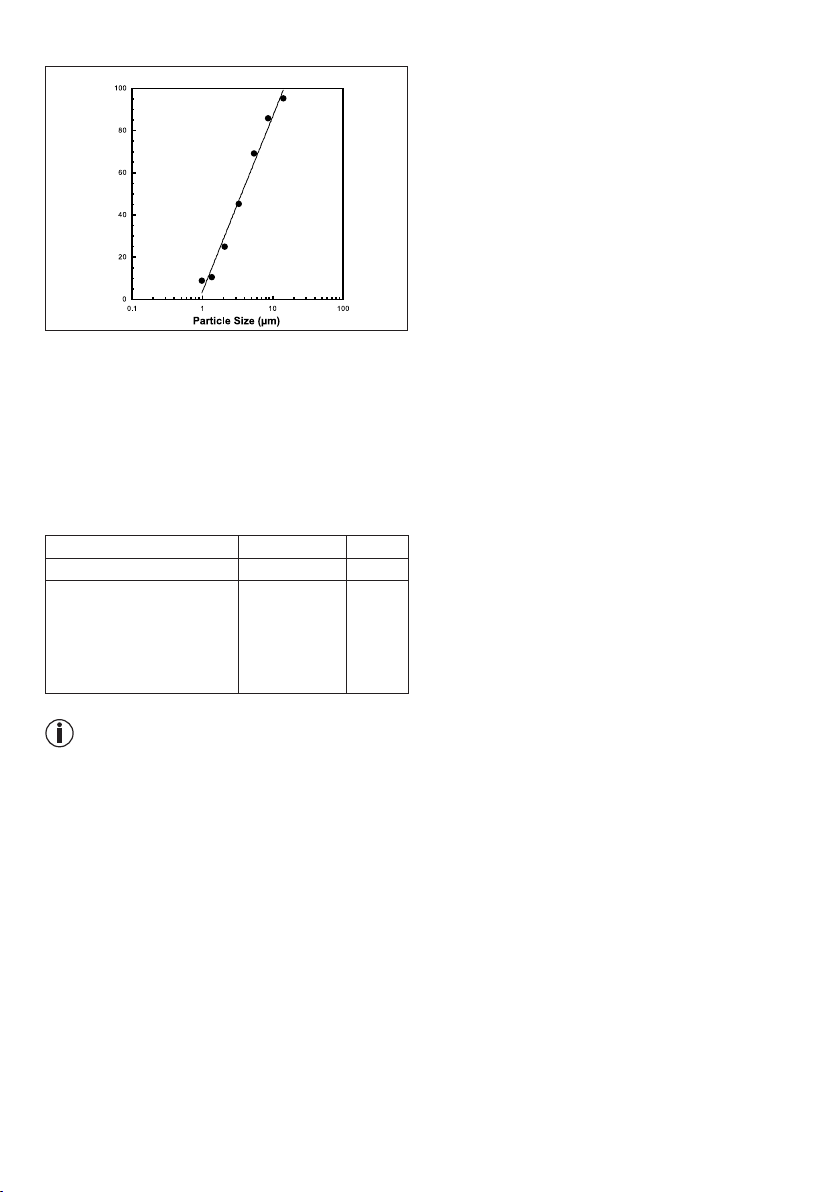
Diagramme sur la taille des particules
Les mesures ont été effectuées avec une solution de
fluorure de sodium à l'aide d'un impacteur NGI (Next
Generation Impactor).
Il se peut que le diagramme ne soit pas utilisable pour
les médicaments en suspension ou extrêmement vis
queux. Renseignez-vous auprès du fabricant du médicament pour obtenir davantage d’informations.
Références pour l’achat ultérieur de certaines
pièces
Désignation Matériau REF
Stoppeur de nébulisation PP
Yearpack (contient
Embout buccalm, Embout
nasal, Masque pour adulte,
Masque pour enfant,
Nébuliseur, Flexible à air
comprimé, Filtre)
PP/ PVC 601.22
162.819
COMPATIBILITE ELECTROMAGNETIQUE
•
L’appareil satisfait au règlement actuellement en
vigueur en ce qui concerne la compatibilité élec
tromagnétique et est approprié pour une utilisation
dans tous les bâtiments, y compris ceux réservés à
un usage privé. Les émissions de radiofréquences
de l’appareil sont extrêmement limitées et ne provoquent selon toute vraisemblance aucune interférence avec d’autres appareils situés à proximité.
•
Il est malgré tout recommandé de ne pas installer
l’appareil au-dessus ni à côté d’autres appareils. S’il
provoque des interférences avec vos appareils électroménagers, changez-le de place ou branchez-le
sur une autre prise.
•
Les appareils radio peuvent avoir une incidence sur
le fonctionnement de l’appareil.
Remarque
En cas d’utilisation de l’appareil en dehors des spécifications, son fonctionnement n’est pas garanti. Sous
réserve de modifications techniques à des fins d’amélioration et de perfectionnement du produit. Cet appareil
et ses accessoires satisfont aux normes européennes
NE60601-1 et NE60601-1-2 ainsi que NE13544-1 et
sont soumis à des mesures de sécurité particulières
en ce qui concerne la compatibilité électromagnétique.
Veuillez tenir compte du fait que les équipements de
communication HF portables et mobiles peuvent avoir
une incidence sur cet appareil. Pour des détails plus précis, veuillez contacter le service après-vente à l’adresse
mentionnée ou vous reporter à la fin du mode d’emploi.
L’appareil satisfait aux exigences de la directive européenne 93/42/CE relative aux dispositifs médicaux.
27
Page 28
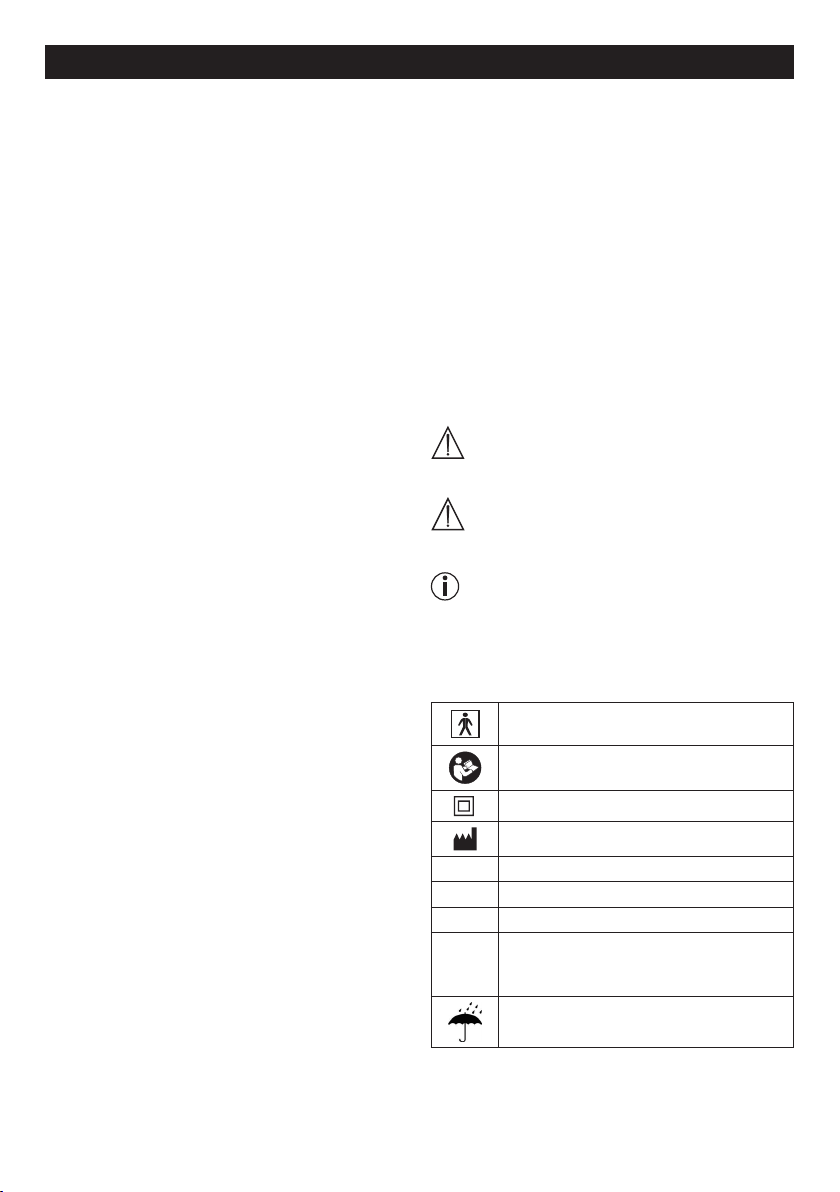
ESPAÑOL
Índice
1. Introducción ......................................................28
2. Símbolos ............................................................28
3. Indicaciones de advertencia y de seguridad .....29
4. Descripción del aparato y los accesorios ..........30
5. Puesta en funcionamiento .................................31
6. Manejo ...............................................................31
7. Cambio de filtro .................................................33
8. Limpieza y desinfección ....................................33
9. Eliminación ........................................................34
10. Resolución de problemas ..................................35
11. Datos técnicos ...................................................36
Artículos suministrados
Véase la descripción del aparato y de los accesorios
en la página 30.
•
Inhalador
•
Nebulizador
•
Tubo flexible de aire comprimido
•
Tubo de boca
•
Mascarilla para adultos
•
Mascarilla para niños
•
Aplicador para nariz
•
Filtro de repuesto
•
Estas instrucciones de uso
1. Introducción
Estimada clienta, estimado cliente:
Nos alegramos de que haya elegido un producto de
nuestra colección. Nuestro nombre es sinónimo de productos de alta y comprobada calidad en el ámbito de
aplicación de calor, peso, presión arterial, temperatura
corporal, pulso, tratamiento suave, masaje y aire.
Lea detenidamente estas instrucciones de uso, consérvelas para su futura utilización, asegúrese de que
estén accesibles para otros usuarios y respete las in
dicaciones.
Atentamente,
El equipo de Beurer
Campo de aplicación
Este inhalador es un aparato para atomizar líquidos y
medicamentos líquidos (aerosoles) y para tratar las vías
respiratorias superiores e inferiores.
Mediante la atomización y la inhalación del medicamento prescrito o recomendado por el médico puede
prevenir enfermedades de las vías respiratorias, aliviar
los síntomas concomitantes y acelerar la curación. Su
médico o farmacéutico le proporcionará más información sobre las posibilidades de uso.
-
El aparato está diseñado para realizar inhalaciones en
el hogar. No obstante, la inhalación de medicamentos debe realizarse siempre por prescripción médica.
Realice la inhalación de forma tranquila y relajada y
respire despacio y profundamente para que el medicamento pueda llegar hasta los bronquios. Respire
normalmente.
Tras una breve preparación, el aparato quedará listo
para un nuevo uso. Para ello deberá cambiar todos los
accesorios, incluido el nebulizador y el filtro de aire, y
desinfectar la superficie del aparato utilizando un desinfectante de venta en establecimientos comerciales.
2. Símbolos
En estas instrucciones de uso se utilizan los siguientes
símbolos.
Advertencia Indicación de advertencia sobre
Atención Indicación de seguridad sobre
Nota
En el embalaje y en la placa de características del
aparato y de los accesorios se utilizan los siguientes
símbolos.
Pieza de aplicación tipo BF
Observe las instrucciones de uso
Aparato con clase de protección 2
F
ON
I
Desactivar
O
Número de serie
SN
30 ON/
30 OFF
30 minutos de servicio, a continuación 30
minutos de descanso antes de volver a
utilizar el aparato.
Proteger de la humedad
peligro de lesiones o para la
salud.
posibles daños del aparato o los
accesorios.
Indicación de información importante.
abricante
28
Page 29

3. Indicaciones de advertencia y de
seguridad
Advertencia
•
Antes de utilizar el aparato deberá asegurarse de que
ni este ni los accesorios presentan daños visibles.
En caso de duda no lo use y póngase en contacto
con su distribuidor o con la dirección de atención al
cliente indicada.
•
Si surgen problemas con el aparato, consulte el ca-
pítulo “10. Resolución de problemas”.
•
La utilización del aparato no exime de acudir al médi-
co ni de seguir el tratamiento prescrito por este. Por
lo tanto, todos los dolores o enfermedades deben
consultarse primero con un médico.
•
Si cree tener algún problema de salud, consulte a su
médico de familia.
•
Respete unas medidas de higiene generales al utili-
zar el nebulizador.
•
Siga siempre las indicaciones de su médico sobre
el tipo de medicamento que deba utilizar, la dosis,
la frecuencia y la duración de la inhalación.
•
Utilice únicamente medicamentos prescritos o reco-
mendados por su médico o farmacéutico.
Tenga en cuenta que
para el tratamiento solo deben utilizarse las piezas
indicadas por el médico según el estadio de la en
fermedad.
•
Compruebe en el prospecto del medicamento si
existen contraindicaciones para el uso con los sistemas habituales de aerosolterapia.
•
Si el aparato no funcionase correctamente, o produ-
jese malestar o dolores, deje de utilizarlo inmediatamente.
•
Mantenga el aparato alejado de los ojos durante su
uso, el vapor de medicamentos podría resultar per
judicial.
•
No utilice el aparato si hay gases inflamables y alta
concentración de oxígeno.
•
Este aparato no debe ser utilizado por niños o adul-
tos con las facultades físicas, sensoriales (p. ej.
insensibilidad al dolor) o mentales limitadas o con
poca experiencia o conocimientos, a no ser que los
vigile una persona responsable de su seguridad o
que esta persona les indique cómo se debe utilizar
el aparato.
•
Antes de cada tarea de limpieza y/o mantenimiento
el aparato se debe apagar y el conector se debe
desenchufar de la red.
•
Mantenga a los niños alejados del material de embalaje (peligro de asfixia).
•
Para evitar el peligro de enredo y estrangulación,
mantenga los cables y conductos de aire fuera del
alcance de los niños pequeños.
•
No utilice piezas adicionales no recomendadas por
el fabricante.
•
El aparato se puede conectar únicamente a la ten-
sión de red indicada en la placa indicadora de tipo.
•
No sumerja el aparato en agua ni lo utilice en am-
bientes húmedos. Bajo ningún concepto deben entrar líquidos en el aparato.
•
Proteja el aparato de impactos fuertes.
•
No agarre nunca el cable de alimentación con las
manos húmedas, de lo contrario podría sufrir una
descarga eléctrica.
•
No desconecte el conector de la toma tirando del
cable.
•
No aplaste ni retuerza el cable ni lo pase por encima
de objetos afilados, no lo deje colgando y protéjalo
del calor.
•
Recomendamos desenrollar completamente el cable
de alimentación para evitar un sobrecalentamiento
peligroso.
•
Si el cable de alimentación de red de este aparato
se daña, su sustitución deberá ponerse en manos
del fabricante, de su servicio técnico o de una peso
na cualificada para tal labor a fin de evitar peligros.
•
Al abrir el aparato existe el peligro de recibir una
descarga eléctrica. El aparato solamente estará
desconectado de la red de alimentación cuando el
conector de red se haya desenchufado de la toma.
-
•
No utilice el aparato si se cae, si se ha expuesto a
una humedad extrema o si resulta deteriorado por
cualquier otro motivo. En caso de duda, póngase en
contacto con el servicio de atención al cliente o con
el distribuidor.
•
El inhalador IH 21 solo deberá utilizarse con nebuliz-
adores compatibles de Beurer y con los correspondientes accesorios de Beurer. El uso de nebulizadores y accesorios de otros fabricantes puede reducir
la eficacia de la terapia y, dado el caso, dañar el
aparato.
Atención
•
El aparato puede dejar de funcionar si se produce un
fallo en el suministro eléctrico, una avería repentina
u otras condiciones adversas. Por lo tanto, le reco
mendamos que disponga de un aparato de repuesto
o de otro medicamento (prescrito por su médico).
•
Si se requiere un adaptador o un prolongador, estos
deberán cumplir la normativa de seguridad vigente.
No sobrepase el límite de potencia de alimentación
ni la potencia máxima especificados en el adaptador.
•
No guarde el aparato ni el cable de alimentación
cerca de fuentes de calor.
•
No utilice el aparato en salas en las que se hayan
utilizado aerosoles con anterioridad. Ventile la sala
antes de iniciar la terapia.
-
-
29
Page 30
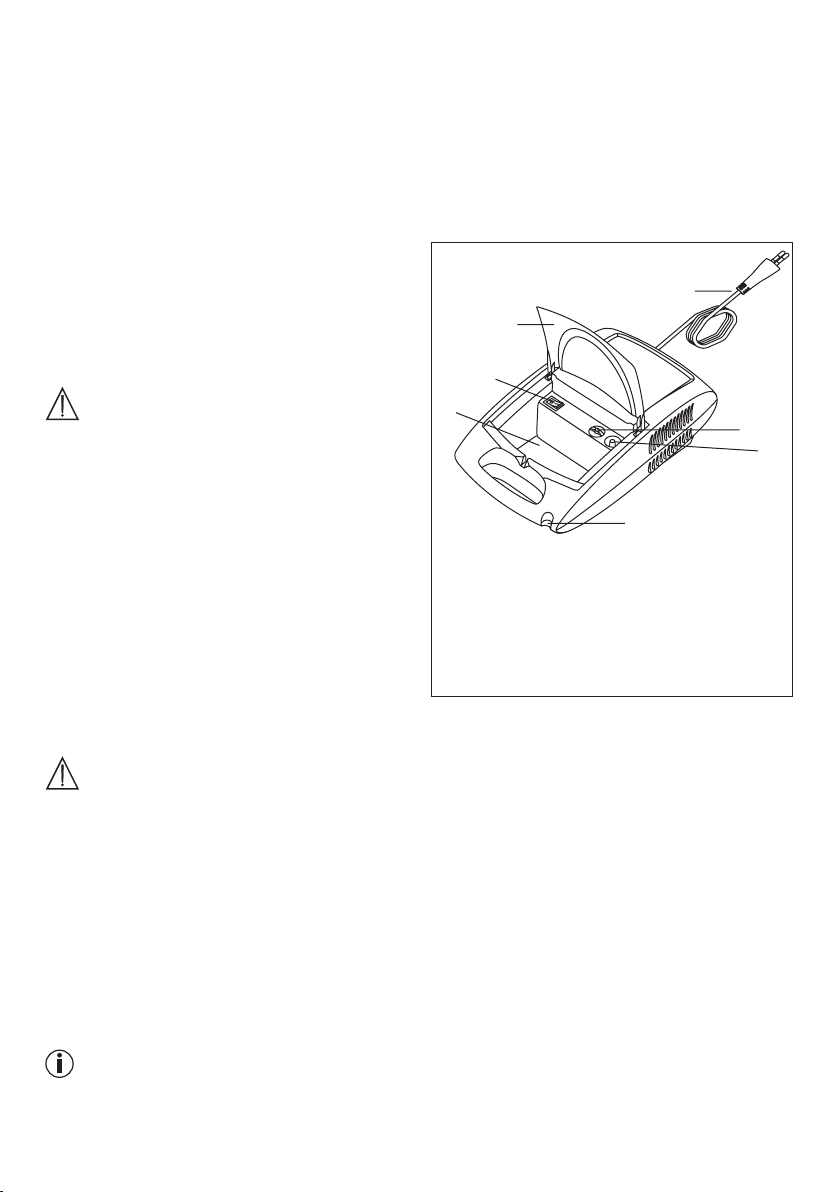
•
4
No introduzca nunca ningún objeto en los orificios
de ventilación.
•
No utilice nunca el aparato cuando al hacerlo se es-
cuche un ruido anómalo.
•
Por motivos de higiene es imperativo que cada usua-
rio utilice sus propios accesorios.
•
Desenchufe el conector de la toma eléctrica después
de cada uso.
•
Guarde el aparato en un lugar protegido de las incle-
mencias meteorológicas. El aparato debe guardarse
en las condiciones atmosféricas especificadas.
FUSIBLE
•
El aparato contiene un fusible de sobrecorriente que
solo podrá ser sustituido por personal especializado
autorizado.
Indicaciones generales
Atención
•
Utilice el aparato exclusivamente:
– con personas,
– para el fin para el que ha sido diseñado (inhalación
de aerosoles) y del modo expuesto en estas instrucciones de uso.
•
¡Todo uso inadecuado puede ser peligroso!
•
En situaciones graves de emergencia, tienen priori-
dad los primeros auxilios.
•
Utilice además de los medicamentos solo agua des-
tilada o una solución salina. En algunas ocasiones,
otros líquidos pueden averiar el inhalador o el nebulizador.
•
Este aparato no está destinado para el uso comercial
o clínico, sino exclusivamente para uso particular en
el ámbito privado.
Antes de la puesta en funcionamiento
Atención
•
Antes de usar el aparato, retire todo el material de
embalaje.
•
Proteja el aparato contra el polvo, la suciedad y la
humedad y no lo cubra nunca mientras esté en funcionamiento.
•
No utilice el aparato en ambientes llenos de polvo.
•
Apague el aparato de inmediato si presenta defectos
o se producen fallos de funcionamiento.
•
El fabricante declinará toda responsabilidad por
daños y perjuicios debidos a un uso inadecuado o
incorrecto.
Reparación
Nota
•
No debe abrir ni reparar el aparato bajo ningún
concepto; en caso contrario, ya no se garantiza su
funcionamiento correcto. El incumplimiento de esta
disposición anula la garantía.
•
Para llevar a cabo las reparaciones, diríjase al servi-
cio de atención al cliente o a un distribuidor autorizado.
4. Descripción del aparato y los
accesorios
Vista general del inhalador
1
2
3
5
7
1 Cable de conexión a red
2 Tapa
3 Interruptor de encendido/apagado
4 Compartimento para accesorios
5 Caperuza del filtro con filtro
6 Empalme de tubo flexible
7 Soporte para nebulizador
6
30
Page 31
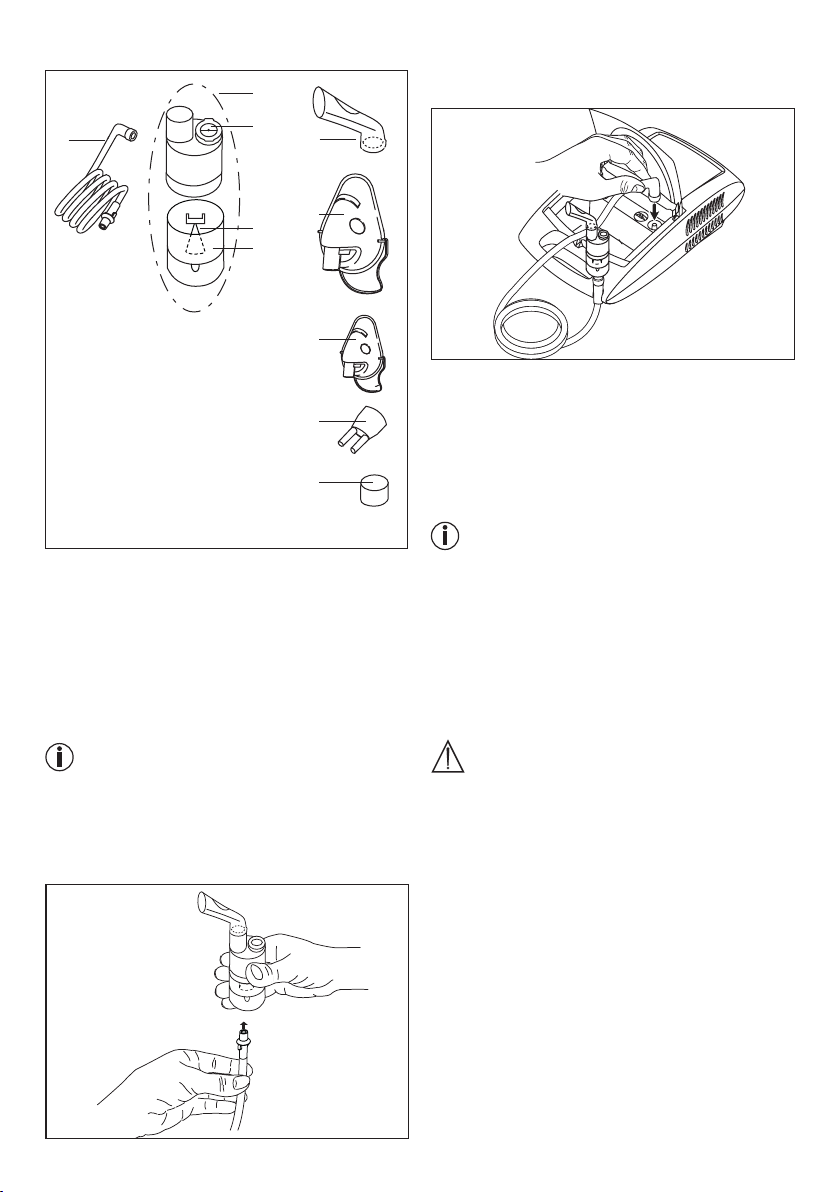
Vista general del nebulizador y los accesorios
9
11
10
13
14
8
12
•
Introduzca el otro extremo del tubo flexible [8] en la
toma para el tubo [6] del inhalador girándolo ligera
mente.
-
8 Tubo flexible de aire comprimido
9 Nebulizador
10 Accesorio insertable del nebulizador
11 Válvula
12 Contenedor de medicamentos
13 Boquilla
14 Mascarilla de adulto
15 Mascarilla infantil
16 Aplicador para nariz
17 Filtro de repuesto
15
16
17
5. Puesta en funcionamiento
Colocación
Saque el aparato del embalaje.
Colóquelo sobre una superficie plana.
Asegúrese de que las ranuras de ventilación estén
libres.
Abra la tapa [2] para acceder a los accesorios.
Antes del primer uso
Nota
•
Antes del primer uso deberá limpiar y desinfectar el
nebulizador y los accesorios. Consulte “Limpieza y
desinfección”, página
• Introduzca el tubo flexible de aire comprimido [8] en la
parte inferior del recipiente para medicamentos [12].
33
.
Alimentación de red
Conecte únicamente el aparato a la tensión de red
indicada en la placa indicadora de tipo.
•
Enchufe el conector del cable de alimentación [1] a
una toma de corriente apta.
•
Para conectar el aparato a la red enchufe el conector
en la toma hasta que haga tope.
Nota
•
Asegúrese de que haya una toma cerca del lugar de
instalación.
•
Tienda el cable de red de modo que nadie pueda
tropezar con él.
•
Para separar el inhalador de la red eléctrica tras la
inhalación, apague primero el aparato y desenchufe
a continuación el conector de la toma.
6. Manejo
Atención
•
Por razones de higiene es obligatorio limpiar el ne-
bulizador [9] y los accesorios después de cada utilización y desinfectarlos diariamente al finalizar los
tratamientos.
•
Las piezas de los accesorios solo deben ser utili-
zadas por una persona; se desaconseja su uso por
varias personas.
•
Si durante la terapia se inhalan diferentes medicamentos de forma sucesiva, asegúrese de lavar el
nebulizador [9] con agua caliente tras cada uso.
Consulte “Limpieza y desinfección”, página 33.
•
Para cambiar el filtro siga las indicaciones de estas
instrucciones de uso.
•
Antes de utilizar el aparato, compruebe que los tubos
flexibles estén correctamente conectados al inhalador [6] y al nebulizador [9].
•
Antes de utilizar el aparato, asegúrese de que fun-
ciona correctamente. Para ello encienda el inhalador
31
Page 32
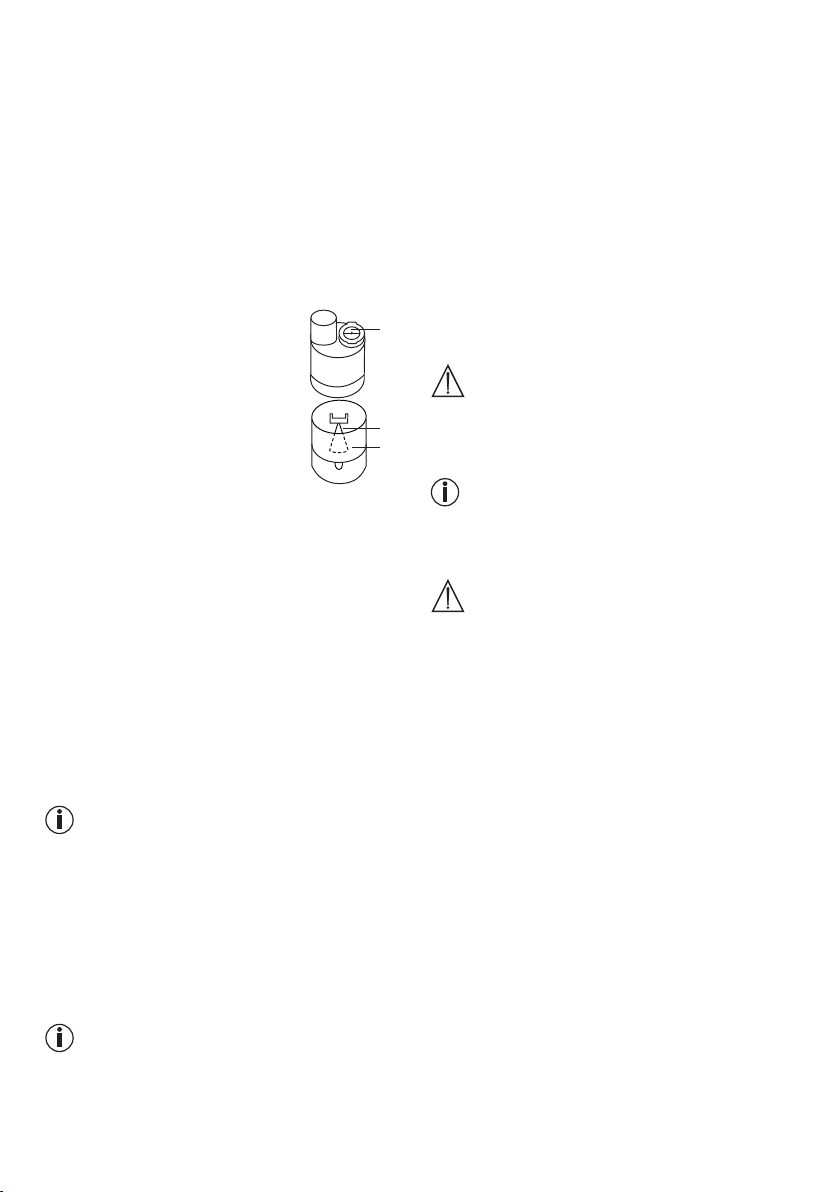
(junto con el nebulizador conectado pero sin medicamento) brevemente. Si al hacerlo sale aire del
nebulizador [9], el aparato funciona correctamente.
1. Colocar la boquilla
• Abra el nebulizador [9] girando la parte superior en
sentido contrario a las agujas del reloj respecto al recipiente para medicamentos [12]. Inserte la boquilla
[10] en el recipiente para medicamentos [12].
• Asegúrese de que el cono de la guía del medicamento esté bien asentado en el cono de la guía de aire
en el interior del pulverizador.
de boca (p.ej. en el caso de niños que aún no pueden
inhalar con el tubo de boca).
• Antes del tratamiento, saque el nebulizador del so
• Encienda el inhalador accionando el interruptor de en-
• El vaho saliendo del nebulizador indica que este
6. Tratamiento
•
2. Llenar el nebulizador
• Ponga la solución salina isotónica
o el medicamento directamente
en el recipiente para medicamentos [12]. No lo llene hasta desbordarlo. La capacidad máxima
recomendada es de 8 ml.
• Utilice solo los medicamentos que
le prescriba su médico e infórmese de la duración y la cantidad
adecuada de inhalaciones.
• Si la cantidad de medicamento prescrita es inferior
a 2 ml, añada solución salina isotónica hasta llegar
como mínimo a los 4 ml. También es necesario diluir
el medicamento cuando sea viscoso. Respete también en este caso la prescripción facultativa.
3. Cerrar el nebulizador
• Cierre el nebulizador [9] girando la parte superior en
el sentido de las agujas del reloj respecto al recipiente para medicamentos [12]. Asegúrese de que queda
cerrado correctamente.
4. Colocar válvula
• Presione la válvula azul [11] en la abertura situada
en la parte superior del nebulizador [9].
Nota
El sistema de válvulas garantiza una mejor respirabilidad del medicamento. Utilizar la válvula [11] únicamente con el tubo de boca [13], nunca con las mascarillas
[14,15] ni con el tubo de nariz [16].
5. Acoplar los accesorios al nebulizador
•
Acople en el nebulizador [9] los accesorios deseados
(boquilla [13], mascarilla de adulto [14], mascarilla
infantil [15] o el aplicador para nariz [16]).
11
•
El aparato no puede utilizarse ininterrumpidamente,
10
se debe apagar 30 minutos tras 30 minutos de fun-
12
cionamiento.
Mantenga el nebulizador en posición vertical durante el
tratamiento. De lo contrario la solución no se atomizará
y el aparato no funcionará correctamente.
En principio, los aceites esenciales vegetales, los jarabes para la tos, las soluciones para hacer gárgaras y las
gotas para friegas o baños de vapor no son adecuados
para su inhalación mediante inhaladores. A menudo,
estos productos son viscosos y pueden influir en el
correcto funcionamiento del aparato, y, con ello, en la
eficacia del tratamiento. En caso de presentar hipersensibilidad del sistema bronquial, los medicamentos
con aceites esenciales pueden provocar bajo determinadas circunstancias un broncoespasmo grave (un
estrechamiento espasmódico repentino de los bronquios con dificultad respiratoria). Consulte a su médico
o farmacéutico.
7. Finalizar la inhalación
El tratamiento puede interrumpirse cuando el vapor
salga irregularmente o cambie el ruido que produce el
aparato al funcionar.
•
•
Nota
La inhalación con el tubo de boca es la forma más
efectiva de la terapia. El uso de la máscara de inhalación solo se recomienda si no es posible usar un tubo
8. Realizar la limpieza
Consulte “Limpieza y desinfección”, página 33.
-
porte [7] retirándolo hacia arriba.
cendido y apagado [3].
funciona correctamente.
Durante la inhalación, siéntese erguido y relajado en
una mesa y no en un sillón, para no comprimir las
vías respiratorias y reducir así la eficacia del tratamiento.
Inhale el medicamento atomizado.
Atención
Nota
Atención
Apague el inhalador tras el tratamiento accionando
el interruptor [3] y desenchúfelo de la red eléctrica.
Una vez acabado el tratamiento, vuelva a colocar el
nebulizador [9] en su soporte [7].
32
Page 33
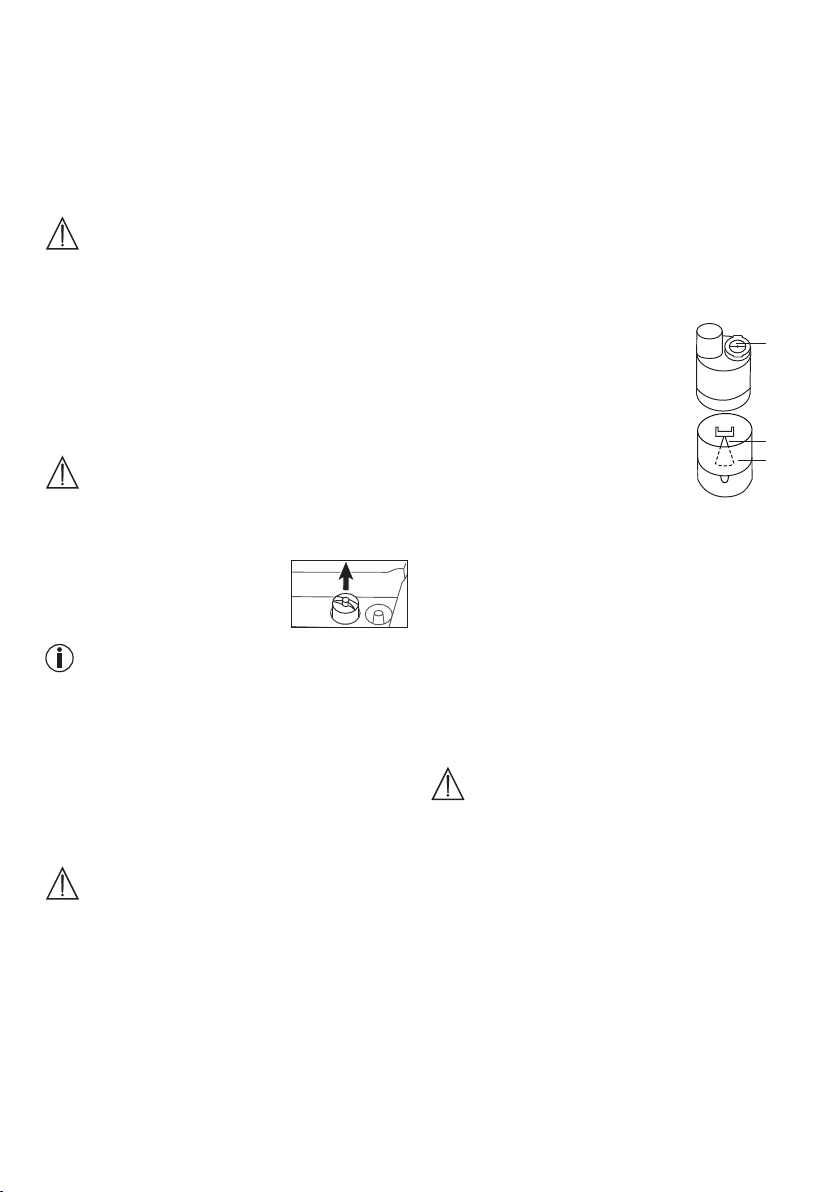
7. Cambio de filtro
En condiciones de uso normales, el filtro de aire debe
sustituirse tras unas 500 horas de funcionamiento o un
año. Compruebe periódicamente el filtro de aire (tras
10-12 procesos de pulverización). Los filtros usados
deberán cambiarse cuando estén muy sucios u obstruidos. Los filtros también deberán sustituirse por uno
nuevo cuando se hayan mojado.
Atención
•
¡No intente limpiar un filtro usado y volver a utilizarlo!
•
Utilice exclusivamente filtros originales del fabrican-
te. De lo contrario el inhalador podría resultar dañado
o el tratamiento podría no ser eficaz.
•
El filtro de aire no se puede reparar ni realizar tareas
de mantenimiento en él mientras esté siendo utilizado con una persona.
•
No utilice nunca el aparato sin filtro.
Proceda de la siguiente forma para cambiar el filtro:
Atención
•
Apague primero el aparato y desenchúfelo de la toma
de red.
•
Deje enfriar el aparato.
1. Tirar de la tapa del filtro [5]
hacia arriba.
Nota
Si, una vez retirada la tapa, el filtro se queda en el
aparato sáquelo de él utilizando unas pinzas o un útil
similar.
2. Volver a colocar la tapa [5] con el nuevo filtro.
3. Comprobar que asiente correctamente.
8. Limpieza y desinfección
Nebulizador y accesorios
Advertencia
Siga las medidas de higiene que se detallan a continuación para evitar riesgos para la salud.
•
El nebulizador [9] y los accesorios se han diseñado
para poder utilizarse en múltiples ocasiones. Tenga
en cuenta que, según el campo de aplicación, de
ben cumplirse diferentes requisitos en cuanto a la
limpieza y la reutilización higiénica.
Indicaciones:
•
No limpie mecánicamente el nebulizador ni los ac-
cesorios utilizando un cepillo o similar, ya que podría
•
•
Preparación
•
•
•
• Desmonte el nebulizador
•
• Retire la válvula [11] del nebulizador [9] tirando de
• El montaje se realizará siguiendo los pasos indica
Limpieza
Desenchufe el aparato de la red y déjelo enfriar antes
de proceder a limpiarlo.
Después de cada aplicación se deben limpiar con agua
caliente (no hirviendo) tanto el nebulizador como los
accesorios utilizados (el tubo de boca, la mascarilla,
la boquilla, etc). Seque las piezas con cuidado con
un paño suave. Cuando estén completamente secas,
vuelva a unir las piezas y colóquelas en un recipiente
-
seco y hermético o desinféctelas.
Asegúrese al realizar la limpieza de que no queda
ningún resto. No utilice sustancias que pudieran ser
venenosas al contacto con la piel o las mucosas o al
ser tragadas o inhaladas.
Para limpiar el aparato utilice un paño suave y seco y
un producto de limpieza no abrasivo.
causar daños irreparables y no podría garantizarse
el éxito del tratamiento.
Consulte a su médico las medidas adicionales que
deba seguir con respecto a la preparación higiénica
necesaria (limpieza de manos, manipulación de los
medicamentos o de las soluciones de inhalación) en
grupos de alto riesgo (p.ej. en pacientes con fibrosis
quística).
Asegúrese de que el aparato se seca completamente
después de cada limpieza o desinfección. Un aparato con restos de humedad puede suponer un mayor
riesgo de crecimiento de gérmenes.
Los restos de medicamento y las
impurezas deberán eliminarse de
todas las piezas del nebulizador
[9] y de los accesorios utilizados
inmediatamente después del tratamiento.
Para ello, desmonte los compo-
nentes del nebulizador [9].
Desacople el tubo de boca [13],la
mascarilla [14,15] o la aplicador
para nariz [16] del nebulizador.
girando la parte superior en sentido contrario a las
agujas del reloj respecto al recipiente para medica
mentos [12].
Retire la boquilla [10] del recipiente para medicamentos [12].
ella.
dos en orden inverso.
11
10
12
-
-
Atención
33
Page 34
No utilice productos de limpieza corrosivos y nunca
sumerja el aparato en agua.
Atención
•
¡Asegúrese de que el interior del aparato no entre en
contacto con el agua!
•
¡No lave el aparato ni los accesorios en el lavavajillas!
•
No toque el aparato con las manos mojadas mientras
esté conectado; no salpique el aparato con agua. El
aparato solo se debe utilizar cuando esté completamente seco.
•
¡No pulverice ningún líquido en las ranuras de venti-
lación! Si entra líquido, puede dañar el sistema electrónico y otras piezas del inhalador y afectar al buen
funcionamiento del mismo.
Condensación de agua, cuidado de los tubos
flexibles
En función de las condiciones del entorno, podría
condensarse agua en el tubo flexible. Para prevenir la
aparición de gérmenes y así garantizar un tratamiento
correcto, es necesario eliminar por completo la humedad. Para ello, proceda de la siguiente manera:
•
Desacople el tubo flexible [8] del nebulizador [9].
•
Deje el tubo flexible acoplado por el lado del inhala-
dor [6].
•
Ponga en marcha el inhalador y déjelo funcionando hasta que el aire circulante haya eliminado la
humedad.
•
Si está muy sucio, sustituya el tubo flexible.
Desinfección
Siga atentamente las indicaciones que se detallan a
continuación para desinfectar el nebulizador y los accesorios. Se recomienda desinfectar todas las piezas
diariamente como mínimo tras el último uso.
(Para ello se necesita solamente un poco de vinagre
incoloro y agua destilada.)
• Limpie primero el nebulizador y los accesorios como
se describe en el apartado “Limpieza”.
• El pulverizador desmontado, el tubo de boca y
aplicador para nariz deberán dejarse 5 minutos en
agua hirviendo.
• Para el resto de los accesorios utilice una mezcla
formada por ¼ de vinagre y ¾ de agua destilada.
Asegúrese de que la cantidad es suficiente y de que
las piezas (nebulizador, mascarilla y tubo de boca)
pueden sumergirse completamente en ella.
•
Deje las piezas durante 30 minutos en la mezcla.
•
Aclare las piezas con agua y séquelas con cuidado
con un paño suave.
•
Cuando estén completamente secas, vuelva a unir
las piezas y colóquelas en un recipiente seco y her
mético.
-
Nota
No olvide secar perfectamente las piezas tras la limpieza, ya que de lo contrario aumentará el riesgo de
que aparezcan gérmenes.
Esterilización
•
Utilizar soluciones de esterilización en frío según las
indicaciones del fabricante.
Secado
•
Coloque las piezas sobre una superficie seca, limpia
y absorbente y déjelas secar completamente (mínimo 4 horas).
Durabilidad de los materiales
•
Como ocurre con cualquier pieza de plástico, el ne-
bulizador y los accesorios se ven afectados por el
desgaste al ser utilizados y tratados higiénicamente
con frecuencia. Con el paso del tiempo esto puede
llegar a modificar el aerosol y, con ello, afectar ne
gativamente a la eficacia del tratamiento. De ahí que
recomendemos cambiar el nebulizador después de
un año.
•
Tenga en cuenta las siguientes indicaciones al selec-
cionar el producto de limpieza o desinfección: utilice
siempre un producto de limpieza o un desinfectante
suave y en la dosis recomendada por el fabricante.
-
Conservación
•
No guarde el aparato en espacios con un alto grado
de humedad (p.ej. cuartos de baño) ni lo transporte
junto con objetos húmedos.
•
Proteja el aparato de la luz solar directa cuando lo
guarde y lo transporte.
•
Los accesorios pueden guardarse en su comparti-
mento [4]. El aparato deberá guardarse en un lugar
seco, a ser posible dentro de su embalaje original.
9. Eliminación
Para proteger el medio ambiente, no tire el dispositivo a la basura doméstica.
Deseche el aparato según la Directiva europea
sobre residuos de aparatos eléctricos y electrónicos
(RAEE).
Para más información, póngase en contacto con la
autoridad municipal competente en materia de eliminación de residuos.
Atención
No hierva ni esterilice en autoclave las mascarillas y el
tubo flexible de aire.
34
Page 35
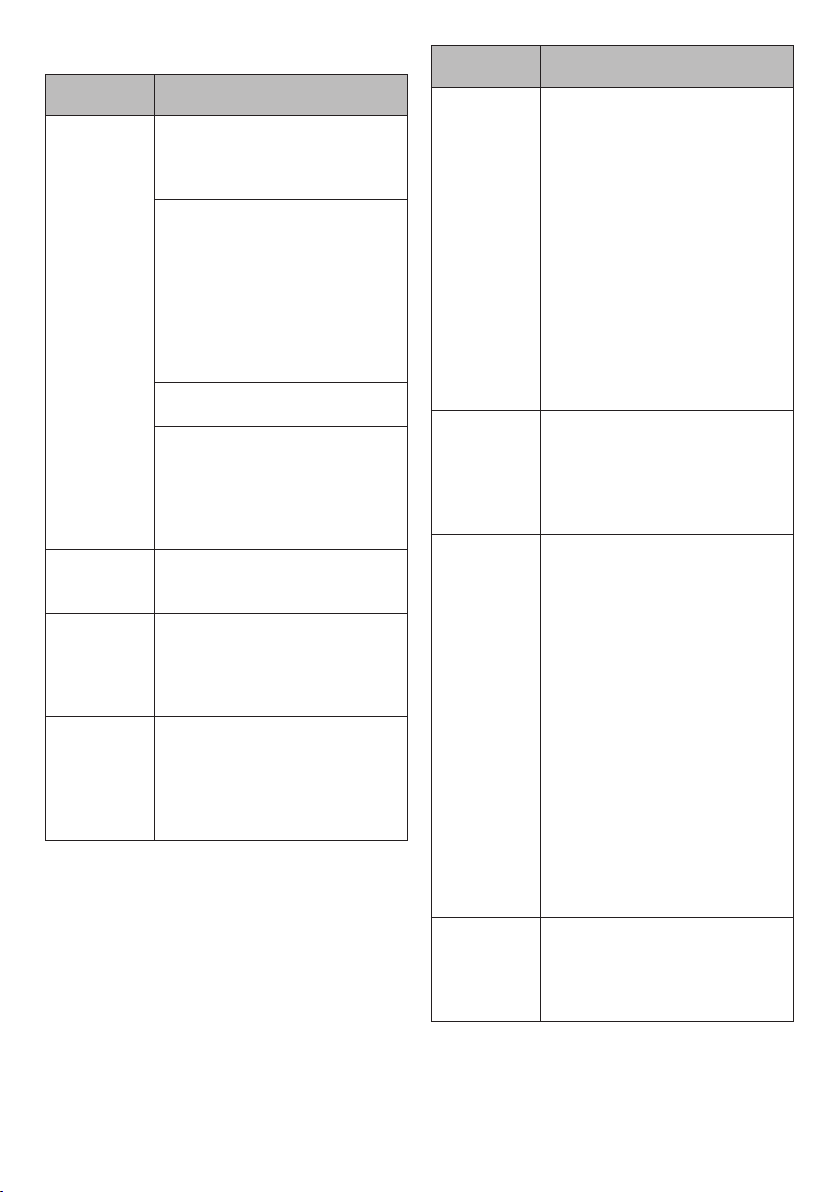
10. Resolución de problemas
Problemas/
Preguntas
El nebulizador
no produce
aerosol o
produce muy
poco.
La emisión es
demasiado
débil.
¿Qué me
dicamentos
pueden
inhalarse?
Quedan
residuos de
la solución de
inhalación en
el nebuliza
dor.
Posible causa/Solución
1. Demasiado o insuficiente medi
camento en el nebulizador.
Mínimo: 2 ml,
Máximo: 8 ml.
2. Comprobar si la boquilla está
atascada.
Si es necesario, limpiarla (p.
ej. con agua). Volver a utilizar
después el nebulizador.
ATENCIÓN: los pequeños orificios
deberán desatascarse con cuidado
solo desde el lado inferior de la
boquilla.
3. No sostenga el nebulizador
verticalmente.
4. Se ha utilizado un fluido de
medicación inadecuado para la
nebulización (p.ej. demasiado
viscoso).
El fluido de medicación debe estar
prescrito por el médico.
Tubo flexible doblado, filtro
atascado, demasiada solución de
inhalación.
Consulte a su médico.
En principio pueden inhalarse
todos los medicamentos compati
bles y homologados con aparatos
de inhalación.
Es normal y necesario por razones
técnicas. Finalice la inhalación
en cuanto el nebulizador haga un
ruido claramente distinto.
-
-
-
Problemas/
Preguntas
¿Qué se debe
tener en cu
enta al utilizar
el aparato
con bebés y
niños?
¿Tarda más
la inhalación
con la masca
rilla?
¿Por qué
debe susti
tuirse periódicamente el
nebulizador?
¿Debería
tener cada
persona su
propio nebu
lizador?
-
-
-
-
Posible causa/Solución
1. En el caso de los bebés, la
mascarilla debe cubrir la boca
y la nariz para garantizar una
inhalación efectiva.
2. En el caso de los niños, la mas
carilla también debe cubrir la
boca y la nariz. No tiene sentido
realizar una nebulización junto a
personas que duermen, ya que
no llegará suficiente medicación
a los pulmones.
Nota: la inhalación deberá realizar
se siempre bajo la supervisión de
un adulto y con su ayuda y no se
deberá dejar solo al niño en ningún
momento.
Se debe a razones técnicas. A tra
vés de los orificios de la mascarilla
se respira menos medicamento por
inhalación que con el tubo de bo
ca. El aerosol se mezcla con el aire
ambiente a través de los orificios.
Hay dos motivos:
1. Para garantizar un espectro
de partículas efectivo desde el
punto de vista terapéutico, el
orificio de la boquilla no debe
superar un diámetro concreto.
Debido a la solicitación mecáni
ca y térmica, el material plástico
está sometido a un continuo
desgaste. La boquilla [10] es
una pieza muy delicada. Estos
factores pueden afectar a la
composición de las minúsculas
gotas del aerosol, lo que, a su
vez, afecta directamente a la
eficacia del tratamiento.
2. Asimismo, se recomienda cam
biar periódicamente el nebulizador por razones de higiene.
Sí, resulta indispensable por moti
vos de higiene.
-
-
-
-
-
-
-
35
Page 36
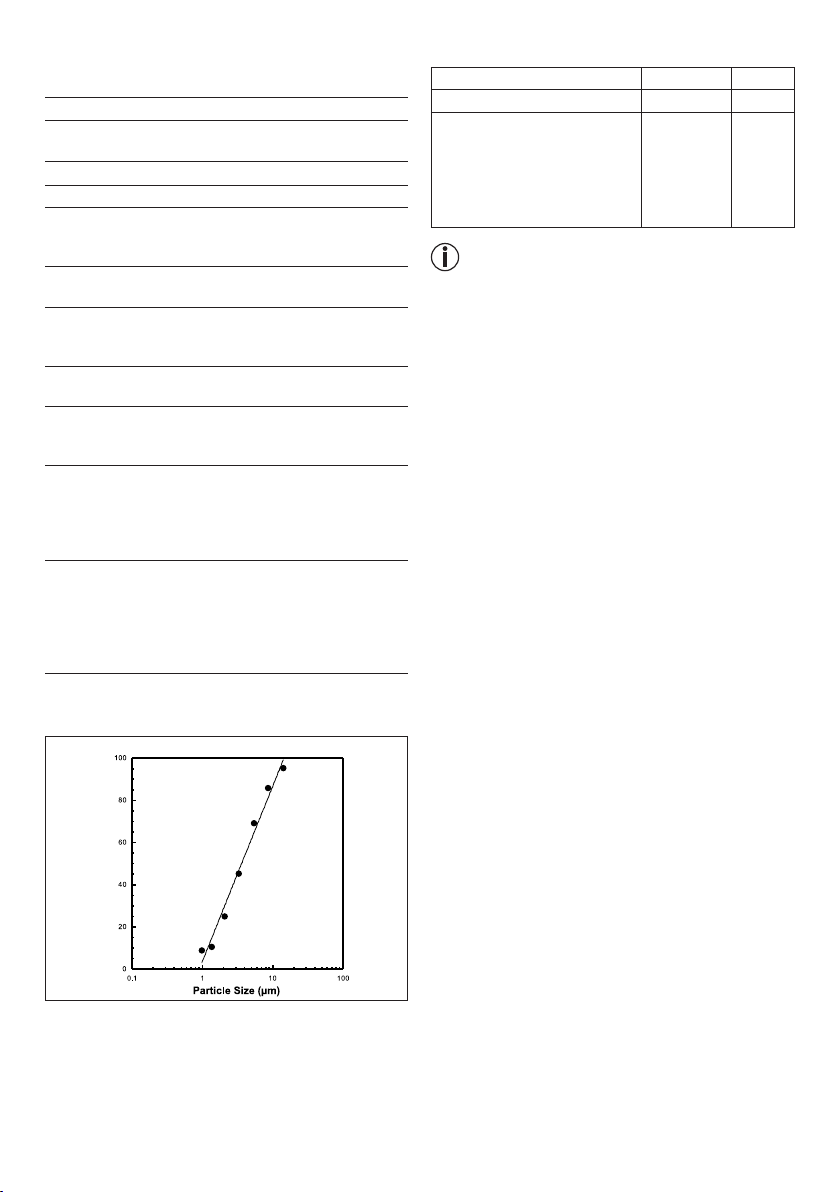
11. Datos técnicos
Modelo
Tipo
Dimensiones
(An x Al x Pr) 300 x 180 x 100 mm
Peso
Presión de trabajo ca. 0,8 - 1,45 bar
Capacidad de
llenado del
nebulizador
Flujo de
medicamento ca. 0,3 ml/min.
Presión acústica max. 52 dBA
Conexión a la red 230 V~; 50 Hz; 230 VA
Condiciones de
funcionamiento
Condiciones de
almacenamiento y
transporte
Propiedades del
aerosol
Salvo modificaciones técnicas.
Diagrama Tamaños de partículas
IH 21
IH 21/1
1,65 kg
max. 8 ml
min. 2 ml
(conforme a DIN EN 13544-1 apartado 26)
UK: 240 V~; 50 Hz; 240 VA
Temperatura: de +10 °C a +40 °C
Humedad relativa del aire:
de 10% a 95%
Temperatura: de 0 °C a +60 °C
Humedad relativa del aire:
de 10% a 95%
Presión ambiental:
de 500 hPa a 1060 hPa
1) Caudal: 5,3 l/min
2) Salida del aerosol: 0,216 ml
3) Tasa de salida del aerosol:
0,112 ml/min
4) Tamaño de las partículas (MMAD):
3,85 µm
Artículos de postventa
Denominación Material REF
Bloqueo del nebulizador PP
Yearpack (contiene tubo de
boca, aplicador para nariz,
mascarilla para adultos, mascarilla para niños, nebulizador,
tubo flexible de aire comprimido y filtro)
PP/ PVC 601.22
162.819
Nota
¡No garantizamos el correcto funcionamiento de este
aparato si se usa al margen de las especificaciones!
Nos reservamos el derecho de efectuar modificaciones técnicas para mejorar y perfeccionar el producto.
Este aparato y sus accesorios cumplen las normas
europeas EN60601-1, EN60601-1-2 y EN13544-1 y
está sujeto a las medidas especiales de precaución
relativas a la compatibilidad electromagnética. Tenga
en cuenta que los dispositivos de comunicación de alta
frecuencia portátiles y móviles pueden interferir en el
funcionamiento de este aparato. Puede solicitar infor
mación más precisa al servicio de atención al cliente
-
en la dirección indicada en este documento o leer el
final de las instrucciones de uso. Este aparato satisface
los requisitos especificados en las directrices europeas
sobre productos sanitarios 93/42/CE, así como la ley
alemana sobre productos sanitarios.
COMPATIBILIDAD ELECTROMAGNÉTICA
•
El aparato cumple las disposiciones actuales vigen-
tes con respecto a la compatibilidad electromagnética y es apto para su uso en cualquier edificio,
incluidos aquellos destinados a uso privado. Las
emisiones de radiofrecuencia del aparato son extremadamente bajas y es muy poco probable que
causen interferencias con otros dispositivos que se
encuentren cerca.
•
En cualquier caso, se recomienda no colocar el apa-
rato cerca de otros aparatos o sobre ellos. En caso
de producirse interferencias con otros dispositivos
eléctricos, cambie el aparato de lugar o conéctelo a
una toma diferente.
•
Los aparatos de radio pueden influir en el funciona-
miento del aparato.
Las mediciones se realizan con una solución de fluoruro sódico con un “Next Generation Impactor” (NGI).
Así pues, el diagrama puede no ser aplicable a suspensiones o medicamentos altamente viscosos. Puede obtener más información del fabricante de la medicación.
36
Page 37
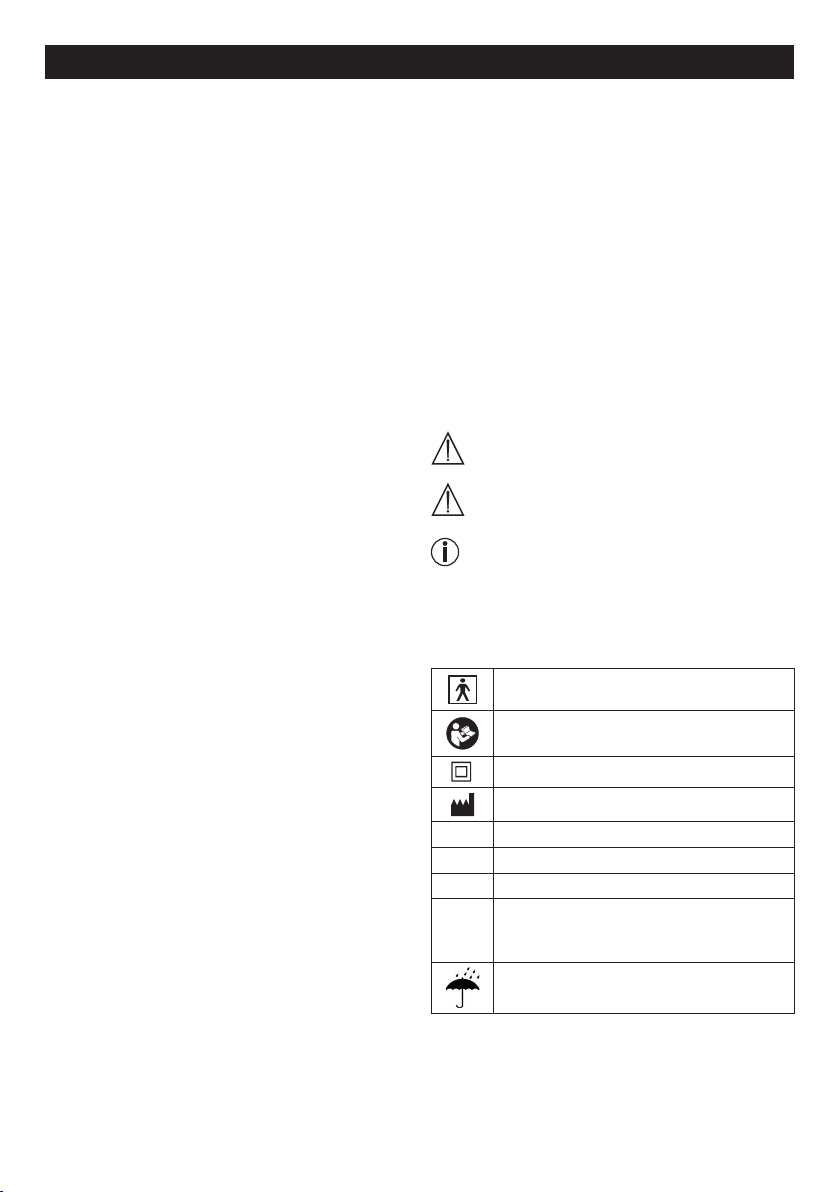
ITALIANO
Indice
1. Presentazione ....................................................37
2. Spiegazione dei simboli .....................................37
3. Avvertenze e indicazioni di sicurezza ................38
4. Descrizione dell’apparecchio e degli accessori 39
5. Messa in funzione ..............................................40
6. Funzionamento ..................................................40
7. Sostituzione del filtro .........................................42
8. Pulizia e disinfezione .........................................42
9. Smaltimento ......................................................43
10. Risoluzione dei problemi ...................................44
11. Dati tecnici .........................................................44
Contenuto della confezione
Vedere la descrizione dell’apparecchio e degli accessori a pag. 39.
•
Inalatore
•
Nebulizzatore
•
Tubo per aria compressa
•
Boccaglio
•
Mascherina per adulti
•
Mascherina per bambini
•
Elemento per il naso
•
Filtro di riserva
•
Questo manuale d’uso
1. Presentazione
Gentile cliente,
siamo lieti che Lei abbia scelto un prodotto del nostro
assortimento. Il nostro nome è garanzia per prodotti di
alta qualità nel settore calore, peso, pressione, temperatura corporea, pulsazioni, terapia dolce, massaggio
e aria.
Leggere attentamente queste istruzioni per l’uso, che
dovranno essere conservate per un uso successivo e
alla portata di chi utilizza l’apparecchio, e rispettare
le avvertenze.
Cordiali saluti
Il Beurer Team
Campo di impiego
Questo inalatore è un apparecchio indicato per la nebulizzazione di fluidi e farmaci in forma liquida (aerosol) e per il trattamento efficace delle vie respiratorie
inferiori e superiori.
Attraverso la nebulizzazione dei medicinali prescritti o
consigliati dal medico, è possibile prevenire numerosi
disturbi dell’apparato respiratorio, alleviarne i sintomi
e accelerarne la guarigione. Per ulteriori informazioni
in merito alle possibilità di impiego dell’apparecchio,
rivolgersi al proprio medico curante o al farmacista.
Questo apparecchio è indicato per l’utilizzo a domicilio
e l’inalazione dei farmaci deve avvenire soltanto dietro
consiglio del medico. Inalare la soluzione nebulizzata
inspirando lentamente e in modo rilassato, affinché il
farmaco possa penetrare fino nelle diramazioni bron
chiali più fini. Espirare normalmente.
Dopo il trattamento di pulitura l’apparecchio è pronto
per essere riutilizzato. Il trattamento include la sostituzione di tutti gli accessori incluso il nebulizzatore e
il filtro dell’aria nonché la disinfezione delle superfici
dell’apparecchio con un disinfettante in commercio.
-
2. Spiegazione dei simboli
Nelle istruzioni d’uso sono utilizzati i seguenti simboli.
Pericolo Segnalazione di rischi di lesioni
Attenzione Segnalazione di rischi di possibili
Avvertenza
Sull’imballaggio e sulla targhetta identificativa dell’apparecchio e degli accessori compaiono i seguenti simboli.
Parte applicata di tipo BF
Leggere le istruzioni per l’uso
Classe di isolamento 2
P
On
I
Off
O
Numero di serie
SN
30 ON /
30 OFF
30 minuti di funzionamento, dopodiché
30 minuti di pausa prima della rimessa in
funzione.
Proteggere dall’umidità
o pericoli per la salute.
danni all’apparecchio.
Indicazione di importanti informa-
zioni.
roduttore
37
Page 38

3. Avvertenze e indicazioni di
sicurezza
Pericolo
• Prima dell’utilizzo accertarsi che l’apparecchio e gli
accessori non presentino danni visibili. In caso di
dubbi non utilizzarlo e rivolgersi al rivenditore oppure
contattare il servizio clienti all’indirizzo indicato.
• Se si verificano problemi con l'apparecchio, consul-
tare il capitolo "10 Soluzione dei problemi".
• L’utilizzo di questo apparecchio non sostituisce il
parere diretto o un trattamento del medico. Quindi, al
manifestarsi di qualsiasi dolore o malattia, consultare
innanzitutto un medico.
• In caso di qualsiasi problema di salute consultare il
proprio medico curante.
• Durante l’utilizzo del nebulizzatore osservare le nor
mali regole di igiene.
• Per quanto riguarda il tipo e la posologia del farmaco
da utilizzare, nonché la durata e la frequenza dell’inalazione, seguire sempre le indicazioni del medico.
• Utilizzare esclusivamente farmaci prescritti o consi-
gliati dal medico o dal farmacista.
Attenzione:
effettuare il trattamento utilizzando esclusivamente
i componenti indicati dal medico a seconda della
patologia.
• Verificare sul foglietto illustrativo del farmaco l'esi-
stenza di controindicazioni per l'uso in combinazione
con i comuni sistemi di aerosolterapia.
• Qualora il dispositivo non funzioni correttamente o
si avverta malessere o dolore, interrompere immediatamente l’utilizzo.
• Durante l’utilizzo, tenere l’apparecchio lontano da-
gli occhi, in quanto il farmaco nebulizzato potrebbe
avere effetti dannosi.
• Non attivare l’apparecchio in presenza di gas infiam-
mabili.
• Questo apparecchio non deve essere utilizzato da
bambini o persone con limitate capacità fisiche e
sensoriali (ad es. insensibilità al dolore) o che non
siano in pieno possesso delle proprie facoltà mentali;
inoltre non deve essere utilizzato da persone senza la
dovuta esperienza e/o le dovute conoscenze a meno che non vengano sorvegliate da un’altra persona
responsabile della loro sicurezza o istruite su come
utilizzare l’apparecchio in questione.
•
Prima di ogni intervento di pulizia o manutenzione,
è necessario spegnere l'apparecchio ed estrarre la
spina.
• Tenere il materiale di imballo fuori dalla portata dei
bambini (pericolo di soffocamento).
• Per evitare il rischio di impigliamento e strangolamen-
to, tenere i cavi e i tubi dell'aria lontano dai bambini.
-
• Non utilizzare accessori che non siano autorizzati dal
produttore del dispositivo.
• L’apparecchio deve essere alimentato solo con la
tensione indicata sulla targhetta identificativa.
• Non immergere l’apparecchio in acqua e non utiliz
zarlo in ambienti umidi. Assicurarsi che all’interno
dell’apparecchio non possa penetrare alcun liquido.
• Proteggere il dispositivo da colpi e urti.
• Non toccare mai il cavo con le mani bagnate, vi è il
rischio di subire una scossa elettrica.
• Per staccare la spina dalla presa di corrente, non
tirare dal cavo.
• Non schiacciare, piegare o lasciare penzolare il cavo,
non farlo passare sopra oggetti dal bordo tagliente e
proteggerlo dal calore.
• È consigliabile srotolare completamente il cavo di
alimentazione, in modo da evitare un pericoloso surriscaldamento.
•
Se il cavo di alimentazione dell'apparecchio viene
danneggiato, richiedere la sostituzione al produttore,
al Servizio clienti o a un tecnico ugualmente qualificato, per evitare qualsiasi rischio.
• L’apertura dell’apparecchio può comportare il rischio
di scossa elettrica. L’apparecchio è scollegato dalla
rete di alimentazione soltanto quando la spina non
è inserita nella presa.
• Qualora il dispositivo cada per terra, venga esposto
a un’eccessiva umidità o subisca danni di altro ge
nere non deve più essere utilizzato. In caso di dubbio
contattare il rivenditore o il servizio clienti.
•
L’inalatore IH 21 deve essere fatto funzionare esclu-
sivamente con gli adeguati nebulizzatori e con i rispettivi accessori. L’impiego di altri nebulizzatori o
accessori può compromettere l’efficienza del trattamento ed eventualmente danneggiare l’apparecchio.
-
-
Attenzione
• Un black-out elettrico, improvvise interferenze o altre
condizioni sfavorevoli potrebbero impedire il funzionamento dell’apparecchio. Per questa ragione consigliamo di tenere a portata di mano un apparecchio di
riserva o un farmaco adeguato (approvato dal medico).
•
Qualora fossero necessari adattatori o prolunghe, tali
dispositivi devono rispettare le norme di sicurezza
vigenti. I limiti dell’intensità di corrente non devono
essere superati, così come i limiti di massima poten
za indicati sull’adattatore.
•
L’apparecchio e il cavo di alimentazione non devono
essere tenuti in prossimità di fonti di calore.
•
L’apparecchio non deve essere utilizzato in stanze
nelle quali sono stati precedentemente impiegati prodotti spray. Prima del trattamento, assicurarsi che tali
stanze siano state sufficientemente aerate.
•
Non inserire oggetti nelle aperture di raffreddamento
dell’apparecchio.
-
38
Page 39
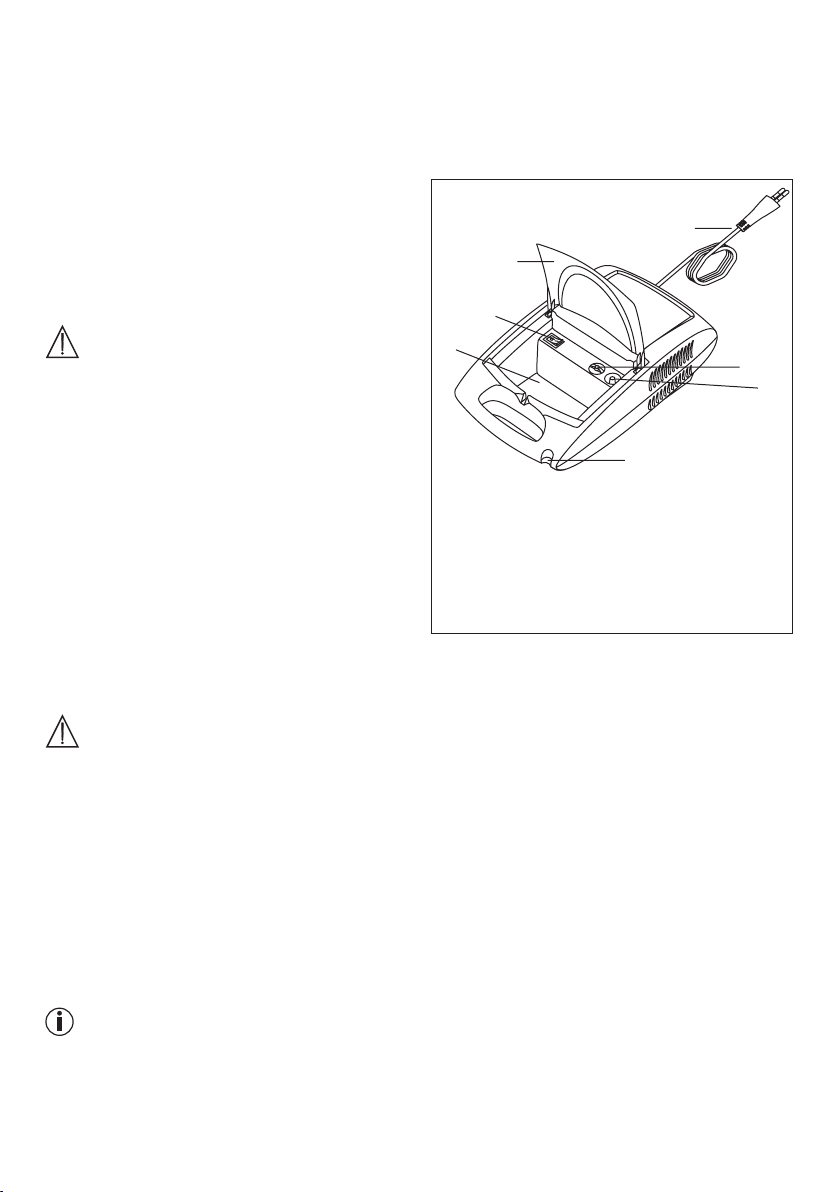
•
4
Non utilizzare l’apparecchio, qualora esso produca
rumori inconsueti.
•
Per ragioni igieniche è assolutamente necessario che
ogni utente utilizzi i suoi accessori personali.
•
Dopo l’utilizzo staccare sempre la spina dalla presa
di corrente.
• Tenere l’apparecchio al riparo dagli agenti atmosferici
e da condizioni ambientali potenzialmente sfavorevoli.
FUSIBILE
•
L’apparecchio è dotato di un fusibile di sovracorren
te che deve essere sostituito soltanto da personale
autorizzato.
Avvertenze generali
Attenzione
•
Utilizzare l’apparecchio esclusivamente:
– sugli esseri umani,
– per lo scopo previsto dal dispositivo stesso (inala-
zione di aerosol) e attenendosi a quanto indicato
in queste istruzioni per l’uso.
• Qualsiasi utilizzo improprio può rivelarsi perico
loso.
•
In caso di incidenti seri, è opportuno rivolgersi in-
nanzitutto al pronto soccorso.
•
Oltre al farmaco, utilizzare esclusivamente acqua
distillata o una soluzione fisiologica. Altri liquidi in
certi casi possono danneggiare l’inalatore o il nebulizzatore.
•
Questo apparecchio non è destinato ad un impiego
commerciale o clinico, bensì esclusivamente ad un
uso personale a domicilio.
Prima della messa in funzione
Attenzione
•
Prima di utilizzare l’apparecchio rimuovere integral-
mente l’imballaggio.
•
Tenere l’apparecchio al riparo da polvere, sporcizia e
umidità, e durante il funzionamento non coprirlo per
nessuna ragione.
•
Non utilizzare l’apparecchio in ambienti polverosi.
•
Spegnere immediatamente l’apparecchio qualora
esso risulti difettoso o si notino anomalie nel funzionamento.
• Il produttore declina ogni responsabilità in caso di
danni derivanti da un utilizzo scorretto o inadeguato.
Riparazione
Avvertenza
•
Per nessuna ragione aprire o cercare di riparare il di-
spositivo, in quanto questo potrebbe comprometterne il funzionamento. Qualora tale regola non venisse
osservata, la garanzia perderebbe di validità.
•
Per le riparazioni rivolgersi al servizio clienti o a un
rivenditore autorizzato.
4. Descrizione dell’apparecchio e
degli accessori
Inalatore
-
2
3
-
1 Cavo di alimentazione
2 Coperchio
3 Interruttore On/Off
4 Scomparto per accessori
5 Tappo del filtro e filtro
6 Attacco per il tubo
7 Supporto del nebulizzatore
1
7
5
6
39
Page 40
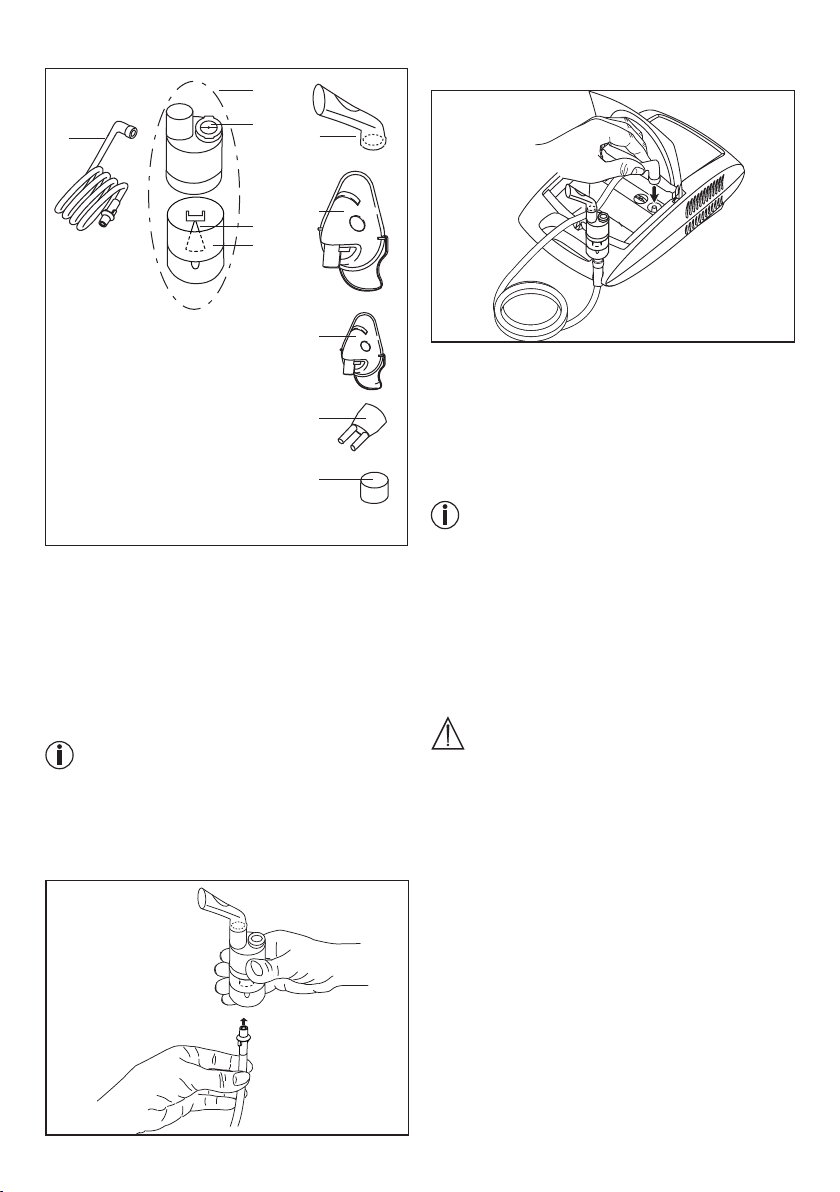
Nebulizzatore e accessori
8
11
10
12
•
Inserire l’altra estremità del tubo [8] con una leggera
rotazione nell’attacco per il tubo [6] sull’inalatore.
9
13
14
8 Tubo per aria compressa
9 Nebulizzatore
10 Accessorio per la nebulizzazione
11 Valvola
12 Ampolla per il farmaco
13 Boccaglio
14 Mascherina per adulti
15 Mascherina per bambini
16 Elemento per il naso
17 Filtro di ricambio
15
16
17
5. Messa in funzione
Posizionamento
Togliere l’apparecchio dalla confezione e appoggiarlo
su una superficie piana.
Assicurarsi che le aperture di aerazione non siano co
perte.
Sollevare il coperchio [2] per accedere agli accessori.
Al primo utilizzo
Avvertenza
•
Al primo utilizzo pulire e disinfettare il nebulizzatore
e gli accessori prima di procedere al trattamento (vedere “Pulizia e disinfezione” pag. 42.
•
Collegare il tubo per aria compressa [8] alla parte
inferiore dell’ampolla per il farmaco [12].
-
Allacciamento elettrico
L’apparecchio deve essere alimentato solo con la tensione indicata sulla targhetta identificativa.
•
Inserire la spina del cavo di alimentazione [1] in una
presa di corrente adeguata.
•
Per il collegamento elettrico inserire completamente
la spina nella presa.
Avvertenza
•
Assicurarsi che ci sia una presa di corrente vicino a
dove si intende posizionare l’apparecchio.
•
Prestare attenzione alla posizione del cavo, in modo
tale che nessuno corra il rischio di inciampare.
•
Dopo l’inalazione, per scollegare l’inalatore dalle rete
elettrica, innanzitutto spegnere l’apparecchio e in
seguito staccare la spina dalla presa di corrente.
6. Funzionamento
Attenzione
•
Per ragioni igieniche è assolutamente necessario
pulire il nebulizzatore [9] e gli accessori dopo ogni
utilizzo e disinfettarli dopo l’ultimo utilizzo giornaliero.
• Gli accessori devono essere utilizzati da un un'unica
persona; l'uso da parte di più persone non è consigliato.
• Qualora la terapia preveda l’inalazione di farmaci di-
versi uno di seguito all’altro, assicurarsi che dopo
ogni utilizzo il nebulizzatore [9] venga risciacquato
con acqua calda corrente (vedere “Pulizia e disinfezione” a pag. 43.
•
Per la sostituzione del filtro, seguire le indicazioni
riportate in queste istruzioni.
•
Prima di ogni utilizzo accertarsi che il tubo sia sal-
damente collegato sia all’inalatore [6] sia al nebulizzatore [9].
•
Prima dell’utilizzo assicurarsi che l’apparecchio fun-
zioni in modo regolare: accendere quindi l’inalatore
(con il nebulizzatore collegato ma senza farmaci) per
40
Page 41
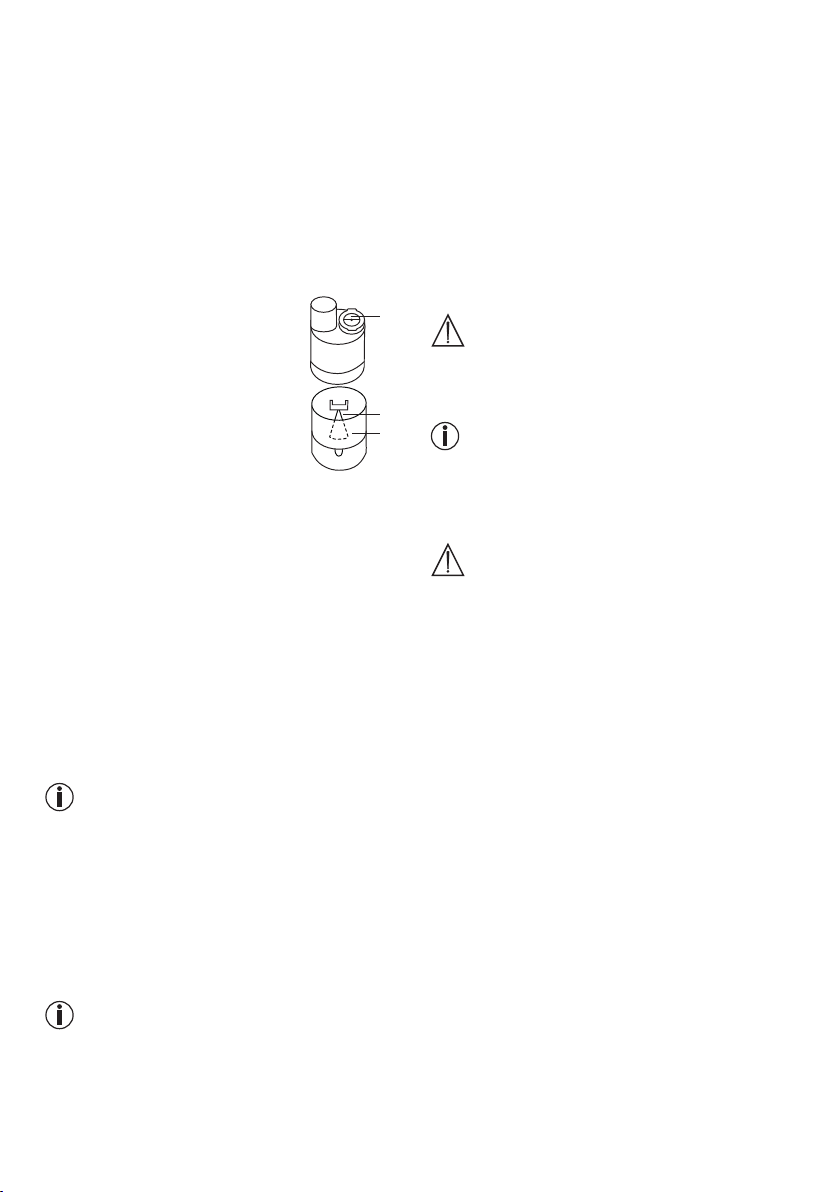
qualche istante. Se dal nebulizzatore [9] fuoriesce
dell’aria, ciò vuol dire che l’apparecchio funziona.
1. Inserimento del boccaglio
•
Aprire il nebulizzatore [9] ruotando la parte superiore
in senso antiorario rispetto all’ampolla per il farmaco[12]. Inserire l’ugello di innesto [10] nell’ampolla
per il farmaco [12].
• Accertarsi che il cono di conduzione del farmaco,
sia correttamente inserito sul cono di conduzione
dell'aria situato all'interno del nebulizzatore.
•
•
•
6. Trattamento
• Durante l'inalazione, sedere in posizione eretta e ri-
2. Riempimento del nebulizzatore
• Versare una soluzione salina isotonica o il medicinale direttamente
nel serbatoio del medicinale [12].
Evitare un riempimento eccessivo.
La quantità massima consigliata è
pari a 8 ml.
• Utilizzare i medicinali solo in base
alle indicazioni del proprio medico
e informarsi in merito alla durata
di inalazione e alla quantità di sostanza da inalare adeguate.
• Se la quantità del medicinale prescritta è inferiore a 2
ml, aggiungervi una soluzione salina isotonica fino ad
arrivare a 4 ml. È inoltre necessario diluire i medicinali
molto viscosi. Anche in questo caso, attenersi alle
indicazioni del proprio medico.
3. Chiusura del nebulizzatore
• Chiudere il nebulizzatore [9] ruotando la parte superiore in senso orario sul serbatoio del medicinale
[12]. Prestare attenzione al collegamento corretto.
4. Inserimento della valvola
• Spingere la valvola blu [11] nell'apposita apertura sul
lato superiore del nebulizzatore [9].
Avvertenza
La valvola garantisce un migliore grado di penetrazione
del farmaco nei polmoni. Utilizzare la valvola [11] solo
con il boccaglio [13], non utilizzarla con le mascherine
[14, 15] o l'erogatore nasale [16].
5. Collegamento degli accessori al nebulizzatore
•
Collegare il nebulizzatore [9] all’accessorio desiderato
(boccaglio [13], mascherina per adulti [14], mascherina per bambini [15] o elemento per il naso [16].
•
11
L'apparecchio non è progettato per il funzionamento
continuo, dopo 30 minuti di esercizio deve rimanere
spento per 30 minuti.
10
12
Durante il trattamento tenere dritto il nebulizzatore (in
posizione verticale): in caso contrario la nebulizzazione
verrebbe ostacolata e di conseguenza il funzionamento
risulterebbe difettoso.
Oli essenziali di piante, sciroppi per la tosse, soluzioni
per i gargarismi, oli per massaggi o per bagno turco
non sono assolutamente adatti all’inalazione. La loro
viscosità può compromettere il funzionamento dell’apparecchio e di conseguenza l’efficacia del trattamento.
In caso di ipersensibilità bronchiale, farmaci con oli
essenziali possono talvolta provocare un broncospasmo acuto (un’improvvisa contrazione spasmodica dei
bronchi con conseguente insufficienza respiratoria).
Chiedere consiglio al proprio medico o farmacista.
7. Fine dell’inalazione
Quando il liquido nebulizzato comincia a fuoriuscire in
modo discontinuo o si avverte un rumore diverso durante l’inalazione, è possibile terminare il trattamento.
• Dopo il trattamento, spegnere l'inalatore con l'inter
•
8. Effettuare la pulizia
Vedere “Pulizia e disinfezione” a pag. 42.
Nota
L'inalazione mediante boccaglio rappresenta la for
ma più efficace della terapia. L'inalazione mediante
mascherina è consigliata solo nel caso in cui non sia
possibile utilizzare il boccaglio (ad esempio in bambini
non ancora in grado di inalare attraverso il boccaglio).
7. Sostituzione del filtro
In condizioni normali di utilizzo, è necessario sostituire
il filtro dell'aria dopo 500 ore di esercizio oppure un
anno. Controllare regolarmente il filtro dell'aria (dopo
10-12 nebulizzazioni). Qualora esso sia molto sporco
Prima del trattamento, estrarre il nebulizzatore dal
relativo supporto [7] tirandolo verso l’alto.
Avviare l’inalatore per mezzo dell’interruttore On/Off
[3].
La fuoriuscita di liquido nebulizzato dal nebulizzatore
indica il corretto funzionamento dell’apparecchio.
lassata a un tavolo e non in poltrona, in modo da non
comprimere le vie respiratorie e non compromettere
così l'efficacia del trattamento.
Inspirare a fondo il farmaco nebulizzato.
Attenzione
Avvertenza
Attenzione
-
ruttore On/Off [3] e scollegarlo dalla rete elettrica.
Riposizionare il nebulizzatore [9] sul relativo supporto
[7].
41
Page 42
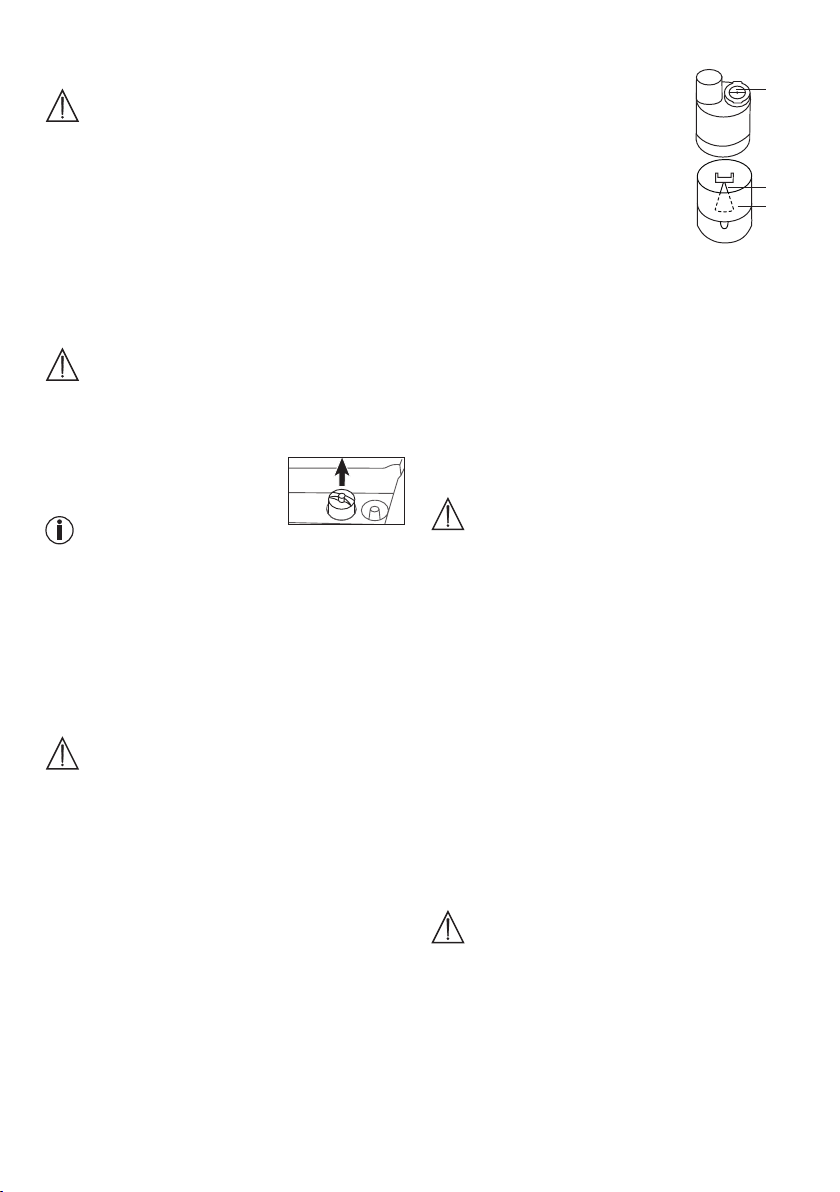
o intasato, sostituirlo. Qualora il filtro si sia inumidito,
occorre comunque sostituirlo con uno nuovo.
Attenzione
• Non cercare di pulire e riutilizzare il filtro usato.
• Utilizzare esclusivamente i filtri originali del produttore, poiché in caso contrario l’inalatore potrebbe essere danneggiato o la terapia potrebbe non rivelarsi
sufficientemente efficace.
• Non è possibile riparare o effettuare interventi di manutenzione sul filtro dell'aria mentre una persona lo
sta utilizzando.
• Non utilizzare mai l’apparecchio senza filtro.
Per sostituire il filtro procedere come segue:
Attenzione
•
Innanzitutto spegnere l’apparecchio e scollegarlo
dalla rete elettrica.
•
Lasciare raffreddare l’apparecchio.
1. Tirare verso l’alto il cappuccio
del filtro [5].
Avvertenza
Qualora il filtro, dopo aver tolto il tappo, rimanga all’interno dell’apparecchio, estrarlo con una pinzetta o
simili.
2. Reinserire il tappo [5] con un nuovo filtro.
3. Verificare che il tappo sia ben fissato.
8. Pulizia e disinfezione
Nebulizzatore e accessori
Pericolo
Attenersi alle seguenti regole di igiene al fine di evitare
possibili rischi per la salute.
•
È previsto che il nebulizzatore [9] e gli accessori ven-
gano utilizzati più volte. È opportuno considerare che
per i diversi campi di impiego vi sono requisiti diversi
in merito alla pulizia e al trattamento igienico.
Avvertenze:
•
Evitare una pulizia meccanica del nebulizzatore e
degli accessori con spazzole o simili, in quanto ciò
potrebbe causare danni irreparabili all’apparecchio
e compromettere l’efficacia della terapia.
•
Per le precauzioni igieniche particolari (cura delle ma-
ni, utilizzo dei farmaci o delle soluzioni da inalare) in
caso di gruppi ad alto rischio (ad es. pazienti affetti
da fibrosi cistica), consultare il medico.
•
Dopo aver pulito e disinfettato il nebulizzatore e l’ac-
cessorio, asciugarli con cura. Residui di umidità o di
acqua possono favorire la proliferazione di germi.
Preparazione
•
Subito dopo ogni trattamento,
tutti i componenti del nebulizzatore [9] e l’accessorio impiegato
devono essere puliti per eliminare
i residui di farmaco e di sporcizia.
•
A tal fine, smontare il nebulizzato-
re[9] separandone i singoli componenti.
•
Estrarre il boccaglio [13] o ma-
schera [14,15] o elemento per il
naso [16] dal nebulizzatore.
•
Aprire il nebulizzatore ruotando la parte superiore in
senso antiorario rispetto all’ampolla per il farmaco
[12].
•
Estrarre l’ugello di innesto [10] dall’ampolla per il
farmaco [12].
• Rimuovere la valvola [11] estraendola dal nebuliz
zatore [9].
•
L’assemblaggio avviene poi seguendo l’ordine inver-
so.
Pulizia
Attenzione
Prima di procedere alla pulizia dell’apparecchio, spegnerlo, scollegarlo dalla rete elettrica e lasciarlo raffreddare.
Dopo ogni utilizzo lavare con acqua calda non bollente
il nebulizzatore e gli accessori utilizzati, come boccaglio, mascherina, ugello, ecc. Asciugare accuratamente
i componenti con un panno morbido. Riassemblare i
componenti perfettamente asciutti e riporli in un con
tenitore asciutto e sigillato oppure disinfettarli.
Durante la pulizia rimuovere accuratamente qualsiasi
residuo. Non utilizzare sostanze che in caso di contatto
con la pelle o le mucose, oppure se ingoiate o inalate,
potrebbero risultare tossiche.
Per pulire l'apparecchio, utilizzare un panno morbido
e asciutto e un detergente non abrasivo.
Non utilizzare prodotti di pulizia aggressivi e non im
mergere mai l’apparecchio nell’acqua.
Attenzione
•
Assicurarsi che non penetri acqua all’interno dell’ap
parecchio.
•
Non lavare l’apparecchio e gli accessori nella lava-
stoviglie.
•
Se collegato alla rete elettrica, l’apparecchio non
deve essere toccato con le mani bagnate. Fare in
modo che su di esso non schizzino gocce d’acqua.
L’apparecchio deve essere messo in funzione soltanto se perfettamente asciutto.
42
11
10
12
-
-
-
-
Page 43
•
Non spruzzare alcun liquido nelle aperture di aera-
zione. Ciò potrebbe danneggiare il sistema elettrico
dell’apparecchio e altri componenti dell’inalatore e
provocare difetti funzionali.
Acqua di condensa, cura del tubo
A seconda delle condizioni ambientali è possibile che
all’interno del tubo si formi dell’acqua di condensa. Al
fine di evitare la proliferazione di germi e assicurare una
terapia il più possibile efficace, l’umidità deve essere
assolutamente eliminata. Procedere come segue:
•
Staccare il tubo [8] dal nebulizzatore [9].
•
Lasciare il tubo collegato all’inalatore [6].
•
Far funzionare l’inalatore finché l’umidità non sia
stata completamente eliminata dal flusso di aria
all’interno del tubo.
•
In caso di sporco persistente, sostituire il tubo.
Disinfezione
Per la disinfezione del nebulizzatore e degli accessori, seguire attentamente i punti elencati di seguito.
Si consiglia di disinfettare i singoli componenti al più
tardi dopo l’ultimo utilizzo giornaliero. (A tal fine sono
sufficienti un poco di aceto incolore e acqua distillata).
•
Innanzitutto pulire il nebulizzatore e gli ac- cessori
Asciugatura
•
Resistenza dei materiali
•
•
Conservazione
•
•
•
come descritto al punto “Pulizia”.
• Immergere il nebulizzatore, boccaglio e il elemento
per il naso disassemblati in acqua bollente per 5
minuti.
• Per gli altri accessori
da ¼ di aceto e ¾ di acqua distillata. Assicurarsi che
la quantità di miscela sia sufficiente per immergere
completamente i componenti.
• Lasciare i componenti immersi per 30 minuti nella
utilizzare una miscela composta
soluzione di aceto.
• Sciacquare i componenti con acqua e asciugarli accuratamente con un panno morbido.
9. Smaltimento
Nel rispetto dell’ambiente, l’apparecchio non
deve essere gettato tra i normali rifiuti domestici.
Smaltire l’apparecchio secondo la direttiva europea sui rifiuti di apparecchiature elettriche ed elettroniche (RAEE).
In caso di dubbi, rivolgersi agli enti comunali respon
sabili in materia di smaltimento.
Attenzione
Non far bollire o sterilizzare in autoclave le mascherine
e il tubo dell'aria.
Disporre i singoli componenti su una superficie
asciutta, pulita e assorbente, e lasciarli asciugare
completamente (almeno 4 ore).
Il nebulizzatore e gli accessori, se utilizzati fre-
quentemente, come tutti i componenti n materiale
plastico, sono soggetti ad usura. Questo col tempo
può portare a una modifica dell’aerosol e a un calo
dell’efficienza della terapia. Pertanto consigliamo di
sostituire il nebulizzatore dopo un anno.
Per la pulizia e la disinfezione è importante: utilizzare
esclusivamente detergenti delicati o disinfettanti il cui
dosaggio deve essere indicato dal produttore.
Non conservare l’apparecchio in ambienti umidi (ad
es. il bagno) e non trasportarlo insieme ad oggetti
umidi.
Conservare e trasportare l’apparecchio al riparo dai
raggi diretti del sole.
Gli accessori possono essere riposti nell’apposito
scomparto [4]. Conservare l’apparecchio in un luogo
asciutto, se possibile all’interno della relativa confezione.
-
•
Riassemblare i componenti perfettamente asciutti e
riporli in un contenitore asciutto e sigillato.
Avvertenza
Al fine di evitare la proliferazione di germi, assicurarsi che dopo essere stati puliti i componenti vengano
perfettamente asciugati.
Sterilizzazione
•
Utilizzare le soluzioni di sterilizzazione a freddo
seguendo le istruzioni del produttore.
43
Page 44
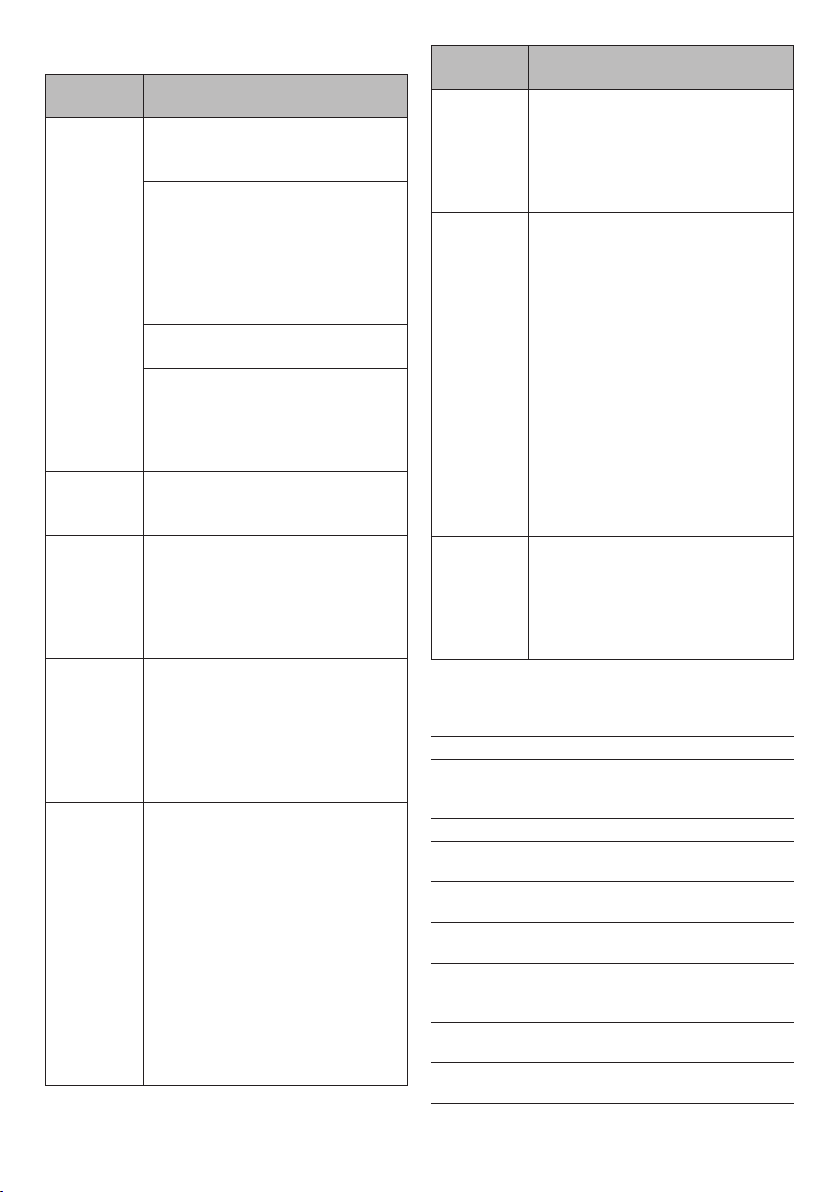
10. Risoluzione dei problemi
Problemi/
domande
Dal nebuliz
zatore non
fuoriesce
aerosol o
ne fuoriesce
troppo
poco.
L’emissione
non è suffi
ciente
Quali
farmaci si
possono
inalare?
Dopo il
trattamento
rimane della
soluzione
all’interno
del nebuliz
zatore.
A che cosa
è necessario
prestare
attenzione
per il tratta
mento dei
bambini e
dei neonati?
Possibile causa/rimedio
1. Eccessiva o insufficiente quantità
di farmaco nel nebulizzatore.
Min.: 2 ml, Max.: 8 ml.
Ugello probabilmente otturato.
2.
Eventualmente pulire l’ugello (ad
es. sciacquandolo). In seguito ri
mettere il nebulizzatore in funzione.
Attenzione: far passare attraverso i
piccoli fori soltanto la parte inferiore
dell’ugello.
3. Il nebulizzatore non è tenuto in
posizione verticale.
4.
Il farmaco impiegato non è adatto
alla nebulizzazione (ad es. troppo
denso).
Il farmaco dovrebbe essere prescritto dal medico.
Tubo piegato, filtro otturato, troppa
soluzione da inalare.
-
A tal proposito, consultare il
medico.
Fondamentalmente possono essere
inalati tutti i farmaci indicati e autorizzati per l’inalazione tramite nebulizzatore.
Questo è tecnicamente normale e
inevitabile. Sospendere l’inalazio
ne, non appena si avverte un netto
cambiamento nel rumore prodotto
dall’apparecchio.
-
1. Nel caso dei neonati, la mascheri
na deve coprire naso e bocca per
garantire un’inalazione efficace.
2.
Anche nel caso dei bambini la
mascherina deve coprire naso e
bocca. L’utilizzo su una persona
addormentata non ha molto senso,
in quanto l’inalazione non è suffi
ciente a far penetrare abbastanza
farmaco nei polmoni.
Avvertenza: il trattamento di un
bambino deve essere effettuato
sempre sotto la supervisione di un
adulto.
Problemi/
Possibile causa/rimedio
domande
L’inalazio
ne con la
mascherina
dura di più?
Questo è tecnicamente inevitabile.
A causa dei fori nella mascherina,
ad ogni respiro viene inalato meno
farmaco rispetto a quando si utilizza
il boccaglio. L’aerosol, attraverso i
fori, viene disperso nell’ambiente.
-
Perché il ne
bulizzatore
deve essere
sostituito
regolarmen
te?
-
Alla base di ciò vi sono due ragioni:
1. Al fine di garantire un trattamento
quanto più efficace, il foro dell’u
gello non deve superare un certo
diametro. A causa di fattori sia
meccanici che termici la plastica
-
è soggetta a usura, e l’ugello di
innesto [10] è particolarmente
sensibile. In questo modo può
variare anche la composizione
delle goccioline dell’aerosol, il che
influisce direttamente sull’efficacia
del trattamento.
2. Inoltre, una regolare sostituzione
del nebulizzatore è consigliabile
anche per ragioni igieniche.
È neces
sario un
nebulizza
Per motivi igienici è assolutamente
indispensabile.
tore diverso
per ogni
utilizzatore?
-
11. Dati tecnici
Modello IH 21
Tipo IH 21/1
Dimensioni (lar
ghezza, altezza,
profondità) 300 x 180 x 100 mm
-
Peso 1,65 kg
Pressione
operativa ca. 0,8 - 1,45 bar
Capacità del
nebulizzatore
Flusso del
farmaco ca. 0,3 ml/min.
-
Pressione
sonora
Allacciamento
elettrico
Condizioni di
funzionamento
-
max. 8 ml
min. 2 ml
max. 52 dBA
(secondo. DIN EN 13544-1 paragrafo 26)
230 V~; 50 Hz; 230 VA
UK: 240 V~; 50 Hz; 240 VA
Temperatura: da +10 °C a +40 °C
Umidità relativa dell’aria: 10% a 95%
44
Page 45
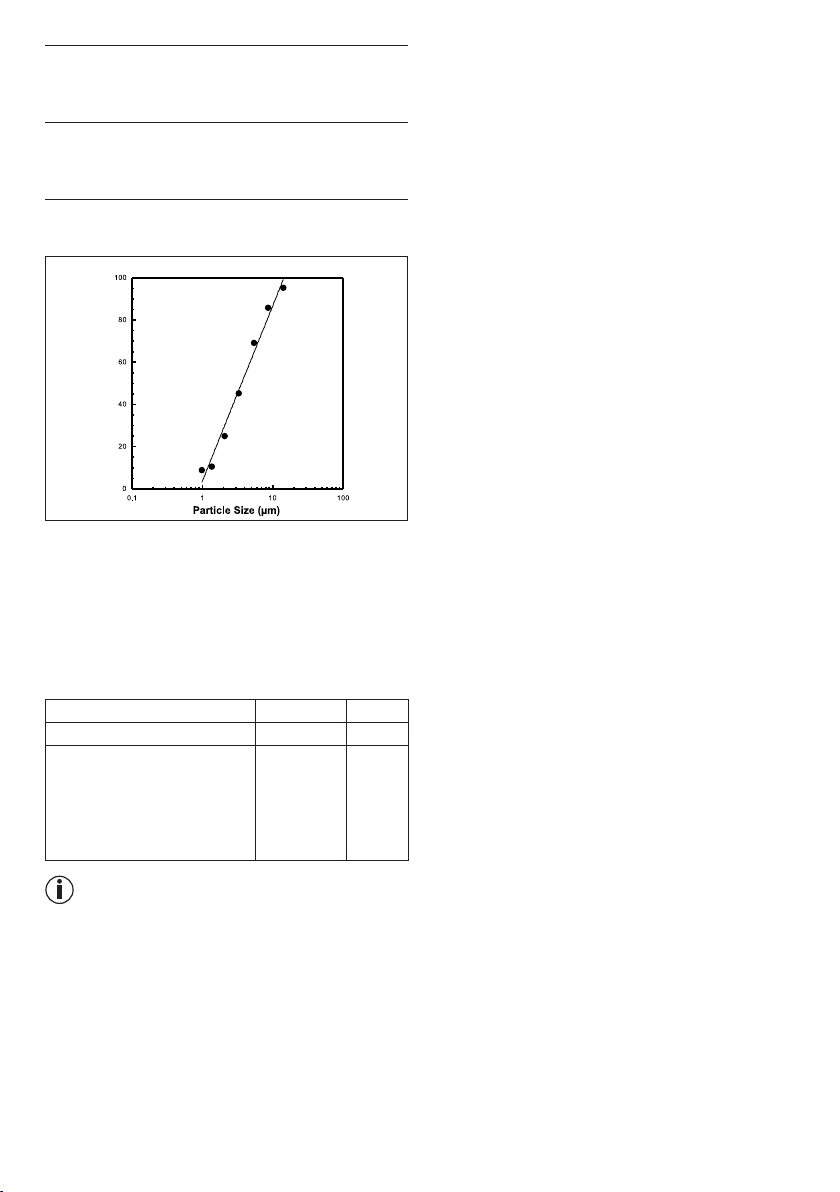
Condizioni di
trasporto e
immagazzinamento
Caratteristiche
aerosol
Temperatura: da 0 °C a +60 °C
Umidità relativa dell’aria: 10% a 95%
Pressione ambiente: da 500 a 1060 hPa
1) Flusso: 5,3 l/min
2) Erogazione aerosol: 0,216 ml
3) Tasso di erogazione: 0,112 ml/min
4)
Dimensione particelle (MMAD): 3,85 µm
Con riserva di modifiche tecniche.
Diagramma dimensioni particelle
Le misurazioni sono state eseguite con una soluzione
di fluoruro di sodio e un "Next Generation Impactor"
(NGI).
Il diagramma non è quindi applicabile a sospensioni o a
farmaci particolarmente densi. Per ulteriori informazioni
a questo riguardo, consultare il produttore del farmaco
in questione.
Acquisto successivo
Denominazione Materiale REF
Stopper nebulizzatore PP
Yearpack (contiene Boccaglio,
PP/ PVC 601.22
162.819
Elemento per il naso, Ma-
scherina per adulti, Mascherina per bambini, Nebulizzatore,
Tubo per aria compressa,
Filtro)
rivolgersi all’Assistenza clienti oppure consultare la par
te finale delle istruzioni per l’uso. Il dispositivo rispetta
inoltre i requisiti della Direttiva europea sui Dispositivi
Medici 93/42/EC.
COMPATIBILITÀ ELETTROMAGNETICA
•
L’apparecchio rispetta le norme vigenti in materia di
compatibilità elettromagnetica e può essere utilizzato
in tutti gli edifici, inclusi quelli di domicilio privato. Le
emissioni in radiofrequenze dell’apparecchio sono
estremamente basse ed è poco probabile che provochino interferenze con altri dispositivi nelle vicinanze.
• Si consiglia comunque di non posizionare l’appa-
recchio sopra o vicino ad altri apparecchi. Qualora
dovessero verificarsi interferenze con altri apparecchi
elettrici, spostarlo o collegarlo a un’altra resa elettrica.
•
Le radio possono influenzare il funzionamento
dell’apparecchio.
Avvertenza
L’inosservanza delle specifiche indicate non garantisce
il perfetto funzionamento del dispositivo. Ci riserviamo
la facoltà di apportare variazioni e migliorie tecniche
per un ulteriore sviluppo del prodotto.
Questo dispositivo e i relativi accessori sono fabbricati in accordo con le norme europee EN60601-1,
EN60601-1-2 e EN13544-1 e rispetta i requisiti es
senziali di compatibilità elettromagnetica. Prestare attenzione al fatto che dispositivi di telecomunicazione
ad alta frequenza portatili e mobili possono interferire
con questo dispositivo. Per informazioni più dettagliate,
45
Page 46
TÜRKÇE
İçindekiler
1. Ürün özellikleri ...................................................46
2. İşaretlerin açıklaması .........................................46
3. Uyarı ve güvenlik yönergeleri .............................46
4. Cihaz ve aksesuar açıklaması ............................48
5. Çalıştırma ...........................................................48
6. Kullanım .............................................................49
7. Filtre değişimi ....................................................50
8. Temizlik ve dezenfeksiyon .................................50
9. Bertaraf etme .....................................................52
10. Sorun giderme ...................................................52
11. Teknik veriler ......................................................53
rahat bir şekilde uygulayın ve ilacın derindeki en küçük
bronşlara kadar varması için yavaş ve derin bir şekilde
teneffüs edin. Nefesinizi normal bir şekilde bırakın.
Cihaz hazırlandıktan sonra tekrar kullanılabilir. Bu ha
zırlık, nebülizatör ve hava filtresi de dahil olmak üzere
tüm aksesuarların değiştirilmesini ve cihaz yüzeylerinin
piyasada bulunan bir dezenfektan ile dezenfekte edilmesini kapsar.
2. İşaretlerin açıklaması
Kullanım kılavuzunda aşağıdaki semboller kullanılmıştır.
Teslimat kapsamı
Cihaz ve aksesuar açıklaması için bkz. sayfa 48.
•
Enhalatör
•
Nebülizatör
•
Basınçlı hava hortumu
•
Ağızlık
•
Yetişkin maskesi
•
Çocuk maskesi
•
Burun parçası
•
Yedek filtre
•
Bu kullanım kılavuzu
Cihazın ve aksesuarların ambalajında ve model etiketinde aşağıdaki semboller kullanılmıştır.
1. Ürün özellikleri
Sayın müşterimiz,
Ürünlerimizden birini seçtiğiniz için teşekkür ederiz.
Isı, ağırlık, kan basıncı, vücut sıcaklığı, nabız, yumuşak
terapi, masaj ve hava konularında değerli ve titizlikle
test edilmiş kaliteli ürünlerimiz, dünyanın her tarafında
tercih edilmektedir.
Lütfen bu kullanım kılavuzunu dikkatle okuyun, ileride
kullanmak üzere saklayın, diğer kullanıcıların erişebil
mesini sağlayın ve içindeki yönergelere uyun.
Yeni cihazınızı iyi günlerde kullanmanızı dileriz
Beurer Ekibiniz
Kullanım alanı
Bu enhalatör, sıvılara ve akışkan ilaçlara (aerosoller)
yönelik nebülizasyonun yanı sıra üst ve alt solunum
yollarının tedavisi için kullanılan bir solunum cihazıdır.
Doktor tarafından öngörülen veya önerilen ilacın nebülizasyonu ve enhalasyonu ile solunum yolları hastalıklarını önleyebilir, bu tür hastalıkların yan etkilerini azaltabilir
ve iyileşme sürecini hızlandırabilirsiniz. Kullanım alanları
ile ilgili ayrıntılı bilgiler için doktorunuza veya eczacınıza
danışabilirsiniz.
Bu cihaz ev ortamında solunum gerçekleştirilmesi için
uygundur. İlaç enhalasyonu sadece doktorun talimatı
üzerine uygulanmalıdır. Enhalasyon işlemini sakin ve
-
3. Uyarı ve güvenlik yönergeleri
•
•
•
46
-
Uyarı Yaralanma tehlikelerine veya
Dikkat Cihaz ve aksesuarlarındaki olası
Not
I
O
SN
30 ON /
30 OFF
sağlığınızla ilgili tehlikelere yönelik
uyarılar.
hasarlar için güvenlik talimatları.
Önemli bilgilere yönelik not.
Uygulama parçası tip BF
Kullanım kılavuzunu dikkate alın
Koruma sınıfı 2'ye tabi cihaz
Ü
retici
Açık
Kapalı
Seri numarası
30 dakika çalışma, ardından yeniden
çalıştırılmadan önce 30 dakika mola.
Nemden koruyun
Uyarı
Cihazı kullanmadan önce, cihazda ve aksesuarların-
da gözle görülür hasarlar olmadığından emin olun.
Şüpheli durumlarda kullanmayın ve satıcınıza veya
belirtilen müşteri hizmetleri adresine başvurun.
Cihazda arıza oluşması durumunda “10. Sorun gi-
derme” bölümünü inceleyin.
Cihazın kullanımı, doktora gitme ve tedavinin yerine
geçmez. Bu nedenle her türlü ağrı veya hastalıkta
için her zaman öncelikle doktorunuza danışın!
Page 47

•
Sağlığınıza yönelik endişeleriniz varsa, aile hekiminize
başvurun!
•
Enhalatörü kullanırken genel hijyen koşullarını dikkate
alın.
•
Kullanılacak olan ilacın tipi, dozaj, enhalasyon sıklığı
ve süresi için her zaman doktorun talimatlarına uyulmalıdır.
•
Sadece doktorunuz veya eczacınız tarafından öngö-
rülen veya önerilen ilaçları kullanın.
Lütfen aşağıdaki hususları dikkate alın:
Uygulama için yalnızca doktor tarafından hastalığa
uygun olarak önerilen parçaları kullanın.
•
İlacın prospektüsünü inceleyerek, aerosol tedavisine
yönelik bilinen sistemler ile birlikte kullanıldığında bir
kontrendikasyon olasılığının söz konusu olup olmadığını öğrenin.
•
Cihazın doğru çalışmaması, kendinizi keyifsiz hisset-
meniz veya ağrıların söz konusu olması durumunda
uygulamayı derhal durdurun.
•
Kullanım sırasında cihazı gözlerinizden uzak tutun,
ilaç buharının hasar verici bir etkisi olabilir.
•
Bu cihazı ortamda yanıcı gazlar varken ve oksijen yoğunluğu yüksekken kullanmayın.
•
Cihaz, çocuklar tarafından veya kısıtlı fiziksel, algısal
(örn. acıya karşı duyarsızlık) ve akli becerileri nedeniyle ya da tecrübesizlik ve bilgisizliklerinden dolayı
cihazı kullanamayacak durumda olan kişiler tarafın
dan kullanılmamalıdır. Belirtilen kişiler cihazı ancak
güvenliklerinden sorumlu olabilecek yetkinlikte bir
kişinin gözetimi altında veya cihazın kullanımına yönelik talimatları bu kişiden almaları durumunda cihazı
kullanabilir.
•
Temizlik veya bakım çalışmalarından önce cihaz ka-
patılmalı ve fişi çekilmelidir.
•
Çocukları ambalaj malzemesinden uzak tutun (boğulma tehlikesi).
•
Çarpılma ve boğulma tehlikesini ortadan kaldırmak
için, kablolar ve hava hatları çocukların erişemeyeceği yerlerde muhafaza edilmelidir.
•
Üretici tarafından tavsiye edilmeyen ek parçalar kul-
lanmayın.
•
Cihaz sadece tip levhasında belirtilen şebeke gerili-
mine bağlanabilir.
•
Cihazı suya daldırmayın ve ıslak/nemli ortamlarda
kullanmayın. Cihaza kesinlikle su girmemelidir.
•
Cihazı sert darbelere karşı koruyun.
•
Elektrik kablosunu kesinlikle ıslak elle tutmayın, elekt-
rik çarpmasına maruz kalabilirsiniz.
•
Fişi prizden çekerken kablodan değil, fişten tutun.
•
Elektrik kablosunu sıkıştırmayın, bükmeyin, keskin
kenarlı cisimler üzerinden çekmeyin, aşağıya doğru
sarkıtmayın ve ısıya karşı koruyun.
•
Tehlikeli bir aşırı ısınma durumunu önlemek için elekt-
rik kablosunu rulo halinde sarmadan, açık şekilde
kullanmanızı tavsiye ederiz.
•
Bu cihazın elektrik kablosu hasar gördüğünde, teh-
likeli durumları önlemek için üretici veya üreti-cinin
müşteri hizmetleri ya da benzeri kalifiye bir şahıs tarafından değiştirilmelidir.
•
Cihazın açılması sırasında elektrik çarpması tehlikesi
söz konusudur. Cihaz ancak fişi prizden çekildiğinde
elektrik şebekesinden ayrılmış olur.
•
Cihaz düşürüldüğü, çok fazla neme maruz bırakıldığı
ya da başka türlü hasar aldığı taktirde bir daha kullanılmamalıdır. Tereddüt durumunda müşteri hizmetleri
ile irtibat kurun.
•
IH 21 Enhalatör, sadece cihaza uygun Beurer ne-
bülizatörler ile birlikte ve uygun Beurer aksesuarlar
kullanılarak çalıştırılmalıdır. Başka markalara ait nebülizatörlerin ve aksesuarların kullanılması, tedavinin
verimliliğini olumsuz etkileyebilir ve cihaza hasar verebilir.
Dikkat
•
Elektrik kesintileri, ani arızalar veya diğer uygun ol-
mayan koşullar, cihazın çalışmamasına neden olabilir.
Bu nedenle yedek bir cihazın veya (doktora başvurarak alınan) bir ilacın hazırda tutulması önerilir.
•
Adaptör veya uzatma kablosu gerekli olursa, bu
parçalar da yürürlükteki güvenlik yönetmeliklerine
uygun özellikte olmalıdır. Elektrik gücü sınır değeri
-
ve adaptör üzerinde belirtilen azami güç sınır değeri
aşılmamalıdır.
•
Cihaz ve elektrik kablosu, ısı kaynaklarının yakınla-
rında muhafaza edilmemelidir.
•
Cihaz, önceden spreylerin kullanılmış olduğu oda-
larda kullanılmamalıdır. Bu odalar tedaviden önce
havalandırılmalıdır.
•
Soğutma deliklerine herhangi bir cismin girmesine
izin verilmemelidir.
•
Cihazdan normal olmayan bir sesin çıkması halinde
cihaz kesinlikle kullanılmamalıdır.
•
Her kullanıcının kendi aksesuarlarını kullanması hijyen
açısından çok önemlidir.
•
Kullanımdan sonra elektrik fişi mutlaka prizden çe-
kilmelidir.
•
Cihaz, hava şartlarına karşı korumalı bir yerde muha-
faza edilmelidir. Cihaz, öngörülen ortam koşullarında
saklanmalıdır.
SİGORTA
•
Cihazda bir aşırı akım sigortası mevcuttur. Bu sigorta
yalnızca yetkili uzman personel tarafından değiştirilebilir.
Genel bilgiler
Dikkat
•
Cihazı sadece şu şekilde kullanın:
– insanlar üzerinde,
47
Page 48
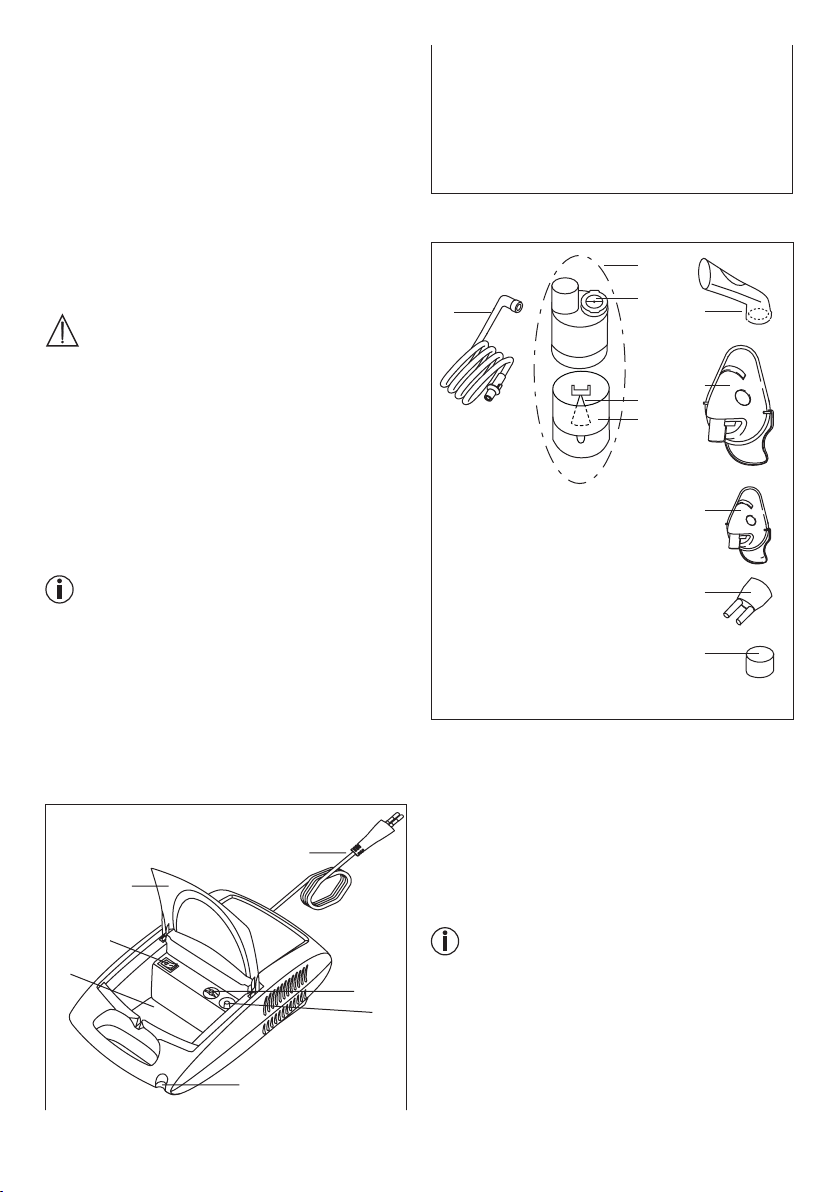
4
– geliştirilme amacına uygun (aerosol enhalasyonu)
ve bu kullanım kılavuzunda belirtilen şekilde.
•
Usulüne uygun olmayan her türlü kullanım tehli-
keli olabilir!
•
Akut acil durumlarda, ilk yardım önceliklidir.
•
İlaçların haricinde sadece damıtılmış su veya sodyum
klorür çözeltisi kullanın. Diğer sıvılar bazı durumlarda
enhalatörün veya nebülizatörün arızalanmasına neden olabilir.
•
Bu cihaz mesleki veya klinik kullanım için tasarlan-
mamıştır, sadece evlerde kişisel kullanım için tasarlanmıştır!
Çalıştırmadan önce
Dikkat
•
Cihazı kullanmaya başlanmadan önce tüm ambalaj
malzemeleri çıkartılmalıdır.
•
Cihazı toza, kire ve neme karşı koruyun ve çalışır
durumdayken kesinlikle cihazın üzerini örtmeyin.
•
Cihazı çok fazla toz olan ortamlarda çalıştırmayın.
•
Arıza veya işlev bozukluğu durumunda cihazı hemen
kapatın.
•
Uygunsuz ve yanlış kullanımdan ötürü oluşacak ha-
sarlardan üretici firma sorumlu değildir.
Onarım
Not
•
Cihazı kesinlikle açmayın ve tamir etmeyin, aksi hal-
de cihazın kusursuz çalışması garanti edilemez. Bu
husus dikkate alınmadığı takdirde garanti geçerliliğini
yitirir.
•
Onarım için müşteri hizmetlerine veya yetkili bir sa-
tıcıya başvurun.
4. Cihaz ve aksesuar açıklaması
Enhalatöre genel bakış
1
2
3
7
1 Şebeke bağlantı kablosu
2 Kapak
3 Açma/Kapama Düğmesi
4 Aksesuar rafı
5 Filtreli filtre kapağı
6 Hortum bağlantısı
7 Nebulizatör tutucusu
Nebülizatöre ve aksesuarlara genel bakış
9
11
10
13
14
8
12
8 Basınçlı hava hortumu
9 Nebulizatör
10 Nebülizatör elemanı
11 Valf
12 İlaç kabı
13 Ağız parçası
14 Yetişkin maskesi
15 Çocuk maskesi
16 Burun parçası
17 Yedek filtre
15
16
17
5. Çalıştırma
Kurulum
Cihazı ambalajından çıkarın.
Düz bir yüzeyin üzerine koyun.
Bütün havalandırma aralıklarının açık olmasına dikkat
edin.
Aksesuarlara ulaşmak için kapağı [2] açın.
İlk kullanımdan önce
Not
•
Nebülizatör ve aksesuarlar ilk kez kullanılmadan önce
5
6
temizlenmeli ve dezenfekte edilmelidir. bkz. “Temizlik
ve dezenfeksiyon”, sayfa 50.
•
Basınçlı hava hortumunu [8] alttan ilaç haznesine [12]
takın.
48
Page 49
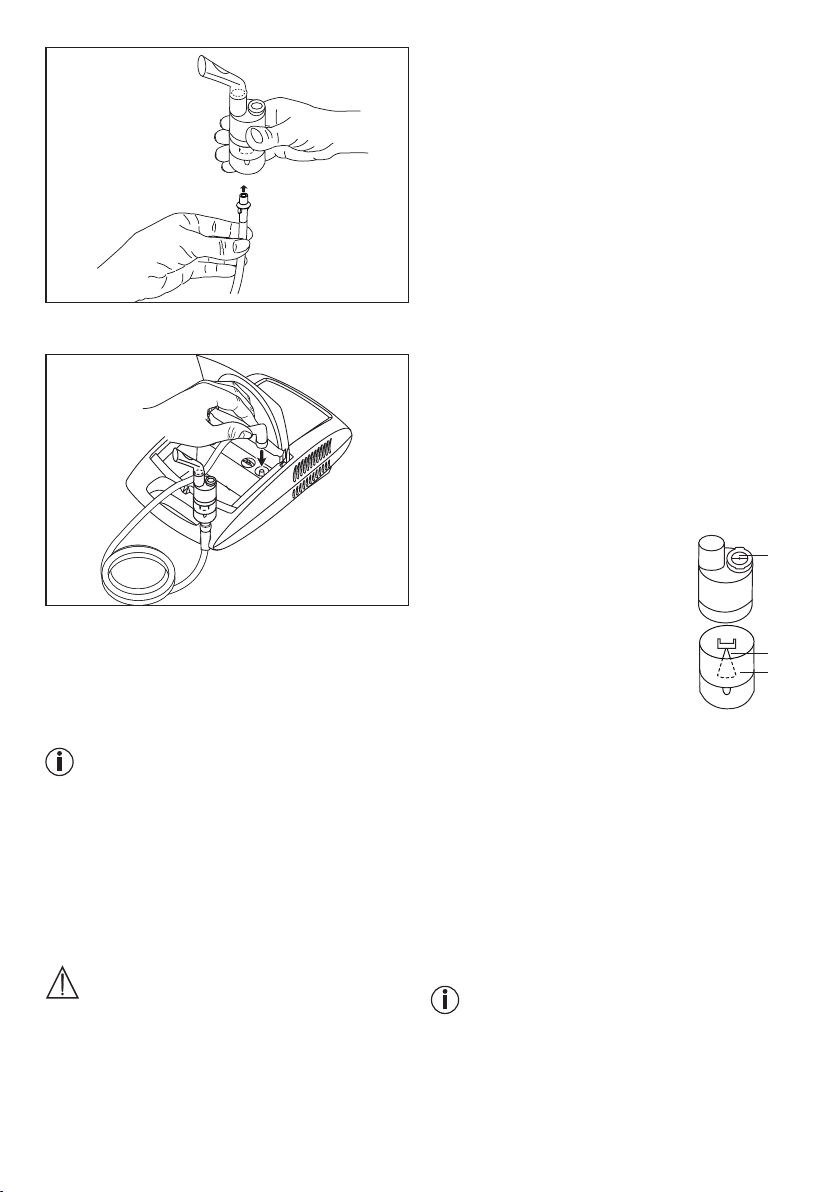
•
Hortumun diğer ucunu [8], hafifçe döndürerek enha-
latörün hortum bağlantısına [6] takın.
Elektrik bağlantısı
Cihaz sadece tip levhasında belirtilen elektrik voltajına
bağlanabilir.
•
Elektrik kablosunun fişini [1] uygun bir prize takın.
•
Elektrik bağlantısını sağlamak için fişi tamamen prizin
içine sokun.
Not
•
Kurulum yerinin yakınlarında bir prizin olmasına dik-
kat edin.
•
Elektrik kablosunu kimsenin takılıp düşmeyeceği
şekilde döşeyin.
•
Enhalasyondan sonra enhalatörün elektrik bağlantı-
sını kesmek için önce cihazı kapatın ve ardından fişi
prizden çekin.
6. Kullanım
Dikkat
•
Hijyenik nedenlerle nebülizatörün [9] ve aksesuarın
her kullanımdan sonra temizlenmesi ve her gün son
tedavinin ardından dezenfekte edilmesi şarttır.
•
Aksesuar parçaları sadece bir kişi tarafından kullanı-
labilir; birden çok kişi tarafından kullanılmaları tavsiye
edilmez.
•
Tedavi sırasında birden fazla farklı ilaç arka arkaya
enhale edilecekse, nebülizatörün [9] her kullanımdan
sonra ılık musluk suyu altında yıkanmasına dikkat
edilmelidir. Bkz. “Temizlik ve dezenfeksiyon”, sayfa50.
•
Bu kullanım kılavuzunda yer alan filtre değişimi yö-
nergelerine uyun!
•
Cihazı her kullanmanızdan önce, hortum bağlantıla-
rının enhalatördeki [6] ve nebülizatördeki [9] yerlerine
doğru oturup oturmadığını kontrol edin.
•
Kullanmadan önce cihazın düzgün çalışıp çalışmadı-
ğını kontrol edin ve bunun için enhalatörü (nebülizatör
bağlıyken ancak ilaç yokken) kısa bir süre çalıştırın.
Nebülizatörden [9] hava çıkışı oluyorsa, cihaz düzgün
çalışıyor demektir.
1. Ağızlık başlığının takılması
• Üst parçayı ilaç kabına [9] göre saat yönünün tersine
çevirerek nebülizatörü [12] açın. Ağızlık başlığını [10]
ilaç kabı [12] içine yerleştirin.
• İlaç yönlendirme konisinin, püskürtücünün içindeki hava yönlendirme konisi üzerine düzgün şekilde
oturduğundan emin olun.
2. Nebülizatörün doldurulması
• İzotonik bir sodyum klorür çözeltisini veya ilacı doğrudan ilaç kabına
[12] doldurun. Aşırı doldurmayın!
Önerilen maksimum doldurma
miktarı 8 ml’dir!
• İlaçları sadece doktor talimatı doğrultusunda kullanın ve sizin için uygun olan enhalasyon süresini ve
miktarını öğrenin!
• İlaç için öngörülen miktar 2 ml’den
az ise, bunu izotonik sodyum klorür çözeltisiyle en az 4 ml olacak şekilde tamamlayın.
Koyu akışkan ilaçların da inceltilmesi gerekir. Bunun
için de doktorunuzun talimatına uyun.
11
10
12
3. Nebülizatörün kapatılması
• Üst parçayı ilaç kabına [12] göre saat yönünde çevirerek nebülizatörü [9] kapatın. Bağlantının doğru
olmasına dikkat edin!
4. Valfi yerleştirin
• Mavi renkli valfı [11] nebülizatörün [9] üst tarafındaki
onun için öngörülmüş olan boşluğa yerleştirin.
Not
Valf sistemi, ilacın akciğerlere daha iyi ulaşmasını sağlar. Valfi [11] sadece ağızlıkla [13] kullanın, asla maskelerle [14,15] veya burunlukla [16] kullanmayın.
49
Page 50
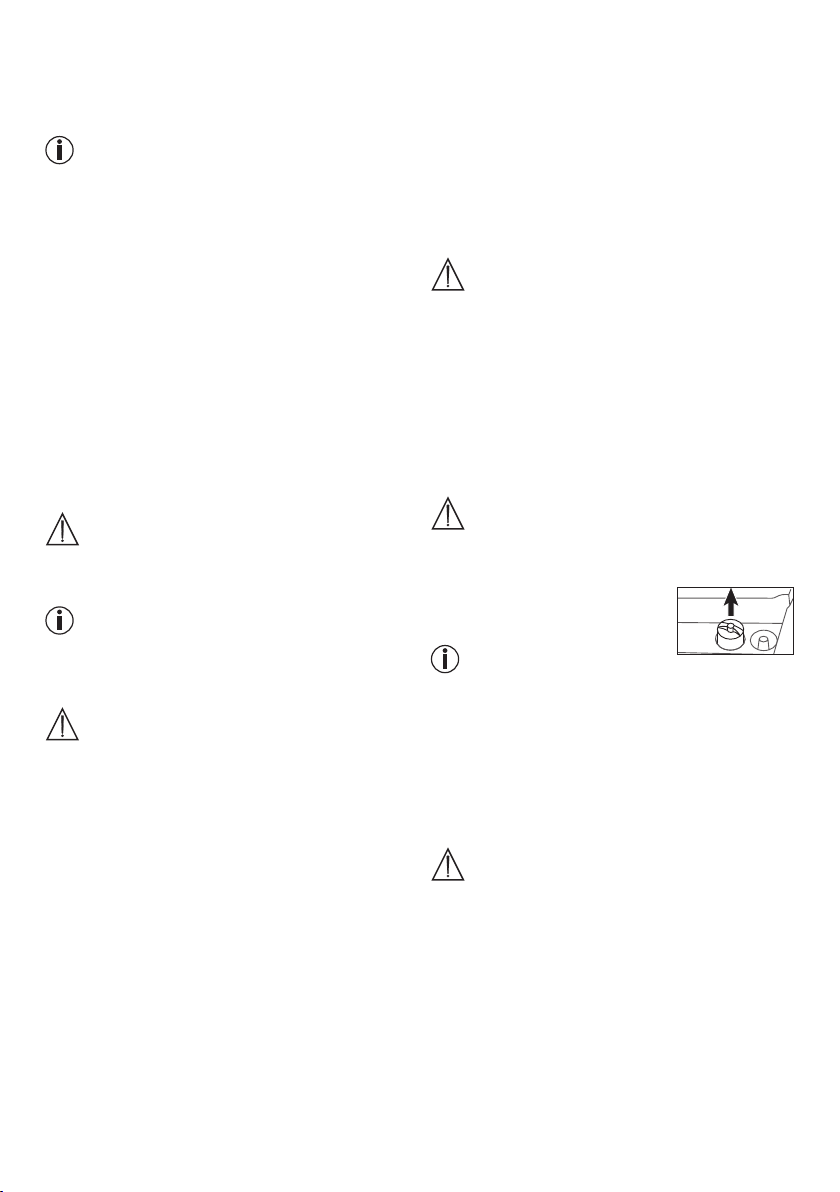
5. Aksesuarların nebülizatörle birleştirilmesi
• Nebülizatörü [9] istenen aksesuarla (ağızlık [13], erişkin maskesi [14] veya çocuk maskesi [15] veya Burun
parçası [16]) birleştirin.
Not
En etkili tedavi şekli ağızlıkla yapılan enhalasyondur.
Maske enhalasyonunun kullanılması sadece ağızlığın
kullanılması mümkün olmadığında (örn. henüz ağızlıkla
enhalasyon yapamayan çocuklarda) önerilir.
8. Temizleme
bkz. “Temizlik ve dezenfeksiyon”, sayfa 50.
7. Filtre değişimi
Normal kullanım koşullarında hava filtresi yaklaşık 500
çalışma saati ya da bir yıl sonunda değiştirilmelidir. Lütfen hava filtresini düzenli aralıklarla kontrol edin (10-12
pulverizasyon işleminden sonra). Aşırı kirlenmiş veya tıkanmışsa, kullanılmış filtreyi değiştirin. Filtre ıslanmışsa
yeni bir filtre ile değiştirilmesi gerekir.
• Uygulamadan önce nebülizatörü yukarı doğru çekerek [7] tutucudan dışarı çıkarın.
• Açık/Kapalı şalteri [3] üzerinden enhalatörü açın.
• Nebülizatörden dışarı çıkan aerosol cihazın sorunsuz
çalıştığını gösterir.
6. Tedavi
•
Enhalasyon sırasında, solunum yollarını tıkamama
ve tedavinin etkinliğini olumsuz etkilememek için,
bir koltuk yerine bir masa üzerinde dik ve düzgün bir
şekilde oturun.
•
Püskürtülen ilacı derin bir nefesle içinize çekin.
Dikkat
Cihaz sürekli kullanım için uygun değildir, 30 dakika
çalıştıktan sonra 30 dakika kapalı kalmalıdır.
Not
Tedavi sırasında nebülizatörü düz (dik) tutun, aksi halde
püskürtme özelliği çalışmaz ve cihazın sorunsuz çalışması garanti edilemez.
Dikkat
Esanslı bitkisel yağlar, öksürük şurupları, gargara solüsyonları, sürülmeye veya buhar banyolarına uygun damlalar, prensip olarak enhalatörler ile enhalasyon yapmak
için uygun değildir. Bu maddeler genelde akışkan değildir ve cihazın doğru şekilde çalışmasını ve uygulamanın
etkinliğini kalıcı şekilde olumsuz etkileyebilir. Bronşların
aşırı hassas olması halinde, esanslı yağlar içeren ilaçlar,
bazı durumlarda akut bir bronş spazmı (nefes darlığı ile
birlikte bronşların bir anda kramplar halinde daralması)
meydana gelebilir. Bununla ilgili olarak doktorunuza
veya eczacınıza danışın!
7. Enhalasyonun sonlandırılması
Enhalasyon sırasında düzensiz bir buhar çıkışı oluyorsa veya normal olmayan sesler duyuluyorsa, tedaviyi
sonlandırabilirsiniz.
•
Tedavi sonrasında enhalatörü şalterinden [3] kapatın
ve fişini elektrik prizinden çekin.
•
Tedavi sonrasında nebülizatörü [9] tekrar tutucusuna
[7] yerleştirin.
Dikkat
•
Kullanılmış bir filtreyi temizleyerek yeniden kullanma-
ya çalışmayın!
•
Sadece üreticiye ait orijinal filtreleri kullanın, aksi hal
de enhalatörünüz hasar görebilir veya yeterli terapi
etkisini garanti edemeyebilir.
•
Hava filtresi kullanımdayken üzerinde onarım veya
bakım çalışması gerçekleştirilmemelidir.
•
Cihaz kesinlikle filtre olmadan kullanılmamalıdır.
Filtre değişimi için aşağıdakileri yapın:
-
Dikkat
•
Önce cihazı kapatın ve fişini elektrik prizinden çekin.
•
Cihazı soğumaya bırakın.
1. Filtre kapağını [5] yukarı
doğru çekip çıkarın.
Not
Kapak çekildikten sonra filtre cihazda kalırsa, bir cımbız
veya benzer bir alet kullanarak filtreyi cihazdan çıkarın.
2. Yeni filtreyi ve filtre kapağını [5] tekrar takın.
3. Sıkıca oturduğundan emin olun.
8. Temizlik ve dezenfeksiyon
Nebülizatör ve aksesuarlar
Uyarı
Sağlığınızın tehlikeye maruz kalmasını önlemek için
aşağıdaki hijyen talimatlarına uyun.
•
Nebülizatör [9] ve aksesuarlar, bir seferden fazla
kullanım için öngörülmüştür. Lütfen farklı uygulama
alanları için farklı temizlik ve hijyenik hazırlama koşullarının mevcut olduğunu dikkate alın.
Bilgiler:
•
Nebülizatör ve aksesuarlar, fırçalarla veya benzer
araçlarla mekanik olarak temizlenmemelidir, aksi takdirde cihaz onarılamayacak şekilde hasar görebilir ve
tedavi başarılı olmayabilir.
50
Page 51
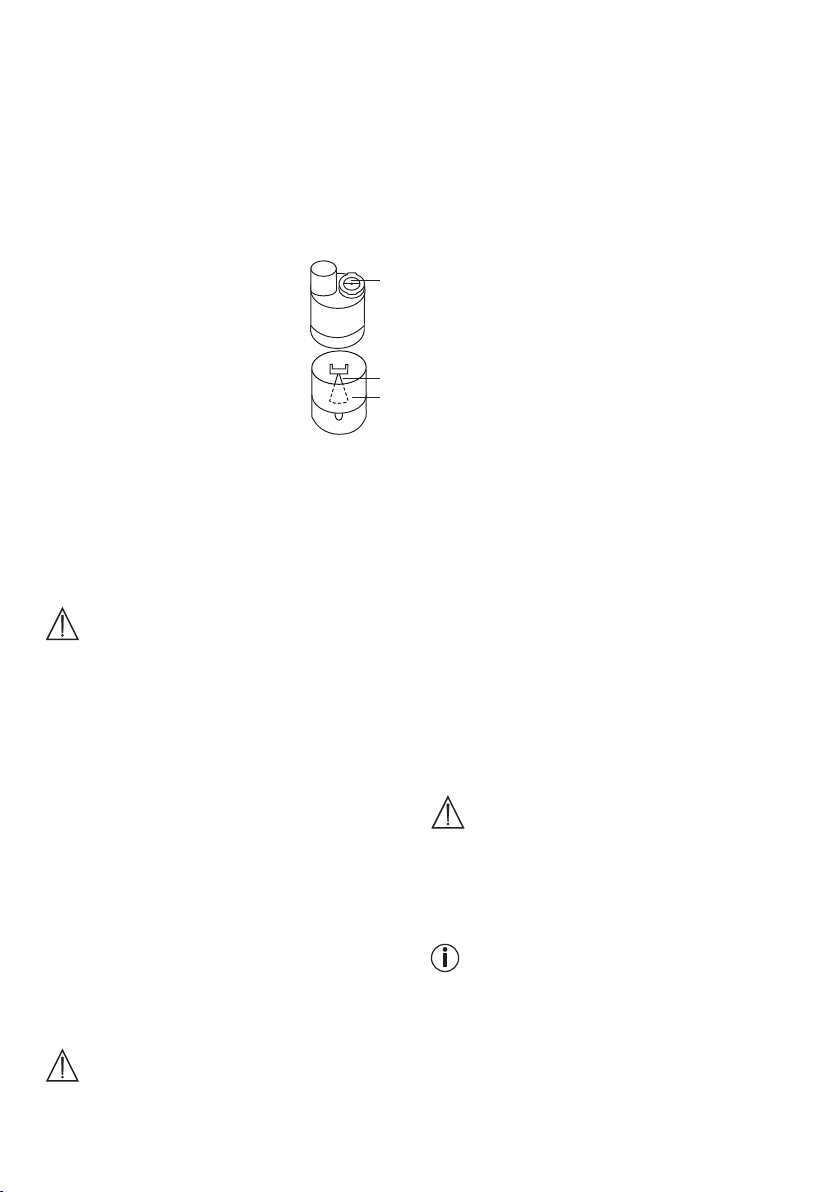
•
Yüksek riskli gruplarda (örn. mukoviskidoz hastaları),
gerekli olan hijyenik hazırlama işlemlerine (el bakımı,
ilaçların veya enhalasyon solüsyonlarının kullanımı)
yönelik ilave koşullar için lütfen doktorunuza başvurun.
•
Her temizlik ve dezenfeksiyon işleminden sonra ilgili
parçanın kuruduğundan emin olun. Parçaların nemli
veya ıslak kalması, bakteri oluşumu riskinin artmasına neden olur.
Hazırlık
•
Her kullanımdan sonra, nebüliza-
törde [9] ve kullanılan aksesuarda
kalan ilaç kalıntıları ve kirler hemen temizlenmelidir.
•
Bunun için nebülizatörü [9] parça-
larına ayırın.
•
Ağızlığı [13] veya maskeyi [14, 15]
ve Burun parçası [16] nebülizatörden çıkarın.
• Üst parçayı saat yönünün tersine
ilaç kabına [12] doğru çevirerek nebülizatörü sö
kün.
•
Ağızlık başlığını [10] ilaç kabından [12] sökün.
• Nebülizatörden [9] çekip çıkararak valfi [11] çıkarın.
• Birleştirme işlemi daha sonra bu sıranın tersi uygu
lanarak yapılacaktır.
11
10
12
-
-
Temizleme
Dikkat
Temizliğe başlanabilmesi için cihazın kapatılmış, elektrik bağlantısı kesilmiş ve soğutulmuş olması gerekir.
Nebülizatör ve birlikte kullanılan ağızlık, maske, ağızlık
başlığı gibi aksesuarlar, her kullanımdan sonra kaynar
olmayan sıcak suyla yıkanarak temizlenmelidir. Parçaları dikkatli bir şekilde yumuşak bir bez ile kurulayın.
Parçalar tamamen kuruduktan sonra parçaları tekrar
birleştirin ve kuru, yalıtımlı bir kaba koyun veya dezenfeksiyon uygulayın.
Temizlik sırasında tüm kalıntıların temizlenmiş olduğundan emin olun. Bu çalışmalar sırasında, cilt veya
mukoz membran ile temas ettiğinde, yutulduğunda
veya teneffüs edildiğinde zehirli olabilecek maddeleri
kesinlikle kullanmayın.
Cihaz temizliği için yumuşak ve kuru bir bez ve aşındırıcı olmayan temizlik maddeleri kullanın.
Agresif temizlik malzemeleri kullanmayın ve cihazı asla
suyun altına tutmayın.
Dikkat
•
Cihazın içine su kaçmamasına dikkat edin!
•
Cihazı ve aksesuarları bulaşık makinesinde yıkama-
yın!
•
Cihaz elektriğe bağlıyken cihaza ıslak ellerle dokun-
mayın; cihazın üzerine su sıçramamalıdır. Cihaz sadece tamamen kurumuş durumdayken kullanılmalıdır.
•
Havalandırma aralıklarına sıvı püskürtmeyin! İçeri
giren sıvılar elektrik sisteminin ve diğer enhalatör
parçalarının hasar görmesine ve bir işlev arızasına
neden olabilir.
Yoğuşma suyu, hortum bakımı
Ortam koşullarına göre hortumda yoğuşma suyu birikebilir. Bakteri oluşumunu önlemek ve kusursuz bir tedavi
sağlamak için nem mutlaka giderilmelidir. Bunun için
aşağıdakileri yapın:
•
Hortumu [8] nebülizatörden [9] çekin.
•
Hortumu enhalatör tarafında [6] takılı bırakın.
•
İçinden geçirilen hava aracılığıyla nem giderilinceye
kadar enhalatörü çalıştırmaya devam edin.
•
Yoğun kirlenme durumunda hortumu değiştirin.
Dezenfeksiyon
Nebülizatörü ve aksesuarları dezenfekte etmek için
lütfen aşağıda belirtilenleri özenli bir şekilde uygulayın. Münferit parçaların en geç günlük son kullanımdan
sonra dezenfekte edilmesi önerilir.
(Bunun için biraz renksiz sirke ve damıtılmış su yeter
lidir!)
•
Önce nebülizatörü ve aksesuarları “Temizleme” bölümü altında tanımlandığı gibi temizleyin.
• Parçalarına ayrılmış püskürteç, ağızlık ve Burun
parçası 5 dakika süreyle kaynar suda tutulmalıdır.
• Diğer aksesuarlar için ¼ sirke ve ¾ damıtılmış sudan
oluşan sirke karışımı kullanın. Miktarın nebülizatör,
maske ve ağızlık gibi parçaların tamamen içine daldırılabileceği kadar çok olmasını sağlayın.
• Parçaları 30 dakika süresince sirke karışımı içinde
bekletin.
• Parçaları suyla durulayın ve dikkatli bir şekilde yumuşak bir bezle kurulayın.
-
Dikkat
Maskeleri ve hava hortumlarını kaynatmayın veya otoklava koymayın.
•
Parçalar tamamen kuruduktan sonra parçaları tekrar
birleştirin ve kuru, yalıtımlı bir kaba koyun.
Not
Lütfen temizlikten sonra parçaların tamamen kurutulmasına dikkat edin, aksi halde bakteri oluşumu riski
yükselir.
Sterilizasyon
•
Soğuk sterilizasyon çözümleri, üretici yönergelerine
uygun şekilde kullanılmalıdır.
51
Page 52
Kurutma
•
Bütün münferit parçaları kuru, temiz ve emici özelliği
olan bir yerin üzerine bırakın ve tamamen kurumalarını bekleyin (en az 4 saat).
Malzeme dayanıklılığı
•
Nebülizatör ve aksesuarlar, çok sık kullanılmaları ve
hijyenik hazırlıklara tabi tutulmaları nedeniyle tüm
plastik parçalar gibi belirli bir yıpranmaya maruz
kalır. Bu durum zamanla aerosolün değişmesine
ve böylece tedavinin olumsuz etkilenmesine neden
olabilir. Bu nedenle nebülizatörü en geç bir yıl sonra
değiştirmenizi öneririz.
•
Temizlik malzemelerini ve dezenfektanları seçerken
aşağıdakilere dikkat edilmelidir: Sadece yumuşak
bir temizlik malzemesi veya dezenfektan kullanın ve
madde dozlarını üretici bilgilerine göre ayarlayın.
Saklama
•
Nemli ortamlarda (örn. banyo) saklamayın ve nemli
cisimlerle birlikte taşımayın.
•
Sürekli doğrudan güneş ışınlarına karşı koruyarak
saklayın ve taşıyın.
•
Aksesuar parçaları aksesuar gözünde [4] güvenle
muhafaza edilebilir. Cihaz kuru bir yerde ve tercihen
ambalajının içinde muhafaza edilmelidir.
9. Bertaraf etme
Çevreyi korumak için cihaz ev atıkları ile birlikte bertaraf
edilmemelidir.
Cihazı lütfen AB Elektrikli ve Elektronik Ekipman
Atık Direktifine (WEEE - Waste Electrical and
Electronic Equipment) uygun olarak bertaraf
edin.
Bertaraf etme ile ilgili diğer sorularınızı, ilgili yerel ma
kamlara iletebilirsiniz.
10. Sorun giderme
Sorunlar/
sorular
Nebülizatör
aerosol
üretmiyor veya
çok az aerosol
üretiyor.
Çıkış çok
düşük.
Hangi ilaçlar
enhale edile
bilir?
Nebülizatör
içinde enhala
syon çözeltisi
kalıyor.
Bebeklerde
ve çocuklarda
nelere dikkat
edilmelidir?
Olası neden/çözüm
1. Nebülizatör içindeki ilaç çok
2. Ağızlığın tıkanmış olup
DİKKAT: İnce delikleri sadece
ağızlığın alt tarafından dikkatle
açın.
3. Nebülizatör dik bir şekilde
4. Nebülizasyon için uygun olmayan
İlaç sıvısı, doktor tarafından belir
tilmelidir.
Hortum katlanmıştır, filtre tıkalıdır,
enhalasyon çözeltisi çok fazladır.
Bununla ilgili olarak lütfen dok
-
torunuza başvurun.
Prensip olarak, cihazla enhalasyon
için uygun olan ve kullanılmasına
izin verilen ilaçların hepsi enhale
edilebilir.
Bu teknik nedenlerden dolayı
meydana gelir ve normaldir.
Nebülizatörün sesi fak edilir
şekilde değiştiğinde enhalasyonu
sonlandırın.
1. Bebeklerde etkili bir enhalasyon
2. Çocuklarda da maske ağzı ve
Not: Sadece yetişkin bir kişinin gö
zetiminde ve yardımıyla enhalasyon
yapılmalı ve çocuk yalnız başına
bırakılmamalıdır.
fazla veya çok azdır.
Minimum: 2 ml,
Maksimum: 8 ml.
olmadığını kontrol edin.
Gerekiyorsa ağızlığı temizleyin
(örn. durulayarak). Ardından
nebülizatörü yeniden çalıştırın.
tutulmadı.
(örn. çok kıvamlı) bir ilaç sıvısı
dolduruldu.
gerçekleştirmek için maske, ağzı
ve burnu örtmelidir.
burnu örtmelidir. Uyuyan kişilere
nebülizasyon uygulamak mantıklı
değildir, çünkü akciğerlere yeterli
miktarda ilaç girmez.
-
-
-
52
Page 53
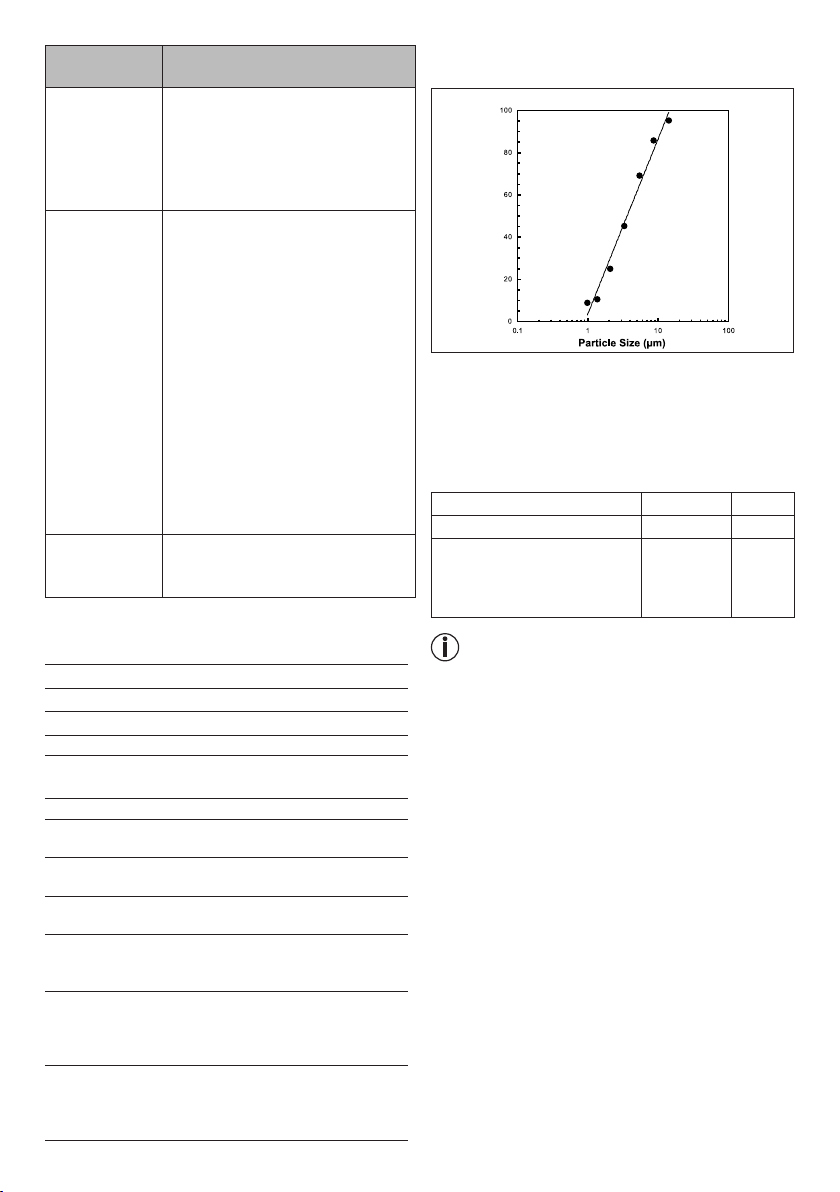
Sorunlar/
Olası neden/çözüm
sorular
Bu teknik nedenlerden dolayıdır.
Maskeyle en
halasyon daha
uzun sürüyor.
Maske deliklerinden alınan nefes
başına, ağızlık ile olduğundan daha
az ilaç teneffüs edersiniz. Aerosol,
delikler üzerinden oda havası ile
karışır.
Nebülizatör
neden düzenli
olarak değişti
rilmelidir?
Bunun iki nedeni vardır:
1. Tedavi için etkili bir parçacık
spektrumunun olmasını
sağlamak için ağızlık deliği
belirli bir çaptan daha büyük
olmamalıdır. Mekanik ve termik
stresten dolayı plastik malzeme
belirli bir ölçüde aşınmaya maruz
kalır. Ağızlık başlığı [10] oldukça
hassastır. Bunun sonucunda
aerosolün damlacık bileşimi de
değişebilir, bu da tedavinin etkili
olmasını doğrudan etkiler.
2. Ayrıca hijyen nedeniyle de
nebülizatörün düzenli olarak
değiştirilmesi önerilir.
Herkesin kendi
nebülizatörü
Hijyenik açıdan bu mutlaka gere
klidir.
mü olmalı?
11. Teknik veriler
Model
Tip
Ölçüler (G x Y x D)
Ağırlık
Çalışma basıncı ca. 0,8 - 1,45 bar
Nebulizatör
doldurma hacmi
İlaç akışı ca. 0,3 ml/min.
Ses basıncı maks. 52 dBA (DIN EN 13544-1
Elektrik bağlantısı 230 V~; 50 Hz; 230 VA
İşletme koşulları Sıcaklık: +10 °C ile +40 °C
Depolama ve
taşıma koşulları
Saklama ve
taşıma koşulları
Aerosol özellikleri 1) Debi: 5,3 l/dak
IH 21
IH21/1
300 x 180 x 100 mm
1,65 kg
maks. 8 ml
min. 2 ml
Bölüm 26 uyarınca)
UK: 240 V~; 50 Hz; 240 VA
bağıl nem: %10 ile %95
Sıcaklık: 0 °C ile +60 °C
bağıl nem: %10 ile %95
Çevre basıncı: 500 ile 1060 hPa
Sıcaklık: 0 °C ile +60 °C
Bağıl nem: %10 ile %95 arası
Ortam basıncı:
500 ile 1060 hPa arası
2) Aerosol çıkışı: 0,216 ml
3) Aerosol çıkış hızı: 0,112 ml/dak
4)
Parçacık büyüklüğü (MMAD): 3,85 µm
Teknik değişiklik hakkı saklı tutulmuştur.
Partikül büyüklükleri grafiği
Ölçümler “Next Generation Impactor” (NGI) özellikli bir
sodyum florür çözeltisi ile gerçekleştirilir.
Grafik bu nedenle süspansiyonlar veya çok koyu kıvamlı ilaçlar için geçerli olmayabilir. Bununla ilgili ayrıntılı bilgileri ilgili ilaç üreticisinden alabilirsiniz.
Sonradan satın alınabilecek ürünler
Tanım Malzeme REF
Nebülizatör durdurucu PP
-
Yıllık paket (ağızlık, burun par-
PP/ PVC 601.22
çası yetişkin maskesi, çocuk
maskesi, nebülizatör, basınçlı
hava hortumu, filtre)
Not
Cihaz belirtilen şartlar dışında kullanılırsa kusursuz çalışması garanti edilememektedir! Ürünü iyileştirmek ve
geliştirmek için teknik değişiklik yapma hakkımız saklıdır. Bu cihaz ve aksesuarları, EN60601-1 ve EN606011-2 ile EN13544-1 normlarına uygundur ve elektromanyetik uyumluluk ile ilgili özel güvenlik tedbirlerine tabidir.
Lütfen taşınabilir veya mobil HF iletişim sistemlerinin
bu cihazı etkileyebileceğini dikkate alın. Ayrıntılı bilgileri
belirtilen müşteri servisi adresinden talep edebilir veya
kullanım kılavuzunun son kısmında bulabilirsiniz. Bu
cihaz, tıbbi ürünler için Avrupa yönetmeliği 93/42/EC
ve Alman Tıbbi Ürün Kanununa uygundur.
ELEKTROMANYETİK UYUMLULUK
•
Cihaz, güncel olarak yürürlükte olan elektromanye-
tik uyumluluk yönetmeliklerine uygundur ve oturum
amaçlı kullanılan özel mülkler de dahil tüm binalar
içinde kullanılabilir. Cihazın radyo frekansı emisyonları oldukça düşüktür ve büyük ihtimalle yakınlarda
bulunan başka cihazlarla enterferanslar oluşturmaz.
•
Cihazı başka cihazların üzerine veya yanına koy-
mamanız önerilir. Elektronik cihazlarla enterferans
olması halinde cihazın ayarını değiştirin veya cihazı
başka bir prize takın.
•
Telsiz cihazlar, cihazın çalışmasını etkileyebilir.
53
162.819
Page 54
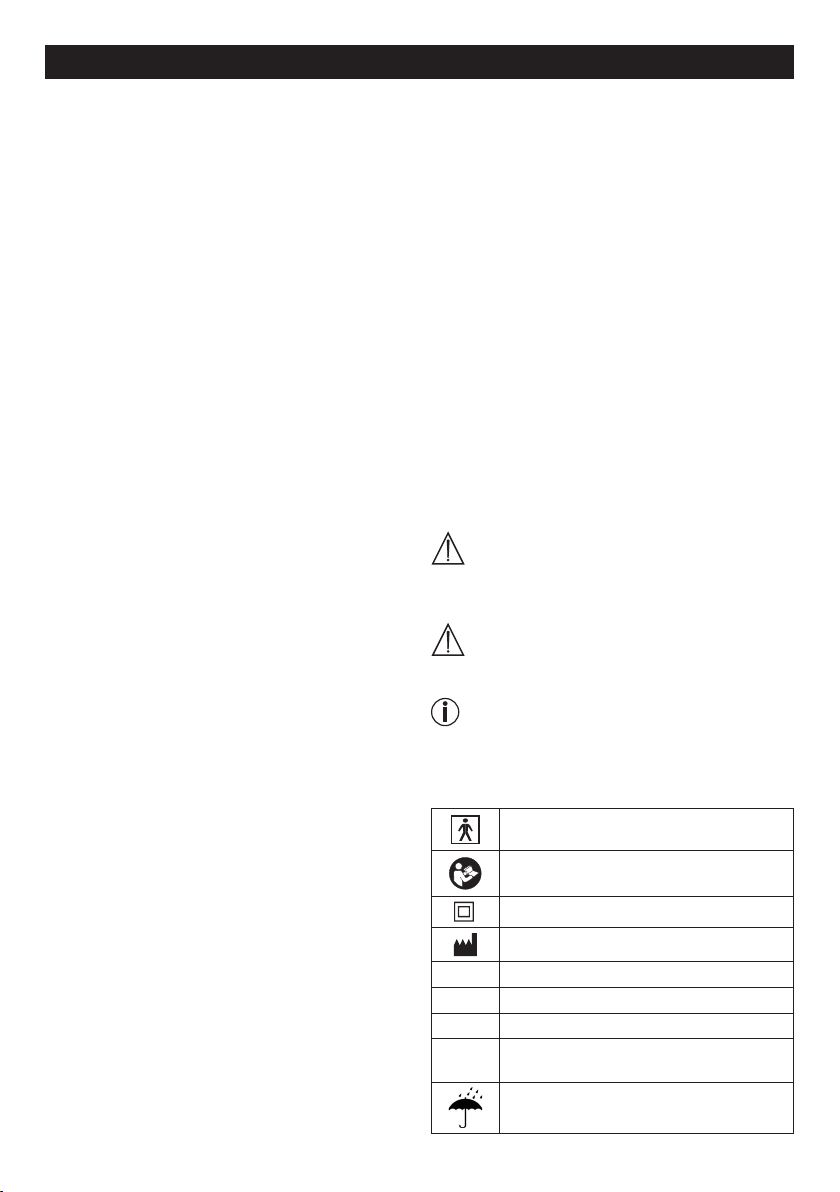
РУССКИЙ
Оглавление
1. Знакомство сприбором..................................54
2. Пояснения ксимволам ....................................54
3. Предостережения иуказания потехнике
безопасности ...................................................55
4. Описание прибора ипринадлежностей.........56
5. Подготовка кработе ........................................57
6. Обслуживание ..................................................57
7. Замена фильтра ...............................................59
8. Очистка идезинфекция ..................................59
9. Утилизация .......................................................61
10. Решение проблем ............................................61
11. Технические данные ........................................62
12. Гарантия ............................................................63
Комплект поставки
См. описание прибора и принадлежностей на
стр.56.
•
Ингалятор
•
Распылитель
•
Трубка-удлинитель
•
Мундштук
•
Маска для взрослых
•
Маска для детей
•
Насадка для носа
•
Запасной фильтр
•
Данная инструкция по применению
1. Знакомство сприбором
Уважаемый покупатель!
Благодарим Вас завыбор продукции нашей фирмы.
Мы производим современные, тщательно протестированные, высококачественные изделия для измерения массы, кровяного давления, температуры
тела, пульса, для легкой терапии, массажа иочистки
воздуха.
Внимательно прочтите данную инструкцию по применению, сохраняйте ее для последующего использования, храните ее вместе, доступном для других
пользователей, иследуйте ее указаниям.
Снаилучшими пожеланиями,
компания Beurer
Область применения
Данный ингалятор предназначен для распыления
жидкостей ижидких лекарственных препаратов
(аэрозолей), атакже для лечения верхних инижних
дыхательных путей.
Распыление иингаляция назначенного или рекомендованного врачом медикамента позволяет проводить профилактику заболеваний дыхательных
путей, смягчать сопутствующие явления иускорять
выздоровление. Дальнейшую информацию овариантах применения данного прибора Вы можете
получить улечащего врача или фармацевта.
Прибор подходит для использования вдомашних
условиях. Ингаляция сиспользованием лекарства
должна осуществляться только по назначению врача. Вдыхайте лекарство вспокойном ирасслабленном состоянии, дышите медленно иглубоко, чтобы
оно могло попасть даже всамые мелкие иглубоко
расположенные бронхи. Выдыхайте, как обычно.
После обработки прибор готов кповторному использованию. Обработка включает всебя замену всех принадлежностей, включая распылитель
ивоздушный фильтр, атакже дезинфекцию поверхности прибора обычным дезинфицирующим
средством.
2. Пояснения ксимволам
Винструкции по применению используются следующие символы.
Предостережение Предупреждает об
Внимание Указывает на возможные по-
вреждения прибора/принадлежностей.
Указание
На упаковке ина типовой табличке прибора ипринадлежностей используются следующие символы.
I
O
SN
30ON /
30OFF
Указывает на важную информацию.
Рабочая часть типа BF
Соблюдайте инструкцию
поприменению
Прибор склассом защиты 2
П
роизводитель
Вкл.
Выкл.
Серийный номер
30мин. работы, затем перерыв 30минут
перед повторным включением.
Хранить всухом месте
опасности травми
рования или ущерба для здоровья.
-
54
Page 55

3. Предостережения иуказания
потехнике безопасности
Предостережение
•
Перед использованием убедитесь, что прибор
иего принадлежности не имеют видимых по
вреждений. При наличии сомнений неиспользуйте прибор иобратитесь кпродавцу или поуказанному адресу сервисной службы.
•
При сбоях вработе прибора см. гл.«10. Решение
проблем».
•
Применение прибора не заменяет консультации
уврача илечения. Поэтому при любых видах боли
или заболеваний всегда предварительно консультируйтесь сврачом.
•
При наличии каких-либо проблем со здоровьем,
вызывающих сомнения ввозможности ингаляционной терапии, проконсультируйтесь слечащим
врачом!
•
При использовании распылителя выполняйте
общепринятые санитарно-гигиенические мероприятия.
•
Необходимо всегда соблюдать указания врача от-
носительно типа используемого лекарственного
препарата, его дозировки, частоты идлительно
сти ингаляций.
•
Используйте только лекарственные препараты,
назначенные или рекомендованные врачом или
фармацевтом.
Соблюдайте следующие указания:
Для лечения использовать только те детали, применение которых было рекомендовано врачом
всоответствии ссостоянием здоровья.
•
Внимательно прочитайте на прилагающемся
клекарственному препарату упаковочном листке информацию овозможных противопоказаниях
кприменению собычными системами аэрозольной терапии.
•
Если прибор работает некорректно или уВас
появились недомогание или боли, сразу же прекратите использование прибора.
•
Во время использования держите прибор на
достаточном расстоянии от глаз, распыленный
лекарственный препарат может привести ких
повреждениям.
•
Не используйте прибор впомещениях сгорючими
газами ипри высокой концентрации кислорода.
•
Данный прибор не предназначен для использова-
ния детьми или людьми сограниченными физическими, сенсорными (например, сотсутствием
болевой чувствительности) или умственными
способностями, снедостаточными знаниями или
опытом. Исключение составляют случаи, когда за
ними осуществляется надлежащий надзор или
-
-
если они получили от Вас инструкции по использованию прибора.
•
Перед выполнением любых работ по очистке или
техническому обслуживанию необходимо выключить прибор вынуть штекер из розетки.
•
Не давайте упаковочный материал детям (опасность удушения).
•
Кабель ивоздуховоды следует хранить вне дося-
гаемости детей младшего возраста во избежание
запутывания иудушения.
•
Не используйте дополнительные детали, не реко-
мендованные производителем.
•
Прибор разрешено подключать только ксете-
вому напряжению, указанному на заводской табличке.
•
Не погружайте прибор вводу ине используйте
его во влажных помещениях. Не допускайте попадания жидкости внутрь прибора.
•
Берегите прибор от сильных ударов.
•
Не прикасайтесь ккабелю мокрыми руками —
опасность поражения электрическим током.
•
Не вытаскивайте штекер из розетки, держась за
сетевой кабель.
•
Не зажимайте иперегибайте кабель, не давайте
ему соприкасаться сострыми краями или свисать, защищайте его от воздействия высокой
температуры.
•
Рекомендуется полностью разматывать питаю-
щий кабель для предотвращения перегрева.
•
Провод сетевого питания прибора не подлежит
замене. При повреждении провода прибор следует утилизировать.
•
При вскрытии прибора возникает опасность по-
ражения электрическим током. Прибор гаранти
рованно отсоединен от сети электроснабжения
только втом случае, если штекер вынут из розетки.
•
Если прибор упал, подвергся сильному воздей-
ствию влаги или получил иные повреждения, его
дальнейшее использование запрещается. При наличии сомнений обратитесь всервисную службу
или кторговому представителю.
•
Ингалятор IH 21 разрешается использовать толь-
ко вместе сподходящими распылителями Beurer
ис соответствующими принадлежностями. Применение принадлежностей сторонних производителей может привести кснижению эффективности лечения идаже кповреждению прибора.
Внимание
•
Сбои вподаче электроэнергии, неожиданно воз-
никшие неисправности идругие неблагоприятные условия могут привести квыходу прибора
из строя. Поэтому рекомендуется иметь запасной
прибор или лекарство (согласованное сврачом).
-
55
Page 56
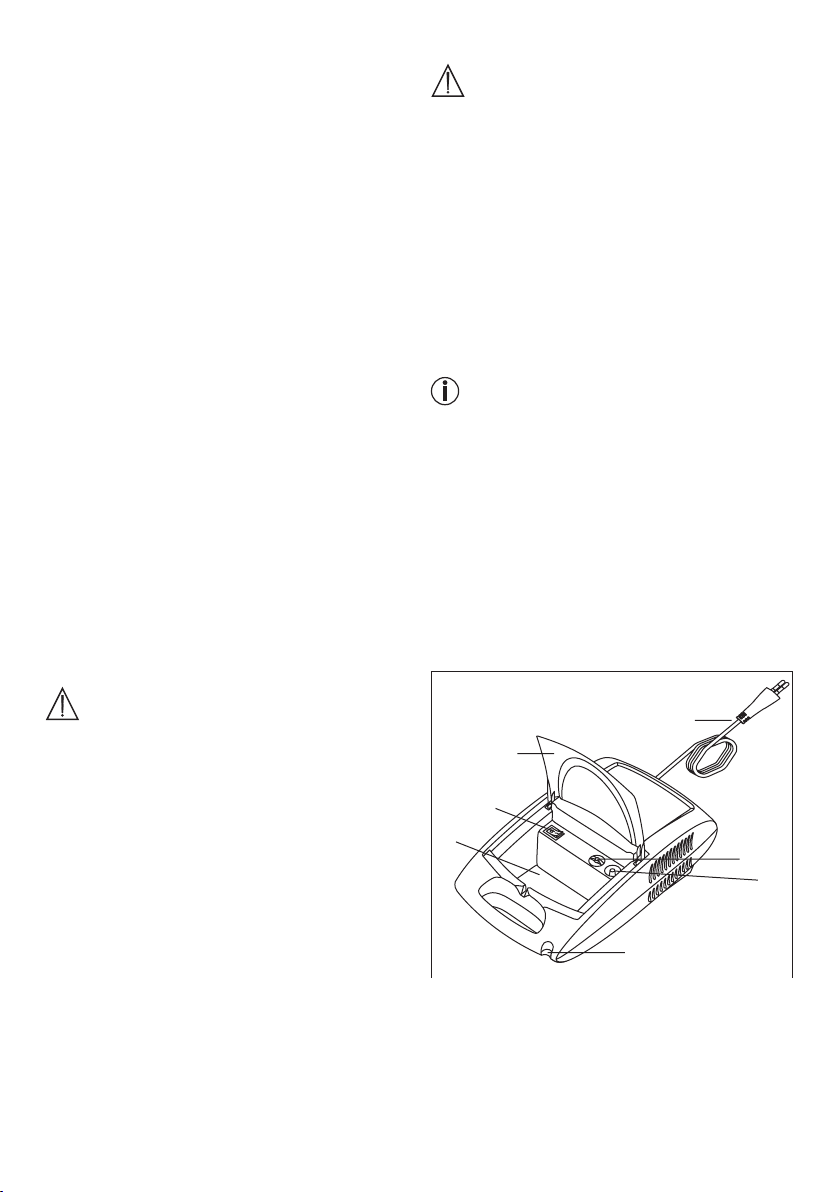
•
4
При необходимости использования адаптеров
или удлинителей они должны отвечать действующим предписаниям техники безопасности.
Нельзя превышать предельную мощность тока
имаксимальную мощность, указанную на адаптере.
•
Прибор ипитающий кабель нельзя хранить вбли-
зи источников тепла.
•
Не пользуйтесь прибором впомещениях, вко-
торых перед этим распылялись аэрозоли. Такие
помещения необходимо проветривать перед проведением терапии.
•
Не допускайте попадания каких-либо предметов
вохлаждающие отверстия.
•
Не используйте прибор, если он издает необыч-
ный шум.
•
Вцелях соблюдения санитарно-гигиенических
требований каждый пользователь должен иметь
свои индивидуальные принадлежности.
•
После каждого использования выключайте при-
бор из розетки.
•
Храните прибор вместах, защищенных от влия-
ния атмосферных воздействий. Необходимо обеспечить соответствующие условия окружающей
среды для хранения прибора.
ПРЕДОХРАНИТЕЛЬ
•
Вприборе установлен максимальный предохра-
нитель. Его замена должна производиться только
квалифицированным персоналом со специальным допуском.
Общие указания
Внимание
•
Используйте прибор исключительно вследующих
целях:
– для людей;
– вцелях, для которых он был разработан (аэро-
зольная ингаляция), всоответствии суказаниями, приведенными вданной инструкции по
применению.
•
Любое применение не по назначению может
быть опасным!
•
Вкритических ситуациях прежде всего следует
оказать первую помощь пострадавшему.
•
Помимо лекарственных препаратов разрешается
использовать только дистиллированную воду или
физиологический раствор. Применение других
жидкостей при определенных условиях может
привести кповреждению ингалятора или распылителя.
•
Прибор не предназначен для использования на
производстве или вклинических условиях. Его
применение разрешено исключительно вдомашних условиях!
Перед вводом вэксплуатацию
Внимание
•
Перед использованием прибора следует удалить
все упаковочные материалы.
•
Не допускайте загрязнения прибора, защищайте
его от пыли ивлаги. Во время использования ни
вкоем случае не накрывайте прибор.
•
Не используйте прибор всильно запыленных по-
мещениях.
•
Вслучае неисправностей или неполадок вработе
немедленно отключите прибор.
•
Изготовитель не несет ответственности за ущерб,
вызванный неквалифицированным или ненадлежащим использованием прибора.
Ремонт прибора
Указание
•
Ни вкоем случае не открывайте прибор ине ре-
монтируйте его самостоятельно, так как вданном
случае надежность его работы больше не гарантируется. Несоблюдение этого требования ведет
кпотере гарантии.
•
Если прибор нуждается времонте, обратитесь
всервисную службу или кавторизованному торговому представителю.
4. Описание прибора ипринадлежностей
Обзор компонентов ингалятора
1
2
3
5
6
7
56
Page 57
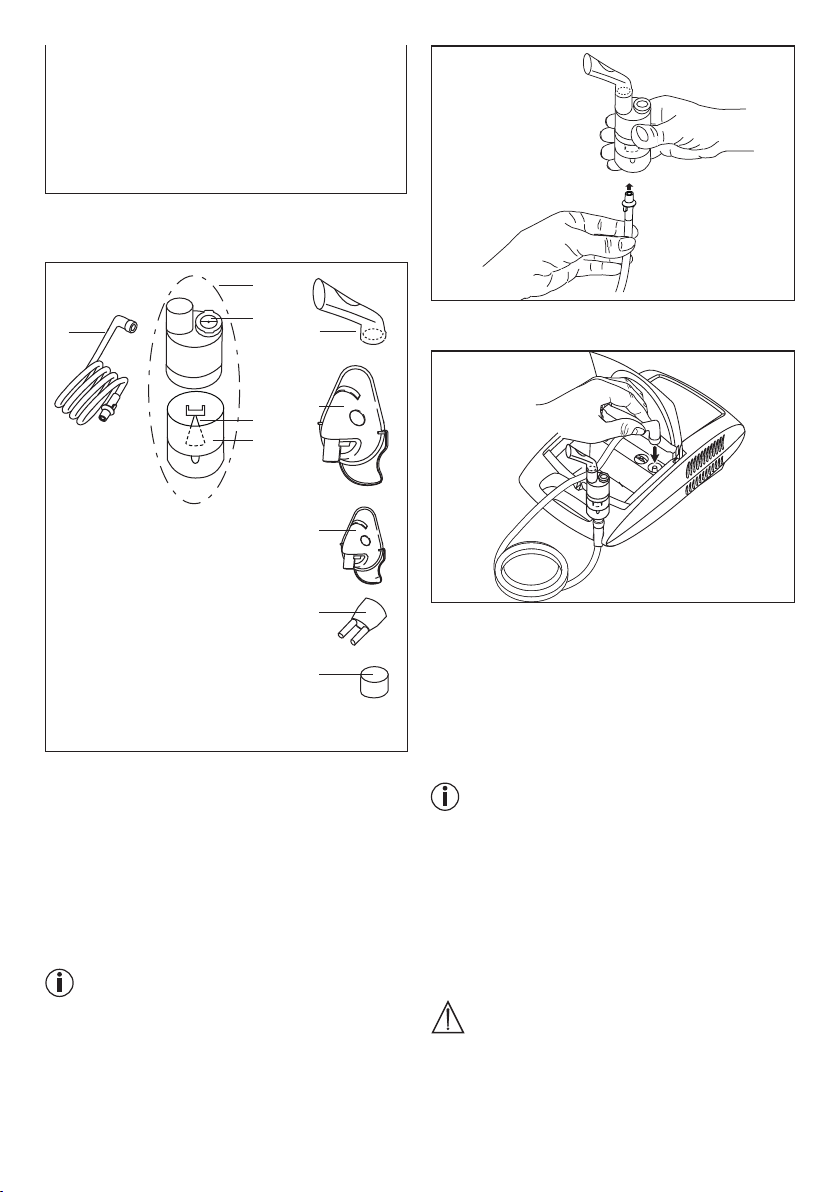
1. Сетевой кабель
2. Крышка
3. Выключатель
4. Отсек для принадлежностей
5. Крышка фильтра с фильтром
6. Разъём для присоединения трубки
7. Держатель для распылителя
Обзор компонентов распылителя ипринадлежностей
9
11
10
13
14
8
12
•
Слегка повернув его, вставьте другой конец труб-
ки [8] вштуцер [6] ингалятора.
8. Трубка-удлинитель
9. Распылитель
10. Насадка распылителя
11. Клапан
12. Ёмкость для лекарственных
средств
13. Мундштук
14. Маска для взрослых
15. Маска для детей
16. Насадка для носа
17. Сменный фильтр
15
16
17
5. Подготовка кработе
Установка
Извлеките прибор из упаковки.
Установите прибор на ровную поверхность.
Следите за тем, чтобы прорези для вентиляции
оставались открытыми.
Чтобы достать принадлежности, откиньте крышку
[2].
Перед первым применением
Указание
•
Перед первым применением следует выполнить
очистку идезинфекцию распылителя ипринадлежностей. См. раздел «Очистка идезинфекция»
на стр. 59.
•
Вставьте трубку-удлинитель [8] вемкость для
лекарства [12].
Подключение ксети
Подключайте прибор только ксетевому напряжению, указанному на заводской табличке.
•
Вставьте штекер сетевого кабеля [1] вподходя-
щую розетку.
•
Для подключения ксети штекер должен быть
полностью вставлен врозетку.
Указание
•
Убедитесь, что рядом сместом установки при-
бора находится розетка.
•
Разместите кабель таким образом, чтобы онего
никто не мог споткнуться.
•
Для отключения ингалятора от сети после ингаля-
ции сначала выключите прибор, затем извлеките
штекер из розетки.
6. Обслуживание
Внимание
•
Вцелях соблюдения санитарно-гигиенических
требований распылитель [9] ипринадлежности
следует очищать после каждого использования,
ав конце дня выполнять дезинфекцию.
57
Page 58
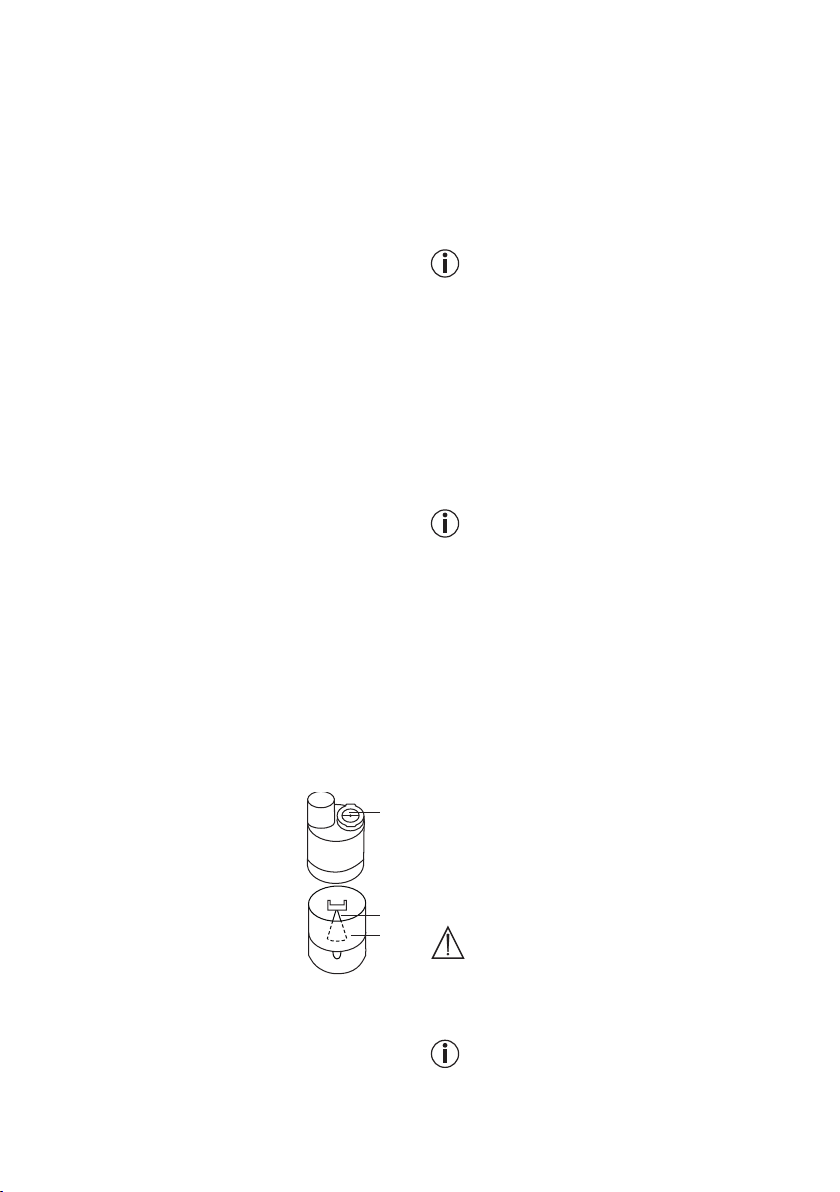
•
10
11
12
Принадлежности могут использоваться только
одним лицом. Использование несколькими лицами не рекомендуется.
•
Если для лечения необходимо последовательно
проводить ингаляцию несколькими видами лекарственных препаратов, то распылитель [9] нужно
промывать теплой водопроводной водой после
каждого применения. См. раздел «Очистка идезинфекция» на стр. 59.
•
Внимательно следуйте указаниям по замене
фильтра, содержащимся вданной инструкции!
•
Перед каждым использованием прибора прове-
ряйте прочность соединения трубки сингалятором [6] ираспылителем [9].
•
Перед использованием проверьте правильность
работы прибора. Для этого ненадолго включите
ингалятор (вместе сподключенным распылителем, но без лекарственного препарата). Если при
этом из распылителя [9] выходит воздух, то прибор работает.
1. Установка распылительной насадки
• Откройте распылитель [9], удерживая емкость
для лекарства [12] иповернув верхнюю часть
корпуса против часовой стрелки. Вставьте распылительную насадку [10] вемкость для лекарства [12].
• Убедитесь, что конус для подачи лекарства хо
рошо закреплен на конусе для подвода воздуха
внутри распылителя.
2. Наполнение распылителя
• Залейте изотонический физиологический рас-
твор или лекарственный препарат непосредственно вемкость для лекарства [12]. Не допускайте переполнения емкости! Максимальный
рекомендуемый объем заполнения составляет
8мл!
• Используйте лекарственный
препарат только по назначению
врача, поинтересуйтесь унего, какая продолжительность
ингаляции икакое количество
медикамента для ингаляции являются наиболее подходящими
для Вас.
• Если назначенное количество
лекарственного препарата
меньше 2мл, добавьте изотонический физиологический раствор, доведя объем
жидкости до минимум 4мл. Необходимо также
разбавлять густые лекарственные препараты.
При этом также следует соблюдать указания
врача.
11
10
12
3. Закрытие распылителя
• Закройте распылитель [9], удерживая емкость
для лекарства [12] иповернув верхнюю часть
корпуса по часовой стрелке. Следите за пра
вильностью соединения!
4. Установить клапан
• Вставьте синий клапан [11] в предназначенное
для него отверстие в верхней части распылителя
[9].
Указание
Система клапанов обеспечивает улучшенную проходимость медикамента в легкие. Клапан [11] применять только с мундштуком [13], и никогда с масками [14,15] или насадкой для носа [16].
5. Подсоединение принадлежностей
краспылителю
•
Соедините распылитель [9] с необходимыми при-
надлежностями (мундштук [13], маска для взрослых [14], маска для детей [15] или насадка для
носа [16]).
Указание
Ингаляция через мундштук является наиболее
эффективной формой терапии. Ингаляция через
маску рекомендуется только втом случае, если ис-
пользование мундштука невозможно (например,
для детей, которые еще не могут вдыхать через
мундштук).
• Перед процедурой извлеките распылитель из
крепления [7], потянув вверх.
• Включите ингалятор при помощи выключателя [3].
• Появление аэрозоля из распылителя означает,
что он работает корректно.
6. Лечение
•
Во время ингаляции рекомендуется сидеть пря-
мо ирасслабленно за столом, ане вкресле для
предотвращения сдавливания дыхательных путей
иснижения эффективности лечения.
•
Глубоко вдыхайте лекарственный препарат.
Внимание
Прибор не предназначен для непрерывного применения, после 30 минут работы его следует отключать на 30 минут.
Указание
Во время процедуры держите распылитель прямо
(вертикально), так как впротивном случае не будет
производиться распыление ине гарантируется безупречное функционирование прибора.
58
-
Page 59
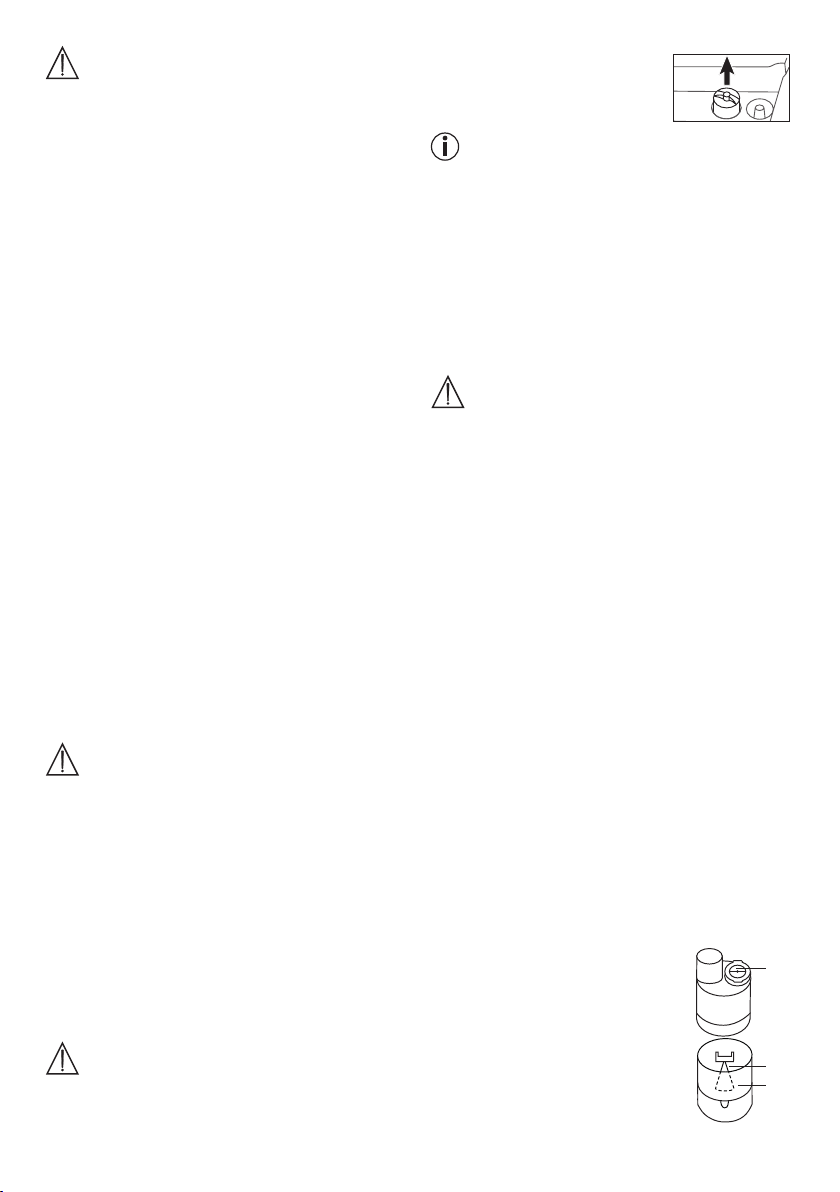
Внимание
Эфирные масла лекарственных растений, микстуры от кашля, растворы для полоскания горла, капли для растирания ипаровых бань впринципе не
подходят для ингаляции спомощью ингаляторов.
Эти добавки часто бывают вязкими имогут отрицательно сказаться на работе прибора, атакже на
эффективности его применения. При повышенной
чувствительности бронхиальной системы медикаменты сэфирными маслами могут вызвать острый
бронхоспазм (резкое исудорожное сужение брон
хов судушьем). Проконсультируйтесь об этом слечащим врачом или фармацевтом!
-
7. Завершение ингаляции
Если распыляемое вещество выходит неравномерно или изменяется звук при ингаляции, процедуру
можно завершить.
•
После завершения процедуры отключите ингаля-
тор спомощью выключателя [3] иотсоедините его
от сети.
•
Снова вставьте распылитель [9] вкрепление [7].
8. Выполнение очистки
См. раздел «Очистка идезинфекция» на стр. 59.
7. Замена фильтра
При обычных условиях использования воздушный
фильтр следует менять примерно после 500 часов
работы или один раз вгод. Регулярно контроли
руйте воздушный фильтр (после каждых 10–12
процедур ингаляции). Замените использованный
фильтр, если он сильно загрязнен или засорился.
Если фильтр намок, если также следует заменить.
Внимание
•
Не пытайтесь очистить иповторно использовать
старый фильтр!
•
Используйте исключительно оригинальный
фильтр от производителя, впротивном случае
возможно повреждение ингалятора или снижение эффективности лечения.
•
Запрещается ремонт итехническое обслужива-
ние воздушного фильтра во время его использования.
•
Никогда не пользуйтесь прибором без фильтра.
Для замены фильтра выполните следующие действия:
Внимание
•
Сначала выключите прибор иотсоедините его от
сети.
•
Дайте прибору остыть.
-
1. Снимите крышку фильтра [5],
потянув ее вверх.
Указание
Если после снятия крышки фильтр остается вприборе, извлеките его из прибора, например, спомощью пинцета или другого подобного инструмента.
2. Установите крышку фильтра [5] сновым филь-
тром на место.
3. Проверьте, прочно ли надета крышка.
8. Очистка идезинфекция
Распылитель ипринадлежности
Предостережение
Соблюдайте описанные ниже правила гигиены, чтобы избежать опасности для здоровья.
•
Распылитель [9] ипринадлежности предназначе-
ны для многократного использования. Учтите, что
требования кочистке игигиенической обработке
различаются взависимости от области применения прибора.
Указания:
•
Не следует выполнять механическую очистку
распылителя ипринадлежностей щетками иподобными средствами, так как это может навсегда
вывести прибор из строя, иуспех лечения более
не будет гарантирован.
•
Проконсультируйтесь сВашим врачом относи-
тельно дополнительных требований, предъявляемых кнеобходимой гигиенической подготовке
(уход за руками, применение лекарственных препаратов или растворов для ингаляций) для групп
повышенного риска (например, для пациентов,
страдающих муковисцидозом).
•
После каждой очистки или дезинфекции обе-
спечьте достаточное просушивание. При наличии
остаточной влажности повышается риск размножения бактерий.
Подготовка
•
Сразу после каждой процеду-
ры все детали распылителя [9],
атакже использованные принадлежности необходимо очистить от остатков лекарственного препарата изагрязнений.
•
Разберите распылитель [9] на
составные части.
11
10
12
59
Page 60
•
Отсоедините от распылителя мундштук [13],
маску [14, 15] или насадку для носа [16].
• Разберите распылитель, удерживая емкость
для лекарства [12] иповернув верхнюю часть
корпуса по часовой стрелке.
•
Извлеките распылительную насадку [10] из
емкости для лекарства [12].
• Удалите клапан [11], вынув его из распылителя
[9].
• Сборка выполняется соответственно вобратной
последовательности.
Очистка
Внимание
Перед каждой очисткой убедитесь, что прибор выключен, отсоединен от сети иостыл.
Сам распылитель ииспользованные принадлеж
ности, такие как мундштук, маска, распылительная
насадка ит.д., после каждого применения необходимо промывать горячей, но не кипящей водой.
Тщательно высушите детали мягкой тканью. После
полного высыхания соберите детали иположите
их всухую герметичную емкость или продезинфицируйте.
При очистке убедитесь, что все остатки удалены.
При этом ни вкоем случае не используйте вещества, которые потенциально могут быть ядовитыми
при попадании на кожу или слизистую оболочку,
проглатывании или вдыхании.
Для очистки прибора используйте мягкую, сухую
салфетку инеабразивное чистящее средство.
Не используйте едкие чистящие средства ини вкоем случае не погружайте прибор вводу.
-
Внимание
•
Следите за тем, чтобы внутрь прибора не попала
вода!
•
Не мойте прибор ипринадлежности впосудомо
ечной машине!
•
Нельзя прикасаться кподключенному ксети при-
бору влажными руками; на него также не должна
попадать вода. Прибор разрешается использовать только абсолютно сухим.
•
Не распыляйте жидкость ввентиляционные от-
верстия! Попадание жидкостей может привести
кповреждению электрических идругих деталей
ингалятора, атакже ксбоям вего работе.
Конденсат, уход за трубкой
В зависимости от условий окружающей среды
в трубке может осаждаться конденсат. Чтобы
препятствовать росту микроорганизмов игаран
тировать безупречное лечение, влагу необходимо
удалять. Для этого необходимо сделать следующее:
•
Извлеките трубку [8] из распылителя [9].
•
Со стороны ингалятора [6] трубку не отсоединяй-
те.
•
Включите ингалятор иоставьте его работать до
тех пор, пока ток воздуха не удалит всю влагу.
•
При сильном загрязнении замените трубку.
Дезинфекция
При проведении дезинфекции распылителя ипринадлежностей тщательно соблюдайте следующие
правила. Рекомендуется дезинфицировать детали
прибора не реже чем после каждого последнего
применения за день.
(Для этого Вам потребуется немного бесцветного
уксуса идистиллированная вода.)
•
Сначала очистите распылитель ипринадлежности, как описано вразделе «Очистка».
• Разобранный распылитель,мундштук и насадку
для носа положите на 5минут вкипящую воду.
• Для прочих принадлежностей используйте раствор, состоящий на ¼ из уксуса ина ¾ из дистиллированной воды. Убедитесь, что жидкости
достаточно, чтобы можно было полностью погрузить внее различные детали (например, распылитель, маску имундштук).
•
Оставьте детали на 30минут вуксусном растворе.
•
Промойте детали водой иразложите из для просушки на мягком полотенце.
Внимание
Маски ивоздушный шланг не кипятить ине стерилизовать вавтоклаве.
• После полного высыхания соберите детали иположите их всухую герметичную емкость.
Указание
Учтите, что после очистки необходимо полностью
высушить детали, так как впротивном случае воз
растает риск размножения бактерий.
Стерилизация
•
Используйте растворы для холодной стерилиза-
ции всоответствии суказаниями производителя.
Сушка
•
Положите отдельные детали на сухую, чистую
ивпитывающую влагу подстилку иоставьте до
полного высыхания (не менее 4часов).
Устойчивость материала
•
Как ивсе детали из пластика, распылитель ипри-
-
надлежности изнашиваются при частом исполь-
-
60
Page 61
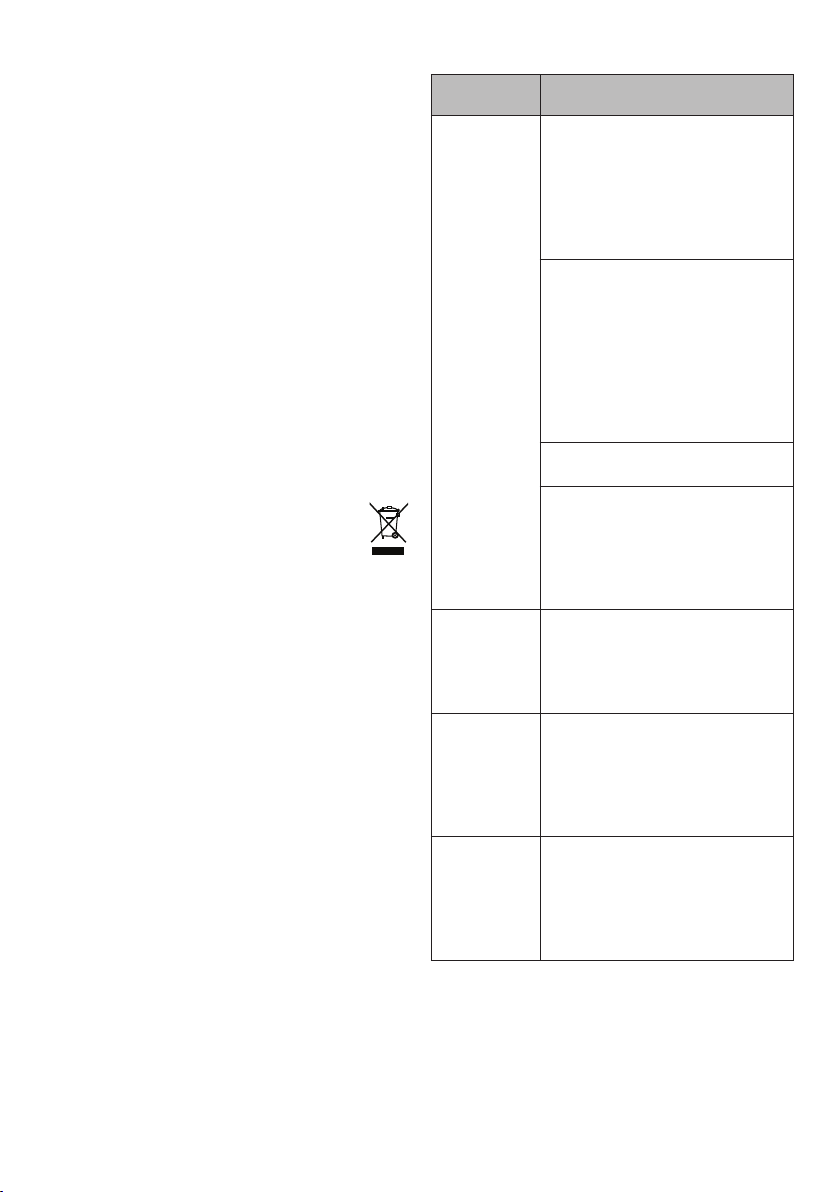
зовании игигиенической обработке. Со временем это может привести кизменению состава
аэрозоля и, как следствие, снизить эффективность лечения. Поэтому рекомендуется ежегодно
заменять распылитель.
•
При выборе средства для очистки идезинфекции
необходимо учитывать следующее: используйте
только мягкое чистящее средство или дезинфи
цирующее средство вколичестве, указанном
производителем.
Хранение
•
Нельзя хранить прибор во влажных помещениях
(например, вванной комнате) иперевозить его
вместе свлажными предметами.
•
Храните иперевозите прибор вместе, защищен-
ном от длительного воздействия прямых солнечных лучей.
•
Принадлежности можно хранить вспециально
предназначенном для этого отсеке [4]. Храните
прибор всухом месте, лучше всего, вупаковке.
9. Утилизация
Вцелях защиты окружающей среды прибор
следует утилизировать отдельно от бытового мусора.
Прибор следует утилизировать согласно Директиве
ЕС поотходам электрического иэлектронного оборудования— WEEE (Waste Electrical and Electronic
Equipment).
При возникновении вопросов, обращайтесь вком
мунальную организацию, занимающуюся вопросами утилизации.
10. Решение проблем
Проблемы/
вопросы
Распылитель
не произво
дит аэрозоль
или произво
-
дит его внедостаточном
количестве.
Объем
получаемого
-
аэрозоля
слишком
мал.
Какие ме
дикаменты
можно ис
пользовать
для ингаля
ций?
Враспылите
ле остается
раствор для
ингаляций.
Возможная причина/
устранение
1. Враспылителе слишком много
или слишком мало лекар
ственного препарата.
-
Минимальное количество лекарственного препарата: 2мл,
максимальное количество лекарственного препарата: 8мл
2. Проверьте, не засорилось ли
сопло.
При необходимости очистите
сопло (например, промыв его).
После этого вновь включите
распылитель.
ВНИМАНИЕ! Мелкие отверстия
осторожно протыкайте только
снижней стороны сопла.
3. Распылитель не ввертикальном положении.
4. Используемый лекарственный
препарат не подходит для рас
пыления (например, жидкость
слишком густая).
Лекарство должно быть назначе
но врачом.
Шланг перегнут, фильтр засорен,
слишком большое количество
раствора для ингаляций.
-
Проконсультируйтесь об этом
сврачом.
-
Впринципе, можно применять
любые лекарства, подходящие
идопущенные киспользованию
для ингаляторов.
Это нормально ипроисходит по
техническим причинам. Если вы
услышите, что звук, издавае
мый распылителем при работе,
сильно изменился, сразу же
прекратите ингаляцию.
-
-
-
-
61
Page 62
Проблемы/
вопросы
На что следу
ет обратить
внимание
при лечении
детей имла
-
денцев?
Ингаляция
смаской
длится доль
-
ше?
Почему нуж
но регулярно
заменять
распыли
-
тель?
Возможная причина/
устранение
-
1. Для обеспечения эффектив
ной ингаляции умладенцев
маска должна закрывать рот
инос.
2. При проведении ингаляции
удетей маска также должна
закрывать рот инос. Рас
пыление лекарства рядом
со спящим человеком менее
эффективно, поскольку влег
кие не попадает достаточное
количество лекарственного
препарата.
Указание: ингаляция должна
осуществляться под присмотром
ис помощью взрослого, во вре
мя ингаляции нельзя оставлять
ребенка одного.
Это происходит по техническим
причинам. Через отверстия вма
ске за один вдох Вы вдыхаете
меньшее количество лекарства,
чем через мундштук. Проходя
через эти отверстия, аэрозоль
смешивается своздухом впо
мещении.
Это обусловлено двумя при
-
чинами:
1. Чтобы обеспечить необходи
мый для эффективного лечения спектр частиц, диаметр
отверстия форсунки не дол
жен превышать определенных
размеров. Пластмасса виз
вестной степени подвержена
износу вследствие механиче
ской итермической нагрузки.
Осторожно обращайтесь
сраспылительной насадкой
[10]. Из-за этого может из
мениться дисперсный состав
аэрозоля, что непосредствен
но влияет на эффективность
лечения.
2. Кроме того, регулярная заме
на распылителя рекомендуется из соображений гигиены.
-
Проблемы/
вопросы
Для каждого
пользова
Возможная причина/
устранение
Это обязательно по гигиениче
-
ским соображениям.
-
теля нужен
собственный
распыли
-
тель?
11. Технические данные
Модель
-
Тип
Размеры (ВxШxГ) 300 x 180 x 100 мм
Масса
Рабочее давление ca. 0,8 - 1,45 бар
Объём
-
распылителя
Расход
лекарственного
средства
-
Звуковое
давление
Подключение
к сети
-
Условия
эксплуатации
Условия хранения
-
и транспорти
ровки
-
Характеристики
аэрозоля
-
-
-
Возможны технические изменения.
-
-
IH21
IH 21/1
1,65 кг
макс. 8 мл
минут 2 мл
ca.
0,3 мл/мин
макс. 52 дБА
(согласно DIN EN 13544-1:2004-09,
раздел 26)
230 В~ / 50 Гц / 230 вольт-ампер
UK: 240 В~; 50 Гц; 240
Температура: от +10 дo +40 °C
Относительная влажность воздуха:
10 дo 95%
Температура: от 0 дo +60 °C
-
Относительная влажность воздуха:
10 дo 95%
Давление окружающей среды:
500 дo 1060 гПа
1) Расход: 5,3л/мин
2) Выходной объем аэрозоля:
0,216мл
3) Скорость распыления:
0,112мл/мин
4) Размер частиц (MMAD):
3,85мкм
вольт-ампер
62
Page 63
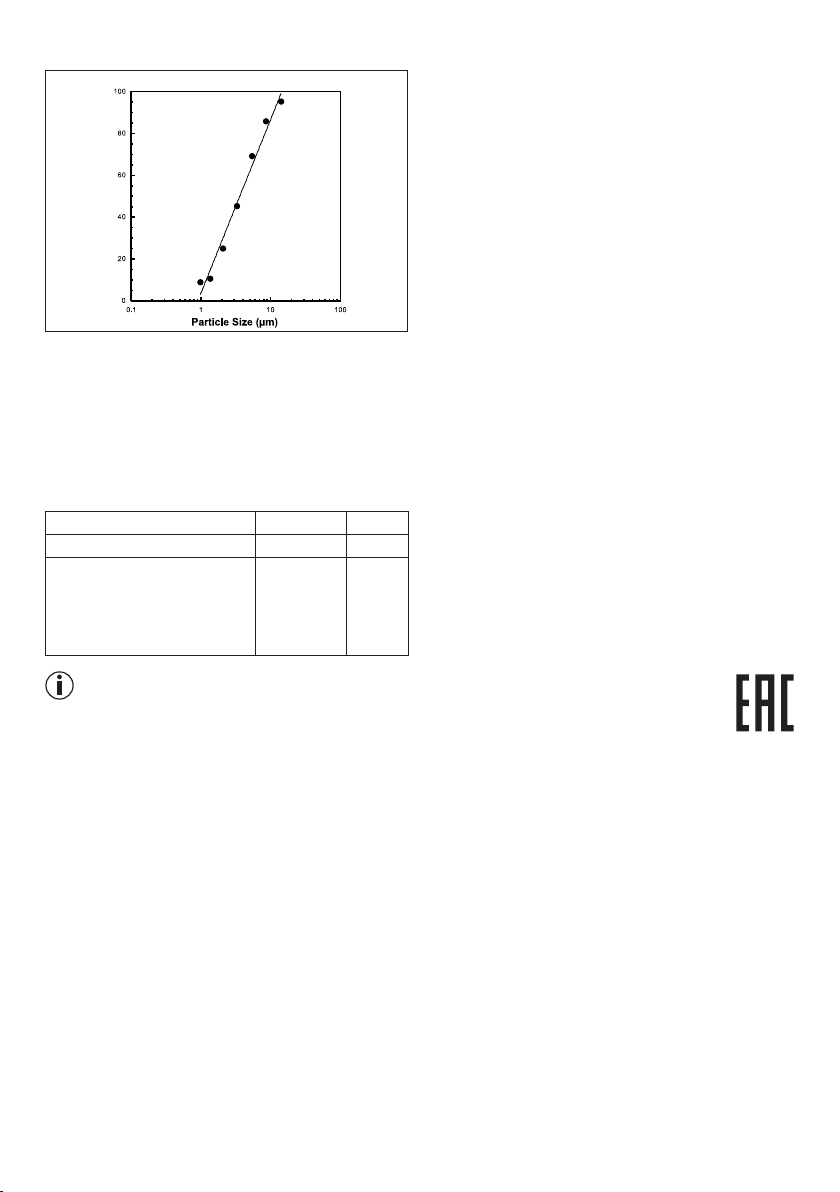
Диаграмма распределения частиц по размеру
ной совместимости иподходит для использования влюбых зданиях, включая жилые помещения.
Уровень испускаемых прибором радиочастот
очень низок ипоэтому вероятность того, что он
вызовет помехи вработе находящегося рядом
оборудования, крайне мала.
•
Влюбом случае не рекомендуется устанавливать
прибор рядом сдругими устройствами или над
ними. Если помехи вработе других приборов все
же возникли, переставьте ингалятор вдругое место или подключите его кдругой розетке.
•
Радиоаппаратура может повлиять на работу ин-
галятора.
Измерения производились сиспользованием раствора фторида натрия при помощи импактора нового поколения (Next Generation Impactor = NGI).
Поэтому диаграмма может не подходить для суспензий или очень густых медикаментов. Более
подробную информацию можно узнать упроизводителя соответствующего лекарства.
Предметы, приобретаемые дополнительно
Наименование предмета Материал REF
Стопор распылителя ПП
Yearpack (содержит
мундштук, Насадка для
носа,
маску для взрослых/
детей, распылитель, трубкуудлинитель, фильтр)
ПП/ПВХ 601.22
162.819
Указание
Вслучае применения прибора не всоответствии
со спецификацией безупречное функционирование
не гарантируется! Мы оставляем за собой право на
технические изменения всвязи смодернизацией
иусовершенствованием продукта. Данный прибор
иего принадлежности соответствуют европейским
стандартам EN60601-1 иEN60601-1-2, а также
EN13544-1 и требуют соблюдения особых мер
предосторожности вотношении электромагнитной
совместимости. Следует учесть, что переносные
имобильные высокочастотные коммуникационные
устройства могут повлиять на работу данного прибора. Более точные данные можно запросить по
указанному адресу сервисной службы или найти
вконце инструкции по применению. Данный прибор соответствует требованиям Европейской директивы омедицинских изделиях 93/42/EC, атакже
Закону омедицинских изделиях.
ЭЛЕКТРОМАГНИТНАЯ СОВМЕСТИМОСТЬ
•
Прибор соответствует всем действующим вна-
стоящее время предписаниям по электромагнит-
12. Гарантия
Мы предоставляем гарантию на дефекты материалов и изготовления этого прибора на срок 24
месяца со дня продажи через розничную сеть.
Гарантия не распространяется:
•
на случаи ущерба, вызванного неправильным
использованием,
•
на быстроизнашивающиеся части (фильтры,
маски, трубки),
•
на дефекты, о которых покупатель знал в момент
покупки
•
на случаи собственной вины покупателя.
Срок эксплуатации изделия: минимум 5 лет
Фирма-изготовитель: Бойрер Гмбх,
Софлингер штрассе 218,
89077-УЛМ, Германия
Фирма-импортер: OOO БОЙРЕР,
109451 г. Москва,
ул. Перерва 62,
корп. 2, офис 3
Сервисный центр: 109451 г. Москва,
ул. Перерва, 62, корп.2
Тел(факс) 495-658 54 90
[email protected]
Дата продажи__________________________________
Подпись продавца______________________________
Штамп магазина_______________________________
Подпись покупателя____________________________
63
Page 64
POLSKI
Spis treści
1. Informacje o urządzeniu ....................................64
2. Objaśnienia do rysunków ..................................64
3. Wskazówki ostrzegawcze i
dotyczące bezpieczeństwa ...............................64
4. Opis urządzenia i akcesoriów ............................66
5. Uruchomienie ....................................................67
6. Obsługa .............................................................67
7. Wymiana filtra ....................................................68
8. Czyszczenie i dezynfekcja .................................69
9. Utylizacja ...........................................................70
10. Usuwanie usterek ..............................................70
11. Dane techniczne ................................................71
Zakres dostawy
Patrz opis urządzenia i akcesoriów, str. 66.
•
Inhalator
•
Nebulizator
•
Przewód powietrzny
•
Ustnik
•
Maska dla dorosłych
•
Maska dla dzieci
•
Końcówka do nosa
•
Filtr zapasowy
•
Instrukcja obsługi
1. Informacje o urządzeniu
Szanowni Klienci,
Dziękujemy, że wybrali Państwo produkt z naszego asortymentu. Firma Beurer oferuje dokładnie przetestowane
produkty wysokiej jakości przeznaczone do pomiaru cię
żaru, ciśnienia, temperatury i tętna, a także przyrządy do
łagodnej terapii, masażu, inhalacji i ogrzewania.
Prosimy uważnie przeczytać instrukcję obsługi i przestrzegać zawartych w niej wskazówek. Instrukcję należy
dać do przeczytania innym użytkownikom urządzenia
oraz zachować do wglądu.
Z poważaniem
Zespół firmy Beurer
Zastosowanie
Prezentowany inhalator jest urządzeniem inhalacyjnym
przeznaczonym do rozpylania płynów oraz płynnych
leków (aerozoli) oraz do leczenia górnych i dolnych
dróg oddechowych.
Rozpylanie i inhalacja przepisanego lub zaleconego
przez lekarza lekarstwa zapobiega chorobom dróg
oddechowych, łagodzi objawy tych chorób i przyspiesza leczenie. Więcej informacji na temat zastosowania
urządzenia można uzyskać u lekarza lub farmaceuty.
Urządzenie przeznaczone jest do inhalacji na użytek
domowy. Lekarstwa można inhalować jedynie po konsultacji i zgodnie z zaleceniami lekarza. Inhalację należy
przeprowadzać spokojnie i być odprężonym. Należy
wziąć wolno głęboki oddech, aby lekarstwo dotarło
głęboko do oskrzeli. Jeszcze raz wziąć oddech.
Po odpowiednim przygotowaniu urządzenie nadaje
się do ponownego użytku. Przygotowanie obejmuje
wymianę wszystkich elementów wyposażenia łącznie
z nebulizatorem i filtrem powietrza, jak również dezynfekcję powierzchni urządzenia za pomocą dostępnego
w handlu środka dezynfekującego.
2. Objaśnienia do rysunków
W instrukcji obsługi zastosowano
następujące symbole:
Ostrzeżenie Ostrzeżenie przed niebezpie-
czeństwem obrażeń ciała lub
utraty zdrowia.
Uwaga Ostrzeżenie przed niebezpie-
czeństwem uszkodzenia urządzenia lub akcesoriów.
Wskazówka
Na opakowaniu i tabliczce znamionowej urządzenia i
akcesoriów zastosowano następujące symbole.
Część aplikacyjna typu BF
-
30 ON /
30 OFF
Należy przestrzegać instrukcji obsługi
Urządzenie klasy ochronnej 2
P
Wł.
I
Wył.
O
Numer seryjny
SN
30 minut eksploatacji, następnie 30 minut
przerwy przed ponowną pracą.
Chronić przed wilgocią
Ważne informacje.
roducent
3. Wskazówki ostrzegawcze i
dotyczące bezpieczeństwa
Ostrzeżenie
•
Przed użyciem należy upewnić się, że urządzenie i
akcesoria nie mają żadnych widocznych uszkodzeń.
64
Page 65

W razie wątpliwości należy zaniechać eksploatacji
urządzenia i skontaktować się z przedstawicielem
handlowym lub z biurem obsługi klienta pod podanym adresem.
• W przypadku usterek urządzenia należy się zapoznać
z rozdziałem „10. Rozwiązywanie problemów”.
•
Stosowanie urządzenia nie zastąpi konsultacji lekar-
skiej i terapii. Dlatego w przypadku każdego rodzaju
bólu lub choroby najpierw należy zasięgnąć porady
lekarza.
•
W razie jakichkolwiek obaw o zdrowie należy skon-
sultować się z lekarzem pierwszego kontaktu!
•
W przypadku stosowania nebulizatora należy prze-
strzegać ogólnych zasad higieny.
•
W przypadku zażywania lekarstw należy stosować
się do zaleceń lekarza odnośnie dawki, częstotliwości i czasu trwania inhalacji.
•
Należy zażywać wyłącznie lekarstw przepisanych lub
zalecanych przez lekarza lub farmaceutę.
Uwaga:
Do terapii używać tylko części zalecanych przez le
karza w zależności od stanu zdrowia.
• Sprawdzić na ulotce lekarstwa, czy nie ma przeciw
wskazań do zastosowania z typowymi urządzeniami
do leczenia nebulizacją.
•
W przypadku nieprawidłowego działania urządzenia,
wywołanego przez inhalację złego samopoczucia lub
bólu, należy natychmiast przerwać terapię.
• Podczas inhalacji trzymać urządzenie z dala od oczu
– rozpylone lekarstwa mogą mieć szkodliwe działanie.
• Nie używać urządzenia w obecności gazów palnych.
•
Urządzenie nie jest przeznaczone do używania przez
dzieci ani osoby z ograniczonymi zdolnościami fizycznymi, sensorycznymi (np. niewrażliwych na ból)
lub umysłowymi lub nie posiadające wystarczającego
doświadczenia i/lub wiedzy. Wyjątek stanowi przypadek, gdy są one nadzorowane przez osobę odpowiedzialną za ich bezpieczeństwo lub zostały przez
nią pouczone, jak należy obsługiwać urządzenie.
•
Przed czyszczeniem i/lub konserwacją należy wyłączyć urządzenie oraz wyjąć wtyczkę.
•
Nie zezwalać dzieciom na zabawę opakowaniem
(niebezpieczeństwo uduszenia).
• Aby uniknąć zagrożenia zaplątania lub uduszenia,
kable i przewody powietrza należy przechowywać
w miejscu niedostępnym dla małych dzieci.
•
Nie używać dodatkowych części, które nie zostały
polecone przez producenta.
• Urządzenie można podłączyć wyłącznie do napięcia
sieciowego podanego na tabliczce znamionowej.
•
Urządzenia nie należy zanurzać w wodzie ani używać
w wilgotnych pomieszczeniach. Pod żadnym pozorem nie mogą wnikać żadne płyny do urządzenia.
•
Urządzenie należy chronić przed silniejszymi wstrzą-
sami.
-
-
•
Nigdy nie dotykać przewodu przyłączeniowego mo-
krymi rękami – istnieje niebezpieczeństwo porażenia
prądem.
•
Nie wyciągać wtyczki z gniazda ciągnąc za przewód
zasilający.
•
Przewodu przyłączeniowego nie przytrzaskiwać, nie
zginać, nie ciągnąć po przedmiotach z ostrymi krawędziami, nie pozostawiać zwisających oraz chronić
przed działaniem wysokiej temperatury.
•
W przypadku uszkodzenia przewodu przyłączenio-
wego lub urządzenia należy skontaktować się z serwisem lub przedstawicielem handlowym.
•
Aby uniknąć niebezpieczeństwa, w przypadku
uszkodzenia kabla zasilającego urządzenia jego
wymianę należy zlecić producentowi, w dziale obsługi klienta lub odpowiednio wykwalifikowa-nemu
fachowcowi.
•
Zalecamy całkowite rozwinięcie kabla zasilającego,
aby zapobiec przegrzaniu, które może stworzyć za
grożenie.
•
Jeśli urządzenie upadło lub zostało narażone na
działanie wysokiej wilgotności albo zostało w inny
sposób uszkodzone, nie wolno go używać. W razie
wątpliwości należy skonsultować się z serwisem lub
przedstawicielem handlowym.
•
Inhalator IH 21 należy stosować wyłącznie z
pasującym nebulizatorem oraz odpowiednimi ak
cesoriami. Stosowanie nebulizatorów i akcesoriów
innych firm może prowadzić do gorszych wyników
terapii, a także do uszkodzenia urządzenia.
Uwaga
• Przerwa w zasilaniu, nagłe zakłócenia lub inne niekorzystne warunki mogą prowadzić do uszkodzenia urządzenia. Dlatego zaleca się posiadanie urządzenia zapasowego lub lekarstwa (przekonsultowanego z lekarzem).
•
Jeśli niezbędny jest adapter lub przedłużacze, muszą
one być zgodne z obowiązującymi przepisami bezpieczeństwa. Nie można przekraczać granicy mocy
prądu oraz podanej na adapterze maksymalnej gra
nicy mocy.
•
Urządzenia i przewodu zasilającego nie wolno prze-
chowywać w pobliżu źródła ciepła.
•
Urządzenia nie wolno stosować w pomieszcze-
niach, w których były wcześniej używane spraye.
Przed przystąpieniem do terapii należy wywietrzyć
pomieszczenie.
•
Nie dopuścić, aby jakiś przedmiot przedostał się
przez szczeliny powietrzne.
•
Nigdy nie używać urządzenia, jeśli odgłos pracy jest
nienaturalny.
•
Ze względów higienicznych jest absolutnie koniecz-
ne, aby każdy użytkownik korzystał z własnego wyposażenia dodatkowego.
-
-
-
65
Page 66
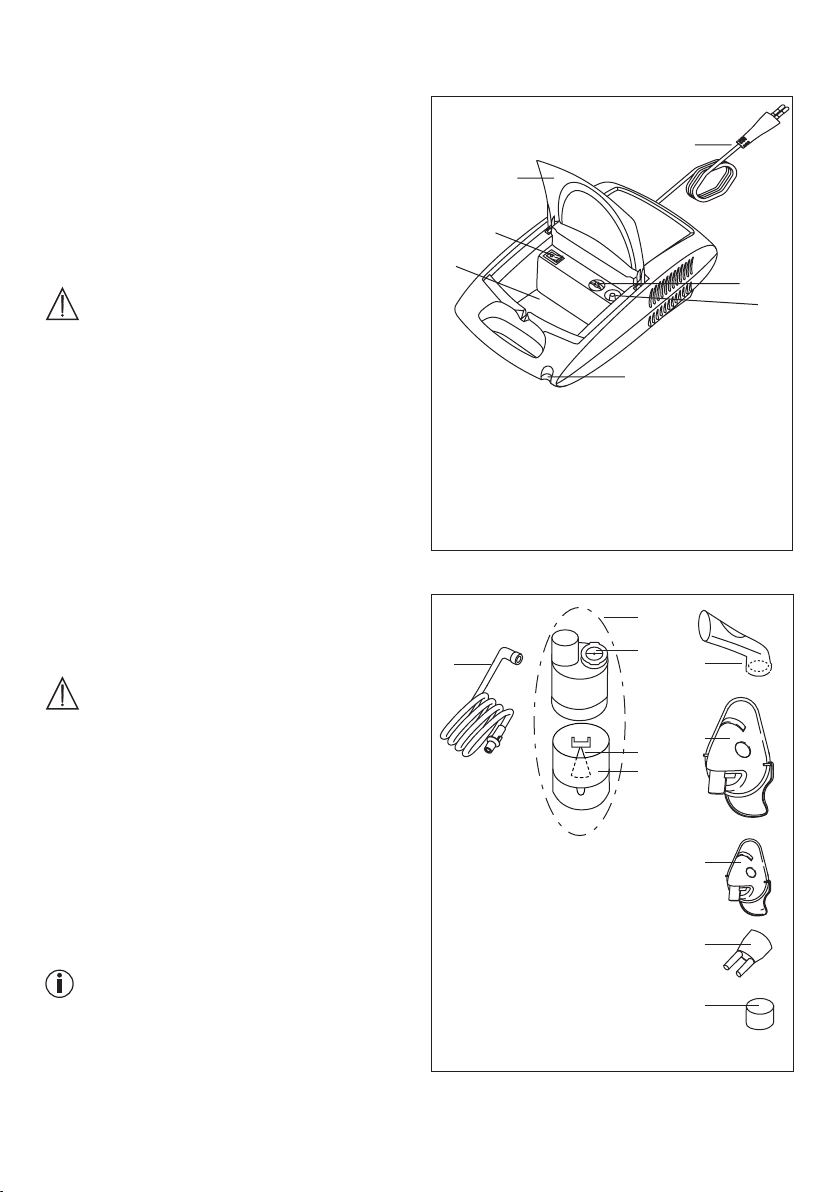
•
4
Po użyciu urządzenia zawsze wyciągać wtyczkę z
gniazda.
•
Urządzenie przechowywać w miejscu chronionym
przed wpływami niekorzystnych warunków atmos
ferycznych. Urządzenie należy przechowywać w
odpowiednich warunkach.
ZABEZPIECZENIE
•
W urządzeniu znajduje się zabezpieczenie przecią-
żeniowe. Może je wymienić wyłącznie pracownik
autoryzowanego serwisu.
Wskazówki ogólne
Uwaga
•
Urządzenia używać wyłącznie:
– do terapii ludzi,
– do celów, do jakich jest przeznaczone (terapia
aerozolowa) oraz w sposób opisany w instrukcji
obsługi.
•
Każde użycie niezgodne z przeznaczeniem może
być niebezpieczne!
•
W nagłych przypadkach natychmiast zastosować
pierwszą pomoc.
•
Oprócz lekarstw można stosować wyłącznie wodę
destylowaną lub roztwór gotowanej wody z solą. Inne
płyny mogą prowadzić do uszkodzenia inhalatora lub
nebulizatora.
•
Urządzenie nie jest przeznaczone do celów przemy-
słowych lub klinicznych, lecz wyłącznie do użytku
własnego w prywatnym domu!
Przed pierwszym uruchomieniem
Uwaga
•
Przed użyciem urządzenia należy całkowicie usunąć
opakowanie.
•
Urządzenie chronić przed kurzem, brudem i wilgocią.
Nigdy nie przykrywać urządzenia podczas eksploatacji.
• Nie używać urządzenia w mocno zapylonym otoczeniu.
• Jeśli urządzenie jest uszkodzone lub dojdzie do zakłóceń w eksploatacji, należy je natychmiast wyłączyć.
•
Producent nie ponosi odpowiedzialności za szkody
powstałe w wyniku użytkowania urządzenia niezgodnie z przeznaczeniem.
Naprawa
Wskazówka
•
Urządzenia pod żadnym pozorem nie otwierać ani
nie naprawiać, ponieważ w przeciwnym razie nie
będzie ono prawidłowo działać. Nieprzestrzeganie
powyższych zasad powoduje wygaśnięcie gwarancji.
•
Konieczność przeprowadzenia jakichkolwiek na-
praw należy zgłosić w serwisie lub autoryzowanemu
przedstawicielowi handlowemu.
4. Opis urządzenia i akcesoriów
Budowa inhalatora
-
1
2
3
7
1 Przewód zasilający
2 Klapka
3 Włącznik/wyłącznik
4 Schowek na akcesoria
5 Pokrywa filtra z filtrem
6 Przyłącze na przewód powietrzny
7 Uchwyt na nebulizator
Budowa nebulizatora i akcesoriów
9
11
10
12
13
14
15
16
17
8
8 Przewód powietrzny
9 Nebulizator
10 Wkład nebulizatora
11 Zawór
12 Pojemnik na lekarstwa
13 Ustnik
14 Maska dla dorosłych
15 Maska dla dzieci
16 Końcówka do nosa
17 Filtr wymienny
5
6
66
Page 67
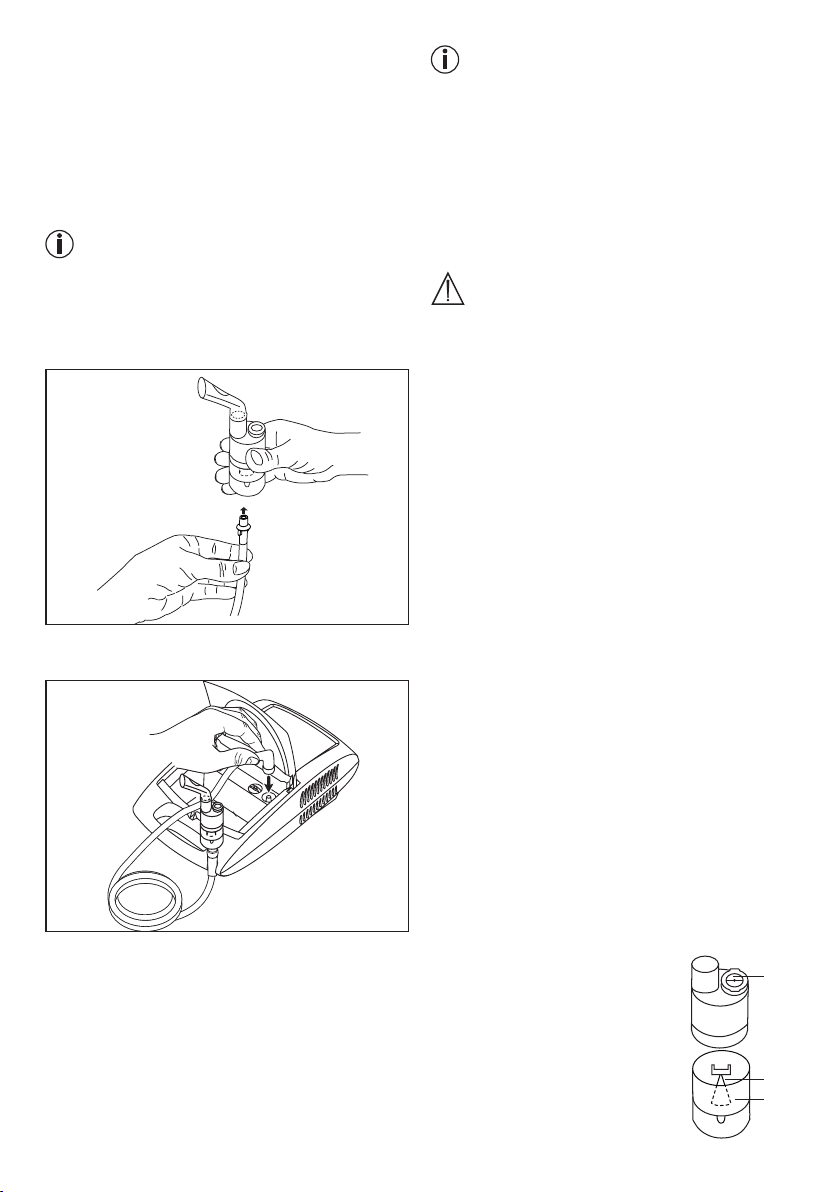
5. Uruchomienie
Ustawianie
Wyjąć urządzenie z opakowania. Ustawić na równej
powierzchni.
Zwrócić uwagę, aby szczeliny wentylacyjne nie były
zasłonięte.
Otwórz pokrywę [2], aby uzyskać dostęp do akcesoriów.
Przed pierwszym użyciem
Wskazówka
•
Nebulizator oraz akcesoria należy przed pierwszym
użyciem wyczyścić i zdezynfekować. Patrz „Czysz
czenie i dezynfekcja” str. 69.
•
Podłączyć przewód powietrzny [8] do dolnej części
pojemnika na lekarstwa [12].
• Drugi koniec przewodu [8] włożyć, lekko przekręcając,
do przyłącza na przewód powietrzny [6] inhalatora.
Zasilanie sieciowe
Urządzenie podłączać tylko do napięcia sieciowego
odpowiadającego parametrom podanym na tabliczce
znamionowej.
•
Wtyczkę przewodu zasilającego [1] włożyć do odpo-
wiedniego gniazda.
•
W celu podłączenia urządzenia do sieci włożyć
wtyczkę do oporu w gniazdo.
-
Wskazówka
•
Należy dopilnować, aby gniazdo sieciowe znajdo-
wało się w pobliżu miejsca ustawienia urządzenia.
•
Przewód zasilający należy położyć w taki sposób,
aby nikt nie mógł się o niego potknąć.
•
W celu odłączenia inhalatora od sieci po zakończe-
niu inhalacji należy najpierw wyłączyć urządzenie, a
następnie wyjąć wtyczkę z gniazda.
6. Obsługa
Uwaga
•
Ze względów higienicznych absolutnie konieczne jest
czyszczenie nebulizatora [9], jak również wyposażenia dodatkowego po każdym użyciu, a po ostatnim
użyciu danego dnia należy je zdezynfekować.
• Akcesoria mogą być używane tylko przez jedną osobę. Odradzamy stosowanie ich przez kilka osób.
•
Jeśli terapia przewiduje inhalację kolejno kilkoma
różnymi lekami, należy płukać nebulizator [9] po
każdym użyciu ciepłą wodą wodociągową. Patrz
„Czyszczenie i dezynfekcja“ na stronie 71.
•
Należy przestrzegać wskazówek dotyczących wy-
miany filtra zawartych w niniejszej instrukcji!
•
Przed każdym użyciem urządzenia należy spraw-
dzić prawidłowe mocowanie przyłączy przewodu
powietrznego w inhalatorze [6] i nebulizatorze [9].
•
Przed użyciem należy sprawdzić, czy urządzenie
działa prawidłowo, włączając na krótko inhalator
(wraz z podłączonym nebulizatorem, ale bez leków).
Jeśli z nebulizatora [9] wydostaje się powietrze, urządzenie działa.
1. Montaż dyszy
•
Otworzyć nebulizator [9], odkręcając jego górną
część w kierunku przeciwnym do ruchu wskazówek
zegara od pojemnika na lekarstwa [12]. Włożyć dyszę
[10] do pojemnika na lekarstwa [12].
• Należy się upewnić, że stożek do wprowadzenia
lekarstwa jest prawidłowo umieszczony na stożku
doprowadzania powietrza we wnętrzu rozpylacza.
2. Napełnianie nebulizatora
•
Do pojemnika na lekarstwa [12] wlać izotoniczny roztwór
gotowanej wody z solą lub lekarstwo. Nie przepełniać
pojemnika! Zalecane maksymalne
napełnienie wynosi 8 ml!
•
Stosować wyłącznie leki zalecone przez lekarza, uzgadniając nim
czas trwania inhalacji oraz ilość
leku!
• Jeśli zalecana ilość leku nie przekracza 2 ml, należy uzupełnić pojemnik izotonicznym roztworem
11
10
12
67
Page 68
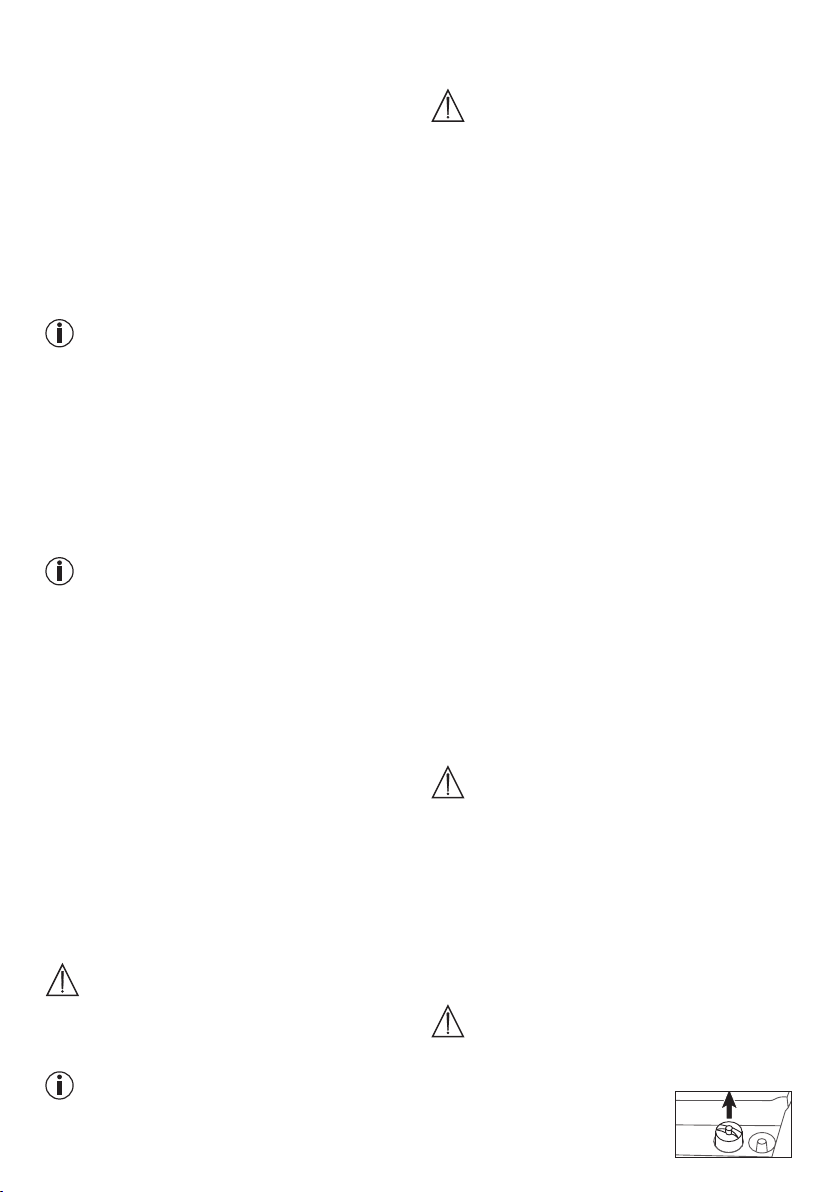
soli kuchennej do co najmniej 4 ml. Rozcieńczenie
konieczne jest również w przypadku lekarstw o gęstej konsystencji. Także w tym przypadku należy
przestrzegać zaleceń lekarza.
3. Zamykanie nebulizatora
• Zamknąć nebulizator [9], dokręcając jego górną
część w kierunku zgodnym z ruchem wskazówek
zegara do pojemnika na lekarstwa [12]. Zwrócić uwagę na prawidłowe połączenie!
4. Wkładanie zaworu
• Wcisnąć niebieski zawór [11] w odpowiedni otwór
na górnej stronie nebulizatora [9].
Wskazówka
System zaworów zapewnia lepszą wdychalność lekarstwa. Zawór [11] stosować wyłącznie z ustnikiem
[13], nigdy nie stosować z maskami [14,15] lub maską
na nos [16].
5. Połączenie akcesoriów z nebulizatorem
•
Połączyć nebulizator [9] z wybranym elementem wy-
posażenia dodatkowego (ustnikiem [13], maską dla
dorosłych [14], maską dla dzieci [15] lub końcówką
do nosa [16]).
Wskazówka
Inhalacja przy użyciu ustnika jest najskuteczniejszą formą terapii. Stosowanie maski podczas inhalacji jest
zalecane tylko, jeśli nie można używać ustnika (np. w
przypadku dzieci, które nie potrafią jeszcze oddychać
przez ustnik).
•
Przed rozpoczęciem terapii nebulizator zdjąć do góry
z uchwytu [7].
•
Włączyć inhalator za pomocą włącznika/wyłącznika
[3].
•
Wydostawanie się rozpylonego płynu z nebulizatora
oznacza prawidłowe działanie urządzenia.
6. Terapia
• Podczas inhalacji usiąść prosto i wygodnie przy stole, ale nie w fotelu, aby nie blokować dróg oddechowych oraz nie zmniejszać skuteczności terapii.
•
Głęboko wdychać rozpylone lekarstwo.
Uwaga
Urządzenie nie jest przeznaczone do długotrwałego
użytku. Po 30 minutach eksploatacji należy je wyłączyć
na kolejnych 30 minut.
Wskazówka
Podczas terapii trzymać nebulizator prosto (w pionie),
ponieważ w przeciwnym razie lekarstwo nie jest ro-
zpylane i nie można zagwarantować prawidłowego
działania urządzenia.
Uwaga
Eteryczne olejki ziołowe, syropy od kaszlu, roztwory
do płukania gardła, krople do
wcierania lub do kąpieli generalnie nie nadają się do
inhalacji przy użyciu inhalatora.
Preparaty te często mają gęstą konsystencję i mogą
zakłócać działanie urządzenia, a tym samym niekorzystnie wpływać na skuteczność terapii.
W przypadku nadwrażliwości oskrzeli lekarstwa z olejkami eterycznymi mogą w niektórych przypadkach
wywołać ostry bronchospazm (gwałtowny skurcz
oskrzeli z dusznościami). Należy zapytać o to lekarza
lub farmaceutę!
7. Zakończenie inhalacji
Jeśli rozpylenie następuje nieregularnie lub zmieniają
się powstające przy inhalacji odgłosy pracy, można
zakończyć inhalację.
•
Po zakończonym zabiegu wyłączyć inhalator za
pomocą włącznika/wyłącznika [3] i odłączyć go od
sieci elektrycznej.
•
Nebulizator [9] ponownie włożyć w uchwyt [7].
8. Czyszczenie
Patrz „Czyszczenie i dezynfekcja“ na stronie 69.
7. Wymiana filtra
W normalnych warunkach użytkowania filtr powietrza
należy wymieniać co 500 roboczogodzin. Należy regularnie sprawdzać stan filtra (po około 10–12 zabiegach).
Jeśli filtr jest mocno zanieczyszczony lub zapchany,
należy go wymienić. Jeśli jest wilgotny, również należy
wymienić go na nowy.
Uwaga
•
Używanego filtra nie należy czyścić i ponownie za-
kładać!
•
Stosować wyłącznie oryginalne filtry, ponieważ w
przeciwnym razie inhalator może zostać uszkodzony,
a terapia nie gwarantuje oczekiwanych rezultatów.
• Nie należy naprawiać ani czyścić filtra powietrza, gdy
jest przez kogoś stosowany.
•
Nigdy nie używać urządzenia bez filtra.
Sposób wymiany filtra:
Uwaga
•
Najpierw wyłączyć urządzenie i odłączyć je od sieci.
•
Poczekać, aż urządzenie ostygnie.
1. Wyciągnij nasadkę filtra [5]
do góry.
68
Page 69
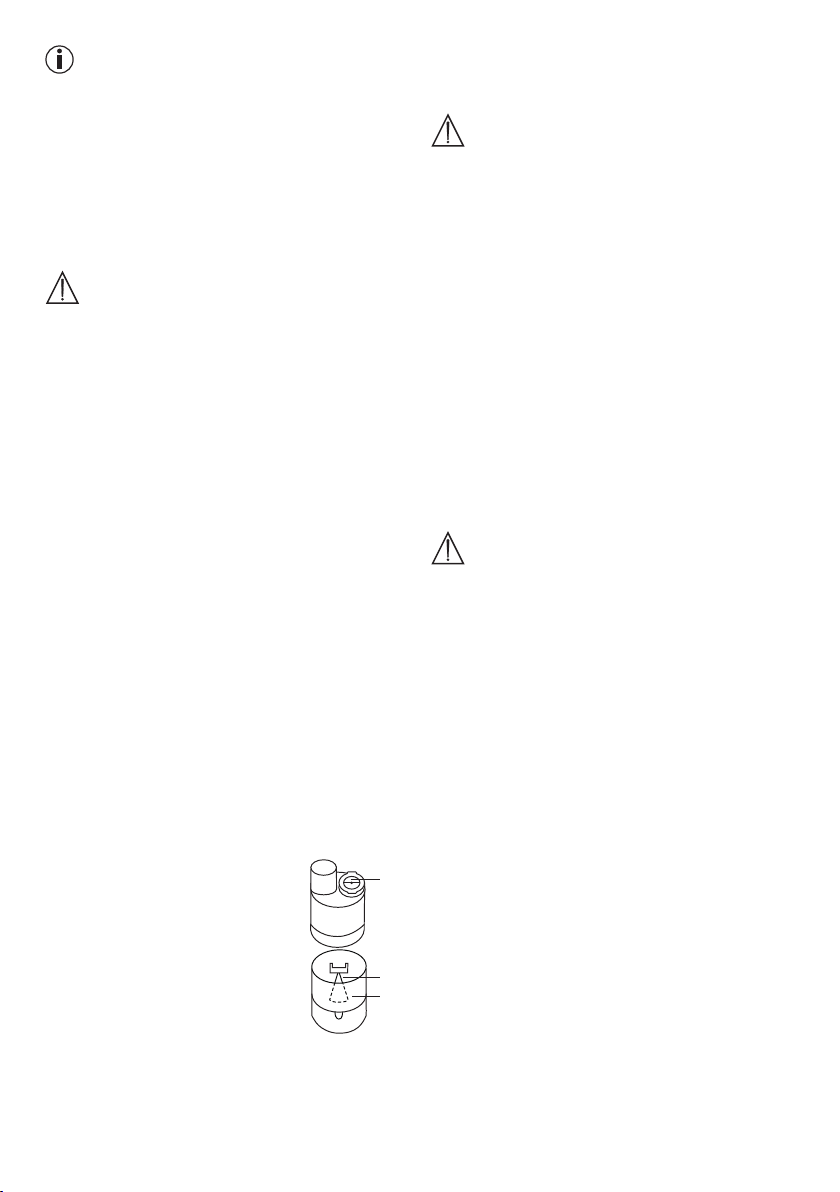
Wskazówka
Jeśli po odciągnięciu pokrywy filtr pozostaje w urządzeniu, usunąć filtr np. za pomocą pęsety lub podobnego narzędzia.
2. Założyć pokrywę filtra [5] z nowym filtrem.
3. Sprawdzić, czy pokrywa jest stabilnie zamocowana.
8. Czyszczenie i dezynfekcja
Nebulizator i akcesoria
Ostrzeżenie
Aby zapobiec zagrożeniu zdrowia, należy przestrzegać
poniższych przepisów dotyczących higieny.
•
Nebulizator [9] oraz akcesoria są przeznaczone do
wielorazowego użytku. Należy pamiętać, że w zależności od rodzaju zastosowania stawiane są różne
wymagania dotyczące czyszczenia i higienicznego
przygotowania urządzenia do terapii.
Wskazówki:
•
Nie czyścić nebulizatora ani akcesoriów mechanicz-
nie za pomocą szczotek lub podobnych przedmiotów, ponieważ może to spowodować trwałe uszkodzenia lub zakłócić działanie urządzenia i uniemożliwić osiągnięcie oczekiwanego rezultatu terapii.
•
O dodatkowe wymagania dotyczące koniecznych
higienicznych przygotowań (pielęgnacja rąk, przy
gotowanie lekarstw lub roztworów do inhalacji) w
przypadku osób szczególnie zagrożonych (np. chorych na mukowiscydozę) należy zapytać się lekarza.
•
Zawsze po czyszczeniu i dezynfekcji starannie osu-
szyć urządzenie. Pozostała wilgoć lub woda stanowi
podwyższone ryzyko rozwoju zaroków.
Przygotowanie
•
Bezpośrednio po każdym seansie terapeutycznym
należy oczyścić wszystkie części nebulizatora [9]
oraz użyte akcesoria z pozostałości leku i innych
zanieczyszczeń.
•
W tym celu rozłożyć nebulizator
[9] na poszczególne części.
•
Zdjąć ustnik [13], maske [14, 15]
lub Końcówka do nosa [16] z nebulizatora.
•
Rozłożyć nebulizator , odkręca-
jąc jego górną część w kierunku
przeciwnym do ruchu wskazówek
zegara od pojemnika na lekarstwa
[12].
•
Wyjąć dyszę [10] z pojemnika na lekarstwa [12].
• Usunąć zawór [11], wyciągając go z nebulizatora
[9].
-
11
10
12
•
Montaż polega na wykonaniu tych samych czynności
w odwrotnej kolejności.
Czyszczenie
Uwaga
Przed każdym czyszczeniem należy wyłączyć urządzenie, odłączyć od sieci i poczekać, aż ostygnie.
Nebulizator oraz użyte akcesoria, takie jak ustnik,
maska, nakładka na dyszę itp., należy wyczyścić gorącą lecz nie wrzącą wodą. Starannie wytrzeć do sucha
części miękką ściereczką. Części zmontować dopiero, gdy będą całkowicie suche i włożyć do suchego,
szczelnego pojemnika lub przeprowadzić dezynfekcję.
Podczas czyszczenia należy upewnić się, że usunięte
zostały wszystkie pozostałości. W żadnym wypadku
nie stosować substancji, które w kontakcie ze skórą
lub śluzówkami, połknięte lub wdychane mogą być
potencjalnie trujące.
Do czyszczenia urządzenia użyć miękkiej, suchej ściereczki oraz delikatnego płynu do czyszczenia.
Nie używać żrących środków czyszczących i nigdy nie
myć urządzenia pod bieżącą wodą.
Uwaga
•
Uważać, aby woda nie dostała się do środka urzą-
dzenia!
•
Nie czyścić urządzenia ani akcesoriów w zmywarce!
•
Podłączonego urządzenia nie wolno dotykać wilgot-
nymi dłońmi; krople wody nie mogą rozpryskiwać się
na urządzeniu. Można użytkować wyłącznie całkowicie suche urządzenie.
•
Nie spryskiwać płynami szczelin wentylacyjnych!
Płyny, które przedostały się do urządzenia mogą
spowodować uszkodzenie układu elektrycznego, jak
również innych części inhalatora oraz doprowadzić
do zakłóceń działania.
Woda kondensacyjna, pompa z przewodem
powietrznym
W zależności od warunków otoczenia w przewodzie
powietrznym może zebrać się woda kondensacyjna.
Aby zapobiec rozwojowi zarodków i zapewnić niezawodną terapię, należy bezwzględnie usunąć wilgoć. W
tym celu należy postępować w następujący sposób:
•
Przewód powietrzny [8] odłączyć od nebulizatora [9].
•
Przewód pozostawić włożony od strony inhalatora
[6].
•
Inhalator powinien pracować tak długo, aż wylatują-
ce powietrze nie będzie zawierało wilgoci.
•
W przypadku mocnego zanieczyszczenia przewód
należy wymienić.
69
Page 70
Dezynfekcja
W celu zdezynfekowania nebulizatora i akcesoriów
należy postępować według poniższych wskazówek.
Dezynfekcja poszczególnych części zalecana jest najpóźniej po ostatnim użyciu urządzenia danego dnia.
(do tego potrzeba tylko nieco bezbarwnego octu i destylowana woda!)
• Najpierw oczyścić nebulizator i akcesoria zgodnie ze
wskazówkami podanymi pod hasłem „Czyszczenie“.
• Rozłożony rozpylacz, końcówka do nosa oraz ust-
nik włożyć na 5 minut do gotującej się wody.
• Do pozostałych akcesoriów
dającego się w ¼ z octu oraz w ¾ z wody destylowanej. Upewnić się, że ilość roztworu jest wystarczająca
do pełnego zanurzenia w nim części.
• Części pozostawić przez 30 minut w roztworze.
• Wypłukać części wodą i wysuszyć je starannie miękką ściereczką.
użyć roztworu octu skła-
Uwaga
Nie wygotowywać ani nie odkażać w autoklawie masek
oraz węża powietrza.
•
Części zmontować dopiero, gdy będą całkowicie
suche i włożyć do suchego, szczelnego pojemnika.
Wskazówka
Należy zwrócić uwagę, aby podczas, a zwłaszcza po
przeprowadzeniu czyszczenia, części były całkowicie
suche, ponieważ w przeciwnym przypadku zwiększa
się ryzyko rozwoju zarodków.
Sterylizacja
•
Stosować rozwiązania do sterylizacji na zimno zgod-
nie z instrukcjami producenta.
Suszenie
•
Poszczególne części położyć na suchej, czystej i
chłonnej powierzchni i pozostawić do całkowitego
wysuszenia (minimum 4 godziny).
Trwałość materiału
•
Podczas częstego używania i higienicznego przygo-
towywania do ponownej terapii nebulizator i akcesoria zużywają się, jak wszystkie inne część z tworzywa
sztucznego. Z czasem może to prowadzić do zmiany
aerozolu, a tym samym do gorszych efektów terapii.
Dlatego zalecamy wymianę nebulizatora po upływie
roku.
•
Przy wyborze środków czyszczących i dezynfe-
kujących należy przestrzegać następującej reguły:
stosować wyłącznie łagodne środki czyszczące lub
dezynfekujące i dozować je zgodnie ze wskazówkami producenta.
Przechowywanie
•
Nie przechowywać w wilgotnych pomieszczeniach
(np. łazienkach) ani nie transportować z wilgotnymi
przedmiotami.
•
Podczas przechowywania i transportowania chronić
przed stałym i bezpośrednim napromieniowaniem
słonecznym.
•
Do przechowywania akcesoriów służy schowek na
akcesoria [4]. Urządzenie przechowywać w miejscu
suchym, najlepiej w opakowaniu.
9. Utylizacja
Ze względu na ochronę środowiska naturalnego urządzenia nie należy wyrzucać wraz z odpadami z gospodarstwa domowego.
Urządzenie należy zutylizować zgodnie z dyrektywą o zużytych urządzeniach elektrycznych i
elektronicznych — WEEE (Waste Electrical and
Electronic Equipment).
W przypadku pytań należy zwrócić się do lokalnego
urzędu odpowiedzialnego za utylizację odpadów.
10. Usuwanie usterek
Problemy/
Pytania
Nebulizator
nie wytwarza
lub wytwa
rza za mało
aerosolu.
Jednorazo
wo rozpylana jest za
mała ilość.
Możliwa przyczyna / Sposób
usunięcia
1. Za dużo lub za mało lekarstw w
nebulizatorze.
-
Minimum: 2 ml, maksimum: 8 ml.
2. Sprawdzić, czy dysza nie jest
zapchana. W razie potrzeby oczy
ścić dyszę (np. przez płukanie).
Następnie ponownie włączyć
nebulizator.
UWAGA: małe otwory ostrożnie
czyścić (przebijać) wyłącznie od
spodu dyszy.
3. Nebulizator nie znajdował się w
pozycji pionowej.
4. Nebulizator został napełniony roz
tworem lekarstwa nie nadającym
się do rozpylenia (np. za gęstym).
Używać roztworu lekarstwa w
proporcjach podanych przez
lekarza.
Zagięty przewód, zapchany filtr, za
dużo roztworu do inhalacji
-
-
70
Page 71
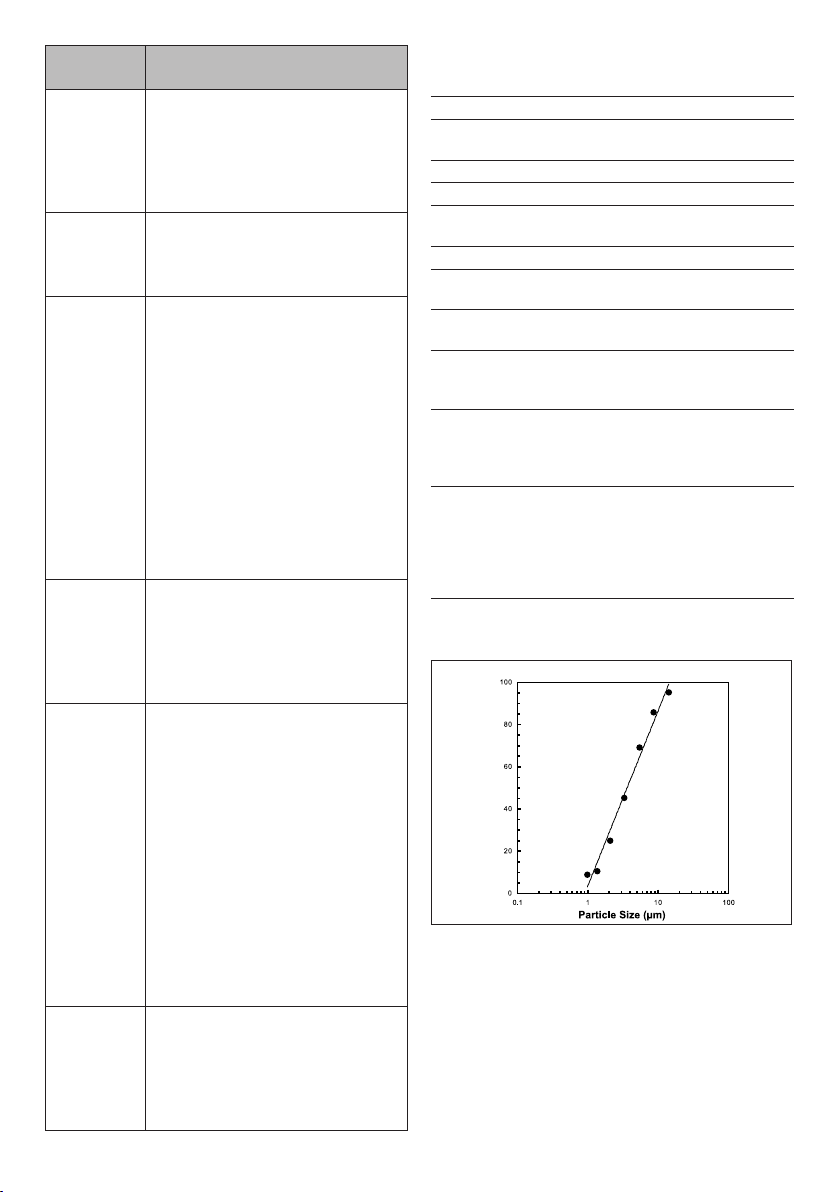
Problemy/
Pytania
Jakich
lekarstw
można
używać do
inhalacji?
Roztwór
do inhalacji
pozostaje w
nebulizatorze.
O czym
należy
pamiętać
przy terapii
niemowląt i
dzieci?
Inhalacja z
maską trwa
dłużej
Dlaczego
należy
regularnie
wymieniać
nebulizator?
Czy dla
każdej
osoby po
trzebny jest
oddzielny
nebulizator?
Możliwa przyczyna / Sposób
usunięcia
Należy skonsultować się z leka
-
rzem!
Zasadniczo można inhalować
wszystkie lekarstwa, które nadają
się do inhalacji za pomocą inhalato
-
ra i zostały do tego dopuszczone.
Jest to technicznie uwarunkowane
i normalne. Inhalację należy zakoń
czyć po usłyszeniu wyraźnie innego
odgłosu pracy z nebulizatora.
1. U niemowląt maska powinna
zakrywać usta i nos, aby inhalacja
była efektywna.
2. Maska powinna zakrywać usta i
nos również w przypadku małych
dzieci. Rozpylanie lekarstwa obok
śpiącej osoby nie ma wiele sensu,
ponieważ do płuc nie dochodzi
wystarczająco dużo lekarstwa.
Wskazówka: inhalację należy
przeprowadzać wyłącznie pod
nadzorem i przy pomocy osoby
dorosłej - dziecko nie powinno samo
robić inhalacji.
Jest to technicznie uwarunkowane.
Przez otwory w masce wdycha się
za każdym razem mniej lekarstwa
niż przez ustnik.
Przez otwory aerosol miesza się z
powietrzem z pomieszczenia.
Są dwa powody:
1. Aby zapewnić terapeutycznie
skuteczne spektrum cząsteczek,
otwór w dyszy nie powinien być
większy od określonego. Z powo
du mechanicznego i termicznego
obciążenia tworzywo sztuczne
ulega zużyciu. Dysza [10] jest
szczególnie podatna na zużycie.
Może to mieć wpływ na skład kro
pelek aerozolu, co bezpośrednio
wpływa na efekt terapii.
2. Poza tym regularna wymiana
nebulizatora zalecana jest ze
względów higienicznych.
Z higienicznego punktu widzenia
jest to konieczne.
11. Dane techniczne
Model IH 21
Typ IH 21/1
Wymiary
(szer. x wys. x gł.) 300 x 180 x 100 mm
Ciężar 1,65 kg
Ciśnienie robocze ca. 0,8 - 1,45 barów
-
Objętość napeł
nienia nebulizatora
Rozpylanie leku
Ciśnienie
akustyczne
Zasilanie sieciowe
Warunki
eksploatacji
Warunki prze
chowywania i
transportu
Właściwości
rozpylania
Zastrzegamy sobie prawo do zmian technicznych.
Wykres wielkości cząstek
Pomiary zostały przeprowadzane za pomocą roztworu
sodu i fluoru oraz urządzenia „Next Generation Impactor” (NGI).
Wykresu nie można prawdopodobnie zastosować w
takiej formie do zawiesin lub bardzo gęstych lekarstw.
Więcej informacji na ten temat można uzyskać u poszczególnych producentów lekarstw.
maks. 8 ml
min. 0,2 ml
ca.
0,3 ml/min.
maks. 52 dBA
(zgodnie z DIN EN 13544-1 akapit 26)
230 V~; 50 Hz; 230 VA
UK: 240 V~; 50 Hz; 240 VA
Temperatura: +10 °C do +40 °C
Względna wilgotność powietrza:
10% do 95%
-
Temperatura: 0 °C do +60 °C
Względna wilgotność powietrza:
10% do 95%
Ciśnienie otoczenia: 500 do 1060 hPa
1) Natężenie przepływu: 5,3 l/min
2) Podawanie aerozolu: 0,216 ml
3) Częstotliwość podawania aerozolu: 0,112 ml/min
4) Wielkość cząsteczek (MMAD):
3,85 µm
71
Page 72
Artykuły zamienne
Nazwa Materiał REF
Korek nebulizatora PP
Yearpack
(zawiera Ustnik, Końcówka do
nosa,
Maska dla dorosłych,
Maska dla dzieci, Nebulizator,
Przewód powietrzny, Filtr)
PP/ PVC 601.22
162.819
Wskazówka
W przypadku zastosowania urządzenia poza zakresem specyfikacji nie można zagwarantować prawidłowego działania. Zastrzegamy sobie prawo do zmian
technicznych mających na celu ulepszenie i rozwój
produktu.
Urządzenie i akcesoria są zgodne z europejskimi nor
mami EN60601-1 i EN60601-1-2 oraz EN13544-1 i
podlegają szczególnym przepisom odnośnie elektromagnetycznej zgodności. Należy pamiętać, że prze
nośne i mobilne urządzenia komunikacyjne HF mogą
oddziaływać na urządzenie. Dokładniejsze dane można uzyskać po skontaktowaniu się z działem obsługi
klienta pod podanym poniżej adresem. Dane znajdują
się także na końcu instrukcji obsługi. Urządzenie odpowiada wymogom europejskiej dyrektywy dotyczącej
artykułów medycznych 93/42/EC (ustawa o wyrobach
medycznych).
KOMPATYBILNOŚĆ ELEKTROMAGNETYCZNA
•
Urządzenie odpowiada obecnie obowiązującym
przepisom dotyczącym elektromagnetycznej kompatybilności i nadaje się do stosowania w różnych
budynkach, łącznie z tymi, które przeznaczone są
na mieszkania prywatne. Emisje częstotliwości
radiowych urządzenia są bardzo niskie i najprawdopodobniej nie powodują żadnych interferencji ze
znajdującymi się w pobliżu urządzeniami.
•
W każdym razie zaleca się nie stawiać urządzenia
nad lub w pobliżu innych urządzeń. Jeśli dojdzie do
interferencji z urządzeniami elektrycznymi, urządzenie należy przestawić w inne miejsce lub podłączyć
do innego gniazda.
•
Radiostacje przenośne mogą wpływać na działanie
urządzenia.
72
Page 73
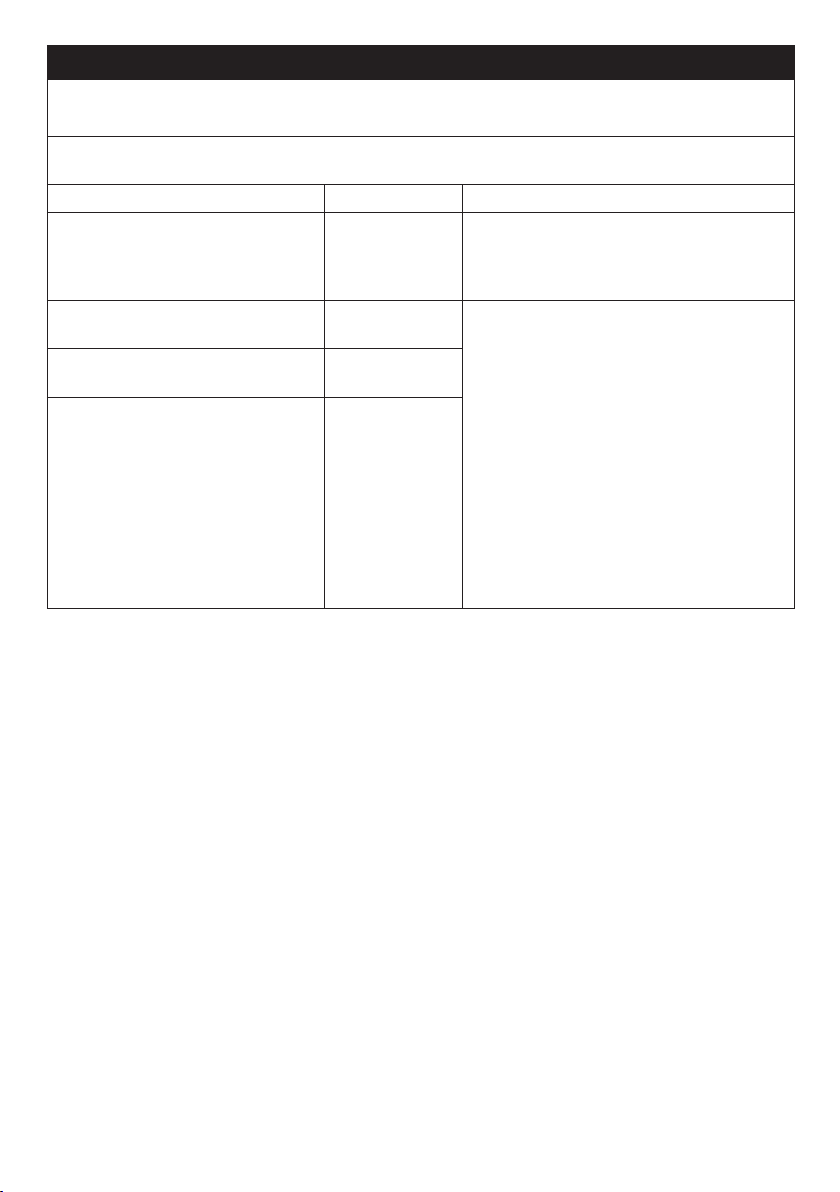
ELECTROMAGNETIC COMPATIBILITY INFORMATION
Guidance and manufacturer’s declaration - electromagnetic emissions
The [IH 21/1] is intended for use in the electromagnetic environment specified below. The customer or the
user of the [IH 21/1] should assure that it is used in such an environment
Emissions Compliance Electromagnetic environment – guidance
RF emissions
CISPR 11
RF emissions
CISPR 11
Harmonic emissions
IEC 61000-3-2
Voltage fluctuations/flicker emissions
IEC 61000-3-3
Group 1
Class B The [IH 21/1] is suitable for use in all establish
Class A
Complies
The [IH 21/1] uses RF energy only for its internal
function. Therefore, its RF emissions are very
low and are not likely to cause any interference
in nearby electronic equipment.
ments other than domestic, and may be used
in domestic establishments and those directly
connected to the public low-voltage power
supply network that supplies buildings used
for domestic purposes, provided the following
warning is heeded:
Warning: This equipment/system is intended
for use by healthcare professionals only. This
equipment/ system may cause radio interference or may disrupt the operation of nearby
equipment. It may be necessary to take mitigation measures, such as re-orienting or relocating
the [IH 21/1] or shielding the location.
73
Page 74

Guidance and manufacturer’s declaration – electromagnetic immunity
The [IH 21/1] is intended for use in the electromagnetic environment specified below. The customer or the
user of the [IH 21/1] should assure that it is used in such an environment
Immunity test EN 60601
test level
Electrostatic
discharge (ESD)
±6 kV contact
±8 kV air
IEC 61000-4-2
Compliance level
±6 kV contact
±8 kV air
Electromagnetic environment –
guidance
Floors should be wood, concrete or
ceramic tile. If floors are covered with
synthetic material, the relative humidity should be at least 30 %
Electrical fast
transient/burst
IEC 61000-4-4
±2 kV for power supply lines
±1 kV for input/output
lines
±2 kV for power supply lines
Mains power quality should be that
of a typical commercial or hospital
environment.
The electrical fast transient burst
(EFT) is generated by the switching of
inductive loads. Separation between
the equipment and other loads shall
be considered before installation.
Mains filter is required, if necessary.
Surge
IEC 61000-4-5
±1 kV line(s) to line(s)
±2 kV line(s) to earth
±1 kV line(s) to line(s)
Mains power quality should be that
of a typical commercial or hospital
environment.
Voltage dips, short
interruptions and
voltage variations
on power supply
input lines
IEC 61000-4-11
Power frequency
(50/60Hz)
magnetic field
IEC 61000-4-8
NOTE U
is the a.c. mains voltage prior to application of the test level
T
<5 % U
T
(>95 % dip in UT)
for 0,5 cycle
40 % U
T
(60 % dip in UT)
for 5 cycles
70 % U
T
(30 % dip in UT)
for 25 cycles
<5 % U
T
(>95 % dip in UT)
for 5s
3 A/m 3 A/m
<5 % U
T
(>95 % dip in UT)
for 0,5 cycle
40 % U
T
(60 % dip in UT)
for 5 cycles
70 % U
T
(30 % dip in UT)
for 25 cycles
<5 % U
T
(>95 % dip in UT)
for 5s
Mains power quality should be that of
a typical commercial or hospital environment. If the user of the [IH 21/1]
requires continued operation during
power mains interruptions, it is recommended the [IH 21/1] be powered
from an uninterruptible power supply
or a battery.
Power frequency magnetic fields
should be at levels characteristic of a
typical location in a typical commer
-
cial or hospital environment.
74
Page 75
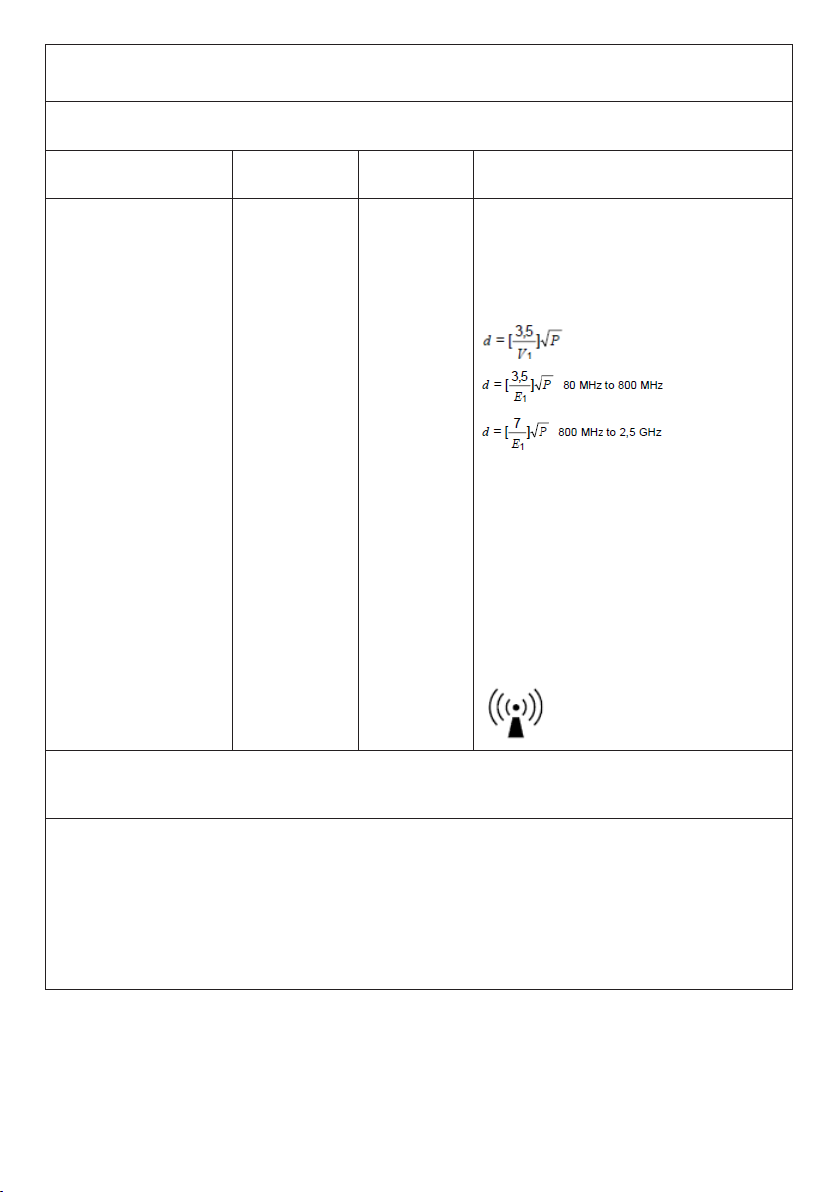
Guidance and manufacturer’s declaration – electromagnetic immunity
The [IH 21/1] is intended for use in the electromagnetic environment specified below. The customer or the
user of the [IH 21/1] should assure that it is used in such an environment
Immunity test EN 60601
test level
Conducted RF
IEC 61000-4-6
3 Vrms
150 kHz to
80 MHz
Compliance
level
3 V
Electromagnetic environment – guidance
Portable and mobile RF communications
equipment should be used no closer to any
part of the [IH 21/1], including cables, than the
recommended separation distance calculated
from the equation applicable to the frequency
of the transmitter.
Radiated RF
IEC 61000-4-3
3 V/m
80 MHz to
3 V/m
2.5 GHz
where p is the maximum output power rating
of the transmitter in watts (W) according to the
transmitter manufacturer and d is the recommended separation distance in metres (m)
Field strengths from fixed RF transmitters,
as determined by an electromagnetic site
survey,a should be less than the compliance
level in each frequency range.b
Interference may occur in the vicinity of equipment marked with the following symbol:
NOTE 1 At 80 MHz and 800 MHz, the higher frequency range applies.
NOTE 2 These guidelines may not apply in all situations. Electromagnetic propagation is affected by
absorption and reflection from structures, objects and people.
a
Field strengths from fixed transmitters, such as base stations for radio (cellular/cordless) telephones and land
mobile radios, amateur radio, AM and FM radio broadcast and TV broadcast cannot be predicted theoretically
with accuracy. To assess the electromagnetic environment due to fixed RF transmitters, an electromagnetic
site survey should be considered. If the measured field strength in the location in which the [IH 21/1] is used
exceeds the applicable RF compliance level above, the [IH 21/1] should be observed to verify normal opera
tion. If abnormal performance is observed, additional measures may be necessary, such as re-orienting or
relocating the [IH 21/1].
b
Over the frequency range 150 kHz to 80 MHz, field strengths should be less than 3 V/m.
75
Page 76
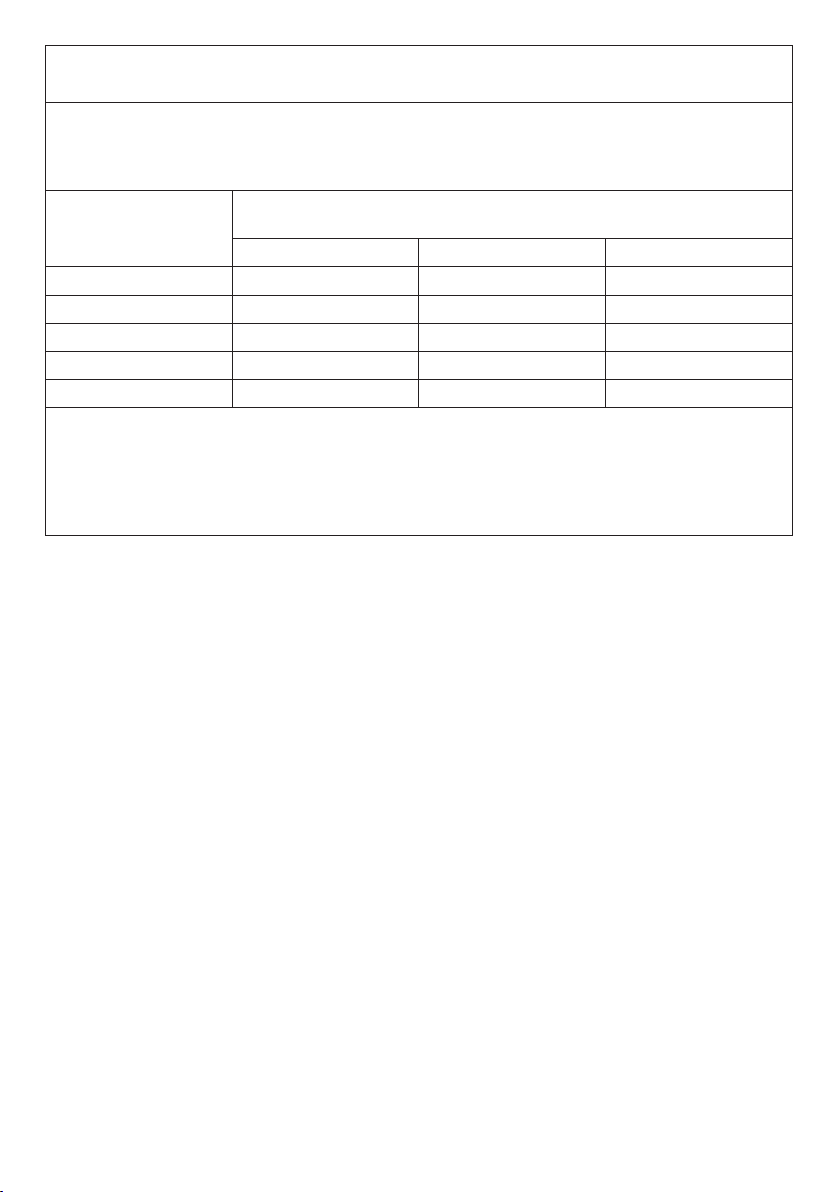
Recommended separation distances between portable and mobile RF communications equipment
and the [IH 21/1]
The [IH 21/1] is intended for use in an electromagnetic environment in which radiated RF disturbances are controlled. The customer or the user of the [IH 21/1] can help prevent electromagnetic interference by maintaining
a minimum distance between portable and mobile RF communications equipment (transmitters) and the [IH
21/1] as recommended below, according to the maximum output power of the communications equipment.
Rated maximum output
power of transmitter
W
0.01 0.12 0.12 0.23
0.1 0.37 0.38 0.73
1 1.2 1.2 2.3
10 3.8 3.8 7.3
100 12 12 23
For transmitters rated at a maximum output power not listed above, the recommended separation distance
d in metres (m) can be estimated using the equation applicable to the frequency of the transmitter, where P
is the maximum output power rating of the transmitter in watts (W) according to the transmitter manufacturer.
NOTE 1 At 80 MHz and 800 MHz, the separation distance for the higher frequency range applies.
NOTE 2 These guidelines may not apply in all situations. Electromagnetic propagation is affected by absorp-
tion and reflection from structures, objects and people.
Separation distance according to frequency of transmitter
m
150 kHz to 80 MHz 80 MHz to 800 MHz 800 MHz to 2.5 GHz
76
751.868-1015 Irrtum und Änderungen vorbehalten
 Loading...