

Page 1
instructions for use
BLOOD SUGAR
MEASURING DEVICE
Step by step
GL34
mmol/L
GB
Beurer GmbH Ɣ Söflinger Straße 218 Ɣ 89077 Ulm Ɣ Germany
Phone: +49 800 6645222
Ɣ E-mail: kd@beurer.de Ɣ www.beurer-medical.de
Page 2

Page 3

Contents: Blood Sugar Measuring Device GL34 mmol/L
1 About Your Beurer Blood Sugar Measuring Device............2
1.1 Delivery scope, replacement parts and accessories.................................2
1.2 Functions of the device .............................................................................3
1.3 Signs and symbols....................................................................................4
2 Safety information and warnings...........................................5
3 Description of Device and Accessories................................8
3.1 Lancing device and needle lancets...........................................................8
3.2 Blood sugar measuring device..................................................................8
3.3 Test strips................................................................................................11
4 Using the Device for the First Time and Basic Settings....13
4.1 Inserting and replacing the batteries.......................................................13
4.2 Basic settings..........................................................................................13
5 Measuring Your Blood Sugar...............................................15
5.1 Obtaining a blood sample........................................................................15
5.2 Measuring the blood sugar value............................................................18
5.3 Evaluating the measured value...............................................................19
5.4 Function test using control solution.........................................................21
6 The Measured Value Memory...............................................24
6.1 Displaying and listening to individual values...........................................24
6.2 Displaying average values ......................................................................25
6.3 Deleting the measured value memory.....................................................26
6.4 Transferring measured values to a PC....................................................27
7 Storage and Maintenance.....................................................29
8 Troubleshooting ....................................................................29
9 Technical Details GL34 mmol/L ...........................................31
10 Guarantee and Customer Service........................................33
Beurer GL34 mmol/L
1
Page 4
1 ABOUT YOUR BEURER BLOOD SUGAR MEASURING DEVICE
Read these instructions for use and all accompanying information material carefully and
thoroughly before performing your first blood sugar measurement. Store the operating
instructions in a safe place where they can be accessed by other users.
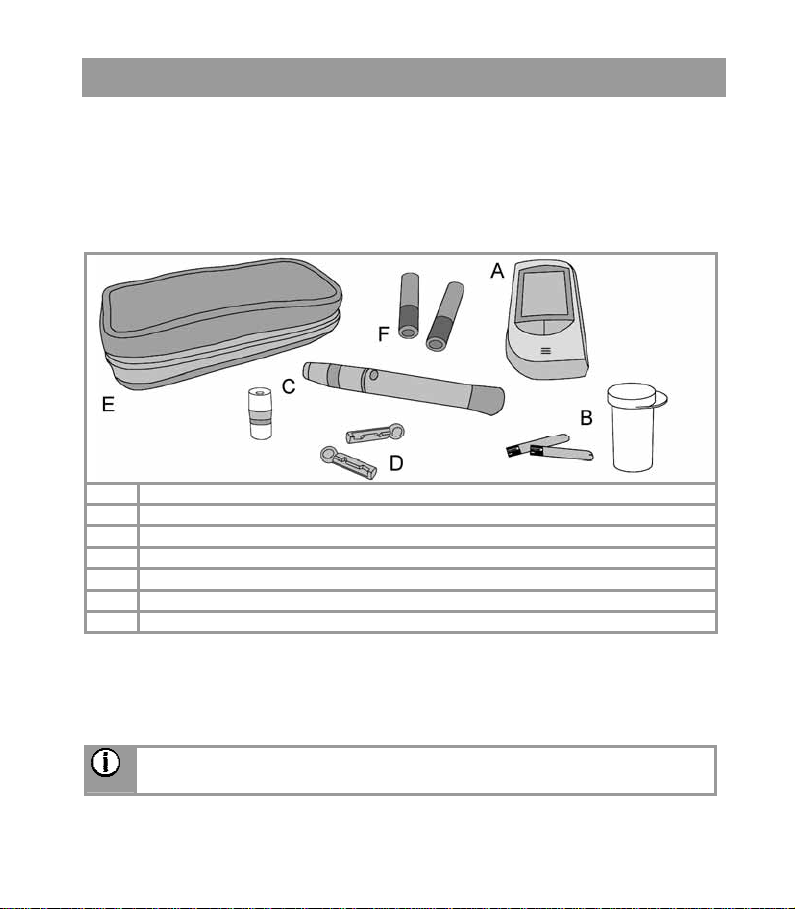
1.1 Delivery scope, replacement parts and accessories
Inspect the Beurer GL34 mmol/L measuring system to ensure that the packaging is
undamaged and the contents are complete:
A 1 GL34 mmol/L blood sugar measuring device
B 10 test strips
C 1 lancing device with AST cap for taking blood samples from alternative sites
D 10 sterile needle lancets
E 1 practical carry case
F 2 x 1.5 V AAA alkaline batteries (contained in the carry case)
These instructions for use, additional information material
If the box has sustained extensive damage or if any contents are missing, please return
the system to the retailer.
The blood sugar measuring device, test strips and control solution (available to purchase
separately) are all designed to be used together. You should therefore only use the test
strips and control solution intended for use with this device.
Note
Only use the manufacturer's original accessories.
Beurer GL34 mmol/L
2
Page 5
Replacement parts and additional accessories
Test strips, control solution and lancets are also a vailable for purcha se w ithout a prescr iption.
Item REF
50 test strips REF 464.00
MEDIUM control solution REF 457.02
100 needle lancets REF 457.01
Beurer GL32, GL34, BGL60 PC kit
(connecting cable, drivers and
test software)
REF 462.10
1.2 Functions of the device
This device is intended for measuring the blood sugar content of human blood. It is suitable for self-testing and does not have to be encoded. This measuring device can
quickly and easily:
x display and simultaneously read out your measured blood sugar values audibly
(mmol/L).
x store your measured values (mmol/L).
x display and audibly read out individual stored measured values.
x display the average of your blood sugar values from the last 7, 14, 21, 28, 60 and 90
days (no voice output).
x set the required language (English or German) and volume (volume "0": no voice
output) for the voice output.
x set the time in 24-hour format and set the date (day and month).
x upload your stored measured values to a PC for evaluation (additional accessories
required).
The measuring device also features the following control functions:
x Warning if the temperature is unsuitable.
x Battery change reminder when battery power is low.
Note
x This device is only to be used for regular monitoring and not for the diagno-
sis of diabetes.
x Discuss your insulin dose with your doctor.
Beurer GL34 mmol/L
3
Page 6
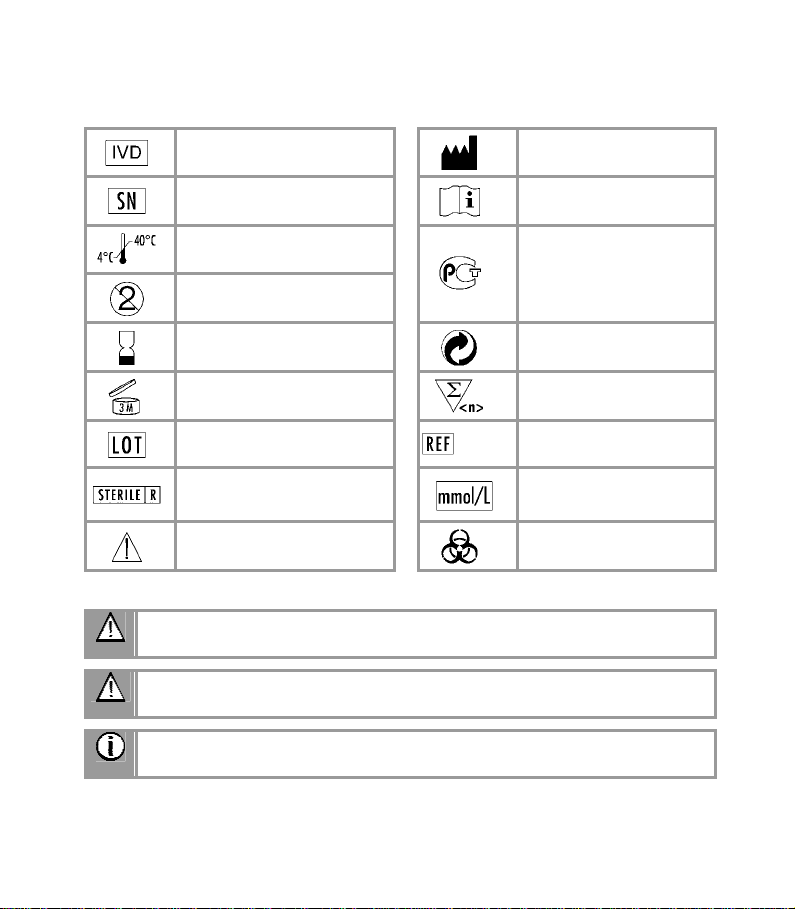
1.3 Signs and symbols
The symbols on the packaging and the nameplate of the measuring device and accessories have the following meaning:
In-vitro diagnostics
Serial number
Temperature range +4°C to
+40°C
Not for reuse/For single use
only
Expiry date
Maximum shelf life after
opening in months
Lot number
Sterilised by radiation
(lancets)
Caution, refer to accompanying documents
/Art.-Nr.
The following symbols are used in the instructions for use:
WARNING
Warning: Risk of injury or danger to health.
CAUTION
Safety notice referring to possible damage to the measuring device/acce ssories.
Note
Important information to be noted.
Manufacturer
Refer to instructions for
use
PCT: Certification for
products exported to the
Russian Federation and
CIS countries
Green Dot: German
recycling system
Contents sufficient for
<n> tests
Order number
Unit of measure for
blood sugar value
Biohazard, risk of infection
Beurer GL34 mmol/L
4
Page 7
2 SAFETY INFORMATION AND WARNINGS
Risk of infection
All components of the measuring device and accessories may come into contact
with human blood, and are therefore a possible source of infection.
WARNING
x This measuring device must display the blood sugar content in
mmol/L. The unit of measure mmol/L follows the blood su gar value. If
your device does not display mmol/L, contact customer ser vices immediately. You risk damaging your health if you perform a blood sugar measurement using an unfamiliar unit of measure, since values
may be interpreted incorrectly and cause the wrong corrective measures to be taken.
x This measuring device must only be used by one person. There is a risk of
infection if the same device is used by more than one person.
x The lancing device is intended for self-testing. Never share the lancing
device or needle lancet with another person (risk of infection).
x Use a new sterile needle lancet for each blood sample (for single use only).
Measuring
WARNING
x The measured values you determine are useful for information purposes
only – they are not intended to replace consultation with your doctor. Discuss your blood sugar values with your doctor on a regular basis. Do not
change any aspects of your treatment unless instructed by your doctor.
x Dehydration or l oss of fluids, for example, through sweating, can lead to
incorrect results.
x A very high or very low haematocrit value (proportion of red blood cells)
can lead to incorrect measurements. With a very high haematocrit value
(over 60%), the displayed blood sugar value may be too low. If you have a
very low haematocrit value (below 20%), the blood sugar value may be too
high. If you do not know your haematocrit value, ask your doctor.
x Do not use the test strips to take blood sugar measurements of newborn
infants.
x Metabolites such as uric acid, ascorbic acid, acetaminophen (paracetamol),
dopa, methyldopa, L-dopa, and tolbutamide do not influence the results if
they are present within the physiological value range.
x Lipemia effects: Elevated blood triglyceride levels of up to 22.6 mmol/L
rarely influence the results. Above this level, however, the blood sugar test
may be affected.
Beurer GL34 mmol/L
5
Page 8
x Only use fresh capillary whole blood. Do not use serum or plasma.
x Use capillary blood obtained without squeezing the puncture site. When
squeezed, the blood is diluted with lymph from the tissues and therefore
leads to an incorrect measurement result.
x Do not use the test strips at an altitude above 3275 m.
Note
The Beurer GL34 mmol/L measuring system is designed for measuring
capillary whole blood.
Storage and maintenance
WARNING
x Store the measuring device and accessories out of the reach of young
children. Small parts such as the needle lancets, batteries or test strips
may be harmful if swallowed. If parts are swallowed, seek medical advice
immediately.
x The test strip container contains a desiccant that may cause skin or eye
irritations if inhaled or swallowed. Keep the container out of reach of young
children.
Batteries/Saving measured values
WARNING
x Batteries may be fatal if swallowed. Therefore, always store batteries out of
the reach of young children. If a battery is swallowed, seek medical advice
immediately.
x Do not throw batteries into a fire: Risk of explosion.
CAUTION
x Remove the batteries if they have run out or if the device is not used for a
long period of time. This prevents any damage that may be caused by
leaking batteries.
x Do not charge the batteries or re activate them using other means. Do not
disassemble or short-circuit the batteries.
x Do not use rechargeable batteries.
Beurer GL34 mmol/L
6
Page 9
Repairs
Disposal
Note
x The stored blood sugar values remain saved during a battery cha nge. The
date and time are retained during battery replacement and if the batteries
are run down.
x Each time you change the batteries, use two batteries of the same type,
the same brand and the same capacity. Alkaline batteries should be used
wherever possible.
Note
x Never open the device. Opening the device invalidates the guarantee.
x Do not perform any repairs on the device yourself, otherwise correct func-
tioning of the device can no longer be guaranteed.
x If repairs are required, please contact customer service.
WARNING
x When disposing of materials from the measuring device, always comply
with the generally applicable guidelines for handling blood. Carefully dispose of all blood samples and materials with which you have come into
contact, in order to prevent injury and infection of others.
x After use, dispose of the test strips and lancets in a sharp-proof container.
Note
x Used and full y discharged batteries should be disposed of in designated
collection containers, at a suitable recycling facility, or via an electrical retailer. You are legally required to dispose of batteries properly.
The following symbols are found on batteries that contain harmful substances:
Pb = Battery contains lead
Cd = Battery contains cadmium
Hg = Battery contains mercury.
x Please dispose of the device in accordance with EU directive
2002/96/EC – WEEE (Waste Electrical and Electronic
Equipment). If you have any questions, contact the local
authority responsible for waste disposal.
Beurer GL34 mmol/L
7
Page 10
3 DESCRIPTION OF DEVICE AND ACCESSORIES
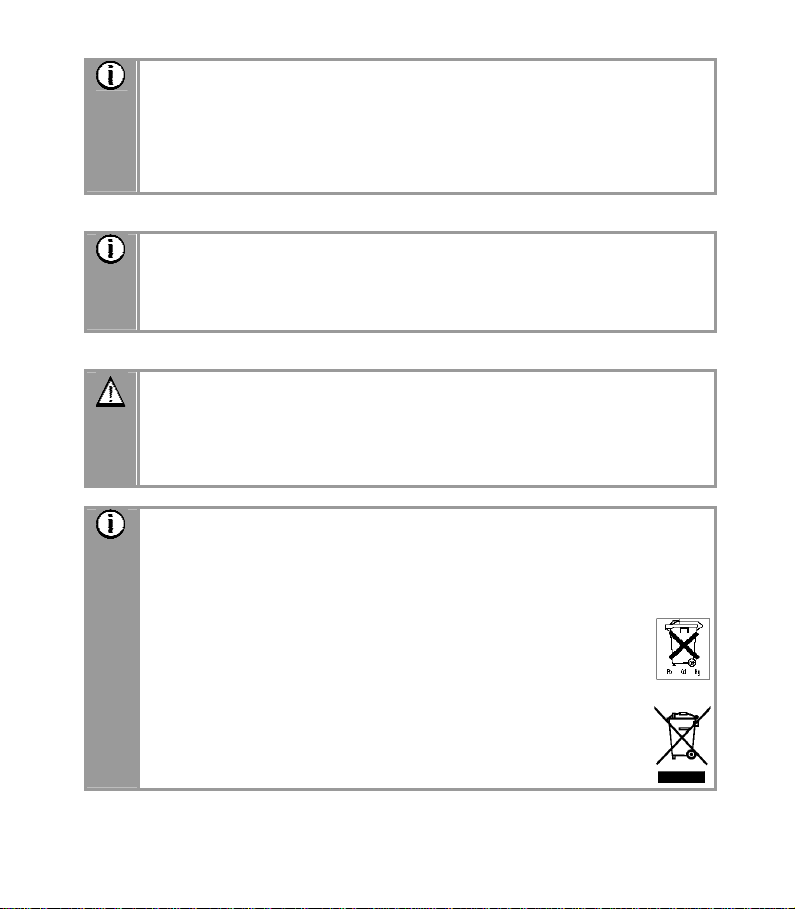
3.1 Lancing device and needle lancets
1
2
3
4
5
6
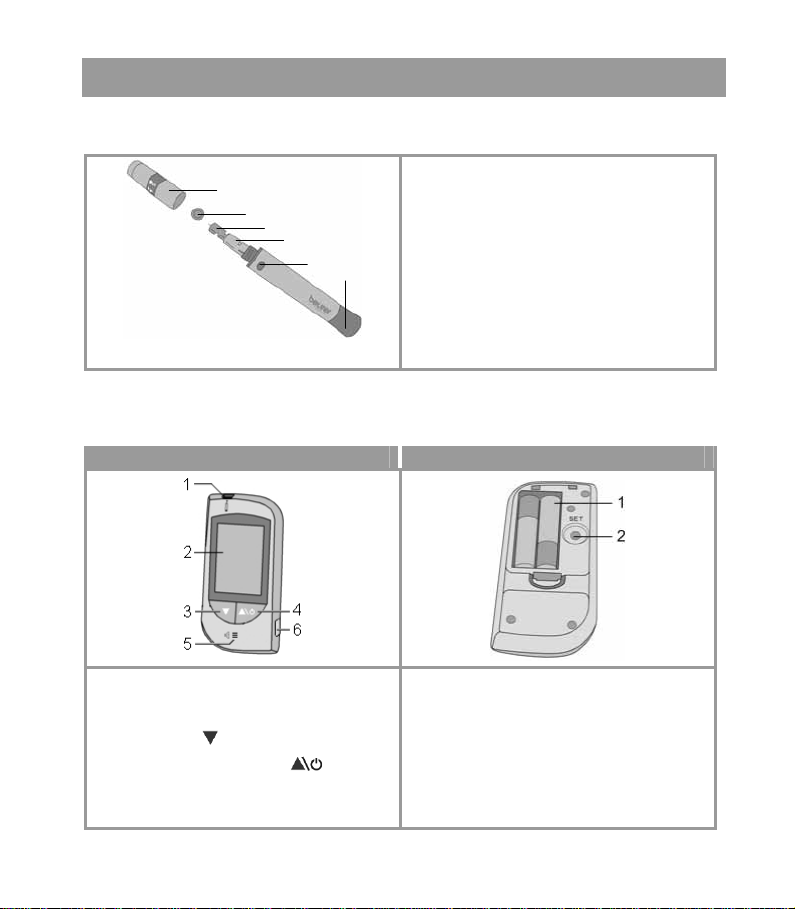
3.2 Blood sugar measuring device
Front view Rear view
1: Cap
2: Protective disk for the lancet
3: Sterile needle lancet
4: Lancet holder
5: Release button
6: Tensioning device
1: Test strip slot
2: LCD display
3: Back button
4: ON/OFF/Forward button
5: Speaker for voice output
6: PC interface with cover
Beurer GL34 mmol/L
1: Two alkaline batteries of type
1.5 V AAA
2: "SET" button for making settings
8
Page 11
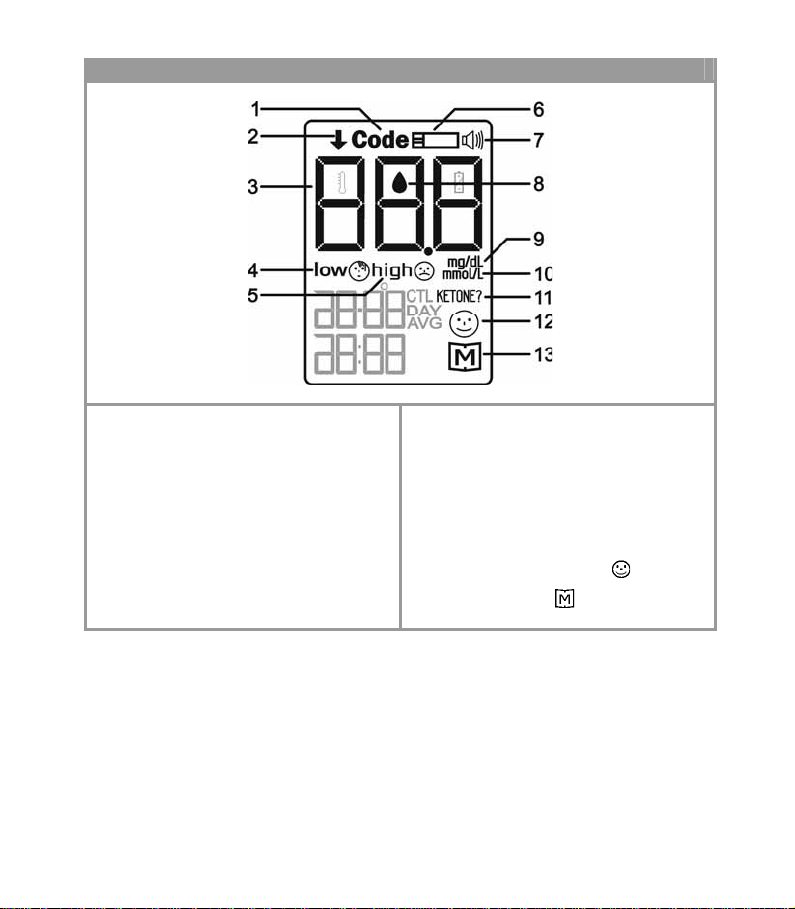
Display symbols for the blood sugar measurement:
1: Code symbol (not functional)
2: Arrow symbol for test strips
3: Value display
4: Low blood sugar value
(not functional)
5: High blood sugar value
(not functional)
6: Test strip symbol
7: Speaker
Beurer GL34 mmol/L
8: Blood droplet symbol
9: Blood sugar unit mg/dL
(not functional)
10: Blood sugar unit mmol/L
11: Ketone measurement recommended
(not functional)
12: Memory deleted symbol
13: Memory symbol
6
9
Page 12

Other display symbols:
14: Temperature symbol
15: Date: Day-Month
16: Time: Hours-minutes
Note
This blood sugar measuring device is delivered with the blood sugar unit
mmol/L and the following basic settings:
x Language: German
x Volume: "3" = Medium volume
Beurer GL34 mmol/L
17: Battery change symbol
18: CTL for control solution
19: DAY AVG for average value over
7, 14, 21, 28, 60 or 90 days
10
Page 13

3.3 Test strips
Front view Rear view
1: Slit for blood collection
2: Hold here
3: Contacts
Insert the test strip into the device so that the contacts are visible in
the slit. Ensure that the front side of the test strip is facing you.
Read the following information about handling and storing your test strips carefully. The
test strips can only be guaranteed to return accurate results if you follow all instructions
carefully.
WARNING
Each test strip must only be used once and only for one patient.
Beurer GL34 mmol/L
The rear side of the test strip is marked
with an 'X'.
11
Page 14

Handling test strips
Note
x Before using the first test strip, ensure that the seal on the container is
unbroken. If the seal is damaged, do not use the test strips.
x Once you have removed the test strip, tightly close the container again
immediately.
x Do not use test strips if the expiry date has passed. The use of expired test
strips can lead to inaccurate measurements. The expiry date is located on
the container next to the egg timer symbol l
x The test strips can be stored for three months once the container is ope-
ned. Make a note of when this time will run out (date of opening + 3
months) on the label
ched before the end of the 3 months (see the date next to the egg timer
).
symbol
x Do not use the test strips if either of these dates has expired (
x Any part of the test strip may be handled with dry, clean hands.
x Use the test strips immediately upon removal from the container.
x Do not bend, cut, or otherwise modify the test strip.
x Do not use test strips that have come into contact with liquids for the blood
sugar measurement.
Storing your test strips
Note
x Store test strips in a cool, dry place between +4°C and 40°C. Protect test
strips against direct sunlight or heat. Do not store test strips in the fridge.
x Test strips may be stored at a relative humidity between 10 % and 85 %.
x Only store test strips in their original container - never use another con-
tainer.
.
. The shelf life decreases if the expiry date is rea-
/ ).
Beurer GL34 mmol/L
12
Page 15

4 USING THE DEVICE FOR THE FIRST TIME AND BASIC SETTINGS
4.1 Inserting and replacing the batteries
Note
Two batteries are included in the delivery scope of your blood-sugar measuring device. The batteries are stored inside the case.
Remove the lid of the battery compartment on the rear of the device (see "3.2
1
Blood sugar measuring device", page 8).
If you are replacing the batteries, first remove both the old batteries. The device
2
retains the date and time when the batteries are replaced. If the replacement
takes a long time, you may have to adjust the date and time afterwards (see "4.2
Basic settings", page 13 ).
Insert two new batteries of type alkaline AAA 1.5 V. It is important to ensure that
3
the batteries are inserted with the correct poles according to the diagram. Do not
use rechargeable batteries.
Carefully replace the lid on the battery compartment.
4
When the battery change symbol
both batteries as soon as possible. The screen displays E-b if the batteries are so
flat that no further measurements are possible.
4.2 Basic settings
The measuring device must be switched off. Remove the lid of
1
the battery compartment on the rear of the device (see "3.2 Blood
sugar measuring device", page 8).
Press the "SET" button.
2
The year display flashes.
appears, the battery is almost empty. Replace
Beurer GL34 mmol/L
13
Page 16

Setting the date and time
3
Set the year (the calendar runs until 2049) by pressing the
ON/OFF/Forward button
The month display flashes. Repeat the above procedure for the
month, day, hours, and minutes.
"dEL" is displayed and the memory symbol flashes.
4
(Caution: All stored measured values will be deleted, if you now
press the ON/OFF/Forward button twice. For more information, see "6.3 Deleting the measured value memory" on page 26.)
Press the "SET" button to make additional basic settings without
deleting the measured values.
Setting the volume of the voice output
5
"Vol" is displayed and the volume flashes. Set the volume ("1"=
Quiet to "7" = Loud) by pressing the ON/OFF/FORWARD button
Press "SET" to confirm the year.
Setting the language for the voice output
6
The language ID flashes. Press the ON/OFF/FORWARD button
Press "SET" to confirm the year.
"OFF" is displayed briefly and the measuring device switches off
7
automatically.
Carefully replace the lid on the battery compartment.
Note
x The date and time must always be set. Otherwise,
you cannot accurately save measured values with
a date and time or call them up later.
x The time is displa yed in 24-hour format, for exam-
ple: 20:32.
. Press "SET" to confirm the year.
. If you do not require any voice output, choose "0".
to switch between "L1" = English and "L2" = German.
Beurer GL34 mmol/L
14
Page 17

5 MEASURING YOUR BLOOD SUGAR
WARNING
If you drop the lancing device while a needle lancet is inserted, pick it up
5.1 Obtaining a blood sample
Preparing to take the blood sample
Beurer GL34 mmol/L
carefully and dispose of the lancet.
CAUTION
x Only use the lancing device with needle lancets made by the same manu-
facturer. The use of other needle lancets may impair the function of the
lancing device.
x If the lancing device is manufactured by a third party, consult their instruc-
tions for use.
Choose a site on the body from where you wish to take the blood sample. You
1
can use the lancing device to take a blood sample from the fingertip or alternative sites such as the palm of the hand, forearm, upper arm, thigh, or calf. We
recommend that you take the blood sample from the fingertip. To make the
blood sample as pain-free as possible, do not take the blood directly from the
centre of the fingertip, but instead from slightly to the side of the centre.
WARNING
x If you suspect hypoglycaemia: Always take blood from the
fingertip. This is because changes in blood sugar levels are mo-
re rapidly detected in blood from the fingertip.
x Measurement at the fingertip and measurement at other body
sites (AST) can lead to considerably different measured values.
Always consult your doctor before starting to test at alternative
Have the following components ready: Measuring device, container of test strips,
2
lancing device, and a sterile needle lancet. If obtaining a blood sample from a
sites.
site other than the fingertip, you will also need the AST cap.
Before taking the sample, wash your hands using soap and warm water. In addition
3
to optimal hygienic conditions, this is also ensures good circulation of blood through
the fingertips. Dry your hands carefully. Also ensure that your lancing site is hygienically clean if taking a blood sample from an alternative site (AST).
15
Page 18
WARNING
If you wipe the lancing site with alcohol, ensure that the site has
Taking the blood sample
1
2
dried completely before beginning the measurement.
WARNING
x Change the lancing site for every test, e.g. use a different finger or the
other hand. Repeated lancing in the same location may lead to infections,
loss of sensation, or scarring.
x Do not use the AST cap to take a blood sample from the finger.
x Never squeeze the finger to obtain a larger droplet of blood. When squee-
zed, the blood is diluted with lymph from the tissues, which may lead to an
incorrect measurement result.
x Note that inadequate circulation at the puncture site, for example caused
by cold or illness, can lead to inaccurate measurements.
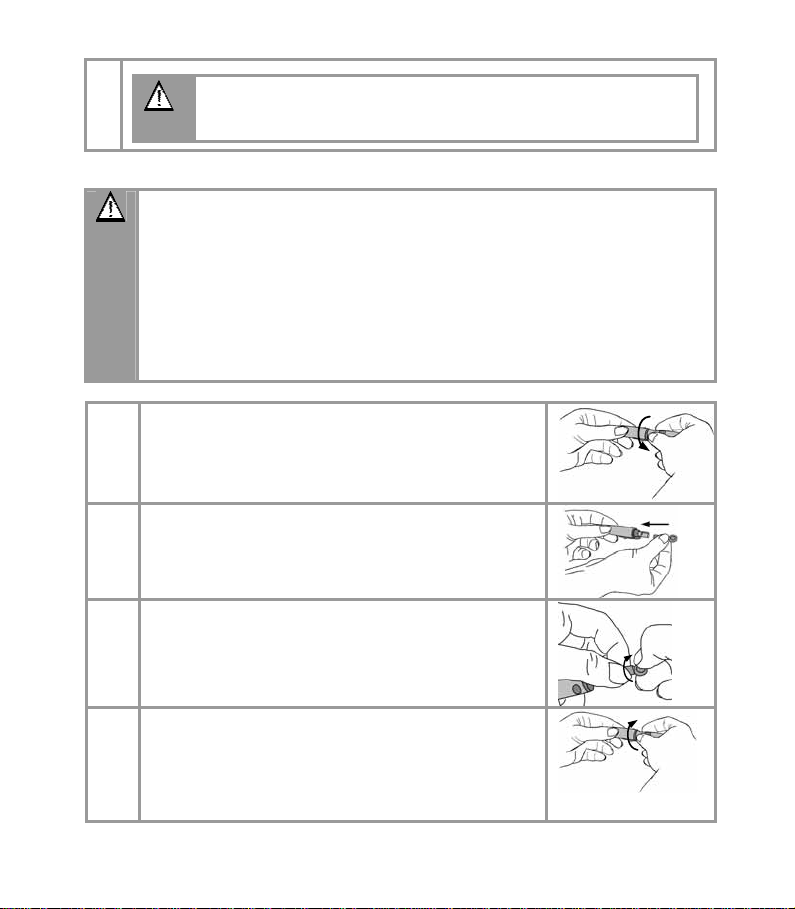
Twist to remove the cap from the lancing device.
Place a sterile needle lancet in the lancing device and
push the lancet firmly into place.
Remove the protective disc from the lancet by twisting
3
while holding the shaft of the lancet firmly. Keep the
protective disc for safe disposal of the used needle
lancet after you have obtained the blood sample.
You will need to use a different cap depending on the
4
site from which you want to take the sample:
Fingertip: Cap (grey)
Other body sites: AST cap (transparent)
Place the selected cap on the lancing device and twist
it into place.
Beurer GL34 mmol/L
16
Page 19

Five different puncture depths can be selected on the
5
lancing device:
x 1 to 2: Delicate or thin skin
x 3: Normal skin
x 4 to 5: Thick or rough skin
Turn the cap in the appropriate direction until the
arrow points to the required puncture setting.
Pull back the tensioning device until you hear it click
6
into place. If it does not engage, the lancing device
may have unintentionally already been tensioned
when inserting the needle lancet and could already be
engaged.
The lancing device can now be used to take the blood
7
sample. Ensure that the blood remains in a droplet
form and is not smeared.
Blood sample from the fingertip
Place the lancing device firmly against the finger,
slightly to the side of the centre of the fingertip. Press
the release button. Lift the lancing device from the
finger. A round blood droplet of at least
0.5 microlitres (approx. 1.2 mm, original size: z) is required.
Blood sample from an alternative
site (AST)
Choose a site that is soft, not next to a bone, with no
visible veins and without excessive body hair. Warm
the puncture site to ensure good circulation, for example by lightly massaging the area. Place and hold the
lancing device against the puncture site for a few
seconds and press the release button. Continue to
hold the lancing device against your skin until a round
droplet of blood has formed under the cap. Maintain
the pressure until the blood droplet has reached a size
of at least 0.5 microlitres (approx. 1.2 mm, original
size: z). Lift the lancing device carefully away from the skin.
If insufficient blood was collected, increase the punc-
8
ture depth and repeat steps 5 to 7.
Untwist the cap and carefully remove it from the lanc-
9
ing device.
Beurer GL34 mmol/L
17
Page 20

Place the protective disk you kept earlier flat on a hard
10
surface. Pierce the protective disk with the tip of the
needle so that the needle is covered.
Carefully remove the needle lancet from the lancing
11
device and discard the lancet in a suitable sharp-proof
container.
Carefully dispose of all blood samples and materials
with which you have come into contact. This prevents
injury and prevents infection spreading to other people.
Twist the (grey) cap back in place.
12
5.2 Measuring the blood sugar value
Hold the measuring device so that the display is facing you.
1
Insert a test strip, contacts first, into the device. Ensure that the front side is
2
facing you. You can handle any part of the test strip with clean, dry hands.
The device switches on automatically and shows the start display, shortly
3
followed by the checking symbol “
ing you to apply the blood. As soon as the flashing blood droplet symbol 6 is
displayed, the device is ready to perform measurements.
Hold the blood collection slit (at the point of the test strip)
4
against the blood droplet. Do not press the puncture site
(fingertip or other body part) against the test strip. The blood
must not be smeared. The blood is sucked into the slit.
WARNING
Hold the blood collection slit of the test strip against the blood
droplet until the slit is completely filled a nd you hear a bee p. Withdrawing the test strip from the blood droplet before the beep may
Once the slit is filled with blood, the device performs the blood sugar meas-
5
urement. The measuring device counts down for 6 seconds, The measure-
lead to incorrect measurements.
“. You will hear the voice output instruct-
Beurer GL34 mmol/L
18
Page 21

ment is then shown on the display and simultaneously read out audibly. Read
and/or listen to your measured value. For an explanation of the measured
value and possible actions, see the next chapter "5.3 Evaluating the measured value", page 19.
If an error message is displayed, refer to chapter “8 Tr oubleshoot ing" on page 2 9.
Remove the test strip from the device and dispose of it carefully in accor-
6
dance with the applicable guidelines in order to prevent infection of other
people.
Note
x If the device does not begin the measurement, do not subsequently apply
more blood. Instead, remove the test strip and end the test procedure.
Start again using a new test strip.
x If the test strip is already inserted in the device and you do not apply any
blood to the test strip within three minutes, the device switches itself off. In
this case, remove the test strip and reinsert it into the slit. The device will
switch on again automatically.
x If you experience difficulties applying blood to the test strip correctly, con-
tact customer service.
5.3 Evaluating the measured value
Your blood sugar measuring device can process values between 1.1 and 33.3 mmol/L.
The warning message "Lo" is displayed for measured values below 1.1 mmol/L. The
warning message "Hi" is displayed for measured values above 33.3 mmol/L.
Note
If you suspect that the blood sugar values are incorrect, first repeat the test
and, if necessary, perform a function test using the control solution. If you
consistently have reason to doubt the results, contact your doctor.
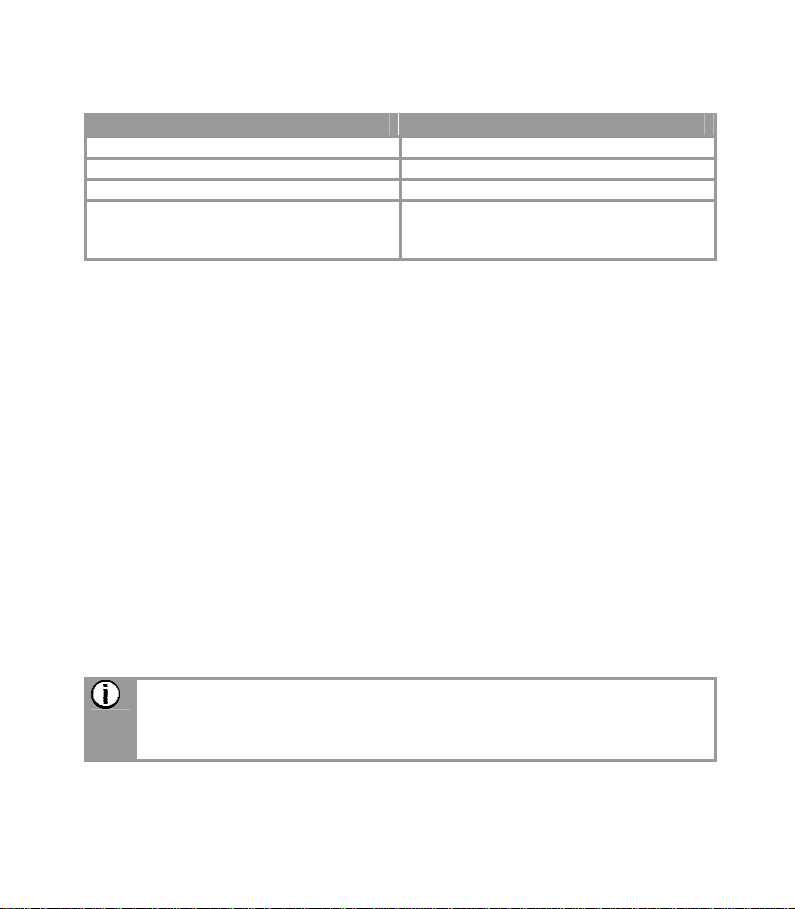
The following table shows a classification of blood sugar values according to the guidelines of the German Diabetes Association (DDG).
Time of blood sugar
measurement
Fasting
2 hours after eating
Source: Deutsche Diabetes Gesellschaft (DDG) 2008
Normal blood
sugar values
Below
5.6 mmol/L
Below
7.8 mmol/L
Suspected
diabetes
5.6 to 6.1 mmol/L
7.8 to 11.1 mmol/L
Diabetes
Above
6.1 mmol/L
Above
11.1 mmol/L
Beurer GL34 mmol/L
19
Page 22

Critical blood sugar values
Display Blood sugar Action
Lo = Severe hypoglycaemia
(low blood sugar)
Immediate medical attention required.
Below 1.1 mmol/L
Low
Below 3.9 mmol/L
Eat a suitable snack or small meal.
Follow your doctor's advice.
High
Fasting:
above 5.6 mmol/L
2 hours after eating:
above 7.8 mmol/L
High, possible ketones
If this high value is still present 2
hours after the last meal, this may
indicate hyperglycaemia (high
blood sugar). Discuss with your
doctor any possible action to take
in this case.
Ketone test recommended.
Consult your doctor.
Above 13.3 mmol/L
Hi = Severe hyperglycaemia
(very high blood sugar).
Above 33.3 mmol/L
Repeat the measurement with a
new test strip. If the display shows
the same result again: Seek medical advice immediately.
Beurer GL34 mmol/L
20
Page 23

5.4 Function test using control solution
The control solution is used for checking the whole blood sugar measuring system. This
enables you to determine whether the measuring device and the test strips are functioning
correctly together and whether the test is performed correctly. It is very important that you
perform these tests using the control solution to ensure accurate measuring results.
CAUTION
Never use control solutions made by other manufacturers. The correct functioning of your Beurer blood sugar measuring device can only be checked
using the Beurer MEDIUM control solution.
When is it recommended to perform a test using the control solution?
x After opening a new test strip container.
x If you suspect that the measuring device or the test strips may be defective.
x If your blood sugar measurement values do not correspond to the way you are feeling..
x If you have dropped the measuri ng device or it has been subjected to other mechani-
cal strain.
x Every time you suspect that the blood sugar results may be incorrect.
It is sufficient to perform a single control solution test if the result is within the recommended range.
WARNING
Do not ingest the control solution. The control solution is only to be used for
function tests and is for external use only.
Note
x Store the control solution in a tightly sealed container at room temperature
below 30°C. Do not refrigerate.
x Store the control solution out of reach of young children.
x Do not store the control solution in the medicine cabinet. It ma y be mis-
taken for medicine to be consumed.
Preparations
x Do not use the control solution once the expiry date has passed. Using control solution
that is out-of-date may lead to incorrect function test results. The expiry date is located
on the bottle next to the egg timer symbol
x The control solution can be kept for three months once the bottle is open. Make a note
of when this time will run out (date of opening + 3 months) on the label
decreases if the expiry date is reached before the end of the 3 months (see the date
next to the egg timer symbol
Beurer GL34 mmol/L
).
.
. The shelf life
21
Page 24

x Do not use the control solution if either of these dates has expired (
x Allow the measuring device, test strips and control solution to reach room temperature
(+20°C to +25°C).
Performing a function test using the control solution
Hold the measuring device so that the display is facing you.
1
Insert a test strip into the slit on the measuring device, contacts first. Ensure
2
that the front side of the test strip is facing towards you (see "3.3 Test strip",
page 11).
The device switches on automatically and shows the start display, shortly
3
followed by the checking symbol “
ing you to apply the blood. As soon as the flashing blood droplet symbol 6 is
displayed, the device is ready to perform measurements.
Press the ON/OFF/Forward button to switch to control mode. In control
4
mode, the measured value is not stored and hence does not distort your
measurement statistics.
"CTL" appears on the display.
5
Shake the control solution well before use. Unscrew the cap and squeeze out
6
a drop of solution. Wipe away the first drop and squeeze out an additional
drop.
To prevent the remaining control solution in the bottle from becoming con-
7
taminated through the tip of the bottle in contact with the test strip, do not
apply the drop directly to the test strip. Instead, apply the drop to a clean
surface, and then apply the drop from there to the blood collection slit on the
test strip. The solution is sucked into the slit. Wipe the tip of the bottle using a
clean, dry paper tissue.
Once the slit is filled with solution, the device begins the measurement. The
8
device counts down for 6 seconds, The measurement is then shown on the
display and simultaneously read out audibly.
Check whether the result is within the specified results range for the control
9
solution. This results range is printed on the test strip container.
“. You will hear the voice output instruct-
/ ).
Beurer GL34 mmol/L
22
Page 25

Expected results
At room temperature, the measurement results for 95% of all control solution tests should
lie within the results range printed on the test strip container.
WARNING
The results range printed on the test strip container applies only for the control
solution. This is not a recommended value for your blood sugar level.
If measurement results are outside the specified range, check the following possible
causes:
Cause Remedy
x The drop of control solution was not
discarded.
x The tip of the bottle was not wiped
clean.
x The bottle was not shaken vigourously
enough.
Control solution has expired or is contaminated.
The control solution, test strip, or measuring device is too warm or too cold.
Test strip is damaged. Repeat the test using a new test strip.
Test strip is out of date. Open a new container of test strips.
There is a problem with the measuring
device.
WARNING
If you persistently obtain results outside of the specified range when testing
with the control solution, do not continue using the system to determine
your blood sugar content. Contact customer service.
Eliminate the cause and repeat the test.
Repeat the test using a new bottle of
control solution.
Allow the measuring device, test strips
and control solution to reach room
temperature (+20°C to +25°C) and
repeat the test.
Repeat the test.
Contact customer service.
Beurer GL34 mmol/L
23
Page 26

6 THE MEASURED VALUE MEMORY
Your blood sugar value is stored automatically each time you take a measurement. Exception: if "CTL" is activated during a measurement with control solution, the value is not
stored. The measured value memory can store up to a maximum of 448 values. Once this
number is reached, the measured value always replaces the oldest value in the memory.
You can display the average value for the last 7, 14, 21, 28, 60 and 90 days, as well as
displaying each value individually.
Note
x If measured values are already stored in the memory and you then reset
the date, the average values are calculated according to the new time period.
x "---" indicates that the measured value memory is empty. "OFF" is then
displayed briefly and the measuring device switches off automatically.
6.1 Displaying and listening to individual values
The device can display and simultaneously read out audibly the last 448 measurements.
The most recent value is displayed first, and the oldest value is displayed last. The measuring device also displays the date and time of the measurement. The number of the
measurement is displayed briefly before each measured value.
The measuring device must be switched off. Press the
1
ON/OFF/Forward button
The start display appears briefly. The device then displays the date
2
and time, and the memory symbol
ON/OFF/Forward button again
.
flashes. Press the
.
Beurer GL34 mmol/L
24
Page 27

The number of the measurement (fig. 1) flashes briefly and the
3
most recent measured value (fig. 2) is displayed and read out
audibly. Each time you press the ON/OFF/FORWARD button
,
the device displays and audibly reads out the previous measured
value. You can display a maximum of 448 previous measured
values. After the last available individual value, the device displays
"End" followed by "OFF".
Note
x You can use the Back button to scroll back to
Fig. 1
measured values that have already been displayed and read out audibly.
x You can cancel the process at a ny time. To exit
the process, press and hold the ON/OFF/Forward
button
The measuring device switches off automatically.
4
"End" followed by "OFF".
for three seconds. The device displays
Fig. 2
6.2 Displaying average values
You can display the average blood sugar value from the last 7, 14, 21, 28, 60 and 90
days. The device also displays how often you measured your blood sugar during the
period selected.
The measuring device must be switched off. Press and hold the
1
ON/OFF/Forward button
The start display appears briefly. The device then displays the date
2
and time, and the memory symbol
for three seconds.
. Once the symbols "DAY" and
"AVG" are flashing, you can release the ON/OFF/Forward but-
.
ton
Beurer GL34 mmol/L
25
Page 28

The average value for 7 days is displayed, together with the num-
3
ber of measured values recorded within this period (in the diagram:
14 measured values within the last 7 days).
Press the
14, 21, 28, 60 and 90 days and the corresponding number of
measurements. After the last available average value, the device
displays "End" followed by "OFF".
The measuring device switches off automatically.
4
button repeatedly to display the average value for
Note
You can cancel the process at any time. To exit the
process, press and hold the ON/OFF/Forward button
for three seconds. The device displays "End"
followed by "OFF".
6.3 Deleting the measured value memory
The measuring device must be switched off. Remove the lid of the
1
battery compartment on the rear of the measuring device.
Press the "SET" button slowly six times.
2
"dEL" is displayed and the memory symbol flashes. Press the
3
ON/OFF/Forward button
The "dEL" symbol is now also flashing. To delete the measured
4
value memory, press the ON/OFF/Forward button
"---" is displayed briefly, followed by the symbol.
5
Press the ON/OFF/Forward button . "OFF" is displayed briefly
6
and the measuring device switches off.
Carefully replace the lid on the battery compartment.
Note
Press the "SET" button three times to switch off the
device without deleting the measured values.
.
.
Beurer GL34 mmol/L
26
Page 29

6.4 Transferring measured values to a PC
The Beurer GL34 mmol/L measuring s ystem features a PC interface that you can use
to upload your stored blood sugar measurement values to a PC. Using special software,
you can evaluate your measured values on the PC and use the evaluations for monitoring
your blood sugar levels.
The connection cable is available from your retailer as the accessory set "Beurer GL32, GL34,
BGL60 PC kit" (see "1.1 Delivery scope, replacement parts and acce ssories", page 2).
The connection cable is supplied together with a CD containing the test software for
evaluating your measurement results, which enables you and your doctor to better monitor your blood sugar levels. For more information, please refer to the instructions included
with the accessory set. These contain all the information you require for the data transfer.
CAUTION
Only use the original data connection cable supplied by Beurer for data trans-
fer. Otherwise, your measuring device or PC may be damaged.
Preparations
x Place the blood sugar measuring device and the Beurer GL32, GL34, BGL60 PC kit next to
the PC ready for use.
x Install the evaluation
Beurer GL32, GL34, BGL60 PC kit.
Transferring your measurement data
Remove the rubber cover from the PC interface on the blood sugar measuring
1
device.
The measuring device must be switched off.
2
Insert the flat USB connector of the connection
cable into a USB port on your PC. Insert the
round jack plug into the PC interface port on
your measuring device.
"PC" appears on the display of the measuring
3
device. The measuring device is now ready for
data transfer.
Follow the information on data transfer and evaluation in the software and in the
4
operating instructions for the Beurer GL32, GL34, BGL60 PC kit.
software on your PC as described in the instructions for the
Beurer GL34 mmol/L
27
Page 30

Note
x You cannot perform blood sugar measurements while the blood sugar
measuring device is connected to a PC.
x Effective evaluation of the measured values is only possible if you have set
the date and time correctly (see "4.2 Basic settings", page 13).
x The measured values remain stored on the measuring device after transfer
to the PC.
Disconnecting the device from the PC
Pull the jack plug from the blood sugar measuring device.
1
The measuring device switches off automatically.
2
Beurer GL34 mmol/L
28
Page 31

7 STOR AG E AND MAINTENANCE
Storing your device
After use, store the measuring device in the supplied case.
Note
x Keep these instructions for use in a safe place.
x If you do not use the device for a prolonged p eriod of time, remove the
batteries.
Maintenance
Clean the surface of the device using a damp cloth (water or mild detergent). Dry the
device using a lint-free cloth.
Note
The measuring device is made from precision components. The accuracy of
the measured values and the service life of the device depend on careful
handling:
x Protect the device against impact and do not drop it.
x Protect the device against damaging influences such as moisture, dirt, dust,
blood, control solution or water, extremes of temper ature and dire ct sunlight.
x Do not store clos e to strong magnetic fields, wireless systems or mobile
telephones.
8 TROUBLESHOOTING
Problem: Unexpected message on the display
No. Cause Action
E-b Flat batteries Replace all batteries.
E-F Test strip was removed from the
device during measurement
E-t Temperature of the measuring
environment, measuring device
or test strip was outside the
permissible range
A used or contaminated test
E-U
strip was inserted
Blood was applied to the test
strip too early
Repeat the blood sugar measurement
using a new test strip
Repeat the test with a new test strip once
the measuring environment, measuring
device, and test strip have reached room
temperature (+20°C to +25°C).
Insert an unused, clean test strip and repeat
the measurement
Repeat the test using a new test strip. Do
not apply the blood until the blood droplet
symbol 6 flashes on the display.
Beurer GL34 mmol/L
29
Page 32

Problem: Device does not turn on.
Cause Action
Flat batteries Replace the batteries.
Battery missing or incorrectly inserted Check whether the batteries are inserted
Test strip was not fully inserted or
inserted on the wrong side
Device is defective Contact customer service.
Problem: You cannot hear the voice output.
Cause Action
The volume is too quiet Set the volume to a higher level (see
Speaker is defective Contact customer service.
Problem: The test does not start after you insert the test strip in the device and
apply blood.
Cause Action
Insufficient quantity of blood Repeat the test with a new test strip and
Test strip is defective Repeat the test using a new test strip.
Blood was applied while the device was
turned off
The basic settings of the device have
been changed and the change was not
completed (see "4.2 Basic settings",
page 13).
Device is defective Contact customer service.
Note
If the problem persists, contact customer service.
correctly (see "4.1 Inserting and replacing
the batteries", page 13).
Insert the test strip, contacts first, into the
slit on the device. Ensure that the front
side of the test strip is facing towards you
(see "3.3 Test strip", page 11).
"4.2 Basic Settings", page 13).
a larger blood droplet.
Repeat the test and apply the blood
when 6 is flashing.
Remove the lid of the battery compartment
and press the "SET" button repeatedly
until "OFF" is displayed. Close the battery
compartment and repeat the test.
Beurer GL34 mmol/L
30
Page 33

9 TECHNICAL DETAILS GL34 mmol/L
Dimensions 96 x 46 x 20 mm
Weight 71 g (including batteries)
Electrical power 2 x 1.5 V AAA alkaline batteries
Battery life More than 1000 measurements
Measured value
memory
Average values For 7, 14, 21, 28, 60, 90 days
Automatic switch-off 3 minutes after the last operation
Storage/transport
temperature
448 measured values with date/time
Forwards and backwards scrolling through the memory
Data retained during battery replacement
Temperature: +4°C – +40°C
Relative humidity: 10 – 85%
Operating ranges
Glucose measurement range
Coding No encoding of the device is required ("codefree")
Blood sample Capillary whole blood
Blood quantity 0.5 microlitres
Measurement
duration
Calibration Plasma
Test method Amperometric biosensor
Application Suitable for self-testing
System function test Each time the device is switched on
Voice output English ("L1") and German ("L2")
Beurer GL34 mmol/L
Temperature: +10°C – +40°C
Relative humidity: 10 – 85% (non-condensing)
1.1 – 33.3 mmol/L
Approx. 6 seconds
31
Page 34

EMC
This device complies with European standard EN 61326 and is subject to specific preventive measures in terms of electromagnetic compatibility. Note that portable and mobile
high-frequency communications equipment may interfere with this device. Further details
can be requested by contacting the customer service address provided below.
Note regarding function of test strips
The test strips enable a quantitative measurement of the glucose content of capillary
whole blood. When the slit for collecting blood comes into contact with a drop of blood, it
fills automatically through simple capillary action. The blood is sucked into the absorbent
slit of the test strip and the measuring device measures the sugar level in the blood.
The test is based on the measurement of an electric current caused by a chemical reaction between the glucose and the test strip reagent. The device analyses this current. The
strength of the current varies according to the glucose content in the blood sample. The
results are shown on the display of the measuring device. Only a small quantity of blood is
required (0.5 microlitres) and the measurement takes approx. 6 seconds. The strips can
detect blood sugar levels in the range 1.1 to 33.3 mmol/L.
Chemical components of the test strip sensor
x Glucose oxidase 10%
x Electron shuttle 50%
x Enzyme protection 8%
x Non-reactive components 32%
Note regarding function of the control solution
The control solution contains a fixed concentration of glucose that reacts with the test
strip. A test with the control solution is performed in the same way as a blood test, but the
control solution is used instead of blood. The results of the control solution test must lie
within the specified results range. This results range is printed on every test strip container.
Chemical composition of the control solution
The control solution is a red-coloured solution with a D-glucose content of less than 0.2%.
Ingredient Percentage concentration
D-glucose 0.05 – 0.19%
Salts 1.4%
Active ingredient for viscosity regulation 15.0%
Standards
The Beurer GL34 mmol/L measuring system fo r self-testing com plies with the following
European Directives and standards: IVD (98/79/EC), EN 61010-1, EN 61010-2-101,
EN 13640, EN ISO 15197, MDD (93/42/EC).
Beurer GL34 mmol/L
32
Page 35

Comparison between measured values and laboratory values
Performance characteristics: Accuracy and precision
The blood sugar results were compared with the YSI 2300 laboratory device. At a concentration of < 4.2 mmol/L, 95% of values were within +/- 0.83 mmol/L, while at a sugar
concentration 4.2 mmol/L,
(coefficient of variation) (%) is < 5 %. The blood sugar measuring device is therefore
comparable with a laboratory system.
> 98% were within 20% of the reference values. The CV
10 GUARANTEE AND CUSTOMER SERVICE
Guarantee
This product comes with a 3-year guarantee for material and manufacturing faults.
The guarantee does not apply:
x in the case of damage caused by improper use
x to wearing parts
x to deficiencies of which the customer was aware at the time of purchase
x to personal negligence on the part of the customer
x in the case of third-party intervention
This guarantee does not affect your statutory rights. In order to make a claim within the
warranty period, the customer is required to provide proof of purchase. Claims must be
made within a period of 3 years from the date of purchase to BE URER GmbH, Söflinger
Str. 218, 89077 Ulm, Germany. In the case of claims against the guarantee, the customer
has the right to have the product repaired by us or in a workshop authorised by us. Further rights (of the guarantee) remain unaffected.
Customer service address
If you have any questions, please contact customer service:
Lifestyle Marketing International Ltd .
P. O. Box 584
WN1 9EX WIGAN
Phone: +44 870 879 0812
E-mail: customerservice@lifestylemi.com
OUR COMMITMENT TO YOU: We aim to satisfy our customers by providing high-quality
healthcare products and the best customer service. If you are not completely satisfied with
this product, please contact customer service.
Brandlinx Direct Limited
Hainault House
Baldonnell Business Park
Dublin 22
Phone: +353 1 412 3606
E-mail: sales@brandlinx.ie
Beurer GL34 mmol/L
33
Page 36
GL34_mmol-L_0109_GB Subject to error and change
 Loading...