

Page 1

Dishwasher
Use & Care Manual
DW24PR
Page 2

CONTENTS
Please carefully read this manual before using the dishwasher, it will help you
use and maintain the dishwasher properly .
1
IMPORTANT SAFETY INSTRUCTIONS
01
2
FEATURES OF YOUR NEW DISHWASHER
2
Specification
02
Filter System
3
Smart Wash System
3
5
OPERATING INSTRUCTIONS
5
03
Control panel
Cycle Chart
6
04
05
06
7
PREPARING AND LOADING DISHES
8
Loading the Lower Basket
Loading the Upper Basket
8
Loading the Silverware Basket
9
Adding A Dish
9
10
11
12
12
12
13
Filling the detergent dispenser
Filling the rinse aid reservoir
USER MAINTENANCE
Cleaning The Exterior
Cleaning The Interior
Cleaning The Nozzles
14
TROUBLESHOOTING
Page 3

IMPORTANT SAFETY INSTRUCTION
WARNING
For your safety, please follow the information in this manual to min imize
the risk of fire, explosion, electric sho ck, and to help p revent property
damage or personal injury.
Proper installation
Please install your dishwa sher proper ly, follow t he installa tion guide.
Water supply inlet t emperatur e should be between 120℉ and 149℉.
Dispose of the discarded app liance and pa cking material properly.
The dishwasher must be prope rly grounde d, or it can result in a risk of electric shock.
PERMANENTLY CONNE CTED is allowed.
If there is any damage to the Dishwasher, plea se contact to your Dealer, do not attempt to
repair or replace any part by yourself.
Basic precaution before use
Read all instructions befo re using the
dishwasher.
The manual does not cover ever y possible
condition and situation that may occur .
Use the dishwasher only for in tended func tion as
described in this manual.
When loading items to be washe d:
-Load sharp items and knives so that they are
not likely to damage the door seal and tub.
-Load sharp items and knives w ith the handl es
up to reduce the risk of injury.
Do not wash plastic items unless they are
marked dishwasher safe, if not marked, ch eck
with manufacture for recommendation , items
that are not dishwasher safe may melt and
create a potential fire hazard.
Do not let children abuse, sit, or stand on doo r
or racks of the dishwasher.
Under certain conditions , hydrogen ga s may
be produced in a hot water system that has not
been used for two weeks or more. HYDROG
GAS IS EXPLOSIVE. If the hot water system
has not been used for such a period, before
using dishwasher, turn on all h ot water fauc ets
and let water flow from each for several
minutes. This will release any accumulated
hydrogen gas. Hydrogen gas i s flammable . Do
not smoke or use an open flame during this
time.
Do not store or use combustible materials ,
gasoline or other flammabl e vapors and
liquids in the vicinity of this or any other
appliance.
EN
If the dishwasher drains in to a food dispose r,
make sure disposer is comple tely empty be fore
running dishwasher.
Do not tamper with controls.
Do not operate your dishwash er unless all
enclosure panels are in the pr operly plac e.
Do not touch the heating element during or
immediately after use, especially if th e sanitize
option has been selected.
To reduce the risk of injury, do not allow children
to play in or on a dishwasher.
Use only detergents or rinse agents
recommended for use in a dishw asher and
keep them out of the reach of children.
Keep young children and infa nts away from
dishwasher when it is operat ing.
Do not use the dishwasher if it has a damaged
power line or plug, and do not plu g the
dishwasher into a damaged ou tlet. Failu re to
observe these instructions may result i n
electrical shock.
Remove the door of the washi ng compartment
when removing an old dishwas her from
service or discarding It.
1
Page 4

FEATURES OF YOUR NEW DISHWASHER
Specification
Capacity
Dimension
Power Supply
Rated power usage
Water Feed Pressur e 5.8 ~ 145 psi (0.04 ~ 1MPa)
1
2
3
23 5 . x 22.6 x 32.4 inches (W x D x H)
Wash motor 100W Heat er 700W
10 place settings
120volts, 60Hz
6
1 Lock
Upper Basket2
Upper Spray Arm3
Cutlery Basket4
Lower Basket5
5
4
6 Cup Shelf
Heating Element7
7
2
Page 5
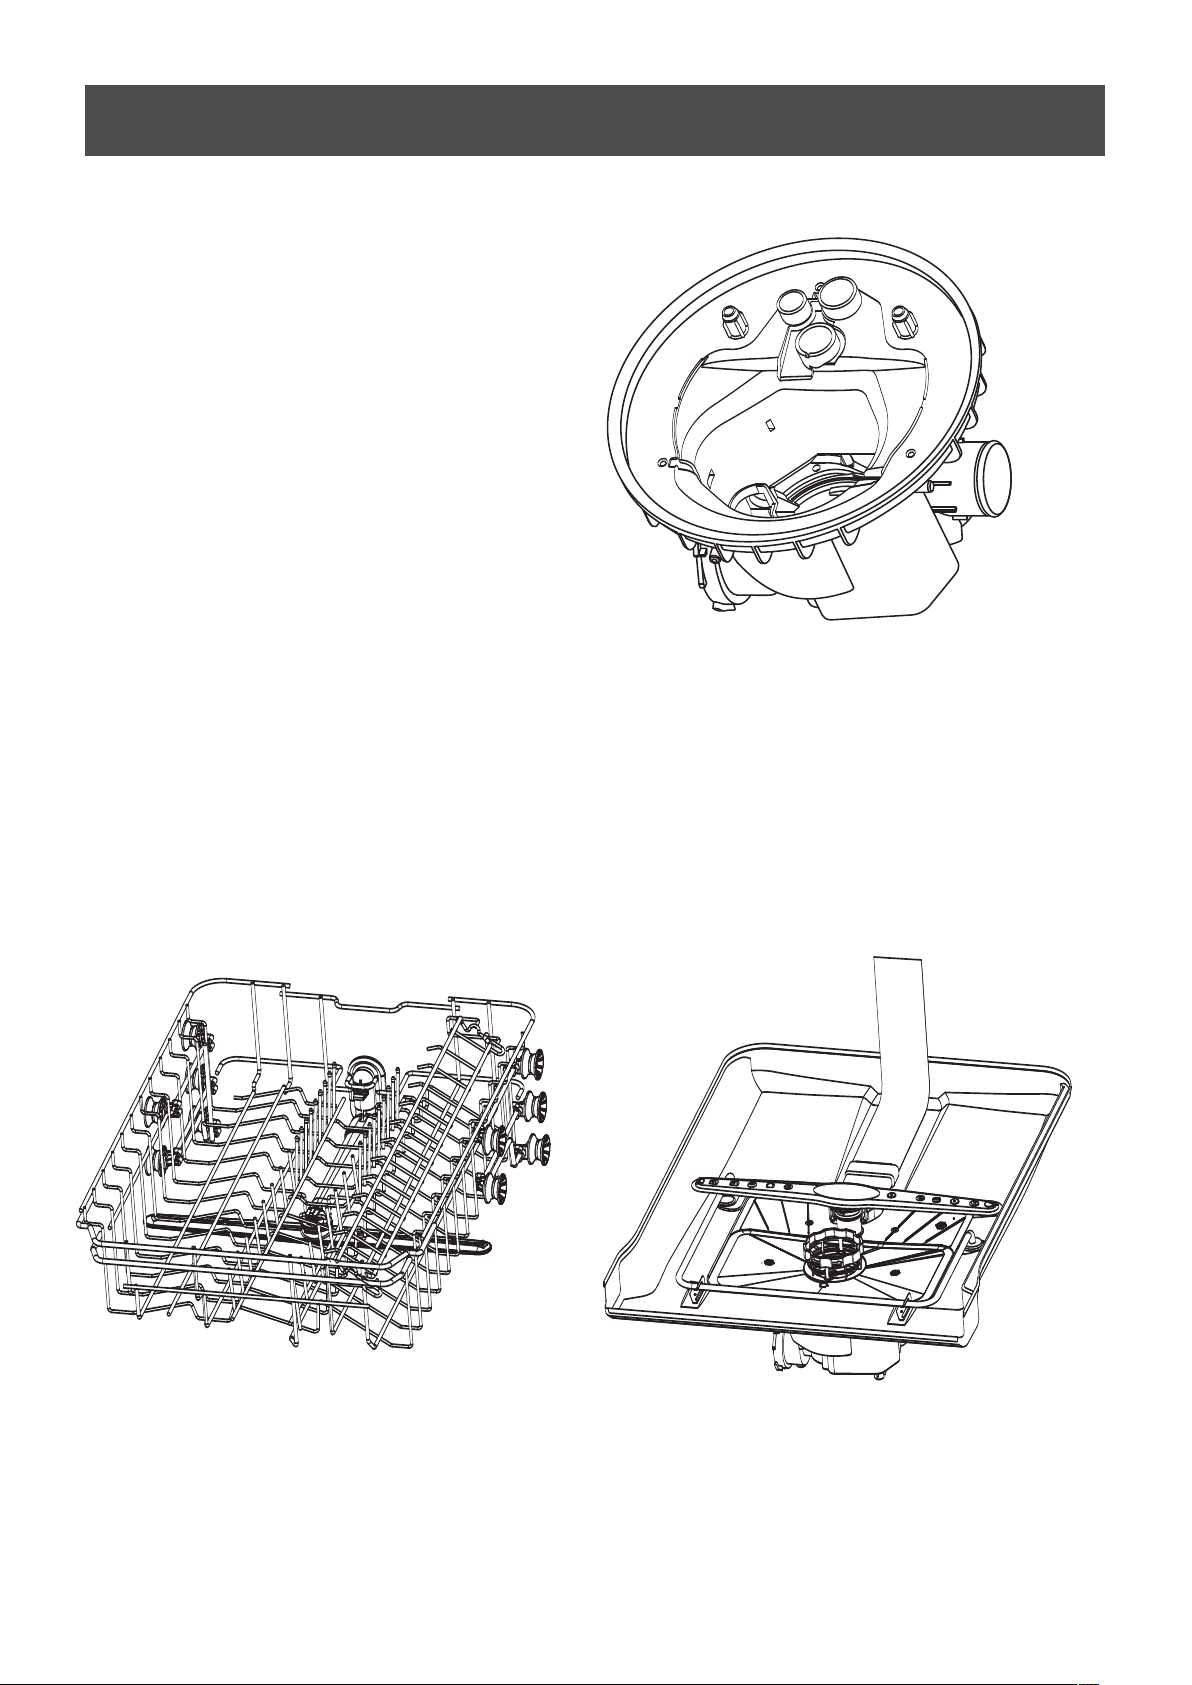
FEATURES OF YOUR NEW DISHWASHER
Filter System
Your dishwasher has a multiple Filter System.
In the System there are three mesh filters.
It can separate soiled water and clean water in
different chambers.
The multiple filter system helps your
dishwasher to get better performance
with less water and less energy.
Smart Wash System
Your dishwasher has a Smart Wash System. When a partial load of lightly soiled dishes is placed in the unit, a
wash cycle similar to hort wash will automatically be performed.
When a full load of heavily soiled dishes is placed in the unit, a heavy wash cycle will automatically be performed.
It can determine the type of cycle required to clean the dishes and will clean more efficiently every time.
a s
比例 1.000
3
Page 6

FEATURES OF YOUR NEW DISHWASHER
How your dishwasher cleans
Your dis hwasher cle ans by spraying
a mixture of hot water and detergent
through the spray arms against
soiled surfaces .
The dishwasher fills with water
covering the filter area. Water i s then
pumped through the multipl e filter
and spray arms. Separated soil
particles go down the drain as the
water is pumped out and replac ed
with clean water.
The number of water fills will vary
with the cycle being used.
Getting Started
1.Load the dishwasher (See D ish Prepara tion and
Loading sections).
2.Add detergent (See Filling the deterg ent dispenser).
3.Add rinse aid (See Filling the rinse aid di spenser).
4.Select desired CYCLE (See Cycle Chart ).
5.Select desired OPTIONS (See Control P anel).
The indic ator light above the pad will glow when
selected.
6.Run the hot water faucet nearest the dish washer
until the water is hot, then turn it off.
7.To start, p ress Start/ Cancel (See Control Panel).
Then clos e door.
Note:
Your dis hwasher has t he controls mounted
in the front of the door. The door should be
closed first if you want to operate the machi ne.
Wash Cycle Selections
Cycle times are approximate and will vary w ith the
options selected. Hot water is necessar y to activate
the detergent and melt fatty food soils. An au tomatic
sensor will check the incomi ng water temp erature. If
it is not at the appropriate temperature th e timer will
delay the cycle to allow automatic water he ating during
the main wash. When the HI-TEMP wash is selected
an even higher temperature will be assure d to handle
heavier soil loads.
4
Page 7

OPERATING INSTRUCTIONS
Control panel
2
1
3
1.Start/Cancel
Select the washing program o r pause the
washing program when the mac hine is worki ng.
2.Wash Cycle Selections
Program Buttons
touch to select the Program, correspond ing
indicator will be lightene d;
Heavy
This cycle is for hard-to-clean, heavil y soiled
dishes, pots, pans, and dishes.
Normal
.It is for regularly This is standard programme
soiled dinner dishes or silv erware.
ECO
It is suitable to clean normally soiled tab leware
and it is the most efficient programme in terms
of it’s com bined energy and water consumption
for that type of tableware.
Glass
For lightly soiled loads, such as glasses , crystal
and fine china.
Rapid
A shorter wash for lightly soiled loads that d o not
need drying.
Rinse
Use for rinsing dishes glasses and silver ware that
will not be wash right away.
3.Delay
To delay the start of a selected cycle, press the
Delay Start pad until the desired delay time shows
in the LED display. You can delay the start for 1 to
24 hours. To cancel the delay start option before the
delay period is over, press the Start/Cancel pad for
3-5 seconds.
4 5
6
4.Display window
This displays the remained hours and minutes of the
running cycle, delay hours and error codes etc.
5.Status Indicators
Rinse detergent need to be refilled
Program end
Water failure,faucet is not open
6.Options
Heating Dry
When the"Heating Dry" f unction is se lected, the
heater will work during the dr ying proces s.
Sanitize
When the Sanitize function is selected, the " "
temperature of water will be maintained a t
(15 ) max. The ma x temperature may 69℃ 6. 2℉
not be reached if the incoming w ater temper ature
is not correct. Certified residential d ishwashers
are not intended for licensed food establ ishments.
Warning: The sanitize option is availabl e with
" " " N " and " " cycles.Heavy omal ECO
Hi Temp
When the Hi Temp wa sh function is selected , " "
the temperature of the water will be mainta ined
at 60 (140 ) max .℃ ℉
Warning: The option is available withHi Temp
" " " N " " "and " " cycles.Heavy omal ECO Glass
Energy Save
When the function is selected, "Energy Save" energy
consumption will be reduce d during wash ing process.
Warning: The option is available withHi Temp
" " and " N " cycles.Heavy omal
5
Page 8
OPERATING THE DISHWASHER
Status Window Error indication
H:01- H:24
If the Delay Start option is selected,
the number of delay start hours
shows in the status window.
2:25-0 :00
After the machine starts operation,
the remaining time of the selected
cycle will be shown in the windo w.
NOTE
The remaining time could suddenly
increase or drop several minutes.
This means the Smart Sensor has
checked the soil level and determined
if additional water fills are needed or if
water fills can be deleted.
In certain situations which are critica l to
the machines function and safe operation, the control shall shut down and
indicate an error ode
(See Error Codes on page 18).
If Error codes are displayed, contact the
dealer or service. They will be able to
provide assistance in trouble shootin g
the problem and or locate auth orized
service technician if need ed.
c
Cycle Chart
Program
Heavy
NORMAL
ECO
Glass
Rapid
Rinse
Description of Cycle
Pre Wash
Main Wash(60℃)
Rinse (65℃)
Rinse (wi th Sani69℃)
Dryin g
Pre Wash
Main Wash(50-55℃)
Rinse (58 -60℃)
Rinse (wi th Sani69℃)
Dryin g
Pre Wash
Main Wash(45-50℃)
Rinse (50 -55℃)
Rinse (wi th Sani69℃)
Dryin g
Pre Wash
Main Wash(48-50℃)
Rinse (50 -55℃)
Dryin g
Pre Wash
Main Wash(50℃)
Rinse (55 )
Pre Wash
Main Wash
Water(L/G)
19.7L/5. 2G
9.5~18.5L/
2.5~4.9G
15.5L/4.1G
15.5L/4.1G
12.5L/3.3G
6.7L/1.8G
Cycle time(min)
155
105~135
105
95
60
20
6
Page 9

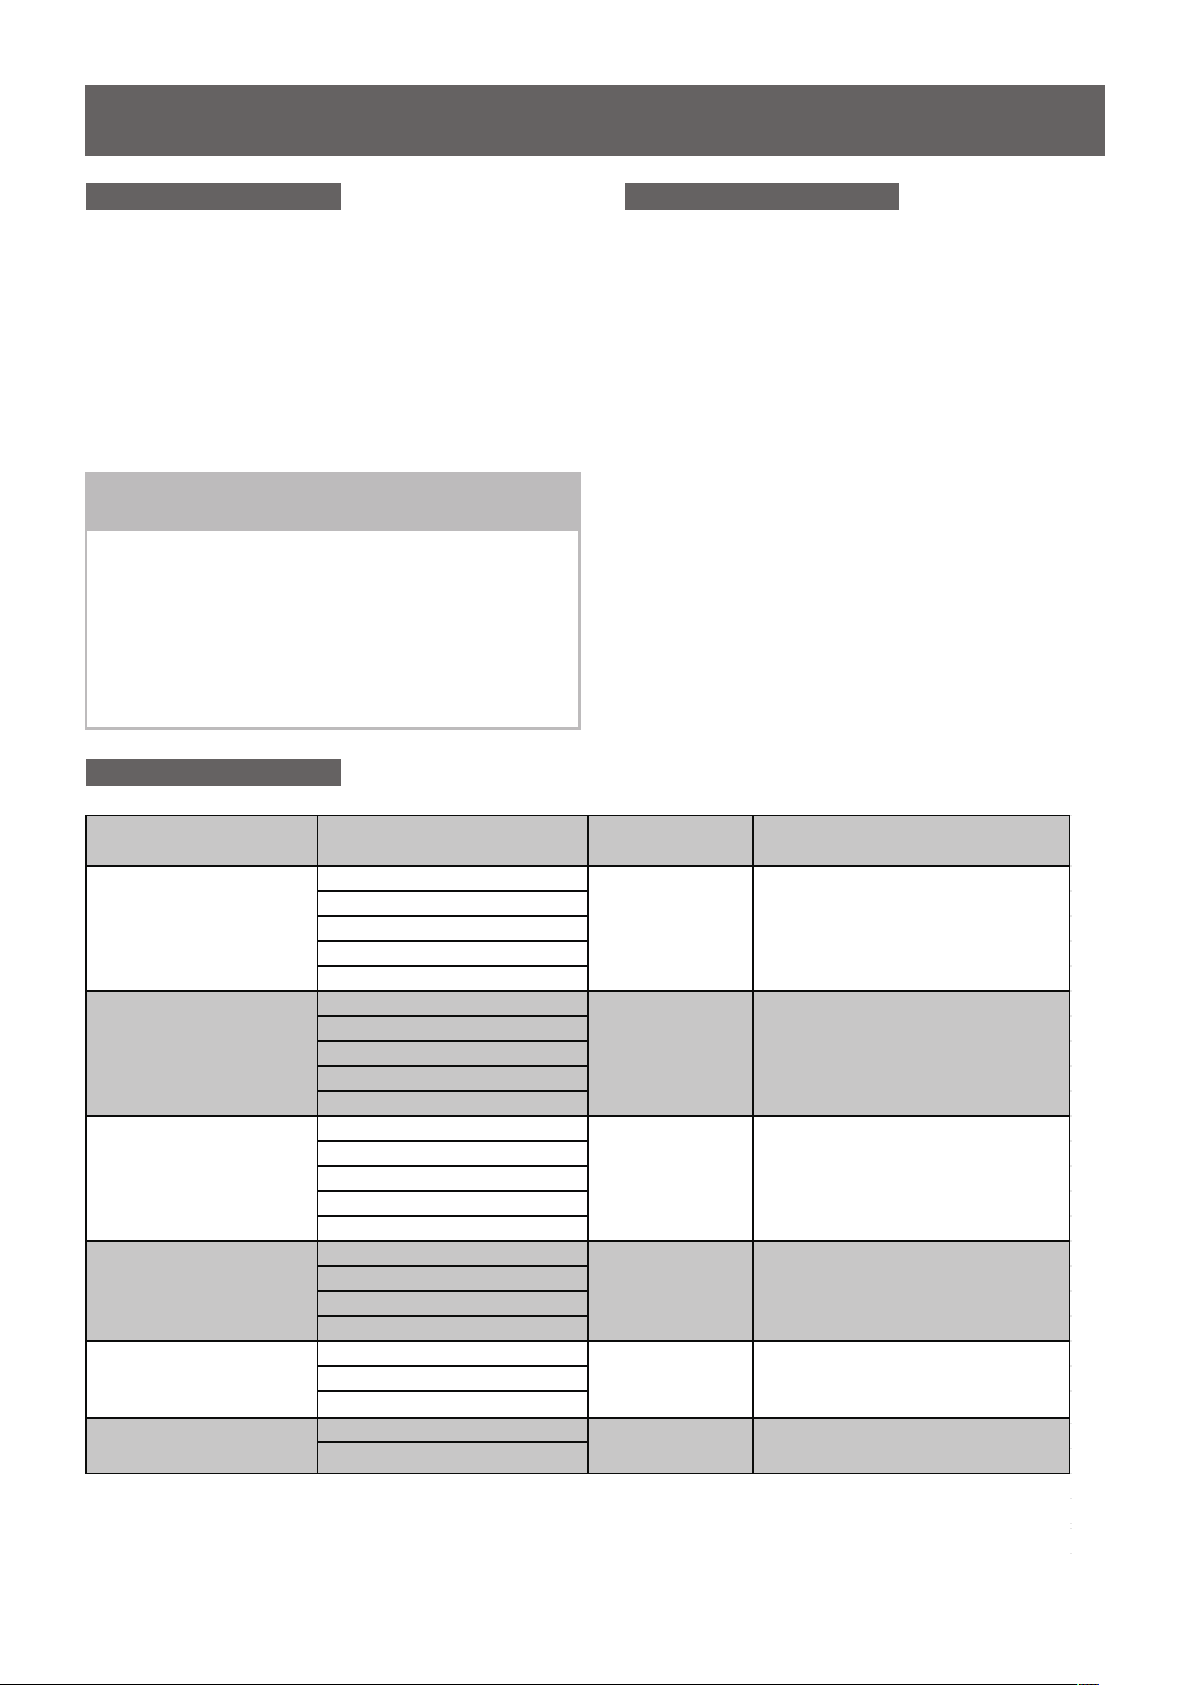
PREPARING AND LOADING DISHES
Dish Preparation
Scrape away large pieces of fo od, bones, pi ts, toothpicks, etc. The continuously filtered wash system will
remove the remaining food pa rticles. Bu rned-onfoods should be loosened befor e loading. Em pty liquids
from glasses and cups. Foods such as mustar d, mayonnaise, vinegar, lemon juice and tomato based
products may cause discolo ration of sta inless steel and plastics if allowed to sit for a long perio d of time.
Unless the dishwasher is to be o perated at on ce it is best to rinse off the se food soils. If the dishwasher
drains into a food disposer, be s ure dispose r is completely empty before starting dishwasher.
Loading the Upper Basket
The upper basket is designed f or cups,
glasses, small plates, bow ls and plasti c items
marked dishwasher safe etc .
For best results, place the bowls, cups,
glasses, sauce pans with soi led surface
facing down or toward the center. Tilt slight ly
for better drainage.
Loading the Bottom Basket
The bottom is designed to load basket
plates, soup bowls, plates , saucers and
cookware. The adju stable sp ace will basket
allow you to load items with a max imum
height of 11 inches.
make it easy to load those extra large and
hard-to-fit items. The tines may be left
up for normal use or folded down for more
flexible loading. Fold dow n for more spac e
to load large pots or pans.
Make sure the loaded dishes do
not interfere with the rotation of
the middle spray arm, which is
located at the bottom of the upper
The fold-down tines in the bottom basket
basket. (Check this by rotating the
middle spray arm by hand.)
Large items should be placed
along the edge so they do not
interfere with the middle sp ray
arm rotation, and make sure
they not prevent the detergent
dispenser from opening.
Large items should be turned so
that the inside faces downwa rd,
and make sure these items
do not interfere with the lowe r
spray arm rotation.
7
Page 10

PREPARING AND LOADING DISHES
Loading the Lower Basket
The lower basket has been especially designed for dinner dishes, soup bowls, plates, pots, lids, casserole
dishes, and plates.
Load large items such as pans and pots into the dishwasher so their open sides face downwards. We
recommend loading cups, stemware, and small plates into the upper basket.
See the recommended loading patterns below.
10 place setting
Loading the Upper Basket
The upper basket has been designed for small plates, mugs, glasses, and plastic items marked “dishwasher
safe”. Load your plates into the dishwasher in two half rows, so that the front of each plate faces the back
of the plate in front of it, and the open sides of the plates at the center of the dishwasher face each other.
See the illustrations below.
Make sure the loaded dishes do not interfere with the rotation of the nozzle which is located at the bottom
of the upper basket. (Check this by rotating the nozzle by hand.)
When loading dishes, pull the upper basket out suff iciently so you can load it without striking the counter
10 place setting
8
Page 11

PREPARING AND LOADING DISHES
Loading the Silverware Basket
The silverwar e basket can be divided
into three separate module s that can
be used in both upp er and lower racks
1.Spoons
2.Knives
3.Salad forks
4.Forks
5.Large spoon s
6. Large forks
1 1 1 1 1 1 1 1
6
2 2 2 2 2 1
5 3 3 3 3 3 3 3 3 3 3
4 4 4 4 4 4 4 4 4 4 1
5
2 2 2 2 2 1
1 1 1 1 1 1 1 1
In
1
Adding A Dish
To add or remove item s after
wash cycle star ts:
1. Open door slightly and wait a f ew
seconds until wash action st ops
before completely openin g.
2.Add the item.
3.Close the door firmly to lat ch within 4 secs,
then cycle will a utomatica lly resume.
CAUTION
TO AVOID BURN INJURY: Slightly
open door and wai t until spray arms
and wash action s top. Hot wate r may
splash out of dishwasher. Fai lure to
do so may result in injury.
1 32 6444 5
WARNING
Do not let item extend though bottom
1.
Be sure nothing protrudes through bottom
2.
of the basket or rack to block the lower
spray arm
9
Page 12

PREPARING AND LOADING DISHES
Filling the detergent dispenser
1. Open the detergent dispenser c ap by pushing the detergent
dispenser release catch.
The fl ap is always open at the end of a dishwashing cycle.
2. Add the recommended amount of detergent to the main
wash detergent compartment.
3. Close the fl ap and then pressing it down.
10
Page 13

PREPARING AND LOADING DISHES
Filling the rinse aid dispenser
Your dishwasher has been designed to use liquid rinse aid only.
Using a powdered rinse aid will clog the reservoir opening and cause the dishwasher to
rinse greatly improves drying performance after the final rinse. Do not use a solid or bar-type rinse aid. Under
normal conditions, the rinse aid will last approximately one month. It is best to keep it full, but do not over fill.
The Heated Dry option will not perform as well without rinse aid. The rinse aid dispenser, located next to the
Detergent cup, automatically releases a measured amount of rinse aid during the last rinse.
If the rinse aid is low, the Rinse Aid light is illuminated at the beginning and end of the cycle indicating that it is
time to refill.
Do not add regular detergent to the rinse aid dispenser.
CAUTION
Remove the rinse aid dispenser cap by rotating
1.
it counterclockwise.
malfunction.
The use of
2.
Fill the rinse aid dispenser with rinse aid.
Use the viewing port when fil ling the rinse aid reservoir.
Do not fi ll the reservoir above the full level indicator.
Excess rinse aid can over flo w during the wash cycle.
CAUTION
3.
Add the rinse aid if the LED screen shows “LSb”.
rinse aid left.
4. Close the rinse aid reservoir cap by rotating it clockwise.
11
Page 14

USER MAINTENANCE
Keeping your dishwasher clean improves its performance, reduces unnecessary
repairs, and lengthens its life.
CLEANING THE EXTERIOR
It’s best to clean spills on the outside of your dishwasher as they occur. Use a soft, damp cloth on the
control panel to gently wipe away spills and dust. Do not use benzene, wax, thinner, chlorine bleach, or
alcohol. These materials may discolor the inner walls and cause stains. Do not clean the dishwasher by
sprinkling water over it and avoid letting water come into contact with any of the electrical parts.
If your dishwasher has a stainless steel door panel, you can clean it with a stainless steel cleaner for
Home Appliances or a similar product using a clean, soft cloth.
CLEANING THE INTERIOR
Clean the interior of your dishwasher periodically to remove any dirt or food particles. Wipe the inside of
the dishwasher and the inner part of the door with a wet dishcloth. We recommend fi lling the detergent
dispenser with dish detergent, and then running the dishwasher empty periodically using either the Normal
or Express 60 cycle with the sanitize option. This will keep your dishwasher clean.
If white spots and odor are still present in your dishwasher, run the Normal cycle with the dishwasher empty
and without detergent until it fl ushes. Then, interrupt the cycle and put an 8 ounce cup of white vinegar into
the lower basket. Close the dishwasher and let the cycle fi nish.
Do not remove the tub front seal (the long rubber seal enclosing the opening of the dishwasher).
CAUTION
Do not touch the HEATING ELEMENT during or immediately after use.
CLEANING THE FILTERS
1. Turn off the dishwasher.
OpenOpenOpen
2. Rotate the fi lter insert counterclockwise to unfasten and then detach
the fi lter insert.
3. Remove the fi ne fi lter (fl at, rectangular).
12
Page 15

USER MAINTENANCE
4. Remove any dirt or other remains from the fil ters, and then rinse them
under running water.
5. Reassemble the fi lters in the reverse order of the dissasembly, replace
the fi lter insert, and rotate clockwise to the close arrow.
If the fil ter insert is not closed properly, its performance will
be decreased.
CAUTION
CLEANING THE NOZZLES
If your dishwasher does not seem to be cleaning adequately or the nozzles seem clogged, you can clean
each of the nozzles. When removing the nozzles, take care as they may break.
Lower nozzle
1. Check whether the nozzle holes are
clogged by food particles.
2. If cleaning is needed, remove the nozzle by
pulling it upwards.
3. Clean the nozzle, and then push it back
into place.
4. Check whether the nozzle is engaged
correctly by rotating it by hand.
13
Page 16

Troubleshooting
Probl em
Dishw ash er won't start
Dishw ash er beeps at th e end o f
the cyc le
Rinse Ai d lig ht on
Dishw ash er operate s too l ong
Dishe s are n ot clean eno ugh
Possi ble cau se
Dishw ash er won't start
Power s upp ly or power li ne is n ot connected
Delay S tar t option has been s elected
Child L ock a ctivated
(sele cte d models)
It indi cat es the wash cycle f ini shed, the
dishw ash er will beep
LED scr een s hows “Lsb”
The dis hwa sher is connect ed to cold water
The cyc le ti me will vary due to t he soil
The san iti ze option is sele cte d
Wat er pressure is te mpo rarily low
The inl et wa ter temperatu re is l ow
Solut ion
Shut th e doo r completely ma ke sure it is latch ed
Check a nd co nnect the po wer s upply
Refer t o Del ay Start sectio n in th is manual to rese t
Deact iva te the child lock , refer to child lo ck
secti on in t his manual
Add rin se ai d
Check t he di shwasher, m ake s ure it is properl y
conne cte d to the hot water su ppl y
When he avy s oil is detected , the a uto, norma l,
pots& pan c ycle will au tom atically incr eas e the
cycle t ime
When sa nit ize option is sel ected, the cycl e tim e
will be i ncr ease to meet the sa nitized tempe rat ure
reque st
Use you d ish washer whe n the w ater pressure i s
norma l
Make su re th e dishwash er is c onnected to the h ot
water s upp ly
Try n ot use your dishw ash er when hot water i s
being u sed e lsewhere i n the h ouse
Dishe s not d rying enou gh
Spots a nd fi lming on dishes
Etchi ng
Dishe s are l oaded too cl ose t ogether
impro per u se of detergent
The sel ect ed cycle is not sui tab le for food
soil condition
Spray arms is blocked by some items
Deter gen t dispenser is em pty
Impro per l oading of dishe s
The cyc le yo u chose did no t inc luded the
dryin g
Wat er hardness is to o hig h
Impro per l oading of dishe s
Old rin se ai d is used
Rinse d isp enser empt y
Using t oo mu ch detergent Use les s det ergent if you hav e soft water
The inl et wa ter temperatu re ex ceeds 158℉
Load th e dis hes again as the ma nual
Add det erg ent depending o n the water hardn ess
and the c ycl e you chose. Use fr esh detergent
Choose another cycle for longer washing time
Make sure the sp
Fill ri nse a id dispens er or i ncrease the amo unt o f
rinse a id.
Load th e dis hes again as the ma nual instruct s.
Choos e the p roper cycle wit h drying
For ext rem ely hard water in stall a water sof ten er
Load th e dis hes again as the ma nual indicate s
Use fre sh ri nse aid
Add rin se ai d to the dispense r
Lower t he in let water tempe rature
ray arm is rotated freely
14
Page 17

Troubleshooting
Probl em Possi ble cau se
Deter gen t left in dispens er cu p
Deter gen t dispenser wil l not
shut
Wat er remains in the
dishw ash er
Dishw ash er does not
drain p rop erly
Suds in t he tu b
Dishw ash er leaks
Deter gen t may be too old
Spray a rm is b locked
Impro per o peration of the d ete rgent cover
Previ ous c ycle has not fini she d or has been
inter rup ted
Drain i s clo gged
Drain h ose i s kinked
Impro per d etergent is use d
Exces siv e suds caused by us ing t he
impro per d etergent
Solut ion
Use fre sh de tergent
Load th e dis hes, making sur e the s pray arms
are not b loc ked
Add the d ete rgent and rinse a id as i ndicated by
the man ual
Selec t the p roper cycle exp lai ned in the manual
Check t he ai r gap if you have one . Mak e sure the
dispo ser i s empty if the dish was her is connecte d
to the di spo ser
Make su re th e drain hose is pro per ly connected
to the si nk
Make su re to u se only the autom ati c dishwasher
deter gen t
Make su re to u se only the prope r dis hwasher
deter gen t
Black o r gra y marks on dishes
Stain ed tu b interior
Noise s
Dishw ash er won't fill
Dishw ash er is not level Level t he di shwasher
Alumi num u tensils have ru bbe d
again st di shes
Coffee and tea so il
Reddi sh st ain
Deter gen t cup opening\ Dr ain p ump sound
A hard obj ect h as entered the wa sh mo dule.
When th e obj ect is ground up, t he so und
shoul d sto p
Wat er valve is turn off
Door la tch m ay not be properl y sea ted
Rearr ang e the dishes
Make su re th e inlet water is no l ess t han 120H
Using a n app roved spot clea ner t o remove the
soil
Some to mat o-based foods w ill c ause this, use of
the rin se on ly cycle right af ter l oading this wil l
decre ase t he staining
This is n orm al
If the no ise p ersists after a c omp lete cycle, cal l
for ser vic e.
Check i f the w ater valve is tur n on
Make su re th e door is closed
15
Page 18

Error Codes
When some malfunctions com e on, the appliance will displ ay error codes to warn you:
1. chec k the w ater supply
2. chec k the i nlet valve
3. chec k the i nlet
4. chec k the fl owmetre
5. chec k the p ressure switc h
6. chec k the d rain
7. chec k the P CB
E1
durin g the w ater inlet step , if th e flow meter
can't d ete ct the defined wat er after 4
minut es, t he dishwasher w ill warning for E 1.
E3
E4
E6
E7
E9
Ed
(only a ppe ared in the facto ry mode)
when th e tem perature cant r eached the defin ed va lue
after 9 0 min utes, the dishw asher will warn ing f or E3.
the wat er flo od into the botto m and r esult in the
detec tiv e switch moves, t he dishwasher w ill w arning
for E4.
(only a ppe ared in the facto ry mode)
E6 - ther mal s ensor cut.
E7 - ther mal s ensor short.
If push ing o ne buttom for mor e tha n 30s, the
dishw ash er will warn ing f or E9
If the Da shb oard
abnor mal
will wa rni ng for Ed
detec t com munication da ta is
for mor e tha n 30s, the dishwa she r
1. chec k the h eater
2. chec k the t hermistor
3. chec k the P CB
1. chec k the u se of the deterge nt
2. chec k whe ther the applia nce is level
3. chec k the m icro-switch
4. chec k the d rain pump
5. chec k the a mount of the fille d water
6. find wh ere l eakage is
1. chec k the i nlet water temp era ture
2. chec k the t hermistor
3. chec k the P CB
Buttom sticks,warning resolved when
relea sin g the buttom
communication
resolved when communicate data return to
normal.
data abnormal, warning
WAR NIN G
If overflow occurs, turn off the main wat er supply before calling a service.
If there is water in the base pan be cause of an overfill or small le ak, the water
should be remov ed before restarting the dishwasher.
16
 Loading...