

Bernina Favorit 940, Industrial 950 Instruction Book

Instruction
Book
Favorit'
W
lnuti
940
950
U
~enn
_
enn
U~.
~~aol
nUsra
U~
i
_
U~~~~~~~
U~90~
5

Contents
Page
Page
Page
3
1
View
of
machine
940/950
Application
of
practical
stitches
13
Zig-zag
setting
11
4
Electrical
section
Brnging
up
lower
thread
6
U
Connecting
mains cable
and
Buttonhole 14
foot
control
unit
Changing
B_ub
16
Sewing
tight
Needles
8
Removing
bobbin
case
Presser
foot
9
5 W
1
iS
=
th
Cleaning
and
lubricating
the
hook
16
Winding
lower
thred
Cleaning
the
machine
16
nserting
bobbin
Connecting
mains
cable
and
Inserting
needle
foot
control
unit
4
6
Thread
ing
Corded
buttonholes
15
Changing
presser
f.ot
Electrical
section
4
Threadingupper
thread
Feed-dog
7
Important!
U
Bringing
out
lower
thread
Five
needle
positions
10
_.
.....
.........
7
L
owering
f
eed-dog
Forwards
sewing
10
Slatons
__
Thread
tension
Inserting
bobbin
5
Subject
to
BEAB
and
OSHA
safety
Presser
footn
lifterInserting
needle
5
regulations
(official
testing
ceritres
in
P1r---esserfoot ter
Inserting
needle
5
~~~Great
Britaini and
the U.SA).JU
8
Needle
and
thread
table
Lubricatingthe
machine
16
The
following
safety
regulations
Special
needles
Lycra
stitch
13
must
be
observed
without
fail:
Some
sewing
tips
Maintenance
16
mhe
roving
needle
is
a
source
of
9
Presser
feet
Needle
and
thread
10
Thedsewing
position jryust
tfiee-
10
Setting
the
straight
stitch
Presser
feet
9
fore
be
kept
under
constant
obt
11
Setting.the
zi_-zag
Presser
fot
lifter
7
servation
I
12
Selecting
the
stitches
1 .
20
Removing
bobbin
case
4
Manipulations
within'
the area
of
13
Application
of
practical
stitches
Scallop
stitch
13
moveient
of
the
needle,
such
as
Sewn-out
zig-zag
Securing
the
end
10
changing
the
needle
the
pres
3e
Bin.
stitch
Setting
Straight
stitch
10
performed
with
the
moachine
Universal
stitch
Zig-zag
1'
switched
off
(main
switlch
set
3i
Lycra
stitch
Sewing
light
4
X
positionl.
The
same
applies
Stre
ch stir
-h
Sewing
everse
10
~~~~~~~~~~~~when
remToving
and
replacingte
Stretch
stitch
Sewtng
reverse
10
lower
thread
bobbin
or
hook.
Gathering
stitch
Sewing
tips
8
Dujring
maintenance
work
(clean-
Vari-overlock
Special
needles
8
ing
or
lubricatingi
or
changing
the
Running
stitch
Straight
stitch
10
lighlt
bulb
and
interruptions
in
sew
Scallop
stitch
Stretch
stitch
13
ing
or
after
completion of
work
p.....
.
^re
rmachine
muitst
be
disconnectedj
Decorative
stitches
Thread
and
needle
1
0
from
the
power
supply
by
pulinl
14
Buttonhole
Threading
upper
thread
6
out
the
mains
plug.
15
Corded
buttonholes
Thread
tension
7
Repairs
to
the electronic
section
i
16
Chanwng
the
bulb
Vari-Overlock
13
especilthe
changing
of
thet
ad
Cleaning
Winding
bobbin
thread
5
~~~~~~~~~~~~~~wire
to
the
foot
controi
uinit,
ma-.y
3
Cleaning
Winding
bobbin
thread
5
0only
be
carried
out
by
ne
of
ourX
ser
vice
agenc,es,

*
View
of
Bernina
940/950
|
9
1011
12 13
14
15
16
2
Nee
te
2 Needle
plate
3
Presser
foot
4
Needle
holder
clamp
_
15
Thread
reuator_
6
Thread
take-up
lever
7
Thread
tension
slot
8
.
8
Thread
tension
disc
7
17
9
Top
frame
cover
18 1 0Thread
tension_indicator
11
Adjusting
wheel
for thread
tension
_
12
Pattern
indicator
.
9 1 3
Practical
and
decorative
stitch
scale
*d _
l
1 1 4 Selector
lever
_
_
w
l
l
*
~~~~~~~~15
Changeover_lever
.....
|B:
u hERNINA
_
i1 |
1
>
21
17
Bobbin
spindle
sr
20
16 R adweelhodrpn
19
Thread
cutter
20 Hn-he ees
ce
1
~~~~~~~~~~~~~~~~~~~~~~~~23
21
Stitch
width
knob
22
Needle p-osition
knob
I
t5_
_l
l .
23
Buttonhole
knob
24
Stitch length
knob
*
--
~~~~~~~~~~~~~~~~~~~~~~~~~~~25
Opening
for
knee
lifter
24_it
26Switch
fr
sewingprdarnin
U~~~~~~~~~~~~~~~~~~~~~~~~~~~~
*
26
U
1_

Dear
Bernina
Customer,
We
would
like
to
congratulate
you
on
the
purchase
of
your
new
Bernina
sewing
machine
and
thank
you
for
the
confidence
shown
in
our
products.
You
have
acquired a top-quality
Swiss
product,
manufactured
with
the
utmost
skill
and care
at
our
Bernina
factory
in
Steckborn/Switzerland.
This
Instruction
Book
provides
you
with
all
the
necessary
information
about your
Bernina and
its
countless applications for
sewing
work.
If
you
should
require
further
details
or
advice
about your
sewing
machine
or
sewing
problems,
please
contact
your
Bernina
stockist.
We
hope
you
are
successful
and
happy
with
your sewing
and
dressmaking
work.
With
kind
regards
Odette Ueltschi-Gegauf,
Chairman
of
the
Board
FRITZ
GEGAUF
LTD.
Manufacturer
of
Bernina
Sewing
Machines,
CH-8266
Steckborn, Switzerland
3
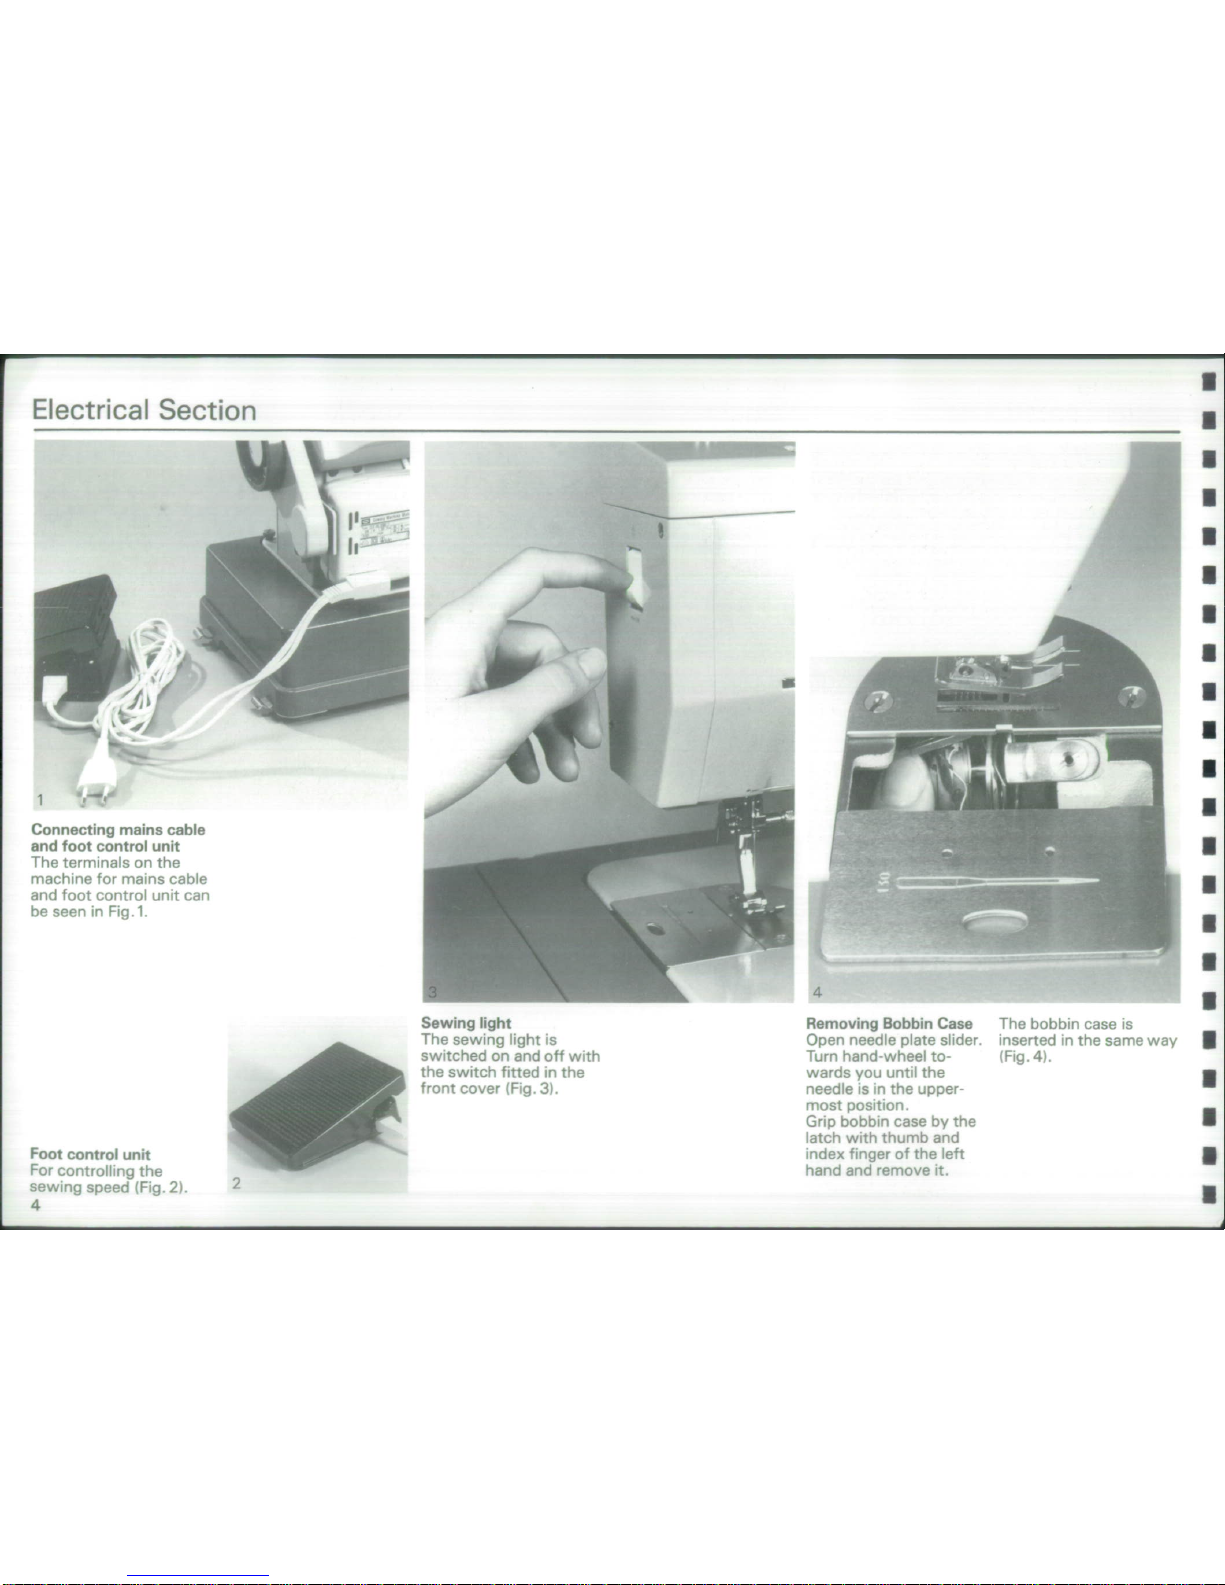
Electrical
Section
Connctin
man
cablegj
and,,
-:
foo
controlxnil
The
temial
ong
theI
macin
frmis
cable
and
foot
contro
unit
canl
__ ;1j
beaeenine
formins
cal,__
4w4
3=
Sewing
light
Removing
Bobbin
Case
The
bobbin
case
is
The
sewing
light
is
Open
needle
plate
slider.
inserted
in
the
same
way
~~~~switched
on
and
off
with
Turn
hand-wheel
to-
iFig,
41.
_
~~~~the
switch
fitted
in
the
wards
you
until
the
front
cover
(Fig,
31.
needle
is
in
the
upper-
Umost
position.
g eGrip
bobbin
case
by
the
~~~~~~~~~~~~~~~~~~~latch
with
thumb
and
Foot
control
unit
index
finger
of
the
left
For
controlling
the
hanc
and
renove
it.
sewing
speed
(Fig.
2).
2
4
*
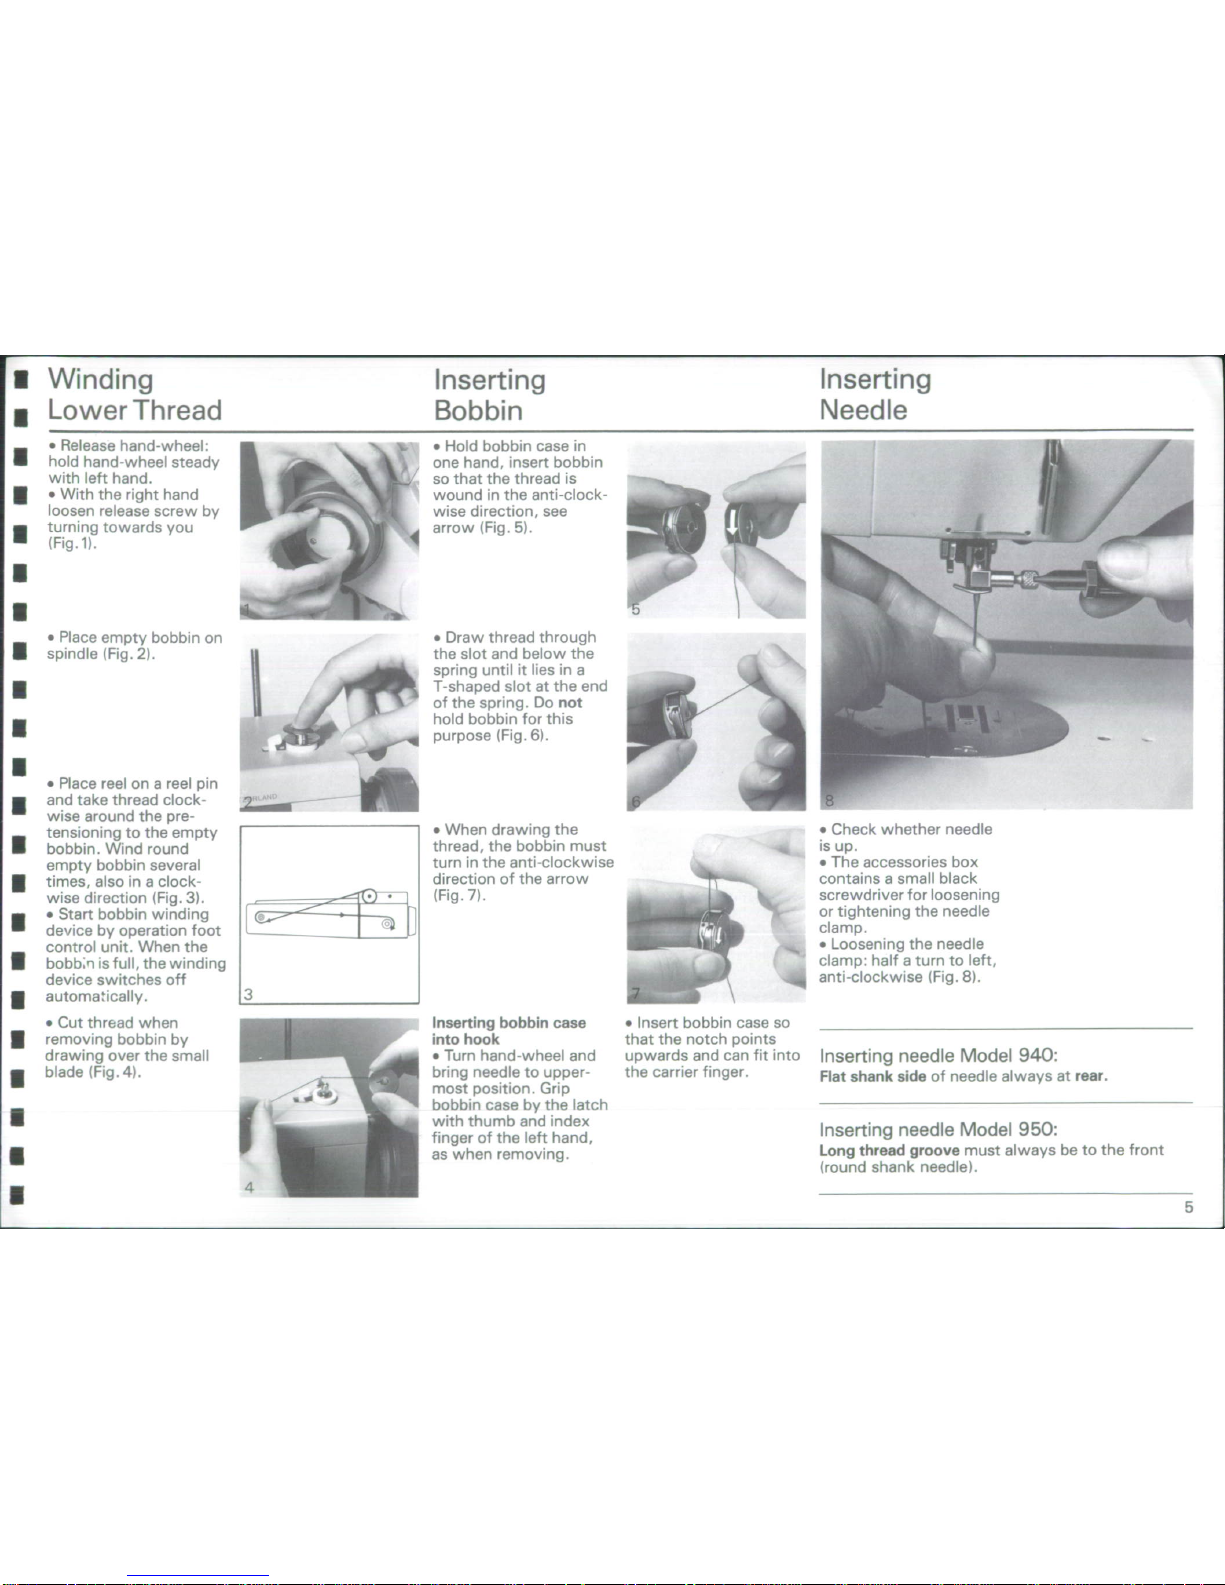
Winding
Inserting
Inserting
*
Lower
Thread
Bobbin
Needle
U
Release
hand-
d -
w
he l :
Hold
bobbin
case
in
WtPlace
empty
bobbin
on
Draw
thread
through
I
spindle
(Fig.
2).
the
slot
and
below
the
'
_
spring
until
it
lies
in
a
l
I
T-shaped
slot
at
the
end
l
AK
~~~~~~~~~~~~of
the
spring,
Do
not
ai
l1
e
hold
bobbin
for
this
I
j
^e_
purpose
(Fig.
6).
*
Place
reel
on
a
reel
pin
and
take
thread
clock-
a
wise
around
the
pre-
tensioning
to
the
empty
*
When
drawing
the
*
Check
whether
needle
*
bobbin.
Wind
round
thread,
the bobbin
must
is
up.
empty bobbin
several
turn
in
the
anti-clockwise
*
The
accessories
box
| times,
also
in a clock- direction
of
the
arrow
contains a small
black
wise
direction
(Fig.
3).
(Fig.
7).
L screwdriver
for
loosening
*
*
Start bobbin
winding
& _
or
tightening
the
needle
device
by
operation
foot
I
clamp.
control unit.
When
the *
Loosening
the
needle
*
bobb
n is
full, the
winding
clamp: half a turn
to
left,
device
switches
off
4
anti-clockwise
(Fig.
8).
automa'ically.
3
*
Cut
thread
when
½ Inserting
bobbin
case
*
Insert
bobbin
case
so
removing
bobbin
by
into
hook
that
the
notch
points
drawing
over
the
small
*
Turn
hand-wheel
and
upwards
and
can
fit
into
Inserting
needle
Model
940:
*
blade (Fig.
4).
bring
needle
to
upper-
the
carrier
finger.
Flat
shank
side of
needle
always
at rear.
-
~~~~~~~~~~~~~~most position.
Grip
-
1 f
J
=
-
bobbin
case
by
the latch
*W i_
fingetof
the
left
hande
Inserting
needle
Model
950:
|
F
as
when removing.
Long
thread
groove
must
always
be
to
the
front
(round
shank
needle).
*
4
_ _ _ _ _
_ _
_
5
 Loading...