

Berkel VOLANO P15, VOLANO B2, VOLANO TRIBUTE, VOLANO B300, VOLANO B114 User Manual
...
Red.
Since 1898.
VOLANO P15 – VOLANO TRIBUTE
VOLANO B2 – VOLANO B3
VOLANO L16 – VOLANO B300
VOLANO B114 - VOLANO B116
EN
USER MANUAL
IT
MANUALE D’USO
DE
GEBRAUCHSANLEITUNG
FR
MANUEL D’INSTRUCTIONS
CS
NÁVOD K POUŽITÍ
DA
BETJENINGSVEJLEDNING
ES
MANUAL DEL USUARIO
LT
NAUDOTOJO VADOVAS
NL
HANDLEIDING
NO
BRUKSANVISNING
PT
MANUAL DE INSTRUÇÕES
RO
MANUAL DE INSTRUCTIUNI
SK
NÁVOD NA POUŽITIE
SV
BRUKSANVISNING
(Fig. 3) (Fig. 4)
A B
(Fig. 5) (Fig. 9)
(Fig. 6)
(Fig. 7)
(Fig. 8) (Fig. 10)
EN
USER MANUAL: FLYWHEEL SLICER
MODELS:
Volano B2, Volano B3, Volano Tribute, Volano P15, Volano L16, Volano B300, Volano B114, Volano
B116
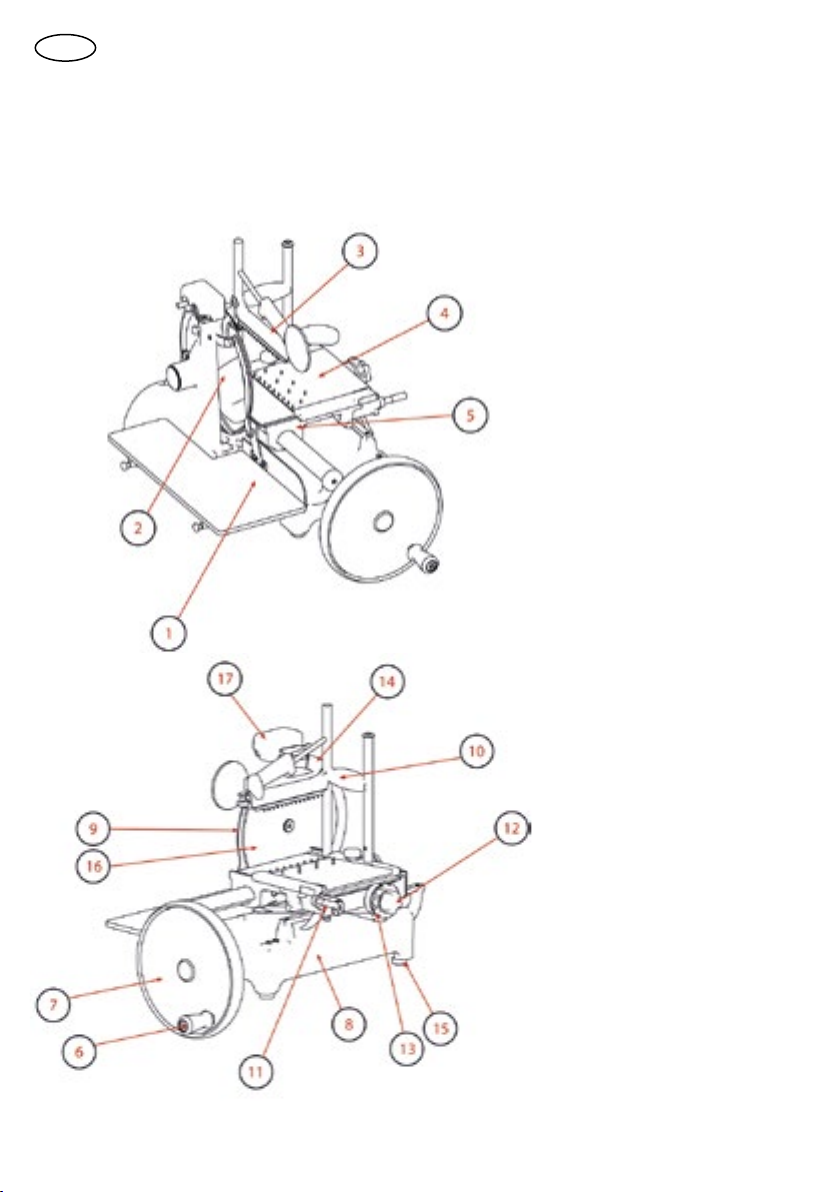
MAIN
COMPONENTS
1. Receiving plate
2. Slice deector
3. Top clamp
4. Meat table
5. Carriage
6. Flywheel operating handle
7. Flywheel
8. Casing
9. Blade protection
10. Vertical sliding top clamp
11. Feed plate fast forward
lever
12. Feed plate forward handle
13. Slice thickness regulating
knob
14. Blade cover
15. Foot
16. Blade
17. Sharpener
Fig. 1
3

DESCRIPTION
Manual, ywheel slicer machine, equipped with a circular
blade, suitable for cutting only
the food products of the types
and within the dimensional
limits indicated in this manual.
The main parts of the machine
are shown in the general component diagram reported in
picture 1.
SAFETY
The machines described in this
manual comply with the latest
European hygiene and safety
standards.
Pay attention to the following
basic safety precautions:
- read all the instructions befo-
re using the machine;
- this product is not intended
to be used by children;
- operate the machine only if
properly trained and in perfect
psycho-physical conditions;
- do not use the machine in any
way other than what indicated
in this manual;
- use the machines only in full
structural, mechanical and system efciency;
- install the machine in conformity to the instructions indicated in the “Installation” section;
- install the machine in a location out of the reach of personnel unauthorized to operate it
and especially out of the reach
of minors;
- stay highly concentrated
when using the machine and
avoid any distraction during
use;
- do not allow the machine to
be used by others who have
not read and fully understood
the content of this manual;
- do not wear baggy clothing or
clothing with open sleeves;
- do not allow anyone else,
other than the operator, to approach during product cutting
operations;
- do not remove, cover or modify the tags located on the
machine body and, in case of
damage of these, replace them
promptly;
- do not remove, modify or
bypass any mechanical protective devices;
- slice only the permitted products, do not attempt cuts on
prohibited type products;
- always keep clean and dry the
sliced product resting surface,
the work area all around the
machine and the operator oor
area;
- do not use the machine as a
resting surface and do not place any objects on it other than
food used for cutting operations;
- do not use the slicer when,
due to normal wear, the distance between the edge of
the blade and the blade guard
ring exceeds 6 mm. In this case,
contact the manufacturer or
one of the Authorized Service
Centers to change the blade.
- Immediately stop the machine in the event of a defect,
abnormal operation, suspicion
of breakdown, incorrect movement, unusual noises;
- use protective gloves for cleaning and maintenance operations;
- place and remove the goods
to be sliced on the sliding plate only with the carriage completely pulled back and put
the blade protection in safety
position;
- for movement of the meat
table during cutting operations
use only the ywheel;
- never put your hands on the
food product while slicing.
4
Always keep your hands far
from the blade;
- use of cutting accessories
which were not provided by
the manufacturer with the machine is prohibited.
The manufacturer declines any
responsibility coming from inappropriate use, modications
and/or repairs carried out by
the user or unauthorized personnel, use of replacement
parts, which are not original
or not specic for the machine
model.
Operating conditions:
- Temperature from -5°C to
+40°C
- Max. humidity 95%
DO NOT SLICE:
- frozen food products;
- food products with bones;
- vegetables in general
- any other product not inten-
ded for food use.
Residual risks
The safety ring around the
blade protects the operator
from incidental contact with
the blade although, in order
to allow the sharpening operations, the protection in the
sharpening area may not entirely eliminate the risk of cut-
ting.
WARNING: during
!
the blade cleaning and
sharpening operations, pay
extra attention to keep your
hands as far as possible from
the unprotected area. Use of
protective gloves is recommended.
INSTALLATION
OF THE MACHINE
If you do not use the stand (op-

tional), install the machine on
a at, smooth and dry surface
suitable for supporting the
weight of the machine itself
plus the goods to be sliced.
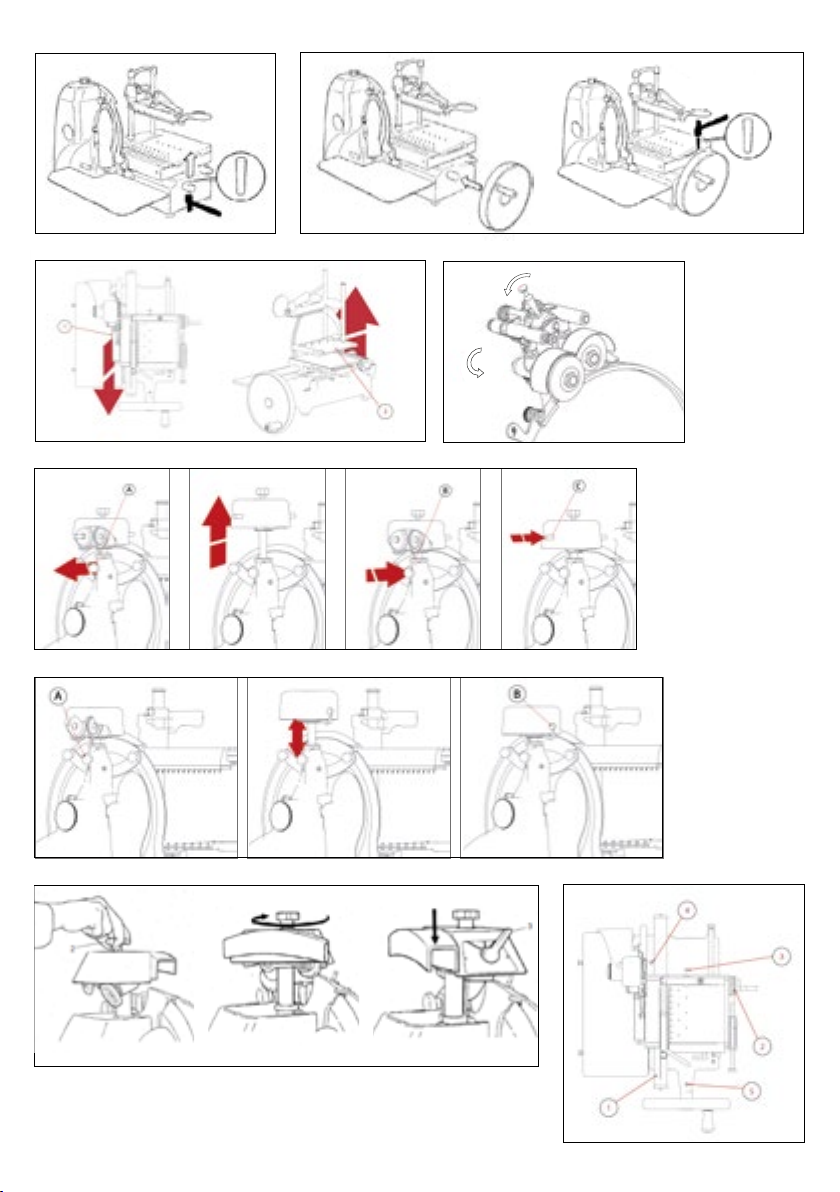
To avoid damages, during the
transport some models are
packaged with the ywheel
disassembled from the machine. If the ywheel of your
machine is not already assemble when you receive it:
- lift the machine carefully and
insert all the feet in the specic
lodgings in the base;
- move the machine carriage all
the way towards the operator;
- take out the taper pin from
the ywheel shaft (Fig. 3) by
hammering the pin at the tapered end (smaller diameter).
Insert the ywheel so that the
maneuvering handle is at the
top and to the left compared to
the hole for the taper pin (Fig.
4A);
- check the correct correspondence of the holes and insert
the pin with the tapered end
(smaller diameter) towards the
sleeve itself;
- hammer the opposite end of
the pin (larger diameter) inserting it all the way (Fig. 4B).
OPERATION
- Using the ywheel handle,
rotate the ywheel (7) to bring
the carriage (5) fully forward
(toward the operator);
- pull back (away from the blade) the meat table (4) using the
meat table rapid advance device (11) or meat table advance
mechanism (12);
- place the product to be sliced
on the sliding meat table;
- hold the handles of the top
clamp: pulling the triggers
move the top clamp to regula-
te the height until locking the
product;
- move the blade protection in
its specic seat to uncover the
blade;
WARNING: risk of in-
!
jury from sharp blade!
When the blade is not covered
with the blade protection, pay
extra attention to keep your
hands as far as possible from
the unprotected area.
- arrange the desired slice thickness, according to the device
present on your machine (13):
sliding the lever with graduation or pulling and rotating the
knob at the same time and select the thickness;
- move the meat table with
product forward (toward the
blade), using the meat table
rapid advance device (11) or
meat table advanced mechanism (12);
- using the ywheel handle,
activate the ywheel turning it
clockwise;
WARNING: risk of dam-
!
ages! Never turn the y-
wheel anti-clockwise, reverse
ywheel rotation may seriously damage the machine.
- during the return movement
of the carriage (towards the
operator) the meat table will
automatically move towards
the blade;
- when the meat table gets to limit advancing towards the blade, stop slicing and lift up the
top clamp. Use the meat table
rapid advance device or the
meat table advance mechanism to pull the meat table away
from the blade. Reposition the
product, relock it with the top
clamp and restart slicing.
5
CLEANING
Clean the machine at least
once a day or more frequently
- if necessary – and always before using, after a long period
of inactivity. Use cut and tear
resistant gloves and perform
all operations with great care.
Products for cleaning:
use only water and biodegradable mild detergent, using a soft, spongy cloth and a
semi-rigid nylon brush for the
sharp areas of the plate and the
product holder. Do not clean
the machine with jets of water
or steam or similar methods.
DISMANTLING
- Check that the blade pro-
tection duly covers the blade (9);
- open the slice deector;
- remove the waste tray;
- if present, loosen the knob on
the meat table. Lift the meat
table with its top clamp arm
(Fig. 5) and remove it.
WARNING! For some
!
models, push the meat
table forward before lifting it
with its top clamp arm.
CLEANING
- The blade: press a damp cloth
on the surface of the blade and
move it slowly from the center
toward the outside on the blade cover side and the opposite
side. In the same way, dry it
using a dry cloth;
WARNING! Never acti-
!
vate the ywheel while
cleaning the blade.
- the safety ring: use a soft bru-
sh to clean the area between
the blade and the safety ring;
- the machine body: use a
damp cloth or a sponge. Dry
carefully.

REASSEMBLING
- Check that the blade pro-
tection duly covers the blade (9);
- put the waste tray in its speci-
c position;
- close the slice deector;
- using the ywheel handle,
rotate the ywheel (7) to bring
the sliding meat table (4) fully
forward (towards the operator);
- with a vertical movement
from top to bottom, place the
meat table in its position.
WARNING: risk of inju-
!
ry from sharp blade! For
some models, after placing the
meat table, push it forward in
order to secure it completely in
the carriage. If present, tighten
the knob on the meat table.
MAINTENANCE
Blade Sharpening
Frequency and duration of
sharpening depend on the use
of the equipment.
WARNING: risk of in-
!
jury from sharp blade!
When the blade is not covered
with the blade protection, pay
extra attention to keep your
hands as far as possible from
the unprotected area.
For sharpening, follow the
instruction according to the
model:
FOR MODEL
B2, B3, TRIBUTE, B300 (Fig. 6)
- Check that the blade protection duly covers the blade;
- check the cover of the sharpener: if it is removable, just
lift it up;
- loosen the sharpener-locking
knob (A);
- lift the sharpener and rotate
it 180°;
- lower the sharpener back
down with care; the blade will
automatically center between
the two grinding wheels;
- re-lock the knob;
- press the button (A) for ap-
proximately 10-15 seconds
and simultaneously rotate the
ywheel. Release the button
(B), press the button (C) for 2-3
seconds and then release it;
- stop turning the ywheel;
- only when the blade is xed,
return the sharpener to its original position and relock the
knob;
- close the cover, if present.
FOR MODEL
P15 (Fig. 7)
- Check that the blade protection duly covers the blade;
- loosen the sharpener-locking
knob (A);
- lift the sharpener and rotate
it 180°;
- lower the sharpener back
down with care; the blade will
automatically center between
the two grinding wheels;
- re-lock the knob;
- pull the lever (B) in an anti-
clockwise for approximately
10-15 seconds and simultaneously rotate the ywheel;
- stop turning the ywheel;
- only when the blade is xed,
return the sharpener to its original position and relock the
knob.
FOR MODEL
B114, B116 (Fig. 8)
- Check that the blade protection duly covers the blade;
- helping with the knob, lift the
sharpener and rotate it 180°;
- lower the sharpener back
down with care; the blade will
automatically center between
the two grinding wheels;
- turn the lever clockwise for
6
approximately 10-15 seconds
and simultaneously rotate the
ywheel;
- turn the lever anticlockwise
for approximately 2-3 seconds
and simultaneously rotate the
ywheel;
- stop turning the ywheel;
- only when the blade is xed,
return the sharpener to its original position.
FOR MODEL
L16, (Fig. 9)
- Check that the blade protection duly covers the blade;
- loosen the sharpener-locking
knob;
- lift the sharpener and rotate
it 180°;
- lower the sharpener back
down with care; the blade will
automatically center between
the two grinding wheels;
- re-lock the knob;
- pull the lever anticlockwise
for approximately 10-15 seconds and simultaneously rotate the ywheel;
- turn the lever clockwise for
approximately 2-3 seconds
and simultaneously rotate the
ywheel;
- stop turning the ywheel;
- only when the blade is xed,
return the sharpener to its original position.
WARNING: risk of dam-
!
ages! Do not excessively
force (more than 2-3 seconds)
the deburring operation to
prevent damaging of the blade.
Lubrication (Fig. 10)
- Put some drops of oil over the
bar (1) and in the junction of
the slice thickness-regulating
knob (2);
- put some drops of oil in the
holes (3 and 4);
- put some drops of oil on the

ywheel in its junction to the
tree (5);
- briey activate the ywheel.
For lubrication only use acid
free oil (we recommend Vaseline oil). Do not use vegetable
oil.
SERVICE
No user-serviceable parts are
inside. Refer servicing to qualied personnel. All the repair
and replacement operations
(like blade replacement, repair
of structural parts, repair and/
or re-placement of sub-baseplate components, or similar)
shall be executed exclusively
by personnel authorized by the
manufacturer.
In the event service is needed, you may return your food
slicer to the manufacturer or
to one of the Authorized Service Centers. For information
about service, centers please
contact us at:
service@berkelinternational.com.
WARNING: risk of in-
!
jury from sharp blade!
The blade replacement is
mandatory if distance between the edge of the blade
and the internal edge of the
guard exceeds 6 mm.
petence or negligence, improper installation, unauthorised
interventions, natural wear
and tear greater than 10% of
the nominal value. More-over,
the warranty does not cover
components intrinsically subject to wear, such as blades and
grinders, except in the event
of evident manufactur-ing de-
fects.
The manufacturer declines any
direct and indirect responsibility coming from:
- failure to observe the in-
structions in this manual;
- use which does not conform
to prevailing specic regulations in the country of installation;
- unauthorized modications
and/or repairs carried out on
the machine;
- use of non-original accessories and replacement parts;
- exceptional events.
Transfer of ownership of the
machine automatically defaults the manufacturer’s liability for the machine in question.
The Identication tag on the
base-plate indicates manufacturer, machine, technical information.
WARRANTY AND
RESPONSIBILITY
The manufacturer supplies The
manufacturer supplies machines with a limited war-ranty
of 24 months from the purchasing date. The warran-ty is
extended only to defects that
arise under intended use conditions and proper use. The warranty does not cover defects
resulting from faults caused by
transport, purchas-er’s incom-
7

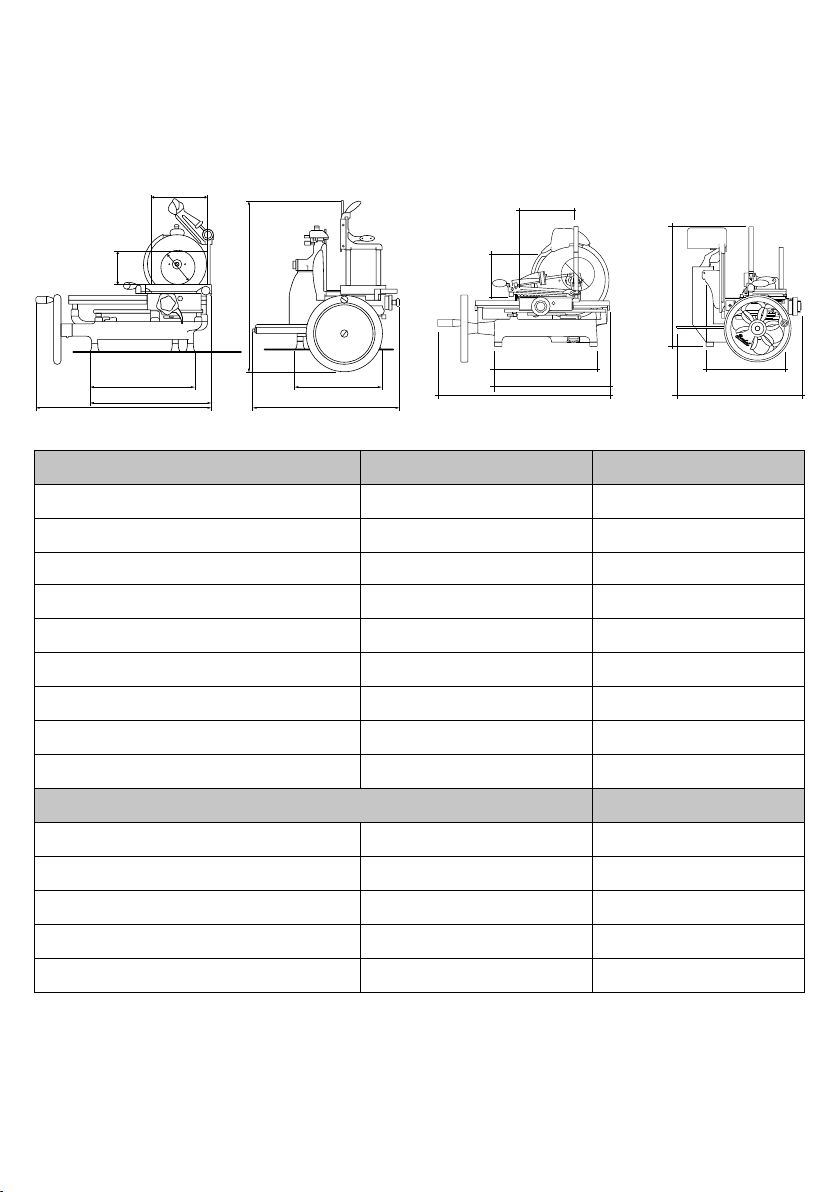
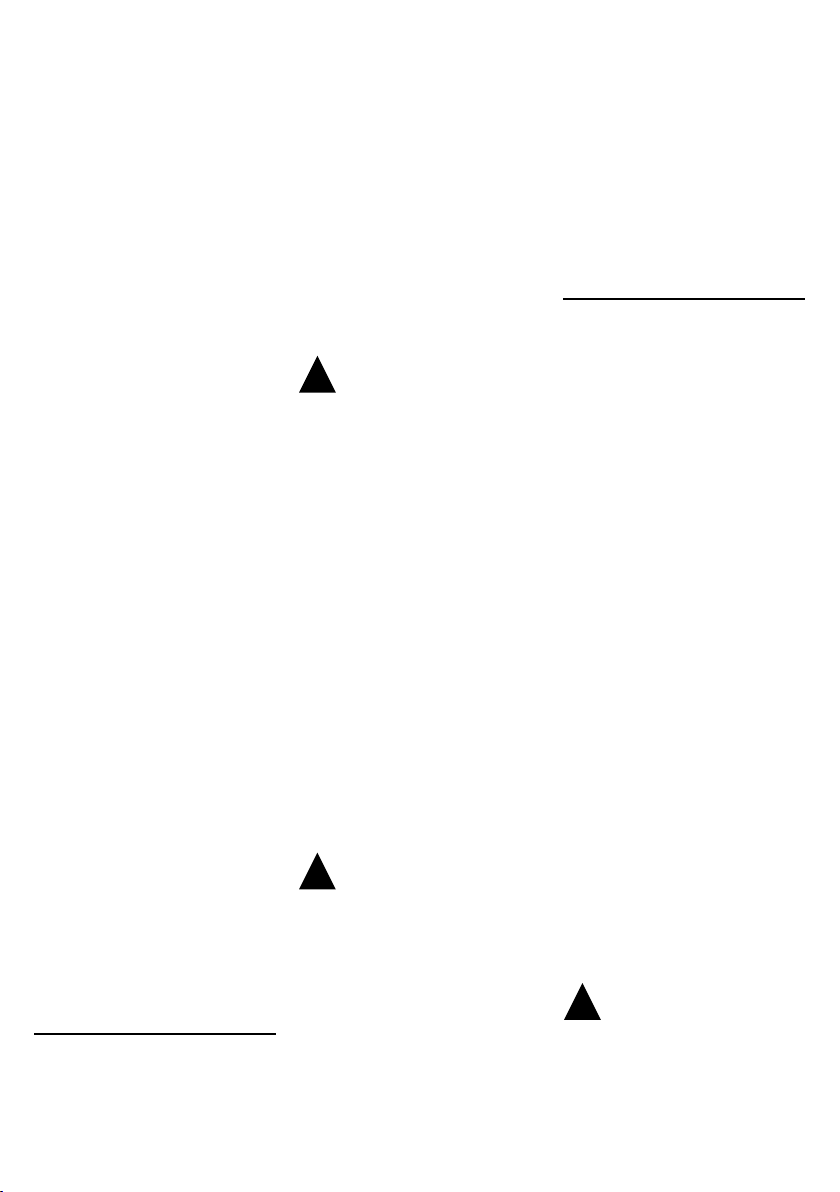
DATA SHEET
B
VOLANO
TRIBUTE
C
G
A
I
D
F
E
H
C
G
D
F
VOLANO
P15
B
A
I
MODEL TRIBUTE P15
A 184 mm 180 mm
B 230 mm 210 mm
C 184 mm 180 mm
D 420 mm 430 mm
E 330 mm 250 mm
F 495 mm 505 mm
E
H
G 750 mm 720 mm
H 545 mm 600 mm
I 730 mm 570 mm
SPECIFICATIONS
Circular cutting capacity 184 mm 180 mm
Rectangular cutting capacity 230x184 mm 210x180 mm
Max slice thickness 3 mm 3 mm
Blade diameter 300 mm 285 mm
Weight 60 Kg 60 kg
8

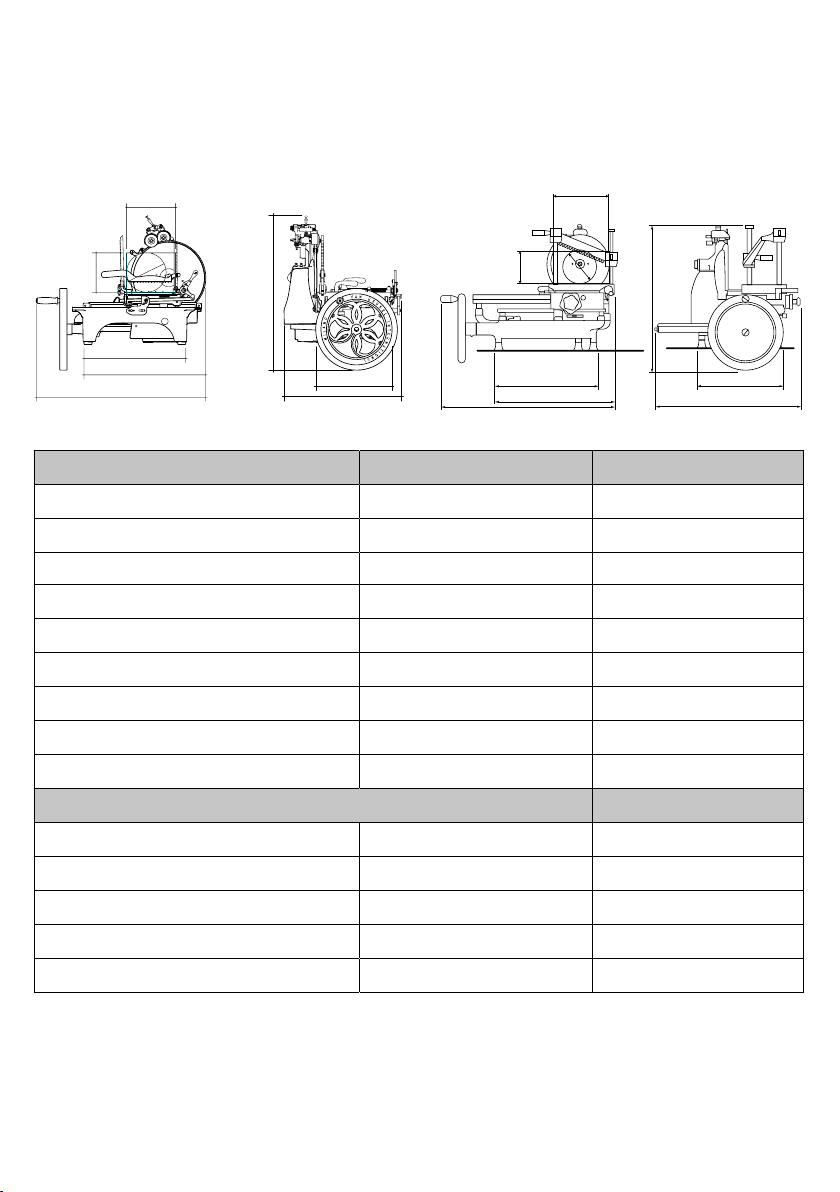
VOLANO
L16
VOLANO
B2
B
A
C
I
D
F
G
H
E
C
G
B
A
I
D
F
MODEL L16 B2
A 210 mm 160 mm
B 260 mm 190 mm
C 200 mm 150 mm
D 305 mm 395 mm
E 640 mm 265 mm
F 880 mm 465 mm
G 600 mm 680 mm
H 545 mm 530 mm
I 750 mm 540 mm
SPECIFICATIONS
E
H
Circular cutting capacity 210 mm 160 mm
Rectangular cutting capacity 260x200 mm 190x150 mm
Max slice thickness 4 mm 2 mm
Blade diameter 350 mm 265 mm
Weight 105 Kg 60 kg
9
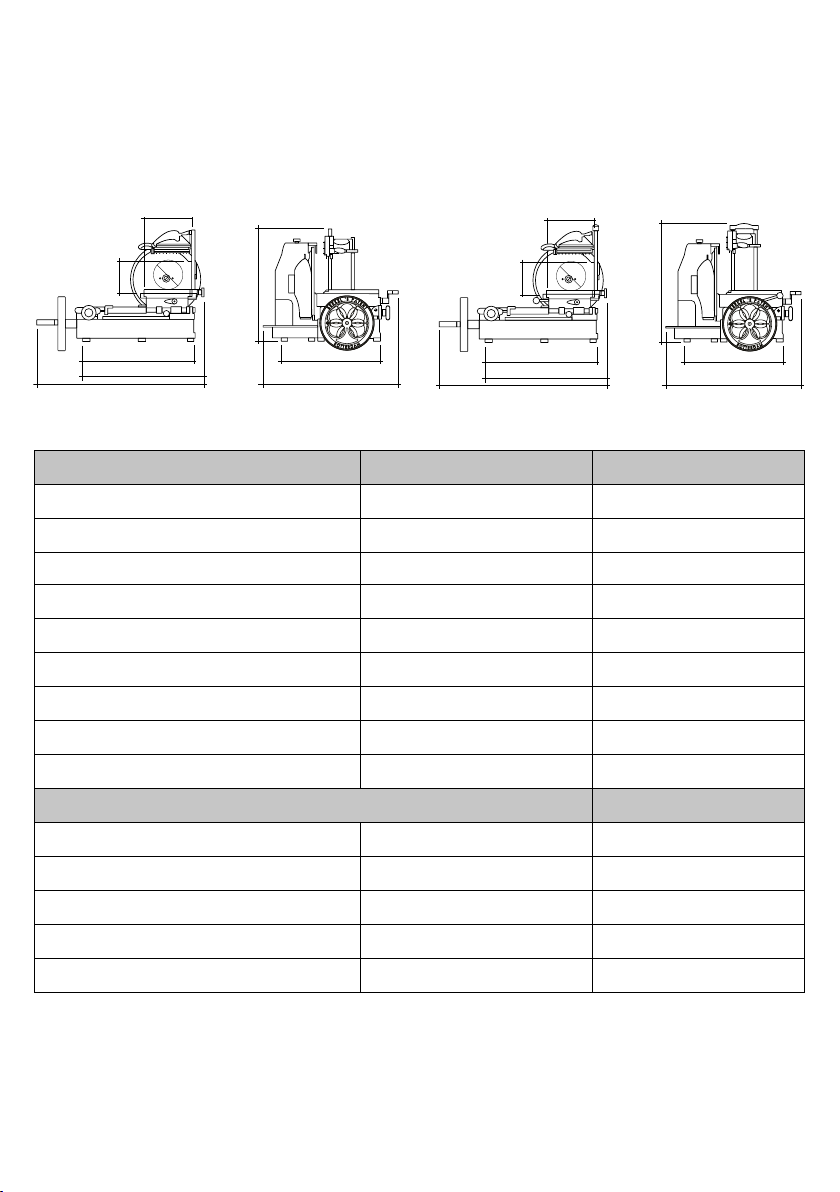
VOLANO
B
B3
VOLANO
B300
B
C
G
A
I
D
F
E
H
C
G
A
D
F
I
MODEL B3 B300
A 184 mm 215 mm
B 230 mm 240 mm
C 184 mm 215 mm
D 380 mm 465 mm
E 300 mm 325 mm
F 480 mm 540 mm
G 725 mm 775 mm
H 560 mm 580 mm
I 735 mm 540 mm
SPECIFICATIONS
Circular cutting capacity 184 mm 215 mm
E
H
Rectangular cutting capacity 230x184 mm 240x215 mm
Max slice thickness 3 mm 3 mm
Blade diameter 300 mm 300 mm
Weight 45 Kg 50 kg
10

VOLANO
B114
VOLANO
B116
B
C
G
A
F
I
ED
H
G
B
A
C
D
F
I
MODEL B114 B116
A 220 mm 235 mm
B 280 mm 280 mm
C 220 mm 235 mm
D 570 mm 620 mm
E 425 mm 480 mm
F 610 mm 680 mm
G 850 mm 930 mm
H 680 mm 750 mm
I 545 mm 670 mm
SPECIFICATIONS
E
H
Circular cutting capacity 220 mm 235 mm
Rectangular cutting capacity 280x220 mm 280x235 mm
Max slice thickness 3 mm 5 mm
Blade diameter 300 mm 370 mm
Weight 62 Kg 88 kg
Note: As we actually strive to improve our products, specications are necessarily subject to change
without notice.
11

IT
MANUALE D’USO: AFFETTATRICE MANUALE A VOLANO
MODELLI:
Volano B2, Volano B3, Volano Tribute, Volano P15, Volano L16, Volano B300, Volano B114, Volano
B116
COMPONENTI
PRINCIPALI
1. Piatto raccoglitore
2. Parafetta
3. Pressamerce
4. Piatto portamerce
scorrevole
5. Carrello
6. Maniglia di manovra volano
7. Volano
8. Basamento
9. Paralama
10. Scorrimento verticale
pressamerce
11. Leva avanzamento rapido
sovrappiatto
12. Volantino avanzamento
sovrappiatto
13. Regolazione spessore fetta
14. Coprilama
15. Piedino di appoggio
16. Lama
17. Aflatoio
Fig. 1
12

DESCRIZIONE
Macchine affettatrici a volano
con lama circolare, progettate
per affettare esclusivamente
prodotti alimentari del tipo e
nei limiti dimensionali indicati
nel presente manuale. Le parti
principali che compongono la
macchina sono illustrate alla
gura 1.
SICUREZZA
Le macchine descritte in questo manuale rispettano gli
standard Europei di igiene e
sicurezza imposti dalle ultime
normative.
Per la vostra sicurezza, fate attenzione alle seguenti istruzioni:
- leggere attentamente tutte
le istruzioni prima di usare la
macchina;
- il prodotto non è indicato per
l’utilizzo da parte dei bambini;
- utilizzare la macchina solo se
propriamente istruiti e in perfetto stato psico-sico;
- non usare la macchina in alcun modo differente da come
indicato nel presente manuale;
- installare la macchina in conformità alle istruzioni riportate
al paragrafo ‘installazione’;
- installare la macchina in luogo al di fuori dalla portata di
personale estraneo alle operazioni relative all’impiego della
stessa e soprattutto di minori;
- utilizzare la macchina con
grande concentrazione ed evitare di distrarsi;
- non permettere l’utilizzo della macchina ad alcuno che non
abbia letto e compreso pienamente il presente manuale;
- non indossare indumenti svolazzanti o con maniche aperte;
- non permettere ad alcuno di
avvicinarsi durante l’operazione di taglio del prodotto;
- non rimuovere, coprire o modicare le targhette collocate
sul corpo della macchina e, in
caso di danneggiamento delle
stesse, sostituirle prontamente;
- non rimuovere le protezioni e
non modicare o escludere le
protezioni meccaniche;
- affettare unicamente i prodotti di tipo consentito, non
tentare alcuna prova di taglio
con prodotti di tipo proibito;
- mantenere la zona di appoggio del prodotto affettato, la
zona tutt’intorno alla macchina
ed il piano pavimento operatore sempre puliti ed asciutti;
- non utilizzare la macchina
come supercie di appoggio e
non appoggiarvi alcuno oggetto estraneo alle normali operazioni di taglio;
- non usare l’affettatrice quando, a seguito di normale usura,
la distanza tra il lo della lama
e l’anello para lama ha superato i 6 mm, in tal caso contattare
il produttore o uno dei Centri
Servizio Autorizzati per cambiare la lama;
- arrestare immediatamente la
macchina e richiedere l’intervento di personale di assistenza autorizzato in caso di funzionamento anomalo, sospetto
di rotture, movimenti non corretti, rumori insoliti, ecc.;
- utilizzare sempre guanti del
tipo resistente al taglio ed alla
lacerazione per le operazioni di
pulizia e di manutenzione;
- porre e rimuovere la merce
da affettare sul sovrappiatto
scorrevole solo con il piatto
completamente retratto (lontano dalla lama) ed il carrello
totalmente verso l’operatore;
- far scorrere il piatto durante
le operazioni di taglio solo ed
esclusivamente mediante l’utilizzo del volano;
- non toccare mai con le mani il
13
prodotto durante l’operazione
di taglio. Mantenere sempre le
mani lontane dalla lama;
- non è ammesso l’uso di accessori per il taglio che non siano
stati forniti dal costruttore della macchina.
Il costruttore declina ogni
responsabilità derivante da
un uso inappropriato, modiche e/o riparazioni effettuate
dall’utente o da personale non
autorizzato, utilizzo di parti di
ricambio non originali o non
speciche per il modello di
macchina.
Condizioni ambientali d’uso:
- Temperatura da -5° C a +40° C
- Umidità max 95%
NON AFFETTARE:
- prodotti alimentari congelati;
- prodotti alimentari surgelati;
- prodotti alimentari con ossa
(carne e pesce);
- ogni altro prodotto non destinato all’uso alimentare.
Rischi residui
L’anello di protezione intorno
alla lama protegge l’operatore
dal contatto accidentale con la
lama tuttavia, al ne di consentire le operazioni di aflatura,
la protezione non elimina completamente il rischio di taglio.
ATTENZIONE! Durante
!
le operazioni di pulizia
e aflatura della lama, fare
estrema attenzione a mantenere le mani il più lontano
possibile dall’area non protetta. Si raccomanda di utilizzare
guanti di protezione.
INSTALLAZIONE
Se non si utilizza la colonna di
supporto (opzionale) installare
la macchina su di un piano ben
livellato, asciutto ed adatto a
sostenere il peso della macchina stessa più la merce da affettare. Vericare che non ci siano
impedimenti al movimento del
volano, alla corsa del carrello
ed al caricamento della merce
da affettare.
Per evitare danneggiamenti,
durante il trasporto alcuni modelli sono imballati con il volano a parte, non montato. Se il
volano della macchina ricevuta
non è montato, seguire le istruzioni:
- sollevare la macchina con attenzione ed inserire i piedini in
gomma nelle relative sedi del
basamento;
- portare il carrello della macchina totalmente verso l’operatore;
- estrarre la spina conica
dall’albero del volano (Fig. 3)
battendo la spina con un martello all’estremità rastremata
(diametro inferiore). Inserire il
volano in modo che la maniglia
di manovra dello stesso venga
a trovarsi in alto e a sinistra
rispetto all’asse del foro per la
spina conica di ssaggio. (Fig.
4A);
- vericare la corretta corrispondenza delle forature ed
inserire la spina nel manicotto con l’estremità rastremata
(diametro inferiore) rivolta
verso il manicotto stesso;
- battere l’estremità opposta
della spina (diametro superiore) inserendola totalmente.
(Fig. 4B).
USO DELL’AFFETTATRICE
- Azionando il volano (7) portare il carrello (5) totalmente in
avanti (verso l’operatore);
- arretrare completamente
(lontano dalla lama) il piatto
porta merce (4) usando il sistema di avanzamento rapido (11)
oppure sul sistema di avanzamento del piatto (12);
- porre la merce da affettare
sul piatto porta merce;
- impugnare le maniglie del
pressamerce: tirando i grilletti
sollevare o abbassare il pressamerce per regolare l’altezza
no a bloccare il prodotto;
- spostare la protezione della
lama nella sua postazione di riposo per scoprire la lama;
ATTENZIONE Lama af-
!
lata, pericolo di taglio!
Quando la lama non è coperta dalla protezione, prestare
estrema attenzione nel mantenere le mani il più possibile
lontano dall’area non protetta.
- predisporre lo spessore fetta
desiderato, secondo il dispositivo di cui è dotata la macchina:
a. far scorrere la leva (13) con
graduazione o b. tirare e ruotare la manopola allo stesso tempo e selezionare lo spessore;
- avvicinare il piatto portamerce (verso la lama) intervenendo
sul sistema di avanzamento rapido del piatto (11) o sul sistema di avanzamento (12);
- azionare il volano facendolo
ruotare in senso orario;
ATTENZIONE rischio di
!
danneggiamento! Non
ruotare il volano del carrello in
senso contrario, la rotazione inversa del volano può seriamente danneggiare la macchina.
- durante la corsa di ritorno del
carrello (verso l’operatore) viene azionato il dispositivo meccanico che fa avanzare, in senso trasversale, il sovrappiatto
verso la lama;
- quando il piatto portamerce
14
raggiunge il limite di avanzamento verso la lama, fermarsi e sollevare il pressamerce.
Utilizzando il sistema di avanzamento del piatto o quello di
avanzamento rapido, allontanare il piatto dalla lama. Riposizionare il prodotto, bloccarlo
nuovamente con il pressamerce e ricominciare ad affettare.
PULIZIA
Le macchine devono essere accuratamente pulite almeno una
volta al giorno. Dopo un periodo di inattività devono essere
pulite anche prima dell’utilizzo.
Utilizzare guanti di protezione
resistenti al taglio ed alla lacerazione ed eseguire tutte le
operazioni con grande attenzione.
Prodotti per la pulizia: usare
esclusivamente acqua con un
panno morbido, spugnoso ed
eventualmente uno spazzolino
di nylon semi rigido per le zone
del piatto e del pressamerce.
Non pulire la macchina con
getti d’acqua o vapore o con
metodi similari.
SMONTAGGIO
- Assicurarsi che la protezione
copra debitamente la lama (9);
- aprire il parafetta;
- rimuovere la vaschetta;
- se presente, svitare la mano-
pola sul piatto portamerce. Sollevare il piatto insieme al pressamerce (Fig. 5) e rimuoverlo.
ATTENZIONE! Per al-
!
cuni modelli, spingere
il piatto portamerce in avanti
prima di sollevarlo insieme al
porta merce.
PULIZIA
- Lama: premere un panno umi-

do sulla supercie della lama e
spostarlo lentamente dal centro verso l’esterno, come in
gura, sul lato corpilama e sul
lato opposto. Asciugare, nello
stesso modo, utilizzando un
panno asciutto;
ATTENZIONE! Non at-
!
tivare l’affettatrice men-
tre si pulisce la lama.
- anello di sicurezza: usare uno
spazzolino di nylon semirigido
per pulire l’area compresa tra
la lama e l’anello di protezione;
- corpo macchina: pulire il corpo macchina con un panno umido o una spugna risciacquando
acqua. Asciugare con cura.
RIASSEMBLAGGIO
- Controllare che la protezione
copra debitamente la lama (9);
- rimettere la vaschetta nella
sua posizione;
- chiudere il parafetta;
- utilizzando la manopola del
volano, ruotare il volano (7)
per portare completamente in
avanti (verso l’operatore) il piatto portamerce scorrevole (4);
- con un movimento verticale
dall’alto verso il basso, rimettere il piatto portamerce nella
sua posizione iniziale.
ATTENZIONE: per al-
!
cuni modelli, dopo aver
posizionato il piatto porta
merce, spingerlo per ssarlo al
supporto piatto. Se presente,
stringere la manopola sul piatto portamerce.
MANUTENZIONE
Aflatura lama
La frequenza e la durata dell’aflatura dipende dall’uso che
viene effettuato.
ATTENZIONE Lama af-
!
lata, pericolo di taglio!
Quando la lama non è coper-
ta dalla protezione, prestare
estrema attenzione nel mantenere le mani il più possibile
lontano dall’area non protetta.
Per l’aflatura della lama, seguire le istruzioni a seconda del
modello indicato:
PER I MODELLI
B2, B3, TRIBUTE, B300 (Fig. 6)
- Vericare che la protezione
copra debitamente la lama;
- controllare la capottina
dell’aflatoio: se è removibile,
sollevarla;
- allentare il pomello di bloccaggio dell’aflatoio (A);
- sollevare l’aflatoio e ruotarlo di 180°;
- abbassare l’aflatoio con
cura, la lama si centrerà automaticamente tra le due mole;
- ribloccare il pomello;
- premere il pulsante (B) per
circa 10-15 secondi e contemporaneamente ruotare il volano. Lasciare il pulsante (B),
premere il pulsante (C) per 2-3
secondi e lasciarlo;
- interrompere la rotazione del
volano;
- solo quando la lama è ferma,
riposizionare l’aflatoio nella
sua posizione originale e avvitare il pomello;
- chiudere la capottina, se presente.
PER IL MODELLO
P15 (Fig. 7)
- Vericare che la protezione
copra debitamente la lama;
- allentare il pomello di bloccaggio dell’aflatoio (A);
- sollevare l’aflatoio e ruotarlo di 180°;
- abbassare l’aflatoio con
cura, la lama si centrerà automaticamente tra le due mole;
- ribloccare il pomello;
- girare la leva (B) in senso
15
antiorario per circa 10-15 secondi e contemporaneamente
ruotare il volano;
- interrompere la rotazione del
volano;
- solo quando la lama è ferma,
rimettere l’aflatoio nella sua
posizione originale e avvitare
il pomello.
PER IL MODELLO
B114, B116 (Fig. 8)
- Vericare che la protezione
copra debitamente la lama;
- aiutandosi con il pomello, sollevare l’aflatoio e ruotare di
180°;
- abbassare l’aflatoio con
cura, la lama si centrerà automaticamente tra le due mole;
- girare la leva in senso orario
per circa 10-15 secondi e contemporaneamente ruotare il
volano;
- girare la leva in senso antiorario per circa 2-3 secondi e
contemporaneamente ruotare
il volano;
- interrompere la rotazione del
volano;
- solo quando la lama è ferma,
rimettere l’aflatoio nella sua
posizione originale.
PER IL MODELLO
L16 (Fig. 9)
- Vericare che la protezione
copra debitamente la lama;
- allentare il pomello di bloccaggio dell’aflatoio;
- sollevare l’aflatoio e ruotarlo di 180°;
- abbassare l’aflatoio con
cura, la lama si centrerà automaticamente tra le due mole;
- avvitare il pomello;
- girare la leva in senso orario
per circa 10-15 secondi e contemporaneamente ruotare il
volano;
- girare la leva in senso antiorario per circa 2-3 secondi e

contemporaneamente ruotare
il volano;
- interrompere la rotazione del
volano;
- solo quando la lama è ferma,
rimettere l’aflatoio nella sua
posizione originale.
ATTENZIONE: rischio di
!
danneggiamento! Non
prolungare eccessivamente
(non più di 2-3 secondi) l’operazione di sbavatura per evitare di danneggiare la lama.
Lubricazione (Fig. 10)
- Versare alcune gocce di olio
sulla barra (1) e nella giunzione della manopola regolazione
spessore fetta (2);
- versare alcune gocce di olio
nei buchi (3 e 4);
- versare alcune gocce di olio
nella giunzione tra volano e
corpo dell’affettatrice (5);
- azionare brevemente il volano.
Per la lubricazione usare solo
oli senza acidi (si consiglia olio
di vaselina). Non usare oli ve-
getali.
ASSISTENZA
Non sono forniti pezzi di ricambio all’interno dell’imballo.
Tutte le attività di riparazione
e sostituzione (quali sostituzione o riparazione di lama,
cinghia, componenti elettrici,
parti strutturali, etc.) devono
essere svolte esclusivamente
da personale autorizzato dal
produttore stesso.
Nel caso fosse necessaria una
riparazione, si raccomanda di
ritornare la macchina al produttore o ad un Centro Servizi
Autorizzato.
Per informazioni riguardo i
centri servizi, rivolgersi a:
service@berkelinternational.com.
ATTENZIONE! E’ ob-
!
bligatorio sostituire la
lama quando la distanza tra il
lo della lama stessa ed il bordo interno della protezione
supera i 6 mm.
GARANZIA
E RESPONSABILITA’
Il produttore fornisce macchine con una garanzia di durata
24 mesi, a partire dalla data di
acquisto. La garanzia copre solo
i difetti riscontrati facendone
un uso appropriato e secondo
le condizioni d’uso previste
dal manuale. La garanzia non
copre difetti dovuti a trasporto, incompetenza o negligenza
dell’acquirente, installazione
o posizionamento improprio,
danni da usura, voltaggio superiore al 10% del valore nominale. Inoltre, la garanzia non
copre componenti intrinsecamente soggetti a usura, quali
la lama e le mole dell’aflatoio,
eccetto nel caso di evidente difetto di produzione.
Il produttore declina qualsiasi
responsabilità diretta e indiretta derivante da:
- mancata osservanza delle
istruzioni presenti nel manuale;
- uso non conforme alla normativa dominante nel paese di
installazione;
- modiche e/o riparazioni sulla macchina non autorizzate;
- uso di accessori e parti di ricambio non originali;
- eventi eccezionali.
Il trasferimento di proprietà
della macchina, comporta
l’immediato sollevamento da
ogni responsabilità da parte
del produttore. La targhetta di
identicazione sulla base della
macchina registra il produttore, la macchina, le informazioni
tecniche.
16

CARATTERISTICHE TECNICHE
B
VOLANO
TRIBUTE
C
G
A
I
D
F
E
H
C
G
D
F
VOLANO
P15
B
A
I
MODELLO TRIBUTE P15
A 184 mm 180 mm
B 230 mm 210 mm
C 184 mm 180 mm
D 420 mm 430 mm
E 330 mm 250 mm
F 495 mm 505 mm
E
H
G 750 mm 720 mm
H 545 mm 600 mm
I 730 mm 570 mm
SPECIFICHE
Capacità di taglio circolare 184 mm 180 mm
Capacità di taglio rettangolare 230x184 mm 210x180 mm
Massimo spessore fetta 3 mm 3 mm
Diametro lama 300 mm 285 mm
Peso 60 Kg 60 kg
17
VOLANO
L16
VOLANO
B2
B
A
C
I
D
F
G
H
E
C
G
B
A
I
D
F
MODELLO L16 B2
A 210 mm 160 mm
B 260 mm 190 mm
C 200 mm 150 mm
D 305 mm 395 mm
E 640 mm 265 mm
F 880 mm 465 mm
G 600 mm 680 mm
H 545 mm 530 mm
I 750 mm 540 mm
SPECIFICHE
E
H
Capacità di taglio circolare 210 mm 160 mm
Capacità di taglio rettangolare 260x200 mm 190x150 mm
Massimo spessore fetta 4 mm 2 mm
Diametro lama 350 mm 265 mm
Peso 105 Kg 60 kg
18

VOLANO
B
B3
VOLANO
B300
B
C
G
A
I
D
F
E
H
C
G
A
D
F
I
MODELLO B3 B300
A 184 mm 215 mm
B 230 mm 240 mm
C 184 mm 215 mm
D 380 mm 465 mm
E 300 mm 325 mm
F 480 mm 540 mm
G 725 mm 775 mm
H 560 mm 580 mm
I 735 mm 540 mm
SPECIFICHE
Capacità di taglio circolare 184 mm 215 mm
E
H
Capacità di taglio rettangolare 230x184 mm 240x215 mm
Massimo spessore fetta 3 mm 3 mm
Diametro lama 300 mm 300 mm
Peso 45 Kg 50 kg
19

VOLANO
B114
VOLANO
B116
B
C
G
A
F
I
ED
H
G
B
A
C
D
F
I
MODELLO B114 B116
A 220 mm 235 mm
B 280 mm 280 mm
C 220 mm 235 mm
D 570 mm 620 mm
E 425 mm 480 mm
F 610 mm 680 mm
G 850 mm 930 mm
H 680 mm 750 mm
I 545 mm 670 mm
SPECIFICHE
E
H
Capacità di taglio circolare 220 mm 235 mm
Capacità di taglio rettangolare 280x220 mm 280x235 mm
Massimo spessore fetta 3 mm 5 mm
Diametro lama 300 mm 370 mm
Peso 62 Kg 88 kg
Nota: A seguito della continua ricerca per migliorare sempre i nostri prodotti, le speciche tecniche
sono soggette a possibili variazioni.
20

DE
GEBRAUCHSANLEITUNG: HANDBETRIEBENE AUFSCHNITTMASCHINE MIT SCHWUNGRAD
MODELLE:
Volano B2, Volano B3, Volano Tribute, Volano P15, Volano L16, Volano B300, Volano B114, Volano
B116
HAUPTBESTANDTEILE
1. Auffangteller
2. Restehalter
3. Schneidgutpresse
4. Schneidgutplatte
5. Schlitten
6. Schwungradgriff
7. Schwungrad
8. Gehäuse
9. Messerschutz
10. Senkrechtlauf der
Schneidgutpresse
11. Hebel für schnelle
Bewegung des Obertellers
12. Handrad für
Vorwärtsbewegung des
Obertellers
13. Reglerknopf fur die
schnittdicke
14. Messerabdeckung
15. Stützfuß
16. Messer
17. Schleifvorrichtung
Abb. 1
21

BESCHREIBUNG
Schwungrad-Aufschnittmaschinen mit kreisrundem Messer, die ausschließlich zum
Aufschneiden von Lebensmitteln des Typs und der Größe
bestimmt sind, die in der vorliegenden Anleitung genannt
werden. Die Hauptbestandteile des Gerätes werden in Abbildung 1 gezeigt.
SICHERHEIT
Die in dieser Anleitung beschriebenen Geräte erfüllen
die europäischen Hygiene- und
Sicherheitsstandards der aktuellen Bestimmungen.
Zu Ihrer Sicherheit möchten
wir Sie bitten, unbedingt die
folgenden Anweisungen zu befolgen:
- Bevor Sie das Gerät benutzen, lesen Sie aufmerksam alle
Anweisungen;
- Das Produkt ist nicht zum Gebrauch durch Kinder geeignet;
- Verwenden Sie das Gerät nur
nach entsprechender Anweisung und wenn Sie sich in
einwandfreiem körperlichem
und geistigem Zustand benden;
- Verwenden Sie das Gerät auf
keinen Fall anders als in der
vorliegenden Anleitung beschrieben;
- Installieren Sie das Gerät
in Übereinstimmung mit den
Anweisungen im Abschnitt „Installation“;
- Stellen Sie das Gerät an einem Ort auf, zu dem Unbefugte
und vor allem Minderjährige
keinen Zugang haben;
- Seien Sie beim Verwenden
des Gerätes stets hochkonzentriert und lassen Sie sich nicht
ablenken;
- Gestatten Sie den Gebrau-
ch des Gerätes niemandem,
der die vorliegende Anleitung
nicht gelesen und/oder verstanden hat;
- Tragen Sie bei der Verwendung keine atternden Kleidungsstücke oder weiten Ärmel;
- Gestatten Sie während des
Schneidvorgangs niemandem,
außer dem Bediener, sich dem
Gerät zu nähern;
- Die Beschilderung am Gerät
darf nicht entfernt, überdeckt
oder verändert werden und ist
im Falle einer Beschädigung
umgehend zu ersetzen;
- Die Schutzvorrichtung darf
nicht entfernt und die mechanischen Schutzvorrichtungen
dürfen nicht verändert werden;
- Es dürfen ausschließlich die
zugelassenen Produkte aufgeschnitten werden. Versuchen
Sie niemals, nicht zugelassene
Produkte zu schneiden;
- Halten Sie den Ablagebereich
für die Aufschnittware, den gesamten Bereich um das Gerät
und den Fußboden im Arbeitsbereich immer sauber und
trocken;
- Nutzen Sie das Gerät nicht
als Fläche zum Abstützen oder
zum Ablegen von Gegenständen, die nicht für den Schneidevorgang erforderlich sind;
- Benutzen Sie die Aufschnittmaschine nicht, wenn der Abstand zwischen dem Messer
und dem Sicherheitsring des
Messers 6 mm infolge der normalen Abnutzung übersteigt.
Wenden Sie sich in diesem Fall
an den Hersteller oder an eine
autorisierte Kundendienststelle, um das Messer auswechseln
zu lassen;
- Halten Sie das Gerät bei einem Defekt, ungewöhnlicher
Funktionsweise, Verdacht
22
auf einen Bruch, nicht korrekten Bewegungen oder ungewöhnlichen Geräuschen
sofort an und fordern Sie den
Eingriff von autorisiertem
Kundendienstpersonal an;
- Tragen Sie bei den Reinigungs- und Wartungsarbeiten
immer schnitt- und rissfeste
Schutzhandschuhe;
- Legen Sie die aufzuschneidende Ware nur auf der beweglichen Oberplatte ab bzw.
entfernen Sie sie von selbiger,
wenn die Platte vollständig
zurückgesetzt ist (weit entfernt vom Messer) und der Schlitten sich vollständig in Richtung
Bediener bendet;
- Lassen Sie die Platte
während des Schneidvorgangs ausschließlich mithilfe des
Schwungrades gleiten.
- Berühren Sie das Produkt
während des Schneidvorgangs
nie mit den Händen. Halten Sie
die Hände immer vom Messer
fern;
- Es ist nicht zulässig, für das
Aufschneiden andere als die
vom Hersteller für die Ausstattung der Maschine vorgesehenen Zubehörteile zu benutzen.
Der Hersteller lehnt jede Verantwortung für Schäden ab, die
die Folge von unsachgemäßem
Gebrauch, von durch nicht
autorisiertes Personal ausgeführten Änderungen und/oder
Reparaturen sowie Gebrauch
von nicht originalen oder nicht
speziell für das Gerätemodell
geeigneten Ersatzteilen sind.
Umgebungsbedingungen für
den Betrieb:
- Temperatur: zwischen -5°C
und +40°C
- Max. Feuchtigkeit 95%
NICHT AUFSCHNEIDEN:
- gefrorene Lebensmittel;

- tiefgekühlte Lebensmittel;
- Lebensmittel mit Knochen
(Fleisch und Fisch);
- alle anderen nicht zu Ernährungszwecken vorgesehenen Produkte.
Restrisiken
Der Schutzring um das Messer
schützt den Bediener vor dem
versehentlichen Kontakt mit
dem Messer; trotzdem kann
dieser Schutz die Schneidgefahr
nicht vollständig beseitigen.
ACHTUNG! Halten Sie
!
Ihre Hände beim Reinigen und Schleifen des Messers
unbedingt möglichst weit vom
nicht geschützten Bereich
entfernt. Es wird das Tragen
von Schutzhandschuhen empfohlen.
INSTALLATION
Wenn keine Standsäule (optional) verwendet wird, stellen Sie das Gerät auf eine gut
nivellierte, glatte, trockene
und dem Gewicht des Gerätes
und des Schneidgutes angemessene Fläche. Stellen Sie
sicher, dass die Bewegung von
Schwungrad und Schlitten sowie das Auaden des Schneidguts durch nichts beeinträchtigt werden.
Um Transportschäden zu vermeiden, werden einige Modelle mit separatem, nicht montiertem Schwungrad geliefert.
Wenn das Schwungrad bei Lieferung des Gerätes nicht montiert ist, gehen Sie wie folgt vor:
- Heben Sie das Gerät vorsichtig an und setzen Sie die
Gummifüße in die zugehörigen
Sitze des Sockels ein;
- Schieben Sie den Schlitten
des Gerätes bis zum Anschlag
in der Nähe des Bedieners;
- Ziehen Sie den konischen
Stecker der Welle des Schwungrads (Abb. 3) heraus und
schlagen Sie mit einem Hammer auf das verjüngte Ende des
Steckers (kleinerer Durchmesser). Setzen Sie das Schwungrad so ein, dass sich der
Manövriergriff desselben oben
links von der Achse des Lochs
für den konischen Befestigungsstift bendet (Abb. 4A);
- Prüfen Sie die korrekte Übereinstimmung der Löcher und
setzen Sie den Stecker so in die
Muffe ein, dass das verjüngte
Ende (kleiner Durchmesser) in
Richtung der Muffe zeigt;
- Schlagen Sie auf das gegenüberliegende Ende des Steckers
(größerer Durchmesser), um
ihn vollständig einzusetzen
(Abb. 4B).
BEDIENUNG
- Betätigen Sie das Schwungrad (7), um den Schlitten (5)
bis an den vorderen Anschlag
(Bediener) zu bewegen;
- Fahren Sie die Schneidgutplatte (4) mithilfe des Schnellvorschubsystems (11) oder
des Vorschubsystems der Platte (12) vollständig zurück (weg
vom Messer);
- Legen Sie die aufzuschneidende Ware auf die Schneidgutplatte;
- Greifen Sie die Griffe der
Anschlagplatte: Ziehen Sie
die Auslöser, um die Anschlagplatte (3) anzuheben oder
abzusenken und so die Höhe
einzustellen, bis das Produkt
blockiert wird;
- Bewegen Sie den Messerschutz in seine Ruheposition,
um das Messer freizulegen;
23
ACHTUNG Scharfes
!
Messer, Schneidgefahr!
Wenn das Messer nicht vom
Schutz bedeckt ist, achten Sie
besonders darauf, Ihre Hände
weit vom ungeschützten Bereich entfernt zu halten.
- Stellen Sie die gewünschte
Scheibendicke ein; die genaue
Vorgehensweise dafür hängt
von der Vorrichtung ab, mit
der das Gerät ausgestattet
ist: a. Bewegen Sie den Hebel
(13) mit Skala oder b. ziehen
und drehen Sie den Knopf gleichzeitig und wählen Sie die
Stärke aus;
- Nähern Sie die Schneidgutplatte (Richtung Messer)
mithilfe des Schnellvorschubsystems der Platte (11) oder
des Vorschubsystems (12) an;
- Betätigen Sie das Schwungrad, indem Sie es im Uhrzeigersinn drehen;
ACHTUNG Beschädi-
!
gungsgefahr! Drehen Sie
das Schwungrad des Wagens
nicht in der entgegengesetzten
Richtung; die umgekehrte Rotation des Schwungrads kann
ernsthafte Schäden am Gerät
verursachen.
- Während der Rückkehr des
Schlittens (in Richtung Bediener) wird die mechanische Vorrichtung betätigt, die die Oberplatte quer in Richtung Messer
bewegt;
- Wenn die Schneidgutplatte
den Anschlag der Bewegung
Richtung Messer erreicht, halten Sie an und heben Sie die
Anschlagplatte an. Nutzen Sie
das Vorschubsystem oder das
Schnellvorschubsystem der
Platte, um diese vom Messer
wegzubewegen. Legen Sie das
Produkt wieder auf, blockieren

Sie es erneut mit der Anschlagplatte und beginnen Sie wieder mit dem Aufschneiden.
REINIGUNG
Die Geräte müssen wenigstens
einmal am Tag gründlich gereinigt werden. Nach einem mehr
oder weniger langen Stillstand
müssen diese auch vor Gebrauch gereinigt werden.
Tragen Sie schnitt- und rissfeste Schutzhandschuhe und
führen Sie alle Arbeiten mit
höchster Vorsicht aus.
Reinigungsprodukte:
Verwenden Sie ausschließlich Wasser und ein weiches
Schwammtuch und bei Bedarf
eine kleine halbsteife Nylonbürste für die Bereiche von
Schneidgut- und Anschlagplatte. Reinigen Sie das Gerät nicht
mit Strahlwasser, Dampf oder
ähnlichen Methoden.
AUSEINANDERBAUEN
- Vergewissern Sie sich, dass
der Schutz das Messer (9) gut
bedeckt;
- Öffnen Sie den Restehalter;
- Entfernen Sie die Schale;
- Wenn vorhanden, schrauben
Sie den Knopf auf der Schneidgutplatte ab. Heben Sie die
Schneidgutplatte zusammen
mit der Anschlagplatte (Abb. 5)
an und entfernen Sie sie.
ACHTUNG! Bei einigen
!
Modellen müssen Sie die
Schneidgutplatte nach vorne
schieben, bevor Sie sie gemeinsam mit der Anschlagplatte anheben können.
REINIGUNG
- Messer: Drücken Sie einen
feuchten Lappen auf die Oberäche des Messers und bewe-
gen Sie ihn dann langsam von
der Mitte nach außen, wie in
der Abbildung gezeigt; gehen
Sie sowohl auf der Seite der
Messerhaube als auch auf
der gegenüberliegende Seite
vor. Trocknen Sie das Messer
auf dieselbe Weise mit einem
trockenen Tuch ab;
WARNUNG! Schalten
!
Sie die Aufschnittmaschine niemals ein, während
Sie das Messer reinigen.
- Sicherheitsring: Verwenden
Sie zum Reinigen des Bereichs
zwischen dem Messer und dem
Sicherheitsring eine kleine halbsteife Nylonbürste;
- Gerätekorpus: Reinigen
Sie den Gerätekorpus mit einem feuchten Lappen oder
Schwamm und spülen Sie ihn
dann mit warmem Wasser ab.
Sorgfältig abtrocknen.
ZUSAMMENBAUEN
- Vergewissern Sie sich, dass
der Schutz das Messer (9) gut
bedeckt;
- Setzen Sie die Wanne wieder ein;
- Schließen Sie den Restehalter;
- Drehen Sie das Schwungrad (7)
mithilfe seines Knopfes, um die
bewegliche Schneidgutplatte
(4) ganz nach vorn (in Richtung
Bediener) zu bewegen;
- Bringen Sie die Schneidgutplatte mit einer senkrechten Bewegung von oben
nach unten wieder in ihre Anfangsposition.
ACHTUNG: Bei einigen
!
Modellen müssen Sie die
Schneidgutplatte nach ihrer
Positionierung in den Schlittentisch drücken, bis sie einrastet.
Wenn vorhanden, schrauben
Sie den Knopf auf der Schneidgutplatte wieder an.
24
INSTANDHALTUNG
Schleifen des Messers
Wie oft das Messer geschliffen
werden muss, hängt vom Gebrauch ab.
ACHTUNG! Scharfes
!
Messer, Schneidgefahr!
Wenn das Messer nicht vom
Schutz bedeckt ist, achten Sie
besonders darauf, Ihre Hände
weit vom ungeschützten Bereich entfernt zu halten.
Für den Schleifvorgang befolgen Sie die Anweisungen des
jeweiligen Modells:
FÜR DIE MODELLE
B2, B3, TRIBUTE, B300 (Abb. 6)
- Vergewissern Sie sich, dass
der Schutz das Messer gut bedeckt;
- Kontrollieren Sie die Haube
der Schleifvorrichtung; wenn sie
beweglich ist, heben Sie sie an;
- Lockern Sie den Feststellknauf der Schleifvorrichtung (a);
- Heben Sie die Schleifvorrichtung an und drehen Sie sie
um 180°;
- Senken Sie die Schleifvorrichtung vorsichtig wieder ab,
wobei sich das Messer automatisch mittig zwischen den
beiden Schleifscheiben positioniert;
- Ziehen Sie den Knauf wieder
fest;
- Drücken Sie die Taste (B)
etwa 10-15 Sekunden lang
und drehen Sie gleichzeitig das
Schwungrad. Lassen Sie die Taste (B) losen, drücken Sie die
Taste (C) für 2-3 Sekunden, und
lassen Sie die los;
- Unterbrechen Sie die Rotation des Schwungrads;
- Erst wenn das Messer still
steht, bringen Sie die Schleifvorrichtung wieder in ihre

ursprüngliche Position und
ziehen Sie den Knauf fest;
- Schließen Sie die Kappe, falls
vorhanden.
FÜR DAS MODELL
P15 (Abb. 7)
- Vergewissern Sie sich, dass
der Schutz das Messer gut bedeckt;
- Lockern Sie den Feststellknauf der Schleifvorrichtung
(A);
- Heben Sie die Schleifvorrichtung an und drehen Sie sie
um 180°;
- Senken Sie die Schleifvorrichtung vorsichtig wieder ab,
wobei sich das Messer automatisch mittig zwischen den
beiden Schleifscheiben positioniert;
- Ziehen Sie den Knauf wieder
fest;
- Drehen Sie den Hebel entgegen den Uhrzeigersinn für
etwa 10-15 Sekunden lang
und drehen Sie gleichzeitig das
Schwungrad;
- Unterbrechen Sie die Rotation des Schwungrads;
- Erst wenn das Messer still
steht, bringen Sie die Schleifvorrichtung wieder in ihre
ursprüngliche Position und
ziehen Sie den Knauf fest.
FÜR DIE MODELLE
B114 und B116 (Abb. 8)
- Vergewissern Sie sich, dass
der Schutz das Messer gut bedeckt;;
- Heben Sie die Schleifvorrichtung mithilfe des Knaufs an
und drehen Sie sie um 180°;
- Senken Sie die Schleifvorrichtung vorsichtig wieder ab,
wobei sich das Messer automatisch mittig zwischen den
beiden Schleifscheiben positioniert;
- Drehen Sie den Hebel im
Uhrzeigersinn für etwa 10-15
Sekunden lang und drehen Sie
gleichzeitig das Schwungrad;
- Drehen Sie den Hebel entgegen den Uhrzeigersinn für
etwa 2-3 Sekunden lang und
drehen Sie gleichzeitig das
Schwungrad;
- Unterbrechen Sie die Rotation des Schwungrads;
- Erst wenn das Messer still
steht, bringen Sie die Schleifvorrichtung wieder in ihre ursprüngliche Position.
FÜR DAS MODELL
L16 (Abb. 9)
- Vergewissern Sie sich, dass
der Schutz das Messer gut bedeckt;
- Lockern Sie den Feststellknauf der Schleifvorrichtung;
- Heben Sie die Schleifvorrichtung an und drehen Sie sie
um 180°;
- Senken Sie die Schleifvorrichtung vorsichtig wieder ab,
wobei sich das Messer automatisch mittig zwischen den
beiden Schleifscheiben positioniert;
- Ziehen Sie den Knauf fest;
- Drehen Sie den Hebel im
Uhrzeigersinn für etwa 10-15
Sekunden lang und drehen Sie
gleichzeitig das Schwungrad;
- Drehen Sie den Hebel entgegen den Uhrzeigersinn für
etwa 2-3 Sekunden lang und
drehen Sie gleichzeitig das
Schwungrad;
- Unterbrechen Sie die Rotation des Schwungrads;
- Erst wenn das Messer still
steht, bringen Sie die Schleifvorrichtung wieder in ihre ursprüngliche Position.
ACHTUNG: Beschädi-
!
gungsgefahr! Lassen Sie
sich für den Vorgang des Abgratens nicht zu viel Zeit (nicht
25
mehr als 2-3 Sekunden), um
eine Beschädigung des Messers zu verhindern.
Schmieren (Abb. 10)
- Geben Sie einige Tropfen Öl
auf die Stange (1) und in die
Dichtung des Reglerknopfes
für die Scheibendicke (2);
- Geben Sie einige Tropfen Öl
in die Löcher (3 und 4);
- Geben Sie einige Tropfen
Öl in die Dichtung zwischen
Schwungrad und Korpus der
Aufschnittmaschine (5);
- Betätigen Sie kurz das
Schwungrad.
Verwenden Sie zum Schmieren nur nicht saure Öle (wir
empfehlen Vaselineöl). Keine
panzlichen Öle verwenden.
ASSISTENZ
Der Verpackung liegen keine
Ersatzteile bei. Sämtliche Reparatur- und Austauscharbeiten (wie Austausch oder Reparatur von Messer, Riemen,
elektrischen Bauteilen, strukturellen Teilen usw.) dürfen
ausschließlich von Personal
durchgeführt werden, das vom
Hersteller autorisiert ist.
Sollte eine Reparatur erforderlich sein, bringen Sie das Gerät
möglichst zum Hersteller oder
zu einer autorisierten Kunden-
dienststelle.
Für Informationen zu Kundendienststellen, wenden Sie
sich an:
service@berkelinternational.com.
ACHTUNG! Das Mes-
!
ser muss ausgetauscht
werden, wenn der Abstand
zwischen der Messerschneide und dem Innenrand der
Schutzvorrichtung 6 mm
übersteigt.

GARANTIE UND HAFTUNG
Der Hersteller liefert Geräte
mit einer Garantielaufzeit von
24 Monaten ab Kaufdatum.
Die Garantie deckt einzig Defekte ab, wenn das Gerät sachgemäß und im Einklang mit den
vorgesehenen Betriebsbedingungen laut Anleitung genutzt
wurde. Die Garantie deckt
keine Mängel oder Schäden
ab, die durch Folgendes verursacht werden: Transport, Unfähigkeit oder Fahrlässigkeit des
Käufers, unsachgemäße Installation oder Positionierung,
Verschleiß, Versorgung mit
einer Spannung, die mehr als
10 % über der Nennspannung
liegt. Darüber hinaus gilt die
Garantie nicht für Verschleißteile wie das Messer und die
Schleifscheiben der Schleifvorrichtung, sofern keine offensichtlichen Herstellungsfehler
vorliegen.
Der Hersteller lehnt jede direkte und indirekte Verantwortung ab, die auf Folgendes
zurückzuführen ist:
- Nichtbeachtung der Anweisungen der vorliegenden Anleitung;
- Gebrauch, der nicht den im
Aufstellungsland geltenden
Normen entspricht;
- nicht autorisierte Änderungen und/oder Reparaturen am
Gerät;
- Verwendung nicht originaler
Zubehör- oder Ersatzteile;
- außergewöhnliche Ereignisse.
Die Übertragung des Eigentums des Gerätes entbindet
den Hersteller umgehend von
jeglicher Verantwortung. Das
Typenschild am Gerätesockel
weist den Hersteller, den Gerätetyp und die technischen
Informationen aus.
26

TECHNISCHE DATEN
B
VOLANO
TRIBUTE
C
G
A
I
D
F
E
H
C
G
D
F
VOLANO
P15
B
A
I
MODELL TRIBUTE P15
A 184 mm 180 mm
B 230 mm 210 mm
C 184 mm 180 mm
D 420 mm 430 mm
E 330 mm 250 mm
F 495 mm 505 mm
E
H
G 750 mm 720 mm
H 545 mm 600 mm
I 730 mm 570 mm
TECHNISCHE MERKMALE
Schnittleistung (rund) 184 mm 180 mm
Schnittleistung (rechteckig) 230x184 mm 210x180 mm
Max. Schnittstärke 3 mm 3 mm
Kilngedurchmesser 300 mm 285 mm
Gewicht 60 Kg 60 kg
27

VOLANO
L16
VOLANO
B2
B
A
C
I
D
F
G
H
E
C
G
B
A
I
D
F
MODELL L16 B2
A 210 mm 160 mm
B 260 mm 190 mm
C 200 mm 150 mm
D 305 mm 395 mm
E 640 mm 265 mm
F 880 mm 465 mm
G 600 mm 680 mm
H 545 mm 530 mm
I 750 mm 540 mm
TECHNISCHE MERKMALE
E
H
Schnittleistung (rund) 210 mm 160 mm
Schnittleistung (rechteckig) 260x200 mm 190x150 mm
Max. Schnittstärke 4 mm 2 mm
Kilngedurchmesser 350 mm 265 mm
Gewicht 105 Kg 60 kg
28

VOLANO
B
B3
VOLANO
B300
B
C
G
A
I
D
F
E
H
C
G
A
D
F
I
MODELL B3 B300
A 184 mm 215 mm
B 230 mm 240 mm
C 184 mm 215 mm
D 380 mm 465 mm
E 300 mm 325 mm
F 480 mm 540 mm
G 725 mm 775 mm
H 560 mm 580 mm
I 735 mm 540 mm
TECHNISCHE MERKMALE
Schnittleistung (rund) 184 mm 215 mm
E
H
Schnittleistung (rechteckig) 230x184 mm 240x215 mm
Max. Schnittstärke 3 mm 3 mm
Kilngedurchmesser 300 mm 300 mm
Gewicht 45 Kg 50 kg
29
VOLANO
B114
VOLANO
B116
B
C
G
A
F
I
ED
H
G
B
A
C
D
F
I
MODELL B114 B116
A 220 mm 235 mm
B 280 mm 280 mm
C 220 mm 235 mm
D 570 mm 620 mm
E 425 mm 480 mm
F 610 mm 680 mm
G 850 mm 930 mm
H 680 mm 750 mm
I 545 mm 670 mm
TECHNISCHE MERKMALE
E
H
Schnittleistung (rund) 220 mm 235 mm
Schnittleistung (rechteckig) 280x220 mm 280x235 mm
Max. Schnittstärke 3 mm 5 mm
Kilngedurchmesser 300 mm 370 mm
Gewicht 62 Kg 88 kg
Anmerkung: Aufgrund der ständigen Forschung für die Verbesserung unserer Produkte, die
Produktionsvorgabe können Änderungen zeigen.
30
 Loading...