

Page 1
BERGES
C
Operating manual
A
SLV
P
Page 2

Page 3
BERGES
Berges electronic • D–51709 Marienheide-Rodt • Tel. 02264/17-0 • Fax 02264/17126
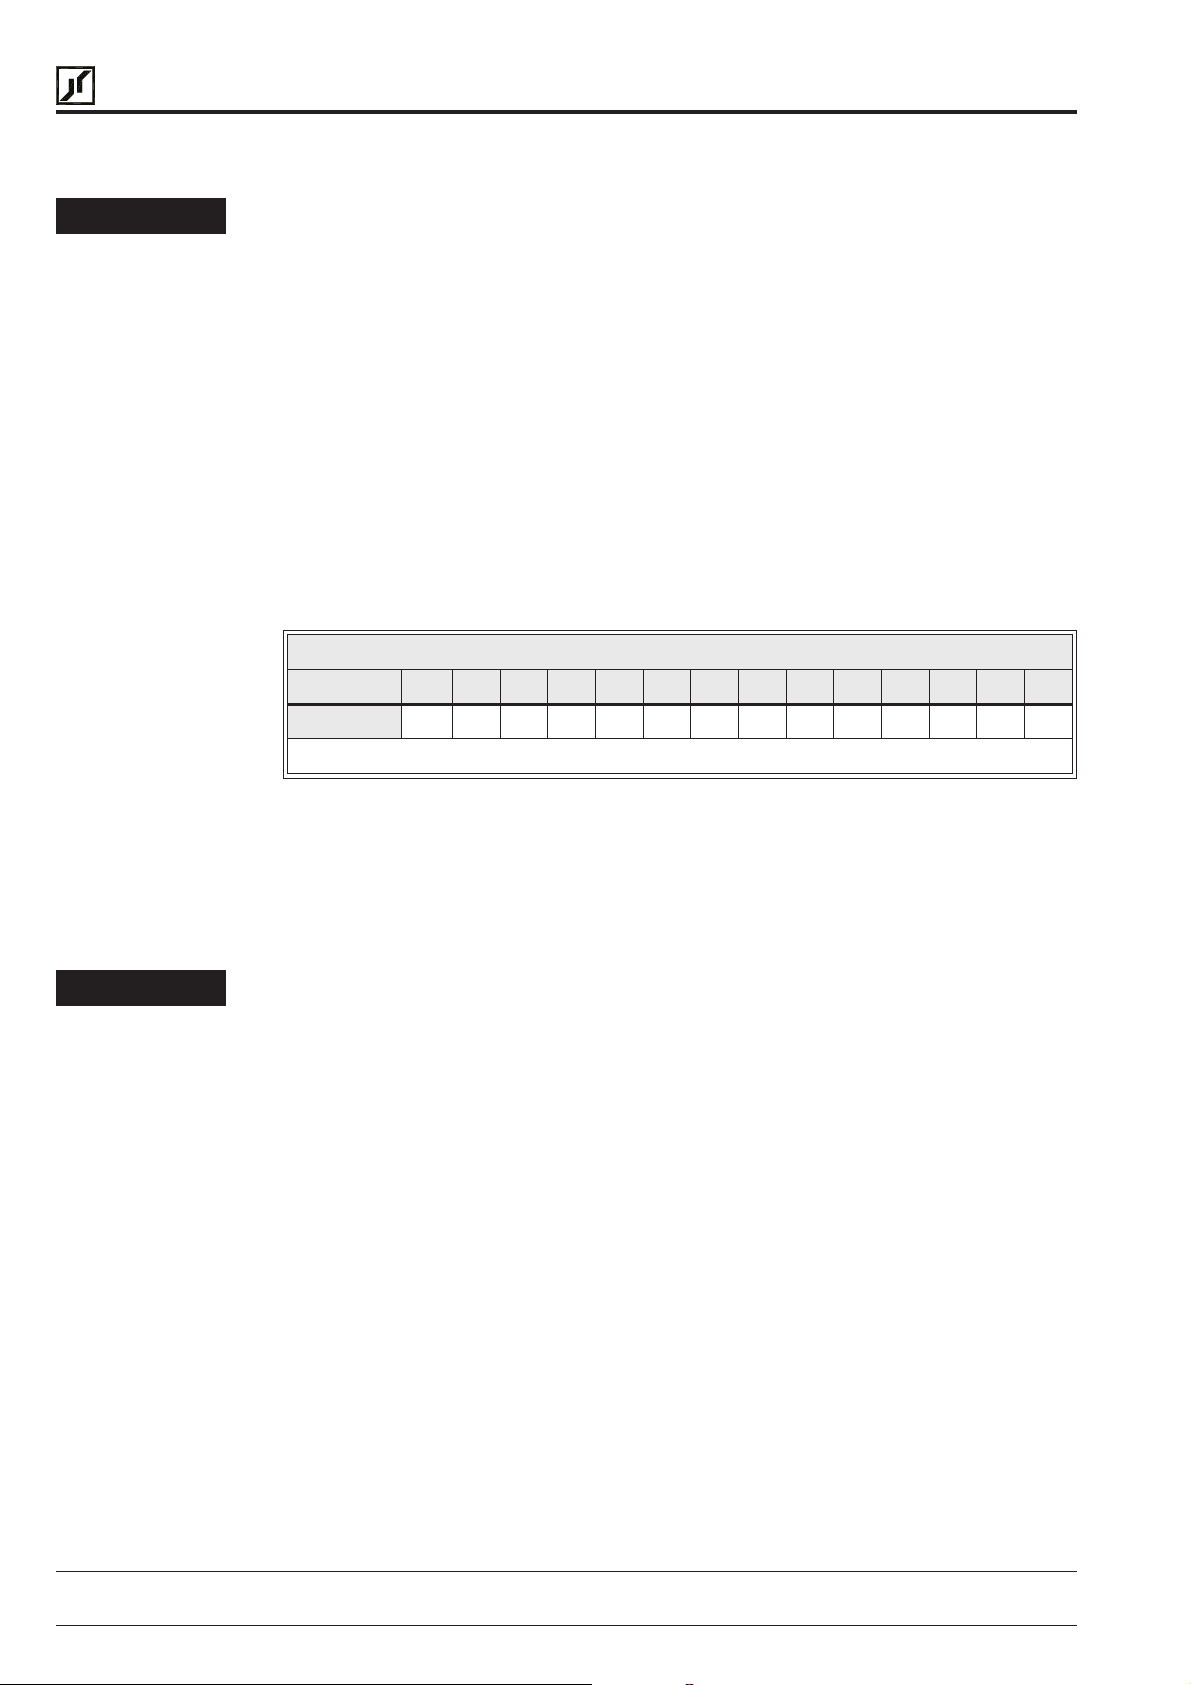
Program Code Summary (Level 1 and 2)
• Level 1 – accesses only basic operator parameters.
• Level 2 – accesses all parameters in Level 1 and Level 2.
• Level 3 – accesses all parameters in Level 1, Level 2 and Level 3.
For more information consult Section 5 and publication “ACP 6000 – Option”.
12
PARAMETER DESCRIPTION DATA RANGE FACTORY
NUMBER NAME
01 MODEL Model Number 0–65000 (
02 RVLVL Software Revision 0–640 (
03 IRAT Rated Current 2–200 A (
05 SERNO Serial Number 0–65000 2 47
06 REP Repair Date 0–65000 2 47
07 FLT3 Last Fault – 1 48
08 FLT2 2nd Fault – 2 48
09 FLT1 1st Fault – 2 48
12 FOUT Output Frequency 0–400 Hz 1 48
13 VOUT Output Voltage 0–100% 1 48
14 IOUT Output Current 0–650A 1 48
15 LOAD Drive Load 0–200% 1 48
16 TORQ LoadTorque 0–200% 1 48
17 TEMP Inverter Temp 2–105 °C 1 48
18 TIME1 Total Run Time 0–65000 h 2 48
19 TIME2 Power OnHours 0–65000 h 2 48
1B FLUX Magnetizing Current 0–100% 2 48
21 MODE Input Mode 0–36 13 1 49
24 FSEL Reference Select 0–19 0 2 49
27 TLSEL Torque Limit Select 0–6 0 2 51
31 FMIN Minimum Frequency 0.01–400.00 Hz 0.00 Hz 1 51
32 FMAX Maximum Frequency 20.00–400.00 Hz 50.00 Hz 1 51
33 F2 Preset Frequency 2 (Jog) 0.00–400.00 Hz 5.00 Hz 1 51
34 F3 Preset Frequency 3 0.00–400.00 Hz 20.00 Hz 2 51
35 F4 Preset Frequency 4 0.00–400.00 Hz 40.00 Hz 2 51
36 F5 Preset Frequency 5 0.00–400.00 Hz 60.00 Hz (
37 F6 Preset Frequency 6 0.00–400.00 Hz 0.00 Hz (
38 F7 Preset Frequency 7 0.00–400.00 Hz 0.00 Hz (
39 FTL Minimum Frequency in Torque Limit 0.00–400.00 Hz 10.00 Hz 2 52
41 RSEL Ramp Selector 0–7 0 2 52
42 ACC1 Acceleration Ramp 1 0.10–600.00 s 3.00 s 1 52
43 DEC1 Deceleration Ramp 1 0.10–600.00 s 3.00 s 1 52
44 ACC2 Acceleration Ramp 2 0.10–600.00 s 1.00 s 2 52
45 DEC2 Deceleration Ramp 2 0.10–600.00 s 1.00 s 2 52
46 DECTL Torque Limit Response Time 0.10–30.00 s 1.00 s 2 53
47 DCBRK DC Brake Time 0.00–5.00 s 0.20 s 2 53
48 DCVLT DC Brake Voltage 0.00–15.00% (
SETTING
1
)147
1
)247
1
)247
1
)253
ACCESS
LEVEL
2
)2 51
2
)251
2
)251
SEE
PAGE
CUSTOMER
SETTING
(1) Default value is model dependant.
(2) Parameter adjustable while the drive is in the run mode.
30.10.97 Operating manual
05_GB ACP 6000
SLV
— 0.75–55
Page 4
BERGES
Berges electronic • D–51709 Marienheide-Rodt • Tel. 02264/17-0 • Fax 02264/17126
PARAMETER DESCRIPTION DATA RANGE FACTORY
NUMBER NAME
51 VSEL V/Hz Characteristic Selector 0–6 0 2 53
52 BOOST Torque Boost 0.00–20.00% (
53 FKNEE V/Hz Knee Frequency 26.00–640.00 Hz 50.00 Hz 2 54
54 SKBND Skip Frequency Hysteresis Band 0.20–20.00 Hz 1.00 Hz 2 54
55 SK1 Skip Frequency 1 0.00–400.00 Hz 0.00 Hz 2 54
56 SK2 Skip Frequency 2 0.00–400.00 Hz 0.00 Hz 2 54
57 SK3 Skip Frequency 3 0.00–400.00 Hz 0.00 Hz 2 54
58 SK4 Skip Frequency 4 0.00–400.00 Hz 0.00 Hz 2 54
59 MVOLT Rated Motor Voltage 370–480 V 400 V 2 55
5B IMAG Rated Magnetizing Current 15.00–80.00% 0.00% 2 55
61 LTLF Load Torque Limit FWD 5–200% 150% 2 56
62 LTLR LoadTorqueLimit REV 5–200% 150% 2 56
63 RTLF Regenerative Torque Limit FWD 5–110% 80% 2 56
64 RTLR Regenerative Torque Limit REV 5–110% 80% 2 56
65 SLIP Slip Compensation 0.00–10.00% 0.00% 1 56
66 STAB Current Stability 0–6 2 2 56
67 TOL Timed Overload Trip Point 0–100% 0% 1 57
68 NRST Restart Number 0–8 0 2 57
69 DRST Restart Delay 0.00–60.00 s 0.00 s 2 58
6A TOLC Timed Overload Characteristic 0–7 0 2 58
70 MCAL Meter Calibration 0–255 Set to
71 METER Analog Meter Output 0–8 1 1 58
72 ST1 Auxiliary Output 1 0–11 6 2 59
73 ST2 Auxiliary Output 2 0–11 3 2 59
74 ST3 Auxiliary Output 3 0–11 7 2 59
75 STR Auxiliary Relay (Fault) 0–11 1 1 59
77 MOL Motor Overload Input Function 0–1 0 2 60
81 PRGNO Special Program Number 0–65000 0 2 61
82 START Inverter Start Options 0–7 0 2 62
83 PWM Carrier Frequency Selector 0–8 1 2 62
84 DISP Display Option Full Setting 0–65000 0 2 63
85 UNITS Display Units 6-digit RPM 1 2 63
86 LANG Display Language 0–3 0 2 64
87 ACODE Security Access Code 0–999 0 2 64
88 FRO Frequency Reference Output 0–1 0 2 65
A2 RATIO MasterSlaveSpeed Ratio 0.00–200.00% 100.00% (
B1 OPTNO Option Board Number 0–6 0 2 65
Cx CNTLx Event Control (1–9) Binary (8) 0 (
Ex ECNTx Event Counts (1–9) 0–65535 0 (
SETTING
1
)154
10 VDC (
3
)2
3
)2
ACCESS
LEVEL
2
)
2
)2 65
158
SEE
PAGE
CUSTOMER
SETTING
123
NOTES:
Level 1 Parameters shown shaded.
See Section 5 for parameters accessible in Level 3 (SIO control).
(1) Default value is model dependant.
(2) Parameter adjustable while the drive is in the run mode.
(3) Consult BERGES for specific implementation instructions.
Operating manual 30.10.97
SLV
ACP 6000
— 0.75–55 05_GB
Page 5

BERGES
Berges electronic • D–51709 Marienheide-Rodt • Tel. 02264/17-0 • Fax 02264/17126
30.10.97 Operating manual
05_GB ACP 6000
SLV
— 0.75–55
Page 6

BERGES
Berges electronic • D–51709 Marienheide-Rodt • Tel. 02264/17-0 • Fax 02264/17126
Operating manual 30.10.97
SLV
ACP 6000
— 0.75–55 05_GB
Page 7

BERGES
1 General information . . . . . . . . . . . . . . . . . . . . . . . . . . . . . . . . . . . . . . . . . . . . . . . . . . . . . . 2
2 Installation and enclosure dimensions . . . . . . . . . . . . . . . . . . . . . . . . . . . . . . . . . . . . . 12
3 Control Functions and Operation. . . . . . . . . . . . . . . . . . . . . . . . . . . . . . . . . . . . . . . . . . 35
4 Level 1 and 2 Parameters . . . . . . . . . . . . . . . . . . . . . . . . . . . . . . . . . . . . . . . . . . . . . . . . 45
5 Level 3 parameter. . . . . . . . . . . . . . . . . . . . . . . . . . . . . . . . . . . . . . . . . . . . . . . . . . . . . . . 66
6 Applications . . . . . . . . . . . . . . . . . . . . . . . . . . . . . . . . . . . . . . . . . . . . . . . . . . . . . . . . . . . 72
7 Troubleshooting. . . . . . . . . . . . . . . . . . . . . . . . . . . . . . . . . . . . . . . . . . . . . . . . . . . . . . . . 77
Berges electronic • D–51709 Marienheide-Rodt • Tel. 02264/17-0 • Fax 02264/17126
Table of contents
Page
1.0 Safety and operating instructions for drive converters . . . . . . . . . . . . . . . . . . . . . . 2
1.1 Preface . . . . . . . . . . . . . . . . . . . . . . . . . . . . . . . . . . . . . . . . . . . . . . . . . . . . . . . . . . 5
1.2 Inspection . . . . . . . . . . . . . . . . . . . . . . . . . . . . . . . . . . . . . . . . . . . . . . . . . . . . . . . . 5
1.3 Control Identification Number . . . . . . . . . . . . . . . . . . . . . . . . . . . . . . . . . . . . . . . . . 5
1.4 ACP Series Control Specifications . . . . . . . . . . . . . . . . . . . . . . . . . . . . . . . . . . . . . 6
1.5 ACP Inverter Input/Output Ratings . . . . . . . . . . . . . . . . . . . . . . . . . . . . . . . . . . . . 10
1.6 AC Inverter Fundamentals. . . . . . . . . . . . . . . . . . . . . . . . . . . . . . . . . . . . . . . . . . . 10
1.7 Description of Operation . . . . . . . . . . . . . . . . . . . . . . . . . . . . . . . . . . . . . . . . . . . . 11
2.1 General Rules for Installation . . . . . . . . . . . . . . . . . . . . . . . . . . . . . . . . . . . . . . . . 12
2.2 Dimensional Data . . . . . . . . . . . . . . . . . . . . . . . . . . . . . . . . . . . . . . . . . . . . . . . . . 14
2.3 Input AC Line Requirements . . . . . . . . . . . . . . . . . . . . . . . . . . . . . . . . . . . . . . . . . 22
2.3.1 Mains power connection . . . . . . . . . . . . . . . . . . . . . . . . . . . . . . . . . . . . . . . . . . . . 23
2.3.2 Motor connection. . . . . . . . . . . . . . . . . . . . . . . . . . . . . . . . . . . . . . . . . . . . . . . . . . 24
2.3.3 EMC Ordinance (EMC Directive, 89/336 EEC). . . . . . . . . . . . . . . . . . . . . . . . . . . 24
2.3.4 Using mains filters. . . . . . . . . . . . . . . . . . . . . . . . . . . . . . . . . . . . . . . . . . . . . . . . . 26
2.3.5 Interference suppression measures/EMC (electromagnetic compatibility) . . . . . . 26
2.4 Line Fuse or Circuit Breaker Sizing. . . . . . . . . . . . . . . . . . . . . . . . . . . . . . . . . . . . 28
2.5 Wiring Practices. . . . . . . . . . . . . . . . . . . . . . . . . . . . . . . . . . . . . . . . . . . . . . . . . . . 28
2.6 Reducing Current Surges and Voltage Transients . . . . . . . . . . . . . . . . . . . . . . . . 29
2.7 Function and Use of Terminals . . . . . . . . . . . . . . . . . . . . . . . . . . . . . . . . . . . . . . . 30
2.8 Environmental Considerations. . . . . . . . . . . . . . . . . . . . . . . . . . . . . . . . . . . . . . . . 33
3.1 General Information. . . . . . . . . . . . . . . . . . . . . . . . . . . . . . . . . . . . . . . . . . . . . . . . 35
3.2 Digital Keypad . . . . . . . . . . . . . . . . . . . . . . . . . . . . . . . . . . . . . . . . . . . . . . . . . . . . 35
3.3 Operation Mode (STOP and RUN modes) . . . . . . . . . . . . . . . . . . . . . . . . . . . . . . 36
3.4 Program Mode. . . . . . . . . . . . . . . . . . . . . . . . . . . . . . . . . . . . . . . . . . . . . . . . . . . . 37
3.5 Status (LED) Indicators . . . . . . . . . . . . . . . . . . . . . . . . . . . . . . . . . . . . . . . . . . . . . 37
3.6 Description of Displays (Operating Display) . . . . . . . . . . . . . . . . . . . . . . . . . . . . . 38
3.7 Operating Tips. . . . . . . . . . . . . . . . . . . . . . . . . . . . . . . . . . . . . . . . . . . . . . . . . . . . 41
3.8 Quick-Start – Running the Motor. . . . . . . . . . . . . . . . . . . . . . . . . . . . . . . . . . . . . . 42
3.9 Programming Flowchart . . . . . . . . . . . . . . . . . . . . . . . . . . . . . . . . . . . . . . . . . . . . 44
4.1 Program Code Summary (Level 1 and 2) . . . . . . . . . . . . . . . . . . . . . . . . . . . . . . . 45
4.2 Programming. . . . . . . . . . . . . . . . . . . . . . . . . . . . . . . . . . . . . . . . . . . . . . . . . . . . . 47
4.3 Parameter Descriptions. . . . . . . . . . . . . . . . . . . . . . . . . . . . . . . . . . . . . . . . . . . . . 47
5.1 Program Code Summary (Level 3) . . . . . . . . . . . . . . . . . . . . . . . . . . . . . . . . . . . . 66
5.2 Programming. . . . . . . . . . . . . . . . . . . . . . . . . . . . . . . . . . . . . . . . . . . . . . . . . . . . . 66
5.3 Parameter Descriptions. . . . . . . . . . . . . . . . . . . . . . . . . . . . . . . . . . . . . . . . . . . . . 67
6.1 Connection Diagrams . . . . . . . . . . . . . . . . . . . . . . . . . . . . . . . . . . . . . . . . . . . . . . 72
6.2 Options and Accessories. . . . . . . . . . . . . . . . . . . . . . . . . . . . . . . . . . . . . . . . . . . . 74
6.3 Application Hints . . . . . . . . . . . . . . . . . . . . . . . . . . . . . . . . . . . . . . . . . . . . . . . . . . 75
7.1 Fault Codes . . . . . . . . . . . . . . . . . . . . . . . . . . . . . . . . . . . . . . . . . . . . . . . . . . . . . . 77
7.2 Troubleshooting. . . . . . . . . . . . . . . . . . . . . . . . . . . . . . . . . . . . . . . . . . . . . . . . . . . 78
7.3 Maintenance and Inspection . . . . . . . . . . . . . . . . . . . . . . . . . . . . . . . . . . . . . . . . . 80
30.10.97 Operating manual
05_GB ACP 6000
SLV
— 0.75–55
1
Page 8
BERGES
Berges electronic • D–51709 Marienheide-Rodt • Tel. 02264/17-0 • Fax 02264/17126
1 General information
Explanation of symbols and notes
Work safety symbol
You will find this symbol next to all work safety notes in this operating manual if there is a
risk of injury or death for persons involved. Pay attention to these notes and observe
particular caution in such cases. Also pass on all work safety instructions to other users.
Voltage warning
This symbol is shown wherever particular caution is necessary owing to occurring or applied
voltages (e.g. DC voltages up to 650 V) and where special precautionary measures have to
be taken. The inverter must always be isolated from the mains when working on it.
Caution note
ATTENTION!
1.0 Safety and operating instructions for drive converters
This note is shown in all parts of this operating manual to which particular attention must be
paid to ensure that the guidelines, specifications, notes and the correct sequence of work
will be obeyed and to prevent damage or destruction of the inverter and/or systems.
1. General
In operation, drive converters, depending on their degree of protection, may have live,
unisolated, and possibly also moving or rotating parts, as well as hot surfaces.
In case of inadmissible removal of the required covers, of improper use, wrong installation
or maloperation, there is the danger of serious personal injury and damage to property.
For further information, see documentation.
All operations serving transport, installation and commissioning as well as maintenance are
to be carried out by skilled technical personnel (Observe IEC 364 or CENELEC HD 384
or DIN VDE 0100 and IEC 664 or DIN/VDE 0110 and national accident prevention rules!).
For the purposes of these basic safety instructions, “skilled technical personnel” means
persons who are familiarwith the installation, mounting, commissioning and operation of the
product and have the qualifications needed for the performance of their functions.
We draw attention to the fact that no liability can be assumed for damage and malfunctions
resulting from failure to observe the operating manual.
Technical amendments of illustrations and data given in this operating manual are reserved
in the interest of improving the unit and its functions.
2
2. Intended use
The application of the drive converter described in this operating manual exclusively serves
the purpose of continuously variable speed control of three-phase motors.
Drive converters are components designed for inclusion in electrical installations or machinery.
The drive converters are designed for installation in a switchgear cabinet (applies only to
units of protection class IP 00/IP 21) and for permanent connection.
The operator of the system is solely liable for damage resulting from improper use of the
drive converter.
Operating manual 30.10.97
ACP 6000
SLV
— 0.75–55 05_GB
Page 9

BERGES
Berges electronic • D–51709 Marienheide-Rodt • Tel. 02264/17-0 • Fax 02264/17126
Only items expressly approved by BERGES (e.g. mains filter, choke, external braking
choppers and braking resistors etc.) may be used as accessories.
The installer of the system is liable for any damage resulting from the use of accessories
that have not been approved expressly by BERGES. Please consult us in case of doubt.
In case of installation in machinery, commissioning of the drive converters (i.e. the starting
of normal operation) is prohibited until the machinery has been proved to conform to the
provisions of the directive 89/392/EEC (Machinery Safety Directive – MSD). Account is to
be taken of EN 60204.
Commissioning (i.e. the starting of normal operation) is admissible only where conformity
with the EMC directive (89/336/EEC) has been established.
The drive converters meet the requirements of the low-voltage directive 73/23/EEC. They are
subject to the harmonized standards of the series prEN 50178/DIN VDE 0160 in conjunction
with EN 60439-1/DIN VDE 0660, part 500, and EN 60146/DIN VDE 0558.
The technical data as well as information concerning the supply conditions shall be taken
from the rating plate and from the documentation and shall be strictly observed.
3. Transport, storage
The instructions for transport, storage and proper use shall be complied with.
Damage established after delivery must be notified to the transport company immediately.
Where necessary, the supplier must also be notified before the damaged drive converter is
put into operation.
The climatic conditions shall be in conformity with prEN 50178.
4. Installation
The installation and cooling of the appliances shall be in accordance with the specifications
in the pertinent documentation.
The drive converters shall be protected against excessive strains. In particular, no components must be bent or isolating distances altered in the course of transportation or handling.
No contact shall be made with electronic components and contacts.
Drive converters contain electrostatic sensitive components which are liable to damage
throughimproperuse. Electric components must notbemechanicallydamagedordestroyed
(potential health risks).
5. Electrical connection
Whenworkingonlive drive converters,theapplicablenational accidentpreventionrules(e.g.
VBG 4) must be complied with.
The electrical installation shall be carried out in accordance with the relevant requirements
(e.g. cross-sectional areas of conductors, fusing, PE connection). For further information,
see documentation.
Instructions for the installation in accordance with EMC requirements, like screening,
earthing, location of filters and wiring, are contained in the drive converter documentation.
They must always be complied with, also for drive converters bearing a CE marking.
Observance of the limit values required by EMC law is the responsibility of the manufacturer
of the installation or machine.
6. Operation
The components of the power section and certain elements of the control section are
connected to the voltage mains when the drive converter is connected to the mains voltage.
Touching these components involves mortal danger!
Always isolate the drive converter from the mains supply before performing any work on the
electrical or mechanical part of the system.
30.10.97 Operating manual
05_GB ACP 6000
SLV
— 0.75–55
3
Page 10

BERGES
Berges electronic • D–51709 Marienheide-Rodt • Tel. 02264/17-0 • Fax 02264/17126
Isolate the drive converter from the mains before removing the terminal cover or the housing
(e.g. by removing or deactivating on-site fuses or by deactivating a master switch isolating
all poles etc.).
After disconnection of the drive converters from the voltage supply, live appliance parts and
powerterminalsmustnotbetouched immediately because of possibly energizedcapacitors.
In this respect, the corresponding signs and markings on the drive converter must be
respected.Afterswitching offthemainsvoltage, waitforatleast 5 minutes beforebeginning
work on or in the drive converter. Dangerous voltages are still present as long as the “BUS
CHG” lamp is still lit. In the event of malfunctions, the discharge time of 5 minutes may be
exceeded substantially.
Thedrive convertercontainsprotectivefacilitiesthatdeactivate itinthe eventofmalfunctions,
whereby the motor is de-energized and comes to a standstill (so-called “coasting” of the
motor is possible depending on the rotating mass of the type of drive involved). Standstill of
the motor can, however, also be produced by mechanical blockage. Voltage fluctuations,
andparticularlymainspowerfailures,mayalsoleadtodeactivation.Incertaincircumstances,
the drive may start up automatically once the cause of the fault has been remedied. As a
result of this, certain systems may be damaged or destroyed and there may be a risk for
operators working on the system. Installations which include drive converters shall be
equipped with additional control and protective devices in accordance with the relevant
applicablesafetyrequirements, e.g. Act respectingtechnicalequipment, accident prevention
rulesetc.Changes tothedrive convertersbymeans oftheoperatingsoftwareareadmissible.
The motor may be stopped during operation by disabling it or by deactivating the setpoint,
wherebythedriveconverterandmotormayremainlive.Ifinadvertentstartup of the motor
must be excluded to protect operating personnel, electronic interlocking by disabling
themotoror by deactivating thesetpointis inadequate. Thisiswhy the driveconverter
must be isolated from the mains voltage.
During operation, all covers and doors shall be kept closed.
Measuringinstrumentsmustbeconnectedand disconnected only inde-energizedcondition.
Unauthorized conversions or modifications on or in the drive converter and its components
and accessories will render all warranty claims void.
When installing an option board, observe the installation specification valid for this board.
Please contact BERGES if conversions or modifications are necessary, particularly if
electrical components are involved.
7. Maintenance and servicing
The manufacturer’s documentation shall be followed.
KEEP SAFETY INSTRUCTIONS IN A SAFE PLACE!
Before you read on, please check whether technical changes are
attached in the annex to this operating manual!
4
Operating manual 30.10.97
ACP 6000
SLV
— 0.75–55 05_GB
Page 11
BERGES
1.1 Preface
Berges electronic • D–51709 Marienheide-Rodt • Tel. 02264/17-0 • Fax 02264/17126
This manual contains the specifications, installation instructions, description of operation and
troubleshooting procedure for the ACP 6000 AC inverter. Before installing the drive, read this
manual carefully to ensure correct installation and maximum performance. The information
containedinthis manual iscurrentforversionsfitted withdrivesoftwareseries 4.43(
Display Language
02-RVLVL
).
HINT!
With the parameter
86-LANG
1.2 Inspection
A. Upon receipt of the product, unpack the AC inverter and carefully inspect for any damage
sustained in transit (depression in the enclosure, damage to parts, missing parts).
B. Next remove the AC Inverter cover, if supplied, and inspect for any loose screws, nuts
or connectors.
C. Read the technical data plate and verify the correct power size for the application and
note the input voltage and current required for the inverter.
D. If the inverter is to be stored for a long period of time, repack the inverter and store in a
clean dry place, free from direct sunlight or corrosive fumes, and in a location where the
ambient temperature will not be less than -20 °C nor more than 60 °C.
1.3 Control Identification Number
A systematic numbering system is used to define all models by input voltage rating, power
rating, and enclosure type. This model number appears both on the shipping carton label
and the technical data label on the enclosure. A model number code is also accessible in
the Level 1 programming mode (Refer page 47,
ACP 6007-5A
you can select the display language, see page 64.
01-MODEL
).
AACP 6 007-5
BERGES inverter type:
Input volts:
KW:
Housing:
6 = 400 V AC
007-5 = 7.5 kW
A = IP 00
C = IP 21/IP 54
Example Control Identification Number
460 V AC
30.10.97 Operating manual
05_GB ACP 6000
SLV
— 0.75–55
5
Page 12
BERGES
Berges electronic • D–51709 Marienheide-Rodt • Tel. 02264/17-0 • Fax 02264/17126
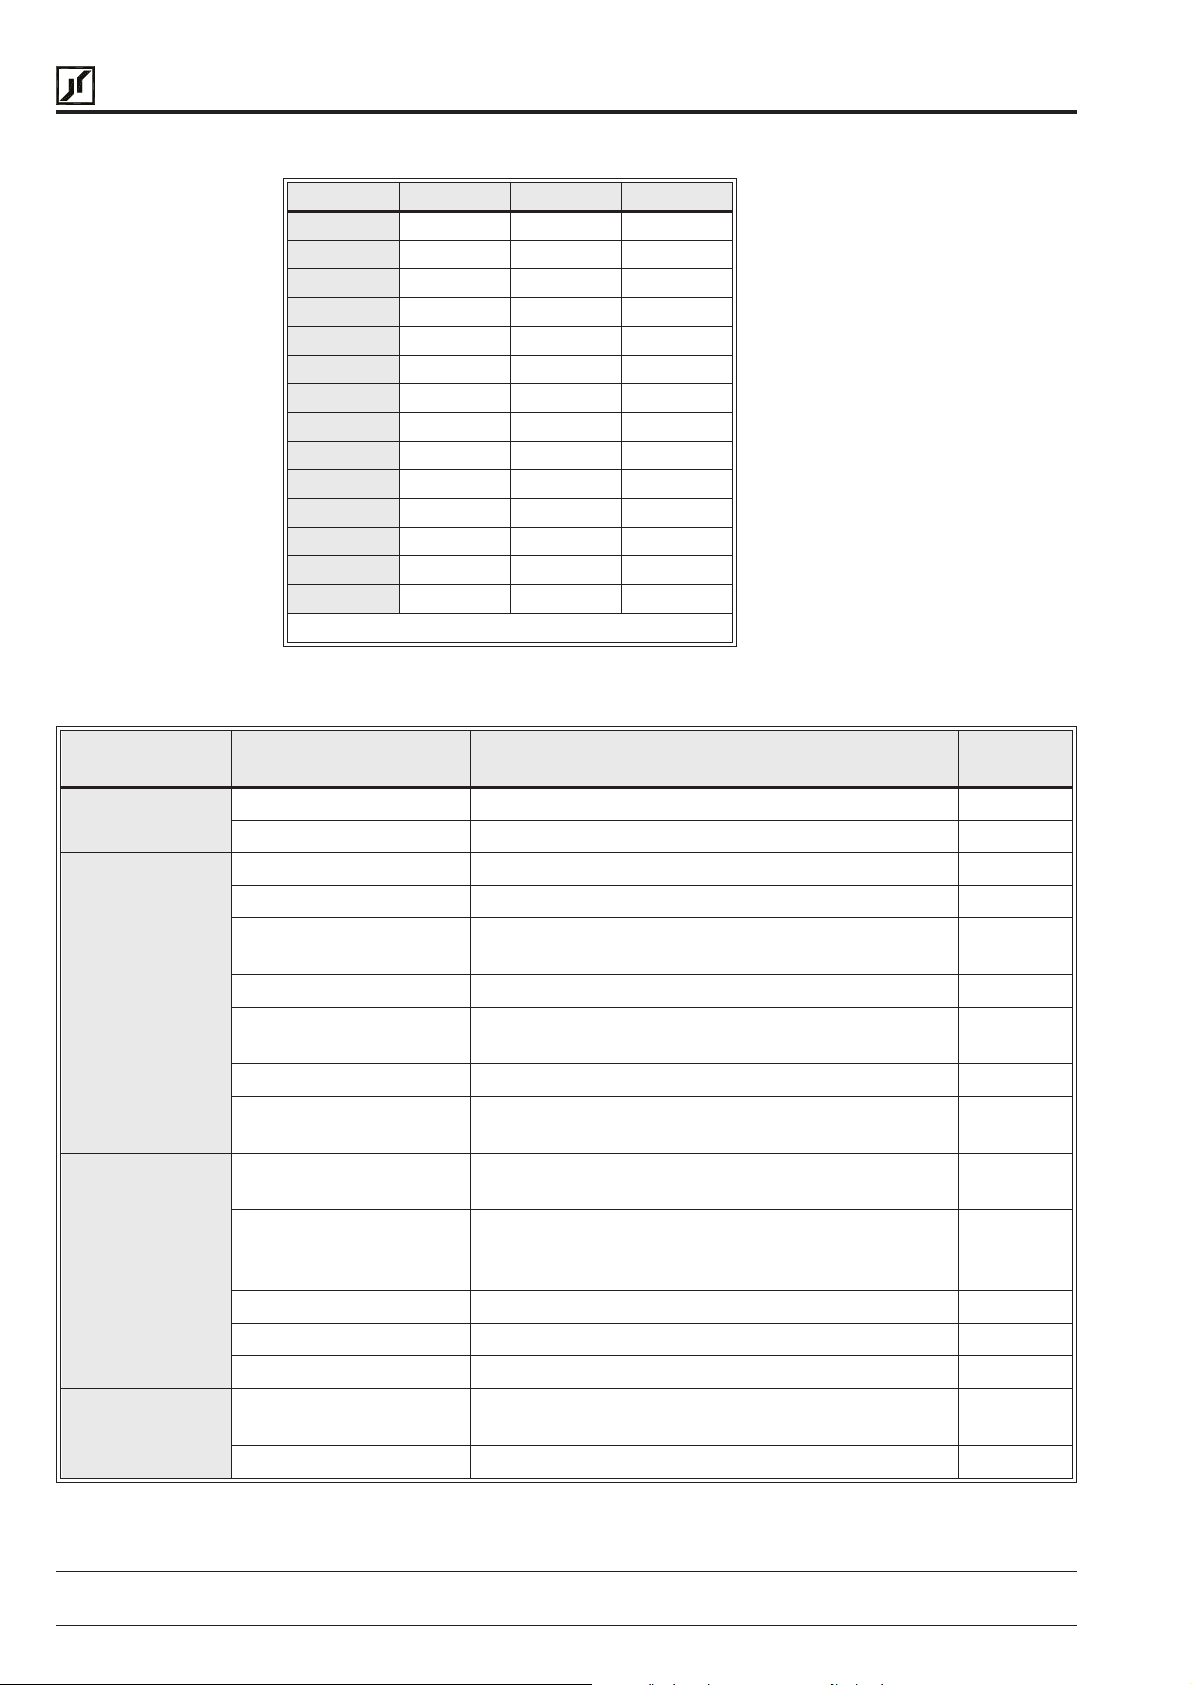
The different power ratings available and code for each rating are as follows:
CODE KW PS 3 × 400 V
6000-7 0.75 1.0 X
6001-5 1.5 2.0 X
6002-2 2.2 3.0 X
6003-0 3.0 4.0 X
6004-0 4.0 5.0 X
6005-5 5.5 7.5 X
6007-5 7.5 10.0 X
6011-0 11.0 15.0 X
6015-0 15.0 20.0 X
6022-0 22.0 30.0 X
6030-0 30.0 40.0 X
6037-0 37.0 50.0 X
6045-0 45.0 60.0 X
6055-0 55.0 75.0 X
Table 1.3
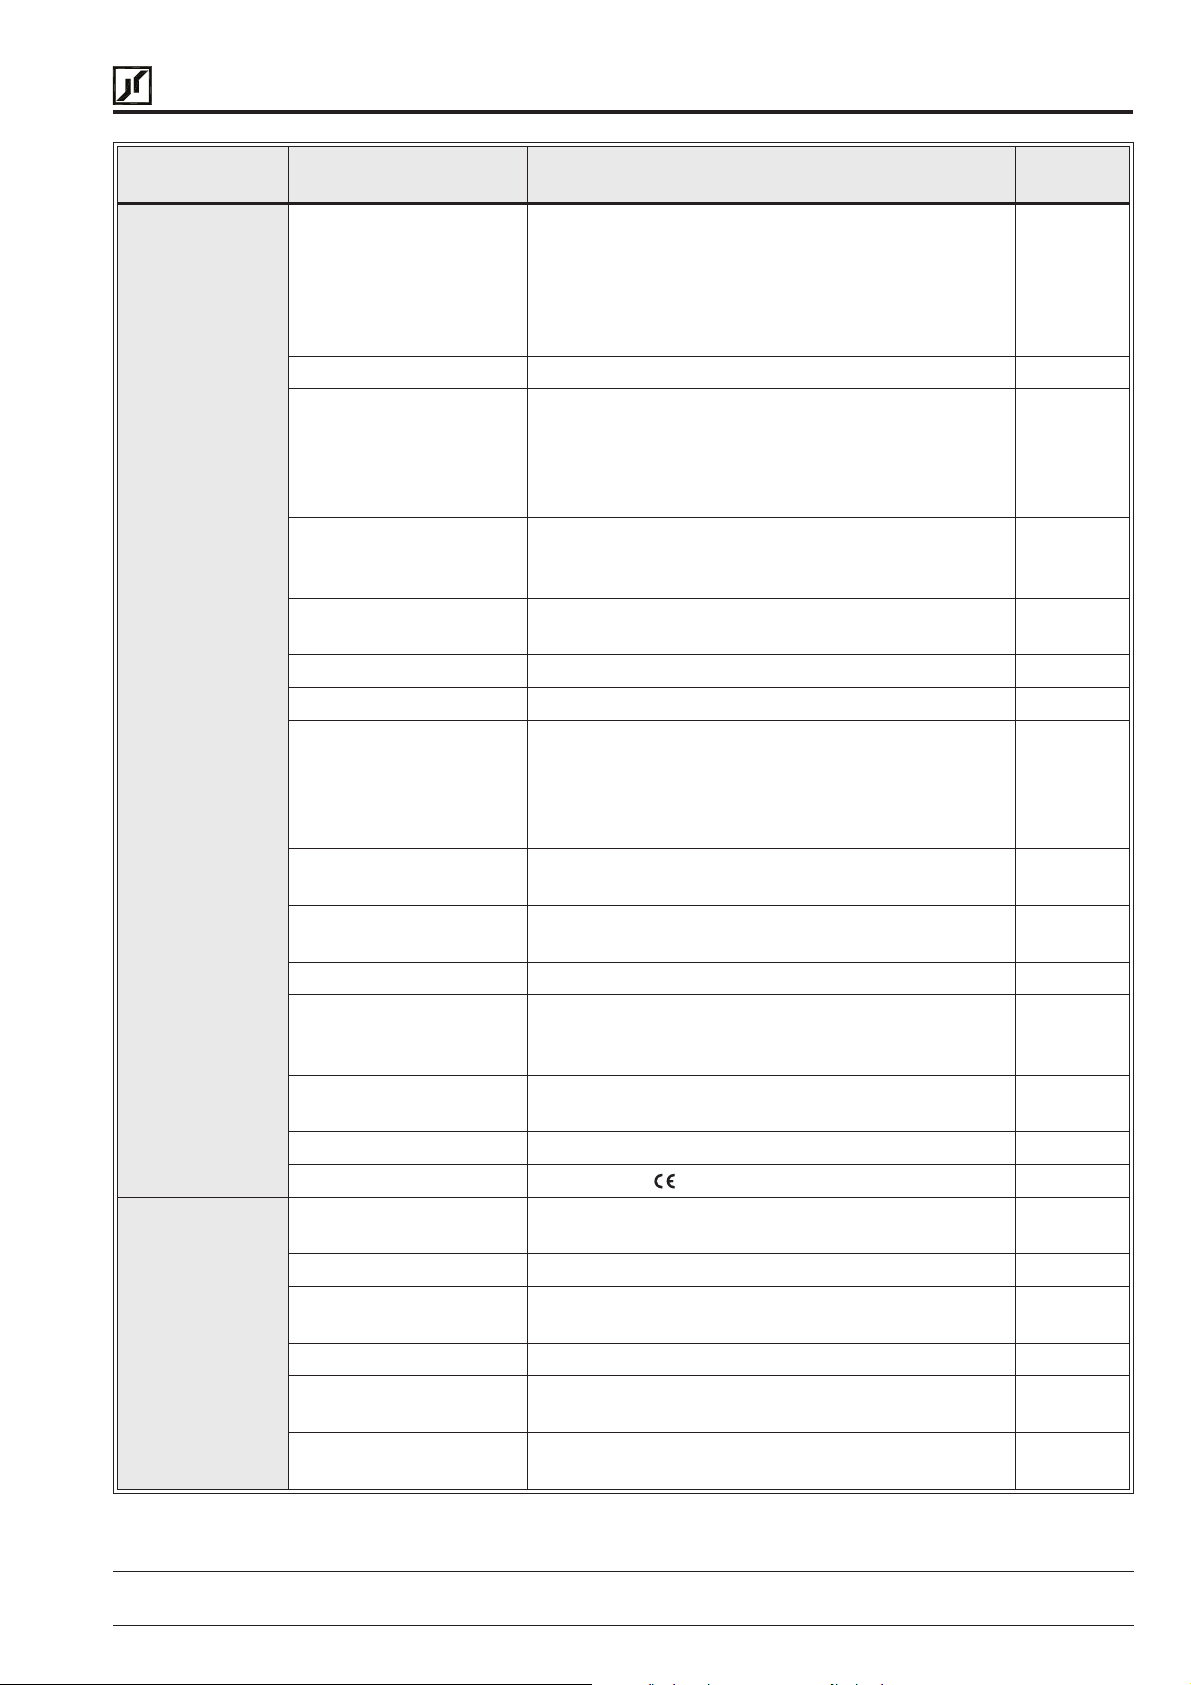
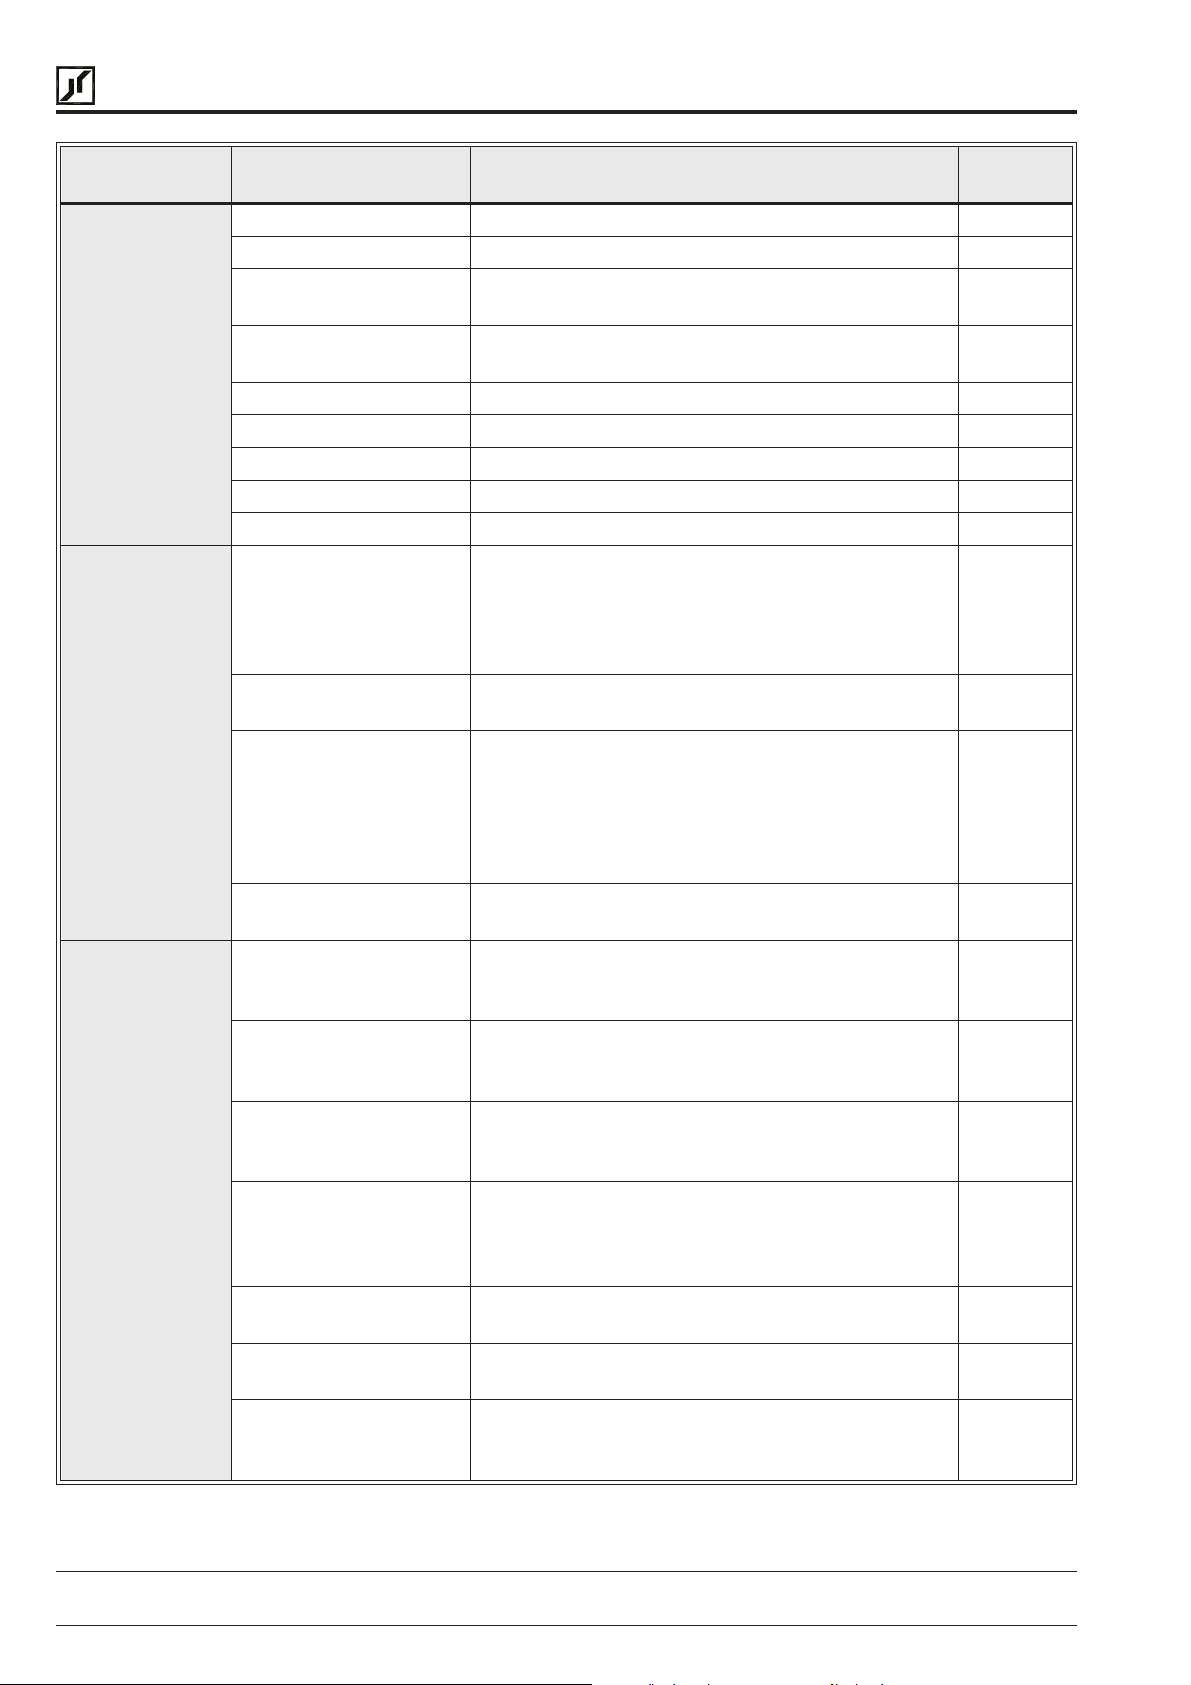
1.4 ACP Series Control Specifications
MODEL SERIES ACP 6000 SEE
Applicable
Motor Output
Inverter Output
Ratings
Inverter Input
Ratings
Control
Specifications
Horsepower (PS) 1–75. –
Kilowatt (kW) 0.75–55. 10
Capacity (kVA) 1.5–135.0. 10
Continuous Amps (A) 2–121. 10
Output Voltage
(Source limited)
Frequency Range Programmable 0.1–400 Hz. 51, 62
Overload Capacity at
40 °C Ambient
Running Torque More than 100% (Programmable) + autoboost. 54
Efficiency at Rated
Outputs
Input Voltage
(3∅ inputs all 3-wire)
Input Current at
Maximum Rated Output
(AC amperes)
KVA at 50/60 Hz 1.8–122.0. 10
Input Frequency 50/60 Hz ±10%. –
Phase Imbalance 2% maximum. 22
Control System Sine weighted Pulse Width Modulation with
Frequency Range 4000:1; 0.1–400 Hz (Programmable). 51, 62
3 × 7.0–460 VAC. –
150% for 60 Seconds;
120% for 90 Seconds.
Greater than 95%. –
±10% at 400–460 V. 10, 22
2.2–152.8 A. 10
Application Specific Integrated Circuit.
PAGE
57, 58
–
6
Operating manual 30.10.97
ACP 6000
SLV
— 0.75–55 05_GB
Page 13
BERGES
Control
Specifications
Protection
Features
Berges electronic • D–51709 Marienheide-Rodt • Tel. 02264/17-0 • Fax 02264/17126
MODEL SERIES ACP 6000 SEE
PAGE
Frequency Command
Selections
Frequency Resolution 0.01 Hz. –
Frequency Stability Analog +0.2%,
V/Hz Ratio Programmable using FKNEE function
Acceleration/Deceleration
Ramps
Minimum Frequency Programmable – 0.5 to 400Hz (0.01 Hz increments). 51
Maximum Frequency Programmable – 20to 400 Hz (0.01 Hz increments). 51
Torque Limit Four Quadrant Programmable –
Torque Limit Deceleration
Rate
Minimum Frequency in
Torque Limit
Torque Boost Programmable to suit requirements plus Autoboost. 53, 54
Dynamic Braking 30–200% of drive rating (10 sec. max.) standard.
Adjustments Over 100 parameters can be monitored with over 80
PWM Frequencies Two settings available. 62
Agency Listing , UL® and CUL® Listed. –
Charge Indicator Indicates the presence of potentially lethalbusvoltage. 31
Ground Fault All models fully protected. –
Output Short Circuit
(Line-to-Line)
Electronic Motor Overload Programmable Inverse Time Overload Trip. 57, 58
Overvoltage Trip Level
(on DC bus)
Undervoltage Trip Level
(on DC bus)
Programmable – 0.1 to 600 seconds to maximum
Individual program settings for FWD run, FWD regen,
Consult BERGES for model specific data. Additional
0–10 VDC or 0–2 VDC (100 kΩ),
4–20 mA (237 Ω),
0–1 kHz or 0–10 kHz pulse train,
Ext. Potentiometer,
Digital Keypad,
RS 485 Serial Communication Link.
0–1 kHz pulse train +0.4%,
0–10 kHz pulse train +0.1%,
Keypad +0.1%,
RS 485 Port +0.1%.
(0.01 Hz resolution)
400 VAC output models – 0.72 to 17.69.
frequency (primary and alternate available).
5 to 200% torque (motoring mode);
5 to 110% torque (regenerative mode);
REV run, and REV regen.
Programmable – 0.1 to 30 Seconds. 53
Programmable – 0.5 to 400 Hz. 52
capacity available by adding external DB kits.
user adjustments.
All models fully protected. –
763 VDC. –
395 VDC. –
30, 49
–
54
52
51, 56
–
–
30.10.97 Operating manual
05_GB ACP 6000
SLV
— 0.75–55
7
Page 14
BERGES
Protection
Features
Error/Fault Messages 19 fault codes, 6 warning displays. 77
External MOL Contact Compatible with NC fault contact. 60
Operating
Features
Programming Programming Levels Level 1 – Operator;
Berges electronic • D–51709 Marienheide-Rodt • Tel. 02264/17-0 • Fax 02264/17126
MODEL SERIES ACP 6000 SEE
Torque Limit 4-Quadrant – Independently Programmable. 51, 56
Program Lockout User definable security access code. 64
Line Start Lockout Prevents automatic start-up when line power is
applied (defeatable by programming).
Overtemperature Drive will shutdown if heat sink temperature exceeds
rating.
DB Failure Drive will sense circuit failure and shutdown. –
Fault Storage Last three (3) faults stored. Most recent displayed. 48
Line Transient Limit 2 kV Maximum (less than 40 microsecond duration). –
Operating Controls 1. Keypad: Forward, Reverse, Jog, Stop, Program,
Shift, Enter, Local/Remote and Up/Down Arrows.
2. Terminal strip: See typical connection diagrams
(Page 72).
3. RS 485 Serial Input/Output (SIO) Link.
LED Indicators Forward, Reverse, Jog, Stop, Bus Charged and CPU
active.
Display 2-lines of 16 characters, Super-Twist alphanumeric
for all modes of operation.
Programmable to display in English, French, Spanish
or German.
Any engineering units such as RPM, FPM, and GPM
are supported.
Auxiliary Relay Programmable as Fault Relay or to signal one of
eleven conditions.
Level 2 – Engineer;
Level 3 – Engineer with SIO.
Parameter Block 00
Drive Data
Parameter Block 10
Status
Parameter Block 20
Control
Parameter Block 30
Frequencies
Parameter Block 40
Ramps
Parameter Block 50
Voltage/Frequency
Characteristics
Model #, software revision, rated current, heat sink
temperature trip point, mfg. serial #, repair date code,
and fault log.
Output frequency, voltage, motor current, motor load,
torque, drive temperature, elapsed time since power
applied, and total hours of operation.
Definition of the LOCal/REMote keypad button in
reference to the keypad, terminal strip, and the SIO
link. Also, various speed and torque references are
contained within this block.
Various speed setpoints of the inverter. –
Ramp time selections (the time from start to
maximum frequency FMAX or from FMAX to stop).
V/Hz curves, boost, minimum frequency at full
voltage, and skip frequencies.
PAGE
62
–
35
32
66
37
38, 63, 64
33, 59
45, 66
–
–
–
–
–
8
Operating manual 30.10.97
ACP 6000
SLV
— 0.75–55 05_GB
Page 15
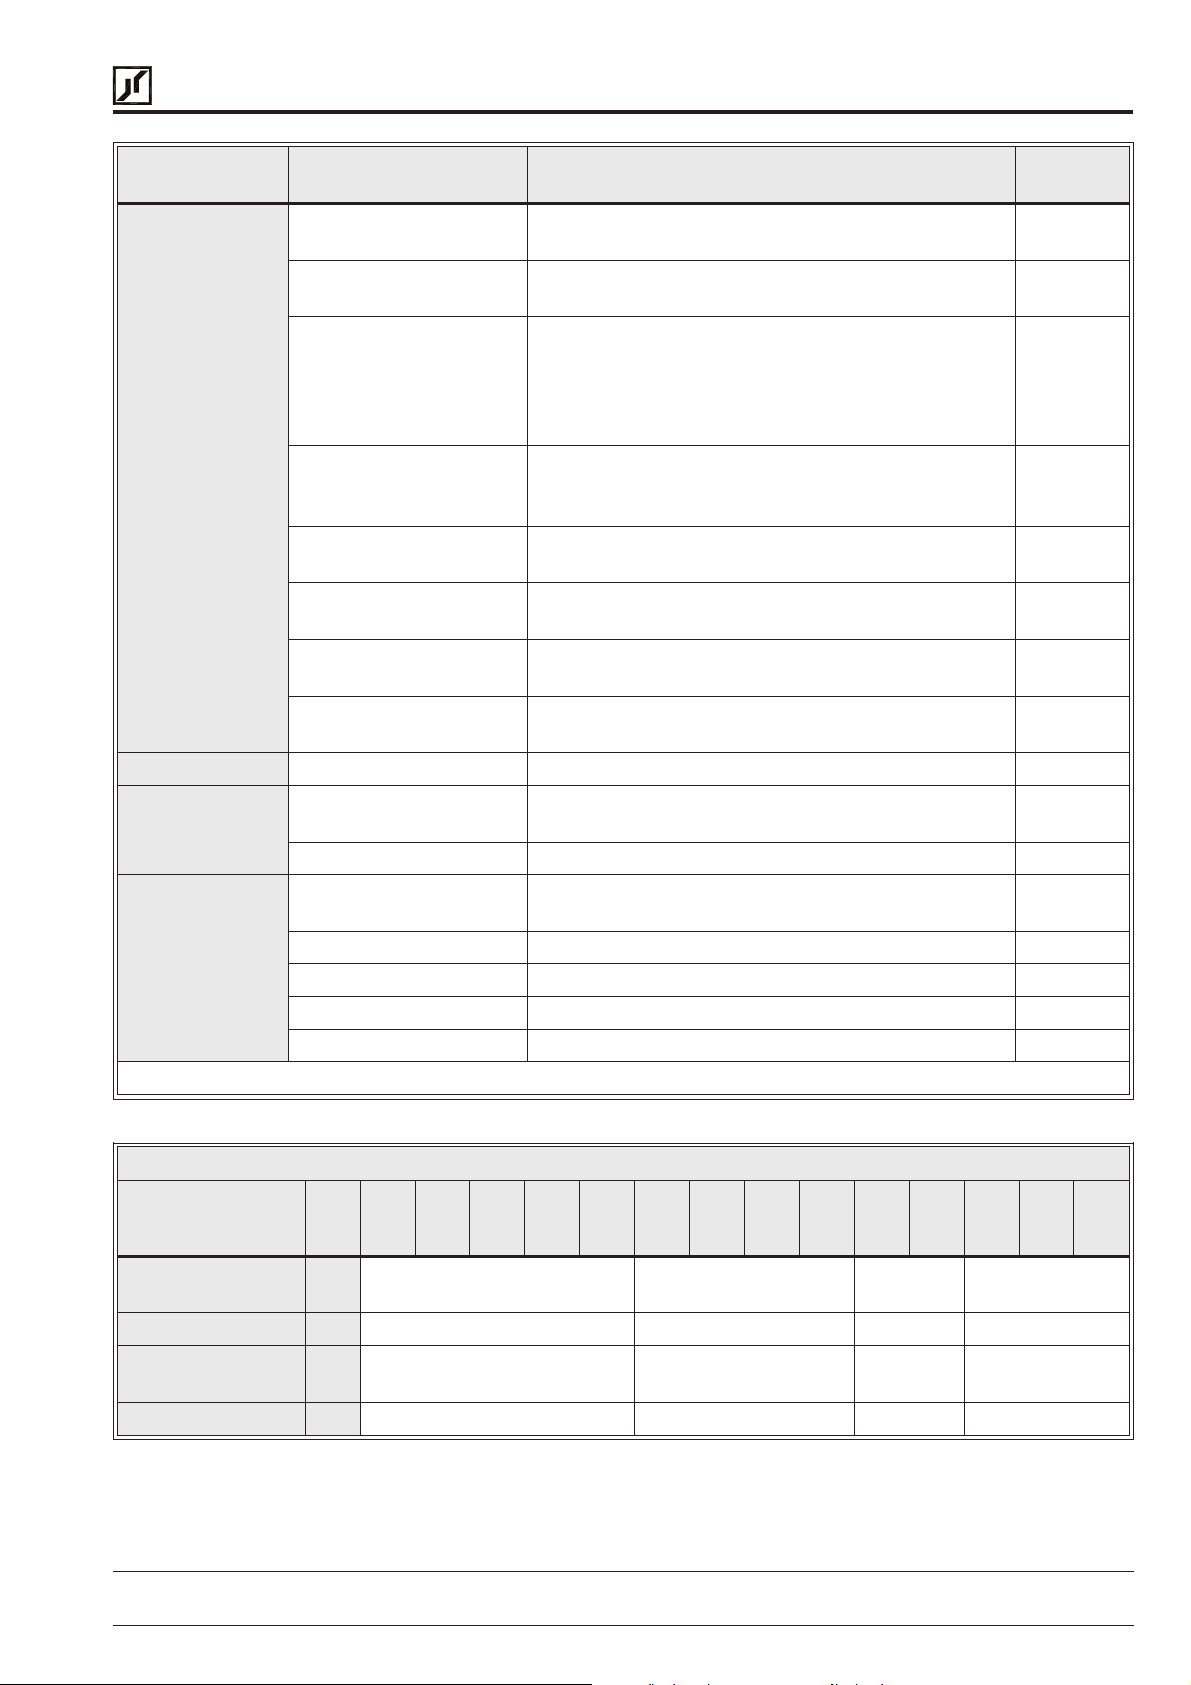
BERGES
Programming Parameter Block 60
Construction IP 00,IP21, IP54 IP 54 standard thru 37 kW. –
Mounting
Location
Ambient
Conditions
Operating Temperature IP 00 – 0 °C to 50 °C;
Storage Temperature -20 °C to +60 °C. –
Berges electronic • D–51709 Marienheide-Rodt • Tel. 02264/17-0 • Fax 02264/17126
MODEL SERIES ACP 6000 SEE
PAGE
Torque limit setpoints, slip compensation, overload
Torque Limit
Parameter Block 70
I/0 Definition
Parameter Block 80
Program Options
Parameter Block 90
RS 485 Serial Link
Options
Parameter Block A0
Option Parameters
Parameter Block B0
Option Parameters
Parameter Block C0
Event Control Bytes
Parameter Block E0
Event Count Bytes
IP 00 and IP 21 In separate enclosure free from dust, liquids and
IP 54 Indoor or Outdoor protected from direct sunlight. 12, 33
Humidity 90% RH or less, noncondensing. –
Vibration 0.6 G Maximum. –
Elevation Below 1000 m without derating. –
trip point, and auto-restart parameters.
METer output, open collector output, and fault relay
definitions.
Storage and Retrieval of standard or custom
programs, complete reset to factory settings, auto-
restart, line start-lockout, PWM selection, display of
engineering units, alternate display languages, and
customer access code storage.
BAUD or communication rate, slave address,
watchdog timer and retrieval of SIO generated fault
codes.
Speed Ratio and various parameters relative to the
calibration of option cards (WPC).
Option Board Identification and various parameters
relative to the calibration of option cards (WPC).
Used with program sequencer to control drive
operation.
Used with program sequencer to control drive
operation.
corrosive fumes.
IP 21/IP 54 – 0 °C to 40 °C.
Table 1.4
–
–
–
–
–
–
–
–
12
–
DIMENSIONS/WEIGHT
Type
6000-7
6001-5
6002-2
6003-0
6004-0
6005-5
6007-5
6011-0
6015-0
6022-0
6030-0
6037-0
Dimensions (IP 00)
(W × H × D)
Weight (IP 00) kg 5,5 11,5 35,0 39,0
Dimensions (IP 54)
(W × H × D)
Weight (IP 54) kg 6,0 12,5 44,0 51,0
30.10.97 Operating manual
05_GB ACP 6000
mm 221 × 301 × 135 229 × 441 × 203 356 ×
619 × 298
mm 227 × 307 × 142 229 × 449 × 210 365 ×
619 × 306
SLV
— 0.75–55
406 ×733 ×298
417 ×
733 × 306
6045-0
6055-0
9
Page 16
BERGES
Berges electronic • D–51709 Marienheide-Rodt • Tel. 02264/17-0 • Fax 02264/17126
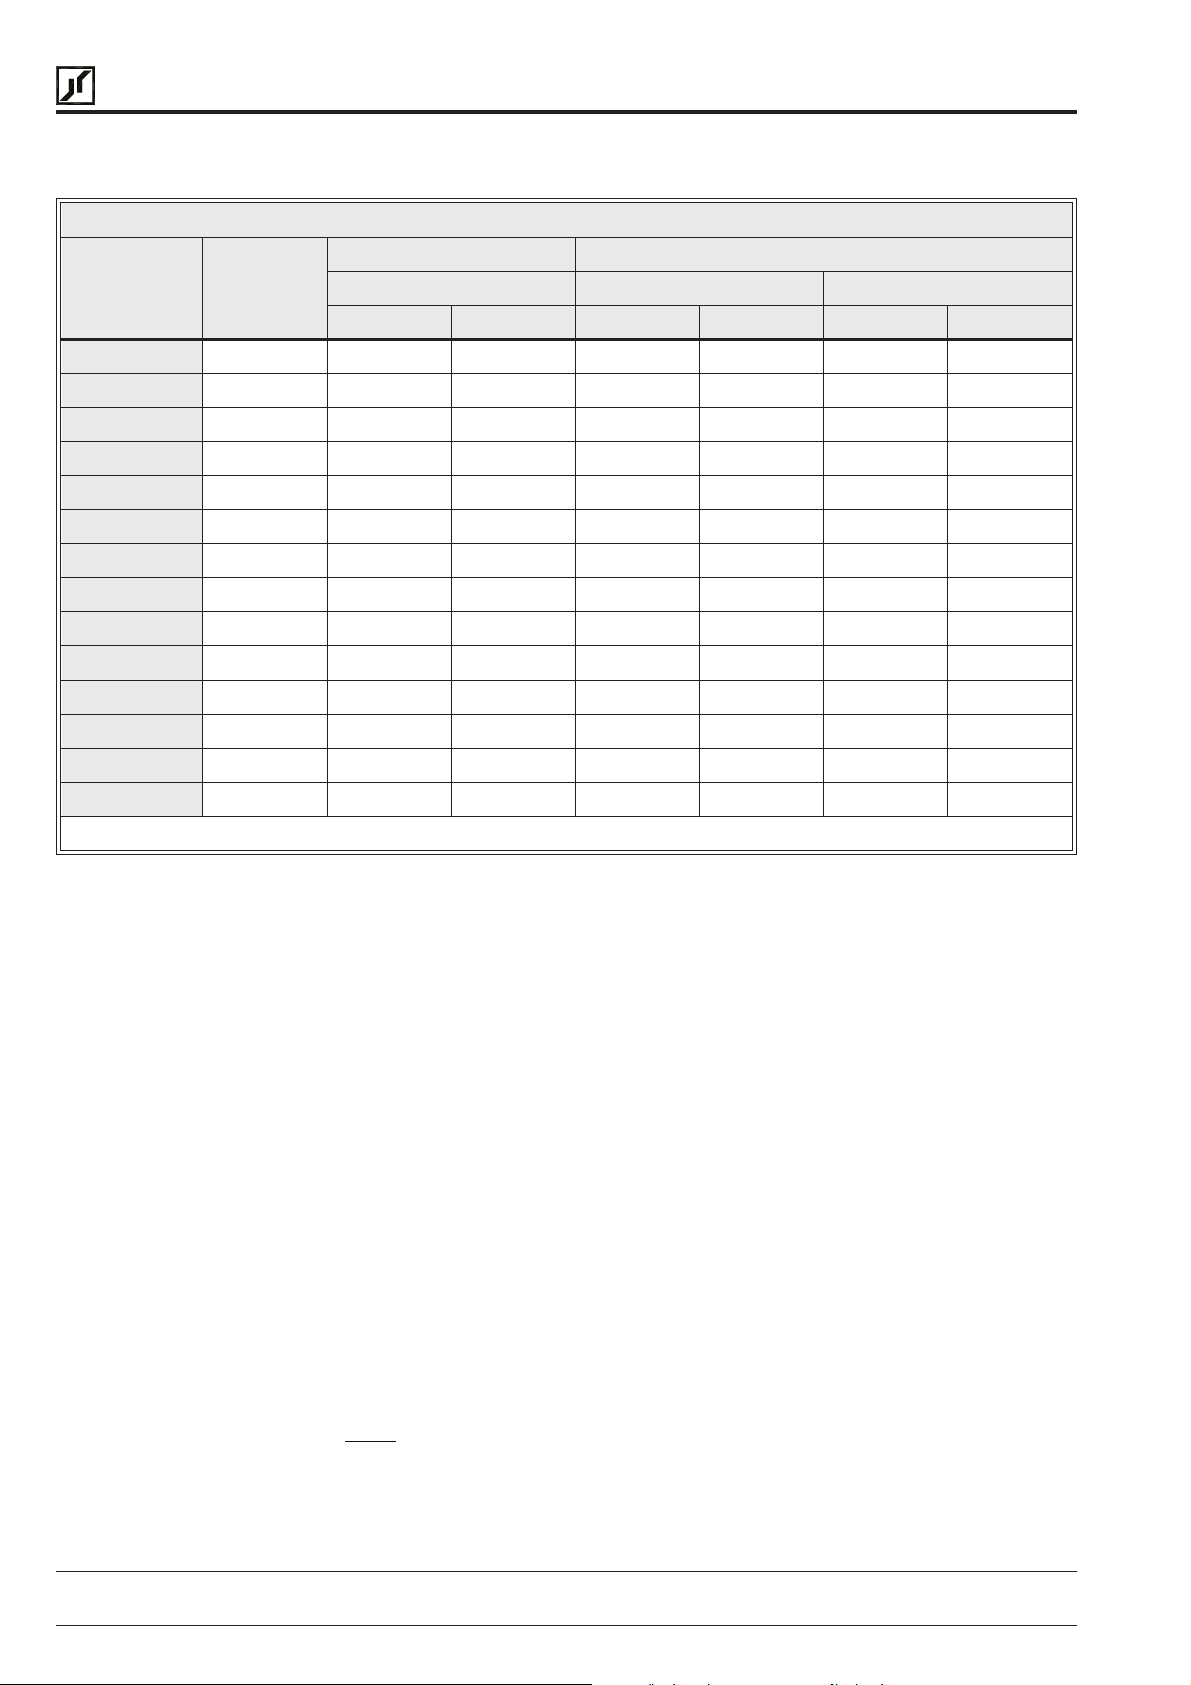
1.5 ACP Inverter Input/Output Ratings
AC RATINGS BY MODEL NUMBERS
Input ratings Maximum motor ratings
Continuous Continuous 1 min at 40 °C (2)
Inverter type KW KVA (5) A KVA A (1) KVA A
6000-7 0.75 1.8 2.2 1.6 2.0 2.4 3.0
6001-5 1.5 3.4 4.3 2.9 3.7 4.4 5.6
6002-2 2.2 4.9 6.2 4.4 5.5 6.6 8.3
6003-0 3.0 5.5 7.0 4.9 7.0 7.4 10.5
6004-0 4.0 8.6 10.8 7.2 9.0 10.8 13.5
6005-5 5.5 12.8 16.0 10.4 13.0 15.5 19.5
6007-5 7.5 17.7 22.2 14.3 18.0 21.5 27.0
6011-0 11.0 24.7 31.0 19.1 24.0 28.7 36.0
6015-0 15.0 30.2 37.9 23.9 30.0 35.9 45.0
6022-0 22.0 45.3 56.8 35.9 45.0 53.8 67.5
6030-0 30.0 61.4 77.1 48.6 61.0 72.9 91.5
6037-0 37.0 75.5 94.7 59.8 75.0 89.6 112.5
6045-0 45.0 90.0 112.0 71.0 90.0 106.4 133.5
6055-0 55.0 111.0 134.0 88.0 110.0 131.5 165.0
Table 1.5
NOTES:
1) Value stored in parameter
copper wire insulation rating.
2) For chassis models (IP 00), ratings are for 1 minute at +50 °C (40 °C external ambient
when enclosed).
3) Control rated for 110% of motor rating (Continuous).
4) Motor thermal overload relay rating – 1.1 × continuous motor nameplate amps (necessary only in multimotor applications).
5) If the kVA rating of the power source exceeds ten times this value, the use of an isolation
transformer or a line inductor is recommended.
03-IRAT
. Wire size must be selected based upon 60/75 °C
1.6 AC Inverter Fundamentals
10
The principal of operation of the ACP or any AC Inverter, is to provide both an adjustable
voltage and an adjustable frequency to the AC motor. The ACP automatically maintains the
requiredvolts/hertzratio,allowing the AC motor to run at itsoptimumefficiencyand providing
rated torque capability throughout the motor’s speed range.
The basic formula that relates the output frequency to motor speed is:
f
N
N
60×
S
=
P
= Synchronous Speed (RPM) f = Frequency (Hertz) P = Number of pairs of poles.
S
Operating manual 30.10.97
ACP 6000
SLV
— 0.75–55 05_GB
Page 17
BERGES
Berges electronic • D–51709 Marienheide-Rodt • Tel. 02264/17-0 • Fax 02264/17126
For Induction Motors:
Motor RPM = Synchronous Speed–Motor Slip (RPM).
The number of pairs of poles of a particular motor, and the amount of slip for a given load
torque, are set by the motor’s design and manufacturer.
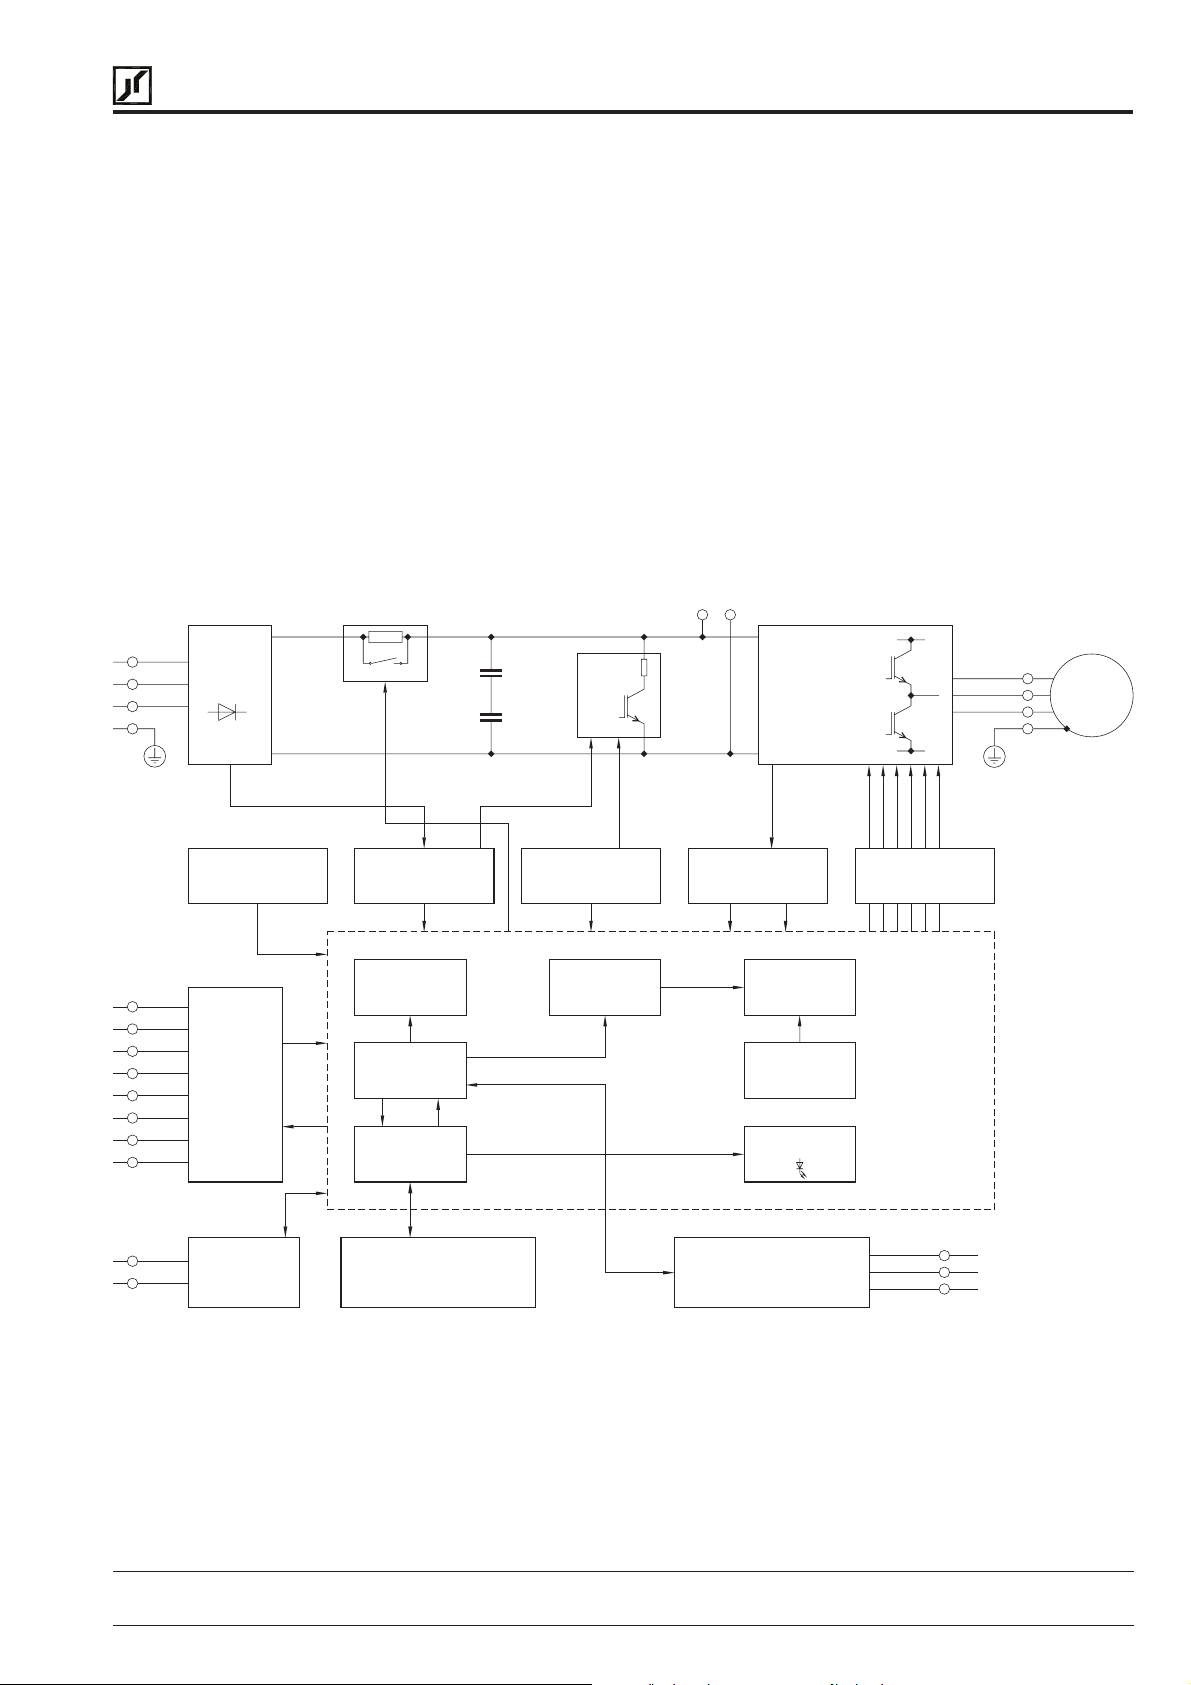
1.7 Description of Operation
The primary functional blocks of the inverter are outlined in Figure 1.7.
Theultimategoal ofanyinverteris toacceptfixedvoltage andfrequencyfrom a powersource
and convert this power into variable voltage and frequency to control a three phase AC
induction motor. The ACP 6000 does this and much more. It allows the user to interface into
the very powerful electronics necessary to provide variable speed control of the motor, in a
very friendly fashion.
Signals can be introduced to the terminal strip for full or partial control of the inverter. The
powerful serial input output (SIO) link is available for total communication and programming.
The keypad provides total control of programming and drive operation.
RECTIFIER
TEMPERATURE
MEASUREMENT
SIGNAL
CONDITIONING
PRE-CHARGE
POWER SUPPLY
AND MONITOR
RAMP
GENERATOR CONTROL
CONTROL
FUNCTIONS
CONTROL
AND PARAMETER
BLOCK
DC BUSLINE INPUTS
MEASUREMENT
DC
BRAKE
VOLTAGE
CURRENT
INVERTER BRIDGE
CURRENT
MEASUREMENT
PWM-
GENERATOR
CHARACTERISTIC
DIAGNOSIS
U/F-
DRIVER ELECTRONICS
CPU
MOTOR
OUTPUTS
M
3~
SERIAL
LINK (SIO)
KEYPAD AND DISPLAY OPTION BOARD
Figure 1.7
30.10.97 Operating manual
05_GB ACP 6000
SLV
— 0.75–55
11
Page 18
BERGES
Berges electronic • D–51709 Marienheide-Rodt • Tel. 02264/17-0 • Fax 02264/17126
2 Installation and enclosure dimensions
2.1 General Rules for Installation
Improper installation of the inverter will greatly effect its life. Be sure to observe the following
points when selecting a mounting location:
A. Mount the unit vertically and do not restrict the airflow to the heat sink fins on the back of
the controller. The fan and fins allow cooling of internal components. Any air restriction
could greatly reduce the life of the inverter, as well as resulting in nuisance overtemperature trips.
B. If the inverter has to be installed in a different position, external cooling is required for full
capacity utilization.
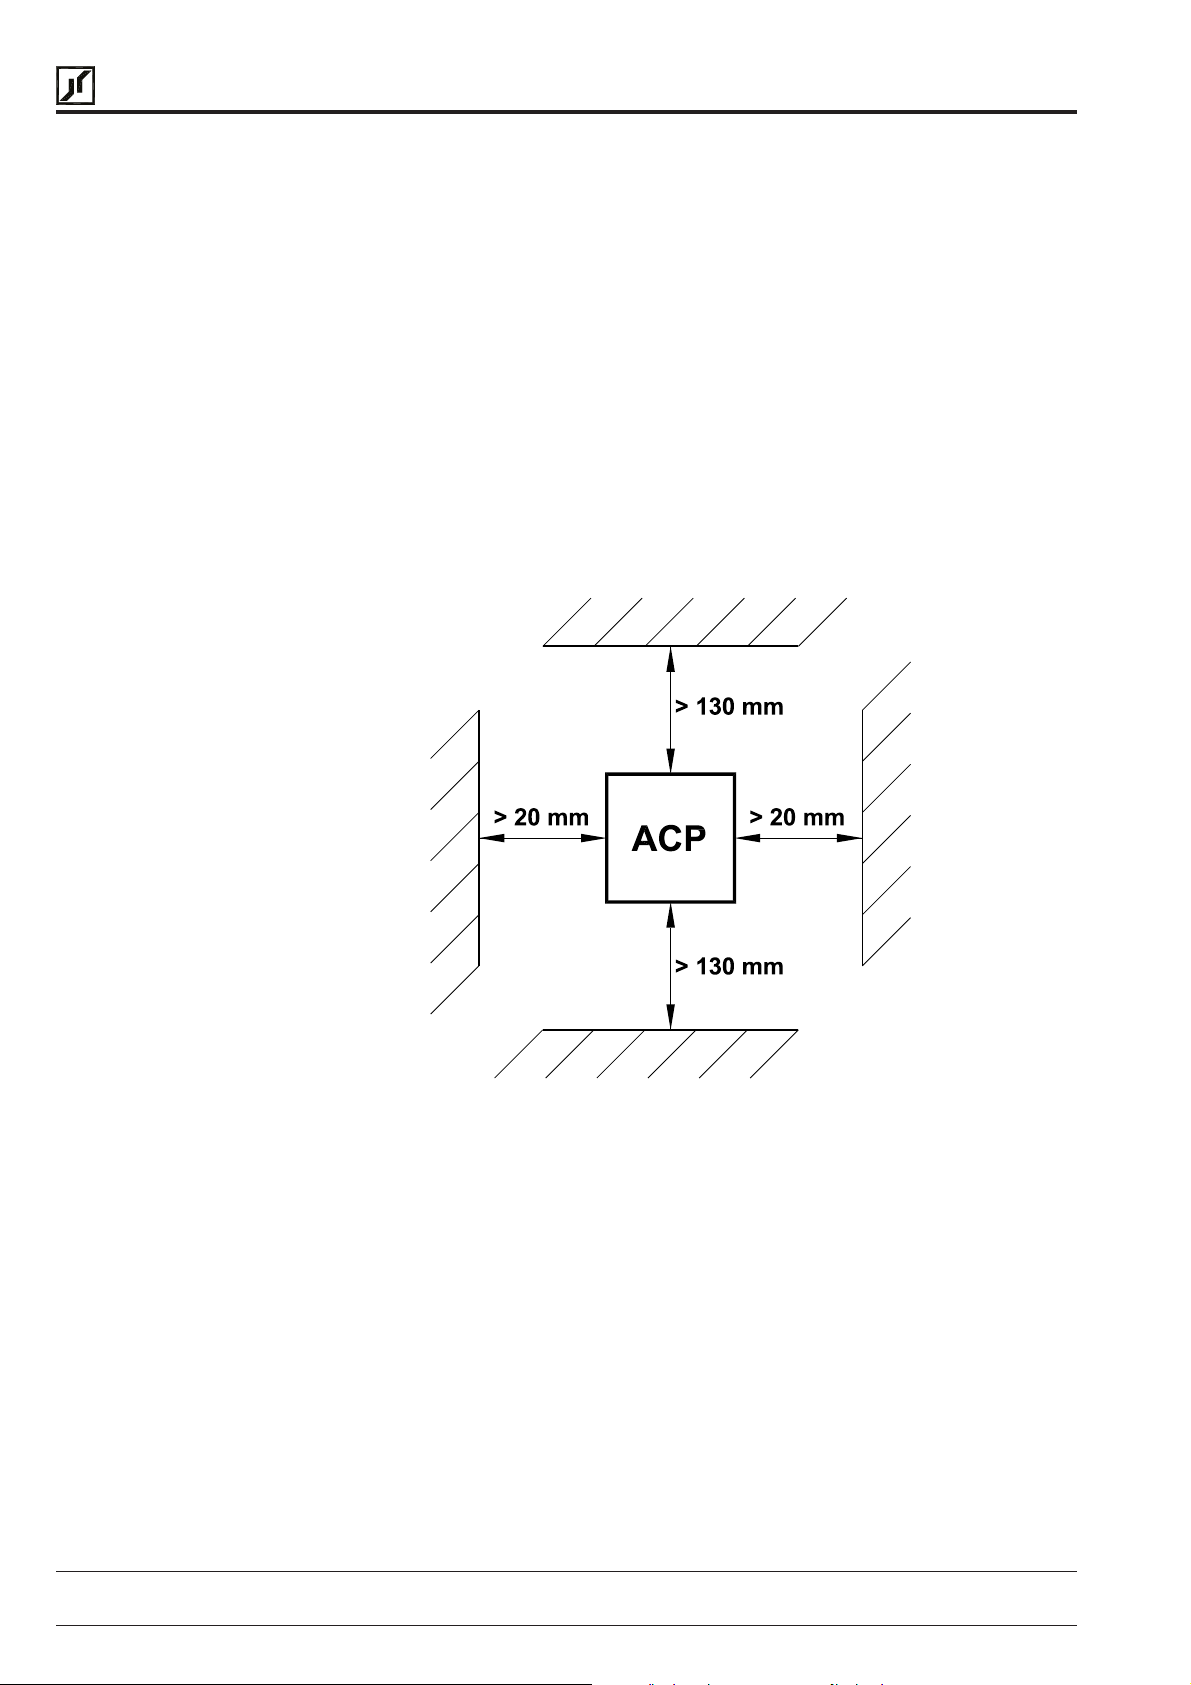
C. The ACP inverter generates heat, and therefore there must be a sufficient amount of free
space around the unit (see Figure 2.1). If the unit is accommodated in a housing together
with a different unit, the prescribed minimum distances must be observed so that
adequate ventilation can be ensured.
12
Figure 2.1
D. Do not install the inverter in a place subjected to high temperature, high humidity, or
excessive vibration (consult Table 1.4 for temperature, humidity and maximum vibration
limits).
E. Do not mount the ACP near heat generating equipment, or in direct sunlight.
F. BERGES inverters are generally designed so that they can be operated at ambient
temperaturesof0°C to +50 °C (IP 00)or0°Cto 40 °C(IP21/54)andat a relativehumidity
of up to 90%.
The occurrence of condensate must be avoided!
G. Please contact BERGES if the above values are exceeded. Therefore, when installing
the unit, you must ensure that a heat buildup is prevented. In certain circumstances, the
internal air circulation does not suffice when installing the unit in a control cabinet with a
small volume.
Operating manual 30.10.97
ACP 6000
SLV
— 0.75–55 05_GB
Page 19

BERGES
Berges electronic • D–51709 Marienheide-Rodt • Tel. 02264/17-0 • Fax 02264/17126
H. The units should never be installed in the proximity of corrosive or flammable gases,
conductive dust or large magnetic and electric fields.
I. Pay close attention during installation to ensuring that no objects (such as drilling swarf,
wireoranythingelse)fallintotheunit.Otherwise,a device fault cannot be excluded, even
after longer periods of operation.
ATTENTION!
J. Do not use wire end ferrules for the control terminals. The terminals are designed
so that the wires can be inserted in the terminals after twisting the individual wires.
K. Line starting
ACP is designed to provide controlled starting and stopping of AC motors by use of the
keypad or external contacts connected to the control terminal strip. ACP may also be
started by applying AC power to terminals L1, L2 and L3. The inverter has line-start-lockout as a standard feature, to prevent automatic starting when line power is applied. This
provision can be defeated by appropriate programming. The inverter may be started
once every two minutes in this mode.
The safety of the operating personnel must be guaranteed in all operating states. Please refer to the safety instructions in chapter 1.0, page 2.
The mains voltage must be switched off before opening or working on
the device. Dangerous voltages are present as long as the charge
indicator lamp is still lit.
30.10.97 Operating manual
05_GB ACP 6000
SLV
— 0.75–55
13
Page 20
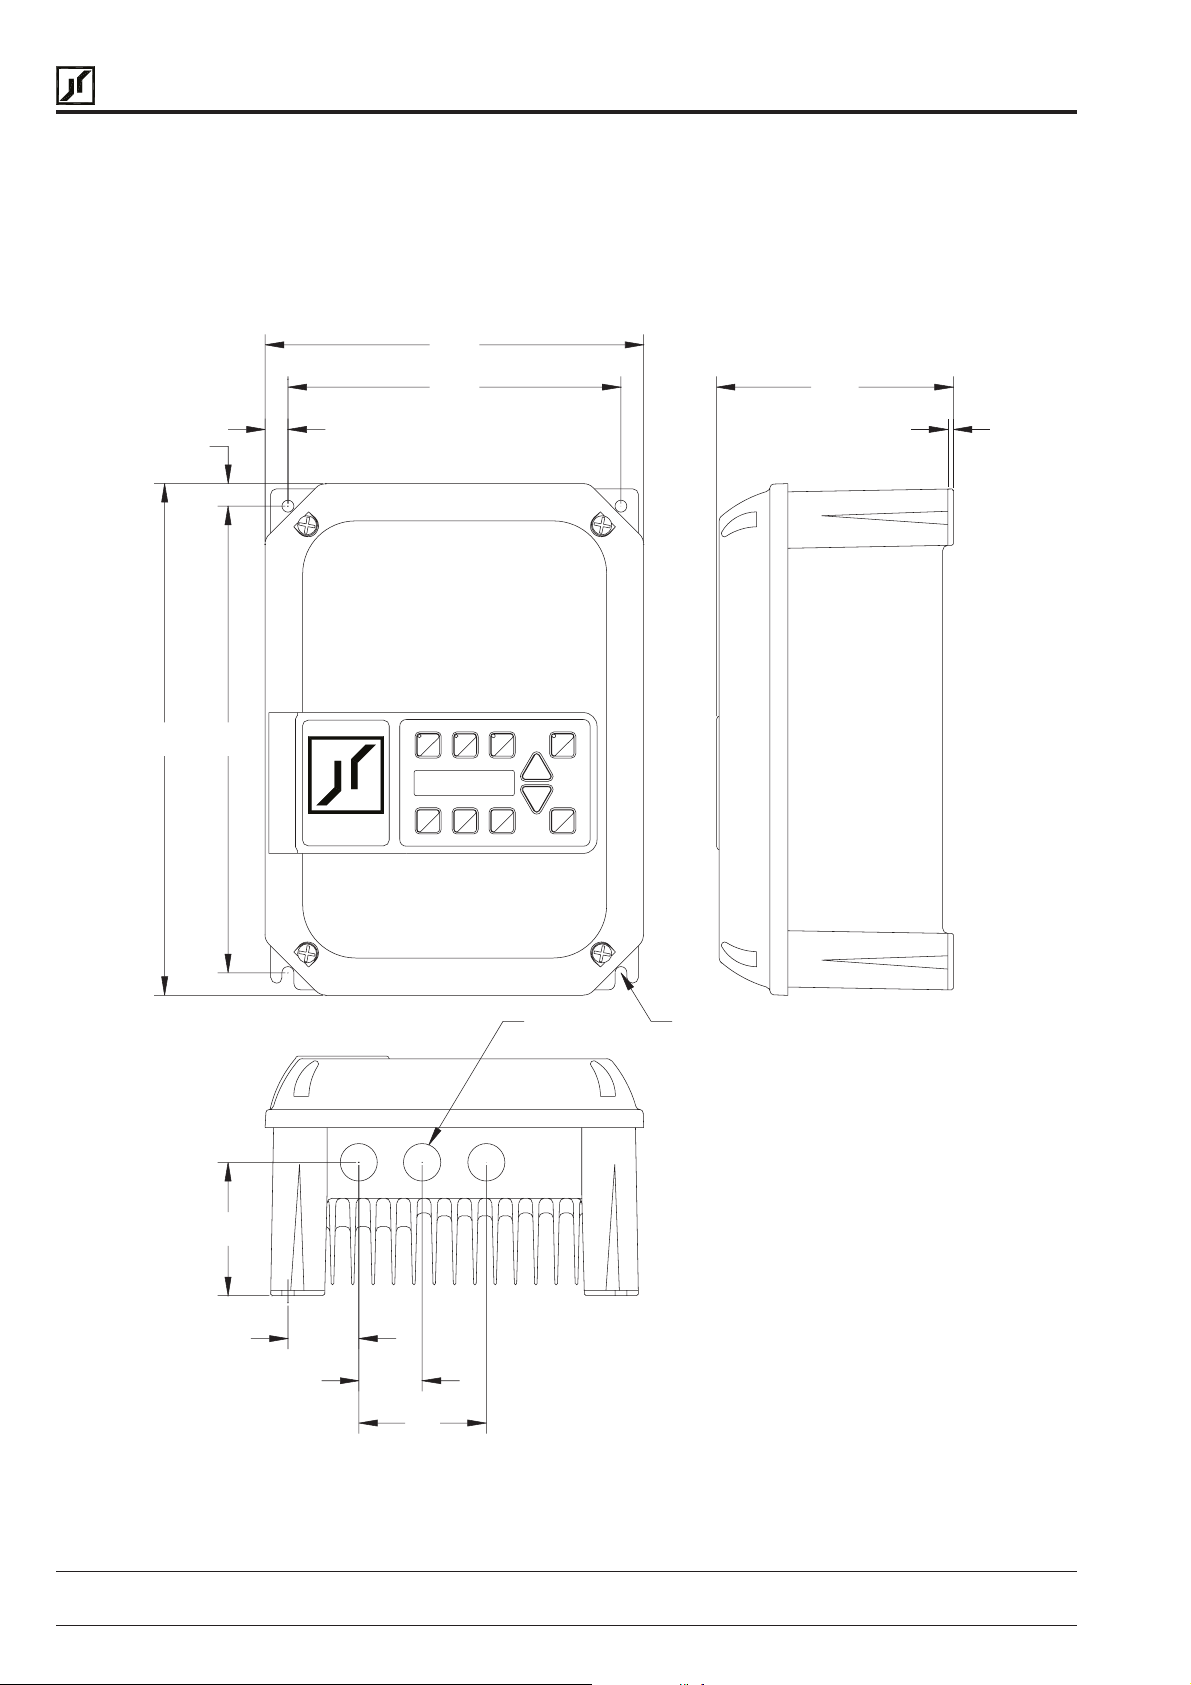
BERGES
2.2 Dimensional Data
ACP 6000 – 0.75...4.0 kW (IP 21/IP 54)
Berges electronic • D–51709 Marienheide-Rodt • Tel. 02264/17-0 • Fax 02264/17126
The following pages show the dimensional data for the IP 00, IP 21 and IP 54 ACP inverters.
227
14
307 280
14
BERGES
200
142
3
14
80
42
38
77
∅ 22 ∅ 7
Figure 2.2.1
Operating manual 30.10.97
ACP 6000
SLV
— 0.75–55 05_GB
Page 21
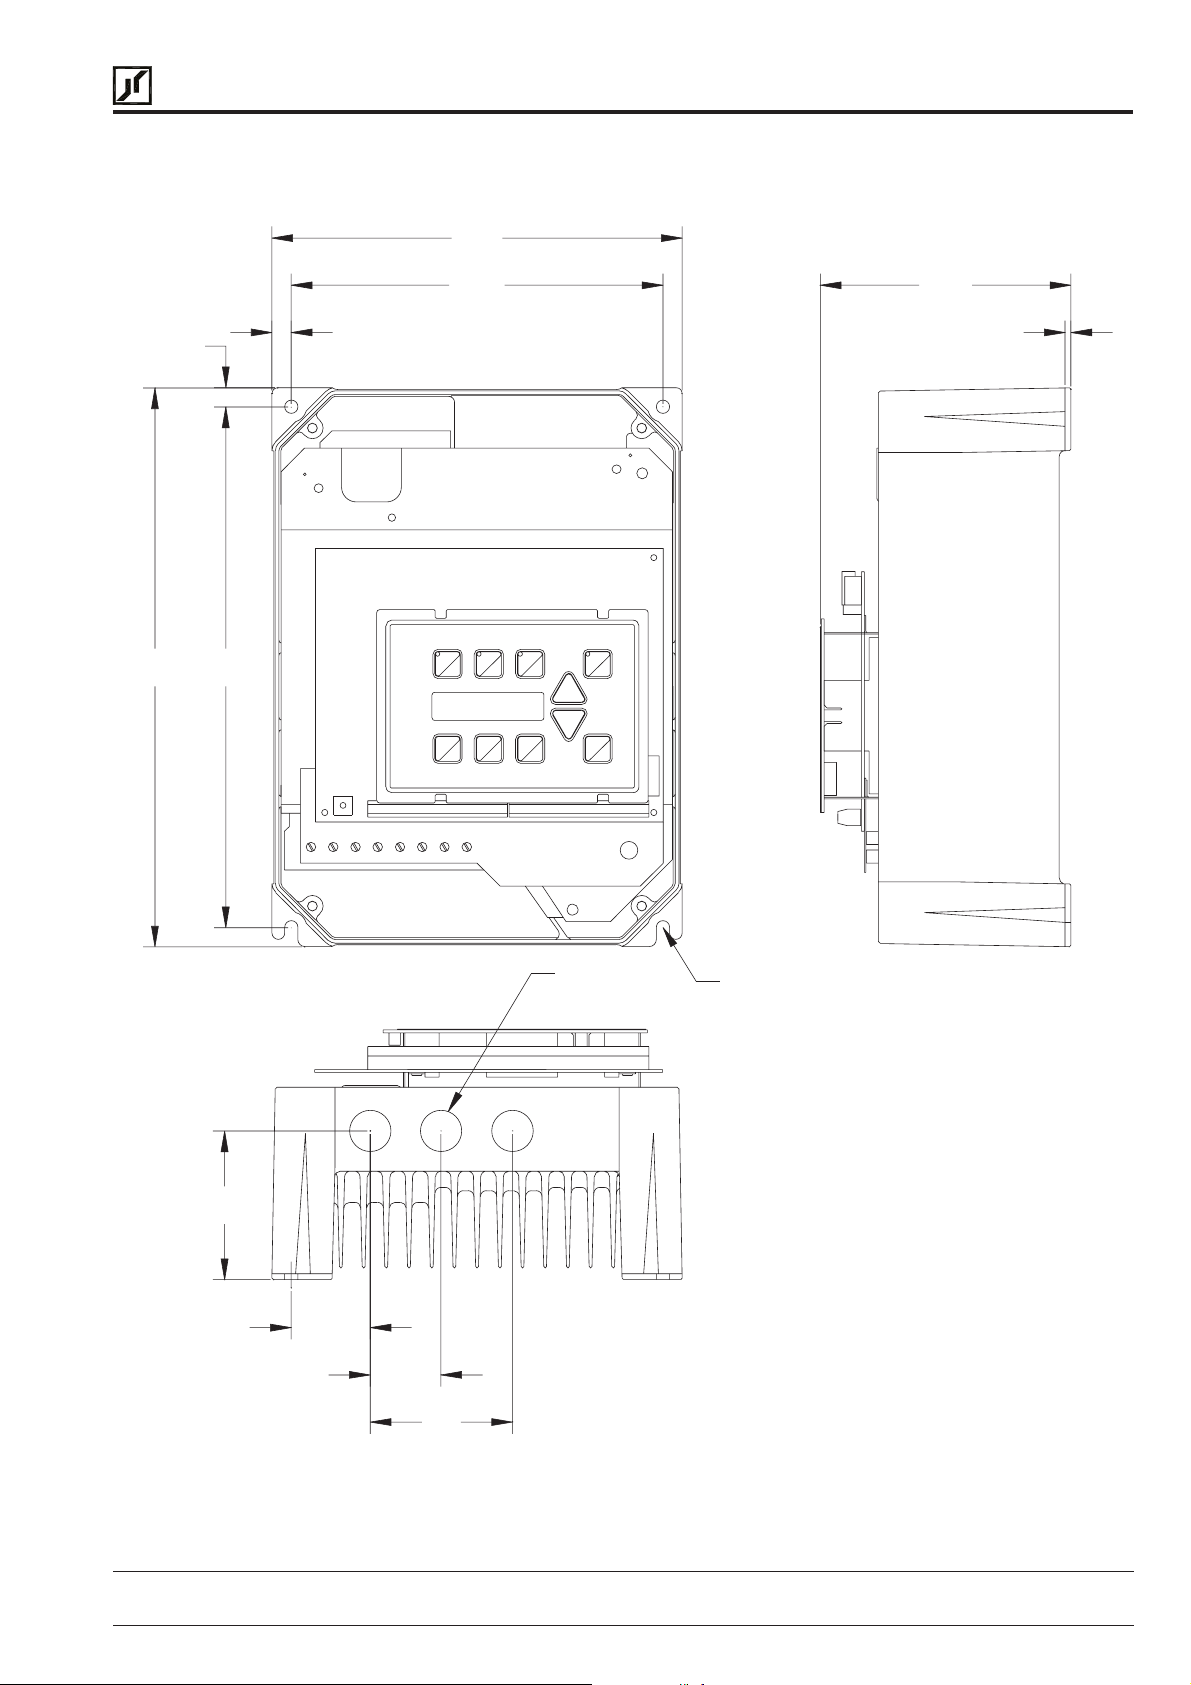
BERGES
ACP 6000 – 0.75...4.0 kW (IP 00)
Berges electronic • D–51709 Marienheide-Rodt • Tel. 02264/17-0 • Fax 02264/17126
221
10
301 280
10
200
135
3
80
42
38
77
∅ 22
Figure 2.2.2
∅ 7
30.10.97 Operating manual
05_GB ACP 6000
SLV
— 0.75–55
15
Page 22
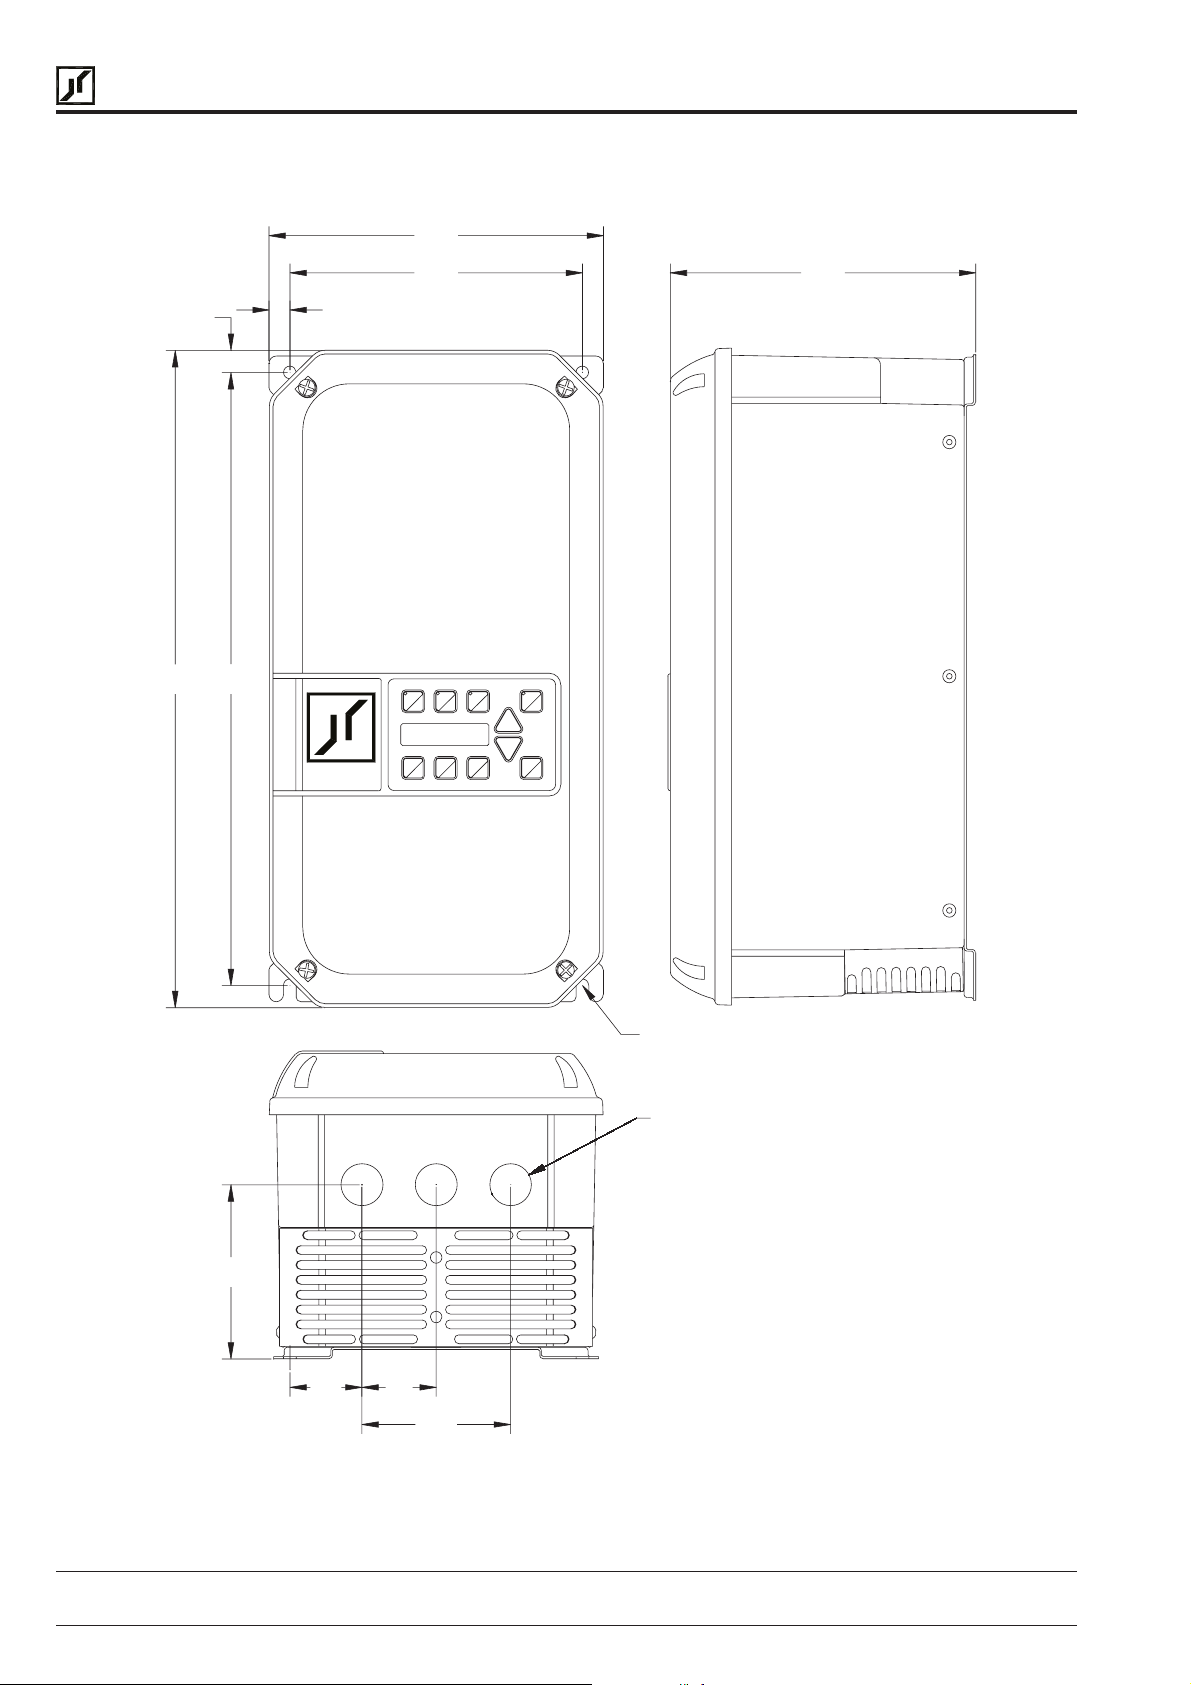
BERGES
ACP 6000 – 5.5...15.0 kW (IP 21/IP 54)
Berges electronic • D–51709 Marienheide-Rodt • Tel. 02264/17-0 • Fax 02264/17126
229
15
449 419
14
BERGES
200
210
16
119
49 51
102
∅ 9
∅ 29
Figure 2.2.3
Operating manual 30.10.97
ACP 6000
SLV
— 0.75–55 05_GB
Page 23
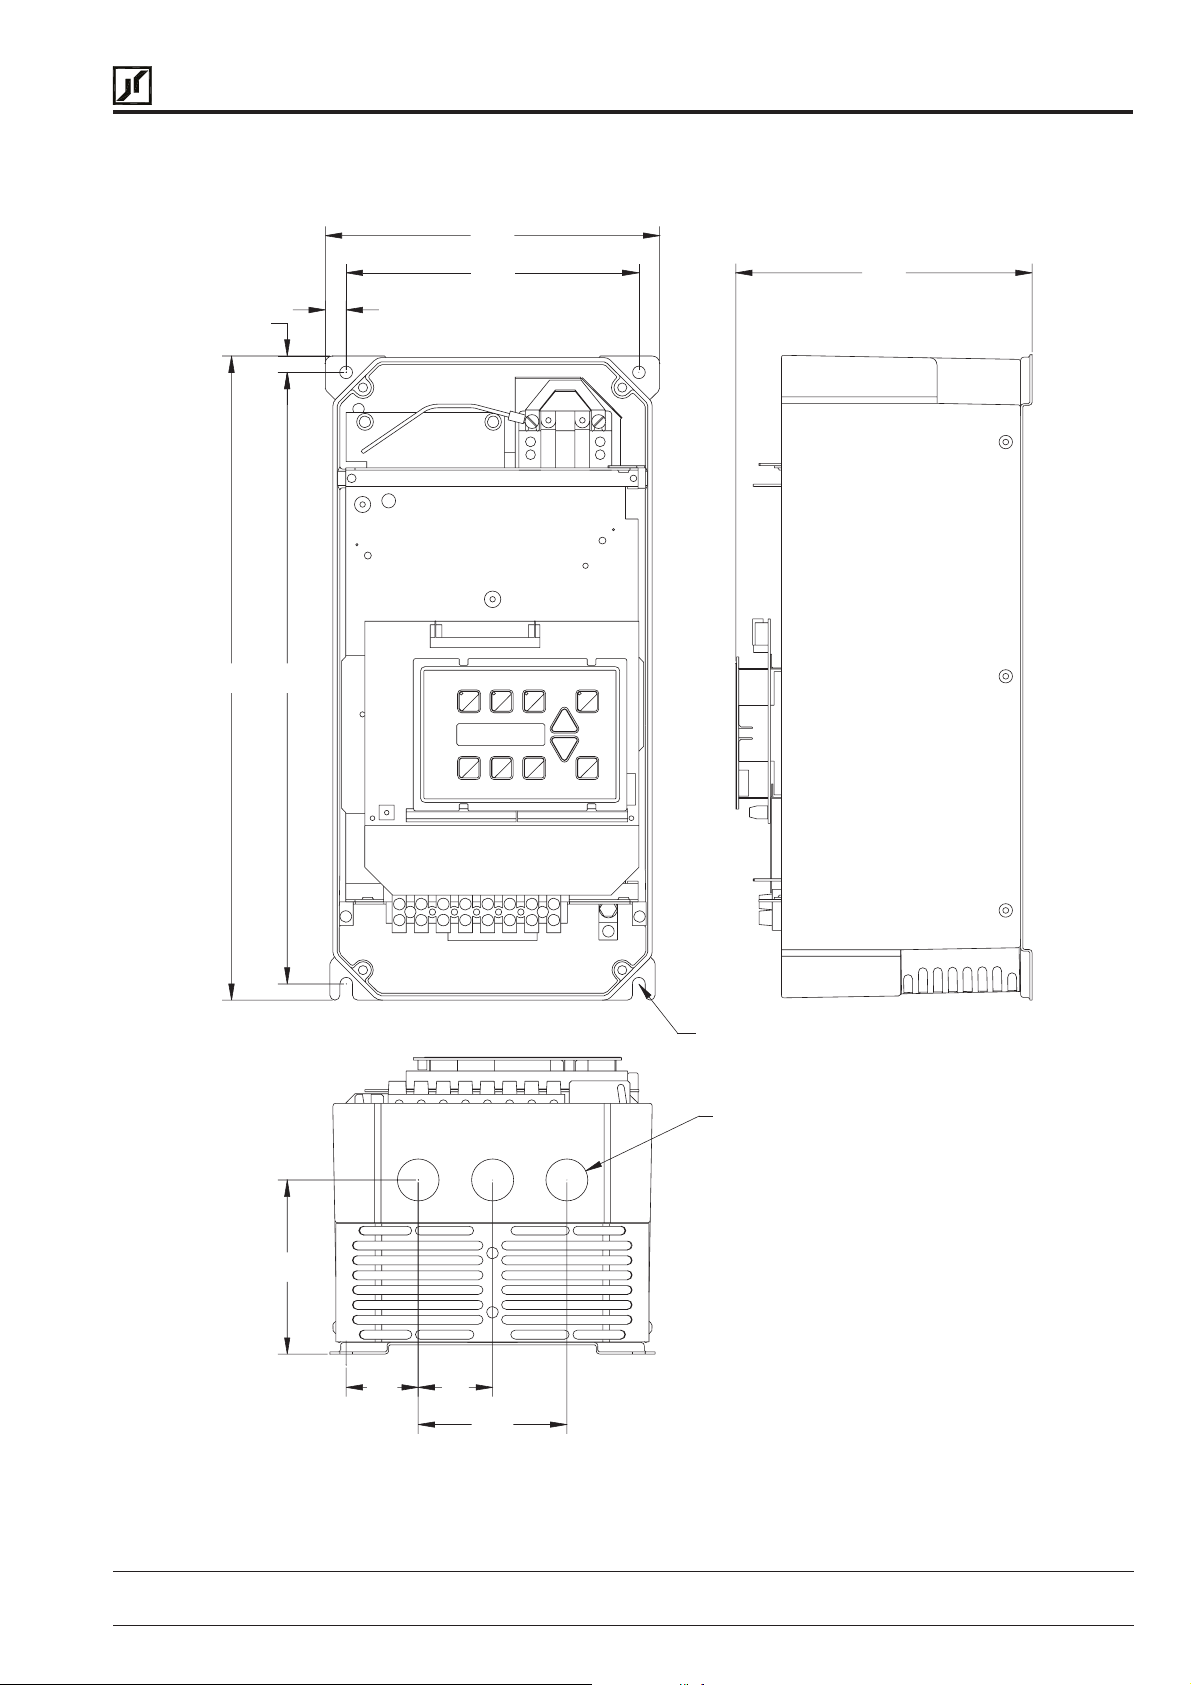
BERGES
ACP 6000 – 5.5...15.0 kW (IP 00)
Berges electronic • D–51709 Marienheide-Rodt • Tel. 02264/17-0 • Fax 02264/17126
229
11
200
14
419441
203
119
49 51
102
Figure 2.2.4
30.10.97 Operating manual
05_GB ACP 6000
SLV
— 0.75–55
∅ 9
∅ 29
17
Page 24
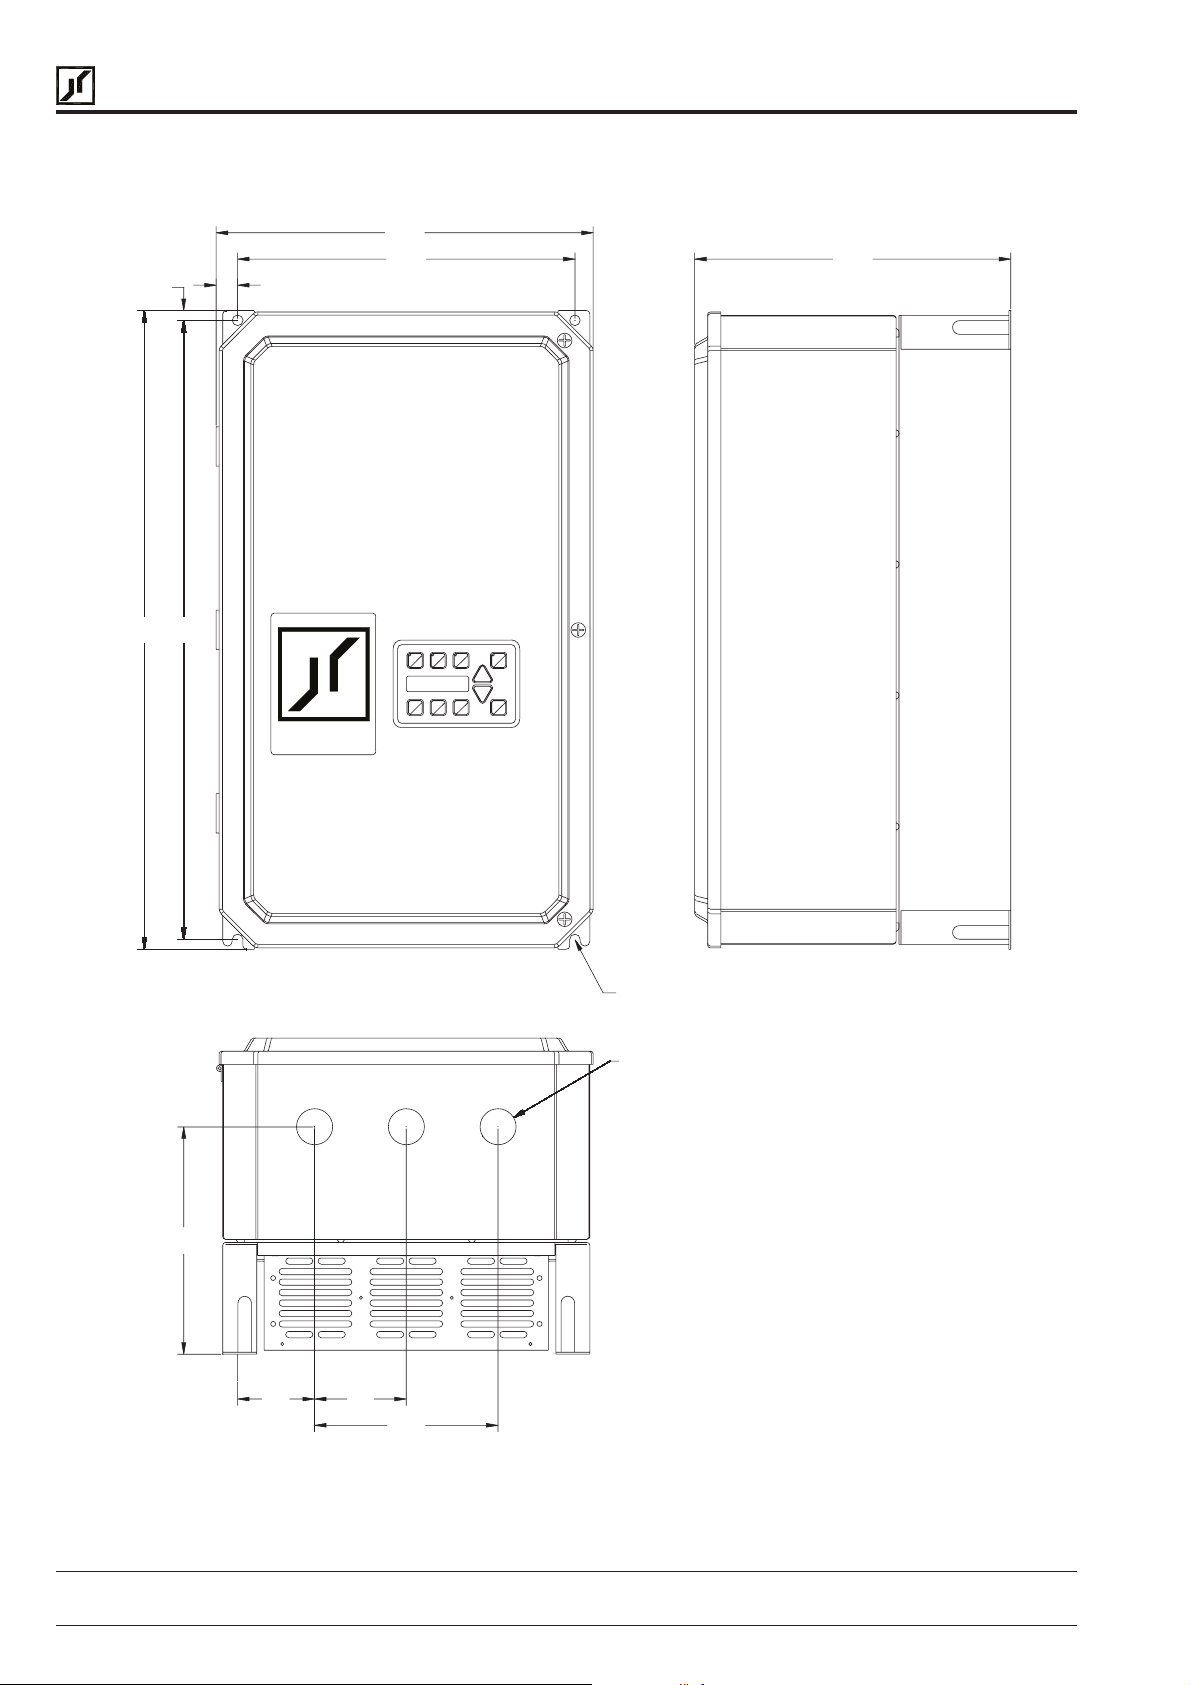
8
BERGES
ACP 6000 – 22...30 kW (IP 21/IP 54)
9
619 600
21
Berges electronic • D–51709 Marienheide-Rodt • Tel. 02264/17-0 • Fax 02264/17126
365
327
306
220
BERGES
∅ 10
∅ 35
18
75 89
17
Figure 2.2.5
Operating manual 30.10.97
ACP 6000
SLV
— 0.75–55 05_GB
Page 25
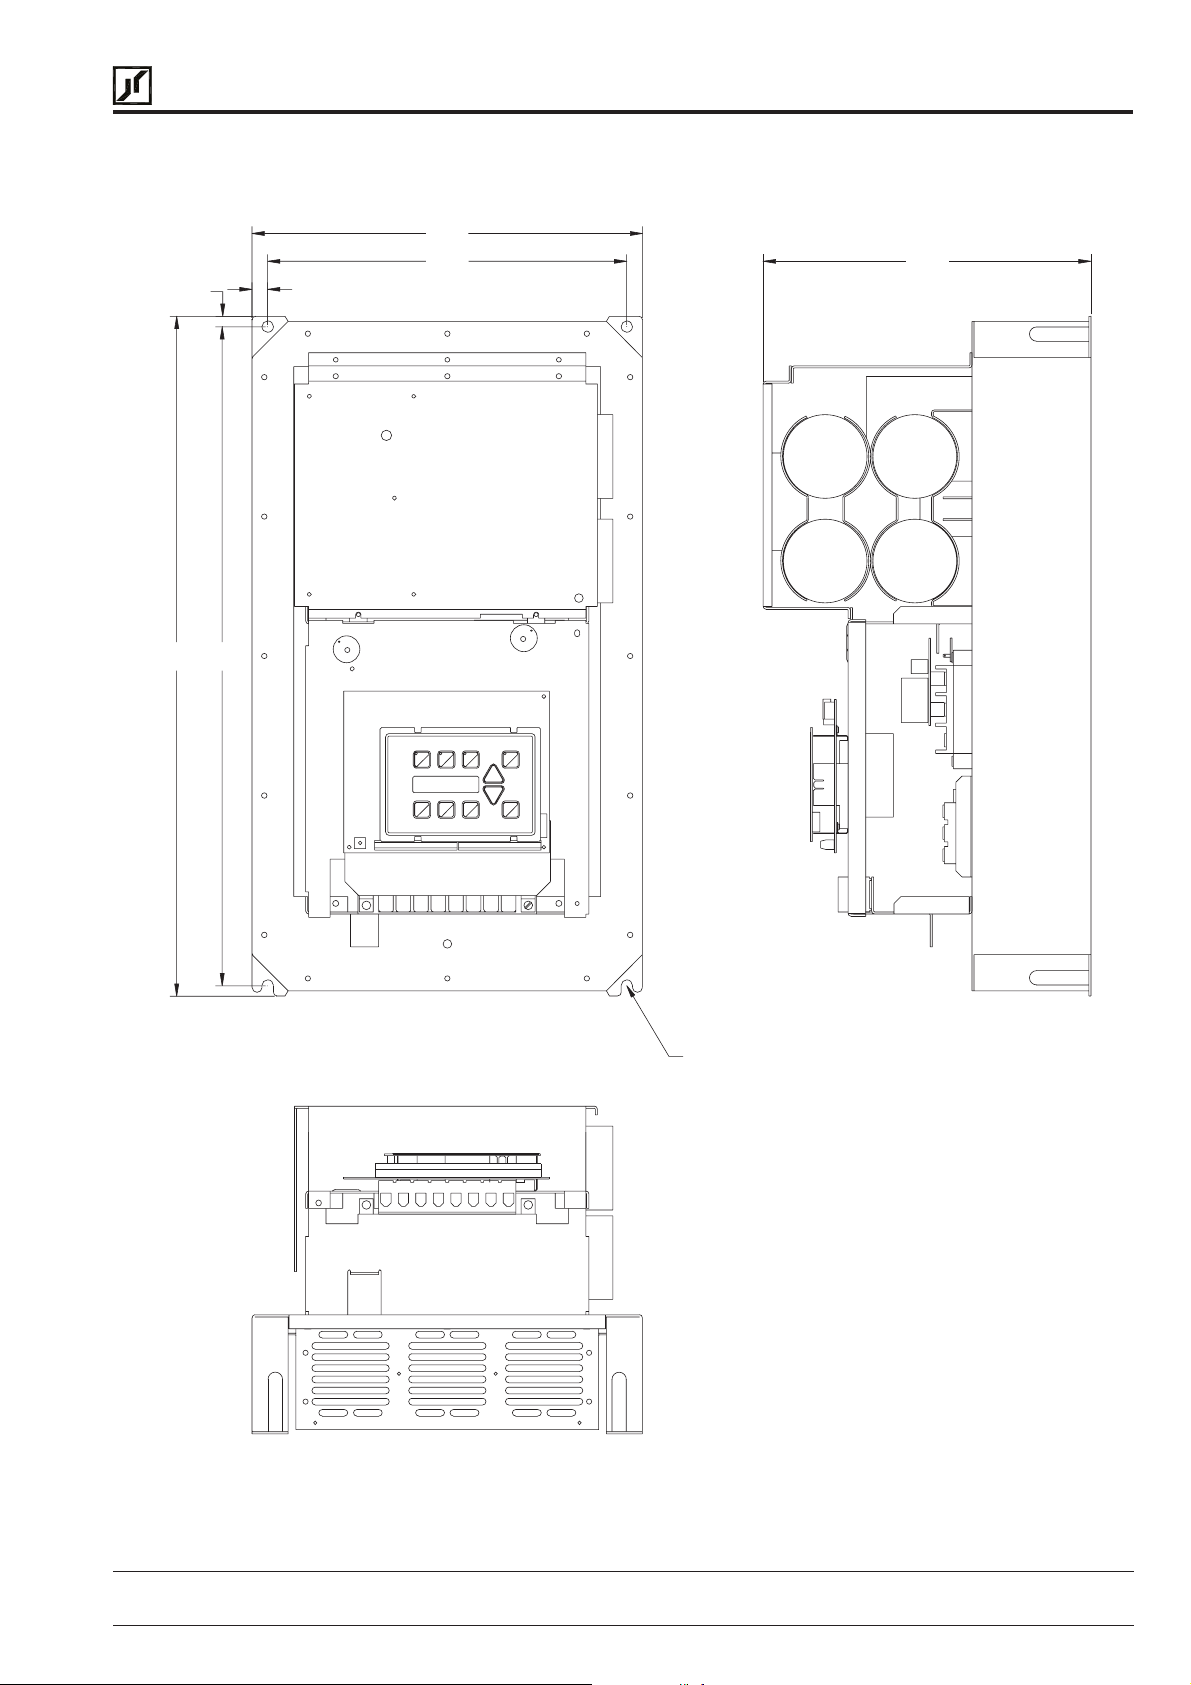
BERGES
ACP 6000 – 22...30 kW (IP 00)
9
619 600
14
Berges electronic • D–51709 Marienheide-Rodt • Tel. 02264/17-0 • Fax 02264/17126
356
327
298
Figure 2.2.6
30.10.97 Operating manual
05_GB ACP 6000
SLV
— 0.75–55
∅ 10
19
Page 26
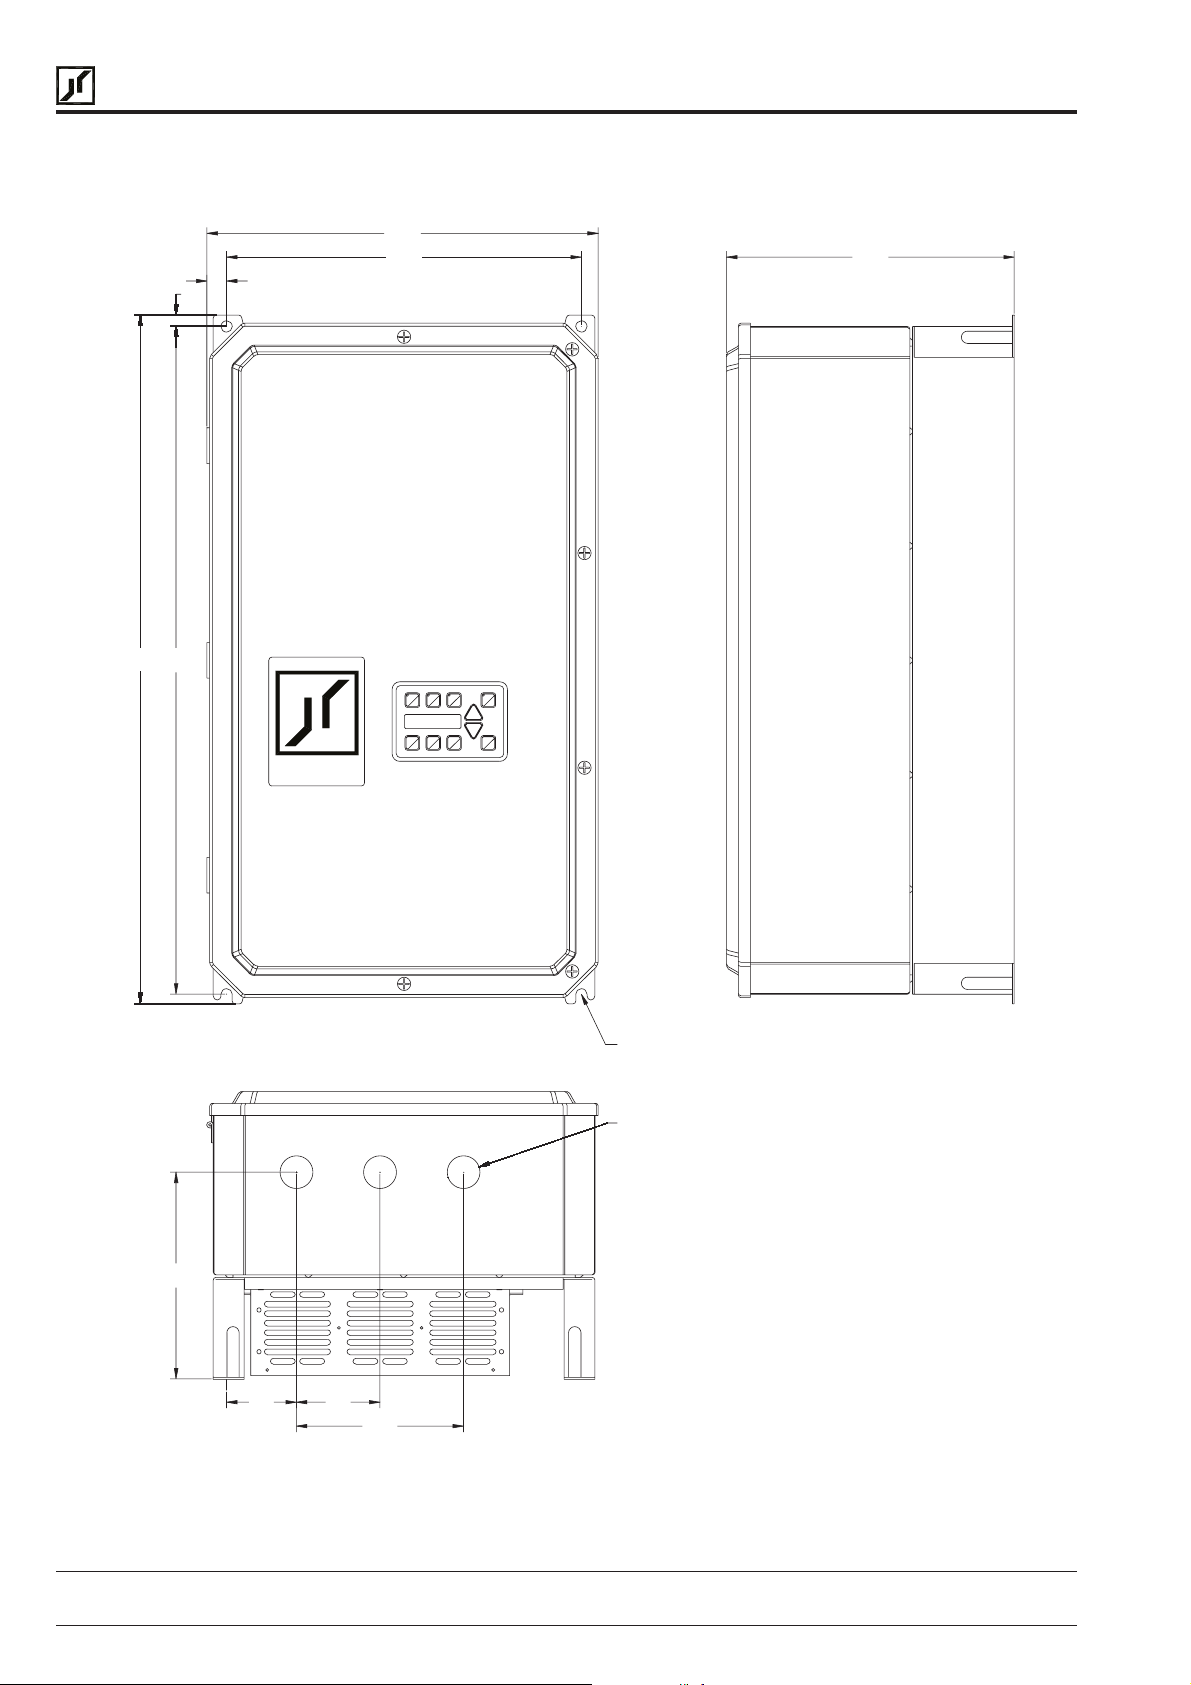
8
BERGES
ACP 6000 – 37...55 kW (37 kW = IP 21 or IP 54; 45...55 kW = only IP 21)
12
733 711
21
Berges electronic • D–51709 Marienheide-Rodt • Tel. 02264/17-0 • Fax 02264/17126
417
378
306
220
BERGES
∅ 12
∅ 35
20
75 89
17
Figure 2.2.7
Operating manual 30.10.97
ACP 6000
SLV
— 0.75–55 05_GB
Page 27
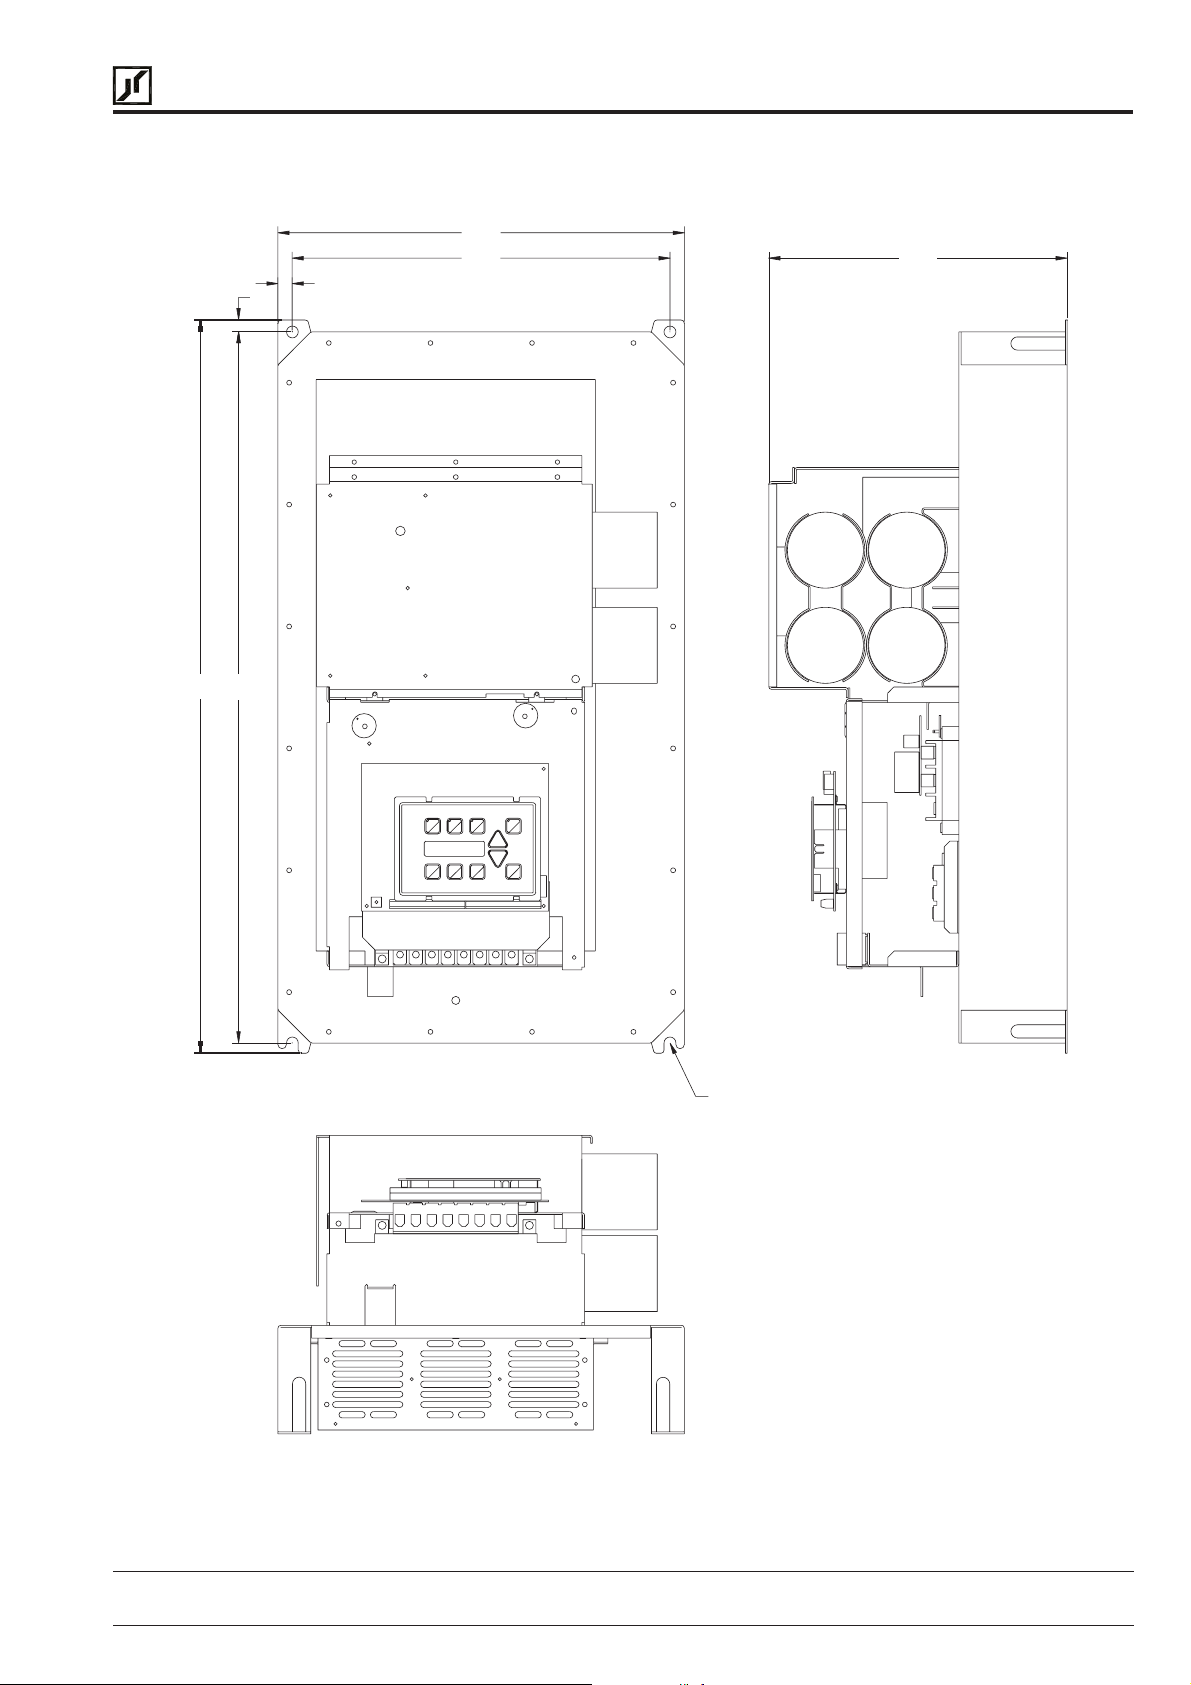
BERGES
ACP 6000 – 37...55 kW (IP 00)
12
14
Berges electronic • D–51709 Marienheide-Rodt • Tel. 02264/17-0 • Fax 02264/17126
406
378
298
733 711
∅ 12
Figure 2.2.8
30.10.97 Operating manual
05_GB ACP 6000
SLV
— 0.75–55
21
Page 28

BERGES
Berges electronic • D–51709 Marienheide-Rodt • Tel. 02264/17-0 • Fax 02264/17126
2.3 Input AC Line Requirements
The allowable AC line voltage fluctuation is +10% to -20% of nominal line voltage (400
V). A supply voltage above or below these limits could cause the inverter to trip out
with either an overvoltage or an undervoltage fault.
Adaptation to rated line voltages outside the permissible range is possible by means of
autotransformers. Calculation according to the formula below is recommend:
U
PP
PUI
NOTE:
Exercise caution when using the ACP 6000 under the conditions of a low-voltage network.
An inverter from the ACP 6000 series is fully functional when connected to an alternating
current of 370 V, for example. However, the maximum output voltage is limited to 370 VAC.
If the motor is rated for a mains voltage of 400 VAC, this can lead to higher motor currents
and overheating of the motor. It must be ensured that the connected mains voltage
corresponds to the rated voltage of the motor.
If other than 50 Hz output can be tolerated, proper volts/hertz can be programmed into the
inverter by the
consult Section 4.3 or BERGES.
Phase voltage imbalance of the input AC source can cause unbalanced currents and
excessive heat in the input rectifier diodes and in the DC bus capacitors of the ACP. Phase
imbalance is calculated by the following method:
Assume:
The voltage from L1 to L2 = La
The voltage from L2 to L3 = Lb
The voltage from L1 to L3 = Lc
The average line voltage = Lavg
F
TD
=−
1
G
H
U
D
=××
22
PT= Equivalent two-winding kVA rating (kVA)
2
I
J
K
1
3
53-FKNEE
= Continuous output (kVA)
P
D
= Rated line voltage (V)
U
1
= Rated voltage, frequency inverter (V)
U
2
= Input current (A) as per table 1.5
I
2
and
32-FMAX
parameters. If you are unsure about this feature,
ATTENTION!
La Lb Lc
=
++
3
Lavg
Determine the absolute value of the difference between each of the line voltages (La, Lb and
Lc) and Lavg (subtract the two values and disregard the sign of the result). Consider the
results of this calculation to be Laa, Lba, and Lca.
Phase Imbalance
Example: Measured phase voltages of 395, 400, and 405 would result in a calculated phase
imbalance of 1.25%.
If the resulting phase imbalance exceeds 2%, consult your local power company or plant
maintenance personnel and ask them to investigate this problem and recommend methods
of correcting this condition.
Phase imbalance can also cause damage to motors running direct on line. A 2% imbalance
requires a 5% derating factor on the motor, 3% imbalance requires a 10% derating. 4%
requires an 18% derating.
NEVER USE POWER-FACTOR IMPROVEMENT CAPACITORS ON THE ACP MOTOR
TERMINALS, M1, M2, AND M3, OR DAMAGE TO THE INVERTER’S SEMICONDUCTORS WILL RESULT.
++
395 400 405
=
Laa Lba Lca
3
++
2 (Lavg)
=
400
505
100%
×=
++
2 400
×
100% 1.25%=
×=
22
Operating manual 30.10.97
ACP 6000
SLV
— 0.75–55 05_GB
Page 29
BERGES
Berges electronic • D–51709 Marienheide-Rodt • Tel. 02264/17-0 • Fax 02264/17126
2.3.1 Mains power connection
The frequency inverters are designed for installation in a switchgear cabinet (applies
only to units of protection class IP 00/IP 21) and for permanent connection.
To guarantee lasting operating safety and reliability,the inverter must be connected expertly
in accordance with the valid electrical standards. Attention must be paid to good insulation
from earth potential on the power terminals.
An three-phase system with a nominal voltage of 400 V (50/60 Hz) must be connected to
mains terminals L1, L2, L3 and PE (pay attention to rating plate). The neutral point must be
earthed (TN-C system).
Ensure a voltage balanced to earth or phase to phase when feeding in the mains power
through an isolating transformer (star point must be earthed).
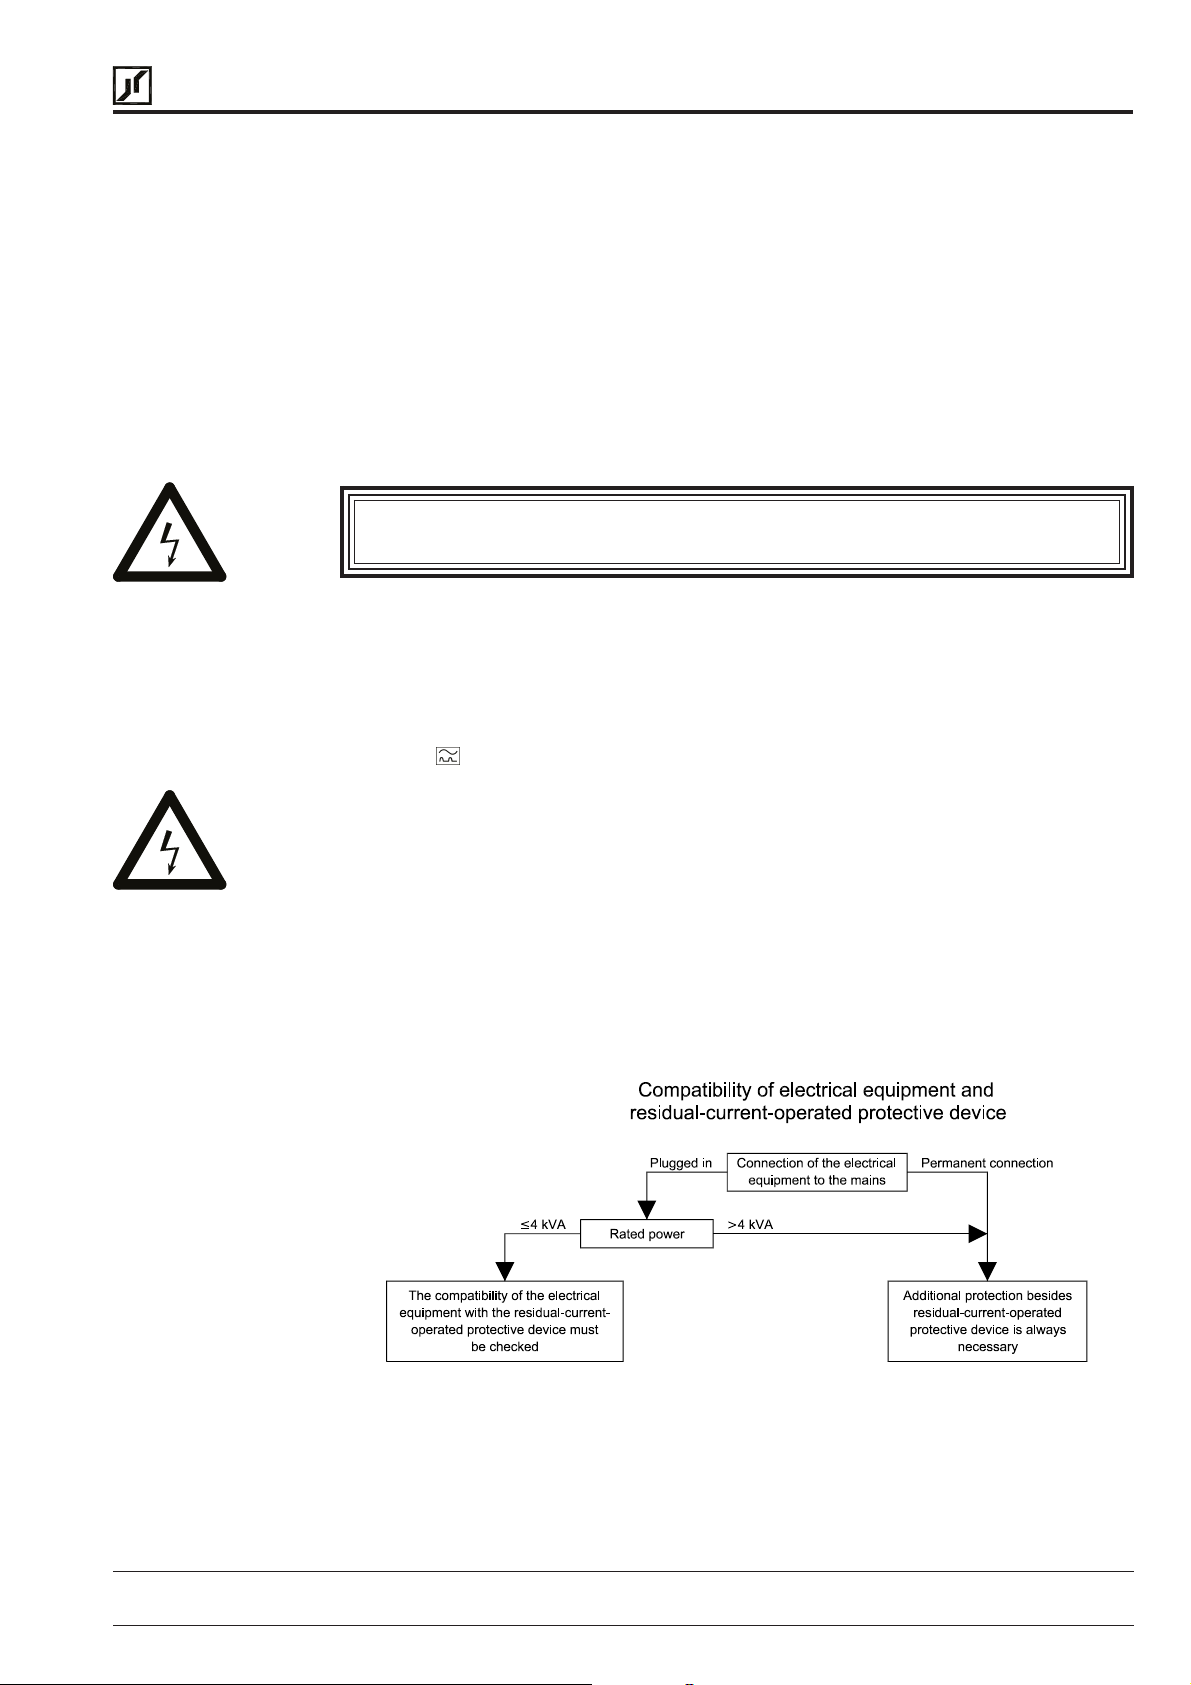
Frequency inverters must not be connected via a residual-current-
operated circuit-breaker as the sole protective measure!
The single exception below permits connection of a frequency inverter via a residual-current-operated circuit-breaker as the sole protective measure:
• Installation of a residual-current-operated circuit-breaker of the newest design for fre-
quency inverters up to 4 kVA (input voltage 1 × 230 V) with MOBILE connection.
This residual current-operated circuit breaker must be suitable for alternating and pulsating
DC leakage current. Residual-current-operated circuit-breakers of this type bear the
symbol .
Reliable tripping of the residual-current-operated circuit-breaker is not ensured in the
case of frequency inverters up to 4 kVA (input voltage 3 × 400 V) with MOBILE
connection; an additional protective measure must be used for this reason. Also see
the diagram below.
In the case of frequency inverters with PERMANENT connection (input voltage 1 ×
230 V and 3 × 400 V), another protective measure must always be used in addition to
the residual-current-operated protective device. Also see the diagram below.
The protective function of the residual-current-operated circuit-breaker is no longer ensured
due to leakage currents from interference suppression capacitors in the inverter and DC
components in the fault current. All devices connected to this residual-current-operated
circuit-breaker (and persons touching them) are no longer protected in the event of a fault.
Flow diagram of the requirements relating to the combination of frequency inverter
and residual-current-operated protective device
The inverter will be destroyed if the mains feeder is confused with the motor cable.
30.10.97 Operating manual
05_GB ACP 6000
SLV
— 0.75–55
23
Page 30

BERGES
Berges electronic • D–51709 Marienheide-Rodt • Tel. 02264/17-0 • Fax 02264/17126
The DC link capacitors must be reformed if the inverter you wish to connect has been out of
operation for more than a year. To do this, connect the inverter to voltage for approx. 30
minutes. The inverter should not be loaded by connected motors during forming.
2.3.2 Motor connection
Connect the motor cable to the “M1, M2, M3” and “PE” terminals.
The inverter will be deactivated if shorted to the motor terminals “M1, M2, M3”.
ATTENTION!
2.3.3 EMC Ordinance (EMC Directive, 89/336 EEC)
The output of the drive will always be three phase. Do not connect single-phase
motors to the inverter output terminals M1, M2 or M3.
Never use power factor correction capacitors on the motor terminals M1, M2 and M3,
or damage to the semi-conductors will result.
If interruptingcontacts(e.g.contactorsormotorprotectionswitchesetc.)havetobeinstalled
between the motor and inverter, the circuit must be configured so as to ensure that the
“Enable” signal (terminals +24V/CTS) is activated before separation of the inverter/motor
connection. A relay switching time of approx. 30 ms suffices.
The frequency inverterswere tested in the form of a practical test set-up in a switchgear cabinet
(in accordance with our interference suppression measures in these operating instructions:
“Interference suppression measures/EMC (electromagnetic compatibility)”. The limit values of
the standards below were fulfilled under these conditions:
EMA (Electromagnetic emission)
EN 50081-1 Basic specification “Emitted interference” (Limit-value class “A”)
or
EN 50081-2 Basic specification “Emitted interference” (Limit-value class “B”)
EN 55011 Emitted interference
HINT!
EMB (Electromagnetic interference)
EN 50082-2 Basic specification “Interference immunity”
EN 50140 Electromagnetic fields
EN 60801 Static discharge (ESD)
IEC 801-4 Burst on mains lead/data line
At least the following conditions must be fulfilled for compliance with
the limit values of the aforementioned standards:
• Installation of a mains filter or a mains filter and a motor choke in accordance with the
table below (mains filter and motor choke are not included in the scope of delivery).
• Laying the motor cable in a shielded configuration.
• Laying the control cable in a shielded configuration.
• Observe general RFI suppression measures (refer to the Chapter “Interference suppres-
sion measures/EMC (electromagnetic compatibility)”.
As compliance with the limit values depends to a great extent on the installation and
combination with other units and on the specific application, a conclusive statement about
compliance with the limit values is possible only after measurement when the installation
has been completely installed and is ready for operation.
24
Operating manual 30.10.97
ACP 6000
SLV
— 0.75–55 05_GB
Page 31
BERGES
DEVICE TYPE FILTER TYPE ARTICLE NO. INPUT PHASES VOLTAGE (V) WEIGHT(kg)
ACP 6000-7 BE/V 3012 32501746 3~ 380/480 1.80
ACP 6001-5 BE/V 3012 32501746 3~ 380/480 1.80
ACP 6002-2 BE/V 3012 32501746 3~ 380/480 1.80
ACP 6003-0 BE/V 3012 32501746 3~ 380/480 1.80
ACP 6004-0 BE/V 3012 32501746 3~ 380/480 1.80
ACP 6005-5 BE/VI 3040 32501747 3~ 380/480 2.70
ACP 6007-5 BE/VI 3040 32501747 3~ 380/480 2.70
ACP 6011-0 BE/VI 3040 32501747 3~ 380/480 2.70
ACP 6015-0 BE/VI 3040 32501747 3~ 380/480 2.70
ACP 6022-0 BE 3060 32501665 3~ 380/480 4.15
ACP 6030-0 BE 3080 32501689 3~ 380/480 7.95
ACP 6037-0 BE 3100 32501621 3~ 380/480 7.95
ACP 6045-0 BE 3120 32501736 3~ 380/480 14.20
ACP 6055-0 BE 3150 32501737 3~ 380/480 15.40
DEVICE TYPE OUTPUT CHOKE ARTICLE NO. INPUT PHASES VOLTAGE (V) WEIGHT(kg)
ACP 6000-7 BV 20394/307 32501345 – 440 0.25
ACP 6001-5 BV 20394/307 32501345 – 440 0.25
ACP 6002-2 BV 20394/307 32501345 – 440 0.25
ACP 6003-0 BV 20394/307 32501345 – 440 0.25
ACP 6004-0 BV 20394/313 32501346 – 440 0.70
ACP 6005-5 BV 20394/313 32501346 – 440 0.70
ACP 6007-5 BV 20394/325 32501347 – 440 1.10
ACP 6011-0 BV 20394/325 32501347 – 440 1.10
ACP 6015-0 BV 20394/330 32501348 – 440 1.15
ACP 6022-0 BV 20394/345 32501350 – 440 1.65
ACP 6030-0 DRDKkes 80.0
60 A; 3 × 0.48 mH)
(I
n
ACP 6037-0 DRDKkes 125.0
100 A; 3 × 0.29 mH)
(I
n
ACP 6045-0 DRDKkes 125.0
(I
100 A; 3 × 0.29 mH)
n
ACP 6055-0 DRDKkes 200.0
130 A; 3 × 0.22 mH)
(I
n
Berges electronic • D–51709 Marienheide-Rodt • Tel. 02264/17-0 • Fax 02264/17126
ACP 6000
32501783 – 440 14.60
32501784 – 440 19.85
32501784 – 440 19.85
32501785 – 440 32.10
ACP 6000 / IP 54
DEVICE TYPE FILTER TYPE ARTICLE NO. INPUT PHASES VOLTAGE (V) WEIGHT(kg)
ACP 6000-7 BE/V 3012 IP 54 32501775 3~ 380/480 4.65
ACP 6001-5 BE/V 3012 IP 54 32501775 3~ 380/480 4.65
ACP 6002-2 BE/V 3012 IP 54 32501775 3~ 380/480 4.65
ACP 6003-0 BE/V 3012 IP 54 32501775 3~ 380/480 4.65
ACP 6004-0 BE/V 3012 IP 54 32501775 3~ 380/480 4.65
ACP 6005-5 BE/VI 3040 IP 54 32501776 3~ 380/480 6.10
ACP 6007-5 BE/VI 3040 IP 54 32501776 3~ 380/480 6.10
ACP 6011-0 BE/VI 3040 IP 54 32501776 3~ 380/480 6.10
ACP 6015-0 BE/VI 3040 IP 54 32501776 3~ 380/480 6.10
30.10.97 Operating manual
05_GB ACP 6000
SLV
— 0.75–55
25
Page 32
BERGES
Berges electronic • D–51709 Marienheide-Rodt • Tel. 02264/17-0 • Fax 02264/17126
2.3.4 Using mains filters
ATTENTION!
ATTENTION!
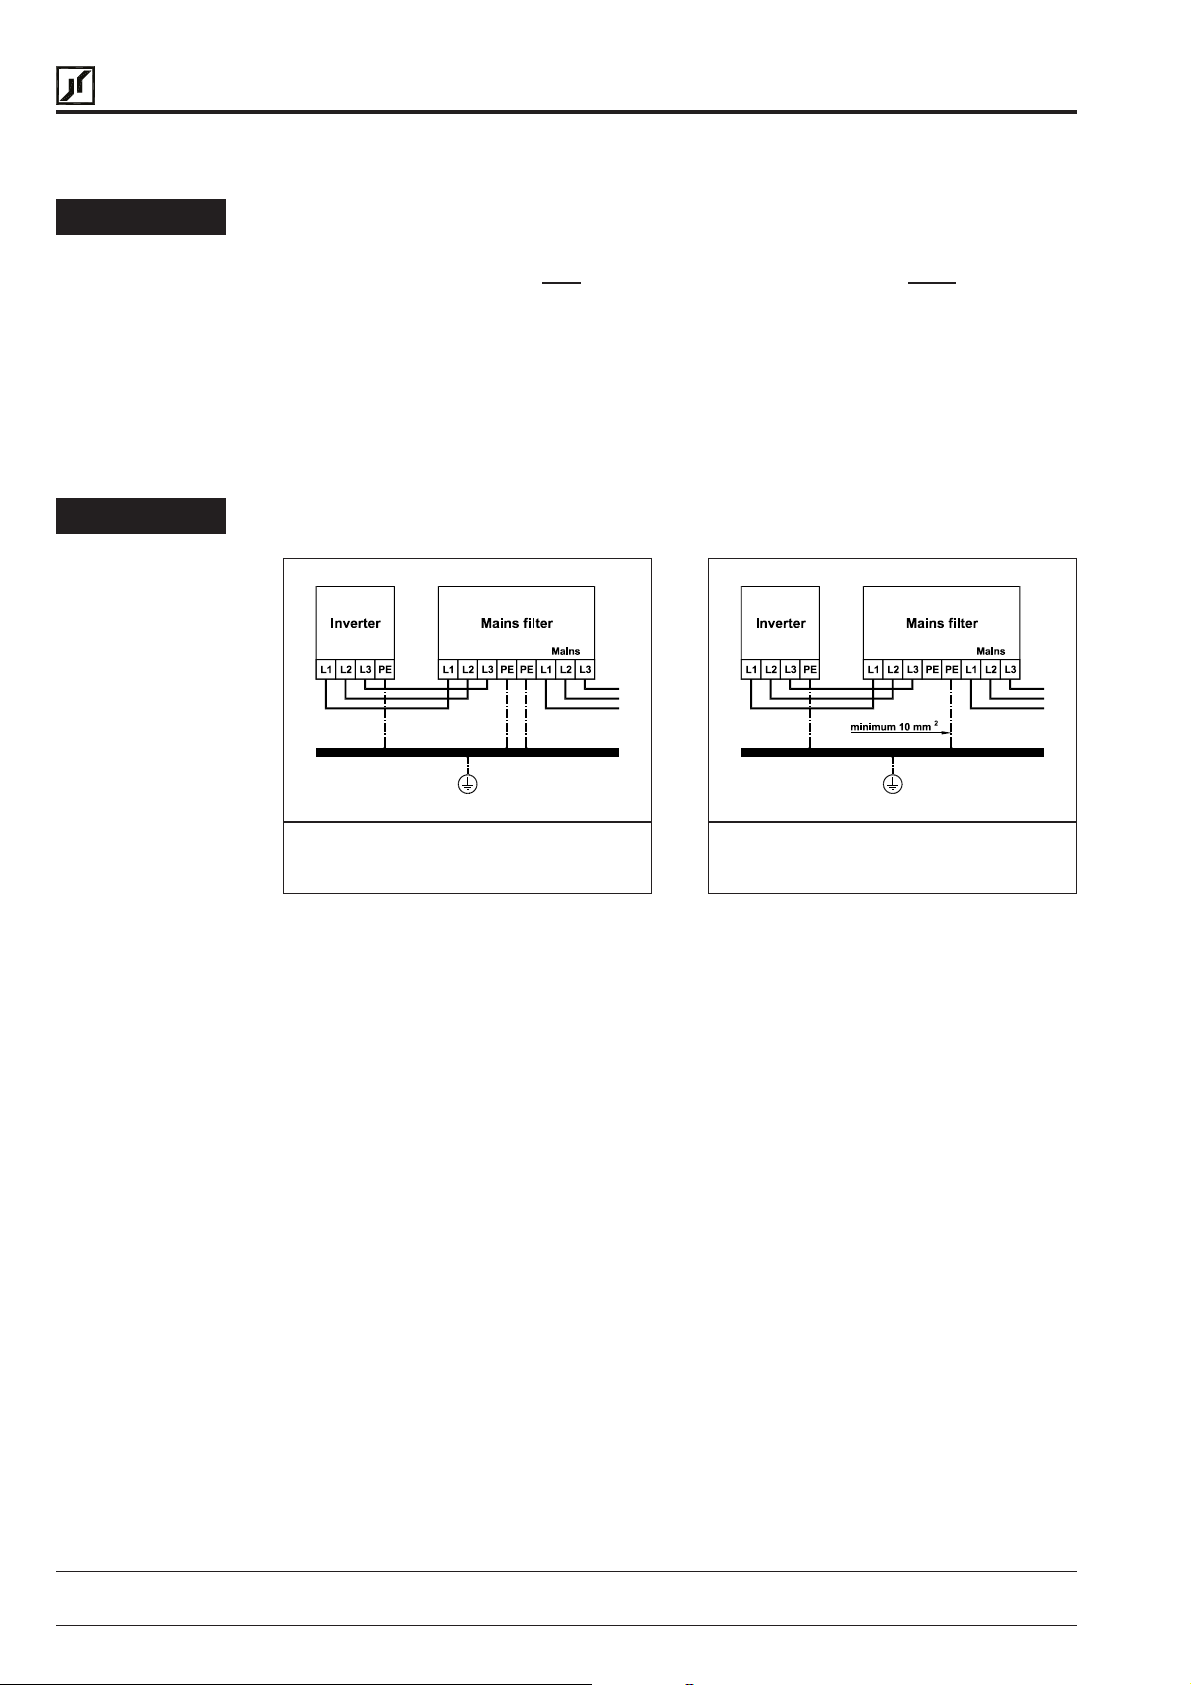
Special protective measures must be observed when using mains filters:
Owing to the leakage current involved (> 3.5 mA), attention must be paid to EN 50178 when
using BERGES mains filters.
• The mains filtermustbeconnectedseparatelybylayingasecondcablethatiselectrically
parallel with the PE conductor; this conductor must meet the requirements of IEC
364-5-543 on its own.
• The PE conductor must have a cross section of at least 10 mm
diagrams).
• The PE conductor must be monitored by a facility that isolates the inverter from the mains
in the event of a fault (PE conductor monitoring).
The inverter must always be connected permanently (EN 50178) when using mains
filters (leakage current > 3.5 mA).
One of the following protective measures must be taken:
2
(refer to the following
Mains filter connection with a second
parallel PE conductor
Mains filter connection with at least
10 mm
2
PE conductor cross section
2.3.5 Interference suppression measures/EMC (electromagnetic compatibility)
Electrical/electronicdevicesarecapableofinfluencingor disturbing each other through connecting cables or other metallic connections. “Electromagnetic compatibility” consists of the factors
“interference resistance” and “interference emission”. Correct installation of the inverter in
conjunction with any possible local interference suppression measures has a crucial
effect on minimizing or suppressing mutual interference.
The following notes refer to a mains power supply that is not “contaminated” by high
frequency interference. Other measures may be necessary to reduce or suppress interference if the mains voltage is “contaminated”. No generally valid recommendations can be
given in such cases. Please consult BERGES if all recommended interference suppression
measures should not produce the desired result.
Basically, it is not the cross section of the conductor that is important for radio-frequency
interference suppression but the surface area. Since the high-frequency interference does
not flow through the entire cross section but mainly on the outer surface of the conductor
(skin effect), braided copper tapes of corresponding cross section should be used.
All conductive housing parts must be interconnected using corresponding lines. Minimum
cross sections are prescribed for a fault case at 50 Hz (referred to the range of the safety
regulations) which must be observed under all circumstances.
26
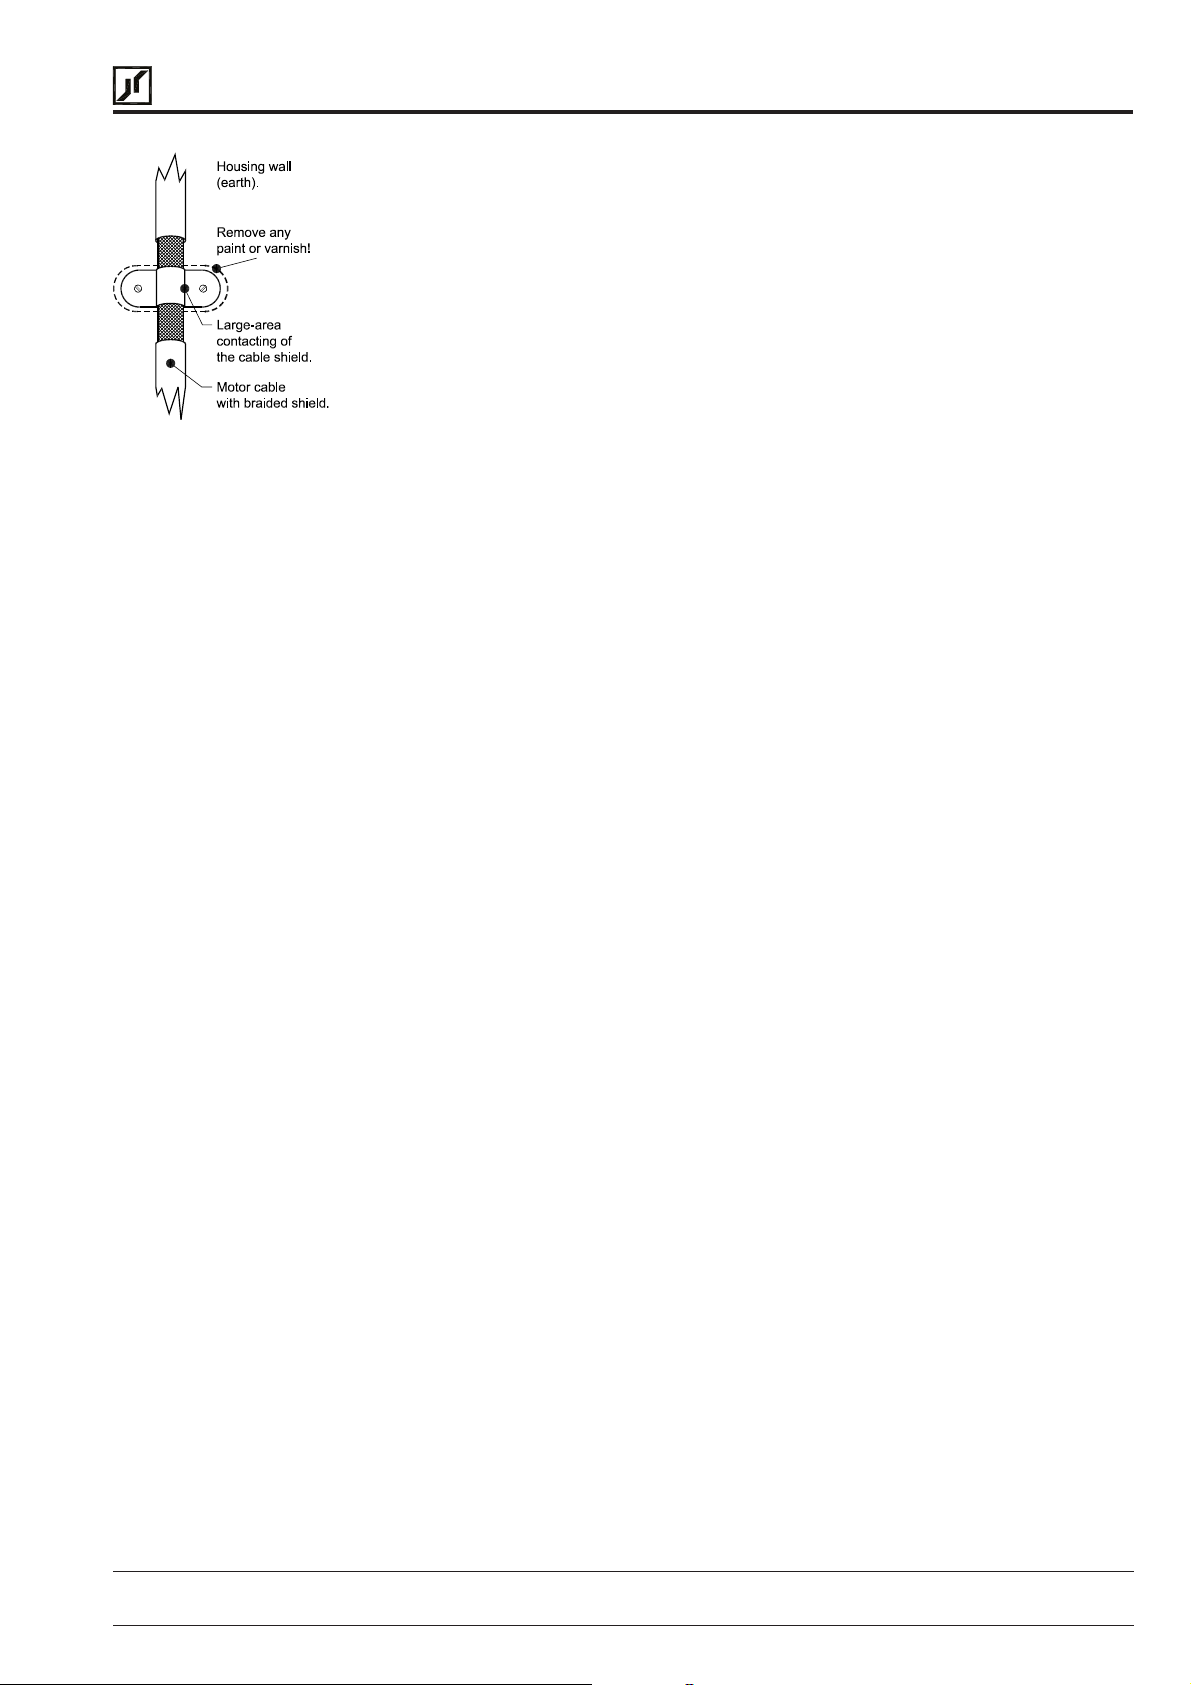
The inverter and all other components used for interferencesuppression (especiallyalso the
shield of the motor cable) should be contacted over as large an area as possible when
connected to metal (control panels, switchgear cabinets and similar) (skin effect). Remove
the paint at the respective areas to ensure good contacting over a large area!
Operating manual 30.10.97
ACP 6000
SLV
— 0.75–55 05_GB
Page 33
BERGES
Berges electronic • D–51709 Marienheide-Rodt • Tel. 02264/17-0 • Fax 02264/17126
A central earthing point should be used for interference suppression (e.g. equipotential
bonding strip or centrally at an interference suppression filter). The earthing lines are routed
to the respective terminals radially from this point. Conductor loops of the earthing lines are
impermissible and can lead to unnecessary interference.
The shield cross section must not be reduced when the shield is connected to continuing
lines. This would give rise to RF resistance at a cross section reduction, and the resulting
RF energy would consequently not be discharged but radiated. Shields – particularly shields
of control lines – must not be contacted via pin contacts of plug connectors. In these cases,
the metallic hand guard of the plug connector should be used for large-area connection of
the shield.
Use a shielded motor cable (earthed over a large area at both sides). The shield should be
routed uninterrupted from the PE terminal of the inverter to the PE terminal of the motor
(see also “Connection Diagrams”, Page 72). If a shielded motor line cannot be used, the
unshielded motor line should be laid in a metal duct. The metal duct must be uninterrupted
andadequatelyearthed. Thefollowingpoints areprescribedifradio interferencesuppression
is to be realized in accordance with EN 55011, EN 55014 and EN 50081-1:
• Installation of a mains filter or a mains filter and a motor choke in accordance with the
table on page 25 (mains filter and motor choke are not included in the scope of delivery).
• Laying the motor cable in a shielded configuration.
• Laying the control cable in a shielded configuration.
• Observe general RFI suppression measures (refer to the Chapter “Interference suppres-
sion measures/EMC (electromagnetic compatibility)”.
Lay motor, mains power and signal cables as far away from each other as possible and
separately.
If a mains filter is used, the smallest possible spatial distance from the frequency inverter
must be selected so that both units can be connected by short connection leads.
If an output choke is used (option), it must be fitted in the direct vicinity of the inverter and
connected to the inverter via screened cables earthed at both ends.
Shielded signal cables should be laid at a minimum distance of 10 cm from power cables
running parallel. A separate earthed metal cable duct is advisable for such signal cables. If
signal cables intercept with a power cable, they should do so at an angle of 90°.
Control lines longer than 1 m must be laid with a shield and earthed at one side on the
frequencyinverter(see“Connection Diagrams”, Page72).Thescreenis earthed via terminal
“COM”. If cables have lengths in excess of 10 m, use a 0–20 mA control signal because of
the possibility of parasitics. The inverter can be switched over to this mode of operation. See
table 2.7 “Description of terminals”, Page 32–33.
Other loads connected to the mains may produce voltage spikes that may interfere with
functioning of the inverter or may even damage it. Chokes or mains filters can be used on
the mains side to protect the inverter against voltage spikes (resulting from switching large
loads to the mains). Such chokes and filters are available as accessories (see page 25).
Ifinvertersareoperatedinswitchgeardevicesorintheirclose proximity (e.g. in onecommon
control cabinet) in connection with the same power mains, we recommend the following
precautionary measures to suppress interference in the switchgear:
• Wire the coils of contactors, switchgear devices and relay combinations with “RC
elements” or with free-wheel diodes.
• Use shielded cables for external control and measuring cables.
• Lay disturbing cables (e.g. power and contactor control circuits) separately and at a
distance from the control cables.
30.10.97 Operating manual
05_GB ACP 6000
SLV
— 0.75–55
27
Page 34
BERGES
Berges electronic • D–51709 Marienheide-Rodt • Tel. 02264/17-0 • Fax 02264/17126
2.4 Line Fuse or Circuit Breaker Sizing
ATTENTION!
The user must provide either a circuit breaker or a fused disconnect switch in
accordance with the local codes.
The following rules should be used to select the correct size of the input line fuses or circuit
breaker.
A. Sizing
The ACP inverter is able to withstand a 150% overload for 60 seconds. Minimum voltage
rating for the protection device should be 500 VAC for ACP 6000 models.
B. Fuse Type
To guarantee a maximum protection of the inverter fuses should be used for current
Limitation. These fuses should have a breaking capacity of 200,000 A
the recommended values in amps for all ACP-inverters. For 400 V mains supplies we
recommend time-lag type NEOZED-fuses.
ACP 6000
KW 0.75 1.5 2.2 3.0 4.0 5.5 7.5 11 15 22 30 37 45 55
Rating (A) 2 4 6 6 10 16 16 25 32 50 63 80 100 125
Table 2.4
. Table 2.4 shows
eff
2.5 Wiring Practices
ATTENTION!
Power Wiring
For mains supplies with rated voltage exceeding 400 V the semi-lag fuses type
“BussmannFRS-R”are recommended.Forcurrentsbetween 15and200amps thetypical
disconnection times are 150–250 sec. for 2 times the overcurrent and 180–1500 msec. for
10 times the overcurrent.
Care should be taken to ensure that field wiring is installed in accordance with the
National standard. Where local codes exceed these requirements, they must be
followed.
Power wiring are those wires which are connected during installation to the power circuit
terminals, L1, L2, L3, M1, M2, and M3. Power wiring must be selected as follows:
1. Use only VDE, UL or CUL recognized wire.
2. Wire voltage rating must be a minimum of 600 V for 400 V systems.
3. Refer to table 2.5 for details of the wire cross sections for mains/motor connection (DIN
VDE 0298, Part 4). The cables must posses copper conductors and must be designed
for an insulation class up to 60 °C or 75 °C. Refer to table 1.5 “Maximum motor ratings,
Continuous, A”.
4. Grounding must be in accordance with VDE, NEC and CEC.
28
Operating manual 30.10.97
ACP 6000
SLV
— 0.75–55 05_GB
Page 35

BERGES
Berges electronic • D–51709 Marienheide-Rodt • Tel. 02264/17-0 • Fax 02264/17126
CROSS SECTION FOR CONNECTION (mm2)
Inverter type 0.75 1.5 2.2 3.0 4.0 5.5 7.5 11 15 22 30 37 45 55
ATTENTION!
Mains supply,
group B2 (B1)
Motor connection,
group B2 (B1)
NOTE:
Observe general RFI suppression measures (refer to the Chapter “Interference suppression
measures/EMC (electromagnetic compatibility)”, Chapter 2.3.5, Page 26.
1.5 1.5 1.5 1.5 1.5 1.5 2.5 4 6 10 16 25 35
1.5 1.5 1.5 1.5 1.5 1.5 2.5 4 6 10 16 25 35
Table 2.5
Control Wiring/Interface
Allinterfacesor controlinputs and outputspossess onlybasicinsulation bythemains
and must be incorporated in a further protective measure.
Control wiring is wiring connected during installation to the control terminal strip (30
terminals). Control wiring must be selected as follows:
1. Screened wire is recommended to prevent electrical noise interference from causing
improper operation or nuisance tripping.
2. Use only VDE, UL or CUL recognized wire.
3. Wire voltage rating must be a minimum of 600 V for 400 V systems.
(B1)50(B1)
(B1)50(B1)
4. Connect shield to inverter COM terminal only.
NOTE:
Observe general RFI suppression measures (refer to the Chapter “Interference suppression
measures/EMC (electromagnetic compatibility)”, Chapter 2.3.5, Page 26.
2.6 Reducing Current Surges and Voltage Transients
Inrush currents to the coils of the magnetic contactors, relays and solenoids associated with,
or in close proximity to, the inverter can induce high current spikes in the power and control
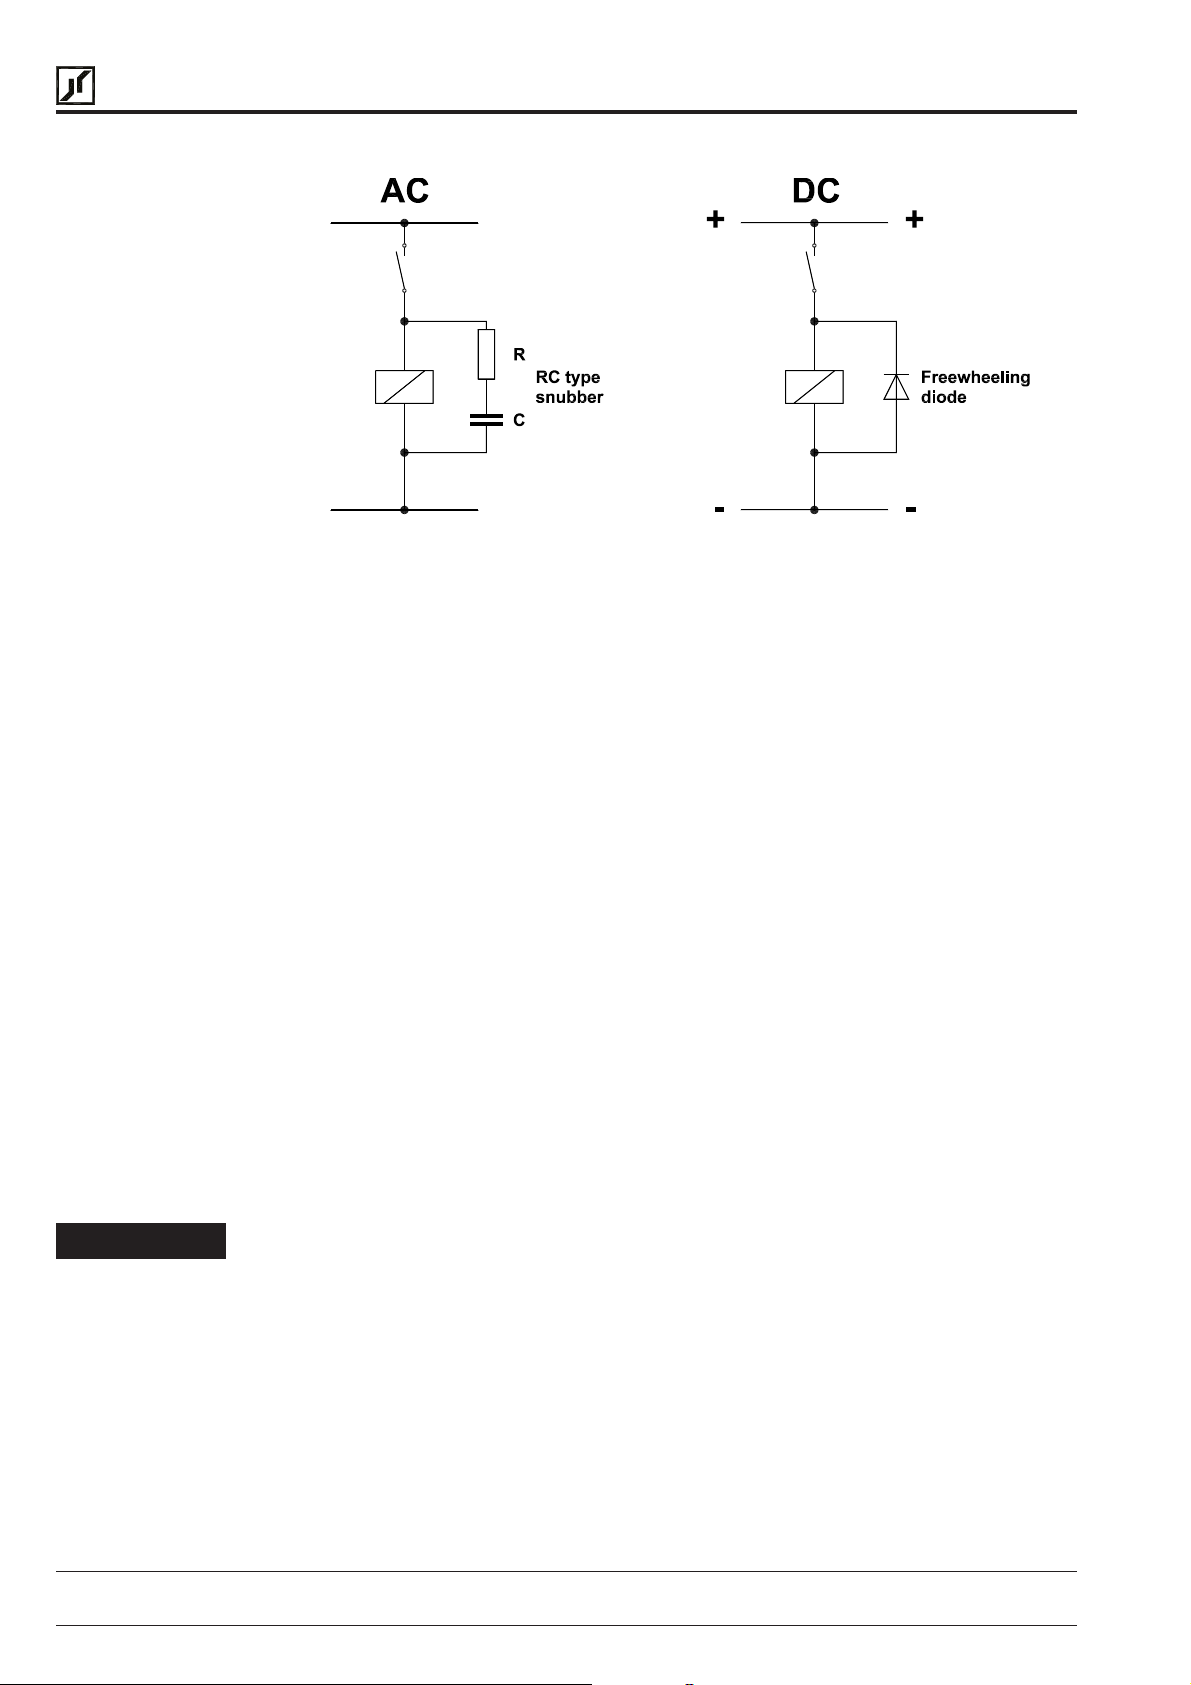
wiringcausing faultyinverteroperation.Ifthis conditionoccurs,asnubbernetwork,consisting
of a series resistor and capacitor for AC loads, or a free-wheeling or flyback diode for DC
loads, should be placed across the relay coil to prevent the occurrence. The following
component values should be used for 230 VAC relays or solenoids:
• Main Circuit Contactors and Solenoids: C = 0.2 MFD, 500 VDC;
R = 500 Ω, 5 Watts.
• Auxiliary Control Circuit Relays: C = 0.1 MFD, 500 VDC
R = 200 Ω, 2 Watts.
For magnetic contactors, relays and solenoids which are energized from a DC source, a
free-wheeling diode should be used. The diode should be a high-speed, fast recovery type.
Connect the diode across the coil as shown above. The diode current and voltage should
be selected by the following formulae:
Diode Current Rating (A)
≥
Coil Capacity (VA)
Rated Voltage of Coil (V)
Diode Voltage Rating (V) Rated Voltage of Coil (V) 2≥×
30.10.97 Operating manual
05_GB ACP 6000
SLV
— 0.75–55
29
Page 36
BERGES
Berges electronic • D–51709 Marienheide-Rodt • Tel. 02264/17-0 • Fax 02264/17126
Connection Diagram for AC and DC Relay Coils and Solenoids:
2.7 Function and Use of Terminals
Figure 2.6
ATTENTION!
A. Power Circuit Terminals
The power terminals are located on the ACP Power Board, and are labelled L1, L2, L3 and
PE for incoming three phases AC line power and M1, M2, and M3 for the motor connections.
Direct access to the inverter DC intermediate circuit is possible via the terminals B+ and B-.
An additional dynamic braking unit, additional support capacitors or a DC emergency power
supply system can, for example, be connected to these terminals. Another possibility is to
connect the inverter intermediate circuits in parallel (regenerative braking) in the case of
group drives in which motor operation and power generation take place at the same time.
Please contact BERGES if you would like further information.
PE is located in the lower left-hand internal corner of the control casting. It is a green screw
with brass cup washer. Finely strandet conductors should be used in order to ensure the
effectiveness of the earthing connection at high frequencies (skin effect). Observe the
respectively valid national regulations and standards (VDE, NEC, CEC) when selecting the
conductor cross section.
B. Control Terminals
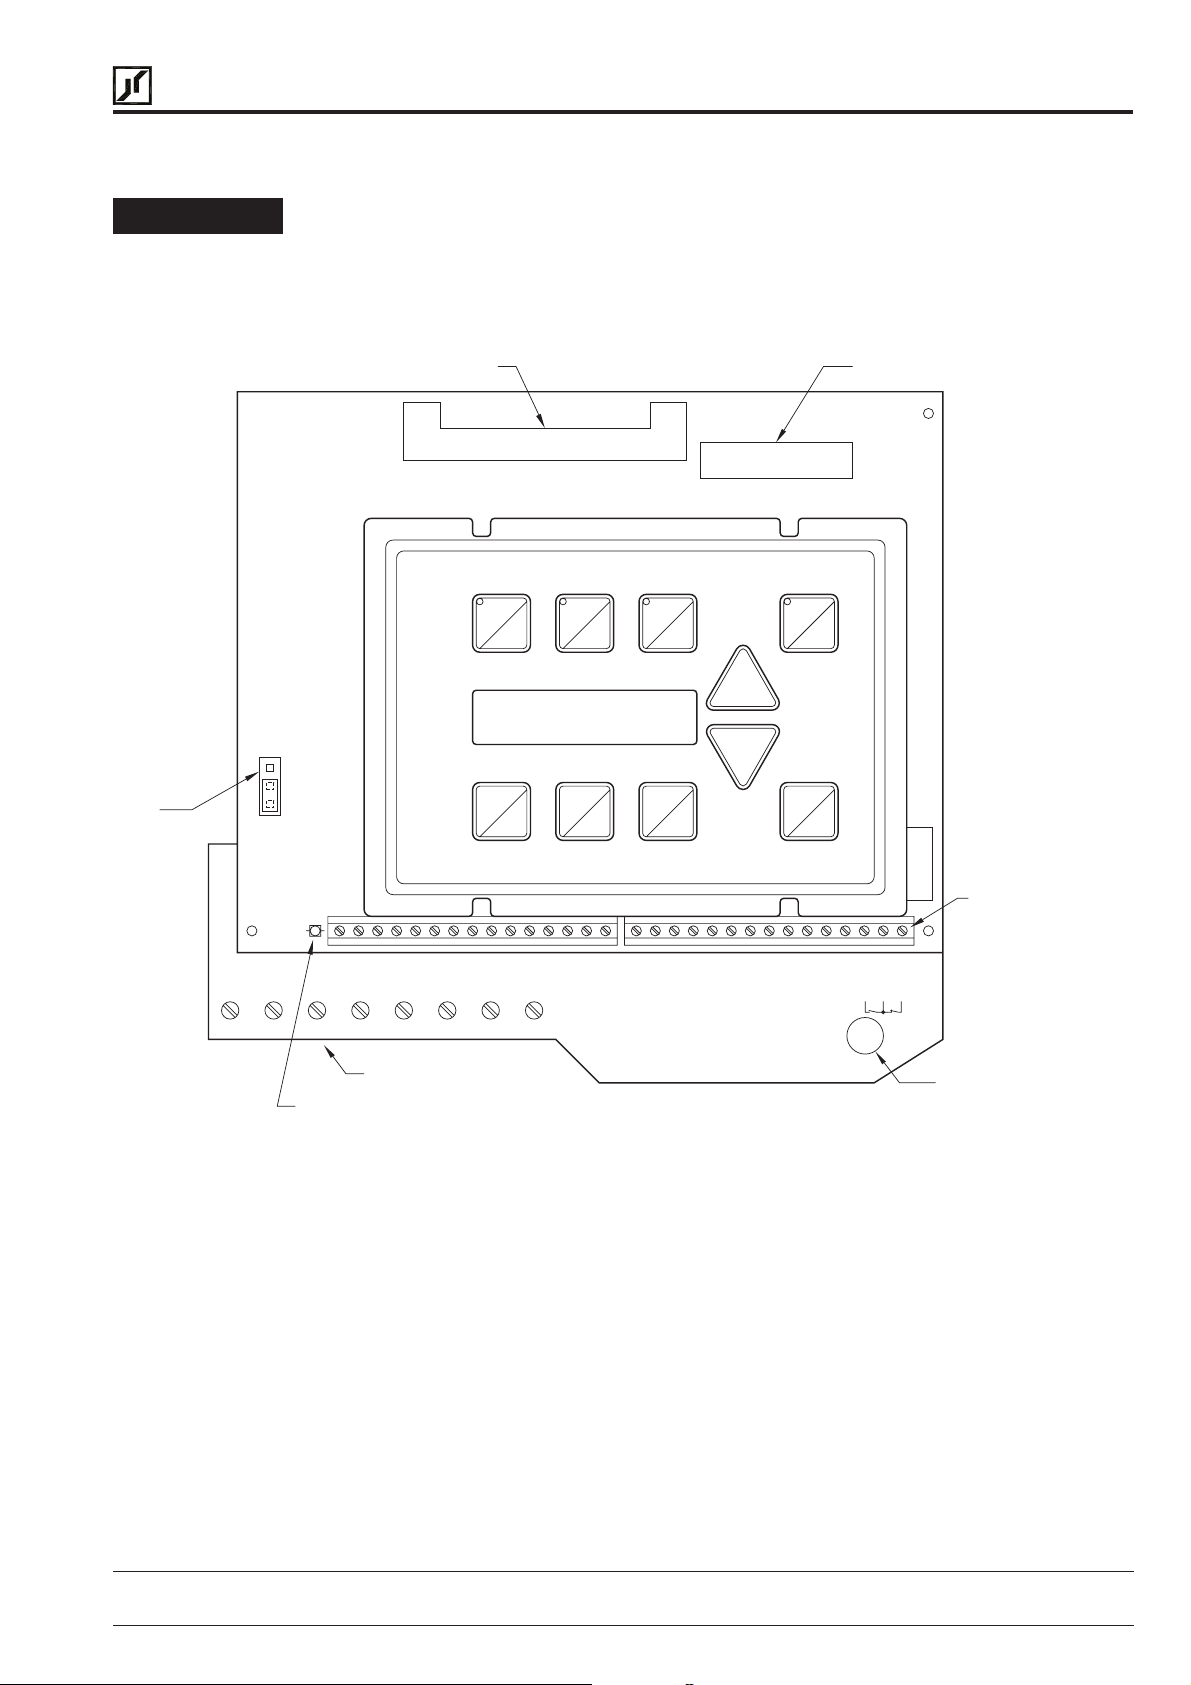
The control terminals are located on the bottom edge of the inverter’s control board (see
Figure 2.7). These terminals are available for use with external control devices if remote
operation is desired.
All control terminals are isolated from earth ground (bases isolated). Do not exceed
50 VAC potential between any terminal and GND.
30
Technical data about the control inputs:
1. Control terminal impedance:
a) VIN terminal 100 kΩ
b) CIN terminal 237 Ω
c) All Logic Terminals 4.5 kΩ.
2. Logic input levels:
a) ACTIVE 10...30 VDC
b) INACTIVE 0...5 VDC.
The input logic will accommodate either 12 or 24 VDC logic signals.
Operating manual 30.10.97
ACP 6000
SLV
— 0.75–55 05_GB
Page 37
J
s
BERGES
C. Input Terminal Usage
Berges electronic • D–51709 Marienheide-Rodt • Tel. 02264/17-0 • Fax 02264/17126
HINT!
All ACP inverters are set at the factory so that control is possible both via the terminals and
viathekeypad. Refertopages49 and72fordetails ofadaptationtocustomer-specific control
methods (
21-MODE;24-FSEL
; Applications).
On delivery, the default language of the display messages is English. If necessary, change
parameter
86-LANG
in order to set the country-specific language.
J6J7 Option connector
JOG
STOP
0...2 V
FWD
REV
11
0...10 V
PROG
SHIFT
ENTER
LOC
REM
Control terminal
RLY
MET
COM
CIN
COM
VIN
REF
LIM
COM
FWD
REV
+24
R/J
PS1
PS2
PS3
ART
+24
MOL
CTS
RST
ST1
ST2
ST3
6FS
COM
SIO+
SIO-
28
29
30
L1 L2 L3 B+ B- M1 M2 M3
Power terminals
BUS
CHG
Charge indicator
CPU activity LED
Figure 2.7
30.10.97 Operating manual
05_GB ACP 6000
SLV
— 0.75–55
31
Page 38
BERGES
Analog
Terminals
Digital
Input
Terminals
Berges electronic • D–51709 Marienheide-Rodt • Tel. 02264/17-0 • Fax 02264/17126
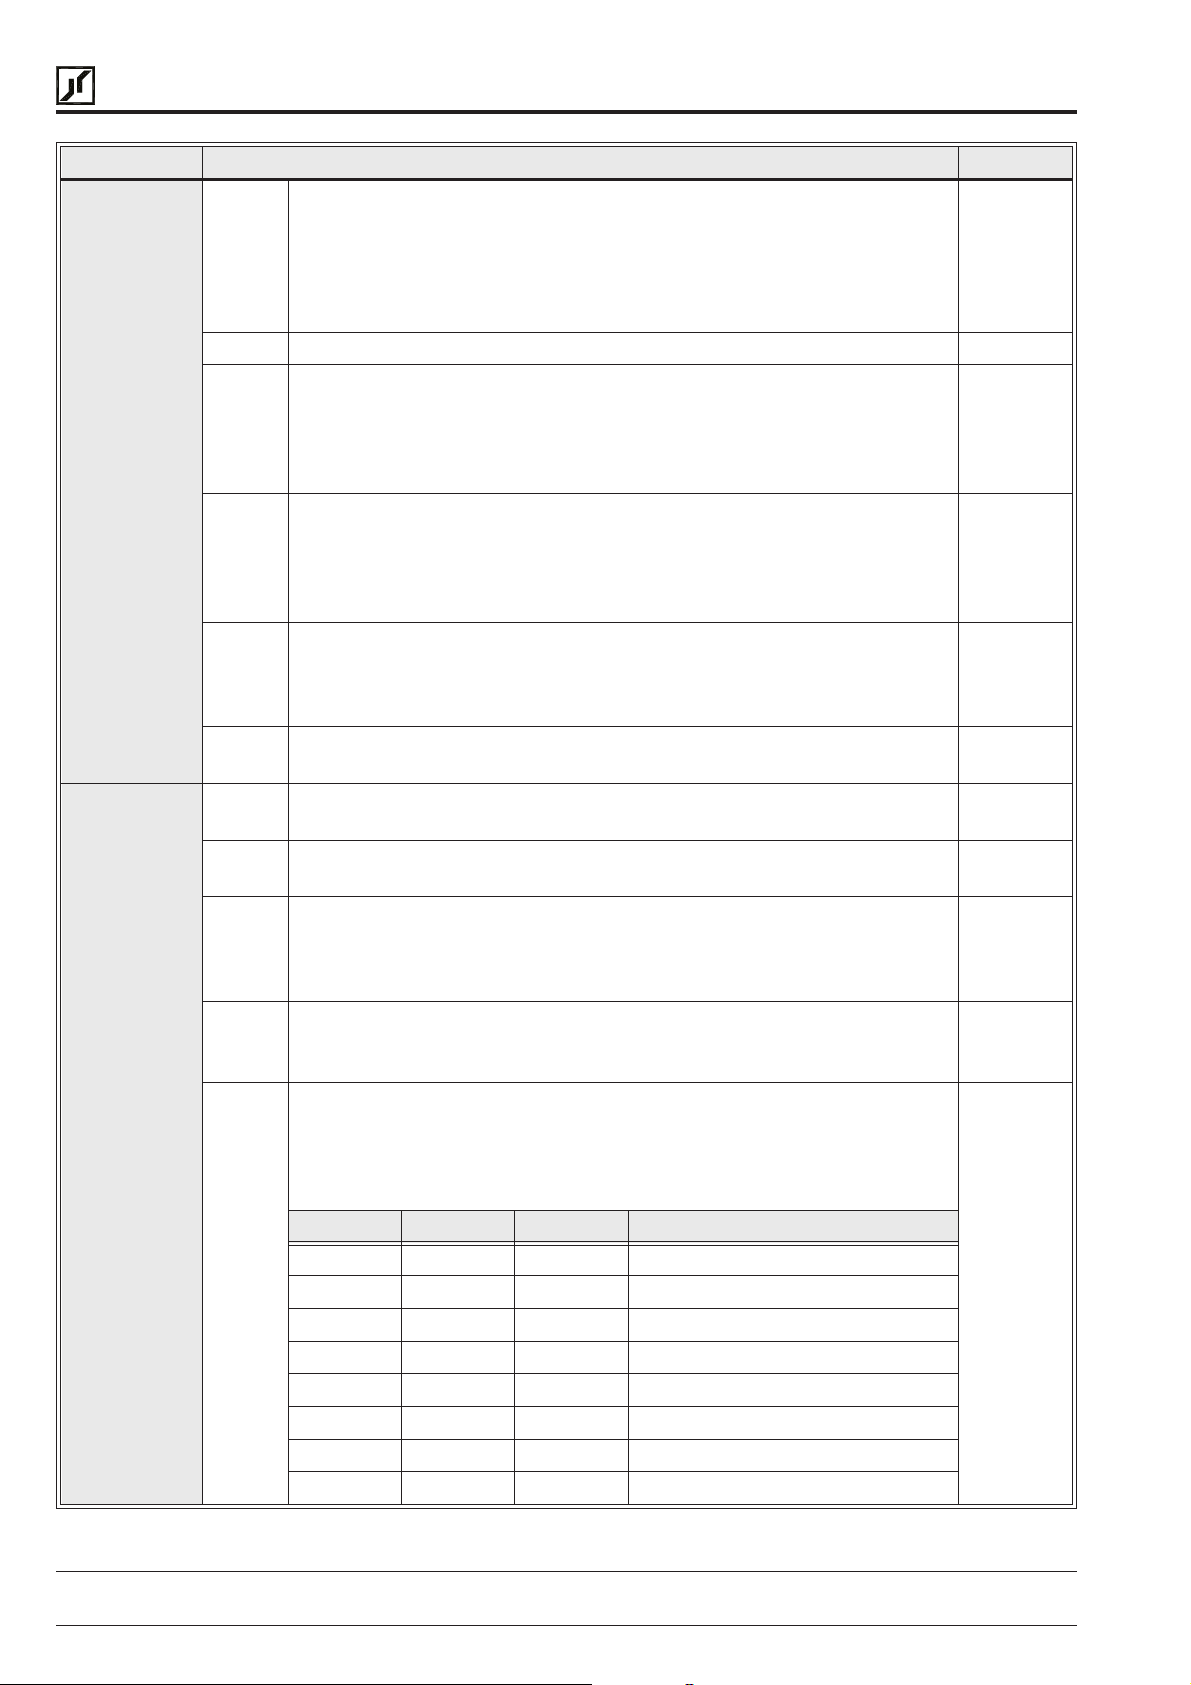
DESCRIPTION OF TERMINALS SEE PAGE
MET This analog output is adjustable from 0 VDC to 15 VDC full scale and is
referenced to COM. It may be programmed via parameter
read output frequency, output voltage, output current, output load in
percent of inverter capacity, and output motor torque. In the constant
torque range, torque follows load. In the constant power range, torque will
decrease as frequency increases. The output is rated at 5 mA.
COM Circuit common, isolated. –
CIN Speed reference input, 4 to 20 mA, 237 Ω load referenced to COM. The
current input signal is calibrated by parameters
FMIN sets the frequency 4 mA should generate, and FMAX sets the
frequency 20 mA should produce. Operation can be inverted, 20 mA =
min. frequency, and 4 mA = max. Frequency (see
VIN Speed Reference input, 0–10 VDC or 0 to 2 VDC, selectable by jumper
(J11). It will also accept pulse train inputs: 0 to 1 kHz or 0 to 10 kHz, (6–
10 V peak min.); and the 6FS output from another control. Operation can
be inverted, 10 V = min. frequency, and 0 V = max. frequency (see
).
FSEL
REF This terminal is a +10 VDC power supply with 10 mA capacity and may be
used as the Torque Limit Reference supply or the reference for VIN, in
which case the drive can be programmed to shut down if the common line
to the remote speed potentiometer opens (see
LIM Torque Limit input terminal. It will accept 0 to 10 VDC. 10 VDC equals
150% output torque. Defaults to +10 V with no input connected.
FWD Forward Direction Selection terminal. May be connected for two-wire
maintained or three-wire momentary operation.
REV Reverse Direction Selection terminal. May be connected for two-wire
maintained or three-wire momentary operation.
+24V Reference Voltage for Digital inputs. FWD REV, R/J (Run/Jog), PS1, PS2,
PS3, MOL and ART, rated 200 mA. Overloading this terminal will result in
fault “F04”. May be used to power relays tied to open collector outputs
ST1, ST2 and ST3.
R/J Run/Jog Selector.When this terminal is connected to +24, momentarily
connecting either FWD or REV to +24 results in a latched run mode (3wire operation).
PS1
PS2
PS3
Preset Speed #1 input, Preset Speed #2 input, Preset Speed #3 input.
Eight preset speeds are attainable; one from the main speed setter, six
programmed speeds, and FMAX. Preset speeds can be programmed from
0 to 400 Hz, but FMAX sets the actual operating range (1 is closed to +24,
0 is open.) All may be obtained from the following switching matrix:
PS1 PS2 PS3 Effective speed reference
0 0 0 Basic speed setpoint 24-FSEL
1 0 0 33-F2
0 1 0 34-F3
1 1 0 35-F4
0 0 1 36-F5
1 0 1 37-F6
0 1 1 38-F7
1 1 1 32-FMAX
31-FMIN
24-FSEL
24-FSEL
71-METER
and
32-FMAX
).
).
to
.
24-
58, 72
49, 72
49, 72
49, 72
51, 72
72, 73
72, 73
72, 73
72, 73
51, 72, 73
32
Operating manual 30.10.97
ACP 6000
SLV
— 0.75–55 05_GB
Page 39
BERGES
Digital
Input
Terminals
Digital
Output
Terminals
Serial
Communi-
cation
Port
Terminals
Auxiliary
Relay
Terminals
(RLY)
Berges electronic • D–51709 Marienheide-Rodt • Tel. 02264/17-0 • Fax 02264/17126
DESCRIPTION OF TERMINALS SEE PAGE
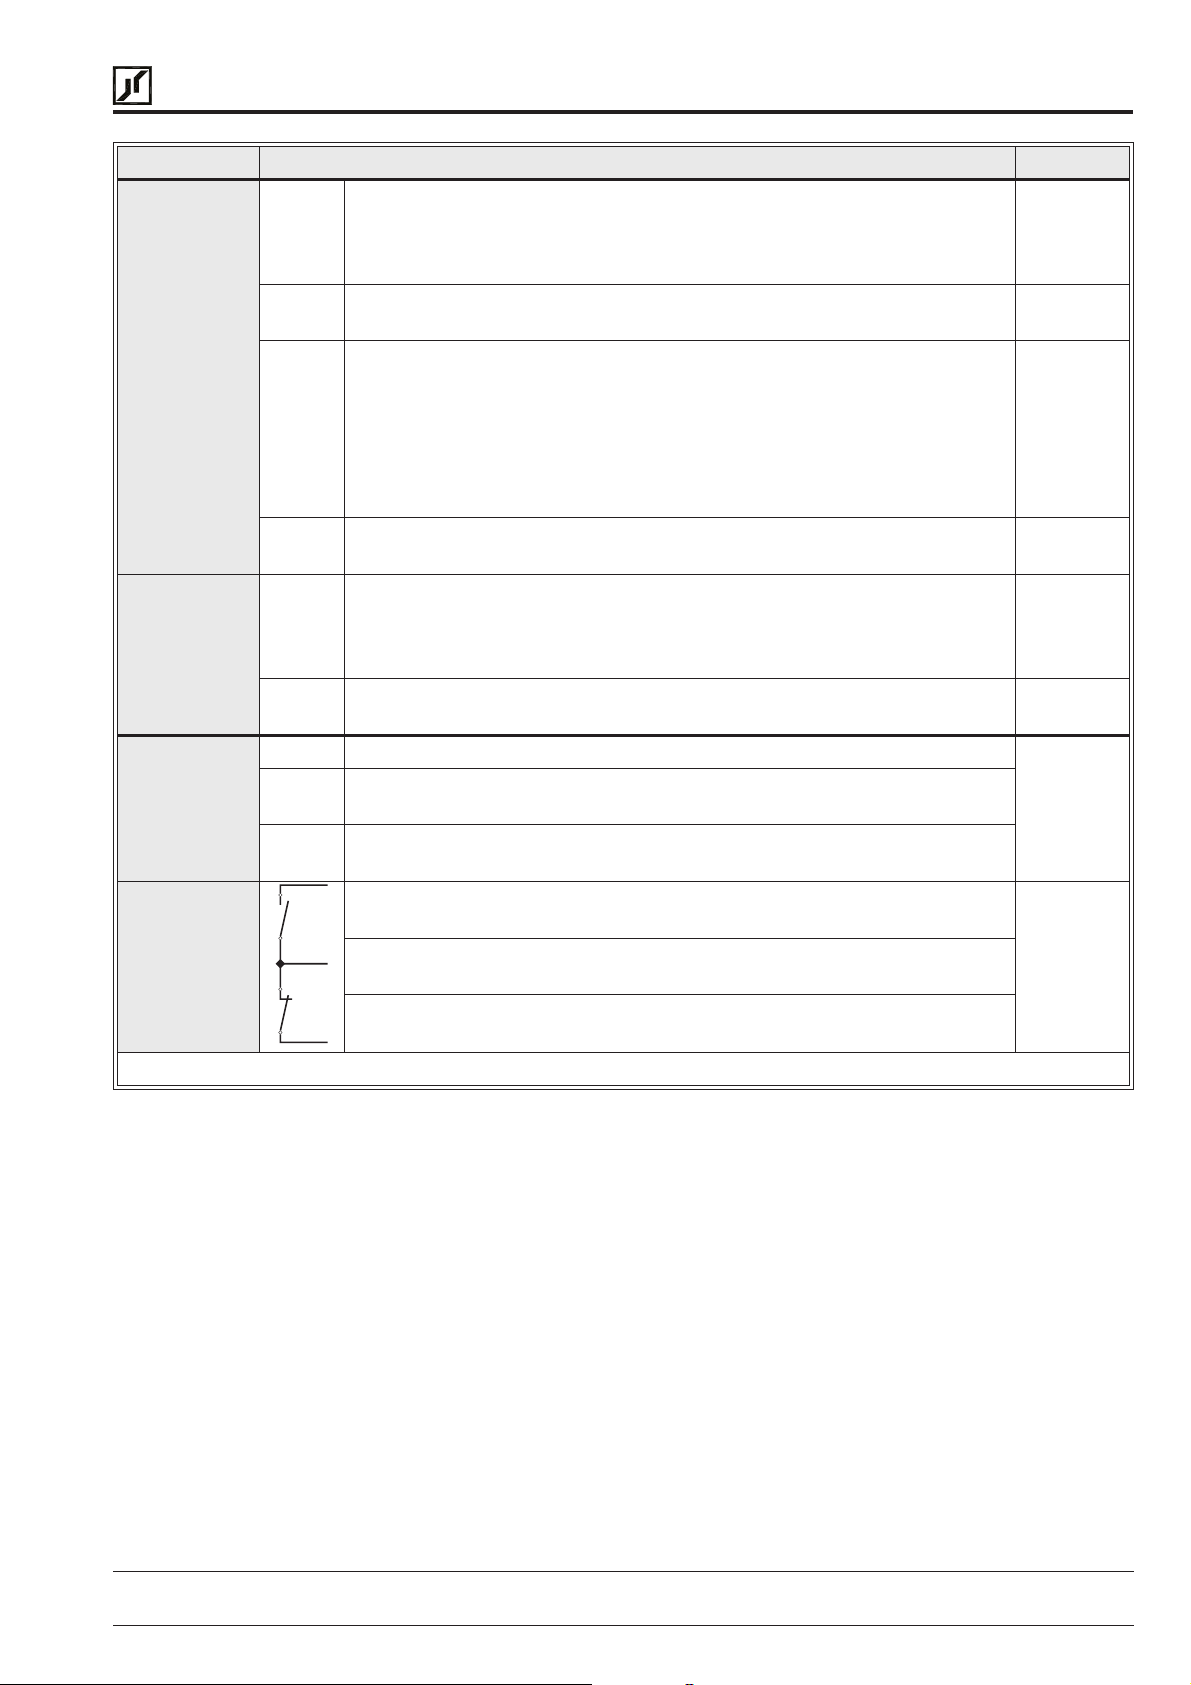
ART Alternate Ramp Time Selector. Separate acceleration and deceleration
ramps can be selected by connecting this terminal to +24. These ramps
are programmed by parameters 41, 44 and 45. See
information on when this function is active.
MOL Motor Overload input terminal. Requires N.C. contact for operation, refe-
renced to +24. Connected to +24 by a jumper wire at the factory.
CTS Coast to Stop. Connecting this terminal to +24 VDC turns the drive output
OFF, allowing the motor to coast to a stop. The inverter’s output is cut off,
not ramped to a stop. When the terminal is set to 0 V (open), the drive
output is reinstated and the output will ramp to the programmed frequency.
This function may be used when electro-mechanical brakes are required.
This feature can also be accessed in programming by the
parameter to automatically coast to a stop on a stop command.
RST External Fault Reset input terminal. After a fault, connecting this terminal
to +24 VDC will reset any fault.
ST1
ST2
ST3
6FS This terminal provides a 24 VDC pulse train output which is 6 times or 48
COM Control circuit common, electrical isolated from the AC line terminals. 66, 72
SIO+ Positive connection for the Serial Input/Output Operation communication
SIO- Negative connection for the Serial Input/Output Operation communication
Open collector NPN transistor output connections. Each output can be
individually programmed to respond to any one of eleven conditions (See
parameters
mA from a 24 VDC source.
times the output frequency of the inverter. Selected by parameter
link. Responds to RS 485 protocol (see Section 5).
link. Responds to RS 485 protocol (see Section 5).
Normally open contact for the Auxiliary Relay. Will close when the relay is
activated. Rating is 115 VAC at 1 Amp.
Auxiliary Relay Common terminal. May release by appropriate adjustment
at one of eleven preset conditions (see parameter
Normally Closed contact for the Auxiliary Relay. Will open when the relay
is activated. Rating is 115 VAC at 1 Amp.
72-ST1,73-ST2
and
74-ST3
Table 2.7
. Each output can sink up to 50
21-MODE
75-STR
for more
41-RSEL
88-FRO
).
49, 52, 52
10, 60, 72,
73
52, 72, 73
72
59, 72, 73
65, 73
.
59
2.8 Environmental Considerations
The BERGES ACP 6000 Inverter is rated IP 54 (through 37 kW), indoor or outdoor use. This
is a sealed unit providing a degree of protection against falling rain, splashing water and
hose-directed water.
If your inverter will be subjected to high-pressure wash-down or atmospheric contaminants
such as acid or caustic vapours, or carbon, metallic, or corrosive dust, contact BERGES for
specific instructions.
In order to maintain the IP 54 (NEMA 4) integrity of the ACP inverter enclosure, some care
must be exercised when the cover is installed.
With the smaller chassis configurations (ACP 6000 thru 15 kW), the following cover
installation procedure shall be employed:
1. Snug each of the four (4) cover screws into place.
2. Sequentially tighten each screw until the gasket is compressed evenly. Tighten first one
corner then the opposing corner to minimize the chance of pinching the gasket.
30.10.97 Operating manual
05_GB ACP 6000
SLV
— 0.75–55
33
Page 40

BERGES
Berges electronic • D–51709 Marienheide-Rodt • Tel. 02264/17-0 • Fax 02264/17126
3. Do not exceed 2 Nm of torque on these screws.
Withthelargerchassisconfigurations, thecovershouldbeinstalled accordingtothefollowing
procedure:
1. Swing the hinged door closed making sure that the gasket is not pinched.
2. Sequentially tighten each screw until the gasket is compress. Alternate sides of the
enclosure when tightening to assure even compression.
3. Do not exceed 1.1 Nm of torque on these screws.
If the conduit entries are not used, utilize the hole plugs (supplied with the IP 54 models and
the WCK01 thru WCK04 Chassis mounting Kits) to close the unused holes. This will assure
the enclosure´s environmental integrity.
34
Operating manual 30.10.97
ACP 6000
SLV
— 0.75–55 05_GB
Page 41
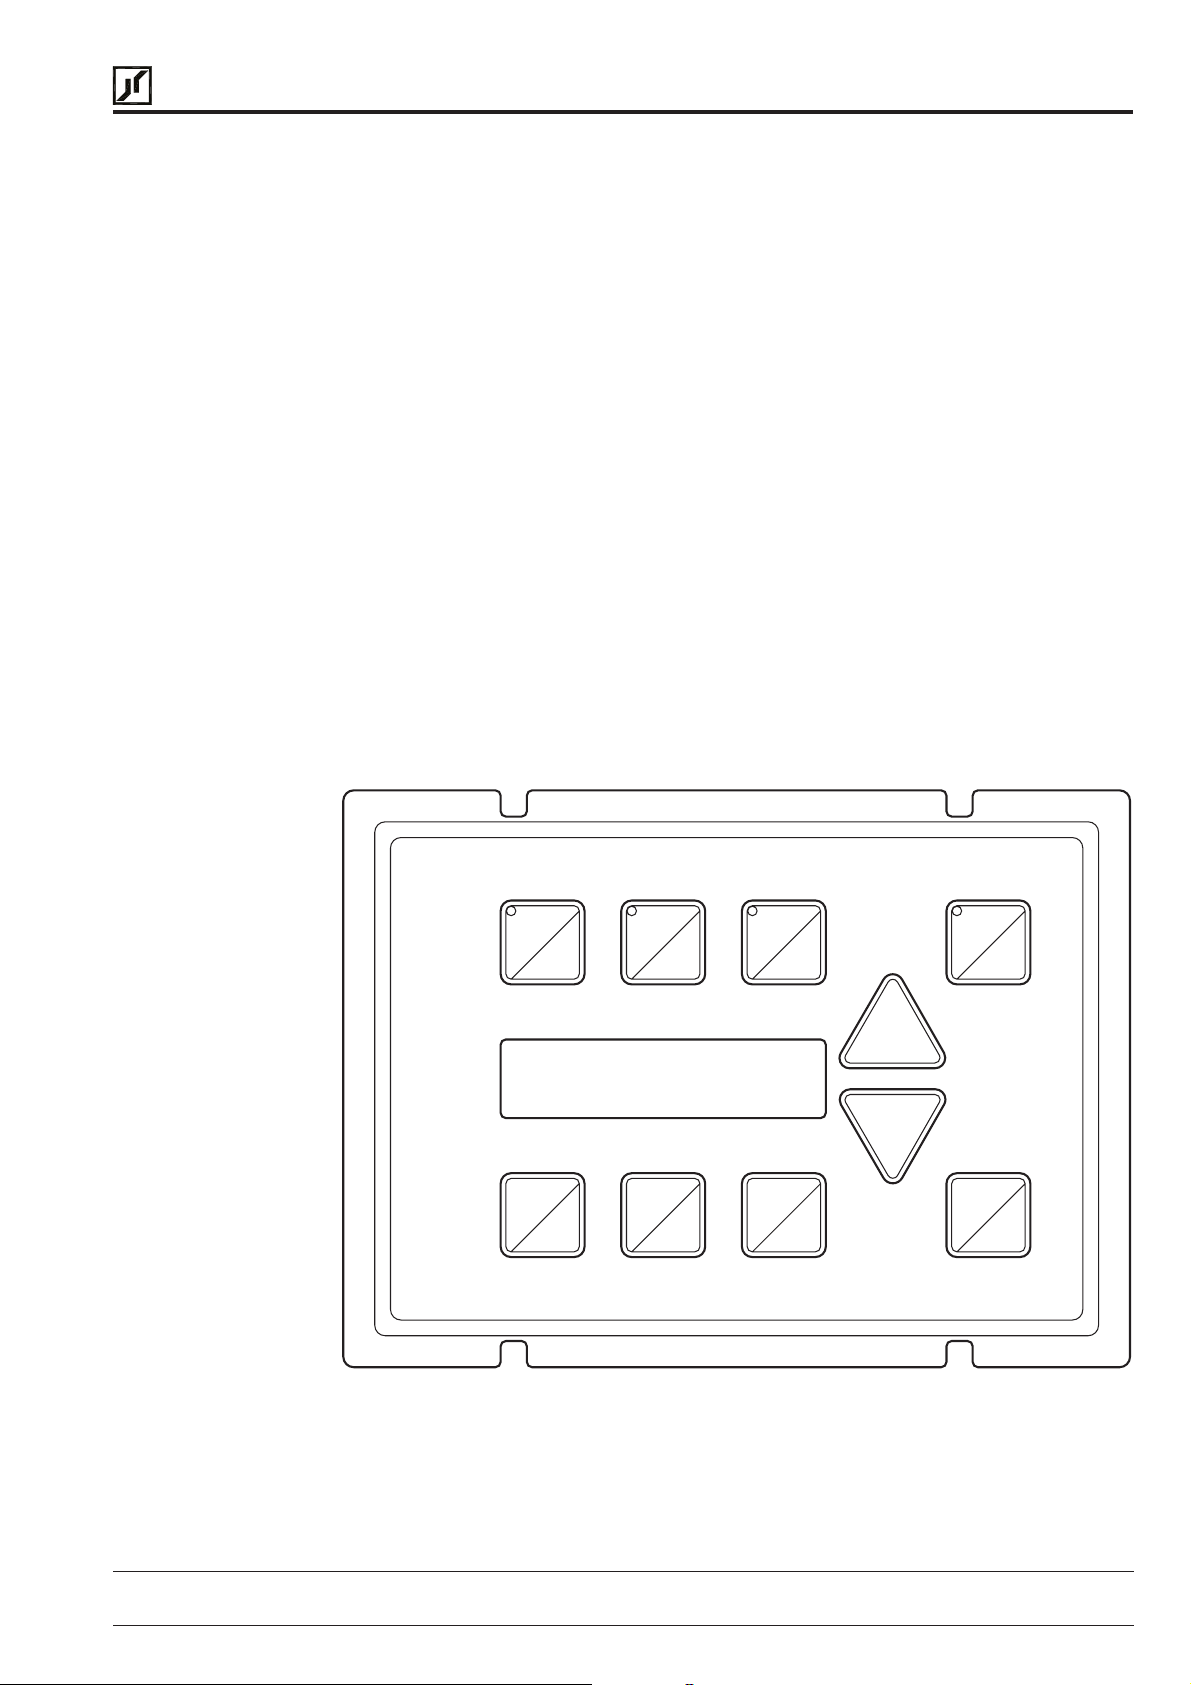
BERGES
Berges electronic • D–51709 Marienheide-Rodt • Tel. 02264/17-0 • Fax 02264/17126
3 Control Functions and Operation
3.1 General Information
All ACP inverters come with a digital keypad as standard equipment.
Your ACP Inverter is pre-programmed to run a standard AC induction motor, in many cases
no additional programming is required.
ACP’s advanced digital keypad controls all operations of the inverter. The ten input keys
allow “Press and Run” operation of the motor and straightforward programming of the
parameters. To simplify the programming further, the parameters are separated into programming levels:
Level 1 Easily accessed by pressing the PROG key at anytime. Limits access to the
most commonly used parameters for operator convenience.
Level 2 This is used when the more advanced features of ACP are needed. It is
accessed by pressing the SHIFT and PROG keys simultaneously. All parameters can be either viewed or programmed except those associated with theSIO
Serial Communication Link.
Level 3 This level is automatically added to Level 2 when the SIO Serial Input/Output
link is selected (parameter
21-MODE
).
3.2 Digital Keypad
FWD
PROG
REV
SHIFT
JOG
ENTER
STOP
LOC
REM
A detailed description of all the keys and displays follows:
30.10.97 Operating manual
05_GB ACP 6000
SLV
— 0.75–55
Figure 3.1
35
Page 42
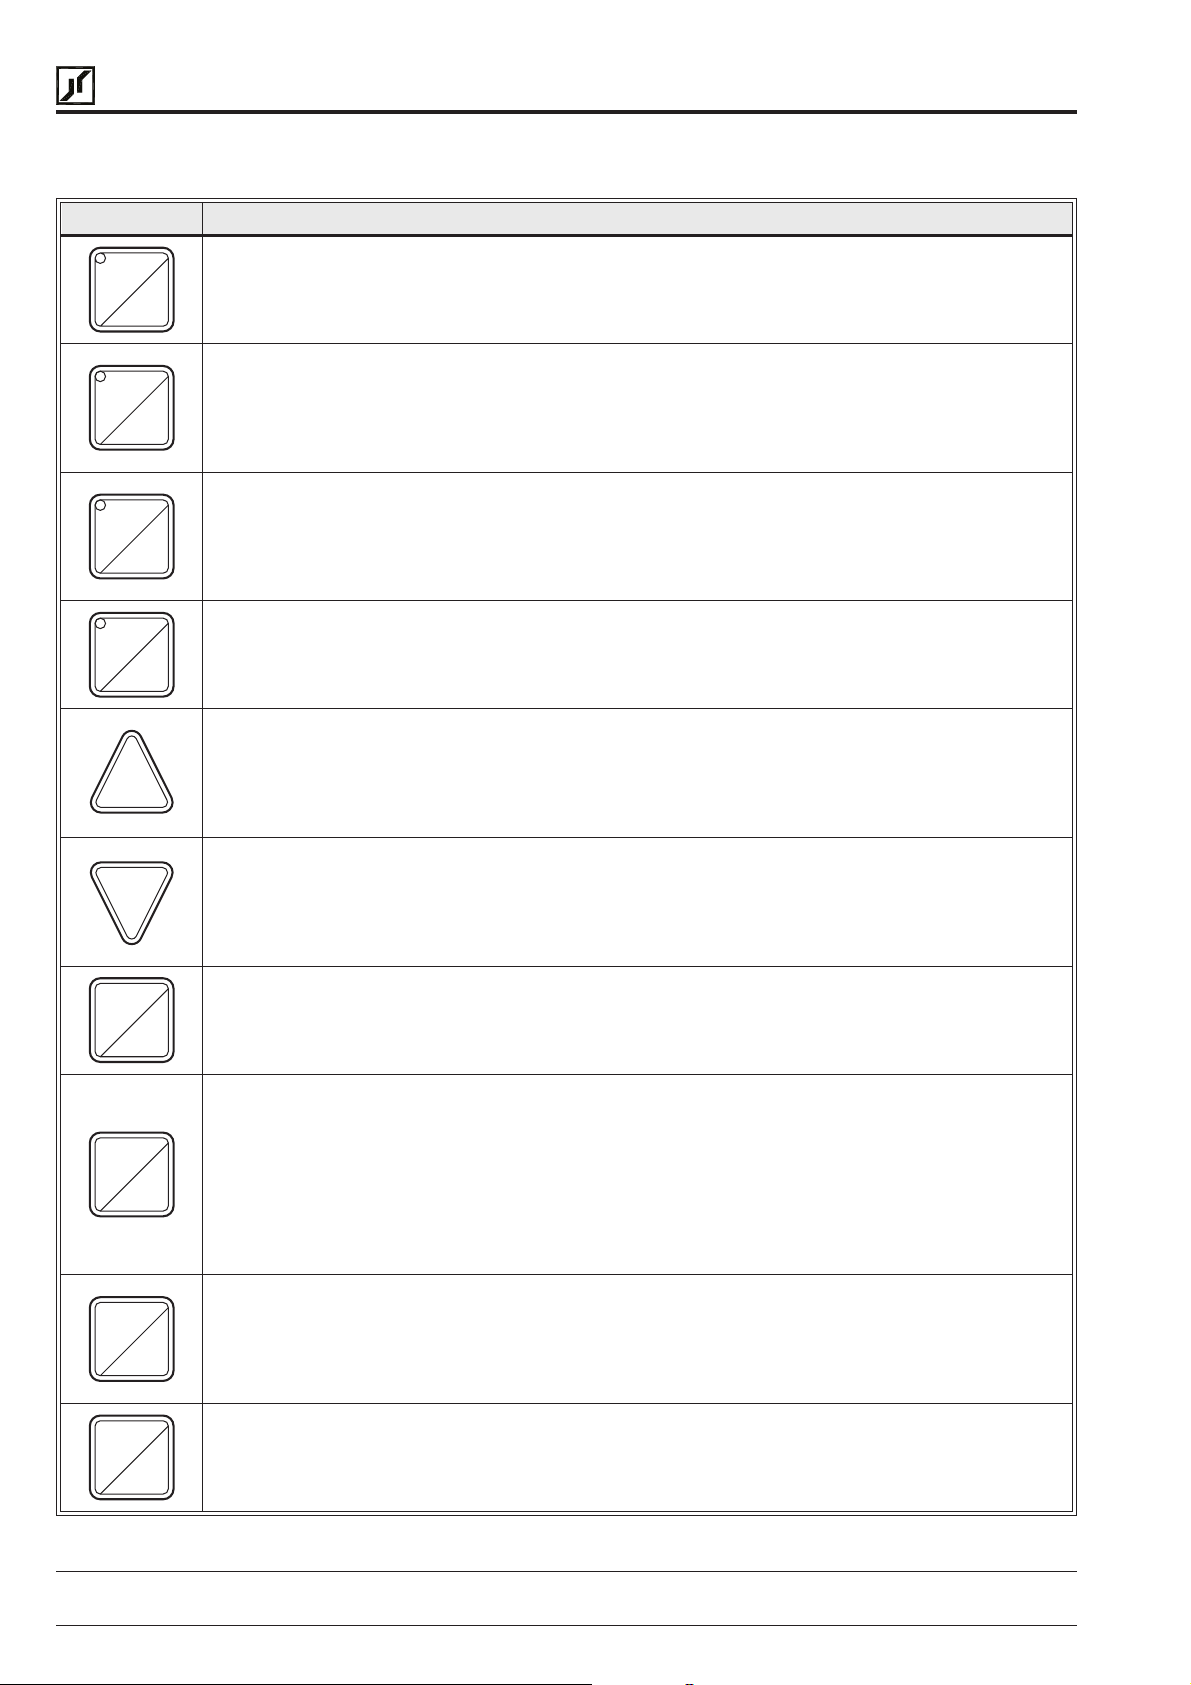
BERGES
Berges electronic • D–51709 Marienheide-Rodt • Tel. 02264/17-0 • Fax 02264/17126
3.3 Operation Mode (STOP and RUN modes)
KEY FUNCTION
Initiates forward run when pressed momentarily. If the drive is running in reverse when FWD is
pressed, it will decelerate to zero speed, change direction and accelerate to the set speed.
FWD
Initiates reverse run when pressed momentarily. If the drive is running in forward when REV is
pressed, it will decelerate to zero speed, change direction and accelerate to the set speed. May
REV
JOG
STOP
be disabled by the setting of
Note: If both keys are pressed and held at the same time, the drive follows the first key
pressed.
Press to enter the JOG mode when stopped. When in the JOG mode, the drive will ramp in the
forward direction to a programmable JOG speed (
ramp to a stop when the FWD key is released. Pressing the REV key causes a similar operation.
The ramp will be at a rate set for normal acceleration and deceleration. To leave the JOG mode,
press STOP or the JOG key a second time.
Causes a Ramp-to-Stop when pressed. This function can be programmed to cause a Coast-ToStop when pressed (
41-RSEL
STOP key will reset the fault. Also functions as an emergency stop when the drive is remotely
controlled.
21-MODE
.
33-F2
). If the drive has stopped due to a Fault condition, pressing the
) while the FWD key is held. The drive will
ENTER
LOC
REM
PROG
SHIFT
In the Stop mode, pressing this key increases the desired running speed of the drive. That is, the
speed to which the drive will accelerate when a Run is initiated. In the Run mode, pressing this
key dynamically adjusts the running speed of the drive. Setting resolution is 0.01 Hz. If the key is
pressed and held for five (5) seconds, the setting frequency will scroll automatically at an
increased rate. Also see SHIFT description below.
In the Stop mode, pressing this key decreases the desired running speed of the drive. That is, the
speed to which the drive will accelerate when a Run is initiated. In the Run mode, pressing this
key dynamically adjusts the running speed of the drive. Setting resolution is 0.01 Hz. If the key is
pressed and held for five (5) seconds, the setting frequency will scroll automatically at an
increased rate. Also see SHIFT description below.
In the Stop or Run modes, pressing this key will “Lock-in” the frequency selected by the UP and
DOWN arrow keys so that if power is removed and re-applied, that frequency will be the initial
default speed setting. The display will show **STORED** for 1 second when the command is
completed.
Shifts drive control between the LOCal and REMote control modes as selected by the
21-MODE
(Page 49) parameter. Can be programmed to shift:
1) The Run/Stop command (either FWD or REV)
2) The speed reference signal
3) Both
or
or
or
4) Disabled.
Will operate either in the Stop mode or while the drive is running. If power is removed and reapplied, the memory will retain the last selected function.
In the Run mode, pressing this key will access the parameters at Level 1 for viewing only.
Pressing the SHIFT and PROG keys simultaneously, will access Level 2 for viewing only. The UP
and DOWN arrow keys will work as described in the Programming section of this document.
Operation of the motor will not be affected while viewing the information in these parameters and
parameter changes cannot be made.
Pressing SHIFT momentarily while holding either the UP or DOWN arrows will initiate the fast
scroll without waiting for the five second delay. Pressing it a second time will start the fastest
scroll rate.
36
Operating manual 30.10.97
ACP 6000
SLV
— 0.75–55 05_GB
Page 43
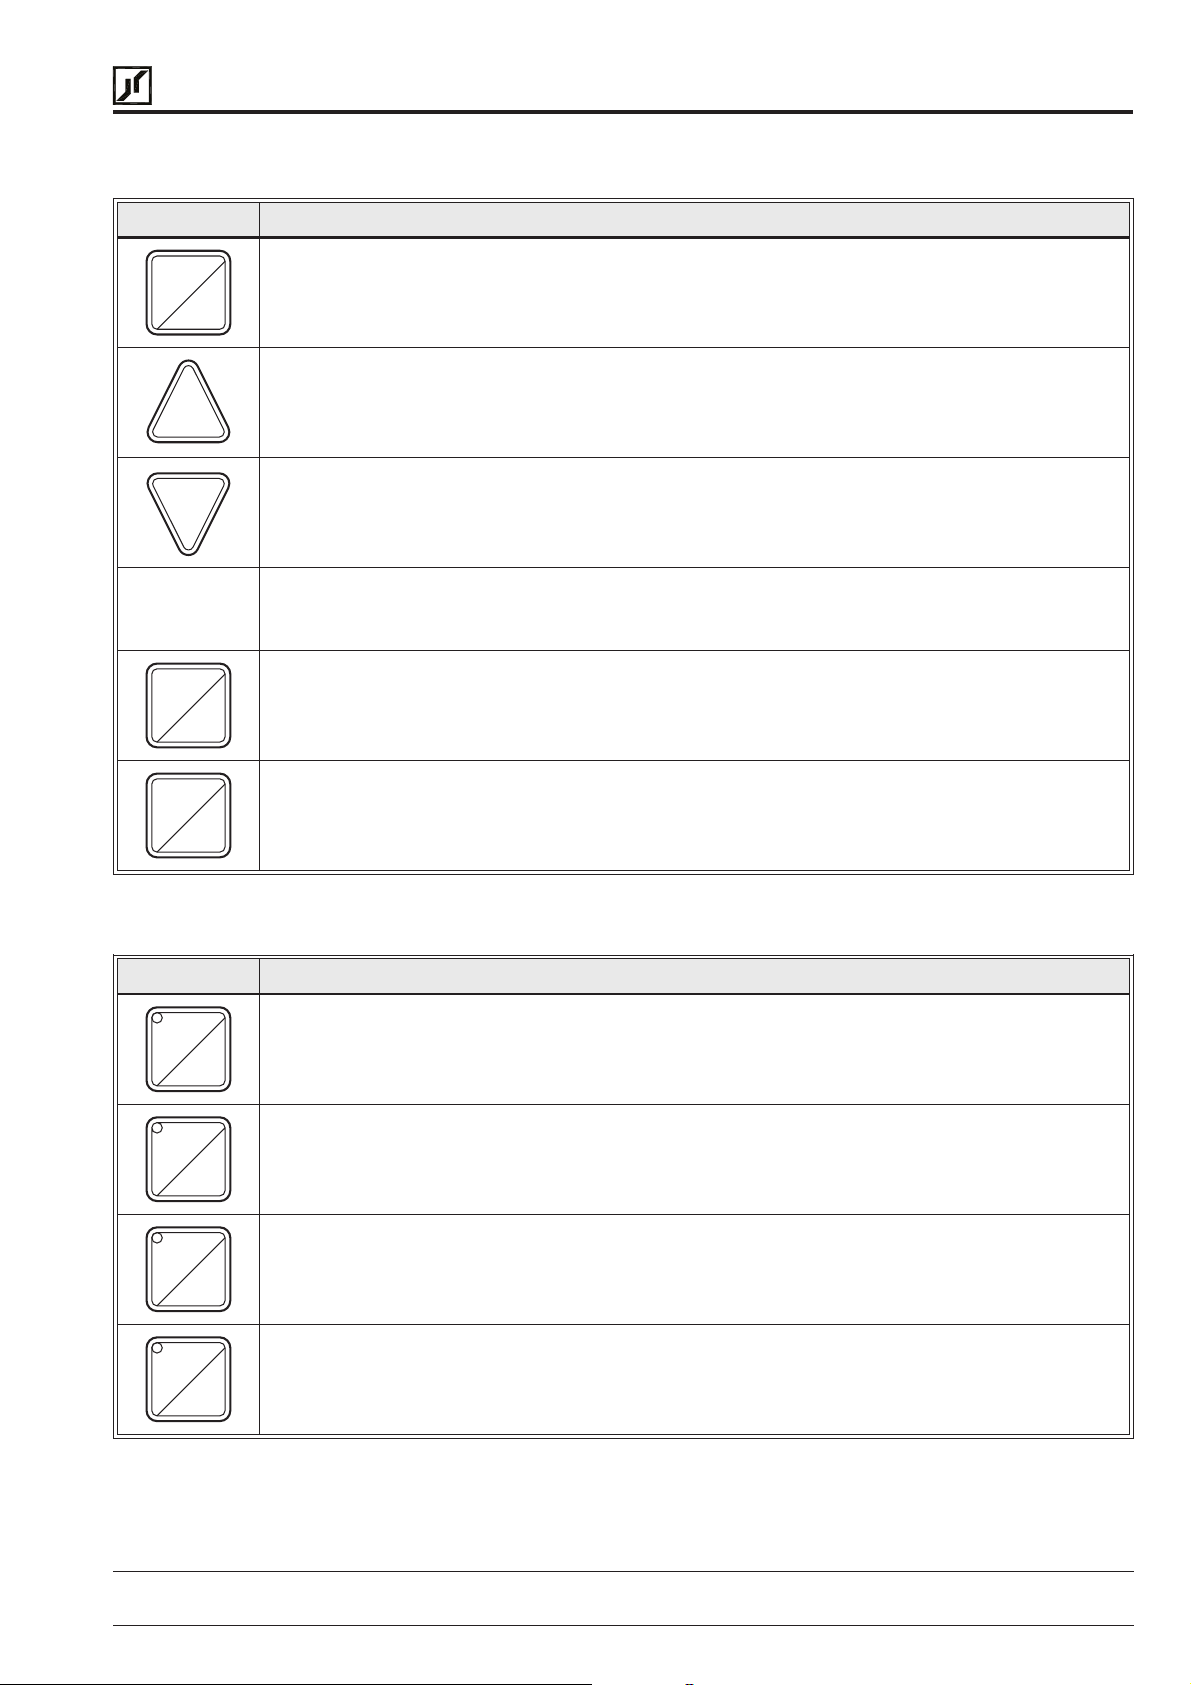
BERGES
Berges electronic • D–51709 Marienheide-Rodt • Tel. 02264/17-0 • Fax 02264/17126
3.4 Program Mode
KEY FUNCTION
When in the STOP mode, pressing this key will enter the PROGRAM mode at Level 1. Pressing
this key at any time while in the PROGRAM mode will return the unit to the OPERATION mode.
PROG
SHIFT
Pressing the SHIFT and PROG keys simultaneously will enter Level 2. If an Access Code has
been entered, re-entry is required to change program data.
In the PROGRAM mode, pressing this key will move forward through the successive Parameter
Addresses. When changing Data in a Parameter, this key will increment the data value. The
ENTER key must be pressed to store the new value.
In the PROGRAM mode, pressing this key will move backward through the successive
Parameter Addresses. Then changing Data in a Parameter, this key will decrement the data
value. The ENTER key must be pressed to store the new value.
NOTE:
All parameters except
85-UNITS
, momentarily pressing both the UP-arrow and DOWN-
arrow keys simultaneously will return the parameter setting to factory defaults.
Pressing this key while a Parameter is displayed will allow that Parameter to have its data
changed by use of the UP and DOWN arrow keys.
Pressing this key after data has been changed in a Parameter will store that information in nonvolatile memory.
ENTER
3.5 Status (LED) Indicators
LED INDICATION/LOCATION
The red Stop LED, located in the STOP key, illuminates whenever a stop command has been
given. If the inverter has stopped due to a fault, this LED will flash to call attention to the digital
STOP
FWD
REV
JOG
display.
The green Forward LED, located in the FWD key, illuminates whenever a forward command has
been given. When both the Forward and Reverse LED’s are on, the DC braking function is active.
The green Reverse LED, located in the REV key, illuminates whenever a reverse command has
been given. When both the Forward and Reverse LED’s are on, the DC braking function is active.
The green Jog LED, located in the JOG key, illuminates to signify the inverter is in the JOG mode
of operation.
30.10.97 Operating manual
05_GB ACP 6000
SLV
— 0.75–55
37
Page 44
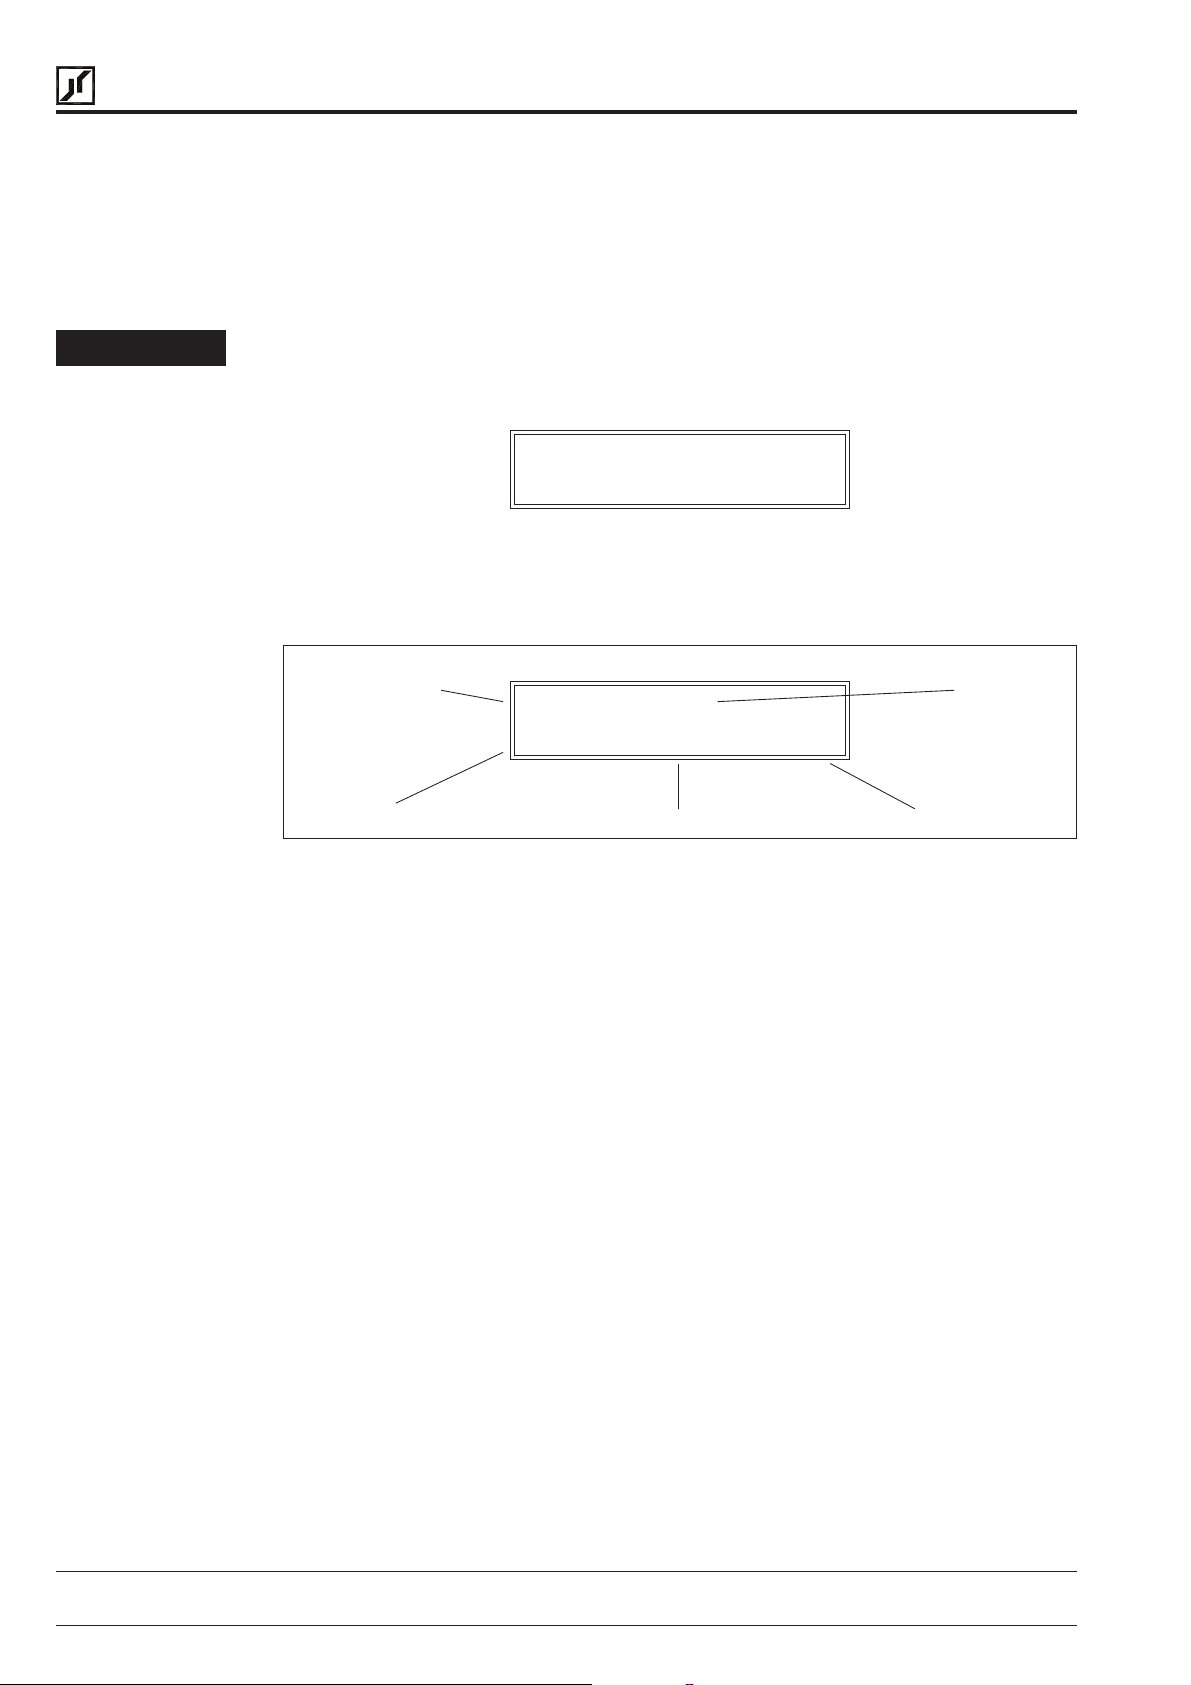
BERGES
Berges electronic • D–51709 Marienheide-Rodt • Tel. 02264/17-0 • Fax 02264/17126
3.6 Description of Displays (Operating Display)
The ACP inverter has been designed to provide the greatest level of information possible to
the operator through an easily readable 2 × 16 character Super-Twist LCD alphanumeric
display, including data on drive and motor status, fault information and parameter values.
This section will give a brief description of the various display formats that may be seen
during start-up, operation and programming.
HINT!
On delivery, the default language of the display messages is English. If necessary, change
parameter
86-LANG
(Page 64) in order to set the country-specific language.
POWER-UP AND FAULT RESET MODES
RESTART
The restart display is present whenever power is applied to the inverter or a fault condition
is reset. It will be displayed for about one second during which time the computer is checking
various functions within the inverter.
OPERATING DISPLAY
Control
Mode
During normal operation, this display will provide important information about the inverter
and load.
LOC STOP
SET 0.00 Hz 0 %
Frequency
Status
Load
CONTROL
The first three characters of the top line denote the source of control for the inverter:
LOC Local control via the Keypad.
REM Remote control from the terminal strip.
SIO Remote control via the RS 485 Serial SIO Link.
SEQx Control via the Program Sequencer.
ADJ Auto-tune mode for Parameter
5B-IMAG
.
STATUS
Twelve characters are dedicated to the current status of the inverter output. This includes
normal operating conditions and warning messages:
STOP The inverter is in the STOP mode.
ACCELERATE The motor is increasing in speed.
DECELERATE The Motor is decreasing in speed.
AT SPEED Motor speed is at the desired point.
ZERO SPEED The inverter is in the RUN mode but the motor is not turning.
38
Operating manual 30.10.97
ACP 6000
SLV
— 0.75–55 05_GB
Page 45

BERGES
Berges electronic • D–51709 Marienheide-Rodt • Tel. 02264/17-0 • Fax 02264/17126
JOG Motor turns only while the FWD or REV keys are pressed (Displayed
only while JOGGING).
TORQ LIMIT The output torque of the inverter has reached it’s programmed limit
level.
DYN BRAKE The Dynamic Brake circuits are helping to decelerate the motor and
load.
HI TEMP The temperature of the drive is near the maximum limit point.
HI CURRENT The output current is near the overcurrent cutoff point.
HI VOLTAGE The voltage on the DC bus is near the high voltage cutoff point.
LO VOLTAGE The voltage on the DC bus is near the low voltage cutoff point.
SPD SEARCH Autostart has been programmed to
attempting to synchronize its output with the motor speed.
IDLE#xx SIO mode of operation only. The drive is programmed to SIO address
(
92-SIOA
LS LOCKOUT Line Start Lockout. A run command was detected when power was
applied.
) = xx. It is awaiting either a program or run command.
82-START
and the inverter is
MODE
The first three characters on the second line denote the present operating mode of the
inverter:
FWD A Forward run command has been given.
REV A Reverse run command has been given.
SET The inverter is waiting to have, or is having, the running frequency set.
FREQUENCY
The standard display shows the inverter operating frequency in Hertz. This can be custom
tailored to any engineering or machine units by the setting of parameters
85-UNITS
.
84-DISP
and
LOAD
The last four characters in line 2 display the percentage of maximum continuous inverter
output current that is being delivered. If a custom display is programmed on this line, this
information is not displayed but is still viewable at parameter
When the programming mode is accessed bypressing the PROG key for LEVEL 1 or SHIFT
and PROG keys for LEVEL 2 or 3, the above display will appear for one second.
PROGRAMMING ACCESS
PARAMETERS
PROGRAM LEVEL 1
Rights Access
30.10.97 Operating manual
05_GB ACP 6000
SLV
— 0.75–55
15-LOAD
.
39
Page 46
BERGES
RIGHTS
ACCESS
Berges electronic • D–51709 Marienheide-Rodt • Tel. 02264/17-0 • Fax 02264/17126
Thissectionexplainstheoperator’saccess rights after the program mode has been entered:
PROGRAM This indicates that while in the programming mode parameter data can
be changed.
VIEW If the inverter is in the run mode (forward or reverse) when the PROG
keys was pressed, parameters may viewed but not changed.
This denotes the access level that is being entered . It may show Level 1 or Level 2 (Section
4) or Level 3 (Section 5).
Once the program mode has been accessed, the above display will provide information on
each parameter:
PROGRAMMING DISPLAYS
Description
MIN FREQUENCY
PROG 31: 0.0 Hz
Rights
Parameter
DESCRIPTION
The top line will give a full 16 character description of the parameter that is being accessed.
RIGHTS
The first four characters of the second line will indicated if the particular parameter can be
changed (PROG) or only examined (VIEW). If an attempt is made to change data while in
the VIEW mode, the message **NO ACCESS** will be displayed for one second.
PARAMETER
This is the actual parameter number being displayed. When data is being changed, this
number will blink on and off. A list of all parameters for levels 1 and 2 is given on page 45 in
section 4.1.
DATA
Data
40
Up to eight characters are used to display the information stored in the parameter. Some
parameters have a unit designator such as:
s = Seconds h = Hours C = Degrees centigrade
Hz = Hertz % = Percent A = Amperes
Operating manual 30.10.97
ACP 6000
SLV
— 0.75–55 05_GB
Page 47
BERGES
Berges electronic • D–51709 Marienheide-Rodt • Tel. 02264/17-0 • Fax 02264/17126
FAULT DISPLAY – PAGE 1
Code
FAULT F07 ∧
MOL CONTACT OPEN
Description
When the inverter stops due to a fault trip, a unique error message will be displayed along
with a flashing STOP LED indicator. “Two pages” of information are available concerning
the actual fault and drive status. “Page 1” is shown above.
Next Page
CODE
Thetoplinesignifies that a faulthasoccurredand displays one of19faultcodes. See Section
7.2, page 78, “Troubleshooting” for a complete list of all codes and explanations of each.
NEXT PAGE
The “∧” symbol indicates that pressing the Up Arrow will shift the display to “Page 2”.
DESCRIPTION
The second line provides a full 16 character description of the cause of the fault.
Page 2 of the fault display will show the operating conditions of the inverter at the time of the
fault. All other operating parameters are “frozen” until the drive is reset.
3.7 Operating Tips
Parameter Access
• When the PROG (or SHIFT-PROG) key is pressed after application of power,
will always be the first parameter displayed.
• If a different parameter is accessed and the Program mode is exited, that parameter will
be the point of entry the next time the programming mode is accessed.
• The ACP will remember different “last parameters” for levels 1, 2, and 3.
• If no key is pressed for 10 minutes while in the programming mode, the ACP will
automatically revert back to the operating mode.
Display Scroll Rate
FAULT DISPLAY – PAGE 2
AT SPEED
FWD 49.60 Hz 80 %
21-MODE
• Three scroll rates are used to speed entry of information into the ACP.
• If either the UP or DOWN arrow is pressed and held for five seconds, the rate of change
of the display will increase.
30.10.97 Operating manual
05_GB ACP 6000
SLV
— 0.75–55
41
Page 48
BERGES
Berges electronic • D–51709 Marienheide-Rodt • Tel. 02264/17-0 • Fax 02264/17126
• If the SHIFT key is momentarily pressed while holding one of the arrow keys, the five
second delay will be bypassed.
• If the SHIFT key is pressed a second time while holding an arrow key the display will
scroll at the fastest rate. This is useful for entering very large numbers as in parameter
84-DISP
Restoring Factory Settings
• Wheneveraparameter’s dataisbeingchanged (notedbythe Parameternumberblinking)
the original factory setting for that parameter can be restored by pressing both the UP
and DOWN arrows simultaneously and pressing the ENTER key.
.
• To restore all parameters to their factory settings, see section 4.3, page 61,
Help
For Application Assistance, call BERGES electronic at 02264/17-160, 02264/17-102 and
02264/17-109.
3.8 Quick-Start – Running the Motor
Thissectionisforoperatorswhowouldliketoget up and running quickly andwithaminimum
amount of research through the manual. Be sure to read sections 3.1 through 3.7 before
proceeding. In many cases your ACP Inverter will perform perfectly without making any
changes to the factory settings.
A. Perform all procedures for installation as specified in Section 2 – InstallationInstructions.
RE-VERIFY THAT THE PROPER VOLTAGE IS AVAILABLE FOR THE INVERTER
BEFORE APPLYING POWER. FAILURE TO DO THIS CAN BE RESULT IN EQUIPMENT FAILURE AND PERSONAL INJURY!
B. Apply AC power to the input terminals. For about one second, all the LED indicators will
illuminate and the display will show:
RESTART
81-PRGNO
.
42
After one second the STOP LED will stay on and the display will change to:
LOC STOP
SET 0.00 Hz 0 %
C. The ACP is programmed at the works for control via the keypad of the control panel, via
theterminalsand for operationinbothdirections ofrotation.The keys REVandLOC/REM
are therefore activated.
Press the FWD key, the display will change to:
LOC ZERO SPEED
SET 0.00 Hz 0 %
D. Press the UP Arrow to increase the desired running frequency. When the motor starts to
turn, note the direction of rotation. If the motor is turning in the wrong direction, STOP
THE DRIVE, REMOVE AC POWER AND WAIT FOR THE BUS CHARGE INDICATOR
TO GO OUT. After the Charge indicator is extinguished, reverse any two of the motor
leads at M1, M2 or M3.
Operating manual 30.10.97
ACP 6000
SLV
— 0.75–55 05_GB
Page 49

BERGES
Berges electronic • D–51709 Marienheide-Rodt • Tel. 02264/17-0 • Fax 02264/17126
E. Thelengthoftime thattheUPArrow is depresseddeterminesthe scrollrateofthe display.
After it is held for five seconds, the rate of change will increase. The five second time can
becircumventedby momentarilypressingthe SHIFT keywhileholdingthe UP(orDOWN)
Arrow.
F. The inverter is preset to run a “typical” induction motor to a maximum speed of 50 Hz with
both Acceleration and Deceleration times set to 3.0 seconds. The Jog frequency is set
for 5.0 Hz.
G. Use the Arrow keys to set the proper running speed of themotor and the FWD and STOP
keys to control it’s operation.
30.10.97 Operating manual
05_GB ACP 6000
SLV
— 0.75–55
43
Page 50
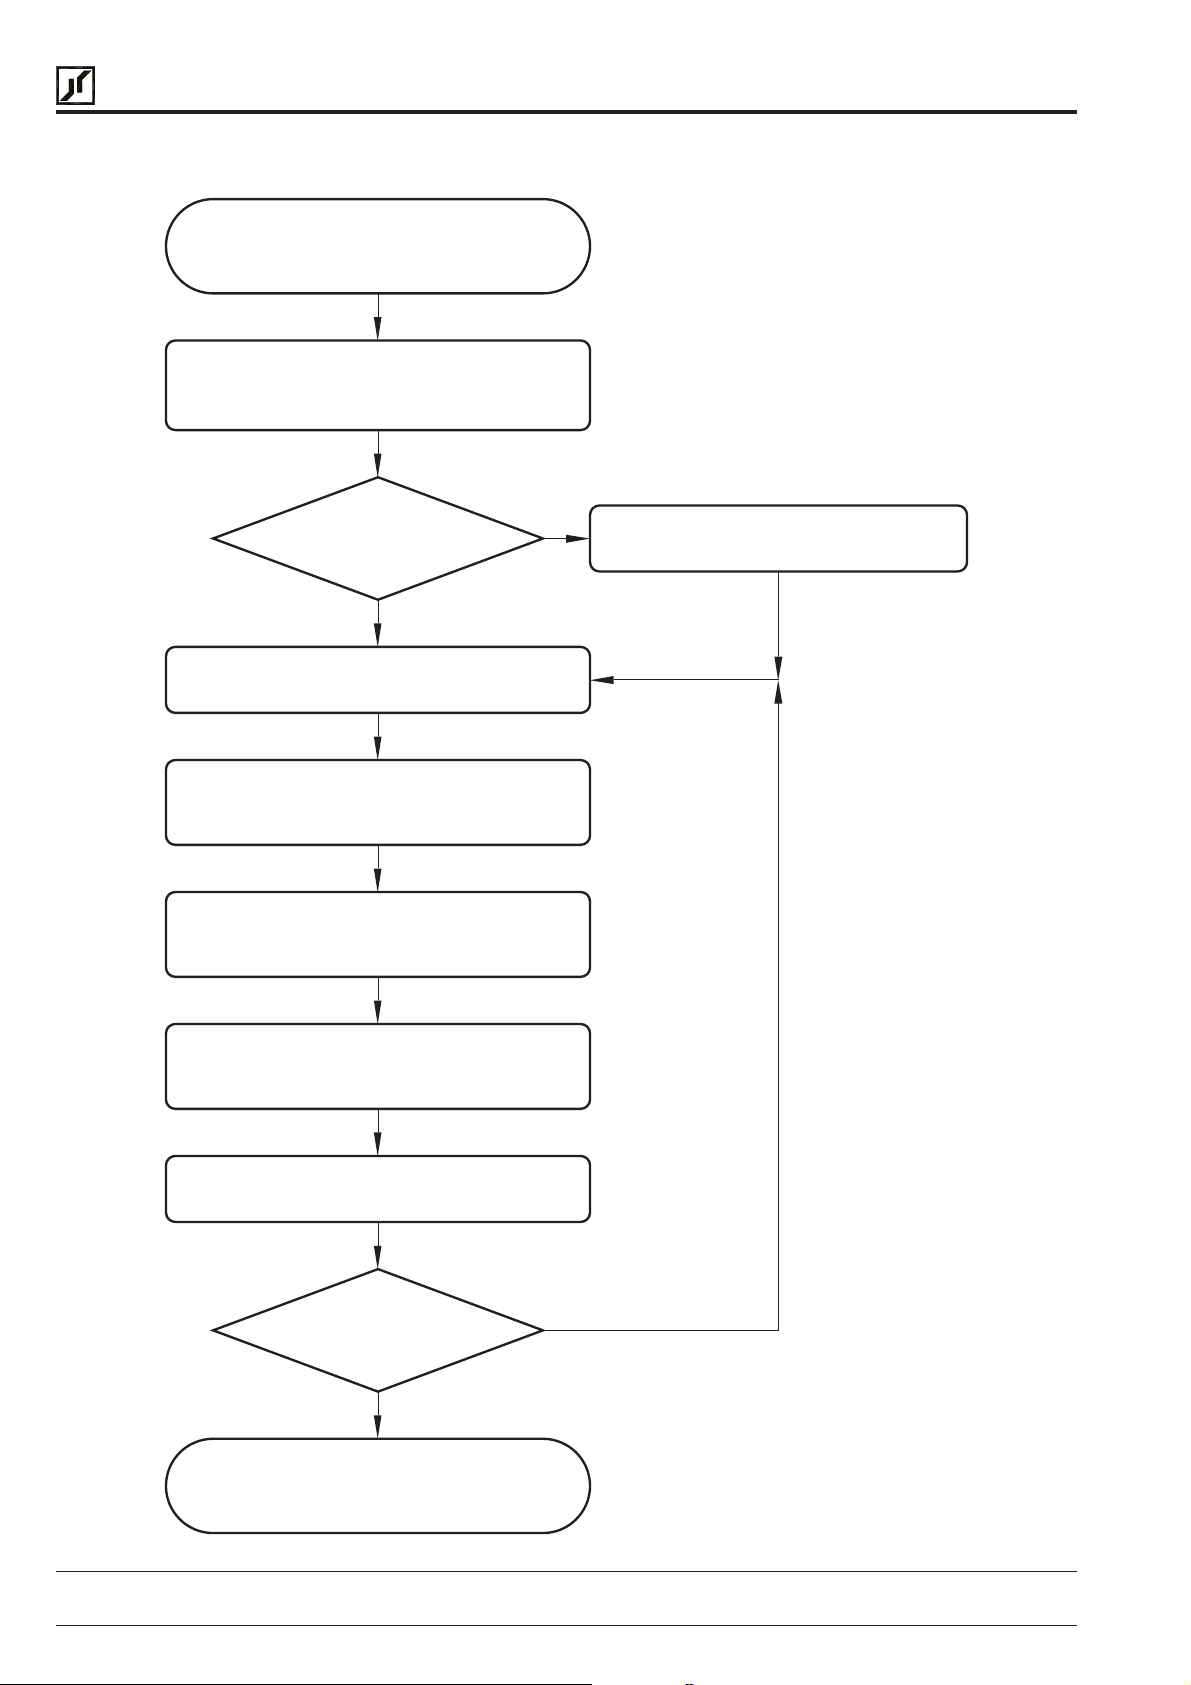
BERGES
Berges electronic • D–51709 Marienheide-Rodt • Tel. 02264/17-0 • Fax 02264/17126
3.9 Programming Flowchart
Press "STOP"
STOP drive
Reset faults
Press: "PROG" for level 1
"SHIFT" and "PROG" for level 2
Enter the PROGram mode
Access code
assigned?
no
View last
parameters
Press " " or " "
Press " " or " "
▲▼
Select new
parameter
Press "SHIFT"
Enable data
change
▲▼
Set new data
value
yes
Enter the
access code
44
Press "ENTER"
Store data
Change
another
parameter?
no
Press "PROG"
Return to
operation mode
yes
Operating manual 30.10.97
ACP 6000
SLV
— 0.75–55 05_GB
Page 51
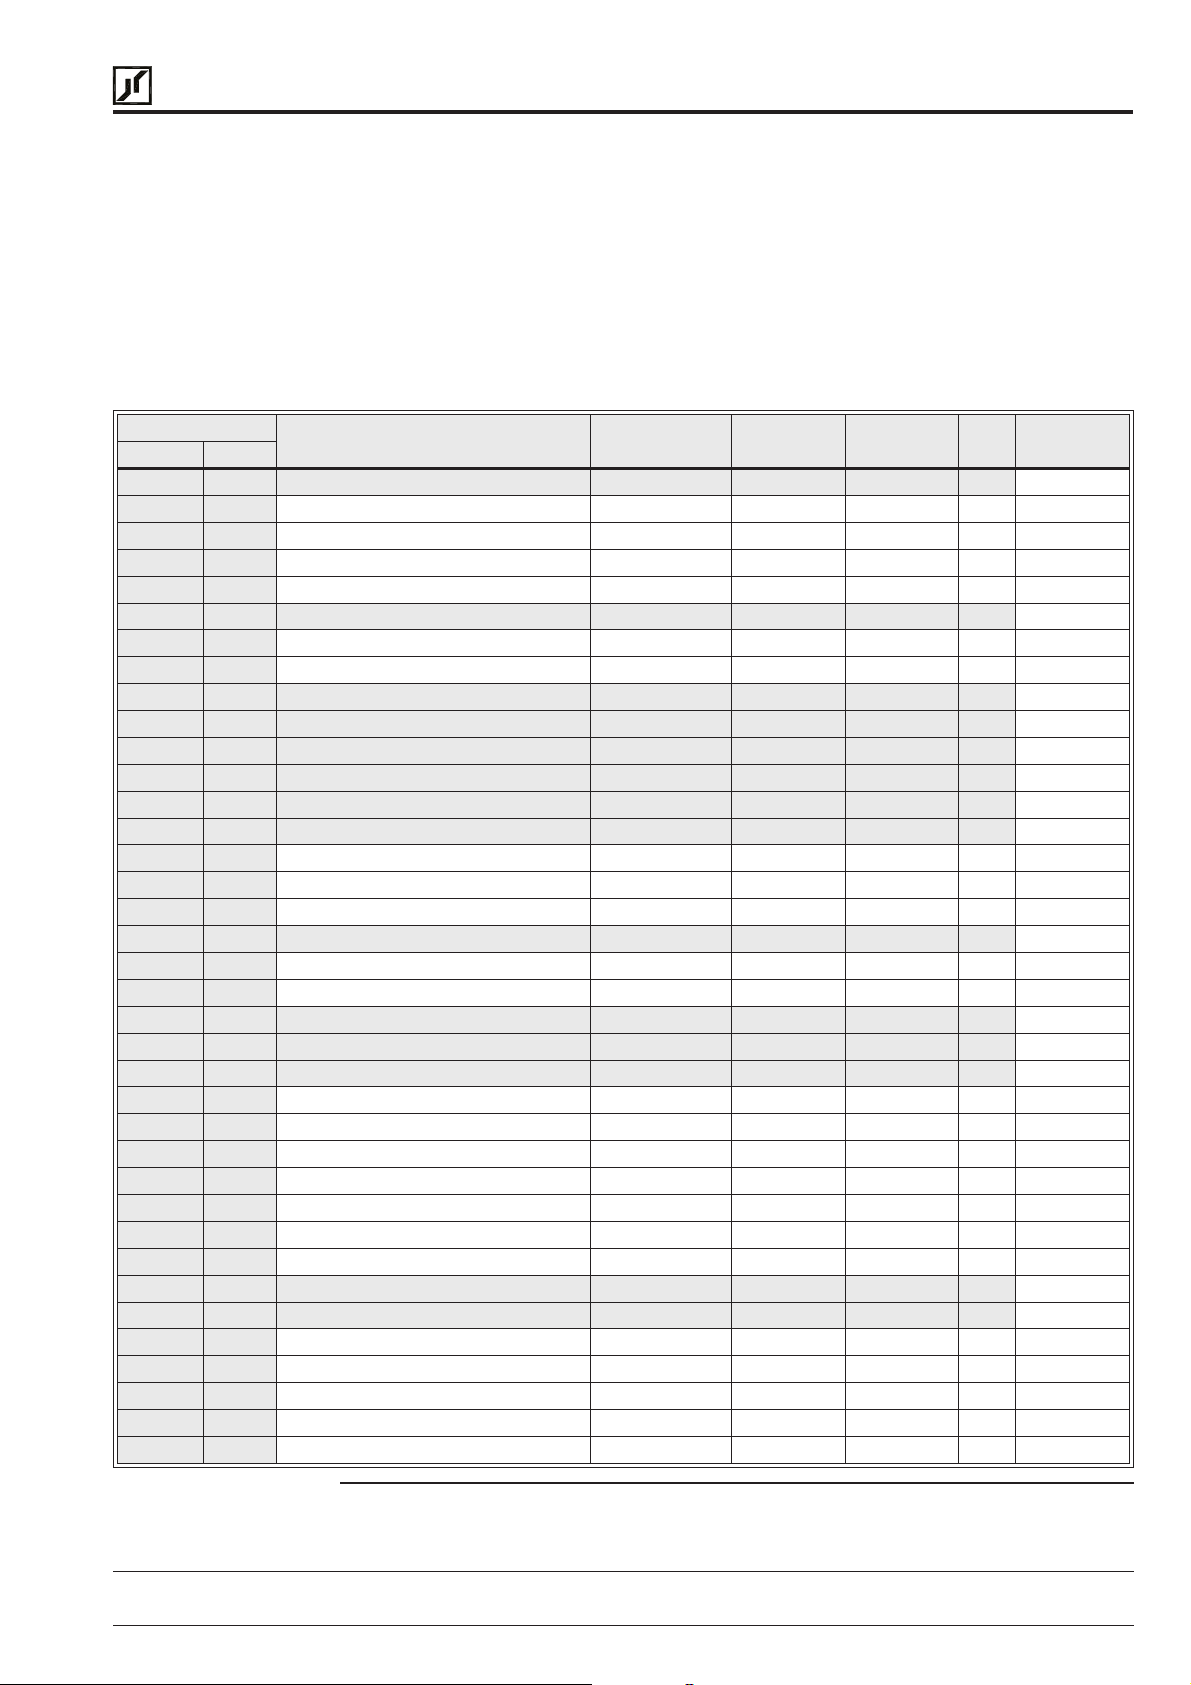
BERGES
Berges electronic • D–51709 Marienheide-Rodt • Tel. 02264/17-0 • Fax 02264/17126
4 Level 1 and 2 Parameters
• Level 1 – accesses only basic operator parameters.
• Level 2 – accesses all parameters in Level 1 and Level 2.
• Level 3 – accesses all parameters in Level 1, Level 2 and Level 3.
For more information consult Section 5 and publication “ACP 6000 – Option”.
4.1 Program Code Summary (Level 1 and 2)
12
PARAMETER DESCRIPTION DATA RANGE FACTORY
NUMBER NAME
01 MODEL Model Number 0–65000 (
02 RVLVL Software Revision 0–640 (
03 IRAT Rated Current 2–200 A (
05 SERNO Serial Number 0–65000 2 47
06 REP Repair Date 0–65000 2 47
07 FLT3 Last Fault – 1 48
08 FLT2 2nd Fault – 2 48
09 FLT1 1st Fault – 2 48
12 FOUT Output Frequency 0–400 Hz 1 48
13 VOUT Output Voltage 0–100% 1 48
14 IOUT Output Current 0–650 A 1 48
15 LOAD Drive Load 0–200% 1 48
16 TORQ Load Torque 0–200% 1 48
17 TEMP InverterTemperature 2–105 °C 1 48
18 TIME1 Total Run Time 0–65000 h 2 48
19 TIME2 Power On Hours 0–65000 h 2 48
1B FLUX Magnetizing Current 0–100% 2 48
21 MODE Input Mode 0–36 13 1 49
24 FSEL Reference Select 0–19 0 2 49
27 TLSEL Torque Limit Select 0–6 0 2 51
31 FMIN Minimum Frequency 0.01–400.00 Hz 0.00 Hz 1 51
32 FMAX Maximum Frequency 20.00–400.00 Hz 50.00 Hz 1 51
33 F2 Preset Frequency 2 (Jog) 0.00–400.00 Hz 5.00 Hz 1 51
34 F3 Preset Frequency 3 0.00–400.00 Hz 20.00 Hz 2 51
35 F4 Preset Frequency 4 0.00–400.00 Hz 40.00 Hz 2 51
36 F5 Preset Frequency 5 0.00–400.00 Hz 60.00 Hz (
37 F6 Preset Frequency 6 0.00–400.00 Hz 0.00 Hz (
38 F7 Preset Frequency 7 0.00–400.00 Hz 0.00 Hz (
39 FTL Minimum Frequency in Torque Limit 0.00–400.00 Hz 10.00 Hz 2 52
41 RSEL Ramp Selector 0–7 0 2 52
42 ACC1 Acceleration Ramp 1 0.10–600.00 s 3.00 s 1 52
43 DEC1 Deceleration Ramp 1 0.10–600.00 s 3.00 s 1 52
44 ACC2 Acceleration Ramp 2 0.10–600.00 s 1.00 s 2 52
45 DEC2 Deceleration Ramp 2 0.10–600.00 s 1.00 s 2 52
46 DECTL Torque Limit Response Time 0.10–30.00 s 1.00 s 2 53
47 DCBRK DC Brake Time 0.00–5.00 s 0.20 s 2 53
48 DCVLT DC Brake Voltage 0.00–15.00% (
SETTING
1
)147
1
)247
1
)247
1
)253
ACCESS
LEVEL
2
)2 51
2
)251
2
)251
SEE
PAGE
CUSTOMER
SETTING
(1) Default value is model dependant.
(2) Parameter adjustable while the drive is in the run mode.
30.10.97 Operating manual
05_GB ACP 6000
SLV
— 0.75–55
45
Page 52
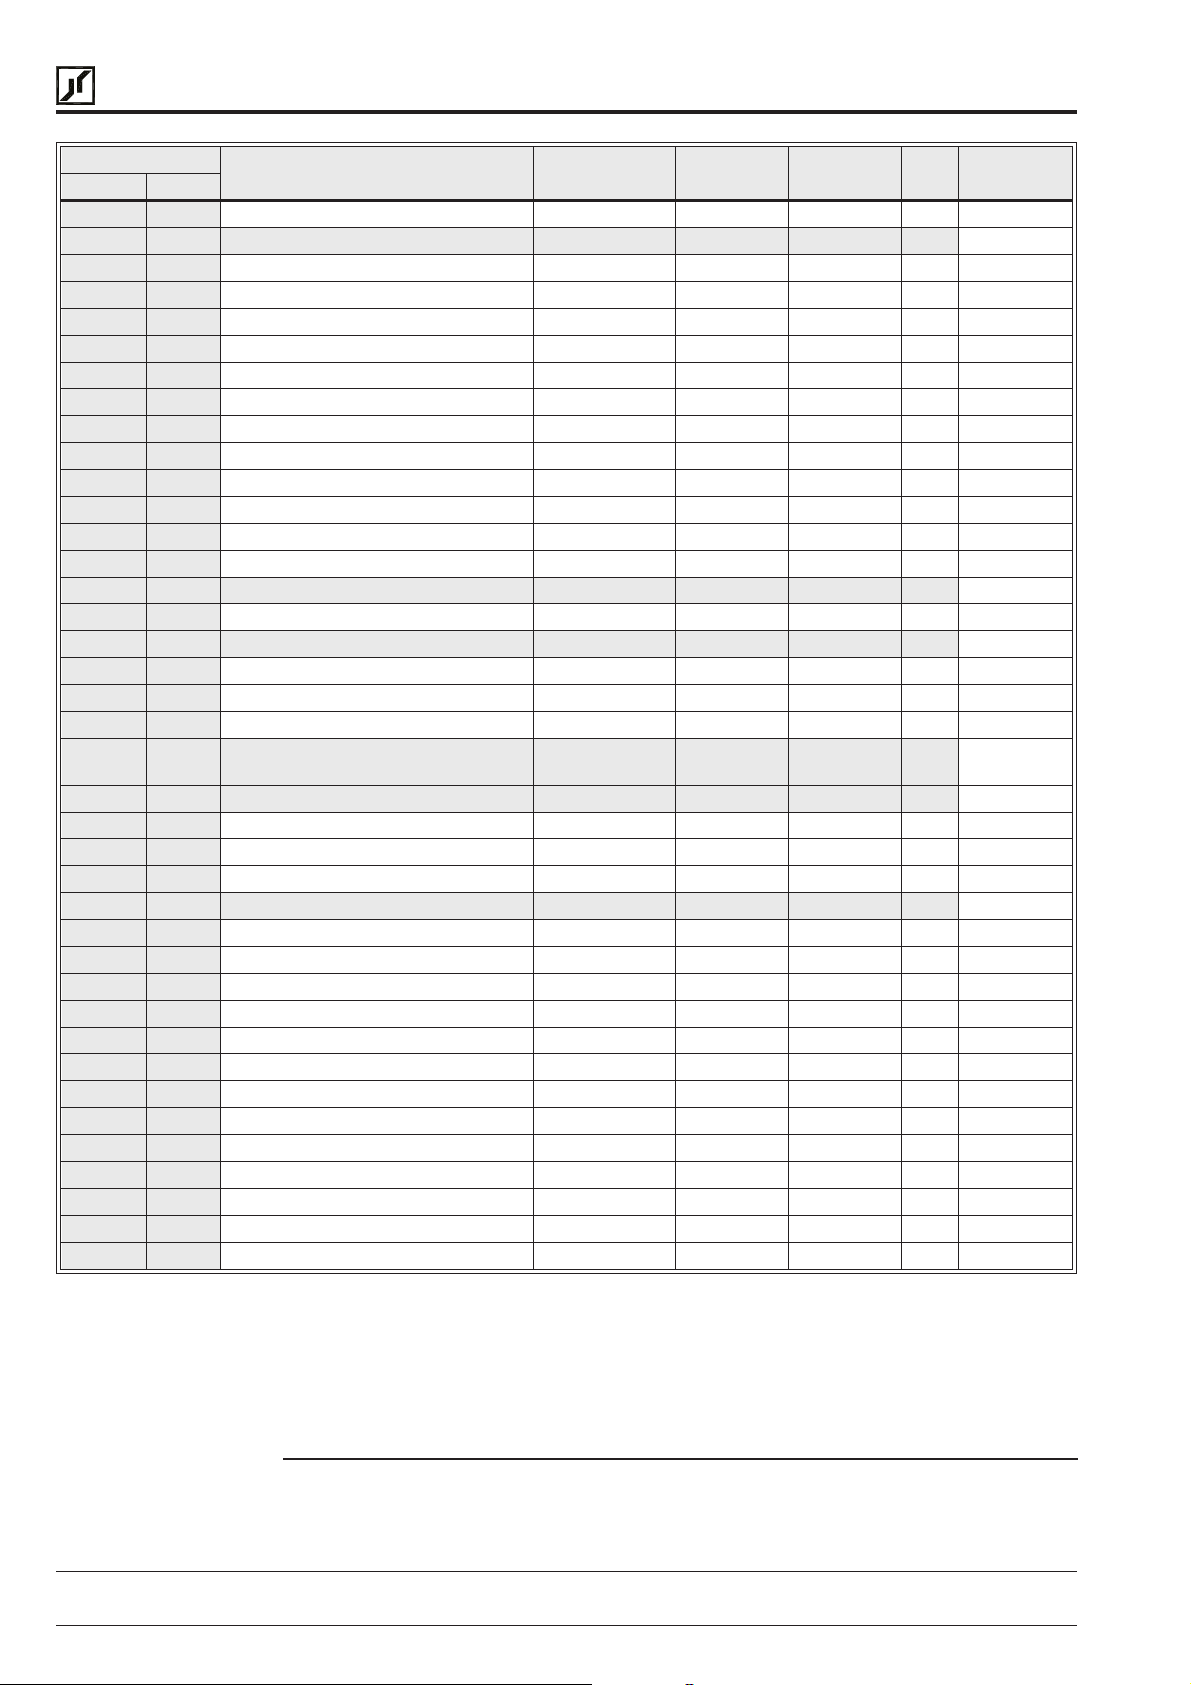
BERGES
Berges electronic • D–51709 Marienheide-Rodt • Tel. 02264/17-0 • Fax 02264/17126
PARAMETER DESCRIPTION DATA RANGE FACTORY
NUMBER NAME
51 VSEL V/Hz Characteristic Selector 0–6 0 2 53
52 BOOST Torque Boost 0.00–20.00% (
53 FKNEE V/Hz Knee Frequency 26.00–640.00 Hz 50.00 Hz 2 54
54 SKBND Skip Frequency Hysteresis Band 0.20–20.00 Hz 1.00 Hz 2 54
55 SK1 Skip Frequency 1 0.00–400.00 Hz 0.00 Hz 2 54
56 SK2 Skip Frequency 2 0.00–400.00 Hz 0.00 Hz 2 54
57 SK3 Skip Frequency 3 0.00–400.00 Hz 0.00 Hz 2 54
58 SK4 Skip Frequency 4 0.00–400.00 Hz 0.00 Hz 2 54
59 MVOLT Rated Motor Voltage 370–480 V 400 V 2 55
5B IMAG Rated Magnetizing Current 15.00–80.00% 0.00% 2 55
61 LTLF Load Torque Limit FWD 5–200% 150% 2 56
62 LTLR LoadTorque Limit REV 5–200% 150% 2 56
63 RTLF Regenerative Torque Limit FWD 5–110% 80% 2 56
64 RTLR Regenerative Torque Limit REV 5–110% 80% 2 56
65 SLIP Slip Compensation 0.00–10.00% 0.00% 1 56
66 STAB Current Stability 0–6 2 2 56
67 TOL Timed Overload Trip Point 0–100% 0% 1 57
68 NRST Restart Number 0–8 0 2 57
69 DRST Restart Delay 0.00–60.00 s 0.00 s 2 58
6A TOLC Timed Overload Characteristic 0–7 0 2 58
70 MCAL Meter Calibration 0–255 Set to
71 METER Analog Meter Output 0–8 1 1 58
72 ST1 Auxiliary Output 1 0–11 6 2 59
73 ST2 Auxiliary Output 2 0–11 3 2 59
74 ST3 Auxiliary Output 3 0–11 7 2 59
75 STR Auxiliary Relay (Fault) 0–11 1 1 59
77 MOL Motor Overload Input Function 0–1 0 2 60
81 PRGNO Special Program Number 0–65000 0 2 61
82 START InverterStart Options 0–7 0 2 62
83 PWM Carrier Frequency Selector 0–8 1 2 62
84 DISP Display Option Full Setting 0–65000 0 2 63
85 UNITS Display Units 6-digit RPM 1 2 63
86 LANG Display Language 0–3 0 2 64
87 ACODE Security Access Code 0–999 0 2 64
88 FRO Frequency Reference Output 0–1 0 2 65
A2 RATIO Master Slave Speed Ratio 0.00–200.00% 100.00% (
B1 OPTNO Option Board Number 0–6 0 2 65
Cx CNTLx Event Control (1–9) Binary (8) 0 (
Ex ECNTx Event Counts (1–9) 0–65535 0 (
SETTING
1
)154
10 VDC (
3
)2
3
)2
ACCESS
LEVEL
2
)
2
)2 65
158
SEE
PAGE
CUSTOMER
SETTING
123
46
NOTES:
Level 1 Parameters shown shaded.
See Section 5 for parameters accessible in Level 3 (SIO control).
(1) Default value is model dependant.
(2) Parameter adjustable while the drive is in the run mode.
(3) Consult BERGES for specific implementation instructions.
Operating manual 30.10.97
ACP 6000
SLV
— 0.75–55 05_GB
Page 53
BERGES
4.2 Programming
Berges electronic • D–51709 Marienheide-Rodt • Tel. 02264/17-0 • Fax 02264/17126
To change the default programming for a given parameter:
A) Press the STOP key to stop the inverter if running. Some parameters (see the individual
parameter description) can be changed while the inverter is operating.
B) To enter Level1programming,press the PROGram key.ToenterLevel 2, holdtheSHIFT
key and press the PROGram key.
C) Use the UP/DOWN arrow keys to select the program parameter for change.
D) Press the SHIFT key. The program number will blink indicating that the data value may
be changed.
E) Use the UP/DOWN arrow keys to select the new data code.
F) Press the ENTER key. The display will indicate **STORED** for one second, then revert
to the normal parameter display.
G) Press the PROGram key to exit the programming mode or the UP/DOWN arrow keys to
select a new parameter for change.
4.3 Parameter Descriptions
Thefollowingsectioncontainsfunctional descriptionsofallprogrammingparametersatLevel
1 and Level 2. The number in the “Level” column indicates the programming level in which
accesstotheparameterinquestionispossible.Accesstoallparametersispossiblein Level
2 (also too parameter in Level 1). A “V” means that this parameter only has a view function,
while “P” stands for programmable.
INPUT MODE
PROG 21: 0
Parameter
PARAMETER DESCRIPTION UNITS / LEVEL
01-MODEL – Inverter Model Number L1V
This display is a code that conveys the input voltage rating and horsepower rating of the
control. For example, a code of 6000-7 would equate to an ACP with 400–460 VAC input
and 0.75 kW rating. A code of 6007-5 would equate to a 400–460 VAC input and 7.5 kW
rating, 6045-0 would indicate 400–460 VAC and 45 kW ratings.
02-RVLVL – Software Revision L2V
This display indicates the software revision installed in your inverter.
03-IRAT – Inverter Rated Current L2V
This display indicates the 100% rating of output current for the inverter. It is used by the
inverter as the basis for all current measurements and output indications. Your ACP 6000
inverter can provide 110% of this rating continuously without damage or tripping.
05-SERNO – Manufacturing Serial Number L2V
This is the unique serial number assigned to the inverter.
06-REP – Repair Date Code L2V
If the control has been repaired, a specific code will be installed in this location.
30.10.97 Operating manual
05_GB ACP 6000
SLV
— 0.75–55
47
Page 54

BERGES
07-FLT3 – Last Fault L1V
08-FLT2 – Second Fault L2V
09-FLT1 – First Fault L2V
12-FOUT – Inverter Output Frequency Hz L1V
13-VOUT – Motor Output Voltage % L2V
14-IOUT – Motor Output Current A L1V
Berges electronic • D–51709 Marienheide-Rodt • Tel. 02264/17-0 • Fax 02264/17126
These displays indicate a code that represents both the cause of the last three (3) inverter
faults and the elapsed time (in 0.1 Hr. increments) between the fault occurrance and the
resetting of it. Parameter
prior to that, and
(power up or fault reset) is the lastdigitand indicates up to 0.9 Hr. The remainder of the code
representsthe reason for the trip. Consult Section 7, Troubleshooting, for a list of fault codes
and their potential causes.
This display indicates the output frequency at which the inverter is operating.
This display indicates the percent of input voltage that is being delivered by the inverter to
the motor. It is useful when operating motors with non-standard Volts/Hertz (V/Hz) ratios by
means of
Thisdisplayindicatescomputedoutputcurrent in amperes. The accuracy is ±10% ofinverter
rating (
53-FKNEE
03-IRAT
09-FLT1
).
07-FLT3
, the first fault on record. The elapsed time since the last restart
and
32-FMAX
contains the most recent occurrance,
.
08-FLT2
, the one
15-LOAD – Drive Load % L1V
The display indicates the real part of the motor current by multiplying the computed output
current by motor power factor and comparing it to the inverter´s capacity. The indication is
positiveinthe motoringmode, negative in the regenerative mode of operation. The accuracy
is ±10% of full scale.
16-TORQ – Load Torque % L1V
This display shows the torque reduction experienced when operating in the constant power
or field weakened condition, when operating above
scale.
17-TEMP – Inverter Temperature C L1V
This display indicates the inverter´s operating temperature in °C. The accuracy is ±2 °C.
18-TIME1 – Total Run Time h L2V
This display is an indication of the total time the inverter is in the run mode of operation. It
has a range of 0–65000 hr. and is not resettable.
NOTE: Frequent line starting operation of the inverter may result in the recording of
erroneous times in this parameter.
19-TIME2 – Total Operating Time h L2V
This display indicates the total time that power has been applied to the inverter, up to 65,000
hrs. It does not reset when power is removed and re-applied.
53-FKNEE
. The accuracy is ±10% of full
48
1B-FLUX – Magnetizing Current % L2P
This display indicates the amount of magnetizing current that is present to the motor. The
displayed percentage is a calculated factor based on a pre-determined motor model. When
using Volts/Hertz mode, the percentage is based on bus current measurements and torque
boostsettings. InVectormode,the percentageisthe inverter’sregulated magnetizingcurrent
levels. Parameter 1B can be monitored while the inverter is in operation.
Operating manual 30.10.97
ACP 6000
SLV
— 0.75–55 05_GB
Page 55
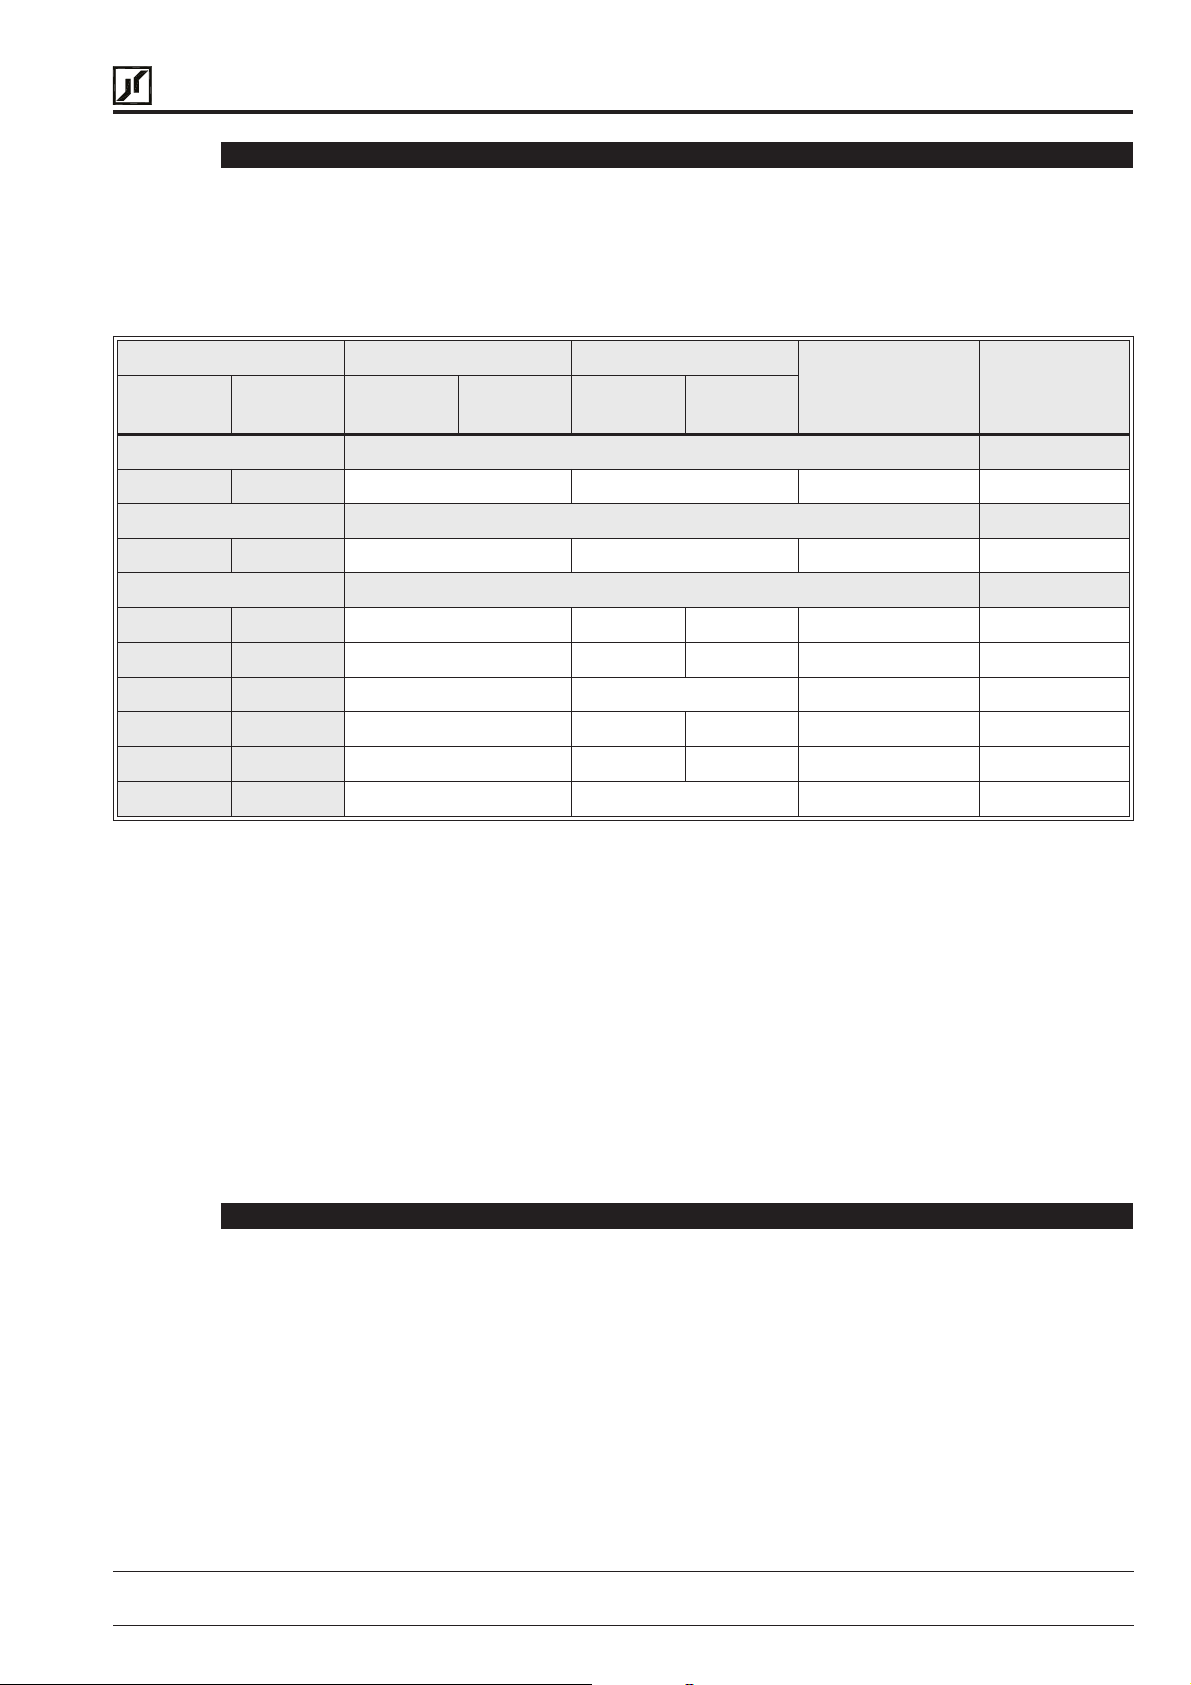
BERGES
21-MODE – Input Mode L1P
Berges electronic • D–51709 Marienheide-Rodt • Tel. 02264/17-0 • Fax 02264/17126
21-MODE
and the SIO Serial Link, in both the LOCal and REMote operating modes. Also the mode
transfer mechanism is defined by your selection at this parameter. Proper setting of this
parameter is the first stepincustomisingtheinvertertoyourapplication. The following
table defines all the combinations available. Other selections for
Section 5.
DATA CODE LOCal (1) REMote
FWD only
(2)
0/20 10/30 Keypad Disabled N/A
4/24 14/34 Disabled Terminals N/A 4
111 Keypad Terminals Keypad LOC/REM key 4, 5
212 Keypad Keypad Terminals LOC/REM key 4
313 Keypad Terminals LOC/REM key 4
21 31 Keypad Terminals Keypad PS3 4, 5
22 32 Keypad Keypad Terminals PS3 4
FWD/REV
(2)
Speed (3) Start/Stop Speed (3) Start/Stop
definestheoperating functionsthatare active fromtheKeypad, the TerminalStrip,
21-MODE
LOC/REM
TRANSFER VIA:
Keypad Control Only
Terminal Strip Control Only
Combination Keypad/Terminal Strip Control
are discussed in
SEE
NOTE
23 33 Keypad Terminals PS3 4
NOTES:
1) Under LOCal operation, when control is specified as keypad, the active torque limit
reference is the preset values at parameters 61 thru 64 as if parameter
set to a code “3”. In all other cases, the drive obeys the setting of parameter 27 directly.
2) Enables or disables the REV key on the keypad.
3) When “Terminals” specified as a speed reference, the programming of parameter
24-FSEL
4) In REM operation, terminals PS1, PS2, PS3 and ART are active. All will (except PS3 in
modes greater than 20) perform their previously defined function (see Section 2.7).
5) Entering the JOG mode from the keypad will override any active presets.
In any questions arise, please don’t hesitate to contact BERGES for clarify before proceeding. See Section 6 for terminal strip connection details.
24-FSEL – Speed Reference Selector L2P
NOTE: Reference
standing of this parameter setting.
Thisparameterisused to define the frequency command signal source when operating from
other than the inverter´s keypad. That generally means the definition of signal types applied
to either the VIN or CIN terminals. This parameter can also be used to re-define terminal
strip speed control (referenced in
actually controls the active speed reference.
21-MODE
and parameter
21-MODE
32-FMAX
) as keypad operation.
through
38-F7
27-TLSEL
for a thorough under-
were
The proper usage of this parameter is dependent on the selection made at
Typically, no changes are necessary at this parameter.
30.10.97 Operating manual
05_GB ACP 6000
SLV
— 0.75–55
21-MODE
49
.
Page 56
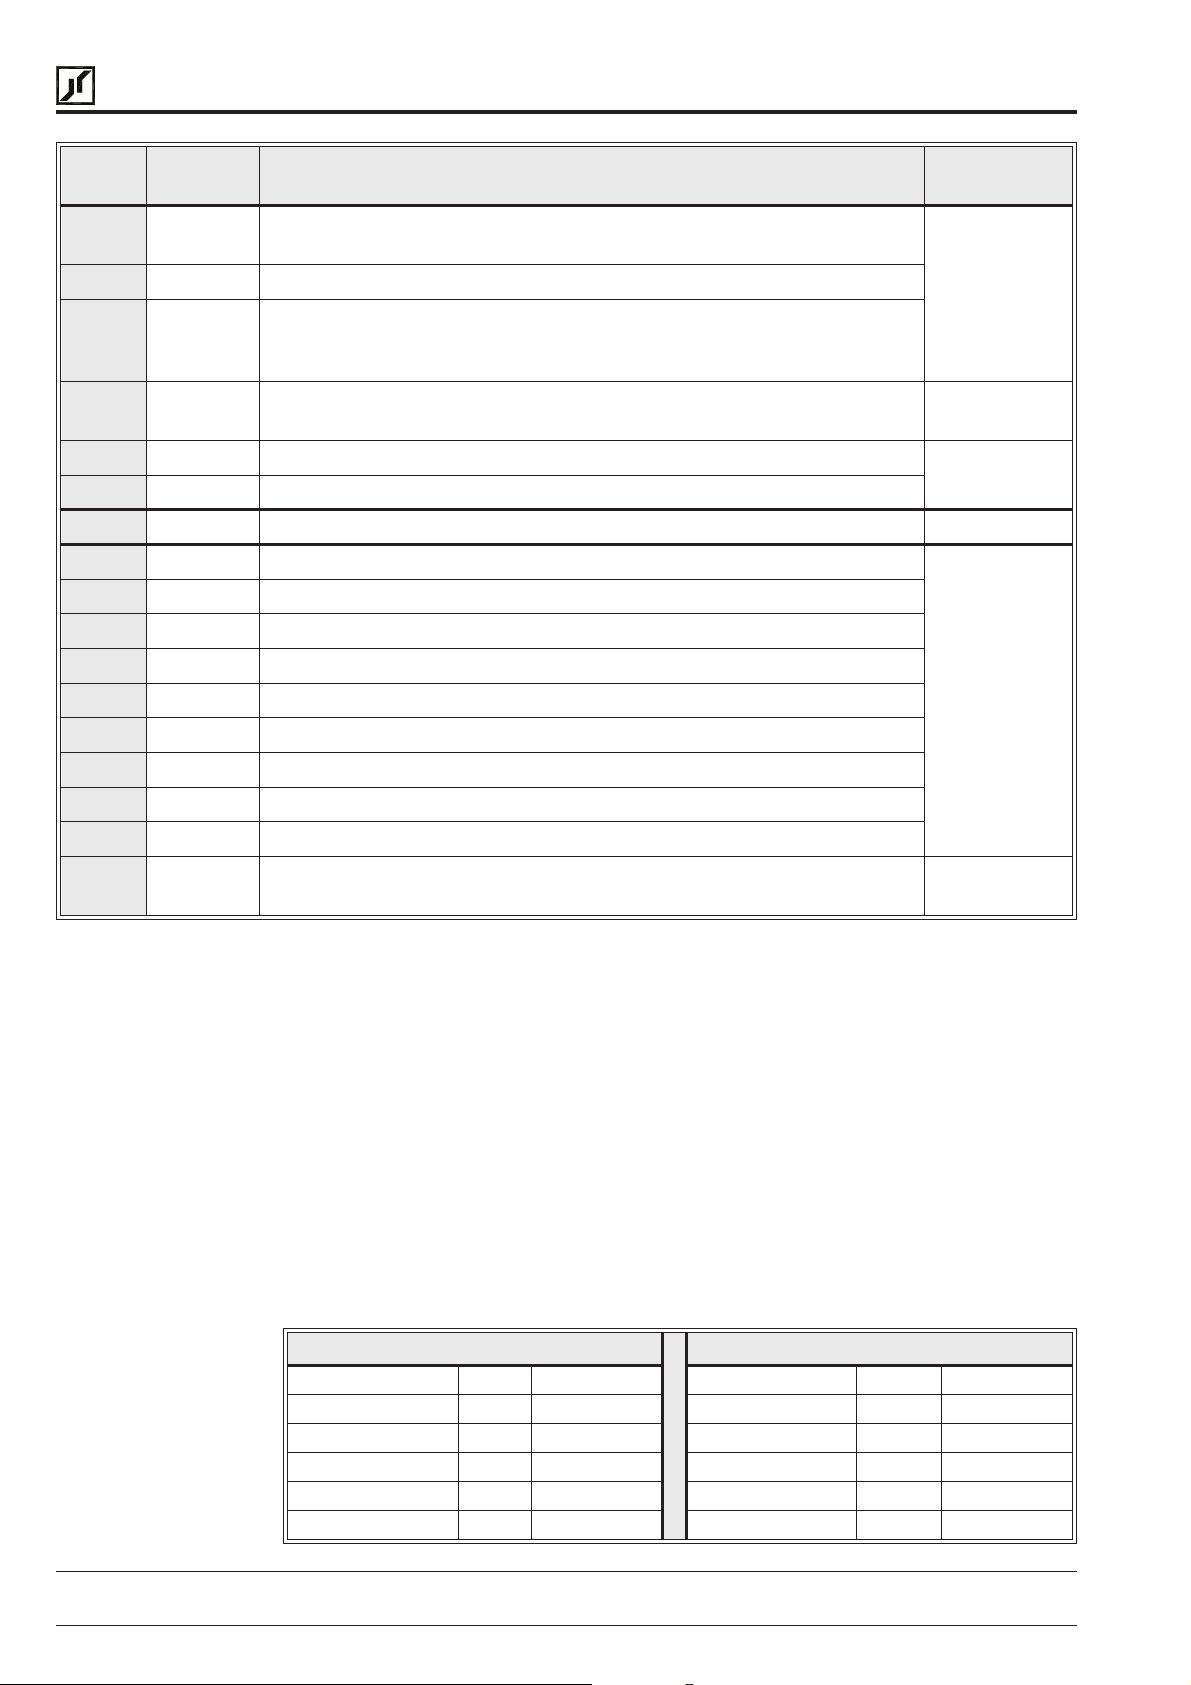
BERGES
Berges electronic • D–51709 Marienheide-Rodt • Tel. 02264/17-0 • Fax 02264/17126
DATA
CODE
REFERENC
E
DESCRIPTION
0 VIN/CIN Terminal input, speed pot or external 0–2 VDC, 0–10 VDC or 4–20 mA;
Potentiometer for speed regulation or an external input unit.
1 -VIN/CIN Terminal input, inverse speed control.
2 VIN Same as Code 0, but external speed pot current monitored. If any of the
three connections are broken, the drive will stop. Not for use with any
external supplied voltage or current references.
3 VIN Terminal Input, follows the 6FS (6×) output of another ACP series
inverter.
4 FPT1 Pulsetrain inputatVIN,0–1kHz(6–10 VDC peak minimum).
5 FPT2 Pulse train input at VIN, 0–10 kHz (6–10 VDC peak minimum).
6 FKPAD Keypad Speed Reference. 2
7 FEXT2 External speed reference 2 programmed via
8 FEXT1 External speed reference 1 programmed via
9 F2 Programmable via
10 F3 Programmable via
11 F4 Programmable via
12 F5 Programmable via
33-F2
(default = 5 Hz).
34-F3
(default = 20 Hz).
35-F4
(default = 40 Hz).
36-F5
(default = 60 Hz).
26-FEXT2
25-FEXT1
(default = 0 Hz).
(default = 0 Hz).
SEE NOTE
1
1, 3
1
3
37-F6
13 F6 Programmable via
14 F7 Programmable via
15 FMAX Programmable via
(default = 0 Hz).
38-F7
(default = 0 Hz).
32-FMAX
(default = 50 Hz).
19 VIN Terminal Input, follows the 6FS (48×) output of another ACP series
inverter.
NOTES:
1) Data codes 0 through 5 define the type and response characteristic of input speed signal
connected to the terminal strip of the inverter.
2) If speed control is programmed from the keypad at parameter
at parameter 24 is ignored.
3) Frequency of input signal determined by parameter
88-FRO
. If parameter
data code 19, adjust the J2 jumper (see page 31, figure 2.7) to the 0–2 V position for
better resolution. The table that follows notes the maximum operating frequency when
using this data code and parameter
The maximum running frequency available when using data code 19 (48× pulse train
from another ACP 6000
SLV
series inverter) is limited by the operating carrier frequency.
When selecting the carrier frequency at parameter
83-PWM
. Consult BERGES with any questions.
83-PWM
set to data code 19, the maximum operating frequency will be limited by the following
values:
SLV
ACP
83-PWM data code 1 (3 kHz) 62 Hz max. 83-PWM data code 1 (2.3 kHz) 48 Hz max.
83-PWM data code 2 (4 kHz) 83 Hz max. 83-PWM data code 2 (2.5 kHz) 52 Hz max.
83-PWM data code 3 (6 kHz) 125 Hz max. 83-PWM data code 3 (4.6 kHz) 95 Hz max.
83-PWM data code 4 (8 kHz) 166 Hz max. 83-PWM data code 4 (5.0 kHz) 104 Hz max.
83-PWM data code 5 (12 kHz) 250 Hz max. 83-PWM data code 5 (9.2 kHz) 191 Hz max.
83-PWM data code 6 (16 kHz) 332 Hz max. 83-PWM data code 6 (10.0 kHz) 208 Hz max.
6000-7...6045-0 ACP
21-MODE
, the selection
24-FSEL
and parameter
SLV
6055-0
1, 3
is set
24-FSEL
is
50
Operating manual 30.10.97
ACP 6000
SLV
— 0.75–55 05_GB
Page 57
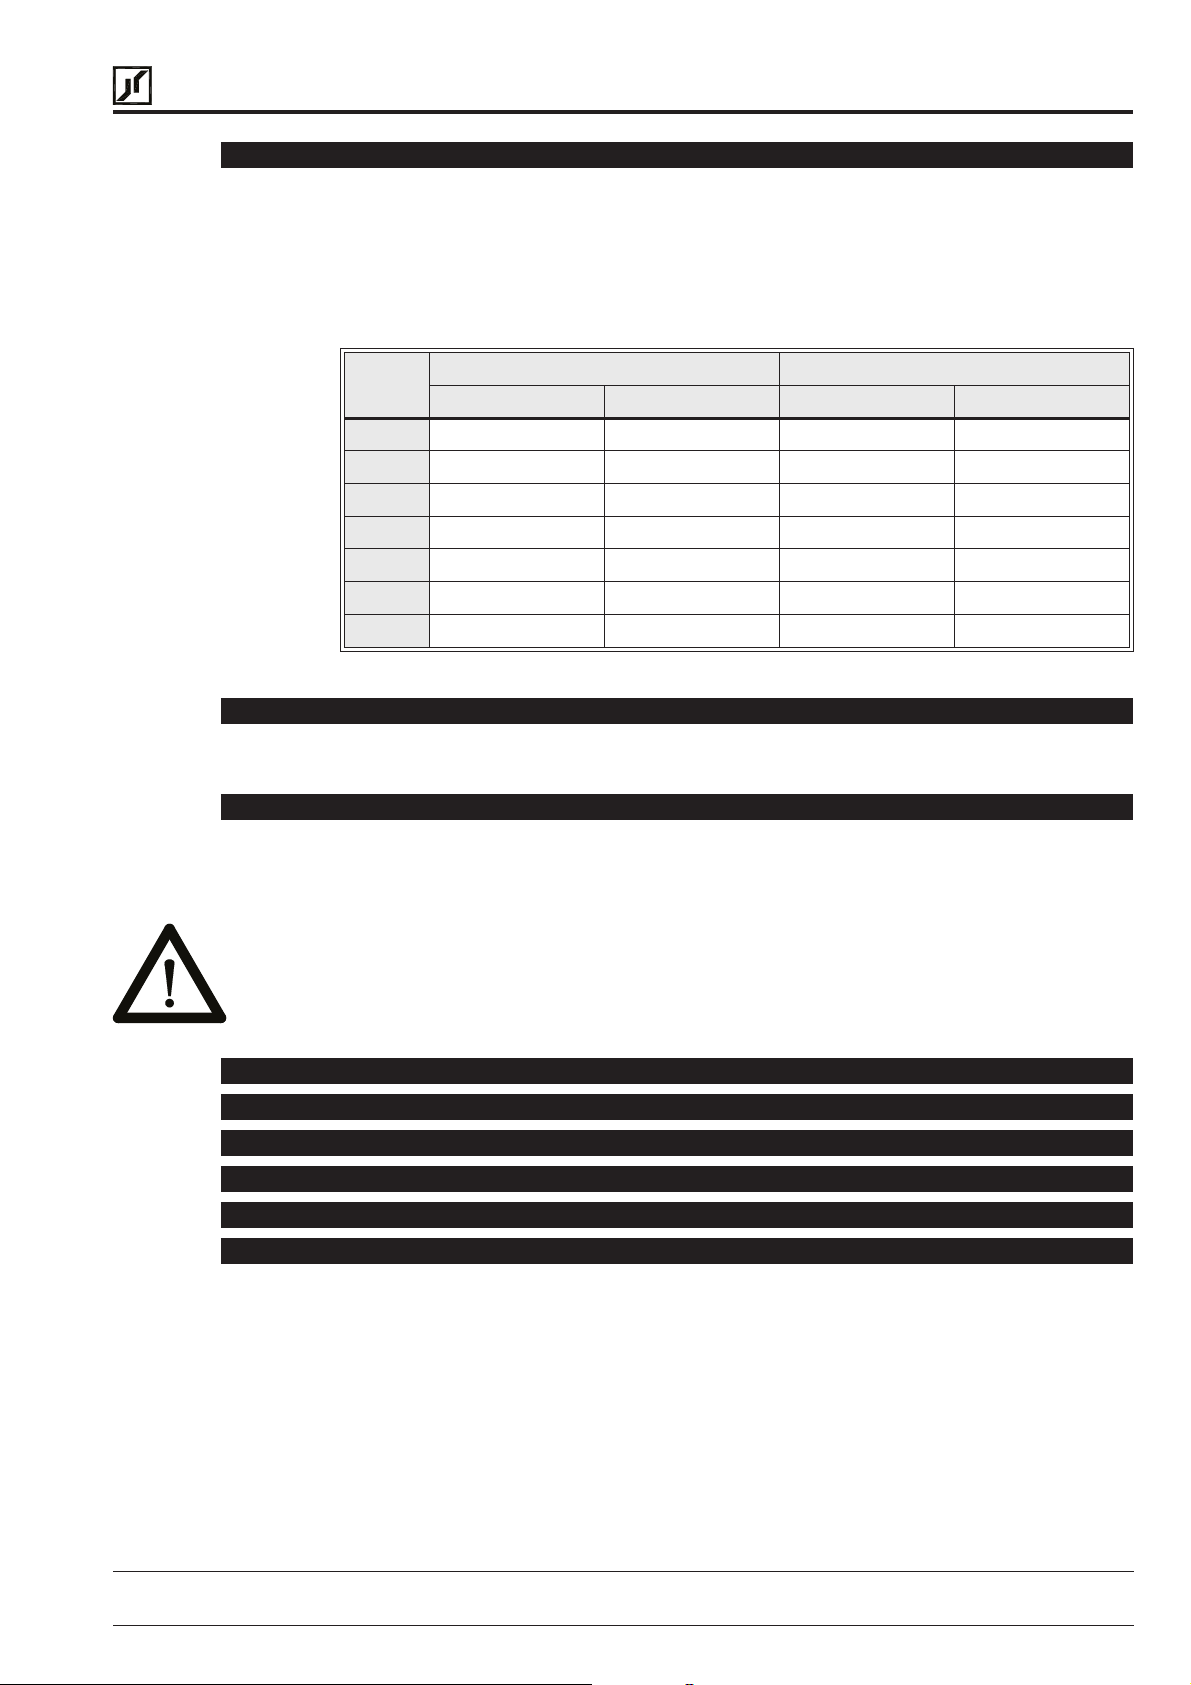
BERGES
27-TLSEL – Torque Limit Reference Selector L2P
Berges electronic • D–51709 Marienheide-Rodt • Tel. 02264/17-0 • Fax 02264/17126
27-TLSEL
during driving and regenerative operation. Torque limit may be different for forward and
reverse operation. Parameter
drive operates under keypad control.
The proper usage of this parameter is dependent on the selection made at
Typically no changes are necessary at this parameter.
DATA
CODE
See Section 5 for more information on parameter
31-FMIN – Minimum Frequency Hz L1P
31-FMIN
mode. It is adjustable in 0.01 Hz increments from 0 to 400 Hz. The factory setting is 0 Hz.
selects one of seven combinations of six torque limit setpoints to be effective
21-MODE
can override this selection when it dictates that the
21-MODE
REVERSE FORWARD
Regenerative Motoring Regenerative Motoring
0 LIMit input LIMit input LIMit input LIMit input
1 64-RTLR LIMit input 63-RTLF LIMit input
2 64-RTLR 62-LTLR 63-RTLF LIMit input
3 64-RTLR 62-LTLR 63-RTLF 61-LTLF
4 28-TLEXT 28-TLEXT 28-TLEXT 28-TLEXT
5 64-RTLR 28-TLEXT 63-RTLF 28-TLEXT
6 64-RTLR 62-LTLR 63-RTLF 28-TLEXT
28-TLEXT
defines the minimum frequency that the inverter will deliver to the motor in the run
.
.
32-FMAX – Maximum Frequency Hz L1P
32-FMAX
run mode. It is adjustable in 0.01 Hz increments from 20 to 400 Hz. The factory setting is 50
Hz.
FOR OPERATION ABOVE 50 HZ, ENSURE THAT THE MOTOR IS CAPABLE OF
EXTENDED SPEED OPERATION. SEE THE INSTRUCTIONS FOR PARAMETER
FKNEE
PARAMETER
FREQUENCY CAPABILITY OF THE DRIVE.
33-F2 – Preset Frequency 2 (Jog Speed) Hz L1P
34-F3 – Preset Frequency 3 Hz L2P
35-F4 – Preset Frequency 4 Hz L2P
36-F5 – Preset Frequency 5 Hz L2P
37-F6 – Preset Frequency 6 Hz L2P
38-F7 – Preset Frequency 7 Hz L2P
Parameter
the keypad operating mode. All preset values are programmed and operate similarly in
conjunction with
NOTE: Parameter
fixed frequencies overwrite the analog setpoint value.
defines the maximum frequency that the inverter will deliver to the motor in the
FOR MORE INFORMATION.
83-PWM
33-F2
is preset speed #2 and is used to set the JOG speed reference when in
24-FSEL
WILL ADDITIONALLY INFLUENCE THE ACTUAL MAXIMUM
. Each is adjustable in 0.01 Hz increments from 0 to 400 Hz.
36-F5,37-F6
and
38-F7
adjustable while the drive is in run mode. The
53-
Refer to Table 2.7 and Section 6 for proper selection of preset frequencies.
30.10.97 Operating manual
05_GB ACP 6000
SLV
— 0.75–55
51
Page 58
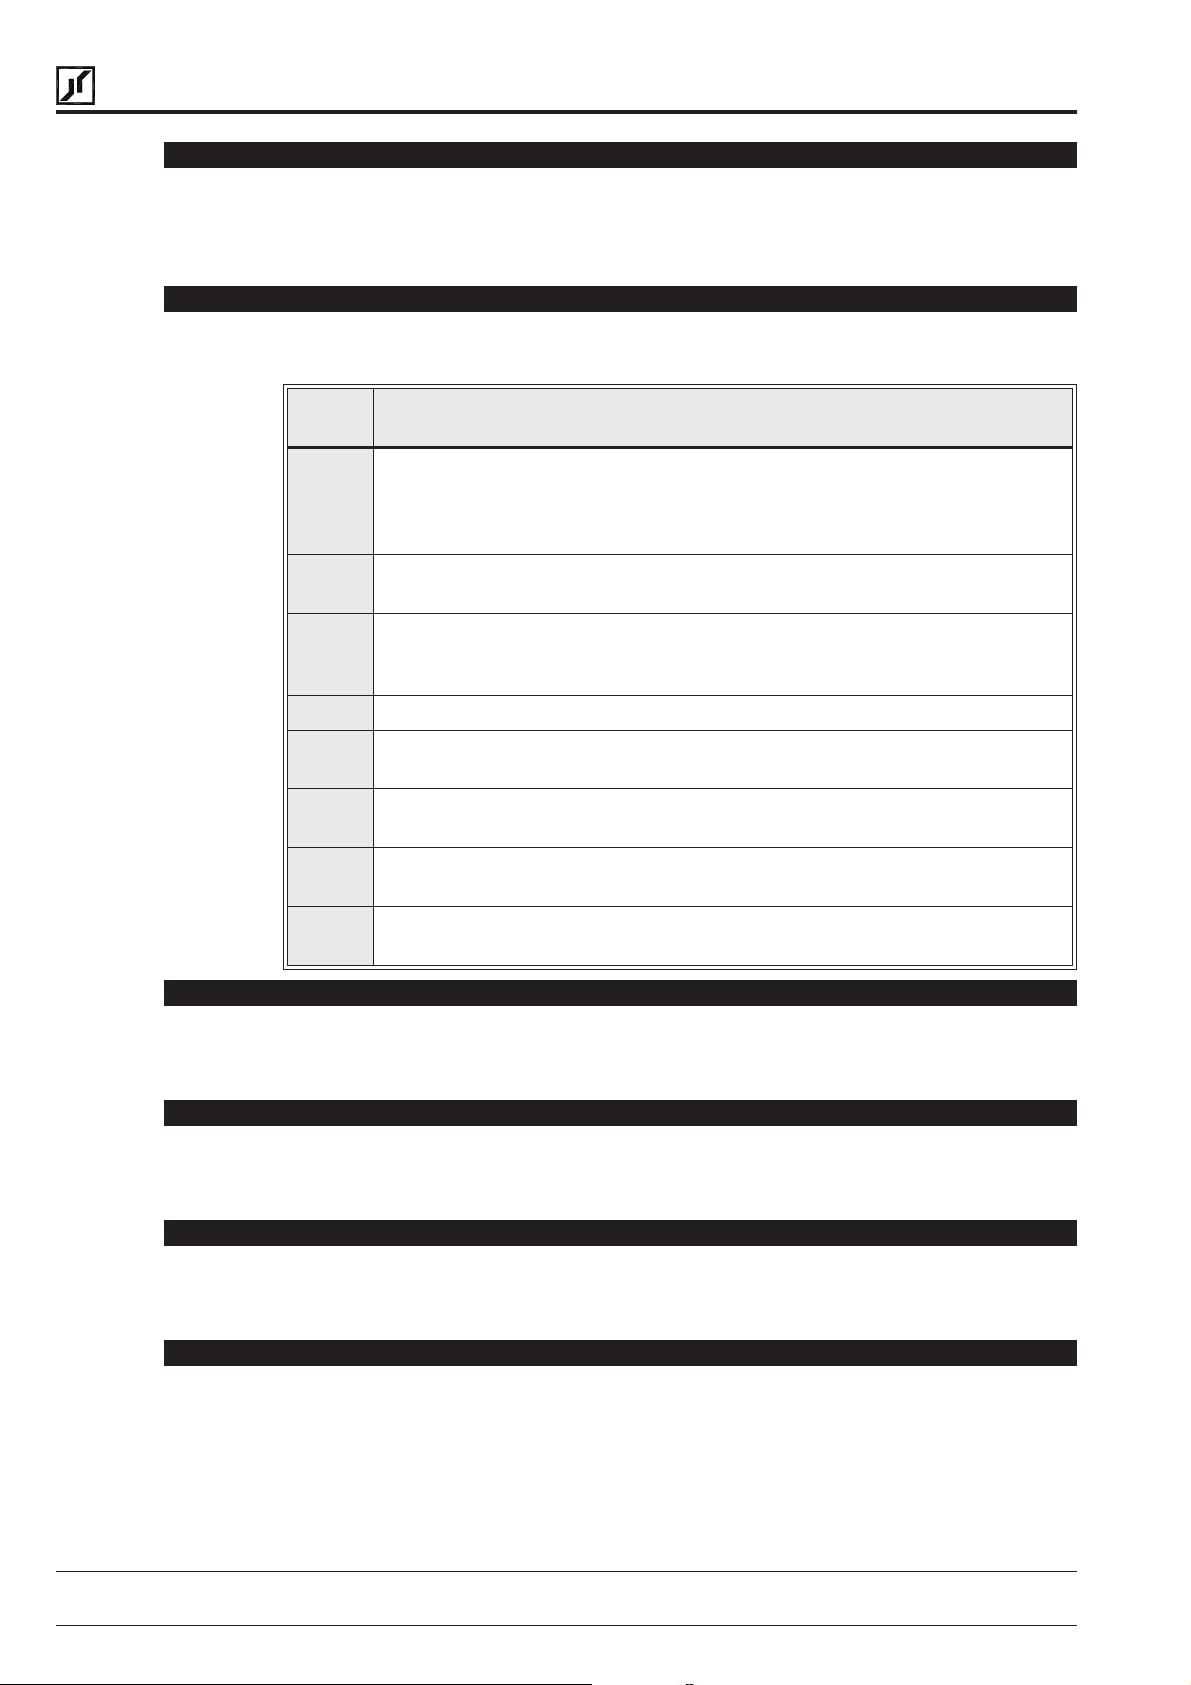
BERGES
39-FTL – Minimum Frequency in Torque Limit Hz L2P
Berges electronic • D–51709 Marienheide-Rodt • Tel. 02264/17-0 • Fax 02264/17126
When the drivers output current exceeds the limits defined by
decelerated at a rate determined by
parameter. If this parameter is set to a value greater than
WILL BE DISABLED.
41-RSEL – Ramp Selector L2P
This parameter defines the acceleration and deceleration characteristics of the drive. The
following table outlines the possibilities:
DATA
CODE
0
42-ACC1
forward and reverse operation.
terminal ART. To use ART,
control.
1 First set of ramps in the forward direction, second set of ramps in the reverse
direction. Terminal ART is inactive.
2 Dual slope linear ramp. Primary set of ramps control acceleration/deceleration
when
ramps control when
3 “S” curve acceleration and deceleration. Terminal Art is inactive.
4 Performance same as code “0” except Coast-to-stop when STOP is
commanded.
and
12-FOUT
43-DEC1
less than the value programmed at
12-FOUT
46-DECTL
DESCRIPTION
control drive acceleration and deceleration for both
44-ACC2
21-MODE
greater than
to the frequency programmed at this
and
must be set for terminal start/stop
37-F6
27-TLSEL
32-FMAX
45-DEC2
37-F6
. Terminal Art is inactive.
, the motor will be
, TORQUE LIMITING
are selected by input
. Secondary set of
5 Performance same as code “1” except Coast-to-stop when STOP is
commanded.
6 Performance same as code “2” except Coast-to-stop when STOP is
commanded.
7 Performance same as code “3” except Coast-to-stop when STOP is
commanded.
42-ACC1 – Acceleration Ramp #1 s L1P
Parameter
mand. It is adjustable in 0.01 second increments from 0.1 to 600 seconds from zero to
maximum frequency. The factory setting is three (3) seconds.
43-DEC1 – Deceleration Ramp #1 s L1P
Parameter
It is adjustable in 0.01 second increments from 0.1 to 600 seconds from maximum to zero
frequency. The factory setting is three (3) seconds.
44-ACC2 – Acceleration Ramp #2 s L2P
Parameter
command. It is adjustable in 0.01 second increments from 0.1 to 600 seconds from zero to
maximum frequency. The factory setting is one (1) second.
45-DEC2 – Deceleration Ramp #2 s L2P
42-ACC1
43-DEC1
44-ACC2
defines the primary inverter response to an increase in speed com-
definestheprimary inverterresponseto adecreasein speedcommand.
defines the secondary inverter response to an increase in speed
52
Parameter
command.Itisadjustable in 0.01secondincrementsfrom0.1 to 600 secondsfrommaximum
to zero frequency. The factory setting is one (1) second.
45-DEC2
defines the secondary inverter response to a decrease in speed
Operating manual 30.10.97
ACP 6000
SLV
— 0.75–55 05_GB
Page 59
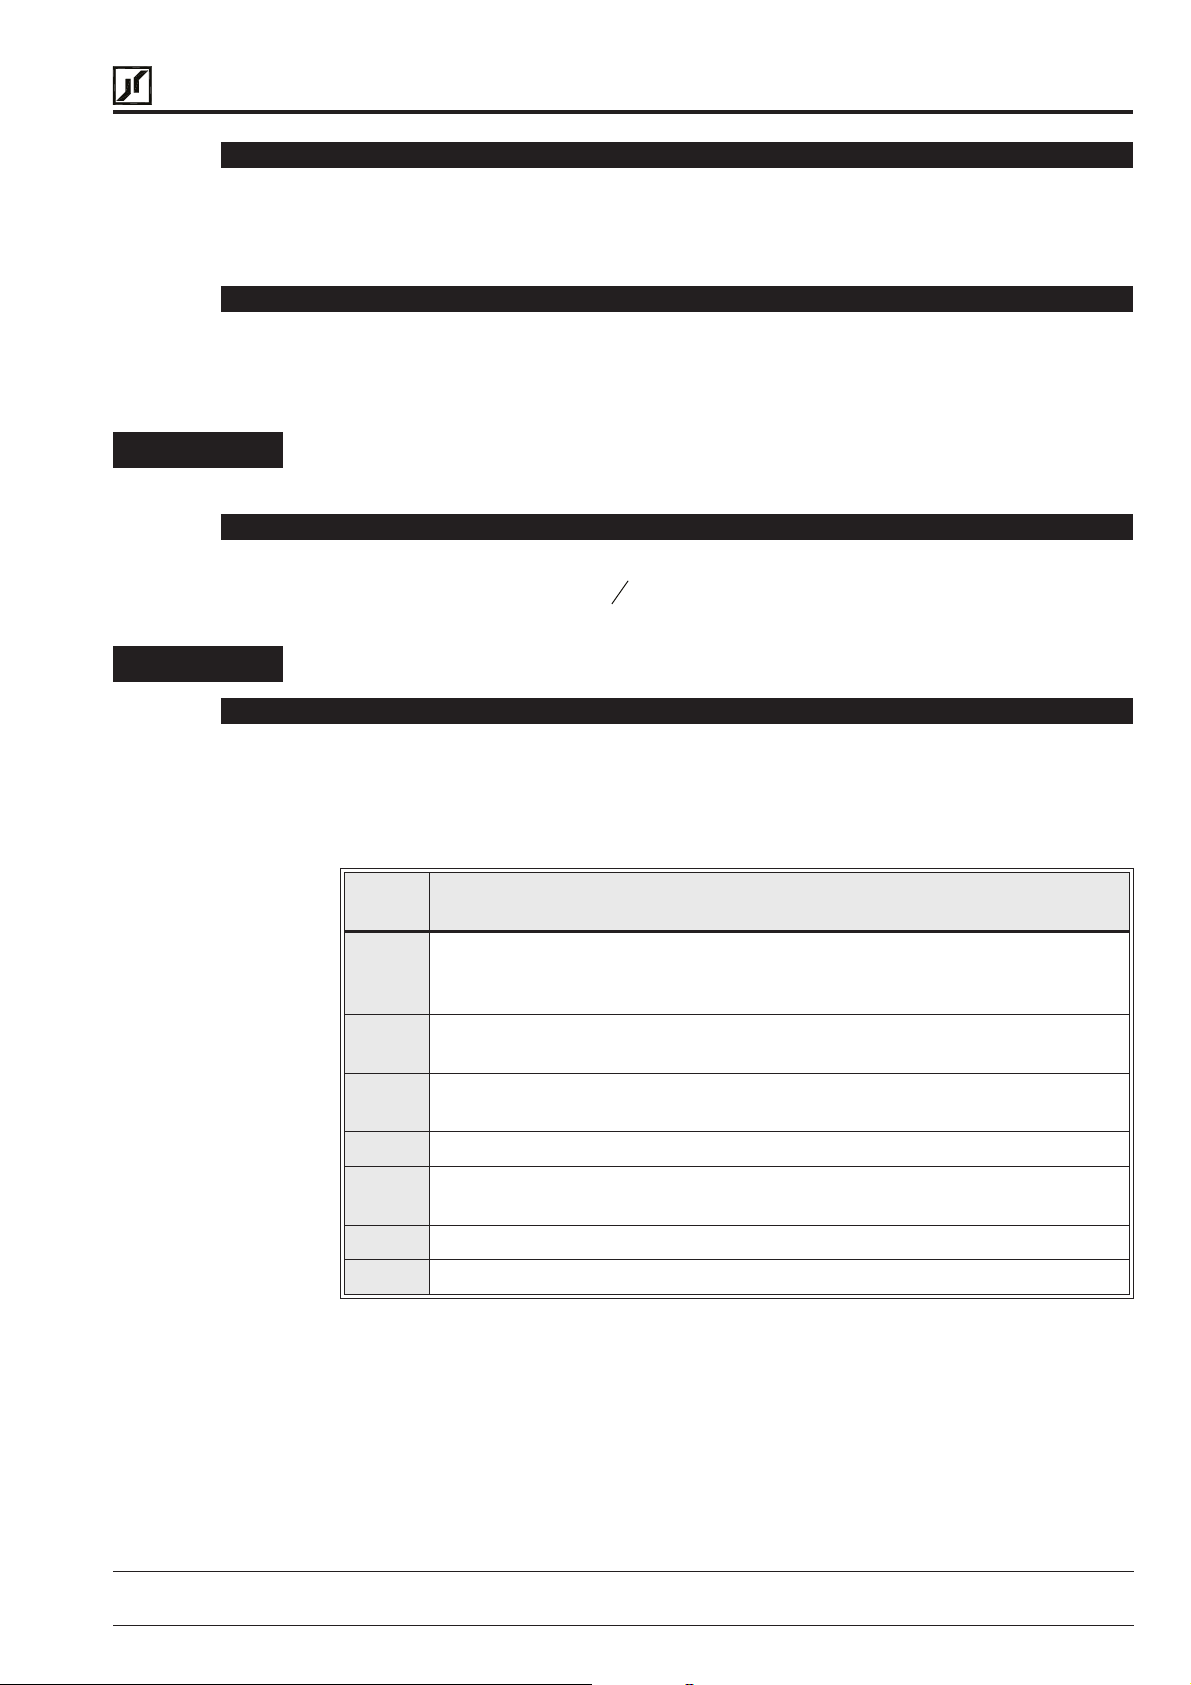
BERGES
46-DECTL – Torque Limit Response Time s L2P
47-DCBRK – DC Brake Time s L2P
Berges electronic • D–51709 Marienheide-Rodt • Tel. 02264/17-0 • Fax 02264/17126
When the drive senses that the torque limit threshold has been exceeded, ittakes immediate
action. If operating in the motoring mode, it begins to decelerate toward the value of
If operating in the regenerative mode, it begins to accelerate toward the rational speed to
which it is being driven. In either case,
In the keypad or terminal input mode, after issuing a STOP command, the inverter ramps
down to zero speed and provides a holding DC current in the motor windings for the period
set by
47-DCBRK
if the stopping performance is set for coast.
. This function is not available with zero (0) seconds set at
46-DECTL
governs the drive´s response time.
39-FTL
47-DCBRK
.
or
ATTENTION!
48-DCVLT – DC Brake Voltage % L2P
ATTENTION!
51-VSEL – Volts/Hertz Characteristic Selector L2P
If DCBRK set to 5.0 seconds and both the FWD and REV terminals activated simulta-
neously or if a zero speed command is issued, DC current will be applied to the motor
at zero speed until one, or both terminals are de-activated.
The parameter controls the amount of DC voltage applied to the motor windings by
47-DCBRK
voltage.
If DC braking is used as a holding brake, excessive motor heating may result.
This parameter selects between the HT mode (Vector Control) and Volts/Hertz operation.
By selecting Data Code 6, the ACP 6000
selecting Data Codes 0 through 5, the Volts/Hertz mode is initiated and one of the three
Volts/Hertz characteristics and one of two Torque Boost modes are enabled. The following
table defines these selections. Their actions are shown graphically below.
DATA
CODE
. Factory setting is of
0 Linear V/Hz characteristic with AUTOBOOST feature. The optimum boost will
be selected upon load and motor condition, with the limit being the
programmed value of
2
52-BOOST
3
52-BOOST
. It is adjustable between 0 and 15% of full
SLV
activates the Vector Control scheme. When
DESCRIPTION
.
1 Linear V/Hz characteristic with constant boost added to the basic V/Hz
pattern. The amount of boost is programmed by
2 Mixed (linear/quadratic) V/Hz characteristic with AUTOBOOST. This cha-
racteristic is typical of pumping applications.
3 Same as (2), but with a fixed boost setting.
4 Quadratic V/Hz characteristic with AUTOBOOST. This characteristic is typical
of fan applications.
5 Same as (4), but with a fixed boost setting.
6 Vector Control.
NOTE:
When selecting the HT mode (Vector Control) parameters
activatedforhigh torque,lowspeedoperation. Fine-tune canbemade foroptimumperformance.
Refer parameter
30.10.97 Operating manual
05_GB ACP 6000
5B-IMAG
.
SLV
— 0.75–55
52-BOOST
5B-IMAG
.
and
65-SLIP
must be
53
Page 60
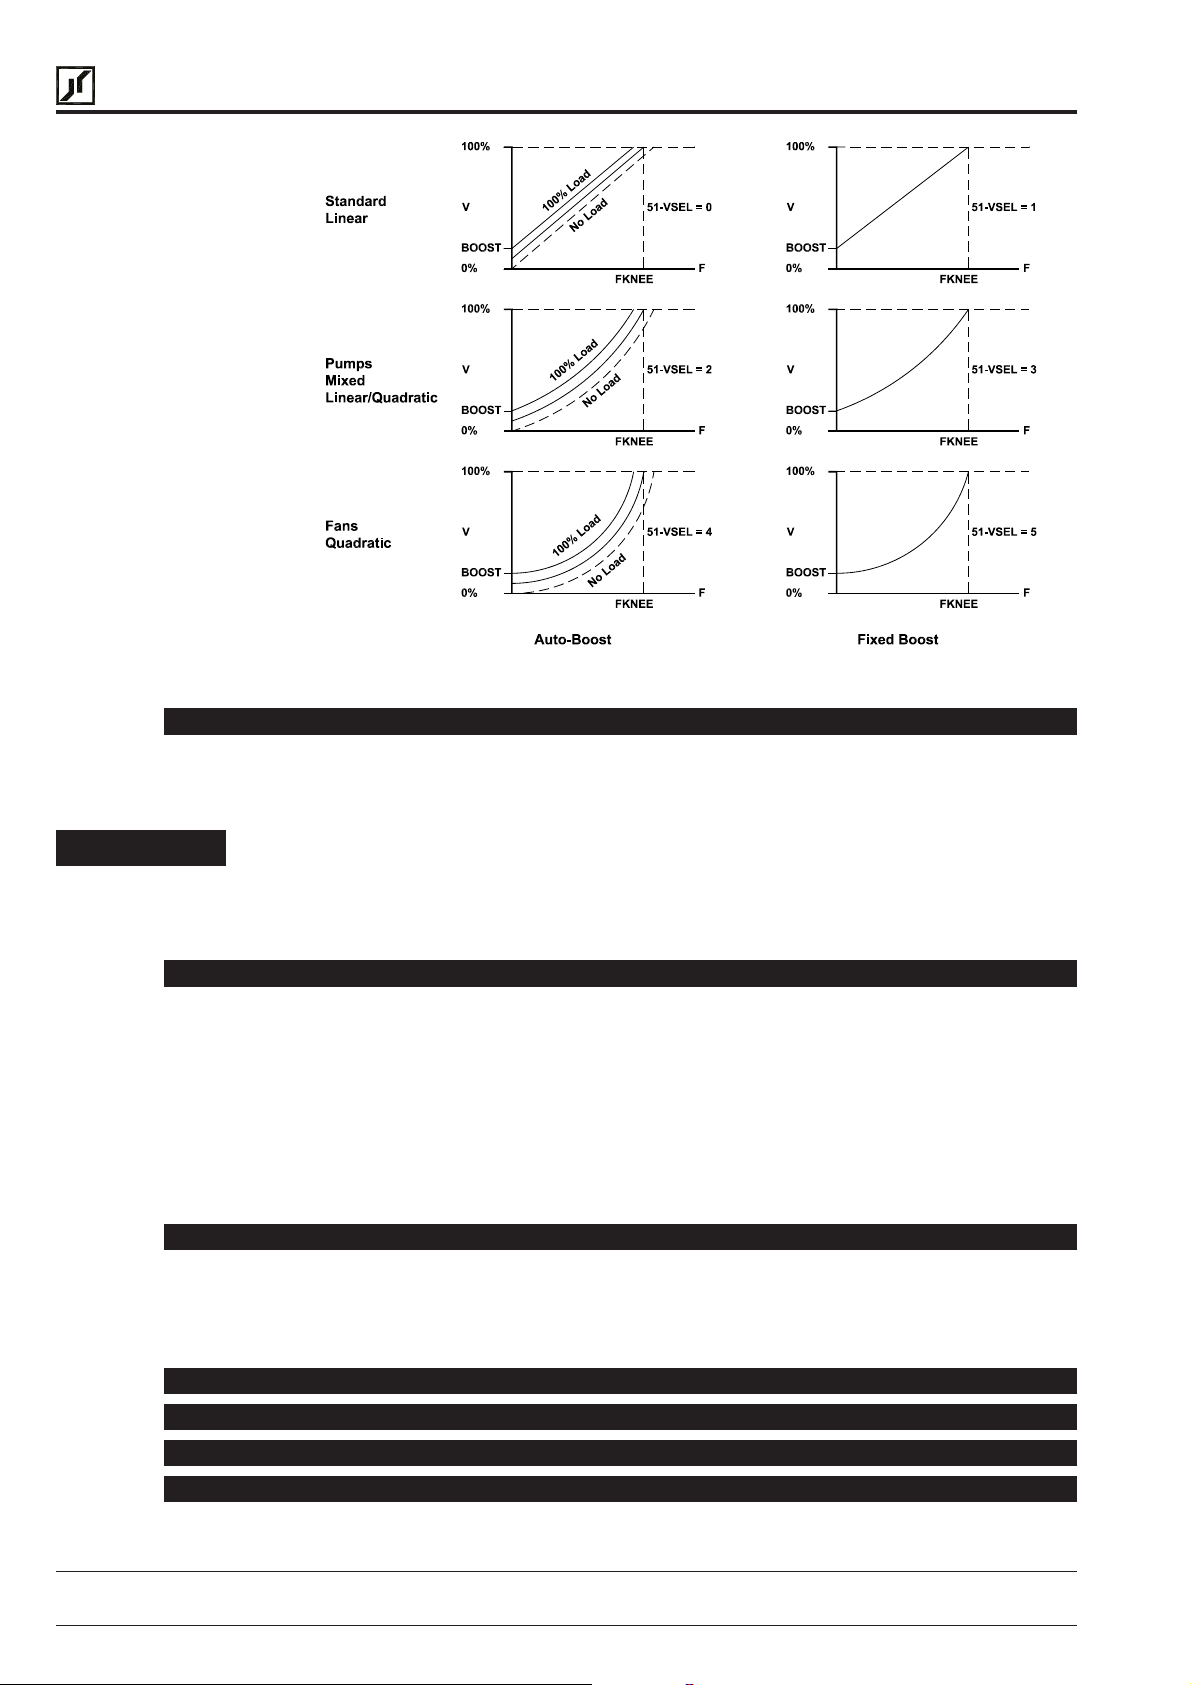
BERGES
Berges electronic • D–51709 Marienheide-Rodt • Tel. 02264/17-0 • Fax 02264/17126
Typical curves for auto-boost and fixed boost
52-BOOST – Torque Boost % L1P
ATTENTION!
53-FKNEE – Volts/Hertz Knee Frequency Hz L2P
54-SKBND – Skip Frequency Hysteresis Band Hz L2P
52-BOOST
It is adjustable in 0.01% increments from 0 to 25%. Factory set BOOST values are model
dependent.
Care must be exercised with this adjustment. Too much boost may cause excessive
motor currents and motor heating. Use only as much boost as is necessary to start
the motor. AUTOBOOST may be selected at parameter
optimum value of boost to suit the load automatically. Some 2-pole (3600 RPM
synchronous speed) have proven to require less than the default value of
This parameter is used to set the frequency at which full voltage is delivered to the motor.
Thereby, the output volts/hertz ratio of the inverter is adjusted. It is adjustable in 0.01 Hz
increments from 26.00 to 640.00 Hz. It is factory set to the base frequency of the motor,
which is 50 Hz for most European made induction motors.
53-FKNEE
operation.
AlmostanyV/Hz profile canbegeneratedusingthe ACP6000
with your special requirements.
This parameter sets the range of frequencies (above and below) associated with each of the
skip frequencies. Skip bands are used to avoid mechanical resonances in a drive system.
The deviation is adjustable in 0.01 Hz increments from 0.20 Hz to 20.00 Hz. The factory
setting is 1.00 Hz equating to an overall 2 Hz band.
maybeprogrammed toprovideadditional startingtorqueto themotor,if required.
51-VSEL
sets the point at which the motor goes from constant torque to constant power
32-FMAX
determines the maximum operating frequency of the drive.
SLV
inverter.ConsultBERGES
to provide the
52-BOOST
.
54
55-SK1 – Skip Frequency #1 Hz L2P
56-SK2 – Skip Frequency #2 Hz L2P
57-SK3 – Skip Frequency #3 Hz L2P
58-SK4 – Skip Frequency #4 Hz L2P
Operating manual 30.10.97
ACP 6000
SLV
— 0.75–55 05_GB
Page 61

BERGES
59-MVOLT – Rated Motor Voltage V L2P
Berges electronic • D–51709 Marienheide-Rodt • Tel. 02264/17-0 • Fax 02264/17126
These four (4) parameters set the center frequency of the skip bands over which normal
operation will not be allowed. The inverter will ramp through these frequencies, but not settle
on them. Each is adjustable in 0.01 Hz increments from 0.00 to 400.00 Hz.
59-MVOLT
calibrate inverter to the motor being operated by it.
This parameter sets the voltage that the inverter delivers to the motor terminals at the setting of
53-FKNEE
VAC to the motor at 50 Hz, precisely matching the motor’s design limits.
The entry specifies the voltage output to the motor by the inverter when
reached. It is thus possible to supply the inverter with a mains voltage of 460 V; however,
the motor would receive a voltage of
permissible setting range lies between 370 and 480 Volts.
Shouldanumber outsideofthe validrangebe selected,aF02 faultcould beregistered.
This will not be resettable until
Simply re-program the drive as you would under normal circumstances.
5B-IMAG – Magnetisierungsstromregelung % L2P
This parameter tunes the Vector Control scheme to match motor design. By adjusting this
parameter, the inverter-motor combination can be optimized for ideal performance. This
parameter becomes active when parameter
The ACP 6000
automatically set
Although normally not required, fine-tune adjustments can be made to the parameter after
the Auto-tune procedure is completed.
The value of
dependant factory setting. The factory setting is 0%.
is a parameter active in the 5.5–55 kW models that allows the user to precisely
. Therefore, it is possible to power the ACP series from 460 VAC and deliver 400
53-FKNEE
59-MVOLT
59-MVOLT
is returned to a number in the valid range.
51-VSEL
SLV
has an Auto-tune function that will measure the “no-load” currents and
5B-IMAG
5B-IMAG
. See “High Torque Set Up Procedure” for Auto-tune procedure.
is adjustable in 0.01% increments in a range of 15–80% with a model
at the frequency of
is set to a Data Code of 6.
53-FKNEE
. The
is
Adjustments to the setting can be made using the following formula:
5B-IMAG
measured no load current
IRAT
100%=×
High Torque Set Up Procedure
The following procedure allows the ACP 6000
speed, high torque operation:
1) Program Parameter
2) Program Parameter
3) Run the drive at 15 Hz setpoint and minimal loading (free shaft operation if possible).
Enter Level 2 programming and scroll to parameter
the lower left corner of display. Press the “ENTER” key on keypad to have the drive Auto
tune the
value into parameter
consistent results is recommended.
Check the system for performance. For most applications, the above procedure is sufficient
for ideal drive-motor performance. For additional fine tune adjustments, see the following
steps:
1) Run the motor in the 2–6 Hz range. If the drive appears to draw excessive currents at
low speeds with no load, decrease the setting of
result in unstable motor operation.
5B-IMAG
51-VSEL
65-SLIP
value. The drive will measure the magnetising currents and place a
5B-IMAG
to Data Code 6 (see page 53).
per the formula on page 56.
. Although not required, repeating the process to verify
SLV
series AC inverter to be set up for low
5B-IMAG
5B-IMAG
. “ADJ” should appear in
. Too much
5B-IMAG
can
30.10.97 Operating manual
05_GB ACP 6000
SLV
— 0.75–55
55
Page 62

BERGES
Berges electronic • D–51709 Marienheide-Rodt • Tel. 02264/17-0 • Fax 02264/17126
2) Run the motor in the 2–6 Hz range under full load conditions. If the drive draws greater
than motor nameplate current, reduce the value of
not developing sufficient torque, increase the value to
52-BOOST
52-BOOST
. If it appears the motor is
.
HINT!
61-LTLF – Preset Load Torque Limit Forward % L2P
62-LTLR – Preset Load Torque Limit Reverse % L2P
63-RTLF – PresetRegenerativeTorqueLimit Forward % L2P
64-RTLR – Preset Regenerative Torque Limit Reverse % L2P
65-SLIP – Slip Compensation % L1P
For proper performance at frequencies below 6 Hz, inverter duty motors are recommended.
52-BOOST
inverter and vector duty motors, the value of
Application support is available from BERGES by calling the telephone numbers 02264/17-160,
02264/17-102 and 02264/17-109.
These parameters work in conjunction with
goes into torque limit in the forward and reverse motoring modes. When these limits are
exceeded,themotorisdeceleratedat a rate determinedby
programmed at
39-FTL
If
These parameters work in conjunction with
goes into torque limit in the forward and reverse regenerative modes. When these limits are
exceeded, the motor is accelerated at a rate determined by
Each is adjustable in 1% increments from 5 to 110% of drive rating.
39-FTL
If
is set at a value predetermined for premium efficiency motors. When using
39-FTL
is set to a value greater than
is set to a value greater than
. Each is adjustable in 1% increments from 5 to 150% of drive rating.
52-BOOST
27-TLSEL
32-FMAX
27-TLSEL
32-FMAX
may need to be adjusted.
to set the level at which the inverter
46-DECTL
, torque limiting will be disabled.
to set the level at which the inverter
46-DECTL
, torque limiting will be disabled.
settlinginatthevalue
toward
32-FMAX
.
Slip compensation is used to provide a more constant output speed as motor loading
changes.Thisparameter isusedin boththeVolts/HertzandHigh Torquemodesof operation.
Toomuchslip compensation may resultinunstable motor operation. Itisnot intended
for use with a synchronous motor. In Volts/Hertz mode, the inverter’s output frequency is
increased as the motor loading increases. In HT mode (Vector Control), the setting of
65-SLIP
for optimum performance at low speeds.
65-SLIP
formula and example to determine the proper setting of parameter
EXAMPLE: Assume the use of a 1440 RPM motor with a nameplate current (I
9.6 amperes. From Section 1.5 or parameter
at15.2amperes. From Section1.6wecan determinethatthesynchronous (unloaded) speed
of the motor to be 1500 RPM. Using the formula, we find:
65 – SLIP =
65-SLIP
66-STAB – Current Stability Adjustment L2P
Lightly loaded motors tend to oscillate and become unstable due to electro-mechanical
relationships in the motor. This may be more prevalent when the inverter capacity is larger
thanthemotor.This adjustment will stabilizethemotorcurrent in these conditions.Therange
of adjustment 0 through 6, with the default being 2 (0 = no compensation, 1 = minimum
compensation, 6 = maximum compensation). Some 2-pole motors (3000 RPM synchronous
speed) have proven to require alteration of this parameter to assure stable operation.
is the nominal full load speed compensation for the motor. This setting is required
is programmable in 0.01% increments from 0.00 to 10.00%. See the following
65-SLIP
03-lRAT
SI
RPM -RPM
S
RPM
is programmable in 0.01% increments from 0.00 to 10.00%.
Im
××=
IRAT
100%
1500 1440
, we determine that the drive is rated
−
1500
9.6
×× =
15.2
100% 2.5%
:
) rating of
m
56
Operating manual 30.10.97
ACP 6000
SLV
— 0.75–55 05_GB
Page 63
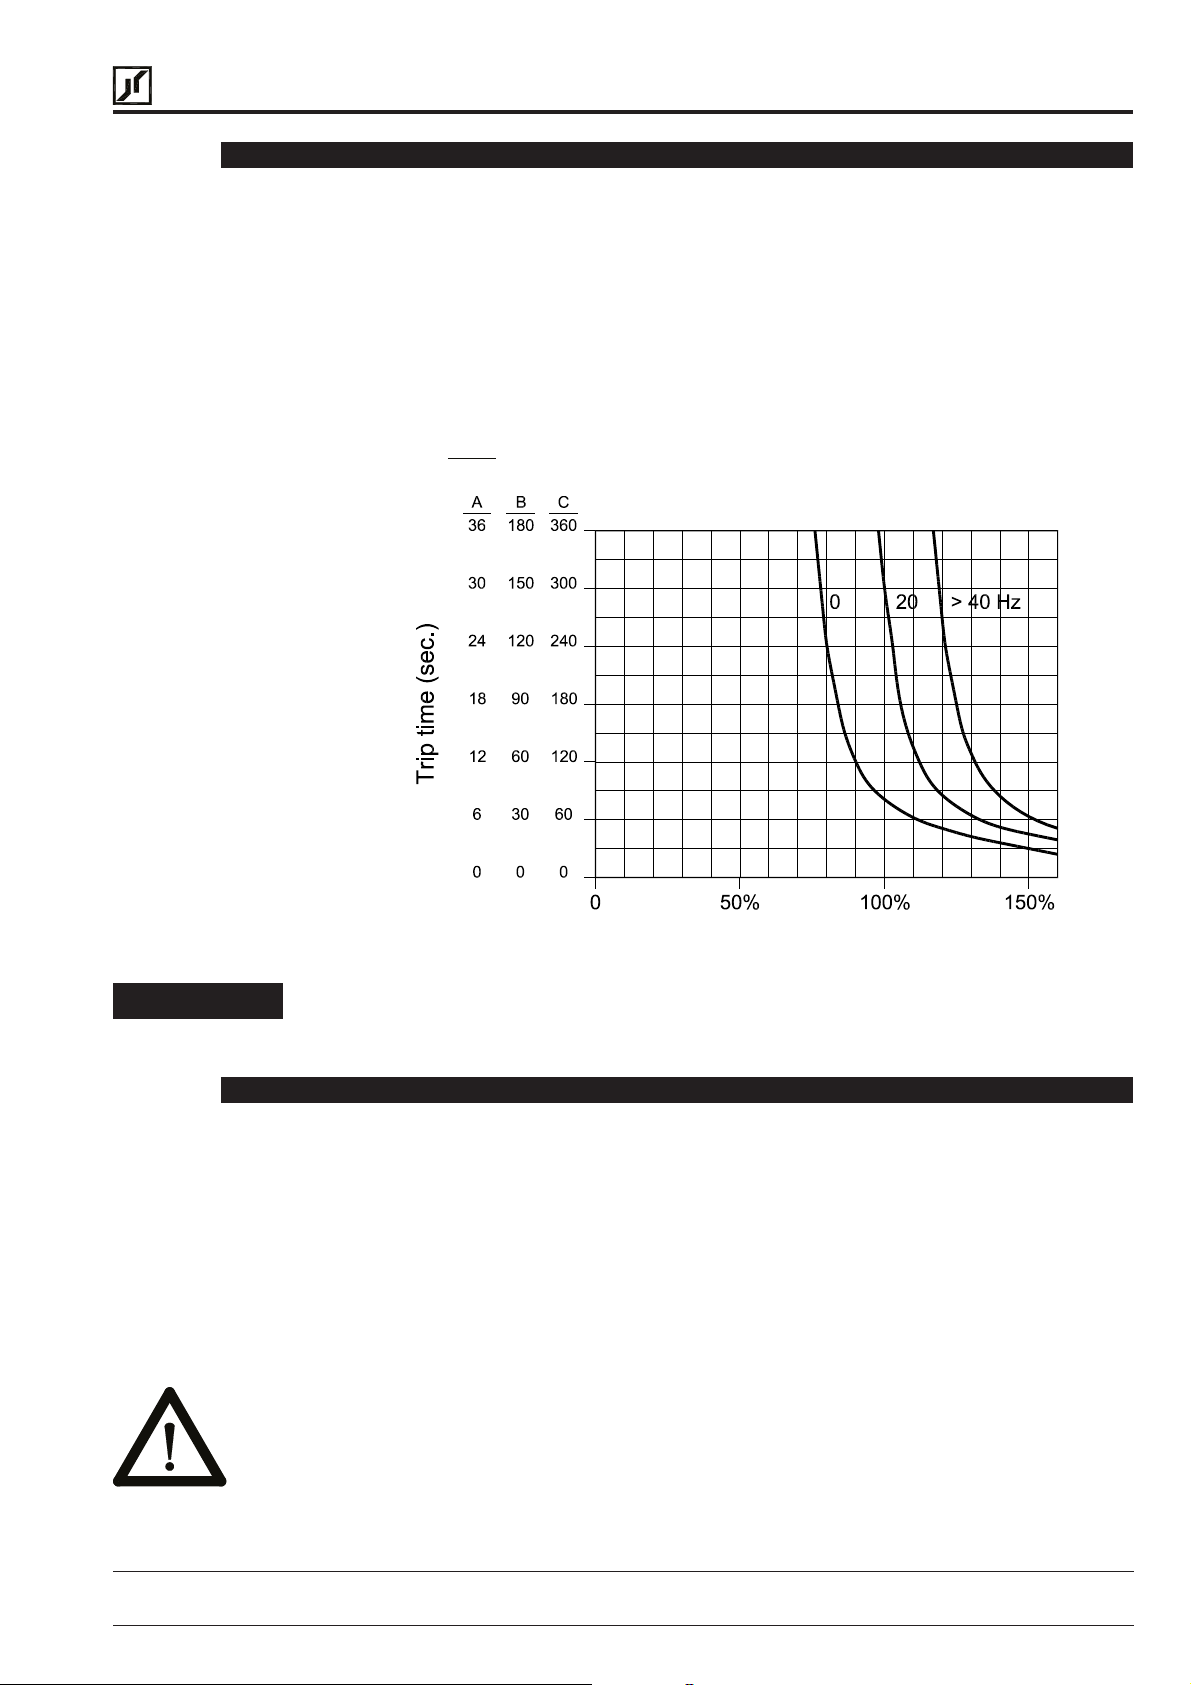
BERGES
67-TOL – Timed Overload Trip Point % L1P
Berges electronic • D–51709 Marienheide-Rodt • Tel. 02264/17-0 • Fax 02264/17126
67-TOL
a timed electronic overload trip can occur. The trip time depends on the amount of overload
and is 1 minute for 150% of the setting, longer for lesser degrees of overload. A 10%overload
will not cause the drive to trip. Parameter
100% of drive capacity. The factory setting is 0, inactive.
The action of
parameter
The proper setting of parameter
and the motor nameplate current (Im) according to the following formula:
67 – TOL
is the timed overload trip point. This parameter defines the load point beyond which
67-TOL
6A-TOLC
I
m
=×
IRAT
is presented graphically in the Trip Time chart to the follow. See also
for information on setting timed overload appropriately for your motor.
100%
67-TOL
67-TOL
is calculated by using the value stored at
is adjustable in 1% increments from 0 to
03-IRAT
ATTENTION!
68-NRST – Trip Restart Number L2P
Percent load
When using multiple motors on a single inverter, use separate external protection on
each motor and set
This parameter is not active when 67-TOL = 0.
Providing the inverter is operated from a maintained run command, this parameter will allow
the drive to be automatically restarted, after fault, up to a programmed number of attempts.
This limit is from zero (0) up to a maximum of eight (8) tries within a 10 minute time frame.
In each case, the drive will wait for the delay programmed at
thru F20 are effected by this process. Once the programmed value of
exceeded, the drive will display a F10 fault and wait for a manual reset.
When
75-STR
output for every fault, only for fault codes 1–10. To maintain a similar, yet inverse
function with
68-NRST
is altered. Data code (2) for each parameter will not activate the respective
67-TOL
is active, the function of parameters
68-NRST
to 0 (disabled).
active, use data code 1.
69-DRST
72-ST1,73-ST2,74-ST3
. Only fault codes F11
68-NRST
has been
and
INSURE THAT AUTOMATIC RESTARTING WILL NOT CAUSE DAMAGE
TO EQUIPMENT OR INJURY TO PERSONNEL!
This function is disabled when it is programmed to zero.
30.10.97 Operating manual
05_GB ACP 6000
SLV
— 0.75–55
57
Page 64
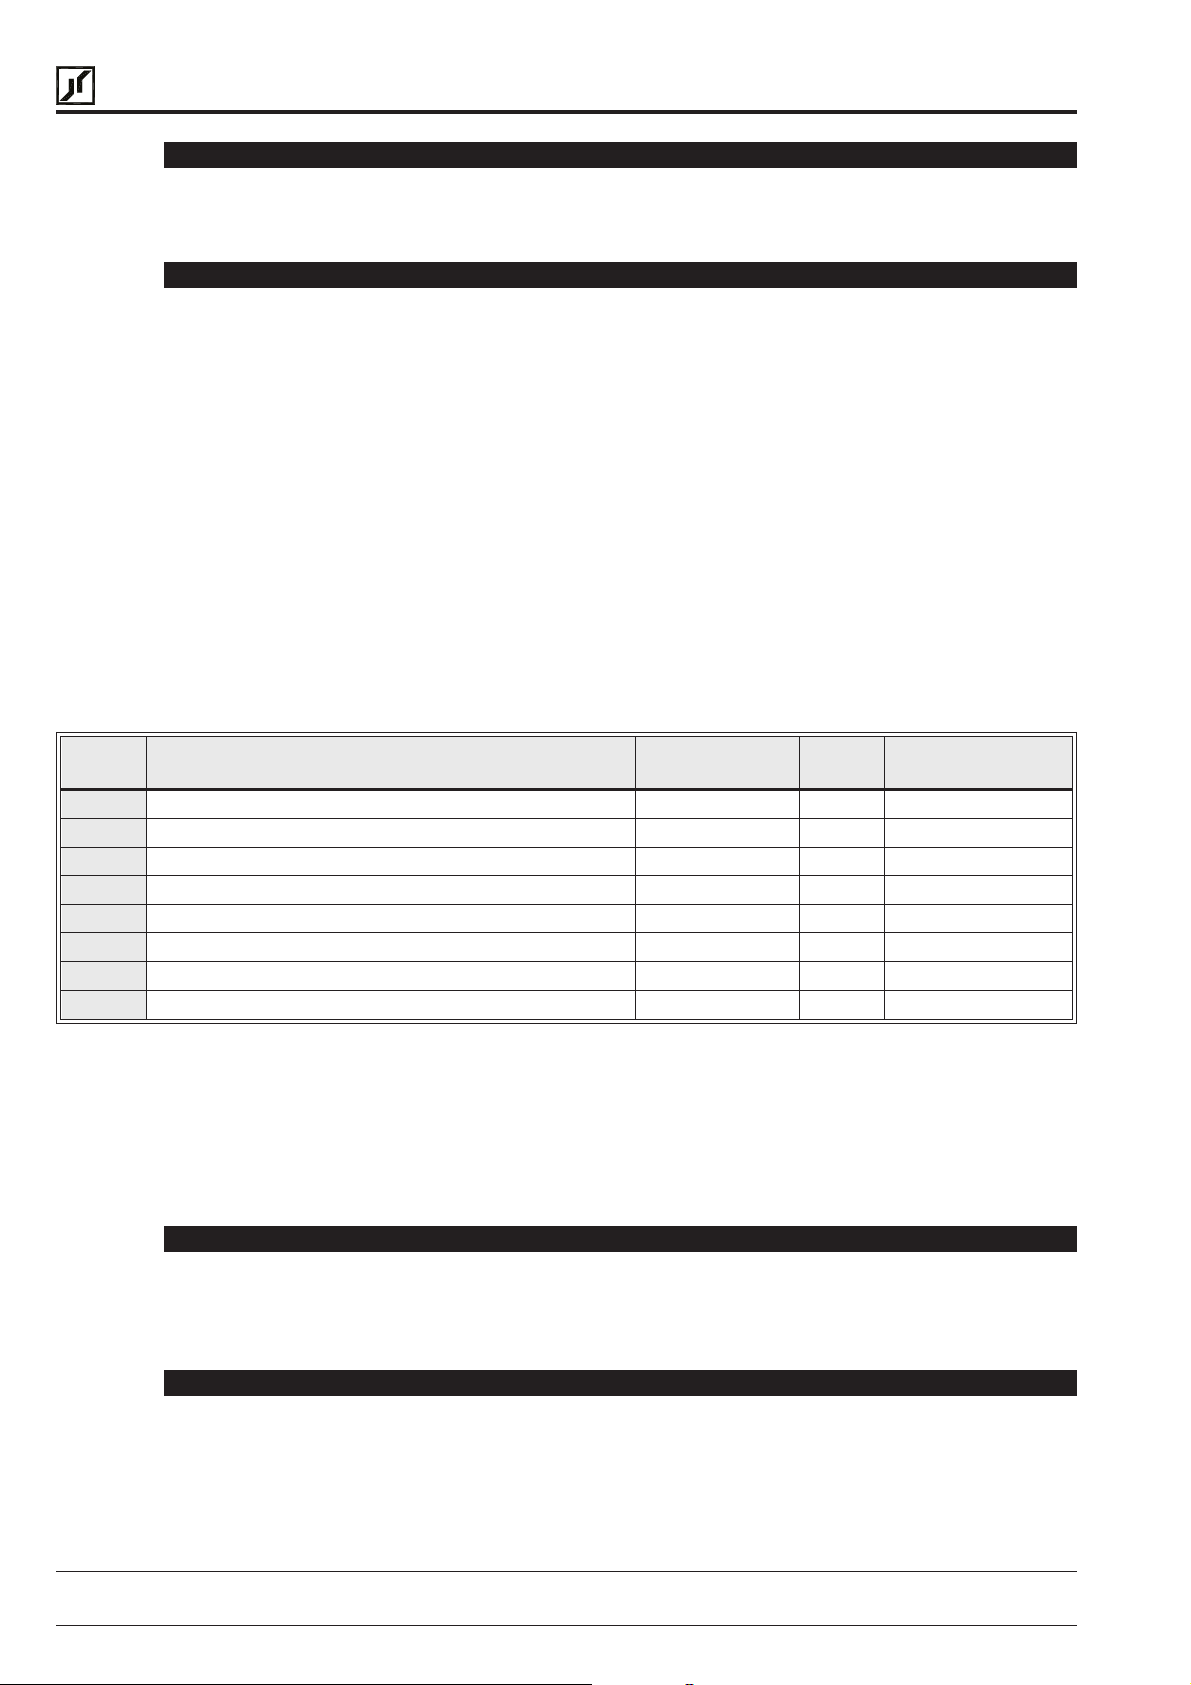
BERGES
69-DRST – Trip Restart Time Delay s L2P
Berges electronic • D–51709 Marienheide-Rodt • Tel. 02264/17-0 • Fax 02264/17126
68-NRST
If
before re-starting. Restart performance will be governed by parameter
programmable in 0.01 sec. Increments from 0.00 to 60.00 seconds.
6A-TOLC – Timed Overload Characteristic L2P
6A-TOLC
inverter to the driven motor. Refer to the graphic presented with parameter 67 for a more
in-depth understanding of this parameter.
Data codes “0” through “3” provide for the use of a “standard” motor that typically has a
limitedcontinuous constanttorqueoperating speedrange.With thesedatacodes, thedegree
of overload permitted by the drive depends on the output frequency. Lesser degrees of
overload are permitted at lower speeds.
Data codes “4” through “7” provide for the use of an “inverter duty” motor that has a more
extensive continuous constant torque operating speed range. With these data codes, the
overload performance follows the curve designated “> 40 Hz” regardless of operating
frequency.
As you adjust between “0” & “3” and “4” & “7”, you get various inverse time characteristics.
Data codes “0” and “4” give you the characteristic depicted by the scale designated “C”. Data
codes “1” and “5” work on scale “B” and codes “2” and “6” on scale “A”. With data codes “3”
and “7”, the parameter
time characteristic.
DATA
CODE
0 Normal – Reduced threshold below 40 Hz * 60 C Standard Induction
1 Medium – Reduced threshold below 40 Hz * 30 B Standard Induction
2 Fast – Reduced threshold below 40 Hz * 10 A Standard Induction
3 “Shear Pin” – Reduced threshold below 40 Hz ** 0 – Standard Induction
4 Normal – Constant torque * 60 C Inverter Duty
5 Medium – Constant torque * 30 B Inverter Duty
6 Fast – Constant torque * 10 A Inverter Duty
7 “Shear Pin” – Constant torque ** 0 – Inverter Duty
TRIPPING CHARACTERISTIC TRIP TIME
greater than 0, the inverter will wait the programmed time value after a fault
works in conjunction with
67-TOL
works as an adjustable electronic “shear pin” with no inverse
67-TOL
82-START
to customize the overload characteristics of the
SCALE MOTOR TYPE
(SECONDS)
. DRST is
58
* Trip time is at 150% of
** Trip time is at 110% of
67-TOLC
If
setting from 44 Hz to 0 Hz in order to compensate for reduced motor ventilation at lower
speeds. If
progressively lower limits at speeds below 44 Hz. Thus the trip curve for >40 Hz will always
apply.
70-MCAL – Analog Meter Output Calibration L2P
This parameter adjusts the meter output value at terminal MET. The full scale output is
programmable from 0 to 255 which corresponds to approximately 0 to 16.5 VDC. Factory
default is for 10 VDC at terminal MET at nominal full scale output.
programmed while the inverter is running.
71-METER – Analog Meter Output Selector L1P
71-METER
codes are defined as:
is selected 0–3 then the overload trip limit is linearly dropped to 63% of TOL
67-TOLC
defines what the analog meter output (terminal MET) will indicate. The data
67-TOL
67-TOL
is selected 4–7 then the function is set for 10:1 motors without
setting.
setting.
70-MCAL
Operating manual 30.10.97
ACP 6000
SLV
— 0.75–55 05_GB
can be
Page 65
BERGES
Berges electronic • D–51709 Marienheide-Rodt • Tel. 02264/17-0 • Fax 02264/17126
DATA
CODE
0 Output inactive.
1 Output proportional to output frequency (
2 Output proportional to output voltage (
3 Output proportional to output current (
drive rating.
4 Output proportional to drive load Current (
load.
5 Output proportional to load torque (
6 Output proportional to stator frequency (
FMAX
.
7 Output proportional to feedback encoder frequency (
scale at
8 Output proportional to FSET with full scale at
An additional meter selection 71-METER = 8 was added which allows the meter output to
follow the speed reference FSET. The FSET meter selection is active during both RUN and
STOP modes but not during POWER-UP, FAULT, IDLE or STOP. These conditions also
applyto71-METER= 7, which allows themeteroutputtofollow theencoderspeedfeedback.
72-ST1 – Auxiliary Output #1 (Open Collector) L2P
32-FMAX
. Used with WPC04, see section 6.2.
DESCRIPTION
12-FOUT
13-VOUT
14-IOUT
15-LOAD
16-TORQ
) with full scale at 200% torque.
1A-FOUT2
) with full scale at
) with full scale at 100%.
) with full scale at 200% of
) with full scale at 200%
) with full scale at
A7-OPTA7
32-FMAX
.
32-FMAX
32-
) with full
.
73-ST2 – Auxiliary Output #2 (Open Collector) L2P
74-ST3 – Auxiliary Output #3 (Open Collector) L2P
75-STR – Auxiliary Relay Output L1P
Each of these parameters work similarly with the open collector outputs at the terminal strip
(designatedST1, ST2 and ST3) and the auxiliaryrelay. The data code programmed at these
parameters defines the condition that activates that particular output (either open collector
or relay). Each may be programmed as follows to indicate:
DATA
CODE
0 Output inactive.
1 No fault (becomes active when the inverter is ready).
2 Fault (refer to parameter
3 Motor running FWD or REV.
4 Motor running REV.
5 Motor running FWD.
6 Motor speed = 0 Hz.
7 Motor at speed.
8 Motor speed greater than value programmed at parameter
9 Drive operating in torque limit.
10 Drive operating near overtemperature limit.
11 Drive operating in LOCal Mode.
DESCRIPTION
68-NRST
for further information).
36-F5
.
75-STR
where
The output actions basically follow the individual bits in variable
to the same rules.
30.10.97 Operating manual
05_GB ACP 6000
becomes active whenever a fault occurs, but not in Auto-Restart fault conditions,
68-NRST
is set different from 0.
SLV
— 0.75–55
11-STAT
, and are subject
59
Page 66
BERGES
77-MOL – Motor Overload Input Function L2P
Berges electronic • D–51709 Marienheide-Rodt • Tel. 02264/17-0 • Fax 02264/17126
The purpose of this parameter is to specify the input for the MOL input on the connection
terminals of the frequency converters and the option boards (WPC02 and WPC06). The
following tables show the different settings that are possible:
DATA
CODE
0 Normally Closed Contact (+24 VDC) applied to MOL contact (Default)
1 Normally Open Contact (0 VDC) applied to MOL contact
DATA
CODE
0 Normally Open Contact (0 VDC) applied to MOL contact
1 Normally Closed Contact (+24 VDC) applied to MOL contact
JUMPER J1
OPTION CARD
WPC02/WPC06
1-2
See note 1
TERMINAL BLOCK TRUTH TABLE ACP 6000
TERMINAL BLOCK TRUTH TABLE OPTION CARD
DATA CODE
77-MOL
0 Option Card Terminals:
High input (+24 VDC) or external signal (max.
+24 VDC referenced to COM) will generate an
F07 Fault (N.O. operation). See also
“Connection Diagrams”, Page 72/73.
1 Option Card Terminals:
Removal of high input (+24 VDC) or external
signal will generate an F07 Fault (N.C.
operation). See also “Connection Diagrams”,
Page 72/73.
DESCRIPTION
SLV
0 Control Board Terminal:
Removal of high input (+24 VDC) or external
signal will generate an F07 Fault (N.C.
operation). See also “Connection Diagrams”,
2-3
See note 2
NOTES:
1) Jumper J1 maintains its function (selection of the MOL input) exactly as specified in the
instructions for installing/setting the option board. If the option board “MOL input” is used,
the MOL input of the option board must be connected to the 24-volt DC connection. This
prevents overdriving of the buffer gate on the option board. If there are zero volts on the
MOL terminal of the control board when the option board is selected, the operation
amplifier of the control board sets the output of the buffer to earth, while the operation
amplifier changes the signal.
2) If the option board has not been installed, the MOL input of the control board has the
same function.
1 Control Board Terminal:
Page 72/73.
High input (+24 VDC) or external signal (max.
+24 VDC referenced to COM) will generate an
F07 Fault (N.O. operation). See also
“Connection Diagrams”, Page 72/73.
60
Operating manual 30.10.97
ACP 6000
SLV
— 0.75–55 05_GB
Page 67
BERGES
81-PRGNO – Special Program Number L2P
Berges electronic • D–51709 Marienheide-Rodt • Tel. 02264/17-0 • Fax 02264/17126
This parameter allows the storage, retrieval and exchange of customer defined program
setups, as well as a means of returning all parameters to factory defaults. Numerous special
programs are also included at this parameter. Standard data codes are outlined in the
following table:
DATA
CODE
0 Standard Factory Program. 1
1 Reset all parameters to factory settings. 1, 2
2 Store customer parameter settings. 1, 3
3 Recall customer parameter settings. 1, 3
4 Exchange current with stored customer parameter settings. 1, 3
10 Makes option parameters inaccessible. 1
11 Makes option parameters accessible for viewing and change. 1
32–33 EMOP2/EMOP3 Electronic Motorized Potentiometer speed
control.
60–62 Program Sequencer (consult factory for specific
implementation instructions).
430 BERGES crane-option (consult factory for specific
implementation instructions).
NOTES:
1) When data codes1–29areinvoked,
mode.Whendatacodes greaterthan29areused,
2) Data code 1 allows all program parameters to be returned to factory defaults. When the
program mode is exited, the display willindicate“INITPARAMETERS” then “RESTART”.
DESCRIPTION
81-PRGNO
willrevert to “0” uponexitingtheprogram
81-PRGNO
willretainthedatasetting.
SEE
NOTE
4, 5
3) Data code 2 allows storage of the current set of program parameters. Data code 3 allows
a previously stored set of program parameters to be retrieved. Data code 4 allows the
current and stored set of program parameters to be exchanged.
4) Parameter
Also, the drive must be operated in REMote mode.
5) Data codes 32 and 33 select the ACP EMOP control programs. With code 32 selected,
commanded output frequency returns to
33 selected, commanded output frequency remains at the previous setpoint. See following table for proper usage.
FUNCTIONAL
DESCRIPTION
Off 00XX
Speed = 0 11XX
FWD Decrease Speed 101X
FWD Hold Speed 1000
FWD Increase Speed 1001
REV Decrease Speed 011X
REV Hold Speed 0100
REV Increase Speed 0101
21-MODE
must be set to a code that permits MODE 2 (REMote) operation.
31-FMIN
EMOP2/EMOP3, DATA CODE 32/33
FWD REV PS1 PS2
0 = Inactive 1 = Active X = Ignored
when the drive is stopped. With code
TERMINALS
30.10.97 Operating manual
05_GB ACP 6000
SLV
— 0.75–55
61
Page 68
BERGES
82-START – Inverter Start Options L2P
Berges electronic • D–51709 Marienheide-Rodt • Tel. 02264/17-0 • Fax 02264/17126
This parameter selects options such as line start lockout, line starting or starting a rotating
motor.
operating the inverter from the terminal strip. Various options for
82-START
alsoallowsthekeypadSTOPkey for function as an emergency stopwhen
82-START
include:
DATA
CODE
0 Line Start Lockout. When the inverter is configured for terminal strip operation
with a maintained run command present, it will not start upon the application
of line power. The direction command must be removed and re-established to
start the drive. The keypad STOP functions as an EMERGENCY STOP when
controlling the inverter from the terminal strip. Recovery from an
EMERGENCY STOP will require that the STOP key be pressed a second
time and then the direction command re-established.
1 Line Start (Autostart). With this setting, the inverter will turn on when line
power is applied and a direction command is present. The STOP key is
configured as an EMERGENCY STOP when operating from the terminal strip.
2 This setting allows the drive to successfully start a rotating motor. Line start
Lockout is active. The STOP key functions as an EMERGENCY STOP when
operating from the terminal strip.
3 Start into a rotating motor with Autostart. STOP key enabled.
4–7 Same start functions as 0 through 3, but STOP key is disabled totally in
terminals mode.
NOTE: When data codes 2, 3, 6 or 7 are selected, the display will indicate SPD SEARCH
upon the initiation of a run command.
INSURE THAT AUTOMATIC RESTARTING WILL NOT CAUSE DAMAGE TO EQUIPMENT OR INJURY TO PERSONNEL!
DESCRIPTION
83-PWM – PWM Carrier Frequency Selector L2P
Thisparametersetsthecarrierfrequency of the Pulse-Width-Modulation wave form supplied
tothemotor.Low carrier frequenciesprovidebetterlow end torquebutproduceaudible noise
HINT!
from the motor. Higher carrier frequencies produce less audible noise, but cause more
heating in the inverter. The ACP 6000
rated ambient temperatures when parameter
8 kHz.
At higher carrier frequencies (12 and 16 kHz), theinverterwillautomaticallyswitchtoalower
carrier frequency when load conditions exceed the derating levels (Consult Factory for
deratingbymodels). When theloadisreduced, thecarrierfrequencywill returntoits previous
setting. Data Code 0 (Autoselect) automatically selects the highest carrier frequency permitted
without overheating the inverter.
Autoselect will also adjust the carrier frequency to 8 kHz at 75 °C and to 4 kHz at 90 °C.
When using Data Codes 5 & 6, the carrier frequency will shift to 1/2 of the selected carrier
frequencywhenthe output voltageislessthan 6% of nominalrating.When usingDataCodes
7 and 8, the carrier frequency will shift to 1/2 of the selected carrier frequency when the
output voltage is less than 12% of nominal rating and to 1/4 of the selected carrier at 6% of
nominal output voltage. For low speed high torque applications, the best performance
can be achieved by selecting Data Codes 1, 2, 7 or 8. Adjustments are as follows:
SLV
is rated to produce continuous full load current at
83-PWM
is set to carrier frequencies 3, 4, 6 or
62
Operating manual 30.10.97
ACP 6000
SLV
— 0.75–55 05_GB
Page 69
BERGES
Berges electronic • D–51709 Marienheide-Rodt • Tel. 02264/17-0 • Fax 02264/17126
DATA
CODE
0 400 Autoselect Autoselect Autoselect
*1 260 3 3 3
2 350 4 4 4
3 400 6 6 6
4 400 8 8 8
5 400 12 6 6
6 400 16 8 8
7 400 12 6 3
8 400 16 8 4
* Factory setting.
84-DISP – Display Option Full Setting L2P
Parameter
display to be programmed in engineering units such as RPM, Bottles per hour – BPH or any
desired unit up to five characters long.
With factory default setting of “0”, the display will present the command output frequency
being delivered to the motor. As long as the speed command does not change, the display
will not change.
MAXIMUM
MOTOR
FREQUENCY (HZ)
84-DISP
, along with parameter
CARRIER
FREQUENCY
(KHZ)
85-UNITS
CARRIER
FREQUENCY
(KHZ) @ 12% VOUT
, allows the bottom line of the keypad
CARRIER
FREQUENCY
(KHZ) @ 6% VOUT
Withdatacode“1”selected,theoperatingdisplay will change as the invertermakeschanges
in the output frequency to maintain commanded performance (stator frequency). For example,
slip compensation and regenerative current limit make changes in the stator frequency (see
parameter
see parameter
The basic question that must be answered is, “What numeric indication do we want the
display to indicate at if we´re operating at maximum frequency (parameter
value may be modified to compensate for the number of decimal places programmed at
parameters
Hz, enter 15000 at parameter
85-UNITS – Display Units Setting L2P
The programming for
operate differently. The UNITS identifier has up to a six-character format with each of the
first five characters having the ability to display characters from the following list:
Blank, #, %, +, -, ., /, 0 through 9, :, <, =, >, and A through Z
The last character is a number between 0 and 9. If this value is set between 0 and 5, it will
assign the position of the decimal place in the engineering units display. The factory setting
is “RPM 1” which will display the value programmed at
If the last character is selected to be “9”, the retention time function is invoked. This is,
rather than a frequency/speed proportional output, a reciprocal function. The maximum
display is 655.34 (dependent on the value programmed at
less than that, or less than 3.2 Hz, the display will indicate “ _ _ _ . _ _ ”. Two decimal places
are maintained in this mode of operation and cannot be changed.
1A-FOUT2
81-PRGNO
85-UNITS
, an option parameter). For more information on option parameters,
.
32-FMAX
. For example, to indicate 1500.0 RPM on the display at FMAX = 50
84-DISP
85-UNITS
. Entries must be within the range of 10–65000.
is different from most parameters, in that the keypad keys
84-DISP
84-DISP
with one decimal place.
); at output frequencies
)?” This
30.10.97 Operating manual
05_GB ACP 6000
SLV
— 0.75–55
63
Page 70
BERGES
Berges electronic • D–51709 Marienheide-Rodt • Tel. 02264/17-0 • Fax 02264/17126
Retention Time Example:
Assume the following program settings: The display versus output frequency
would be:
32-FMAX = 50 Hz Motor Frequency Display
31-FMIN = 10 Hz 50 10.00 MIN
84-DISP = 1000 40 15.00 MIN
85-UNITS = MIN__9 30 20.00 MIN
20 30.00 MIN
10 60.00 MIN
To program
1. Press the STOP key if the inverter is running.
2. Hold the SHIFT key while pressing the PROGram key to enter level 2.
3. Press the SHIFT key. The cursor will appear under the leftmost characterinthedatafield.
4. Use the UP/DOWN arrow keys to scroll through the available choices.
5. Press the SHIFT key to move the cursor one place to the right.
6. Repeat steps 4 and 5 to complete the character selections.
7. The sixth position requires a number from 0–9 and either determines the number of
decimal places in the display or whether the retention time function is activated.
8. Press the ENTER key to store the engineering units display in memory or the SHIFT key
to move the cursor back to the first position.
84-DISP
After
the engineering units format.
86-LANG – Display Language L2P
This parameter sets the language for the display readout. The factory can supply a complete
listing in all languages. The options include:
85-UNITS
and
85-UNITS
:
have been set, the inverter output will be set and displayed in
DISPLAY UNITS
PROG 85: RPM 1
64
DATA CODE LANGUAGE
0 English
1 Spanish
2 French
3 German
87-ACODE – Security Access Code L2P
This parameter allows the user to control access to the programmable functions of the
inverter. The initial value of
necessary. Any number between 001 and 999 may be used for an access code, but is not
necessary.
To enter a access code, simply re-program parameter 87 as though you would any other
parameter. After you have stored this new value, you will have ten minutes of free access.
If you remove power and re-establish it, you will need to enter the access code to change
any program parameter.
If you enter an incorrect access code, the inverter will display **WRONG CODE** and allow
only VIEWing rights to the various parameters. Once the correct code is entered you again
have 10 minutes of free access unless power is removed and re-applied.
To disable the access code requirement, set
Operating manual 30.10.97
ACP 6000
87-ACODE
SLV
— 0.75–55 05_GB
is 000, that results in no access code being
87-ACODE
back to 000.
Page 71
BERGES
88-FRO – Frequency Reference Output L2P
Berges electronic • D–51709 Marienheide-Rodt • Tel. 02264/17-0 • Fax 02264/17126
This parameter determines the frequency pulse-train output from the 6FS terminal. Each of
the frequency outputs can be used as a speed reference input to another ACP 6000
series inverter. See parameter
from the 6F6 terminal is rated at approximately a 30% duty cycle.
DATA
CODE
0 6 times operating frequency
1 48 times operating frequency
A2-RATIO – Master/Slave Speed Ratio L2P
A2-RATIO
the speed of up to eight (8) other (slave) inverters. The output of each slave unit can be
individually programmed, or trimmed “ON-THE-FLY” with
ment is 50–200% of the master.
NOTE: Parameter adjustable while the drive is in run mode.
See Section 6.3 – Application Hints for further information.
B1-OPTNO – Option Board Number L2V
This parameter serves as an excellent diagnostic tool. It indicates which, if any, of the WPC
style option cards have been installed in the ACP 6000
WPC01 Isolated Analog and Digital Output Card has been installed in the drive, B1 would
indicate “1”. If no card is in the drive or if the card is not recognized by the drive, B1 would
indicate “0”.
allows the 6FS output of one ACP series inverter (master) to be used to control
DESCRIPTION
24-FSEL
for additional information. Note that the pulse train
A2-RATIO
SLV
. The range of adjust-
inverter. For instance, if the
SLV
30.10.97 Operating manual
05_GB ACP 6000
SLV
— 0.75–55
65
Page 72
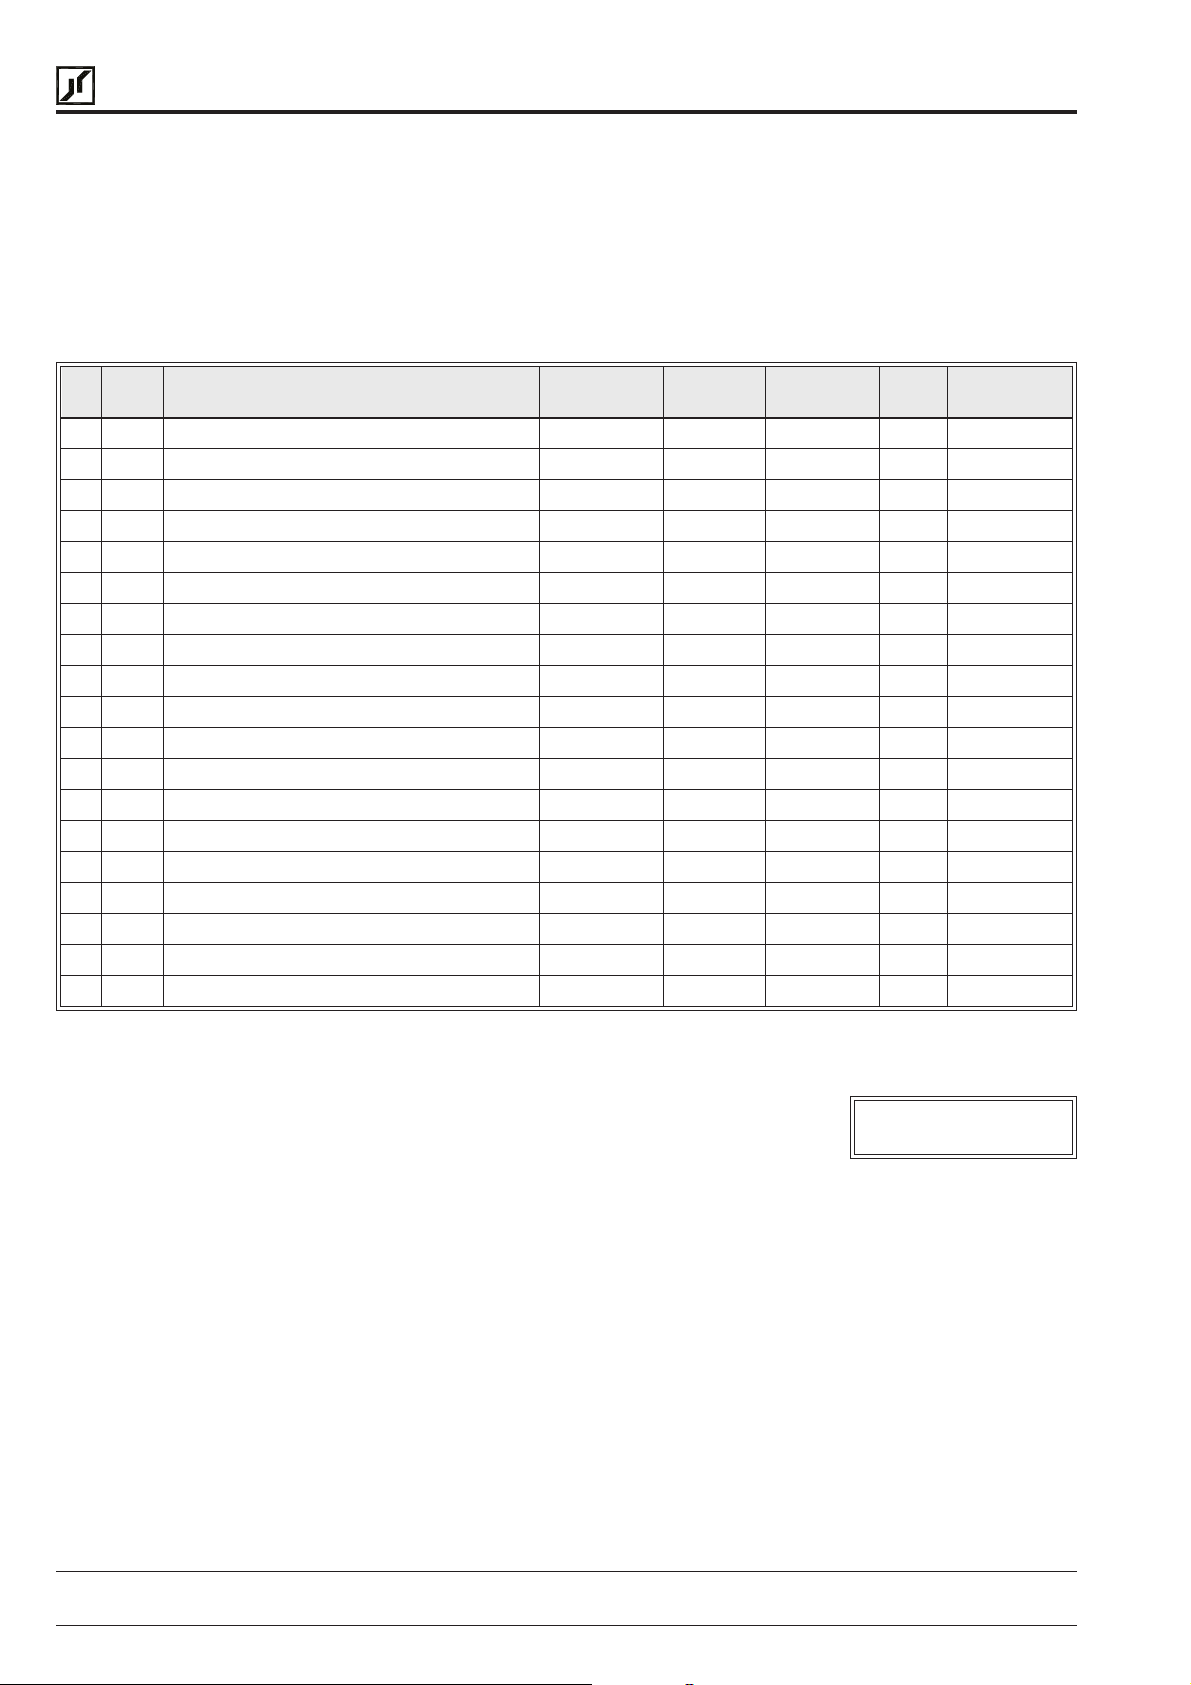
BERGES
Berges electronic • D–51709 Marienheide-Rodt • Tel. 02264/17-0 • Fax 02264/17126
5 Level 3 parameter
The following is a summary of the parameters associated with SIO communication. Consult
BERGES for more information on the use of ACP 6000
SLV
series inverters in serial
communication applications.
5.1 Program Code Summary (Level 3)
# NAME DESCRIPTION DATA RANGE FACTORY
SETTING
04 TMAX Maximum Heat sink Temperature 60–100 °C 85 °C 3 67
0A CFLT Current Fault – – 3 67
11 STAT Inverter Status Byte Binary (8) – 3 67
22 FNCT Inverter Operating Function 0–4 – 3 68
23 CNTL Control Information Byte Binary (8) – 3 68
25 FEXT1 External Speed #1 0.00–400.00 Hz 0.00 Hz 3 69
26 FEXT2 External Speed #2 0.00–400.00 Hz 0.00 Hz 3 69
28 TLEXT External Torque Limit Reference 0–150% 0% 3 69
29 COUT Control Output Status Binary (8) – 3 69
7A CIN Control Board Terminal Status Binary (8) – 3 69
7B CIN2 Option Board Terminal Status Binary (8) – 3 69
7C FIN Control Board Analog Input Status 0–32768 0 3 70
7D FAUX Option Board Analog Input Status 0–32768 0 3 70
7E LIM Analog Torque Limit Input Status 0–15000 15000 3 70
91 SIOC SIOCommunication BAUD Rate 0–7 0 3 70
92 SIOA SIO Slave Address 1–94 1 3 70
93 SIOT SIO Watchdog Timer 0.00–60.00s 0.00 s 3 70
94 SIOF SIO FaultByte Binary (8) – 3 70
95 SIOP SIO Protocol 0–3 0 3 70
ACCESS
LEVEL
SEE
PAGE
CUSTOMER
SETTING
66
5.2 Programming
Tochangethedefault programming for agivenparameterfrom
the Keypad:
A) Press the STOP key to stop the inverter if running. Some parameters (see the individual
parameter description) can be changed while the inverter is operating.
B) To enter Level1programming,press the PROGram key.ToenterLevel 3, holdtheSHIFT
key and press the PROGram key.
C) Use the UP/DOWN arrow keys to select the program parameter for change.
D) Press the SHIFT key. The program number will blink indicating that the data value may
be changed.
E) Use the UP/DOWN arrow keys to select the new data code.
F) Press the ENTER key. The display will indicate **STORED** for one second, then revert
to the normal parameter display.
G) Press the PROGram key to exit the programming mode or the UP/DOWN arrow keys to
select a new parameter for change.
SIO SLAVE ADDR
PROG 92: 1
Operating manual 30.10.97
ACP 6000
SLV
— 0.75–55 05_GB
Page 73
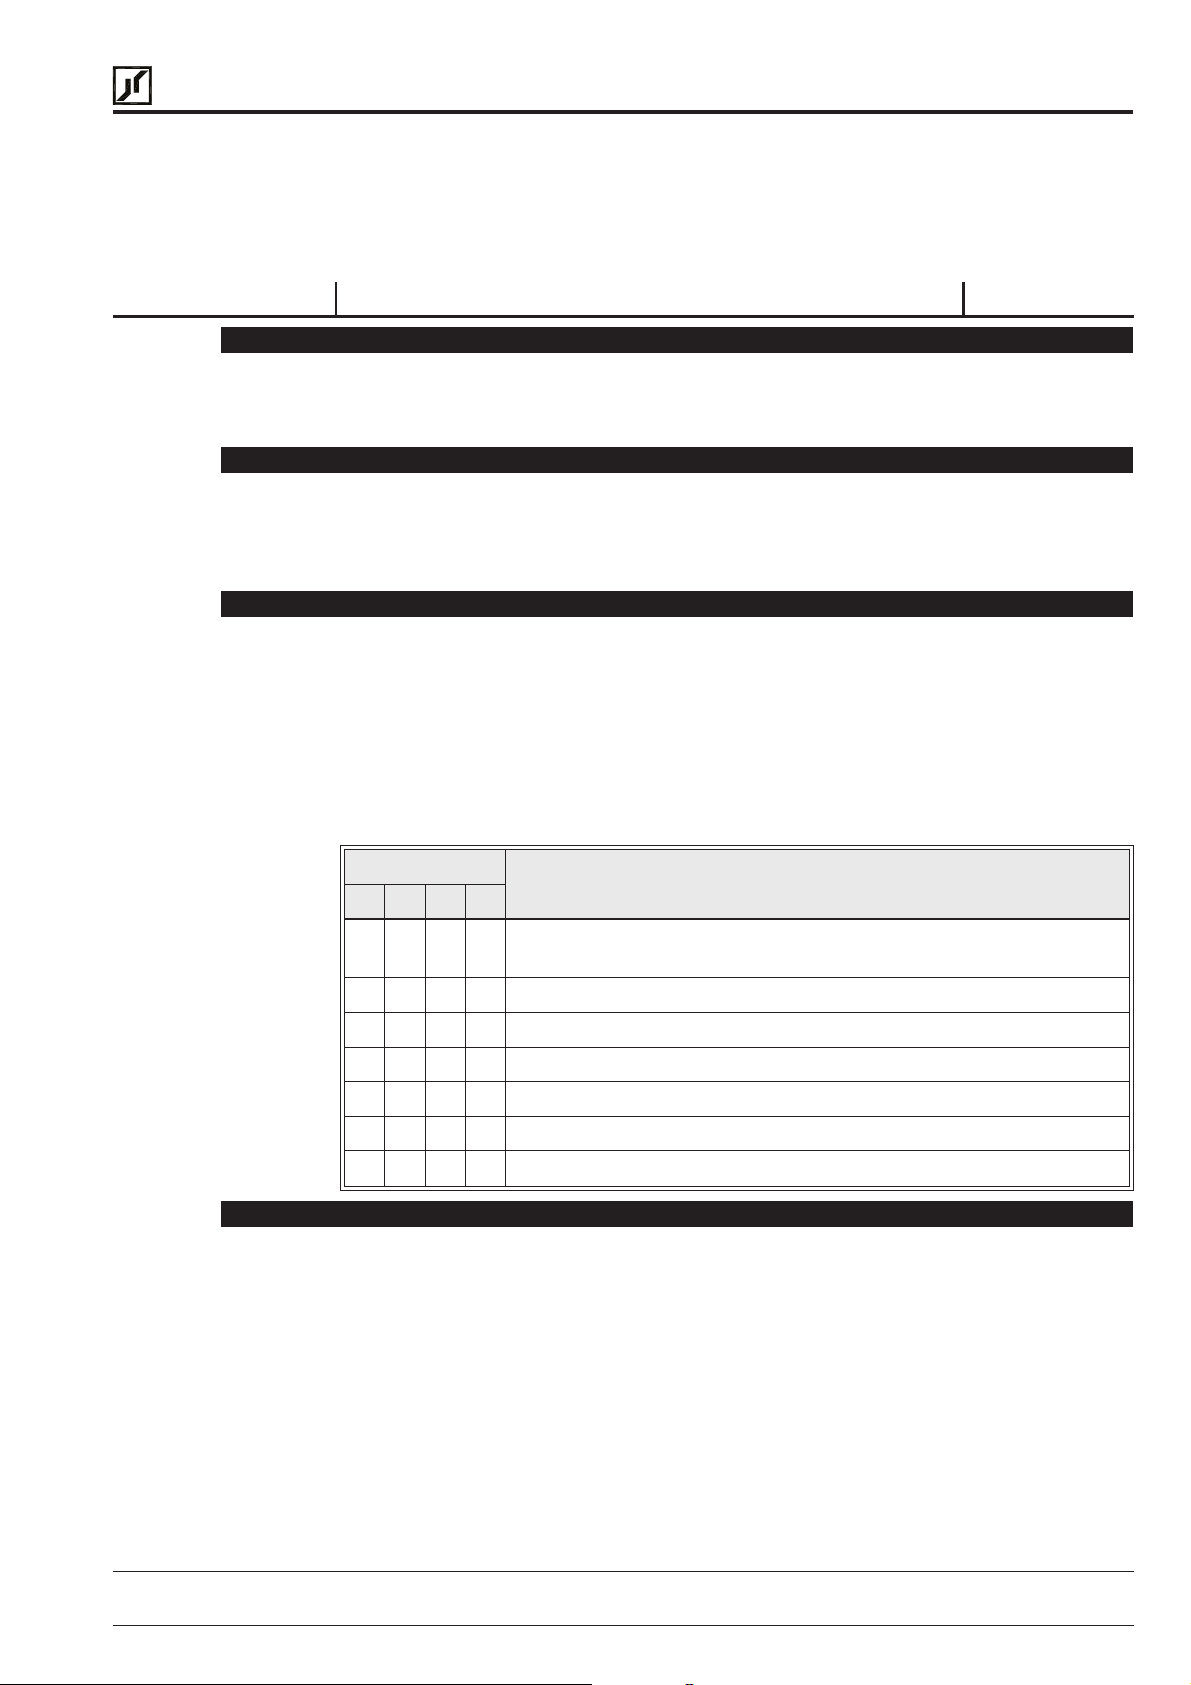
BERGES
Berges electronic • D–51709 Marienheide-Rodt • Tel. 02264/17-0 • Fax 02264/17126
5.3 Parameter Descriptions
This section provides a functional description of all ACP 6000
at Level 3. A “V” means that this parameter only has a view function, while “P” stands for
programmable.
PARAMETER DESCRIPTION UNITS / LEVEL
04-TMAX – Maximum Heat sink Temperature C L3V
This parameter is factory set to the maximum heat sink temperature that the processor will
allowcontinuousoperationofthedrive.The inverter´s display will indicateHITEMPatTMAX
8 °C. The data type for
0A-CFLT – Current Fault L3P
This parameter is accessible serially in the event of a default to determine the cause of a
fault.Itis stored asanintegervalue with faultcode(Seesection 7)andelapsedtime available
to the host computer. Refer to Section 4 for a more thorough discussion of fault codes
(
07-FLT3,08-FLT2
11-STAT – Inverter Status Byte L3P
This parameter is accessible to determine the present conditions in which the inverter is
operating. The data is stored as an integer, but represents a binary word. Bit #7, the most
significant bit, when active indicates that the drive is operating within the 8 °C limit of
04-TMAX
#5 is active, the drive is operating at an output frequency in excess of that programmed at
parameter
. Bit #6, when active, indicates that the drive is operating in torque limit. When bit
36-F5
04-TMAX
and
09-FLT1
. Bit #4 being active indicates that the drive is “AT SPEED”.
is a real number.
).
SLV
programming parameters
The remaining bits (3 through 0) combine to indicate multiple conditions as outlined in the
following table:
BIT NUMBER
3210
0 0 0 0 Power applied to the inverter and it is IDLE, awaiting either an
operation or programming instruction.
0 0 0 1 The inverter has faulted.
0 0 1 0 The inverter is in the STOP condition.
0 1 0 0 The FORWARD direction has been selected.
1 0 0 0 The REVERSE direction has been selected.
1 1 1 0 DC voltage is presently applied to the motor.
1 1 1 1 Writing this value into
21-MODE – Input Mode L1P/L3P
21-MODE
and the SIO Serial Link, in both the LOCal and REMote operating modes. Also the mode
transfer mechanism is defined by your selection at this parameter. Proper setting of this
parameter is the first stepincustomisingtheinvertertoyourapplication. The following
table defines the combinations available to the SIO user.
definestheoperating functionsthatare active fromtheKeypad, the TerminalStrip,
DESCRIPTION
11-STAT
can be used to reset all faults.
30.10.97 Operating manual
05_GB ACP 6000
SLV
— 0.75–55
67
Page 74
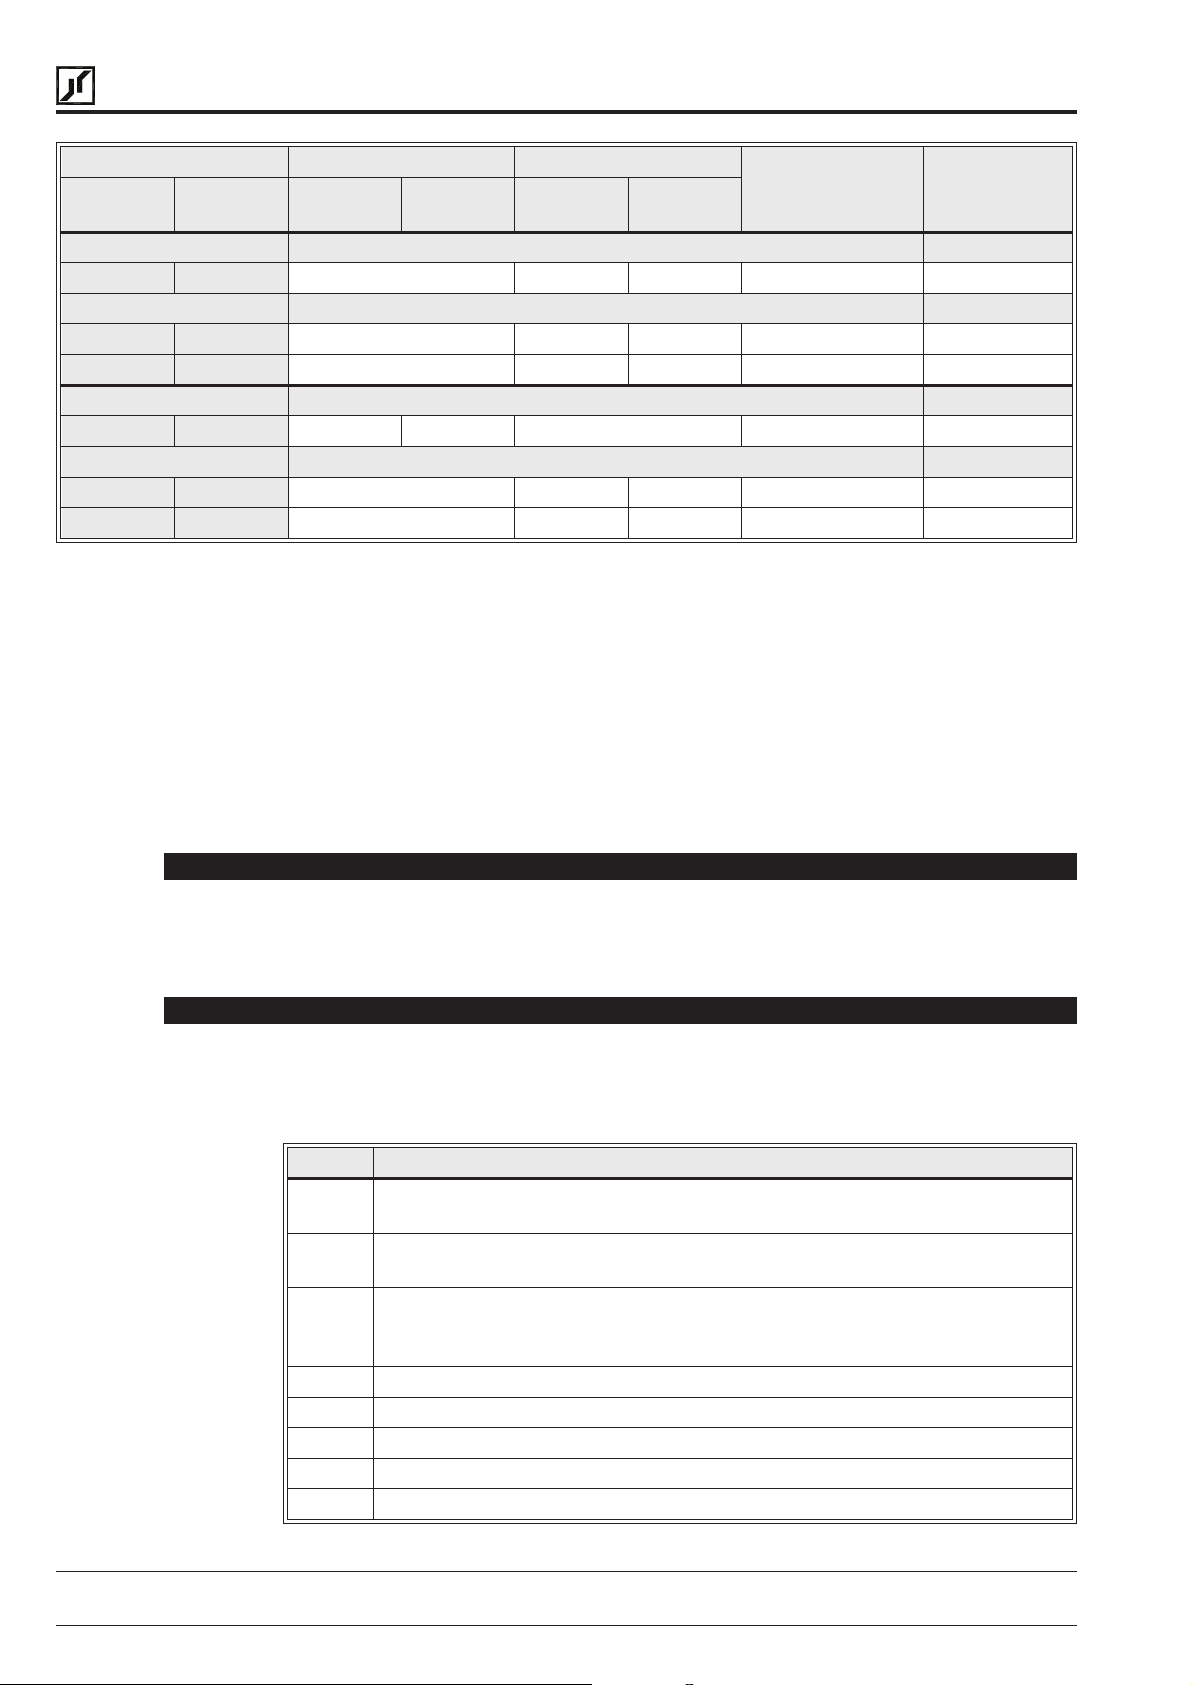
BERGES
Berges electronic • D–51709 Marienheide-Rodt • Tel. 02264/17-0 • Fax 02264/17126
DATA CODE LOCal (1) REMote
FWD only
(2)
717 Disabled 24-FSEL 23-CNTL N/A
616 Keypad 24-FSEL 23-CNTL LOC/REMkey
26 36 Keypad 24-FSEL 23-CNTL PS3
81824-FSEL 23-CNTL Terminals PS3
515 Keypad 25-FEXT1 Terminals LOC/REM key 4
25 35 Keypad 25-FEXT1 Terminals PS3 4
FWD/REV
(2)
Speed (3) Start/Stop Speed (3) Start/Stop
SIO Control Only
Combination Keypad/SIO Control
Combination Terminal Strip/SIO Control
Combination Keypad/Terminal Strip/SIO Control
NOTES:
1) Under LOCal operation, when control is specified as keypad, the active torque limit
reference is the preset values at parameters 61 through 64 as if parameter
were set to a code “3”. In all other cases, the drive obeys the setting of parameter 27
directly.
2) Enables or disables the REV key on the keypad.
LOC/REM
TRANSFER VIA:
SEE NOTE
27-TLSEL
3) When “Terminals” specified as a speed reference, the programming of parameter
24-FSEL
4) In REM operation, terminals PS1, PS2, PS3 and ART are active. All will (except PS3 in
modes greater than 20) perform their previously defined function (see Section 2.7).
22-FNCT – Inverter Operating Function L3P
ThisRAMparameter,represented by the integervalues0thru4, defines whethertheinverter
is expecting to receive a programming change or an operational command. The host
computer either sets
“3” to enable an operational command.
23-CNTL – Control Information Byte L3P
This RAM parameter is the mechanism thru which actual SIO control of the inverter is
achieved. It is represented by a binary word. The activation of each binary bit is read by the
inverter as if the respective terminal were activated at the terminal strip. The breakdown is
as follows:
BIT # FUNCTIONAL RESPONSE
7 A forward command is initiated as though the FWD terminal is activated from
6 A reverse command is initiated as though the REV terminal is activated from
5 Once this command is initiated, either directional command will be maintained
4 Activating this bit will put the inverter in a coast to stop mode.
3 Activating this bit is functionally the same as engaging the ART terminal.
2 Activating this bit is functionally the same as engaging terminal PS3.
1 Activating this bit is functionally the same as engaging terminal PS2.
0 Activating this bit is functionally the same as engaging terminal PS1.
actually controls the active speed reference.
22-FNCT
the terminal strip.
the terminal strip.
until the inverter is commanded to stop or change direction, just as if the R/J
terminal were activated.
to code “4” to enable a program parameter change, or code
68
Operating manual 30.10.97
ACP 6000
SLV
— 0.75–55 05_GB
Page 75
BERGES
25-FEXT1 – External Speed #1 Hz L3P
26-FEXT2 – External Speed #2 Hz L3P
Berges electronic • D–51709 Marienheide-Rodt • Tel. 02264/17-0 • Fax 02264/17126
25-FEXT1
Both
real values for output frequency in storage registers. Parameter
to have the inverter to look at these values as the active speed reference. The range is 0.00
to 400 Hz.
28-TLEXT – External Torque Limit Reference L3P
25-FEXT1
Like
register. Real number values between 5 and 150% or drive rating can be stored here. Based
on the value of
29-COUT – Control Output Status L3P
The binary word that is represented by this integer value can be used to deduce the status
of the drive´s digital outputs. Bits 5 thru 7 are not used and will always be “0”. If bits 4 thru 0
active, the representation is as follows:
BIT # FUNCTIONAL INDICATION
4 Will indicate the activity of ST5, used only on option boards.
3 Will indicate the activity of STR, the auxiliary relay mounted on the control
2 Will indicate the activity of ST3, one of the open collector outputs on the
1 Will indicate the activity of ST2, one of the open collector outputs on the
and
26-FEXT2
and
26-FEXT2,28-TLEXT
27-TLSEL,28-TLEXT
board.
control board, or the option card mounted relay following its active state.
control board, or the option card mounted relay following its active state.
are RAM parameters that allow the host computer to write
24-FSEL
is a RAM parameter that works as a storage
can become the activate torque limit reference.
then can be used
0 Will indicate the activity of ST1, one of the open collector outputs on the
control board, or the option card mounted relay following its active state.
7A-CIN – Control Board Terminal Status L3P
7B-CIN2 – Option Board Terminal Status L3P
The binary word represented by this integer value can be used to determine the status of
the input terminal function. Parameter
7B relates to the option board inputs. The functions detected by this parameter are
represented as active bits according to the following:
BIT # FUNCTIONAL INDICATION
7 Will indicate that Reverse is active.
6 Will indicate that Forward is active.
5 Will indicate that R/J is active.
4 Will indicate that CTS function is active.
3 Will indicate that the ART input is active.
2 Will indicate that terminal PS3 is active.
1 Will indicate that terminal PS2 is active.
0 Will indicate that terminal PS1 is active.
7A-CIN
relates to the control board inputs, parameter
30.10.97 Operating manual
05_GB ACP 6000
SLV
— 0.75–55
69
Page 76
BERGES
7C-FIN – Control Board Analog Input Status L3P
7D-FAUX – Option Board Analog Input Status L3P
7E-LIM – Analog Torque Limit Input Status L3P
91-SIOC – SIO Communication BAUD Rate L3P
Berges electronic • D–51709 Marienheide-Rodt • Tel. 02264/17-0 • Fax 02264/17126
Theintegervalue found at thisparameterrepresentsthereal world valueoftheanalog speed
input at the control board (
to a number in the range of 0–32,767 for 0 to maximum input.
Theintegervalue found atthisparameterrepresents therealworld value oftheanalog torque
limit input at the control board. It translates to a number in the range of 0–15,000 for 0 to
150% of rated torque.
The integer value stored at this parameter determines the communication BAUD rate used
between the inverter and the host computer. Also, communication rights may be selected
as either read/write or read-only. Data codes “0” thru “3” provide both read and write
capability. Codes “4” through “7” are read-only. The BAUD rates available are:
DATA CODE BAUD RATE
0/4 9600
1/5 4800
7C-FIN
) or from the option board input (
7D-FAUX
). It translates
2/6 2400
3/7 1200
92-SIOA – SIO Slave Address L3P
This parameter allows an individual slave address to be assigned to each slave inverter in
a multi-drive application. Integer values between 1 and 94 are available.
93-SIOT – SIO Watchdog Timer L3P
This parameter is the storage location for a real number of seconds. With
value greater than zero, SIO activity must be logged at least once in that timeframe. It is
used to monitor communication integrity primarily.
94-SIOF – SIO Fault Byte L3P
The integer value stored at this location may be decoded to a binary word detect faults
associated with SIO communication. When various bits become active, they represent
various faults that are SIO communication related. The significant bits and their indication
are as follows:
BIT # FUNCTIONAL INDICATION
7 The value written in the last communication was outside the range of
acceptable values.
6 The last communication was to a write protected parameter.
5 The last communication was to an unknown parameter.
93-SIOT
set to a
70
1 The value in seconds programmed at
valid SIO communication.
0 The restart procedure of drive re-initialisation is in process.
95-SIOP – SIO Fault Byte L3P
The integer value stored at this parameter defines the communication protocol, selecting
various ISO 1745 and OPTO22™ options. The selections are outlined as follows:
Operating manual 30.10.97
ACP 6000
SLV
— 0.75–55 05_GB
93-SIOT
has been exceeded without a
Page 77
BERGES
Berges electronic • D–51709 Marienheide-Rodt • Tel. 02264/17-0 • Fax 02264/17126
DATA
CODE
0 ISO 1745 protocol with even parity and seven data bits.
1 ISO 1745 protocol with no parity and seven data bits.
2/3 OPTO™ protocol with no parity and seven data bits.
OPTO22™ is a trademark of OPTO 22, Huntingdon Beach, CA.
DESCRIPTION
30.10.97 Operating manual
05_GB ACP 6000
SLV
— 0.75–55
71
Page 78
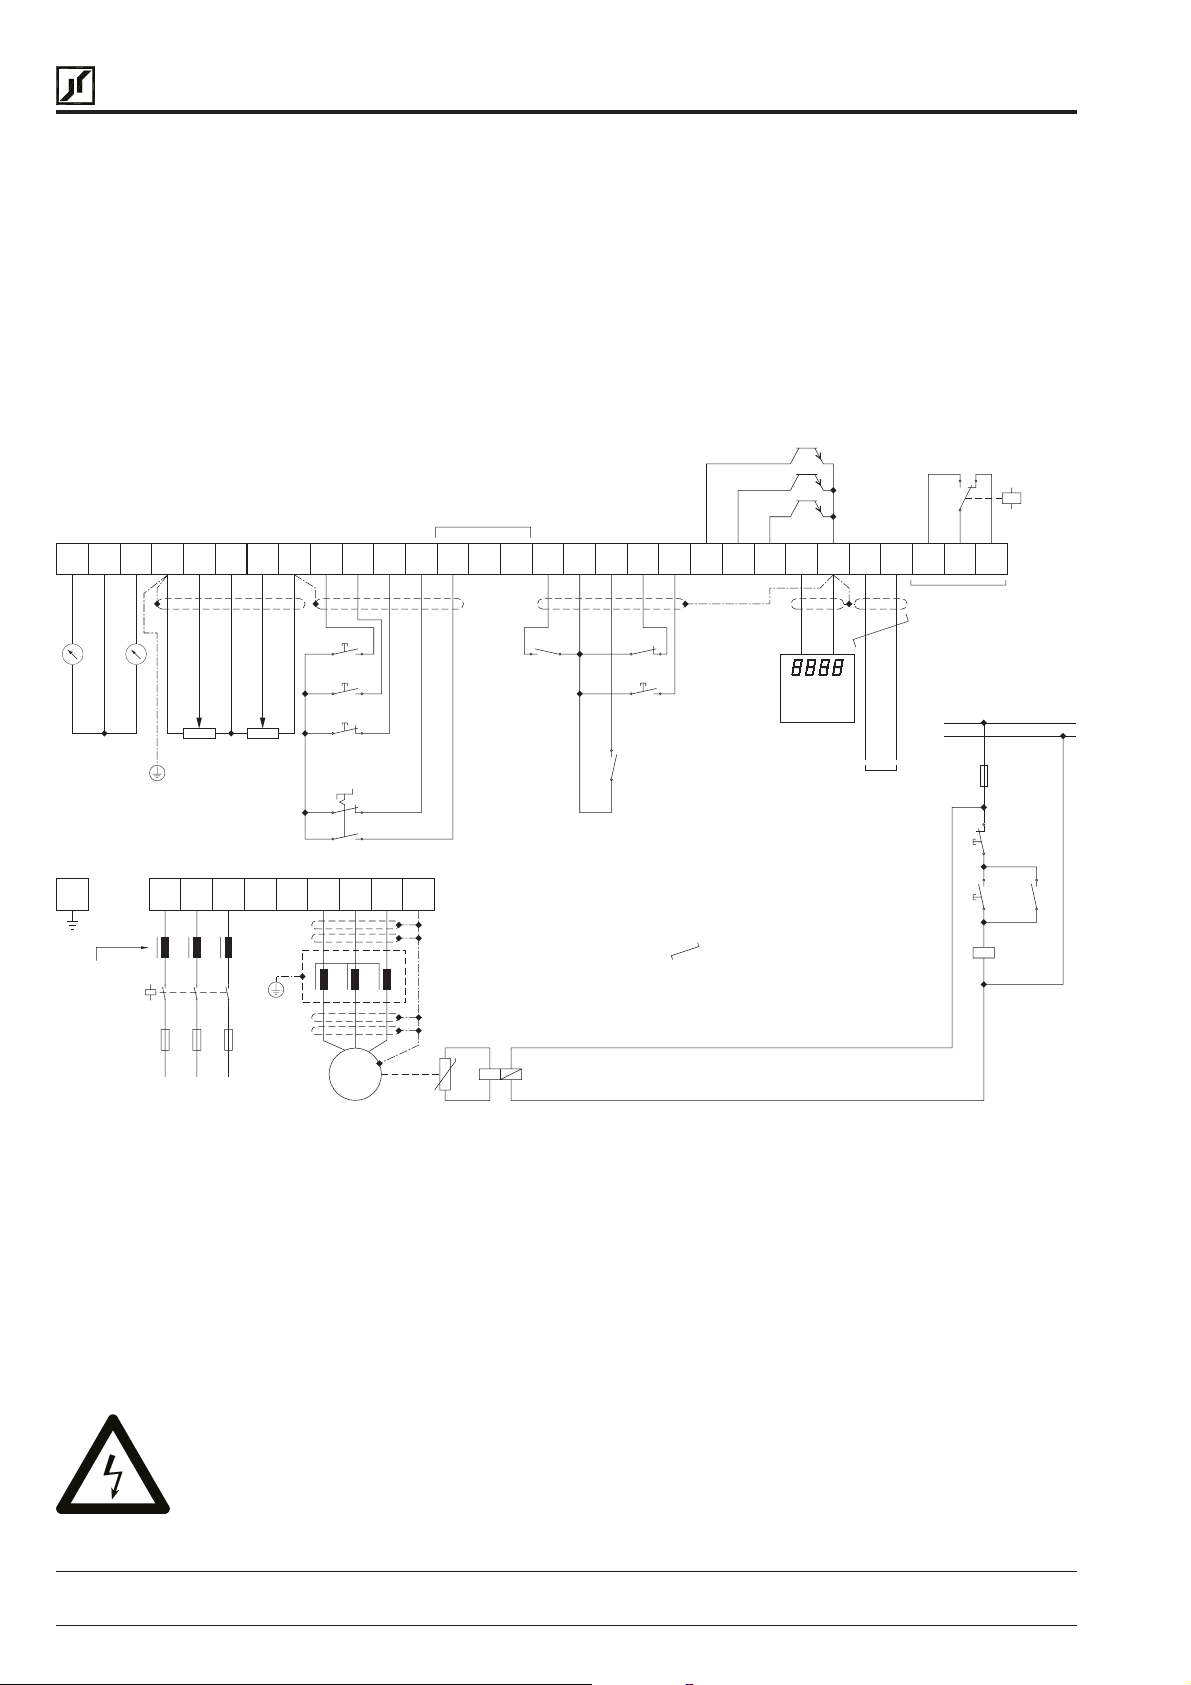
BERGES
6 Applications
Berges electronic • D–51709 Marienheide-Rodt • Tel. 02264/17-0 • Fax 02264/17126
Thefollowingsections showvarioustypicalwiring connectionsofexternal controlstotheACP 6000
SLV
inverter.Section
6.1containswiring diagrams forvariousspeedcontrol, torquecontrol,start/stopand direction control,aswellas options
available from the inverter’s terminal strip. Refer to Section 2.7 Function and Use of Terminals.
6.1 Connection Diagrams
The following diagram shows typical connections for external speed and torque control as well as external starting and
stopping of the inverter. Requirements for a job feature and reversing are also included.
115 V AC/1 A
PRESET
SPEED SELECTIONS
MET COM CIN COM VIN
SPEED
4...20 mA
CUST. DISPLAY METER
PROCESS SOURCE
(NOTE 4)
(NOTE 2)
POTENTIOMETER
(NOTE 1)
TORQUE LIMIT
POTENTIOMETER
REVREF LIM COM FWD R/J
FORWARD
REVERSE
STOP
RUN/JOG
+24
PS1 PS2
ALTERNATE
RAMP TIME
SELECTOR
+24
CTSPS3 ART
MOL RST ST1 ST2 ST3
COAST
TO STOP
SELECTOR
REMOTE
RESET
PUSHBUTTON
K2 (NOTE 6)
6FS SIO+COM SIO-
DIGITAL
FREQUENCY
METER
SIO
SERIAL
INPUT/OUTPUT
RS 485
28
L1
AUXILIARY
RELAY
OUTPUTS
N
F4
3029
OFF
ON
A1
A2
13
K1
14
K1
13
24
F2
F3
L3
B-B+
M1 M2
5
6
PE PE
L1 L2
K1
M3
M
OPTION MAINS FILTER
L1F1L2
L3
3~
PTC
OPTION
OUTPUT CHOKE
P1
P2
NOTES:
F1...F4 = FUSES
= TWISTET WIRE
IF TERMINAL "MOL" IS NOT USED,
A JUMPER WIRE BETWEEN "MOL"
AND "+24" HAS TO BE CONNECTED.
A1
K2
A2
NOTES:
1. The total resistance connected between terminals REF and COM shall not be less than 1000 Ohms.
2. Do not connect a potentiometer if inputs such as 4–20 mA or 0–10 VDC are used.
3. All control board connections should use twisted and shielded wire with the shield connected to terminal COM; see
also page 26, “Interference suppression measures/EMC (electromagnetic compatibility)” and page 28 “Wiring
Practices”.
4. The factory setting for the customer meter is 10 VDC full scale, indicating output frequency. See
71-METER
for
further information.
5. External overloads are optional when using single motors (see parameter
6. The function of the MOL input (normally closed or normally open contact) has to be set via parameter
67-TOL
).
77-MOL
.
Frequency inverters must not be connected via a residual-current-operatedcircuit-breakeras the sole protective measure(seechapter 2.3.1,
page 23)!
72
Operating manual 30.10.97
ACP 6000
SLV
— 0.75–55 05_GB
Page 79
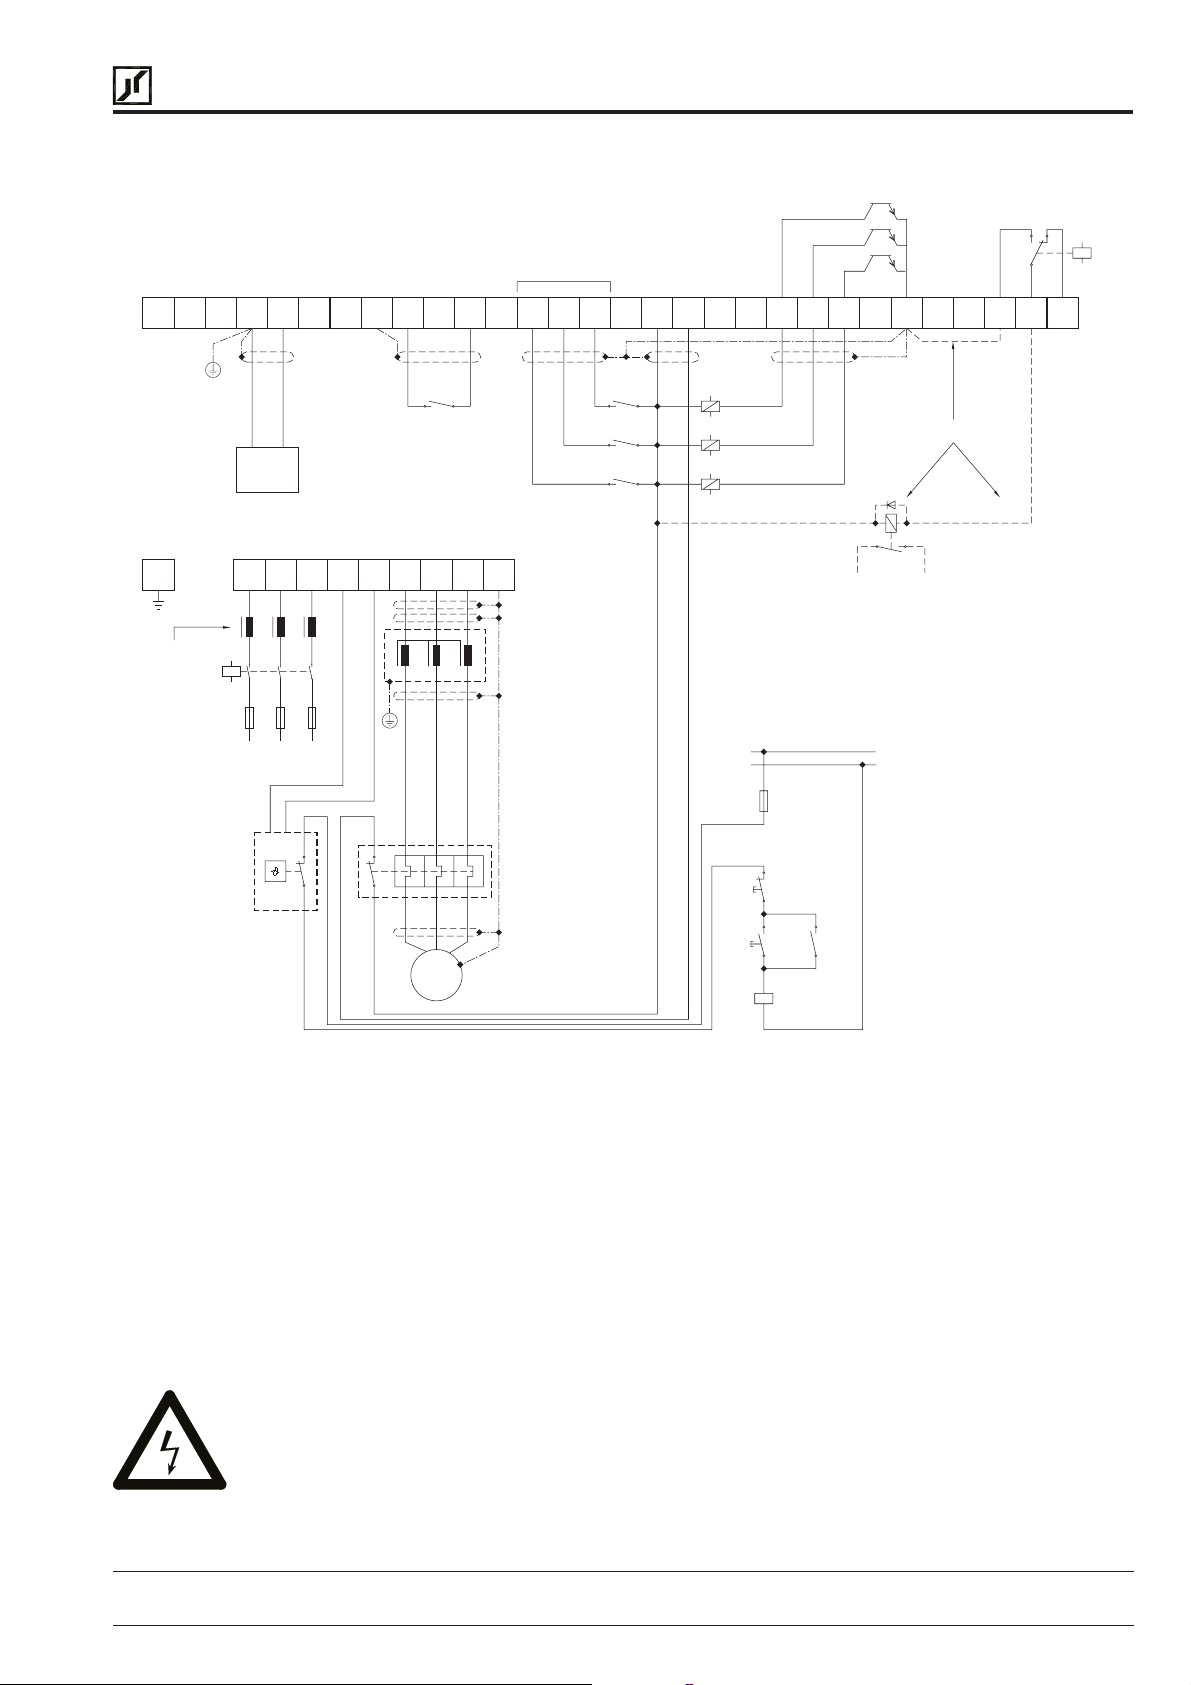
BERGES
Berges electronic • D–51709 Marienheide-Rodt • Tel. 02264/17-0 • Fax 02264/17126
The following diagram shows a two wire starting control along with the implementation of preset speeds and open
collector outputs. In addition, it shows the connection of various customer supplied speed command signals.
115 V AC/1 A
PRESET
SPEED SELECTIONS
MET COM CIN COM VIN REF LIM
CUSTOMER
SUPPLIED
SPEED COMMAND
(SEE NOTE 3)
PE
K0
OPTION MAINS FILTER
OPTION
EXTERNAL
BRAKING
CHOPPER
L1 L2 B+
F1 F2 F3
L1 L2
L3
135
642
L3
BDB
COM
B-
REVFWD R/J
START/STOP
RELAY
M1 M2
M
3~
+24
M3
PS1 PS2 PS3 ART
PE
OPTION
OUTPUT CHOKE
MOTOR
THERMAL
OVERLOAD
F5
(NOTE 6)
+24
K1
K2
K3
(NOTE 4) (NOTE 5)
CTSMOL RST ST1 ST2 ST3 6FS COM
K4
K5
K6
SEE RECOMMENDATION:
R E C O M M E N D A T I O N :
ON CONTROL VOLTAGES >115 V,
DISCOUPLE WITH EXTERNAL 24 V-RELAY.
CURRENT SUM OF 24 V-SUPPLY = 200 mA.
L1
N
F4
OFF
ON14K0
A1
K0
A2
A T T E N T I O N :
13
NOTES:
F1...F4 = FUSES
F5
K1...K3 = PRESET SPEED SELECTIONS
K4...K6 = OPEN COLLECTOR OUTPUT
IF TERMINAL "MOL" IS NOT USED,
A JUMPER WIRE BETWEEN "MOL"
AND "+24" HAS TO BE CONNECTED.
SIO-
28
SIO+
= MOTOR THERMAL OVERLOAD
3029
AUXILIARY
RELAY
OUTPUTS
28...30
NOTES:
1. Do not connect a potentiometer if inputs such as 4–20 mA or 0–10 VDC are used.
2. All control board connections should use twisted and shielded wire with the shield connected to terminal COM; see
also page 26, “Interference suppression measures/EMC (electromagnetic compatibility)” and page 28 “Wiring
Practices”.
3. The customer supplied speed command may be:
A) 0–2/10 VDC.
B) 0–1/10 kHz. Pulse train.
C) The 6FS output of another ACP 6000
SLV
series inverter.
4. The relay combinations (K1, K2 and K3) may select 1 of 8 preset speeds. See section 2.7 for further Details.
5. Relays K4–K6 shall be selected such that their maximum coil current doesn’t exceed 50 mA.
6. External overloads are optional when using single motors (see parameter
(normally closed or normally open contact) has to be set via parameter
67-TOL
77-MOL
). The function of the MOL input
.
Frequency inverters must not be connected via a residual-current-operatedcircuit-breakeras the sole protective measure(see chapter 2.3.1,
page 23)!
30.10.97 Operating manual
05_GB ACP 6000
SLV
— 0.75–55
73
Page 80

BERGES
Berges electronic • D–51709 Marienheide-Rodt • Tel. 02264/17-0 • Fax 02264/17126
6.2 Options and Accessories
WPC Plug-In Option Boards
WPC Plug-In Option Boards are specifically designed to work with BERGES ACP Inverters.
They install inside any ACP model inverter above the control board in the J7 connector.
WPC01 – Isolated Output Board
The WPC01 Isolated Output Board has two functions. One section is used to convert the
three open collector transistor outputs (ST1, ST2 and ST3) to Form C contacts rated 115
VAC/1 Amp for customer use. Each relay can be individually programmed to indicate one of
eleven (11) inverter states. The other section provides two isolated, 4–20 mA output signals
for customer use. One output varies proportionally to the output load, and the other is
programmable to follow either frequency, volts, current, load or torque.
WPC02 – 115 Volt Input Interface Board
This option card is used to allow the inverter to be controlled by 115 VAC signals instead of
the normal +24 VDC logic. It provides isolated control of FWD, REV, R/J, PS1, PS2, PS3,
ART, MOL, CTS and RST. Additionally, two relays are provided with one Form C contact
each rated 115 VAC, 1 Amp. These are controlled by the settings of ST1 and ST3. A Triac
output is also supplied which is controlled by the setting of ST2.
WPC03 – Relay/Line Transfer Board
This option board provides three relays to convert the three open collector transistor outputs
(ST1, ST2 and ST3) to Form C contacts rated at 115 VAC, 1 Amp for customer use. It also
allows for synchronous transfer of a motor from inverter power to AC line power and back
when used with external contactors (not supplied).
WPC04 – Encoder Interface Board
The WPC04 option allows the user to interface the ACP 6000
encoder or magnetic pickup. It permits such advanced control functions as: Closed loop
speed control, Master/Slave operation, and Event counting.
WPC05 – Process Control Board
The WPC05 board adds two additional functions to the ACP 6000
reference input with trim and an interface with process signals for speed regulation. The
bi-polar speed reference allows a ±10 VDC signal or potentiometer to be used to control
both the speed and direction of the motor. The process control function permits set-point
with proportional and integral gain adjustment, of pumps, fans, winders, etc., using standard
analogue feedback signals.
WPC06 – Logic Interface Board
This option board has similar features and functions as WPC02 – 115 VDC Input Interface
Board but is scaled for use with 24 volts AC or DC control signals. It also permits the ACP
SLV
6000
output used on the WPC02 is not provided.
tobecontrolled by opencollector“pull-down”transistor circuitsifrequired. The Triac
SLV
Inverter to a shaft mounted
SLV
: A bipolar speed
74
Operating manual 30.10.97
ACP 6000
SLV
— 0.75–55 05_GB
Page 81

BERGES
Berges electronic • D–51709 Marienheide-Rodt • Tel. 02264/17-0 • Fax 02264/17126
WKM01 – Keypad Mounting Kit
The WKM01 option is intended for use when the standard ACP is mounted inside another
enclosure and it is desired to have the standard keypad remotely mounted from the control.
The kit includes a mounting bezel, instructions, a 3 m cable for installation, and a terminal
“fan-out” strip. When used with WBP01(see below), the keypad can be mounted more than
30 m from the control. If properly installed, the keypad will retain its IP 54 rating.
WKM02 – Keypad Remote Control Kit
The WKM02 option is intended for use when it is desired to have the standard keypad
remotely mounted from the IP 54 inverter unit. It allows the keypad to be mounted in its own
enclosure up to 30 m from the control. The kit includes the mounting enclosure (135.9 ×
172.2 × 63.5 mm, H × W × D), keypad connector fan-out board, WBP01 Keypad Blank
Plate Option and instructions for installation. When properly installed, the keypad and unit
will retain their IP 54 ratings.
WBP01 – Keypad Blank Plate Option
This option is used to replaced the digital keypad in IP 54 models when the keypad has been
remotely mounted. When properly installed, the ACP 6000
BC6000 – External Dynamic Brake Assembly
The BC6000 assemblies are designed to increase the capacity of the ACP 6000 to absorb
the regenerated energy from a motor during rapid deceleration or overhauling loads. The
BC6000 is designed to connected to any 400 Volt ACP Inverter and provide 13.6 kW of
braking capacity at a 10% duty cycle. For capacities greater than 13.6 kW, units can be
connected in parallel.
SIOC01 – Serial Interface Converter
This is a stand-alone converter module which will translate the RS 232 communications
protocol used in many personal computers to the industrial RS 485 protocol used in the ACP
SLV
6000
6.3 Application Hints
A number of typical applications have proven to require further explanation. Several typical
applications are summarized in the following paragraphs.
Defeating the Keypad
Inverter.
SLV
will retains its IP 54 rating.
The inverter´s standard keypad is designed to give full functional control for most applications. This may be prohibitive in some cases. If a remote station is to have exclusive control
of speed and direction commands, set
remain active as both an EMERGENCY STOP button and a fault RESET mechanism. To
defeatthe E-STOP function,setparameter
to observe the other ramifications of the selection (ability to start a rotating motor and line
start lockout).
An access code may be assigned to prohibit unauthorized program revision. See parameter
87-ACODE
Finally, if absoluted necessary, the entire keypad may be removed for total isolation of the
control. Install a WBP01 in place of the keypad on enclosed models to maintain the IP 54
integrity.
30.10.97 Operating manual
05_GB ACP 6000
for more information.
SLV
21-MODE
— 0.75–55
to code 4 or 14. The keypad stop key will
82-START
toavaluegreaterthan3,beingcareful
75
Page 82

BERGES
Berges electronic • D–51709 Marienheide-Rodt • Tel. 02264/17-0 • Fax 02264/17126
Fixed Ratio Master/Slave Control of Multiple Inverters
A series of master and slave controls is quite common in industrial processes. Most are
uni-directional applications. Frequently, it is necessary that they not all run at exactly the
same speed. With the ACP 6000
maintainingtheuseofonestandardkeypadforsystemcontrol.This scheme requires control
reprogramming to reset the speed ratio of the followers, however.
To accomplish full system control from the master´s keypad, the following program changes
must be made:
Master – 75-STR = 5
88-FRO = 0
Slave(s) – 21-MODE = 4
24-FSEL = 3
75-STR = 1
SLV
series, the kind of control is possible even while
Parameter
to the master´s speed.
To get the speed to follow each other in a ratio sequence, connect Terminal 6FS on the
master to each of the follower´s VIN terminals and Terminal COM on all the drives together.
To achieve common direction command, connect the FWD terminals on all slaves together
with the normally open auxiliary relay on the master and connect the common connection of
the master´s auxiliary relay to its Terminal +24.
To achieve fault interlocking for all the drives, connect the normally closed auxiliary relay
contacts on all the follower drives in series back to Terminals +24 and MOL on the master.
This will cause the fault on any slave to shut down the master and the entire system.
Conclusion
Refer to the description of the individual parameters in this manual for the effects of the
individual program changes. You can consult BERGES if you should have any questions.
See the contact information on the back of the manual.
A2-RATIO
on each other drive willbe used to set the speed ratioof each follower
76
Operating manual 30.10.97
ACP 6000
SLV
— 0.75–55 05_GB
Page 83
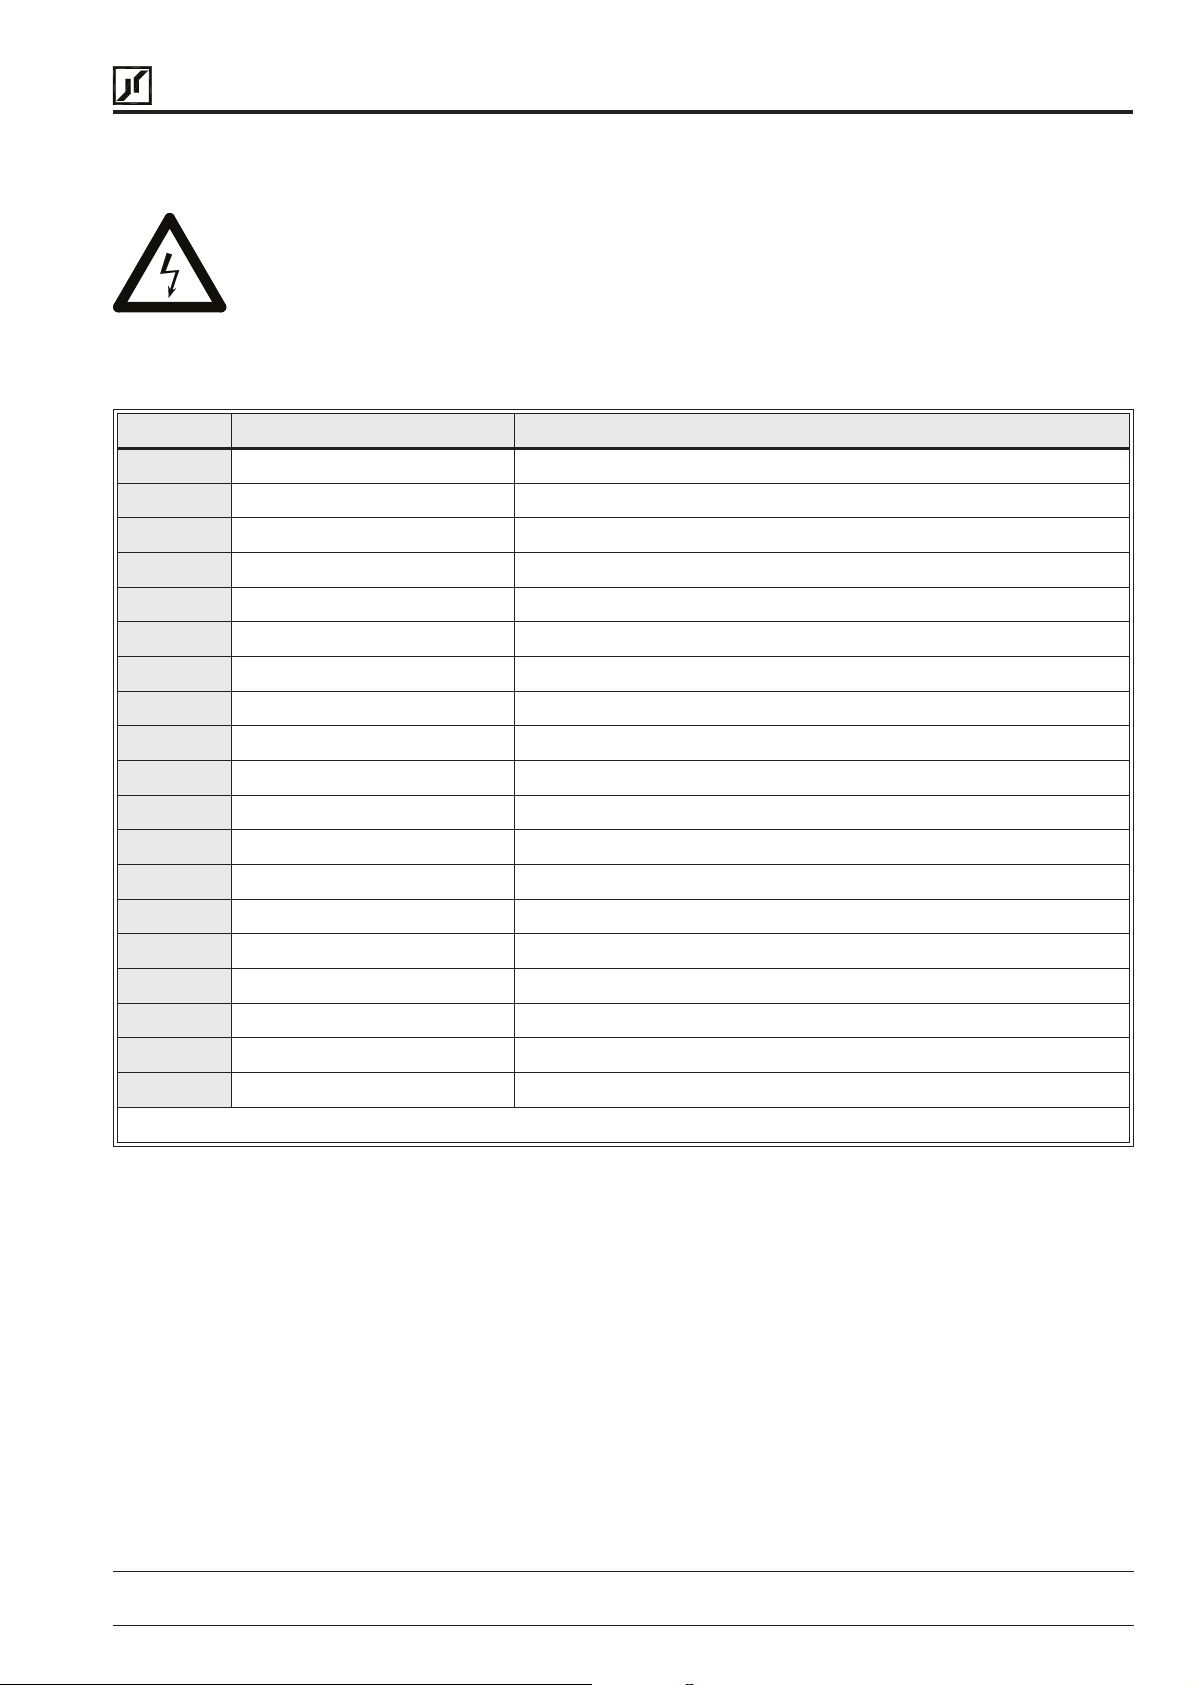
BERGES
Berges electronic • D–51709 Marienheide-Rodt • Tel. 02264/17-0 • Fax 02264/17126
7 Troubleshooting
POTENTIAL DANGER!
Disconnect electrical supply before servicing the electrical system!
7.1 Fault Codes
NUMBER MESSAGE EXPLANATION
F01 COMPUTER ERROR CPU Malfunction
F02 MEMORY ERROR EEPROM Data Destroyed
F03 CURR SENSE ERROR Wrong Bus Current Measurement
F04 PWR SUPPLY ERROR Power Supply Voltage Low
F05 NO DC BUS VOLTS Low DC Bus Voltage Detected
F06 OUTPUT SHORT CKT Short Sensed During Power-up
F07 MOL CONTACT OPEN Motor Overload Terminal Fault
F08 OPTION BD FAULT Error in an Option Card
F10 RESTART LOCKOUT Auto Restart Number Exceeded
F11 GROUND FAULT Ground Fault Detected
F12 EXT INTERFERENCE External Interference
F13 OVERVOLTAGE DC Bus Voltage Too High
F14 UNDERVOLTAGE DC Bus Voltage Too Low
F15 DYN BRAKE OVLD DB Duty Cycle above Limits
F16 ACCEL OVERCURR Overcurrent During Acceleration
F17 DECEL OVERCURR Overcurrent During Deceleration
F18 RUN OVERCURRENT Overcurrent While at Speed
F19 OVERTEMP TRIP Heat sink Temperature Too High
F20 TIMED OVERLOAD Electronic Overload Exceeded
Table 7.1
NOTES:
1. Faults F01–F08 are checked during the power-up sequence.
F02 is also checked during programming.
F04 is also checked in the run and stop modes.
2. Faults F11–F20 will be reset and the inverter restarted if the Auto-Restart function is
selected.
Afaultresetforall faults (F01...F20)can be effected by mains ON and OFF or by pushing
the STOP key.
30.10.97 Operating manual
05_GB ACP 6000
SLV
— 0.75–55
77
Page 84
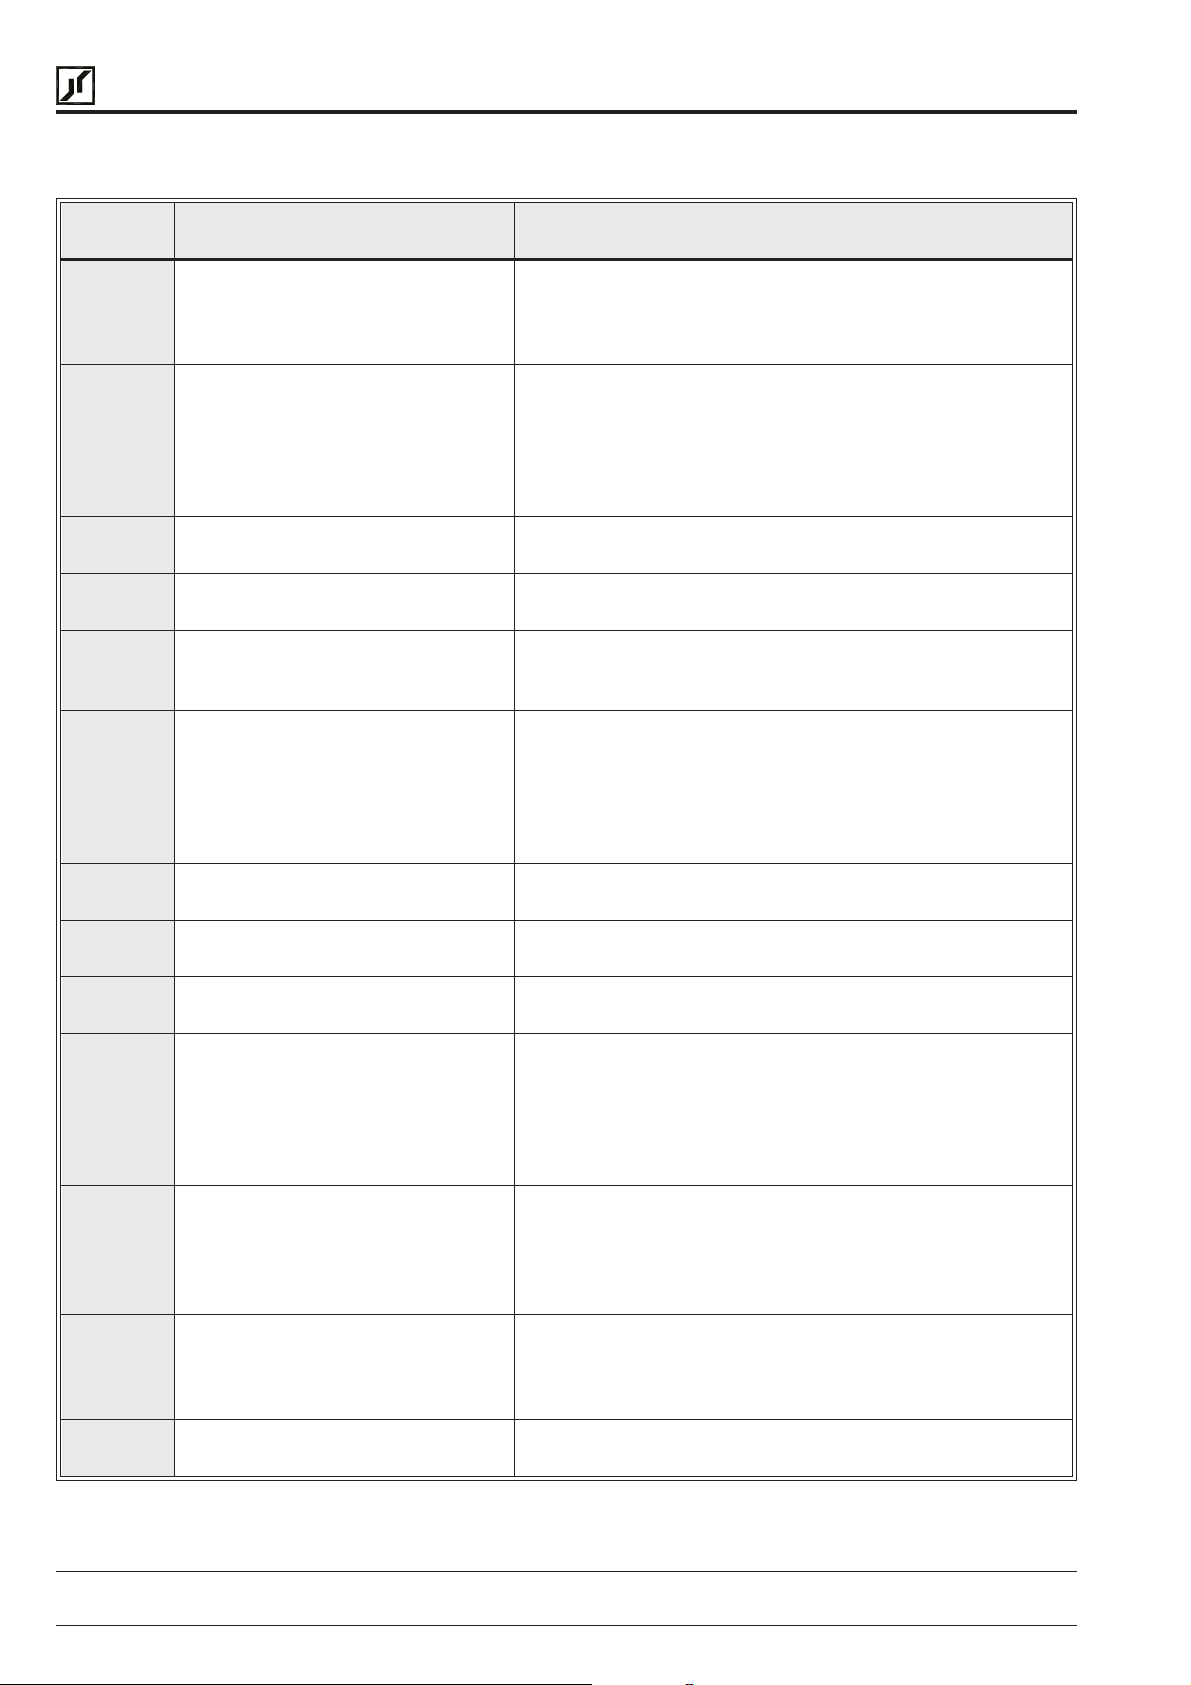
BERGES
Berges electronic • D–51709 Marienheide-Rodt • Tel. 02264/17-0 • Fax 02264/17126
7.2 Troubleshooting
FAULT
NUMBER
F01 Noise on Power Line 1.
F02 Excessive Ambient Electrical Noise
or an Invalid
F03 Excessive DC BUS Current 1.2.Verify the proper sizing of the inverter for the driven load.
F04 Logic Power Supply Overload 1.2.Check for/reduce excessive load on the +24 VDC supply.
F05 No DC Bus Voltage 1.
F06 Output Short Circuit or Ground
Fault
F07 External Fault Mechanism (i.e. Motor
Overload Relay (MOL) Tripped)
F08 Option Board Fault 1. Verify the proper connection and usage of applicable
F10 Auto-Restart (
Exceeded
F11 Ground Fault 1.
F12 External Interference 1.
F13 Overvoltage on DC Bus 1.
F14 Undervoltage on DC Bus 1.2.Verify applied line voltage.
CAUSE REMEDY
Reset the drive using the stop key or remote reset.
2.
Removepower,wait fortheBUSCHG indicator toextinguish
and re-establish power.
If the problem persists, install a line noise filter.
3.
1.
Verify the proper use of shielded wire for remote signal
59-MVOLT
68-NRST
Setting
) Number
connections.
Remove power, wait for the BUS CHG indicator to ex-
2.
tinguish and re-establish power.
3.
Verify the setting of
number.
Determine the reason for the overload.
Remove power 10–15 min.; then reapply.
Check for proper source voltage.
2.
Check for DB component or output transistor failure.
3.
Check for shorted DC bus.
Check motor wiring.
1.
Extend the acceleration time.
2.
Consult BERGES.
3.
Reduce
4.
5.
Increase
6.
Isolate line and load wires.
1.2.Check motor temperature.
Verify the sizing of MOL.
option board.
1.2.Check the fault log (
Institute corrective action for those faults.
Check motor wiring.
Extend the acceleration time.
2.
Check for and remove any capacitive load.
3.
Reduce
4.
5.
Increase
6.
Isolate line and load wires.
Verify line voltage.
Look for electrical noise sources in proximity to the drive
2.
(see Section 2.3.5).
Install line reactor or isolation transformer.
3.
Consult BERGES.
4.
Motor is decelerating too quickly.
Increase deceleration time or add optional external DB
2.
package.
Check input line voltage.
3.
Check for possible DB failure.
52-BOOST
53-FKNEE
52-BOOST
53-FKNEE
59-MVOLT
value.
value.
07-FLT3,08-FLT2
value.
value.
and reset to a valid
, and
09-FLT1
).
78
Operating manual 30.10.97
ACP 6000
SLV
— 0.75–55 05_GB
Page 85
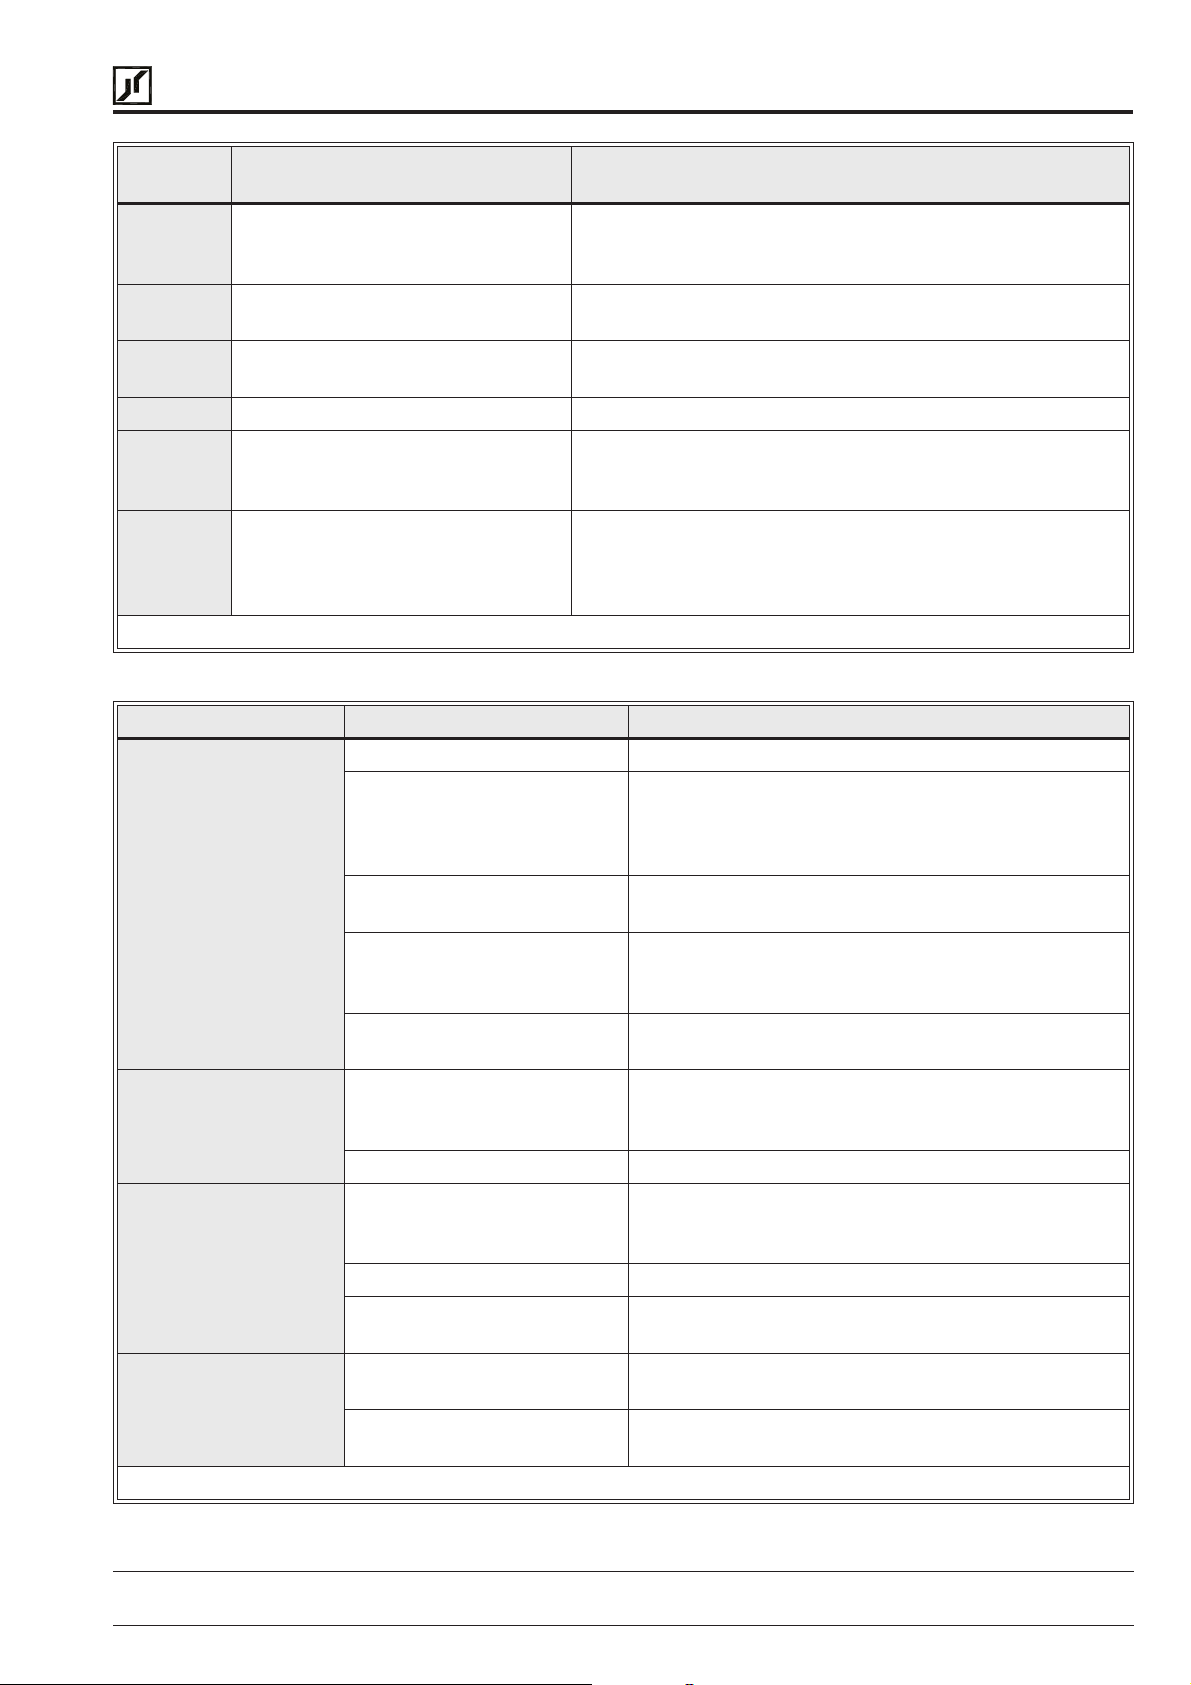
BERGES
Berges electronic • D–51709 Marienheide-Rodt • Tel. 02264/17-0 • Fax 02264/17126
FAULT
NUMBER
F15 DB Overload 1.
F16 Acceleration Overcurrent 1.2.Increase acceleration ramp time.
F17 Deceleration Overcurrent 1.2.Increase deceleration ramp time.
F18 Running Overcurrent 1. Locate the cause of a mechanical overload on the motor.
F19 Heat Sink Overtemperature 1.
F20 Timed Overload 1.
PROBLEM CHECK POINT CORRECTIVE ACTION
Motor is not running Incorrect wiring 1. Check all power and control wiring.
Motor Speed
Fluctuation
Motor Speed Too High
or Too Low
Display Blank Keypad connections
CAUSE REMEDY
Reduce the braking duty cycle.
Install optional external DB package.
2.
Verify line voltage.
3.
Check motor wiring for short circuit.
Install optional external DB package.
Check for excessive load on the motor.
2.
Verify the proper sizing of the ACP for the application.
3.
Locate the ACP in a cooler location, out of direct sunlight.
Check for ACP sizing for the application.
Reduce the loading on the motor.
2.
Check for DB component or output transistor failure.
3.
Check for shorted DC bus.
4.
Table 7.2
External frequency command
(if used)
Programming selections 1. Verify that the proper programming selections have
Fault 1.2.Verify that the inverter has not shutdown due to a
Motor stall 1.2.Release any overload on the motor.
Loose terminal connection 1.2.Stop the inverter, turn off power, and tighten all
Frequency control pot erratic 1. Replace frequency control potentiometer.
Frequency profile 1. Verify that the setting of
Frequency control signal 1. Verify the input signal level.
Motor nameplate specifications 1. Verify that the motor selection is proper for the
intermittent
Logic supply overload 1.2.Check for excessive load on terminal +24.
1.2.Verify that the external frequency control signal is
properly connected.
Verify the integrity of the frequency control potentiometer (if used).
been made for the application.
fault condition.
Consult Table 7.2.
Verify that adequate torque boost is available.
terminal screws.
Check for tightness of all connections within the drive.
53-FKNEE
are correct for the motor specification and
application.
application.
1. Verify keypad connections to control board.
Remove power for 10–15 minutes; then reapply.
Table 7.3
and
32-FMAX
30.10.97 Operating manual
05_GB ACP 6000
SLV
— 0.75–55
79
Page 86

BERGES
Berges electronic • D–51709 Marienheide-Rodt • Tel. 02264/17-0 • Fax 02264/17126
7.3 Maintenance and Inspection
The ACP Inverter is essentially maintenance-free and should provide years of trouble-free
operationifproper installation andoperationproceduresare observed. Chassis typecontrols
are designed to be operated in relatively clean and low humidity areas. If dust accumulates
on the internal printed circuit boards and components, remove power and clean with low
pressure air or vacuum. Remove any dust or lint that accumulates on the outside of the
enclosure, the fan, the fan grille and the heat sink fins to maintain the excellent cooling
properties of your ACP Inverter. IP 54 models are by design compatible with being washed
downbywater.Afterthis has been done,itissuggestedthat the drive beoperatedforseveral
minutes to expel any water trapped within the fan motor.
80
Operating manual 30.10.97
ACP 6000
SLV
— 0.75–55 05_GB
Page 87

Page 88

BERGES
t
BERGES electronic GmbH
Industriestraße 13 • D–51709 Marienheide-Rod
Postfach 1140 • D–51703 Marienheide
Tel. (0 22 64) 17-0 • Fax (0 22 64) 1 71 26
 Loading...