


Silent Base 600

2 3
ENGLISH »
DEUTSCH »
INDEX
FRANÇAIS »
Glinde, October 2016
Introduction ����������������������������������������������������������������������������������������������������������������������������������������������������������4
Scope of delivery ��������������������������������������������������������������������������������������������������������������������������������������������������4
Warranty ����������������������������������������������������������������������������������������������������������������������������� ����������������������������������4
Manufacturer’s details �����������������������������������������������������������������������������������������������������������������������������������������4
Copyright �������������������������������������������������������������������������������������������������������������������������������������������������������������� 4
Specications ������������������������������������������������������������������������������������������������������������������������������������������������������� 4
Installation process ���������������������������������������������������������������������������������������������������������������������������������������������� 5
Remove the side panels ����������������������������������������������������������������������������������������������������������������������������������� 29
Changing the door opening direction ���������������������������������������������������������������������������������������������������������������29
Optional fans/radiator installation�������������������������������������������������������������������������������������������������������������������31
Installation of the motherboard �����������������������������������������������������������������������������������������������������������������������33
Installation of Power Supply unit �������������������������������������������������������������������������������������������������������������������34
Installation of a 5�25” device/ODD ������������������������������������������������������������������������������������������������������������������34
Installation of a 3�5” device/HDD ��������������������������������������������������������������������������������������������������������������������35
Installation of the 3-bay HDD cage into the 5�25” bay ������������������������������������������������������������������������������������36
Installation of a 2�5” device/SSD ���������������������������������������������������������������������������������������������������������������������38
Cleaning the air lters ��������������������������������������������������������������������������������������������������������������������������������������40
Einleitung ��������������������������������������������������������������������������������������������������������������������������������������������������������������9
Lieferumfang ��������������������������������������������������������������������������������������������������������������������������������������������������������9
Garantiebedingungen �������������������������������������������������������������������������������������������������������������������������������������������9
Herstellerangaben ������������������������������������������������������������������������������������������������������������������������������������������������ 9
Copyright �������������������������������������������������������������������������������������������������������������������������������������������������������������� 9
Spezikationen �����������������������������������������������������������������������������������������������������������������������������������������������������9
Installation ����������������������������������������������������������������������������������������������������������������������������������������������������������10
Entfernen der Seitenabdeckungen ������������������������������������������������������������������������������������������������������������������29
Wechseln des Türanschlags �����������������������������������������������������������������������������������������������������������������������������29
Montage zusätzlicher Lüfter/Radiatoren ��������������������������������������������������������������������������������������������������������� 31
Installation des Mainboards �����������������������������������������������������������������������������������������������������������������������������33
Einbau des Netzteils ����������������������������������������������������������������������������������������������������������������������������������������34
Installation eines 5.25” Laufwerks/ODD ���������������������������������������������������������������������������������������������������������34
Installation eines 3.5” Laufwerks/HDD ����������������������������������������������������������������������������������������������������������� 35
Montage des 3-fach HDD-Kägs im 5.25” Rahmen ����������������������������������������������������������������������������������������36
Installation eines 2.5” Lauf-werks/SSD ����������������������������������������������������������������������������������������������������������38
Reinigung der Luftlter ������������������������������������������������������������������������������������������������������������������������������������40
Introduction �������������������������������������������������������������������������������������������������������������������������������������������������������� 14
Contenu �������������������������������������������������������������������������������������������������������������������������������������������������������������� 14
Garantie �������������������������������������������������������������������������������������������������������������������������������������������������������������� 14
Informations constructeur ���������������������������������������������������������������������������������������������������������������������������������14
Droits d’auteur ���������������������������������������������������������������������������������������������������������������������������������������������������14
Caractéristiques ������������������������������������������������������������������������������������������������������������������������������������������������� 14
Installation - général �������������������������������������������������������������������������������������������������������������������������������������������15
Comment démonter les panneaux latéraux ? ��������������������������������������������������������������������������������������������������29
Comment modier le sens d’ouverture des portes ? ��������������������������������������������������������������������������������������� 29
Comment installer des ventilateurs optionnels ou des radiateurs ?����������������������������������������������������������������31
Comment installer la carte mère ? �������������������������������������������������������������������������������������������������������������������33
Comment installer l’alimentation ? ������������������������������������������������������������������������������������������������������������������������34

POLSKI »
Comment installer les périphériques 5�25’’ ? ��������������������������������������������������������������������������������������������������34
Comment installer les périphériques 3�5”/HDD ? �������������������������������������������������������������������������������������������35
Comment installer le rack disque dur 3 baies dans la baie 5,25’’ ? �����������������������������������������������������������������36
Comment installer des périphériques 2�5”/SSD ? �������������������������������������������������������������������������������������������38
Comment nettoyer les ltres ? �������������������������������������������������������������������������������������������������������������������������40
Wprowadzenie ����������������������������������������������������������������������������������������������������������������������������������������������������19
Elementy zestawu ����������������������������������������������������������������������������������������������������������������������������������������������19
Gwarancja�����������������������������������������������������������������������������������������������������������������������������������������������������������19
Dane Producenta ������������������������������������������������������������������������������������������������������������������������������������������������19
Prawa Autorskie ������������������������������������������������������������������������������������������������������������������������������������������������� 19
Wskazówki dotyczące bezpieczeństwa ��������������������������������������������������������������� ����������������������������������������������� 19
Proces instalacji �������������������������������������������������������������������������������������������������������������������������������������������������20
Demontaż paneli bocznych ������������������������������������������������������������������������������������������������������������������������������29
Zmiana kierunku otwierania drzwiczek panelu przedniego �����������������������������������������������������������������������������29
Instalacja opcjonalnych wentylatorów/radiatora ��������������������������������������������������������������������������������������������31
Instalacja płyty głównej ����������������������������������������������������������������������������������������������������������������������������������33
Instalacja zasilacza ������������������������������������������������������������������������������������������������������������������������������������������34
Instalacja urządzeń 5.25”/ODD �����������������������������������������������������������������������������������������������������������������������34
Instalacja urządzeń 3.5”/HDD �������������������������������������������������������������������������������������������������������������������������35
Instalacja koszyka HDD z 3 zatokami w zatoce 5.25”��������������������������������������������������������������������������������������36
Instalacja urządzeń 2.5”/SSD ���������������������������������������������������������������������������������������������������������������� 38
Czyszczenie ltrów przeciwkurzowych ������������������������������������������������������������������������������������������������������������ 40
ESPAÑOL »
Introducción �������������������������������������������������������������������������������������������������������������������������������������������������������24
Volumen de suministro ���������������������������������������������������������������������������������������������������������������������������������������24
Garantía �������������������������������������������������������������������������������������������������������������������������������������������������������������� 24
Información del fabricante ���������������������������������������������������������������������������������������������������������������������������������24
Copyright ������������������������������������������������������������������������������������������������������������������������������������������������������������ 24
Volumen de suministro ���������������������������������������������������������������������������������������������������������������������������������������24
Proceso de instalación ���������������������������������������������������������������������������������������������������������������������������������������25
Retirada de los paneles laterales ���������������������������������������������������������������������������������������������������������������������29
Cambio de la dirección de apertura de la puerta ��������������������������������������������������������������������������������������������29
Instalación de ventiladores/radiadores opcionales�����������������������������������������������������������������������������������������31
Instalación de la placa base ��������������������������������������������������������������� ��������������������������������������������������������������33
Instalación de la fuente de alimentación ���������������������������������������������������������������������������������������������������������34
Instalación de un dispositivo o unidad de disco óptico de 5,25" ���������������������������������������������������������������������34
Instalación de un dispositivo o disco duro de 3,5" ������������������������������������������������������������������������������������������35
Instalación de la caja para discos duros de 3 bahías en la bahía de 5,25" ������������������������������������������������������36
Instalación de un dispositivo o disco duro SSD de 2,5" ����������������������������������������������������������������������������������38
Limpieza de los ltros de aire ��������������������������������������������������������������������������������������������������������������������������40
LIMITED WARRANTY ������������������������������������������������������������������������������������������������������������������������������������ 41
i
» Руководство на русском языке можно загрузить по адресу bequiet.com/ru/download
» 可在此下載繁體中文(臺灣)版的手冊:bequiet.com/tw/download
» 日本語のマニュアルは、bequiet.com/tw/downloadでダウンロードできます

4 5
1. INTRODUCTION
We are delighted you have chosen to buy our Silent Base 600 PC case� Please read the information here and
carefully follow all the instructions prior to installation� Should you have further questions, please contact our
customer service� See contact information in the manufacturer’s details section�
2. SCOPE OF DELIVERY
∙ 1 case
∙ 1 accessory kit box
∙ 1 manual
3. WARRANTY
∙ 3-year manufacturer’s warranty for the consumer (original purchase from authorized be quiet! dealers only)
∙ Your original receipt of purchase will be required before warranty services are rendered� Please store it
carefully�
∙ Manipulations and/or technical modications of any kind, or damage due to the application of mechanical
force, will void your warranty�
∙ To read the warranty terms and conditions in full, see Service/Warranty Conditions on our website at
bequiet�com�
Our General Terms and Conditions of Business also apply� For details please refer online under bequiet�com�
4. MANUFACTURER’S DETAILS
Listan GmbH & Co. KG | Biedenkamp 3a | 21509 Glinde | Germany
For support in Germany, you can call our free service hotline
Monday through Friday 09:00 – 17:30 (UTC+1)
Tel� 0049 40 736 7686 - 44 Fax 0049 40-7367686-69
Email: service@bequiet�com
Website: www�bequiet�com
5. COPYRIGHT
∙ You are not allowed to reproduce, disclose, publish or store the contents of this documentation, or excerpts
of it, without the prior written consent of Listan�
∙ be quiet! is a registered trademark of Listan GmbH & Co. KG. Other products and company names mentioned
in this documentation may be the brands or trademarks of their respective owners.
∙ In accordance with company policy, all Listan products are subject to ongoing development� Listan reserves
the right to make changes and improvements to any product described in this documentation without prior
notice�
∙ Under no circumstances shall Listan be held liable for loss of data or income, or for any specic, incidental,
direct, or indirect damage, however it arises�
∙ The content of this documentation represents the status at time of writing� Listan does not assume, whether
expressed or implicit, any liability for the correctness or completeness of the content of this documentation,
including, but not limited to the implicit guarantee of market suitability and tness for a particular purpose,
unless applicable laws or jurisdiction specically stipulate such a liability.
Listan reserves the right to make changes to this documentation or to withdraw the documentation at any time
without prior announcement�
6. SPECIFICATIONS
Ensure your hardware does not exceed any of the limits listed in the table of specications, as this could cause
damage to the housing or the equipment you install in it. Note that product specications are subject to change
without notice�
Model Silent Base 600 Orange / Black / Sliver / Red / Green
Article number BG005 (Orange), BG006 (Black), BG007 (Silver), BG008 (Red), BG009 (Green)
Material 0�7mm SECC, ABS, nylon
Case size (L x W x H), (mm) 495 x 230 x 493
Net weight (kg) 7�8
Main board size Mini-ITX, Micro-ATX, ATX
5�25” bays 3
3�5” bays 3
2�5” bays 3
Front I/O ports USB 3�0 (2 of), USB 2�0 (2 of), HD Audio (Microphone and Headset)
Front cooling fan 140mm @900rpm - be quiet! Pure Wings 2
Rear cooling fan 120mm @1200rpm - be quiet! Pure Wings 2
Optional cooling 2x 140/120mm (top), 1x 140/120mm (bottom), 1x 140mm (front),
1x 120mm (side panel)
PCI slots 7
Power supply PS2 ATX, maximum length 300mm
CPU cooler height (mm) 170 max�
Graphics card length (mm) 290 (with HDD cage), 400 (HDD cage removed)
Liquid cooling system Front 120/140mm radiator (optional)
Rear 120mm radiator (optional)
Top 240mm radiator (optional)
7. INSTALLATION PROCESS
Before commencing assembly please ensure that all accessories and components are available and in the
amount listed�
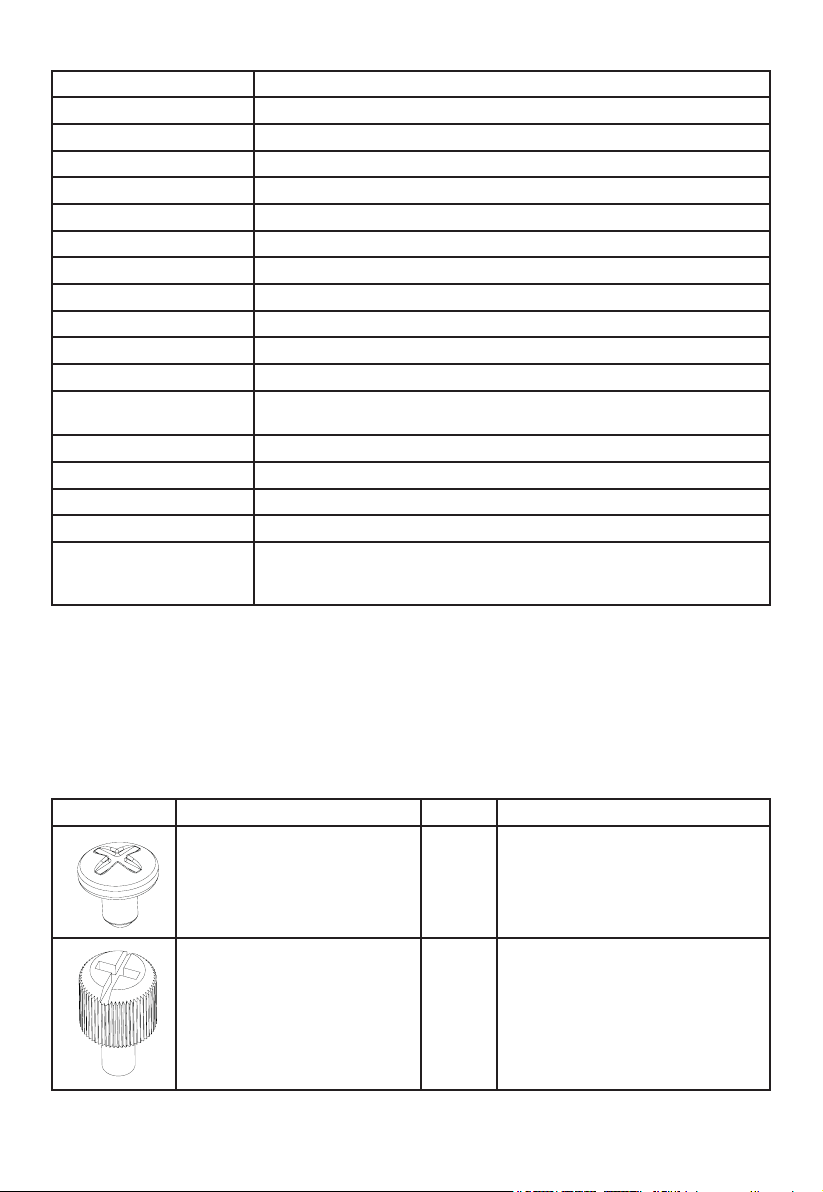
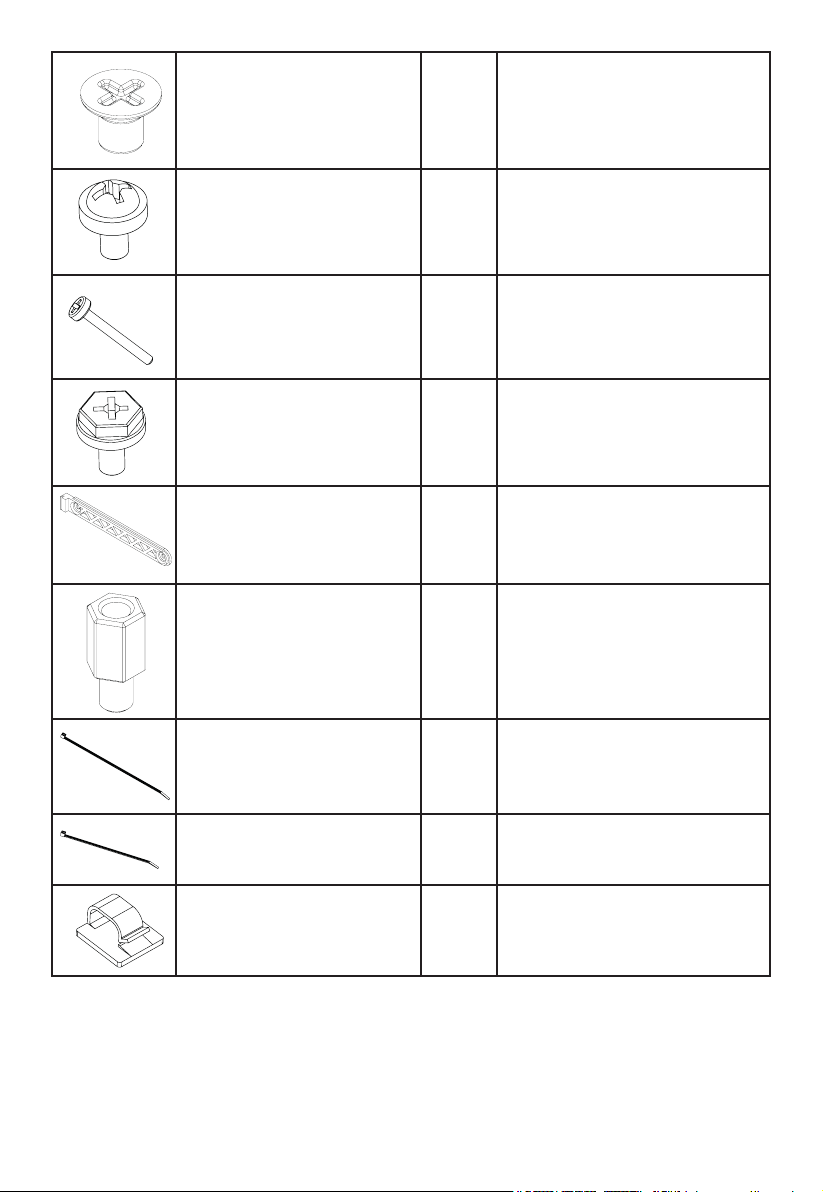
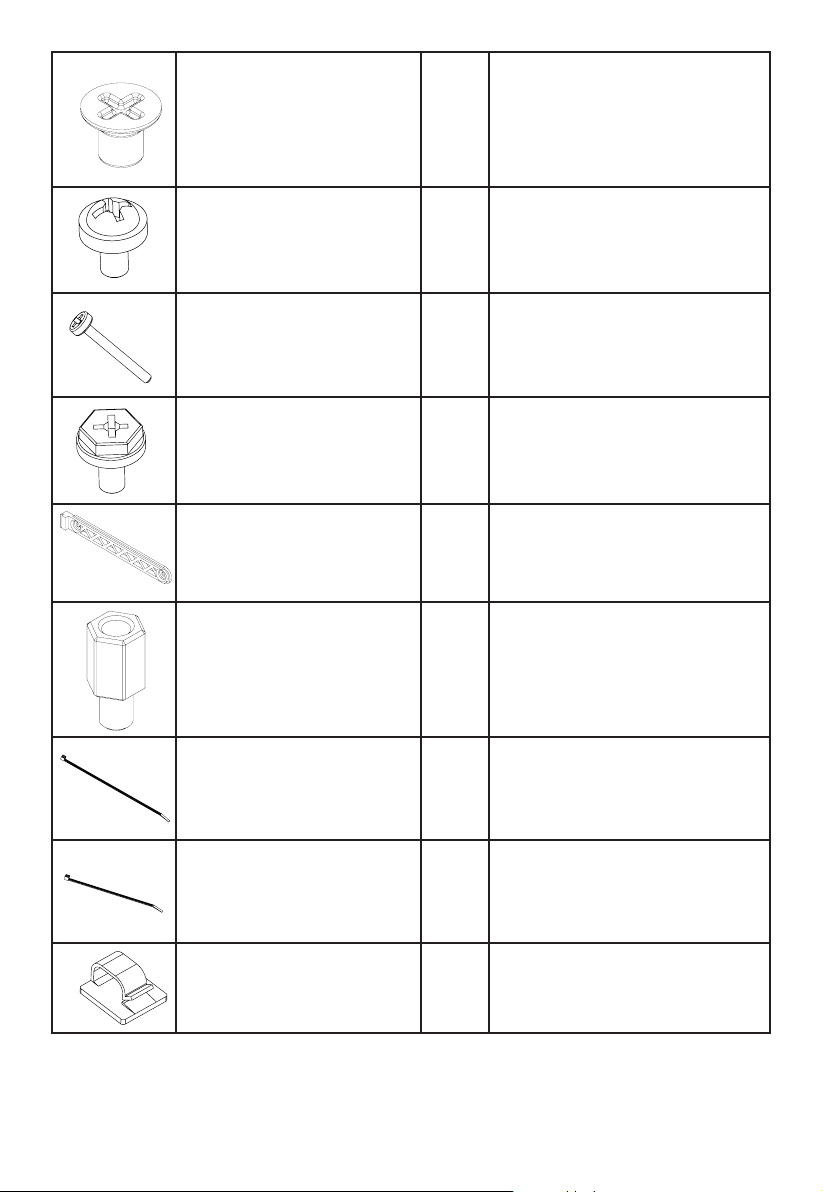
7.1 Accessories Pack
Images Part Name Amount Usage
#6-32 Round head screws 8 Secure motherboard
M3 HDD screws 12 Secure rubber rail to HDD
6 7
M3 x8 Flat head screws
#6-32 x 5 Flat head screws
12
4
Secure 2�5” HDD/SSD
Secure 2.5" HDD cage tray
M3 x 5 Round head screws 6 Secure 5�25” device/ODD
#6-32 x30 at head screws 4 Secure front intake fan
#6-32 Hex head screws 4 PSU
Rubber rail 6 Mounting HDD to HDD cage
Stando 2 For motherboard
Cable tie long 2 Cable management
Cable tie short 2 Cable management
Cable tie holder 1 Cable management
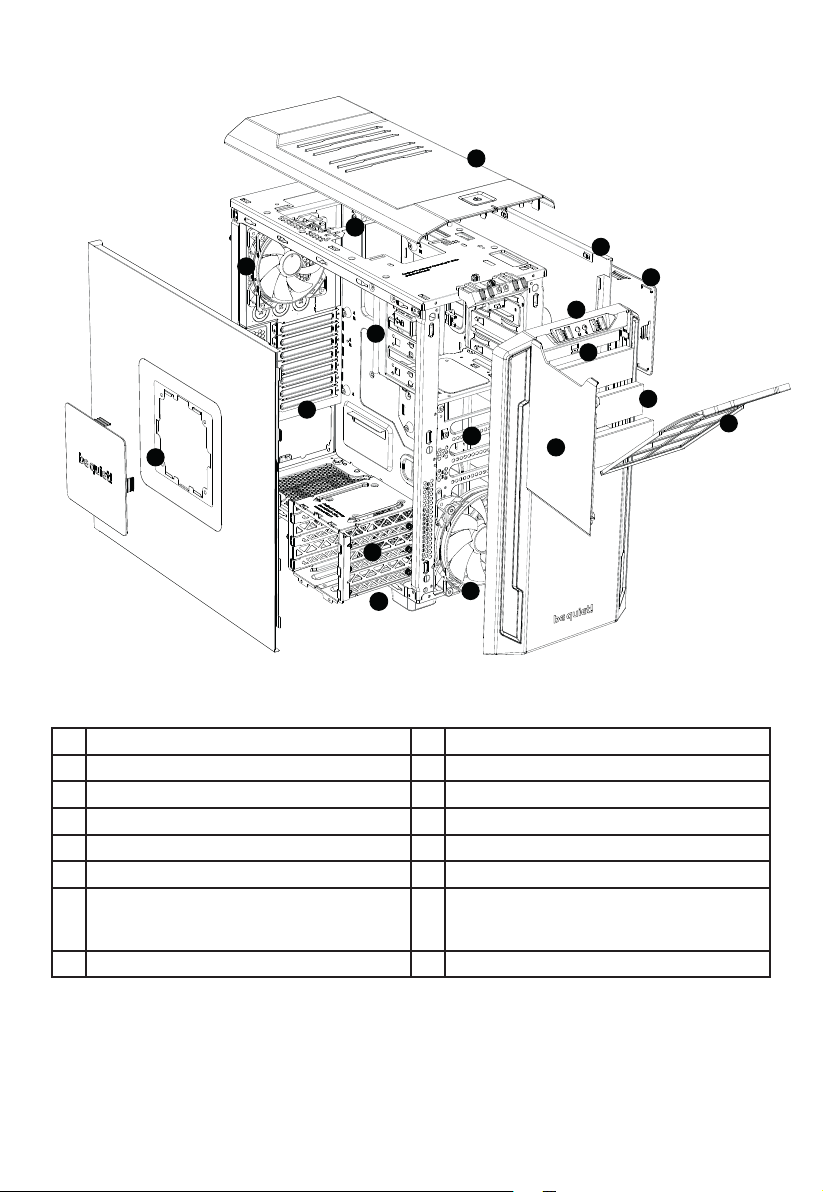
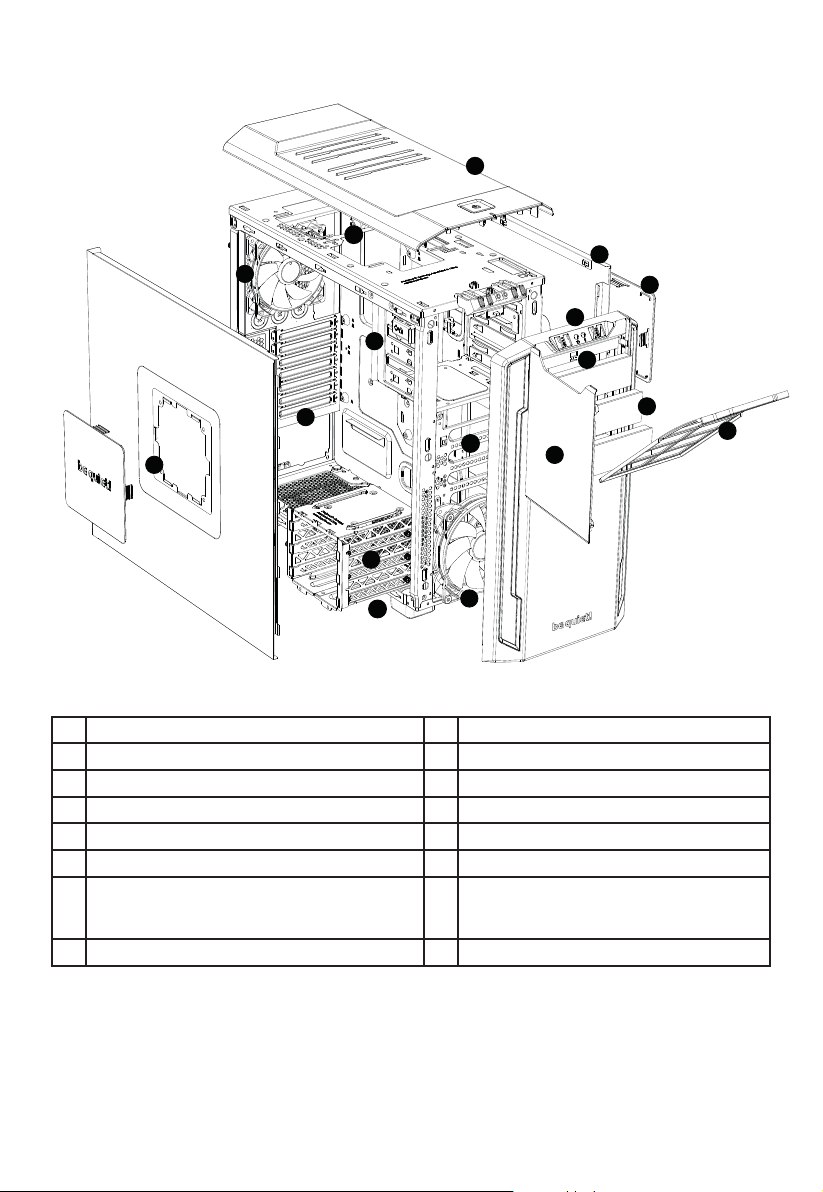
7.2 Description of the model
1 Upper front panel 9 Front I/O ports
2 Front air lter 10 Optional fan mountings
3 Intake fans 11 Rear exhaust fan
4 5�25” bays/bezels 12 5.25” device lock
5 Left side panel with fan mounting and lter 13 3-bay HDD cage
6 Side panel bezel 14 3-step fan controller
7 Right side panel with lter.
NOTE: no optional fan mounting on right side
panel
15 PCI brackets
8 Top cover
11
12
13
15
14
1
2
3
7
4
8
9
10
10
10
5
6
8 9
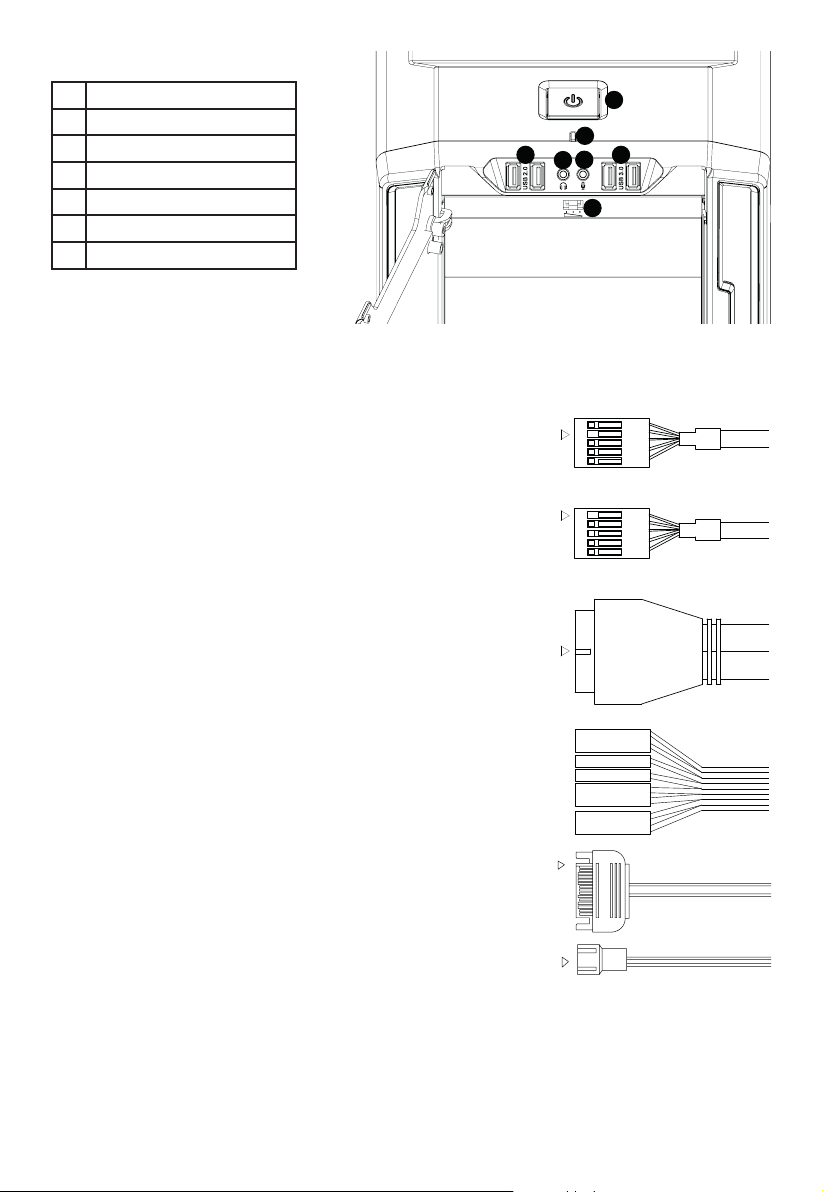
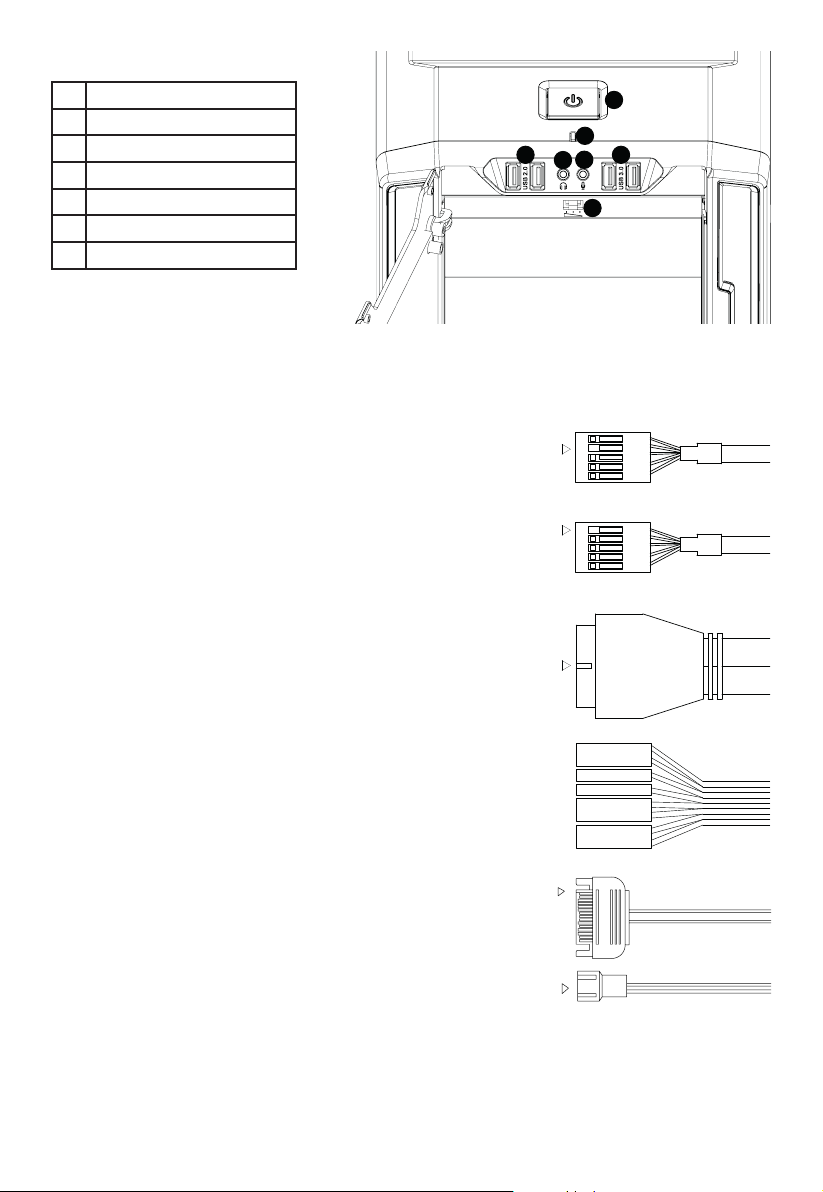
7.3 Front I/O ports
1 USB 2�0
2 Headphone jack
3 Microphone jack
4 USB 3�0
5 Power button/Power LED
6 HDD LED/reset button
7 3-step fan controller
7.4 The function panel has several wire connections that need to be installed.
HD audio (headphone jack/microphone jack)
Find the “Front panel audio headers/pin connectors” on the
motherboard� Plug in the wires according to the motherboard
manual�
USB 2.0
Find the “USB 2�0 Headers/pin connectors” on the motherboard�
Plug in the wires according to the motherboard manual�
USB 3.0
Find the “USB 3�0 Headers/pin connectors” on the motherboard�
Plug in the wires according to the motherboard manual�
Power switch, Power LED, HDD LED, Reset switch
These wires plug into the motherboard where all the front panel
switch/pin connectors functions are located� The motherboard
manual will have a description of where to plug these in, usually
their location is labeled in the motherboard manual�
3-step fan controller
The fan controller is powered by a SATA connector that has to be
connected directly to the power supply� The controller is able to
control up to three 3-pin fans� Plug in the 3-pin connector of the
fan controller into the plug of your 3-pin fan�
8. STEP-BY-STEP INSTALLATION ����������������������������������������������������������������������������������������� 29
HD AUDIOUSB
KEY
KEY
KEY
POWER SW
POWERLED +
H.D.D LED
RESET SW
POWERLED -
1
2
3
6
7
4
5
KEY
KEY

1. EINLEITUNG
Wir freuen uns, dass Sie sich für das be quiet! Gehäuse Silent Base 600 entschieden haben� Bitte lesen Sie
vor Inbetriebnahme die nachstehenden Informationen aufmerksam durch und beachten Sie die einzelnen
Installationshinweise. Bei weiteren Fragen wenden Sie sich gern an unseren Kundenservice. Die Kontaktdaten
nden Sie im Abschnitt „Herstellerangaben“.
2. LIEFERUMFANG
∙ 1 Gehäuse
∙ 1 Zubehör-Box
∙ 1 Handbuch
3. GARANTIEBEDINGUNGEN
∙ 3 Jahre Herstellergarantie für Endkunden, nur bei Ersterwerb von einem autorisierten be quiet! Händler.
∙ Eine Garantieleistung kann nur bei Vorlage des Kaufbelegs bzw. der Originalrechnung erfolgen. Bitte heben
Sie entsprechende Belege sorgfältig auf�
∙ Mit Manipulationen oder baulichen Veränderungen jeglicher Art sowie Beschädigungen durch mechanische
Einwirkung erlischt jeder Garantieanspruch.
∙ Bitte beachten Sie auch die ausführlichen Informationen auf unserer Website, unter bequiet�com im
Menüpunkt Service/Herstellergarantie.
Es gelten unsere Allgemeinen Geschäfts- und Garantiebedingungen, die Sie auf unserer Website bequiet�com
einsehen können.
4. HERSTELLERANGABEN
Listan GmbH & Co. KG | Biedenkamp 3a | 21509 Glinde | Deutschland
Für weitere Unterstützung erreichen Sie uns innerhalb Deutschlands unter der kostenlosen Service-Hotline,
montags bis freitags von 09�00 bis 17�30 Uhr�
Tel�: 040/7367686–44; Fax: 040/7367686-69
E-Mail: service@bequiet�com
Internet: bequiet�com
5. COPYRIGHT
∙ Der Inhalt dieser Dokumentation darf ohne vorherige schriftliche Genehmigung durch Listan in keiner Form,
weder ganz noch teilweise, vervielfältigt, weitergegeben, verbreitet oder gespeichert werden�
∙ be quiet! ist eine eingetragene Marke der Firma Listan GmbH & Co. KG. Andere in dieser Dokumentation
erwähnte Produkt- und Firmennamen können Marken oder Handelsnamen ihrer jeweiligen Eigentümer sein.
∙ Listan entwickelt entsprechend ihrer Politik die Produkte ständig weiter. Listan behält sich deshalb das
Recht vor, ohne vorherige Ankündigungen an allen in dieser Dokumentation beschriebenen Produkte
Änderungen und Verbesserungen vorzunehmen�
∙ Listan ist unter keinen Umständen verantwortlich für den Verlust von Daten und Einkünften oder für
jedwede besonderen, beiläugen, mittelbaren oder unmittelbaren Schäden, wie immer diese auch zustande
gekommen sind.
∙ Der Inhalt dieser Dokumentation wird so präsentiert, wie er aktuell vorliegt. Listan übernimmt weder
ausdrücklich noch stillschweigend irgendeine Gewährleistung für die Richtigkeit oder Vollständigkeit des
Inhalts dieser Dokumentation, einschließlich, aber nicht beschränkt auf die stillschweigende Garantie der
Markttauglichkeit und der Eignung für einen bestimmten Zweck, es sei denn, anwendbare Gesetze oder
Rechtsprechung schreiben zwingend eine Haftung vor�
Listan behält sich das Recht vor, jederzeit ohne vorherige Ankündigung Änderungen an dieser Dokumentation
vorzunehmen oder die Dokumentation zurückzuziehen.
6. SPEZIFIKATIONEN
Überprüfen Sie, ob Ihre Hardware mit den angegebenen Maßen und Anforderungen kompatibel ist, um
Schäden am Gehäuse oder an Komponenten zu vermeiden. Beachten Sie, dass einzelne Produkteigenschaften
ohne vorherige Ankündigung geändert werden können.

10 11
Modell Silent Base 600 Orange / Black / Silver / Red / Green
Artikelnummer
BG005 (Orange), BG006 (Schwarz), BG007 (Silber), BG008 (Rot), BG009 (Grün)
Material 0,7mm Stahl, ABS, Nylon
Abmessungen (L x W x H), (mm) 495 x 230 x 493
Gewicht (kg) 7,8
Formfaktor Mini-ITX, Micro-ATX, ATX
5�25” Schächte 3
3�5” Schächte 3
2�5” Schächte 3
Front I/O-Anschlüsse USB 3.0 (2), USB 2.0 (2), HD Audio (Mikrofon und Kopfhörer)
Lüfter (Vorderseite) 140mm @900rpm – be quiet! Pure Wings 2
Lüfter (Rückseite) 120mm @1200rpm – be quiet! Pure Wings 2
Zusatzlüfter (optional) 2x 140/120mm (Deckel), 1x 140/120mm (Boden), 1x 140mm (Front),
1x 120mm (Seitenpanel)
PCI-Steckplätze 7
Netzteil PS2 ATX, max� Länge 300mm
Max� Höhe CPU-Kühler (mm) 170
Max. Länge Grakkarte 290mm (mit HDD-Käg), 400mm (ohne HDD-Käg)
Wasserkühlung (optional) Vorderseite 120mm/140mm Radiator
Rückseite 120mm Radiator
Deckel 240mm Radiator
7. INSTALLATION
Bitte überprüfen Sie vor Installationsbeginn die Vollständigkeit des hier aufgelisteten Zubehörs und halten Sie
alle notwendigen Bauteile gribereit.
7.1 Zubehör
Abbildung Bezeichnung Anzahl Verwendungszweck
#6-32 Rundkopfschraube 8 Mainboard-Befestigung
M3 Rändelschraube 12 Befestigung Silikonschienen an HDD
M3 x8 Flachkopfschraube
#6-32 x5 Flachkopfschraube
12
4
Befestigung 2.5” Laufwerk (HDD/SSD)
Befestigung 2.5" HDD Käg Platte
M3 x5 Rundkopfschraube 6 Befestigung 5.25” Laufwerk(ODD)
#6-32 x30 Flachkopfschraube 4 Befestigung vorderer Lüfter
#6-32 Sechskantschraube 4 Netzteil-Befestigung
Silikonschiene 6 Montage HDD am HDD-Käg
Abstandshalter 2 Mainboard-Fixierung
Kabelbinder lang 2 Kabelmanagement
Kabelbinder kurz 2 Kabelmanagement
Kabelbinder Halterung 1 Kabelmanagement
12 13
7.2 Gehäusebeschreibung
1 Obere Frontabdeckung 9 Front I/O-Anschlüsse
2 Front-Luftlter 10 Montage Zusatzlüfter (optional)
3 Ansauglüfter 11 Abluft-Lüfter
4 5�25” Schächte/Blenden 12 Verriegelung 5.25” Laufwerk
5 Linke Seitenabdeckung, Luftlter, Lüfterönung 13 HDD-Käg (3 Schächte)
6 Belüftungsklappe 14 3-Stufen Lüftersteuerung
7 Rechte Seitenpanel, Luftlter
HINWEIS: rechts keine Montage von
Zusatzlüftern möglich!
15 PCI-Halterung
8 Gehäusedeckel
11
12
13
15
14
1
2
3
7
4
8
9
10
10
10
5
6
7.3 Front I/O ports
1 USB 2�0
2 Kopfhörerbuchse
3 Mikrofonbuchse
4 USB 3�0
5 Power Knopf/Power LED
6 HDD LED/Reset Knopf
7 3-Stufen Lüftersteuerung
7.4 Die vorhandenen Front I/O-Anschlüsse müssen mit Ihrem Mainboard verbunden werden.
HD Audio (Kopfhörer- und Mikrofon-Buchse)
Ermitteln Sie die HD Audio Pin-Anschlüsse an Ihrem Mainboard
und stecken Sie die HD Audio-Kabel in die dort vorgesehenen
Steckplätze. Informationen zur Pin-Belegung Ihres Mainboards
nden Sie in Ihrem Mainboard-Handbuch.
USB 2.0
Ermitteln Sie die USB 2�0 Pin-Anschlüsse an Ihrem Mainboard
und stecken Sie die USB 2.0-Kabel in die dort vorgesehenen
Steckplätze. Informationen zur Pin-Belegung Ihres Mainboards
nden Sie in Ihrem Mainboard-Handbuch.
USB 3.0
Ermitteln Sie die USB 3�0 Pin-Anschlüsse an Ihrem Mainboard
und stecken Sie die USB 3.0-Kabel in die dort vorgesehenen
Steckplätze. Informationen zur Pin-Belegung Ihres Mainboards
nden Sie in Ihrem Mainboard-Handbuch.
Ein-/Aus-Taste, LED-Betriebsanzeige, HDD-Anzeige, Reset-
Taste
Die abgebildeten Stecker verbinden die Funktionsschalter und
LED-Leuchten des Gehäuses mit Ihrem Mainboard� Achten Sie bei
den LEDs auf die richtige Polung� Ihr Mainboard-Handbuch sollte
Ihnen Aufschluss über den richtigen Steckplatz geben.
3-Stufen Lüftersteuerung
Der SATA-Anschluss der Lüftersteuerung muss direkt mit dem
Netzteil verbunden werden� Die Lüftersteuerung ist in der Lage
bis zu drei 3-Pin Lüfter zu kontrollieren. Verbinden Sie den 3-Pin
Anschluss der Lüftersteuerung mit dem 3-Pin Anschluss des
Lüfters�
8. SCHRITT-FÜR-SCHRITT ANLEITUNG ���������������������������������������������������������������������������� 29
HD AUDIOUSB
KEY
KEY
KEY
POWER SW
POWERLED +
H.D.D LED
RESET SW
POWERLED -
1
2
3
6
7
4
5
KEY
KEY

14 15
1. INTRODUCTION
Nous vous remercions d’avoir choisi d’acquérir notre Silent Base 600� Nous vous invitons à lire attentivement
le manuel et à suivre les instructions avec beaucoup d’attention� Si toutefois, vous aviez des questions, veuillez
contacter notre service client, dont vous trouverez les coordonnées dans le paragraphe appelé ‘Informations
constructeur »�
2. CONTENU
∙ 1 boîtier
∙ 1 boîte d’accessoires
∙ 1 manuel d’utilisation
3. GARANTIE
∙ Garantie constructeur de 3 ans pour l’utilisateur nal (achat auprès d’un revendeur be quiet! agréé)
∙ Sur présentation de la facture d’achat initiale� Veuillez penser à la conserver
∙ Toute manipulation ou modication du châssis entraîne l’annulation de la garantie
∙ Les conditions générales de garantie sont disponibles dans leur intégralité sur notre site internet
bequiet�com dans la rubrique « Service/Garantie constructeur »
Nos conditions générales de vente s’appliquent également� Pour plus d’information, veuillez vous rendre sur
bequiet�com
4. INFORMATIONS CONSTRUCTEUR
Listan GmbH & Co. KG | Biedenkamp 3a | 21509 Glinde | Allemagne
Si vous souhaitez joindre notre service client, nous vous invitons à contacter notre numéro vert, du lundi au
vendredi, de 09 à 18h, au 0800 469 209 ou à nous écrire :
Courriel : service@be-quiet�fr
Site internet : bequiet�com
5. DROITS D’AUTEUR
∙ Le contenu de la présente documentation ne peut être reproduit, distribué, diusé ou enregistré d’aucune
manière que ce soit, ni en tout ni en partie, sans l’autorisation préalable écrite de Listan GmbH & Co. KG.
∙ be quiet! est une marque déposée de la société Listan GmbH & Co. KG. Les autres noms de produits et de
sociétés mentionnés dans la présente documentation peuvent être des marques ou des noms commerciaux
appartenant à leurs propriétaires respectifs�
∙ Listan ne cesse d’améliorer ses produits conformément à sa politique� Par conséquent, Listan se réserve
le droit de procéder à des modications et à des améliorations de chacun des produits décrits dans la
présente documentation, sans aucun préavis�
∙ Listan décline toute responsabilité en cas de pertes de données et de revenus, de dommages particuliers,
accessoires, directs ou indirects, quels qu’ils soient, et quelle qu’en soit l’origine�
∙ La présente documentation décrit le produit sous sa forme actuelle� Listan décline toute responsabilité
expresse ou tacite quant à l’exactitude et à l’exhaustivité du contenu de la présente documentation, y
compris, sans s’y limiter, de la garantie tacite de l’aptitude à la commercialisation et d’aptitude à un usage
déni, sauf dans les cas où la législation applicable ou la jurisprudence exigent une telle responsabilité.
Listan se réserve le droit de procéder à tout moment et sans avis préalable à des modications de la présente
documentation, ou à son retrait�
6. CARACTÉRISTIQUES
Avant de commencer l’installation, veuillez vous assurer que vos composants sont conformes aux spécications
listées ci-dessous. Le cas échéant, cela pourrait causer des dommages sérieux à votre conguration.
Attention, les caractéristiques de nos produits peuvent être modiées sans préavis.
 Loading...