

Page 1

Page 2

Welcome t o Mir a scan 6 !
Welcome t o Mir a scan 6 !
Welcome t o Mir a scan 6 !Welcome t o Mir a scan 6 !
In the “For Beginners” section, we will walk you through your first scan. You don’t
need to know much about scanners and digital imaging. Just follow the steps in this
section and you’ll be able to scan images and save them as files, copy a photo or e-mail,
or put them on a web page..., etc.
Before you start, check the following items:
Before you start, check the following items:
Before you start, check the following items:Before you start, check the following items:
• Check if the scanner is correctly installed and connected to your computer. For
details, please see the scanner installation quick guide in the package.
• If you want to use the “Scan to E-mail”, “Scan to Application”, “Scan to OCR” and
“Scan to PDA” functions, make sure related software programs are installed.
• Check if the printer is correctly installed and turned on before using the “Copy a
photo/document” function.
For Beginners
For Beginners
For BeginnersFor Beginners
1
Page 3

Prepare your original for scanning
Prepare your original for scanning
Prepare your original for scanningPrepare your original for scanning
If you want to scan a photograph
If you want to scan a photograph
If you want to scan a photographIf you want to scan a photograph
Place the photograph with the side to be scanned facing down on the scanner
glass plate and align it against the edge of the scanner. Note the direction of the
photograph so that you will not scan the photograph in wrong direction.
Close scanner cover.
If you want to scan a picture on a book or magazine
If you want to scan a picture on a book or magazine
If you want to scan a picture on a book or magazineIf you want to scan a picture on a book or magazine
Open the book to the page that contains the picture you want to scan and put
it on the scanner with the picture against the glass plate. Note the direction of
the picture so that you will not scan the picture in wrong direction.
Close scanner cover.
For Beginners
For Beginners
For BeginnersFor Beginners
2
Page 4
Open Mirascan 6 (Wizard Mode)
Open Mirascan 6 (Wizard Mode)
Open Mirascan 6 (Wizard Mode)Open Mirascan 6 (Wizard Mode)
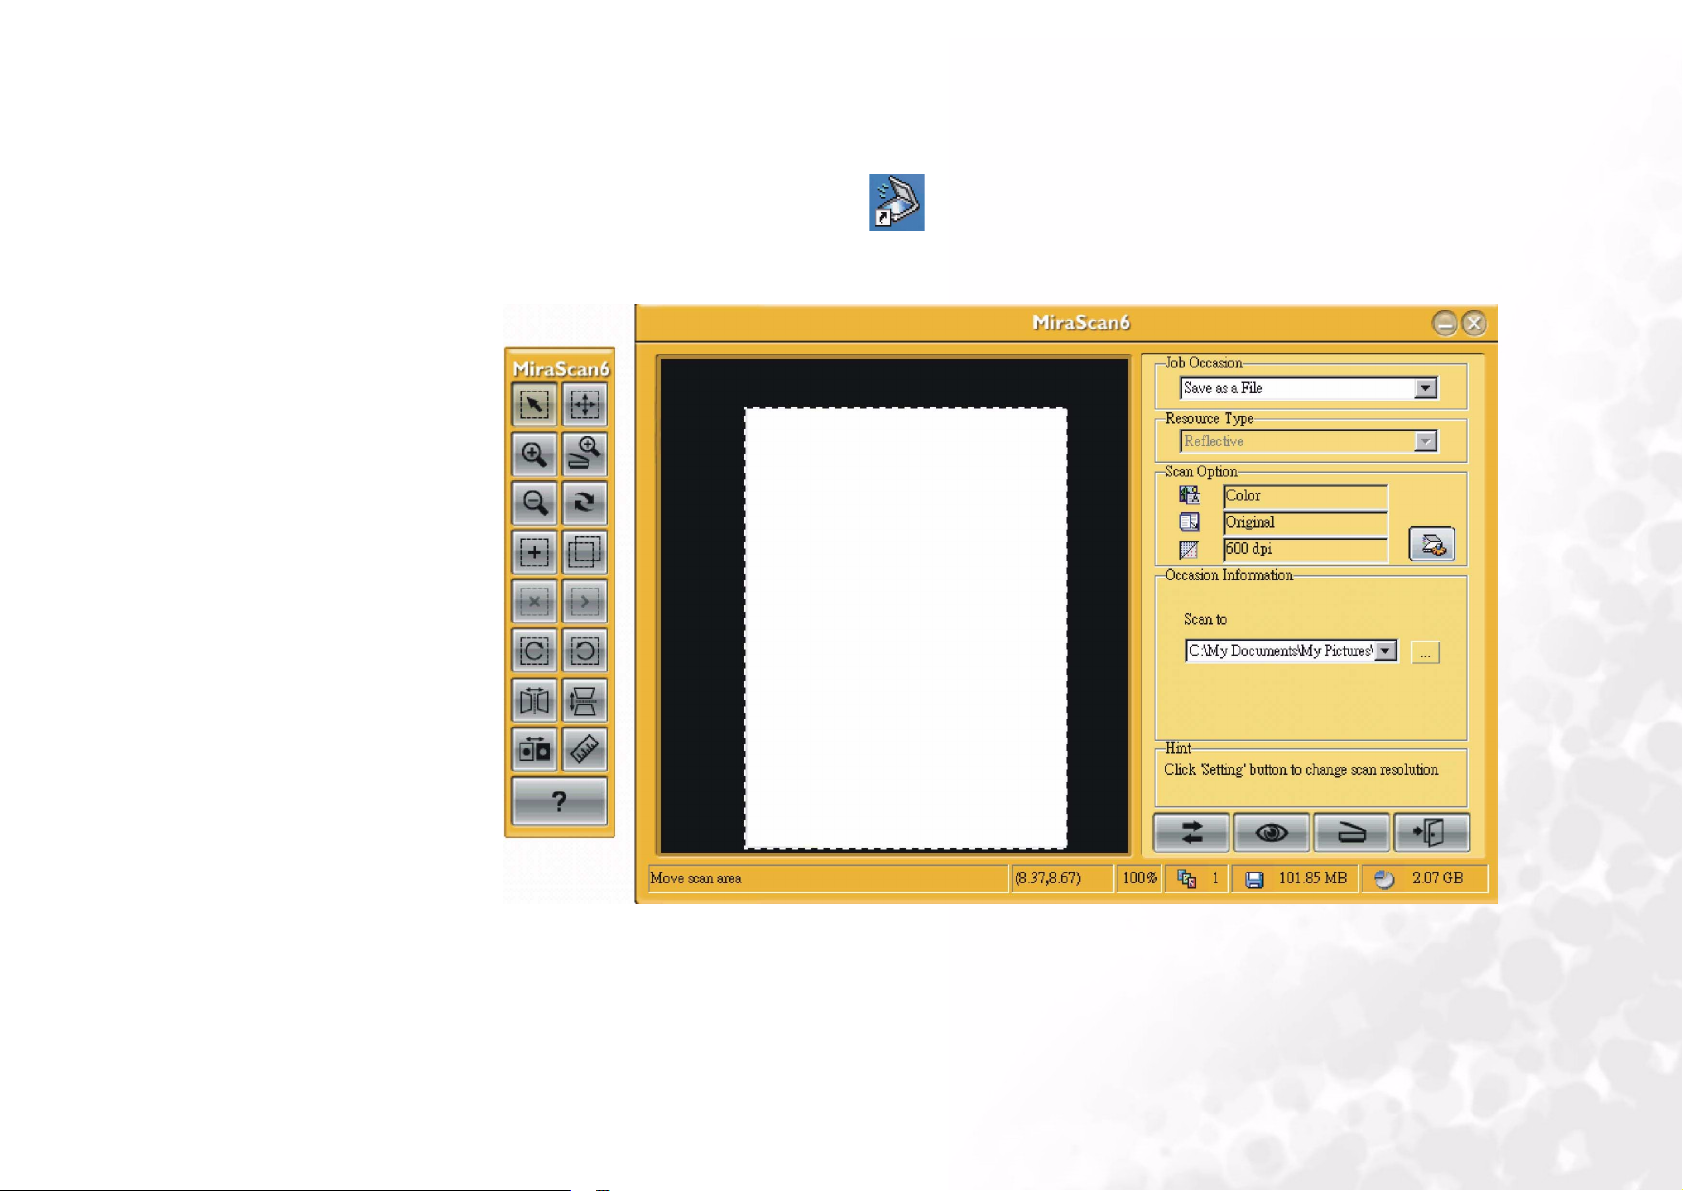
Double-click the MiraScan icon on your desktop. Mirascan 6 will open to the
screen in Wizard mode.
Now you are ready to use the scan functions listed in “Job Occasion”.
For Beginners
For Beginners
For BeginnersFor Beginners
3
Page 5
Save as a File
Save as a File
Save as a FileSave as a File
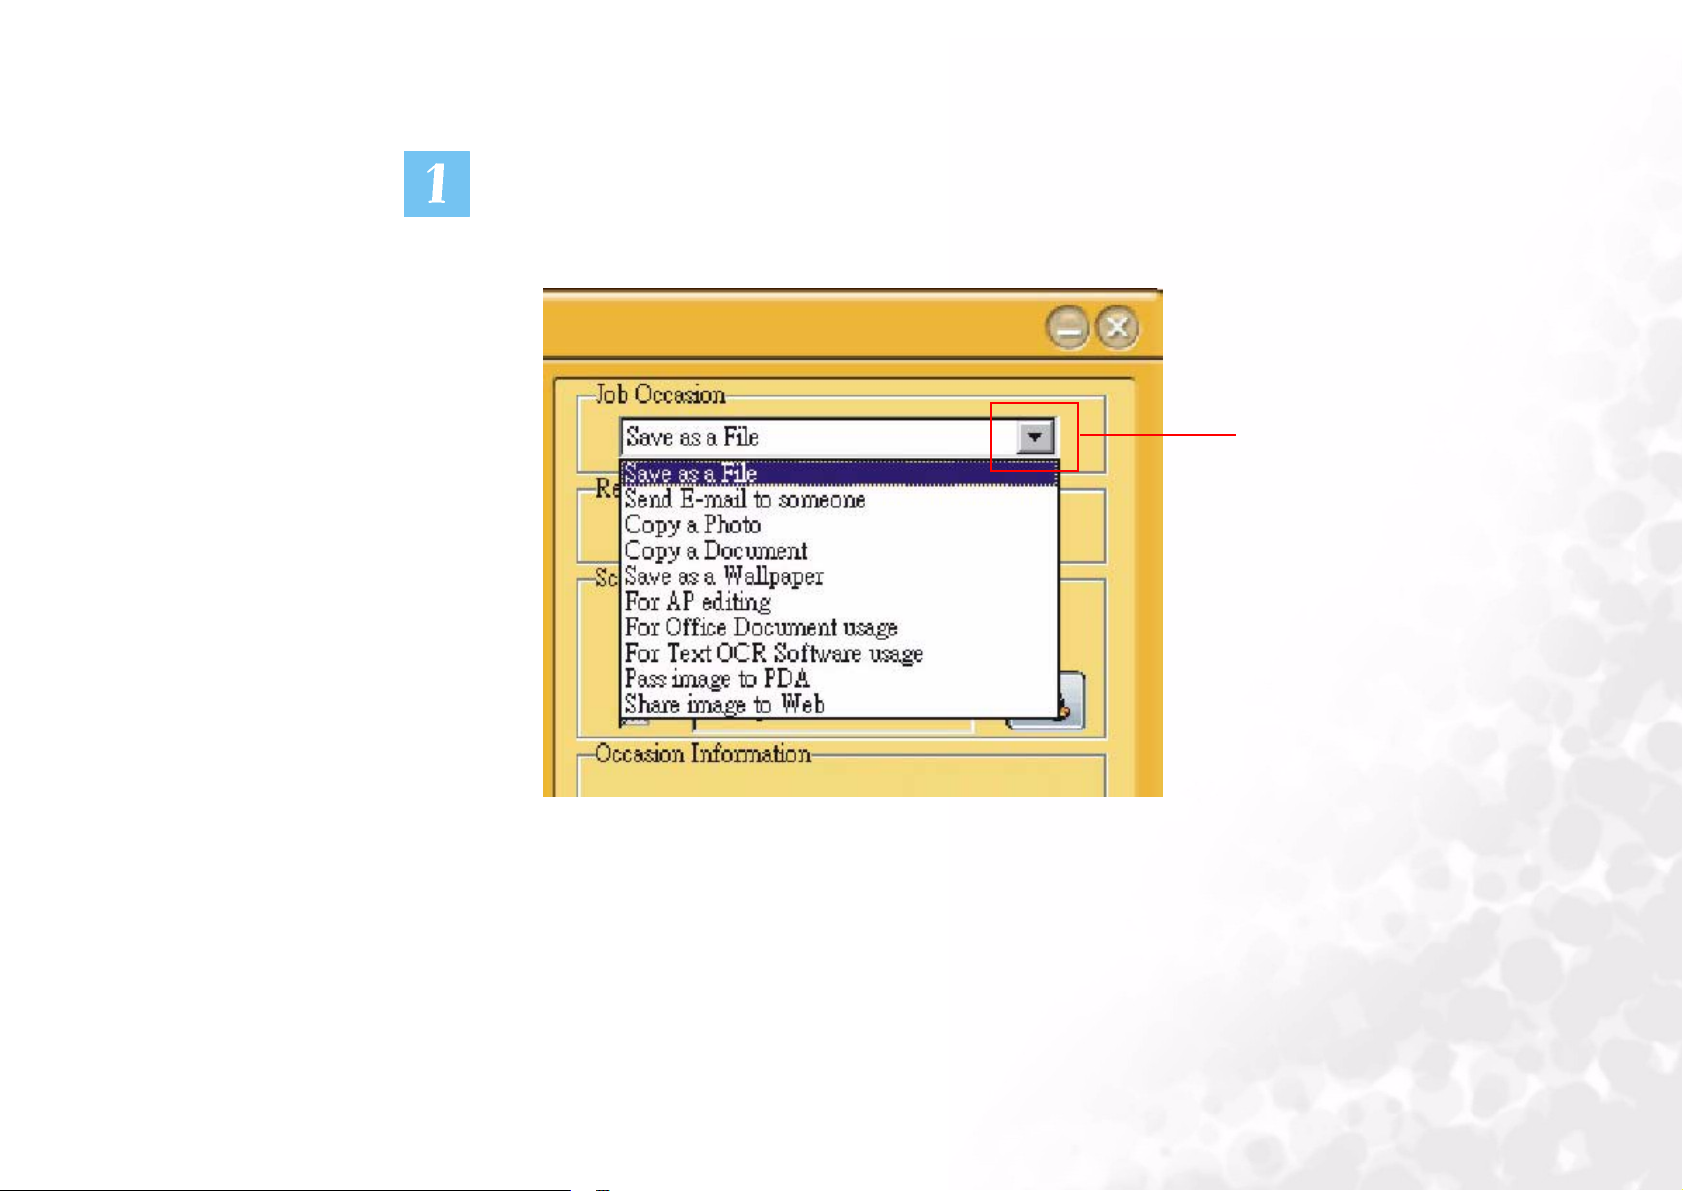
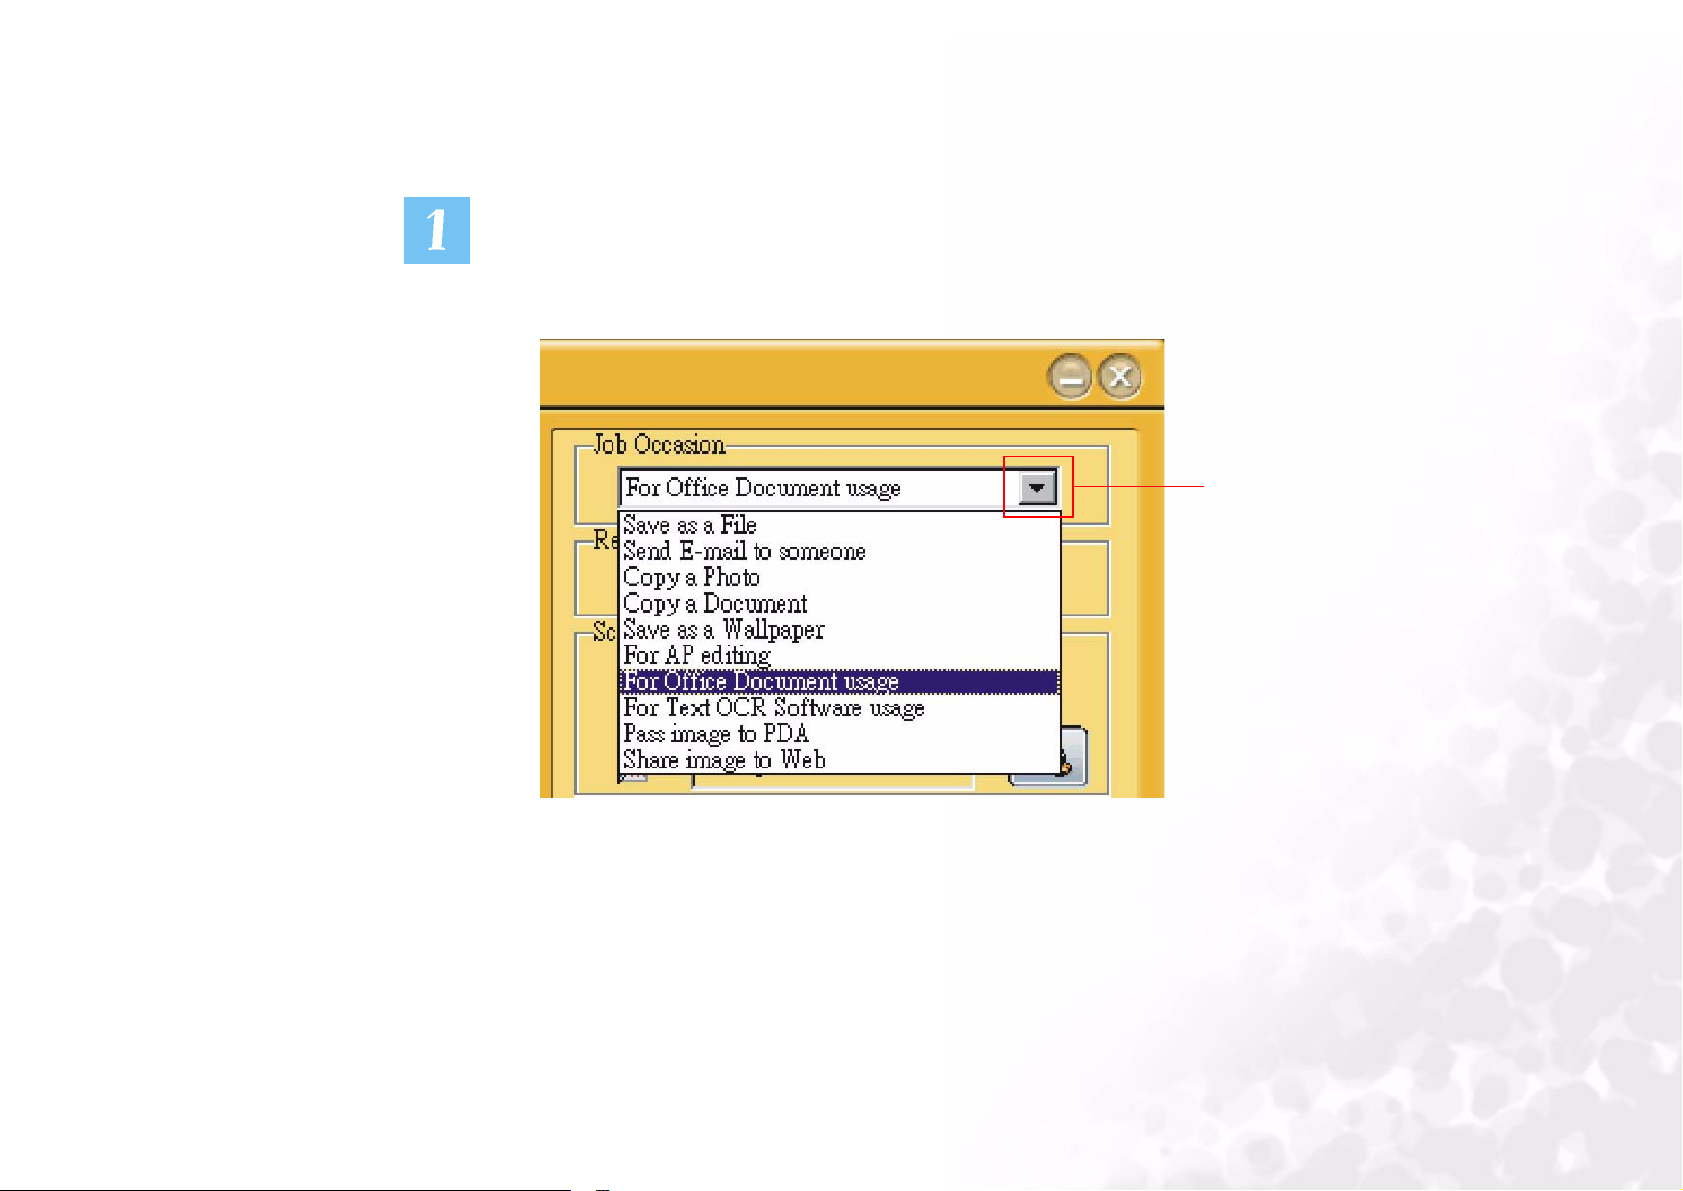
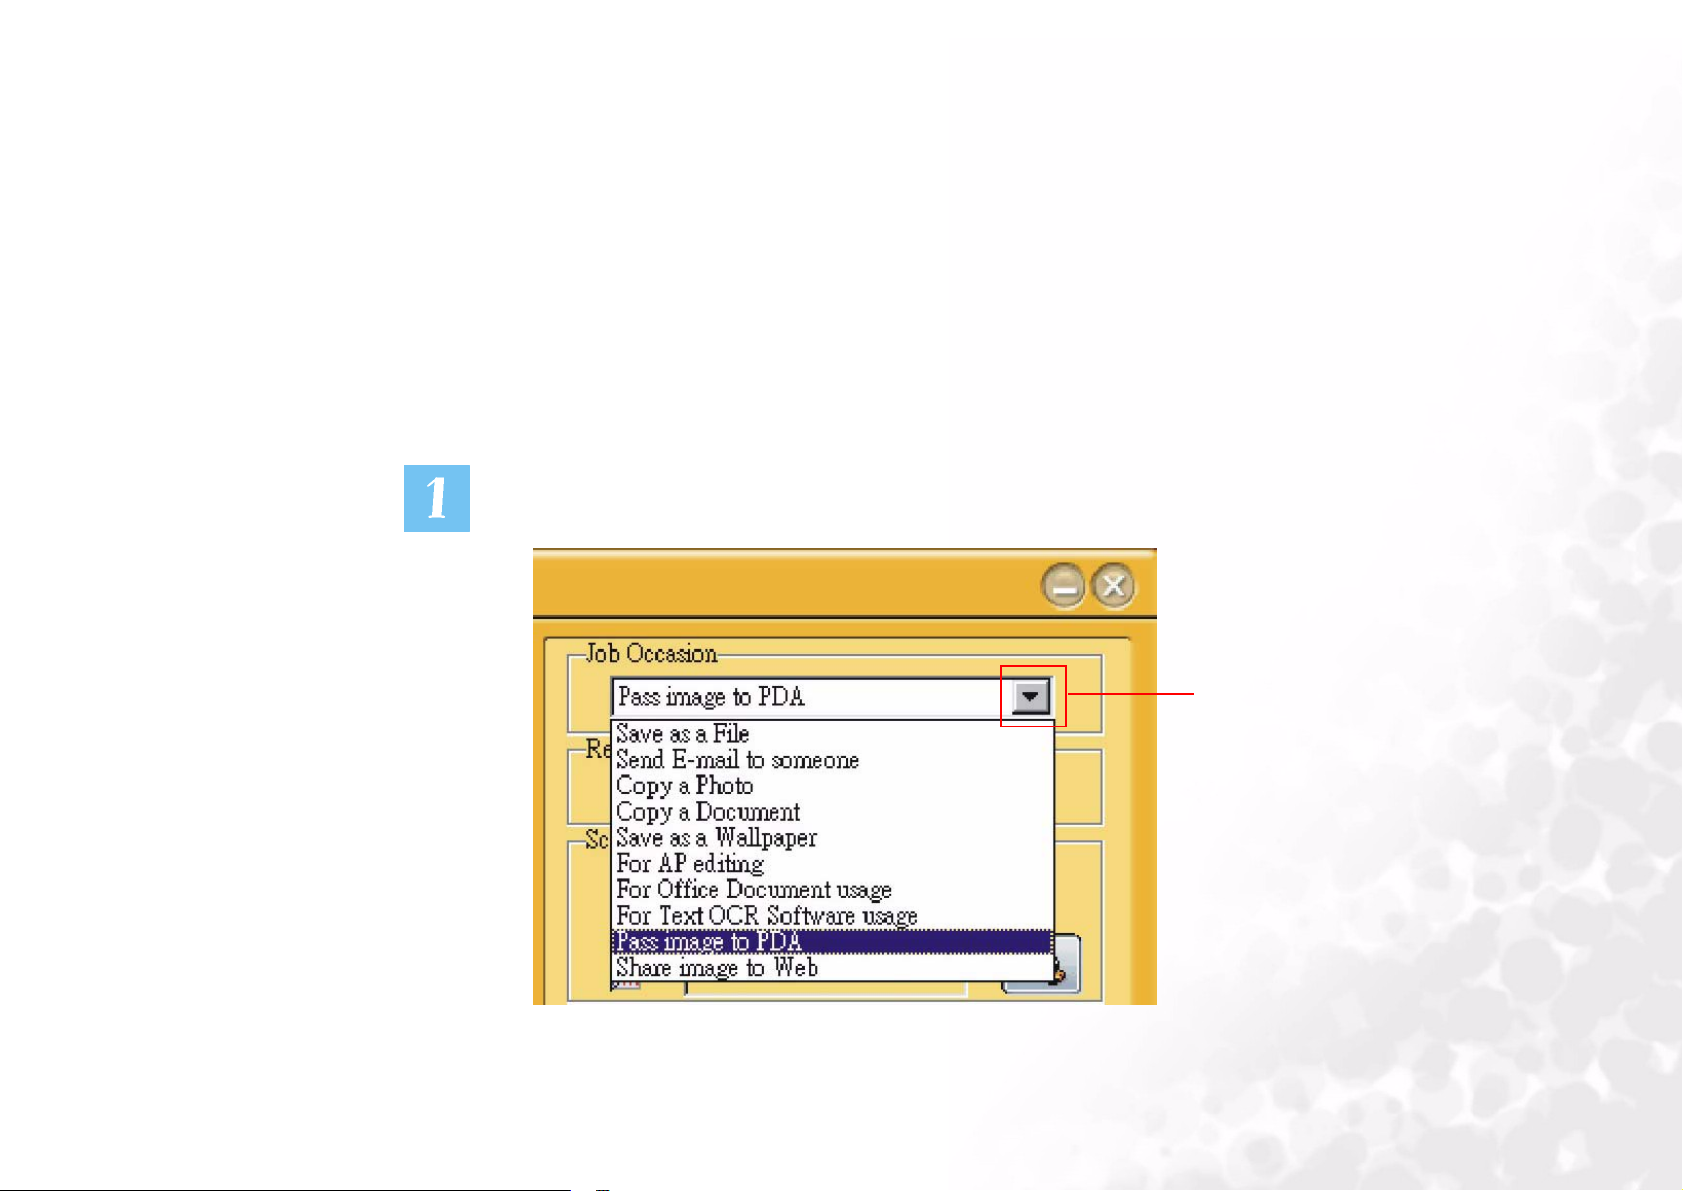
Click the button indicated below and a list of job occassion will appear on the screen.
Choose “Save as a File”.
Click this button.
For Beginners
For Beginners
For BeginnersFor Beginners
4
Page 6
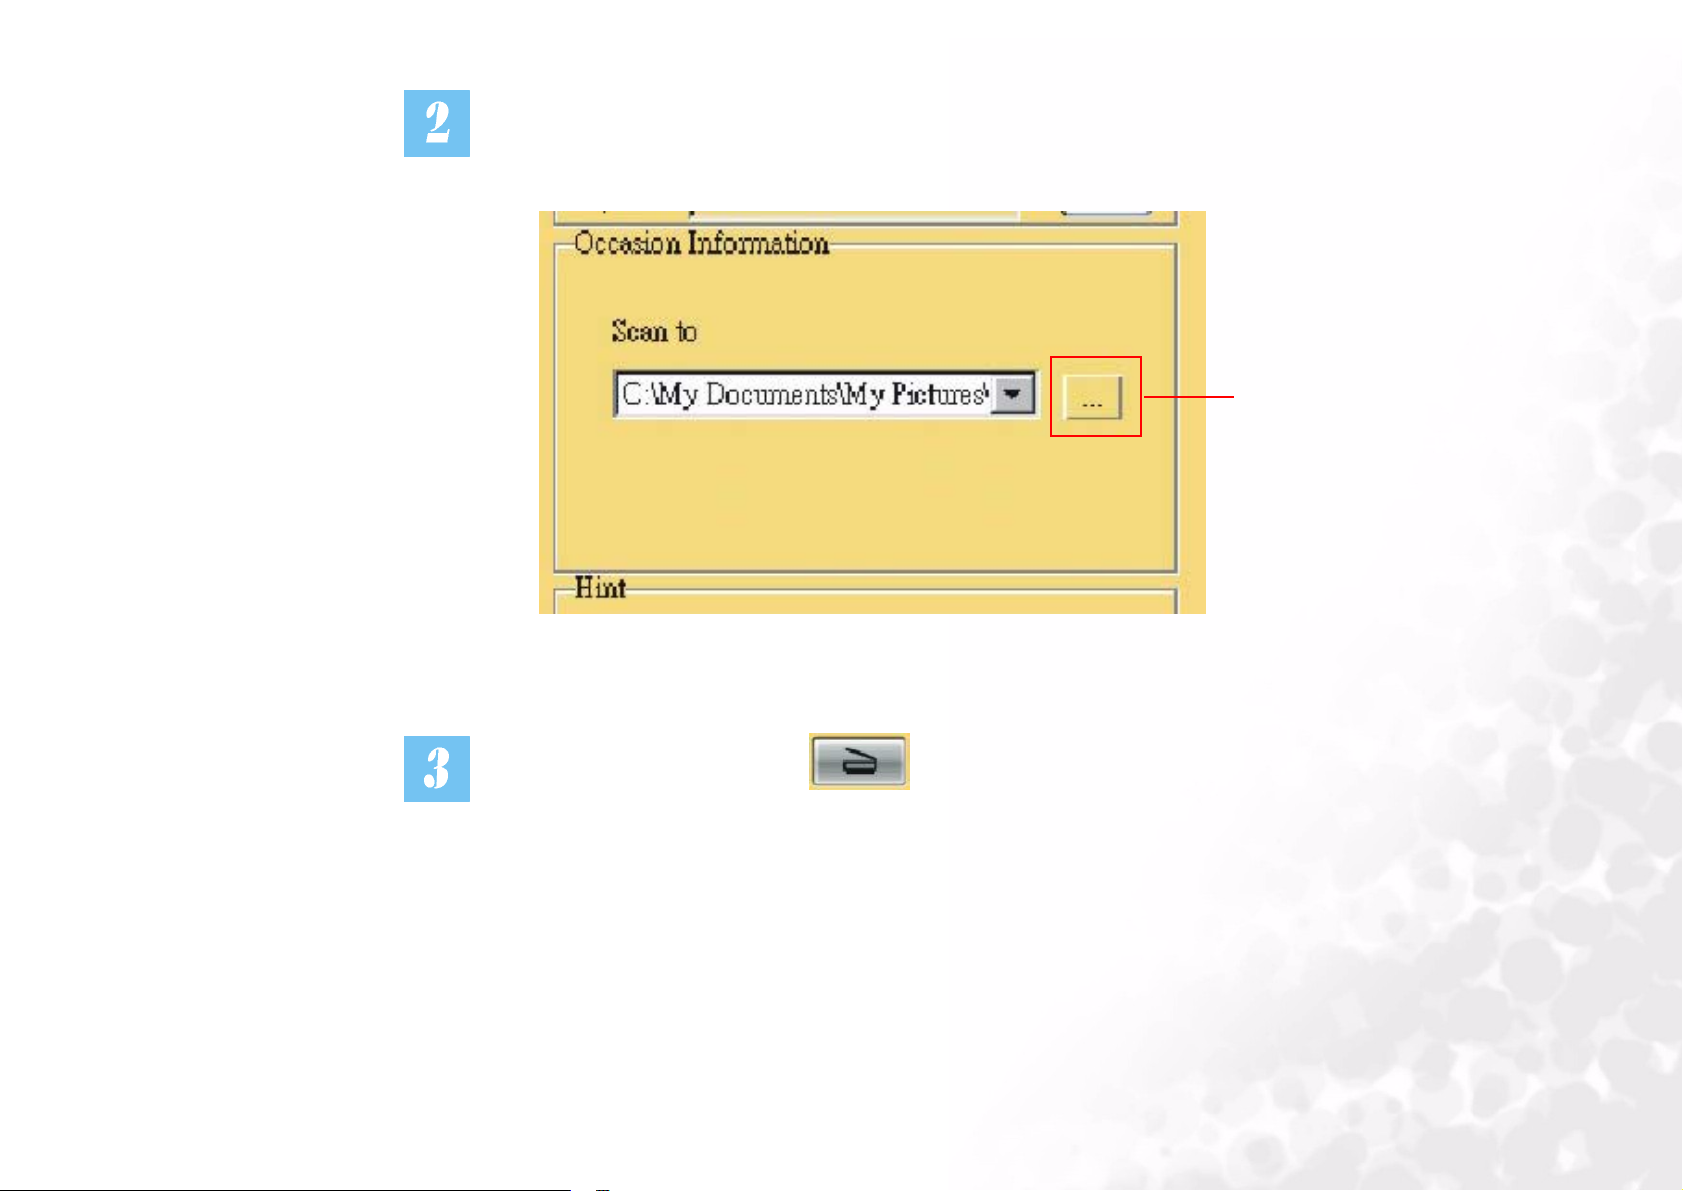
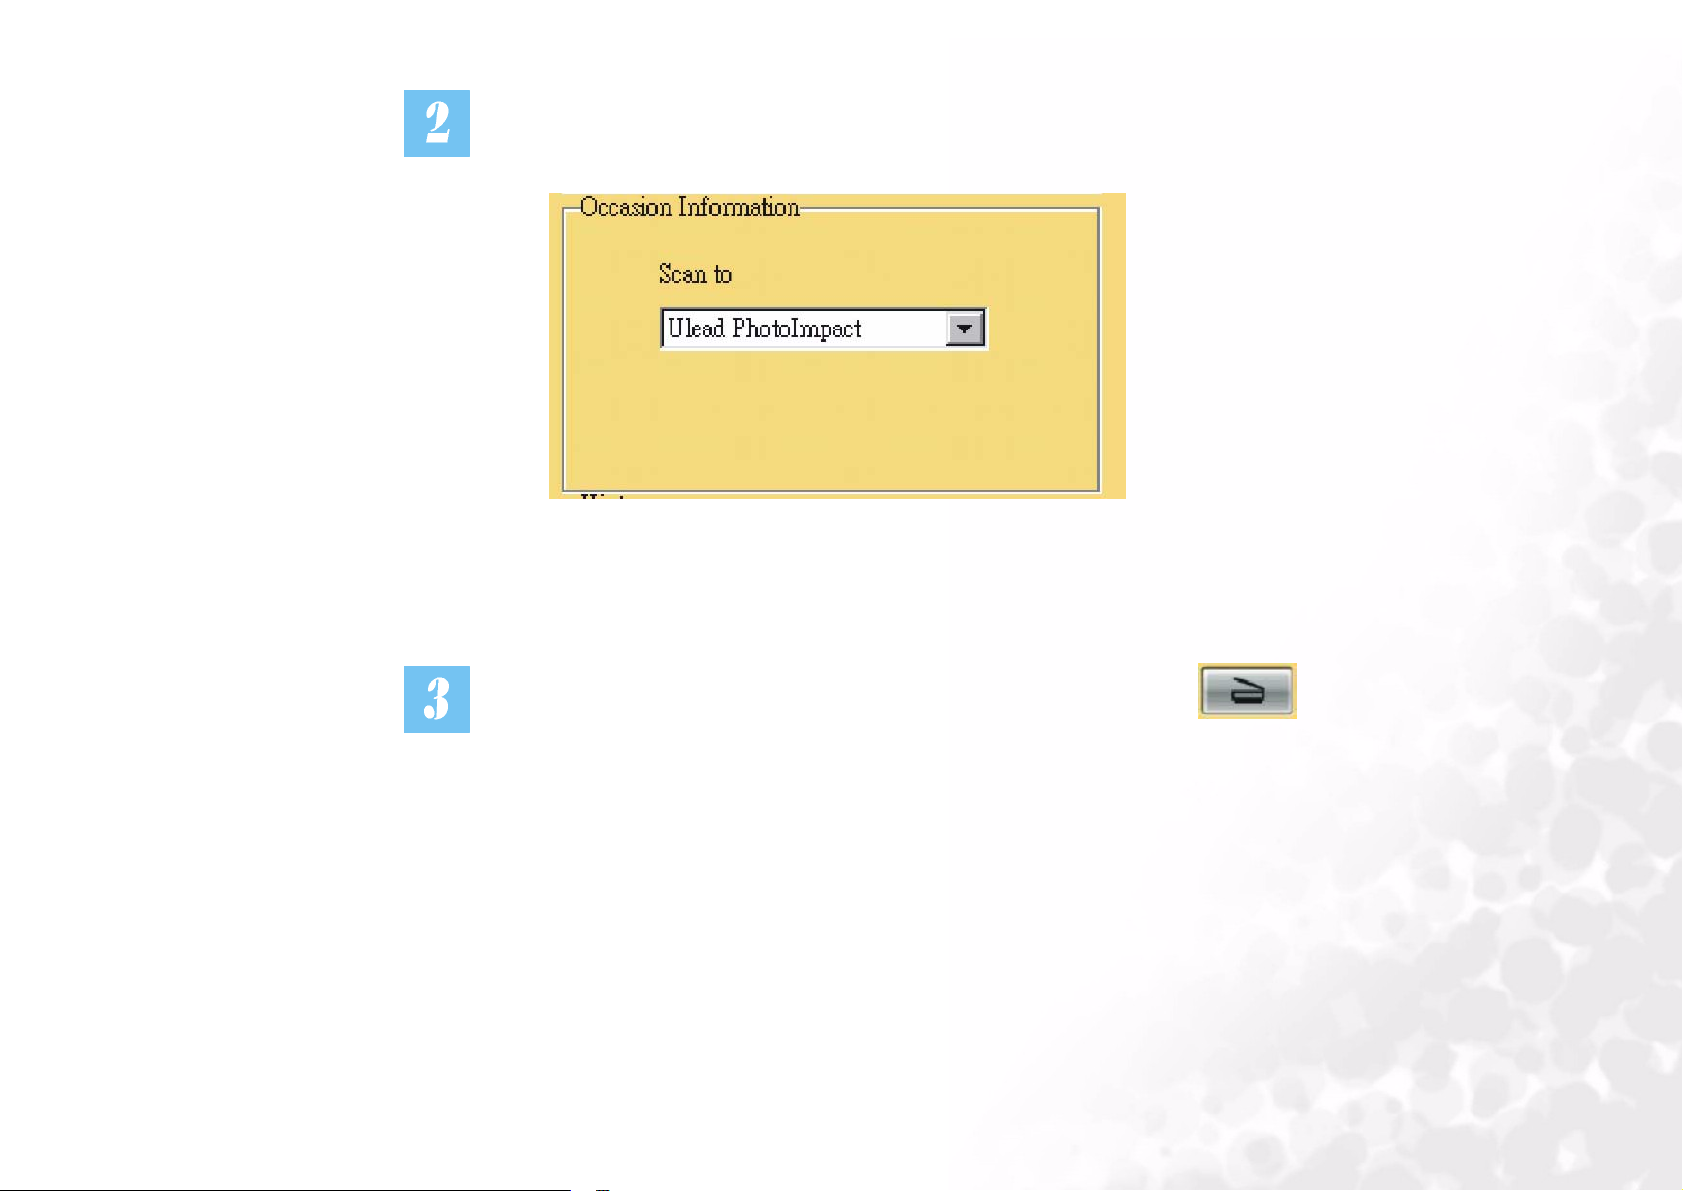
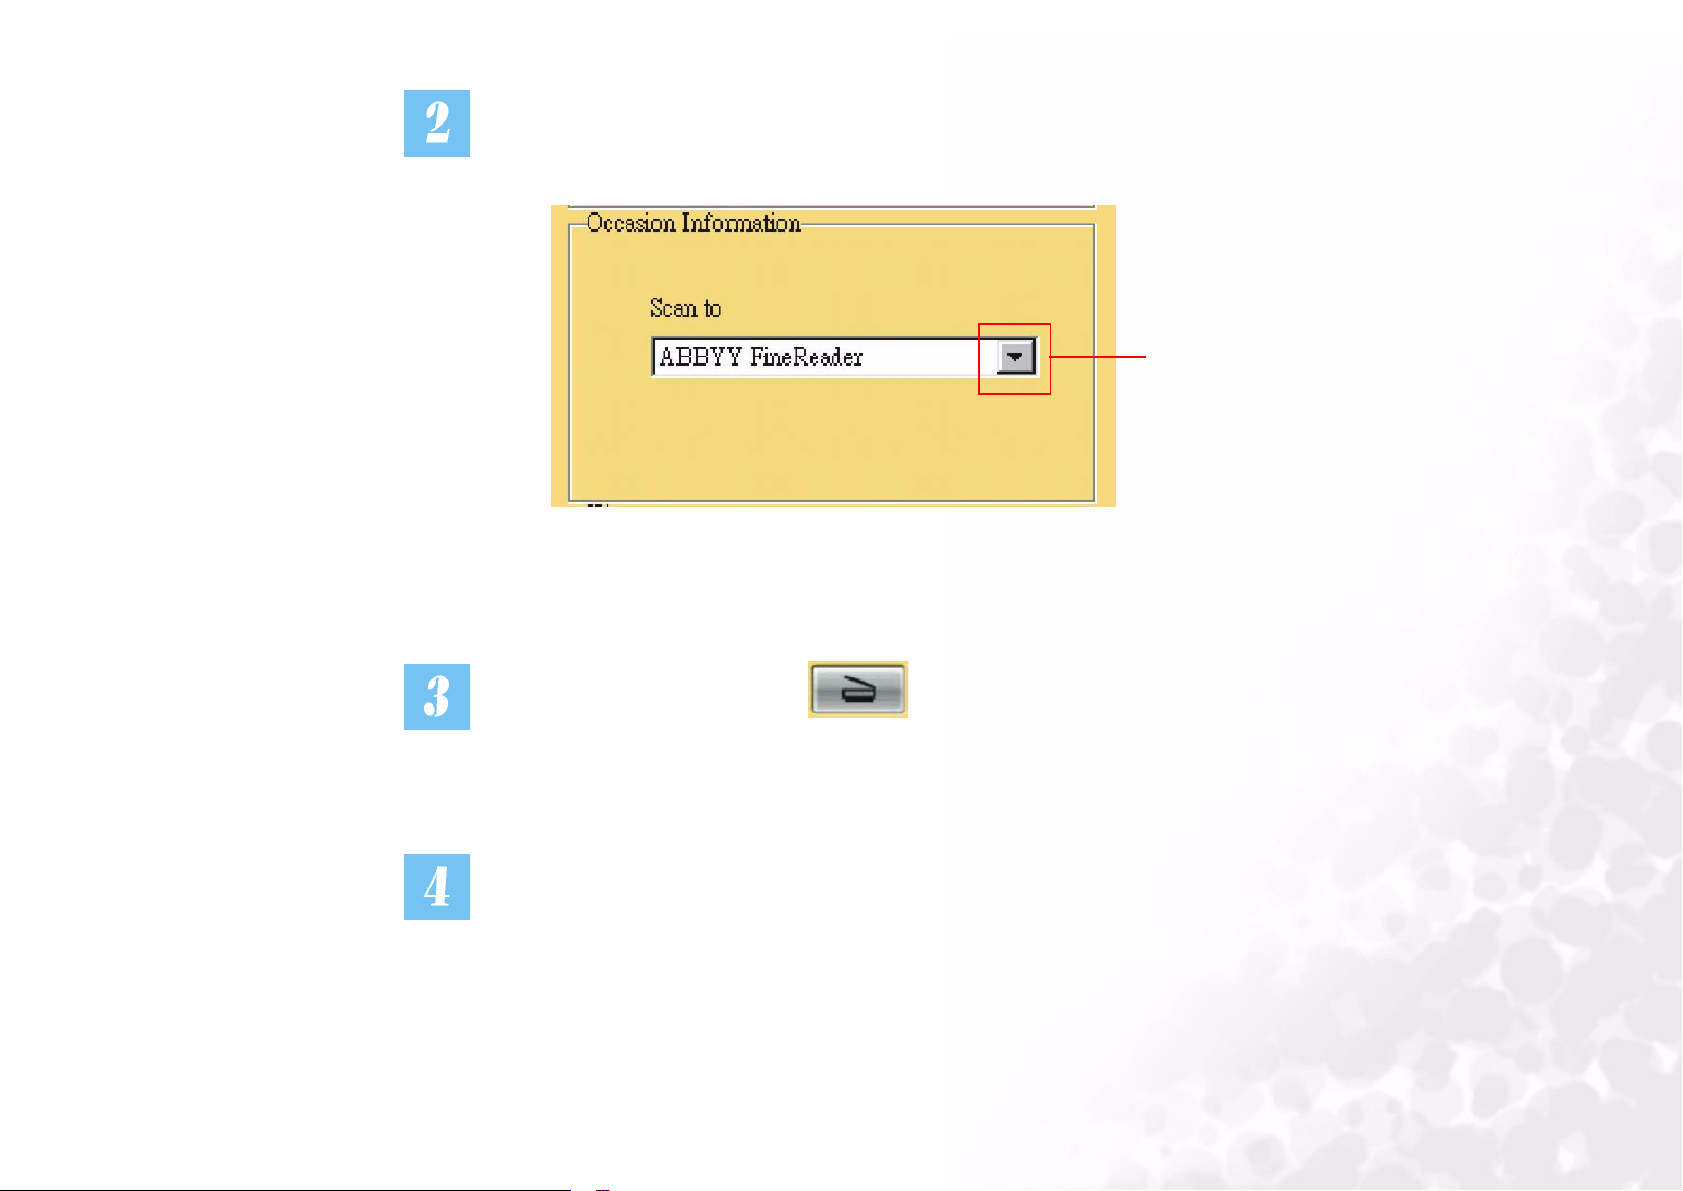
In this occasion information menu, click the button indicated below to choose the path
you desire to store your scanned images. The default path is C:\My Documents\My
Pictures\Scan Pictures.
Click this button
to change path.
Then click the scan button on the screen. The scanner will start scanning the
original. When finished, the scanned image file will be saved to the default file folder or
the file older your set.
For Beginners
For Beginners
For BeginnersFor Beginners
5
Page 7
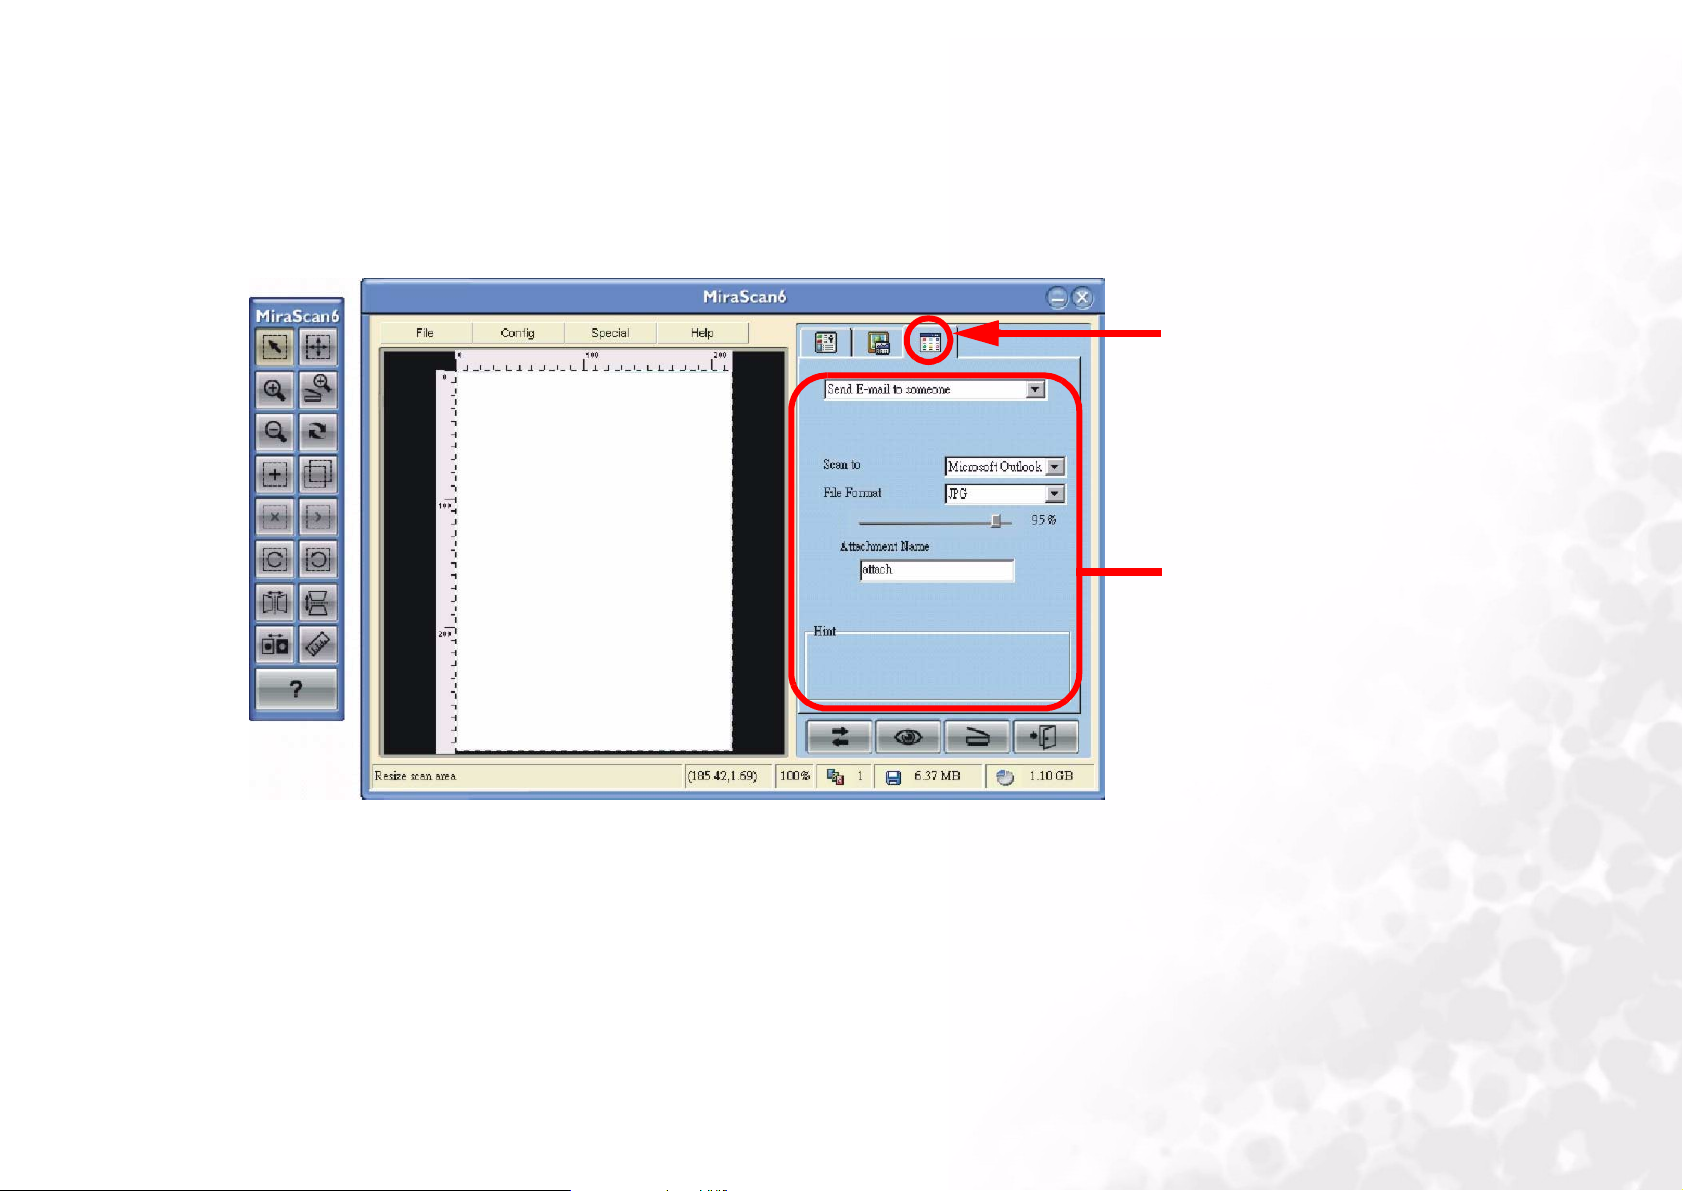
Send E-mail to someone
Send E-mail to someone
Send E-mail to someoneSend E-mail to someone
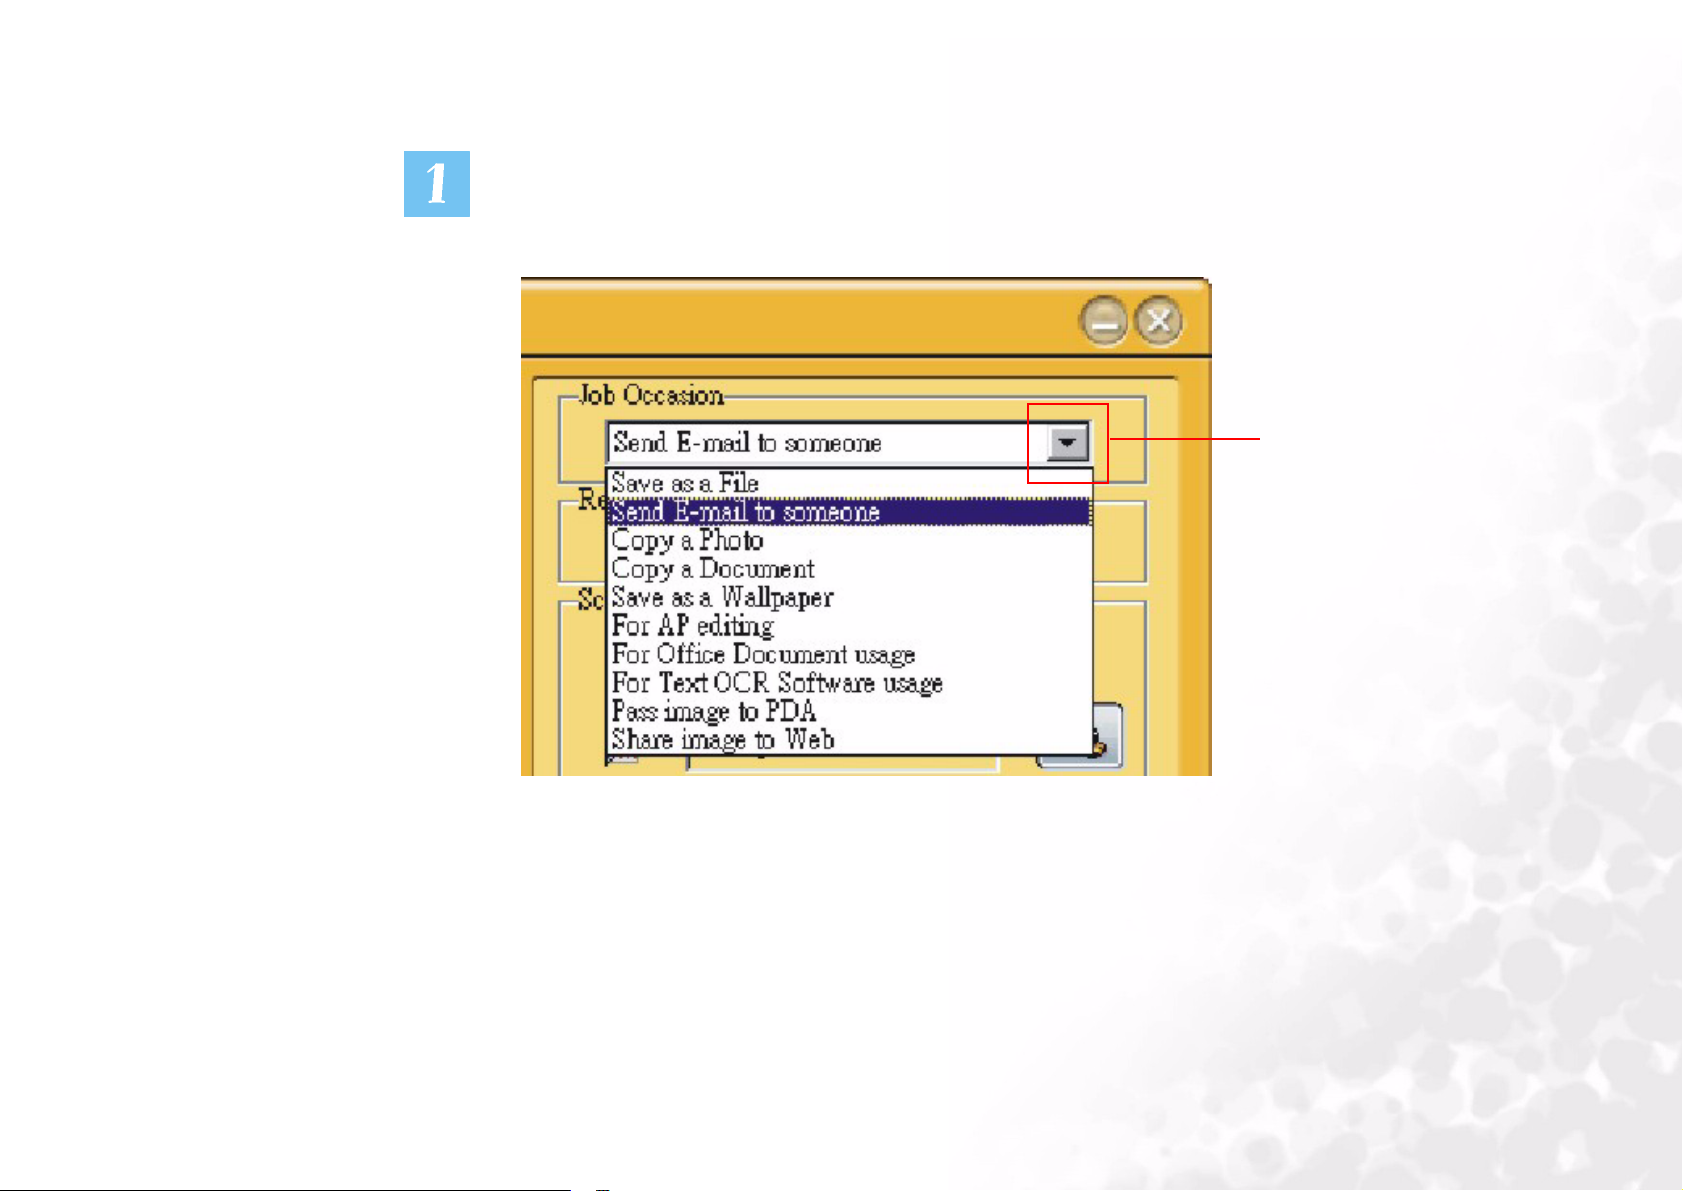
Click the button indicated below and a list of job occassion will appear on the screen.
Choose “Send E-mail to someone”.
Click this button.
For Beginners
For Beginners
For BeginnersFor Beginners
6
Page 8
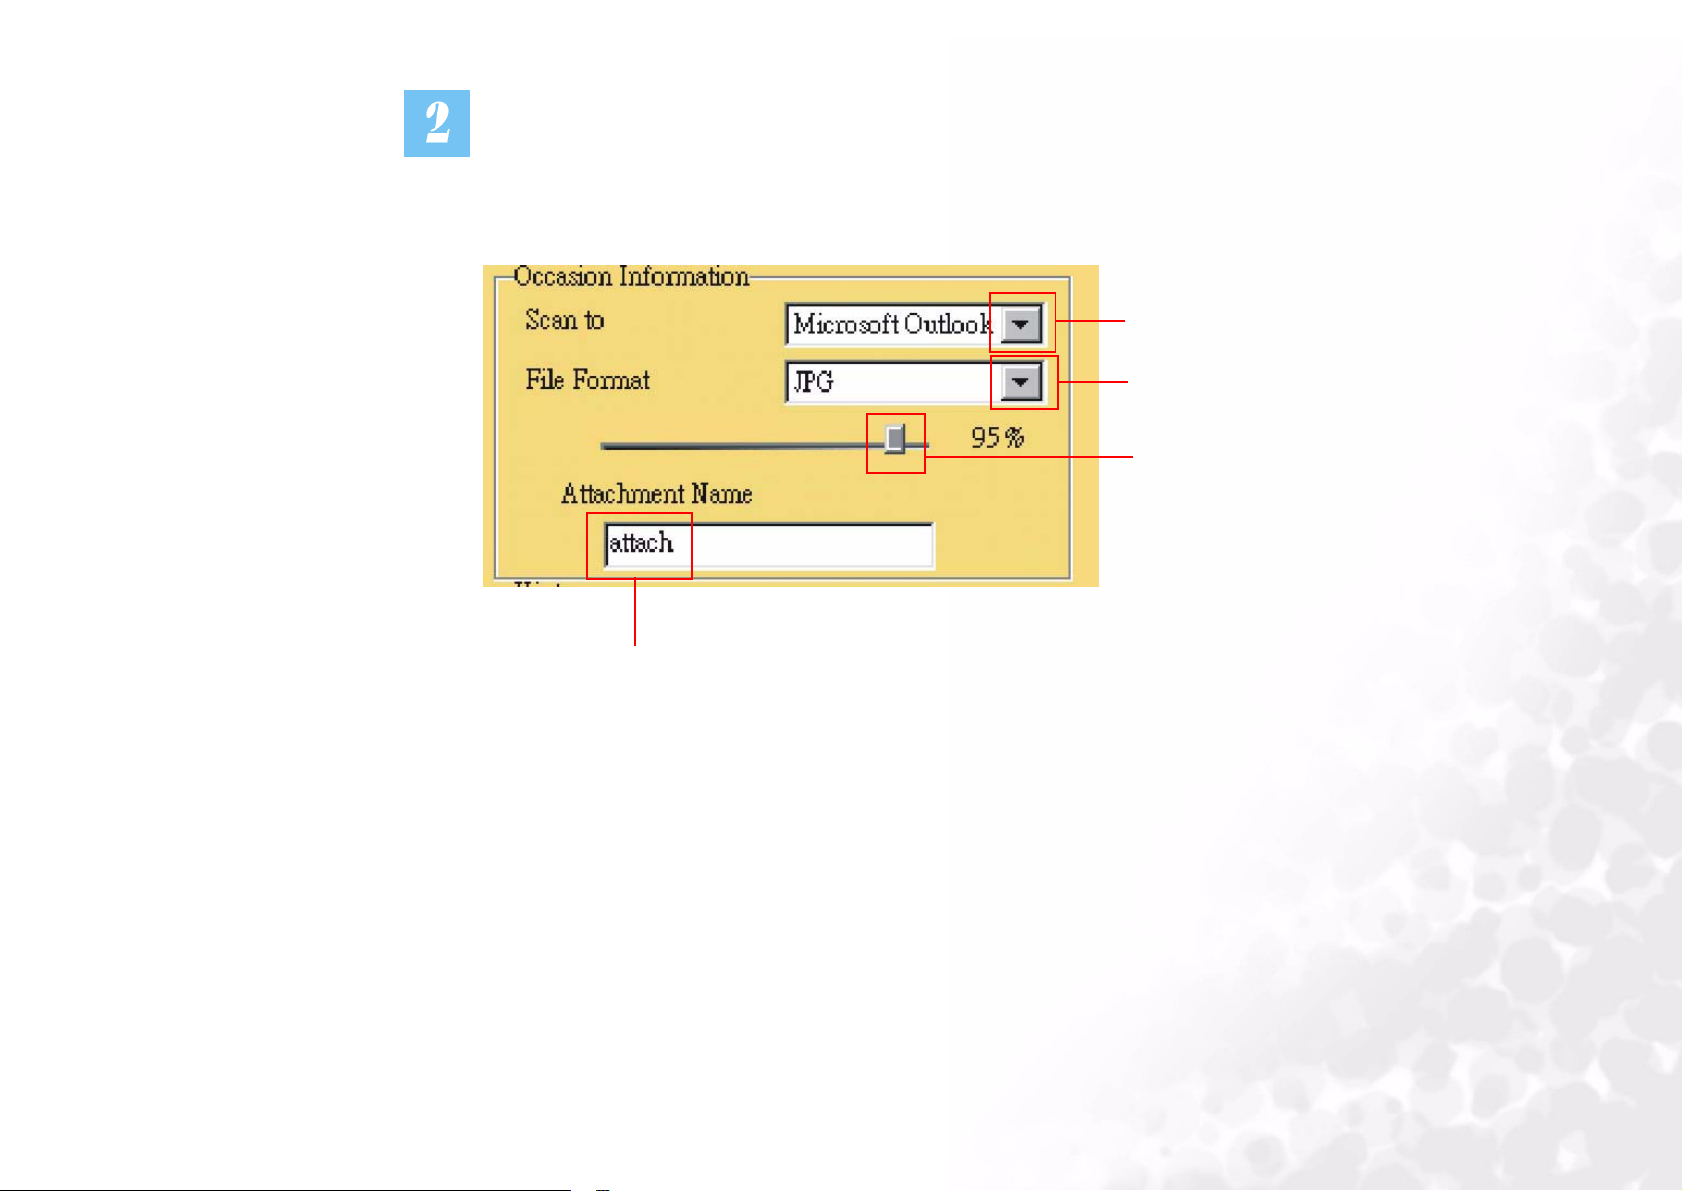
In this occasion information menu, you can setup email settings. In “scan to” item, you
can choose to scan to Microsoft Oulook
you can choose to scan your image as a JPG file or BMP file. In “Attachment Name”
item, you can name or rename the attached file.
You can name or rename the attached file in this column.
Microsoft Oulook or Outlook Express
Microsoft OulookMicrosoft Oulook
Outlook Express. In “File Format” item,
Outlook ExpressOutlook Express
Click this button to choose.
Click this button to choose.
Drag this bar to setup the
compress ratio if you choose
JPG format.
For Beginners
For Beginners
For BeginnersFor Beginners
7
Page 9
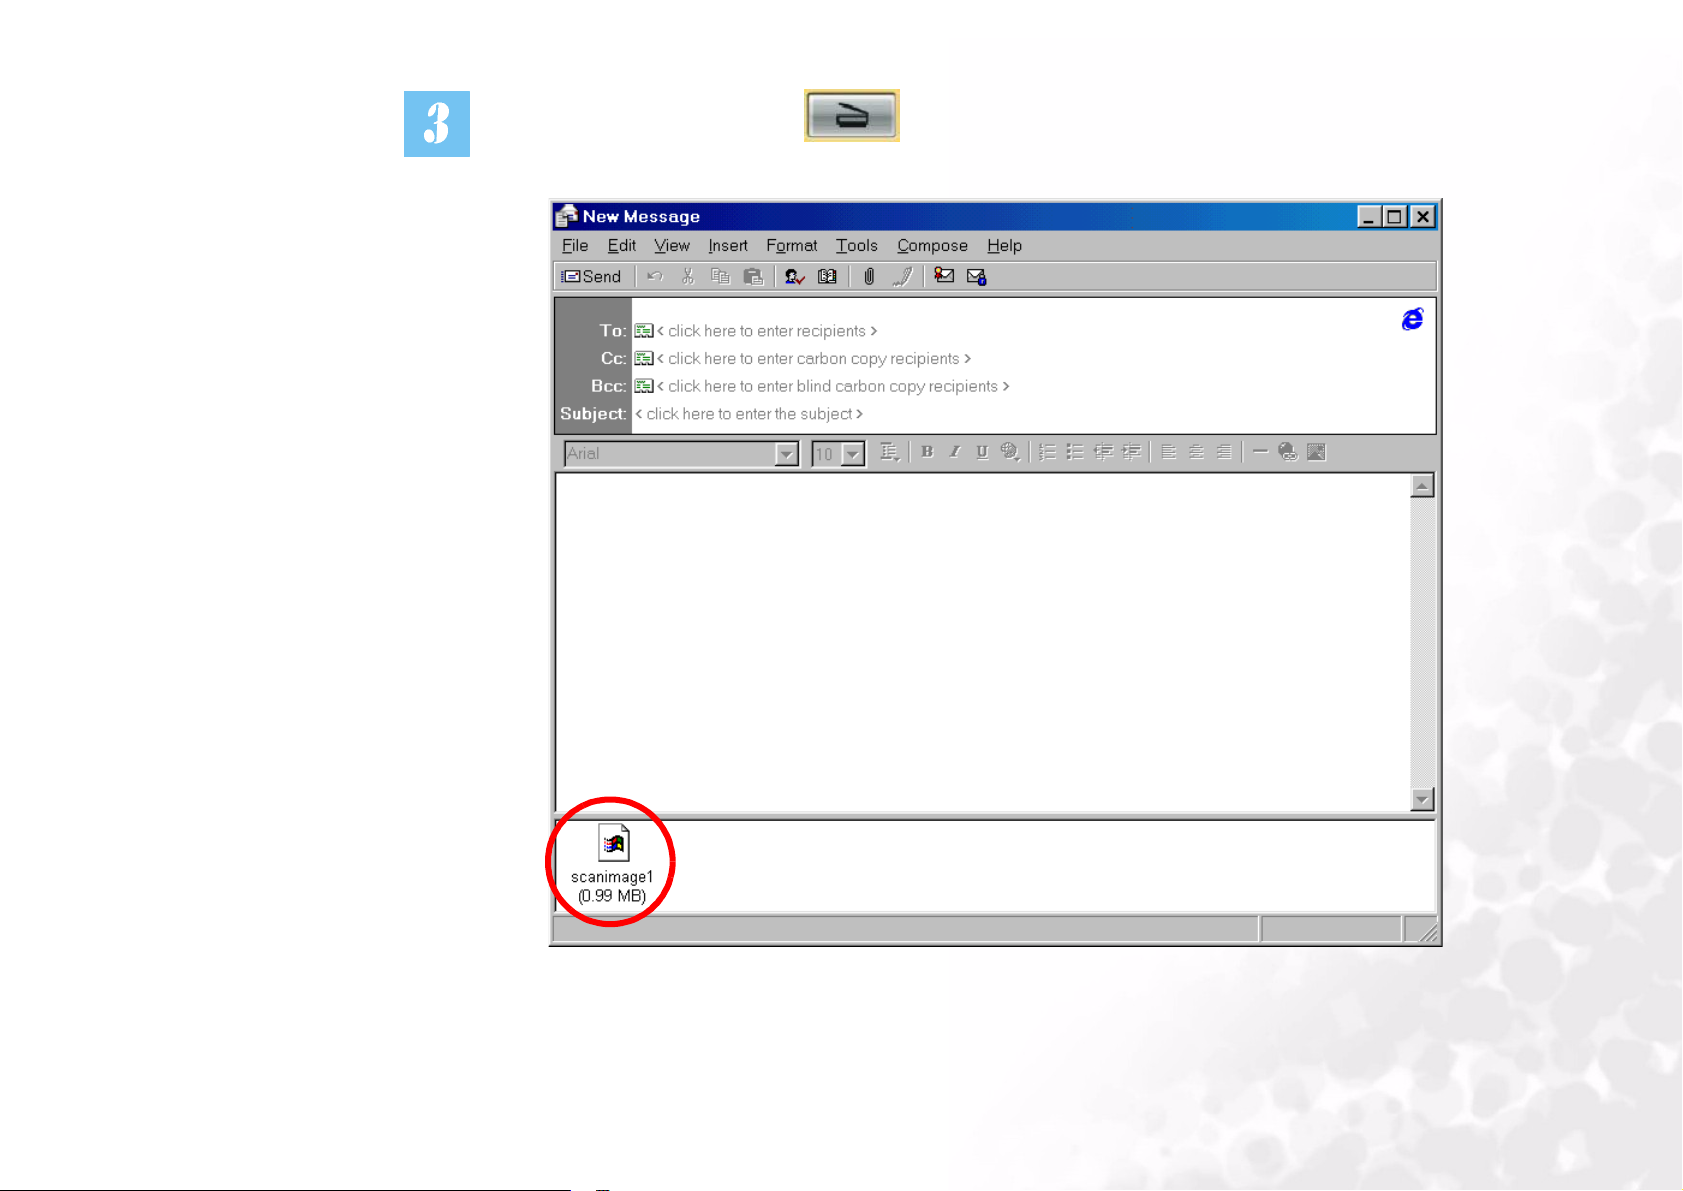
Then click the scan button on the screen. Mirascan 6 will scan the original and
transfer the scanned image to a new e-mail as an attachment.
For Beginners
For Beginners
For BeginnersFor Beginners
8
Page 10
Copy a Photo
Copy a Photo
Copy a PhotoCopy a Photo
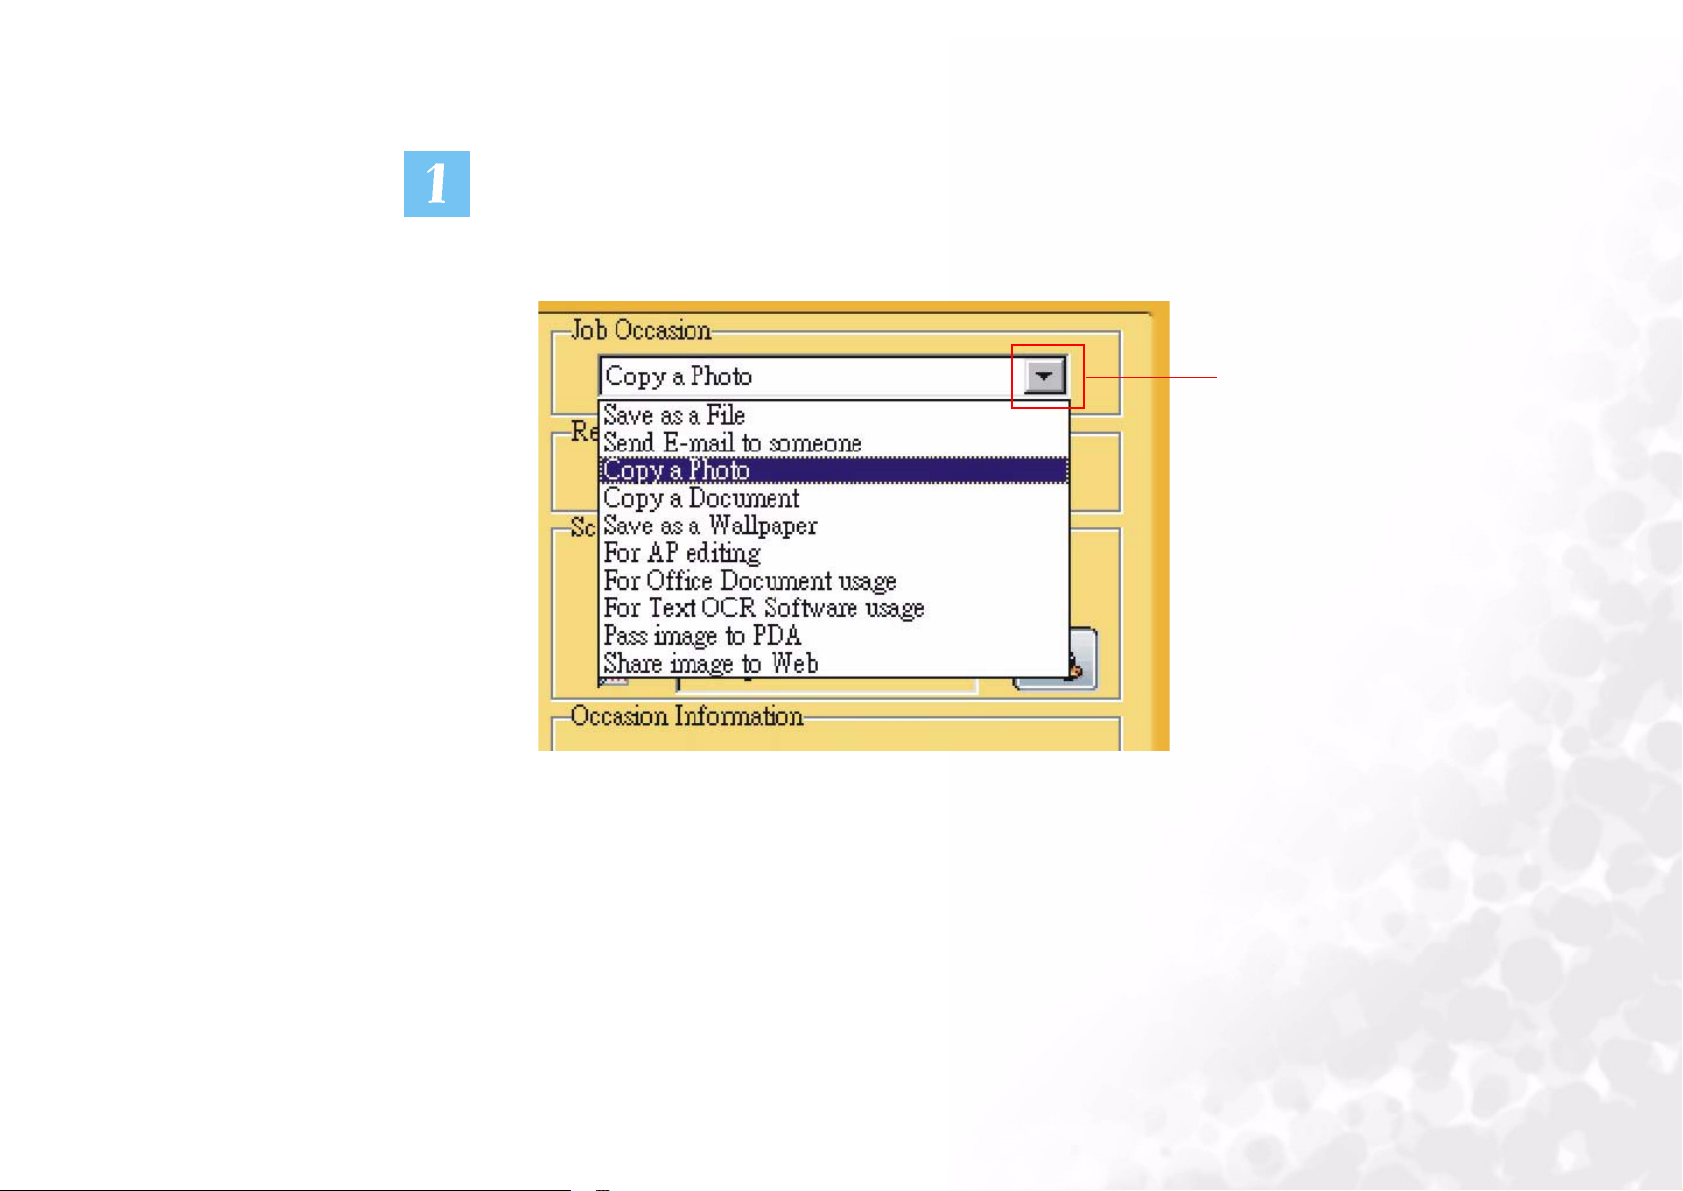
Click the button indicated below and a list of job occasion will appear on the screen.
Choose “Copy a Photo”.
Click this button.
For Beginners
For Beginners
For BeginnersFor Beginners
9
Page 11
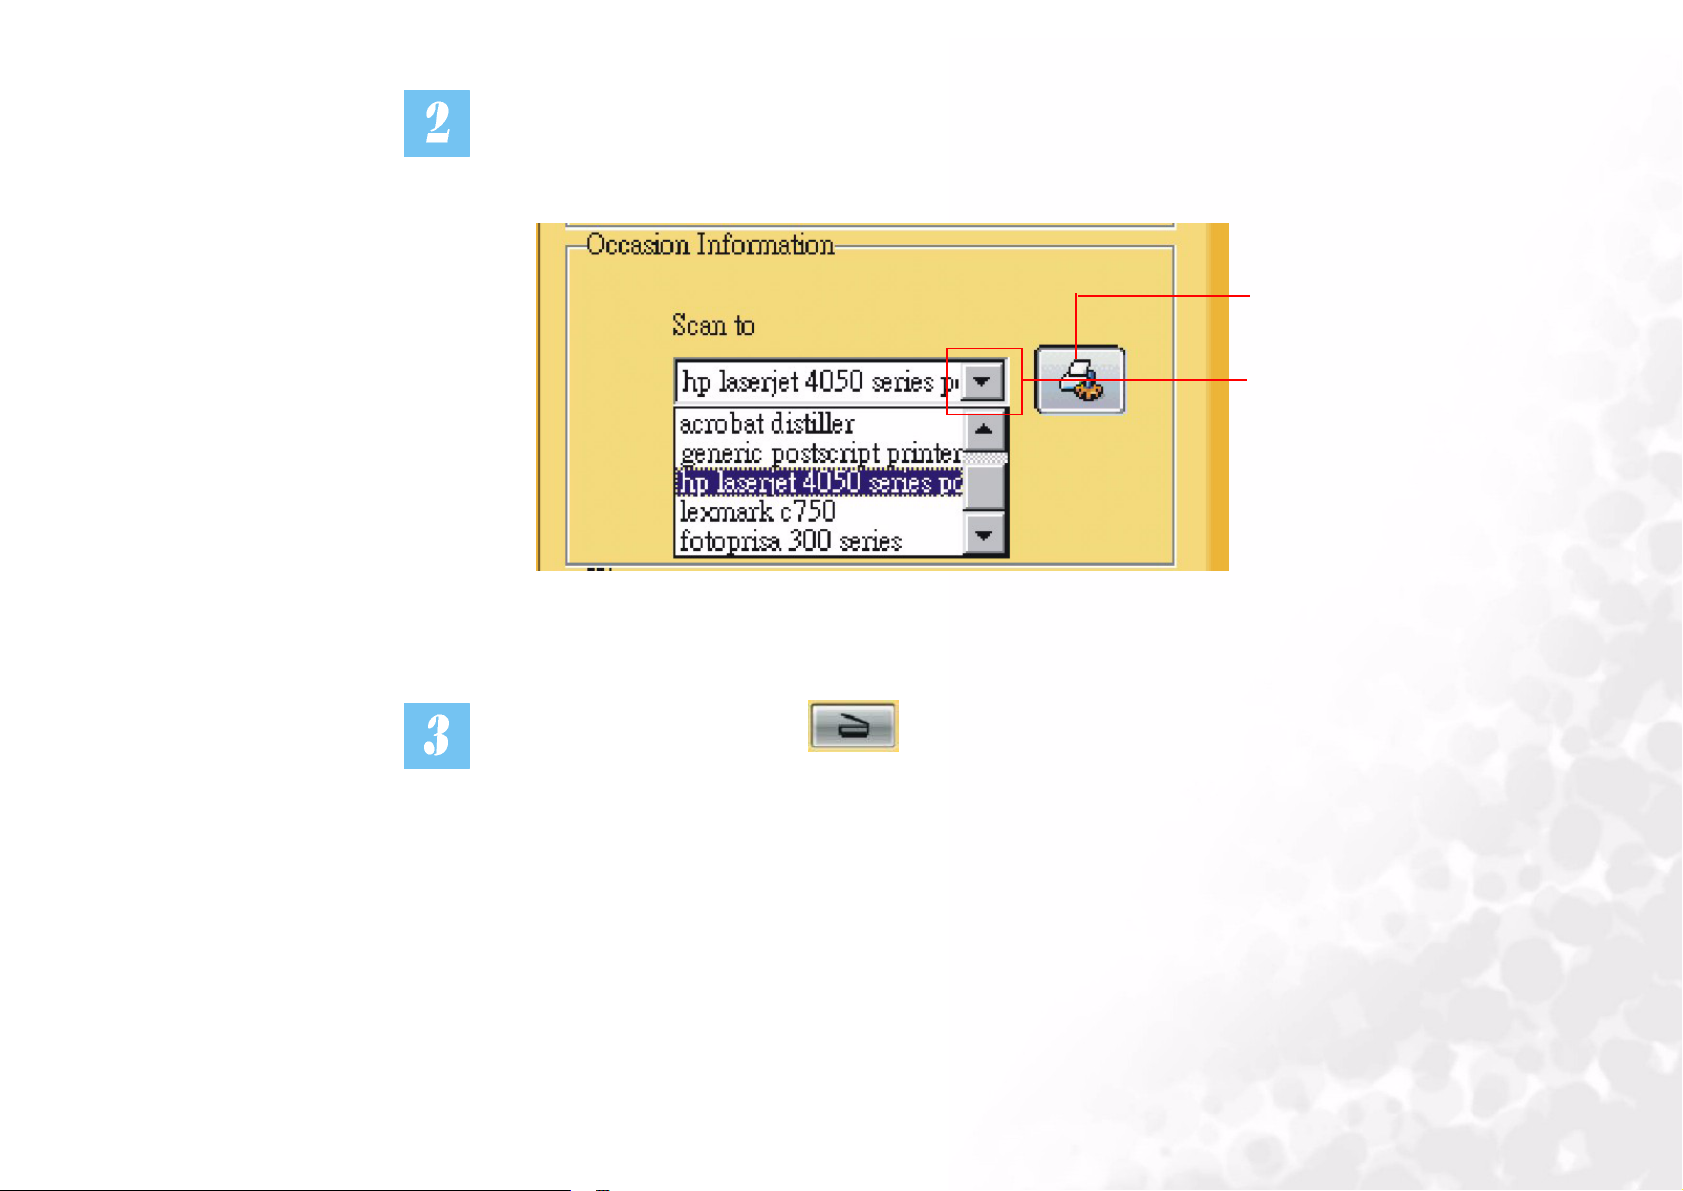
In this occasion information menu, you can select a printer to print your scanned
photo.
Click this button to
set your printer.
Click this button
Then click the scan button on the screen. Mirascan 6 will start scanning the
original. When finished, the image will be printed by the printer you select.
For Beginners
For Beginners
For BeginnersFor Beginners
10
Page 12
Copy a Document
Copy a Document
Copy a DocumentCopy a Document
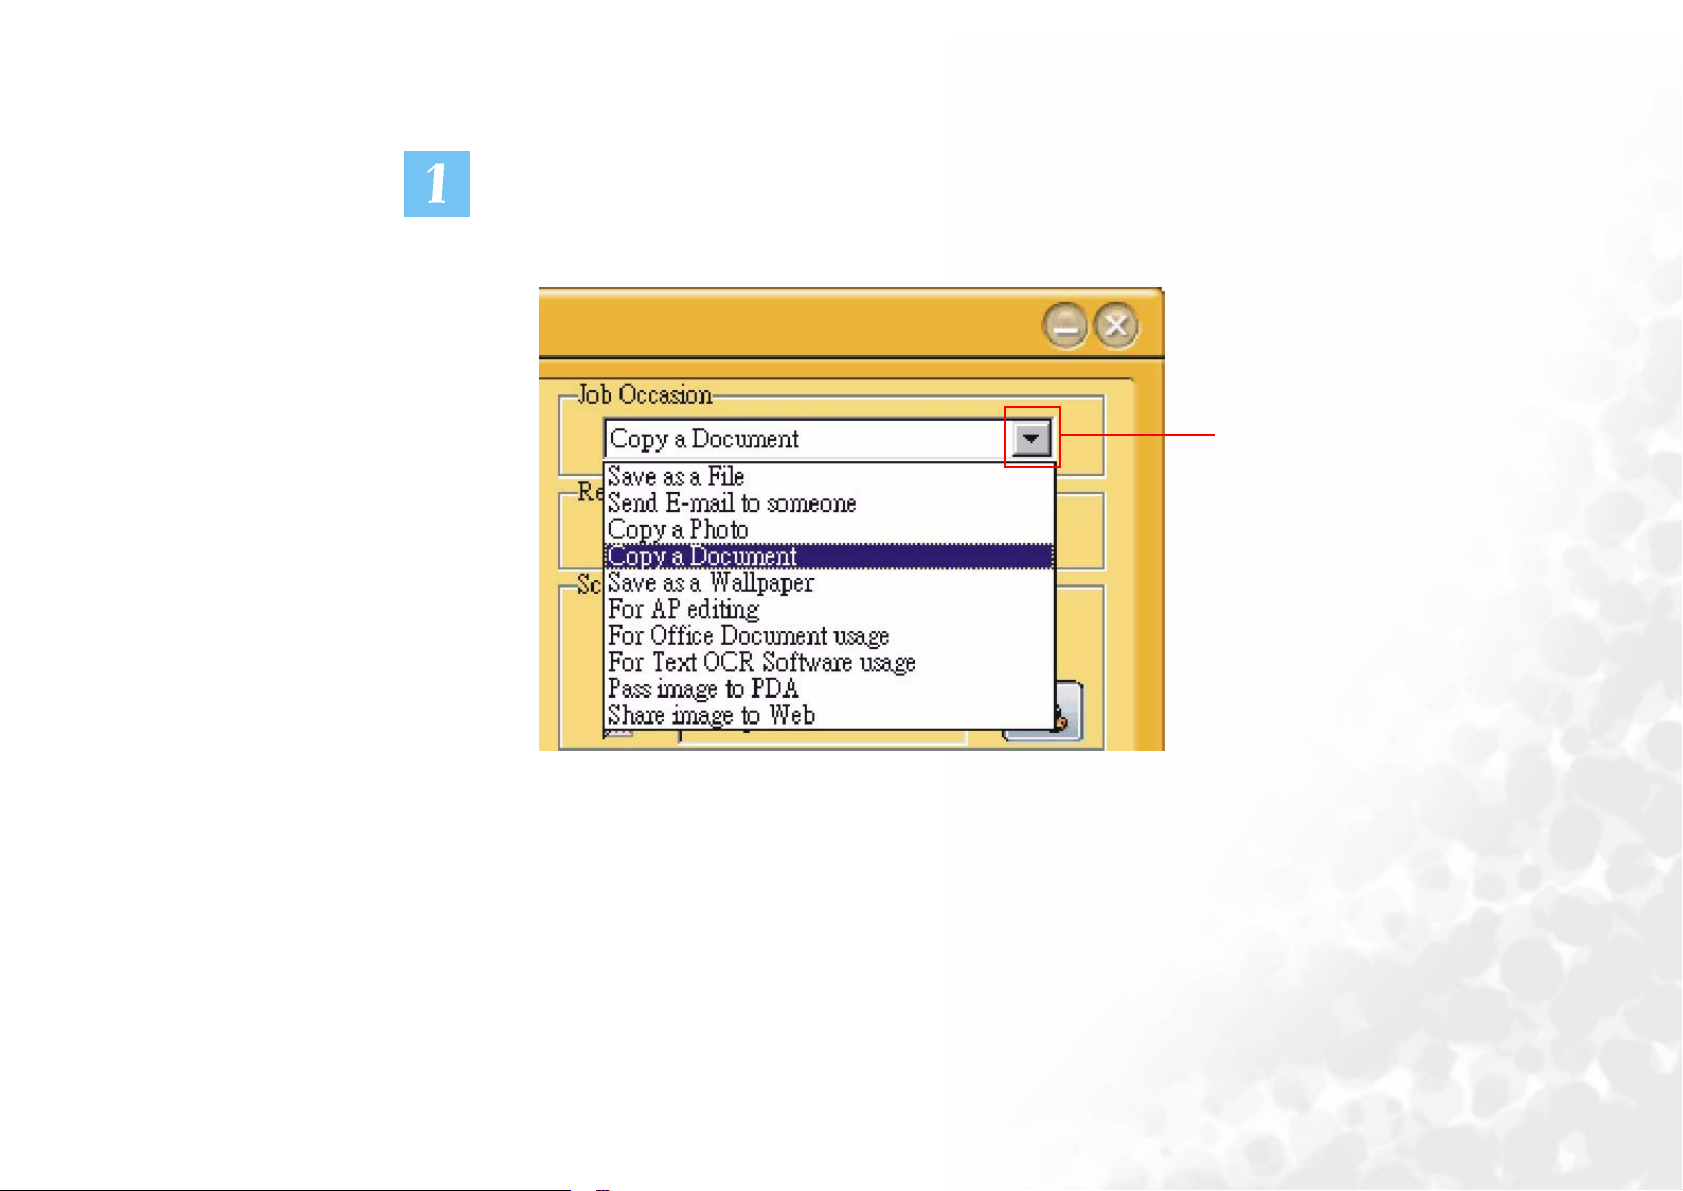
Click the button indicated below and a list of job occasion will appear on the screen.
Choose “Copy a Document”.
Click this button.
For Beginners
For Beginners
For BeginnersFor Beginners
11
Page 13

In this occasion information menu, you can select a printer to print your scanned
document.
Click this button to
set your printer.
Click this button
Then click the scan button on the screen. Mirascan 6 will start scanning the
original. When finished, the scanned document will be printed out by the printer you
select.
For Beginners
For Beginners
For BeginnersFor Beginners
12
Page 14
Save as a Wallpaper
Save as a Wallpaper
Save as a WallpaperSave as a Wallpaper
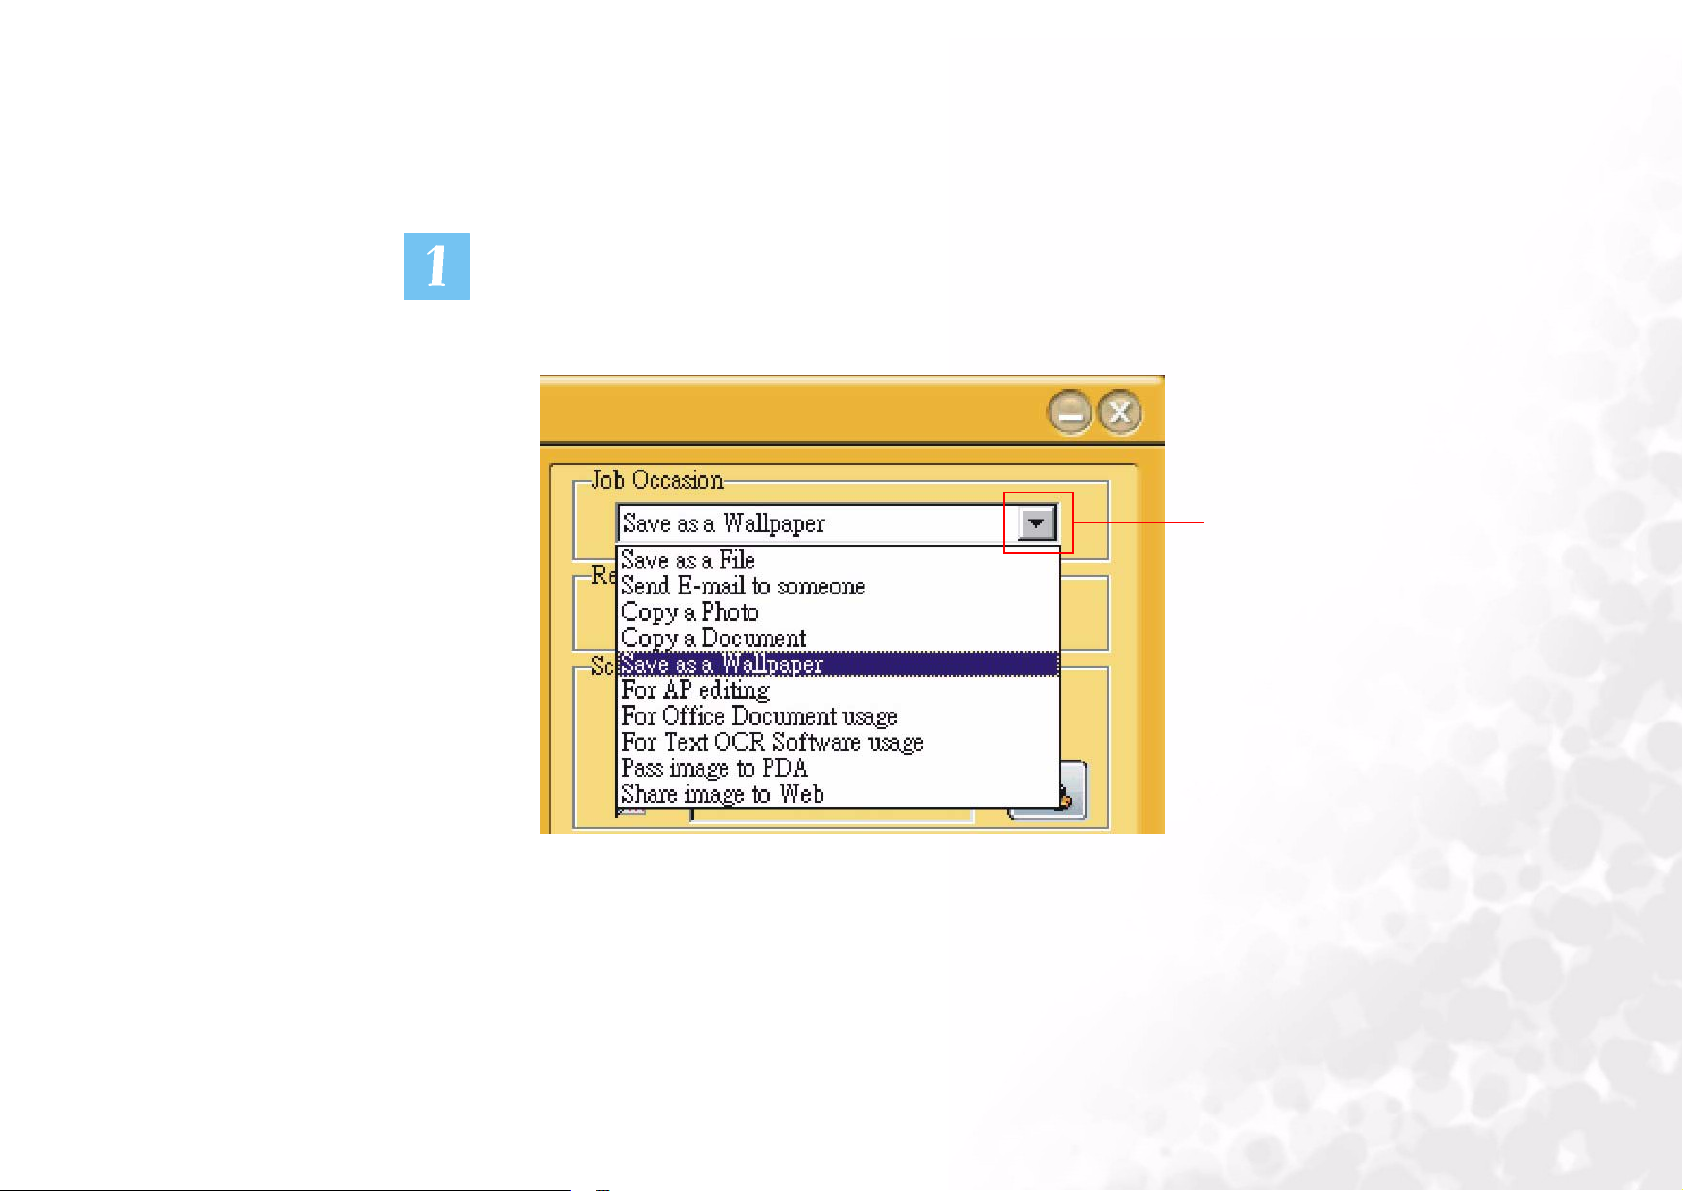
This function enables you to scan images and replace your current Windows wallpaper
with the new scanned image.
Click the button indicated below and a list of job occasion will appear on the screen.
Choose “Save as a Wallpaper”.
Click this button.
For Beginners
For Beginners
For BeginnersFor Beginners
13
Page 15
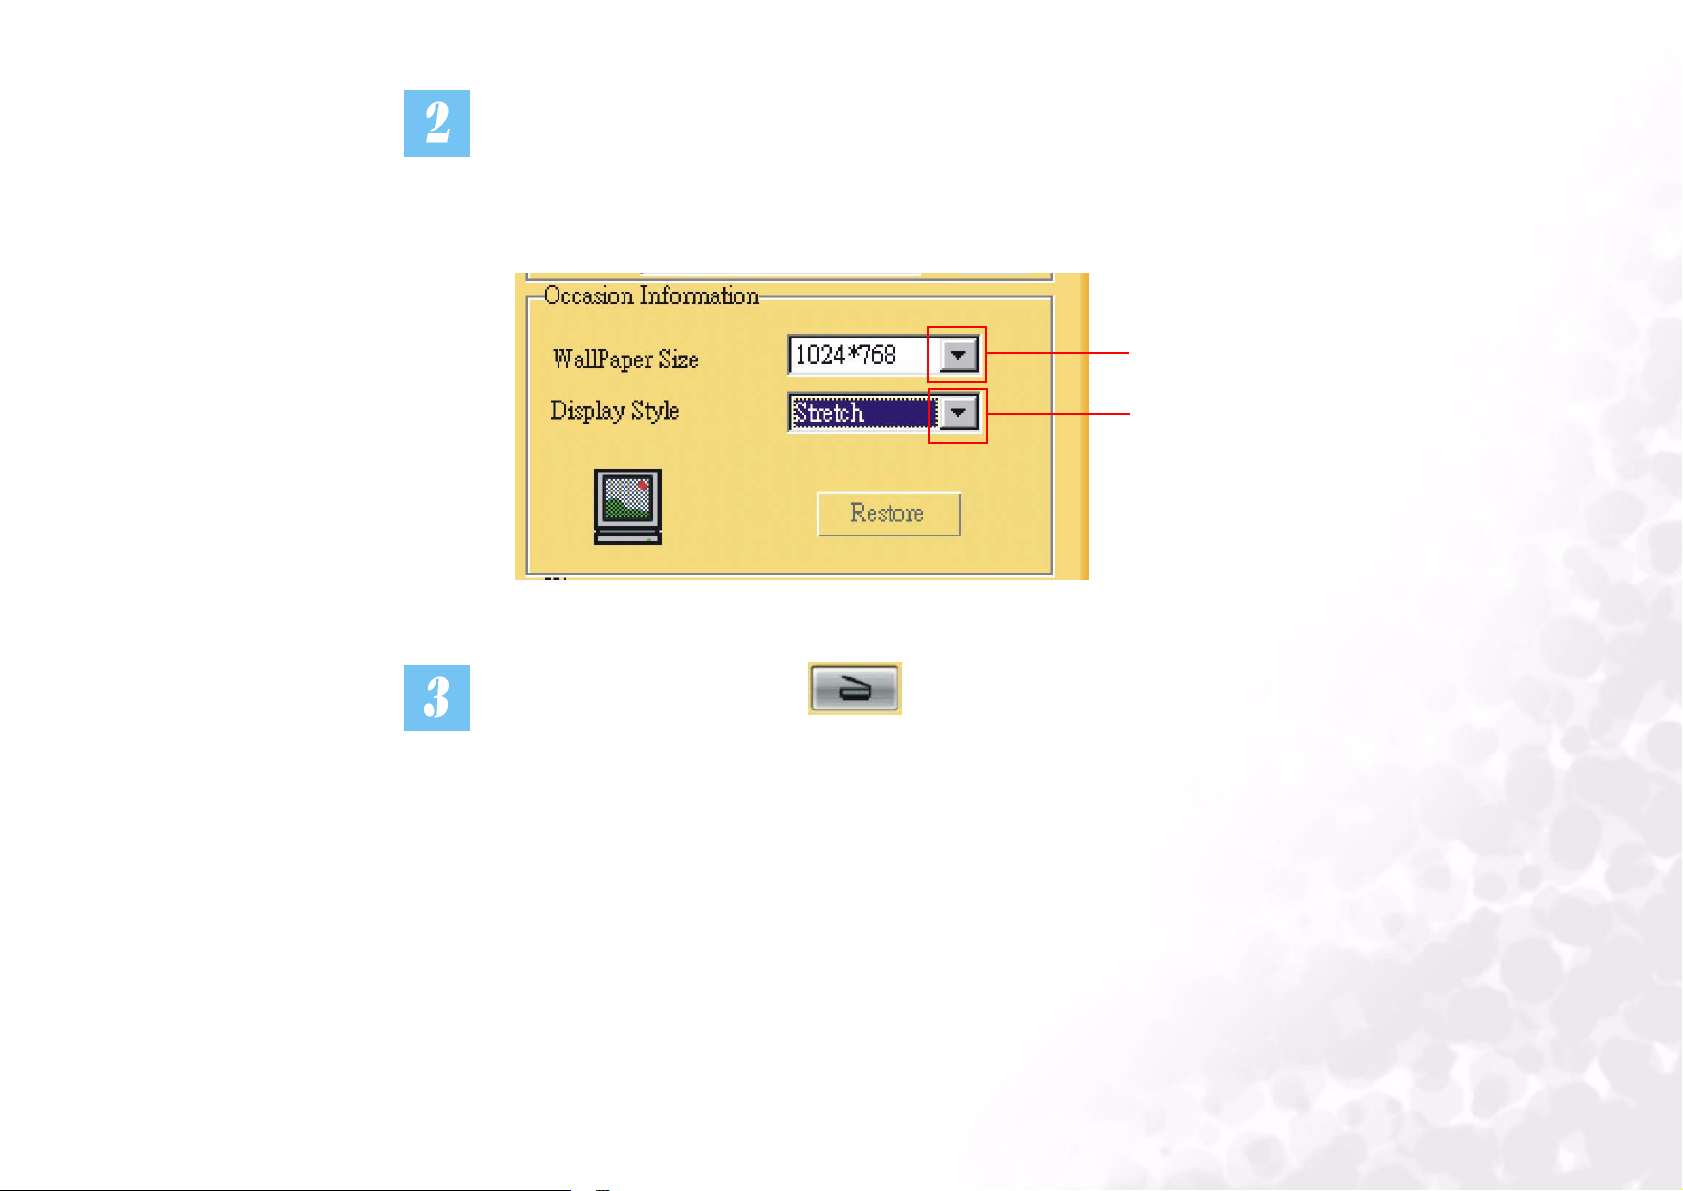
In this occasion information menu, you can change your wallpaper setup. In “
Wallpaper Size” item, you can choose to change the size of your wallpaper. In “Display
Style”, you can change the display setting. There are 3 options for you to choose:
Stretch, Center and Tile.
Click this button to select.
Click this button to select.
Then click the scan button on the screen. Mirascan 6 will start scanning the
original and when finished, your wallpaper will be replaced by the scanned image.
For Beginners
For Beginners
For BeginnersFor Beginners
14
Page 16
For AP editing
For AP editing
For AP editingFor AP editing
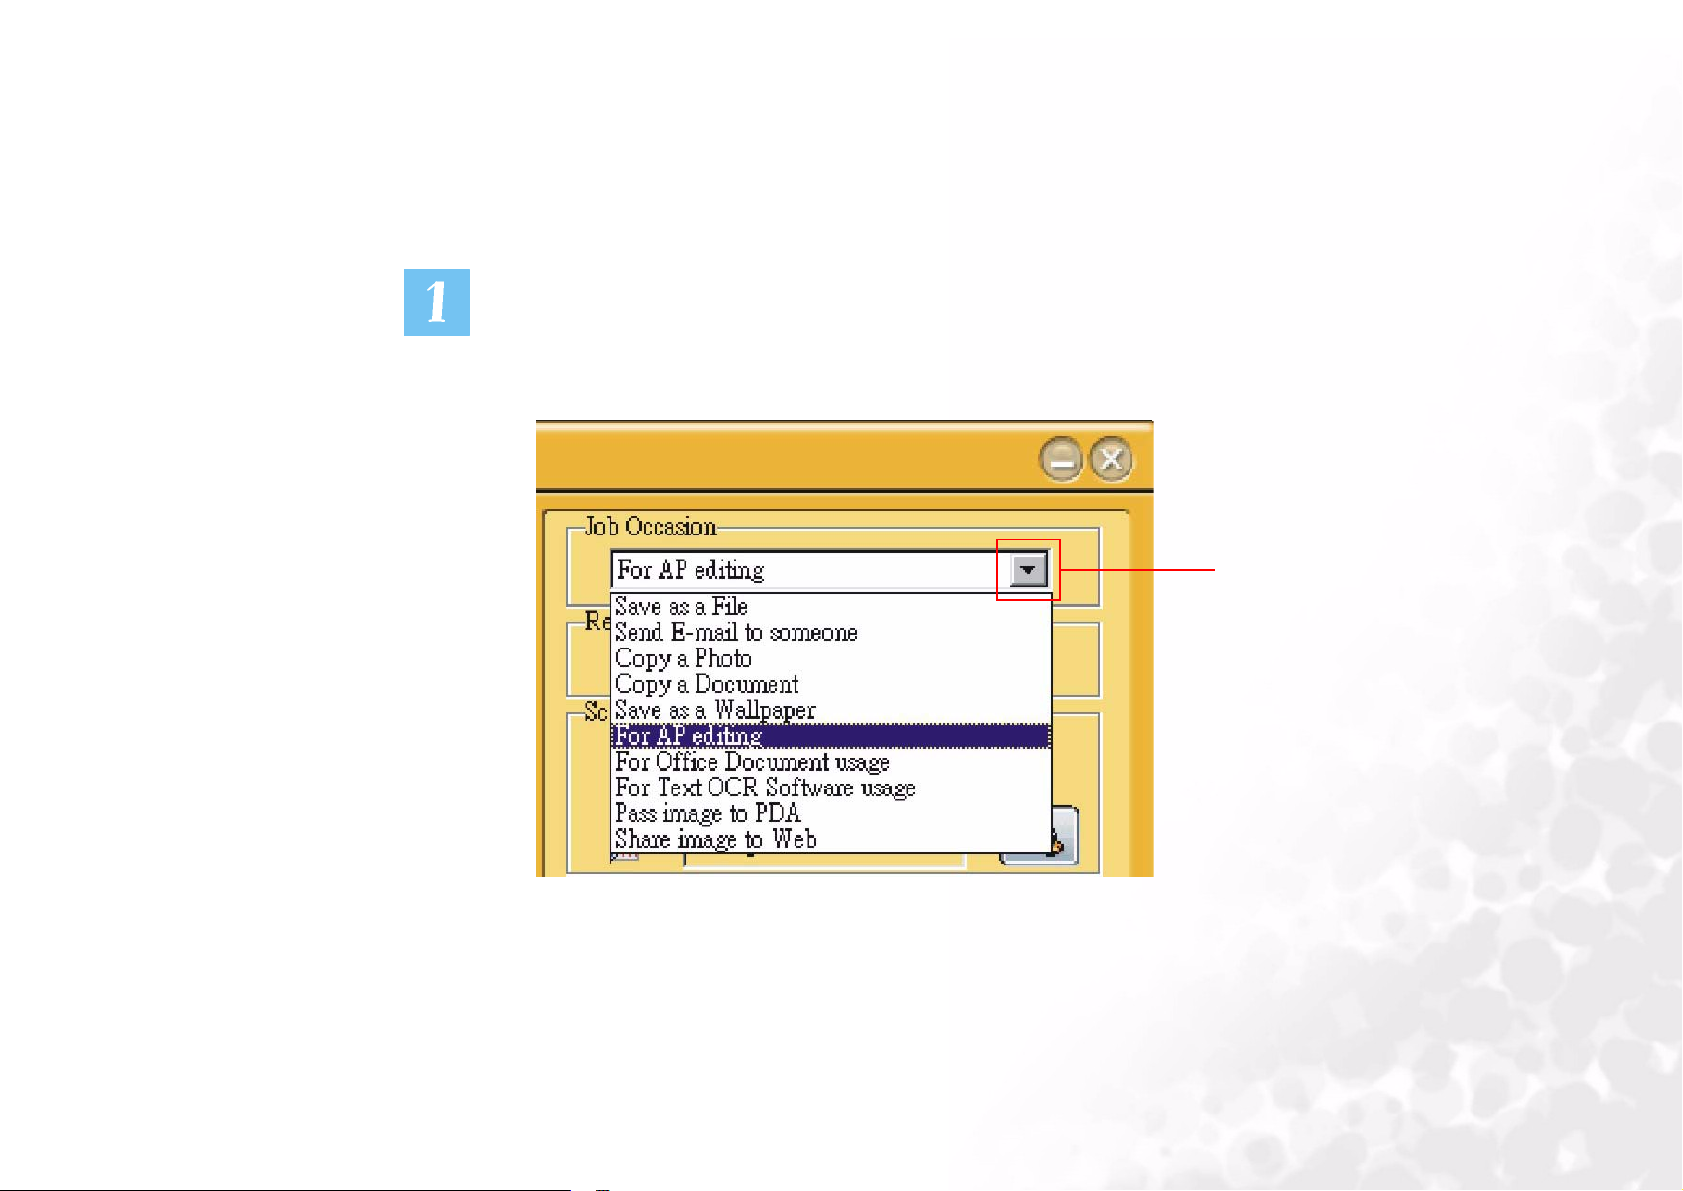
If you have installed application programs that Mirascan 6 can recognize and work
with, you can use this function to scan and transfer the scanned images to those application programs.
Click the button indicated below and a list of job occasion will appear on the screen.
Choose “For AP editing”.
Click this button.
For Beginners
For Beginners
For BeginnersFor Beginners
15
Page 17
In this occasion information menu, you can choose the application program to which
you want to scan and transfer the scanned images.
Click an icon on the button bar. Then click the scan button on the screen.
Mirascan 6 will start scanning the original and transfer the scanned image to the
application program of your choice.
For Beginners
For Beginners
For BeginnersFor Beginners
16
Page 18
For Office Document usage
For Office Document usage
For Office Document usageFor Office Document usage
This function enables you to scan documents as a Microsoft Office program file.
Click the button indicated below and a list of job occasion will appear on the screen.
Choose “For Office Document usage”.
Click this button.
For Beginners
For Beginners
For BeginnersFor Beginners
17
Page 19
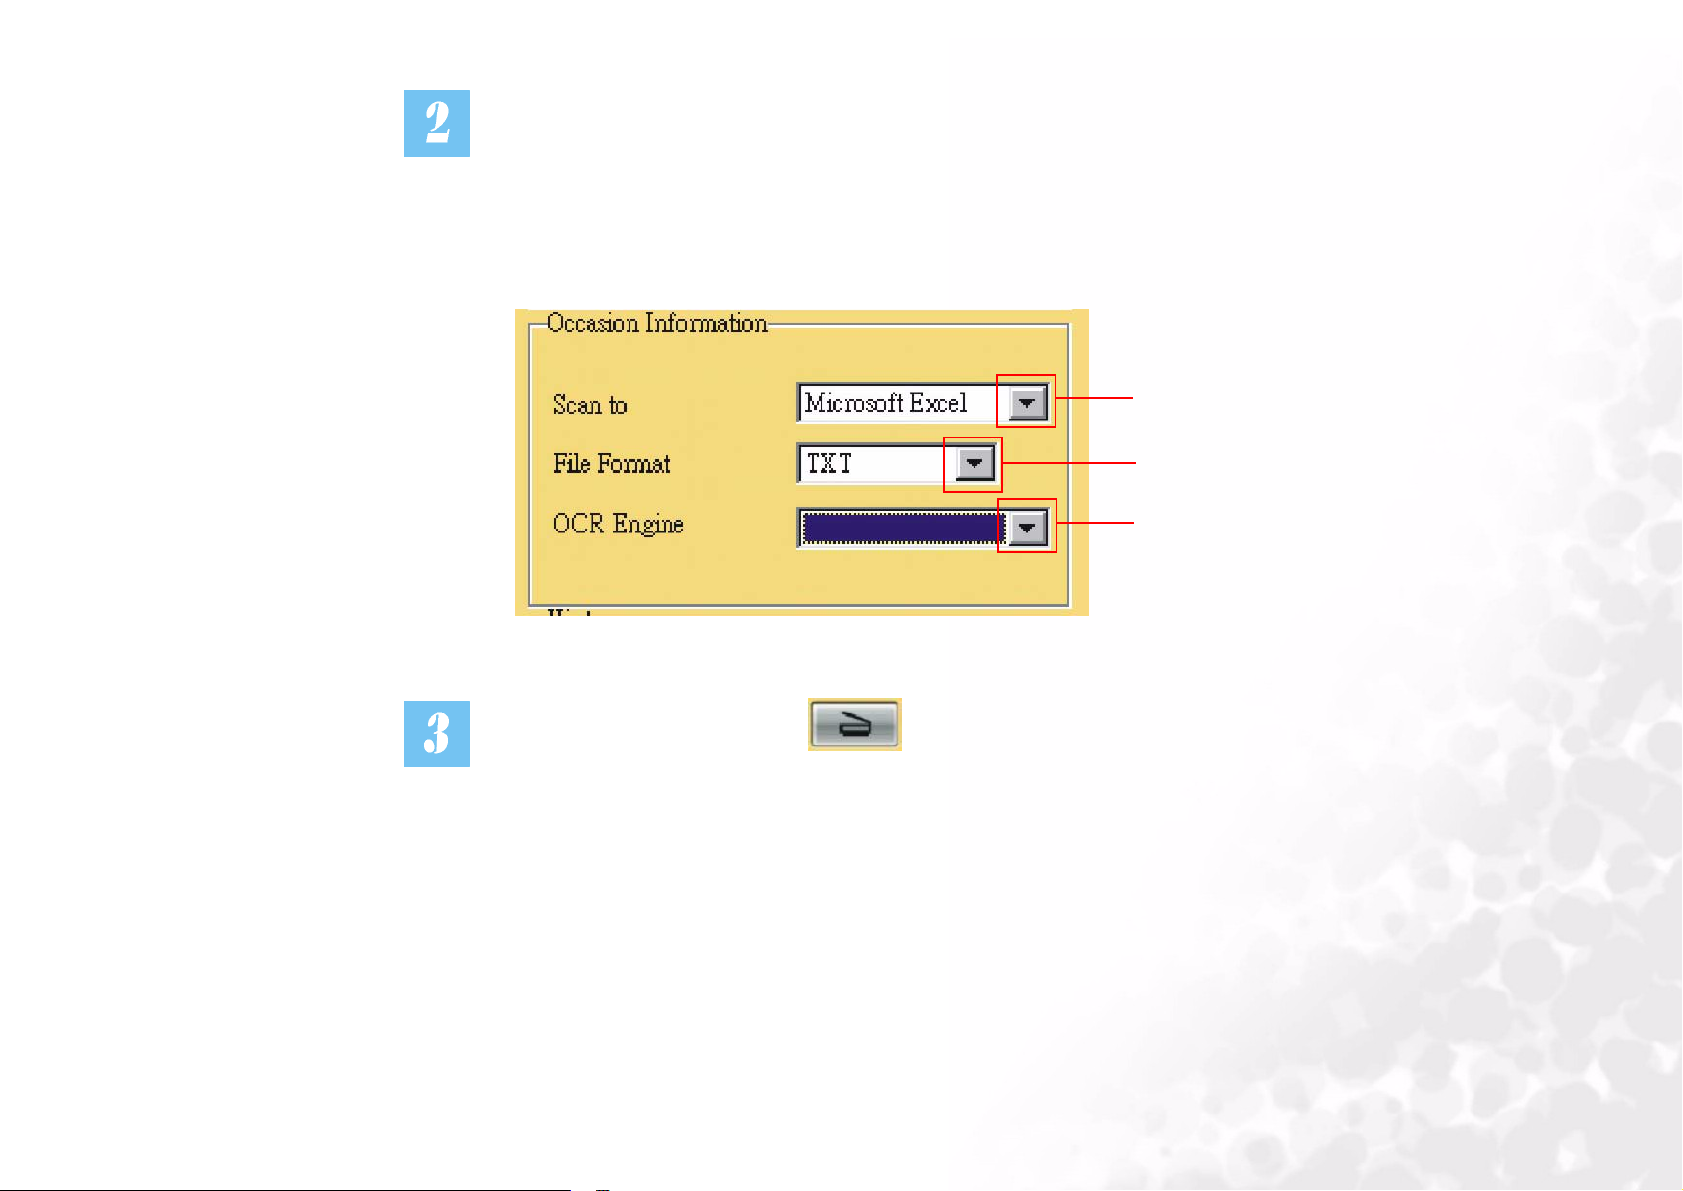
In this occasion information menu, you can change your scanned document setup. In “
Scan to” item, you can choose to scan the document to Microsoft Excel or Microsoft
Word. In “File Format” item, you can set the file format of the scanned document. In
“OCR Engine” item, you can select a proper OCR engine which had been installed in
your computer..
Click this button to select.
Click this button to select.
Click this button to select.
Then click the scan button on the screen. Mirascan 6 will start scanning the
document and save as a Microsoft Office program file.
For Beginners
For Beginners
For BeginnersFor Beginners
18
Page 20
For Text OCR Software usage
For Text OCR Software usage
For Text OCR Software usageFor Text OCR Software usage
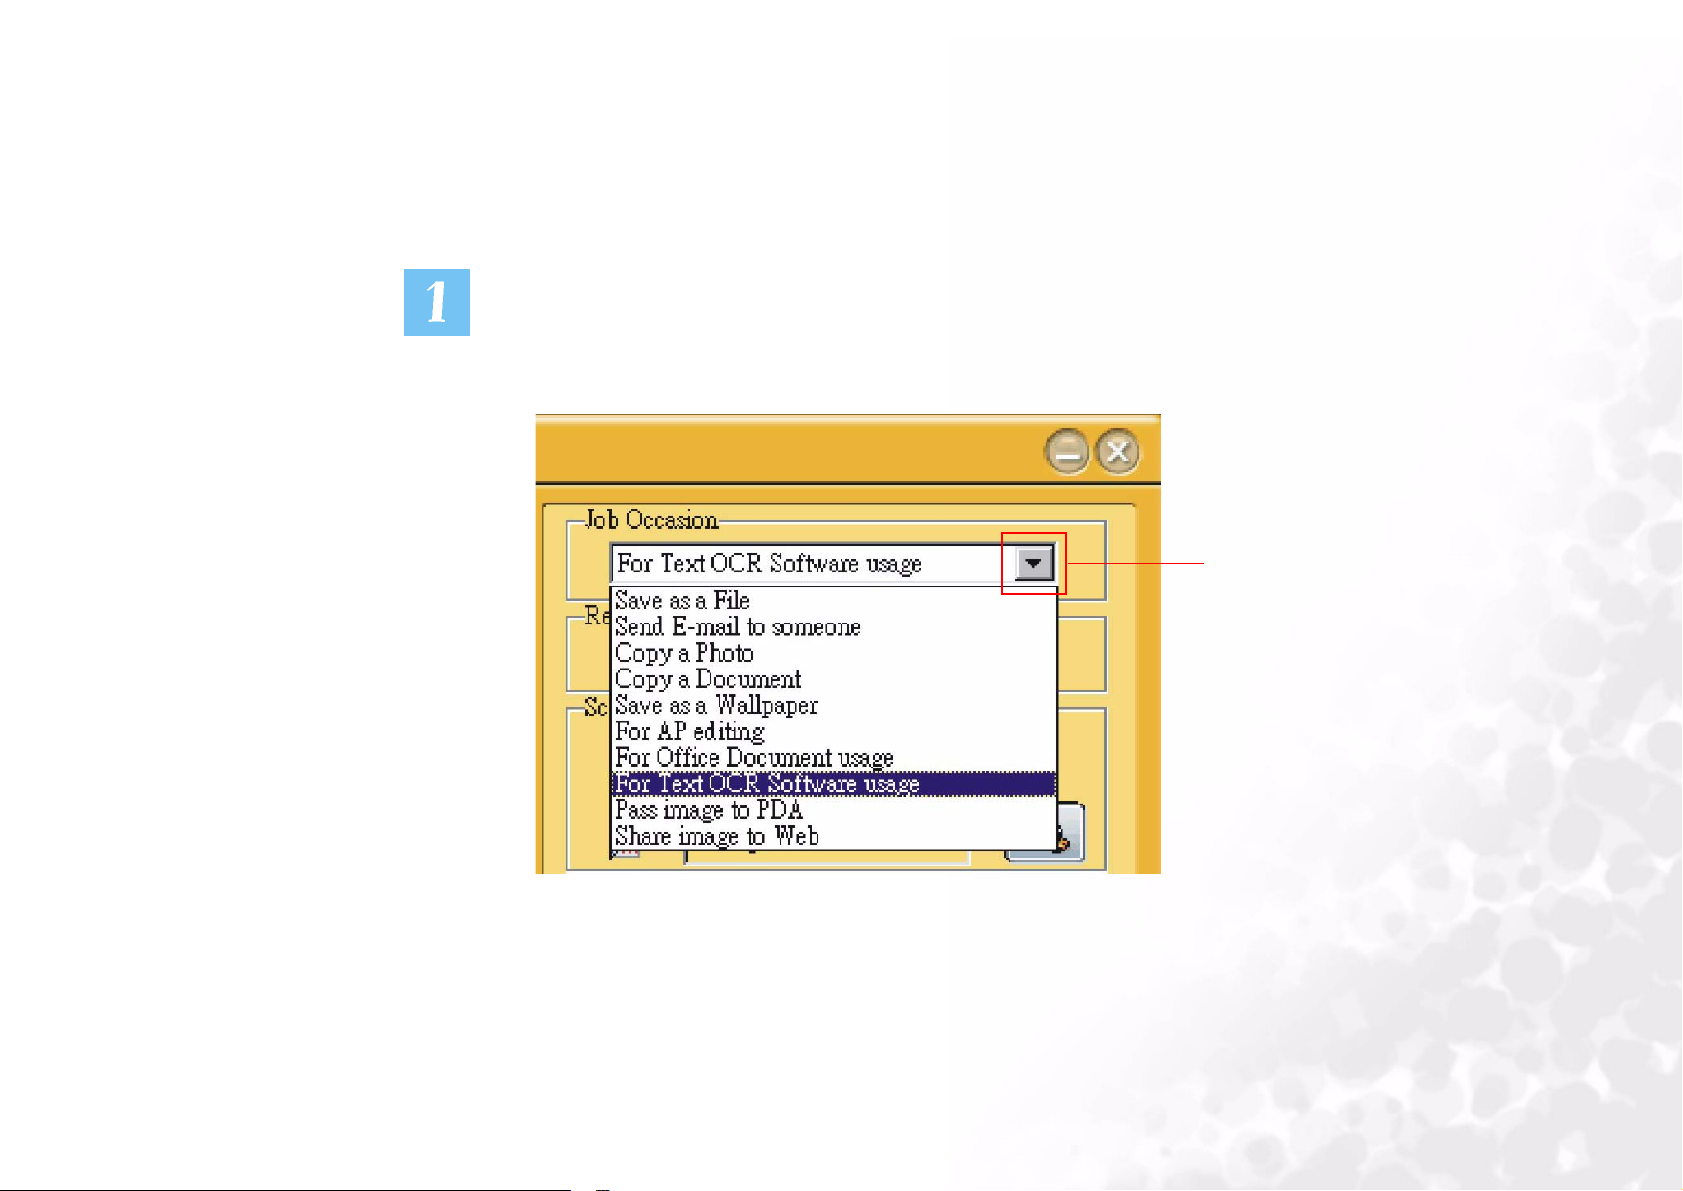
The “For Text OCR Software usage” function allows you to scan documents and turn
the scanned document image into editable text files. This will save you a lot of time retyping the text.
Click the button indicated below and a list of job occasion will appear on the screen.
Choose “For Text OCR Software usage”.
Click this button.
For Beginners
For Beginners
For BeginnersFor Beginners
19
Page 21
In this occasion information menu, you can select an proper OCR engine which is
already installed in your system to do Optical Character Recognition.
Click this button to select.
Then click the scan button on the screen.
Mirascan 6 will start scanning the image. A dialogue box will then appear to show the
scanning process.
For Beginners
For Beginners
For BeginnersFor Beginners
20
Page 22

The OCR software (taking FineReader Sprint for example) will recognize the scanned
image and save the result.
For Beginners
For Beginners
For BeginnersFor Beginners
21
Page 23
Pass image to PDA
Pass image to PDA
Pass image to PDAPass image to PDA
This function allows you to scan your favorite photos to Palm compatible
(Personal Digital Assistant).
Before you start, check the following:
• The utility software that comes with your PDA (such as Palm Desktop) is installed.
• The software “Album ToGo” (available in the “AlbumTG” folder in the scanner software CD-ROM) is installed.
• The PDA is placed on its cradle and connected to your computer correctly.
Click the button indicated below and choose “Pass image to PDA”.
Palm compatible PDAs
Palm compatiblePalm compatible
Click this button.
For Beginners
For Beginners
For BeginnersFor Beginners
22
Page 24

In this occasion information menu, you will see the link status between your PDA and
PC..
Then click the scan button on the screen. Mirascan 6 will start scanning the
original. When finished, press the Sync button on cradle to transfer the scanned image
to your PDA.
For Beginners
For Beginners
For BeginnersFor Beginners
23
Page 25

Share image to Web
Share image to Web
Share image to WebShare image to Web
Click the button indicated below and a list of job occasion will appear on the screen.
Choose “Share image to Web”.
Click this button.
For Beginners
For Beginners
For BeginnersFor Beginners
24
Page 26

In this occasion information menu shown below, we provide you a web site (http://
www.Clubphoto.com) for sharing your photos. Please register a free membership at
the web site..
Click this button
Then click the scan button on the screen. Mirascan 6 will start scanning the
original. When finished, the following dialogue box will appear.
Enter your e-mail
address
Specify your own
password
For Beginners
For Beginners
For BeginnersFor Beginners
25
Page 27

Now you need to register to the photo sharing web site and get your own album page.
Connect to the Internet. Enter your e-mail address and specify your own password in
the dialogue box. Click “OK” when finished.
The following dialogue box will pop up, showing the upload progress. When upload is
completed, your Internet browser (such as Microsoft Internet Explorer) will open and
the scanned image will appear on your own album page. If the image does not appear,
click “Refresh” button of your browser.
For Beginners
For Beginners
For BeginnersFor Beginners
26
Page 28

Closing Mirascan 6
Closing Mirascan 6
Closing Mirascan 6Closing Mirascan 6
To close Mirascan 6, click the button .
Click this button to exit.
For Beginners
For Beginners
For BeginnersFor Beginners
27
Page 29

Additional Operations
Additional Operations
Additional OperationsAdditional Operations
Click this button to
minimize Mirascan 6
Click this button to switch to
classic mode
For more information on how to access other powerful and convenient features provided by
For more information on how to access other powerful and convenient features provided by
For more information on how to access other powerful and convenient features provided by For more information on how to access other powerful and convenient features provided by
Mirascan 6, you can go to the “For Experienced Users” section for details.
Mirascan 6, you can go to the “For Experienced Users” section for details.
Mirascan 6, you can go to the “For Experienced Users” section for details.Mirascan 6, you can go to the “For Experienced Users” section for details.
Click this button to
preview scanned image
For Beginners
For Beginners
For BeginnersFor Beginners
28
Page 30

Overview
Overview
OverviewOverview
Introduction to Mirascan 6
Introduction to Mirascan 6
Introduction to Mirascan 6Introduction to Mirascan 6
As a radically new application program, Mirascan 6 provides a more convenient and friendly user interface
and functions thanks to a more advanced design and development. Mirascan 6 offers an ultimately novel
operative way for users.
What is new in Mirascan 6?
What is new in Mirascan 6?
What is new in Mirascan 6?What is new in Mirascan 6?
In MiraScan 6, we provide 3 major modes for different usage: Button Mode
For optimum personalization, this version offers the following advanced features:
Button Mode
Button Mode
Button ModeButton Mode
scanner without any option on screen.
Wizard Mode
Wizard Mode
Wizard ModeWizard Mode
mode, which is called “Wizard Mode.” Whether it is the first time you use Mirascan 6 or whether you are a
seasoned user, in either case you will want to start using the many advantages it offers as quickly as possible.
When using wizard mode, we believe you’ll find its user interface is more friendly and functional than before
and has a very nice look. For easy operation, Mirascan 6 provides Wizard Mode in the form of easily recognizable buttons. This allows you to swiftly locate the button linked to a certain sub-task and will help you
better understand the relationship between the operations Mirascan 6 supports.
Don't worry about not having any experience with scanning or image formats. This application program
allows you to scan to diverse destinations with the click of a button. We have roughly divided all operations
into five classes. They are: Scan to Office Assistance (OA), Scan to Document, Scan to Web & Remote, Scan
to Image Application and Scan to Image Fun. You can click to expand each class for further selection. In each
class, some default application programs are provided. You can add a new application program using the
drag-drop function or through the settings dialog. To increase the intuitive character of the application
--- Under this mode, users can do their scanning job by only pressing the real buttons on the
--- The big difference between Mirascan 6 and Mirascan 5 is that Mirascan 6 contains a new
Button Mode, Wizard Mode
Button ModeButton Mode
Wizard Mode and Classic Mode
Wizard ModeWizard Mode
Classic Mode.
Classic ModeClassic Mode
For Experienced Users
For Experienced Users
For Experienced UsersFor Experienced Users
29
Page 31

program, all prompts are shown in a message window. Nearly all settings and macros can be changed in the
settings tabs. All you need to do is click a button. It doesn't get much easier than this, does it?
As a matter of fact, Wizard Mode combines both basic functions and advanced functions of this application
program. In other words, you may scan to different destinations with only the click of a button if you have no
any experience with scanning or image formats. On the contrary, if you are a seasoned user, you can directly
change some advanced settings of this application program in this mode. Moreover, if you are not used to
this Wizard Mode, you can change to Classic Mode by clicking the switch button. All you have to do is to
click the switch button in Wizard Mode and change the UI Skin to Classic Mode.
Classic Mode
Classic Mode
Classic ModeClassic Mode
stand alone AP mode, user can setup the parameters in this mode and further application. In TWAIN mode,
user can only setup the parameters to the specific AP and other application, and “Button/Wizard” modes wil
be disabled temporarily.
Shift between Wizard Mode and Classic Mode
Shift between Wizard Mode and Classic Mode
Shift between Wizard Mode and Classic ModeShift between Wizard Mode and Classic Mode
you will want to start using them to achieve the output you require. You can shift between two modes.
Wizard Mode and Classic Mode can be switching freely by a switching button. But Button Mode in MiraScan
6 is only an isolated off-line tool for change the button setting. Any Button function should be disable
temporarily during any UI mode is opened.
--- This is the classic UI scanning mode (Stand alone AP/TWAIN dual mode). In driver
--- Once you've familiarized yourself with the Modes,
Scan Jobs Menu
Scan Jobs Menu
Scan Jobs MenuScan Jobs Menu
offers you an overview of your workflow. All information on browsing, scanning, variables and operation,
etc. is available in this menu. You can define properties for various items to best suit your needs.
WIA Mode
WIA Mode
WIA ModeWIA Mode
--- You can specify a scanning job sequence in the novel Scan Jobs Menu. The Job List
--- For WHQL application. It’s the standard of Microsoft acquire mode under Windows XP.
For Experienced Users
For Experienced Users
For Experienced UsersFor Experienced Users
30
Page 32
Mirascan 6 user interfaces
Mirascan 6 user interfaces
Mirascan 6 user interfacesMirascan 6 user interfaces
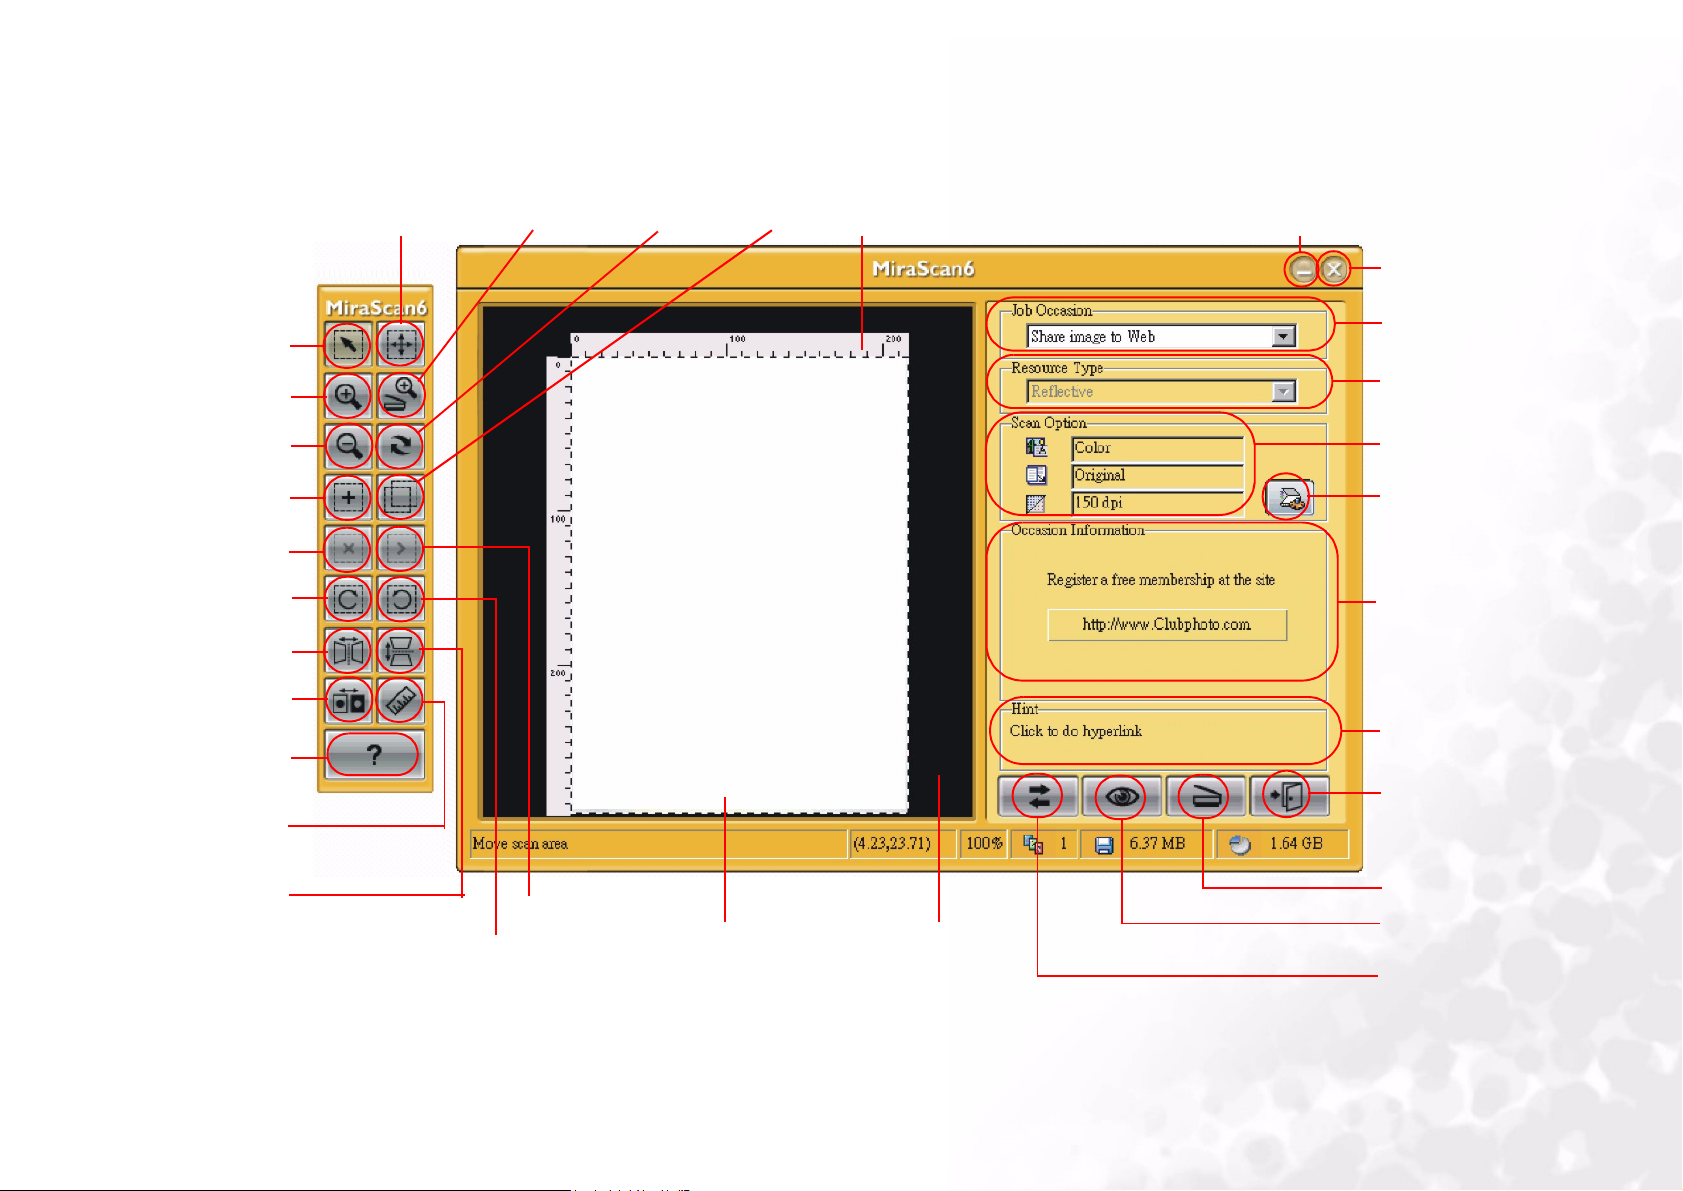
The Wizard Mode
The Wizard Mode
The Wizard ModeThe Wizard Mode
Frame selection
Zoom in
Zoom out
Add
Delete
Clockwise 90
degree
Flip Horizontal
Invert
Help File
Show Ruler
Hand
Zoom Scan
Refresh
Copy
Ruler
Minimize MiraScan 6
Close
MiraScan 6
Job
Occasion
Resource
Ty pe
Scan Option
Setting
Occasion
Information
Hint
Exit
Flip Vertical
Next frame
Counterclockwise
90 degree
Scan area
Preview area
For Experienced Users
For Experienced Users
For Experienced UsersFor Experienced Users
Scan
Preview
Switch
button
31
Page 33

How to adjust settings in Wizard Mode
How to adjust settings in Wizard Mode
How to adjust settings in Wizard Mode How to adjust settings in Wizard Mode
Click the “Settings” button and a setting window will appear in which you can define the various items.
There are six items in this setting window, namely, Image Type, Output Size, Resolution, Brightness,
Contrast and Saturation.
Click the “setting”
button and the
setting window
appears.
For Experienced Users
For Experienced Users
For Experienced UsersFor Experienced Users
32
Page 34

Setting Options (Please note that the parameter values mentioned below may change by different job
Setting Options (Please note that the parameter values mentioned below may change by different job
Setting Options (Please note that the parameter values mentioned below may change by different job Setting Options (Please note that the parameter values mentioned below may change by different job
occasion)
occasion)
occasion)occasion)
Image Type
Image Type
Image TypeImage Type
This item allows you to select the color mode which you wish to apply to the scanned imges. Default color
mode is “Color”. Others like Gray, BW, Color 48 or Gray 16 are optional.
Output Size
Output Size
Output SizeOutput Size
Selects the exact size which you wish to perform your scanned images.
Resolution
Resolution
ResolutionResolution
Selects scan resolution. Default resolution is 150dpi. Others like 75, 100, 150, 200, 300, 600, 1200, 2400, 4800,
9600 or 19200 are optional.
Brightness
Brightness
BrightnessBrightness
Here you can adjust the brightness of scanned images. The brightness value is between 100 and -100. You can
choose to increase or decrease the brightness value of scanned images.
Contrast
Contrast
ContrastContrast
This item allows you to adjust the contrast of scanned images. The contrast value is between 100 and -100.
You can choose to increase or decrease the contrast value of scanned images.
Saturation
Saturation
SaturationSaturation
This item allows you to adjust the color saturation of scanned images. The color saturation value is between
100 and -100. You can choose to increase or decrease the color saturation value of scanned images.
For Experienced Users
For Experienced Users
For Experienced UsersFor Experienced Users
33
Page 35

Getting Help
Getting Help
Getting HelpGetting Help
To help you better understand and operate Mirascan 6, you can access the Help system by clicking the Help
button.
For Experienced Users
For Experienced Users
For Experienced UsersFor Experienced Users
34
Page 36

PPPP
RRRREEEEVVVVIIIIEEEEWWWW
W
W
W W
IIIINNNNDDDDOOOOWWWW
Frame selection
Zoom in
Zoom out
Add
Delete
Clockwise 90
degree
Flip Horizontal
Invert
Help File
Hand
Zoom Scan
Refresh
Copy
Ruler
Show Ruler
Flip Vertical
Next frame
Counterclockwise
90 degree
Scan area
Preview area
For Experienced Users
For Experienced Users
For Experienced UsersFor Experienced Users
35
Page 37

Frame tool buttons
Frame tool buttons
Frame tool buttonsFrame tool buttons
Frame Selection
Frame Selection
Frame SelectionFrame Selection
Click this button to select a single or multiple frames.
Hand
Hand
HandHand
Click this button too display a hand to drag the image when it does not entirely fit in the previewing window.
Zoom in
Zoom in
Zoom inZoom in
Click this button to zoom in on an image.
Zoom Scan
Zoom Scan
Zoom ScanZoom Scan
Click this button to display the active frame to fit the Preview Window and view it at the highest resolution.
Zoom out
Zoom out
Zoom outZoom out
Click this button to zoom out on an image.
Refresh
Refresh
RefreshRefresh
Click this button to refresh the frames.
Add
Add
AddAdd
Click this button to draw a new frame in the Preview Window.
Copy
Copy
CopyCopy
Click this button to copy the frames.
Delete
Delete
Delete Delete
Click this button to delete the active frame. It will be removed when you exit the program.
Go to next Frame
Go to next Frame
Go to next FrameGo to next Frame
Click this button to activate the next frame.
Clockwise 90 degree
Clockwise 90 degree
Clockwise 90 degreeClockwise 90 degree
Click this button to turn the frame 90 degree clockwise.
Counterclockwise 90 degree
Counterclockwise 90 degree
Counterclockwise 90 degreeCounterclockwise 90 degree
For Experienced Users
For Experienced Users
For Experienced UsersFor Experienced Users
36
Page 38

Click this button to turn the frame 90 degree counterclockwise.
Flip Horizontal
Flip Horizontal
Flip HorizontalFlip Horizontal
Click this button to flip the frame horizontal.
Flip Vertical
Flip Vertical
Flip VerticalFlip Vertical
Click this button to flip the frame vertical.
Invert
Invert
Invert Invert
Click this button to invert the frame.
Rulers' Operation
Rulers' Operation
Rulers' OperationRulers' Operation
You can make changes to the ruler's appearance here. Click the button at the cross of ruler, a menu pops up
for option.
Show Cross Lines:
Show Cross Lines: If you click this item and move the cursor back to the Preview Window, crossed lines will
Show Cross Lines:Show Cross Lines:
appear to help you position the cursor more accurately.
Hide Ruler:
Hide Ruler: If you click this item, the ruler will be hidden and the Preview Window will fit out. If you want to
Hide Ruler:Hide Ruler:
restore the ruler, select the item "Show ruler" in the Settings dialog or in the menu which pops up after clicking the cross.
Unit:
Unit: selects the unit for the ruler. There are three units for you to choose: millimeter, inch and pixel.
Unit:Unit:
Rulers
Rulers
RulersRulers
A horizontal ruler helps you locate the image and calculate its size.
Preview Area
Preview Area
Preview AreaPreview Area
All pre-scanning results will be displayed in this area for you to preview.
For Experienced Users
For Experienced Users
For Experienced UsersFor Experienced Users
37
Page 39
Copy
Refresh
Zoom Scan
Hand
Frame selection
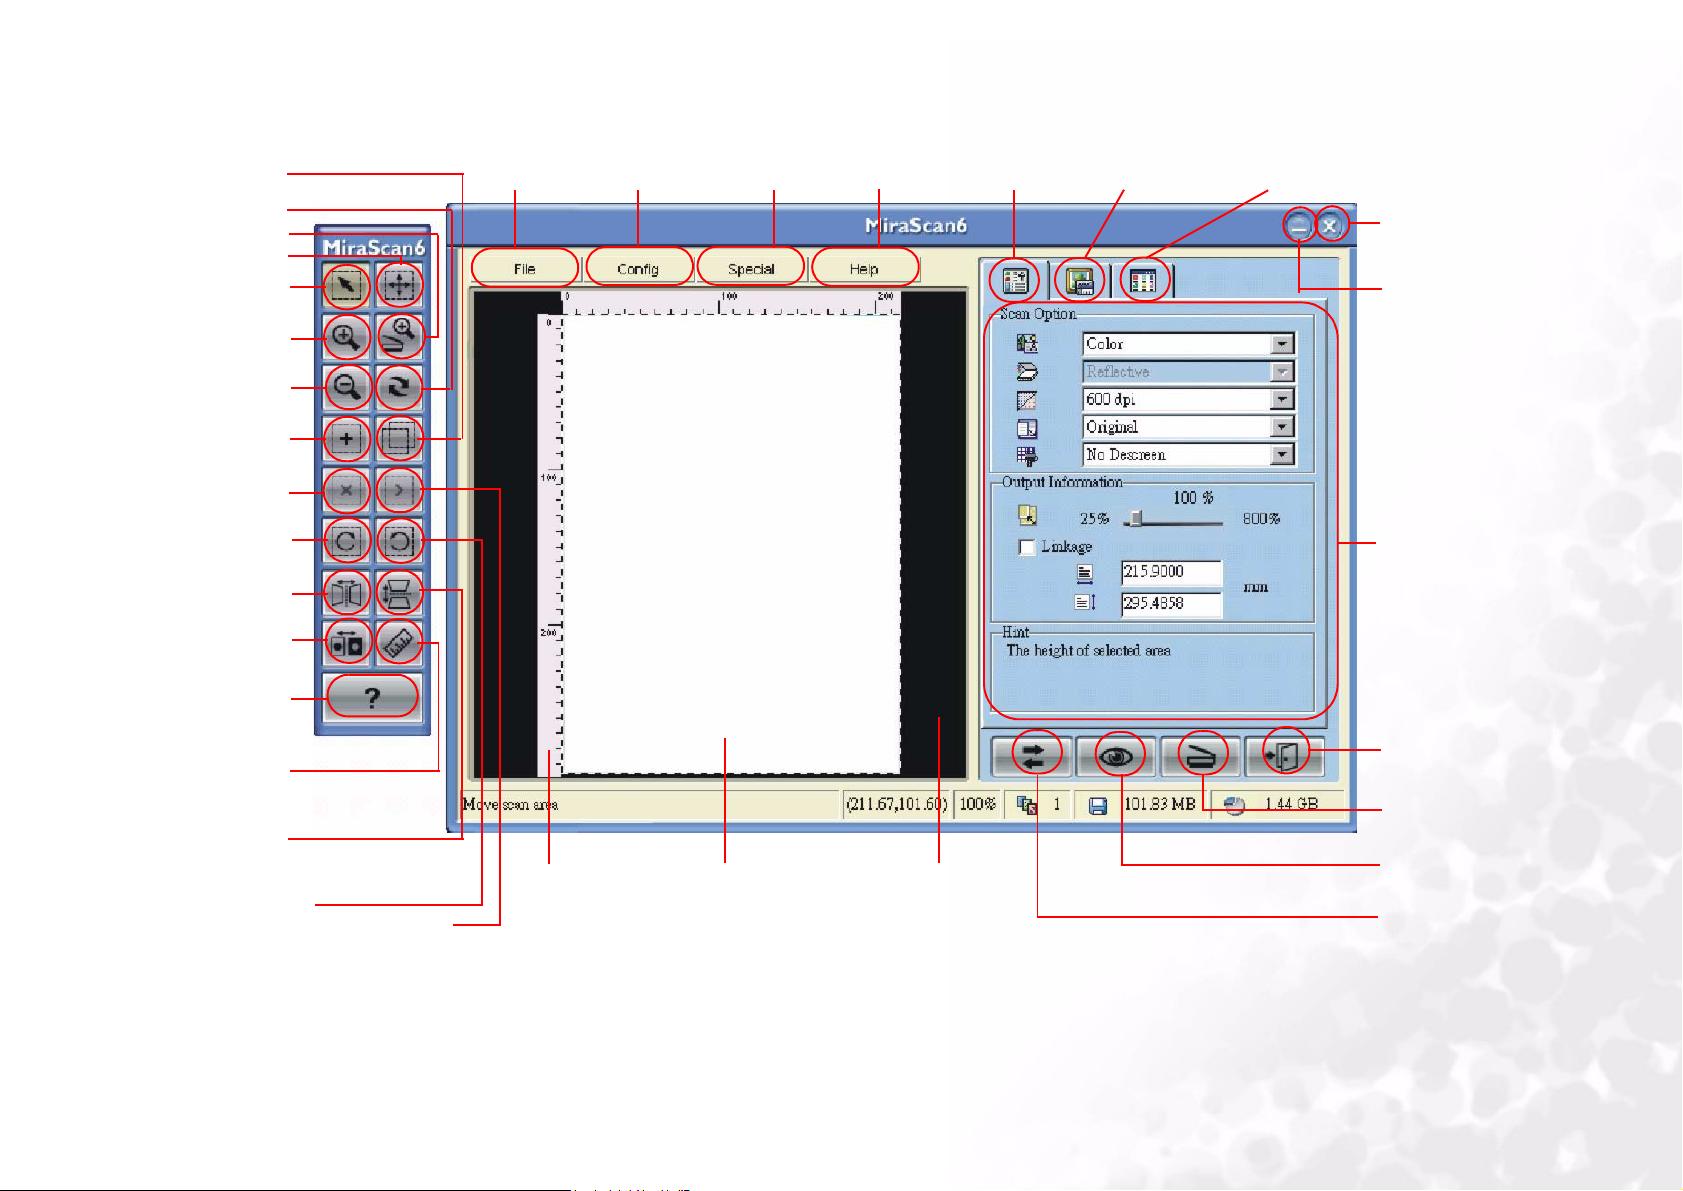
The Classic Mode
The Classic Mode
The Classic ModeThe Classic Mode
Configuration
File
Special setting
Help
Common
Job Settings
Color Adjust
Job Occasion
Close
MiraScan 6
Minimize
Zoom in
Zoom out
Add
Delete
Clockwise 90
degree
Flip Horizontal
Invert
Help File
Show Ruler
Flip Vertical
Counterclockwise
90 degree
Next frame
Ruler
Scan area
MiraScan 6
Setting Menu
Area
(Menus and
Items shown
here change
by different
setting mode
you choose.)
Exit
Scan
Preview
Preview area
Switch
button
For Experienced Users
For Experienced Users
For Experienced UsersFor Experienced Users
38
Page 40

How to adjust settings in Classic Mode
How to adjust settings in Classic Mode
How to adjust settings in Classic Mode How to adjust settings in Classic Mode
I. Common Job Setting
I. Common Job Setting
I. Common Job SettingI. Common Job Setting
Click the “Common Job Settings” button and the settings menu will appear in which you can define the
various items. There are three main items in this setting menu, namely, Scan Option, Output Information
and Hint.
Click the “Common
Job Setting” button
and the setting
menu appears.
Scan Option
Scan Option
Scan OptionScan Option
Image Type
Image Type
Image TypeImage Type
This item allows you to select the color mode which you wish to apply to the scanned imges. Default color
mode is “Color”. Others like Gray, BW, Color 48 or Gray 16 are optional.
For Experienced Users
For Experienced Users
For Experienced UsersFor Experienced Users
39
Page 41

Resource Type
Resource Type
Resource TypeResource Type
Selects the resource type of the original.
Scan Resolution
Scan Resolution
Scan ResolutionScan Resolution
Selects scan resolution. Default resolution is 150dpi. Others like 75, 100, 150, 200, 300, 600, 1200, 2400, 4800,
9600, 19200 or Custom are optional.
Output Size
Output Size
Output SizeOutput Size
Selects the exact size which you wish to perform your scanned images.
Descreen Selection
Descreen Selection
Descreen SelectionDescreen Selection
If you are scanning images from magazines, newspapers or other printed materials, you will find that the
scanned image appears to be covered by tiny screen patterns. To eliminate this screen pattern, you can use the
options and choose the kind of original you want to descreen. Mirascan 6 will descreen the scanned image
automatically.
Output Information
Output Information
Output InformationOutput Information
This sub-menu allows you to define the various items. There are four items in this setting window, namely,
Scaling, Constrain Proportion, Document Width and Document Height.
Select the scaling of output images.
Select the constrain proportion.
Change the width of seleted area.
Change the height of seleted area.
For Experienced Users
For Experienced Users
For Experienced UsersFor Experienced Users
40
Page 42

Hint
Hint
HintHint
This sub-menu offers you the hint of each function. With the descriptions, you can easily undersatnd how to
operate those functions.
For Experienced Users
For Experienced Users
For Experienced UsersFor Experienced Users
41
Page 43

II. Color Adjust
II. Color Adjust
II. Color AdjustII. Color Adjust
Click the “Color Adjust” button and the settings menu will appear in which you can define the various items.
There are five main items in this setting menu, namely, Brightness and Contrast Adjustment, Color Balance,
Curve Adjustment, Level Adjustment and Hue & Saturation Adjustment.
Click the “Color Adjust
and the setting menu appears.
Color Adjust Settings
Color Adjust Settings: Click to
Color Adjust SettingsColor Adjust Settings
choose Brightness and Contast
Adjustment, Color Balance, Curve
Adjustment, Level Adjustment, or
Hue and Saturation Adjustment.
Setting Menu Area
Setting Menu Area
Setting Menu AreaSetting Menu Area
Color Adjust” button
Color AdjustColor Adjust
For Experienced Users
For Experienced Users
For Experienced UsersFor Experienced Users
42
Page 44

Adjust Brightness and Contrast
Adjust Brightness and Contrast
Adjust Brightness and ContrastAdjust Brightness and Contrast
This item allows you to adjust the brightness and contrast of the scanned image.
You can manually type the values between -100 and 100 (the default is 0) into their text boxes. You can also
drag the scroll bar left to decrease or right to increase the effect. We recommend you to click the "Auto"
button to let the software adjust the effect automatically.
Adjust Brughtness and
Conntrast
Adjust Brightness
Adjust Contrast
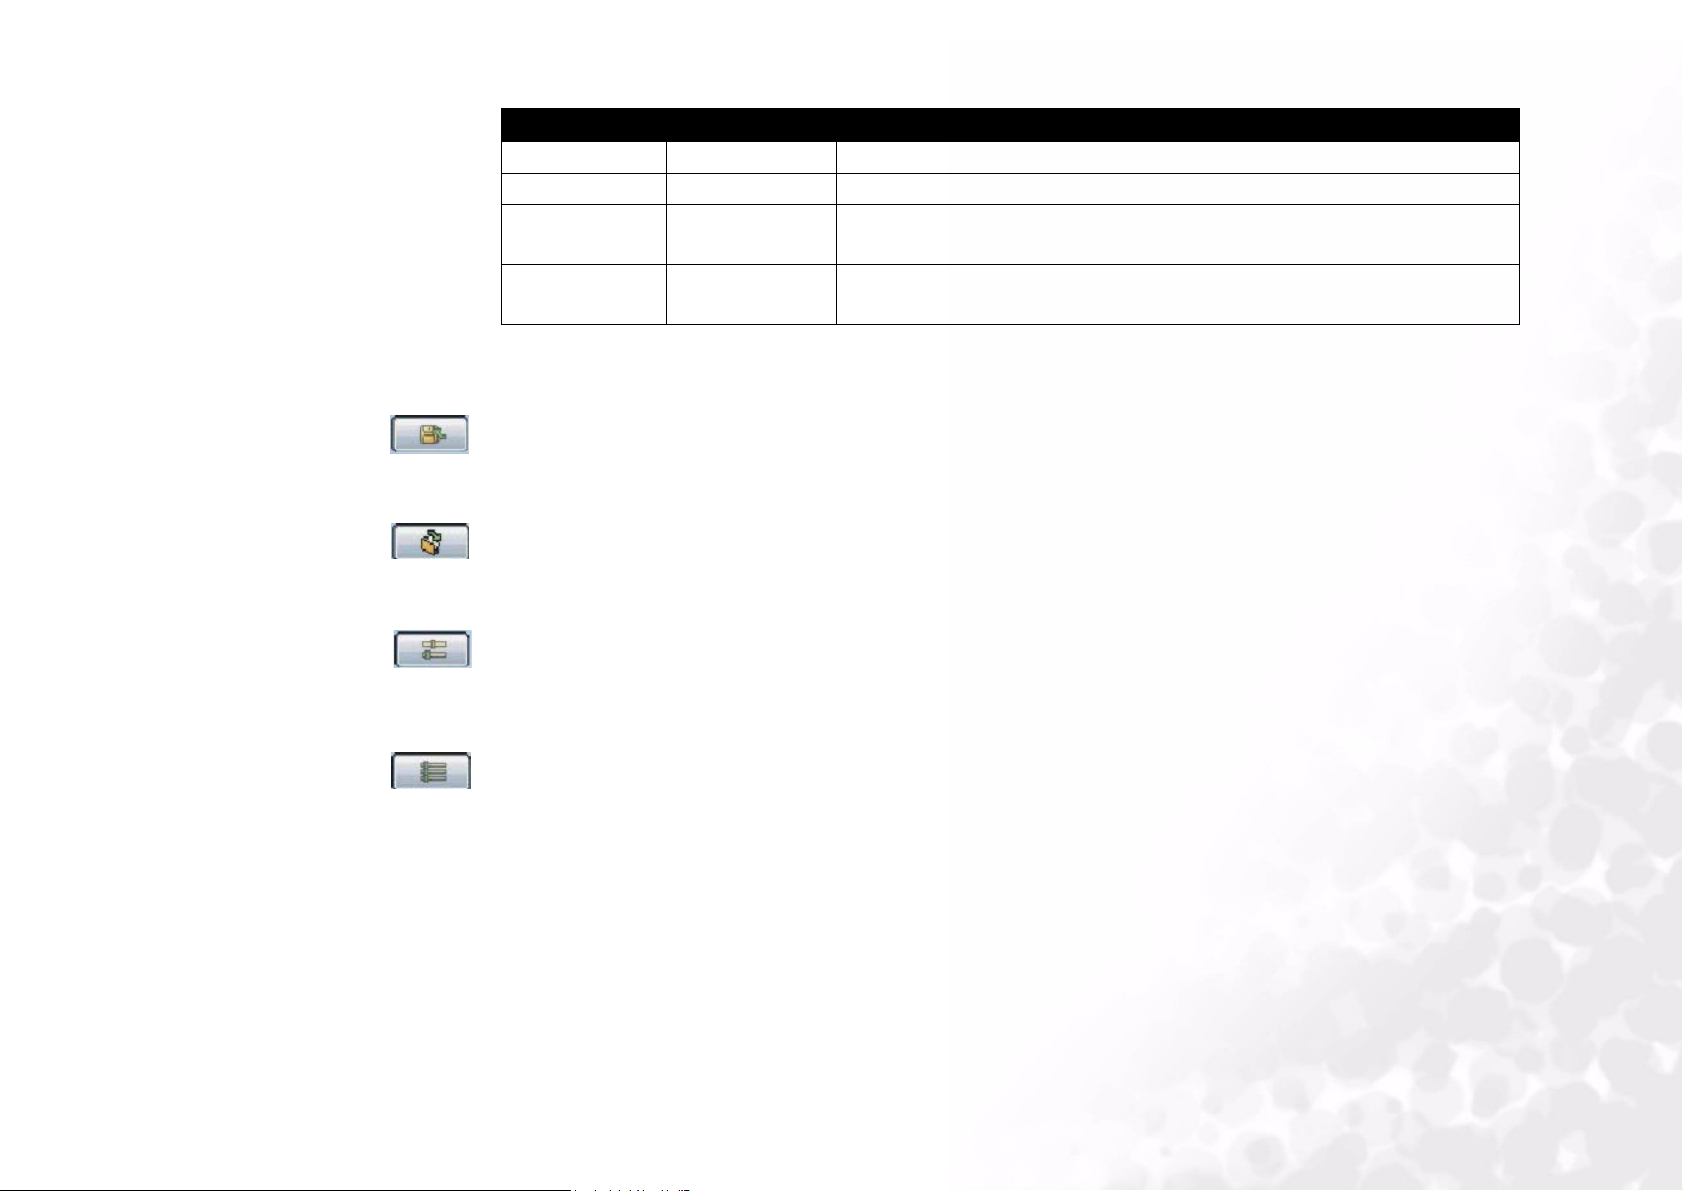
Load
Load
LoadLoad
Load setting value.
Save
Save
SaveSave
Load
Load
LoadLoad
Hint
Auto
Auto
AutoAuto
Reset
Reset
ResetReset
Reset All
Reset All
Reset AllReset All
For Experienced Users
For Experienced Users
For Experienced UsersFor Experienced Users
43
Page 45

Save
Save
SaveSave
Save selected setting value.
Reset
Reset
ResetReset
This item allows you to reset the brightness or contrast value.
Reset All
Reset All
Reset AllReset All
Reset both brightness and contrast value.
Auto
Auto
AutoAuto
Click this "Auto" button to let the software adjust the effect automatically.
For Experienced Users
For Experienced Users
For Experienced UsersFor Experienced Users
44
Page 46

Adjust Color Balance
Adjust Color Balance
Adjust Color BalanceAdjust Color Balance
With the Color Balance menu, you can change the mixture of colors of an image and emphasize or diminish
certain colors.
The color channel
color channel is where you can select the channel to be adjusted.
color channelcolor channel
Color Balance Value:
Color Balance Value: You can drag the triangles or enter the value (from 0 to 100) in the box directly to
Color Balance Value: Color Balance Value:
adjust.
Adjust Color Balance
Color Balance Value
Color Balance Value
Color Balance ValueColor Balance Value
Color Channel
Color Channel
Color ChannelColor Channel
Save
Save
SaveSave
Reset
Reset
ResetReset
Reset All
Reset All
Load
Load
LoadLoad
Hint
To adjust the color balance, first, you select the channel you want to adjust, then drag the triangles under the
three color bars. You can also enter the desired values directly into the three entry boxes to the right of the
color bars to adjust the color balance.
For example, if the color of the brighter area in the original you scan appears to be bluish, you can first
choose Highlight
triangle below the Yellow-Blue bar to the left to eliminate the bluish effect.
Highlight as the channel, and then drag the triangle below Cyan-Red bar to the right, or drag the
HighlightHighlight
For Experienced Users
For Experienced Users
For Experienced UsersFor Experienced Users
Reset AllReset All
45
Page 47
Default parameters as:
Item
Item Range
ItemItem
Color channel Mid-tone
Cyan and red -100~100 0
Magenta and
green
Yellow and
blue
Load
Load
LoadLoad
Load setting value.
Save
Save
SaveSave
Save selected setting value.
Reset
Reset
ResetReset
Range Default value
RangeRange
-100~100 0
-100~100 0
Default value
Default value Default value
This item allows you to reset the color balance value.
Reset All
Reset All
Reset AllReset All
Reset all color balance value.
For Experienced Users
For Experienced Users
For Experienced UsersFor Experienced Users
46
Page 48

Adjust Curve
Adjust Curve
Adjust CurveAdjust Curve
The Curve tool is used to adjust the brightness properties of midtone pixels in an image.
Use the Color Channel box
property of each color channel respectively.
Color Channel box to select the color channel to be adjusted. This allows you to adjust the curve
Color Channel boxColor Channel box
Adjust Curve
Tonal M a p
Tonal M a p
Tonal M a pTo n a l M ap
Save
Save
SaveSave
Load
Load
LoadLoad
Hint
Color Channel Box
Color Channel Box
Color Channel BoxColor Channel Box
Reset
Reset
ResetReset
Reset All
Reset All
Reset AllReset All
The x-axis in the Tonal Map
image. The y-axis represents the output brightness level of the image. By clicking and
dragging the curve to change its shape, you can adjust the difference between input
and output brightness level of an image without extensively modifying the dark and
bright areas. If we compare the following images and their Tonal Maps:
Tonal Map represents the input brightness level of the pixels in an
Tonal MapTonal Map
For Experienced Users
For Experienced Users
For Experienced UsersFor Experienced Users
47
Page 49

The original image and its Tonal Map.
The curve is straight and diagonal.
You can also click the curve to add new points and further change the shape of the curve:
Click to add a new point
You can read the precise input/output value in the Input/Output Status Area.
Drag the curve to the left, and the
mid-tone area of the image becomes
brighter.
Drag the curve to the right, and the
mid-tone area of the image becomes
darker.
For Experienced Users
For Experienced Users
For Experienced UsersFor Experienced Users
48
Page 50

Load
Load
LoadLoad
Load setting value.
Save
Save
SaveSave
Save selected setting value.
Reset
Reset
ResetReset
This item allows you to reset the curve value.
Reset All
Reset All
Reset AllReset All
Reset all curve value.
For Experienced Users
For Experienced Users
For Experienced UsersFor Experienced Users
49
Page 51

Adjust Level
Adjust Level
Adjust LevelAdjust Level
The Color Level dialog box shows the distribution of brightness levels of an image and its values classified
into the Input Level and the Output Level.
Adjust Curve
Input Level
Input Level
Input LevelInput Level
Output Level
Output Level
Output LevelOutput Level
Save
Save
SaveSave
Load
Load
LoadLoad
Hint
Color Channel Box
Color Channel Box
Color Channel BoxColor Channel Box
Auto
Auto
AutoAuto
Reset
Reset
ResetReset
Reset All
Reset All
Reset AllReset All
Use the Color Channel
the histogram property of each color channel respectively.
Color Channel box to select a color channel to adjust. This will allow you to adjust
Color ChannelColor Channel
For Experienced Users
For Experienced Users
For Experienced UsersFor Experienced Users
50
Page 52

A Histogram displays the distributing status of dark and bright pixels in an
image. The x-axis is divided into 256 equal portions, representing the
brightness level of 0 to 255. The y-axis is used to represent the quantity of
pixel in each brightness level. A comparison of two images and their
histograms follows:
Brighter images have
brighter pixels,
therefore the bars in
the right are higher
than that in the left.
Darker images
have darker pixels,
therefore the bars
in left are higher
than that in the
right.
Image 1
Image 2
For Experienced Users
For Experienced Users
For Experienced UsersFor Experienced Users
51
Page 53

We can see that in Image 1, there is a higher contrast between the brighter and darker part of the image.
Bright and dark pixels occupy a larger portion of the total image. Therefore, in the histogram there are higher
bars in the left (darker side) and right (brighter side), and in the center the bars are relatively much lower,
which means that there are only a few midtone pixels in the image.
In image 2, pixels in objects possess greater levels of brightness and darkness. The distribution is more even
than that in Image 1 as well. Therefore, the brighter, midtone and darker pixels share evenly the total pixels
in the image. This will make the histogram for Image 2 appear smoother.
To adjust level, first choose the color channel. There are four radio boxes for the selection of channels. If you
select the Master, the level of all three color channels (red, green and blue) will be adjusted simultaneously. If
you select one of the Red, Green, or Blue boxes, then only the selected color channel will be adjusted.
Next, you can adjust the level by dragging the triangle under the diagrams. The Black handle (the left one) is
for the adjustment of shadow of input/output level, the gray handle (the middle one) is for mid-tone, and the
white handle (the right one) is for highlight. In addition, you can adjust the values by directly entering the
desired values in the text boxes. You can also press the "Auto" button to let Mirascan 6 automatically adjust
the color level according to the color of the whole image.
Below is an example of using the histogram tools to enhance the image and add detail:
Before adjustment
After adjustment
For Experienced Users
For Experienced Users
For Experienced UsersFor Experienced Users
52
Page 54

Default parameters are:
Item Range Default value
Input level
max
Input level
min
Gamma 0.1~9.9 1.5
Output level
max
Output level
min
Load
Load
LoadLoad
Load setting value.
Input level
min+2~255
0~input level
max-2
0~255 255
0~255 0
255
0
Save
Save
SaveSave
Save selected setting value.
Reset
Reset
ResetReset
This item allows you to reset the level value.
Reset All
Reset All
Reset AllReset All
Reset all level value.
For Experienced Users
For Experienced Users
For Experienced UsersFor Experienced Users
53
Page 55
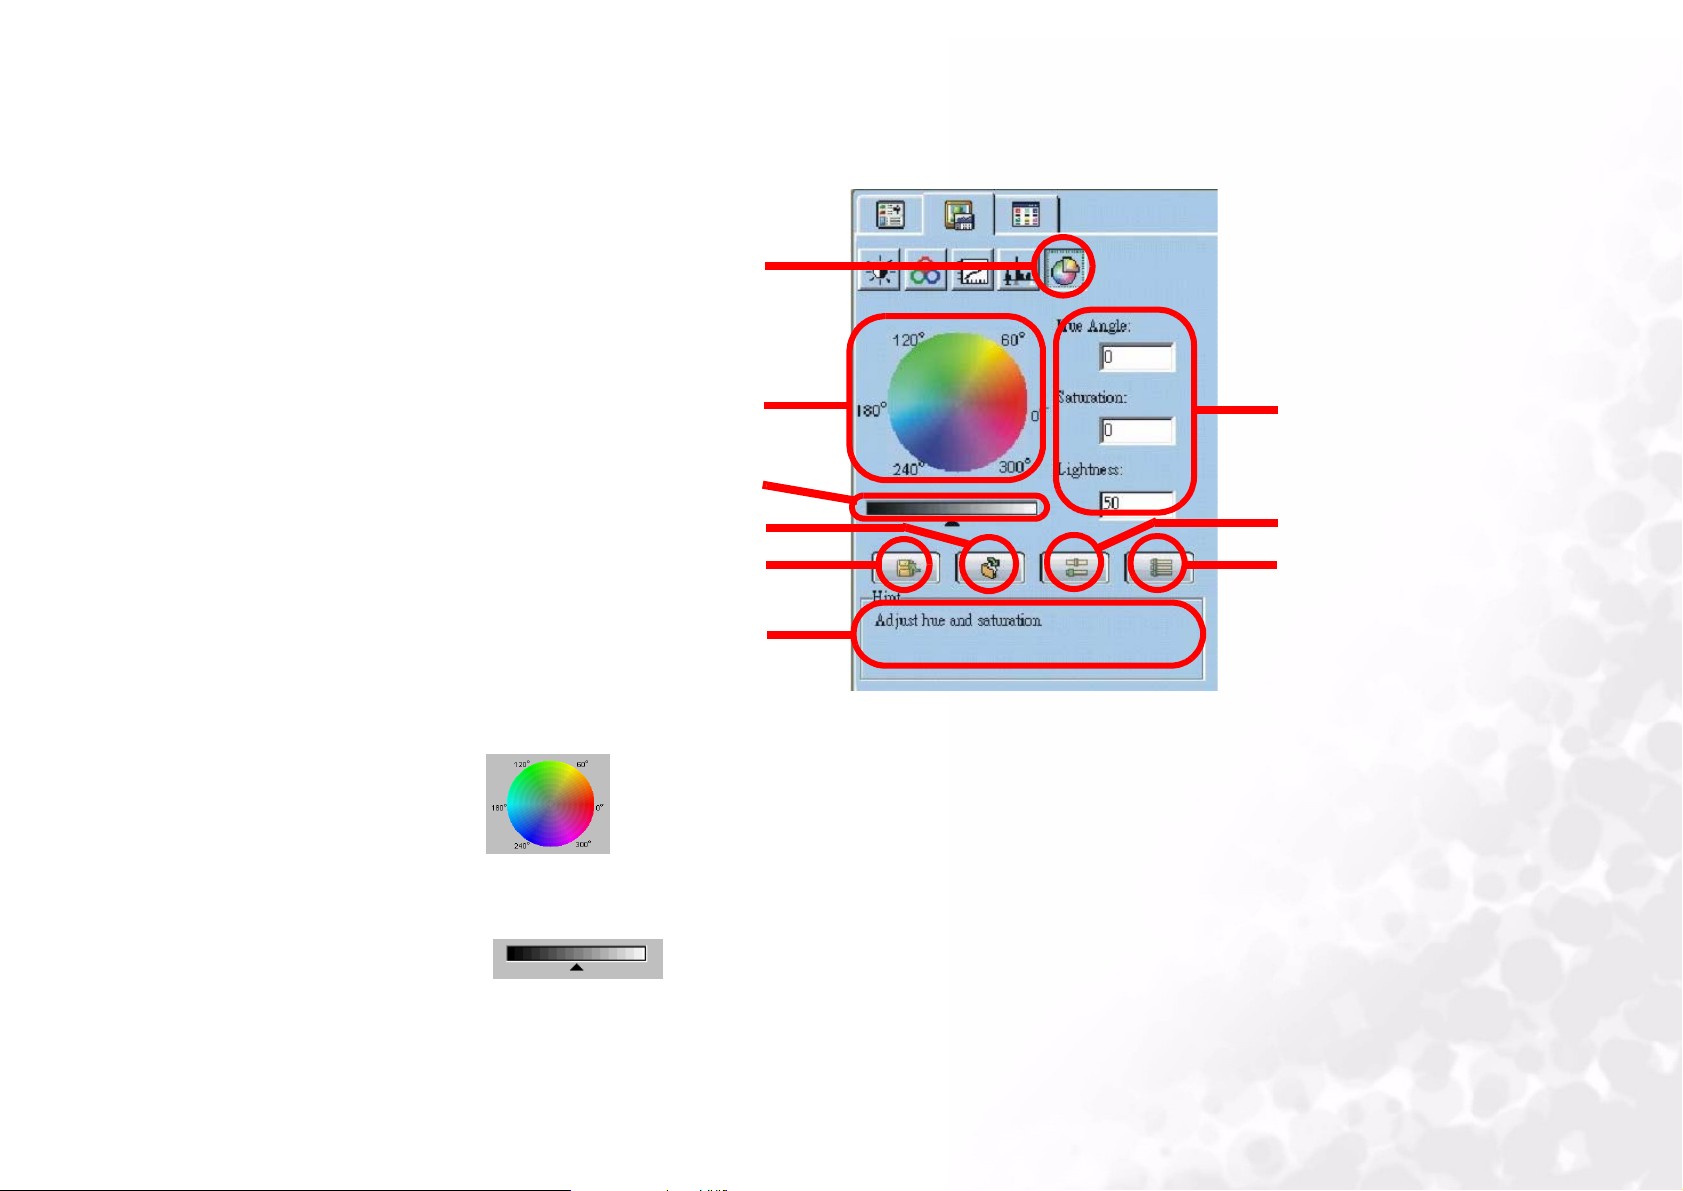
Adjust Hue and Saturation
Adjust Hue and Saturation
Adjust Hue and SaturationAdjust Hue and Saturation
Hue is a characteristic that distinguishes one color from another, while Saturation decides the intensity of a
color.
Adjust Hue and
Saturation
Adjust Contrast
Lightness Bar
Save
Save
SaveSave
Load
Load
LoadLoad
Hint
You can use the Color Wheel
Move your mouse cursor on the Color Wheel and then click on it. Drag within the Color
Wheel to select the hue of the color you want to use. The distance from the center of the wheel
decides the saturation of the color: the farther you drag your mouse cursor from the center of
the Color Wheel, the higher the saturation.
You can drag the triangle below the Lightness Bar to adjust the lightness of the color you
choose. To increase the lightness, drag the triangle to the right. Otherwise, drag the
triangle to the left to reduce the lightness.
Color Wheel to specify the hue and saturation of the color you want to use.
Color WheelColor Wheel
Entry Boxes
Reset
Reset
ResetReset
Reset All
Reset All
Reset AllReset All
For Experienced Users
For Experienced Users
For Experienced UsersFor Experienced Users
54
Page 56

While you drag within the Color Wheel
the triangle below the Lightness Bar to specify the lightness of color, the related information will also be shown in the Entry Boxes
Default parameters as:
Item
Item Range
ItemItem
Hue
Hue 0~359
HueHue
Saturation
Saturation 0~100%
SaturationSaturation
Lightness
Lightness 0~100%
LightnessLightness
Load
Load
LoadLoad
Load setting value.
Save
Save
SaveSave
Color Wheel to choose the hue and saturation of color or drag
Color Wheel Color Wheel
Range Default value
RangeRange
0~359 0000
0~3590~359
0~100% 0%
0~100% 0~100%
0~100% 50%
0~100%0~100%
Default value
Default value Default value
0%
0%0%
50%
50%50%
Entry Boxes. You can also enter the values here directly.
Entry BoxesEntry Boxes
Save selected setting value.
Reset
Reset
ResetReset
This item allows you to reset the hue or saturation value.
Reset All
Reset All
Reset AllReset All
Reset all hue and saturation value.
For Experienced Users
For Experienced Users
For Experienced UsersFor Experienced Users
55
Page 57
III. Job Occasion
III. Job Occasion
III. Job OccasionIII. Job Occasion
Click the “Job Occasion” button and the settings menu will appear. Note that these functions of Job Occasion
in Classic mode are just the same as those in Wizard mode. Please refer to the instructions in “Open
Mirascan 6 (Wizard Mode)” on page 3.
Click the “Job Occasion
and the setting menu appears.
Job Occasion Setting Menu
Job Occasion Setting Menu
Job Occasion Setting MenuJob Occasion Setting Menu
Job Occasion” button
Job OccasionJob Occasion
For Experienced Users
For Experienced Users
For Experienced UsersFor Experienced Users
56
Page 58

IV. Setting Tool Bar
IV. Setting Tool Bar
IV. Setting Tool BarIV. Setting Tool Bar
In Classic mode, we provide you the setting tool bar functions. There are four main items in the tool bar,
namely, File, Config, Special and Help.
Setting Tool Bar
Setting Tool Bar
Setting Tool BarSetting Tool Bar
For Experienced Users
For Experienced Users
For Experienced UsersFor Experienced Users
57
Page 59

File
File
FileFile
Load
Load
LoadLoad
Load setting value.
Save
Save
SaveSave
Save selected setting value.
Reset
Reset
ResetReset
This item allows you to reset setting value.
For Experienced Users
For Experienced Users
For Experienced UsersFor Experienced Users
58
Page 60

Config
Config
ConfigConfig
Auto Preview
Auto Preview
Auto PreviewAuto Preview
If you check this item, Mirascan 6.0 will do a preview when the modes are shifted.
Auto Function
Auto Function
Auto FunctionAuto Function
Left click the mouse on the “Auto Function” item and the Auto Function Menu shown below appears. There
are four items to choose: Auto Crop, Auto Rotate, Ayto Type and Auto Object.
For Experienced Users
For Experienced Users
For Experienced UsersFor Experienced Users
59
Page 61

1. Auto Crop
1. Auto Crop
1. Auto Crop1. Auto Crop
Check this check box and Mirascan 6.0 will crop the scanned images. With this function, you can choose to
crop max area of all image objects or crop area for each object.
2. Auto Rotate
2. Auto Rotate
2. Auto Rotate2. Auto Rotate
Check this item and Mirascan 6.0 will automatically rotate the scanned image to a correct position.
3. Auto Type
3. Auto Type
3. Auto Type3. Auto Type
If this check box is checked, Mirascan 6.0 will choose an appropriate image type to scan. You can also
uncheck the check box and select an image from the drop-down list box.
4. Auto Object
4. Auto Object
4. Auto Object4. Auto Object
If this check box is checked, Mirascan 6.0 will automatically recognize whether the scanned object is
reflective original or positive/negative film.
Preview Resolution
Preview Resolution
Preview ResolutionPreview Resolution
You can change the preview resolution by inputting a value into the edit box or by dragging the slider.
For Experienced Users
For Experienced Users
For Experienced UsersFor Experienced Users
60
Page 62

Special
Special
SpecialSpecial
Color Matching
Color Matching
Color Matching Color Matching
Left click the mouse on the “Color Matching” item and the Color Matching function will be enabled.
Calibration
Calibration
CalibrationCalibration
Enable this function to calibrate your scanner again. (Only for CIS models.)
For Experienced Users
For Experienced Users
For Experienced UsersFor Experienced Users
61
Page 63

Help
Help
HelpHelp
To help you better understand and operate Mirascan 6, you can access the Help system provided in the
Classic Mode. Click the Help button and a submenu with the following items will appear.
Contents
Contents: Load help file and show the Mirascan 6 Button Mode page. You can also press the “F1” key on the
ContentsContents
keyboard.
Scanner Info:
Scanner Info: Show scanner's information in a dialog which includes "Scanner Model", "Firmware version",
Scanner Info:Scanner Info:
"Driver version", "Device Manager", "USB Info", "Max resolution", "Max Scan area" and an "OK" button.
Before you ask for technical support, please have these information ready.
Online Help:
Online Help: Connect to BenQ web site to get further customer service.
Online Help:Online Help:
For Experienced Users
For Experienced Users
For Experienced UsersFor Experienced Users
62
Page 64

The Button Mode
The Button Mode
The Button ModeThe Button Mode
There are five buttons on the scanner and these buttons provide five scan functions such as: Scan to Text,
Scan to E-mail, Scan to Explorer, Scan to Copy and Scan to Editing. You can do your scanning job by simply
pressing these buttons.
The Button Configuration
The Button Configuration
The Button ConfigurationThe Button Configuration
Left click the “Start” button on the system tray and follow the path: Programs\MiraScan V6.00\Button
configuration to run Button Configuration.
Left click “Button Configuration” and the Button Mode Configuration Menu appears.
For Experienced Users
For Experienced Users
For Experienced UsersFor Experienced Users
63
Page 65

The Button Mode Settings
The Button Mode Settings
The Button Mode SettingsThe Button Mode Settings
There are five different settings for you to use. They are Sacn to Text, Scan to E-mail, Scan to Explorer, Scan
to Copy and Scan to Editing. Click these buttons to set the Button mode settings.
Scan to Copy
Scan to Copy
Scan to CopyScan to Copy
Scan to Editing
Scan to Editing
Scan to EditingScan to Editing
Job Setting Area
Job Setting Area
Job Setting AreaJob Setting Area
Hint
Scan to Text
Scan to Text
Scan to TextScan to Text
Scan to E-mail
Scan to E-mail
Scan to E-mailScan to E-mail
Scan to Explorer
Scan to Explorer
Scan to ExplorerScan to Explorer
Default Setting
For Experienced Users
For Experienced Users
For Experienced UsersFor Experienced Users
Apply
Exit
64
Page 66

Problems and Solutions
Problems and Solutions
Problems and SolutionsProblems and Solutions
Installation and uninstallation problems
Installation and uninstallation problems
Installation and uninstallation problemsInstallation and uninstallation problems
Installation Problems
Installation Problems
Installation ProblemsInstallation Problems
How to install Mirascan 6?
How to install Mirascan 6?
How to install Mirascan 6?How to install Mirascan 6?
First check the System requirements. When you first install the program, we recommend the following
installation sequence:
Automatically: Put the CD into the CD-ROM drive, and follow every command or prompt in Autorun and
the Setup guide.
Manually: If the automatic setup is not successful, try the following steps:
Step 1: If scanner and pc are connected, disconnect the scanner.
Step 1: If scanner and pc are connected, disconnect the scanner.
Step 1: If scanner and pc are connected, disconnect the scanner. Step 1: If scanner and pc are connected, disconnect the scanner.
Step 2: Install the scanner driver.
Step 2: Install the scanner driver.
Step 2: Install the scanner driver.Step 2: Install the scanner driver.
Step 3: Reboot the PC.
Step 3: Reboot the PC.
Step 3: Reboot the PC.Step 3: Reboot the PC.
Step 4: Plug the USB cable into the scanner and PC. Then plug the AC adapter of scanner.
Step 4: Plug the USB cable into the scanner and PC. Then plug the AC adapter of scanner.
Step 4: Plug the USB cable into the scanner and PC. Then plug the AC adapter of scanner.Step 4: Plug the USB cable into the scanner and PC. Then plug the AC adapter of scanner.
For Experienced Users
For Experienced Users
For Experienced UsersFor Experienced Users
65
Page 67

Though I followed the above steps the installation was not successful. What should I
Though I followed the above steps the installation was not successful. What should I
Though I followed the above steps the installation was not successful. What should I Though I followed the above steps the installation was not successful. What should I
do?
do?
do?do?
If all of the above actions fail, then there are five possibilities:
Causes
Causes Solution
CausesCauses
There's something wrong with the Windows
95 system in your PC.
There is a hardware conflict. There is no solution unless you repair the hardware.
Former version error
Disk space error (insufficient)
RAM error (Too tiny RAM to run Setup)
During installation scanner was not found?
During installation scanner was not found?
During installation scanner was not found? During installation scanner was not found?
Please make sure to move the lock switch located at the bottom of the scanner. If you are sure the lock is
already moved, check the scanner as follows:
Solution
SolutionSolution
Format the hard drive and install Windows 98.
Windows 98 has much better compatibility to
support USB.
Manually delete all files of the former version of
Mirascan 6 and Keywords of "MiraScan" in the
regedit file. Or setup your system again.
Clear the Disk or choose another Disk which has
enough space. See System requirements.
Add RAM or appoint enough virtual RAM. See to
System requirement.
• Power on the scanner.
• The white lamp inside the imaging carriage should come on.
• The imaging carriage moves forward a little and back.
• During the movement of the imaging carriage, the light indicator (green or red) at the front of the scanner
blinks for about 15 seconds.
• Then, the indicator should stay lit. If the indicator blinks periodically, then the scanner is out of order.
And: Is the USB port in your PC active? Windows supports USB, but please make sure to activate the USB
ports from the BIOS. If "Universal serial bus controller" is shown under "Start -> Setting -> Control Panel ->
System -> Device Manager", the scanner will be installed successfully.
For Experienced Users
For Experienced Users
For Experienced UsersFor Experienced Users
66
Page 68

When the installation program asks to reboot, my computer does not respond.
When the installation program asks to reboot, my computer does not respond.
When the installation program asks to reboot, my computer does not respond.When the installation program asks to reboot, my computer does not respond.
The rebooting process during the Mirascan 6 Quick Install works with most computer systems. However, if
you encounter any difficulty, simply reboot your system, and everything will return to normal. The files have
already been copied to your hard drive and the installation is complete. Simply reboot and try scanning.
Can I setup Mirascan 6 in Windows NT?
Can I setup Mirascan 6 in Windows NT?
Can I setup Mirascan 6 in Windows NT?Can I setup Mirascan 6 in Windows NT?
No, Because Windows NT does not support USB. Please read System Requirements carefully before installation.
There's something wrong with my scanner after I have connected a USB CD-RW. What
There's something wrong with my scanner after I have connected a USB CD-RW. What
There's something wrong with my scanner after I have connected a USB CD-RW. What There's something wrong with my scanner after I have connected a USB CD-RW. What
should I do?
should I do?
should I do?should I do?
If the problem happened after you set up the USB CD-RW, then an unknown software conflict may have
happened. Try to disconnect the USB CD-RW and re-install the program.
Uninstallation Problems
Uninstallation Problems
Uninstallation ProblemsUninstallation Problems
How to uninstall Mirascan 6?
How to uninstall Mirascan 6?
How to uninstall Mirascan 6?How to uninstall Mirascan 6?
Follow this path: Start - > Settings -> Control Panel -> Add/Remove Programs -> Setup/Uninstalltion ->
"Mirascan 6" -> button of "Add/Remove" or double-click file of Uninstall in Mirascan 6's folder.
For Experienced Users
For Experienced Users
For Experienced UsersFor Experienced Users
67
Page 69

Why can't I uninstall Mirascan 6?
Why can't I uninstall Mirascan 6?
Why can't I uninstall Mirascan 6?Why can't I uninstall Mirascan 6?
Several possibilities:
Cause
Cause Solution
CauseCause
System error: You did not uninstall Mirascan 6
before you setup the operating system again. So in
the new system, there's an error in regedit file.
The uninstallation file is corrupt.
The last uninstallation is unsuccessful.
Troubles in starting Mirascan 6
Troubles in starting Mirascan 6
Troubles in starting Mirascan 6Troubles in starting Mirascan 6
Why can’t I start up Mirascan 6?
Why can’t I start up Mirascan 6?
Why can’t I start up Mirascan 6?Why can’t I start up Mirascan 6?
As for our experience, we list out possible causes and solutions:
Cause
Cause Solution
CauseCause
Installation is blocked or bothered accidentally Uninstall it or delete all files manually, then reinstall it.
File is destroyed Copy intact file or do as above
Shortcut is changed Redefine shortcut's path
Pirated software Purchase authorized software
Solution
SolutionSolution
Import the former system's regedit or delete all
Mirascan 6 files manually.
Delete all files in the folder and "MiraScan"
references in the regedit manually.
Delete "Mirascan 6" in Add&Remove Programs in
the Control Panel. If it is impossible, use other
system edition program such as Tweak Tools
Solution
Solution Solution
Why the procedure to start Mirascan 6 is too slow?
Why the procedure to start Mirascan 6 is too slow?
Why the procedure to start Mirascan 6 is too slow?Why the procedure to start Mirascan 6 is too slow?
RAM and virtual RAM are very important to image processing program, Mirascan 6 need large RAM to
undertake complete image processing. It is better for you to equip the computer with more than 128MB
RAM. We urge you to close other programs before open Mirascan 6, so that its speed will be fast.
For Experienced Users
For Experienced Users
For Experienced UsersFor Experienced Users
68
Page 70

I've been using my scanner for a while with no problems, but recently something
I've been using my scanner for a while with no problems, but recently something
I've been using my scanner for a while with no problems, but recently something I've been using my scanner for a while with no problems, but recently something
strange occurred and my system locked up. Now every time I try to acquire the scan-
strange occurred and my system locked up. Now every time I try to acquire the scan-
strange occurred and my system locked up. Now every time I try to acquire the scan-strange occurred and my system locked up. Now every time I try to acquire the scanner, I can't find it. Sometimes I get into Mirascan 6 and the crop box and the select box
ner, I can't find it. Sometimes I get into Mirascan 6 and the crop box and the select box
ner, I can't find it. Sometimes I get into Mirascan 6 and the crop box and the select box ner, I can't find it. Sometimes I get into Mirascan 6 and the crop box and the select box
will not move.
will not move.
will not move. will not move.
Mirascan 6 stores your last settings in its resource file. If your computer locks up while you are using the
scanner, it's possible for these settings to have been corrupted. Try holding down the Alt key when you
Acquire Mirascan 6. This will reset the defaults in our software and you will be able to use it. If you still cannot get into your software, simply reload Mirascan 6 software from the original disk.
Why can’t I call Mirascan 6 in other programs such as Photoshop?
Why can’t I call Mirascan 6 in other programs such as Photoshop?
Why can’t I call Mirascan 6 in other programs such as Photoshop?Why can’t I call Mirascan 6 in other programs such as Photoshop?
In other applications programs such as Photoshop, only TWAIN Mode of Mirascan 6 can be called. If it is the
first time to run Mirascan 6 in application program, You must define TWAIN source.
Follow below steps to define source (take Photoshop as example): File - > Import -> Select TWAIN_32
Source -> in dialog box, to define Mirascan 6 as TWAIN source.
How to set scanner as one can be used by all users in Windows2000?
How to set scanner as one can be used by all users in Windows2000?
How to set scanner as one can be used by all users in Windows2000?How to set scanner as one can be used by all users in Windows2000?
During the installation of the scanner driver, the installer will modify some system files, and only "Administrator" is authorized to do so in Windows 2000.
Please follow step to authorize all user to access the scanner:
• Click "Start -> Settings ->Control Panel -> System"
• Click "User Profiles -> Copy to"
• Click "Everyone -> OK"
Where do the files go, after finishing "Scan to file", "Scan to document"...?
Where do the files go, after finishing "Scan to file", "Scan to document"...?
Where do the files go, after finishing "Scan to file", "Scan to document"...?Where do the files go, after finishing "Scan to file", "Scan to document"...?
After activating the "Scan to file", "Scan to web"..., operation, the files are sent to the appropriate application,
such as Microsoft Word. But if something goes wrong during transfer, you can retrieve the files in a temporary folder: c:\windows\temp\. See File's default settings.
For Experienced Users
For Experienced Users
For Experienced UsersFor Experienced Users
69
Page 71

Operation problems
Operation problems
Operation problemsOperation problems
Why can’t I set preview action under Auto Function?
Why can’t I set preview action under Auto Function?
Why can’t I set preview action under Auto Function?Why can’t I set preview action under Auto Function?
If all check boxes in Auto Function Settings Dialog are unchecked, it will be disabled. You can check any of
the boxes in that dialog to activate it.
Why the button of Auto-function doesn’t work?
Why the button of Auto-function doesn’t work?
Why the button of Auto-function doesn’t work?Why the button of Auto-function doesn’t work?
If all of sub-items of it in Advanced settings are unchecked, it is disabled. To check any of them, button will
work.
Why the buttons of "Add" and "Duplicate" in preview window don't work?
Why the buttons of "Add" and "Duplicate" in preview window don't work?
Why the buttons of "Add" and "Duplicate" in preview window don't work?Why the buttons of "Add" and "Duplicate" in preview window don't work?
If frames' or jobs' number in preview window is more than 28, it will be disabled.
When I send E-mail with image scanned from Mirascan 6, it's too slow and no
When I send E-mail with image scanned from Mirascan 6, it's too slow and no
When I send E-mail with image scanned from Mirascan 6, it's too slow and no When I send E-mail with image scanned from Mirascan 6, it's too slow and no
response. Why?
response. Why?
response. Why?response. Why?
Considering to presently transiting speed in Internet, each e-mail should not exceed 1MB. And each image is
better less than 300kb for E-mail . If the size of scanned image is too large, it will influence transiting speed.
You can reduce its size through adjusting its resolution or format in Mirascan 6 or in other image processing
programs before adding it to E-mail. Normally, 150dpi is good enough and JPG or GIF is very small compared with other formats. Even more, you can compress image with Winzip or others.
How to add a program to "Destination"?
How to add a program to "Destination"?
How to add a program to "Destination"? How to add a program to "Destination"?
You can drag-drop a short-cut in desktop into relative scan classes or define program's path in Settings
Dialog.
For Experienced Users
For Experienced Users
For Experienced UsersFor Experienced Users
70
Page 72

How to change Mirascan 6's default settings to meet my special demand?
How to change Mirascan 6's default settings to meet my special demand?
How to change Mirascan 6's default settings to meet my special demand? How to change Mirascan 6's default settings to meet my special demand?
Please carefully read references to change settings in How to make Settings in Button Mode and in Console
Mode. And see to How to improve image's quality.
When I scanned material, its background would be scanned and printed. How to pre-
When I scanned material, its background would be scanned and printed. How to pre-
When I scanned material, its background would be scanned and printed. How to pre-When I scanned material, its background would be scanned and printed. How to prevent?
vent?
vent?vent?
• Crop the wanted scanning area in the preview window. The black background will not scanned.
• Place a white A4 paper and stick it on the inner side of the top cover of the scanner. Then the background
color will become white.
Why can’t I choose a scanning destination when Mirascan 6 TWAIN Mode is run in a
Why can’t I choose a scanning destination when Mirascan 6 TWAIN Mode is run in a
Why can’t I choose a scanning destination when Mirascan 6 TWAIN Mode is run in a Why can’t I choose a scanning destination when Mirascan 6 TWAIN Mode is run in a
certain image-processing application program?
certain image-processing application program?
certain image-processing application program?certain image-processing application program?
In image-processing application program, when TWAIN Mode is called, there's no selection for scanning
destination. You can just go on with it, the scanned image will be automatically sent to the application program.
Additional tips on improving image quality
Additional tips on improving image quality
Additional tips on improving image qualityAdditional tips on improving image quality
How to enhance image's definition and verisimilitude?
How to enhance image's definition and verisimilitude?
How to enhance image's definition and verisimilitude?How to enhance image's definition and verisimilitude?
As you know, resolution is used to measure an image's definition, but definition and size contradict each
other. In order to enhance image definition and reduce file size, we recommend the following methods:
• Classify material into corresponding scanning type, such as color, line-art, reflective.
• Choose the smallest and efficient resolution.
• Choose the right scanning destination, such as file, web page, OCR.
• Use default settings unless you are an advanced user.
• Use pre-defined macros to optimize operation.
For Experienced Users
For Experienced Users
For Experienced UsersFor Experienced Users
71
Page 73

• Adjust image adequately.
How to darken or brighten an image?
How to darken or brighten an image?
How to darken or brighten an image? How to darken or brighten an image?
You can simply adjust an image's brightness and contrast to reach the desired effect. For details see Brightness
and Contrast.
How to enlarge or diminish image?
How to enlarge or diminish image?
How to enlarge or diminish image? How to enlarge or diminish image?
Do as follows:
Involved item
Involved item Enlarge
Involved itemInvolved item
Color more than 16 bits less than 16 bits or art-line.
Resolution more than 300 dpi less than 150 dpi
scaling scaled not scaled
Crop area full area only desired area
file format BMP JPG or GIF
compress uncompressed Winzip or others
How to change the color balance?
How to change the color balance?
How to change the color balance?How to change the color balance?
Enlarge Diminish
EnlargeEnlarge
Diminish
DiminishDiminish
You can adjust the color balance (red/blue/green) in Hue and Saturation, Color Balance and Level Tabs (click
hyperlinks to see more).
How to rotate image?
How to rotate image?
How to rotate image?How to rotate image?
You can click in the Preview window to rotate an image clockwise or counterclockwise .
How to apply advanced skills?
How to apply advanced skills?
How to apply advanced skills?How to apply advanced skills?
Please carefully read the chapters about Image adjustment and Settings, because they are quite complicated.
For Experienced Users
For Experienced Users
For Experienced UsersFor Experienced Users
72
Page 74

Service Information
Service Information
Service InformationService Information
Technical support
Technical support
Technical supportTechnical support
If you encountered problems using Mirascan 6 and the scanner, please send an E-mail (containing detailed
descriptions of the problem you came upon, the hardware and software environment of your system) to the
following addresses:
For free driver program updates, product information and news release, please visit the following web
address:
USA: support-sc.us@BenQ.com
USA: support-sc.us@BenQ.com
USA: support-sc.us@BenQ.comUSA: support-sc.us@BenQ.com
Europe: support@BenQ-eu.com
Europe: support@BenQ-eu.com
Europe: support@BenQ-eu.comEurope: support@BenQ-eu.com
Asia and Taiwan: support@BenQ.com
Asia and Taiwan: support@BenQ.com
Asia and Taiwan: support@BenQ.comAsia and Taiwan: support@BenQ.com
China: service@BenQ.com.cn
China: service@BenQ.com.cn
China: service@BenQ.com.cn China: service@BenQ.com.cn
other countries: IMGservice@BenQ.com
other countries: IMGservice@BenQ.com
other countries: IMGservice@BenQ.comother countries: IMGservice@BenQ.com
http://global.BenQ.com/service/scan/drivers.htm
http://global.BenQ.com/service/scan/drivers.htm
http://global.BenQ.com/service/scan/drivers.htmhttp://global.BenQ.com/service/scan/drivers.htm
Re-packing directions
Re-packing directions
Re-packing directionsRe-packing directions
To avoid unpredictable damages during transportation, before you send the scanner for repair, please follow
these guidelines when repacking your scanner:
• Lock the scanner: side the scanner lock to the lock position before you put the scanner in the box.
• Use the original shipping carton and packing materials for repacking.
• Send only the product and other hardware required to complete the repair.
• Enclose a document describing the problems you encountered.
For Experienced Users
For Experienced Users
For Experienced UsersFor Experienced Users
73
Page 75

Appendix
Appendix
AppendixAppendix
Copyright
Copyright
CopyrightCopyright
Copyright © 2003 by this company. All rights reserved. No part of this publication may be reproduced, transmitted, transcribed, stored in a retrieval system or translated into any language or computer language, in any
form or by any means, electronic, mechanical, magnetic, optical, chemical, manual or otherwise, without the
prior written permission of this company.
Disclaimer
Disclaimer
DisclaimerDisclaimer
This company makes no representations or warranties, either expressed or implied, with respect to the contents hereof and specifically disclaims any warranties, merchantability or fitness for any particular purpose.
Further, this company reserves the right to revise this publication and to make changes from time to time in
the contents hereof without obligation of this company to notify any person of such revision or changes.
Brands and product names are trademarks or registered trademarks of their respective companies.
IMPORTANT SAFETY INSTRUCTIONS ON USING YOUR
IMPORTANT SAFETY INSTRUCTIONS ON USING YOUR
IMPORTANT SAFETY INSTRUCTIONS ON USING YOUR IMPORTANT SAFETY INSTRUCTIONS ON USING YOUR
SCANNER
SCANNER
SCANNERSCANNER
Read these instructions carefully. Save these instructions for future reference.
Follow all warnings and instructions marked on the scanner and related accessories.
Unplug the scanner from the wall outlet before cleaning. Do not use liquid cleaners or aerosol cleaners. Use a
damp cloth for cleaning.
Do not use scanner near water.
Do not place scanner on an unstable cart, stand, or table. The scanner may fall, causing serious damage to the
scanner.
Openings in the scanner are provided for ventilation; to ensure reliable operation of the scanner and to protect it from overheating, these openings must not be blocked or covered. The openings should never be
For Experienced Users
For Experienced Users
For Experienced UsersFor Experienced Users
74
Page 76

blocked by placing the scanner on a bed, sofa, rug, or other similar surface. This scanner should never be
placed near or over a radiator or heat register, or in a built-in installation unless proper ventilation is provided.
The scanner should be operated from the type of power indicated on the marking label. If you are not sure of
the type of power available, consult your dealer or local power company.
Do not allow anything to rest on the power cord. Do not locate the scanner where persons will walk on the
cord.
If an extension cord is used with the scanner, make sure that the total ampere rating of the equipment
plugged into the extension cord does not exceed the extension cord ampere rating. Also, make sure that the
total rating of all products plugged into the wall outlet does not exceed the fuse rating.
Never push objects of any kind into the scanner through cabinet openings as they may touch dangerous voltage points or short out parts that could result in a fire or electric shock. Never spill liquid of any kind on the
scanner.
Do not attempt to service the scanner yourself, as opening or removing covers may expose you to dangerous
voltage points or other risks. Refer all servicing to qualified service personnel.
Unplug this product from the wall outlet and refer servicing to qualified service personnel under the following conditions:
• When the power cord or plug is damaged or frayed
• If liquid has been spilled into the product
• If the scanner has been exposed to rain or water
• If the scanner does not operate normally when the operating instructions are followed. Adjust only those
controls that are covered by the operating instructions since improper adjustment of other controls may
result in damage and will often require extensive work by a qualified technician to restore the product to
normal condition.
• If the scanner has been dropped or the cabinet has been damaged
• If the scanner exhibits a distinct change in performance, indicating a need for service.
• Use only the power cord or power adapter which is of the same type as the one originally included with the
scanner.
For Experienced Users
For Experienced Users
For Experienced UsersFor Experienced Users
75
 Loading...