

Page 1

M73 Series
Network Projector
Operation Guide
V1.00
Page 2

Copyright
Copyright 2017 BenQ Corporation. All rights reserved. No part of this publication may
be reproduced, transmitted, transcribed, stored in a retrieval system or translated into
any language or computer language, in any form or by any means, electronic, mechanical,
magnetic, optical, chemical, manual or otherwise, without the prior written permission
of BenQ Corporation.
All other logos, products, or company names mentioned in this manual may be the
registered trademarks or copyrights of their respective companies, and are used for
informational purposes only.
Disclaimer
BenQ Corporation makes no representations or warranties, either expressed or
implied, with respect to the contents hereof and specifically disclaims any warranties,
merchantability or fitness for any particular purpose. Further, BenQ Corporation
reserves the right to revise this publication and to make changes from time to time in
the contents hereof without obligation of BenQ Corporation to notify any person of
such revision or changes.
This user manual aims to provide the most updated and accurate information to
customers, and thus all contents may be modified from time to time without prior
notice. Please visit http://www.benq.com for the latest version of this manual.
BenQ is not responsible for the content of the websites or of similar resources, which
are maintained and controlled by third parties, that may be linked from this product.
Providing links to those websites or to similar resources does not mean that BenQ
makes any warranty or representation to their content by expression or by implication.
Any third party content or service preinstalled in this product is provided "as is". BenQ
does not, by expression or by implication, make any warrant to the content or to the
services provided by third parties. BenQ does not warrant or guarantee that the
content or services provided by third parties are accurate, effective, most up-to-date,
legal, or complete. Under no circumstances shall BenQ be liable for the content or
services provided by third parties including their negligence.
Services provided by third parties may be terminated temporarily or permanently. BenQ
does not warrant or guarantee that the any content or services provided by third
parties are in good condition at any time, and is not liable for the termination of the said
content and services.
In addition, BenQ is not involved in any transactions you conduct in the websites or
similar resources maintained by third parties.
You should contact the content or service providers for any questions, concerns, or
disputes.
Page 3

Table of contents
Preparation ......................................................................................5
Switching to Advanced Menu...............................................................5
Wired connections .....................................................................................6
Setting up a wired network for the projector........................................................6
Connecting your computer to the projector via a wired connection..............7
Wireless connections.................................................................................8
Setting up a wireless network for the projector ...................................................8
Connecting your computer or mobile device to the projector wirelessly......9
Projecting via QCast (for PCs)................................................11
Minimum system requirements............................................................. 11
Prerequisite................................................................................................ 11
Downloading QCast..................................................................................................11
Installing QCast ..........................................................................................................11
Connecting your computer to the projector .......................................................12
Selecting Network Display in the input source menu....................................12
Launching QCast ........................................................................................................12
Using QCast............................................................................................. 14
Role assignment ...........................................................................................................14
Network Display Code.........................................................................................15
Mirror Off / On / Extension......................................................................................15
Quality..........................................................................................................................16
Audio ............................................................................................................................16
Compatible ................................................................................................................17
Advanced ....................................................................................................................17
Preference..................................................................................................................21
Projecting via QCast (for mobile devices)............................22
Minimum system requirements............................................................. 22
Prerequisite................................................................................................ 22
Selecting Network Display in the input source menu....................................22
Downloading QCast..................................................................................................22
Connecting your mobile device to the projector................................................23
Launching QCast ........................................................................................................23
3
Page 4

Using QCast ...............................................................................................26
Role assignment........................................................................................................... 26
Network Display Code ........................................................................................ 27
Mirror Off / Mirror On......................................................................................... 27
Photo............................................................................................................................28
Camera ....................................................................................................................... 28
Document.................................................................................................................. 28
Advanced.................................................................................................................... 29
Preference ................................................................................................................. 29
Managing the projector using a web browser ...................... 30
Supported web browsers........................................................................30
Configuring Standby Settings for the projector ...........................30
Accessing the BenQ Projector Control System .......................30
Main function................................................................................................................ 32
Accessing the Internet with a wireless
connection..................................................................................... 40
Accessing the Internet via QCast ........................................................40
Accessing the Internet via projector OSD..........................................40
PJLink commands......................................................................... 42
11/27/17
4
Page 5

Preparation
Your BenQ projector is equipped with wired and wireless network function. Via a network
connection you can project what is shown on your computer or mobile device’s screen
using the QCast app. You can also manage and control the projector from remote devices
such as desktops, laptops, tablets, and smartphones using web browsers.
In order to take advantage of these features, you need to complete the steps described in
the following sections. The basic workflow for projecting through a network is:
1. Set up a wired or wireless network for the projector.
See "Setting up a wired network for the projector" on page 6 or "Setting up a
wireless network for the projector" on page 8 for details.
2. Connect your computer or mobile device to the projector.
For wired connections, see "Connecting your computer to the projector via a wired
connection" on page 7 for details.
For wireless connections, see "Connecting your computer or mobile device to the
projector wirelessly" on page 9 for details.
3. Download QCast on your computer or mobile device.
For downloading QCast on your computer, see "Downloading QCast" on page 11
for details.
For downloading QCast on your mobile devices, see "Downloading QCast" on page
22 for details.
4. Project via QCast.
For using your computer to project via wired connections, see "Launching QCast"
on page 12 for details.
For using your computer to project via wireless connections, see "Launching QCast"
on page 12 for details.
For using your mobile device to project, see "Launching QCast" on page 23 for
details.
Switching to Advanced Menu
When you first enter the projector’s OSD menu, you will see the OSD’s Basic Menu.
Before you can configure the projector and network settings to use the features described
in this guide, you need to switch to the OSD’s Advanced Menu. Follow the steps below
to switch to the Advanced Menu:
1. Turn on the projector.
2. Press MENU to open the OSD’s Basic Menu.
3. Highlight Menu Type and press OK.
4. Highlight Advanced and press OK.
The OSD menu will now be set to the Advanced Menu which allows you to start
configuring the network settings.
After setting the Menu Type to Advanced, the Advanced Menu will be shown every time you
press the MENU button.
Preparation 5
Page 6
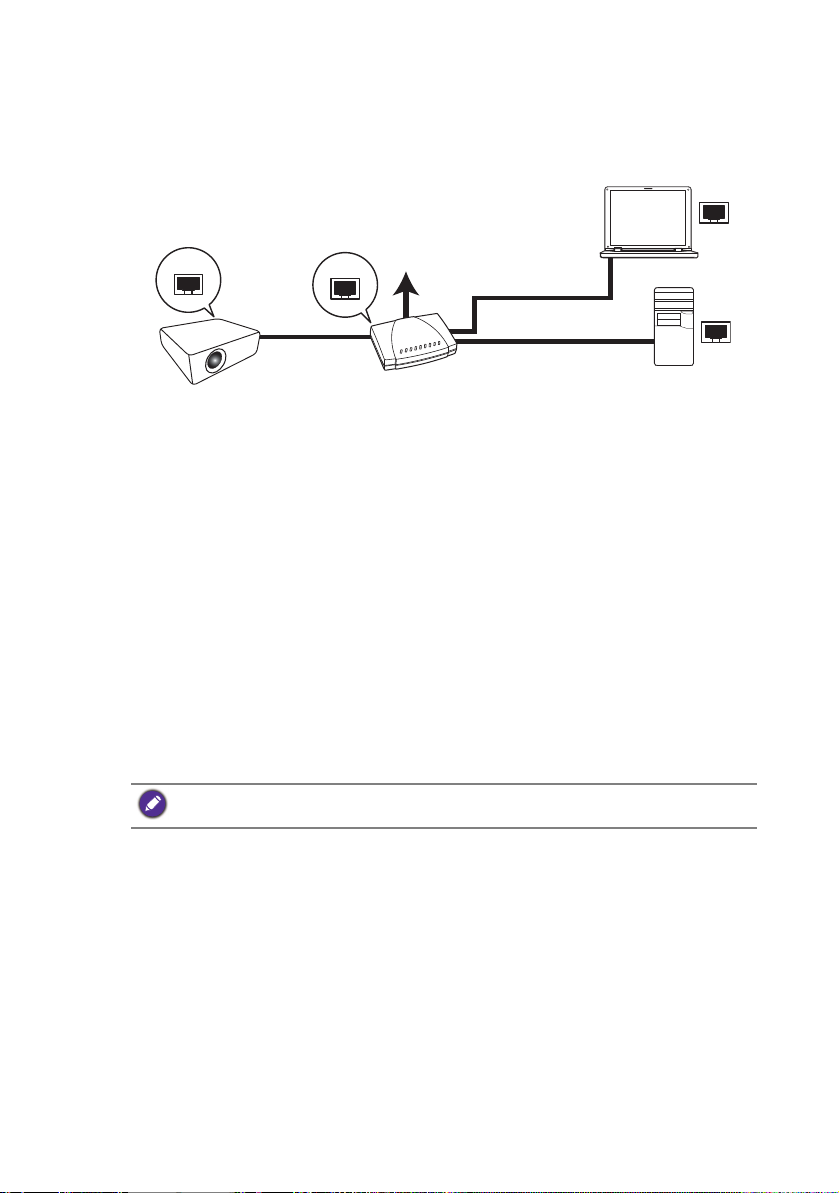
Wired connections
RJ45 cable
RJ45 cable
Laptop computer
Desktop computer
Projector
RJ45 cable
Wired LAN
Internet
For projecting through a wired network, you need to connect the projector and your
device to the same local area network (LAN).
Setting up a wired network for the projector
If you are in a DHCP environment:
If your projector is in a DHCP environment, you do not have to manually set the IP
address. Follow the steps below to configure the wired network settings for the projector
in a DHCP environment:
1. Connect the projector to a local area network via an RJ45 cable.
2. Turn on the projector.
3. Press MENU to open the Advanced Menu.
4. Highlight Network and press OK.
5. Highlight Wired LAN and press OK.
6. Highlight DHCP and press OK.
7. Select On and press OK.
8. Highlight Apply and press OK.
9. Re-enter the Wired LAN page and check if the IP Address, Subnet Mask,
Default Gateway, and DNS Server have been automatically configured. Make
sure the Status is Connect.
If the IP Address still does not appear, contact your network administrator.
If you are in a non-DHCP environment:
If your projector is in a non-DHCP environment, you need to manually set the IP Address,
Subnet Mask, Default Gateway, and DNS Server. Follow the steps below to configure the
wired network settings for the projector in a non-DHCP environment:
1. Repeat step 1 to 5 described in "If you are in a DHCP environment:" on page 6.
2. Highlight DHCP and press OK.
3. Select Off then press OK.
4. Contact your network administrator for information on the IP Address, Subnet
Mask, Default Gateway, and DNS Server settings.
5. Enter the projector’s IP Address, Subnet Mask, Default Gateway, and DNS
Server and assign the values as needed.
6. After finishing the settings, highlight Apply and press OK.
Preparation6
Page 7
Your projector is now connected to your local area network and can be accessed by any
devices linked to the same local area network.
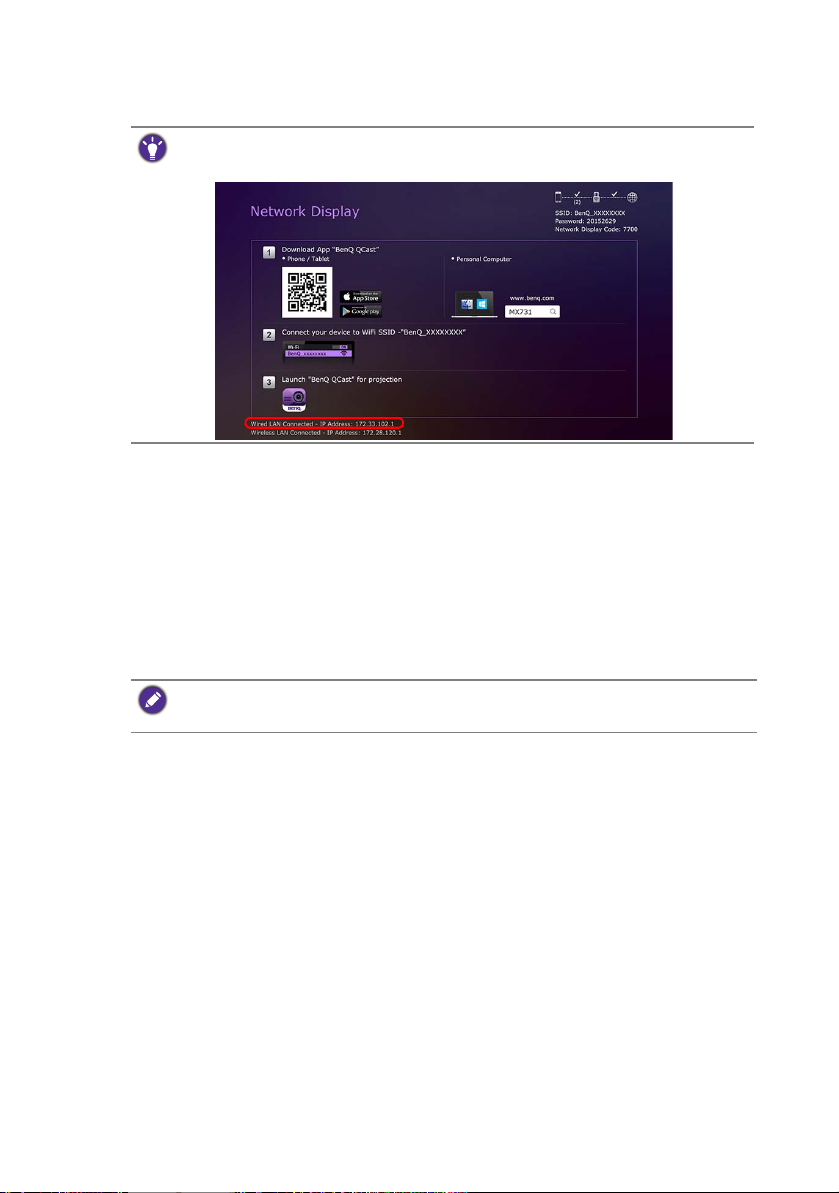
Alternatively, to check the IP address of the projector, make sure the projector is connected to the
network, and press SOURCE on the projector and then select Network Display. The IP address
is displayed on the bottom left corner of the Network Display screen.
Connecting your computer to the projector via a wired
connection
Follow the steps below to connect your computer to the projector through the local area
network:
1. Ensure the projector is connected to the local area network. You can enter the
Wired LAN page to check if the IP Address, Subnet Mask, Default Gateway,
and DNS Server are configured as needed and if the Status is Connect.
2. Connect your computer to the same local area network via an RJ45 cable.
Now your computer and the projector are on the same local area network.
Your computer should be properly configured to detect a wired network connection. Check the
user manual of your computer or visit the manufacturer’s website for information on how to
configure a wired network connection.
Preparation 7
Page 8
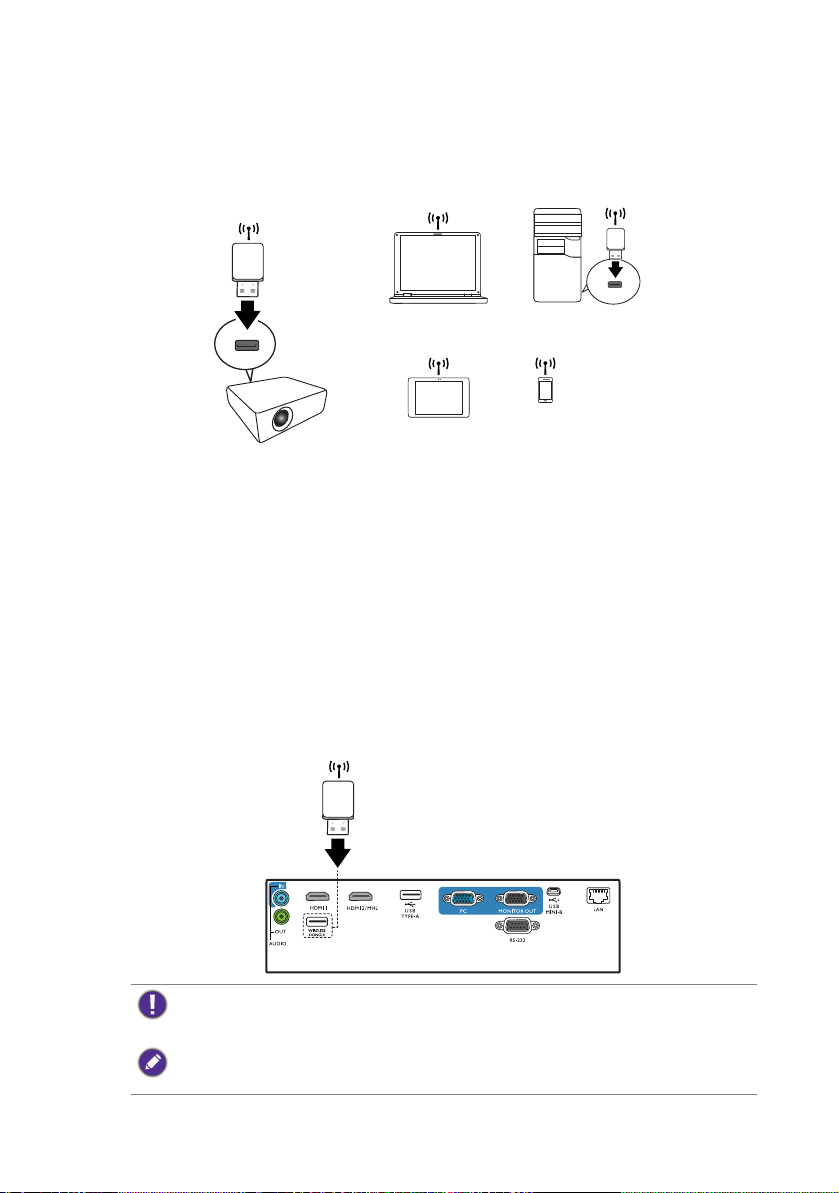
Wireless connections
Projector
Wireless Dongle
Wireless Dongle
Laptop computer
Desktop computer
Smartphone
Tablet
If you want to project wirelessly, you must first install the BenQ WDRT8192 USB wireless
dongle onto your projector. This USB wireless dongle is not shipped with your projector
and is sold separately. Do not install any other type of wireless dongle or module.
With the USB wireless dongle, your projector will be able to operate as a wireless LAN
access point (AP), allowing you to connect your computer or mobile device directly to this
ad hoc network. Furthermore, with the USB dongle installed, the projector can also
connect to your organization’s wireless network so that you can access the Internet while
projecting and making a presentation. See "Network Setup" on page 18 or "Accessing the
Internet with a wireless connection" on page 40 for details on accessing the Internet via a
wireless connection.
Setting up a wireless network for the projector
In order to use your projector wirelessly, follow the steps below:
1. Turn off the projector if it is powered on.
2. Insert the designated USB wireless dongle into the WIRELESS DONGLE port at
the rear of the projector.
3. Turn on the projector.
• Never insert the dongle into the projector while the projector is powered on, as the network
connection may not be made properly.
• If you intend to re-insert the dongle during operation, power off the projector first.
The wireless dongle should only be installed into the WIRELESS DONGLE port. Installing the
dongle into the USB TYPE-A port on the projector will prevent the wireless dongle from
functioning.
Preparation8
Page 9

A wireless network for the projector will be set up automatically. The projector is now
operating as a wireless LAN access point and can be accessed wirelessly by your computer
or mobile device.
If you want to check the projector’s wireless network connection status, follow the steps
below:
1. Press MENU to open the Advanced Menu.
2. Highlight Network and press OK.
3. Highlight Wireless LAN and press OK.
4. Highlight Point to Point and press OK.
5. On the Point to Point page, make sure that Status is Connect, and that the
Network (SSID) information and IP Address are displayed.
• Network (SSID) is the projector’s ID used to identify the projector over the network and can be
modified. If you want to modify the SSID, select the Network (SSID) on the Point to Point
page and the (SSID) page will appear. On the (SSID) page, you can modify the projector’s
SSID. Select Commit to have the modifications take effect.
• The projector supports WPA2 security encryption.
• The SSID has a maximum length of 13 alphanumeric characters.
• The SSID and password can also be modified using a web browser. See "Network Settings" on
page 38 for details.
Connecting your computer or mobile device to the
projector wirelessly
Follow the steps below to connect your computer or mobile device wirelessly to the
projector:
1. Make sure the BenQ USB wireless dongle has been properly inserted into the
WIRELESS DONGLE port at the rear of the projector.
2. Check the projector’s wireless network connection status. Go to the Point to
Point page, make sure the Network (SSID) has been set up and the Status shows
Connect.
3. Open the wireless menu of your computer or mobile device and search for the
available wireless networks.
4. Select the SSID of the projector.
5. Enter the login password to connect to the projector. You can find the password on
the (SSID) page.
If your computer or mobile device cannot detect the wireless network, check the user manual of
your computer or mobile device or visit the manufacturer’s website for information on how to
connect to a wireless network.
Preparation 9
Page 10

Alternatively, to check the login passwords and SSID of the projector, make sure the USB wireless
dongle is properly connected to the projector, and press SOURCE on the projector. Select
Network Display. The SSID and password are displayed on the upper right corner of the screen.
Preparation10
Page 11

Projecting via QCast (for PCs)
QCast is an application that allows you to project your computer’s screen as well as
photos and documents saved on your computer on the BenQ network projector.
Minimum system requirements
Before installing and running QCast, please make sure your computer meets the
requirements listed below.
• Computers with Windows Operating System (OS):
• Supported OS version: Windows 7 / 8.0 / 8.1 / 10
• CPU: Dual Core Intel Core i 2.4GHz equivalent or above
• Memory: 4GB DDR memory or more
• Graphics: 256MB VRAM equivalent or more
• Atom processors are not supported
• Computers with Mac OS:
• Supported OS version: Mac OS X 10.11 / OS X 10.12 (The latest 2 versions
will be supported.)
• CPU: Dual Core Intel Core i 1.4GHz equivalent or above
• Graphics: Intel or nVIDIA or ATI with 64MB VRAM equivalent or more
• PowerPC is not supported.
BenQ does not guarantee compatibility in respective user environments. Certain users may
experience compatibility issues when running QCast.
Prerequisite
The basic workflow for projecting via QCast:
1. Download QCast from BenQ’s website.
2. Install QCast on your computer.
3. Connect your computer to the projector.
4. Select Network Display in the input source menu.
5. Launch QCast and start projecting.
Downloading QCast
Visit BenQ’s website at http://business-display.benq.com/en/getsupport/downloads.html or
www.BenQ.com and search for the projector by model name, and then download the
latest version of QCast from the projector’s feature page.
Installing QCast
For Windows OS
1. When the download from BenQ’s website is complete, double-click the .exe file.
2. Follow the on-screen instructions to finish the installation.
Projecting via QCast (for PCs) 11
Page 12
For Mac OS
1. When the download from BenQ’s website is complete, double-click the .dmg file to
make its content available.
2. Drag the content into the computer’s Applications folder. The installation will be
processed automatically.
Connecting your computer to the projector
You can connect your computer to the projector either through a wired or wireless
network.
Wired connection
Make sure you have set up a wired connection for the projector and connected your
computer and the projector to the same local area network. See "Wired connections" on
page 6 for details.
Wireless connection
Make sure the BenQ WDRT8192 USB wireless dongle is installed on your projector and
your computer has been connected to the projector’s wireless network. See "Wireless
connections" on page 8 for details.
Selecting Network Display in the input source menu
Before projecting your computer’s screen to the projector, you have to select Network
Display in the input source menu.
1. Press SOURCE on the projector.
2. Highlight Network Display and press OK.
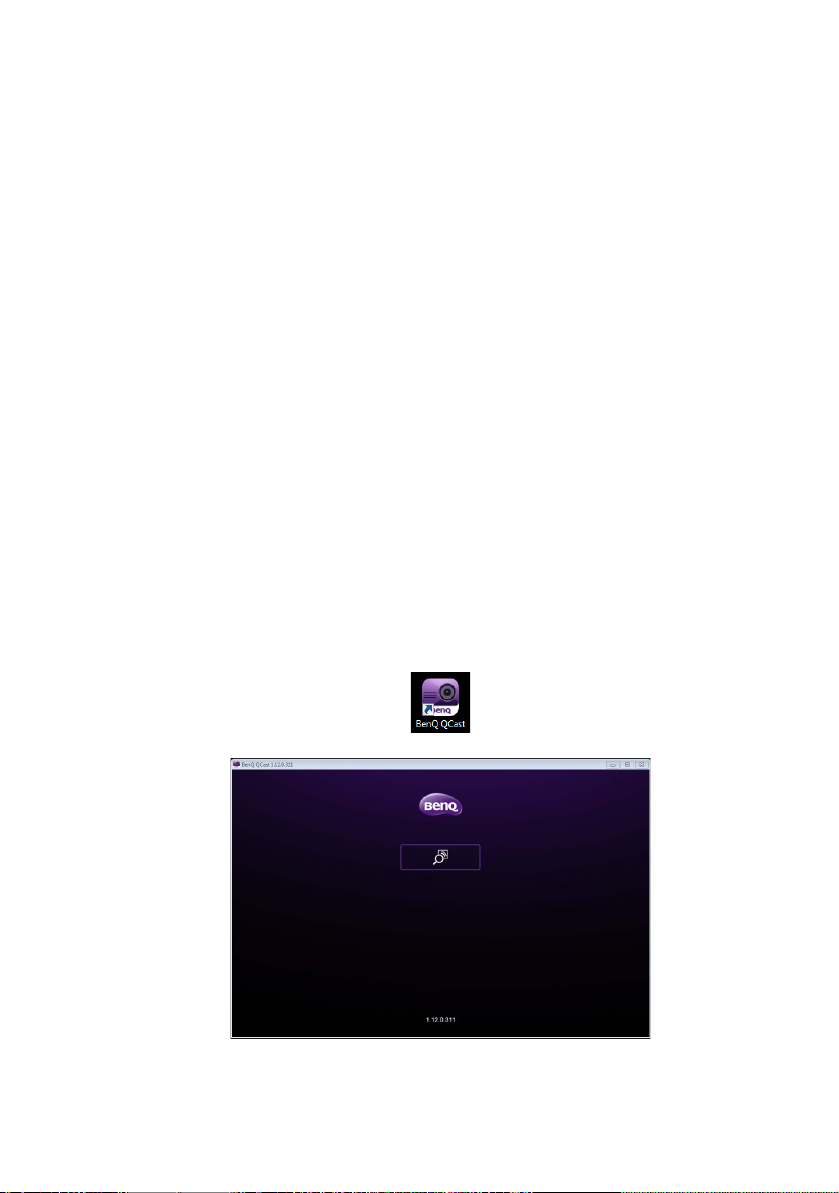
Launching QCast
1. Launch QCast.
2. Click the Search button to detect available projectors.
Projecting via QCast (for PCs)12
Page 13
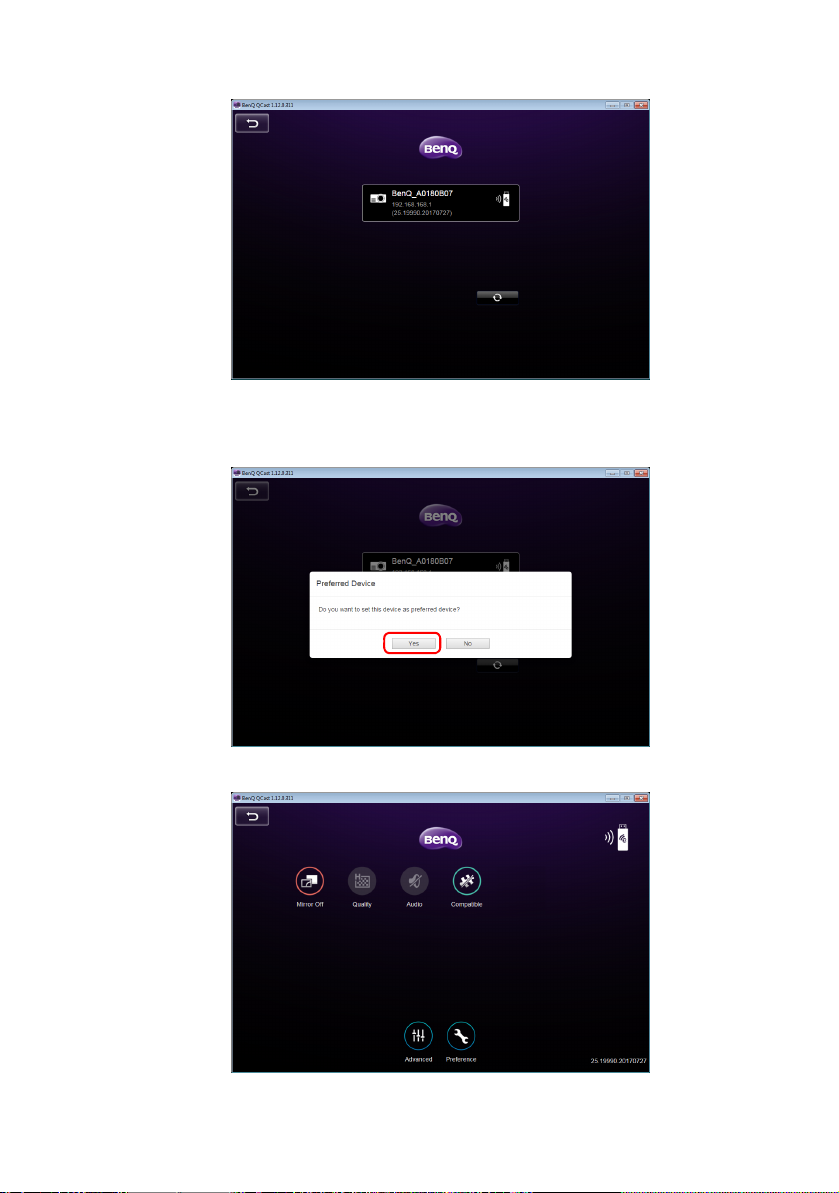
3. Click the preferred projector and your computer will connect to the projector.
4. A preferred device prompt will display. Click Yes if you want to set the projector as
the default projector. If the projector is set as the default projector, the next time
you launch QCast your computer will search for the projector and automatically
connect to it if it is available through the network.
5. After you confirm or decline the preferred device setting, the QCast main screen
will appear. You can start using QCast.
Projecting via QCast (for PCs) 13
Page 14

Using QCast
The display texts on the user interface may vary by operation system, though the functions are identical.
No. Function Description
Mirror Off /
Mirror On /
Mirror
Extension
Quality Allows you to adjust the image quality. See "Quality" on page
Audio Allows you to broadcast audio on the projector. See "Audio"
Compatible Allows you to mirror the mouse-over information of a
Advanced Allows you to view more functions for QCast. See
Preference Allows you to set your personal preferences. See "Preference"
Allows you to mirror or extend your screen to the projector.
See "Mirror Off / On / Extension" on page 15 for details.
16 for details.
on page 16 for details.
document or folder on your computer. See "Compatible" on
page 17 for details.
"Advanced" on page 17 for details.
on page 21 for details.
Role assignment
The first user connected to the projector using QCast is designated as the host. Users
that join subsequently are designated as guests. Only the host is allowed to use the
Advanced function. See "Advanced" on page 17 for details.
Projecting via QCast (for PCs)14
Page 15

Network Display Code
If you are the first user (the host) connected to the projector, when you click the Mirror
Off / Mirror On button to mirror your computer screen on the projector, a password
prompt will display requesting a password. You will need to enter the Network Display
Code to start mirroring. The Network Display Code is displayed at the upper right
corner of the Network Display screen.
• If the Network Display screen is not shown on the projector, press SOURCE on the
projector and then select Network Display to view the screen.
• Subsequent users (the guests) do not have to enter the Network Display Code to join the
session. However, their projection requests must be approved by the host. See "Preference" on
page 21 for details.
Mirror Off / On / Extension
You can switch between different display options by clicking the Mirror Off / Mirror On
/ Mirror Extension button. The options available are: Mirror Off, Mirror On, and
Mirror Extension.
Icon Name Description
Mirror Off When Mirror Off is displayed, your screen is not
mirrored on the projector.
Mirror On When Mirror On is displayed, your screen is
mirrored on the projector, allowing other users to
see your screen.
Mirror
Extension
If you are the first user and you click the Mirror Off / Mirror On / Mirror Extension button to
switch to Mirror On, a password prompt will appear. See "Network Display Code" on page 15 for
details.
When Mirror Extension is displayed, the projector
will act as an extended desktop for the computer.
Projecting via QCast (for PCs) 15
Page 16

Certain computers may not support Mirror Extension. If you are notified of a display extension
failure, check the user manual of your computer or visit the manufacturer’s website for more
information about mirroring or extending your screen.
Quality
You can switch between High Quality and Low Quality by clicking the Quality button.
Icon Name Description
High Quality When High Quality is displayed, the mirrored
Low Quality When Low Quality is displayed, the mirrored screen
Quality This button is not selectable when QCast is set to
screen will have better image quality but slower
transmission speed.
will have normal image quality but faster transmission
speed
Mirror Off.
Audio
You can switch between Audio Off and Audio On by clicking the Audio button.
Icon Name Description
Audio Off When Audio Off is displayed, the projector’s speaker
Audio On When Audio On is displayed, the projector’s speaker
Audio This button is not selectable when QCast is set to
is turned off.
is turned on.
Mirror Off.
Projecting via QCast (for PCs)16
Page 17

Compatible
When you hover your cursor over a document or folder while projecting in QCast, the
document or folder information will be displayed. The Compatible button allows you to
enable/disable this function.
Icon Name Description
Grayed-out
Compatible
Compatible When Compatible is on, other users can see the
The Compatible function is only supported on the computers running Windows 7.
When Compatible is grayed out, other users cannot
see the hover-over information.
hover-over information.
Advanced
When you click Advanced on the main screen, the Advanced panel appears. The
Advanced features the Conference, Network Setup and Remote Control options.
Icon Name Description
Advanced • Consists of Conference, Network Setup and
Remote Control options.
• Only the host is allowed to access the options in
the Advanced menu.
• Guests will not be able to use the Advanced
options and the button will be grayed out on their
screens.
Projecting via QCast (for PCs) 17
Page 18

Conference
Conference allows the host to create and manage a presentation where there are
multiple users connected to the projector.
No. Description
Disconnects the user from the presentation.
Projects the user’s screen in full-screen mode.
Projects the user’s screen in half-screen mode.
Displays/Hides the user status bar.
Projects the user’s screen in 4-way split screen mode.
Disconnects all users, including the host, from the presentation.
For hosts, a Network Display Code is required during the initial conference. For guests, login
requests require the host’s approval. See "Network Display Code" on page 15 and "Preference" on
page 21 for details.
Network Setup
When an ad hoc wireless network is setup for your projector using the steps described in
the Wireless connections section, connections to the projector by your computer or
mobile device will lack internet access. The Network Setup option allows you to
connect the projector to a wireless network that provides connected devices Internet
access.
This option is also available via the projector’s OSD. See "Accessing the Internet with a wireless
connection" on page 40.
Projecting via QCast (for PCs)18
Page 19

Accessing the Internet via Network Setup
Follow the steps below to connect your projector to a wireless network with Internet
access:
1. Click Network Setup on the Advanced panel to prompt the Network Setup
screen.
2. Click the Network (SSID) to display the available wireless networks.
3. A list of the wireless networks that can be detected by the projector will be
displayed. Select the wireless network that you want to connect your projector to.
4. Enter the password and click OK to proceed.
Projecting via QCast (for PCs) 19
Page 20

5. If the projector successfully connects to the wireless network, a message will appear
instructing you to reconnect the projector. When this message appears, turn off
QCast and reconnect your computer to the projector and re-launch QCast.
For confirming if the projector is connected to the wireless network, you can re-enter the Network
Setup in QCast and check if the wireless network’s SSID is displayed.
Remote Control
When you click Remote Control on the Advanced panel, a virtual keypad appears. It
allows you to control the projector as if using the physical keypad on the projector.
Projecting via QCast (for PCs)20
Page 21

Preference
Preference allows users to set customized settings that are in effect when they are
designated as the host.
Icon Name Description
Preference Allows users to set My Hostname, Preferred
• My Hostname: Sets a custom name for your computer. Press Set to make the
hostname go into effect.
• Current Device: Displays the projector which you are currently mirroring your
screen to.
• Preferred Device: Check to make the current projector your default projector when
using QCast.
• Host Control: Check Do not disturb to automatically reject projection requests
from guests. Check Auto allow request to automatically accept projection requests
from guests.
QCast supports up to 4 users presenting via a 4-way presentation. If Auto allow
request and Do not disturb are not checked, a request confirmation box will appear on
the host’s screen whenever a guest attempts to project, as seen in the image below.
Device and Host Control.
• Full Screen: Click Full Screen to accept the request and enter the full screen
projection.
• Share: Click Share to accept the request and then decide to use the 2-way or 4-way
projection.
• Deny: Click Deny to decline the request.
Projecting via QCast (for PCs) 21
Page 22

Projecting via QCast (for mobile devices)
QCast is an application that allows you to project your mobile device’s screen as well as
photos and documents saved on your computer on the BenQ network projector.
Minimum system requirements
Before installing and running QCast, please check to make sure your mobile device meets
the requirements listed below.
• Mobile devices with Android Operating System (OS):
• Supported OS version: Android 5.0
• CPU: Quad Core equivalent or above
• Memory: 1GB memory or more
• Storage: At least 100MB free space needed
• Mobile devices with iOS:
• Supported OS version: iOS 9 / 10 (The latest 2 versions will be supported.)
• All iPhone models after iPhone 5 are supported
• All iPad models after iPad mini 2 are supported
• Storage: At least 100MB free space needed
BenQ does not guarantee compatibility in respective user environments. Certain users may
experience compatibility issues when running QCast.
Prerequisite
The basic workflow for projecting via QCast is:
1. Select Network Display in the input source menu.
2. Download and install QCast using the app store of your mobile device.
3. Connect your mobile device to the projector.
4. Launch QCast and start projecting.
Selecting Network Display in the input source menu
Before projecting your computer’s screen to the projector, you have to select Network
Display in the input source menu.
1. Press SOURCE on the projector.
2. Highlight Network Display and press OK.
Downloading QCast
1. Ensure that the projector’s input source is set to Network Display.
Projecting via QCast (for mobile devices)22
Page 23

2. Make sure that your mobile device has Internet access. Scan the QR code displayed
on the Network Display screen. The QCast download screen will appear on your
mobile device.
3. Follow on-screen instructions to download and install QCast on your mobile device.
Connecting your mobile device to the projector
To wirelessly connect your mobile device to the projector, follow step 2 shown on the
Network Display screen, or see "Wireless connections" on page 8 for detailed
instructions.
Launching QCast
1. Launch QCast.
2. Tap QCast.
Projecting via QCast (for mobile devices) 23
Page 24

3. Tap the Search button to detect available projectors.
4. Tap the preferred projector and your mobile device will connect to the projector.
5. A preferred device prompt will display. Tap Yes if you want to set the projector as
the default projector. If the projector is set as the default projector, the next time
you launch QCast your computer will search for the projector and automatically
connect to it if it is available through the network.
Projecting via QCast (for mobile devices)24
Page 25

6. After you confirm or decline the preferred device setting for default projector in
previous step, the QCast main screen will appear. You can start using QCast.
Projecting via QCast (for mobile devices) 25
Page 26

Using QCast
The display texts on the user interface may vary by operation system, though the functions are identical.
No. Function Description
Mirror Off /
Mirror On
Photo Allows you to display and share the images saved on your
Camera Allows you to use your device’s camera to broadcast a live
Document Allows you to share the documents saved on your device. See
Preference Allows you to set your personal preferences. See "Preference"
Advanced Allows you to view more functions for QCast. See
Allows you to mirror your screen to the projector. See
"Mirror Off / Mirror On" on page 27 for details.
device. See "Photo" on page 28 for details.
video feed via the projector. See "Camera" on page 28 for
details.
"Document" on page 28 for details.
on page 21 for details.
"Advanced" on page 17 for details.
Role assignment
The first user connected to the projector using QCast is designated as the host. Users
that join subsequently are designated as guests. Only the host is allowed to use the
Advanced function. See "Advanced" on page 17 for details.
Projecting via QCast (for mobile devices)26
Page 27

Network Display Code
If you are the first user (the host) connected to the projector, when you tap the Mirror
Off/On button to mirror your computer screen on the projector, a password prompt will
display requesting a password. You will need to enter the Network Display Code to
start mirroring. The Network Display Code is displayed at the upper right corner of the
Network Display screen.
• If the Network Display screen is not shown on the projector, press SOURCE on the
projector and then select Network Display to view the screen.
• Subsequent users (the guests) do not have to enter the Network Display Code to join the
session. However, their projection requests must be approved by the host. See "Preference" on
page 21 for details.
Mirror Off / Mirror On
You can switch between Mirror Off and Mirror On by tapping the Mirror Off / Mirror
On button. This button will not be displayed on devices running iOS.
Icon Name Description
Mirror Off When Mirror Off is displayed, your screen is not
mirrored on the projector.
Mirror On When Mirror On is displayed, your screen is
mirrored on the projector, allowing other users can
see your screen.
If you are the first user and you click the Mirror Off / Mirror On button to switch to Mirror On,
a password prompt will appear. See "Network Display Code" on page 27 for details.
Projecting via QCast (for mobile devices) 27
Page 28

Photo
The Photo button allows you to share or display images saved on your device.
Icon Name Description
Photo • Follow the on-screen instructions or the user
interface of your device to share or display your
images.
• For sharing images saved on devices running iOS,
the images have to be sent to QCast via iTunes.
• When this function is first used on the devices
running iOS, a request confirmation prompt will
pop up.
Camera
The Camera button allows you to use your device’s camera to broadcast a live video feed
via the projector.
Icon Name Description
Camera • When this function is first used on the devices
with iOS, a request confirmation prompt will pop
up.
• Both portrait mode and landscape mode are
supported.
Document
The Document button allows you to present and share the documents saved on your
mobile device.
Icon Name Description
Document Follow the on-screen instructions or the user
Documents on iPhone cannot be shared directly in this way. To share a document on iPhone, use
iTunes to sync with a Mac computer first and share from the computer.
Projecting via QCast (for mobile devices)28
interface of your mobile device to present or share
your documents.
Page 29

Advanced
Advanced consists of Conference, Network Setup and Remote Control options.
See "Advanced" on page 17 for details.
Icon Name Description
Advanced • Consists of Conference, Network Setup and
Remote Control options.
• Only the host is allowed to access the options in
the Advanced menu.
• Guests will not be able to use the Advanced
options and the button will be grayed out on their
screens.
Preference
The Preference button allows users to set customized settings that are in effect when
they are designated as the host.
Icon Name Description
Preference Allows users to set My Hostname, Preferred
Device and Host Control. See "Preference" on
page 21 for details.
Projecting via QCast (for mobile devices) 29
Page 30

Managing the projector using a web browser
Once the projector is connected to a wired local area network and the projector is on or
in standby mode, you can use any computer that is in the same network to manage and
control the projector via BenQ Projector Control System accessed through the
computer’s web browser.
Supported web browsers
Make sure you are using one of the following web browsers:
• Internet Explorer: 9 / 10 / 11
• Chrome: 55.0 / 56.0 / 57.0
• Safari: 8.0 / 9.0 / 10.0
• Firefox: 50.0 / 51.0 / 52.0
Configuring Standby Settings for the projector
In order to control the projector remotely while the projector is in standby mode, you
need to enable the Network Standby Mode and Monitor Out settings for the projector. To
do so, follow the steps below:
1. Press MENU on the projector to open the Advanced Menu options.
2. Highlight System and press OK.
3. Highlight Standby Settings and press OK.
4. Highlight Network and press OK.
5. Highlight Enable Network Standby Mode and press OK.
6. Select On then press OK.
7. Press BACK to return to Standby Settings.
8. Highlight Monitor Out and press OK.
9. Select On then press OK.
Accessing the BenQ Projector Control System
1. Make sure your computer and the projector are connected to the same local area
network. See "Wired connections" on page 6 for details.
2. Launch the web browser on your computer.
3. Enter the IP address of the projector in the browser’s address bar and press the
computer’s Enter key.
Managing the projector using a web browser30
Page 31

You can follow the steps described in "Setting up a wired network for the projector" on page 6 to
check the projector’s IP address. Alternatively, you can press SOURCE on the projector. Select
Network Display. The IP address is displayed on the bottom left corner of the screen.
4. The main page of BenQ Projector Control System appears. This web page
provides access to a variety of functions described in the following sections.
Managing the projector using a web browser 31
Page 32

Main function
Virtual Keypad
The Virtual Keypad page displays a virtual keypad with which you can control the
projector as if using the physical keypad on the projector.
Image Settings
Image Settings consists of the Picture and Display pages.
Display
The Display page features Auto Keystone and Corner Fit options.
• Auto Keystone: Allows you to automatically adjust the keystone setting for the
projector.
• Corner Fit: Allows you to correct image dimensions by adjusting each corner of an
image when the projector is used to project within a restricted or unevenly rectangular
frame.
• After making any adjustments, click Apply to have the adjustments take effect.
Managing the projector using a web browser32
Page 33

When adjusting Auto Keystone or Corner Fit, it is suggested to adjust each value in small
intervals and then check if the image is projected as expected, as applied values may cause the
projected image dimensions to exceed the edge of frame.
Picture
The Picture page allows you to adjust effects for projected images.
• Color Temperature Tuning: Allows you to adjust the color temperature.
• Color Management: Allows you to control conversion between the color
representations of a variety of devices.
• After making any adjustments, click Apply to have the adjustments take effect.
Projector Setup
• Setup Settings: Allows you to choose the type of physical setting in which the
projector is installed.
• Lamp Mode: Allows you to select different lamp mode to extend the lamp life as long
as possible.
• After making any adjustments, click Apply to make the settings go into effect.
Managing the projector using a web browser 33
Page 34

Crestron eControl
The Crestron eControl page displays the Crestron eControl and RoomView user
interface. The eControl page provides a variety of virtual keys to control the projector or
adjust the projected pictures.
No. Function
Click the Tools tab for more setting options and Info tab for information on the
projector.
Allows you to select the input source.
These buttons function in the same way as the buttons on the OSD menus or
remote control. See the chapter “Controls and Functions” in the user manual for
details.
The Menu button can also be used to return to the previous OSD menu, exit and save menu settings.
Managing the projector using a web browser34
Page 35

Tools
The Tools menu allows you to manage the projector, configure the wired LAN settings
and protect access to the remote network operation for this projector. Every sub-menu
can be configured separately. After making any adjustments, click Send to have the settings
go into effect. Click Exit to return to the BenQ Projector Control System page.
No. Function
Allows you to name the projector and add remarks for the projector. After
making any adjustments, click Send to have the settings go into effect.
Allows you to configure the network settings. After making any adjustments,
click Send to have the settings go into effect.
Allows you to set User Password. If User Password is enabled, a password
will be required to access the remote network operation. After making any
adjustments, click Send to have the settings go into effect.
Allows you to set Admin Password. If Admin Password is enabled, a
password will be required for having access to the Tools page. After making any
adjustments, click Send to have the settings go into effect.
Click Exit to return to the remote network operation page.
Managing the projector using a web browser 35
Page 36

Info
The Info page includes the current status and information for this projector.
No. Function
Displays basic information about the projector.
Displays the current status of the projector.
Click Exit to return to the remote network operation page.
Click Expansion Options for more information about the Crestron and
RoomView monitoring and control system.
For more information about Crestron and RoomView monitoring and control system, visit
http://www.crestron.com & http://www.crestron.com/microsites/get-roomview.
Managing the projector using a web browser36
Page 37

Management
The Management page allows you to name the projector for quick identification and set
a password to protect the projector’s configuration.
• Projector Device Name: Allows you to name the projector.
• Web Control Lock:
• When set to Off (default), users are allowed to access the BenQ Projector
Control System and change the projector’s configuration.
• When set to On, users can only review the Information page. An admin
password will be required to enter other function control pages.
• Web Admin Account Name Change: Allows you to change the admin account
name. The default account name is admin.
• Web Admin Password Change: Allows you to change the admin password. The
default admin password is 0000.
• Record the new admin password if you change the admin password. If the admin password is
lost, you must contact BenQ Customer Center to make an unlock request.
• Web Admin Account Name and Web Admin Password can only be changed when Web
Control Lock is set to On.
Alternatively, you can also enable the Web Control Lock using the projector’s OSD
menu:
1. Press MENU on the projector.
2. Highlight Settings and press OK.
3. Highlight Security Settings and press OK.
4. Highlight Web Control Lock and set it to On.
Once Web Control Lock is set to On, you cannot set the Web Control Lock to Off via the
projector’s OSD. To set Web Control Lock to Off, you need to have the admin password and
reset Web Control Lock to Off via the BenQ Projector Control System.
Managing the projector using a web browser 37
Page 38

Network Settings
Network Settings consists of the Wired LAN and Wireless LAN pages.
Wired LAN
The Wired LAN page allows you to modify the Wired LAN settings.
• DHCP Get Auto: If the projector is in a DHCP environment, set this setting to On
to obtain the IP address provided by the DHCP server. Set this setting to Off if you
want to configure the wired LAN settings manually.
Wireless LAN
The Wireless LAN page allows you to modify the wireless LAN settings.
• The Point to Point Settings (AP) table will be blank if the projector is not installed
with the BenQ WDRT8192 USB wireless dongle.
• Wireless LAN Radio: Allows you to reset the power for RF dongle.
• SSID: Allows you to modify the projector’s ID for quick identification over the
wireless network. The SSID has a maximum length of 13 alphanumeric characters.
Managing the projector using a web browser38
Page 39

• Password: Allows you to set the projector’s login password. The Password has a
maximum length of 8 alphanumeric characters.
• Client Settings: Displays the client settings only. It cannot be configured through this
interface.
Projector Language
The Projector Language page allows you to change the projector’s OSD interface
language.
Managing the projector using a web browser 39
Page 40

Accessing the Internet with a wireless
Ta bl e t
Laptop computer
Projector
Smartphone
Wireless Dongle
Internet
Wireless LAN
connection
When a wireless network is set up for your projector as described in the Wireless
connections section, connections to the projector by your computer or mobile device will
lack internet access. You can obtain Internet access for the network either via QCast or
the projector’s OSD menu options.
Accessing the Internet via QCast
1. Make sure the projector is installed with BenQ WDRT8192 USB wireless dongle and
a wireless network is set up for the projector. See "Setting up a wireless network for
the projector" on page 8 for details.
2. Make sure your computer or mobile device is connected to the wireless network
created by the designated USB wireless dongle. See "Connecting your computer or
mobile device to the projector wirelessly" on page 9 for details.
3. Launch QCast. Go to the Network Setup page in the Advanced menu and
configure the network settings. See "Accessing the Internet via Network Setup" on
page 19 for details.
Accessing the Internet via projector OSD
1. Press MENU on the projector.
2. Highlight Network and press OK.
3. Highlight Wireless LAN and press OK.
4. Highlight Client and press OK.
5. Highlight Network (SSID) and press OK.
6. Select a wireless network with Internet access and press OK.
7. Enter the password for the wireless network.
8. Highlight Commit and press OK.
9. Return to the Client page. Check if the Status is Connect and the SSID of the
desired wireless network is displayed. If so, the projector is connected to the desired
wireless network.
10. Connect your computer or mobile device to the projector.
Accessing the Internet with a wireless connection40
Page 41

Now you can access the Internet while your device is wirelessly connected to the
projector.
• The display format for SSIDs only support alphanumeric characters and underscores. If a
router’s SSID does not match this format, the router’s MAC address will be shown instead.
• The projector can detect up to 16 router signals depending on the strength of the signal.
• The network router supports WPA2 security and its password has a maximum length of 20
alphanumeric characters.
Accessing the Internet with a wireless connection 41
Page 42

PJLink commands
This projector supports standard protocol PJLink for projector control. Supported
commands are as below.
The below supported commands may vary depending on different models.
Command Description Parameter
POWER OFF Power control. 0 = Power Off
POWER ON Power control. 1 = Power On
Power? Query the power status. 0 = Power Off
INPT Input switch command. 11 = VGA1
INPT? Query the current input switch
status.
AVMT Mute control. 10 = Video mute off
AVMT? Query the current mute status.
LAMP? Query the number of lamp
hours.
INST? Query the list which enables
input switch.
NAME? Query the projector name. Return “Digital Projector”
INF0? Query resolution information. Return “Education Series”
INF1? Query the maker name. Return “BenQ”
1 = Power On
2 = Cooling down
3 = Warm up
12 = VGA2
21 = SVideo
22 = CVBS
31 = HDMI
51 = CARD_READER
52 = LAN DISPLAY
53 = USB DISPLAY
11 = Video mute on
20 = Audio mute off
21 = Audio mute on
30 = Video & Audio mute off
31 = Video & Audio mute on
Lamp hour
Return
“11 12 21 22 31 51 52 53”
INF2? Query the model name. Return model name as below,
CLSS? Query class information. Return “Version”
ERST? Query the error status Error Status
GET ALL Query all status Return all “?” items
PJLink commands42
“BenQ Projector”
 Loading...