

Page 1
Page 2
Page 3

Joybee 125
MP3 Player
User’s Manual
Welcome
Page 4

Copyright
All rights reserved. No part of this publication may be reproduced,
transmitted, recorded, stored in a retrieval system, or translated into any
language or computer language, in any form or by any means, electronic, mechanical, recording, photocopying, or otherwise, without the
prior permission of BenQ Corporation.
Disclaimer
No warranty or representation, either expressed or implied, shall BenQ
Corporation make with respect to the quality, accuracy or fitness for any
particular purpose of this document. The information in this document
is subject to change without notice. The content of this manual has been
checked and proofread prior to publication.
*Windows is the registered trademark of Microsoft Corporation. All
trademarks or product names appearing in this manual are registered
property of their respective owners.
Cautions
…This MP3 player is a delicate electronic device, DO NOT OPEN IT.
…Do not format memory into FAT32 or NTFS format.
…Do not attempt to dissemble or modify any part of device.
…Avoid shock or impact on device.
…Keep device away from water.
…Keep device away from extreme temperatures, humidity, dust or
direct sunlight.
…Do not clean device with chemical solvent. Clean device with a cloth
dampened with water.
…Use only adaptor and accessories approved by the manufacturer. War-
ranty voided if other adaptor or accessories are used, and danger may
occur.
Page 5

…Avoid high volume which may damage hearing.
…BenQ Corporation assumes no responsibility for the loss of data due
to damage of device, repair of device and/or battery replacement.
Users are advised to back up all data on other storage device. Use of
device not in accordance with the instructions (such the cautions)
will void the warranty.
Page 6

<Memo>
Page 7

Contents
Contents .....................................................................1
Thank you for using BenQ Joybee 125 MP3 Player! 1
Introduction .........................................................................1
Package content ...................................................................2
System requirements ...........................................................3
Description and function of different parts .......................4
Screen ...............................................................................8
Getting started... ........................................................11
Charging the battery ............................................................11
Installing drivers and software ............................................13
Using BenQ Joybee 125 MP3 Player ........................15
Turning the power switch on and off .................................15
Transferring files to Joybee 125 ...........................................16
Transferring files with Windows File Manager .............16
Transferring files with QMusic .......................................17
Description of QMusic main screen ........................... 17
Adding music on an audio CD to Joybee 125 ............ 20
Adding new files to Joybee 125 from a PC ................. 25
Updating files automatically with QMusic................. 29
Function menu .....................................................................33
Launching to the function menu ....................................33
Button functions in menu mode ....................................34
Playing a MP3/WMA file .....................................................34
Playing an file ...................................................................34
Operating Joybee 125 when a file is being played ..........35
Pause a playing file....................................................... 35
Fast forward.................................................................. 35
Next file ........................................................................ 35
Rewind.......................................................................... 35
1
Page 8

Previous file.................................................................. 35
Stop............................................................................... 35
Adjusting volume ........................................................ 35
Selecting an EQ mode ................................................. 36
Selecting repeat mode.................................................. 36
Locking buttons ........................................................... 36
Repeat playing a selected section ................................ 36
Listening to FM radio ..........................................................38
Operating Joybee 125 when listening to FM radio ........ 38
Muting/resuming a radio program............................. 38
Changing the station ................................................... 38
Saving a channel .......................................................... 39
Deleting a channel ....................................................... 39
Scanning channels ....................................................... 39
Adjusting radio volume............................................... 39
Changing to another mode ......................................... 40
Recording a FM program ............................................ 40
Playing an FM file ........................................................... 40
Operating Joybee 125 when playing an FM file ......... 41
Recording with Joybee 125 .................................................. 43
Playing a recorded file .....................................................44
Operating Joybee 125 when playing a recorded file .. 44
Selecting a repeat mode .......................................................46
Turn backlight ON/OFF ..................................................... 47
System setup ........................................................................47
Adjusting volume ............................................................47
Selecting an EQ mode .....................................................48
Deleting a file or recording .............................................49
Checking battery status ................................................... 52
Checking memory status ................................................53
Adjusting screen brightness ............................................54
Playlist ..............................................................................55
Creating a playlist with QMusic ................................. 55
Running playlist........................................................... 56
2
Page 9

Joybee 125 as a flash disk .....................................................57
Connecting Joybee 125 to a PC ......................................57
Disconnecting Joybee 125 from a PC .............................58
Updating firmware and formatting memory .....................60
Updating firmware ..........................................................60
Formatting memory ........................................................63
Troubleshooting ........................................................65
Service ........................................................................66
3
Page 10

4
Page 11

Thank you for using BenQ Joybee
125 MP3 Player!
Introduction
Thank you for purchasing BenQ Joybee 125 MP3 Player!
BenQ Joybee 125 offers outstanding playback and recording
functions at low power consumption*. You may download any
legal MP3 files from the Internet or convert music from an
audio CD into MP3 files with QMusic that comes with Joybee
125 and save them on Joybee 125. Moreover, the seven built-in
EQ modes on Joybee 125 allow you to enjoy music at the best
sound quality. In addition to a MP3 player, Joybee is a FM
radio and a recorder. Its screen is designed to use clod light
display and its firmware can be updated from a PC. Joybee 125
not only enriches your musical life but also allows you to carry
your data everywhere. Its convenient driver-free plug and play
function allows you to use it as a USB flash disk on Windows
2000/XP.
In this manual, you will find detailed descriptions and instructions of every function on Joybee 125. Please read carefully in
order to use these convenient functions and enjoy high quality
music with Joybee 125.
When batteries are fully charged, Joybee 125 offers about
10 hours of continuous replay time for MP3 music. Of
course, the exact replay time is subject to the condition of
battery, operation frequency and format of files being
played.
Thank you for using BenQ Joybee 125 MP3 Player! 1
Page 12
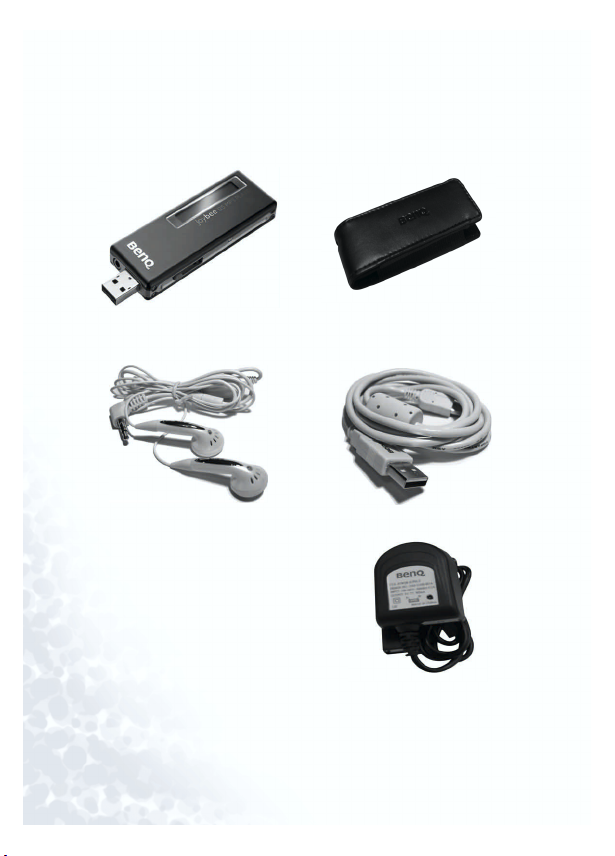
Package content
Please check the content of your Joybee 125 MP3 Player. Should any
accessories be missing or damaged, please contact your dealer immediately.
BenQ Joybee 125 MP3 Player
Earphones
† Neck Strap
† Software CD
† Warranty Card
Charger and plug (Output: 5V---300mA)
2 Thank you for using BenQ Joybee 125 MP3 Player!
Belt Clip
USB cable
Page 13

System requirements
If you want to install QMusic on a PC to convert music on an
audio CD into MP3 files for use on Joybee 125 or use Joybee
125 as a flash disk, your PC must comply with the following
requirements:
† OS: Microsoft Windows 98/2000/Me/XP (QMusic supports
Windows 2000/XP)
† CPU: Pentium 200MHz or faster
† I/O port: USB
† Device: CD-ROM
† Hard drive: 40MB or more space
† Memory: 32MB or more
Thank you for using BenQ Joybee 125 MP3 Player! 3
Page 14
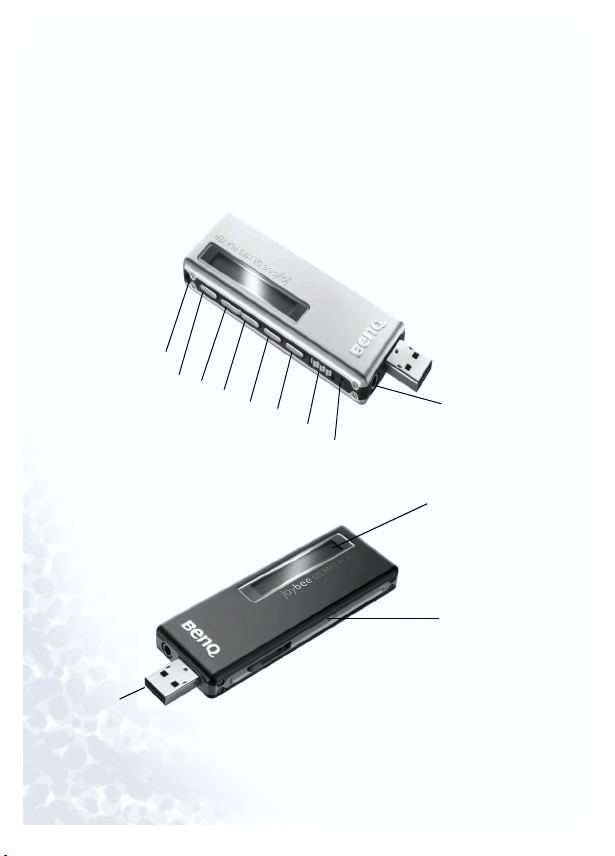
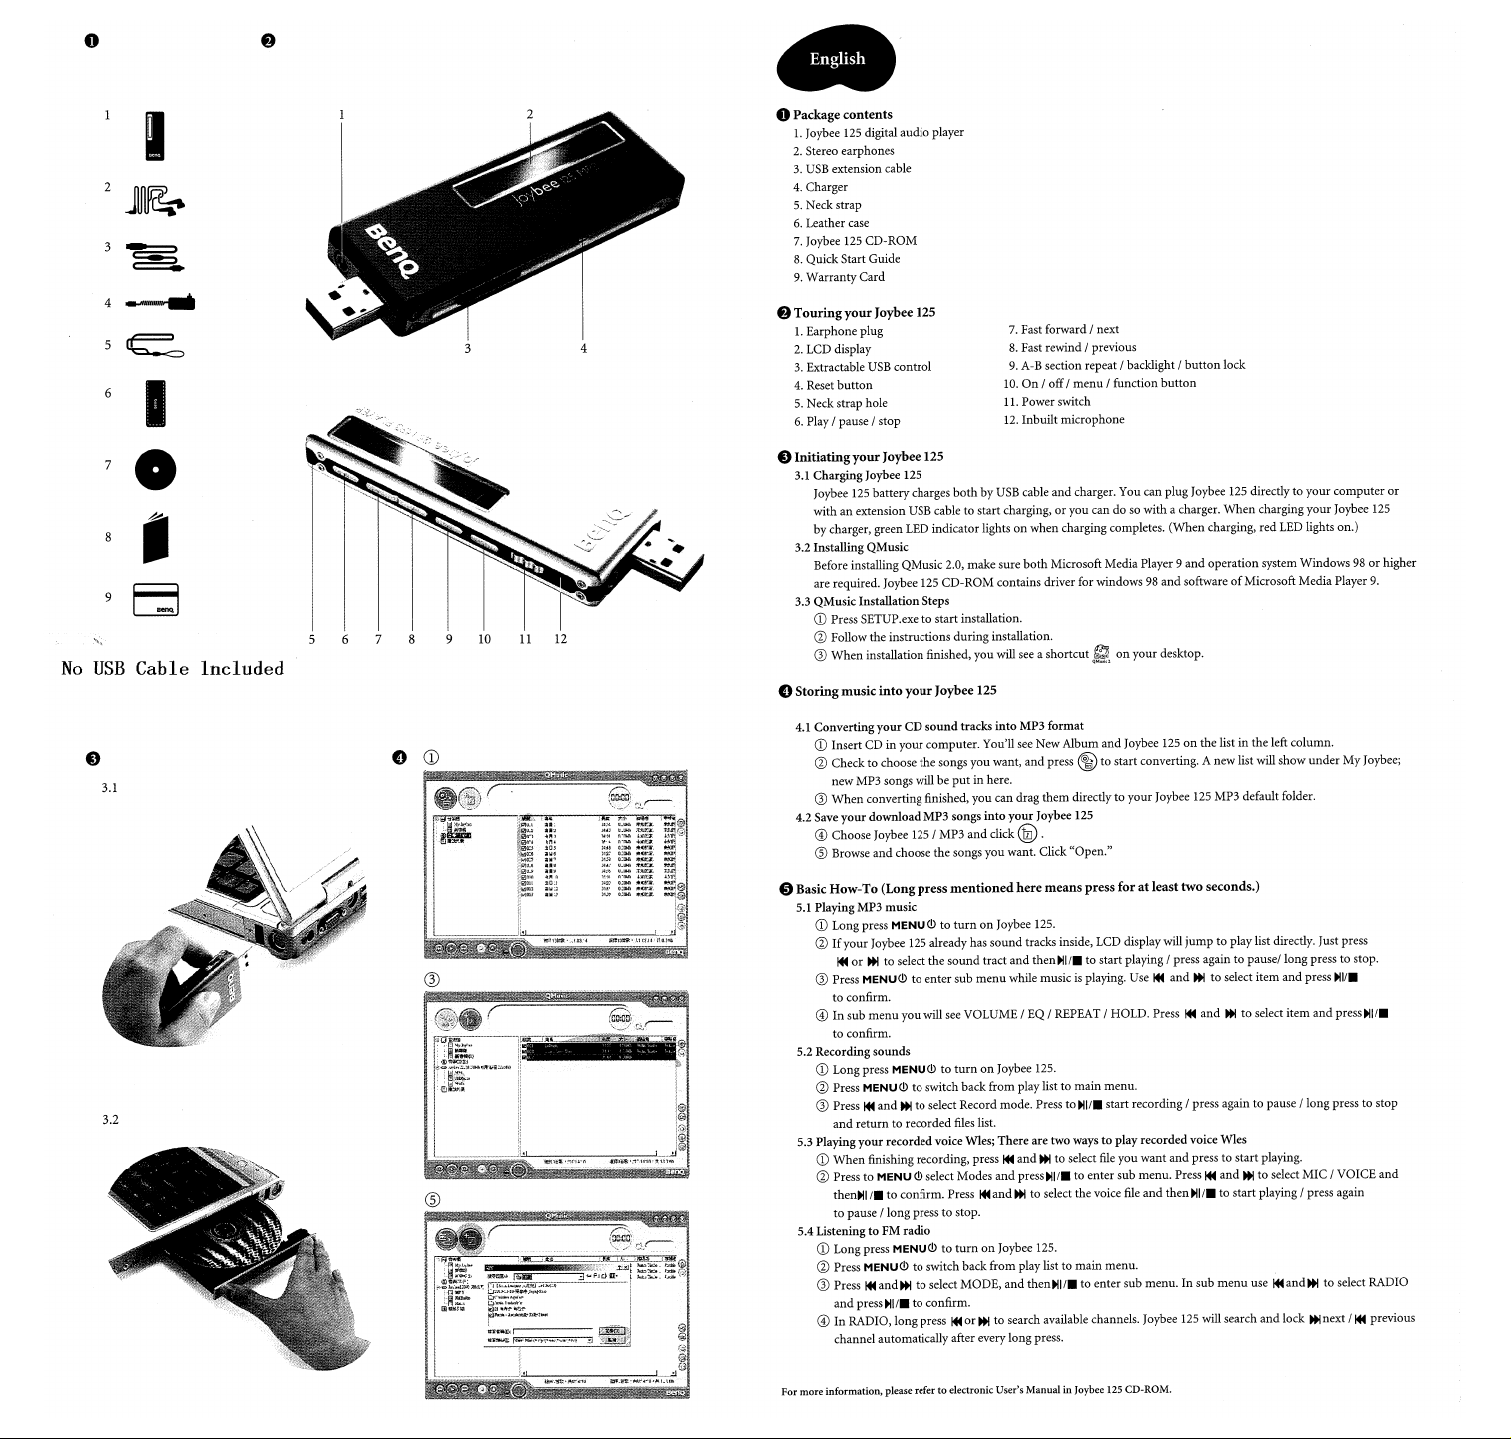
Description and function of different parts
Description and function of different parts of BenQ Joybee 125
MP3 Player, please see bottom pictures and tables for details.
Buttons and jacks
(11)
(6)
(5)
(4)
(3)
(2)
(8)
(9)
(1)
(10)
(12)
(7)
4 Thank you for using BenQ Joybee 125 MP3 Player!
Page 15
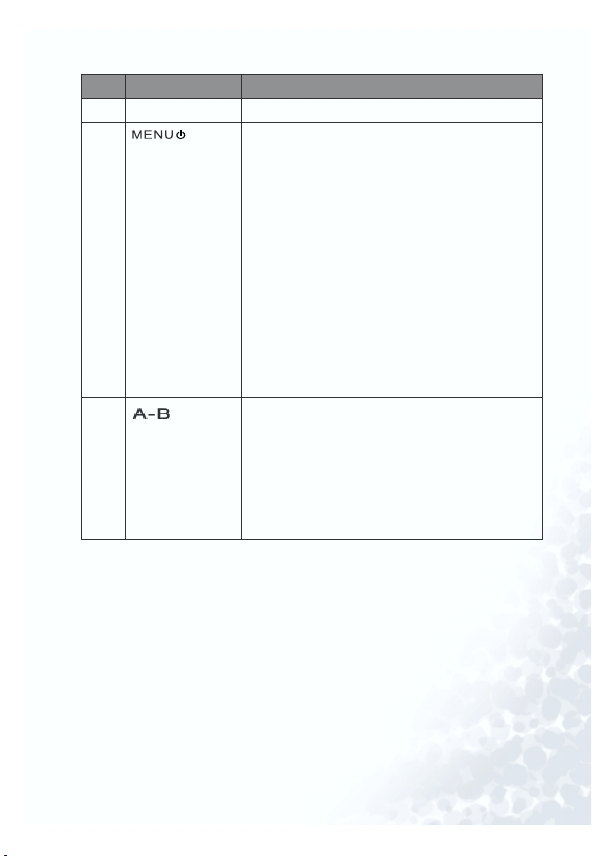
Item Description Functions
(1) Earphone jack For connection with earphones
(2) …When Joybee 125 is turned off, press but-
ton once to turn on Joybee 125. After the
welcome note is displayed, Joybee 125 will
enter into the MP3/WMA mode automatically. If there are files on Joybee, the title of
these files will display on the screen.
…After turning on Joybee 125, press and hold
button for about 3 seconds, the message
‘System Off’ will display on the screen
before the power goes off.
…Press button once to launch to the function
menu After turning on Joybee 125, and
press button again to launch to the submenu in playback mode.
(3)
(repeat/
backlight)
…Press button once to enable or disable
repeat in playback mode.
…After turning on Joybee 125, press and hold
button for about 2 seconds to turn backlight on/off.
…When listening to FM radio, press button
once to record a FM radio program.
Thank you for using BenQ Joybee 125 MP3 Player! 5
Page 16
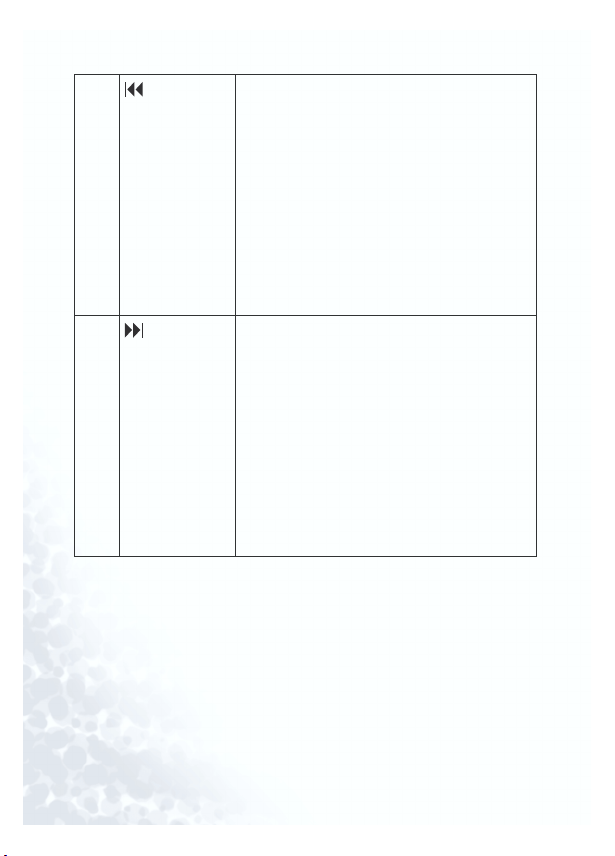
(4)
(5)
(Previous/
Fast Rewind)
(Next/Fast
Forward)
…Press button once to skip to the previous
file in MP3/WMA, Voice Playback, FM File
Playback or standby mode.
…Press and hold button to rewind file in
playback mode.
…Press button once to scroll back to the pre-
vious item in menu mode.
…When listening to FM radio, press button
once to skip to the previous channel.
…Press and hold button for two seconds to
search for the previous station in FM Radio
mode.
…Press button once to skip to the next file in
MP3/WMA, Voice Playback, FM or
standby mode.
…Press and hold button to forward file in
playback mode.
…Press button once to scroll to the next item
in menu mode.
…When listening to FM radio, press button
once to skip to the next channel.
…Press and hold button for two seconds to
search for the next station in FM Radio
mode.
6 Thank you for using BenQ Joybee 125 MP3 Player!
Page 17
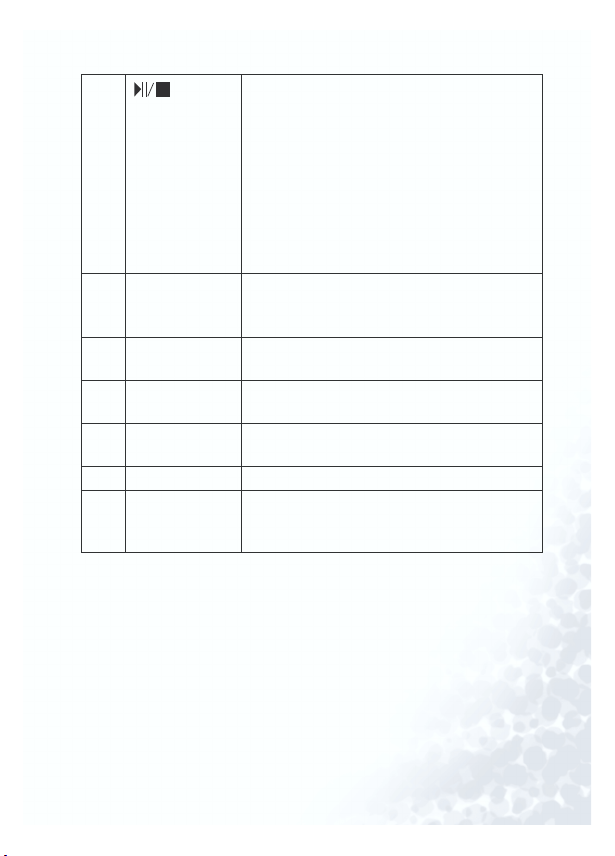
(6)
(Play/
Pause/Stop/
Enter)
…Press button once to play an file in MP3/
WMA, Voice Playback, FM File Playback or
standby mode. Press button once to pause
an file and press again to continue playing
in playback mode.
…Press and hold button for about 2 seconds
to stop playing or recording.
…In FM Radio mode, press button once to
play FM radio. Press button again to stop
playing FM Radio.
(7) USB port/
charger socket
…USB port for connecting Joybee 125 to a
PC
…Charger socket for recharging battery.
(8) Recharge Switch Switch to “On” to charge, and switch to “Off ”
to stop charging.
(9) MIC High sensitivity built-in MIC for voice
recording
(10) Screen Display player status and file information. See
the following section for details.
(11) Hook For hanging various pendent accessories.
(12) Reset button Restarts Joybee 125. Press Reset when Joybee
125 does not respond or to return all settings
to default.
Thank you for using BenQ Joybee 125 MP3 Player! 7
Page 18
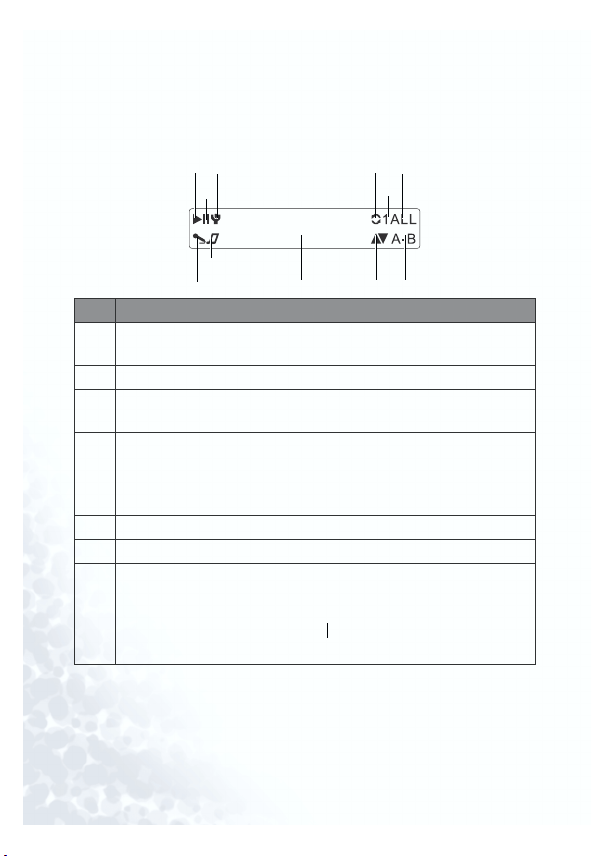
Screen
The following table shows the icons displayed on the screen
and their meanings.
(1)
(3)
(2)
(8)
Item Description
(7)
(1) The icon appears when Joybee 125 is playing an file in MP3/
WMA, Voice Playback, or FM Radio mode.
(2) The icon appears when the playing is paused.
(3) The icon appears when a file is being played in Voice Playback
mode.
(4) This icon and the icon in (5) appear at the same time when the
‘repeat single’ function is enabled.
This icon and the icon in (6) appear at the same time when the
‘repeat all’ or ‘random’ function or playback mode is enabled.
(7) The icon appears when Joybee 125 is in Voice Playback mode.
(8) The icon appears when Joybee 125 is in MP3/WMA mode.
(9) Displays file information and player status.
In Menu mode:
(9)
1: Menu
Menu options
(4)
(10)
(6)
(5)
(11)
8 Thank you for using BenQ Joybee 125 MP3 Player!
Page 19
F
ile information displayed in MP3/WMA mode:
(9) F
Tota l f il e
Title
Information displayed when playing an file in MP3/WMA
mode:
Current file title
File information displayed in Voice Playback mode:
Information displayed when playing a file in Voice Playback
mode:
File information displayed in FM File Playback mode:
Filename Battery status
Information displayed when playing a file in FM File Playback
mode:
Filename
Battery status
Battery status
Filename
Filename Elapsed playing time
Battery status
4:38filename.mp3
0:04 / 4:38filename.mp3
Elapsed playing time
0:28V001.WAV
Battery status
0:28 / 4:38V001.WAV
Battery status
14:38F001.WAV
1:27 / 14:38F001.WAV
playing time
Tota l f ile
playing time
Total file
playing time
Total fil e
playing time
Total file
playing time
Total file
playing time
Elapsed playing time
Thank you for using BenQ Joybee 125 MP3 Player! 9
Page 20

Information displayed in FM Radio mode:
Current channel (expressed in MHz)
Information displayed in FM or Voice recording mode:
F001.WAV
Filename
0:15
4:38
Elapsed recording
time
Total recording
time
(10)
Displays current file or function. When appears, it means the
item displayed is the last option/file. When appears, it means
the item displayed is the first option/file.
(11) The icon appears when ‘Repeat A-B’ function is enabled.
10 Thank you for using BenQ Joybee 125 MP3 Player!
Page 21
Getting started...
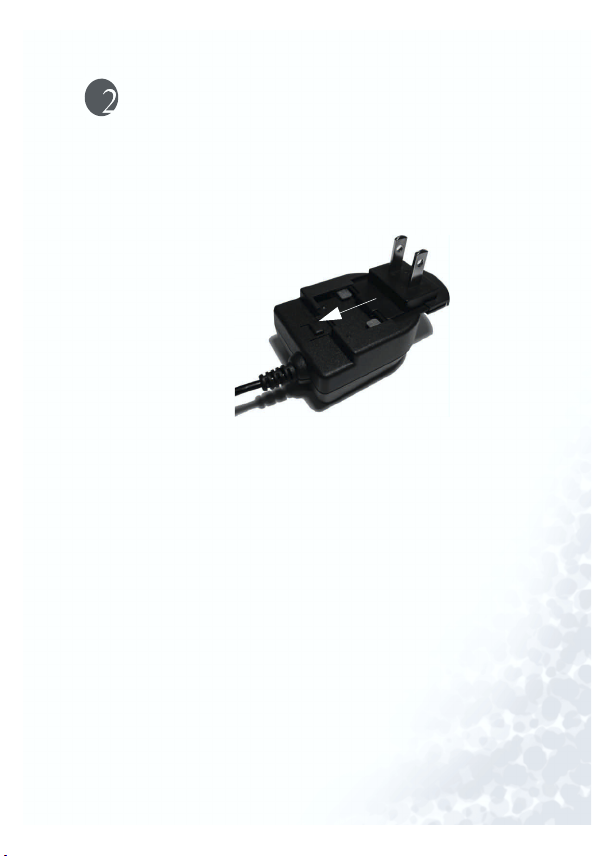
Charging the battery
1. Turn the Recharge On/Off sw itch to On before recharging the
battery.
2. Install the plug to the charger as shown in the bottom picture.
3. Please make sure that plug is properly installed to the charger
before connecting it to the socket.
4. Connect charger to a wall outlet. The red indicator on charger
will illuminate. In about 3.5 hours, the indicator will turn
into amber. In about 4 hours, the indicator will turn into
green and the charging process is about to complete. In about
4.5 hours, the battery will be fully charged.
5. Joybee 125 battery charges both by USB cable and charger.
You can plug Joybee 125 directly to your computer or with an
extension USB cable to start charging, or you can do so with a
charger.
Getting started... 11
Page 22

Exact charging time differs according to battery status.
•
Please check the status of charging from the color
changes of indicator.
• Chargers for use in some areas may not have an indica-
tor. Please check battery status according to"Checking
battery status" p.52.
• The life of battery will depend on the frequency of charge,
and more frequently the battery is recharged, the shorter
the replay time of device will be. It is a normal phenomenon and not a manufacturing defect of battery.
12 Getting started...
Page 23
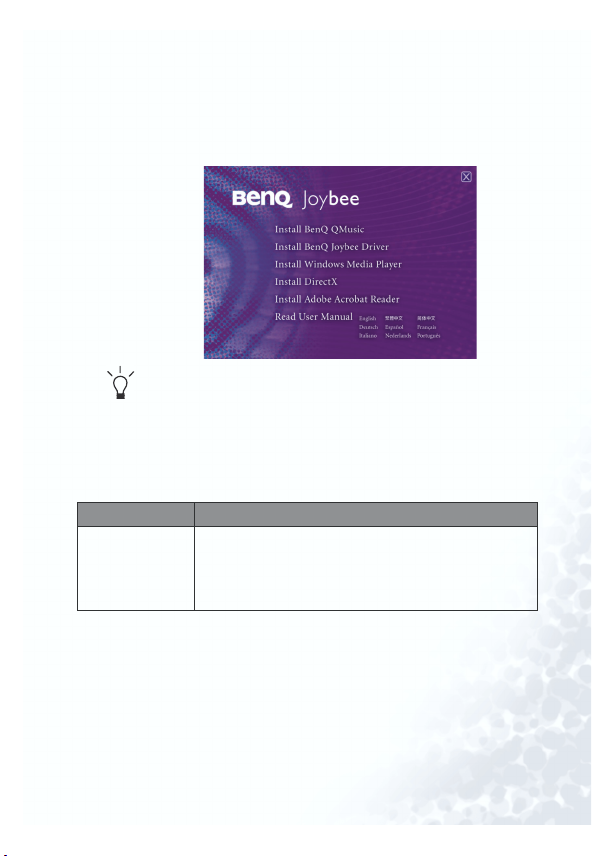
Installing drivers and software
Put the Software CD that comes with Joybee 125 in the CDROM on your PC. The installation menu will display on the PC
screen in a few seconds.
If it does not appear on the PC screen, open File Manager in Windows
and locate the ‘autorun.exe’ file on the Software CD. Double click the
icon to open the installation menu.
Click on the icon to install the corresponding software. Follow
the on-screen instructions to complete the installation.
The bottom table shows the functions and content of software
on the Software CD.
Item Description
Install Joybee
125 MP3 Player
Driver
The driver includes Joybee 125 firmware upgrade
and memory quick format utilities. If you are using
Windows 98, you must install this driver before
connecting Joybee 125 to your PC.
Getting started... 13
Page 24
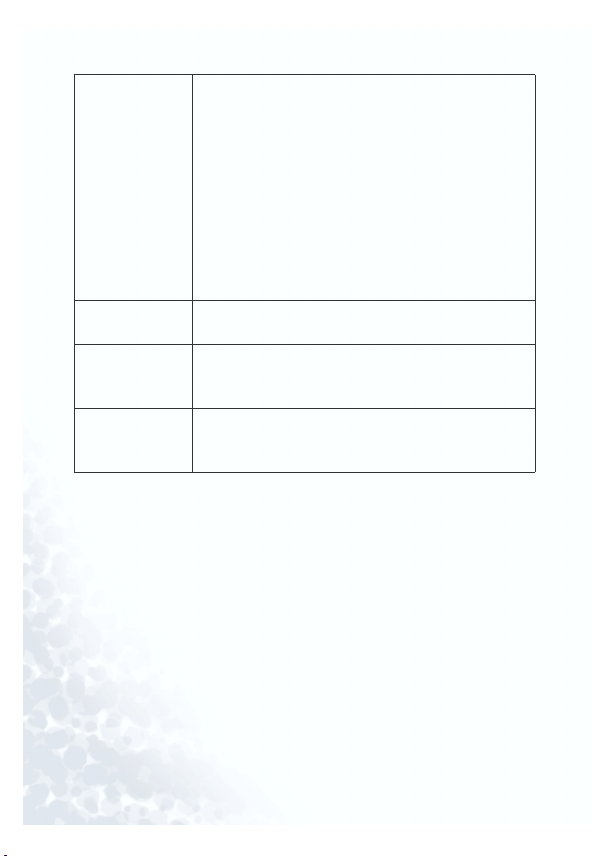
Install QMusic QMusic is an easy-to-use file manager. It allows you
to play an audio CD and MP3/WMA files, convert
music on an audio CD into MP3 files, create
playlists, create audio CDs and organize your CD
albums.
With QMusic, you can convert music on an audio
CD into MP3 files and save them on Joybee 125, and
organize and update files stored in Joybee 125.
Please be noted that QMusic supports only
Windows 2000/XP. No CD burning function on
Windows 2000.
Install Acrobat
Reader
Install Windows
Media Player
After installing Acrobat Reader to your PC, you can
read the e-manual on the Software CD.
QMus ic must work with Windows Media Player 9. If
you have not yet installed Windows Media Player 9
on your PC, please install it first.
Install Direct X QMusic must work with Windows Direct X. If you
have not yet installed Windows Direct X on your PC,
please install it first.
14 Getting started...
Page 25
Using BenQ Joybee 125 MP3
Player
Turning the power switch on and off
Press to turn on Joybee 125. The welcome note will
appear on the screen before Joybee 125 enters into the standby
mode.
If you want to turn off Joybee 125, press and hold
for about 3 seconds, the message ‘System Off’ will display on
the screen before the power goes off.
When Joybee 125 is in standby mode, it will turn off automatically when there is no action for 3 minutes to save
energy (this function will be disabled when Joybee 125 is
connected to a PC).
Using BenQ Joybee 125 MP3 Player 15
Page 26

Transferring files to Joybee 125
Transferring files with Windows File Manager
1. Turn on Joybee 125.
2. Connect Joybee 125 to a PC. When Joybee 125 is successfully
connected to the PC, a new icon ‘Removable Disk’ will appear
in My Computer on Windows. Also, a message read ‘Connection completed’ will display on the screen of Joybee 125.
If the dialog box ‘Windows found new hardware’ keeps popping up after the connection, press Next or OK to close the
dialog box.
3. If you already have MP3 (.mp3) or WMA (.wma) files on
your hard disk, locate them with File Manager.
4. Then, select files and draw them to the new Removable Disk.
By doing so, the selected files will be transferred to Joybee
125.
When files are being transferred to Joybee 125, do not disconnect
•
Joybee 125 from the PC when the message read ‘Communication in
progress...’ displays on the screen of Joybee 125. Disconnect Joybee
125 from your PC after the message read ‘Connection completed’
displays on the screen.
• Please check if there is enough memory space on Joybee 125 before
transferring files to Joybee 125.
16 Using BenQ Joybee 125 MP3 Player
Page 27

Transferring files with QMusic
1. The QMusic icon will appear on Desktop after it is successfully installed. Double click the icon to open QMusic.
You may also run QMusic from
StartgProgramsgQMusic2gQMusic2.
Description of QMusic main screen
Action buttons
Display
System
buttons
Search
window
Right
pane
Feature
buttons
Left panel
Features Description
Action buttons Run specific functions of QMusic
Left panel Displays all files supported by QMusic
Playing
buttons
Playing buttons
Press button to play a selected file
Status bar
Using BenQ Joybee 125 MP3 Player 17
Page 28

Status bar Displays details of files, such as total number of files
and playing time
Feature
Set repeat or random playing of files in playback mode
buttons
Right panel Displays files selected on the left panel or media
Search
Enter the name of an file and search it
window
System
Control QMusic window
buttons
Display Displays progress of an action. For example, when an
file is being played, the name, elapsed playing time and
other information of the file will be displayed.
2. Turn on Joybee 125.
3. Connect Joybee 125 to a PC. When Joybee 125 is successfully
connected to the PC, a new icon ‘Removable Disk’ will appear
in My Computer on Windows. Also, a message read ‘Connection Completed’ will display on the screen of Joybee 125.
If the dialog box ‘Windows found new hardware’ keeps popping up after the connection, press Next or OK to close the
dialog box.
18 Using BenQ Joybee 125 MP3 Player
Page 29

4. If Joybee 125 is successfully connected to the PC, the icon
will appear on the left panel of QMusic, and
the directories on Joybee 125 will be displayed under the icon.
Using BenQ Joybee 125 MP3 Player 19
Page 30

Adding music on an audio CD to Joybee 125
1. Put an audio CD in the CD-ROM on your PC. In a few sec-
onds, the icon will appear on the left panel of
QMusic, and the files on the CD will appear on the right
panel.
20 Using BenQ Joybee 125 MP3 Player
Page 31

2. Select the files to be added to Joybee 125 by clicking on the
box in front of the files. Then click on the icon, and
QMusic will convert the selected files into MP3 files.
Using BenQ Joybee 125 MP3 Player 21
Page 32

3. After the conversion is completed, a n
n
a
to the left panel of QMusic. All the files converted will be displayed in the album. Click on the a
files on the right panel.
ew album will be added
lbum to display details of
22 Using BenQ Joybee 125 MP3 Player
Page 33

4. Click on the file to be added to Joybee 125 from the right
C
S
D
panel, and it will be highlighted. If you want to select more
than one file, press and hold the C
click on the next file with the left button of the mouse. If you
want to select all files, click on the first file on the right panel,
press and hold the S
last file with the left button of the mouse. If you want to deselect files, select files and press the D
hift key on the keyboard, and click on the
trl key on the keyboard and
elete key on the keyboard.
Using BenQ Joybee 125 MP3 Player 23
Page 34

5. Draw the selected files from the right panel to the M
M
tory under the icon.
•
When files are being transferred to Joybee 125, do not disconnect
Joybee 125 from the PC when the message read ‘Communication in
progress...’ displays on the screen of Joybee 125. Disconnect Joybee
125 from your PC after the message read ‘Connection completed’
displays on the screen.
• Please check if there is enough memory space on Joybee 125 before
transferring files to Joybee 125.
P3 direc-
24 Using BenQ Joybee 125 MP3 Player
Page 35

Adding new files to Joybee 125 from a PC
1. Click on the My Joybee on the left panel.
Using BenQ Joybee 125 MP3 Player 25
Page 36

2. Press and browse and select MP3, WAV or WMA files
O
to be added to Joybee 125 from the PC. Then press O
add the selected files to My Joybee.
pen to
26 Using BenQ Joybee 125 MP3 Player
Page 37

3. Click on the icon on the left panel.
Using BenQ Joybee 125 MP3 Player 27
Page 38

4. Press and QMusic will transfer the files you have just
added to My Joybee to Joybee 125. Before transferring the
selected files to Joybee 125, QMusic will ask if you want to
delete the existing files in My Joybee. If you want keep them,
abort the transfer and back up these files, and start transfer
again.
When files are being transferred to Joybee 125, do not disconnect
•
Joybee 125 from the PC when the message read ‘Communication in
progress...’ displays on the screen of Joybee 125. Disconnect Joybee
125 from your PC after the message read ‘Connection completed’
displays on the screen.
• Please check if there is enough memory space on Joybee 125 before
transferring files to Joybee 125.
28 Using BenQ Joybee 125 MP3 Player
Page 39

Updating files automatically with QMusic
1. Click on MMy Joybee on the left panel.
Using BenQ Joybee 125 MP3 Player 29
Page 40

2. Press and browse and select MP3, WAV or WMA files to
O
be added to Joybee 125 from the PC. Then press O
the selected files to My Joybee.
pen to add
30 Using BenQ Joybee 125 MP3 Player
Page 41

S
etup of QMusic in the function button area.
J
3. Press S
4. Click on J
oybee label in the Option dialog box.
Using BenQ Joybee 125 MP3 Player 31
Page 42

5. Select ‘A
A
A
utomatically launch QMusic when Joybee added’ and
‘A
utomatically transfer MP3 files to Joybee when added’.
Then click on button.
6. Disconnect Joybee 125 from the PC and reconnect it to the
PC, QMusic will automatically update files on Joybee 125
with the files in My Joybee on the left panel.
From now on, if you want to automatically update files on Joybee 125, you will only need to save files in My Joybee and connect Joybee 125 to your PC, QMusic will automatically
transfer the selected files to Joybee 125.
When files are being transferred to Joybee 125, do not disconnect
•
Joybee 125 from the PC when the message read ‘Communication in
progress...’ displays on the screen of Joybee 125. Disconnect Joybee
125 from your PC after the message read ‘Connection completed’
displays on the screen.
• Please check if there is enough memory space on Joybee 125 before
transferring files to Joybee 125.
32 Using BenQ Joybee 125 MP3 Player
Page 43

Function menu
All functions on Joybee 125 are accessible from the function
menu. Therefore, all you need to do is to remember how to
operate the function menu as shown in the bottom instructions in order to use these functions and change their settings.
Launching to the function menu
† When you turn on Joybee 125 for the first time, it will auto-
matically launch to the MP3/WMA mode. Press to
launch to the function menu.
† If you have turned off Joybee 125 in MP3/WMA, Voice Play-
back or FM File Playback mode, you may launch to the func-
tion menu by pressing and to launch to the
function menu.
† If you have turned off Joybee 125 in FM Radio mode, follow
the bottom instructions to launch to the function menu.
1. Press .
2. Press or to scroll to ‘Mode’, and press .
3. After scrolling to ‘MP3/WMA’, ‘Voice Playback’ or ‘FM File
Playback’ mode, press .
4. Press .
Using BenQ Joybee 125 MP3 Player 33
Page 44

Button functions in menu mode
After launching to the function menu:
† Press or to scroll to the previous or next item of the
function menu.
† Press to select an item or skip to the next level of the
menu.
† Press to skip to the previous level of the menu.
Playing a MP3/WMA file
Playing an file
1. Turn on Joybee 125.
2. Launch to the function menu according to the instructions
given in the ‘Launching to the function menu’ section.
3. When ‘Mode’ appears on the screen, press .
4. When ‘MP3/WMA’ appears on the screen, press .
5. Then, the name of files saved on Joybee 125 will be displayed
on the screen. Press or to select an file and
press to play the file.
34 Using BenQ Joybee 125 MP3 Player
Page 45

Operating Joybee 125 when a file is being played
Pause a playing file
When an file is being played, press to pause. If you want
to play the file again, press again.
Fast forward
When an file is being played, press to go forward.
Next file
When an file is being played, press to skip to the next file.
Rewind
When an file is being played, press to rewind.
Previous file
When an file is being played, press to skip to the previous
file.
Stop
When an file is being played, press and hold for about 2
seconds to stop playing.
Adjusting volume
1. When an file is being played, press and then .
2. Press or to adjust volume. Press to reduce and
to increase volume.
3. Press to confirm adjustment and to return to
the playback screen.
You may also adjust volume in ‘System Setup’. See"Adjusting volume" p.41 for details.
Using BenQ Joybee 125 MP3 Player 35
Page 46

Selecting an EQ mode
1. When an file is being played, press .
2. Press or to scroll to ‘EQ’ and press .
3. Press or to select a desired EQ mode (mega base, tre-
ble, rock, jazz, classical, pop or normal) and press to
confirm.
4. Press to return to the playback screen.
You may also adjust volume in ‘System Setup’. See"Selecting an EQ
mode" p.48 for details.
Selecting repeat mode
1. When an file is being played, press .
2. Press or to scroll to ‘Repeat’ and press .
3. Press or to select a desired repeat mode (repeat all,
repeat one, random or normal) and press to confirm.
4. Press for several times to return to the playback
screen.
You may also set the repeat mode in function menu. See"Selecting a
repeat mode" p.46 for details.
Locking buttons
By locking the buttons you may avoid pressing any button on
Joybee 125 by accident.
1. When a file is being played, press .
2. Press or to scroll to Lock and press to confirm.
Press and hold for about 2 seconds to unlock buttons.
Repeat playing a selected section
1. Press at the start of section. The icon ‘A’ will appear on
the screen.
36 Using BenQ Joybee 125 MP3 Player
Page 47

2. Press again at the end of section. The icon ‘A-B’ will
appear on the screen. Joybee 125 will star t playing the selected
section repeatedly.
Press again to cancel repeat section, and the icon A-B
will disappear.
Using BenQ Joybee 125 MP3 Player 37
Page 48

Listening to FM radio
1. Turn on Joybee 125.
2. Launch to the function menu as in "Launching to the function menu" p.33.
3. When "Mode" appears on the screen, press .
4. When "FM Radio" appears on the screen, press .
5. Press and hold or to activate the auto station search
function of Joybee 125. Joybee 125 will stop searching when it
receives a stable and powerful signal from a station. Press
or to fine-tune a station.
If you want to search for stations manually, press or in
FM Radio mode.
You must use earphones when listening to FM radio,
because the earphone cable will be the antenna of the radio.
Operating Joybee 125 when listening to FM radio
Muting/resuming a radio program
When listening to a radio program, press to mute. If you
want to resume, press again.
Changing the station
If you want to change a station, press and hold or to
activate the auto channel search function. Joybee 125 will stop
searching when receiving stable and powerful signals from a
certain station. Press or to fine-tune a station.
If you want to search for a station manually, press or in
FM Radio mode.
38 Using BenQ Joybee 125 MP3 Player
Page 49

Saving a channel
You can save up to 10 FM Radio channels.
1. When a channel is being played, press .
2. Press or to scroll to Save Channel and press .
3. Press again to confirm or press to
cancel.
Once ten channels are saved, you must delete a channel before
adding a new one.
Deleting a channel
1. When a channel is being played, press .
2. Press or to scroll to Delete Channel and press .
3. Press again to confirm or press to
cancel.
4. Continue pressing to delete more channels. When all
channels are deleted, the channel search screen appears.
Scanning channels
1. When a channel is being played or is paused, press
.
2. Press or to scroll to Scan Channels and press
.
3. Press or to scan forward or backward.
Adjusting radio volume
1. When listening to FM radio, press and .
2. Press or to adjust volume.
Using BenQ Joybee 125 MP3 Player 39
Page 50

Then, press for several times to return to FM Radio
screen.
Changing to another mode
1. When listening to the FM radio, press .
2. Press or to scroll to Mode and press .
3. Select the desired mode and press .
Recording a FM program
•Do not turn off Joybee 125 or connect or disconnect it from
a PC while recording.
•Do not turn on backlight while recording to avoid noise in recording.
1. When listening to FM radio, press to start recording.
2. Press and hold for two seconds and then release the
button to stop recording.
All recorded programs will be saved in the format
F001.WAV, F002.WAV, F003.WAV etc, the number appearing
in the end of the filenames refers to the order to programs
recorded. These files will be saved under the FMRadio
folder in Joybee 125.
Playing an FM file
1. Turn on Joybee 125 (skip this step when Joybee 125 has been
turned on).
2. Launch to the function menu as in "Launching to the function menu" p.33.
3. When “Mode” appears on the screen, press .
4. When “FM File Playback” appears on the screen, press .
5. Press and hold or to select the desired FM file and
press to confirm and start playing the file.
40 Using BenQ Joybee 125 MP3 Player
Page 51

Operating Joybee 125 when playing an FM file
Pause a playing file
When a file is being played, press to pause. If you want
to play the file again, press again.
Fast forward
When a file is being played, press to go forward.
Next file
When a file is being played, press to skip to the next file.
Rewind
When a file is being played, press to rewind.
Previous file
When a file is being played, press to skip to the previous file.
Stop
When a file is being played, press and hold for about 2
seconds to stop playing.
Adjusting volume
1. When a file is being played, press and then .
2. Press or to adjust volume. Press to reduce and
to increase volume.
3. Press to confirm adjustment and to return to
the FM File Playback screen.
You may also adjust volume in “System Setup”. See "Adjusting
volume" p.47 for details.
Selecting an EQ mode
1. When a file is being played, press .
2. Press or to scroll to “EQ” and press .
Using BenQ Joybee 125 MP3 Player 41
Page 52

3. Press or to select a desired EQ mode (m
m
r
ble,r
ock,jjazz,cclassical,ppop or nnormal) and press to
confirm.
ega base,ttre-
4. Press to return to the FM file playback screen.
You may also adjust volume in “System Setup”. See "Selecting an EQ
mode" p.48 for details.
Selecting repeat mode
1. When a file is being played, press .
2. Press or to scroll to “Repeat” and press .
3. Press or to select a desired repeat mode (repeat all,
repeat one, random or normal) and press to confirm.
4. Press for several times to return to the FM file playback screen.
You may also set the repeat mode in function menu. See "Selecting a
repeat mode" p.46 for details.
Locking buttons
1. When a file is being played, press .
2. Press or to scroll to Lock and press to confirm.
Press and hold for about 2 seconds to unlock buttons.
42 Using BenQ Joybee 125 MP3 Player
Page 53

Recording with Joybee 125
• Do not turn on backlight while recording to avoid noise in
recording.
• Do not turn off Joybee 125 or connect or disconnect it from a PC
while recording.
• Recording function will be disabled when the battery is low.
1. Turn on Joybee 125.
2. Launch to the function menu as in "Launching to the function menu" p.33.
3. Press or to scroll to “Recording”, and press to
confirm and start recording.
4. Press and hold for two seconds and then release the
button to stop recording.
All recordings will be saved in the format V001.WAV,
V002.WAV, V003.WAV etc, the number appearing in the end
of the filenames refers to the order to recordings. These
files will be saved under the MicIn folder in Joybee 125.
Using BenQ Joybee 125 MP3 Player 43
Page 54

Playing a recorded file
1. Turn on Joybee 125 (skip this step when Joybee 125 has been
turned on).
2. Launch to the function menu as in "Launching to the function menu" p.33.
3. When “Mode” appears on the screen, press .
4. When “Voice Playback” appears on the screen, press .
5. Press and hold or to select the desired recording and
press to confirm and start playing the file.
Operating Joybee 125 when playing a recorded file
Pause a playing file
When a file is being played, press to pause. If you want
to play the file again, press again.
Fast forward
When a file is being played, press to go forward.
Next file
When a file is being played, press to skip to the next file.
Rewind
When a file is being played, press to rewind.
Previous file
When a file is being played, press to skip to the previous file.
Stop
When a file is being played, press and hold for about 2
seconds to stop playing.
Adjusting volume
44 Using BenQ Joybee 125 MP3 Player
Page 55

1. When a file is being played, press and then .
2. Press or to adjust volume. Press to reduce and
to increase volume.
3. Press to confirm adjustment and to retur n to
the Voice Playback screen.
You may also adjust volume in “System Setup”. See "Adjusting volume"
p.41 for details.
Selecting an EQ mode
1. When a file is being played, press .
2. Press or to scroll to “EQ” and press .
3. Press or to select a desired EQ mode (mega base, tre-
ble, rock, jazz, classical, pop or normal) and press to
confirm.
4. Press to return to the Voice Playback screen.
You may also adjust volume in “System Setup”. See "Selecting an EQ
mode" p.48 for details.
Selecting a repeat mode
1. When a file is being played, press .
2. Press or to scroll to “Repeat” and press .
3. Press or to select a desired repeat mode (repeat all,
repeat one, random or normal) and press to confirm.
4. Press for several times to return to the Voice Playback screen.
You may also set the repeat mode in function menu. See “Selecting
Repeat Mode” for details.
Locking buttons
1. When a file is being played, press .
Using BenQ Joybee 125 MP3 Player 45
Page 56

2. Press or to scroll to Lock and press to confirm.
r
r
Press and hold for about 2 seconds to unlock buttons.
Selecting a repeat mode
1. Turn on Joybee 125 (skip this step when Joybee 125 has been
turned on).
2. Launch to the function menu as in "Launching to the function menu" p.33.
3. Press or to scroll to “Repeat”, and press .
4. Press or to select a desired repeat mode (r
repeat one,r
andom or nnormal) and press to confirm.
epeat all,
46 Using BenQ Joybee 125 MP3 Player
Page 57

Turn backlight ON/OFF
After turning on Joybee 125, press and hold for about 2
seconds to turn on backlight. Press and hold for about 2
seconds again to turn off backlight.
Do not turn on backlight while recording to avoid noise in recording.
System setup
Adjusting volume
1. Turn on Joybee 125 (skip this step when Joybee 125 has been
turned on).
2. Launch to the function menu as in "Launching to the function menu" p.33.
3. Press or to scroll to “System Setup” and press .
4. Press to launch to the Volume screen. Press to
reduce and to increase volume.
5. Press to confirm adjustment.
Press for several times to return to the function
menu.
Using BenQ Joybee 125 MP3 Player 47
Page 58

Selecting an EQ mode
1. Turn on Joybee 125 (skip this step when Joybee 125 has been
turned on).
2. Launch to the function menu as in "Launching to the function menu" p.33.
3. Press or to scroll to “System Setup” and press .
4. Press or to scroll to “EQ” and press .
5. Press or to select a desired EQ mode (mega base, tre-
ble, rock, jazz, classical, pop or normal) and press to
confirm.
Press for several times to return to the function
menu.
48 Using BenQ Joybee 125 MP3 Player
Page 59

Deleting a file or recording
You may delete an file saved on Joybee 125 with the delete
function.
1. Turn on Joybee 125 (skip this step when Joybee 125 has been
turned on).
2. Launch to the function menu as in "Launching to the function menu" p.33.
3. Press or to scroll to “System Setup” and press .
4. Press or to scroll to “Delete File” and press .
5. Joybee 125 will ask you to prompt the deletion “Delete file?”
Press to confirm deletion or to abort deletion.
6. Repeat step 5 to delete other files.
If you want to delete a specific file or recorded file saved on
Joybee 125, connect Joybee 125 to a PC, select and delete
file(s) or recorded file(s) from File Manager or QMusic.
Deleting an file or recording to QMusic
1. Double click QMusic on Desktop.
2. Turn on Joybee 125.
3. Connect Joybee 125 to a PC. When Joybee 125 is successfully
connected to the PC, a new icon “Removable Disk” will
appear in My Computer. Also, a message read “Connection
Completed” will display on the screen of Joybee 125.
If the dialog box “Windows found new hardware” keeps
appearing on the PC screen after the connection, press
Next or OK to close the dialog box.
Using BenQ Joybee 125 MP3 Player 49
Page 60

4. Select the location of files to be deleted by clicking on a subdi-
M
C
S
rectory under the icon on the left panel of
QMusic, e.g. M
icIn.
5. Files in the selected directory will be displayed on the right
panel. Click on the file to be deleted. It will be highlighted. If
you want to select more than one file, press and hold the C
key on the keyboard and click on the next file with the left
button of the mouse. If you want to select all files, click on the
first file on the right panel, press and hold the S
hift key on the
trl
50 Using BenQ Joybee 125 MP3 Player
Page 61

keyboard, and click on the last file with the left button of the
D
mouse.
6. Then, press the D
selected files from Joybee 125.
elete key on the keyboard to delete all
Using BenQ Joybee 125 MP3 Player 51
Page 62

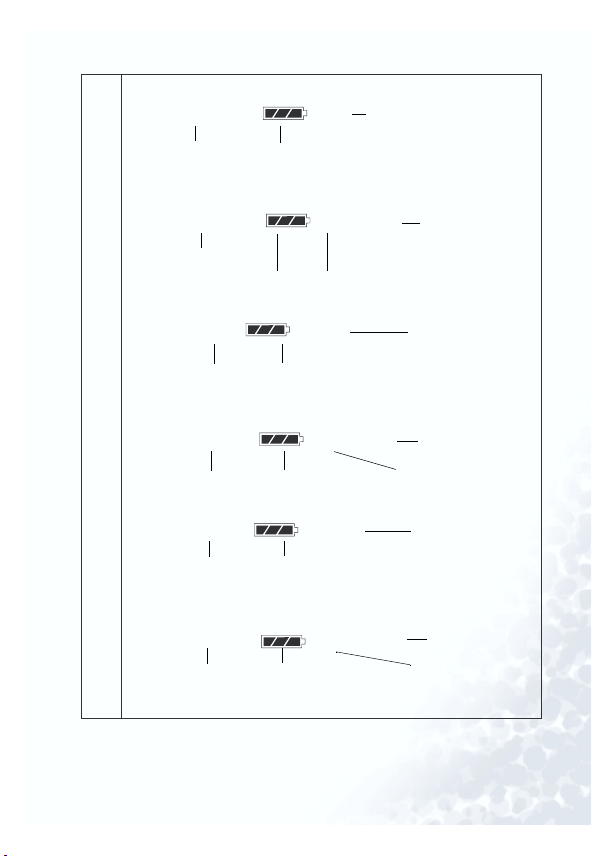
Checking battery status
1. Turn on Joybee 125 (skip this step when Joybee 125 has been
turned on).
2. Launch to the function menu as in "Launching to the function menu" p.33.
3. Press or to scroll to “System Setup” and press .
4. Press or to scroll to “Check Battery Status” and
press .
5. The status of battery will be displayed on the screen as shown
in the bottom table.
Icon Battery status
Full
Low
Recharge needed
Press for several times to return to the function menu.
52 Using BenQ Joybee 125 MP3 Player
Page 63
Checking memory status
1. Turn on Joybee 125 (skip this step when Joybee 125 has been
turned on).
2. Launch to the function menu as in "Launching to the function menu" p.33.
3. Press or to scroll to “System Setup” and press .
4. Press or to scroll to “Check Memory Status” and
press .
5. The status of memory will be displayed on the screen.
Press for several times to return to the function
menu.
Using BenQ Joybee 125 MP3 Player 53
Page 64

Adjusting screen brightness
1. Turn on Joybee 125 (skip this step when Joybee 125 has been
turned on).
2. Launch to the function menu as in "Launching to the function menu" p.33.
3. Press or to scroll to “System Setup” and press .
4. Press or to scroll to “Brighness” and press .
5. The brightness adjust screen will appear. Press to reduce
brightness or to increase brightness.
6. Press to confirm.
Press for several times to return to the function menu.
54 Using BenQ Joybee 125 MP3 Player
Page 65

Playlist
In addition to playing MP3/WMA files stored in the memory
in order, Joybee 125 has been equipped with the playlist function which allows you to play files in an order as you desire.
Creating a playlist with QMusic
1. Double click the QMusic icon on Desktop.
2. Turn on Joybee 125.
3. Connect Joybee 125 to the PC. When Joybee 125 is successfully connected to the PC, a new icon “Removable Disk” will
appear in My Computer. Also, a message read “Connection
Completed” will display on the screen of Joybee 125.
If the dialog box “Windows found new hardware” keeps
appearing on the PC screen after the connection, press
Next or OK to close the dialog box.
4. Click on the MMP3 directory under on the left
panel of QMusic.
Using BenQ Joybee 125 MP3 Player 55
Page 66

5. Press and QMusic will create a playlist under M
M
on the right panel and update the playlist on Joybee 125.
y Joybee
Running playlist
You must create a playlist according to the top instructions
before using the playlist function.
1. If your Joybee 125 has been connected to a PC, you must wait
until the message “Connection completed..." appear on the
screen before disconnecting it from your PC. Then, turn on
Joybee 125.
2. Launch to the function menu as in "Launching to the function menu" p.33.
3. Press or to scroll to “System Setup” and press .
4. Press or to scroll to “Playlist” and press .
5. When the message “Open playlist” appears on the screen,
press to run playlist.
If you want to stop the playlist function, repeat steps 2 to 4,
and scroll to “Close Playlist” and press in step 4.
56 Using BenQ Joybee 125 MP3 Player
Page 67

Joybee 125 as a flash disk
Connecting Joybee 125 to a PC
1. Turn on Joybee 125.
2. Connect Joybee 125 to a PC. When Joybee 125 is successfully
connected to the PC, a new icon “Removable Disk” will
appear in My Computer window. Also, a message read “Connection Completed” will display on the screen of Joybee 125.
If the dialog box “Windows found new hardware” keeps
appearing on the PC screen after the connection, press
Next or OK to close the dialog box.
3. Now, you may cut, copy and paste files stored in Joybee 125
with File Manager as you are working on any fixed disk.
If you are using Windows 98, you must install the driver that comes
•
with Joybee 125 to enable Joybee 125 to communicate with your PC.
• When files are being transferred to Joybee 125, do not disconnect
Joybee 125 from the PC when the message read “Communication in
progress...” displays on the screen of Joybee 125. Disconnect Joybee
125 from your PC after the message read “Connection completed”
displays on the screen.
• Please check if there is enough memory space on Joybee 125 before
transferring files to Joybee 125.
• Do not delete the SETTINGS.DAT file on Joybee 125.
• If the files transferred to Joybee 125 are WMA, MP3 or WAV files,
you can play them on Joybee 125.
Using BenQ Joybee 125 MP3 Player 57
Page 68

Disconnecting Joybee 125 from a PC
S
B
1. Double click the USB device icon on the taskbar tray.
2. A dialog box as shown below will appear on the screen. Select
USB Mass Storage Device in the dialog box and press S
3. Another dialog box as shown bellow will appear on the
screen. Select B
enQ Joybee 125 USB Device and press OOK.
top.
58 Using BenQ Joybee 125 MP3 Player
Page 69

4. When the bottom dialog box appears on the screen, press OK
and disconnect Joybee 125 from the PC.
Do not disconnect Joybee 125 from a PC when the message read
“Communication in progress...” displays on the screen of Joybee
125. Disconnect Joybee 125 from a PC after the message read
“Connection completed”
Operation procedure may differ from one OS to another.
Using BenQ Joybee 125 MP3 Player 59
Page 70

Updating firmware and formatting memory
Updating firmware
If your Joybee 125 does not work properly due to firmware
damage, you may update the firmware of Joybee 125 with the
tool that comes with the device.
Please make sure that you have backed up all files on Joybee 125 before updating the firmware.
1. Make sure Jobee 125 is turned off.
2. Connect Joybee 125 to PC.
3. Press Start, Programs (or all programs), BENQ Joybee 125
MP3 Player, JoyBee Firmware Update from Windows. The
bottom dialog box will appear on the PC screen.
4. Press and hold on Joybee 125 for about 10 seconds. If Joybee 125 is successfully connected to the PC, the
connection progress will be displayed on the PC screen.
60 Using BenQ Joybee 125 MP3 Player
Page 71

5. When the dialog box disappears, the Joybee Firmware
Update main menu will on the PC screen.
6. Press Start and the bottom dialog box will appear on the
screen. Press Yes to start firmware update.
Do not disconnect Joybee 125 from the PC while firmware update
is in progress.
Using BenQ Joybee 125 MP3 Player 61
Page 72

7. Press Close when firmware update is completed.
9. Then, disconnect Joybee 125 from the PC and turn it on.
If firmware update fails, disconnect Joybee 125 from the PC
USB port, and press the Reset button. Then follow steps 1
to 7 again to update the firmware.
62 Using BenQ Joybee 125 MP3 Player
Page 73

Formatting memory
You can perform quick format of the memory on Joybee 125
with the memory formatting tool that comes with Joybee 125.
Do not disconnect Joybee 125 from the PC when format is in
•
progress.
• All data including files, files and directories on Joybee 125 will be
removed after formatting.
1. Turn on Joybee 125.
2. Connect Joybee 125 to the PC.
3. Press Start,Programs (or all programs), BENQ Joybee 125
MP3 Player, JoyBee Format Utility from Windows. The bottom dialog box will appear on the PC screen.
Using BenQ Joybee 125 MP3 Player 63
Page 74

4. Press Start to start formatting Joybee 125.
5.Press Close to end task after format is completed.
You may format Joybee 125 from Windows. However, make sure that
you do not format it in FAT32 or NTFS format.
64 Using BenQ Joybee 125 MP3 Player
Page 75

Troubleshooting
Unable to transfer files to Joybee 125:
Please check the following:
† If the USB cable has been securely connected to a PC and
Joybee 125, and Joybee 125 is turned on.
† If USB driver has been installed on your PC system.
† If battery on Joybee 125 is full.
Data stored in Joybee 125 is lost.
When power supply is unstable while Joybee 125 is connected to a PC, it may cause data loss. Hence, we strongly
recommend you to back up all data stored in Joybee 125.
BenQ Coproation shall make no representation on damage
or indemnification arising out of loss of data.
The memory on Joybee 125 is big enough for the files I want
to transfer to Joybee 125, but I just can’t transfer them to Joybee 125.
Joybee 125 allocates memory in either 16KB or 32KB each
block. That is to say, when a file is but 1byte big, it will occupies one block of memory. Therefore, even the total size of
files may not be bigger than the memory size, you may not
be able to transfer them to Joybee 125.
I can’t see anything on the screen of Joybee 125.
† Check battery status.
† The firmware of Joybee 125 may be damaged due to
improper operation, perform Firmware Update.
Troubleshooting 65
Page 76

Service
If you cannot solve the problems found on Joybee 125 with the
troubleshooting guide, please contact our worldwide service
locations to obtain the latest drivers and online services.
Area Country Telephone Number E-mail Address
China +86-512-68092520 service@benq.com.cn
Hong Kong +852-23306188 service@benq.com.cn
Asia
Australia Europe 61-1300-130-336 service-au@benq.com
Europe
Europe
Taiwan 0800-027-427 support@benq.com.tw
Singapore +65-6777-2229 servicesg@benq.com
Thailand :+66-2-6700310-1 serviceth@benq.com
Malaysia +603-7954-8660 servicemy@benq.com
The Netherlands 0900-2367-669
Luxem bourg
Germany
Switzerland +41(0)22-567-5331 N/A
Italy +39(0)2-385-91-029 support@benq.it
UK/Ireland +44(0)207-216-0039 support@benq.co.uk
Spain +34(0)91-754-7015
Portugal +351-2-1316-4113
Austria +43(0)1-360-2772-062
Romania +40(0)259-342431
Czechoslovakia 02-24321322 service@medisoft.cz
Poland 032-373-6168 serwis@itus.pc
+32(0)2-645-32-52
0180-3232-002
(Euro$0.09/minute)
support@Benq.nlBelgium
support@benq.de
support@benq.es
support@benq.at
66 Service
Page 77

America
Middle
East
USA +305-593-5250 compumex@fdr.com
Los Angeles 888-723-2238 BenqCS.us@benq.com
Mexico 01-800-712-7745
Chile 562-399-5000 rcox@vector.cl
The United Arab
Emirates
Iran
Kuw ait
Ye m en
Qatar
Saudi Arabia
+971-4-2825767
support.latinamerica@be
nq.com
DhirajMang-
hnani@benq.com
Service 67
Page 78

Page 79

Page 80

Page 81

 Loading...