

Page 1

DC E300 Digital Camera
User’s Manual
Welcome
Page 2

Copyright
Copyright 2005 by BenQ Corporation. All rights reserved. No part of this publication may be reproduced, transmitted, transcribed, stored in a retrieval system, or
translated into any language or computer language, in any form or by any means,
electronic, mechanical, magnetic, optical, chemical, manual, or otherwise, without
the prior written permission of this company.
Disclaimer
BenQ Corporation makes no representations or warranties, either expressed or
implied, with respect to the contents hereof and specifically disclaims any warranties, merchantability or fitness for any particular purpose. Further, BenQ Corporation reserves the right to revise this publication and to make changes from time to
time in the contents hereof without obligation of this company to notify any person
of such revision or changes.
*Windows, Internet Explorer and Outlook Express are trademarks of Microsoft
Corporation. Others are copyrights of their respective companies or organizations.
Taking Care of Your Camera
• Do not use your camera at temperatures below 0°C or above 40°C.
• Do not use or store your camera in the environments listed below:
–Direct sunlight
– High and dusty places
– Next to an air conditioner, electric heater or other heat sources
– In a closed car that is directly under the sun
–Unstable locations
• If your camera becomes wet, wipe it with dry cloth as soon as possible.
• Salt or seawater may cause severe camera damage.
• Do not use organic solvents, such as alcohol, etc., to clean your camera.
• If the lens or viewfinder is dirty, use a lens brush or soft cloth to clean the lens. Do not
touch the lens with your fingers.
• To prevent electrical shock, do not attempt to disassemble or repair your camera by
yourself.
• Water may cause a fire or electric shock. Therefore, store your camera in a dry place.
• Do not use your camera outdoors when it is raining or snowing.
• Do not use your camera in or near water.
• If a foreign substance or water gets in your camera, please turn the power off immediately and disconnect the batteries and the transformer. Remove the foreign substance
or water, and send it to the maintenance center.
• Transfer the data to the computer as soon as possible to avoid losing your image data.
Page 3

Table of Contents
1TOURING YOUR DC E300 ...........................................................................................1
1.1 Checking the Package Contents ..........................................................................................1
1.2 DC E300 Components ......................................................................................................... 2
1.2.1 Front View .................................................................................................................. 2
1.2.2 Rear View .................................................................................................................... 2
1.2.3 LCD Monitor Icons ................................................................................................... 3
1.2.3.1 Display icons -- Still Image Record Mode: ....................................................... 3
1.2.3.2 Display icons -- Still Image Record Mode: ....................................................... 4
1.2.3.3 Display icons -- Still Image Record Mode: ....................................................... 4
2PREPARING YOUR DC E300 FOR USE .......................................................................... 5
2.1 Installing Batteries ................................................................................................................ 5
2.2 Inserting an SD Memory Card (optional accessory) ......................................................... 6
2.3 To remove a memory card: ................................................................................................. 6
2.4 Attaching the Hand Strap: ...................................................................................................7
2.5 Turning the Power On/Off ..................................................................................................7
2.6 Setting the Date and Time ...................................................................................................7
2.7 Setting Image Resolution and Quality ................................................................................ 8
3CAMERA OPERATING MODE ........................................................................................ 9
3.1 Record Mode ........................................................................................................................ 9
3.1.1 Taking Images ............................................................................................................9
3.1.2 Digital Zoom ..............................................................................................................9
3.1.3 Self-Timer ................................................................................................................. 10
3.1.4 Flash .......................................................................................................................... 10
3.2 Playback Mode ................................................................................................................... 11
3.2.1 Viewing Images ........................................................................................................ 11
3.2.2 Zoom Playback ......................................................................................................... 12
3.2.3 Displaying Thumbnail Images ................................................................................ 12
3.2.4 Slideshow Display .................................................................................................... 13
3.2.5 Deleting Images ........................................................................................................ 13
3.2.6 Formatting Media ....................................................................................................16
3.2.7 Copying the Contents of Internal Memory to a Memory Card ............................ 16
3.2.8 Changing the Camera Startup Logo ....................................................................... 17
3.2.9 Setting the DPOF .....................................................................................................17
3.3 MOVIE MODE ..................................................................................................................19
3.3.1 Recording Video Clips ............................................................................................. 19
3.3.2 Viewing Video Clips ................................................................................................ 19
4MENU OPTIONS .......................................................................................................20
4.1 The Basic of the Menu Operation ..................................................................................... 20
4.2 OSD Menus ........................................................................................................................ 20
4.2.1 Record Menu ............................................................................................................ 20
4.2.2 Movie Menu ............................................................................................................. 22
4.2.3 Playback Menu ......................................................................................................... 22
4.2.4 Setup Menu .............................................................................................................. 23
5CONNECTING TO A COMPUTER .................................................................................24
5.1 Installing the Digital Camera Software ............................................................................. 24
English
Table of Contents 1
Page 4

5.2 Bundled Software ............................................................................................................... 25
5.3 Transferring Files To/From a Computer .......................................................................... 26
5.3.1 Transferring Photos and Movie Clips ..................................................................... 26
5.4 USING THE CAMERA AS A PC CAMERA ..................................................................... 27
6TROUBLESHOOTING ...................................................................................................29
PECIFICATIONS ......................................................................................................... 30
7S
ERVICE INFORMATION .............................................................................................31
8S
English
Table of Contents2
Page 5

BenQ DC 5530 User’s Manual
1 TOURING YOUR DC E300
1.1 Checking the Package Contents
The package includes the following items:
Common Product Components:
1. User's manual
2. DC E300 digital camera
3. USB cable
4. Camera strap
5. DC E300 software CD-ROM
6. Camera pouch
7. Batteries
Common (Optional) Accessories:
1. Memory card
If anything is missing or appears damaged, contact your dealer. Save the packaging in the event
you need to ship your camera for service.
Note
Accessories and components may vary by retailer.
•
Note
16MB internal memory (14MB available for image storage) lets you capture and store
•
images without the need for an additional memory card. However, you may wish to
expand the memory capacity (up to 512MB capacity) by using an external memory card.
English
Touring Your DC E300 1
Page 6

BenQ DC 5530 User’s Manual
1.2 DC E300 Components
1.2.1 Front View
1. Strap eyelet
English
2. Lens cover
3. Lens
4. Self-timer LED
5. Flash
6. POWER Power but ton
7. Shutter buttonr
1.2.2 Rear View
1. Focus switch
Macro mode
Normal mode
2. Status LED
3. Arrow button (up)
Thumbnail button
MENU Menu button
4. Arrow button (right)
MODE Mode button
5. SET Set button
Flash button
6. Arrow button (down)
Zoom button
7. Arrow button (left)
Quick view button
Delete button
8. LCD monitor
9. USB connector
10. Battery cover
11. Memory card cover
12. Tripod socket
Touring Your DC E3002
Page 7

BenQ DC 5530 User’s Manual
1.2.3 LCD Monitor Icons
1.2.3.1 Display icons -- Still Image Record Mode:
1. Possible number of shots
(at the current size and quality settings)
2. Battery level
Full battery power
Medium battery power
Virtually no battery power
3. Memory card indicator
4. Flash mode
Auto flash
Flash off
5. Focus Mode
Macro mode
Normal mode
6. White balance
A Auto
Daylight
Cloudy
Tun g st e n
Fluorescent
7. Image quality
Super fine
Fine
Norma l
8. Image size
2032 x 1520 pixels
1600 x 1200 pixels
1280 x 960 pixels
640 x 480 pixels
9. Self-timer mode
English
1
2
3456789
Touring Your DC E300 3
Page 8
BenQ DC 5530 User’s Manual
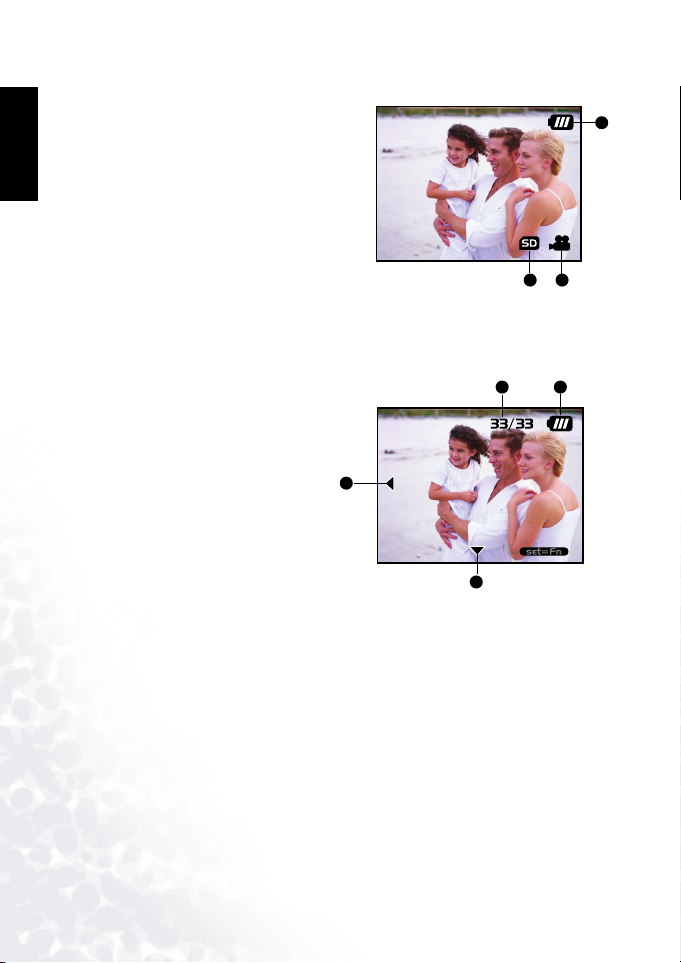
1.2.3.2 Display icons -- Still Image Record Mode:
English
1. Battery level
2. Movie mode
3. Memory card indicator
1.2.3.3 Display icons -- Still Image Record Mode:
1. Frame number
2. Battery level
3. Forward arrow
4. Reverse arrow
4
1
23
1 2
3
Touring Your DC E3004
Page 9

BenQ DC 5530 User’s Manual
2 PREPARING YOUR DC E300 FOR USE
You can use either 2 AAA size batteries (Alkaline or Ni-MH) to power the camera.
2.1 Installing Batteries
1. Make sure the camera is turned off.
2. Slide the battery cover in the direction of the
[OPEN] arrow.
3. Insert the batteries, noting correct polarity (+ and
-).
4. Close the battery cover firmly.
Note
Different battery types and surrounding temperatures may affect the battery
•
performance.
• Avoid using batteries in extremely cold environments as low temperatures can shorten
the battery life and reduce camera performance. This low temperature will also
influence Alkaline battery performance, therefore Ni-MH rechargeable battery is highly
recommended.
• If you are using the new rechargeable batteries or rechargeable batteries that have not
been used for an extended period of time (batteries that pass the expiry date are
exceptions) might affect the number of pictures that can be taken. Therefore, to
maximize their performance and lifetime, we recommend that you fully charge the
batteries and discharge them for at least one complete cycle before use.
• If you will not be using the batteries for an extended period of time, remove them from
the camera to prevent leakage or corrosion.
• Never use batteries of different types (together) or mix old and new batteries.
• Never use manganese batteries.
English
Preparing Your DC E300 for Use 5
Page 10

BenQ DC 5530 User’s Manual
2.2 Inserting an SD Memory Card (optional accessory)
The camera comes with 16MB (14MB available for
image storage) of internal memory, allowing you to
store images and video clips in the camera. However,
English
you can expand the memory capacity by using an
optional S D (Secure Digital) memory ca rd so that you
can store additional images and video clips.
1. Make sure the camera is turned off.
2. Insert an SD memory card:
• The front side of the memory card (printed
arrow) should face towards the rear side of the
camera.
• If the card cannot be inserted, check the orientation.
Be sure to format the memory card with this camera before its initial usage. Refer to
•
section in this manual titled ìFormatting Mediaî for further details.
2.3 To remove a memory card:
Make sure the camera is turned off. Press lightly on
the edge of the memory card and it will eject.
Note
Note
To prevent valuable data from being accidentally erased from an SD memory card you
•
can slide the write protect tab (on the side of the SD memory card) to “LOCK”.
• To save, edit, or erase data on an SD memory card, you must unlock the card.
Preparing Your DC E300 for Use6
Page 11
BenQ DC 5530 User’s Manual
2.4 Attaching the Hand Strap:
To prevent accidental dropping of the camera, always
use the strap.
2.5 Turning the Power On/Off
The camera is switched between On/Off as follows:
1. You can use the POWER button to power on/off
the camera.
• Open the lens cover before you start taking
pictures/recording video clips.
• When the power is turned on, the camera will
start in the mode.
Note
If the camera goes unused for a certain period of time while the camera is powered on,
•
the camera will switch to an idle mode, and eventually turn itself off to conserve power.
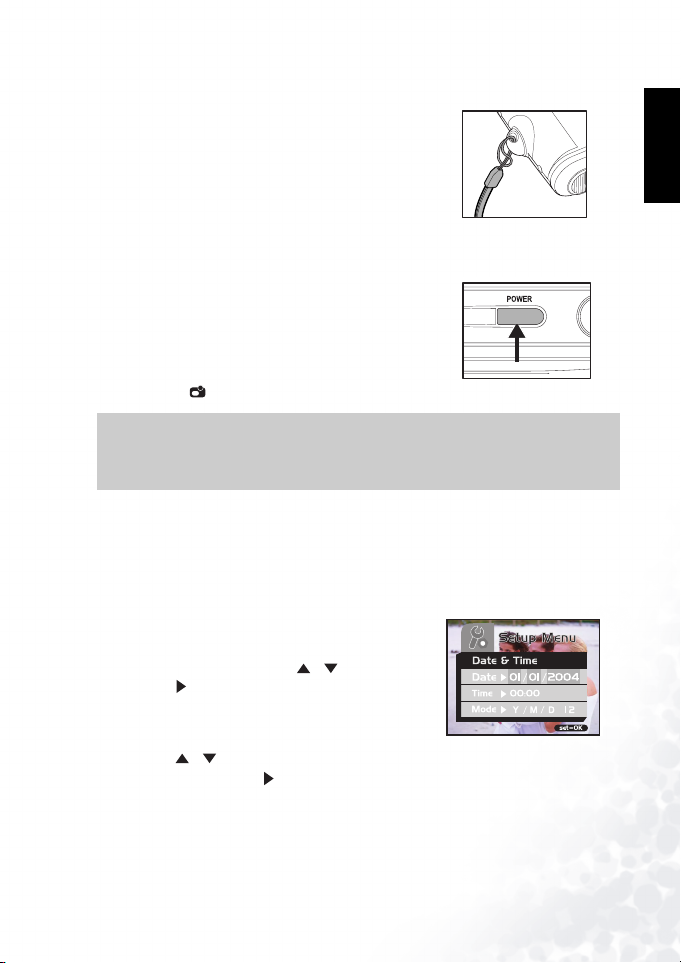
2.6 Setting the Date and Time
The Date & Time screen will be presented if/when:
• Camera is turned on for the first time.
• Camera is turned on after leaving the camera without batteries for an extended period of
time.
When the D ate & Time s creen appea rs, f ollow these step s
to set the correct date and time.
1. Select the setting item with the / buttons and
press the button.
• [Date]: Set the date.
• [Time]: Set the time.
• [Mode]: Set the date and time format.
2. Press the / buttons to change the value and press the SET button to confirm.
• [Date]/[Time]: Press the button to select the field item.
3. Toggle the SET button to return to the main menu.
English
Preparing Your DC E300 for Use 7
Page 12

BenQ DC 5530 User’s Manual
2.7 Setting Image Resolution and Quality
Resolution and quality settings determine the pixel size (dimension), image file size, and
compression ratio for your images. These settings affect the number of images that can be
stored in memory, or on a memory card. As you get to know the camera, it is recommended
English
that you try each quality and resolution setting to get an appreciation for the effects that these
settings will have on your images.
Higher resolution and higher quality images offer the best photographic results but produce
large files sizes. Therefore, few images will take up a lot of memory space.
High resolution and quality settings are recommended for
printed output and situations requiring the finest detail.
Lower resolution/quality images take up less memory
space and may be quite suitable for sharing images via email, in a report, or on a web page.
To change image resolution or image quality, perform
these steps below:
1. Toggle the MODE button to , and press the SET
button.
2. Press the MENU button.
3. Select [Resolution]/[Quality] using the /
buttons and press the button.
4. Use the / buttons to select the setting that you
desire, and press the SET button.
• Toggle the button to exit from the menu mode.
Preparing Your DC E300 for Use8
Page 13

BenQ DC 5530 User’s Manual
3 CAMERA OPERATING MODE
This chapter describes the camera operating modes, and explains how to take pictures, record
movie clips and play back photos, movies.
3.1 Record Mode
3.1.1 Taking Images
Your camera is equipped with a 1.5” LCD monitor to
compose images. Before you start taking pictures, be sure
that the lens cover is opened and the focus switch is set
to the appropriate photography mode.
1. Open the lens cover.
2. Set the focus switch to .
3. Toggle the MODE button to , and press the SET
button.
4. Compose your shot on the display screen.
5. Place the subject of your photo at the center and press the shutter button.
Note
The LCD display darkens in strong sunlight or bright light. This is not a malfunction.
•
• For a close-up photography, set the focus switch to . The flash mode is automatically
set to .
• To review the last recorded image, press the button. Press the button again to
return to the record mode.
3.1.2 Digital Zoom
Using digital zoom, images appear closer. Digital
processing lets you zoom in the image without
deterioration.
1. Toggle the MODE button to , and press the SET
button.
2. Compose your picture while viewing the LCD
monitor.
3. Press the button to activate the digital zoom.
English
Camera Operating Mode 9
Page 14

BenQ DC 5530 User’s Manual
• Toggle the button to magnify up to 4x.
4. Press the shutter button to capture a “zoomed” image.
English
Digital zoom is only available at the resolution of 2912 x 2184 and 2032 x 1520 pixels.
•
3.1.3 Self-Timer
The self-timer duration is ten seconds. Activate the self-timer by pressing the shutter button.
The self-timer LED blinks slowly for seven seconds and then blinks rapidly for the last three
seconds. This allows you to get into the scene when taking group images.
1. Secure the camera to a tripod or place it on a stable
surface.
2. Toggle the MODE button to , and press the SET
button.
3. Press the MENU button.
4. Select [Self Timer] using the / buttons and
press the button.
5. Use the / buttons to select [Ye s], and press
the SET button.
• Toggle the button to exit from the menu mode.
6. Press the shutter button.
• The self-timer function is activated.
• To cancel the self-timer at any time, press the shutter button to disrupt the sequence.
Note
Note
After an image is taken using self-timer, the self-timer mode is turned off.
•
• If you wish to take another image using the self-timer, repeat these steps.
3.1.4 Flash
The flash is designed to function automatically when lighting conditions warrant the use of
flash. When you are in Normal mode (the focus switch is set to ), you can take an image
using a flash mode suitable to your circumstances.
Camera Operating Mode10
Page 15

BenQ DC 5530 User’s Manual
1. Toggle the MODE button to , and press the SET
button.
2. Press the button repeatedly until the desired
flash mode appears.
: Auto flash.
The flash fires automatically according to the
ambient lighting conditions. Select this mode for
general flash photography.
: Flash off.
The flash will not fire. Select this mode when taking images in a place where flash
photography is prohibited, or when the distance to the subject is beyond the effective
range of the flash.
3. Compose the image and press the shutter button..
Note
If you will not be using the flash, turn it off. Turning the flash OFF will result in faster
•
camera startup and faster operation because the capacitor will not be charged needlessly.
Turning the flash OFF when not needed, will also improve battery life.
3.2 Playback Mode
In the mode, you can view, magnify, delete images, play video clips, or run a slide show.
Playback mode also provides a thumbnail image display, allowing you to quickly search for the
image you want.
3.2.1 Viewing Images
When you take a still image or movie, it is immediately stored in internal memory or on an SD
memory card. Still images and movie in internal memory or on an SD memory card can be
displayed on the LCD monitor.
To view still images, follow the steps below:
1. Toggle the MODE button to , and press the SET
button.
• The last still image taken is displayed.
• For movies, the first frame is displayed as a still
image.
2. Move to the still image you want to view using thethe
/ buttons.
English
Camera Operating Mode 11
Page 16

BenQ DC 5530 User’s Manual
• If you press the button, you can view the next still image or movie.
• If you press the button, you can view the previous still image or movie.
• To cancel the self-timer at any time, press the shutter button to disrupt the sequence.
English
Images are played back from the following recording media:
•
* When no memory card is loaded, it plays back from internal memory.
* When an SD memory card is loaded, it plays back from SD memory card.
• If there are no images stored in memory, the ìNo imageî message will appear on the LCD
monitor.
3.2.2 Zoom Playback
While reviewing your images, you may enlarge a selected portion of an image. This
magnification allows you to view fine details.
To view still images, follow the steps below:
1. Toggle the MODE button to , and press the SET
button.
2. Select the image that you want to view using the /
buttons and press the SET button.
3. Activate the digital zoom feature using the
button.
• Enlarge the image by toggling the SET button.
• To view the different portion of the enlarged image,
press the / / / buttons.
Note
3.2.3 Displaying Thumbnail Images
This function allows you to view as many as nine thumbnail images on the LCD monitor
simultaneously so you may search for a particular image.
Camera Operating Mode12
Page 17

BenQ DC 5530 User’s Manual
To view still images, follow the steps below:
1. Toggle the MODE button to , and press the SET
button.
2. Press the button.
• Nine thumbnail images appear on the LCD monitor
(Assuming there are nine or more images in
memory).
3. To view a full-size image, selecting it using the
/ / / buttons, and then press the SET
button and the selected image will be displayed in the full LCD frame.
3.2.4 Slideshow Display
The slideshow function enables you to playback your images back automatically in sequential
order as a slide show. This is a very useful and entertaining feature for reviewing recorded
images and for presentations.
To view still images, follow the steps below:
1. Toggle the MODE button to , and press the SET
button.
2. Press the MENU button and move to [Slide Show]
using the / buttons.
3. Press the button.
4. Set the playback interval using the / buttons
and press the SET button.
• The slideshow starts, displaying your images on the
LCD monitor, one by one, at the set interval.
• To stop the slideshow display, press any button. Until stopped, the slideshow will repeat
itself.
English
Note
You can adjust the slideshow display interval from [1 sec], [3 sec], [6 sec] or [10 sec].
•
• If you wish to exit from the [Slide Show] menu, select [Exit] on the menu setting
options.
3.2.5 Deleting Images
You can easily delete still images and video clips that have not come out right. The following
are the 4 ways to delete photos:
Camera Operating Mode 13
Page 18

BenQ DC 5530 User’s Manual
• One shot at a time
* Using the button.
* Using the [Delete] menu.
• All frames at once
English
To delete one image or movie (Quick Delete- mode):
1. Toggle the MODE button to , and press the SET
button.
2. To delete the last recorded image/movie, press the
button.
3. Press the SET button.
4. When the delete message appears, select [Yes] using
the / buttons and then press the SET button.
• If you wish to cancel the deletion, select [No].
• It returns to the preview screen.
To delete one image or movie (Quick Delete- mode):
1. Toggle the MODE button to , and press the SET
button.
2. Select the image/video clip you wish to delete using
the / buttons.
3. Press the SET button.
4. To delete this current image, press the button.
5. When the delete message appears, select [Yes] using
the / buttons and then press the SET button.
• If you wish to cancel the deletion, select [No].
Camera Operating Mode14
Page 19

BenQ DC 5530 User’s Manual
To delete one image/movie (Delete menu):
1. Toggle the MODE button to , and press the SET
button.
2. Select the image/video clip you wish to delete using
the / buttons.
3. Press the MENU button.
4. Select [Delete] using the / buttons and press
the button.
5. Select [This Image] using the / buttons and
press the SET button.
6. To confirm the deletion on the selected image, select [Yes] using the / buttons and
press the SET button.
• The next image/video clip appears.
To delete all images or movies (at once):
1. Toggle the MODE button to , and press the SET
button.
2. Press the MENU button.
3. Select [Delete] using the / buttons and press
the button.
4. Select [All Images] using the / buttons and
press the SET button.
5. To confirm the deletion on the selected image, select
[Yes] using the / buttons and press the SET button.
• The message “No image” appears on the LCD monitor.
English
Note
To delete images or videos stored in internal memory, do not insert a memory card into
•
the camera. Otherwise, you will delete the images or video clips stored on the memory
card.
Camera Operating Mode 15
Page 20

BenQ DC 5530 User’s Manual
3.2.6 Formatting Media
This utility formats the internal memory (or memory card) and erases all stored images and
data.
1. Toggle the MODE button to , and press the
English
SET button.
2. Press the MENU button.
3. Select [Delete] using the / buttons and press
the button.
4. Select [Format] using the / buttons and press
the SET button.
5. To format the memory card/internal memory, select
[Yes] and press the SET button.
• The message “No image” appears on the LCD monitor.
Formatting is an irreversible action and data cannot be recovered at a later time.
•
• To format the internal memory, do not insert a memory card into the camera.
Otherwise, you will format the memory card.
3.2.7 Copying the Contents of Internal Memory to a Memory Card
Th is fe at ur e a ll ow s yo u t o c op y yo ur im ag es fr om th e c am er a’s i nt er na l m em or y t o a n S D
memory card. Of course, you can only do this if you have an SD memory card installed and
some images in internal memory.
To copy still images and movies from internal memory to SD memory card, follow the steps
below:
1. Be sure the camera power is off and insert the SD
memory card.
2. Turn the camera on.
3. Toggle the MODE button to , and press the SET
button.
4. Press the MENU button.
5. Select [Card Copy] using the / buttons and
press the button.
6. To proceed with the copying process, select [Yes]
using the / buttons and press the SET button.
• The display indicates copying is in progress; once finished, you return to the playback
screen.
Note
Camera Operating Mode16
Page 21

BenQ DC 5530 User’s Manual
Note
It is not possible to copy from SD memory card to internal memory.
•
3.2.8 Changing the Camera Startup Logo
You can specify the start up logo for your camera. You can select the new logo among the taken
still images.
To activate the new startup logo, follow the steps below:
1. Toggle the MODE button to , and press the SET
button.
2. Display the still image you want to specify using the
/ buttons.
3. Press the MENU button.
4. Select [Save As Logo] using the / buttons and
press the button.
5. To set the new logo, select [Yes] using the /
buttons and press the SET button.
• Toggle the button to exit from the menu mode.
• This new logo will be activated on the next time you turn on the camera.
3.2.9 Setting the DPOF
DPOF is a standard for recording printing information directly on the SD memory cards and
other media. Files saved in the DPOF format can be printed using compatible printers or
through a laboratory printing device.
To set the DPOF setting on a still image:
English
Camera Operating Mode 17
Page 22

BenQ DC 5530 User’s Manual
1. Toggle the MODE button to , and press the SET
button.
2. Press the MENU button.
3. Select [DPOF] using the / buttons and press
the button.
English
4. Select [Single] using the / buttons and press
the SET button.
5. Select the desired field item using the / buttons
and press the SET button.
• [Quantity]: Allow you to select the image quantity
• [Set Image]: Allow you to select another desired still
• [Exit]: Allow you to exit from the menu mode.
To set the DPOF setting on all still images (at once):
1. Toggle the MODE button to , and press the SET
button.
2. Press the MENU button.
3. Select [DPOF] using the / buttons and press
the button.
4. Select [All] using the / buttons and press the
SET button.
5. To confirm the setting, use the / buttons to
select [Yes] and press the SET button. (Quantity=1)
(0~9). Use the / buttons to select
the desired image quantity.
image you want to specify using the
/ buttons.
Press the SET button to exit from menu
mode.
Note
This function can be used only on still image files that are saved on memory cards.
•
Camera Operating Mode18
Page 23

BenQ DC 5530 User’s Manual
3.3 MOVIE MODE
3.3.1 Recording Video Clips
The movie mode allows you to record video clips at a resolution of 320 x 240 pixels.
To view still images, follow the steps below:
1. Open the lens cover.
2. Toggle the MODE button to , and press the SET button.
3. To start recording a video clip, press the shutter button.
• Shooting continues until you press the shutter button again.
4. Pressing the shutter button again stops recording.
Note
Flash/self-timer cannot be used.
•
3.3.2 Viewing Video Clips
To view a recorded video clip, follow these steps:
1. Toggle the MODE button to , and press the SET button.
2. Move to the movie you want to see using the / buttons.
3. Press the shutter button.
• Playback begins.
• The elapsed playback indicator or the elapsed time is displayed on the LCD monitor.
• Press the shutter button again to stop the playback. (To pause/resume: press the
button.)
English
Note
•
The zoom function cannot be activated during movie playback.
• To play the video clip back on your computer, you may use either Windows Media
Player or Apple “QuickTime Player”.
• QuickTime basic player is available free of charge, compatible with both Mac- and
Windows- computers and can be download from the Apple web site at www.apple.com
For help using QuickTime Player usage, please refer to the QuickTime on-line help for
more information.
.
Camera Operating Mode 19
Page 24

BenQ DC 5530 User’s Manual
4 MENU OPTIONS
4.1 The Basic of the Menu Operation
• To display the menu:
English
1. Toggle the MODE button to / / / .
2. Press the SET button.
• On the mode, the menu appears. Skip Step 3.
3. Press the MENU button.
• The menu appears.
• To select an item:
1. Press the / buttons to select the desired item.
2. Press the button to enter the field menu.
• To select a setting value:
1. Press the / buttons to select the desired setting.
2. Press the SET button to confirm the selection.
3. Toggle the button to exit from the menu mode.
• To implement a confirmation screen:
1. Press the / buttons to select [Yes].
2. Press the SET button.
3. Toggle the button to exit from the menu mode.
4.2 OSD Menus
To display the related menu options, press the MENU button.
4.2.1 Record Menu
MENU Options20
Page 25

BenQ DC 5530 User’s Manual
Setting Description Option
Resolut ion
Quality
Exposure Your camera adjusts the exposure of each scene
WB (White
Balance)
Self Timer This feature gives you an option whether to enable/disable
Sets the image resolution. Refer to section in this manual
titled “Setting Image Resolution and Quality” for further
details.
Sets the image quality. Refer to
section in this manual titled “Setting Image Resolution and
Quality” for further details.
automatically. However,
if the subject is very dark, or very bright, you may override
the camera’s
automatic exposure determination to
make the subject brighter or darker.
This is called EV compensation.
Examples of Exposure Compensation:
• Posi tive (+) Com pensa tion
*Imaging printed text (black characters on white paper)
*Portraiture with back lighting
*Very bright scenes (such as snow) and highly reflective
subjects
*Shots made up predominantly of sky
• Negative (-) Compensation
*Spot lighted subjects, particularly ag ainst dark
backgrounds
*Imaging of printed text (white characters on black paper)
*Scenes with low reflectivity, such as shots of g reen or dark
foliage
Your camera adjusts the white balance of each scene
automatically. However, the images that your camera
captures will appear different under different lighting
conditions (sun, shade, fluorescent,tungsten lights).
Unlike your eyes, which can easily adjust to different
lighting conditions (lighting temperatures), a digital
camera cannot always diff erentiate between lighting types.
Under some lighting conditions the image may appear in
strange shades. If that occurs you may change the white
balance setting by specifying a lighting condition
(temperature) most appropriate for your scene.
the self-timer function.
-1.5EV~+1.5EV
A Auto
Ye s
No
English
2032 x 1520
1600 x 1200
1280 x 960
640 x 480
Super fine
Fine
Normal
Daylight
Cloudy
Tungsten
Fluorescent
MENU Options 21
Page 26

BenQ DC 5530 User’s Manual
4.2.2 Movie Menu
English
Setting Description Option
Exposure Refer to section in this manual titled “Exposure” in the
WB (White
Balance)
4.2.3 Playback Menu
Setting Description Option
Delete
Card Copy Refer to section in this manual t itled “Copying the
Slide Show
DPOF Refer to section in this manual titled “Setting the DPOF”
Save As Logo Refer to section in this manual titled “Changing the
Record Menu for further details.
Refer to section in this manual titled “WB” in the Record
Menu for further details.
Refer to section in this manual titled “Deleting
Images/Formatting Media” for further details.
Contents of Internal Memory to a Memory Card” for
further details.
Refer to section in this manual titled “Slideshow Display”
for further details.
for further details.
Camera StartupLogo” for further details.
-1.5EV~+1.5EV
A Auto
Daylight
Cloudy
Tungsten
Fluorescent
This Image
All Images
Format
Exit
Ye s
No
1 Sec
3 Sec
6 Sec
10 Sec
Exit
Single
All
Ye s
No
MENU Options22
Page 27

BenQ DC 5530 User’s Manual
4.2.4 Setup Menu
Setting Description Option
Date & Time Refer to section in this manual titled “Setting the Date and
Beeper The camera produces a sound (beep) each time you press a
Language
Power Off (Auto
Power Off)
Reset This feature gives you an option whether to restore all
Frequency This camera supports different lighting frequencies: 50 Hz
Time” for further details.
camera button, if this function is enabled.
This option allows you to select the language for the menus
and the text display on the LCD monitor.
If there is no camera activity (no buttons are pressed) for a
defined period of time (3 minutes) while the camera is
powered on, the camera will switch to an idle mode, and
eventually turn itsel f off to conserve power. If the camera is
idle, re-activate the camera by pressing any button or
switch the mode dial. If the camera has powered off you
must to turn the camera on again by pressing the POWER
button.
camera settings to their original status or not.
and 60 Hz. When photographing under fluorescent
lighting, select the correct frequency setting depending in
your local area’s voltage. This function is only effective if
you set the White Balance to (Fluorescent) setting.
--
On
Off
English/French/
German/Spanish/
Italian/Traditional
Chinese/Simplified
Chinese
1 Min
3 Min
5 Min
10 Min
Cancel
Ye s
No
50 Hz
60 Hz
English
MENU Options 23
Page 28

BenQ DC 5530 User’s Manual
5 CONNECTING TO A COMPUTER
Connecting the DC E300 to your computer enables you to perform the following functions:
• upload photos, movie clips, and sound clips to your computer for storage and organization
English
Before connecting to a computer running Microsoft Windows 98SE, you must first install the
software that is included on the software installation CD-ROM that came with the DC E300.
5.1 Installing the Digital Camera Software
• It's recommended that you set up the driver and software before connecting the digital
camera to your PC. Normally, a software installation menu appears automatically after this
installation CD is inserted into your CD-ROM drive. If the menu does not appear, browse
the CD with Windows Explorer, find a program file named “Autorun.exe” in the root
directory and double-click it. The setup menu appears.
• Click each item to install the software program of your choice.
To browse the content of this CD and install software manually, refer to the descriptions of the
CD content in the next section.
Connecting to a Computer24
Page 29

BenQ DC 5530 User’s Manual
5.2 Bundled Software
The software installation CD-ROM included with the DC E300 includes the following
software. Please refer to the software’s help or electronic user manual for instructions.
Software Description
1. DC E300 Driver (Win 98SE) For Win 98SE only. If your operation system is Windows
2. Ulead Photo Express Ulead® Photo Express is a complete photo project software
3. Ulead Photo Explorer Ulead® Photo Explorer provides an efficient way to transfer,
4. Microsoft DirectX Microsoft DirectX, an all-in-one and closs-platform media
5. Microsoft NetMeeting You can use your camera with NetMeeting for remote video
6. Acrobat reader Adobe Acrobat Reader, it's a "must have" utility to read files
7. Electronic User's manual Allows you to view the user’s manual on-line.
98SE, please setup the DC E300 driver first. If the operation
system is Windows ME/2000/XP, then it's not necessary for
you to setup driver in advance.
for digital images. Acquire photos
effortlessly from digital cameras or scanners. Edit and
enhance images using easy-to-use editing tools and cool
photographic filters and effects. Assemble creative photo
projects and share results via e-mail and multiple print
options.
browse, modify and distribute digital media. It is the all-inone tool for owners of digital cameras, WebCams, DV
camcorders, scanners or anyone who strives to effectively
handle digital media.
tool.
conferencing.
in the popular cross-platform file format "PDF".
English
Connecting to a Computer 25
Page 30

BenQ DC 5530 User’s Manual
5.3 Transferring Files To/From a Computer
This section explains how to transfer images, movies between your camera and a PC using
Windows XP/ME/2000/98SE.
English
5.3.1 Transferring Photos and Movie Clips
This section shows you how to use the Windows Explorer utility to manipulate files between
your camera and a PC.
1. Tu rn o n the co mp ute r.
2. Turn on the camera.
3. Select [Disk Drive] using the / buttons and press the
SET button.
4. Connect the camera to the PC with the included USB cable.
Ensure that the connection is secure.
5. A new disk appears in Windows Explorer labelled
“Removable Disk.” (See note below).
6. Stored photos and movie clips can be found in the directory
“Removable Disk\DCIM\100CAMEA”.
Copy, view, delete, and move images, movie clips using standard
drag and drop Windows Explorer commands.
Note
Photo files have the suffix “.jpg”
•
• Movie clips have the suffix “.mpg”
• Refer to your computer’s Help for information on viewing or playing multimedia files on
your computer.
Note
When transferring images to the computer, there is no need to install any batteries into
•
the camera. The camera will automatically power on when connected to the computer
via USB cable.
Connecting to a Computer26
Page 31

BenQ DC 5530 User’s Manual
5.4 USING THE CAMERA AS A PC CAMERA
Your camera can act as a PC camera, which allows you to videoconference with business
associates, or have a real-time conversation with friends or family.
To use the camera as a PC camera, follow these steps:
Step 1: Install the PC camera driver (it is combined with the USB mass-storage driver on the
CD-ROM)
Step 2: Connecting the camera to your computer
Step 3: Running your application software (i.e. Windows NetMeeting)
Note
Video conferencing (or video editing) software is not included with the camera.
•
• This mode is not supported for Mac.
General System Requirements for Videoconferencing
To use the camera for videoconferencing, your computer system must include:
•Microphone
•Sound card
• Speakers or headphones
• Network or Internet connection
Step 1: Install the PC Camera Driver
The PC-camera driver included on the CD-ROM is exclusively for Windows. The PC camera
function is not supported for Mac platforms.
1. Insert the CD-ROM that came with the camera into your CD-ROM drive. The welcome
screen appears.
2. Click “INSTALL USB DRIVER”. Follow the on-screen instructions to complete the
installation. After the driver installation is completed, restart your computer.
Note
The USB driver that bundled inside the CD-ROM is designed in a form 2 in 1 (USB & PC
•
camera driver).
A. On Windows 98, the Windows OS will install both USB mass-storage & PC camera
drivers.
B. On Windows 2000/ME/XP, it will only install PC camera driver.
English
Connecting to a Computer 27
Page 32

BenQ DC 5530 User’s Manual
Step 2: Connecting the Camera to Your Computer
1. Connect one end of the USB cable to an available USB port
on your computer.
2. Connect the other end of the USB cable to the USB
English
connector on the camera.
3. Select [PC Cam] using the / buttons and press the
SET button.
4. Position the camera steadily on top of your computer
monitor or use a tripod.
When using camera as a PC camera, there is no need to install any batteries into the
•
camera. The camera will automatically power on when connected to the computer via
USB cable.
Step 3: Running Your Application Software (i.e. Windows NetMeeting)
To use Windows NetMeeting for videoconferencing:
1. Go to Start -->Programs -->Accessories -->Communications -->NetMeeting to launch
the NetMeeting program.
2. Click the Start Video button to view live video.
3. Click the Place Call button.
4. Type the e-mail address or the network address of the computer that you are calling.
5. Click Call. The person that you are calling must also have Windows NetMeeting running
and be willing accept your call to start the videoconference.
The video resolution for videoconferencing applications is generally 320 x 240.
•
• For more information about the operation of videoconference application software, refer
to its respective help documentation.
Note
Note
Connecting to a Computer28
Page 33

BenQ DC 5530 User’s Manual
6 TROUBLESHOOTING
Symptoms Causes Solutions
The power won’t turn
on.
The power turns off
during use.
The battery power is
being used up too
quickly.
The camera does not
take pictures when the
shutter button is
pressed.
The close-up image is
blurred.
The flash does not fire. • The camera flash is turned off.
There is something
wrong with the color
of the captured image.
The picture is too
bright or too dark.
The LCD screen is not
clear.
The camera cannot
download images to
the PC.
• The battery is out of power.
• The USB cable is not properly
connected to the camera or PC.
• The battery is out of power.
• Power Saving mode is enabled.
• The battery cover is opened when in
use.
• The external temperature is too
cold.
• The battery is not used for a long
time.
• The camera is not in Capture Mode.
• The battery is weak.
• The power has not been switched
on.
• Select the correct focus range. • If the subject is within 40 to 60 cm,
• The light source is sufficient.
• The flash is not fully charged.
• White balance is not set properly. • Set the white balance to Auto mode
• There is excessive or inadequate
exposure.
• The LCD screen plastic cover is
dirty.
• The LCD screen has hot spots.
• The cable is not connected properly.
• The camera is off.
• OS is not Windows 98SE
/2000/ME/XP or the PC is not
equipped with a USB port.
• USB driver is not installed
(Windows 98SE only).
• First turn on the PC, then connect
the camera and PC with the USB
cable.
• Switch on the power.
• Do not open the battery cover when
the camera is in use.
• Keep the camera away from extreme
temperatures.
• Set the Mode switch to Capture
mode.
• Replace the battery.
• Switch on the power.
select Macro mode.
• Set the flash mode to Auto Flash
mode.
• Wait for the flash to fully charge.
or other suitable mode.
• Reset EV bias value.
• Clean the LCD screen with a soft
cloth.
• Hot spots are normal and do not
affect the camera’s functionality.
• Check the cable conne ction.
• Turn on the power.
• Install Windows 98SE/2000/ME/XP
and USB port.
• Install the USB Driver (Windows
98SE only).
English
Troubleshooting 29
Page 34

BenQ DC 5530 User’s Manual
7 SPECIFICATIONS
Item Description
Image Sensor Approx. 3.0 Mega pixels
English
Lens Focal length: f = 8.65mm
Digital Zoom Digital: 4X
LCD Monitor 1.5-inch color TFT LCD
Focus Range Normal: 1.6m to infinity
Exposure Automatic exposure with manual EV Compensationcompensation + /-
File standards JPEG, EXIF 2.2, DPOF 1.0, DCF 1.0, MPEG-1
White Balance Automatic with presets for Cloudy, Daylight, Tungsten, Fluorescent
Capture modes Still Image, Video (mov ie) recording
Self-Timer 10-second delay
File Format JPEG, MPEG-1-for video clip
Movie Mo de Size: 320x240
Image size 2032 x 1520 pixels, 1600 x 1200 pixels
Storage Type 16MB internal memory (14MB available for image storage)
Interface USB connector
Power Source 2 AAA Alkaline (1.5V) or Ni-MH (2.0V) batteries
Dimensions (WxHxD) 89.5 x 56 x 24 mm (W x H x D) (exclusive of protruding features)
Weight Approx. 82g (without batteries and memory card)
CD-ROM Contents DC E300 Driver
F-number: 3.0
Macro: 0.4m to 0.6m
1.5EV in 0.3EV steps
1280 x 960 pixels, 640 x 480 pixels
SD memory card (optional, up to 512MB capacity)
Ulead Photo Express
Ulead Photo Explorer
Adobe Arcobat Reader
Microsoft DirectX
Microsoft NetMeeting
User’s Manual
System Requirments
FOR WINDOWS * Pentium 166Mhz or higher CPU * 64MB RAM
* 128MB free hard disk space * CD-ROM drive
* Windows XP/ME/2000/98SE * Available USB port
Specifications30
Page 35

BenQ DC 5530 User’s Manual
8 SERVICE INFORMATION
If you encountered problems using DC E30 and the camera driver program, please visit the
following website for technical support, answers to frequently asked questions and download
services:
http://support.BenQ.com
For free driver program updates, product information and news release, please visit the
following web address:
http://www.BenQ.com
English
Service Information 31
 Loading...