

Page 1
ROTATING BELGIAN
WAFFLE MAKER
APPAREIL À GAUFRES
BELGES ROTATIF
WAFLERA GIRATORIA
BELGA REVESTIDA
Instruction Manual
Recipe Guide
Manuel d’instructions
Guide de recettes
Manual de instrucciones
Guía de recetas
Register your product and get support at:
Pour vous inscrire et obtenir l’aide de votre produit:
Para registrar y obtener asistencia de su producto ir:
www.bellahousewares.com
Page 2

Page 3

Table Of Contents
Important Safeguards . . . . . . . . . . . . . . . . . . . . . . . . . . . . . . . . . . . . . . . . . . . . . . . . 4
Additional Important Safeguards . . . . . . . . . . . . . . . . . . . . . . . . . . . . . . . . . . . . . . . . . . 5
Notes On The Plug . . . . . . . . . . . . . . . . . . . . . . . . . . . . . . . . . . . . . . . . . . . . . . . . . . 5
Notes On The Cord . . . . . . . . . . . . . . . . . . . . . . . . . . . . . . . . . . . . . . . . . . . . . . . . . . 5
Plasticizer Warning . . . . . . . . . . . . . . . . . . . . . . . . . . . . . . . . . . . . . . . . . . . . . . . . . . 5
Electric Power . . . . . . . . . . . . . . . . . . . . . . . . . . . . . . . . . . . . . . . . . . . . . . . . . . . .5
Getting To Know Your Wafe Maker . . . . . . . . . . . . . . . . . . . . . . . . . . . . . . . . . . . . . . . . 6
Before Using For The First Time . . . . . . . . . . . . . . . . . . . . . . . . . . . . . . . . . . . . . . . . . . 6
Using Your Wafe Maker . . . . . . . . . . . . . . . . . . . . . . . . . . . . . . . . . . . . . . . . . . . . . . 6
Locking And Unlocking Your Wafe Maker . . . . . . . . . . . . . . . . . . . . . . . . . . . . . . . . . . . .7
Tips For Perfectly Baked Wafes . . . . . . . . . . . . . . . . . . . . . . . . . . . . . . . . . . . . . . . . . . 7
Cleaning And Maintenance . . . . . . . . . . . . . . . . . . . . . . . . . . . . . . . . . . . . . . . . . . . . . 7
Recipes . . . . . . . . . . . . . . . . . . . . . . . . . . . . . . . . . . . . . . . . . . . . . . . . . . . . . . . . 8
Warranty . . . . . . . . . . . . . . . . . . . . . . . . . . . . . . . . . . . . . . . . . . . . . . . . . . . . . . . 9
Table Des Matières
Consignes De Sécurité Importantes . . . . . . . . . . . . . . . . . . . . . . . . . . . . . . . . . . . . . . . 10
Autres Consignes De Sécurité Importantes . . . . . . . . . . . . . . . . . . . . . . . . . . . . . . . . . . . 11
Notes Sur La Fiche . . . . . . . . . . . . . . . . . . . . . . . . . . . . . . . . . . . . . . . . . . . . . . . . . 11
Notes Sur Le Cordon . . . . . . . . . . . . . . . . . . . . . . . . . . . . . . . . . . . . . . . . . . . . . . . . 11
Avertissement De Migration De Plastiants . . . . . . . . . . . . . . . . . . . . . . . . . . . . . . . . . . . 11
Alimentation Électrique . . . . . . . . . . . . . . . . . . . . . . . . . . . . . . . . . . . . . . . . . . . . . . 11
Connaître Votre Appareil À Gaufres . . . . . . . . . . . . . . . . . . . . . . . . . . . . . . . . . . . . . . . 12
Avant La Première Utilisation . . . . . . . . . . . . . . . . . . . . . . . . . . . . . . . . . . . . . . . . . . . 12
Utilisation De Votre Appareil À Gaufres . . . . . . . . . . . . . . . . . . . . . . . . . . . . . . . . . . . . . 12
Verrouillage Et Déverrouillage De L’appareil À Gaufres . . . . . . . . . . . . . . . . . . . . . . . . . . . . 13
Conseils Pour Obtenir Des Gaufres Cuites Parfaitement . . . . . . . . . . . . . . . . . . . . . . . . . . . . 13
Nettoyage Et Entretien . . . . . . . . . . . . . . . . . . . . . . . . . . . . . . . . . . . . . . . . . . . . . . . 14
Recettes . . . . . . . . . . . . . . . . . . . . . . . . . . . . . . . . . . . . . . . . . . . . . . . . . . . . . . . 15
Garantie . . . . . . . . . . . . . . . . . . . . . . . . . . . . . . . . . . . . . . . . . . . . . . . . . . . . . . . 16
Índice
Medidas De Seguridad Importantes . . . . . . . . . . . . . . . . . . . . . . . . . . . . . . . . . . . . . . . 17
Otras Medidas De Seguridad Importantes . . . . . . . . . . . . . . . . . . . . . . . . . . . . . . . . . . . . 18
Notas Sobre El Enchufe . . . . . . . . . . . . . . . . . . . . . . . . . . . . . . . . . . . . . . . . . . . . . . 18
Notas Sobre El Cable . . . . . . . . . . . . . . . . . . . . . . . . . . . . . . . . . . . . . . . . . . . . . . . 18
Advertencia Sobre El Plasticante . . . . . . . . . . . . . . . . . . . . . . . . . . . . . . . . . . . . . . . . 18
Energía Eléctrica . . . . . . . . . . . . . . . . . . . . . . . . . . . . . . . . . . . . . . . . . . . . . . . . . . 18
Conozca Su Waera . . . . . . . . . . . . . . . . . . . . . . . . . . . . . . . . . . . . . . . . . . . . . . . . 19
Antes Del Primer Uso . . . . . . . . . . . . . . . . . . . . . . . . . . . . . . . . . . . . . . . . . . . . . . . 19
Para Usar La Waera . . . . . . . . . . . . . . . . . . . . . . . . . . . . . . . . . . . . . . . . . . . . . . . 19
Para Colocar Y Quitar El Seguro De La Waera . . . . . . . . . . . . . . . . . . . . . . . . . . . . . . . . . 20
Consejos Para Obtener Waes Perfectamente Cocidos . . . . . . . . . . . . . . . . . . . . . . . . . . . . . 20
Limpieza Y Mantenimiento . . . . . . . . . . . . . . . . . . . . . . . . . . . . . . . . . . . . . . . . . . . . 21
Recetas . . . . . . . . . . . . . . . . . . . . . . . . . . . . . . . . . . . . . . . . . . . . . . . . . . . . . . . 22
Garantía . . . . . . . . . . . . . . . . . . . . . . . . . . . . . . . . . . . . . . . . . . . . . . . . . . . . . . . 23
Page 4

IMPORTANT SAFEGUARDS
WARNING: When using electrical appliances, basic safety precautions should
always be followed, including the following:
1. READ ALL INSTRUCTIONS BEFORE USING APPLIANCE.
2. Do not touch hot surfaces. Use handles or knobs.
3. To protect against risk of electric shock, do not immerse or partially immerse
the cord, plugs, or the entire unit in water or any other liquid.
4. This appliance is not intended for use by persons (including children) with
reduced physical, sensory or mental capabilities, or lack of experience and
knowledge, unless they have been given supervision or instruction concerning
use of the appliance by a person responsible for their safety.
5. Close supervision is necessary when any appliance is used by or near children.
6. Unplug from wall outlet when not in use and before cleaning.
Allow to cool before cleaning or storing this appliance.
7. Never yank the cord to disconnect the appliance from the outlet.
Instead, grasp the plug and pull to disconnect.
8. Do not operate any appliance with a damaged cord or plug or after
the appliance malfunctions or is dropped or damaged in any manner.
Bring the appliance to a qualied service agent for examination,
repair or electrical/mechanical adjustment to avoid hazard.
9. The use of accessories attachments not recommended by the appliance
manufacturer may cause re, electrical shock or injuries.
10. Do not use outdoors. This is for household only.
11. Do not use for commercial purposes.
12. Do not let the electrical cord hang over the edge of the table or counter,
or touch hot surfaces.
13. Do not allow appliance to come into contact with any materials that
are ammable such as draperies, walls, etc.
14. Do not place on or near a hot gas or electric burner or in a heated oven.
15. Use on a heat-resistant, at level surface only.
16. Extreme caution must be used when moving an appliance containing hot food,
hot water, hot oil or other hot liquids.
17. The cord to this appliance should be plugged into a 120V AC electrical
outlet only.
18. A short power-supply cord is to be provided to reduce the risk resulting
from becoming entangled in or tripping over a longer cord.
19. To disconnect, remove plug from outlet.
20. Always unplug after use. The appliance will remain ON unless unplugged.
21. CAUTION HOT SURFACES: This appliance generates heat during use. Proper
precautions must be taken to prevent the risk of burns, re or other damage to
persons or property.
22. When using this appliance, provide adequate ventilation above and on all sides
for air circulation. Do not allow this appliance to touch curtains, wall coverings,
clothing, dish towels or other ammable materials during use.
23. Do not use appliance for other than intended use.
Use with wall receptacle only.
4
Page 5

FOR HOUSEHOLD USE ONLY
SAVE THESE INSTRUCTIONS
ADDITIONAL IMPORTANT
SAFEGUARDS
CAUTION: This appliance is hot during operation and retains heat for some time
after turning OFF. Always use oven mitts when handling hot materials and allow
metal parts to cool before cleaning. Do not place anything on top of the appliance
while it is operating or while it is hot.
1. All users of this appliance must read and understand this Instruction Manual
before operating or cleaning this appliance.
2. Do not leave this appliance unattended during use.
Notes on the Plug
This appliance has a polarized plug (one blade is wider than the other). To reduce
the risk of electric shock, this plug will t in a polarized outlet only one way. If the
plug does not t fully into the outlet, reverse the plug. If it still does not t, contact a
qualied electrician. Do not modify the plug in any way.
Notes on the Cord
The provided short power-supply cord (or detachable power-supply cord) should
be used to reduce the risk resulting from becoming entangled in or tripping over a
longer cord. Do not use an extension cord with this product. Always plug directly
into a wall outlet/receptacle.
Plasticizer Warning
CAUTION: To prevent Plasticizers from migrating to the nish of the counter top or
table top or other furniture, place NON-PLASTIC coasters or place mats between the
appliance and the nish of the counter top or table top. Failure to do so may cause
the nish to darken; permanent blemishes may occur or stains can appear.
Electric Power
If the electrical circuit is overloaded with other appliances, your appliance may not
operate properly. It should be operated on a separate electrical circuit from other
appliances.
5
Page 6
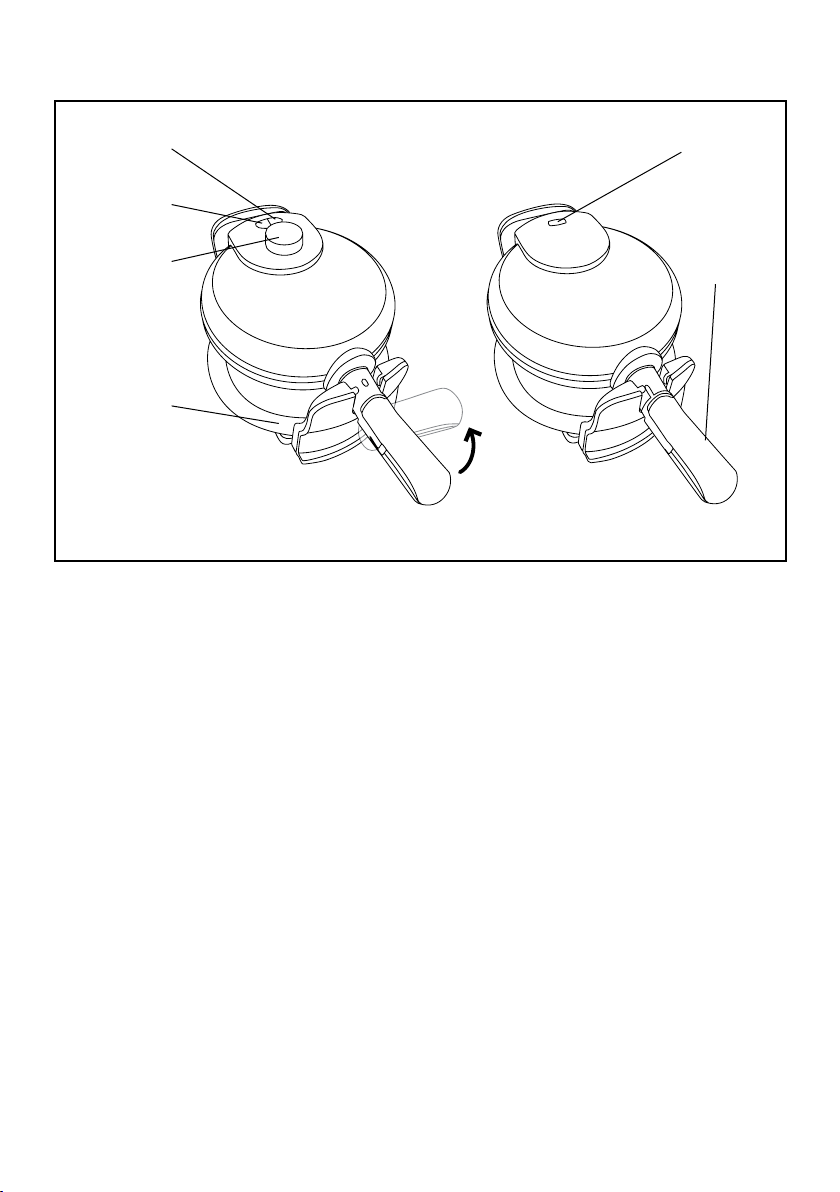
Getting to know your wafe maker
Product may vary slightly from illustration
Green
Ready Light
Red
Power Light
Control Knob
Drip Tray*
* Drip tray included to collect overow of batter and crumbs.
Green
Ready Light
Handle
Before Using For The First Time
• Remove all parts included in the box.
• Wash all the parts thoroughly (refer to Cleaning and Maintenance section for more information).
NOTE: Your Wafe Maker may emit a small amount of smoke and/or odor when you use it for the rst time.
This is normal and harmless, however we recommend that you do not eat the rst wafe you make with the
Wafe Maker.
Using Your Wafe Maker
1. Plug the cord into your 120 V AC wall outlet. The Red Power Light will turn on
indicating the appliance is ready for preheating.
2. Set the Control Knob to your desired setting. The higher your setting, the darker your wafes will be.
Experiment with the setting and different wafe batters to determine your ideal Wafe Maker settings.
NOTE: The Red Power Light will remain on until the appliance is unplugged.
3. The Green Ready Light will turn off and the Wafe Maker will begin to preheat.
The Green Ready Light will turn on when the appliance reaches proper cooking temperature. This should
take approximately 3 to 5 minutes. Once heated, ready times will be faster.
4. When the Green Ready Light turns on, open the Wafe Maker, and apply a light layer of vegetable oil,
olive oil or canola oil to the cooking plates. Pour and spread the wafe batter evenly onto the lower plate
so that the batter lls the lower plate and the peak areas of the plate are covered.
CAUTION: DO NOT USE COOKING SPRAYS. THEY CAN CAUSE A BUILD-UP ON THE COOKING
PLATES AND MAY AFFECT THE NON-STICK PERFORMANCE OF THE PRODUCT.
Close the Wafe Maker and rotate the handle 180º clockwise (right) until it locks for cooking.
5. When the Green Ready Light turns on again, rotate the handle 180º counter-clockwise (left) to unlock
and then carefully open the Wafe Maker.
NOTE: Do not open the wafe maker for at least 1 min 30 seconds. This can cause the under-cooked
wafes to break and they can be difcult to remove from the plates.
6. If the wafes are not dark enough, close the Waf e Maker, rotate to lock, and then wait another 30
seconds. Repeat as needed.
6
Page 7

7. When you are satised with your wafes, use a non-metallic utensil to remove them from
the heating plates.
8. To make more wafes, close the Wafe Maker until the Green Ready Light comes on, then repeat
from step 4.
9. When nished baking wafes, set the heat setting to lowest setting and remove plug from wall outlet.
10. After it has sufciently cooled, the heating plates may be wiped clean.
Locking And Unlocking Your Wafe Maker
Your Wafe Maker is unlocked only when the Control Knob is facing up. You can only open the Wafe Maker
in the unlocked position.
Tips For Perfectly Baked Wafes
1. Stir your wafe bat ter only until large chunks of dry ingredients are dissolved. Over mixing the waf e
batter can cause the wafes to be hard.
2. Set the Control Knob to your desired setting. The higher your setting, the darker your wafes will be.
The color and crispness of the wafes also depends on the bat ter used. Experiment with the setting
and dif ferent wafe batters to determine your ideal Wafe Maker settings
3. The exact amount of batter needed to make perfect full-sized wafes depends on the type and
consistency of the batter. Use the same ladle or measuring cup each time to determine how much
batter you need to ll the lower plate fully so as to cover the peaks in the plate.
4. When making softer variety of waf es, once they are baked, make sure to cut the wafes into halves
or in 4 quarters and suppor t them with a spatula at the bottom so it is easier to take them out from the
plates, since softer wafes can break easily.
5. When making large batches to serve at once, you can keep the wafes fresh & crisp by placing them
in a preheated oven at 200°F. Take them out using oven mitts when you are ready to serve.
6. To avoid wafes with a moist base, kept the wafes on a wire cooling rack. This will retain the
crispness of the wafes.
7. You can reheat your wafes in the wafe maker. Pre-heat the wafe maker on low set ting. Once
preheated, place the wafes on the lower plate so they t the grooves correctly, then close the wafe
maker and heat for 1 to 2 minutes, checking every 30 seconds to avoid burning.
8. You can also freeze your wafes to eat later. After the freshly baked wafes have cooled completely,
pack them in a covered container or plastic freezer bag. Make sure to separate the wafes with a sheet
of wax paper between each wafe. To reheat the frozen wafes, place in a pre-heated oven, toaster
oven or toaster until they are hot.
Cleaning and Maintenance
1. Always turn off the appliance, unplug it, and allow it to cool down before cleaning.
2. You can easily remove any excess oils or crumbs without disassembling the appliance.
3. Never submerge the appliance in water or place it in the dishwasher.
4. Use only plastic or wooden utensils on the heating plates. Metal may damage the plates.
5. Use a sof t cloth on the heating plates and occasionally a metal polish intended for stainless steel on
the outer housing. Never use abrasive scouring pads or steel wool.
6. If there is hardened batter on the plates, pour a little oil and let it sit for about 5-7 minutes. You can
then wipe clean with a paper towel.
7. Do not use the Waf e Maker for anything other than making wafes.
7
Page 8

Recipes
Wafe Base Mix
This easy to make wafe mix can be made in so many ways with only a few ingredients from your pantry.
Try both savory and sweet recipes for a unique way to serve this classic breakfast favorite at anytime
of the day!
• 3 cups all-purpose our
• 2 tbsp. baking powder
1. Mix all ingredients together and store in an airtight container until ready to use.
Classic Buttermilk Wafes
Makes 4 wafes
• 1 1⁄2 cups Classic Wafe Base
• 2 eggs
1. In a mixing bowl, combine all ingredients and whisk until mixture is smooth
and contains no lumps.
2. In preheated wafe iron, ladle in about 1⁄3 cup for each wafe and cook until wafes are
golden brown (about 2-4 minutes).
TIPS:
1. Add 1⁄4 cup of your favorite jam avor to batter before cooking.
2. Layer wafes with fresh fruit, toasted nuts, honey, avored syrups or yogurt
for a delicious breakfast or treat.
Chocolate Chip Wafes
Makes 4 wafes
• 1 1⁄2 cups Classic Wafe Base
• 4 tbsp. melted butter
• 2 eggs
1. In a mixing bowl, combine all ingredients and whisk until mixture is smooth
and contains no lumps.
2. In preheated wafe iron, ladle in about 1⁄3 cup for each wafe and cook until wafes are golden brown
(about 2-4 minutes).
• 1 tsp. salt
• 1⁄2 cup sugar
• 4 tbsp. melted butter
• 1⁄2 cup buttermilk
• 1⁄2 cup buttermilk
• 1⁄4 cup chocolate chips
Blueberry Wafes
Makes 4 wafes
• 1 1⁄2 cups Classic Wafe Base
• 4 tbsp. melted butter
• 2 eggs
1. In a mixing bowl, combine all ingredients and whisk until mixture is smooth
and contains no lumps.
2. In preheated wafe iron, ladle in about 1⁄3 cup for each wafe and cook until wafes are
golden brown (about 3-4 minutes).
• 1⁄2 cup buttermilk
• 1⁄4 cup blueberries
TIP: Top with sliced strawberries for a berry-delicious breakfast!
8
Page 9

Limited ONE-YEAR Warranty
SENSIO Inc. hereby warrants that for a period of ONE YEAR from the date of purchase,
this product will be free from mechanical defects in material and workmanship, and
for 90 days in respect to non-mechanical parts. At its sole discretion, SENSIO Inc. will
either repair or replace the product found to be defective, or issue a refund on the
product during the warranty period.
The warranty is only valid for the original retail purchaser from the date of initial retail
purchase and is not transferable. Keep the original sales receipt, as proof of purchase is
required to obtain warranty validation. Retail stores selling this product do not have the
right to alter, modify, or in any way revise the terms and conditions of the warranty.
EXCLUSIONS:
The warranty does not cover normal wear of parts or damage resulting from any of the
following: negligent use of the product, use of improper voltage or current, improper
routine maintenance, use contrary to the operating instructions, disassembly, repair,
or alteration by anyone other than qualied SENSIO Inc. personnel. Also, the warranty
does not cover Acts of God such as re, oods, hurricanes, or tornadoes.
SENSIO Inc. shall not be liable for any incidental or consequential damages caused
by the breach of any express or implied warranty. Apart from the extent prohibited
by applicable law, any implied warranty of merchantability or tness for a particular
purpose is limited in time to the duration of the warranty. Some states, provinces or
jurisdictions do not allow the exclusion or limitation of incidental or consequential
damages, or limitations on how long an implied warranty lasts, and therefore, the
above exclusions or limitations may not apply to you. The warranty covers specic
legal rights which may vary by state, province and/or jurisdiction.
HOW TO OBTAIN WARRANTY SERVICE:
You must contact Customer Service at our toll-free number: 1-866-832-4843.
A Customer Service Representative will attempt to resolve warranty issues over the
phone. If the Customer Service Representative is unable to resolve the problem, you will
be provided with a case number and asked to return the product to SENSIO Inc. Attach
a tag to the product that includes: your name, address, daytime contact telephone
number, case number, and description of the problem. Also, include a copy of the
original sales receipt. Carefully package the tagged product with the sales receipt,
and send it (with shipping and insurance prepaid) to SENSIO Inc.’s address. SENSIO
Inc. shall bear no responsibility or liability for the returned product while in transit to
SENSIO Inc.’s Customer Service Center.
9
Page 10

CONSIGNES DE SÉCURITÉ
IMPORTANTES
AVERTISSEMENT : Respecter les consignes de sécurité de base au moment
d’utiliser des appareils électriques, y compris les suivantes :
1. LIRE TOUTES LES DIRECTIVES.
2. Ne pas toucher aux surfaces chaudes. Utiliser les poignées ou les boutons.
3. Pour éviter les décharges électriques, ne pas immerger le cordon,
la prise ou l’appareil dans de l’eau ou dans d’autres liquides.
4. Cet appareil n’est pas destiné à être utilisé par des personnes (y compris les
enfants) dont les capacités physiques, sensorielles ou mentales sont limitées
ou qui ne possèdent ni l’expérience ni les compétences nécessaires pour
utiliser l’appareil, à moins qu’elles soient supervisées ou qu’elles aient reçu des
directives d’utilisation adéquates de l’appareil par la personne responsable de
leur sécurité.
5. Une surveillance étroite est nécessaire quand un appareil est utilisé par un
enfant ou près de lui.
6. Débrancher l’appareil de la prise murale lorsqu’il n’est pas utilisé et avant de le
nettoyer. Laisser refroidir l’appareil avant de le nettoyer ou de le ranger.
7. Ne jamais débrancher l’appareil de la prise murale en tirant sur le cordon
d’alimentation. Saisir plutôt la che et la retirer de la prise.
8. Ne pas utiliser un appareil électrique dont le cordon ou la che est endommagé
ni un appareil défectueux ou endommagé d’une quelconque façon. Pour éviter
un incident, l’apporter à un technicien qualié pour le faire examiner, réparer
ou y faire un ajustement électrique ou mécanique.
9. L’usage d’accessoires auxiliaires non recommandés ou vendus par le fabricant
de l’appareil peut provoquer un incendie, un choc électrique ou des blessures
corporelles.
10. Ne pas utiliser à l’extérieur.
11. Ne pas utiliser cet appareil à des ns commerciales.
12. Ne pas laisser le cordon pendre d’un bord de table ou d’un comptoir, ni entrer
en contact avec une surface chaude.
13. Ne pas laisser l’appareil toucher à des matières inammables telles que des
rideaux, murs, etc.
14. Ne pas placer l’appareil sur, ou à proximité, de brûleurs à gaz ou d’éléments
chauffants chauds ou dans un four chaud.
15. Placer l’appareil sur une surface plane résistante à la chaleur uniquement.
16. Déplacer avec grande prudence un appareil contenant des aliments ou des
liquides (eau, huile, etc.) chauds.
17. Le cordon de l’appareil doit être branché uniquement dans une prise
de 120 V c.a.
18. L’appareil doit être pourvu d’un cordon d’alimentation court pour réduire les
risques d’entremêlement ou de trébuchement que pose un cordon long.
19. Pour débrancher l’appareil, retirer la che électrique de la prise murale.
20. Toujours débrancher l’appareil après son utilisation. L’appareil demeure sous
tension tant qu’il est branché.
10
Page 11

21. MISE EN GARDE! SURFACES CHAUDES : Cet appareil dégage de la chaleur et
de la vapeur pendant son fonctionnement. Prendre les précautions nécessaires
pour prévenir les risques de brûlure et autres blessures ainsi que les risques
d’incendie et autres dommages matériels.
22. Pendant l’utilisation, veiller à ce qu’il y ait sufsamment de ventilation
au-dessus de l’appareil et sur tous ses côtés. Pendant l’utilisation, veiller à ce
que l’appareil ne soit pas en contact avec des rideaux, un revêtement mural,
des vêtements, un linge à vaisselle ou toute autre matière inammable.
23. Ne pas utiliser l’appareil pour un usage autre que prévu. Utiliser avec prise
murale seulement.
POUR USAGE DOMESTIQUE
SEULEMENT
CONSERVER CES CONSIGNES
AUTRES CONSIGNES DE
SÉCURITÉ IMPORTANTES
MISE EN GARDE : Cet appareil dégage de la chaleur et de la vapeur pendant
son utilisation. Prendre les précautions nécessaires pour prévenir les risques de
brûlures, d’incendie, de blessures et de dommages matériels.
1. Tous les utilisateurs de cet appareil doivent lire et comprendre le mode
d’emploi avant d’utiliser ou de nettoyer l’appareil.
2. Ne pas laisser l’appareil sans surveillance pendant son fonctionnement.
Notes sur la che
Cet appareil est doté d’une che polarisée (une broche est plus large que l’autre).
Pour réduire le risque de décharge électrique, la che s’insère d’une seule manière
dans une prise polarisée. Si la che ne s’insère pas complètement dans la prise,
la tourner pour l’insérer de l’autre côté. S’il est toujours impossible de l’insérer
complètement dans la prise, communiquer avec un électricien qualié. Ne jamais
modier la che de quelque façon que ce soit.
Notes sur le cordon
Le cordon court fourni (ou cordon amovible) devrait être utilisé an de réduire
le risque provoqué par un enchevêtrement ou une chute dus à un cordon
d’alimentation plus long. Ne pas utiliser de rallonge avec ce produit.
Toujours brancher directement à une prise murale.
Avertissement de migration de plastiants
MISE EN GARDE : An d’éviter la migration de plastiants vers le ni de comptoirs,
de tables ou de tout autre meuble, placer des sous-verres fait de matière non
plastique ou des napperons entre l’appareil et la surface du comptoir ou de la table.
Si cette consigne n’est pas respectée, le ni du comptoir ou de la table noircira et
s’en suivront des ternissures permanentes ou des tâches indélébiles.
Alimentation Électrique
Si le circuit électrique est surchargé parce qu’il doit alimenter d’autres appareils
en plus du nouvel appareil, ce dernier ne fonctionnera pas correctement. Il est
conseillé de faire fonctionner l’appareil sur un circuit électrique distinct.
11
Page 12

Connaître votre appareil à gaufres
Le produit peut légèrement différer de l’illustration
Voyant
lumineux vert
(Prêt)
Voyant
d’alimentation
rouge
Bouton de
commande
Ramasse-
gouttes*
* Ramasse-gouttes inclus pour recevoir l’excédent de pâte et les miettes.
Voyant
lumineux
vert (Prêt)
Poignée
Avant la première utilisation
• Retirer toutes les pièces incluses dans la boîte.
• Laver à fond toutes les pièces (voir la section Nettoyage et entretien pour plus d’information).
NOTE : Lors de l’utilisation, pour la première fois, de votre appareil à gaufres, il peut y avoir une légère
émanation de fumée et/ou d’odeur. Ceci est normal et inoffensif, toutefois
nous vous recommandons de ne pas manger la première gaufre que vous ferez cuire avec l’appareil à
gaufres.
Utilisation de votre appareil à gaufres
1. Brancher le cordon dans votre prise de courant murale de 120 V AC. Le voyant d’alimentation rouge
s’allumera indiquant ainsi que l’appareil est prêt pour le préchauffage.
2. Régler le bouton de commande à la position que vous désirer. Plus le réglage sera élevé, plus vos
gaufres seront foncées. Expérimenter avec des réglages et différentes pâtes à gaufres an de déterminer
les réglages idéaux de votre appareil à gaufres.
NOTE : Le voyant d’alimentation rouge restera allumé jusqu’à ce que l’appareil
soit débranché.
3. L’indicateur lumineux vert (Prêt) s’éteindra et l’appareil à gaufres commencera le préchauffage.
L’indicateur lumineux vert (Prêt) s’allumera lorsque l’appareil aura
atteint la température de cuisson appropriée. Ceci devrait prendre approximativement
de 3 à 5 minutes. Une fois chaud, les temps pour atteindre la température désirée
seront plus rapides.
4. Lorsque le voyant lumineux vert (Pret) s’allume, ouvrir l’appareil a gaufres et appliquer une mince couche
d’huile vegetale, d’huile d’olive ou d’huile de canola sur les plaques
de cuisson. Verser et etendre la pate a gaufres de manière uniforme sur la plaque
inferieure pour que la pate remplisse cette derniere et que les zones en pointes de la
plaque soient recouvertes.
Mise en garde : ne pas utiliser de vaporisateurs de cuisson. Ils peuvent causer une accumulation sur les
plaques de cuisson et affecter la performance anti-adhérente du produit.
12
Page 13

5. Fermer l’appareil à gaufres et tourner la poignée de 180º dans le sens des aiguilles
d’une montre (vers la droite) jusqu’à ce qu’elle se verrouille pour amorcer la cuisson.
6. Lorsque l’indicateur lumineux vert (Prêt) se rallume, tourner la poignée de 180º dans
le sens contraire des aiguilles d’une montre (vers la gauche) pour déverrouiller puis
ouvrir prudemment l’appareil à gaufres.
NOTE : Attendre au moins 1 minute 30 secondes avant d’ouvrir l’appareil. Sinon, les gaufres qui
ne sont pas assez cuites peuvent se briser et être difciles à retirer des plaques.
7. Si les gaufres ne sont pas sufsamment foncées, fermer l’appareil à gaufres, tourner pour verrouiller et
attendre un autre 30 secondes. Répéter au besoin.
8. Lorsque vous êtes satisfaits de vos gaufres, utiliser un ustensile non métallique pour les retirer des
plaques chauffantes.
9. Pour faire d’autres gaufres, fermer l’appareil à gaufres jusqu’à ce que l’indicateur lumineux vert (Prêt)
s’allume, puis répéter à partir de l’étape 4.
10. Lorsque la cuisson des gaufres est terminée, mettre le réglage de chauffage au plus bas et retirer la che
électrique de la prise murale.
11. Après qu’il a sufsamment refroidi, les plaques de chauffage peuvent être nettoyées.
Verrouillage et déverrouillage de l’appareil à gaufres
Votre appareil à gaufres n’est déverrouillé que lorsque le bouton de commande est positionné vers le haut.
Vous ne pouvez ouvrir l’appareil à gaufres que lorsqu’il est en position de déverrouillage.
Conseils pour obtenir des gaufres cuites parfaitement
1. Mélanger la pâte à gaufres jusqu’à ce que les gros morceaux d’ingrédients secs soient bien dissous. Le
fait de trop mélanger la pâte peut rendre les gaufres dures.
2. Placer le bouton de commande au réglage désiré. Plus le réglage est élevé, plus les gaufres seront
foncées. La couleur et le caractère croustillant des gaufres dépendent également de la pâte utilisée.
Expérimenter avec différents réglages et pâtes à gaufres an de déterminer les meilleurs réglages de
l’appareil.
3. La quantité exacte de pâte à gaufres nécessaire pour créer des gaufres de taille parfaite dépend du type
et de la consistance de la pâte. Utiliser toujours la même louche ou tasse à mesurer an de déterminer la
quantité de pâte nécessaire pour remplir complètement la plaque inférieure et pour recouvrir les pointes
de cette dernière.
4. Pour les gaufres plus tendres, qui se brisent plus facilement, s’assurer de les couper en moitiés ou en
quarts une fois qu’elles sont cuites et d’utiliser une spatule pour les retirer plus facilement des plaques.
5. Lors de la cuisson d’une grande quantité de gaufres à servir en même temps, mettre les gaufres dans un
four préchauffé à 200 °F (90 °C) pour qu’elles restent fraîches et croustillantes. Sortir les gaufres à l’aide
de gants de cuisine pour les servir.
6. Pour éviter que la base des gaufres soit humide, mettre ces dernières sur une grille de refroidissement.
De cette manière, elles conserveront leur caractère croustillant.
7. Il est possible de réchauffer les gaufres dans l’appareil à gaufres. Préchauffer l’appareil à gaufres au
réglage bas. Une fois qu’il est préchauffé, mettre les gaufres sur la plaque inférieure de manière à ce
qu’elles soient bien alignées sur les rainures, puis fermer l’appareil à gaufres et chauffer pendant 1 à 2
minutes en vériant toutes les 30 secondes pour éviter de les brûler.
8. Les gaufres peuvent aussi être congelées pour être mangées ultérieurement. Une fois que les gaufres
fraîchement cuites ont refroidi complètement, les déposer dans un récipient à couvercle ou dans un sac
en plastique allant au congélateur. S’assurer de les séparer en disposant une feuille de papier ciré entre
chaque gaufre. Pour réchauffer les gaufres congelées, les mettre dans un four, un four grille-pain ou
un grille-pain jusqu’à ce qu’elles soient chaudes.
13
Page 14

Nettoyage et entretien
1. Toujours mettre l’appareil hors tension, le débrancher et le laisser refroidir
avant de la nettoyer.
2. Vous pouvez facilement enlever tout surplus d’huile ou de miettes sans démonter l’appareil.
3. Ne jamais immerger l’appareil dans l’eau et ne le placer pas dans un lave-vaisselle.
4. N’utiliser que des ustensiles en plastique ou en bois sur les plaques chauffantes.
Le métal peut endommager les plaques.
5. Utiliser un linge doux sur les plaques chauffantes et occasionnellement un produit d’entretien pour les
métaux pour l’acier inoxydable du boîtier extérieur. Ne jamais utiliser des tampons à récurer abrasifs ou
de la laine d’acier.
6. S’il y a de la pâte durcie sur les plaques, verser un peu d’huile et laisser reposer pendant
5 à 7 minutes. Essuyer ensuite avec un essuie-tout propre.
7. N’utiliser pas l’appareil à gaufres pour faire autre chose que des gaufres.
14
Page 15

Recettes
Mélange à gaufres de base
Ce mélange à gaufres, facile à faire, peut être effectué de multiples façons à partir de seulement quelques
ingrédients que vous posséder dans votre garde-manger. Essayer ces recettes aussi savoureuses que douces
pour une façon unique de servir un déjeuner classique de choix, à tous moments de la journée!
• 3 tasses de farine à tout usage
• 2 cuillerées à table de levure chimique
1. Mélanger tous les ingrédients ensembles et ranger le mélange dans un contenant hermétique jusqu’à ce
que vous soyer prêt à l’utiliser.
Gaufres aux babeurre
• 1 1⁄2 tasse de Mélange à gaufres
de base classique
• 4 cuillerées à table de beurre fondu
1. Dans un bol de malaxage, combiner tous les ingrédients et fouetter jusqu’à ce que le mélange soit lisse et
ne contienne plus de grumeaux.
2. Dans le gaufrier préchauffé, étender à la louche environ 1⁄3 de tasse de la pâte pour chaque gaufre et
faites cuire jusqu’à ce que les gaufres soient d’un brun doré
(environ 2-4 minutes).
TRUC :
1. Ajouter 1⁄4 de tasse de votre conture préférée à la pâte à frire avant la cuisson.
2. Garnisser les gaufres de fruits frais, de noix grillées, de miel, de sirops aromatisés
ou de yogourt pour un déjeuner délicieux ou une gâterie.
Gaufres aux brisures de chocolat
Portion pour 4 gaufres
• 1 1⁄2 tasse de Mélange à gaufres de base
classique
• 4 cuillerées à table de beurre fondu
1. Dans un bol de malaxage, combiner tous les ingrédients et fouetter jusqu’à ce que le mélange soit lisse et
ne contienne plus de grumeaux.
2. Dans le gaufrier préchauffé, étender à la louche environ 1⁄3 de tasse de la pâte pour chaque gaufre et
faites cuire jusqu’à ce que les gaufres soient d’un brun doré
(environ 2-4 minutes).
• 1 cuillerée à thé de sel
• 1⁄2 tasse de sucre
• 2 oeufs
• 1⁄2 tasse de babeurre
• 2 œufs
• 1⁄2 tasse de babeurre
• 1⁄4 de tasse de brisures de chocolat
GAUFRES AUX BLEUETS
Portion pour 4 gaufres
• 1⁄2 tasse de Mélange à gaufres
de base classique
• 4 cuillerées à table de beurre fondu
1. Dans un bol de malaxage, combiner tous les ingrédients et fouetter jusqu’à ce que le mélange soit lisse et
ne contienne plus de grumeaux.
2. Dans le gaufrier préchauffé, étender à la louche environ 1⁄3 de tasse de la pâte pour chaque gaufre et
faites cuire jusqu’à ce que les gaufres soient d’un brun doré
(environ 3-4 minutes).
TRUC : Garnisser de tranches de fraises pour un déjeuner délicieusement fruité!
• 2 oeufs
• 1⁄2 tasse de babeurre
• 1⁄4 de tasse de bleuets
15
Page 16

Garantie limitée d’UN AN
SENSIO Inc. assure par la présente que le produit est garanti contre tout défaut de
matériel et de fabrication pendant une période d’UN AN à compter de la date d’achat
et contre tout défaut des pièces autres que mécaniques pendant 90 jours. À son entière
discrétion, SENSIO Inc. réparera ou remplacera un produit défectueux, ou accordera un
remboursement pour ce produit, pendant la période de la garantie.
Cette garantie s’applique uniquement à l’acheteur initial du produit, à compter de la
date initiale de l’achat, et est incessible. Pour que la garantie soit valide, l’acheteur doit
conserver le reçu de caisse original. Les magasins de détail qui vendent ce produit
n’ont pas le droit de l’altérer ou de le modier, ni de modier de quelque façon les
modalités de la garantie.
EXCLUSIONS :
La garantie ne couvre pas l’usure normale des pièces ou les dommages causés par
une utilisation négligente du produit, le branchement sur un circuit de tension ou de
courant inapproprié, un entretien de routine inadéquat, une utilisation contraire aux
instructions de fonctionnement, de démontage et de réparation, ou par la modication
du produit par une personne autre qu’un technicien qualié de SENSIO Inc. De plus, la
garantie ne couvre pas les cas de force majeure comme les incendies, les inondations,
les ouragans et les tornades.
SENSIO Inc. ne pourra être tenue responsable de tout dommage indirect ou accessoire
causé par la violation de toute garantie explicite ou implicite. Sauf dans la mesure où
cela est interdit par la loi, toute garantie implicite concernant la valeur commerciale
ou l’adéquation à la n visée se limite à la durée de la garantie. Certains États et
certaines provinces ou compétences administratives ne permettent pas l’exclusion
ou la limitation des dommages indirects ou accessoires, ou les limitations quant
à la durée des garanties implicites; par conséquent, les exclusions ou limitations
mentionnées précédemment peuvent ne pas s’appliquer à vous. La garantie couvre les
droits légaux spéciques qui peuvent varier selon l’état, la province ou la compétence
administrative.
COMMENT OBTENIR UN SERVICE SOUS GARANTIE :
Communiquez avec le service à la clientèle en composant notre numéro sans frais :
1 866 832-4843. Un représentant du service à la clientèle tentera de résoudre par
téléphone les questions relatives à la garantie. Si le représentant du service à la
clientèle est incapable de résoudre le problème, il vous fournira un numéro de
demande et vous informera que vous devez retourner le produit à SENSIO Inc. Apposez
sur le produit une étiquette indiquant votre nom, votre adresse, votre numéro de
téléphone (de jour), le numéro de demande ainsi qu’une description du problème.
Incluez également une copie du reçu de caisse original. Emballez soigneusement
le produit avec son reçu de caisse et faites-le parvenir (port et assurance payés) à
l’adresse de SENSIO Inc. SENSIO Inc. n’assume aucune responsabilité quant au produit
retourné pendant son transport jusqu’au centre de service à la clientèle de SENSIO Inc.
16
Page 17

MEDIDAS DE SEGURIDAD
IMPORTANTES
ADVERTENCIA: Cuando se utilizan aparatos eléctricos, se deben seguir
precauciones de seguridad básicas, entre ellas:
1. LEA TODAS LAS INSTRUCCIONES ANTES DE UTILIZAR EL APARATO.
2. No toque las supercies calientes. Use las manijas o perillas.
3. Para protegerse contra riesgos de descarga eléctrica, no sumerja,
ni total ni parcialmente, el cable, el enchufe ni la unidad completa
en agua u otros líquidos.
4. Este dispositivo no está diseñado para ser utilizado por personas (incluidos
niños) con capacidades físicas, sensoriales o mentales reducidas, o falta de
experiencia y conocimiento, a menos que una persona responsable de su
seguridad los supervise o instruya en el uso del aparato.
5. Es necesario supervisar atentamente a los niños si usan aparatos o están
cerca de ellos.
6. Desenchufe el aparato del tomacorriente de la pared cuando no lo utilice o
antes de limpiarlo. Deje que se enfríe el aparato antes de limpiarlo o guardarlo.
7. Nunca tire del cable para desconectar el aparato del tomacorriente. En cambio,
tome el enchufe y tire de él para desconectarlo.
8. No utilice ningún electrodoméstico que tenga un cable o enchufe dañado, que
muestre un funcionamiento defectuoso o que se haya dañado de cualquier
manera. Lleve el electrodoméstico a un agente de servicio técnico calicado
para que lo examine, lo repare o le haga ajustes eléctricos o mecánicos a n
de evitar accidentes.
9. El uso de accesorios no recomendados por el fabricante del artefacto puede
ocasionar incendios, descargas eléctricas o lesiones.
10. No lo utilice en el exterior. Este aparato es para uso doméstico únicamente.
11. No lo utilice para nes comerciales.
12. No permita que el cable eléctrico cuelgue del borde de la mesa o mesada ni
que toque supercies calientes.
13. No deje que el aparato entre en contacto con ningún material que sea
inamable como colgaduras, paredes, etc.
14. No lo coloque encima ni cerca de un quemador eléctrico o de gas calientes, ni
de un horno caliente.
15. Solo utilice el aparato sobre una supercie plana y resistente al calor.
16. Se debe tener sumo cuidado cuando se traslada un aparato con alimento
caliente, o agua, aceite u otros líquidos calientes.
17. El cable del aparato se debe enchufar únicamente a un tomacorriente eléctrico
de 120 V de CA.
18. Se suministrará un cable de alimentación corto para reducir el riesgo de
enredarse o tropezarse con un cable más largo.
19. Para desconectar la unidad, desenchúfela del tomacorriente.
20. Siempre desenchufe el aparato después de usarlo. El aparato permanecerá
encendido a menos que se desenchufe.
21. PRECAUCIÓN CON LAS SUPERFICIES CALIENTES: Este aparato genera calor
durante el uso. Se deben tomar las medidas necesarias para evitar riesgos de
quemaduras, incendios u otros daños a personas o a la propiedad.
17
Page 18

22. Cuando utilice este aparato, deje suciente ventilación por encima y alrededor
de él para la circulación del aire. No permita que este aparato esté en contacto
con cortinas, revestimientos de paredes, ropas, repasadores u otros materiales
inamables durante su uso.
23. No le dé al aparato otro uso que no sea el indicado. Utilizar con enchufe de
pared única.
GUARDE ESTAS
INSTRUCCIONES
PARA USO DOMÉSTICO
ÚNICAMENTE
OTRAS MEDIDAS DE
SEGURIDAD IMPORTANTES
PRECAUCIÓN: Este electrodoméstico se calienta durante el funcionamiento y
mantiene el calor un tiempo después de apagado. Siempre use manoplas al
manipular materiales calientes y deje que las piezas metálicas se enfríen antes
de limpiarlas. No coloque nada sobre el electrodoméstico mientras esté en
funcionamiento o mientras esté caliente.
1. Todos los usuarios de este electrodoméstico deben leer y comprender este
manual de instrucciones antes de ponerlo en funcionamiento o limpiarlo.
2. No descuide el electrodoméstico mientras esté en funcionamiento.
Notas sobre el enchufe
El producto tiene un enchufe polarizado (una pata es más ancha que la otra).
Para reducir el riesgo de electrocución, este enchufe viene para entrar en tomas de
corriente polarizadas de una sola forma. Si el enchufe no entra completamente en
la toma, invierta la posición del enchufe. Si sigue sin entrar, contacte un electricista
calicado. No intente modicar el enchufe de ninguna manera.
Notas sobre el cable
El cable de alimentación corto (o el cable de alimentación desmontable)
suministrado se debe utilizar para reducir los riesgos de enredarse o tropezar con
un cable más largo. No utilice un cable de extensión con este producto. Siempre
conecte el aparato directamente a una toma elétrica de pared.
Advertencia sobre el plasticante
PRECAUCIÓN: Para evitar que el plasticante se transera sobre el acabado de la
encimera, la supercie de trabajo u otro mueble, coloque posavasos o manteles
individuales NO PLÁSTICOS entre el electrodoméstico y el acabado de la encimera
o la supercie. De lo contrario, el acabado puede oscurecerse o pueden aparecer
manchas o marcas permanentes.
Energía eléctrica
Si el circuito eléctrico está sobrecargado con otros artefactos, su electrodoméstico
puede dejar de funcionar correctamente. El electrodoméstico debe funcionar en un
circuito eléctrico separado de otros artefactos.
18
Page 19

Conozca su waera
El producto puede diferir levemente de la ilustración
Luz verde de
estado listo
Luz roja de
encendido
Perilla de
control
Bandeja de
goteo*
* Bandeja de goteo incluida para recolectar el batido que se desborda y las migas.
Luz verde de
estado listo
Manija
Antes del primer uso
• Saque todas las piezas incluidas en la caja.
• Lave bien todas las piezas (Consulte la sección Limpieza y mantenimiento para más información).
NOTA: La waera puede emitir una pequeña cantidad de humo y/u olor al usarla por primera vez. Esto es
normal e inofensivo, sin embargo, recomendamos que no coma el primer wafe que haga con la waera.
Para usar la Waera
1. Enchufe el cordón en una toma de corriente de pared de 120 V AC. La luz roja
de encendido se prenderá para indicar que el aparato está listo para precalentarse.
2. Fije la perilla de control en el ajuste deseado. Mientras más alto el ajuste, más oscuro quedará el wafe.
Haga el experimento con los ajustes y diferentes bastidos para waes para determinar los ajustes ideales
para su waera.
NOTA: La luz roja de de encendido quedará prendida hasta que se desenchufe el aparato.
3. Aplique una delgada capa de aceite vegetal o mantequilla derretida a las placas calefactoras (las
mantequillas rociadas son ideales), y luego gire la perilla de control a los ajustes deseados. La luz verde
de estado listo se apagará y la waera empezará a precalentar. La luz verde de estado listo se prenderá
cuando el aparato alcance la temperatura adecuada de cocción. Esto tomará aproximadamente de 3 a 5
minutes.
Una vez caliente, los tiempos de estado listo se alcanzarán más rápidamente.
4. Cuando la luz verde de estado listo se prende, abra la waera, aplique una delgada capa de aceite vegetal,
aceite de olive o aceite de canola en las placas de coccion. Vierta y esparsa de manera uniforme el batido
para waes sobre la placa inferior de modo que esta se llene con el batido y se cubran las areas en pico
de la placa.
PRECAUCIÓN: No utilice aerosoles de cocina. Pueden causar una acumulación en las placas de
cocción y puede afectar el rendimiento ANTIADHERENTE DEL PRODUCTO.
19
Page 20

5. Cierre la waera y gire la manija 180º en el sentido de las manecillas del reloj (derecha) hasta que se
enganche para cocer.
6. Cuando se prende la luz verde de estado listo de nuevo, gire la manija 180º en el sentido contrario a las
manecillas del reloj y abra la waera con cuidado.
NOTA: No abra la waera durante al menos 1 minuto, 30 segundos. Si lo hace, puede romper los waes
medio crudos y puede resultar difícil quitarlos de las placas.
7. Si los waes no quedan lo sucientemente oscuros, cierre la waera, gire para cerrar
y espere otros 30 segundos. Repita según la necesidad.
8. Cuando esté satisfecho con sus waes, use un utensilio no metálico para retirarlos
de las placas calefactoras.
9. Para hacer más waes, cierre la waera hasta que se prenda la luz verde de estado listo
y repita desde el paso 4.
10. Cuando termine de cocinar los waes, baje el calor al ajuste más bajo y desenchufe
la unidad del tomacorriente de pared.
11. Después de se haya enfriado lo sucientemente, se puede limpiar.
Para colocar y quitar el seguro de la waera
La waera está sin seguro únicamente cuando la perilla de control está frente a usted.
Usted sólo puede abrir la waera en la posición sin seguro.
Consejos para obtener waes perfectamente cocidos
1. Mezcle el batido para waes hasta disolver los pedazos grandes de ingredientes secos.
Si mezcla demasiado el batido para waes, serán demasiado duros.
2. Coloque la perilla de control en el ajuste deseado. Cuanto mayor sea el ajuste, más oscuros serán los
waes. El color y la textura crujiente de los waes también dependen del batido que utilice. Pruebe con el
ajuste y diferentes batidos para waes a n de determinar el ajuste ideal de la waera.
3. La cantidad exacta de batido necesario para hacer los waes perfectos de tamaño normal depende del
tipo y consistencia del batido. Utilice el mismo cucharón o taza medidora cada vez para determinar la
cantidad de batido necesario para llenar la placa inferior por completo y cubrir los picos de la placa.
4. Si desea realizar una variedad más blanda de waes, cuando estén cocidos, asegúrese de cortarlos en
mitades o en 4 cuartos y tomarlos con una espátula por la base para retirarlos de las placas con mayor
facilidad, ya que los waes más blandos se pueden romper fácilmente.
5. Cuando realice grandes cantidades de waes al mismo tiempo y desea guardarlos frescos y crocantes,
colóquelos en un horno precalentado a 200 °F (90 °C). Retírelos con guantes para horno cuando esté listo
para servir.
6. Para evitar que los waes tengan la base húmeda, colóquelos sobre una rejilla de alambre para enfriar.
De esta manera, mantendrá la textura crujiente de los waes.
7. Puede calentar los waes en la waera. Precaliente la waera en un ajuste de temperatura baja. Cuando
esté precalentada, coloque los waes sobre la placa inferior de manera que encajen correctamente en las
ranuras; luego, cierre la waera y caliente de 1 a 2 minutos, controlando cada 30 segundos para evitar
que se quemen.
8. También los puede congelar para consumirlos más adelante. Después de enfriar por completo los waes
recién cocidos, colóquelos en un recipiente con tapa o bolsa plástica para congelador. Asegúrese de
separar los waes con una hoja de papel encerado entre cada uno. Para recalentar los waes congelados,
colóquelos en el horno precalentado, horno tostador o tostadora hasta que estén calientes.
20
Page 21

Limpieza y mantenimiento
1. Apague siempre el electrodoméstico, desenchúfelo y déjelo enfriar antes de limpiar.
2. Usted puede quitar fácilmente cualquier exceso de aceite o de migas sin desensamblar
el aparato.
3. Nunca sumerja el aparato en agua ni lo coloque en el lavaplatos automático.
4. Use únicamente utensilios de plástico o de madera sobre las placas calefactoras.
Los metales pueden dañar las placas.
5. Use un paño suave sobre las placas calefactoras y a veces un brillo para meta destinado a ser usado con
acero inoxidable en la parte externa de la cubierta protectora. Nunca use esponjillas abrasivas o de acero.
6. Si hubiera batido endurecido sobre las placas, vierta un poco de aceite y déjelo reposar durante
aproximadamente 5 a 7 minutos. Luego lo puede limpiar con una toalla de papel.
7. No use la waera para nes distintos a hacer waes.
21
Page 22

Recetas
Mezcla básica para wae
Esta mezcla para wae fácil de hacer se puede preparar de tantas maneras con apenas unos cuantos
ingredientes de su despensa. ¡Pruebe recetas sabrosas y dulces en una forma excepcional de servir este
desayuno clásico favorito a cualquier día!
• 3 tazas de harina todo uso
• 2 Cucharadas de polvo de hornear
1. Mezcle todos los ingredientes juntos y guárdelos en un recipiente estanco hasta que esté listo para
usarlos.
Waes con suero de leche
Hace 4 waes
• 1 1⁄2 tazas de Base clásica para wae
• 4 Cucharadas de mantequilla derretida
1. En una taza de mezclar, combine todos los ingredientes y bata hasta que la mezcla quede lisa y quede sin
grumos.
2. En una waera precalentada, vierta aproximadamente 1⁄3 taza para cada wae y cueza hasta que los
waes queden dorados (cerca de 2-4 minutos).
Consejos:
1. Agregue 1⁄4 taza de su sabor favorito de mermelada a la masa antes de cocer.
2. Coloque sobre los waes capas de frutas frescas, nueces tostadas, miel, lmíbares con sabores o yogurt
para un delicioso desayuno o un bocado.
Waes con chips de chocolate
Hace 4 wafles
• 1 1⁄2 tazas de Base clásica para wae
• 4 Cucharadas de mantequilla derretida
• 2 huevos
1. En una taza de mezclar, combine todos los ingredientes y bata hasta que la mezcla quede lisa y quede sin
grumos.
2. En una waera precalentada, vierta aproximadamente 1⁄3 taza para cada wae y cueza hasta que los
waes queden dorados (cerca de 2-4 minutos).
• 1 cucharadita de sal
• 1⁄2 taza de azúcar
• 2 huevos
• 1⁄2 taza de suero de leche
• 1⁄2 taza de suero de leche
• 1⁄4 taza de chips de chocolate
WAFLES CON ARÁNDANO
Hace 4 waes
• 1 1⁄2 tazas de Base clásica para wae
• 4 Cucharadas de mantequilla derretida
• 2 huevos
1. En una taza de mezclar, combine todos los ingredientes y bata hasta que la mezcla quede lisa y quede sin
grumos.
2. En una waera precalentada, vierta aproximadamente 1⁄3 taza para cada wae y cueza hasta que los
waes queden dorados (cerca de 3-4 minutos).
CONSEJOS: ¡Cubra con fresas en rebanadas para un delicioso desayuno con bayas!
• 1⁄2 taza de suero de leche
• 1⁄4 de taza de arándano
22
Page 23

Garantía limitada de UN AÑO
Mediante la presente, SENSIO Inc. garantiza que, durante el plazo de UN AÑO a partir
de la fecha de compra, este producto no presentará defectos mecánicos en el material
ni en la mano de obra, y durante 90 días, no los presentará en las piezas no mecánicas.
A su entera discreción, SENSIO Inc. reparará o reemplazará el producto que resulte
defectuoso, o emitirá un reembolso por el producto durante el plazo de garantía.
Esta garantía es válida únicamente para el comprador minorista original a partir de la
fecha de compra minorista inicial y no es transferible. Conserve el recibo de compra
original, ya que se exige una prueba de compra para obtener la validación de la
garantía. Las tiendas minoristas no tienen derecho a alterar, modicar ni corregir de
ninguna manera los términos y condiciones de la garantía.
EXCLUSIONES:
La garantía no cubre el desgaste normal de las piezas ni el daño ocasionado por
cualquiera de las siguientes causas: uso negligente del producto, uso de un voltaje
o corriente incorrectos, mantenimiento de rutina inadecuado, uso contrario al de
las instrucciones de funcionamiento, desarmado, reparación o alteración a cargo de
personas que no sean miembros del personal calicado de SENSIO Inc. Asimismo, la
garantía no cubre actos de la naturaleza, como incendios, inundaciones, huracanes o
tornados.
SENSIO Inc. no asumirá responsabilidad por daños incidentales o resultantes
ocasionados por la violación de cualquier garantía expresa o implícita. Salvo en
la medida en que lo prohíban las leyes aplicables, cualquier garantía implícita de
comerciabilidad o aptitud para un propósito particular se limita temporalmente a la
duración de la garantía. Algunos estados, provincias o jurisdicciones no permiten la
exclusión ni la limitación de daños incidentales o resultantes, o limitaciones sobre
la duración de una garantía implícita y, por lo tanto, es posible que las exclusiones o
limitaciones mencionadas no le correspondan. La garantía cubre derechos legales
especícos que pueden variar de un estado, una provincia o una jurisdicción a otros.
CÓMO OBTENER EL SERVICIO DE GARANTÍA:
Debe comunicarse con el Servicio de atención al cliente a nuestro número telefónico
gratuito: 1-866-832-4843. Un representante del Servicio de atención al cliente intentará
resolver los problemas referidos a la garantía por teléfono. Si este no puede resolver
el problema, le proporcionarán un número de caso y le solicitarán que devuelva el
producto a SENSIO Inc. Adhiera una etiqueta al producto que incluya: su nombre,
dirección, número telefónico de contacto durante el día, número de caso y descripción
del problema. Además, incluya una copia del recibo de compra original. Envuelva
cuidadosamente el producto etiquetado con el recibo de compra, y envíelo (con el
envío y el seguro prepagados) a la dirección de SENSIO Inc. SENSIO Inc. no asumirá
obligación ni responsabilidad alguna por el producto devuelto que esté en el trayecto
hacia el Centro de servicio al cliente de SENSIO Inc.
23
Page 24

bellahousewares.com
Dudas o comentarios contactar el departamento de servicio al cliente
BellaLife
BellaLife
BellaLifestyle
BellaLifestyle
For customer service questions or comments
Pour le service à la clientèle, question ou commentaires
1-866-832-4843
www.sensioinc.com
®
is a registered trademark of Sensio Inc.
BELLA
BELLA® est un marque déposée de Sensio Inc.
BELLA® es una marca registrada de Sensio Inc.
Montréal, Canada H3B 3X9
SO-312384
 Loading...