

Page 1
4.5L THREE BASKET
DEEP FRYER
FRITEUSE DE 4,5 L
À TROIS PANIERS
FREIDORA DE
TRES CANASTAS DE 4,5 L
Instruction Manual
Recipe Guide
Manuel d’instructions
Guide de recettes
Manual de instrucciones
Guía de recetas
Register your product and get support at:
Pour vous inscrire et obtenir l’aide de votre produit:
Para registrar y obtener asistencia de su producto ir:
www.bellahousewares.com/welcome
SO-312096_14406 BELLA 4.5L deep fryer IM_R6.indd 1 2016-08-23 9:36 AM
Page 2

Table of Contents
Important Safeguards .................................................................................................................................. 2
Additional Important Safeguards ........................................................................................................... 3-4
Notes on the Plug .........................................................................................................................................4
Notes on the Cord.........................................................................................................................................4
Plasticizer Warning ....................................................................................................................................... 4
Electric Power................................................................................................................................................4
Getting to Know Your 4.5 L Three Basket Deep Fryer ............................................................................. 5
Control Panel ............................................................................................................................................. 5-6
Assembling the Fry Basket Handles .......................................................................................................... 6
Before Using for the First Time .................................................................................................................. 6
Operating Instructions ..............................................................................................................................7-8
Helpful Hints .............................................................................................................................................. 8-9
Cooking Chart ...............................................................................................................................................9
User Maintenance Instructions .................................................................................................................10
Care & Cleaning Instructions .................................................................................................................... 10
Storing Instructions .................................................................................................................................... 10
Trouble Shooting ........................................................................................................................................ 10
Recipes .................................................................................................................................................... 11-13
Warranty ......................................................................................................................................................14
Table des matières
Consignes de sécurité importantes ......................................................................................................... 15
Consignes de sécurité additionnelles .................................................................................................16 -17
Notes sur la che ........................................................................................................................................17
Notes sur le cordon ................................................................................................................................... 17
Avertissement de migration de plastiants ............................................................................................17
Alimentation électrique ............................................................................................................................. 17
Connaître sa de friteuse de 4,5 L à trois paniers ....................................................................................18
Tableau de commande ..........................................................................................................................18-19
Assemblage de la poignée de panier à friture ....................................................................................... 19
Avant d’utiliser l’appareil pour la première fois ..................................................................................... 19
Instructions d’utilisation ...................................................................................................................... 20-21
Conseils utiles ........................................................................................................................................21-22
Grille de cuisson ......................................................................................................................................... 23
Instructions pour l’entretien .....................................................................................................................23
Instructions d’entretien et de nettoyage .................................................................................................24
Instructions de rangement ........................................................................................................................ 24
Dépannage ...................................................................................................................................................24
Recettes ................................................................................................................................................. 25-27
Garantie........................................................................................................................................................28
Índice
Medidas de seguridad importantes ......................................................................................................... 29
Otras medidas de seguridad importantes ........................................................................................ 30-31
Notas sobre el enchufe .............................................................................................................................. 31
Notas sobre el cable ...................................................................................................................................31
Advertencia sobre el plasticante ............................................................................................................31
Energía eléctrica .........................................................................................................................................31
Conozca su freidora grande de 4,5 litros ................................................................................................32
Panel de control .................................................................................................................................... 32-33
Armado del mango de la cesta para freír ...............................................................................................33
Antes de utilizar por primera vez .............................................................................................................33
Instrucciones de funcionamiento ....................................................................................................... 34-35
Consejos útiles ...................................................................................................................................... 35-36
Cuadro de tiempos de cocción ........................................................................................................... 36-37
Instrucciones de mantenimiento para el usuario ..................................................................................37
Instrucciones de limpieza y cuidado .................................................................................................. 37-38
Instrucciones de almacenamiento ...........................................................................................................38
Solución de problemas ..............................................................................................................................38
Recetas ................................................................................................................................................... 3 9- 41
Garantía........................................................................................................................................................42
SO-312096_14406 BELLA 4.5L deep fryer IM_R6.indd 2-3 2016-08-23 9:36 AM
Page 3

IMPORTANT SAFEGUARDS
When using electrical appliances, basic safety precautions should always be
followed, including the following:
1. READ ALL INSTRUCTIONS.
2. Do not touch hot surfaces. Use handles or knobs. Use oven mitts or potholders.
3. To protect against electric shock do not immerse cord, plugs, or appliance in
wateror other liquid.
4. This appliance is not intended for use by persons (including children) with
reducedphysical, sensory or mental capabilities, or lack of experience
and knowledge, unless they have been given supervision or instruction
concerning useof the appliance by a person responsible for their safety.
5. Close supervision is necessary when any appliance is used by or near children.
6. Unplug from outlet when not in use and before cleaning. Allow to cool
beforeputting on or taking off parts, and before cleaning the appliance.
7. Do not operate any appliance with a damaged cord or plug or after the appliance
malfunctions, or has been damaged in any manner. Bring it to a qualied
technician for examination, repair or electrical or mechanical adjustment.
8. The use of accessory attachments not recommended by the appliance
manufacturer may cause injuries.
9. Do not use outdoors.
10. Do not let cord hang over edge of table or counter, or touch hot surfaces.
11. Do not place on or near a hot gas or electric burner, or in a heated oven.
12. Extreme caution must be used when moving an appliance containing hot oil
or other hot liquids.
13. Always attach plug to appliance rst, then plug cord in the wall outlet.
To disconnect, turn both the ON/OFF temperature control dial and the timer
control dial to OFF. Then remove plug from wall outlet.
14. Do not use appliance for other than intended use.
15. Extreme caution must be used when moving the Deep Fryer containing hot oil.
16. Be sure handle is properly assembled to fry basket and locked in place.
See detailed assembly instructions.
FOR HOUSEHOLD USE ONLY
SAVE THESE INSTRUCTIONS
ADDITIONAL IMPORTANT
SAFEGUARDS
CAUTION HOT SURFACES: This appliance generates heat and escaping steam
during use. Proper precautions must be taken to prevent the risk of burns, res,
or other injury to persons or damage to property.
CAUTION: This appliance is hot during operation and retains heat for some
time afterturning OFF. Always use oven mitts when handling hot materials and
allow metal parts to cool before cleaning. Do not place anything on top of the
appliance while it is operating or while it is hot.
1. All users of this appliance must read and understand this owner’s manual
beforeoperating or cleaning this appliance.
2. The cord to this appliance should be plugged into a 120V AC electrical outlet only.
3. If this appliance begins to malfunction during use, immediately unplug the
cord. Do not use or attempt to repair the malfunctioning appliance.
4. Do not leave this appliance unattended during use.
5. Do not immerse detachable power cord in any liquid. If the cord falls in water
or other liquid, DISCARD IMMEDIATELY and replace it with a new cord.
If the supply cord to this appliance is damaged, it must be replaced by
contacting Consumer Service.
6. Keep the cord out of reach from children and infants to avoid the risk of
electricshock and choking.
7. Use fry basket handle to raise and lower fry basket.
Always raise fry basket out of hot oil and allow cooked food to rest
for 5 to 10 seconds before removing food from basket.
8. Do not use this appliance if the viewing window is cracked.
9. Dry damp foods before placing into oil. When deep frying frozen foods,
remove any excessive ice as it can cause hot oil to spatter.
10. Always keep lid closed while Deep Fryer is frying foods.
11. Do not obstruct the ltered air outlet vent on top of lid with any objects.
Avoid contact with escaping steam from the ltered air outlet during operation
12. Keep appliance at least 4 inches away from walls or other objects during
operation. Do not place any objects on top of appliance while it is operating.
Place the appliance on a at surface that is resistant to heat.
13. Be sure oil tank is lled with oil to at least the marked MIN level.
Do not operate appliance without oil or with an insufcient amount of oil.
Do not over-ll the tank with oil past the MAX mark.
WARNING: Under- or over-lling the oil tank may damage the Deep Fryer
andcould result in serious personal injury.
14. Always pour oil into tank before plugging in and heating the appliance.
Never pour oil into heated tank.
15. Ensure that there are no ammable objects on or near the appliance.
If the oil catches re, unplug the appliance and replace the lid.
Never use water to extinguish the re.
16. Do not operate this appliance if the lid and the tank are not completely dry.
17. It is not recommended to move the Deep Fryer containing hot oil.
Allow to cool before moving.
18. Do not use this Deep Fryer to boil water.
19. Make sure that the temperature control dial is turned to “MIN”
and the timer dial to “0” before plugging in the cord.
3 2
SO-312096_14406 BELLA 4.5L deep fryer IM_R6.indd 2-3 2016-08-23 9:36 AM
Page 4
KEEP FR
CHILDREN!
callouts aligned
20. Once the cord is plugged into an electric outlet, “power” and “ready” lights
will go on. To start heating the oil, set the temperature dial to the desired
temperature and set the timer dial to the desired cooking time, the green
ready light will go off. When the oil reaches the set temperature, the green
READY light will go ON.
IMPORTANT: Always turn the timer dial on and select the desired cooking
time in order to ensure that the unit turns on and begins preheating. The
unit will not start to preheat until BOTH the desired cooking temperature and
cooking time isselected.
Notes on the Plug
This appliance has a polarized plug (one blade is wider than the other).
To reduce the risk of electric shock, this plug will t in a polarized outlet only
oneway. If the plug does not t fully into the outlet, reverse the plug. If it still
does not t, contact aqualied electrician. Do not modify the plug in any way.
Notes on the Cord (Detachable Cord Instructions)
CAUTION: A short detachable power-supply cord is provided to reduce the risk of
personal injury resulting from becoming entangled in or tripping over a longer cord.
The cord is designed to break away from the Deep Fryer quickly and smoothly to
prevent the unit from tipping over when someone unintentionally pulls on the cord.
This detachable cord is designed for use with this designated Deep Fryer only.
Do not try using it on any other appliance.
SERIOUS HOT-OIL BURNS MAY RESULT FROM A DEEP
FRYER OR COOKER/FRYER BEING PULLED OFF OF
COUNTERTOP. DO NOT ALLOW THE CORD TO HANG
OVER THE EDGE OF THE COUNTER WHERE IT MAY
BE GRABBED BY CHILDREN OR BECOME ENTANGLED
WITHTHE USER.
DO NOT USE WITH AN EXTENSION CORD.
DO NOT DRAPE CORD!
OM
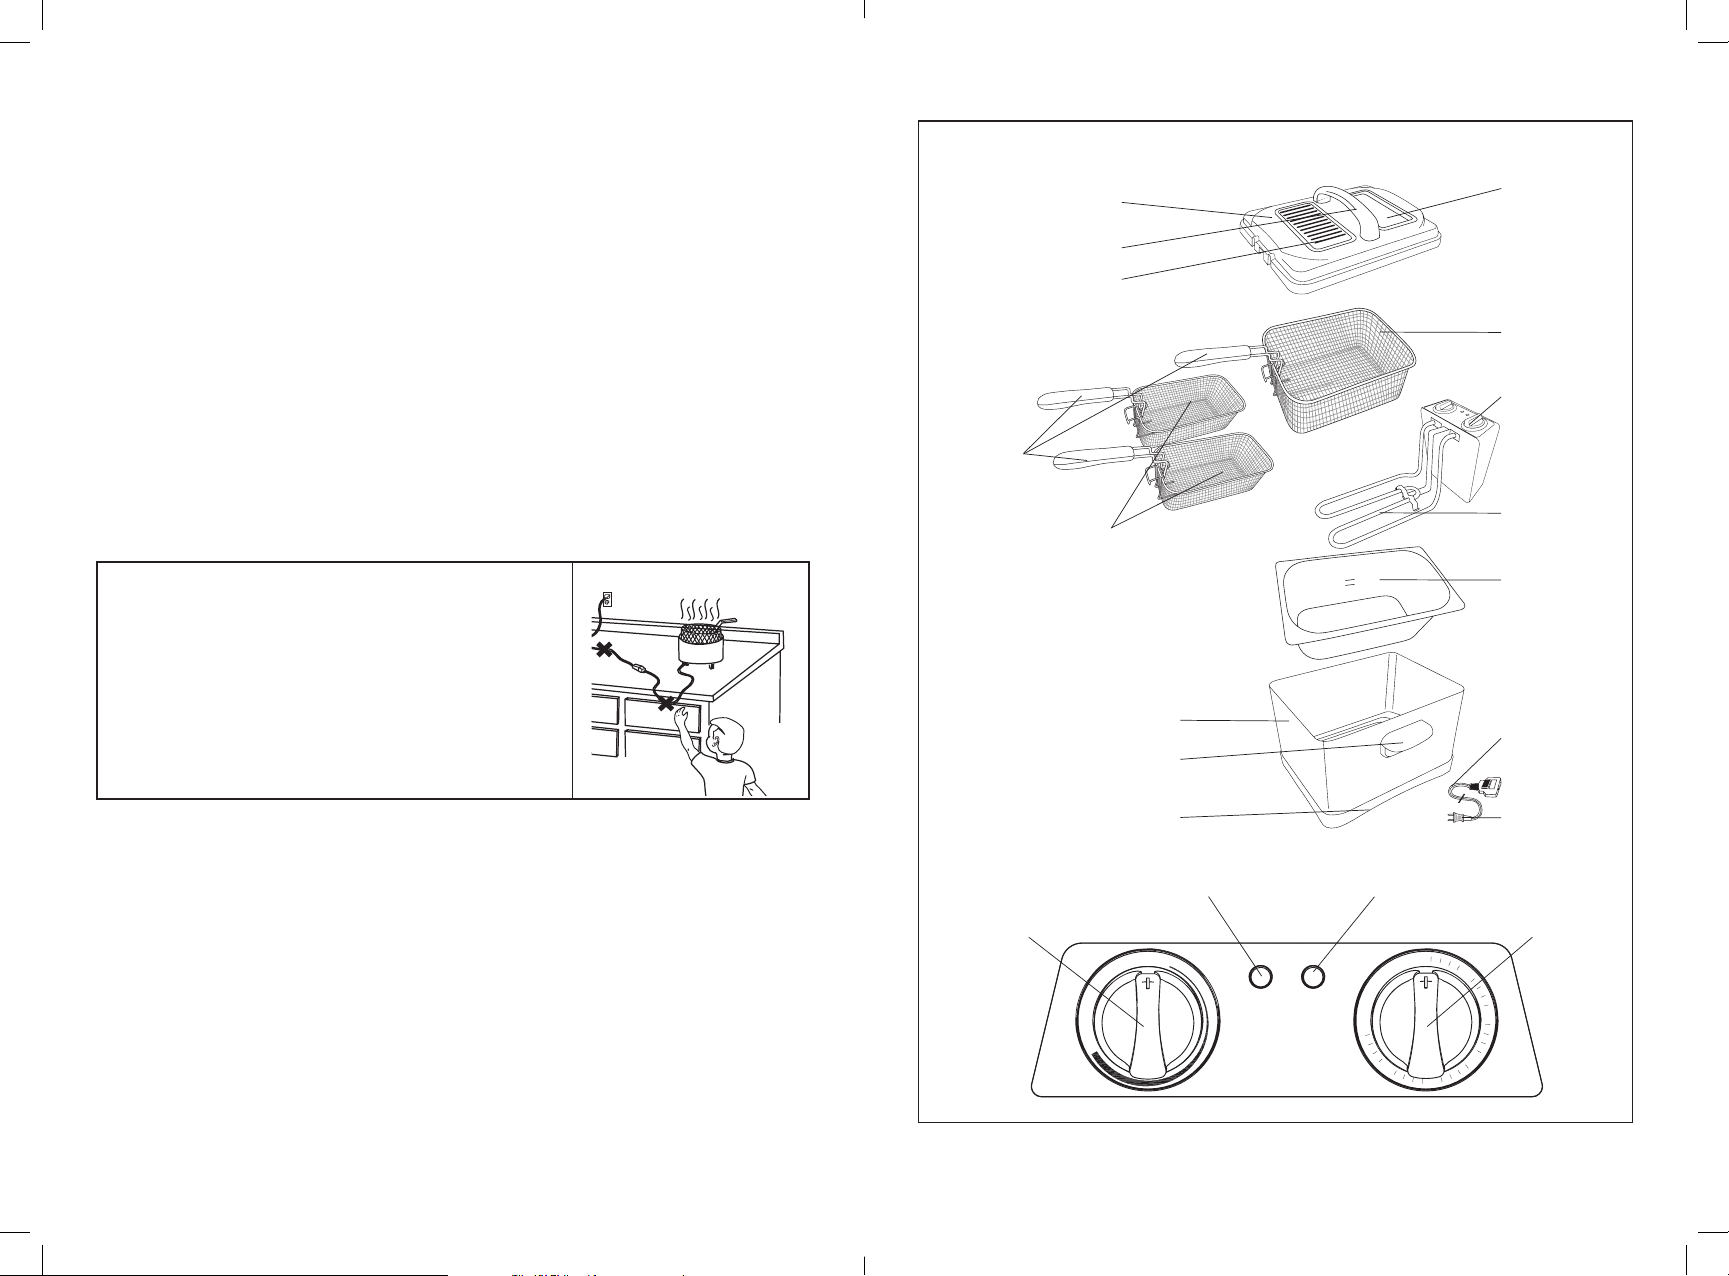
Getting to Know Your 4.5 L Deep Fryer
Product may vary slightly from illustration
Figure 1
Lid
Lid Handle
Filtered Air Outlet
3 Frying
Basket
Handles
2 Small Frying
Baskets
Stainless Steel Body
Deep Fryer Body Handles
Viewing
Window
1 Large
Frying Basket
Control
Panel/ Heater
assembly
Heater Coils
MAX
MIN
Removable Oil
Tank
Detachable
Power Cord
Plasticizer Warning
CAUTION: To prevent Plasticizers from migrating to the nish of the counter top
ortable top or other furniture, place NON-PLASTIC coasters or place mats between
Control Panel
theappliance and the nish of the counter top or table top. Failure to do so may
causethe nish to darken; permanent blemishes may occur or stains can appear.
Electric Power
Temperature
Control Dial
If the electrical circuit is overloaded with other appliances, your appliance
maynotoperate properly. It should be operated on a separate electrical circuit
fromother appliances.
SO-312096_14406 BELLA 4.5L deep fryer IM_R6.indd 4-5 2016-08-23 9:36 AM
Non-Slip Feet (not seen)
Red POWER
MIN
°F
375
350
325
300
Light
POWER READY
5 4
Green READY
Light
min
30
25
0
20
Polarized Plug
30 Minute
Timer Dial
5
10
15
Page 5
Temperature Control Dial
• Adjustable temperature control for perfect frying
• Select deep frying temperatures from 300°F to 375°F
30 Minute Timer Dial
• Once the temperature control dial is set, turn the timer dial on and select deep frying cooking time.
• When selecting the desired frying time, add an additional 10-15 minutes to the desired frying/
cooking time to account for the pre-heating time.
NOTE: Preheat time may vary between 10-15 minutes.
• Once both the desired frying temperate and cooking time is selected, the Deep Fryer will begin heating
the oil.
NOTE: The unit will not turn on and begin to pre-heat unless the timer dial is turned ON and
thedesired frying time has been selected.
• One beep will sound when the set time is up.
• Check food for browning and doneness.
NOTE: Always turn the timer dial ON and select the desired cooking time in order to ensure that
the unit turns on and begins preheating. The unit will not start to preheat until BOTH the desired
cooking temperature and cooking time is selected.
IMPORTANT: When the timer sounds, the Deep Fr yer will turn off automatically.
When all deep frying is nished, turn the temperature control dial to “MIN” and the timer dial to “0”.
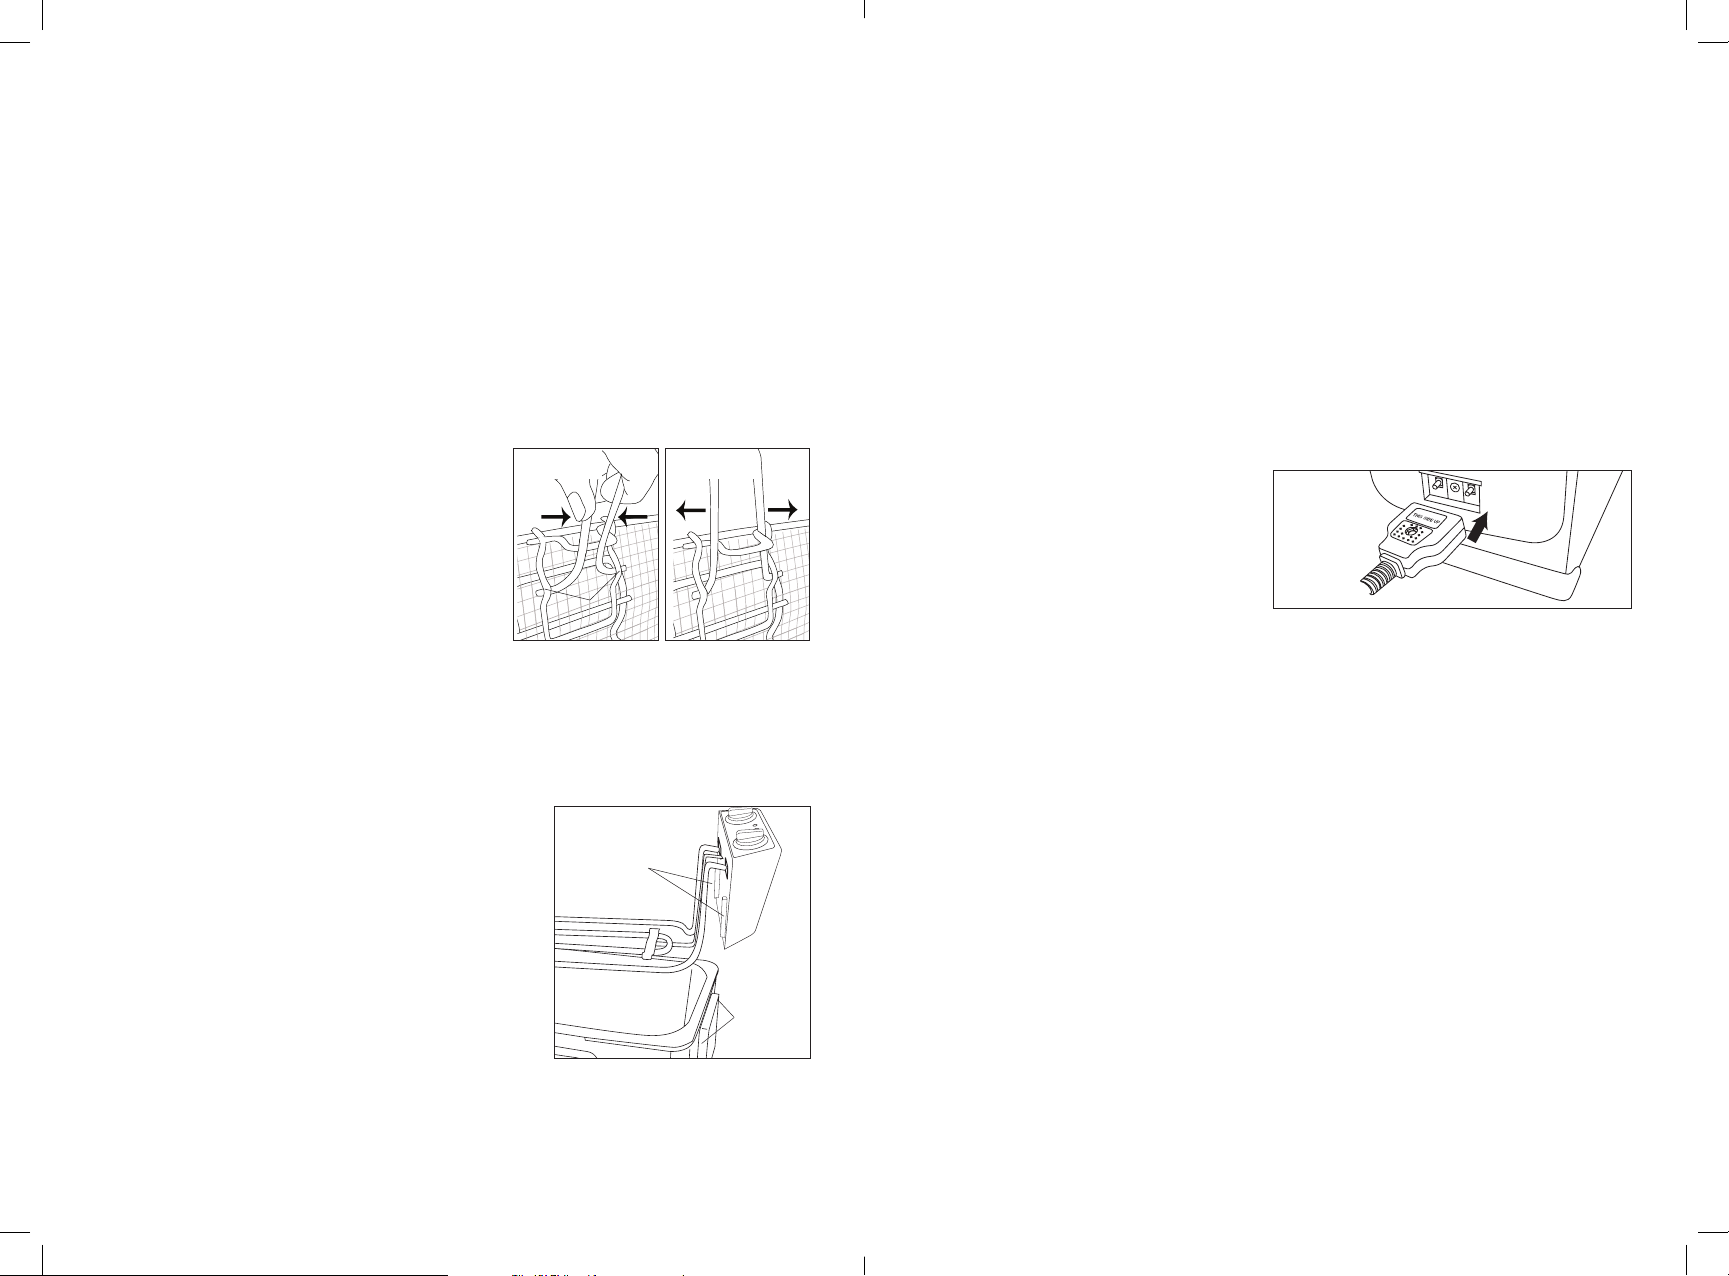
Assembling Frying Basket Handles
1. Your fryer will be shipped with the basket handles in the
storage position. To attach a handle to a frying basket,
hold the arms of the handle inside fry basket as shown.
Gently squeeze the arms of the handle so they t into
the eyelets on the fr ying basket (see Figure 2).
2. Release the arms of the frying basket and push handle
against the back of the frying basket until it locks into
place (see gure 3).
Figure 2 Figure 3
Eyelets
Before Using for the First Time
1. Remove all packing material and labels from the inside and outside of the Deep Fryer. Check that
there is no packaging underneath and around the oil tank and control panel/heater assembly.
2. During rst use of the Deep Fryer, the oil tank and fry basket may emit a slight odor. This is normal.
To avoid this odor, please follow the instructions outlined below.
3. Set the lid and 1 large + 2 small fry baskets aside.
4. Grasp the sides of the control panel/heater assembly rmly and lift up and off the Deep Fryer body
(see Figure 4.) Carefully set control panel/heater assembly aside.
5. Lift the oil tank up and out of the deep fryer body.
6. Wash lid, 3 fry baskets, and oil tank in hot, soapy water.
DO NOT IMMERSE THE CONTROL PANEL /HEATER
ASSEMBLY IN WATER. Wipe control panel/heater assembly
and deep fryer body with a damp cloth. Dry all parts
thoroughly.
7. Inser t oil tank into deep fryer body. Be sure tank is centered
and resting properly on top of the stainless steel body.
8. Attach the control panel/heater assembly. Slide the
2brackets located on the inside wall of the heater assembly
down into the
2 retaining slots on the back of the deep fryer body
(seegure 4). Make sure the brackets are tted securely
inthe 2 slots.
IMPORTANT: The Deep Fryer will not operate if the heater
assemblybrackets are not fully inserted and properly
attached tothe deep fryer body.
9. Fold each fry basket handle over into the basket. (See Figure 3.)
Place 3 folded baskets into the oil tank.
10. Remove detachable cord and place it into the oil tank.
11. Replace lid on top of oil tank. Store until ready to use.
Figure 4
Brackets
Retaining
Slots
Operating Instructions
WARNING! This unit should not be used to boil water.
1. Place the Deep Fryer on a clean, dr y, at, heat-resistant surface such as a table or counter top,
approximately 2 feet from a standard 120V AC electrical outlet.
2. Remove lid and folded fry basket(s).
3. Be sure the oil tank is properly seated inside deep fryer body. Pour liquid cooking oil (corn,
vegetable, peanut, etc.) into the tank. Fill with oil to a level between the MIN and MA X marks.
NOTE: The minimum oil capacity is 3.91 liters (4.13 qt./17 cups). The maximum oil capacity is
4.5liters (4.75 qt./19 cups). (See Figure 4.)
WARNING: Under- or over-lling the oil tank may damage the Deep Fryer and could result in serious
personal injury.
4. To prevent condensation from fogging the viewing window on lid, use a paper towel or napkin to
spread athin layer of cold cooking oil onto inside of viewing window.
5. Depending on the fr ying task, place either the 1 large fry basket or 2 small fry baskets into the oil
tank. When cooking, the bottom of the fry basket(s) will rest on the heater coils.
IMPORTANT: When frying 2 baskets of food, it is best to keep food tastes alike. For instance,
2baskets ofvegetables, 2 baskets of sh, 2 baskets of desser ts.
6. Then position the lid over the basket or baskets with the ltered air outlet away from basket
handles. The single set of cutouts will t over the heater coils. The double set of cutouts in the lid
will t over the fry basket handle(s).
7. Turn the Temperature control dial to “MIN” and the timer dial to OFF.
8. Connect the detachable power cord into the
appliance receptacle, with the “THIS SIDE UP”
topside (see Figure 5.) Make sure the cord is
rmly in place. Then connect the polarized plug to
the wall outlet.
The red POWER light will illuminate.
CAUTION: Do not let the cord hang over
the edge of table or counter.
9. See the Cooking Chart for suggested temperatures and cooking times. Turn the temperature control dial
to the desired cooking temperature and turn the timer dial on toselect the desired cooking time. When
selecting the desired frying time, add an additional 10-15 minutes to the desired frying/cooking time to
account for the pre-heating time.
NOTE: Preheat time may vary between 10-15 minutes.
The green READY light will cycle on and off. When the oil reaches the selected cooking
temperature, thegreen READY light will illuminate steadily.
NOTE: Always turn the timer dial ON and select the desired cooking time in order to ensure that
theunitturns on and begins preheating. The unit will not start to preheat until BOTH the desired
cookingtemperature and cooking time is selected.
NOTE: Allow 10 to 15 minutes for the oil to preheat.
NOTE: Oil may make a “popping” sound inside the Deep Fryer as the oil heats. This is normal.
10. Remove lid and set aside. Wearing an oven mitt, grasp the fry basket handle and lift fry basket out
of the oil. Carefully rest the fr y basket(s) on the back of the oil tank.
CAUTION: Do not touch any interior parts of the Deep Fryer or the oil during use as they are hot!
WARNING! Be careful around hot parts and hot spitting oil. Remember that the oil is actually hotter
than boiling water! Never put hands in the oil. Always keep hands and face away from rising steam or
spitting oil.
11. Carefully place food into the fr y basket(s), being careful not to touch the fr y basket as it may be hot.
Do not overll fry basket with food.
NOTE: Maximum food frying capacity for the large fry basket is 12 cups, almost 4 lbs.
Maximum food frying capacity for the small fry baskets is 4 cups, almost 1.5 lb. per basket.
CAUTION: The fry basket should never be more than 2/3 full of food to be fried.
12. Grasp fr y basket handle and carefully lower fry basket with food into the hot oil. Replace the lid.
13. Set the timer control dial to the desired fry time.
WARNING: This appliance generates heat and escaping steam during use. Use proper precautions
to prevent the risk of burns, res, or other injury to persons or damage to proper ty.
14. As the Deep Fryer cooks the food and the oil cools, the heater coils and the green READY light will
cycle on and off as proper cooking temperature of the oil is maintained. See the Cooking Chart for
sample cooking times and temperatures.
Figure 5
7 6
SO-312096_14406 BELLA 4.5L deep fryer IM_R6.indd 6-7 2016-08-23 9:36 AM
Page 6

15. Allow foods to cook. Gently move the basket from side to side once or twice during cooking to
encourage even browning on all sides. Check the food’s cooking progress through the viewing window.
CAUTION: Do not raise lid during deep frying! Hot oil could spatter out of the Deep Fryer causing
burns orother injuries.
16. One beep will sound when the set time is up.
WARNING: Use caution when opening lid; steam escapes as soon as the lid is opened.
Use oven mitts when handling hot materials.
17. Remove lid and turn food as needed. When food is cooked to desired doneness, using oven mitts,
grasp fry basket handle and lif t fr y basket out of the oil. Carefully rest the fry basket on the back of
the oil tank. Allow cooked foods to drain for 5-10 seconds.
NOTE: To prevent early degradation of the oil, do not add salt or other spices to the food during
frying orwhen the food is draining above the oil.
18. Use the fr y basket handle to lift up and remove fr y basket(s) containing food. DO NOT touch fry
basket wires as they are very hot!
19. Use a heat-resistant long-handled fork or tongs to remove cooked food or pour cooked foods from
fry basket onto absorbent paper towels to soak up excess oil.
20. To deep fry another batch of food, replace lid, allow unit to reheat. When the oil reaches the
selected cooking temperature, the green READY light will illuminate. Replace fry basket(s) into the
oil, turn the timer dial to the desired fry time and continue deep frying.
21. When all cooking is complete, turn the temperature control dial to “MIN” and the timer control dial
to OFF. Finish removing all fried food from the fry basket(s) onto absorbent paper towels.
22. Unplug the polarized plug from the wall outlet, then detach the cord from the appliance receptacle.
23. Replace the lid and allow oil and Deep Fryer to cool.
WARNING! Oil will remain hot for an extended period of time. Be sure all parts of the Deep Fryer
andtheoil have cooled completely before discarding or storing oil and cleaning the unit.
Helpful Hints
Frying
• Never over-ll the fry basket(s) with food. Maximum basket capacity is 2/3 full.
• Maximum food fr ying capacity for the large fry basket is 12 cups, almost 4 lbs. Maximum food
frying capacity for the small fry baskets is 4 cups, almost 1.5 lb. per basket.
• Fry more batches of smaller amounts of food. Best results are obtained when the hot oil can freely
circulate all around the food.
• In general, pre-cooked foods require higher temperatures and less cooking time.
• Cut or sort food into uniform sizes. Cook same-size pieces together so they will be cooked
in the same amount of time.
• Be sure foods are free from ice crystals and excess moisture before fr ying.
Water on the surface of the food can cause the oil to spatter and foam.
• When using a breading, evenly coat the food to be fried. Fine, uniform crumbs stick better than
coarse, uneven ones. Shake off all extra breading to help keep oil clean.
• To prevent contamination of the oil, do not add salt or other spices to the food during frying or
when thefood is draining above the oil.
• Space coated foods so they do not touch while cooking.
• For best results when fr ying doughs or foods dipped in a liquid batter, place the foods into the
basket rst and then lower the fr y basket into the hot oil.
• Always use the fry basket to lift food out of the oil; hook the basket to the rim and allow oil to drain.
Thenremove fried food from the fry basket.
Oil
WARNING! Never, under any circumstances, add water or any other liquid to the oil.
• Never over-ll or under-ll the fryer with oil. The minimum oil capacity is 3.91 liters (4.13 qt./17
cups). Themaximum oil capacity is 4.5 liters (4.75 qt./19 cups). Both the MIN and MAX oil levels are
marked onthe inside of the tank.
WARNING: Under- or over-lling the oil tank may damage the Deep Fr yer and could result in serious
personal injury.
• Always use sunower oil, vegetable oil or corn oil. Never use hard fats, olive oil or oil with a high
water content.
• Never mix different oils together to fr y foods.
• Never use butter or margarine to fry foods.
• When frying sh or seafood, the oil may absorb a “shy” taste or odor. To eliminate transferring
this “shy” taste or odor to other foods, we suggest changing the oil before frying other foods.
Draining and Recycling Oil
WARNING! Be careful around hot parts and hot spitting oil. Remember that the oil is actually hotter
than boiling water! Never put hands in the oil. Always keep hands and face away from rising steam or
spitting oil.
• Oil should be ltered regularly.
• DO NOT pour oil from the Deep Fryer without rst removing fry basket(s), control panel/heater
assembly and tank from the Deep Fryer body.
NOTE: DO NOT pour used oil down any household drain. Discard used oil into a container with a lid
and dispose in garbage.
• Filter the cooled oil through a ne sieve into a wide-neck, air tight, covered container. If necessary,
use a funnel to avoid oil spillage.
NOTE: A coffee lter or piece of clean cotton material can be placed in a colander and used to lter
used oil.
• As oil will absorb food avors and odors, it’s a good idea to label the container with the type of
food the oil was used to cook in. For example: desserts, chicken, sh, etc.
• Store oil in the refrigerator until next use.
Cooking Chart
WARNING! ALWAYS USE A MEAT THERMOMETER TO ENSURE THAT MEAT AND FISH ARE COOKED
THOROUGHLY BEFORE EATING.
The following chart is intended as a guide only. The quantity of food fried at one time may alter the
total cooking time necessary. Remember, frying smaller batches will result in shor ter cooking times
and higher food quality. Turn the timer control dial to the desired fr y time. Adjust fr ying temperature
and times as necessary to suit your taste.
FOOD TEMP COOKING TIME
Mushrooms 340ºF /170ºC 2-5 minutes
Eggplant 340ºF /170ºC 5-7 minutes
Broccoli 356 ºF /180ºC 3-5 minutes
Onion Rings (fresh) 356 ºF /180ºC 3-5 minutes
Onion Rings (frozen) 340ºF /170ºC 5-6 minutes
French Fried Potatoes (fresh)
Blanch 265ºF /130ºC 2-3 minutes
Deep Fry 356ºF /180ºC 3-4 minutes
French Fried Potatoes (frozen) 375ºF /190ºC 3-5 minutes
Chicken Wings 356 ºF /180ºC 8-10 minutes
Chicken Tenders 340ºF /170ºC 6-10 minut es
Chicken Pieces 375ºF /190ºC 13-20 minutes
Chicken Nuggets, frozen 340ºF /170ºC 6- 7 minutes
Shrimp (fresh, thawed) regular or jumbo 340ºF /170ºC 4-8 minutes
Shrimp (frozen) regular or jumbo 375ºF /190ºC 1-4 minutes
PLEASE NOTE:
The USDA recommends that meats such as beef and lamb, etc. should be cooked to an internal
temperature of 145ºF/63ºC. Pork should be cooked to an internal temperature of 160ºF/71ºC and poultry
products should be cooked to an internal temperature of 170ºF/77ºC - 180ºF/82ºC to be sure any harmful
bacteria has been killed. When reheating meat/poultry products, they should also be cooked to an
internal temperature of 165ºF/74ºC.
NOTE: Frozen foods may require different cooking times and temperatures; follow package directions.
Use 375ºF/191ºC for all foods that have package instructions for a higher temperature and adjust times
as necessary.
IMPORTANT: Remove ice crystals from frozen foods before placing in the hot oil.
CAUTION: NEVER ll any fry basket more than 2/3 full.
9 8
SO-312096_14406 BELLA 4.5L deep fryer IM_R6.indd 8-9 2016-08-23 9:36 AM
Page 7

Recipes
User Maintenance Instructions
This appliance requires little maintenance. It contains no user-serviceable par ts. Any servicing
requiring disassembly other than cleaning must be performed by a qualied appliance repair
technician.
Care & Cleaning Instructions
WARNING! Allow the fryer to cool fully before emptying the oil and cleaning the appliance.
1. Make sure your Deep Fryer is unplugged and the lled oil tank has cooled completely.
2. Remove the lid.
3. Remove the fry basket from the oil tank.
4. Grasp control panel/heater assembly and gently pull up to remove. Use caution when removing
the control panel/heater assembly as oil may splash out of the tank. Wipe control panel/heater
assembly witha damp cloth and dry completely. Handle the heater coils and assembly with care.
CAUTION: Do not immerse the control panel/heater assembly in water. Doing so could permanently
damage the Deep Fryer.
5. Grasp rim of oil tank and carefully lift tank out of deep fryer body. Carefully strain the oil from the
tank into a suitable container. (See Draining and Recycling Oil for complete details.)
NOTE: It is best to work over a sink or garbage can in case of any spillage.
6. Oil Tank Cleaning: Soak in hot, soapy water. Use a stiff nylon brush to remove stubborn or burned-on
residue. Do not use harsh or abrasive cleaning products they may damage the surface of the tank.
7. The oil tank, lid and 3 fry baskets are dishwasher safe.
8. Wash deep fryer body in hot, soapy water by hand. Dry all parts thoroughly.
IMPORTANT: Make sure the lid and oil tank are completely dry af ter washing and before use.
Reassemble Deep Fryer as described in Before Using for the First Time.
Storing Instructions
1. Make sure all par ts are clean and dr y before storing.
2. Never store Deep Fr yer while it is hot or wet.
3. To store, assemble clean Deep Fryer, placing the oil tank into the stainless steel body.
4. Slide the control panel/heater assembly into position.
5. Fold each fryer basket handle over into the basket. (See Figure 3.)
Place all 3 folded baskets into theoiltank to store.
6. Remove detachable cord and place it into the oil tank.
7. Cover with the lid.
8. Store appliance in its box or in a clean, dry place.
Trouble Shooting
Deep Fryer does not operate
• Make sure the detachable power supply cord is properly attached to the receptacle.
• Make sure the control panel/heater assembly is correctly tted. The Deep Fryer will not operate if
theheater assembly brackets are not fully inserted and properly attached to the deep fryer body.
Oil temperature is too high
• Not enough oil in oil tank. Unplug Deep Fryer and check oil level. Oil level should be bet ween MIN
andMAX ll lines. Add oil as necessary.
Oil bubbles over
• Too much oil in Deep Fryer oil tank. Never ll with oil above the MAX ll line.
• Too much food. Fry smaller quantities at one time.
• Food is too wet. Pat dry with paper towels before placing in fryer basket.
Food tastes greasy or not crisp
• The wrong type of oil has been used. Use a high-quality oil such as vegetable, canola or corn.
• Too much food cooked at the same time. Cook smaller amounts of food, especially frozen foods.
• Frying temperature is too low. Allow unit to preheat or reheat to the desired temperature prior to
use.
Food or Deep Fryer emits unpleasant odors
• Oil has deteriorated. Change oil as needed.
• Used oil absorbs food odors. Do not fry desserts in oil that has been used to fry sh.
Fritto Misto di Verdura (Mixed Fried Vegetables)
An assortment of crispy bite-size pieces of vegetables, dipped in batter and deep-fried.
Serve in paper fry cones (also called “frites cones”) for a fun presentation.
Any vegetables may be substituted in any quantities to your liking. Other vegetables that often
appear in fritto misto include: cauliower, artichoke hearts, garbanzo beans, and fennel.
The large fry basket can accommodate approximately 12 cups of breaded vegetables.
Serves 12
• 1 lb. (2 cups) thin asparagus, stalks trimmed
• 1/2 lb. (2 cups) green beans, ends trimmed
• 1/2 lb. (2 cups) broccoli, cut into thin spears
• 2 zucchini, (2 cups) cut into
1/2-inchthickrounds
• 1 bell pepper, (1 cup) 1/2-inch strips
• 1 (2 cups) onion, cut into rings and
soakedinwater for 1 hour
• 1 lemon, (1 cup) seeds
and skin removed, cutinto thin rounds
• 3 cups buttermilk
• 1 cup cornstarch
• 2 cups all purpose our
(may substitute 1 cup all-purpose
+ 1 cup semolina our)
• 1 tablespoon garlic powder
• 1 tablespoon oregano
• 4 – 4.5 L (135 to 152 oz) canola oil,
for frying
• Kosher or sea salt, to taste
1. Preheat oil to 356 °F (180 °C). Use the large fry basket. Turn the timer dial on and select
thedesired frying time (Recommended frying time for this recipe is 3 minutes). When
selectingthe desired frying time, add and an additional 10-15 minutes to the desired
frying/cooking time to account for thepre-heating time. Preheat time may vary between
10-15 mi nute s.
2. In a large bowl, mix trimmed vegetables and lemon rounds together well.
3. Add buttermilk, mix well to coat.
4. In a large bowl, using a fork, stir the corn starch and our.
5. It is easiest to dust vegetables in smaller batches. Remove 1/4 of the vegetables to a
large shallow pan. Sprinkle with dry our mixture, toss with hands to coat and pat lightly
removeexcess.
6. Drop the dusted vegetables and lemons into the hot oil.
7. Watch the browning process through the viewing window.
8. When the timer sounds, check fried vegetables. When golden brown and crispy,
remove to a plate lined with paper towels or brown paper bags to drain.
9. Season the Fritto Misto generously with salt.
10. Serve immediately with Spicy Yogurt Dipping Sauce.
Spicy Yogurt Dipping Sauce
• 2 cups Greek yogurt
• 4 tablespoons white horseradish
• 2 teaspoons Sriracha hot chili sauce
1. Combine ingredients in a small serving bowl.
2. Mix well.
• 1/2 teaspoon cayenne pepper
• Salt and freshly ground black pepper to
taste
CAUTION: In order to avoid the risk of an electric shock, never try to repair the unit yourself.
Take it to an authorized service station for examination and repair.
11 10
SO-312096_14406 BELLA 4.5L deep fryer IM_R6.indd 10-11 2016-08-23 9:36 AM
Page 8

Recipes Recipes
Deep Fried Spicy Chix Wings
Serves 3 to 5
• 2 – 3 lbs. chicken wings (6 to 10)
• 2 cups all-purpose our
• 4 – 4.5 L (135 to 152 oz)
canola oil, for frying
Spicy Chix Rub
• 1 tablespoon seasoned salt
• 1 tablespoon crushed red pepper akes
• 2 teaspoons cayenne pepper
• 2 teaspoons poultry seasoning
Spicy Chix Batter
• 2 eggs
• 2 tablespoons Sriracha hot chili sauce
1. Prepare spicy chix rub. Whisk together seasoned salt, red pepper akes, cayenne pepper
and poultry seasoning.
2. Rinse chix wings and pat dry.
3. Cut all chix wings into ats and drums at the joint.
NOTE: Freeze wing tips for soups and stocks.
4. Sprinkle the chix wings parts evenly with the spicy chix rub. Cover and chill for 1 hour.
5. Prepare spicy chix batter. Whisk eggs, hot sauce, red pepper akes, and cayenne pepper
inamedium mixing bowl.
6. Preheat oil to 340ºF. Turn the timer dial on and select the desired frying time
(Recommended frying time for this recipe is 8 minutes). When selecting the desired frying
time, add and an additional 10-15 minutes to the desired frying/cooking time to account for
the pre-heating time. Preheat time may vary between 10-15 minutes.
7. Empty the our into a shallow pan or pie plate.
8. Dredge chicken wings into the spicy chix batter; then into the our.
9. Place chix wings into the hot oil.
10. Turn chix wings occasionally. When the timer sounds, check fried chix wings.
Remove golden brown and crispy chix wings to a plate lined with paper towels
or brown paper bags to drain.
11. Sprinkle fried chix wings with Sriracha hot chili sauce for extra heat.
• 1 tablespoon crushed red pepper akes
• 2 teaspoons cayenne pepper
Fish Tacos with Chipotle Cream
Serves 8 -12
• 2 - 3 lbs. fresh sh : mahi mahi, tilapia, cod
(skinned, boned and cleaned) cut into strips
(Hint: As sh varies in density, cook times
may vary. Using both small fry baskets
to fry 2 types of sh, will allow individual
times for deep frying perfection.)
• 3 eggs, lightly beaten
1. Preheat oil to 375ºF. Turn the timer dial on and select the desired frying time
(Recommended frying time for this recipe is 3 minutes). When selecting the desired frying
time, add and an additional 10-15 minutes to the desired frying/cooking time to account for
the pre-heating time. Preheat time may vary between 10-15 minutes.
2. Prepare the sh. Cut into strips. Combine salt and ancho chili powder in a small bowl.
Season the sh lightly.
3. Dip sh strips in egg. Coat well.
4. Drop egg-coated sh into the plate of panko bread crumbs. Press the sh rmly into the
panko until all sides of the sh strip are well coated.
5. Deep-fry sh in small batches.
6. When the timer sounds, check sh. Remove golden brown and crispy fried sh to a plate
lined with paper towels or brown paper bags to drain.
7. Keep sh warm until ready to serve.
8. Warm tortillas. Assemble tacos with fried sh, pico de gallo, fresh guacamole,
shredded red cabbage.
9. Drizzle each taco with chipotle cream.
Chipotle Cream
• 1 cup sour cream
• 1 cup Greek yogurt
• 2 chipotles* in adobo, plus 2 tablespoons of
adobo sauce (*add more or less to taste)
1. Using a blender, slowly blend chipotles, then puree until smooth.
2. Add the sour cream, yogurt, adobo sauce and lemon juice. Process until the mixture is
creamy.
3. Add salt to taste.
4. Refrigerate until ready to use.
• 3 cups panko bread crumbs
• 2 teaspoons Kosher salt
• 2 tablespoons ancho chili powder
• 4 – 4.5 L (135 to 152 oz) canola oil, for frying
• 16 - 24 tortillas, corn or our
• 3 limes, cut into wedges for garnish
• 1/2 lemon, juiced
• Kosher salt
13 12
SO-312096_14406 BELLA 4.5L deep fryer IM_R6.indd 12-13 2016-08-23 9:36 AM
Page 9

Limited TWO-YEAR Warranty
SENSIO Inc. hereby warrants that for a period of TWO YEARS from the date
of purchase, this product will be free from mechanical defects in material and
workmanship, and for 90 days in respect to non-mechanical parts. At its sole
discretion, SENSIO Inc. will either repair or replace the product found to be
defective, or issue a refund on the product during the warranty period.
The warranty is only valid for the original retail purchaser from the date of initial
retail purchase and is not transferable. Keep the original sales receipt, as proof
of purchase is required to obtain warranty validation. Retail stores selling this
product do not have the right to alter, modify, or in any way revise the terms and
conditions of the warranty.
EXCLUSIONS:
The warranty does not cover normal wear of parts or damage resulting from
any of the following: negligent use of the product, use of improper voltage or
current, improper routine maintenance, use contrary to the operating instructions,
disassembly, repair, or alteration by anyone other than qualied SENSIO Inc.
personnel. Also, the warranty does not cover Acts of God such as re, oods,
hurricanes, or tornadoes.
SENSIO Inc. shall not be liable for any incidental or consequential damages
caused by the breach of any express or implied warranty. Apart from the extent
prohibited by applicable law, any implied warranty of merchantability or tness
for a particular purpose is limited in time to the duration of the warranty. Some
states, provinces or jurisdictions do not allow the exclusion or limitation of
incidental or consequential damages, or limitations on how long an implied
warranty lasts, and therefore, the above exclusions or limitations may not apply to
you. The warranty covers specic legal rights which may vary by state, province
and/or jurisdiction.
HOW TO OBTAIN WARRANTY SERVICE:
You must contact Customer Service at our toll-free number: 1-866-832-4843.
A Customer Service Representative will attempt to resolve warranty issues
over the phone. If the Customer Service Representative is unable to resolve the
problem, you will be provided with a case number and asked to return the product
to SENSIO Inc. Attach a tag to the product that includes: your name, address,
daytime contact telephone number, case number, and description of the problem.
Also, include a copy of the original sales receipt. Carefully package the tagged
product with the sales receipt, and send it (with shipping and insurance prepaid)
to SENSIO Inc.’s address. SENSIO Inc. shall bear no responsibility or liability for
the returned product while in transit to SENSIO Inc.’s Customer Service Center.
CONSIGNES DE SÉCURITÉ
IMPORTANTES
Lorsqu’on utilise des appareils électriques, certaines mesures de sécurité
élémentaires doivent être respectées :
1. LIRE TOUTES LES DIRECTIVES.
2. Ne pas toucher les surfaces chaudes. Utiliser les poignées ou les boutons.
Utiliser des gants de cuisson ou des poignées.
3. An de prévenir tout risque d’électrocution, ne pas immerger le cordon,
lache ou l’appareil dans l’eau ou dans tout autre liquide.
4. Cet appareil n’est pas destiné à être utilisé par des personnes (y compris des
enfants) aux capacités physiques, sensorielles ou mentales réduites ou n’ayant
pas les connaissances et l’expérience nécessaires, sauf si elles sont supervisées
ou si les personnes responsables de leur sécurité leur ont donné des instructions.
5. Une supervision étroite est de rigueur quand l’appareil est utilisé par des
enfants ou près d’eux.
6. Débrancher l’appareil de la prise murale lorsqu’il n’est pas utilisé et avant
le nettoyage. Laisser refroidir l’appareil avant d’installer ou de retirer des
pièces et avant le nettoyage.
7. Ne pas utiliser un appareil électrique dont le cordon ou la che est
endommagé ni un appareil défectueux ou endommagé d’une quelconque
façon. On doit le faire examiner, réparer ou faire faire un ajustement
mécanique ou électrique par un technicien qualié.
8. L’utilisation d’accessoires non recommandés par le fabricant de l’appareil
peut entraîner des blessures.
9. Ne pas utiliser à l’extérieur.
10. Ne pas laisser le cordon pendre d’un bord de table ou d’un comptoir,
nientrer en contact avec une surface chaude.
11. Ne pas placer sur ou à proximité d’un élément de cuisinière électrique
ouàgaz ni dans un four chaud.
12. Faire preuve d’une extrême prudence en déplaçant l’appareil s’il contient
del’huile chaude ou d’autres liquides chauds.
13. Toujours xer la che à l’appareil en premier lieu. Brancher ensuite la che du
cordon d’alimentation à la prise murale. Pour débrancher l’appareil, tourner le
bouton de réglage de la température et le cadran de réglage de la minuterie sur
la position OFF (arrêt). Retirer ensuite la che de la prise murale.
14. Ne pas utiliser l’appareil à des ns autres que celles pour lesquelles il a été conçu.
15. Faire preuve d’une extrême prudence en déplaçant la friteuse si elle contient
de l’huile chaude.
16. S’assurer que la poignée est correctement assemblée au panier à friture et
bien xée en place. Consulter les instructions d’assemblage détaillées.
POUR USAGE DOMESTIQUE
SEULEMENT
CONSERVER CES CONSIGNES
14
SO-312096_14406 BELLA 4.5L deep fryer IM_R6.indd 14-15 2016-08-23 9:36 AM
15
Page 10

N’ENTORTILLEZ PAS LE CORDON!
GARDEZ HORS DE
PORTÉE DES ENFANTS!
AUTRES CONSIGNES DE
SÉCURITÉ IMPORTANTES
MISE EN GARDE, SURFACES CHAUDES : Cet appareil produit de la chaleur et
de la vapeur lorsqu’il fonctionne. Prendre les précautions d’usage an de prévenir
les risques de brûlures, d’incendie ou autres blessures et des dommages matériels.
MISE EN GARDE : Cet appareil devient chaud pendant son utilisation et demeure
chaud pendant quelque temps lorsqu’il est éteint. Toujours utiliser des gants
isolants lorsqu’on manipule des objets chauds et laisser aux parties métalliques
le temps de refroidir avant de nettoyer l’appareil. Ne placer aucun objet sur le
dessus de l’appareil lorsqu’il est en marche ou lorsqu’il est chaud.
1. Toutes les personnes qui utilisent cet appareil doivent lire le manuel du
propriétaire et le comprendre avant d’utiliser cet appareil ou de le nettoyer.
2. La che de cet appareil doit être branchée dans une prise murale de
120Vc.a.seulement.
3. Si l’appareil montre des signes de défectuosité durant l’utilisation, ledébrancher
immédiatement. Ne pas utiliser un appareil défectueux ou tenter de le réparer.
4. Ne jamais laisser cet appareil en marche sans surveillance.
5. Ne pas immerger le cordon d’alimentation amovible dans un liquide. Si le
cordon tombe dans l’eau ou un autre liquide, LE JETER IMMÉDIATEMENT et
le remplacer par un cordon neuf. Si le cordon d’alimentation à cet appareil est
endommagé, il doit être remplacé en contactant le Service à la clientèle.
6. Garder le cordon hors de la portée des enfants pour éviter le risque de choc
électrique et de suffocation.
7. Utiliser la poignée pour soulever et abaisser le panier à friture. Toujours soulever
complètement le panier à friture de l’huile chaude et laisser les aliments cuits
reposer pendant 5 à 10 secondes avant d’enlever les aliments du panier.
8. Ne pas utiliser cet appareil si la fenêtre d’observation est ssurée.
9. Assécher les aliments humides avant de les mettre dans l’huile. Avant de frire
des aliments surgelés, enlever toute glace en excès, puisque que cela pourrait
cause des éclaboussures d’huile chaude.
10. Toujours garder le couvercle fermé lorsque la friteuse frit des aliments.
11. Ne pas obstruer l’évent de sortie d’air ltré sur le dessus du couvercle.
Éviter lavapeur qui s’échappe de la sortie d’air ltré durant l’utilisation.
12. Maintenir l’appareil à au moins 10 cm (4 po) des murs ou de tout autre objet
pendant son fonctionnement. Ne placer aucun objet sur l’appareil pendant
qu’il fonctionne. Placer l’appareil sur une surface plane résistante à la chaleur.
13. S’assurer que le réservoir d’huile est rempli d’huile au moins jusqu’au niveau
marqué MIN. Ne pas faire fonctionner l’appareil sans huile ou avec une quantité
d’huile insufsante. Ne pas dépasser la marque MAX du réservoir avec de l’huile.
AVERTISSEMENT : Si le réservoir est trop ou pas assez rempli d’huile, la friteuse
pourrait être endommagée et de graves blessures pourraient se produire.
14. Toujours verser de l’huile dans le réservoir avant de brancher et de chauffer
l’appareil. Ne jamais verser d’huile dans un réservoir chauffé.
15. S’assurer qu’il n’y a pas d’objets inammables sur l’appareil ou près de celuici. Si l’huile prend en feu, débrancher l’appareil et replacer le couvercle.
Ne jamais utiliser d’eau pour éteindre le feu.
16. Ne pas faire fonctionner cet appareil si le couvercle et le réservoir ne sont pas
complètement secs.
17. Il n’est pas recommandé de déplacer la friteuse lorsqu’elle contient de l’huile
chaude. La laisser refroidir avant de la déplacer.
18. Ne pas utiliser cette friteuse pour faire bouillir de l’eau.
19. Avant de brancher le cordon, vérier que le bouton de réglage de la
température est à MIN et que le cadran de réglage de la minuterie est à 0.
20. Lorsque le cordon est branché dans une prise électrique, les voyants
POWER (Alimentation) et READY (Prêt) s’allument. Pour faire chauffer l’huile,
positionner le bouton de réglage à la température souhaitée et réglez le
cadran de la minuterie sur le temps de cuisson désiré. Le voyant vert READY
(Prêt) s’éteint. Lorsque l’huile atteint la température souhaitée, le voyant vert
READY (Prêt) s’allume. Ajuster ensuite le cadran de réglage de la minuterie à
la durée de cuisson souhaitée.
IMPORTANT: Toujours tourner le cadran de la minuterie sur le temps de
cuisson désiré, an que l’appareil se mette en marche et commence le
préchauffage. L’unité ne commencera pas à préchauffer jusqu’à ce que la
température de cuisson désirée et le temps de cuisson soient sélectionnés.
Remarque sur la che
Cet appareil est muni d’une che polarisée (une lame plus large que l’autre).
An d’éviter tout risque d’électrocution, on ne peut brancher la che que
dans un seul sens. Si la che ne s’insère pas complètement dans la prise, on
doit la tourner dans l’autre sens. Si cela ne fonctionne toujours pas, on doit
communiquer avec unélectricien qualié. On ne doit en aucun cas modier la
che soi-même.
Remarque sur le cordon (instructions sur le cordon amovible)
MISE EN GARDE : Le cordon court amovible est fourni an de réduire le risque
de blessures provoqué par un enchevêtrement ou une chute du à un cordon
d’alimentation plus long.
Le cordon est conçu pour se détacher rapidement et doucement de la friteuse,
pour éviter que l’appareil se renverse lorsqu’une personne tire accidentellement
surle cordon. Le cordon détachable est conçu pour être utilisé uniquement avec
cettefriteuse. Ne pas tenter de l’utiliser avec un autre appareil.
L’HUILE BOUILLANTE CONTENUE DANS LA FRITEUSE
PEUT CAUSER DES BRÛLURES SÉRIEUSES SI LA
FRITEUSE TOMBE D’UN COMPTOIR. NE PAS LAISSER
LE CORDON PENDRE DU BORD D’UN COMPTOIR;
DES ENFANTS POURRAIENT LE SAISIR OU CELUI-CI
POURRAIT S’ENROULER AUTOUR
DE L’UTILISATEUR. NE PAS UTILISER L’APPAREIL
AVECUNE RALLONGE.
Avertissement de migratin de plastants
MISE EN GARDE : An d’éviter la migration de plastiants vers le ni de comptoirs,
de tables ou de tout autre meuble, placer des sous-verres faits de matière non
plastique ou des napperons entre l’appareil et la surface du comptoir ou de la table.
Si cette consigne n’est pas respectée, le ni du comptoir ou de la table noircira et
s’en suivront des ternissures permanentes ou des taches indélébiles.
Alimentation Électrique
Si le circuit électrique est surchargé parce qu’il doit alimenter d’autres appareils
en plus du nouvel appareil, ce dernier ne fonctionnera pas correctement. Il est
conseillé de faire fonctionner l’appareil sur un circuit électrique distinct.
17 16
SO-312096_14406 BELLA 4.5L deep fryer IM_R6.indd 16-17 2016-08-23 9:36 AM
Page 11

Connaître sa de friteuse de 4,5 L à trois paniers
L’appareil peut différer légèrement de l’illustration.
Figure 1
Couvercle
Poignée du couvercle
Sortie d’air ltré
3 poignées
de panier
à friture
2 petits paniers
à friture
Boîtier en acier inoxydable
Poignées du boîtier
de friteuse
Pieds antidérapants (non
illustrés)
Tableau
de commande
Voyant D’ALIMENTATION
Bouton de
réglage de la
température
rouge (Power)
°F
375
350
325
300
MIN
POWER READY
MAX
MIN
Voyant vert
READY (Prêt)
min
30
25
Bouton de réglage de la température
• Réglage de la température pour obtenir une friture parfaite
• Températures de friture allant de 150 ºC à 190 ºC (300 ºF à 375 ºF)
Cadran de réglage de la minuterie de 30 minutes
• Une fois le bouton de réglage de la température ajusté, tournez le cadran de la minuterie sur ON
Fenêtre
d’observation
(Marche) et sélectionnez le temps de friture .
• Lors de la sélection du temps de cuisson désiré pour la friture, ajouter 10 à 15 minutes au temps
defriture/cuisson désiré pour tenir compte du temps de pré-chauf fage.
REMARQUE : Le temps de préchauffage peut varier entre 10 et 15 minutes.
• Une fois la température et le temps de cuisson de la friture sélectionnés, la friteuse commencera
àchauffer l’huile.
REMARQUE : Cet appareil ne se mettra pas en marche et ne commencera pas à préchauffer à moins
quelecadran de la minuterie ne soit activé et le temps de cuisson désiré sélectionné .
1 grand panier
à friture
• Un signal sonore retentira lorsque la durée dénie sera écoulée.
• Vérier la coloration et la cuisson des aliments.
REMARQUE : Toujours tourner le cadran de la minuterie sur le temps de cuisson désiré, an que
Ensemble
tableau de
commande/
élément
chauffant
Serpentins
d’élément
chauffant
Réservoir d’huile
amovible
l’appareil se mette en marche et commence le préchauffage. L’unité ne commencera pas à préchauffer
jusqu’à ce que la température de cuisson désirée et le temps de cuisson soient sélectionnés.
IMPORTANT : Dès que la minuterie retentit, la friteuse s’éteint automatiquement. Si tous les aliments sont
frits, tourner le bouton de réglage de la température sur MIN et le cadran de réglage de la minuterie sur 0.
Assemblage de la poignée de panier à friture
1. Lors de l’expédition, les poignées de panier sont placées
Figure 2 Figure 3
en position de rangement. Pour xer une poignée à un
panier de friture, tenir les montants à l’intérieur de ce
dernier comme sur l’illustration. Comprimer doucement
les bras de la poignée, an qu’ils s’emboîtent dans les
oeillets sur le panier à friture. Voir Figure 2.
2. Les relâcher et pousser la poignée contre le dos
du panier de friture jusqu’à ce qu’elle s’enclenche
(sereporter à la gure 3).
œillets
Avant d’utiliser l’appareil pour la première fois
1. Retirer tous les matériaux d’emballage et les étiquettes à l’intérieur et à l’extérieur de la friteuse. Vérier qu’il n’y
a pas d’emballage sous et autour du réservoir d’huile et de l’ensemble tableau de commande/élément chauffant.
2. Lors de la première utilisation de la friteuse, il se peut qu’une légère odeur se dégage du réservoir d’huile
Cordon
d’alimentation
amovible
Fiche polarisée
Cadran
0
5
20
de réglage
de la minuterie
de 30 minutes
10
15
et du panier de friture. Ce phénomène est normal. Pour l’éviter, suivre les instructions ci-dessous.
3. Mettre de côté le couvercle, le grand panier et les deux petits paniers de friture.
4. Saisir fermement les côtés de l’ensemble tableau de commande/élément chauffant, puis soulever et
sortir l’ensemble du boîtier de la friteuse (Voir Figure 4.) Mettre l’ensemble tableau de commande/
élément chauffant soigneusement de côté.
5. Soulever le réservoir d’huile et le sor tir du boîtier de la friteuse.
6. Laver le couvercle, les trois paniers de friture et le réservoir d’huile à l’eau chaude savonneuse.
NE PAS IMMERGER L’ENSEMBLE TABLEAU DE COMMANDE/ÉLÉMENT CHAUFFANT DANS L’EAU.
Essuyer l’ensemble tableau de commande/élément chauffant et le boîtier de la friteuse avec un
chiffon humide. Bien sécher toutes les pièces.
7. Insérer le réservoir d’huile dans le boîtier de la friteuse. S’assurer que le réservoir en centré et repose
correctement sur le dessus du boîtier en acier inoxydable.
8. Fixer l’ensemble tableau de commande/élément chauffant.
Figure 4
Faire glisser les 2 languettes situées sur le côté intérieur de
l’ensemble d’élément chauffant dans les 2 fentes de retenue sur
Attaches
l’arrière du boîtier de la friteuse (voir Figure 4). S’assurer que les
attaches sont insérées de façon sécuritaire dans les deux fentes.
IMPORTANT : La friteuse ne fonctionnera pas si les attaches de
l’ensemble d’élément chauffant ne sont pas entièrement insérées
et correctement xées au boîtier de la friteuse.
9. Plier la poignée du panier à friture au-dessus et à l’intérieur
dupanier. (Voir Figure 3.) Installer le panier replié dans le réservoir
d’huile pour le rangement.
10. Replacer le couvercle sur le dessus du réservoir d’huile.
Rangerjusqu’à la prochaine utilisation.
19 18
Fentes de
retenue
SO-312096_14406 BELLA 4.5L deep fryer IM_R6.indd 18-19 2016-08-23 9:36 AM
Page 12

Instructions d’utilisation
AVERTISSEMENT ! Cette unité ne devrait pas être utilisée pour faire bouillir de l’eau.
1. Installer la friteuse sur une surface propre, sèche, plane et résistante à la chaleur, comme une table
ouuncomptoir, à environ 60 cm (2 pi) d’une prise électrique standard de 120 V c.a.
2. Retirer le panier et le ou les paniers de friture pliés.
3. S’assurer que le réservoir d’huile est correctement positionné dans le boîtier de la friteuse.
Verser de l’huile à cuisson liquide (maïs, végétale, arachide, etc.) dans le réservoir.
Remplir d’huile à un niveau entre les marques MIN et MAX.
REMARQUE : La capacité d’huile minimum est de 3.91 litres (4.13 pintes/139.6 oz).
La capacité d’huile maximum est de 4.5 litres (4.75 pintes/152.16 oz). (Voir Figure 4.)
AVERTISSEMENT : Si le réservoir est trop ou pas assez rempli d’huile, la friteuse pourrait être
endommagée et de graves blessures pourraient se produire.
4. Pour éviter la condensation d’embuer la fenêtre d’obser vation sur le couvercle, utiliser un essuie-tout
ouune serviette en papier pour étendre une mince couche d’huile de cuisson froide sur l’intérieur de
la fenêtre d’observation.
5. En fonction du volume d’aliments à frire, placer le grand panier ou les deux petits dans le réservoir
d’huile. Lors de la cuisson, le fond des paniers repose sur les résistances chauffantes.
IMPORTANT : Lorsque deux paniers sont employés, il est préférable de frire des aliments ayant des goûts
approchants (p. ex. deux paniers de légumes, deux paniers de poisson, deux paniers de desserts).
6. Placer ensuite le couvercle sur le ou les paniers, la sortie d’air ltré à l’opposé des poignées.
L’ensembleunique de découpes s’adapte sur les résistances chauffantes. Le double ensemble
dedécoupes du couvercle s’adapte sur la ou les poignées de panier.
7. Tourner le bouton de réglage de la température sur MIN et le cadran de réglage de la minuterie
sur OFF (Arrêt).
8. Brancher le cordon d’alimentation amovible à
la prise de l’appareil, en orientant l’indication
«THISSIDE UP» vers le haut. (Voir Figure 5.)
S’assurer que le cordon est fermement en place.
Ensuite, brancher la che polarisée dans la prise
murale. Le voyant d’alimentation rouge s’allumera.
MISE EN GARDE : Ne pas laisser le cordon
pendre d’un bord de table ou d’un comptoir.
9. Consulter la table de cuisson pour connaître les durées de cuisson. Régler le bouton de réglage de
température à la température désirée et réglez le cadran de la minuterie sur le temps de cuisson
désiré. Lors de la sélection du temps de cuisson désiré pour la friture, ajouter 10 à 15 minutes au
temps de friture/cuisson désiré pour tenir compte du temps de pré-chauffage.
REMARQUE : Le temps de préchauffage peut varier entre 10 et 15 minutes.
Le voyant vert READY (Prêt) clignote. Lorsque l’huile atteint la température de cuisson sélectionnée,
ilreste allumé.
REMARQUE : Toujours tourner le cadran de la minuterie sur le temps de cuisson désiré, an
que l’appareil se mette en marche et commence le préchauffage. L’unité ne commencera pas
à préchauffer jusqu’à ce que la température de cuisson désirée et le temps de cuisson soient
sélectionnés.
REMARQUE : Prévoir de 10 à 15 minutes pour le préchauffage de l’huile.
REMARQUE : L’huile produit un crépitement lorsqu’elle est chauffée dans la friteuse. Ce bruit est normal.
10. Ouvrir le couvercle et le mettre de côté. À l’aide d’un gant de cuisson, saisir la poignée du panier à
friture et soulever le panier à friture pour le retirer de l’huile. Déposer avec précaution le panier à
friture sur l’arrière du réservoir d’huile.
MISE EN GARDE : Lorsque la friteuse est en cours d’utilisation, éviter de toucher aux pièces
intérieures ouà l’huile, car elles sont très chaudes !
AVERTISSEMENT ! Faire preuve de prudence lors de la manipulation de pièces chaudes et lorsqu’il
y a un risque d’éclaboussure d’huile bouillante. Se rappeler que l’huile est beaucoup plus chaude
que l’eau bouillante! Ne jamais plonger la main l’huile. Toujours tenir les mains et le visage à
distance de la vapeur et des éclaboussures d’huile.
11. Placer la nourriture avec soin dans le panier à friture, en s’assurant de ne pas toucher au panier,
quipourrait être très chaud. Éviter de trop remplir le panier à friture avec des aliments.
REMARQUE: Le volume de friture maximum du grand panier est de 12 tasses d’aliments, soit près
de1,8kg (4 lb). Le volume de friture maximum de chaque petit panier est de 4 tasses d’aliments,
soit près de 0,7 kg (1,5 lb).
AVERTISSEMENT : Ne jamais trop remplir le paniers à friture avec des aliments. Ils ne peuvent être
remplis qu’aux 2/3 de leur capacité.
Figure 5
12. Saisir la poignée du panier à friture et l’abaisser avec précaution dans l’huile chaude.
Remettre le couvercle.
13. Ajuster le cadran de réglage de la minuterie sur la durée de cuisson souhaitée.
AVERTISSEMENT : Cet appareil produit de la chaleur et de la vapeur lorsqu’il fonctionne.
Prendre les précautions d’usage an de prévenir les risques de brûlures, d’incendie ou autres
blessures et des dommages matériels.
14. Lorsque la friteuse cuit la nourriture et que l’huile refroidit, les serpentins de l’élément chauffant
et le témoin de Prêt verte s’allumeront et s’éteindront, an de maintenir la température de cuisson voulue.
Consulter la table de cuisson pour obtenir des exemples de durées et de températures de cuisson.
15. Laisser cuire la nourriture. Déplacer doucement le panier d’un côté à l’autre une ou deux fois
pendant la cuisson pour obtenir un brunissement uniforme de la nourriture. Vérier la cuisson des
aliments à travers la fenêtre d’obser vation.
MISE EN GARDE : Ne jamais soulever le couvercle en cours de friture! De l’huile chaude pourrait
jaillir de la friteuse et causer des brûlures ou d’autres blessures.
16. Un signal sonore retentira lorsque la durée dénie sera écoulée.
AVERTISSEMENT : Faire preuve de prudence lors de l’ouver ture du couvercle; de la vapeur
s’échappe de l’appareil aussitôt que le couvercle est ouvert. Utiliser des gants de cuisson pour
manipuler des objets chauds.
17. Retirer le couvercle et retourner la nourriture au besoin. Lorsque le degré de cuisson désiré est
atteint, saisir la poignée du panier à friture et le soulever au-dessus de l’huile. Déposer avec
précaution le panier à friture sur l’arrière du réservoir d’huile. Laisser l’huile s’égoutter de la
nourriture cuite pendant5à10secondes.
REMARQUE : An de prévenir une dégradation prématurée de l’huile, ne pas ajouter de sel ou
d’autres assaisonnements à la nourriture pendant la cuisson ou lorsque la nourriture se trouve
au-dessusde l’huile.
18. Utiliser la poignée du panier à friture pour soulever le panier rempli de nourriture et le retirer de
l’appareil. NE PAS toucher aux grilles du panier car elles sont très chaudes !
19. Utiliser une fourchette à long manche résistante à la chaleur ou des pinces pour retirer les aliments cuits
ou déposer les aliments cuits du panier à friture sur des essuie-tout pour éponger l’excès d’huile.
20. Pour enchaîner sur une autre friture, remettre le couvercle en place pour faire chauffer l’appareil à
nouveau. Lorsque l’huile atteint la température de cuisson sélectionnée, le voyant vert READY (Prêt)
s’allume. Redescendre le ou les paniers de friture dans l’huile, tourner le cadran de réglage de la
minuterie sur la durée de cuisson souhaitée et poursuivre la friture.
21. Une fois la friture complètement terminée, tourner le bouton de réglage de la température sur MIN
et lecadran de réglage de la minuterie sur OFF (Arrêt). Terminer d’enlever tous les aliments frits de
l’huile enles déposant sur des essuie-tout.
22. Débrancher la prise polarisée de la prise murale, puis détacher le cordon de la prise de l’appareil.
23. Replacer le couvercle et laisser l’huile et la friteuse refroidir.
AVERTISSEMENT ! L’huile demeure chaude pendant une période prolongée. S’assurer que toutes les
pièces de la friture et l’huile sont complètement refroidies avant de jeter ou de ranger l’huile et de
nettoyer l’unité.
Conseils utiles
Friture
• Ne jamais trop remplir le paniers à friture avec des aliments. Ils ne peuvent être remplis qu’aux
2/3de leur capacité.
• Le volume de friture maximum du grand panier est de 12 tasses d’aliments, soit près de 1,8 kg (4 lb).
Levolume de friture maximum de chaque petit panier est de 4 tasses d’aliments, soit près de 0,7 kg (1,5 lb).
• Frire plusieurs lots de petite quantité d’aliments. Les résultats seront meilleurs si l’huile chaude
peut circuler librement autour de tous les aliments.
• En général, les aliments précuits nécessitent des températures plus élevées et un temps de cuisson
plus court.
• Couper ou trier les aliments pour qu’ils aient tous la même taille. Cuire les morceaux de même taille
ensemble, an qu’ils puissent cuire en même temps.
• S’assurer que les aliments sont exempts de cristaux de glace et d’excès d’humidité avant de frire.
L’eau à la surface des aliments peut causer des éclaboussures d’huile et de la mousse.
• Lors de l’utilisation d’une chapelure, recouvrir uniformément les aliments à frire. Une chapelure
ne etuniforme colle mieux qu’une chapelure grossière et non uniforme. Secouer l’aliment pour
éliminer lesurplus de chapelure, an de garder l’huile propre.
• An de prévenir la contamination de l’huile, ne pas ajouter de sel ou d’autres assaisonnements à
lanourriture pendant la cuisson ou lorsque la nourriture se trouve au-dessus de l’huile.
21 20
SO-312096_14406 BELLA 4.5L deep fryer IM_R6.indd 20-21 2016-08-23 9:36 AM
Page 13

• Espacer les aliments recouverts pour qu’ils ne se touchent pas pendant la cuisson.
• Pour obtenir de meilleurs résultats lors de la friture de pâte ou d’aliments trempés dans une pâte liquide,
placer tout d’abord les aliments dans le panier, puis abaisser le panier à friture dans l’huile chaude.
• Toujours utiliser le panier à friture pour retirer la nourriture de l’huile; accrocher le panier au rebord
et laisser l’huile s’égoutter. Puis, retirer les aliments frits du panier à friture.
Huile
• AVERTISSEMENT ! Ne jamais, en aucune circonstance, ajouter de l’eau ou tout autre liquide à
l’huile.
• Ne jamais remplir la friteuse avec trop ou trop peu d’huile.
La capacité d’huile minimum est de 3,91 litres (4,13 pintes/ 139,6 oz).
La capacité d’huile maximum est de 4,5 litres (4,75 pintes/152,16 oz).
Les niveaux d’huile MIN et MA X sont tous deux indiqués à l’intérieur du réservoir.
AVERTISSEMENT : Si le réservoir est trop ou pas assez rempli d’huile, la friteuse pourrait être
endommagée et de graves blessures pourraient se produire.
• Toujours utiliser de l’huile de tournesol, de l’huile végétale ou de l’huile de maïs. Ne jamais utiliser
de graisses solides, d’huile d’olive ou d’huile avec un contenu élevé en eau.
• Ne jamais mélanger des huiles différentes pour frire des aliments.
• Ne jamais utiliser de beurre ou de margarine pour frire des aliments.
• Lors de la friture de poisson ou de fruits de mer, l’huile pourrait absorber les odeurs ou acquérir un
goût « poissonneux ». Pour éliminer le transfert du goût ou de l’odeur de poisson, il est suggéré de
remplacer l’huile avant de frire d’autres aliments.
Vidange et recyclage de l’huile
• AVERTISSEMENT ! Faire preuve de prudence lors de la manipulation de pièces chaudes et lorsqu’il
y a un risque d’éclaboussure d’huile bouillante. Se rappeler que l’huile est beaucoup plus chaude
que l’eau bouillante! Ne jamais plonger la main dans l’huile. Toujours tenir les mains et le visage à
distance de la vapeur et des éclaboussures d’huile.
• L’huile devrait être ltrée régulièrement.
• NE PAS verser d’huile de la friteuse sans tout d’abord retirer le panier à friture, l’ensemble tableau
de commande/élément chauffant et le réservoir du boîtier de la friteuse.
REMARQUE : NE PAS déverser l’huile usée dans les égouts domestiques. Jeter l’huile usée dans
un contenant avec un couvercle et mettre au rebut.
• Filtrer l’huile refroidie à travers un tamis n dans un contenant couver t à col large et étanche à l’air.
Au besoin, utiliser un entonnoir pour éviter un débordement.
REMARQUE : Un ltre à café ou un morceau de coton propre peut être placé dans une passoire
pour ltrer l’huile usée.
• Parce que l’huile absorbe les saveurs et les odeurs des aliments, il est suggéré d’identier le
contenant d’huile pour indiquer le type d’aliment ayant été cuit dans l’huile qu’il contient. Par
exemple : desserts, poulet, poisson, etc.
• Ranger l’huile au réfrigérateur jusqu’à la prochaine utilisation.
Grille de cuisson
AVERTISSEMENT ! TOUJOURS UTILISER UN THERMOMÈTRE À VIANDE POUR S’ASSURER QUE LA
VIANDE ET LE POISSON SONT ENTIÈREMENT CUITS AVANT DE LES CONSOMMER.
La grille suivante est fournie à des ns de référence seulement. La quantité de nourriture frite en une fois
peut inuencer la durée totale de cuisson nécessaire. Se rappeler que la friture en petites quantités permet
d’obtenir des durées de cuisson plus courtes et des résultats de meilleure qualité. Ajuster la température
de cuisson et la durée de cuisson selon les préférences personnelles.
ALIMENT TEMP DURÉE DE CUISSON
Champignons 340 ºF/170 ºC 2-5 minutes
Aubergine 340 ºF /170 ºC 5-7 minutes
Brocoli 356 ºF /180 ºC 3-5 minutes
Rondelles d’oignon (fraîches) 356 ºF /180 ºC 3-5 minutes
Rondelles d’oignon (surgelées) 340 ºF /170 ºC 5-6 minutes
Pommes de terre frites (fraîches)
Blanchir 265 ºF /130 ºC 2-3 minutes
Frire 356 ºF /180 ºC 3-4 minutes
Pommes de terre frites (surgelées) 375 ºF /190 ºC 3-5 minutes
Ailes de poulet 356 ºF /180 ºC 8-10 minutes
Filets de poitrine de poulet 340ºF /170ºC 6-10 minutes
Morceaux de poulet 375 ºF /190 ºC 13-20 minutes
Croquettes de poulet (surgelées) 340 ºF /170 ºC 6-7 minutes
Crevettes (fraîches, décongelé) (régulières ou
géantes)
Crevettes (surgelées) (régulières ou géantes) 375 ºF/190 ºC 1-4 minutes
REMARQUE IMPORTANTE : L’USDA recommande que les viandes telles le boeuf et l’agneau soient cuites
jusqu’à ce que la température interne atteigne 63 ºC / 145 ºF. Le porc devrait être cuit jusqu’à ce que la
température interne atteigne 71 ºC / 160 ºF et la volaille devrait être cuite jusqu’à ce que la température interne
atteigne 77 ºC à 82 ºC (170 ºF à 180 ºF), an de s’assurer que les bactéries pathogènes soient tuées. Lorsque les
viandes et les volailles sont réchauffées, leurs températures internes devraient atteindre 74 ºC (165 ºF).
REMARQUE : Les aliments surgelés pourraient demander une durée de cuisson et une température
différente; suivre les instructions sur l’emballage. Utiliser le réglage 191 ºC / 375 ºF pour tous les aliments
dont les instructions sur l’emballage indiquent une température de friture plus élevée et ajuster la durée de
cuisson au besoin.
IMPORTANT : Enlever les cristaux de glace des aliments surgelés avant de les plonger dans l’huile chaude.
MISE EN GARDE : NE JAMAIS remplir le panier à friture à plus des 2/3.
340 ºF/170 ºC 4-8 minutes
Instructions pour l’entretien
Cet appareil requiert peu d’entretien. Il ne contient pas de pièce réparable par l’utilisateur. Toute réparation
qui nécessite un démontage autre que pour le nettoyage doit être effectuée par un technicien qualié en
réparation d’appareils.
Instructions d’entretien et de nettoyage
AVERTISSEMENT ! Laisser la friteuse refroidir complètement avant de vider l’huile et de nettoyer
l’appareil.
1. S’assurer que la friteuse est débranchée et que le réservoir rempli d’huile est complètement
refroidi.
2. Retirer le couvercle.
3. Retirer le panier à friture du réservoir d’huile.
4. Saisir l’ensemble tableau de commande/élément chauffant et tirer doucement vers le haut pour le retirer.
Faire preuve de prudence en retirant l’ensemble tableau de commande/élément chauffant parce que de
l’huile pourrait jaillir du réservoir. Essuyer l’ensemble tableau de commande/élément chauffant avec un
chiffon humide et l’essuyer complètement. Manipuler les serpentins de l’élément chauffant avec soin.
MISE EN GARDE : Ne pas immerger l’ensemble tableau commande/élément chauf fant dans l’eau.
Cela pourrait causer des dommages permanents à la friteuse.
23 22
SO-312096_14406 BELLA 4.5L deep fryer IM_R6.indd 22-23 2016-08-23 9:36 AM
Page 14

Recettes
5. Saisir le rebord du réser voir d’huile et soulever soigneusement le réservoir hors du boîtier de la
friteuse. Transférer avec soin l’huile du réservoir dans un contenant approprié. (Pour de plus amples
renseignements, consulter la section Vidange et recyclage de l’huile du présent document.)
REMARQUE : Il est préférable de transférer l’huile au-dessus d’un lavabo ou d’une poubelle an de
recueillir tout déversement.
6. Nettoyage du réservoir d’huile : Faire tremper le réservoir d’huile dans de l’eau chaude savonneuse.
Utiliser une brosse de nylon rigide pour retirer les résidus tenaces ou brûlés. Ne pas utiliser de
produits rugueux ou abrasifs, qui pourraient endommager la surface du réservoir.
7. Le réservoir, le couvercle et les 3 paniers sont lavables au lave-vaisselle.
8. Laver le boîtier de la friteuse dans de l’eau chaude savonneuse. Bien sécher toutes les pièces.
IMPORTANT : S’assurer que le couvercle et le réservoir d’huile sont complètement secs après le
lavage et avant l’utilisation.
Réassembler la friteuse comme décrit dans la section Avant d’utiliser l’appareil pour la première
fois. (Voir Figure 1.)
Instructions de rangement
1. S’assurer que toutes les pièces sont propres et sèches avant de ranger l’appareil.
2. Ne jamais ranger la friteuse lorsqu’elle est chaude ou mouillée.
3. Pour le rangement, assembler la friteuse propre, en plaçant le réservoir d’huile dans le boîtier
en acier inoxydable.
4. Faire glisser l’ensemble tableau de commande/élément chauffant en place.
5. Plier la poignée du panier à friture au-dessus et à l’intérieur du panier. (Voir Figure 3.)
Installer le panier replié dans le réservoir d’huile.
6. Retirer le cordon amovible et le ranger dans le réservoir d’huile.
7. Mettre le couvercle.
8. Ranger l’appareil dans sa boîte ou dans un endroit sec et propre.
Dépannage
La friteuse ne fonctionne pas
• S’assurer que le cordon d’alimentation amovible est xé correctement au boîtier de la friteuse.
• S’assurer que l’ensemble tableau de commande/élément chauffant est installé correctement.
La friteuse ne fonctionnera pas si les attaches de l’ensemble d’élément chauffant ne sont pas
entièrement insérées et correctement xées au boîtier de la friteuse.
La température de l’huile est trop élevée
• Quantité insufsante d’huile dans le réservoir. Débrancher la friteuse et vérier le niveau d’huile.
Leniveau d’huile devrait se situer entre les lignes de remplissage MIN et MAX. Ajouter de l’huile au
besoin. L’huile bouillonne et déborde
L’huile bouillonne et déborde
• Quantité d’huile trop importante dans le réservoir de la friteuse. La quantité d’huile ne devrait
jamais dépasser la ligne de remplissage MAX.
• Quantité de nourriture trop impor tante. Ne frire que de petites quantités d’aliments à la fois.
• Les aliments sont trop humides. Les essuyer avec des essuie-tout avant de les placer dans le panier
à friture.
Les aliments goûtent graisseux plutôt que croquants
• Le mauvais type d’huile a été utilisé. Utiliser une huile de haute qualité comme une huile végétale,
de canola ou de maïs.
• Trop d’aliments ont été cuits en même temps. Cuire de plus petites quantités d’aliments à la fois –
en particulier pour des aliments surgelés.
• La température pour frire est trop basse. Laisser l’unité préchauffer ou réchauffer à la température
désirée avant l’utilisation.
La nourriture ou la friteuse produit des odeurs déplaisantes
• L’huile s’est dégradée. Remplacer l’huile au besoin.
• L’huile usée absorbe les odeurs des aliments. Ne pas frire des desserts dans de l’huile ayant servi à
frire du poisson.
MISE EN GARDE :
le faire examiner, réparer ou faire faire un ajustement mécanique ou électrique par un technicien qualié.
An de prévenir tout risque d’électrocution, n’essayer pas de réparer l’appareil. On doit
Fritto misto di verdura (mélange de légumes frits)
Assortiment de bouchées de légumes croustillantes, enrobées de pâte et frites.
Servir dans un cornet à frites pour rendre la présentation amusante.
Toutes les substitutions de légumes sont permises, peu importe la quantité. D’autres légumes
s’apprêtent bien au fritto misto, notamment le chou-eur, les cœurs d’artichaut, les pois
chiches etlefenouil. Le grand panier peut contenir environ 12 tasses de légumes panés.
Portions : 12
• 1 lb (450 g ou 2 tasses) d’asperges minces,
sans les queues
• 1/2 lb (225 g ou 2 tasses)
de haricots verts, équeutés
• 1/2 lb (225 g ou 2 tasses)
de brocoli, eneurettes
• 2 courgettes (2 tasses) en rondelles
épaisses de ½ po (1,3 cm)
• 1 poivron (1 tasse) en lanières de ½ po (1,3
cm)
• 1 oignon (2 tasses) en rondelles, ayant
trempé 1 heure dans l’eau
• 1 citron (1 tasse) pelé, épépiné,
• 3 tasses de babeurre
• 1 tasse de fécule de maïs
• 2 tasses de farine tout usage
(remplaçables par 1 tasse de farine tout
usage et 1 tasse desemoule de blé tendre)
• 1 c. à soupe de poudre d’ail
• 1 c. à soupe d’origan
• 4 à 4,5 L (de 135 à 152 onces)
d’huile de canola, pour la friture
• Sel casher ou de mer, au goût
en rondelles minces
1. Préchauf fer l’huile à 356 °F (180 °C). Prendre le grand panier de friture. Tournez le cadran
deréglage de la minuterie sur le temps de cuisson désiré pour que la friteuse démarre.
Le temps de cuisson recommandé pour cette recette est de 3 minutes. Lors de la sélection
dutemps de cuisson désiré pour la friture, ajouter 10 à 15 minutes au temps de friture/
cuisson désiré pourtenir compte du temps de pré-chauffage.
REMARQUE: Le temps de préchauffage peut varier entre 10 et 15 minutes.
2. Dans un grand bol, bien mélanger les légumes coupés et les tranches de citron.
3. Ajouter le babeurre et bien mélanger pour enrober.
4. Dans un grand bol, mélanger la fécule et la farine à l’aide d’une fourchette.
5. Il est plus facile de saupoudrer les légumes en petits lots. Insérer le quart des légumes
dansungrand plat peu profond. Saupoudrer les légumes du mélange à farine, retourner
à la main pourbien enrober et tapoter pour enlever l’excédent.
6. Plonger les légumes saupoudrés et le citron dans l’huile bouillante.
7. Surveiller la coloration des légumes par la fenêtre d’observation.
8. Lorsque la minuterie retentit, vérier la cuisson des légumes. S’ils sont dorés et
croustillants, lesdéposer sur une assiette recouverte d’essuie-tout ou de sacs en papier
bruns pour égoutter.
9. Assaisonner copieusement les fritto misto de sel.
10. Servir immédiatement accompagné de trempette au yogourt épicée.
Trempette au yogourt épicée
• 2 tasses de yogourt grec
• 4 c. à soupe de raifort blanc
• 2 c. à thé de sauce aux piments forts
Sriracha
1. Mettre les ingrédients dans un petit bol de service.
2. Bien mélanger.
• ½ c. à thé de poivre de Cayenne
• Sel et poivre fraîchement moulu, au goût
25 24
SO-312096_14406 BELLA 4.5L deep fryer IM_R6.indd 24-25 2016-08-23 9:36 AM
Page 15

Recettes Recettes
Ailes de poulet frites et épicées
Portions : 3 à 5
• 2 à 3 lb (900 g à 1,4 kg) d’ailes de poulet
(6 à 10)
• 2 tasses de farine tout usage
• 4 à 4,5 L (de 135 à 152 onces)
d’huile de canola, pour la friture
Apprêt poulet épicé
• 1 c. à soupe de sel assaisonné
• 1 c. à soupe de ocons
de piment rouge concassés
• 2 c. à thé de poivre de Cayenne
• 2 c. à thé d’assaisonnement pour volaille
Pâte épicée pour poulet
• 2 œufs
• 2 c. à soupe de sauce
aux piments forts Sriracha
1. Préparer l’apprêt poulet épicé. Mélanger le sel assaisonné, les ocons de piment,
le poivre de Cayenne et l’assaisonnement pour volaille.
2. Rincer les ailes de poulet et les éponger.
3. Trancher les ailes aux articulations pour les découper en pilons et en ailerons.
REMARQUE: faire congeler les pointes d’aile pour faire des soupes ou du bouillon.
4. Saupoudrer uniformément d’apprêt épicé les morceaux d’ailes. Couvrir et refroidir 1 heure.
5. Préparer la pâte épicée pour poulet. Battre les œufs, la sauce Sriracha, les ocons de
piment etlepoivre de Cayenne dans un bol de taille moyenne.
6. Préchauf fer l’huile à 340 °F (170 °C). Tournez le cadran de réglage de la minuterie sur le
temps de cuisson désiré pour que la friteuse démarre. Le temps de cuisson recommandé
pour cette recette est de 8 minutes. Lors de la sélection du temps de cuisson désiré pour
la friture, ajouter10à15minutes au temps de friture / cuisson désiré pour tenir compte du
temps de pré-chauffage.
REMARQUE: Le temps de préchauffage peut varier entre 10 et 15 minutes.
7. Verser la farine dans un moule peu profond ou une assiette à tarte.
8. Plonger les ailes de poulet dans la pâte épicée, puis les rouler dans la farine.
9. Frire les ailes dans l’huile bouillante.
10. Retourner les ailes de poulet de temps en temps. Lorsque la minuterie retentit, vérier la
cuisson. Déposer les ailes dorées et croustillantes sur une assiette recouverte d’essuie-tout
ou de sacs enpapier bruns pour égoutter.
11. Relever encore les ailes en les aspergeant de sauce aux piments forts Sriracha.
• 1 c. à soupe de ocons
de piment rougeconcassés
• 2 c. à thé de poivre de Cayenne
Tacos de poisson et crème chipotle
Portions : 8 à 12
• 2 à 3 lb (900 g à 1,4 kg) de poisson frais
mahi-mahi, tilapia, morue (sans peau,
sansarêtes et nettoyés) coupés en lanières
(Conseil : les poissons n’ayant pas tous la
même densité, le temps de cuisson peut
varier. Avec deux poissons différents,
prendreles deux petits paniers pour des
temps de friture variables et des fritures
parfaites.)
• 3 œufs, légèrement battus
1. Préchauf fer l’huile à 375 °F (190 °C). Tournez le cadran de réglage de la minuterie
sur le temps de cuisson désiré pour que la friteuse démarre. Le temps de cuisson
recommandé pour cette recette est de 3 minutes. Lors de la sélection du temps de cuisson
désiré pour lafriture, ajouter 10à15minutes au temps de friture / cuisson désiré pour tenir
compte
du temps de pré-chauffage.
REMARQUE: Le temps de préchauffage peut varier entre 10 et 15 minutes.
2. Préparer le poisson. Découper en lanières. Mélanger le sel et la poudre de piment ancho
dansunpetit bol. Assaisonner légèrement le poisson.
3. Tremper les lanières dans les œufs battus. Bien enrober.
4. Déposer les lanières enrobées sur une assiette de chapelure panko.
Bien enfoncer les lanières dans la panko de tous côtés pour bien les enrober.
5. Faire frire en petits lots.
6. Lorsque la minuterie retentit, vérier la cuisson. Déposer les lanières dorées et
croustillantes surune assiette recouverte d’essuie-tout ou de sacs en papier bruns
pourégoutter.
7. Garder au chaud jusqu’au moment de servir.
8. Réchauffer les tortillas. Garnir les tacos de poisson frit, de pico de gallo, de guacamole frais
etdechou rouge découpé en lanières.
9. Verser un let de crème chipotle sur chaque taco.
Crème chipotle
• 1 tasse de crème sure
• 1 tasse de yogourt grec
• 2 piments chipotle* en adobo et 2 c. à
soupe de sauce adobo (*ajuster au goût)
1. À l’aide d’un mélangeur, couper les piments à faible vitesse, puis les réduire en purée.
2. Ajouter la crème sure, le yogourt, la sauce adobo et le jus de citron.
Continuer à mélanger jusqu’àl’obtention d’une consistance crémeuse.
3. Saler au goût.
4. Réfrigérer jusqu’au moment de servir.
• 3 tasses de chapelure panko
• 2 c. à thé de sel casher
• 2 c. à soupe de poudre de piment ancho
• 4 à 4,5 L (de 135 à 152 onces)
d’huile végétale ou de canola, pour la
friture
• 16 à 24 tortillas de maïs ou de blé
• 3 limes, en quartiers, comme garniture
• Jus de ½ citron
• Sel casher
27 26
SO-312096_14406 BELLA 4.5L deep fryer IM_R6.indd 26-27 2016-08-23 9:36 AM
Page 16

Garantie limitée de DEUX ANS
SENSIO Inc. assure par la présente que le produit est garanti contre tout défaut
de matériel et de fabrication pendant une période de DEUX ANS à compter de
la date d’achat et contre tout défaut des pièces autres que mécaniques pendant
90 jours. À son entière discrétion, SENSIO Inc. réparera ou remplacera un produit
défectueux, ou accordera un remboursement pour ce produit, pendant la période
de la garantie.
Cette garantie s’applique uniquement à l’acheteur initial du produit, à compter
de la date initiale de l’achat, et est incessible. Pour que la garantie soit valide,
l’acheteur doit conserver le reçu de caisse original. Les magasins de détail qui
vendent ce produit n’ont pas le droit de l’altérer ou de le modier, ni de modier
de quelque façon les modalités de la garantie.
EXCLUSIONS :
La garantie ne couvre pas l’usure normale des pièces ou les dommages causés
par une utilisation négligente du produit, le branchement sur un circuit de tension
ou de courant inapproprié, un entretien de routine inadéquat, une utilisation
contraire aux instructions de fonctionnement, de démontage et de réparation, ou
par la modication du produit par une personne autre qu’un technicien qualié de
SENSIO Inc. De plus, la garantie ne couvre pas les cas de force majeure comme
les incendies, les inondations, les ouragans et les tornades.
SENSIO Inc. ne pourra être tenue responsable de tout dommage indirect ou
accessoire causé par la violation de toute garantie explicite ou implicite. Sauf
dans la mesure où cela est interdit par la loi, toute garantie implicite concernant
la valeur commerciale ou l’adéquation à la n visée se limite à la durée de la
garantie. Certains États et certaines provinces ou compétences administratives
ne permettent pas l’exclusion ou la limitation des dommages indirects ou
accessoires, ou les limitations quant à la durée des garanties implicites; par
conséquent, les exclusions ou limitations mentionnées précédemment peuvent
ne pas s’appliquer à vous. La garantie couvre les droits légaux spéciques qui
peuvent varier selon l’état, la province ou la compétence administrative.
COMMENT OBTENIR UN SERVICE SOUS GARANTIE :
Communiquez avec le service à la clientèle en composant notre numéro sans
frais : 1 866 832-4843. Un représentant du service à la clientèle tentera de
résoudre par téléphone les questions relatives à la garantie. Si le représentant
du service à la clientèle est incapable de résoudre le problème, il vous fournira
un numéro de demande et vous informera que vous devez retourner le produit
à SENSIO Inc. Apposez sur le produit une étiquette indiquant votre nom, votre
adresse, votre numéro de téléphone (de jour), le numéro de demande ainsi qu’une
description du problème. Incluez également une copie du reçu de caisse original.
Emballez soigneusement le produit avec son reçu de caisse et faites-le parvenir
(port et assurance payés) à l’adresse de SENSIO Inc. SENSIO Inc. n’assume
aucune responsabilité quant au produit retourné pendant son transport jusqu’au
centre de service à la clientèle de SENSIO Inc.
28
MEDIDAS DE SEGURIDAD
IMPORTANTES
Cuando se utilizan aparatos eléctricos, se deben seguir precauciones de
seguridad básicas, entre ellas:
1. Lea todas las instrucciones.
2. No toque las supercies calientes. Utilice los mangos o las perillas. Use
manoplaso agarraderas.
3. Para protegerse del riesgo de descarga eléctrica, no sumerja el cable, el
enchufe ni el electrodoméstico en agua ni en ningún otro líquido.
4. Este electrodoméstico no debe ser utilizado por personas (incluidos niños)
con capacidades físicas, sensoriales o mentales reducidas, o falta de
experiencia y conocimientos, a menos que una persona responsable de su
seguridad les haya brindado supervisión o instrucciones sobre el uso del
electrodoméstico.
5. Es necesario que haya una supervisión estricta cuando el electrodoméstico
sea utilizado por niños o cerca de ellos.
6. Desenchufe el electrodoméstico del tomacorriente cuando no lo utilice y
antes de limpiarlo. Deje que se enfríe antes de colocar o retirar piezas, y antes
de limpiar el electrodoméstico.
7. No utilice ningún electrodoméstico que tenga un cable o enchufe dañado,
que muestre un funcionamiento defectuoso o que se haya dañado de
cualquier manera. Lleve el electrodoméstico a un técnico autorizado para que
lo examine, lo repare o le haga ajustes eléctricos o mecánicos.
8. El uso de accesorios no recomendados por el fabricante del electrodoméstico
puede provocar lesiones.
9. No utilice este electrodoméstico en exteriores.
10. No permita que el cable cuelgue del borde de una mesa o de una encimera ni
que entre en contacto con supercies calientes.
11. No lo coloque sobre un quemador a gas o eléctrico, ni cerca de él, ni dentro
de un horno caliente.
12. Se debe ser sumamente cuidadoso al mover un electrodoméstico que
contenga aceite caliente u otros líquidos calientes.
13. Siempre coloque el enchufe en el electrodoméstico antes de enchufar el cable
en el tomacorriente de pared. Para desconectar, gire el selector de control
de temperatura ON/OFF (Encendido/Apagado) y el selector de control del
temporizador hacia la posición OFF (Apagado).
14. No utilice el electrodoméstico para otros nes que no sean para los que
fue diseñado.
15. Se debe ser sumamente cuidadoso al mover la freidora cuando contenga
aceite caliente.
16. Asegúrese de que el mango esté colocado correctamente en la cesta para
freír y de que quede bien trabado. Consulte las instrucciones detalladas
demontaje
GUARDE ESTAS INSTRUCCIONES
PARA USO DOMÉSTICO
ÚNICAMENTE
29
SO-312096_14406 BELLA 4.5L deep fryer IM_R6.indd 28-29 2016-08-23 9:36 AM
Page 17

¡NO DOBLE EL CORDÓN!
SEGURIDAD IMPORTANTES
PRECAUCIÓN, SUPERFICIES CALIENTES: Este electrodoméstico genera calor y
libera vapor mientras está en uso. Se deben tomar las medidas adecuadas para evitar
el riesgo de quemaduras, incendios u otro tipo de lesiones o daños a la propiedad.
PRECAUCIÓN: Este electrodoméstico se calienta durante el funcionamiento
y mantiene el calor un tiempo después de apagado. Siempre use manoplas al
manipular materiales calientes y deje que las piezas metálicas se enfríen antes
de limpiarlas. No coloque nada sobre el electrodoméstico mientras esté en
funcionamiento o esté caliente.
1. Todos los usuarios de este electrodoméstico deben leer y comprender
este manual del usuario antes de poner en funcionamiento o limpiar este
electrodoméstico.
2. El cable de este electrodoméstico sólo debe enchufarse en un tomacorriente
eléctrico de CA de 120 V.
3. Si el electrodoméstico comienza a funcionar mal mientras está en
uso, desenchufe el cable de inmediato. No utilice ni intente reparar un
electrodoméstico que funcione mal.
4. No descuide el electrodoméstico mientras esté en funcionamiento.
5. No sumerja el cable de alimentación desmontable en ningún líquido. Si el cable
cae en el agua o en otro líquido, TÍRELO INMEDIATAMENTE y reemplácelo
por un cable nuevo. Si el cable de alimentación de este electrodoméstico está
dañado, debe comunicarse con atención al cliente para reemplazarlo.
6. Mantenga el cable fuera del alcance de los niños para evitar el riesgo de
descargas eléctricas y estrangulación.
7. Utilice el mango de la cesta para freír para levantar y bajar la cesta para freír.Siempre
retire la cesta para freír del aceite caliente y deje que los alimentos cocidos se enfríen
durante un período de entre 5 y 10 segundos antes de retirarlos de la cesta.
8. No utilice este electrodoméstico si la ventana de observación está rajada.
9. Seque los alimentos húmedos antes de colocarlos en el aceite. Al freír alimentos
congelados, retire el exceso de hielo, ya que puede provocar que el aceite
caliente salpique.
10. Siempre mantenga la tapa cerrada mientras fría alimentos en la freidora.
11. No obstruya con ningún objeto la salida de aire ltrado que se encuentra en
la parte superior de la tapa. Evite el vapor que sale de la salida de aire ltrado
durante el funcionamiento.
12. Mantenga el electrodoméstico por lo menos a 4 pulgadas de distancia de paredes
u otros objetos mientras está en funcionamiento. No coloque ningún objeto sobre
el electrodoméstico mientras esté en funcionamiento. Coloque el electrodoméstico
13. Asegúrese de que el depósito de aceite tenga aceite al menos hasta el nivel
de la marca MIN (Mínimo). No utilice el electrodoméstico sin aceite ni con
una cantidad insuciente de aceite. No coloque demasiado aceite en el
depósito por encima de la marca MAX (Máximo).
ADVERTENCIA: La falta o el exceso de aceite en el depósito puede dañar la
freidora y podría ocasionar lesiones personales graves.
14. Siempre vierta aceite en el depósito antes de enchufar el electrodoméstico y
de calentarlo. Nunca vierta aceite en el depósito si se encuentra caliente.
15. Asegúrese de que no haya objetos inamables sobre el electrodoméstico
ni cerca de éste. Si se incendia el aceite, desenchufe el electrodoméstico y
vuelva a colocar la tapa. Nunca use agua para extinguir el fuego.
OTRAS MEDIDAS DE
16. No utilice este electrodoméstico si la tapa y el depósito no se encuentran
completamente secos.
17. No se recomienda mover la freidora si contiene aceite caliente. Déjela enfriar
antes de moverla.
18. No use esta freidora para hervir agua.
19. Asegúrese de que el selector de control de temperatura esté en la posición
“MIN” (Mínimo) y el selector del temporizador en “0” antes de enchufar el cable.
20. Una vez que el cable esté enchufado en un tomacorriente, se encenderán las
luces de “encendido” y “listo”. Para empezar a calentar el aceite, coloque el
selector de temperatura a la temperatura deseada y se apagará la luz verde
de listo. Cuando el aceite alcance la temperatura seleccionada y el ajuste el
selector de temporizador hacia el tiempo de cocción deseado.
NOTA: Siempre gire el selector de temporizador hacia el tiempo de cocción
deseado, para que la unidad se enciende y comience a precalentar. La unidad no
comenzará a precalentar hasta que se seleccione tanto la temperatura de cocción
deseado y el tiempo de cocción.
Notas sobre el enchufe
Este electrodoméstico tiene un enchufe polarizado (una pata es más ancha
que la otra). A n de reducir el riesgo de descarga eléctrica, el enchufe entra
en un tomacorriente polarizado en un solo sentido. Si el enchufe no entra
completamente en el tomacorriente, invierta el enchufe. Si aun así no entra,
consulte a un electricista autorizado. No realice ninguna modicación al enchufe.
Notas sobre el cable (instrucciones para el cable desmontable)
PRECAUCIÓN: El producto se proporciona con un cable de alimentación desmontable
corto para reducir los riesgos de lesiones personales por enredarse o tropezar con
un cable más largo. El cable está diseñado para desprenderse rápidamente y con
facilidad de la freidora para evitar que la unidad se caiga cuando alguien tira del
cable involuntariamente. Este cable desmontable está diseñado para ser usado con
esta freidora en particular. No intente utilizarlo en ningún otro electrodoméstico.
¡NO DOBLE EL CORDÓN!
SI LA FREIDORA CAE DESDE UNA ENCIMERA, SE PUEDEN
PRODUCIR QUEMADURAS GRAVES CON EL ACEITE
CALIENTE. NO PERMITA QUE EL CABLE CUELGUE DEL
BORDE DE UNA MESA DONDE LOS NIÑOS PUEDAN
TOMARLO O EL USUARIO PUEDA ENREDARSE. NO LA
UTILICE CON UN CABLE DE EXTENSIÓN.
¡MANTÉNGALO
FUERA DEL
ALCANCE DE LOS NIÑOS!
Advertencia sobre los plasticantes
PRECAUCIÓN: Para evitar que el plasticante se transera sobre el acabado de la
encimera, la supercie de trabajo u otro mueble, coloque posavasos o manteles
individuales NO PLÁSTICOS entre el electrodoméstico y el acabado de la encimera o la
supercie. De lo contrario, el acabado puede oscurecerse o pueden aparecer manchas
o marcas permanentes.
Corriente eléctrica
Si el circuito eléctrico está sobrecargado con otros artefactos, su electrodoméstico
puede dejar de funcionar correctamente. El electrodoméstico debe funcionar en un
circuito eléctrico separado de otros artefactos.
31 30
SO-312096_14406 BELLA 4.5L deep fryer IM_R6.indd 30-31 2016-08-23 9:36 AM
Page 18

Conozca su freidora grande de 4,5 litros
El producto puede diferir levemente de las ilustraciones.
Figure 1
Tapa
Mango de la tapa
Salida de aire
ltrado
3 asas para
las canastas
freidoras
2 canastas
freidoras
pequeñas
Cuerpo de acero inoxidable
Mangos del cuerpo de la freidora
Patas antideslizantes (no se ven)
Panel de control
Luz roja POWER
(Encendido)
Selector de
control de
temperatura
325
MIN
°F
375
350
300
POWER READY
MAX
MIN
Luz verde de
READY (Listo)
min
30
25
Selector de control de temperatura
• Control de temperatura regulable para freír de manera perfecta
• Seleccione temperaturas para freír en abundante aceite desde 150 °C a 190 °C (300 °F hasta 375) °F
Selector del temporizador de 30 minutos
• Una vez el selector de control de temperatura ajustado, gire el selector de temporizador hacia la
Ventana de
observación
posición ON (Encendido) y seleccione el tiempo de fritura.
• Al seleccionar el tiempo deseado de fritura, añadir unos 10 a 15 minutos adicionales al tiempo de
fritura / cocción deseado para tener en cuenta el tiempo de precalentamiento.
NOTA: El tiempo de precalentamiento puede variar entre 10 y 15 minutos.
• Una vez seleccionados la temperatura y el tiempo de la fritura, la freidora comenzará a calentar el aceite.
NOTA: Esta unidad no se encenderá y comenzará a precalentar a menos que el selector de
temporizador sea activado y se haya seleccionado el tiempo de fritura deseado.
1 canasta freidora
grande
• Se emitirá una señal sonora cuando nalice el tiempo establecido.
• Controle el dorado y el punto de cocción de los alimentos.
NOTA: Siempre gire el selector de temporizador hacia el tiempo de cocción deseado, para que la
unidad se enciende y comience a precalentar. La unidad no comenzará a precalentar hasta que se
Panel de
control/
Elemento
calentador
seleccione tanto la temperatura de cocción deseado y el tiempo de cocción.
IMPORTANTE: Cuando suene el temporizador, la freidora se apagará automáticamente. Cuando
termine de freír todo, gire el selector de control de temperatura hacia la posición “MIN” (Mínimo) y
el selector del temporizador hacia “0”.
Armado del mango de la cesta para freír
Figure 2 Figure 3
1. La freidora se enviará con las asas para las canastas en
Serpentines
calentadores
la posición de almacenamiento. Para enganchar un asa
en una canasta freidora, mantenga los brazos del asa
dentro de la canasta freidora como se muestra. Apriete
suavemente los brazos del mango para que entren en
Depósito
de aceite
desmontable
lasaberturas de la cesta para freír. (Ver Figura 2.)
2. Suelte los brazos de la canasta freidora y empuje el
asacontra la parte posterior de la canasta freidora
aberturas
hastaque quede trabada en su lugar. (Ver Figura 3.)
Antes de utilizar por primera vez
1. Retire todos los materiales del embalaje y las etiquetas del interior y exterior de la freidora. Asegúrese de que
no queden materiales del embalaje debajo y alrededor del depósito de aceite, el panel de control y el elemento
calentador.
Cable de
alimentación
desmontable
Con enchufe
polarizado
Selector del
0
5
15
20
temporizador
de 30 minutos
10
2. Durante el primer uso de la freidora, el depósito de aceite y la canasta freidora pueden emitir un
ligero olor. Esto es normal. Para evitar este olor, siga las instrucciones que se indican a continuación.
3. Deje la tapa y las canastas freidoras, 1 grande y 2 pequeñas, a un lado.
4. Sujete rmemente los lados del panel de control y el elemento calentador, levante el cuerpo de la
freidora y retírelo. (Ver Figura 4). Coloque el panel de control y el elemento calentador a un lado.
5. Levante el depósito de aceite y retírelo del cuerpo de la freidora.
6. Lave la tapa, las 3 canastas freidoras y el depósito de aceite en agua caliente con jabón. NO SUMERJA
EL PANEL DE CONTROL NI EL ELEMENTO CALENTADOR EN AGUA. Limpie el panel de control, el
elemento calentador y el cuerpo de la freidora con un paño húmedo. Seque completamente las piezas.
7. Coloque el depósito de aceite dentro del cuerpo de la freidora. Asegúrese de que el depósito esté ubicado
en el centro y que quede correctamente colocado en la parte superior del cuerpo de acero inoxidable.
8. Coloque el panel de control y el elemento calentador. Deslice los
dos soportes que se encuentran en la pared interior del elemento
Figure 4
calentador y colóquelos dentro de las 2 ranuras de retención que
se encuentran en la parte trasera del cuerpo de la freidora. (Ver
Figura 4.) Asegúrese de que los soportes queden correctamente
Soportes
colocados en las 2 ranuras.
IMPORTANTE: La freidora no funcionará si los soportes del
elemento calentador no están correctamente colocados
dentro delcuerpo de la freidora.
9. Doble el mango de la cesta para freír hacia el interior de la
cesta. (Ver Figura 3). Coloque la cesta con el mango doblado
dentro deldepósito de aceite para almacenar la unidad.
10. Vuelva a colocar la tapa en la par te superior del depósito de
aceite. Guárdela hasta que esté lista para ser utilizada.
33 32
Ranures
de
retención
SO-312096_14406 BELLA 4.5L deep fryer IM_R6.indd 32-33 2016-08-23 9:36 AM
Page 19

Instrucciones de funcionamiento
ADVERTENCIA: No se debe usar esta unidad para hervir agua.
1. Coloque la freidora en una super cie limpia, seca, plana y resistente al calor como una mesa o
encimera, aproximadamente a 2 pies de distancia de un tomacorriente estándar de CA de 120 V.
2. Retire la tapa y la o las canastas freidoras plegadas.
3. Asegúrese de que el depósito de aceite esté colocado correctamente dentro del cuerpo de la
freidora. Vierta el aceite de cocina líquido (de maíz, vegetal, maní, etc.) en el depósito. Coloque
aceite hasta un nivel entre las marcas MIN (Mínimo) y MAX (Máximo).
NOTA: La capacidad mínima de aceite es 3.91 litros (4,13 cuartos/139.6 onzas). La capacidad máxima
de aceite es 4,5 litros (4,75 cuartos/152.16 onzas). (Ver Figura 4).
ADVERTENCIA: La falta o el exceso de aceite en el depósito puede dañar la freidora y podría
ocasionar lesiones personales graves.
4. Para evitar que la condensación empañe la ventana de observación de la tapa, utilice una servilleta
de papel para esparcir una capa delgada de aceite de cocina en la ventana de observación.
5. En función de lo que freirá, coloque la canasta freidora grande o las 2 canastas freidoras pequeñas
en el depósito de aceite. Cuando cocine, la parte inferior de la o las canastas freidoras se apoyará
en las bobinas del calentador.
IMPORTANTE: Cuando fría 2 canastas de comida, es conveniente que los sabores de las comidas sean
iguales. Por ejemplo, 2 canastas de verduras, 2 canastas de pescado, 2 canastas de alimentos dulces.
6. A continuación, coloque la tapa sobre la canasta o las canastas con la salida del aire ltrado fuera
de las asas para las canastas. El conjunto único de recor tes encajará sobre las bobinas del calentador.
El conjunto doble de recortes en la tapa encajará sobre el o las asa(s) para las canastas freidoras.
7. Gire el selector de control de temperatura hacia la posición “MIN” (Mínimo) y el selector del
temporizador hacia la posición OFF (Apagado).
8. Conecte el cable de alimentación desmontable
con el receptáculo del electrodoméstico,
con la indicación “THIS SIDE UP (ESTE
LADO ARRIBA)” hacia arriba. (Ver Figura 5).
Asegúrese de que el cable quede rme en su
lugar. Luego, conecte el enchufe polarizado en
el tomacorriente de pared. La luz roja POWER
(Encendido) se prenderá.
PRECAUCIÓN: No permita que el cable cuelgue del borde de una mesa o de una encimera.
9. Lleve el indicador de control de temperatura a la temperatura de cocción deseada et ajuste el
selectordetemporizador hacia el tiempo de cocción deseado. Al seleccionar el tiempo deseado de
fritura, añadir unos 10 a 15 minutos adicionales al tiempo de fritura / cocción deseado para tener en
cuenta eltiempo de precalentamiento.
NOTA: El tiempo de precalentamiento puede variar entre 10 y 15 minutos.
Para obtener las temperaturas y los tiempos de cocción sugeridos, consulte el Cuadro de tiempos
decocción. La luz verde de READY (Listo) se encenderá y apagará. Cuando el aceite alcance la
temperatura de cocción seleccionada, la luz verde de READY (Listo) se iluminará en forma constante.
NOTA: Siempre gire el selector de temporizador hacia el tiempo de cocción deseado, para que la
unidad se enciende y comience a precalentar. La unidad no comenzará a precalentar hasta que se
seleccione tanto la temperatura de cocción deseado y el tiempo de cocción.
NOTA: Deje que el aceite se precaliente durante 10 a 15 minutos.
NOTA: Es posible que el aceite haga un sonido “de explosión” dentro de la freidora mientras se
calienta. Esto es normal.
10. Retire la tapa y déjela a un lado. Con una manopla, sujete el mango de la cesta para freír y levante
la cesta para separarla del aceite. Coloque cuidadosamente la cesta para freír en la par te trasera del
depósito de aceite.
PRECAUCIÓN: No toque las piezas interiores de la freidora ni el aceite durante el uso, ya que
están calientes.
ADVERTENCIA! Tenga cuidado con las piezas calientes y el aceite caliente que salpica. Recuerde
que el aceite está más caliente que el agua hirviendo. Nunca coloque las manos en el aceite.
Siempre mantenga las manos y la cara alejadas del vapor o del aceite que salpica.
11. Coloque los alimentos cuidadosamente en la cesta para freír y tenga cuidado de tocar la cesta para
freír, ya que puede estar caliente. No coloque demasiados alimentos en la cesta para freír.
NOTE: La capacidad máxima para freír alimentos de la canasta freidora grande es de 12 tazas,
casi 1,8 kg (4 libras). La capacidad máxima para freír alimentos de las canastas freidoras pequeñas
es de 4 tazas, casi 0,7 kg (1,5 libras) por canasta.
CAUTION: La cesta para freír nunca debe tener más de 2/3 de alimentos para freír.
Figura 5
12. Sujete el mango de la cesta para freír y sumerja cuidadosamente la cesta para freír con los
alimentos en el aceite. Vuelva a colocar la tapa.
13. Ajuste el dial de control de temporizador en el tiempo fritura deseado.
ADVERTENCIA: Este electrodoméstico genera calor y libera vapor mientras está en uso. Se deben
tomar las medidas adecuadas para evitar el riesgo de quemaduras, incendios u otro tipo de
lesiones o daños a la propiedad.
14. Mientras la freidora cocina los alimentos y el aceite se enfría, los serpentines calentadores y la luz
azul WORKING (En funcionamiento) se encenderán y apagarán mientras se mantiene la temperatura
adecuada de cocción del aceite. Para obtener los tiempos y las temperaturas de cocción de ejemplo,
consulte el Cuadro de tiempos de cocción.
15. Deje que los alimentos se cocinen. Durante la cocción, mueva cuidadosamente la cesta de lado a
lado una o dos veces para que los alimentos se doren de forma pareja en todos lados. Controle el
progreso de la cocción de los alimentos a través de la ventana de observación.
CAUTION: ¡No levante la tapa mientras fríe alimentos! El aceite caliente puede salpicar y provocar
quemaduras u otras lesiones.
16. Se emitirá una señal sonora cuando nalice el tiempo establecido.
ADVERTENCIA: Sea cuidadoso al abrir la tapa, ya que se libera vapor al hacerlo. Use manoplas al
manipular materiales calientes.
17. Retire la tapa y dé vuelta los alimentos según sea necesario. Cuando los alimentos alcancen el
punto de cocción deseado, utilice manoplas para sujetar el mango de la cesta para freír y levántela
para retirarla del aceite. Coloque cuidadosamente la cesta para freír en la parte trasera del depósito
de aceite. Deje que los alimentos cocidos se escurran durante 5 a 10 segundos.
NOTA: Para evitar que el aceite se degrade pronto, no agregue sal ni otras especias a los alimentos
durante la cocción ni cuando los alimentos se escurren arriba del aceite.
18. Use el mango de la cesta para freír para levantar y retirar la cesta que contiene alimentos. No toque
los alambres de la cesta para freír, ya que están muy calientes.
19. Use un tenedor o pinzas resistentes al calor y con mango largo para retirar los alimentos cocidos o verter los
alimentos cocidos de la cesta para freír en servilletas de papel absorbente para absorber el exceso de aceite.
20. Para freír otra tanda de alimentos, coloque nuevamente la tapa, deje que la unidad se vuelva a
calentar. Cuando el aceite alcance la temperatura de cocción seleccionada, la luz verde de READY
(Listo) se iluminará. Vuelva a colocar la o las canastas freidoras en el aceite, gire el selector del
temporizador hacia el tiempo deseado para freír y continúe friendo.
21. Cuando termine de cocinar todo, gire el selector de control de temperatura hacia la posición “MIN”
(Mínimo) y el selector de control del temporizador hacia la posición “OFF” (Apagado). termine de
retirar todos los alimentos fritos del aceite y colóquelos en las servilletas de papel absorbente.
22. Desenchufe el enchufe polarizado del tomacorriente de pared, luego retire el cable del receptáculo
del electrodoméstico.
23. Vuelva a colocar la tapa y deje enfriar el aceite y la freidora.
ADVERTENCIA! El aceite permanecerá caliente durante más tiempo. Asegúrese de que todas las
piezas dela freidora y el aceite se hayan enfriado completamente antes de tirar o guardar el aceite
y limpiar la unidad.
Consejos útiles
Freír
• No coloque demasiados alimentos en la cesta para freír.La capacidad máxima de la canasta es
de 2/3 del total.
• La capacidad máxima para freír alimentos de la canasta freidora grande es de 12 tazas,
casi 1,8 kg (4 libras). La capacidad máxima para freír alimentos de las canastas freidoras pequeñas
es de 4 tazas, casi 0,7 kg (1,5 libras) por canasta.
• Fría más tandas de pequeñas cantidades de alimentos. Se obtienen mejores resultados cuando el
aceite caliente puede circular libremente en torno a los alimentos.
• En general, los alimentos precocidos requieren temperaturas más altas y un tiempo de cocción menor.
• Corte o agrupe los alimentos en trozos de tamaño uniforme. Cocine juntos los alimentos del mismo
tamaño para que puedan cocinarse en la misma cantidad de tiempo.
• Asegúrese de que los alimentos no tengan cristales de hielo y exceso de humedad antes de freírlos.
El agua en la supercie de los alimentos puede hacer espuma y que el aceite salpique.
• Cuando use un rebozado, cobra los alimentos uniformemente para freírlos. Las migas nas y
uniformes se adhieren mejor que las gruesas y desiguales. Sacuda las migas sobrantes para
mantener el aceite limpio.
• Para evitar la contaminación del aceite, no agregue sal ni otras especias a los alimentos durante la
cocción ni cuando los alimentos se escurren arriba del aceite.
35 34
SO-312096_14406 BELLA 4.5L deep fryer IM_R6.indd 34-35 2016-08-23 9:36 AM
Page 20

• Separe los alimentos rebozados para que no entren en contacto durante la cocción.
• Para obtener mejores resultados, al freír masas o alimentos bañados con una mezcla líquida, coloque
los alimentos dentro de la cesta primero y luego, sumerja la cesta para freír en el aceite caliente.
• Siempre use la cesta para freír para retirar los alimentos del aceite; enganche la cesta en el borde y
deje que el aceite se escurra. Luego, retire los alimentos cocidos de la cesta para freír.
Aceite
ADVERTENCIA: Bajo ninguna circunstancia agregue agua ni otros líquidos al aceite.
• No coloque demasiado ni poco aceite en la freidora. La capacidad mínima de aceite es 3.91 litros
(4,13 cuartos/139.6 onzas). The maximum oil capacity is de 4,5 litros (4,75 cuar tos/152.16 onzas).
Las marcas MIN (Mínimo) y MAX (Máximo) del aceite se encuentran en el interior del depósito.
ADVERTENCIA: La falta o el exceso de aceite en el depósito puede dañar la freidora y podría
ocasionar lesiones personales graves.
• Siempre use aceite de girasol, vegetal o de maíz. Nunca use grasas sólidas, aceite de oliva ni aceite
con alto contenido de agua.
• Nunca mezcle diferentes tipos de aceite para freír los alimentos.
• Nunca use manteca ni margarina para freír los alimentos.
• Al freír pescado o mariscos, el aceite puede absorber un sabor o un olor “a pescado”. Para evitar
transferir este sabor u olor “a pescado” a otros alimentos, sugerimos cambiar el aceite antes de
freír otros alimentos.
Cómo colar y reciclar el aceite
ADVERTENCIA: Tenga cuidado con las piezas calientes y el aceite caliente que salpica. Recuerde que
el aceite está más caliente que el agua hirviendo. Nunca coloque las manos en el aceite. Siempre
mantenga las manos y la cara alejadas del vapor o del aceite que salpica.
• El aceite se debe ltrar con regularidad.
• No vier ta aceite en la freidora sin retirar primero la cesta para freír, el panel de control, el elemento
calentador y el depósito del cuerpo de la freidora.
NOTA: No vier ta el aceite usado en los drenajes domésticos. Tire el aceite usado en un recipiente
con una tapa y arrójelo a la basura.
• Filtre el aceite enfriado por un colador no y colóquelo en un recipiente hermético con tapa y de
boca amplia. Si es necesario, use un embudo para evitar el derrame del aceite.
NOTA: Se puede colocar un ltro de café o un trozo de material de algodón limpio en un colador y
emplearlo para ltrar el aceite usado.
• Como el aceite absorberá los sabores y los olores de los alimentos, se recomienda etiquetar los
recipientes con el tipo de alimento que se cocinó en el aceite. Por ejemplo: postres, pollo, pescado, etc.
• Guarde el aceite en el refrigerador hasta el próximo uso.
Cuadro de tiempos de cocción
ADVERTENCIA: SIEMPRE USE UN TERMÓMETRO PARA CARNES PARA ASEGURARSE DE QUE LA CARNE
Y EL PESCADO ESTÉN COMPLETAMENTE COCIDOS ANTES DE CONSUMIRLOS.
El siguiente cuadro es solamente una guía. La cantidad de alimentos que se fríen al mismo tiempo puede
alterar el tiempo de cocción total necesario. Recuerde que si fríe tandas más pequeñas, el tiempo de
cocción y la calidad de los alimentos serán mejores. Ajuste la temperatura y el tiempo de cocción según
sea necesario y a su gusto.
ALIMENTO TEMP TIEMPO DE COCCIÓN
Hongos 340ºF /170ºC De 2-5 minutos
Berenjena 340ºF /170ºC De 5-7 minutos
Brócoli 356ºF /180ºC De 3-5 minutos
Aros de cebolla (frescos) 356ºF /180ºC De 3-5 minutos
Aros de cebolla (congelados) 340ºF /170ºC De 5-6 minutos
Papas fritas (frescas)
Palidecer 265ºF /130ºC De 2-3 minutos
Freír 356ºF /180ºC De 3-4 minutos
Papas fritas (congeladas) 375ºF /190ºC De 3-5 minutos
Alitas de pollo 356ºF /180ºC De 8-10 minutos
Tiras de pollo 340ºF /170ºC De 6-10 minutos
Trozos de pollo 375ºF /190ºC De 13-20 minutos
Nuggets de pollo (congeladas) 340ºF /170ºC De 6-7 minutos
Camarones (frescas, descongelado)
tamaño estándar o gigantes
Camarones (congeladas) tamaño
estándar o gigantes
TENGA EN CUENTA QUE: El Departamento de Agricultura de los Estados Unidos (United States
Department of Agriculture, USDA) recomienda que las carnes de vaca, de ternera, etc. se deben cocinar a
una temperatura interna de 145 ºF/63 ºC. El cerdo debe cocinarse a una temperatura interna de 160 ºF/71
ºC y los productos avícolas también se deberán cocinar a una temperatura interna de entre 170 ºF/77 ºC y
180 ºF/82 ºC para asegurarse de que cualquier bacteria nociva muera. Cuando se recalienten carnes rojas y
productos avícolas, también se deberán cocinar a una temperatura interna de 165 ºF/74 ºC.
NOTA: Los alimentos congelados pueden necesitar diferentes tiempos y temperaturas de cocción: siga
las instrucciones del paquete. Use 375 ºF/191 ºC con todos los alimentos para los que se indica una
temperatura más alta en las instrucciones del paquete y ajuste los tiempo según sea necesario.
IMPORTANTE: Retire los cristales de hielo de los alimentos congelados antes de colocarlos en el aceite caliente.
PRECAUCIÓN: Nunca llene la cesta para freír más de 2/3.
340ºF /170ºC De 4-8 minutos
375ºF /190ºC De 1-4 minutos
Instrucciones de mantenimiento para el usuario
Este electrodoméstico requiere poco mantenimiento. No contiene piezas que puedan ser reparadas por el
usuario. Todo mantenimiento para el que sea necesario desarmar el aparato, aparte de la limpieza, debe
ser realizado por un técnico autorizado para reparar electrodomésticos.
Instrucciones de limpieza y cuidado
ADVERTENCIA: Deje que la freidora se enfríe completamente antes de sacar el aceite y limpiar
el electrodoméstico.
1. Asegúrese de que la freidora esté desenchufada y de que el depósito lleno de aceite se haya
enfriado completamente.
2. Retire la tapa.
3. Retire la cesta para freír del depósito de aceite.
4. Sujete el panel de control y el elemento calentador y tire cuidadosamente hacia arriba para retirarlos.
Sea cuidadoso al retirar el panel de control y el elemento calentador, ya que el aceite puede salpicar
fuera del depósito. Limpie el panel de control y el elemento calentador con un paño húmedo y séquelos
completamente. Manipule los serpentines calentadores y el elemento calentador con cuidado.
PRECAUCIÓN: No sumerja el panel de control ni el elemento calentador en agua. Esto podría dañar
permanentemente la freidora.
5. Sujete el borde del depósito de aceite, levántelo cuidadosamente y retírelo del cuerpo de la
freidora. Retire cuidadosamente el aceite del depósito y colóquelo en un recipiente adecuado. (Para
obtener más información, consulte Cómo colar y reciclar el aceite).
NOTA: Se recomienda trabajar sobre un fregadero o recipiente de residuos en caso de que se
produzcan derrames.
37 36
SO-312096_14406 BELLA 4.5L deep fryer IM_R6.indd 36-37 2016-08-23 9:36 AM
Page 21

Recetas
6. Limpieza del depósito de aceite: Déjelo en remojo en agua caliente y jabón. Use un cepillo duro de
nailon para quitar los residuos rebeldes o adheridos. No utilice productos de limpieza fuertes ni
abrasivos, ya que pueden dañar la supercie del depósito.
7. El tanque de aceite, la tapa y las 3 canastas freidoras son aptos para lavaplatos.
8. Lave la cuerpo de la freidora con agua caliente y jabón.
Seque completamente las piezas.
IMPORTANTE: Asegúrese de que la tapa y el depósito de aceite estén completamente secos
después de limpiarlos y antes de usar el electrodoméstico. Vuelva a armar la freidora como se
describe en la sección Antes de utilizar por primera vez. (Ver Figura 1).
Instrucciones de almacenamiento
1. Asegúrese de que todas las piezas estén limpias y secas antes de guardarlas.
2. Nunca guarde la freidora si está caliente o mojada.
3. Para almacenar, coloque el depósito de aceite dentro del cuerpo de acero inoxidable para armar
la freidora limpia.
4. Coloque el panel de control y el elemento calentador en su posición.
5. Doble el mango de la cesta para freír hacia el interior de la cesta. (Ver Figura 3).
Coloque la cesta para freír con el mago doblado dentro del depósito de aceite.
6. Retire el cable desmontable y colóquelo en el depósito de aceite.
7. Coloque la tapa.
8. Guarde el electrodoméstico en la caja o en un lugar limpio y seco.
Solución de problemas
La freidora no funciona
• Asegúrese de que el cable de alimentación desmontable esté correctamente colocado en el
receptáculo.
• Asegúrese de que el panel de control y el elemento calentador queden correctamente colocados. La
freidora no funcionará si los soportes del elemento calentador no están correctamente colocados
dentro del cuerpo de la freidora.
La temperatura del aceite es demasiado alta
• No hay suciente aceite en el depósito. Desenchufe la freidora y controle el nivel de aceite. El nivel
de aceite debe estar entre las líneas de llenado MIN (Mínimo) y MAX (Máximo). Agregue aceite
según sea necesario.
El aceite burbujea
• Hay demasiado aceite en el depósito de aceite de la freidora. Nunca coloque aceite por encima de
la línea de llenado MAX (Máximo).
• Hay demasiados alimentos. Fría cantidades más pequeñas al mismo tiempo.
• Los alimentos están demasiado mojados. Séquelos con servilletas de papel antes de colocarlos en
la cesta de la freidora.
Los alimentos quedan grasosos o no quedan crujientes
• Se usó un tipo incorrecto de aceite. Use un aceite de alta calidad como aceite vegetal, de canola o
de maíz.
• Cocina demasiados alimentos al mismo tiempo. Cocine cantidades más pequeñas, especialmente
alimentos congelados.
• La temperatura para freír es demasiado baja. Deje que la unidad se precaliente o se recaliente hasta
que alcance la temperatura deseada antes de usarla.
Los alimentos o la freidora despiden olores desagradables
• El aceite se deterioró. Cambie el aceite según sea necesario.
• Los aceites usados absorben los olores de los alimentos. No fría postres con el aceite que usó para
freír pescado.
ADVERTENCIA: Para evitar el riesgo de descarga eléctrica, no contiene piezas que puedan ser reparadas
por el usuario. Lleve el electrodoméstico a un técnico autorizado para que lo examine, lo repare o le haga
ajustes eléctricos o mecánicos.
Fritto Misto di Verdura (Salteado de verduras mixtas)
Variedad de trozos pequeños de verduras crocantes, sumergidos en un batido y fritos.
Sírvalos en conos de papel para frituras (también llamados “conos de papas fritas”) para
presentarlos de manera divertida.
Las cantidades de las verduras se pueden modicar a su gusto. Otras verduras que
frecuentemente
se utilizan en los salteados de verduras mixtas son: colior, corazón de alcaucil, garbanzos e
hinojo.
La canasta freidora grande tiene capacidad para aproximadamente 12 tazas de verduras
empanadas.
Rinde de 12 porciones
• 1 libra (450 g, 2 tazas) de espárragos nos,
sin tallos
• 1/2 libra (225 g, 2 tazas) de habichuelas,
sin los extremos
• 1/2 libra (225 g, 2 tazas) de brócoli, cortado
en tiras nas
• 2 zapallitos, (2 tazas) cortados en rodajas
de 1/2 pulgada (1,3 cm) de espesor
• 1 pimiento dulce (1 taza) en tiras de 1/2
pulgada (1,3 cm) de espesor
• 1 cebolla (2 tazas), cor tada en aros y
remojada en agua durante 1 hora
• 1 limón, (1 taza) sin semillas ni piel,
cortado en rodajas nas
• 3 tazas de suero de leche
• 1 taza de fécula de maíz
• 2 tazas de harina común (se puede sustituir
por 1 taza de harina común + 1 taza de
harina de sémola)
• 1 cucharada de ajo en polvo
• 1 cucharada de orégano
• 4 a 4,5 litros (135 a 152 onzas) de aceite de
canola, para freír
• Sal Kosher o sal marina, a gusto
1. Precaliente el aceite a 356 °F (180 °C). Utilice la canasta freidora grande. Gire el selector de
temporizador hacia el tiempo de fritura deseado para que la freidora se enciende. El tiempo
de fritura recomendado para esta receta es de 3 minutos. Al seleccionar el tiempo deseado
de fritura, añadir unos 10 a 15 minutos adicionales al tiempo de fritura / cocción deseado
para tener en cuenta el tiempo de precalentamiento. NOTA: El tiempo de precalentamiento
puede variar entre 10 y 15 minutos.
2. En un tazón grande, mezcle bien las verduras cortadas y las rodajas de limón.
3. Agregue el suero de leche y mezcle bien para que quede todo cubierto.
4. En un tazón grande y con la ayuda de un tenedor, incorpore la fécula de maíz y la harina.
5. Es más fácil cubrir las verduras en porciones más pequeñas. Retire 1/4 de las verduras y
coloque en un molde grande poco profundo. Rocíe con la mezcla de harina seca, mezcle con
las manos para cubrir y golpee suavemente para quitar el exceso.
6. Sumerja las verduras y los limones cubiertos en el aceite caliente.
7. Observe el proceso de dorado por la ventana de visualización.
8. Cuando suene el temporizador, verique las verduras fritas. Cuando estén doradas y
crocantes, quite y coloque en una placa cubierta con toallas de papel o bolsas de papel
madera para escurrir.
9. Condimente el Fritto Misto con abundante sal.
10. Sirva de inmediato con salsa picante de yogur para acompañar.
Salsa picante de yogur para acompañar
• 2 tazas de yogur griego
• 4 cucharadas de rábano picante blanco
• 2 cucharaditas de salsa de chile
picanteSriracha
• 1/2 cucharadita de pimienta de Cayena
• Sal y pimienta negra recién molida
parasazonar
1. Coloque los ingredientes en un tazón pequeño para servir.
2. Mezcle bien.
39 38
SO-312096_14406 BELLA 4.5L deep fryer IM_R6.indd 38-39 2016-08-23 9:36 AM
Page 22

Recetas Recetas
Alitas de pollo fritas picantes
Porciones: de 3 a 5
• 2 a 3 libras (900 g a 1,4 kg) de alitas de pollo
(6 a 10)
• 2 tazas de harina común
• 4 a 4,5 litros (135 a 152 onzas) de aceite de
canola, para freír
Adobo picante para pollo
• 1 cucharada de sal con especias
• 1 cucharada de ají molido
• 2 cucharaditas de pimienta de Cayena
• 2 cucharaditas de condimento para ave
Batido picante para pollo
• 2 huevos
• 2 cucharadas de salsa de chile picante
Sriracha
1. Prepare el adobo picante para pollo. Mezcle la sal con especias, el ají molido, la pimienta de
cayena y el condimento para ave.
2. Enjuague las alitas de pollo y séquelas suavemente.
3. Corte todas las alitas en las uniones para obtener alitas planas y muslitos.
NOTA: Guarde en el congelador los ex tremos de las alitas de pollo para preparar caldos y
sopas.
4. Espolvoree los trozos de alitas de pollo de manera pareja con el adobo picante para pollo.
Cubra y deje enfriar durante 1 hora.
5. Prepare el batido picante para pollo. Bata los huevos, la salsa picante, el ají molido y la
pimienta de cayena en un tazón para batir mediano.
6. Precaliente el aceite a 340 ºF (170 °C). Gire el selector de temporizador hacia el tiempo de
fritura deseado para que la freidora se enciende. El tiempo de fritura recomendado para
esta receta es de 8 minutos. Al seleccionar el tiempo deseado de fritura, añadir unos 10 a 15
minutos adicionales al tiempo de fritura / cocción deseado para tener en cuenta el tiempo
de precalentamiento.
NOTA: El tiempo de precalentamiento puede variar entre 10 y 15 minutos.
7. Coloque la harina en un molde para tar tas o placa poco profunda.
8. Sumerja las alitas de pollo en el batido picante y luego páselas por harina.
9. Coloque las alitas de pollo en el aceite caliente.
10. Gire las alitas de pollo de tanto en tanto. Cuando suena el temporizador, verique las alitas
de pollo fritas. Retire las alitas de pollo doradas y crocantes, y colóquelas en una placa
cubierta con papel de cocina o bolsas de papel madera para escurrir.
11. Rocíe las alitas de pollo fritas con salsa de chile picante Sriracha para darle un sabor
máspicante.
• 1 cucharada de ají molido
• 2 cucharaditas de pimienta de Cayena
Tacos de pescado con crema de Chipotle
Porciones: de 8 a 12
• 2 a 3 libras (900 g a 1,4 kg)
de pescado fresco
mahi mahi, tilapia, bacalao (sin piel,
con huesos y limpio) cortado en tiras
(Consejo: Debido a que la densidad del
pescado varía, el tiempo de cocción
puede variar. Utilice las dos canastas
freidoras pequeñas para freír 2 tipos de
pescado, locual le permitirá tener tiempos
individuales de cocción para obtener una
fritura más perfecta).
1. Precaliente el aceite a 375 ºF (190 °C). Gire el selector de temporizador hacia el tiempo de
fritura deseado para que la freidora se enciende. El tiempo de fritura recomendado para
esta receta es de 3 minutos. Al seleccionar el tiempo deseado de fritura, añadir unos 10 a 15
minutos adicionales al tiempo de fritura / cocción deseado para tener en cuenta el tiempo
de precalentamiento.
NOTA: El tiempo de precalentamiento puede variar entre 10 y 15 minutos.
2. Prepare el pescado. Corte en tiras. En un tazón pequeño, mezcle la sal y el polvo de chile
Ancho. Condimente ligeramente el pescado.
3. Sumerja las tiras de pescado en huevo. Cubra bien.
4. Coloque el pescado cubierto con huevo en la placa con pan rallado panko. Presione el
pescado rmemente en el pan hasta cubrir bien todos los lados de las tiras de pescado.
5. Fría en abundante aceite en porciones pequeñas.
6. Cuando suene el temporizador, verique el pescado. Retire el pescado frito crocante y
dorado,
y coloque sobre una placa cubierta con papel de cocina o bolsas de papel madera para
escurrir.
7. Mantenga el pescado caliente hasta servir.
8. Caliente las tortillas. Arme los tacos con pescado frito, pico de gallo, guacamole fresco,
col roja cortada.
9. Esparza crema de chipotle sobre cada taco.
Crema de Chipotle
• 1 taza de crema agria
• 1 taza de yogur griego
• 2 chipotles* adobados, más 2 cucharadas
de salsa de adobo (*agregue cantidad a
gusto)
1. Use una batidora para batir lentamente los chipotles, luego haga puré hasta obtener
unapreparación homogénea.
2. Incorpore la crema agria, el yogur, la salsa de adobo y el jugo de limón.
Procese hasta obtener unamezcla cremosa.
3. Agregue sal a gusto.
4. Refrigere hasta que esté listo para servir.
• 3 huevos, ligeramente batidos
• 3 tazas de pan rallado panko
• 2 cucharaditas de sal Kosher
• 2 cucharadas de polvo de chile Ancho
• 4 a 4,5 l (135 a 152 onzas) de aceite de
canola ovegetal, para freír.
• 16 a 24 tortillas, de maíz o harina
• 3 limas, cortadas en rodajas para decorar
• jugo de 1/2 limón
• Sal Kosher
41 40
SO-312096_14406 BELLA 4.5L deep fryer IM_R6.indd 40-41 2016-08-23 9:36 AM
Page 23

Garantía limitada de DOS AÑOS
Mediante la presente, SENSIO Inc. garantiza que, durante el plazo de DOS AÑOS
a partir de la fecha de compra, este producto no presentará defectos mecánicos
en el material ni en la mano de obra, y durante 90 días, no los presentará en las
piezas no mecánicas. A su entera discreción, SENSIO Inc. reparará o reemplazará
el producto que resulte defectuoso, o emitirá un reembolso por el producto
durante el plazo de garantía.
Esta garantía es válida únicamente para el comprador minorista original a partir
de la fecha de compra minorista inicial y no es transferible. Conserve el recibo de
compra original, ya que se exige una prueba de compra para obtener la validación
de la garantía. Las tiendas minoristas no tienen derecho a alterar, modicar ni
corregir de ninguna manera los términos y condiciones de la garantía.
EXCLUSIONES:
La garantía no cubre el desgaste normal de las piezas ni el daño ocasionado
por cualquiera de las siguientes causas: uso negligente del producto, uso de
un voltaje o corriente incorrectos, mantenimiento de rutina inadecuado, uso
contrario al de las instrucciones de funcionamiento, desarmado, reparación o
alteración a cargo de personas que no sean miembros del personal calicado
de SENSIO Inc. Asimismo, la garantía no cubre actos de la naturaleza, como
incendios, inundaciones, huracanes o tornados.
SENSIO Inc. no asumirá responsabilidad por daños incidentales o resultantes
ocasionados por la violación de cualquier garantía expresa o implícita. Salvo en
la medida en que lo prohíban las leyes aplicables, cualquier garantía implícita de
comerciabilidad o aptitud para un propósito particular se limita temporalmente
a la duración de la garantía. Algunos estados, provincias o jurisdicciones no
permiten la exclusión ni la limitación de daños incidentales o resultantes, o
limitaciones sobre la duración de una garantía implícita y, por lo tanto, es posible
que las exclusiones o limitaciones mencionadas no le correspondan. La garantía
cubre derechos legales especícos que pueden variar de un estado, una provincia
o una jurisdicción a otros.
CÓMO OBTENER EL SERVICIO DE GARANTÍA:
Debe comunicarse con el Servicio de atención al cliente a nuestro número
telefónico gratuito: 1-866-832-4843. Un representante del Servicio de atención
al cliente intentará resolver los problemas referidos a la garantía por teléfono.
Si este no puede resolver el problema, le proporcionarán un número de caso
y le solicitarán que devuelva el producto a SENSIO Inc. Adhiera una etiqueta
al producto que incluya: su nombre, dirección, número telefónico de contacto
durante el día, número de caso y descripción del problema. Además, incluya
una copia del recibo de compra original. Envuelva cuidadosamente el producto
etiquetado con el recibo de compra, y envíelo (con el envío y el seguro
prepagados) a la dirección de SENSIO Inc. SENSIO Inc. no asumirá obligación ni
responsabilidad alguna por el producto devuelto que esté en el trayecto hacia el
Centro de servicio al cliente de SENSIO Inc.
SO-312096_14406 BELLA 4.5L deep fryer IM_R6.indd 42-43 2016-08-23 9:36 AM
42
Page 24

SO-312096_14406 BELLA 4.5L deep fryer IM_R6.indd 44-45 2016-08-23 9:36 AM
Page 25

For customer service questions or comments
Pour le service à la clientèle, question ou commentaires
Dudas o comentarios contactar el departamento de servicio al cliente
1-866-832-4843
www.sensioinc.com
BELLA is a registered trademark of Sensio Inc., Montréal, Canada H3B 3X9.
All rights reserved.
BELLA est une marque déposée de Sensio Inc., Montréal, Canada H3B 3X9.
Tous droits réservés.
BELLA es una marca registrada de Sensio Inc., Montréal, Canada H3B 3X9.
Todos los derechos reservados.
BellaLife
bellahousewares.com
BellaLifestyle
BellaLifestyle
BellaLife
SO_312096
SO-312096_14406 BELLA 4.5L deep fryer IM_R6.indd 46 2016-08-23 9:36 AM
 Loading...