

Page 1

5-SPEED DIgItal
JuIcE StatIon
cEntrIfugEuSE
numérIquE
à 5 vItESSES
EStacIón DIgItal Para
JugoS DE 5 vElocIDaDES
Instruction Manual
Recipe Guide
Manuel d’instructions
Guide de recettes
Manual de instrucciones
Guía de recetas
Register your product and get support at:
Pour vous inscrire et obtenir l’aide de votre produit:
Para registrar y obtener asistencia de su producto ir:
www.bellahousewares.com/welcome
Page 2

Table of Contents
Important Safeguards ............................................................................................................................ 1
Additional Important Safeguards ......................................................................................................... 2
Notes on the Cord ...................................................................................................................................2
Notes on the Plug ................................................................................................................................... 2
Plasticizer Warning ................................................................................................................................. 2
Electric Power .......................................................................................................................................... 2
Getting to know your 5-Speed Digital Juice Station ......................................................................... 3
Before using for the rst time ............................................................................................................... 4
Assembly instructions ....................................................................................................................... 4-5
Preparing fruits and vegetables for your 5 speed digital juice extractor ....................................... 5
Operating instructions ....................................................................................................................... 5-6
Disassembly instructions ......................................................................................................................6
User maintenance instructions ............................................................................................................. 6
Care & cleaning instructions ..............................................................................................................6 -7
Storing instructions ................................................................................................................................ 7
Troubleshooting ......................................................................................................................................7
Recipes .....................................................................................................................................................8
Warranty ..................................................................................................................................................9
Table des matières
Consignes de sécurité importantes ................................................................................................... 10
Autres consignes de sécurité importantes ....................................................................................... 11
Remarque à propos de la che ........................................................................................................... 11
Remarque à propos du cordon ........................................................................................................... 11
Avertissement de migration de plastiants ...................................................................................... 11
Alimentation électrique ....................................................................................................................... 11
Caractéristiques de la centrifugeuse numérique à 5 vitesses ........................................................ 12
Avant la première utilisation ............................................................................................................... 13
Directives d’assemblage .................................................................................................................13 -14
Préparer les fruits et légumes à mettre dans la centrifugeuse numérique à 5 vitesses ............ 14
Mode d’emploi ...................................................................................................................................... 15
Instructions de démontage ................................................................................................................. 15
Réparation ............................................................................................................................................. 16
Entretien et nettoyage ..........................................................................................................................16
Rangement ............................................................................................................................................ 16
Dépannage ............................................................................................................................................. 17
Recettes ................................................................................................................................................. 18
Garantie ..................................................................................................................................................19
Índice
Medidas de seguridad importantes ................................................................................................... 20
Otras medidas de seguridad importantes ......................................................................................... 21
Notas sobre el cable .............................................................................................................................21
Notas sobre el enchufe ........................................................................................................................ 21
Advertencia sobre los plasticantes ................................................................................................. 21
Corriente eléctrica ................................................................................................................................21
Descripción de la estación digital para jugos de 5 velocidades ....................................................22
Antes de utilizar por primera vez ........................................................................................................23
Instrucciones para armar el aparato .............................................................................................23-24
Preparación de frutas y verduras para el extractor digital para jugos de 5 velocidades ........... 24
Instrucciones de funcionamiento ....................................................................................................... 25
Instrucciones para desarmar el aparato ............................................................................................ 25
Instrucciones de mantenimiento para el usuario ............................................................................. 26
Instrucciones de cuidado y limpieza .................................................................................................. 26
Instrucciones de almacenamiento ..................................................................................................... 26
Resolución de problemas ....................................................................................................................27
Recetas ................................................................................................................................................... 28
Garantía ..................................................................................................................................................29
Page 3

IMPORTANT SAFEGUARDS
When using electrical appliances, basic safety precautions should always be followed,
including the following:
1. READ ALL INSTRUCTIONS.
2. To protect against risk of electrical shock do not put cord, plugs, or appliance in
water or other liquid.
3. This appliance is not intended for use by persons (including children) with reduced
physical, sensory or mental capabilities, or lack of experience and knowledge,
unless they have been given supervision or instruction concerning use of the
appliance by a person responsible for their safety.
4. Children should be supervised to ensure that they do not play with the appliance.
5. Unplug from outlet when not in use, before putting on or taking off parts, and
before cleaning.
6. Avoid contacting moving parts.
7. Do not operate any appliance with a damaged cord or plug or after the appliance
malfunctions, or is dropped or damaged in any manner.
8. The use of attachments, including canning jars, not recommended by the
manufacturer may cause re, electric shock, or injury.
9. Do not use outdoors.
10. Do not let cord hang over edge of table or counter.
11. Do not let cord contact any hot surface, including the stove.
12. Always make sure the juice extractor cover is clamped securely in place before the
extractor is turned on.
Do not unfasten locking clamp while the juice extractor is in operation.
13. Turn the speed dial to Power (OFF) and unplug from electrical outlet after each
use of your juice extractor. Make sure the motor is completely stopped before
disassembling.
14. Do not put your ngers or other objects into the juice extractor opening while
it is in operation. If food becomes lodged in the feed tube, use the food pusher
or another piece of fruit or vegetable to push it down. When this method is not
possible, turn the speed dial to Power (OFF), unplug the juice extractor from the
electrical outlet, and disassemble the juice extractor to remove remaining food.
15. Do not use the appliance if the rotating juicing blades and basket are damaged.
16. Use care when handling the stainless steel blade basket. Hold the basket’s rim only.
Do not touch the cutter blades on the bottom of the basket. The cutter blades are
very sharp!
17. Do not operate without the pulp container in place.
FOR HOUSEHOLD USE ONLY
SAVE THESE INSTRUCTIONS
1
Page 4

ADDITIONAL IMPORTANT
SAFEGUARDS
1. All users of this appliance must read and understand this instruction manual
before operating or cleaning this appliance.
2. The cord to this appliance should be plugged into a 120v ac electrical outlet only.
3. Do not leave this appliance unattended during use.
4. If this appliance begins to malfunction during use, immediately turn the speed
dial to Power (OFF) and unplug the cord. Do not use or attempt to repair the
malfunctioning appliance.
5. If this appliance falls or accidentally becomes immersed in water, unplug it
immediately. Do not reach into the water! Do not use this appliance after it has
fallen into or becomes immersed in water.
6. To reduce the risk of injury to persons or property, never use this appliance in an
unstable position.
7. Do not use this appliance for other than its intended use.
8. Pay special attention to the amount of pulp and residue produced while juicing.
Always empty a full pulp container before continuing to juice.
9. Always ensure that the anti-drip spout is in the OPEN position when juicing. The
anti-drip spout should only be used to prevent dripping when the juice jar is
removed.
Notes on the Plug
This appliance has a polarized plug (one blade is wider than the other). To reduce
the risk of electric shock, this plug will t in a polarized outlet only one way. If the
plug does not t fully into the outlet, reverse the plug. If it still does not t, contact a
qualied electrician. Do not modify the plug in any way.
Notes on the Cord
The provided short power-supply cord (or detachable power-supply cord) should be
used ato reduce the risk resulting from becoming entangled in or tripping over a longer
cord. Do not use an extension cord with this product.
Plasticizer Warning
CAUTION: To prevent Plasticizers from migrating from the nish of the counter top or
table top or other furniture, place NON-PLASTIC coasters or place mats between the
appliance and the nish of the counter top or table top. Failure to do so may cause the
nish to darken; permanent blemishes may occur or stains can appear.
Electric Power
If the electrical circuit is overloaded with other appliances, your appliance may not
operate properly. It should be operated on a separate electrical circuit from other
appliances.
2
Page 5
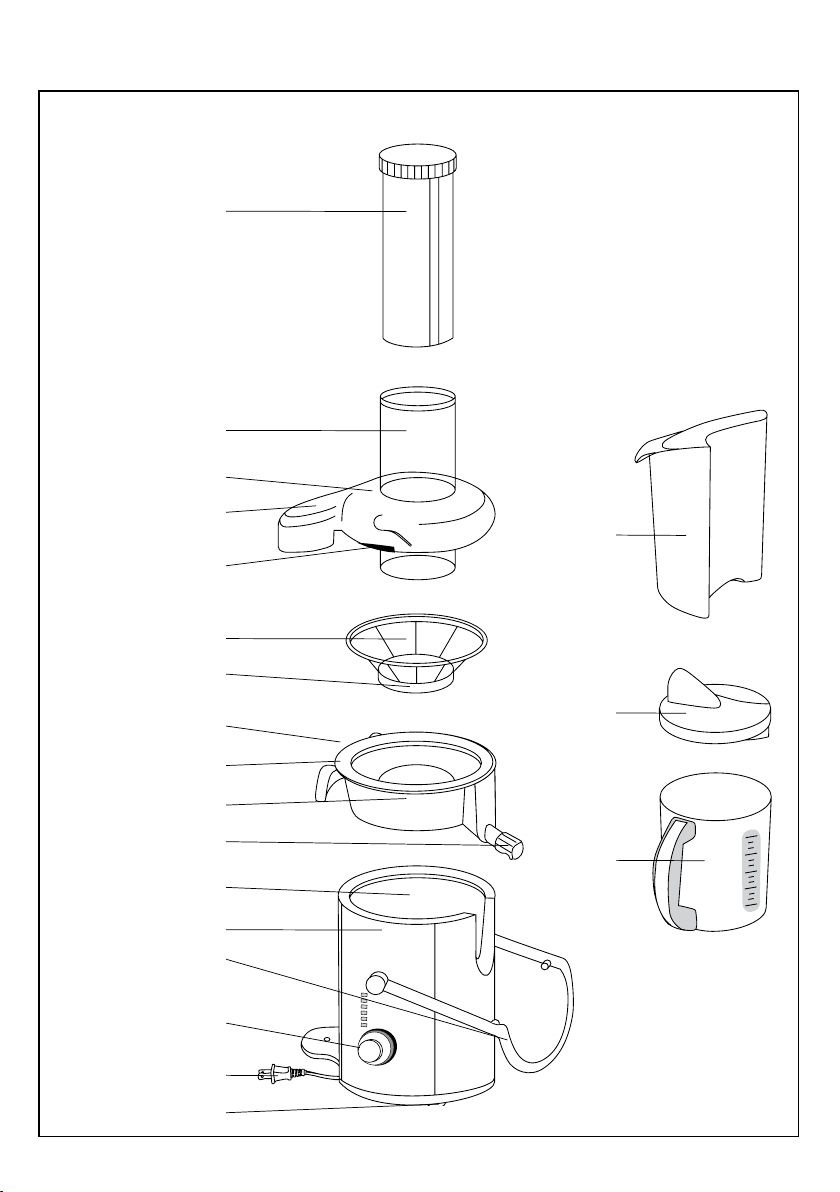
Getting To Know Your 5-Speed Digital Juice Station
Product may vary slightly from illustration
Figure 1
Food Pusher
Feed Tube
Clear Cover
Pulp Spout Cover
Clamp Locking
Slots
Pulp
Basket
Cutter Blades
Stainless Steel
Blade Basket
Pulp Spout
Juice Bowl Lip
Juice Bowl
Anti-drip Spout
Motor Hub
Motor Base
Locking Clamp
Speed selector knob
Polarized Plug
Rubber Feet
Juice
Pitcher
Lid
Juice
Pitcher
3
Page 6
Before using for the rst time
The juice extractor comes almost completely assembled in the box.
1. Your extractor may be shipped with a protective cardboard insert between the clear cover and the blade
basket. Remove this and any other protective packaging before using your juice extractor.
2. Following the disassembly instructions, remove the food pusher from the feed tube, then the cover, juice
bowl with stainless steel blade basket.
3. Wash all removable parts (food pusher, clear cover, juice bowl, pulp basket, and juice pitcher with lid) in
warm water with a biodegradable, non-abrasive liquid detergent. Rinse well and air-dry. This will eliminate
any traces of dust or residue from manufacturing
or shipping.
Caution: Use care when handling the blade basket. Hold the basket’s rim only.
Do not touch the cutter blades on the bottom of the basket. The cutter blades are very sharp!
Caution: Never rinse or immerse the motor base in water or any other liquid.
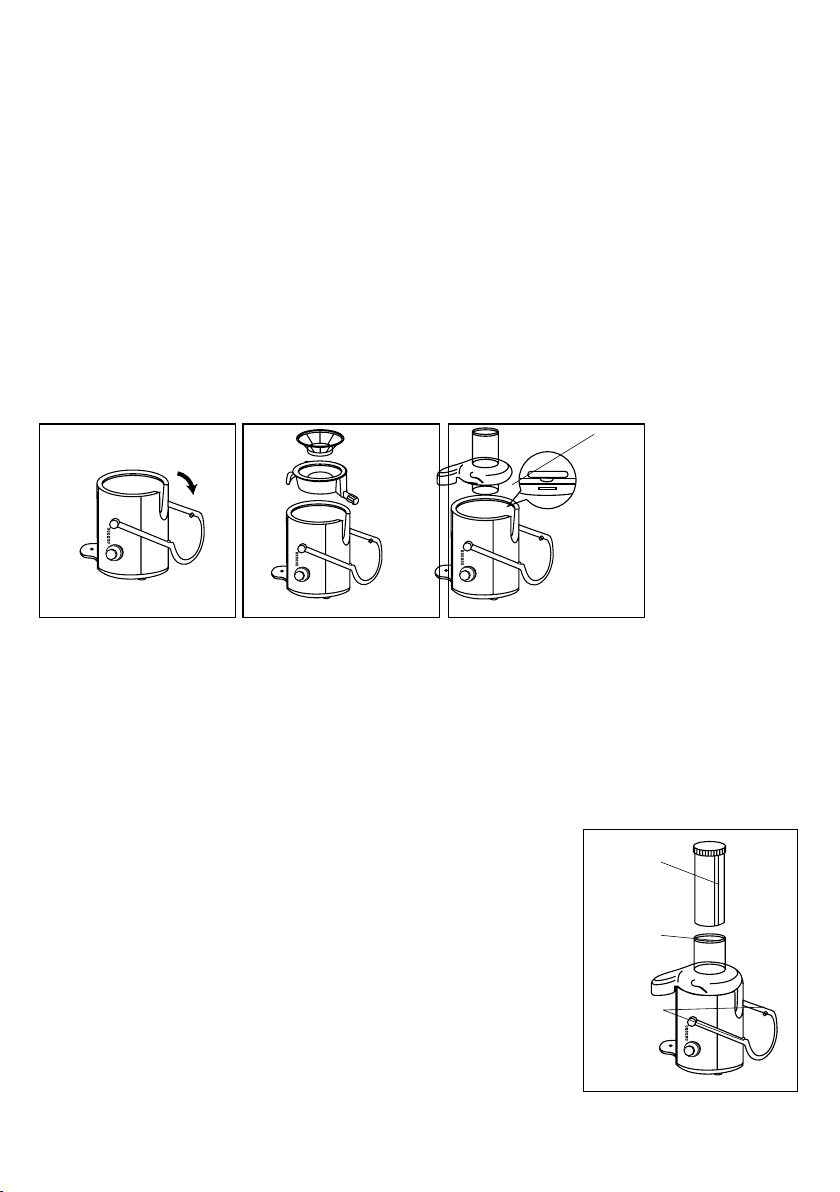
Assembly instructions
Warning: Always make sure the juice extractor is unplugged before starting assembly.
Important: The juice extractor is equipped with a safety system that prevents the extractor from being turned on
unless the unit is completely and properly assembled.
1. Rotate the locking clamp so that it sits at the front of the base (see gure 2).
2. Place the juice bowl on top of the motor base so that the juice spout ts into the cut out at the front of the
base (see gure 3).
Cover
Tab
Figure 2 Figure 3 Figure 4
Caution: Use care when handling the stainless steel blade basket.
Hold the basket’s rim only. Do not touch the cutter blades on the bottom of the basket. The cutter blades
are very sharp!
3. Set the stainless steel blade basket onto the motor hub in the center
of the juice bowl (see gure 3). Press down on the blade basket’s outer rim until it drops into place and is
securely seated. Gently rotate the blade basket to ensure that it turns freely.
If initially it fails to seat, this should slip it into place. Double check by pressing down on the rim and
spinning it again.
4. Align the cover so that the pulp cover ts over the back of the base. Fit the tab of the cover into the slot on
the top of the juice bowl (see gure 4).
5. Turn the food pusher so that the groove in the side lines up with the tab
in the feed tube. Insert the food pusher into the feed tube (see gure 5).
Store the food pusher in the feed tube of the lid until the produce is ready
to juice.
6. Push the locking clamp up and over the lid. Hold clamp rmly and push
until the two black clamp locks rest in the 2 locking slots on the top of the
lid. Make sure the lid is clamped securely into place
(see gure 6).
7. Add the pulp basket (see gure 7). Tilt the pulp basket slightly so that the
lip of the juice bowl ts snugly over the inside of the pulp basket. Push the
bottom of the pulp basket so that it rests securely on its platform.
Important: to avoid spillage, make sure the pulp basket sits ush up
against the base.
Note: to save cleaning time, line the pulp basket with a plastic grocer y
store produce bag.
8. Make sure the anti-drip spout is properly open (see gure 8).
4
Groove
Tab
Black
Clamp
Locks
Figure 5
Page 7

9. Add the juice pitcher lid to the juice pitcher so that the lid’s cut out ts
over the pitcher’s pouring spout. Tilt the juice pitcher slightly so that the
extractor’s juice spout ts into the top of the pitcher lid (see gure 7).
This will prevent juice spillage.
Lid
Locking
Slots
Preparing fruits and vegetables for your 5 speed digital
juice extractor
• Clean all produce thoroughly, using a natural bristle brush. If you are not
using organic produce, we recommend using a biodegradable cleaner to
help remove pesticide residue.
• Remove and discard the outer leaves of non-organic produce and peel
any waxed fruit or vegetable.
• Trim away any discolored or bruised sections.
• The skin may be left on all produce (including pineapple and melons)
except oranges, grapefruit, and tangerines. The oil found in these skins
Platform
Figure 6
tastes bitter and is difcult to digest.
• Remove melon seeds when possible, as they may escape through
the top of the feed tube while juicing. The pits of fruits such as cherries,
pears, and peaches should also be removed.
• Cut produce into pieces small enough to t into the feed tube.
Use the food pusher to gently direct produce through the tube.
Never push produce into the feed tube with your ngers.
• It may be necessary to cut hard produce (carrots, beets, pineapple, etc.)
into smaller pieces to facilitate juicing.
• Leafy greens, parsley, wheat grass, and sprouts should be bunched up
into a small, tight ball and pushed through with either a carrot or the food
pusher.
• Bananas are not suitable for juicing; a clear juice cannot be obtained from
Figure 7
them and residue left in the machine can clog the micro-mesh screen.
• For best results when juicing apricots, plums, pears, peaches,
and tomatoes, produce should be rm.
• When juicing apples, add a small amount of fresh lemon or lime to help
CLOSE
OPEN
slow down the browning process.
• Fruits that contain starch, such as bananas, papayas, avocados, gs and
mangoes are not suitable for the juice extractor. Use a food processor,
blender or bar blender to process these fruits.
Figure 8
• The juice extractor is not suitable for processing very hard and/or brous/starchy fruits or vegetables such
as sugar cane.
Operating instructions
5 speed Dial control
Your juice extractor offers 5 speed options that ensure optimal rpm to provide maximum juicing efciency.
Note: Efciency describes the amount of juice extracted from your produce.
Speed Description Example
5 Hard Fruits Apples, beets, carrots, fennel
4 Celery Pear, Celery, Cabbage, Cauliower
3 Peach Peach, Apricots, Plums, tomato
2 Citrus Orange, Lime, grapefruit, lemon
1 Soft Fruits Mango, Watermelon, grapes,
0 Power (OFF) Turn Off the machine; Ready to use
cucumber
Important: The juice extractor is equipped with a safety system that prevents the Extractor from being turned on
unless the unit is completely and properly assembled.
1. Assemble the juice extractor following the assembly instructions described in this manual.
2. Have all fruits and vegetables prepared for juicing.
3. Plug the unit into a 120v ac electrical outlet.
4. Remove the food pusher from the feed tube.
5
Page 8

5. Place produce into the feed tube. Use the food pusher to gently direct through the feed tube and blade
basket with the food pusher.
6. Turn the speed control dial to 5 to juice harder produce.
7. Turn the speed control dial to 1 to juice softer produce.
Note: When juicing a combination of hard and soft produce, such as beets, carrots and strawberry, you
will want to use the highest speed setting (5) for beets and carrots and the lowest speed setting (1) for the
strawberry. You do not have to turn the machine off to change speeds. Simply turn the dial to change to
the appropriate speed for each t ype of produce being juiced.
Tip: To ensure maximum efciency, alternate types of produce.
8. Do not operate juice extractor for longer than 40 seconds at a time when juicing heav y loads; if necessary,
allow the juice extractor to cool down for 2 minutes after wards.
9. When juicing is completed, turn the speed dial to Power (OFF).
10. Slide the pitcher out from the juice spout. Serve juice immediately for the freshest avor and highest
nutritional value.
11. Remove the pulp basket and save or discard pulp.
Note: The pulp from your juice extractor can be used in many different applications such as breads,
mufns, cakes, soup stocks, compressed facial packs and garden compost material.
12. Unplug the juice extractor from the outlet after use.
13. Follow disassembly instructions described in this manual; all removable parts should be rinsed and
cleaned after each use. Clean the juice extractor following the procedures described in the care & cleaning
instructions.
Disassembly instructions
Warning: always make sure juice extractor is unplugged before starting disassembly.
1. Remove the pulp basket and juice pitcher.
2. Lift the locking clamp up and off the 2 clamp locking slots on the cover. Rest the locking clamp at the front
of the unit.
3. Lift juice extractor cover up and of f the juice ex tractor.
4. Grasping the pulp spout in one hand and the back of the juice bowl in the other, loosen and lift the juice
bowl and blade basket off as one piece. These 2 parts will then easily separate for easy cleaning.
Caution: Use care when handling the blade basket. Hold the basket’s rim only. Do not touch the cutter
blades on the bottom of the basket. The cutter blades are very sharp!
5. Please follow the procedures outlined in the care & cleaning instructions for specic cleaning instructions.
User maintenance instructions
This appliance requires little maintenance. It contains no user serviceable parts. Do not try to repair it yourself.
Any servicing that requires disassembly other than cleaning must be performed by a qualied appliance repair
technician.
Care & cleaning instructions
1. Unplug from outlet. Please follow the procedures outlined in the disassembly instructions to remove par ts
before cleaning.
2. Clean unit and parts after each use.
3. Do not immerse the motor base in water or spray it with water. Clean only by wiping with a damp sponge,
cloth, or paper towel. Use any liquid dishwashing detergent but do not use products containing ammonia
or scouring powders. These products will dull, scratch or mar the surface.
4. If any juice has spilled under the juice extractor, clean legs and area with a lightly soaped sponge, then
dry. Use a damp toothbrush or cloth to clean juice from inside the motor hub on top of the motor base.
5. All par ts (except the blade basket and motor base) are washable in warm, soapy water or in the
dishwasher.
6. When cleaning the blade basket, make sure the tiny holes in the basket are not clogged. This can be
accomplished by holding the blade basket under running water faucet. Rub a plastic scrub pad in a circular
motion to clean the basket holes from both inside and outside of the blade basket.
Caution: Use care when handling the blade basket. Hold the basket’s rim only. Do not touch the cutter
blades on the bottom of the basket. The cutter blades are very sharp!
Note: If necessary, allow the blade basket to soak in hot water with 10% lemon juice added.
7. The juice extractor clear cover, juice bowl, pulp basket, juice pitcher and juice pitcher lid may be washed in
the top rack of a dishwasher. However, washing with warm (not hot) tap water on a daily basis should be
sufcient.
8. Due to the powerful staining proper ties of the carotenoids that are found in many vegetables, especially
carrots, we suggest soaking stained par ts overnight in any of these 4 cleaning solutions:
6
Page 9

• Biodegradable soap in enough warm water to cover juice ex tractor parts
• 1 part warm water to 1 part cider vinegar
• 1/2 small box baking soda in enough warm water to cover parts.
• Warm water with 10% lemon juice solution.
Caution: Never use ammonia or abrasives.
• Lightly clean with a sponge or kitchen rag and liquid detergent after soaking.
Warning: Never submerge the motor base in water or other liquid!
Storing instructions
1. Unplug unit, assemble clean, dry parts before storing.
2. Store the juice extractor in its box in a clean, dr y place. Never store it while it is hot or still plugged in.
3. Store the food pusher in the feed tube of the lid.
4. Never wrap cord tightly around the appliance. Do not put any stress on the cord where it enters the unit;
while holding the cord perpendicular to the unit, push inwards slowly to store it inside the base of the
unit.
Troubleshooting
Symptom Possible correction
The juice extractor will not turn on • The juice extractor is equipped with a safety system that prevents
Excessive noise or vibrations occur
after juice extractor is turned on.
Excessive noise or vibrations,
unpleasant odor, appliance is hot
to the touch, or the juice extractor
smokes after it is turned on.
The blade basket is blocked. Food Is
jammed in the base of the feed tube;
the juice extractor has stopped during
juicing.
the extractor from being turned on unless the unit is completely and
properly assembled.
• Turn the speed dial to Power (OFF). Check to make sure the blade
basket is properly seated.
• Make sure 2 black clamp locks rest in the 2 locking slots on the top of
the lid. (see gure 6.) The lid must be clamped securely into place
or the juice extractor will not turn on.
• Check to make sure the blade basket is properly seated.
• Pulp may have built up on the blade basket. Clean the blade basket.
• Try alternating different types of produce while juicing.
Note: Because of the juice extractor’s powerful motor, a small amount
of noise and/or vibration is normal when the extractor is turned on
and as it comes to a complete stop. All juicers will sound slightly
different.
• Unplug the unit immediately. Take the juice extractor to a qualied
appliance repair technician for servicing.
• Turn the speed selector dial to Power (OFF). Remove cover and clear
feed tube.
Chop fruits and vegetables into smaller pieces
to facilitate juicing.
7
Page 10

Recipes
Virgin Extractor Mojito
Here’s a healthy non-alcoholic version of a cocktail favorite.
• 2 cucumbers
• 2 large Anjou pears
Extractor Apple Pie
• 1 tsp cinnamon
• 1 tsp nutmeg
• 1 large handfuls fresh mint
• 1 lime
• 8 large grany smith apples
8
Page 11

Limited TWO-YEAR Warranty
SENSIO Inc. hereby warrants that for a period of TWO YEARS from the date
of purchase, this product will be free from mechanical defects in material and
workmanship, and for 90 days in respect to non-mechanical parts. At its sole
discretion, SENSIO Inc. will either repair or replace the product found to be defective,
or issue a refund on the product during the warranty period.
The warranty is only valid for the original retail purchaser from the date of initial retail
purchase and is not transferable. Keep the original sales receipt, as proof of purchase is
required to obtain warranty validation. Retail stores selling this product do not have the
right to alter, modify, or in any way revise the terms and conditions of the warranty.
EXCLUSIONS:
The warranty does not cover normal wear of parts or damage resulting from any of the
following: negligent use of the product, use of improper voltage or current, improper
routine maintenance, use contrary to the operating instructions, disassembly, repair,
or alteration by anyone other than qualied SENSIO Inc. personnel. Also, the warranty
does not cover Acts of God such as re, oods, hurricanes, or tornadoes.
SENSIO Inc. shall not be liable for any incidental or consequential damages caused
by the breach of any express or implied warranty. Apart from the extent prohibited
by applicable law, any implied warranty of merchantability or tness for a particular
purpose is limited in time to the duration of the warranty. Some states, provinces or
jurisdictions do not allow the exclusion or limitation of incidental or consequential
damages, or limitations on how long an implied warranty lasts, and therefore, the
above exclusions or limitations may not apply to you. The warranty covers specic
legal rights which may vary by state, province and/or jurisdiction.
HOW TO OBTAIN WARRANTY SERVICE:
You must contact Customer Service at our toll-free number: 1-866-832-4843.
A Customer Service Representative will attempt to resolve warranty issues over the
phone. If the Customer Service Representative is unable to resolve the problem, you will
be provided with a case number and asked to return the product to SENSIO Inc. Attach
a tag to the product that includes: your name, address, daytime contact telephone
number, case number, and description of the problem. Also, include a copy of the
original sales receipt. Carefully package the tagged product with the sales receipt,
and send it (with shipping and insurance prepaid) to SENSIO Inc.’s address. SENSIO
Inc. shall bear no responsibility or liability for the returned product while in transit to
SENSIO Inc.’s Customer Service Center.
3
Page 12

CONSIGNES DE SÉCURITÉ
IMPORTANTES
Respecter les consignes de sécurité de base au moment d’utiliser des appareils
électriques, y compris les suivantes.
1. LIRE TOUTES LES INSTRUCTIONS.
2. Pour prévenir tout risque de décharge électrique, ne pas immerger le cordon, la
prise ou l’appareil dans de l’eau ou dans d’autres liquides.
3. Cet appareil n’est pas destiné à être utilisé par des personnes (y compris les
enfants) dont les capacités physiques, sensorielles ou mentales sont limitées ou
qui ne possèdent ni l’expérience, ni les compétences nécessaires pour utiliser
l’appareil, à moins qu’elles soient supervisées ou qu’elles aient reçu des directives
d’utilisation adéquates de l’appareil par la personne responsable de leur sécurité.
4. Surveiller les enfants pour éviter qu’ils jouent avec l’appareil.
5. Débrancher l’appareil de la prise murale lorsqu’il n’est pas utilisé, avant de poser
ou d’enlever des pièces et avant le nettoyage.
6. Éviter tout contact avec des pièces en mouvement.
7. Ne pas utiliser l’appareil lorsque la che électrique ou le cordon est endommagé,
après une défectuosité ou lorsque l’appareil a été endommagé, notamment en
raison d’une chute.
8. L’utilisation de pièces non recommandées par le fabricant, y compris des bocaux à
conserve, peut entraîner un incendie, des décharges électriques ou des blessures.
9. Ne pas utiliser l’appareil à l’extérieur.
10. Ne pas laisser le cordon pendre d’un bord de table ou d’un comptoir.
11. Ne pas laisser le cordon en contact avec une surface chaude, tel qu’un four.
12. S’assurer que le couvercle de la centrifugeuse est bien verrouillé avant de
faire fonctionner l’appareil. Ne pas déverrouiller le couvercle pendant que la
centrifugeuse est en marche.
13. Placer le bouton de réglage à la position arrêt (POWER) et débrancher l’appareil
de la prise électrique après chaque utilisation. S’assurer que le moteur est
complètement arrêté avant de démonter l’appareil.
14. Ne pas insérer les doigts ou tout autre objet dans l’orice d’alimentation de la
centrifugeuse lorsqu’elle fonctionne. Si de la nourriture se coince dans l’entonnoir,
utiliser le poussoir ou un autre morceau de fruit ou de légume pour la pousser
dans l’appareil. Lorsqu’il est impossible de le faire, placer le bouton de réglage à la
position arrêt (POWER), débrancher l’appareil de la prise électrique et le démonter
an d’enlever la nourriture restante.
15. Ne pas utiliser l’appareil si l’ensemble passoire et lames rotatif, en acier
inoxydable, est endommagé.
16. Manipuler l’ensemble passoire et lames avec soin.
En tenir le rebord seulement. Ne pas toucher aux lames de la passoire, car elles
sont très tranchantes!
17. Ne faites pas fonctionner sans le réservoir à pulpe en place.
POUR USAGE DOMESTIQUE
SEULEMENT
CONSERVER CES CONSIGNES
10
Page 13

AUTRES CONSIGNES DE SÉCURITÉ
IMPORTANTES
1. Lire et comprendre le mode d’emploi avant d’utiliser ou de nettoyer l’appareil.
2. Le cordon de l’appareil doit être branché uniquement dans une prise de 120 V c.a.
3. Ne pas laisser l’appareil sans surveillance pendant qu’il est en marche.
4. Si l’appareil se met à fonctionner anormalement pendant son utilisation, placer
immédiatement le bouton de réglage à la position arrêt (POWER) et débrancher le
cordon. Ne pas utiliser ni tenter de réparer l’appareil s’il est défectueux.
5. Débrancher immédiatement l’appareil s’il tombe ou s’il est immergé
accidentellement dans de l’eau ou dans un autre liquide. Ne pas plonger la main
dans l’eau! Ne pas utiliser l’appareil après sa chute ou son immersion dans l’eau.
6. An de réduire les risques de blessures ou de dommages, ne jamais utiliser
l’appareil dans une position instable.
7. Ne pas utiliser l’appareil à une n autre que celle pour laquelle il a été conçu.
8. Porter une attention particulière à la quantité de pulpe et de résidus produits
pendant l’extraction du jus. S’il est plein, vider le réservoir à résidus avant de
continuer à extraire le jus.
9. S’assurer que le bec antigoutte est en position ouverte (OPEN) pendant l’extraction
du jus. Utiliser le bec uniquement pour éviter que des gouttes ne s’échappent
lorsque le pichet est enlevé.
Remarques sur la che
Cet appareil est doté d’une che polarisée (une broche est plus large que l’autre). Pour
réduire le risque de décharge électrique, la che s’insère d’une seule manière dans une
prise polarisée. Si la che ne s’insère pas complètement dans la prise, la tourner pour
l’insérer de l’autre côté. S’il est toujours impossible de l’insérer complètementdans la
prise, communiquer avec un électricien qualié. Ne jamais modier la che de quelque
façon que ce soit.
Remarques sur le cordon
Utiliser le cordon d’alimentation court (ou cordon d’alimentation amovible) fourni avec
l’appareil an de réduire le risque d’emmêlement ou de trébuchement que présente un
cordon long. Il n’est pas recommandé d’utiliser une rallonge avec cet appareil.
Avertissement de migration de plastiants
Mise en garde : Pour éviter la migration de plastiants vers le ni de comptoirs, de
tables ou de tout autre meuble, placer des sous-plats ou des napperons faits de matière
non plastique entre l’appareil et le dessus du comptoir ou de la table. Si cette consigne
n’est pas respectée, le ni de la surface pourrait noircir et des ternissures permanentes
ou des taches indélébiles pourraient se former.
Alimentation électrique
Si le circuit électrique est surchargé parce qu’il doit également alimenter d’autres
appareils, l’appareil pourrait ne pas fonctionner correctement. Il doit être alimenté par
un circuit électrique distinct de tout autre appareil.
11
Page 14

Caractéristiques de la centrifugeuse numérique à 5 vitesses
L’appareil peut varier quelque peu des illustrations.
Figure 1
Poussoir
Entonnoir
Couvercle transparent
Couvercle du bec verseur
Ouvertures pour verrous
Ensemble passoire et
Patte de verrouillage
de résidus
Lames
lames en acier
inoxydable
Bec verseur
de résidus
Bec de la cuvette
Cuvette
Bec antigoutte
Moyeu
Bloc-moteur
Bouton de réglage
de vitesse
Fiche polarisée
Réservoir
à résidus
Couvercle
du pichet
Pichet
Pieds en caoutchouc
12
Page 15

Avant la première utilisation
La centrifugeuse est presque entièrement préassemblée.
1. Un carton protecteur peut se trouver entre le couvercle transparent et l’ensemble passoire et lames de la
centrifugeuse. Le retirer ainsi que tout autre emballage protecteur avant d’utiliser l’appareil.
2. En suivant les instructions de démontage, enlever le poussoir de l’entonnoir, puis enlever le couvercle, la
cuvette et l’ensemble passoire et lames en acier inoxydable.
3. Laver toutes les pièces amovibles (poussoir, couvercle transparent, cuvette, réservoir à résidus, pichet et
son couvercle) dans l’eau chaude avec un savon liquide biodégradable non abrasif. Rincer et laisser sécher
à l’air libre. Le nettoyage éliminera toute trace de poussière et tout résidu provenant de la fabrication
et du transport.
Mise en garde : Manipuler l’ensemble passoire et lames en acier inoxydable avec soin. En tenir le rebord
seulement. Ne pas toucher aux lames de la passoire, car elles sont très tranchantes!
Mise en garde : Ne jamais rincer ou plonger le bloc-moteur dans l’eau ou dans un autre liquide.
Directives d’assemblage
Avertissement : Toujours s’assurer que la centrifugeuse est débranchée avant de commencer l’assemblage.
Important : La centrifugeuse est munie d’un dispositif de sécurité qui empêche sa mise en marche si elle n’est
pas complètement et correctement assemblée.
1. Abaisser la patte de verrouillage jusqu’à ce qu’elle repose devant la base de l’appareil. (Voir la gure 2.)
2. Placer la cuvette sur le bloc-moteur de façon à ce que le bec d’écoulement se positionne dans l’ouverture
située sur le devant de la base. (Voir la gure 3.)
Patte du
couvercle
Figure 2 Figure 3 Figure 4
Avertissement : Manipuler l’ensemble passoire et lames en acier inoxydable avec soin.En tenir le rebord
seulement. Ne pas toucher aux lames de la passoire, car elles sont très tranchantes!
3. Fixer l’ensemble passoire et lames sur le moyeu situé au centre de la cuvette. (Voir la gure 3.) Exercer
une pression vers le bas sur le rebord de l’ensemble jusqu’à ce qu’il soit bien en place et xé de façon
sécuritaire. Le faire tourner délicatement an de s’assurer qu’il pivote librement.
Si l’ensemble n’était pas déjà en place,
cette manipulation devrait y remédier. Presser et faire tourner une seconde fois pour s’assurer que
l’ensemble est bien xé.
4. Aligner le couvercle de sorte que le couvercle du réser voir à résidus se place à l’arrière de la base de
l’appareil. Positionner la patte du couvercle dans la fente située sur le dessus de la cuvette.
(Voir la gure 4.)
5. Tourner le poussoir de façon à ce que ses rainures latérales s’alignent
avec celles situées dans l’entonnoir. Mettre le poussoir dans l’entonnoir.
(Voir la gure 5.) Ranger le poussoir dans l’entonnoir du couvercle
jusqu’au moment de l’extraction du jus.
6. Remonter la patte de verrouillage par-dessus le couvercle. Tenir
fermement la patte et pousser jusqu’à ce que les deux verrous noirs
reposent dans les deux ouvertures conçues à cet effet, situées
au-dessus du couvercle. S’assurer que le couvercle est xé de façon
sécuritaire. (Voir la gure 6.)
7. Ajouter le réservoir à résidus. (Voir la gure 7.) Incliner légèrement
le réservoir à résidus an que le bec de la cuvette soit parfaitement
positionné au-dessus du réservoir à résidus. Exercer une pression
sur le bas du réservoir à résidus an qu’il repose correctement sur la
plateforme.
Important : Pour éviter les éclaboussures, s’assurer que le réservoir à
13
Rainure
Rainure de
l’entonnoir
Verrous
noirs
Figure 5
Page 16

résidus est directement appuyé contre la base de l’appareil.
Remarque : Pour faciliter le nettoyage, doubler le réservoir d’un sac de
plastique.
Ouvertures
pour
verrous
8. S’assurer que le bec antigoutte est correctement ouvert. (Voir la gure 8).
9. Mettre le couvercle sur le pichet de façon à ce que bec et ouverture
soient alignés. Incliner légèrement le pichet an que le bec d’écoulement
de la centrifugeuse se positionne dans le haut du couvercle du pichet.
(Voir la gure 7.) Cette étape permet d’éviter les éclaboussures.
Préparer les fruits et légumes à mettre dans la centrifugeuse
numérique à 5 vitesses
• Nettoyer complètement les fruits et les légumes à l’aide d’une brosse à
soies naturelles. Si un aliment n’est pas biologique, il est recommandé
d’utiliser un nettoyant biodégradable, qui contribuera à éliminer les
résidus de pesticides.
• Retirer et jeter les feuilles extérieures des aliments non biologiques et
peler tous les fruits et légumes cirés.
• Couper et jeter les par ties décolorées et meurtries.
• La peau peut être conservée sur tous les aliments (y compris les ananas
et les melons), à l’exception des oranges, des pamplemousses et des
mandarines. La peau de ces fruits contient une huile au goût amer qui est
difcile à digérer.
• Lorsque possible, retirer les graines de melons puisqu’elles pourraient
sortir de la centrifugeuse par l’orice d’alimentation lors de l’extraction
du jus. Les noyaux de fruits comme les cerises, les poires et les pêches
devraient aussi être retirés.
• Couper les aliments en morceaux sufsamment petits pour entrer dans
l’entonnoir. Utiliser le poussoir pour pousser délicatement les aliments
dans l’orice d’alimentation. Ne jamais pousser les aliments dans
l’entonnoir avec les doigts.
• Il pourrait être nécessaire de couper les aliments durs (carottes, betteraves,
ananas, etc.) en plus petits morceaux pour faciliter la production de jus.
• Les légumes verts avec feuilles, le persil, l’herbe de blé et les pousses
devraient être compactés en petites boulettes, puis poussés dans
l’entonnoir à l’aide d’une carotte ou du poussoir.
• Il n’est pas recommandé d’utiliser des bananes pour produire du jus; elles
ne produiront pas un jus clair et les résidus qu’elles feront s’accumuler
dans l’appareil peuvent obstruer le tamis à très nes mailles.
• Pour obtenir les meilleurs résultats avec la production de jus d’abricot, de prune, de pêche et de tomate,
l’aliment devrait être ferme.
• Lors de la production de jus de pomme, l’ajout d’une petite quantité de jus de lime ou de citron frais
contribue à ralentir le brunissement.
• Les fruits qui contiennent de l’amidon, comme les bananes, les papayes, les avocats, les gues et les
mangues, ne produiront pas de jus. Utiliser un robot culinaire ou un mélangeur an d’extraire le jus de ces
fruits.
• La centrifugeuse ne convient pas au traitement de fruits et de légumes très durs ou breux ou riches en
amidon, comme la canne à sucre.
Plateforme
Figure 6
Figure 7
CLOSE
Figure 8
OPEN
14
Page 17

Mode d’emploi
Bouton de réglage à 5 vitesses
La centrifugeuse offre un choix de 5 vitesses qui assurent une efcacité et un nombre de tr/min optimaux.
Remarque : L’efcacité représente ici la quantité de jus extrait des aliments.
Vitesse Description Exemple
5 Fruits durs (Hard Fruits) Pomme, betterave, carotte, fenouil
4 Céleri (Celery) Poire, céleri, chou, chou-eur
3 Pêche (Peach) Pêche, abricot, prune, tomate
2 Agrumes (Citrus) Orange, lime, pamplemousse, citron
1 Fruits mous (Soft Fruits) Mangue, melon d’eau, raisin, concombre
0 Bouton Marche/Arrêt (Power) Met l’appareil hors tension (OFF);
Important : La centrifugeuse est munie d’un dispositif de sécurité qui empêche
sa mise en marche si elle n’est pas complètement et correctement assemblée.
1. Assembler la centrifugeuse en suivant le mode d’emploi contenu dans le manuel d’instructions.
2. Préparer tous les fruits et les légumes pour la production de jus.
3. Brancher l’appareil dans une prise électrique de 120 V c.a.
4. Retirer le poussoir de l’entonnoir.
5. Mettre les aliments dans l’entonnoir. Utiliser le poussoir an de délicatement pousser les aliments dans
l’entonnoir et dans l’ensemble passoire et lames.
6. Régler l’appareil à la vitesse 5 an d’extraire le jus d’aliments durs.
7. Régler l’appareil à la vitesse 1 an d’extraire le jus d’aliments mous.
Remarque : Si un mélange d’aliments durs et mous, tel celui de betteraves, de carottes et de fraises, est
utilisé pour la production de jus, placer le bouton de réglage à la vitesse (5) pour les betteraves et les
carottes et à la vitesse (1) pour les fraises. Il n’est pas nécessaire d’éteindre l’appareil an de changer
de vitesse. Tourner le bouton de réglage an d’obtenir la vitesse correspondant à chaque type d’aliment
utilisé.
Conseil : Pour une efcacité maximale, alterner le type d’aliments utilisés.
8. Lors de la production de grandes quantités de jus, ne pas faire fonctionner la centrifugeuse pendant plus
de 40 secondes à la fois; au besoin, la laisser reposer 2 minutes après chaque mise en marche.
9. Lorsque la production de jus est terminée, mettre le bouton de réglage à la position arrêt (POWER).
10. Retirer le pichet de sa position sous le bec d’écoulement. Pour obtenir la pleine saveur et la valeur
nutritive la plus élevée, servir le jus immédiatement.
11. Retirer le réservoir à résidus et conserver ou jeter les résidus qui s’y trouvent.
Remarque : Les résidus produits par la centrifugeuse peuvent être utilisés pour préparer différentes
recettes comme le pain, les mufns, les gâteaux et les bouillons, ou encore des masques faciaux et du
compost de jardin.
12. Débrancher la centrifugeuse de la prise électrique après utilisation.
13. Suivre les instructions de démontage décrites dans le présent mode d’emploi; toutes les pièces amovibles
devraient être rincées et nettoyées après chaque utilisation. Nettoyer la centrifugeuse en suivant la
procédure décrite dans la section Entretien et nettoyage.
prêt à l’emploi
Instructions de démontage
Avertissement : Toujours s’assurer que la centrifugeuse est débranchée avant de commencer le démontage.
1. Enlever le réservoir à résidus et le pichet.
2. Soulever la patte de verrouillage et dégager les verrous des ouvertures situées sur le couvercle. Déposer
la patte de verrouillage à sa place, devant l’appareil.
3. Soulever le couvercle de la centrifugeuse et l’enlever.
4. Empoigner d’une main le bec du réservoir à résidus et de l’autre, l’arrière de la cuvette; desserrer et
soulever la cuvette et l’ensemble passoire et lames en même temps. Une fois retirées de l’appareil, ces
deux pièces se séparent et se nettoient facilement.
Mise en garde : Manipuler l’ensemble passoire et lames en acier inoxydable avec soin. En tenir le rebord
seulement. Ne pas toucher aux lames de la passoire, car elles sont très tranchantes!
5. Suivre les indications précises correspondantes décrites dans la section Entretien et nettoyage.
15
Page 18

Réparation
L’appareil exige peu d’entretien. Il ne contient aucune pièce pouvant être réparée ou remplacée par l’utilisateur. Il
ne faut donc pas tenter de le réparer soi-même. Toute opération d’entretien qui exige le démontage de l’appareil,
autre que le nettoyage, doit être exécutée par un technicien en réparation d’appareils ménagers qualié.
Entretien et nettoyage
1. Débrancher l’appareil de la prise électrique. Suivre la procédure décrite dans la section Instructions de
démontage pour retirer toutes les pièces avant de les nettoyer.
2. Nettoyer la centrifugeuse ainsi que toutes les pièces après chaque utilisation.
3. Ne pas asperger ou immerger dans l’eau le bloc-moteur. Nettoyer en utilisant une éponge, un linge ou un
essuie-tout humides seulement. Utiliser un savon à vaisselle liquide, mais éviter d’utiliser des produits
contenant de l’ammoniaque ou des poudres à récurer. Ces produits pourraient ternir, égratigner ou
endommager la surface.
4. Si du jus a débordé sous la centrifugeuse, net toyer les pattes de l’appareil et la surface sale à l’aide d’une
éponge légèrement savonneuse, puis laisser sécher. Utiliser une brosse à dents ou un linge humides an
d’enlever le jus qui se trouve dans l’espace où se situe le moyeu, au centre du bloc-moteur.
5. Toutes les pièces (sauf l’ensemble passoire et lame et le bloc-moteur) vont au lave-vaisselle ou peuvent
être lavées avec de l’eau chaude savonneuse.
6. En nettoyant l’ensemble passoire et lames, s’assurer que les mailles de la passoire ne sont pas obstruées.
Pour ce faire, tenir la passoire sous l’eau courante. Nettoyer les trous de la passoire en décrivant un
mouvement circulaire, au moyen d’un tampon à récurer en plastique, tant par l’intérieur que par l’extérieur
de l’ensemble passoire et lames.
Mise en garde : Manipuler l’ensemble passoire et lames en acier inoxydable avec soin. En tenir le rebord
seulement. Ne pas toucher aux lames de la passoire, car elles sont très tranchantes!
Remarque : Au besoin, faire tremper l’ensemble passoire et lames dans un mélange d’eau chaude incluant
10 % de jus de citron.
7. Laver le couvercle transparent, la cuvet te, le réservoir à résidus, le pichet et son couvercle dans le panier
supérieur du lave-vaisselle.
Un lavage quotidien à l’eau du robinet tiède (et non chaude) est cependant sufsant.
8. Puisque le caroténoïde contenu dans de nombreux légumes, notamment la carotte, tache énormément, il
est recommandé de faire tremper les pièces tachées une nuit entière dans l’une des solutions suivantes :
• Savon biodégradable et eau chaude – quantité sufsante pour recouvrir les pièces de la centrifugeuse.
• Eau chaude et vinaigre de cidre en quantité égale.
• 1/2 boîte de bicarbonate de soude et eau chaude – quantité sufsante pour recouvrir les pièces de la
centrifugeuse.
• Eau chaude incluant 10 % de jus de citron.
Avertissement : Ne jamais utiliser de nettoyant liquide abrasif ou contenant de l’ammoniac.
• Nettoyer délicatement avec une éponge ou un chiffon et un savon liquide après avoir laissé tremper.
Avertissement : Ne jamais plonger le bloc-moteur dans l’eau ou dans
un autre liquide!
Rangement
1. Avant de le ranger, débrancher l’appareil et assembler les pièces propres et sèches.
2. Le ranger dans sa boîte dans un endroit propre et sec.
Ne jamais le ranger lorsqu’il est encore chaud ou branché.
3. Ranger le poussoir dans l’entonnoir du couvercle.
4. Ne jamais enrouler le cordon de façon serrée autour de l’appareil.
Ne pas tendre le cordon là où il s’insère dans l’appareil; le faire pénétrer lentement dans la base de
l’appareil.
16
Page 19

Dépannage
Problème Solution possible
La centrifugeuse ne se met pas en
marche.
Des vibrations et du bruit excessifs
se produisent après la mise en
marche de la centrifugeuse.
Des vibrations et du bruit excessifs
se produisent après la mise en
marche de la centrifugeuse; une
odeur désagréable ou une fumée
s’en dégage, ou encore, sa surface
est très chaude.
La passoire est bloquée. Des
aliments sont coincés dans
l’entonnoir; la centrifugeuse a cessé
de fonctionner.
• La centrifugeuse possède un dispositif de sécurité qui empêche
sa mise en marche si elle n’est pas complètement et correctement
assemblée.
• Placer le bouton de réglage à la position arrêt (POWER). S’assurer que
l’ensemble passoire et lames est bien installé.
• S’assurer que les deux verrous noirs reposent bel et bien dans les
ouvertures prévues à cet effet. (Voir la gure 6.) Le couvercle de la
centrifugeuse doit être bien en place et xé de façon sécuritaire pour la
mise en marche.
• S’assurer que l’ensemble passoire et lames est bien installé.
• Il est possible que des résidus se soient accumulés dans l’ensemble
passoire et lames. Nettoyer l’ensemble passoire et lames.
• Essayer d’alterner différents types d’aliments lors de la production du
jus.
Remarque : À cause du puissant moteur de la centrifugeuse, il est
normal de percevoir un peu de bruit et de vibrations lors de la mise en
marche ou de l’arrêt de l’appareil. Toutes les centrifugeuses émettent
un bruit légèrement différent.
• Débrancher l’appareil immédiatement.
Faire réparer la centrifugeuse par un technicien en réparation
d’appareils ménagers qualié.
• Placer le bouton de réglage à la position arrêt (POWER). Enlever le
couvercle et vider l’entonnoir. Couper les morceaux de fruits et de
légumes en morceaux plus petits pour faciliter l’extraction du jus.
17
Page 20

Recettes
Jus à saveur de mojito (sans alcool)
Une variante santé de votre cocktail préféré!
• 2 concombres
• 2 grosses poires d’Anjou
Jus à saveur de tarte aux pommes
• 1 c. à thé de cannelle
• 1 c. à thé de muscade
• 2 grosses poignées de menthe fraîche
• 1 lime
• 8 grosses pommes Granny Smith
18
Page 21

Garantie limitée de DEUX ANS
SENSIO Inc. assure par la présente que le produit est garanti contre tout défaut de
matériel et de fabrication pendant une période de DEUX ANS à compter de la date
d’achat et contre tout défaut des pièces autres que mécaniques pendant 90 jours. À
son entière discrétion, SENSIO Inc. réparera ou remplacera un produit défectueux, ou
accordera un remboursement pour ce produit, pendant la période de la garantie.
Cette garantie s’applique uniquement à l’acheteur initial du produit, à compter de la
date initiale de l’achat, et est incessible. Pour que la garantie soit valide, l’acheteur doit
conserver le reçu de caisse original. Les magasins de détail qui vendent ce produit
n’ont pas le droit de l’altérer ou de le modier, ni de modier de quelque façon les
modalités de la garantie.
EXCLUSIONS :
La garantie ne couvre pas l’usure normale des pièces ou les dommages causés par
une utilisation négligente du produit, le branchement sur un circuit de tension ou de
courant inapproprié, un entretien de routine inadéquat, une utilisation contraire aux
instructions de fonctionnement, de démontage et de réparation, ou par la modication
du produit par une personne autre qu’un technicien qualié de SENSIO Inc. De plus, la
garantie ne couvre pas les cas de force majeure comme les incendies, les inondations,
les ouragans et les tornades.
SENSIO Inc. ne pourra être tenue responsable de tout dommage indirect ou accessoire
causé par la violation de toute garantie explicite ou implicite. Sauf dans la mesure où
cela est interdit par la loi, toute garantie implicite concernant la valeur commerciale
ou l’adéquation à la n visée se limite à la durée de la garantie. Certains États et
certaines provinces ou compétences administratives ne permettent pas l’exclusion
ou la limitation des dommages indirects ou accessoires, ou les limitations quant
à la durée des garanties implicites; par conséquent, les exclusions ou limitations
mentionnées précédemment peuvent ne pas s’appliquer à vous. La garantie couvre les
droits légaux spéciques qui peuvent varier selon l’état, la province ou la compétence
administrative.
COMMENT OBTENIR UN SERVICE SOUS GARANTIE :
Communiquez avec le service à la clientèle en composant notre numéro sans frais :
1 866 832-4843. Un représentant du service à la clientèle tentera de résoudre par
téléphone les questions relatives à la garantie. Si le représentant du service à la
clientèle est incapable de résoudre le problème, il vous fournira un numéro de
demande et vous informera que vous devez retourner le produit à SENSIO Inc. Apposez
sur le produit une étiquette indiquant votre nom, votre adresse, votre numéro de
téléphone (de jour), le numéro de demande ainsi qu’une description du problème.
Incluez également une copie du reçu de caisse original. Emballez soigneusement
le produit avec son reçu de caisse et faites-le parvenir (port et assurance payés) à
l’adresse de SENSIO Inc. SENSIO Inc. n’assume aucune responsabilité quant au produit
retourné pendant son transport jusqu’au centre de service à la clientèle de SENSIO Inc.
21
Page 22

MEDIDAS DE SEGURIDAD
IMPORTANTES
Cuando se utilizan aparatos eléctricos, se deben seguir precauciones de seguridad
básicas, entre ellas:
1. Lea todas las instrucciones.
2. Para protegerse contra una descarga eléctrica, no sumerja el cable, los enchufes ni
el aparato en agua u otros líquidos.
3. Este dispositivo no está diseñado para ser utilizado por personas (incluidos niños)
con capacidades físicas, sensoriales o mentales reducidas, o falta de experiencia
y conocimiento, a menos que una persona responsable de su seguridad los
supervise o instruya en el uso del aparato.
4. Se debe supervisar a los niños para evitar que jueguen con el aparato.
5. Desenchufe el aparato del tomacorriente cuando no lo usa, antes de colocarle o
extraerle piezas, y antes de limpiarlo.
6. Evite el contacto con las piezas móviles.
7. No utilice ningún aparato si el cable o el enchufe están dañados, o si el aparato no
funciona bien o se ha caído o dañado de alguna forma.
8. El uso de accesorios, incluidos los tarros para conserva, que no recomiende el
fabricante puede provocar incendio, descarga eléctrica o lesiones.
9. No lo utilice en exteriores.
10. No permita que el cable cuelgue del borde de la mesa o mesada.
11. No permita que el cable toque una supercie caliente, incluida la estufa.
12. Siempre procure que la cubierta del extractor de jugos esté sujetada de forma
segura antes de encender el extractor. No desenganche la abrazadera de sujeción
mientras el extractor de jugos está en funcionamiento.
13. Gire el dial de velocidad hasta la posición de apagado (POWER) y desenchufe el
extractor del tomacorriente eléctrico luego de cada uso. Procure que el motor
se detenga completamente antes de desarmarlo.
14. No coloque los dedos ni otros objetos en la abertura del extractor de jugos
mientras este está en funcionamiento. Si el alimento se atasca en el tubo
de entrada, use el empujador de alimentos u otra fruta o verdura para empujarlo
hacia abajo. Cuando esto no sea posible, gire el dial de velocidad hasta la posición
de apagado (POWER), desenchufe el extractor de jugos del tomacorriente eléctrico
y desármelo para extraer el alimento sobrante.
15. No use el aparato si las cuchillas extractoras giratorias y la cesta están dañadas.
16. Tenga cuidado cuando manipula la cesta con cuchillas de acero inoxidable.
Sostenga la cesta desde el borde únicamente. No toque las cuchillas cortantes de
la parte inferior de la cesta. Estas son muy losas.
17. No opere sin el contenedor de pulpa en su lugar.
GUARDE ESTAS INSTRUCCIONES
PARA USO DOMÉSTICO
úNICAMENTE
20
Page 23

OTRAS MEDIDAS DE SEGURIDAD
IMPORTANTES
1. Todos los usuarios de este aparato deben leer y comprender este manual de
instrucciones antes de manejar o limpiar la unidad.
2. El cable del aparato se debe enchufar únicamente a un tomacorriente eléctrico de
120 V de CA.
3. No deje este aparato sin vigilancia durante el uso.
4. Si este aparato comienza a funcionar mal durante el uso, gire inmediatamente
el dial de velocidad para apagarlo (POWER) y desenchufe el cable. No utilice ni
intente reparar el aparato si funciona mal.
5. Si el aparato se cae al agua, o se sumerge por accidente en ella, desenchúfelo
inmediatamente. ¡No lo saque del agua! No use este aparato luego de haberse
caído al agua o sumergido en ella.
6. Para reducir el riesgo de lesiones a personas o a la propiedad, nunca use este
aparato en una posición inestable.
7. No le dé al aparato otro uso que no sea el indicado.
8. Preste mucha atención a la cantidad de pulpa y residuos generados al exprimir.
Siempre vacíe un envase lleno de pulpa antes de seguir exprimiendo.
9. Procure siempre que el pico antigoteo esté abierto (posición OPEN) al exprimir. El
pico antigoteo debe usarse únicamente para evitar el goteo cuando extrae el vaso
para jugo.
Notas sobre el enchufe
Este aparato tiene un enchufe polarizado (una clavija es más ancha que la otra).
Para reducir el riesgo de descarga eléctrica, este enchufe se debe colocar en un
tomacorriente polarizado en una sola dirección. Si el enchufe no entra completamente
en el tomacorriente, dé vuelta el enchufe.
Si aun así no encaja, llame a un electricista calicado.
No modique el enchufe de ninguna manera.
Notas sobre el cable
Se debe usar el cable de alimentación corto provisto (o cable de alimentación
separable) para reducir el riesgo de enredarse o tropezarse si el cable fuera más largo.
No utilice un cable de extensión con este producto.
Advertencia sobre los plasticantes
PRECAUCIÓN: A n de evitar que los plasticantes
se adhieran al acabado de la mesada, la mesa u otro mueble, coloque un posafuentes
o salvamanteles que
NO SEA DE PLÁSTICO entre el aparato y la supercie
de la mesada o mesa. Si no se hace esto, es posible
que el acabado se oscurezca, se formen marcas permanentes o aparezcan manchas.
Corriente eléctrica
Si se recarga el circuito eléctrico con otros aparatos,
es posible que este aparato no funcione correctamente.
Se debe utilizar en un circuito eléctrico separado de los otros aparatos.
21
Page 24

Descripción de la estación digital para jugos de 5 velocidades
El producto puede diferir levemente de las ilustraciones.
Figura 1
Empujador de
alimentos
Tubo de entrada
Cubierta transparente
Cubierta del pico
para pulpa
Ranuras de bloqueo de
la abrazadera
para pulpa
Cesta
Cuchillas cortantes
Cesta con cuchillas
de acero inoxidable
Pico para pulpa
Reborde del bol
para jugo
Bol para jugo
Pico antigoteo
Buje del motor
Base de motor
Abrazadera
de sujeción
Dial de velocidad
Enchufe polarizado
Patas de goma
Tapa del jarro
para jugo
Jarro
para jugo
22
Page 25

Antes de utilizar por primera vez
El extractor de jugos viene casi armado completamente en la caja.
1. Es posible que reciba el extractor con un inserto protector de car tón entre la cubierta transparente y la
cesta con cuchillas. Extraiga este y cualquier otro envoltorio protector antes de usar el ex tractor de jugos.
2. Siga las instrucciones para desarmar el aparato a n de extraer el empujador de alimentos del tubo de
entrada; luego, la cubierta y el bol para jugos con la cesta de cuchillas de acero inoxidable.
3. Lave todas las piezas desmontables (empujador de alimentos, cubierta transparente, bol para jugo,
cesta para pulpa y jarro para jugo con tapa) con agua caliente y un detergente líquido biodegradable no
abrasivo. Enjuáguelas bien y séquelas. De este modo, eliminará los rastros de polvo o residuos generados
durante la fabricación o el envío.
Precaución: Tenga cuidado cuando manipula la cesta con cuchillas. Sostenga la cesta desde el borde
únicamente. No toque las cuchillas cor tantes de la parte inferior de la cesta. Estas son muy losas.
Precaución: Nunca enjuague ni sumerja la base de motor en agua u otros líquidos.
Instrucciones para armar el aparato
Advertencia: Procure siempre que el extractor de jugos esté desenchufado antes de comenzar a armarlo.
Importante: El extractor de jugos incluye un sistema de seguridad que evita que la unidad se encienda a menos
que esté armada completa y correctamente.
1. Gire la abrazadera de sujeción de modo que se apoye en la par te delantera de la base (vea la gura 2).
2. Coloque el bol para jugo en la parte superior de la base de motor de modo que el pico para jugo encaje en
la aber tura en la par te delantera de la base (vea la gura 3).
Lengüeta
de la cubierta
Figura 2 Figura 3 Figura 4
Precaución: Tenga cuidado cuando manipula la cesta con cuchillas de acero inoxidable. Sostenga la cesta
desde el borde únicamente. No toque las cuchillas cortantes de la par te inferior de la cesta.
Estas son muy losas.
3. Coloque la cesta con cuchillas de acero inoxidable en el buje del motor, en el centro del bol para jugo
(vea la gura 3). Presione el borde externo de la cesta con cuchillas hasta que la cesta encaje en su lugar
y esté colocada de forma segura. Gire con cuidado la cesta con cuchillas para garantizar que lo haga
sin problemas. Si al principio no se apoya correctamente, mediante este último paso debería hacerlo.
Compruébelo nuevamente al presionar el borde y hacer girar la cesta.
4. Alinee la cubierta de modo que la tapa para pulpa encaje sobre la parte trasera de la base. Encaje la
lengüeta de la cubierta en la ranura de la parte superior del bol para
jugo (vea la gura 4).
5. Gire el empujador de alimentos de modo que la ranura lateral coincida
con la lengüeta del tubo de entrada. Introduzca el empujador de
alimentos en el tubo de entrada (vea la gura 5). Guarde el empujador
de alimentos en el tubo de entrada de la tapa hasta que las frutas y
verduras estén listas para exprimirse.
6. Empuje la abrazadera de sujeción hacia arriba y sobre la tapa. Sostenga
la abrazadera rmemente y empuje las dos trabas negras de la
abrazadera hasta que se apoyen en las 2 ranuras de bloqueo de la parte
superior de la tapa. Procure que la tapa esté sujetada de forma segura
(vea la gura 6).
7. Agregue la cesta para pulpa (vea la gura 7). Incline levemente la cesta
para pulpa de modo que el reborde del bol para jugo encaje de forma
ceñida sobre el interior de la cesta para pulpa. Empuje la parte inferior
de la cesta para pulpa de modo que se apoye de forma segura sobre su
plataforma.
Importante: Para evitar derrames, procure que la cesta para pulpa se
23
Ranura
Lengüeta
Trabas
negras de la
abrazadera
Figure 5
Page 26

apoye al ras de la base.
Nota: Para ahorrar tiempo en limpieza, forre la cesta para pulpa con una
bolsa plástica para frutas y verduras.
Ranuras de
bloqueo de
la tapa
8. Procure que el pico antigoteo esté debidamente abierto (vea la gura 8).
9. Agregue la tapa correspondiente al jarro para jugo de modo que la
abertura de la tapa encaje sobre el pico vertedor del jarro. Incline
levemente el jarro para jugo de modo que el pico para jugo del extractor
encaje en la parte superior de la tapa del jarro (vea la gura 7). De este
modo, evitará que se derrame el jugo.
Preparación de frutas y verduras para el extractor digital
para jugos de 5 velocidades
• Limpie todas las frutas y verduras minuciosamente con un cepillo
de cerdas naturales. Si no usa frutas y verduras orgánicas,
le recomendamos que use un limpiador biodegradable que ayude
a eliminar los residuos de pesticidas.
• Ex traiga y deseche las hojas externas de las frutas y verduras que
no son orgánicas, y pele las frutas y verduras enceradas.
• Recorte las zonas descoloridas o magulladas.
• Puede dejar la piel en todas las frutas y verduras (incluidas las piñas
y los melones), con la excepción de naranjas, pomelos y mandarinas.
El aceite que presentan estas pieles tiene un gusto amargo y es difícil
de d ig erir.
• Ex traiga las semillas del melón cuando sea posible, ya que pueden salirse
por la parte superior del tubo de entrada al exprimir. Los huesos de las
frutas como cerezas, peras y duraznos también se deben extraer.
• Corte las frutas y verduras en trozos pequeños de modo que encajen en
el tubo de entrada. Use el empujador de alimentos para dirigir las frutas y
verduras directamente a través del tubo. Nunca empuje las frutas
y verduras hacia el tubo de entrada con los dedos.
• Es posible que deba cortar las frutas y verduras duras (zanahorias,
remolachas, ananás, etc.) en trozos más pequeños para facilitar
el exprimido.
• Las verduras de hojas, el perejil, el pasto de trigo y los brotes se deben
agrupar en una bola pequeña y compacta, y empujar con una zanahoria o
el empujador de alimentos.
• Las bananas no son aptas para exprimirlas; de ellas no se puede obtener
un jugo claro y los residuos que dejan en la máquina pueden obstruir
el ltro de malla na.
• Para obtener mejores resultados cuando exprime damascos, ciruelas, peras, duraznos y tomates, estos
deben ser rmes.
• Cuando exprime manzanas, agregue una pequeña cantidad de jugo fresco de limón o lima para ayudar a
retardar el proceso de oxidación.
• Las frutas que contienen almidón, como las bananas y papayas, y los aguacates, higos y mangos, no son
aptas para el extractor de jugos. Use una procesadora de alimentos, licuadora o batidora para procesar
estas frutas.
• El extractor de jugos no es apto para procesar frutas o verduras muy duras o brosas/amiláceas, como la
caña de azúcar.
Plataforma
Figura 6
Figura 7
CLOSE
Figura 8
OPEN
24
Page 27

Instrucciones de funcionamiento
Dial de control de 5 velocidades
El extractor de jugos le ofrece 5 opciones de velocidad que garantizan rpm óptimas a n de lograr una máxima
ecacia al exprimir.
Nota: La ecacia describe la cantidad de jugo que se extrae de las frutas
y verduras.
Velocidad Descripción Ejemplo
5 Frutas duras Manzana, remolacha, zanahoria, hinojo
4 Apio Pera, apio, col, colior
3 Durazno Durazno, damasco, ciruela, tomate
2 Cítricos Naranja, lima, pomelo, limón
1 Frutas blandas Mango, sandía, uva, pepino
0 Potencia Apagar la máquina; Lista para usar
Importante: El extractor de jugos incluye un sistema de seguridad que evita que la unidad se encienda a menos
que esté armada completa y correctamente.
1. Para armar el extractor de jugos siga las instrucciones de montaje que se describen en este manual.
2. Prepare todas las frutas y verduras para exprimirlas.
3. Enchufe la unidad a un tomacorriente eléctrico de 120 V de CA.
4. Extraiga el empujador de alimentos del tubo de entrada.
5. Coloque las frutas y verduras en el tubo de entrada. Use el empujador de alimentos para dirigir los
alimentos por el tubo de entrada y la cesta con cuchillas.
6. Gire el dial de control de velocidad hasta 5 para exprimir frutas y verduras duras.
7. Gire el dial de control de velocidad hasta 1 para exprimir frutas y verduras blandas.
Nota: Cuando exprima una combinación de frutas y verduras duras y blandas, como remolachas,
zanahorias y fresas, use la conguración de velocidad más alta (5) para la remolachas y zanahorias, y la
más baja (1) para las fresas. No hace falta apagar la máquina para cambiar las velocidades. Solo gire el
dial para cambiar a la velocidad adecuada para cada tipo de fruta y verdura que exprima.
Sugerencia: Para garantizar la ecacia máxima, alterne entre tipos de frutas y verduras.
8. No haga funcionar el extractor de jugos durante más de 40 segundos por vez cuando exprime muchos
productos; si es necesario, permita que el extractor de jugos se enfríe durante 2 minutos.
9. Cuando termine de exprimir, gire el dial de velocidad a la posición de apagado (POWER).
10. Deslice el jarro fuera del pico para jugo. Sirva el jugo de inmediato para ofrecer el sabor más fresco y el
mayor valor nutricional.
11. Extraiga la cesta para pulpa, y guarde o deseche la pulpa.
Nota: La pulpa que obtiene del extractor de jugos se puede usar en diversas aplicaciones, como panes,
molletes, pasteles, caldos, compresas faciales y material de compostaje para jardines.
12. Desenchufe el extractor de jugos del tomacorriente luego de usarlo.
13. Sigua las instrucciones para desarmar el aparato descritas en este manual; todas las piezas desmontables
se deben enjuagar y limpiar luego de cada uso. Para limpiar el extractor de jugos, siga los procedimientos
que se describen en las instrucciones de cuidado y limpieza.
Instrucciones para desarmar el aparato
Advertencia: Procure siempre que el extractor de jugos esté desenchufado antes de comenzar a desarmarlo.
1. Extraiga la cesta para pulpa y el jarro para jugo.
2. Levante la abrazadera de sujeción y quítela de las 2 ranuras de bloqueo de la abrazadera de la cubierta.
Apoye la abrazadera de sujeción en la parte delantera de la unidad.
3. Levante la cubierta del extractor de jugos y quítela del extractor.
4. Tome el pico para pulpa con una mano y la parte trasera del bol para jugo con la otra, a n de aojar
y levantar el bol para jugo y la cesta con cuchillas como una sola pieza. Estas 2 piezas se separarán
fácilmente para simplicar la limpieza.
Precaución: Tenga cuidado cuando manipula la cesta con cuchillas. Sostenga la cesta desde el borde
únicamente. No toque las cuchillas cor tantes de la parte inferior de la cesta. Estas son muy losas.
5. Siga los procedimientos que se detallan en las instrucciones de cuidado y limpieza para conocer las
instrucciones de limpieza especícas.
25
Page 28

Instrucciones de mantenimiento para el usuario
Este aparato requiere de poco mantenimiento. No contiene piezas que
el usuario pueda reparar.
No intente reparar la unidad usted mismo. Cualquier servicio en el que
la unidad deba desarmarse, además de la limpieza, debe ser realizado por
un técnico de reparación de aparatos eléctricos calicado.
Instrucciones de cuidado y limpieza
1. Desenchufe el aparato del tomacorriente. Siga los procedimientos detallados que se describen en las
instrucciones para desarmar
el aparato y quite las piezas antes de hacer la limpieza.
2. Limpie la unidad y las piezas luego de cada uso
3. No sumerja la base de motor en agua ni la rocíe con agua.
Limpie solo como una esponja, un paño o una servilleta de papel húmedos. Use cualquier detergente
líquido, pero no use productos
que contengan amoníaco ni polvos limpiadores. Estos productos opacarán, rayarán o estropearán la
supercie.
4. Si ha derramado jugo debajo del extractor de jugos, limpie las patas
y el área con una esponja y un poco de jabón; luego, séquelas. Use un cepillo de dientes o un paño
húmedos para limpiar el jugo que está en
el interior del buje del motor, en la parte superior de la base de motor.
5. Todas las piezas (con la excepción de la base de motor y
la cesta con cuchillas) se pueden lavar con agua tibia y jabón,
o en el lavavajillas.
6. Al limpiar la cesta con cuchillas, procure que los oricios minúsculos de la cesta no se obstruyan. Esto se
puede lograr al sostener la cesta con cuchillas debajo del agua corriente de grifo. Frote una almohadilla
plástica para fregar en movimiento circular a n de limpiar los oricios de la cesta del lado interior y
exterior de la cesta con cuchillas.
Precaución: Tenga cuidado cuando manipula la cesta con cuchillas. Sostenga la cesta desde el borde
únicamente. No toque las cuchillas cor tantes de la parte inferior de la cesta. Estas son muy losas.
Nota: Si es necesario, remoje la cesta con cuchillas en agua caliente
y agregue un 10 % de jugo de limón.
7. La cubierta transparente del extractor de jugos, el bol para jugo, la cesta para pulpa, y el jarro para jugo y
su tapa se pueden lavar en el estante superior del lavavajillas. Sin embargo,
el lavado diario con agua de grifo tibia (no caliente) es suciente.
8. Puesto que los carotenoides que se encuentran en diversas verduras, especialmente en las zanahorias,
tienen propiedades de tinción potentes, sugerimos que ponga en remojo las piezas manchadas durante
toda la noche en cualquiera de estas 4 soluciones de limpieza:
• Jabón biodegradable en agua tibia suciente como para cubrir las piezas del extractor de jugos.
• 1 medida de agua tibia por 1 medida de vinagre de sidra.
• 1/2 caja pequeña de bicarbonato de sodio en agua tibia suciente
como para cubrir las piezas.
• Agua tibia con una solución de 10 % de jugo de limón.
Precaución: Nunca use amoníaco ni productos abrasivos.
• Limpie suavemente con una esponja o un trapo de cocina, y detergente líquido luego del remojo.
Advertencia: Nunca sumerja la base de motor en agua u otros líquidos.
Instrucciones de almacenamiento
1. Desenchufe el aparato; arme las piezas limpias y secas antes de guardar.
2. Guarde el extractor de jugos en su caja, en un lugar limpio y seco.
Nunca lo almacene si está caliente o enchufado.
3. Guarde el empujador de alimentos en el tubo de entrada de la tapa.
4. Nunca ate el cable de forma ceñida alrededor del aparato. No ejerza fuerza sobre el cable cuando lo
introduce en la unidad; empújelo lentamente guardarlo en la base de la unidad.
26
Page 29

Resolución de problemas
Señal Posible corrección
El extractor de jugos no enciende. • El extractor de jugo incluye un sistema de seguridad que evita
Hay un ruido o vibraciones
excesivos al encender el extractor
de jugos.
que la unidad se encienda a menos que esté armada completa y
correctamente.
• Gire el dial de velocidad hasta la posición de apagado (POWER).
Compruebe que la cesta con cuchillas esté correctamente colocada.
• Procure que las 2 trabas negras de la abrazadera se apoyen en las
2 ranuras de bloqueo de la parte superior de la tapa (vea la gura 6).
La tapa se debe sujetar de forma segura o el extractor de jugos no
encenderá.
• Compruebe que la cesta con cuchillas esté correctamente colocada.
• Es posible que la pulpa se haya acumulado en la cesta con cuchillas.
Limpie la cesta con cuchillas.
• Al exprimir, intente alternar entre distintos tipos de frutas y verduras.
Nota: Dado que el extractor de jugos tiene
un motor potente, es normal sentir leves
ruidos y/o vibraciones cuando el extractor
se enciende y cuando está por detenerse.
Todos los exprimidores sonarán de un modo levemente diferente.
Al encenderlo,
el extractor genera ruido o
vibraciones excesivos, o un dolor
desagradable; está caliente al tacto
o emite humo.
La cesta con cuchillas está
obstruida. El alimento está atascado
en la base del tubo de entrada; el
extractor de jugo se ha detenido
durante el funcionamiento.
• Desenchufe la unidad de inmediato.
Lleve el extractor de jugos a un técnico de reparación de aparatos
calicado.
• Gire el dial de velocidad a la posición
de apagado (POWER). Extraiga la cubierta y limpie el tubo de entrada.
Pique las frutas y verduras en trozos más pequeños para facilitar
su exprimido.
27
Page 30

Recetas
Mojito virgen hecho con extractor
Esta es la versión saludable y sin alcohol de uno de los cocteles preferidos.
• 2 pepinos
• 2 peras Anjou grandes
Pastel de manzana hecho con extractor
• 1 cucharadita de canela
• 1 cucharadita de nuez moscada
• 2 puñados grandes de menta fresca
• 1 lima
• 8 manzanas verdes de la Abuela Smith
grandes
28
Page 31

Garantía limitada de DOS AÑOS
Mediante la presente, SENSIO Inc. garantiza que, durante el plazo de DOS AÑOS a
partir de la fecha de compra, este producto no presentará defectos mecánicos en el
material ni en la mano de obra, y durante 90 días, no los presentará en las piezas no
mecánicas. A su entera discreción, SENSIO Inc. reparará o reemplazará el producto
que resulte defectuoso, o emitirá un reembolso por el producto durante el plazo de
garantía.
Esta garantía es válida únicamente para el comprador minorista original a partir de la
fecha de compra minorista inicial y no es transferible. Conserve el recibo de compra
original, ya que se exige una prueba de compra para obtener la validación de la
garantía. Las tiendas minoristas no tienen derecho a alterar, modicar ni corregir de
ninguna manera los términos y condiciones de la garantía.
EXCLUSIONES:
La garantía no cubre el desgaste normal de las piezas ni el daño ocasionado por
cualquiera de las siguientes causas: uso negligente del producto, uso de un voltaje
o corriente incorrectos, mantenimiento de rutina inadecuado, uso contrario al de
las instrucciones de funcionamiento, desarmado, reparación o alteración a cargo de
personas que no sean miembros del personal calicado de SENSIO Inc. Asimismo, la
garantía no cubre actos de la naturaleza, como incendios, inundaciones, huracanes o
tornados.
SENSIO Inc. no asumirá responsabilidad por daños incidentales o resultantes
ocasionados por la violación de cualquier garantía expresa o implícita. Salvo en
la medida en que lo prohíban las leyes aplicables, cualquier garantía implícita de
comerciabilidad o aptitud para un propósito particular se limita temporalmente a la
duración de la garantía. Algunos estados, provincias o jurisdicciones no permiten la
exclusión ni la limitación de daños incidentales o resultantes, o limitaciones sobre
la duración de una garantía implícita y, por lo tanto, es posible que las exclusiones o
limitaciones mencionadas no le correspondan. La garantía cubre derechos legales
especícos que pueden variar de un estado, una provincia o una jurisdicción a otros.
CÓMO OBTENER EL SERVICIO DE GARANTÍA:
Debe comunicarse con el Servicio de atención al cliente a nuestro número telefónico
gratuito: 1-866-832-4843. Un representante del Servicio de atención al cliente intentará
resolver los problemas referidos a la garantía por teléfono. Si este no puede resolver
el problema, le proporcionarán un número de caso y le solicitarán que devuelva el
producto a SENSIO Inc. Adhiera una etiqueta al producto que incluya: su nombre,
dirección, número telefónico de contacto durante el día, número de caso y descripción
del problema. Además, incluya una copia del recibo de compra original. Envuelva
cuidadosamente el producto etiquetado con el recibo de compra, y envíelo (con el
envío y el seguro prepagados) a la dirección de SENSIO Inc. SENSIO Inc. no asumirá
obligación ni responsabilidad alguna por el producto devuelto que esté en el trayecto
hacia el Centro de servicio al cliente de SENSIO Inc.
Page 32

bellahousewares.com
Dudas o comentarios contactar el departamento de servicio al cliente
BellaLife
BellaLife
BellaLifestyle
BellaLifestyle
For customer service questions or comments
Pour le service à la clientèle, question ou commentaires
1-866-832-4843
www.sensioinc.com
BELLA® is a registered trademark of Sensio Inc.,
BELLA® est un marque déposée de Sensio Inc.,
BELLA® es una marca registrada de Sensio, Inc.,
©2013 Sensio.
Montréal, Canada H3B 3X9
 Loading...