

Page 1

INSTRUCTION MANUAL / RECIPE GUIDE
MANUAL DE INSTRUCCIÓNES / GUÍA DE RECETAS
For customer service questions or comments
Dudas o commentarios para departamento de servico a clientes
1-866-832-4843
www.sensioinc.com
ICE CREAM SANDWICH MAKER
BELLA®is a registered t ademark of Sensio Inc., Montréal, Canada H3B 3X9
©2012 Sensio.
BELLA®es una marca regist ada de Sensio Inc., Montréal, Canada H3B 3X9
SO-308811_13662 BELLA ice cream sandwich maker cover indd 1 11-12-16 11 55 AM
MÁQUINA PARA HACER
SÁNDWICHES DE HELADO
Page 2

Page 3

SO-308811_13662 BELLA ice cream sandwich maker M indd 1 11-12-16 11 32 AM
Page 4

IMPORTANT SAFEGUARDS
WARNING: When using electrical appliances, basic safety precautions should always
be followed, including the following:
1. Read all instructions before using appliance.
2. Do not touch hot surfaces. Use handles or knobs.
3. To protect against risk of electric shock, do not immerse or partially immerse the cord,
plugs, or the entire unit in water or any other liquid.
4. This appliance is not intended for use by persons (including children) with reduced
physical, sensory or mental capabilities, or lack of experience and knowledge,
unless they have been given supervision or instruction concerning use of the appliance by
a person responsible for their safety.
5. Close supervision is necessary when any appliance is used by or near children.
6. Unplug from wall outlet when not in use and before cleaning. Allow to cool before
cleaning or storing this appliance.
7. Never yank the cord to disconnect the appliance from the outlet. Instead, grasp the plug
and pull to disconnect.
8. Do not operate any appliance with a damaged cord or plug or after the appliance
malfunctions, or has been damaged in any manner. Return appliance to the nearest
authorized service facility for examination, repair or adjustment.
9. The use of accessories attachments not recommended by the appliance manufacturer
may cause fire, electrical shock or injuries.
10. Do not use outdoors. This is for household only.
11. Do not use for commercial purposes.
12. Do not let the electrical cord hang over the edge of the table or counter,
or touch hot surfaces.
13. Do not place on or near a hot gas or electric burner or in a heated oven.
14. Use on a heat-resistant, flat level surface only.
15. Extreme caution must be used when moving an appliance containing hot food, hot water,
hot oil or other hot liquids.
16. This appliance has a polarized plug (one blade is wider than the other). To reduce
the risk of electric shock, this plug is intended to fit into a polarized outlet only one way.
If the plug does not fit fully into the outlet, reverse the plug. If it still does not fit, contact
a qualified electrician. Do not attempt to modify the plug in any way.
17. The cord to this appliance should be plugged into a 120V AC electrical outlet only.
18. A short power-supply cord is to be provided to reduce the risk resulting from becoming
entangled in or tripping over a longer cord.
19. Longer extension cords are available and may be used if care is exercised in their use.
20. If an extension cord is used:
a. The marked electrical rating of the detachable power-supply cord or extension cord
should be at least as great as the electrical rating of the appliance,
b. If the appliance is of the grounded type, the extension cord should be a grounding
type 3-wire cord; and
c. The longer cord should be arranged so that it will not drape over the counter top
or table top where it can be pulled on by children or tripped over unintentionally.21.
To disconnect, remove plug from outlet.
22. Always unplug after use. The appliance will remain ON unless unplugged.
23.
CAUTION HOT SURFACES: This appliance generates heat during use.
Proper precautions must be taken to prevent the risk of burns, fire or other damage
to persons or property.
24. When using this appliance, provide adequate ventilation above and on all sides
for air circulation. Do not allow this appliance to touch curtains, wall coverings, clothing,
dish towels or other flammable materials during use.
25. Use with wall receptacle only.
26. Do not use appliance for other than intended use.
1
SO-308811_13662 BELLA ice cream sandwich maker M indd 1 11-12-16 11 32 AM
Page 5

FOR HOUSEHOLD USE ONLY
SAVE THESE INSTRUCTIONS
ADDITIONAL
IMPORTANT SAFEGUARDS
CAUTION: This appliance is hot during operation and retains heat for some time
after turning OFF. Always use oven mitts when handling hot materials and allow
metal parts to cool before cleaning. Do not place anything on top of the appliance
while it is operating or while it is hot.
1. All users of this appliance must read and understand this Instruction Manual
before operating or cleaning this appliance.
2. Do not leave this appliance unattended during use.
NOTES ON ThE PLug
This appliance has a polarized plug (one blade is wider than the other). To reduce the risk
of electric shock, this plug will fit in a polarized outlet only one way. If the plug does not fit
fully into the outlet, reverse the plug. If it still does not fit, contact a qualified electrician.
Do not modify the plug in any way.
NOTES ON ThE COrd
The provided short power-supply cord (or detachable power-supply cord) should be used
to reduce the risk resulting from becoming entangled in or tripping over a longer cord.
PLASTiCizEr WArNiNg
CAUTION: To prevent Plasticizers from migrating to the finish of the counter top or table top
or other furniture, place NON-PLASTIC coasters or place mats between the appliance
and the finish of the counter top or table top. Failure to do so may cause the finish to darken;
permanent blemishes may occur or stains can appear.
ELECTriC POWEr
If the electrical circuit is overloaded with other appliances, your appliance may not operate
properly. It should be operated on a separate electrical circuit from other appliances.
2
SO-308811_13662 BELLA ice cream sandwich maker M indd 2 11-12-16 11 32 AM
Page 6

Page 7

BEFOrE uSiNg FOr ThE FirST TiME
1. Carefully unpack the Ice Cream Sandwich Maker and remove all packaging and materials.
2. Wash the ice cream sandwich press lid, cylinder and base in warm, soapy water. Rinse
well and dry.
3. Before using your Ice Cream Sandwich Maker for the first time, wipe the cooking plates
with a damp cloth to remove all dust, and then dry. Wipe outer surfaces with a slightly
damp, soft cloth or sponge.
CAUTION: Take care to prevent water from running into the appliance.
NEVER IMMERSE ICE CREAM SANDWICH MAKER BODY IN WATER
OR ANY OTHER LIQUIDS!
4. Set the appliance on a dry, clean and flat surface. Keep the Ice Cream Sandwich Maker
closed until use.
OPErATiNg iNSTruCTiONS
1. Press to unlatch the handle; then lift the top lid to the open position.
2. Before baking the first sandwiches of the day, condition the sandwich molds.
See Care & Cleaning Instructions in this Instruction Manual for a complete description.
3. Close the lid. An audible click can be heard as the latch locks the Ice Cream Sandwich
Maker closed.
4. Plug unit into a 120 V AC electrical outlet to preheat. The orange POWER ON light
will illuminate.
NOTE: When your Ice Cream Sandwich Maker is heated for the first time,
it may emit slight smoke or odor. This is normal and should disappear after 1 or 2 uses.
This does not affect the safety of the appliance. However, as it may affect the flavor
of the first sandwiches prepared in the Ice Cream Sandwich Maker, it is recommended
that these be discarded.
5. While preheating, prepare sandwich batter.
6. After approximately 4 to 5 minutes, the green READY light will illuminate,
indicating the unit is preheated and is ready for use.
7. Use a heat-resistant brush to apply a generous coat of vegetable oil to each
of the upper and lower sandwich molds.
8. Add 1 level tablespoon batter to the center of each of the molds on the lower
cooking plate.
NOTE: Depending on the density and rise of the batter, it may be necessary to adjust
to more or less batter to accommodate.
IMPORTANT: Do not overfill, batter will expand when baked.
NOTE: All 4 ice cream sandwich molds do not need to be used when baking
in the Ice Cream Sandwich Maker.
9. Use the handle to lower the top lid. To ensure even baking, make sure the lid is locked
closed. Allow sandwiches to bake for approximately 2 to 3 minutes or until done.
Recipe bake times may vary.
NOTE: The green READY light will cycle on and off as the unit maintains
baking temperatures.
10. Wearing oven mitts, wipe the outside with a clean paper towel or cleaning cloth
if necessary.
11. After 2 minutes, press to unlatch the handle; then lift the top lid.
NOTE: Check for doneness by inserting a dry toothpick into the center of the sandwich.
If it comes out clean, the sandwiches are ready.
12. If necessary, lower the top lid and continue baking for 1 minute at a time until sandwiches
are browned and baked to your liking.
IMPORTANT: Recipes may vary in bake time and brownness; batters with more sugar
will brown quicker. Note the perfect bake times for each batter recipe for future use.
13. Wearing oven mitts, remove the sandwiches from the cooking plate using a non-metallic
utensil. A small plastic fork or spoon will help to remove the sandwiches.
4
SO-308811_13662 BELLA ice cream sandwich maker M indd 4 11-12-16 11 32 AM
Page 8

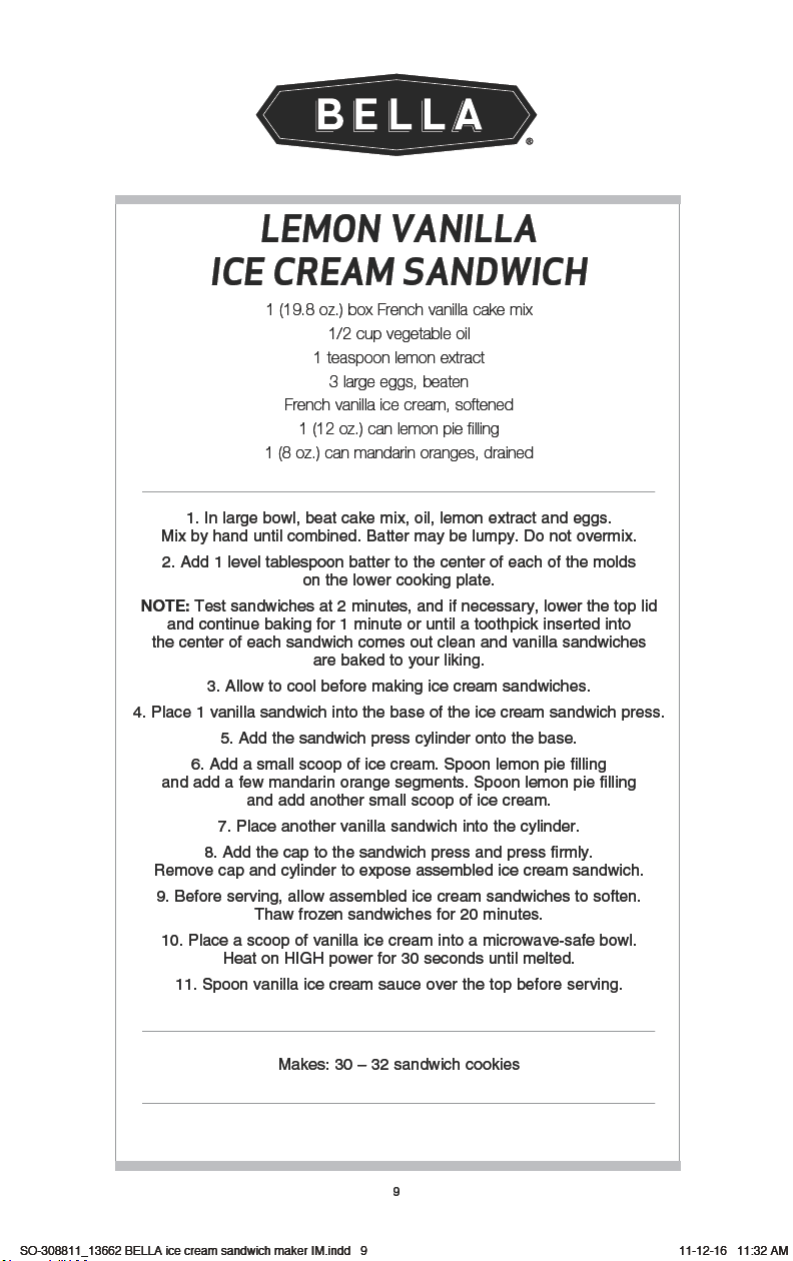
Page 9

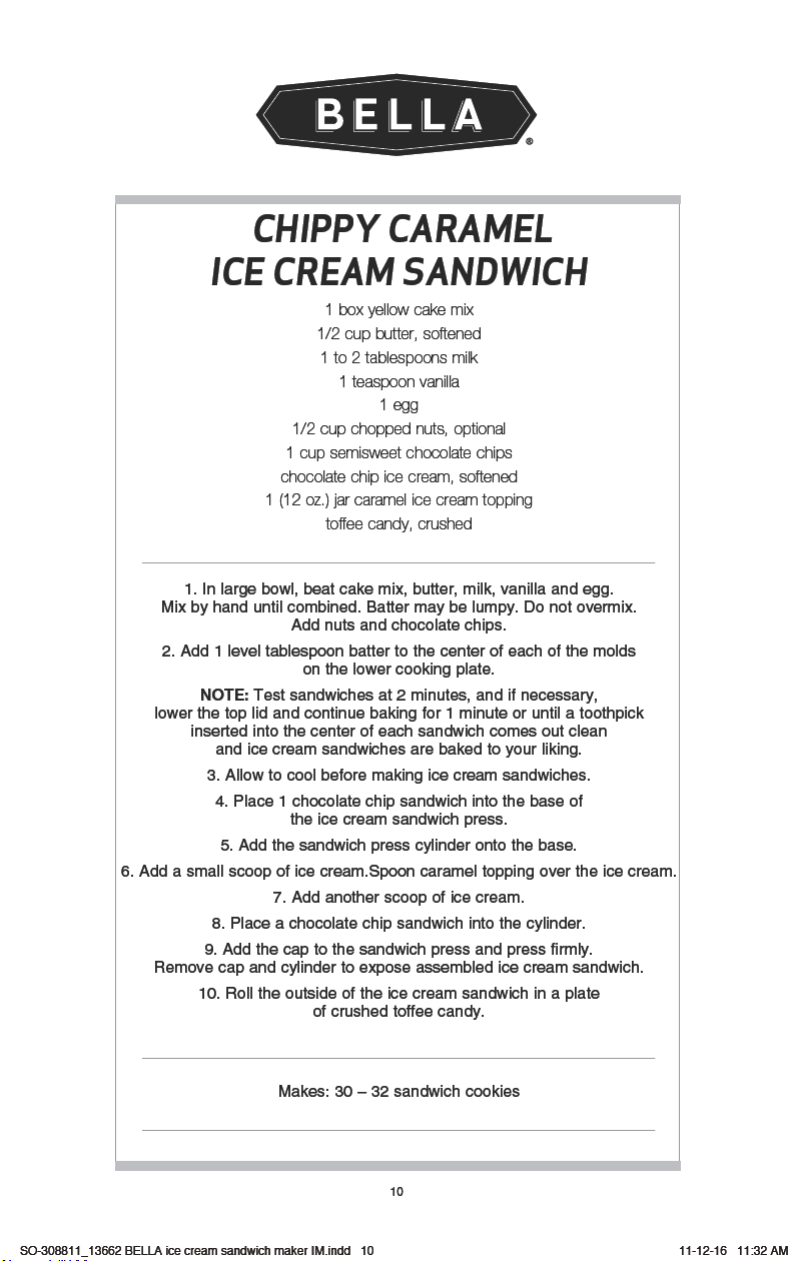
Page 10

Page 11

Page 12
Page 13
Page 14

Page 15

SO-308811_13662 BELLA ice cream sandwich maker M indd 12 11-12-16 11 32 AM
Page 16

MEDIDAS DE SEGURIDAD
IMPORTANTES
ADVERTENCIA: Cuando se utilizan aparatos eléctricos, se deben seguir precauciones
de seguridad básicas, entre ellas:
1. Lea todas las instrucciones antes de utilizar el aparato.
2. No toque las superficies calientes. Utilice las asas o manijas.
3. Para protegerse contra riesgos de descarga eléctrica, no sumerja, ni total ni parcialmente,
el cable, el enchufe ni la unidad completa en agua u otros líquidos.
4. Este dispositivo no está diseñado para ser utilizado por personas (incluidos niños)
con capacidades físicas, sensoriales o mentales reducidas, o falta de experiencia
y conocimiento, a menos que una persona responsable de su seguridad los supervise
o instruya en el uso del aparato.
5. Es necesario supervisar atentamente a los niños si usan aparatos o están cerca de ellos.
6. Desenchufe el aparato del tomacorriente de la pared cuando no lo utilice o antes
de limpiarlo. Deje que se enfríe el aparato antes de limpiarlo o guardarlo.
7. Nunca tire del cable para desconectar el aparato del tomacorriente. En cambio,
tome el enchufe y tire de él para desconectarlo.
8. No utilice ningún aparato si el cable o el enchufe están dañados, o si el aparato
no funciona bien o se ha dañado de alguna forma. Lleve el aparato al servicio técnico
autorizado más cercano para que lo examinen, reparen o ajusten.
9. El uso de accesorios no recomendados por el fabricante del artefacto puede ocasionar
incendios, descargas eléctricas o lesiones.
10. No lo utilice en el exterior. Este aparato es para uso doméstico únicamente.
11. No lo utilice para fines comerciales.
12. No permita que el cable eléctrico cuelgue del borde de la mesa o mesada
ni que toque superficies calientes.
13. No lo coloque encima ni cerca de un quemador eléctrico o de gas calientes,
ni de un horno caliente.
14. Solo utilice el aparato sobre una superficie plana y resistente al calor.
15. Se debe tener sumo cuidado cuando se traslada un aparato con alimento caliente,
o agua, aceite u otros líquidos calientes.
16. Este aparato tiene un enchufe polarizado (una clavija es más ancha que la otra).
Para reducir el riesgo de descarga eléctrica, el enchufe fue diseñado para entrar
en el tomacorriente polarizado de una sola manera. Si el enchufe no entra
completamente en el tomacorriente, dé vuelta el enchufe. Si aun así no encaja,
llame a un electricista calificado. No intente modificar el enchufe de ningún modo.
17. El cable del aparato se debe enchufar únicamente a un tomacorriente eléctrico
de 120 V de CA.
18. Se suministrará un cable de alimentación corto para reducir el riesgo de enredarse
o tropezarse con un cable más largo.
19. Hay cables de extensión más largos disponibles y pueden usarse si se tiene cuidado.
20. Si usa un cable de extensión:
a. El calibre indicado del cable de alimentación separable o del cable de extensión
debe ser igual al calibre del aparato.
b. Si el aparato tiene conexión a tierra mediante 3 conductores, el cable de extensión
debe ser un cable a tierra de conductores.
c. Por último, el cable más largo debe manipularse de modo que no cuelgue
por la mesada ni la mesa, los niños no puedan jalarlo ni las personas puedan
tropezar con él accidentalmente.
21. Para desconectar la unidad, desenchúfela del tomacorriente.
22. Siempre desenchufe el aparato después de usarlo. El aparato permanecerá encendido
a menos que se desenchufe.
13
SO-308811_13662 BELLA ice cream sandwich maker M indd 13 11-12-16 11 32 AM
Page 17

23. PRECAUCIÓN CON LAS SUPERFICIES CALIENTES: Este aparato genera calor
durante el uso. Se deben tomar las medidas necesarias para evitar riesgos
de quemaduras, incendios u otros daños a personas o a la propiedad.
24. Cuando utilice este aparato, deje suficiente ventilación por encima y alrededor
de él para la circulación del aire. No permita que este aparato esté en contacto
con cortinas, revestimientos de paredes, ropas, repasadores u otros materiales
inflamables durante su uso.
25. Únicamente enchufe este aparato a un receptáculo montado en la pared.
26. No le dé al aparato otro uso que no sea el indicado.
PARA USO DOMÉSTICO
ÚNICAMENTE
GUARDE ESTAS INSTRUCCIONES
OTRAS MEDIDAS
DE SEGURIDAD IMPORTANTES
PRECAUCIÓN: Este electrodoméstico se calienta durante el funcionamiento
y mantiene el calor un tiempo después de apagado. Siempre use manoplas al
manipular materiales calientes y deje que las piezas metálicas se enfríen antes
de limpiarlas. No coloque nada sobre el electrodoméstico mientras esté en
funcionamiento o mientras esté caliente.
1. Todos los usuarios de este electrodoméstico deben leer y comprender este manual
de instrucciones antes de ponerlo en funcionamiento o limpiarlo.
2. No descuide el electrodoméstico mientras esté en funcionamiento.
14
SO-308811_13662 BELLA ice cream sandwich maker M indd 14 11-12-16 11 32 AM
Page 18

NOTAS SOBrE EL ENChuFE
Este aparato tiene un enchufe polarizado (una clavija es más ancha que la otra). Para reducir
el riesgo de descarga eléctrica, este enchufe se debe colocar en un tomacorriente polarizado
en una sola dirección. Si el enchufe no entra completamente en el tomacorriente, dé vuelta
el enchufe. Si aun así no encaja, llame a un electricista calificado. No modifique el enchufe
de ninguna manera.
NOTAS SOBrE EL CABLE
Se debe usar el cable de alimentación corto (o cable de alimentación separable) para reducir
el riesgo de enredarse o tropezarse con un cable más largo.
AdvErTENCiA SOBrE PLASTiFiCANTES
PRECAUCIÓN: A fin de evitar que los plastificantes se adhieran al acabado de la mesada
o mesa o de otro mueble, coloque un posafuentes o salvamanteles que NO SEAN
DE PLÁSTICO entre el aparato y la superficie de la mesada o mesa. Si no se hace esto,
es posible que el acabado se oscurezca; se pueden formar marcas permanentes
o aparecer manchas.
COrriENTE ELéCTriCA
Si se recarga el circuito eléctrico con otros aparatos, es posible que este aparato no funcione
correctamente. Se debe utilizar en un circuito eléctrico separado de los otros aparatos.
15
SO-308811_13662 BELLA ice cream sandwich maker M indd 15 11-12-16 11 32 AM
Page 19

Page 20

ANTES dE uTiLizAr POr PriMErA vEz
1. Desenvuelva con cuidado la máquina para hacer sándwiches de helado y retire todos
los materiales del embalaje.
2. Lave la tapa, el cilindro y la base de la prensa para hacer sándwiches de helado
con agua tibia y jabón. Enjuáguelos bien y séquelos.
3. Antes de usar la máquina para hacer sándwiches de helado por primera vez,
limpie las placas de cocción con un paño húmedo para eliminar todo el polvo y,
luego, séquelos. Limpie las superficies externas con un paño suave levemente húmedo
o una esponja.
PRECAUCIÓN: Tenga cuidado para evitar que ingrese agua dentro del aparato.
NUNCA SUMERJA EL CUERPO DE LA MÁQUINA PARA HACER SÁNDWICHES
DE HELADO EN AGUA NI EN OTROS LÍQUIDOS.
4. Coloque el aparato sobre una superficie plana, seca y limpia. Mantenga la máquina
para hacer sándwiches de helado cerrada hasta usarla.
iNSTruCCiONES dE FuNCiONAMiENTO
1. Presione el mango para destrabarlo; luego, levante la tapa hasta abrirla.
2. Antes de hornear los primeros sándwiches del día, acondicione los moldes
para sándwiches. Consulte las Instrucciones de cuidado y limpieza de este manual
de instrucciones para obtener una descripción completa.
3. Cierre la tapa. Se escuchará un clic cuando el pestillo se trabe para cerrar la máquina
para hacer sándwiches de helado.
4. Enchufe la unidad a un tomacorriente eléctrico de 120 V de CA. Se encenderá
la luz anaranjada de ENCENDIDO.
NOTA: Cuando la máquina para hacer sándwiches de helado se calienta por primera vez,
es posible que emita un leve humo u olor. Es normal y debería desaparecer luego
de 1 o 2 usos. Esto no afecta la seguridad del aparato. Sin embargo, debido a que
puede afectar el sabor de las primeros sándwiches preparados en la máquina para hacer
sándwiches de helado, se recomienda que estos se tiren.
5. Mientras se precalienta la máquina, prepare la masa.
6. Luego de aproximadamente 4 a 5 minutos, la luz verde de LISTO se iluminará,
lo que indicará que la unidad está precalentada y lista para usarse.
7. Use un cepillo resistente al calor para aplicar una capa abundante de aceite vegetal
en los moldes para sándwiches superior e inferior.
8. Agregue 1 cucharada sopera de masa al centro de cada molde de la placa
de cocción inferior.
NOTA: De acuerdo con la densidad y el leudado de la masa, es posible que sea
necesario usar más o menos masa para compensar.
IMPORTANTE: No llene el molde en exceso, ya que la masa se expandirá cuando
se hornee.
NOTA: Los 4 moldes para sándwiches de helado no deben usarse cuando la máquina
para hacer sándwiches de helado se usa para hornear.
9. Utilice el mango para bajar la tapa superior. Para garantizar un horneado uniforme,
procure que la tapa esté cerrada con traba. Deje hornear los sándwiches durante
aproximadamente 2 a 3 minutos o hasta que estén listos. Los tiempos de cocción
pueden variar según la receta.
NOTA: La luz verde de LISTO se encenderá intermitentemente mientras la unidad
mantiene las temperaturas de horneado.
10. Use manoplas para horno para limpiar la parte externa con una toalla de papel limpia
o un paño de limpieza, si fuera necesario.
11. Luego de 2 minutos, presione el mango para destrabarlo; luego, levante la tapa.
NOTA: Para verificar si está cocido, inserte un palillo seco en el centro del sándwich.
Si al extraerlo, el palillo está limpio, el sándwich está listo.
17
SO-308811_13662 BELLA ice cream sandwich maker M indd 17 11-12-16 11 32 AM
Page 21

12. Si fuera necesario, baje la tapa y continúe horneando de a 1 minuto por vez hasta
que los sándwiches estén dorados y horneados a su gusto.
IMPORTANTE: El tiempo de horneado y el dorado variarán según las recetas;
las masas que contienen más azúcar se dorarán más rápido. Anote los tiempos
de horneado perfectos de cada receta de masa para usarlos en el futuro.
13. Use manoplas para horno y un utensilio no metálico para extraer los sándwiches
de la placa de cocción. Un tenedor o una cuchara de plástico pequeños ayudarán
a retirar los sándwiches.
14. Coloque los sándwiches horneados sobre una rejilla para enfriamiento antes de preparar
los sándwiches de helado.
NOTA: Si horneará sándwiches adicionales, mantenga cerrada la máquina para hacer
sándwiches de helado para mantener el calor. Siempre espere hasta que se encienda
la luz verde de LISTO antes de hornear más sándwiches.
NOTA: Los sándwiches que cocine más tarde se hornearán más rápido ya
que la máquina retuvo calor adicional. Es posible que sea necesario disminuir
el tiempo de horneado para compensar.
15. Cuando finalice el horneado, desenchufe el cable de alimentación del tomacorriente
eléctrico. Presione para destrabar, levante la tapa superior para dejar al descubierto
las placas de cocción y deje que la unidad se enfríe.
16. No limpie la máquina para hacer sándwiches de helado hasta que la unidad se haya
enfriado por completo.
iNSTruCCiONES dE MANTENiMiENTO PArA EL uSuAriO
Este aparato requiere de poco mantenimiento. No contiene piezas que el usuario pueda
reparar. No intente reparar la unidad usted mismo. Comuníquese con un técnico de reparación
de aparatos eléctricos calificado si el producto necesita algún servicio.
iNSTruCCiONES dE CuidAdO Y LiMPiEzA
PRECAUCIÓN: Desenchufe el aparato del tomacorriente y deje que se enfríe por completo
antes de limpiarlo.
1. La prensa para hacer sándwiches de helado puede lavarse en el estante superior
del lavavajillas. Para lavar a mano, remoje la tapa, el cilindro y la base del molde
para hacer sándwiches de helado con agua tibia y jabón. Para limpiar, use una esponja
de cocina o un cepillo. Enjuáguelos bien y séquelos.
2. La máquina para hacer sándwiches de helado no se desarma para limpiarla.
3. Nunca sumerja el artefacto en agua u otros líquidos. Nunca coloque la máquina
en el lavavajillas.
4. Limpie las placas de cocción con un pincel de repostería o un paño limpios y suaves.
5. Para acondicionar las placas para sándwiches de helado: vierta una cucharadita
de aceite vegetal en cada una de las placas para sándwiches inferiores. Pincele la placa
de cocción superior con una capa generosa de aceite vegetal. Desparrame el aceite
con un paño de cocina absorbente y limpie cualquier exceso.
6. Siga atentamente los procedimientos de limpieza que se sugieren a continuación.
Luego de un tiempo, si los sándwiches muestran indicios de adherencia, reacondicione
la máquina según sea necesario.
7. Para proteger las superficies antiadherentes de primera calidad, use únicamente
utensilios de plástico, nilón o madera.
18
SO-308811_13662 BELLA ice cream sandwich maker M indd 18 11-12-16 11 32 AM
Page 22

Page 23

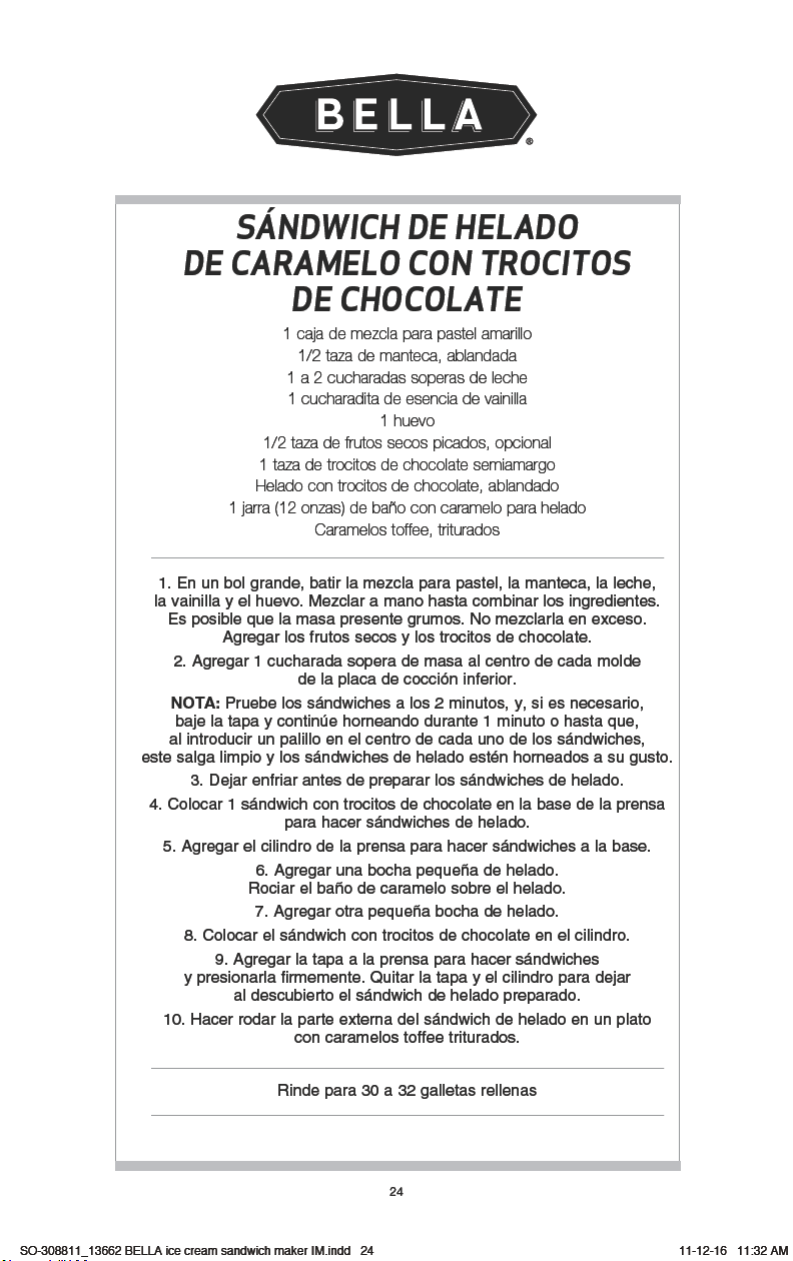
Page 24

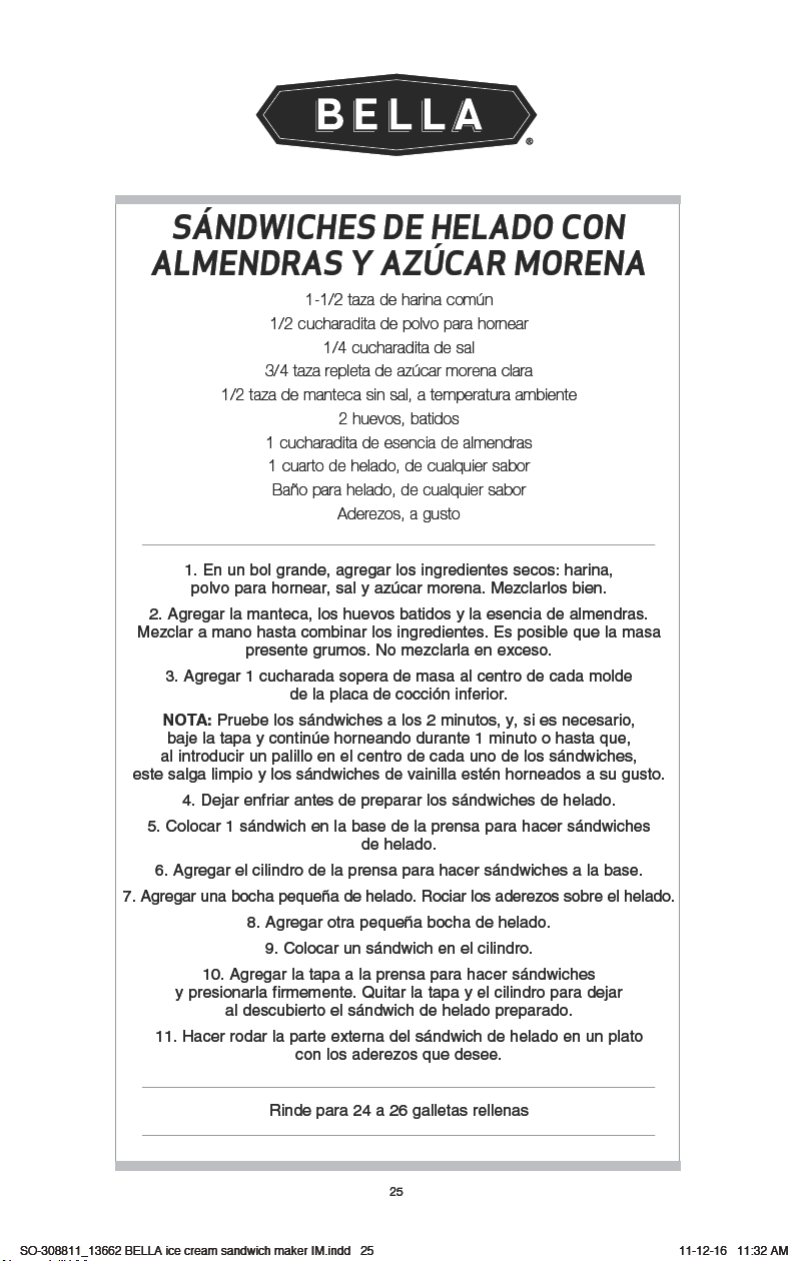
Page 25

Page 26

Page 27
Page 28
Page 29

SO-308811_13662 BELLA ice cream sandwich maker M indd 26 11-12-16 11 32 AM
 Loading...