

Page 1

Page 2

Page 3
Page 4

IMPORTANT SAFEGUARDS
WARNING: When using an electrical appliance, basic safety precautions should always
be followed to reduce the risk of fire, electric shock, and/or injury, including the following:
1. READ ALL INSTRUCTIONS BEFORE USING.
2. To protect against risk of electric shock, do not place cord, plug, or base of appliance
in water or any other liquid.
3. Close supervision is necessary when any appliance is used by or near children.
This is not a toy or children’s product. This product is not designed or intended
for use by children age 12 or younger.
4. Always unplug from outlet when not in use, before putting on or taking off parts,
and before cleaning.
5. Check to make sure the power ON/OFF button is in the (O) OFF position before plugging
into or unplugging the Ice Cream Maker from the electrical outlet.
6. Avoid contact with moving parts. Keep hands, hair, clothing, as well as spatulas and other
utensils away during operation to reduce the risk of injury to persons and/or damage
to the appliance.
7. Do not operate any appliance if the cord is damaged. Do not use this appliance if the unit
malfunctions, if it is dropped or has been damaged in any manner. In order to avoid
the risk of an electric shock, never try to repair the Ice Cream Maker yourself.
Bring it to a qualified technician for examination, repair or electrical or mechanical
adjustment. An incorrect reassembly could present a risk of electric shock when
the Ice Cream Maker is used.
8. The use of attachments not recommended by the manufacturer may cause fire,
electric shock or risk, of injuries.
9. Do not use outdoors.
10. Do not let cord hang over edge of table or counter, or touch hot surfaces.
11. Keep hands and utensils out of freezer bowl while in use to reduce the risk of injury
to persons or to the appliance itself.
12. DO NOT USE SHARP OBJECTS OR UTENSILS INSIDE THE BOWL! Sharp objects
will scratch and damage the inside of the bowl. A rubber spatula or wooden spoon
may be used to scoop finished ice cream.
13. Do not place Ice Cream Maker on or near hot surfaces such as a hot gas or electric
burner. Do not use this unit near oven, heater, or fireplace.
14. Do not use the freezer bowl near flames, hot plates or stoves. Do not expose to any heat
source.
15. To reduce the risk of fire or electric shock, do not disassemble the Ice Cream Maker
blender motor or body.
16. Never clean any part or accessory of the Ice Cream Maker with scouring powders
or hard implements.
17. Failure to lock the lid flush onto the freezer bowl may cause damage to the Ice Cream
Maker.
18. Do not leave the Ice Cream Maker unattended while churning.
19. Do not use appliance for other than intended purpose.
20. Do not expose the freezer bowl to temperatures above 105°F/41°C.
21. Do not place the freezer bowl or motor housing into the dishwasher. The mixing paddle
and clear plastic lid are top-rack dishwasher safe.
SAVE THESE INSTRUCTIONS
This product is for household use only
2
Page 5

NOTES ON THE PADDLE
Unit may take up to 30 minutes (or less) to create ice cream depending on the ingredients. If
the paddle changes direction repeatedly, the ice cream is ready. Press the power ON/OFF
button to the (O) OFF position and unplug the Ice Cream Maker from the electrical outlet.
NOTES ON THE PLUG
This appliance has a polarized plug (one blade is wider than the other). To reduce the risk
of electric shock, this plug will fit in a polarized outlet only one way. If the plug does not fit fully
into the outlet, reverse the plug. If it still does not fit, contact a qualified electrician.
Do not modify the plug in any way.
NOTES ON THE CORD
The provided short power-supply cord (or detachable power-supply cord) should be used
to reduce the risk resulting from becoming entangled in or tripping over a longer cord.
Do not use an extension cord with this product.
ELECTRIC POWER
If the electrical circuit is overloaded with other appliances, your appliance may not operate
properly. It should be operated on a separate electrical circuit from other appliances.
3
Page 6
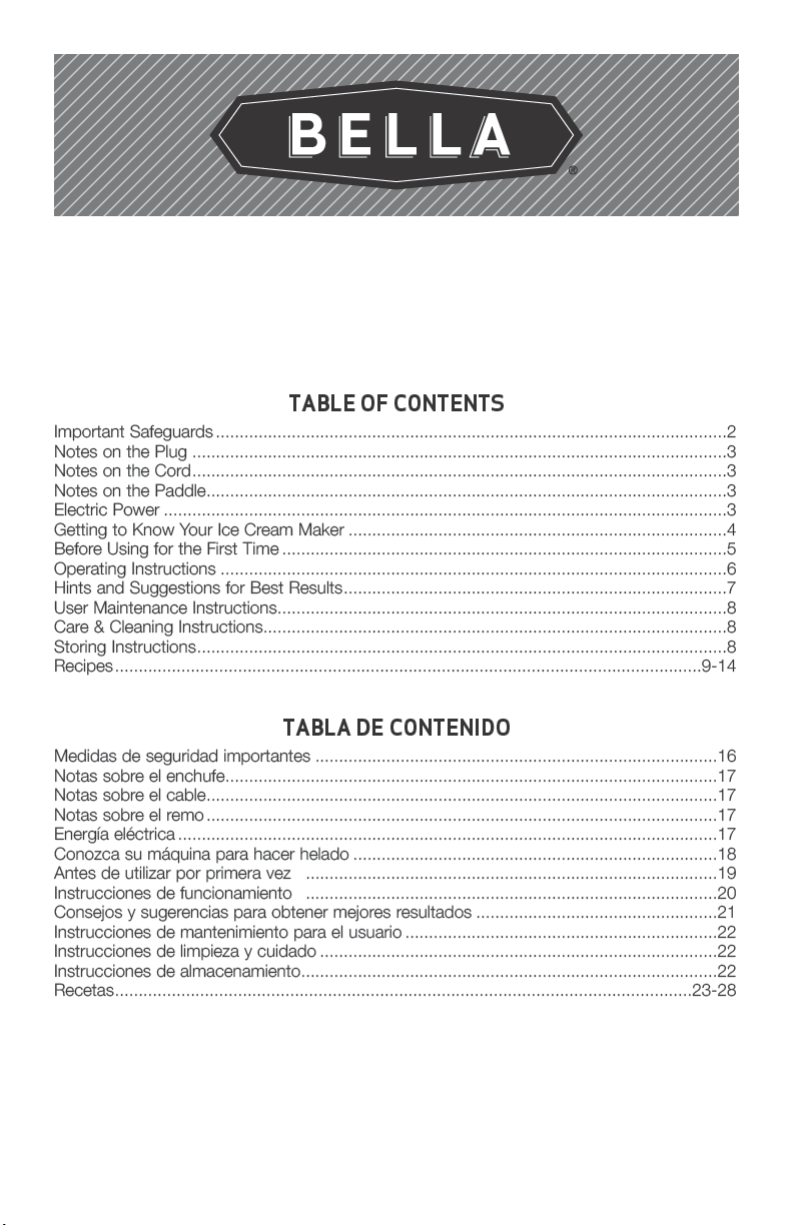
GETTING TO KNOW YOUR ICE CREAM MAKER
Product may vary slightly from illustrations.
Figure 1
Motor Housing
Ice Cream Chute
Lid
Power ON/OFF Button
Lid tab
Freezer Bowl
Mixing Paddle
Side Locks
4
Page 7
BEFORE USING FOR THE FIRST TIME
1. Carefully unpack the Ice Cream Maker and all parts. Your Ice Cream Maker will be
assembled; the mixing paddle will be packed inside the freezer bowl.
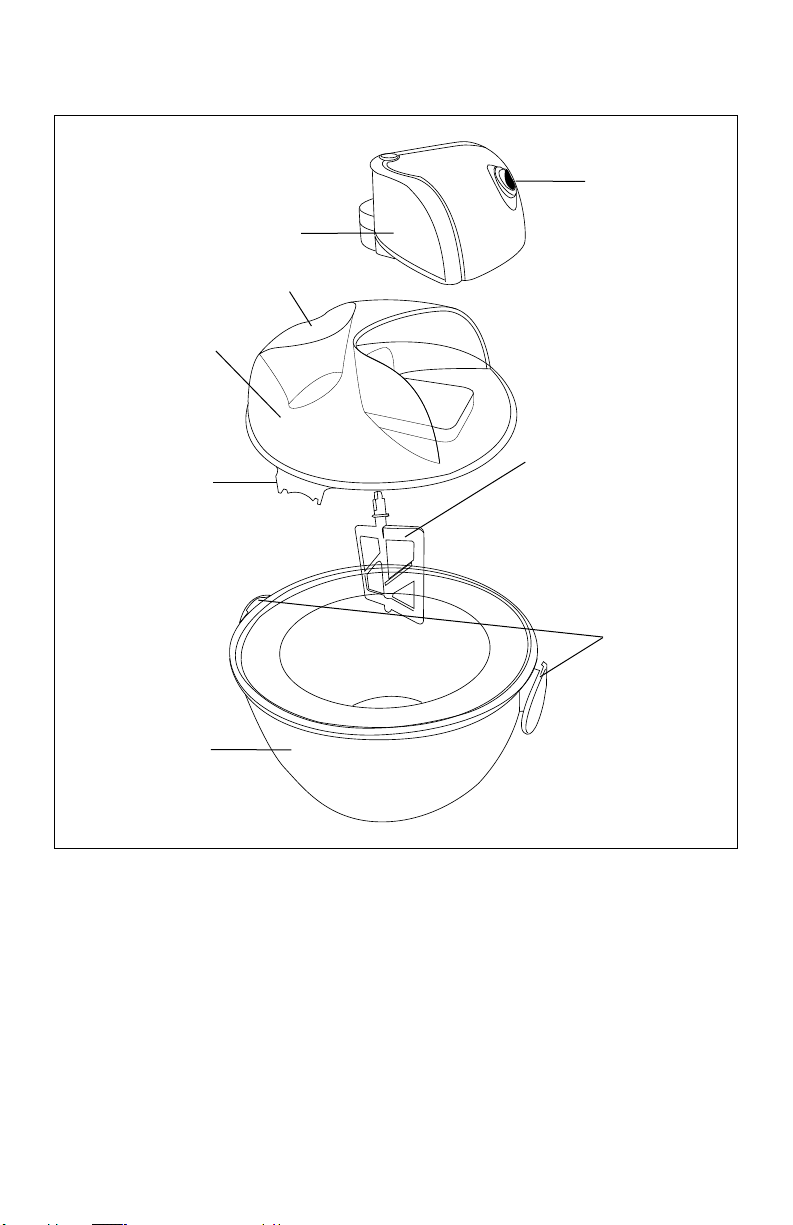
2. Remove the motor housing / cord from the lid. Rest the lid on a clean, flat surface.
Press the 2 release pins while pulling the lid up and off the motor. (See Figure 2.)
Set motor aside in a clean, dry area.
Figure 2
Release Pins
Paddle Lock
3. Wash the freezer bowl, mixing paddle and lid in warm soapy water. Rinse and dry
thoroughly.
CAUTION: To protect against risk of electrical shock, do not place motor housing,
plug or cord in water or any other liquid.
4. Wipe the motor housing with a moistened cloth. Dry thoroughly.
5. Replace the motor housing into the lid. An audible click can be heard as the motor locks
into position.
6. Press firmly until the mixing paddle locks into the center hole in the motor housing.
Set aside. (See Figure 2.) Set assembled lid aside.
7. Set your freezer to the coldest setting. Place clean, empty freezer bowl in an upright
position, towards the back wall of the freezer for at least 12 hours before processing
frozen desserts.
NOTE: Freezing the freezer bowl 25 hours prior to use will ensure the best possible results.
IMPORTANT: To ensure proper freezing ability of your Ice Cream Maker, before adding
mixture, make sure the empty freezer bowl has been stored in an upright position
in the freezer for at least 12 hours.
5
Page 8

OPERATING INSTRUCTIONS
1. Place empty freezer bowl in an upright position, towards the back wall of the freezer for at
least 12 hours before processing.
2. Prepare ice cream or dessert mixture and refrigerate in an airtight container until cold, or
store for up to 3 days until use.
IMPORTANT: Mixture must be cold before processing frozen desserts. If the recipe needs
to be cooked, allow the heated mixture to cool for several hours or preferably store mixture
covered in the refrigerator overnight before freezing
3. Remove freezer bowl from freezer. Place assembled lid with mixing paddle onto the
freezer bowl. Rotate lid so that both lid tabs fit directly over both of the side locks.
4. Grasping both side locks, rotate locks towards you to lock.
5. Check to make sure the power ON/OFF button is in the (O) OFF position. Plug the Ice
Cream Maker into a 120V AC electrical outlet.
6. Press the power ON/OFF button to the (—) ON position. The paddle will begin to turn.
7. Pour 12 oz. to 28 oz. (1-1/2 to 3-1/2 cups) prepared ice cream/dessert mixture into the
freezer bowl through the ice cream chute on the top of the lid.
CAUTION: Do not exceed 28 oz. (3-1/2 cup) maximum capacity. To assure proper freezing,
always process a minimum of 12 oz. (1-1/2 cups) prepared ice cream/dessert mixture.
IMPORTANT: Foods expand in volume during the freezing process. To avoid overflow
and waste, adjust recipe to allow extra room in the freezer bowl when adding in
ingredients during the final minutes of processing.
8. Allow the Ice Cream Maker to churn for 12 to 20 minutes, depending on the thickness of
the mixture and the quantity processed.
9. Add-Ins such as mini chocolate chips or chopped chocolate, fruits or nuts should
be chopped into small pieces. Depending on the quantity processed, about 10 to 15
minutes into the churning, after the mixture has thickened, drop ingredients through
the add-in chute on top of the lid.
IMPORTANT: Check to make sure the mixing paddle sits down into the mixture, not on
top of the add-ins, and continues to churn through all ingredients in the full freezer bowl.
WARNING: To avoid spills and possible damage to the unit, do not overfill the freezer bowl.
10. Do not leave the Ice Cream Maker unattended while churning.
11. When the ice cream or frozen dessert is processed to the desired consistency, press the
power ON/OFF button to the (O) OFF position and unplug the Ice Cream Maker from the
electrical outlet.
12. Unlock the lid to disassemble. Grasping both side locks, rotate locks away from you to
unlock. Lift lid up and off the freezer bowl.
CAUTION: To avoid scratching the non-stick surface of the freezer bowl, NEVER use a
metal scoop or any metal utensils to remove ice cream/frozen dessert from the freezer
bowl.
13. Use a plastic or wood spoon or plastic or rubber spatula to remove the frozen dessert from
the freezer bowl. Pack into a plastic airtight storage container for freezer storage.
14. Mark the prepare date and type of desserts on the storage container.
IMPORTANT: Use your freshly prepared ice cream soon after processing. After 1 or 2
weeks, the structure of ice cream deteriorates and the fresh taste may be lost.
CAUTION: To ensure the best flavor, consistency and to avoid sickness, do not refreeze
and consume the desserts, which have been totally or partly defrosted.
6
Page 9

HINTS AND SUGGESTIONS FOR BEST RESULTS
• Always plan ahead! Freeze the clean, empty freezer bowl for at least 12 hours before
processing.
• Ice cream or dessert recipes can be made ahead and refrigerated in an airtight container
until cold or for to up to 3 days before churning.
• Recipes using fresh-cooked ingredients should be cooled 2 hours to overnight before
using.
• Fresh or frozen fruits may taste less sweet when frozen. Adding extra sugar or sweetener
may be necessary.
• Create fresh frozen desserts without preservatives, using pure, fresh ingredients.
• For those with dietary restrictions or health-conscious, luscious frozen desserts may be
prepared using soy milk, almond milk, coconut, or rice milk.
• Desserts prepared in this Ice Cream Maker will not have the same characteristics as
commercially prepared frozen desserts using preservatives or gum bases to make them
firm. For a denser, harder consistency, transfer processed frozen dessert to an airtight
plastic container and store in the freezer until the desired consistency is reached, usually 2
hours or more.
• Higher fat dairy products, such as heavy or whipping cream, create a smooth, rich, and
creamy ice cream. Lower fat dairy products create a lighter dessert with a slightly different
texture.
• For lower fat alternatives, substitute low fat milk for whole milk, whole milk for half-andhalf, and evaporated skim milk for heavy or whipping cream. Substitute lower fat creams in
equal quantities. However, lower fat substitutes may change the taste, consistency, and
texture . . . the higher the fat content, the richer and creamier the dessert.
• For lower sugar alternatives, artificial sweeteners may be used.
• To ensure proper freezing, do not allow freezer bowl to remain out of the freezer for longer
than 5 minutes before processing.
• Do not fill the freezer bowl with more than 28 oz. (3-1/2 cups) or less than 12 oz.
(1-1/2 cups) of food ingredients.
NOTE: Cut recipes to 24 oz. (3 cups) liquid when planning to add in additional ingredients.
• Allow extra room in the freezer bowl when adding in ingredients during the final minutes of
processing.
• Water-based recipes may cause the Ice Cream Maker to produce less than favorable
results. It is recommended that mashed fruit, sugar, juices or creams be used in recipes to
facilitate even freezing.
• Never add alcohol to the freezing mixture. If desired, add ice cream or frozen dessert to
glasses, then add alcohol before serving.
CAUTION: To avoid scratching the non-stick surface of the freezer bowl, NEVER use a
metal scoop or any metal utensils to remove frozen dessert from the freezer bowl.
7
Page 10

USER MAINTENANCE INSTRUCTIONS
This appliance requires little maintenance. It contains no user serviceable parts.
Do not try to repair it yourself. Any servicing that requires disassembly other than cleaning
must be performed by a qualified appliance repair technician.
CARE & CLEANING INSTRUCTIONS
CAUTION: Never immerse the motor housing, plug or cord in water or any other liquid.
1. Always unplug the unit before cleaning.
2. Unlock and remove the Ice Cream Maker lid following instructions outlined in the
“Operating Instructions” section of this Instruction Manual.
3. Remove the motor housing from the lid following instructions outlined in the “Before Using
for the First Time” section of this Instruction Manual. (See Figure 2.)
4. Whenever possible, rinse parts immediately after processing to make cleanup easier.
WARNING: To assure the maximum freezing performance of the freezer bowl, DO NOT
use scalding hot water to rinse or wash freezer bowl.
5. Wash and rinse the freezer bowl, mixing paddle and lid in warm, soapy water. Dry using a
clean kitchen towel. Do not use paper towels as they will stick to the cold freezer bowl.
IMPORTANT: Do not place the freezer bowl or motor housing into the dishwasher. The
mixing paddle and clear plastic lid are top-rack dishwasher safe.
6. If necessary, wipe the exterior surface of the freezer bowl and the motor housing with a
moist cloth or sponge and dry thoroughly.
7. Never use rough scouring pads or abrasive cleansers on any plastic or metal parts as the
surface may be damaged.
STORING INSTRUCTIONS
1. Make sure Ice Cream Maker is unplugged before storing.
2. After using the ice cream maker, follow the CARE & CLEANING INSTRUCTIONS to
ensure the unit is properly clean.
3. Store in original box or in a clean, dry place.
4. Never place any stress on the power-supply cord, especially where the cord enters the
unit, as this could cause the cord to fray and break.
8
Page 11

Page 12

Page 13

Page 14

Page 15

Page 16

Page 17

MEDIDAS DE SEGURIDAD
IMPORTANTES
PRECAUCION: Al utilizar un electrodoméstico, siempre deben cumplirse las precauciones
de seguridad básicas a fin de evitar el riesgo de incendio, descargas eléctricas y lesiones,
incluidas las siguientes:
1. LEA TODAS LAS INSTRUCCIONES ANTES DE UTILIZAR EL ELECTRODOMÉSTICO.
2. Para protegerse del riesgo de descarga eléctrica, no sumerja el cable,
el enchufe ni la base en agua ni en ningún otro líquido.
3. Es necesario que haya una supervisión estricta cuando el electrodoméstico sea utilizado
por niños o cerca de ellos. No es un juguete ni un producto para niños.
Este producto no debe ser utilizado por niños menores de 12 años de edad.
4. Siempre desenchufe el electrodoméstico del tomacorriente cuando no lo utilice,
antes de colocar o quitar piezas y antes de limpiarlo.
5. Verifique que el botón “ On/off” se encuentre en la posición 0 “off” antes de conectar el
electrodoméstico en la toma de corriente.
6. Evite el contacto con las piezas móviles. Durante el funcionamiento, mantenga alejadas
las manos, el cabello y la ropa, al igual que las espátulas y otros utensilios, a fin de evitar
el riesgo de lesiones personales o de daños al electrodoméstico.
7. No utilice ningún electrodoméstico si el cable está dañado. No utilice este
electrodoméstico si la unidad presenta un funcionamiento defectuoso, si se ha caído
o se ha dañado de alguna manera. Para evitar el riesgo de descargas eléctricas,
nunca trate de reparar la máquina para hacer helado usted mismo. Llévela a un técnico
autorizado para que la examine, la repare o le haga ajustes eléctricos o mecánicos.
Si la máquina para hacer helado se vuelve a armar de manera incorrecta,
se corre el riesgo de sufrir una descarga eléctrica al utilizarla.
8. El uso de accesorios no recomendados por el fabricante puede provocar incendios,
descargas eléctricas o lesiones.
9. No utilice este aparato en exteriores.
10. No permita que el cable cuelgue del borde de una mesa o de una encimera ni que entre
en contacto con superficies calientes.
11. Mantenga las manos y utensilios fuera del tazón mientras el electrodoméstico esté
en funcionamiento a fin de reducir el riesgo de lesiones personales o daños a la unidad.
12. ¡NO UTILICE OBJETOS O UTENSILIOS FILOSOS DENTRO DEL TAZÓN!
Los objetos filosos pueden rayar o dañar el interior del tazón. Se puede utilizar una
espátula de goma o cuchara de madera para servir el helado cuando esté listo.
13. No coloque la máquina para hacer helado sobre superficies calientes, como
un quemador a gas o eléctrico, ni cerca de éstas. No utilice esta unidad cerca
de un horno, de un calentador ni de una chimenea.
14. No utilice el tazón para congelador cerca de llamas, placas calientes ni estufas.
No lo exponga a ninguna fuente de calor.
15. Para reducir el riesgo de incendio o descarga eléctrica, no desarme el motor ni el cuerpo
de la mezcladora de la máquina para hacer helado.
16. Nunca limpie ninguna pieza o accesorio de la máquina para hacer helado con polvos
limpiadores ni implementos duros.
17. Si no se cierra la tapa del tazón para congelador, la máquina para hacer helado podría
dañarse.
18. No descuide la máquina para hacer helado mientras está batiendo.
19. No utilice el electrodoméstico para otros fines que no sean para los que fue diseñado.
20. No exponga el tazón para congelador a temperaturas superiores a 105°F/41°C.
21. No coloque el tazón para congelador o la caja del motor en el lavavajillas. La paleta
de mezclar y la tapa de plástico transparente se pueden lavar en el estante superior del
lavavajillas.
GUARDE ESTAS INSTRUCCIONES
Este producto es para uso en el hogar solamente.
16 16
Page 18

NOTAS SOBRE EL REMO
La unidad puede tardar hasta 30 minutos (o menos) para crear helado dependiendo de los
ingredientes. Si la paleta para mezclar cambia de direccion constantemente, el helado esta
listo. Presione el botón de encendido-apagado “ on/off” en la posición 0 “off” y desconecte el
electrodoméstico de la toma de corriente.
NOTAS SOBRE EL ENCHUFE
Este electrodoméstico tiene un enchufe polarizado (una pata es más ancha que la otra).
A fin de reducir el riesgo de una descarga eléctrica, el enchufe entra en un tomacorriente
polarizado en un solo sentido. Si el enchufe no entra completamente en el tomacorriente,
invierta la posición del enchufe. Si aun así no entra, consulte a un electricista autorizado.
No realice ninguna modificación al enchufe.
NOTAS SOBRE EL CABLE
El cable de alimentación corto (o el cable de alimentación desmontable) suministrado se debe
utilizar para reducir los riesgos de enredarse o tropezar con un cable más largo.
No utilice un cable de extensión con este producto.
ENERGÍA ELÉCTRICA
Si el circuito eléctrico está sobrecargado con otros artefactos, su electrodoméstico puede dejar
de funcionar correctamente. El electrodoméstico debe funcionar en un circuito eléctrico
separado de otros artefactos.
17 17
Page 19

CONOZCA SU MÁQUINA PARA HACER HELADO
El producto puede diferir levemente de las ilustraciones.
Figura 1
Caja del motor
Congelador
Tapa
Botón ON/OFF
(Encendido/Apagado)
Lengüeta de la tapa
Tazón Congelado
Paleta Para Mezcla
Traba lateral
18 18
Page 20

ANTES DE UTILIZAR POR PRIMERA VEZ
1. Retire con cuidado la máquina para hacer helado y todas las piezas del embalaje.
Su máquina para hacer helado estará armada; la paleta de mezclar estará dentro del
tazón para congelador.
2. Quite la caja del motor/el cable de la tapa. Apoye la tapa sobre una superficie limpia
y plana. Presione las dos perillas de desenganche mientras tira la tapa hacia arriba,
retirándola del motor (Ver figura2). Deje el motor a un lado, en un lugar limpio y seco.
Figura 2
Pasadores
Eje del motor
3. Lave el tazón para congelador, la paleta de mezclar y la tapa con agua tibia y jabón.
Enjuague y seque completamente.
PRECAUCIÓN: Para protegerse del riesgo de descarga eléctrica, no sumerja la caja
del motor, el enchufe ni el cable en agua ni en ningún otro líquido.
4. Limpie la caja del motor con un paño húmedo. Seque completamente.
5. Vuelva a colocar la caja del motor en la tapa. Cuando el motor queda colocado en su
posición, se escucha un clic.
6. Presione firmemente hasta que la paleta de mezclar quede asegurada en el orificio central
de la caja del motor. Deje la tapa armada a un lado.
7. Configure el congelador en la temperatura más fría. Colóquelo en posición vertical, cerca
de la pared trasera del congelador por
al menos 12 horas antes de procesar postres congelados.
NOTA: Congelar el tazón para congelador 25 horas antes de utilizar garantizará los
mejores resultados posibles
IMPORTANTE: Para garantizar una adecuada capacidad de congelación de su máquina
para hacer helado, antes de agregar la mezcla, asegúrese de que el tazón
para congelador vacío haya estado guardado en posición vertical por al menos 12 horas.
19 19
Page 21

INSTRUCCIONES DE FUNCIONAMIENTO
1. Colóquelo en posición vertical, cerca de la pared trasera del congelador por al menos 12
horas antes de procesar.
2. Prepare helado o mezcla para postres y colóquelo en el refrigerador en un recipiente
hermético por hasta 3 días hasta que lo utilice.
IMPORTANTE: La mezcla debe estar fría antes de procesar postres congelados.
Si la receta necesita cocción, deje enfriar la mezcla después de la cocción durante varias
horas o preferentemente guarde la mezcla cubierta en el refrigerador durante toda
la noche antes de congelarla.
3. Remover el tazón congelador del congelador. Ensamblar tapa con caja del motor, y paleta
para mezcla. Una vez que este sea ensamblado, coloque este ensamble por encima del
tazón congelador, asegurando que las lengüetas de la tapa y las trabas laterales
embonen correctamente.
4. Coloque la caja del motor, con la tapa y la paleta de mezclar colocadas, en el tazón para
congelador.
5. Para trabarla, gire las trabas hacia usted, sujetando ambas trabas laterales. Enchufe la
máquina para hacer helado en un tomacorriente de CA de 120 V.
6. Coloque el botón ON/OFF (Encendido/Apagado) en la posición ON (—) (Encendido).
Cuando la paleta comience a batir. La paleta pasa mezda comenzara a girar.
7. Vierta de 12 a 28 onzas (1-1/2 a 3-1/2 tazas) de la preparación de helado/mezcla para
postre en el tazón para congelador.
PRECAUCION No supere la capacidad máxima de 28 onzas (3-1/2 tazas). Para
garantizar
una congelación adecuada, siempre procese al menos 12 onzas (1-1/2 tazas) mezcla
para helado/postre preparada.
IMPORTANTE: Los alimentos aumentan de volumen durante el proceso de congelación.
Para evitar derrames y desperdicios, modifique la receta de manera que quede espacio
adicional en el tazón para congelador cuando tenga que añadir ingredientes en los
minutos finales del procesamiento.
8. Deje que la máquina para hacer helado bata durante 12 a 20 minutos,
según la consistencia de la mezcla y la cantidad procesada.
9. Los complementos como mini chispas o pequeños trozos de chocolate, frutas o nueces
se deben picar pequeños y agregar luego sobre la mezcla congelada una vez que haya
tomado consistencia, cuando hayan pasado alrededor de 5 minutos en el proceso
de batido. Dependiendo de la cantidad procesada, luego de haber batido de 10 a 15
minutos, una vez que la mezcla se haya espesado, introduzca los ingredientes a través
del tubo que se encuentra en la parte superior de la tapa.
NOTA: Asegúrese de que la paleta de mezclar no se apoye sobre los complementos,
pero que continúe batiendo todos los ingredientes en el tazón para congelador lleno.
ADVERTENCIA: A fin de evitar derrames y posibles daños a la unidad,
no llene demasiado el tazón para congelador.
10. No descuide la máquina para hacer helado mientras está batiendo.
11. Cuando el helado o el postre congelado haya alcanzado la consistencia deseada,
lleve el botón de Encendido/Apagado a la posición “O” (OFF, Apagado) y desenchufe
la máquina para hacer helado del tomacorriente.
12. Abra la tapa para desensamblar. Gire las trabas laterales y una vez localizada la zona de
apertura levante la tapa.
PRECAUCIÓN: Para evitar que se raye la superficie antiadherente del tazón para
congelador, NUNCA utilice una cuchara o utensilios de metal para quitar el helado/postre
congelado del tazón para congelador.
13. Utilice una cuchara de plástico o madera, o una espátula de plástico o goma para quitar
el postre congelado del tazón del congelador. Colóquelo en un recipiente de plástico
hermético para guardarlo en el congelador.
20 20
Page 22

14. Indique la fecha de preparación y el tipo de postre en el recipiente.
IMPORTANTE: Consuma el helado recién preparado al poco tiempo de su procesamiento.
Después de 1 ó 2 semanas, la consistencia del helado se deteriora y se puede perder
el sabor fresco.
PRECAUCIÓN: Para garantizar el mejor sabor y consistencia, y para evitar
enfermedades, no vuelva a congelar para su consumo postres que se hayan
descongelado total o parcialmente.
CONSEJOS PARA OBTENER MEJORES RESULTADOS
• Siempre planifique con anticipación! Congele el tazón para congelador durante al menos
12 horas antes del procesamiento.
• Las recetas de helados o de postres congelados pueden prepararse por adelantado y
refrigerarse en un recipiente hermético hasta 3 días antes de batirlo.
• En las recetas que se utilicen ingredientes recientemente cocinados, dejar que se enfríen
dentro del refrigerador por lo menos 2 horas, lo ideal seria dejarlos durante toda la noche
antes de ser utilizados.
• Las frutas frescas o congeladas pueden tener un sabor menos dulce cuando estén
congeladas. Es posible que se necesite agregar azúcar o endulzante adicional.
• Utilice ingredientes puros y frescos para preparar postres congelados frescos sin
conservantes.
• Para aquellas personas con restricciones alimenticias o para aquellos que se preocupan
por la salud, se pueden preparar postres congelados deliciosos utilizando leche de soja,
de almendras o de arroz.
• Los postres preparados con esta máquina para hacer helado no tendrán las mismas
características que los postres congelados comerciales que utilizan conservantes o base
de goma de mascar para añadir firmeza. Para lograr una consistencia más espesa y dura,
coloque el postre congelado procesado en un recipiente de plástico hermético y guárdelo
en el congelador hasta lograr la consistencia deseada, generalmente 2 horas o más.
• Los productos lácteos con mayor contenido graso, como la crema entera o crema para
batir, permiten crear un helado homogéneo, rico y cremoso.
• Para alternativas con menor contenido graso, utilice leche con 1% de contenido graso
en lugar de leche entera; leche entera en lugar de mezcla de leche y crema; y leche
descremada evaporada en lugar de crema entera o crema para batir.
• Para alternativas con menos azúcar, se pueden usar endulzantes artificiales.
• Para garantizar una congelación adecuada, no deje el tazón para congelador fuera
del congelador por más de 5 minutos.
• No llene el tazón para congelador con más de 28 onzas (3-1/2 tazas) ni con menos de 12
onzas (1-1/2 tazas) de ingredientes.
NOTA: Reduzca las recetas a 24 onzas (3 tazas) de líquidos cuando tenga pensado
agregar ingredientes adicionales.
• Deje espacio adicional en el tazón para congelador cuando tenga que añadir ingredientes
en los minutos finales del procesamiento.
• Las recetas a base de agua pueden hacer que la máquina para hacer helado produzca
resultados poco favorables. Se recomienda el uso de puré de frutas,
azúcar, jugos o cremas en las recetas para facilitar una congelación uniforme.
• Nunca agregue alcohol a la mezcla congelada. Si lo desea, sirva el helado o postre
congelado en copas, luego añada alcohol antes de servirlo.
PRECAUCIÓN: Para evitar que se raye la superficie antiadherente del tazón
para congelador, NUNCA utilice una cuchara o utensilios de metal para quitar el postre
congelado del tazón para congelador.
21
Page 23

INSTRUCCIONES DE MANTENIMIENTO PARA EL USUARIO
Este electrodoméstico requiere poco mantenimiento. No contiene piezas que puedan
ser reparadas por el usuario. No intente repararlo usted mismo. Cualquier mantenimiento
para el que sea necesario desarmar el aparato, aparte de la limpieza, debe ser realizado
por un técnico autorizado para reparar electrodomésticos.
INSTRUCCIONES DE LIMPIEZA Y CUIDADO
PRECAUCIÓN: Nunca sumerja la caja del motor, el enchufe o el cable en el agua, ni en
ningún otro líquido.
1. Siempre desenchufe la unidad antes de ser limpiada.
2. Abra y remueva la tapa de la maquina para hacer helado siguiendo las instrucciones
localizadas en la sección de “instrucciones de funcionamiento” de este manual
3. Remueva la caja del motor de la tapa del electrodoméstico siguiendo las instrucciones
indicadas en la sección “Antes de utilizar por primera vez”
4. Cuando sea posible, enjuague las piezas inmediatamente después de utilizarlas para
facilitar la limpieza.
ADVERTENCIA: Para garantizar el mejor rendimiento de congelación del tazón
congelador, NO utilice agua hirviendo para enjuagarlo o lavarlo.
5. Lave y enjuague el tazón congelador, la paleta para mezclar y la tapa con agua tibia y
jabón, Séquelos utilizando un paño de cocina limpio. No utilice servilletas de papel ya que
se pegaran en el tazón para congelador frío.
IMPORTANTE: No coloque el tazón congelador o la caja del motor en el lavavajillas. La
paleta de mezclar y la tapa de plástico transparente se pueden lavar en la parte superior
del lavavajillas.
6. Si es necesario, limpie las superficies exteriores del tazón congelador y de la caja del
motor utilizando un paño húmedo o una esponja casi seca.
7. Nunca utilice esponjas metálicas duras ni productos de limpieza abrasivos para limpiar las
piezas de plástico o metal, ya que se puede dañar la superficie.
INSTRUCCIONES DE ALMACENAMIENTO
1. Desenchufe y limpie la unidad después de cada uso.
2. Después de usar la maquina para hacer helado, siga las “instrucciones de limpieza y
cuidado” para asegurar que el electrodoméstico has sido limpiado correctamente.
3. Guardar la unidad en un lugar limpio y sin humedad.
4. Nunca ejerza presión sobre el cable de alimentación, especialmente donde ingresa
en la unidad, ya que podría desgastarse y romperse.
22
Page 24

Page 25

Page 26

Page 27

Page 28

Page 29

Page 30

Page 31

Page 32

 Loading...