


GN1416223ZX |
BGN532DXP |
REM91ZXB |
EN FR |

Please read this manual before using the product!
Dear Customer,
We'd like you to make the best use of our product, which has been manufactured in modern facilities with care and meticulous quality controls.
Thus, we advice you to read the entire user manual before you use the product. In case the product changes hands, do not forget to hand the guide to its new owner along with the product.
This guide will help you use the product quickly and safely.
•Please read the user guide carefully before installing and operating the product.
•Always observe the applicable safety instructions.
•Keep the user guide within easy reach for future use.
•Please read any other documents provided with the product.
Keep in mind that this user guide may apply to several product models. The guide clearly indicates any variations of different models.
C Important information and useful tips.
A Risk of life and property.
B Risk of electric shock.
The product’s packaging is made of recyclable materials, in accordance with the National Environment Legislation.
1 |
Important Instructions Regarding |
|
Safety and Environment |
3 |
|
2 |
Your Refrigerator |
7 |
|
|
|
2 |
Your Refrigerator |
8 |
|
|
|
3 |
Installation |
9 |
3.1 Appropriate location for installation. . . . . . . . 9 3.2 Installing the plastic wedges . . . . . . . . . . . . 9 3.3* Adjusting the feet . . . . . . . . . . . . . . . . . . . 10 3.4 Electric connection . . . . . . . . . . . . . . . . . . 11
4 Preparation |
12 |
4.1 Things to be done for saving energy . . . . 12
4.2 Recommendations about the fresh food compartment . . . . . . . . . . . . . . . . . . . . . 12
4.3 Initial use . . . . . . . . . . . . . . . . . . . . . . . . 13
5 Operating the product |
14 |
5.1 Indicator panel . . . . . . . . . . . . . . . . . . . . . 14 5.2 Indicator panel . . . . . . . . . . . . . . . . . . . . 19 5.3 Freezing fresh food . . . . . . . . . . . . . . . . . . 22
5.4 Recommendations for preserving the frozen food . . . . . . . . . . . . . . . . . . . . . . . . . . . . 22
5.5 Deep-freeze information . . . . . . . . . . . . . . 22 5.6 Placing the food . . . . . . . . . . . . . . . . . . . . 23 5.7 Door open warning . . . . . . . . . . . . . . . . . . 23 5.8 Chiller compartment . . . . . . . . . . . . . . . . . 23 5.9 Crisper . . . . . . . . . . . . . . . . . . . . . . . . . . . 23 5.10 Humidity-controlled crisper . . . . . . . . . . . 23 (FreSHelf) . . . . . . . . . . . . . . . . . . . . . . . . . . . . 23 5.11 Egg tray . . . . . . . . . . . . . . . . . . . . . . . . . 24 5.12 Movable Middle Section . . . . . . . . . . . . . 24 5.13 Cool Control Storage Compartment . . . . 24 5.14 Blue light . . . . . . . . . . . . . . . . . . . . . . . . .24 5.15 Odour filter . . . . . . . . . . . . . . . . . . . . . . . 24 5.16 Wine cellar compartment . . . . . . . . . . . . . 25 5.17 Using internal water dispenser. . . . . . . . . 26 5.18 Dispensing water. . . . . . . . . . . . . . . . . . . 26 5.19 For using water dispenser . . . . . . . . . . . . 27 5.20 Icematic . . . . . . . . . . . . . . . . . . . . . . . . . 27 5.21 Icematic and ice storage container . . . . . . 28
6 |
Maintenance and Cleaning |
29 |
|
|
|
7. |
Troubleshooting |
30 |
|
|
|
|
2 / 30 EN |
Refrigerator / User Manual |
|
|
|

1 Important Instructions Regarding Safety and Environment
This chapter contains safety information that will help you avoid the risk personal injury or property damage. Failure to follow these instructions shall render any product warranty void.
Intended use
WARNING:
Keep ventilation openings, in A the appliance enclosure or in the built-instructure, clear of
obstruction.
WARNING:
Do not use mechanical devices or other means to
A accelerate the defrosting process, other than those recommended by the manufacturer.
WARNING:
A Docircuit.not damage the refrigerant
WARNING:
Do not use electrical appliances inside the food
A storage compartments of the appliance, unless they are of the type recommended by the
manufacturer.
This appliance is intended to be used in household and similar applications such as
–staff kitchen areas in shops, offices and other working environments;
–farm houses and by clients in hotels, motels and other residential type environments;
–bed and breakfast type environments;
–catering and similar non-retail applications.
1.1. General Safety
•Persons with physical, sensory or mental disabilities; persons who lack experience and information and children should not
approach, enter or play with the product.
•Failure to follow the instructions and uncontrolled use of the product lead to dangerous results!
•Unplug the product if you encounter a failure during use.
•If the product malfunctions, it must not be operated until repaired by the authorised service provider. Risk of electric shock!
•Plug the product into a grounded socket protected by a fuse that corresponds
to the value on its nameplate. Have a qualified electrician ground the product. Our company cannot be held responsible for damages resulting from the failure to use the product with a grounded socket pursuant to local regulations.
•Unplug the product when not in use.
•Never wash the product by spreading or pouring water onto it! Risk of electric shock!
•Never touch the plug with wet hands!
•Never unplug the product by pulling the cable. Always pull the plug by holding the socket.
•Do not plug the refrigerator if the wall socket is loose.
•Never connect your refrigerator to energy saving devices. Such systems are harmful to your product.
•Unplug the product during installation, care, cleaning and repairing procedures.
•Always have the Authorised Service Provider install the product and establish its electrical connections. The manufacturer
|
3 / 30 EN |
Refrigerator / User Manual |
|
|
|

Important instructions regarding safety and environment
cannot be held responsible for damages |
• Do not place vessels filled with liquid |
|
caused by procedures performed by |
onto the product. Splashing water on |
|
unauthorised persons. |
an electrical part may cause electric |
|
• Do not eat cone ice cream or ice cubes |
chock or the risk of fire. |
|
immediately after you take them out of |
• Do not store items that need precise |
|
the freezer compartment! This may cause |
temperature adjustment (such as |
|
frostbite in your mouth! |
vaccines, heat-sensitive medication, |
|
• Do not touch frozen food with wet hands! |
science materials etc.) in the |
|
They may stick to your hand! |
refrigerator. |
|
• Do not put bottled or canned liquid |
• If you are not going to use the product |
|
beverages in the freezer compartment. |
for a long time, unplug it and remove |
|
They may burst! |
the food in it. |
|
• Never use steam or steam cleaners to |
• If there is a blue light on the |
|
clean or defrost the refrigerator. Steam |
refrigerator, do not look at this light |
|
gets into contact with the live parts in |
with optical tools. |
|
your refrigerator, causing short circuit or |
• Exposing the product to rain, snow, |
|
electric shock! |
sun or wind is dangerous in terms of |
|
• Do not use mechanical devices or other |
electrical safety. |
|
means to accelerate the defrosting |
• In products with mechanical control |
|
process other than those recommended |
(thermostat), wait for 5 minutes to plug |
|
by the manufacturer. |
in the product again after unplugging. |
|
• Never use the parts in your refrigerator |
• Do not overload the refrigerator. |
|
such as the door and drawer as a means |
Objects in the refrigerator may fall |
|
of support or step. This may cause the |
down when the door is opened, |
|
product to tip over or damage the parts |
causing injury or damage. Similar |
|
of it. |
problems may arise if any object is |
|
• Do not damage the parts where the |
placed onto the product. |
|
refrigerant is circulating with drilling or |
• If the product has a door handle, do not |
|
cutting tools. The refrigerant that might |
pull the handle when re-locating the |
|
blow out when the gas channels of the |
product. The handle might be loose. |
|
evaporator, pipe extensions or surface |
• Be careful not to jam your hand or any |
|
coatings are punctured causes skin |
other body part in the moving parts of |
|
irritations and eye injuries. |
the refrigerator. |
|
• Do not cover or block the ventilation holes |
• Do not put your hand or any other |
|
in your refrigerator with any object. |
foreign materials into the ice machine |
|
• Place the beverage with higher proofs |
while it is operating. |
|
tightly closed and vertically. |
1.1.1 Hydrocarbon (HC) Warning |
|
• Do not use gaseous sprays near the |
||
• If your product's cooling system |
||
product since there is the risk or fire or |
||
explosion! |
contains R600a: |
|
This gas is flammable. Therefore, pay |
||
• Flammable items or products that contain |
||
attention not to damage the cooling |
||
flammable gases (e.g. spray) as well as |
system or the piping during use and |
|
explosive materials should never be kept |
||
transportation. If damaged, keep the |
||
in the appliance. |
||
|
|
4 / 30 EN |
Refrigerator / User Manual |
|
|
|
Important instructions regarding safety and environment
product away from potential fire sources that may cause it to catch fire and ventilate the room where the product is placed.
If the product is damaged and if you see gas leak, please
C keep away from the gas. It may cause frostbite when it gets into contact with the skin.
(including R134)
Ignore this warning if the cooling C systemR134a. of your product contains
Type of gas used in the product C is stated on the type plate which
is on the left wall inside the refrigerator.
WARNING:
A Neverfor disposal.throw the product into fire
1.1.2 For Products with a Water Dispenser/Ice Machine
•Pressure for cold water inlet shall be maximum 90 psi (620 kPa). If your water pressure exceeds 80 psi (550 kPa), use a pressure limiting valve in your mains system. If you do not know how to check your water pressure, ask for the help of a professional plumber.
•If there is a risk of water impact in your installation, always use a water impact protection equipment in that installation. Please consult professional plumbers if you are not sure if there is water impact in your installation.
•Do not make installation on the hot water inlet.
•Use drinking water only.
•Take the necessary measures against the freezing risk of the hoses. The water temperature operating range must be 0.6°C (33°F) minimum and 38°C (100°F) maximum.
WARNING:
Never connect the product A to a cold water mains with a
pressure of 550 kPa (80 psi) or above.
1.2. Intended Use
•This product has been designed for domestic use. It is not suitable for commercial use and it must not be used out of its intended use.
•It must be used only for storing food.
•The manufacturer will not take any responsibility for damages resulting from improper use or transport.
•Original spare parts will be available for 10 years after the purchase date of the product.
1.3. Children's Safety
•If there is a lock on the door of the product, the key should be kept out of the reach of children.
•Do not let children play with the product.
DANGER:
Before disposing your old refrigerator or freezer:
• Children may get locked inside.
A• Remove the doors.
• Leave the shelves to prevent children from getting inside the product easily.
|
5 / 30 EN |
Refrigerator / User Manual |
|
|
|
Important instructions regarding safety and environment
1.4. Compliance with the WEEE Directive and Disposing the Waste Product:
This product conforms to the EU
WEE Directive (2012/19 EU). This product bears a classification symbol
for waste electrical and electronic equipment (WEEE). This product has
been manufactured from high quality parts and materials which can be
reused and are suitable for recycling. Therefore, do not dispose the product with normal domestic waste or other waste at the end of its service life.
Take it to a collection centre for recycling electrical and electronic equipment. Please consult local authorities to learn about the locations of such collection centres.
1.5. Compliance with the RoHS Directive:
The unit you have purchased conforms to the EU RoHS Directive (2011/65/EU). It does not contain harmful or prohibited materials specified in the Directive.
1.6. Packaging Information
•Packaging materials of the product have been manufactured from recyclable materials in accordance with our National Environment Regulations. Do not dispose the packaging materials with normal domestic waste or other types of waste. Take these materials to a recycling point designated by local authorities.
|
DANGER: |
|
Risk of Fire or Explosion: |
|
• This product uses flammable |
|
refrigerant. |
|
• Do not use mechanical devices |
|
to defrost the refrigerator. |
|
• Do not use chemicals for |
A |
cleaning. |
• Do not pierce the refrigerant |
|
pipe. |
|
|
• If the refrigerant pipe is pierced, |
|
it must be repaired only by |
|
licensed service personnel. |
|
• Please consult the repair/user |
|
manual before cleaning the |
|
product. All safety instructions |
|
must be followed. |
|
• Dispose the product according to |
|
federal or local regulations. |
|
6 / 30 EN |
Refrigerator / User Manual |
|
|
|

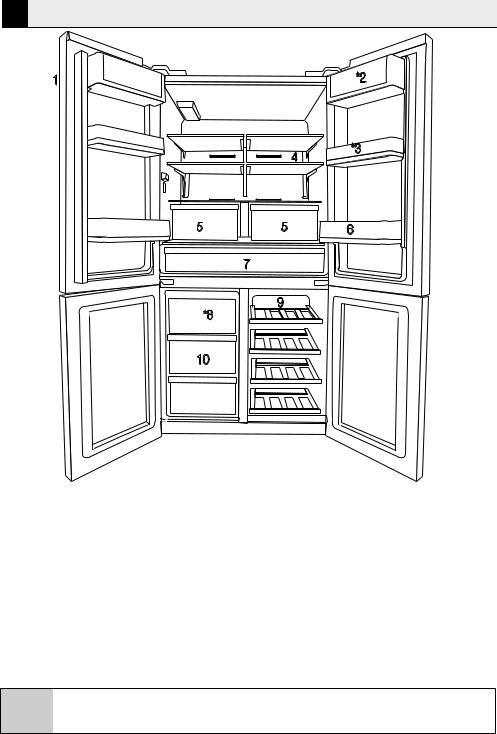
2 Your Refrigerator
*2
1
4 |
*3 |
|
5 |
5 |
|
6 |
|
7 |
*8
9
10
11
1- Control and indicator panel |
7- |
Chiller compartment |
|
2- Butter & Cheese section |
8- |
Icebox drawer |
|
3- 70 mm moving door shelf |
9- Multizone compartment glass shelf/cooler |
||
4- Fridge compartment glass shelf |
10Freezer compartment drawers |
||
5- |
Fridge compartment crisper |
11Multizone Compartment's drawer |
|
6- |
Gallon door shelf |
* OPTIONAL |
|
May not be available in all models
C Figures in this user manual are schematic and may not match the product exactly. If the subject parts are not included in the product you have purchased, then those parts are valid for other models.
7 / 30 EN |
Refrigerator / User Manual |
|
|
2 Your Refrigerator
1 |
*2 |
|
|
4 |
*3 |
|
|
|
|
5 |
5 |
|
6 |
|
7 |
|
|
 9 *8
9 *8 
10
1- Control and indicator panel |
7- |
Chiller compartment |
|
2- Butter & Cheese section |
8- |
Icebox drawer |
|
3- 70 mm moving door shelf |
9- Multizone compartment glass shelf/cooler |
||
4- Fridge compartment glass shelf |
10Freezer compartment drawers |
||
5- |
Fridge compartment crisper |
11Multizone Compartment's drawer |
|
6- |
Gallon door shelf |
* OPTIONAL |
|
May not be available in all models
C Figures in this user manual are schematic and may not match the product exactly. If the subject parts are not included in the product you have purchased, then those parts are valid for other models.
|
8 / 30 EN |
Refrigerator / User Manual |
|
|
|
3Installation
3.1Appropriate location
for installation
Contact an Authorized Service for the installation of the product. In order to prepare the product for use, refer the information in the user manual and ensure that electrical installation and water installation are appropriate. If not, call a qualified electrician and technician to have any necessary arrangements carried out.
BWARNING: Manufacturer shall not be held liable for damages that may arise from procedures carried out by unauthorized persons.
BWARNING: Product must not be plugged in during installation. Otherwise, there is the risk of death or serious injury!
WARNING: : If the door clearance of the room where the product shall be placed is Aso tight to prevent passing of the product, remove the door of the room and pass the
product through the door by turning it to its side; if this does not work, contact the authorized service.
•Place the product on a level floor surface to prevent jolts.
•Install the product at least 30 cm away from heat sources such as hobs, heater cores and stoves and at least 5 cm away from electrical ovens.
•Product must not be subjected to direct sun light and kept in humid places.
•Appropriate air ventilation must be provided around your product in order to achieve an efficient operation. If the product is to be placed in a recess in the wall, pay attention to leave at least 5 cm distance with the ceiling and side walls.
•Do not install the product in places where the temperature falls below -5°C.
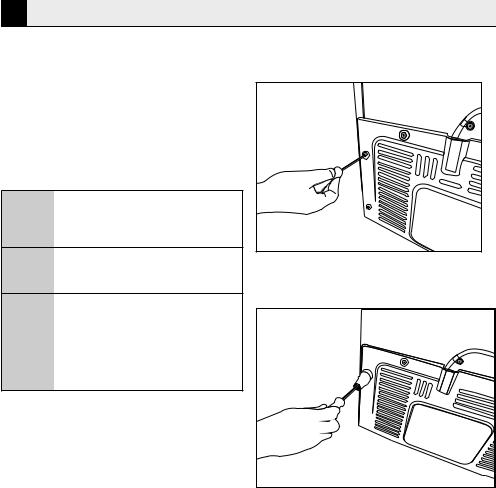
3.2 Installing the plastic wedges
Plastic wedges supplied with the product are used to create the distance for the air circulation between the product and the rear wall.
1. To install the wedges, remove the screws on the product and use the screws supplied together with the wedges.
2. Insert the 2 plastic wedges onto the rear ventilation cover as illustrated in the figure.
|
9 / 30 EN |
Refrigerator / User Manual |
|
|
|
Installation
3.3* Adjusting the feet
If the product stands unbalanced after installation, adjust the feet on the front by rotating them to the right or left.
*If your product does not have a wine compartment or is not a glass door, your product does not have adjustable stands, the product has fixed stands.
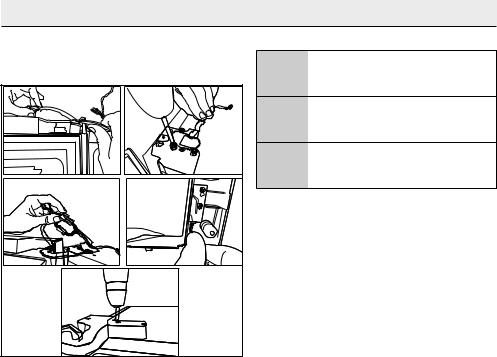
To adjust the doors vertically,
Loosen the fixing nut located at the bottom.
Rotate the adjusting nut according to the position of the door (clockwise/counter-clockwise).
Tighten the fixing nut in order to fix the position. To adjust the doors horizontally,
Loosen the fixing nut located at the top.
Rotate the side adjusting nut according to the position of the door (clockwise/counter-clockwise).
Tighten the fixing nut which is at the top in order to fix the position.
adjusting nut |
fixing nut |
fixing nut |
adjusting nut |
|
10 / 30 EN |
Refrigerator / User Manual |
|
|
|
Installation
-Upper hinge group is fixed with 3 screws.
-The hinge cover is attached after the sockets are installed.
- Then the hinge cover is fixed with two screws.
3.4 Electric connection
AWARNING: Do not make connections via extension cables or multi-plugs.
BWARNING: Damaged power cable must be replaced by the Authorized Service Agent.
C If two coolers are to be installed side by side, there should be at least 4 cm distance between them.
•Our company shall not be liable for any damages that will arise when the product is used without grounding and electrical connection in accordance with the national regulations.
•Power cable plug must be within easy reach after installation.
•Do not extension cords or cordless multiple outlets between your product and the wall outlet.
|
11 / 30 EN |
Refrigerator / User Manual |
|
|
|
4 Preparation
4.1 Things to be done for Asaving energy
• Do not leave the doors of your refrigerator open for a long time.
• Do not put hot food or drinks in your refrigerator.
• Do not overload the refrigerator. Cooling capacity will fall when the air circulation in the refrigerator is hindered.
• Do not place the refrigerator in places subject to direct sunlight. Install the product at least 30 cm away from heat sources such as hobs, ovens, heater units and stoves and at least 5 cm away from electrical ovens.
• Pay attention to store your food in refrigerator in closed containers.
• To be able store maximum food in the freezer compartment of your refrigerator, the upper drawer has to be removed and placed on top of glass shelf. Power consumption stated for your refrigerator has been determined after removing the icematic and the upper drawers as to allow maximum loading. It is strongly recommended to use the lower drawers in the freezer and the multizone compartment while loading.
• Airflow should not be blocked by placing foods in front of the freezer and the multizone compartment fans. Foods should be loaded by leaving minimum 5 cm space in front of the protective fan grid.
• Thawing the frozen foods in the fridge compartment both saves energy and reserves
the quality of the foods.
C
C
C If two coolers are to be installed side by side, there should be at least 4 cm distance between them.
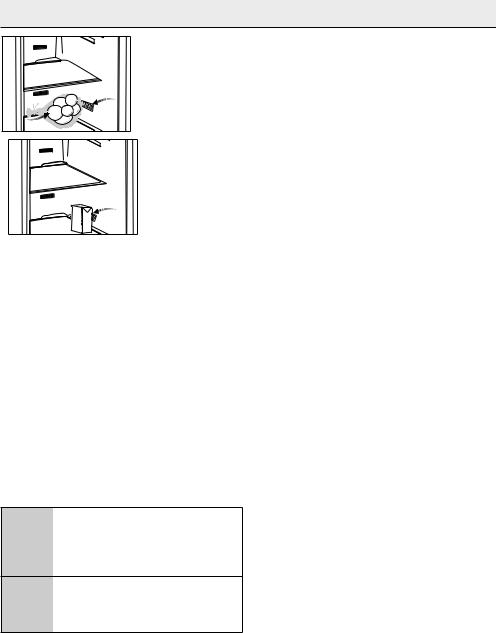
4.2 Recommendations about the fresh food compartment
•Make sure that the food does not touch the temperature sensor in fresh food compartment. To allow the fresh food compartment to keep its ideal storage temperature, the sensor must not be hindered by food.
•Do not place hot foods or beverages inside the product.
|
12 / 30 EN |
Refrigerator / User Manual |
|
|
|
Preparation
4.3 Initial use
Before using the product, make sure that all preparations have been made in accordance with the instructions given in the "Important
instructions regarding safety and environment" and "Installation" chapters.
• Clean the interior of the refrigerator as recommended in the “Maintenance and cleaning” section. Before you start the refrigerator, make sure that the interior is dry.
• Plug the refrigerator in a grounded socket. The interior illumination is lit when the door of the refrigerator is opened.
• Operate the refrigerator for 6 hours without placing any food in it and do not open its door
unless it is necessary.
C
C
|
13 / 30 EN |
Refrigerator / User Manual |
|
|
|
5 Operating the product
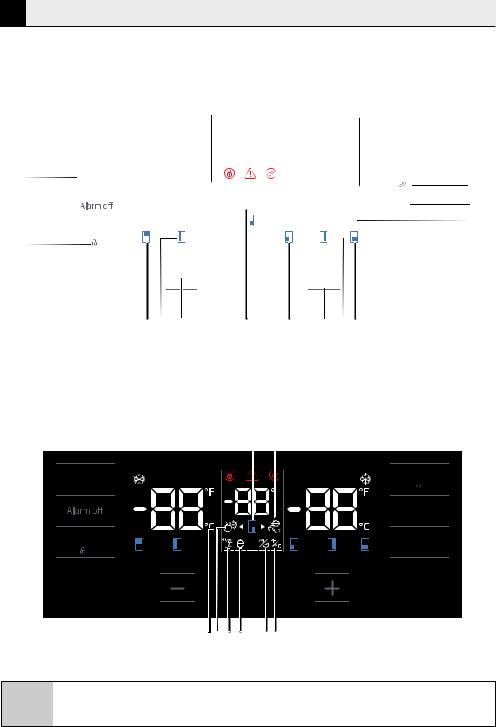
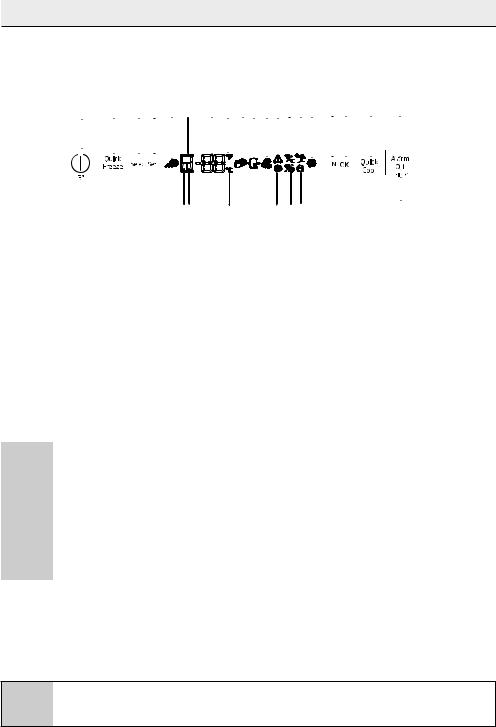
5.1 Indicator panel
Touch-controlled indicator panel allows you to set the temperature and control the other functions related to the refrigerator without opening the door of the product. Just press the relevant buttons for function settings.
|
1 |
2 |
3 |
4 |
5 |
6 |
9 |
1011 |
|
|
||
|
|
|
|
|
|
|
|
|
|
|
|
12 |
|
|
|
|
|
|
|
|
|
|
|
|
|
33 |
|
Quick Cool |
|
|
|
|
|
|
|
|
Quick Freeze |
|
|
|
|
|
|
|
|
|
|
||||
|
|
|
|
|
|
|
|
|
|
|
3 “ |
13 |
32 |
|
|
|
|
|
|
|
|
|
|
FN |
14 |
|
|
|
|
|
|
|
|
|
|
|
|
15 |
|
|
|
|
|
|
|
|
|
|
|
|
|
31 |
|
Select |
|
|
|
|
|
|
|
|
OK |
16 |
30 |
|
3 “ |
|
|
|
|
|
|
|
|
|
|
|
|
|
|
|
|
|
|
|
|
|
|
|
|
|
|
|
|
|
|
|
|
|
|
|
|
|
|
|
|
|
|
|
|
|
|
|
|
|
|
|
|
|
|
|
|
|
|
|
|
|
|
|
|
|
|
|
|
|
|
|
|
|
|
|
|
|
|
|
|
|
|
|
|
|
|
|
|
|
|
|
|
|
|
|
|
|
|
|
|
|
|
|
|
|
|
|
|
|
|
|
|
|
|
29 |
28 |
27 |
*34.1*34.2 |
20 |
19 |
18 17 |
7 *8
Quick Cool
Select
“
Quick Freeze
 3 “
3 “
FN
OK
26 *25 2423 |
22 21 |
May not be available in all models
C Figures in this user manual are schematic and may not match the product exactly. If the subject parts are not included in the product you have purchased, then those parts are valid for other models.
|
14 / 30 EN |
Refrigerator / User Manual |
|
|
|
Operating the product
1. Quick cooling function indicator
It turns on when the quick fridge function is activated.
2.Fridge compartment temperature indicator
Temperature of the fridge compartment is shown; it can be set to 8,7,6,5,4,3,2,1.
3.Fahrenheit indicator
It is a Fahrenheit indicator. When the Fahrenheit indication is activated, the temperature set values are shown in Fahrenheit and the relevant icon turns on.
4. Key lock
Press key lock button simultaneously for 3 seconds. Key lock symbol
will light up and key lock mode will be activated. Buttons will not function if the Key lock mode is active. Press key lock button simultaneously for 3 seconds again. Key lock symbol will turn off and the key lock mode will be exited.
Press the key lock button if you want to prevent changing of the temperature setting of the refrigerator.
5. Power failure/High temperature / error warning
This indicator illuminates during power failure, high temperature failures and error warnings. During long-term power failures, the highest temperature value that the freezer compartment reaches will blink on the digital display. After checking the food located in the freezer compartment, press the alarm off button to clear the warning.
Please refer to "solutions recommended for troubleshooting" section on your manual if you observe that this indicator is illuminated.
6. Filter reset icon
This icon turns on when the filter needs to be reset.
7. Temperature change cabin icon
Indicates the cabin whose temperature is to be changed. When the temperature change cabin icon starts flashing, it is understood that the relevant cabin has been selected.
8. Joker freezer icon
Hover over the Joker freezer icon using the FN button; the icon will start to flash. When you press the OK key, joker
cabin freezer icon turn on and operates as a freezer.
9. Freezer compartment temperature indicator
Temperature of the fridge compartment is shown; it can be set to -18, -19, -20, -21, -22, -23, -24.
10. Quick freeze function indicator
It turns on when the quick freeze function is activated.
11. Fahrenheit indicator
It is a Fahrenheit indicator. When the Fahrenheit indication is activated, the temperature set values are shown in Fahrenheit and the relevant icon turns on.
12. Quick freeze function button
Press this button to activate or deactivate the quick freeze function. When you activate the function, the freezer compartment will be cooled to a
temperature lower than the set value.
C
C
C
13. Filter reset
The filter is reset when the quick freeze button is pressed for 3 seconds. Filter reset icon goes off.
|
15 / 30 EN |
Refrigerator / User Manual |
|
|
|
Operating the product
14. FN button
Using this key, you can switch between the functions that you want to select. Upon pressing this key, the icon, whose function is required to be activated or deactivated, and this icon's indicator starts flashing. The FN button gets deactivated if not pressed for 20 seconds. You need to press this button to change the functions again.
15. Celsius indicator
It is a Celsius indicator. When the Celsius indication is activated, the temperature set values are shown in Celsius and the relevant icon turns on.
16. OK button
After navigating the functions using the FN button, when the function is cancelled via the OK button, the relevant icon and the indicator flashes. When the function is activated, it remains on. The indicator continues to flash in order to show the icon it is on.
17.Temperature change cabin icon
Indicates the cabin whose temperature is to be changed. When the temperature change cabin icon starts flashing, it is understood that the relevant cabin has been selected.
18.Temperature change cabin icon
Indicates the cabin whose temperature is to be changed. When the temperature change cabin icon starts flashing, it is understood that the relevant cabin has been selected.
19. Set increasing button
Select the relevant cabin with the select button; the cabin icon representing the relevant cabin will start to flash. If you press the set increasing button during this process, the set value gets increased. If you keep pressing it in a loop, the set value returns to the beginning.
20. Temperature change cabin icon
Indicates the cabin whose temperature is to be changed. When the temperature change cabin icon starts flashing, it is understood that the relevant cabin has been selected.
|
16 / 30 EN |
Refrigerator / User Manual |
|
|
|

Operating the product
hover over the icon and the indicator again and press the OK key. Thus, both the eco fuzzy function icon and the indicator will start flashing. If you do not press any button within 20 seconds, the icon and the indicator will go off and the eco fuzzy function will be cancelled.
24. Vacation function icon
Press the FN key (until it reaches the umbrella icon and the lower line) to activate the vacation function. When you hover over the vacation function icon and the vacation function indicator, they start flashing. Thus, you can understand whether the vacation function will be activated or deactivated. When you press the OK button, the vacation function icon lights continuously and thus the Vacation function is activated. The Indicator continues to flash during this process. Press the OK key to cancel the vacation function. Thus, both the vacation function icon and the indicator will start flashing and the vacation function will be cancelled.
25. Joker fridge icon
When you select the joker fridge icon using the FN button and press the OK key, the joker cabin turns into a fridge cabin and operates as a cooler.
26. Celsius indicator
It is a Celsius indicator. When the Celsius indication is activated, the temperature set values are shown in Celsius and the relevant icon turns on.
27. Set decreasing function
Select the relevant cabin with the select button; the cabin icon representing the relevant cabin will start to flash. If you press the set decreasing button during this process, the set value gets
decreased. If you keep pressing it in a loop, the set value returns to the beginning.
28. Temperature change cabin icon
Indicates the cabin whose temperature is to be changed. When the temperature change cabin icon starts flashing, it is understood that the relevant cabin has been selected.
29.Temperature change cabin icon
Indicates the cabin whose temperature is to be changed. When the temperature change cabin icon starts flashing, it is understood that the relevant cabin has been selected.
30.Key lock
Press key lock button simultaneously for 3 seconds. Key lock symbol
will light up and key lock mode will be activated. Buttons will not function if the Key lock mode is active. Press key lock button simultaneously for 3 seconds again. Key lock symbol will turn off and the key lock mode will be exited.
Press the key lock button if you want to prevent changing of the temperature setting of the refrigerator.
31.Select button
Use this button to select the cabin whose temperature you want to change. Switch between the cabins by pressing this button. The selected cabin can be understood from the cabin icons
(7,17,18,20,28,29). Whichever cabin icon is flashing, the cabin, whose temperature set value you want to change, is selected. Then, you can change the set value by pressing the cabin set value decreasing button (27) and the cabin set value increasing button (19). If you do not press the select button for 20 seconds, the cabin icons will go off. You need to press this key to select a cabin again.
32. Alarm off warning
In case of power failure/high temperature alarm, after checking the foods in the freezer compartment, press the alarm off button to clear the warning.
33. Quick cooling function button
The button has two functions. To activate or deactivate the quick cool function, press it briefly. Quick Cool indicator will turn off and the product will return to its normal settings.
|
17 / 30 EN |
Refrigerator / User Manual |
|
|
|
Operating the product
C Use quick cooling function when you want to quickly cool the food placed in the fridge compartment. If you want to cool large amounts of fresh food,
activate this function before putting the food into the product.
C If you do not cancel it, quick cooling will cancel itself automatically after 8 hours at the most or when the fridge compartment reaches to the required temperature.
C If you press the quick cooling button repeatedly with short intervals, the electronic circuit protection will be activated and the compressor will not start up immediately.
C This function is not recalled when power restores after a power failure.
34. 1 Joker temperature indicator
Temperature set values of the joker cabin are displayed.
34. 2 Wine cooler compartment tempature indicator
Tempature set values of the winecabin are displayed.
|
18 / 30 EN |
Refrigerator / User Manual |
|
|
|
Operating the product
5.2 Indicator panel
Touch-control indicator panel allows you to set the temperature and control the other functions related to the product without opening the door of the refrigerator. Just press the relevant buttons for function settings.
1 |
2 |
3 |
4 |
5 |
6 |
7 |
8 |
*9 |
10 |
*11 |
12 |
13 |
14 |
15 |
16 |
17 |
18 |
|
19 |
|
|||||||||||||||
|
|
|
|
|
|
|
|
|
|
|
|
|
|
|
|
|
|
|
|
|
|
|
|
|
|
|
|
|
|
|
|
|
|
|
|
|
|
|
|
|
|
|
|
|
|
|
|
|
|
|
|
|
|
|
|
|
|
|
|
|
|
|
|
|
|
|
|
|
|
|
|
|
|
|
|
|
|
|
|
|
|
|
|
|
|
|
|
|
|
|
|
|
|
|
|
|
|
|
|
|
|
|
|
|
|
|
|
|
|
|
|
|
|
|
|
|
|
|
|
|
|
|
|
|
|
|
|
|
|
|
|
|
|
|
|
|
|
|
|
|
|
|
|
|
|
|
|
|
|
|
|
|
|
|
|
|
|
|
|
|
|
|
|
|
|
|
|
|
|
|
|
|
|
|
|
|
|
|
|
|
|
|
|
|
|
|
|
|
|
|
|
|
|
|
|
|
|
|
|
|
|
|
|
|
|
|
|
|
|
|
|
|
|
|
|
|
|
|
|
|
|
|
|
|
|
|
|
|
|
|
|
|
|
|
|
|
|
|
|
|
|
|
|
|
|
|
|
|
|
|
|
26 25 |
24 |
23 |
22 |
21 |
*20 |
|
1-On/Off function |
|
3.Select button |
|
|||
Press the On/Off button for 3 seconds to turn off or |
Use this button to select the cabin whose |
|||||
turn on the fridge. |
|
temperature you want to change. Switch between |
||||
2. Quick freeze function button |
|
the cabins by pressing this button. The selected |
||||
Press this button to activate or deactivate the quick |
cabin can be understood from the cabin icons (6, |
|||||
freeze function. When you activate the function, |
|
25, 24 ). Whichever cabin icon is power on, the |
||||
the freezer compartment will be cooled to a |
|
cabin, whose temperature set value you want to |
||||
temperature lower than the set value. |
|
change, is selected. Then, you can change the set |
||||
|
|
|
value by pressing the cabin set value Temperature |
|||
C |
Use the quick freeze function when you |
|
||||
want to quickly freeze the food placed |
|
Adjustment button (4) |
|
|||
in freezer compartment. If you want |
|
4.Temperature Adjustment / Temperature |
||||
|
to freeze large amounts of fresh food, |
|
||||
|
|
Decrease |
|
|||
|
activate this function before putting the |
|
|
|||
|
|
When pressed, decreases the temperature of the |
||||
|
food into the product. |
|
||||
|
|
|
selected compartment. |
|
||
|
If you do not cancel it, Quick Freeze |
|
|
|||
|
|
5-Quick freeze Indicator |
|
|||
|
will cancel itself automatically after 4 |
|
|
|||
C hours at the most or when the fridge |
|
This icon lits when the Quick freeze function is |
||||
|
compartment reaches to the required |
|
active. |
|
|
|
|
temperature. |
|
6. Fridge compartment indicator |
|||
|
|
|
||||
|
This function is not recalled when |
|
When this indicator is active, the temperate |
|||
|
|
of the fridge compartment is displayed on the |
||||
C power restores after a power failure. |
|
temperature value indicator.Fridge compartment |
||||
|
|
|
||||
|
|
|
can be set to 8, 7, 6, 5, 4, 3, 2 or 1°C / 46, 45, |
|||
|
|
|
44, 43, 42, 41, 40,39,38,37,36,35,34 or 33°F by |
|||
|
|
|
pressing Temperature Adjustment button (4). |
|||
|
May not be available in all models |
|
||||
C Figures in this user manual are schematic and may not match the product exactly. If the subject parts are not included in the product you have purchased, then those parts are valid for other models.
19 / 30 EN |
Refrigerator / User Manual |
|
|
Operating the product
7. Temperature value indicator
Shows the temperature value of the selected compartment.
8. Fahrenheit indicator
It is a Fahrenheit indicator. When the Fahrenheit indication is activated, the temperature set values are shown in Fahrenheit and the relevant icon turns on.
9. Joker fridge icon
When you select the joker fridge icon using the FN button (16) and press the OK button (17) the joker cabin turns into a fridge cabin and operates as a cooler.
10. Joker cabin icon
It shows joker cabin icon.
11. Joker freezer icon
When you select the joker freezer icon using the FN button (16) and press the OK button (17) the joker cabin turns into a freezer cabin and operates as a freezer.
12. Power failure/High temperature / error warning
This indicator illuminates during power failure, high temperature failures and error warnings. During long-term power failures, the highest temperature value that the freezer compartment reaches will blink on the digital display. After checking the food located in the freezer compartment, press the alarm off button (19) to clear the warning.
13.Setting the Celsius and Fahrenheit indicator
Hover over this key using the FN key and select Fahrenheit and Celsius via the OK key. When the relevant temperature type is selected, the Fahrenheit and Celsius indicator turns on.
14. Vacation function icon
Press the FN key (until it reaches the umbrella icon) to activate the vacation function. When you hover over the vacation function icon, it start flashing. Thus, you can understand whether the vacation function will be activated or deactivated.
When you press the OK button, the vacation function indicator lights continuously and thus the Vacation function is activated. Press the OK key to cancel the vacation function. Thus, the vacation function indicator will start flashing and the vacation function will be cancelled.
15. Quick cooling function indicator
It turns on when the quick fridge function is activated.
16. FN button
Using this key, you can switch between the functions that you want to select. Upon pressing this key, the icon, whose function is required to be activated or deactivated, and this icon’s indicator starts flashing. The FN button gets deactivated if not pressed for 20 seconds. You need to press this button to change the functions again.
17. OK button
After navigating the functions using the FN button, when the function is cancelled via the OK button, the relevant indicator flashes. When the function is activated, it remains on. The indicator continues to flash in order to show the icon it is on.
18. Quick cooling function button
The button has two functions. To activate or deactivate the quick cool function, press it briefly. Quick Cool indicator will turn off and the product will return to its normal settings.
19. Alarm off warning
In case of power failure/high temperature alarm, after checking the foods in the freezer compartment, press the alarm off button to clear the High temperature warning icon (12).
20. Filter reset
The filter is reset when the alarm off button (19) is pressed for 3 seconds. Filter reset icon goes off.
21. Eco fuzzy function icon
Press the FN key (until it reaches the letter e icon) to activate the eco fuzzy. When you hover over the eco fuzzy icon it start flashing. Thus, you can understand whether the eco fuzzy function will be activated or deactivated. When you press the OK button, the eco fuzzy function icon lights continuously during this process. If you
|
20 / 30 EN |
Refrigerator / User Manual |
|
|
|
 Loading...