

Page 1

• MR 52
(Mains Operated)
• MR 62
(Mains or Battery
Operated, 12V)
1.5 cu.ft
Mini - Bar
(ABSORPTION SYSTEM)
Beko (UK) Ltd.
Beko House
Caxton Way
Watford
Hertfordshire
WD 18 8UF
Tel: 01923 654650
Fax: 01923 819653
e-mail: service@beko.co.uk
website: www.beko.co.uk
Printed in Turkey
Part no: MR52 IB 039901
Operating
REFRIGERATION
Instructions
Page 2
Congratulations on your choice of a Quality Mini - Bar which
has been designed to give you service for many years.
WARNING!
IMPORTANT!
DO NOT-connect the Mini - Bar to the electricity supply until all packing and transit
protectrs have been removed.
• Leave to stand For at least 4 hours before switching on to allow system to settle if
transported horizontally.
• If you are discardina an old refrigerator with a lock or latch fitted to the door, ensure
that it is left in a safe condition to prevent the entrapment of children.
• This Mini - Bar must only be used for its intended purpose i.e the storing of drinks,
penshable beveraaes and fresh food. See WARNING below.
• Do not dispose of ihe appliance on a fire. Your appliance contains non CFC/HFC
substances in the cooling system and in the insulation which are potentially flammable
if exposed to fire. We suggest you contact your local authority fo; disposal information
and facilities available.
• We do not recommend use of this appliance in a unheated, cold room. (E.g.: garage,
conservatory, annex, shed, out-house etc.) See INSTALLATION INSTRUCTIONS.
WARNING! The Mini - Bar is suitable for the storage of fresh food and perishable
beverages for a short period of time only. Therefore, we recommend you to monitor the
temperature in the Mini - Bar with an accurate thermometer (See section on TEMPERATURE
CONTROL AND ADJUSTMENT) and ensure food which has a short shelf life G.e. meat,
sausage, dairy products, milk) is not stored for more than a few days.
To obtain the best possible performance and trouble Free operation from your bpplidnce
it is very important to carefully read these instructions.
Failure to observe these instructions may invalidate your right to free service during the
Conaratulation on fuarantee period.
Please keep these instructions in a safe place for
THIS PRODUCT IS DESIGNED FOR INDOOR USE ONLY!
MINIBAR MUST NOT BE USED OUTDOORS AND MUST NOT BE EXPOSED TO RAIN
PERFORMANCE
Energy efficiency class
Energy consumption - Kwh/year
Net storage - vol fresh food Itrs (cu.ft.)
Net storage - vol frozen food Itrs (cu.ft.)
Total net vol - Itrs (cu.ft.)
Frozen food compartment rating
Conservation time from failure
Freezing capacity fresh food - kg
Climate class
Operating noise level (dba)
* When connected to main supply
** Due to absorption system, the Mini - Bar operates virtuallysilent.
1
Mini - Bar MR 52, MR62*
G
525
40 lt. (1.4)
--------
40 lt. (1.4)
--------
--------
-------N
Noise free**
Page 3
CONTENTS PAGE
SAFETY FIRST / ELECTRICAL REQUIREMENTS (MAINS OPERATION)
BATTERY OPERATION (MR62 ONLY)
TRANSPORTATION INSTRUCTIONS
INSTALLATION INSTRUCTIONS
GETTING TO KNOW YOUR MINI-BAR
REPOSITIONING THE DOOR
TEMPERATURE CONTROL AND ADJUSTMENT
STARTING
MAKING ICE CUBES
DEFROSTING
3
4
5
6
7
8
9
9
9
10
CLEANING AND CARE
DO'S AND DON'TS
PROBLEM SOLVING
GUARANTEE DETAILS
10
11
11
12
2
Page 4
SAFETY FIRST!
ELECTRICAL REQUIREMENTS (WHEN CONNECTED TO MAINS SUPPLY)
Before you insert the plug into the wall socket make sure that the voltage and the frequency
shown in the rating label loccated inside of the right hand side panel at the back of the
appliance corresponds to your electricity supply. Rating label is on the apper left side
of the back wall. We recommend that this appliance is connected to the mains supply
via a suitably switched and fused socket in a readily accessible position.
Should the mains lead of the appliance becom damaged or should it need replacing at
any time, it must bee replaced by a special purpose made mains lead which can only
be obtained from an Authorized Service Agent.
WARNING! THIS APPLIANCE MUST BE EARTHED
If the fitted moulded plug is not suitable for your socket, then plug should cut off and an
appropriate plug fitted. Destroy the old plug which is cut off as a plug with bared cord
could cause a shock hazard if inserted into a socket elsewhere in the house.
The moulded plug on this appliance incorporates a 13 A fuse. Should the fuse need to
be replaced an ASTA approved BS 1362 fuse of the same rating must be used. Do not
forget to refit the fuse cover. In the event of losing the fuse cover the plug must not be
used until a replacement fuse cover has been fitted. Colour of the replacement fuse cover
must be the same colour as that visible on the pin face of the plug. Fuse covers available
from any good electrical store.
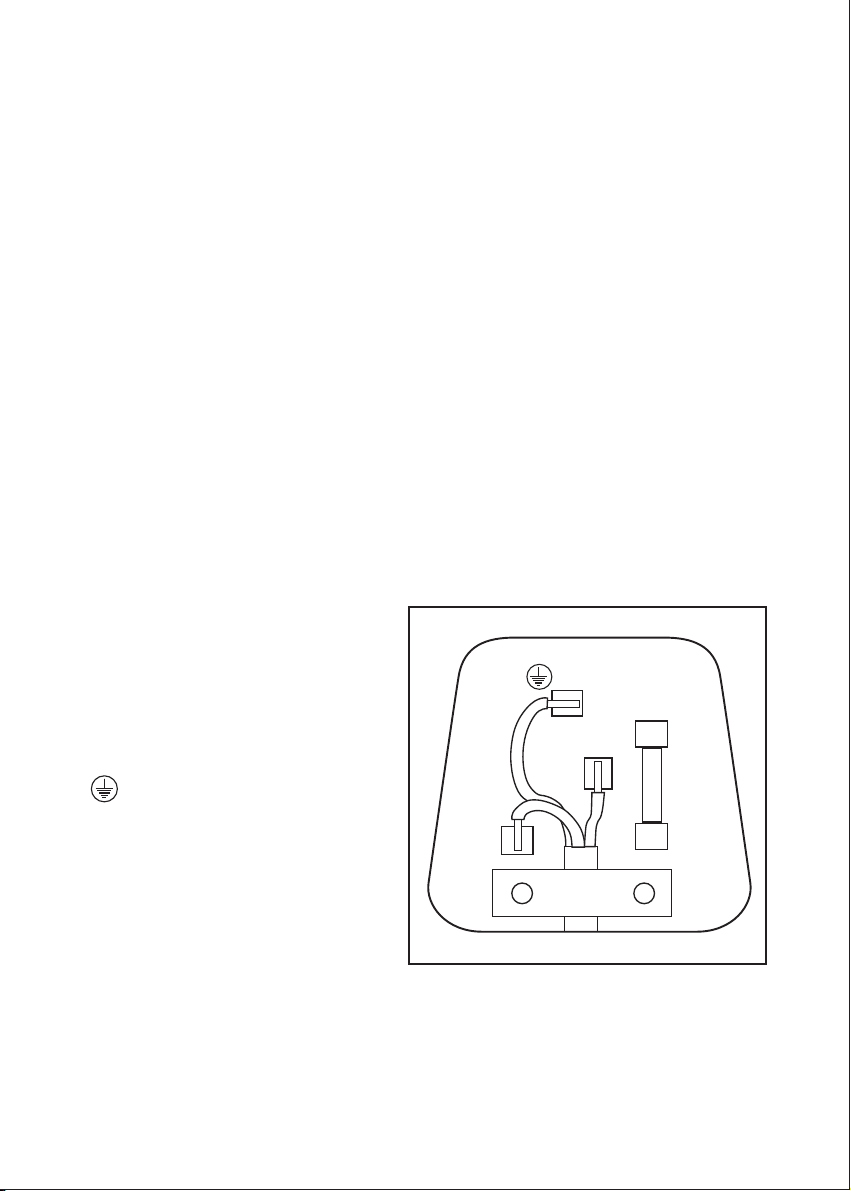
IMPORTANT! FITTING A DIFFERENT PLUG
As the colours of the wires in the mains
lead of this appliance may not correspond
with the coloured markings identifying
the terminals in your plug proceed as
follows: (See diagram).
1. Connect the green-Yellow or green
(Earth) wire to the therminal in the plug
marked ‘E’ or with the symbol
or coloured green and yellow or
green.
2. Connect the blue (Neutral) wire to
the terminal in the plug marked ‘N’ zor
coloured black.
3. Connect the brown (Live) wire to the
GREEN &
YELLOW
OR
GREEN
N
BLUE
OR
BLACK
32 mm
22 mm
6 mm
BROWN
6 mm
L
OR
RED
12 mm
CORD GRIP
6 mm
FUSE
FITTED WITH
CARTTRIDGE FUSE
FIT BS 1362 REPLECAMENT
BS 1362 13A FUSE ALWAYS
terminal in the plug marked ‘L’ or coloured
red.
With alternative plugs a 13 A fuse must be fitted either in the plug or adaptor or in the
main fuse box.
If in doubt contact a qualified electrician.
3
Page 5

BATTERY OPERATION (MR 62 MODEL ONLY)
Model MR is the dual voltage Mini - Bar, which operates from Mains supply or a 12V
battery.
WARNING!
IMPORTANT!
DO NOT CONNECT THE MAINS PLUG AND THE BA~TERY CONNECTION AT THE
SAME TIME. ONLY ONE POWER SOURCE MUST BE USED AT ALL TIKES.
Colours of the wires for battery operation are black (negative connection) and red (positive
connection)
When connected to a battery, the thermostat is by-passed therefore the Mini - Bar absorption
system will operate non-stop. We recommend you run the Mini - Bar on mains supply
wherever possible prior to connecting to a battery.
In order to prevent draining the battery, check that battery is disconnected when the
vehicle engine is not running.
We recommend the Following to ensure a satisfactory operation:
• Use a minimum of 2.0 mm2 cross-sectional cable when connecting the Mini - Bar to
the battery.
• Do not use a cable longer than 25 ft.
• Check the battery condition to ensure the voltage is no less than 13.5 V.
• Fit a 15 A Fuse to the positive lead.
• Keep the battery connections with the vehicle manufacturer.
• Check the installation and cable connections with the vehicle manufacturer.
IF IN DOUBT, CONTACT A QUALIFIED ELECTRICIAN.
4
Page 6

TRANSPORTATION INSTRUCTIONS
1.The Mini - Bar should be transported only in a vertical upright position. The packing
as supplied must be intact during transportation.
2. If during the course of transport the Mini - Bar has been transported horizontally, it
must not be operated for at least 4 hours to allow the system to settle.
3. Failure to comply with the above instructions could result in damage occuring
to the Mini - Bar. The manufacturer will not be held responsible if these instructions are
disregarded.
4. The Mini - Bar must be protected against rein, moisture, water and other atmospheric
influences. This product is designed for indoor use only.
IMPORTANT: Care must be taken while cleaning / carrying the appliance to ovoid
touching the ventilation slots, condenser metal wires at the back of the appliance as you
might injure your fingers and hands.
Important: This appliance is not designed for stacking with any other appliance.
Do not attemp to sit or stand on top of your appliance as it is not designed for such use.
You could injure yourself or damage the appliance.
“IMPORTANT: Make sure that mains cable is not caught under the appliance during
and after carrying / moving the appliance, to avoid the mains cable becoming cut or
damaged.”
Electrical leads must not come in contact with any part of the appliance:
Do not allow children to play with the appliance or tamper with the controls. Beko (UK)
Ltd declines to accept any liability should the instructions not be followed
5
Page 7

IMPORTANT
INSTALLATION INSTRUCTIONS
4. Avoid placing the appliance near cookers, radiators or in direct sunlight as this will
cause the Mini - Bar to run for long periods.
2. Make sure that sufficient room is provided around the appliance to ensure free air
circulation. Leave minimum 2
1/2
" (60 mm) clearance on sides and 4 inch (100mm)
clearance on the rear sides.
3. Do not cover ventilation slots as this will block the dissipation of heat generated at
the back.
4. The Mini - Bar should be located on a smooth surface. Ensure that Mini - Bar is level
and in firm cotact with the Floor.
5. Refer to "Cleaning and Care" section to prepare your appliance for use.
6. This appliance has been designed to operate in ambient temperatures between +16
and +32 degrees C (60 and 90 degrees F). Therefore if the appliance is installed in an
unheated / cold room (E.g.: Conservatory / annex / shed / garage etc.) then the
appliance may not operate and as a result the storage temperature of beverages and
food may rise.
6
Page 8

• Place mini ice cube trays on the evaporator to make ice cubes.
• Place large bottles in the Mini - Bar and not on door shelves.
• Don't place fiuy drinks or any bottled / canned drink container on the evaporator.
• Ensure ventilation slots are clear from any obstruction.
• Parts at the back, including condenser will get hot during operation. Take care not
to touch these surfaces.
7
Page 9

REPOSITIONING THE DOOR
Follow the step instructions and the diagrams below. Numbers in brackets refer to
diagrams.
1. Switch off the Mini - Bar.
2. Remove beverages, loose items from door shelves.
3. Prise off plastic screw caps and unscrew two screws securing top hinge (1) using the
special tool provided while holding the door. (You should keep the right hand side
door opening top hinge in a safe place in case needed in Future.)
4. Prise oft plastic screw caps and unscrew two screws on the opposite side and prise
off the plastic plug with the tip of a small screwdriver. (2)
5. Lift the door carefully from the bottom hinge and stand the door safely. (3)
6. Fit the bottom hinge pin on the opposite side ensuring thick section of pin is facing
up. (4)
7. locate the door on the bottom hinge, while holding it carefully. (5)
8. Fit top hinge for left hand side door openning which is supplied with the Mini - Bar.
To do this; Locate the hinge pin in the door while holding the door away from the Mini
- Bar by about 5". Insert the top hinge into the hinge slot. Fit the two screws. (6)
9. Insert the plastic plug in the slot on the opposite side and fit the two screws. Fit plastic
screw caps on all screws.
10. Check that door opens and closes easily and that there are no gaps allowing air
into the Mini- Bar.
11. Put back beverages; loose items
12. Switch on when required.
8
Page 10

TEMPERATURE CONTROL AND ADJUSTMENT
Operating temperature is controlled by the thermostat at the bottom of the inner liner of
Mini - Bar. (See diagram) Setting may be made from 1 to 5, the coldest position. Turn
the thermostat knob clock - wise to obtain a colder temperature and vice versa.
When the appliance is switched on for
the first time, the thermostat should be
adiusted so that after 24 hours, the
average temperature is no higher than
+5 degrees C (+41 degrees Fl. We
recommend you set the thermostat at 3
and monitor to obtain the desired
1
2
temperature i.e. towards 5 you will obtain
a colder temperature and vice versa.
0
3
Some sections of the Mini - Bar may be
cooler or warmer which is quite normal.
When you set the thermostat knob to O
5
[Zero] position, the appliance will be
switched off.
STARTING
Before you start using the Mini - Bar:
1. Check the interior is dry and air can circulate freel. (See INSTALLATION INSTRUCTIONS)
2. Clean the interior (See CLEANING AND CARE)
3. Switch on the power supply. (Before switching on make sure you have observed all
the instructions provided in this booklet.)
4. Do not load the appliance immediately it is switched on. Wait until the correct
storage temperature has been reached. We recommend that you check the temperature
with an accurate thermometer (see; Temperature Control and Adwustment).
5. Frequent door openings cause higher internal temperatures, so close the door as soon
as possible after use.
6. Please note that during the first 24 hours of use, some odour may be noticed as the
protective coating on the heating element is being burnt oft, this is quite normal and
is not a fault.
MAKING ICE CUBES
Fill the mini ice - cube trays supplied 3/4 full with water and place them on the evaporator.
Loosen frozen trays with a spoon handle or a similar implement. Never use sharp edged
obiucts such as knives, forks.
Increase the thermostat setting to maximum setting which is 5 to speed up the ice making.
Remember to turn the thermostat setting to its usual setting when ice cubes have formed,
otherwise the Mini - Bar may become too cold.
9
Page 11

DEFROSTING
Frost will gradually from on evaporator surface of the Mini - Bar will decrease when thick
frost accumulates on the evaporator. Defrost when the frost layer on the evaporator
reaches about approx. 1/4" (6 mm).
To start the defrosting procedure switch off at the socket outlet and open the door. Defrost
water will drip into the drain tray underneath the evaporator and via a tube will be
collected in an evaporating container at the back. The water will evaporate so you don't
have to emty tha container. When defrosting is completed, wipe the evaporator dry and
switch on.
We suggest you defrost the Mini - Bar regularly.
CLEANING AND CARE
• We recommend that you switch off the Mini - Bar before cleaning.
• Never use any sharp instruments, abrasive substances, household cleaner, detergent
and wax polish for cleaning.
• Use luke warm water to clean the cabinet of the Mini - Bar and wipe it dry.
• Use a damp cloth wrung out in a solution of one teaspoon of bicarbonate of soda
to one pint of water to clean the interior and wipe it dry.
• Make sure that no water enters the temperature control box or the electrical parts
at the rear of the Mini - Bar.
• If the Mini - Bar is not going to be used for a long period of time, switch it off, remove
the contents clean it and leave the door ajar.
• Any dust that gathers on the condenser, which is located at the back of the Mini - Bar,
should be removed once a year with a vacuum cleaner.
• Check door seal regularly to ensure they are clean and dry. After cleaning put some
talcum powder on door seal to keep it supple.
• Never:
- Clean the Mini - Bar with unsuitable material
- Subject it to temperatures in any way
- Scour, rub etc. with abrsive material.
10
Page 12

DO’S AND DON’TS
Do-
Clean and defrost your Mini - Bar regularly
Do-
Ensure sufficient ventilation is provided around the Mini - Bar
Don’t-
Leave the door open for long periods as this will make the Mini - Bar more costly
to run.
Cover the shelves with any material
Don’t-
Store poisonous or any dangerous substances in the Mini - Bar.
Don’t-
Use pointed or sharp edged obiects such as knives, forks to remove the frost.
Don’t-
Freeze fizzy drinks on the evaporator
Don’t-
Consume ice lollies stright from the Mini - Bar as they may be too cold.
Don’t-
PROBLEM SOLVING
If the appliance does not operate when switched on check;
• The plug is intersed properly in the socket and that the power supply is on. (To check
the power supply to the socket, plug in another appliance)
• The fuse has blown / circuit breaker has tripped / main distribution switch has been
turned off.
• The temperature control has been set correctly.
• New plug is wired correctly if you have changed the If the appliance is still not operating
at all after above checks, contact the dealer from whom you purchased the unit.
Please ensure that above checks have been made as a charge will be made if no fault
is found.
11
Page 13

GUARANTEE DETAILS
This product is guaranteed for twelve months from the date of original purchase.
Any defect that arises due to faulty materials or workmanship will sbe repaired free of
chorge during this period.
The guarantee is subject to the following provisions:
The guarantee does not cover accidental or transportation damage, misuse, cabinet parts,
knobs, or consumable items e.g. bulbs and food loss, and consequential cots correcting
improperly installed product.
Beko (UK) Ltd. disclaims any liability for worktop damages, scratches discolouration,
breakage due to scouring, cleaning rubbing etc., with unsuitable material, subiecting the
appliance parts to hot temperatures in any way.
The product must be correctly installed and operated in accordance with the instructions
contained in this booklet. It must be used solely for normal domestic purposes only and
within the boundaires of the United Kingdom and the Republic of Ireland.
The guarantee will be rendered invalid if the product is resold or has been damaged by
inexpert repair.
Please keep your purchase receipt in a safe place as you will need to produce it should
the product require attention whilst under guarantee.
Beko (UK) Ltd. disclaims any liability for incidental or consequential damages.
The guarantee is in addition to and does not diminish your statutory or legal rights.
Please complate for your future records. Model and Serial Numbers can be found in the
rating label located inside of right hand side panel at the back of the appliance.
MODEL NUMBER
SERIAL NUMBER
DATE OF PURCHASE
PURCHASED FROM
In the event of breakdown, please check the problem solving section as visits where there
is no fault with the appliance could incur a charge even though the appliance is under
guarantee.
In the absence of specific instructions from your retailer, to obtain service under guarantee,
please refer to the chart below.
Whenever you request service please advise the name of the supplier.
LOCATION
UK Mainand
Scottish Island Isle of Wight
Northern Ireland
Republic of Ireland
Because we continually strive to improve our products we may change our specifications
and designs without prior notice.
:
:
:
:
CONTACT
0870 241 0638
If purchased from Currys or a Mail Order
Company Phone: 0870 241 0638
in all other instances to your retailer.
01 862 3411
12
 Loading...