


HCA92844WH
Beko HCA92844WH, HCA92741W, HCA62844BH, HCA62741B, HCA62741W User Manual
...
Hood
User Manual
HCA92844BH
HCA92844WH
HCA62844BH
HCA62844WH
HCA92741B
HCA92741W
HCA62741B
HCA62741BH
HCA62741W
HCA62844GH
HCA62844ZH
HCA92741BH
01M-8847933200-3018-04
EN DE BG CZ NL ET
FR HR IT LT PL PT
RU SK LV

This product has been manufactured in environmental friendly modern plants without giving any harm to the nature.
This appliance conforms to the WEEE regulation.
It does not contain PCB.
Please read this manual first!
Dear Customers!
Thank you for preferring a Beko product. We hope that you get the best results from your product which
has been manufactured with high quality and state-of-the-art technology. Therefore, please read this
entire user manual and all other accompanying documents carefully before using the product and keep
it as a reference for future use. If you handover the product to someone else, give the user manual as
well. Follow all warnings and information in the user manual.
Remember that this user manual is also applicable for several other models. Differences between the
models are explicitly described in the manual.
Meanings of the Symbols
Following symbols are used in the various section of this manual:
C
Important information and useful hints about
usage.
A
WARNING: Warnings for dangerous situations
concerning the safety of life and property.
B
Warning for electric shock.
Warning for hot surfaces.
3 / EN
Hood / User Manual
CONTENTS
ENGLISH 5-17
DEUTSCH 18-34
БЪЛГАРСКИ 35-51
ČESKY 52-66
NEDERLANDS 67-83
ESTONIAN 84-98
FRANÇAIS 99-115
HRVATSKI 116-130
ITALIANO 131-146
LIETUVIU 147-162
POLSKI 163-178
PORTUGUÊS 179-195
РУССКИЙ 196-213
SLOVAKIA 214-228
LATVIJAS 229-245
01M-8847943200-3018-04
01M-8847953200-3018-04
01M-8847963200-3018-04
01M-8847973200-3018-04
01M-8847983200-3018-04
01M-8847993200-3018-04
01M-8850553200-3018-04
01M-8848003200-3018-04
01M-8851133200-3018-04
01M-8851143200-3018-04

4 / EN
Hood / User Manual
1
Important safety and environmental
instructions
This section contains safety instructions that will help protect
from risk of personal injury or
property damage. Failure to follow
these instructions invalidates the
granted warranty.
1.1 General safety
• Always have the installation and
repairing procedures carried out
by the Authorized Service Agent.
Manufacturing firm shall not be
held responsible for damages that
may be caused by unauthorized
persons.
• This appliance is not intended
for use by persons (including
children) with reduced physical,
sensory or mental capabilities, or
lack of experience and knowledge.
Children should be supervised to
ensure that they do not play with
the appliance.
1.1.1 Electrical safety
• Always unplug the appliance
from the mains supply during
installation, maintenance,
cleaning and repair operations.
• If the power cable is faulty,
it should be replaced by a
qualified person certified by
the manufacturer, after-sales
service or similar (preferably an
electrician) or a person described
by the importer.
• Operating voltage is 220 to 240
volts.
• If the appliance has a failure, it
should not be operated unless
it is repaired by the Authorized
Service Agent. There is the risk of
electric shock!
• Do not route power cable close to
hobs. Otherwise power cable may
cause fire since it melts down
easily.
• Never plug the hood before
installation is completed.
• In order to obtain the best
performance, external conductor
must not be longer than 4 m. It
must not contain more than 2
perpendicular (90°) angles and its
diameter must be min. ø120 mm.
• Disconnect the appliance from
mains before any intervention to
the internal parts of the appliance.
• Use the appliance with a grounded
outlet only.

5 / EN
Hood / User Manual
1
Important safety and environmental
instructions
1.1.2 Product safety
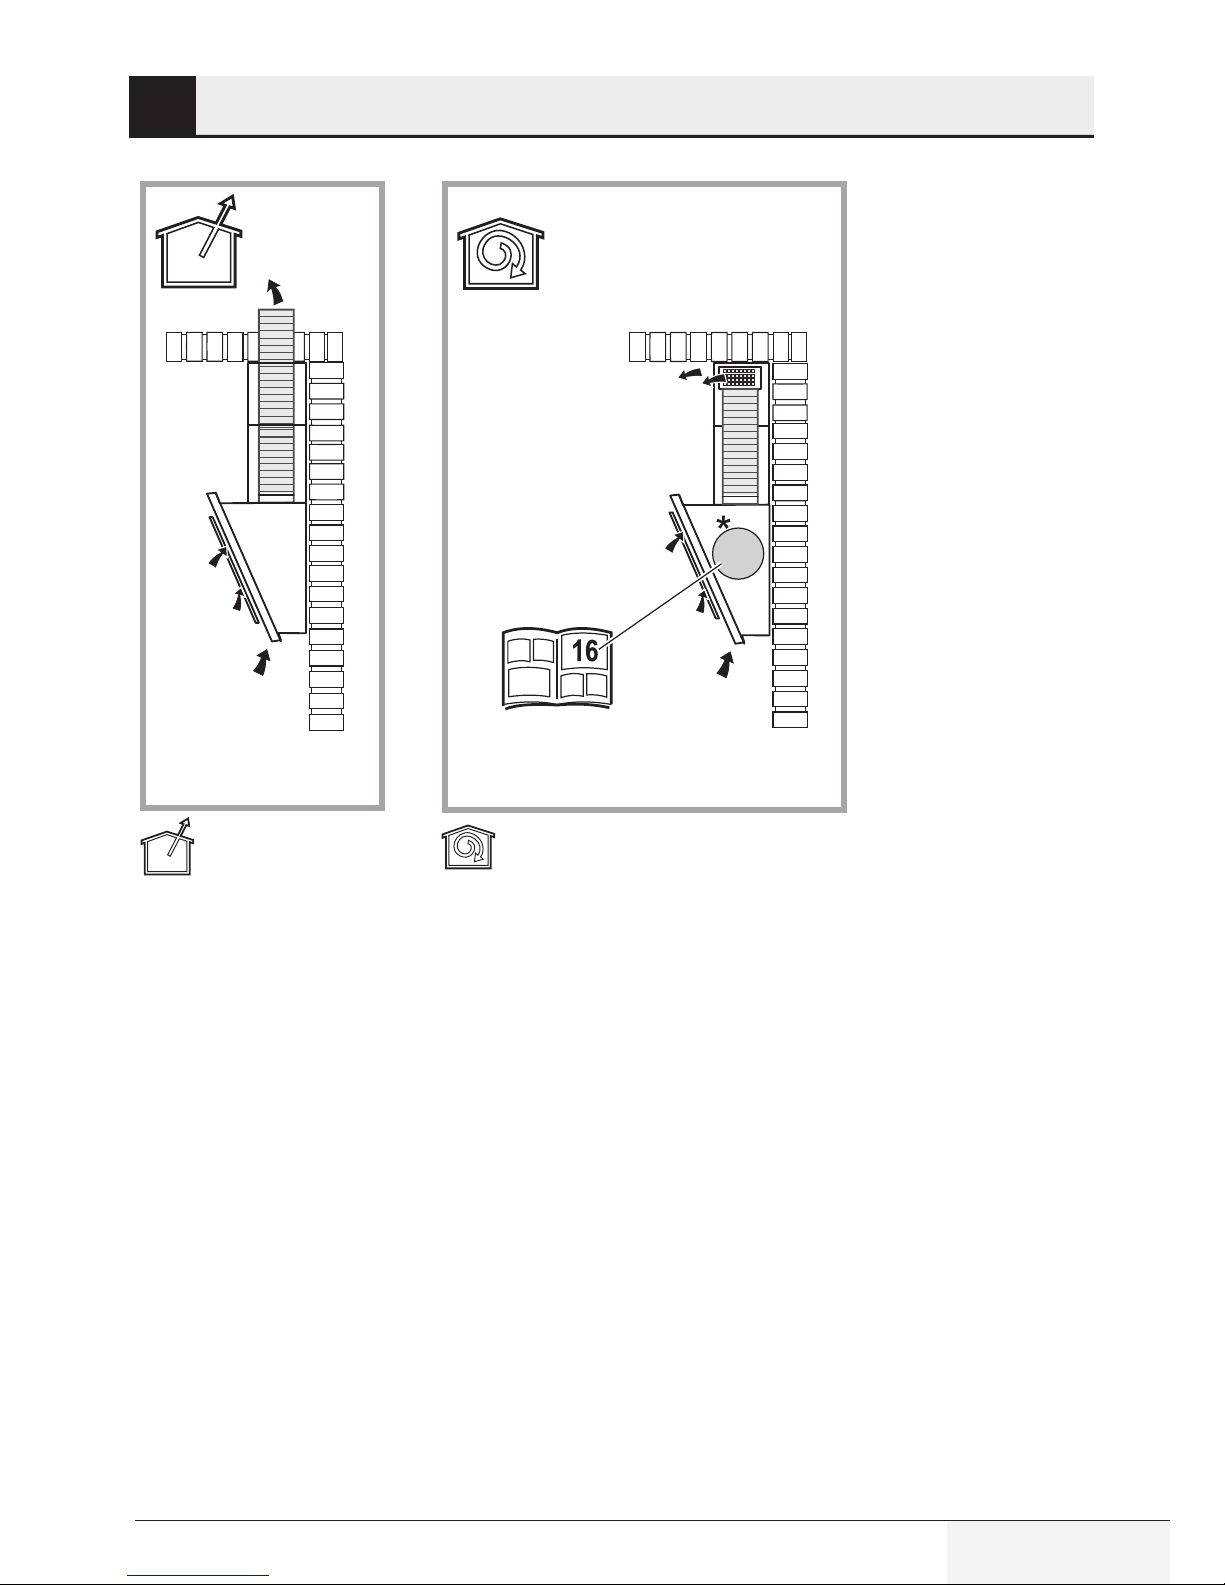
• You can use a pipe with a diameter
of 120 mm or 150 mm on the flue
connection of the hood.
• Do not make connections to the
flues connected with stoves,
exhaust shafts or flues with rising
flames. Observe the rules set by
authorities on the discharge of
exhaust air.
• The height between the lower
surface of the hood and upper
surface of the stove/oven should
not be less than 50 cm for gas
hobs and 45 cm for electric hobs.
• Do not operate the hood without
aluminum filters and do not
remove the filters while it is
operated.
• Never touch the hood's lamps
after they are operated for a long
time. Hot lamps may burn your
hand.
• Avoid large flames beneath the
product. Otherwise, particles on
oil filter may ignite and lead to a
fire.
• Turn on the hobs after placing
pans or pots on it. Otherwise,
rising heat may deform certain
parts of your product.
• Turn off the hobs before taking
away pans or pots.
• Avoid inflammable materials
under the hood.
• Oil may ignite while frying foods.
Therefore, be careful about cloths
and curtains.
• Never leave the cooker unat-
tended when frying foods; otherwise hot oil may cause fire.
• There is the risk of fire if your hood
is not cleaned in the specified
periods.
• Be extremely careful and wear
gloves when cleaning the hood.
• We advise you to operate the
appliance a few minutes before
starting to cook in order to
increase the suction power. Thus,
you shall have a continuous and
stable suction power when the
vapors arise.
• Operate your hood for 15 minutes
more after the end of cooking or
frying in order to remove the smell
and cooking vapor in the kitchen.
• When the hood is in use, especially
together with gas cookers,
make sure that environment is
ventilated with clean air.

6 / EN
Hood / User Manual
• Pay attention not to connect
the appliance to the flues used
by non-electrical devices. (E.g.:
Heater flue).
• Simultaneous and smooth
operation of the hood and
another device that require air is
only possible when a low pressure
of 4 Pa (0.04 mbar) is reached,
and thus the reabsorption of the
gas is avoided. This can only be
achieved by means of air coming
from uncovered openings (door,
window, ventilation openings
or other technical measures).
Pay utmost attention to provide
sufficient air flow. A flue that
provides air ingress/egress is not
enough for this purpose.
1.1.3 Children's safety
• Packaging materials are
dangerous to children. Keep
packaging materials in a safe place
out of reach of children.
• Electrical appliances are
dangerous to children. Keep
children away from the product.
Do not allow children play with the
appliance.
• This appliance can be used by the
children who are at the age of 8 or
over and by the people who have
limited physical, sensory or mental
capacity or who do not have
knowledge and experience, as
long as they are supervised with
regard to safe use of the product
or they are instructed accordingly
and understand the risks of using
the product. Children should not
play with the appliance.
• CAUTION: Accessible parts may
heat up when used with a cooking
device.
1.2 Intended use
• This appliance is intended for
domestic use. It is not suitable for
commercial use and it must not be
used out of its intended use.
• The manufacturer shall not be
liable for any damage caused by
improper use or handling.
• Service life of your appliance is 10
years. This is the period required
for availability of spare parts for
proper functioning of the product.
• WARNING: Failure to fix the
screws in concordance with
the instructions provided in the
manual may lead to electrical
hazards.
1
Important safety and environmental
instructions

7 / EN
Hood / User Manual
1
Important safety and environmental
instructions
1.3 Compliance with WEEE
Directive and disposing of the
waste product
This product complies with EU WEEE
Directive (2012/19/EU). This product
bears a classification symbol for waste
electrical and electronic equipment
(WEEE).
This product has been manufactured with high
quality parts and materials which can be reused
and are suitable for recycling. Do not dispose of
the waste product with normal domestic and
other wastes at the end of its service life. Take it to
the collection center for the recycling of electrical
and electronic equipment. Please consult your
local authorities to learn about these collection
centers.
Compliance with RoHS
Directive:
The product you have purchased complies with EU
RoHS Directive (2011/65/EU). It does not contain
harmful and prohibited materials specified in the
Directive.
1.4 Package information
Package of the product is made of recyclable materials in accordance with our
National Legislation. Do not dispose of
the packaging materials together with the domestic or other wastes. Take them to the packaging material collection points designated by the
local authorities.
8 / EN
Hood / User Manual
Markings on the product or the values stated in other documents supplied with the product are values obtained
under laboratory conditions as per relevant standards. These values may vary depending on operational and
environmental conditions of the product.
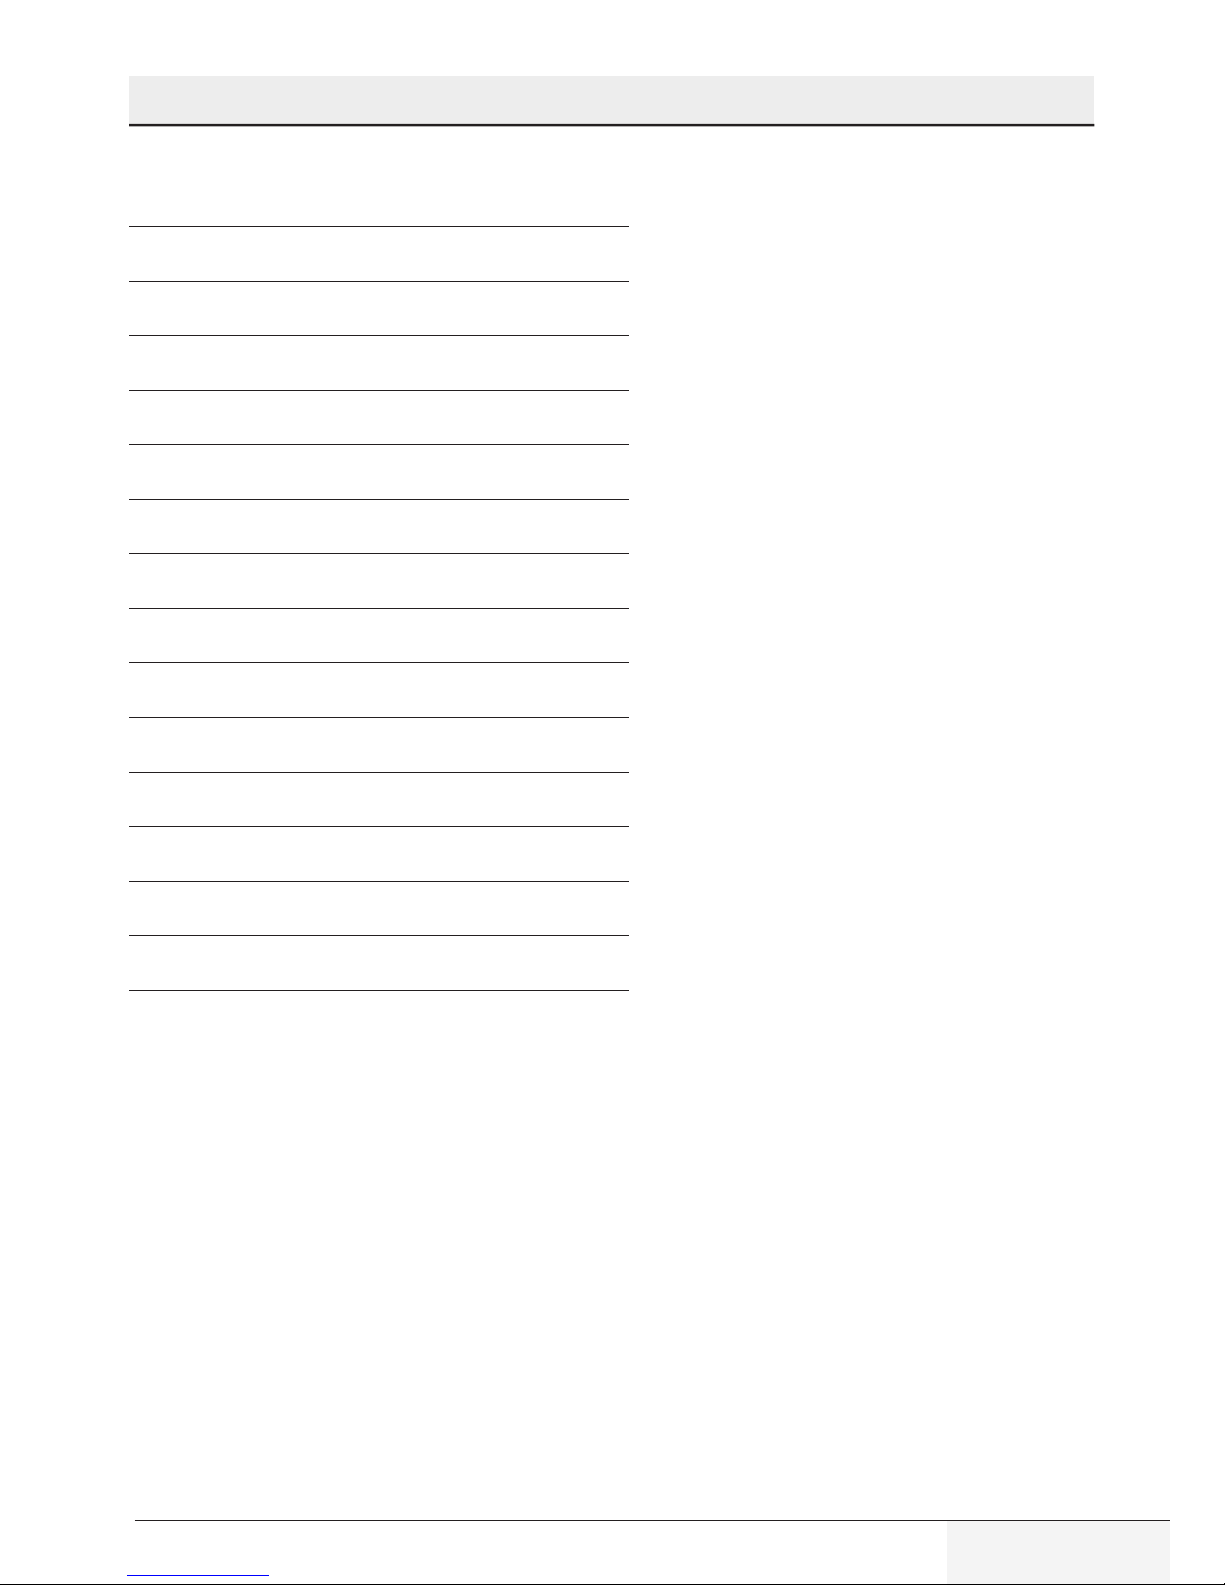
Usage with charcoal filterUsage with flue
2 Technical specifıcations of your appliance

9 / EN
Hood / User Manual
Please consult the nearest Authorized Service
Agent for the installation of the hood.
*Preparation of location and electrical installation
for the product is under customer’s responsibility.
A
WARNING: Remove the protective
film (if any) on the hood and flue
surface after the installation.
The height between the lower surface of the hood
and upper surface of a hob should not be less than
50 cm for gas hobs and 45 cm for electric hobs.
Have a qualified electrician make the electrical
connection.
Install your product so that you can reach the
power connection (plug, outlet) easily after
installation.
Dimensions are given in mm.
3.1. Power connection
• Main power supply should comply with the
values indicated on the plate inside the hood.
Connect the hood to an outlet in compliance
with current regulations by means of a plug
and place it within an accessible area. After
installation; if device doesn't have a plug (direct
mains supply connection) or plug is out of reach,
use a double-pole switch in line with standards,
that enables disconnection of main plug under
circumstances related to overcurrent category
III.
A
WARNING: Before reconnecting
the hood to main power source and
checking if it functions correctly,
ensure that main power cable is
connected properly.
• The hood is equipped with a special power
cable. Contact Authorised Service Agent if the
the power cable is damaged.
3.2. Installation
3.2.1 Before you start
installation:
• Check that the product purchased has
appropriate sizes for installation location.
• Remove the active charcoal (*) filter if supplied
(see also relative paragraph). That/those will
only be installed if you want to use the hood as
a filtered model.
• Check if any other material (such as screw
package (*), warranty card (*) etc.) is delivered
in the hood and if available, remove them and
keep elsewhere.
• If possible, remove freestanding or sliding hob
and pull it aside in order to reach rear wall /
ceiling easily. If not possible, cover the bench,
hob or oven with a thick protective cloth in order
to secure them against damage and dirt. Select
a flat surface to install the appliance. Cover the
surface with a protective cloth and place all
awning hood parts and hardware in it.
• Besides; check if a plug is available on assembly
area of hood (besides, on the accessible
area after assembling the hood) and check if
connecting the hood to outside (only for the
model with aspiration) is possible.
• Finish all required operations related to wall
(e.g. plugging power plug and/or opening a hole
for discharge hose).
Wide dowels are available to allow for fixing
the hood on a variety of wall/ceiling types.
Additionally, conformity of material to wall/
ceiling type should be confirmed by a qualified
technician. Wall/ceiling should be able to sustain
the hood. Do not assemble the appliance on tile,
plaster or silicon surfaces. Assemble it only on to
a wall.
If a panel and/or side wall and/or furniture exist,
check that there is sufficient place for assembly
of hood and that control panel is easily accessible.
3 Installing your appliance
10 / EN
Hood / User Manual
3 Installing your appliance
3.2.2 Preparation for the
Assembly of the Hood onto the
Wall
Information required for the preparation of the
installation place for your hood is given below.
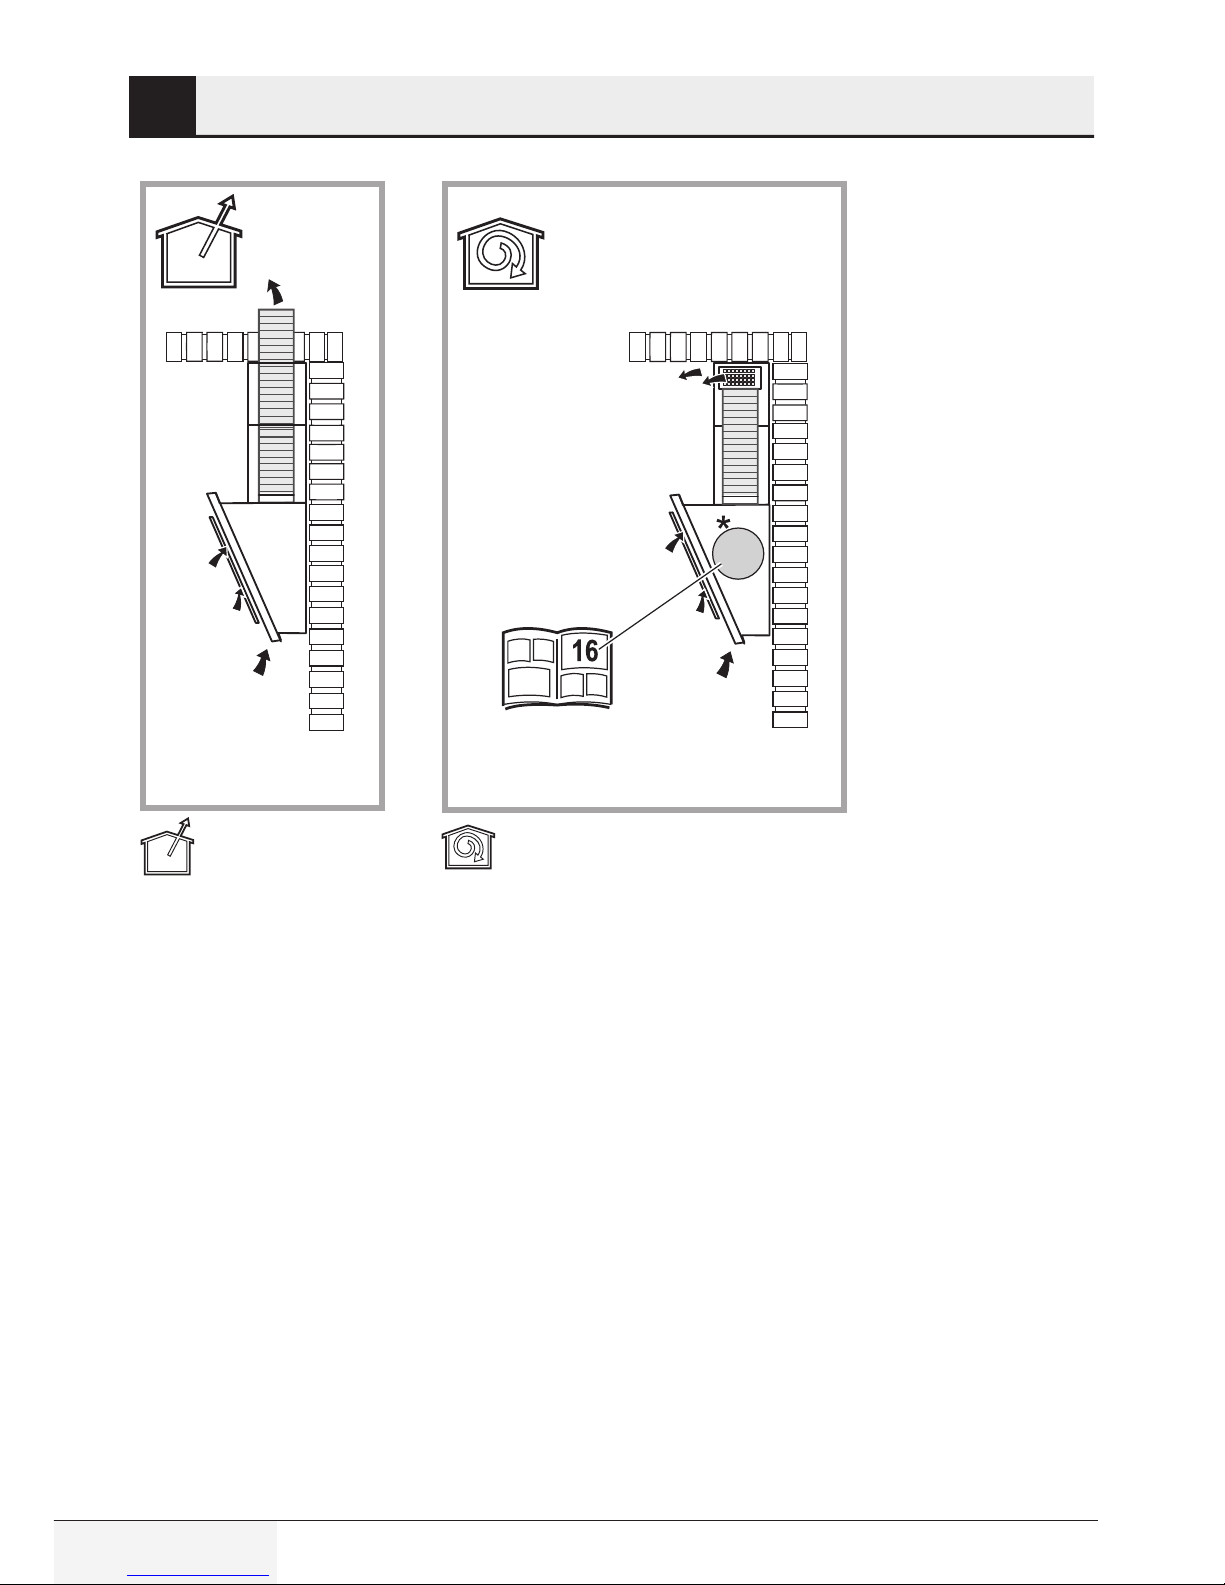
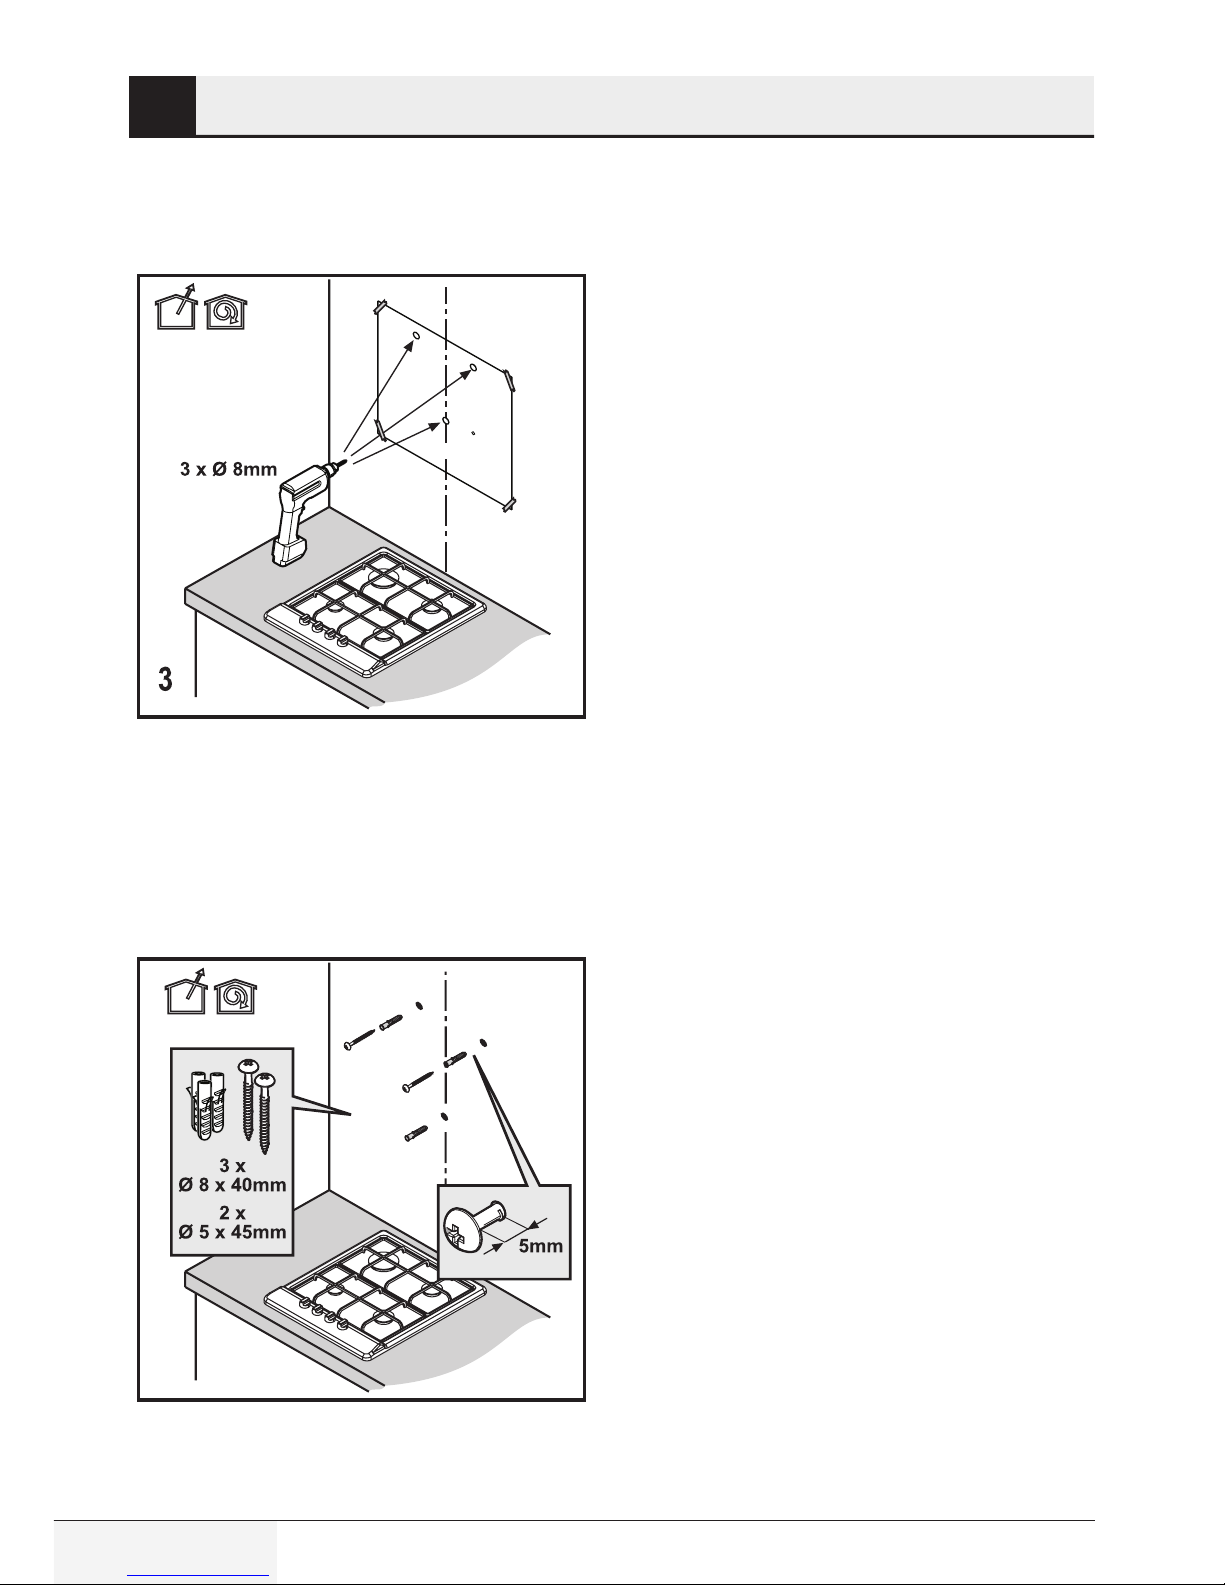
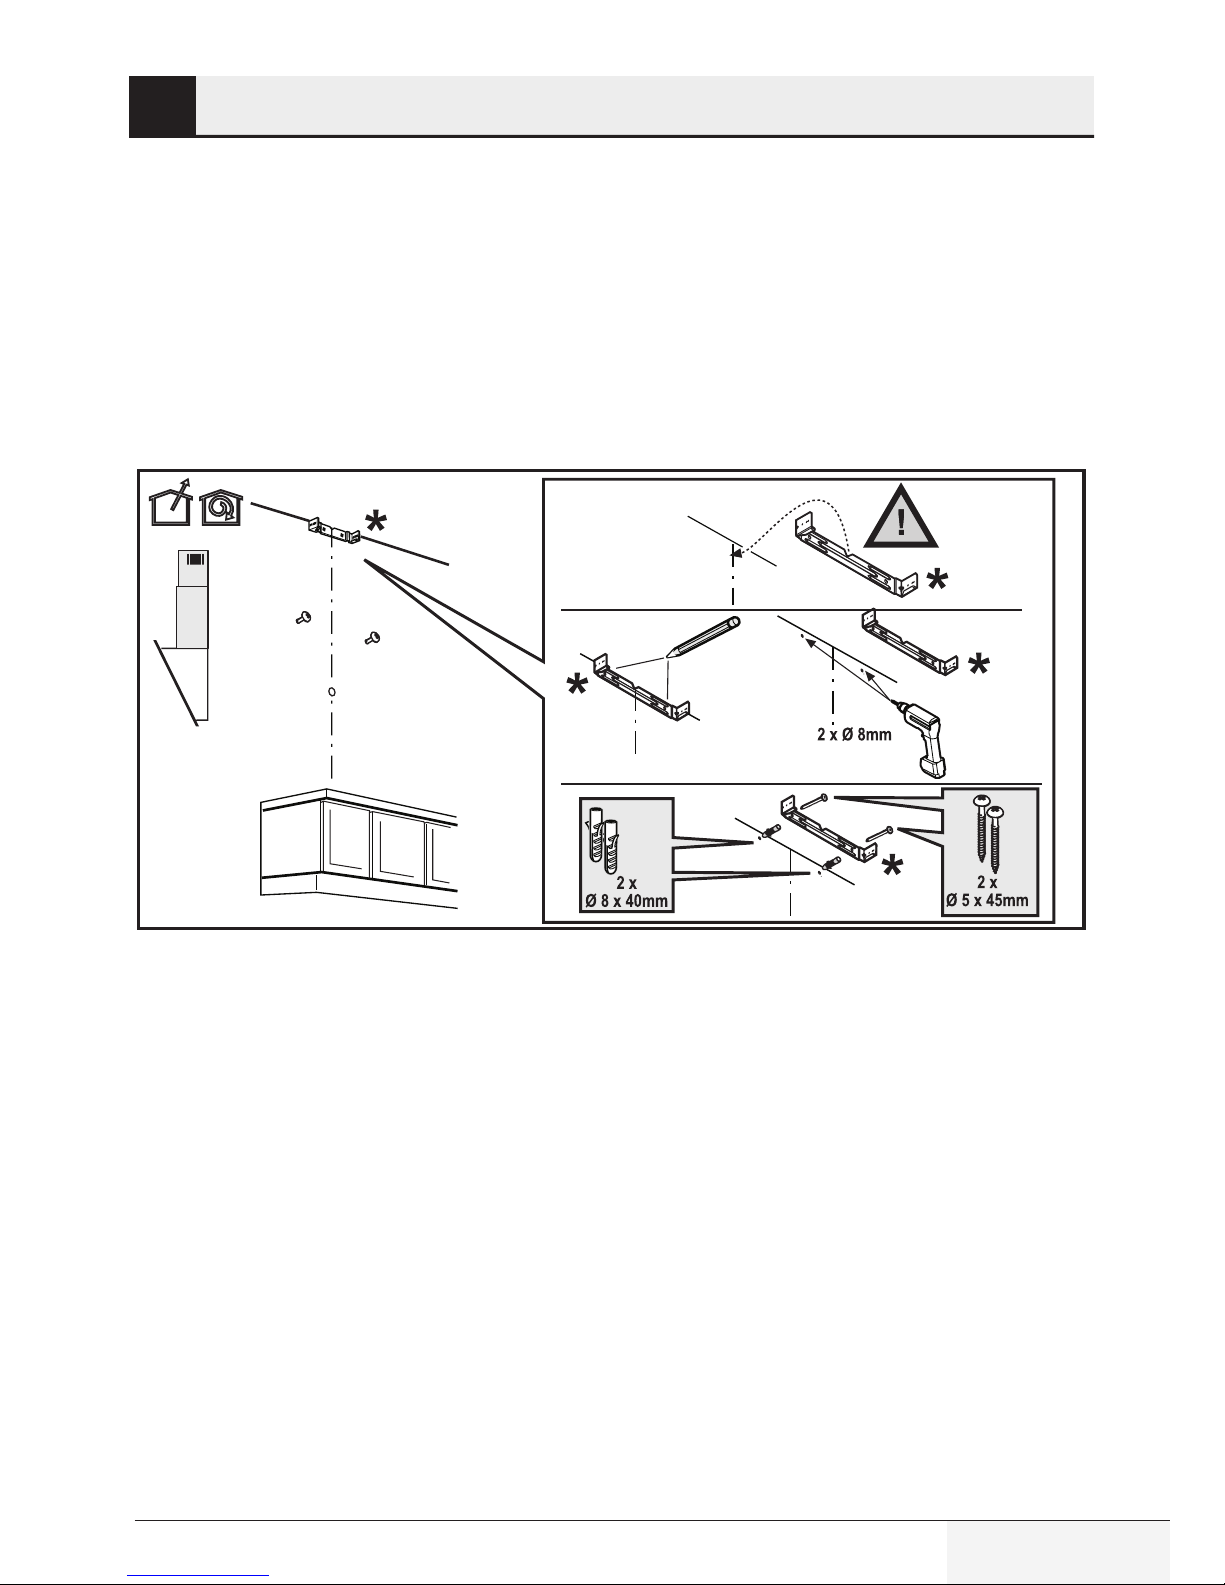
1. Mark the surface where assembly template is
going to be hung. (Figure 1)
2. Affix the assembly template onto the
installation place of the hood. (Figure 2)
3. Drill a hole with Ø 8 mm bit on marked points.
(Figure 3)
4. Hammer 3 pieces of Ø 8x40 mm dowels in
drilled holes. Screw 2 pieces of Ø 5x45 mm
hanging screws to dowels hammered above.
There must be a gap of 5 mm between the
screw head and the wall. (Figure 4)
4

11 / EN
Hood / User Manual
3.2.3 Assembling the hood flue
Drill holes on marked points with Ø8 mm bit in
order to attach flue plate. Hammer 2 pieces of Ø
8x40 mm dowels in drilled holes. Screw 2 pieces of
Ø 5x45 mm hanging screws to dowels hammered.
(Figure 5)
5
3 Installing your appliance
12 / EN
Hood / User Manual
3.2.4 Assembly of the Hood onto
the Wall
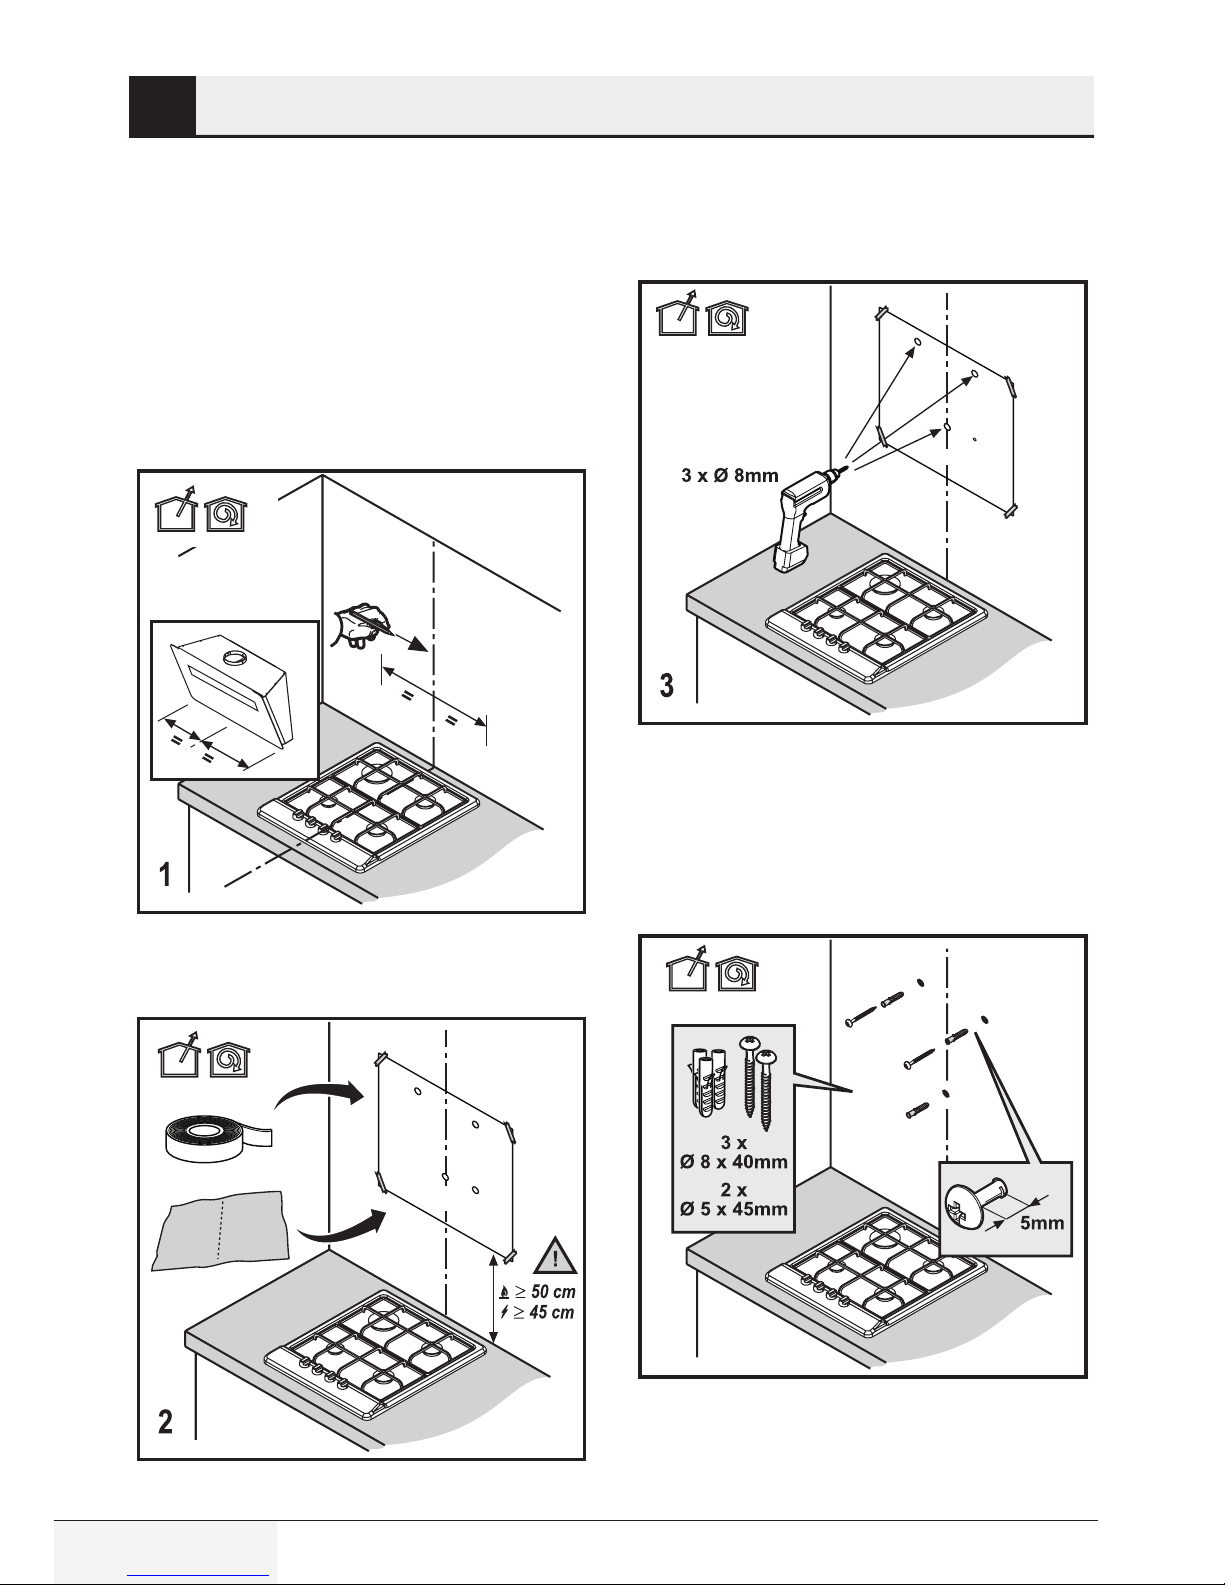
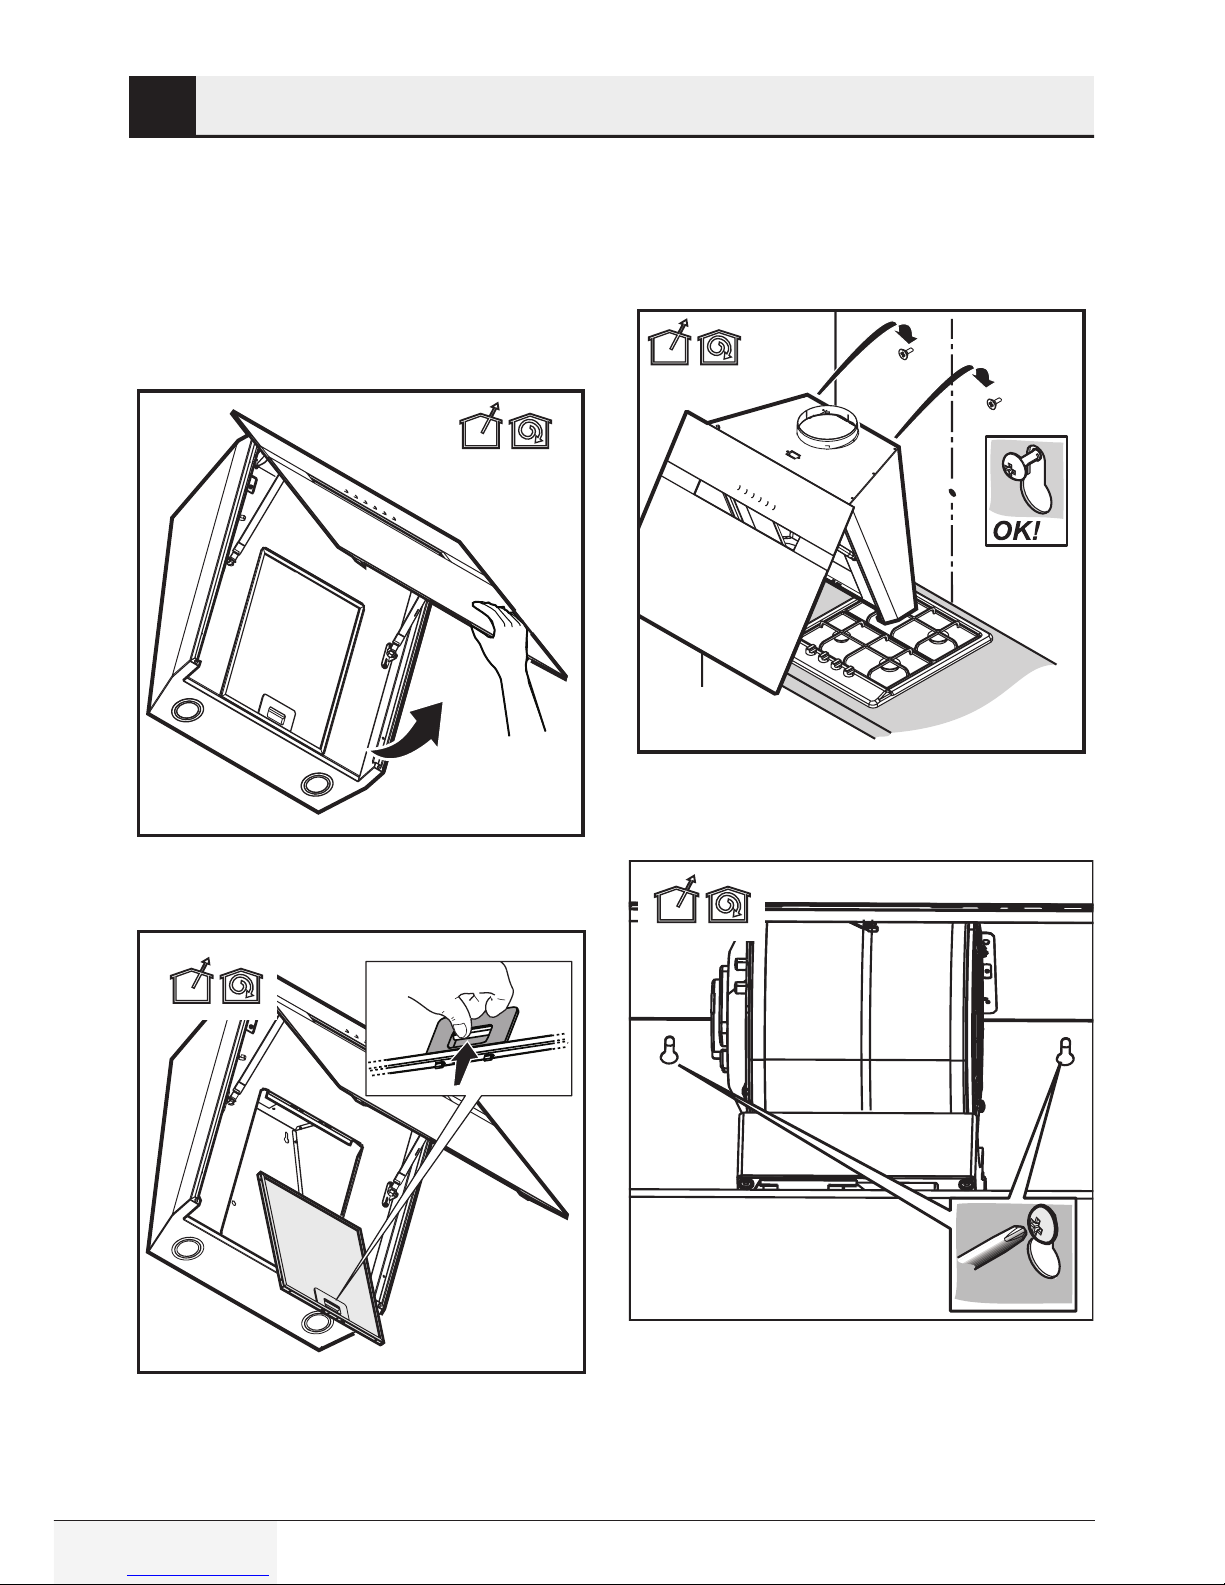
1. Remove front panel to attach the hood onto
the wall. (Figure 7)
7
2. Remove the filters. (Figure 8)
8
3. Place the hood in a way that screws match with
screw heads. (Figure 9)
9
4. Tighten the screws to fasten the hood.
(Figure 10)
10
3 Installing your appliance
13 / EN
Hood / User Manual
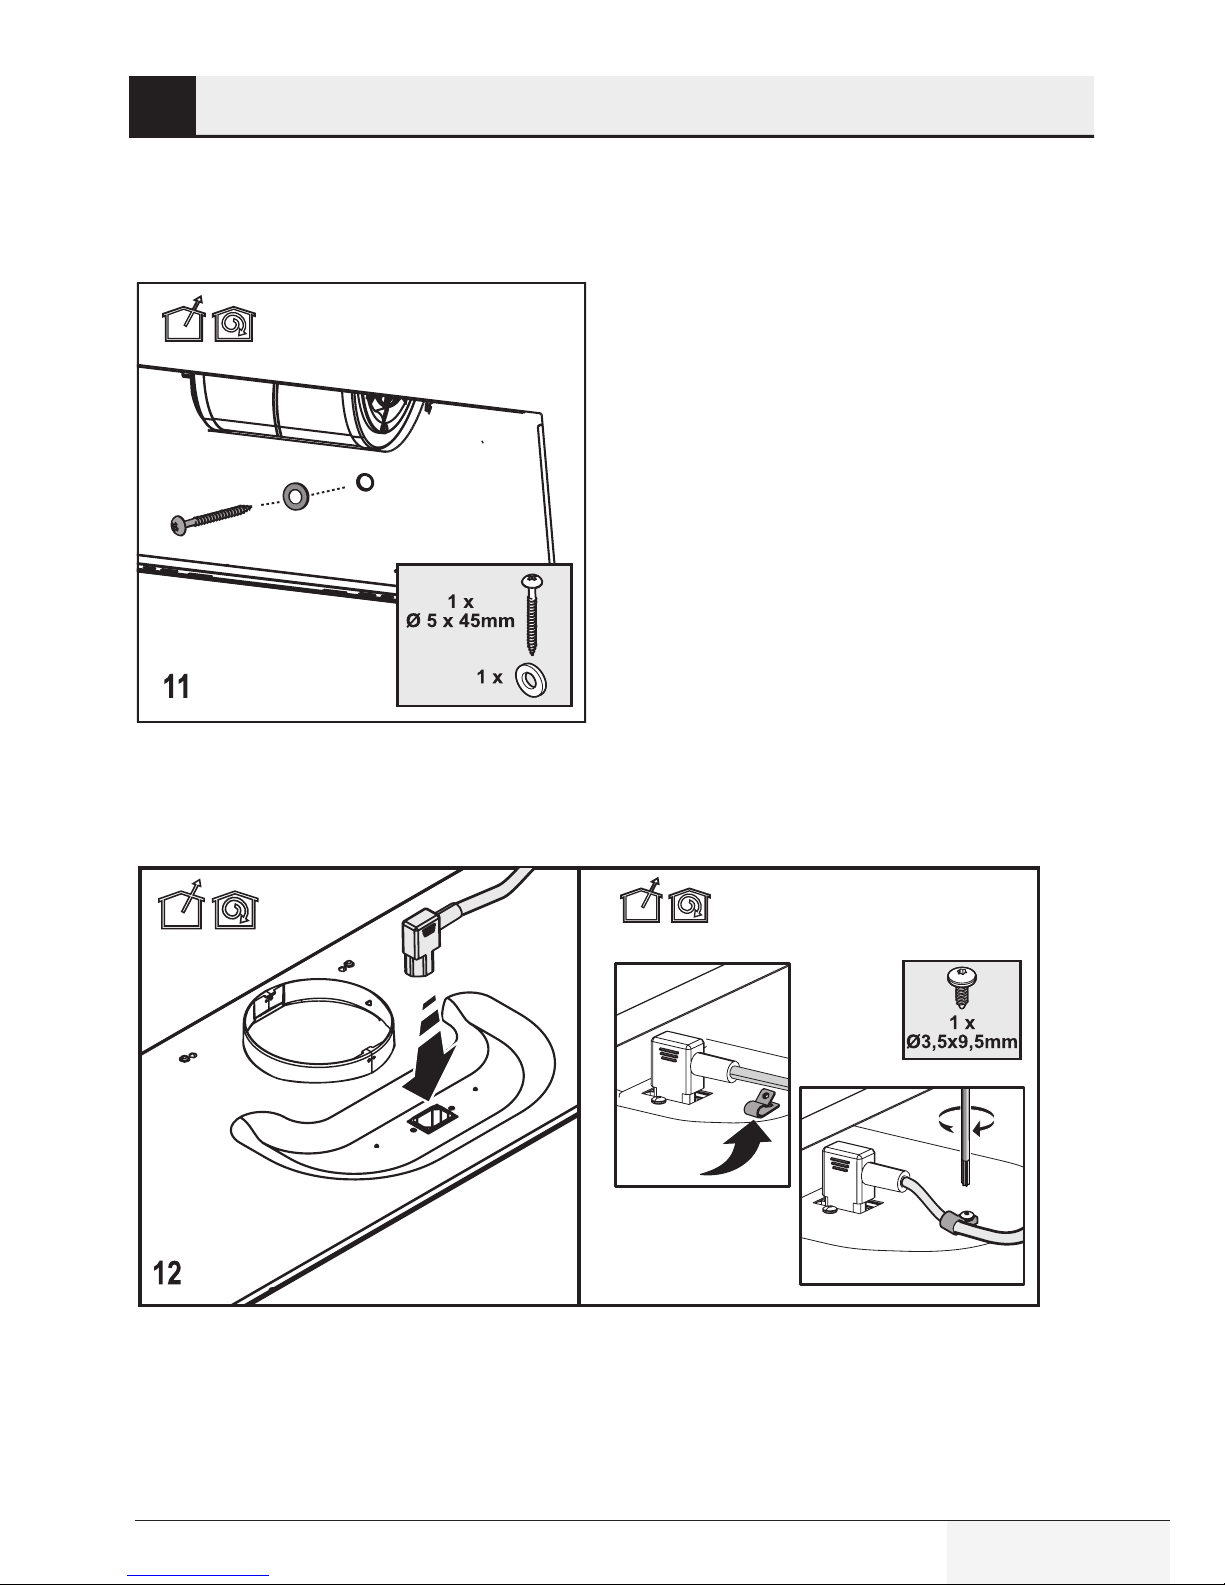
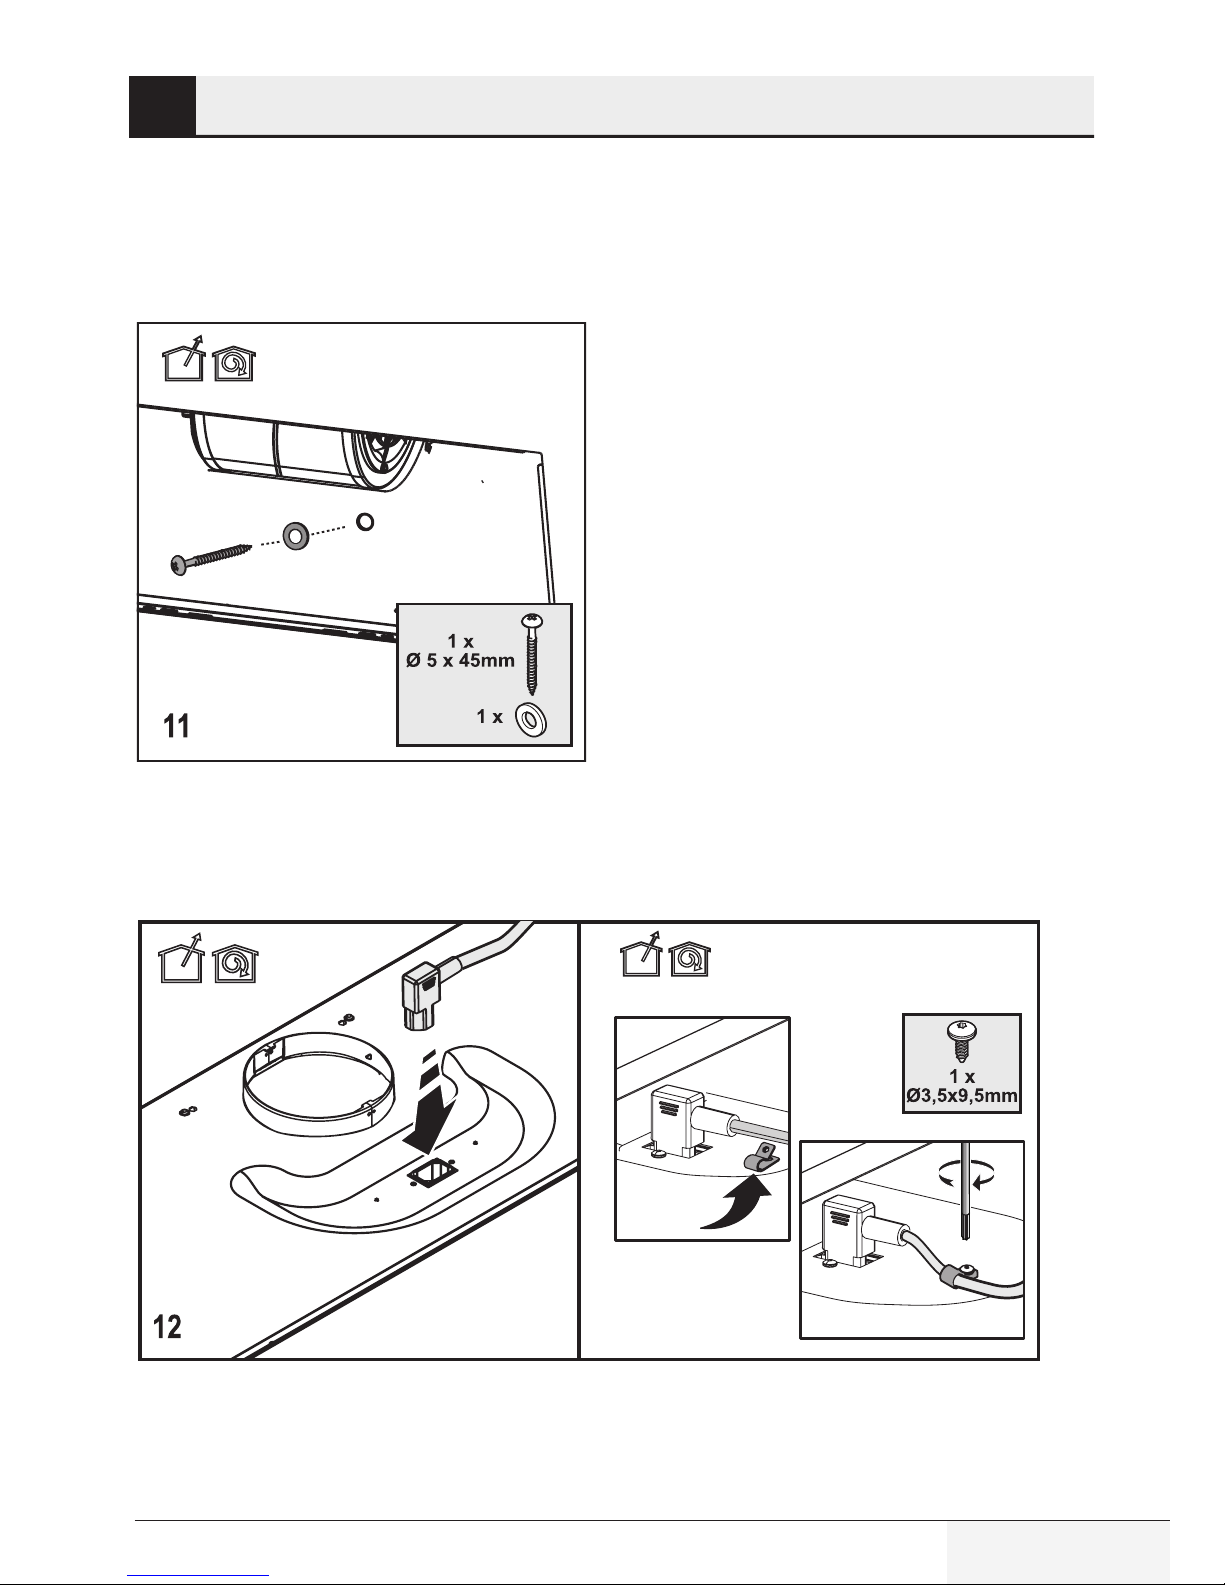
5. In order to fasten the hood, use washers and
tighten with Ø 5x45 screws.(Figure 11)
6. Plug in the power cable. Use Ø 3.5x9.5 screw to
fasten the cable.(Figure 12)
3 Installing your appliance

14 / EN
Hood / User Manual
7. Place flue connection according to figures.
(Figure 13, 14)
13
14
3 Installing your appliance
15 / EN
Hood / User Manual
4.1 Operation
• Use high suction power if excessive vapor is
formed in kitchen. It is recommended that hob
hood suction unit is turned on 5 minutes before
beginning cooking and is left in operation during
and for 15 minutes after cooking.
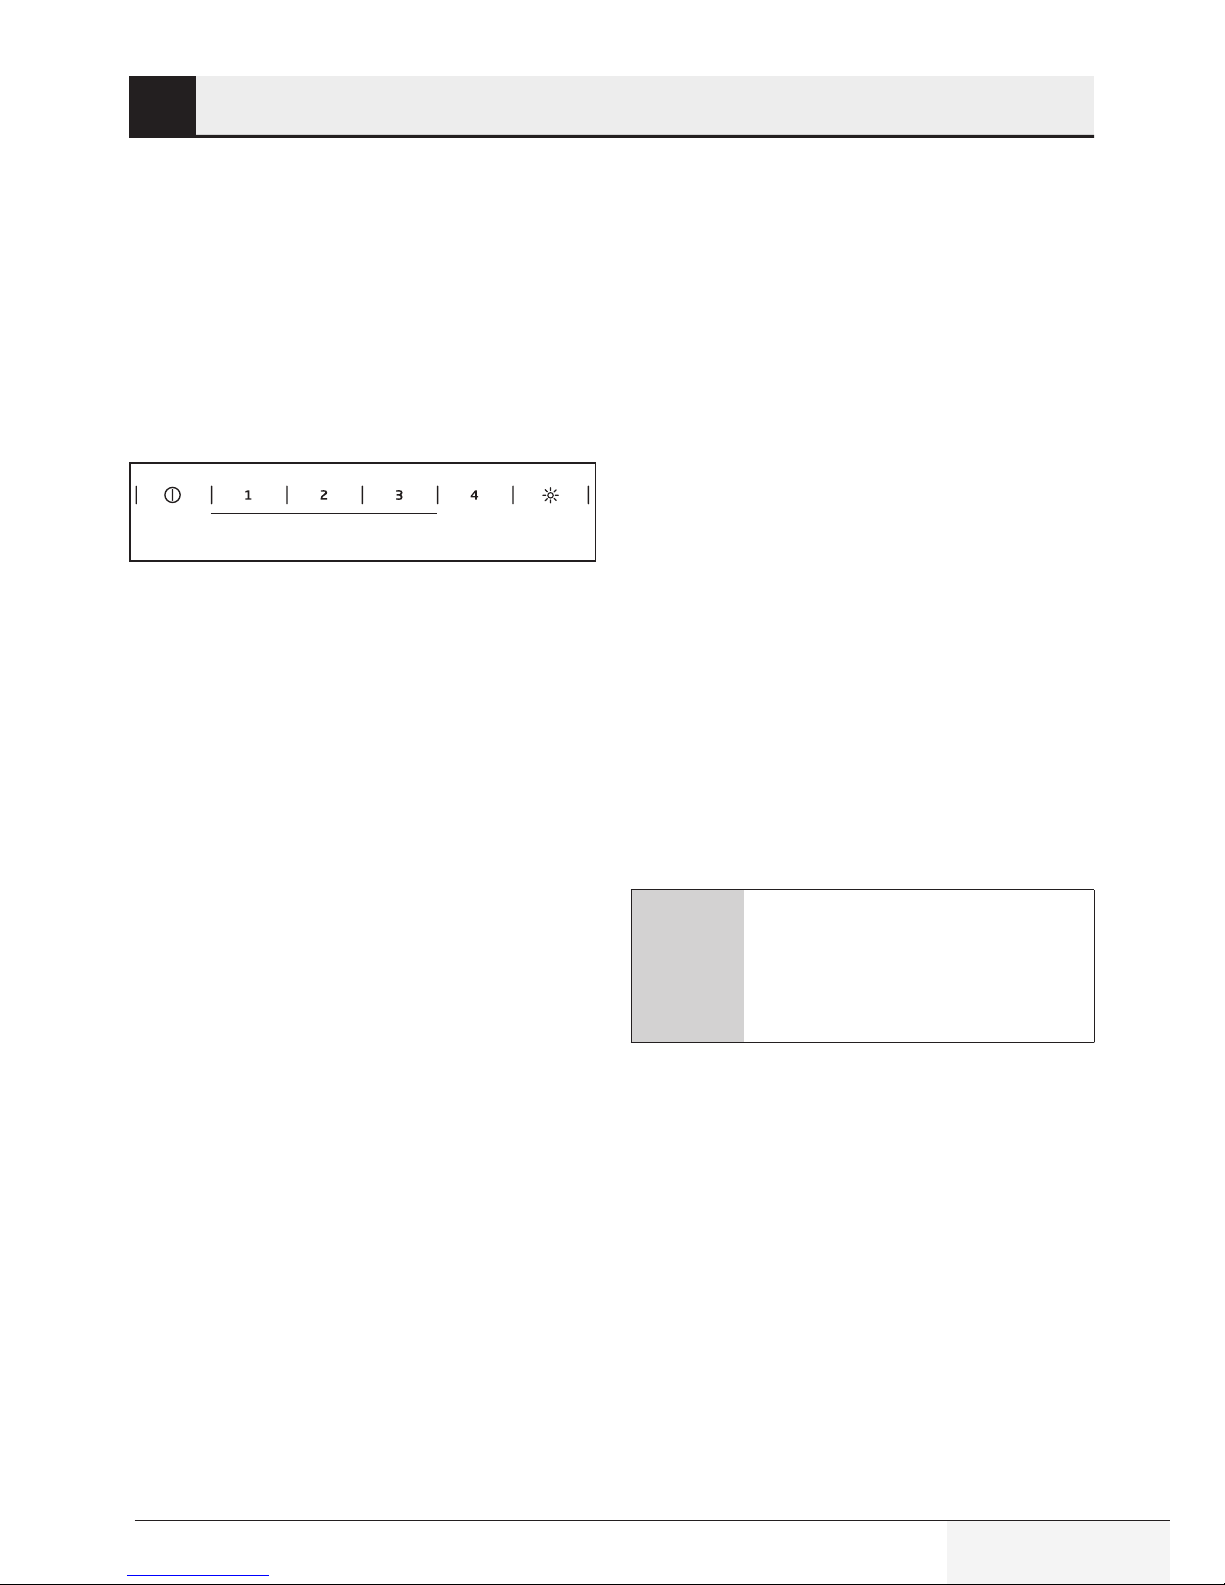
4.2 Control with levels
T1 T2 T3 T4
T1. On/Off key. If the appliance is OFF, turns on
the appliance. If the appliance is at any speed
level, turns it OFF .
T2. Operates the appliance in speed levels 1, 2
and 3.
Operates the appliance in speed level 1. LED 1
lights.
Operates the appliance in speed level 2. LED 2
lights.
Operates the appliance in speed level 3. LED
3 lights.
T3. Operates the appliance at speed level 4 for 5
minutes. While the appliance is in operation
in any level (1, 2, 3) if this key is pressed then
the current speed LED will become steady
and speed level 4 LED will flash. At the end of
5 minutes, speed level 4 LED will switch OFF
and the product will exit max. speed mode. If
speed level 4 key is pressed before 5 minutes
is over, the product exits max. speed mode.
T4. Lamp On/Off key. Briefly press this key to
turn ON/OFF the lamp. Press and hold for
more than 1 second to select one of the 5
brightness levels.
4.3 Grease filter alarm
Flashing of LED 1 warns the user for cleaning the
metal filter. When this alarm is given, it is time to
clean the grease filter. Press and hold the ON/OFF
key for 3 seconds to reset the warning while the
product is in operation. LED 1 will stop flashing.
4.4 Charcoal filter alarm
The product is delivered with the charcoal filter
alarm deactivated. Press and hold keys 1 and 2 for
3 seconds to activate the charcoal filter cleaning
warning while the product is OFF. First LED 1 and
then LED 1 and 2 light up and indicate that the
warning is activated. Press and hold keys 1 and 2
for 3 seconds to deactivate the warning while the
product is OFF. First LED 1 and 2 then LED 1 light
up and indicate that the warning is deactivated.
Flashing of LED 2 warns the user for cleaning the
charcoal filter. Press and hold the ON/OFF key
for 3 seconds to reset the the warning while the
product is in operation.
C
If both metal and charcoal filter
warnings are activated simultaneously, resetting should be performed separately for each warning.
4.5 Energy efficient usage:
• When operating the hood, adjust the speed
level according to the odour and vapour
intensity in order to prevent unnecessary
power consumption.
• Use low speeds in normal conditions (1-2), and
high speeds (3-4) when smell and vapors are
intensified.
• Lamps on the hood are intended for illuminating
the cooking zone. Using them to illuminate the
ambient/kitchen will result with unnecessary
power consumption and inadequate
illumination.
4 Operating your appliance
16 / EN
Hood / User Manual
5.1 Cleaning
• Prior to cleaning and maintenance, unplug the
appliance or turn the main switch off or loosen/
switch off the fuse that supplies the hood.
• Hood should be cleaned regularly (at least with
the same frequency with which you carry out
maintenance of the grease filters) internally
and externally.
• Clean the hood using a clean cloth dampened
with a mixture of warm water and neutral liquid
detergent.
• Do not use abrasive products. DO NOT USE
ALCOHOL!
A
WARNING: Failure to carry out the
basic cleaning instructions of the
hood and to replace the filters may
cause fire.
• For this reason, we recommend you to follow
mentioned instructions.
• Manufacturer cannot be held responsible for
motor and fire damage caused by inappropriate
maintenance or not following the above
mentioned safety recommendations.
5.2 Cleaning the glass panel
• Glass panel and suction surfaces should be
cleaned with the same interval valid for grease
filters.
• Clean with a damp cloth and a neutral liquid
detergent.
• Avoid using abrasive products. DO NOT CLEAN
WITH ALCOHOL!
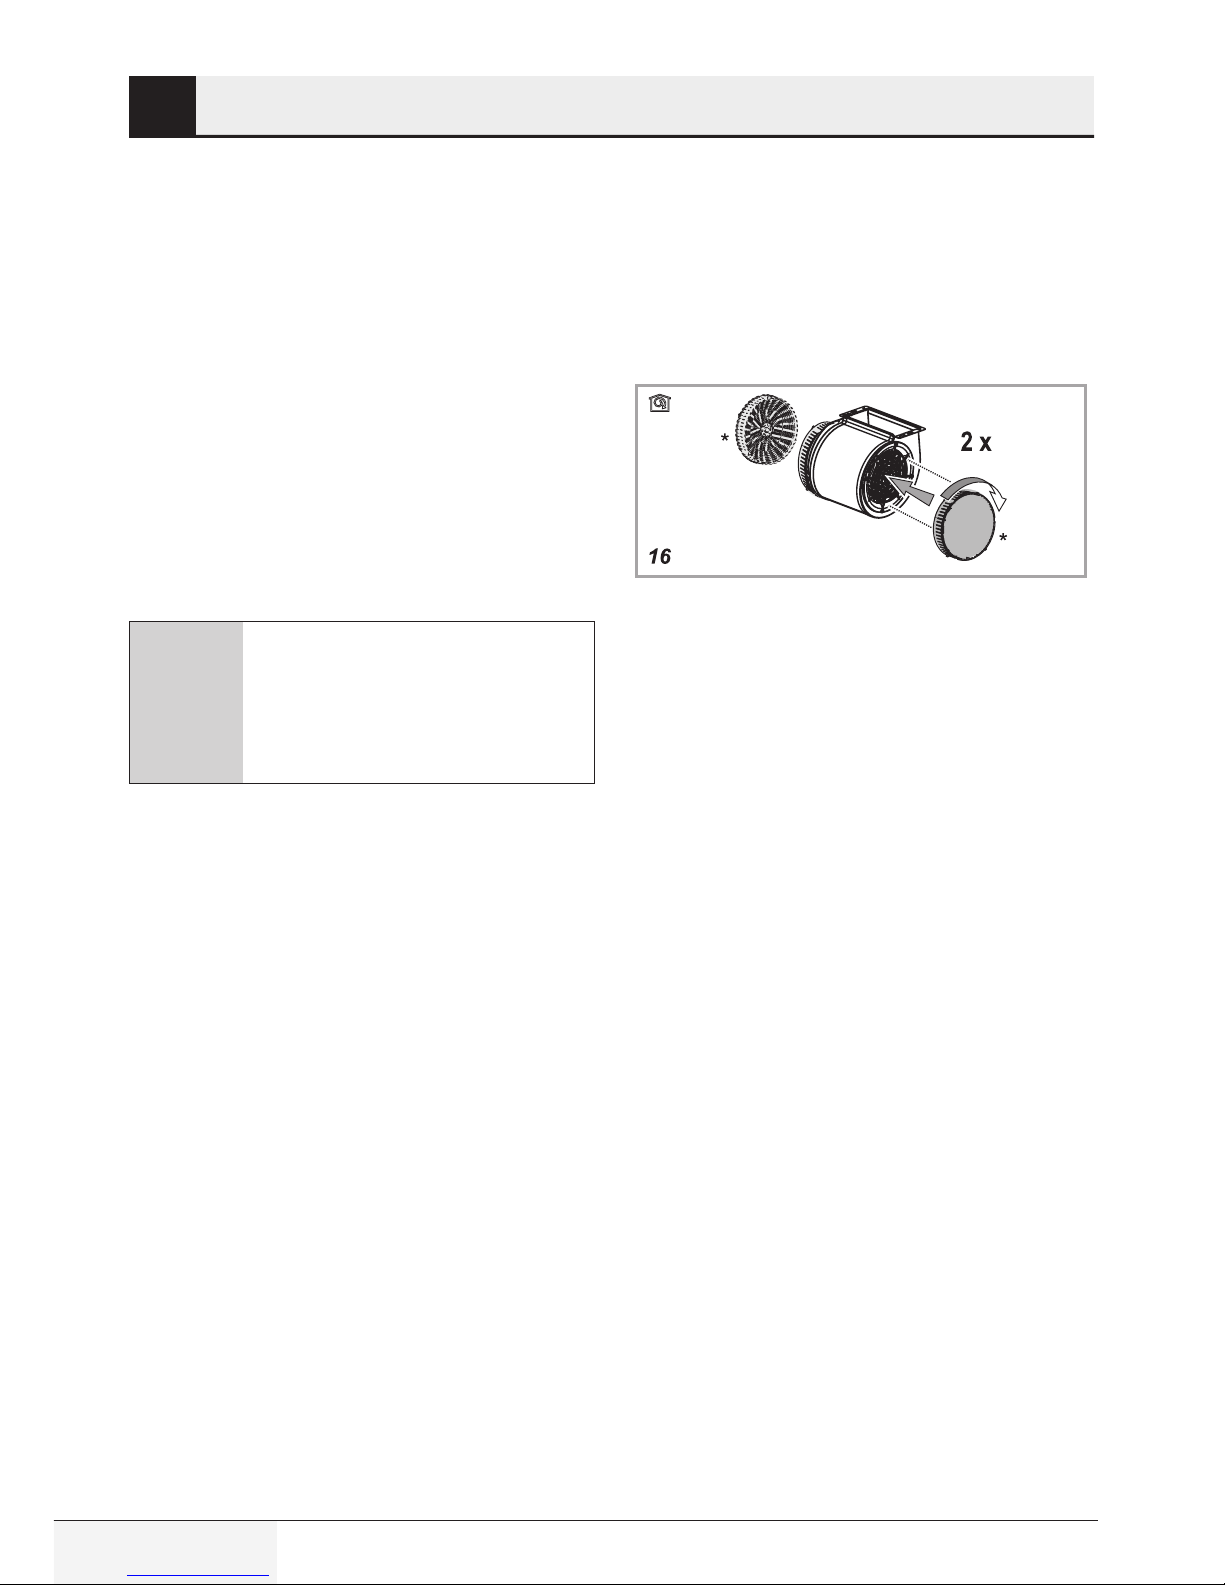
5.3 Charcoal filter (filtered
models only)
• After a long usage period, charcoal filter may
become full depending on cooking type and
whether the oil filter is cleaned regularly.
• In any case, cartridge should be replaced at
least every four months (or when filter fullness
indicator system indicates that filter should be
replaced if available in the model). (Figure 16)
• Charcoal filter cannot be washed and reused.
Circular charcoal filter
• Place one filter next to the protection cages of
motor propeller, then turn the part clockwise.
• For disassembly, turn the part counterclockwise.
5.4 Grease filter
• Retains grease particles caused by cooking
procedure.
• Grease filter should be cleaned monthly (or
filter fullness indicator system - if available in
purchased model - indicates when it is time)
using acid-free detergent by hand or in a
dishwasher with low temperature and short
program.
• When washed in a dishwasher, color of grease
filter may fade slightly, but this does not affect
its filtering capacity.
• Pull spring release lever in order to remove
grease filter. (Figure 17)
5 Cleaning and maintenance

17 / EN
Hood / User Manual
5 Cleaning and maintenance
17
5.5 Cleaning
• Particularly do not neglect to clean your hood
immediately after you have made frying.
• Use a soft cloth soaked with liquid detergent to
clean the outer surface of your hood.
• Never use abrasive or scratching materials for
cleaning.
• You may use the cleaning agents commercially
available for persistent grease etc. by following
the warnings on the product. In order not the
scratch the brushed steel body, wipe in the
same direction with the bush trace.
• Do not use cleaning agents containing
hydrochloric acid, bleach or abrasive powders
in order to maintain the surface quality of your
product. Use a cloth dampened in soapy water
or special stainless steel cleaning spray for
stainless steel surfaces. Remove the protective
foil on the appliance.
A
Caution: You may cause a fire if
you do not follow the instructions
on the cleaning and replacement of
the filters of your hood.
C
If you need to transport the
appliance:
Keep the original packaging of the
appliance. Transport the appliance
with its original package, and follow
the transport markings on the original package.
If you do not have the original
package:
• Do not put heavy objects on the hood.
• Protect the outer surface from impacts.
• Pack the product so that it would not be
damaged during transport.
5.6 Replacing the lamps
A
WARNING: Prior to touching the
light bulbs, ensure that they are
cooled down.
C
Contact Authorized Service Agent
for lamp replacement.
Dieses Produkt wurde in umweltfreundlichen, modernen Einrichtungen ohne schädliche Auswirkungen auf die Natur
hergestellt.
Dieses Gerät stimmt mit der WEEE-Richtlinie überein.
Es enthält kein PCB.
Bitte zunächst diese Anleitung lesen!
Sehr geehrte Kundin, sehr geehrter Kunde,
Danke, dass Sie sich für ein Produkt der Marke Beko entschieden haben. Wir hoffen, dass Sie mit diesem
Produkt, das mit den höchsten Qualitätsanforderungen und der modernsten Technologie hergestellt
wurde, beste Ergebnisse erzielen. Bitte lesen Sie diese gesamte Bedienungsanleitung und alle anderen
Begleitdokumente aufmerksam, bevor Sie das Produkt verwenden; bewahren Sie sie zum künftigen
Nachschlagen sicher auf. Wenn Sie das Produkt an einen Dritten weitergeben, händigen Sie bitte auch
diese Anleitung aus. Befolgen Sie alle Warnhinweise und Informationen in dieser Anleitung.
Bitte denken Sie daran, dass diese Anleitung auch für einige andere Modelle erstellt wurde. Unterschiede
zwischen den Modellen werden in der Anleitung klar und deutlich beschrieben.
Bedeutung der Symbole
Folgende Symbole werden in den verschiedenen Abschnitten dieser Anleitung verwendet:
C
Wichtige Informationen und nützliche Tipps in
Bezug auf die Verwendung.
A
WARNUNG: Warnhinweise zu gefährlichen
Situationen im Hinblick auf die Sicherheit von
Leib, Leben und Eigentum.
B
Warnung vor Stromschlägen.
Warnung vor heißen Flächen.

19 / DE
Dunstabzugshaube / Bedienungsanleitung
1
Wichtige Sicherheits- und
Umweltanweisungen
Dieser Abschnitt enthält
Sicherheitsanweisungen, die
beim Schutz vor Personenund Sachschäden helfen.
Bei Nichtbeachtung dieser
Anweisungen erlischt die gewährte Garantie.
1.1 Allgemeine
Sicherheit
• Lassen Sie Installations- und Re-
paraturarbeiten immer von einem
autorisierten Servicedienst durchführen. Der Hersteller übernimmt
keine Haftung für Schäden, die von
unautorisierten Personen verursacht wurden.
• Dieses Gerät darf nicht von Perso-
nen (einschließlich Kindern) benutzt
werden, die unter körperlichen oder
geistigen Einschränkungen leiden
oder denen es an der nötigen Erfahrung im Umgang mit solchen Geräten mangelt. Kinder sollten soweit
beaufsichtigt werden, dass sie nicht
mit dem Gerät spielen.
1.1.1 Elektrische
Sicherheit
• Trennen Sie das Gerät bei Installa-
tions-, Wartungs-, Reinigungs- und
Reparaturarbeiten immer von der
Stromversorgung.
• Falls das Netzkabel defekt ist, sollte
es vom Hersteller, Kundendienst
oder einer ähnlich qualifizierten Person (idealerweise einem Elektriker)
bzw. einer vom Importeur genannten Person ersetzt werden.
• Die Betriebsspannung beträgt 220
bis 240 Volt.
• Falls das Gerät einen Fehler auf-
weist, darf es erst nach Reparatur
durch den autorisierten Servicedienst wieder in Betrieb genommen
werden. Es besteht Stromschlaggefahr!
• Netzkabel nicht in der Nähe von
Kochfeldern verlegen. Andernfalls
kann das Netzkabel einen Brand verursachen, da es leicht schmilzt.
• Die Dunstabzugshaube niemals vor
Abschluss der Installation an die
Stromversorgung anschließen.
• Zur Erzielung optimaler Leistung
darf der Abzug nicht länger als 4 m
sein. Er darf nicht mehr als 2 rechte
Winkel (90 °) zählen und sein Durchmesser muss mind. ø 120 mm betragen.
• Trennen Sie das Gerät vor jegli-
cher Handhabung der internen
Teile des Gerätes von der Stromversorgung.

20 / DE
Dunstabzugshaube / Bedienungsanleitung
1
Wichtige Sicherheits- und
Umweltanweisungen
• Verwenden Sie das Gerät nur mit
einer geerdeten Steckdose.
1.1.2 Produktsicherheit
• Sie können ein Rohr mit einem
Durchmesser von 120 oder 150
mm am Abluftanschluss der
Dunstabzugshaube verwenden.
• Keine Verbindungen zu Schäch-
ten herstellen, die mit Öfen, Abluftschächten oder Kaminen mit
aufsteigenden Flammen verbunden sind. Beachten Sie behördliche Richtlinien zur Ableitung von
Abluft.
• Der Abstand zwischen der Unter-
kante der Dunstabzugshaube und
der Oberkante des Herdes/Ofens
sollte nicht weniger als 50 cm bei
Gasherden und 45 cm bei Elektroherden betragen.
• Dunstabzugshaube nicht ohne Alu-
miniumfilter betreiben; Filter nicht
entfernen, während die Dunstabzugshaube in Betrieb ist.
• Lampen der Dunstabzugshaube nie-
mals berühren, wenn sich das Gerät
bereits längere Zeit in Betrieb befindet. Die Lampen können heiß sein
und Verbrennungen verursachen.
• Vermeiden Sie hohe Flammen unter
dem Gerät. Andernfalls können sich
im Aluminiumfilter gesammelte Partikel entzünden und einen Brand
verursachen.
• Schalten Sie Kochfelder erst ein,
nachdem Sie Kochgeschirr darauf
gestellt haben. Andernfalls kann die
steigende Temperatur bestimmte
Teile Ihres Produktes verformen.
• Schalten Sie die Kochfelder ab, bevor
Sie das Kochgeschirr herunternehmen.
• Vermeiden Sie entflammbare Mate-
rialien unter der Dunstabzugshaube.
• Öl kann sich beim Braten entzünden.
Achten Sie daher besonders auf
Kleidung und Vorhänge.
• Lassen Sie das Kochgerät niemals
unbeaufsichtigt, während Sie braten; heißes Öl kann Feuer fangen.
• Falls die Dunstabzugshaube nicht in
den angegebenen Intervallen gereinigt wird, besteht Brandgefahr.
• Seien Sie bei der Reinigung der
Dunstabzugshaube extrem vorsichtig, tragen Sie Handschuhe.
• Zur Steigerung der Saugleistung
empfehlen wir Ihnen, das Gerät einige Minuten vor Beginn des Kochens oder Bratens in Betrieb zu
nehmen.

21 / DE
Dunstabzugshaube / Bedienungsanleitung
Dadurch erhalten Sie eine kontinuierliche und stabile Saugleistung,
sobald Küchendünste entstehen.
• Dunstabzugshaube nach Abschluss
des Kochens oder Bratens 15 Minuten weiterlaufen lassen, damit Gerüche und Küchendünste entfernt
werden.
• Achten Sie bei der Benutzung der
Dunstabzugshaube – insbesondere
in Verbindung mit Gasherden – auf
eine ausreichende Frischluftzufuhr.
• Achten Sie darauf, das Gerät nicht
an Abzugsschächte anzuschließen,
die von nicht elektrischen Geräten
verwendet werden. (Bsp.: Heizungsschacht)
• Die gleichzeitige Verwendung der
Dunstabzugshaube und eines weiteren, Luft ansaugenden Geräts ist
nur möglich, wenn ein geringerer
Druck von 4 Pa (0,04 mbar) erreicht
und dadurch die Resorption des
Gases vermieden wird. Dies kann nur
dadurch erreicht werden, dass Luft
durch nicht abgedeckte Öffnungen
(Tür, Fenster, Lüftungsöffnungen
oder andere technische Messungen)
einströmt. Achten Sie darauf, dass
ausreichend Luft zugeführt wird. Ein
Schacht, der den Luftein- und -austritt ermöglicht, ist für diesen Zweck
nicht ausreichend.
1.1.3 Sicherheit von
Kindern
• Verpackungsmaterialien können für
Kinder gefährlich sein. Bewahren
Sie Verpackungsmaterialien an
einem sicheren Ort außerhalb der
Reichweite von Kindern auf.
• Elektrische Geräte können für Kinder
gefährlich sein. Halten Sie Kinder
stets vom Produkt fern. Verbieten Sie
Kindern, mit dem Gerät zu spielen.
• Dieses Gerät kann von Kindern ab
8 Jahren sowie von Personen mit
eingeschränkten körperlichen,
sensorischen oder geistigen
Fähigkeiten oder einem Mangel an
Wissen und Erfahrung verwendet
werden, sofern sie im Hinblick
auf eine sichere Benutzung des
Gerätes beaufsichtigt werden
oder entsprechend angeleitet
wurden und die damit verbundenen
Gefahren verstehen. Kinder dürfen
nicht mit dem Gerät spielen.
• ACHTUNG: Zugängliche Teile kön-
nen sich bei der Verwendung mit
dem Kochgerät aufheizen.
1
Wichtige Sicherheits- und
Umweltanweisungen
22 / DE
Dunstabzugshaube / Bedienungsanleitung
1.2 Zweckmäßiger
Gebrauch
• Dieses Gerät ist für den privaten Ge-
brauch bestimmt. Es eignet sich nicht
zum kommerziellen Einsatz und darf
nicht zweckentfremdet verwendet
werden.
• Der Hersteller haftet nicht für Schä-
den aufgrund von unsachgemäßer
Benutzung oder Handhabung.
• Die Betriebslebenszeit des Gerätes
beträgt 10 Jahre. Dies entspricht
dem Verfügbarkeitszeitraum von
Ersatzteilen, damit das Produkt
richtig funktioniert.
• WARNUNG: Falls Sie die Schrauben
nicht entsprechend den Anweisungen in der Anleitung befestigen, können elektrische Gefahren entstehen.
1.3 Konformität mit WEEERichtlinie und Entsorgung von
Altgeräten
Dieses Produkt stimmt mit der europäischen WEEE-Richtlinie überein
(2012/19/EU). Dieses Produkt trägt ein
Klassifizierungssymbol für elektrische
und elektronische Altgeräte (WEEE).
Dieses Produkt wurde aus hochwertigen Teilen
und Materialien hergestellt, die wiederverwendet werden können und zum Recycling geeignet
sind. Altgeräte dürfen nicht über den normalen
Hausmüll oder anderen Müll entsorgt werden.
Geben Sie das Gerät bei der Sammelstelle für das
Recycling von elektrischen und elektronischen
Geräten ab. Bitte informieren Sie sich bei Ihren
örtlichen Behörden nach diesen Sammelstellen.
Konformität mit der
RoHS-Richtlinie:
Das von Ihnen erworbene Produkt stimmt mit
der europäischen RoHS-Richtlinie (2011/65/EU)
überein. Es enthält keine in der Richtlinie angegebenen gefährlichen und verbotenen Materialien.
1.4 Informationen zur
Verpackung
Die Verpackung des Produkts wurde gemäß unserer nationalen Gesetzgebung
aus recyclingfähigen Materialien hergestellt. Entsorgen Sie die Verpackungsmaterialien
nicht mit dem Hausmüll oder anderem Müll.
Bringen Sie sie zu von den lokalen Behörden bereitgestellten Sammelstellen.
1
Wichtige Sicherheits- und
Umweltanweisungen
23 / DE
Dunstabzugshaube / Bedienungsanleitung
Markierungen am Produkt oder in den mitgelieferten Dokumenten angegebene Werte stellen Werte dar, die
unter Laborbedingungen gemäß den jeweils geltenden Standards ermittelt wurden. Diese Werte können je nach
Einsatzumgebung und Nutzungsweise des Gerätes variieren.
Verwendung mit KohlefilterVerwendung mit
Schacht
2 Technische Daten des Gerätes
24 / DE
Dunstabzugshaube / Bedienungsanleitung
Bitte kontaktieren Sie den autorisierten
Servicedienst in Ihrer Nähe für die Installation
des Geräts.
*Die Vorbereitung des Aufstellortes sowie die
Elektroinstallation des Produktes liegen in der
Verantwortung des Kunden.
A
WARNUNG: Nach der Installation
Schutzfolie (sofern vorhanden) von
Dunstabzugshaube und dem Abzug
entfernen.
Der Abstand zwischen der Unterkante der
Dunstabzugshaube und der Oberkante eines
Herdes sollte nicht weniger als 50 cm bei
Gasherden und 45 cm bei Elektroherden betragen.
Der elektrische Anschluss sollte von einem
qualifizierten Elektriker durchgeführt werden.
Installieren Sie Ihr Produkt so, dass der elektrische
Anschluss (Stecker, Steckdose) nach der
Installation leicht zugänglich ist.
Alle Abmessungen sind in mm angegeben.
3.1 Elektrischer Anschluss
• Die Stromversorgung sollte mit den an
der Platte in der Haube angegebenen
Werten übereinstimmen. Schließen Sie die
Dunstabzugshaube in Übereinstimmung mit den
aktuellen Sicherheitsvorkehrungen mit einem
Stecker an eine Steckdose an und platzieren
Sie diese an einem leicht zugänglichen Ort.
Wenn das Gerät nach der Installation nicht über
einen Stecker (zur Stromversorgung) verfügen
sollte, verwenden Sie einen mit den Richtlinien
konformen, doppelpoligen Schalter, mit dem ein
Abtrennen zur Vermeidung von Überstrom der
Kategorie III gewährleistet wird.
A
WARNUNG: Bevor Sie die Haube
wieder an die Stromversorgung anschließen und überprüfen, ob diese
richtig funktioniert, vergewissern
Sie sich, dass das Netzkabel richtig
angeschlossen ist.
• Die Dunstabzugshaube ist mit einem speziellen
Netzkabel ausgestattet. Wenden Sie sich an den
autorisierten Kundendienst, falls das Netzkabel
beschädigt ist.
3.2 Installation
3.2.1 Bevor Sie beginnen:
• Überprüfen Sie, ob die Größe des erworbenen
Produktes für den Installationsort geeignet ist.
• Entfernen Sie den Aktivkohlefilter (*), sofern
mitgeliefert (siehe auch betreffenden
Absatz). Dieser wird nur installiert, wenn Sie
die Dunstabzugshaube als Modell mit Filter
verwenden möchten.
• Überprüfen Sie, ob anderes Material (z. B.
Schraubensatz (*), Garantieschein (*) usw.) mit
der Haube geliefert wurde. Falls ja, entfernen
Sie es und bewahren Sie es an einem anderen
Ort auf.
• Entfernen Sie einen freistehenden bzw.
verschiebbaren Herd nach Möglichkeit und
ziehen Sie ihn zur Seite, damit Rückwand/Decke
leicht zugänglich werden. Wenn dies nicht
möglich sein sollte, decken Sie Arbeitsplatte,
Herd bzw. Ofen zum Schutz vor Schmutz und
Beschädigungen mit einem dicken Stofftuch
ab. Wählen Sie zur Installation des Geräts einen
ebenen Untergrund. Decken Sie die Fläche mit
einem Tuch ab und legen Sie alle zusätzlichen
Teile der Dunstabzugshaube darauf.
• Prüfen Sie, ob am Montagestandort der
Dunstabzugshaube eine Steckdose zur
Verfügung steht (die nach der Montage
der Haube erreichbar ist) und ob die
Dunstabzugshaube nach außen angeschlossen
werden kann (nur bei Modellen mit Abluft).
3 Gerät installieren

25 / DE
Dunstabzugshaube / Bedienungsanleitung
3 Gerät installieren
• Beenden Sie alle erforderlichen Installations-
schritte in Verbindung mit der Wand (z. B. Netzstecker anschließen und/oder Loch für den
Abzugsschlauch bohren).
Es sind unterschiedliche Dübel verfügbar, damit
Sie die Dunstabzugshaube an verschiedenen
Arten von Wänden/Decken montieren können.
Zusätzlich sollte die Eignung der Wand/Decke von
einem qualifizierten Techniker bestätigt werden.
Wand/Decke sollten die Dunstabzugshaube
tragen können. Montieren Sie die Haube nicht
an Fliesen, Putzwänden oder Silikonoberflächen.
Montieren Sie sie nur an einer Wand.
Falls eine Blende und/oder Seitenwand und/
oder ein Möbelstück vorhanden sind, stellen
Sie sicher, dass der Platz für die Montage der
Dunstabzugshaube ausreicht und das Bedienfeld
leicht zugänglich ist.
3.2.2 Vorbereitungen für die
Montage der Dunstabzugshaube
an der Wand
Die zur Vorbereitung des Installationsstandortes
nötigen Informationen werden nachstehend
angegeben.
1. Markieren Sie die Oberfläche, auf der die
Montageschablone angebracht werden soll.
(Abbildung 1)
2. Bringen Sie die Montageschablone am
Installationsort der Dunstabzugshaube an.
(Abbildung 2)
26 / DE
Dunstabzugshaube / Bedienungsanleitung
3 Gerät installieren
3. Bohren Sie Löcher von Ø 8 mm an den
markierten Punkten. (Abbildung 3)
4. Schlagen Sie 3 Dübel á Ø 8 x 40 mm in die
gebohrten Löcher. Schrauben Sie 2 Schrauben
á Ø 5 x 45 mm in die zuvor eingesteckten
Dübel. Zwischen Schraubkopf und Wand muss
ein Abstand von 5 mm eingehalten werden.
(Abbildung 4)
4
27 / DE
Dunstabzugshaube / Bedienungsanleitung
3 Gerät installieren
3.2.3 Dunstabzugsschacht
montieren
Bohren Sie zum Befestigen der Platte Löcher von
Ø 8 mm an den markierten Punkten. Schlagen Sie
2 Dübel á Ø 8 x 40 mm in die gebohrten Löcher.
Schrauben Sie 2 Schrauben á Ø 5 x 45 mm in die
zuvor eingesteckten Dübel. (Abbildung 5)
5
28 / DE
Dunstabzugshaube / Bedienungsanleitung
3.2.4 Dunstabzugshaube an der
Wand montieren
1. Entfernen Sie die Frontblende, um die
Dunstabzugshaube an der Wand zu montieren.
(Abbildung 7)
7
2. Entfernen Sie die Filter. (Abbildung 8)
8
3. Platzieren Sie die Dunstabzugshaube so, dass
die Schrauben auf die Schraubenköpfe passen.
(Abbildung 9)
9
4. Ziehen Sie die Schrauben fest, um die Haube
zu befestigen. (Abbildung 10)
10
3 Gerät installieren
29 / DE
Dunstabzugshaube / Bedienungsanleitung
5. Nutzen Sie zum Befestigen der
Dienstabzugshaube Unterlegscheiben;
ziehen Sie Schrauben á Ø 5 x 45 mm fest.
(Abbildung 11)
6. Schließen Sie das Netzkabel an. Verwenden Sie
zum Befestigen des Kabels eine Schraube á Ø
3,5 x 9,5 mm. (Abbildung 12)
3 Gerät installieren

30 / DE
Dunstabzugshaube / Bedienungsanleitung
7. Platzieren Sie die Schachtverbindung in
Übereinstimmung mit den Abbildungen.
(Abbildung 13, 14)
13
14
3 Gerät installieren
 Loading...