

Page 1

No Frost GNE 35715 S
GNE 35715 W
Page 2
Contents
Technical specifications of your refrigerator
Prior to operating your refrigerator
Why No-Frost? ............................................. 5
Safety precautions›....................................... 6
Installing Your Refrigerator........................... 7
Operating your refrigerator ...........................14
Using your refrigerator
Using the accessories ..................................18
Placing the food............................................24
Things to be done for saving energy ............25
Changing the illumination lamp ....................23
Deep-Freeze information
Cleaning your refrigerator
Service
> 4
> 5
> 15
> 25
> 26
> 26
1
EN
Page 3

The Refrigerator
1
3
4
5
7
6
6
6
8
8
9
23
Freezer compartment
1
Fridge compartment
2
Fresh Freeze compartment
3
Ice container
4
Freezer Compartment interior light
5
Freezer Compartment glass shelves
6
Ice duct lid
7
Freezer compartment drawers
8
Ventilation lid
9
Humidity adjustment slider
10
Crisper cover
11
Butter and cheese lid
12
Fridge Compartment glass shelves
13
17
2
12
13
14
15
16
15
13
21
22
12
21
22
19
18
111020
23
14
Egg holder
15
Fridge Compartment door racks
16
Fridge Compartment interior light
17
Snack tray
18
Crisper compartment
19
Crisper or Chiller Compartment
20
Crisper or Chiller Compartment
adjustment bolt
21
Bottle holder
22
Bottle shelves
23
Adjustable front legs
• Figures that take place in this instruction manual are schematic and may not correspond
exactly with your product. If the subject parts are not included in the product you have
purchased, then it is valid for other models.
2
EN
Page 4
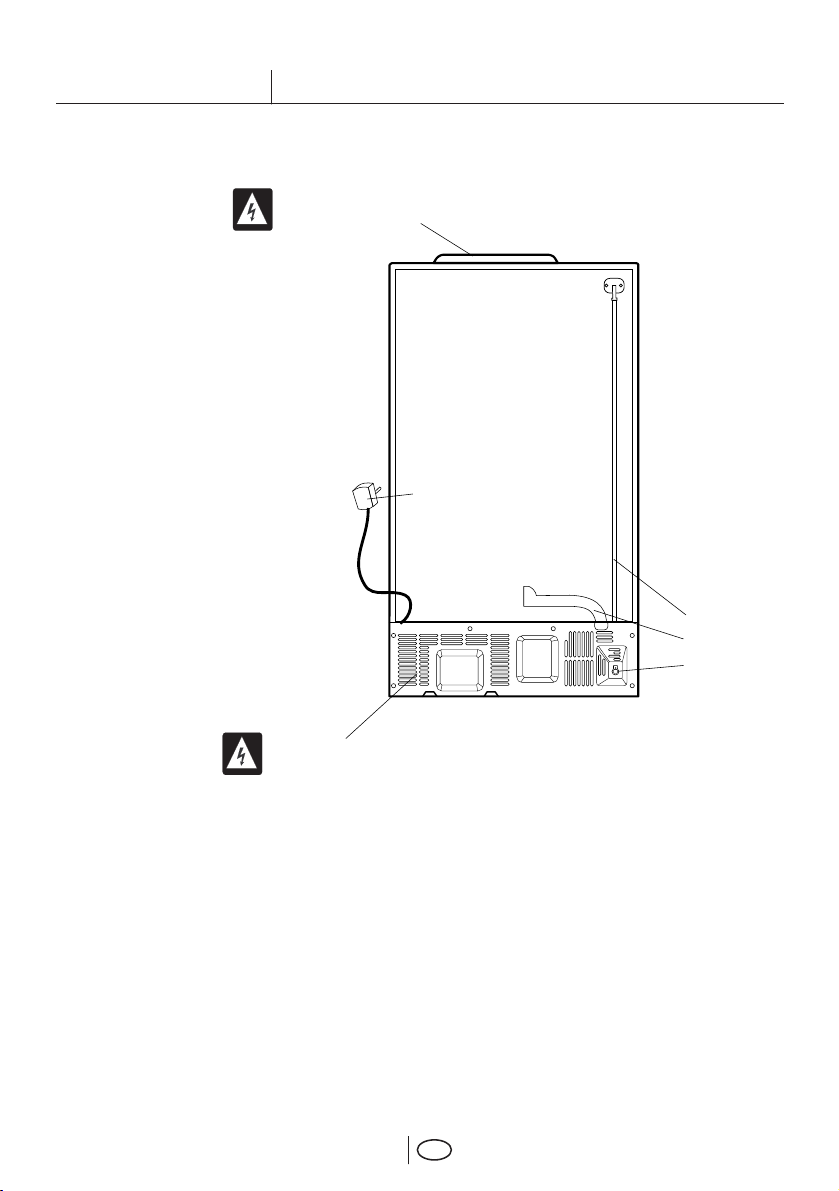
The Refrigerator
MAIN BOARD COVER: NEVER REMOVE THIS COVER
Power mains cable
Icematic water supply pipe
Water pipe cover
Cold water mains inlet valve
REAR COVER: NEVER REMOVE THIS COVER
3
EN
Page 5
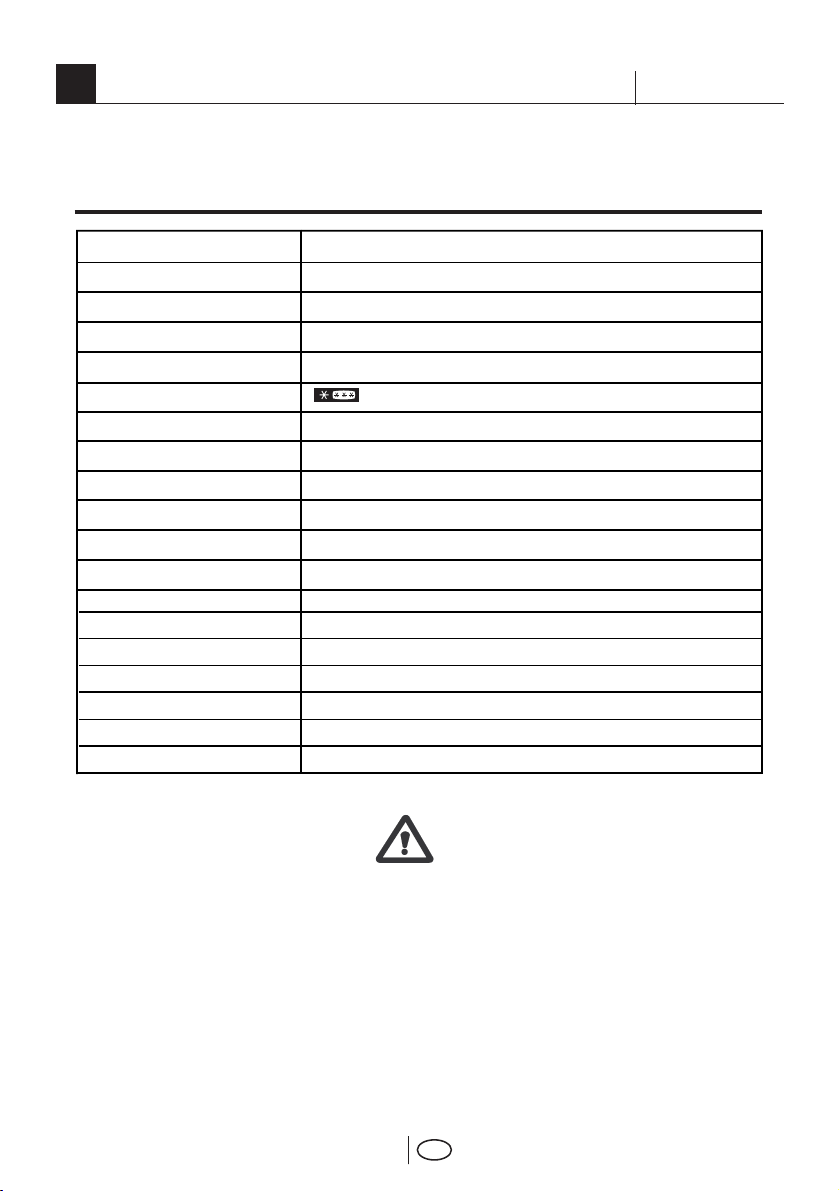
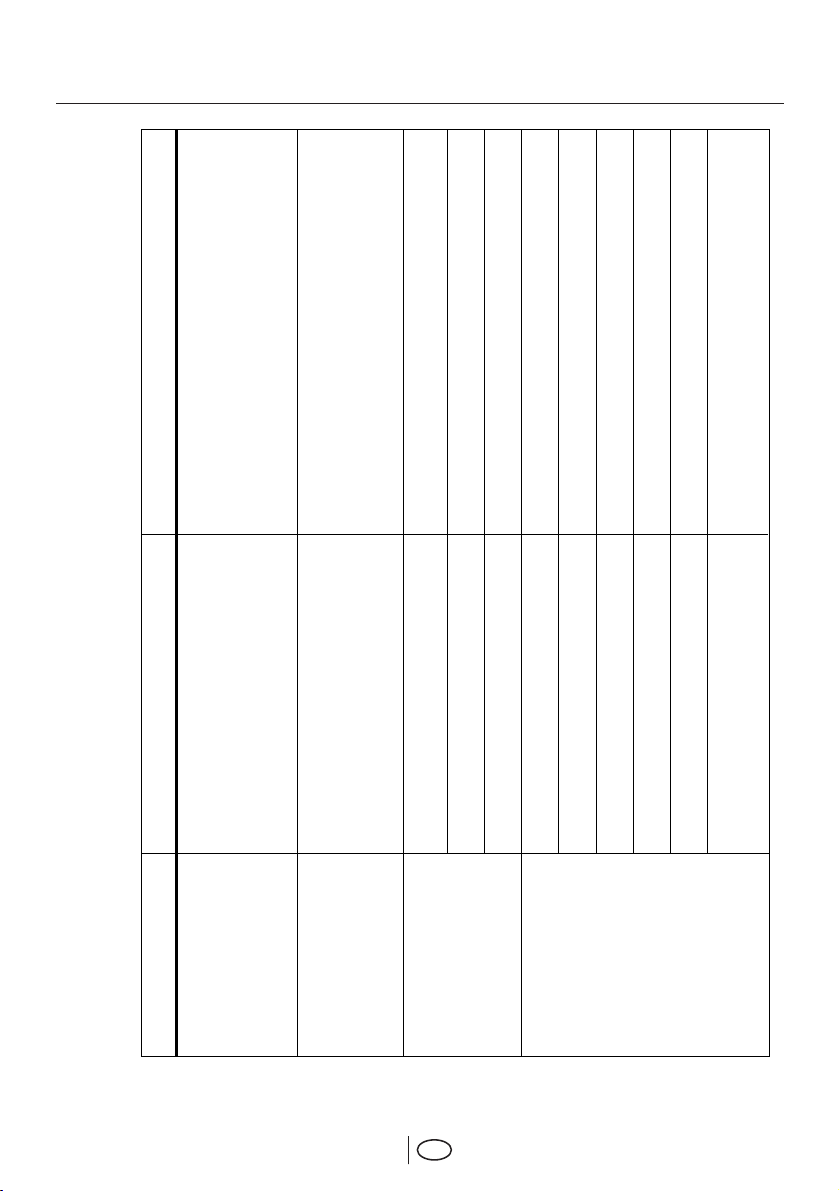
Technical specifications of your refrigerator
1
Product Category
Energy Class
Annual Energy Consumption
(kWh/year)
Fridge Compartment Volume (Net-lt)
Frozen Food Compartment Volume
(Net-lt)
Star Class
Two Star Compartment (lt)
Cooling System
Temperature Increasing Time (hour)
Freezing Capacity (kg/24 hours)
Climate Class
Noise Level (dB(A))
Total Net Volume (lt)
(H) Height (cm)
(W) Width (cm)
(D) Depth (cm)
Weight (kg)
Electric Supply (V/Hz)
Total Power (W)
Refrigerator/deep-freeze for domestic use
A
(Actual consumption varies depending on
529
where and how the appliance is used)
383
146
6
NO-FROST
(Power failure safety; it is recommended not to consume the food
8
in freezer compartment after this period.)
13
SN
46
535
177.5
92.5
74
124
230/50
180
• Technical specifications can be changed to increase the product
quality without being subject to prior notice.
• Values stated on the markings on the product or in the printed
materials supplied with the product are the values obtained in
laboratory in accordance with relevant standards. Such values may
vary depending on the usage of the product and the ambient
conditions.
• You can find the information about the cabin size of the refrigerator
in section “Installing your refrigerator”.
4
EN
Page 6

Prior to operating your refrigerator
2
• Please remember that the manufacturer shall not be held liable if the
information given in the instruction manual is not observed. This
product is designed for domestic use.
Prior to operating your refrigerator,
please read the instruction manual
carefully that includes important
information such as installation,
usage and maintenance of your
product.
Things to be done
• Your refrigerator should be installed at least
30 cm away from heat sources such as hobs,
ovens, central heater and stoves and at least
5 cm in away from electrical ovens and
should not be located under direct sunlight.
• The ambient temperature of the room where
you install your refrigerator should at least be
10°C. Operating your refrigerator under
cooler conditions than this is not
recommended with regard to its efficiency.
• Please care to keep the inside of your
refrigerator clean.
• If two refrigerators are to be installed side
by side, there should be at least 2 cm
distance between them.
• Your refrigerator must run smoothly without
any vibration. To ensure this, maintain the
balance of your refrigerator on the floor by
turning the adjustable front legs clockwise or
counterclockwise. This should be done
before the food is placed in the refrigerator.
• When you operate your refrigerator for the
first time, please observe the following
instructions during the initial six hours.
- Temperature adjustment button should
not be turned off.
- The door should not be opened
frequently.
- It must be operated empty without any
food in it.
- Do not unplug your refrigerator; if a
power failure occurs out of your control,
please see the warnings in section “Things
to be done before calling the authorized
service”.
• Original packaging and foam materials
should be kept for future transportations or
moving.
Points to be Considered when Transporting the Product:
1. Your refrigerator must be emptied and
cleaned prior to any transportation.
2. Shelves, accessories, crisper and etc. in
your refrigerator must be fastened securely
by adhesive tape against any jolt before
repackaging.
3. Packaging must be tied with thick tapes
and strong ropes and the rules of
transportation printed on the package must
be followed.
Why No-Frost?
• No-Frost refrigerators are quite different from
other refrigerators with respect to their
operating principles. In normal fridges, the
humidity that rushes into the refrigerator and
the humidity brought by the food causes ice
formation in the freezer compartment. This
ice is melted and cleaned with certain intervals.
• However, in No-frost refrigerators no ice or
snow formation occurs inside the usable areas
of the refrigerator.
5
Please remember…
Every recycled material is an indispensable
source for the nature and for our national
resources.
If you wish to contribute to recycling the
packaging materials, you can get further
information from the environmental bodies or
local authorities.
• No-Frost refrigerators also show very different
characteristics from other refrigerators with
respect to their cooling systems. A No-Frost
refrigerator provides equal cooling down of
all the food in it thanks to the cool air being
circulated in it continuously.
• Therefore, your No-Frost refrigerator provides
you a great comfort in usage.
EN
Page 7
Safety precautions
This product, included in the newest product
line is particularly environment friendly. Your
product is equipped with a natural cooling
system (R600a) which does not contain CFC
and HFC gases. This gas is flammable.
Therefore, pay attention to not damaging the
cooling system and piping during usage and
transportation. In the event of damage, do not
dispose the product in fire; keep your product
away from potential fire sources that can cause
the product catch a fire and ventilate the room
in which the unit is placed.
• When you want to dispose/scrap the product,
we recommend you to consult the authorized
service in order to learn the required
information and authorized bodies.
• Do not damage the cooling circuit.
• Do not use any electrical tools other than
those recommended by the manufacturer
inside the food storage compartments of the
product.
• Consult your authorized service for all your
questions and problems related to the
refrigerator. Do not intervene or let someone
intervene to the refrigerator without notifying
the authorized services.
• Do not eat cone ice cream and ice cubes
immediately after you take them out of the
freezer compartment! (This may cause frostbite
in your mouth.)
• Do not put bottled and canned liquid
beverages in the freezer compartment.
Otherwise, these may burst.
• Do not touch frozen food by hand; they may
stick to your hand.
• Vapor and vaporized cleaning materials
should never be used in cleaning and
defrosting processes of your refrigerator. In
such cases, the vapor might get in contact
with the electrical parts and cause short circuit
or electric shock.
• Never use the parts on your refrigerator
such as kick plate or door as a means of
support or step.
• Do not use electrical devices inside the
refrigerator.
• Do not operate a damaged refrigerator.
Consult your service if you have any doubts.
• Do not damage the parts, where the
refrigerant is circulating, with drilling or cutting
tools. The refrigerant that might blow out
when the gas channels of the evaporator,
pipe extensions or surface coatings are
punctured may cause skin irritations and eye
injuries.
• Do not cover or block the ventilation holes
on your refrigerator with any material.
• Only authorized service personnel may
6
make any repair on electrical appliances.
Repairs performed by incompetent persons
may create a risk for the user.
• In case of any failure or during a
maintenance or repair work, disconnect your
refrigerator's mains supply by either turning
off the relevant fuse or unplugging your
appliance.
• Be careful not to pull from the cable when
pulling the plug out.
• Electrical safety of your refrigerator shall be
guaranteed only if the earth system in your
house complies with standards.
• Do not allow children play with your
refrigerator. They might harm themselves
and the refrigerator. (E.g. do not allow them
hang from the door.)
• Place the beverage with higher proofs tightly
closed and vertically.
• Flammable items or products that contain
flammable gases (e.g. spray) as well as the
explosive materials should never be kept
in the appliance.
• Do not use mechanical devices or other
means to accelerate the defrosting process,
others than those recommended by the
manufacturer.
• Moving parts such as blades in a
housing at the ice outlet of the
dispenser and in cube ice
compartment, must not be touched to
avoid injury.
This appliance is not intended for use by
persons (including children) with reduced
physical, sensory or mental capabilities,
or lack of experience and knowledge,
unless they have been given supervision
or instruction concerning use of the
appliance by a person responsible for
their safety.
Children should be supervised to ensure
that they do not play with the appliance.
Electrical Safety
This product is designed for indoor use. It is
not appropriate to use it outdoor even if the
place is covered with a roof.
Exposing the product to rain, snow, sun and
wind is dangerous with respect to electrical
safety.
If the connection cable is damaged, it must
be changed by the manufacturer or customer
services in order to avoid potential risks to
you.
EN
Page 8
Placing and Assembly of Your Refrigerator
Caution: Never plug the refrigerator in to
the wall outlet during installation. Otherwise,
risk of death or serious injury may arise.
If the entrance door of the room where the
refrigerator will be installed is not wide enough
for the refrigerator to pass through, than call
the authorized service to have them remove
the doors of your refrigerator and pass it
sideways through the door.
1. Install your refrigerator to a place that
allows ease of use.
2. Keep your refrigerator away from heat
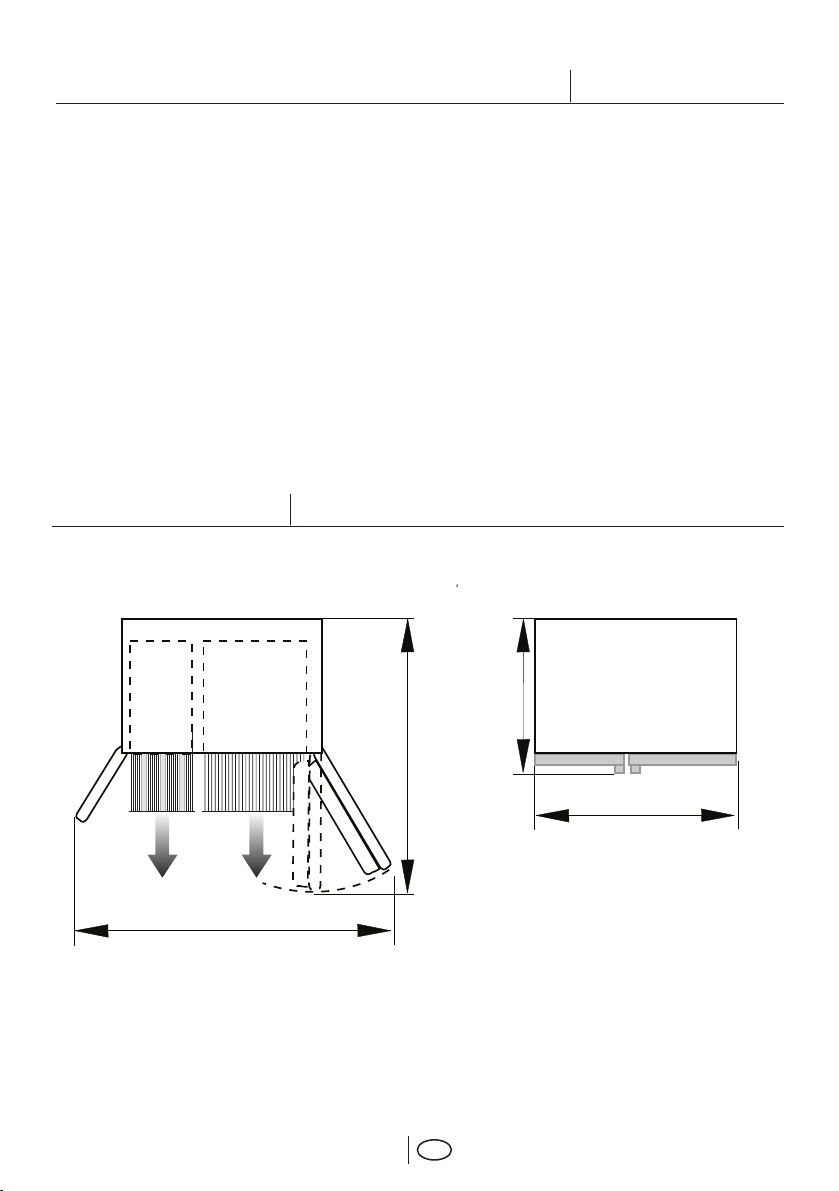
Usage area measures
Following figure shows the required place to
allow you use your refrigerator most efficiently.
sources, humid places and direct sunlight.
3. There must be appropriate air ventilation
around your refrigerator in order to achieve
an efficient operation. If the refrigerator is to
be placed in a recess in the wall, there must
be at least 5 cm distance with the ceiling and
at least 5 cm with the wall.
If the floor is covered with a carpet, your
product must be elevated 2.5 cm from the
floor.
4. Place your refrigerator on an even floor
surface to prevent jolts.
5. Do not keep your refrigerator in ambient
temperatures under 10°C.
74 cm
154 cm
7
117 cm
92.5
EN
Page 9

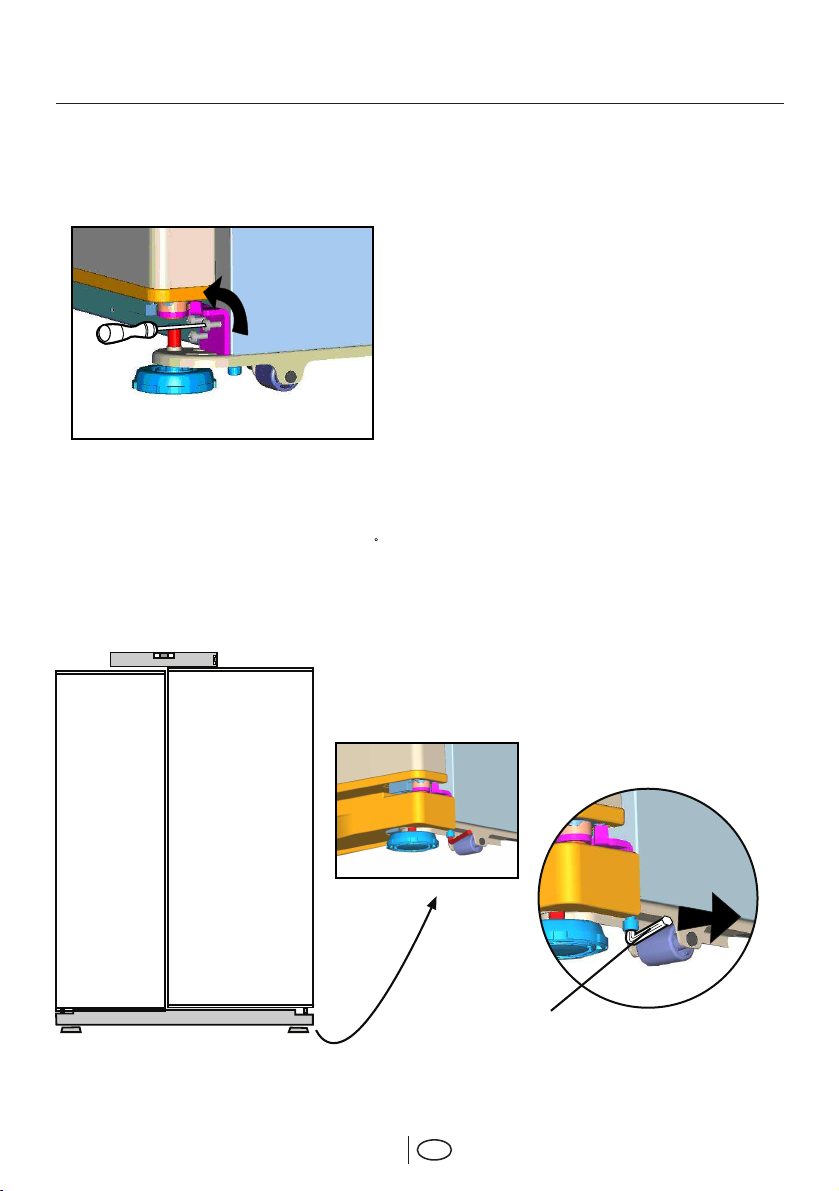
Floor balance adjustment
4
1 2 3
Door height adjustment
If your refrigerator is not level, you can level
it by turning the front feet as illustrated in the
figure below. (See. Figure A) The corner
where the leg exists is lowered when you turn
in the direction of black arrow and raised when
you turn in the opposite direction. Taking help
from someone to slightly lift the refrigerator
will facilitate this process.
In case there is a problem with the
alignment of the doors, with respect to
each other, they may be aligned by
ascension vertically in the order given
below. Ensure that door shelves are
empty when adjusting the door height.
1. Remove the lower ventilation door by
unscrewing its screws, as shown in the figure
below. (See. Figure B)
(Figure A)
(Figure B)
EN
8
Page 10
2. Loosen the three screws of the hinges of
the lower door, which you wish to escalate,
with the help of a screwdriver as shown in
the figure below. (Do not remove completely)
(See. Figure C)
(Figure C)
• If the freezer compartment door is lower
than the fridge compartment door, bring them
to the same level by turning the turning the
elevation screw on the freezer compartment
side in the direction of arrow using a M6 Allen
wrench as illustrated in Figure D.
• If the freezer compartment door is higher
than the fridge compartment door, bring them
to the same level by turning the elevation
screw on the freezer compartment side in the
direction of arrow using a M6 Allen wrench
as illustrated in Figure D.
After bringing the doors to the same level by
elevating the front part with the aid of the
elevation screws, doors of the refrigerator
shall close properly. If the doors do not close
properly, this might adversely affect the
efficiency of the refrigerator.
Allen Wrench (M6)
EN
9
(Figure D)
Page 11

Installation Requirements
1
2
In order to operate the automatic ice
maker/dispenser and chilled water dispenser,
your appliance needs to be plumbed into the
cold mains water supply in your house via a
standard 1/2 “ valve fitting. In case this valve
is not present or in case you are not sure,
consult a qualified plumber.
* First of all, make sure that the parts on the
side are shipped with the device.
1. 5-meter long water pipe (1/4 inch in
diameter)
2. Cold mains water valve with mesh filter
(Tap Adapter)
3. 3 pieces of pipe clips (In case required to
secure the water pipe)
4. Water Filter to be fitted to the bracket
inside the fridge compartment.
5. Nut for connection of the water pipe to the
rear of the appliance
Connection to the Cold Mains
Please follow the instructions below.
1
2
3
5
4
MAKE SURE THAT STANDARD 1/2”
VALVE FITTING FED BY COLD MAINS
WATER SUPPLY IS AVAILABLE AND
IS TURNED OFF FULLY.
Connection of the Water Pipe to the
Refrigerator
1. After assembling the nut on the water
pipe, insert the water pipe to the refrigerator
inlet valve by pressing downwards firmly.
2. Fix nut as seen in the opposite figure, by
squeezing by hand on the refrigerator inlet
valve.
Note: You should not need to tighten the
nut with a tool to achieve water tight
assembly. In case of a leak use a spanner
or a pair of pliers to tighten the nut.
10
Water Tube
Water Tube
Nut
Valve
EN
Page 12
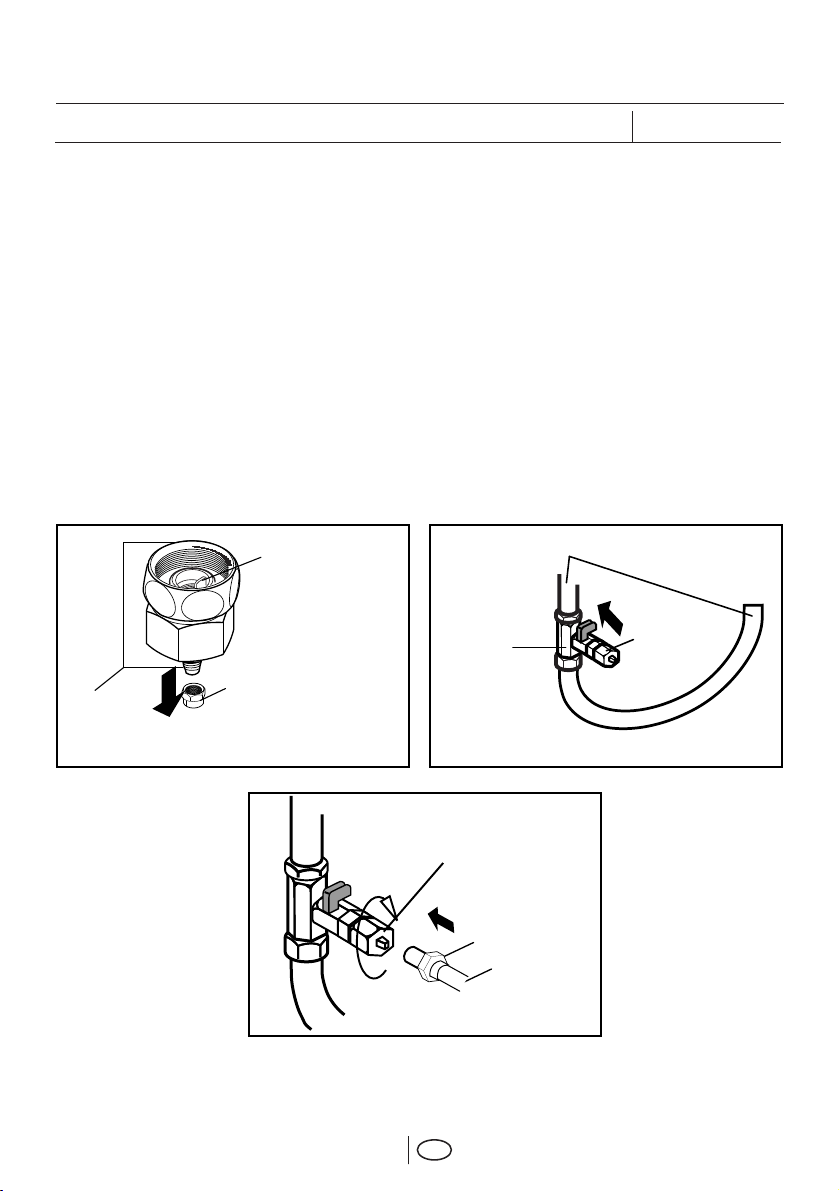
Connection of the Water Pipe to the Cold Water Mains Line
1. Separate the nut from the tap adaptor.
(Figure A)
2. As shown in the figure, assemble the tap
adaptor to 1/2” valve fitting (Figure B)
3. As shown in the figure, after inserting the
water pipe to the nut, install it to the tap
adaptor and insert to the tap as shown in the
figure. (Figure C)
4. Tighten the nut manually. In case of a
leak use a spanner or a pair of pliers to
tighten the nut.
Mesh Filter
Tap Adaptor
Nut
Figure A
Caution: Secure the water pipe to suitable
points by means of the pipe clips supplied
to avoid any damage or displacement or
accidental disconnection.
Caution: After turning on the water valve,
make sure that there is no leakage at both
connection points of the water pipe. In case
of a leak, turn off the valve immediately and
tighten all joints again using a spanner or a
pair of pliers.
Main Cold Water Line
Tap
Adaptor
Feed
Valve
Figure B
11
Tap
Adaptor
Nut
Water Tube
Figure C
EN
Page 13
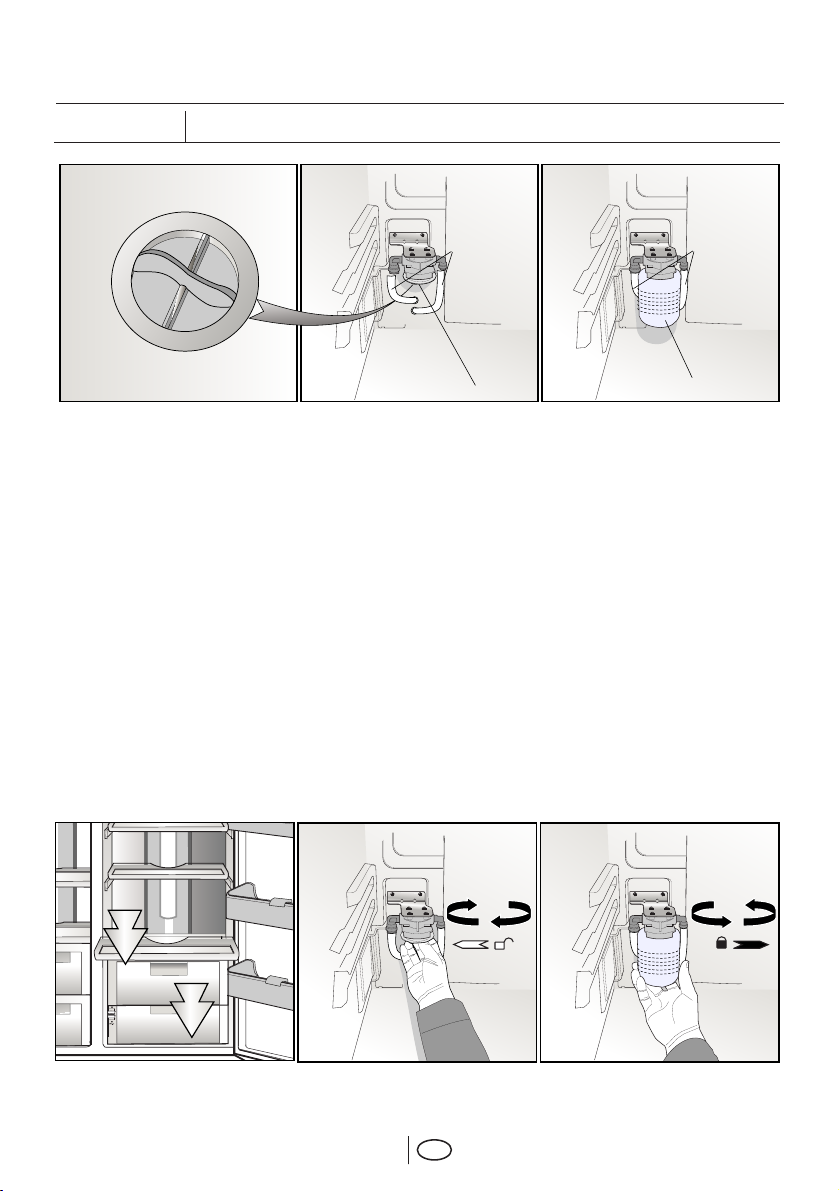
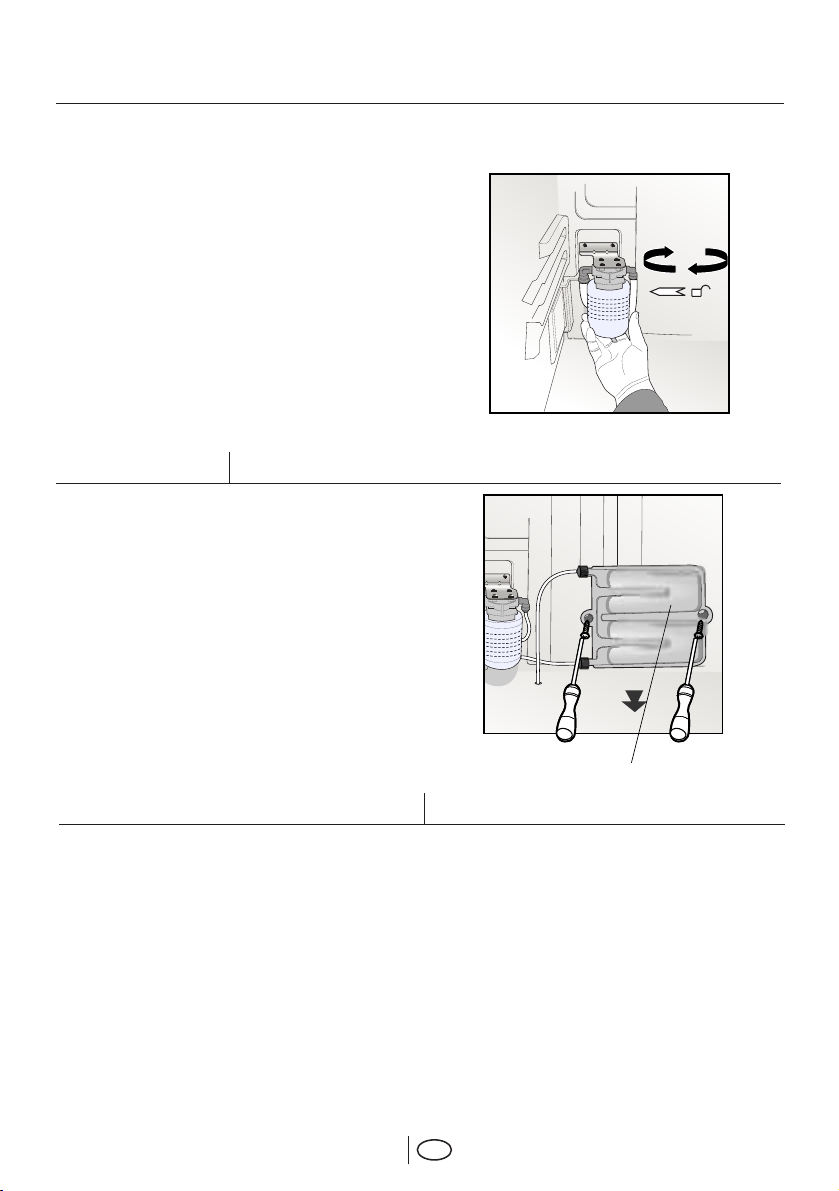
Water Filter
Water Pipe Water Pipe
By-pass Cover
To fit the water filter follow the instructions
below referring to figures supplied:
1. Take out the upper salad crisper in the
fridge as shown in the figure below.
2. Unscrew the water filter by-pass cover.
Caution: Make sure that the Ice off mode
is active before taking out the by-pass cover.
Note: It is normal that a few drops of water
drip after the cover has been taken out.
3. After removing the red cover on the head
of the water filter, install it as shown in the
figure below.
4. Press Ice Off button on the display again
to exit from this mode.
Water filter should be replaced every 6
months. Water filter replacement warning will
Bypass Cover
Filter
appear on the screen after about 6 months.
The warning light will remain on for about 15
days before it starts to flash. Once the filter
has been replaced, this warning light can be
cancelled by pressing the Eco Extra button
on the display for 5 seconds.
The water filter must be removed as shown
in the figure when it is going to be replaced
or when it will no longer be used. Make sure
that the Ice off mode is active before removing
the water filter.
If you do not want to use the water filter,
warning light should be cancelled. To do this,
“Freezer Set” and “Water/Ice Type Selection”
buttons must be pressed simultaneously for
2 seconds. Filter warning will flash for 5 times
when pressed in this way and the warning
will be cancelled. Filter warning will flash for
10 times when the same buttons are pressed
REMOVE LOCK
1 2 3
EN
12
Page 14
for 2 seconds and the warning will be
reactivated.
Caution: Water filter is for cleaning some
foreign particles in the water. It does not purify
water from microorganisms.
Caution: Ice off button must always be
pressed during replacement of the water filter
or installing the bypass cover.
Water Reservoir
If you wish to disassemble the water reservoir
from the refrigerator for cleaning the vicinity
of the water reservoir follow the instructions
below;
• Remove the 2 screws by using a cross
headed screwdriver as shown in the figure.
• Gently hold and remove the water reservoir
as shown in the figure.
REMOVE
Caution:
Never remove the bolts, assembled to the
water reservoir.
Ice/Water Dispenser Prior to First Use
• Water mains pressure must not be below 1
bar.
• Water mains pressure must not be over 8
bars.
• Pumps must be used in case the water
mains pressure drops below 1 bar.
• Water system of the refrigerator must be
connected to the cold water line. It must not
be connected to hot water line.
• Do not forget to remove the ice channel
cover from its location before using Ice
Dispenser.
13
Water Reservoir
• In case you see condensation on the
dispenser (water drops) or in case you connect
your device to the water mains, make sure
that the anti-condensation switch is pressed.
(See Page 15) Anti-Condensation button is
pressed as a factory setting.
• Dispenser will not work when the door of the
freezer compartment is open. Make sure that
the door is closed for the operation of the
dispenser.
• No water may be obtained in the initial
operation of the refrigerator. This is caused
by the air in the system. To discharge air from
the system, press Dispenser latch for periods
EN
Page 15

of 1 minute until water comes from the
Dispenser. Water flow may be irregular in the
beginning. Irregular water flow will be
normalized after the air in the system is
discharged.
• When the refirigerator is run for the first
time, Water Dispenser choice will be selected
automatically. However, approximately 12
hours must pass before cold water can be
obtained.
8 bars for the operation of Ice/water Dispenser
smoothly. For this, check that 1 glass of water
(100 cc) can be filled in 10 seconds.
• The first 10 glasses of water should not be
consumed.
• 12 hours must pass to obtain ice from the
Ice Dispenser for the first time. In case not
enough ice is present in the ice dispenser,
ice may not be obtained from ice dispenser.
• Water mains pressure must be between 1-
Operating your refrigerator
Before you start using the fridge/freezer check
that:
1. The feet have been adjusted so that the
product stands level.
2. The interior is dry and air can circulate
freely at the rear.
3. Clean the interior as recommended under
"CLEANING AND CARE."
4. Plug the refrigerator into the power mains
outlet.
• When the door is open the respective
interior light will come on.
5. You will hear a noise as the compressor
starts up. The liquid and gases sealed within
the refrigeration system may also give rise
to noise, even if the compressor is not running
or not which is quite normal.
Due to the operation of fans inside the
appliance, overall noise level is slightly
higher in comparison to non-frost free
appliances. This is quite normal and is
not a fault.
6. Front edges of the refrigerator may feel
warm. This is normal. These areas are
designed to be warm to avoid condensation.
7. Do not fill the interiors of the refrigerator
in initial operation. Wait until the correct
storage temperature has been reached. (See
page 16)
• Approximately the first 30 cubes of ice to be
obtained from the ice dispenser must not be
used.
8. When the compartments reach the
desired temperatures fans will stop.
9. Especially pay special attention to prevent
the foodstuffs, in particular, small pieces,
such as rice, peas and beans from running
into the fan protectors and air flow ducts.
These may cause clogging of the cooling
system and a decrease in the efficiency of
the device.
10. The factory set temperature is +4°C for
fridge compartment and -18°C for freezer
compartment.
11. The compressor will start running
approximately 5 minutes after the refrigerator
is plugged in to protect the electronic
components of your appliance. After startup
of the compressor, compartment
temperatures will reach to the setup
temperatures in 24 hours depending on the
ambient temperature and load status of your
refrigerator.
12. Pay attention to the following points during
the first 24 hours of the operation:
-Do not open the doors frequently.
-Do not overload your refrigerator.
-Do not put hot food.
14
EN
Page 16
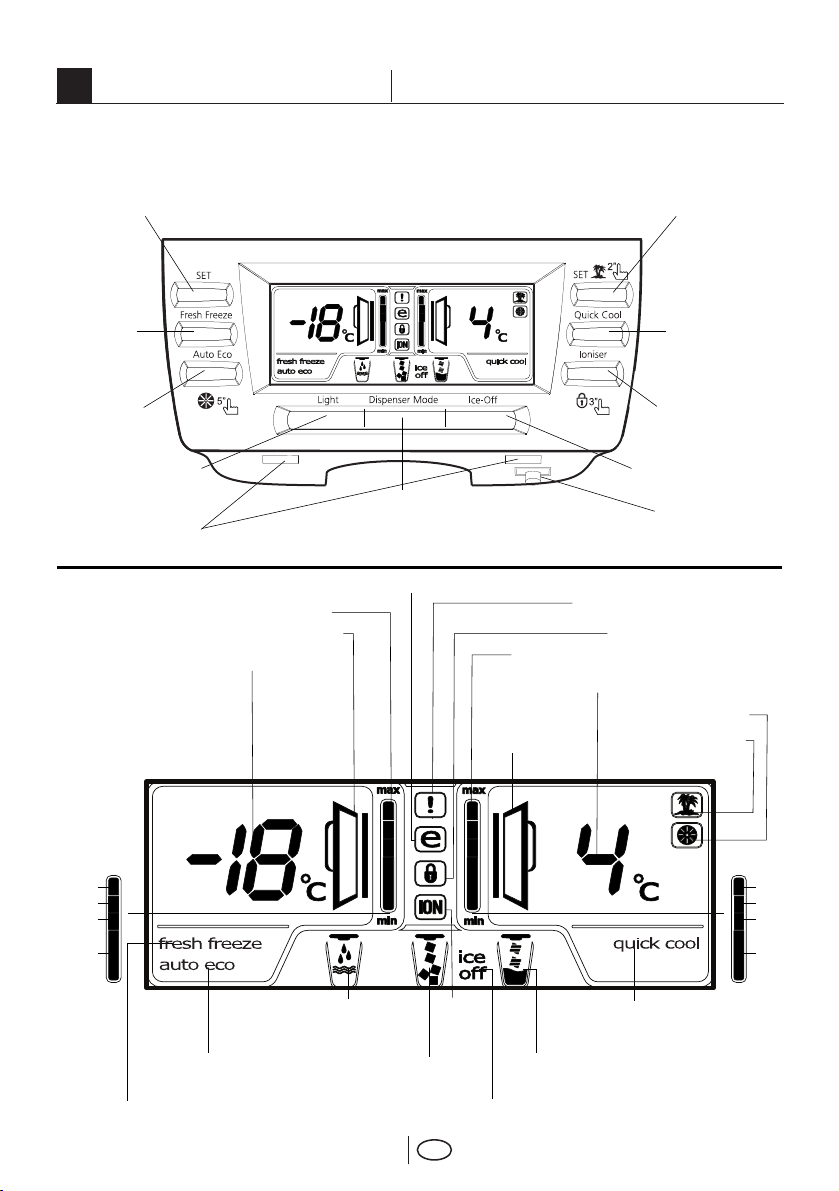
Using your refrigerator
3
Setting Buttons and Temperature Control
Control buttons allow you to make the settings of your refrigerator easily and without opening
the doors. Thus, heat loss is avoided.
Freezer Set button
Fridge Set/ Vacation button
Fresh
Freeze
Button
Eco
Extra
Button
Water Dispenser light
button
Water Dispenser Lights
Freezer Compartment Temperature
indicator
Freezer Door Open indicator
Freezer Temperature Setting indicator
-24 °C
-22 °C
-20 °C
Ice / Water selection button
Economy Mode indicator
Freezer Door
Open indicator
Quick Cool
button
Ioniser / Key lock
button
Ice-off button
Anti-condensation switch
High Temperature/ Error
Warning indicator
Key Lock indicator
Fridge Temperature indicator
Fridge Temperature Setting indicator
Filter indicator
Vacation indicator
2 °C
4 °C
6 °C
-18 °C
Eco Extra indicator
Fresh Freeze indicator
Water indicator
15
Ionizer
indicator
Ice Cube
Ice Off indicator
EN
8 °C
Quick Cool indicator
Crash Ice indicator
Page 17
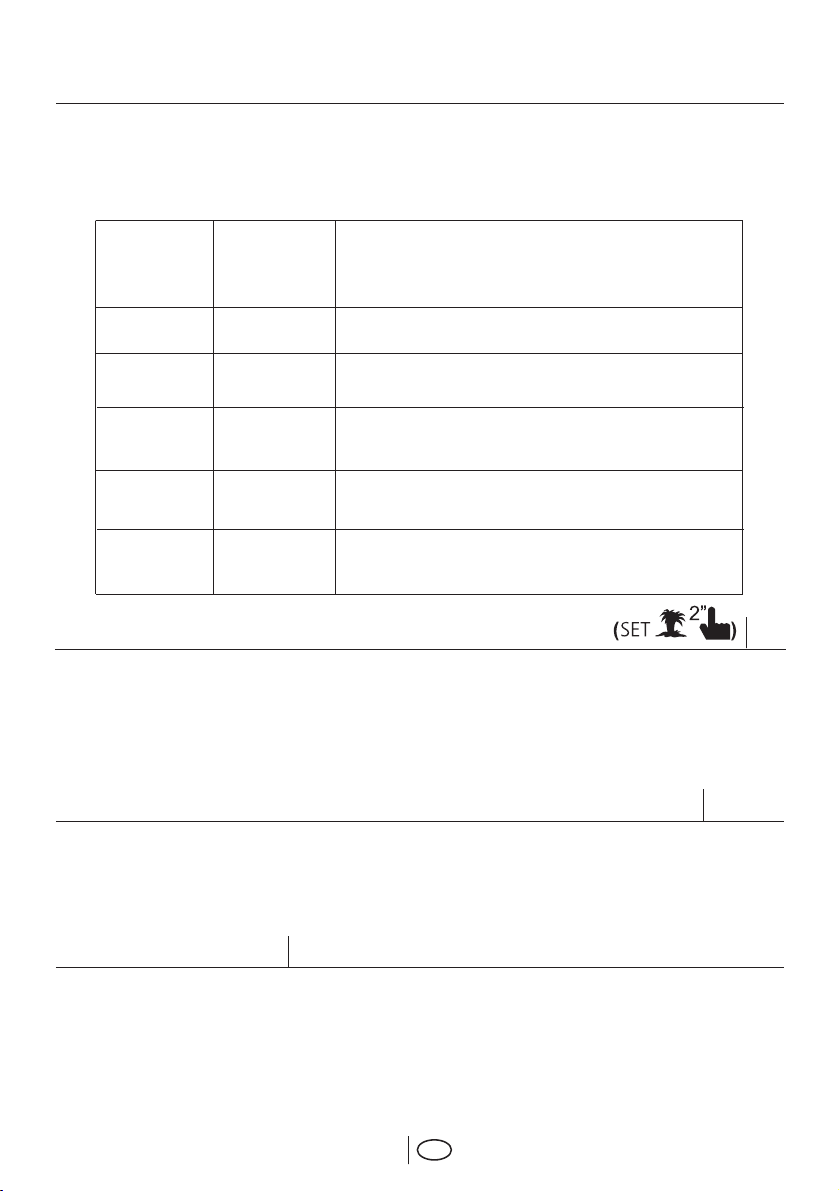
Fridge/Freezer Door Open Indicator:
Fridge/Freezer Door Open Indicator is activated either fridge or freezer door is open. If the
door remains opened for 60 sec, buzzer is on to alarm. If any button on display is pressed
buzzer will be off even if the door is not closed.
Freezer
Compartment
Adjustment
-18°C
-20,-22 or -24°C 4°C
Fresh freeze
Display will show
-27°C
-18°C
or colder
-18°C
or colder
Fridge
Compartment
Adjustment
4°C
4°C
2°C
Quick cool
Display will
show +1°C
Explanations
This is the normal recommended setting.
These settings are recommended when the ambient
temperature exceeds 30°C.
Use this when you wish to freeze your food or make ice in a
short time. Your refrigerator will return to its previous mode
when the process is over.
If you think that your fridge compartment is not cold enough
because of the hot conditions or frequent opening and closing
of the door.
You can use it when your fridge compartment is overloaded
or if you wish to cool down your food rapidly.
Making the Fridge Compartment Temperature Adjustment
Fridge temperature can be set at one of the
following temperatures : 8,6,4 and 2°C
Press the button to change. The temperature
will decrease by 2°C. Everytime you press
the button, it will go down and then around
to the highest setting. Release at the desired
temperature and the new set temperature
will be stored.
If you think that your food is colder than you
desired, you can adjust the temperature
setting of fridge compartment to 6 or 8.
Making the Freezer Compartment Temperature Adjustment (SET)
Freezer temperature can be set at one of
the following temperatures : -18,-20,-22 and
-24°C
Press the button to change. The temperature
will decrease by 2°C. Everytime you press
Fresh Freeze Function
When you press “Fresh Freeze" button, the
compressor will run for about 24 hours. Fresh
Freeze indicator will glow and freezer
compartment temperature settings will switch
to -27°C whilst the Fresh Freeze is active. To
cancel this function press Fresh Freeze
button again. Fresh Freeze indicator will turn
off and return to its normal settings. Fresh
16
the button, temperature will go down and
then return to the highest setting. Release at
the desired temperature and the new set
temperature will be stored.
Freeze will cancel itself automatically after
about 24 hours if you do not cancel it.
If you want to freeze large amounts of fresh
food, press the fresh freeze button 24 hours
before putting the food into the freezer
compartment.
EN
Page 18
Quick Cool Function
When you press “Quick Cool” button, the
temperature of the compartment will be
colder than the adjusted values. This function
can be used for food placed in the fridge
compartment and required to be cooled down
rapidly.
After pressing the Quick Cool button, Quick
Cool indicator will glow and fridge
Vacation Button
In case the fridge compartment will not be
used for a long time, the usage of the fridge
compartment may be cancelled by pressing
on the “Set” Button. By this way, the
refrigerator may operate more economically.
Special Economy Function (Auto Eco)
compartment temperature setting will switch
to 1°C whilst the Quick Cool is active. To
cancel this function press Quick Cool button
again. Quick Cool indicator will turn off and
return to its normal settings. Quick Cool
function will cancel itself automatically in case
you do not cancel it.
Press on Vacation Button for 2 seconds to
activate this function. When this function is
active, the door of the fridge compartment
must be kept closed and no food must be left
in the fridge compartment.
When “Auto Eco” button is pressed, Special
Economy Function will be activated. If the
door of the fridge compartment is kept closed
for a long time when this function is selected,
the fridge compartment will switch to a more
economic operation mode to safe electricity
automatically. When the “Auto Eco” button
is pressed again, this function is deactivated.
Ion+ Button (Ioniser)
Ionizing in the refrigerator is carried out
automatically.
Press this button if you request extra ions.
Key Lock Button (Ioniser)
The key lock is activated when this button is
pressed for 3 seconds and all buttons and
the dispenser latch will not work. If you want
to deactivite key lock press again for 3
seconds.
Water Dispenser Illumination (Light)
When the “Light” button is pressed, the water
dispenser lamp will light up and it will go off
when the button is pressed again. This
illumination will also light up when the water
dispenser latch is pressed, and it will go off
delayed when the latch is released.
Water/Ice Type Selection (Dispenser Mode)
With “Dispenser Mode” button, either one of
“water” or “ice cube” or “crushed ice” options
is selected.
17
EN
Page 19
Using the accessories
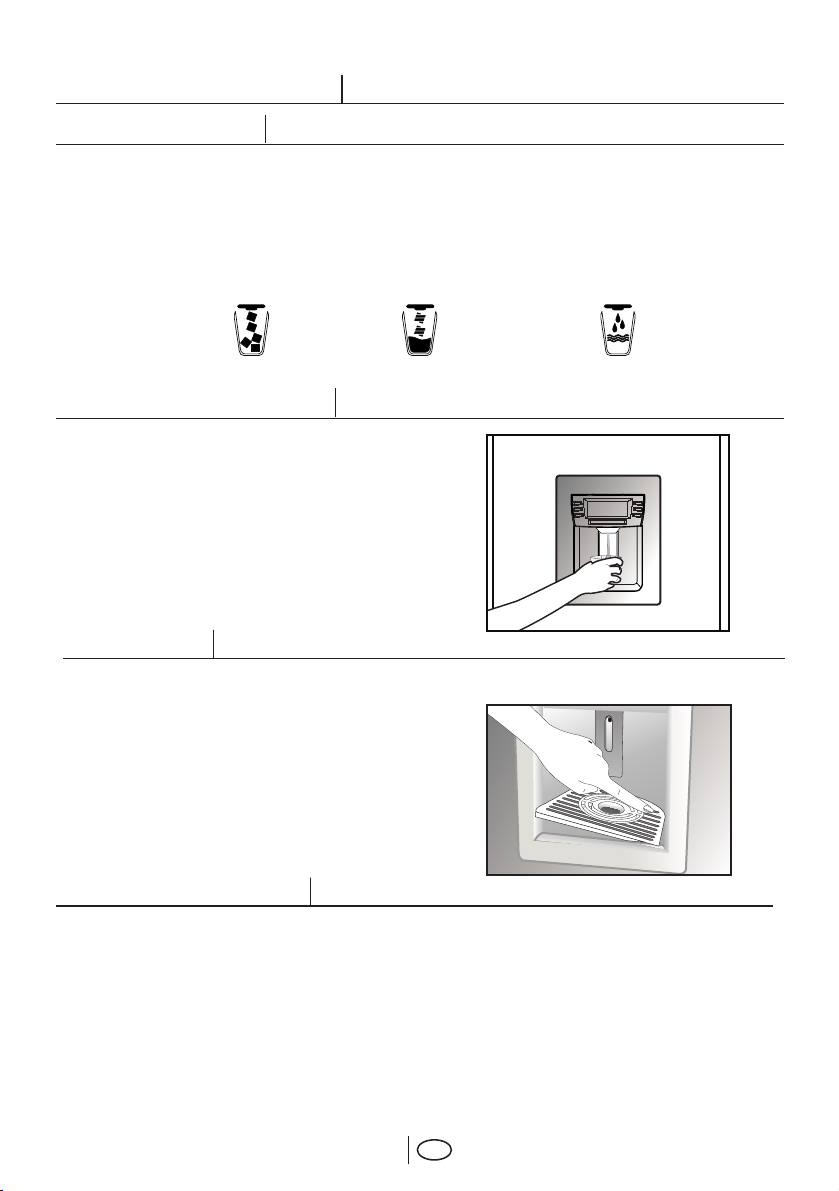
Ice/Water Dispenser
With its three different functions, the dispenser
efficiently meets your cold water, cube ice
and crushed ice needs without having to open
the door of the refrigerator. It is a continuous
cold water and ice source without adding
water. User friendly control panel provides
the following dispensing functions:
Note:
• Water or ice can be dispensed for a
maximum of 60 seconds at each use.
• When the freezer door is open, the dispenser
will not work.
Ice Cube
Crushed Ice
Using the Water Dispenser
Warnings
* It is normal for the first few glasses of water
taken from the dispenser to be warm.
* In cases where the water dispenser has not
been used frequently, sufficient amount of
water must be drained from the dispenser to
get fresh water.
Spillage Tray
Water drops that drip during use, accumulates
in the spillage tray. Remove the spillage tray
by pressing down in the right corner. You can
remove the water with a sponge or a soft
cloth.
Using the Ice Dispenser
Cold Water
Please note, first ice cubes will not be ready
before 12 hours after switching on the
appliance.
In case you do not need ice, such as during
winter or in case you are on vacation, turn on
Ice Off function.
Ice device produces approximately 110 cubes
of ice in 24 hours and this amount may change
according to the frequency of opening of doors,
18
refrigerator settings and power outage.
Produced ice may be obtained from the
dispenser as cube ice or crushed ice.
It is normal to get crushed ice from the
dispenser in a longer time than in getting the
ice cubes and also flowing of some crushed
ice before the ice cubes drop if crushed ice
option had been selected
Change in the smell or taste of the ice or sticky
EN
Page 20
cubes and a decrease in the form of ice is
normal in case ice is not obtained from
dispenser for a long time or in case of power
outages. If this is the case, the ice in the icebox
must be controlled and the icebox should be
emptied and cleaned thoroughly.
Warnings
• No ice must be added to the ice dispenser
compartment. This may adversely affect the
ice supply or crushing the ice.
• It is normal to have a couple of ice cubes
stuck together in the icebank.
• Moving parts such as blades in a housing
at the ice outlet of the dispenser must not be
touched to avoid injury.
• Never use sharp objects to break the ice
in the icebox. This may cause damage on the
icebox.
• Food stuff should never be placed into the
icebank for quick cooling purposes.
• In case you see condensation on the
dispenser (water drops) or in case you connect
your device to the water mains, make sure
that the anti-condensation switch is pressed.
(See Page 15) Anti-Condensation button is
pressed as a factory setting.
• When the ice container is to be removed
for any reason, first of all Ice Off Button must
be pressed.
Ice Off
To stop ice formation, “Ice Off” button is
pressed. When ice off is selected, no water
will be taken into the Icematic. However,
already existing ice can be taken from the
dispenser. To restart ice formation, “ice off”
button must be pressed again.
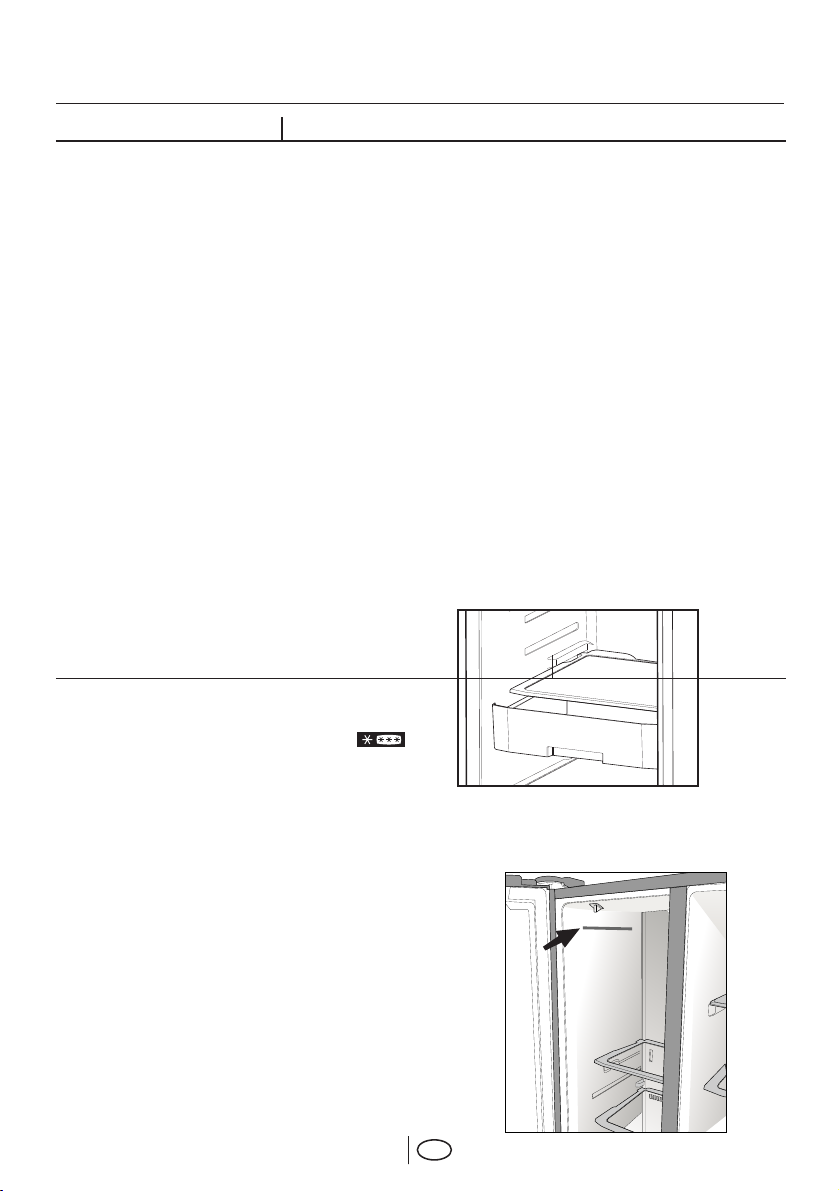
Caution: If you do not use the ice dispenser,
do not forget to put ice duct cover into the ring
inside of the freezer door. (See. Page 2)
Cleaning the Icebox and the Water Dispenser
Follow the procedure and warnings below to
clean the icebox:
• Remove the Icebox by lifting first and then
pulling towards yourself as shown in the
diagram.
• Empty the ice in the Icebox if any. To take
out the stuck ice, use objects that are not
sharp to avoid any damage on the Icebox.
• Pay attention that the inside of the Icebox
is not wet/damp before placing it back to its
housing.
• If you want to get ice from the ice dispenser
after placing theicebox back to its housing
and closing the freezer door, exit from ice off
mode by pressing the ice off button again.
2. Pull
1. Lift
• Do not touch moving parts like the knife
in the Icebox
19
EN
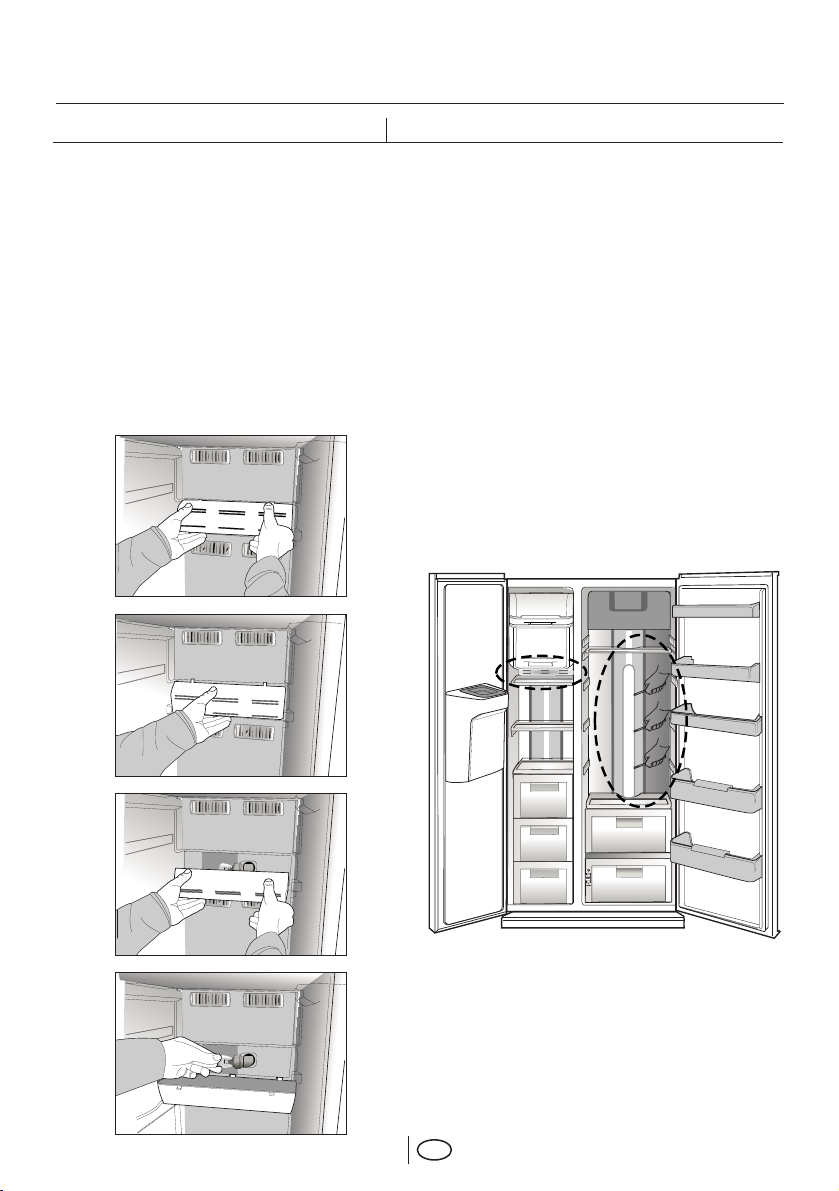
Page 21
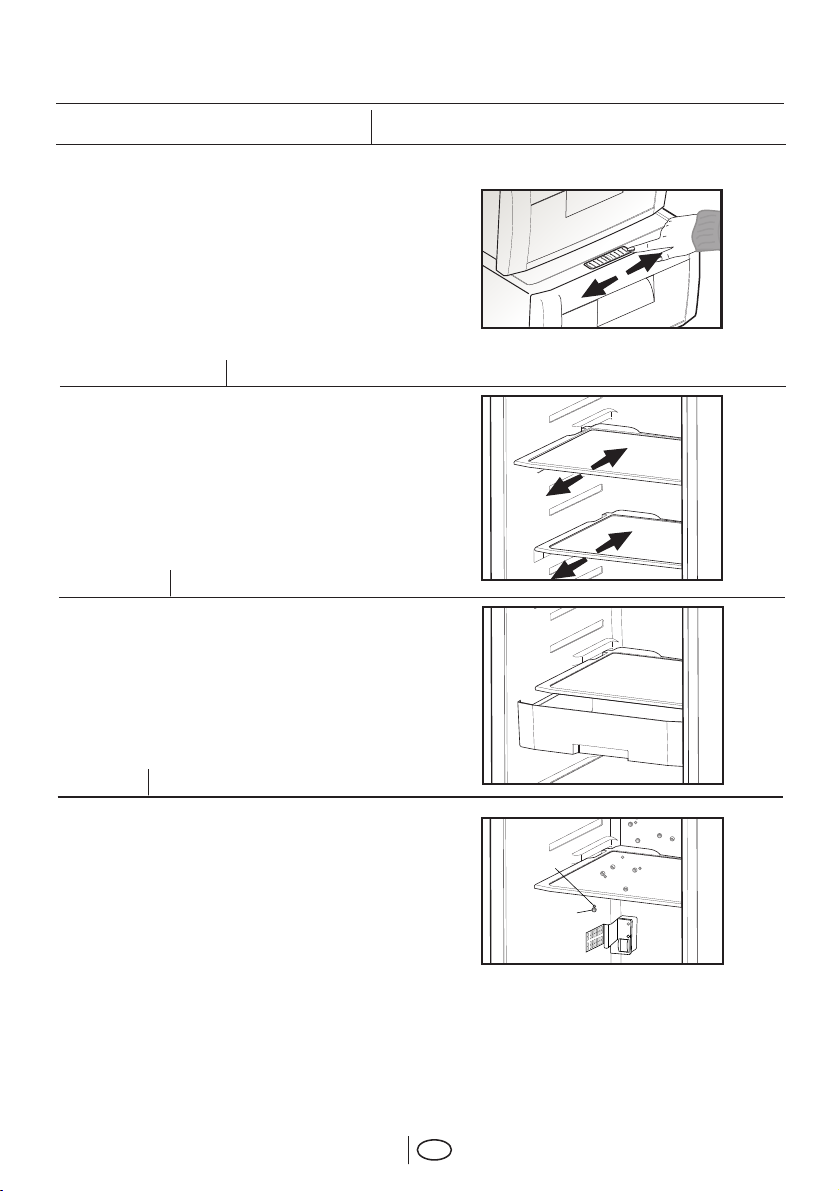
Humidity control in the crisper
Humidity level can be adjusted by sliding the
humidity adjustment slider to the right or left.
• If you want to maintain humidity in this
compartment, set the humidity adjustment
slider to the closed position. (Left)
• If you want to eliminate humidity in this
compartment, set the humidity adjustment
slider to the open position. (Right)
Sliding Shelves
Sliding shelves can be pulled by about 10 cm
to easily reach the food placed at the rear of
the shelf in the side fridge compartment and
also for easier cleaning.
Snack Tray
Snack Tray can be used to store small items
that you frequently use. Please take extra
care not to damage the Snack Tray when you
take it out of the fridge and place it back in
the fridge gently.
Ioniser
It is in the air channel of refrigerator back side
of the crisper. With ionizing the air, airborne
bacteria and the bad smell originated from
these bacteria will be reduced.
20
Bacteria
Ion
EN
Page 22
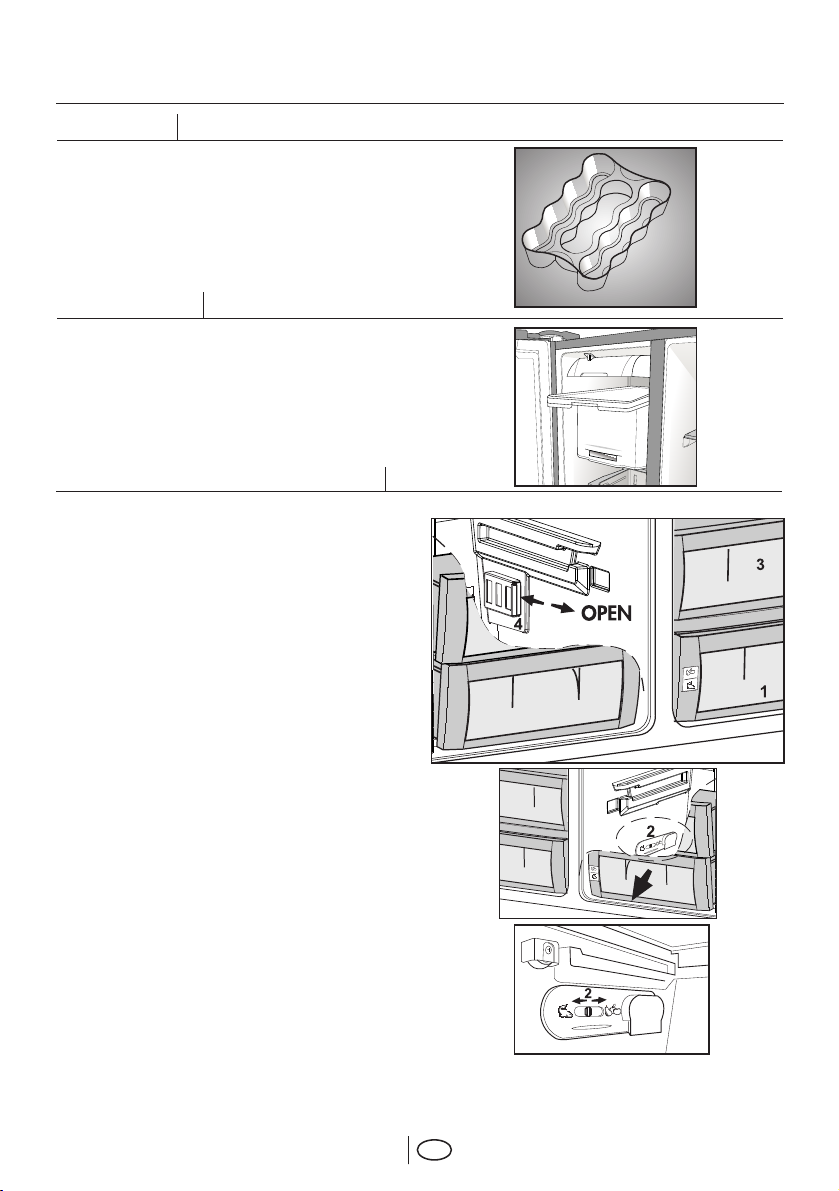
Egg Holder
You can install the egg holder to the desired
door or body shelf.
Never store the egg holder in the freezer
compartment
Fresh Freeze
This compartment freezes your food quickly
and preserves their tastes and nutritional
values.
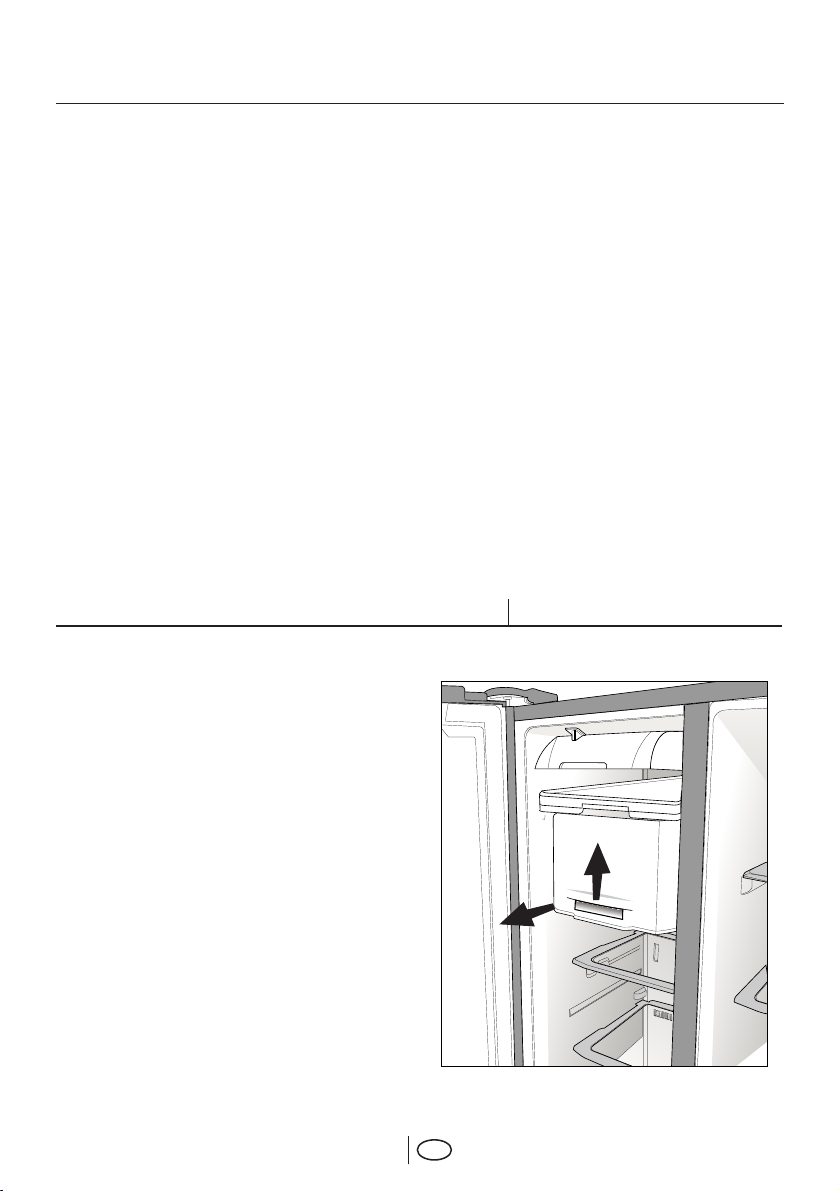
Crisper and Chiller Compartment
Crisper or Chiller (0°C i. e. zero degree
centigrade compartment (1)
• The drawer at the bottom of the fridge
compartment can be converted into a salad
crisper or a Chiller Compartment.
• The Chiller Compartment will keep the
temperature below the temperature in the
fridge compartment around 0°C and so, meat
or fish can be kept fresher for longer.
Chiller Compartment is also ideal for the
storage of ready cooked chilled food.
Important:
• Vegetables and fruits may freeze if the
adjustment slider (2) is kept at Chiller
Compartment position. Therefore, check the
position of the slider (2) before storing food.
• In ambient temperatures at 10°C or lower,
green leaf vegetables and other easily frozen
salad should be removed from this
compartment (1) and placed into the upper
crisper compartment. (3)
• Do not swap the position of these drawers
and make sure that the position adjustment
slider is set at the desired position i.e. salad
crisper or Chiller Compartment.
• In ambient temperatures at above 28°C, if
the compartment (1) is desired to use colder,
the adjustment slider (4) into the freezer can
be converted to open position. Be sure the
adjustment slider (4) into the freezer is in close
position when the ambient temperature is at
28°C or lower.
21
EN
Page 23
Freezing Fresh Food
• It must be preferred to wrap or cover the
food before placing them in the refrigerator.
• Hot food must cool down to the room
temperature before putting them in the
refrigerator.
• The foodstuff that you want to freeze must
be fresh and in good quality.
• Foodstuff must be divided into portions
according to the family's daily or meal based
consumption needs.
• Foodstuff must be packaged in an airtight
manner to prevent them from drying even if
they are going to be kept for a short time.
• Materials to be used for packaging must
be tear-proof and resistant to cold, humidity,
odor, oils and acids and they must also be
airtight. Moreover, they must be well closed
and they must be made from easy-to-use
materials that are suitable for deep freeze
usage.
• Food to be frozen must be put in the freezer
compartment. (They should not be allowed to
come in contact with the previously frozen
items to prevent their partial thawing. Freezing
capacity of our product is given in the technical
specifications of your refrigerator.)
• Periods given in the information about deep
freeze must be obeyed for storage times.
• Frozen food must be used promptly after
they are thawed and they should never be refrozen.
• Please observe the following instructions
to obtain the best results.
• Do not freeze too large quantites of food
at once one time. The quality of the food is
best preserved when it is frozen right through
to the core as quickly as possible.
• Do not exceed the freezing capacity of your
appliance in 24 h which is 13 kg.
• Placing warm food into the freezer
compartment causes the refrigeration
compressor to operate continuously until the
food is frozen solid. This can temporarily lead
to excessive cooling of the refrigeration
compartment.
• You may place the fresh food to be frozen
in any place you like in the freezer. However,
we recommend you to use quick freeze
compartment for fastest freezing.
• Take special care not to mix already frozen
food and fresh food.
Recommendation for Preservation of Frozen Food
• Prepacked commercially frozen food
should be stored in accordance with the frozen
food manufacturer's instructions for a
( 4 star) frozen food storage compartment.
• To ensure that the high quality achieved
by the frozen food manufacturer and the food
retailer is maintained, the following should be
remembered:
1. Put packets in the freezer as quickly as
possible after purchase.
2. Ensure that contents are labelled and dated.
3. Do not exceed "Use By", "Best Before"
dates on the packaging.
If there is a power failure do not open the
freezer door. Even if the power failure lasts
up to 8 hours, frozen food will not be affected.
In case the failure lasts longer, the food must
be checked and when necessary, must be
consumed immediately or must be frozen
after cooked.
* If you remove freezer compartment drawer
and icebox to increase the volume, section
over the line shown in the figure below
becomes two star section. Use this volume
only for short-term storage of food.
Defrosting
The fridge and freezer compartments defrost
automatically.
22
EN
Page 24
Replacing the Interior Light Bulb
Should the light fail to work, proceed as
follows:
1. Switch off at the socket outlet and pull out
the mains plug.
• Remove all shelves and drawers for easy
access.
2. Use a flat tipped screwdriver to gently
remove the light diffuser cover by inserting
the blade to prise off each side. Take care
not to damage the plastic cover and inner
liner.
3. First check that the bulb hasn't worked
loose by ensuring that it is screwed securely
in the holder. Replace the plug and switch on.
If the bulb works, replace the light cover by
inserting the rear lug and pushing up to locate
the front two lugs.
4. If the light still fails to work, switch off at
the socket outlet and pull out the mains plug.
Replace the bulb with a new 15 watt (max)
screw cap E14 (SES) bulb.
5. Carefully dispose of the burnt-out light bulb
immediately.
Replacement light bulb can easily be obtained
from a good local electrical or DIY store.
23
EN
Page 25

Placing the food
Breakfast stuff, delicatessen
Various frozen food such as meat, fish, ice cream, vegetables and etc.
Store the food such as meat, chicken, fish and etc. after wrapping with thin
cellophane.
Dairy products such as milk, butter, cheese
Egg
Food in pans, plates, closed containers
Small and packaged food or drinks (such as milk, fruit juice and beer)
Vegetables and fruits
Vegetables, fruits, meat and raw fish to be thawed
The cycle slider should be adjusted as required.
Check the cycle slider before placing your food.
Snack tray
Freezer
compartment drawer
Butter & Cheese
Freezer compartment
shelves
section
24
Egg holder
Fridge compartment
shelves
Fridge compartment
EN
door shelves
Crisper
Crisper / chiller
compartment
Page 26
Things to be done for saving energy
1. Do not keep the doors of your refrigerator
open for a long time.
2. Do not put hot food or drinks in your
refrigerator.
3. Do not overload your refrigerator so that
the air circulation inside of it is not prevented.
4
Deep-Freeze information
Food must be frozen as rapidly as possible
when they are put in a refrigerator in order to
keep them in good quality.
The TSE norm requires (according to certain
measurement conditions) the refrigerator to
freeze 4.5 kg of foodstuff at 32°C ambient
temperature to -18°C or lower within 24 hours
for every 100-liters of freezer volume.
It is possible to keep the food for a long
time only at -18°C or lower temperatures.
You can keep the freshness of food for
many months (at -18°C or lower
temperatures in the deep freeze).
WARNING!
• The foodstuff that you want to freeze
must be in good quality.
• Foodstuff must be divided into portions
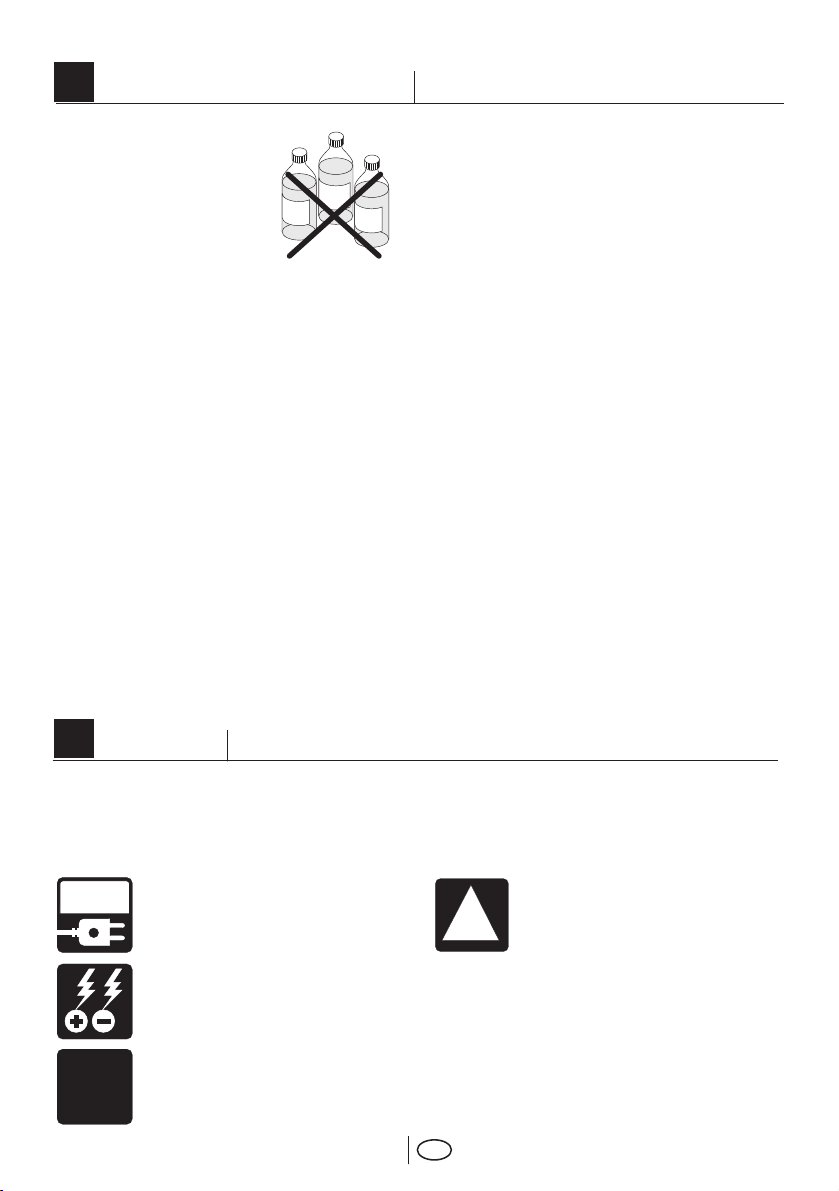
according to the family's daily or meal based
consumption needs.
• Foodstuff must be packaged in an
airtight manner to prevent them from drying
even if they are going to be kept for a short
time.
4. Do not install your refrigerator under direct
sunlight or near heat emitting appliances such
as oven, dishwasher or radiator.
5. Pay attention to keep your food in closed
containers.
Materials necessary for packaging:
• Cold resistant adhesive tape
• Self adhesive label
• Rubber rings
• Pen
Materials to be used for packaging the
foodstuff must be tear-proof and resistant to
cold, humidity, odor, oils and acids.
Foodstuff to be frozen should not be allowed
to come in contact with the previously frozen
items to prevent their partial thawing.
You can check the freezing capacity of your
refrigerator from “Technical Specifications”
section in Part 1.
Always follow the values in the tables for
storage periods.
Frozen food must be used immediately
after they are thawed and they should
never be re-frozen.
25
EN
Page 27
5
Cleaning your refrigerator
Warning!!!
Never use gasoline,
benzene or similar
substances for cleaning
purposes.
We recommend that you
switch off the appliance at the socket outlet
and pull out the mains plug before cleaning.
• Never use any sharp abrasive instrument,
soap, household cleaner, detergent and wax
polish for cleaning.
• Use luke warm water to clean the cabinet
of the appliance and wipe it dry.
• Use a damp cloth wrung out in a solution
of one teaspoon of bicarbonate of soda to one
pint of water to clean the interior and wipe it
dry.
• Make sure that no water enters the lamp
housing and other electrical items.
• If the appliance is not going to be used for
a long period of time switch it off, remove all
food, clean it and leave the door ajar.
• Vacuum-clean the dusts on the appliance
once a year.
• Check door seals regularly to ensure they
are clean and free from food particles.
• Removal of door tray
• To remove door racks, remove all the
contents and then simply push the door rack
A
S
E
T
N
O
B
E
N
T
Z
‹
N
‹
N
E
R
upwards from the base.
• To remove a freezer drawer, pull it as far
as possible, and then tilt it upwards, and then
pull it out completely.
• Especially pay special attention to prevent
the foodstuffs, in particular, small pieces, such
as rice, peas and beans from running into the
fan protectors and air flow ducts. These may
cause clogging of the cooling system and a
decrease in the efficiency of the device.
Protection of plastic surfaces
Do not put liquid oils or oil-cooked meals in
your refrigerator in unsealed containers as
they damage the plastic surfaces of your
refrigerator. In case of spilling or smearing oil
on the plastic surfaces, clean and rinse the
relevant part of the surface at once with warm
water.
Specially Treated Doors
Genuine stainless steel doors have been
specially treated to enhance and maintain the
elegant appearance of the material. To ensure
you can preserve and maintain this, we
recommend that you regularly wipe the doors,
in an up and down motion with a soft, dry and
clean piece of kitchen roll. For further
information, please contact Beko Customer
Services.
6
Service
Things to be done before calling the authorized service
Please check the following points before calling the service.
?
°C
-/+
1. Is the refrigerator properly
plugged in?
2. Has the fuse of the socket
which the refrigerator is connected
to or the main fuse blown out?
3. Are the temperature
adjustments correctly made?
26
pressure in the cooling system of the
refrigerator has not been balanced
yet. Your refrigerator will start
running approximately after 6
minutes. Please call the service if
your refrigerator does not startup at
the end of this period.
EN
Important note: Protective
thermic of the compressor
will blow out during sudden
!
power failures or plug-out
plug-ins as the refrigerant
Page 28
This is normal for a full-automatically defrosting refrigerator.
* Switching the adjustment slider to the crisper position.
* Moving the vegetables from this compartment to the upper
crisper.
* Icing up on the outer surfaces of foodstuff such as meat is
normal.
* This is normal if the adjustment slider is at
Chiller Compartment (0ºC) position. Ambient
temperature is very low (around or lower than
10 ºC)
* Switching the thermostat to a colder degree. (2 °C)
* Decreasing the time the door left open or using it less frequently.
* Covering the food stored in open containers with a suitable
material.
* Wipe the condensation using a dry cloth and check if it persists.
* Very cold ambient conditions.
* Frequent opening an closing of the door.
* Highly humid ambient conditions.
* Storage of food containing liquid in open
containers.
Defrosting cycle occurs periodically.
The fridge is in defrost cycle.
* Leaving the door ajar.
The appliance is not plugged into the socket.
Complaint Possible Reason Solution
Be sure that the plug is properly fit into the socket.
Call your electricity supplier.
There is a power failure.
This is quite normal.
This is quite normal. Large refrigerators operate for a longer
period of time.
Your new refrigerator may be wider than the
previous one.
The ambient room temperature may be high.
Hot food causes longer running of the refrigerator until
they reach the safe storage temperature.
The warm air that has entered into the refrigerator causes the
refrigerator to run for longer periods. Open the doors less frequently.
Cooling down of the refrigerator completely may last for a couple
of hours longer.
The refrigerator might have been plugged in recently
or might have been loaded with food.
Large amounts of hot food might have been
put in the refrigerator recently.
Check doors close fully.
Doors might have been opened frequently or left
ajar for a long time.
Freezer or fridge compartment door might have
been left ajar.
Freezing of the food in the
bottom drawer (crisper /
Chiller.
Please review this list before calling the service. It might save you time and money. This list includes frequent complaints
that are not arising from defective workmanship or material usage.
Condensation on the side wall
of the fridge compartment.
Compressor is not running
27
EN
The fridge is running
frequently or for a long time.
Page 29

Adjust the refrigerator temperature to a warmer degree and wait
until the temperature is achieved.
Clean or replace the seal. Damaged/broken seal causes the
refrigerator to run for a longer period of time in order to maintain
the current temperature.
The refrigerator is adjusted to a very low
temperature.
Door seal of the fridge or freezer may be soiled,
worn out, broken or not properly seated.
Adjust the freezer temperature to a warmer degree and
check.
Adjust the fridge temperature to a warmer degree and check.
The fridge temperature is adjusted to a very
low temperature.
The freezer temperature is adjusted to a very low
temperature.
Formation of ice crystals is normal because of the water contant
in the meat.
Adjust the fridge temperature to a warmer degree and check.
The fridge temperature is adjusted to a very
low temperature.
The meats must be kept just below the freezing
point of water to have them retain their freshness
for a long time.
Complaint Possible Reason Solution
The fridge is running
frequently or for a long time.
Having very low temperatures
Fridge temperature is very low
while the freezer temperature is
sufficient.
Food kept in the refrigerator
compartment trays freezes.
Freezer temperature is very low
while the fridge temperature is
sufficient.
Meat kept in the Chiller
compartment freezes.
Having very high
Change the temperature of the fridge or freezer until the fridge
or freezer temperature reaches to a sufficient level.
Change the temperature of the fridge or freezer until the fridge
or freezer temperature reaches to a sufficient level.
Warm air rushes into the fridge or freezer when the doors are
opened. Open the doors less frequently.
Close the door completely.
Wait until the fridge or freezer reaches the desired temperature.
Cooling down of the refrigerator completely takes time because
of the size.
Adjust the fridge to a warmer temperature.
The fridge temperature is adjusted to a very
high degree.
The fridge temperature is adjusted to a very high degree. Fridge
adjustment has an effect on the temperature of the freezer.
Doors might have been opened frequently or left
ajar for a long time.
The door might be left ajar.
Large amounts of hot food might have been put
in the refrigerator recently.
The refrigerator might have been plugged in
recently.
The fridge temperature is adjusted to a very cold
degree.
temperatures.
Temperature in the fridge or
freezer is very high.
Fridge temperature is very high
while the freezer temperature is
at sufficient level.
28
EN
Page 30

It is normal and not a fault.
Storage capacities of today's Frost Free refrigerators
have been increased and they can work under lower
Make sure that the floor is level, strong and capable to
carry the refrigerator.
Remove the objects on it.
temperatures.
The floor is not even or it is weak. The refrigerator
rocks when moved slowly.
The objects placed on top of the refrigerator rock.
Complaint Possible Reason Solution
Noise
The operation noise increases
when the refrigerator is running.
Vibrations or noise.
Water/condensation/ice in the
It is normal and not a fault.
Make sure doors close fully.
Open the door less frequently.
Hot and humid weather increases icing and
condensation.
The doors are ajar.
Doors might have been opened very frequently
or they might have been left open for along time.
refrigerator.
Condensation on the inner walls
of refrigerator.
This is quite normal in humid weather. When the humidity is
less, condensation will disappear.
The weather may be humid.
Water/condensation/ice on the
outside of the refrigerator.
Humidity occurs on the outside
of the refrigerator or between
the doors.
Clean the inside of the refrigerator with a sponge, warm water
or carbonated water.
Pack the food.
Use a different container or different brand packaging material.
Inside of the refrigerator must be cleaned.
There might be food with pungent odor inside the
refrigerator.
Some containers or packaging materials might be
causing the smell.
29
EN
Page 31

Complaint Possible Reason Solution
Replace the packages that are obstructing the door.
Food packages may prevent the door's closing.
Adjust the elevation screws.
Make sure that the floor is level and capable to carry the refrigerator.
The refrigerator is probably not completely vertical
on the floor and it might be rocking when slightly
pushed.
The floor is not level or strong.
Rearrange food in the drawer.
Clean the roller wheel.
Ice off mode is active Exit from the mode
The food might be touching the ceiling of the drawer.
The roller wheel on which the drawer slides might
Water supply line turned off or not connected Check/Connect the water supply line
have been soiled or jammed.
Check the water tubes
Set the temperature of the freezer compartment as described
in the user manual
Wait about 24 hours
It happens when ice dispenser did not use for a long time.
Empty/Clean the icebank
There is folding on water tubes between
refrigerator and water line
Water pressure is not enough Use impulsive pump
Freezer compartment is too warm
After first installation, 12-24 hours need for ice
formation
Ice cubes stuck together in icebank
The door(s) is/are not closing.
Opening and closing of the
doors.
Drawers are stuck.
EN
30
Ice Dispenser
Ice dispenser does not work
Page 32

Set the temperature of the freezer Compartment
as described in the user manual or check the
freezer compartment door
Wait for ice until freezer compartment reaches to
setting temperature
This is normal. After 2-3 seconds, cube ice would
be despensed
This is normal.
Check the door closing
Reduce the set temperature of the freezer
compartment cold enough
Check the water tubes
Press the latch for at least one minute
Be sure anti-condensation swicth is pressed and set the
refrigerator a warmer setting
It is normal
Despense water until all the water in the system
is replenished
Use filter or use water container with impulsive
pump
It is normal
Freezer compartment is too warm or Freezer
compartment door was not closed properly
Power failure
Just before the ice cube option, crush
ice was dispensed
One or two ice cubes may pass crusher side and
can be crushed by the crushers during the cube ice
option
Freezer compartment door is not closed properly or
freezer compartment is used very frequently
Complaint Possible Reason Solution
Ice cubes are melting, slushy
Ice cube option is selected but crush
ice is dispensed
Temperature control of freezer compartment is not
set cold enough
There is folding on water tubes between refrigerator
kinked water pipes
Water supply line turned off or not connected Check/Connect the water supply line
Water pressure is not enough Use impulsive pump
The air entrapped in the system
Ice cube formation is slow
31
Water Dispenser does not
Water Dispenser
work
EN
Water in the system is frozen
First glass of water is warm Water dispenser is not used for a long time Dispense water until cool water is dispensed
Water dispenser does not work but
Dipenser was not used for a long time
Low quality of the water in the main water supply line
ice dispenser works
Poor Taste/Odor
Ice cubes/Water have poor
Icebank is not clean Empty and clean the icebank
taste/odor
The sound comes from the motor and the selonoids It is normal
Sounds of water flowing in the dispenser
Noise produced by ice dropping and hitting to icebank
Rumbling sound
Sound and Noise come from Dispenser
Whirring sound
Whizz and Click sound
Page 33

Inhalt
Technische Daten Ihres Kühlschranks
Vor Inbetriebnahme des Kühlschranks
Warum eisfrei?
Sicherheitsmaßnahmen
Aufstellen des Kühlschranks
Bedienung des Kühlschranks
Nutzung des Kühlschranks
Nutzung des Zubehörs
Lebensmittel einlagern
Was Sie zum Energiesparen beachten sollten
Auswechseln der Beleuchtung
Hinweise zum Schnellgefrieren
Reinigung des Kühlschranks
Service
> 4
> 5
> 15
> 25
> 26
> 26
1
DE
Page 34

Der Kühlschrank
1
2
3
4
5
7
6
6
6
8
8
23
Tiefkühlbereich
1
Kühlbereich
2
Frischgefrierfach
3
Eisbehälter
4
Tiefkühlbereich-Innenbeleuchtung
5
Tiefkühlbereich-Glasablagen
6
Eiskanaldeckel
7
Tiefkühlbereichschubladen
8
Belüftungsdeckel
9
Feuchtigkeitseinstellschieber
10
Gemüsefachabdeckung
11
Butter und Käse-Klappe
12
Kühlbereich-Glasablagen
13
12
13
14
15
16
15
13
21
22
12
21
22
19
18
17
9
111020
23
14
Eierhalter
15
Kühlbereich-Türablagen
16
Kühlbereich-Innenbeleuchtung
17
Snack-Schale
18
Gemüsefach
19
Gemüsefach oder Kühlfach
20
Gemüse-/Kühlfach-Einstellschraube
21
Flaschenhalter
22
Flaschenablagen
23
Einstellbare Vorderfüße
* Die Abbildungen in dieser Anleitung sind schematisch und können etwas von Ihrem
Produkt abweichen. Wenn die Teile nicht im gekauften Produkt enthalten sind, gelten
Sie für andere Modelle.
2
DE
Page 35

Der Kühlschrank
HAUPTABDECKUNG: NIEMALS ENTFERNEN
Netzkabel
RÜCKWAND: NIEMALS ENTFERNEN
3
DE
Wasserleitung für Eismaschine
Wasserleitungsabdeckung
Kaltwasser-Einlassventil
Page 36

Technische Daten Ihres Kühlschranks
1
Produktkategorie
Energieklasse
Jährlicher Energieverbrauch (kWh/Jahr)
Kühlbereichvolumen (Liter, netto)
Gefrierbereichvolumen (Liter, netto)
Stern-Einstufung
Zweisterne-Fach (Liter)
Kühlsystem
Temperaturanstiegszeit (h)
Tiefkühlkapazität (kg / 24 Stunden)
Klimaklasse
Geräuschpegel (dB(A))
Gesamtnettovolumen (Liter)
(H) Höhe (cm)
(B) Breite (cm)
(T) Tiefe (cm)
Gewicht (kg)
Netzanschluss (V / Hz)
Gesamtleistung (W)
Kühlschrank/Tiefkühler für Haushaltsgebrauch
A
(Der tatsächliche Verbrauch variiert je nach
529
Standort und Gebrauch des Gerätes.)
383
146
6
EISFREI
(Stromausfallsicherheit; wir raten vom Genuss von Lebensmitteln
8
aus dem Tiefkühlbereich nach Ablauf dieser Zeit ab.)
13
SN
46
535
177.5
92.5
74
124
230/50
180
• Technische Daten können sich zur Verbesserung der Produktqualität ohne
Vorankündigung ändern.
• Werte, die in Kennzeichnungen am Produkt selbst oder in den Dokumenten
erwähnt werden, wurden in Übereinstimmung mit den zutreffenden Normen
im Labor ermittelt. Diese Werte können je nach Gebrauch des Gerätes und
den Umgebungsbedingungen variieren.
• Hinweise zum Platzbedarf des Kühlschranks finden Sie im Abschnitt
„Aufstellen des Kühlschranks“.
4
DE
Page 37

Vor Inbetriebnahme des Kühlschranks
2
Bitte beachten Sie, dass der Hersteller nicht haftet, wenn Sie sich nicht an die
Informationen und Anweisungen der Bedienungsanleitung halten. Dieses Gerät
ist zur Nutzung im Haushalt vorgesehen.
Lesen Sie sich die Gebrauchsanleitung vor
Inbetriebnahme des Kühlschranks gründlich
durch, da diese wichtige Informationen über
Aufstellung, Nutzung und Wartung des
Produktes liefert.
Die ersten Schritte
• Ihr Kühlschrank sollte mindestens 30 cm von
Hitzequellen wie Kochstellen, Öfen, Heizungen,
Herden und ähnlichen Einrichtungen aufgestellt
werden. Halten Sie mindestens 5 cm Abstand
von Elektroöfen ein, vermeiden Sie die
Aufstellung im direkten Sonnenlicht.
• Die Zimmertemperatur des Raumes, in dem
der Kühlschrank aufgestellt wird, sollte
mindestens 10 °C betragen. Im Hinblick auf die
Effizienz ist der Betrieb des Kühlschranks bei
geringerer Umgebungstemperatur nicht ratsam.
• Bitte denken Sie daran, das Kühlschrankinnere
sauber zu halten.
• Falls zwei Kühlschränke nebeneinander
platziert werden sollen, achten Sie darauf, dass
sie mindestens 2 cm voneinander entfernt
aufgestellt werden.
• Ihr Kühlschrank muss leise und vibrationsfrei
arbeiten. Um dies zu gewährleisten, stellen Sie
Ihren Kühlschrank absolut gerade auf; dies
erreichen Sie, indem Sie die einstellbaren Füße
an der Vorderseite im oder gegen den
Uhrzeigersinn drehen. Dies sollten Sie tun,
bevor Sie Lebensmittel in den Kühlschrank
legen.
• Wenn Sie den Kühlschrank zum ersten Mal in
Betrieb nehmen, halten Sie sich bitte an die
folgenden Anweisungen für die ersten sechs
Betriebsstunden.
- Stellen Sie die Temperatur nicht auf den
Minimalwert ein.
- Die Kühlschranktür sollte nicht zu häufig
geöffnet werden.
- Der Kühlschrank sollte leer sein.
- Falls ein unbeabsichtigter Stromausfall
eintreten sollte, ziehen Sie nicht den
Netzstecker. Beachten Sie die Warnhinweise
im Abschnitt „Bevor Sie den Kundendienst
rufen“.
• Originalverpackung und
Schaumstoffmaterialien sollten für den
zukünftigen Transport des Gerätes aufbewahrt
werden.
Das müssen Sie beim Transportieren des Gerätes beachten:
1. Der Kühlschrank muss vor dem Transport
geleert und gesäubert werden.
2. Befestigen und sichern Sie Ablagen, Zubehör,
Gemüsefach, etc. mit Klebeband, bevor Sie das
Gerät neu verpacken.
3. Die Verpackung muss mit kräftigem Klebeband
und stabilen Seilen gesichert, die auf der
Verpackung aufgedruckten Transporthinweise
müssen beachtet werden.
Bitte nicht vergessen
Jeder wiederverwendete Artikel stellt eine
unverzichtbare Hilfe für unsere Natur und unsere
Ressourcen dar.
Wenn Sie zur Wiederverwertung von
Verpackungsmaterialien beitragen möchten,
können Sie sich bei Umweltschutzvereinigungen
und Ihren Behörden vor Ort informieren.
Warum eisfrei?
* Eisfreie Kühlschränke unterscheiden sich
hinsichtlich ihrer Arbeitsweise stark von
herkömmlichen Kühlschränken. Bei
herkömmlichen Kühlschränken bildet sich durch
die Feuchtigkeit einströmender Luft und die
Feuchtigkeit von eingelagerten Lebensmitteln
schnell Eis im Tiefkühlbereich. Dieses Eis wird
in bestimmten Abständen geschmolzen und
entfernt.
* Bei eisfreien Kühlschränken bildet sich jedoch
5
weder Eis noch Reif an den nutzbaren Stellen.
* Eisfreie Kühlschränke unterscheiden sich auch
hinsichtlich des Kühlungssystems von anderen
Kühlschränken. Da die Luft in eisfreien
Kühlschränken ständig zirkuliert, wird eine
besonders gleichmäßige Kühlung der
Lebensmittel erreicht.
* Aus diesen Gründen ist Ihr eisfreier Kühlschrank
definitiv eine sehr gute Wahl.
DE
Page 38

Sicherheitsmaßnahmen
• Dieses Produkt aus unserer neuesten
Produktionslinie ist besonders umweltfreundlich.
Das Produkt arbeitet mit einem natürlichen
Kühlmittel (R600a), das weder FCKW noch HFC
enthält. Dieses Gas ist leicht entflammbar. Achten
Sie also darauf, Kühlkreislauf und Leitungen
während Betrieb und Transport nicht zu
beschädigen. Bei Beschädigungen verbrennen
Sie das Produkt nicht; halten Sie das Produkt
von potenziellen Zündquellen fern und sorgen
Sie für eine gute Belüftung des Raumes, in dem
das Gerät aufgestellt wird.
• Wenn Sie das Gerät entsorgen möchten,
wenden Sie sich am besten an den autorisierten
Kundendienst. Hier erhalten Sie notwendige
Informationen und erfahren, welche Stellen für
die Entsorgung zuständig sind.
• Beschädigen Sie nicht den Kühlkreislauf.
• Verwenden Sie im Lebensmittelaufbewahrung-
sbereich keinerlei elektrischen Hilfsmittel, die
nicht vom Hersteller empfohlen wurden.
• Bei Problemen und Fragen zum Gerät wenden
Sie sich grundsätzlich an den autorisierten
Kundendienst. Ziehen Sie keine Dritten zu Rate,
versuchen Sie nichts in Eigenregie, ohne den
autorisierten Kundendienst davon in Kenntnis
zu setzen.
• Der Verzehr von Speiseeis und Eiswürfeln
unmittelbar nach der Entnahme aus dem
Tiefkühlbereich ist nicht ratsam. (Dies kann zu
Erfrierungen führen.)
• Bewahren Sie Getränke in Flaschen und Dosen
niemals im Tiefkühlbereich auf. Diese platzen.
• Berühren Sie gefrorene Lebensmittel nicht mit
der Hand; sie können festfrieren.
• Verwenden Sie niemals Dampf- oder
Sprühreiniger zum Reinigen und Abtauen Ihres
Kühlschranks. Die Dämpfe oder Nebel können
in Kontakt mit stromführenden Teilen geraten
und Kurzschlüsse oder Stromschläge auslösen.
• Missbrauchen Sie niemals Teile Ihres
Kühlschranks (z. B. Anschläge oder die Tür) als
Befestigungen oder Kletterhilfen. Mit anderen
Worten: Stellen Sie sich niemals auf Teile Ihres
Kühlschranks, hängen Sie sich nicht daran. Dies
gilt natürlich auch für Kinder.
• Nutzen Sie keine elektrischen Geräte innerhalb
des Kühlschranks.
• Nehmen Sie einen beschädigten Kühlschrank
nicht in Betrieb. Bei Zweifeln wenden Sie sich
bitte an den Kundendienst.
• Achten Sie darauf, den Kühlkreislauf keinesfalls
mit Bohr- oder Schneidwerkzeugen zu
beschädigen. Das Kühlmittel kann
herausspritzen, wenn die Gaskanäle des
Verdunsters, Rohr- und Schlauchleitungen oder
Oberflächenversiegelungen beschädigt werden.
Dies kann zu Hautreizungen und
Augenverletzungen führen.
• Decken Sie keinerlei Belüftungsöffnungen des
Kühlschranks ab. Dabei spielt es keine Rolle,
womit solche Öffnungen blockiert werden:
Verdeckt ist verdeckt.
• Die Reparatur von Elektrogeräten darf nur von
autorisierten Fachleuten durchgeführt werden.
Reparaturen durch weniger kompetente
Personen können erhebliche Gefährdungen des
Anwenders verursachen.
• Sollten Fehler oder Probleme während der
Wartung oder Reparaturarbeiten auftreten, so
trennen Sie den Kühlschrank von der
Stromversorgung, indem Sie die entsprechende
Sicherung abschalten oder den Netzstecker
ziehen.
• Achten Sie darauf, beim Ziehen des
Netzsteckers nicht am Kabel zu ziehen.
• Die elektrische Sicherheit des Gerätes ist nur
dann gewährleistet, wenn das hausinterne
Erdungssystem den zutreffenden Normen
entspricht.
• Lassen Sie nicht zu, dass Kinder mit dem
Kühlschrank spielen. Sie könnten sich verletzen
oder den Kühlschrank beschädigen. (Erlauben
Sie ihnen beispielsweise nicht, sich an die Tür
zu hängen.)
• Lagern Sie hochprozentige alkoholische
Getränke gut verschlossen und aufrecht.
• Bewahren Sie in dem Gerät niemals
entflammbare oder explosive Produkte auf oder
solche, die entflammbare oder explosive Gase
(z. B. Spray) enthalten.
• Verwenden Sie ausschließlich vom Hersteller
empfohlene Geräte oder sonstige Mittel zum
Beschleunigen des Abtaugvorgangs. Benutzen
Sie nichts anderes.
• Bewegliche Teile wie Klingen am Eisauslass
des Spenders und im Eiswürfelfach dürfen
niemals berührt werden; es besteht
Verletzungsgefahr.
Dieses Gerät wird nicht für Personen
(einschließlich Kinder) mit verringerten
körperlichen, sensorischen oder
Geistesfähigkeiten oder Mangel an Erfahrung
und Wissen beabsichtigt, es sei denn sie
überwachung oder die Anweisung hinsichtlich
ist des Gebrauches des Gerätes von einer
Person erteilt worden sind, die für ihre
Sicherheit verantwortlich ist.
Kinder sollten überwacht werden, um
sicherzugehen, daß sie nicht mit dem Gerät
spielen
Elektrische Sicherheit
Dieses Gerät ist zur Nutzung in Innenräumen
vorgesehen. Es ist nicht für die Nutzung
außerhalb des Hauses geeignet, auch wenn die
Stelle überdacht ist.
Setzen Sie das Gerät keinem Regen, Schnee,
direktem Sonnenlicht oder Wind aus, da dies
die elektrische Sicherheit gefährden kann.
Wenn das Anschlusskabel beschädigt ist, muss
es durch den Hersteller oder einen
Reparaturservice ersetzt werden, damit
potentielle Gefahren vermieden werden.
DE
6
Page 39

Aufstellung und Installation Ihres Kühlschranks
Achtung: Stecken Sie während der Installation
niemals den Netzstecker ein. Andernfalls kann
es zu schweren bis tödlichen Verletzungen
kommen.
Falls die Tür des Raumes, in dem der
Kühlschrank aufgestellt werden soll, nicht breit
genug ist, wenden Sie sich an den autorisierten
Kundendienst, lassen die Kühlschranktüren
demontieren und befördern das Gerät seitlich
durch die Tür.
1. Stellen Sie Ihren Kühlschrank an einer gut
erreichbaren Stelle auf.
2. Platzieren Sie den Kühlschrank nicht in der
Stellfläche
Die folgenden Darstellungen zeigen den
erforderlichen Platz, um den Kühlschrank effektiv
nutzen können.
Nähe von Wärmequellen oder dort, wo er
Feuchtigkeit oder direktem Sonnenlicht
ausgesetzt ist.
3. Damit das Gerät richtig arbeiten kann, müssen
Sie ausreichend Platz um das Gerät herum
freilassen, damit eine ordentliche Belüftung
gewährleistet ist. Wenn Sie den Kühlschrank in
einer Nische aufstellen, müssen Sie einen
Abstand von mindestens 5 cm zur Decke und
5 cm zu den Wänden einhalten.
Wenn Sie das Gerät auf einem Teppich oder
Teppichboden aufstellen, müssen Sie einen
Abstand von mindestens 2,5 cm zum Boden
einhalten.
4. Stellen Sie Ihren Kühlschrank auf einem
ebenen Untergrund auf, damit er nicht wackelt.
5. Stellen Sie den Kühlschrank nicht an Stellen
auf, an denen Temperaturen von weniger als 10
°C herrschen.
154 cm
7
74 cm
117 cm
92.5
DE
Page 40
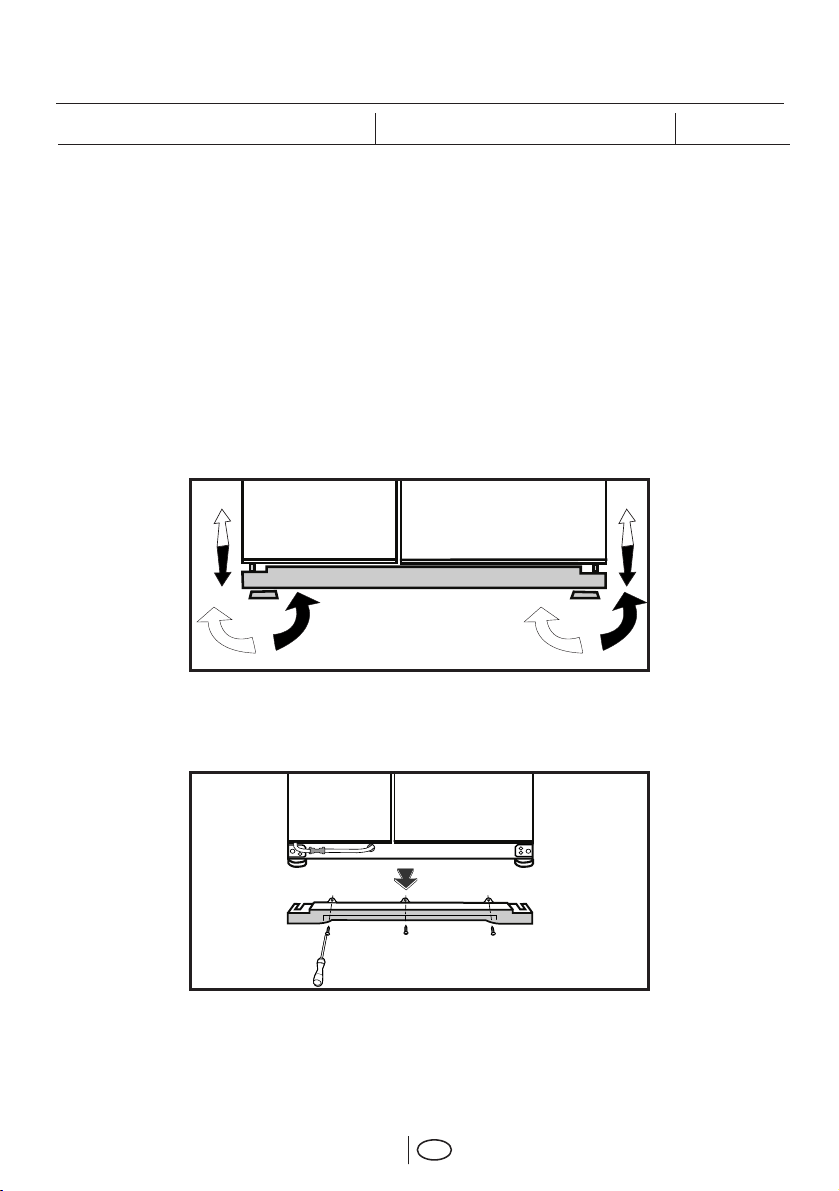
Gerade, ausbalancierte Aufstellung
4
1 2 3
Türhöheneinstellung
Falls Ihr Kühlschrank nicht gerade stehen sollte,
können Sie dies durch Drehen der Füße an der
Vorderseite korrigieren. (Siehe Abbildung A.)
Wenn Sie in Richtung des schwarzen Pfeils
drehen, senkt sich die Ecke, an der sich der Fuß
befindet. Beim Drehen in Gegenrichtung wird
die Ecke angehoben. Diese Arbeit fällt erheblich
leichter, wenn ein Helfer das Gerät etwas anhebt.
Falls die Türen nicht exakt parallel
zueinander ausgerichtet sein sollten, können
Sie dies in der nachstehend angegebenen
Reihenfolge durch Justage der Türhöhe
korrigieren. Sorgen Sie dafür, dass die
Türablagen beim Einstellen der Türhöhe
leer sind.
1. Entfernen Sie die untere Belüftungsabdeckung
- wie in der nachstehenden Abbildung gezeigt durch Lösen der Schrauben. (Siehe Abbildung
B.)
(Abbildung A)
(Abbildung B)
DE
8
Page 41

2. Lösen Sie die Schrauben am Scharnier der
unteren Tür (die Sie anheben wollen) mit einem
Schraubendreher; wie in der nachstehenden
Abbildung gezeigt. (Nicht komplett
herausdrehen) (Siehe Abbildung C.)
(Abbildung C)
• Wenn die Tiefkühlbereichtür niedriger als die
Kühlbereichtür ist, bringen Sie die Tür auf
dieselbe Höhe, indem Sie die
Höheneinstellschraube an der Tiefkühlbereichtür
mit einem M6-Innensechskantschlüssel drehen;
siehe (Abbildung D.)
• Wenn die Tiefkühlbereichtür niedriger als die
Kühlbereichtür ist, bringen Sie die Tür auf
dieselbe Höhe, indem Sie die
Höheneinstellschraube an der Tiefkühlbereichtür
mit einem M6-Innensechskantschlüssel drehen;
siehe (Abbildung D.)
Nachdem Sie die Türen durch Anheben des
Frontteils mit Hilfe der Höheneinstellschrauben
auf dieselbe Höhe eingestellt haben, sollten sich
die Türen richtig schließen lassen. Sollten sich
die Türen nicht richtig schließen lassen, kann
sich dies negativ auf die Leistung Ihres
Kühlschranks auswirken.
Sechskantschlüssel (M6)
DE
9
(Abbildung D)
Page 42

Installationsvoraussetzungen
1
2
Zum Betrieb des automatischen
Eisbereiters/Eisspenders und Wasserspenders
muss Ihr Gerät an die Kaltwasserversorgung
der Wohnung angeschlossen werden; dies
geschieht über einen üblichen1/2 Zoll-Anschluss.
Falls dieser Anschluss nicht vorhanden oder
Sie sich nicht sicher sein sollten, ziehen Sie
bitte einen versierten Klempner hinzu.
* Zuerst überzeugen Sie sich davon, dass
sämtliche aufgeführten Teile mitgeliefert wurden.
1. Wasserschlauch, 5 m (Durchmesser 0,635
mm oder 1/4 Zoll)
2. Kaltwasseranschlussventil mit Maschenfilter
(Anschlussadapter )
3. Rohrclips (zur Fixierung des
Wasserschlauchs)
4. Wasserfilter, zum Einsetzen in die Halterung
im Kühlbereich.
5. Mutter zum Anschluss des Wasserschlauches
an die Rückwand des Gerätes
Wasseranschluss
Bitte halten Sie sich an die nachstehende
Anleitung.
SORGEN SIE DAFÜR, DASS EIN 1/2
ZOLL-KALTWASSERSTANDARDANSCHLUSS ZUR
VERFÜGUNG STEHT UND KOMPLETT
ZUGEDREHT IST.
1
2
3
5
4
Wasserschlauch
Wasserschlauch an den Kühlschrank
anschließen
1. Nachdem Sie die Mutter am Wasserschlauch
angebracht haben, führen Sie den
Wasserschlauch in das Einlassventil am
Kühlschrank ein, indem Sie es fest nach unten
drücken.
2. Fixieren Sie die Mutter wie in der Abbildung
gegenüber gezeigt durch Zusammendrücken
des Einlassventils am Kühlschrank per Hand.
Hinweis: Um Wasserdichtigkeit erreichen, ist
es nicht nötig, die Mutter mit einem Werkzeug
anzuziehen. Falls dennoch Wasser austritt,
ziehen Sie die Mutter mit einem Schlüssel oder
einer Zange an.
10
Wasserschlauch
Mutter
Ventil
DE
Page 43

Wasserschlauch an den Kaltwasseranschluss anschließen
1. Lösen Sie die Mutter vom Anschlussadapter.
(Abbildung A)
2. Bringen Sie den Anschlussadapter wie in der
Abbildung gezeigt am 1/2 Zoll-Anschluss an
(Abbildung B).
3. Nachdem Sie den Wasserschlauch durch
die Mutter geführt haben, bringen Sie ihn am
Anschlussadapter an und verbinden ihn wie in
der Abbildung gezeigt mit dem Hahn.
(Abbildung C)
4. Ziehen Sie die Mutter mit der Hand an. Falls
dennoch Wasser austritt, ziehen Sie die Mutter
mit einem Schlüssel oder einer Zange an.
Maschenfilter
Anschlussadapter
Mutter
Abbildung A
Achtung: Fixieren Sie den Wasserschlauch
an geeigneten Stellen mit den mitgelieferten
Rohrclips, damit sich der Schlauch nicht
verschieben oder aus Versehen lösen kann.
Achtung: Achten Sie nach dem Aufdrehen
des Ventils darauf, dass kein Wasser an den
beiden Verbindungensstellen des
Wasserschlauches austritt. Falls Wasser
austreten sollte, schließen Sie das Ventil sofort
und ziehen sämtliche Verbindungen mit einem
Schlüssel oder einer Zange an.
Kaltwasserleitung
Anschlussadapter
Zulaufventil
Abbildung B
Anschlussadapter
Mutter
Wasserschlauch
Abbildung C
DE
11
Page 44

Wasserfilter
Verzweigungsabdeckung
Verzweigungsabdeckung
Zum Einsetzen des Wasserfilters halten Sie
sich an die nachstehenden Anweisungen und
beachten die Abbildungen:
1. Nehmen Sie das obere Gemüsefach wie in
der nachstehenden Abbildung gezeigt aus dem
Kühlschrank.
2. Drehen Sie die Verzweigungsabdeckung am
Wasserfilter heraus.
Achtung: Achten Sie darauf, dass der Kein
Eis-Modus aktiv ist, bevor Sie die
Verzweigungsabdeckung abnehmen.
Hinweis: Nach dem Abnehmen der Abdeckung
können ein paar Wassertropfen austreten; dies
ist völlig normal.
3. Nehmen Sie die rote Abdeckung am Kopf
des Wasserfilters ab und installieren Sie ihn
wie in der nachstehenden Abbildung gezeigt.
4. Heben Sie den Kein Eis-Modus wieder auf,
Wasserschlauch
Wasserschlauch
Filter
indem Sie die „Ice Off“-Taste am Bedienfeld
noch einmal drücken.
Der Wasserfilter sollte alle sechs Monate
ausgetauscht werden. Eine Erinnerung zum
Austauschen des Wasserfilters wird nach etwa
sechs Monaten angezeigt. Etwa 15 Tage lang
leuchtet eine Warnleuchte, anschließend beginnt
diese zu blinken. Nachdem Sie den Filter
ausgetauscht haben, können Sie diese
Warnleuchte ausschalten, indem Sie die „Auto
Eco“-Taste an der Anzeige etwa 5 Sekunden
lang gedrückt halten.
Wenn Sie den Wasserfilter austauschen oder
nicht weiter verwenden möchten, müssen Sie
ihn wie in der Abbildung gezeigt entfernen.
Sorgen Sie dafür, dass der Kein Eis-Modus aktiv
ist, bevor Sie den Wasserfilter entfernen.
Wenn Sie den Wasserfilter nicht nutzen möchten,
sollten Sie die Warnleuchte ausschalten. Dazu
ENTFERNEN
1 2 3
DE
12
SPERRE
Page 45

halten Sie die Tasten „Set“ und „Dispenser Mode“
2 Sekunden lang gleichzeitig gedrückt.
Anschließend blinkt die Filter-Warnleuchte
fünfmal auf, danach schaltet sie sich aus. Wenn
Sie die Filter-Warnleuchte durch Gedrückthalten
derselben Tasten (2 Sekunden) wieder
einschalten, blinkt die Warnleuchte zehnmal.
Achtung: Der Wasserfilter entfernt Fremdkörper
aus dem Wasser. Er reinigt das Wasser nicht
von Mikroorganismen.
Achtung: Die „Ice off“-Taste muss grundsätzlich
gedrückt werden, bevor Sie den Wasserfilter
austauschen oder die Verzweigungsabdeckung
installieren.
Wasserbehälter
Wenn Sie den Wasserbehälter zum Reinigen
des Behälters und seiner Umgebung aus dem
Kühlschrank entfernen möchten, folgen Sie bitte
den nachstehenden Anweisungen:
* Drehen Sie die beiden Schrauben mit einem
Kreuzkopfschraubendreher wie in der Abbildung
gezeigt heraus.
* Fassen Sie den Wasserbehälter wie der
Abbildung gezeigt und ziehen Sie ihn vorsichtig
heraus.
ENTFERNEN
Achtung:
Entfernen Sie niemals die am Wasserbehälter
angebrachten Bolzen.
Eis-/Wasserspender - Vor der ersten Benutzung
• Der Wasserdruck muss mindestens 1 bar
betragen.
• Der Wasserdruck darf 8 bar nicht überschreiten.
• Falls der Wasserdruck unterhalb 1 bar liegt,
müssen Sie eine geeignete Pumpe verwenden.
• Das Wassersystem des Kühlschranks muss
an den Kaltwasseranschluss angeschlossen
werden. Es darf nicht mit dem
Warmwasseranschluss verbunden werden.
• Vergessen Sie nicht, die Abdeckung des
Eiskanals zu entfernen, bevor Sie den Eisspender
benutzen.
• Wenn sich Kondensation (Wassertropfen) am
Spender bildet und beim Anschließen des
Gerätes an die Wasserleitung vergessen Sie
nicht, den Antikondensationschalter zu drücken.
(Siehe Seite 15.) Der Antikondensationschalter
ist bei der Auslieferung bereits eingedrückt.
• Der Spender arbeitet nicht, wenn die Tür des
Gefrierbereiches geöffnet ist. Achten Sie darauf,
die Tür zu schließen, bevor Sie den Spender
benutzen.
• Nach der ersten Inbetriebnahme des
Kühlschranks wird kein Wasser ausgegeben.
Dies liegt daran, dass sich Luft im System
befindet. Um sämtliche Luft aus dem System zu
entfernen, halten Sie den Spenderhebel etwa 1
DE
13
Wasserbehälter
Page 46

Minute lang gedrückt, bis Wasser aus dem
Spender austritt. Zu Beginn kann der
Wasserfluss noch etwas unregelmäßig sein.
Der Wasserfluss stabilisiert sich, wenn sich
keine Luft mehr im System befindet.
• Wenn Sie den Kühlschrank zum ersten Mal
benutzen, wird die Wasserspenderfunktion
automatisch ausgewählt. Allerdings müssen
zunächst etwa 12 Stunden vergehen, bevor Sie
kaltes Wasser zapfen können.
• Damit der Eis-/Wasserspender problemlos
funktioniert, muss der Wasserdruck zwischen
Bedienung des Kühlschranks
1 und 8 bar liegen. Als Richtwert: Ein Wasserglas
(100 ml) wird in etwa 10 Sekunden gefüllt.
• Die ersten 10 Gläser Wasser sollten nicht
getrunken werden.
• Etwa 12 Stunden müssen vergehen, bis Sie
das erste Mal Eis aus dem Eisspender
entnehmen können. Falls noch nicht genug Eis
gebildet wurde, lässt sich auch kein Eis aus dem
Spender entnehmen.
• Die ersten 30 Eiswürfel aus dem Spender
sollten nicht konsumiert werden.
Ehe Sie Ihr Kühlgerät in Betrieb nehmen:
1. Die Füße wurden so eingestellt, dass das
Gerät absolut eben steht.
2. Der Innenraum ist trocken, die Luft an der
Rückseite kann frei zirkulieren.
3. Der Innenraum wurde entsprechend der
Hinweise im Abschnitt „REINIGUNG UND
PFLEGE“ gereinigt.
4. Das wurde Kühlgerät mit der Stromversorgung
verbunden.
* Bei geöffneter Tür schaltet sich das Licht im
Innenraum ein.
5. Sie hören ein Geräusch, wenn sich der
Kompressor einschaltet. Die Flüssigkeiten und
Gase im Kühlsystem können auch leichte
Geräusche erzeugen, wenn der Kompressor
nicht läuft. Dies ist völlig normal.
Da im Inneren des Gerätes Lüfter arbeiten,
ist die Gesamt-Geräuschentwicklung etwas
höher als bei nicht vereisungsfreien Geräten.
Dies ist völlig normal und kein Fehler.
6. Die Vorderkanten des Kühlgerätes können
sich warm anfühlen. Dies ist normal. Diese
Bereiche wärmen sich etwas auf, damit sich
kein Kondenswasser bildet.
7. Füllen Sie den Kühlschrank noch nicht, wenn
Sie ihn das erste Mal in Betrieb nehmen. Warten
Sie, bis die richtige Lagerungstemperatur erreicht
ist. (Siehe Seite 16.)
8. Die Lüfter stoppen, wenn die gewünschten
Temperaturen in den einzelnen Bereichen
erreicht sind.
9. Achten Sie besonders darauf, dass keine
Lebensmittel - insbesondere kleine Lebensmittel
wie Reis, Erbsen und Bohnen - in die LüfterSchutzgitter und in die Luftkanäle fallen. Dadurch
kann das Kühlungssystem verstopft und die
Leistung des Gerätes eingeschränkt werden.
10. Das Gerät ist ab Werk auf +4 °C im
Kühlbereich und auf -18 °C im Tiefkühlbereich
eingestellt.
11. Der Kompressor beginnt erst etwa 5 Minuten
nach dem Herstellen der Stromversorgung zu
arbeiten; dies geschieht zum Schutz der
Elektronik Ihres Gerätes. Nachdem der
Kompressor angelaufen ist, braucht das Gerät
etwa 24 Stunden, bis die vorgegebenen
Temperaturen erreicht sind. Die tatsächlich
benötigte Zeit hängt von der
Umgebungstemperatur und dem Inhalt des
Gerätes ab.
12. In den ersten 24 Betriebsstunden achten
Sie bitte auf Folgendes:
-Verzichten Sie auf häufiges Öffnen der
Türen.
- Überladen Sie den Kühlschrank nicht.
-Geben Sie keine heißen Lebensmittel in
den Kühlschrank.
14
DE
Page 47

Nutzung des Kühlschranks
3
Einstelltasten und Temperatursteuerung
Die Bedientasten befinden sich an der Außenseite Ihres Kühlschranks und ermöglichen Ihnen,
sämtliche nötigen Einstellungen schnell und bequem vorzunehmen, ohne die Tür öffnen zu
müssen. Dadurch werden Verluste durch Wärme vermieden.
„SET“-Taste (Gefriertemperatur)
„SET“-Taste (Kühltemperatur/Urlaubsmodus)
„Fresh Freeze“-
Taste
(Frischgefrieren)
„Auto Eco“-
Taste
(Auto-Öko)
(Wasserspenderbeleu
chtung)
Wasserspenderleuchten
Tiefkühlbereichtemperaturanzeige
Kühlbereichtür offen-Anzeige
Tiefkühlbereichtemperatureinstellungsanzeige
-24 °C
-22 °C
-20 °C
„Dispenser Mode“-Taste
(Eis/Wasser-Auswahl)
Ökomodus-Anzeige
„Quick Cool“
-Taste
(Schnellkühlen)
„Ioniser“-Taste
(Ionisator)/Tastensperre
„Ice off“-Taste„Light“-Taste
Antikondensationschalter
Hochtemperatur-/Fehler-
Warnanzeige
Tastensperre-Anzeige
Kühlbereichtemperaturanzeige
Kühlbereichtemperatureinstellungsanzeige
Kühlbereichtür
offen-Anzeige
Filteranzeige
Urlaub-Anzeige
2 °C
4 °C
6 °C
-18 °C
Öko-Extra-Anzeige
Frischgefrieren-Anzeige
Wasseranzeige
15
Ionisatoranzeige
Eiswürfel
Kein Eis-Anzeige
DE
8 °C
Schnellkühlen-Anzeige
Zerstoßenes Eis-Anzeige
Page 48
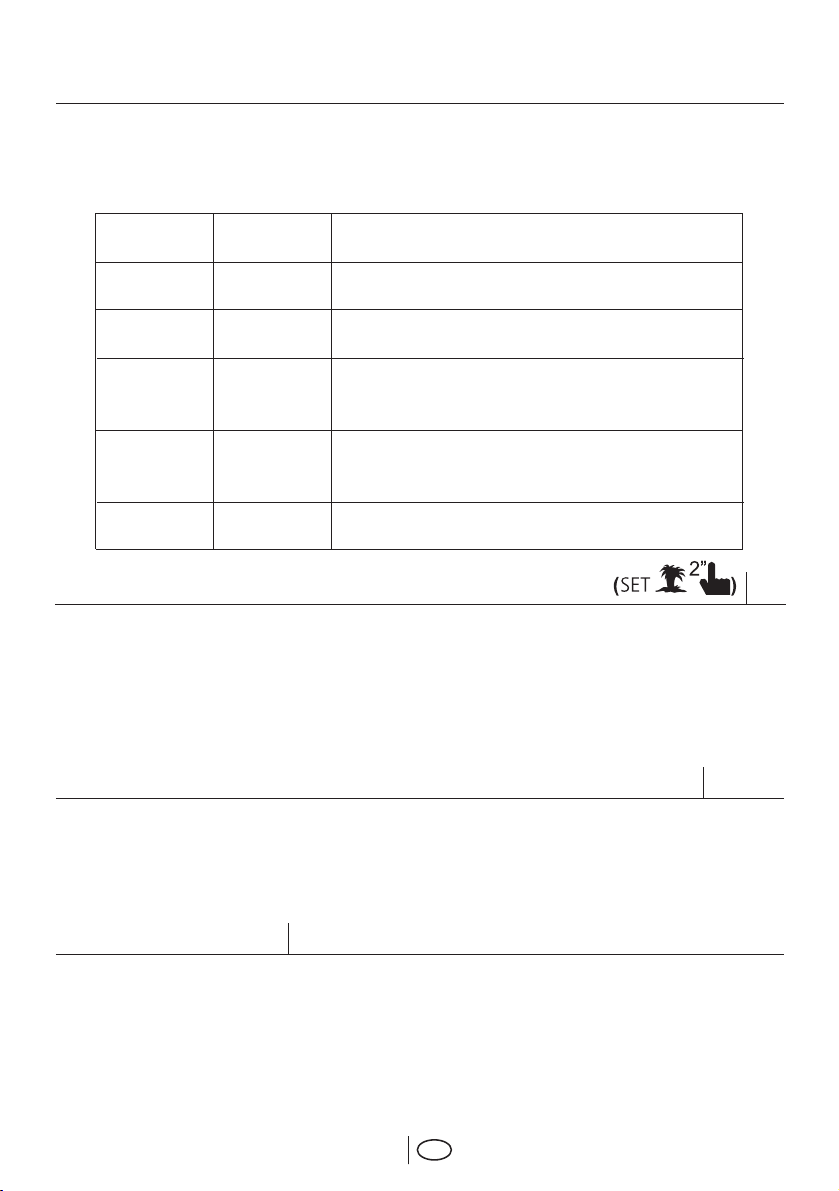
Tiefkühlbereic
heinstellung
-18°C
-20,-22
oder
24°C
Frischgefrieren-
Anzeige
zeigt -27 °C
18 °C oder
kälter
18 °C oder
kälter
Kühlbereiche
instellung
4°C
-
4°C
4°C
2°C
Schnellkühlen-
Anzeige zeigt +1 °C
Kühlbereichtemperatur einstellen
Erklärungen
Dies ist die allgemein empfohlene Einstellung.
Diese Einstellungen werden empfohlen, wenn die
Umgebungstemperatur 30 °C überschreitet.
Nutzen Sie diese, wenn Sie Lebensmittel schnell einfrieren oder
in kurzer Zeit Eis herstellen möchten. Nachdem der Vorgang
abgeschlossen ist, wechselt Ihr Kühlschrank wieder zum zuvor
eingestellten Modus.
Halten Sie sich an diese Einstellung, falls Sie meinen, dass der
Kühlbereich aufgrund zu hoher Außentemperatur, der Nähe zu
Wärmequellen oder zu häufiges Öffnen und Schließen der
Kühlschranktür nicht kalt genug wird.
Verwenden Sie diese Einstellung, wenn der Kühlbereich
überladen ist oder Sie die Inhalte schneller abkühlen möchten.
Die Kühlbereichtemperatur kann auf die
nachstehenden Werte eingestellt werden: 8, 6,
4 und 2 °C
Zum Ändern drücken Sie die Taste. Die
Temperatur wird um 2 °C vermindert. Bei jedem
Tastendruck wird die Einstellung vermindert
Tiefkühlbereichtemperatur einstellen (SET)
Die Tiefkühlbereichtemperatur kann auf die
nachstehenden Werte eingestellt werden: -18,
-20, -22 und -24 °C
Zum Ändern drücken Sie die Taste. Die
Temperatur wird um 2 °C vermindert. Bei jedem
Frischgefrierfunktion
Wenn Sie die “Fresh Freeze"-Taste drücken,
arbeitet der Kompressor etwa 24 Stunden lang.
Solange das Frischgefrieren aktiv ist, leuchtet
die Frischgefrieren-Anzeige, die
Tiefkühlbereichtemperatur wird auf -27°C
eingestellt. Zum Abbrechen dieser Funktion
drücken Sie die „Fresh Freeze“-Taste noch
einmal. Die Frischgefrieren-Anzeige erlischt, die
normalen Einstellungen werden wiederhergestellt.
16
und springt anschließend wieder zur höchsten
Einstellung. Lassen Sie die Taste los, wenn die
gewünschte Temperatur erreicht ist; die neu
eingestellte Temperatur wird gespeichert.
Falls Sie den Eindruck haben, dass Ihre
Lebensmittel kälter als gewünscht sind, können
Sie die Temperatur des Kühlbereiches auf 6
oder 8 °C einstellen.
Tastendruck wird die Temperatur vermindert
und springt anschließend wieder zur höchsten
Einstellung. Lassen Sie die Taste los, wenn die
gewünschte Temperatur erreicht ist; die neu
eingestellte Temperatur wird gespeichert.
Die Frischgefrierfunktion wird nach 24 Stunden
automatisch beendet, sofern Sie sie nicht vorher
abbrechen.
Wenn Sie große Menschen frischer Lebensmittel
einfrieren möchten, drücken Sie die „Fresh
Freeze“-Taste 24 Stunden, bevor Sie die
Lebensmittel in den Tiefkühlbereich geben.
DE
Page 49

Schnellkühlfunktion
Wenn Sie die „Quick Cool“-Taste drücken, wird
die Innentemperatur noch weiter abgesenkt.
Diese Funktion dient dazu, Lebensmittel, die im
Kühlbereich aufbewahrt werden, schnell
herunterzukühlen.
Nachdem Sie die „Quick Cool“-Taste gedrückt
haben, leuchtet die Schnellkühlanzeige auf, die
Kühlbereichtemperatur wird auf 1 °C eingestellt.
Urlaubstaste
Falls Sie den Kühlbereich längere Zeit nicht
benutzen, können Sie die Kühlung durch
Drücken der „Set“-Taste abschalten. Dadurch
arbeitet Ihr Kühlgerät erheblich wirtschaftlicher.
Zum Aktivieren dieser Funktion halten Sie die
Spezielle Energiesparfunktion (Auto Eco)
Zum Abbrechen dieser Funktion drücken Sie
die „“Quick Cool”“-Taste noch einmal. Die
Schnellkühlen-Anzeige erlischt, die normalen
Einstellungen werden wiederhergestellt. Die
Schnellkühlfunktion wird automatisch beendet,
sofern Sie sie nicht zuvor abbrechen.
„Set“-Taste (funktioniert als Urlaubstaste) 2
Sekunden lang gedrückt. Wenn diese Funktion
aktiv ist, muss die Tür des Kühlbereiches
bleiben; im Kühlbereich dürfen keine
Lebensmittel zurückgelassen werden.
Wenn Sie die „Auto Eco“-Taste drücken, wird
eine spezielle Energiesparfunktion aktiviert.
Wenn die Tür des Kühlbereiches länger
geschlossen bleibt, während diese Funktion
„Ioniser“-Taste (Ioniser)
Ihr Kühlgerät wird automatisch ionisiert.
Mit dieser Taste können Sie eine zusätzliche
Tastensperre-Taste (Ioniser)
Wenn Sie diese Taste 3 Sekunden lang
gedrückt halten, wird die Tastensperre aktiviert:
Sämtliche Tasten werden gesperrt, der
Wasserspenderbeleuchtung (Light)
Wenn Sie die Beleuchtungstaste („Light“)
drücken, leuchtet die
Wasserspenderbeleuchtung, bis Sie die Taste
Eis/Wasser-Auswahltaste (Dispenser Mode)
Mit der „Dispenser Mode“-Taste wählen Sie
aus, ob Wasser, Eiswürfel oder zerstoßenes Eis
ausgegeben werden.
aktiviert ist, schaltet das Gerät auf einen
wirtschaftlicheren Betriebsmodus um, um
automatisch Energie zu sparen. Sie schalten
diese Funktion aus, indem Sie die „Auto Eco“Taste noch einmal drücken.
Ionenabgabe abrufen.
Spenderhebel ist ebenfalls ohne Funktion. Zum
Abschalten der Tastensperre halten Sie die
Taste noch einmal 3 Sekunden lang gedrückt.
noch einmal drücken. Die Beleuchtung schaltet
sich auch ein, wenn Sie den Spenderhebel
betätigen und erlischt, wenn Sie den Hebel
wieder loslassen.
17
DE
Page 50
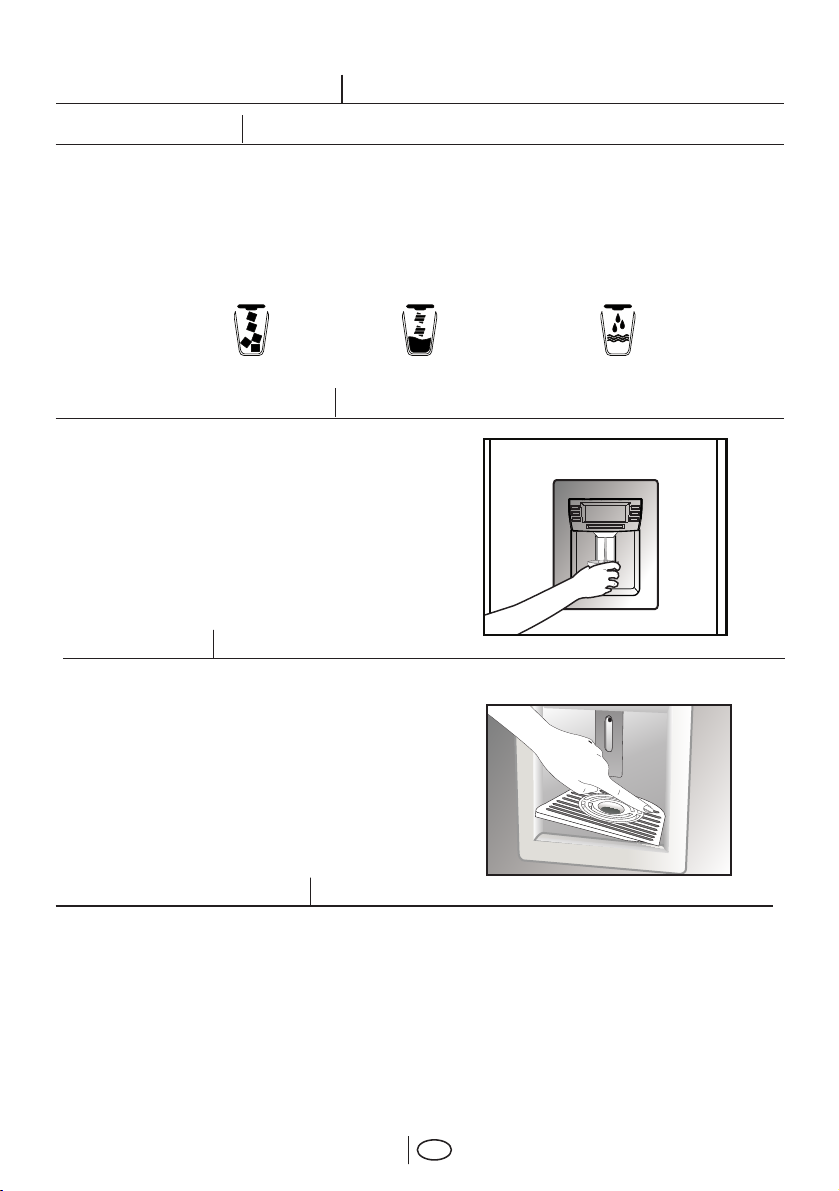
Nutzung des Zubehörs
Eis-/Wasserspender
Durch seine drei unterschiedlichen Funktionen
liefert Ihnen der Spender kühles Wasser,
Eiswürfel und zerstoßenes Eis, ohne dass Sie
die Tür des Kühlschranks öffnen müssen. Der
Spender liefert dauerhaft kühles Wasser und
Eis, ohne dass Sie Wasser nachfüllen müssen.
Das benutzerfreundliche Bedienfeld bietet Ihnen
Eiswürfel
Zerstoßenes Eis
Wasserspender benutzen
Warnungen
* Das erste Wasser, das aus dem Spender fließt,
kann noch etwas warm sein. Dies ist normal.
* Wenn der Wasserspender längere Zeit nicht
genutzt wurde, müssen Sie zunächst ein wenig
Wasser ausfließen lassen, bis frisches Wasser
ausgegeben wird.
Tropfschale
In der Tropfschale sammelt sich Wasser, das
während der Benutzung nach unten tropft. Sie
können die Tropfschale entfernen, indem Sie
sie an der rechten Ecke nach unten drücken.
Das Wasser können Sie mit einem Schwamm
oder einem weichen Tuch entfernen.
die folgenden Spenderfunktionen:
Hinweis:
* Wasser oder Eis können jeweils maximal 60
Sekunden lang ausgegeben werden
* Der Spender arbeitet nicht, wenn die Tür des
Tiefkühlbereiches geöffnet ist.
Kaltes Wasser
Eisspender benutzen
Bitte beachten Sie, dass etwa 12 Stunden
vergehen müssen, bevor Sie das erste Eis
entnehmen können.
Wenn Sie kein Eis benötigen (zum Beispiel im
Winter oder wenn Sie im Urlaub sind), nutzen
Sie die Kein Eis-Funktion.
In 24 Stunden produziert das Gerät etwa 110
Eiswürfel. Diese Menge kann etwas variieren
und hängt davon ab, wie oft die Türen geöffnet
werden und wie der Kühlschrank eingestellt ist.
18
Stromausfälle wirken sich natürlich ebenfalls
aus. Das erzeugte Eis kann in Form von
Eiswürfeln oder zerstoßenem Eis aus dem
Spender entnommen werden.
Wenn Sie den Spender zunächst für zerstoßenes
Eis genutzt haben und danach auf Eiswürfel
umschalten, wird eine Zeit lang weiter
zerstoßenes Eis ausgegeben, bevor der erste
Eiswürfel erscheint. Dies ist völlig normal, da
zunächst die Reste des zerstoßenen Eises
ausgegeben werden müssen.
DE
Page 51

Wenn Sie den Spender längere Zeit nicht genutzt
haben (und nach Stromausfällen) kann es
vorkommen, dass sich Geruch oder Geschmack
des Eises verändern, Eiswürfel aneinander
kleben oder kleiner werden. In diesem Fall sollten
Sie das Eis im Eisbehälter kontrollieren, den
Eisbehälter leeren und sorgfältig reinigen.
Warnungen
• Wenn sich Kondensation (Wassertropfen)
am Spender bildet und beim Anschließen des
Gerätes an die Wasserleitung vergessen Sie
nicht, den Antikondensationschalter zu drücken.
(Siehe Seite 15.) Der Antikondensationschalter
ist bei der Auslieferung bereits eingedrückt.
• Wenn Sie den Eisbehälter einmal entfernen
möchten, müssen Sie in jedem Fall zuerst die
„Ice off“-Taste drücken.
• Geben Sie selbst kein zusätzliches Eis in
den Eisspender. Dies kann zu
Funktionsstörungen führen.
• Es ist normal, dass einzelne Eiswürfel im
Eisbehälter aneinander kleben.
• Bewegliche Teile wie Klingen am Eisauslass
des Spenders und dürfen niemals berührt
werden; es besteht Verletzungsgefahr.
• Zerkleinern Sie das Eis im Eisbehälter
niemals mit scharfen oder spitzen Gegenständen.
Der Eisbehälter kann dadurch beschädigt
werden.
• Missbrauchen Sie den Eisbehälter niemals
zum schnellen Kühlen von Lebensmitteln.
Eisbehälter und Wasserspender reinigen
Zum Reinigen des Eisbehälters beachten Sie
bitte die nachstehende Vorgehensweise und die
entsprechenden Warnungen:
* Entnehmen Sie den Eisbehälter, indem Sie
ihn zunächst anheben und dann zu sich hin
herausziehen; siehe Abbildung.
* Leeren Sie den Eisbehälter aus. Verklemmtes
Eis entfernen Sie mit einem geeigneten
Werkzeug (keine spitzen oder scharfen
Gegenstände!), damit der Eisbehälter nicht
beschädigt wird.
* Sorgen Sie dafür, dass das Innere des
Eisbehälters nicht feucht oder gar nass ist, bevor
Sie den Behälter wieder in sein Gehäuse setzen.
* Wenn Sie Eis aus dem Eisspender
entnehmen möchten, nachdem Sie den
Eisbehälter wieder in sein Gehäuse gesetzt und
die Tür des Tiefkühlbereiches geschlossen
haben, beenden Sie den Kein Eis-Modus, indem
Sie die „Ice off“-Taste noch einmal drücken.
* Berühren Sie keinerlei beweglichen Teile;
z. B. die Klinge im Eisbehälter.
Kein Eis
Um die Eisbildung zu stoppen, drücken Sie die
„Ice off“-Taste. Wenn die Eisproduktion gestoppt
ist (Kein Eis), benötigt der Eisbereiter kein Wasser
mehr. Bereits vorhandenes Eis kann aber nach
wie vor aus dem Spender entnommen werden.
Um die Eisproduktion wieder zu starten, drücken
Sie die „Ice off“-Taste noch einmal.
Achtung: Wenn Sie den Eisspender nicht
benutzen, vergessen Sie nicht, den
Eiskanaldeckel in den Ring in der
Tiefkühlbereichtür einzusetzen. (Siehe Seite 2.)
1. Anheben
2. Ziehen
19
DE
Page 52

Feuchtigkeitskontrolle im Gemüsefach
Sie können den Feuchtigkeitsgrad regulieren, indem
Sie den Feuchtigkeitseinstellschieber nach rechts oder
links bewegen.
• Wenn Sie etwas Feuchtigkeit in diesem Fach bewahren
möchten, bringen Sie den Feuchtigkeitseinstellschieber
in die geschlossene Position. (links)
• Wenn Sie die Feuchtigkeit in diesem Fach beseitigen
möchten, bringen Sie den Feuchtigkeitseinstellschieber
in die offene Position. (rechts)
Schubablagen
Die Schubablagen können etwa 10 cm weit
herausgezogen werden. Auf diese Weise können
Sie Lebensmittel im hinteren Bereich der Ablage
einfacher erreichen und das Gerät leichter
reinigen.
Snack-Schale
In der Snack-Schale können Sie kleinere Dinge
lagern, die Sie häufig verwenden. Bitte gehen
Sie besonders vorsichtig vor, wenn Sie die SnackSchale aus dem Gerät nehmen und wieder
einsetzen, damit Sie nichts beschädigen.
Ionisator
Der Ionisator befindet sich im Luftkanal des
Gerätes, an der Rückseite des Gemüsefaches.
Durch Ionisierung der Luft werden schwebende
Bakterien und dadurch entstehende,
unangenehme Gerüche wirksam reduziert.
20
Bakterien
Ionen
DE
Page 53

Frischgefrieren
In diesem Bereich können Sie Ihre Lebensmittel
schnell einfrieren und damit ihren Geschmack
und Nährwert erhalten.
Eierhalter
Sie können den Eierhalter in der Tür oder auf
einer Ablage platzieren.
Legen Sie den Eierhalter niemals in den
Tiefkühlbereich.
Gemüsefach oder Kühlfach
Gemüse- oder Kühlfach (0 °C-Fach (1))
* Die Schublade am Boden des Kühlgerätes
können Sie in ein Gemüse- oder Kühlfach
verwandeln.
* Die Tenmperatur des Kühlfachs liegt unter der
Temperatur des Kühlbereiches (etwa bei 0 °C);
so bleiben Fleisch und Fisch länger frisch.
Das Kühlfach eignet sich auch ideal zum Lagern
von vorgekochten Lebensmitteln.
Wichtig:
* Gemüse und Früchte können gefrieren, wenn
der Einstellschieber (2) in der Kühlfach-Position
steht. Überprüfen Sie also die Position des
Schiebers (2), bevor Sie Lebensmittel einlagern.
* Bei Umgebungstemperaturen von 10 °C und
weniger sollte grünes Blattgemüse und andere
leicht einfrierende Lebensmittel aus dem Fach
(1) genommen und in das obere Gemüsefach
gelegt werden. (3)
* Tauschen Sie die Position dieser Schubfächer
nicht, achten Sie darauf, dass der Einstellschieber
auf die gewünschte Position eingestellt ist, also
Gemüsefach oder Kühlfach.
*Wenn das Fach (1) bei
Umgebungstemperaturen von mehr als 28 °C
kühler werden soll, können Sie den
Einstellschieber (4) im Tiefkühlbereich öffnen.
Beim Umgebungstemperaturen bis 28 °C achten
Sie darauf, den Einstellschieber (4) im
Tiefkühlbereich zu schließen.
21
DE
Page 54

Frische Lebensmittel tiefkühlen
* Es ist ratsam, die Lebensmittel einzuwickeln
oder abzudecken, bevor sie im Kühlschrank
gelagert werden.
* Heiße Spiesen müssen auf Raumtemperatur
abgekühlt sein, ehe sie in den Kühlschrank
gegeben werden.
* Lebensmittel, die Sie einfrieren möchten, sollten
frisch und von guter Qualität sein.
* Verteilen Sie die Lebensmittel / Gerichte auf
familienfreundliche oder sonstwie sinnvolle
Portionen.
* Lebensmittel sollten luftdicht verpackt sein,
damit sie nicht austrocknen. Dies gilt auch dann,
wenn Sie Lebensmittel nur kurze Zeit lagern
möchten.
* Geeignete Verpackungsmaterialien müssen
reißfest, luftdicht und unempfindlich gegenüber
Kälte, Feuchtigkeit, Gerüchen, Ölen und Säuren
sein. Darüber hinaus müssen sie sich leicht
verschließen lassen, unkompliziert in der
Handhabung und natürlich zum Tiefkühlen
geeignet sein.
* Lebensmittel, die eingefroren werden sollen,
müssen im Tiefkühlbereich verstaut werden.
(Sie sollten keinen direkten Kontakt zu bereits
eingefrorenen Lebensmitteln haben, um diese
nicht anzutauen. Die Angaben zur
Tiefkühlkapazität finden Sie bei den technischen
Daten des Gerätes.)
* Halten Sie sich bitte an die Angaben zur
maximalen Lagerungszeit von Lebensmitteln.
* Verbrauchen Sie eingefrorene Lebensmittel
nicht direkt nach dem Auftauen und frieren Sie
sie nicht wieder ein.
* Bitte beachten Sie die folgenden Anweisungen,
um beste Resultate zu erzielen.
* Frieren Sie nicht zu große Mengen auf einmal
ein. Die Qualität der Lebensmittel bleibt am
besten erhalten, wenn sie so schnell wie möglich
bis in den Kern tiefgekühlt werden.
* Überschreiten Sie nicht die tägliche
Tiefkühlkapazität ihres Gerätes (13 kg).
* Wenn Sie noch warme Speisen in das
Tiefkühlfach stellen, verursachen Sie damit, dass
der Kompressor ununterbrochen arbeitet, bis
die Speisen komplett tiefgekühlt sind. Dies kann
vorübergehend zu einer stärkeren Kühlung im
Kühlschrankbereich führen.
* Frische Lebensmittel zum Einfrieren können
Sie an eine beliebige Stelle des Tiefkühlbereich
legen. Allerdings empfehlen wir Ihnen das
Schnellgefrierfach, um Lebensmittel besonders
schnell einfrieren zu können.
* Achten Sie besonders darauf, bereits
tiefgekühlte und frische Speisen nicht zu
vermischen.
Empfehlungen zur Konservierung von gefrorenen Lebensmitteln
• Handelsübliche, verpackte Tiefkühlkost sollte
gemäß den Hinweisen des Herstellers zur
Lagerung in Viersterne-Fächern gelagert
werden.
• Um besonders gute Ergebnisse zu erzielen
und zu erhalten, sollten Sie Folgendes
berücksichtigen:
1. Geben Sie Lebensmittel so schnell wie möglich
nach dem Kauf in den Tiefkühlbereich.
2. Sorgen Sie dafür, dass sämtliche Lebensmittel
beschriftet und mit einem Datum versehen
werden.
3. Achten Sie darauf, dass das
Mindesthaltbarkeitsdatum auf der Verpackung
nicht überschritten wird.
Bei Stromausfall halten Sie die Tür des
Tiefkühlbereiches geschlossen. Ein Stromausfall
bis zu acht Stunden wirkt sich nicht auf die
gefrorenen Lebensmitteln aus. Falls der
Stromausfall länger andauern sollte, müssen
Sie die Lebensmittel überprüfen und nötigenfalls
entweder sofort konsumieren oder kochen und
danach wieder einfrieren.
* Wenn Sie die Gefrierbereich-Schublade und
den Eiswürfelbehälter zur Volumenvergrößerung
herausnehmen, wird der Bereich über der in der
nachstehenden Abbildung gezeigten Linie zum
Zweisternebereich. Nutzen Sie dieses Volumen
lediglich zur kurzzeitigen Lagerung von
Lebensmitteln.
Abtauen
Die Kühl- und Tiefkühlbereiche werden
automatisch abgetaut.
22
DE
Page 55

Replacing the Interior Light Bulb
Sollte die Lampe ausgefallen sein, gehen Sie
wie folgt vor:
1. Schalten Sie die Stromversorgung an der
Steckdose ab und ziehen Sie den Stecker.
* Nehmen Sie sämtliche Ablagen und
Schubladen heraus.
2. Nehmen Sie die Abdeckung vorsichtig ab,
indem Sie die Seiten behutsam mit einem
Schlitzschraubendreher lösen. Achten Sie darauf,
weder die Kunststoffabdeckung noch die
Führungen im Inneren zu beschädigen.
3. Überprüfen Sie, dass sich die Lampe nicht
gelöst hat und fest in der Halterung sitzt. Stecken
Sie den Netzstecker wieder ein und schalten Sie
das Gerät ein. Wenn die Lampe jetzt funktioniert,
setzen Sie die Abdeckung wieder auf.
4. Wenn die Lampe nach wie vor nicht leuchtet,
ziehen Sie den Netzstecker. Ersetzen Sie die
Glühbirne durch eine maximal 15 Watt starke
Glühbirne mit E14-Gewinde (SES).
5. Entsorgen Sie die ausgebrannte Glühbirne
sofort und mit Vorsicht.
23
DE
Page 56

Lebensmittel einlagern
Frühstück, Delikatessen
Verschiedene gefrorene Lebensmittel wie Fleisch, Fisch, Speiseeis, Gemüse, etc.
Lagern Sie Lebensmittel wie Fleisch, Geflügel, Fisch und Ähnliches in dünne
Frischhaltefolie (Zellophan) eingewickelt.
Milchprodukte wie Milch, Butter, Käse.
Eier
Lebensmittel in Pfannen, Töpfen, geschlossenen Behältern
Kleine, verpackte Lebensmittelprodukte oder Getränke (zum Beispiel Milch,
Saft und Bier)
Gemüse und Früchte
Gemüse, Obst, Fleisch und roher Fisch, der abtauen soll.
Der Einstellschieber sollte je nach Bedarf eingestellt werden.
Überprüfen Sie den Einstellschieber, ehe Sie Lebensmittel einlagern.
Snack-Schale
Tiefkühlbereich-Ablagen
Schublade im
Tiefkühlbereich
Butter- & Käsefach
Eierhalter
Kühlbereich-Ablagen
Kühlbereich-Türablagen
Gemüsefach
Gemüsefach/Kühlfach
24
DE
Page 57

Was Sie zum Energiesparen beachten sollten
1. Halten Sie die Kühlschranktüren möglichst
kurz geöffnet.
2. Lagern Sie keine warmen Speisen oder
Getränke im Kühlschrank ein.
3. Überladen Sie den Kühlschrank nicht; die Luft
muss frei zirkulieren können.
4
Hinweise zum Schnellgefrieren
Lebensmittel sollten schnellstmöglich
eingefroren werden, damit sie nicht an Qualität
verlieren.
Die TSE-Norm schreibt (je nach
Messbedingungen) vor, dass ein Kühlschrank
4,5 kg Lebensmittel pro 100 Liter
Gefriervolumen bei einer Umgebungstemperatur
von 32 °C in 24 Stunden auf -18 °C abkühlen
kann.
Nur bei Temperaturen von -18 °C oder
weniger ist es möglich, Lebensmittel lange
Zeit zu lagern.
Sie können die Frische von Lebensmitteln
viele Monate bewahren (bei einer Temperatur
von -18 °C oder weniger im Tiefkühlbereich).
WARNUNG!
* Lebensmittel, die Sie einfrieren möchten,
müssen von guter Qualität sein.
* Verteilen Sie die Lebensmittel / Gerichte
auf familienfreundliche oder sonstwie sinnvolle
Portionen.
* Lebensmittel sollten luftdicht verpackt
sein, damit sie nicht austrocknen. Dies gilt auch
dann, wenn Sie Lebensmittel nur kurze Zeit
lagern möchten.
4. Stellen Sie den Kühlschrank nicht im direkten
Sonnenlicht oder in der Nähe von Wärmequellen
wie Öfen, Spülmaschinen oder Heizkörpern auf.
5. Achten Sie darauf, Ihre Lebensmittel in
verschlossenen Behältern aufzubewahren.
Benötigtes Verpackungsmaterial:
* Kältebeständiges Klebeband
* Selbstklebende Etiketten
* Gummiringe
* Stift
Geeignete Verpackungsmaterialien müssen
reißfest und unempfindlich gegenüber Kälte,
Feuchtigkeit, Gerüchen, Ölen und Säuren sein.
Einzufrierende Lebensmittel sollten keinen
direkten Kontakt zu bereits gefrorenen
Lebensmitteln haben, damit diese nicht
anzutauen.
Die Gefrierkapazität Ihres Kühlschranks können
Sie im Bereich „Technische Daten“ im ersten
Teil nachlesen.
Halten Sie sich hinsichtlich der
Aufbewahrungsdauer immer an die
Tabellenwerte.
Verbrauchen Sie eingefrorene Lebensmittel
nicht direkt nach dem Auftauen und frieren
Sie sie nicht wieder ein.
25
DE26DE
Page 58

5
Reinigung des Kühlschranks
Warnung!!!
Verwenden Sie zu
Reinigungszwecken
niemals Benzin oder
ähnliche Substanzen.
Wir empfehlen, das Gerät an
der Steckdose auszuschalten
und den Netzstecker zu ziehen, ehe Sie mit der
Reinigung beginnen.
* Verwenden Sie zur Reinigung niemals scharfe
Gegenstände, Seife, Haushaltsreiniger,
Waschmittel oder Wachspolituren.
* Reinigen Sie die Außenflächen des Gerätes
mit lauwarmem Wasser, wischen Sie die Flächen
danach trocken.
* Zur Reinigung des Innenraums verwenden Sie
ein feuchtes Tuch, das Sie in eine Lösung aus
1 Teelöffel Natron und einem halben Liter Wasser
getaucht und ausgewrungen haben. Nach dem
Reinigen wischen Sie den Innenraum trocken.
*Achten Sie darauf, dass kein Wasser in das
Lampengehäuse und andere elektrische
Einrichtungen eindringt.
* Wenn das Gerät längere Zeit nicht benutzt
wird, schalten Sie es ab, nehmen alle
Lebensmittel heraus, reinigen das Gerät und
lassen die Türe geöffnet.
* Befreien Sie das Gerät einmal pro Jahr von
Staub; dazu können Sie einen Staubsauger
benutzen.
* Kontrollieren Sie die Türdichtungen regelmäßig
und achten Sie darauf, dass diese sauber und
A
S
E
T
N
O
B
E
N
T
Z
‹
N
‹
N
E
R
frei von Speiseresten sind.
* Türablage entfernen
* Zum Entfernen einer Türablage räumen Sie
sämtliche Gegenständen aus der Ablage und
schieben diese dann nach oben heraus.
* Um eine Lade zu entfernen, ziehen Sie diese
so weit wie möglich heraus, heben sie etwas an
und ziehen sie dann komplett heraus.
* Achten Sie besonders darauf, dass keine
Lebensmittel - insbesondere kleine Lebensmittel
wie Reis, Erbsen und Bohnen - in die LüfterSchutzgitter und in die Luftkanäle fallen. Dadurch
kann das Kühlungssystem verstopft und die
Leistung des Gerätes eingeschränkt werden.
Schutz der Kunststoffflächen
Geben Sie keine Öle oder stark fetthaltige
Speisen offen in Ihren Kühlschrank - dadurch
können die Kunststoffflächen angegriffen werden.
Sollten die Plastikoberflächen einmal mit Öl in
Berührung kommen, so reinigen Sie die
entsprechend Stellen umgehend mit warmem
Wasser.
Speziell behandelte Türen
Echte Edelstahltüren wurden speziell behandelt,
um das elegante Erscheinungsbild des Materials
zu verbessern und beizubehalten. Damit dies
so bleibt, empfehlen wir Ihnen, die Türen von
Zeit zu Zeit mit weichem, trockenem und
sauberem Küchenpapier in einer Aufwärts/Abwärtsbewegung abzuwischen. Weitere
Informationen erhalten Sie vom BekoKundendienst.
6
Service
Bevor Sie den Kundendienst rufen
Bitte überprüfen Sie die folgenden Punkte, ehe Sie den Kundendienst anrufen.
?
°C
-/+
1. Ist der Kühlschrank richtig
angeschlossen?
2. Ist die entsprechende
Haussicherung herausgesprungen
oder durchgebrannt?
3. Stimmen die
Temperatureinstellungen?
das Gerät zu oft und schnell ein- und
ausgeschaltet wird, da der Druck des
Kühlmittels eine Weile lang ausgeglichen
werden muss. Ihr Kühlschrank beginnt
nach etwa sechs Minuten wieder zu
arbeiten. Bitte wenden Sie sich an den
Kundendienst, wenn Ihr Kühlschrank
nach Ablauf dieser Zeit nicht wieder zu
arbeiten beginnt.
Wichtiger Hinweis: Eine
Schutzschaltung stoppt den
Kompressor bei kurzzeitigen
!
Unterbrechungen der
Stromversorgung und wenn
Page 59
Dies ist bei einem vollautomatisch abtauenden Kühlschrank
* Einstellschieber in die Gemüsefachposition bringen.
* Gemüse in das obere Gemüsefach umlagern.
* Eisbildung an den Außenflächen von Lebensmitteln wie Fleisch
ist normal.
* Dies ist normal, wenn sich der Einstellschieber
in der Kühlfachposition (0 °C) befindet.
Umbegungstemperatur sehr niedrig (um oder
weniger als 10 °C)
* Kühlere Thermostateinstellung wählen. (2 °C)
* Türen kürzer geöffnet halten oder seltener öffnen.
* Offene Behälter abdecken oder mit einem geeigneten Material
einwickeln.
* Kondensation mit einem trockenen Tuch entfernen und
* Sehr geringe Umgebungstemperaturen.
* Häufiges Öffnen und Schließen der Tür.
* Sehr feuchte Umgebung.
* Offene Lagerung von feuchten Lebensmitteln.
* Tür nicht richtig geschlossen.
völlig normal. Das Gerät taut von Zeit zu Zeit ab.
überprüfen, ob diese erneut auftritt.
Der Kühlschrank taut ab.
Problem Mögliche Ursache Problemlösung
Überprüfen Sie, ob das Gerät richtig angeschlossen ist.
Wenden Sie sich an Ihren Stromversorger.
Der Netzstecker ist nicht eingesteckt.
Der Strom ist ausgefallen.
Dies ist völlig normal.
Dies ist völlig normal. Große Kühlgeräte arbeiten oft längere
Zeit.
Ihr neuer Kühlschrank ist vielleicht etwas breiter
als sein Vorgänger.
Die Umgebungstemperatur ist eventuell sehr hoch.
Heiße Speisen führen dazu, dass der Kühlschrank etwas länger arbeiten
muss, bis die geeignete Temperatur zur sicheren Lagerung erreicht ist.
Der Kühlschrank muss länger arbeiten, weil warme Luft in den
Innenraum eingedrungen ist. Öffnen Sie die Türen möglichst selten.
Überzeugen Sie sich davon, dass die Türen komplett geschlossen
Es kann einige Stunden länger dauern, bis der Kühlschrank
seine Arbeitstemperatur erreicht hat.
Das Kühlgerät wurde möglicherweise erst vor kurzem
in Betrieb genommen oder mit Lebensmitteln gefüllt.
Kurz zuvor wurden größere Mengen warmer
Speisen im Kühlschrank eingelagert.
sind.
Türen wurden häufig geöffnet oder längere Zeit
nicht richtig geschlossen.
Die Tür des Kühl- oder Tiefkühlbereichs war nur
angelehnt.
Die Lebensmittel in der
unteren Schublade
(Gemüsefach) gefrieren.
Bitte arbeiten Sie diese Liste durch, bevor Sie den Kundendienst anrufen. Das kann Ihnen Zeit und Geld sparen. In der Liste finden
Sie häufiger auftretende Probleme, die nicht auf Verarbeitungs- oder Materialfehler zurückzuführen sind.
Kondensation an den
Seitenwänden des
Kühlbereiches.
Der Kompressor läuft nicht
Der Kühlschrank arbeitet
sehr intensiv oder über eine
sehr lange Zeit.
27DE28
Page 60

Stellen Sie die Kühlschranktemperatur höher ein und warten Sie,
bis die gewünschte Temperatur erreicht ist.
Reinigen oder ersetzen Sie die Dichtung. Beschädigte oder
defekte Dichtungen führen dazu, dass der Kühlschrank länger
arbeiten muss, um die Temperatur halten zu können.
Die Kühlschranktemperatur ist sehr niedrig
eingestellt.
Die Türdichtungen von Kühl- oder Gefrierbereich
sind verschmutzt, verschlissen, beschädigt oder
sitzen nicht richtig.
Stellen Sie die Gefrierfachtemperatur wärmer ein und prüfen
Sie.
Stellen Sie die Kühlbereichtemperatur wärmer ein und prüfen
Sie.
Die Kühltemperatur ist sehr niedrig eingestellt.
Die Tiefkühltemperatur ist sehr niedrig eingestellt.
Eine Bildung von Eiskristallen ist normal; diese wird durch die
Feuchtigkeit des Fleisches verursacht.
Stellen Sie die Kühlbereichtemperatur wärmer ein und prüfen
Sie.
Die Kühltemperatur ist sehr niedrig eingestellt.
Fleisch muss bei Temperaturen knapp unter dem
Gefrierpunkt aufbewahrt werden, um es möglichst
lange frisch zu halten.
Problem Mögliche Ursache Problemlösung
Der Kühlschrank arbeitet sehr
intensiv oder über eine sehr
lange Zeit.
Sehr geringe Temperaturen
Die Temperatur im Tiefkühlbereich ist
sehr niedrig, während die Termperatur
im Kühlbereich normal ist.
Lebensmittel, die in den
Kühlbereichablagen aufbewahrt
Die Temperatur im Kühlbereich ist
werden, gefrieren.
sehr niedrig, während die Termperatur
im Tiefkühlbereich normal ist.
Fleisch, das im Kühlfach
aufbewahrt wird, gefriert.
Sehr hohe Temperaturen
Stellen Sie den Kühl- oder Tiefkühlbereich auf die gewünschte
Temperatur ein.
Stellen Sie den Kühl- oder Tiefkühlbereich auf die gewünschte
Temperatur ein.
Warme Luft dringt in den Kühl- und Tiefkühlbereich ein, wenn
die Türen geöffnet sind. Öffnen Sie die Türen möglichst selten.
Schließen Sie die Tür komplett.
Warten Sie, bis der Kühl- oder Tiefkühlbereich die gewünschte
Temperatur erreicht.
Ihr Kühlschrank braucht aufgrund der Größe einige Zeit, um sich
auf die gewünschte Temperatur abzukühlen.
Stellen Sie die Kühlschranktemperatur etwas höher ein.
Die Kühltemperatur ist sehr hoch eingestellt.
Die Kühltemperatur ist sehr hoch eingestellt. Die Einstellung des
Kühlbereichs beeinflusst die Temperatur im Tiefkühlbereich.
Türen wurden häufig geöffnet oder längere Zeit
nicht richtig geschlossen.
Die Kühlschranktür ist nur angelehnt.
Kurz zuvor wurden größere Mengen warmer
Speisen im Kühlschrank eingelagert.
Der Kühlschrank war kurz zuvor von der
Stromversorgung getrennt.
Die Kühltemperatur ist sehr niedrig eingestellt.
Die Temperatur im Kühl- oder
Tiefkühlbereich ist sehr hoch.
Die Temperatur im Kühlbereich ist
sehr hoch, während die Temperatur
im Tiefkühlbereich normal ist.
DE
Page 61

Dies ist völlig normal und keine Fehlfunktion.
Das Fassungsvermögen moderner, vereisungsfreier
Kühlschränke wurde erhöht, niedrigere
Temperaturen sind möglich.
Problem Mögliche Ursache Problemlösung
Betriebsgeräusch
Das Betriebsgeräusch nimmt
zu, wenn der Kühlschrank
arbeitet.
Achten Sie darauf, dass der Boden eben, stabil und in
der Lage ist, den Kühlschrank sicher zu tragen.
Nehmen Sie die Gegenstände herunter.
Der Boden ist nicht eben oder nicht fest. Der
Kühlschrank wackelt, wenn er etwas bewegt wird.
Auf dem Kühlschrank abgestellte Gegenstände
bewegen sich.
Vibrationen oder
Betriebsgeräusche.
Dies ist völlig normal und keine Fehlfunktion.
Überzeugen Sie sich davon, dass die Türen komplett
geschlossen sind.
Öffnen Sie die Türen möglichst selten.
Bei heißen und feuchten Wetterlagen tritt verstärkt
Eisbildung und Kondensation auf.
Die Türen sind nicht richtig geschlossen.
Die Türen wurden sehr häufig geöffnet oder längere
Zeit offen stehen gelassen.
Bildung von Wasser / Kondensation
/ Eis im Kühlschrank
Kondensation an den
Kühlschrankinnenflächen.
Dies ist bei feuchtem Wetter völlig normal. Die Kondensation
verschwindet, sobald die Feuchtigkeit abnimmt.
Es herrscht hohe Luftfeuchtigkeit.
Wasser / Kondensation / Eis an
der Außenseite des Kühlschranks.
Feuchtigkeit sammelt sich an
der Außenseite des
Kühlschranks oder an den
Reinigen Sie das Innere des Kühlschranks mit einem Schwamm, den
Sie mit warmem oder kohlensäurehaltigem Wasser angefeuchtet haben.
Verpacken Sie die Lebensmittel.
Verwenden Sie andere Behälter oder Verpackungsmaterial
einer anderen Marke.
Das Innere des Kühlschranks muss gereinigt
werden.
Im Kühlschrank befinden sich stark riechende
Lebensmittel.
Einige Behälter oder Verpackungsmaterialien
verursachen den Geruch.
Türen.
29
DE
Page 62

Entfernen Sie die Verpackungen, welche die Tür blockieren.
Lebensmittelpackungen verhindern eventuell
das Schließen der Tür.
Problem Mögliche Ursache Problemlösung
Die Tür(en) lässt/lassen
sich nicht schließen.
Öffnen und Schließen der
Türen.
Stellen Sie die Höheneinstellschrauben ein.
Achten Sie darauf, dass der Boden eben ist und das Gewicht des
Kühlschranks problemlos tragen kann.
Der Kühlschrank ist vermutlich nicht absolut gerade
aufgestellt und wackelt, wenn er leicht bewegt wird.
Der Boden ist nicht eben oder nicht stabil genug.
Ordnen Sie die Lebensmittel in der Schublade anders an.
Reinigen Sie die Laufrollen.
Die Lebensmittel berühren eventuell den oberen
Teil der Schublade.
Die Schubladen klemmen.
Das Gerät taut gerade ab Beenden Sie diesen Modus.
Die Laufrollen der Schubladen sind eventuell
verschmutzt oder verklemmt.
Eisspender
Überprüfen Sie die Wasserschläuche.
Überprüfen Sie die Wasserzuleitung oder schließen Sie sie an.
Die Wasserversorgung ist abgedreht oder nicht
angeschlossen
Stellen Sie die Kühlbereichtemperatur wie in der
Die Wasserschläuche zwischen Kühlschrank
und Wasseranschluss sind geknickt.
Der Wasserdruck reicht nicht aus. Verwenden Sie eine geeignete Pumpe.
Bedienungsanleitung beschrieben ein.
Warten Sie etwa 24 Stunden.
Dies kann passieren, wenn der Eisspender längere Zeit nicht
benutzt wurde. Leeren/Reinigen Sie den Eisbereiter.
Die Kühlbereichtemperatur ist zu hoch.
Nach der Inbetriebnahme dauert es 12 bis 24
Stunden, bis Eis bereitet wird.
Eiswürfel kleben im Eisbereiter aneinander
Der Eisspender funktioniert
nicht
30
DE
Page 63
Stellen Sie die Temperatur des Gefrierbereiches
wie in der Bedienungsanleitung beschrieben ein
oder überprüfen Sie die Tür des Gefrierbereiches.
Warten Sie, bis die Temperatur im Gefrierbereich
die eingestellte Temperatur erreicht hat.
Dies ist normal. Nach zwei bis drei Sekunden
werden Eiswürfel ausgegeben.
Dies ist normal.
Vergewissern Sie sich, dass die Tür richtig schließt.
Stellen Sie die Temperatur des
Gefrierbereiches niedrig genug ein.
Überprüfen Sie die Wasserschläuche.
Halten Sie den Riegel mindestens 1 Minute lang gedrückt.
Vergewissern Sie sich, dass der Antikondensationschalter
gedrückt ist und stellen Sie den Kühlschrank wärmer ein.
Lassen Sie Wasser auslaufen, bis der
Überprüfen Sie die Wasserzuleitung oder schließen Sie sie an.
Lassen Sie das Wasser laufen, bis kühles Wasser ausgegeben wird.
Wasservorrat des Systems komplett erschöpft ist.
Dies ist normal.
Benutzen Sie einen Filter oder einen
Wasserbehälter mit einer entsprechenden Pumpe.
Dies ist normal.
Dies ist normal.
Die Gefrierbereichtemperatur ist zu hoch, oder die Tür
des Gefrierbereiches wurde nicht richtig geschlossen.
Stromausfall
Zerstoßenes Eis wurde kurz vor der
Eiswürfelauswahl ausgegeben.
Ein oder zwei Eiswürfel sind irrtümlich zerstoßen
worden und in die Eiswürfelbereitung gelangt.
Die Tür des Gefrierbereiches wurde nicht richtig
geschlossen oder sehr häufig geöffnet.
Die Temperatur des Gefrierbereiches wurde nicht
Problem Mögliche Ursache Problemlösung
Die Eiswürfel schmelzen, sind zu weich.
Eiswürfel wurden gewählt, allerdings
wird zerstoßenes Eis ausgegeben.
Die Eiswürfelbereitung braucht
sehr lange.
niedrig genug eingestellt.
Die Wasserschläuche zwischen Kühlschrank und
Wasseranschluss sind geknickt.
Die Wasserversorgung ist abgedreht oder nicht angeschlossen
Der Wasserdruck reicht nicht aus. Verwenden Sie eine geeignete Pumpe.
Im System wurde Luft eingeschlossen.
Das Wasser im System ist gefroren.
Der Wasserspender
DE
funktioniert nicht.
Das erste Glas Wasser ist warm. Der Wasserspender wurde längere Zeit nicht benutzt.
Der Wasserspender arbeitet nicht,
allerdings funktioniert der Eisspender.
Unangenehmer Geschmack/Geruch
Wasserspender
31
Der Spender wurde längere Zeit nicht
benutzt.
Schlechte Qualität der Wasserversorgung.
Der Eisbereiter ist nicht sauber. Leeren und reinigen Sie den Eisbereiter.
Unangenehmer Geschmack oder
Geruch von Eiswürfeln oder Wasser
Ungewöhnliches Betriebsgeräusch aus
Die Geräusche entstehen durch den Motor und die Elektromagneten.
Das Wasser verursacht Geräusche, während es in den Spender fließt.
Das Geräusch wird durch Eis verursacht, das in den Eisbereiter fällt.
Rumpelndes Geräusch
dem Spender
Surrendes Geräusch
Zischen und Klicken
Page 64

Table des matières
Caractéristiques techniques du réfrigérateur
Avant de faire fonctionner le réfrigérateur
Pourquoi Froid Ventilé ? ............................... 5
Précautions de sécurité ................................ 6
Installation du réfrigérateur........................... 7
Fonctionnement du réfrigérateur ..................14
Utilisation du réfrigérateur
Utilisation des accessoires ...........................18
Disposition des denrées ...............................24
Mesures d'économie d'énergie.....................25
Remplacement de la lampe..........................23
Informations sur la congélation rapide
Nettoyage du réfrigérateur
Dépannage
> 4
> 5
> 15
> 25
> 26
> 26
1
FR
Page 65

Le Réfrigérateur
1
2
3
4
5
7
6
6
6
8
8
9
23
Compartiment congélateur
1
Compartiment réfrigérateur
2
Compartiment Ultra Congélation
3
Appareil à glaçons
4
Éclairage intérieur du compartiment congélateur
5
Clayettes en verre du compartiment congélation
6
Couvercle du conduit à glaçons
7
Tiroirs du compartiment congélateur
8
Plinthe
9
Curseur de réglage de l'humidité
10
Couvercle du bac à légumes
11
Couvercle à Beurre et Fromages
12
Clayettes en verre du compartiment de réfrigération
13
12
13
14
15
16
15
13
21
22
12
21
22
19
18
17
111020
23
14
Support à oeufs
15
Balconnets de porte du compartiment réfrigérateur
16
Éclairage intérieur du compartiment réfrigérateur
17
Bac à amuse-gueule
18
Bac à légumes
19
Compartiment 0°/Bac à légumes
20
Curseur de réglage du Compartiment 0°/Bac à
légumes
21
Cale-bouteilles
22
Balconnets range-bouteilles
23
Pieds avant réglables
• Les illustrations présentées dans cette notice d'utilisation sont schématiques et peuvent
ne pas correspondre exactement à votre produit. Si des pièces présentées ne sont pas
comprises dans le produit que vous avez acheté, elles sont valables pour d'autres
modèles.
2
FR
Page 66
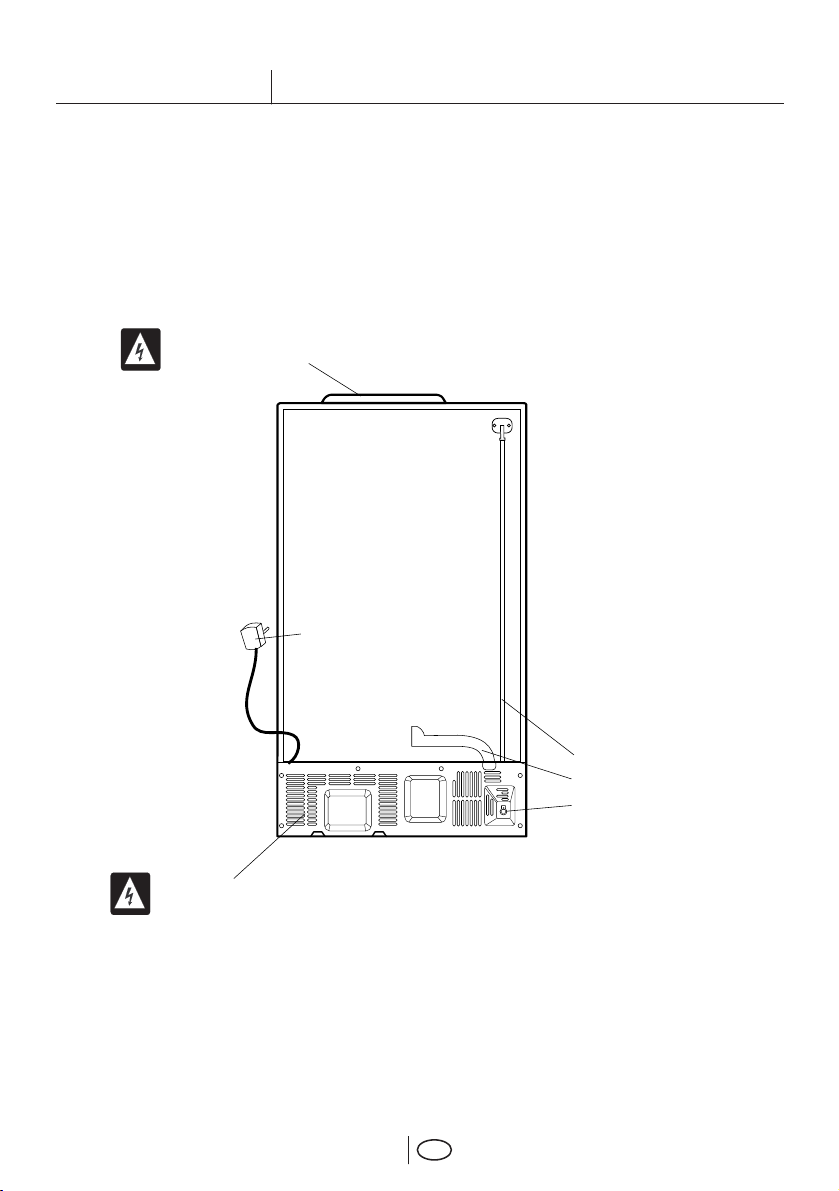
Le Réfrigérateur
COUVERCLE DU TABLEAU PRINCIPAL: NE JAMAIS ENLEVER CE COUVERCLE
câble d'alimentation électrique
Tuyau d'alimentation en eau du
distributeur de glaçons
Couvercle de conduite d'eau
Arrivée d'eau
COUVERCLE ARRIERE: NE JAMAIS ENLEVER CE COUVERCLE
3
FR
Page 67
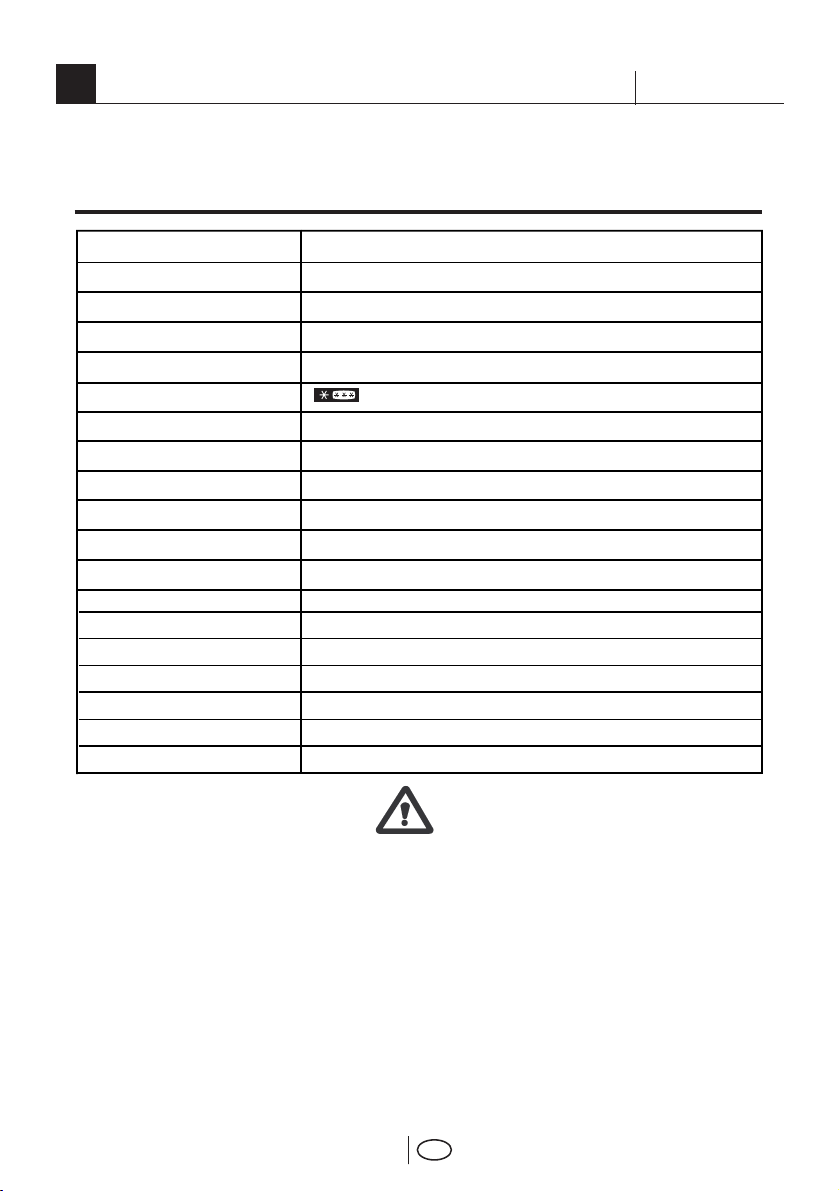
Caractéristiques techniques du réfrigérateur
1
Catégorie de produit
Classe énergétique
Consommation énergétique
annuelle (kWh/an)
Volume du compartiment de
réfrigération (Net-l)
Volume du compartiment pour
produits congelés (Net-l)
Nombre d'étoiles
Compartiment deux étoiles (l)
Système de réfrigération
Autonomie en cas de coupure (h)
Pouvoir de congélation (kg/24 h)
Classe Climatique
Niveau sonore (dB(A))
Volume net total (l)
(h) Hauteur (cm)
(l) largeur (cm)
(p) profondeur (cm)
Poids (kg)
Alimentation électrique (V/Hz)
Puissance totale (W)
Réfrigérateur / type Américain, à usage ménager
A
(La consommation réelle dépendra de comment
529
l'appareil est utilisé et d'où il est installé)
383
146
6
FROID VENTILE
(Sécurité contre les coupures de courant ; il est recommandé de ne pas consommer les
8
produits dans le compartiment de congélation après cette période).
13
SN
46
535
177.5
92.5
74
124
230/50
180
• Les caractéristiques techniques peuvent être soumises à des
modifications sans avis préalable, dans le but d'améliorer la qualité
du produit.
• Les valeurs indiquées sur les étiquettes du produit ou sur les
documents fournis avec le produit, sont des valeurs obtenues en
laboratoire conformément aux normes applicables. Ces valeurs
peuvent varier en fonction de l'utilisation du produit et des conditions
environnantes.
• Les informations sur les dimensions de l'appareil sont disponibles
dans la section « Installation du réfrigérateur ».
4
FR
Page 68

Avant de faire fonctionner le réfrigérateur
2
• Veuillez noter que le fabricant ne pourra être tenu responsable si les
informations fournies dans cette notice d'utilisation ne sont pas
respectées. Cet appareil est destiné à un usage ménager.
Avant de mettre en marche le
réfrigérateur, veuillez lire
attentivement la notice d'utilisation qui
contient des informations importantes
concernant l'installation, l'utilisation
et l'entretien de votre produit.
Mesures à appliquer
• Votre réfrigérateur doit être installé à au
moins 30 cm des sources de chaleur telles
que les plaques de cuisson, les fours,
appareils de chauffage ou cuisinières, et à au
moins 5 cm des fours électriques. De même
il ne doit pas être exposé à la lumière directe
du soleil.
• La température ambiante de la pièce où
vous installez le réfrigérateur doit être d'au
moins 10°C. Faire fonctionner l'appareil sous
des températures inférieures n'est pas
recommandé et pourrait nuire à son efficacité.
• Veillez à maintenir l'intérieur du réfrigérateur
propre.
• Si deux réfrigérateurs sont installés côte à
côte, ils doivent être séparés par au moins 2
cm.
• Le réfrigérateur doit fonctionner
silencieusement, sans vibrations. Pour
s'assurer de cela, maintenez la stabilité de
votre appareil sur le sol en tournant les pieds
avant dans un sens ou dans l'autre. Cette
opération doit être réalisée avant de placer
les denrées dans le réfrigérateur.
• Lorsque vous faites fonctionner le
réfrigérateur pour la première fois, assurezvous de suivre les instructions suivantes
pendant les six premières heures.
- Le bouton de réglage de la température
ne doit pas être placé sur la position OFF.
- La porte ne doit pas être ouverte
fréquemment.
- Le réfrigérateur doit fonctionner à vide,
sans denrées à l'intérieur.
- Ne débranchez pas votre réfrigérateur si
une panne de courant se produit, veuillez
vous reporter aux avertissements dans la
section « Mesures à prendre avant d'appeler
le service après-vente agréé ».
• L'emballage et les matériaux de protection
d'emballage doivent être conservés pour les
éventuels transports ou déplacements à venir.
Points à prendre en compte lors du transport du produit.
1. Le réfrigérateur doit être vidé et nettoyé
avant tout transport.
2. Les clayettes, accessoires, bac à légumes,
etc. de votre réfrigérateur doivent être fixés
solidement avec de la bande adhésive avant
de remballer l'appareil, pour le protéger en
cas de chocs.
3. L'emballage doit être fixé avec une bande
adhésive forte et des cordes solides, et les
normes de transport indiquées sur
Pourquoi Froid Ventilé ?
• Les réfrigérateurs à froid ventilé se distinguent
des autres réfrigérateurs de par leur principe
de fonctionnement. Dans les réfrigérateurs
normaux, l'humidité qui s'engouffre dans le
réfrigérateur et celle émanant des denrées,
provoque une formation de givre dans le
compartiment de congélation. La glace doit
fondre et être nettoyée régulièrement.
• Cependant, dans les réfrigérateurs à froid
ventilé, il n'y a pas de formation de glace ou
de givre à l'intérieur des zones utilisables du
5
l'emballage doivent être appliquées.
Rappelez-vous...
Chaque matériau recyclé est une participation
indispensable à la préservation de la nature
et conservation de nos ressources nationales.
Si vous souhaitez contribuer à recycler les
matériaux d'emballage, vous pouvez obtenir
des informations supplémentaires auprès des
organismes environnementaux ou des
autorités locales.
réfrigérateur.
• Les réfrigérateurs à froid ventilé présentent
également des caractéristiques très différentes
concernant leur système de refroidissement.
Un réfrigérateur à froid ventilé fournit un
refroidissement uniforme de toutes les denrées
qui se trouvent à l'intérieur grâce à l'air froid
qui y circule en continu.
• C'est pourquoi votre réfrigérateur à Froid
Ventilé vous procurera un grand confort
d'utilisation.
FR
Page 69

Précautions de sécurité
• Ce produit, appartenant à notre toute dernière
gamme de produits, est particulièrement
écologique. Votre appareil est équipé d'un
système de refroidissement naturel (R600a)
ne contenant pas de gaz CFC et HFC. Ce
gaz est inflammable. Par conséquent, veuillez
prendre garde à ne pas endommager le
système de refroidissement et les tuyauteries
lors de son utilisation ou de son transport. En
cas de dommages, ne pas jeter le produit au
feu ; conservez votre produit éloigné de toute
source potentielle de flammes qui pourrait
provoquer l'incendie de l'appareil. De même,
placez le produit dans une pièce aérée.
• Avant de vous débarrasser de votre appareil,
veuillez consulter les authorités locales ou
votre revendeur pour connaitre le mode
opératoire et les organismes agréés de
collecte.
• N'abîmez pas le circuit de refroidissement.
• N'utilisez pas d'outils électriques autres que
ceux recommandés par le fabricant dans les
compartiments de conservation des denrées
du produit.
• Consultez le service après-vente agréé
concernant toutes questions ou problèmes
relatifs au réfrigérateur. N'intervenez pas ou
ne laissez personne intervenir sur le
réfrigérateur sans le communiquer au service
après-vente agréé.
• Ne mangez pas de cônes de crème glacée
ou des glaçons immédiatement après les avoir
sortis du compartiment de congélation. (cela
pourrait provoquer des gelures dans votre
bouche).
• Ne placez pas de boissons en bouteilles ou
en cannettes dans le congélateur. Cela peut
entraîner leur éclatement.
• Ne touchez pas des produits congelés avec
les mains, ils pourraient se coller à celles-ci.
• La vapeur et des matériaux de nettoyage
pulvérisés ne doivent jamais être utilisés pour
les processus de nettoyage ou de dégivrage
de votre réfrigérateur. La vapeur pourrait
pénétrer dans les pièces électriques et
provoquer des courts-circuits ou des
électrocutions.
• Ne jamais utiliser les pièces de votre
réfrigérateur telles que la plaque de
protection ou la porte, comme un support ou
une marche.
• N'utilisez pas d'appareils électriques à
l'intérieur du réfrigérateur.
• Ne faites pas fonctionner un réfrigérateur
endommagé. Consultez le service aprèsvente en cas de doutes.
• N'endommagez pas les pièces où circule le
liquide réfrigérant avec des outils de forage
ou coupants. Le liquide réfrigérant qui
6
pourrait s'échapper si les canalisations de
gaz de l'évaporateur, les rallonges de tuyau
ou les revêtements de surface étaient percés,
peut irriter la peau et provoquer des
blessures aux yeux.
• Ne pas couvrir ou obstruer les orifices de
ventilation du réfrigérateur.
• Seul le personnel d'entretien agréé est
habilité à effectuer des réparations sur les
appareils électriques. Les réparations
réalisées par des personnes ne présentant
pas les compétences requises peuvent
présenter un risque pour l'utilisateur.
• En cas de dysfonctionnement ou lors
d'opérations d'entretien ou de réparation,
débranchez l'alimentation électrique du
réfrigérateur soit en désactivant le fusible
correspondant, soit en débranchant l'appareil.
• Veillez à ne pas tirer sur le câble pour
débrancher la prise.
• La sécurité électrique du réfrigérateur n'est
assurée que si le système de mise à la terre
de votre domicile est conforme aux normes
en vigueur.
• Veillez à ce que les enfants ne jouent pas
avec le réfrigérateur. Ils pourraient se blesser
ou endommager l'appareil. (par ex. : ne les
laissez pas se suspendre aux portes).
• Placez les boissons alcoolisées
verticalement, dans des récipients
convenablement fermés.
• Les articles inflammables ou les produits
contenants des gaz inflammables (par ex. :
aérosols) ainsi que les matériaux explosifs
ne doivent jamais être conservés dans
l'appareil.
• N'utilisez pas d'outils mécaniques ou autres
dispositifs pour accélérer le processus de
décongélation autres que ceux qui sont
recommandés par le fabricant.
• Il faut éviter de déplacer des pièces
de l'appareil, comme les lames, dans
un logement ou un compartiment à
glaçons pour éviter de se blesser
Sécurité électrique
Cet appareil est destiné à un usage en
intérieur. Il n'est pas approprié à un usage
en extérieurs, même si l'endroit est abrité par
un auvent.
L'exposition du produit à la pluie, la neige,
au soleil ou au vent présente des risques
concernant la sécurité électrique.
Si le câble d'alimentation est endommagé, il
doit être remplacé par le fabricant ou le
service clientèle afin de vous préserver de
tout risque éventuel.
FR
Page 70
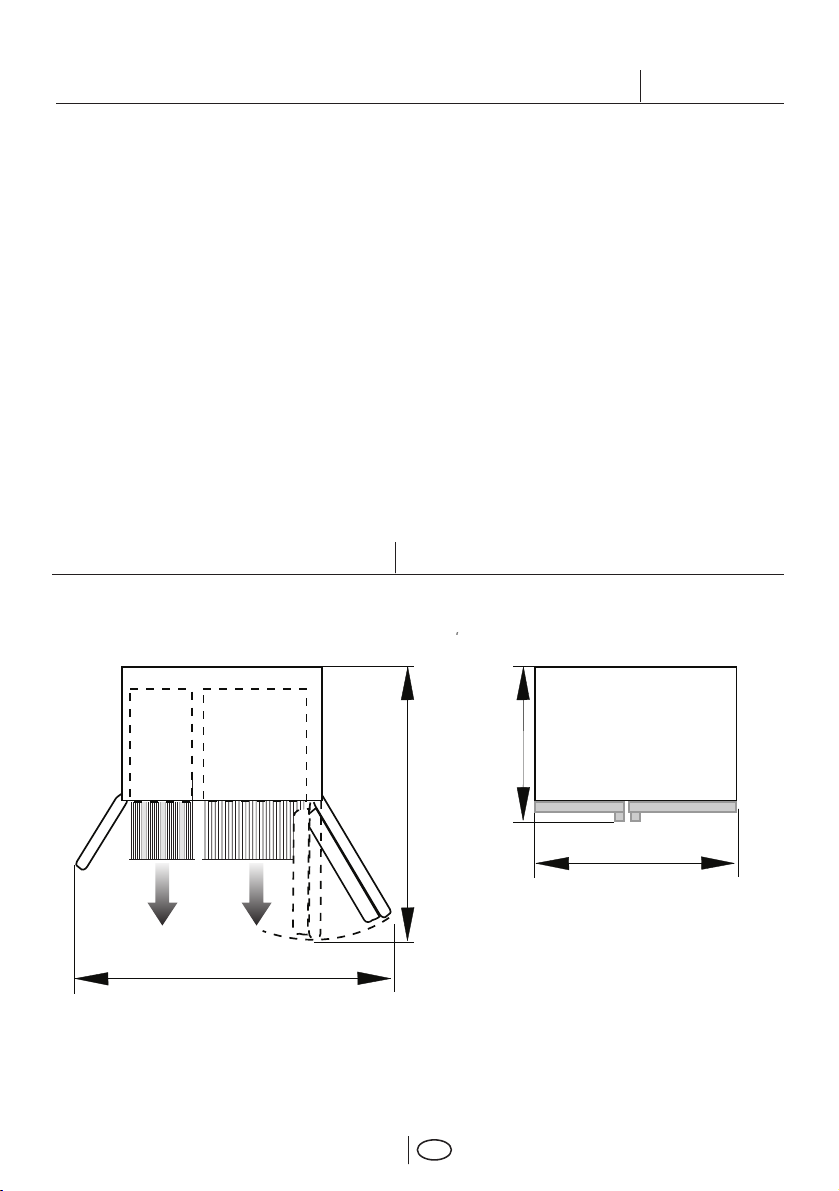
Installation et assemblage de votre refrigérateur
Attention ! Ne branchez jamais le
réfrigérateur à la prise murale au cours de
l'installation. Vous vous exposeriez à un risque
de mort ou à de blessures graves.
Si la porte d'entrée de la pièce où sera installé
le réfrigérateur n'est pas assez large pour
laisser passer le réfrigérateur, appelez alors
le service après-vente pour faire retirer les
portes du réfrigérateur et le faire passer
latéralement.
1. Installez le réfrigérateur dans un
emplacement qui permette une utilisation
pratique.
Mesures de la zone d'utilisation
Le schéma suivant présente l'espace
nécessaire pour vous permettre d'utiliser le
réfrigérateur de la manière la plus efficace.
2. Maintenez le réfrigérateur éloigné de toutes
sources de chaleur, des endroits humides et
de la lumière directe du soleil.
3. Une ventilation d'air autour du réfrigérateur
doit être aménagée pour obtenir un
fonctionnement efficace. Si le réfrigérateur
est placé dans un enfoncement du mur, il doit
y avoir un espace d'au moins 5 cm avec le
plafond et d'au moins 5 cm avec le mur.
Si le sol est couvert de moquette, votre produit
doit être surélevé à 2,5 cm du sol.
4. Placez le réfrigérateur sur un a de surface
plane afin d'éviter les à-coups.
5. N'exposez pas le réfrigérateur à des
températures ambiantes inférieures à 10°C.
154 cm
7
74 cm
117 cm
92.5
FR
Page 71

Réglage de la stabilité au sol
4
1 2 3
Réglage de la hauteur de la porte
Si votre réfrigérateur n'est pas à niveau, vous
pouvez l'y mettre en tournant les pieds avant
tel qu'illustré dans le schéma ci-dessous. (Voir
Schéma A) Le côté où se trouve le pied
s'abaisse lorsque vous tournez dans le sens
de la flèche noire, et s'élève lorsque vous
tournez dans le sens opposé. Si vous vous
faites aider par quelqu'un pour légèrement
soulever le réfrigérateur, l'opération s'en
trouvera simplifiée.
En cas de problème avec le réglage des
portes, celui-ci peut être effectué
verticalement, par ascension, suivant
l'ordre donné ci-dessous. Veillez à ce que
les clayettes de la porte soient vides lors
du réglage de la hauteur de la porte.
1. Retirez la plinthe de la porte en enlevant
ses vis, tel qu'illustré sur le schéma. (Voir
Schéma B)
(Schéma A)
(Schéma B)
FR
8
Page 72

2. À l'aide d'un tournevis, desserrez les trois
vis des charnières de porte inférieures, sur
lesquelles vous souhaitez travailler, tel
qu'indiqué sur le schéma ci-dessous. (Ne pas
retirer complètement) (Voir Schéma C)
(Schéma C)
• Si la porte du compartiment de congélation
est plus basse que celle du compartiment de
réfrigération, amenez-les à la même hauteur,
en tournant la vis d'élévation située du côté
du compartiment de congélation, dans le sens
indiquée par la flèche, en utilisant une clé
hexagonale M6, tel qu'illustré dans le
schéma D.
• Si la porte du compartiment de congélation
est plus haute que celle du compartiment de
réfrigération, amenez-les à la même hauteur,
en tournant la vis d'élévation située du côté
du compartiment de congélation, dans le sens
indiquée par la flèche, en utilisant une clé
hexagonale M6, tel qu'illustré dans le
schéma D.
Après avoir égalisé la hauteur des portes en
élevant la partie avant à l'aide des vis
d'élévation, les portes du réfrigérateur
devraient se fermer convenablement. Si les
portes ne se ferment pas correctement, cela
peut nuire aux performances du réfrigérateur.
Clé hexagonale (M6)
FR
9
(Schéma D)
Page 73

Conditions d'installation
1
2
Afin de faire fonctionner l'appareil à glaçons
et le distributeur d'eau fraîche, votre appareil
a besoin d'être relié à l'arrivée d'eau de votre
domicile à travers l'installation d'une valve
standard 1/2. Si cette valve est absente de
votre appareil ou si vous n'en êtes pas sûr,
consultez un plombier qualifié.
* Veillez tout d'abord à ce que les pièces cidessous soient livrées avec l'appareil.
1. Tuyau d'alimentation en eau de 5 mètres
(1/4 pouce de diamètre)
2. Robinet d'adduction d'eau froide
(Adaptateur de robinet)
3. 3 pieces de collier de fixation (si nécessaire
à la sécurisation du tuyau d'alimentation en
eau)
4. Filtre à eau à intégrer à l'intérieur du
compartiment réfrigérateur.
5. Écrou de raccordement du tuyau
d'alimentation en eau à l'arrière de l'appareil
Raccordement à l'arrivée d'eau
Veuillez suivre les instructions ci-dessous :
1
2
3
5
4
VEILLEZ À CE QUE L'INSTALLATION
DE LA VALVE STANDARD 1/2,
ALIMENTÉE PAR L'ARRIVEE D'EAU,
EST DISPONIBLE ET EST
COMPLÈTEMENT FERME.
Raccordement du tuyau
d'alimentation en eau au réfrigérateur
1. Après assemblage de l'écrou au tuyau
d'alimentation en eau, insérez celle-ci au à
l'arrivée d'eau du réfrigérateur en appuyant
solidement vers le bas.
2. Fixez l'écrou tel qu'illustré dans le schéma
ci-dessous, en appuyant avec la main sur
l'arrivée d'eau du réfrigérateur.
Remarque : Il n'est pas nécessaire de
serrer l'écrou avec un outil pour parvenir à
un assemblage étanche. En cas de fuite,
utilisez une clé à molette ou une pince pour
le faire.
10
FR
Tuyau
d'alimentation
Tuyau
d'alimentation
Valve
Écrou
Page 74

Raccordement du tuyau d'alimentation en eau à l'arrivée d'eau
1. Séparer l'écrou de l'adaptateur du robinet.
(Schéma A)
2. Tel qu'illustré dans le schéma, assemblez
l'adaptateur du robinet à l'installation de la
valve 1/2. (Schéma B)
3. Tel qu'indiqué dans le schéma, après avoir
inséré le tuyau d'alimentation à l'écrou,
installez-le sur l'adaptateur du robinet et
insérez-le sur le robinet comme indiqué dans
le schéma. (Schéma C)
4. Serrez l'écrou manuellement. En cas de
fuite, utilisez une clé à molette ou une pince
pour le faire.
Filtre à tamis
Adaptateur
de robinet
Écrou
Schéma A
Attention ! Sécurisez le tuyau
d'alimentation en eau à des points
appropriés, au moyen de Colliers de fixation
fournies pour éviter tout dommage,
déplacement ou coupure accidentelle.
Attention ! Après avoir tourné le robinet
de prise d'eau, veillez à ce qu'il n'y ait pas
de fuite aux deux points de raccordement
du tuyau d'alimentation en eau. En cas de
fuite, arrêtez la valve immédiatement et
serrez tous les joints à nouveau à l'aide
d'une clé à molette ou d'une pince.
Tuyau d'alimentation en eau principal
Adaptateur
de robinet
Soupape
d'alimentation
Schéma B
11
Adaptateur
de robinet
Écrou
Tuyau
d'alimentation
Schéma C
FR
Page 75

Filtre à eau
Conduite d'eau Conduite d'eau
Couvercle de dérivation
Pour installer le filtre à eau, suivez les
instructions ci-dessous, renvoyant aux
schémas fournis :
1. Sortez le bac à légumes supérieur du
réfrigérateur tel qu'illustré dans le schéma
ci-dessous.
2. Dévissez le couvercle de dérivation du
filtre à eau.
Attention ! Veillez à ce que le mode Ice
Off soit actif avant de retirer le couvercle de
dérivation.
Remarque : Il est tout à fait normal que
quelques gouttes d'eau tombent après le
retrait du couvercle.
3. Après le retrait du couvercle rouge de la
tête du filtre à eau, installez-le tel qu'indiqué
ci-dessous.
Couvercle de dérivation
Filtre
4. Appuyez une nouvelle fois sur le bouton
Ice Off à l'écran pour quitter ce mode.
Le filtre à eau doit être remplacé tous les 6
mois. Un avertissement concernant ce
remplacement s'affichera à l'écran après
environ 6 mois. Le témoin d'avertissement
restera allumé pendant environ 15 jours avant
de commencer à clignoter. Une fois le filtre
remplacé, ce témoin d'avertissement peut
être annulé en appuyant pendant 5 secondes
sur le bouton Auto Eco à l'écran.
Le filtre à eau doit être retiré tel qu'illustré sur
le schéma lorsqu'il sera remplacé ou ne sera
plus utilisé. Assurez-vous que le mode Ice
Off est actif avant de retirer le filtre à eau.
Si vous ne voulez pas utiliser le filtre à eau,
retirezle. Pour ce faire, les boutons « Réglage
du congélateur » et « Sélection du type de
RETRAIT FERMETURE
1 2 3
FR
12
Page 76

glace/d'eau » doivent être appuyés
simultanément pendant 2 secondes.
L'avertissement du filtre clignotera 5 fois
lorsqu'il sera appuyé de cette façon, puis sera
annulé. Il clignotera 10 fois lorsque les mêmes
boutons seront appuyés pendant 2 secondes,
et l'avertissement sera réactivé.
Attention ! Le filtre à eau sert à nettoyer
les corps étrangers dans l'eau. En
conséquence, il ne débarrasse pas celle-ci
des micro-organismes.
Attention ! Appuyez sur le bouton Ice Off
avant le remplacement du filtre à eau ou de
l'installation du couvercle de dérivation.
Réservoir d'eau
Si vous voulez démonter le réservoir d'eau
du réfrigérateur afin de nettoyer autour, suivez
les instructions ci-dessous ;
• Enlevez les 2 vis à l'aide d'un tournevis
cruciforme tel qu'illustré dans le schéma.
• Maintenez doucement et enlevez le réservoir
d'eau, tel qu'illustré dans le schéma.
Attention !
Ne jamais enlever les boulons, assemblés au
réservoir d'eau.
Distributeur d'eau et glace avant toute première utilisation
• La pression des tuyaux d'alimentation en
eau ne doit pas être en dessous de 1 bar.
• La pression des tuyaux d'alimentation en
eau ne doit pas être au-dessus de 8 bar.
• Les pompes doivent être utilisées au cas
où la pression des tuyaux d'alimentation en
eau chute d'un bar.
• Le réseau d'alimentation en eau du
réfrigérateur doit être raccordé au tuyau
d'alimentation. Il ne doit pas être raccordé à
un tuyau d'alimentation en eau chaude.
• Ne pas oublier d'enlever le couvercle du
conduit de glace de son emplacement avant
toute utilisation du tiroir à glaçons.
• Dans le cas où vous voyez une condensation
sur le distributeur (gouttes d'eau) ou au cas
où vous raccordez votre appareil aux tuyaux
d'alimentation en eau, veillez à ce que la
touche anti-condensation soit appuyée. (Voir
Page 15) la touche anti-condensation est
appuyée comme réglée en usine.
• Le refroidisseur d'eau ne fonctionnera pas
lorsque la porte du compartiment congélateur
est ouverte. Assurez-vous que celle-ci est
fermée pour le fonctionnement de la fontaine.
• Aucune eau ne peut être obtenue au cours
du fonctionnement initial du réfrigérateur. Cette
situation est provoquée par l'air à l'intérieur
du système. Pour vider l'air du système,
appuyez sur la broche pendant une minute
jusqu'à ce que l'eau sorte de la fontaine. Le
FR
13
RETRAIT
Réservoir d'eau
Page 77

débit d'eau peut être irrégulier au départ. Tout
débit d'eau irrégulier sera normalisé après
évacuation de l'air du système.
• Lorsque le réfrigérateur fonctionne pour la
première fois, l'option Refroidisseur d'eau
sera sélectionnée automatiquement.
Cependant, il faut attendre environ 12 heures
pour obtenir de l'eau fraîche.
• La pression des conduites principales d'eau
doit être comprise entre 1 et 8 barres pour
un bon fonctionnement de la
glace/Refroidisseur d'eau. Pour cela, vérifiez
Fonctionnement du réfrigérateur
qu'un verre d'eau (100 cc) peut se remplir en
10 secondes.
• Les 10 premiers verres d'eau ne doivent pas
être consommés.
• Il faut attendre 12 heures pour obtenir de la
glace de l'appare›l à glaçons pour la première
fois. Au cas où il n'y a pas suffisamment de
glace dans le tiroir à glaçons, celle-ci peut ne
pas être obtenue du tiroir à glaçons.
• Les 30 premiers glaçons environ à être
obtenus de l'appare›l à glaçons ne doivent
pas être utilisés.
Avant de commencer à utiliser le
réfrigérateur/congélateur, vérifiez que :
1. Les pieds ont été réglés de sorte que le
produit est à niveau.
2. L'intérieur est sec et l'air peut circuler
librement derrière l'appareil.
3. L'intérieur est propre comme l'indique la
section « NETTOYAGE ET ENTRETIEN ».
4. Branchez le réfrigérateur dans la sortie
de l'alimentation électrique.
• Lorsque la porte est ouverte, l'éclairage
intérieur correspondant s'allumera.
5. Vous remarquerez un bruit lorsque le
compresseur se met en marche. Le liquide
et les gaz intégrés au système du réfrigérateur
peuvent également faire du bruit, que le
compresseur soit en marche ou non. Ceci
est tout à fait normal.
En raison du fonctionnement des
ventilateurs à l'intérieur de l'appareil, le
niveau de bruit total est légèrement
supérieur à celui des appareils qui ne sont
pas Non Frost. Ce phénomène est tout à
fait normal et ne constitue pas un défaut.
6. Les parties antérieures du réfrigérateur
peuvent chauffer. Ce phénomène est normal.
Ces zones doivent en principe être chaudes
pour éviter tout risque de condensation.
7. Ne pas remplir les surfaces intérieures
du réfrigérateur au cours du fonctionnement
initial. Attendez que la bonne température de
conservation soit atteinte. (Voir page 16)
8. Lorsque les compartiments atteignent les
températures souhaitées, les ventilateurs
s'arrêtent.
9. Veillez surtout à éviter que les denrées
alimentaires de petite taille comme le riz, les
pois, et les haricots ne rentrent dans les
protecteurs de ventilateur et les conduits des
voies d'aération. Ceci peut provoquer
l'obstruction du système de refroidissement
et une baisse de l'efficacité de l'appareil.
10. La température définie en usine est de
+4°C pour le compartiment réfrigérateur et de
-18°C pour le compartiment congélateur.
11. Le compresseur commencera à
fonctionner 5 minutes environ après
branchement du réfrigérateur, afin de protéger
les composants électroniques de votre
appareil. Après l'allumage du compresseur,
les températures des compartiments vont
atteindre les températures définies en 24 h,
en fonction de la température ambiante et du
niveau de charge du réfrigérateur.
12. Veuillez prêter attention aux points suivants
pendant les premières 24 heures du
fonctionnement de l'appareil:
-N'ouvrez pas les portes fréquemment.
-Ne surchargez pas le réfrigérateur.
-N'y introduisez pas d'aliment chaud.
14
FR
Page 78

Utilisation du réfrigérateur
3
Réglage des boutons et contrôle de la température
Les boutons de commande vous permettent d'effectuer les réglages de votre réfrigérateur
facilement et sans avoir à ouvrir les portes. De cette manière, vous évitez les pertes de
chaleur.
Bouton Réglage du Congélateur
Bouton Réglage du réfrigérateur/Vacances
Bouton
Congélation
rapide
Bouton
Auto Eco
Bouton Eclairage
Distributeur
Témoins Distributeur
Indicateur de température du
compartiment de congélation
Indicateur de porte du congélateur ouverte
Température sélectionnée à l'intérieur du
congélateur
-24 °C
-22 °C
-20 °C
Indicateur mode Economie
Bouton de sélection
Eau/Glace
Indicateur de porte
Bouton de
refroidisse-
ment
rapide
Ioniseur / Bouton
de verrouillage des
commandes
Bouton Ice Off
Touche anti-condensation
Température élevée/Indicateur
d'avertissement d'erreur
Voyant verrouillage des
Indicateur de la température du réfrigérateur
Indicateur de règlement de la température
du réfrigérateur
ouverte
du réfrigérateur
commandes
Indicateur de filtre
Indicateur Vacances
2 °C
4 °C
6 °C
-18 °C
Indicateur Auto Eco
Indicateur Congélation rapide
Indicateur d'eau
15
Indicateur
Ioniseur
Glaçons
Indicateur Ice Off
FR
8 °C
Indicateur de refroidissement rapide
Indicateur de glace pilée
Page 79

Réglage du
compartiment
de
congélation
-18°C
Réglage du
compartiment
de
réfrigération
4°C
Explications
Voici le réglage normal recommandé.
-20,-22 ou -24°C 4°C
Compartiment
Ultra Congélation
L'affichage
indiquera -27°C
-18°C ou plus
froid
-18°C ou plus
froid
4°C
2°C
Refroidissement
rapide L'affichage
indiquera +1°C
Ces réglages sont recommandés lorsque la température
ambiante dépasse 30 °C
Utilisez ce réglage lorsque vous souhaitez surgeler des
denrées ou fabriquer de la glace en peu de temps. Le
réfrigérateur retournera à son mode de fonctionnement
précédent lorsque le processus sera terminé.
Si vous pensez que le compartiment de réfrigération n'est pas
assez froid à cause de la chaleur ou des ouvertures /
fermetures fréquentes de la porte.
Vous pouvez utiliser ce réglage lorsque le compartiment de
réfrigération est surchargé ou lorsque vous souhaitez refroidir
rapidement vos denrées.
Réglage de la température du compartiment de réfrigération
La température du réfrigérateur peut être
réglée à l'une des températures suivantes :
8, 6,4 et 2°C
Appuyez sur le bouton pour modifier. La
température baissera de 2°C. A chaque
appui, le bouton s'enfoncera, puis tournera
dans le sens de la température la plus haute.
Relâcher à la température souhaitée et la
nouvelle température réglée sera stockée.
Si vous estimez que vos denrées sont plus
froides que souhaitées, vous pouvez ajuster
le réglage de la température du
compartiment réfrigérateur à 6 ou 8.
Réglage de la température du compartiment de congélation (SET)
La température du congélateur peut être
réglée à l'une des températures suivantes :
-18,-20,-22 et -24°C
Appuyez sur le bouton pour modifier. La
température baissera de 2°C. A chaque
appui, le bouton s'enfoncera, puis tournera
dans le sens de la température la plus haute.
Relâcher à la température souhaitée et la
nouvelle température réglée sera stockée.
Fonction Congélation rapide (Fast Freeze)
Lorsque vous appuyez sur le bouton «Fresh
Freeze», le compresseur fonctionnera
pendant environ 24 heures. L'indicateur
Congélation rapide frais s'allumera et les
réglages de la température du compartiment
congélateur diminuent à -27°C pendant que
l'indicateur Congélation rapide reste actif.
Pour annuler cette fonction, appuyez à
nouveau sur le bouton Fresh Freeze.
L'indicateur Congélation rapide s'éteindra et
retournera à son réglage normal. Cet
indicateur s'annulera automatiquement après
24 heures si vous ne le faites pas.
Si vous souhaitez congeler de grandes
quantités de produits frais, appuyez sur le
bouton Fresh Freeze 24 heures avant
d'introduire les produits frais dans le
compartiment de congélation rapide.
16
FR
Page 80

Fonction de refroidissement rapide (Quick Cool)
Lorsque vous appuyez sur le bouton «Quick
Cool», la température du compartiment sera
plus froide que les valeurs de réglage. Cette
fonction peut être utilisée pour les denrées
placées dans le compartiment de réfrigération
que l'on souhaite refroidir rapidement.
Après avoir appuyé sur le bouton de
refroidissement par jet d'air froid, l'indicateur
de refroidissement rapide s'allumera et le
réglage de la température du compartiment
réfrigérateur passera à 1°C tandis que le
refroidissement rapide restera actif. Pour
annuler cette fonction, appuyez à nouveau
sur le bouton Quick Cool. L'indicateur de
refroidissement rapide s'éteindra et
retournera à son réglage normal. La fonction
de efroidissement rapide se désactivera
automatiquement au cas où vous ne le faites
pas.
Mode Vacances
Dans le cas où le compartiment réfrigérateur
ne serait pas utilisé pendant une longue
période (Vacances, par exemple), son
fonctionnement peut être fortement ralenti
afin d'économiser l'électricité.
Pour cela, appuyez sur le bouton de réglage
de la température du réfrigérateur durant 2
secondes. Le voyant "Mode Vacances"
s'allume aussitôt.
Lorsque le mode Vacances est activé, le
réfrigérateur doit être vide et sa porte doit
rester fermée.
Pour réutiliser le compartiment réfrigérateur,
sélectionner la température que vous
souhaitez en appuyant sur le bouton "Set"
ou appuyez sur le bouton de refroidissement
rapide "Quick Cool".
Fonction Auto Eco (Auto Eco)
Le compartiment congélateur peut être
automatiquement basculé en mode Economie
afin de réaliser des économies d'électricité.
Pour cela, appuyez sur le bouton "Auto Eco".
Si la porte du congélateur reste fermée
pendant 6 heures, le compartiment congélateur
passera en mode Economie et le voyant Mode
Economie s'allumera.
Fonction Ioniseur (Ioniser)
L'ioniseur fonctionne automatiquement toutes
les 8 heures afin de purifier le compartiment
réfrigérateur. Si vous souhaitez déclencher
Si l'on ouvre la porte du congélateur ou si l'on
sélectionne une température de congélation
différente, le mode Economie sera annulé et
le voyant s'éteindra. Il redeviendra
automatiquement actif si la porte du
congélateur reste à nouveau fermée pendant
6 heures.
Pour désactiver la fonction Auto Eco, appuyez
sur la touche "Auto Eco".
immédiatement l'ioniseur, appuyez sur le
bouton "Ioniser". Le voyant "Ioniser" se
mettra alors à clignoter.
Verrouillage des commandes (Ioniser)
Pour verrouiller les commandes, appuyez
pendant 3 secondes sur le bouton "Ioniser".
Les commandes de l'afficheur ainsi que le
distributeur d'eau et de glace seront alors
bloquées et le voyant Verrouillage des
commandes s'allumera.
Pour déverrouiller les commandes, appuyez
de nouveau pendant 3 secondes sur le
bouton "Ioniser".
Eclairage du distributeur d'eau et de glace (Light)
Appuyez sur le bouton "Light" pour éclairer
le distributeur d'eau et de glace. Appuyez de
nouveau sur le bouton "Light" pour éteindre
la lumière du distributeur.
Lorsque l'on appuie sur la languette du
distributeur, celui-ci s'éclaire automatiquement,
puis s'éteint lorsque l'on relâche la pression
sur la languette.
Bouton de Sélection Eau/Glace (Dispenser Mode)
Appuyez sur le bouton "Dispenser Mode" pour
sélectionner soit de l'eau fraîche, soit des
glaçons soit de la glace pilée. Un voyant
indique ce que le distributeur est alors prêt à
distribuer (eau fraîche, glaçons, glace pilée).
17
FR
Page 81

Utilisation des accessoires
Distributeur d'eau et glace
Avec ses trois fonctions différentes, le
distributeur vous offre une eau fraîche, des
glaçons et de la glace pilée sans avoir à ouvrir
la porte du réfrigérateur. C'est une source
intarissable d'eau fraîche et de glace, sans
ajout d'eau. Un bandeau de commande
convivial fournit les fonctions suivantes :
Remarque :
• L'eau ou la glace peut être délivré pendant
un maximum de 60 secondes environ à
chaque utilisation.
• Lorsque la porte du congélateur est ouverte,
la fontaine ne fonctionnera pas.
Glaçons
Glace Glace
pilée
Utilisation du distributeur
Avertissements
* Il est tout à fait normal que les premiers
verres d'eau tirés du distributeur soient chauds.
* Dans des cas où le distributeur n'a pas été
utilisée fréquemment, une quantité d'eau
suffisante doit y être retirée afin d'obtenir de
l'eau fraîche.
Socle du distributeur
Les gouttes d'eau qui tombent au cours de
leur utilisation, s'accumulent dans le socle du
distributeur. Enlevez ce bac à projections en
appuyant vers le bas sur le côté droit. Vous
pouvez retirer l'eau à l'aide d'une éponge ou
d'un chiffon doux.
Utilisation de l'appareil à glaçons
Veuillez noter que les premiers glaçons ne
seront pas prêts avant 12 heures après que
l'appareil ait été mis en marche.
Au cas où vous n'avez pas besoin de glace,
comme pendant l'été ou pendant vos
vacances, activez la fonction Ice Off.
Le glacier produit environ 110 glaçons en 24
heures et cette quantité peut varier suivant
la fréquence d'ouverture des portes, les
réglages du réfrigérateur, et la panne
d'électricité. La glace produite peut être
18
Eau fraîche
obtenue de la fontaine sous forme de glaçon
ou de glace concassée.
Il est tout à fait normal que l'obtention de la
glace pilée du distributeur prenne plus de
temps que l'obtention des glaçons. Par ailleurs,
la glace s'écoule avant le glaçon si l'option
glace concassée a été sélectionnée avant
celle du glaçon.
Un changement au niveau de l'odeur ou du
goût de la glace, et une diminution au niveau
de la forme de celle-ci est un phénomène
FR
Page 82

normal au cas où la glace n'est pas obtenue
du distributeur pendant un long moment ou
en cas de coupures d'électricité. Si tel est le
cas, la glace doit être contrôlée, et l'appareil
à glaçons vidé, puis soigneusement nettoyée.
Avertissements
• Aucune glace ne doit être ajoutée à
l'appareil à glaçons. Ceci peut nuire à la
production de glace ou à son concassage.
• C'est un phénomène normal que d'avoir
deux glaçons bloqués dans l'appareil à
glaçons.
• Il faut éviter de déplacer des pièces de
l'appareil, comme les lames, pour éviter de
se blesser
• Ne jamais utiliser d'objets pointus pour
casser la glace dans l'appareil à glaçons. Ce
geste est susceptible d'endommager cet
appareil.
• Les denrées alimentaires ne doivent jamais
être introduites dans l'appareil à glaçons à
des fins de refroidissement rapide.
• Dans le cas où vous voyez une condensation
sur le distributeur (gouttes d'eau) ou au cas
où vous raccordez votre appareil aux tuyaux
d'alimentation en eau, veillez à ce que la
touche anti-condensation soit appuyée. (Voir
Page 15) la touche anti-condensation est
appuyée comme réglée en usine.
• Lorsque l'appareil à glaçons doit être enlevé
pour une raison ou pour une autre, le bouton
Ice Off doit d'abord être appuyé.
Ice Off
Pour empêcher la formation de cristaux, le
bouton «Ice Off» doit être appuyé. Lorsque
cette option est sélectionnée, l'eau ne circule
plus dans le distributeur de glaçons. Toutefois,
du givre déjà existante peut être retirée du
distributeur. Pour reprendre la formation de
cristaux, le bouton « Ice Off » doit être appuyé
à nouveau.
Attention ! Si vous n'utilisez pas l'appareil à
glaçons, n'oubliez pas de mettre le couvercle
du conduit à glaçons à l'intérieur de la porte
du congélateur (Voir Page 2)
Nettoyage de l'appareil à glaçons et du distributeur
Veuillez suivre la procédure et les
avertissements ci-dessous pour nettoyer
l'appareil à glaçons
• Retirez l'appareil à glaçons en le soulevant
d'abord, puis en le tirant vers vous tel
qu'illustré dans le schéma ci-contre.
• Videz la glace dans le récipient à glaçons,
s'il y en a. Sortez la glace bloquée, utilisez
des objets non pointus pour éviter d'abîmer
le récipient à glaçons.
• Veillez à ce que l'intérieur du récipient à
glaçons ne soit pas mouillé/humide avant de
le remettre dans son logement.
• Après avoir remis le récipient à glaçons
à son emplacement initial et fermé la porte
du congélateur, quittez le mode « Ice Off »
en appuyant à nouveau sur la touche « Ice
Off ».
2. Tirer
1. Soulever
• Ne pas toucher aux pièces mobiles
comme les lames de l'appareil à glaçons.
19
FR
Page 83

Contrôle de l'humidité dans le bac à légumes
Le niveau de l'humidité peut être réglé en
faisant passer le curseur de réglage de
l'humidité vers la gauche ou la droite.
• Si vous souhaitez conserver l'humidité dans
ce compartiment, ajustez le curseur de réglage
de l'humidité à la position fermée. (gauche)
• Si vous souhaitez éliminer l'humidité de ce
compartiment, ajustez le curseur de réglage
de l'humidité à la position ouverte. (droit)
Clayettes coulissantes
Afin d'atteindre facilement les denrées
alimentaires placées à l'arrière de la clayette
du compartiment réfrigérateur, et pour faciliter
le nettoyage, les clayettes coulissantes
peuvent être tirées de 10 cm environ.
Bac à amuse-gueule
Vous pouvez utiliser le bac à amuse-gueule
pour conserver les petits éléments auxquels
vous recourrez assez fréquemment. Veuillez
prendre des précautions particulières pour
éviter d'abîmer ce bac lorsque vous le sortez
du réfrigérateur, et remettez-le doucement à
son emplacement initial.
Ioniseur
L'ioniseur se trouve dans le conduit d'aération
du réfrigérateur, à l'arrière du bac à légumes.
Grâce à l'ionisation de l'air, les bactéries
présentes dans l'air, de même que les
mauvaises odeurs qu'elles dégagent, seront
affaiblies.
20
Bactérie
Ion
FR
Page 84

Compartiment Ultra Congélation
Ce compartiment congèle rapidement vos
aliments tout en préservant leurs saveurs et
leurs valeurs nutritives.
Support à oeufs
Vous pouvez installer le support à oeufs sur
un balconnet de la porte ou de l'intérieur que
vous souhaitez.
Ne placez jamais le support à oeufs dans
le compartiment de congélation.
Compartiment zone fraîche et bac à légumes
Bac à légume ou zone fraîche (0°C par ex.
compartiment zéro degré centigrade (1)
• Le tiroir du compartiment inférieur du
réfrigérateur peut être converti en bac à
légumes ou en Compartiment zone fraîche.
• Le Compartiment zone fraîche maintient une
température en dessous de celle du
compartiment de réfrigération qui est d'environ
0°C, ce qui permet de conserver de la viande
ou du poisson pendant une plus longue
période.
Le compartiment Zone fraîche est tout aussi
idéal pour la conservation des produits
surgelés du commerce.
Important:
• Les légumes et les fruits peuvent geler si le
curseur de réglage (2) est maintenu dans la
position Compartiment Zone fraîche. Par
conséquent, vérifiez la position du curseur (2)
avant de disposer les denrées.
• Avec des températures inférieures ou égales
à 10°C, les légumes à feuilles vertes et d'autres
légumes facilement congelables doivent être
retirés de ce compartiment (1) et placés dans
le bac à légumes du dessus. (3)
• N'intervertissez pas la position de ces tiroirs
et veillez à ce que le curseur de réglage de
position soit défini à la position souhaitée, par
ex. Bac à légumes ou Compartiment Zone
fraîche.
• Lorsque les températures ambiantes
dépassent 28°C, si le compartiment (1) est
conçu pour utiliser plus froid, le curseur de
réglage (4) dans le congélateur peut être
converti à la position ouverte. Assurez-vous
que le curseur de réglage (4) du congélateur
est dans une position proche lorsque la
température ambiante est égale ou inférieure
à 28°C.
21
FR
OUVRIR
Page 85

Congeler les produits frais
• Il est préférable d'emballer ou de couvrir les
denrées avant de les placer dans le réfrigérateur.
• Laissez refroidir les aliments à la température
ambiante avant de les introduire dans le
réfrigérateur.
• Les denrées que vous souhaitez surgeler
doivent être fraîches et en bon état.
• Il est conseillé de séparer les denrées en
portions en fonction des besoins quotidiens de
votre famille ou par repas.
• Les denrées doivent être emballées
hermétiquement afin d'éviter qu'elles ne
s'assèchent, même si elles ne doivent être
conservées qu'une courte période.
• Les matériaux utilisés pour l'emballage
doivent résister aux déchirures, au froid, à
l'humidité, et doivent être imperméables aux
odeurs, aux graisses et aux acides et être
hermétiques. Par ailleurs, ils doivent fermer
correctement et être composés de matériaux
simples d'utilisation et adaptés à un usage dans
un congélateur.
• Les denrées à congeler doivent être placées
dans le compartiment de congélation. (Il faut
éviter qu'elles n'entrent en contact avec des
aliments déjà congelés afin d'empêcher le dégel
partiel de ces aliments. Les capacités de
congélation de notre produit sont fournies dans
les caractéristiques techniques du réfrigérateur).
• Les périodes indiquées dans les informations
relatives à la congélation rapide doivent être
appliquées pour les durées de conservation.
• Les denrées congelées doivent être
consommées peu de temps après leur
décongélation et elles ne doivent jamais être
recongelées.
• Veuillez respecter les instructions suivantes
afin d'obtenir les meilleurs résultats.
• Ne congelez pas une quantité trop importante
à la fois. La qualité des aliments est préservée
de façon optimale lorsqu'ils sont entièrement
congelés aussi rapidement que possible.
• Ne dépassez pas le pouvoir de congélation
de votre appareil par 24 heures, qui est 13 kg.
• Le fait d'introduire des aliments chauds dans
le congélateur entraîne le fonctionnement du
dispositif de réfrigération en continu jusqu'à ce
que les aliments soient entièrement congelés.
Cela peut occasionner un refroidissement
excessif temporaire du compartiment
réfrigérateur.
• Vous pouvez mettre les produits frais à
congeler n'importe où dans le congélateur.
Toutefois, nous vous conseillons d'utiliser le
compartiment Congélation pour une congélation
plus rapide.
• Faites particulièrement attention à ne pas
mélanger les produits déjà congelés et les
produits frais.
Recommandation pour la conservation des aliments congelés
• Pour un compartiment des denrées
congelées
préemballés et surgelés, destinés à un usage
commercial, doivent être conservés
conformément aux instructions du fabricant
de produits congelés.
• Afin de veiller à ce que la qualité supérieure
recherchée par le fabricant et le détaillant des
produits congelés soit atteinte, il convient de
se rappeler les points suivants :
1. Mettre les emballages dans le congélateur
aussi rapidement que possible après achat.
2. S'assurer que le contenu est étiquetté et
daté.
3. Ne pas dépasser les dates « à consommer
avant le » et « à consommer de préférence
avant le » figurant sur l'emballage.
En cas de panne de courant, n'ouvrez pas la
porte du congélateur. Même si la coupure
d'électricité dure jusqu'à 8 heures, les produits
congelés n'en seront pas affectés. Au cas où
la coupure dure plus longtemps, l'aliment doit
être contrôlé et, le cas échéant, consommé
immédiatement ou congelé après cuisson.
* Si vous enlevez le tiroir du congélateur
(4 étoiles), les aliments
domestique et le bac à glaçons pour en
augmenter le volume, la section figurant audessus de la ligne présentée dans le schéma
ci-dessous se transforme en une section deux
étoiles. N'utilisez ce volume que pour des
stockages de denrées alimentaires à court
terme.
Dégivrage
Les compartiments réfrigérateur et congélateur
dégivrent automatiquement.
22
FR
Page 86

Remplacer l'ampoule intérieure
Si l'ampoule ne fonctionne pas, procédez
comme suit.
1. Déconnecter la prise de courant et
débrancher la prise d'alimentation.
• Pour un accès facile, retirez toutes les
étagères et les tiroirs.
2. Utilisez un tournevis à tête plate pour
enlever doucement le diffuseur, en insérant
la lame sur chaque côté. Veillez à ne pas
abîmer le couvercle en plastique et l'habillage
intérieur.
3. Vérifiez d'abord que l'ampoule ne s'est pas
desserrée en s'assurant qu'elle soit bien vissée
dans son support. Rebranchez la prise et
mettez en marche. Si l'ampoule fonctionne,
replacez le diffuseur en insérant le tenon
arrière et en poussant vers le haut.
4. Si l'ampoule ne fonctionne toujours pas,
déconnectez la prise de courant et débranchez
la prise d'alimentation. Remplacez l'ampoule
par une nouvelle ampoule de 15 watt (max.)
à pas de vis E14 (SES).
5. Jetez soigneusement l'ampoule grillée
immédiatement.
Les ampoules de remplacement se trouvent
facilement dans les magasins de matériel
électrique ou de bricolage locaux.
23
FR
Page 87

Disposition des denrées
Produits pour petit déjeuner, charcuterie
Différentes denrées congelées comme de la viande, du poisson, des crèmes
glacées, des légumes, etc.
Conservation de denrées comme de la viande, du poulet, du poisson, etc. après
les avoir emballées dans du film en cellophane.
Produits laitiers comme le lait, beurre, fromages
Oeufs
Nourriture dans des casseroles, assiettes, récipients fermés
Produits ou boissons de petite taille et sous emballage (comme du lait, des jus
de fruits ou de la bière)
Fruits et légumes
Légumes, fruits, viande et poisson cru à décongeler
Le curseur de cycle doit être réglé en fonction des besoins
Vérifiez le curseur de cycle avant de placer les denrées
Bac à amuse-gueule
Tiroir du compartiment de
congélation
Section pour Beurre et
Clayettes du
compartiment congélation
Fromages
24
Support à oeufs
Clayettes du compartiment
de réfrigération
Balconnets de la porte du
compartiment de réfrigération
FR
Bac à légumes
Zone plus
fraîche/compartiment
bac à légumes
Page 88

Mesures d'économie d'énergie
1. Ne laissez pas les portes du réfrigérateur
ouvertes pendant une durée prolongée.
2. N'introduisez pas de denrées ou de
boissons chaudes dans le réfrigérateur.
3. Ne surchargez pas le réfrigérateur pour ne
pas obstruer pas la circulation d'air à
l'intérieur.
4
Informations sur la congélation rapide
Les denrées doivent être congelées le plus
rapidement possible lorsqu'elles sont placées
dans un réfrigérateur, afin de préserver leur
qualité.
La norme TSE exige (sous certaines
conditions de mesures) que le réfrigérateur
congèle 4,5 kg de denrées par volume de
100 litres de congélation en moins de 24
heures, avec une température ambiante de
32°C et une température intérieure inférieure
ou égale à -18°C.
Il n'est possible de conserver des denrées
sur de longues périodes qu'avec des
températures inférieures ou égales à 18°C.
Vous pouvez conserver la fraîcheur de
vos denrées pendant plusieurs mois (à
des températures inférieures ou égales à
-18°C dans le surgélateur).
AVERTISSEMENT !
• Les denrées que vous souhaitez
surgeler doivent être en bon état.
• Il est conseillé de séparer les denrées
en portions en fonction des besoins
quotidiens de votre famille ou par repas.
• Les denrées doivent être emballées
hermétiquement afin d'éviter qu'elles ne
s'assèchent, même si elles ne doivent être
conservées qu'une courte période.
4. N'installez pas le réfrigérateur à la lumière
directe du soleil ou près d'appareil émettant
de la chaleur tels qu'un four, un lave-vaisselle
ou un radiateur.
5. Veillez à conserver vos denrées dans des
récipients fermés.
Matériaux nécessaires à l'emballage :
• Bande adhésive résistant au froid
• Etiquette autocollante
• Elastiques en caoutchouc
• Stylo
Les matériaux utilisés pour l'emballage des
denrées doivent résister aux déchirures, au
froid, à l'humidité, et doivent être
imperméables aux odeurs, aux graisses et
aux acides.
Il faut éviter que les denrées à congeler
n'entrent en contact avec des aliments déjà
congelés afin d'empêcher le dégel partiel de
ces aliments.
Vous pouvez vérifier la capacité de
congélation du réfrigérateur dans la section
« Caractéristiques techniques » du
Chapitre 1.
Suivez toujours les valeurs indiquées dans
les tableaux concernant les périodes de
conservation.
Les denrées congelées doivent être
consommées immédiatement après leur
décongélation et elles ne doivent jamais
être recongelées.
25
FR
Page 89

5
Nettoyage du réfrigérateur
Avertissement !!!
N'utilisez jamais
d'essence, de benzène ou
de matériaux similaires
pour le nettoyage.
Avant de procédez au
nettoyage, veuillez déconnecter le réfrigérateur
et débrancher la prise d'alimentation.
• N'utilisez jamais d'ustensiles tranchants,
savon, produit de nettoyage domestique,
détergent et cirage pour le nettoyage.
• Utilisez de l'eau tiède pour nettoyer la
carrosserie et séchez soigneusement à l'aide
d'un chiffon.
• Utilisez un chiffon humide imbibé d'une
solution composée d'une cuillère à café de
bicarbonate de soude pour un demi litre d'eau
pour nettoyer l'intérieur et séchez
soigneusement.
• Prenez soin de ne pas faire couler d'eau
dans le logement de la lampe et dans d'autres
éléments électriques.
• En cas de non utilisation de l'appareil
pendant une période prolongée, débranchezle, sortez toutes les denrées, nettoyez-le et
laissez la porte entrouverte.
• Passez l'aspirateur sur l'appareil une fois
pas an.
• Inspectez les joints de porte régulièrement
pour vérifier qu'ils sont propres et qu'il n'y a
pas de particules de nourriture.
6
Dépannage
A
S
E
T
N
O
B
E
N
T
Z
‹
N
‹
N
E
R
• Retirer les balconnets :
• Pour retirer les balconnet de portes, sortez
tout son contenu puis poussez simplement le
balconnet vers le haut à partir de la base.
• Pour sortir un tiroir congélateur, tirez-le
vers vous autant que possible, soulevez-le et
retirez-le ensuite complètement.
• Veillez surtout à éviter que les denrées
alimentaires de petite taille comme le riz, les
pois, et les haricots ne rentrent dans les
protecteurs de ventilateur et les conduits des
voies d'aération. Ceci peut provoquer
l'obstruction du système de refroidissement
et une baisse de l'efficacité de l'appareil.
Protection des surfaces en plastique.
Ne placez pas d'huiles ou de plats huileux
dans le réfrigérateur dans des récipients non
fermés, car les graisses peuvent endommager
les surfaces en plastique du réfrigérateur. Si
vous versez ou éclaboussez de l'huile sur les
surfaces en plastique, nettoyez et lavez les
parties souillées avec de l'eau chaude
immédiatement.
Portes spécialement traitées
De véritables portes en acier inoxydable ont
été spécialement traitées afin de renforcer et
maintenir l'élégante apparence du matériel.
Pour s'assurer que vous pouvez préserver et
maintenir cet état, nous vous conseillons de
nettoyer régulièrement les portes, du haut
vers le bas, à l'aide d'un essuie-tout doux,
sec et propre. Pour plus d'informations, veuillez
contacter le le service clientèle Beko.
Points à vérifier avant d'appeler le service après-vente agréé.
Veuillez vérifier les points suivant avant d'appeler le service après-vente.
Remarque importante : Le
dispositif de protection
thermique du compresseur
!
sautera en cas de coupures
soudaines du courant ou de
?
°C
-/+
1. Le réfrigérateur est-il
correctement branché ?
2. Est-ce que le fusible ou la
douille de raccord du réfrigérateur
sont connectés ou est-ce que le
fusible principal a sauté ?
3. Les réglages de température
sont-ils corrects ?
26
débranchement intempestif, en effet
la pression du liquide réfrigérant du
système de refroidissement ne sera
pas équilibrée. Le réfrigérateur
recommencera à fonctionner
normalement après 6 minutes
environ. Veuillez contacter le service
après-vente si le réfrigérateur ne
redémarre pas après cette période.
FR
Page 90

Cela est normal pour un réfrigérateur à dégivrage semi-
automatique. Le cycle de dégivrage se déclenche régulièrement.
Assurez-vous que la prise est branchée à la prise murale.
* Déplacez le curseur de réglage sur la position de bac à légumes.
* Déplacez les légumes au bac à légumes du dessus.
* Le givrage sur les surfaces extérieures des denrées comme la
viande est normale
* Cela est normal si le curseur de réglage est
sur la position du compartiment fraîcheur (0°C).
La température ambiente est très basse (aux
alentours ou inférieure à 10°C)
* Réglez le thermostat à un niveau de froid supérieur. (2 °C)
* Réduisez les temps d'ouverture de la porte ou utilisez-la moins
fréquemment.
* Couvrez les denrées dans des récipients ouverts à l'aide d'un
matériau adapté.
* Essuyez la condension à l'aide d'un tissu sec et vérifiez si elle
persiste.
* Température ambiante très basse.
* Ouvertures et fermetures fréquentes de la porte.
* Humidité ambiante très élevée.
* Conservation de denrées liquides dans des
Le réfrigérateur est en mode de dégivrage.
récipients ouverts.
* Porte laissée entrouverte.
Veuillez contacter votre fournisseur d'électricité.
Le réfrigérateur n'est pas branché à la prise.
Il y a une panne de courant.
Problème Cause possible Solution
Le compresseur ne
Congélation des denrées
alimentaires dans le tiroir
inférieur (Compartiment
0°/Bac à légumes)
Condensation sur la paroi
intérieure du compartiment
réfrigérateur.
fonctionne pas.
Ceci est tout à fait normal.
Ceci est tout à fait normal. Les grands réfrigérateurs fonctionnent
pendant une période de temps plus longue.
Votre nouveau réfrigérateur est peut être plus large
que l'ancien.
La température ambiante de la salle peut être
Le réfrigérateur fonctionne
fréquemment ou pendant
de longue périodes.
Les denrées chaudes provoquent un fonctionnement prolongé
du réfrigérateur avant d'atteindre le niveau de température de
conservation raisonnable.
L'air chaud qui entre dans le réfrigérateur le fait fonctionner
pendant de plus longues périodes. Ouvrez les portes moins
souvent.
Le refroidissement complet du réfrigérateur peut durer quelques
heures de plus.
élevée.
Le refrigérateur pourrait y avoir été branché tout
récement ou pourrait avoir été chargé de denrées
alimentaires.
D'importantes quantités de denrées chaudes ont
peut être été introduites dans le réfrigérateur
Vérifiez que les portes sont bien fermées.
récemment.
Les portes ont peut être été ouvertes fréquemment
ou laissées entrouvertes pendant une durée prolongée.
La porte du réfrigérateur ou du congélateur ont
peut être été laissées entrouvertes.
Veuillez vérifier la liste suivante avant d'appeler le service après-vente. Cela peut vous faire économiser du temps et de
l'argent. Cette liste regroupe les problèmes les plus fréquents ne provenant pas d'un défaut de fabrication ou d'utilisation du
matériel.
27
FR
Page 91

Réglez la température du réfrigérateur à un degré supérieur et
attendez jusqu'à ce que la température soit bonne.
Nettoyez ou remplacez le joint. Tout joint endommagé/déchiré
fait fonctionner le réfrigérateur pendant une période de temps
plus longue afin de conserver la température actuelle.
Le réfrigérateur est réglé à une température très
basse.
Le joint de la porte du réfrigérateur ou du
congélateur peut être sale, déchiré, rompu ou mal
en place.
Réglez la température du congélateur à un dégré supérieur
et vérifiez.
Réglez la température du réfrigérateur à un dégré supérieur et
vérifiez.
La température du réfrigérateur est réglée à
une température très basse.
La température du congélateur est réglée à une
température très basse.
La formation de cristaux est normale à cause de la teneur en
eau de la viande.
Réglez la température du réfrigérateur à un dégré supérieur et
vérifiez.
La température du réfrigérateur est réglée à
une température très basse.
Les viandes doivent être conservées juste au-
dessus du point de congélation de l'eau pour
conserver leur fraîcheur longtemps.
Problème Cause possible Solution
Le réfrigérateur fonctionne
fréquemment ou pendant
de longue périodes.
Présente des températures très
basses
La température du réfrigérateur
est très basse alors que celle du
congélateur est correcte.
Les aliments conservés dans les
bacs du compartiment
réfrigérateur se congèlent.
La température du congélateur
est très basse alors que celle du
réfrigérateur est correcte.
La viande conservée dans le
compartiment fraîcheur congèle.
Modifiez la température du réfrigérateur ou du congélateur
jusqu'à ce qu'elles atteignent un niveau correct.
Modifiez la température du réfrigérateur ou du congélateur
jusqu'à ce qu'elles atteignent un niveau correct.
De l'air chaud s'engouffre dans le réfrigérateur ou le congélateur
lorsque les portes sont ouvertes. Ouvrez les portes moins souvent.
Refermez complètement la porte.
Attendez que le réfrigérateur ou le congélateur atteigne la bonne
température.
Le refroidissement complet du réfrigérateur nécessite du temps
à cause de sa taille.
Réglez le réfrigérateur à une température supérieure.
La température du réfrigérateur est réglée à
un niveau de froid très élevé.
La température du réfrigérateur est réglée à un niveau de froid
très élevé. Le réglage du réfrigérateur a un effet sur la température
du congélateur.
Les portes ont peut être été ouvertes fréquemment
ou laissées entrouvertes pendant une durée prolongée.
La porte est peut être restée ouverte.
D'importantes quantités de denrées chaudes ont peut
être été introduites dans le réfrigérateur récemment.
Le réfrigérateur y a peut être été branché
récemment.
La température du réfrigérateur est réglée à un
niveau de froid très important.
Présente des températures
très élevées
La température dans le
réfrigérateur ou le congélateur
est très élevée.
La température du réfrigérateur
est très élevée alors que celle
du congélateur est correcte.
28
FR
Page 92

Cela est normal et n'est pas un défaut.
Les capacités de conservation des réfrigérateurs
anti-givre actuels ont été accrues et ils peuvent
Assurez-vous que le sol est plat, solide et qu'il peut
supporter le réfrigérateur.
Retirez les objets se trouvant dessus.
fonctionner à des températures inférieures.
Le sol n'est pas plat ou n'est pas solide. Le
réfrigérateur oscille lorsqu'on le bouge lentement.
Les objets placés sur le réfrigérateur oscillent.
Problème Cause possible Solution
Bruit
Le niveau sonore augmente
lorsque le réfrigérateur est en
marche.
Vibrations ou bruits
Eau / condensation / glace
Cela est normal et n'est pas un défaut.
Assurez-vous que les portes se ferment entièrement.
Ouvrez la porte moins souvent.
Un temps chaud et humide augmente la formation
de givre et de condensation.
Les portes sont entrouvertes.
Les portes ont peut être été ouvertes très fréquemment
ou ont peut être été laissées ouvertes pendant une
durée prolongée.
dans le réfrigérateur.
Condensation sur les parois
intérieures du réfrigérateur.
Ceci est tout à fait normal avec un temps humide. Lorsque
l'humidité est faible, la condensation disparaîtra.
Nettoyez l'intérieur du réfrigérateur avec une éponge, de l'eau
ou de l'eau gazeuse chaude.
Le temps est peut être humide.
L'intérieur du réfrigérateur doit être nettoyé.
Eau / condensation / glace à
l'extérieur du réfrigérateur.
De l'humidité est présente à
l'extérieur ou entre les portes du
réfrigérateur.
Emballez les denrées.
Utilisez un autre récipient ou changez de marque de matériau
d'emballage.
Il se peut qu'il y ait des denrées aux odeurs fortes
dans le réfrigérateur.
Certains récipients ou matériaux d'emballage
peuvent provoquer ces odeurs.
29
FR
Page 93
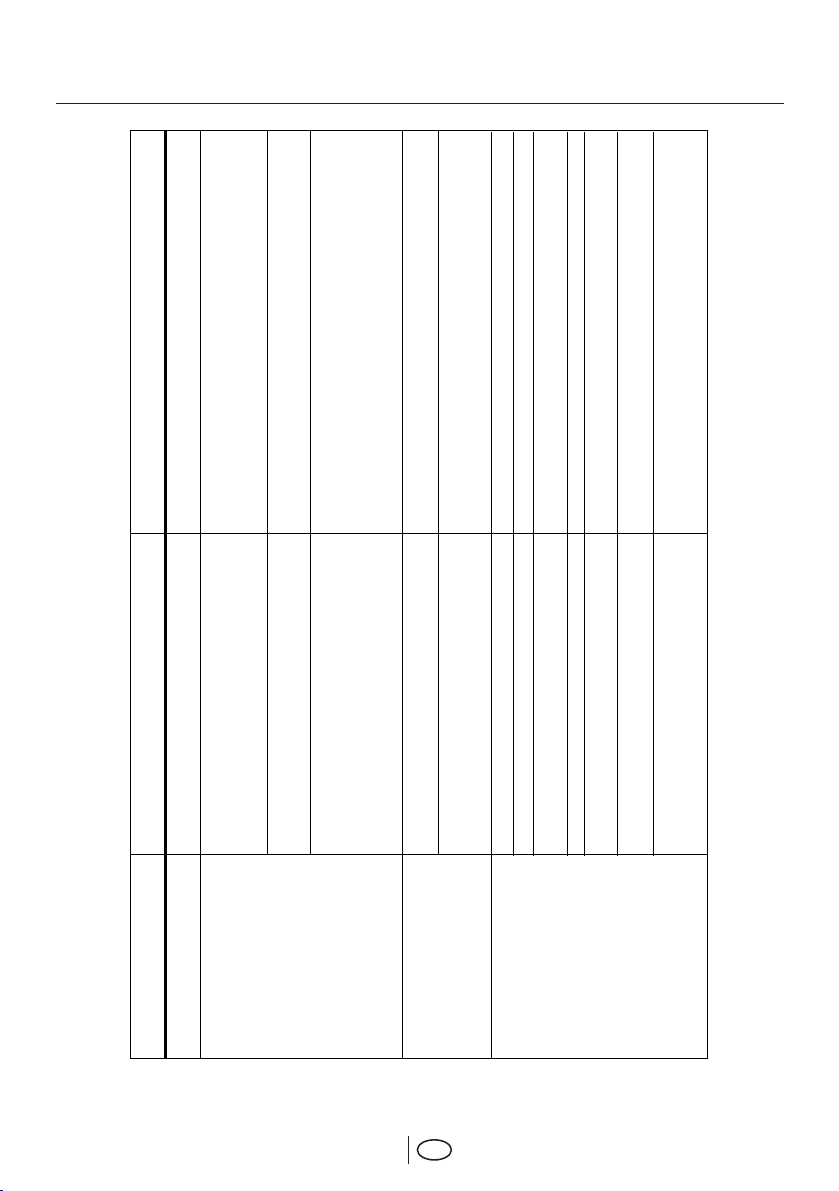
Remplacez les emballages qui obstruent la porte.
Des récipients peuvent empêcher la fermeture
de la porte.
Problème Cause possible Solution
La (les) porte(s) ne ferme(nt)
pas.
Ouverture et fermeture
fréquente des portes.
Réglez les vis de levage.
Assurez-vous que le sol est plat et qu'il peut supporter le
réfrigérateur.
Le réfrigérateur n'est probablement pas
complètement vertical et il peut balancer lorsqu'on
le pousse légèrement.
Le sol n'est pas plat ou solide.
Disposez à nouveau les denrées dans le tiroir.
Nettoyez la glissière.
Il se peut que les denrées touchent le plafond du
tiroir.
La glissière sur laquelle coulisse le tiroir est peut
être sale ou bloquée.
Les tiroirs sont coincés.
Vérifiez les tuyaux d'eau
Vérifiez/Raccordez le tuyau d'alimentation en ea
Le mode Ice Off est actif Quittez le mode
Le tuyau d'alimentation en eau est fermé ou non raccordé
Il y a un coude sur les tuyaux d'eau entre le
refrigérateur et la le tuyau d'alimentation
Tiroir à glaçons
Réglez la température du compartiment congélateur tel que
décrit dans le manuel de l'utilisateur
Patientez pendant 24 heures environ
Cette situation se produit lorsque le tiroir à glaçons n'a pas
été utilisé pendant longtemps. Videz/Nettoyez la glacière
La pression d'eau est insuffisante Utilisez une pompe impulsive
Le compartiment congélateur est trop chaud
Après une première installation, il faut prévoir 12-24
heures pour observer la première formation de givre
Les glaçons se collent dans l'appareil à glaçons
L'appareil à glaçons ne
fonctionne pas
30
FR
Page 94

Réglez la température du compartiment
Congélateur tel que décrit dans le manuel de
l'utilateur ou vérifiez sa porte
Attendez la glace jusqu'à ce que le compartiment
Congélateur atteigne la température de réglage
Ce phénomène est normal. Après 2-3 secondes,
le glaçon sera abandonné
Ce phénomène est normal.
Vérifiez la fermeture de la porte
Réduire la température réglée du compartiment
Congélateur
Vérifiez les tuyaux d'eau
Appuyez sur le loquet pendant au moins une minute
Veillez à ce que la touche anti-condensation soit
appuyée et ajustez la température à un réglage chaud.
Faites couler l'eau jusqu'à ce le système soit
rempli
Utilisez un filtre ou un récipient à eau avec une
Vérifiez/Raccordez le tuyau d'alimentation en eau
Frigorifiez l'eau jusqu'à ce que de l'eau fraîche soit obtenue
pompe impulsive
C'est un phénomène normal
C'est un phénomène normal
Le compartiment congélateur est trop chaud ou la
porte de celui-ci n'a pas été bien fermée
Panne de courant
Juste avant l'option glaçons, la glace
pilée a été sélectionnée.
Un ou deux glaçons peuvent passer par le
concasseur et peuvent être pilés par les
concasseurs dans l'option Glaçon
La porte du compartiment Congélateur n'est pas bien fermée
ou le compartiment Congélateur est utilisé très fréquemment
La commande de température du compartiment
Problème Cause possible Solution
Les glaçons fondent, sont couverts de
neige fondue
L'option glaçon pilée est distribuée
est sélectionnée Mais de la pilée est
distribuée
La formation de cristaux de glace
est lente
congélateur n'est pas suffisamment réglée à Froid
Les tuyaux d'alimentation situés entre la section de
refroidissement et le compartiment réfrigérateur sont pliés
Le tuyau d'alimentation en eau est fermé ou non raccordé
La pression d'eau est insuffisante Utilisez une pompe impulsive
L'air est pris au piège dans le système
L'eau dans le système est congelée
Le distributeur n'a pas été utilisée
Le refroidisseur d'eau n'est pas utilisé pendant longtemps
Le distributeur d'eau ne
FR
fonctionne pas
Le premier verre d'eau est chaud
Le distributeur d'eau et glace
31
Le refroidisseur d'eau ne fonctionne
pas, contrairement au tiroir à glaçons
pendant Longtemps
Mauvais goût/mauvaise odeur
Les glaçons/l'eau a un mauvais
Mauvaise qualité de l'eau dans la conduite principale
d'alimentation
L'appareil à glaçons n'est pas propre Videz et nettoyez la l'appareil à glaçons
goût/une mauvaise odeur
Le bruit provient du moteur et des solénoïdes C'est un phénomène normal
Bruits d'eau s'écoulant dans le distributeur
Bruit produit par la glace qui tombe dans la glacière
Bruit de grondement du distributeur
Les bruits proviennent du distributeur
Bruit de bourdonnement du distributeur
Bruit de sifflement et de déclic du distributeur
Page 95

48 5288 0000
 Loading...