

GNE134621X
GNE134631X
EN
PL CZ

Please read this manual first!
Dear Customer,
We hope that your product, which has been produced in modern plants and
checked under the most meticulous quality control procedures, will provide you
an effective service.
For this, we recommend you to carefully read the entire manual of your product
before using it and keep it at hand for future references.
This manual
• Will help you use your appliance in a fast and safe way.
• Read the manual before installing and operating your product.
• Follow the instructions, especially those for safety.
• Keep the manual in an easily accessible place as you may need it later.
• Besides, read also the other documents provided with your product.
Please note that this manual may be valid for other models as well.
Symbols and their descriptions
This instruction manual contains the following symbols:
C Important information or useful usage tips.
A Warning against dangerous conditions for life and property.
B Warning against electric voltage.

CONTENTS
1 Your Refrigerator 3
2 Important Safety
Warnings 4
Intended use .....................................4
General safety ...................................5
For products with a ..........................9
water dispenser; ................................9
Child safety ........................................9
Compliance with WEEE Directive and
Disposing of the Waste Product: .......9
Package information ........................10
HC warning .....................................10
Things to be done for energy saving 10
Reccomendations for freshfood
compartment ................................... 11
3 Installation 12
Points to be considered when re-
transporting your refrigerator ...........12
Before operating your refrigerator .... 12
Electric connection .......................... 12
Disposing of the packaging .............13
Disposing of your old refrigerator ..... 13
Placing and Installation .................... 13
Floor balance adjustment ................14
Adjusting the gap between the upper
door ................................................14
Changing the illumination lamp ....... 15
Installing Water Filter ....................... 16
Connection of the Water Pipe to the
Refrigerator .....................................16
Connection of Water Hose to the
Jug .................................................17
Connection of the Water Pipe to the
Cold Water Mains Line ....................18
Prior to first use of Water Dispenser . 20
4 Preparation 21
5 Using your refrigerator 22
Indicator Panel .................................22
Door Open Alarm: ..........................25
Dual cooling system: .......................25
Freezing fresh food ..........................25
Recommendations for preservation of
frozen food ......................................26
Defrosting ........................................ 27
Placing the food ..............................27
Deep-freeze information ..................27
Things to do to have the filter usage
time calculated automatically ...........28
Sliding Body Shelves ....................... 29
Egg tray ........................................... 29
Crisper ............................................29
Chiller compartment ........................ 29
Movable Middle Section .................30
Multi Zone Storage Compartment .. 30
Blue light .........................................30
Sliding Body Shelves With Rear
Hangers ..........................................31
Butter & Cheese Section .................31
Using the water spring ..................... 31
Spillage Tray ....................................31
6 Maintenance and
cleaning 32
Protection of plastic surfaces .......... 32
7 Troubleshooting 33
EN
2
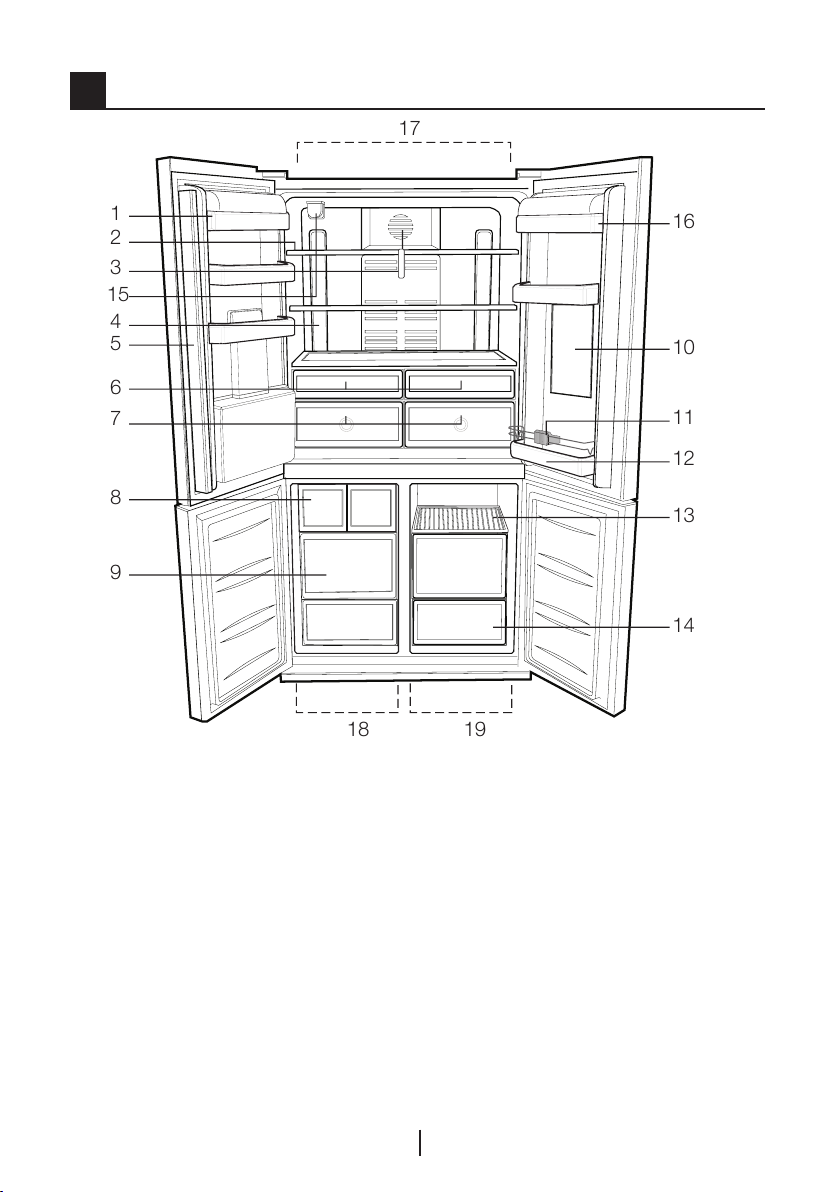
1 Your Refrigerator
17
18 19
2
3
6
7
8
9
5
4
16
13
11
14
1
12
10
15
1- Fridge compartment door shelves
2- Fridge compartment glass shelves
3- Diffuser cover
4- Illumination lens
5- Movable middle section
6- Chiller compartment
7- Crisper
8- Icematic
9- Frozen food storage
compartments
C Figures that take place in this instruction manual are schematic and may not
correspond exactly with your product. If the subject parts are not included in the
product you have purchased, then it is valid for other models.
10- Minibar
11- Bottle holder
12- Bottle shelf
13- Food storage compartment shelves
14- Food storage compartments
15- Water Filter
16- Dairy compartment
17- Fridge compartment
18- Freezer compartment
19- Multi Zone
EN
3
2 Important Safety Warnings
Please review the
following information.
Failure to observe this
information may cause
injuries or material
damage. Otherwise, all
warranty and reliability
commitments will
become invalid.
Original spare parts will
be provided for 10 years,
following the product
purchasing date.
Intended use
WARNING:
Keep ventilation
openings, in the
appliance enclosure
A
or in the built-in
structure, clear of
obstruction.
WARNING:
Do not use
mechanical devices
or other means
A
to accelerate the
defrostingprocess,
other than those
recommended by
the manufacturer.
WARNING:
A
Do not damage the
refrigerant circuit.
WARNING:
Do not use electrical
appliances inside
the food storage
compartments
A
of the appliance,
unless they
are of the type
recommended by
the manufacturer.
This appliance is intended
to be used in household
and similar applications
such as
– staff kitchen areas in
shops, offices and other
working environments;
– farm houses and by
clients in hotels, motels
and other residential type
environments;
– bed and breakfast type
environments;
– catering and similar
non-retail applications.
EN
4

General safety
• When you want to
dispose/scrap the
product, we recommend
you to consult the
authorized service
in order to learn the
required information and
authorized bodies.
• Consult your authorized
service for all your
questions and problems
related to the refrigerator.
Do not intervene or let
someone intervene to
the refrigerator without
notifying the authorised
services.
• For products with a
freezer compartment;
Do not eat cone ice
cream and ice cubes
immediately after you
take them out of the
freezer compartment!
(This may cause frostbite
in your mouth.)
• For products with a
freezer compartment;
Do not put bottled
and canned liquid
beverages in the
freezer compartment.
Otherwise, these may
burst.
• Do not touch frozen food
by hand; they may stick
to your hand.
• Unplug your refrigerator
before cleaning or
defrosting.
• Vapor and vaporized
cleaning materials should
never be used in cleaning
and defrosting processes
of your refrigerator. In
such cases, the vapor
may get in contact with
the electrical parts and
cause short circuit or
electric shock.
• Never use the parts on
your refrigerator such as
the door as a means of
support or step.
• Do not use electrical
devices inside the
refrigerator.
• Do not damage the
parts, where the
refrigerant is circulating,
with drilling or cutting
tools. The refrigerant
that might blow out
when the gas channels
of the evaporator, pipe
extensions or surface
coatings are punctured
causes skin irritations and
eye injuries.
EN
5

• Do not cover or block
the ventilation holes on
your refrigerator with any
material.
• Electrical devices must
be repaired by only
authorised persons.
Repairs performed by
incompetent persons
create a risk for the user.
• In case of any failure or
during a maintenance or
repair work, disconnect
your refrigerator’s mains
supply by either turning
off the relevant fuse
or unplugging your
appliance.
• Do not pull by the cable
when pulling off the plug.
• Ensure highly alcoholic
beverages are stored
securely with the lid
fastened and placed
upright.
• Never store spray
cans containing
flammable and explosive
substances in the
refrigerator.
• Do not use mechanical
devices or other means
to accelerate the
defrosting process,
other than those
recommended by the
manufacturer.
• This product is not
intended to be used by
persons with physical,
sensory or mental
disorders or unlearned
or inexperienced people
(including children)
unless they are attended
by a person who will
be responsible for their
safety or who will instruct
them accordingly for use
of the product
• Do not operate a
damaged refrigerator.
Consult with the service
agent if you have any
concerns.
• Electrical safety of your
refrigerator shall be
guaranteed only if the
earth system in your
house complies with
standards.
• Exposing the product
to rain, snow, sun and
wind is dangerous with
respect to electrical
safety.
• Contact authorized
service when there is a
power cable damage to
avoid danger.
EN
6
• Never plug the
refrigerator into the wall
outlet during installation.
Otherwise, risk of death
or serious injury may
arise.
• This refrigerator is
intended for only storing
food items. It must not
be used for any other
purpose.
• Label of technical
specifications is located
on the left wall inside the
refrigerator.
• Never connect your
refrigerator to electricitysaving systems; they
may damage the
refrigerator.
• If there is a blue light on
the refrigerator, do not
look at the blue light with
optical tools.
• For manually controlled
refrigerators, wait for at
least 5 minutes to start
the refrigerator after
power failure.
• This operation manual
should be handed in to
the new owner of the
product when it is given
to others.
• Avoid causing damage
on power cable when
transporting the
refrigerator. Bending
cable may cause fire.
Never place heavy
objects on power cable.
Do not touch the plug
with wet hands when
plugging the product
• Do not plug the
refrigerator if the wall
outlet is loose.
• Water should not be
sprayed on inner or outer
parts of the product for
safety purposes.
• Do not spray substances
containing inflammable
gases such as propane
gas near the refrigerator
to avoid fire and
explosion risk.
• Never place containers
filled with water on top
of the refrigerator; in
the event of spillages,
EN
7

this may cause electric
shock or fire.
• Do not overload the
refrigerator with food.
If overloaded, the food
items may fall down and
hurt you and damage
refrigerator when you
open the door.
• Never place objects on
top of the refrigerator;
otherwise, these objects
may fall down when
you open or close the
refrigerator’s door.
• As they require a precise
temperature, vaccines,
heat-sensitive medicine
and scientific materials
and etc. should not be
kept in the refrigerator.
• If not to be used for a
long time, refrigerator
should be unplugged.
A possible problem in
power cable may cause
fire.
• Refrigerator may move
if adjustable legs are not
properly secured on the
floor. Properly securing
adjustable legs on the
floor can prevent the
refrigerator to move.
• When carrying the
refrigerator, do not hold
it from door handle.
Otherwise, it may be
snapped.
• When you have to place
your product next to
another refrigerator or
freezer, the distance
between devices
should be at least 8cm.
Otherwise, adjacent side
walls may be humidified.
• The product shall never
be used while the
compartment which is
located at the top or
back of your product
and in which electronic
boards are available
(electronic board box
cover) (1) is open.
1
1
EN
8

For products with a
water dispenser;
• Pressure for cold water
inlet shall be maximum
90 psi (6.2 bar). If your
water pressure exceeds
80 psi (5.5 bar), use a
pressure limiting valve
in your mains system. If
you do not know how
to check your water
pressure, ask for the
help of a professional
plumber.
• If there is risk of water
hammer effect in your
installation, always
use a water hammer
prevention equipment
in your installation.
Consult Professional
plumbers is you are not
sure that there is no
water hammer effect in
your installation.
• Do not install on the
hot water inlet. Take
precautions against
of the risk of freezing
of the hoses. Water
temperature operating
interval shall be 33°F
(0.6°C) minimum
and 100°F (38°C)
maximum.
• Use only potable water.
Child safety
• If the door has a lock,
the key should be kept
away from reach of
children.
• Children must be
supervised to prevent
them from tampering
with the product.
Compliance with WEEE
Directive and Disposing of
the Waste Product:
This product complies
with EU WEEE Directive
(2012/19/EU). This product
bears a classification
symbol for waste electrical
and electronic equipment
(WEEE).
This product has been manufactured
with high quality parts and materials
which can be reused and are suitable
for recycling. Therefore, do not dispose
the product with normal domestic
waste at the end of its service life. Take
it to a collection point for the recycling
of electrical and electronic equipment.
Please consult your local authorities
to learn the nearest collection point.
Help protect the environment and
natural resources by recycling used
products. For children’s safety, cut the
power cable and break the locking
mechanism of the door, if any, so
that it will be non-functional before
disposing of the product.
EN
9

Package information
Packaging materials of the product
are manufactured from recyclable
materials in accordance with our
National Environment Regulations. Do
not dispose of the packaging materials
together with the domestic or other
wastes. Take them to the packaging
material collection points designated
by the local authorities.
Do not forget...
Any recycled substance is an
indispensable matter for nature and
our national asset wealth.
If you want to contribute to the
re-evaluation of the packaging
materials, you can consult to your
environmentalist organizations or the
municipalities where you are located.
HC warning
If your product's cooling system
contains R600a:
This gas is flammable. Therefore, pay
attention to not damaging the cooling
system and piping during usage and
transportation. In the event of damage,
keep your product away from potential
fire sources that can cause the
product catch a fire and ventilate the
room in which the unit is placed.
Ignore this warning if your
product's cooling system contains
R134a.
Type of gas used in the product is
stated in the type label which is on the
left wall inside the refrigerator.
Never throw the product in fire for
disposal.
Things to be done for energy
saving
• Do not leave the doors of your
refrigerator open for a long time.
• Do not put hot food or drinks in your
refrigerator.
• Do not overload your refrigerator so
that the air circulation inside of it is not
prevented.
• Do not install your refrigerator
under direct sunlight or near heat
emitting appliances such as ovens,
dishwashers or radiators. Keep your
refrigerator at least 30cm away from
heat emitting sources and at least
5cm from electrical ovens.
• Pay attention to keep your food in
closed containers.
• For products with a freezer
compartment; You can store
maximum amount of food items in
the freezer when you remove the
shelf or drawer of the freezer. Energy
consumption value stated for your
refrigerator has been determined
by removing freezer shelf or drawer
and under maximum load. There
is no harm to use a shelf or drawer
according to the shapes and size of
food to be frozen.
• Thawing frozen food in fridge
compartment will both provide energy
saving and preserve the food quality.
10
EN
Reccomendations for
temperature
sensor
food
MILK
juice
etc.
temperature
sensor
MILK
juice
etc.
temperature
sensor
freshfood compartment
* OPTIONAL
• Please do not let any foodstuff to
come to contact with the temperature
sensor in freshfood compartment.
In order to maintain freshfood
compartment at ideal storage
temperature, the sensor must not be
blocked by fodstuffs.
• Do not place hot foodstuff in your
appliance.
11
EN
3 Installation
C Please remember that the
manufacturer shall not be held liable if
the information given in the instruction
manual is not observed.
Points to be considered
when re-transporting your
refrigerator
1. Your refrigerator must be
emptied and cleaned prior to any
transportation.
2. Shelves, accessories, crisper and etc.
in your refrigerator must be fastened
securely by adhesive tape against any
jolt before repackaging.
3. Packaging must be tied with thick
tapes and strong ropes and the
rules of transportation printed on the
package must be followed.
C Always remember...
Every recycled material is an
indispensable source for the nature
and for our national resources.
If you wish to contribute to recycling
the packaging materials, you can
get further information from the
environmental bodies or local
authorities.
Before operating your
refrigerator
Before starting to use your refrigerator
check the following:
1. Is the interior of the refrigerator dry
and can the air circulate freely in the
rear of it?
2. Insert the 2 plastic wedges onto the
rear ventilation cover as illustrated
in the following figure. To do this,
remove the screws on the product
and use the screws given in the same
pouch.
Plastic wedges will provide the
required distance between your
refrigerator and the wall in order to
allow the air circulation.
3. Clean the interior of the refrigerator as
recommended in the “Maintenance
and cleaning” section.
4. Plug the refrigerator into the wall
outlet. When the door is open the
respective interior light will come on.
5. You will hear a noise as the
compressor starts up. The liquid and
gases sealed within the refrigeration
system may also give rise to noise,
even if the compressor is not running
and this is quite normal.
6. Front edges of the refrigerator may
feel warm. This is normal. These
areas are designed to be warm to
avoid condensation.
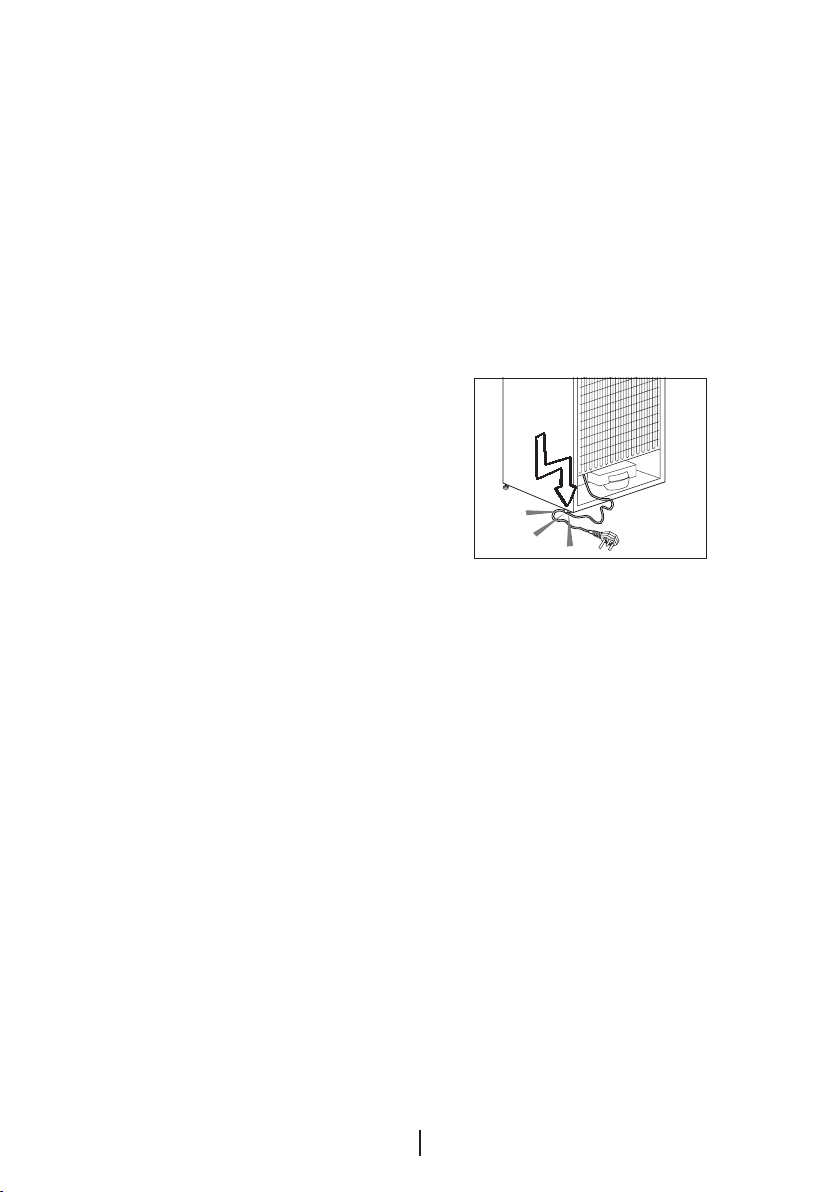
Electric connection
Connect your refrigerator to a grounded
socket which is being protected by a
fuse with the appropriate capacity.
12
EN

Important:
B The connection must be in
compliance with national regulations.
B The power cable plug must be easily
accessible after installation.
B Voltage and allowable fuse protection
are specified in the “Technical
Specifications” section.
BThe specified voltage must be equal
to your mains voltage.
B Extension cables and multiway plugs
must not be used for connection.
B A damaged power cable must be
replaced by a qualified electrician.
B The appliance must not be operated
before it is repaired! There is danger
of electric shock!
Disposing of the packaging
A The packing materials may be
dangerous for children. Keep the
packing materials out of the reach
of children or dispose them of by
classifying them in accordance
with the waste instructions. Do not
dispose them of along with the
normal household waste.
The packing of your refrigerator is
produced from recyclable materials.
Disposing of your old
refrigerator
Dispose of your old machine without
giving any harm to the environment.
A You may consult your authorized
dealer or waste collection center of
your municipality about the disposal
of your refrigerator.
A Before disposing of your refrigerator,
cut out the electric plug and, if there
are any locks on the door, make them
inoperable in order to protect children
against any danger.
Placing and Installation
B Caution: Never plug the refrigerator
into the wall outlet during installation.
Otherwise, risk of death or serious
injury may arise.
A If the entrance door of the room
where the refrigerator will be installed is
not wide enough for the refrigerator to
pass through, than call the authorised
service to have them remove the
doors of your refrigerator and pass it
sideways through the door.
1. Install your refrigerator to a place
that allows ease of use.
2. Keep your refrigerator away from
heat sources, humid places and direct
sunlight.
3. There must be appropriate air
ventilation around your refrigerator in
order to achieve an efficient operation.
If the refrigerator is to be placed in a
recess in the wall, there must be at
least 5 cm distance with the ceiling
and at least 5 cm with the wall.
If the floor is covered with a carpet,
your product must be elevated 2.5 cm
from the floor.
4. Place your refrigerator on an even
floor surface to prevent jolts.
5. Do not keep your refrigerator in
ambient temperatures under 10°C.
13
EN
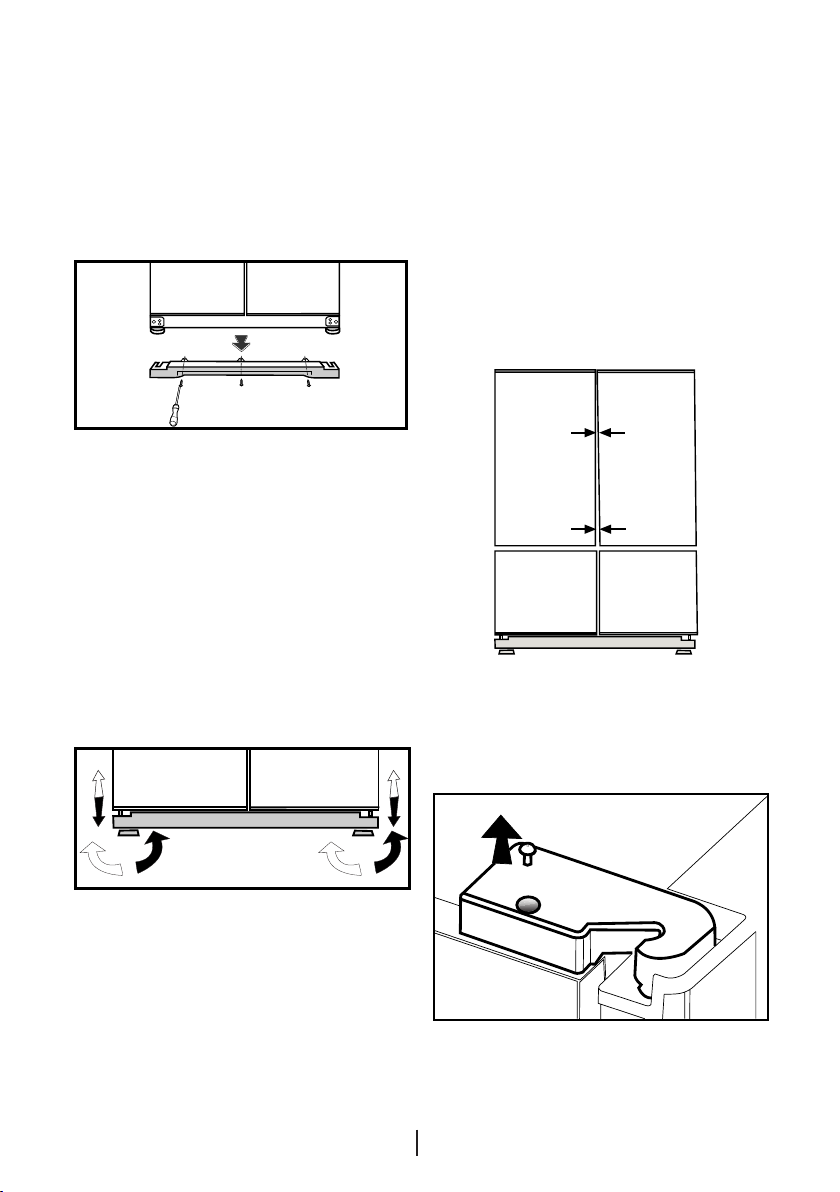
Floor balance adjustment
AIf your refrigerator is unbalanced;
B First unplug the product. The
product must be unplugged when
making the balance adjustment. There
is the risk of electric shock.
4
1 2 3
1- Ventilation cover is removed by
unscrewing its screws as illustrated
in the figure before the procedure.
You can balance your refrigerator by
turning the front legs of it as illustrated
in the figure. The corner where the
leg exists is lowered when you turn
in the direction of black arrow and
raised when you turn in the opposite
direction. Taking help from someone to
slightly lift the refrigerator will facilitate
this process.
2. After the balance issue is remedied,
install back the ventilation cover and
fasten the screws.
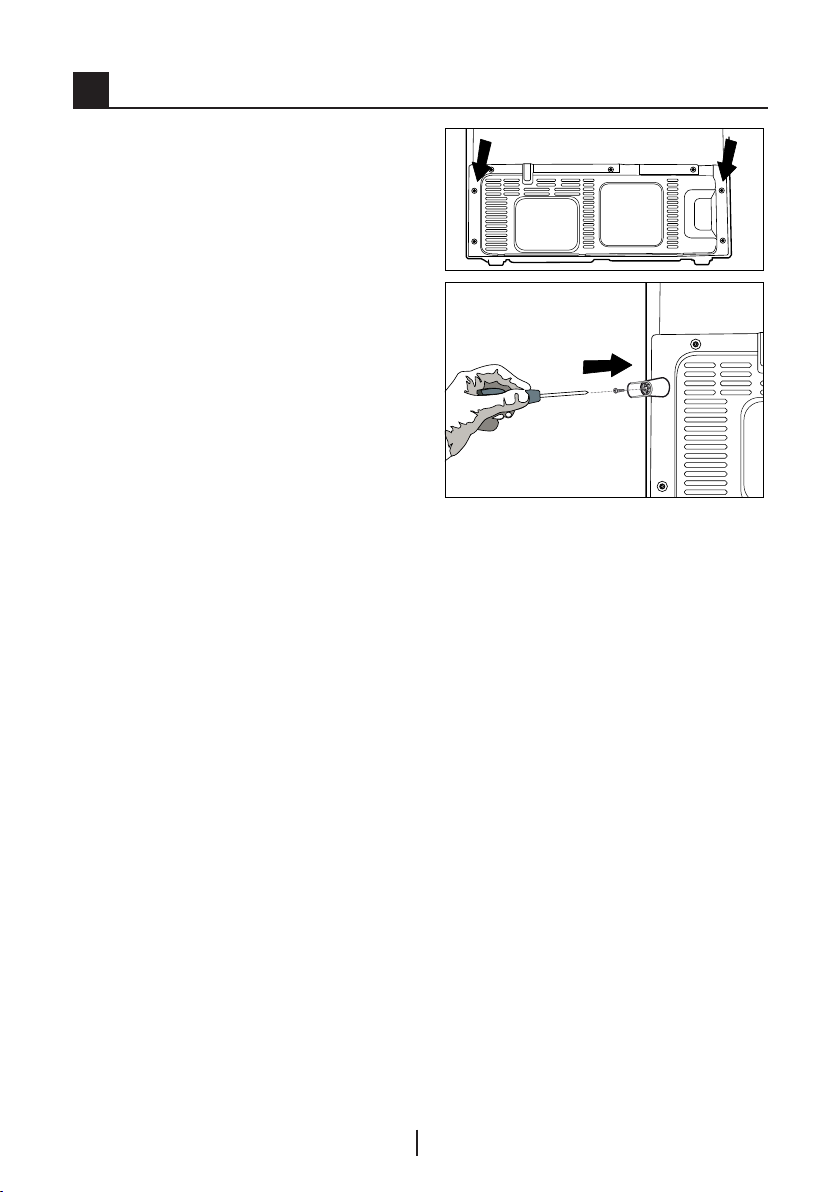
3. Remove the screws fastening the
lower ventilation cover using a Philips
screwdriver.
Adjusting the gap between
the upper door
C You can adjust the gap between
the fridge compartment doors as
illustrated in the figures.
Door shelves should be empty when
adjusting the door height.
C Using a screwdriver, remove the
screw of upper hinge cover of the door
you want to adjust.
EN
14
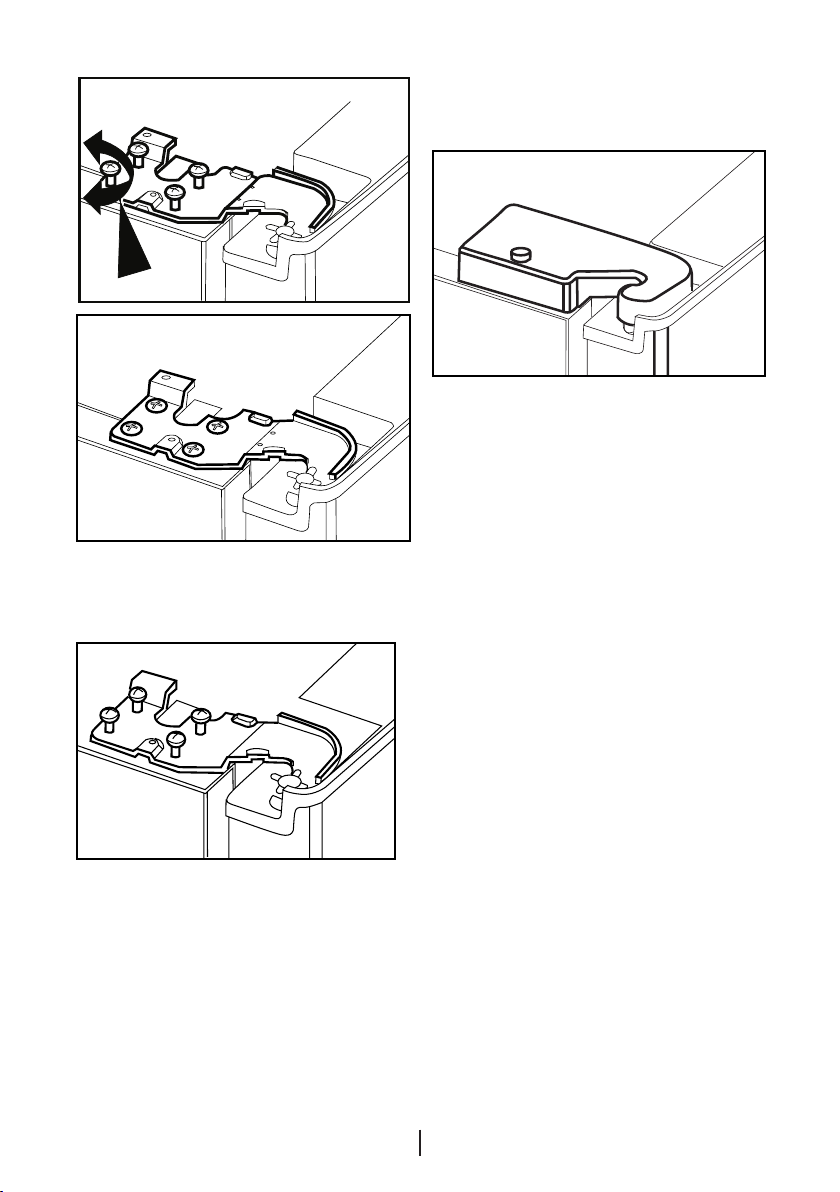
C Adjust the door appropriately as
you desire by loosing the screws.
C Fix the door you have adjusted by
tightening the screws without changing
the position of the door.
C Replace the hinge cover and fix
with the screw.
Changing the illumination
lamp
To change the Bulb/LED used for
illumination of your refrigerator, call
your AuthorisedService.
The lamp(s) used in this appliance
is not suitable for household room
illumination. The intended purpose of
this lamp is to assist the user to place
foodstuffs in the refrigerator/freezer
in a safe and comfortable way.The
lamps used in this appliance have to
withstand extreme physical conditions
such as temperatures below -20 °C.
(only chest and upright freezer)
15
EN
Installing Water Filter
1
2
(in some models)
Two different water sources may
be connected to the refrigerator
for water supply: the mains cold
water supply and water in a jug.
Installation Requirements
A pump should be used for jug water
usage.
Check that the parts stated below are
supplied with your appliance.
1. Union for connection of the water
pipe to the rear of the appliance.
(If it does not fit, provide it from the
nearest authorized service.)
2. 2 pieces of pipe clips (In case
required to secure the water pipe)
Note: Since the following parts are
not required in use with a jug, they
may not be found in the product you
purchased.
3. 5-meter long water pipe (1/4 inch in
diameter)
4. Cold mains water valve with mesh
filter (Tap Adapter)
5. Water Filter or externally connectable
filter to be fitted to the bracket inside
the fridge compartment.
Place where the external filter is going
to be fitted should be determined
first. (Applies to the filter being
used outside the refrigerator.) Then,
determine the distance between the
filter and the refrigerator and required
hose lengths from the filter to the
refrigerator water inlet.
Water filter must be hold upright as
shown in the figure. It is important to
properly attach the filter to water inlet
and water outlet points.
After attaching the filter, do not use first
3-4 glasses of water.
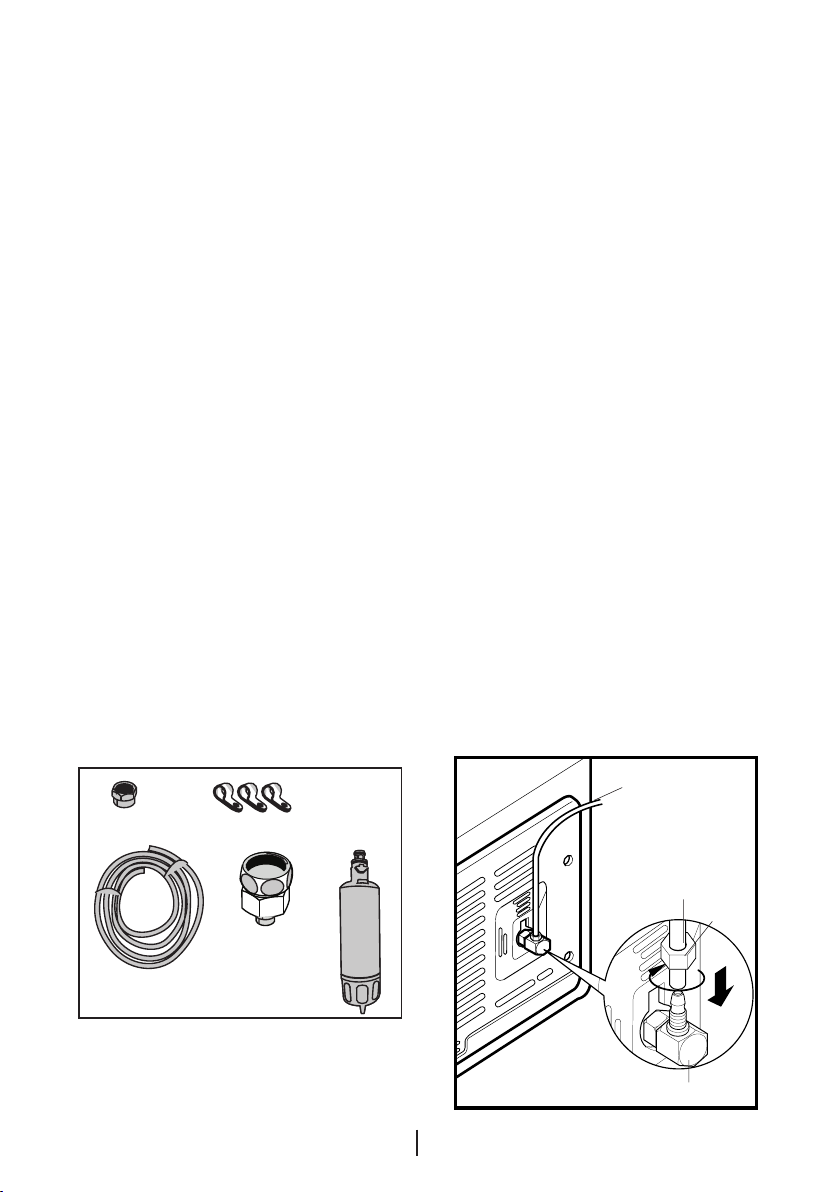
Connection of the Water
Pipe to the Refrigerator
1. After installing the union onto the
water pipe, insert the water pipe to
the refrigerator inlet valve by pressing
downwards firmly.
2. Fix union as seen in the opposite
figure, by squeezing by hand on the
refrigerator inlet valve.
(a- Water Pipe, b-Union, c-Valve)
1
3
2
4
*5
EN
16
a
a
b
c
C Note 1: You should not need to
tighten the union with a tool to achieve
water tight assembly. In case of a leak
use a spanner or a pair of pliers to
tighten the union.
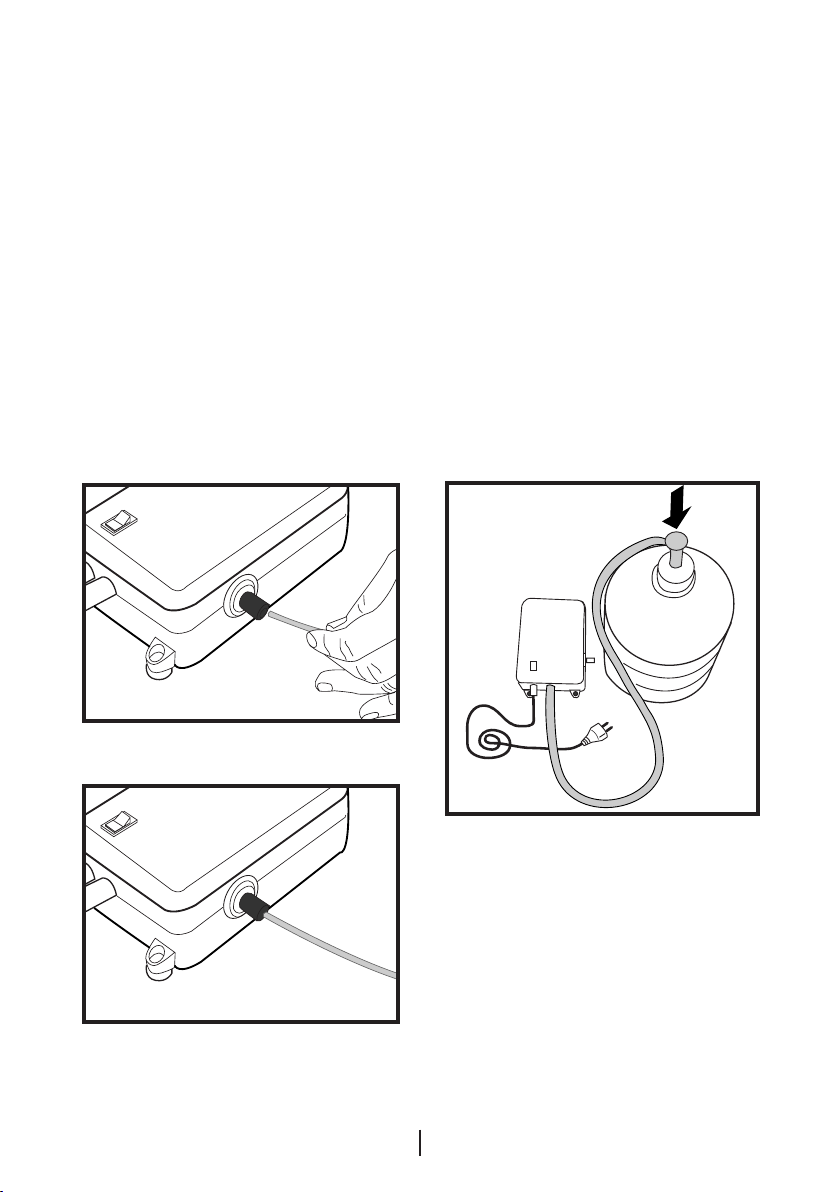
Connection of Water Hose to
the Jug
(in some models)
To connect water to the refrigerator
from a jug, a pump is needed. Follow
the instructions below after connecting
one end of the water pipe coming
out of the pump to the refrigerator as
described on the previous page.
1. Finish the connection by pushing
the other end of the water pipe into
the water pipe inlet of the pump as
shown in the figure.
2. Put and fix the pump hose into the
jug as shown in the figure.
3. After completing the connection, plug
in and run the pump.
To provide an efficient operation of the
pump, wait for 2-3 minutes after
starting the pump.
C You may refer to the user manual
of the pump while making the water
connection.
17
EN
C There is no need to use water filter in
case a jug is used.
C Pump must be used when jug will be
used.
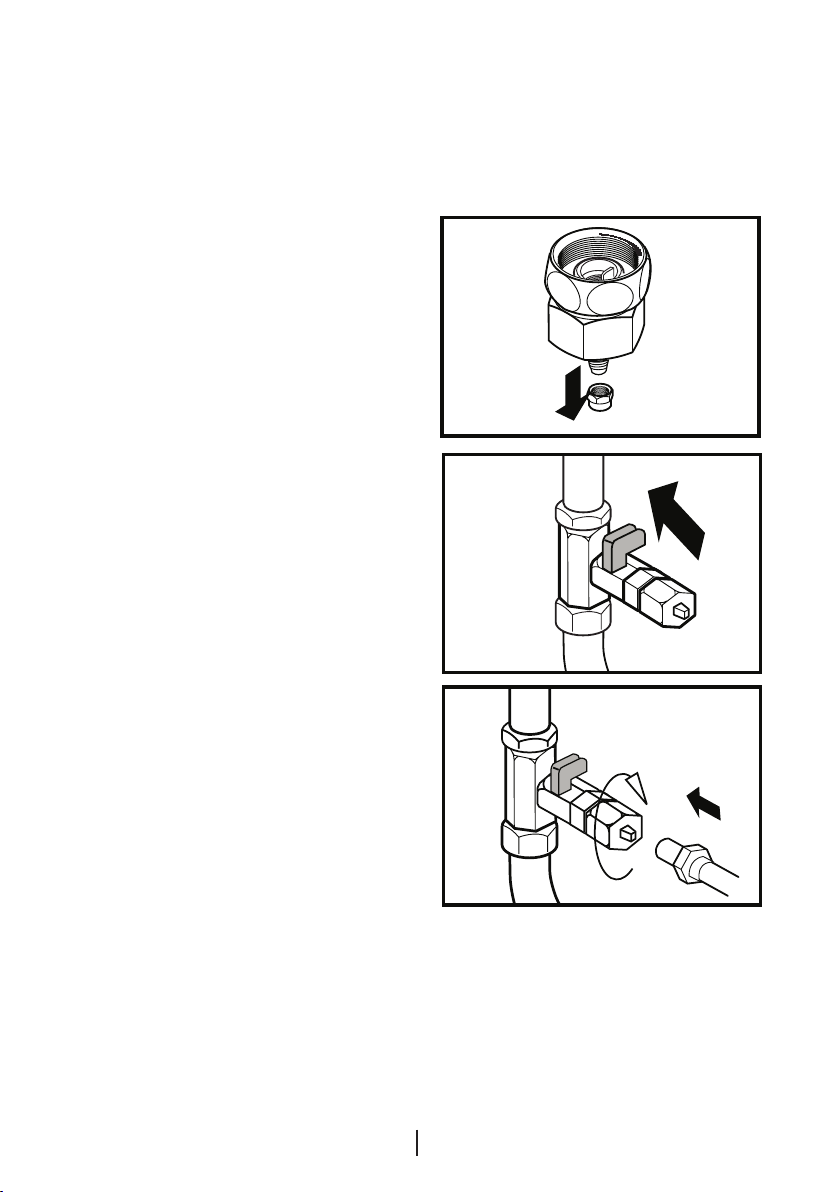
Connection of the Water
Pipe to the Cold Water Mains
Line
(in some models)
If you want to use your refrigerator by
connecting it to the cold water mains
line,
you will have to connect a standard
1/2" valve connection fitting to the cold
water supply in your house. In case
this valve is not present or in case
you are not sure, consult a qualified
plumber.
1. Separate the union from the tap
adaptor. (Figure A)
2. Install the tap adaptor to 1/2” valve
fitting as shown in the figure. (Figure
B)
3. After inserting the water pipe to the
union, install it to the tap adaptor
and insert to the tap as shown in the
figure. (Figure C)
4. Tighten the union manually. In case of
a leak use a spanner or a pair of pliers
to tighten the union.
A Caution: Secure the water pipe
to suitable points by means of the
pipe clips supplied to avoid any
damage or displacement or accidental
disconnection.
18
EN
A Caution: After turning on the water
valve, make sure that there is no
leakage at both connection points of
the water pipe. In case of a leak, turn
off the valve immediately and tighten all
joints again using a spanner or a pair
of pliers.
A Caution: Make sure that standard
1/2" valve fitting fed by cold mains
water supply is available and is turned
off fully.
To fit the water filter follow the
instructions below referring to figures
supplied:
1. Press ice cancel button on the
display.
2. Remove the filter cover in the fridge
compartment by pulling it forward.
3. Take out the water filter by-pass
cover by rotating it downwards.
A Caution: Make sure that the “Ice
off” mode is active before taking out
the by-pass cover.
Note: It is normal that a few drops of
water drip after the cover has been
taken out.
4. Remove the lid on top of the water
filter to place it as shown in the figure
and turn upwards to lock it.
5. Press ice cancel button on the
display again to exit from this mode.
Water filter should be replaced every 6
months.
19
EN

If you want to have the filter change
time calculated automatically and
receive a warning at the end of usage
time, please read "Calculating the Filter
Usage Time Automatically" section.
The water filter must be removed as
shown in the figure when it is going to
be replaced or when it will no longer
be used and by-pass cover must be
attached. It must be made sure that
Ice Off mode is active before taking it
out.
C Approximately the first 30 cubes
of ice to be obtained from the Ice
Dispenser must not be used.
C Always use the water filter when a
jug is not being used.
A Caution: Water filter cleans some
foreign particles in the water. It does
not purify water from microorganisms.
A Caution: Ice Off button must always
be pressed during replacement of the
water filter or installing the by-pass
cover.
Prior to first use of Water
Dispenser
C Water mains pressure must not be
below 1 bar.
C Water mains pressure must not be
above 8 bars.
C Pumps must be used in case the
supply water pressure drops below 1
bar or if a jug is going to be used.
C Water system of the refrigerator
must be connected to the cold water
line. It must not be connected to hot
water line.
C No water may be obtained in the
initial operation of the refrigerator. This
is caused by the air in the system. To
discharge air from the system, press
Dispenser latch for periods of 1 minute
until water comes from the Dispenser.
Water flow may be irregular in the
beginning. Irregular water flow will be
normalized after the air in the system is
discharged.
C At the initial startup of the
refrigerator approx.12 hours must pass
before cold water can be obtained.
C Water mains pressure must be
between 1-8 bars for the operation
of Ice/Water Dispenser smoothly. For
this, check that 1 glass of water (100
cc) can be filled in 10 seconds.
C The first 10 glasses of water should
not be consumed.
20
EN

4 Preparation
C Your refrigerator should be installed at
least 30 cm away from heat sources
such as hobs, ovens, central heater
and stoves and at least 5 cm away
from electrical ovens and should not
be located under direct sunlight.
C The ambient temperature of
the room where you install your
refrigerator should at least be 10°C.
Operating your refrigerator under
cooler conditions than this is not
recommended with regard to its
efficiency.
C Please make sure that the interior
of your refrigerator is cleaned
thoroughly.
C If two refrigerators are to be installed
side by side, there should be at least
2 cm distance between them.
C When you operate your refrigerator
for the first time, please observe the
following instructions during the initial
six hours.
- The door should not be opened
frequently.
- It must be operated empty without
any food in it.
- Do not unplug your refrigerator. If
a power failure occurs out of your
control, please see the warnings in
the “Recommended solutions for the
problems” section.
C Original packaging and foam
materials should be kept for future
transportations or moving.
21
EN
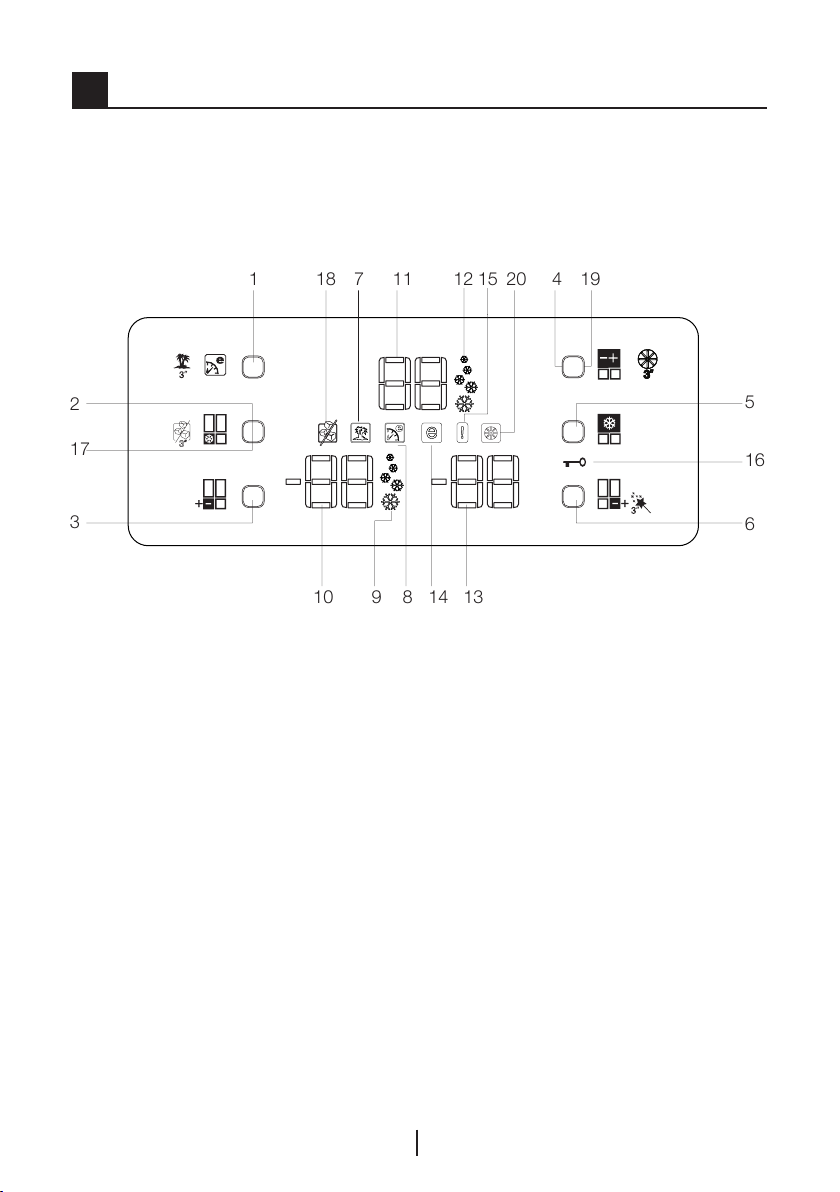
5 Using your refrigerator
1 7 11 12 15 4
5
6
2
3
16
17
18 20 19
10 9 14 138
Indicator Panel
This touch-control indicator panel allows you to set the temperature without
opening the door of your refrigerator. Just touch the relevant button with your
finger to set the temperature.
1. Eco-Extra / Vacation Button
2. Fast Freeze Button
3. Freezer Compartment
Temperature Setting Button
4. Fridge Compartment Temperature
Setting Button
5. Quick Cool Button
6. Multi Zone Compartment
Temperature Setting Button
7. Vacation Function Indicator
8. Eco-Extra Function Indicator
9. Fast Freeze Function Indicator
10. Freezer Compartment
11. Fridge Compartment Temperature
Indicator
12. Quick Cool Function Indicator
13. Multi Zone Compartment Temperature
Indicator
14. Economy Mode Indicator
15. Error Status Indicator
16. Key Lock Indicator
17. Ice Cancel Button
18. Ice Off indicator
19. Cancel Filter Change Warning Button
20. Filter Change Warning Indicator
Temperature Indicator
C Figures that take place in this instruction manual are schematic and may not
correspond exactly with your product. If the subject parts are not included in the
product you have purchased, then it is valid for other models.
EN
22

1. Eco Extra/Vacation Button
Press this button briefly to activate the
Eco Extra function. Press and hold
this button for 3 sec. to activate the
Vacation function. Press this button
again to deactivate the selected
function.
2. Fast Freeze Button
Press this button briefly to activate
the Fast Freeze function. Press this
button again to deactivate the selected
function.
3. Freezer Compartment
Temperature Setting Button
Press this button to set the
temperature of the freezer
compartment to -18, -20, -22, -24,
-18... respectively. Press this button
to set the desired temperature for the
Freezer Compartment.
4. Fridge Compartment
Temperature Setting Button
Press this button to set the
temperature of the fridge compartment
to 8, 6, 4, 2, 8... respectively.
Press this button to set the
desired temperature for the Fridge
Compartment.
5. Quick Cool Button
Press this button briefly to activate
the Quick Cool function. Press this
button again to deactivate the selected
function.
23
6. Multi Zone Compartment
Temperature Setting Button
You can set the Multi Zone
Compartment either as a Freezer or
a Cooler. Press and hold this button
for a long time (3 sec) to set the Multi
Zone Compartment as a Freezer or a
Cooler. This compartment is set as a
Freezer Compartment at factory.
If the Multi Zone Compartment is set
as a Freezer, then the temperature
of the Multi Zone Compartment
will change as -18, -20, -22, -24,
-18... respectively each time you
press this button. If the Multi Zone
Compartment is set as a Fridge, then
the temperature of the Multi Zone
Compartment will change as 10, 8, 6,
4, 2, 0, -6, ... respectively each time
you press this button.
7. Vacation Function Indicator
Indicates that the vacation function
is active. If this function is active,
"- -" appears on the indicator of the
fridge compartment and no cooling is
performed in the fridge compartment.
Other compartments will be cooled in
accordance with the temperature set
for them.
Press the relevant button again to
deactivate this function.
8. Eco Extra Function Indicator
It indicates that the Eco-Extra function
is active. If this function is active, your
refrigerator will automatically detect
the least usage periods and energyefficient cooling will be performed
during those times. Economy indicator
will be active while energy-efficient
cooling is performed.
EN

Press the relevant button again to
deactivate this function.
9. Quick Freeze Function Indicator
It indicates that the Fast Freeze
function is active. Use this function
when you place fresh food into the
freezer compartment or when you
need ice. When this function is active,
your refrigerator will run for a certain
period of time.
Press the relevant button again to
deactivate this function.
10. Freezer Compartment
Temperature Indicator
It indicates the temperature set for
Freezer Compartment.
11. Fridge Compartment
Temperature Indicator
Indicates the temperature set for
Fridge Compartment.
12. Quick Cool Function Indicator
Indicates that the Quick Cool function
is active. Use this function when
you place fresh food into the fridge
compartment or when you need to
cool your food quickly. When this
function is active, your refrigerator will
run for 2 hours without stopping.
14. Economy Mode Indicator
Indicates that the refrigerator is running
in energy-efficient mode. Freezer
Compartment temperature
This indicator will be active if the
function is set to -18 or the energy
efficient cooling is being performed
due to Eco-Extra function.
15. Error Status Indicator
If your refrigerator does not cool
adequately or if there is a sensor
failure, this indicator will be activated.
When this indicator is active,
Freezer Compartment Temperature
indicator will display "E" and Fridge
Compartment Temperature Indicator
will display numbers such as "1,2,3…".
These numbers on the indicator
provides information about the error to
the service personnel.
16. Key Lock Indicator
Use this function if you do not
want your refrigerator temperature
setting changed. Press Quick Cool
Button and Flexi Zone Compartment
Temperature Setting Button
simultaneously for a long time (3 sec)
to activate this feature.
Press the relevant buttons again to
deactivate this function.
Press the relevant button again to
deactivate this function.
13. Multi Zone Compartment
Temperature Indicator
It indicates the temperature set for
Multi Zone compartment.
17. Ice Cancel Button
To stop ice formation, ice cancel
button is pressed for 3 seconds. When
ice cancel is selected, no water will
be sent to the ice box. Despite this,
some ice may be leftover in the ice
box which may be taken from there. To
restart ice formation, ice cancel button
has to be pressed for 3 seconds.
EN
24

18. Ice Cancel Indicator
If you do not want to get ice from
the refrigerator, you need to use this
function. You may use this function by
pressing the ice cancel button for 3
seconds.
19. Cancel Filter Change Warning
Button
Filter of your refrigerator must be
replaced every 6 months. Your
refrigerator calculates this time
automatically and the filter change
waning indicator illuminates when the
filter usage time has elapsed. Press
Cancel filter change warning button
for 3 seconds to allow the refrigerator
to calculate the new filter time
automatically after changing the filter.
20. Cancel Filter Change Warning
Indicator
When the filter usage time has
elapsed, filter change warning indicator
starts to illuminate.
Door Open Alarm:
In case of leaving any of the
Fridge Compartment or Flexi Zone
Compartment doors open minimum
for 1 minute, audible Door Open Alarm
will be activated and heard. Just press
any button on the indicator or close
the open door to silence the alarm.
Dual cooling system:
Your refrigerator is equipped with
two separate cooling systems to
cool the fresh food compartment and
freezer compartment. Thus, air in the
fresh food compartment and freezer
compartment do not get mixed.
Thanks to these two separate cooling
systems, cooling speed is much higher
than other refrigerators. Odors in the
compartments do not get mixed. Also
additional power saving is provided
since the defrosting is performed
individually.
Freezing fresh food
• Wrap or cover the food before
placing them in .
• Hot food must cool down to the
room temperature before putting
them in the refrigerator.
• The foodstuff that you want to
freeze must be fresh and in good
quality.
• Foodstuff must be divided into
portions according to the family’s
daily or meal based consumption
needs.
• Foodstuff must be packaged in an
airtight manner to prevent them from
drying even if they are going to be
kept for a short time.
• Materials to be used for
packagings must be resistant to
cold and humidity and they must
be airtight. The packaging material
of the food must be at a sufficient
thickness and durability. Otherwise
the food hardened due to freezing
may puncture the packaging. It is
important for the packaging to be
closed securely for safe storage of
the food.
25
EN
• Frozen food must be used
immediately after they are thawed
and they should never be re-frozen.
• Please observe the following
instructions to obtain the best results.
1. If the fridge has a quick freeze
function, activate the quick freeze
function when you want to freeze the
food.
2. Do not freeze too large quantities
of food at one time. The quality of
the food is best preserved when it
is frozen right through to the core as
quickly as possible.
3. Take special care not to mix
already frozen food and fresh food.
4. Make sure raw foods are not in
contact with cooked foods in the
fridge.
Recommendations for
preservation of frozen food
• Pre-packed commercially frozen
food should be stored in accordance
with the frozen food manufacturer's
instructions in a frozen food storage
compartment.
• To ensure that the high quality
supplied by the frozen food
manufacturer and the food retailer is
maintained, following points should
be noted:
1.Put packages in the freezer as
quickly as possible after purchase.
2.Ensure that contents of the package
are labeled and dated.
3. Do not exceed "Use By", "Best
Before" dates on the packaging.
Freezer
Compartment
Setting
Fridge
Compartment
Setting
Remarks
-18°C 4°C This is the normal recommended setting.
-20, -22 or
-24°C
4°C
These settings are recommended when the
ambient temperature exceeds 30°C.
Use when you wish to freeze your food in a
Quick Freeze 4°C
short time. If is recommended to be used
to maintain the quality of meat and fish
products.
If you think that your fridge compartment
-18°C or
colder
2°C
is not cold enough because of the hot
conditions or frequent opening and closing of
the door.
You can use it when your fridge compartment
-18°C or
colder
Quick Fridge
is overloaded or if you wish to cool down
your food rapidly. It is recommended that you
activate the quick freeze function 4-8 hours
before placing the food.
EN
26
Defrosting
The freezer compartment defrosts
automatically.
Placing the food
Freezer
compartment
shelves
Egg section Egg
Fridge
compartment
shelves
Door shelves
of fridge
compartment
Crisper Vegetables and fruits
Freshzone
compartment
Various frozen food
such as meat,
fish, ice cream,
vegetables and etc.
Food in pans,
covered plates and
closed containers
Small and packaged
food and drinks
(such as milk, fruit
juice and beer)
Delicatessen
products (cheese,
butter, salami and
etc.)
Deep-freeze information
Food must be frozen as rapidly as
possible when they are put in the
freezer in order to keep them in good
quality.
It is possible to preserve the food for
a long time only at -18°C or lower
temperatures.
You can keep the freshness of food
for many months (at -18°C or lower
temperatures in the deep freeze).
WARNING! A
• Foodstuff must be divided into
portions according to the family’s daily
or meal based consumption needs.
• Foodstuff must be packaged in an
airtight manner to prevent them from
drying even if they are going to be kept
for a short time.
Materials necessary for packaging:
• Cold resistant adhesive tape
• Self-adhesive label
• Rubber rings
• Pen
Materials to be used for packaging
the foodstuff must be tear-proof and
resistant to cold, humidity, dour, oils
and acids.
Foodstuff to be frozen should not be
allowed to come in contact with the
previously frozen items to prevent their
partial thawing. Thawed out food
must be consumed and must not be
frozen again.
27
EN
Things to do to have the filter usage time calculated
automatically
(For products connected to the mains water line and equipped with filter)
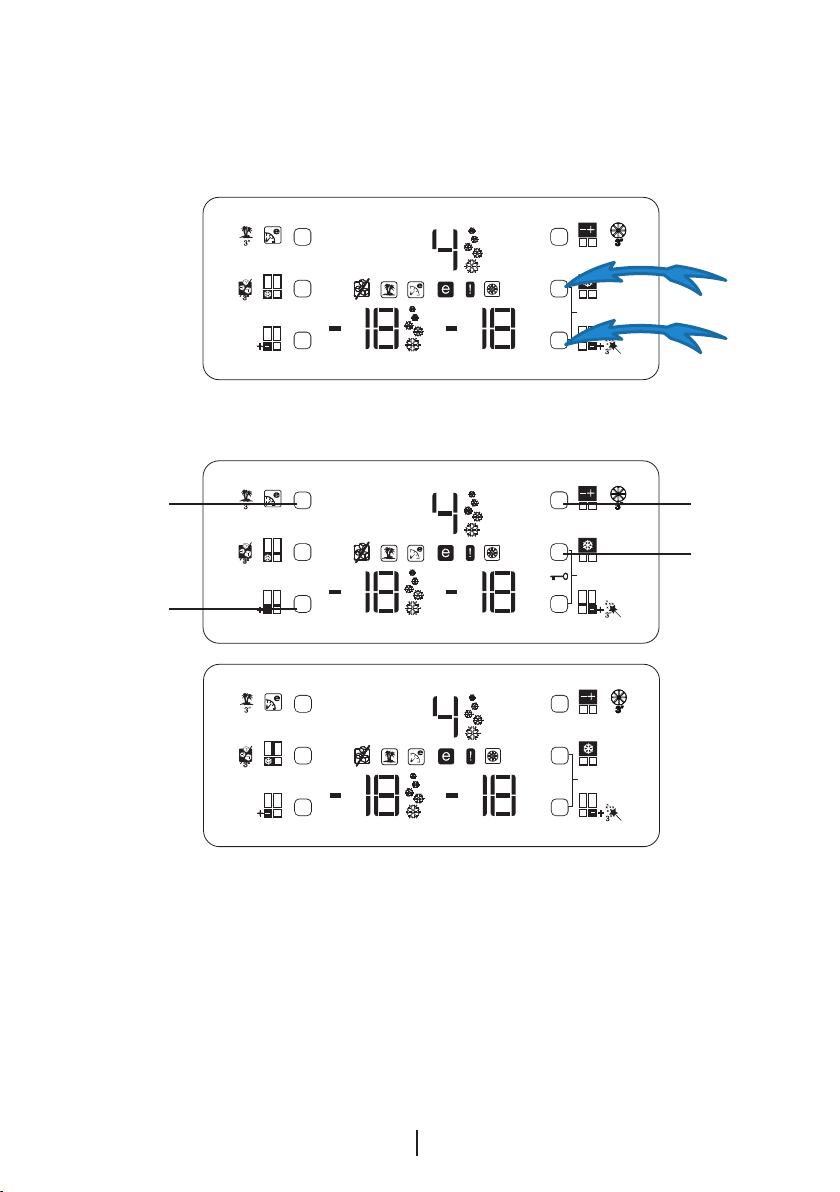
1- After plugging the refrigerator in, press A and B buttons together to activate
the key lock.
A
B
2- Then press Eco-Extra (1), Fridge Compartment Temperature Setting (4), Quick
Cool (5) and Freezer Compartment Temperature Setting (3) buttons respectively.
1 4
5
3
If button configuration is pressed in the correct order, key lock symbol will go off,
buzzer will be activated shortly, and Filter change warning indicator illuminates.
Press cancel filter change warning button (Item 19 in display descriptions) after
changing the filter to have the filter usage time calculated automatically.
C If the filter usage time is being calculated automatically, filter change warning
indicator will illuminate in a few seconds after the product is plugged in.
C Automatic filter usage time calculation is not active ex factory. It must
be activated in products equipped with a filter.
C Repeat the same procedure in products whose automatic filter usage
time calculation is activated in order to deactivate the filter usage time
calculation.
28
EN
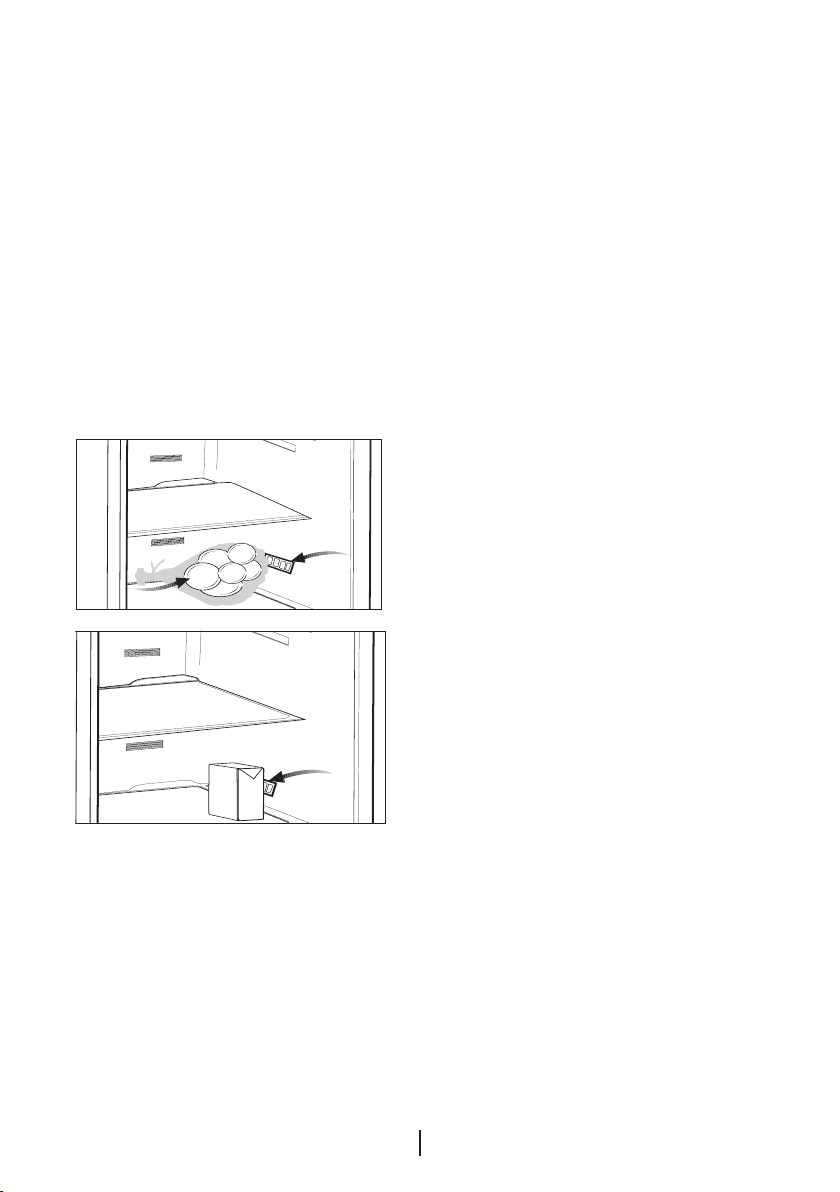
Egg tray
You can install the egg holder to the
desired door or body shelf.
Never store the egg holder in the
freezer compartment
Sliding Body Shelves
Sliding body shelves can be pulled
by slightly lifting up from the front and
moved back and forth. They come to
a stop point when pulled towards front
to allow you reach the foods placed at
the back of the shelf; when it is pulled
after slightly lifted upwards at the
second stop point, the body shelf will
be released.
The shelf should be hold tightly from
the bottom as well in order to prevent
it from tipping over. The body shelf is
placed on the rails at the sides of the
refrigerator body by bringing it to one
lower or one upper level.
The body shelf should be pushed
backwards to seat it completely.
1
2
3
4
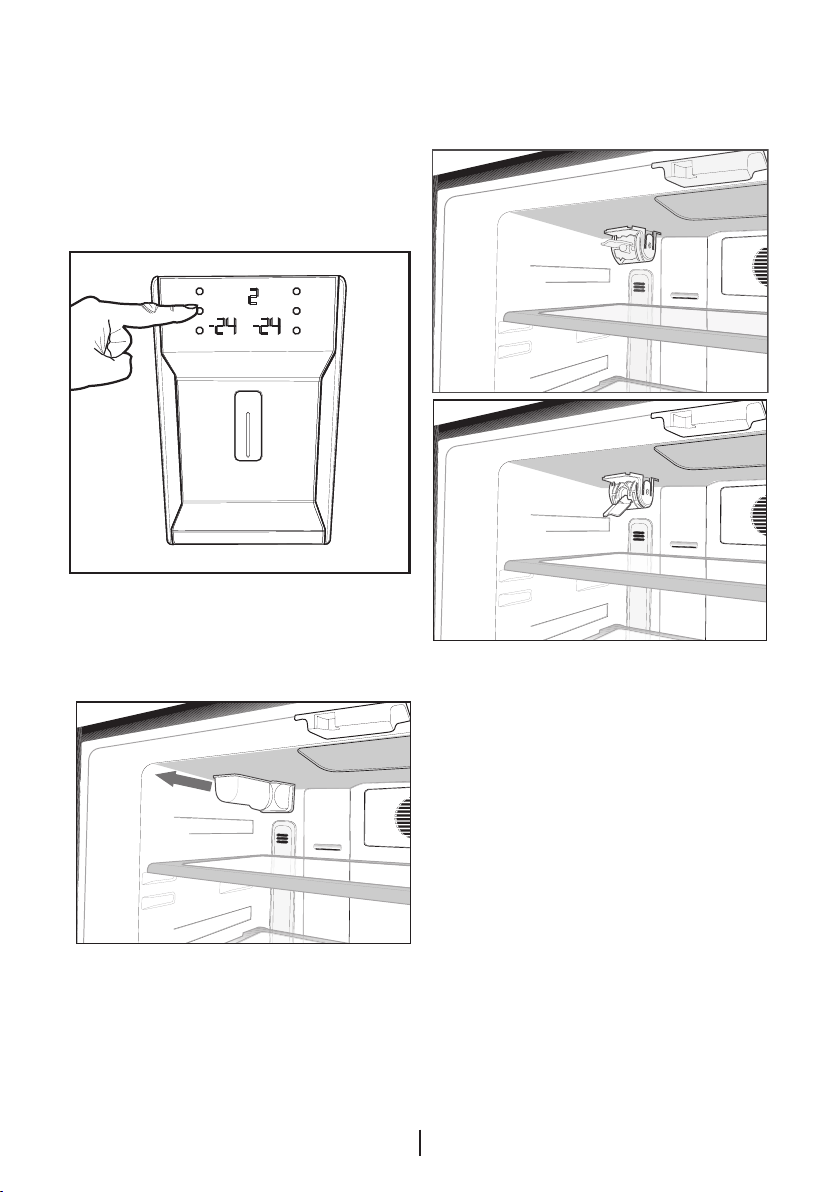
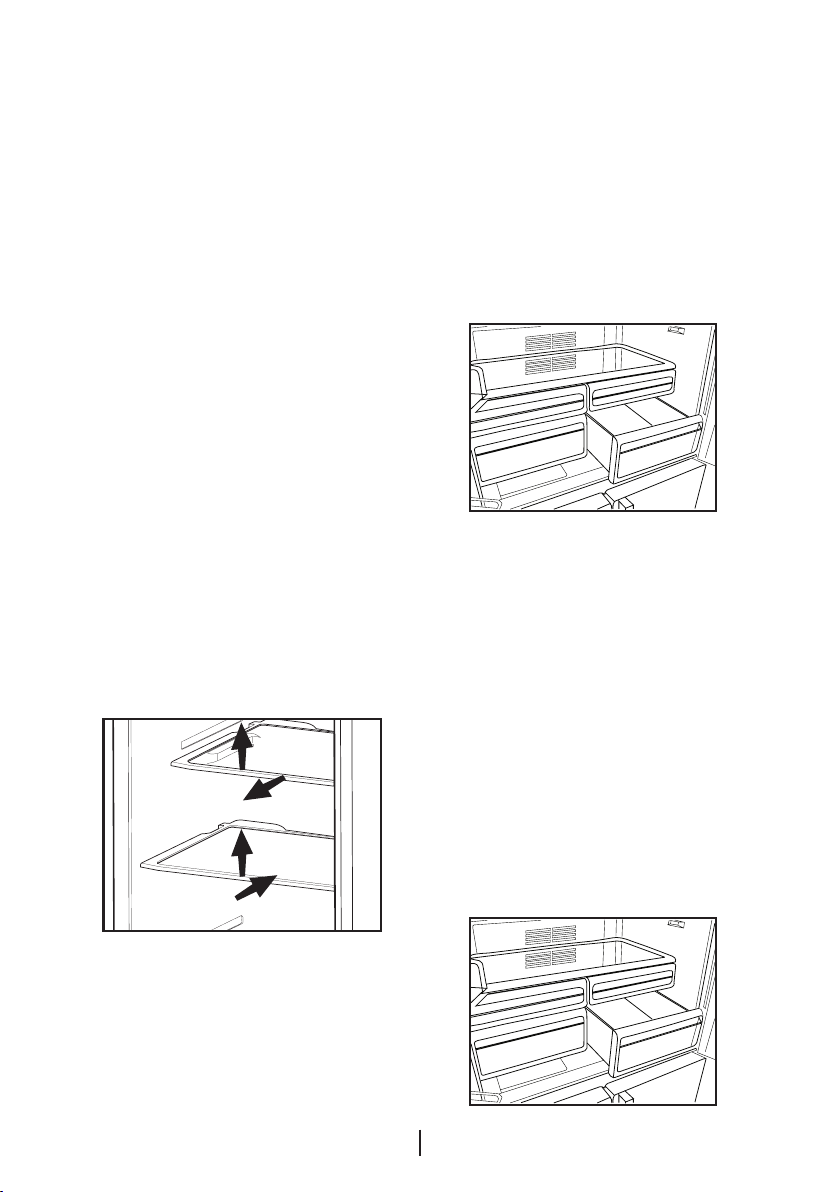
Crisper
Crisper of your refrigerator is designed
specially to keep your vegetables
freshly without loosing their humidity.
For this purpose, cool air circulation
occurs around the crisper in general.
Remove the door shelves that align
with the crisper before removing the
crispers. You can remove the crispers
as illustrated in the figure.
Chiller compartment
Chiller compartments enable the
foods to be frozen become ready
for freezing. You can also use these
compartments to store your food at a
temperature a few degrees below the
fridge compartment.
You can increase the inner volume of
your refrigerator by removing any of
the chiller compartments. To do this,
pull the compartment towards yourself;
the compartment will lean against the
stopper and stop. This compartment
will be released when you lift it about 1
cm and pull it towards yourself.
29
EN

Movable Middle Section
Movable middle section is intended
to prevent the cold air inside your
refrigerator from escaping outside.
1- Sealing is provided when the
gaskets on the door presses on the
surface of the movable middle section
while the fridge compartment doors
are closed.
2- Another reason that your refrigerator
is equipped with a movable middle
section is that it increases the net
volume of the fridge compartment.
Standard middle sections occupy
some non-usable volume in the
refrigerator.
3- Movable middle section is closed
when the left door of the fridge
compartment is closed.
4- It must not be opened manually.
It moves under the guidance of the
plastic part on the body while the door
is closed.
Multi Zone Storage
Compartment
The Multi Zone Storage Compartment
of your refrigerator may be used in
any desired mode by adjusting it to
fridge (2/4/6/8 °C) or freezer (-18/20/-22/-24) temperatures. You can
keep the compartment in the desired
temperature with the Multi Zone
Storage Compartment Temperature
Setting Button. The temperature of
the Multi Zone Storage Compartment
may be set to 0 and 10 degrees in
addition to the fridge compartment
temperatures and to -6 degrees in
addition to the freezer compartment
temperatures. 0 degree is used to
store the deli products longer, and -6
degrees is used to keep the meats
up to 2 weeks in an easily cuttable
condition.
C The feature of switching to a Fridge
or Freezer compartment is provided by
a cooling element located in the closed
section (Compressor Compartment)
behind the refrigerator. During
operation of this element, sounds
similar to the sound of seconds heard
from an analog clock may be heard.
This is normal and is not fault cause.
Blue light
Foodstuff stored in the crispers that
are enlightened with a blue light
continue their photosynthesis by
means of the wavelength effect of blue
light and thus, preserve their freshness
and increase their vitamin content.
30
EN

Sliding Body Shelves With
Rear Hangers
Sliding body shelves with rear hangers
can be moved back and forth. Height
of these shelves can be adjusted by
removing and then installing them
to upper or lower positions. Raise
the shelf up slightly and pull towards
yourself to remove it.
Using the water spring
Warnings
It is normal for the first few glasses of
water taken from the dispenser to be
warm.
In cases where the water dispenser
has not been used frequently, sufficient
amount of water must be drained from
the dispenser to get fresh water.
Butter & Cheese Section
You can store food such as butter,
cheese, and margarine in this section
which has a lid.
Spillage Tray
Water drops that drip during use,
accumulates in the spillage tray. You
can remove spillage tray by pulling
it to yourself or pressing on its edge
(depending on the model). You can
remove the water with a sponge or a soft
cloth.
EN
31

6 Maintenance and cleaning
ANever use gasoline, benzene or similar
substances for cleaning purposes.
BWe recommend that you unplug the
appliance before cleaning.
BNever use any sharp abrasive
instrument, soap, household
cleaner, detergent and wax polish for
cleaning.
CUse lukewarm water to clean the
cabinet of your refrigerator and wipe
it dry.
CUse a damp cloth wrung out in
a solution of one teaspoon of
bicarbonate of soda to one pint of
water to clean the interior and wipe
it dry.
BMake sure that no water enters the
lamp housing and other electrical
items.
BIf your refrigerator is not going to be
used for a long period of time, unplug
the power cable, remove all food,
clean it and leave the door ajar.
CCheck door seals regularly to ensure
they are clean and free from food
particles.
ATo remove door racks, remove all the
contents and then simply push the
door rack upwards from the base.
ANever use cleaning agents or water
that contain chlorine to clean the
outer surfaces and chromium coated
parts of the product. Chlorine causes
corrosion on such metal surfaces.
ADo not use sharp, abrasive tools,
soap, household cleaning agents,
detergents, kerosene, fuel oil,
varnish etc. to prevent removal and
deformation of the prints on the
plastic part. Use lukewarm water
and a soft cloth for cleaning and then
wipe it dry.
Protection of plastic
surfaces
C Do not put the liquid oils or oil-cooked
meals in your refrigerator in unsealed
containers as they damage the
plastic surfaces of your refrigerator. In
case of spilling or smearing oil on the
plastic surfaces, clean and rinse the
relevant part of the surface at once
with warm water.
32
EN

7 Troubleshooting
Please review this list before calling the service. It will save your time and
money. This list includes frequent complaints that are not arising from defective
workmanship or material usage. Some of the features described here may not
exist in your product.
The refrigerator does not operate.
• The plug is not inserted into the socket correctly. >>>Insert the plug into the
socket securely.
• The fuse of the socket which your refrigerator is connected to or the main fuse
have blown out. >>>Check the fuse.
Condensation on the side wall of the fridge compartment (MULTIZONE, COOL
CONTROL and FLEXI ZONE).
• Door has been opened frequently. >>>Do not open and close the door of
refrigerator frequently.
• Ambient is very humid. >>>Do not install your refrigerator into highly humid
places.
• Food containing liquid is stored in open containers. >>>Do not store food with
liquid content in open containers.
• Door of the refrigerator is left ajar. >>>Close the door of the refrigerator.
• Thermostat is set to a very cold level. >>>Set the thermostat to a suitable level.
• Compressor is not running
• Protective thermic of the compressor will blow out during sudden power
failures or plug-out plug-ins as the refrigerant pressure in the cooling system
of the refrigerator has not been balanced yet. The refrigerator will start running
approximately after 6 minutes. Please call the service if the refrigerator does not
startup at the end of this period.
• The fridge is in defrost cycle. >>>This is normal for a full-automatically defrosting
refrigerator. Defrosting cycle occurs periodically.
• The refrigerator is not plugged into the socket. >>>Make sure that the plug is fit
into the socket.
• Temperature settings are not made correctly. >>>Select the suitable temperature
value.
• There is a power outage. >>>Refrigerator returns to normal operation when the
power restores.
The operation noise increases when the refrigerator is running.
• The operating performance of the refrigerator may change due to the changes in
the ambient temperature. It is normal and not a fault.
The refrigerator is running frequently or for a long time.
33
EN

• New product may be wider than the previous one. Larger refrigerators operate
for a longer period of time.
• The room temperature may be high. >>>It is normal that the product operates
for longer periods in hot ambient.
• The refrigerator might be plugged in recently or might be loaded with food.
>>>When the refrigerator is plugged in or loaded with food recently, it will take
longer for it to attain the set temperature. This is normal.
• Large amounts of hot food might be put in the refrigerator recently. >>>Do not
put hot food into the refrigerator.
• Doors might be opened frequently or left ajar for a long time. >>>The warm air
that has entered into the refrigerator causes the refrigerator to run for longer
periods. Do not open the doors frequently.
• Freezer or fridge compartment door might be left ajar. >>>Check if the doors are
closed completely.
• The refrigerator is adjusted to a very low temperature. >>>Adjust the refrigerator
temperature to a warmer degree and wait until the temperature is achieved.
• Door seal of the fridge or freezer may be soiled, worn out, broken or not
properly seated. >>>Clean or replace the seal. Damaged/broken seal causes
the refrigerator to run for a longer period of time in order to maintain the current
temperature.
Freezer temperature is very low while the fridge temperature is sufficient.
• The freezer temperature is adjusted to a very low value. >>>Adjust the freezer
temperature to a warmer degree and check.
Fridge temperature is very low while the freezer temperature is sufficient.
• The fridge temperature is adjusted to a very low value. >>>Adjust the fridge
temperature to a warmer degree and check.
Food kept in the fridge compartment drawers is frozen.
• The fridge temperature is adjusted to a very high value. >>>Adjust the fridge
temperature to a lower value and check.
Temperature in the fridge or freezer is very high.
• The fridge temperature is adjusted to a very high value. >>>Fridge compartment
temperature setting has an effect on the temperature of the freezer. Change the
temperatures of the fridge or freezer and wait until the relevant compartments
attain a sufficient temperature.
• Doors are opened frequently or left ajar for a long time. >>>Do not open the
doors frequently.
• Door is ajar. >>>Close the door completely.
• The refrigerator is plugged in or loaded with food recently. >>>This is normal.
When the refrigerator is plugged in or loaded with food recently, it will take longer
for it to attain the set temperature.
• Large amounts of hot food might be put in the refrigerator recently. >>>Do not
put hot food into the refrigerator.
34
EN

• Vibrations or noise.
• The floor is not level or stable. >>> If the refrigerator rocks when moved slowly,
balance it by adjusting its feet. Also make sure that the floor is strong enough to
carry the refrigerator, and level.
• The items put onto the refrigerator may cause noise. >>>Remove the items on
top of the refrigerator.
There are noises coming from the refrigerator like liquid flowing, spraying, etc.
• Liquid and gas flows occur in accordance with the operating principles of your
refrigerator. It is normal and not a fault.
Whistle comes from the refrigerator.
• Fans are used in order to cool the refrigerator. It is normal and not a fault.
Condensation on the inner walls of refrigerator.
• Hot and humid weather increases icing and condensation. It is normal and not a
fault.
• Doors are opened frequently or left ajar for a long time. >>>Do not open the
doors frequently. Close them if they are open.
• Door is ajar. >>>Close the door completely.
Humidity occurs on the outside of the refrigerator or between the doors.
• There might be humidity in the air; this is quite normal in humid weather. When
the humidity is less, condensation will disappear.
Bad odour inside the refrigerator.
• No regular cleaning is performed. >>>Clean the inside of the refrigerator regularly
with a sponge, lukewarm water or carbonate dissolved in water.
• Some containers or package materials may cause the smell. >>>Use a different
container or different brand packaging material.
• Food is put into the refrigerator in uncovered containers. >>>Keep the food in
closed containers. Microorganisms spreading out from uncovered containers
can cause unpleasant odours.
• Remove the foods that have expired best before dates and spoiled from the
refrigerator.
The door is not closing.
• Food packages are preventing the door from closing. >>>Replace the packages
that are obstructing the door.
• The refrigerator is not completely even on the floor. >>>Adjust the feet to
balance the refrigerator.
• The floor is not level or strong. >>>Make sure that the floor is level and capable
to carry the refrigerator.
Crispers are stuck.
• The food is touching the ceiling of the drawer. >>>Rearrange food in the drawer.
35
EN

Chłodziarka
Instrukcja użytkowania
EWWERQWEW
PL

Prosimy najpierw przeczytać tę instrukcję obsługi!
Drodzy Klienci,
Mamy nadzieję, że nasz wyrób, wyprodukowany w nowoczesnym zakładzie i
sprawdzony według najbardziej drobiazgowych procedur kontroli jakości, będzie
Wam dobrze służył.
Dlatego zalecamy, aby uważnie przeczytać całą instrukcję obsługi tego wyrobu
przed jego uruchomieniem i zachować ją do wglądu w przyszłości.
Instrukcja niniejsza
• Pomoże używać tego urządzenia sprawnie i bezpiecznie.
• Przeczytaj tę instrukcję przed zainstalowaniem i uruchomieniem chłodziarki.
• Postępuj zgodnie z tymi wskazówkami, zwłaszcza dotyczącymi
bezpieczeństwa.
• Przechowuj tę instrukcję w łatwo dostępnym miejscu, bo może się przydać
później.
• Prosimy przeczytać także inne dokumenty dostarczone wraz z lodówką.
Prosimy zauważyć, że instrukcja ta może odnosić się także do innych modeli.
Symbole i ich znaczenie
Niniejsza instrukcja obsługi zawiera następujące symbole:
C Ważne informacje lub przydatne wskazówki użytkowania.
A Ostrzeżenie przed zagrożeniem życia i mienia.
B Ostrzeżenie przed porażeniem elektrycznym.

SPIS TREŚCI
1 Oto Wasza chłodziarka 3
2 Ważne ostrzeżenia dot.
bezpieczeństwa 4
Zamierzone przeznaczenie ................4
Ogólne zasady bezpieczeństwa ......... 5
Dla modeli z wodotryskiem ..............10
Bezpieczeństwo dzieci ....................10
Zgodność z dyrektywą WEEE i
usuwanie odpadów: ....................... 10
Zgodność z dyrektywą RoHS: ......... 11
Informacje opakowaniu .................... 11
Ostrzeżenie HC ...............................11
Co robić, aby oszczędzać energię. .. 11
Zalecenia dot. komory na żywność
świeżą. ............................................12
3 Instalacja 13
W razie potrzeby ponownego
transportu chłodziarki należy
przestrzegać następujących
wskazówek: ....................................13
Przed uruchomieniem chłodziarki ....13
Połączenia elektryczne ....................14
Pozbywanie się opakowania ............14
Złomowanie starej lodówki ............... 14
Ustawienie i instalacja ......................14
Wyrównanie nierówności podłogi ..... 15
Ustawianie szczeliny między górnymi
drzwiczkami ....................................15
Wymiana lampki oświetlenia ........... 16
Instalowanie filtru wody ................... 17
Przyłączenie do lodówki rury do
wody ............................................... 17
Przyłączenie węża do wody do
pojemnika ....................................... 18
Przyłączenie rury do wody do domowej
instalacji wody zimnej ....................19
Przed pierwszym użyciem dozownika
wody. .............................................. 21
4 Przygotowanie 22
5 Obsługa lodówki 23
Panel wskaźników ........................... 23
Alarm otwartych drzwiczek: ............26
Zamrażanie żywności świeżej ..........27
Zalecenia co do przechowywania
mrożonek ........................................ 28
Rozmieszczenie żywności ...............28
O głębokim zamrażaniu ................... 28
Co zrobić, aby automatycznie wyliczać
czas użytkowania filtru .....................30
Półki wysuwane ...............................31
Półka na jajka ..................................31
Pojemnik na świeże warzywa ...........31
Komora schładzania ........................ 31
Ruchoma sekcja środkowa .............32
Komora Multi Zone ........................32
Niebieskie światło ............................ 32
Półki wysuwane z wieszakami
tylnymi .............................................33
Miejsce na masło i sery .................... 33
Korzystanie z dozownika wody ........33
Tacka na wodę przelaną .................. 33
Minibar ............................................ 34
6 Konserwacja i czyszczenie
35
Zabezpieczenia powierzchni
plastykowych ..................................35
7 Zalecane rozwiązania
problemów 36
PL
2

1 Oto Wasza chłodziarka
17
18 19
2
3
6
7
8
9
5
4
16
13
11
14
1
12
10
15
1- Półki w drzwiczkach komory
chłodniczej
2- Szklane półki w komorze
chłodniczej
3- Pokrywa dyfuzora
4- Klosz lampy
5- Ruchoma sekcja środkowa
6- Komora schładzania
7- Pojemnik na świeże warzywa
8- Kostkarka Icematic
9- Komory na żywność mrożoną
11- Uchwyt na butelki
12- Półka na butelki
13- Półki w komorze przechowywania
żywności
14- Komory przechowywania żywności
15- Filtr do wody
16- Pojemnik na nabiał
17- Komora chłodziarki
18- Komora zamrażalnika
19- Komora Multi Zone
10- Minibar
C Rysunki w niniejszej instrukcji to tylko schematy i nie muszą ściśle odpowiadać
Waszemu modelowi chłodziarki. Jeśli pewnych części nie ma w Waszej lodówce,
to znaczy, że odnoszą się do innych modeli.
PL
3

2 Ważne ostrzeżenia dot. bezpieczeństwa
Prosimy przeczytać
następujące ostrzeżenia.
Ich nieprzestrzeganie
grozi obrażeniami lub
uszkodzeniem mienia.
W takim przypadku
tracą ważność wszelkie
gwarancje i zapewnienia
niezawodności.
Oryginalne części
zamienne będą dostępne
przez 10 lat od daty
zakupu produktu.
OSTRZEŻENIE:
Nie blokuj otworów
A
wentylacyjnych
urządzenia ani w
zabudowie.
OSTRZEŻENIE:
Nie używaj urządzeń
mechanicznych,
ani innych środków
do przyspieszenia
A
procesu
rozmrażania, poza
tymi, które zaleca
producent.
OSTRZEŻENIE:
A
Nie uszkodź obiegu
chłodzącego.
OSTRZEŻENIE:
Nie używaj urządzeń
elektrycznych
w komorze do
A
przechowywania
żywności, chyba, że
są rekomendowane
przez producenta.
Urządzenie to jest
przeznaczone do użytku
domowego lub w
podobnych miejscach,
np.
- w kuchniach personelu
sklepu, biur i innych
środowisk pracy;
- gospodarstwa rolne,
przez klientów hoteli,
moteli i innych miejsc
typu mieszkalnego
- pensjonaty;
- catering i podobne
aplikacje niehandlowe
Zamierzone
przeznaczenie
• Urządzenie można
używać wyłącznie
w gospodarstwie
domowym oraz:
• na zapleczu kuchennych
personelu w sklepach,
PL
4

biurach i w innych
miejscach pracy;
• w kuchniach wiejskich i
przez gości hotelowych,
w motelach i innych tego
rodzaju miejscach;
• w pensjonatach
serwujących nocleg ze
śniadaniem;
• cateringu i w innych
tego rodzajach
zastosowaniach
niedetalicznych.
• Nie należy używać jej
na dworze. Nie nadaje
się do użytkowania
na dworze, nawet w
miejscach zadaszonych.
Ogólne zasady
bezpieczeństwa
• Gdy zechcecie pozbyć
się tego urządzenia/
złomować je, zalecamy
skonsultowanie się
z autoryzowanym
serwisem, aby uzyskać
potrzebne informacje i
poznać kompetentne
organa.
• Konsultujcie się z
Waszym autoryzowanym
serwisem w sprawach
wszelkich pytań i
problemów związanych
z tą lodówką. Bez
powiadomienia
autoryzowanego serwisu
nie wolno samemu
ani innym osobom
naprawiać chłodziarki.
• Nie jedzcie lodów ani
lodu bezpośrednio
po wyjęciu ich z
zamrażalnika! (Może
to spowodować
odmrożenia w ustach).
• Nie wkładajcie do
zamrażalnika napojów
w puszkach ani w
butelkach. Mogą
wybuchnąć.
• Nie dotykajcie palcami
mrożonej żywności, bo
może do nich przylgnąć.
• Do czyszczenia i
rozmrażania lodówki nie
wolno stosować pary ani
środków czyszczących
w tej postaci. W takich
przypadkach para może
zetknąć się z częściami
urządzeń elektrycznych
i spowodować
zwarcie albo porażenie
elektryczne.
• Nie wolno używać
żadnych części lodówki,
takich jak drzwiczki, jako
podpory ani stopnia.
PL
5

• Wewnątrz lodówki nie
wolno używać urządzeń
elektrycznych.
• Nie wolno uszkadzać
obwodu chłodzącego,
w którym krąży
środek chłodzący,
narzędziami do
wiercenia i cięcia. Środek
chłodzący, który może
wybuchnąć skutkiem
przedziurawienia
przewodów
gazowych parownika,
przedłużeń rur lub
powłok powierzchni,
może spowodować
podrażnienia skóry lub
obrażenia oczu.
• Nie przykrywajcie
żadnym materiałem ani
nie blokujcie otworów
wentylacyjnych w
lodówce.
• Urządzenia elektryczne
naprawiać mogą
tylko wykwalifikowani
fachowcy. Naprawy
wykonywane przez
osoby niekompetentne
mogą powodować
zagrożenie dla
użytkowników.
• W razie jakiejkolwiek
awarii, a także w trakcie
prac konserwacyjnych
lub napraw, odłączcie
lodówkę od zasilania
z sieci albo wyłączając
odnośny bezpiecznik,
albo wyjmując wtyczkę z
gniazdka.
• Wyjmując przewód
zasilający z gniazdka
należy ciągnąć za
wtyczkę, nie za
przewód.
• Napoje o wyższej
zawartości alkoholu
wkładajcie do lodówki
w ściśle zamkniętych
naczyniach i w pozycji
pionowej.
• Upewnij się, że
wysokoprocentowe
napoje alkoholowe
są bezpiecznie
przechowywane,
szczelnie zamkniete i w
pozycji pionowej.
• W celu przyśpieszenia
procesu rozmrażania
lodówki nie
należy używać
żadnych urządzeń
mechanicznych ani
innych środków poza
zalecanymi przez jej
producenta.
• Urządzenie to nie jest
przeznaczone do obsługi
przez osoby (w tym
PL
6

dzieci) z ograniczoną
sprawnością fizyczną,
zmysłową lub umysłową,
czy bez odpowiedniego
doświadczenia i
umiejętności, o ile nie
zapewni się im nadzoru
lub instrukcji jego
użytkowania ze strony
osoby odpowiedzialnej
za ich bezpieczeństwo.
• Nie uruchamiajcie
lodówki, jeśli jest
uszkodzona. W razie
wątpliwości należy
się skonsultować z
serwisem.
• Bezpieczeństwo
elektryczne tej lodówki
gwarantuje się tylko
jeśli system uziemienia
Waszej instalacji
domowej spełnia
wymogi norm.
• Wystawianie tego
urządzenia na działanie
deszczu, śniegu,
słońca i wiatru zagraża
jego bezpieczeństwu
elektrycznemu.
• W razie uszkodzenia
przewodu zasilającego
itp. skontaktujcie się
z autoryzowanym
serwisem, aby
nie narażać się na
zagrożenie.
• W trakcie instalowania
chłodziarki nigdy nie
wolno włączać wtyczki
w gniazdko w ścianie.
Może to zagrażać
śmiercią lub poważnym
urazem.
• Chłodziarka ta
służy wyłącznie do
przechowywania
żywności. Nie należy
jej używać w żadnym
innym celu.
• Etykietka z danymi
technicznymi chłodziarki
umieszczona jest po
lewej stronie w jej
wnętrzu.
• Nie przyłączaj tej
chłodziarki do systemu
oszczędzania energii,
ponieważ może to ją
uszkodzić.
• Jeśli na chłodziarce pali
się niebieska lampka,
nie należy patrzeć
na nie dłuższy czas
nieosłoniętymi oczami
ani przez przyrządy
optyczne.
• Jeśli od ręcznie
nastawianej chłodziarki
odłączy się zasilanie,
prosimy odczekać co
PL
7

najmniej 5 minut, zanim
ponownie się je załączy.
• Jeżeli zmieni się
właściciel tej chłodziarki,
niniejszą instrukcję
obsługi należy przekazać
wraz z nią nowemu
właścicielowi.
• Przy przesuwaniu
chłodziarki uważaj,
żeby nie uszkodzić
przewodu zasilającego.
Aby zapobiec pożarowi
nie wolno skręcać tego
przewodu. Nie ustawiać
na przewodzie żadnych
ciężkich przedmiotów.
Gdy wtyczka chłodziarki
jest wsadzona do
gniazdka nie wolno jej
dotykać wilgotnymi
dłońmi.
• Nie wsadzaj wtyczki
chłodziarki do
obluzowanego gniazdka.
• Ze względów
bezpieczeństwa
nie pryskaj wodą
bezpośrednio na
zewnętrzne ani na
wewnętrzne części
chłodziarki.
• Ze względu na
zagrożenie pożarem i
wybuchem nie rozpylaj
łatwopalnych materiałów,
takich jak gaz propan
itp., w pobliży
chłodziarki.
• Nie stawiaj na
chłodziarce przedmiotów
wypełnionych
wodą, ponieważ
grozi to porażeniem
elektrycznym lub
pożarem.
• Nie przeciążaj
chłodziarki nadmierną
ilością żywności.
Nadmiar żywności
może wypaść, gdy
otwiera się drzwiczki,
narażając użytkownika
na obrażenia ciała lub
uszkodzenie chłodziarki.
Nie wolno stawiać
żadnych przedmiotów
na chłodziarce,
ponieważ mogą spaść
przy otwieraniu lub
zamykaniu drzwiczek.
• W chłodziarce nie należy
PL
8

przechowywać żadnych
materiałów, które
wymagają utrzymania w
pewnej temperaturze,
takich jak szczepionki,
lekarstwa wrażliwe na
temperaturę, materiały
do badań naukowych
itp.
• Jeśli chłodziarka ma
być nieużywana przez
dłuższy czas, należy
wyjąc jej wtyczkę z
gniazdka. Uszkodzenie
izolacji elektrycznej
przewodu zasilającego
może spowodować
pożar.
• Jeśli nastawialne nóżki
nie stoją pewnie na
podłodze, chłodziarka
może się przesuwać.
Prawidłowa regulacja
nóżek chłodziarki
zapewnia jej stabilność
na podłodze.
• Jeśli chłodziarka ma
klamkę w drzwiach
nie należy ciągnąć za
nią, gdy przesuwa się
chłodziarkę, ponieważ
można w ten sposób
odłączyć ją od
chłodziarki.
• Jeśli musisz ustawić
chłodziarkę obok
innej chłodziarki
lub zamrażarki,
odległość między tymi
urządzeniami musi
wynosić co najmniej 8
mm. W przeciwnym
razie na ich ustawionych
naprzeciw siebie
bocznych ścianach
może skraplać się
wilgoć.
• Używaj wyłącznie wody
pitnej.
• Nigdy nie korzystaj z
urządzenia, jeśli górna
lub tylna jego część,
zawierająca płytki
obwodów drukowanych
jest otwarta (osłona płytki
obwodów drukowanych)
(1).
1
1
PL
9

Dla modeli z
wodotryskiem
• Maksymalnie
dopuszczalne ciśnienie
dla dopływu zimnej wody
wynosi 6,2 bara (90
psi). Jeśli ciśnienie wody
w Państwa instalacji
przekroczy 5,5 bara (80
psi), należy zastosować
zawór ograniczający
ciśnienie w Państwa
sieci wodociągowej. Jeśli
nie wiedzą Państwo w
jaki sposób sprawdzić
ciśnienie wody, prosimy
poprosić o pomoc
profesjonalnego
hydraulika.
• Jeśli w Państwa
instalacji występuje
ryzyko uderzenia
wodnego, należy zawsze
stosować wyposażenie
zapobiegające przed
uderzeniem wodnym.
Jeśli nie mają Państwo
pewności co do
występowania efektu
uderzenia wodnego w
swojej instalacji, prosimy
zasięgnąć porady
u profesjonalnego
hydraulika.
• Nie podłączać do
dopływu ciepłej wody.
Zachować środki
ostrożności przed
ryzykiem zamarznięcia
przewodów.
Temperatura robocza
wody powinna mieścić
się w zakresie od 0,6°C
(33°F) do 38°C (100°F).
• Należy używać tylko
wody pitnej.
Bezpieczeństwo dzieci
• Jeśli drzwiczki zamykane są na klucz,
należy go chronić przez dostępem
dzieci.
• Należy zapewnić opiekę dzieciom,
aby nie bawiły się lodówką.
Zgodność z dyrektywą WEEE
i usuwanie odpadów:
Niniejszy wyrób jest zgodny z
dyrektywą Parlamentu
Europejskiego i Rady
(2012/19/WE). Wyrób ten
oznaczony jest symbolem
klasyfikacji zużytych
urządzeń elektrycznych i
elektronicznych (WEEE).
Wyrób ten wykonano z części i
materiałów wysokiej jakości, które
mogą być odzyskane i użyte jako
surowce wtórne. Po zakończeniu
użytkowania nie należy pozbywać
się go razem z innymi odpadkami
domowymi. Należy przekazać
go do punktu zbiórki urządzeń
elektrycznych i elektronicznych na
surowce wtórne. Aby dowiedzieć
się, gdzie jest najbliższy taki punkt,
10
PL

prosimy skonsultować się z władzami
lokalnymi.
Zgodność z dyrektywą
RoHS:
Niniejszy wyrób jest zgodny z
dyrektywą Parlamentu Europejskiego
i Rady RoHS (Ograniczenie użycia
substancji niebezpiecznych) (2011/65/
WE). Nie zawiera szkodliwych i
zakazanych materiałów, podanych w
tej dyrektywie.
Informacje opakowaniu
Materiały opakowania tego
wyrobu są wykonane z surowców
wtórnych, zgodnie z naszymi
krajowymi przepisami dotyczącymi
ochrony środowiska. Materiałów
opakunkowych nie wolno wyrzucać z
odpadami z gospodarstwa domowego
lub innymi. Należy przekazać je do
punktu zbiórki surowców wtórnych.
Ostrzeżenie HC
Jeśli chłodziarka ta wyposażona
jest w system chłodniczy
zawierający R600a:
Gaz ten jest łatwopalny. Należy
zatem uważać, aby w trakcie
jego użytkowania i transportu nie
uszkodzić systemu i przewodów
chłodzenia. W razie uszkodzenia,
należy trzymać chłodziarkę z dala
od potencjalnych źródeł ognia, które
mogą spowodować jej pożar i należy
wietrzyć pomieszczenie, w którym jest
umieszczona.
Prosimy zignorować to
ostrzeżenie, jeśli chłodziarka
ta wyposażona jest w system
chłodniczy zawierający R134a.
Oznaczenie gazu zastosowanego w
danej chłodziarce można odczytać z
tabliczki znamionowej umieszczonej z
lewej strony w jej wnętrzu.
Nie należy złomować chłodziarki przez
jej spalenie.
Co robić, aby oszczędzać
energię.
• Nie zostawiajcie drzwiczek lodówki
otwartych na dłużej.
• Nie wkładajcie do lodówki gorących
potraw ani napojów.
• Nie przeładowujcie lodówki tak,
aby przeszkadzało to w krążeniu
powietrza w jej wnętrzu.
• Nie instalujcie lodówki tam, gdzie
narażona będzie na bezpośrednie
działanie słońca ani w pobliżu
urządzeń wydzielających ciepło takich
jak piecyki, zmywarki do naczyń lub
grzejniki.
• Pamiętajcie, aby żywność
przechowywać w zamkniętych
pojemnikach.
• Po wyjęciu półki lub szuflady z
komory zamrażalnika można
do niego włożyć maksymalna
ilość żywności. Deklarowane
zużycie energii przez chłodziarkę
określono przy półce lub szufladzie
wyjętej z komory zamrażania i
przy maksymalnym wypełnieniu
żywnością. Używanie półki lub
szuflady odpowiednio do kształtów i
rozmiarów zamrażanej żywności jest
bezpieczne.
11
PL

Zalecenia dot. komory na
temperature
sensor
food
MILK
juice
etc.
temperature
sensor
MILK
juice
etc.
temperature
sensor
żywność świeżą.
*OPCJA
• Prosimy, aby zapobiegać stykaniu
się żywności z czujnikiem temperatury
w komorze na żywność świeżą.
Aby utrzymać idealną temperaturę
przechowywania żywności świeżej w
tej komorze czujnik ten nie może być
blokowany żywnością.
• Nie wkłada się do chłodziarki
żywności gorącej.
12
PL

3 Instalacja
C Prosimy pamiętać, że producent
nie ponosi odpowiedzialności, jeśli
ignoruje się informacje podane w
niniejszej instrukcji.
W razie potrzeby ponownego
transportu chłodziarki należy
przestrzegać następujących
wskazówek:
1. Przed transportem należy chłodziarkę
opróżnić i oczyścić.
2. Półki, akcesoria, pojemnik na
warzywa itp. w chłodziarce należy
przymocować taśmą klejącą
zabezpieczając je przed wstrząsami
przed ponownym zapakowaniem.
3. Opakowanie należy obwiązać
grubą taśmą i silnymi sznurkami
i przestrzegać reguł transportu
wydrukowanych na opakowaniu.
C Zawsze pamiętajcie...
Wszystkie surowce wtórne stanowią
niezbywalne źródło oszczędności
zasobów naturalnych i krajowych.
Jeśli chcecie przyczynić się do
wtórnego wykorzystania materiałów
opakunkowych, możecie uzyskać
dodatkowe informacje od instytucji
ochrony środowiska lub władz
lokalnych.
Przed uruchomieniem
chłodziarki
Zanim zaczniecie użytkować tę
chłodziarkę, sprawdźcie, co następuje:
1. Czy wnętrze chłodziarki jest suche
i czy z tyłu za nią może swobodnie
krążyć powietrze?
2. Wsadź 2 plastykowe kliny w tylną
płytę wentylatacyjną, jak pokazano
na poniższym rysunku. W tym celu
wyjmij śruby z chłodziarki i użyj śrub
dostarczonych w tej samej torebce.
Kliny plastykowe zapewniają odstęp
pomiędzy chłodziarką a ścianą
wymagany do umożliwienia krążenia
powietrza.
3. Oczyść wnętrze chłodziarki,
jak zaleca się to w rozdziale
„Konserwacja i czyszczenie”.
4. Włączcie wtyczkę chłodziarki w
gniazdko w ścianie. Po otwarciu
drzwiczek zapali się światło we
wnętrzu odnośnej komory.
5. Po uruchomieniu sprężarki usłyszycie
jej szum. Płyny i gazy zawarte w
systemie chłodzenia także mogą
powodować szumy, nawet jeśli nie
działa sprężarka, i jest to zupełnie
normalne.
13
PL

6. Przednie krawędzie lodówki mogą
się nieco nagrzewać. Jest to całkiem
normalne. Te obszary mogą się
nagrzewać, co zapobiega skraplaniu
się pary.
Połączenia elektryczne
Chłodziarkę przyłącza się do gniazdka
z uziemieniem, zabezpieczonego
bezpiecznikiem o odpowiedniej
wartości.
Ważna uwaga:
B Przyłączenie chłodziarki musi być
zgodne z przepisami krajowymi.
B Po instalacji wtyczka zasilania musi
być łatwo dostępna.
B Napięcie i dopuszczalny prąd
bezpiecznika podano w rozdziale
„Dane techniczne”.
BPodane tam napięcie musi być równe
napięciu w Waszej sieci zasilającej.
B Do przyłączenia nie można używać
przedłużaczy, ani rozgałęźników.
B Uszkodzony przewód zasilający
musi wymienić upoważniony i
wykwalifikowany elektryk.
B Nie można ponownie uruchomić
chłodziarki przed jej naprawieniem!
Grozi to porażeniem elektrycznym!
Pozbywanie się opakowania
A Materiały opakunkowe mogą być
niebezpieczne dla dzieci. Należy
chronić materiały opakunkowe przed
dostępem dzieci, albo pozbyć się ich
zgodnie z instrukcją odpowiednią dla
odpadków ich kategorii. Nie można
pozbywać się ich w taki sam sposób,
jak innych odpadków domowych.
Opakowanie tej lodówki wyprodukowano
z surowców wtórnych.
Złomowanie starej lodówki
Starej lodówki należy pozbyć się
tak, aby nie zaszkodzić środowisku
naturalnemu.
A W sprawie złomowania chłodziarki
możecie skonsultować się z
autoryzowanym sprzedawcą lub
punktem zbiorki surowców wtórnych
w swojej miejscowości.
A Przed złomowaniem chłodziarki
należy odciąć wtyczkę zasilania
elektrycznego, a jeśli w drzwiczkach
są jakieś zamki, należy je trwale
uszkodzić, aby zapobiec zagrożeniu
dzieci.
Ustawienie i instalacja
B Uwaga: W trakcie instalowania
chłodziarki nie wolno włączać jej
wtyczki w gniazdko w ścianie. Może
to zagrażać śmiercią lub poważnym
urazem.
A Jeśli drzwi wejściowe do
pomieszczenia, w którym ma być
zainstalowana lodówka, są zbyt
wąskie, aby lodówka mogła przez nie
przejść, należy wezwać autoryzowany
serwis, który zdejmie z niej drzwiczki i
przeniesie ją bokiem przez drzwi.
14
PL

1. Chłodziarkę należy zainstalować
w miejscu, w którym łatwo będzie ją
używać.
2. Chłodziarka musi stać z dala od
źródeł ciepła, miejsc wilgotnych i
bezpośrednio nasłonecznionych.
3. Aby uzyskać wydajną pracę
chłodziarki, należy zapewnić
odpowiednią wentylację wokół niej.
Jeśli lodówka ma stanąć we wnęce w
ścianie, należy zachować co najmniej
5 cm odstęp od sufitu i ściany.
Jeśli podłoga pokryta jest wykładziną
dywanową, lodówka musi stać 2,5 cm
ponad powierzchnią podłogi.
4. Aby uniknąć wstrząsów, chłodziarkę
należy ustawić na równej powierzchni
podłogi.
5. Temperatura w otoczeniu chłodziarki
nie powinna spadać poniżej 10°C.
Wyrównanie nierówności
podłogi
A Jeśli chłodziarka nie stoi równo;
B Najpierw wyjmij wtyczkę z
gniazdka. W trakcie ustawiania
chłodziarki na podłodze wtyczka
musi być wyjęta z gniazdka. Grozi to
porażeniem elektrycznym.
ustawienie obracając przednie nóżki,
tak jak pokazano na rysunku. Narożnik
lodówki obniża się obracając nóżkę
w tym narożniku w kierunku czarnej
strzałki, lub podnosi obracając nóżkę
w przeciwnym kierunku. Proces ten
ułatwi lekkie uniesienie lodówki z
pomocą innej osoby.
2. Gdy po wyrównaniu robolem
ustąpił, załóż z powrotem pokrywę
wentylacyjną i przykręć śruby.
3. Śruby mocujące dolna pokrywę
wentylacyjną odkręca się krzyżowym
śrubokrętem Philipsa.
Ustawianie szczeliny między
górnymi drzwiczkami
4
1 2 3
1 - Pokrywę wentylacyjną zdejmuje
się pod uprzednim odkręceniu
mocujących ja śrubek, jak pokazano
na rysunku. Można wyrównać jej
15
PL

C Szczelinę pomiędzy drzwiczkami
komory chłodzenia można ustawić tak,
jak pokazano na rysunkach.
Przed ustawieniem wysokości
drzwiczek należy opróżnić półki w
nich.
C Przy pomocy śrubokrętu odkręć
i wyjmij śrubkę z pokrywy górnego
zawiasu drzwiczek, które chcesz
ustawić.
C Odpowiednio ustaw drzwiczki
odkręcając śruby.
C Umocuj tak ustawione drzwiczki
zakręcając śruby bez zmiany
ustawienia drzwiczek.
C Załóż z powrotem pokrywę
zawiasu i umocuj ją śrubą.
Wymiana lampki oświetlenia
Aby wymienię lampkę używaną do
oświetlenia chłodziarki, prosimy
wezwać autoryzowany serwis.
Lampa (lampy) wykorzystywane w tym
urządzeniu nie są przeznaczone do
oświetlania pomieszczeń. Lampa ta
ma pomagać użytkownikowi wygodnie
i bezpiecznie umieszczać pożywienie
w lodówce/zamrażarce.
Żarówki używane w urządzeniu muszą
wytrzymywać ekstremalne warunki
fizyczne, jak np. temperatury poniżej
-20°C.
PL
16

Instalowanie filtru wody
1
2
(w niektórych modelach)
Wodę do chłodziarki można
czerpać z dwóch różnych źródeł: z
sieci zaopatrzenia w wodę zimną
lub z pojemnika na wodę.
Wymagania co do instalacji
Do korzystania z wody z pojemnika
potrzebna jest pompa.
Sprawdź, czy wraz z chłodziarką
dostarczono podane poniżej części:
1. Nakrętka do przyłączenia rury do
wody do tylnej ścianki lodówki (Jeśli
nie pasuje, zaopatrz się w nią w
najbliższym autoryzowanym punkcie
serwisowym.)
2. 2 sztuki obejmy na rurę (na wypadek,
gdyby trzeba było zabezpieczyć rurę
do wody)
Uwaga: Ponieważ następujące części
nie są potrzebne przy korzystaniu z
pojemnika na wodę, mogą nie być
dostarczane razem z zakupioną
chłodziarką.
3. 5-metrowa rura do wody (średnica
1/4 cala)
4. Zawór zasilania wodą zimną z filtrem
siatkowym (Adapter do kranu)
5. Filtr do wody lub filtr zewnętrzny
zakładany na wspornik wewnątrz
komory chłodzenia.
Najpierw trzeba określić miejsce
założenia filtru zewnętrznego.
(Dotyczy filtru użytego na zewnątrz
chłodziarki.) Następnie określa
się odległość pomiędzy filtrem a
chłodziarką i wymaganą długość
węża od filtru do wlotu wody do
chłodziarki.
Filtr wody należy umieścić pionowo,
jak pokazano na rysunku. Ważne
jest, aby właściwie umocować filtr w
punktach wlotu i wylotu wody.
Nie należy używać pierwszych 3-4
szklanek wody zaraz po założeniu
filtru.
Przyłączenie do lodówki rury
do wody
1. Po założeniu nakrętki na rurę
do wody włóżcie rurę do zaworu
wlotowego lodówki mocno naciskając
w dół.
2. Załóżcie nakrętkę, jak pokazano to
na rysunku obok, zaciskając ją ręcznie
na zaworze wlotowym lodówki.
(a- rura do wody, b-nakrętka, c-zawór)
a
1
3
2
4
*5
PL
17
a
b
c

C Uwaga 1: Aby uzyskać ścisłe
połączenie nie trzeba zakręcać
nakrętki żadnym narzędziem. W razie
wycieku użyjcie klucza lub kleszczy do
zakręcenia nakrętki.
Przyłączenie węża do wody
do pojemnika
(w niektórych modelach)
Do przyłączenia wody ze zbiornika
do chłodziarki potrzebna jest pompa.
Postępujcie według poniższych
instrukcji po przyłączeniu jednego
końca rury do wody wychodzącej z
pompy do chłodziarki jak opisano to
na poprzedniej stronie.
1. Dokończcie przyłączenia wpychając
drugi koniec rury na wodę do wlotu
rury w pompie, jak pokazano na
rysunku.
2. Włóżcie i umocujcie wąż z pompy w
zbiorniku, jak pokazano na rysunku.
3. Po ukończeniu przyłączenia włączcie
pompę do zasilania i uruchomcie ją.
Pompa osiąga stan skutecznej pracy po
2-3 minutach od uruchomienia.
C Przy przyłączaniu zasilania w wodę
można korzystać z instrukcji obsługi
pompy.
18
PL

C Jeśli używa się wody ze zbiornika nie
potrzeba filtru do wody.
C Jeśli używa się wody ze zbiornika
potrzeba pompy.
Przyłączenie rury do wody
do domowej instalacji wody
zimnej
(w niektórych modelach)
Jeśli chce się korzystać z chłodziarki
przyłączonej do domowej instalacji
wody zimnej,
na instalacji tej należy założyć
standardową złączkę zaworową 1/2".
Jeśli brak takiego zaworu, lub w
przypadku wątpliwości, skonsultujcie
się z wykwalifikowanym hydraulikiem.
1. Zdejmijcie nakrętkę z adapteru do
kranu. (Rysunek A)
2. Załóż adapter do kranu na złączkę
zaworową 1/2', jak pokazano na
rysunku. Rysunek B)
3. Po włożeniu rury do wody do nakrętki
zainstalujcie ją na adapterze do kranu
i włóżcie do kranu, jak pokazano na
rysunku. (Rysunek C)
4. Ręcznie dokręćcie nakrętkę. W razie
wycieku użyjcie klucza lub kleszczy
do zakręcenia nakrętki.
A Uwaga: Aby uniknąć uszkodzeń,
przemieszczeń lub przypadkowego
odłączenia w odpowiednich punktach
zabezpieczcie rurę do wody
dostarczonymi obejmami.
A Uwaga: Po otwarciu zaworu do
wody upewnijcie się, że żadne z obu
połączeń rury do wody nie przecieka.
W razie wycieku natychmiast
zamknijcie zawór i ponownie
zaciśnijcie wszystkie złącza przy
pomocy klucza lub szczypiec.
19
PL

A Uwaga: Upewnijcie się, że
standardowa złączka zaworowa 1/2'
zasilana z domowej instalacji wody
zimnej jest dostępna i całkowicie
zamknięta.
Aby założyć filtr do wody, postępujcie
według poniższych instrukcji odnosząc
się do podanych rysunków:
Jeśli chcecie automatycznie obliczać
termin wymiany filtru i odbierać sygnał
ostrzegawczy po upływie czasu
użytkowania, prosimy przeczytać
rozdział "Automatyczne obliczanie
czasu użytkowania filtru".
Filtr do wody wymienia się jak
pokazano na rysunku, jeśli trzeba
go wymienić lub jeśli nie będzie już
20
1. Naciśnijcie przycisk kasowania lodu
na wyświetlaczu.
2. Zdejmijcie pokrywkę filtru w komorze
chłodzenia pociągając za nią do
przodu.
3. Zdejmijcie pokrywkę bocznika filtru
obracając ja ku dołowi.
AUwaga: Przed zdjęciem pokrywy
bocznika upewnijcie sie, że załączono
tryb "Ice off" [Bez lodu].
Uwaga: Po zdjęciu pokrywy może
wyciec kilka kropli wody. To normalne.
4. Zdejmijcie pokrywę z góry filtru wody
aby umieścić ją jak pokazano na
rysunku i obróćcie ją do góry, aby ją
zamknąć.
5. Ponownie naciśnijcie przycisk "Ice
Off" [Bez lodu] na wyświetlaczu, aby
wyjść z tego trybu.
Filtr do wody należy wymieniać co 6
miesięcy.
PL

używany i trzeba założyć pokrywę
bocznika. Przed jego wyjęciem należy
się upewnić, że czynny jest tryb "Ice
Off' [Bez lodu].
A Uwaga: Filtr do wody służy do
czyszczenia jej z niektórych obcych
cząstek. Nie oczyszcza wody z
mikroorganizmów.
A Uwaga: Przycisk "Ice off" [Bez
lodu] musu być zawsze przyciśnięty
w trakcie wymiany filtru do wody lub
instalowania pokrywy bocznika.
C Gdy nie używa się wody ze
zbiornika, należy zawsze stosować filtr
wody.
Przed pierwszym użyciem
dozownika wody.
C Ciśnienie wody w instalacji
wodociągowej musi wynosić co
najmniej 1 bar.
C Ciśnienie wody w instalacji
wodociągowej nie może przekroczyć
8 bar.
C Jeśli ciśnienie wody zasilającej
spadnie poniżej 1 bara, lub jeśli
używana ma być woda ze zbiornika,
trzeba użyć pomp.
C System wodny chłodziarki należy
przyłączyć do instalacji wodociągowej
wody zimnej. Nie wolno przyłączać go
do instalacji wody gorącej.
C Na wstępnym etapie pracy
lodówki nie można uzyskać wody.
Powoduje to obecność powietrza w
systemie. Aby odpowietrzyć system,
naciśnij zapadkę dozownika przez
1 min. aż z dozownika popłynie
woda. Na początku strumień wody
może być nierówny. Po całkowitym
odpowietrzeniu systemu strumień
wody wyrówna się.
C Przy pierwszym uruchamianiu
chłodziarki należy odczekać ok.
12 godzin, zanim można będzie
uzyskiwać z niej wodę.
Aby dozownik lodu/wody działał
równomiernie, ciśnienie wody w
instalacji wodociągowej musi wynosić
1-8 barów. Można to określić
sprawdzając, czy szklanka wody (100
cm3) napełnia się wodą w ciągu 10
sek.
C Nie należy pić wody z pierwszych
10 szklanek.
Pierwsze ok. 30 kostek lodu
uzyskanych z dozownika lodu nie
nadaje się do użycia.
PL
21

4 Przygotowanie
C Chłodziarkę tę należy zainstalować
przynajmniej 30 cm od źródeł ciepła
takich jak kuchenka, kaloryfer lub
piec, i przynajmniej 5 cm od piecyka
elektrycznego, a także że należy
chronić ją przez bezpośrednim
działaniem słońca.
C Temperatura otoczenia w
pomieszczeniu, gdzie instaluje
się chłodziarkę, powinna wynosić
co najmniej 10oC. Ze względu na
wydajność chłodziarki nie zaleca
się użytkowania jej niższych
temperaturach.
C Prosimy upewnić się, że wnętrze
chłodziarki zostało dokładnie
oczyszczone.
C Jeśli zainstalowane maja być dwie
chłodziarki obok siebie, należy
zachować co najmniej 2 cm odstęp
między nimi.
C Przy pierwszym uruchomieniu
chłodziarki prosimy przez pierwsze
sześć godzin przestrzegać
następujących instrukcji.
- Nie należy zbyt często otwierać
drzwiczek.
- Należy uruchomić ja pustą, bez
żadnej żywności we wnętrzu.
- Nie należy wyłączać wtyczki
chłodziarki z gniazdka. W przypadku
awarii zasilania, której nie można
samemu naprawić, prosimy
zastosować się do ostrzeżenia z
rozdziału „Zalecane rozwiązania
problemów”.
C Oryginalne opakowanie i elementy
z pianki należy zachować
do przyszłego transportu lub
przeprowadzek.
22
PL

1 7 11 12 15 4
5
6
2
3
16
17
18 20 19
10 9 14 138
5 Obsługa lodówki
Panel wskaźników
Ten dotykowy panel wskaźników umożliwia nastawianie temperatury bez
otwierania drzwiczek chłodziarki. Aby nastawić temperaturę, wystarczy dotknąć
palcem właściwy przycisk.
1. Przycisk Eco Extra/Vacation
2. Przycisk szybkiego zamrażania
3. Przycisk nastawienia temperatury w
komorze zamrażania
4. Przycisk nastawienia temperatury w
komorze chłodzenia
5. Przycisk szybkiego chłodzenia
6. Przycisk nastawiania temperatury w
komorze Multi Zone
7. Wskaźnik funkcji Vacation
8. Wskaźnik funkcji Eco Extra
9. Wskaźnik funkcji szybkiego
zamrażania
11. Wskaźnik temperatury w komorze
chłodzenia
12. Funkcja szybkiego schładzania
13. Wskaźnik temperatury w komorze
Multi Zone
14. Wskaźnik trybu oszczędnego
15. Wskaźnik błędu
16. Wskaźnik blokady klawiszy
17. Przycisk wyłączania tworzenia lodu
18. Wskaźnik Ice-off [Bez lodu]
19. Przycisk kasowania ostrzeżenia o
zmianie filtru
20. Wskaźnik ostrzeżenia o zmianie filtru
10. Wskaźnik temperatury w komorze
zamrażania
C Rysunki w niniejszej instrukcji to tylko schematy i nie muszą ściśle odpowiadać
Waszemu modelowi chłodziarki. Jeśli pewnych części nie ma w Waszej lodówce,
to znaczy, że odnoszą się do innych modeli.
PL
23

1. Przycisk Eco Extra/Vacation
Aby uruchomić funkcję Eco Extra
na chwilę naciśnij ten przycisk. Aby
uruchomić funkcję Vacation naciśnij
ten przycisk i przytrzymaj go przez 3
sek. Aby wyłączyć wybraną funkcję,
ponownie naciśnij ten przycisk.
2. Przycisk szybkiego zamrażania
Aby uruchomić funkcję szybkiego
zamrażania na chwilę naciśnij ten
przycisk. Aby wyłączyć wybraną
funkcję, ponownie naciśnij ten
przycisk.
3. Przycisk nastawienia
temperatury w komorze
zamrażania
Naciśnij ten przycisk, aby nastawić
temperaturę w komorze zamrażalnika
odpowiednio na -18, -20, -22, -24
stopni. Naciśnij ten przycisk, aby
nastawić żądaną temperaturę w
komorze zamrażania.
4. Przycisk nastawienia
temperatury w komorze chłodzenia
Naciśnij ten przycisk, aby nastawić
temperaturę w komorze chłodzenia
odpowiednio na 8, 6, 4, 2... stopni.
Naciśnij ten przycisk, aby nastawić
żądaną temperaturę w komorze
chłodzenia.
5. Przycisk szybkiego chłodzenia
Aby uruchomić funkcję szybkiego
chłodzenia na chwilę naciśnij ten
przycisk. Aby wyłączyć wybraną
funkcję, ponownie naciśnij ten
przycisk.
6. Przycisk nastawiania
temperatury w komorze Multi Zone
Komorę Multi Zone można nastawić
na schładzanie lub na zamrażanie.
Aby nastawić komorę Multi Zone na
schładzanie lub zamrażanie, naciśnij
ten przycisk i przytrzymaj go przez
chwilę (3 sek.). Komora ta nastawiona
jest fabrycznie na zamrażanie.
Jeśli komora Multi Zone nastawiona
jest na zamrażanie, temperatura
w niej za każdym naciśnięciem
tego przycisku zmieniać sie będzie
odpowiednio od -18, przez -20,
-22, -24, aż do -18... stopni. Jeśli
komora Multi Zone nastawiona jest
na chłodzenie, temperatura w niej za
każdym naciśnięciem tego przycisku
zmieniać sie będzie odpowiednio
od 10, przez 8, 6, 4, 2, 0 aż do -6...
stopni.
7. Wskaźnik funkcji Vacation
Wskaźnik ten pokazuje, że
uruchomiono funkcję Vacation. Gdy
funkcja ta jest aktywna, wskaźnik
komory chłodzenia pokazuje “- -” i nie
jest ona chłodzona. Inne komory będą
chłodzone stosownie do nastawionych
w nich temperatur.
Aby wyłączyć tę funkcję, ponownie
naciśnij odpowiadający jej przycisk.
24
PL

8. Wskaźnik funkcji Eco Extra
Wskaźnik ten pokazuje, ze
uruchomiono funkcję Eco Extra. Jeśli
funkcja ta jest aktywna, chłodziarka
automatycznie rozpozna okresy mniej
intensywnego użytkowania i przełączy
się na chłodzenie energooszczędne
w tym czasie. W trakcie chłodzenia
energooszczędnego czynny będzie
wskaźnik trybu oszczędnego.
12. Funkcja szybkiego schładzania
Wskaźnik ten pokazuje, ze
uruchomiono funkcję szybkiego
schładzania. Funkcję tę stosuje się,
gdy do komory chłodzenia włożono
świeżą żywność lub gdy potrzeba
szybko schłodzić żywność. Gdy
funkcja ta jest aktywna, chłodziarka
będzie pracować przez 2 godzin bez
przerwy.
Aby wyłączyć tę funkcję, ponownie
naciśnij odpowiadający jej przycisk.
9. Wskaźnik funkcji szybkiego
zamrażania
Wskaźnik ten pokazuje, ze
uruchomiono funkcję szybkiego
zamrażania. Funkcję tę stosuje się,
gdy do komory zamrażania włożono
świeżą żywność lub gdy potrzebny
jest lód. Gdy funkcja ta jest czynna,
chłodziarka może pracować przez
pewien okres czasu.
Aby wyłączyć tę funkcję, ponownie
naciśnij odpowiadający jej przycisk.
10. Wskaźnik temperatury w
komorze zamrażania
Wskazuje temperaturę nastawioną w
komorze zamrażania.
11. Wskaźnik temperatury w
komorze chłodzenia
Wskazuje temperaturę nastawioną w
komorze chłodzenia.
Aby wyłączyć tę funkcję, ponownie
naciśnij odpowiadający jej przycisk.
13. Wskaźnik temperatury w
komorze Multi Zone
Pokazuje temperaturę nastawioną w
komorze Multi Zone.
14. Wskaźnik trybu oszczędnego
Pokazuje, że chłodziarka pracuje
w trybie energooszczędnym.
Temperatura w komorze zamrażania
Wskaźnik ten będzie aktywny,
jeśli funkcję tę nastawiono na -18
stopni lub zgodnie z funkcją Eco-
Extra chłodzenie przebiega w trybie
energooszczędnym.
15. Wskaźnik błędu
Wskaźnik ten uruchamia się, jeśli
chłodziarka nie chłodzi dostatecznie
lub jeśli zepsuje się jakiś czujnik.
Gdy wskaźnik ten jest aktywny,
wskaźnik temperatury w komorze
zamrażania wyświetli "E", wskaźnik
zaś temperatury w komorze
chłodzenia wyświetli liczby takie jak
"1, 2, 3..." Liczby te oznaczają kod
błędu rozpoznawany przez personel
serwisowy.
25
PL

16. Wskaźnik blokady klawiszy
Funkcji tej używa się, gdy chce się
zabezpieczyć ustawienia temperatury
chłodziarki przed zmianą. Aby
uruchomić tę funkcję naciśnij
równocześnie przyciski szybkiego
chłodzenia i nastawiania temperatury
w komorze Flexi Zone i przytrzymaj
przez 3 sek.
Aby wyłączyć tę funkcję, ponownie
naciśnij odpowiadające jej przyciski.
17. Przycisk wyłączania tworzenia
lodu
Aby przerwać tworzenie lodu, naciśnij
i przez 3 sek. przytrzymaj ten przycisk.
Po naciśnięciu tego przycisku do
pojemnika na lód nie podaje się wody.
Mimo to, w pojemniku mogą zostać
resztki lodu, które można stamtąd
wyjąć. Aby przywrócić tworzenie lodu,
naciśnij i przez 3 sek. przytrzymaj ten
przycisk.
18. Wskaźnik wyłączenia tworzenia
lodu
Jeśli nie chcesz pobierać lodu z
chłodziarki, musisz użyć tej funkcji.
Funkcji tej możesz użyć naciskając ten
przycisk i przytrzymując go przez 3
sekundy.
19. Przycisk kasowania
ostrzeżenia o zmianie filtru
Filtr w tej chłodziarce trzeba
wymieniać co 6 miesięcy. Chłodziarka
automatycznie odlicza ten czas i po
jego upływie zapala się wskaźnik
wzywający do wymiany filtru. Naciśnij
przycisk kasowania ostrzeżenia o
zmianie filtru i przytrzymaj przez 3 sek.,
aby chłodziarka mogła automatycznie
wyliczyć termin nowej wymiany filtru.
20. Wskaźnik kasowania
ostrzeżenia o zmianie filtru
Po upływie czasu użytkowania filtru
zapala się wskaźnik wezwania do jego
wymiany.
Alarm otwartych drzwiczek:
W razie pozostawienia drzwiczek
komory chłodzenia lub komory Flexi
Zone na dłużej niż 1 min., uruchomi
się i odezwie dźwiękowy alarm
otwartych drzwiczek. Aby uciszyć ten
alarm, wystarczy nacisnąć jakikolwiek
przycisk wskaźnika lub zamknąć
otwarte drzwiczki.
26
PL

Regulacja komory
zamrażalnika
-18°C 4°C Jest to ustawienie normalne i zalecane.
-20,-22 lub -24°C 4°C
Quick Freeze 4°C
-18°C lub zimniej 2°C
-18°C lub zimniej
Zamrażanie żywności
świeżej
• Przed włożeniem do lodówki
żywność świeżą należy opakować
lub przykryć.
• Przed włożeniem do lodówki gorące
potrawy trzeba najpierw ostudzić do
temperatury pokojowej.
• Żywność przeznaczona do
zamrożenia musi być świeża i dobrej
jakości.
• Żywność należy podzielić na porcje,
stosownie do dziennych potrzeb
konsumpcyjnych rodziny.
• Żywność musi być hermetycznie
zapakowana aby zapobiec jej
wysychaniu, nawet jeśli ma być
przechowywana przez krótki czas.
Regulacja
komory
chłodzenia
Quick Fridge
[Szybkie
chłodzenie]
Objaśnienia
Ustawienia te zaleca się, gdy temperatura
otoczenia przekracza 30oC.
Funkcji tej używa się do szybkiego
zamrażania żywności. Po zakończeniu
tego procesu chłodziarka powróci do
pierwotnego trybu.
Jeśli użytkownik uważa, że w komorze
chłodzenia nie jest dostatecznie zimno z
powodu wysokiej temperatury otoczenia
lub częstego otwierania i zamykania
drzwiczek.
Używa się tego, gdy komora chłodzenia
jest przeładowana żywnością lub chce
się ją szybciej ochłodzić. Zaleca się
uruchomienie funkcji szybkiego chłodzenia
na 4 - 8 godz. przed włożeniem żywności.
• Materiały użyte do opakowania
muszą być mocne i odporna
na zimno, wilgotność, zapachy,
olej i kwas, a także muszą być
hermetyczne. Ponadto muszą
być dobrze zamknięte i muszą
być zrobione z łatwych do użycia i
nadających się do zastosowania przy
głębokim zamrażaniu materiałów.
• Zamrożoną żywność należy
spożywać bezpośrednio po
odmrożeniu i nie wolno jej ponownie
zamrażać.
• Aby uzyskać najlepsze rezultaty
prosimy przestrzegać następujących
instrukcji.
1. Nie należy zamrażać zbyt dużych
ilości żywności na raz. Jakość
żywności zachowuje się najlepiej
zamrażając ją na wskroś najszybciej,
jak to możliwe.
27
PL

2. Umieszczenie w komorze
zamrażalnika żuwności ciepłej
powoduje ciągłą pracę systemu
chłodzącego aż do całkowitego jej
zamrożenia.
3. Należy specjalnie zadbać, aby nie
mieszać żywności już zamrożonej ze
świeżą.
Zalecenia co do
przechowywania mrożonek
• Pakowane mrożonki ze sklepu
należy przechowywać zgodnie z
instrukcjami ich producentów dla
( 4-gwiazdkowych) komór do
przechowywania mrożonek.
• Aby utrzymać wysoką jakość
mrożonek, którą zapewnili im
producenci i sprzedawcy detaliczno
należy pamiętać, co następuje:
1. Paczki z mrożonkami należy wkładać
do zamrażalnika możliwie szybko po
ich zakupie.
2. Sprawdzić, czy paczki zaopatrzone
są w etykietki oznaczające zawartość
oraz datę.
3. Nie przekraczajcie terminów
podanych na opakowaniu jako
terminy przydatności do spożycia.
Odszranianie
Komora zamrażarki rozmraża się
automatycznie.
Rozmieszczenie żywności
Półki w
komorze
zamrażalnika
Tacka na jajka Jajka
Półki komory
chłodniczej
Półki w
drzwiczkach
komory
chłodniczej
Pojemnik
na świeże
warzywa
Komora strefy
świeżej
Różne mrożonki, np.
mięso, ryby, lody,
warzywa, itp.
Potrawy w garnkach,
na talerzach z
pokrywkami i
w zamkniętych
pojemnikach
Niewielkie
zapakowane
potrawy lub napoje
(np. mleko, soki
owocowe, piwo)
Warzywa i owoce
Produkty
delikatesowe (ser,
masło, salami, itp.)
O głębokim zamrażaniu
Aby zachować dobrą jakość żywności
należy zamrozić ją
najprędzej jak to możliwe po włożeniu
do lodówki.
Żywność można przechowywać przez
dłuższy czas tylko w temperaturze
-18oC lub niższej.
Świeżość żywności można zachować
przez wiele miesięcy (głęboko
zamrożoną w temperaturze -18oC).
OSTRZEŻENIE! A
• Żywność należy podzielić na porcje,
stosownie do dziennych potrzeb
konsumpcyjnych rodziny.
28
PL

• Żywność musi być hermetycznie
zapakowana aby zapobiec jej
wysychaniu, nawet jeśli ma być
przechowywana przez krótki czas.
Niezbędne do pakowania materiały:
• Odporna na zimno taśma klejąca.
• Etykiety samoprzylepne
• Pierścienie gumowe
• Pisak
Materiały używane do pakowania
żywności muszą być wytrzymałe na
rozdarcie i odporne na zimno, wilgoć,
zapachy, oleje i kwasy.
Nie należy dopuścić, aby
przeznaczona do zamrożenia żywność
stykała się z uprzednio zamrożoną
żywnością, co grozi ich częściowym
rozmarznięciem.
Zamrożoną żywność należy spożywać
bezpośrednio po odmrożeniu i nie
wolno jej ponownie zamrażać.
29
PL

Co zrobić, aby automatycznie wyliczać czas użytkowania
filtru
(Dla modeli przyłączanych do sieci wodociągowej i wyposażonych w filtr)
1- Po włożeniu wtyczki do gniazdka równocześnie naciśnij przyciski A i B aby
uruchomić blokadę klawiszy.
A
B
1- Następnie naciśnij przycisk - odpowiednio - Eco-Extra (1), nastawiania
temperatury w komorze chłodzenia (4), szybkiego chłodzenia (5) lub nastawiania
temperatury w komorze zamrażania (3).
1 4
5
3
Za naciśnięciem we właściwym porządku konfiguracji przycisków symbol blokady
znika, na chwilę odzywa się buczek i zapala wskaźnik ostrzeżenia o wymianie filtru.
Po wymianie filtru naciśnij przycisk kasowania ostrzeżenia o wymianie filtru (poz. 19
opisu wyświetlacza) aby automatycznie wyliczać czas jego użytkowania.
C Jeśli czas użytkowania filtru jest automatycznie wyliczany, wskaźnik ostrzeżenia
o wymianie filtru zapala sie na kilka sekund za każdym przyłączeniem chłodziarki
do zasilania.
C Automatyczne wyliczanie czasu użytkowania filtru nie jest fabrycznie
uruchamiane. Trzeba je uruchomić w modelach wyposażonych w filtr.
C Aby wyłączyć wyliczanie czasu użytkowania filtru w modelu z
uruchomioną taką funkcję powtórz tę samą procedurę.
PL
30

Półka na jajka
Na wybranych drzwiczkach lub półce
można założyhc uchwyt na jajka.
Nie wolno przechowywać uchwytu na
jajka w komorze zamrażalnika.
Półki wysuwane
Półki wysuwane można wyciągać
lekko podnosząc ich przód i
przesuwając do przodu i do tyłu.
Wysuwane do przodu zatrzymują się w
punkcie, w którym można sięgnąć po
żywność umieszczona z tyłu półki, po
lekkim podniesieniu ich przodu można
je dalej wysuwać aż do następnego
punktu zatrzymania, w którym można
wyjąc półkę z komory.
Półkę należy mocno podtrzymywać
od spodu, żeby się nie przewróciła.
Półki wysuwane umieszczone są
na szynach na bocznych ścianach
komory chłodziarki, co umożliwia
przenoszenie ich w górę lub w dół.
Aby umieścić półkę wysuwana w jej
stałej pozycji należy wsunąć ja do
samego końca.
1
2
3
Pojemnik na świeże warzywa
Pojemnik na świeże warzywa w
tej chłodziarce służy specjalnie
do zachowania świeżości warzyw
bez utraty ich wilgoci. W tym celu
zapewnia się ogólne krążenie zimnego
powietrza wokół pojemnika na świeże
warzywa. Zanim wyjmiesz pojemnik na
świeże warzywa najpierw wyjmij półki
z drzwiczek na tym samym poziomie.
Pojemniki na świeże warzywa wyjmuje
się tak, jak pokazano to na rysunku.
Komora schładzania
W komorze schładzania przygotowuje
się żywność do zamrożenia. Można w
niej także przechowywać żywność w
temperaturze o kilka stopni niższej niż
w komorze zamrażania.
Pojemność wnętrza chłodziarki można
zwiększyć wyjmując z niej pojemniki na
żywność do schładzania. W tym celu
pociągnij pojemnik ku sobie, pojemnik
oprze sie o blokadę i zatrzyma. Można
go wyjąć podnosząc o ok. 1 cm i
pociągając ku sobie.
4
PL
31

Ruchoma sekcja środkowa
Ruchoma sekcja środkowa służy
zapobieganiu ulatniania się zimnego
powietrza z wnętrza chłodziarki na
zewnątrz.
1- Przy zamykaniu drzwiczek komory
chłodzenia uszczelka w drzwiczkach
szczelnie przylega do powierzchni
ruchomej sekcji środkowej.
2 - Inny powód wyposażenia
chłodziarki w środkową sekcje
ruchomą polega na powiększeniu
objętości netto komory chłodzenia.
Standardowe sekcje środkowe zajmują
nieco miejsca niewykorzystywanego
do chłodzenia.
3- Ruchomą sekcję środkową zamyka
się przy zamykaniu lewych drzwiczek
komory chłodzenia.
4- Nie można otwierać jej ręcznie.
Przy zamykaniu drzwiczek porusza się
pod prowadnicą części plastykowej
korpusu.
Komora Multi Zone
Komorę Multi Zone tej chłodziarki
można używać w dowolnym
wybranym trybie, nastawiając ja na
temperatury chłodzenia (2/4/6/8
°C) lub zamrażania (-18/-20/-22/-
24). Temperaturę w tej komorze
nastawia się “przyciskiem nastawiania
temperatury w komorze Multi
Zone”. Temperaturę w tej komorze
można nastawiać na 0 i 10 stopni
na dodatek do temperatur komory
chłodzenia oraz na -6 stopni na
dodatek do temperatury w komorze
zamrażania. 0 stopni stosuje się do
dłuższego przechowywania produktów
delikatesowych, - 6 stopni zaś do
przechowywania mięs aż do 2 tygodni
w stanie umożliwiającym ich łatwe
krojenie.
C Funkcję przełączania na komorę
chłodzenia lub zamrażania zapewnia
element chłodzący umieszczony w
sekcji zamkniętej (komora sprężarki) z
tyłu chłodziarki. W trakcie pracy tego
elementu mogą być słyszalne odgłosy
podobne do tych, jakie wydaje zegar
analogowy odliczając sekundy. Jest
to zupełnie normalne i nie świadczy o
zakłóceniu w pracy chłodziarki.
Niebieskie światło
Żywność przechowywana w
pojemniku na świeże warzywa i
oświetlona niebieskim światłem
kontynuuje fotosyntezę pod jego
wpływem i tym samym zachowuje
świeżość i podnosi zawartość
witamin.
32
PL

Półki wysuwane z
wieszakami tylnymi
Półki wysuwane z wieszakami tylnymi
można przesuwać w tył i w przód. Ich
wysokość można regulować wyjmując
je i instalując w wyższej lub niższej
pozycji. Aby wyjąc półkę, podnieś ja
lekko i pociągnij ku sobie.
Miejsce na masło i sery
W tej zaopatrzonej w pokrywkę części
można przechowywać żywność taka
jak masło, ser i margarynę.
Jeśli z dozownika wody korzysta się
niezbyt często, aby uzyskać świeżą
wodę trzeba przedtem spuścić z niego
odpowiednią ilość wody.
Tacka na wodę przelaną
Krople wody, które kapią podczas
użytkowania, zbiera się w specjalnej
tacce. Tackę na rozlana wodę wyjmuje
się pociągając ku sobie lub naciskając
na jej krawędź (zależnie od modelu).
Wodę usuwa się z niej gąbką lub
miękką ściereczką.
Korzystanie z dozownika
wody
Ostrzeżenie
Pierwsze kilka szklanek wody z
dozownika mogą być ciepłe i jest to
całkiem normalne.
33
PL

Minibar
Drzwiczki minbaru to dodatkowe
ułatwienie przy korzystaniu z
chłodziarki. Do półki w drzwiczkach
chłodziarki można się dostać bez
ich otwierania; dzięki temu można
łatwo wyjmować z chłodziarki często
spożywane potrawy i napoje. Rzadziej
otwierając drzwiczki chłodziarki
zużywa się mniej energii.
Aby otworzyć drzwiczki minibaru
naciśnij je dłonią i pociągnij do tyłu.
Przy otwartych drzwiczkach minibaru
wewnętrzną płaszczyznę drzwiczek
można wykorzystać jako stolik do
postawienia na chwilę butelek i
szklanek, jak pokazano to na rysunku.
A Uwaga: Nie rób nic, co
obciążałoby drzwiczki, nie siadaj na
nich, nie wspinaj się na stolik, nie
wieszaj na nim, ano nie stawiaj na nim
nic ciężkiego. Może to spowodować
uszkodzenie chłodziarki i obrażenia
użytkowników.
AUwaga: Nie tnij nic na drzwiczkach
minibaru i chroń je przed
uszkodzeniem ostrymi przedmiotami.
34
PL

6 Konserwacja i czyszczenie
A Do czyszczenia chłodziarki nie wolno
używać benzyny, benzenu, ani
podobnych substancji..
B Zaleca się wyłączenie wtyczki
chłodziarki z gniazdka przed jej
czyszczeniem.
B Do czyszczenia nie wolno stosować
żadnych szorstkich narzędzi
ani mydła, domowych środków
czystości, detergentów, ani wosku do
polerowania.
C Umyj obudowę chłodziarki letnią
wodą i wytrzyj ją do sucha.
C Wnętrze należy czyścić ściereczką
zamoczoną i wyżętą w roztworze
jednej łyżeczki do herbaty sody
oczyszczonej w 0,5 litra wody, a
następnie wytrzeć do sucha.
B Zadbać, aby do obudowy lampki i
innych urządzeń elektrycznych nie
dostała się woda.
B Jeśli chłodziarka ma być nieużywana
przez dłuższy okres czasu, należy
ją wyłączyć i całkowicie opróżnić z
żywności, oczyścić i pozostawić z
uchylonymi drzwiczkami.
C Regularnie sprawdzać, czy
uszczelki w drzwiczkach są czyste
i nie osadzają się na nich cząstki
żywności.
A Aby wyjąć półki z drzwiczek, opróżnić
je z zawartości, a potem po prostu
nacisnąć od podstawy ku górze.
A Do czyszczenia powierzchni
zewnętrznych i chromowanych
części produktu nie należy używać
ani środków czyszczących,ani
wody z zawartością chloru. Chlor
powoduje korozję takich powierzchni
metalowych.
A Nie korzystaj z ostrych i ścierających
narzędzi lub mydła, domowych
środków czyszczących, detergentów,
benzyny, benzenu, wosku, itp., gdyż
może to spowodować odklejenie się
znaczków i części plastikowych oraz
może doprowadzić do deformacji.
Do czyszczenia używaj ciepłej wody i
miękkiej ściereczki, następnie wytrzyj
do sucha.
Zabezpieczenia powierzchni
plastykowych
C Nie wkładać do chłodziarki oleju
ani potraw smażonych na oleju
w nieszczelnych pojemnikach,
ponieważ może to uszkodzić jej
plastikowe powierzchnie. W razie
rozlania sie lub rozsmarowania oleju
na plastikowej powierzchni, od razu
oczyścić i opłukać ciepłą wodą jej
zabrudzoną część.
35
PL

7 Zalecane rozwiązania problemów
Prosimy zapoznać się z tym wykazem przed wezwaniem serwisu. Może to
oszczędzić Wasz czas i pieniądze. Wykaz ten zawiera częste kłopoty, które
nie wynikają z wadliwego wykonania ani zastosowania wadliwych materiałów.
Niektóre z opisanych tu funkcji mogą nie występować w tym modelu
urządzenia.
Chłodziarka nie działa.
• Czy jest prawidłowo przyłączona do zasilania? Włożyć wtyczkę do gniazdka.
• Czy nie zadziałał bezpiecznik gniazdka, do którego jest przyłączona albo
bezpiecznik główny? Sprawdzić bezpiecznik.
Skropliny na bocznej ściance komory chłodzenia (MULTIZONE, COOL
CONTROL oraz FLEXI ZONE).
• Bardzo niska temperatura otoczenia. Częste otwieranie i zamykanie drzwiczek.
Znaczna wilgoć w otoczeniu. Przechowywanie żywności zawierającej płyny
w otwartych pojemnikach. Pozostawienie uchylonych drzwiczek. Przełączyć
termostat na niższą temperaturę.
• Otwierać drzwiczki na krócej albo rzadziej.
• Nakrywać żywność przechowywaną w otwartych pojemnikach odpowiednim
materiałem.
• Wycierać skropliny suchą ściereczką i sprawdzać, czy nadal się utrzymują.
Sprężarka nie działa
• Zabezpieczenie termiczne sprężarki zadziała w trakcie nagłego zaniku zasilania
lub załącza się i wyłącza, ponieważ nie wyrównało się jeszcze ciśnienie w
systemie chłodzącym chłodziarki. Chłodziarka zacznie działać po ok. 6
minutach. Jeśli po upływie tego czasu chłodziarka nie zacznie działać, prosimy
wezwać serwis.
• Chłodziarka jest w cyklu rozmrażania. Ton normalne dla chłodziarki z całkowicie
automatycznym rozmrażaniem. Cykl rozmrażania następuje okresowo.
• Chłodziarka nie jest włączona do gniazdka. Upewnij się, że wtyczka jest
prawidłowo włożona do gniazdka.
• Czy temperatura jest właściwie nastawiona?
• Być może w sieci nie ma prądu.
Chłodziarka pracuje często lub przez zbyt długi czas.
36
PL

• Nowa chłodziarka jest szersza od poprzedniej. Jest to całkiem normalne. Duże
chłodziarki działają przez dłuższy czas.
• Zbyt wysoka temperatura otoczenia. Jest to całkiem normalne.
• Chłodziarka została niedawno załączona lub jest przeładowana żywnością.
Całkowite ochłodzenie chłodziarki może potrwać o parę godzin dłużej.
• Ostatnio włożono do chłodziarki znaczne ilości gorącej żywności. Gorące
potrawy powodują dłuższą pracę chłodziarki zanim osiągnie temperaturę
przechowywania.
• Zbyt często otwierano drzwiczki lub na dłużej pozostawiano je uchylone. Ciepłe
powietrze, które weszło do chłodziarki, powoduje, że działa ona dłużej. Rzadziej
otwierać drzwiczki.
• Pozostawiono uchylone drzwiczki komory chłodzenia lub zamrażania.
Sprawdzić, czy drzwiczki są szczelnie zamknięte.
• Chłodziarka jest nastawiona na bardzo niską temperaturę. Nastawić chłodziarkę
na wyższą temperaturę i odczekać, aż zostanie ona osiągnięta.
• Uszczelka w drzwiczkach chłodziarki lub zamrażalnika jest zabrudzona,
uszkodzona, pęknięta lub nieprawidłowo włożona. Oczyścić lub wymienić
uszczelkę. Uszkodzona/pęknięta uszczelka powoduje, że chłodziarka pracuje
przez dłuższy czas, aby utrzymać bieżącą temperaturę.
Temperatura zamrażalnika jest bardzo niska, a temperatura chłodzenia jest
wystarczająca.
• Chłodziarka jest nastawiona na bardzo niską temperaturę zamrażania. Nastawić
chłodziarkę na wyższą temperaturę zamrażania i sprawdzić.
Temperatura chłodzenia jest bardzo niska, a temperatura zamrażania jest
wystarczająca.
• Chłodziarka nastawiona jest na bardzo niską temperaturę chłodzenia. Nastawić
chłodziarkę na wyższą temperaturę chłodzenia i sprawdzić.
Żywność przechowywana w szufladach komory zamarza.
• Chłodziarka nastawiona jest na bardzo niską temperaturę chłodzenia. Nastawić
chłodziarkę na wyższą temperaturę chłodzenia i sprawdzić.
Bardzo wysoka temperatura w chłodziarce lub zamrażalniku.
• Chłodziarka nastawiona jest na bardzo wysoką temperaturę chłodzenia.
Nastawienia chłodziarki wpływają na temperaturę w zamrażalniku. Zmienić
temperaturę w chłodziarce lub zamrażalniku aż osiągnie odpowiedni poziom.
• Zbyt często otwierano drzwiczki lub na dłużej pozostawiano je uchylone, należy
je rzadziej otwierać.
• Drzwiczki pozostawiono uchylone, należy je dokładnie zamknąć.
• Ostatnio włożono do chłodziarki znaczne ilości gorącej żywności. Odczekać, aż
temperatura w chłodziarce lub zamrażalniku osiągnie właściwy poziom.
• Chłodziarkę załączono niedawno. Całkowite chłodzenie chłodziarki trochę
potrwa.
Gdy chłodziarka pracuje, poziom hałasu wrasta.
37
PL

• Z powodu zmian temperatury otoczenia zmieniły się charakterystyki
eksploatacyjne chłodziarki. Jest to stan normalny, nie zaś awaria.
Drgania lub hałas
• Nierówna lub słaba podłoga. Chłodziarka podskakuje, gdy porusza się ją powoli.
Sprawdź, czy podłoga jest równa i wytrzymuje ciężar chłodziarki.
• Hałas powodują rzeczy położone na chłodziarce. Należy usunąć przedmioty
ustawione na chłodziarce.
Z chłodziarki dochodzą odgłosy przelewania się i syczenia płynu.
• Zgodnie z zasadą funkcjonowania chłodziarki następują przepływy płynu lub
gazu. Jest to stan normalny, nie zaś awaria.
Odgłos jakby szumu wiatru.
• Do ochłodzenia chłodziarki użyto wentylatorów. Jest to stan normalny, nie zaś
awaria.
Skropliny na wewnętrznych ściankach chłodziarki.
• Ciepła i wilgotna pogoda sprzyja oblodzeniu i skraplaniu. Jest to stan normalny,
nie zaś awaria.
• Drzwiczki mogą być uchylone, upewnij się, że są całkowicie zamknięte.
• Zbyt często otwierano drzwiczki lub na dłużej pozostawiano je uchylone, należy
je rzadziej otwierać.
Na zewnątrz chłodziarki, lub pomiędzy drzwiczkami pojawia się wilgoć.
• Być może w powietrzu jest wilgoć; to całkiem normalne przy wilgotnej pogodzie.
Gdy wilgoć w powietrzu ustąpi, skropliny znikną.
Nieprzyjemna woń wewnątrz chłodziarki.
• Trzeba oczyścić wnętrze chłodziarki. Oczyść wnętrze chłodziarki gąbką
namoczoną w ciepłej lub gazowanej wodzie.
• Woń powodują jakieś pojemniki lub materiały opakowaniowe. Używać innych
pojemników lub materiałów opakowaniowych innej marki.
Drzwiczki są niezamknięte.
• W zamknięciu drzwiczek przeszkadzają paczki z żywnością. Przełożyć paczki
przeszkadzające zamknięciu drzwiczek.
• Chłodziarka nie stoi całkiem pionowo na podłodze i kiwa się przy lekkim
poruszeniu. Wyregulować wysokość nóżek.
• Podłoga nie jest równa lub dość wytrzymała. Sprawdzić, czy podłoga jest równa
i wytrzymuje ciężar chłodziarki.
Szuflady do przechowywania świeżych warzyw się zatarły.
• Żywność dotyka sufitu szuflady. Zmienić ułożenie żywności w szufladzie.
38
PL

Lednice
Návod k použití
EWWERQWEW
CZ

Nejprve si přečtěte tento návod!
Vážený zákazníku,
Doufáme, že výrobek, který byl vyroben v moderních závodech a kontrolován v
souladu s nejpřísnějšími postupy kontroly kvality, vám zajistí účinný provoz.
Z tohoto důvodu vám doporučujeme pozorně si přečíst celý návod k výrobku,
než jej použijete, a uskladněte je v dosahu pro budoucí použití.
Tento návod
• Pomůže vám s použitím spotřebiče rychle a bezpečně.
• Návod si přečtěte dříve, než produkt nainstalujete a zapnete.
• Dodržujte pokyny, zejména ty, které se týkají bezpečnosti.
• Návod uschovejte na snadno přístupném místě, možná jej budete později
potřebovat.
• Kromě toho si přečtěte i další dokumenty dodané s výrobkem.
Nezapomeňte, že tento návod může platit i pro jiné modely.
Symboly a jejich popis
Tento návod obsahuje následující symboly:
C Důležité informace nebo užitečné tipy k použití.
A Varování před nebezpečnými situacemi pro život a majetek.
B Varování na elektrické napětí.

OBSAH
1 Vaše chladnička 3
2 Důležitá bezpečnostní
upozornění 4
Určené použití ...................................4
U výrobků s dávkovačem vody; .........9
Bezpečnost dětí ................................9
Dodržování směrnice WEEE a o
likvidaci odpadů: ...............................9
Dodržování směrnice RoHS: ............10
Informace o balení ........................... 10
Upozornění HC ................................ 10
Postup pro úsporu energie .............. 10
Doporučení pro prostor pro čerstvé
potraviny .........................................11
3 Instalace 12
Body ke zvážení při přepravě
chladničky ....................................... 12
Než chladničku zapnete ...................12
Zapojení do sítě ...............................12
Likvidace obalu ................................13
Likvidace vaší staré chladničky ........ 13
Umístění a instalace ......................... 13
Seřízení rovnováhy ...........................14
Úprava mezery mezi horními dveřmi 14
Výměna žárovky .............................15
Instalace vodního filtru .................... 16
Připojení vodovodní trubice k
chladničce .......................................16
Připojení vodovodní hadice k nádrži 17
Připojení vodovodní trubice k přívodu
studené vody .................................. 18
Před prvním použitím dávkovače
vody ................................................ 20
4 Příprava 21
5 Používání chladničky 22
Panel ukazatelů ...............................22
Alarm při otevřených dveřích: ..........25
Mražení čerstvých potravin .............. 26
Doporučení pro uschování mražených
potravin ........................................... 26
Vkládání potravin ............................. 27
Informace o hloubkovém mražení .... 27
Co musíte udělat, aby se doba použití
filtru vypočítávala automaticky .........28
Posuvné police trupu .......................29
Tácek na vejce .................................29
Prostor pro čerstvé potraviny ........... 29
Prostor chlazení ............................... 29
Pohyblivá střední část ..................... 30
Prostor víceúčelové zóny ...............30
Modré světlo ....................................30
Posuvné police se zadními závěsy ... 31
Oddíl na máslo a sýr ........................31
Používání pramene vody .................. 31
Odkapávač ......................................31
Minibar ............................................ 32
6 Údržba a čištění 33
Ochrana plastových ploch .............. 33
7 Doporučená řešení
problémů 34
CZ
2

1 Vaše chladnička
17
18 19
2
3
6
7
8
9
5
4
16
13
11
14
1
12
10
15
1- Police dveří prostoru chladničky
2- Skleněné police prostoru chladničky
3- Kryt difuzéru
4- Osvětlovací čočka
5- Pohyblivá střední část
6- Prostor chlazení
7- Prostor pro čerstvé potraviny
8- Automat na led
9- Prostory na zmražené potraviny
10- Minibar
11- Držák lahví
12- Police na lahve
13- Police prostor na skladování potravin
14- Prostory na skladování potravin
15- Vodní filtr
16- Prostor pro mléčné výrobky
17- Prostor chladničky
18- Prostor mrazničky
19- Víceúčelová zóna
C Obrázky uvedené v tomto návodu k použití jsou schematické a nemusejí přesně
korespondovat s vaším výrobkem. Pokud zobrazené části nejsou obsaženy v
produktu, který jste zakoupili, jde o součásti jiných modelů.
CZ
3

2 Důležitá bezpečnostní upozornění
Prostudujte si následující
informace. Nedodržení
těchto informací může
vést ke zraněním nebo
škodám na majetku.
Jinak neplatí záruka ani
jiné závazky.
Originální náhradní díly
budou dodávány po dobu
10 let od koupě výrobku.
Určené použití
UPOZORNĚNÍ:
V případě, že
je zařízení v
ochranné fázi
A
nebo umísteno,
ujistěte se,
zda nejsou
odvětrávací dírky
uzavřeny.
A
A
A
UPOZORNĚNÍ:
Za účelem
urychlení
rozpouštěné ledu
nepoužívejte
žádné jiné
mechanické
zařízení nebo jiný
přístroj než ty jež
byly doporučeny
výrobcem.
UPOZORNĚNÍ:
Pokud je
chladidlo
v provozu,
nezasahujte do
jeho obvodu.
UPOZORNĚNÍ:
Uvnitř
skladovacích
prostor jídla
přístroje
nepoužívejte jiná
elektrická zařízení
než ta, která
byla doporučena
výroobcem.
Toto zařízení bylo
navrženo pro použití v
domácnosti nebo pro
níže uvedené aplikování.
CZ
4

- V kuchyních
personálu obchodů,
kanceláří a jiných
pracovních míst;
- Za účelem použití
návštěvníky farem a
hotelů, motelů a jiných
míst s ubytováním.
Obecná bezpečnost
• Když chcete výrobek
zlikvidovat/sešrotovat,
doporučujeme
kontaktovat autorizovaný
servis, kde zjistíte
nezbytné informace a
autorizované orgány.
• Veškeré otázky a
problémy související
s chladničkou vám
pomůže vyřešit
autorizovaný servis.
Nezasahujte do
chladničky a nikomu
toto nedovolte
bez upozornění
autorizovaného servisu.
• U výrobků s prostorem
mrazničky; Nejezte
zmrzlinu a kostky ledu
bezprostředně poté, co
je vyjmete z prostoru
mrazničky! (Může dojít k
omrznutí úst.)
• U výrobků s prostorem
mrazničky; Nevkládejte
do prostoru mrazničky
nápoje v lahvích a
plechovkách. Jinak
by mohlo dojít k jejich
explozi.
• Nedotýkejte se
mražených potravin
rukou; mohou se vám
přilepit k ruce.
• Odpojte chladničku,
než ji vyčistíte nebo
odmrazíte.
• Výpary a parní čisticí
materiály nikdy
nepoužívejte při čištění a
odmražování chladničky.
V těchto případech by
se totiž výpary mohly
dostat do styku s
elektrickými součástmi a
způsobit zkrat či zásah
elektrickým proudem.
• Nikdy nepoužívejte
součásti na chladničce,
jako je ochranná
deska, jako dvířka nebo
podprěru nebo schůdek.
• Nepoužívejte elektrická
zařízení uvnitř chladničky.
• Nepoškozujte součásti,
kde obíhá chladicí
médium, vrtáním nebo
řezáním. Chladicí
médium by mohlo
vytéct v místech
porušení plynových
CZ
5

kanálů výparníku,
prodlouženích trubek
nebo povrchových vrstev
a způsobit podráždění
kůže a zranění očí.
• Nezakrývejte a
neblokujte větrací otvory
na chladničce žádným
materiálem.
• Elektrické spotřebiče
musejí opravovat jen
autorizované osoby.
Opravy provedené
nekompetentními
osobami mohou vést k
ohrožení uživatele.
• V případě poruchy nebo
při údržbě či opravách
odpojte napájení
chladničky buď vypnutím
příslušné pojistky nebo
odpojením spotřebiče.
• Netahejte za kabel –
tahejte za zástrčku.
• Ujistěte se, že nápoje
s vysokým obsahem
alkoholu jsou bezpečně
uzavřené a umístěné
kolmo .
• Nikdy neskladujte
nádoby s hořlavými spreji
a výbušnými látkami v
chladničce.
• Nepoužívejte
mechanické nástroje
nebo jiné prostředky
k urychlení procesu
odmrazení s výjimkou
těch, které doporučuje
výrobce.
• Tento výrobek by
neměly používat osoby
s tělesnými, smyslovými
nebo duševními
poruchami či nezkušené
nebo nepoučené osoby
(včetně dětí), pokud jsou
bez dohledu osoby, která
bude odpovídat za jejich
bezpečnost nebo která
jim poskytné náležité
školení k používání
výrobku
• Nepoužívejte
poškozenou chladničku.
V případě jakýchkoli
pochybností kontaktujte
servisního zástupce.
• Elektrická bezpečnost
chladničky je zaručena
pouze tehdy, pokud
systém uzemnění ve
vašem domě splňuje
patřičné normy.
• Vystavení výrobku dešti,
sněhu, slunci a větru je
nebezpečné z hlediska
elektrické bezpečnosti.
CZ
6

• Pokud dojde k
poškození napájecího
kabelu, kontaktujte
autorizovaný servis.
• Během instalace nikdy
nezapojujte chladničku
k zásuvce. Jinak může
dojít k ohrožení zdraví s
následkem smrti.
• Tato chladnička je
určena jen k uchovávání
potravin. Neměla by být
používána k žádnému
jinému účelu.
• Štítek s technickými
parametry se nachází
na levé stěně uvnitř
chladničky.
• Nikdy nepřipojujte
chladničku k systémům
pro úsporu elektřiny;
mohly by chladničku
poškodit.
• Pokud se na chladničce
rozsvítí modré světlo,
nedívejte se do něj
nezakrytýma očima
nebo bez ochranných
pomůcek příliš dlouho.
• U manuálně ovládaných
chladniček počkejte
nejméně 5 minut, než
chladničku po výpadku
energie znovu spustíte.
• Tento návod k použití
předejte novému majiteli
v případě prodeje
výrobku.
• Při přepravě chladničky
nepoškozujte napájecí
kabel. Ohnutím kabelu
může dojít k požáru.
Na napájecí kabel nikdy
nestavte těžké předměty.
Nedotýkejte se zástrčky
mokrýma rukama při
zapojování výrobku.
• Nezapojujte chladničku,
pokud je zásuvka
uvolněna.
• Nestříkejte vodu
přímo na vnitřní či
vnější části výrobku z
bezpečnostních důvodů.
• Do blízkosti chladničky
nestříkejte látky s
hořlavými plyny, jako je
propan, aby nedošlo k
požáru a výbuchu.
• Na horní stranu
chladničky nikdy
nestavte nádoby
CZ
7

naplněné vodou, jinak
by mohlo dojít k zásahu
elektrickým proudem
nebo k požáru.
• Do chladničky
nevkládejte přílišná
množství potravin.
Při přeplnění mohou
potraviny spadnout dolů
a poranit vás a poškodit
chladničku při otevření
dveří. Na horní stranu
chladničky nic nestavte;
tyto předměty by jinak
mohly spadnout, až
otevřete nebo zavřete
dvířka chladničky.
• Jelikož vakcíny, léky
citlivé na teplo a vědecké
materiály atd. vyžadují
přesnou teplotu,
neskladujte je tedy v této
chladničce.
• Pokud chladničku delší
dobu nebudete používat,
odpojte ji. Možný
problém napájecího
kabelu by mohl způsobit
požár.
• Chladničku se můůže
pohybovat, pokud její
nožky nejsou řádně
upevněny na podlaze.
Správným nastavením
nožek na podlaze
předejdete pohybu
chladničky.
• Při přenášení chladničky
ji nedržte za kliku dvířek.
Jinak by se mohla
odlomit.
• Když musíte postavit
tento výrobek vedle
jiné chladničky nebo
mrazničky, vzdálenost
mezi zařízeními by měla
být nejméně 8 cm.
Jinak by mohlo dojít k
provlhnutí sousedních
stěn.
• Nikdy nepoužívejte
výrobek, pokud část
nacházející se na horní
nebo zadní straně
výrobku s elektronickou
deskou s plošným
spojem uvnitř je
otevřená (krycí deska
elektronických plošných
spojů) (1).
CZ
8

1
1
U výrobků s
dávkovačem vody;
• Tlak pro přívod
studené vody musí
být maximálně 90 psi
(6,2 bar). Pokud je váš
tlak vody vyšší než 80
psi (5,5 bar), použijte
ve vaší síti ventil na
omezování tlaku. Pokud
nevíte, jak zkontrolovat
tlak vody, požádejte o
pomoc profesionálního
instalatéra.
• Pokud při instalaci
existuje riziko vodního
rázu, vždy použijte
preventivně zařízení
proti vodnímu rázu.
Pokud jste si není jistý,
zda ve Vaší síti je efekt
vodního rázu, poraďte
se s profesionálním
instalatérem.
• Neinstalujte na přívodu
pro teplou vodu.
Proveďte nezbytná
opatření proti riziku
zamrznutí hadic.
Provozní interval teplota
vody musí být mezi
minimálně 33 ° F (0,6 °
C) a maximálně 100 ° F
(38 ° C).
• Používejte jen pitnou
vodu.
Bezpečnost dětí
• Pokud mají dvířka zámek, měli byste
skladovat klíč mimo dosah dětí.
• Děti je nutno kontrolovat, aby
nezasahovaly do součástí výrobku.
Dodržování směrnice WEEE
a o likvidaci odpadů:
Tento produkt splňuje
směrnici EU WEEE
(2012/19/EU). Tento
výrobek nese symbol pro
třídění, platný pro elektrický
a elektronický odpad
(WEEE).
Tento produkt byl vyroben z vysoce
kvalitních součástí a materiálů, které
lze znovu použít a které jsou vhodné
pro recyklaci. Produkt na konci
životnosti nevyhazujte do běžného
domácího odpadu. Odvezte ho
do sběrného místa pro recyklaci
elektrických a elektronických zařízení.
Informace o těchto sběrných místech
získáte na místních úřadech.
CZ
9

Dodržování směrnice RoHS:
Produkt, který jste zakoupili splňuje
směrnicih EU RoHS (2011/65/
EU). Neobsahuje žádné škodlivé ani
zakázané materiály, které jsou směrnicí
zakázané.
Informace o balení
Balící materiály jsou vyrobeny z
recyklovatelných materiálů v souladu
s našimi národními směrnicemi na
ochranu životního prostředí. Balící
materiály nevyhazujte do domácího
nebo jiného odpadu. Odvezte je na
sběrné místo balícího materiálu, které
má pověření místních orgánů.
Upozornění HC
Pokud chladicí systém vašeho
výrobku obsahuje R600a:
Tento plyn je hořlavina. Dávejte tedy
pozor, abyste nepoškodili systém
chlazení a potrubí během použití a
přepravy. V případě poškození udržujte
výrobek mimo potenciální zdroje
hoření, které mohou způsobit vznícení
výrobku, a vyvětrejte místnost, v níž je
přístroj umístěn.
Ignorujte toto upozornění, pokud
chladicí systém vašeho výrobku
obsahuje R134a.
Typ plynu použitý ve výrobku je uveden
na typovém štítku na levé stěně uvnitř
chladničky.
Výrobek nikdy nevhazujte do ohně.
• Neinstalujte chladničku na přímé
sluneční světlo nebo do blízkosti
tepelných spotřebičů, jako je trouba,
myčka nebo radiátor.
• Dávejte pozor, abyste nechávali
potraviny v uzavřených nádobách.
• U výrobků s prostorem mrazničky;
Maximální množství potravin v
mrazničce můžete uskladnit,
pokud vyjmete polici nebo zásuvku
mrazničky. Hodnota spotřeby energie
udaná pro vaši chladničku byla
stanovena při vyjmuté polici nebo
zásuvce mrazničky a při maximální
náplni. Nehrozí riziko při používání
police nebo zásuvky podle tvarů a
rozměrů potravin, které chcete mrazit.
• Rozmrazování zmražených potravin
v prostoru chladničky zajistí úsporu
energie a zachová kvalitu potravin.
Postup pro úsporu energie
• Nenechávejte dvířka chladničky
otevřená delší dobu.
• Nevkládejte do chladničky horké
potraviny nebo nápoje.
• Nepřeplňujte chladničku, abyste
nebránili oběhu vzduchu uvnitř.
10
CZ

Doporučení pro prostor pro
temperature
sensor
food
MILK
juice
etc.
temperature
sensor
MILK
juice
etc.
temperature
sensor
čerstvé potraviny
* VOLITELNÉ
• Zamezte jakémukoli kontaktu
potravin se senzorem teploty v
prostoru pro čerstvé potraviny. Z
důvodu zajištění ideální skladovací
teploty v prostoru pro čerstvé
potraviny nesmí být senzor blokován
potravinami.
• Nevkládejte do spotřebiče horké
potraviny.
11
CZ

3 Instalace
C Nezapomeňte, že výrobce
neodpovídá za nedodržení informací
uvedených v návodu k použití.
Body ke zvážení při přepravě
chladničky
1. Chladničku je nutno vyprázdnit a
vyčistit před jakoukoli přepravou.
2. Police, příslušenství, prostor pro
čerstvé potraviny atd. v chladničku je
nutno řádně upoutat lepicí páskou,
aby nedocházelo k vibracím.
3. Obaly je nutno upevnit silnými
páskami a lany a je nutno dodržovat
pravidla pro přepravu vytištěná na
obalu.
C Vždy si pamatujte...
Každý recyklovaný materiál je nezbytný
zdroj pro přírodu a naše národní
zdroje.
Pokud chcete přispět k recyklaci
obalových materiálů, další informace
získáte od orgánů ochrany životního
prostředí nebo místních úřadů.
Než chladničku zapnete
Než začnete používat chladničku,
zkontrolujte následující:
1. Je vnitřek chladničky suchý a může
za ní volně obíhat vzduch?
2. Zasuňte 2 plastové klínky do
krytu zadních větracích otvorů dle
následujícího obrázku. Za tímto
účelem odstraňte šrouby na výrobku
a použijte šrouby ze stejného pytlíku.
Plastové klínky zajistí potřebnou
vzdálenost mezi vaší chladničkou
a zdí, aby se umožnilo proudění
vzduchu.
3. Vyčistěte vnitřek chladničky podle
kapitoly "Údržba a čištění".
4. Zapojte chladničku do sítě. Po
otevření dvířek se rozsvítí vnitřní
osvětlení.
5. Uslyšíte hluk při startování
kompresoru. Kapalina a plyn v
chladicí soustavě mohou také
vydávat zvuky, i když kompresor
neběží, což je poměrně normální.
6. Přední kraje chladničky mohou
být teplé. Je to zcela normální.
Tyto oblasti mají být teplé, aby
nedocházelo ke kondenzaci.
Zapojení do sítě
Připojte chladničku k uzemněné zásuvce,
která je chráněna pojistkou vhodné
kapacity.
Důležité:
12
CZ

B Spojení musí být v souladu s
národními předpisy.
B Napájecí kabel musí být po instalaci
snadno dostupný.
B Napětí a povolená ochrana pojistky
jsou uvedeny v kapitole „Technické
parametry“.
B Specifikované napětí musí být rovné
napětí v síti.
B Prodlužovací kabely a vícecestné
zásuvky nepoužívejte na spojení.
B Poškozený napájecí kabel musí
vyměnit kvalifikovaný elektrikář.
B Spotřebič nesmíte používat, dokud
není opraven! Hrozí riziko zásahu
elektrickým proudem!
Likvidace obalu
A Obalové materiály mohou být pro
děti nebezpečné. Udržujte materiály
mimo dosah dětí nebo je zlikvidujte
v souladu s pokyny zpracování
odpadů. Nelikvidujte je s běžným
domovním odpadem.
Balení chladničky je z recyklovatelných
materiálů.
A Než chladničku použijete, odřízněte
zástrčku a v případě, že jsou na
dveřích zámky, zneškodněte je, aby
nedošlo k ohroženní dětí.
Umístění a instalace
B Pozor: Během instalace nikdy
nezapojujte chladničku k zásuvce.
Jinak může dojít k ohrožení zdraví s
následkem smrti.
A Pokud nejsou vstupní dveře
do místnosti, v níž chladničku
nainstalujete, dostatečně široké,
aby chladnička prošla, kontaktujte
autorizovaný servis a nechte sejmout
dveře chladničky a protáhněte je
bokem.
1. Chladničku umístěte na místo, které
umožňuje snadnou obsluhu.
Likvidace vaší staré
chladničky
Starý přístroj zlikvidujte tak, abyste
neohrozili životní prostředí.
A Informace o likvidaci chladničky
získáte u autorizovaného prodejce
nebo odpadového odboru vašeho
města.
13
CZ

2. Chladničku umístěte mimo zdroje
tepla, vlhka a přímé světlo.
3. Kolem chladničky musí být
dostatečný prostor pro ventilaci, aby
se zajistila účinnost provozu. Pokud
máte chladničku umístit do výklenku,
musí být nejméně 5 cm od stropu a 5
cm od stěn.
Pokud je na podlaze koberec, musíte
zvednout produkt o 2,5 cm nad zem.
4. Umístěte chladničku na rovnou
podlahu, aby nedocházelo ke
kymácení.
5. Neskladujte chladničku při teplotách
pod 10°C.
Seřízení rovnováhy
A Pokud je vaše chladnička
nevyvážená;
B Nejprve odpojte výrobek ze
zásuvky. Výrobek musí být odpojený
ze zásuvky, když provádíte vyvažování.
Hrozí riziko zásahu elektrickým
proudem.
nadzvednout chladničku, proces se
usnadní.
2. Po odstranění problému s
rovnováhou nainstalujte zpět větrací
kryt a utáhněte šrouby.
3. Odstraňte šrouby, které upevňují
dolní větrací kryt, pomocí křížového
šroubováku.
Úprava mezery mezi horními
dveřmi
4
1 2 3
1- Větrací kryt odmontujete tak, že
odšroubujete jeho šrouby podle
obrázku, než zahájíte činnost.
Chladničku vyrovnáte tak, že otáčíte
předními nožkami podle obrázku. Roh,
kde jsou umístěny nožky, se sníží,
když otáčíte ve směru černé šipky,
zvedne se, když otáčíte opačným
směrem. Pokud vám někdo pomůže
14
C Můžete nastavit mezeru mezi
dveřmi prostoru chladničky podle
obrázků.
Police ve dveřích by měly být prázdné,
když upravujete výšku dveří.
CZ

C Šroubovákem odstraňte šroub z
horního krytu závěsu ve dveřích, které
chcete upravit.
C Upravte dveře podle potřeby
pomocí uvolnění šroubů.
C Upevněte dveře, které jste nastavili,
utažením šroubů, aniž byste změnili
pozici dveří.
C Vraťte zpět kryt závěsu a upevněte
jej šroubem.
Výměna žárovky
Za účelem výměny žárovky osvětlení
v chladničce prosím kontaktujte
Autorizovaný servis.
Lampa (y) použité v tomto přístroji
nejsou vhodné pro osvětlení místnosti
domácnosti. Zamýšlený účel tohoto
svítidla je pomoci uživateli umístit
potraviny do chladničky / mrazničky
bezpečně a pohodlně.
Žárovky použité v tomto spotřebiči
musí vydržet extrémní fyzické
podmínky, např. teploty pod -20 °C.
15
CZ

Instalace vodního filtru
1
2
(u některých modelů)
Jako zdroj vody mohou být k
chladničce připojeny dva rozdílné
vodní zdroje: hlavní přívod studené
vody a voda v nádrži.
Požadavky na instalaci
Pro používání vody z nádrže musí být
použito čerpadlo.
Zkontrolujte, zda jsou části uvedené
níže dodané s vaším zařízením.
1. Jednotka pro připojení vodovodní
trubice k zadní části spotřebiče.
(Pokud nesedí, získáte ji v nejbližším
autorizovaném servisu.)
2. 2 díly svorek trubic (v případě nutnosti
zajištění vodovodní trubice)
Poznámka: Protože následující
části nejsou pro používání s
nádrží vyžadované, nemusíte je u
zakoupeného výrobku nalézt.
3. 5-metrová vodovodní trubice (průměr
1/4 palce)
4. Ventil na studenou vodu s filtrem
(adaptér na kohout)
5. Vodovodní filtr nebo externě
připojitelný filtr bude upevněn na
držák v prostoru chladničky.
Nejprve určete místo, kde bude externí
filtr připojen. (Týká se filtru, který bude
použit vně chladničky.) Poté určete
vzdálenost mezi filtrem a chladničkou
a nutnou délku hadice od filtru k
přívodu vody chladničky.
Vodní filtr musí být držen svisle, jak je
zobrazeno. Je důležité správné
připojení filtru k přívodu vody a
vývodům vody.
Po připojení filtru první 3 - 4 sklenice vody
nepoužívejte.
Připojení vodovodní trubice k
chladničce
1. Po instalaci jednotky na vodovodní
trubici zasuňte trubici do vstupního
ventilu chladničky a pevně zatlačte
směrem dolů.
2. Upevněte jednotku dle protějšího
obrázku, stiskněte rukou vstupní ventil
chladničky.
(a - vodovodní trubice, b - jednotka,
c - ventil)
C Poznámka 1: Neměli byste utahovat
jednotku nářadím, abyste dosáhli
vodotěsného spoje. V případě úniku
použijte klíč nebo kleště pro utažení
jednotky.
1
3
2
4
*5
CZ
16
a
a
b
c

Připojení vodovodní hadice k
nádrži
(u některých modelů)
Pro připojení vody k chladničce z
nádrže je nutné čerpadlo. Řiďte se
pokyny níže po připojení jednoho
konce vodovodní trubice vystupující z
čerpadla k chladničce, jak je popsáno
na předchozí straně.
1. Připojení dokončíte zatlačením
druhého konce vodovodní hadice do
vstupního otvoru vodovodní hadice
na čerpadle, jak je zobrazeno.
2. Vložte hadici čerpadla do nádrže
a upevněte ji, jak je uvedeno na
obrázku.
3. Po dokončení připojení zapojte
čerpadlo do zásuvky a zapněte.
Abyste zajistili účinnou činnost čerpadla,
počkejte po jeho zapnutí 2 - 3 minuty.
C Při realizaci vodní přípojky můžete
nahlédnout do návodu pro uživatele
čerpadla.
C V případě používání vodní nádrže
není nutné používat vodní filtr.
17
CZ

C Při používání nádrže musí být použito
čerpadlo.
Připojení vodovodní trubice k
přívodu studené vody
(u některých modelů)
Pokud chcete vaši chladničku používat
tak, že ji připojíte k hlavnímu přívodu
studené vody,
budete muset k přívodu studené vody
ve vašem domě připojit standardní
1/2" přípojku. V případě, že tento ventil
nemáte nebo si nejste jisti, kontaktujte
kvalifikovaného instalatéra.
1. Oddělte jednotku od adaptéru
kohoutu. (Obr. A)
2. Na 1/2" přípojku nainstalujte adaptér
kohoutu, jak je zobrazeno na
obrázku. (Obr. B)
3. Po vložení vodovodní trubice do
jednotky nainstalujte adaptér kohoutu
a zasuňte kohout, jak je uvedeno na
obrázku. (Obr. C)
4. Rukou utáhněte jednotku. V případě
úniku použijte klíč nebo kleště pro
utažení jednotky.
A Upozornění: Připevněte vodovodní
trubici k vhodným bodům pomocí
svorek, aby nedošlo k poškození či
odpojení nebo náhodnému uvolnění.
A Upozornění: Po zapnutí
vodovodního ventilu ověřte, zda
nedochází k úniku na obou spojích
vodovodní trubice. V případě úniku
okamžitě ventil uzavřete a utáhněte
znovu všechny spoje pomocí klíče
nebo kleští.
A Upozornění: Ověřte, zda je
dostupný standardní 1/2" ventil
přívodu studené vody a zda je zcela
vypnutý.
18
CZ

Pro upevnění vodního filtru dodržujte
pokyny uvedené níže spolu s
uvedenými obrázky:
1. Stiskněte tlačítko Zrušit led na displeji.
2. Odstraňte kryt filtru v prostoru
chladničky jeho vytažením dopředu.
3. Vyjměte obtokový kryt vodního filtru
jeho otáčením směrem dolů.
A Upozornění: Ověřte, zda je vypnutý
režim „Vypnout led“, než obtokový kryt
vyjmete.
Poznámka: Je normální, že při vyjímání
krytu odkápne několik kapek vody.
4. Odstraňte víko z horní části vodního
filtru, abyste jej umístili tak, jak je
zobrazeno na obrázku a otáčejte
směrem nahoru, abyste jej zamkli.
5. Znovu stiskněte tlačítko Zrušit led na
displeji pro ukončení tohoto režimu.
Vodní filtr vyměňujte každých 6
měsíců.
Pokud chcete, aby se čas pro výměnu
filtru vypočítával automaticky a chcete
být varováni na konci doby použití,
CZ
19

přečtěte si prosím části „Automatický
výpočet doby použití filtru“.
Vodní filtr je nutno vyjmout dle obrázku,
když jej chcete vyměnit nebo jej již
nebudete používat a musí být připojen
obtokový kryt. Před jeho vyjímáním je
nutné se ujistit, že režim Vypnout led je
aktivní.
A Upozornění: Vodní filtr čistí cizí
částice ve vodě. Nečistí vodu od
mikroorganismů.
A Upozornění: Tlačítko Vypnout
led je nutno vždy stisknout při
výměně vodního filtru nebo instalaci
obtokového krytu.
Před prvním použitím
dávkovače vody
C Tlak vody nesmí být nižší než 1 bar.
C Tlak vody nesmí být vyšší než 8 bar.
C V případě, že tlak přívodu vody
spadne pod 1 bar nebo bude
používána nádrž, je nutné použít
čerpadlo.
C Systém vody v chladničce musí
být připojen k přívodu studené vody.
Nesmí být připojen k přívodu teplé
vody.
C Při počátečním použití chladničky
nebude možné používat vodu.
Způsobuje to vzduch v soustavě.
Pro vypuštění vzduchu ze soustavy
stiskněte dávkovač na 1 minutu, až
začne voda vytékat z dávkovače.
Proud vody může být na začátku
nepravidelný. Nepravidelný proud vody
se urovná po vypuštění vzduchu ze
soustavy.
CPři počátečním zapnutí chladničky
musí uplynout přibl. 12 hodin, než
můžete začít používat studenou vodu.
C Tlak vody musí být v rozmezí
1-8 barů, aby mohl dávkovač ledu/
vody fungovat. Zkontrolujte, zda lze 1
sklenku vody (100 cc) naplnit během
10 sekund.
C Prvních 10 sklenic vody nepijte.
C Asi prvních 30 kostek ledu z
dávkovače se nesmí používat.
C Pokud nepoužíváte nádrž, vždy
používejte vodní filtr.
20
CZ

4 Příprava
C Chladničku instalujte nejméně
30 cm od zdrojů tepla, jako jsou
varné desky, trouby, ústřední topení
a sporáky a nejméně 5 cm od
elektrických trub, neumisťujte ji na
přímé sluneční světlo.
C Teplota prostředí v místnosti, kde
instalujete chladničku, by měla
být nejméně 10 °C. Používání
chladničky za chladnějších podmínek
se nedoporučuje vzhledem k její
účinnosti.
C Zajistěte, aby byl vnitřek vaší
chladničky důkladně vyčištěn.
C Pokud vedle sebe instalujete dvě
chladničky, měl by mezi nimi být
rozestup nejméně 2 cm.
C Když spustíte chladničku poprvé,
dodržujte následující pokyny během
prvních šesti hodin.
- Dveře neotevírejte často.
- Musí běžet prázdná bez vkládání
potravin.
- Neodpojujte chladničku. Pokud
dojde k výpadku energie,
prostudujte si varování v kapitole
„Doporučená řešení problémů“.
C Původní obaly a pěnové materiály
uschovejte pro budoucí přepravu či
přesun.
21
CZ

1 7 11 12 15 4
5
6
2
3
16
17
18 20 19
10 9 14 138
5 Používání chladničky
Panel ukazatelů
Tento panel ukazatelů s ovladači vám umožňuje anstavit teplotu, aniž byste
otevírali dveře chladničky. Stačí vám stisknout příslušné tlačítko a nastavíte
teplotu.
1. Tlačítko Eco Extra/Vacation (Eco
Extra/Prázdniny)
2. Tlačítko pro rychlé mražení
3. Prostor mrazničky - tlačítko nastavení
teploty
4. Prostor chladničky - tlačítko nastavení
teploty
5. Tlačítko Quick Cool (Rychlé chlazení)
6. Tlačítko nastavení teploty víceúčelové
zóny
7. Ukazatel funkce prázdnin
8. Ukazatel funkce Eco Extra
9. Ukazatel funkce rychlého mražení
10. Ukazatel teploty v mrazničce
11. Ukazatel teploty v chladničce
12. Ukazatel funkce rychlého chlazení
13. Ukazatel teploty víceúčelové zóny
14. Ukazatel úsporného režimu
15. Ukazatel chyby
16. Ukazatel zámku
17. Tlačítko Vypnout led
18. Ukazatel vypnutí ledu
19. Tlačítko pro zrušení varování o
výměně filtru
20. Ukazatel varování o výměně filtru
C Obrázky uvedené v tomto návodu k použití jsou schematické a nemusejí přesně
korespondovat s vaším výrobkem. Pokud zobrazené části nejsou obsaženy v
produktu, který jste zakoupili, jde o součásti jiných modelů.
CZ
22

1. Tlačítko Eco Extra/Vacation (Eco
Extra/Prázdniny)
Krátkým stiskem aktivujete funkci Eco
Extra. Stiskněte a přidržte toto tlačítko
3 sekundy a aktivujte funkci Prázdniny.
Dalším stiskem tohoto tlaíčítka
zvolenou funkci vypnete.
2. Tlačítko pro rychlé mražení
Krátkým stiskem aktivujete funkci
rychlého mražení. Dalším stiskem
tohoto tlačítka zvolenou funkci
vypnete.
3. Prostor mrazničky - tlačítko
nastavení teploty
Stiskem tohoto tlačítka nastavíte
teplotu prostoru mrazničky na -18,
-20, -22, -24, -18... Stiskem tohoto
tlačítka nastavíte požadovanou teplotu
v prostoru mrazničky.
4. Prostor chladničky - tlačítko
nastavení teploty
Stiskem tohoto tlačítka nastavíte
teplotu prostoru chladničky na 8, 6, 4,
2, 8... Stiskem tohoto tlačítka nastavíte
požadovanou teplotu v prostoru
chladničky.
5. Tlačítko Quick Cool (Rychlé
chlazení)
Krátkým stiskem aktivujete funkci
rychlého chlazení. Dalším stiskem
tohoto tlačítka zvolenou funkci
vypnete.
6. Tlačítko nastavení teploty
víceúčelové zóny
Prostor víceúčelové zóny můžete
nastavit jako chladničku nebo
mrazničku. Stiskněte a přidržte toto
tlačítko delší dobu (3 sekundy) a
nastavte prostor víceúčelové zóny jako
mrazničku nebo chladničku. Tento
prostor je od výrobce nastaven jako
prostor mrazničky.
Pokud nastavíte víceúčelovou zónu
jako mrazničku, změní se teplota
víceúčelové zóny na -18, -20, -22,
-24, -18... při každém stisknutí tohoto
tlačítka. Pokud nastavíte víceúčelovou
zónu jako chladničku, změní se teplota
víceúčelové zóny na 10, 8, 6, 4, 2... při
každém stisknutí tohoto tlačítka.
7. Ukazatel funkce prázdnin
Označuje, že je funkce prázdnin
aktivní. Pokud je tato funkce aktivní, na
ukazateli prostoru chladničky se objeví
„- -“ a v prostoru chladničky nedochází
k žádnému chlazení. Ostatní prostory
budou chlazené podle teploty, která
pro ně byla nastavena.
Stiskem příslušného tlačítka tuto funkci
vypnete.
8. Ukazatel funkce úsporného
provozu
Označuje, že je funkce Eco Extra
aktivní. Pokud je tato funkce aktivní,
vaše chladnička automaticky detekuje
poslední období používání a během
této doby se pak bude provádět
energeticky úsporné chlazení. Ukazatel
úsporného prostoru bude aktivní při
provádění energeticky úsporného
chlazení.
23
CZ

Stiskem příslušného tlačítka tuto funkci
vypnete.
9. Ukazatel funkce rychlého
mražení
Označuje, že je funkce Fast Freeze
(Rychlé zmrazení) aktivní. Použijte tuto
funkci, když vložíte čerstvé potraviny
do prostoru mrazničky nebo když
potřebujete led. Když je tato funkce
aktivní, vaše chladnička poběží určitou
dobu.
Stiskem příslušného tlačítka tuto funkci
vypnete.
13. Ukazatel teploty víceúčelové
zóny
Označuje teplotu nastavenou pro
prostor víceúčelové zóny.
14. Ukazatel úsporného režimu
Označuje, že chladnička běží v
energeticky úsporném režimu. Teplota
v prostoru mrazničky
Tento ukazatel bude aktivní, pokud
nastavíte funkci na -18 nebo probíhá
energeticky úsporné chlazení v rámci
funkce Eco-Extra.
10. Ukazatel teploty v mrazničce
Udává teplotu nastavenou pro prostor
mrazničky.
11. Ukazatel teploty v chladničce
Udává teplotu nastavenou pro prostor
chladničky.
12. Ukazatel funkce rychlého
chlazení
Označuje, že je funkce Quick Cool
(Rychlé chlazení) aktivní. Použijte tuto
funkci, když vložíte čerstvé potraviny
do prostoru chladničky nebo když
potřebujete rychle ochladit potraviny.
Když je tato funkce aktivní, vaše
chladnička poběží 2 hodiny bez
zastavení.
Stiskem příslušného tlačítka tuto funkci
vypnete.
15. Ukazatel chyby
Pokud vaše chladnička nechladí
správně nebo pokud dojde k poruše
snímačů, tento ukazatel se aktivuje.
Když je tento ukazatel aktivní, na
ukazateli teploty prostoru mrazničky
se zobrazí „E“ a na ukazateli teploty v
prostoru chladničky se zobrazí číslice,
například „1,2,3..“. Tato čísla na
ukazateli poskytují informace o chybě
servisním pracovníkům.
16. Ukazatel zámku
Použijte tuto funkci, pokud nechcete
změnit nastavení teploty ve vaší
chladničce. Tuto funkci aktivujete
stiskem tlačítka Quick Cool (Rychlé
chlazení) a tlačítka nastavení teploty
ve flexibilní zóně současně po dlouhou
dobu (3 sekundy).
Stiskem příslušných tlačítek tuto funkci
vypnete.
24
CZ
 Loading...