

Page 1

Refrigerator
Холодильник
GNE 134620 X
Page 2
Please read this manual first!
Recycling
www.beko.com
Dear Customer,
We hope that your product, which has been produced in modern plants and
checked under the most meticulous quality control procedures, will provide you
an effective service.
For this, we recommend you to carefully read the entire manual of your product
before using it and keep it at hand for future references.
This manual
• Will help you use your appliance in a fast and safe way.
• Read the manual before installing and operating your product.
• Follow the instructions, especially those for safety.
• Keep the manual in an easily accessible place as you may need it later.
• Besides, read also the other documents provided with your product.
Please note that this manual may be valid for other models as well.
Symbols and their descriptions
This instruction manual contains the following symbols:
C Important information or useful usage tips.
A Warning against dangerous conditions for life and property.
B Warning against electric voltage.
This product is supplied with the selective sorting symbol for waste electrical
and electronic equipment (WEEE).
This means that this product must be handled pursuant to European Directive
2002/96/EC in order to be recycled or dismantled to minimise its impact on
the environment. For further information, please contact your local or regional
authorities.
Electronic products not included in the selective sorting process are potentially
dangerous for the environment and human health due to the presence of
hazardous substances.
This product was manufactured using the latest technology in environmentally friendly conditions.
Page 3
CONTENTS
1 Your Refrigerator 3
2 Important Safety
Warnings 4
Intended use .....................................4
For products with a water dispenser; . 6
Child safety ........................................6
HCA Warning ....................................6
Things to be done for energy saving ..7
Technical specifications of your
refrigerator .........................................7
Reccomendations for freshfood
compartment .....................................8
3 Installation 9
Points to be considered when re-
transporting your refrigerator .............9
Before operating your refrigerator ...... 9
Electric connection ............................9
Changing the illumination lamp .......10
Disposing of the packaging .............10
Disposing of your old refrigerator .....10
Placing and Installation ....................10
Floor balance adjustment ................11
Adjusting the gap between the upper
door ................................................11
Installing Water Filter .......................13
Connection of the Water Pipe to the
Refrigerator .....................................13
Connection of Water Hose to the
Jug ................................................. 14
Connection of the Water Pipe to the
Cold Water Mains Line .................... 15
Prior to first use of Water Dispenser . 17
4 Preparation 18
5 Using your refrigerator 19
Indicator Panel ................................. 19
Door Open Alarm: ..........................22
Things to do to have the filter usage
time calculated automatically ...........23
Sliding Body Shelves .......................24
Egg tray ........................................... 24
Crisper ............................................24
Chiller compartment ........................ 24
Movable Middle Section .................25
Multi Zone Storage Compartment .. 25
Blue light .........................................25
Sliding Body Shelves With Rear
Hangers ..........................................26
Butter & Cheese Section .................26
Using the water spring ..................... 26
Spillage Tray ....................................26
Minibar ............................................ 27
6 Cleaning and care 28
Protection of plastic surfaces .......... 28
7 Recommended solutions
for the problems 29
EN
2
Page 4
1 Your Refrigerator
17
18 19
2
3
6
7
8
9
5
4
16
13
11
14
1
12
10
15
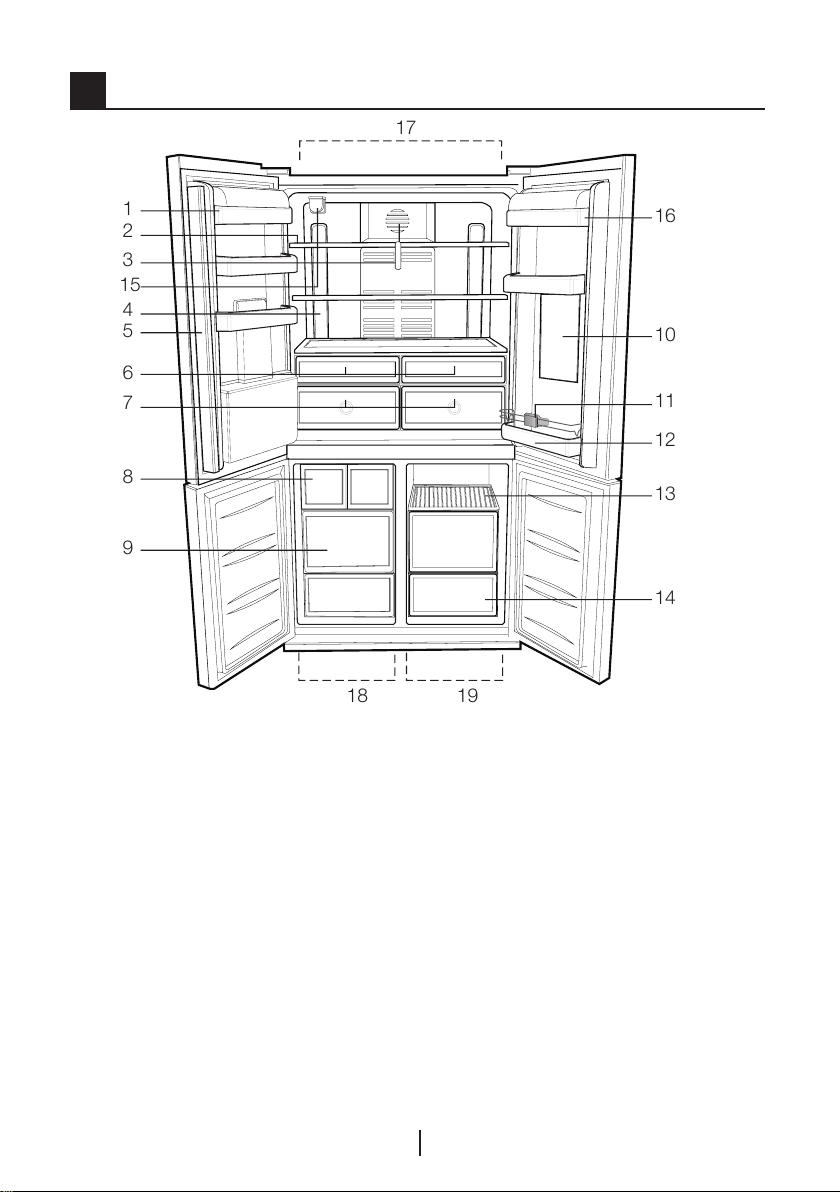
1- Fridge compartment door
shelves
2- Fridge compartment glass
shelves
3- Diffuser cover
4- Illumination lens
5- Movable middle section
6- Chiller compartment
7- Crisper
8- Icematic
9- Frozen food storage
10- Minibar
11- Bottle holder
12- Bottle shelf
13- Food storage compartment
shelves
14- Food storage compartments
15- Water Filter
16- Dairy compartment
17- Fridge compartment
18- Freezer compartment
19- Multi Zone
compartments
C Figures that take place in this instruction manual are schematic and may not
correspond exactly with your product. If the subject parts are not included in the
product you have purchased, then it is valid for other models.
EN
3
Page 5

2 Important Safety Warnings
Please review the following
information. Failure to observe this
information may cause injuries or
material damage. Otherwise, all
warranty and reliability commitments
will become invalid.
The usage life of the unit you
purchased is 10 years. This is the
period for keeping the spare parts
required for the unit to operate as
described.
Intended use
This product is intended to be used
– indoors and in closed areas such as
homes;
– in closed working environments such
as stores and offices;
– in closed accommodation areas such
as farm houses, hotels, pensions.
• This product should not be used
outdoors.
General safety
• When you want to dispose/scrap
the product, we recommend you
to consult the authorized service in
order to learn the required information
and authorized bodies.
• Consult your authorized service for
all your questions and problems
related to the refrigerator. Do not
intervene or let someone intervene to
the refrigerator without notifying the
authorised services.
• For products with a freezer
compartment; Do not eat cone ice
cream and ice cubes immediately
after you take them out of the freezer
compartment! (This may cause
frostbite in your mouth.)
• For products with a freezer
• Do not touch frozen food by hand;
• Unplug your refrigerator before
• Vapor and vaporized cleaning
• Never use the parts on your
• Do not use electrical devices inside
• Do not damage the parts, where
• Do not cover or block the ventilation
• Electrical devices must be repaired
• In case of any failure or during
compartment; Do not put bottled and
canned liquid beverages in the freezer
compartment. Otherwise, these may
burst.
they may stick to your hand.
cleaning or defrosting.
materials should never be used in
cleaning and defrosting processes of
your refrigerator. In such cases, the
vapor may get in contact with the
electrical parts and cause short circuit
or electric shock.
refrigerator such as the door as a
means of support or step.
the refrigerator.
the refrigerant is circulating, with
drilling or cutting tools. The refrigerant
that might blow out when the gas
channels of the evaporator, pipe
extensions or surface coatings are
punctured causes skin irritations and
eye injuries.
holes on your refrigerator with any
material.
by only authorised persons. Repairs
performed by incompetent persons
create a risk for the user.
a maintenance or repair work,
disconnect your refrigerator’s mains
supply by either turning off the
relevant fuse or unplugging your
appliance.
EN
4
Page 6

• Do not pull by the cable when pulling
off the plug.
• Place the beverage with higher proofs
tightly closed and vertically.
• Never store spray cans containing
flammable and explosive substances
in the refrigerator.
• Do not use mechanical devices
or other means to accelerate the
defrosting process, other than those
recommended by the manufacturer.
• This product is not intended to be
used by persons with physical,
sensory or mental disorders or
unlearned or inexperienced people
(including children) unless they are
attended by a person who will be
responsible for their safety or who will
instruct them accordingly for use of
the product
• Do not operate a damaged
refrigerator. Consult with the service
agent if you have any concerns.
• Electrical safety of your refrigerator
shall be guaranteed only if the earth
system in your house complies with
standards.
• Exposing the product to rain, snow,
sun and wind is dangerous with
respect to electrical safety.
• Contact authorized service when
there is a power cable damage to
avoid danger.
• Never plug the refrigerator into
the wall outlet during installation.
Otherwise, risk of death or serious
injury may arise.
• This refrigerator is intended for only
storing food items. It must not be
used for any other purpose.
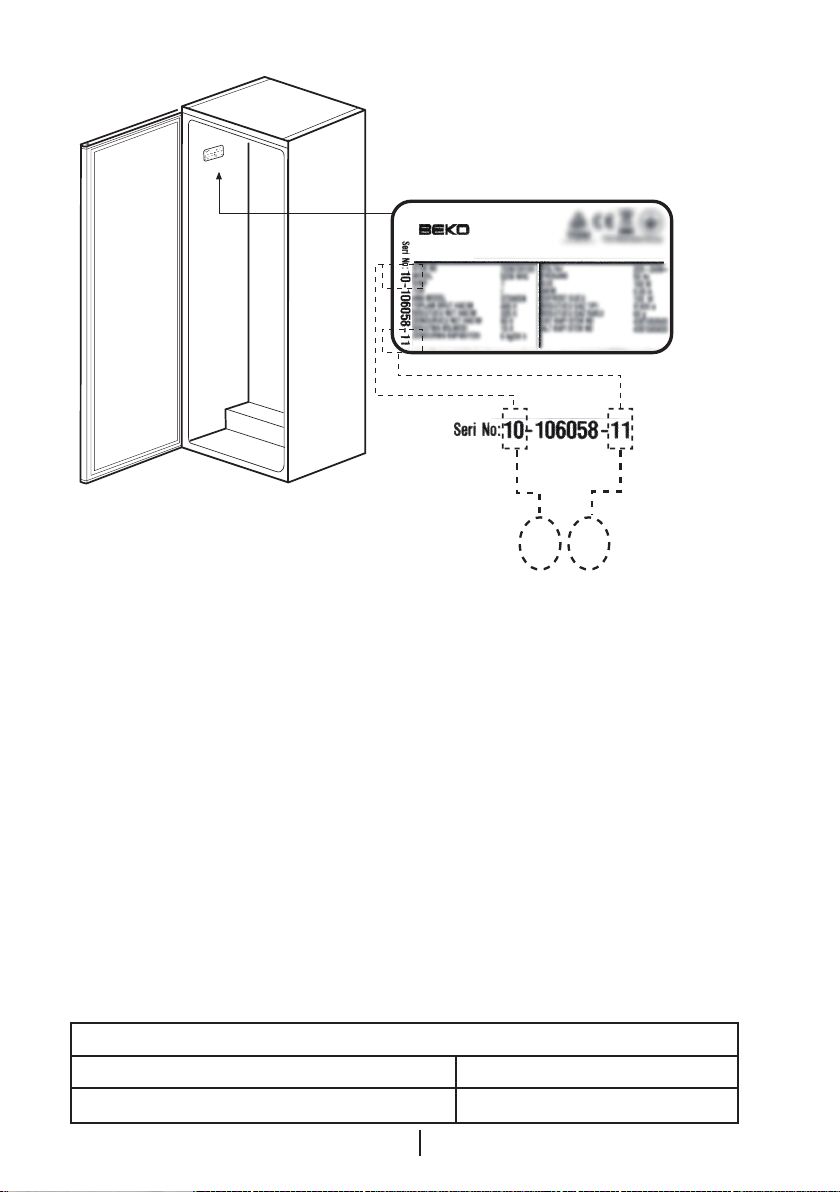
• Label of technical specifications is
located on the left wall inside the
refrigerator.
• Never connect your refrigerator to
electricity-saving systems; they may
damage the refrigerator.
• If there is a blue light on the
refrigerator, do not look at the blue
light with optical tools.
• For manually controlled refrigerators,
wait for at least 5 minutes to start the
refrigerator after power failure.
• This operation manual should be
handed in to the new owner of the
product when it is given to others.
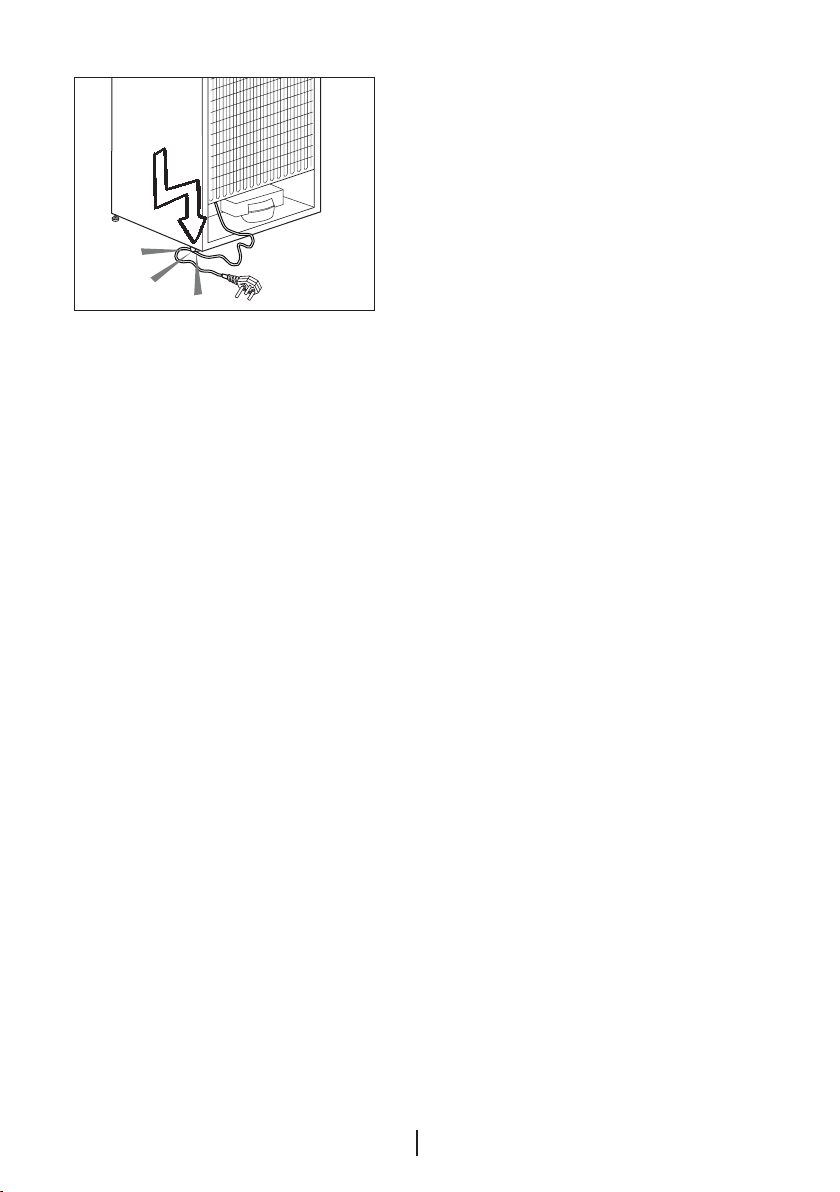
• Avoid causing damage on power
cable when transporting the
refrigerator. Bending cable may cause
fire. Never place heavy objects on
power cable. Do not touch the plug
with wet hands when plugging the
product.
• Do not plug the refrigerator if the wall
outlet is loose.
• Water should not be sprayed directly
on inner or outer parts of the product
for safety purposes.
• Do not spray substances containing
inflammable gases such as propane
gas near the refrigerator to avoid fire
and explosion risk.
• Never place containers filled with
water on top of the refrigerator,
otherwise this may cause electric
shock or fire.
• Do not overload your refrigerator
with excessive amounts of food. If
overloaded, the food items may fall
down and hurt you and damage
refrigerator when you open the door.
Never place objects on top of the
refrigerator; otherwise, these objects
may fall down when you open or
close the refrigerator's door.
EN
5
Page 7
• As they require a precise temperature,
vaccines, heat-sensitive medicine and
scientific materials and etc. should
not be kept in the refrigerator.
• If not to be used for a long time,
refrigerator should be unplugged. A
possible problem in power cable may
cause fire.
• The plug's tip should be regularly
cleaned; otherwise, it may cause fire.
• Refrigerator may move if adjustable
legs are not properly secured on the
floor. Properly securing adjustable
legs on the floor can prevent the
refrigerator to move.
• When carrying the refrigerator, do not
hold it from door handle. Otherwise, it
may be snapped.
• When you have to place your product
next to another refrigerator or freezer,
the distance between devices should
be at least 8cm. Otherwise, adjacent
side walls may be humidified.
Child safety
• If the door has a lock, the key should
be kept away from reach of children.
• Children must be supervised to
prevent them from tampering with the
product.
HCA Warning
If your product's cooling system
contains R600a:
This gas is flammable. Therefore, pay
attention to not damaging the cooling
system and piping during usage and
transportation. In the event of damage,
keep your product away from potential
fire sources that can cause the
product catch a fire and ventilate the
room in which the unit is placed.
Ignore this warning if your
product's cooling system contains
R134a.
Type of gas used in the product is
stated in the type plate which is on the
left wall inside the refrigerator.
Never throw the product in fire for
disposal.
For products with a water
dispenser;
Pressure of water mains should be
minimum 1 bar. Pressure of water
mains should be maximum 8 bars.
• Use only potable water.
EN
6
Page 8
2010-11-xx
Y Y Y Y - M M - D D
• For products with a freezer
Things to be done for energy
saving
• Do not leave the doors of your
refrigerator open for a long time.
• Do not put hot food or drinks in your
refrigerator.
• Do not overload your refrigerator so
that the air circulation inside of it is not
prevented.
• Do not install your refrigerator
under direct sunlight or near heat
emitting appliances such as ovens,
dishwashers or radiators.
• Pay attention to keep your food in
closed containers.
Technical specifications of your refrigerator
Energy efficiency class А +
Protection class
compartment; You can store
maximum amount of food items in
the freezer when you remove the
shelf or drawer of the freezer. Energy
consumption value stated for your
refrigerator has been determined
by removing freezer shelf or drawer
and under maximum load. There
is no harm to use a shelf or drawer
according to the shapes and size of
food to be frozen.
• Thawing frozen food in fridge
compartment will both provide energy
saving and preserve the food quality.
1
EN
7
Page 9
Reccomendations for
temperature
sensor
food
MILK
juice
etc.
temperature
sensor
MILK
juice
etc.
temperature
sensor
freshfood compartment
* OPTIONAL
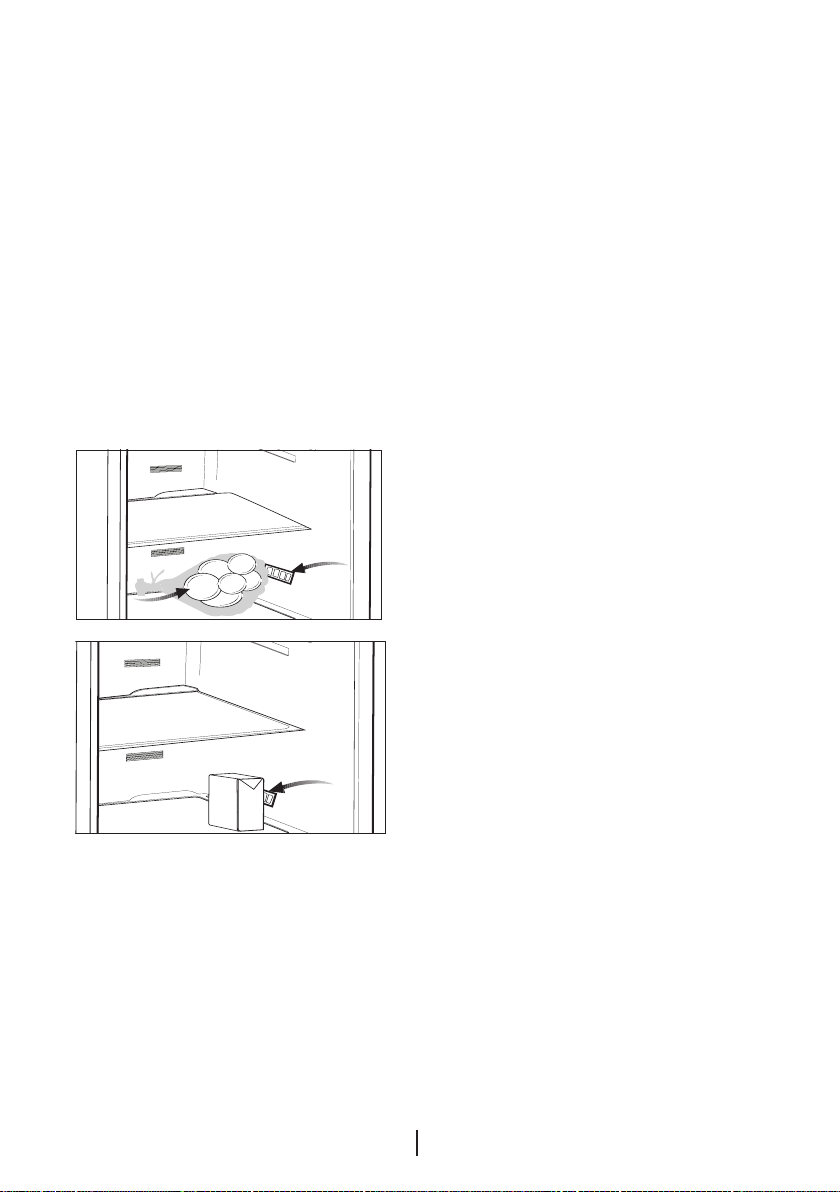
• Please do not let any foodstuff to
come to contact with the temperature
sensor in freshfood compartment.
In order to maintain freshfood
compartment at ideal storage
temperature, the sensor must not be
blocked by fodstuffs.
• Do not place hot foodstuff in your
appliance.
EN
8
Page 10
3 Installation
C Please remember that the
manufacturer shall not be held liable if
the information given in the instruction
manual is not observed.
Points to be considered
when re-transporting your
refrigerator
1. Your refrigerator must be
emptied and cleaned prior to any
transportation.
2. Shelves, accessories, crisper and etc.
in your refrigerator must be fastened
securely by adhesive tape against any
jolt before repackaging.
3. Packaging must be tied with thick
tapes and strong ropes and the
rules of transportation printed on the
package must be followed.
C Always remember...
Every recycled material is an
indispensable source for the nature
and for our national resources.
If you wish to contribute to recycling
the packaging materials, you can
get further information from the
environmental bodies or local
authorities.
Before operating your
refrigerator
Before starting to use your refrigerator
check the following:
1. Is the interior of the refrigerator dry
and can the air circulate freely in the
rear of it?
2. Insert the 2 plastic wedges onto the
rear ventilation cover as illustrated
in the following figure. To do this,
remove the screws on the product
and use the screws given in the same
pouch.
Plastic wedges will provide the
required distance between your
refrigerator and the wall in order to
allow the air circulation.
3. Clean the interior of the refrigerator as
recommended in the “Maintenance
and cleaning” section.
4. Plug the refrigerator into the wall
outlet. When the door is open the
respective interior light will come on.
5. You will hear a noise as the
compressor starts up. The liquid and
gases sealed within the refrigeration
system may also give rise to noise,
even if the compressor is not running
and this is quite normal.
6. Front edges of the refrigerator may
feel warm. This is normal. These
areas are designed to be warm to
avoid condensation.
Electric connection
Connect your refrigerator to a grounded
socket which is being protected by a
fuse with the appropriate capacity.
Important:
EN
9
Page 11

B The connection must be in
compliance with national regulations.
B The power cable plug must be easily
accessible after installation.
B Voltage and allowable fuse protection
are specified in the “Technical
Specifications” section.
BThe specified voltage must be equal
to your mains voltage.
B Extension cables and multiway plugs
must not be used for connection.
B A damaged power cable must be
replaced by a qualified electrician.
B The appliance must not be operated
before it is repaired! There is danger
of electric shock!
Disposing of your old
refrigerator
Dispose of your old machine without
giving any harm to the environment.
A You may consult your authorized
dealer or waste collection center of
your municipality about the disposal
of your refrigerator.
A Before disposing of your refrigerator,
cut out the electric plug and, if there
are any locks on the door, make them
inoperable in order to protect children
against any danger.
Placing and Installation
Disposing of the packaging
A The packing materials may be
dangerous for children. Keep the
packing materials out of the reach
of children or dispose them of by
classifying them in accordance
with the waste instructions. Do not
dispose them of along with the
normal household waste.
The packing of your refrigerator is
produced from recyclable materials.
Changing the illumination
lamp
To change the lamp used for
illumination of your refrigerator, please
call your Authorized Service.
B Caution: Never plug the refrigerator
into the wall outlet during installation.
Otherwise, risk of death or serious
injury may arise.
A If the entrance door of the room
where the refrigerator will be installed is
not wide enough for the refrigerator to
pass through, than call the authorised
service to have them remove the
doors of your refrigerator and pass it
sideways through the door.
1. Install your refrigerator to a place
that allows ease of use.
2. Keep your refrigerator away from
heat sources, humid places and direct
sunlight.
3. There must be appropriate air
ventilation around your refrigerator in
order to achieve an efficient operation.
10
EN
Page 12
If the refrigerator is to be placed in a
recess in the wall, there must be at
least 5 cm distance with the ceiling
and at least 5 cm with the wall.
If the floor is covered with a carpet,
your product must be elevated 2.5 cm
from the floor.
4. Place your refrigerator on an even
floor surface to prevent jolts.
5. Do not keep your refrigerator in
ambient temperatures under 10°C.
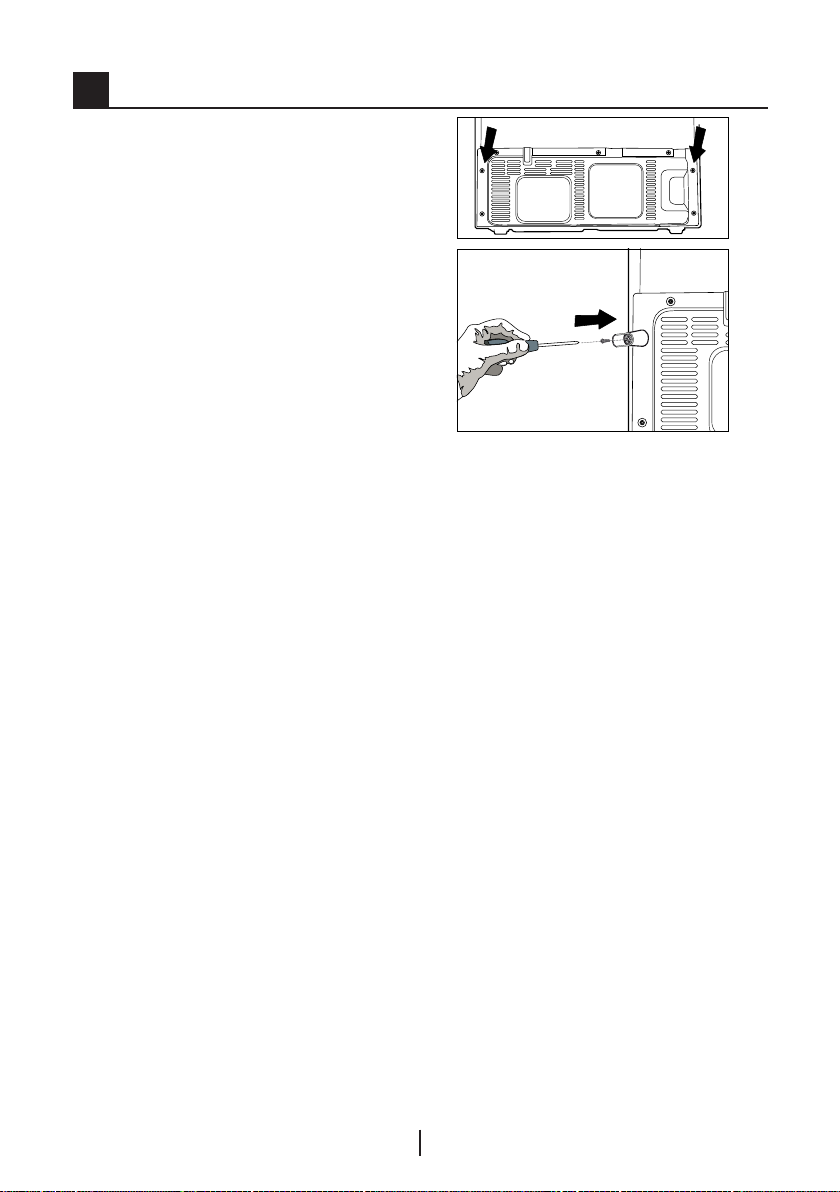
Floor balance adjustment
AIf your refrigerator is unbalanced;
B First unplug the product. The
product must be unplugged when
making the balance adjustment. There
is the risk of electric shock.
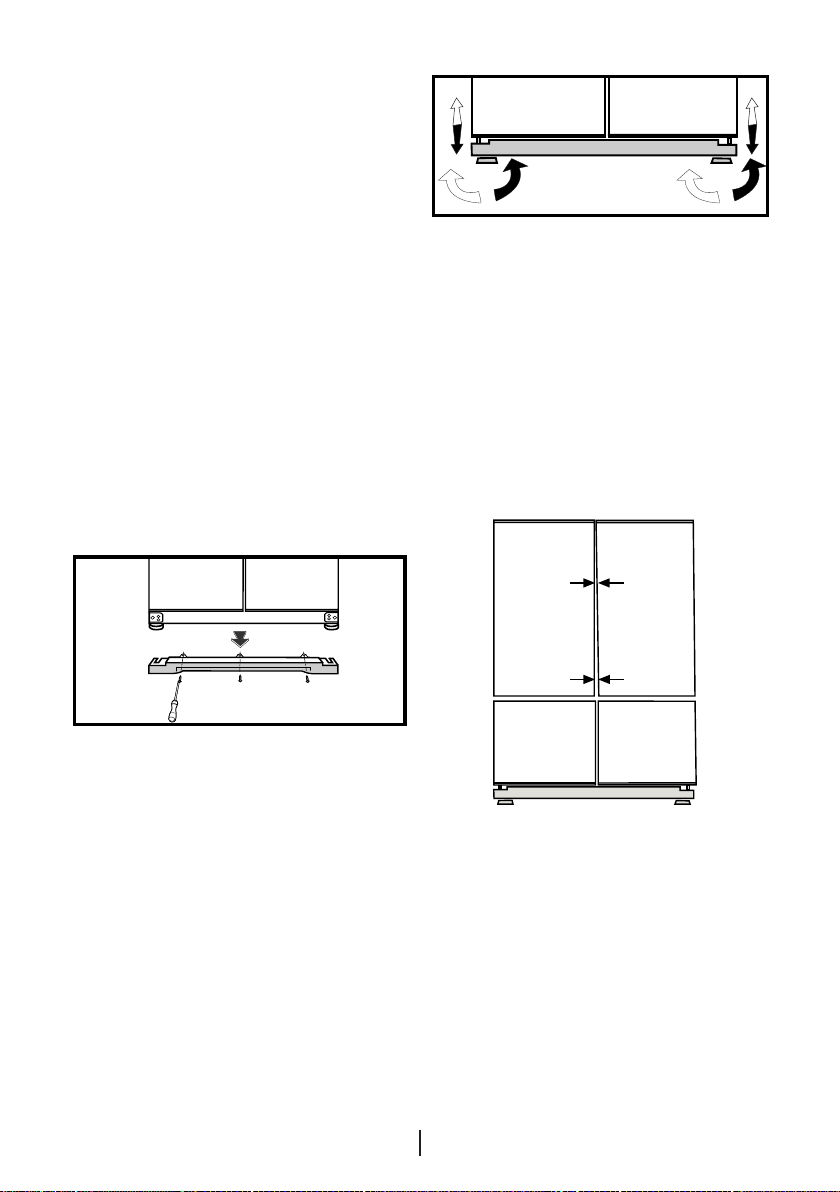
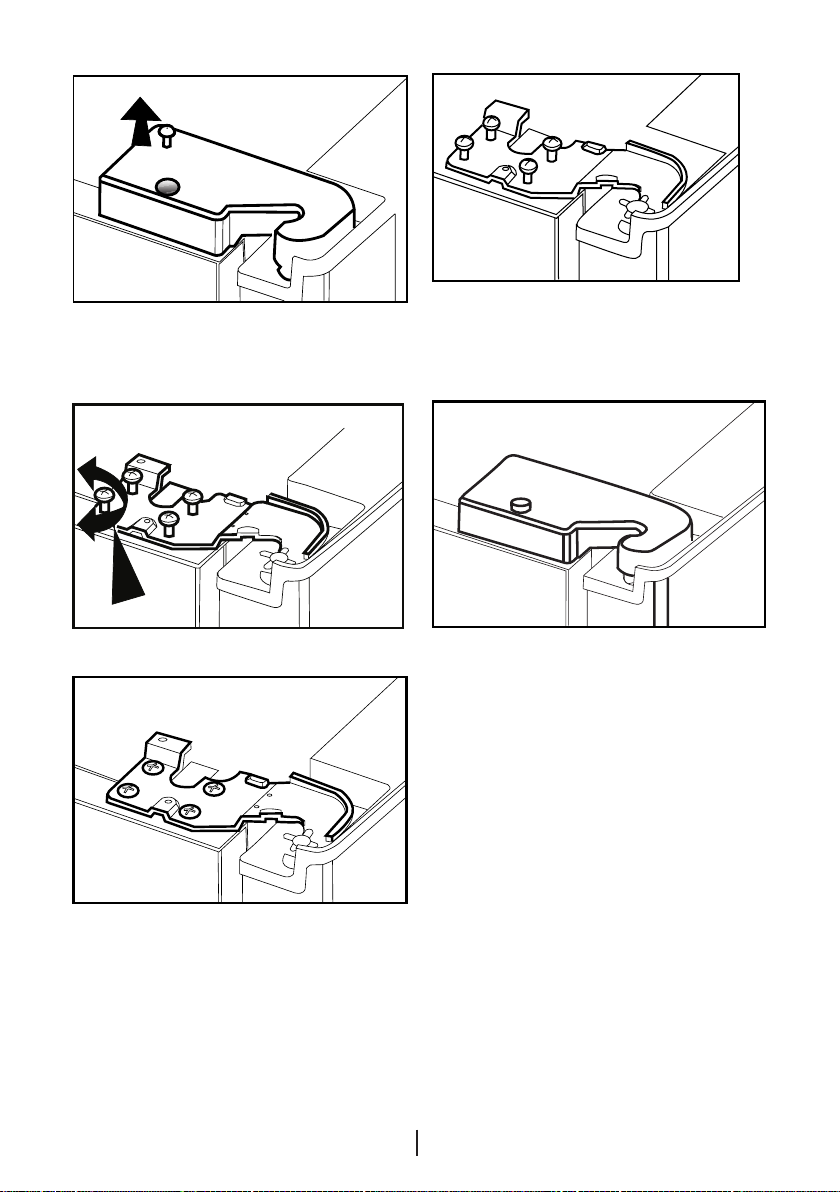
4
2. After the balance issue is remedied,
install back the ventilation cover and
fasten the screws.
3. Remove the screws fastening the
lower ventilation cover using a Philips
screwdriver.
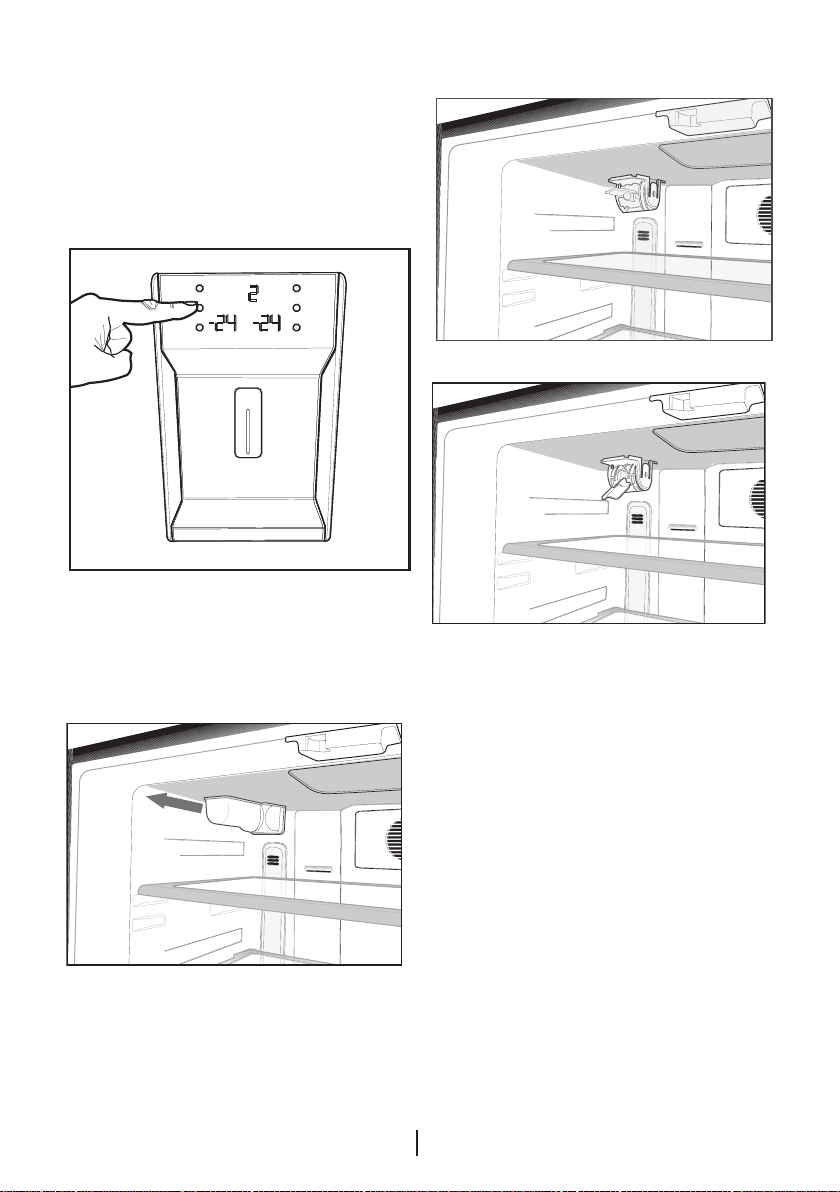
Adjusting the gap between
the upper door
1 2 3
1- Ventilation cover is removed by
unscrewing its screws as illustrated
in the figure before the procedure.
You can balance your refrigerator by
turning the front legs of it as illustrated
in the figure. The corner where the
leg exists is lowered when you turn
in the direction of black arrow and
raised when you turn in the opposite
direction. Taking help from someone to
slightly lift the refrigerator will facilitate
this process.
11
C You can adjust the gap between
the fridge compartment doors as
illustrated in the figures.
Door shelves should be empty when
adjusting the door height.
EN
Page 13
C Using a screwdriver, remove the
screw of upper hinge cover of the door
you want to adjust.
C Fix the door you have adjusted by
tightening the screws without changing
the position of the door.
C Replace the hinge cover and fix
with the screw.
C Adjust the door appropriately as
you desire by loosing the screws.
12
EN
Page 14
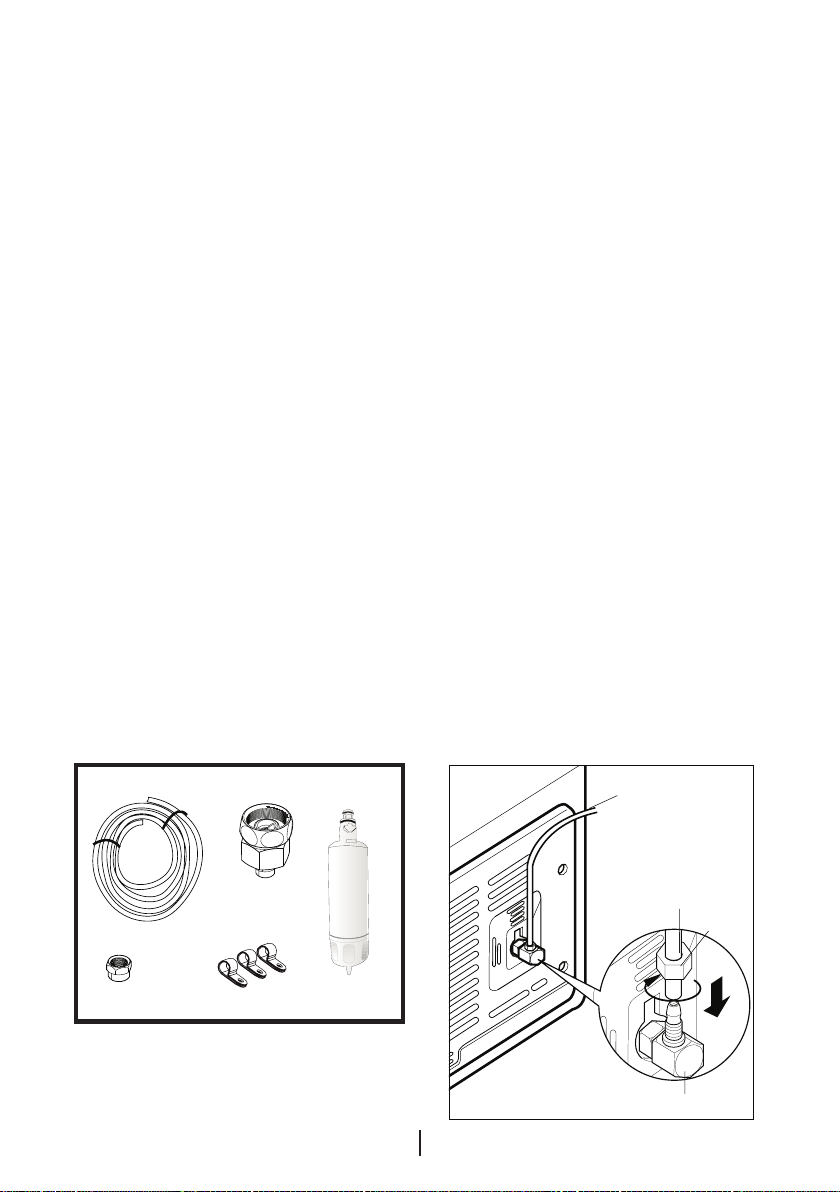
Installing Water Filter
1
2
(in some models)
Two different water sources may
be connected to the refrigerator
for water supply: the mains cold
water supply and water in a jug.
Installation Requirements
A pump should be used for jug water
usage.
Check that the parts stated below are
supplied with your appliance.
1. Union for connection of the water
pipe to the rear of the appliance.
(If it does not fit, provide it from the
nearest authorized service.)
2. 2 pieces of pipe clips (In case
required to secure the water pipe)
Note: Since the following parts are
not required in use with a jug, they
may not be found in the product you
purchased.
3. 5-meter long water pipe (1/4 inch in
diameter)
4. Cold mains water valve with mesh
filter (Tap Adapter)
5. Water Filter or externally connectable
filter to be fitted to the bracket inside
the fridge compartment.
Place where the external filter is going
to be fitted should be determined
first. (Applies to the filter being
used outside the refrigerator.) Then,
determine the distance between the
filter and the refrigerator and required
hose lengths from the filter to the
refrigerator water inlet.
Water filter must be hold upright as
shown in the figure. It is important to
properly attach the filter to water inlet
and water outlet points.
After attaching the filter, do not use first
3-4 glasses of water.
Connection of the Water
Pipe to the Refrigerator
1. After installing the union onto the
water pipe, insert the water pipe to
the refrigerator inlet valve by pressing
downwards firmly.
2. Fix union as seen in the opposite
figure, by squeezing by hand on the
refrigerator inlet valve.
3
1
4
2
*5
EN
13
a
a
b
c
Page 15
(a- Water Pipe, b-Union, c-Valve)
C Note 1: You should not need to
tighten the union with a tool to achieve
water tight assembly. In case of a leak
use a spanner or a pair of pliers to
tighten the union.
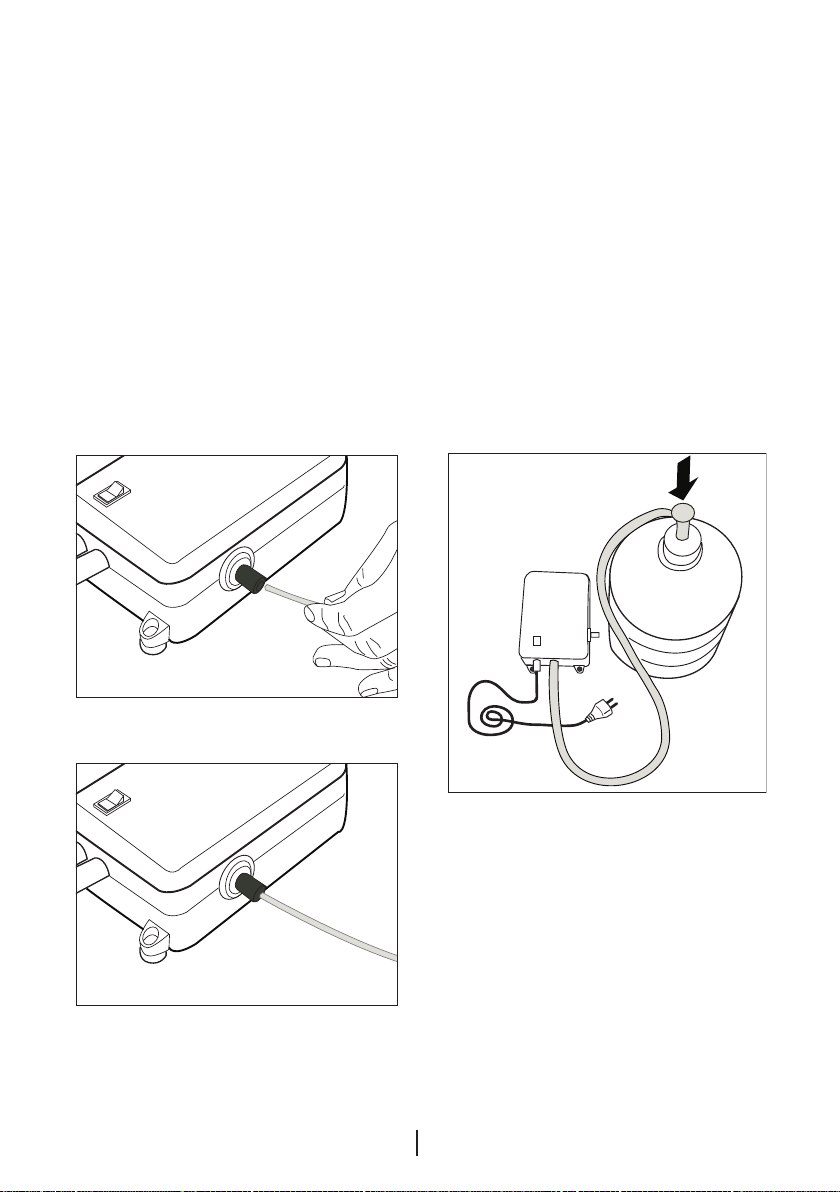
Connection of Water Hose to
the Jug
(in some models)
To connect water to the refrigerator
from a jug, a pump is needed. Follow
the instructions below after connecting
one end of the water pipe coming
out of the pump to the refrigerator as
described on the previous page.
1. Finish the connection by pushing
the other end of the water pipe into
the water pipe inlet of the pump as
shown in the figure.
2. Put and fix the pump hose into the
jug as shown in the figure.
3. After completing the connection, plug
in and run the pump.
To provide an efficient operation of the
pump, wait for 2-3 minutes after
starting the pump.
C You may refer to the user manual
of the pump while making the water
connection.
14
EN
Page 16
C There is no need to use water filter in
case a jug is used.
C Pump must be used when jug will be
used.
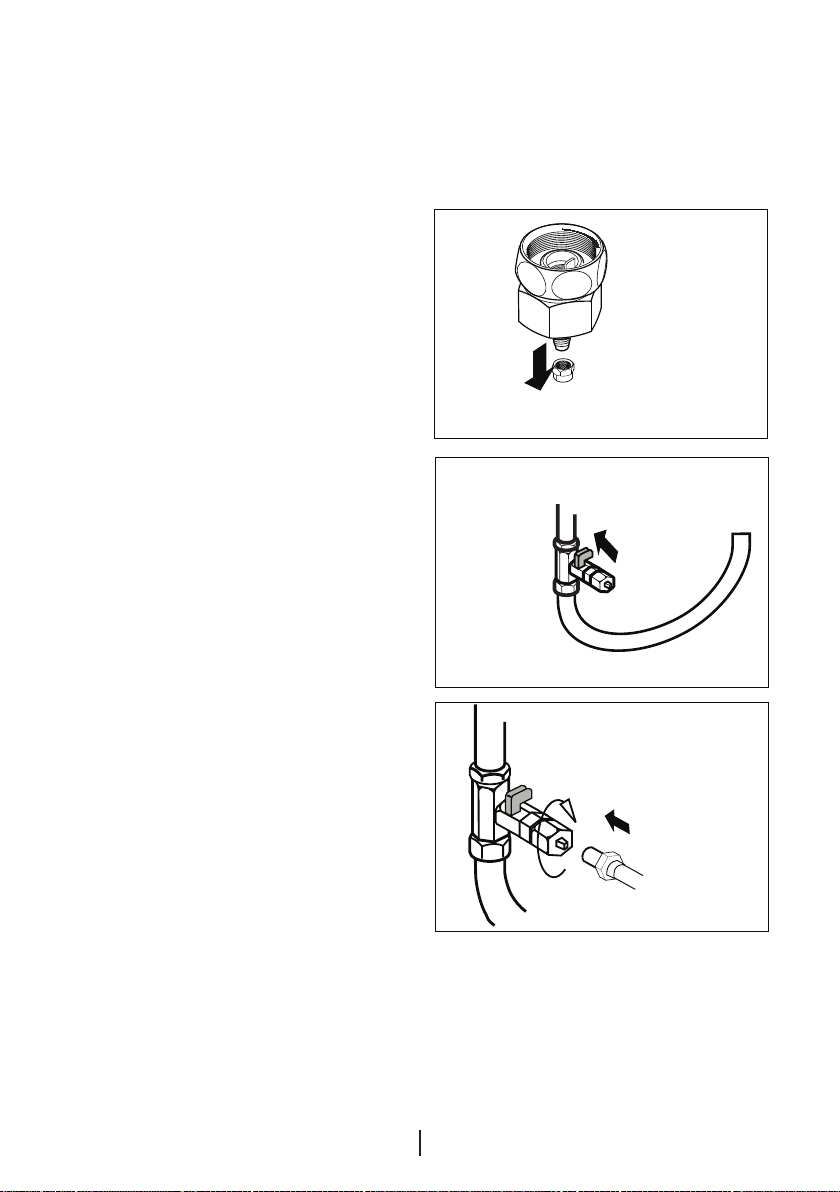
Connection of the Water
Pipe to the Cold Water Mains
Line
(in some models)
If you want to use your refrigerator by
connecting it to the cold water mains
line,
you will have to connect a standard
1/2" valve connection fitting to the cold
water supply in your house. In case
this valve is not present or in case
you are not sure, consult a qualified
plumber.
1. Separate the union from the tap
adaptor. (Figure A)
2. Install the tap adaptor to 1/2” valve
fitting as shown in the figure. (Figure
B)
3. After inserting the water pipe to the
union, install it to the tap adaptor
and insert to the tap as shown in the
figure. (Figure C)
4. Tighten the union manually. In case of
a leak use a spanner or a pair of pliers
to tighten the union.
A Caution: Secure the water pipe
to suitable points by means of the
pipe clips supplied to avoid any
damage or displacement or accidental
disconnection.
15
EN
Page 17
A Caution: After turning on the water
valve, make sure that there is no
leakage at both connection points of
the water pipe. In case of a leak, turn
off the valve immediately and tighten all
joints again using a spanner or a pair
of pliers.
A Caution: Make sure that standard
1/2" valve fitting fed by cold mains
water supply is available and is turned
off fully.
To fit the water filter follow the
instructions below referring to figures
supplied:
1. Press ice cancel button on the
display.
2. Remove the filter cover in the fridge
compartment by pulling it forward.
3. Take out the water filter by-pass
cover by rotating it downwards.
A Caution: Make sure that the “Ice
off” mode is active before taking out
the by-pass cover.
Note: It is normal that a few drops of
water drip after the cover has been
taken out.
4. Remove the lid on top of the water
filter to place it as shown in the figure
and turn upwards to lock it.
16
EN
Page 18

5. Press ice cancel button on the
display again to exit from this mode.
Water filter should be replaced every 6
months.
If you want to have the filter change
time calculated automatically and
receive a warning at the end of usage
time, please read "Calculating the Filter
Usage Time Automatically" section.
The water filter must be removed as
shown in the figure when it is going to
be replaced or when it will no longer
be used and by-pass cover must be
attached. It must be made sure that
Ice Off mode is active before taking it
out.
A Caution: Water filter cleans some
foreign particles in the water. It does
not purify water from microorganisms.
A Caution: Ice Off button must always
be pressed during replacement of the
water filter or installing the by-pass
cover.
Prior to first use of Water
Dispenser
C Water mains pressure must not be
below 1 bar.
C Water mains pressure must not be
above 8 bars.
C Pumps must be used in case the
supply water pressure drops below 1
bar or if a jug is going to be used.
C Water system of the refrigerator
must be connected to the cold water
line. It must not be connected to hot
water line.
C No water may be obtained in the
initial operation of the refrigerator. This
is caused by the air in the system. To
discharge air from the system, press
Dispenser latch for periods of 1 minute
until water comes from the Dispenser.
Water flow may be irregular in the
beginning. Irregular water flow will be
normalized after the air in the system is
discharged.
C At the initial startup of the
refrigerator approx.12 hours must pass
before cold water can be obtained.
C Water mains pressure must be
between 1-8 bars for the operation
of Ice/Water Dispenser smoothly. For
this, check that 1 glass of water (100
cc) can be filled in 10 seconds.
C The first 10 glasses of water should
not be consumed.
C Approximately the first 30 cubes
of ice to be obtained from the Ice
Dispenser must not be used.
C Always use the water filter when a
jug is not being used.
17
EN
Page 19

4 Preparation
C Your refrigerator should be installed at
least 30 cm away from heat sources
such as hobs, ovens, central heater
and stoves and at least 5 cm away
from electrical ovens and should not
be located under direct sunlight.
C The ambient temperature of
the room where you install your
refrigerator should at least be 10°C.
Operating your refrigerator under
cooler conditions than this is not
recommended with regard to its
efficiency.
C Please make sure that the interior
of your refrigerator is cleaned
thoroughly.
C If two refrigerators are to be installed
side by side, there should be at least
2 cm distance between them.
C When you operate your refrigerator
for the first time, please observe the
following instructions during the initial
six hours.
- The door should not be opened
frequently.
- It must be operated empty without
any food in it.
- Do not unplug your refrigerator. If
a power failure occurs out of your
control, please see the warnings in
the “Recommended solutions for the
problems” section.
C Original packaging and foam
materials should be kept for future
transportations or moving.
18
EN
Page 20
1 7 11 12 15 4
5
6
2
3
16
17
18 20 19
10 9 14 138
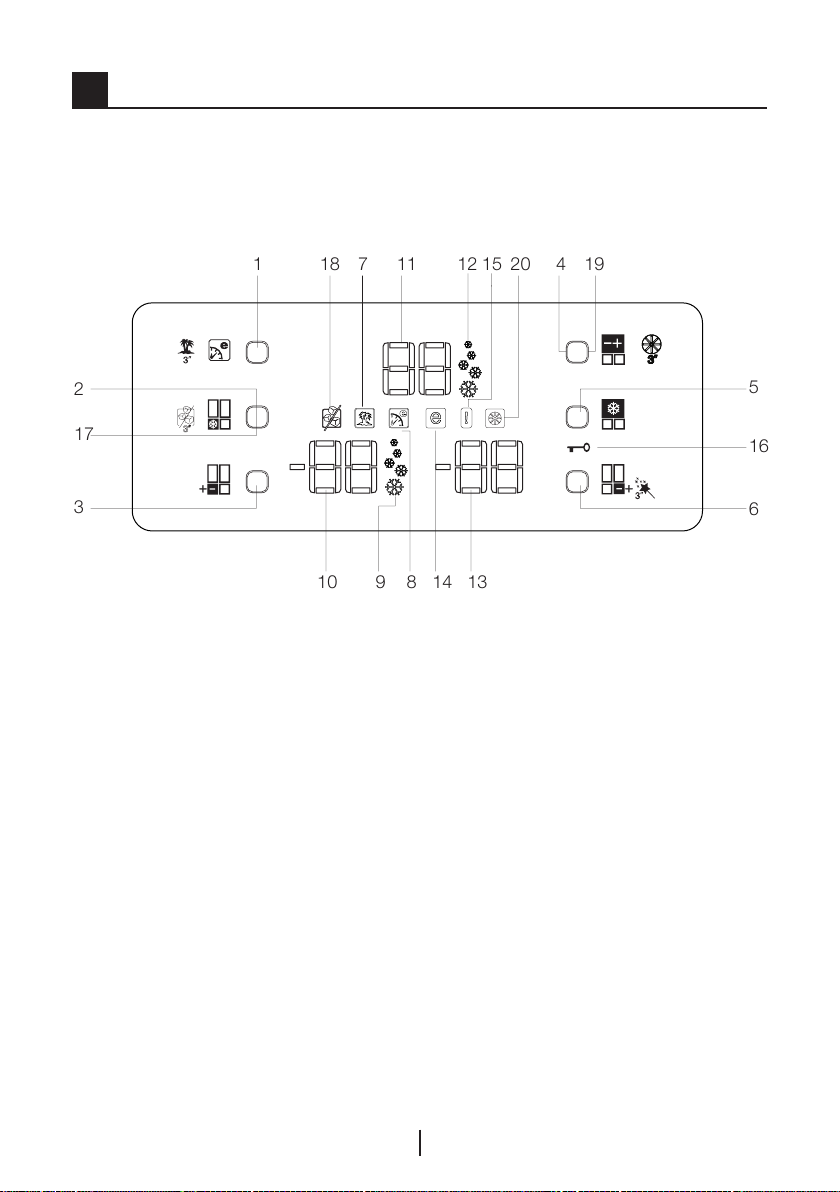
5 Using your refrigerator
Indicator Panel
This touch-control indicator panel allows you to set the temperature without
opening the door of your refrigerator. Just touch the relevant button with your
finger to set the temperature.
1. Eco-Extra / Vacation Button
2. Fast Freeze Button
3. Freezer Compartment
Temperature Setting Button
4. Fridge Compartment Temperature
Setting Button
5. Quick Cool Button
6. Multi Zone Compartment
Temperature Setting Button
7. Vacation Function Indicator
8. Eco-Extra Function Indicator
9. Fast Freeze Function Indicator
10. Freezer Compartment
Temperature Indicator
C Figures that take place in this instruction manual are schematic and may not
11. Fridge Compartment Temperature
Indicator
12. Quick Cool Function Indicator
13. Multi Zone Compartment
Temperature Indicator
14. Economy Mode Indicator
15. Error Status Indicator
16. Key Lock Indicator
17. Ice Cancel Button
18. Ice Off indicator
19. Cancel Filter Change Warning
Button
20. Filter Change Warning Indicator
correspond exactly with your product. If the subject parts are not included in the
product you have purchased, then it is valid for other models.
EN
19
Page 21

1. Eco Extra/Vacation Button
Press this button briefly to activate the
Eco Extra function. Press and hold
this button for 3 sec. to activate the
Vacation function. Press this button
again to deactivate the selected
function.
2. Fast Freeze Button
Press this button briefly to activate
the Fast Freeze function. Press this
button again to deactivate the selected
function.
3. Freezer Compartment
Temperature Setting Button
Press this button to set the
temperature of the freezer
compartment to -18, -20, -22, -24,
-18... respectively. Press this button
to set the desired temperature for the
Freezer Compartment.
4. Fridge Compartment
Temperature Setting Button
Press this button to set the
temperature of the fridge compartment
to 8, 6, 4, 2, 8... respectively.
Press this button to set the
desired temperature for the Fridge
Compartment.
5. Quick Cool Button
Press this button briefly to activate
the Quick Cool function. Press this
button again to deactivate the selected
function.
20
6. Multi Zone Compartment
Temperature Setting Button
You can set the Multi Zone
Compartment either as a Freezer or
a Cooler. Press and hold this button
for a long time (3 sec) to set the Multi
Zone Compartment as a Freezer or a
Cooler. This compartment is set as a
Freezer Compartment at factory.
If the Multi Zone Compartment is set
as a Freezer, then the temperature
of the Multi Zone Compartment
will change as -18, -20, -22, -24,
-18... respectively each time you
press this button. If the Multi Zone
Compartment is set as a Fridge, then
the temperature of the Multi Zone
Compartment will change as 10, 8, 6,
4, 2, 0, -6, ... respectively each time
you press this button.
7. Vacation Function Indicator
Indicates that the vacation function
is active. If this function is active,
"- -" appears on the indicator of the
fridge compartment and no cooling is
performed in the fridge compartment.
Other compartments will be cooled in
accordance with the temperature set
for them.
Press the relevant button again to
deactivate this function.
8. Eco Extra Function Indicator
It indicates that the Eco-Extra function
is active. If this function is active, your
refrigerator will automatically detect
the least usage periods and energyefficient cooling will be performed
during those times. Economy indicator
will be active while energy-efficient
cooling is performed.
EN
Page 22

Press the relevant button again to
deactivate this function.
9. Quick Freeze Function Indicator
It indicates that the Fast Freeze
function is active. Use this function
when you place fresh food into the
freezer compartment or when you
need ice. When this function is active,
your refrigerator will run for a certain
period of time.
Press the relevant button again to
deactivate this function.
13. Multi Zone Compartment
Temperature Indicator
It indicates the temperature set for
Multi Zone compartment.
14. Economy Mode Indicator
Indicates that the refrigerator is running
in energy-efficient mode. Freezer
Compartment temperature
This indicator will be active if the
function is set to -18 or the energy
efficient cooling is being performed
due to Eco-Extra function.
10. Freezer Compartment
Temperature Indicator
It indicates the temperature set for
Freezer Compartment.
11. Fridge Compartment
Temperature Indicator
Indicates the temperature set for
Fridge Compartment.
12. Quick Cool Function Indicator
Indicates that the Quick Cool function
is active. Use this function when
you place fresh food into the fridge
compartment or when you need to
cool your food quickly. When this
function is active, your refrigerator will
run for 2 hours without stopping.
Press the relevant button again to
deactivate this function.
15. Error Status Indicator
If your refrigerator does not cool
adequately or if there is a sensor
failure, this indicator will be activated.
When this indicator is active,
Freezer Compartment Temperature
indicator will display "E" and Fridge
Compartment Temperature Indicator
will display numbers such as "1,2,3…".
These numbers on the indicator
provides information about the error to
the service personnel.
16. Key Lock Indicator
Use this function if you do not
want your refrigerator temperature
setting changed. Press Quick Cool
Button and Flexi Zone Compartment
Temperature Setting Button
simultaneously for a long time (3 sec)
to activate this feature.
Press the relevant buttons again to
deactivate this function.
21
EN
Page 23

17. Ice Cancel Button
To stop ice formation, ice cancel
button is pressed for 3 seconds. When
ice cancel is selected, no water will
be sent to the ice box. Despite this,
some ice may be leftover in the ice
box which may be taken from there. To
restart ice formation, ice cancel button
has to be pressed for 3 seconds.
18. Ice Cancel Indicator
If you do not want to get ice from
the refrigerator, you need to use this
function. You may use this function by
pressing the ice cancel button for 3
seconds.
19. Cancel Filter Change Warning
Button
Filter of your refrigerator must be
replaced every 6 months. If you
apply instructions on page 22, your
refrigerator calculates this time
automatically and the filter change
waning indicator illuminates when the
filter usage time has elapsed. Press
Cancel filter change warning button
for 3 seconds to allow the refrigerator
to calculate the new filter time
automatically after changing the filter.
20. Cancel Filter Change Warning
Indicator
When the filter usage time has
elapsed, filter change warning indicator
starts to illuminate.
Door Open Alarm:
In case of leaving any of the
Fridge Compartment or Flexi Zone
Compartment doors open minimum
for 1 minute, audible Door Open Alarm
will be activated and heard. Just press
any button on the indicator or close
the open door to silence the alarm.
22
EN
Page 24

Things to do to have the filter usage time calculated
automatically
(For products connected to the mains water line and equipped with filter)
1- After plugging the refrigerator in, press A and B buttons together to activate
the key lock.
A
B
2- Then press Eco-Extra (1), Fridge Compartment Temperature Setting (4), Quick
Cool (5) and Freezer Compartment Temperature Setting (3) buttons respectively.
1 4
5
3
If button configuration is pressed in the correct order, key lock symbol will go off,
buzzer will be activated shortly, and Filter change warning indicator illuminates.
Press cancel filter change warning button (Item 19 in display descriptions) after
changing the filter to have the filter usage time calculated automatically.
NOTE:
1. If the filter usage time is being calculated automatically, filter change warning
indicator will illuminate continuously in a few seconds after the product is
plugged in.
2. Automatic filter usage time calculation is not active ex factory. It must be
activated in products equipped with a filter.
3. Repeat the same procedure in products whose automatic filter usage time
calculation is activated in order to deactivate the filter usage time calculation.
EN
23
Page 25

Egg tray
You can install the egg holder to the
desired door or body shelf.
Never store the egg holder in the
freezer compartment
Sliding Body Shelves
Sliding body shelves can be pulled
by slightly lifting up from the front and
moved back and forth. They come to
a stop point when pulled towards front
to allow you reach the foods placed at
the back of the shelf; when it is pulled
after slightly lifted upwards at the
second stop point, the body shelf will
be released.
The shelf should be hold tightly from
the bottom as well in order to prevent
it from tipping over. The body shelf is
placed on the rails at the sides of the
refrigerator body by bringing it to one
lower or one upper level.
The body shelf should be pushed
backwards to seat it completely.
1
2
3
4
Crisper
Crisper of your refrigerator is designed
specially to keep your vegetables
freshly without loosing their humidity.
For this purpose, cool air circulation
occurs around the crisper in general.
Remove the door shelves that align
with the crisper before removing the
crispers. You can remove the crispers
as illustrated in the figure.
Chiller compartment
Chiller compartments enable the
foods to be frozen become ready
for freezing. You can also use these
compartments to store your food at a
temperature a few degrees below the
fridge compartment.
You can increase the inner volume of
your refrigerator by removing any of
the chiller compartments. To do this,
pull the compartment towards yourself;
the compartment will lean against the
stopper and stop. This compartment
will be released when you lift it about 1
cm and pull it towards yourself.
24
EN
Page 26

Movable Middle Section
Movable middle section is intended
to prevent the cold air inside your
refrigerator from escaping outside.
1- Sealing is provided when the
gaskets on the door presses on the
surface of the movable middle section
while the fridge compartment doors
are closed.
2- Another reason that your refrigerator
is equipped with a movable middle
section is that it increases the net
volume of the fridge compartment.
Standard middle sections occupy
some non-usable volume in the
refrigerator.
3- Movable middle section is closed
when the left door of the fridge
compartment is closed.
4- It must not be opened manually.
It moves under the guidance of the
plastic part on the body while the door
is closed.
store the deli products longer, and -6
degrees is used to keep the meats
up to 2 weeks in an easily cuttable
condition.
C The feature of switching to a Fridge
or Freezer compartment is provided by
a cooling element located in the closed
section (Compressor Compartment)
behind the refrigerator. During
operation of this element, sounds
similar to the sound of seconds heard
from an analog clock may be heard.
This is normal and is not fault cause.
Multi Zone Storage
Compartment
The Multi Zone Storage Compartment
of your refrigerator may be used in
any desired mode by adjusting it to
fridge (2/4/6/8 °C) or freezer (-18/20/-22/-24) temperatures. You can
keep the compartment in the desired
temperature with the Multi Zone
Storage Compartment Temperature
Setting Button. The temperature of
the Multi Zone Storage Compartment
may be set to 0 and 10 degrees in
addition to the fridge compartment
temperatures and to -6 degrees in
addition to the freezer compartment
temperatures. 0 degree is used to
Blue light
Foodstuff stored in the crispers that
are enlightened with a blue light
continue their photosynthesis by
means of the wavelength effect of blue
light and thus, preserve their freshness
and increase their vitamin content.
EN
25
Page 27

Sliding Body Shelves With
Rear Hangers
Sliding body shelves with rear hangers
can be moved back and forth. Height
of these shelves can be adjusted by
removing and then installing them
to upper or lower positions. Raise
the shelf up slightly and pull towards
yourself to remove it.
Using the water spring
Warnings
It is normal for the first few glasses of
water taken from the dispenser to be
warm.
In cases where the water dispenser
has not been used frequently, sufficient
amount of water must be drained from
the dispenser to get fresh water.
Butter & Cheese Section
You can store food such as butter,
cheese, and margarine in this section
which has a lid.
Spillage Tray
Water drops that drip during use,
accumulates in the spillage tray. You
can remove spillage tray by pulling
it to yourself or pressing on its edge
(depending on the model). You can
remove the water with a sponge or a
soft cloth.
EN
26
Page 28

Minibar
Minibar door provides you extra
comfort when using your refrigerator.
The door shelf in the refrigerator
can be accessed without opening
the refrigerator door; thanks to this
feature, you can easily pick from the
refrigerator the foods and drinks which
you frequently consume. Since you do
not have to open the refrigerator door
frequently, you will have decreased the
power consumption of refrigerator.
To open the minibar door, press by
your hand on the minibar and pull
back to open.
When the door of minibar is open, you
may use the inner face of the door as
a table on which you may put your
bottles and glasses for a short time as
shown in the figure.
A Caution: Never do things that
may put pressure on the door such
as sitting on, climbing up or hanging
to the table and do not place heavy
objects on it. This may cause damage
on the refrigerator or personal injuries.
A Caution: Never perform cutting on
the Minibar door and be careful that
the door is not damaged by pointed
objects.
27
EN
Page 29

6 Cleaning and care
A Never use gasoline, benzene or
similar substances for cleaning
purposes.
B We recommend that you unplug the
appliance before cleaning.
C Never use any sharp abrasive
instrument, soap, household
cleaner, detergent and wax polish for
cleaning.
C Use lukewarm water to clean the
cabinet of your refrigerator and wipe it
dry.
C Use a damp cloth wrung out in
a solution of one teaspoon of
bicarbonate of soda to one pint of
water to clean the interior and wipe it
dry.
B Make sure that no water enters the
lamp housing and other electrical
items.
B If your refrigerator is not going to be
used for a long period of time, unplug
the power cable, remove all food,
clean it and leave the door ajar.
C Check door seals regularly to ensure
they are clean and free from food
particles.
A To remove door racks, remove all the
contents and then simply push the
door rack upwards from the base.
Protection of plastic
surfaces
C Do not put the liquid oils or oil-cooked
meals in your refrigerator in unsealed
containers as they damage the
plastic surfaces of your refrigerator. In
case of spilling or smearing oil on the
plastic surfaces, clean and rinse the
relevant part of the surface at once
with warm water.
28
EN
Page 30

7 Recommended solutions for the problems
Please review this list before calling the service. It might save you time and
money. This list includes frequent complaints that are not arising from defective
workmanship or material usage. Some of the features described here may not
exist in your product.
The refrigerator does not operate.
• Is the refrigerator properly plugged in? Insert the plug to the wall socket.
• Is the fuse of the socket which your refrigerator is connected to or the main fuse
blown out? Check the fuse.
Condensation on the side wall of the fridge compartment (MULTIZONE, COOL
CONTROL and FLEXI ZONE).
• Very cold ambient conditions. Frequent opening and closing of the door. Highly
humid ambient conditions. Storage of food containing liquid in open containers.
Leaving the door ajar. Switching the thermostat to a colder degree.
• Decreasing the time the door left open or using it less frequently.
• Covering the food stored in open containers with a suitable material.
• Wipe the condensation using a dry cloth and check if it persists.
Compressor is not running
• Protective thermic of the compressor will blow out during sudden power
failures or plug-out plug-ins as the refrigerant pressure in the cooling system of
the refrigerator has not been balanced yet. Your refrigerator will start running
approximately after 6 minutes. Please call the service if the refrigerator does not
startup at the end of this period.
• The fridge is in defrost cycle. This is normal for a full-automatically defrosting
refrigerator. Defrosting cycle occurs periodically.
• Your refrigerator is not plugged into the socket. Make sure that the plug is
properly fit into the socket.
• Are the temperature adjustments correctly made?
• Power might be cut off.
The fridge is running frequently or for a long time.
29
EN
Page 31

• Your new product may be wider than the previous one. This is quite normal.
Large refrigerators operate for a longer period of time.
• The ambient room temperature may be high. This is quite normal.
• The refrigerator might have been plugged in recently or might have been loaded
with food. Cooling down of the refrigerator completely may last for a couple of
hours longer.
• Large amounts of hot food might have been put in the refrigerator recently. Hot
food causes longer running of the refrigerator until they reach the safe storage
temperature.
• Doors might have been opened frequently or left ajar for a long time. The warm
air that has entered into the refrigerator causes the refrigerator to run for longer
periods. Open the doors less frequently.
• Freezer or fridge compartment door might have been left ajar. Check if the doors
are tightly closed.
• The refrigerator is adjusted to a very low temperature. Adjust the refrigerator
temperature to a warmer degree and wait until the temperature is achieved.
• Door seal of the fridge or freezer may be soiled, worn out, broken or not properly
seated. Clean or replace the seal. Damaged/broken seal causes the refrigerator
to run for a longer period of time in order to maintain the current temperature.
Freezer temperature is very low while the fridge temperature is sufficient.
• The freezer temperature is adjusted to a very low temperature. Adjust the freezer
temperature to a warmer degree and check.
Fridge temperature is very low while the freezer temperature is sufficient.
• The fridge temperature might have been adjusted to a very low temperature.
Adjust the fridge temperature to a warmer degree and check.
Food kept in the fridge compartment drawers are freezing.
• The fridge temperature might have been adjusted to a very low temperature.
Adjust the fridge temperature to a warmer degree and check.
Temperature in the fridge or freezer is very high.
• The fridge temperature might have been adjusted to a very high degree.
Fridge adjustment has an effect on the temperature of the freezer. Change the
temperature of the fridge or freezer until the fridge or freezer temperature reaches
to a sufficient level.
• Doors might have been opened frequently or left ajar for a long time; open them
less frequently.
• Door might have been left ajar; close the door completely.
• Large amount of hot food might have been put in the refrigerator recently. Wait
until the fridge or freezer reaches the desired temperature.
• The refrigerator might have been plugged in recently. Cooling down of the
refrigerator completely takes time.
The operation noise increases when the refrigerator is running.
30
EN
Page 32

• The operating performance of the refrigerator may change due to the changes in
the ambient temperature. It is normal and not a fault.
Vibrations or noise.
• The floor is not even or it is weak. The refrigerator rocks when moved slowly.
Make sure that the floor is strong enough to carry the refrigerator, and level.
• The noise may be caused by the items put onto the refrigerator. Items on top of
the refrigerator should be removed.
There are noises coming from the refrigerator like liquid spilling or spraying.
• Liquid and gas flows happen in accordance with the operating principles of your
refrigerator. It is normal and not a fault.
There is a noise like wind blowing.
• Fans are used in order to cool the refrigerator. It is normal and not a fault.
Condensation on the inner walls of refrigerator.
• Hot and humid weather increases icing and condensation. It is normal and not a
fault.
• Doors might have been left ajar; make sure that the doors are closed fully.
• Doors might have been opened frequently or left ajar for a long time; open them
less frequently.
Humidity occurs on the outside of the refrigerator or between the doors.
• There might be humidity in the air; this is quite normal in humid weather. When
the humidity is less, condensation will disappear.
Bad odor inside the refrigerator.
• Inside of the refrigerator must be cleaned. Clean the inside of the refrigerator with
a sponge, lukewarm water or carbonated water.
• Some containers or package materials might cause the smell. Use a different
container or different brand packaging material.
The door is not closing.
• Food packages may prevent the door's closing. Replace the packages that are
obstructing the door.
• The refrigerator is not completely upright on the floor and rocking when slightly
moved. Adjust the elevation screws.
• The floor is not level or strong. Make sure that the floor is level and capable to
carry the refrigerator.
Crispers are stuck.
• The food might be touching the ceiling of the drawer. Rearrange food in the
drawer.
31
EN
Page 33

Producer: «Arcelik A.S.»
www.beko.com
Address: Karaağaç Caddesi No:2-6 Sütlüce, 34445, Turkey
Made in Turkey
Importer in Russia: «BEKO LLC»
Address: 601010, Vladimirskaja oblast, Kirjach region, factory «BEKO»
The manufacture date is included in the serial number of a product specified on
rating label, which is located on a product, namely: first two figures of serial number
indicate the year of manufacture, and last two – the month. For example, ”10100001-05» indicates that the product was produced in May, 2010.
You can ask for certification number from our Call Center 8-800-200-23-56
EN
32
Page 34

Пожалуйста, сначала прочтите данное руководство!
Уважаемый покупатель!
Надеемся, что наше изделие, выпущенное на современных предприятиях, и
проверенное с помощью самых тщательных процедур контроля качества, будет
надежно служить вам.
Поэтому, прежде чем пользоваться изделием, рекомендуем внимательно и
полностью изучить данное руководство и хранить его под рукой для использования в
справочных целях в будущем.
Данное руководство
• Поможет вам быстро и безопасно пользоваться изделием.
• Прежде чем устанавливать изделие и пользоваться им, прочтите руководство.
• Соблюдайте инструкции, особенно в отношении техники безопасности.
• Храните руководство в легко доступном месте, так как оно может понадобиться
вам в будущем.
• Кроме того, прочитайте другие документы, поставляющиеся в комплекте с
изделием.
Просим учесть, что данное руководство по эксплуатации может применяться и для
других моделей.
Символы и их описания
В данном руководстве по эксплуатации используются следующие символы:
Важная информация или полезные советы по эксплуатации.
C
Предупреждение об опасности для жизни и имущества.
A
Предупреждение об опасном напряжении электросети.
B
Page 35

СОДЕРЖАНИЕ
1 Холодильник 3
2 Важные указания по технике
безопасности 4
Использование по назначению ............4
Для изделий с раздатчиком
охлажденной воды: ...............................6
Безопасность детей ..............................6
Предупреждение органов
здравоохранения ...................................6
Рекомендации по экономии
электроэнергии ......................................7
Технические характеристики
морозильника ........................................7
Рекомендации по использованию
отделения для свежих продуктов .......8
3 Установка 9
Что следует учитывать при
транспортировке холодильника ...........9
Перед эксплуатацией холодильника ....9
Подключение к электросети ................9
Утилизация упаковки ..........................10
Утилизация старого холодильника ....10
Размещение и установка ....................10
Регулировка положения на полу ........ 10
Регулировка зазора между верхними
дверцами .............................................. 11
Замена лампочки ................................ 12
Установка водяного фильтра ............13
Подключение водопроводной трубы к
холодильнику. ....................................... 13
Подсоединение шланга подачи воды к
баку ......................................................14
Подключение водопроводной трубы к
водопроводной линии ........................15
Прежде чем использовать
распределитель воды .........................17
5 Пользование
холодильником 19
Панель индикаторов ...........................19
Сигнал открытия дверцы ..................22
Рекомендации по автоматическому
определению времени использования
фильтра ................................................23
Выдвижные полки ...............................24
Лоток для яиц ......................................24
Контейнер для фруктов и овощей .....24
Отделение охладителя .......................24
Съемное среднее отделение ............25
Отделение для хранения продуктов
Flexi Zone ..............................................25
Синий свет ...........................................25
Скользящие полки с задними
креплениями ........................................26
Полка для масла и сыра .....................26
Пользование краном подачи воды.....26
Лоток для разлитых продуктов..........26
Мини-бар ..............................................27
6 Чистка и уход 28
Защита пластмассовых
поверхностей ......................................28
7 Рекомендации
по устранению
неисправностей 29
4 Подготовка 18
RU
2
Page 36

1 Холодильник
17
18 19
2
3
6
7
8
9
5
4
16
13
11
14
1
12
10
15
1- Полки в дверце холодильного
отделения
2- Стеклянные полки холодильного
отделения
3- Крышка рассеивателя
4- Рассеиватель лампочки освещения
5- Съемное среднее отделение
6- Отделение охладителя
7- Контейнер для фруктов и овощей
8- Icematic (ледогенератор)
9- Отделения для хранения
замороженных продуктов
10- Мини-бар
11- Держатель для бутылок
12- Полка для бутылок
13- Полки отделения для хранения
продуктов
14- Отделения для хранения продуктов
15- Водяной фильтр
16- Полка для масла и сыра
17- Холодильное отделение
18- Морозильное отделение
19- Отделение Flexi Zone
C Цифры, приведенные в данном руководстве по эксплуатации, являются
схематическими и могут не полностью соответствовать вашему изделию. Если
некоторые компоненты не входят в состав приобретенного вами изделия, они
действительны для других моделей.
RU
3
Page 37

2 Важные указания по технике безопасности
Обязательно ознакомьтесь со следующей
информацией. Игнорирование данной
информации может привести к
причинению травм или повреждению
имущества. Кроме того, гарантийные
обязательства и обязательства по
эксплуатационной надёжности утратят
силу.
Срок службы приобретенного вами
изделия составляет 10 лет. Это срок,
в течение которого предоставляются
запасные части, необходимые для
нормальной работы изделия.
Использование по
назначению
Это изделие предназначено для
использования
– в помещении и на закрытых
пространствах, например, в доме;
– в закрытых рабочих помещениях,
например, в магазинах и офисах;
– в закрытых жилых помещениях,
например, в загородных домах,
гостиницах, пансионах.
• Это изделие предназначено для
использования только в помещении.
Общие правила техники безопасности
• В случае необходимости утилизировать
или уничтожить изделие для
получения необходимой информации
рекомендуется обратиться в
фирменный сервисный центр, а также в
местные органы власти.
• По всем вопросам, касающимся
холодильника, обращайтесь в
фирменный сервисный центр. Не
вмешивайтесь в работу изделия
и не разрешайте этого другим без
уведомления фирменного сервисного
центра.
• Для изделий с морозильным
отделением: не ешьте мороженое в
рожках и кубики льда сразу после их
извлечения из морозильного отделения!
(Это может вызвать обморожение
полости рта.)
• Для изделий с морозильным
отделением: не помещайте напитки
в бутылках и банках в морозильное
отделение. Они могут лопнуть.
• Не дотрагивайтесь до замороженных
продуктов – они могут примерзнуть к
рукам.
• Отключайте холодильник от сети перед
чисткой или размораживанием.
• Ни в коем случае не используйте для
чистки и размораживания холодильника
пар или аэрозольные чистящие
средства. В этом случае пар может
попасть на электрические компоненты,
что приведет к короткому замыканию
или поражению электрическим током.
• Ни в коем случае не используйте
холодильник или его части (например,
дверцу) в качестве подставки или
опоры.
• Не используйте электрические приборы
внутри холодильника.
• Не допускайте повреждения частей,
в которых циркулирует хладагент,
используя режущие или сверлильные
инструменты. Хладагент может
вырваться из пробитого испарителя,
трубопроводов или покрытий
поверхности и вызвать раздражение
кожи и поражение глаз.
• Ни в коем случае не закрывайте и
не закупоривайте вентиляционные
отверстия холодильника.
• Ремонт электрического оборудования
должны производить только
квалифицированные специалисты.
Ремонт, выполненный некомпетентными
лицами, может создать опасность для
потребителя.
• В случае неполадок во время
эксплуатации, а также при проведении
техобслуживания или ремонта
отключите холодильник, выключив
соответствующий предохранитель или
вынув шнур питания из розетки.
• Не тяните за сетевой шнур, вынимая
вилку из розетки.
• Крепкие спиртные напитки следует
хранить в плотно закрытом виде и
вертикальном положении.
• Нельзя хранить в холодильнике
банки с горючими и взрывоопасными
веществами.
RU
4
Page 38

• Для ускорения процесса
размораживания не используйте
механические устройства или
другие средства, кроме тех, которые
рекомендованы производителем.
• Данный электроприбор не предназначен
для использования лицами (включая
детей) с ограниченными физическими,
сенсорными и интеллектуальными
возможностями либо не имеющими
опыта и знаний. Они могут пользоваться
электроприбором только под
наблюдением лица, ответственного
за их безопасность, или под его
руководством.
• Ни в коем случае нельзя пользоваться
неисправным холодильником. При
возникновении вопросом обращайтесь к
квалифицированному специалисту.
• Электрическая безопасность
гарантируется только в том случае,
если система заземления в вашем доме
соответствует стандартам.
• Воздействие на устройство дождя,
снега, солнца или ветра опасно с точки
зрения электробезопасности.
• В случае повреждения шнура питания и
т.п. обратитесь в фирменный сервисный
центр, чтобы не подвергать себя
опасности.
• Ни в коем случае нельзя включать
холодильник в розетку во время
установки. Это может привести к
серьезным травмам или смерти.
• Этот холодильник предназначен только
для хранения пищевых продуктов. Его
нельзя использовать для каких-либо
иных целей.
• Табличка с техническими
характеристиками находится слева на
внутренней стенке холодильника.
• Ни в коем случае нельзя подключать
холодильник к электронным системам
экономии электроэнергии, поскольку это
может привести к его поломке.
• При наличии в холодильнике синей
подсветки не смотрите на нее через
оптические устройства.
• При отключении от сети электропитания
холодильника с ручным управлением
подождите не менее 5 минут, прежде
чем подключать его снова.
• В случае продажи изделия эту
инструкцию по эксплуатации следует
передать новому владельцу.
• При транспортировке холодильника
избегайте повреждения шнура
питания. Изгибание шнура питания
может привести к возгоранию. Не
ставьте на него тяжелые предметы.
При подключении холодильника к сети
электропитания не прикасайтесь к
вилке влажными руками.
• Ни в коем случае нельзя подключать
холодильник к плохо закрепленной
стенной розетке сети электропитания.
• Из соображений безопасности не
допускайте попадания воды на внешние
или внутренние части холодильника.
• Не распыляйте рядом с холодильником
воспламеняющиеся газы, такие как
газ пропан, ввиду риска пожара или
взрыва.
• Не ставьте сосуды с водой на
холодильник, поскольку это может
привести к поражению электрическим
током или пожару.
• Не загружайте холодильник продуктами
сверх меры. Если холодильник
перегружен, продукты могут выпасть
при открытии дверцы и травмировать
вас или повредить холодильник. Не
кладите предметы на холодильник,
поскольку они могут упасть при
открытии или закрытии дверцы.
• В холодильнике нельзя хранить
вещества, требующие определенных
температурных условий, такие как
вакцины, термочувствительные
медикаменты, материалы для научных
исследований и т.п.
• Холодильник следует отключить
от электросети, если он не будет
использоваться в течение длительного
времени. Неисправность шнура питания
может привести к возгоранию.
• Необходимо регулярно очищать
концы вилки шнура электропитания;
несоблюдение этого условия может
привести к пожару.
RU
5
Page 39

• Необходимо регулярно очищать
контакты вилки шнура питания сухой
тканью. Несоблюдение этого правила
может привести к пожару.
• Холодильник может смещаться, если
регулируемые ножки не зафиксированы
на полу. Фиксирование регулируемых
ножек на полу предотвратит смещение
холодильника.
• При перемещении холодильника не
держите его за ручку. В противном
случае он может поломаться.
• При установке холодильника
расстояние между ним и другим
холодильником или морозильником
должно составлять минимум 8
см. В противном случае боковые
прилегающие стенки будут
увлажняться.
Для изделий с раздатчиком
охлажденной воды:
Давление в водопроводной линии не
должно быть ниже 1 бара. Давление в
водопроводной линии не должно быть
выше 8 бар.
• Используйте только питьевую воду.
Безопасность детей
• Если на дверце есть замок, ключ
следует хранить в недоступном для
детей месте.
• Следует присматривать за детьми и не
разрешать им портить холодильник.
Предупреждение органов
здравоохранения
Если система охлаждения вашего
изделия содержит R600a:
Этот газ огнеопасен, поэтому будьте
осторожны, чтобы не повредить
систему охлаждения и трубопроводы
при эксплуатации и во время
транспортировки. В случае повреждения
уберите устройство подальше от
потенциальных источников огня, которые
могут привести к возгоранию, а также
проветривайте помещение, в котором
находится устройство.
Не обращайте внимания на
предупреждение, если система
охлаждения вашего изделия содержит
R134a.
Тип газа, используемого изделием,
указан на паспортной табличке,
расположенной слева на внутренней
стенке холодильника.
Не сжигайте изделие в целях утилизации.
RU
6
Page 40

2010-11-xx
Y Y Y Y - M M - D D
• Для изделий с морозильным
Рекомендации по экономии
электроэнергии
• Не оставляйте дверцу холодильника
открытой на длительное время.
• Не кладите в холодильник горячие
продукты или напитки.
• Не перегружайте холодильник, чтобы не
нарушать циркуляцию воздуха.
• Не устанавливайте холодильник в
местах, где на него попадают прямые
солнечные лучи, или поблизости от
источников тепла, таких как плита,
посудомоечная машина или радиатор
отопления.
• Следите за тем, чтобы контейнеры с
продуктами были закрыты.
Технические характеристики морозильника
Класс энергетической эффективности А+
Класс защиты
отделением: в морозильное
отделение холодильника можно
заложить максимальное количество
продуктов, если достать из него полку
или ящик. Указанное в технических
характеристиках энергопотребление
холодильника определено при
условии, что полка или ящик
морозильного отделения извлечены,
и в него загружено максимально
возможное количество продуктов.
Полку и ящик можно использовать
для замораживания продуктов в
соответствии с их формой и размером.
• Таяние замороженных продуктов в
холодильном отделении обеспечит
экономию электроэнергии и сохранение
качества продуктов.
1
RU
7
Page 41

Рекомендации по
temperature
sensor
food
MILK
juice
etc.
temperature
sensor
MILK
juice
etc.
temperature
sensor
использованию отделения
для свежих продуктов
*необязательный
• Не допускайте какого-либо контакта
продуктов с температурным датчиком в
отделении для свежих продуктов. Для
поддержания идеальной температуры
хранения в отделении для свежих
продуктов датчик не должен закрываться
хранящимися там продуктами.
•Не помещайте в холодильник горячие
продукты.
RU
8
Page 42

3 Установка
Помните, что производитель не
C
несет ответственности в случае
несоблюдения указаний, приведенных
в настоящем руководстве.
Что следует учитывать
при транспортировке
холодильника
1. Из холодильника следует вынуть все
продукты и промыть его перед любой
транспортировкой.
2. Перед упаковкой все полки,
оборудование, контейнеры для
фруктов и овощей и т.п. в холодильнике
должны быть хорошо закреплены от
тряски при помощи клейкой ленты.
3. Упаковывая холодильник с помощью
плотных лент и прочных веревок,
следует придерживаться правил
транспортировки, напечатанных на
упаковке.
Помните!
C
Вторичное использование материалов
очень важно для сохранения природы и
наших национальных богатств.
Если вы хотите отправить на
переработку материалы упаковки, более
подробную информацию можно получить
в экологических учреждениях или в
органах местной власти.
Перед эксплуатацией
холодильника
Перед началом эксплуатации изделия
проверьте следующее:
1. Сухо ли внутри холодильника, и может
ли воздух свободно циркулировать
позади него?
2. Вставьте 2 пластиковых клина на
задней вентиляционной крышке, как
показано на следующем рисунке. Для
этого отвинтите имеющиеся винты и
воспользуйтесь винтами из упаковки с
клиньями.
Пластиковые клинья обеспечат
необходимое расстояние между
холодильником и стеной для
надлежащей циркуляции воздуха.
3. Выполните чистку холодильника в
соответствии с рекомендациями,
приведенными в разделе
«Обслуживание и чистка».
4. Включите холодильник в сеть. При
открытии дверцы загорается лампочка
внутреннего освещения.
5. При запуске компрессора будет слышен
шум. Жидкость и газы, находящиеся
внутри герметичной системы
охлаждения, также могут создавать
шум, независимо от того, работает
компрессор или нет, что является
вполне нормальным явлением.
6. Передние кромки холодильника могут
казаться теплыми. Это нормально. Эти
области должны нагреваться, чтобы
избежать конденсации.
Подключение к
электросети
Подсоедините морозильную камеру к
правильно установленной заземленной
розетке, защищенной предохранителем
с соответствующим номиналом.
Важно!
RU
9
Page 43

Подключение следует выполнять в
B
соответствии с действующими в стране
правилами.
Вилка сетевого шнура должна быть
B
легко доступна после установки.
Напряжение и допустимые параметры
B
предохранителей указаны в разделе
«Технические характеристики».
Напряжение в сети должно
B
соответствовать указанному
напряжению.
Запрещается использовать
B
при установке удлинители и
многоконтактные штепсельные вилки.
Поврежденный шнур питания должен
B
быть заменен квалифицированным
электриком.
Запрещается пользоваться изделием
B
до его ремонта. Имеется опасность
поражения электрическим током.
Утилизация упаковки
Упаковочные материалы могут
A
быть опасны для детей. Храните
упаковочный материал в недоступном
для детей месте или утилизируйте
его, рассортировав в соответствии с
правилами утилизации отходов. Не
утилизируйте их вместе с обычными
бытовыми отходами.
Упаковочные материалы холодильника
изготовлены из материалов,
подлежащих вторичной переработке.
Утилизация старого
холодильника
Утилизация старого изделия должна
выполняться экологически безопасным
способом.
Чтобы узнать, как утилизировать
A
изделие, вы можете обратиться к
авторизованному дилеру или в пункт
сбора отходов по месту жительства.
Прежде чем утилизировать
A
холодильник, отрежьте шнур питания
и, в случае наличия замков на
дверце, выведите их из строя, чтобы
предотвратить создание опасных
ситуаций для детей.
Размещение и установка
Внимание! Не включайте
B
холодильник в розетку во время
его установки. В противном случае,
существует опасность получения
серьезных травм или смертельного
случая.
Если дверь помещения, в котором
A
будет установлен холодильник,
недостаточно широка, обратитесь в
авторизованный сервисный центр за
помощью в снятии дверец холодильника
и пронести в дверь холодильник боком.
1. Устанавливайте холодильник в месте,
удобном для его использования.
2. Холодильник должен находиться
в месте, удаленном от источника
тепла, мест повышенной влажности,
защищенном от прямых солнечных
лучей.
3. Для более эффективной работы
необходимо обеспечить хорошую
вентиляцию вокруг холодильника. Если
холодильник устанавливается в нише
стены, минимальное расстояние до
потолка должно составлять не менее 5
см и 5 см до стены.
Если пол имеет ковровое покрытие,
следует поднять холодильник на 2,5 см
над уровнем пола.
4. Холодильник должен стоять на ровной
поверхности для того, чтоб не возникала
тряска.
5. Температура помещения, в котором
находится холодильник, не должна быть
меньше 10°C.
Регулировка положения на
полу
Если холодильник расположен
A
неустойчиво:
Отсоедините его от электросети. В
B
течение регулировки положения на полу
холодильник должен быть отсоединен
от электросети. Имеется опасность
поражения электрическим током.
10
RU
Page 44

4
1 2 3
1- Отвинтите винты, которые держат
вентиляционную крышку, как показано
на рисунке. Вы можете отрегулировать
устойчивое положение холодильника
вращением передних ножек, как
показано на рисунке. Угол холодильника,
под которым находится ножка, будет
опускаться, если поворачивать ее
в направлении черной стрелки, или
подниматься, если поворачивать ее в
противоположном направлении. Если
слегка приподнять холодильник, это
облегчит процесс.
2. После того, как процесс балансировки
завершен, установите вентиляционную
крышку на место и закрепите ее
винтами.
Регулировка зазора между
верхними дверцами
Вы можете отрегулировать зазор
C
между дверцами холодильной камеры,
как указано на рисунке.
Во время регулировки дверей по высоте
двери холодильника должны быть
пустыми.
3. Отвинтите винты, которые держат
нижнюю вентиляционную крышку,
используя для этого отвертку Philips.
Используя отвертку, выньте винт
C
из крышки верхней петли той двери,
которую нужно отрегулировать.
RU
11
Page 45

Отрегулируйте дверь по своему
C
усмотрению, немного ослабляя винты.
Зафиксируйте отрегулированную
C
дверь,
затянув винты, не изменяя положения
двери.
Замена лампочки
Для замены лампочки освещения
холодильника обратитесь в
авторизированный сервисный центр.
Установите на место крышку петли и
C
зафиксируйте винтом.
12
RU
Page 46

Установка водяного
1
2
фильтра
(в некоторых моделях)
Для подачи воды к холодильнику
можно подсоединить два разных
источника воды: линию подачи
холодной воды и воду из бака.
Требования по установке
Во втором случае следует использовать
насос.
Проверьте, входят ли указанные
ниже запчасти в комплект поставки
холодильника.
1. Гайка для подключения водопроводной
трубы к задней стороне прибора.
(Если она не подходит, обратитесь
в ближайшую авторизованную
сервисную службу.)
2. 2 скобы водосточной трубы (если они
требуются для крепления водосточной
трубы).
Примечание. В случае использования
воды из бака эти запчасти не требуются,
поэтому могут не входить в комплект
поставки.
3. 5-метровая водопроводная труба
(диаметром ј дюйма).
4. Клапан в водопроводной линии с
сетчатым фильтром (переходная
втулка).
5. Водяной фильтр или фильтр,
присоединяемый снаружи, следует
прикрепить к скобе внутри холодильной
камеры.
Сначала определите место крепления
внешнего фильтра. (Относится к
фильтру, использующемуся вне
холодильника.) Затем измеряйте
расстояние между фильтром и
холодильником и необходимую длину
шланга от фильтра до отверстия
подачи воды.
Водяной фильтр должен находиться в
вертикальном положении, как показано
на рисунке. Крайне важно правильно
прикрепить фильтр к отверстиям
подачи и слива воды.
Установив фильтр, не используйте первые
3-4 стакана воды.
Подключение
водопроводной трубы к
холодильнику.
1. После установки гайки на
водопроводную трубу вставьте трубу во
впускной клапан холодильника, сильно
нажав его вниз.
2. Закрепите гайку, как показано на
рисунке, надавив рукой на впускной
клапан холодильника.
(a – водопроводная труба, b – гайка, c –
клапан)
Примечание 1. Чтобы узел был
C
водонепроницаемым, не нужно
закручивать гайку каким-либо
инструментом. В случае утечки
закрутите гайку гаечным ключом или
плоскогубцами.
a
3
1
4
2
*5
a
b
c
RU
13
Page 47

Подсоединение шланга
подачи воды к баку
(в некоторых моделях)
Для подачи в холодильник воды из
бака необходим насос. Выполните
изложенные ниже инструкции
после подсоединения одного конца
водопроводной трубы, выходящей из
насоса, к холодильнику, как описано на
предыдущей странице.
1. Завершите соединение, вставив
другой конец водопроводной трубы в
соответствующее входное отверстие
насоса, как показано на рисунке.
2. Вставьте и закрепите шланг насоса в
бак, как показано на рисунке.
3. По завершении монтажа подсоедините
насос к сети питания и включите его.
Эффективная работа насоса начнется
через 2-3 минуты после его включения.
Выполняя подключение воды,
C
обращайтесь к руководству
пользователя насоса.
В случае использования бака нет
C
необходимости в работе водяного
фильтра.
В случае использования бака
C
необходим насос.
14
RU
Page 48

Подключение
водопроводной трубы к
водопроводной линии
(в некоторых моделях)
Подсоединение холодильника к линии
подачи холодной воды в вашем доме
осуществляется через стандартный
патрубок с клапаном 1/2". Если такой
клапан отсутствует или вы не уверены
в своих действиях, обратитесь к
квалифицированному водопроводчику.
1. Отсоедините гайку от переходной
втулки. (Рис. А)
2. Установите переходную втулку в
патрубок с клапаном 1/2", как показано
на рисунке. (Рис. B)
3. После надевания гайки на
водопроводную трубу установите ее на
переходную втулку и вставьте втулку,
как показано на рисунке. (Рис. C)
4. Закрутите гайку вручную. В случае
утечки закрутите гайку гаечным
ключом или плоскогубцами.
Внимание! С помощью скоб
A
закрепите водопроводную трубу в
соответствующих местах для того, чтобы
избежать повреждений, смещения или
случайного отсоединения.
Внимание! После поворота водяного
A
клапана проверьте, чтобы в обеих точках
соединения водяной трубы не было
утечки. При наличии утечки немедленно
отключите клапан и снова затяните все
соединения, воспользовавшись гаечным
ключом или плоскогубцами.
Внимание! Убедитесь в наличии
A
стандартного патрубка с клапаном 1/2" в
линии подачи холодной воды и в том, что
он полностью отключен.
15
RU
Page 49

Для установки водяного фильтра
соблюдайте приведенные ниже
инструкции и следуйте приведенным
рисункам.
1. Нажмите кнопку остановки
образования льда на дисплее.
2. Снимите крышку воздушного фильтра
в холодильном отделении, потянув ее
на себя.
3. Снимите крышку обводной линии
водяного фильтра, вращая ее вниз.
Внимание! Перед снятием крышки
A
убедитесь в отключении режима
образования льда.
Примечание. Падение нескольких капель
воды после снятия крышки является
нормальным явлением.
4. Снимите крышку на водяном фильтре,
чтобы установить ее, как показано
на рисунке, и поверните вверх для
фиксации.
5. Снова нажмите на кнопку остановки
образования льда на дисплее для
выхода из данного режима.
Водяной фильтр требуется менять
каждые шесть месяцев.
Для настройки автоматического
определения времени смены фильтра
и получения соответствующего
предупреждения см. раздел
«Автоматическое определение времени
использования фильтра».
RU
16
Page 50

Если водяной фильтр подлежит замене
или больше не используется, его следует
снять, как показано на рисунке, и
прикрепить крышку обводной линии.
Перед снятием крышки убедитесь в
отключении режима образования льда.
Внимание! Водяной фильтр
A
предназначен для удаления из воды
инородных частиц. Он не очищает воду
от микроорганизмов.
Внимание! При замене водяного
A
фильтра или установке крышки обводной
линии всегда необходимо нажать на
кнопку «Ice Оff».
Прежде чем использовать
распределитель воды
Давление в водопроводной линии не
C
должно быть ниже 1 бара.
Давление в водопроводной линии не
C
должно быть выше 8 бар.
Если давление воды в магистральной
C
линии упало ниже 1 бара, и в случае
подачи воды из бака необходимо
использовать насосы.
Водяная система холодильника
C
должна быть подключена к линии
холодной воды. Ее нельзя подключать к
линии горячей воды.
При первоначальном включении
C
холодильника воду получить нельзя. Это
вызвано наличием воздуха в системе.
Для выпуска воздуха из системы
нажимайте на защелку распределителя с
интервалом 1 минуту до тех пор, пока из
него не покажется вода. В начале поток
воды может быть неравномерным. Он
нормализуется после выпуска воздуха из
системы.
При первоначальном включении
C
холодильника до получения холодной
воды должно пройти ориентировочно 12
часов.
Для бесперебойной работы
C
распределителя льда/воды давление
в водопроводной линии должно быть в
пределах 1-8 бар. Для этого проверьте,
можно ли наполнить стакан воды (100
куб. см) за 10 секунд.
Первые 10 стаканов воды потреблять
C
нельзя.
Около 30 первых кубиков льда,
C
полученных из распределителя,
использовать нельзя.
Если бак не используется,
C
применяйте водяной фильтр.
17
RU
Page 51

4 Подготовка
Ваш холодильник следует установить,
C
по крайней мере, в 30 см от источников
тепла, таких как газовые конфорки,
плиты, батареи центрального
отопления и печи, и, по крайней мере,
в 5 см от электрических плит, в месте,
куда не попадает прямой солнечный
свет.
Температура воздуха в помещении, где
C
устанавливается холодильник, должна
быть не менее 10°С. Использовать
холодильник при более низкой
температуре не рекомендуется в связи
с его низкой эффективностью в таких
условиях.
Содержите внутреннее пространство
C
холодильника в чистоте.
Если два холодильника
C
устанавливаются рядом, то между
ними должно быть расстояние не менее
2 см.
При первом включении холодильника
C
просим соблюдать следующие
инструкции во время первых шести
часов работы.
- Не открывайте часто дверцу.
- Холодильник должен быть пустым,
без продуктов внутри.
- Не отключайте холодильник от
сети. Если произошло отключение
электроэнергии не по вашей вине, см.
указания в разделе «Рекомендации по
устранению неполадок».
Оригинальную упаковку и пленку
C
следует сохранить для последующей
транспортировки или перевозки
изделия.
18
RU
Page 52

1 7 11 12 15 4
5
6
2
3
16
17
18 20 19
10 9 14 138
5 Пользование холодильником
Панель индикаторов
Сенсорная панель индикаторов позволяет регулировать температуру, не открывая
дверцы холодильника. Для этого нажимайте соответствующие кнопки.
1. Кнопка «Eco Extra»/временного
отключения
2. Кнопка быстрой заморозки
3. Кнопка настройки температуры
морозильного отделения
4. Кнопка настройки температуры
холодильного отделения
5. Кнопка быстрого охлаждения
6. Кнопка регулировки температуры
отделения Flexi Zone
7. Индикатор режима временного
отключения
8. Индикатор режима Eco Extra
9. Индикатор режима быстрой заморозки
10. Индикатор температуры морозильного
отделения
11. Индикатор температуры холодильного
отделения
12. Индикатор режима быстрого
охлаждения
13. Индикатор температуры отделения
Flexi Zone
14. Индикатор экономичного режима
15. Индикатор неисправного состояния
16. Индикатор блокировки клавиш
17. Кнопка остановки образования льда
18. Индикатор режима отключения льда
19. Кнопка отключения предупреждения о
замене фильтра
20. Индикатор предупреждения о замене
фильтра
C Цифры, приведенные в данном руководстве по эксплуатации, являются
схематическими и могут не полностью соответствовать вашему изделию. Если
некоторые компоненты не входят в состав приобретенного вами изделия, они
действительны для других моделей.
RU
19
Page 53

1. Кнопка «Eco Extra»/временного
отключения
После короткого нажатия этой кнопки
включается режим Eco Extra. После
нажатия и удерживания кнопки в
течение 3 секунд включается режим
временного отключения. Чтобы
отключить выбранный режим, еще раз
нажмите на кнопку.
2. Кнопка быстрой заморозки
После короткого нажатия этой кнопки
включается режим быстрой заморозки.
Чтобы отключить выбранный режим, еще
раз нажмите на кнопку.
3. Кнопка настройки температуры
морозильного отделения
Нажимайте эту кнопку, чтобы установить
в морозильной камере температуру
-18, -20, -22, -24, -18... соответственно.
Нажимайте эту кнопку, чтобы установить
нужную температуру морозильной
камеры.
4. Кнопка настройки температуры
холодильного отделения
Нажимайте эту кнопку, чтобы установить
в холодильной камере температуру 8,
6, 4, 2, 8... соответственно. Нажимайте
эту кнопку, чтобы установить нужную
температуру холодильной камеры.
5. Кнопка быстрого охлаждения
После короткого нажатия этой
кнопки включается режим быстрого
охлаждения. Чтобы отключить
выбранный режим, еще раз нажмите на
кнопку.
Если в отделении Flexi Zone установлен
режим морозильника, при каждом
нажатии кнопки температура будет
изменяться в такой последовательности:
-18, -20, -22, -24, -18... соответственно.
Если в отделении Flexi Zone установлен
режим холодильника, при каждом
нажатии кнопки температура будет
изменяться в такой последовательности:
10, 8, 6, 4, 2, 0, -6... соответственно.
7. Индикатор режима временного
отключения
Показывает, что включен режим
временного отключения. В таком случае
на индикаторе холодильной камеры
появляется символ «- -» и охлаждение
в ней не производится. В других
отделениях охлаждение происходит
в соответствии с установленной
температурой.
Чтобы отключить выбранный режим, еще
раз нажмите соответствующую кнопку.
8. Индикатор режима Eco Extra
Показывает, что включен режим EcoExtra. В таком случае холодильник
автоматически определит минимальные
периоды использования, в течение
которых охлаждение будет происходить
в энергосберегающем режиме. Все это
время индикатор экономичного режима
будет включен.
Чтобы отключить выбранный режим, еще
раз нажмите соответствующую кнопку.
6. Кнопка регулировки температуры
отделения Flexi Zone
Вы можете установить в отделении
Flexi Zone режим морозильника или
холодильника. Для этого нажмите
и удерживайте указанную кнопку в
течение 3 секунд. Заводская настройка
данного отделения – морозильник.
20
RU
Page 54

9. Индикатор режима быстрой
заморозки
Показывает, что включена функция
быстрого замораживания. Пользуйтесь
этим режимом, если помещаете в
морозильную камеру свежие продукты,
или если вам нужен лед. В этом
случае холодильник будет работать
определенный период времени.
Чтобы отключить выбранный режим, еще
раз нажмите соответствующую кнопку.
10. Индикатор температуры
морозильного отделения
Указывает температуру, установленную
для морозильного отделения.
11. Индикатор температуры
холодильного отделения
Указывает температуру, установленную
для холодильного отделения.
12. Индикатор режима быстрого
охлаждения
Показывает, что включен режим
быстрого охлаждения. Пользуйтесь
этим режимом, если помещаете в
холодильную камеру свежие продукты,
или если необходимо быстро охладить
продукты. В этом случае холодильник
будет работать без остановки в течение
2 часов.
Чтобы отключить выбранный режим, еще
раз нажмите соответствующую кнопку.
13. Индикатор температуры отделения
Flexi Zone
Указывает температуру, установленную
для отделения Flexi Zone.
14. Индикатор экономичного режима
Показывает, что холодильник работает в
энергосберегающем режиме. Температура
морозильной камеры
Индикатор будет включен, если
установлена температура -18 или
в режиме Eco Extra происходит
энергосберегающее охлаждение.
15. Индикатор неисправного
состояния
Этот индикатор включается при сбое
в работе холодильника или поломке
сенсора. В этом случае на индикаторе
температуры морозильной камеры
появится символ «E», а на индикаторе
холодильной камеры – числа «1,2,3…».
Они сообщают об определенной ошибке
персоналу сервисной службы.
16. Индикатор блокировки клавиш
С помощью этого режима можно
предотвратить изменение
температурных настроек холодильника.
Для его включения одновременно
нажмите кнопки быстрого охлаждения
и регулировки температуры отделения
Flexi Zone и удерживайте их в течение 3
секунд.
Чтобы отключить выбранный режим, еще
раз нажмите соответствующие кнопки.
17. Кнопка остановки образования
льда
Чтобы остановить образование льда,
нажмите и удерживайте кнопку
остановки образования льда в течение
3 секунд. При этом в отсек для льда
не будет поступать вода. Однако в нем
может остаться лед, который можно
извлечь. Чтобы возобновить образование
льда, нажмите и удерживайте кнопку
остановки образования льда в течение 3
секунд.
21
RU
Page 55

18. Индикатор остановки образования
льда
Воспользуйтесь этой функцией, если не
нуждаетесь в образовании льда. Для ее
активирования нажмите и удерживайте
кнопку прекращения образования льда в
течение 3 секунд.
19. Кнопка отключения
предупреждения о замене фильтра
Фильтр холодильника следует заменять
каждые 6 месяцев. Холодильник
определяет это время автоматически,
и по истечении времени использования
фильтра загорается индикатор
предупреждения о замене фильтра.
Нажмите и удерживайте кнопку
отключения предупреждения о замене
фильтра в течение 3 секунд, чтобы
холодильник автоматически определил
новое время использования фильтра
после его замены.
20. Индикатор отключения
предупреждения о замене фильтра
По истечении времени использования
фильтра загорается индикатор
предупреждения о замене фильтра.
Сигнал открытия дверцы
Если дверца холодильной камеры или
отделения Flexi Zone остается открытой
в течение, как минимум, 1 минуты,
прозвучит сигнал открытия дверцы.
Нажмите любую кнопку на панели
индикаторов или закройте дверцу –
сигнал прекратится.
22
RU
Page 56

Рекомендации по автоматическому определению
времени использования фильтра
(для изделий, подсоединенных к водопроводной линии и оснащенных фильтром)
1- Подсоединив холодильник к электросети, одновременно нажмите кнопки A и B для
включения блокировки клавиш.
A
B
2- Затем нажмите кнопки Eco-Extra (1), настройки температуры холодильного
отделения (4), быстрого охлаждения (5) и настройки температуры морозильного
отделения (3) соответственно.
1 4
5
3
Если нажать кнопки в правильной последовательности, символ блокировки
кнопок погаснет, индикатор предупреждения о замене фильтра включится и
вскоре будет активирован зуммер. После замены фильтра нажмите кнопку
отключения предупреждения о замене фильтра (номер 19 в описании дисплея) для
автоматического определения времени использования фильтра.
ПРИМЕЧАНИЕ.
1. Если время использования фильтра определяется автоматически, индикатор
предупреждения о замене фильтра загорится постоянным светом через несколько
секунд после подключения изделия к сети питания.
2. Автоматическое определение времени использования фильтра не является
заводской настройкой. В изделиях с фильтром его нужно активировать.
3. Чтобы отключить автоматическое определение времени использования фильтра,
повторите все вышеуказанные действия.
RU
23
Page 57

Лоток для яиц
Вы можете установить держатель для
яиц на полочку двери или обычную
полку, как вам удобнее.
Никогда не помещайте держатель для
яиц в камеру морозильника.
Выдвижные полки
Чтобы выдвинуть выдвижную полку,
слегка приподнимите ее спереди, после
чего ее можно сдвинуть назад и вперед.
Полку можно выдвинуть вперед до
упора, чтобы достать продукты в конце
полки. Чтобы вынуть полку, сдвиньте ее
до второго упора, слегка приподнимите и
потяните на себя.
Крепко придерживайте полку
снизу, чтобы она не перевернулась.
Полки холодильного отделения
устанавливаются на направляющие,
расположенные на боковых стенках, и их
можно переставлять выше или ниже.
Чтобы установить полку на место,
сдвиньте ее назад до конца.
1
2
3
4
Контейнер для фруктов и
овощей
Контейнер для фруктов и овощей
предназначен специально для их
сохранения в свежем виде, чтобы
они не теряли влагу. Для этого вокруг
контейнера циркулирует холодный
воздух. Перед тем как вынуть контейнер
для фруктов и овощей, выньте
совмещенные с ним дверные полки, как
показано на рисунке.
Отделение охладителя
Отделение охладителя подготавливает
продукты к заморозке. Кроме того, эти
отделения можно использовать для
хранения продуктов при температуре, на
несколько градусов ниже температуры
холодильной камеры.
Вы можете освободить место внутри
холодильника, вынув любой из
охладителей. Для этого потяните
лоток на себя, пока он не упрется в
ограничитель. Затем приподнимите
лоток приблизительно на 1 см и снова
потяните на себя.
24
RU
Page 58

Съемное среднее
отделение
Съемное среднее отделение
предназначено для предотвращения
просачивания холодного воздуха изнутри
холодильника наружу.
1- Когда дверцы холодильной камеры
закрыты, прокладки плотно прилегают
к поверхности съемного среднего
отделения.
2- Еще одно предназначение съемного
среднего отделения – увеличение
полезного объема холодильной камеры.
Стандартные средние отделения
занимают неиспользуемое пространство
холодильника.
3- Съемное среднее отделение закрыто,
когда закрыта левая дверца холодильной
камеры.
4- Съемное отделение нельзя открывать
вручную, поскольку при закрытых
дверцах оно двигается под управлением
пластмассовой детали корпуса.
Отделение для хранения
продуктов Flexi Zone
Отделение для хранения продуктов
Flexi Zone вашего холодильника можно
использовать в любом нужном режиме,
установив температуру холодильной
(2/4/6/8 °C) или морозильной (-18/-
20/-22/-24) камер. С помощью кнопки
регулировки температуры отделения
Flexi Zone можно устанавливать в
отделении нужную температуру.
Температуру отделения Flexi Zone можно
установить на значения от 0 до 10
градусов в дополнение к температуре
холодильной камеры и -6 градусов в
дополнение к температуре морозильной
камеры. При значении 0 дольше
хранятся деликатесы, а при -6 можно
в течение двух недель хранить мясные
продукты в легком для нарезания
состоянии.
Переключение между режимами
C
холодильного и морозильного
отделений позволяет охлаждающий
элемент, находящийся в закрытом
отделении (отделение компрессора)
за холодильником. Когда этот элемент
работает, из холодильника доносится
шум, похожий на тиканье механических
часов. Это вполне нормально и не
является причиной неисправности.
Синий свет
В продуктах, хранящихся в контейнерах
для фруктов и овощей с синей
подсветкой, продолжается процесс
фотосинтеза, благодаря длине волн
синего света и, таким образом, они
сохраняют свою свежесть, а содержание
витаминов в них увеличивается.
25
RU
Page 59

Скользящие полки с
задними креплениями
Скользящие полки с задними
креплениями легко передвигаются
вперед и назад. Их высоту можно
регулировать, устанавливая полки ниже
или выше. Чтобы достать полку, слегка
приподнимите ее и потяните на себя.
Полка для масла и сыра
На этой полке с крышкой можно хранить
масло, сыр и маргарин.
Если распределитель воды используется
нечасто, то для получения свежей воды
необходимо слить некоторое количество
воды из распределителя.
Лоток для разлитых
продуктов
Капли воды, падающие во время работы,
накапливаются в лотке для разлитых
продуктов. Вы можете достать лоток,
потянув его на себя или нажав на край
(в зависимости от модели). Воду можно
удалить с помощью губки или мягкой
ткани.
Пользование краном
подачи воды
Предостережения
Первые несколько стаканов воды,
вышедшей из распределителя, могут
быть теплыми. Это вполне нормально.
26
RU
Page 60

Мини-бар
Функция «Мини-бар» обеспечивает
дополнительное удобство использования
холодильника. Чтобы получить доступ
к дверной полке, нет необходимости
открывать дверцу холодильника;
благодаря этой функции вы можете
доставать из холодильника еду и
напитки частого употребления. Таким
образом вы будете реже открывать
дверцу холодильника и снизите его
энергопотребление.
Чтобы открыть дверцу мини-бара,
надавите на нее рукой и потяните на
себя.
Если дверца мини-бара открыта,
используйте ее внутреннюю поверхность
в качестве столика, на который можно
ненадолго ставить бутылки и стаканы,
как показано на рисунке.
Внимание! Запрещено оказывать
A
на столик мини-бара давление (сидеть,
висеть или использовать в качестве
ступени) и ставить на него тяжелые
предметы. Это может привести к
повреждению холодильника или
травмам.
Внимание! На дверце мини-бара
A
запрещено резать продукты; избегайте
повреждения дверцы острыми
предметами.
27
RU
Page 61

6 Чистка и уход
A Ни в коем случае не используйте
бензин, бензол или подобные вещества
для чистки.
B Перед чисткой рекомендуем
отсоединить изделие от электросети.
C Не используйте для чистки острые
абразивные инструменты, мыло,
бытовые чистящие средства, моющие
средства и восковую политуру.
C Корпус изделия промойте теплой водой
и затем вытрите насухо.
C Протрите внутреннюю поверхность
изделия хорошо отжатой тканью,
смоченной в растворе питьевой соды
(1 чайная ложка на пол-литра воды), и
вытрите насухо.
B Не допускайте попадания воды
в корпус лампочки и в другие
электрические компоненты.
B Если холодильник не будет
использоваться в течение длительного
времени, отключите сетевой шнур,
извлеките все продукты, выполните
чистку и оставьте дверцу приоткрытой.
C Регулярно проверяйте, не испачкан ли
уплотнитель дверцы частицами пищи.
C Для снятия полок в дверце полностью
разгрузите их, а затем просто
приподнимите вверх.
Защита пластмассовых
поверхностей
C Не храните жидкое масло или
продукты, приготовленные с
добавлением масла, в морозильной
камере в открытых контейнерах,
так как они могут повредить
пластмассовые поверхности. Если
же масло протекло или попало на
пластмассовую поверхность, сразу же
очистите и промойте это место теплой
водой.
28
RU
Page 62

7 Рекомендации по устранению неисправностей
Прежде чем обращаться в сервисный центр, просмотрите этот перечень. Это может
помочь вам сэкономить время и деньги. Ниже перечислены часто возникающие
проблемы, причиной которых не являются дефекты производства или материалов.
Некоторые из функций, описанных здесь, могут отсутствовать в вашем изделии.
Холодильник не работает.
• Правильно ли включен холодильник в сеть? Вставьте вилку в розетку электросети.
• Не перегорел ли предохранитель розетки, в которую включена морозильная камера,
и главный предохранитель? Проверьте предохранитель.
Конденсация на боковой стенке холодильного отделения (MULTI ZONE, COOL
CONTROL и FLEXI ZONE).
• Очень низкая температура окружающей среды. Частое открывание и закрывание
дверцы. Изделие работает в условиях повышенной влажности. Хранение продуктов,
содержащих жидкость, в открытых контейнерах. Неплотно закрыта дверца.
Переключите термостат на более низкую температуру.
• Уменьшите время открывания дверцы или открывайте ее реже.
• Накройте продукты, хранящиеся в открытых контейнерах, соответствующим
материалом.
• Вытрите конденсат сухой тканью и проверьте, не образуется ли он снова.
Не работает компрессор
• Термозащита компрессора может сработать при неожиданных отключениях
энергоснабжения либо при выключениях-включениях прибора, поскольку давление
хладагента в системе охлаждения не успевает стабилизироваться. Холодильник
начнет работать ориентировочно через 6 минут. Если по истечении этого времени
холодильник не заработал, обратитесь в сервисный центр.
• Холодильник находится в режиме размораживания. Это нормально для полностью
автоматически размораживающегося холодильника. Цикл размораживания
выполняется периодически.
• Холодильник не включен в розетку электросети. Убедитесь, что вилка должным
образом включается в розетку.
• Правильно ли отрегулирована температура?
• Возможно, отключена подача электроэнергии.
29
RU
Page 63

Холодильник включается слишком часто или работает слишком долго.
• Ваш новый холодильник может быть больше, чем предыдущий. Это вполне
нормально. Большие холодильники работают в течение более длительного времени.
• Возможно, температура в помещении повышена. Это вполне нормально.
• Возможно, холодильник был недавно включен или загружен продуктами. Полное
охлаждение холодильника может продолжаться на пару часов дольше.
• Возможно, в холодильник недавно поместили большое количество горячих
продуктов. Горячие продукты в холодильнике заставляют его работать дольше, пока
не будет достигнута нужная температура хранения.
• Возможно, дверцы часто открываются либо были приоткрыты в течение
длительного времени. Теплый воздух, попадающий в холодильник, заставляет его
работать дольше. Открывайте дверцы реже.
• Неплотно закрыта дверца морозильного или холодильного отделения. Проверьте,
плотно ли закрыты дверцы.
• Холодильник отрегулирован на очень низкую температуру. Отрегулируйте
температуру холодильника до более высокого значения и подождите, пока
установленная температура не будет достигнута.
• Уплотнитель двери холодильного или морозильного отделения, возможно,
загрязнен, изношен, разорван или неправильно установлен. Почистите или замените
уплотнитель. Поврежденный/разорванный уплотнитель заставляет холодильник
работать дольше для того, чтобы поддерживать текущую температуру.
Температура в морозильном отделении слишком низкая, в то время как температура в
холодильном отделении достаточная.
• Температура морозильного отделения установлена на очень низкое значение.
Отрегулируйте температуру морозильного отделения на более высокое значение и
проверьте работу.
Температура холодильного отделения очень низкая, в то время как температура в
морозильном отделении достаточная.
• Возможно, температура холодильного отделения отрегулирована на очень низкое
значение. Отрегулируйте температуру холодильного отделения до более высокого
значения и проверьте работу.
Замерзают продукты в выдвижных контейнерах холодильного отделения.
• Возможно, температура холодильного отделения отрегулирована на очень низкое
значение. Отрегулируйте температуру холодильного отделения до более высокого
значения и проверьте работу.
Температура в холодильном и морозильном отделении слишком высокая.
• Возможно, температура холодильного отделения отрегулирована на очень высокое
значение. Настройка холодильного отделения влияет на температуру морозильного
отделения. Измените температуру холодильного или морозильного отделения, пока
не будет достигнут нужный уровень температуры.
• Возможно, дверцы часто открываются либо были приоткрыты в течение
длительного времени; открывайте их реже.
• Возможно, дверца холодильника приоткрыта; закройте ее полностью.
• Возможно, в холодильник недавно поместили большое количество горячих
продуктов. Подождите, пока холодильное или морозильное отделение достигнет
нужной температуры.
• Возможно, морозильник был недавно включен в сеть. На полное охлаждение
холодильника потребуется время.
30
RU
Page 64

Уровень рабочего шума повышается во время работы холодильника.
• Рабочие характеристики изделия могут изменяться в зависимости от изменений
температуры окружающей среды. Это нормально и не является неисправностью.
Вибрация или шум.
• Пол неровный или нетвердый. При медленном перемещении морозильник дрожит.
Убедитесь в том, что пол ровный и достаточно прочный, чтобы выдержать вес
холодильника.
• Шум могут вызывать предметы, поставленные на холодильник. Посторонние
предметы следует убрать с холодильника.
Из холодильника доносится шум льющейся или распыляющейся жидкости.
• Расход жидкости и газа изменяется в соответствии с принципами работы изделия.
Это нормально и не является неисправностью.
Слышен шум, похожий на шум ветра.
• Для охлаждения холодильника используются вентиляторы. Это нормально и не
является неисправностью.
Конденсация влаги на внутренних стенках холодильника.
• Жаркая и влажная погода способствует образованию льда и конденсации влаги.
Это нормально и не является неисправностью.
• Возможно, дверцы холодильника приоткрыты; убедитесь, что они полностью
закрыты.
• Возможно, дверцы часто открываются либо были приоткрыты в течение
длительного времени; открывайте их реже.
Появление влаги снаружи холодильника или между дверцами.
• Воздух может быть влажным; это вполне нормально при влажной погоде. Когда
влажность уменьшится, конденсация исчезнет.
Неприятный запах внутри холодильника.
• Следует выполнить чистку внутри холодильника. Протрите внутреннюю часть с
помощью губки, теплой или газированной воды.
• Некоторые контейнеры или упаковочные материалы также могут быть источником
запаха. Используйте другой контейнер или упаковочный материал другой марки.
Дверца не закрыта, как следует.
• Упаковки продуктов могут препятствовать закрыванию дверцы. Переместите
упакованные продукты, препятствующие закрытию дверцы.
• Холодильник стоит не совсем вертикально, это может вызвать дрожание даже при
незначительном перемещении. Отрегулируйте регулировочные винты.
• Пол неровный или нетвердый. Убедитесь в том, что пол ровный и может выдержать
вес холодильника.
Контейнеры для фруктов и овощей прилипли.
• Возможно, продукты касаются верхней части контейнера. Переместите продукты в
контейнере.
31
RU
Page 65

Производитель: «Arcelik A.S.»
Адрес: Karaağaç Caddesi No:2-6 Sütlüce, 34445, Turkey
Сделано в Турции.
Импортер в РФ: «BEKO LLC»
Адрес: 601010, Владимирская область, Киржачский район, фабрика
«BEKO»
Дата изготовления содержится в серийном номере изделия, указанном
в паспортной табличке, которая находится на изделии, а именно: две
первые цифры серийного номера указывают год изготовления, две
последние – месяц. Например, «10-100001-05» означает, что изделие
произведено в мае 2010 года.
Сертификационный номер можно уточнить, позвонив в центр телефонного
обслуживания по номеру 8-800-200-23-56.
RU
32
Page 66

www.beko.com
57 0365 0000/AC
EN-RUS
 Loading...