

GNE 134620 X
EN
DAEL

Please read this manual first!
Dear Customer,
We hope that your product, which has been produced in modern plants and
checked under the most meticulous quality control procedures, will provide you an
effective service.
For this, we recommend you to carefully read the entire manual of your product
before using it and keep it at hand for future references.
This manual
• Will help you use your appliance in a fast and safe way.
• Read the manual before installing and operating your product.
• Follow the instructions, especially those for safety.
• Keep the manual in an easily accessible place as you may need it later.
• Besides, read also the other documents provided with your product.
Please note that this manual may be valid for other models as well.
Symbols and their descriptions
This instruction manual contains the following symbols:
C Important information or useful usage tips.
A Warning against dangerous conditions for life and property.
B Warning against electric voltage.
EN
1

CONTENTS
1 Your Refrigerator 3
2 Safety and Environment
Instructions 4
General Safety ...................................4
Intended Use .....................................6
Child Safety .......................................6
Compliance with WEEE Directive and
Disposing of the Waste Product .........6
Compliance with RoHS Directive .......6
Package Information ..........................7
Reccomendations for freshfood
compartment .....................................7
3 Installation 8
Points to be considered when re-
transporting your refrigerator .............8
Before operating your refrigerator ...... 8
Electric connection ............................ 8
Disposing of the packaging ...............9
Disposing of your old refrigerator .......9
Placing and Installation ...................... 9
Changing the illumination lamp ......... 9
Floor balance adjustment ................10
Adjusting the gap between the upper
door ................................................10
Installing Water Filter .......................12
Connection of the Water Pipe to the
Refrigerator .....................................12
Connection of Water Hose to the
Jug ................................................. 13
Connection of the Water Pipe to the
Cold Water Mains Line .................... 14
Prior to first use of Water Dispenser .16
5 Using your refrigerator 18
Indicator Panel ................................. 18
Door Open Alarm: ..........................21
Dual cooling system: .......................21
Freezing fresh food .......................... 21
Deep-freeze information ..................22
Recommendations for preservation of
frozen food ......................................23
Defrosting ........................................23
Placing the food ..............................23
Things to do to have the filter usage
time calculated automatically ...........24
Sliding Body Shelves ....................... 25
Egg tray ...........................................25
Crisper ............................................25
Chiller compartment ........................ 25
Movable Middle Section .................26
Multi Zone Storage Compartment ..26
Blue light .........................................26
Sliding Body Shelves With Rear
Hangers ..........................................27
Butter & Cheese Section .................27
Using the water spring .....................27
Spillage Tray ....................................27
Minibar ............................................ 28
6 Maintenance and
cleaning 29
Protection of plastic surfaces ..........29
7.
Troubleshooting 30
4 Preparation 17
EN
2
1 Your Refrigerator
17
18 19
2
3
6
7
8
9
5
4
16
13
11
14
1
12
10
15
1- Fridge compartment door
shelves
2- Fridge compartment glass
shelves
3- Diffuser cover
4- Illumination lens
5- Movable middle section
6- Chiller compartment
7- Crisper
8- Icematic
9- Frozen food storage
10- Minibar
11- Bottle holder
12- Bottle shelf
13- Food storage compartment
shelves
14- Food storage compartments
15- Water Filter
16- Dairy compartment
17- Fridge compartment
18- Freezer compartment
19- Multi Zone
compartments
Figures that take place in this instruction manual are schematic and may not
C
correspond exactly with your product. If the subject parts are not included in the
product you have purchased, then it is valid for other models.
EN
3

2 Safety and Environment Instructions
This section provides the safety
instructions necessary to prevent
the risk of injury and material
damage. Failure to observe these
instructions will invalidate all
Do not store explosive
substances such as
A
aerosol cans with a
flammable propellant in
.types of product warranty
Intended use
WARNING:
Keep ventilation
openings, in the
A
appliance enclosure or
in the built-instructure,
.clear of obstruction
WARNING:
Do not use mechanical
devices or other
means to accelerate
A
the defrostingprocess,
other than those
recommended by the
.manufacturer
WARNING:
Do not damage the
A
.refrigerant circuit
WARNING:
Do not use electrical
appliances inside
the food storage
compartments of the
A
appliance, unless
they are of the type
recommended by the
.manufacturer
This appliance is intended to be
used in household and similar
applications such as
staff kitchen areas in shops, –
offices and other working
;environments
farm houses and by clients –
in hotels, motels and other
;residential type environments
bed and breakfast type –
;environments
catering and similar non-retail –
.applications
General Safety
• This product should not be used by
persons with physical, sensory and
mental disabilities, without sufficient
knowledge and experience or by
children. The device can only be used
by such persons under supervision
and instruction of a person responsible
for their safety. Children should not be
allowed to play with this device.
• In case of malfunction, unplug the
device.
• After unplugging, wait at least 5
minutes before plugging in again.
• Unplug the product when not in use.
• Do not touch the plug with wet hands!
Do not pull the cable to plug off, always
hold the plug.
EN
4
WARNING:
.this appliance
• Do not plug in the refrigerator if the
socket is loose.
• Unplug the product during installation,
maintenance, cleaning and repair.
• If the product will not be used for a
while, unplug the product and remove
any food inside.
• Do not use the product when the
compartment with circuit cards located
on the upper back part of the product
(electrical card box cover) (1) is open.
1
1
• Do not use steam or steamed cleaning
materials for cleaning the refrigerator
and melting the ice inside. Steam may
contact the electrified areas and cause
short circuit or electric shock!
• Do not wash the product by spraying
or pouring water on it! Danger of
electric shock!
• In case of malfunction, do not use the
product, as it may cause electric shock.
Contact the authorized service before
doing anything.
• Plug the product into an earthed
socket. Earthing must be done by a
qualified electrician.
• If the product has LED type lighting,
contact the authorized service for
replacing or in case of any problem.
• Do not touch frozen food with wet
hands! It may adhere to your hands!
• Do not place liquids in bottles and cans
into the freezer compartment. They
may burst out!
• Place liquids in upright position after
tightly closing the lid.
• Do not spray flammable substances
near the product, as it may burn or
explode.
• Do not keep flammable materials and
products with flammable gas (sprays,
etc.) in the refrigerator.
• Do not place containers holding liquids
on top of the product. Splashing water
on an electrified part may cause electric
shock and risk of fire.
• Exposing the product to rain, snow,
sunlight and wind will cause electrical
danger. When relocating the product,
do not pull by holding the door handle.
The handle may come off.
• Take care to avoid trapping any part
of your hands or body in any of the
moving parts inside the product.
• Do not step or lean on the door,
drawers and similar parts of the
refrigerator. This will cause the product
to fall down and cause damage to the
parts.
• Take care not to trap the power cable.
• When positioning the appliance, ensure
the supply cord is not trapped or
damaged.
EN
5

• Do not locate multiple portable socketoutlets or portable power supplies at
the rear of the appliance.
1.1.1 HC Warning
If the product comprises a
cooling system using R600a
gas, take care to avoid
damaging the cooling system
and its pipe while using and
moving the product. This gas is
flammable. If the cooling system
is damaged, keep the product
away from sources of fire and
.ventilate the room immediately
The label on the inner left side
indicates the type of gas used
C
in the product.
1.1.2 For Models with
Water Dispenser
• Pressure for cold water inlet shall be
maximum 90 psi (6.2 bar). If your water
pressure exceeds 80 psi (5.5 bar), use
a pressure limiting valve in your mains
system. If you do not know how to
check your water pressure, ask for the
help of a professional plumber.
• If there is risk of water hammer effect
in your installation, always use a water
hammer prevention equipment in
your installation. Consult Professional
plumbers if you are not sure that there
is no water hammer effect in your
installation.
• Do not install on the hot water inlet.
Take precautions against of the
risk of freezing of the hoses. Water
temperature operating interval shall
be 33°F (0.6°C) minimum and 100°F
(38°C) maximum.
• Use drinking water only.
Intended Use
• This product is designed for home use. It
is not intended for commercial use.
• The product should be used to store
food and beverages only.
• Do not keep sensitive products requiring
controlled temperatures (vaccines, heat
sensitive medication, medical supplies,
etc.) in the refrigerator.
• The manufacturer assumes no
responsibility for any damage due to
misuse or mishandling.
• Original spare parts will be provided
for 10 years, following the product
purchasing date.
Child Safety
• Keep packaging materials out of
children’s reach.
• Do not allow the children to play with the
product.
• If the product’s door comprises a lock,
keep the key out of children’s reach.
Compliance with WEEE
Directive and Disposing of
the Waste Product
This product complies with EU WEEE
Directive (2012/19/EU). This product bears a
classification symbol for waste electrical and
.(electronic equipment (WEEE
This product has been
collection center for the recycling of electrical and
electronic equipment. Please consult your local
.authorities to learn about these collection centers
manufactured with high quality parts
and materials which can be reused
and are suitable for recycling.
Do not dispose of the waste
product with normal domestic and
other wastes at the end of its
service life. Take it to the
Compliance with RoHS
Directive
• This product complies with EU WEEE
Directive (2011/65/EU). It does not
contain harmful and prohibited materials
specified in the Directive.
EN
6
Package Information
temperature
sensor
food
MILK
juice
etc.
temperature
sensor
MILK
juice
etc.
temperature
sensor
Packaging materials of the product are
manufactured from recyclable materials in
accordance with our National Environment
Regulations. Do not dispose of the packaging
materials together with the domestic or other
wastes. Take them to the packaging material
collection points designated by the local
.authorities
Reccomendations for
freshfood compartment
* OPTIONAL
• Please do not let any foodstuff to come
to contact with the temperature sensor
in freshfood compartment.In order to
maintain freshfood compartment at ideal
storage temperature, the sensor must not
be blocked by fodstuffs.
• Do not place hot foodstuff in your
appliance.
EN
7
3 Installation
C Please remember that the manufacturer
shall not be held liable if the information
given in the instruction manual is not
observed.
Points to be considered
when re-transporting your
refrigerator
1. Your refrigerator must be emptied and
cleaned prior to any transportation.
2. Shelves, accessories, crisper and etc.
in your refrigerator must be fastened
securely by adhesive tape against any
jolt before repackaging.
3. Packaging must be tied with thick
tapes and strong ropes and the rules of
transportation printed on the package
must be followed.
C Always remember...
Every recycled material is an
indispensable source for the nature and
for our national resources.
If you wish to contribute to recycling the
packaging materials, you can get further
information from the environmental
bodies or local authorities.
Before operating your
refrigerator
Before starting to use your refrigerator
check the following:
1. Is the interior of the refrigerator dry and
can the air circulate freely in the rear of
it?
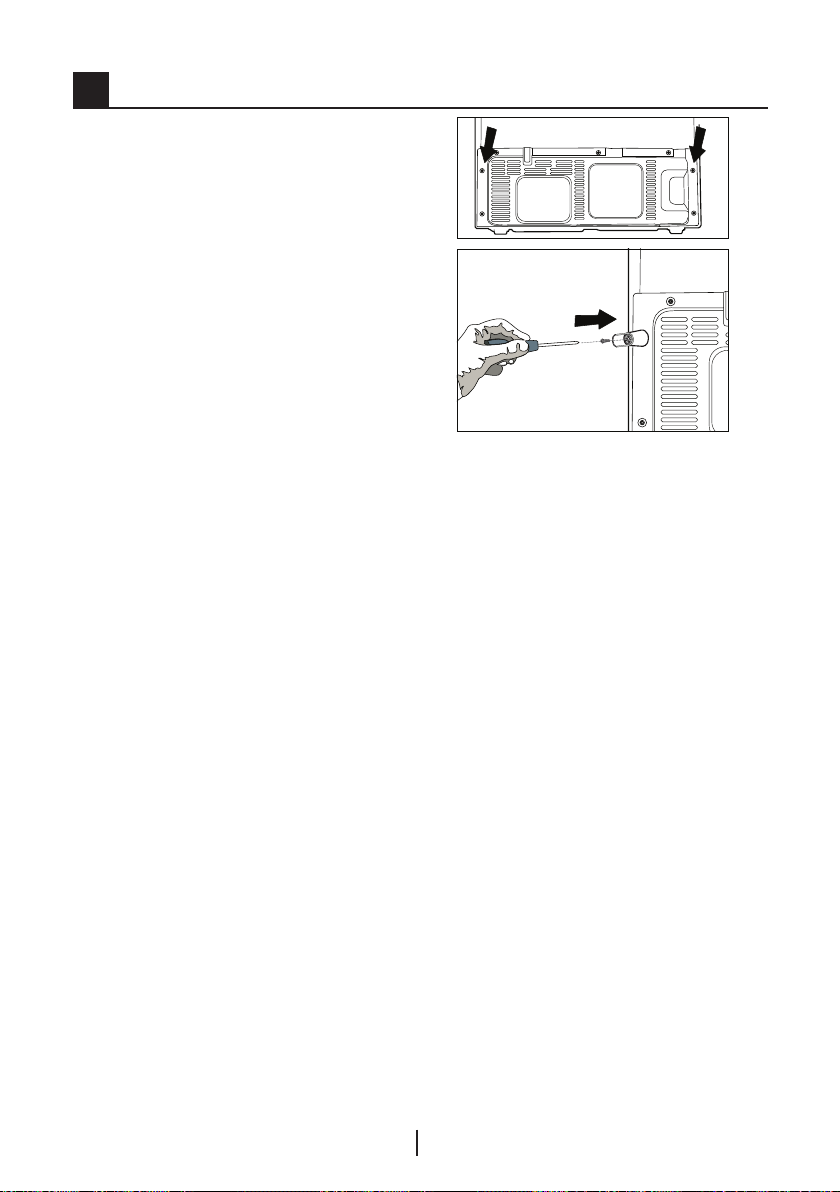
2. Insert the 2 plastic wedges onto the
rear ventilation cover as illustrated in
the following figure. To do this, remove
the screws on the product and use the
screws given in the same pouch.
Plastic wedges will provide the required
distance between your refrigerator
and the wall in order to allow the air
circulation.
3. Clean the interior of the refrigerator as
recommended in the “Maintenance and
cleaning” section.
4. Plug the refrigerator into the wall outlet.
When the door is open the respective
interior light will come on.
5. You will hear a noise as the compressor
starts up. The liquid and gases sealed
within the refrigeration system may
also give rise to noise, even if the
compressor is not running and this is
quite normal.
6. Front edges of the refrigerator may
feel warm. This is normal. These areas
are designed to be warm to avoid
condensation.
Electric connection
Connect your refrigerator to a grounded
socket which is being protected by a
fuse with the appropriate capacity.
Important:
B The connection must be in compliance
with national regulations.
B The power cable plug must be easily
accessible after installation.
B Voltage and allowable fuse protection
are specified in the “Technical
Specifications” section.
EN
8

BThe specified voltage must be equal to
your mains voltage.
B Extension cables and multiway plugs
must not be used for connection.
B A damaged power cable must be
replaced by a qualified electrician.
B The appliance must not be operated
before it is repaired! There is danger of
electric shock!
Disposing of the packaging
A
The packing materials may be
dangerous for children. Keep the
packing materials out of the reach
of children or dispose them of by
classifying them in accordance
with the waste instructions. Do not
dispose them of along with the normal
household waste.
The packing of your refrigerator is
produced from recyclable materials.
Disposing of your old
refrigerator
Dispose of your old machine without
giving any harm to the environment.
A You may consult your authorized dealer
or waste collection center of your
municipality about the disposal of your
refrigerator.
A Before disposing of your refrigerator,
cut out the electric plug and, if there
are any locks on the door, make them
inoperable in order to protect children
against any danger.
Placing and Installation
Caution: Never plug the refrigerator
B
into the wall outlet during installation.
Otherwise, risk of death or serious injury
may arise.
A If the entrance door of the room
where the refrigerator will be installed is
not wide enough for the refrigerator to
pass through, than call the authorised
service to have them remove the doors
of your refrigerator and pass it sideways
through the door.
1. Install your refrigerator to a place that
allows ease of use.
2. Keep your refrigerator away from
heat sources, humid places and direct
sunlight.
3. There must be appropriate air
ventilation around your refrigerator in
order to achieve an efficient operation.
If the refrigerator is to be placed in a
recess in the wall, there must be at least
5 cm distance with the ceiling and at
least 5 cm with the wall.
If the floor is covered with a carpet, your
product must be elevated 2.5 cm from
the floor.
4. Place your refrigerator on an even
floor surface to prevent jolts.
5. Do not keep your refrigerator in
ambient temperatures under 10°C.
Changing the illumination
lamp
To change the Bulb/LED used for
illumination of your refrigerator, call your
AuthorisedService.
The lamp(s) used in this appliance
is not suitable for household room
illumination. The intended purpose of
this lamp is to assist the user to place
foodstuffs in the refrigerator/freezer in
a safe and comfortable way.The lamps
used in this appliance have to withstand
extreme physical conditions such as
temperatures below -20 °C.
(only chest and upright freezer)
EN
9
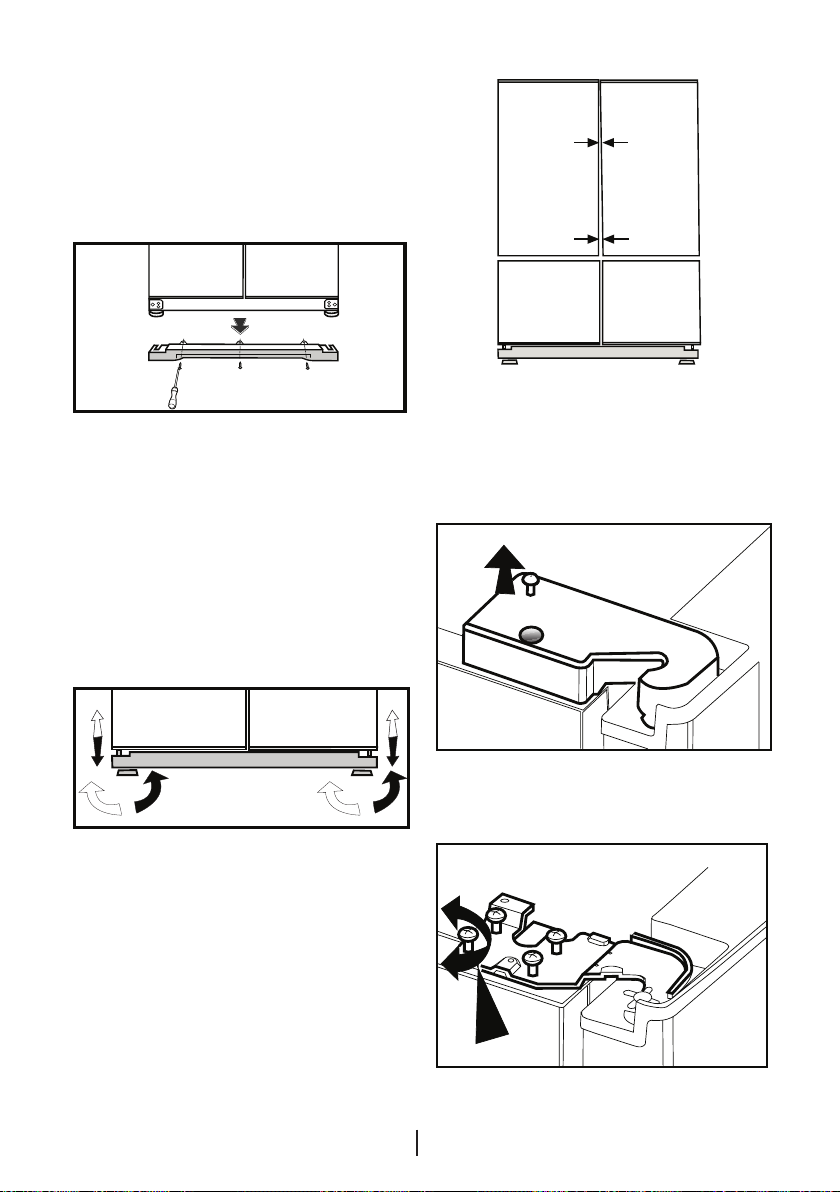
Floor balance adjustment
If your refrigerator is unbalanced;
A
B First unplug the product. The product
must be unplugged when making the
balance adjustment. There is the risk of
electric shock.
4
1 2 3
1- Ventilation cover is removed by
unscrewing its screws as illustrated in
the figure before the procedure. You
can balance your refrigerator by turning
the front legs of it as illustrated in the
figure. The corner where the leg exists is
lowered when you turn in the direction of
black arrow and raised when you turn in
the opposite direction. Taking help from
someone to slightly lift the refrigerator will
facilitate this process.
C You can adjust the gap between the
fridge compartment doors as illustrated
in the figures.
Door shelves should be empty when
adjusting the door height.
2. After the balance issue is remedied,
install back the ventilation cover and
fasten the screws.
3. Remove the screws fastening the
lower ventilation cover using a Philips
screwdriver.
Adjusting the gap between
the upper door
C Using a screwdriver, remove the
screw of upper hinge cover of the door
you want to adjust.
EN
10
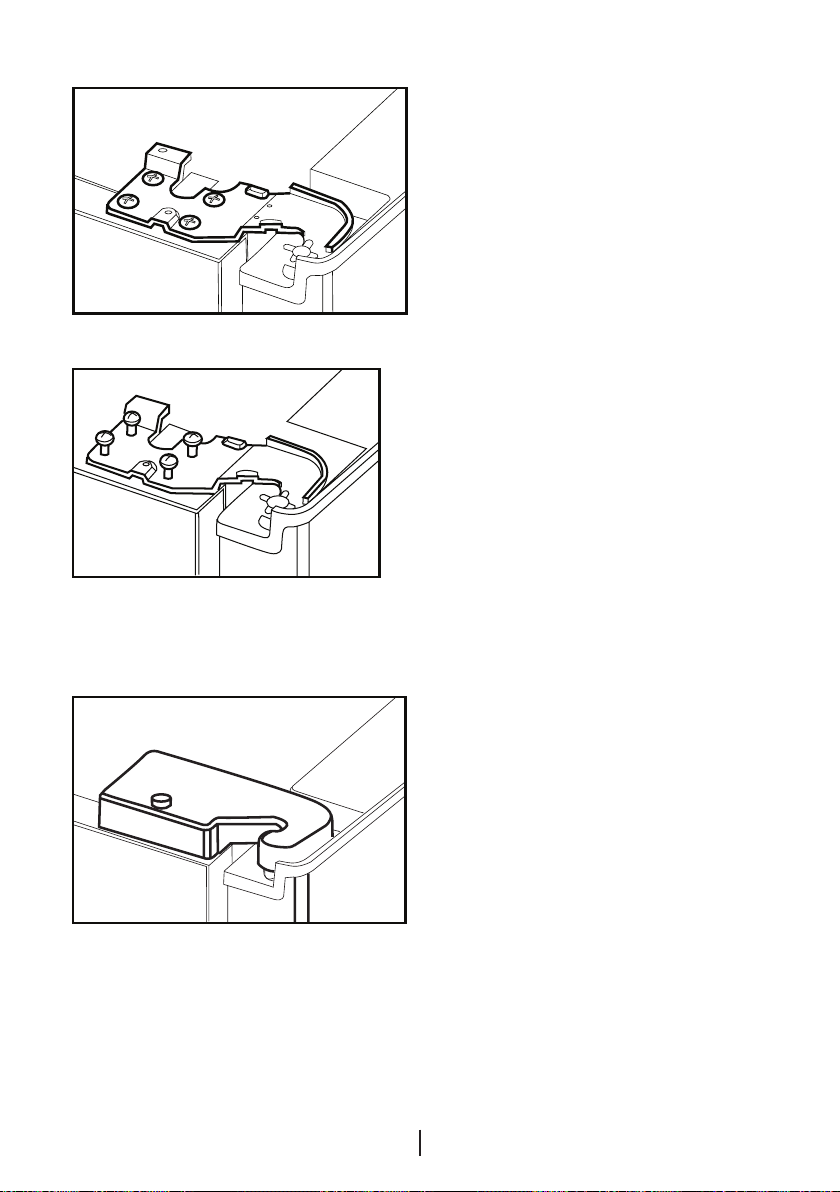
C Adjust the door appropriately as you
desire by loosing the screws.
C Fix the door you have adjusted by
tightening the screws without changing
the position of the door.
C Replace the hinge cover and fix with
the screw.
11
EN
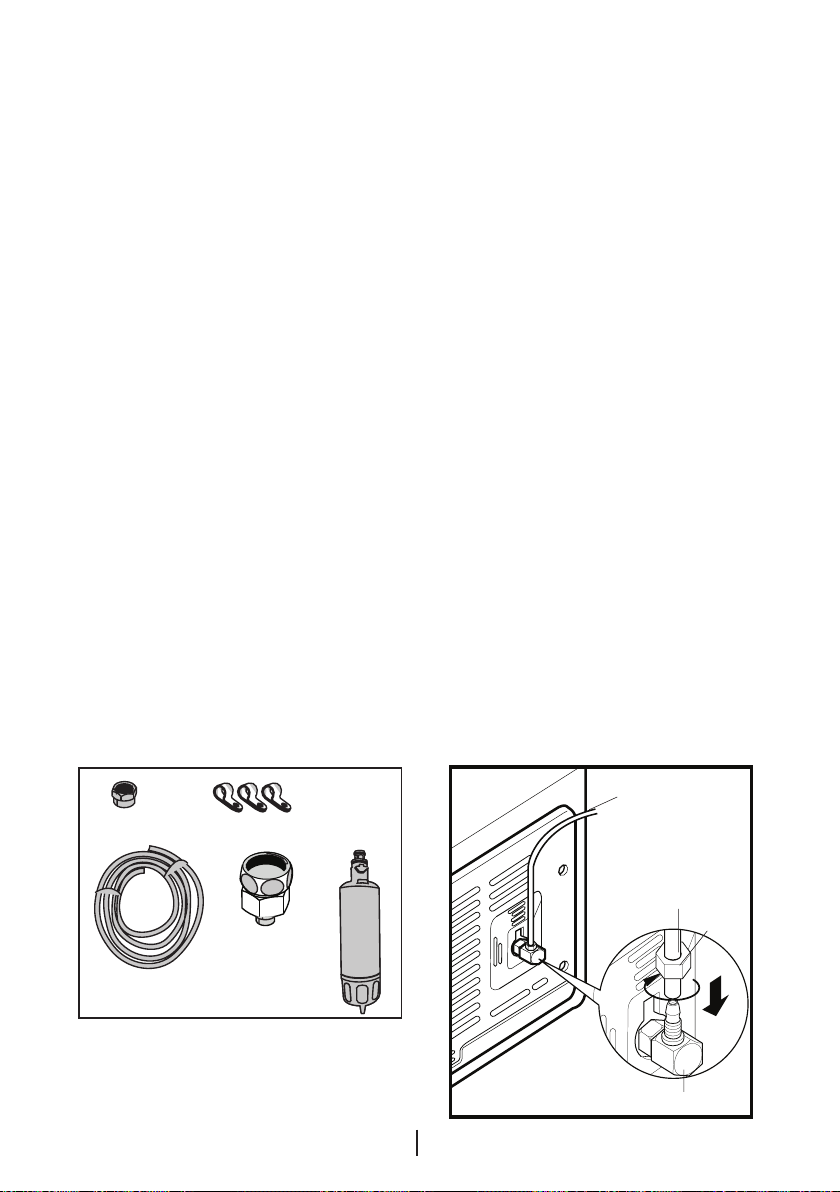
Installing Water Filter
1
2
(in some models)
Two different water sources may
be connected to the refrigerator for
water supply: the mains cold water
supply and water in a jug.
Installation Requirements
A pump should be used for jug water
usage.
Check that the parts stated below are
supplied with your appliance.
1. Union for connection of the water
pipe to the rear of the appliance. (If it
does not fit, provide it from the nearest
authorized service.)
2. 2 pieces of pipe clips (In case required
to secure the water pipe)
Note: Since the following parts are not
required in use with a jug, they may not
be found in the product you purchased.
3. 5-meter long water pipe (1/4 inch in
diameter)
4. Cold mains water valve with mesh filter
(Tap Adapter)
5. Water Filter or externally connectable
filter to be fitted to the bracket inside
the fridge compartment.
Place where the external filter is going to
be fitted should be determined first.
(Applies to the filter being used outside
the refrigerator.) Then, determine the
distance between the filter and the
refrigerator and required hose lengths
from the filter to the refrigerator water
inlet.
Water filter must be hold upright as shown
in the figure. It is important to properly
attach the filter to water inlet and water
outlet points.
After attaching the filter, do not use first 3-4
glasses of water.
Connection of the Water
Pipe to the Refrigerator
1. After installing the union onto the
water pipe, insert the water pipe to
the refrigerator inlet valve by pressing
downwards firmly.
2. Fix union as seen in the opposite
figure, by squeezing by hand on the
refrigerator inlet valve.
(a- Water Pipe, b-Union, c-Valve)
C Note 1: You should not need to
tighten the union with a tool to achieve
water tight assembly. In case of a leak
use a spanner or a pair of pliers to
tighten the union.
1
3
2
4
*5
EN
12
a
a
b
c
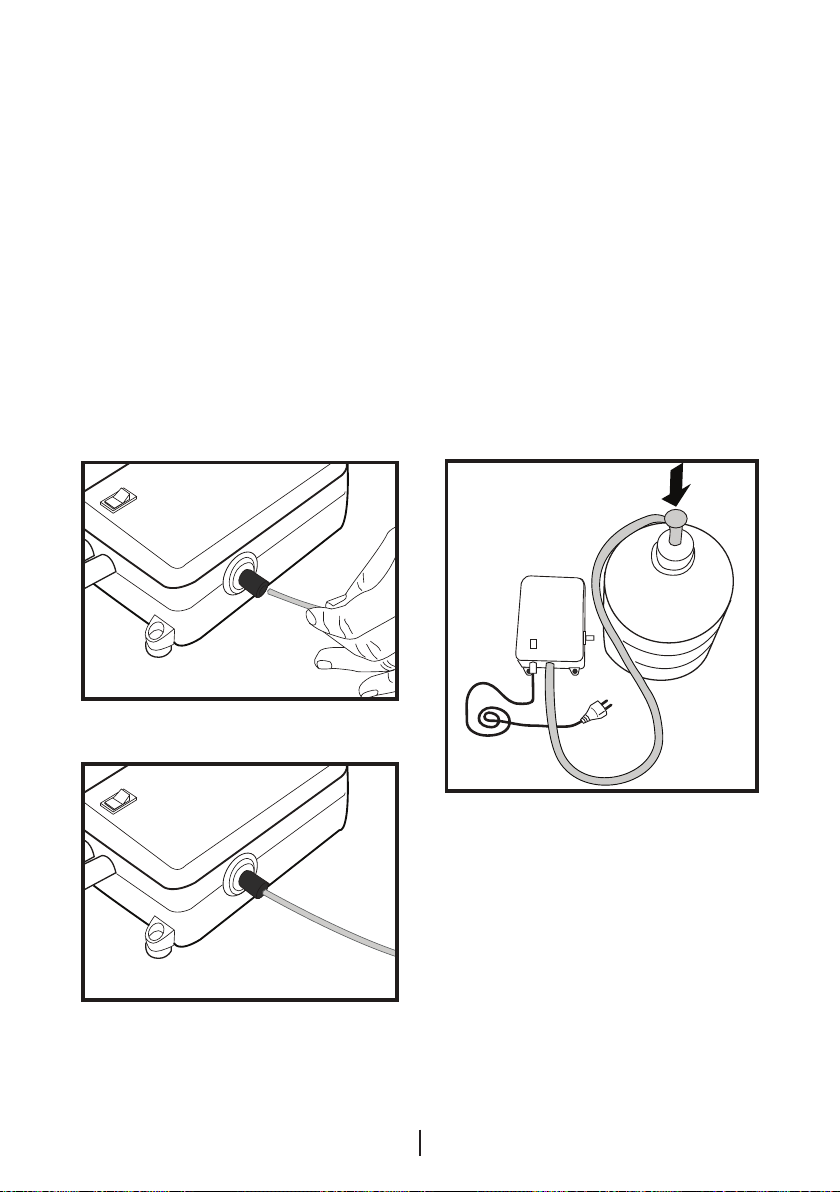
Connection of Water Hose to
the Jug
(in some models)
To connect water to the refrigerator from
a jug, a pump is needed. Follow the
instructions below after connecting one
end of the water pipe coming out of the
pump to the refrigerator as described on
the previous page.
1. Finish the connection by pushing the
other end of the water pipe into the
water pipe inlet of the pump as shown
in the figure.
2. Put and fix the pump hose into the jug
as shown in the figure.
3. After completing the connection, plug in
and run the pump.
To provide an efficient operation of the
pump, wait for 2-3 minutes after
starting the pump.
C You may refer to the user manual
of the pump while making the water
connection.
C There is no need to use water filter in
case a jug is used.
C Pump must be used when jug will be
used.
13
EN
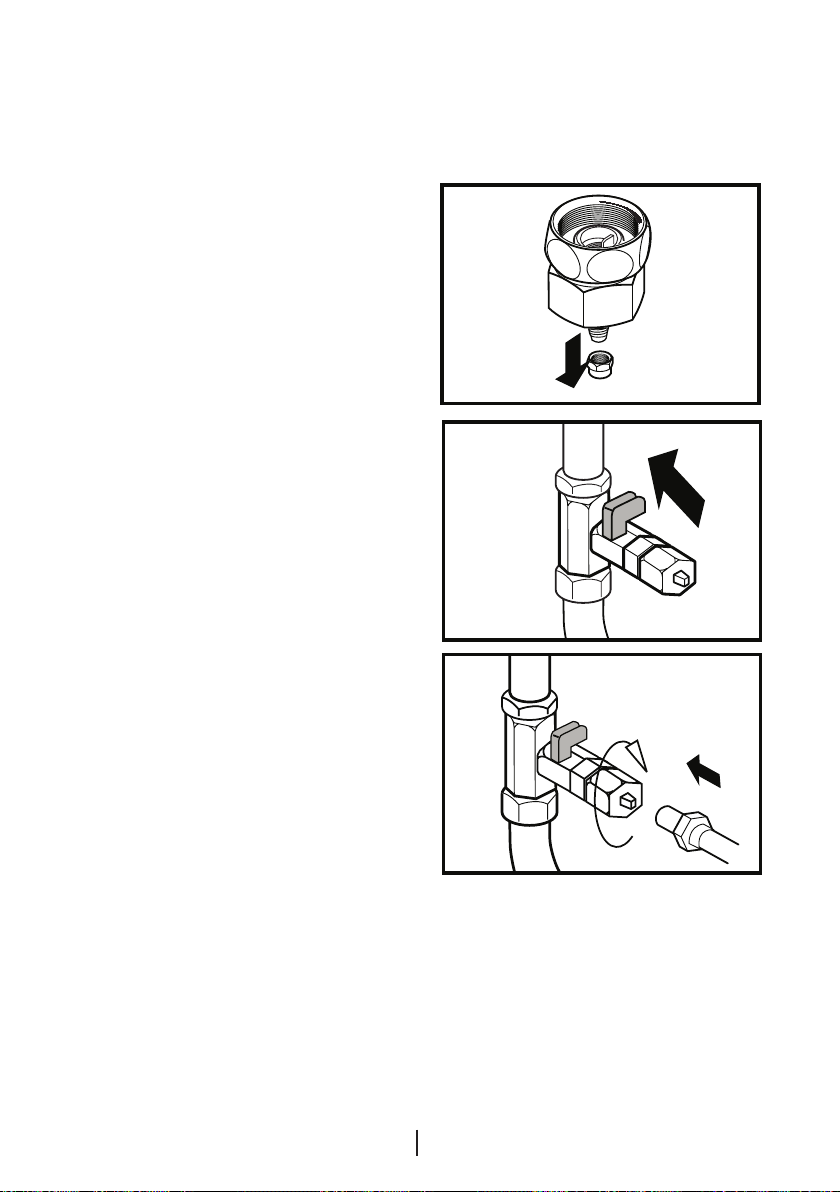
Connection of the Water
Pipe to the Cold Water Mains
Line
(in some models)
If you want to use your refrigerator by
connecting it to the cold water mains
line,
you will have to connect a standard 1/2"
valve connection fitting to the cold water
supply in your house. In case this valve is
not present or in case you are not sure,
consult a qualified plumber.
1. Separate the union from the tap
adaptor. (Figure A)
2. Install the tap adaptor to 1/2” valve
fitting as shown in the figure. (Figure B)
3. After inserting the water pipe to the
union, install it to the tap adaptor and
insert to the tap as shown in the figure.
(Figure C)
4. Tighten the union manually. In case of a
leak use a spanner or a pair of pliers to
tighten the union.
A Caution: Secure the water pipe
to suitable points by means of the
pipe clips supplied to avoid any
damage or displacement or accidental
disconnection.
A Caution: After turning on the water
valve, make sure that there is no leakage
at both connection points of the water
pipe. In case of a leak, turn off the valve
immediately and tighten all joints again
using a spanner or a pair of pliers.
A Caution: Make sure that standard
1/2" valve fitting fed by cold mains water
supply is available and is turned off fully.
14
EN
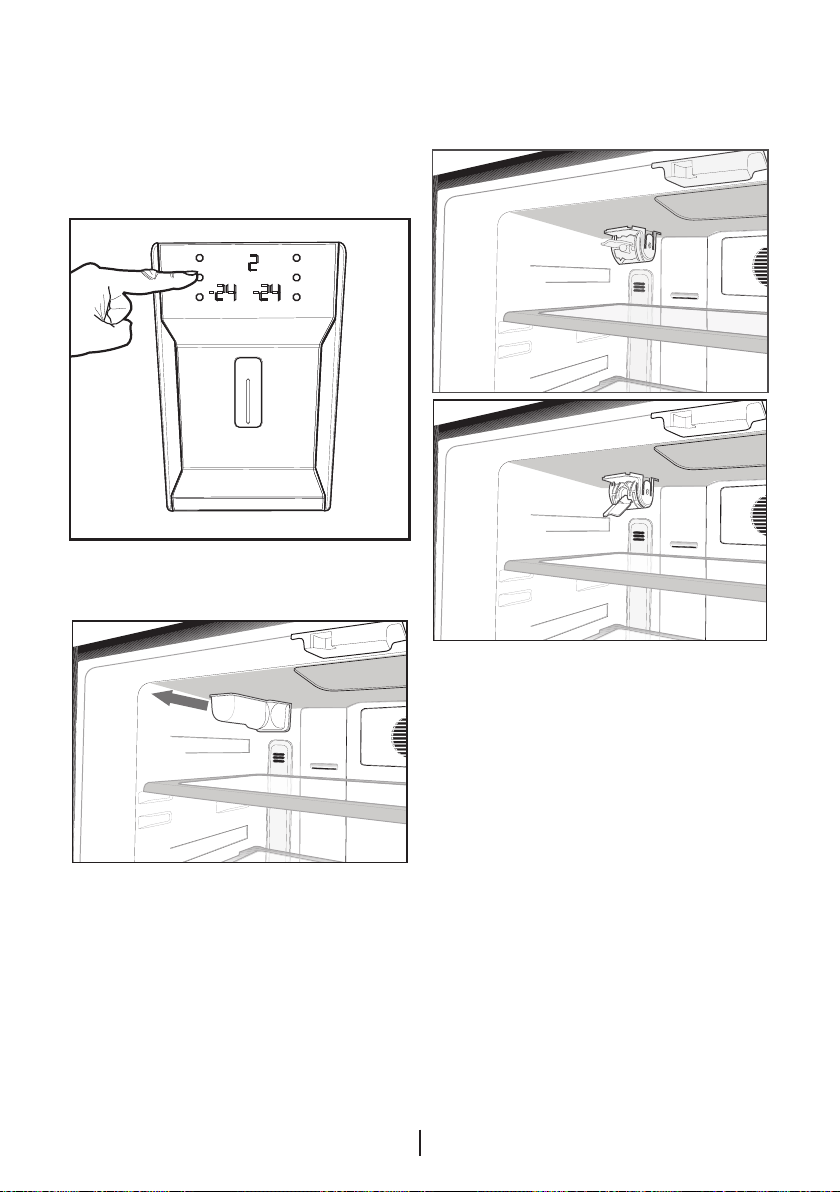
To fit the water filter follow the
instructions below referring to figures
supplied:
1. Press ice cancel button on the display.
2. Remove the filter cover in the fridge
compartment by pulling it forward.
3. Take out the water filter by-pass cover
by rotating it downwards.
A Caution: Make sure that the “Ice off”
mode is active before taking out the bypass cover.
Note: It is normal that a few drops of
water drip after the cover has been taken
out.
4. Remove the lid on top of the water filter
to place it as shown in the figure and
turn upwards to lock it.
5. Press ice cancel button on the display
again to exit from this mode.
Water filter should be replaced every 6
months.
If you want to have the filter change time
calculated automatically and receive a
warning at the end of usage time, please
read "Calculating the Filter Usage Time
Automatically" section.
EN
15
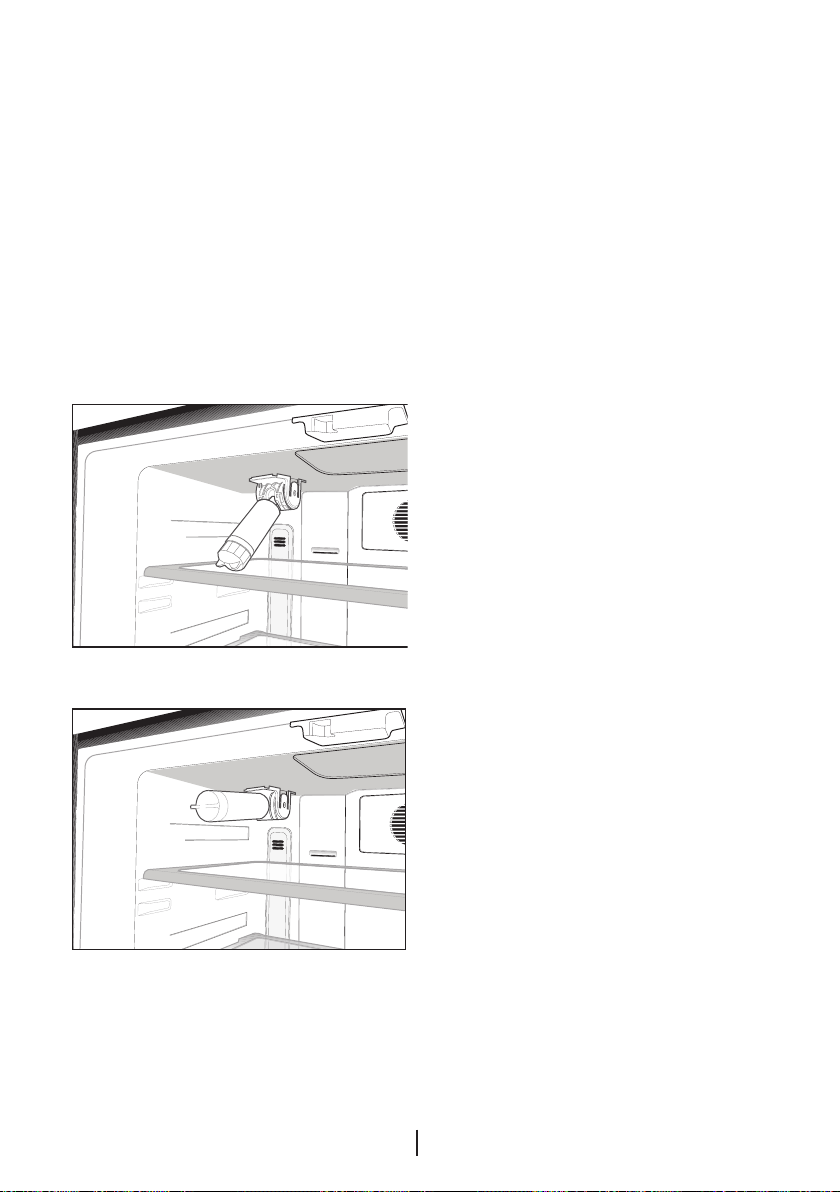
The water filter must be removed as
shown in the figure when it is going to
be replaced or when it will no longer
be used and by-pass cover must be
attached. It must be made sure that Ice
Off mode is active before taking it out.
A Caution: Water filter cleans some
foreign particles in the water. It does not
purify water from microorganisms.
A Caution: Ice Off button must always
be pressed during replacement of the
water filter or installing the by-pass
cover.
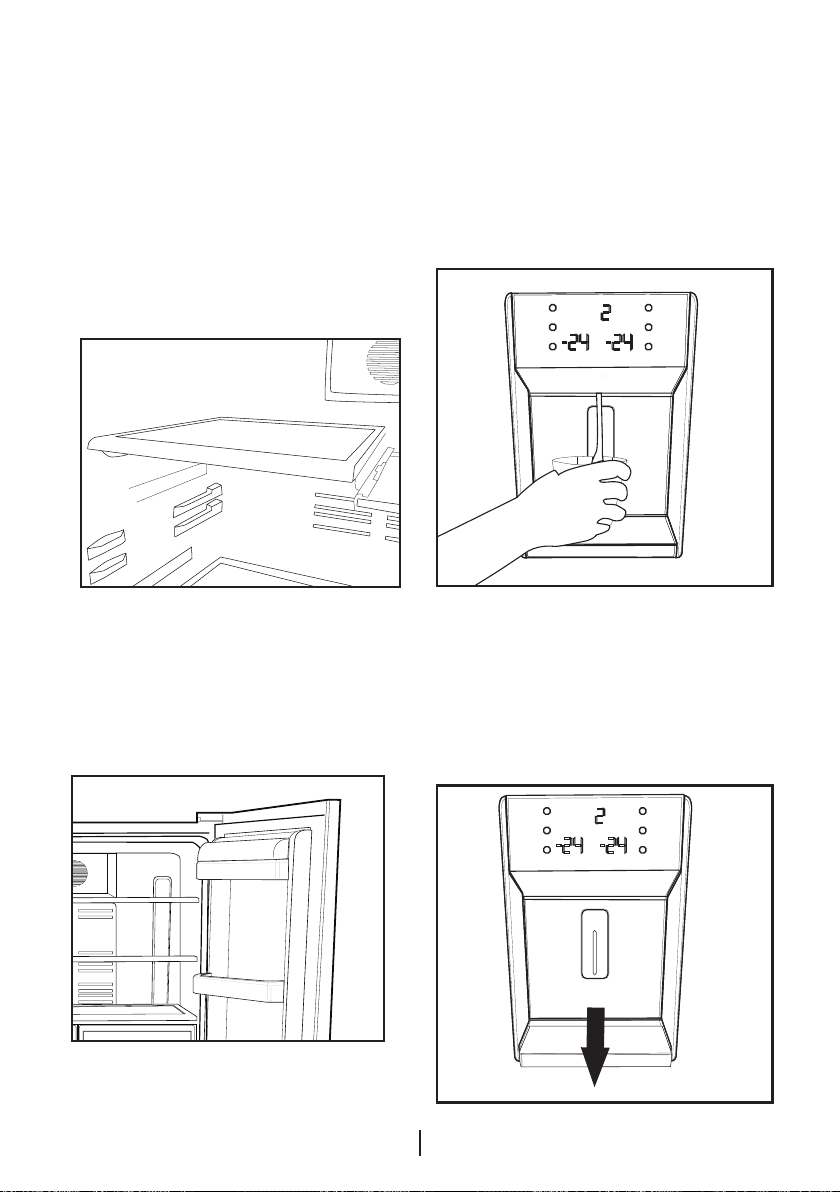
Prior to first use of Water
Dispenser
C
Water mains pressure must not be
below 1 bar.
C Water mains pressure must not be
above 8 bars.
C Pumps must be used in case the
supply water pressure drops below 1 bar
or if a jug is going to be used.
C Water system of the refrigerator must
be connected to the cold water line. It
must not be connected to hot water line.
C No water may be obtained in the
initial operation of the refrigerator. This
is caused by the air in the system. To
discharge air from the system, press
Dispenser latch for periods of 1 minute
until water comes from the Dispenser.
Water flow may be irregular in the
beginning. Irregular water flow will be
normalized after the air in the system is
discharged.
C At the initial startup of the refrigerator
approx.12 hours must pass before cold
water can be obtained.
C Water mains pressure must be
between 1-8 bars for the operation of
Ice/Water Dispenser smoothly. For this,
check that 1 glass of water (100 cc) can
be filled in 10 seconds.
C The first 10 glasses of water should
not be consumed.
C Approximately the first 30 cubes
of ice to be obtained from the Ice
Dispenser must not be used.
C Always use the water filter when a jug
is not being used.
16
EN

4 Preparation
C Your refrigerator should be installed at
least 30 cm away from heat sources
such as hobs, ovens, central heater
and stoves and at least 5 cm away
from electrical ovens and should not be
located under direct sunlight.
C The ambient temperature of the room
where you install your refrigerator
should at least be 10°C. Operating your
refrigerator under cooler conditions
than this is not recommended with
regard to its efficiency.
C Please make sure that the interior of
your refrigerator is cleaned thoroughly.
C If two refrigerators are to be installed
side by side, there should be at least 2
cm distance between them.
C When you operate your refrigerator
for the first time, please observe the
following instructions during the initial
six hours.
- The door should not be opened
frequently.
- It must be operated empty without
any food in it.
- Do not unplug your refrigerator. If
a power failure occurs out of your
control, please see the warnings in
the “Recommended solutions for the
problems” section.
C Original packaging and foam
materials should be kept for future
transportations or moving.
17
EN

1 7 11 12 15 4
5
6
2
3
16
17
18 20 19
10 9 14 138
5 Using your refrigerator
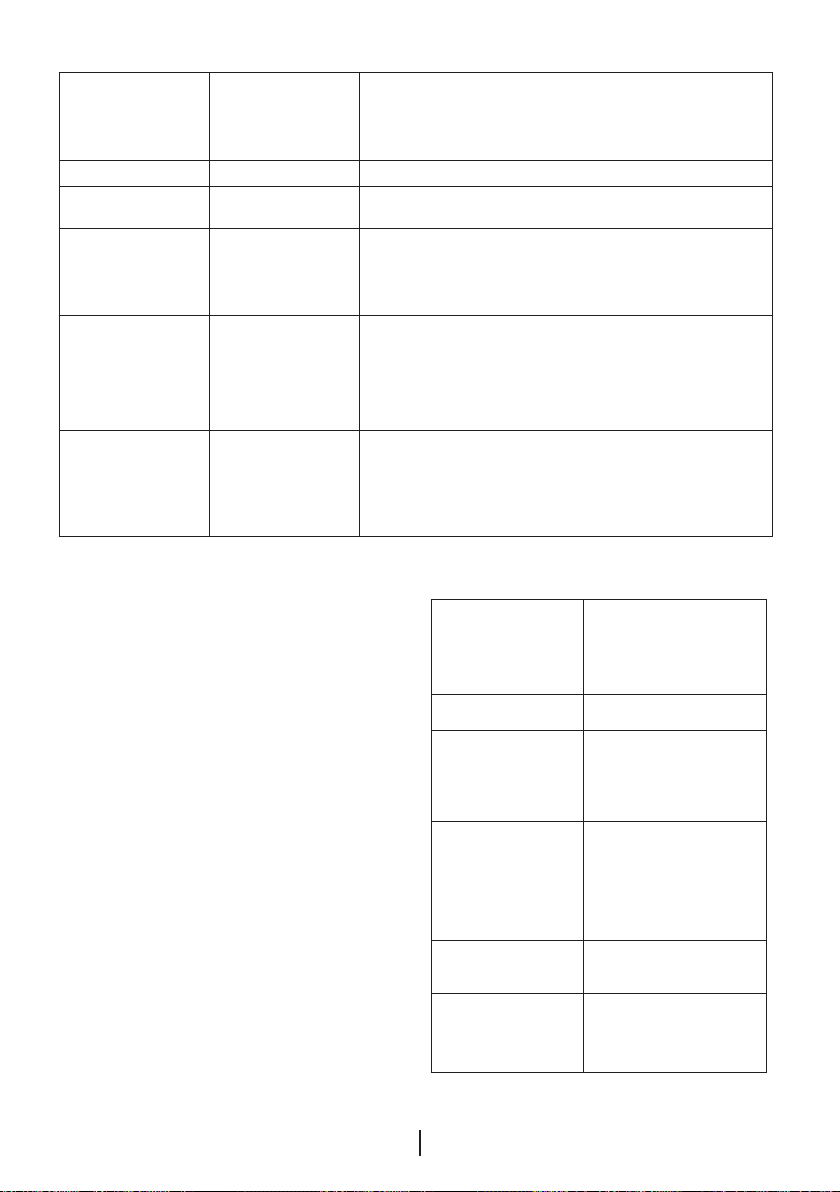
Indicator Panel
This touch-control indicator panel allows you to set the temperature without opening
the door of your refrigerator. Just touch the relevant button with your finger to set the
temperature.
1. Eco-Extra / Vacation Button
2. Fast Freeze Button
3. Freezer Compartment
Temperature Setting Button
4. Fridge Compartment
Temperature Setting Button
5. Quick Cool Button
6. Multi Zone Compartment
Temperature Setting Button
7. Vacation Function Indicator
8. Eco-Extra Function Indicator
9. Fast Freeze Function Indicator
10. Freezer Compartment
Temperature Indicator
11. Fridge Compartment Temperature
Indicator
12. Quick Cool Function Indicator
13. Multi Zone Compartment
Temperature Indicator
14. Economy Mode Indicator
15. Error Status Indicator
16. Key Lock Indicator
17. Ice Cancel Button
18. Ice Off indicator
19. Cancel Filter Change Warning Button
20. Filter Change Warning Indicator
C Figures that take place in this instruction manual are schematic and may not
correspond exactly with your product. If the subject parts are not included in the
product you have purchased, then it is valid for other models.
EN
18

1. Eco Extra/Vacation Button
Press this button briefly to activate the
Eco Extra function. Press and hold this
button for 3 sec. to activate the Vacation
function. Press this button again to
deactivate the selected function.
2. Fast Freeze Button
Press this button briefly to activate the
Fast Freeze function. Press this button
again to deactivate the selected function.
3. Freezer Compartment
Temperature Setting Button
Press this button to set the temperature
of the freezer compartment to -18, -20,
-22, -24, -18... respectively. Press this
button to set the desired temperature for
the Freezer Compartment.
If the Multi Zone Compartment is set as
a Freezer, then the temperature of the
Multi Zone Compartment will change
as -18, -20, -22, -24, -18... respectively
each time you press this button. If the
Multi Zone Compartment is set as a
Fridge, then the temperature of the Multi
Zone Compartment will change as 10, 8,
6, 4, 2, 0, -6, ... respectively each time
you press this button.
7. Vacation Function Indicator
Indicates that the vacation function
is active. If this function is active,
“- -” appears on the indicator of the
fridge compartment and no cooling is
performed in the fridge compartment.
Other compartments will be cooled in
accordance with the temperature set for
them.
4. Fridge Compartment Temperature
Setting Button
Press this button to set the temperature
of the fridge compartment to 8, 6, 4, 2,
8... respectively. Press this button to set
the desired temperature for the Fridge
Compartment.
5. Quick Cool Button
Press this button briefly to activate the
Quick Cool function. Press this button
again to deactivate the selected function.
6. Multi Zone Compartment
Temperature Setting Button
You can set the Multi Zone
Compartment either as a Freezer or a
Cooler. Press and hold this button for a
long time (3 sec) to set the Multi Zone
Compartment as a Freezer or a Cooler.
This compartment is set as a Freezer
Compartment at factory.
19
Press the relevant button again to
deactivate this function.
8. Eco Extra Function Indicator
It indicates that the Eco-Extra function
is active. If this function is active, your
refrigerator will automatically detect
the least usage periods and energyefficient cooling will be performed during
those times. Economy indicator will be
active while energy-efficient cooling is
performed.
Press the relevant button again to
deactivate this function.
9. Quick Freeze Function Indicator
It indicates that the Fast Freeze function
is active. Use this function when
you place fresh food into the freezer
compartment or when you need ice.
When this function is active, your
refrigerator will run for a certain period of
time.
EN

Press the relevant button again to
deactivate this function.
10. Freezer Compartment
Temperature Indicator
It indicates the temperature set for
Freezer Compartment.
11. Fridge Compartment
Temperature Indicator
Indicates the temperature set for Fridge
Compartment.
12. Quick Cool Function Indicator
Indicates that the Quick Cool function is
active. Use this function when you place
fresh food into the fridge compartment
or when you need to cool your food
quickly. When this function is active, your
refrigerator will run for 2 hours without
stopping.
Press the relevant button again to
deactivate this function.
13. Multi Zone Compartment
Temperature Indicator
It indicates the temperature set for Multi
Zone compartment.
14. Economy Mode Indicator
Indicates that the refrigerator is running
in energy-efficient mode. Freezer
Compartment temperature
This indicator will be active if the function
is set to -18 or the energy efficient
cooling is being performed due to EcoExtra function.
15. Error Status Indicator
If your refrigerator does not cool
adequately or if there is a sensor failure,
this indicator will be activated. When this
indicator is active, Freezer Compartment
Temperature indicator will display “E”
and Fridge Compartment Temperature
Indicator will display numbers such
as “1,2,3…”. These numbers on the
indicator provides information about the
error to the service personnel.
16. Key Lock Indicator
Use this function if you do not want your
refrigerator temperature setting changed.
Press Quick Cool Button and Flexi Zone
Compartment Temperature Setting
Button simultaneously for a long time (3
sec) to activate this feature.
Press the relevant buttons again to
deactivate this function.
17. Ice Cancel Button
To stop ice formation, ice cancel button
is pressed for 3 seconds. When ice
cancel is selected, no water will be sent
to the ice box. Despite this, some ice
may be leftover in the ice box which
may be taken from there. To restart ice
formation, ice cancel button has to be
pressed for 3 seconds.
18. Ice Cancel Indicator
If you do not want to get ice from
the refrigerator, you need to use this
function. You may use this function by
pressing the ice cancel button for 3
seconds.
20
EN

19. Cancel Filter Change Warning
Button
Filter of your refrigerator must be
replaced every 6 months. If you apply
instructions on page 22, your refrigerator
calculates this time automatically and
the filter change waning indicator
illuminates when the filter usage time
has elapsed. Press Cancel filter change
warning button for 3 seconds to allow
the refrigerator to calculate the new filter
time automatically after changing the
filter.
20. Cancel Filter Change Warning
Indicator
When the filter usage time has elapsed,
filter change warning indicator starts to
illuminate.
Door Open Alarm:
In case of leaving any of the
Fridge Compartment or Flexi Zone
Compartment doors open minimum for
1 minute, audible Door Open Alarm will
be activated and heard. Just press any
button on the indicator or close the open
door to silence the alarm.
21
Dual cooling system:
Your refrigerator is equipped with two
separate cooling systems to cool the
fresh food compartment and freezer
compartment. Thus, air in the fresh food
compartment and freezer compartment
do not get mixed. Thanks to these two
separate cooling systems, cooling speed
is much higher than other refrigerators.
Odors in the compartments do not get
mixed. Also additional power saving
is provided since the defrosting is
performed individually.
Freezing fresh food
• Wrap or cover the food before placing
them in • Hot food must cool down to
the room temperature before putting
them in the refrigerator.
• The foodstuff that you want to freeze
must be fresh and in good quality.
• Foodstuff must be divided into
portions according to the family’s daily
or meal based consumption needs.
• Foodstuff must be packaged in an
airtight manner to prevent them from
drying even if they are going to be kept
for a short time.
• Materials to be used for packagings
must be resistant to cold and humidity
and they must be airtight. The
packaging material of the food must be
at a sufficient thickness and durability.
Otherwise the food hardened due to
freezing may puncture the packaging.
It is important for the packaging to be
closed securely for safe storage of the
food.
• Frozen food must be used
immediately after they are thawed and
they should never be re-frozen.
• Please observe the following
instructions to obtain the best results.
1. If the fridge has a quick freeze
function, activate the quick freeze
function when you want to freeze the
food.
EN

2. Do not freeze too large quantities
of food at one time. The quality of the
food is best preserved when it is frozen
right through to the core as quickly as
possible.
3. Take special care not to mix already
frozen food and fresh food.
4. Make sure raw foods are not in
contact with cooked foods in the fridge.
Deep-freeze information
Food must be frozen as rapidly as
possible when they are put in the freezer
in order to keep them in good quality.
It is possible to preserve the food for
a long time only at -18°C or lower
temperatures.
You can keep the freshness of food
for many months (at -18°C or lower
temperatures in the deep freeze).
WARNING!
• Foodstuff must be divided into portions
according to the family’s daily or meal
based consumption needs.
• Foodstuff must be packaged in an
airtight manner to prevent them from
drying even if they are going to be kept
for a short time.
Materials necessary for packaging:
• Cold resistant adhesive tape
• Self-adhesive label
• Rubber rings
• Pen
Materials to be used for packaging
the foodstuff must be tear-proof and
resistant to cold, humidity, dour, oils and
acids.
Foodstuff to be frozen should not be
allowed to come in contact with the
previously frozen items to prevent their
partial thawing. Thawed out food must
be consumed and must not be frozen
again.
A
22
EN
Freezer
Compartment
Setting
-18°C 4°C This is the normal recommended setting.
-20, -22 or
-24°C
Quick Freeze 4°C
-18°C or colder 2°C
-18°C or colder Quick Fridge
Recommendations for
preservation of frozen food
• Pre-packed commercially frozen
food should be stored in accordance
with the frozen food manufacturer's
instructions in a frozen food storage
compartment.
• To ensure that the high quality
supplied by the frozen food
manufacturer and the food retailer is
maintained, following points should be
noted:
1.Put packages in the freezer as quickly
as possible after purchase.
2.Ensure that contents of the package
are labeled and dated.
3. Do not exceed "Use By", "Best
Before" dates on the packaging.
Defrosting
The freezer compartment defrosts
automatically.
Fridge
Compartment
Setting
4°C
Remarks
These settings are recommended when the
ambient temperature exceeds 30°C.
Use when you wish to freeze your food in a
short time. If is recommended to be used to
maintain the quality of meat and fish products.
If you think that your fridge compartment is not
cold enough because of the hot conditions or
frequent opening and closing of the door.
You can use it when your fridge compartment
is overloaded or if you wish to cool down
your food rapidly. It is recommended that you
activate the quick freeze function 4-8 hours
before placing the food.
Placing the food
Freezer
compartment
shelves
Egg section Egg
Fridge
compartment
shelves
Door shelves
of fridge
compartment
Crisper Vegetables and fruits
Freshzone
compartment
Various frozen food
such as meat, fish,
ice cream, vegetables
and etc.
Food in pans,
covered plates and
closed containers
Small and packaged
food and drinks (such
as milk, fruit juice and
beer)
Delicatessen products
(cheese, butter,
salami and etc.)
23
EN
Things to do to have the filter usage time calculated
automatically
(For products connected to the mains water line and equipped with filter)
1- After plugging the refrigerator in, press A and B buttons together to activate
the key lock.
A
B
2- Then press Eco-Extra (1), Fridge Compartment Temperature Setting (4), Quick
Cool (5) and Freezer Compartment Temperature Setting (3) buttons respectively.
1 4
5
3
If button configuration is pressed in the correct order, key lock symbol will go off,
buzzer will be activated shortly, and Filter change warning indicator illuminates.
Press cancel filter change warning button (Item 19 in display descriptions) after
changing the filter to have the filter usage time calculated automatically.
NOTE:
If the filter usage time is being calculated automatically, filter change warning
1.
indicator will illuminate continuously in a few seconds after the product is
plugged in.
2. Automatic filter usage time calculation is not active ex factory. It must be
activated in products equipped with a filter.
3. Repeat the same procedure in products whose automatic filter usage time
calculation is activated in order to deactivate the filter usage time calculation.
EN
24
Egg tray
You can install the egg holder to the
desired door or body shelf.
Never store the egg holder in the freezer
compartment
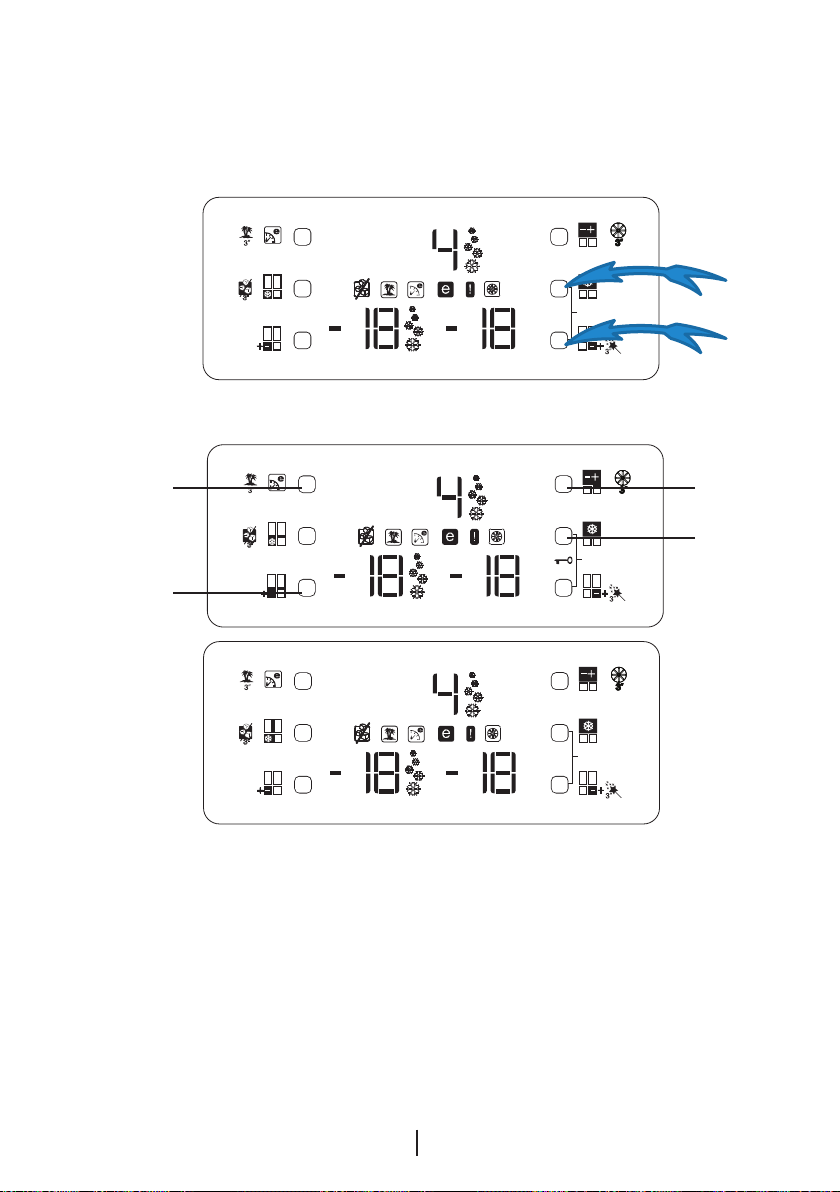
Sliding Body Shelves
Sliding body shelves can be pulled
by slightly lifting up from the front and
moved back and forth. They come to a
stop point when pulled towards front to
allow you reach the foods placed at the
back of the shelf; when it is pulled after
slightly lifted upwards at the second stop
point, the body shelf will be released.
The shelf should be hold tightly from the
bottom as well in order to prevent it from
tipping over. The body shelf is placed on
the rails at the sides of the refrigerator
body by bringing it to one lower or one
upper level.
The body shelf should be pushed
backwards to seat it completely.
1
2
3
4
Crisper
Crisper of your refrigerator is designed
specially to keep your vegetables
freshly without loosing their humidity.
For this purpose, cool air circulation
occurs around the crisper in general.
Remove the door shelves that align
with the crisper before removing the
crispers. You can remove the crispers
as illustrated in the figure.
Chiller compartment
Chiller compartments enable the foods
to be frozen become ready for freezing.
You can also use these compartments to
store your food at a temperature a few
degrees below the fridge compartment.
You can increase the inner volume of
your refrigerator by removing any of
the chiller compartments. To do this,
pull the compartment towards yourself;
the compartment will lean against the
stopper and stop. This compartment will
be released when you lift it about 1 cm
and pull it towards yourself.
25
EN

Movable Middle Section
Movable middle section is intended
to prevent the cold air inside your
refrigerator from escaping outside.
1- Sealing is provided when the gaskets
on the door presses on the surface of
the movable middle section while the
fridge compartment doors are closed.
2- Another reason that your refrigerator
is equipped with a movable middle
section is that it increases the net volume
of the fridge compartment. Standard
middle sections occupy some nonusable volume in the refrigerator.
3- Movable middle section is closed
when the left door of the fridge
compartment is closed.
4- It must not be opened manually. It
moves under the guidance of the plastic
part on the body while the door is
closed.
Multi Zone Storage
Compartment
The Multi Zone Storage Compartment
of your refrigerator may be used in
any desired mode by adjusting it to
fridge (2/4/6/8 °C) or freezer (-18/20/-22/-24) temperatures. You can
keep the compartment in the desired
temperature with the Multi Zone Storage
Compartment Temperature Setting
Button. The temperature of the Multi
Zone Storage Compartment may be
set to 0 and 10 degrees in addition to
the fridge compartment temperatures
and to -6 degrees in addition to the
freezer compartment temperatures. 0
degree is used to store the deli products
longer, and -6 degrees is used to keep
the meats up to 2 weeks in an easily
cuttable condition.
The feature of switching to a Fridge
C
or Freezer compartment is provided by
a cooling element located in the closed
section (Compressor Compartment)
behind the refrigerator. During operation
of this element, sounds similar to the
sound of seconds heard from an analog
clock may be heard. This is normal and
is not fault cause.
Blue light
Foodstuff stored in the crispers that are
enlightened with a blue light continue
their photosynthesis by means of the
wavelength effect of blue light and thus,
preserve their freshness and increase
their vitamin content.
26
EN
Sliding Body Shelves With
Rear Hangers
Sliding body shelves with rear hangers
can be moved back and forth. Height
of these shelves can be adjusted by
removing and then installing them to
upper or lower positions. Raise the shelf
up slightly and pull towards yourself to
remove it.
Using the water spring
Warnings
It is normal for the first few glasses of water
taken from the dispenser to be warm.
In cases where the water dispenser has not
been used frequently, sufficient amount of
water must be drained from the dispenser
to get fresh water.
Butter & Cheese Section
You can store food such as butter,
cheese, and margarine in this section
which has a lid.
Spillage Tray
Water drops that drip during use,
accumulates in the spillage tray. You can
remove spillage tray by pulling it to yourself
or pressing on its edge (depending on the
model). You can remove the water with a
sponge or a soft cloth.
EN
27
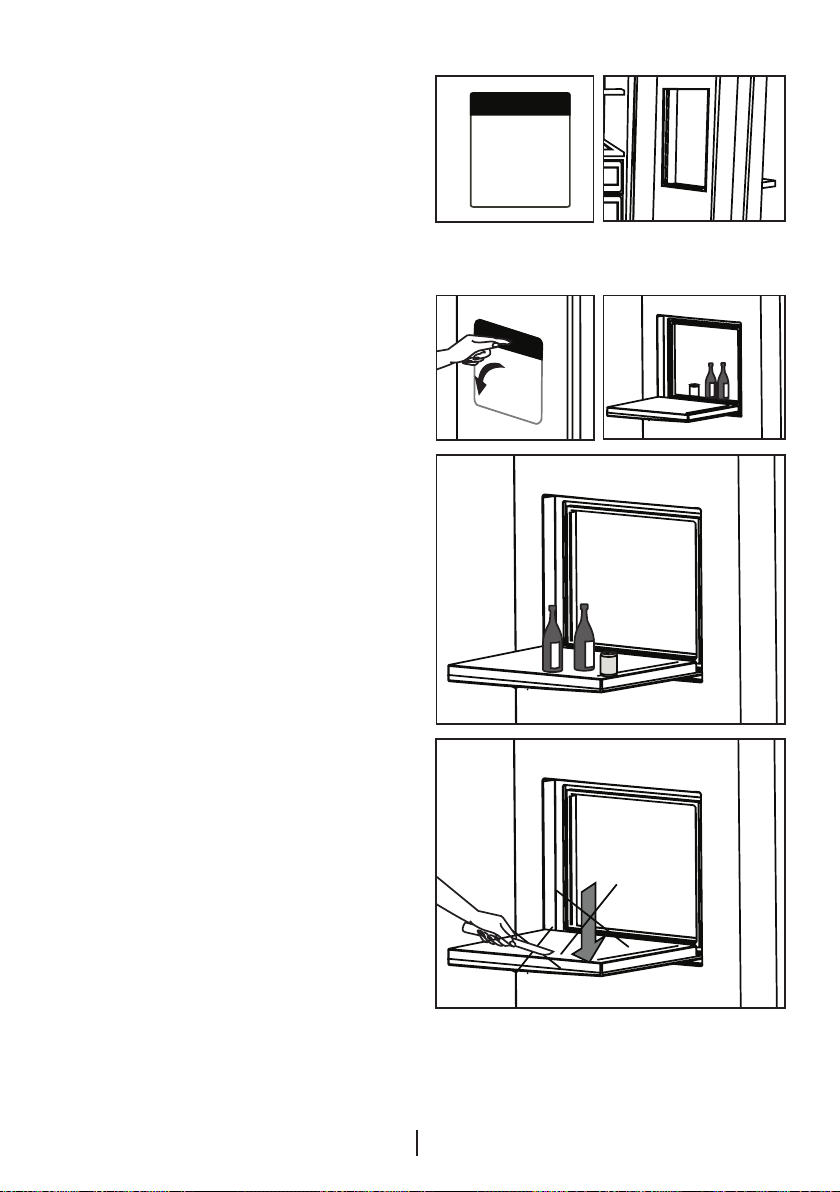
Minibar
Minibar door provides you extra comfort
when using your refrigerator. The door
shelf in the refrigerator can be accessed
without opening the refrigerator door;
thanks to this feature, you can easily pick
from the refrigerator the foods and drinks
which you frequently consume. Since
you do not have to open the refrigerator
door frequently, you will have decreased
the power consumption of refrigerator.
To open the minibar door, press by your
hand on the minibar and pull back to
open.
When the door of minibar is open, you
may use the inner face of the door as a
table on which you may put your bottles
and glasses for a short time as shown in
the figure.
A Caution: Never do things that may
put pressure on the door such as
sitting on, climbing up or hanging to the
table and do not place heavy objects
on it. This may cause damage on the
refrigerator or personal injuries.
A Caution: Never perform cutting on
the Minibar door and be careful that the
door is not damaged by pointed objects.
28
EN

6 Maintenance and cleaning
Never use gasoline, benzene or similar
A
substances for cleaning purposes.
We recommend that you unplug the
B
appliance before cleaning.
Never use any sharp abrasive
B
instrument, soap, household cleaner,
detergent and wax polish for cleaning.
For non-No Frost products, water
B
drops and frosting up to a fingerbreadth
occur on the rear wall of the Fridge
compartment. Do not clean it; never
apply oil or similar agents on it.
Only use slightly damp microfiber
B
cloths to clean the outer surface of
the product. Sponges and other types
of cleaning cloths may scratch the
surface.
Use lukewarm water to clean the cabinet
C
of your refrigerator and wipe it dry.
Use a damp cloth wrung out in a solution
C
of one teaspoon of bicarbonate of soda
to one pint of water to clean the interior
and wipe it dry.
Make sure that no water enters the lamp
B
housing and other electrical items.
If your refrigerator is not going to be used
B
for a long period of time, unplug the
power cable, remove all food, clean it
and leave the door ajar.
Check door seals regularly to ensure they
C
are clean and free from food particles.
To remove door racks, remove all the
A
contents and then simply push the
door rack upwards from the base.
Never use cleaning agents or water
A
that contain chlorine to clean the outer
surfaces and chromium coated parts of
the product. Chlorine causes corrosion
on such metal surfaces.
Do not use sharp, abrasive tools, soap,
A
household cleaning agents, detergents,
kerosene, fuel oil, varnish etc. to
prevent removal and deformation of the
prints on the plastic part. Use lukewarm
water and a soft cloth for cleaning and
then wipe it dry.
Protection of plastic
surfaces
Do not put the liquid oils or oil-cooked
C
meals in your refrigerator in unsealed
containers as they damage the plastic
surfaces of your refrigerator. In case of
spilling or smearing oil on the plastic
surfaces, clean and rinse the relevant
part of the surface at once with warm
water.
29
EN
 Loading...