

Page 1

FSE 1121
Page 2
en-Index 1-9
Safety first ................................................./1
Transport instructions................................/2
Disposal ..................................................../2
Appliance Setup......................................../2
Get to know your appliance......................./3
Prior to startup.........................................../3
Setting the operating temperature............./4
Indicator lights.........................................../4
Freezing ..................................................../5
Defrosting of the appliance ......................./5
Cleaning and care...................................../6
Practical tips and notes............................./7
Normal operating noises............................/7
What, if....................................................../8
Reversing the door..................................../8
Meaning of energy fiche............................/9
1-9
1/
2/
2/
2/
3/
3/
4/
4/
5/
5/
6/
7/
7/
8/
8/
9/
fr-Index
La sécurité d'abord..................................../1
Instructions de transport............................/2
Mise au rebut ............................................/2
Installation de l'appareil............................./2
Apprendre à connaître votre appareil......../3
Avant la mise en service .........................../3
Réglage de la température de
fonctionnement........................................../4
Voyants lumineux....................................../4
Congélation.............................................../5
Dégivrage de l'appareil............................../5
Nettoyage et entretien.............................../6
Conseils pratiques et remarques ............../7
Bruits normaux de fonctionnement .........../7
Et si…......................................................../8
Réversibilité de la porte............................./8
Signification de la fiche énergétique ........./9
1-9
Page 3
54 23
1
6
7
8
8
9
1
Page 4

1-
4-
-2
-3
4 2 3 1 5
2
3
5
4
6
Page 5
6
1
5
4
60°
3
2
7
8
10
9
7
Page 6

en en
Congratulations on your choice of our product which will certainly provide you with many years
of good service.
Safety comes first!
Please read this Instruction Manual carefully. It contains important information on how to use
your new appliance. If instructions are not adhered to, you may lose your right to service at
no charge during the warranty period. Please keep this manual in a safe place and pass it on
to later users if applicable.
• Do not connect your appliance to the power supply until all packing and transit protectors
have been removed.
• Leave to stand upright for at least 4 hours before switching on to allow the system to settle
if transported horizontally.
• This appliance must only be used for its intended purpose, i.e. the storing and freezing of
edible foodstuff.
• We do not recommend use of this appliance in an unheated, cold room e.g. garage,
conservatory, annex, shed, outdoors, etc. See ‘Location’.
• On delivery, check to make sure that the product is not damaged and that all the parts and
accessories are in perfect condition.
• Do not operate a damaged appliance; if in doubt, check with your dealer.
• Do not allow children to play with the appliance.
• Do not sit or stand on or let the children sit or stand on the applianceor on the pull-out parts.
• Do not hang on the appliance door.
• Your appliance contains no fluoridated coolants (CFC/HFC), but isobutane
(R 600 a), a natural gas which is highly compatible with the environment.
(R 600 a) is easily flammable. Therefore, be sure that the cooling circuit is not damaged
either during transport or during operations.
In the event of damage;
• Avoid any open flame, sources of sparks and flammable substances.
• Immediately air the room in which the appliance is located.
• In case the coolant spraying out contacts your eyes it may cause eye injuries.
metres.
• The space in the room where the appliance is installed must not be smaller than 10 cubic
• Do not dispose of the appliance in a fire. Your appliance contains non CFC substances in
the insulation which are flammable.
• Please contact the local authority in your region for information on disposal methods and
facilities available.
Warning - Keep ventilation openings on the appliance enclosure or in the built-in structure,
clear of obstruction.
Warning - Do not use mechanical devices or other means to accelerate the defrosting
process, other than those recommended by the manufacturer.
Warning - Do not damage the refrigerant circuit.
Warning - Do not use electrical devices inside the food storage compartments of the
appliance, unless they are of the type recommended by the manufacturer.
• Avoid touching the metal condenser wiring on the backside of the appliance; there is risk
of injury.
• In the event of a possible malfunction, disconnect the appliance from the power supply first.
• Prior to cleaning the appliance always unplug the appliance or switch off the circuit breaker.
Do not pull from the power cable. Pull from the plug.
• Repairs to the electrical equipment may only be made by qualified experts. If the power cable
is damaged, the manufacturer or customer service must replace it in order to avoid
danger.
1
Page 7
en en
Transport instructions
The appliance should be transported only in
upright position.
The packing as supplied must be intact during
transportation.
If the appliance is transported in the horizontal
position, it must be placed vertically and left
in this position for 4 hours before taking into
operation.
The appliance must be protected against rain,
moisture and other atmospheric influences.
The manufacturer assumes no liability if safety
instructions are disregarded.
Disposal
Make the appliance unusable immediately.
Pull out the mains plug and cut the power
cable. Remove or destroy snap or latch locks
before disposing of the appliance. In this
manner you prevent children from locking
themselves in and endangering their lives.
Appliance setup
• Do not operate your appliance in a room
where the temperature is likely to fall below
10 °C at night and/or especially in winter. At
lower temperatures the appliance may not
operate, resulting in a reduction in the storage
life of the food.
• The climate class rate of your appliance is
given on the rating label located inside the
appliance. It specifies the appropriate operating
ambient temperatures as explained below.
Climatic class Ambient temperatures
SN.......................+10 °C to 32 °C
N .........................+16 °C to 32 °C
ST .......................+18 °C to 38 °C
T..........................+18 °C to 43 °C
SN-ST.................+10 °C to 38 °C
SN-T ...................+10 °C to 43 °C
Location
Only place the appliance in dry rooms which
can be ventilated.
Avoid direct sunlight or direct heat sources
such as a stove or a heater.
If this cannot be avoided, the following
minimum distances should be maintained:
Electric stoves: 3.00 cm
Heater: 3.00 cm
Cooling devices: 2.50 cm
• Make sure that sufficient room is provided
around the appliance to ensure free air
circulation.
Fit the two plastic wall spacers supplied with
the appliance rotating 1/4 turn to the condenser
at the back of the appliance (Fig. 6).
• The appliance should be placed on a level
surface. The two front feet can be adjusted as
required. To ensure that your appliance is
standing upright adjust the two front feet by
turning clockwise or counter-clockwise, until
the product is in firm contact with the floor.
Correct adjustment of feet avoids excessive
vibration and noise.
Electrical connections
Warning
This appliance must be grounded.
• Check whether the power type and voltage
in your region corresponds to the one stated
on the rating label inside the appliance.
• The electrical safety of the appliance is only
assured when the grounding system in the
house is installed in accordance with
regulations.
• When placing the appliance, do not let the
power cable get stuck under it; otherwise the
cable will be damaged.
• Ensure that the plug remains readily
accessible. Do not use a multiple adapter bar
or an extension cable.
• The electrical specifications of your appliance
is given on the rating label located inside the
appliance.
• Route power cable to allow easy connection
and disconnection after installation.
• A contact separator should be used if the
power cable is not accessible. (for built-in
models)
2
Page 8

en en
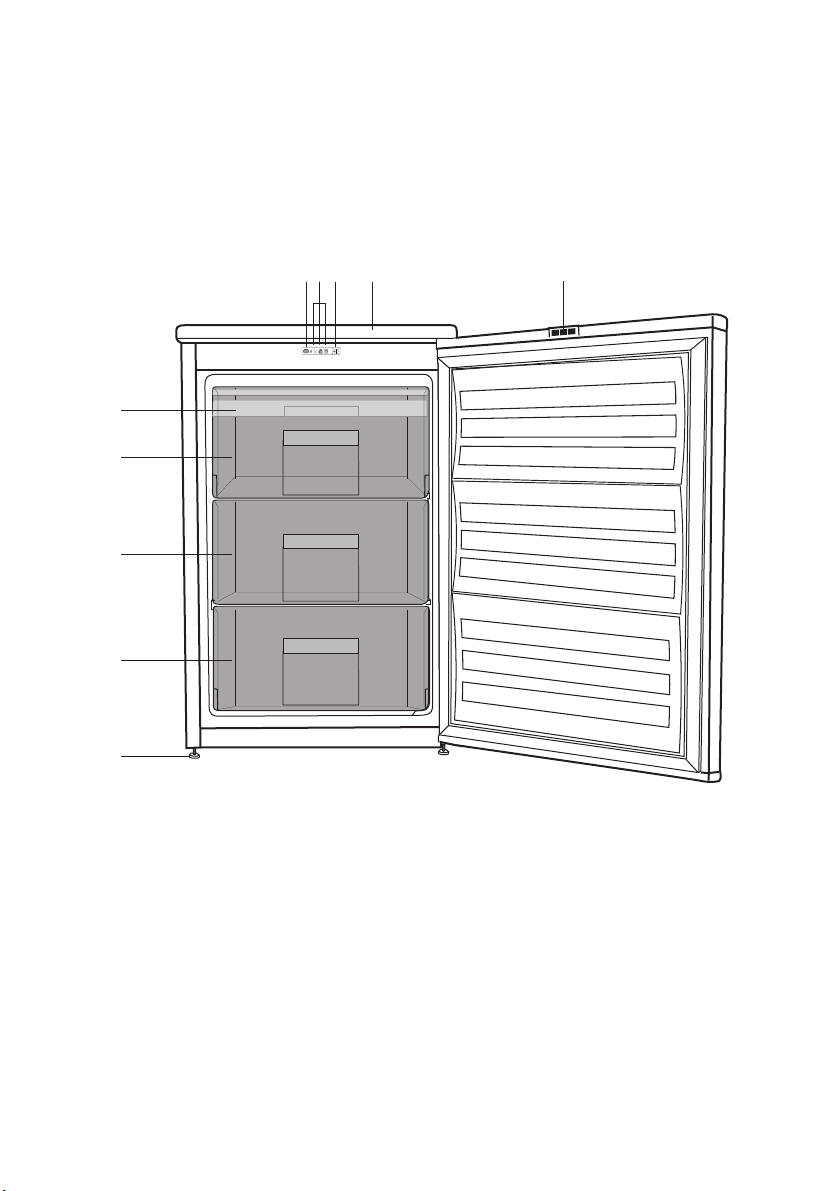
Get to know your appliance
Warning
Below information about accessories are
supplied only for reference. Below accessories
may not be exactly same as the accessories
of your appliance.
Fig. 1
Reflectors
1.
Top trim
2.
Fast-Freeze switch
3.
Indicator lights
4.
Thermostat knob
5.
Ice bank
6.
Fast-freeze compartment
7.
Frozen-food compartments
8.
Adjustable front feet
9.
Do not place hot objects or any
appliance that generates heat
on the top trim otherwise the
top trim may be damaged.
Prior to startup
Before you start operating your appliance, the
following points should be re-checked for
safety:
• Is the appliance standing level on the floor?
• Is there sufficient space for good air
circulation?
• Is the interior clean? (Also see the section
‘Cleaning and care’)
• Set the thermostat knob half way between
1 and 4 or Min. and Max.
• Now connect the appliance to the mains.
Do not place foodstuff into the refrigerator until
the temperature has reached the desired level.
3
Page 9
en en
Setting the operating
temperature
(Fig. 2)
The operating temperature is regulated by the
temperature control.
Warm Cold
1 2 3 4
(Or) Min. Max.
1 = Lowest cooling setting (Warmest setting)
4 = Highest cooling setting (Coldest setting)
(Or)
Min. = Lowest cooling setting
(Warmest setting)
Max. = Highest cooling setting
(Coldest setting)
Please choose the setting according to the
desired temperature.
The interior temperature also depends on
ambient temperature, the frequency with which
the door is opened and the amount of food
kept inside.
Frequently opening the door causes the interior
temperature to rise.
For this reason, it is recommended to close
the door again as soon as possible after use.
Indicator lights
There are three coloured indicator lights located
on the front of the appliance which shows the
operating mode of the freezer. (Fig. 2)
Green Indicator (1) Illuminates when the
appliance is connected to the mains and will
glow as long as electricity is available. The
green light will not glow if the thermostat is
set to '0' position. The green indicator does
not give any indication of the temperature
inside the freezer.
Amber Indicator (2) This indicator will glow
when the fast freeze switch (4) is on and will
continue to glow until the fast freeze switch is
turned off. The compressor will run
continuously while fast freeze switch is on.
Fast freeze operation is for freezing fresh food.
Red Indicator (3) Illuminates:
a) If the pre-set temperature can not be
maintained.
b) If excessive amounts of fresh food are
placed inside.
c) If the appliance door is left open accidentally.
Thermostat knob (5) Thermostat knob is
located on the indicator light set.
The normal storage temperature of your
appliance should be -18 °C (0 °F). If the
thermostat knob is turned counter clockwise
from position 1, the appliance will be switched
off and “click” sound will be heard. Lower
temperatures can be obtained by adjusting
the thermostat knob towards Position 4.
We recommend checking the temperature
with a thermometer to ensure that the storage
compartments are kept to the desired
temperature. Remember at take the reading
immediately since the thermometer
temperature will rise very rapidly after you
remove it from the freezer.
IMPORTANT:
When you press the fast freeze switch, there
may be a short delay before the compressor
starts to operate. This is normal and does not
indicate a compressor fault.
4
Page 10
en en
Freezing
Freezing food
The freezing area is marked with
symbol on the door liner.
You can use the appliance for freezing fresh
food as well as for storing pre-frozen food.
Please refer to the recommendations given
on the packaging of your food.
Attention
Do not freeze fizzy drinks, as the bottle may
burst when the liquid in it is frozen.
Be careful with frozen products such as
coloured ice-cubes.
Do not exceed the freezing capacity of your
appliance in 24 hours. See the rating label.
In order to maintain the quality of the food, the
freezing must be effected as rapidly as possible.
Thus, the freezing capacity will not be
exceeded, and the temperature inside the
freezer will not rise.
Attention
Keep the already deep-frozen food always
separated with freshly placed food.
Making ice cubes
Fill the ice-cube tray 3/4 full with water and
place it in the freezer.
As soon as the water has turned into ice, you
can take out the ice cubes.
Never use sharp objects such as knives or
forks to remove the ice cubes. There is a risk
of injury!
Let the ice cubes slightly thaw instead, or put
the bottom of the tray in hot water for a short
moment.
Fast freeze
If large amounts of fresh food are going to be
frozen, push the fast freeze switch 24 hours
before putting the fresh food in the fast freeze
compartment.
It is strongly recommended to keep fast freeze
switch on 24 hours to freeze maximum amount
of fresh food declared as freezing capacity.
Take special care not to mix frozen food and
fresh food.
When deep-freezing hot food, the cooling
compressor will work until the food is completely
frozen. This can temporarily cause excessive
cooling of the refrigeration compartment.
If you find the freezer door difficult to open just
after you have closed it, don’t worry. This is
due to the pressure difference which will
equalize and allow the door to open normally
after a few minutes.
You will hear a vacuum sound just after closing
the door. This is quite normal.
Defrosting of the appliance
Excessive build-up of ice will affect the freezing
performance of your appliance.
It is therefore recommended that you defrost
your appliance at least twice a year, or
whenever the ice build-up exceeds 7 mm.
Defrost your appliance when there is only little
or no food in it.
Take out the deep-frozen food from the
drawers. Wrap the deep-frozen food in several
layers of paper, or a blanket, and keep it in a
cold place.
Unplug the appliance or switch off the circuit
breaker to start the defrosting process.
Take out the accessories (like shelf, drawer
etc.) from the appliance (Fig. 4) and use a
suitable container to collect the thawing water.
5
Page 11
en en
Use a sponge or a soft cloth to remove thawing
water if necessary (Fig. 5).
Keep the door open during defrosting.
For quicker defrosting, place containers with
warm water inside the appliance.
Never use electrical devices, defrosting sprays
or pointed or sharp-edged objects such as
knives or forks to remove the ice.
After the defrosting is done, clean the inside
(see the section ‘Cleaning and care’).
Reconnect the appliance to the mains. Place
the frozen food into the drawers and slide the
drawers into the freezer.
Cleaning and care
Interior and Exterior Surfaces
Attention
Always unplug the power cable or switch
off the circuit breaker before cleaning.
Clean the exterior using lukewarm water and
a mild detergent.
Never use detergents, abrasive or acidic
agents.
Wipe the inside compartment dry.
Be careful to prevent water from getting into
contact with the electrical connections of the
temperature control or the interior light.
If the appliance is not going to be used for a
long period of time, unplug the power cable
and remove all food. Clean the appliance and
keep the door open.
To preserve the appearance of your appliance,
you can polish the exterior and the door
accessories with a silicone wax.
Clean the condenser at the back of the
appliance once a year using a brush or a
vacuum cleaner. Dust build-up leads to
increased energy consumption.
Inspect the door gasket at regular intervals.
Clean with water only, and wipe totally dry.
Cleaning of the accessories
Drawers:
To clean a drawer, pull it out as far as possible,
tilt it upwards and then pull it out completely.
6
Page 12

en en
Practical tips and notes
Freezing
• Always leave food to thaw in a container that
allows the thawing water to run off.
• Do not exceed the maximum allowable
freezing capacity when freezing fresh food
(see the section "Freezing")
• Do not give children ice-cream and ices directly
from the freezer.
The low temperature may cause cold burns on
lips.
• Never re-freeze defrosted food; defrosted food
must be consumed within 24 hours. Only food
that has been cooked can be refrozen.
• Do not take out frozen food with wet hands.
• Store only fresh and impeccable food.
• Always use appropriate packaging material
to avoid odour penetration or degradation of
the food.
• Store commercially frozen food in accordance
with the instructions given on the packaging.
• Freeze cooked food in small quantities. This
ensures rapid freezing and maintains the
quality of the food.
• Do not freeze liquids in tightly closed bottles
or containers.
The bottles/containers may burst at low
temperatures.
• Carry pre-frozen food in suitable bags and
place it in your freezer as soon as possible.
Always defrost food in the fridge compartment.
Normal operating noises
Various functional noises are completely
normal due to the operation of the cooling
system of your appliance;
• Gurgling, hissing, boiling or bubbling noises
are caused by the refrigerant, circulating inside
the cooling system. These noises can still be
heard for a short period of time after the
compressor shuts off.
• Sudden, sharp cracking or popping noises
are caused by the expansion and contraction
of the inside walls or some components inside
the cabinets.
• Buzzing, whirring, pulsating or high-pitched
humming noises are caused by the
compressor. These noises are slightly louder
at the start-up of the compressor and reduce
when the appliance reaches the operating
temperatures.
Also to avoid disturbing vibrations and
noises make sure that;
• Your refrigerator is standing level on all four
feet.
• Your refrigerator is not in contact with the
walls, surrounding objects or kitchen cabinets
and furniture.
• Cans, bottles or dishes inside the refrigerator
are not touching and hitting each other.
• All shelves and bins are mounted correctly
inside the refrigerator cabinets and doors.
7
Page 13

en en
What, if....
1- The appliance will not work, even though
it is switched on.
• Check if the power cable is properly
connected!
• Check if the mains supply is in order, or if a
circuit breaker has been tripped!
• Check the temperature control for correct
setting!
2- There is a power failure.
Your freezer is suitable for the long-term
storage of frozen food that are available
commercially and also can be used to freeze
and store fresh food.
Do not open the door in case of a power failure.
For a
the freezer compartment will not be affected
if the power failure lasts shorter than the
“Conservation Time From Failure (hours)”
mentioned in the rating label.
If the power failure is longer than the
“Conservation Time From Failure (hours)”,
then the food should be checked and either
consumed immediately or cooked and then
re-frozen.
rated appliance, frozen food in
3- Other possible malfunctions
Not every malfunction is a case for our
customer service. Very often, you can easily
resolve the problem without requesting service.
Before requesting service, please check if the
malfunction has been caused by an operating
error. If this is the case, and a service has
been requested, a service charge will be levied
even if the appliance is still under guarantee.
If the problem persists please contact your
dealer or customer service.
Please have the type and serial number of
your appliance ready when calling. The rating
label is located inside the appliance.
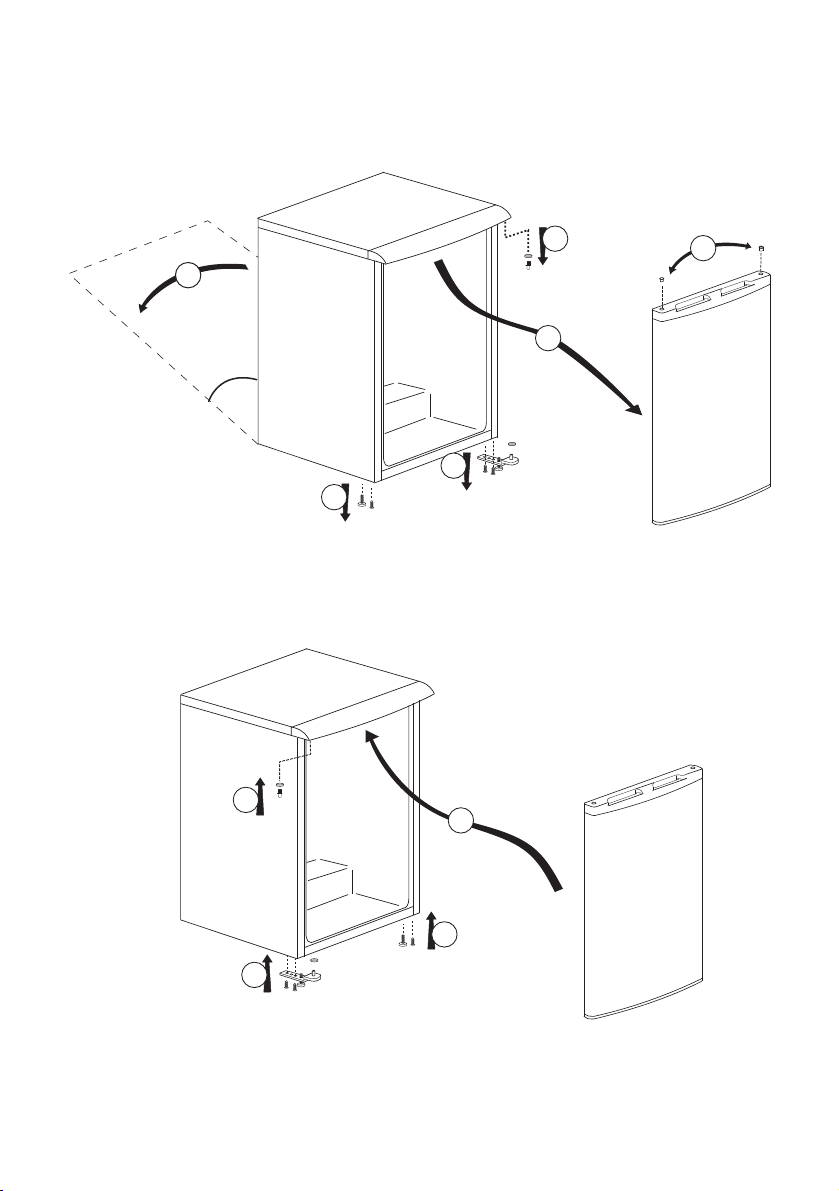
Reversing the door
Proceed in numerical order (Fig. 7).
8
Page 14

Meaning of energy fiche (
Energy
Manufacturer
Model
More efficient
A
B
C
D
E
Only for information purpose)
en
F
G
Less efficient
Energy consumption kWh/year
(Based on standard test results for 24 h)
Actual comsumption will
depend on how the appliance is
used and where it is located
Fresh food volume l
Frozen food volume l
Chill compartment volume l
Noise
(dB(A) re 1 pW)
9
You may stick the energy fiche given in the polybag to the area above.
Page 15

fr fr
Nous vous félicitons d'avoir choisi l'un de nos produits qui vous procurera certainement de nombreuses
années de fonctionnement de qualité.
La sécurité d'abord !
Veuillez lire la notice d'utilisation attentivement. Elle contient des informations importantes relatives
à l'utilisation de votre nouvel appareil. Si vous ne vous conformez pas aux instructions, vous risquez
de perdre votre droit à l'assistance sans frais pendant la période de garantie. Veuillez conservez
ce manuel soigneusement et faites-le passer aux utilisateurs ultérieurs le cas échéant.
• Ne branchez pas votre appareil à l'alimentation électrique avant d'avoir enlevé tous les emballages
et protections de transport.
• Laissez-le dans la position verticale pendant au moins 4 heures avant de le brancher afin que
le système se stabilise s'il a été transporté à l'horizontale.
• L'utilisation de cet appareil s'applique exclusivement à l'usage prévu, c'est-à-dire à la conservation
et congélation des denrées alimentaires.
• L'utilisation de cet appareil dans une pièce non chauffée et froide telle qu'un garage, jardin d'hiver,
annexe, abri, à l'extérieur, etc. n'est pas recommandée. Se référer à la section «Emplacement».
• À la réception de l'appareil, vérifiez qu'il ne soit pas endommagé et que les pièces et accessoires
soient en parfait état.
• N'utilisez pas un appareil endommagé. En cas de doute, vérifiez auprès de votre vendeur.
• Veillez à ce que les enfants ne jouent pas avec l'appareil.
• Ne pas s'asseoir ou monter sur l'appareil ou les pièces coulissantes, et ne pas permettre aux
enfants de s'y asseoir ou monter dessus.
• Ne pas s'appuyer à la porte de l'appareil.
• Votre appareil ne contient pas de réfrigérants fluorés (CFC/HFC) mais un réfrigérant isobutane
(R 600 a), gaz naturel qui contribue à préserver l'environnement.
(R 600 a) est facilement inflammable. Assurez-vous donc que le circuit de refroidissement n'est
pas endommagé pendant le transport ou l'installation.
En cas de dommage ;
• La superficie de la pièce dans laquelle l'appareil est installé ne doit pas être inférieure à 10 mètres
• Ne vous débarrassez pas de l'appareil dans un feu. L'isolation de votre appareil contient des
• Veuillez contacter les autorités locales de votre région pour obtenir des renseignements concernant
• Évitez les flammes vives, sources d'étincelles et substances inflammables.
• Aérez immédiatement la pièce où se trouve l'appareil.
• Si le réfrigérant s'échappe et entre en contact avec les yeux, il peut occasionner des
blessures.
cube.
substances non CFC qui sont inflammables.
les méthodes de mise au rebut et les endroits possibles.
Avertissement - Veillez à ce que les conduits d'aération de l'enceinte de l'appareil ou de la
structure intégrée ne soient pas obstrués.
Avertissement - N'utilisez pas d'outils mécaniques ou d'autres moyens pour accélérer le processus
de décongélation autres que ceux qui sont recommandés par le fabricant.
Avertissement - N'abîmez pas le circuit réfrigérant.
Avertissement - Ne faites pas fonctionner d'appareils électriques à l'intérieur des compartiments
de conservation de denrées de l'appareil, à moins qu'ils soient recommandés par le fabricant.
• Évitez de toucher l'installation métallique du condenseur situé au dos de l'appareil ; au risque
de se blesser.
• En cas d'anomalie éventuelle, débranchez d'abord l'appareil de l'alimentation électrique.
• Avant de procéder au nettoyage de l'appareil, débranchez toujours l'appareil ou coupez le
disjoncteur. Ne tirez pas sur le câble. Tirez à partir de la prise.
• Les réparations de l'appareillage électrique sont réservées exclusivement aux spécialistes
qualifiés. Si le câble d'alimentation est endommagé, il doit être remplacé par le constructeur ou
service clientèle afin d'écarter tout danger.
1
Page 16

fr fr
Instructions de transport
L'appareil doit être transporté dans la position
verticale uniquement.
L'emballage fourni doit rester intact pendant
le transport.
Si l'appareil est transporté dans la position
horizontale, il ne peut être mis en service que
4 heures après avoir été redressé.
L'appareil doit être protégé contre la pluie,
l'humidité et autres conditions atmosphériques.
La responsabilité du fabricant n'est pas
engagée en cas de non-respect des
instructions de sécurité.
Mise au rebut
Rendez l'appareil inutilisable immédiatement.
Débranchez la prise d'alimentation et couper
le câble électrique. Retirez ou détruisez les
fermetures à bascule ou à ressort avant de
vous débarrasser de l'appareil. Ceci permet
d'éviter aux enfants de s'enfermer dans
l'appareil et de mettre ainsi leur vie en danger.
Installation de l'appareil
• Ne faites pas fonctionner votre appareil dans
un local dont la température peut descendre
en dessous de 10 °C la nuit et/ou
particulièrement en hiver. En cas de
températures inférieures, l'appareil peut ne
pas fonctionner correctement et réduire ainsi
la durée de conservation des denrées.
• La classe climatique de votre appareil est
indiquée sur la plaque signalétique située à
l'intérieur de l'appareil. Elle stipule les
températures ambiantes de fonctionnement
appropriées comme suit.
Classe climatique Températures ambiantes
SN.......................+10 °C à 32 °C
N .........................+16 °C à 32 °C
ST .......................+18 °C à 38 °C
T..........................+18 °C à 43 °C
SN-ST.................+10 °C à 38 °C
SN-T ...................+10 °C à 43 °C
Emplacement
Installez l'appareil seulement dans des pièces
sèches pouvant être aérées.
Évitez la lumière du soleil directe ou les sources
de chaleur directes telles qu'un four ou un
radiateur.
Si cela n'est pas possible, il est indispensable
d'observer les distances minimales suivantes :
Cuisinières électriques : 3,00 cm
Radiateur : 3,00 cm
Dispositifs de réfrigération : 2,50 cm
• Assurez-vous de laisser suffisamment d'espace
autour de l'appareil pour que l'air puisse circuler
librement.
Ajustez les cales plastiques d'espacement
fournies avec l'appareil par rapport au mur en
tournant d'1/4 de tour vers le condenseur au dos
de l'appareil (Fig. 6).
• L'appareil doit être installé sur une surface plate.
Les deux pieds avant peuvent être ajustés si
nécessaire. Pour faire en sorte que votre appareil
soit à niveau, réglez les deux pieds avant en
tournant dans le sens des aiguilles d'une montre
ou dans le sens inverse jusqu'à ce que l'appareil
soit bien calé au sol. Un bon réglage des pieds
évite les vibrations et bruits excessifs.
Branchements électriques
Avertissement
Cet appareil doit être branché à une borne de
mise à la terre.
• Vérifiez si le type de courant et le voltage de
votre installation correspondent aux indications
de la plaque signalétique située à l'intérieur de
l'appareil.
• La sécurité électrique de l'appareil n'est assurée
que si le système de mise à la terre de l'habitation
est installé conformément aux prescriptions.
• Lors de l'installation de l'appareil, veillez à ce
que le câble d'alimentation ne soit pas coincé
dessous, dans quel cas ce dernier serait
endommagé.
• Veillez à ce que la prise soit facile d'accès. Ne
pas utiliser de prise multiple ni de rallonge.
• Les spécifications électriques de votre appareil
sont indiquées sur la plaque signalétique située
à l'intérieur de l'appareil.
• Placez le câble d'alimentation électrique de
façon à faciliter le branchement et la coupure
après l'installation.
• Un séparateur de contact doit être utilisé si le
câble d'alimentation n'est pas accessible. (pour
les modèles encastrés)
2
Page 17

fr fr
Apprendre à connaître votre
appareil
Avertissement
Les renseignements suivants relatifs aux
accessoires sont fournis à titre indicatif
uniquement. Les accessoires ci-dessous
peuvent ne pas correspondre exactement aux
accessoires de votre appareil.
Fig. 1
Réflecteurs
1.
Bandeau supérieur
2.
Touche de congélation rapide
3.
Voyants lumineux
4.
Commande du thermostat
5.
Bac à glaçons
6.
Compartiment de congélation rapide
7.
Compartiments des denrées congelées
8.
Pieds avant réglables
9.
Ne pas poser d'objets chauds
ou tout appareil générant de la
chaleur sur le bandeau
supérieur, auquel cas ce dernier
pourrait être endommagé.
Avant la mise en service
Avant de commencer à faire fonctionner votre
appareil, les points suivants doivent être
inspectés à nouveau par mesure de sécurité:
• L'appareil est-il correctement calé au sol ?
• L'espace est-il suffisant pour permettre une
bonne circulation d'air ?
• L'intérieur est-il propre ? (Consultez
également la section “Nettoyage et entretien”)
• Réglez la commande du thermostat à michemin entre 1 et 4 ou Min. et Max.
• Branchez alors l'appareil au réseau électrique.
N'introduisez pas les denrées dans le
réfrigérateur avant que la température atteigne
le niveau souhaité.
3
Page 18

fr fr
Réglage de la température
de fonctionnement
(Fig. 2)
La température de fonctionnement est réglée
à l'aide de la commande de température.
Tiède Froid
1 2 3 4
(Ou) Min. Max.
1 = Réglage de réfrigération le plus faible
(réglage le plus chaud)
4 = Réglage de réfrigération le plus fort
(réglage le plus froid)
(Ou)
Min. = Réglage de réfrigération le plus faible
(réglage le plus chaud)
Min. = Réglage de réfrigération le plus fort
(réglage le plus froid)
Veuillez choisir le réglage en fonction de la
température désirée.
La température intérieure est également fonction
de la température ambiante, de la fréquence
d'ouverture de la porte et de la quantité de
denrées stockées à l'intérieur.
Si la porte est ouverte fréquemment, la
température intérieure monte.
Pour cette raison, il est recommandé de refermer
la porte aussitôt que possible après utilisation.
La température normale de stockage de votre
appareil doit être de -18 °C (0 °F). Lorsque l'on
tourne le bouton de commande du thermostat
dans le sens inverse des aiguilles d'une montre
à partir de la position 1, l'appareil s'éteint et un
déclic se fait entendre. Vous pouvez obtenir des
températures plus basses en ajustant la
commande du thermostat dans la direction de
la Position 4.
Nous vous conseillons de vérifier la température
à l'aide d'un thermomètre pour s'assurer que les
compartiments de stockage sont maintenus à la
température souhaitée. Pensez à lire la
température sur le thermomètre immédiatement
comme elle montera très rapidement après l'avoir
sorti du congélateur.
Voyants lumineux
L'appareil dispose de trois voyants lumineux
de couleur situés sur la façade de l'appareil
indiquant le mode de fonctionnement du
congélateur. (Fig. 2)
Le voyant vert (1) s'allume lorsque l'appareil
est raccordé à l'alimentation électrique et
restera allumé tant que l'appareil sera alimenté.
Le voyant vert ne sera pas allumé si le
thermostat est réglé sur la position “0”. Il ne
donne aucune indication de température de
l'intérieur du congélateur.
Le voyant orange (2) s'allume lorsque la
touche de congélation rapide (4) est
enclenchée et restera allumé jusqu'à ce que
cette fonction soit éteinte. Le compresseur
fonctionnera en continu pendant que la touche
de congélation rapide est enclenchée. Le
mode congélation rapide est destiné à la
congélation des produits frais.
Le voyant rouge (3) s'allume :
a) Si la température prédéfinie ne peut être
maintenue.
b) Si des quantités excessives de produits
frais sont insérées à l'intérieur.
c) Si la porte de l'appareil est restée ouverte
par erreur.
La commande du thermostat (5) est située
sur le bandeau des voyants lumineux.
IMPORTANT :
Lorsque vous appuyez sur la touche
congélation rapide, il peut y avoir un délai
avant que le compresseur se mette en marche.
Cela est normal et ne correspond pas à un
défaut du compresseur.
4
Page 19

fr fr
Congélation
Congeler les denrées
La zone de congélation est indiquée par le
symbole
Vous pouvez utilisez cet appareil pour congeler
des denrées fraîches ainsi que pour stocker
des denrées surgelées.
Veuillez vous référez aux recommandations
indiquées sur l'emballage de votre aliment.
sur la contre-porte.
Attention
Ne pas congeler de boissons gazeuses car le
liquide congelé peut faire éclater la bouteille.
Soyez prudents avec les produits congelés
tels que les glaçons colorés.
Ne dépassez pas le pouvoir de congélation
de votre appareil par 24 heures. Se référer à
la plaque signalétique.
Afin de préserver la qualité des aliments, la
congélation doit avoir lieu le plus rapidement
possible.
Ainsi, le pouvoir de congélation ne sera pas
dépassé et la température à l'intérieur du
congélateur ne montera pas.
Attention
Conservez toujours les aliments déjà surgelés
séparément des denrées qui viennent d'y être
placées.
Lorsque vous surgelez un aliment chaud, le
compresseur de réfrigération fonctionnera tant
que l'aliment n'est pas complètement congelé.
Cela peut causer un refroidissement excessif
temporaire du compartiment réfrigérateur.
Si vous trouvez que la porte du congélateur
est difficile à ouvrir juste après l'avoir fermée,
ne vous inquiétez pas. Cela est dû à la
différence de pression qui va se régulariser et
permettra d'ouvrir la porte normalement au
bout de quelques minutes.
Vous entendrez un bruit d'aspiration juste
après avoir fermé la porte. Ceci est tout à fait
normal.
Fabrication de glaçons
Remplissez les bacs à glaçons aux 3/4 d'eau
et introduisez-les dans le congélateur.
Dès que l'eau est devenue glace, vous pouvez
sortir les glaçons.
N'utilisez jamais d'objets tranchants tels que
couteaux ou fourchettes pour démouler les
glaçons. Vous pourriez vous blesser !
Laisser plutôt les glaçons dégeler légèrement
ou bien mettez le fond du bac dans l'eau
chaude pendant quelques instants.
Congélation rapide
Si vous vous apprêtez à congeler de grandes
quantités de produits frais, appuyez sur le
bouton congélation rapide 24 heures avant
d'introduire les produits frais dans le
compartiment de congélation rapide.
Nous vous recommandons fortement de laisser
le bouton de congélation rapide enclenché
pendant 24 heures pour congeler le volume
maximal de produits frais stipulé de pouvoir
de congélation. Prenez particulièrement soin
de ne pas mélanger les produits congelés et
les produits frais.
Dégivrage de l'appareil
La couche excessive de givre diminue
l'efficacité de congélation de votre appareil.
Il est donc recommandé de dégivrer votre
appareil au moins deux fois par an ou lorsque
la couche de givre dépasse 7 mm.
Dégivrez votre appareil quand il est peu garni
ou vide.
Sortez les denrées surgelées des tiroirs.
Enveloppez-les dans plusieurs feuilles de
papiers ou dans une couverture et conservezles dans un endroit frais.
Débranchez l'appareil ou coupez le disjoncteur
afin de procéder au dégivrage.
Sortez les accessoires (tablette, tiroir, etc.) de
l'appareil (Fig. 4) et utilisez un récipient
approprié pour recevoir l'eau de dégivrage.
5
Page 20

fr fr
Utilisez une éponge ou un chiffon doux pour
éponger l'eau de dégivrage si besoin (Fig. 5).
Maintenez la porte ouverte pendant le
dégivrage.
Pour un dégivrage accéléré, placez des
récipients contenant de l'eau chaude à
l'intérieur de l'appareil.
N'utilisez jamais d'appareils électriques,
bombes de dégivrage ou d'objets tranchants
comme des couteaux ou fourchettes pour
enlever la glace.
Une fois le dégivrage terminé, nettoyez
l'intérieur (voir la section « Nettoyage et
entretien »).
Rebranchez l'appareil au réseau électrique.
Placez les produits surgelés dans les tiroirs
et insérez-les dans le congélateur.
Nettoyage et entretien
Surfaces intérieures et extérieures
Attention
Débranchez toujours le câble d'alimentation
ou coupez le disjoncteur avant de procéder
au nettoyage.
Laver l'extérieur à l'eau tiède additionnée d'un
produit nettoyant doux.
N'utilisez jamais de détergents ou d'agents
abrasifs ou acides.
Séchez l'intérieur du compartiment.
Veillez à ce que l'eau n'entre pas en contact
avec les connections électriques de la
commande de température or l'éclairage
intérieur.
En cas de non utilisation de l'appareil pendant
une période prolongée, débranchez le câble
d'alimentation et retirez toutes les denrées.
Nettoyez l'appareil et maintenez la porte
ouverte.
Pour préservez l'apparence de votre appareil,
vous pouvez polir l'extérieur et les accessoires
de la porte à l'aide de cire en silicone.
Nettoyez le condenseur à l'arrière de l'appareil
une fois par an à l'aide d'une brosse ou d'un
aspirateur. L'accumulation de poussière
entraîne une plus grande consommation
d'énergie.
Inspectez le joint de porte de temps en temps.
Nettoyez à l'eau uniquement et séchez
complètement.
Nettoyage des accessoires
Tiroirs :
Pour nettoyez un tiroir, faites-le glisser autant
que possible, soulevez-le et retirez-le ensuite
complètement.
6
Page 21

fr fr
Conseils pratiques et
remarques
Congélation
• Laissez toujours les aliments dégeler dans
un récipient permettant à l'eau de
décongélation de s'écouler.
• Ne dépassez pas le pouvoir de congélation
maximal admis quand vous congelez des
produits frais (voir la section « Congélation »)
• Ne donnez pas de la glace ou bâtonnets
glacés dès leur sortie du congélateur :
La basse température peut provoquer des
brûlures sur les lèvres.
• Ne recongelez jamais de denrées
décongelées ; ces dernières doivent être
consommées sous 24 heures. Seuls les
aliments que l'on cuit peuvent ensuite être
recongelés.
• Ne sortez pas de produits congelés avec les
mains mouillées.
• Ne stockez que des aliments frais et
impeccables.
• Utilisez toujours des emballages appropriés
pour éviter la pénétration des odeurs ou la
dégradation des aliments.
• Stockez les aliments surgelés achetés dans
le commerce selon les instructions indiquées
sur l'emballage.
• Congelez les aliments cuisines en petites
quantités. Cela assure une congélation rapide
et préserve la qualité des aliments.
• Ne congelez pas de liquides dans des
bouteilles ou récipients bien fermés.
Les bouteilles/récipients pourraient éclater à
basse température.
• Transportez les produits surgelés dans des
sacs appropriés et placez-les dans votre
congélateur dès que possible.
Dégeler toujours les aliments dans le
compartiment réfrigérateur.
Bruits normaux de
fonctionnement
Divers bruits de fonctionnement sont
complètement normaux en raison du
fonctionnement du système réfrigérant de
votre appareil ;
• Des bruits de gargouillement, sifflement,
ébullition ou bouillonnement sont occasionnés
par le gaz qui circule dans le système
réfrigérant. Ces bruits se font encore entendre
pendant un instant après que le compresseur
se soit éteint.
• Des bruits soudains et aigus de coup ou
bruits secs sont produits par l'expansion et la
contraction des parois intérieures ou de
composants à l'intérieur des rangements.
• Des bruits de bourdonnement, ronronnement,
de vibration ou de vrombissement aigu sont
provoqués par le compresseur. Ces bruits
sont légèrement plus forts au démarrage du
compresseur et s'atténuent lorsque l'appareil
atteint les températures de fonctionnement.
Aussi, afin d'éviter des vibrations et bruits
gênants, assurez- vous que :
• Votre réfrigérateur est à plat sur ces quatre
pieds.
• Votre réfrigérateur ne touche pas les murs,
objets environnant ou placards et meubles de
cuisine.
• Les conserves, bouteilles ou plats à l'intérieur
du réfrigérateur ne se touchent et ne
s'entrechoquent pas.
• Toutes les clayettes et casiers sont installés
correctement dans les compartiments et portes
du réfrigérateur.
7
Page 22

fr fr
Et si…
1- L'appareil ne fonctionne pas, même s'il
est mis sous tension.
• Vérifiez que la prise d'alimentation est
branchée correctement !
• Vérifiez que l'alimentation électrique est en
état de marche, ou si le disjoncteur a été
déclenché !
• Vérifiez si la commande de température est
correctement réglée !
2- Il y a une panne de courant.
Votre congélateur est destiné à la conservation
à long terme de denrées surgelées vendues
dans le commerce et peut servir également à
congeler et conserver des produits frais.
En cas de panne de courant, n'ouvrez pas la
porte. Pour un appareil de type
a pas de risque pour les aliments congelés
dans la mesure où la panne dure moins
longtemps que « l'autonomie de
fonctionnement en cas de panne » (en heures)
indiquée sur la plaque signalétique.
Si la panne est plus longue que « l'autonomie
de fonctionnement en cas de panne » (en
heures), inspectez les denrées et mangez-les
immédiatement ou bien faites-les cuire puis
congelez-les à nouveau.
, il n'y
Réversibilité de la porte
Procédez dans l'ordre numérique (Fig. 7).
3- Autres anomalies possibles
Toute anomalie n'implique pas notre service
clientèle. Dans la majorité des cas, vous
pouvez y remédier facilement sans avoir
recours à une intervention. Avant de demander
notre assistance, veuillez vérifier si l'anomalie
a été occasionnée par une erreur d'utilisation.
Si c'est le cas et qu'une intervention a été
demandée, des frais de service seront à votre
charge même si l'appareil est encore sous
garantie.
Si le problème persiste, veuillez consulter
votre vendeur ou le service clientèle.
Lors de votre appel, munissez-vous du modèle
et numéro de série de votre appareil. La plaque
signalétique est située à l'intérieur de l'appareil.
8
Page 23

Signification de la fiche énergétique
(À titre indicatif uniquement)
Énergie
Fabricant
Modèle
Plus efficace
A
B
C
D
E
fr
F
G
Moins efficace
Consommation énergétique kWh/an
(basée sur les résultats types des tests
réalisés sur 24 heures)
La consommation réelle
dépendra de comment l'appareil
est utilisé et d'où il est installé.
Produits frais volume l
Produits surgelés volume l
Compartiment fraîcheur volume l
Bruit
(dB(A) re 1 pW)
9
Vous pouvez coller la fiche énergétique fournie dans le sachet polybag
au cadre ci-dessus.
Page 24

Page 25

Page 26

Page 27

Page 28

Page 29

Page 30

Page 31

Page 32

Page 33

Page 34

WARNING !
* DO NOT USE ANY COPPER POT, DISH INSIDE THE CABINET!
* DO NOT LOAD ANY FOOD WITHOUT PACKAGE!
WARNUNG !
* BENUTZEN SIE KEINERLEI KUPFERGESCHIRR IM GERÄT!
* GEBEN SIE KEINE UNVERPACKTEN LEBENSMITTEL IN DAS
GERÄT!
AVERTISSEMENT !
* N'UTILISEZ PAS DE RECIPIENTS OU DE PLATS EN CUIVRE A
L'INTERIEUR DES COMPARTIMENTS !
* N'INTRODUISEZ PAS DE DENREES NON EMBALLEES
48 3918 00 01/AE
 Loading...