


1 |
|
2 |
|
3 |
1 |
3 |
|
3 |
|
9

en |
en |
Congratulations on your choice of our product which will certainly provide you with many years of good service.
Safety comes first!
Please read this Instruction Manual carefully. It contains important information on how to use your new appliance. If instructions are not adhered to, you may lose your right to service at no charge during the warranty period. Please keep this manual in a safe place and pass it on to later users if applicable.
•Do not connect your appliance to the power supply until all packing and transit protectors have been removed.
•Leave to stand upright for at least 4 hours before switching on to allow the system to settle if transported horizontally.
•This appliance must only be used for its intended purpose, i.e. the storing and freezing of edible foodstuff.
•We do not recommend use of this appliance in an unheated, cold room e.g. garage, conservatory, annex, shed, outdoors, etc. See ‘Location’.
•On delivery, check to make sure that the product is not damaged and that all the parts and accessories are in perfect condition.
•Do not operate a damaged appliance; if in doubt, check with your dealer.
•Do not allow children to play with the appliance.
•Do not sit or stand on or let the children sit or stand on the applianceor on the pull-out parts.
•Do not hang on the appliance door.
•Your appliance contains no fluoridated coolants (CFC/HFC), but isobutane
(R 600 a), a natural gas which is highly compatible with the environment.
(R 600 a) is easily flammable. Therefore, be sure that the cooling circuit is not damaged either during transport or during operations.
In the event of damage;
•Avoid any open flame, sources of sparks and flammable substances.
•Immediately air the room in which the appliance is located.
•In case the coolant spraying out contacts your eyes it may cause eye injuries.
•The space in the room where the appliance is installed must not be smaller than 10 cubic metres.
•Do not dispose of the appliance in a fire. Your appliance contains non CFC substances in the insulation which are flammable.
•Please contact the local authority in your region for information on disposal methods and facilities available.
 Warning - Keep ventilation openings on the appliance enclosure or in the built-in structure, clear of obstruction.
 Warning - Do not use mechanical devices or other means to accelerate the defrosting process, other than those recommended by the manufacturer.
 Warning - Do not damage the refrigerant circuit.
 Warning - Do not use electrical devices inside the food storage compartments of the appliance, unless they are of the type recommended by the manufacturer.
•Avoid touching the metal condenser wiring on the backside of the appliance; there is risk of injury.
•In the event of a possible malfunction, disconnect the appliance from the power supply first.
•Prior to cleaning the appliance always unplug the appliance or switch off the circuit breaker. Do not pull from the power cable. Pull from the plug.
•Repairs to the electrical equipment may only be made by qualified experts. If the power cable is damaged, the manufacturer or customer service must replace it in order to avoid
danger.
1
en |
en |
Transport instructions
The appliance should be transported only in upright position.
The packing as supplied must be intact during transportation.
If the appliance is transported in the horizontal position, it must be placed vertically and left in this position for 4 hours before taking into operation.
The appliance must be protected against rain, moisture and other atmospheric influences. The manufacturer assumes no liability if safety instructions are disregarded.
 Disposal
Make the appliance unusable immediately. Pull out the mains plug and cut the power cable. Remove or destroy snap or latch locks before disposing of the appliance. In this manner you prevent children from locking themselves in and endangering their lives.
Appliance setup
•Do not operate your appliance in a room where the temperature is likely to fall below 10 °C at night and/or especially in winter. At lower temperatures the appliance may not operate, resulting in a reduction in the storage life of the food.
•The climate class rate of your appliance is given on the rating label located inside the appliance. It specifies the appropriate operating ambient temperatures as explained below.
Climatic class |
Ambient temperatures |
SN....................... |
+10 °C to 32 °C |
N ......................... |
+16 °C to 32 °C |
ST ....................... |
+18 °C to 38 °C |
T.......................... |
+18 °C to 43 °C |
SN-ST ................. |
+10 °C to 38 °C |
SN-T ................... |
+10 °C to 43 °C |
Location
Only place the appliance in dry rooms which can be ventilated.
Avoid direct sunlight or direct heat sources such as a stove or a heater.
If this cannot be avoided, the following minimum distances should be maintained: Electric stoves: 3.00 cm
Heater: 3.00 cm Cooling devices: 2.50 cm
•Make sure that sufficient room is provided around the appliance to ensure free air circulation.
Fit the two plastic wall spacers supplied with the appliance rotating 1/4 turn to the condenser at the back of the appliance (Fig. 6).
•The appliance should be placed on a level surface. The two front feet can be adjusted as required. To ensure that your appliance is standing upright adjust the two front feet by turning clockwise or counter-clockwise, until the product is in firm contact with the floor. Correct adjustment of feet avoids excessive vibration and noise.
Installation (Under the counter)
•Internal height of the counter should be 820mm.
(!) Cookers or other heat sources must not be placed above the counter where the appliance is installed under the counter.
•The mains wall socket plug must be close to the right or left hand side of the appliance.
•Remove the top cover of the appliance. There are 4 screws(2 pieces at the back, 2 pieces below the front edge) that should be removed.
Fig.9
•Cut the part shown in the picture and then remove it by the help of pliers.
•Place you appliance under the counter and adjust the front feets until its top touches to the counter.
In order to use the product under the counter, the distance between the wall and the reference indicated in the top connection plastic must be minimum 595 mm.Fig.10-11
•Fix the appliance under the counter by using 2 of the screws that was removed from the top cover.(Material of the counter must be plastics or wood based!) Fig:12
2
en |
en |
Electrical connections
 Warning
This appliance must be grounded.
•Check whether the power type and voltage in your region corresponds to the one stated on the rating label inside the appliance.
•The electrical safety of the appliance is only assured when the grounding system in the house is installed in accordance with regulations.
•When placing the appliance, do not let the power cable get stuck under it; otherwise the cable will be damaged.
•Ensure that the plug remains readily accessible. Do not use a multiple adapter bar or an extension cable.
•The electrical specifications of your appliance is given on the rating label located inside the appliance.
•Route power cable to allow easy connection and disconnection after installation.
•A contact separator should be used if the power cable is not accessible. (for built-in models)
Get to know your appliance
 Warning
Below information about accessories are supplied only for reference. Below accessories may not be exactly same as the accessories of your appliance.
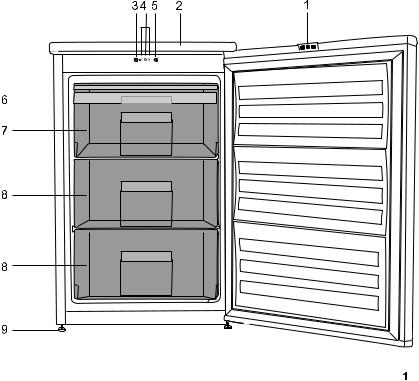
Fig. 1
1.Reflectors
2.Top trim
3.Fast-Freeze switch
4.Indicator lights
5.Thermostat knob
6.Ice bank
7.Fast-freeze compartment
8.Frozen-food compartments
9.Adjustable front feet
Do not place hot objects or any appliance that generates heat on the top trim otherwise the top trim may be damaged.
Prior to startup
Before you start operating your appliance, the following points should be re-checked for safety:
•Is the appliance standing level on the floor?
•Is there sufficient space for good air circulation?
•Is the interior clean? (Also see the section ‘Cleaning and care’)
•Set the thermostat knob half way between 1 and 4 or Min. and Max.
•Now connect the appliance to the mains.
Do not place foodstuff into the refrigerator until the temperature has reached the desired level.
3
en |
en |
Setting the operating
temperature
(Fig. 2)
The operating temperature is regulated by the temperature control.
Warm |
|
|
Cold |
1 |
2 |
3 |
4 |
(Or) Min. |
|
|
Max. |
1 = Lowest cooling setting (Warmest setting)
4 = Highest cooling setting (Coldest setting)
(Or)
Min. = Lowest cooling setting
(Warmest setting)
Max. = Highest cooling setting
(Coldest setting)
Please choose the setting according to the desired temperature.
The interior temperature also depends on ambient temperature, the frequency with which the door is opened and the amount of food kept inside.
Frequently opening the door causes the interior temperature to rise.
For this reason, it is recommended to close the door again as soon as possible after use.
The normal storage temperature of your appliance should be -18 °C (0 °F). If the thermostat knob is turned counter clockwise from position 1, the appliance will be switched off and “click” sound will be heard. Lower temperatures can be obtained by adjusting the thermostat knob towards Position 4.
We recommend checking the temperature with a thermometer to ensure that the storage compartments are kept to the desired temperature. Remember at take the reading immediately since the thermometer temperature will rise very rapidly after you remove it from the freezer.
Indicator lights
There are three coloured indicator lights located on the front of the appliance which shows the operating mode of the freezer. (Fig. 2)
Green Indicator (1) Illuminates when the appliance is connected to the mains and will glow as long as electricity is available. The green light will not glow if the thermostat is set to '0' position. The green indicator does not give any indication of the temperature inside the freezer.
Amber Indicator (2) This indicator will glow when the fast freeze switch (4) is on and will continue to glow until the fast freeze switch is turned off. The compressor will run continuously while fast freeze switch is on. Fast freeze operation is for freezing fresh food.
Red Indicator (3) Illuminates:
a)If the pre-set temperature can not be maintained.
b)If excessive amounts of fresh food are placed inside.
c)If the appliance door is left open accidentally.
Thermostat knob (5) Thermostat knob is located on the indicator light set.
IMPORTANT:
When you press the fast freeze switch, there may be a short delay before the compressor starts to operate. This is normal and does not indicate a compressor fault.
4

en |
en |
Freezing
Freezing food
The freezing area is marked with symbol on the door liner.
You can use the appliance for freezing fresh food as well as for storing pre-frozen food. Please refer to the recommendations given on the packaging of your food.
 Attention
Do not freeze fizzy drinks, as the bottle may burst when the liquid in it is frozen.
Be careful with frozen products such as coloured ice-cubes.
Do not exceed the freezing capacity of your appliance in 24 hours. See the rating label. In order to maintain the quality of the food, the freezing must be effected as rapidly as possible. Thus, the freezing capacity will not be exceeded, and the temperature inside the freezer will not rise.
 Attention
Keep the already deep-frozen food always separated with freshly placed food.
When deep-freezing hot food, the cooling compressor will work until the food is completely frozen. This can temporarily cause excessive cooling of the refrigeration compartment.
If you find the freezer door difficult to open just after you have closed it, don’t worry. This is due to the pressure difference which will equalize and allow the door to open normally after a few minutes.
You will hear a vacuum sound just after closing the door. This is quite normal.
Making ice cubes
Fill the ice-cube tray 3/4 full with water and place it in the freezer.
As soon as the water has turned into ice, you can take out the ice cubes.
Never use sharp objects such as knives or forks to remove the ice cubes. There is a risk of injury!
Let the ice cubes slightly thaw instead, or put the bottom of the tray in hot water for a short moment.
Fast freeze
If large amounts of fresh food are going to be frozen, push the fast freeze switch 24 hours before putting the fresh food in the fast freeze compartment.
It is strongly recommended to keep fast freeze switch on 24 hours to freeze maximum amount of fresh food declared as freezing capacity.
Take special care not to mix frozen food and fresh food.
Defrosting of the appliance
Excessive build-up of ice will affect the freezing performance of your appliance.
It is therefore recommended that you defrost your appliance at least twice a year, or whenever the ice build-up exceeds 7 mm. Defrost your appliance when there is only little or no food in it.
Take out the deep-frozen food from the drawers. Wrap the deep-frozen food in several layers of paper, or a blanket, and keep it in a cold place.
Unplug the appliance or switch off the circuit breaker to start the defrosting process. Take out the accessories (like shelf, drawer etc.) from the appliance (Fig. 4) and use a suitable container to collect the thawing water.
5
en |
en |
Use a sponge or a soft cloth to remove thawing water if necessary (Fig. 5).
Keep the door open during defrosting.
For quicker defrosting, place containers with warm water inside the appliance.
Never use electrical devices, defrosting sprays or pointed or sharp-edged objects such as knives or forks to remove the ice.
After the defrosting is done, clean the inside (see the section ‘Cleaning and care’).
Reconnect the appliance to the mains. Place the frozen food into the drawers and slide the drawers into the freezer.
Cleaning and care
Interior and Exterior Surfaces
 Attention
Always unplug the power cable or switch off the circuit breaker before cleaning.
Clean the exterior using lukewarm water and a mild detergent.
Never use detergents, abrasive or acidic agents.
Wipe the inside compartment dry.
Be careful to prevent water from getting into contact with the electrical connections of the temperature control or the interior light.
If the appliance is not going to be used for a long period of time, unplug the power cable and remove all food. Clean the appliance and keep the door open.
To preserve the appearance of your appliance, you can polish the exterior and the door accessories with a silicone wax.
Clean the condenser at the back of the appliance once a year using a brush or a vacuum cleaner. Dust build-up leads to increased energy consumption.
Inspect the door gasket at regular intervals. Clean with water only, and wipe totally dry.
Cleaning of the accessories
Drawers:
To clean a drawer, pull it out as far as possible, tilt it upwards and then pull it out completely.
6
en |
en |
Practical tips and notes
Freezing
•Always leave food to thaw in a container that allows the thawing water to run off.
•Do not exceed the maximum allowable freezing capacity when freezing fresh food (see the section "Freezing")
•Do not give children ice-cream and ices directly from the freezer.
The low temperature may cause cold burns on lips.
•Never re-freeze defrosted food; defrosted food must be consumed within 24 hours. Only food that has been cooked can be refrozen.
•Do not take out frozen food with wet hands.
•Store only fresh and impeccable food.
•Always use appropriate packaging material to avoid odour penetration or degradation of the food.
•Store commercially frozen food in accordance with the instructions given on the packaging.
•Freeze cooked food in small quantities. This ensures rapid freezing and maintains the quality of the food.
•Do not freeze liquids in tightly closed bottles or containers.
The bottles/containers may burst at low temperatures.
•Carry pre-frozen food in suitable bags and place it in your freezer as soon as possible. Always defrost food in the fridge compartment.
Normal operating noises
Various functional noises are completely normal due to the operation of the cooling system of your appliance;
•Gurgling, hissing, boiling or bubbling noises are caused by the refrigerant, circulating inside the cooling system. These noises can still be heard for a short period of time after the compressor shuts off.
•Sudden, sharp cracking or popping noises are caused by the expansion and contraction of the inside walls or some components inside the cabinets.
•Buzzing, whirring, pulsating or high-pitched humming noises are caused by the compressor. These noises are slightly louder at the start-up of the compressor and reduce when the appliance reaches the operating temperatures.
Also to avoid disturbing vibrations and noises make sure that;
•Your refrigerator is standing level on all four feet.
•Your refrigerator is not in contact with the walls, surrounding objects or kitchen cabinets and furniture.
•Cans, bottles or dishes inside the refrigerator are not touching and hitting each other.
•All shelves and bins are mounted correctly inside the refrigerator cabinets and doors.
7

en |
en |
What, if....
1- The appliance will not work, even though it is switched on.
•Check if the power cable is properly connected!
•Check if the mains supply is in order, or if a circuit breaker has been tripped!
•Check the temperature control for correct setting!
2- There is a power failure.
Your freezer is suitable for the long-term storage of frozen food that are available commercially and also can be used to freeze and store fresh food.
Do not open the door in case of a power failure.
For a rated appliance, frozen food in the freezer compartment will not be affected if the power failure lasts shorter than the “Conservation Time From Failure (hours)” mentioned in the rating label.
If the power failure is longer than the “Conservation Time From Failure (hours)”, then the food should be checked and either consumed immediately or cooked and then re-frozen.
3- Other possible malfunctions
Not every malfunction is a case for our customer service. Very often, you can easily resolve the problem without requesting service. Before requesting service, please check if the malfunction has been caused by an operating error. If this is the case, and a service has been requested, a service charge will be levied even if the appliance is still under guarantee.
If the problem persists please contact your dealer or customer service.
Please have the type and serial number of your appliance ready when calling. The rating label is located inside the appliance.
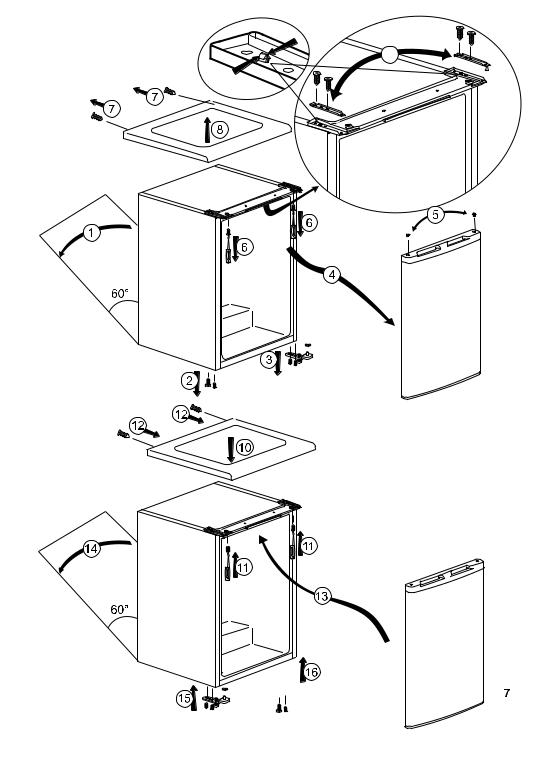
Reversing the door
Proceed in numerical order (Fig. 7).
8

Meaning of energy fiche (Only for information purpose)
Energy
Manufacturer
Model
More efficient
A
B
C
D
E
F
G
Less efficient
Energy consumption kWh/year
(Based on standard test results for 24 h)
Actual comsumption will depend on how the appliance is used and where it is located
Fresh food volume l
Frozen food volume l
Chill compartment volume l
Noise
(dB(A) re 1 pW)
en
You may stick the energy fiche given in the polybag to the area above.
9
de |
de |
Herzlichen Glückwunsch zum Kauf unseres Produktes, das Ihnen ganz sicher viele Jahre lang gute Dienste leisten wird.
Wichtige Hinweise zu Ihrer Sicherheit!
Bitte lesen Sie diese Bedienungsanleitung aufmerksam durch. Sie enthält wichtige Informationen zum Betrieb Ihres neuen Gerätes. Wenn Sie sich nicht an die Anweisungen halten, verlieren Sie dadurch eventuell das Recht auf kostenlose Leistungen während der Garantiezeit. Bitte bewahren Sie dieses Handbuch an einem sicheren Ort auf und geben es an zukünftige Benutzer des Gerätes weiter.
•Schließen Sie Ihr Gerät nicht an die Stromversorgung an, solange nicht alle Verpackungsstoffe und Transportsicherungen entfernt wurden.
•Wenn der Transport in waagerechter Lage durchgeführt wurde, lassen Sie das Gerät mindestens 4 Stunden aufrecht stehen, ehe Sie es einschalten, damit sich das Kühlsystem setzen kann.
•Dieses Gerät darf nur für seinen bestimmungsgemäßen Einsatzzweck verwendet werden: also zum Lagern und Einfrieren von Lebensmitteln.
•Wir raten davon ab, dieses Gerät in unbeheizten, kalten Räumen zu betreiben, wie in Garagen, Lagerräumen, Anbauten, Schuppen, Außenbereichen, und so weiter. Siehe „Aufstellungsort“.
•Achten Sie bei der Lieferung darauf, dass das Produkt nicht beschädigt ist und dass sich sämtliche Teile und Zubehörteile in einwandfreiem Zustand befinden.
•Arbeiten Sie niemals mit einem beschädigten Gerät; falls irgendwelche Zweifel bestehen sollten, fragen Sie beim Händler nach.
•Lassen Sie nicht zu, dass Kinder mit dem Gerät spielen.
•Setzen oder stellen Sie sich nicht selbst oder Kinder auf das Gerät oder auf ausziehbare Teile.
•Hängen Sie sich nicht an die Tür des Gerätes.
•Ihr Gerät enthält keine fluorierten Kühlmittel (FKCW/HFC), sondern Isobutan (R 600 a), ein in der Natur vorkommendes, sehr umweltfreundliches Gas.
(R 600 a) ist leicht entflammbar. Achten Sie daher darauf, dass der Kühlkreislauf weder beim Transport noch im Betrieb beschädigt wird.
Im Falle einer Beschädigung:
•Vermeiden Sie sämtliche offenen Flammen, Funken und entflammbare Substanzen.
•Lüften Sie den Raum, in dem das Gerät aufgestellt ist, sofort gut durch.
•Austretendes Kühlmittel kann Ihre Augen bei Kontakt verletzen.
•Der Raum, in dem Sie das Gerät aufstellen, darf nicht kleiner als 10 m3 sein.
•Entsorgen Sie das Gerät nicht durch Verbrennen. Die Isolierung Ihres Gerätes enthält brennbare Substanzen (FCKW-frei).
•Ihre örtlichen Behörden informieren Sie über die verfügbaren Entsorgungsweisen und -einrichtungen.
 WARNUNG- Belüftungsöffnungen an Geräteumund -einbauten dürfen nicht abgedeckt werden.
 WARNUNG- Verwenden Sie außer den vom Hersteller empfohlenen, keine mechanischen oder anderen Hilfsmittel zum Beschleunigen des Abtauvorgangs.
 WARNUNG- Beschädigen Sie den Kühlkreislauf nicht.
 WARNUNG- Verwenden Sie im Lebensmittelaufbewahrungsbereich Ihres Gerätes keinerlei Elektrogeräte, sofern diese nicht vom Hersteller empfohlen werden.
•Vermeiden Sie es, die Metall-Kondensatorröhren an der Rückseite des Gerätes zu berühren; es besteht Verletzungsgefahr.
•Im Falle einer Fehlfunktion ziehen Sie immer zuerst den Netzstecker oder schalten die Sicherung aus.
•Vor der Reinigung des Gerätes ziehen Sie grundsätzlich den Netzstecker oder schalten die entsprechende Sicherung aus. Ziehen Sie nicht am Stromkabel. Ziehen Sie immer nur am Stecker.
•Reparaturen an Elektrogeräten dürfen nur von qualifizierten Fachleuten ausgeführt werden. Falls das Stromkabel beschädigt sein sollte, muss es vom Hersteller oder vom Kundendienst ersetzt werden, damit es nicht zu Gefährdungen kommen kann.
1
de |
de |
Transporthinweise
Das Gerät sollte nur in aufrechter Position transportiert werden.
Die Originalverpackung muss während des gesamten Transports unbeschädigt bleiben. Falls das Gerät liegend transportiert werden sollte, muss es danach aufrecht gestellt und mindestens 4 Stunden in dieser Position verbleiben, ehe es angeschlossen und in Betrieb genommen wird.
Das Gerät muss vor Regen, Feuchtigkeit und anderen atmosphärischen Einflüssen geschützt werden.
Der Hersteller haftet nicht, wenn Sicherheitshinweise nicht beachtet werden.
 Entsorgung
Machen Sie das Gerät zunächst unbrauchbar. Ziehen Sie den Netzstecker und schneiden Sie das Stromkabel ab. Entfernen oder zerstören Sie Schnappverschlüsse oder Riegel, ehe Sie das Gerät entsorgen. Auf diese Weise verhindern Sie, dass sich Kinder selbst einsperren und ihr Leben gefährden können.
Aufstellung des Gerätes
•Betreiben Sie das Gerät nicht in Räumen, in denen die Temperatur unter 10 °C abfallen kann; dies gilt insbesondere nachts und im Winter. In Umgebungen mit geringerer Temperatur arbeitet das Gerät möglicherweise nicht; dadurch wird die Haltbarkeit eingelagerter Lebensmittel reduziert.
•Die Klimaklasse Ihres Gerätes ist auf dem Typenschild im Inneren des Gerätes angegeben. Die Klimaklasse gibt die zulässigen Umgebungstemperaturen an, wie nachstehend aufgeführt.
Klimaklasse |
Umgebungstemperaturen |
SN....................... |
+10 °C bis 32 °C |
N ......................... |
+16 °C bis 32 °C |
ST ....................... |
+18 °C bis 38 °C |
T.......................... |
+18 °C bis 43 °C |
SN-ST ................. |
+10 °C bis 38 °C |
SN-T ................... |
+10 °C bis 43 °C |
Aufstellungsort
Stellen Sie das Gerät nur in trockenen Räumen auf, die belüftet werden können.
Vermeiden Sie direkte Sonneneinstrahlung und nahe Wärmequellen wie Herde und Heizungen. Falls dies nicht vermieden werden kann, sollten die folgenden Mindestabstände eingehalten werden:
Elektroherde: |
3.00 cm |
Heizungen: |
3.00 cm |
Kühlgeräte: |
2.50 cm |
•Sorgen Sie dafür, dass um das Gerät herum genügend Raum ist, um ungehinderte Luftzirkulation zu garantieren.
Bringen Sie die beiden mitgelieferten Distanzstücke aus Kunststoff per Vierteldrehung am Kondensator an der Rückseite des Gerätes an (Abb. 6).
•Das Gerät sollte auf einer ebenen Fläche aufgestellt werden. Die beiden Füße an der Frontseite können nach Bedarf eingestellt werden. Um sicherzustellen, dass das Gerät gerade steht, drehen Sie die beiden Füße an der Frontseite so lange im oder gegen den Uhrzeigersinn, bis ein stabiler Bodenkontakt gegeben ist. Die richtige Einstellung der Füße verhindert übermäßige Vibrationen und Geräusche.
Installation (Montage unter der Arbeitsplatte)
•Die Höhe der Arbeitsplatte sollte 820 mm betragen.
(!) Kochgeräte und sonstige Wärmequellen dürfen nicht oberhalb des unter der Arbeitsplatte montierten Gerätes platziert werden.
•Eine Steckdose muss sich nahe der linken oder rechten Seite des Gerätes befinden.
•Schneiden Sie den im Bild gezeigten Teil aus und entfernen Sie ihn mit einer Zange. Bild Nr.:7
•Platzieren Sie das Gerät unter der Arbeitsplatte und stellen Sie die Füße an der Frontseite so ein, dass das Oberteil des Gerätes die Platte berührt.
•Damit das Gerät unter der Arbeitplatte eingesetzt werden kann, muss zwischen Wand und der Referenzmarkierung am oberen KunststoffVerbindungsstück mindestens 595 mm Platz vorhanden sein. Bild Nr.:8-9
Fixieren Sie das Gerät mit zwei der Schrauben, die Sie aus der oberen Abdeckung herausgedreht haben. (Die Arbeitsplatte muss aus Kunststoff oder Holz bestehen!) Bild Nr.:10
2
de |
de |
Elektrischer Anschluss
 Warnung
Dieses Gerät muss geerdet werden.
•Vergewissern Sie sich, dass Stromart und Stromspannung am Aufstellungsort des Gerätes mit den Angaben auf dem Typenschild im Innenraum des Gerätes übereinstimmen.
•Die elektrische Sicherheit des Gerätes ist nur dann gewährleistet, wenn das hausinterne Erdungssystem ordnungsgemäß installiert wurde.
•Achten Sie beim Aufstellen des Gerätes darauf, dass das Stomkabel nicht darunter eingeklemmt wird; dies kann zu Schäden am Kabel führen.
•Sorgen Sie dafür, dass der Stecker stets zugänglich bleibt. Verwenden Sie keine Mehrfachsteckdosen oder Verlängerungskabel
•Die elektrischen Daten Ihres Gerätes finden Sie auf dem Typenschild im Geräteinneren.
•Verlegen Sie das Stromkabel so, dass Sie es nach der Installation des Gerätes problemlos anschließen und trennen können.
•Falls das Stromkabel nicht zugänglich ist, sollten Sie einen passenden Schalter (z. B. eine abschaltbare Steckdose) zwischenschalten. (Bei Einbaugeräten.)
Lernen Sie Ihr neues Gerät kennen
 Warnung
Die nachstehenden Angaben über Zubehörteile werden nur zur Kenntnisnahme erwähnt. Die aufgeführten Zubehörteile müssen nicht exakt mit den Zubehörteilen Ihres Gerätes übereinstimmen.
Abb. 1
1.Reflektoren
2.Obere Abschlussplatte
3.Schnellgefrierschalter
4.Anzeigeleuchten
5.Thermostatknopf
6.Eiswürfelfach
7.Schnellgefrierfach
8.Gefriergutfächer
9.Einstellbare Füße an der Frontseite
Stellen Sie keine heißen Gegenstände oder Geräte, die Wärme abgeben, auf die obere Abschlussplatte; die Platte kann dadurch beschädigt werden.
3

de |
de |
Vor der ersten
Inbetriebnahme
Bevor Sie Ihr Gerät in Betrieb nehmen, sollten Sie aus Sicherheitsgründen die folgenden Punkte noch einmal kontrollieren:
•Steht das Gerät gerade?
•Ist ausreichend Platz für gute Luftzirkulation vorhanden?
•Ist der Innenraum sauber? (Schauen Sie dazu auch in den Abschnitt „Reinigung und Pflege“.)
•Stellen Sie den Thermostatknopf auf die Mitte zwischen den Markierungen 1 und 4 oder Min. und Max. ein.
•Schließen Sie das Gerät nun an die Stromversorgung an.
Geben Sie noch keine Lebensmittel in das Kühlgerät, solange die gewünschte Temperatur noch nicht erreicht ist.
Bitte wählen Sie die der gewünschten Temperatur entsprechende Einstellung.
Die Innentemperatur hängt auch von der Umgebungstemperatur ab, außerdem davon, wie oft die Tür geöffnet wird und wie viel Lebensmittel im Inneren gelagert werden. Beim häufigen Öffnen der Tür steigt die Innentemperatur an.
Aus diesem Grund empfehlen wir, die Tür möglichst schnell wieder zu schließen.
Zum Lagern von Lebensmitteln sollte die Innentemperatur des Gerätes -18 °C betragen. Wenn Sie den Thermostatknopf aus der Position 1 weiter gegen den Uhrzeigersinn drehen, schaltet sich das Gerät ab. Dabei hören Sie ein Klicken. Sie können noch tiefere Temperaturen erreichen, indem Sie den Thermostatknopf zur Position 4 hin drehen.
Wir empfehlen, die Temperatur mit einem Thermometer zu überprüfen - so können Sie sicher sein, dass in den Ablagen die gewünschte Temperatur herrscht. Denken Sie daran, das Thermometer sofort abzulesen, da die angezeigte Temperatur sehr schnell ansteigt, sobald Sie das Thermometer aus dem Kühlgerät nehmen.
Einstellen der
Betriebstemperatur
(Abb. 2)
Die Betriebstemperatur wird über die Temperatursteuerung reguliert.
Warm |
|
|
Kalt |
1 |
2 |
3 |
4 |
(Oder) Min. |
|
|
Max. |
1 = Schwächste Kühlung (wärmste Einstellung)
4 = Stärkste Kühlung (kälteste Einstellung)
(Oder)
Min. = Schwächste Kühlung
(wärmste Einstellung)
Max. = Stärkste Kühlung
(kälteste Einstellung)
Anzeigeleuchten
An der Vorderseite des Gerätes befinden sich drei farbige Anzeigeleuchten, die über den Betriebsmodus des Gerätes Auskunft geben.
(Abb. 2)
Die grüne Leuchte (1) leuchtet, wenn das Gerät mit Strom versorgt wird. Diese Anzeigeleuchte erlischt erst dann, wenn die Stromversorgung unterbrochen wird. Die grüne Leuchte leuchtet nicht, wenn sich das Thermostat in der “0”-Position befindet. Die grüne Leuchte dient nicht zur Temperaturanzeige; sie zeigt lediglich an, dass das Gerät eingeschaltet ist.
Die orangefarbene Anzeigeleuchte (2) leuchtet auf, wenn der Schnellgefrierschalter
(4) betätigt wurde und leuchtet, bis die Schnellgefrierfunktion abgeschaltet wird. Im Schnellgefrierbetrieb arbeitet der Kompressor kontinuierlich. Sie verwenden die Schnellgefrierfunktion zum Einfrieren frischer Lebensmittel.
4
 Loading...