

Page 1
CN160120
CN161220X
CN161220FCX
EN DE
Page 2
Please read this manual before using the product!
Dear Customer,
We'd like you to make the best use of our product, which has been manufactured in modern facilities
with care and meticulous quality controls.
Thus, we advice you to read the entire user manual before you use the product. In case the product
changes hands, do not forget to hand the guide to its new owner along with the product.
This guide will help you use the product quickly and safely.
• Pleasereadtheuserguidecarefullybeforeinstallingandoperatingtheproduct.
• Alwaysobservetheapplicablesafetyinstructions.
• Keeptheuserguidewithineasyreachforfutureuse.
• Pleasereadanyotherdocumentsprovidedwiththeproduct.
Keep in mind that this user guide may apply to several product models. The guide clearly indicates any
variations of different models.
Important information and useful
C
tips.
Risk of life and property.
A
Risk of electric shock.
B
The product’s packaging is made of
recyclable materials, in accordance
with the National Environment
Legislation.
Page 3

1 Safety and environment instructions 3
1.1. General safety . . . . . . . . . . . . . . . . . . . . . . 3
1.2. Intended use . . . . . . . . . . . . . . . . . . . . . . . 5
1.3. Child safety . . . . . . . . . . . . . . . . . . . . . . . . 6
1.4. Compliance with WEEE Directive and
Disposing of the Waste Product . . . . . . . . . 6
1.5. Compliance with RoHS Directive. . . . . . . . . 6
1.6. Package information . . . . . . . . . . . . . . . . . 6
2 Your appliance 7
3 Installation 8
3.1. Appropriate installation location . . . . . . . . . 8
3.2. Installing the plastic wedges. . . . . . . . . . . . 8
3.3. Electrical connection . . . . . . . . . . . . . . . . . 8
3.4. Adjusting the feet. . . . . . . . . . . . . . . . . . . . 9
3.5. Illumination lamp . . . . . . . . . . . . . . . . . . . . 9
3.6. Door open warning. . . . . . . . . . . . . . . . . . . 9
3.7. Transportation of the product . . . . . . . . . . . 9
4 Preparation 10
4.1. Things to be done for energy saving. . . . . 10
4.2. Recommendations on the fridge
compartment. . . . . . . . . . . . . . . . . . . . . . 10
4.3. Initial use. . . . . . . . . . . . . . . . . . . . . . . . . 11
5 Using the product 12
5.1. Indicator panel. . . . . . . . . . . . . . . . . . . . . 12
5.2. Dual cooling system . . . . . . . . . . . . . . . . 17
5.3. Freezing fresh food . . . . . . . . . . . . . . . . . 17
5.4. Recommendations for preserving the frozen
food . . . . . . . . . . . . . . . . . . . . . . . . . . . . 18
5.5. Placement of food . . . . . . . . . . . . . . . . . . 18
5.6. Deep-freeze information. . . . . . . . . . . . . . 18
5.7. Ice machine. . . . . . . . . . . . . . . . . . . . . . . 19
5.8. Icematic . . . . . . . . . . . . . . . . . . . . . . . . . 19
5.9. Ice container . . . . . . . . . . . . . . . . . . . . . . 20
5.10. Blue light. . . . . . . . . . . . . . . . . . . . . . . . . 20
5.11. Egg holder. . . . . . . . . . . . . . . . . . . . . . . . 20
5.12. Description and cleaning of odor filter . . . 21
5.13. Snack compartment . . . . . . . . . . . . . . . . 21
5.14. Sliding storage container. . . . . . . . . . . . . 22
5.15. Rotary storage container . . . . . . . . . . . . . 22
5.16. Crisper. . . . . . . . . . . . . . . . . . . . . . . . . . 23
5.17. Using the water dispenser . . . . . . . . . . . . 24
5.18. Filling the water dispenser's tank . . . . . . . 24
5.19. Cleaning the water tank . . . . . . . . . . . . . 25
5.20. Drip tray. . . . . . . . . . . . . . . . . . . . . . . . . 26
5.21. Humidity-controlled crisper (Ever Fresh) . . 26
5.22. Quick bottle cooling/quick ice making
compartment. . . . . . . . . . . . . . . . . . . . . . 30
6 Maintenance and cleaning 33
6.1. Preventing malodour . . . . . . . . . . . . . . . . 33
6.2. Protecting plastic surfaces . . . . . . . . . . . . 33
7 Troubleshooting 34
2 /36EN
Refrigerator / User manual
Page 4
1 Safety and environment instructions
This section provides the safety
instructions necessary to prevent
the risk of injury and material
damage. Failure to observe these
instructions will invalidate all
types of product warranty.
1.1. General safety
• This product should not be
used by persons with physical,
sensory and mental disabilities,
without sufficient knowledge
and experience or by children.
The device can only be used by
such persons under supervision
and instruction of a person
responsible for their safety.
Children should not be allowed
to play with this device.
• In case of malfunction, unplug
the device.
• After unplugging, wait at least
5 minutes before plugging in
again.
• Unplug the product when not in
use.
• Do not touch the plug with wet
hands! Do not pull the cable to
plug off, always hold the plug.
• Wipe the power plug’s tip with
a dry cloth before plugging in.
• Do not plug in the refrigerator if
the socket is loose.
• Unplug the product during
installation, maintenance,
cleaning and repair.
• If the product will not be used
for a while, unplug the product
and remove any food inside.
• Do not use the product when
the compartment with circuit
cards located on the upper
back part of the product
(electrical card box cover) (1) is
open.
1
1
Refrigerator / User manual
3 /36EN
Page 5

Important instructions for safety and environment
• Do not use steam or
steamed cleaning materials
for cleaning the refrigerator
and melting the ice inside.
Steam may contact the
electrified areas and cause
short circuit or electric
shock!
• Do not wash the product by
spraying or pouring water on
it! Danger of electric shock!
• In case of malfunction, do
not use the product, as it
may cause electric shock.
Contact the authorized
service before doing
anything.
• Plug the product into an
earthed socket. Earthing
must be done by a qualified
electrician.
• If the product has LED
type lighting, contact the
authorized service for
replacing or in case of any
problem.
• Do not touch frozen food
with wet hands! It may
adhere to your hands!
• Do not place liquids in
bottles and cans into the
freezer compartment. They
may burst out!
• Place liquids in upright
position after tightly closing
the lid.
• Do not spray flammable
substances near the product,
as it may burn or explode.
• Do not keep flammable
materials and products with
flammable gas (sprays, etc.)
in the refrigerator.
• Do not place containers
holding liquids on top of the
product. Splashing water on
an electrified part may cause
electric shock and risk of
fire.
• Exposing the product to rain,
snow, sunlight and wind
will cause electrical danger.
When relocating the product,
do not pull by holding the
door handle. The handle may
come off.
• Take care to avoid trapping
any part of your hands or
body in any of the moving
parts inside the product.
• Do not step or lean on the
door, drawers and similar
parts of the refrigerator. This
will cause the product to fall
down and cause damage to
the parts.
4 /36EN
Refrigerator/ User manual
Page 6
Important instructions for safety and environment
• Take care not to trap the
power cable.
limiting valve in your mains
system. If you do not know
how to check your water
pressure, ask for the help of
a professional plumber.
• If there is risk of water
hammer effect in your
installation, always
use a water hammer
1.1.1 HC warning
If the product comprises a
cooling system using R600a
gas, take care to avoid
damaging the cooling system
and its pipe while using and
moving the product. This gas
is flammable. If the cooling
system is damaged, keep the
product away from sources
of fire and ventilate the room
immediately.
prevention equipment in
your installation. Consult
Professional plumbers if you
are not sure that there is no
water hammer effect in your
installation.
• Do not install on the hot
water inlet. Take precautions
against of the risk of
freezing of the hoses. Water
temperature operating
interval shall be 33°F
(0.6°C) minimum and 100°F
The label on the inner
left side indicates the
C
type of gas used in the
product.
1.1.2 For models with
water dispenser
• Pressure for cold water
(38°C) maximum.
• Use drinking water only.
1.2. Intended use
• This product is designed for
home use. It is not intended
for commercial use.
inlet shall be maximum 90
psi (6.2 bar). If your water
pressure exceeds 80 psi
(5.5 bar), use a pressure
Refrigerator/ User manual
5 /36EN
Page 7

Important instructions for safety and environment
• The product should be used
to store food and beverages
only.
• Do not keep sensitive
products requiring controlled
temperatures (vaccines,
heat sensitive medication,
medical supplies, etc.) in the
refrigerator.
• The manufacturer assumes
no responsibility for any
damage due to misuse or
mishandling.
• Original spare parts will
be provided for 10 years,
following the product
purchasing date.
1.3. Child safety
• Keep packaging materials
out of children’s reach.
• Do not allow the children to
end of its service life. Take it to the collection
center for the recycling of electrical and
electronic equipment. Please consult your
local authorities to learn about these
collection centers.
1.5. Compliance with RoHS
Directive
• This product complies with EU WEEE
Directive (2011/65/EU). It does not contain
harmful and prohibited materials specified
in the Directive.
1.6. Package information
• Packaging materials of the product are
manufactured from recyclable materials in
accordance with our National Environment
Regulations. Do not dispose of the
packaging materials together with the
domestic or other wastes. Take them to
the packaging material collection points
designated by the local authorities.
This product has been
manufactured with high quality
parts and materials which can be
reused and are suitable for
recycling. Do not dispose of the
waste product with normal
domestic and other wastes at the
play with the product.
• If the product’s door
comprises a lock, keep the
key out of children’s reach.
1.4. Compliance with WEEE
Directive and Disposing of the
Waste Product
This product complies with EU WEEE
Directive (2012/19/EU). This product bears a
classification symbol for waste electrical and
electronic equipment (WEEE).
6 /36EN
Refrigerator/ User manual
Page 8
*5
*6
*3
4
7
8
10*11
*12
13
*14
*
15
16
17
18
19
9
*1
*2
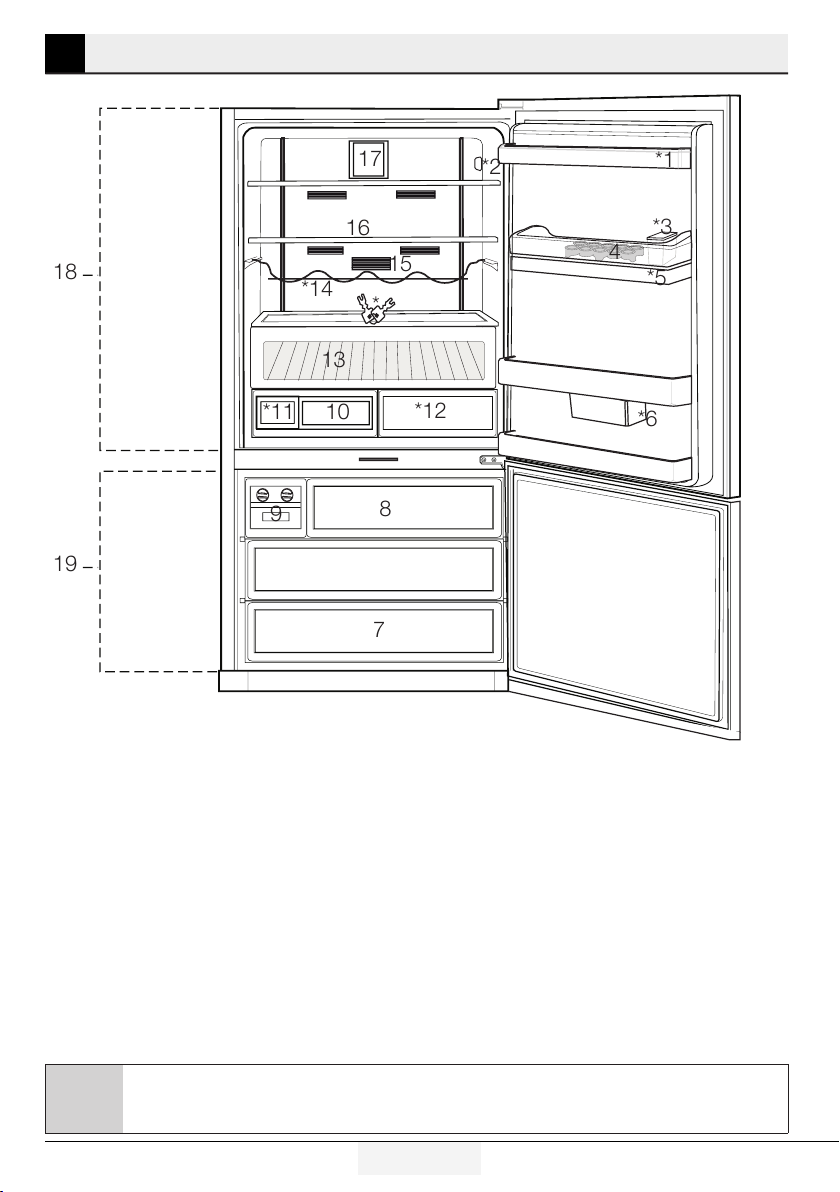
2 Your appliance
1. Door shelves of fridge compartment
2. Display
3. Water dispenser filling tank
4. Egg section
5. Water dispenser reservoir
6. Rotary storage container
7. Freezer compartment drawers
8. Icematic drawer
9. Icematic
10. Crisper
*optional:Figures in this user manual are given as an example and may not match the product
exactly. If the relevant parts are not available in the product you purchased, the figure applies to other
C
Refrigerator / User manual
models.
11. Water tank
12. Crisper
13. Chiller compartment
14. Bottle shelf
15. Odor filter
16. Glass shelves of fridge compartment
17. Fan
18. Glass shelves of fridge compartment
19. Freezer compartment
*optional
7 /36EN
Page 9
3 Installation
Always have the installation and repairing
procedures carried out by the Authorized Service
Agent. Manufacturer shall not be held liable for
damages that may arise from procedures carried
out by unauthorized persons.
Refer to the nearest Authorized Service Agent for
installation of the product. To make the product
ready for use, make sure that the electricity
installation is appropriate before calling the
Authorized Service Agent. If not, call a qualified
electrician to have any necessary arrangements
carried out.
Preparation of the location and electrical
installation at the place of installation is
C
B
B
A
C
under customer's responsibility.
Product must not be plugged in during
installation. Otherwise, there is the risk
of death or serious injury!
WARNING: Installation and electrical
connections of the product must be
carried out by the Authorised Service
Agent. Manufacturer shall not be held
liable for damages that may arise from
procedures carried out by unauthorised
persons.
WARNING: Prior to installation, visually
check if the product has any defects
on it. If so, do not have it installed.
Damaged products cause risks for your
safety.
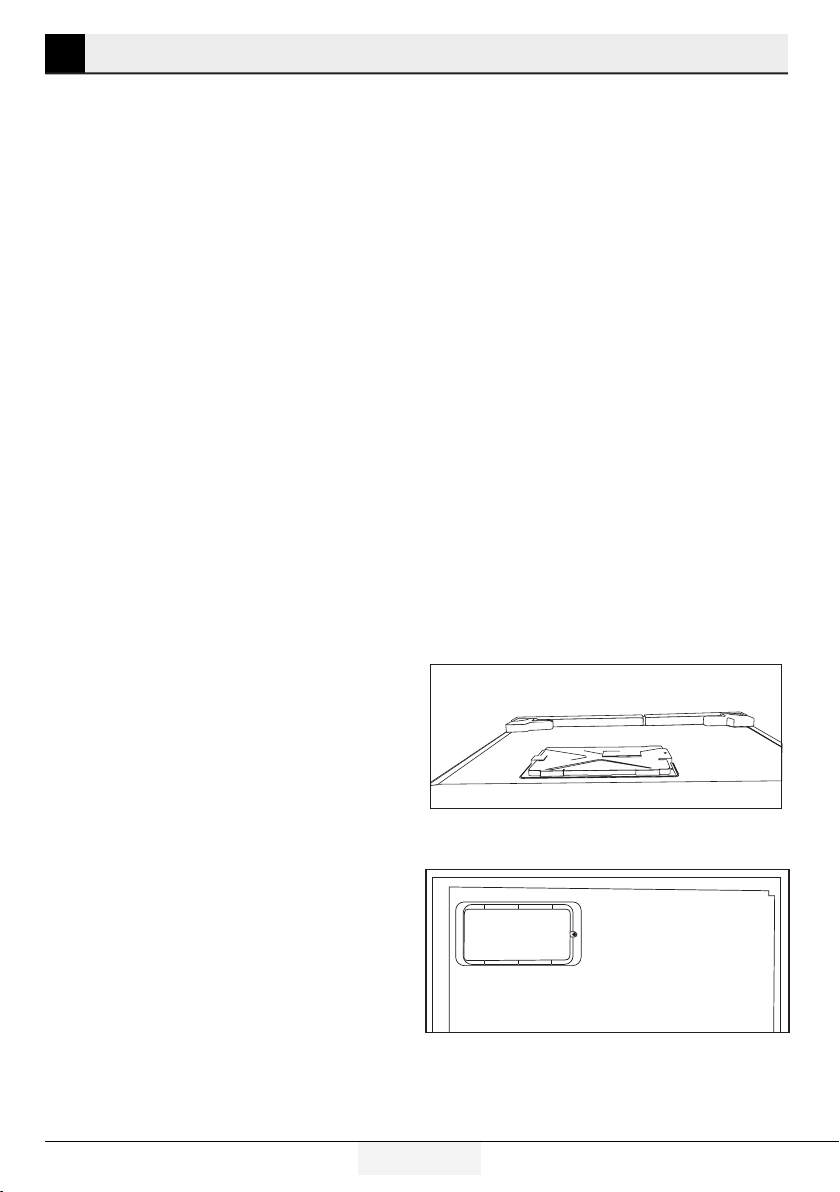
Make sure that the power cable is not
pinched or crushed while pushing the
product into its place after installation or
cleaning procedures.
to direct sun light and kept in humid places after
installation.
•Appropriateairventilationmustbeprovided
around your product in order to achieve an
efficient operation. If the product is to be placed in
a recess in the wall, pay attention to leave at least
5 cm distance with the ceiling and side walls.
•Donotplacetheproductonthematerialssuchas
rugs or carpets.
•Placetheproductonanevenfloorsurfaceto
prevent jolts.
•Donotinstalltheproductinplaceswherethe
temperature falls below 10°C.
If two coolers are to be installed side
by side, there should be at least 8 cm
C
distance between them. Otherwise,
adjacent side walls may get damp.
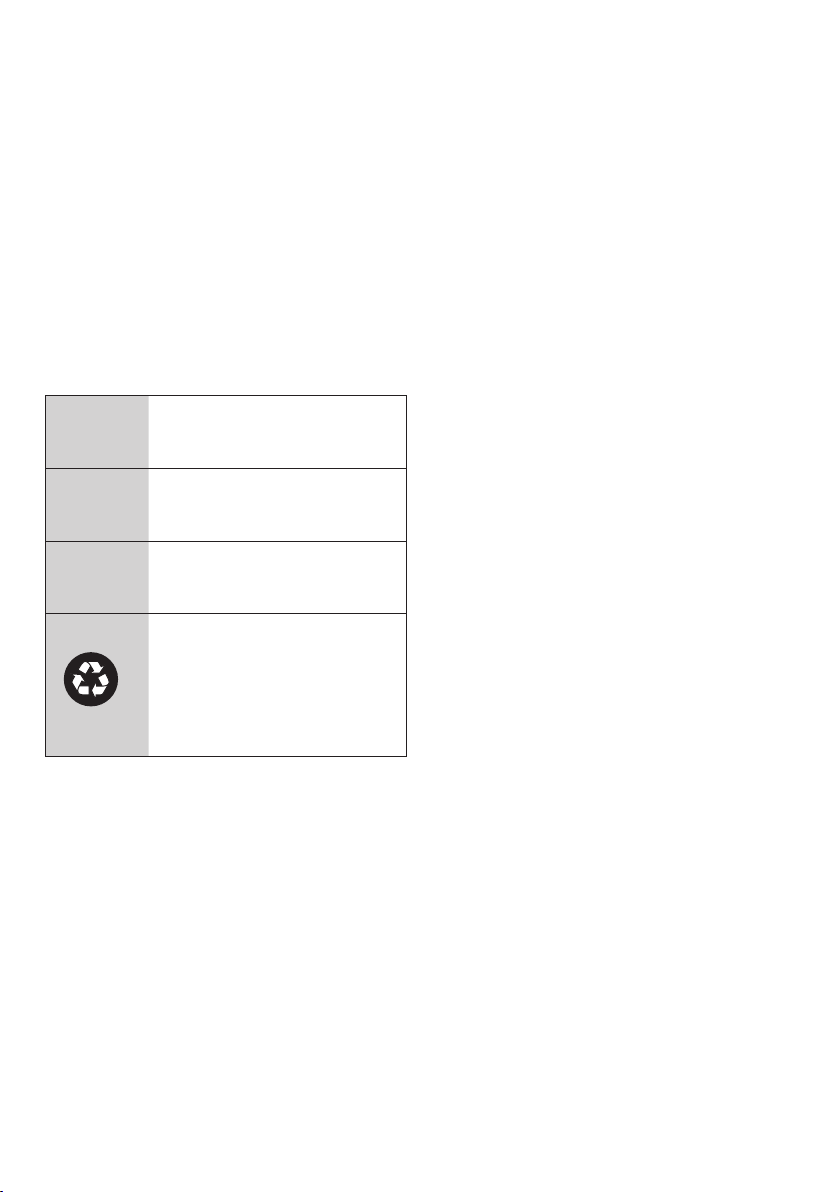
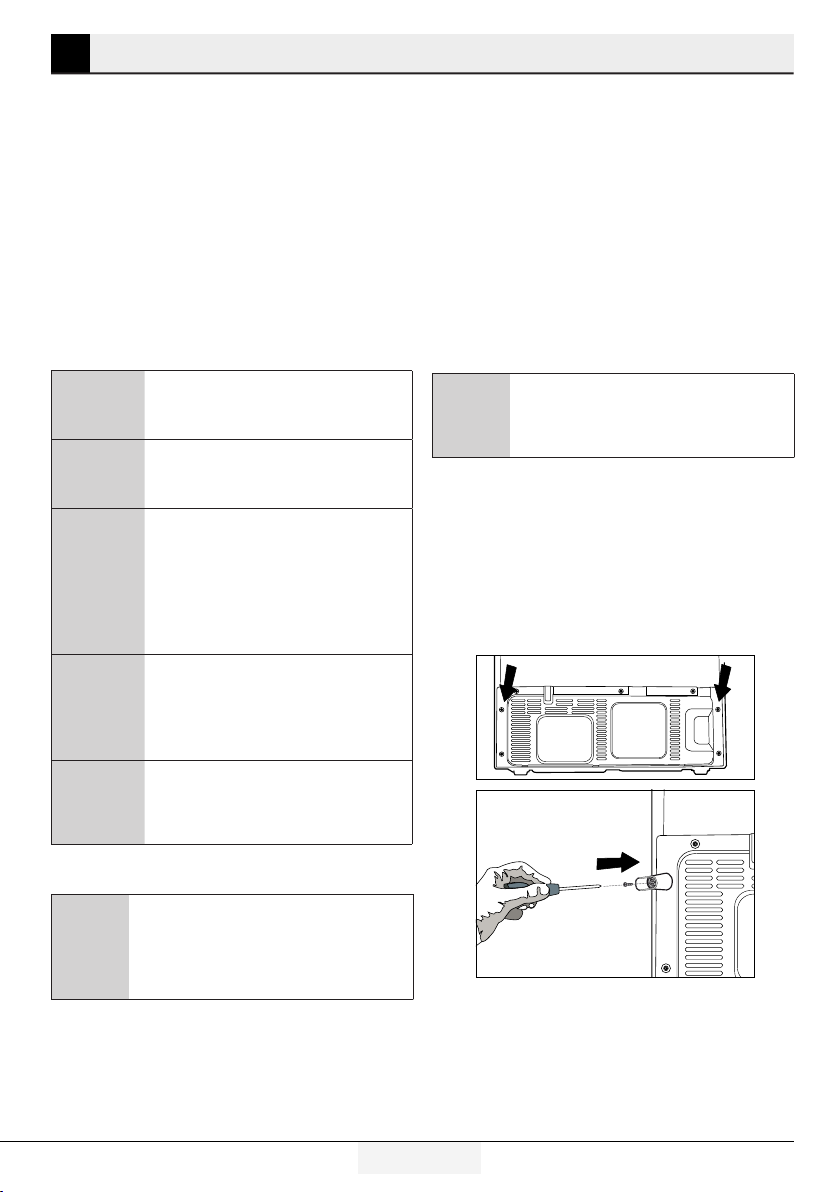
3.2. Installing the plastic wedges
Plastic wedges are used to create the distance for
the air circulation between the product and the
rear wall. Insert the 2 plastic wedges onto the rear
ventilation cover as illustrated in the figure. To install
the wedges, remove the screws on the product and
use the screws given in the same pouch with the
wedges.
3.1. Appropriate installation location
WARNING: If the door of the room where
the product will be placed is too small for
the product to pass, then the product's
A
•Chooseaplaceatwhereyouwouldusethe
product comfortably.
•Installtheproductatleast30cmawayfrom
heat sources such as hobs, ovens, heater
cores and stoves and at least 5 cm away from
electrical ovens. Product must not be subjected
doors must be removed and the product
must be turned aside to pass it through.
3.3. Electrical connection
Connect the product to a grounded outlet
protected by a fuse complying with the values in
the rating plate. Our company shall not be liable
for any damages that will arise when the product is
8 /36EN
Refrigerator / User manual
Page 10
Installation
used without grounding in accordance with the
local regulations.
•Electricalconnectionmustcomplywith
national regulations.
•Powercableplugmustbewithineasyreach
after installation.
•Thevoltageandallowedfuseorbreaker
protection are specified in the Rating Plate
which is affixed to interior of the product. If
the current value of the fuse or breaker in
the house does not comply with the value in
the rating plate, have a qualified electrician
install a suitable fuse.
•Thespecifiedvoltagemustbeequaltoyour
mains voltage.
•Donotmakeconnectionsviaextension
cables or multi-plugs.
WARNING: Damaged power cable
must be replaced by the Authorized
B
B
Service Agent.
WARNING: If the product has a
failure, it should not be operated
unless it is repaired by the
Authorised Service Agent! There is
the risk of electric shock!
Authorized Service Agent if the illumination
lamps do not go on or are out of order.
The lamp(s) used in this appliance is not
suitable for household room illumination. The
intended purpose of this lamp is to assist the
user to place foodstuffs in the refrigerator/
freezer in a safe and comfortable way.
3.6. Door open warning
(This feature is optional)
An audio warning signal will be given when the
door of your product is left open for 1 minute.
This warning will be muted when the door is
closed or any of the display buttons (if any) are
pressed.
3.7. Transportation of the product
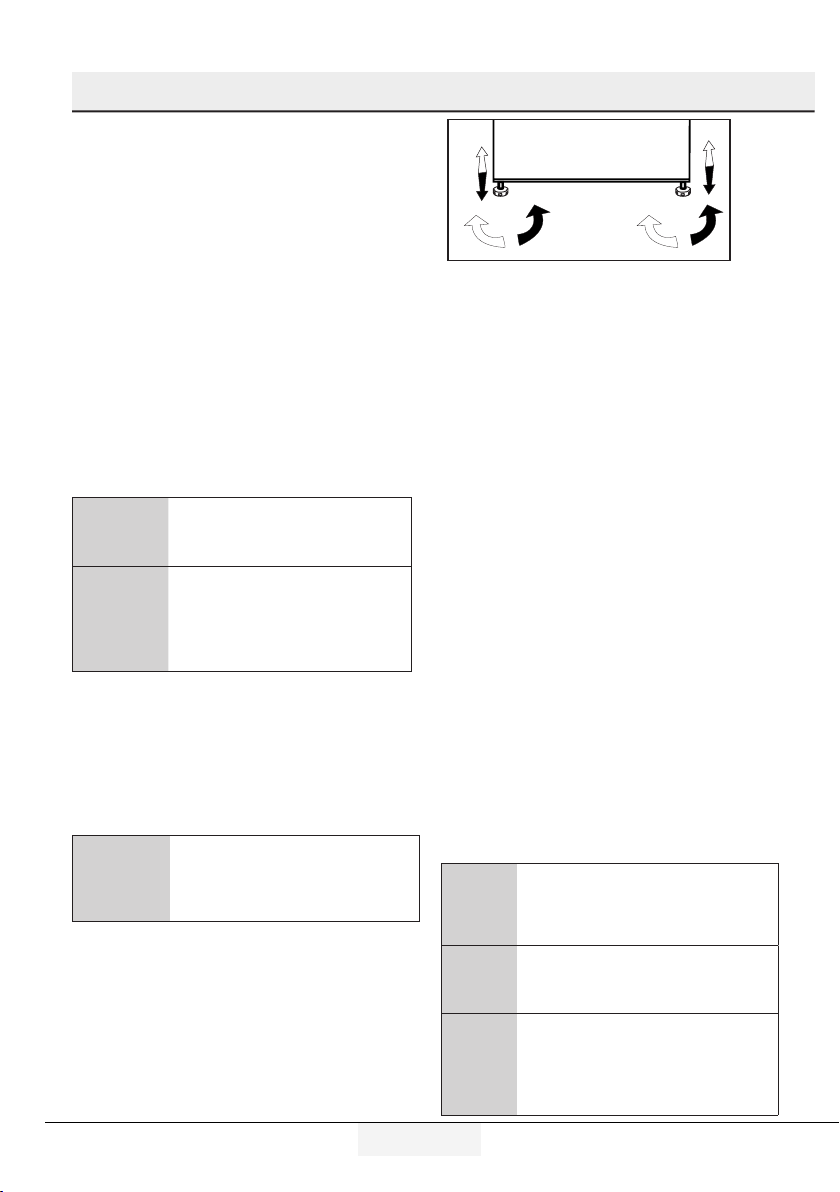
3.4. Adjusting the feet
If the product stands unbalanced after
installation adjust the feet. Taking help from
someone to slightly lift the product will facilitate
this process.
WARNING: First unplug the product.
Product must not be plugged in when
B
Turn the front feet to balance the product. The
corner where the foot exists is lowered when
you turn in the direction of arrow and raised
when you turn it in the opposite direction.
adjusting the feet. There is the risk of
electric shock!
3.5. Illumination lamp
Do not attempt to repair yourself but call the
Refrigerator/ User manual
9 /36EN
1.
Unplug the product before transporting it.
2.
Clean the interior of the product as
recommended in the “Maintenance and
cleaning” section.
3.
Secure the shelves, accessories, crisper and
etc. in the product by adhesive tape before
repackaging it.
Packaging must be tied with thick
tapes or strong ropes and the rules of
C
C
A
transportation printed on the package
must be followed.
Original packaging and foam
materials should be kept for future
transportations.
Packaging materials are dangerous
for the children. Keep packaging
materials
in a safe place away
from reach of the children.
Page 11
4 Preparation
4.1. Things to be done for energy
saving
Connecting the product to electric energy
saving systems is risky as it may cause
A
• Do not leave the doors of your product open for
• Do not put hot food or drinks in your product.
• Do not overload the product. Cooling capacity
• Do not place the product in places subject to
• Store your food in product in closed containers.
• You can load maximum amount of food to
• Thawing frozen food in fridge compartment will
C
damage on the product.
a long time.
will fall when the air circulation inside is
hindered.
direct sunlight. Install the product at least 30 cm
away from heat sources such as hobs, ovens,
heater cores and stoves and at least 5 cm away
from electrical ovens.
the freezer compartment of the product by
removing the freezer compartment shelf of
drawer. Declared energy consumption value of
the product was determined with the freezer
compartment shelf or drawer removed and with
maximum amount of food loaded. There is no
risk in using a shelf or drawer suitable for the
shapes and sizes of the foods to be frozen.
both provide energy saving and preserve the
food quality.
The ambient temperature of the room
where you install the product should at
least be -5°C. Operating your product
under cooler conditions than this is not
recommended.
4.2. Recommendations on the fridge
compartment
• Do not allow the food to touch the temperature
sensor in fridge compartment. To allow the
fridge compartment keep its ideal storage
temperature, sensor must not be hindered by
food.
• The baskets/drawers that are provided with the
chill compartment must always be in use for
low energy consumption and for better storage
conditions.
• Food contact with the temperature sensor in
the freezer compartment may increase energy
consumption of the appliance. Thus any
contact with the sensor(s) must be avoided.
• Do not put hot food and beverages inside the
product.
C
C
Inside of your product must be cleaned.
If two coolers are to be installed side
by side, there should be at least 4 cm
distance between them.
10 /36EN
Refrigerator / User manual
Page 12
Preparation
4.3. Initial use
Before starting to use the product, check that all
preparations are made in accordance with the
instructions in sections "Important instructions for
safety and environment" and "Installation".
• Clean the interior of the product as
recommended in the “Maintenance and
cleaning” section. Check that inside of it is dry
before operating it.
• Plug the product into the grounded wall
outlet. When the door is opened the interior
illumination will turn on.
• Run the product without putting any food for 6
hours and do not open its door unless certainly
required.
You will hear a noise when the compressor
starts up. The liquids and gases sealed
C
C
C
within the refrigeration system may also
give rise to noise, even if the compressor is
not running and this is quite normal.
Front edges of the product may feel warm.
This is normal. These areas are designed
to be warm to avoid condensation.
In some models, the instrument panel
automatically turns off 5 minutes after
the door has closed. It will be reactivated
when the door has opened or pressed on
any key.
Refrigerator / User manual
11 /36EN
Page 13
5 Using the product
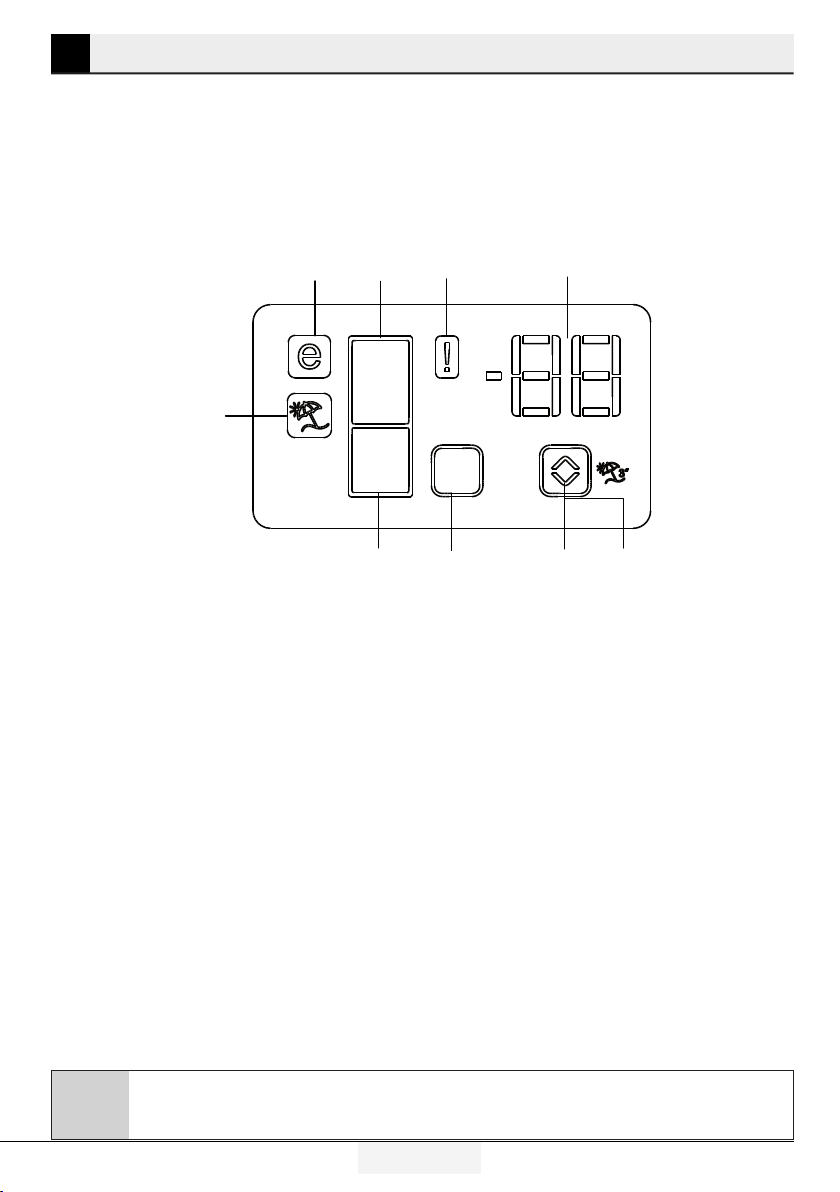
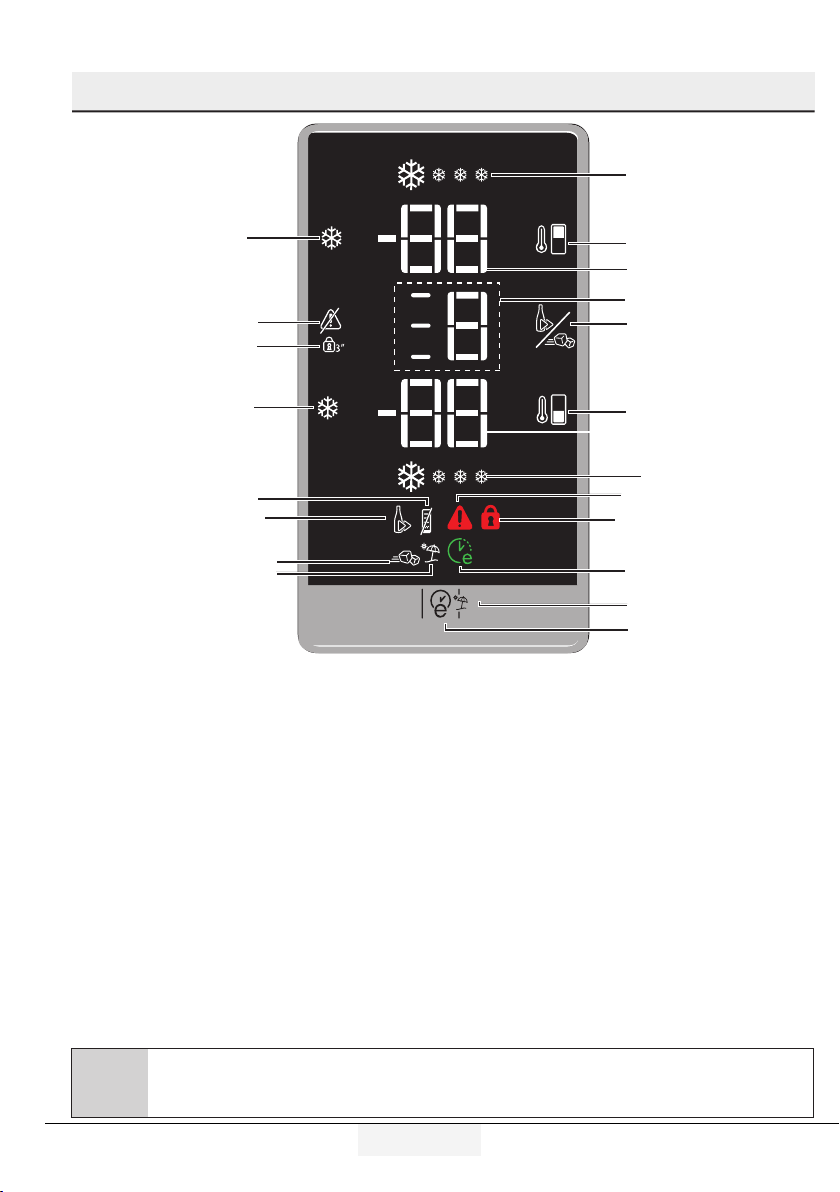
5.1. Indicator panel
Indicator panels may vary according to the product model.
Audio – visual functions on the indicator panel helps you in using your product.
8
9
1. Fridge Compartment Indicator
2. Error status indicator
3. Temperature indicator
4. Vacation function button
5. Temperature setting button
6. Compartment selection button
7. Freezer compartment indicator
8. Economy mode indicator
9. Vacation function indicator
*optional
1
7
2
6
3
45
C
*Optional: Figures in this user manual are given as an example and may not match the product
exactly. If the relevant parts are not available in the product you purchased, the figure applies to other
models.
12 /36EN
Refrigerator / User manual
Page 14

5 Using the product
1. Fridge compartment indicator
Fridge compartment light is illuminated while the
fridge compartment temperature is set.
2. Error status indicator
If your refrigerator does not perform enough
cooling or in case of a sensor fault, this indicator
is activated. When this indicator is activated, “E” is
displayed on the freezer compartment temperature
indicator, and numbers such as “1,2,3...” are
displayed on the fridge compartment temperature
indicator. These numbers on the indicator inform
service personnel about the error.
3. Temperature indicator
Indicates freezer, fridge compartment temperature.
4. Vacation function button
Press on Vacation Button for 3 seconds to
activate this function. When the vacation function
is activated, “- -” is displayed on the fridge
compartment temperature indicator and no active
cooling is performed on the fridge compartment.
It is not suitable to keep the food in the fridge
compartment when this function is activated. Other
compartments shall be continued to be cooled as
per their set temperature.
To cancel this function press Vacation button
again.
5. Temperature setting button
Changes the temperature of the relevant
compartment between -24°C... -18°C and
8°C...1°C.
6. Compartment selection button
Selection button: Press compartment selection
button to switch between fridge and freezer
compartments.
7. Freezer compartment indicator
Fridge compartment light is illuminated while the
freezer compartment temperature is set.
8. Economy mode indicator
Indicates that the refrigerator operates in energy
saving mode. This display shall be activated if the
freezer compartment temperature is set to -18°C.
9. Vacation function indicator
Indicates that vacation is activated.
Refrigerator / User manual
13 /36EN
Page 15
5 Using the product
*optional
16
15
14
1
2
13
12
11
10
9*
8
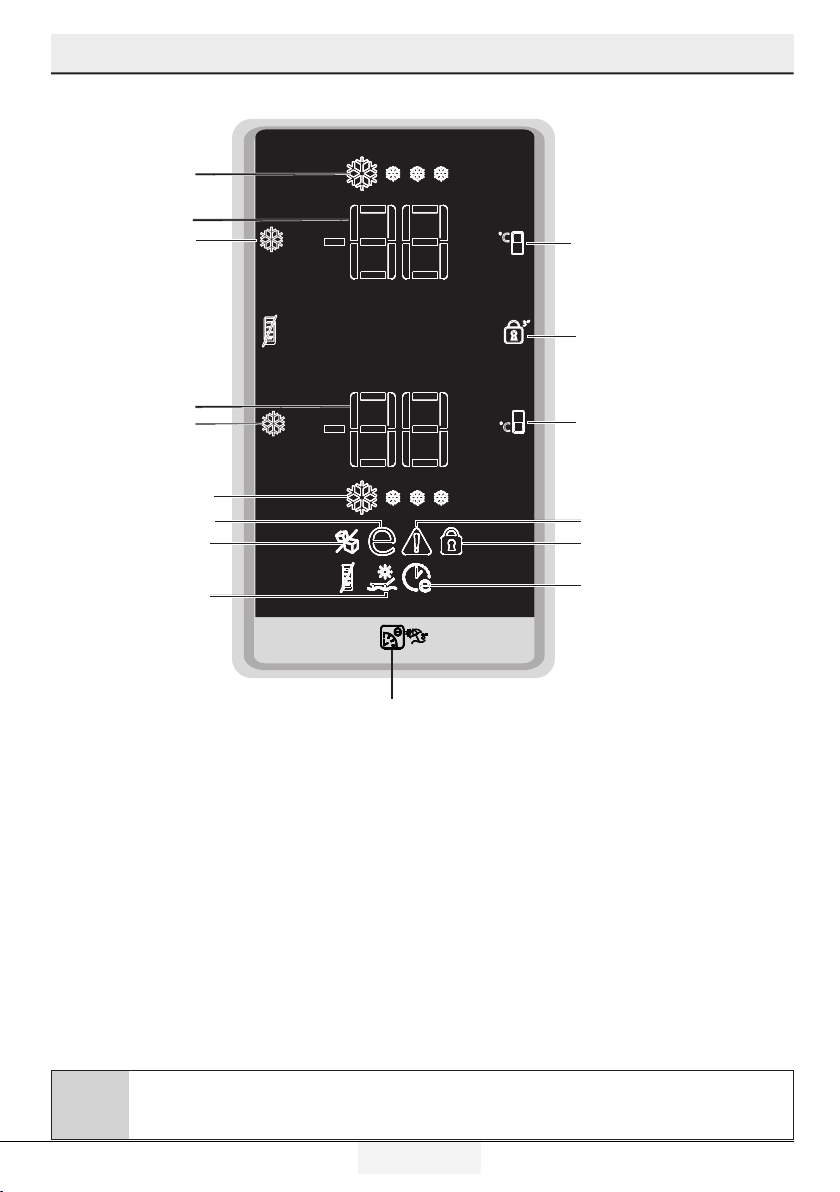
1. Fridge compartment temperature setting button
2. Key lock button
3. Freezer compartment temperature setting button
4. Error status indicator
5. Key lock indicator
6. Eco Extra Function Indicator
7. Eco Extra / Vacation Button
8. Vacation function indicator
3
4
5
6
7
9. Icematic Off Indicator
(*In some models)
10. Economic usage indicator
11. Quick freeze function indicator
12. Quick freeze function button/ Icematic on-off button
13. Freezer compartment temperature indicator
14. Quick cool function
15. Fridge Compartment Temperature indicator
16. Quick cooling function indicator
C
*Optional: Figures in this user manual are given as an example and may not match the product
exactly. If the relevant parts are not available in the product you purchased, the figure applies to other
models.
14 /36EN
Refrigerator / User manual
Page 16
Using your appliance
1. Fridge compartment temperature setting
button
Press this button to set the temperature of the
fridge compartment to 8, 7,6, 5,4,3, 2, 8...
respectively. Press this button to set the fridge
compartment temperature to the desired value.
2. Key lock button
Pressing and holding this button for 3 seconds
will activate the key lock function and the key
lock indicator will turn on. Pressing and holding
this button again for 3 seconds will deactivate
the key lock function.
3. Freezer compartment temperature setting
button
Press this button to set the temperature of the
freezer compartment to -18,-19,-20,-21, -22,
-23,-24, -18... respectively. Press this button
to set the freezer compartment temperature to
the desired value.
4. Error status indicator
If your product does not perform enough
cooling or in case of a sensor fault, this
indicator is activated.
When this indicator is activated, “E” is
displayed on the freezer compartment
temperature indicator, and numbers such
as “1,2,3...” are displayed on the fridge
compartment temperature indicator. The
numbers on the indicator inform service
personnel about the error.
When you place hot food into the
freezer compartment or if you leave
C
5. Key lock indicator
Use this function if you want to prevent
Refrigerator/ User manual
the door open for a long time, an
exclamation mark can be displayed for
some time. This is not a failure; this
warning will disappear when the food
cools down.
changing of the temperature setting of the
product. To activate it press and hold fridge
compartment temperature setting button and
freezer compartment temperature setting
button simultaneously for 3 seconds.
6. Eco extra function ındicator
Indicates that the Eco Extra function is active.
If this function is active, your product will
automatically detect the least usage periods
and energy-efficient cooling will be performed
during those times.
Economy indicator will be active while
C
C
7. Eco extra / Vacation button
Pressing this button briefly will activate the
Eco Extra function. Pressing and holding this
button for 3 seconds will activate the Vacation
function. Pressing this button again will
deactivate the selected function.
8. Vacation function indicator
Indicates that the Vacation Function is active.
When this function is active “- -“ appears on
the Fridge Compartment Temperature indicator
and no cooling is performed in the fridge
compartment. Other compartments will be
cooled in accordance with the temperature set
for them.
C
9. Icematic off indicator
Indicates whether the icematic is on or off.
If On, then the icematic is not operating. To
operate the icematic again press and hold the
On-Off button for 3 seconds.
15 /36EN
energy-efficient cooling is performed.
Press the relevant button to disable the
function.
Press the relevant button to disable the
function.
Page 17

Using your appliance
Water flow from water tank will stop
when this function is selected. However,
C
ice made previously can be taken from
the icematic.
C
This function is not recalled when
power restores after a power failure.
10. Economic usage indicator
Indicates that the product is running in
energy-efficient mode. This indicator will
be active if the Freezer Compartment
temperature is set to -18 or the energy
efficient cooling is being performed due to
Eco-Extra function.
Economic usage indicator is turned
off when quick cooling or quick freeze
C
11. Quick freeze function indicator
Flashes in an animated style to indicate that
the Quick Freeze function is enabled.
12. Quick freeze function button/ Icematic
on-off button
Press this button to activate or
deactivate the quick freezing function.
When you activate the function, the
freezer compartment will be cooled to a
temperature lower than the set value.
To turn on and off the icematic press and
hold it for 3 seconds.
C
C
functions are selected.
Use the quick freeze function when
you want to quickly freeze the food
placed in fridge compartment. If
you want to freeze large amounts
of fresh food, activate this function
before putting the food into the
product.
If you do not cancel it, Quick Freeze
will cancel itself automatically
after 4 hours or when the fridge
compartment reaches to the
required temperature.
13. Freezer compartment temperature indicator
Indicates the temperature set for freezer
compartment.
14. Quick cool function
The button has two functions. To activate or
deactivate the quick cool function press it briefly.
Quick Cool indicator will turn off and the product
will return to its normal settings.
Use quick cooling function when you
want to quickly cool the food placed
C
C
C
C
15. Fridge compartment temperature indicator
Indicates the temperature set for Fridge
compartment.
16. Quick cooling function indicator
Flashes in an animated style to indicate that the
Quick Cooling function is enabled.
in the fridge compartment. If you want
to cool large amounts of fresh food,
activate this function before putting the
food into the product.
If you do not cancel it, quick cooling
will cancel itself automatically after 8
hours or when the fridge compartment
reaches to the required temperature.
If you press the quick cooling button
repeatedly with short intervals, the
electronic circuit protection will be
activated and the compressor will not
start up immediately.
This function is not recalled when
power restores after a power failure.
16 /36EN
Refrigerator/ User manual
Page 18
Using your appliance
5.2. Dual cooling system
Your product is equipped with two separate
cooling systems to cool the fresh food
compartment and freezer compartment. Thus,
air and odor in the fresh food compartment
and frozen food compartment do not get
mixed. Thanks to these two separate cooling
systems, cooling speed is much higher then
other refrigerators. Also additional power saving
is provided since the defrosting is performed
individually.
5.3. Freezing fresh food
• Place the food in the product wrapped or
covered.
• Hot food must be cooled down to the room
temperature before putting them in the
product.
• The food that you want to freeze must be
fresh and in good quality.
• Divided the food into portions according
to your family’s daily or meal based
consumption needs.
• Pack the food in an airtight manner to
prevent them from drying even if they are
going to be stored for a short time.
• Materials to be used for packaging must be
tear-proof and resistant to cold, humidity,
odor, oils and acids and they must also
be airtight. Moreover, they must be well
closed and they must be made from easyto-use materials that are suitable for deepfreezers.
• Frozen food must be used immediately after
they are thawed and they should never be
re-frozen.
• Do not freeze too large quantities of food
at one time. The quality of the food is best
preserved when it is frozen right through to
the core as quickly as possible.
• Placing warm food into the freezer
compartment causes the cooling system to
operate continuously until the food is frozen
solid.
• Take special care not to mix already frozen
food and fresh food.
• If the product has a quick freeze function,
activate the quick freeze function when you
want to freeze the food.
Freezer
compartment
setting
-18°C 4°C This is the normal recommended setting.
-20, -24 or -24°C 4°C
Quick freeze 4°C
-18°C or colder 2°C
-18°C or colder Quick fridge
Refrigerator/ User manual
Fridge
compartment
setting
Remarks
These settings are recommended when the ambient temperature
exceeds 30°C.
Use when you wish to freeze your food in a short time. Your product
will return to its previous mode when the process is over.
Use these settings if you think that your fridge compartment is not
cold enough because of the hot ambient conditions or frequent
opening and closing of the door.
Use this function when you place too much into the fridge
compartment or when you need to cool your food quickly. It is
recommended that you activate quick fridge function 4-8 hours before
placing the food.
17 /36EN
Page 19
Using your appliance
5.4. Recommendations for
preserving the frozen food
•Frozenfoodthatyouhavepurchasedshould
be stored in accordance with the frozen food
manufacturer's instructions for a frozen food
storage compartment.
Note the following to ensure that the high quality
achieved by the frozen food manufacturer and
the food retailer is maintained:
1. Put packages in the freezer as quickly as
possible after purchase.
2. Ensure that contents are labeled and dated.
3. Do not exceed "Use By", "Best Before" dates
on the packaging.
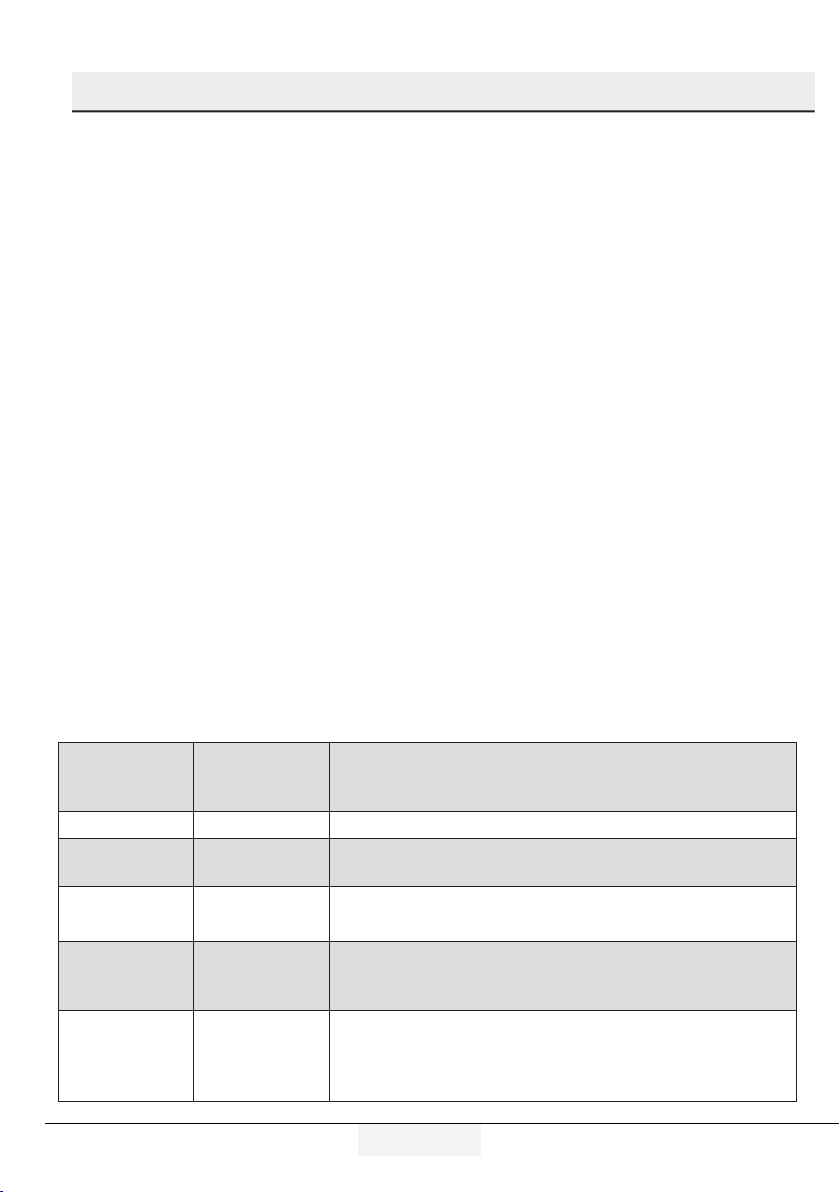
5.5. Placement of food
Freezer compartment
shelves
Egg section Eggs
Refrigerator
compartment
shelves
Door shelves
of fridge
compartment
Crisper Vegetables and fruits
Freshzone
compartment
Various frozen food such
as meat, fish, ice cream,
vegetables and etc.
Food in pans, covered
plates and closed
containers
Small and packaged food
and beverage (such as
milk, fruit juice, beer and
etc.)
Delicatessen products
(cheese, butter, salami
and etc.)
Divided the food into portions according to
your family’s daily or meal based consumption
needs.
Pack the food in an airtight manner to prevent
them from drying even if they are going to be
stored for a short time.
Materials necessary for packaging:
•Coldresistantadhesivetape
•Self-adhesivelabel
•Rubberrings
•Pen
Materials to be used for packaging the
foodstuff must be tear-proof and resistant to
cold, humidity, dour, oils and acids.
Foods to be frozen should not be allowed to
come in contact with the previously frozen
items to prevent them from getting thawed
partially.
Frozen food must be used immediately after
they are thawed and they should never be refrozen.
5.6. Deep-freeze information
Food must be frozen as rapidly as possible
when they are put in a product refrigerator in
order to keep them in good quality.
It is possible to preserve the food for a long time
only at -18°C or lower temperatures.
You can keep the freshness of food for many
months (at -18°C or lower temperatures in the
deep freeze).
18 /36EN
Refrigerator/ User manual
Page 20
Using your appliance
5.7. Ice machine
*optional
Icematic allows you to obtain ice from the
product easily.
Using the icematic
1. Remove the water tank from the fridge
compartment.
2. Fill water tank with water.
3. Replace the water tank. First ice cubes
will be ready in approximately four hours in
the icematic drawer located in the freezer
compartment.
While the water tank is completely
filled, you will be able to obtain
C
C
approximately 60-70 ice cubes.
The water within the tank should be
renewed in every 2-3 weeks.
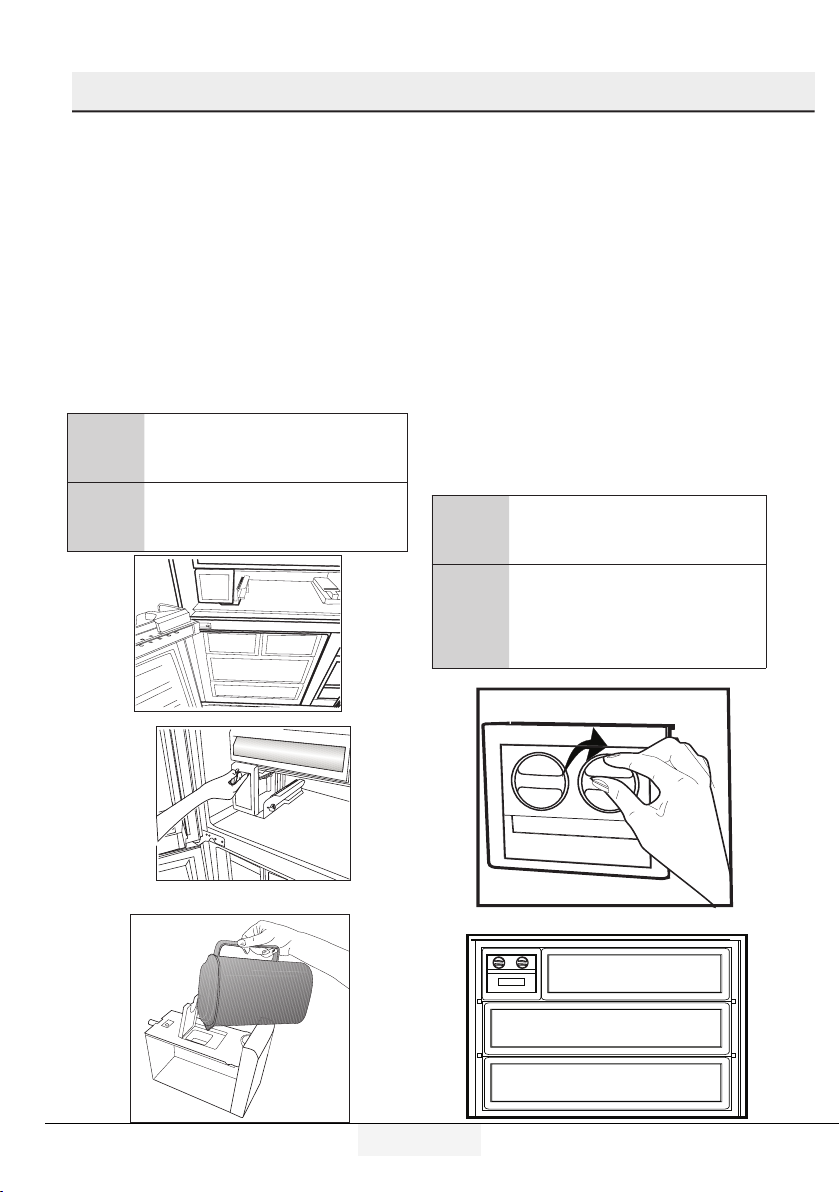
5.8. Icematic
*optional
Icematic allows you to obtain ice from the
product easily.
Using the icematic
1. Take out the icematic pulling it out carefully.
2. Fill the Icematic with water.
3. Place Icematic in place. About two hours
later, the ice is ready.
4. To obtain ice, turn the knobs on the ice
reservoirs clockwise by 90˚ degrees. Ice cubes
in the reservoirs will fall down into the ice
storage container below.
5. You may take out the ice storage container
and serve the ice cubes.
Do not remove the Icematic from its
C
C
seating to obtain ice.
If you wish, you may keep the ice
cubes in the ice storage container.
The ice storage container is just for
accumulating ice cubes. Do not put
water in it. Otherwise, it will break.
Refrigerator/ User manual
19 /36EN
Page 21
Using your appliance
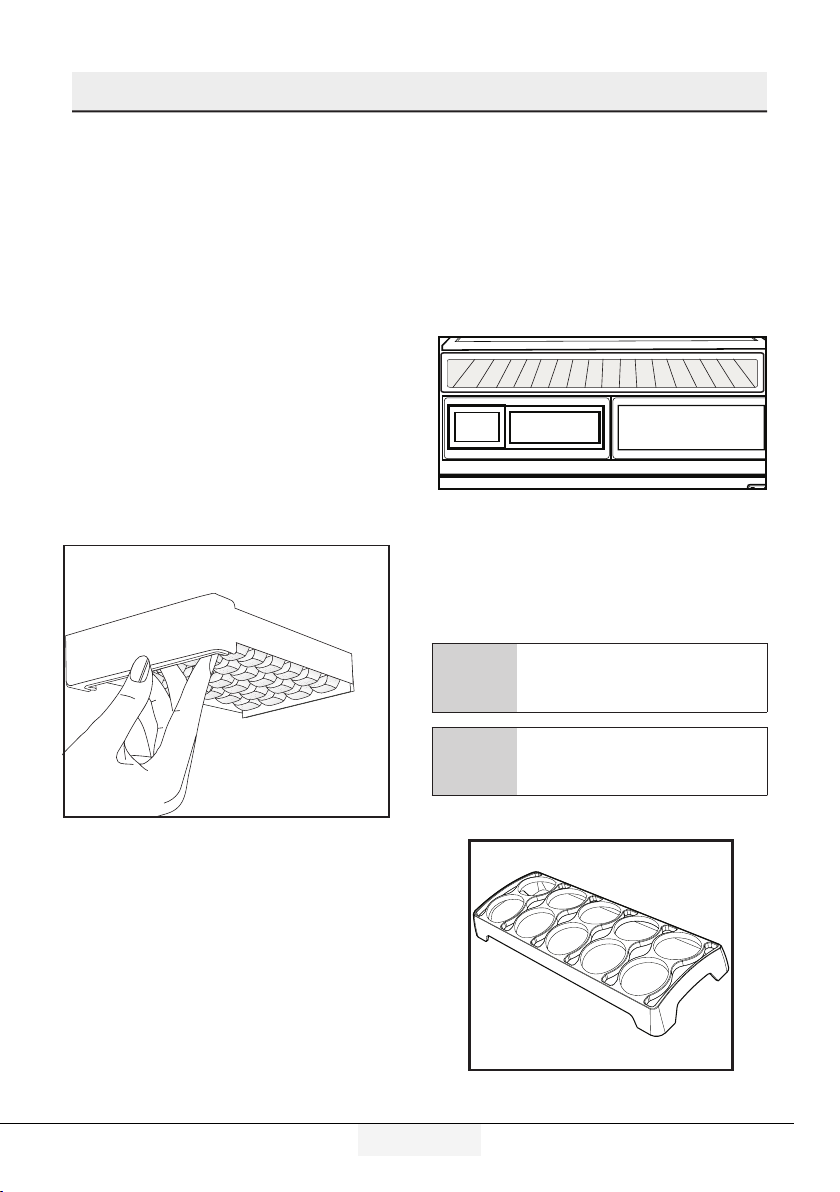
5.9. Ice container
*optional
Icematic allows you to obtain ice from the
product easily.
Using the ice container
1. Remove the ice container from the freezer
compartment.
2. Fill the ice container with water.
3. Place the ice container in the freezer
compartment. About two hours later, the ice is
ready.
4. Remove the ice container from the freezer
compartment and bend it over the service
plate. Ice cubes will easily fall down to the
service plate.
5.10. Blue light
*optional
Crispers of the product are illuminated with
blue light. Food stored in the crispers continue
their photosynthesis by means of the
wavelength effect of blue light and thus,
preserve their freshness and increase their
vitamin content.
5.11. Egg holder
You can install the egg holder to the desired
door or body shelf. If it will be placed on body
shelves than the lower cooler shelves are
recommended.
Never place the egg holder in the
A
freezer compartment
20 /36EN
C
Make sure that eggs are not in direct
contact with other food products.
Refrigerator/ User manual
Page 22

Using your appliance
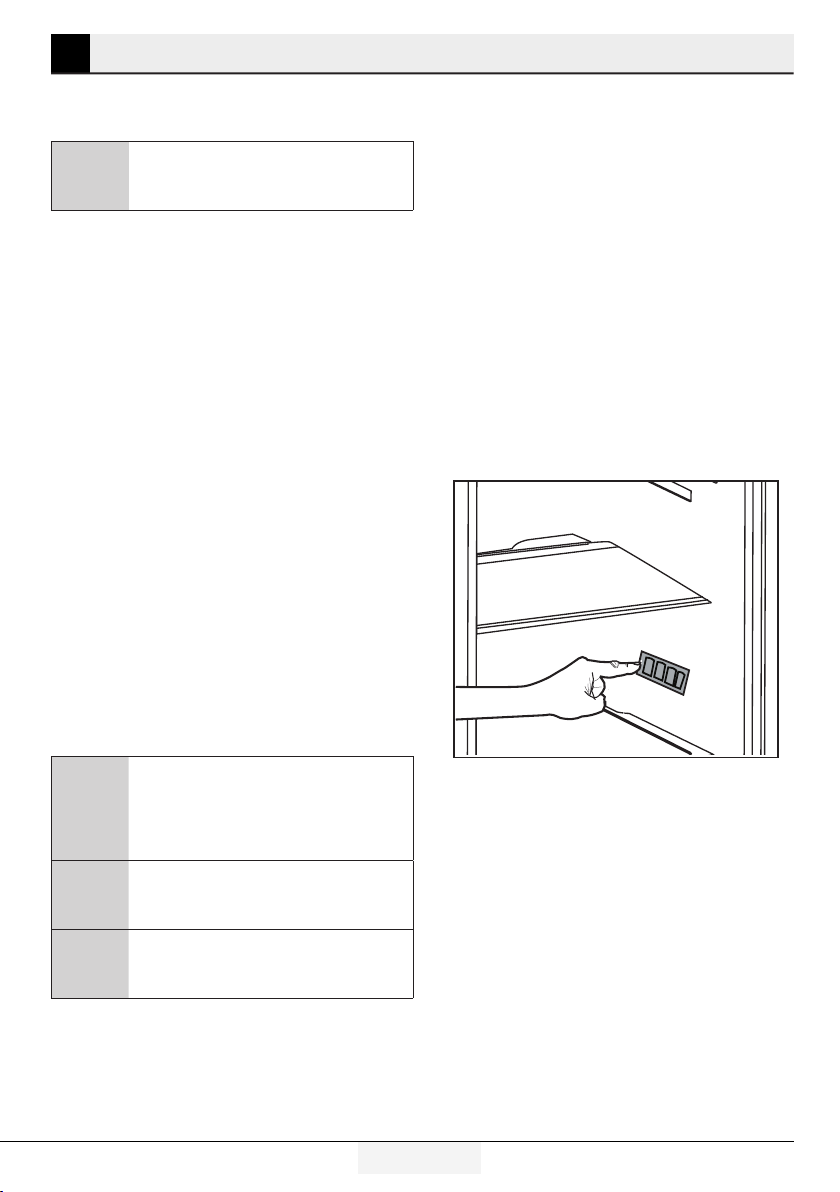
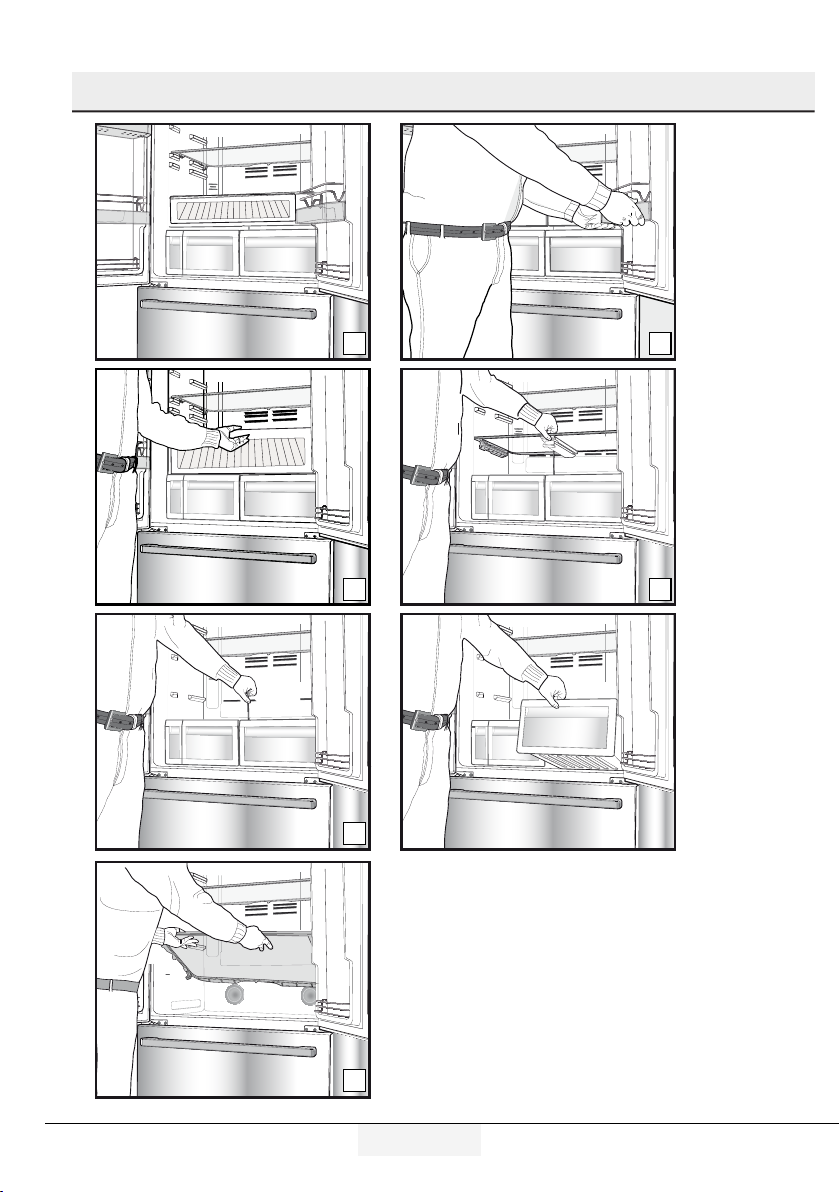
5.12. Description and cleaning of
odor filter
Odor filter prevents unpleasant odor build-up in
your product.
1. Pull the cover into which the odor filter is
installed downwards from the front section
and remove as illustrated.
2. Leave the filter under sunlight for one day.
Filter will be cleaned during this time.
3. Install the filter back to its place.
Odor filter must be cleaned once in a
C
year.
5.13. Snack compartment
It is used for storing food such as fish, red
meat, chicken meat, and dairy products such
as cheese, yoghurt and milk that need to be
kept a few degrees cooler than the fridge
compartment.
It is not recommended to place
fruit and vegetables in the snack
C
You can increase the inner volume of your
product by removing the snack compartment:
1. Pull the compartment towards yourself until it
rests and stops against the stopper.
2. Lift the front section and pull towards yourself
to remove the compartment from its seating.
compartment. Especially tomatoes,
eggplants, zucchinis, cucumbers and
lemons are sensitive to the cold. They
should not be stored in the snack
compartment.
Refrigerator/ User manual
21 /36EN
Page 23

Using your appliance
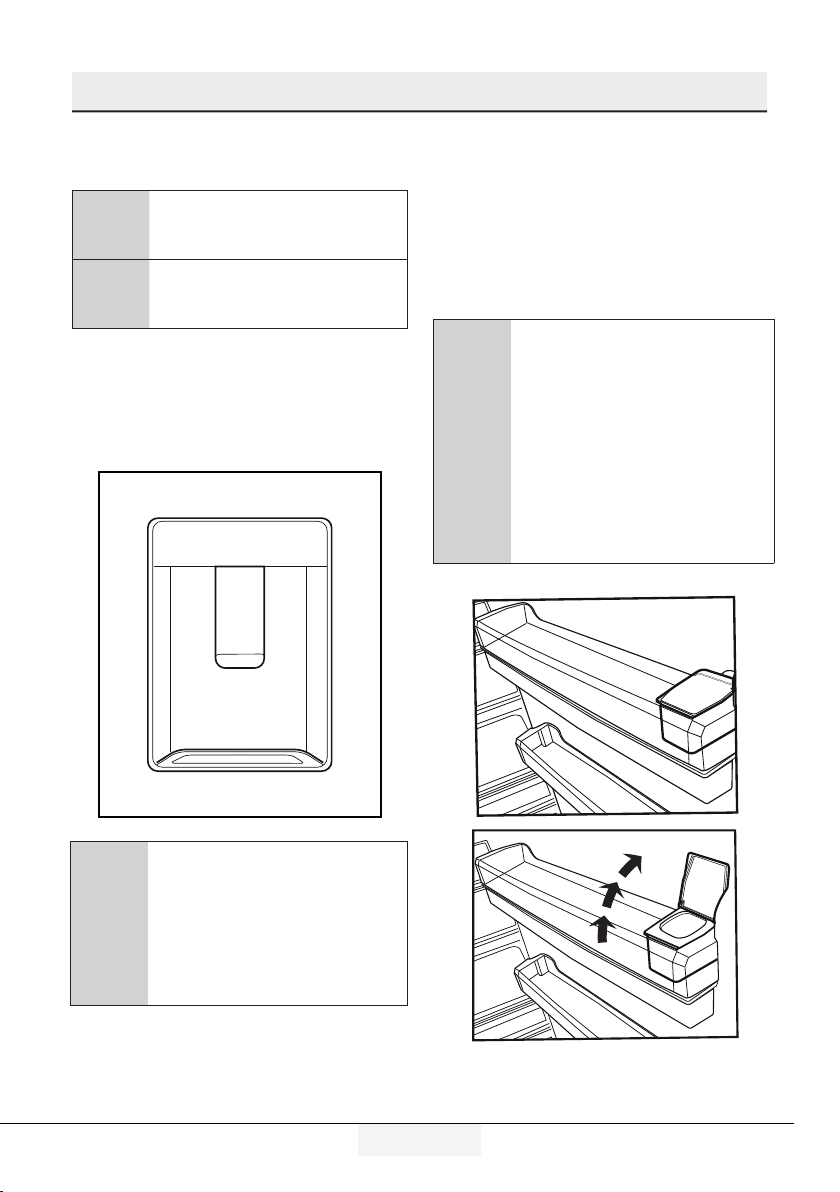
5.14. Sliding storage container
5.15. Rotary storage container
*optional
This accessory is designed to increase the
usable volume of the door shelves. It allows
you to easily place the tall bottles, jars and tins
to the lower bottle shelf thanks to its ability to
move right or left.
*optional
Rotary storage container can also be moved
to right or left. In this way, long bottles, jars or
boxes can be placed easily in the bottom shelf
(Fig. 1).
You can reach the food that you have placed into
the shelf by grabbing and turning it from its right
edge (Fig.2).
When you want to load or remove it to clean,
turn it by 90 degrees, raise it up and pull
towards yourself (Fig. 3-4).
1
2
22 /36EN
3
4
Refrigerator/ User manual
Page 24
Using your appliance
1 2
3 4
Refrigerator/ User manual
5
5.16. Crisper
Crisper of the product is designed specially to keep
the vegetables fresh without loosing their humidity.
For this purpose, cool air circulation is intensified
around the crisper in general. Remove the door
shelves that stand against the crisper before
removing the crispers.
7
23 /36EN
6
Page 25
Using your appliance
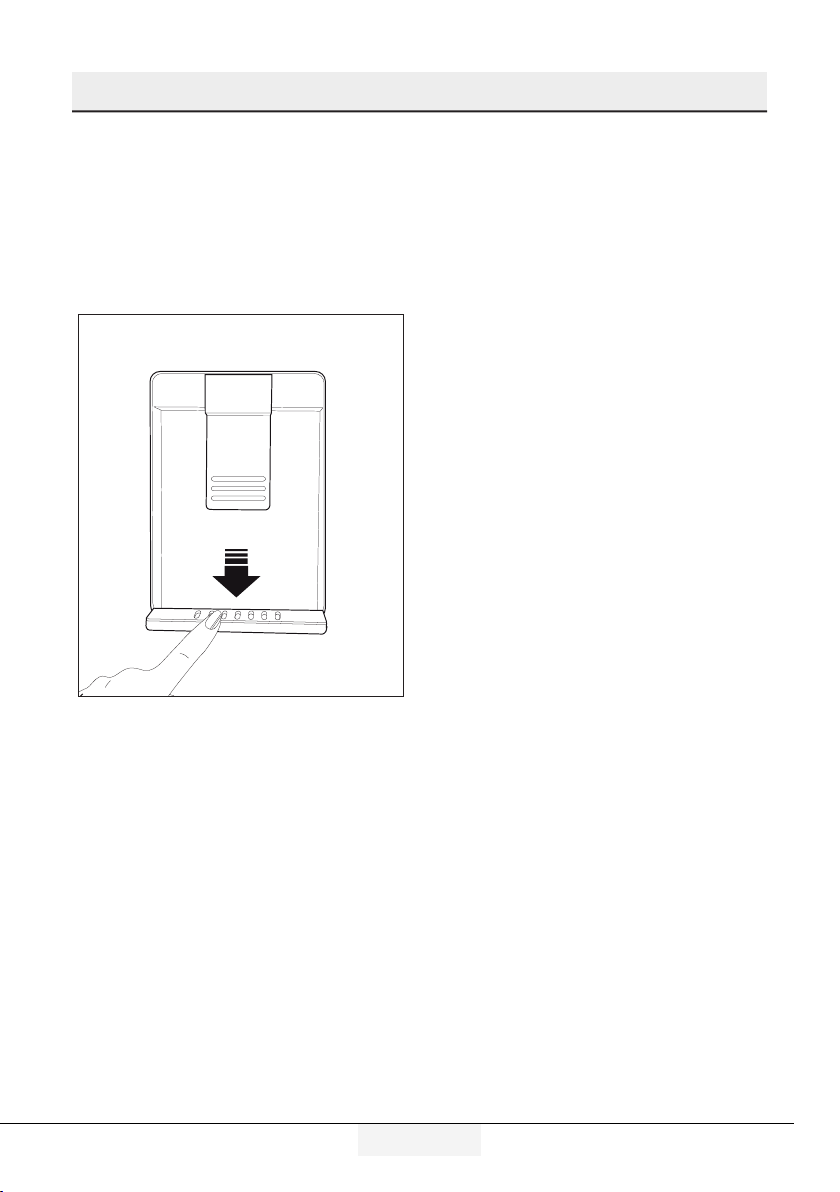
5.17. Using the water dispenser
*optional
It is normal for the first few glasses of
water taken from the dispenser to be
C
C
1. Push in the lever of the water dispenser with
your glass. If you are using a soft plastic cup,
pushing the lever with your hand will be easier.
2. After filling the cup up to the level you want,
release the lever.
warm.
If the water dispenser is not used for a
long period of time, dispose of first few
glasses of water to obtain fresh water.
5.18. Filling the water dispenser's
tank
Water tank filling reservoir is located inside the
door rack.
1. Open the cover of the tank.
2. Fill the tank with fresh drinking water.
3. Close the cover.
Do not fill the water tank with any
other liquid except for water such as
C
fruit juices, carbonated beverages or
alcoholic drinks which are not suitable
to use in the water dispenser. Water
dispenser will be irreparably damaged
if these kinds of liquids are used.
Warranty does not cover such usages.
Some chemical substances and
additives contained in these kinds of
drinks/liquids may damage the water
tank.
C
Please note, how much water flows
from the dispenser depends on how far
you depress the lever. As the level of
water in your cup / glass rises, gently
reduce the amount of pressure on the
lever to avoid overflow. If you slightly
press the arm, the water will drip; this
is quite normal and not a failure.
24 /36EN
Refrigerator/ User manual
Page 26
Using your appliance
Use clean drinking water only.
C
Capacity of the water tank is 3 liters;
C
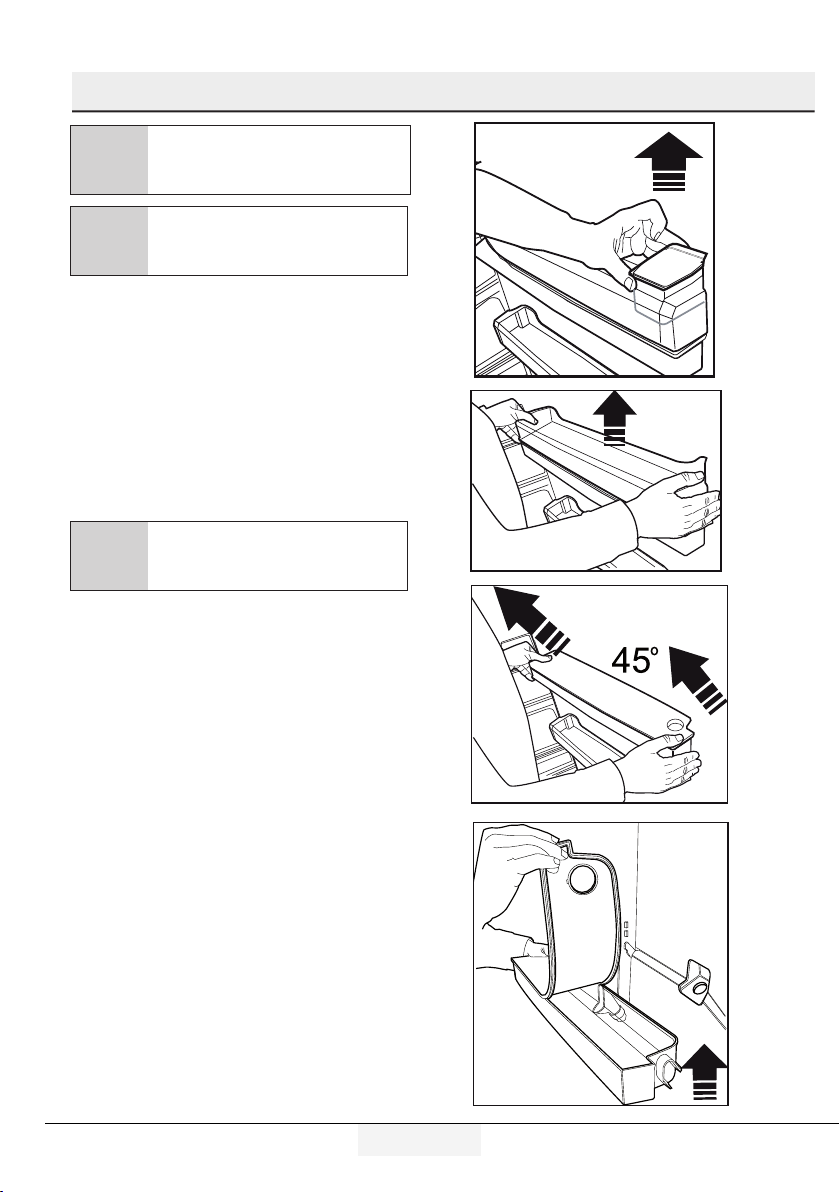
5.19. Cleaning the water tank
1. Remove the water filling reservoir inside the
door rack.
2. Remove the door rack by holding from both
sides.
3. Grab the water tank from both sides and
remove it with an angle of 45°C.
4. Remove the cover of the water tank and
clean the tank.
C
do not overfill.
Components of the water tank and
water dispenser should not be washed
in dishwasher.
Refrigerator/ User manual
25 /36EN
Page 27
Using your appliance
5.20. Drip tray
Water that dripped while using the water
dispenser accumulates in the spillage tray.
Remove the plastic filter as shown in the
figure.
With a clean and dry cloth, remove the water
that has accumulated.
5.21. Humidity-controlled crisper
(Ever Fresh)
*optional
Humidity rates of the vegetables and fruit
are kept under control with the feature of
humidity-controlled crisper and the food is
ensured to stay fresh for longer.
reasonable period of time without needing to
leave them inside their bags. In case contacting with other vegetables is not preferred for
hygiene concerns, use a perforated paper,
foam and other similar packaging materials
instead of a bag.
While the vegetables are being placed, specific
gravity of the vegetables should be taken into
consideration. Heavy and hard vegetables
should be put at the bottom of the crisper and
the lightweight and soft vegetables should be
placed over.
Do not place together the pear, apricot, peach,
etc. and apple in particular which have a high
level of generation of ethylene gas in the same
crisper with the other vegetables and fruit. The
ethylene gas which is emitted by these fruit
may cause the other fruit to ripen faster and
decompose in a shorter time.
Do not take the crisper main body out of the
refrigerator apart from the drawers unless you
have to, and call for technical service if necessary. Before removing the crisper main body
from its place, wipe and clean it with a wet
piece of cloth.
Never leave the vegetables inside the crisper
in their bags. If the vegetables are left inside
their bags, this will cause them to decompose
in a short period of time. When a high level
of humidity is set, your vegetables keep their
humidity content and can be preserved for a
26 /36EN
Refrigerator/ User manual
Page 28
Using your appliance
7
6
5
9
10
8
20
17
18
2
1
4
16
15
12
14
3
13
21
11
19
3”
1. Freezer compartment temperature setting in-
dicator
2. Freezer compartment temperature setting func-
tion
3. Quick freeze function button icematic on-off
button (3") function
4. Quick freeze function indicator
5. Fridge compartment temperature setting indi-
cator
6. Fridge compartment temperature setting func-
tion
7. Quick fridge function button
8. Eco-Fuzzy (special economic usage) function
9. Eco-Fuzzy (special economic usage) indicator
10. Vacation function
11. Vacation function indicator
*Optional: Figures in this user manual are given as an example and may not match the product
exactly. If the relevant parts are not available in the product you purchased, the figure applies to other
C
Refrigerator/ User manual
models.
12. Alarm off warning function
13. Energy saving indicator
14. Key lock function
15. Key lock indicator
16. Power failure / High temperature / error war-
ning indicator
17. Quick bottle cooling/quick ice making selection
function (Rapid Cooler)
18. Quick bottle cooling/quick ice making functi-
on indicator
19. Quick bottle cooling indicator (Rapid Cooler)
20. Quick cooling indicator
21. Quick ice making indicator
*optional
27 /36EN
Page 29

Using your appliance
1.Freezer compartment temperature indica-
tor
Indicates the temperature set for the Freezer
Compartment.
2.Freezer compartment temperature setting
function
Allows you to set the temperature of the
freezer compartment. Press this button to set
the temperature of the freezer compartment
to -18, -19, -20, -21 -22, -23 and -24,
respectively.
3.Quick freeze function button icematic on-
off button (3") function
Quick freeze indicator is illuminated when the quick freeze function is active. To cancel this function,
press the quick freeze button again. Quick freeze
indicator will turn off and return to its normal settings. If you do not cancel it, the quick freeze will
cancel itself automatically after 4 hours or when
the freezer compartment reaches the required
temperature. If you want to freeze large amounts
of fresh food, press the quick freeze button before putting the food into the freezer compartment. If
you press the quick freeze button repeatedly with
short intervals, the electronic circuit protection will
be activated and the compressor will not start up
immediately. This function is not recalled when power restores after a power failure!
4.Quick freeze function indicator
This symbol flashes in an animated style when
the quick freeze function is active.
5.Fridge compartment temperature setting
indicator
Indicates the temperature set for the fridge
compartment.
6.Fridge compartment temperature setting
function
Allows you to set the fridge compartment’s
temperature. Press this button to set the
temperature of the fridge compartment to 8, 7,
6, 5, 4, 3, 2 degrees, respectively.
7.Quick fridge function button
When you press the quick fridge button,
the temperature of the compartment will be
colder than the adjusted values. This function
can be used for food required to be cooled
down rapidly in the fridge compartment. If you
want to cool large amounts of fresh food, it is
recommended to activate this function before
putting the food into the fridge. Quick fridge
indicator is illuminated when the quick fridge
function is active. To cancel this function,
press the quick fridge button again. The quick
fridge indicator will turn off and the unit will
return to its normal settings. If you do not
cancel it, the quick fridge function will cancel
itself automatically after 2 hours or when the
fridge compartment reaches the required
temperature.
This function is not recalled when power
restores after a power failure.
8.Eco-Fuzzy (special economic usage) function
When you press the eco-fuzzy button, the eco
fuzzy function will be activated and the ecofuzzy indicator will illuminate. The refrigerator
will start operating in the most economic mode
at least 6 hours later and the economic usage
indicator will turn on when the function is
active. To deactivate the eco-fuzzy function, You
need to press the eco-fuzzy button again.
9.Eco-Fuzzy (special economic usage) indicator
This symbol illuminates when the eco-fuzzy
function is active.
10.Vacation function
If you press and hold the eco fuzzy button for 3
seconds, the vacation function will be activated
and the vacation indicator will illuminate. The
28 /36EN
Refrigerator/ User manual
Page 30

Using your appliance
cooling of the fridge compartment is stopped
and the temperature of the fridge compartment
is fixed to 15 degrees to prevent bad odors.
When this function is active, the fridge
compartment temperature indicator will not
display the temperature.
To deactivate the vacation function, press and
hold the Eco-fuzzy button for 3 seconds.
11. Vacation function indicator
This indicator illuminates when the vacation
function is active.
12.Alarm off warning function
In case of power failure/high temperature
alarm, after checking the foods in the freezer
compartment, press the alarm off button to
clear the warning.
13.Energy saving function (display off) indi-
cator
If the product doors are kept closed for a
long time, the energy saving function is
automatically activated and the energy saving
symbol is illuminated. When the energy saving
function is activated, all symbols on the display
will turn off except for the energy saving
symbol. When the energy saving function is
activated, if any button is pressed or the door
is opened, energy saving function will be
canceled and the symbols on display will return
to normal.
Energy saving function is activated during
delivery from factory and cannot be canceled.
14.Key lock function
When you press and hold the key lock button
for 3 seconds, the key lock function will
be activated and the key lock indicator will
illuminate. No button will operate when this
function is active. Press and hold the key lock
button for 3 seconds again to deactivate this
function.
15.Key lock indicator
This indicator will illuminate when the key lock
function is active.
16.Power failure / High temperature / error
warning indicator
This indicator illuminates during power
failure, high temperature failures and error
warnings. During long-term power failures,
the highest temperature value that the freezer
compartment reaches will blink on the digital
display. After checking the food located in
the freezer compartment, press the alarm off
button to clear the warning.
Please refer to "solutions recommended for
troubleshooting" section on your manual if you
observe that this indicator is illuminated.
17.Quick bottle cooling/quick ice making selection function
When the quick bottle cooling/quick ice making
function button is pressed and held for 3
seconds, the quick bottle cooling/quick ice
making selection indicator will flash.
If this button is not pressed again in 30
seconds, display will return to its previous
view, the quick bottle cooling and quick ice
making selection indicators will turn off. Every
time you briefly press the quick bottle cooling/
quick ice making button, the number on the
quick bottle cooling/quick ice making indicator
will increase by one. If "1" is displayed, this
means that the quick bottle cooling function
can be activated and if "2" is displayed, the
quick ice making function can be activated. If
you press and hold the quick bottle cooling/
quick ice making button again for 3 seconds
when "1" is displayed, the quick bottle cooling
function will be activated and the quick bottle
cooling indicator will be illuminated. "1" lights
continuously and the icons on the left light as
animations. If you press and hold the quick
Refrigerator/ User manual
29 /36EN
Page 31

Using your appliance
bottle cooling/quick ice making button again
for 3 seconds when "2" is displayed, the
quick ice making function will be activated
and the quick ice making indicator will be
illuminated. "2" lights continuously and the
icons on the left light as animations. The
icons will turn off when the process for the
selected function is completed.
If you want to end the audio warning, just
briefly press the quick bottle cooling/quick ice
making function button. If you briefly press
the quick bottle cooling/quick ice making
button when the function is still active, no
change will be observed on the display. If
a power cut occurs and then the power is
resumed again when the quick bottle cooling/
quick ice making function is active, the quick
bottle cooling process will resume.
18.Quick bottle cooling/quick ice making
function indicator
Displays the set function. If "1" is displayed,
this means that the quick bottle cooling
function will be or has been selected and if
"2" is displayed, this means that the quick ice
making function will be or has been selected.
19.Quick bottle cooling indicator
Displays the quick bottle cooling function.
20.Quick fridge button
This symbol flashes in an animated style when
the quick fridge function is active.
21.Quick ice making indicator
Displays the quick ice making function
30 /36EN
Refrigerator/ User manual
Page 32

Using your appliance
5.22. Quick bottle cooling/quick
ice making compartment
(Rapid Cooler)
(This feature is optional)
You can use the quick bottle cooling
compartment for making ice or cooling your
beverages quickly.
This closed compartment, which is located at
the lower left part in the fridge compartment,
is cooled with the help of a separate fan and
cooler surface.
After placing the icebox or the beverage you
want to cool in this compartment, you can
initiate the quick fridge function by pressing the
relevant buttons on the indicator.
When the cooling is done, the "="
symbol on the indicator disappe-
C
C
Refrigerator/ User manual
ars. After the process ends, remove the beverage or the ice you have
placed in the compartment. If you
want to cool them further, you can
activate the same function again
while your beverage or icebox is inside the compartment.
If you see "0" warning message on
the display when you want to activate the quick bottle cooling function, wait for a while. This warning
message may appear when you
have used the compartment 4 times at frequent intervals. When
you see this message, your refrigerator will not allow the compartment to be used for a while in order to deliver the best cooling performance and maintain the storage temperature of the food. When
the inner temperatures of the refrigerator are balanced, the compartment will be ready to be used again. Please try again later.
31 /36EN
C
C
C
If you see "0" warning message
on the display when you want to
activate the ice making function,
wait for a while. This warning
message may appear when you
have used the compartment
2 times at frequent intervals.
When you see this message,
your refrigerator will not allow
the compartment to be used for
a while in order to deliver the
best cooling performance and
maintain the storage temperature
of the food. When the inner
temperatures of the refrigerator
are balanced, the compartment
will be ready to be used again.
Please try again later.
Do not place any other material in
this compartment other than beverages and the supplied icebox.
Make sure that the caps of the beverages you are going to put in the
compartment are closed.
Before activating the function,
ensure that the door of the
compartment is completely closed.
This compartment has been
designed to cool 1.5 liters of
water at 20°C down to 10°C in
15 minutes. If you think that the
beverage you are going to remove
from the compartment is not cold
enough, you can activate the
compartment again.
Page 33

Using your appliance
Do not leave a cold beverage inside the compartment for your own
C
hygiene and safety. Keeping your
fizzy drinks in the compartment for
a long time may lead to risks such
as cracking etc.
When the ice making function is
over, the ice in the icebox may melt
as the compartment will return to
fresh food storing temperatures.
Do not leave frozen ice in the compartment.
When this compartment is activated, the fan in the compartment will
operate at the highest speed in order to deliver the best cooling performance in the shortest period of
time. For this reason, the sound
that will arise when the compartment is operating is normal.
32 /36EN
Refrigerator/ User manual
Page 34

6 Maintenance and cleaning
Cleaning the product regularly will prolong its
service life.
WARNING: Disconnect the power before
B
• Do not use sharp and abrasive tools, soap,
• Melt a teaspoonful of carbonate in the water.
• Take care to keep water away from the lamp’s
• Clean the door using a wet cloth. Remove all
• Do not use chloric water or cleaning products
• Do not use sharp, abrasive tools, soap,
cleaning the refrigerator.
house cleaning materials, detergents, gas,
gasoline, varnish and similar substances for
cleaning.
Moisten a piece of cloth in the water and wring
out. Wipe the device with this cloth and dry off
thoroughly.
cover and other electrical parts.
items inside to detach the door and chassis
shelves. Lift the door shelves up to detach.
Clean and dry the shelves, then attach back in
place by sliding from above.
on the exterior surface and chrome-coated
parts of the product. Chlorine will cause rust on
such metallic surfaces.
household cleaning agents, detergents,
kerosene, fuel oil, varnish etc. to prevent
removal and deformation of the prints on the
plastic part. Use lukewarm water and a soft
cloth for cleaning and then wipe it dry.
6.1. Preventing malodour
The product is manufactured free of any
odorous materials. However, keeping the food in
inappropriate sections and improper cleaning of
internal surfaces may lead to malodour.
To avoid this, clean the inside with carbonated
water every 15 days.
• Keep the foods in sealed holders.
Microorganisms may spread out of unsealed
food items and cause malodour.
• Do not keep expired and spoilt foods in the
refrigerator.
6.2. Protecting plastic surfaces
Oil spilled on plastic surfaces may damage the
surface and must be cleaned immediately with
warm water.
Refrigerator / User manual
33 /36EN
Page 35

7 Troubleshooting
Please review this list before calling the service. It will save your time and money. This list includes
frequent complaints that are not arising from defective workmanship or material usage. Some of the
features described here may not exist in your product.
The refrigerator does not operate.
• Theplugisnotinsertedintothesocketcorrectly.>>>Inserttheplugintothe
socketsecurely.
• Thefuseofthesocketwhichyourrefrigeratorisconnectedtoorthemainfuse
haveblownout.>>>Checkthefuse.
Condensation on the side wall of the fridge compartment (MULTIZONE, COOL CONTROL and
FLEXI ZONE).
• Doorhasbeenopenedfrequently.>>>Donotopenandclosethedoorof
refrigeratorfrequently.
• Ambientisveryhumid.>>>Donotinstallyourrefrigeratorintohighlyhumid
places.
• Foodcontainingliquidisstoredinopencontainers.>>>Donotstorefoodwith
liquidcontentinopencontainers.
• Dooroftherefrigeratorisleftajar.>>>Closethedooroftherefrigerator.
• Thermostatissettoaverycoldlevel.>>>Setthethermostattoasuitablelevel.
• Compressorisnotrunning
• Protectivethermicofthecompressorwillblowoutduringsuddenpower
failuresorplug-outplug-insastherefrigerantpressureinthecoolingsystem
oftherefrigeratorhasnotbeenbalancedyet.Therefrigeratorwillstartrunning
approximatelyafter6minutes.Pleasecalltheserviceiftherefrigeratordoesnot
startupattheendofthisperiod.
• Thefridgeisindefrostcycle.>>>Thisisnormalforafull-automaticallydefrosting
refrigerator.Defrostingcycleoccursperiodically.
• Therefrigeratorisnotpluggedintothesocket.>>>Makesurethattheplugisfit
intothesocket.
• Temperaturesettingsarenotmadecorrectly.>>>Selectthesuitabletemperature
value.
• Thereisapoweroutage.>>>Refrigeratorreturnstonormaloperationwhenthe
powerrestores.
The operation noise increases when the refrigerator is running.
• Theoperatingperformanceoftherefrigeratormaychangeduetothechangesin
theambienttemperature.Itisnormalandnotafault.
The refrigerator is running frequently or for a long time.
34 /36EN
Refrigerator / User manual
Page 36

Troubleshooting
• Newproductmaybewiderthanthepreviousone.Largerrefrigeratorsoperate
foralongerperiodoftime.
• Theroomtemperaturemaybehigh.>>>Itisnormalthattheproductoperates
forlongerperiodsinhotambient.
• Therefrigeratormightbepluggedinrecentlyormightbeloadedwithfood.
>>>Whentherefrigeratorispluggedinorloadedwithfoodrecently,itwilltake
longerforittoattainthesettemperature.Thisisnormal.
• Largeamountsofhotfoodmightbeputintherefrigeratorrecently.>>>Donot
puthotfoodintotherefrigerator.
• Doorsmightbeopenedfrequentlyorleftajarforalongtime.>>>Thewarmair
thathasenteredintotherefrigeratorcausestherefrigeratortorunforlonger
periods.Donotopenthedoorsfrequently.
• Freezerorfridgecompartmentdoormightbeleftajar.>>>Checkifthedoorsare
closedcompletely.
• Therefrigeratorisadjustedtoaverylowtemperature.>>>Adjusttherefrigerator
temperaturetoawarmerdegreeandwaituntilthetemperatureisachieved.
• Doorsealofthefridgeorfreezermaybesoiled,wornout,brokenornot
properlyseated.>>>Cleanorreplacetheseal.Damaged/brokensealcauses
therefrigeratortorunforalongerperiodoftimeinordertomaintainthecurrent
temperature.
Freezer temperature is very low while the fridge temperature is sufficient.
• Thefreezertemperatureisadjustedtoaverylowvalue.>>>Adjustthefreezer
temperaturetoawarmerdegreeandcheck.
Fridge temperature is very low while the freezer temperature is sufficient.
• Thefridgetemperatureisadjustedtoaverylowvalue.>>>Adjustthefridge
temperaturetoawarmerdegreeandcheck.
Food kept in the fridge compartment drawers is frozen.
• Thefridgetemperatureisadjustedtoaveryhighvalue.>>>Adjustthefridge
temperaturetoalowervalueandcheck.
Temperature in the fridge or freezer is very high.
• Thefridgetemperatureisadjustedtoaveryhighvalue.>>>Fridgecompartment
temperaturesettinghasaneffectonthetemperatureofthefreezer.Changethe
temperaturesofthefridgeorfreezerandwaituntiltherelevantcompartments
attainasufficienttemperature.
• Doorsareopenedfrequentlyorleftajarforalongtime.>>>Donotopenthe
doorsfrequently.
• Doorisajar.>>>Closethedoorcompletely.
• Therefrigeratorispluggedinorloadedwithfoodrecently.>>>Thisisnormal.
Whentherefrigeratorispluggedinorloadedwithfoodrecently,itwilltakelonger
forittoattainthesettemperature.
• Largeamountsofhotfoodmightbeputintherefrigeratorrecently.>>>Donot
puthotfoodintotherefrigerator.
Refrigerator / User manual
35 /36EN
Page 37

Troubleshooting
www.beko.com.tr
www.beko.com
• Vibrationsornoise.
• Thefloorisnotlevelorstable.>>>Iftherefrigeratorrockswhenmovedslowly,
balanceitbyadjustingitsfeet.Alsomakesurethatthefloorisstrongenoughto
carrytherefrigerator,andlevel.
• Theitemsputontotherefrigeratormaycausenoise.>>>Removetheitemson
topoftherefrigerator.
There are noises coming from the refrigerator like liquid flowing, spraying, etc.
• Liquidandgasflowsoccurinaccordancewiththeoperatingprinciplesofyour
refrigerator.Itisnormalandnotafault.
Whistle comes from the refrigerator.
• Fansareusedinordertocooltherefrigerator.Itisnormalandnotafault.
Condensation on the inner walls of refrigerator.
• Hotandhumidweatherincreasesicingandcondensation.Itisnormalandnota
fault.
• Doorsareopenedfrequentlyorleftajarforalongtime.>>>Donotopenthe
doorsfrequently.Closethemiftheyareopen.
• Doorisajar.>>>Closethedoorcompletely.
Humidity occurs on the outside of the refrigerator or between the doors.
• Theremightbehumidityintheair;thisisquitenormalinhumidweather.When
thehumidityisless,condensationwilldisappear.
Bad odour inside the refrigerator.
• Noregularcleaningisperformed.>>>Cleantheinsideoftherefrigeratorregularly
withasponge,lukewarmwaterorcarbonatedissolvedinwater.
• Somecontainersorpackagematerialsmaycausethesmell.>>>Useadifferent
containerordifferentbrandpackagingmaterial.
• Foodisputintotherefrigeratorinuncoveredcontainers.>>>Keepthefoodin
closedcontainers.Microorganismsspreadingoutfromuncoveredcontainers
cancauseunpleasantodours.
• Removethefoodsthathaveexpiredbestbeforedatesandspoiledfromthe
refrigerator.
The door is not closing.
• Foodpackagesarepreventingthedoorfromclosing.>>>Replacethepackages
thatareobstructingthedoor.
• Therefrigeratorisnotcompletelyevenonthefloor.>>>Adjustthefeetto
balancetherefrigerator.
• Thefloorisnotlevelorstrong.>>>Makesurethatthefloorislevelandcapable
tocarrytherefrigerator.
Crispers are stuck.
• Thefoodistouchingtheceilingofthedrawer.>>>Rearrangefoodinthedrawer.
36 /36EN
Refrigerator / User manual
Page 38

Gefrierschrank
Bedienungsanleitung
EWWERQWEW
DE
Page 39

Bitte lesen Sie zuerst diese Anleitung!
Liebe Kundin, lieber Kunde,
Wir möchten, dass Sie optimale Effizienz von unserem Produkt erhalten, das in modernen Einrichtungen
mit sorgfältigen Qualitätskontrollen hergestellt wurde.
Bitte lesen Sie die Bedienungsanleitung zu diesem Zweck vor Benutzung des Produktes vollständig und
bewahren Sie sie zum Nachschlagen auf. Falls Sie das Produkt an eine andere Person weitergeben,
händigen Sie bitte auch diese Anleitung aus.
Die Bedienungsanleitung gewährleistet die schnelle und sichere Benutzung des Produktes.
• Bitte lesen Sie die Bedienungsanleitung, bevor Sie das Produkt aufstellen und bedienen.
• Halten Sie stets die zutreffenden Sicherheitshinweise ein.
• Bewahren Sie die Bedienungsanleitung zum künftigen Nachschlagen an einem leicht zugänglichen Ort
auf.
• Bitte lesen Sie alle anderen mit dem Produkt bereitgestellten Dokumente.
Beachten Sie, dass diese Bedienungsanleitung auf verschiedene Produktmodelle zutreffen kann. Die
Anleitung zeigt jegliche Abweichungen unterschiedener Modelle deutlich an.
Symbole und Anmerkungen
In der Bedienungsanleitung verwenden wir folgende Symbole:
Wichtige Informationen und nützlic-
C
he Tipps.
A
B
Gefahr für Leib und Eigentum.
Stromschlaggefahr.
Die Produktverpackung
besteht gemäß nationalen Umweltgesetzen aus
recyclingfähigen Materialien.
Page 40

Inhalt
1 Hinweise zu Sicherheit und Umwelt 4
1.1. Allgemeine Sicherheitshinweise . . . . . . . . . 4
1.2. Bestimmungsgemäßer Einsatz . . . . . . . . . . 7
1.3. Sicherheit von Kindern . . . . . . . . . . . . . . . . 8
1.4. Einhaltung von WEEE-Vorgaben und
Altgeräteentsorgung. . . . . . . . . . . . . . . . . . 8
1.5. Einhaltung von RoHS-Vorgaben . . . . . . . . . 8
1.6. Hinweise zur Verpackung . . . . . . . . . . . . . . 8
2 Ihr neues Gerät 9
3 Installation 10
3.1. Der richtige Aufstellungsort. . . . . . . . . . . . 10
3.2. Kunststoffkeile anbringen. . . . . . . . . . . . . 11
3.3. Elektrischer Anschluss . . . . . . . . . . . . . . . 11
3.4. Füße einstellen . . . . . . . . . . . . . . . . . . . . 11
3.5. Beleuchtung . . . . . . . . . . . . . . . . . . . . . . 12
3.6. Tür-offen-Warnung. . . . . . . . . . . . . . . . . . 12
3.7. Gerät transportieren. . . . . . . . . . . . . . . . . 12
4 Vorbereitungen 13
4.1. Tipps zum Energiesparen. . . . . . . . . . . . . 13
4.2. Empfehlungen zum Kühlbereich . . . . . . . . 13
4.3. Erste Inbetriebnahme. . . . . . . . . . . . . . . . 13
4 Vorbereitungen 14
5 Nutzung des Geräts 15
5.1. Anzeigefeld . . . . . . . . . . . . . . . . . . . . . . . 15
5.2. Doppeltes Kühlsystem . . . . . . . . . . . . . . 20
5.3. Frische Lebensmittel einfrieren . . . . . . . . 20
5.4. Empfehlungen zum richtigen Einfrieren 21
5.5. Lebensmittel richtig platzieren . . . . . . . . . 21
5.6. Hinweise zum Einfrieren. . . . . . . . . . . . . . 21
5.7. Eisbereiter. . . . . . . . . . . . . . . . . . . . . . . . 22
5.8. Eisbereiter. . . . . . . . . . . . . . . . . . . . . . . . 23
5.9. Eisbehälter . . . . . . . . . . . . . . . . . . . . . . . 24
5.10. Abtauen . . . . . . . . . . . . . . . . . . . . . . . . . 24
5.11. Blaues Licht. . . . . . . . . . . . . . . . . . . . . . . 24
5.12. Eierhalter. . . . . . . . . . . . . . . . . . . . . . . . . 24
5.13. Beschreibung und Hinweise zur Reinigung
des Geruchsfilters . . . . . . . . . . . . . . . . . . 25
5.14. Snack-Fach . . . . . . . . . . . . . . . . . . . . . . 25
5.15. Verschiebbarer Vorratsbehälter . . . . . . . . 25
5.16. Drehbarer Behälter . . . . . . . . . . . . . . . . . 26
5.17. Gemüsefach. . . . . . . . . . . . . . . . . . . . . . 27
5.18. So benutzen Sie den Wasserspender . . . . 28
5.19. Wasserspendertank füllen . . . . . . . . . . . . 28
5.20. Wassertank reinigen . . . . . . . . . . . . . . . . 29
5.21. Tropfschale. . . . . . . . . . . . . . . . . . . . . . . 30
5.22. Gemüsefach mit Feuchtigkeitsregelung
(ImmerFrisch) . . . . . . . . . . . . . . . . . . . . . 30
Kühlschrank/Bedienungsanleitung
6 Pflege und Reinigung 31
6.1. Vermeidung von schlechtem Geruch. . . . . 31
6.2. Schutz von Kunststoffoberflächen . . . . . . 31
7 Problemlösung 32
3 /40 DE
Page 41

1 Hinweise zu Sicherheit und Umwelt
Dieser Abschnitt bietet die zur
Vermeidung von Verletzungen und
Materialschäden erforderlichen
Sicherheitsanweisungen.
Bei Nichtbeachtung dieser
Anweisungen erlöschen jegliche
Garantieansprüche.
1.1. Allgemeine
Sicherheitshinweise
• Dieses Produkt darf nicht von
Personen mit körperlichen,
sensorischen oder mentalen
Einschränkungen, einem
Mangel an Erfahrung und
Wissen oder von Kindern
verwendet werden. Das Gerät
darf nur dann von solchen
Personen benutzt werden,
wenn diese von einer für ihre
Sicherheit verantwortlichen
Person beaufsichtigt werden
oder angeleitet wurden. Kinder
dürfen nicht mit diesem Gerät
spielen.
• Ziehen Sie bei Fehlfunktionen
den Netzstecker des Gerätes.
• Warten Sie nach Ziehen des
Netzsteckers mindestens 5
Minuten, bevor Sie ihn wieder
anschließen.
• Ziehen Sie den Netzstecker,
wenn Sie das Gerät nicht
nutzen.
• Berühren Sie den Netzstecker
niemals mit feuchten oder
gar nassen Händen. Ziehen
Sie beim Trennen niemals am
Kabel, greifen Sie immer am
Stecker.
• Wischen Sie den Netzstecker
vor dem Einstecken mit einem
trockenen Tuch ab.
• Schließen Sie den Kühlschrank
nicht an lose Steckdosen an.
• Das Gerät muss bei
Aufstellung, Wartungsarbeiten,
Reinigung und bei Reparaturen
vollständig vom Stromnetz
getrennt werden.
• Falls das Produkt längere Zeit
nicht benutzt wird, ziehen Sie
den Netzstecker und nehmen
Sie sämtliche Lebensmittel aus
dem Kühlschrank.
• Verwenden Sie das Produkt
nicht, wenn das Fach mit
Leiterplatten im unteren
4 /40 DE
Kühlschrank/Bedienungsanleitung
Page 42

1 Hinweise zu Sicherheit und Umwelt
hinteren Bereich des Gerätes
(Abdeckung des Fachs mit der
elektrischen Karte) (1) geöffnet
ist.
1
1
• Benutzen Sie keine
Dampfreiniger oder ähnlichen
Gerätschaften zum Reinigen
oder Abtauen Ihres Gerätes.
Der Dampf kann in Bereiche
eindringen, die unter Spannung
stehen. Kurzschlüsse oder
Stromschläge können die Folge
sein!
• Lassen Sie niemals Wasser
direkt auf das Gerät gelangen;
auch nicht zum Reinigen! Es
besteht Stromschlaggefahr!
• Verwenden Sie das Produkt
bei Fehlfunktionen nicht; es
besteht Stromschlaggefahr!
Wenden Sie sich als erstes an
den autorisierten Kundendienst.
• Stecken Sie den Netzstecker
des Gerätes in eine geerdete
Steckdose. Die Erdung muss
durch einen qualifizierten
Elektriker vorgenommen
werden.
• Falls das Gerät über eine LED-
Beleuchtung verfügt, wenden
Sie sich zum Auswechseln
sowie im Falle von Problemen
an den autorisierten
Kundendienst.
• Berühren Sie gefrorene
Lebensmittel nicht mit feuchten
Händen! Sie können an Ihren
Händen festfrieren!
• Geben Sie keine Flüssigkeiten
in Flaschen oder Dosen in den
Tiefkühlbereich. Sie können
platzen!
• Geben Sie Flüssigkeiten in
aufrechter Position in den
Kühlschrank; zuvor den Deckel
sicher verschließen.
Kühlschrank/Bedienungsanleitung
5 /40 DE
Page 43

1 Hinweise zu Sicherheit und Umwelt
• Sprühen Sie keine
entflammbaren Substanzen in
die Nähe des Gerätes, da sie
Feuer fangen oder explodieren
könnten.
• Bewahren Sie keine
entflammbaren Materialien
oder Produkte mit
entflammbaren Gasen (Sprays
etc.) im Kühlschrank auf.
• Stellen Sie keine mit
Flüssigkeiten gefüllten
Behälter (z. B. Vasen) auf
dem Gerät ab. Falls Wasser
oder andere Flüssigkeiten an
unter Spannung stehende
Teile gelangen, kann es zu
• Achten Sie darauf, dass weder
Ihre Hände noch andere
Körperteile von beweglichen
Teilen im Inneren des Gerätes
eingeklemmt oder gequetscht
werden.
• Achten Sie darauf, nicht auf die
Tür, Schubladen oder ähnliche
Teile des Kühlschranks zu
treten; lehnen Sie sich nicht
daran an. Andernfalls könnte
das Gerät umkippen, Teile
könnten beschädigt werden.
• Achten Sie darauf, das
Netzkabel nicht einzuklemmen.
Stromschlägen oder Bränden
kommen.
• Setzen Sie das Gerät keinem
Regen, Schnee, direkten
Sonnenlicht oder Wind aus;
dies kann die elektrische
Sicherheit gefährden.
Verschieben Sie das Gerät
nicht durch Ziehen an den
Türgriffen. Die Griffe könnten
sich lösen.
1.1.1 Wichtige Hinweise
zum Kältemittel
Wenn das Gerät über ein
Kühlsystem mit R600a-Gas
verfügt, achten Sie darauf,
das Kühlsystem und den
dazugehörigen Schlauch
während der Benutzung und des
Transports nicht zu beschädigen.
6 /40 DE
Kühlschrank/Bedienungsanleitung
Page 44

1 Hinweise zu Sicherheit und Umwelt
Dieses Gas ist leicht entflammbar.
Bei Beschädigungen des
Kühlsystems halten Sie das Gerät
von potenziellen Zündquellen (z.
B. offenen Flammen) fern und
sorgen für eine gute Belüftung
des Raumes.
Das Typenschild an
der linken Innenwand
des Kühlschranks gibt
C
die Art des im Gerät
verwendeten Gases an.
1.1.2 Modelle mit
Wasserspender
• Der Druck für die
Kaltwasserzufuhr sollte
maximal 90 psi (6,2
bar) betragen. Wenn der
Wasserdruck in Ihrem Haushalt
80 psi (5,5 bar) übersteigt,
verwenden Sie bitte ein
Druckbegrenzungsventil
in Ihrem Leitungssystems.
Sollten Sie nicht wissen, wie
der Wasserdruck gemessen
wird, ziehen Sie bitte einen
Fachinstallateur hinzu.
• Sollte für Ihr Leitungssystem
das Risiko eines Wasserschlags
(Druckstoß) bestehen,
verwenden Sie stets eine
geeignete Druckstoßsicherung.
Wenden Sie sich bitte an
einen Fachinstallateur,
falls Sie sich über die
Wasserschlaggefährdung in
Ihrem Leitungssystem nicht
sicher sein sollten.
• Nutzen Sie niemals die
Warmwasserzufuhr für den
Einbau. Treffen Sie geeignete
Vorsichtsmaßnahmen zum
Schutz der Leitungen gegen
mögliches Einfrieren. Die
für den Betrieb zulässige
Wassertemperatur liegt im
Bereich von mindestens 0,6°C
(33°F) bis hin zu maximal 38°C
(100°F ).
• Nutzen Sie ausschließlich
Trinkwasser.
1.2. Bestimmungsgemäßer
Einsatz
• Dieses Gerät ist für den Einsatz
im Haushalt vorgesehen.
Kühlschrank/Bedienungsanleitung
7 /40 DE
Page 45

1 Hinweise zu Sicherheit und Umwelt
Er eignet sich nicht zum
kommerziellen Einsatz.
• Das Produkt sollte
ausschließlich zum Lagern von
Lebensmitteln und Getränken
verwendet werden.
• Bewahren Sie keine
empfindlichen Produkte, die
kontrollierte Temperaturen
• Lassen Sie Kinder nicht mit dem
Gerät spielen.
• Falls das Gerät mit einer
abschließbaren Tür ausgestattet
ist, bewahren Sie den Schlüssel
außerhalb der Reichweite von
Kindern auf.
1.4. Einhaltung von WEEE-Vorgaben
und Altgeräteentsorgung
erfordern (z. B. Impfstoffe,
wärmeempfindliche
Medikamente, Sanitätsartikel
etc.) im Kühlschrank auf.
• Der Hersteller haftet nicht für
jegliche Schäden, die durch
Missbrauch oder falsche
Handhabung entstehen.
• Die Einsatzzeit des Produktes
beträgt 10 Jahre. Während
dieser Dauer werden alle
für die Funktionstüchtigkeit
des Gerätes erforderlichen
Ersatzteile vorgehalten.
1.3. Sicherheit von Kindern
• Bewahren Sie
Verpackungsmaterialien
außerhalb der Reichweite von
Kindern auf.
Dieses Gerät erfüllt die Vorgaben der EU-WEEE-
Direktive (2012/19/EU). Das Gerät wurde mit
einem Klassifizierungssymbol für elektrische und
elektronische Altgeräte (WEEE) gekennzeichnet.
Dieses Gerät wurde aus hochwertigen
Materialien hergestellt, die
wiederverwendet und recycelt werden
können. Entsorgen Sie das Gerät am
Ende seiner Einsatzzeit nicht mit dem
regulären Hausmüll. Bringen Sie das
Gerät zu einer Sammelstelle zum
Recycling von elektrischen und elektronischen
Geräten. Ihre Stadtverwaltung informiert Sie gerne
über geeignete Sammelstellen in Ihrer Nähe.
1.5. Einhaltung von RoHS-Vorgaben
• Dieses Gerät erfüllt die Vorgaben der EU-WEEEDirektive (2011/65/EU). Es enthält keine in
der Direktive angegebenen gefährlichen und
unzulässigen Materialien.
1.6. Hinweise zur Verpackung
• Die Verpackungsmaterialien des Gerätes wurden
gemäß nationalen Umweltschutzbestimmungen
aus recyclingfähigen Materialien hergestellt.
Entsorgen Sie Verpackungsmaterialien nicht
mit dem regulären Hausmüll oder anderen
Abfällen. Bringen Sie Verpackungsmaterialien zu
geeigneten Sammelstellen; Ihre Stadtverwaltung
berät Sie gern.
8 /40 DE
Kühlschrank/Bedienungsanleitung
Page 46

*5
*6
*3
4
7
8
10*11
*12
13
*14
*
15
16
17
18
19
9
*1
*2
2 Ihr neues Gerät
1. Kühlbereich-Türablagen
2. Display
3. Wasserspendertank
4. Eierbehälter
5. Wasserspenderbehälter
6. Drehbarer Behälter
7. Tiefkühlbereichschubladen
8. Eisbereiterschublade
9. Eisbereiter
10. Gemüsefach
* optional:Die Abbildungen in dieser Anleitung dienen zur Orientierung und können etwas vom
tatsächlichen Aussehen des Gerätes abweichen. Falls bestimmte Teile bei Ihrem Gerät nicht vorhanden
C
Kühlschrank/Bedienungsanleitung
sind, gilt die Abbildung für andere Modelle.
11. Wassertank
12. Gemüsefach
13. Kühlfach
14. Flaschenablage
15. Geruchsfilter
16. Kühlbereich-Glasablagen
17. Lüfter
18. Kühlbereich-Glasablagen
19. Tiefkühlbereich
* optional
9 /40 DE
Page 47

3 Installation
Lassen Sie Aufstellung und Reparaturen
grundsätzlich vom autorisierten Kundendienst
ausführen. Der Hersteller haftet nicht bei Schäden,
die durch das Zutun nicht autorisierter Personen
verursacht werden.
Lassen Sie das Gerät vom autorisierten
Kundendienst in Ihrer Nähe installieren. Damit
das Gerät schnell betriebsbereit gemacht
werden kann, achten Sie auf eine einwandfreie
Elektroinstallation, bevor Sie sich an den
autorisierten Kundendienst wenden. Falls noch
weitere Vorbereitungen zu treffen sind, lassen
Sie die entsprechenden Arbeiten von einem
qualifizierten Elektriker ausführen.
Vorbereitung des Aufstellungsortes und
Elektroinstallation vor Ort sind Sache
C
B
B
A
C
des Kunden.
Das Gerät darf während der Installation
nicht mit dem Stromnetz verbunden
werden. Andernfalls besteht die Gefahr
schwerer bis tödlicher Unfälle!
WARNUNG: Installation und
elektrischer Anschluss des Gerätes
müssen vom autorisierten Kundendienst
vorgenommen werden. Der Hersteller
haftet nicht bei Schäden, die durch
das Zutun nicht autorisierter Personen
verursacht werden.
WARNUNG: Prüfen Sie das Gerät
vor der Installation auf sichtbare
Beschädigungen. Falls Beschädigungen
vorhanden sind, lassen Sie das Gerät
nicht installieren. Beschädigte Geräte
bergen ein nicht zu unterschätzendes
Sicherheitsrisiko.
Achten Sie darauf, dass das Netzkabel
weder gequetscht noch geklemmt wird,
wenn Sie das Gerät nach Installation
oder Reinigung an seinen Platz rücken.
3.1. Der richtige Aufstellungsort
WARNUNG: Falls die Türöffnung des
Raumes, in dem das Gerät aufgestellt
werden soll, zu schmal sein sollte,
A
•
Wählen Sie einen Aufstellungsort, an dem Sie
das Gerät bequem erreichen können.
• StellenSiedasGerätmindestens30cm
von Wärmequellen wie Herden, Öfen,
Zentralheizungen und ähnlichen Geräten
entfernt auf. Das Gerät darf nach der Installation
keinem direkten Sonnenlicht oder Feuchtigkeit
ausgesetzt werden.
• DamitdasGerätrichtigarbeitenkann,müssen
Sie ausreichend Platz um das Gerät herum
freilassen, damit es ausreichend belüftet
werden kann. Falls Sie das Gerät in einer Nische
aufstellen, achten Sie darauf, dass mindestens 5
cm zur Decke und zu den Wänden frei bleiben.
• StellenSiedasGerätnichtaufweichen
Untergründen wie Teppichen oder Teppichböden
auf.
• StellenSiedasGerätaufeinerebenenUnterlage
auf, damit es weder wackelt noch kippelt.
• InstallierenSiedasGerätnichtanStellen,an
denen die Temperatur unter 10 °C abfallen
C
müssen die Türen des Gerätes
abgebaut, das Gerät seitlich durch die
Öffnung geführt werden.
kann.
Falls zwei Kühlschränke nebeneinander
aufgestellt werden sollen, achten Sie
darauf, dass mindestens 8 cm Abstand
zwischen den Geräten verbleibt.
Andernfalls können die benachbarten
Seitenwände feucht werden.
10 /40 DE
Kühlschrank/Bedienungsanleitung
Page 48

3 Installation
3.2. Kunststoffkeile anbringen
Die Kunststoffkeile sorgen für den richtigen
Abstand zwischen Kühlschrank und Wand
– und damit für die richtige Luftzirkulation.
Setzen Sie die beiden Kunststoffkeile wie in der
Abbildung gezeigt an der Abdeckung der hinteren
Belüftungsöffnungen ein. Dazu drehen Sie die
Schrauben aus dem Gerät heraus und drehen
stattdessen die mitgelieferten Schrauben ein. Die
Schrauben finden Sie gemeinsam mit den Keilen in
einem Beutel.
Haussicherungen nicht zu den Angaben auf dem
Typenschild passen sollte, lassen Sie von einem
qualifizierten Elektriker eine passende Sicherung
installieren.
•DieangegebeneSpannungmussmitIhrer
Netzspannung übereinstimmen.
•VerzichtenSieaufVerlängerungskabelund
Mehrfachsteckdosen.
WARNUNG: Beschädigte Netzkabel
müssen vom autorisierten Kundendienst
B.
B.
ausgetauscht werden.
WARNUNG: Falls das Gerät eine
Fehlfunktion aufweisen sollte,
darf es erst nach Reparatur durch
den autorisierten Kundendienst
wieder genutzt werden! Es besteht
Stromschlaggefahr!
3.3. Elektrischer Anschluss
Schließen Sie das Gerät an eine geerdete
Steckdose (Schukosteckdose) an, sichern Sie
das Gerät über eine zu den Angaben auf dem
Typenschild passende Sicherung ab. Unser
Unternehmen haftet nicht bei Schäden, die durch
Einsatz des Gerätes ohne ordnungsgemäße Erdung
gemäß örtlichen Vorschriften entstehen.
•DerelektrischeAnschlussmussgemäßörtlichen
Vorschriften ausgeführt werden.
•DerNetzsteckermussauchnachderInstallation
stets leicht zugänglich bleiben.
•DasTypenschildanderInnenseitedes
Gerätes informiert über richtige Spannung und
zulässige Absicherung. Falls die Kapazität Ihrer
Kühlschrank/Bedienungsanleitung
11 /40 DE
3.4. Füße einstellen
Falls das Gerät nach der Aufstellung nicht
felsenfest stehen sollte, stellen Sie die Füße
entsprechend nach. Diese Arbeit fällt erheblich
leichter, wenn ein Helfer das Gerät etwas anhebt.
WARNUNG: Ziehen Sie zuerst den
Netzstecker. Beim Einstellen der
Füße muss das Gerät vollständig vom
B
Balancieren Sie das Gerät durch Drehen der Füße
an der Vorderseite aus. Wenn Sie in Pfeilrichtung
drehen, senkt sich die Ecke, an der sich der Fuß
befindet. Beim Drehen in Gegenrichtung wird die
Ecke angehoben.
Stromnetz getrennt sein. Es besteht
Stromschlaggefahr!
Page 49

3 Installation
3.5. Beleuchtung
Falls die Beleuchtung ausfallen sollte, versuchen
Sie keine eigenmächtigen Reparaturen. Wenden
Sie sich an den autorisierten Kundendienst.
Die Glühbirnen für dieses Haushaltsgerät sind
für Beleuchtungszwecke nicht geeignet. Die
beabsichtigte Aufgabe dieser Lampe ist es den
Benutzer zu ermöglichen die Plazierung der
Lebensmittel in den Kühlschrank / Eiskühltruhe
sicher und bequem vorzunehmen.
3.6. Tür-offen-Warnung
(Diese Funktion gibt es nur bei bestimmten
Geräten.)
Ein Tonsignal erklingt, wenn die Tür länger als
eine Minute offen steht. Die Warnung verstummt,
sobald Sie die Tür schließen oder eine Anzeigetaste
(sofern vorhanden) betätigen.
3.7. Gerät transportieren
1.
Ziehen Sie den Netzstecker, bevor Sie das Gerät
transportieren oder anderweitig bewegen.
2.
Reinigen Sie das Innere des Gerätes wie im
Abschnitt „Reinigung und Pflege” beschrieben.
3.
Fixieren Sie Ablagen, Zubehör, Gemüsefach und
dergleichen mit Klebeband, bevor Sie das Gerät
verpacken.
Die Verpackung muss mit kräftigem
Klebeband oder stabilen Seilen gesichert,
C
die auf der Verpackung aufgedruckten
Transporthinweise müssen beachtet
werden.
C
A
Originalverpackung und
Schaumstoffmaterialien sollten zum
künftigen Transport des Gerätes
aufbewahrt werden.
Verpackungsmaterialien können für Kinder
gefährlich werden
. Bewahren Sie Verpackungsmaterialien
an einem sicheren Ort außerhalb
der Reichweite von Kindern auf.
12 /40 DE
Kühlschrank/Bedienungsanleitung
Page 50

4 Vorbereitungen
4.1. Tipps zum Energiesparen
Der Anschluss des Gerätes an
Energiesparsysteme birgt Risiken, da
A
• Halten Sie die Kühlschranktüren nur möglichst
• Geben Sie keine warmen Speisen oder Getränke
• Überladen Sie das Gerät nicht. Die
• Stellen Sie das Gerät nicht im prallen
• Bewahren Sie Ihre Lebensmittel in
• Wenn Sie die Ablagen oder Schubladen aus
• Das Auftauen von gefrorenen Lebensmitteln im
C
C
C
Schäden am Gerät auftreten können.
kurz geöffnet.
in den Kühlschrank.
Kühlungsleistung nimmt ab, wenn die freie
Luftzirkulation im Inneren behindert wird.
Sonnenlicht auf. Stellen Sie das Gerät
mindestens 30 cm von Wärmequellen wie
Herden, Öfen, Zentralheizungen und ähnlichen
Geräten entfernt auf.
geschlossenen Behältern im Kühlschrank auf.
dem Tiefkühlbereich herausnehmen, können
Sie das Volumen des Tiefkühlbereiches
vollständig nutzen. Die angegebenen
Energieverbrauchswerte Ihres Kühlschranks
wurden unter maximaler Beladung bei
herausgenommenen Ablagen oder Schubladen
ermittelt. Ansonsten ist es Ihnen völlig
freigestellt, die Ablagen oder Schubladen zu
verwenden.
Kühlbereich ist energiesparend und bewahrt die
Qualität der Lebensmittel.
Die Temperatur des Raumes, in dem
der Kühlschrank aufgestellt wird,
sollte mindestens -5 °C betragen. Im
Hinblick auf den Wirkungsgrad ist der
Betrieb des Kühlschranks bei geringerer
Umgebungstemperatur nicht ratsam.
Das Innere Ihres Gerätes muss gereinigt
werden.
Falls zwei Kühlschränke nebeneinander
aufgestellt werden sollen, achten Sie
darauf, dass mindestens 4 cm Abstand
zwischen den Geräten verbleibt.
4.2. Empfehlungen zum Kühlbereich
• Achten Sie darauf, dass die Lebensmittel
nicht den Temperatursensor im Kühlbereich
berühren. Damit frische Lebensmittel bei
optimalen Temperaturen gelagert werden, darf
der Sensor nicht durch Lebensmittel blockiert
oder beeinflusst werden.
• Für einen energieeffizienten Betrieb und die
qualitätsgerechte Lagerung des Gefriergut sind
stets die mit dem Gefrierschrank gelieferten
Körbe/Schübe zu verwenden.
• Ein direkter Kontakt des Gefrierguts mit dem
Temperatursensor im Gefrierschrank kann zu
einem erhöhten Energieverbrauch des Geräts
führen. Daher muss solch ein Kontakt mit
einem oder mehreren Sensoren vermieden
werden.
• Geben Sie keine warmen Speisen oder
Getränke in das Gerät.
4.3. Erste Inbetriebnahme
Bevor Sie das Gerät zum ersten Mal benutzen,
vergewissern Sie sich, dass sämtliche
Vorkehrungen wie in den Abschnitten „Wichtige
Hinweise zu Sicherheit und Umwelt“ und
„Installation“ getroffen wurden.
• Reinigen Sie das Innere des Gerätes wie im
Abschnitt „Reinigung und Pflege” beschrieben.
Sorgen Sie dafür, dass der Innenraum komplett
trocken ist, bevor Sie das Gerät benutzen.
• Stecken Sie den Netzstecker des Gerätes in
eine geerdete Steckdose. Bei geöffneter Tür
schaltet sich die Beleuchtung im Innenraum
ein.
Kühlschrank/Bedienungsanleitung
13 /40 DE
Page 51

4 Vorbereitungen
• Lassen Sie den Kühlschrank etwa 6 Stunden
lang leer arbeiten; verzichten Sie in dieser Zeit
möglichst vollständig auf das Öffnen der Türen.
Sie hören Geräusche, wenn sich der
Kompressor einschaltet. Die Flüssigkeiten
C
C
C
und Gase im Kühlsystem können auch
leichte Geräusche erzeugen, wenn der
Kompressor nicht läuft. Dies ist völlig
normal.
Die Vorderkanten des Kühlschranks
können sich etwas erwärmen. Dies ist
völlig normal. Diese Bereiche sollen sich
bewusst etwas aufwärmen, damit sich kein
Kondenswasser bildet.
Bei einigen Modellen schaltet sich das
Armaturenbrett 5 Minuten nach dem
Schließen der Tür automatisch ab. Es
schaltet sich wieder an, wenn die Tür
geöffnet wurde oder indem man auf einen
beliebigen Schalter drückt.
14 /40 DE
Kühlschrank/Bedienungsanleitung
Page 52

5 Nutzung des Geräts
5.1. Anzeigefeld
Die Anzeigefelder können je nach Modell etwas anders ausfallen.
Audiovisuelle Funktionen am Anzeigefeld helfen Ihnen bei der Bedienung Ihres Gerätes.
8
9
1. Kühlbereichanzeige
2. Fehlerstatusanzeige
3. Temperaturanzeige
4. Urlaubstaste
5. Temperatureinstelltaste
6. Kühlbereichauswahltaste
7. Tiefkühlbereichanzeige
8. Energiesparmodusanzeige
9. Urlaubsfunktionanzeige
* optional
1
7
2
6
3
45
* Optional: Die Abbildungen in dieser Anleitung dienen zur Orientierung und können etwas vom
tatsächlichen Aussehen des Gerätes abweichen. Falls bestimmte Teile bei Ihrem Gerät nicht vorhanden
C
Kühlschrank/Bedienungsanleitung
sind, gilt die Abbildung für andere Modelle.
15 /40 DE
Page 53

5 Nutzung des Geräts
1. Kühlbereichanzeige
Die Kühlbereichanzeige leuchtet beim Einstellen
der Kühlbereichtemperatur auf.
2. Fehlerstatusanzeige
Falls der Kühlschrank nicht genügend kühlt
oder ein Sensor ausfällt, wird diese Anzeige
aktiv. Wenn diese Anzeige aktiv ist, zeigt die
Tiefkühlbereichtemperaturanzeige „E“, die
Kühlbereichtemperaturanzeige Zahlen an;
z. B. 1, 2, 3, ... Diese Zahlen der Anzeige
helfen Kundendienstmitarbeitern, einen Fehler
einzugrenzen.
3. Temperaturanzeige
Zeigt Tiefkühl- und Kühlbereichtemperatur.
4. Urlaubstaste
Zum Aktivieren dieser Funktion halten Sie die
Urlaubstaste 3 Sekunden lang gedrückt. Wenn
die Urlaubsfunktion aktiv ist, erscheint „- -“ in der
Kühlbereichtemperaturanzeige; der Kühlbereich
wird nun nicht mehr aktiv gekühlt. Wenn diese
Funktion aktiv ist, sollten keine Lebensmittel im
Kühlbereich aufbewahrt werden. Andere Bereiche
werden entsprechend der eingestellten Temperatur
weiterhin gekühlt.
Zum Aufheben dieser Funktion drücken Sie die
Urlaubstaste noch einmal.
5. Temperatureinstelltaste
Ändert die Temperatur des jeweiligen Bereiches
zwischen -24 °C und -18 °C sowie 8 °C und 1 °C.
6. Kühlbereichauswahltaste
Auswahltaste: Mit der Kühlbereichauswahltaste
schalten Sie zwischen Kühlbereich und
Tiefkühlbereich um.
7. Tiefkühlbereichanzeige
Die Kühlbereichanzeige leuchtet beim Einstellen
der Tiefkühlbereichtemperatur auf.
8. Energiesparmodusanzeige
Zeigt an, dass das Kühlgerät besonders
energiesparend arbeitet. Diese Anzeige wird aktiv,
wenn die Tiefkühlbereichtemperatur auf -18 °C
eingestellt ist.
9. Urlaubsfunktionanzeige
Zeigt an, dass die Urlaubsfunktion aktiv ist.
16 /40 DE
Kühlschrank/Bedienungsanleitung
Page 54

5 Nutzung des Geräts
* optional
16
15
14
1
2
13
12
11
10
9*
8
1. Kühlbereichtemperatur-Einstelltaste
2. Tastensperre-Taste
3. Tiefkühlbereichtemperatur-Einstelltaste
4. Fehlerstatusanzeige
5. Tastensperre-Anzeige
6. Öko-Extra-Anzeige
7. Öko-Extra-/Urlaubstaste
8. Urlaubsfunktionanzeige
3
4
5
6
7
9. Eisbereiter-aus-Anzeige
(* bei bestimmten Modellen)
10. Energiesparanzeige
11. Schnellgefrieranzeige
12. Schnellgefriertaste/Eisbereiter-aus-Taste
13. Tiefkühlbereichtemperaturanzeige
14. Schnellkühlfunktion
15. Kühlbereichtemperaturanzeige
16. Schnellkühlfunktionsanzeige
* Optional: Die Abbildungen in dieser Anleitung dienen zur Orientierung und können etwas vom
tatsächlichen Aussehen des Gerätes abweichen. Falls bestimmte Teile bei Ihrem Gerät nicht vorhanden
C
sind, gilt die Abbildung für andere Modelle.
Kühlschrank/Bedienungsanleitung
17 /40 DE
Page 55

5 Nutzung des Geräts
1. Kühlbereichtemperatur-Einstelltaste
Durch mehrmaliges Drücken dieser Taste stellen
Sie die Kühlbereichtemperatur auf 8 °, 7 °, 6 °, 5
°, 4°, 3 °, 2 °, 8 °C ... ein. Mit dieser Taste stellen
Sie die gewünschte Kühlbereichtemperatur ein.
2. Tastensperre-Taste
Wenn Sie diese Taste 3 Sekunden lang
gedrückt halten, tritt die Tastensperre in Kraft,
die Tastensperre-Anzeige leuchtet auf. Zum
Abschalten der Tastensperre halten Sie die Taste
erneut 3 Sekunden lang gedrückt.
3. Tiefkühlbereichtemperatur-Einstelltaste
Durch mehrmaliges Drücken dieser Taste stellen
Sie die Tiefkühlbereichtemperatur auf -18 °, -19
°, -20 °, -21 °, -22 °, -23 °, -24 °, -18 °C, ...
ein. Mit dieser Taste stellen Sie die gewünschte
Temperatur des Tiefkühlbereiches ein.
4. Fehlerstatusanzeige
Falls der Kühlschrank nicht genügend kühlt oder
ein Sensor ausfällt, wird diese Anzeige aktiv.
Wenn diese Anzeige aktiv ist, zeigt die Ti
efkühlbereichtemperaturanzeige „E“, die
Kühlbereichtemperaturanzeige Zahlen an;
z. B. 1, 2, 3, ... Diese Zahlen der Anzeige
helfen Kundendienstmitarbeitern, einen Fehler
einzugrenzen.
Wenn Sie warme Speisen in den
Kühlbereich geben oder die Tür
C
5. Tastensperre-Anzeige
Mit dieser Funktion verhindern Sie ungewollte
Temperatureinstellungen. Zum Einschalten
halten Sie die Kühltemperaturtaste und
Tiefkühltemperaturtaste gemeinsam 3 Sekunden
lang gedrückt.
6. Öko-Extra-Anzeige
Zeigt an, dass die Öko Extras-Funktion aktiv ist.
Wenn diese Funktion aktiv ist, erkennt
längere Zeit offen steht, leuchtet ein
Ausrufezeichen einige Zeit lang auf. Dies
ist kein Fehler; die Warnung verschwindet,
sobald die Speisen abkühlen.
18 /40 DE
Ihr Kühlgerät die Zeiten, in denen Sie das
Kühlgerät besonders selten nutzen und passt
die Kühlungsleistung in diesen Zeiträumen
entsprechend an.
In den Perioden besonders
energiesparender Kühlung leuchtet das
C
C
7. Öko-Extra-/Urlaubstaste
Zum Einschalten der Öko-Extra-Funktion drücken
Sie diese Taste einmal kurz. Durch Gedrückthalten
dieser Taste (3 Sekunden lang) schalten Sie
die Urlaubsfunktion ein. Zum Abschalten der
ausgewählten Funktion drücken Sie die Taste noch
einmal.
8. Urlaubsfunktionanzeige
Zeigt an, dass die Urlaubsfunktion aktiv ist. Wenn
die Urlaubsfunktion aktiv ist, erscheint „- -“ in
der Temperaturanzeige des Kühlbereiches – der
Kühlbereich wird nun nicht mehr gekühlt. Die
restlichen Bereiche werden weiterhin mit den
vorgegebenen Temperaturen gekühlt.
C
9. Eisbereiter-aus-Anzeige
Zeigt an, ob der Eisbereiter ein- oder ausgeschaltet
ist. Bei der Einstellung Ein ist der Eisbereiter
abgeschaltet. Zum Einschalten des Eisbereiters
halten Sie die Ein-/Austaste 3 Sekunden lang
gedrückt.
C
Energiesparsymbol.
Zum Abschalten der Funktion drücken Sie
die entsprechende Taste.
Zum Abschalten der Funktion drücken Sie
die entsprechende Taste.
Bei der Auswahl dieser Funktion wird kein
Wasser mehr aus dem Tank zugeführt.
Bereits bereitetes Eis kann aber nach
wie vor aus dem Eisbereiter entnommen
werden.
Kühlschrank/Bedienungsanleitung
Page 56

5 Nutzung des Geräts
10. Energiesparanzeige
Zeigt an, dass das Gerät besonders
energiesparend arbeitet. Diese Anzeige leuchtet
auf, wenn die Temperatur des Tiefkühlbereiches
auf -18 °C eingestellt ist oder das Gerät mit
der Öko-Extra-Funktion besonders ökonomisch
arbeitet.
Die Energiesparanzeige erlischt, wenn
Sie Schnellkühlen oder Schnellgefrieren
C
11. Schnellgefrieranzeige
Zeigt durch Blinken an, dass die
Schnellgefrierfunktion aktiv ist.
12. Schnellgefriertaste/Eisbereiter-aus-Taste
Mit dieser Taste schalten Sie die
Schnellgefrierfunktion ein und aus. Wenn diese
Funktionen aktiv ist, wird der Tiefkühlbereich
besonders stark (über die eingestellte Temperatur
hinaus) gekühlt.
Zum Ein- und Ausschalten des Eisbereiters halten
Sie die Taste 3 Sekunden lang gedrückt.
C
C
zuschalten.
Die Schnellgefrierfunktion nutzen Sie, wenn
Sie die Lebensmittel im Tiefkühlbereich
besonders schnell abkühlen möchten.
Wenn Sie große Mengen frischer
Lebensmittel kühlen möchten, sollten
Sie diese Funktion vor dem Einlagern der
Lebensmittel einschalten.
Sofern Sie diese Funktion nicht vorzeitig
abschalten, wird das Schnellgefrieren
beendet, sobald die nötige Temperatur
erreicht ist, spätestens jedoch nach 4
Stunden.
Diese Funktion wird nach einem
C
13. Tiefkühlbereichtemperaturanzeige
Zeigt die für den Tiefkühlbereich eingestellte
Temperatur an.
14. Schnellkühlfunktion
Diese Taste erfüllt zwei Funktionen. Zum Ein- und
Ausschalten der Schnellkühlfunktion drücken Sie
die Taste einmal kurz. Die Schnellkühlenanzeige
erlischt, der Kühlschrank arbeitet wieder mit
normalen Einstellungen.
C
C
C
C
Stromausfall nicht automatisch wieder
eingeschaltet.
Die Schnellkühlfunktion nutzen Sie, wenn
Sie Lebensmittel im Kühlbereich besonders
schnell abkühlen möchten. Wenn Sie
große Mengen frischer Lebensmittel
kühlen möchten, sollten Sie diese Funktion
vor dem Einlagern der Lebensmittel
einschalten.
Sofern Sie diese Funktion nicht vorzeitig
abschalten, wird das Schnellkühlen
beendet, sobald die nötige Temperatur
erreicht ist, spätestens jedoch nach 8
Stunden.
Sollten Sie die Schnellkühltaste mehrmals
innerhalb kurzer Zeit drücken, greift eine
elektronische Schutzschaltung ein und
sorgt dafür, dass der Kompressor nicht
sofort anläuft.
Diese Funktion wird nach einem
Stromausfall nicht automatisch wieder
eingeschaltet.
Kühlschrank/Bedienungsanleitung
15. Kühlbereichtemperaturanzeige
Zeigt die für den Kühlbereich eingestellte
Temperatur an.
16. Schnellkühlfunktionsanzeige
Zeigt durch Blinken an, dass die
Schnellkühlfunktion aktiv ist.
19 /40 DE
Page 57

5 Nutzung des Geräts
5.2. Doppeltes Kühlsystem
Ihr Kühlgerät ist mit zwei getrennten Kühlsystemen
für Kühl- und Tiefkühlbereich ausgestattet.
Dadurch werden Kühlbereich und Tiefkühlbereich
nicht gegenseitig durch Luft und Gerüche
beeinflusst. Durch die Trennung der Kühlsysteme
kühlt Ihr Gerät erheblich schneller als viele andere
Kühlgeräte. Darüber hinaus sparen Sie Energie, da
auch das Abtauen getrennt erfolgt.
5.3. Frische Lebensmittel einfrieren
• Geben Sie Lebensmittel verpackt oder
zumindest abgedeckt in das Gerät.
• Heiße Speisen müssen auf Raumtemperatur
abgekühlt sein, ehe sie in den Kühlschrank
gegeben werden.
• Lebensmittel, die Sie einfrieren möchten,
sollten frisch und von guter Qualität sein.
• Teilen Sie Lebensmittel in sinnvolle, dem
Bedarf Ihrer Familie angepasste Portionen auf.
• Lebensmittel sollten luftdicht verpackt werden,
damit sie nicht austrocknen. Dies gilt auch
dann, wenn Sie Lebensmittel nur kurze Zeit
lagern möchten.
• Geeignete Verpackungsmaterialien müssen
reißfest, luftdicht und unempfindlich gegenüber
Kälte, Feuchtigkeit, Gerüchen, Ölen und
Säuren sein. Darüber hinaus sollten sie sich
leicht verschließen lassen, unkompliziert in
der Handhabung und natürlich zum Tiefkühlen
geeignet sein.
• Verbrauchen Sie eingefrorene Lebensmittel
direkt nach dem Auftauen, frieren Sie sie nicht
wieder ein.
• Frieren Sie nicht zu große Mengen auf einmal
ein. Die Qualität der Lebensmittel bleibt am
besten erhalten, wenn sie so schnell wie
möglich bis in den Kern tiefgekühlt werden.
• Wenn Sie noch warme Speisen in den
Tiefkühlbereich stellen, bewirken Sie damit,
dass das Kühlsystem ununterbrochen arbeiten
muss, bis die Speisen komplett tiefgekühlt
sind.
• Achten Sie besonders darauf, bereits
tiefgekühlte und frische Speisen nicht zu
vermischen.
• Wenn Ihr Kühlgerät mit einer
Schnellgefrierfunktion ausgestattet ist, nutzen
Sie diese zum schnellen Einfrieren.
Tiefkühlbereichein
stellung
-18 °C 4 °C Dies ist die allgemein empfohlene Einstellung.
-20, -24 oder -24 °C 4 °C
Schnellgefrieren 4 °C
-18 °C und kälter 2 °C
-18 °C und kälter Schnellkühlen
Kühlbereichein
stellung
Anmerkungen
Diese Einstellungen empfehlen wir bei
Umgebungstemperaturen über 30 °C.
Diese Funktion nutzen Sie zum Einfrieren von Lebensmitteln
in kurzer Zeit. Nach Abschluss wechselt Ihr Gerät wieder zur
zuvor eingestellten Betriebsart.
Nutzen Sie diese Einstellungen, falls Sie meinen, dass der
Kühlbereich aufgrund zu hoher Umgebungstemperatur,
der Nähe zu Wärmequellen oder zu häufigem Öffnen und
Schließen der Tür nicht kalt genug wird.
Diese Funktion nutzen Sie, wenn Sie (zu) viele frische
Lebensmittel in den Kühlbereich geben oder Ihre
Lebensmittel besonders schnell kühlen möchten. Wir
empfehlen, die Schnellkühlfunktion 4 bis 8 Stunden vor dem
Einlagern frischer Lebensmittel einzuschalten.
20 /40 DE
Kühlschrank/Bedienungsanleitung
Page 58

5 Nutzung des Geräts
5.4. Empfehlungen zum richtigen
Einfrieren
•Handelsübliche,verpackteTiefkühlkostsollte
gemäß den Hinweisen des Herstellers aufbewahrt
werden.
Damit Lebensmittel bei bester Qualität bleiben,
sollten Sie Folgendes berücksichtigen:
1. Geben Sie Lebensmittel so schnell wie möglich
nach dem Kauf in den Tiefkühlbereich.
2. Sorgen Sie dafür, dass sämtliche Lebensmittel
beschriftet und mit einem Datum versehen
werden.
3. Achten Sie darauf, dass das auf der Verpackung
angegebene Mindesthaltbarkeitsdatum auf der
Verpackung nicht überschritten wird.
5.5. Lebensmittel richtig platzieren
Tiefkühlbereich-
Ablagen
Eierbehälter Eier
Kühlbereichablagen
Kühlbereich-
Türablagen
Gemüsefach Gemüse und Früchte
Frischefach
Unterschiedliche gefrorene
Lebensmittel wie Fleisch,
Fisch, Speiseeis, Gemüse
etc.
Lebensmittel in Pfannen,
Töpfen, auf abgedeckten
Tellern, in geschlossenen
Behältern
Kleine, verpackte
Lebensmittelprodukte
oder Getränke (zum
Beispiel Milch, Saft, Bier
usw.)
Milch- und Wurstprodukte
(Käse, Butter, Salami und
dergleichen)
Sie können die Frische Ihrer Lebensmittel
viele Monate bewahren (bei einer
Tiefkühlbereichtemperatur von maximal -18 °C).
Teilen Sie Lebensmittel in sinnvolle, dem Bedarf
Ihrer Familie angepasste Portionen auf.
Lebensmittel sollten luftdicht verpackt werden,
damit sie nicht austrocknen. Dies gilt auch dann,
wenn Sie Lebensmittel nur kurze Zeit lagern
möchten.
Benötigtes Verpackungsmaterial:
•KältebeständigesKlebeband
•SelbstklebendeEtiketten
•Gummiringe
•Stift
Geeignete Verpackungsmaterialien müssen reißfest
und unempfindlich gegenüber Kälte, Feuchtigkeit,
Gerüchen, Ölen und Säuren sein.
Einzufrierende Lebensmittel sollten keinen direkten
Kontakt zu bereits gefrorenen Lebensmitteln
haben, damit diese nicht antauen.
Verbrauchen Sie eingefrorene Lebensmittel direkt
nach dem Auftauen, frieren Sie sie nicht wieder
ein.
5.6. Hinweise zum Einfrieren
Lebensmittel sollten schnellstmöglich eingefroren
werden, damit sie nicht an Qualität verlieren.
Nur bei Temperaturen von -18 °C oder weniger ist
es möglich, Lebensmittel lange Zeit zu lagern.
Kühlschrank/Bedienungsanleitung
21 /40 DE
Page 59

5 Nutzung des Geräts
5.7. Eisbereiter
* optional
Mit dem Eisbereiter bereiten Sie Eiswürfel schnell
und einfach.
Eisbereiter verwenden
1. Nehmen Sie den Wassertank aus dem
Kühlbereich.
2. Füllen Sie den Tank mit Trinkwasser.
3. Setzen Sie den Wassertank wieder ein. Nach
etwa vier Stunden liegen die ersten Eiswürfel in
der Eisbereiter-Schublade im Tiefkühlbereich für
Sie bereit.
Eine Komplettfüllung des Wassertanks
C
C
reicht für etwa 60 – 70 Eiswürfel.
Das Wasser im Tank sollte alle 2 – 3
Wochen getauscht werden.
22 /40 DE
Kühlschrank/Bedienungsanleitung
Page 60

5 Nutzung des Geräts
5.8. Eisbereiter
* optional
Mit dem Eisbereiter bereiten Sie Eiswürfel schnell
und einfach.
Eisbereiter verwenden
1. Ziehen Sie den Eisbereiter vorsichtig aus dem
Gerät.
2. Füllen Sie den Eisbereiter mit Trinkwasser.
3. Setzen Sie den Eisbereiter wieder an Ort und
Stelle. Nach etwa 2 Stunden liegen die ersten
Eiswürfel für Sie bereit.
4. Zum Entnehmen der Eiswürfel drehen Sie die
Knöpfe am Eisbehälter um 90 ° im Uhrzeigersinn.
Die Eiswürfel fallen in den Eiswürfelbehälter
darunter.
5. Sie können den Eisbehälter zum Servieren der
Eiswürfel herausnehmen.
Nehmen Sie den Eisbereiter zum
C
C
Entnehmen der Eiswürfel nicht heraus.
Wenn Sie möchten, können Sie das Eis
auch im Eisbehälter aufbewahren. Der
Eiswürfelbehälter dient nur dazu, Eiswürfel
aufzufangen. Füllen Sie kein Wasser ein;
der Behälter bricht sonst .
Kühlschrank/Bedienungsanleitung
23 /40 DE
Page 61

5 Nutzung des Geräts
5.9. Eisbehälter
* optional
Mit dem Eisbereiter bereiten Sie Eiswürfel schnell
und einfach.
Eisbehälter verwenden
1. Nehmen Sie den Eisbehälter aus dem
Tiefkühlbereich.
2. Füllen Sie den Eisbehälter mit Trinkwasser.
3. Legen Sie den Eisbehälter in den
Tiefkühlbereich. Nach etwa 2 Stunden liegen die
ersten Eiswürfel für Sie bereit.
4. Nehmen Sie den Eisbehälter aus dem
Tiefkühlbereich, biegen Sie ihn über einem Teller
etwas durch. Die Eiswürfel fallen auf den Teller.
5.10. Abtauen
Der Tiefkühlbereich taut automatisch ab.
5.11. Blaues Licht
* optional
Die Gemüsefächer des Kühlschranks werden mit
blauem Licht beleuchtet. Dadurch wird die
Photosynthese durch die bestimmte Wellenlängen
des blauen Lichtes fortgesetzt, Vitamine und
Frische bleiben erhalten.
5.12. Eierhalter
Sie können den Eierhalter in der Tür oder auf einer
Ablage platzieren. Bei einer Platzierung auf den
Ablagen wählen Sie am besten eine der unteren,
kühleren Ablagen.
24 /40 DE
A
C
Stellen Sie den Eierhalter niemals in den
Tiefkühlbereich.
Achten Sie darauf, dass die Eier keine
anderen Lebensmittel berühren.
Kühlschrank/Bedienungsanleitung
Page 62

5 Nutzung des Geräts
5.13. Beschreibung und Hinweise zur
Reinigung des Geruchsfilters
Der Geruchsfilter verhindert die Bildung
unangenehmer Gerüche in Ihrem Gerät.
1. Ziehen Sie die Abdeckung, in der sich der
Geruchsfilter befindet, nach unten, entnehmen
Sie ihn wie in der Abbildung gezeigt.
2. Legen Sie den Filter einen Tag lang ins
Sonnenlicht. Der Filter reinigt sich in dieser Zeit.
3. Bringen Sie den Filter wieder an Ort und Stelle an.
Der Geruchsfilter muss einmal jährlich
C
gereinigt werden.
5.14. Snack-Fach
Dieses Fach eignet sich für Lebensmittel wie Fisch,
rotes Fleisch, Geflügel und Milchprodukte wie
Käse, Joghurt und Milch – also in erster Linie für
Lebensmittel, die ein paar Grad kühler als andere
gelagert werden sollten.
Gemüse und Früchte sollten nicht
im Snack-Fach gelagert werden.
C
Sie können den Innenraum Ihres Gerätes
vergrößern, indem Sie das Snack-Fach
herausnehmen:
1. Ziehen Sie das Fach bis zum Anschlag zu sich
hin.
2. Heben Sie das Fach vorne etwas an, ziehen Sie
das Fach anschließend zu sich hin heraus.
Insbesondere Tomaten, Auberginen,
Zucchini, Gurken und Zitronen vertragen
keine starke Kälte. Daher gehören solche
Lebensmittel nicht in das Snack-Fach.
Kühlschrank/Bedienungsanleitung
5.15. Verschiebbarer Vorratsbehälter
* optional
Dieses Zubehör vergrößert das nutzbare Volumen
der Türablagen. So können Sie durch einfaches
Verschieben beispielsweise hohe Flaschen, Gläser
und Dosen bequem in der unteren Flaschenablage
unterbringen.
25 /40 DE
Page 63

5 Nutzung des Geräts
5.16. Drehbarer Behälter
* optional
Der drehbare Behälter lässt sich ebenfalls nach
links und rechts versetzen. So können Sie hohe
Flaschen, Gläser und andere Behälter problemlos
auf der unteren Ablagen unterbringen (Abbildung
1).
So gelagerte Lebensmittel erreichen Sie bequem,
indem Sie den Behälter an der rechten Seite
fassen und nach vorne drehen (Abbildung 2).
Wenn Sie den Behälter zum einfacheren Beladen
oder zum Reinigen herausnehmen möchten,
drehen Sie ihn um 90 ° nach vorne, heben ihn
etwas an und ziehen ihn dann zu sich hin heraus
(Abbildungen 3 – 4).
1
2
3
4
26 /40 DE
Kühlschrank/Bedienungsanleitung
Page 64

5 Nutzung des Geräts
1 2
3 4
Kühlschrank/Bedienungsanleitung
5
5.17. Gemüsefach
Im Gemüsefach Ihres Kühlgerätes bleibt Gemüse
länger frisch und behält seine natürliche
Feuchtigkeit. Dazu wird ständig reichlich kühle
Luft zum Gemüsefach geleitet. Nehmen Sie die
Türablagen in der Höhe des Gemüsefaches heraus,
bevor Sie das Gemüsefach entnehmen.
7
27 /40 DE
6
Page 65

5 Nutzung des Geräts
5.18. So benutzen Sie den
Wasserspender
* optional
Das erste Wasser, das aus dem Spender
fließt, kann noch etwas warm sein. Dies
C
C
ist normal.
Falls der Wasserspender längere Zeit nicht
genutzt wurde, gießen Sie die ersten paar
Gläser Wasser weg, bis frisches Wasser
ausgegeben wird.
Die Wassermenge können Sie nach
Wunsch regulieren, indem Sie den Hebel
C
nur leicht oder ganz betätigen. Verringern
Sie den Druck auf den Hebel, wenn
das Gefäß fast gefüllt ist, damit nichts
überläuft. Das Wasser tritt nur tropfenweise
aus, wenn Sie den Hebel nur leicht
betätigen; dies ist völlig normal.
5.19. Wasserspendertank füllen
Der Wassertank befindet sich an der Innenseite der
Türablage.
1. Öffnen Sie den Deckel des Tanks.
2. Füllen Sie den Tank mit Trinkwasser.
3. Schließen Sie den Deckel.
1. Drücken Sie mit einem Glas gegen den Hebel
des Wasserspenders. Wenn Sie weiche
Plastikbecher benutzen, drücken Sie den Hebel
am besten mit der Hand.
2. Lassen Sie den Hebel wieder los, wenn das Glas
gefüllt ist.
28 /40 DE
Kühlschrank/Bedienungsanleitung
Page 66

5 Nutzung des Geräts
Füllen Sie den Wassertank nur mit
frischem Trinkwasser, nicht mit anderen
C
C
C
5.20. Wassertank reinigen
1. Nehmen Sie den Füllbehälter an der Innenseite
der Türablage heraus.
2. Entfernen Sie die Türablage, indem Sie diese an
beiden Seiten greifen.
3. Fassen Sie den Wassertank an beiden Seiten,
nehmen Sie ihn in einem Winkel von 45 °
heraus.
4. Nehmen Sie den Deckel vom Wassertank ab,
reinigen Sie den Tank gründlich.
Flüssigkeiten gleich welcher Art.
Falls andere Flüssigkeiten eingefüllt
werden, kann der Wasserspender
irreparabel beschädigt werden. Solche
Beschädigungen werden nicht durch die
Garantie abgedeckt. Viele Flüssigkeiten
und Getränke enthalten Zusätze, die das
Material des Wassertanks schädigen
können.
Nutzen Sie ausschließlich reines
Trinkwasser.
Der Wassertank fasst maximal 3 Liter;
füllen Sie nicht mehr ein.
Die Komponenten des Wasserspenders
und des Wassertanks sollten nicht in der
C
Kühlschrank/Bedienungsanleitung
Spülmaschine gereinigt werden.
29 /40 DE
Page 67

5 Nutzung des Geräts
5.21. Tropfschale
Wasser, das bei der Nutzung des Wasserspenders
heruntertropft, sammelt sich in der Tropfschale.
Nehmen Sie den Kunststofffilter wie in der
Abbildung gezeigt heraus.
Entfernen Sie angesammeltes Wasser mit einem
sauberen, trockenen Tuch.
5.22. Gemüsefach mit
Feuchtigkeitsregelung (ImmerFrisch)
* optional
Im Gemüsefach mit Feuchtigkeitsregelung bleiben
Gemüse und Früchte länger frisch.
Legen Sie Blattgemüse wie Salat, Spinat und
anderes Gemüse, das schnell Feuchtigkeit verliert,
möglichst waagerecht in das Fach. Stellen Sie
solches Gemüse nicht auf seine Wurzeln.
Geben Sie Gemüse niemals verpackt in das
Gemüsefach. Falls Gemüse in seiner Verpackung
verbleibt, verdirbt es in kürzester Zeit. Wenn Sie
eine hohe Feuchtigkeit einstellen, trocknet Ihr
Gemüse nicht aus und lässt sich auch unverpackt
längere Zeit ohne nennenswerten Qualitätsverlust
lagern. Falls Gemüse aus hygienischen Gründen
nicht mit anderen Lebensmittel in Kontakt geraten
soll, nutzen Sie perforiertes Papier, Schaumstoff
oder ähnliche Verpackungsmaterialien statt Tüten
oder Beuteln.
Beim Platzieren von Gemüse im Gemüsefach
sollten Sie das unterschiedliche Gewicht der
einzelnen Gemüsesorten beachten. Schweres,
hartes Gemüse sollte auf dem Boden des
Gemüsefaches liegen, leichtes und weiches
Gemüse darüber.
Geben Sie Erbsen, Aprikosen, Pfirsiche
und besonders Äpfel nicht gemeinsam mit
anderen Obst- oder Gemüsesorten in dasselbe
Gemüsefach, da diese Früchte und Gemüse
Ethylengas abgeben. Ethylengas führt dazu, dass
andere Früchte schneller reifen und daher auch
schneller verderben.
30 /40 DE
Kühlschrank/Bedienungsanleitung
Page 68

5 Nutzung des Geräts
7
6
5
9
10
8
20
17
18
2
1
4
16
15
12
14
3
13
21
11
19
3”
1. Tiefkühlbereich-Temperatureinstellungsanzeige
2. Tiefkühlbereich-Temperatureinstellungsfunktion
3. Schnellgefriertaste/Eisbereiter-ein/aus-Taste (3 s)
4. Schnellgefrieranzeige
5. Kühlbereich-Temperatureinstellungsanzeige
6. Kühlbereich-Temperatureinstellfunktion
7. Schnellkühltaste
8. Öko-Fuzzy (besonders ökonomischer Betrieb)
9. Öko-Fuzzy-Anzeige (besonders ökonomischer
Betrieb)
10. Urlaubsfunktion
11. Urlaubsfunktionsanzeige
12. Alarm-aus-Warnung
13. Energiesparanzeige
C
Kühlschrank/Bedienungsanleitung
* Optional: Die Abbildungen in dieser Anleitung dienen zur Orientierung und können etwas vom
tatsächlichen Aussehen des Gerätes abweichen. Falls bestimmte Teile bei Ihrem Gerät nicht vorhanden
sind, gilt die Abbildung für andere Modelle.
14. Tastensperre
15. Tastensperre-Anzeige
16. Stromausfall-/Hochtemperatur-/Fehler-
Warnanzeige
17. Flaschenschnellkühl-/Schnell-Eisbereiter-
Auswahlfunktion (Schnellkühlen)
18. Flaschenschnellkühl-/Schnell-Eisbereiter-
Funktionsanzeige
19. Flaschenschnellkühlanzeige (Schnellkühlen)
20. Schnellkühlanzeige
21. Schnell-Eisbereiter-Anzeige
* optional
31 /40 DE
Page 69

5 Nutzung des Geräts
1. Tiefkühlbereich-Temperaturanzeige
Zeigt die für den Tiefkühlbereich eingestellte
Temperatur an.
2. Tiefkühlbereich-Temperatureinstellung
Ermöglicht die Vorgabe der Temperatur
des Tiefkühlbereiches. Durch mehrmaliges
Drücken dieser Taste stellen Sie die
Tiefkühlbereichtemperatur auf -18 °, -19 °C, -20
°, -21 °C, -22 °, -23 °C oder -24 ° ein.
3. Schnellgefriertaste /
Eisbereiter-ein/aus-Taste (3 s)
Die Schnellgefrieranzeige leuchtet bei aktiver Schnellgefrierfunktion. Zum Abbrechen dieser
Funktion drücken Sie die Schnellgefriertaste noch
einmal. Die Schnellgefrieranzeige erlischt, die normalen Einstellungen werden wiederhergestellt.
Sofern Sie diese Funktion nicht vorzeitig abschalten, wird das Schnellgefrieren beendet, sobald die nötige Temperatur erreicht ist. Nach 4 Stunden schaltet sich diese Funktion automatisch ab. Wenn Sie
große Mengen frischer Lebensmittel einfrieren möchten, drücken Sie die Schnellgefriertaste, bevor Sie die
Lebensmittel in den Tiefkühlbereich geben. Sollten Sie
die Schnellgefriertaste mehrmals innerhalb kurzer Zeit
drücken, spricht eine elektronische Schutzschaltung
an, die dafür sorgt, dass der Kompressor nicht sofort
anläuft. Diese Funktion wird nach einem Stromausfall
nicht automatisch wieder eingeschaltet!
4. Schnellgefrieranzeige
Dieses Symbol blinkt, wenn die
Schnellgefrierfunktion aktiv ist.
5. Kühlbereich-Temperatureinstellungsanzeige
Zeigt die für den Kühlbereich eingestellte
Temperatur an.
6. Kühlbereich-Temperatureinstellung
Ermöglicht die Vorgabe der Temperatur des
Kühlbereiches. Durch mehrmaliges Drücken dieser
Taste stellen Sie die Kühlbereichtemperatur auf 8
°, 7 °, 6 °, 5 °, 4 °, 3 ° oder 2 °C ein.
32 /40 DE
7. Schnellkühltaste
Wenn Sie die Schnellkühltaste drücken, sinkt die
Temperatur des Fachs unter die eingestellten
Werte. Diese Funktion dient dazu, Lebensmittel
im Kühlbereich schnell herunterzukühlen. Wenn
Sie große Mengen Lebensmittel kühlen möchten,
sollten Sie diese Funktion vor dem Einlagern der
Lebensmittel einschalten. Die Schnellkühlanzeige
leuchtet bei aktiver Schnellkühlfunktion.
Zum Abbrechen dieser Funktion drücken
Sie die Schnellkühltaste noch einmal. Die
Schnellkühlanzeige erlischt, die normalen
Einstellungen werden wiederhergestellt. Sofern
Sie diese Funktion nicht vorzeitig abschalten, wird
das Schnellkühlen beendet, sobald die nötige
Temperatur erreicht ist. Nach 2 Stunden schaltet
sich diese Funktion automatisch ab.
Diese Funktion wird nach einem Stromausfall nicht
automatisch wieder eingeschaltet.
8. Öko-Fuzzy (besonders ökonomischer Betrieb)
Beim Drücken der Öko-Fuzzy-Taste wird die
Öko-Fuzzy-Funktion eingeschaltet, die ÖkoFuzzy-Anzeige leuchtet auf. Spätestens sechs
Stunden später arbeitet Ihr Kühlgerät besonders
ökonomisch; die Energiesparanzeige leuchtet. Zum
Abschalten der Öko-Fuzzy-Funktion drücken Sie
die Öko-Fuzzy-Taste noch einmal.
9. Öko-Fuzzy-Anzeige (besonders ökonomischer Betrieb)
Dieses Symbol leuchtet bei aktiver Öko-FuzzyFunktion auf.
10. Urlaubsfunktion
Durch 3-sekündiges Gedrückthalten der ÖkoFuzzy-Taste wird die Urlaubsfunktion aktiviert, die
Urlaubsfunktionsanzeige leuchtet auf. Die Kühlung
des Tiefkühlbereiches wird abgeschaltet, die
Temperatur des Kühlbereiches auf 15 °C fixiert,
damit keine unangenehmen Gerüche entstehen.
Wenn diese Funktion aktiv ist, wird die Temperatur
des Kühlbereiches nicht mehr angezeigt.
Zum Deaktivieren der Urlaubsfunktion halten Sie
die Öko-Fuzzy-Taste 3 Sekunde lang gedrückt.
Kühlschrank/Bedienungsanleitung
Page 70

5 Nutzung des Geräts
11. Urlaubsfunktionsanzeige
Diese Anzeige leuchtet bei aktiver Urlaubsfunktion.
12. Alarm-aus-Warnung
Bei einem Stromausfall/Temperaturalarm
drücken Sie nach Prüfen der Lebensmittel im
Tiefkühlbereich die Alarm-aus-Taste zum Aufheben
der Warnung.
13. Energiesparfunktionsanzeige (Display aus)
Falls die Gerätetüren lange Zeit geschlossen
bleiben, wird die Energiesparfunktion automatisch
aktiviert und das Energiesparsymbol leuchtet.
Bei aktiver Energiesparfunktion erlöschen
sämtliche Display-Symbole mit Ausnahme des
Energiesparsymbols. Die Energiesparfunktion wird
aufgehoben, sobald Tasten betätigt werden oder
die Tür geöffnet wird. Das Display zeigt wieder die
normalen Symbole.
Die Energiesparfunktion wird während der
Lieferung ab Werk aktiviert und kann nicht
aufgehoben werden.
14. Tastensperre
Durch 3-sekündiges Gedrückthalten der
Tastensperre-Taste wird die Tastensperre aktiviert,
die Tastensperre-Anzeige leuchtet auf. Wenn diese
Funktion aktiv ist, sind sämtliche Tasten ohne
Funktion. Zum Aufheben dieser Funktion halten Sie
die Tastensperre-Taste erneut 3 Sekunden lang
gedrückt.
15. Tastensperre-Anzeige
Diese Anzeige leuchtet bei aktiver Tastensperre.
16. Stromausfall-/Hochtemperatur-/Fehler-
Warnanzeige
Diese Anzeige leuchtet bei einem Stromausfall,
zu hohen Innentemperaturen und sonstigen
Fehler. Bei längeren Stromausfällen blinkt der
höchste Temperaturwert, den der Tiefkühlbereich
erreicht, in der digitalen Anzeige. Drücken Sie nach
Kontrolle der Lebensmittel im Tiefkühlbereich zum
Aufheben der Warnung die Alarm-aus-Taste.
Bitte beachten Sie den Abschnitt „Empfohlene
Problemlösungen“ in Ihrer Anleitung, falls Sie
bemerken, dass diese Leuchte eingeschaltet ist.
17. Flaschenschnellkühl-/Schnell-EisbereiterAuswahlfunktion
Wenn die Flaschenschnellkühl-/SchnellEisbereiter-Funktionstaste 3 Sekunden lang
gedrückt wird, blinkt die Flaschenschnellkühl-/
Schnell-Eisbereiter-Auswahlanzeige.
Wenn Sie diese Taste innerhalb 30 Sekunden nicht
noch einmal drücken, tritt wieder der vorherige
Zustand ein – die Flaschenschnellkühl- und SchnellEisbereiter-Auswahlanzeigen schalten sich aus. Mit
jeder kurzen Betätigung der Flaschenschnellkühl-/
Schnell-Eisbereiter-Funktionstaste erhöht sich
der Wert in der Flaschenschnellkühl-/SchnellEisbereiter-Auswahlanzeige um eins. Wenn
„1“ angezeigt wird, bedeutet dies, dass die
Flaschenschnellkühlfunktion aktiviert werden
kann; wenn „2“ angezeigt wird, kann die SchnellEisbereiter-Funktion aktiviert werden. Falls Sie die
Flaschenschnellkühl-/Schnell-Eisbereiter-Taste bei
Anzeige von „1“ erneut 3 Sekunden lang drücken,
wird die Flaschenschnellkühlfunktion aktiviert und die
Flaschenschnellkühlanzeige leuchtet. „1“ leuchtet
kontinuierlich und die Symbole links leuchten wie
Animationen. Falls Sie die Flaschenschnellkühl-/
Schnell-Eisbereiter-Taste bei Anzeige von „2“
erneut 3 Sekunden lang drücken, wird die
Schnell-Eisbereiter-Funktion aktiviert und die
Schnell-Eisbereiter-Anzeige leuchtet. „2“ leuchtet
kontinuierlich und die Symbole links leuchten wie
Animationen. Die Symbole erlöschen, sobald der
Vorgang der ausgewählten Funktion abgeschlossen
ist.
Wenn Sie die akustische Warnung beenden
möchten, drücken Sie einfach kurz die
Flaschenschnellkühl-/Schnell-EisbereiterFunktionstaste. Wenn Sie die Flaschenschnellkühl-/
Schnell-Eisbereiter-Taste kurz drücken, während
die Funktion aktiv ist, werden Sie keine Änderung
am Display beobachten. Wenn bei aktiver
Kühlschrank/Bedienungsanleitung
33 /40 DE
Page 71

5 Nutzung des Geräts
Flaschenschnellkühl-/Schnell-Eisbereiter-Funktion
ein Stromausfall auftritt, wird das Schnellkühlen
bei Wiederherstellung der Stromversorgung
fortgesetzt.
18. Flaschenschnellkühl-/Schnell-EisbereiterFunktionsanzeige
Zeigt die eingestellte Funktion. Wenn „1“
angezeigt wird, bedeutet dies, dass die
Flaschenschnellkühlfunktion ausgewählt wird oder
wurde; wenn „2“ angezeigt wird, bedeutet dies,
dass die Schnell-Eisbereiter-Funktion ausgewählt
wird oder wurde.
19. Flaschenschnellkühlanzeige
Zeigt die Flaschenschnellkühlfunktion.
20. Schnellkühltaste
Dieses Symbol blinkt, wenn die Schnellkühlfunktion
aktiv ist.
21. Schnell-Eisbereiter-Anzeige
Zeigt die Schnell-Eisbereiter-Funktion.
5.23. Flaschenschnellkühl-/SchnellEisbereiter-Fach
(Schnellkühlen)
(Diese Funktion gibt es nur bei bestimmten Geräten.)
Mit dem Flaschenschnellkühlfach können
Sie Eis herstellen oder Ihre Getränke schnell
herunterkühlen.
Dieses geschlossene Fach unten links im
Kühlbereich wird mit Hilfe eines separaten
Gebläses und einer Kühlfläche gekühlt.
Nachdem Sie Ihr Getränk oder den Eisbehälter
in das Fach gegeben haben, können Sie durch
Betätigung der entsprechenden Tasten an der
Anzeige die Schnellkühlfunktion aktivieren.
34 /40 DE
Kühlschrank/Bedienungsanleitung
Page 72

5 Nutzung des Geräts
C
C
Nach Abschluss des Kühlens verschwindet das Symbol „=“ von
der Anzeige. Nehmen Sie nach
Beendigung des Vorgangs das
Getränk oder Eis aus dem Fach.
Wenn Sie es weiter kühlen möchten, können Sie Ihr Getränk oder
den Eisbehälter im Fach lassen und
die Funktion erneut aktivieren.
Warten Sie eine Weile, falls Sie
die Flaschenschnellkühlfunktion
aktivieren möchten und die
Warnmeldung „0“ am Display sehen. Diese Warnmeldung wird
möglicherweise angezeigt, wenn
Sie das Fach 4-mal kurz hintereinander verwendet haben.
Wenn Sie diese Meldung sehen, verhindert der Kühlschrank
zur Optimierung der Kühlleistung
und zur Beibehaltung der
Aufbewahrungstemperatur von
Lebensmitteln einige Zeit die
Benutzung des Fachs. Sobald
die Innentemperaturen des
Kühlschranks ausgeglichen sind,
ist das Fach wieder einsatzbereit.
Bitte versuchen Sie es später noch
einmal.
C
C
C
Warten Sie eine Weile, falls
Sie die Eisbereiter-Funktion
aktivieren möchten und die
Warnmeldung „0“ am Display
sehen. Diese Warnmeldung
wird möglicherweise angezeigt,
wenn Sie das Fach 2-mal kurz
hintereinander verwendet haben.
Wenn Sie diese Meldung sehen,
verhindert der Kühlschrank zur
Optimierung der Kühlleistung
und zur Beibehaltung der
Aufbewahrungstemperatur von
Lebensmitteln einige Zeit die
Benutzung des Fachs. Sobald
die Innentemperaturen des
Kühlschranks ausgeglichen sind,
ist das Fach wieder einsatzbereit.
Bitte versuchen Sie es später
noch einmal.
Geben Sie ausschließlich Getränke
und den mitgelieferten Eisbehälter
in dieses Fach. Achten Sie darauf, dass die Getränke, die Sie in
das Fach geben, sicher verschlossen sind.
Stellen Sie vor Aktivierung der
Funktion sicher, dass die Tür des
Fachs vollständig geschlossen ist.
Dieses Fach wurde darauf
ausgelegt, 1,5 Liter Wasser bei
20 °C in 15 Minuten auf 10 °C
herunterzukühlen. Wenn Sie
den Eindruck haben, dass das
Getränk, das Sie aus dem Fach
nehmen möchten, nicht kalt genug
ist, können Sie das Fach erneut
aktivieren.
Kühlschrank/Bedienungsanleitung
35 /40 DE
Page 73

5 Nutzung des Geräts
Lassen Sie ein kaltes Getränk aus
Hygiene- und Sicherheitsgründen
C
nicht im Fach. Wenn
kohlensäurehaltige Getränke lange Zeit in diesem Fach aufbewahrt
werden, können die Flaschen bersten usw.
Wenn die Eisbereiter-Funktion abgeschlossen ist, könnte das Eis
im Eisbehälter schmelzen, da das
Fach wieder auf Temperaturen zur
Lagerung frischer Lebensmittel zurückgesetzt wird. Lassen Sie kein
gefrorenes Eis in dem Fach.
Wenn dieses Fach aktiviert ist, arbeitet das Gebläse im Fach bei
höchster Geschwindigkeit, damit innerhalb kürzester Zeit maximale
Kühlleistung erreicht wird. Aus diesem Grund arbeitet das Gerät lauter, wenn das Fach in Betrieb ist.
36 /40 DE
Kühlschrank/Bedienungsanleitung
Page 74

6 Pflege und Reinigung
Eine regelmäßige Reinigung erhöht die
Lebensdauer des Geräts.
HINWEIS: Trennen Sie Ihren Kühlschrank
B
• Verwenden Sie zur Reinigung auf keinen Fall
• Schütten Sie ein Teelöffel Karbonat in einen
• Achten Sie darauf, dass das Gehäuse der
• Reinigen Sie die Tür mit einem feuchten Tuch.
• Verwenden Sie auf keinen Fall bei der
• Verwenden Sie keine spitzen oder scheuernde
vor der Reinigung vom Netz.
scharfen oder spitzen Gegenstände, Seife,
Hausreinigungsmittel, Reinigungsmittel, Gas,
Benzin, Lack u. Ä.
halben Liter Wasser. Nehmen Sie ein Tuch,
tauchen Sie es in diese Flüssigkeit und wringen
Sie es gut kräftig. Wischen Sie mit diesem Tuch
das Innere des Geräts und trocknen Sie es
gründlich.
Leuchte und sonstige elektrischen Teile nicht
mit Wasser in Berührung kommen.
Entnehmen Sie den Inhalt vom Innenraum
und den Türen. Entfernen Sie die Regale nach
oben hebend. Nach der Reinigung und dem
Trocknen legen Sie es wieder ein, indem Sie es
nach unten schieben.
Reinigung der Außenfläche des Geräts und den
verchromten Teilen chlorhaltigem Wasser oder
Reinigungsmittel. Chlor führt bei dieser Art von
Oberflächen zur Verrostungen.
Gegenstände, Seifen, Reinigungsmittel
bzw. Chemikalien, sowie auch kein Benzin,
keine Benzole bzw. Wachse usw. Andernfalls
werden die Einprägungen auf den Plasteteilen
möglicherweise beschädigt oder deformiert.
Verwenden Sie warmes Wasser und einen
weichen Lappen zum anschließenden
Trockenreiben.
6.1. Vermeidung von schlechtem
Geruch
Bei der Herstellung Ihres Geräts wurden keinerlei
Materialien verwendet, die Geruch verursachen
könnten. Jedoch können aufgrund von
ungeeigneter Lagerung von Lebensmitteln und
unsachgemäßer Reinigung der Innenseite Gerüche
entstehen.
Zur Vermeidung dieses Problems reinigen Sie es
regelmäßig alle 15 Tage.
• Bewahren Sie die Speisen in geschlossenen
Behältern auf. Lebensmittel, die in offenen
Behältern aufbewahrt werden, können durch
die Verbreitung von Mikroorganismen Gerüche
verursachen.
• Keine Lebensmittel deren Aufbewahrungsdauer
abgelaufen ist im Kühlschrank aufbewahren.
6.2. Schutz von
Kunststoffoberflächen
Das Ausschütten von Öl kann den
Kunststoffoberflächen Schaden zufügen, daher
sollte hier mit lauwarmem Wasser gereinigt
werden.
Kühlschrank/Bedienungsanleitung
37 /40 DE
Page 75

7 Problemlösung
Bitte schauen Sie sich zunächst diese Liste an, bevor Sie sich an den Kundendienst wenden. Das kann
Ihnen Zeit und Geld sparen. In der Liste finden Sie Lösungsvorschläge für allgemeine Probleme, die nicht
durch Material- oder Herstellungsfehler verursacht werden. Bestimmte hierin erwähnte Funktionen und
Merkmale treffen möglicherweise nicht auf Ihr Produkt zu.
Der Kühlschrank schaltet sich nicht ein.
• Der Netzstecker ist nicht vollständig eingesteckt. >>> Stecker vollständig in die Steckdose
einstecken.
• Die mit der Steckdose, die das Produkt mit Strom versorgt, verbundene Sicherung oder die
Hauptsicherung ist durchgebrannt. >>> Sicherungen prüfen.
Kondensation an den Seitenwänden des Kühlbereiches (Multizone, Kühlkontrolle und FlexiZone).
• Die Umgebungstemperatur ist zu niedrig. >>> Produkt nicht in Umgebungen mit Temperaturen
unter -5 °C aufstellen.
• Die Tür wird zu häufig geöffnet. >>> Darauf achten, die Gerätetür nicht zu häufig zu öffnen.
• Die Umgebungsfeuchtigkeit ist zu hoch. >>> Produkt nicht in Umgebungen mit hoher
Luftfeuchtigkeit aufstellen.
• Lebensmittel mit hohem Flüssigkeitsgehalt werden in nicht abgedichteten Behältern aufbewahrt.
>>> Lebensmittel mit hohem Flüssigkeitsgehalt in abgedichteten Behältern aufbewahren.
• Die Gerätetür wurde offen gelassen. >>> Gerätetür nicht längere Zeit offen lassen.
• Das Thermostat ist auf eine zu geringe Temperatur eingestellt. >>> Thermostat auf eine geeignete
Temperatur einstellen.
Der Kompressor läuft nicht.
• Wenn ein Stromausfall auftritt oder der Netzstecker gezogen und wieder angeschlossen wird,
ist der Gasdruck im Kühlsystem des Gerätes nicht ausgeglichen, was den Temperaturschutz des
Kompressors auslöst. Das Produkt startet nach etwa 6 Minuten neu. Falls das Produkt nach diesem
Zeitraum nicht neu startet, wenden Sie sich an den Kundendienst.
• Die Abtaufunktion ist aktiv. >>> Dies ist bei einem vollautomatisch abtauenden Produkt normal.
Das Abtauen wird regelmäßig durchgeführt.
• Das Gerät ist nicht an die Stromversorgung angeschlossen. >>> Prüfen, ob das Netzkabel
angeschlossen ist.
• Die Temperatur ist nicht richtig eingestellt. >>> Die geeignete Temperatureinstellung wählen.
• Der Strom ist ausgefallen. >>> Sobald die Stromversorgung wiederhergestellt ist, setzt das Gerät
den Betrieb fort.
Während der Benutzung nehmen die Betriebsgeräusche des Kühlschranks zu.
• Die Betriebsleistung des Gerätes kann je nach Umgebungstemperatur variieren. Dies ist völlig
normal und keine Fehlfunktion.
Der Kühlschrank arbeitet zu oft oder zu lange.
38 /40 DE
Kühlschrank/Bedienungsanleitung
Page 76

Problemlösung
• Ihr neues Gerät ist vielleicht etwas grö0er als sein Vorgänger. Größere Produkte arbeiten länger.
• Die Umgebungstemperatur ist sehr hoch. >>> Das Gerät arbeitet bei höheren
Umgebungstemperaturen normalerweise länger.
• Das Gerät wurde erst vor Kurzem angeschlossen oder mit neuen Lebensmitteln beladen. >>>
Das Gerät benötigt mehr Zeit zum Erreichen der eingestellten Temperatur, wenn es gerade erst
angeschlossen oder mit neuen Lebensmitteln befüllt wurde. Dies ist völlig normal.
• Es wurden erst vor Kurzem große Mengen warmer oder gar heißer Lebensmittel in das Gerät
gegeben. >>> Keine warmen oder gar heißen Lebensmittel in das Gerät geben.
• Die Türen wurden häufig geöffnet oder längere Zeit offen gelassen. >>> Da warme Luft in das
Innere strömt, muss das Gerät länger arbeiten. Türen nicht zu häufig öffnen.
• Die Tür des Tiefkühl- oder Kühlbereichs steht halb offen. >>> Prüfen, ob Türen vollständig
geschlossen sind.
• Das Gerät wurde auf eine zu geringe Temperatur eingestellt. >>> Höhere Temperatur einstellen
und warten, bis das Gerät die eingestellte Temperatur erreicht hat.
• Die Türdichtungen von Kühl- oder Gefrierbereich sind verschmutzt, verschlissen, beschädigt oder
sitzen nicht richtig. >>> Dichtung reinigen oder ersetzen. Beschädigte/verschlissene Dichtungen
sorgen dafür, dass das Produkt zum Halten der aktuellen Temperatur länger arbeiten muss.
Die Temperatur im Tiefkühlbereich ist sehr niedrig, während die Temperatur im Kühlbereich angemessen ist.
• Die Tiefkühlbereichtemperatur ist sehr niedrig eingestellt. >>> Tiefkühlbereichtemperatur höher
einstellen, Temperatur nach einer Weile prüfen.
Die Temperatur im Tiefkühlbereich ist sehr niedrig, während die Temperatur im Kühlbereich angemessen ist.
• Die Kühlbereichtemperatur ist sehr niedrig eingestellt. >>> Tiefkühlbereichtemperatur höher
einstellen, Temperatur nach einer Weile prüfen.
Im Kühlbereich gelagerte Lebensmittel frieren ein.
• Die Kühlbereichtemperatur ist sehr niedrig eingestellt. >>> Tiefkühlbereichtemperatur höher
einstellen, Temperatur nach einer Weile prüfen.
Die Temperatur im Kühl- oder Tiefkühlbereich ist zu hoch.
• Die Kühlbereichtemperatur ist sehr hoch eingestellt. >>> Die Kühlbereichtemperatur beeinflusst
die Tiefkühlbereichtemperatur. Warten Sie, bis die entsprechenden Teile das erforderliche
Temperatur erreicht haben, indem Sie die Temperatur des Kühl- oder Tiefkühlbereichs ändern.
• Die Türen wurden häufig geöffnet oder längere Zeit offen gelassen. >>> Türen nicht zu häufig
öffnen.
• Die Tür steht halb offen. >>> Tür vollständig schließen.
• Das Gerät wurde erst kurz zuvor angeschlossen oder es wurden neue Lebensmittel hineingegeben.
>>> Dies ist völlig normal. Das Gerät benötigt mehr Zeit zum Erreichen der eingestellten
Temperatur, wenn es gerade erst angeschlossen oder mit neuen Lebensmitteln befüllt wurde.
• Es wurden erst vor Kurzem große Mengen warmer oder gar heißer Lebensmittel in das Gerät
gegeben. >>> Keine warmen oder gar heißen Lebensmittel in das Gerät geben.
Vibrationen oder Betriebsgeräusche.
Kühlschrank/Bedienungsanleitung
39 /40 DE
Page 77

Problemlösung
• Der Boden ist nicht eben oder stabil. >>> Falls das Produkt bei langsamem Bewegen wackelt,
müssen die Füße zum Ausgleichen des Gerätes angepasst werden. Außerdem darauf achten, dass
der Untergrund ausreichend stabil ist, das Gerät zu tragen.
• Jegliche auf dem Gerät abgelegten Dinge können Geräusche verursachen. >>> Jegliche auf dem
Gerät abgelegten Dinge entfernen.
Das Produkt macht Sprüh- oder Fließgeräusche etc.
• Die Arbeitsweise des Gerätes beinhaltet Flüssigkeits- und Gasströme. >>>Dies ist völlig normal
und keine Fehlfunktion.
Das Gerät macht windartige Geräusche.
• Das Produkt nutzt einen Lüfter zur Kühlung. Dies ist völlig normal und keine Fehlfunktion.
Es befindet sich Kondenswasser an den Innenwänden des Produktes.
• Bei heißen oder feuchten Wetterlagen treten verstärkt Eisbildung und Kondensation auf. Dies ist
völlig normal und keine Fehlfunktion.
• Die Tür wurde häufig geöffnet oder längere Zeit offen gelassen. >>> Tür nicht zu häufig öffnen; Tür
nicht offen stehen lassen.
• Die Tür steht halb offen. >>> Tür vollständig schließen.
Es befindet sich Kondenswasser an der Außenseite des Produktes oder zwischen den Türen.
• Eventuell herrscht hohe Luftfeuchtigkeit; dies ist je nach Wetterlage völlig normal. >>> Das
Kondenswasser verdunstet, wenn sich die Luftfeuchtigkeit verringert.
Der Innenraum riecht unangenehm.
•DasProduktwurdenichtregelmäßiggereinigt.>>>InnenraumregelmäßigmiteinemSchwamm
und warmem Wasser und etwas in Wasser aufgelöstem Natron reinigen.
•BestimmteVerpackungsmaterialienkönnenGeräuscheverursachen.>>>Geruchsneutrale
Halterungen und Verpackungen verwenden.
•LebensmittelwurdeinoffenenBehälternindenKühlschrankgestellt.>>>Lebensmittelinsicher
abgedichteten Behältern aufbewahren. Andernfalls können sich Mikroorganismen ausbreiten und
unangenehme Gerüche verursachen. Jegliche abgelaufenen oder verdorbenen Lebensmittel aus
dem Gerät entfernen.
Die Tür lässt sich nicht schließen.
• Lebensmittelverpackungen blockieren die Tür. >>> Inhalt so platzieren, dass die Tür nicht blockiert
wird.
• Das Gerät steht nicht vollständig aufrecht auf dem Boden. >>> Füße zum Ausgleichen des Gerätes
anpassen.
• Der Boden ist nicht eben oder stabil. >>> Darauf achten, dass der Untergrund eben und
ausreichend stabil ist, das Gerät zu tragen.
Das Gemüsefach klemmt.
• Die Lebensmittel berühren den oberen Bereich der Schublade. >>> Lebensmittel in der Schublade
neu anordnen.
A
WARNUNG: Falls sich das Problem nicht durch Befolgen der Anweisungen in diesem Abschnitt
beheben lässt, wenden Sie sich an Ihren Händler oder ein autorisiertes Kundencenter. Versuchen Sie
nicht, das Produkt zu reparieren.
40 /40 DE
Kühlschrank/Bedienungsanleitung
Page 78

www.beko.com.tr
www.beko.com
57 4068 0000/AL
1/4
EN-DE
Page 79

CN160120
CN161220X
CN161220FCX
HR SL
Page 80

EWWERQWEW
Hladnjak
Korisnički priručnik
HR
Page 81

Molimo, prvo pročitajte ovaj priručni!
Poštovani korisniče,
Zahvaljujemo na odabiru ovog proizvoda. Nadamo se da ćete biti zadovoljni sjajnim rezultatima ovog
proizvoda koji je proizveden primjenom visokokvalitetne i najsuvremenije tehnologije. Stoga vas molimo,
pročitajte pažljivo ovaj priručnik u cijelosti kao i ostalu isporučenu dokumentaciju prije uporabe proizvoda
i čuvajte ga za buduću uporabu. Ako proizvod odlučite proslijediti nekom drugom tada mu proslijedite i
ovaj priručnik. Pridržavajte se svih upozorenja i informacija u korisničkom priručniku.
Upamtite kako je ovaj korisnički priručnik primjenjiv i na nekoliko drugih modela. Razlike između modela
navest će se u priručniku.
Objašnjenje simbola
U korisničkom priručniku koriste se sljedeći simboli:
Važne informacija i korisni savjeti o
C
A
načinu korištenja.
Upozorenja za situacije opasne po život
i imovinu.
Upozorenje za strujni udar.
B
Ambalažni materijal proizvoda proizveden je od recikliranih materijala u skladu s nacionalnim odredbama o zaštiti
okoliša.
Page 82

Sadržaj
1 Važne upute za sigurnost i očuvanje
okoliša 3
1.1. Općenite informacije o sigurnosti . . . . . . . . 3
1.2. Namjena . . . . . . . . . . . . . . . . . . . . . . . . . . 6
1.3. Sigurnost djece . . . . . . . . . . . . . . . . . . . . . 7
1.4. Sukladnost s Direktivom o gospodarenju
otpadnim električnim i elektroničkim uređajima
i opremom (WEEE Directive) i odlaganjem
otpada: . . . . . . . . . . . . . . . . . . . . . . . . . . . 7
1.5. Sukladnost s Direktivom o ograničavanju
opasnih tvari (RoHS Directive): . . . . . . . . . . 7
1.6. Informacije o pakiranju. . . . . . . . . . . . . . . . 7
2 Vaš uređaj 8
3 Postavljanje 9
3.1. Odgovarajuća lokacija za postavljanje . . . . . 9
3.2. Postavljanje plastičnih klinova. . . . . . . . . . . 9
3.3. Priključivanje na električnu mrežu. . . . . . . . 9
3.4. Podešavanje nožica . . . . . . . . . . . . . . . . . 10
3.5. Rasvjetna žaruljica. . . . . . . . . . . . . . . . . . 10
3.6. Upozorenje za otvorena vrata . . . . . . . . . . 10
3.7. Prijevoz proizvoda . . . . . . . . . . . . . . . . . . 10
4 Priprema 11
4.1. Ušteda energije . . . . . . . . . . . . . . . . . . . . 11
4.2. Preporuke za odjeljke hladnjaka . . . . . . . . 11
4.3. Prije uporabe. . . . . . . . . . . . . . . . . . . . . . 11
5 Rukovanje uređajem 12
5.1. Kontrolni zaslon . . . . . . . . . . . . . . . . . . . . 12
5.2. Dvostruki rashladni sustav. . . . . . . . . . . . 17
5.3. Zamrzavanje svježih namirnica. . . . . . . . . 17
5.4. Preporuke za očuvanje zamrznutih
namirnica . . . . . . . . . . . . . . . . . . . . . . . . 18
5.5. Stavljanje namirnica u hladnjak. . . . . . . . . 18
5.6. Informacije o dubokom zamrzavanju. . . . . 18
5.7. Ledomat . . . . . . . . . . . . . . . . . . . . . . . . . 19
5.8. Icematic ledomat . . . . . . . . . . . . . . . . . . . 19
5.9. Posudica za led . . . . . . . . . . . . . . . . . . . . 20
5.10. Plavo svjetlo. . . . . . . . . . . . . . . . . . . . . . . 20
5.11. Držač za jaja . . . . . . . . . . . . . . . . . . . . . . 20
5.12. Opis i čišćenje filtra mirisa. . . . . . . . . . . . 21
5.13. Odjeljak za meso i mliječne proizvode . . . 21
5.14. Klizni spremnik . . . . . . . . . . . . . . . . . . . . 22
5.15. Rotirajući spremnik . . . . . . . . . . . . . . . . . 22
5.16. Posuda za povrće . . . . . . . . . . . . . . . . . . 23
5.17. Uporaba dispenzera za vodu . . . . . . . . . . 24
5.18. Punjenje spremnika dispenzera za vodu . . 24
5.19. Čišćenje spremnika za vodu . . . . . . . . . 25
5.20. Posuda za prikupljanje vode . . . . . . . . . . 26
5.21. Odjeljak za povrće s kontrolom vlage . . . . 26
5.22. Odjeljak za brzo hlađenje boce / brzo
stvaranje leda . . . . . . . . . . . . . . . . . . . . . 30
6 Čišćenje i održavanje 33
6.1. Izbjegavanje neugodnih mirisa . . . . . . . . . 33
6.2. Zaštita plastičnih površina . . . . . . . . . . . 33
7 Rješavanje problema 34
2 /36 HR
Hladnjak
Page 83

1 Važne upute za sigurnost i očuvanje okoliša
Ovaj odjeljak sadrži informacije
o sigurnosti koje će vam pomoći
zaštiti se od opasnosti od tjelesnih
ozljeda i oštećenja imovine. Ne
pridržavanje ovih uputa poništava
sva jamstva.
1.1. Općenite informacije o
sigurnosti
•Djecastarijaod8godinai
ljudi sa smanjenim tjelesnim,
psihičkim, senzornim i
mentalnim sposobnostima, kao i
neupućene ili neiskusne osobe,
mogu koristiti ovaj uređaj ako su
pod nadzorom i ako su upućeni
u sigurnu uporabu uređaja, kao
i povezane opasnosti.. Djeca
se ne smiju igrati s uređajem.
Čišćenje i korisničko održavanje
uređaja nikada ne smiju
obavljati djeca, osim kad su pod
nadzorom odrasle osobe.
•Vezanozasvapitanjaiprobleme
povezane s proizvodom
posavjetujte se s ovlaštenim
servisom. Nemojte sami
pokušati popraviti proizvod i ne
dopuštajte drugima da to čine
ako niste o tome obavijestili
ovlašteni servis.
•Akodođedokvaratijekomrada
uređaja isključite ga iz strujne
utičnice.
•Akojeproizvodpokvarenne
smije se koristiti osim ako ga
nije popravilo osoblje ovlaštenog
servisa. Postoji opasnost od
električnog udara!
•Proizvodspojitenauzemljenu
utičnicu osiguranu osiguračem
u skladu s vrijednostima na
nazivnoj pločici. Uzemljenje
treba napraviti ovlašteni
električar Naša tvrtka neće
biti odgovorna za bilo kakva
oštećenja koja nastanu kad se
proizvod koristi bez uzemljenja u
skladu s lokalnim zakonima.
•Kadnekoristiteproizvod
isključite ga iz strujne utičnice.
•Proizvodnikadneperite
prskanjem ili ulijevanjem vode
u njega! Postoji opasnost od
električnog udara!
•Nikadnedirajteutikačiutičnicu
mokrim rukama! Ne isključujte
uređaj povlačenjem kabela,
uvijek ga izvlačite tako da
rukama pridržavate utikač.
•Redovitočistitevrhutikačasa
suhom krpom, u protivnom
postoji opasnost od požara.
•Neuključujteuređajuutičnicu
ako je olabavljena.
•Nikadnespajajteproizvodna
sustav za uštedu energije. Takvi
sustavi mogu oštetiti proizvod.
Hladnjak
3 /36 HR
Page 84

Važne upute za sigurnost i očuvanje okoliša
•Isključiteproizvodtijekom
postavljanja, održavanja,
čišćenja i popravka.
•Nejeditesladoledikockice
leda odmah nakon što ste ih
izvadili iz odjeljka zamrzivača!
To može izazvati ozebline u
ustima!
•Nedirajterukamazamrznute
namirnice! Mogu se zalijepiti
za ruku!
•Nestavljajteboceililimenke
pića u odjeljak zamrzivača.
Mogu puknuti!
•Nikadnekoristiteparui
materijale za čišćenje koji
sadrže paru za čišćenje i
odmrzavanje proizvoda. Para
će izazvati kratki spoj ili struni
udar, jer dolazi u kontakt
s električnim dijelovima
uređaja!
•Nemojtekoristitimehaničke
uređaje ili druga sredstva
za ubrzanje postupka
odmrzavanja, osim onih koje
je preporučio proizvođač.
•Nikadnekoristitedijelove
uređaj poput vrata ili ladica
kao potpornje ili stepenice.
To može izazvati prevrtanje
proizvoda ili oštećenje
njegovih dijelova.
•Neoštećujterashladni
sklop, unutar koje cirkulira
rashladno sredstvo, s
bušilicama ili alatom za
rezanje. Rashladno sredstvo
može isteći kada se
plinski kanali evaporatora,
produžetka cijevi ili premaza
površine probuše te to može
izazvati iritaciju kože i ozljede
oka.
•Neprekrivajteineblokirajte
ventilacijske otvore proizvoda
s niti jednom vrstom
materijala.
•Tekućinestavitesamou
uspravni položaj i dobro ih
zatvorite.
•Nekoristiteplinovite
raspršivače u blizini
proizvoda, jer postoji opasnost
od požara ili eksplozije!
•Zapaljivipredmetiiliproizvodi
koji sadržavaju zapaljive
plinove (npr. raspršivači) te
eksplozivni materijali ne smiju
se nikad držati u proizvodu.
•Navrhproizvodanestavljajte
posude s vodom. Ako se
voda prospe po električnim
dijelovima to može izazvati
električni udar ili požar.
4 /36 HR
Hladnjak
Page 85

Važne upute za sigurnost i očuvanje okoliša
•Uproizvodunečuvajte
predmete (cjepiva, lijekove
osjetljive na toplinu,
znanstvene materijale i sl.)
koji zahtijevaju preciznu
kontrolu temperature.
•Akoproizvodnećetekoristiti
duže vrijeme tada ga isključite
iz strujne utičnice i izvadite
namirnice iz njega.
•Akojeproizvodopremljens
plavim svjetlom ne gledajte
u plavo svjetlo s optičkim
pomagalima ili golim okom.
•Izlaganjeproizvodakiši,
snijegu, suncu i vjetru je
opasno u vezi sa zaštitom od
električnog udara.
•Akojeproizvodopremljen
s mehaničkom kontrolom
(termostat) pričekajte
najmanje 5 minuta prije nego
što proizvod ponovo uključite
nakon isključivanja iz strujne
utičnice ili nakon nestanka
struje.
•Prilikomprijevozaproizvoda
pripazite na kabel kako se ne
bi oštetio.
•Nikadnestavljajteteške
•Nepreopterećujteproizvod.
Može pasti kada se vrata
otvore i izazvati ozljede ili
oštećenja. Slični problemi
mogu nastati ako se na vrh
proizvoda stavljaju predmeti.
•Akonavratimauređaj
postoji ručka ne povlačite
ručku prilikom premještanja
proizvoda. Ručka se može
olabaviti.
•Pripazitekakopokretni
dijelovi unutar proizvoda ne bi
zahvatili ruku ili druge dijelove
tijela.
1.1.1 HCA upozorenje
•Akojeproizvodopremljen
rashladnim sustavom koji
sadrži plin R600a vodite
računa i nemojte oštetiti
rashladni sustav i cijevi
tijekom uporabe i prijevoza.
To je zapaljivi plin. Ako je
rashladni sustav oštećen,
proizvod držite podalje od
potencijalni izvora koji mogu
izazvati zapaljivanje proizvoda
i odmah dobro prozračite
prostoriju u kojoj se uređaj
nalazi.
predmete na strujni kabel.
Oštećeni kabel može izazvati
požar.
Hladnjak
5 /36 HR
Page 86

Važne upute za sigurnost i očuvanje okoliša
Zanemarite ovo
upozorenje ako je
C
C
A
1.1.2 Za proizvode s
dispenzerom za vodu
•Tlaknaulaznomotvoru
hladne vode treba biti
maksimalno 90 psi (6.2
bar). Ako tlak vode premaši
(5,5 bar) tada na cijevima
za opskrbu vodom koristite
tlačno-granični ventil. Ako
ne znate kako provjeriti
tlak vode tada potražite
pomoć kod profesionalnog
vodoinstalatera.
•Akouinstalacijamapostoji
opasnost od efekta vodenog
udara tada u instalacijama
uvijek koristite opremu
za sprječavanje vodenog
proizvod opremljen s
rashladnim sustavom
koji sadrži plin R134a.
Plin koji se koristi u
proizvodu naveden je
na pločici s tehničkim
podacima smještenoj
na lijevom unutrašnjem
dijelu hladnjaka.
UPOZORENJE: Nikad
ne bacajte proizvod u
vatru.
udara. Posavjetujte
se s profesionalnim
vodoinstalaterom ako
niste sigurni postroji li
efekt vodenog udara u
instalacijama.
•Neinstalirajtenaulaznom
otvoru za vruću vodu.
Poduzmite mjere opreza zbog
opasnosti od zamrzavanja
cijevi. Radni interval
temperature vode treba biti
minimalno 33°F (0.6°C) i
maksimalno 100°F (38°C).
•Koristitesamopitkuvodu.
1.2. Namjena
•Ovajuređajnamijenjenjeza:
- uporabu u zatvorenim
prostorima kao što su
kućanstva;
- zatvorenim radnim
prostorima poput trgovina i
ureda;
- zatvorenim smještajnim
jedinicama poput kuća,
hotela, pansiona.
•Ovajproizvodnesmijese
koristiti na otvorenom.
•Ovajproizvodmorasekoristiti
samo za čuvanje namirnica.
6 /36 HR
Hladnjak
Page 87

Važne upute za sigurnost i očuvanje okoliša
•Proizvođačnesnosinikakvu
odgovornost zbog šteta
nastalih uslijed neispravne
uporabe ili prijevoza.
•Radnivijekproizvodaje
10 godina. Tijekom ovog
razdoblja originalni rezervni
Ovaj proizvod proizveden je od
visokokvalitetnih dijelova i materijala koji se
mogu ponovo koristiti i koji su pogodni za
recikliranje. Po završetku vijeka trajanja ne
zbrinjavajte proizvod s normalnim kućanskim
i drugim otpadom Odnesite ga od sabirnog
centra za recikliranje električne i elektroničke
opreme. Za više informacija o sabirnim
centrima molimo posavjetujte se s tijelima
lokalnih vlasti.
dijelovi bit će dostupni za
ispravan rad uređaja.
1.3. Sigurnost djece
•Ambalažnimaterijalisuopasnizadjecu.
Držite ambalažne materijale na sigurnom
mjestu izvan dosega djece.
•Električniproizvodisuopasnizadjecu.Kada
koristite uređaj držite djecu podalje od njega.
•Akosuvrataproizvodaopremljenasbravom,
ključeve držite izvan dohvata djece.
1.4. Sukladnost s Direktivom
o gospodarenju otpadnim
električnim i elektroničkim
uređajima i opremom (WEEE
Directive) i odlaganjem otpada:
Ovaj proizvod je sukladan s
Direktivom EU o gospodarenju
otpadnim električnim i
elektroničkim uređajima i
opremom (EU WEEE Directive)
(2012/19/EU). Ovaj proizvod
označen je klasifikacijskim
simbolom za otpadne električne i
elektroničke uređaje i opremu (WEEE).
1.5. Sukladnost s Direktivom o
ograničavanju opasnih tvari (RoHS
Directive):
Ovaj proizvod je sukladan s Direktivom EU o
ograničavanju opasnih tvari (RoHS Directive)
(2011/65/EU). Proizvod ne sadrži štetne i
zabranjene materijale koji su specificirani u
Direktivi.
1.6. Informacije o pakiranju
•Ambalažnimaterijalproizvodaproizveden
je od recikliranih materijala u skladu s
nacionalnim odredbama o zaštiti okoliša.
Ambalažni materijal ne zbrinjavajte zajedno
s kućanskim i drugim otpadom. Odnesite
ga u sabirne centre za ambalažni materijal
određene od strane tijela lokalnih vlasti.
Hladnjak
7 /36 HR
Page 88

*5
*6
*3
4
7
8
10*11
*12
13
*14
*
15
16
17
18
19
9
*1
*2
2 Vaš uređaj
1. Police na vratima odjeljka hladnjaka
2. Zaslon
3. Spremnik za punjenje dispenzera za vodu
4. Dio za jaja
5. Spremnik dispenzera za vodu
6. Rotirajući spremnik
7. Ladice odjeljka zamrzivača
8. Ladica icematic ledomata
9. Ledomat
10. Posuda za povrće
*opcionalno: Ilustracije u ovom korisničkom priručniku dane su kao primjer i možda neće u
potpunosti odgovarati modelu. Ako proizvod kojeg ste kupili ne sadrži određene dijelove to znači kako
C
se ilustracija odnosi na druge modele.
11. Spremnik za vodu
12. Posuda za povrće
13. Ledenica
14. Polica za boce
15. Filtar mirisa
16. Staklene police odjeljka hladnjaka
17. Ventilator
18. Staklene police odjeljka hladnjaka
19. Odjeljak zamrzivača
*opcionalno
8 /36 HR
Hladnjak
Page 89

3 Postavljanje
Neka postavljanje i popravak uvijek vrši osoblje
ovlaštenog servisa. Proizvođač se neće smatrati
odgovornim za štete nastale uslijed popravaka koje
su izvršile neovlaštene osobe.
Za postavljanje proizvoda kontaktirajte obližnji
ovlašteni servis. Kako biste uređaj pripremili za
rad prije poziva ovlaštenom servisu provjerite je
li električna instalacija odgovarajuća. Ako nije
pozovite kvalificiranog električara koji će izvršiti
neophodne prilagodbe.
Za pripremu mjesta i električne
instalacije na mjestu postavljanja
C
B
B
A
C
odgovoran je korisnik.
Tijekom postavljanja proizvod ne smije
biti uključen u strujnu utičnicu. U
protivnom, postoji opasnost od smrti ili
teških ozljeda!
UPOZORENJE: Postavljanje i spajanje
na električnu mrežu proizvoda mora
izvršiti osoblje ovlaštenog servisa.
Proizvođač se neće smatrati odgovornim
za štete nastale uslijed popravaka koje
su izvršile neovlaštene osobe.
UPOZORENJE: Prije postavljanja,
vizualno pregledajte proizvod i potražite
oštećenja. Ako je uređaj oštećen
nemojte ga postavljati. Oštećeni
proizvodi predstavljaju opasnost za vašu
sigurnost.
Pripazite da strujni kabel nije zgnječen
ili prignječen prilikom guranja proizvoda
na njegovo mjesto nakon postavljanja ili
čišćenja.
postavljanja proizvod se ne smije izlagati izravnoj
sučevoj svjetlosti te ga ne smije čuvati na vlažnim
mjestima.
•Trebaosiguratiodgovarajućuventilacijuoko
proizvoda radi učinkovitog rada. Ako se proizvod
postavlja u otvor u zidu, pripazite te ostavite
barem 5 cm razmaka od stropa i bočnih zidova.
•Nestavljajteproizvodnamaterijalepoputsagova
ili tepiha.
•Postaviteproizvodnaravnupodnupovršinui
spriječite drmanje.
•Nepostavljajteuređajuprostorijegdje
temperatura pada ispod 10°C.
Ako će se hladnjaci postaviti jedan pored
drugog tada treba ostaviti barem 8 cm
C
razmaka između njih. U protivnom,
susjedne stjenke mogu biti vlažne.
3.2. Postavljanje plastičnih klinova
Plastični klinovi koriste se za stvaranje razmaka
potrebnog za cirkuliranje zraka između proizvoda i
stražnjeg zida. Umetnite 2 plastična klina na stražnji
ventilacijskih poklopac ako što je prikazano na
ilustraciji. Za stavljanje klinova, uklonite vijke na
proizvodu i koristite vijke koji su isporučeni u istoj
vrećici s klinovima.
3.1. Odgovarajuća lokacija za
postavljanje
UPOZORENJE: Ako su vrata prostorije
u kojoj će se postaviti uređaj premala da
kroz njih prođe proizvod, tada skinite vrata
A
•Odaberitemjestonakojemćetemoći
nesmetano koristiti proizvod.
•Proizvodpostavitetakodajebarem30cm
udaljen od izvora topline poput ploča za
kuhanje, peći, radijatora i štednjaka te barem
5 cm udaljen od električnih pećnica. Nakon
Hladnjak
proizvoda te okrenite uređaj postranice
kako bi prošao kroz vrata prostorije.
3.3. Priključivanje na električnu
mrežu
Proizvod spojite na uzemljenu utičnicu osiguranu
osiguračem u skladu s vrijednostima na nazivnoj
pločici. Naša tvrtka neće biti odgovorna za bilo
kakva oštećenja koja nastanu kad se proizvod
9 /36 HR
Page 90

Postavljanje
koristi bez uzemljenja u skladu s lokalnim
zakonima.
•Električnipriključakmorabitisukladan
nacionalnim odredbama.
•Nakonpostavljanjautikačstrujnogkabela
mora biti lako dostupan.
•Naponidozvoljenizaštitniosiguračili
sklopka naznačeni su na nazivnoj pločici koja
se pričvršćena u unutrašnjosti proizvoda.
Ako vrijednost struje osigurača ili sklopke u
kući nije u skladu s vrijednosti naznačenoj na
nazivnoj pločici tada pozovite kvalificiranog
električara koji će instalirati odgovarajući
osigurač.
•Specificiraninaponmorabitijednaknaponu
električne mreže.
•Nepriključujtepomoćuprodužnogkabelaili
razdjelne utičnice.
UPOZORENJE: Oštećeni
strujni kabel mora se zamijeniti u
B
B
ovlaštenom servisu.
UPOZORENJE: Ako je proizvod
pokvaren ne smije se koristiti
osim ako ga nije popravilo osoblje
ovlaštenog servisa. Postoji opasnost
od električnog udara!
Ne pokušavajte sami popraviti žaruljicu već
pozovite osoblje ovlaštenog servisa ako se
rasvjetna žaruljica ne uključuje ili ako ne radi.
Lampa koja se koristi u ovom uređaju nije
podesna za uporabu za osvjetljenje doma.
Predviđena namjena ove lampe je da pomogne
korisniku da stavi hranu u hladnjak/škrinju na
siguran i ugodan način.
3.6. Upozorenje za otvorena vrata
(Ovo je opcionalna funkcija)
Ako su vrata proizvoda otvorena duže do
1 minute začut će se zvučni signal. Ovo
upozorenje neće se oglasiti kada su vrata
zatvorena ili ako je iti jedan od prikazanih
gumba pritisnut.
3.7. Prijevoz proizvoda
3.4. Podešavanje nožica
Ako proizvod nakon postavljanja ne stoji
ravnomjerno podesite nožice. Neka vam netko
pomogne da malo podignete proizvod, to će
vam olakšati postupak.
UPOZORENJE: Prvo isključite
proizvod iz strujne utičnice. Prilikom
podešavanja nožica proizvod ne smije
B
Okrenite prednju nožicu za poravnanje
proizvoda. Ugao u kojem se nalazi nožica je
spušten kada je okrenete u smjeru strelice, a
podignut kada je okrenete u suprotnom smjeru.
biti uključen u strujnu utičnicu. Postoji
opasnost od električnog udara!
3.5. Rasvjetna žaruljica
10 /36HR
1.
Prije prijevoza proizvod isključite iz strujne
utičnice.
2.
Unutrašnjost proizvoda očistite kako je
preporučeno u odjeljku “Održavanje i čišćenje”.
3.
Učvrstite police, dodatni pribor, posudu za
povrće i sl. unutar proizvoda pomoću ljepljive
trake prije nego što ga ponovo upakirate.
Pakiranje je potrebno učvrstiti širokom
trakom ili čvrstom užadi te se treba
C
C
A
pridržavati pravila prilikom prijevoza
otisnutih na pakiranju.
Originalno pakiranje i spužvasti materijal
trebaju se čuvati za budući prijevoz.
Ambalažni materijali su opasni
za djecu. Ambalažni materijal držite
na sigurnom mjestu izvan
dosega djece.
Hladnjak
Page 91

4 Priprema
4.1. Ušteda energije
Povezivanje proizvoda na sustav za uštedu
energije je opasno, jer može izazvati
A
• Ne ostavljajte vrata proizvoda otvorena dugo vremena.
• Ne stavljajte vruće namirnice ili pića u proizvod.
• Ne preopterećujte proizvod. Kapacitet hlađenja opast
• Ne postavljajte proizvod na mjestima koja su izravno
• Namirnice čuvajte unutar proizvoda u zatvorenim
• U odjeljak zamrzivača može se staviti više namirnica
• Odleđivanje zamrznute hrane u odjeljku hladnjaka
C
oštećenje proizvoda.
će kada je cirkulacija zraka otežana.
izložena sunčevom svjetlu. Proizvod postavite tako da
je barem 30 cm udaljen od izvora topline poput ploča
za kuhanje, peći, radijatora i štednjaka te barem 5 cm
udaljen od električnih pećnica.
spremnicima.
kada se iz odjeljka zamrzivača uklone polica ili ladica.
Naznačena vrijednost potrošnje energije proizvoda
određena je s izvađenom policom ili ladicom i s
maksimalnom količinom stavljenih namirnica. Ne
postoji opasnost ako se polica ili ladica koristi u
skladu s oblikom i veličinom namirnica koje će se
zamrznuti.
pridonijet će uštedi energije i očuvanju kvalitete
namirnica.
Temperatura zraka u prostoriji u kojoj se
postavlja proizvod treba biti najmanje -5°C.
Ne preporučuje se koristiti proizvod na
nižim temperaturama.
Unutrašnjost proizvoda mora biti čista.
C
Ako će se hladnjaci postaviti jedan pored
drugog tada treba ostaviti barem 4 cm
C
4.2. Preporuke za odjeljke hladnjaka
• Ne dozvolite da namirnice dodiruju senzor
•Košare/ladicekojesuisporučenesledenicommoraju
se uvijek koristit radi manje potrošnje energije i boljih
uvjeta čuvanja.
razmaka između njih.
temperature u odjeljku hladnjaka. Kako bi odjeljak
hladnjaka održavao idealnu temperaturu čuvanja
namirnice ne smiju zaklanjati senzor.
•Akohranadođeukontaktsasenzorom
temperaturu o odjeljku zamrzivača to može
povećati razinu potrošnje energije uređaja.
Stoga treba izbjegavati bilo kakvi kontakt sa
senzorom(ima).
• Ne stavljajte vruće namirnice i hranu u
proizvod.
4.3. Prije uporabe
Prije uporabe proizvoda provjerite jesu li izvršene sve
pripremne radnje u skladu s uputama u odjeljku “Važne
upute za sigurnost i očuvanje okoliša” i “Postavljanje”.
• Unutrašnjost proizvoda očistite kako je preporučeno
u odjeljku “Održavanje i čišćenje”. Prije uporabe
provjerite je li unutrašnjost proizvoda suha.
• Proizvod uključite u uzemljenu zidnu utičnicu.
Kada su vrata otvorena uključit će se svjetlo unutar
proizvoda.
• Uključite proizvod i pustite ga da radi 6 sati bez
namirnica te za to vrijeme ne otvarajte vrata osim
ako je to neophodno potrebno.
Kad kompresor započne s radom začut će
se zvuk. Tekućine i plinovi koji se nalaze
C
C
unutar rashladnog sustava također mogu
stvarati zvukove čak i kad kompresor ne
radi, a to je potpuno normalno.
Prednji rubovi proizvoda mogu biti topli. To
je normalno. Ova područja su i dizajnirana
tako da se zagriju radi izbjegavanja
kondenzacije.
Kod nekih modela instrument ploča
isključuje se 5 minuta nakon što se vrata
C
zatvore. Ona će se ponovo aktivirati kada
se vrata otvore ili kada se pritisne bilo koji
gumb.
Hladnjak
11 /36 HR
Page 92

5 Rukovanje uređajem
5.1. Kontrolni zaslon
Kontrolni zasloni biti različiti, ovisno o modelu proizvoda.
Audio - vizualne funkcije na kontrolnom zaslonu pomažu vam pri uporabi proizvoda.
8
9
1. Indikator odjeljka hladnjaka
2. Indikator statusa greške
3. Indikator temperature
4. Gumb funkcije odmor
5. Gumb podešavanja temperature
6. Gumb odabira odjeljka
7. Indikator odjeljka zamrzivača
8. Indikator ekonomičnog moda
9. Indikator funkcije odmor
*opcionalno
1
7
2
6
3
45
C
*Opcionalno: Ilustracije u ovom korisničkom priručniku dane su kao primjer i možda neće u
potpunosti odgovarati modelu. Ako proizvod kojeg ste kupili ne sadrži određene dijelove to znači kako
se ilustracija odnosi na druge modele.
12 /36 HR
Hladnjak
Page 93

5 Rukovanje uređajem
1. Indikator odjeljka hladnjaka
Svjetlo odjeljka hladnjaka svijetli kada je podešena
temperatura odjeljka hladnjaka.
2. Indikator statusa greške
Ako vaš hladnjak ne hladi dovoljno ili u slučaju
kvara senzora tada će se aktivirati ovaj indikator.
Kada je ovaj indikator aktiviran, na indikatoru
temperature odjeljka zamrzivača prikazat će se
"E", a na indikatoru temperature odjeljka hladnjaka
prikazat će se brojevi poput "1,2,3...". Ovi brojevi
na indikatoru služe kao informacija o vrsti greške
servisnom osoblju.
3. Indikator temperature
Pokazuje temperaturu odjeljka hladnjaka i
zamrzivača.
4. Gumb funkcije odmor
Za aktiviranje ove funkcije pritisnite gumb
odmor u trajanju od 3 sekunde. Kada je funkcija
odmor aktivirana “- -” prikazuje se na indikatoru
temperature odjeljka hladnjaka te se u odjeljku
hladnjaka ne vrši hlađenje. Kada je aktivirana
ova funkcija ne preporučuje se držati namirnice
u odjeljku hladnjaka. Ostali odjeljci i dalje će se
hladiti u skladu s podešenom temperaturom.
Za poništenje ove funkcije ponovo pritisnite gumb
Odmor.
5. Gumb podešavanja temperature
Mijenja temperaturu određenog odjeljka između
-24°C... -18°C i 8°C...1°C.
6. Gumb odabira odjeljka
Gumb odabira: Pritisnite gumb odabira odjeljka
za prebacivanje između odjeljka hladnjaka i
zamrzivača.
7. Indikator odjeljka zamrzivača
Svjetlo odjeljka hladnjaka svijetli kada je podešena
temperatura odjeljka zamrzivača.
8. Indikator ekonomičnog moda
Ukazuje kako hladnjak radi u modu uštede
energije. Ovaj prikaz bit će aktiviran kada je
temperatura odjeljka zamrzivača podešena na
-18°C.
9. Indikator funkcije odmor
Ukazuje kako je funkcija odmora aktivirana.
Hladnjak
13 /36 HR
Page 94

5 Rukovanje uređajem
*opcionalno
16
15
14
1
2
13
12
11
10
9*
8
7
1. Gumb podešavanja temperature odjeljka hladnjaka
2. Gumb zaključavanja
3. Gumb podešavanja temperature odjeljka zamrzivača
4. Indikator statusa greške
5. Indikator zaključavanja
6. Indikator funkcije Eco Extra
7. Gumb Eco Extra / Odmor
8. Indikator funkcije odmor
3
4
5
6
9. Indikator isključenog icematic ledomata
(*kod nekih modela)
10. Indikator ekonomične uporabe
11. Indikator funkcije brzog zamrzavanja
12. Gumb funkcije brzog zamrzavanja/ Gumb icematic
ledomat uključen-isključen
13. Indikator temperature odjeljka zamrzivača
14. Funkcija brzog hlađenja
15. Indikator temperature odjeljka hladnjaka
16. Indikator funkcije brzog hlađenja
C
*Opcionalno: Ilustracije u ovom korisničkom priručniku dane su kao primjer i možda neće u
potpunosti odgovarati modelu. Ako proizvod kojeg ste kupili ne sadrži određene dijelove to znači kako
se ilustracija odnosi na druge modele.
14 /36 HR
Hladnjak
Page 95

Rukovanje uređajem
1. Gumb podešavanja temperature odjeljka
hladnjaka
Pritisnite gumb za podešavanje temperature
odjeljka hladnjaka na 8, 7,6, 5,4,3, 2, 8...
Pritisnite gumb za podešavanje temperature
odjeljka hladnjaka na željenu vrijednost.
2. Gumb zaključavanja
Pritisnite i držite ovaj gumb u trajanju od 3
sekunde, to će aktivirati funkciju zaključavanja
i uključivanje indikatora zaključavanja. Ponovno
pritisnite i držite ovaj gumb u trajanju od 3
sekunde za deaktiviranje funkcije zaključavanja.
3. Gumb podešavanja temperature odjeljka
zamrzivača
Pritisnite gumb za podešavanje temperature
odjeljka zamrzivača na -18,-19,-20,-21, -22,
-23,-24, -18... Pritisnite gumb za podešavanje
temperature odjeljka zamrzivača na željenu
vrijednost.
4. Indikator statusa greške
Ako vaš proizvod ne hladi dovoljno ili u slučaju
kvara senzora tada će se aktivirati ovaj
indikator.
Kada je ovaj indikator aktiviran, na indikatoru
temperature odjeljka zamrzivača prikazat će
se "E", a na indikatoru temperature odjeljka
hladnjaka prikazat će se brojevi poput
"1,2,3...". Brojevi na indikatoru služe kao
informacija o vrsti greške servisnom osoblju.
Kad u odjeljak frizera stavite vruće
namirnice ili ako duže vrijeme ostavite
C
5. Indikator zaključavanja
Ovu funkciju koristite kada želite spriječiti
promjenu podešene temperature. Za
aktivaciju pritisnite i držite istovremeno gumb
otvorena vrata, neko vrijeme će se
prikazivati znak uskličnika. Ovo nije znak
kvara; ovo upozorenje će nestati kada
se namirnice ohlade.
podešavanja temperature odjeljka hladnjaka
i gumb podešavanja temperature odjeljka
zamrzivača u trajanju od 3 sekunde.
6. Indikator funkcije eco extra
Pokazuje kako je aktivirana funkcija Eco Extra.
Ako je aktivirana ova funkcija proizvod
automatski prepoznaje razdoblje zadnje
uporabe i tijekom tog vremena izvršit će
energetski učinkovito hlađenje.
Tijekom odvijanja energetski
učinkovitog hlađenja aktivirat će se
C
C
7. Gumb Eco Extra / Odmor
Kratki pritisak gumba aktivirat će funkciju Eco
Extra. Pritisnite i držite ovaj gumb u trajanju
od 3 sekunde za aktiviranje funkcije odmora.
Ponovno pritisnite ovaj gumb za deaktiviranje
odabrane funkcije.
8. Indikator funkcije odmor
Pokazuje kako je aktivirana funkcija odmor.
Kada je funkcija odmor aktivirana “- -”
prikazuje se na indikatoru temperature odjeljka
hladnjaka te se u odjeljku hladnjaka ne vrši
hlađenje. Ostali odjeljci i dalje će se hladiti u
skladu s podešenom temperaturom.
C
9. Indikator isključenog icematic ledomata
Pokazuje je li icematic ledomat uključen
ili isključen. Ako je uključen tada icematic
ledomat ne radi. Za rad icematic ledomata
ponovo pritisnite i držite gumb uključenoisključeno u trajanju od 3 sekunde.
indikator ekonomičnog moda.
Za deaktiviranje funkcije pritisnite
odgovarajući gumb.
Za deaktiviranje funkcije pritisnite
odgovarajući gumb.
Hladnjak
15 /36 HR
Page 96

Rukovanje uređajem
Protok vode iz spremnika za vodu će
se zaustaviti kada je odabrana ova
C
10. Indikator ekonomične uporabe
Pokazuje kako proizvod radi u energetski
učinkovitom modu. Ovaj indikator će se
aktivirati kada je temperatura odjeljka
zamrzivača podešena na -18 ili ako se
izvodi energetski učinkovito hlađenje u
okviru funkcije Eco-Extra.
C
11. Indikator funkcije brzog zamrzavanja
Treperi u animiranom stilu i pokazuje kako
je aktivirana funkcija brzog zamrzavanja.
12. Gumb funkcije brzog zamrzavanja/
Gumb icematic ledomat uključenisključen
Pritisnite ovaj gumb za aktiviranje ili
deaktiviranje funkcije brzog zamrzavanja.
Kada aktivirate funkciju odjeljak zamrzivača
će se ohladiti na temperaturu nižu od
podešene vrijednosti.
Za uključivanje i isključivanje icematic
ledomata pritisnite i držite gumb u trajanju
od 3 sekunde.
C
C
funkcija. Međutim, prethodno nastali led
može se izvaditi iz icematic ledomata.
Indikator ekonomične uporabe isključit će
se kada se odabere funkcija brzog hlađenja
ili funkcija brzog zamrzavanja.
Funkciju brzog zamrzavanja
koristite kada želite brzo zamrznuti
namirnice koje se nalaze u odjeljku
hladnjaka. Ako želite zamrznuti
veće količine svježih namirnica
aktivirajte ovu funkcije prije
stavljanja namirnica u hladnjak.
Ako je ne poništite funkcija brzog
zamrzavanja sama će se poništiti
nakon 4 sata ili kada odjeljak
hladnjaka dosegne željenu
temperaturu.
Ova se funkcija neće ponovo
C
13. Indikator temperature odjeljka zamrzivača
Pokazuje temperaturu podešenu za odjeljak
zamrzivača.
14. Funkcija brzog hlađenja
Gumb ima dvije funkcije. Za aktiviranje ili
deaktiviranje funkcije brzog hlađenja nakratko
pritisnite gumb. Indikator brzog hlađenja isključit
će se, te će se vratiti normalne postavke hladnjaka.
C
C
C
C
15. Indikator temperature odjeljka hladnjaka
Pokazuje temperaturu podešenu za odjeljak
hladnjaka.
16. Indikator funkcije brzog hlađenja
Treperi u animiranom stilu i pokazuje kako je
aktivirana funkcija brzog hlađenja.
16 /36HR
aktivirati kada se ponovo uključi
struja nakon nestanka.
Funkciju brzog hlađenja koristite kada
želite brzo rashladiti namirnice koje
se nalaze u odjeljku hladnjaka. Ako
želite rashladiti veće količine svježih
namirnica aktivirajte ovu funkcije prije
stavljanja namirnica u hladnjak.
Ako je ne poništite funkcija brzog
hlađenja sama će se poništiti nakon 8
sata ili kada odjeljak hladnjaka dosegne
željenu temperaturu.
Ako uzastopno pretiskate gumb
brzog hlađenja u kratkim vremenskim
razmacima, aktivirat će se zaštita
strujnog kruga i kompresor neće odmah
početi s radom.
Ova se funkcija neće ponovo aktivirati
kada se ponovo uključi struja nakon
nestanka.
Hladnjak
Page 97

Rukovanje uređajem
5.2. Dvostruki rashladni sustav
Vaš proizvod je opremljen s dva zasebna
rashladna sustava za hlađenje odjeljka svježih
namirnica i za hlađenje odjeljka zamrzivača.
Tako se zrak i miris iz odjeljka svježih namirnica
i odjeljka zamrznutih namirnica ne miješaju.
Zahvaljujući ovim odvojenim rashladnim
sustavima brzina hlađenja je veće nego kod
drugih hladnjaka. Također, osigurana je i
dodatna uštede energije jer se odmrzavanja vrši
odvojeno.
5.3. Zamrzavanje svježih
namirnica
• Namirnice stavite u hladnjak omotane i
pokrivene.
• Vruće namirnice moraju se ohladiti na
sobnu temperaturu prije stavljanja u
hladnjak.
• Namirnice koje želite zamrznuti moraju biti
svježe i dobre kvalitete.
• Namirnice podijelite u manje dijelove u
skladu s dnevnim potrebama vaše obitelji ili
obroka koje pripremate.
• Hranu pakirajte hermetično i spriječite
njihovo sušenje čak i kada će u hladnjaku
biti samo kratko vrijeme.
• Materijal koji trebate koristiti za pakiranje
mora biti otporan na habanje i na hladnoću,
vlagu, mirise, ulja i kiseline te mora biti
hermetičan. Uz to, mora dobro prianjati
te mora biti proizveden od materijala
jednostavnih za uporabu i pogodan za
duboko zamrzavanje.
• Zamrznute namirnice moraju se odmah po
odmrzavanju upotrijebiti i nikad se ne smiju
ponovo zamrzavati.
• Ne zamrzavajte odjednom prevelike količine
namirnica. Kvaliteta namirnica najbolje
se čuva kada se potpuno zamrznu u što
kraćem roku.
• Stavljanje vrućih namirnica u odjeljak
zamrzivača utjecat će na neprekidni rad
rashladnog sustava sve dok se namirnice
potpuno na zamrznu.
• Budite posebno pažljivi i ne miješajte već
zamrznute namirnice i svježe namirnice.
• Ako proizvod ima funkciju brzog
zamrzavanja aktivirajte funkciju brzog
zamrzavanja kada želite zamrznuti
namirnice.
Postavke
odjeljak
zamrzivača
-18°C 4°C Ovo je normalna preporučena postavka.
-20, -24 ili -24°C 4°C
Brzo zamrzavanje 4°C
-18°C ili hladnije 2°C
-18°C ili hladnije Brzo hlađenje
Hladnjak
Postavke
odjeljak
hladnjaka
Primjedbe
Ove postavke se preporučuju kada je temperatura okruženja veća
od 30°C.
Koristite kada želite zamrznuti namirnice u kratkom roku. Proizvod
će se vratiti u prethodni mod kada postupak završi.
Ove postavke korisnika kad smatrate kako odjeljak hladnjaka ne
hladi dovoljno zbog vrućih uvjeta u okruženju ili čestog otvaranja
i zatvaranja vrata.
Ovu funkciju koristite kada se stavili previše namirnica u odjeljak
hladnjaka ili kada želite brzo ohladiti namirnice. Preporučuje se
aktivirati funkciju brzog hlađenja 4-8 sati prije stavljanja namirnica u
hladnjak.
17 /36 HR
Page 98

Rukovanje uređajem
5.4. Preporuke za očuvanje
zamrznutih namirnica
•Zamrznutenamirnicekojestekupilitrebaju
se čuvati u skladu s uputama proizvođača
zamrznutih namirnica u odjeljku za čuvanje
zamrznutih namirnica.
Upamtite sljedeće i održavajte visoku kvalitetu
koju su postigli proizvođači zamrznutih
namirnica i trgovci namirnicama:
1. Nakon kupovine pakiranja stavite u zamrzivač
što je prije moguće.
2. Vodite jesu li pakiranja označena i postoji li na
njima datum.
3. Ne koristite namirnice ako je istekao datum
naznačen kao "Iskoristiti do" ili "Najbolje koristiti
do".
5.5. Stavljanje namirnica u
hladnjak
Police odjeljak
zamrzivača
Dio za jaja Jaja
Police odjeljak
hladnjaka
Police na vratima
odjeljka hladnjaka
Posuda za povrće Povrće i voće
Odjeljak svježih
namirnica
Različite zamrznute
namirnice poput mesa,
ribe, sladoleda, povrća
i sl.
Namirnice u loncima,
zatvorenim posudama
i zatvorenim spremnicima
Male i pakirane namirnice
i pića (poput mlijeka,
voćnih sokova, piva i sl.)
Delikatesni proizvodi (sir,
maslac, salame i sl.)
Moguće je očuvati namirnice duže vrijeme
samo pri temperaturi od -18°C ili nižim
temperaturama.
Svježinu namirnica možete održati
mjesecima (pri temperaturi od -18°C ili nižim
temperaturama u dubokom zamrzavanju.)
Namirnice podijelite u manje dijelove u skladu s
dnevnim potrebama vaše obitelji ili obroka koje
pripremate.
Hranu pakirajte hermetično i spriječite njihovo
sušenje čak i kada će u hladnjaku biti samo
kratko vrijeme.
Materijal potreban za pakiranje:
•Ljepljivatrakaotpornanahladnoću
•Samoljepivenaljepnice
•Gumice
•Olovka
Materijali koji će se koristiti za pakiranje
namirnica mora biti otporan na habanje te na
hladnoću, vlagu, miris, ulja i kiseline.
Namirnice koje će se zamrznuti ne smiju doći
u kontakt s već zamrznutim namirnicama radi
sprječavanja parcijalnog odmrzavanja.
Zamrznute namirnice moraju se odmah po
odmrzavanju upotrijebiti i nikad se ne smiju
ponovo zamrzavati.
5.6. Informacije o dubokom
zamrzavanju
Namirnice se moraju zamrznuti što je brže
moguće kada se stave u hladnjak kako bi se
očuvala njihova dobra kvaliteta.
18 /36HR
Hladnjak
Page 99

Rukovanje uređajem
5.7. Ledomat
*opcionalno
Icematic ledomat omogućava vam jednostavnu
proizvodnju leda.
Uporaba icematic ledomata
1. Uklonite spremnik za vodu iz odjeljka
hladnjaka.
2. Napunite vodom spremnik za vodu.
3. Vratite spremnika za vodu na njegovo mjesto.
Prve kockice leda bit će gotove za približno
četiri sata u ladici icematic ledomata koja se
nalazi u odjeljku zamrzivača.
Kada je spremnik za vodu potpuno
napunjen moći ćete dobiti približno 60-
C
C
70 kockica leda.
Vodu u spremniku trebate promijeniti
svaka 2-3 tjedna.
5.8. Icematic ledomat
*opcionalno
Icematic ledomat omogućava vam jednostavnu
proizvodnju leda.
Uporaba icematic ledomata
1. Izvucite icematic ledomat pažljivim
izvlačenjem.
2. Napunite vodom icematic ledomat.
3. Vratite Icematic ledomat na njegovo mjesto.
Nakon približno dva sata led je spreman.
4. Za stvaranje leda okrenite kolo na spremniku
za led u smjeru kazaljke na satu za 90˚
stupnjeva. Kockice leda iz spremnika past će u
posudu za led koja se nalazi ispod.
5. Možete izvaditi posudu za led i poslužiti
kockice leda.
Ne uklanjajte Icematic ledomat iz
C
C
njegovog odjeljka za proizvodnju leda.
Ako želite kockice leda možete čuvati
u posudi za čuvanje leda. Posuda za
čuvanje leda služi samo za stvaranje
kockica leda. Ne ulijevajte vodu u nju.
U protivnom, ona će puknuti.
Hladnjak
19 /36 HR
Page 100

Rukovanje uređajem
5.9. Posudica za led
*opcionalno
Icematic ledomat omogućava vam jednostavnu
proizvodnju leda.
Uporaba posudice za led
1. Uklonite posudicu za led iz odjeljka
zamrzivača.
2. Napunite vodom posudicu za led.
3. Stavite posudicu za led u odjeljak
zamrzivača. Nakon približno dva sata led je
spreman.
4. Izvadite posudicu za led iz odjeljka
zamrzivača i presavijte je iznad posude za
posluživanje. Kockice leda jednostavno će pasti
u posudu za posluživanje.
5.10. Plavo svjetlo
*opcionalno
Posude za povrće hladnjaka osvijetljene su
plavim svjetlom. Namirnice koje se čuvaju u
posudama za povrće nastavljaju s procesom
fotosinteze pomoću efekta valne duljine plavog
svjetla i tako zadržavaju svježinu i povećavaju
udio vitamina.
5.11. Držač za jaja
Držač za jaja možete staviti na željenu policu
na vratima ili u hladnjaku. Bit će postavljen
na police u hladnjaku, a preporučuju se donje
hladnije police.
Nikad ne stavljajte držač za jaja u
A
odjeljak zamrzivača.
20 /36HR
C
Pripazite da jaja ne dolaze u izravan
kontakt s drugim namirnicama.
Hladnjak
 Loading...