

Manual Espresso
Machine
User Manual
CEP5152B
EN FR DE CS SK IT PL RO
01M-8839933200-4217-01
Please read this user manual first!
Dear Customer,
Thank you for prefering a Beko product. We hope that you get the best results
from your product which has been manufactured with high quality and stateof-the-art technology. Therefore, please read this entire user manual and all
other accompanying documents carefully before using the product and keep
it as a reference for future use. If you handover the product to someone else,
give the user manual as well. Follow all warnings and information in the user
manual.
Explanation of symbols
Throughout this user manual the following symbols are used:
Important nformaton or useful hnts
C
about usage.
DANGER:
stuatons wth regard to lfe and
A
A
A
Ths product has been produced n envronmentally frendly, modern facltes
Comples wth the WEEE
Regulaton.
property.
WARNING:
potentally dangerous stuaton.
CAUTION:
potental materal damage.
Warnng for hazardous
Warnng ndcates a
Warnng ndcates
Does not contan PCB.
Made n: P.R.C.
CONTENTS
ENGLISH 4-34
FRANÇAIS 35-60
DEUTSCH 61-85
ČESKY 86-109
SLOVENSKÝ 110-134
ITALIANO 135-160
POLSKI 161-185
ROMÂN 186-219
Manual Espresso Machine
/ User Manual
3 / EN

Important instructions for
1
safety and environment
This section includes the safety instructions that will
help providing protection against personal injury and
material loss risks. Failure to follow these instructions
invalidates the granted warranty.
1.1 Danger of electrc current
Danger to life by electric current!
Contact with live wires or components could lead to
serious injury or even death!
Observe the following safety precautions to avoid
electric shocks:
• Do not use the coffee machne f the connectng
cable or mans plug are damaged.
• Before reusng the coffee machne, the mans
cable must be renewed by a qualfed electrcan.
• Do not open the housng of the coffee machne.
Danger of electrc shock f lve connectons are
touched and/or the electrcal and mechancal
confguraton s changed.
• Before cleanng the bean contaner, pull the mans
plug of the applance out of the socket. Danger
from rotatng coffee mll!
4 / EN
Manual Espresso Machine
/ User Manual

Important instructions for
1
safety and environment
1.2 Danger of burnng or scaldng
Parts of the coffee machine can become very hot
during operation! Dispensed drinks and escaping
steam are very hot!
Observe the following safety precautions to avoid
burning/scalding yourself and/or others:
• Do not touch ether of the metal sleeves on both
coffee spouts.
• Avod drect contact of the skn wth escapng
steam or hot rnsng, cleanng and descalng water.
1.3 Fundamental safety
precautons
Observe the following safety precautions to ensure
safe handling of the coffee machine:
• Never play wth packagng materal. Rsk of
suffocaton.
• Inspect the coffee machne for vsble sgns of
damage before use. Do not use a damaged coffee
machne.
Manual Espresso Machine
/ User Manual
5 / EN

Important instructions for
1
safety and environment
•
If the connecting cable is damaged, it should only
be replaced by a service agent recommended by the
manufacturer in order to prevent any danger! Please
contact the manufacturer or his customer service.
•
Repairs to the coffee machine must only be carried
out by an authorised specialist or by the works
customer service. Unqualified repairs can lead to
considerable danger for the user. They will also void
the warranty.
•
Repairs to the coffee machine during the warranty
period may only be carried out by service centres
authorised by the manufacturer, otherwise the
warranty will become void in the event of subsequent
damage.
•
Defective parts may only be replaced with original
spare parts. Only original spare parts guarantee that
the safety requirements are met.
6 / EN
Manual Espresso Machine
/ User Manual

Important instructions for
1
safety and environment
•
This appliance can be used by children from the age
of 8 up as well as by persons with reduced physical,
sensory or mental abilities or with lacking experience
and/or knowledge, if these persons are supervised
or have been instructed how to use the appliance in
a safe way and have understood the hazards which
could arise from using it. Children must not play with
the appliance. Cleaning and user maintenance shall
not be made by children unless they are older than 8
and supervised.
• Ths applance s ntended to be used n household
and smlar applcatons such as:
- staff ktchen areas n shops, offces and other
workng envronments,
- farm houses,
- by clents n hotels, motels and other resdental
type envronments,
- bed and breakfast type envronments.
• Protect the coffee machne aganst the effects of
weather such as ran, frost and drect sunlght. Do
not use the coffee machne outdoors.
Manual Espresso Machine
/ User Manual
7 / EN

Important instructions for
1
safety and environment
• Never mmerse the coffee machne tself, the
mans cable or the mans plug nto water or other
lquds.
• Do not clean the coffee machne or accessores n
a dsh washer.
• Do not pour any other lquds apart from water or
place foodstuffs nto the water tank.
• Do not fll the water tank beyond the maxmum
mark (lower edge of the fllng hole) (1.4 ltres).
• Only operate the machne when the waste
contaner, drp tray and the cup grate are ftted.
• Do not pull the cable to remove the plug from the
mans socket or touch wth wet hands.
• Do not hold the coffee machne wth the mans
cable.
• Keep the applance and ts cord out of reach of
chldren aged less than 8 years.
8 / EN
Manual Espresso Machine
/ User Manual

Important instructions for
1
safety and environment
1.4 Intended use
The manual espresso machine Beko
is intended for use in homes and
similar applications, for instance
in staff kitchens, shops, offices
and similar areas or by customers
in bed & breakfast, hotels, motels
and other living accommodation.
This coffee machine is not intended
for commercial use. The machine is
only intended for preparing coffee
and heating milk and water. Any
other use other than previously
stated is considered as improper
use.
Danger resultng from
mproper use!
If not used for its intended purpose
or used in any other way, the coffee machine may be or become a
source of danger.
A
WARNING:
Therefore, the coffee
machine may only be
used for its intended
purpose.
A
No claims of any kind will be accepted
for damage or injury resulting from
use of the coffee machine for other
than its intended purpose.
The risk has to be borne solely by the
machine owner.
1.5 Lmtaton of
lablty
All technical information, data
and instructions on installation,
operation and maintenance of the
coffee machine contained in these
operating instructions represent
the current status at the time of
printing and are based on the best
possible knowledge gained by
experience and knowhow.
No claims can be derived from
the information, illustrations and
descriptions in this user manual.
WARNING:
Observe the
procedures
described in this user
manual.
Manual Espresso Machine
/ User Manual
9 / EN
Important instructions for
1
safety and environment
The manufacturer assumes no
liability for damage or injury
resulting from failure to observe the
user manual, use for other than the
intended purpose, unprofessional
repairs, unauthorised modifications
or use of non-approved spare parts.
1.6 Complance wth
the WEEE Drectve
and Dsposng of the
Waste Product:
This product complies with EU
WEEE Directive (2012/19/EU). This
product bears a classification symbol for waste electrical and electronic equipment (WEEE).
This product has been
manufactured with high
quality parts and materials which can be re-
used and are suitable for
recycling. Do not dispose of the
waste product with normal domestic and other wastes at the end of
its service life. Take it to the collection center for the recycling of electrical and electronic equipment.
Please consult your local authorities to learn about these collection
centers.
1.7 Complance wth
RoHS Drectve
The product you have purchased
complies with EU RoHS Directive
(2011/65/EU). It does not contain
harmful and prohibited materials
specified in the Directive.
1.8 Package
nformaton
with our National Environment
Regulations. Do not dispose of the
packaging materials together with
the domestic or other wastes. Take
them to the packaging material collection points designated by the local authorities.
Packaging materials of
the product are manufactured from recyclable
materials in accordance
10 / EN
Manual Espresso Machine
/ User Manual
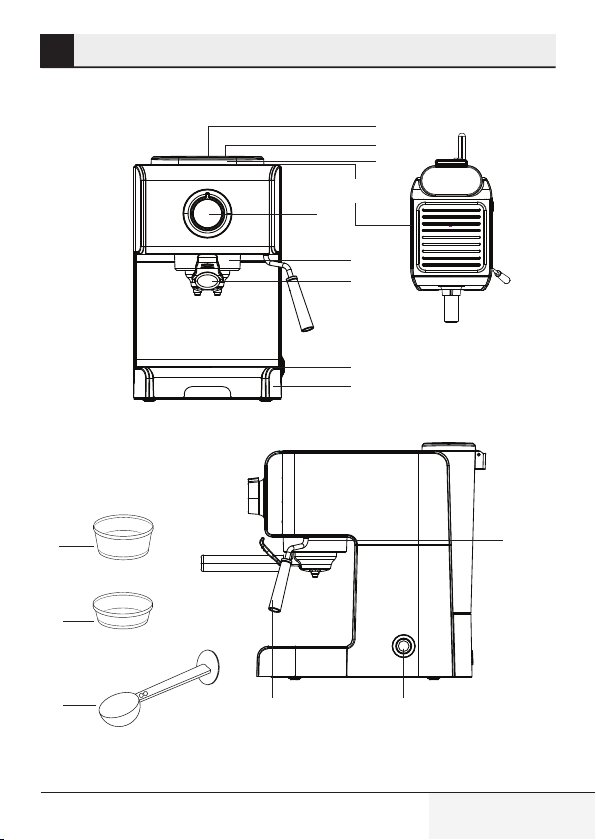
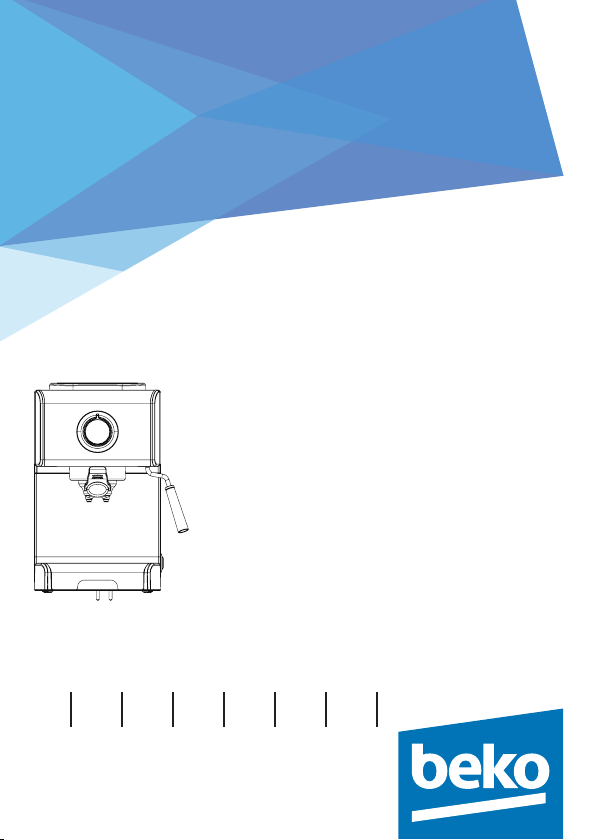
2 Your coffee machne
2.1 Overvew
1
2
3
4
5
6
7
8
9
15
10
14
13
All declared values on the product and on the printed leaflets are picked up after laboratory measurements
performed according to related standarts. These values may differ upon usage and ambient conditions.
Manual Espresso Machine
/ User Manual
1112
11 / EN

2 Your Coffee machne
1. Water Tank Lid
2. Water Tank Handle
3. Removable Water Tank
4. Warming Platform
5. Control Knob
6. Brew Head
7. Filter Holder
8. Drip Tray Grid
9. Drip Tray
10. Frothing Wand
11. Power Button
12. Frothing Sleeve
13. Coffee Scoop / Tamper
14. 2-Cup Sieve
15. 1-Cup Sieve
2.2 Techncal data
Power supply:
220-240 V~, 50-60 Hz
Power:
Water Tank:
Technical and design modifications
reserved.
1200 W
1.2 Litre
12 / EN
Manual Espresso Machine
/ User Manual

3 Tps for Brewng
• To extract the fullest flavor from
your coffee beans, we recommend usng whole coffee beans
that have been freshly ground
each tme espresso s prepared.
• In addton to the coffee used,
usng fresh cold water that s
free of chlorne, odors and other
mpurtes wll help ensure the
perfect espresso.
• Store your espresso grounds n
an artght contaner, and n a
cool, dry place to retan the flavor. Grounds should not be kept
for long perods of tme as the
flavor wll be reduced.
• Do not fll your portaflter (7) and
selected seve to the brm. Usng
the coffee scoop ncluded, use 1
level spoon (13) of grounds per
shot of espresso.
• If you do not use the machne
for more than 5 consecutve
days, rnse and dran the water
tank (3).
• Before removng the water tank
(3) to fll or empty t, always turn
the machne off.
• Always place the unt on a flat,
stable, heat-resstant work surface.
• To ensure your espresso stays
at optmum temperature, we recommend that you preheat your
cups.
• Before brewng, the portaflter
(7) must be turned to the rght
as tght as possble to prevent
the portaflter from loosenng
due to hgh pressure.
A
1. Never remove the water tank
CAUTION:
to avoid possible
burns to body parts
and/or other injury
from hot steam and
water or damages to
the machine.
(3) or the portaflter (7) whle your machne s brewng
espresso or frothng mlk. The
Control Knob (5) should be n
the "O" poston before you
remove the portaflter (7) to
make addtonal cups of espresso. If you need to add more
water to the tank, turn the
Control Knob to the "O" poston
and power off the machne by
pressng the Power Button (11)
on the sde of the machne so
that the blue lght s turned off.
In order
Manual Espresso Machine
/ User Manual
13 / EN

3 Tps for Brewng
2. If espresso does not flow
from the portaflter (7) (only
drps very slowly), the seve s
blocked. Turn off the applance
and allow t to cool down. Check
that the coffee s not too fnely
ground, chapter 5a.
3. Use cauton when removng the
portaflter (7). The metal parts
may stll be very hot. There may
also be hot water floatng on
the top of the ground coffee.
Hold the portaflter only by
ts handle and dspose of the
brewed coffee grounds by
usng the thumb guard.
4. If steam s not released from
the frothng wand (10), the
frother s blocked. Turn off the
applance and allow t to cool
down. Clean the frothng wand
as descrbed n chapter 8b.
5. In order for your machne to
work properly tme after tme,
clean the frothng sleeve
(12), frothng wand (10), and
frothng tp after each use.
14 / EN
Manual Espresso Machine
/ User Manual

4 Operaton and use
4.1 Before Frst Use
After carefully unpacking your espresso machine, wash all removable parts with warm soapy water
and rinse thoroughly. Familiarize
yourself with the appliance and
read the instruction manual. Plug
the power cord into a grounded
wall outlet according to the safety
instructions. Turn the machine on
by pressing the Power Button (11)
on the side of the appliance.
The Power Button will light solid
blue while the indicator light on the
Control Knob (5) will start to blink,
indicating the machine is heating
up.
Rinse the internal components before making espresso. Fill the water
tank and pump a few ounces of
water through the brew head (6)
and the frothing wand (10). Follow
the procedure in chapter 4 for
"Warming Internal Components &
Cups" to rinse the machine before
first use.
4.2 Fllng the Water
Tank
Remove the water tank (3) by lifting up on the handle (2). Open the
lid (1) and fill the water tank with
fresh cold water between the MIN
and MAX markings.
Close the lid (1) and replace the
water tank by pushing down firmly,
to ensure the tank is properly engaged.
Manual Espresso Machine
/ User Manual
15 / EN
4 Operaton and use
4.3 Control Panel
4.3.1 The Power
Button
The Power Button (11) on the side
of the machine turns the machine
on and off. When the machine is
turned on, the indicator light on the
Control Knob (5) will start to blink
red, signifying that the machine is
warming up the heating system.
The initial heat-up time is under
one minute at normal room temperature. When the indicator light
illuminates solid blue, the internal
components are heated and ready
to brew coffee. To turn the machine off, ensure the Control Knob
is in the "O" position and press the
Power Button on the side of the
machine to turn it off.
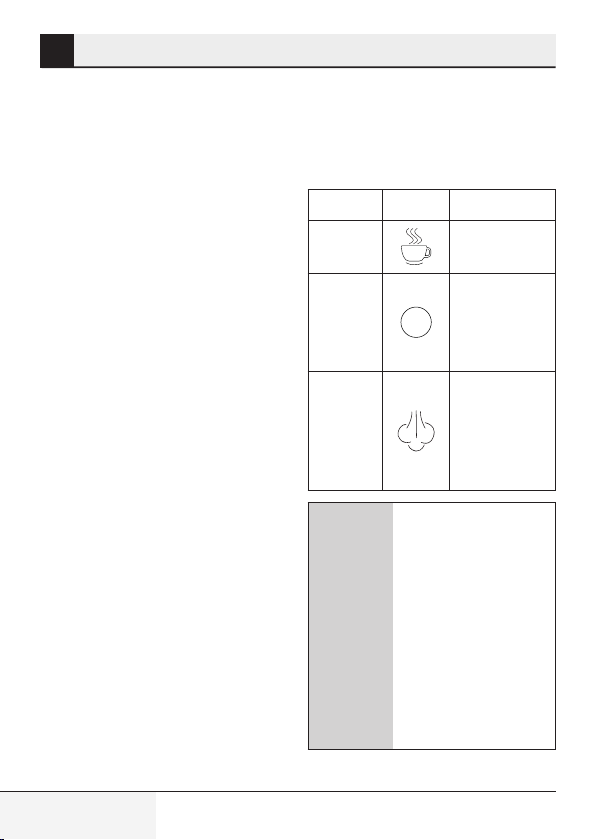
4.3.2 The Control Knob
The Control Knob (5) has three
positions:
Position
Left brewng
Mddle
Rght steam
C
Symbol
Explanation
coffee
standby,
cup warmng, preparedness
producton
through the
frothng
spout
During brewing or
steaming, the indicator light inside
the Control Knob (5)
may start to blink or
change color, specifying the heating
system is on, maintaining the proper
temperature for
brewing or steaming.
16 / EN
Manual Espresso Machine
/ User Manual
Operaton and use
4
6. Align the portafilter (7) to the
C
Always turn the
Control Knob (5) to
the "O" position before turning off the
machine.
4.3.3 Warmng Internal
Components & Cups
Before making espresso, it is important to pre-warm all the internal
components in the appliance and
the cups. This short procedure will
add 10° to 15° F to the first cup of
espresso.
1. Fill the water tank (3) with
fresh cold water as described in
chapter.
2. Make sure the Control Knob (5)
is in the "O" position.
3. Turn on the machine by pressing
the Power Button (11) located
on the side of the machine. The
indicator light on the Control
Knob (5) begins to blink red as
the machine begins to heat.
4. Place the sieve inside the
portafilter (7) (without coffee) 3
for proper sieve placement.
5. Make sure the thumb guard
does not cover the sieve.
7. Place one or two espresso cups
8. Turn the Control Knob (5) to the
9. Turn the Control Knob (5) back
"
INSERT
of the brew head (6), while
pushing the portafilter up. Turn
the portafilter firmly to the right
towards the "
middle of the brew head, until it
feels tight.
underneath the portafilter. Once
the indicator light illuminates
solid blue, the machine is ready
for coffee brewing.
left towards the "Cup icon". Hot
water will be pumped through
the portafilter (7) into the cups.
to the center towards the "O" to
stop the flow of hot water.
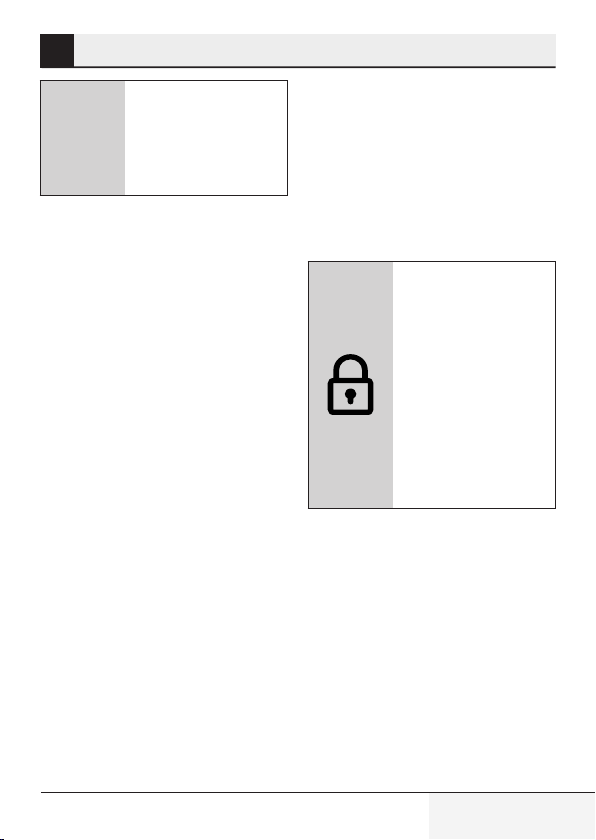
" on the left side
LOCK
" on the
In the beginning it
might not be possible to turn the portafilter all the way to
the "
LOCK
" position.
Just make sure the
portafilter is firmly
placed. Over time
the portafilter can be
moved closer to the
"
LOCK
" position.
Manual Espresso Machine
/ User Manual
17 / EN

4 Operaton and use
CAUTION:
leave the machine
unattended during
brewing or steaming. You always must
A
10. Empty the cups and remove
the portafilter (7). All parts
are now pre-warmed.
TIP!
down on the warming platform
(4) on top of the machine. When
the machine has been turned on
for approximately 15 minutes,
the warming platform will be
heated and can be used to prewarm cups instead of using hot
water from the machine.
turn the Control Knob
(5) back to the center
position towards the
"O" position to stop
brewing.
Place espresso cups upside
Never
18 / EN
Manual Espresso Machine
/ User Manual

5 Preparng
5.1 Preparng
Espresso
5.1.1 Selectng the
Coffee Grnd
This is an important step in the espresso making process as the finely
ground coffee must have uniform
consistency.
• The correct grind should look like
salt.
• If the grind is too fine, the water
will not flow through the coffee
and cause too much pressure to
build up in the machine. These
grinds look like powder and feel
like flour when rubbed between
fingers.
• If the grind is too coarse, the
water flows through the coffee
too quickly, preventing a full-flavored extraction. Tip! Be sure to
use a quality burr grinder for uniform consistency. Blade coffee
grinders are not recommended
for espresso brewing because
the grind is not as consistent.
• If you are experiencing problems
with taste (bitter, sour, under
extracted, etc.) adjust the grind
size of the coffee and/or switch
the brand or roast of whole bean
coffee.
5.1.2 Preparng the
Machne for Brewng
1. Make sure the indicator light is
illuminated solid blue and the
Control Knob (5) is in the "O"
position.
2. Make sure there is water in the
water tank (3) and your cup(s)
are prewarmed as described in
earlier chapters.
3. Make sure the drip tray (9) and
drip tray grid (8) are placed
correctly on the unit.
5.1.3 Fllng and
Insertng the
Portaflter
1. Select from the two sieves
(14-15) that come with your
machine depending on the
amount of cups you wish to
prepare (1 or 2 cups).
Manual Espresso Machine
/ User Manual
19 / EN

5 Preparng
2. Place the sieve in the portafilter
(7) and ensure it sits level.
3. Fill the selected sieve with
fresh, finely ground coffee.
Clean any excess coffee from
the rim of the portafilter (7).
This will assure proper fit under
the brew head (6).
4. Tamp or compress coffee using
the flat side of the coffee
scoop/tamper (13). Do not
overfill the sieve. This might
cause clogging or overflow.
5. Position portafilter (7)
underneath the brew head
(6) and align the portafilter
to "
INSERT
the portafilter up. Turn the
portafilter firmly to the right
towards "
tight.
" while pushing
LOCK
" until it feels
5.1.4 Brewng Espresso
If you are planning
to make cappuccino,
please refer to the
next section "Making
C
Cappuccino" after
reading "Brewing
Espresso."
1. After you prepare the machine
and ground coffee as described
in the previous sections you are
ready to start brewing your espresso.
2. Place 1 or 2 small cups under
the portafilter (7). For brewing
two cups at a time, you can
place the cups under the
portafilter ensuring each one
of them is directly under one of
the two spouts.
3. Once the indicator light in the
center of the Control Knob
(5) illuminates solid blue,
the machine is heated to the
proper temperature. Rotate the
Control Knob to the left towards
the "Cup icon", to start brewing.
The pump is audible for a
short moment as the grounds
are pre-infused with water.
Then, after a short pause, the
espresso will begin to flow into
the cup(s).
4. When the cup is filled to the
desired level, turn the Control
Knob (7) back to the "O"
position. Keep cup(s) under the
spouts for an additional few
seconds to be sure all of the
espresso has dripped out.
20 / EN
Manual Espresso Machine
/ User Manual

5 Preparng
A
C
CAUTION:
machine must be
turned off manually. Do not leave
machine unattended
while brewing. You
must manually stop
the brewing process.
This will avoid overflow, spillage and potential hazards and
damages.
After the espresso is
brewed, the machine
automatically creates
a bit of steam and
pushes the remaining
water from the pump
into the drip tray (9).
This ensures that
there will be no restwater in the heating
system. After preparing a few cups of espresso, carefully pull
the drip tray out of
the machine, empty
and replace.
The
5. After the machine has cooled
6. If you wish to brew additional
7. Once you have prepared the
down, carefully remove the
portafilter from the brew head
(6) by holding it by the handle
and pulling it towards the
left. Using the thumb guard
to secure the sieve in the
portafilter, turn the portafilter
(7) upside down to empty.
Rinse the sieve and portafilter
with water.
espresso, repeat the process
above. Add freshly ground
coffee into the sieve as
described in chapter 5c, "Filling
and Inserting the Portafilter,"
lock the portafilter (7) back
underneath the brew head (6)
and follow the instructions to
brew espresso again (items 2-5
from this section).
desired amount of espresso,
make sure the Control Knob (5)
is in the "O" position and turn
off the machine by pressing
the Power Button (11) on the
side of the machine. Allow the
machine to cool down before
removing parts and accessories
prior to cleaning.
Manual Espresso Machine
/ User Manual
21 / EN

5 Preparng
8. For cleaning instructions, refer
to chapter 8.
A
CAUTION:
metal parts of the
portafilter (7) might
still be very hot.
Always use caution
when handling the
machine and the
removable parts.
Make sure to use
the thumb guard
when discarding the
grounds. Cool these
parts by running under cold water.
The
5.1.5 Makng
Cappuccno
Cappuccino is the combination of
one or two shots of espresso with
an equal or larger amount of hot
milk and milk froth.
When frothing the
sieve and portafilter
(7) should be assem-
C
bled in the "
position. For best
results always start
with fresh, cold milk
(about 34°F).
LOCK
"
22 / EN
Manual Espresso Machine
/ User Manual

5 Preparng
C
Do not use a pitcher
which has just been
washed in warm water. We also recommend a beverage
thermometer for
preparing the best
frothed and steamed
milk. The ideal end
temperature for
frothed or steamed
milk is between
140°F - 165°F. Any
type of milk can be
used when frothing.
Whole milk will produce good microfoam
(small bubbles) while
low-fat and fat-free
milk will produce
large, airy bubbles in
the froth. Non-dairy
milks will not hold
the froth as well but
can be steamed and
heated for lattes.
5.1.6 Frothng Mlk
1. First prepare espresso into a
2. Fill a small stainless steel or
3. Before frothing, it is
large, pre-heated cup as described in chapter 5d, "Brewing
Espresso".
ceramic pitcher 1/2 full with
cold milk and set aside.
recommended to purge the
frothing wand (10) of any hot
water. Place a cup under the
frothing wand (or turn the
frothing wand directly into
the drip tray (9)). Once the
indicator light is solid blue,
turn the Control Knob (5) to
the right towards the "Steam
icon". The indicator light blinks
red for 5-8 seconds while the
water is purged from the wand.
Once the water is purged, the
indicator light will turn blue,
and steam is produced from
the frothing wand. Turn the
Control Knob back to the “O”
position. The indicator light is
now illuminated red indicating
the machine is ready to froth/
steam milk.
Manual Espresso Machine
/ User Manual
23 / EN
5 Preparng
4. Take the cold pitcher of milk
and submerge the frothing
wand (10) (with frothing sleeve
(12) assembled) about two
thirds into the milk inside the
pitcher. Make sure the frothing
sleeve does not hit the bottom
of the pitcher during frothing.
5. With the frothing wand (10)
submerged into the milk, turn
the Control Knob (5) to the right
towards the "Steam icon".
6. Steam will start to exit the
frothing wand (10) releasing
hot steam into the milk. During
frothing, the machine’s pump
will make intermittent noise
indicating that water is being
pumped through the heating
system to be converted into
steam.
A
CAUTION:
splattering of hot milk,
do not let the opening
of the frothing wand
(10) go above the surface of the milk. Keep
the frothing wand
submerged in the
milk during the entire
frothing process.
To avoid
CAUTION:
remove the frothing
wand (10) from the
milk while the Control
Knob (5) is still in
the steam position.
Always turn the
A
C
7. When the milk has doubled in
volume, or, if you are using a
beverage thermometer, when
the milk has reached 165°F
(68°C), turn the Control Knob
(5) back to the “O” position.
Control Knob to the
“O” position before
removing the frothing wand from the
milk or it could cause
hot milk to splatter.
During brewing or
steaming, the indicator light may turn off,
change color, or blink,
specifying the heating system is active
and maintaining the
proper temperature
for brewing or steaming.
Never
24 / EN
Manual Espresso Machine
/ User Manual
5 Preparng
Carefully clean the
frothing wand (10)
and frothing sleeve
(12) with a wet cloth
immediately after
C
8. Pour the frothed milk into the
prepared espresso, now the
cappuccino is ready. Sweeten to
taste and add any ingredients
you desire such as flavored
syrups, extracts or cocoa
powder/spices.
steaming to avoid
milk build up. Take
care to avoid contact
with hot parts.
C
After frothing, we
recommended you
allow the machine
to cool down for at
least 5 minutes before making espresso
again. This allows
the machine to cool
down from steaming temperature to
the proper espresso
brewing temperature. If indicator light
is red, you may turn
Control Knob (5) to
the left to run water
through the portafilter (7). This will cool
down the system
so espresso can be
made after steaming.
If multiple cappuccinos will be made,
prepare all the espressos first into hot
cups and then froth
the milk after.
Manual Espresso Machine
/ User Manual
25 / EN
5 Preparng
9. Follow the instructions in point
3 above to purge the frothing
wand (10) and to flush out
any residual milk from the
frothing wand and frothing
tip. It is important to properly
clean your frothing wand and
frothing tip and wash the
frothing sleeve (12) after each
use to ensure the frother
continues to work properly.
10. Turn the machine off by
pressing the Power Button (11)
on the side of the machine.
Unplug the power cord and
allow the machine to cool.
A
CAUTION:
frothing or steaming milk, the frothing
wand (10), frothing tip, and frothing
sleeve (12) will be
VERY HOT!
contact metal parts!
To avoid potential
injury, always make
sure that all parts
have cooled down
completely before
handling.
After
Do not
5.1.7 Makng Latte
Latte is the combination of one
or two shots of espresso with
an equal or larger amount of hot
steamed milk with very little or
no froth. Without the frothing
sleeve (12), the frothing wand
(10) will steam, not froth the milk.
Remove the frothing sleeve then
proceed with steaming the milk as
described in chapter 6. Pour hot,
steamed milk over espresso. Follow
steps 9 & 10 above in chapter 6,
“Making Cappuccino” to clean and
power down the machine.
A
CAUTION:
frothing or steaming milk, the frothing
wand (10) and frothing tip will be
HOT!
metal parts! To avoid
potential injury, always make sure that
all parts have cooled
down completely before handling.
After
VERY
Do not contact
26 / EN
Manual Espresso Machine
/ User Manual

6 Cleanng and Mantanng Your Machne
6.1 Daly Cleanng
1. Always make sure the Control
Knob (5) is in the “"O"” position
and the machine is powered off
by pressing the Power Button
(11) on the side of the machine
so that the blue light is turned
off. Unplug the cord from the
outlet and allow all of the parts
to cool before cleaning.
2. Remove and wash the frothing
sleeve (12) and wipe the
frothing wand (10) with a damp
cloth.
3. The water tank (3), sieves and
drip tray (9) can be washed in a
solution of hot water and mild
liquid soap.
A
C
CAUTION:
immerse appliance
in water, in any other
liquid or place in the
dishwasher.
Never use abrasive
cleansers, steel wool
pads or other abrasive materials to
clean the machine.
Do not
6.2 Cleanng the
Frothng Wand
It is recommended to purge (chapter 6, point 3) and wipe the frothing
wand (10) clean with a damp cloth
each and every time immediately
after frothing or steaming milk to
prevent build up. Thoroughly clean
the frothing wand before turning
off the machine to ensure cleanliness.
1. Pull the black frothing sleeve
(12) down and off the frothing wand (10) and clean under
warm running water.
2. Fill a cup with a bit of water
and immerse the frothing wand
(10).
3. Turn the Control Knob (5) to the
right towards the "Steam icon"
and let steam push into the
water for a few seconds.
4. Turn the Control Knob (5) back
towards the center to the OFF
position "O".
5. Use a cloth to dry the frothing
wand (10) and replace the black
frothing sleeve (12), ensuring
it is firmly pushed up onto the
frothing wand.
Manual Espresso Machine
/ User Manual
27 / EN

6 Cleanng and Mantanng Your Machne
6. If extremely clogged, the
frothing tip can be unscrewed,
and soaked in warm soapy
water for approximately 30
minutes. Once soaking is
complete, thoroughly rinse the
tip under running water.
A
CAUTION:
frothing wand (10),
frothing tip, and
frothing sleeve
(12) may be
HOT!
tential injury, always
make sure that all
parts have cooled
down completely before handling.
The
C
VERY
To avoid po-
C
If no steam comes
out of the frothing
wand (10), hardened
milk blocks its path.
Turn the Control
Knob (5) back to the
"O" position. Remove
the black frothing
sleeve (12) and carefully use a needle to
loosen the milk residue from the opening of the frothing
tip to remove any
blockage, then steam
again.
In order for your machine to work properly time after time,
clean the frothing
wand (10), sleeve
and tip after each
use as described
above.
28 / EN
Manual Espresso Machine
/ User Manual

6 Cleanng and Mantanng Your Machne
6.3 Decalcfyng
When making espresso always use
cold, clean water. Using spring water or filtered water will slow down
calcium build up. We recommend
decalcifying the machine after
100-200 uses or at least every 2-3
months.
• When using commercial decal-
cifying agents it is important to
follow their instructions. You can
also use Capresso Cleaning Solution, available at www.capresso.
com. Dissolve 1 packet of Capresso Cleaning Solution with 30
oz. of water and add to the water
tank (3).
Do not use vinegar
as this will considerably shorten the life
C
6.3.1 Decalcfyng the
Brew Head
1. Remove the portafilter (7).
2. For best results unscrew the
screen inside the brew head
(6). Wipe off any coffee residue
with a damp cloth.
of the seal inside the
brew head (6).
3. Fill the water tank (3) with the
decalcifying solution.
4. Place a large bowl beneath the
brew head (6).
5. Push the Power Button (11) on
the side of the machine and
turn the Control Knob (5) to
the left towards the "Cup icon".
Allow 1/3 to 1/2 of the solution
to be pumped through the
system and the brew head.
6. Turn the Control Knob (5) back
towards “O” position to stop the
process.
7. Let the machine sit for
approximately 10 minutes.
6.3.2 Decalcfyng the
frothng wand
1. Remove the black frothing
sleeve (12).
2. Fill a pitcher with 6 to 8 oz. of
cold water and immerse the
frothing wand (10) into the cold
water.
3. Turn the Control Knob (5) to the
right towards the "Steam icon"
and let the steam pass through
for about 30 seconds. Repeat
this process three or four times.
Manual Espresso Machine
/ User Manual
29 / EN

6 Cleanng and Mantanng Your Machne
11. Now process the remaining
decalcifying solution through the
brew head (6) as described above.
6.3.3 Rnsng the
system
1. Remove the water tank (3) and
rinse thoroughly, then fill with
fresh cold water.
2. Repeat above steps (4 through
6) with fresh cold water.
3. Replace screen in the brew
head (6) and tighten the screw
securely.
30 / EN
Manual Espresso Machine
/ User Manual

7 Troubleshootng
7.1 Problems, possble causes and remedes
Problem Cause Remedy
Coffee runs
down the
side of the
portafilter.
Portaflter (7) s not
properly nserted.
Edge of seve s not
free of ground coffee
Screen nsde brew
head (6) s drty.
Turn the handle of the
portaflter (7) further to
the rght.
Turn off the machne,
remove the portaflter (7)
holder and clean the
edges of the seve.
Remove the screen n
the brew head (6) by
removng the two screws
that hold the screen n
place. Clean thoroughly
wth warm water, dry
and replace the screen.
Ensure the screws are
tghtly fxed back on.
CAUTION! HOT.
Manual Espresso Machine
/ User Manual
31 / EN

7 Troubleshootng
Problem Cause Remedy
No water n tank. Fll the tank wth water.
Very little
or no coffee
flows
through the
portafilter.
Espresso
brews out
only as
drops.
Espresso
brews too
quickly.
The screen nsde
the brew head (6) s
blocked.
The seve s blocked. Correcton: Clean the
Coffee grounds are
too fne or packed
down too frmly.
Machne blocked by
calcum deposts.
Ground coffee s too
coarse.
Not enough coffee n
the seve.
Brew water through
the screen wthout the
portaflter (7) nserted. If
no water comes through,
unscrew the screen,
clean and replace.
seve, nsert nto the
portaflter (7) and pump
water through wthout
coffee. If no water comes
through the seve call
Customer Servce to
order a replacement
seve.
Do not tamp coffee
grounds so frmly. Use a
coarser grnd of coffee.
Decalcfy the applance.
See chapter 8c.
Use a fner grnd.
Use more ground coffee.
32 / EN
Manual Espresso Machine
/ User Manual

7 Troubleshootng
Problem Cause Remedy
Coffee old or too dry. Use fresh coffee.
No crema.
No steam
from the
frothing
wand.
Coffee not pushed
down frmly enough.
Water pushes through
the coffee too fast.
Coffee too coarse. Use a concal burr grnder
Coffee blend not
suted to espresso
coffee.
Tp of frothng wand
(10) s blocked.
Tamp coffee grounds
more frmly. Use a fner
grnd.
to obtan a fner and more
consstent grnd.
Change brand of
espresso.
See chapter 8b, “Cleanng
the Frothng Wand”.
If frothng wand (10)
s clear of dred mlk
deposts, but no steam
comes out of the frothng
wand, then decalcfy
the frothng wand as
descrbed n chapter 8c.
If the applance s stll
blocked, call Customer
Servce, see chapter 11.
Manual Espresso Machine
/ User Manual
33 / EN

7 Troubleshootng
Problem Cause Remedy
Mlk not fresh. Use fresh mlk.
Mlk not sutable. Use lower fat content
Not enough
froth when
frothing
milk.
Mlk was too warm
from the start.
dary mlk. Non-dary mlk
won’t froth as
well.
Use mlk straght from
the refrgerator (34°F).
34 / EN
Not enough mlk to
froth.
Manual Espresso Machine
Use more cold mlk.
/ User Manual

2 Votre cafetière
2.1 Vue d’ensemble
1
2
3
4
5
6
7
8
9
15
10
14
13
Toutes les valeurs déclarées sur le produit et sur les livrets imprimés sont le résultat d’analyses en laboratoire
effectuées conformément aux normes associées. Ces valeurs peuvent varier en fonction de l’utilisation et des
conditions environnantes
Cafetière entièrement automatique /
Manuel d’utilisation
1112
35 / FR

2 Votre cafetière
1. Couvercle du réservoir d’eau
2. Manche du réservoir d’eau
3. Réservoir d’eau démontable
4. Plateforme chauffante
5. Bouton de commande
6. Tête d’infusion
7. Porte-filtre
8. Grille de l’égouttoir
9. Égouttoir
10. Buse de moussage
11. Bouton d’alimentation
12. Bras de moussage
13. Mesure à café / pressemouture
14. Tamis pour 2 tasses
15. Tamis pour 1 tasse
2.2 Données
techniques
Alimentation électrique :
220 - 240 V~, 50-60 Hz
Puissance : 1 200 W
Réservoir d’eau : 1,2 litre
Modifications techniques et
conceptuelles réservées.
36 / FR
Cafetière entièrement automatique /
Manuel d’utilisation

3 Astuces pour la préparation du café
• Pour extraire toute la saveur de
vos graines, nous vous recommandons d’utiliser les grains de
café entiers fraîchement moulus à chaque préparation d’un
expresso.
• En plus du café utilisé, l’utilisation
de l’eau douce froide exempte de
chlore, d’odeurs et d’autres impuretés garantit la préparation d’un
expresso excellent.
• Gardez votre café moulu ex-
presso dans un contenant hermétique et dans un endroit
froid et sec afin de conserver sa
saveur. Ne conservez pas le café
moulu pendant longtemps de
peur qu’il perde sa saveur.
• Évitez de remplir complètement
le porte-filtre (7) et le tamis sélectionné. À l’aide de la mesure à
café (13) intégrée, utilisez 1 cuillère de dosage de café moulu
pour chaque tasse d’expresso.
• Si vous n’avez pas utilisé la ma-
chine pendant plus de 5 jours
consécutifs, rincez le réservoir
d’eau et égouttez-le.
• Avant de retirer le réservoir d’eau
pour le remplir ou le vider, éteignez toujours la machine.
Cafetière entièrement automatique /
Manuel d’utilisation
• Posez toujours la machine sur
une surface de travail plane,
stable et résistant à la chaleur.
• Pour garantir que votre expresso
conserve une température optimale, nous vous recommandons
de préchauffer vos tasses.
• Avant la préparation du café,
tournez le porte-filtre (7) vers
la droite pour éviter qu’il ne se
desserre en raison de la pression
élevée.
MISE EN
A
GARDE :
éviter tout risque de
brûlure corporelle
et/ou des blessures
par la vapeur et l’eau
chaudes ou des
dommages sur la
machine :
Pour
37 / FR

3 Astuces pour la préparation du café
1. Ne retirez jamais le réservoir
d’eau ou le porte-filtre (7)
lorsque la machine prépare
l’expresso ou fait mousser le
lait ; placez le bouton de commande sur la position « O »
avant de retirer le porte-filtre
(7) pour préparer d’autres
tasses d’expresso. Si vous souhaitez ajouter de l’eau dans le
réservoir, tournez le bouton
de commande vers la position
« O » et éteignez la machine
en appuyant sur le bouton d’alimentation (11) situé sur le côté
de la machine pour éteindre le
voyant bleu.
2. Si l’expresso ne s’écoule pas du
porte-filtre (7) (ne s’égoutte
que très lentement), alors le
tamis est bouché. Éteignez la
machine et laissez-la refroidir.
Vérifiez que le café n’est
pas trop finement moulu,
chapitre 5a.
3. Retirez le porte-filtre (7) avec
beaucoup de précautions. Les
pièces métalliques peuvent
être encore très chaudes. De
l’eau chaude peut également
flotter sur la surface du café
moulu. Tenez le porte-filtre (7)
uniquement par son manche
et retirez les moutures de café
préparées à l’aide du gardepouce (fig. 5).
4. Si la vapeur ne s’échappe pas de
la buse de moussage (10), alors
le mousseur à lait est bloqué.
Éteignez la machine et laissezla refroidir. Nettoyez la buse de
moussage (10) comme indiqué
dans le chapitre 8b.
5. Pour que votre machine
fonctionne correctement à
tout moment, nettoyez le bras
de moussage (12), la buse
de moussage (10) et la buse
vapeur après chaque utilisation.
38 / FR
Cafetière entièrement automatique /
Manuel d’utilisation

4 Fonctionnement et utilisation
4.1 Avant la première
utilisation
Après le déballage soigneux de
votre machine à expresso, lavez
toutes les pièces démontables
avec de l’eau chaude savonneuse
et rincez-les minutieusement.
Prenez connaissance de l’utilisation de l’appareil en lisant le manuel
d’utilisation. Branchez le cordon
d’alimentation sur une prise murale
mise à la terre conformément aux
instructions de sécurité. Éteignez
la machine en appuyant sur le bouton d’alimentation (11) situé sur le
côté de la machine.
Le bouton d’alimentation (11)
s’allume en bleu fixe lorsque le
voyant du bouton d’alimentation
(11) clignote, ce qui indique que la
machine chauffe.
Rincez les composants internes
avant la préparation d’un expresso.
Remplissez le réservoir d’eau et
pompez un peu d’eau à travers la
tête d’infusion (6) (fig. 1, F) et la
buse de moussage (fig. 1, J). Suivez
la procédure du chapitre 4 relative
au « chauffage des composants
internes et des tasses » pour rincer
la machine avant la première utilisation.
4.2 Remplissage du
réservoir d’eau
Retirez le réservoir d’eau (3) en le
soulevant par son manche. Ouvrez
le couvercle (1) et remplissez le
réservoir d’eau douce froide à un
niveau compris entre les marques
MIN et MAX.
Fermez le couvercle (1) et replacez
le réservoir d’eau (3) en poussant
fortement vers le bas pour s’assurer qu’il s’installe correctement.
Cafetière entièrement automatique /
Manuel d’utilisation
39 / FR

4 Fonctionnement et utilisation
4.3 Panneau de
commande
4.3.1 Bouton
d’alimentation
Le bouton d’alimentation (11) situé
sur le côté de la machine permet
d’allumer et d’éteindre la machine.
Lorsque la machine s’allume, le
voyant du bouton de commande
(5) clignote en rouge, ce qui signifie que la machine chauffe grâce au
système de chauffage. Le temps de
chauffage initial est inférieur à une
minute à la température ambiante.
Lorsque le voyant s’allume en bleu
fixe, les composants internes
chauffent et sont prêts pour la
préparation du café. Pour allumer
la machine, assurez-vous que le
bouton de commande est sur la position « O » et appuyez sur bouton
d’alimentation (11) pour l’éteindre.
4.3.2 Bouton de
commande
Le bouton de commande (5) peut
occuper trois positions :
Position
Gauche
Centre
Droite
Symbole
Explication
préparation
du café
veille, arrêt
de la préparation et la
cuisson à la
vapeur
production
de la vapeur
par le
mousseur
à lait
40 / FR
Cafetière entièrement automatique /
Manuel d’utilisation

4 Fonctionnement et utilisation
Lors de la préparation ou de la cuisson
à la vapeur, le voyant
du bouton de commande (5) clignote
ou change de couleur pour indiquer
C
C
Cafetière entièrement automatique /
Manuel d’utilisation
que le système de
chauffage est activé,
maintenant ainsi la
température appropriée pour la préparation ou la cuisson à la
vapeur du café.
Placez toujours le
bouton de commande (5) à la position « O » avant
d’éteindre la machine.
4.3.3 Chauffage des
composants internes
et des tasses
Avant la préparation d’un expresso,
il est recommandé de préchauffer
tous les composants internes de
la machine, ainsi que les tasses.
Cette courte procédure ajoutera
10 à 15 °F supplémentaires à la
température de la première tasse
d’expresso.
1. Remplissez le réservoir d’eau
(3) douce froide comme indiqué
dans le chapitre
2. Assurez-vous que le bouton de
commande est sur la position
« O ».
3. Allumez la machine en
appuyant sur le bouton
d’alimentation (11) situé sur le
côté de la machine. Le voyant
du bouton de commande (5)
clignote en rouge, indiquant
que la machine commence à
chauffer.
4. Placez le tamis à l’intérieur
du porte-filtre (7) (sans
café) ; voir la figure 3 pour un
positionnement correct.
5. Assurez-vous que le gardepouce ne couvre pas le tamis.
41 / FR

4 Fonctionnement et utilisation
6. Alignez le porte-filtre (7) sur
«
INSÉRER
gauche de la tête d’infusion
(6), tout en le poussant vers le
haut. Tournez le porte-filtre (7)
fermement vers la droite sur
«
VERROUILLER
milieu de la tête d’infusion (6)
jusqu’à ce qu’il soit serré.
7. Placez une ou deux tasses
d’expresso sous le porte-filtre
(7). Une fois que le voyant
s’allume en bleu fixe, la machine
est prête pour la préparation du
café.
» situé au côté
» situé au
Au début, il peut
être impossible de
tourner complètement le porte-filtre
(7) vers la position
«
VERROUILLER
Assurez-vous que le
porte-filtre (7) est
bien placé. Avec le
temps, vous pourrez
déplacer le portefiltre (7) et le rapprocher de la position
«
VERROUILLER
».
».
8. Tournez le bouton de commande
(5) vers la gauche, vers l’icône
« Tasse ». L’eau chaude est
alors pompée dans les tasses, à
travers le porte-filtre (7).
9. Tournez le bouton de
commande (5) vers le centre, à
la position « O » pour arrêter
l’écoulement d’eau chaude.
MISE EN
A
GARDE :
sez jamais la machine
sans surveillance lors
de la préparation
ou de la cuisson à la
vapeur. Vous devez
toujours ramener
le bouton de commande (5) au centre,
à la position « O »
pour arrêter la préparation.
Ne lais-
42 / FR
Cafetière entièrement automatique /
Manuel d’utilisation

4 Fonctionnement et utilisation
10. Videz les tasses et retirez le
porte-filtre (7). Toutes les
pièces sont préchauffées.
ASTUCE ! Placez les tasses à
expresso retournées sur la
plateforme chauffante audessus de la machine. Lorsque
vous laissez la machine allumée
pendant environ 15 minutes,
la plateforme chauffe (4) et
vous pouvez utiliser celle-ci
pour préchauffer les tasses au
lieu d’utiliser de l’eau chaude
provenant de la machine.
Cafetière entièrement automatique /
Manuel d’utilisation
43 / FR

5 Préparation
5.1 Préparation d’un
expresso
5.1.1 Choix de la
mouture de café
C’est une étape importante dans le
processus de préparation d’un expresso car le café finement moulu
doit avoir une consistance homogène.
• La bonne mouture de café de-
vrait ressembler à du sel.
• Si la mouture est trop fine, elle
empêche l’eau de couler à travers le café, ce qui entraîne une
forte accumulation de pression
dans la machine. Cette mouture
ressemble à de la poudre et sa
texture est comme de la farine
lorsque vous la frottez entre les
doigts.
• Si la mouture trop épaisse, elle
cause un écoulement trop rapide
de l’eau à travers le café, ce qui
empêche une extraction du
café avec toutes ses saveurs.
Astuce ! Assurez-vous d’utiliser
un broyeur à café de qualité afin
d’obtenir une consistance homogène. Les broyeurs à café à lame
ne sont pas recommandés pour
la préparation de l’expresso car
la mouture obtenue n’est pas
homogène.
• En cas de problèmes de goût
(amer, acide, sous extrait, etc.),
ajustez la taille de la mouture de
café et/ou changez de marque
ou de méthode de torréfaction
des grains de café.
5.1.2 Préparation de la
machine à café
1. Assurez-vous que le voyant
s’allume en bleu et que le bouton de commande (5) est sur la
position « O ».
2. Assurez-vous que le réservoir
d’eau (3) est plein et que vos
tasses sont préchauffées
comme décrit dans les chapitres
précédents.
44 / FR
Cafetière entièrement automatique /
Manuel d’utilisation

5 Préparation
3. Assurez-vous que l’égouttoir
(9) et la grille de l’égouttoir (8)
sont correctement placés sur
l’appareil.
5.1.3 Remplissage et
montage du porte-filtre
1. Sélectionnez parmi les deux
tamis (14-15) fournis avec votre
machine en fonction de la quantité de tasses que vous souhaitez préparer (1 ou 2 tasses).
2. Placez le tamis dans le portefiltre (7) et assurez-vous qu’il est
placé au niveau.
3. Remplissez le tamis sélectionné
avec du café frais et finement
moulu. Nettoyez tout excès
de café sur le bord du portefiltre (7). Ceci permet une
installation appropriée sous la
tête d’infusion (6).
4. Tassez ou compressez le café
à l’aide de la face plate de la
cuillerée à café / du pressemouture (13). Évitez de trop
remplir le tamis. Si vous le faites,
cela pourrait provoquer une
obstruction ou un débordement.
5. Placez le porte-filtre (7)
sous la tête d’infusion (6)
et alignez le porte-filtre (7)
sur «
INSÉRER
le poussant vers le haut.
Tournez fermement le portefiltre (7) vers la droite sur
«
VERROUILLER
ce qu’il s’installe parfaitement.
» tout en
» jusqu’à
5.1.4 Préparation d’un
expresso
Si vous envisagez de
réaliser un cappuccino, reportez-vous
à la section suivante
C
1. Après avoir préparé la machine
et le café moulu comme décrit
dans les sections précédentes,
vous pouvez commencer à préparer votre expresso.
« Réalisation d’un
cappuccino » après
avoir lu « Préparation
d’un expresso ».
Cafetière entièrement automatique /
Manuel d’utilisation
45 / FR

5 Préparation
2. Placez une ou deux petites
tasses sous le porte-filtre (7).
Pour préparer deux tasses à
la fois, vous pouvez placer les
tasses sous le porte-filtre (7)
en vous assurant que chacune
est placée directement sous
l’un des deux becs verseurs.
3. Une fois que le voyant au
centre du bouton de commande
s’allume en bleu fixe, la machine
chauffe à la température
appropriée. Tournez le bouton
de commande vers la gauche,
vers l’icône « Tasse », pour
lancer la préparation. La pompe
émet un bruit pendant un
court moment, car les grains
sont pré-infusés dans de l’eau.
Ensuite, après une courte
pause, l’expresso commence à
s’écouler dans la tasse ou les
tasses.
4. Lorsque la tasse est remplie
au niveau souhaité, placez le
bouton de commande sur la
position « O ». Maintenez les
tasses sous les becs verseurs
pendant quelques secondes
supplémentaires pour vous
assurer que l’expresso s’est
complètement écoulé.
46 / FR
MISE EN
GARDE :
manuellement la
machine. Ne laissez
pas la machine sans
surveillance lors de la
préparation. Arrêtez
manuellement la
A
Cafetière entièrement automatique /
préparation. Cette
mesure permet d’éviter tout débordement, déversement
et tous risques et
dommages potentiels.
Éteignez
Manuel d’utilisation

5 Préparation
Une fois votre expresso prêt, la machine produit automatiquement un peu
de vapeur et évacue
l’eau restante de la
pompe dans l’égouttoir (9). Ainsi, vous
êtes certain que le
C
5. Une fois la machine refroidie,
retirez soigneusement le portefiltre (7) de la tête d’infusion (6)
en le tenant par le manche et
en le tirant vers la gauche. À
l’aide du garde-pouce intégré
pour sécuriser le tamis dans
le porte-filtre (7), retournez le
porte-filtre (7) pour le vider.
Rincez le tamis et le porte-filtre
(7) avec de l’eau.
système de chauffage ne contient pas
d’eau. Après avoir
préparé quelques
tasses d’expresso,
retirez soigneusement l’égouttoir de la
machine, videz-le et
remettez-le en place.
6. Si vous souhaitez préparer
une tasse supplémentaire
d’expresso, répétez le
processus ci-dessus. Ajoutez
du café fraîchement moulu
dans le tamis comme décrit
au chapitre 5c, « Remplissage
et montage du porte-filtre
(7) », fixez le porte-filtre (7) en
dessous de la tête d’infusion
(6) et suivez les instructions
pour préparer à nouveau votre
expresso (articles 2 à 5 de cette
section).
7. Une fois que vous avez
préparé la quantité d’expresso
souhaitée, assurez-vous que
le bouton de commande (5) est
sur la position « O » et éteignez
la machine en appuyant sur le
bouton d'alimentation (11) sur
le côté de la machine. Laissez
la machine refroidir avant
de retirer les pièces et les
accessoires pour le nettoyage.
8. Pour les instructions de
nettoyage, référez-vous au
chapitre 8.
Cafetière entièrement automatique /
Manuel d’utilisation
47 / FR

5 Préparation
MISE EN
A
GARDE :
métalliques du
porte-filtre (7) pourraient encore être
très chaudes. Soyez
prudent lorsque
vous manipulez la
machine ainsi que
les pièces démontables. Assurez-vous
d’utiliser le gardepouce lors du rejet
des grains de café.
Refroidissez ces
pièces en les plaçant
sous de l’eau froide.
Les pièces
5.1.5 Réalisation du
cappuccino
Le cappuccino est la combinaison
d’une ou de deux doses d’expresso
avec une quantité équivalente
ou supérieure de lait chaud et de
mousse de lait. (Pour la préparation
du café latte, référez-vous au chapitre 7).
Lors de l’ébullition,
assurez-vous que
le tamis et le portefiltre (7) sont montés sur la position
«
C
5.1.6 Moussage du lait
1. Préparez tout d’abord un expresso
dans une grande tasse préchauffée comme l’indique le chapitre 5d :
« Préparation d’un expresso ».
2. Remplissez de moitié un petit
pichet en acier inoxydable ou en
céramique avec du lait froid et
mettez-le de côté.
VERROUILLER
Pour un meilleur résultat, commencez toujours avec du lait frais
(environ 34 °F)
».
48 / FR
Cafetière entièrement automatique /
Manuel d’utilisation

5 Préparation
3. Avant le moussage, nous vous
recommandons d’éliminer toute
trace d’eau chaude dans la buse
de moussage (10). Placez une
tasse sous la buse de moussage
(10) (ou dirigez directement la
buse de moussage (10) dans
l’égouttoir (9)). Une fois que le
voyant est bleu fixe, tournez le
bouton de commande vers la
droite sur « l’icône Vapeur » Le
voyant clignote en rouge pendant
5 à 8 secondes tandis que l’eau est
éliminée de la buse. Dès que l’eau
est éliminée, le voyant passe au
bleu et la vapeur s’échappe de la
buse de moussage (10). Ramenez
le bouton de commande à la
position « O ». Le voyant s’allume
en rouge indiquant que la machine
est prête à mousser / cuire le lait à
la vapeur.
4. Prenez un pichet de lait froid
et immergez-y la buse de
moussage (10) (avec le bras
de moussage (12) monté) aux
deux tiers environ. Assurezvous que le bras de moussage
(12) ne touche pas le fond du
pichet lors du moussage.
5. Lorsque la buse de moussage
(10) est immergée dans le
lait, tournez le bouton de
commande vers la droite, vers
« l’icône Vapeur ».
6. Une vapeur chaude commence
à sortir de la buse de moussage
(10) pour s’introduire dans le
lait. Pendant le moussage, la
pompe de la machine émet des
bruits intermittents indiquant
que l’eau est pompée à travers
le système de chauffage pour
être transformée en vapeur.
MISE EN
A
GARDE :
ter les éclaboussures
de lait chaud, évitez
de laisser l’ouverture
de la buse de moussage (10) remonter
à la surface du lait.
Maintenez la buse
de moussage (10)
immergée dans le lait
pendant l’ensemble
du processus de
moussage.
Pour évi-
Cafetière entièrement automatique /
Manuel d’utilisation
49 / FR

5 Préparation
A
C
MISE EN
GARDE :
jamais la buse de
moussage (10) du
lait lorsque le bouton
de commande est
encore à la position
vapeur. Placez toujours le bouton de
commande sur la
position « O » avant
de retirer la buse de
moussage (10) du
lait. Le cas contraire
pourrait entraîner
des éclaboussures
de lait.
Lors de la préparation ou de la cuisson
à la vapeur, le voyant
peut s’éteindre, changer de couleur ou clignoter pour indiquer
que le système de
chauffage est activé,
maintenant ainsi la
température appropriée pour la préparation ou la cuisson à la
vapeur.
Ne retirez
7. Lorsque vous doublez le
volume du lait, ou si vous
utilisez un thermomètre pour
boisson, ramenez le bouton de
commande (5) sur la position
« O » lorsque le lait atteint une
température de 165 °F (68 °C),
Nettoyez soigneusement la buse et le
bras de moussage
(12) à l’aide d’un chiffon humide immédiatement après la
C
8. Versez le lait mousseux
dans l’expresso préparé, et le
cappuccino est prêt. Édulcorez
à votre goût et ajoutez tout
ingrédient souhaité, notamment
les sirops aromatisés, les
extraits ou la poudre cacao.
cuisson à la vapeur
pour éviter l’accumulation de lait. Évitez
tout contact avec les
pièces chaudes.
50 / FR
Cafetière entièrement automatique /
Manuel d’utilisation

5 Préparation
9. Suivez les instructions du
point 3 ci-dessus pour nettoyer
la buse vapeur et la buse
de moussage (10) afin d’y
éliminer tout résidu de lait.
Il est important de nettoyer
correctement votre buse vapeur
et votre la buse de moussage
(10) et de laver le bras de
moussage (12) après chaque
utilisation pour s’assurer que
le mousseur à lait continue de
fonctionner correctement. (Voir
chapitre 8b)
10. Éteignez la machine en
appuyant sur le bouton
d’alimentation (11) situé sur le
côté de la machine. Débranchez
le cordon d’alimentation et
laissez la machine refroidir.
MISE EN
GARDE :TRÈS
A
CHAUDS !
tout contact avec les
pièces métalliques !
Pour éviter d’éventuelles blessures,
assurez-vous toujours
que toutes les pièces
ont complètement refroidi avant toute nouvelle manipulation.
Évitez
5.1.7 Préparation du
café latte
Le café latte est la combinaison d’une
ou de deux doses d’expresso avec
une même quantité ou plus de lait
chaud cuit à la vapeur et très peu ou
pas de mousse. En l’absence du bras
de moussage (12), la buse de moussage (10) cuit le lait à la vapeur sans
toutefois le mousser. Retirez le bras
de moussage (12) (fig. 4), puis faites
cuire le lait à la vapeur tel que décrit
au chapitre 6. Versez du lait chaud
cuit à la vapeur dans l’expresso.
Suivez les étapes 9 et 10 décrites au
chapitre 6 ci-dessus « Préparation
du Cappuccino » pour nettoyer et
éteindre la machine.
Cafetière entièrement automatique /
Manuel d’utilisation
51 / FR

5 Préparation
MISE EN
GARDE :TRÈS
CHAUDES !
tout contact avec
les pièces métalliques ! Pour éviter
d’éventuelles bles-
A
sures, assurez-vous
toujours que toutes
les pièces ont complètement refroidi
avant toute nouvelle
manipulation.
Évitez
52 / FR
Cafetière entièrement automatique /
Manuel d’utilisation

6 Nettoyage et entretien de la machine
6.1- Nettoyage
quotidien
1. Assurez-vous toujours que le
bouton de commande (5) est
sur la position « O » et que la
machine s’éteint lorsque l’on
appuie sur le bouton d’alimentation (11) situé sur le côté de la
machine afin que le voyant bleu
s’éteigne. Débranchez le cordon
de la prise et laissez refroidir
toutes les pièces avant de les
nettoyer.
2. Retirez et lavez le bras de
moussage (12), puis nettoyez la
buse de moussage (10) à l’aide
d’un chiffon humide.
3. Le réservoir d’eau (3), les tamis
et l’égouttoir (9) peuvent être
lavés dans de l’eau chaude avec
un détergent liquide doux.
MISE EN
GARDE :
de plonger l’appareil
dans de l’eau, dans
A
Cafetière entièrement automatique /
Manuel d’utilisation
tout autre liquide ou
de le placer dans le
lave-vaisselle.
Évitez
6.2 Nettoyage de la
buse de moussage
Il est recommandé de purger (chapitre 6, point 3), puis d’essuyer la
buse de moussage (10) à l’aide d’un
chiffon humide immédiatement
après chaque moussage ou cuisson
du lait à la vapeur pour éviter l’accumulation. Nettoyez soigneusement
la buse de moussage (10) avant
d’éteindre la machine pour qu’elle
reste propre.
1. Tirez le bras de moussage (12)
2. Remplissez d’eau une tasse et
3. Tournez le bouton de
N’utilisez jamais de
nettoyants abrasifs,
de laine d’acier ou
C
noir vers le bas, arrêtez la buse
de moussage (10) et nettoyezla avec de l’eau chaude.
plongez-y la buse de moussage
(10).
commande (5) vers la droite,
vers « l’icône Vapeur » et laissez
la poussée de vapeur dans l’eau
pendant quelques secondes.
d’autres matériaux
abrasifs pour nettoyer la machine.
53 / FR

6 Nettoyage et entretien de la machine
4. Ramenez le bouton de
commande (5) vers le milieu, à
la position d’arrêt « O ».
5. Utilisez un tissu pour sécher
la buse de moussage (10) et
replacez le bras de moussage
(12) noir, en vous assurant qu’il
est bien fixé sur la buse de
moussage (10).
6. Si la buse vapeur est
complètement bouchée,
dévissez et trempez-la dans
de l’eau chaude et savonneuse
pendant environ 30 minutes.
Une fois le trempage terminé,
rincez soigneusement la buse
vapeur avec de l’eau courante.
MISE EN
GARDE :TRÈS
A
CHAUDS !
éviter d’éventuelles
blessures, assurezvous toujours que
toutes les pièces
ont complètement
refroidi avant toute
nouvelle manipulation.
Pour
C
C
Si la vapeur ne
s’échappe pas de la
buse de moussage
(10), cela indique
une obstruction de
sa voie, causée par
le lait durci. Ramenez
le bouton de commande (5) à la position « O ». Retirez le
bras de moussage
(12) noir et utilisez
soigneusement une
aiguille pour retirer
les résidus de lait
de l’ouverture de la
buse vapeur (fig. 4)
afin d’éliminer tout
blocage, puis faites
échapper la vapeur à
nouveau.
Pour que votre machine fonctionne
correctement au fil
du temps, nettoyez
la buse de moussage
(10), le bras de moussage (12) et la buse
vapeur après chaque
utilisation comme
indiqué ci-dessus.
54 / FR
Cafetière entièrement automatique /
Manuel d’utilisation

6 Nettoyage et entretien de la machine
6.3 Décalcification
Utilisez toujours de l’eau froide et
propre pour préparer un expresso.
L’utilisation d’eau de source ou
d’eau filtrée ralentit l’accumulation
de calcium. Nous recommandons la
décalcification de la machine après
100 à 200 utilisations ou au moins
tous les 2 à 3 mois.
• Pour utiliser des détartrants
commerciaux, il est important
de suivre les instructions y afférentes. Vous pouvez également
utiliser le Capresso Cleaning
Solution, disponible sur www.
capresso.com. Dissolvez 1 paquet
de Capresso Cleaning Solution
dans 30 oz. d’eau et ajoutez au
réservoir d’eau (3).
N’utilisez pas de
vinaigre, car il réduit
considérablement la
C
durée de vie du joint
à l’intérieur de la tête
d’infusion (6).
6.3.1 Décalcification de
la tête d’infusion
1. Retirez le porte-filtre (7).
2. Pour obtenir de meilleurs
3. Remplissez le réservoir
4. Placez le grand bol sous la tête
5. Appuyez sur le bouton
6. Ramenez le bouton de
7. Laissez la machine au repos
résultats, dévissez l’écran à
l’intérieur de la tête d’infusion
(6). Essuyez les résidus de café
à l’aide d’un chiffon humide.
d’eau (3) avec la solution de
décalcification.
d’infusion (6).
d’alimentation (11) sur le côté
de la machine et tournez le
bouton de commande (5) vers
la gauche, vers « l’icône de la
tasse ». Pompez 1/3 à 1/2 de la
solution à travers le système et
la tête d’infusion (6).
commande (5) à la position
« O » pour interrompre le
processus.
pendant environ 10 minutes.
Cafetière entièrement automatique /
Manuel d’utilisation
55 / FR

6 Nettoyage et entretien de la machine
6.3.2 Décalcification de
la buse de moussage
1. Retirez le bras de moussage (12)
noir.
2. Remplissez un pichet de 6 à
8 oz. d’eau froide et plongez la
buse de moussage (10) dans
cette eau.
3. Tournez le bouton de
commande (5) vers la droite,
vers « l’icône Vapeur » et laissez
la vapeur s’échapper pendant
environ 30 secondes. Répétez
le processus trois ou quatre fois.
4. Appliquez maintenant la
solution de décalcification
restante sur la tête d’infusion
(6) tel que décrit ci-dessus.
6.3.3 Rinçage du
système
1. Retirez le réservoir d’eau (3), rin-
2. Répétez les étapes ci-dessus (4
3. Replacez l’écran dans la
cez-le soigneusement et remplissez-le avec de l’eau douce
froide.
à 6) avec de l’eau douce froide.
tête d’infusion (6) et vissez
correctement.
56 / FR
Cafetière entièrement automatique /
Manuel d’utilisation

7 Dépannage
7.1 Problèmes, Causes probables et
Solutions
Problème Cause Solution
Le café
coule sur
les côtés du
porte-filtre.
Le porte-filtre (7) n’est
pas correctement
inséré.
Les bords du tamis ne
sont pas exempts du
café moulu
L’écran à l’intérieur de
la tête d’infusion (6)
est sale.
Tournez davantage le
manche du porte-filtre
(7) vers la droite.
Éteignez la machine,
retirez le porte-filtre (7)
et nettoyez les bords du
tamis.
Retirez l’écran de la
tête d’infusion (6) en
retirant les deux vis
qui le maintiennent
en place. Nettoyez-le
soigneusement avec de
l’eau chaude, séchez et
remettez-le en place.
Assurez-vous que les vis
sont fermement serrées.
MISE EN GARDE ! CHAUD.
Cafetière entièrement automatique /
Manuel d’utilisation
57 / FR

7 Dépannage
Problème Cause Solution
Pas d’eau dans le
réservoir
Remplissez le réservoir
d’eau (3).
Très peu
ou pas de
café coule
à travers le
porte-filtre.
L’expresso
ne s’écoule
qu’en gouttelettes.
L’écran à l’intérieur de
la tête d’infusion (6)
est bloqué.
Le tamis est bloqué. Correction : Nettoyez le
Les moutures de
café sont trop fines
ou se tassent trop
fermement.
Machine bloquée par
des dépôts de calcium.
Infusez de l’eau à travers
l’écran sans installer le
porte-filtre (7). Si l’eau
ne circule pas, dévissez
l’écran, nettoyez-le et
remettez-le en place.
tamis, insérez-le dans
le porte-filtre (7) et
pompez-y de l’eau simple,
sans café. Si de l’eau ne
passe pas à travers le
tamis, appelez le Service
client pour commander
un tamis de rechange.
Ne tassez pas trop
fermement les moutures
de café. Utilisez des
moutures de café plus
épaisses.
Veuillez procéder à
la décalcification de
l’appareil. Voir chapitre 8c.
58 / FR
Cafetière entièrement automatique /
Manuel d’utilisation

7 Dépannage
Problème Cause Solution
L’expresso
se prépare
trop rapidement.
La mouture de café est
trop épaisse.
Pas assez de café dans
le tamis.
Utilisez une mouture plus
fine.
Utilisez plus de café
moulu.
Le café est vieux ou
trop sec.
Le café n’est pas
poussé assez
fermement. L’eau
traverse trop vite le
Pas de
crème.
Cafetière entièrement automatique /
Manuel d’utilisation
café.
Le café est trop épais. Utilisez un broyeur à café
Le mélange de café
n’est pas indiqué pour
le café expresso.
Utilisez du café frais.
Tassez les moutures de
café plus fermement.
Utilisez une mouture plus
fine.
conique pour obtenir une
mouture plus fine et plus
homogène.
Changez la marque
d’expresso
59 / FR

7 Dépannage
Problème Cause Solution
La vapeur ne
s’échappe
pas de la
buse de
moussage.
L’embout de la buse
de moussage (10) est
bloqué.
Le lait n’est pas frais. Utilisez du lait frais.
Référez-vous au
chapitre 8b « Nettoyage
de la buse de moussage
(10) ». Si la buse de
moussage (10) est
dépourvue de résidus de
lait séché, mais la vapeur
ne s’en échappe pas,
veuillez procéder à sa
décalcification en suivant
les instructions du
chapitre 8c. Si l’appareil
est toujours bloqué,
appelez le Service client,
voir chapitre 11.
Pas assez de
mousse lors
du moussage du lait.
60 / FR
Le lait n’est pas
approprié.
Le lait était trop chaud
au départ.
Pas assez de lait à
mousser.
Utilisez du lait à faible
teneur en matières
grasses. Le succédané de
lait ne mousse pas
également.
Utilisez du lait venant
directement du
réfrigérateur (avec une
température de 34 °F).
Utilisez davantage de lait
frais.
Cafetière entièrement automatique /
Manuel d’utilisation

2 Ihre Kaffeemaschine
2.1 Übersicht
1
2
3
4
5
6
7
8
9
15
10
14
13
Alle angegebenen Werte am Produkte und im Dokument wurden unter Laborbedingungen entsprechend den
zutreffenden Standards ermittelt. Diese Werte können je nach Nutzung und Umgebungsbedingungen variieren.
Kaffeevollautomat / Bedienungsanleitung
1112
61 / DE

2 Ihre Kaffeemaschine
1. Wassertankdeckel
2. Wassertankgriff
3. Abnehmbarer Wassertank
4. Heizplatte
5. Knopf
6. Brühkopf
7. Siebträger
8. Tropfschalengitter
9. Tropfschale
10. Aufschäumer
11. Ein-/Austaste
12. Aufschäumtülle
13. Kaffeelöffel / -stampfer
14. 2-Tassen-Sieb
15. 1-Tassen-Sieb
2.2 Technische Daten
Spannungsversorgung:
220 – 240 V~, 50-60 Hz
Leistung: 1200 W
Wassertank: 1,2 Liter
Technische und optische
Änderungen vorbehalten.
62 / DE
Kaffeevollautomat / Bedienungsanleitung

3 Tipps zur Kaffeezubereitung
• Ihr Kaffee gibt sein Aroma am
intensivsten frei, wenn Sie jedes
Mal frisch gemahlene ganze Kaffeebohnen verwenden.
• Neben dem verwendeten Kaffee
sorgt auch frisches, kaltes Wasser, das frei von Chlor, Gerüchen
und anderen Verunreinigungen
ist, für perfekten Espresso.
• Bewahren Sie gemahlenen Kaf-
fee in einem luftdichten Behälter
auf und lagern Sie ihn an einem
kühlen, trockenen Ort, damit er
sein Aroma beibehält. Gemahlener Kaffee sollte nicht längere
Zeit aufbewahrt werden, da er
mit der Zeit sein Aroma verliert.
• Füllen Sie den Siebträger (7)
und das ausgewählte Sieb nicht
bis zum Rand. Geben Sie pro Espresso einen gestrichenen Löffel
Kaffee in das Sieb. Verwenden Sie
den mitgelieferten Kaffeelöffel.
• Falls Sie das Gerät länger als 5
Tage in Folge nicht benutzen,
spülen und leeren Sie den Wassertank (3).
• Schalten Sie das Gerät immer aus,
bevor Sie den Wassertank (3)
zum Füllen und Leeren entfernen.
• Stellen Sie das Gerät immer auf
einen flachen, stabilen, hitzeresistenten Untergrund.
• Stellen Sie sicher, dass Ihr Es-
presso die optimale Temperatur
behält, indem Sie die Tassen vorwärmen.
• Vor der Zubereitung muss der
Siebträger (7) so weit wie möglich nach rechts gedreht werden, damit er sich aufgrund des
hohen Drucks nicht löst.
A
ACHTUNG:
Vermeiden
Sie mögliche
Verbrennungen
und/oder andere
Verletzungen durch
heißen Dampf
und Wasser oder
Schäden am Gerät,
Kaffeevollautomat / Bedienungsanleitung
63 / DE

3 Tipps zur Kaffeezubereitung
1. indem Sie niemals den
Wassertank (3) oder Siebträger
(7) entfernen, während das
Gerät Kaffee zubereitet oder
Milch aufschäumt. Der Knopf
sollte sich zur Zubereitung weiterer Tassen Espresso in der
„O“-Position befinden, bevor
Sie den Siebträger (7) entfernen. Falls Sie mehr Wasser in
den Tank geben müssen, drehen Sie den Knopf in die „O“Position und schalten Sie das
Gerät über die Ein-/Austaste
(11) an der Seite des Gerätes
aus, damit die blaue Leuchte
erlischt.
2. Falls kein Espresso aus dem
Siebträger (7) herauskommt
(tropft nur sehr langsam), ist
das Sieb zugesetzt. Schalten
Sie das Gerät aus und lassen Sie
es abkühlen. Prüfen Sie, ob der
Kaffee fein genug gemahlen
ist; siehe Kapitel 5a.
3. Seien Sie beim Entfernen des
Siebträgers vorsichtig. Die
Metallteile könnten immer noch
sehr heiß sein. Zudem könnte
sich heißes Wasser auf dem
gemahlenen Kaffee befinden.
Halten Sie den Siebträger
(7) nur an seinem Griff und
entsorgen Sie den gemahlenen
Kaffee mit dem Daumenschutz
(Abb. 5).
4. Falls kein Dampf vom
Aufschäumer ausgegeben
wird, ist der Aufschäumer
wahrscheinlich zugesetzt.
Schalten Sie das Gerät aus
und lassen Sie es abkühlen.
Reinigen Sie den Aufschäumer
wie in Kapitel 8b beschrieben.
5. Damit Ihr Gerät lange Zeit
reibungslos läuft, sollten Sie
Aufschäumer, Tülle und Spitze
nach jeder Benutzung wie oben
beschrieben reinigen.
64 / DE
Kaffeevollautomat / Bedienungsanleitung

4 Bedienung
4.1 Vor der ersten
Benutzung
Packen Sie die Kaffeemaschine
vorsichtig aus, reinigen Sie alle
abnehmbaren Teile mit warmem
Seifenwasser und spülen Sie sie
gründlich ab. Machen Sie sich mit
dem Gerät vertraut und lesen Sie die
Bedienungsanleitung. Schließen Sie
den Netzstecker entsprechend den
Sicherheitshinweisen an eine geerdete Steckdose an. Schalten Sie das
Gerät über die Ein-/Austaste (11) an
der Seite des Gerätes ein.
Die Ein-/Austaste (11) leuchtet blau,
während die Anzeige am Knopf (Abb.
1, E) zu blinken beginnt und dadurch
anzeigt, dass sich das Gerät aufheizt.
Spülen Sie die internen Komponenten
vor der Kaffeezubereitung ab. Füllen
Sie den Wassertank (3) und pumpen
Sie einige ml Wasser durch Brühkopf
und Aufschäumer. Befolgen Sie zum
Spülen des Gerätes vor der ersten
Benutzung die Schritte in Kapitel 4
„Interne Komponenten und Tassen
aufwärmen“.
4.2 Wassertank
füllen
Entfernen Sie den Wassertank,
indem Sie ihn am Griff (2) anheben. Öffnen Sie den Deckel (1)
und füllen Sie den Wassertank
(3) mit kaltem, frischem Wasser
auf einen Füllstand zwischen den
Markierungen MIN und MAX.
Schließen Sie den Deckel (1) und
setzen Sie den Wassertank (3) wieder ein, indem Sie ihn fest nach unten drücken, bis er einrastet.
Kaffeevollautomat / Bedienungsanleitung
65 / DE

4 Bedienung
4.3 Bedienfeld
4.3.1 Ein-/Austaste
Die Ein-/Austaste (11) an der
Seite des Gerätes schaltet das
Gerät ein und aus. Wenn das Gerät
eingeschaltet wird, beginnt die
Anzeige am Knopf rot zu blinken,
was anzeigt, dass das Gerät das
Heizsystem aufwärmt. Das erstmalige Aufheizen dauert bei normaler Raumtemperatur weniger
als eine Minute. Wenn die Anzeige
dauerhaft blau leuchtet, sind die
internen Komponenten erwärmt
und zur Kaffeezubereitung bereit.
Stellen Sie zum Ausschalten des
Geräts zunächst sicher, dass sich
der Knopf in der „O“-Position befindet; drücken Sie dann die Ein-/
Austaste (11) an der Seite des
Gerätes.
4.3.2 Knopf
Der Knopf (Abb. 2) hat drei
Positionen:
Positi-onSym-
Links
Mitte
Rechts
bol
Erläuterung
Kaffee
zubereiten
Bereitschaft,
Brühen
und
Dampfen
stoppen
Dampfproduktion
durch den
Aufschäumer
66 / DE
Kaffeevollautomat / Bedienungsanleitung

4 Bedienung
1. Füllen Sie den Wassertank (3)
2. Stellen Sie sicher, dass der
3. Schalten Sie das Gerät über die
4. Setzen Sie das Sieb in den
5. Stellen Sie sicher, dass der
6. Richten Sie den Siebträger
C
C
Während des
Brühens oder
Dampfens könnte
die Anzeige im Knopf
zu blinken beginnen oder ihre Farbe
wechseln und dadurch angeben, dass
das Heizsystem aktiv
ist und die angemessene Temperatur
für das Brühen oder
Dampfen beibehalten wird.
Drehen Sie den Knopf
vor Abschaltung
des Gerätes immer
zurück in die „O“Position.
4.3.3 Interne
Komponenten und
Tassen aufwärmen
Vor der Zubereitung von Espresso
müssen Sie alle internen
Komponenten im Gerät sowie die
Tassen vorwärmen. Dieses kurze
Verfahren macht die erste Tasse
Espresso um 10 bis 15 Grad heißer.
mit kaltem, klarem Wasser, siehe Kapitel
Knopf auf die „O“-Position
eingestellt ist.
Ein-/Austaste (11) an der Seite
des Gerätes ein. Die Anzeige am
Knopf beginnt rot zu blinken,
sobald das Gerät mit dem
Erhitzen anfängt.
Siebträger ein (ohne Kaffee).
Die richtige Platzierung
entnehmen Sie Abb. 3.
Daumenschutz das Sieb nicht
verdeckt.
(7) an „
linke Seite des Brühkopfs
aus, während Sie ihn nach
oben drücken. Drehen Sie den
Siebträger (7) kraftvoll nach
rechts in Richtung „
der Mitte des Brühkopfs, bis er
fest sitzt.
INSERT
“ auf die
LOCK
“ in
Kaffeevollautomat / Bedienungsanleitung
67 / DE

4 Bedienung
Zu Beginn kann der
Siebträger möglicherweise nicht
vollständig in die
„
LOCK
“-Position
gedreht werden.
Achten Sie einfach
darauf, dass der
Siebträger (7) fest
platziert ist. Mit der
Zeit kann sich der
Siebträger (7) näher
zur „
LOCK
“-Position
hin bewegen lassen.
7. Stellen Sie eine oder zwei
Espresso-Tassen unter den
Siebträger (7). Sobald die
Anzeige blau leuchtet, ist das
Gerät zum Brühen bereit.
8. Drehen Sie den Knopf nach
links auf das „Tassensymbol“.
Heißes Wasser wird durch den
Siebträger (7) in die Tassen
gepumpt.
9. Drehen Sie den Knopf zurück in
die mittlere Position Richtung
„O“, damit kein heißes Wasser
mehr austritt.
ACHTUNG:
Lassen Sie das Gerät
beim Brühen oder
Dampfen nicht unbeaufsichtigt. Sie müs-
A
10. Leeren Sie die Tassen und
entfernen Sie den Siebträger (7).
Alle Teile sind nun vorgewärmt.
TIPP!
Tassen verkehrt herum auf die
Heizplatte an der Oberseite des
Gerätes. Wenn das Gerät etwa
15 Minuten eingeschaltet war,
hat sich die Heizplatte so stark
erwärmt, dass sie anstelle von
heißem Wasser aus dem Gerät
zum Vorwärmen von Tassen
verwendet werden.
sen den Knopf zum
Stoppen des Brühens
immer zurück in die
mittlere Position „O“
drehen.
Stellen Sie Espresso-
68 / DE
Kaffeevollautomat / Bedienungsanleitung

5 Vorbereitung
5.1 Espresso
• Falls Probleme mit dem Ge-
zubereiten
5.1.1 Mahlgrad wählen
Dies ist ein wichtiger Schritt in der
Espresso-Zubereitung, da fein gemahlener Kaffee eine einheitliche
Konsistenz haben muss.
• Richtig gemahlener Kaffee sollte
die Größe von feinen Salzkörnern
haben.
• Falls der Mahlgrad zu fein ist,
läuft das Wasser nicht frei durch
den Kaffee, wodurch sich zu viel
Druck im Gerät aufbaut. Dieser
Mahlgrad ähnelt Pulver und fühlt
sich mehlig an, wenn man es zwischen den Fingern reibt.
• Falls der Mahlgrad zu grob ist,
läuft das Wasser zu schnell durch
den Kaffee, wodurch dieser nicht
das volle Aroma entfalten kann.
Tipp Achten Sie darauf, für einheitliche Konsistenz eine hochwertige Mühle zu verwenden.
Kaffeemühlen mit Klingen werden für Espresso nicht empfohlen, da der Mahlgrad damit nicht
gleichmäßig wird.
5.1.2 Gerät vorbreiten
1. Stellen Sie sicher, dass die
2. Stellen Sie sicher, dass sich
3. Stellen Sie sicher, dass
5.1.3 Siebträger füllen
und einsetzen
1. Wählen Sie entsprechend der
schmack auftreten (bitter, sauer,
wenig aromatisch usw.), passen
Sie den Mahlgrad des Kaffees an
und/oder wechseln Sie die Marke
oder die Röstung der ganzen
Kaffeebohnen.
Anzeige blau leuchtet und der
Knopf auf die „O“-Position eingestellt ist.
Wasser im Wassertank (3)
befindet und Ihre Tasse(n)
wie in den vorherigen Kapiteln
beschrieben vorgewärmt sind.
Tropfschale (9) und
Tropfschalengitter (8) richtig
am Gerät platziert sind.
Anzahl Tassen, die Sie zubereiten möchten (1 oder 2 Tassen),
zwischen den beiden mit Ihrem
Gerät gelieferten Sieben (14-
15).
Kaffeevollautomat / Bedienungsanleitung
69 / DE

5 Vorbereitung
2. Platzieren Sie das Sieb
in den Siebträger (7) und
vergewissern Sie sich davon,
dass es gerade sitzt.
3. Füllen Sie das ausgewählte Sieb
mit frischem, fein gemahlenem
Kaffee. Beseitigen Sie
überschüssigen Kaffee vom
Rand des Siebträgers. Dadurch
passt er besser unter den
Brühkopf.
4. Komprimieren Sie den
Kaffee durch Andrücken
mit der flachen Seite des
Kaffeelöffels / -stampfers
(13). Füllen Sie das Sieb nicht
übermäßig. Andernfalls könnte
es verstopfen und/oder
überlaufen.
5. Positionieren Sie den
Siebträger (7) unter dem
Brühkopf und richten Sie den
Siebträger (7) an „
aus, während Sie ihn nach
oben drücken. Drehen Sie den
Siebträger (7) kraftvoll nach
rechts in Richtung „
er fest sitzt.
INSERT
LOCK
5.1.4 Espresso
zubereiten
C
1. Nachdem Sie wie in den vorherigen Abschnitten beschrieben
das Gerät vorbereitet und den
Kaffee gemahlen haben, können Sie mit der Zubereitung
Ihres Espressos beginnen.
2. Stellen Sie 1 oder 2 kleine
Tassen unter den Siebträger
(7). Wenn Sie zwei Tassen
“
gleichzeitig zubereiten, können
Sie die Tassen unter den
Siebträger (7) stellen. Achten
“, bis
Sie darauf, dass sich jede von
ihnen direkt unter einem der
beiden Ausgießer befinden.
3. Sobald die Anzeige in der Mitte
des Knopfes dauerhaft blau
leuchtet, ist das Gerät auf die
Falls Sie einen
Cappuccino machen möchten,
beachten Sie bitte den Abschnitt
„Cappuccino zubereiten“ nachdem Sie
sich mit „Espresso
zubereiten“ vertraut
gemacht haben.
70 / DE
Kaffeevollautomat / Bedienungsanleitung

5 Vorbereitung
geeignete Temperatur erhitzt.
Drehen Sie den Knopf zum
Starten des Brühens nach
links auf das „Tassensymbol“.
Die Pumpe ist einen kurzen
Augenblick hörbar, während
der Kaffee vorab mit
Wasser aufgegossen wird.
Anschließend läuft nach einer
kurzen Pause der Espresso in
die Tasse(n).
4. Drehen Sie den Knopf zurück
in die „O“-Position, sobald
die Tasse ausreichend voll ist.
Lassen Sie die Tasse(n) noch
einige Sekunden unter den
Ausgießern, bis der gesamte
Espresso herausgetropft ist.
A
C
ACHTUNG: Das Gerät
muss manuell abgeschaltet werden.
Lassen Sie das Gerät
beim Brühen nicht unbeaufsichtigt. Sie müssen den Brühvorgang
manuell stoppen.
Dies verhindert mögliches Überlaufen,
Verschütten und andere Gefahren und
Schäden.
Nach Zubereitung des
Espressos erzeugt das
Gerät automatisch
etwas Dampf und
drückt das Restwasser
aus der Pumpe in die
Tropfschale. Dies stellt
sich, dass sich kein
Restwasser mehr im
Heizsystem befindet. Ziehen Sie nach
Zubereitung einiger
Tassen Espresso vorsichtig die Tropfschale
aus dem Gerät, leeren
Sie sie und setzen Sie
sie wieder ein.
Kaffeevollautomat / Bedienungsanleitung
71 / DE

5 Vorbereitung
5. Nachdem sich das Gerät
abgekühlt hat, entfernen Sie
vorsichtig den Siebträger (7)
aus dem Brühkopf, indem Sie
ihn am Griff halten und nach
links ziehen. Sichern Sie mit
dem Daumenschutz das Sieb
im Siebträger (7), drehen Sie
den Siebträger (7) zum Leeren
herum. Spülen Sie Sieb und
Siebträger (7) mit Wasser ab.
6. Wiederholen Sie den obigen
Vorgang, wenn Sie einen
weiteren Espresso zubereiten
möchten. Geben Sie frisch
gemahlenen Kaffee wie in
Kapitel 5c „Siebträger füllen
und einsetzen“ in das Sieb,
verriegeln Sie den Siebträger
wieder unter dem Brühkopf und
befolgen Sie die Anweisungen
zur erneuten Zubereitung
eines Espressos (Punkt 2 bis 5
dieses Abschnitts).
7. Stellen Sie nach Zubereitung
der gewünschten Menge
Espresso sicher, dass sich
der Knopf in der „O“-Position
befindet, und schalten Sie das
Gerät aus, indem Sie die Ein-/
Austaste (11) an der Seite
des Gerätes drücken. Lassen
Sie das Gerät abkühlen, bevor
Sie Teile und Zubehör zur
Reinigung entfernen.
8. Die Reinigungsanweisungen
finden Sie in Kapitel 8.
A
ACHTUNG:
Metallteile des
Siebträgers könnten immer noch sehr
heiß sein. Seien Sie
beim Umgang mit
dem Gerät und den
abnehmbaren Teilen
immer entsprechend
vorsichtig. Achten
Sie beim Entsorgen
des gemahlenen
Kaffees darauf, den
Daumenschutz zu
verwenden. Kühlen
Sie diese Teile unter
fließendem kaltem
Wasser ab.
Die
72 / DE
Kaffeevollautomat / Bedienungsanleitung

5 Vorbereitung
5.1.5 Cappuccino
zubereiten
Cappuccino ist die Kombination
aus ein oder zwei Espressos mit
der gleichen oder einer etwas
größeren Menge heißer Milch und
Milchschaum.
Beim Aufschäumen
sollten Sieb und
Siebträger in der
„
LOCK
“-Position
montiert sein.
C
5.1.6 Milch
aufschäumen
1. Bereiten Sie zunächst wie
in Kapitel 5d „Espresso zubereiten“ beschrieben einen
Espresso in einer großen vorgeheizten Tasse zu.
2. Füllen Sie eine kleine Edelstahloder Keramikkanne zur Hälfte
mit kalter Milch und stellen Sie
sie beiseite.
Beginnen Sie für optimale Ergebnisse
immer mit frischer,
kalter Milch (etwa 1
°C).
3. Vor dem Aufschäumen sollten
Sie den Aufschäumer von
heißem Wasser befreien.
Geben Sie eine Tasse unter
den Aufschäumer (oder drehen
Sie den Aufschäumer direkt
in die Tropfschale). Sobald die
Anzeige blau leuchtet, drehen
Sie den Knopf nach rechts auf
das „Dampfsymbol“. Die Anzeige
blinkt 5 bis 8 Sekunden rot,
während das Wasser aus dem
Aufschäumer entfernt wird.
Sobald das Wasser entfernt
wurde, leuchtet die Anzeige
blau und der Aufschäumer
produziert Dampf. Drehen Sie
den Knopf zurück in die „O“Position. Die Anzeige leuchtet
nun rot und zeigt damit an, dass
das Gerät zum Aufdampfen/
Aufschäumen von Milch bereit
ist.
4. Nehmen Sie die kalte Kanne
mit Milch und tauchen Sie
den Aufschäumer (mit
angebrachter Aufschäumtülle)
zu etwa zwei Drittel in die
Milch. Achten Sie darauf, dass
die Aufschäumtülle beim
Aufschäumen nicht gegen den
Boden der Kanne stößt.
Kaffeevollautomat / Bedienungsanleitung
73 / DE

5 Vorbereitung
5. Drehen Sie den Knopf nach
rechts auf das „Dampfsymbol“,
während der Aufschäumer (12)
in die Milch getaucht ist.
6. Der Aufschäumer gibt Dampf
aus, wodurch die Milch mit
heißem Dampf versetzt wird.
Während des Aufschäumens
macht die Pumpe des Gerätes
von Zeit zu Zeit Geräusche, die
anzeigen, dass Wasser durch
das Heizsystem gepumpt und
so in Dampf umgewandelt wird.
ACHTUNG: Achten
Sie darauf, dass
die Öffnung des
Aufschäumers nicht
über die Oberfläche
der Milch hinausragt. Andernfalls
A
könnte heiße Milch
herumspritzen.
Halten Sie den
Aufschäumer während des gesamten
Aufschäumvorgangs
in die Milch getaucht
.
A
C
ACHTUNG:
Entfernen Sie den
Aufschäumer niemals aus der Milch,
während sich der
Knopf noch in der
Dampfposition befindet. Drehen Sie den
Knopf immer in die
„O“-Position, bevor
Sie den Aufschäumer
aus der Milch entfernen; andernfalls
könnte heiße Milch
herumspritzen.
Während des
Brühens oder
Dampfens könnte die
Anzeige erlöschen,
ihre Farbe wechseln
oder blinken und dadurch angeben, dass
das Heizsystem aktiv
ist und die angemessene Temperatur
für das Brühen oder
Dampfen beibehalten wird.
74 / DE
Kaffeevollautomat / Bedienungsanleitung

5 Vorbereitung
7. Drehen Sie den Knopf zurück in
die „O“-Position, wenn sich das
Volumen der Milch verdoppelt
oder die Milch eine Temperatur
von 68 °C (bei Verwendung
eines Getränkethermometers)
erreicht hat.
Reinigen Sie
Aufschäumer und
Aufschäumtülle
sofort nach jeder
Benutzung sorgfältig
mit einem feuchten
C
8. Gießen Sie aufgeschäumte
Milch in den Espresso. Nun ist
der Cappuccino fertig. Geben
Sie bei Bedarf Süßungsmittel
und/oder andere Zutaten, wie
aromatisierten Sirup, Extrakte,
Kakaopulver oder Gewürze
hinzu.
Tuch, damit sich keine Milchreste ablagern. Vermeiden Sie
Kontakt mit heißen
Teilen.
C
Nach dem
Aufschäumen sollten
Sie das Gerät mindestens 5 Minuten
abkühlen lassen, bevor Sie erneut einen
Espresso zubereiten.
Dadurch kann sich
das Gerät von der
Dampftemperatur
auf die für
die EspressoZubereitung geeignete Temperatur
herunterkühlen.
Falls die Anzeige
rot ist, können Sie
den Knopf nach
links drehen, damit
Wasser durch den
Siebträger läuft. Dies
kühlt das System
ab, damit nach dem
Dampfen Espresso
zubereitet werden
kann. Falls mehrere
Cappuccinos zubereitet werden sollen,
bereiten Sie zunächst alle Espressos
in heißen Tassen zu
und schäumen Sie
erst dann die Milch
auf.
Kaffeevollautomat / Bedienungsanleitung
75 / DE

5 Vorbereitung
9. Reinigen Sie den Aufschäumer
und entfernen Sie Milchreste
aus Aufschäumer und
Aufschäumspitze, indem
Sie die Anweisungen unter
Punkt 3 oben befolgen. Es
ist wichtig, Aufschäumer
und Aufschäumspitze sowie
Aufschäumspitze nach jeder
Benutzung angemessen
zu reinigen, damit der
Aufschäumer reibungslos
arbeiten kann. (Siehe Kapitel
8b)
10. Schalten Sie das Gerät über die
Ein-/Austaste (11) an der Seite
des Gerätes ab. Ziehen Sie den
Netzstecker und lassen Sie das
Gerät abkühlen.
A
ACHTUNG:
dem Aufschäumen
oder Aufdampfen
sind Aufschäumer,
Aufschäumspitze
und Aufschäumtülle
SEHR HEISS!
Berühren Sie keine Metallteile!
Vermeiden Sie mögliche Verletzungen,
indem Sie immer
sicherstellen, dass
alle Teile vollständig
abgekühlt sind, bevor
Sie sie berühren.
Nach
76 / DE
Kaffeevollautomat / Bedienungsanleitung

5 Vorbereitung
5.1.7 Latte zubereiten
Latte ist die Kombination aus ein
oder zwei Espressos mit der gleichen oder einer etwas größeren
Menge aufgedampfter Milch ohne
Schaum. Ohne Aufschäumtülle
wird die Milch aufgedampft, nicht
aufgeschäumt. Entfernen Sie die
Aufschäumtülle, fahren Sie dann
wie in Kapitel 6 beschrieben mit
dem Aufdampfen der Milch fort.
Gießen Sie heiße, aufgedampfte
Milch über Ihren Espresso. Befolgen
Sie zum Reinigen und Abschalten
des Gerätes die Schritte 9 und 10 in
Kapitel 6 „Cappuccino zubereiten“.
A
ACHTUNG:
dem Aufschäumen
oder Aufdampfen
der Milch sind
Aufschäumer und
Aufschäumspitze
SEHR HEISS!
Berühren Sie keine Metallteile!
Vermeiden Sie mögliche Verletzungen,
indem Sie immer
sicherstellen, dass
alle Teile vollständig
abgekühlt sind, bevor
Sie sie berühren.
Nach
Kaffeevollautomat / Bedienungsanleitung
77 / DE

6 Reinigung und Wartung
6.1 Tägliche
Reinigung
1. Stellen Sie immer sicher, dass
sich der Knopf in der „O“Position befindet und das Gerät
ausgeschaltet ist, indem Sie die
Ein-/Austaste (11) an der Seite
des Gerätes drücken, sodass
das blaue Licht erlischt. Ziehen
Sie den Netzstecker aus der
Steckdose und lassen Sie vor
der Reinigung alle Teile abkühlen.
2. Entfernen und reinigen Sie
die Aufschäumtülle (12) und
wischen Sie den Aufschäumer
mit einem feuchten Tuch ab.
3. Wassertank (3), Sieb und
Tropfschale können in einer
Lösung aus heißem Wasser und
mildem Spülmittel gereinigt
werden.
A
ACHTUNG:
Tauchen Sie das
Gerät nicht in
Wasser oder andere
Flüssigkeiten, geben
Sie es nicht in den
Geschirrspüler.
C
6.2 Aufschäumer
reinigen
Sie sollten den Aufschäumer umgehend nach jeder Benutzung mit
einem feuchten Tuch reinigen und
abwischen (Kapitel 6, Punkt 3), damit er sich nicht zusetzt. Reinigen
Sie den Aufschäumer gründlich,
bevor Sie das Gerät ausschalten.
1. Ziehen Sie die schwarze
Aufschäumtülle nach unten
vom Aufschäumer ab und reinigen Sie sie unter fließendem
warmem Wasser.
2. Füllen Sie eine Tasse mit etwas
klarem Wasser und tauchen Sie
den Aufschäumer hinein.
3. Drehen Sie den Knopf nach
rechts auf das „Dampfsymbol“
und lassen Sie einige Sekunden
Dampf in das Wasser strömen.
4. Drehen Sie den Knopf zurück in
die Mitte der „O“-Position.
Reinigen Sie das
Gerät niemals mit
Scheuermitteln,
Stahlwolle oder anderen scheuernden
Materialien.
78 / DE
Kaffeevollautomat / Bedienungsanleitung

6 Reinigung und Wartung
5. Trocknen Sie den Aufschäumer
mit einem Tuch ab und
bringen Sie die schwarze
Aufschäumtülle wieder an.
Achten Sie darauf, sie sicher auf
den Aufschäumer zu stecken.
6. Falls der Aufschäumer
stark zugesetzt ist, kann
die Aufschäumspitze
abgeschraubt und etwa
30 Minuten in warmes
Seifenwasser getaucht
werden. Spülen Sie die Spitze
anschließend gründlich unter
fließendem Wasser ab.
A
ACHTUNG:
Aufschäumer,
Aufschäumspitze
und Aufschäumtülle
können
HEISS sein!
Vermeiden Sie mögliche Verletzungen,
indem Sie immer
sicherstellen, dass
alle Teile vollständig
abgekühlt sind, bevor
Sie sie berühren.
SEHR
C
C
Falls kein Dampf aus
dem Aufschäumer
herauskommt, ist die
Düse wahrscheinlich
durch eingetrocknete Milch blockiert.
Drehen Sie den Knopf
zurück in die „O“Position. Entfernen
Sie die schwarze
Aufschäumtülle und
lösen Sie vorsichtig mit einer Nadel
die Milchreste aus
der Öffnung der
Aufschäumspitze.
Anschließend können Sie wieder aufdampfen.
Damit Ihr Gerät lange Zeit reibungslos
läuft, sollten Sie
Aufschäumer, Tülle
und Spitze nach jeder
Benutzung wie oben
beschrieben reinigen.
Kaffeevollautomat / Bedienungsanleitung
79 / DE

6 Reinigung und Wartung
6.3 Entkalken
Verwenden Sie zur EspressoZubereitung immer nur kaltes,
sauberes Wasser. Quellwasser
und gefiltertes Wasser verlangsamen die Ablagerung von Kalk. Sie
sollten das Gerät alle 100 bis 200
Benutzungen oder mindestens
einmal alle 2 bis 3 Monate entkalken.
• Halten Sie sich bei der Verwen-
dung kommerzieller Entkalkungsmittel unbedingt an die
zugehörigen Anweisungen. Wir
empfehlen die Capresso Cleaning
Solution, die Sie bei www.capresso.com bestellen können.
Lösen Sie 1 Beutel Capresso
Cleaning Solution in 900 ml Wasser auf und geben Sie die Mixtur
in den Wassertank (3).
Verwenden Sie keinen Essig, da dieser
die Lebensdauer
C
der Dichtung im
Brühkopf erheblich
verkürzt.
6.3.1 Brühkopf
entkalken
1. Entfernen Sie den Siebträger.
2. Schrauben Sie für optimale
3. Füllen Sie den Wassertank (3)
4. Stellen Sie eine große Schüssel
5. Drücken Sie die Ein-/Austaste
6. Drehen Sie den Knopf zum
7. Lassen Sie das Gerät etwa 10
Ergebnisse das Sieb im
Brühkopf ab. Wischen Sie
Kaffeereste mit einem
feuchten Tuch weg.
mit Entkalker.
unter den Brühkopf.
(11) an der Seite des Gerätes
und drehen Sie den Knopf nach
links auf das „Tassensymbol“.
Lassen Sie 1/3 bis 1/2 der
Lösung durch das System und
den Brühkopf pumpen.
Stoppen des Vorgangs zurück
in die „O“-Position.
Minuten ruhen.
80 / DE
Kaffeevollautomat / Bedienungsanleitung

6 Reinigung und Wartung
6.3.2 Aufschäumer
entkalken
1. Entfernen Sie die schwarze
Aufschäumtülle.
2. Füllen Sie eine Kanne mit 180
bis 240 ml kaltem Wasser und
tauchen Sie den Aufschäumer
in das kalte Wasser.
3. Drehen Sie den Knopf nach
rechts auf das „Dampfsymbol“
und lassen Sie etwa 30
Sekunden lang Dampf
hindurchströmen. Wiederholen
Sie diesen Vorgang drei- bis
viermal.
4. Lassen Sie nun den
verbleibenden Entkalker wie
oben beschrieben durch den
Brühkopf laufen.
6.3.3 System spülen
1. Entfernen Sie den Wassertank
(3) und spülen Sie ihn gründlich
aus, füllen Sie ihn dann mit frischem kaltem Wasser.
2. Wiederholen Sie die obigen
Schritte (4 bis 6) mit frischem
kaltem Wasser.
3. Setzen Sie das Sieb wieder in
den Brühkopf ein und ziehen
Sie die Schraube sicher fest.
Kaffeevollautomat / Bedienungsanleitung
81 / DE

7 Fehlerbehebung
7.1 Probleme, mögliche Ursachen und
Abhilfemaßnahmen
Problem Ursache Lösung
Kaffee läuft
an der Seite
des Siebträgers aus.
Siebträger ist nicht
richtig eingesetzt.
Rand des Siebs
ist nicht frei von
gemahlenem Kaffee.
Sieb im Brühkopf ist
verschmutzt.
Griff des Siebträgers
weiter nach rechts
drehen.
Gerät ausschalten,
Halter des Siebträgers
entfernen und
Rand des Siebs reinigen.
Das Sieb im Brühkopf
durch Lösen der beiden
Befestigungsschrauben
des Siebs entfernen.
Sieb gründlich mit
warmem Wasser
reinigen, abtrocknen
und wieder anbringen.
Darauf achten, die
Schrauben wieder sicher
festzudrehen.
VORSICHT! HEISS.
82 / DE
Kaffeevollautomat / Bedienungsanleitung

7 Fehlerbehebung
Problem Ursache Lösung
Kein Wasser im Tank. Tank mit Wasser füllen.
Es läuft nur
wenig oder
gar kein Kaffee durch
den Siebträger.
Espresso
wird nur
tröpfchenweise ausgegeben.
Das Sieb im Brühkopf
ist verstopft.
Das Sieb ist verstopft. Korrektur: Sieb reinigen, in
Kaffee zu fein
gemahlen oder zu
stark verdichtet.
Gerät durch
Kalkablagerungen
zugesetzt.
Wasser durch das Sieb
ohne Einsetzen des
Siebträgers brühen.
Falls kein Wasser
herauskommt, Sieb
abschrauben, reinigen
und wieder anbringen.
den Siebträger einsetzen
und Wasser ohne Kaffee
hindurchpumpen. Falls
kein Wasser durch das
Sieb läuft, Ersatzsieb
einsetzen oder beim
Kundendienst bestellen.
Gemahlenen Kaffee
nicht zu stark verdichten.
Grober gemahlenen
Kaffee verwenden.
Gerät entkalken. Siehe
Kapitel 8c.
Kaffeevollautomat / Bedienungsanleitung
83 / DE

7 Fehlerbehebung
Problem Ursache Lösung
Espresso
wird zu
schnell gebrüht.
Kaffee ist zu grob
gemahlen.
Nicht genug Kaffee im
Sieb.
Feiner gemahlenen
Kaffee verwenden.
Mehr gemahlenen Kaffee
verwenden.
Kein
Schaum.
84 / DE
Kaffee ist alt oder zu
trocken.
Gemahlener Kaffee
ist nicht ausreichend
verdichtet. Wasser
läuft zu schnell durch
den gemahlenen
Kaffee.
Kaffee zu grob
gemahlen.
Kaffeemischung nicht
für Espresso geeignet.
Kaffeevollautomat / Bedienungsanleitung
Frischen Kaffee
verwenden.
Gemahlenen Kaffee
stärker verdichten. Feiner
gemahlenen Kaffee
verwenden.
Zur Erzielung
eines feineren und
einheitlicheren
Mahlgrads einen
konischen Mahlzahn
verwenden.
Espresso-Marke
wechseln.

7 Fehlerbehebung
Problem Ursache Lösung
Kein Dampf
vom Aufschäumer.
Spitze des
Aufschäumers ist
verstopft.
Die Milch ist nicht
frisch.
Siehe Kapitel 8b
„Aufschäumer
reinigen“. Falls sich
keine getrockneten
Milchablagerungen am
Aufschäumer befinden
und trotzdem kein Dampf
ausgegeben wird, sollten
Sie den Aufschäumer wie
in Kapitel 8c beschrieben
entkalken. Kundendienst
kontaktieren, falls das
Gerät dennoch zugesetzt
ist; siehe Kapitel 11.
Frische Milch verwenden.
Die Milch ist nicht
geeignet.
Nicht genug
Schaum
beim
Milchaufschäumen.
Kaffeevollautomat / Bedienungsanleitung
Milch war von Beginn
an zu warm.
Nicht genügend Milch
zum Aufschäumen.
Milch mit einem
geringeren Fettgehalt
verwenden. Milchersatz
lässt sich nicht so gut
aufschäumen.
Gerade aus dem
Kühlschrank
entnommene Milch (1 °C)
verwenden.
Mehr kalte Milch
verwenden.
85 / DE

2 Váškávovar
2.1 Přehled
1
2
3
4
5
6
7
8
9
15
10
14
13
Všechny hodnoty uvedené na výrobku a na tištěných letácích jsou určené laboratorním měřením prováděným
podle příslušných norem. Tyto hodnoty se mohou lišit podle použití a okolních podmínek.
86 / CS
Plně automatický kávovar / Návod k použití
1112

2 Váš kávovar
1. Víko nádržky na vodu
2. Ovladač nádržky na vodu
3. Odnímatelná nádržka na vodu
4. Ohřívací deska
5. Ovládací knoflík
6. Hlavice filtru
7. Portafilter
8. Mřížka odkapávací misky
9. Odkapávací miska
10. Napěňovací tryska
11. Tlačítko napájení
12. Napěňovací nádržka
13. Kávová odměrka
14. 2-Malé sítko
15. Malé sítko
2.2 Technické údaje
Napájení:
220-240 V~, 50-60 Hz
Výkon: 1200 W
Nádržka na vodu: 1,2 litru
Technické a konstrukční změny vyhrazeny.
Plně automatický kávovar / Návod k použití
87 / CS

3 Tipy na vaření kávy
• Na extrahování celé chutí ze zrn,
doporučujeme používat celá
kávová zrna, která byla čerstvě
vytáhlá, pokaždé co je espresso
připravováno.
• Kromě používané kávy, užití čer-
stvé vody bez chloru, zápachu
a dalších nečistot vám pomůže
dosáhnout perfektní chuti espressa.
• Skladujte svou namletou kávu
ve vzduchotěsném nádobce a
na chladném, suchém místě, pro
zachování chuti. Namletá káva
by se nikdy neměla skladovat po
nějakou dlouhou dobu z důvodu
následného úbytku její chuti.
• Nenaplňuj svůj portafilter (7) a
nevybírej sítko až po okraj. Užitím kávové lžíce, použijte jeden
naplněný level namleté kávy na
jedno espresso.
• V případě, že nepoužíváte pří-
stroj víc než 5 po sobě jdoucích
dnů, opláchněte a o osušte nádržku na vodu.
• Před odstraněním nádržky na
vodu pro doplnění, případně vyprázdnění přístroj vždy vypněte.
• Všechny komponenty pokládejte
na rovný, stabilní, horkuvzdorný
povrch.
• Pro ujištění, že Vaše espresso zů-
stane na optimální teplotě, doporučuje se předehřát si hrnek.
• Před vařením musí být portaifilter
zasunut napravo co nejvíc natěsno jako prevence jeho uvolňování z důvodu vysokého tlaku.
POZOR:
vyhnutí se možným
popálením částí
těla a/nebo dalším
A
1. Nikdy nevyndávejte vodní nádrž
ani portafilter (7) v době, kdy se
vaří espresso nebo napěňuje
mléko. Ovládací tlačítko by mělo
být v pozici „O“ předtím než odstraňujete portafilter (7), aby se
dělaly další šálky kávy. V případě, že potřebujete doplnit více
vody do nádrže, otočte ovládací
tlačítko do „O“ pozice a vypojte
přístroj z elektřiny zmáčknutím
tlačítka na vypínaní na boční
straně přístroje, tak že modré
světýlko bude vypnuto.
zraněním z horké
páry a vody nebo
poškozením přístroje.
Z důvodu
88 / CS
Plně automatický kávovar / Návod k použití

3 Tipy na vaření kávy
2. Jestli espresso neprotéká
z portafilter (7)u (pouze
odkapává velmi pomalu), sítko
je ucpáno. Umístěte spotřebič
na teplu vzdornou plochu a
nechte jej vychladnout. Ověřte
si, že káva není příliš najemno
umletá, kapitola 5a.
3. Dbejte opatření když vyndáváte
portafilter. Kovové části mohou
být stále velmi horké. Může zde
rovněž být horká plovoucí voda
nahoře na namleté kávě. Držte
portafiltr pouze za jeho rukojeť
a vyprazdňujte kávu za použíti
palcové záklopky.
4. Jestli pára není uvolňována z
napěňovací trysky, napěňování
je ucpáno. Umístěte spotřebič
na teplu vzdornou plochu
a nechte jej vychladnout.
Vyčistěte napěňovací trysku,
jak bylo popsáno v kapitole 8b.
5. Aby váš přístroj fungoval
správně i po nějaké době,
umývejte napěňovací nádržku,
napěňovací trysku po každém
napěňování.
Plně automatický kávovar / Návod k použití
89 / CS

4 Obsluha a používání
4.1 Před prvním
použitím
Po opatrném vybalení espresso kávovaru, umyjte všechny vyjmutelné části horkou mýdlovou vodou a
důkladně je opláchněte. Seznamte
se se spotřebičem a přečtěte si příručku. Zapojte kabel do zásuvky dle
bezpečnostních pokynů. Zapněte
přístroj za pomocí zmáčknutí tlačítka napájení (11) na straně zařízení.
Tlačítko napájení (11) bude svítit
jasnou modrou barvou, zatímco indikátor světla na ovládacím knoflíku
(5) začne blikat, pro indikaci toho,
že se přístroj nahřívá.
Opláchněte vnitřní součástky předtím, než si začnete dělat espresso.
Nádržku naplňte vodou.
a propláchněte hlavici filtru (6) a
napěňovací trysku (10). Následujte
procedury v kapitole 4 „Zahřívání
vnitřních součástek & nádobek“
na proplach přístroje před prvním
užitím.
4.2 Nádržku naplňte
vodou
Vyjměte nádržku na vodu, tím, že ji
zvednete za její úchyt. Naplňte nádržku na vodu pouze čerstvou, studenou vodou někde mezi MIN a MAX
okrajovými hodnotami.
Zavřete víčko a nahraďte vodní nádrž pevným stlačením dolů, pro ujištění, že nádrž je dobře ukotvena.
4.3 Ovládací panel
4.3.1 Tlačítko napájení
Tlačítko napájení (11) na boku přístroje zapíná a vypíná kávovar.
Poté co je přístroj zapnut, indikátor
světélka na ovládacím knoflík začne blikat červeně, což znamená,
že přístroj nahřívá ohřevný systém.
Základní čas na nahřátí je pod jednu minutu za normální pokojové
teploty. Když indikátor světla osvítí
jasnou modrou barvu, znamená to,
že vnitřní součástky jsou nahřáty
a připraveny na vaření. Pro vypnutí
přístroje se ujistěte, že kontrolní tlačítko „O“ pozice a zmáčkněte tlačítko
napájení (11) na straně pro vypnutí
přístroje.
90 / CS
Plně automatický kávovar / Návod k použití

4 Obsluha a používání
4.3.2 Ovládací knoflík
Ovládací knoflík má 3 polohy:
Poloha Sym-
bol
Vlevo
Střed
Vpravo
Vysvětlení
symbolů
vaření
kávy
rezerva,
vařící a
párová
stopka
produkt z
páry z napěňovače
mléka
V průběhu vaření
nebo napařování
může světelný indikátor ovládacího
knoflíku začít blikat
nebo změnit barvu a
C
C
4.3.3 Zahřívání
vnitřních součástek a
šálků
Předtím než začnete dělat espresso, je důležité předehřát vnitřní
součástky ve spotřebiči a v nádobkách. Tento krátký proces přidá 10
až 15° k prvnímu šálku kávy.
1. Naplňte nádržku na vodu pouze
čerstvou, studenou vodou, jak
již bylo v kapitole popsáno
2. Ujistěte se, že ovládací knoflík
je v poloze "O„.
oznámit tak, že ohřívací systém je zapnutý pro udržení správné teploty na ohřev
nebo páru.
Vždy dejte ovládací
knoflík do polohy „O“
před vypnutím zařízení.
Plně automatický kávovar / Návod k použití
91 / CS

4 Obsluha a používání
3. Zapněte přístroj stisknutím
tlačítka napájení umístěného
na boku kávovaru. Světelný
indikátor na ovládacím knoflíku,
začne blikat červeně když se
přístroj začne nahřívat.
4. Umístěte sítko dovnitř
portafilteru (bez kávy)
Podívejte se na Obr.3 pro
správné umístění sítka.
5. Ujistěte se, že palcová záklopka
nezakrývá sítko.
6. Zarovnejte portafilter (7) do
„
INSERT
vařící hlavice, zatímco tlačíte
portafilter (7) nahoru. Natočte
portafilter (7) pevně doprava
směrem k "
vařící hlavně, dokud to není
natěsno.
“ na levé straně
LOCK
" ve středu
Na začátku, nemusí
být možné dát portafilter úplně do polohy
"
LOCK
„. Pouze se
ujistěte, že je pevně
zakotven. Po nějaké
době ke možno portafilter (7) dát blíže
do polohy „
LOCK
7. Umístěte jeden až dva šálky
8. Dejte ovládací knoflík doleva
9. Natočte ovládací knoflík zpět
A
“.
kávy pod portafilter (7). Poté
co se indikátor rozsvítí jasnou
modrou barvu, přístroj je
připraven na vaření kávy.
směrem k „Ikoně hrníčku“.
Horká voda bude pumpována
přes portafilter (7) do šálků.
do středu, směrem k "O„ pro
zastavení průtoku horké vody.
POZOR:
nechávejte přístroj
bez dozoru v průběhu vaření kávy nebo
nahřívání. Vždy musíte natočit ovládací
knoflík zpět do středu, směrem do pozice "O„ pro zastavení
vaření kávy.
Nikdy ne-
92 / CS
Plně automatický kávovar / Návod k použití

4 Obsluha a používání
10. Vyprázdněte šálky a vyjměte
portafilter (7). Všechny
části jsou nyní předehřáty.
TIP!
Umístěte espressové
šálky stranou dolů na ohřívací
desku nahoře přístroje. Když už
bude přístroj zapnutý přibližně
15 minut, hřející deska bude
nahřátá a může být použita na
pře-nahřátí šálků namísto užití
horké vody z přístroje.
Plně automatický kávovar / Návod k použití
93 / CS

5 Příprava
5.1 Příprava espressa
5.1.1 Výběr mletí kávy
Toto je důležitý krok v procesu dělaní espressa, jelikož jemně namletá
káva musí mít jednotnou konzistenci.
• Správně namletá zrnka kávy by
měla vypadat jako sůl.
• Pokud je namletí příliš jemné,
voda se nedostane do kávy a způsobí příliš velký tlak ve stroji. Tato
namletí vypadajíkalp prášek and
na dotek působí jako mouka promnutá mezi prsty.
• Pokud je namletí příliš hrubé, voda
se dostane do kávy příliš rychle,
což zabraňuje plné chuťové extrakci. Tip! Ujistěte se, že používáte kvalitně naostřený mlýnek
pro zachování jednoty namletí.
Kávové mlýnky s čepelí nejsou doporučené na vaření espressa, jelikož mleti není příliš konzistentní.
• V případě, že zaznamenáváte
problém s chutí (hořkost, kyselost, nedostatečné vylouhování,
etc.), upravte hrubost mletí kávy
a/nebo změňte značku nebo druh
pražení celých zrnek kávy.
5.1.2 Příprava přístroje
na vaření kávy
1. Ujistěte se, že indikátor světla
je nasvícený jasnou modrou
barvou a ovládací knoflík je v
poloze knoflíku v "O."
2. Ujistěte se, že v nádržce na
vodu je voda a vaše šálky jsou
předehřáty, jak bylo popsáno v
předchozích kapitolách.
3. Ujistěte se, že odkapávací miska
(9) a mřížka odkapávací misky
(8) jsou na jednotce umístěny
správně.
5.1.3 Plnění a vkládání
portafilteru
1. Vyberte si ze dvou sítek (14-15),
které patří k vašemu kávovaru,
podle množství šálků, které si
přejete připravit (1 nebo 2).
2. Umístěte sítko do portafilteru
a ujistěte se, že je na správné
úrovni.
3. Naplňte vybrané sítko čerstvou,
jemně namletou kávou. Ukliďte
jakoukoliv nadbytečnou kávu z
okraje portafilteru. Toto zajistí
správné usednutí pod vařící
hlavici.
94 / CS
Plně automatický kávovar / Návod k použití

5 Příprava
4. Upěchujte nebo stlačte kávu
za použití ploché strany
kávové lžičky/pěchovače (13).
Nenaplňte sítko přespříliš.
Mohlo by to způsobit ucpání,
nebo přetečení.
5. Zarovnejte portafilter (7) do
"
INSERT
hlavy, zatímco tlačíte portafilter
(7) nahoru. Natočte portafiltr
pevně doprava směrem k
"
LOCK
dokud to není natěsno.
„na levé straně vařící
" ve středu vařící hlavně,
5.1.4 Vaření espressa
Jestli máte v plánu
si dělat cappuccino.
prosím odkažte se na
další sekci „Příprava
C
1. Poté co připravíte stroj a máte
připravenou namletou kávu, jak
bylo popsáno v předchozí sekci,
jste připraven/a začít vařit espresso.
cappuccina“ po přečtení „Vaření espressa“.
2. Vložte 1 až 2 malé šálky pod
jeden nebo dva pod portafilter
(7). Pro vaření dvou šálků
zároveň, můžete umístit šálky
pod portafilter (7), tak že každý
z nich je přímo pod jedním ze
dvou výpustků.
3. Poté co se indikátor nasvítí
jasnou modrou barvu, přístroj
je nahřát na vhodnou teplotu.
Pootočte ovládací knoflík
doleva směrem k „Ikoně
hrníčku“, pro začátek vaření.
Pumpa je slyšitelná pro pár
momentů, když namletá káva
je před-naplněná vodou. Poté,
chvíli po krátké pauze, espresso
začne plout v šálku(šálcích).
4. Když je šálek zaplněn do
požadovaného množství, znovu
zpětně pootočte ovládacím
knoflíkem zpět do pozice
"O„. Nechte šálek(šálky) pod
výpustky ještě dalších pár
sekund pro ujištění, že všechno
espresso odkapalo.
Plně automatický kávovar / Návod k použití
95 / CS

5 Příprava
POZOR:
musí být vypnut ručně. Nenechávejte přístroj bez dozoru při
vaření kávy. Musíte
A
C
5. Poté co se přístroj zchladil,
opatrně vyjměte portafilter (7)
z hlavice filtru (6) za pomoci
jejího držení pomocí úchytek a
ručně zastavit proces
vaření. Tímto předejdete přetečení, vylití
a potencionálnímu
hazardu a poškození.
Poté co je espresso
uvařeno, přístroj automaticky vytvoří
trošku páry a stlačí
zbytek vody z čerpadla do odkapávací
misky. Toto zajistí, že
v ohřevném systému nebude zbytková
voda. Po přípravě pár
šálků espressa, opatrně vyjměte odkapávací misku, vyprázdněte a nahraďte.
Přístroj
tlačení směrem doleva. Užitím
palcové záklopky ubezpečte
sítko v portafilteru, otočte
portafilter (7) směrem dolů pro
vyprázdnění. Opláchněte sítko a
portafilter (7) vodou.
6. Pokud si přejete uvařit další
espresso.opakujte proces nad
tím. Přidejte čerstvě pomletou
kávu do sítka, jak bylo popsáno
v kapitole 5c, „Doplnění a
vložení portafilteru,“ zamkněte
portafilter (7) zpátky pod vařící
hlavu a znovu následujete
instrukce vaření espressa
(položky 2-5 z této sekce).
7. Poté co připravíte požadované
množství espressa, ujistěte
se, že ovládací knoflík je v
poloze "O" a vypněte přístroj
zmáčknutím na tlačítko
napájení (11) na boku přístroje.
Nechte přístroj vychladnout
předtím, než před čištěním
odstraníte jednotlivé části a
doplňky.
8. Pro pokyny k čištění viz kapitolu
8.
96 / CS
Plně automatický kávovar / Návod k použití

5 Příprava
A
POZOR:
části mohou být stále
velmi horké. Vždy si
dávejte pozor, když
ovládáte přístroj a
odnímatelné části.
Ujistěte se o použití
palcové záklopky při
vyhazování gruntu.
Ochlaďte tyto části
pod proudem takoucí
studené vody.
Kovové
5.1.5 Příprava
Cappuccina
Cappuccino je kombinací jednoho
až dvou espress se stejným nebo
větším množstvím teplého mléka a
mléčné pěny. (Pro přípravu latte se
podívejte do kapitoly 7).
Když napěňujeme,
sítko a portafilter (7)
by měl být sestaven
v "
LOCK
„polože. Pro
C
co nejlepší výsledky
vždy používejte čerstvé, studené mléko
(kolem 1°C).
C
Nepoužívejte džbánek, který byl zrovna
umyt v teplé vodě.
Dále rovněž doporučujeme nápojový termometr pro přípravu
nejlepšího napěněného a napařeného
mléka. Ideální teplota
pro napěněné nebo
napařené mléko je
mezi 140°F - 165°F.
Jakékoliv mléko může
být použito na napěnění. Plnotučné
mléko vyprodukuje
mikropěnu (malé
bublinky), zatímco
nízkotučné mléko a
mléko bez tuku udělá
velké, vzdušné bublinky při napěňování.
Bezlaktózová mléka
neudrží pěnu, ale
mohou být nahřáta
pro latte.
Plně automatický kávovar / Návod k použití
97 / CS

5 Příprava
5.1.6 Napěňování mléka
1. Nejdříve připravte espresso do
velkého, předehřatého šálku,
jak bylo popsáno v kapitole 5d,
„Vařená Espressa“.
2. Naplňte malý nerezově ocelený
nebo keramický džbánek z 1/2
plný studeným mlékem and
dejte jej bokem.
3. Před napěňováním se
doporučuje zbavit napěňovací
trysku jakékoliv horké
vody. Umístěte hrníček pod
napěňovací trysku (nebo nechte
napěňovací trysku běžet přímo
do odkapávací mísky). Poté co se
indikátor rozsvítí v jasné modré
světlo, pootočte ovládacím
knoflíkem doprava směrem k
ikonce páry. Indikátor světla bliká
červeně 5-8 sekund, zatímco
voda se čistí od svých trysek. Poté
co je voda očištěna, indikátor
světla se rozsvítí modře a pára
je vyprodukována z napěňovací
trysky. Zapněte ovládací knoflík
zpět do polohy "O„. Indikátor
světla je nyní osvícen červeně,
což znamená, že přístroj je
připraven na pěnění/páru z
mléka.
4. Vemte studený džbán s mlékem
5. Spolu s napěňovací tryskou
6. Pára začne končit v napěňovací
A
a ponořte napěňovací trysku
(s nastavenou naplňovací
nádržkou) zhruba do dvou třetin
mléka v džbánku. Ujistěte se, že
napěňovací nádržka nebude
narážet až na dno džbánku v
průběhu napěňování.
ponořenou do mléka, dejte
ovládací knoflík doprava
směrem k „napěňovací ikonce“.
trysce při uvolňovaní horké páry
do mléka. V průběhu ohřívání
bude čerpadlo přístroje dělat
občasné zvuky indikující, že
voda je pumpovaná napříč
zahřívacím systémem přemění
na páru.
POZOR:
se vyhnuli vystříknutí horkého mléka,
nenechávejte otvor
napěňovací trysky
dostat se nad hladinu mléka. Udržujte
napěňovací trysku
ponořenou v mléku v
průběhu celého procesu.
Abyste
98 / CS
Plně automatický kávovar / Návod k použití

5 Příprava
POZOR:
odstraňujte napěňovací trysku z mléka v
době, kdy je ovládací
knoflík v pozici páry.
Vždy dejte ovládací
A
C
7. Když už se mléko zdvojnásobí
ve svém objemu, nebo když
používáte nápojový teploměr
a mléko dosáhne 68°C, dejte
zpět ovládací knoflík do polohy
„O“.
knoflík do polohy „O“
před odstraněním
napěňovací trysky z
mléka, mohlo by to
způsobit postříkání
se mlékem.
V průběhu vaření
nebo napařování se
může světelný indikátor ovládacího
knoflíku vypnout,
blikat, změnit barvu,
což určuje, že ohřívací systém je zapnutý
pro udržení správné teploty na ohřev
nebo páru.
Nikdy ne-
Opatrně očistěte napěňovací trysku a napěňovací nádržku navlhčeným hadříkem
hned po napaření, ať
C
8. Nalijte napěněné mléko do
připraveného espressa a tím
připravíte Vaše cappuccino.
Oslaďte dle chuti a přidejte
Vaše oblíbené ingredience jako
ochucený sirup, koncentrát
nebo kakaový prášek/koření.
se vyhnete usazení
mléka. Vyhněte se
kontaktu s horkými
povrchy.
Plně automatický kávovar / Návod k použití
99 / CS

5 Příprava
C
Po napěňování se
doporučuje nechat
přístroj vychladnout
minimálně minut
předtím, než začneme vařit nové espresso. Toto zchlazení
umožní přístroji dostat se zpět na správnou teplotu pro vaření espressa. Pokud
se světlo indikátoru
rozsvítí červeně, měl
by se ovládací knoflík
pootočit doleva, aby
voda protékala portafilterem. Toto zchladí
systém tak, že espresso se může dělat
hned po napařování.
Pokud se dělá více
cappuccin, připravte nejdříve všechna
espressa do teplých
šálků a poté napěňte
mléko.
9. Následujte instrukce
10. Vypněte přístroj zmáčknutím
zmíněné v bodě 3 nahoře pro
zbavení napěňovací trysky a
popláchnutí od zbytkového
mléka z napěňovací trysky a
napěňovacího hrotu. Je důležité
správně vyčistit napěňovací
trysku a napěňovací hrot a
umýt napěňovací nádržku po
každém použití, pro ujištění, že
přístroj bude správně fungovat
i nadále. (Viz kapitola 8b)
tlačítka napájení na boku
kávovaru. Odpojte nabíjecí
kabel a umožněte přístroji se
zchladit.
100 / CS
Plně automatický kávovar / Návod k použití
 Loading...