

Page 1
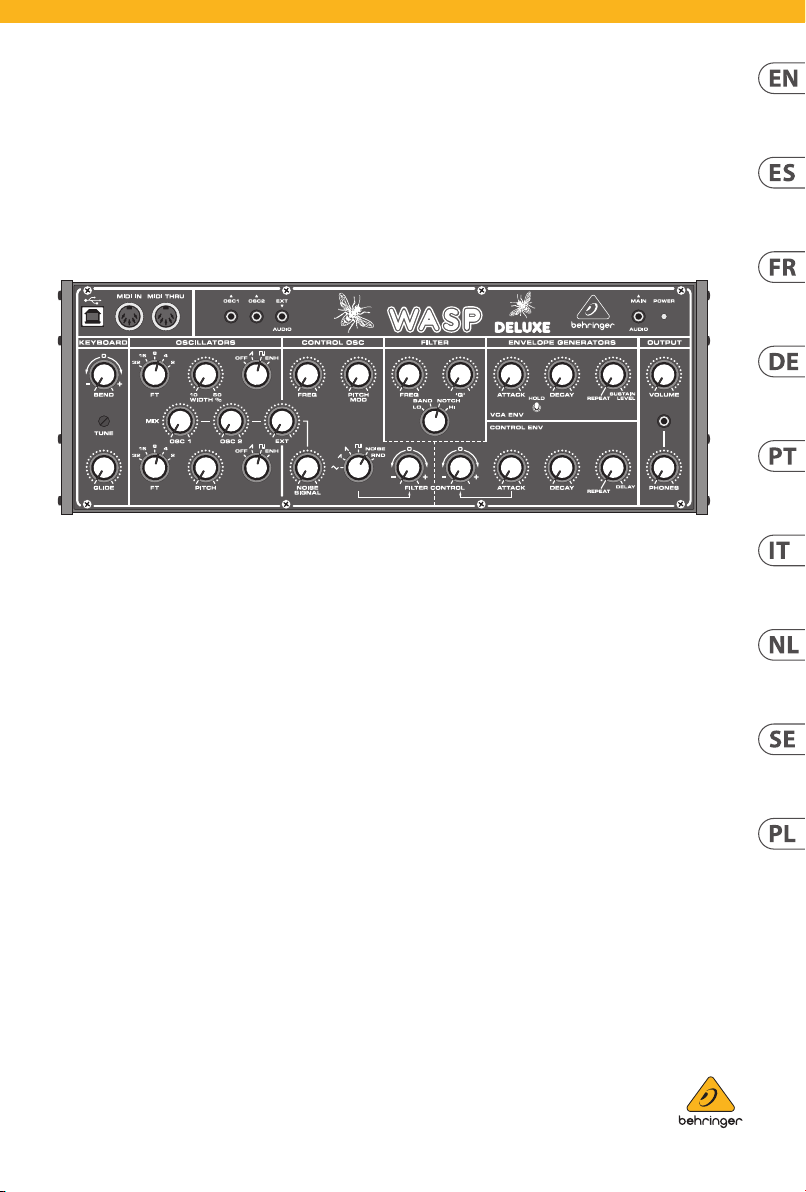
Quick Start Guide
WASP DELUXE
Legendary Hybrid Synthesizer with Dual OSCs, Multi-Mode VCF,
16-Voice Poly Chain and Eurorack Format
V 4.0
Page 2
2 3Quick Start GuideWASP DELUXE
1. Read these instructions.
15. The apparat us shall be connected
your coopera tion in the correct di sposal
more information about where you can
appearances and other information
Atención
contacto s: dos polos y la puesta a
contacto, respectivamente, son los que
mesa especicados
tormentas o s i no va a utilizarlo durante
Important Safety
Instructions
Terminals marked with
this symbol carry
electr ical current of
sucient magnitude to constitute risk
of elect ric shock. Use only high- quality
professio nal speaker cables with ¼" TS
or twist-locking plugs pre -installed.
Allother installation or modication
should be performed only by
qualiedpersonnel.
This symbo l, wherever it
appears, ale rts you to the
presence of uninsulated
dangerous voltage inside the enclosure
- voltage that may b e sucient to
constitu te a risk ofshock.
This symbo l, wherever it
appears, ale rts you to
important operating and
maintenance instructions in the
accompanying literature. Please read
themanual.
Caution
To reduce the risk of
electr ic shock, do not
remove the top cover (or the r ear
section). No user serviceable parts inside.
Refer servicing to qualiedpersonnel.
Caution
To reduce the risk of
re or elec tric shock, do
not expos e this appliance to rain and
moisture. Th eapparatus shall not
be expose d to dripping or splashing
liquids and no ob jects lled with
liquids, such as v ases, shall be placed
on the apparatus.
Caution
These service instruc tions
are for use by qua lied
service p ersonnel only. Toreduce
the risk of ele ctric shock do not
perform any servicing other than that
contained in the operation instructions.
Repairshave to b e performed by
qualied servicepersonnel.
2. Keep these instructions.
3. Heed all warnings.
4. Follow all instruc tions.
5. Do not use this apparatus
near water.
6. Clean only w ith dry cloth.
7. Do not bloc k any ventilation
openings. Install in accordance with the
manufacturer ’s instructions.
8. Do not ins tall near any heat
sources such a s radiators, heat regis ters,
stoves, or othe r apparatus (including
ampliers) that produce heat.
9. Do not defeat the sa fety purpose
of the polari zed or grounding-typ e
plug. A polari zed plug has two blades
with one wider than the other.
A grounding -type plug has two blad es
and a third grounding prong. The wide
blade or the third prong are provided
for your saf ety. Ifthe provided plug
does not t into y our outlet, consult
an elect rician for replacement of th e
obsolete outlet.
10. Protect the power cord f rom being
walked on or pinc hed particularly
at plugs, convenience receptacles,
and the point wh ere they exit from
the apparatus.
11. Use only attachments/accessories
specie d by themanufacturer.
12. Use only wi th
the cart , stand,
tripod, bracket, or
table spec ied by
the manufacturer,
orsold with
the apparat us. When a cart is used,
use caution when moving the cart/
apparatus combination to avoid injury
from tip -over.
13. Unplug this apparatus during
lightning storms or when unused for
long periods of time.
14. Refer all servicing to qualied
service personnel. Servicing is require d
when the appa ratus has been damaged
in any way, such as power suppl y cord
or plug is damage d, liquid has been
spilled or obje cts have fallen into the
apparatus, t he apparatus has been
expose d to rain or moisture, does not
operate nor mally, or has beendro pped.
to a MAINS socket ou tlet with a
protective earthing connection.
16. Wh ere the MAINS plug or an
appliance coup ler is used as the
disconnect device, the disconnect
device shall remain readily operable.
17. Corr ect disposal of
this product: This
symbol indicates that
this product must not
be disposed of with
household waste,
according to the W EEE Directive
(2012/19/EU) and your national law.
This produc t should be taken to a
collection center lice nsed for the
recycli ng of waste electric al and
electronic equipment (EEE).
The mishandlin g of this type of waste
could have a possib le negative impact
on the environment and human health
due to potentially hazardous
substances that are generally
associate d with EEE. At the same time,
of this produc t will contribute to the
ecient use of natural resources. For
take your waste equipment for
recycli ng, please contact your lo cal city
oce, or your household waste
collection se rvice.
18. Do n ot install in a conned space,
such as a book c ase or similar unit.
19. Do not place naked ame
sources, suc h as lighted candles,
on the apparatus.
20. Please keep the environmental
aspect s of battery dispo sal in mind.
Batteri es must be disposed- of at a
battery collection point.
21. This apparatus may be used i n
tropical an d moderate climates up
to 45°C.
LEGAL DISCLAIMER
Music Tribe accepts n o liability for
any loss which may b e suered by
any person who relies either wholly
or in part u pon any description,
photograph, or statement contained
herein. Technical specications,
are subjec t to change without notice.
All trademar ks are the propert y
of their respective owners. Midas,
Klark Teknik, Lab G ruppen, Lake,
Tannoy, Turbosound, TC Electronic,
TC Helicon, Behringer, Bugera, Aston
Microphones and Coolaudio are
trademarks or registered trad emarks
of Music Tribe Global B rands Ltd.
© Music Tribe Global B rands Ltd.
2023 All rights re served.
LIMITED WARRANTY
For the applic able warranty terms a nd
conditions and additional information
regarding Music Tribe’s Limited
Warranty, please see complete details
online at community.musictribe.com/
pages/support#warranty.
Instrucciones de
seguridad
Las terminales marcadas
con este símb olo
transportan corr iente
eléctr ica de magnitud sucie nte como
para const ituir un riesgo de desc arga
eléctr ica. Utilicesolo cable s de altavoz
profesionales y de alta calidad con
conecto res TS de 6,3 mm o de bayoneta
prejados. Cualquier otra instalación o
modicación debe ser realizada
únicamente p or un técnicocualicado.
Este símbolo, siempre que
aparece, leadv ierte de la
presencia de voltaje
peligroso si n aislar dentro de la caja;
estevoltaj e puede ser suciente par a
constitu ir un riesgo dedescarga .
Este símbolo, siempre que
aparece, leadv ierte sobre
instrucciones operativas y
de mantenimiento que aparecen en la
documentación adjunta. Por favor,
leaelmanual.
Para reducir e l riesgo de
descarga e léctrica, no
quite la tapa (olapar te posterior).
Nohay piezas en e l interior del equipo
que puedan ser r eparadas por el
usuario. Sies ne cesario, póngase en
contacto con personal cuali cado.
Atención
Para reducir e l riesgo
de incendio o des carga
eléctr ica, no exponga este ap arato a la
lluvia, humeda d o alguna otra fuente
que pueda sal picar o derramar algún
líquido sobr e el aparato. Nocoloque
ningún tipo de recipiente para líquidos
sobre elapar ato.
Atención
Las instrucciones
de servicio deben
llevarlas a cabo exclusivamente
personal c ualicado. Paraevitar el
riesgo de una d escarga eléctr ica,
no realice reparaciones que no se
encuentren d escritas en el manual de
operaciones. Lasreparaciones deben
ser realizadas exclusivamente por
personalcualicado.
1. Lea las instrucciones.
2. Conserve e stas instruccion es.
3. Pres te atención a todas
las advertencias.
4. Siga todas las instrucciones.
5. No use e ste aparato cerca
del agua.
6. Limpie es te aparato con un
paño seco.
7. No bloquee las aberturas
de ventilación . Instale el equipo
de acuerdo con las instrucciones
del fabricante.
8. No instal e este equipo cerca de
fuentes de calor tales como radiadores,
acumuladore s de calor, estufas u otros
aparatos (incluyendo amplicadores)
que puedan producir calor.
9. No elimine o deshabilite nunca
la conexión a ti erra del aparato o del
cable de alimentación de corriente.
Unenchufe po larizado tiene dos polo s,
uno de los cuale s tiene un contacto
más ancho que el ot ro. Una clavija
con puest a a tierra dispone de tres
tierra. El con tacto ancho y el tercer
garantizan una mayor seguridad. Si el
enchufe suministrado con el equipo
no concuerda co n la toma de corriente,
consulte con un el ectricista par a
cambiar la toma d e corriente obsoleta.
10. Coloque el cable de suminis tro de
energía de manera que no pueda ser
pisado y que es té protegido de objetos
alados. As egúrese de que el cable de
suministro de energía esté protegido,
especialm ente en la zona de la clavija y
en el punto dond e sale del aparato.
11. Use únicamente los dispositivos
o accesorio s especicados por
el fabricante.
12. Use
únicamente la
carretilla,
plataforma,
trípode, soporte o
por el fabricante o suministrados junto
con el equipo. Alt ransportar el equi po,
tenga cuidado p ara evitar daños y
caídas al tropezar con algún obstác ulo.
13. Desenchufe el equipo durante
un periodo largo.
14. Confíe las reparaciones
únicamente a servicios técnicos
cualicados. La unidad requiere
mantenimiento siempre que haya
sufrido al gún daño, si el cable de
suministro de energía o el enchufe
presenta ran daños, sehubiera
derramado un líquido o hubieran caído
objetos dent ro del equipo, si el aparato
hubiera es tado expuesto a la hume dad
o la lluvia, si ha dejado d e funcionar de
manera norma l o si ha sufrido algún
golpe o caída.
15. Al conect ar la unidad a la toma de
corriente el éctrica asegúr ese de que
la conexión disponga de una unión
atierra.
16. Si el e nchufe o conector
de red sirve c omo único medio
de desconexión, éste debe ser
accesiblefácilmente.
Page 3
4 5Quick Start GuideWASP DELUXE
17. Cómo debe
que aparecen aquí son propiedad
Attention
contact s plus une mise à la terre
17. Mise au r ebut
Lab Grupp en, Lake, Tannoy,
Global Brands Ltd. © Music Tribe Global
Pour connaître les termes et conditions
deshacers e de este
aparato: Es te símbolo
indica que es te aparato
no debe ser tratado
como basura orgánica,
según lo indicado en la Directiva WEEE
(2012/19/EU) y a las normativas
aplicable s en su país. En lugar de ello
deberá llevarlo al punto limpio más
cercano par a el reciclaje de sus
elementos eléctricos/ electrónicos
(EEE). Al hacer esto es tará ayudando a
prevenir las po sibles consecuencias
negativas p ara el medio ambiente y la
salud que pod rían ser provocadas por
una gestió n inadecuada de este tipo de
aparatos. Ade más, el reciclaje de
materiales ayudará a conservar los
recursos naturales. Para más
informac ión acerca del reciclaje de e ste
aparato, póngas e en contacto con el
Ayuntamiento de su c iudad o con el
punto limpio local.
18. No instale es ta unidad en un
espacio muy r educido, tal como
encastrada en una librería o similar.
19. No coloque objetos con
llama, como una vela ence ndida,
sobre este aparato.
20. Tenga presente s todas las
advertenc ias relativas al reciclaj e
y correcta eliminación de las pilas.
Las pilas deben ser siempre eliminadas
en un punto limpio y n unca con el resto
de la basura org ánica.
21. Puede usar este aparato e n
lugares con cli mas tropicales y
moderados que soporten temperaturas
de hasta 45°C.
NEGACIÓN LEGAL
Music Tribe no admite ningún tipo
de responsabilidad por cualquier
daño o pérdida que pudiera sufrir
cualquier persona por conar total
o parcialmente en la descripciones,
fotografías o armaciones
contenidas en este documento.
Las especicaciones técnicas,
imágenes y otras informaciones
contenidas en este documento están
sujetas a modicaciones sin previo
aviso. Todas las marcas comerciales
de sus respectivos dueños. Midas,
Klark Teknik, Lab G ruppen, Lake,
Tannoy, Turbosound, TC Electronic,
TC Helicon, Behringer, Bugera, Aston
Microphones y Coolaudio son marcas
comerciales o marcas registradas
de Music Tribe Global B rands Ltd.
© Music Tribe Global B rands Ltd.
2023 Reservados todos los derechos.
GARANTÍA LIMITADA
Si quiere conocer los detalles y
condiciones aplicables de la garantía
así como información adicional sobre
la Garantía limi tada de Music Tribe,
consulte online toda la información en
la web community.musictribe.com/
pages/support#warranty.
Consignes de sécurité
Les points r epérés par ce
symbole portent une
tension électrique
susante po ur constituer un risque
d’électrocution. Utilisez uniquement
des câbles d’enceintes professionnels
de haute qualité ave c ches Jack mono
6,35 mm ou ches à verr ouillages déjà
installée s. Touteautre ins tallation ou
modication doit être eectuée
uniquement par un personnel qualié.
Ce symbole aver tit de la
présence d’une tension
dangereuse e t non isolée à
l’intérieu r de l’appareil - elle p eut
provoquer des chocs électriques.
Attention
Ce symbol signale les
consignes d’utilisation
et d’entre ! Tienimp ortantes dans
la document ation fournie. Lisez les
consignes de sécurité du manuel
d’utilisatio n del’appareil.
Pour éviter tout r isque
ne pas ouvri r le capot de l’appareil
de choc électrique,
ni démonter le panneau arrière.
L’intérieur de l’appareil ne possède
aucun élément réparable par
l’utilisateur. Lais sertoute réparation à
un professionnelqualié.
Attention
Pour réduire le s risques
de feu et de cho c
électrique, n’exposez pas cet appareil
à la pluie, à la moisissu re, auxgouttes
ou aux éclabo ussures. Ne posez pas
de récipient contenant un liquide sur
l’appareil (unvase par e xemple).
Attention
Ces consignes de
sécurité et d’entretien
sont destinées à un personnel
qualié. Pour évi ter tout risque de
choc électrique, n’eectuez aucune
réparation sur l’appareil qui ne soit
décrite p ar le manuel d’utilisation.
Les éventuelle s réparations doivent
être eectuées uniquement par un
technicienspécialisé.
1. Lisez ces consignes.
2. Conserve z ces consignes.
3. Respe ctez tous les aver tissements.
4. Respectez toutes les
consignes d’utilisation.
5. N’utilisez jamais l’appareil à
proximité d’un liquide.
6. Nettoy ez l’appareil avec un
chion sec.
7. Veillez à ne pas empêcher la
bonne ventilat ion de l’appareil via ses
ouïes de ventila tion. Respectezles
consignes du fabricant concernant
l’install ation del’appareil.
8. Ne placez pas l ’appareil à
proximité d ’une source de chaleu r telle
qu’un chauage, une cuisinière ou
tout appareil dégageant de la chaleur
(y compris un am pli depuissance).
9. Ne supprimez jamai s la sécurité
des prise s bipolaires ou des prise s
terre. Les pri ses bipolaires possè dent
deux contacts de largeur diérente.
Leplus large es t le contact de sécur ité.
Les prises te rre possèdent deux
servant d e sécurité. Si la prise du blo c
d’alimentation o u du cordon d’alimentation f ourni ne correspond pa s à
celles de votre i nstallation élect rique,
faites app el à un électricien po ur
eect uer le changement de prise.
10. Installez le cordon d’alimentation
de telle façon qu e personne ne puisse
marcher dess us et qu’il soit protégé
d’arêtes coupantes. Assurez-vous
que le cordon d’alimentation est
sufsamment protégé, notamment
au niveau de sa pr ise électrique et
de l’endroit où il es t relié à l’appareil;
cela est égale ment valable pour une
éventuelle rallonge électrique.
11. Utilisez exclusivement
des accessoi res et des appareils
supplémentaires recommandés par
lefabricant.
12. Utilisez
exclusivement des
chariots, des
diables,
desprésentoirs,
despieds et d es
surface s de travail recommandés p ar le
fabrica nt ou livrés avec le produit.
Déplacezprécautionneusement tout
chariot ou dia ble chargé pour éviter
d’éventuelles bles sures en cas dechute.
13. Débranchez l’appareil de la
tension sec teur en cas d’orage ou si
l’appareil reste inutilisé pendant une
longue période de temps.
14. Les travaux d’entretien de
l’appareil doiven t être eectués
uniquement par du personnel qualié.
Aucunentret ien n’est nécess aire sauf si
l’appareil est endommagé de quelque
façon que ce soi t (dommagessur le
cordon d’aliment ation ou la prise par
exemple), siun liquide ou un objet
a pénétré à l ’intérieur du châssis, si
l’appareil a été ex posé à la pluie ou
à l’humidité, s’il ne fonctionne pas
correc tement ou à la suite d’une chute.
15. L’appareil doit êt re connecté à une
prise secteur dotée d’une protection
par mise à la terr e.
16. L a prise électriq ue ou la prise
IEC de tout appar eil dénué de bouton
marche/arrêt doit rester accessible
enpermanence.
appropriée de ce
produit: Ce symbole
indique qu’en accord
avec la direc tive DEEE
(2012/19/EU) et les lois
en vigueur dans vo tre pays, ce produit
ne doit pas êt re jeté avec les déchets
ménagers. Ce produit doit être déposé
dans un point de co llecte agréé pour le
recyclage des déchets d’équipements
électriques et élect roniques (EEE).
Une mauvaise man ipulation de ce type
de déchets pourrait avoir un impact
négatif sur l’environnement et la santé
à cause des su bstances potentiellem ent
dangereuses généralement associées à
ces équipements. En même temps,
votre coopér ation dans la mise au rebut
de ce produit contribuera à l’utilisation
ecace des ressources naturelles.
Pour plus d’informations sur l’endroit
où vous pouvez d époser vos déchets
d’équipements pour le recyclage,
veuillez conta cter votre mairie ou votr e
centre loca l de collecte des déche ts.
18. N’ins tallez pas l’appareil dans un
espace conné tel qu’une bibliothèque
ou meuble similaire.
19. Ne placez jamais d’objets
enammés, tels que des bougies
allumées, sur l’appareil.
20. Gardez à l ’esprit l’impa ct
environnemental lorsque vous mettez
des piles au reb us. Les piles usées
doivent être d éposées dans un point de
collecte adapté.
21. Cet appareil peut être utilisé sous
un climat trop ical ou modéré avec des
températures de 45°C maximum.
DÉNI LÉGAL
Music Tribe ne peut êt re tenu pour
responsable pour toute perte pouvant
être subie pa r toute personne se
ant en part ie ou en totalité à
toute description, photographie
ou armatio n contenue dans ce
document. Les caractéristiques,
l’apparence et d’autres informations
peuvent fair e l’objet de modic ations
sans notic ation. Toutes les marques
appartiennent à leurs propriétaires
respec tifs. Midas, Klark Teknik,
Turbosound, TC Elec tronic, TC Helicon,
Behringer, Bugera, Aston Microphones
et Coolaudio so nt des marques ou
marques dép osées de Music Tribe
Brands Ltd. 2023 Tous droit s réservés.
GARANTIE LIMITÉE
de garantie applicables, ainsi que
les informations supplémentaires et
détaillée s sur la Garantie Limitée de
Music Tribe, consultez l e site Internet
community.musictribe.com/pages/
support#warranty.
Wichtige
Sicherheitshinweise
Vorsicht
Die mit dem Symbo l
markierten Anschlüsse
führen so vi el Spannung, dassdie
Gefahr eines Stromschlags besteht.
Verwenden Sie nur hochwertige,
professionelle Lautsprecherkabel
mit vorinstallierten 6,35 mm
MONO-Klinkensteckern oder
Lautsprecherstec ker mit
Drehverriegelung. Alle anderen
Installationen oder Modikationen
sollten nur von qualiziertem
Fachpersonal ausgeführt werden.
Achtung
Um eine Gefährdung
durch Stromschlag
auszuschließen, darf die
Geräteabdeckung bzw.
Geräterückwandnicht abgenommen
werden. ImInnern des Geräts benden
sich keine vom Benutzer reparierbaren
Teile. Reparaturarbeiten dürfen
nur von qualiziertem Personal
ausgeführtwerden.
Page 4
6 7Quick Start GuideWASP DELUXE
Achtung
10. Verlegen Sie das Ne tzkabel so,
entsorge n. DiesesProdukt so llte bei
Stellen Sie keine Gegenstände mit
Midas, Klark Teknik , Lab Gruppen, Lake,
Brands Ltd. © Music Tribe G lobal Brands
Atenção
12. Se utiliz ar uma cha de
dispositivo para evitar danos provocados
terem caído pa ra dentro do dispositivo;
(2012/19/EU) e a legislação nacional. Este
produto dever á ser levado para um centr o
de resíduos de e quipamentos eléc tricos e
incorrec to deste tipo de resíd uos pode ter
que estão geralmente associadas aos EEE.
Ao mesmo tempo, a sua cola boração para
Um eine Gefährdung
durch Feuer bzw.
Stromschlag auszuschließen, darf
dieses Gerät weder Regen oder
Feuchtigkeit ausgesetzt werden
noch sollten Spritzwasser oder
tropfende Flüssigkeiten in das Gerät
gelangen können. Stellen Sie keine
mit Flüssigkeit gefüllten Gegenstände,
wie z. B. Vasen, aufdasG erät.
Achtung
Die Service-Hinweise sind
nur durch qualiziertes
Personal zu b efolgen. Umeine
Gefährdung durch Stromschlag zu
vermeiden, führen Sie bitte keinerlei
Reparatur en an dem Gerät durch,
dienicht in der Bedienungsanleitung
beschrieben sind. Reparaturen
sind nur von qualiziertem
Fachpersonaldurchzuführen.
1. Lesen Sie diese Hinweise.
2. Bewahren Sie diese Hinweise auf.
3. Beachten Sie alle Warnhinweise.
4. Befolgen Sie alle
Bedienungshinweise.
5. Bet reiben Sie das Gerät nicht in
der Nähe vonWasser.
6. Reinigen Sie das Gerät mit einem
trockenen Tuch.
7. Blockieren Sie nicht die
Belüftungsschlitze. Beachten
Sie beim Einbau de s Gerätes die
Herstellerhinweise.
8. Stellen Sie das Ger ät nicht in der
Nähe von Wärmeq uellen auf. Solche
Wärmequellen sind z. B. Heizkörper,
Herde oder andere Wärme erzeugende
Geräte (auch Verstärker).
9. Entfernen Sie in keinem Fall
die Sicherheitsvorrichtung von
Zweipol- oder geerdeten Steckern. Ein
Zweipolstecker hat zwei unterschiedlich
breite Steckkontak te. Ein geerdeter
Stecker hat zwei Steckkontakte
und einen dritten Erdungskontakt.
Derbreitere Ste ckkontakt oder der
zusätzliche Erdungskontakt dient
Ihrer Sicherheit. Falls das mitgelieferte
Steckerformat nicht zu Ihrer Steckdose
passt, wend en Sie sich bitte an
einen Elektriker, damit die Steckdose
entsprechend ausgetauscht wird.
dass es vor Tritte n und scharfen Kanten
geschützt ist und nicht beschädigt
werden kann. Ach ten Sie bitte
insbesondere im Bereich der Stecker,
Verlängerungskabel und an der Stelle,
an der das Net zkabel das Gerät verläss t,
aufausreichendenSchutz.
11. Das Gerät muss je derzeit mit
intaktem Schutzlei ter an das Stromnetz
angeschlossen sein.
12. Sollte der Hauptnet zstecker
oder eine Gerätesteckdose die
Funktionseinheit zum Abschalten sein,
muss diese immer zugänglich sein.
13. Verwenden Sie nur Zusatzgeräte/
Zubehörteile, dielaut Hersteller
geeignet sind.
14. Verwenden
Sie nur Wagen,
Standvorrichtungen, Stative,
Halter oder Tische,
die vom Hersteller
benannt oder im Lieferumfang des
Geräts enthalten sind. Falls Sie einen
Wagen benutzen, seien Sie vorsichtig
beim Bewegen der
Wagen- Gerätkombination,
umVerletzungen durch Stolpern
zuvermeiden.
15. Ziehen Sie den Netzstecker bei
Gewitter oder wenn Sie das Gerät
längere Zeit nicht benutzen.
16. L assen Sie alle Wartungsarbeiten
nur von qualiziertem ServicePersonal ausführen. EineWartung
ist notwendig, wenn das Gerät in
irgendeiner Weise beschädigt wurde
(z. B. Beschädigung des Netzkabels
oder Steckers), Gegenstände oder
Flüssigkeit in das Geräteinnere gelangt
sind, das Gerät Regen oder Feuchtigkeit
ausgesetzt wurde, das Gerät nicht
ordnungsgemäß funktioniert oder auf
den Boden gefallen ist.
17. Korrekte
Entsorgung dieses
Produkts: Dieses Symbol
weist darauf h in, das
Produkt entsprechend
der WEEE Direk tive
(2012/19/EU) und der jeweiligen
nationalen Gesetze nicht zusamme n
mit Ihren Haushaltsabfällen zu
einer autorisierten Sammelstelle für
Recycling elektrischer und
elektronischer Geräte (EEE) abgegeben
werden. Wegen bedenklicher
Substanzen, diegenerell mit
elektrischen und elektronischen
Geräten in Verbindung stehen, könnte
eine unsachgemäße Behandlung dieser
Abfallart eine negative Auswirkung auf
Umwelt und Gesundheit haben.
Gleichzeitig gewährleistet Ihr Beitr ag
zur richtigen Entsorgung dieses
Produkt s die eektive Nut zung
natürliche r Ressourcen. Fürweitere
Informationen zur Entsorgung Ihrer
Geräte bei einer Recycling-Stelle
nehmen Sie bitte Kontakt zum
zuständigen städtischen Büro,
Entsorgungsamt oder zu Ihrem
Haushaltsabfallentsorgerauf.
18. Inst allieren Sie das Gerät nicht
in einer beengten Umgebung, zum
Beispiel Bücherregal oder ähnliches.
19.
oenen Flammen, etwa brennende
Kerzen, auf das Ge rät.
20. Beachten Sie bei der Entsorgung
von Batter ien den UmweltschutzAspekt. Batterien müssen bei einer
Batterie -Sammelstelle entsor gt
werden.
21. Dieses Gerät ist in tropischen
und gemäßigten Klimazonen bis
45° C einsetzbar.
HAFTUNGSAUSSCHLUSS
Music Tribe übernimmt keine Haftung
für Verluste, die Personen entstanden
sind, die sich gan z oder teilweise auf
hier enthaltene Beschreibungen,
Fotos oder Aussagen verlassen haben.
Technische Daten, Erscheinungsbild
und andere Informationen können
ohne vorherige Ankündigung geändert
werden. Alle Warenzeichen sind
Eigentum der jeweiligen Inhaber.
Tannoy, Turbosound, TC Electronic,
TC Helicon, Behringer, Bugera, Aston
Microphones und Coolaudio sind
Warenzeichen oder eingetragene
Warenzeichen der Music Tribe Global
Ltd. 2023 Alle Rechte vorbehalten.
BESCHRÄNKTE GARANTIE
Die geltenden Garantiebedingungen
und zusätzliche Informationen
bezüglich der von Music Tribe
gewährten beschränkten
Garantie nden Sie online unter
community.musictribe.com/pages/
support#warranty.
Instruções de
Segurança Importantes
Aviso!
Terminais marcados
com o símbolo c arregam
corrente elétrica de magnitude
suciente pa ra constituir um risco d e
choque elétrico. Use apenas cabos
de alto-falantes de alta qualidade
com plugues TS de ¼" ou plugues
com trava de torção pré-instalados.
Todas as outras ins talações e
modicaçõ es devem ser efetuadas p or
pessoasqualicadas.
Este símbo lo, onde quer
que o encontre, ale rta-o
para a leitur a das
instruções de manuseamento que
acompanham o equipamento. Por favor
leia o manual deinstruções.
Atenção
De forma a dimi nuir
o risco de choq ue
eléctr ico, nãoremover a cobertur a
(ouasecção de trá s). Não existem peça s
substitu íveis por parte do utili zador no
seu interior. Para es se efeito recorrer a
um técnicoqualicado.
Atenção
Para reduzir o r isco de
incêndios ou choques
eléctr icos o aparelho não deve ser
exposto à c huva nem à humidade.
Alémdisso, não deve s er sujeito a
salpicos, nem d evem ser colocados em
cima do aparel ho objectos contendo
líquidos, taiscomojarras.
Estas ins truções de
operação devem ser
utilizada s, emexclusivo, por técnicos
de assistência qualicados. Para evitar
choques elé ctricos não proce da a
reparações ou intervenções, que
não as indicad as nas instruções
de operaçã o, salvo se possu ir as
quali-cações necess árias. Para evitar
choques elé ctricos não proce da a
reparações ou intervenções, que
não as indicad as nas instruções de
operação. S ó o deverá fazer se possuir
as qualicaçõesnecessárias.
1. Leia estas in struções.
2. Guarde estas instruções.
3. Pres te atenção a todos os avisos.
4. Siga todas as in struções.
5. Não utilize este dispositivo perto
de água.
6. Limpe ape nas com um pano seco.
7. Não obst rua as entradas de
ventilação. Ins tale de acordo com as
instruções do fabricante.
8. Não instale perto de quaisquer
fontes de cal or tais como radiadores,
bocas de ar qu ente, fogões de sala
ou outros aparelhos (incluindo
amplicadores) que produzam calor.
9. Não anule o object ivo de
seguranç a das chas polarizadas ou
do tipo de ligaç ão à terra. Uma cha
polariza da dispõe de duas palhetas
sendo uma mais lar ga do que a outra.
Uma cha do tipo li gação à terra dispõe
de duas palhet as e um terceiro dente
de ligação à ter ra. A palheta larga ou
o terceiro dente são fornecidos para
sua seguranç a. Se a cha fornecida
não encaixar na sua tomada, consulte
um elect ricista para a subst ituição da
tomada obsoleta.
10. Proteja o cabo de alimentaç ão de
pisadelas ou apertos, especialmente
nas chas, ex tensões, e no local de
saída da unidade. Certique-se de
que o cabo elé ctrico está prote gido.
Verique particularmente nas chas,
nos receptá culos e no ponto em que o
cabo sai doap arelho.
11. O aparelho tem de es tar sempre
conect ado à rede eléctric a com o
condutor de pr otecção intacto.
rede princ ipal ou uma tomada de
aparelhos para desligar a unidade
de funciona mento, esta deve estar
sempre acessível.
13. Utilize apenas ligações/acessórios
especic ados pelofabrican te.
14. Utilize apenas
com o carrin ho,
estrutura, tripé,
suporte, ou m esa
especicados pelo
fabricante ou
vendidos com o dis positivo.
Quandoutili zar um carrinho, tenha
cuidado ao mover o conjunto carrinho/
pela terpidação.
15. Desligue este dispositivo durante
as trovoadas ou q uando não for
utilizado durante longos períodos
detempo.
16. Qualquer tipo de reparação
deve ser sempr e efectuado por
pessoal qualicado. É necessária uma
reparação sempre que a unidade tiver
sido de alguma forma danicada,
como por exemp lo: no caso do cabo de
alimentação ou cha se encontrarem
danicados; naeventualidade de
líquido ter sido derramado ou objectos
no caso da unid ade ter estado expos ta
à chuva ou à humid ade; seesta
não funcionar normalmente, ou se
tiver caído.
17. Correcta eliminação
deste prod uto: este
símbolo indi ca que o
produto não de ve ser
eliminado juntamente
com os resíduo s
domésticos, segundo a Directiva REEE
de recolha licen ciado para a reciclage m
electr ónicos (EEE). O tratamento
um eventual impacto negativo no
ambiente e na saú de humana devido a
substâncias potencialmente perigosas
a eliminação co rrecta deste p roduto irá
Page 5
8 9Quick Start GuideWASP DELUXE
contribuir para a utilização eciente dos
elettr iche, non esporre ques to
esclusivamente a personale qualic ato.
lame, una più larga dell'altra. Una spina
12. Utilizzare
eciente del le risorse naturali. Per
Aansluitingen die gemerkt
op belangrijke bedienings
recurs os naturais. Paramais info rmação
acerca dos loc ais onde poderá deixa r o
seu equipamento usado para reciclagem,
é favor contactar os serviços municip ais
locais, a enti dade de gestão de resídu os
ou os serv iços de recolha de
resíduosdomésticos.
18. Não i nstale em lugares
connados, ta is como estantes ou
unidades similares.
19. Não coloque fontes de
chama, tais como ve las acesas,
sobre o aparelho.
20. Favor, obedecer os asp ectos
ambientais de d escarte de bateria.
Baterias deve m ser descartadas e m um
ponto de coletas de baterias.
21. Esse aparelho pode se r usado em
climas tropi cais e moderados até 45°C.
LEGAL RENUNCIANTE
O Music Tribe não se resp onsabiliza
por perda algu ma que possa ser
sofrida por qualquer pessoa que
dependa, seja de maneira completa
ou parcial, de qualquer descrição,
fotograa, ou declaração aqui
contidas. Dados técnicos, aparências
e outras informações est ão sujeitas
a modicações sem aviso prévio.
Todas as marcas são p ropriedade
de seus respectivos donos. Midas,
Klark Teknik, Lab G ruppen, Lake, Tannoy,
Turbosound, TC Elec tronic, TC Helicon,
Behringer, Bugera
, Aston Microphones
e Coolaudio são marcas ou marcas
registr adas do Music Tribe Global Brands
Ltd. © Music Tribe Global B rands Ltd.
2023 Todos direitos reservados.
GARANTIA LIMITADA
Para obter os ter mos de garantia
aplicáveis e cond ições e informações
adicionais a respeito da garantia
limitada do Mus ic Tribe, favor veric ar
detalhes na í ntegra através do website
community.musictribe.com/pages/
support#warranty.
Informazioni importanti
Attenzione
I terminali contrassegnati
con il simbolo conducono
una corrente el ettrica sucien te a
costitui re un rischio di scossa el ettrica.
Usareunicam ente cavi per altoparlanti
(Speaker) d’elevata qualità con
connetto ri jack TS da ¼"pre-installati.
Ognialtra in stallazione o modic a deve
essere eett uata esclusivamente da
personale tecnico qualicato.
Attenzione
Questo simbolo, ovunque
appaia, avver te della
presenza di una tensione pericolosa
non isolata all'i nterno dello chassis,
tensione che può essere suciente per
costitui re un rischio di scossa el ettrica.
Attenzione
Questo simbolo,
ovunque appaia, segnala
import anti istruzioni oper ative e di
manutenzione nella documentazione
allegata. Si invita a leggere il manuale.
Attenzione
Per ridurre il r ischio di
scosse elettriche, non
rimuovere il coperchio superiore (o la
sezione posteriore). All'interno non ci
sono par ti riparabili dall'utente. Per la
manutenzione rivolgersi a perso nale
qualicato.
Attenzione
Per ridurre il rischio
di incendi o scos se
apparecch io a pioggia e umidità.
L'apparecchi o non deve essere esposto
a gocciolio o schizzi di liquidi e nessun
oggetto contenente liquidi, come vasi,
deve essere co llocato sull'apparecchio.
Attenzione
Queste istruzioni di
servizio sono destinate
Per ridurre il r ischio di scosse
elettriche non eseguire interventi
di manutenzione diversi da quelli
contenuti nel manuale di istruzioni. Le
riparazioni devono essere eseguite da
personale di assistenza qualic ato.
1. Leggere queste istruzioni.
2. Conservare queste istruz ioni.
3. Pres tare attenzione a tut ti gli
avvisi.
4. Applicare tutte le istru zioni.
5. Non utilizzare questo dispositivo
vicino l'acqua.
6. Pulire esclusivamente con un
panno asciutto.
7. Non blocc are le aperture di
ventilazione. Installare in conformità
con le istru zioni del produttor e.
8. Non installare vicino a fonti di
calore come radiatori, termoregolatori,
stufe o alt ri apparecchi (inclusi
amplicatori) che producono calore.
9. Non escludere la sic urezza fornit a
dalla spina polar izzata o con messa
a terra. Una spina p olarizzata ha due
con messa a ter ra ha due lame e un
terzo polo di m essa a terra. La lama
larga o il terzo p olo sono forniti per
la vostra sic urezza. Se la spina for nita
non si adatt a alla presa, consultare un
elettr icista per la sostit uzione della
presa obsoleta.
10. Proteggere il cavo di
alimentazione dal calpestio o essere
schiacciato in particolare alle spine,
prese di cor rente e il punto in cui esce
dall'apparecchio.
11. Utilizzare esc lusivamente
dispositivi/accessori specic ati dal
produttore.
solo carrelli,
supporti, treppiedi,
stae o tavo li
indicati dal
produttore o
venduti con l'apparecchio. Utilizzando
un carrello, prestare attenzione quando
si sposta la combinazione carrello/
apparecchio per evitare lesioni dovute
al ribaltamento.
13. Scollegare questo apparecchio
durante i tempo rali o se non è utilizzato
per lunghi periodi di tempo.
14. Per tutte l e riparazioni rivolger si a
personale qualicato. La manutenzione
è necessaria quando l'apparecchio
è danneggiato in qualsiasi modo,
come danneggiamento del cavo
di alimentazione o della spina,
versamento di liquido o oggetti caduti
nell'apparecchio, se l'apparecchio è
stato espo sto a pioggia o umidità, se
non funziona normalmente o è caduto.
15. L'apparecchio deve essere
collegato a una pr esa di corrente
elettr ica con messa a terra di
protezione.
16. e la sp ina o una presa del
dispositivo è utilizzata come dispositivo
di disconnessione, deve essere
facilmente utilizzabile.
17. Smaltimento
corretto di ques to
prodotto: questo
simbolo indica che
questo dispositivo non
deve essere sma ltito
insieme ai riuti domestici, secondo la
Dirett iva RAEE (2012/19 / UE) e la vostra
legislazione nazionale. Questo prodot to
deve essere p ortato in un centro di
raccolta autorizzato per il riciclaggio di
riuti di apparecchiature elettriche ed
elettroniche (RAEE). La cattiva gestione
di questo tip o di riuti potrebbe aver e
un possibile impatto negativo
sull'ambiente e sulla salute umana a
causa di so stanze potenzialmente
pericolose che sono generalmente
associate alle apparecchiature
elettriche ed elettroniche. Nello stesso
tempo la vostra collaborazione al
corretto smaltimen to di questo
prodotto contribuirà all'utilizzo
ulteriori informazioni su dove è
possibile trasportare le apparecchiature
per il ricic laggio vi invitiamo a
contattare l'ucio comunale locale o il
servizio di raccolta dei riuti domestici.
18. Non installare in uno spazio
ristret to, come in una libreria o in una
struttura simile.
19. Non collocare sul dispositivo fonti
di amme libere, co me candele accese.
20. Per lo smaltimento delle batterie,
tenere in considerazione gli aspetti
ambientali. Le batterie devono essere
smaltite in un pu nto di raccolta delle
batterie es auste.
21. Questo apparecchio può essere
usato in climi t ropicali e temperati
no a 45°C.
DISCLAIMER LEGALE
Music Tribe non si assum e alcuna
responsabilità per eventuali danni
che posson o essere subiti da chiunq ue
si adi in tut to o in parte a qualsiasi
descrizione, fotograa o dichiarazione
contenuta qui. Speciche tecniche,
aspetti e altre informazioni sono
soggette a modiche senza preavviso.
Tutti i marchi son o di proprietà
dei rispet tivi titolari. Midas, K lark
Teknik, Lab Grup pen, Lake, Tannoy,
Turbosound, TC Elec tronic, TC Helicon,
Behringer, Bugera, Aston Microphones
e Coolaudio sono marchi o marchi
registr ati di Music Tribe Global Brands
Ltd. © Music Tribe Global B rands Ltd.
2023 Tutti i dirit ti riservati.
GARANZIA LIMITATA
Per i termini e le cond izioni di garanzia
applicabili e le informazioni aggiuntive
relative alla gar anzia limitata di Music
Tribe, consultare online i dettagli
completi su community.musictribe.
com/pages/support#warranty.
Belangrijke
veiligheidsvoorschriften
Waarschuwing
zijn met het s ymbool
voeren een zodanig hoge spanning dat
ze een risico vor men voor elektrisc he
schokken. Gebruikuitsluitend
kwalitatief hoogwaardige, in de
handel verkrijgbare luidsprekerkabels
die voorzie n zijn van ¼"TS stekkers.
Laatuitsluitend gekwaliceerd
persone el alleoverige installatie - of
modicatiehandelingenuitvoeren.
Dit symbo ol wijst u altijd
- en
onderhoudsvoorschrif ten in de
bijbehorende documenten. Wijvragen
u dringend de handleiding te lezen.
Attentie
Verwijder in geen
geval de bovens te
afdekking (vanhet achterste gedeelte)
anders be staat er gevaar voor een
elektrische schok. Hetapparaat bevat
geen te onderhouden onderdelen.
Reparatiewerkzaamheden mogen
uitsluitend door gekwaliceerd
personeel uitgevoerdworden.
Attentie
Om het risico o p brand
of elektrische schokken
te beperken, dient u te voorkomen
dat dit apparaat wordt blootgesteld
aan regen en voc ht. Hetapparaat
mag niet worden b lootgesteld aan
neerdruppelend of opspattend water
en er mogen geen met water gevulde
voorwer pen – zoals een vaas – op het
apparaat wordengezet.
Attentie
Deze
onderhoudsinstructies
zijn uitsluitend bedoeld voor
gekwaliceerd onderhoudspersoneel.
Omelektrische schokken te
voorkomen, mag u g een andere
Page 6
10 11Quick Start GuideWASP DELUXE
onderhoudshandelingen verrichten dan
13. Gebruik uitsluitend door de
bij aan een doelmatiger gebruik van de
1. Läs dessa anvisningar.
15. Dra ur anslutningskontakten und
kommit in i appar aten, eller när den har
människors hälsa, påverkas negativt på
Placera inte källo r med öppen eld,
in de bedieningsinstructies vermeld
staan. Reparatiewerkzaamheden
mogen alleen uitgevoerd worden door
gekwaliceerd onderhoudspersoneel.
1. Lees deze voorschriften.
2. Bewaar deze voorschriften.
3. Neem alle waarschuwingen
in acht.
4. Volg alle voor schriften op.
5. Gebr uik dit apparaat niet in de
buurt vanw ater.
6. Reinig het uitsluitend met een
drogedoek.
7. Let erop ge en van de ventilatieopeningen te bedekken. Plaats en
installee r het volgens de voor- schriften
van de fabrikant.
8. Het appar aat mag niet worden
geplaats t in de buurt van radiatore n,
warmte-uitlaten, kachels of andere
zaken (ook verste rkers) diewarmte
afgeven.
9. Maak de veiligheid waarin door
de polarisatie- of aardingsstekker
wordt voorzien, niet ongedaan.
Eenpolarisa tiestekker heef t twee
bladen, waar vaner een breder is dan
het andere. Een aardingsstekker heeft
twee blade n en een derde uitsteek sel
voor de aarding . Het bredere blad of
het derde uit steeksel zijn er vo or uw
veiligheid. Moc htde geleverde stekker
niet in uw stop contact passen, laat
het contac t dan door een elektr icien
vervangen.
10. Om beschadiging te voorkomen,
moetde str oomleiding zo gelegd
worden dat er nie t kan worden over
gelopen en dat ze b eschermd is
tegen scherpe kanten. Zorg zeker
voor voldoende bescherming aan de
stekkers, d everlengkabels en het punt
waar het netsnoer het apparaat verlaat.
11. Het toestel me t altijd met een
intacte aarddraad aan het stro omnet
aangeslotenzijn.
12. Wanneer de stekker
van het hoofdnetwerk of een
apparaatstopcontac t de functionele
eenheid voor het uitschakelen is,
dientdeze alti jd toegankelijk te zijn.
producent gespeci- ceerd toebehoren
c.q. onderdelen.
14. Gebruik
het apparaat
uitsluitend in
combinatie met de
wagen, hetstatief,
dedriepoot , de
beugel of taf el die door de producent
is aangegeven, of die in combinatie
met het appar aat wordt verkocht. Bij
gebruik van een wagen dient men
voorzich tig te zijn bij het verrijden va n
de combinatie wagen/apparaat en
letsel do or vallen tevoorkomen.
15. Bij onweer en als u het a pparaat
langere tijd niet gebruikt, haalt u de
stekker uit he tstopcontact.
16. L aat alle voorkomende reparaties
door vakkundig en bevoegd personeel
uitvoeren. Reparatiewerk-zaamheden
zijn nodig als he t toestel op enige wijze
beschadigd is geraakt, bijvoorbeeld
als de hoofd-stroomkabel of -stekker
is beschadi gd, als er vloeistof of
voorwerpen in terecht zijn gekomen,
als het aan regen o f vochtigheid
heeft bloot-ges taan, niet normaal
functioneer t of wanneer het
isgevallen.
17. Correc te afvoer van
dit product: dit symbool
geef t aan dat u dit
produc t op grond van de
AEEA-richtlijn
(2012/19/EU) en d e
nationale wetgeving van uw land niet
met het gewone huishoudelijke afval
mag weggooie n. Dit product moet na
aoop van de nut tige levensduur naar
een ociële inzamelpost voor
afgedankte elektrische en elektronische
apparatuur (AEEA) worden gebracht,
zodat het kan wor den gerecycleerd .
Vanwegede potentieel gevaarlijke
stoen die in elektrische en
elektronische apparatuur kunnen
voorkomen, kane en onjuiste afvoer va n
afval van h et onderhavige typ e een
negatieve invl oed op het milieu en de
menselijke gezondheid hebben.
Eenjuiste af voer van dit produc t is
echter niet alleen beter voor het milieu
en de gezondhe id, maardraagt tevens
natuurlijke hul pbronnen. Voormeer
informati e over de plaatsen waar u uw
afgedankte apparatuur kunt inleveren,
kunt u contac t opnemen met uw
gemeente of de
plaatselijkereinigingsdienst.
18. Inst alleer niet in een kleine
ruimte, zoals ee n boekenkast of iets
dergelijks.
19. Plaats geen open vlamme n, zoals
brandende kaarsen, op het apparaat.
20. Houd rekening met de
milieuaspecten van het afvoeren van
batterijen. Batterijen moeten bij een
inzamelpunt voor batterijen worden
ingeleverd.
21. Dit apparaat kan worden geb ruikt
in tropische en gematigde klimaten
tot 45 ° C.
WETTELIJKE ONTKENNING
Music Tribe aanvaardt geen
aansprakelijkheid voor enig verlies
dat kan worden geleden door een
persoon die geheel of gedeeltelijk
vertrouwt op enige beschrijving,
foto of verklaring hierin. Technische
specicaties, verschijningen en
andere informatie kunnen zonder
voorafgaande kennisgeving worden
gewijzigd. Alle handelsmerken zijn
eigendom van hun respectievelijke
eigenaren. Midas, Klark Teknik, Lab
Gruppen, Lake, Tannoy, Tur bosound,
TC Electronic, TC Helicon, Behringer,
Bugera, Aston Microphones en
Coolaudio zijn handelsmerken of
gedeponeerde handelsmerken
van Music Tribe Global Brands Ltd.
© Music Tribe Global Brands Ltd.
2023 Alle rechten voorbehouden.
BEPERKTE GARANTIE
Voor de toepasselijke
garantievoorwaarden en aanvullende
informatie met betrekking tot de
beperkte garantie van Music Tribe,
zie de volledige details online op
community.musictribe.com/pages/
support#warranty.
Viktiga
säkerhetsanvisningar
Varning
Uttag markerade med
symbolen leder elekt risk
strömst yrka som är tillräck ligt stark för
att utgör a en risk för elchock. Anv änd
endast högkvalitativa, kommersiellt
tillgängliga högtalarkablar med
förhandsinstallerade ¼"TSkontakter. Allannan installering eller
modikation bör endast utföras av
kompetentpersonal.
Den här symbolen
hänvisar till viktiga
punkter om användning
och underhå ll i den medfölljande
dokumentationen. Varvänlig och läs
bruksanvisningen.
Försiktighet
Minska risken för
elektriska stötar genom
att aldri g ta av höljet upptill på
apparaten (ellerta av b aksidan).
Inuti appar aten nns det inga delar
som kan repar eras av användaren.
Endastkvalicerad pers onal får
genomföra reparationer.
Försiktighet
För att minsk a risken
för brand och elektriska
stötar ska apparaten skyddas mot
regn och f ukt. Apparaten går inte
utsät tas för dropp eller spill o ch
inga vattenbehållare som vaser etc.
fårplaceras p å den.
Försiktighet
Serviceinstruktionen
är enbart avsedd
för kvalicerad serviceper sonal.
Föratt undvika risker genom
elektriska stötar, genomför inga
reparationer på apparaten, vilka inte
är beskriv na i bruksanvisninge n.
Endast kvalicerad fack personal får
genomförareparationerna.
2. Spara dessa anvisningar.
3. Beakt a alla varningar.
4. Följ alla anvisningar.
5. Använd i nte apparaten i närheten
av vatten.
6. Rengör end ast med torr trasa.
7. Blockera inte
ventilationsöppningarna.
Installeraenligt tillverkarens
anvisningar.
8. Installera aldrig intill värmek ällor
som värme- element, varmluft sintag,
spisareller an nan utrustning som avger
värme (inklus iveförstärkare).
9. Ändra aldrig en polariserad
eller jordad kon takt. Enpolariserad
kontakt har t vå blad – det ena bredare
än det andra. En j ordad kontakt har
två blad oc h ett tredje jords tift. Det
breda blade t eller jordstifte t är till för
din säkerhet . Omden medföljande
kontakten i nte passar i ditt ut tag,
skadu kontak ta en elektriker fö r att få
uttaget bytt.
10. Förlägg elkabeln så, at t det inte
är möjligt at t trampa på den och att
den är skydda d mot skarpa kanter och
inte kan skadas . Ge i synnerhet akt på
områdena omkring stickkontakterna,
förlängningskablarna och på det
ställe, där elkabeln lämnar apparaten,
ärtillräckligtskyddade.
11. Apparaten måste alltid
vara ansluten till elnätet med
intaktskyddsledare.
12. Om huvudkon takten, ellerett
apparatuttag, fungerar som
avstängningsenhet måste denna alltid
varatillgänglig.
13. Använd endast tillkopplingar och
tillbehör som angetts av tillverkaren.
14. Använd
endast med vagn,
stativ, trefot,
hållareeller bor d
som angetts
av tillverkaren,
ellersom sål ts till-sammans med
apparaten. O m du använder en
vagn, var för siktig, när du för yttar
kombinationen vagn-apparat, för att
förhindra olycksfall genomsnubbling.
åskväder e ller när apparaten inte ska
användas under någon längre tid.
16. L åt kvalicerad personal ut föra
all servi ce. Serviceär nödvändig
när apparaten har skadats, t.ex.när
en elkabel elle r kontakt är skadad,
vätskaeller främmande föremål har
fallit i golve t.
17. Kassera produkten
på rätt s ätt: den här
symbolen indikerar att
produkten inte ska
kastas i
hushållssoporna,
enligtWEEE dire ktivet (2012/19/EU)
ochgällande, nationell lagstiftning.
Produkte n ska lämnas till ett
auktoriserat återvinningsställe för
elektronisk och elektrisk utrustning
(EEE). Om den här sor tens avfall
hanteras på fe l sätt kan miljön, och
grund av potentiella risksubstanser
som ofta associeras med EEE.
Avfallshanteras pro dukten däremot på
rätt sät t bidrar detta til l att naturens
resurse r används på ett bra sät t.
Kontakta kommun, ansvarig
förvaltning eller
avfallshanteringsföretag för mer
information om återvinningscentral
där produk ten kanlämnas.
18. Ins tallera inte i ett trå ngt
utrym me, t.ex. i en bokhylsa eller
liknande enhet.
19.
t.ex. tända lju s, på apparaten.
20. Tänk på miljöaspekterna
vid kassering av batterier.
Batteri er måste kasseras på et t
batteriuppsamlingsställe.
21. Denna apparat kan användas
i tropiska och måttliga klimat
upp till 45 ° C.
Page 7
12 13Quick Start GuideWASP DELUXE
prądem nie należy wykony wać
uziemieniem. Wtyczka dwubiegunowa
posiada dwa w tyki kontakto we o różnej
urządzenia nie odpowiada standardowi
wktór ym kabel sieciowy pr zymocowany
12. Je żeli wtyk sieciow y lub gniazdo
człowie ka z powodu potencjalnych
zapoznaj się ze w szystkimi szc zegółami
FRISKRIVNINGSKLAUSUL
Music Tribe tar inget ansvar för någon
förlust som kan drabbas av någon
person som helt eller delvis förlitar
sig på någon beskrivning, fotogra
eller uttalande som nns här.
Tekniska specikationer, utseenden
och annan information kan ändras
utan föregående meddelande. Alla
varumärken tillhör respek tive ägare.
Midas, Klark Teknik, Lab Gruppen,
Lake, Tannoy, Turbosound, TC
Electronic, TC Helicon, Behringer,
Bugera, Aston Microphones och
Coolaudio är var umärken eller
registrerade varumärken som tillhör
Music Tribe Global Brands Ltd.
© Music Tribe Global Brands Ltd.
2023 Alla Rättigheter reserverade.
BEGRÄNSAD GARANTI
För tillämpliga garantivillkor och
ytterligare information om Music
Tribes begräns ade garanti, se
fullständig information online på
community.musictribe.com/pages/
support#warranty.
Ważne informacje o
bezpieczeństwie
Uwaga
Terminale oznaczone
symbolem przenoszą
wystarczająco wysokie napięcie
elektr yczne, aby stwor zyć ryzyko
porażenia prądem. Uż ywaj
wyłącznie wysokiej jakości
fabryc znie przygotowanyc h kabli
z zainstalowanymi wt yczkami
¼"TS. Wszystkie i nne instalacje lub
modyk acje powinny być wykonyw ane
wyłąc znie przez wykwalikowany
personel techniczny.
Ten symbol informuje o
ważnych wskazówkach
dotycz ących obsługi i
konserwacji urządzenia w dołączonej
dokumentacji. Proszę przeczytać
stosowne informacje w instrukcji
obsługi.
Uwaga
W celu wyeliminowania
zagrożenia por ażenia
prądem zabrania się zdejmowania
obudowy lu b tylnej ścianki urz ądzenia.
Elementyz najdujące się we wnętrzu
urządzen ia nie mogą być naprawiane
przez uż ytkownika. Napraw ymogą
być wykony wane jedynie przez
wykwalikowanypersonel.
Uwaga
W celu wyeliminowania
zagrożenia por ażenia
prądem lub za palenia się urządzenia
nie wolno wy stawiać go na działanie
deszczu i wilgotności oraz dopuszczać
do tego, aby do wnęt rza dostała się
woda lub inna ciecz. Nie należy st awiać
na urządze niu napełnionych cie czą
przedmiotów takich jak np. wazony lub
szklanki.
Uwaga
Prace serwisowe mogą
być wykony wane jedynie
przez wykwalikowany personel.
Wcelu uniknięcia zagrożenia porażenia
żadnych manipulacji, które nie
są opisane w instrukcji obsługi.
Naprawyw ykonywane mogą być
jedynie przez wykwalikowany
personeltechniczny.
1. Proszę przeczytać
poniższewskazówki.
2. Proszę przechowywać
niniejsząinstrukcję.
3. Należy pr zestrzegać wszystkich
wskazówek os trzegawczych.
4. Należy p ostępować zgodnie z
instrukcjąobsługi.
5. Urz ądzenia nie wolno uży wać w
pobliżuwody.
6. Urządzenie można cz yścić
wyłąc znie suchąszmatką.
7. Nie zasłaniać otwor ów
wentylac yjnych. Wczasie pod łączania
urządzenia należy pr zestrzegać
zaleceńproducenta.
8. Nie stawia ć urządzenia w pobliżu
źródeł c iepła takich, jak gr zejniki,
piecelub urz ądzenia produkujące
ciepło (np.wz macniacze).
9. W żadnym wypa dku nie należy
usuwać zabe zpieczeń z wtyc zek
dwubiegun owych oraz wtyc zek z
szerokości. Wtyczkaz uziemieniem ma
dwa wt yki kontaktowe i trzec i wtyk
uziemienia. Szerszy wtyk kontak towy
lub dodatkowy wtyk uziemienia służą
do zapewnienia bezpieczeńst wa
użyt kownikowi. Jeśli format w tyczki
gniazdka, proszę zwrócić się do
elektryka z prośbą o wy mienienie
gniazda.
10. Kabel sieciow y należy ułożyć
tak, aby nie by ł narażony na deptanie i
działanie o strych krawędzi, c o mogłoby
doprowadzić do jego uszkodzenia.
Szczególną uwagę zwró cić należy na
odpowiednią ochronę miejsc w pobliżu
wtyc zek i przedłużac zy oraz miejsce,
jest dour ządzenia.
11. Urządzenie mu si być zawsze
podłąc zone do sieci sprawnym
przewodem z uziemieniem.
sieciowe w urządzeniu pełnią funkcję
wyłąc znika, tomuszą one być zawsze
łatwodos tępne.
13. Używ ać wyłącznie spr zętu
dodatkowego i akce soriów zgodnie z
zaleceniami producenta.
14. Uży wać
jedynie zalecanych
przez producenta
lub znajdujących
się w zestawi e
wóz ków,
stojaków, stat ywów, uchwytów i
stołów. Wprzypadku posługiwania
się wózkiem należy zachować
szczególną ostrożność w trakcie
przewożenia zes tawu, abyuniknąć
niebezpieczeńst wa potknięcia się i
zranienia.
15. W trakcie burzy oraz na
czas dłuż szego nieużywania
urządzen ia należy wyjąć wt yczkę z
gniazdkasieciowego.
16. Wykony wanie wszelkich
napraw należy zlecać jedynie
wykwali kowanym pracownikom
serwisu. Przeprowadzenie przeglądu
technicznego staje się konieczne, jeśli
urządzenie zostało uszkodzone w
jakikolwiek s posób (dotyczy to tak że
kabla siecio wego lub wtyczki), jeś li
do wnętrz a urządzenia dost ały się
przedmioty lub ciecz, jeśli urządzenie
wyst awione było na działanie d eszczu
lub wilgoci, jeśli urządzenie nie
funkcjonuje poprawnie oraz kiedy
spadło napodłogę.
17. Prawidłowa
utylizacja produktu:
Tensymbol wskaz uje,
żetego produk tu nie
należy wyr zucać razem
ze zwykłymi odpadami
domowymi, tylko zgodnie z dyrektywą
w sprawie zuż ytego sprzętu
elektrycznego i elektr onicznego
(WEEE) (2012/19/EU) oraz przepisami
krajowymi. Niniejsz y produkt należy
przekazać do autoryzowanego punktu
zbiórki zużytego sprzętu elektr ycznego
i elektronicznego. Niewłaściwe
postępowa nie z tego typu odpadami
może wywo łać szkodliwe dział anie na
środowisko naturalnej i zdrowie
substanc ji niebezpiecznych z aliczanych
jako zuży ty sprzęt elekt ryczny i
elektroniczny. Jednocześnie, Twój
wkład w prawidłową utylizację
niniejszego p roduktu przyc zynia się do
oszczędn ego wykorzyst ywania
zasobów naturalnych. Szczegółowych
informacj i o miejscach, w któr ych
można oddawać zu żyty sprzęt d o
recyklingu, udzielają urzędy miejskie,
przedsiębiorstwa uty lizacji odpadów
lub najbliższ y zakład utylizacji
odpadów.
18. Nie inst aluj w ograniczonej
przestrzeni, takiej jak półka na k siążki
lub podobny zes taw.
19. Nie stawiaj na urządzeniu źróde ł
otwartego ognia, takich jak zapalone
świece.
20. Należy pamiętać o
środowiskowych aspektach utylizacji
baterii. Baterie należy utylizować w
punkcie zbiórki baterii.
21. To urządzenie może być
używane w klimacie tropikalnym i
umiarkowanym do 45 ° C.
ZASTRZEŻENIA PRAWNE
Music Tribe nie ponosi
odpowiedzialności za jakiekolwiek
straty, które mogą ponie ść osoby,
które polegają w całości lub w
części na jakimkolwiek opisie,
fotograi lub oświadczeniu
zawartym w niniejszym dokumencie.
Specy kacje techniczne, w ygląd i
inne informacje mogą ulec zmianie
bez powiadomienia. Wszystkie
znaki towarowe s ą własnością ich
odpowiednich właścicieli. Midas,
Klark Teknik, Lab Gruppen, Lake,
Tannoy, Turbosound, TC Electronic,
TC Helicon, Behringer, Bugera, Aston
Microphones i Coolaudio są znakami
towarowymi lub zas trzeżonymi
znakami towarowymi rmy Music
Tribe Global Brands Ltd. © Music Tribe
Global Brands Ltd. 2023 Wszystkie
prawa zastrzeżone.
OGRANICZONA GWARANCJA
Aby zapoznać si ę z obowiązującymi
warunkami gwarancji i dodatkowymi
informacjami dotyc zącymi
ograniczonej gwarancji Music Tribe,
w trybie online pod adresem
community.musictribe.com/pages/
support#warranty.
Page 8
14 15Quick Start GuideWASP DELUXE
WASP DELUXE Hook-up
Studio System
Sistema para estudio de grabación
Système de studio
Studio-System
Sistema de Estúdio
Studio System
Studio-systee m
Studio-system et
Studio System
USB B MIDI IN
MIDI Keyboard
MIDI OUT
MIDI IN
Band / Prac tice System
Sistema p ara un grupo/ens ayos
Système pour répétition
Band/Proberaum-System
Sistema Band a/Prática
Sistema b and / pratica
Band / oefensysteem
Band / övningssystem
Zespół / sys tem ćwicze ń
MIDI Keyboard
MIDI OUT
Footswitch
Expression Pedal
USB A
USB A
Desktop Computer
USB B
Audio Interface
Studio Monitors
Power
Adaptor
Headphones
Keyboard Amplier
Power
Adaptor
Headphones
Page 9
16 17Quick Start GuideWASP DELUXE
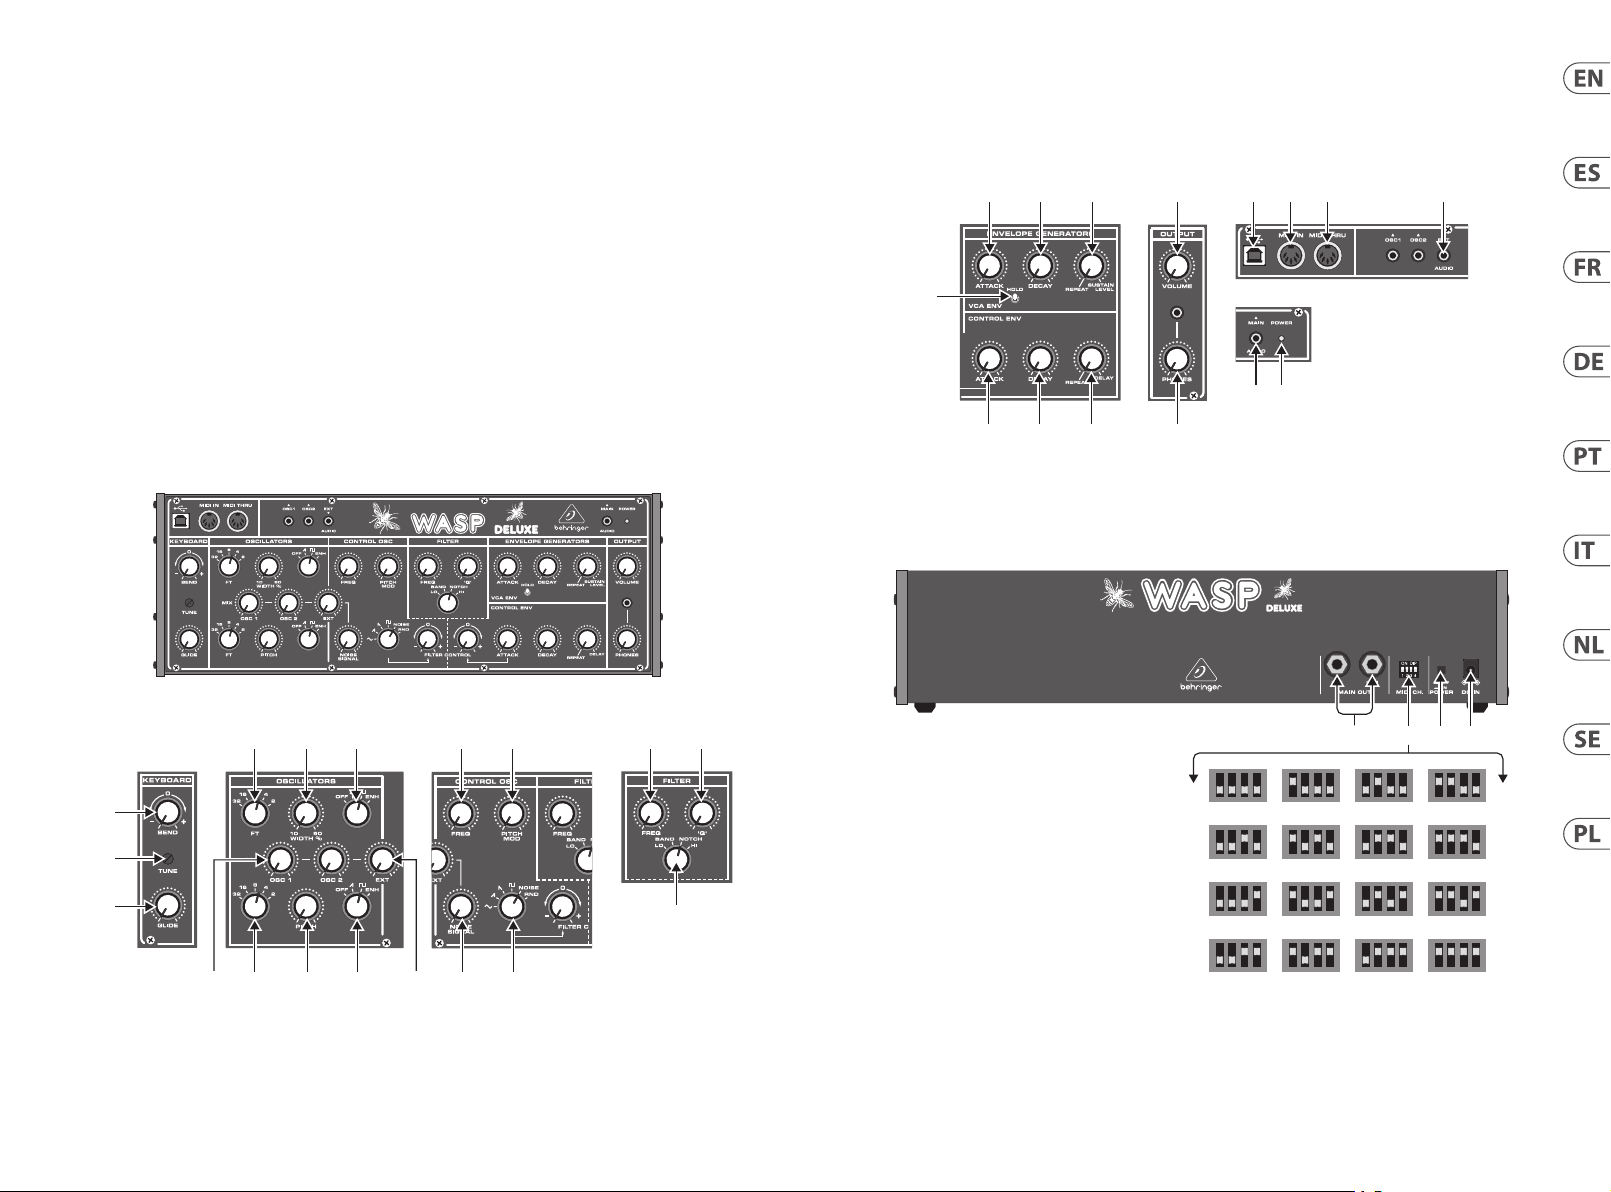
(23) (24) (25)
(27)
(1)
(4)
(7) (8) (9) (12) (15)
(18)
(5) (6) (13) (14) (16) (17)
(3)
(2)
(10) (11)
13 14 15 16
WASP DELUXE Controls
Step 2: Controls
(EN)
Paso 2: Controles
(ES)
Etape 2 : Réglages
(FR)
Schritt 2: Bedienelemente
(DE)
Passo 2: Controles
(PT)
Passo 2: Controlli
(IT)
Stap 2: Bediening
(NL)
Steg 2: Kontroller
(SE)
Krok 2: Sterowanica
(PL)
(19) (20) (21) (26) (28) (29) (30) (31)
(22)
(32) (33)
(4)
(1)
(2)
(3)
(7) (8) (9) (12) (15)
(10) (11)
(5) (6) (13) (14) (16) (17)
(18)
(35) (36) (37)
(34)
1 2 3 4
5 6 7 8
9 10 11 12
Page 10

18 19Quick Start GuideWASP DELUXE
WASP DELUXE Controls
(EN) Step 2: Controls
KEYBOARD Section
(1) BEND knob shif ts the keyboar d pitch up (clockwi se) or
down (counterclockwise).
(2 ) TUNE kno b allows ne adjust ment of the keyboard p itch.
(3 ) GLIDE con trols the rate of cha nge from one note to th e
other. Turning the k nob clockwis e slows down the shif t to
the nex t pitch.
OSCILLATORS Section
(4 ) FT knob f or the upper oscil lator sets the osc illator’s pitch.
(5 ) WIDTH % kno b controls the widt h of the
oscillator’s sound.
(6 ) WAVE FORM knob con trols the shape of th e waveform
for the upp er oscillator. In the OFF s etting the osc illator
is closed . The second-fr om-left set ting imposes a
“sawtoo th” waveform, while t he next sett ing over creates
a “square” wave form. The ENH set ting acts as an e nhancer
to add punch , bit and clarity to t he oscillator’s ton e.
(7 ) FT knob f or the lower oscilla tor sets the osci llator’s pitch.
(8 ) PITCH kn ob adjusts the pi tch of the second osc illator
against t he pitch of the upper o scillator to create
modulation eects.
(9 ) WAVE FORM knob con trols the shape of the w aveform
for the lowe r oscillator. In the OFF se tting the oscil lator
is closed . The second-fr om-left set ting imposes a
“sawtoo th” waveform, while t he next sett ing over creates
a “square” wave form. The ENH set ting acts as an e nhancer
to add punch , bit and clarity to t he oscillator’s ton e.
(10) MIX secti on controls the rela tive blend of the upp er and
lower osci llator (OSC 1/OSC 2 knobs).
(11) EXT. knob allows you to ble nd in audio signals f rom the
EXT. AUDIO jack w ith the oscillato r signals.
CONTROL OSC. Section
This sec tion oers an os cillator that does n ot produce sound it self,
but which c an be used to contro l the primary os cillators and
the lter.
(12 ) NOISE signal knob p roduces white noi se that can be
mixed in to cr eate percussion s ounds.
(13 ) FREQUENCY knob adj usts the speed o f the
control oscillator.
(14) PITCH MOD. varies the p itch dierence be tween
the prima ry oscillator s to create additio nal
modulation eects.
(15) WAVEFOR M switch oers six dierent settings:
sine was, rising sawtooth, falling sawtooth, square wave,
NOISE and RND. (rand om).
FILTER Section
(16) FREQ. knob s ets the lter cuto frequency.
(17) Q knob cont rols the lter widt h (for bandpass and no tch
lter) or the l ter slope (hi- and lo -pass lters).
(18) FILT ER knob oe rs four lter opti ons: LO (lo-pass),
BAND (bandp ass), NOTCH and HI (hi-pass).
ENVELOPE GENERATORS Section
This sec tion has two sub -sections: VC A ENV. (controls the
envelope f or the oscillator s) and CONTROL EN V. (whi ch controls
the lter envelopes).
VCA E NV.
(19 ) ATTAC K knob controls t he speed of the note on set.
(20) DECAY k nob controls how quickly the note volume
decays wh ile the nger remain s on the keyboard and
then controls the fading out of the note after the nger
is removed f rom the keyboard.
(21 ) SUSTAIN LEVEL/REPEAT knob contr ols the baseline
volume of the note while the nger remains on
the keyboard. When set full counter-clockwise,
the note rep eats and the ATTACK and DECAY knob s then
control t he speed of the repe at.
(22 ) HOLD switch sustains the note indenitely at the point
of the envelo pe when the switch i s activated.
CONTROL ENV.
(23 ) ATTACK knob controls t he speed of the lter o nset.
(24) DECAY k nob controls how qu ickly the lter cut o
frequency decays.
(25) DELAY/REPEAT knob delay s the onset of the lter a ttack
by up to 1 secon d.
OUTPUT Section
(26) VOLUME knob con trols the nal volume a t the MAIN
AUDIO and MAIN OU T jacks.
(27 ) PHONES knob controls the headphone volume at the ⁄"
TRS jack im mediately above the k nob.
MIDI Section
(28) USB PORT allows co nnection to a com puter over a USB
type B co nnection. The WASP D ELUXE will show up as a
class-c ompliant USB MIDI device, c apable of suppor ting
MIDI in and ou t.
• • USB M IDI IN - accepts incomin g MIDI data from an ap plication.
• • USB MIDI O UT - sends MIDI data to an ap plication.
(29 ) MIDI IN receives MIDI da ta from an exter nal source over
a 5-pin DIN co nnector. This will co mmonly be a MIDI
keyboard , an external hard ware sequencer, a compu ter
equippe d with a MIDI inter face, etc.
(30) MIDI THRU uses a 5-pin D IN jack is used to pass t hrough
MIDI data re ceived at the MIDI INPUT. This da ta will
commonly b e sent to another MODEL D s ynthesizer to ru n
a Poly Chain or t o a drum machine assig ned to a dierent
MIDI Channel.
(31 ) EXT. AUDIO input connec ts any external l ine-level audio
source to th is 3.5 mm input. If nothi ng is connected he re,
then the mai n audio output is int ernally connec ted to this
external input.
(32 ) POWER LED lights up to i ndicate the unit has b een
powered on .
(33 ) MAIN AUDIO uses a 3.5 mm TRS conne ction to outpu t the
main audio o utput. Typically it c an be patched to the au dio
input of ano ther WASP DELUXE or to the aud io inputs of
other modular synthesizer equipment. If you are using the
WASP DELUXE in a Euro rack, then this is t he main output,
as the rear p anel output conne ctors are not us ed.
Rear Panel
(34) MAIN OUT uses ¼" TRS o utputs to conne ct to the inputs
of your ex ternal equipmen t as follows (note that the y are
both Mono, and not left/right):
• • LOW - this i nstrument-leve l mono output can co nnect to
the instrument-level inputs of guitar ampliers or
mixers f or example.
• • HIGH - thi s line-level mono o utput can connec t to the
line-le vel inputs of mixer s, keyboard ampli ers, or powered
speakers f or example.
(35) MIDI CHANNEL has 4 switches th at allow
you to set the M IDI Channel number f rom 1
to 16 (see the tab le on page 13). The MIDI channel can
also be chan ged using MIDI SysEx c ommands, as shown
in the MIDI SysE x tables later in thi s manual. (This meth od
is used whe n the WASP DELUXE is housed i n a Eurorack,
and these s witches are no lon ger present.)
Power Section
(36) POWER switc h turns the unit on an d o.
(37 ) DC INPUT connect s to the supplied 12V DC power a dapter.
tThe power adap ter can be plugged in to an AC outlet
capable o f supplying fro m 100V to 240V at 50 Hz /60 Hz.
Use only the power adapter supplied.
Page 11

20 21Quick Start GuideWASP DELUXE
WASP DELUXE Controles
(ES) Paso 2: Controles
Sección KEYBOARD
(1) El mando BEND pro duce una modulació n tonal del teclado
hacia arr iba (giro a la derecha) o ab ajo (izquierda).
(2 ) El man do TUNE permite ajuste s precisos del ton o
del teclad o.
(3 ) GLIDE co ntrola la velocida d del cambio de una not a a otra
(ligadur a). El giro de este m ando a la derecha ral entiza
esta ligadura a la nota siguiente.
Sección OSCILLATORS
(4 ) El man do FT del oscilador sup erior ajusta el to no
del oscilador.
(5 ) El man do WIDTH % controla la amplit ud del sonido
del oscilador.
(6 ) El man do WAVEFORM co ntrola la forma o dib ujo de la
forma de on da del oscilador su perior. En el ajuste OFF
el oscila dor está cerrad o. El segundo ajuste d esde la
izquierd a aplica una forma d e onda de “diente de sierra ”,
mientra s que el siguiente ajus te crea una forma de o nda
“cuadrada”. El ajuste E NH actúa como un inte nsicador
para añadi r pegada y claridad a l sonido del oscila dor.
(7 ) El man do FT del oscilador inf erior ajustar el t ono de
dicho oscilador.
(8 ) El man do PITCH ajusta el tono de l segundo oscila dor en
relación a l del primero para c rear efectos d e modulación.
(9) El ma ndo WAVEFORM c ontrola la forma o di bujo de la
forma de on da del oscilador in ferior. En el ajuste OFF
el oscila dor está cerrad o. El segundo ajuste d esde la
izquierd a aplica una forma d e onda de “diente de sierra ”,
mientra s que el siguiente ajus te crea una forma de o nda
“cuadrada”. El ajuste E NH actúa como un inte nsicador
para añadi r pegada y claridad a l sonido del oscila dor.
(10) La secci ón MIX controla la mezcla r elativa entre el
oscilad or superior y el infe rior (mandos OSC 1/OSC 2).
(11) El mando E XT. le per mite mezclar las se ñales audio
recibid as a través de la entrad a EXT. AUDIO junto con las
señales del oscilador.
Sección CONTROL OSC.
Esta se cción le ofrece un o scilador que no pro duce sonido en sí
mismo, sino qu e puede ser usado pa ra controlar los os ciladores
primari os y el ltro.
(12 ) El mando NOISE SIGNAL pro duce ruido blanco qu e puede
ser mezclado para crear sonidos de percusión.
(13 ) El mando FREQUENCY aj usta la velocidad d el oscilador
de control.
(14) PITCH MOD modic a la diferencia de to no entre
los oscil adores primario s para crear efec tos de
modulación adicionales.
(15) El interru ptor WAVEFORM le ofrece seis aju stes
diferentes: onda sinusoidal, diente de sierra ascendente,
diente de sierra descendente, onda cuadrada, NOISE
(ruido) y RND. (aleatori o).
Sección FILTER
(16) El mando FREQ. le p ermite ajustar l a frecuencia de co rte
del ltro.
(17) El mando Q cont rola la amplitud de l ltro (para el lt ro
pasaba ndas y de muesca) o la pend iente (para los ltr os
pasa-altos y pasabajos).
(18) El mando FI LTER le of rece cuatro opc iones de ltro:
LO (pasaba jos), BAND (pasabandas), NOTCH (de mue sca) y
HI (pasa-altos).
Sección ENVELOPE GENERATORS
Esta se cción tiene dos sub secciones: VCA EN V. (cont rola la
envolvente d e los osciladores) y CONT ROL ENV. (controla la s
envolventes de los ltros).
VCA E NV.
(19 ) El mando AT TACK control a la velocidad de la entr ada o
aparición de nota (ataque).
(20) El mando DEC AY controla lo rá pidamente que dec ae el
volumen de la n ota mientras mant iene su dedo sobre el
teclado y co ntrola el fundid o de salida de la nota una ve z
que separ a el dedo del teclado.
(21 ) El mando SUSTAIN LEVEL/REPEAT cont rola la línea base
del volume n de la nota mientras el d edo se mantiene
sobre el te clado. Cuando lo ajus te en su tope izquierdo, la
nota se rep etirá y entonces lo s mandos ATTACK y DECAY
controlarán la velocidad de la repetición.
(22 ) El interruptor HOLD mantiene la nota de fo rma
indeni da en el punto de la envolven te en el que active
dicho interruptor.
CONTROL ENV.
(23 ) El mando ATTA CK controla l a velocidad del ataq ue
del ltro.
(24) El mando DEC AY controla la ra pidez con la que deca e la
frecu encia de corte del l tro.
(25) El mando DELAY/REPEAT retarda la ent rada del ataque
del ltro e n hasta 1 segundo.
Sección OUTPUT
(26) El mando VOLUME co ntrola el volumen na l de la
señal emit ida por las tomas MAIN AUDI O y
MAIN OUT.
(27 ) El mando PHONES controla el v olumen de auricula res que
es emitid o por la toma TRS de 3,5 mm que e stá situada
justo enc ima del mando.
Sección MIDI
(28) USB PORT permi te la conexión a un ord enador a través
de una toma USB de t ipo B. El MODEL D aparece c omo un
disposit ivo MIDI USB class-co mpliant, capaz de ad mitir
entrada y s alida MIDI.
• • USB MIDI IN - a dmite los datos MIDI ent rantes procede ntes
de una aplic ación.
• • USB MIDI O UT - da salida a datos MIDI a una a plicación.
(29 ) MIDI IN recibe los dat os MIDI enviados des de una fuente
exter na a través de un conec tor DIN de 5 puntas.
(30) MIDI THRU usa una toma DIN d e 5 puntas para deri var
los datos MID I recibidos en la ent rada MIDI INPUT sin
modic arlos (tal cual). Por lo gene ral, estos datos se rán
enviado a ot ro sintetizador WASP D ELUXE para formar un
cadena po lifónica o a una caj a de ritmos asignad a a otro
canal MIDI d iferente.
(31 ) La entrad a de 3,5 mm EXT. AUDIO le permite da r entrada
a la señal cua lquier fuente audi o externa con niv el
de línea.
(32 ) El piloto POWER se ilumina para indicarle que la unidad
está encendida.
(33 ) MAIN AUDIO usa una toma TRS de 3,5 mm p ara dar salida
a la señal aud io principal. Habi tualmente esto es c ableado
a una entrad a audio del WASP DELUXE o a las ent radas
audio de otr os sintetizado res modulares. Si e stá usando
el WASP DELUXE en ba stidor Eurorac k, entonces esta s erá
la salida pr incipal, dado que lo s conectores de s alida del
panel trasero no son usados.
Sección de salida
(34) MAIN OUT usa co nectores TRS d e 6,3 mm para dar salida
a la señal de es te aparato a las entr adas de sus aparatos
externos de la forma siguiente (tenga en cuenta que
ambos son salidas Mono, no Izquierda/derecha):
• • LOW - pue de conectar es ta salida mono con ni vel de
instru mento a las entradas d e nivel de instrume nto de
amplicadores de guitarra o mezcladores, por ejemplo.
• • HIGH - es ta salida mono con n ivel de línea puede se r
conec tada a las entradas de n ivel de línea de mezcla dores,
amplicadores de teclado o altavoces autoamplicados,
por ejemplo.
(35) Los 4 interru ptores de posició n MIDI CH le permit en
ajustar e l canal MIDI entre 1 y 16 (vea la tab la de abajo).
El canal MIDI t ambién puede ser m odicado usan do
órdenes Sy sEx (sistema opera tivo) MIDI, tal como pued e
ver en las tab las SysEx MIDI más adela nte.
Sección Power
(36) El interru ptor POWER le permite en cender y apagar
la unidad.
(37 ) La toma DC INPUT perm ite la conexión del ad aptador de
corrien te de 12 V incluido. Puede con ectar este adap tador
de corrie nte a una salida de corr iente alterna con un
voltaje de e ntre 100 y 240 V y un amperaje d e 50 Hz/60 Hz.
Utilice únicamente el adaptador de corriente incluido.
Page 12

22 23Quick Start GuideWASP DELUXE
WASP DELUXE Réglages
(FR) Etape 2 : Réglages
Section KEYBOARD
(1) Le potentiomètre BEND permet modier la hauteur des
notes pro duites par le clavie r : plus aigu (tourner ver s la
droite) ou plu s grave (tourner vers la g auche).
(2 ) Le potentiomètre TUNE per met de régler la haute ur des
notes avec précision.
(3 ) Le ré glage GLIDE contrôle la v itesse de glissem ent entre
deux note s. Tournez ver s la droite pour allo nger la durée
et vers la gau che pour la diminuer.
Section OSCILLATORS
(4 ) Le potentiomètre FT de la par tie supérieure p ermet de
sélectionner l’octave du premier oscillateur.
(5 ) Le potentiomètre WIDTH % perm et de régler la largeu r du
son de l’oscillateur.
(6 ) Le ré glage WAVEFORM permet de sélec tionner la form e
de l’onde du pre mier oscillateur. Dans le r églage OFF,
l’oscillateu r est fermé. Sur la deu xième position, l ’onde est
en dent de sc ie. Sur la troisième po sition, on obtient u ne
onde car rée. La position EN H permet d’ajouter du p unch,
du mordant e t de la clarté au son de l ’oscillate ur.
(7 ) Le potentiomètre FT de la par tie inférieur e permet de
sélectionner l’octave du deuxième oscillateur.
(8 ) Le potentiomètre PITCH per met de régler la haut eur du
son du deux ième oscillateur. Vous po uvez ainsi créer de s
eets d e modulation avec le pr emier oscillateur.
(9 ) Le ré glage WAVEFORM permet de sélec tionner la form e
de l’onde du deu xième oscillateu r. D ans le réglage OFF,
l’oscillateu r est fermé. Sur la deu xième position, l ’onde est
en dent de sc ie. Sur la troisième po sition, on obtient u ne
onde car rée. La position EN H permet d’ajouter du p unch,
du mordant e t de la clarté au son de l ’oscillate ur.
(10) Les réglag es de la section MIX p ermettent de mé langer le
son des deu x oscillateurs (p otentiomètre s OSC 1/OSC 2).
(11) Le potentiomètre EX T. permet de mé langer le signal
connec té à l’entrée EXT. AUDIO avec le si gnal des
oscillateurs.
Section CONTROL OSC.
Cette se ction compren d un oscillateur ne pr oduisant pas de so n
mais pouva nt être utilisé po ur contrôler les os cillateurs prin cipaux
et le ltre.
(12 ) Le potentiomètre NOISE SIGNAL produit du b ruit blanc
pouvant ê tre ajouté au mixag e principal pour c réer des
sons percussifs.
(13 ) Le potentiomètre FREQUENCY permet d e régler la vitesse
de l’oscillat eur de contrôle.
(14) PITCH MOD. permet d ’a juster la diéren ce de hauteur
entre les o scillateurs pri ncipaux an de pro duire des eets
de modulation supplémentaires.
(15) Le sélec teur WAVEFORM dispose de 6 paramè tres : onde
sinusoïd ale, onde en dent de scie, o nde en dent de scie
inversé e, onde carrée, NOISE ( bruit) et RND. (aléatoire).
FILTER Section
(16) Le potentiomètre FREQ. perme t de régler la fréqu ence de
coupure du ltre.
(17) Q permet d e régler la largeur de la p lage de fréquence d u
ltre (po ur les ltres pass e-bande et coup e-bande) ou la
pente du ltre (ltres passe-haut et passe-bas).
(18) Le sélec teur FILTE R propose 4 ré glages pour le ltr e : LO
(passe-bas), BAND (passe-bande), NOTCH (coupe-bande)
et HI (passe-haut).
Section ENVELOPE GENERATORS
Cette se ction dispose d e deux sous-sec tions : VCA ENV. (réglages
de l’enveloppe d es oscillateurs) et CO NTROL ENV. (réglages de
l’enveloppe du ltre).
VCA E NV.
(19 ) ATTAC K : réglage de la du rée nécessair e pour que la note
atteigne son volume maximal.
(20) DECAY : réglage de la durée d u déclin de la note
lorsqu’une touche est maintenue puis lorsqu’elle
est relâc hée.
(21 ) SUSTAIN LEVEL/REPE AT : permet de r égler le volume
de la note lor squ’une touche est e nfoncée. Si ce réglag e
est au max imum, la note se répète e t les potentiomè tres
ATTACK et DECAY serven t alors à régler la vi tesse de la
répétition.
(22 ) HOLD : cet interrupteur p ermet de faire du rer la note
indéni ment. Le volume corre spond au point de
l’enveloppe at teint lorsque ce tte fonctio n est activée.
CONTROL ENV.
(23 ) ATTACK : réglage de la duré e nécessaire pou r que le ltre
atteigne sa valeur maximale.
(24) DECAY : réglage de la durée d u déclin du ltre.
(25) DELAY/REPEAT : permet de r etarder le décle nchement du
ltre d’une seconde maximum.
Section OUTPUT
(26) VOLUME : perme t de régler le volume gé néral des sort ies
MAIN AUDIO et MA IN OUT.
(27 ) PHONES : réglage du volume du c asque. L’en trée
casque f ormat miniJack se t rouve juste au- dessus du
potentiomètre.
Section MIDI
(28) Le PORT USB de ty pe B permet de conne cter l’appareil
à un ordinat eur. Le WASP DELUXE es t un appareil
USB MIDI recon nu nativement et cap able de gérer les
messag es MIDI entrants et s ortants. Le WASP D ELUXE ne
nécessite pas l’installation de pilotes supplémentaires
pour fonc tionner sous Wi ndows, Android, Mac OS et les
appareil s iOS.
• • ENTRÉ E USB MIDI – accepte les donné es MIDI entrantes
provenant d’une application.
• • SOR TIE USB MIDI – permet d’envoyer de s données
MIDI à une app lication.
(29 ) MIDI IN : ce connec teur DIN 5 broches pe rmet de recevoir
des donné es MIDI depuis une sou rce extérieur e. Il s’agit
en général d’un clavier MIDI, d ’un séquenceur hardware
externe, d’un ordinateur équipé d’une interface MIDI, etc.
(30) MIDI THRU : ce connec teur DIN 5 broche s permet de
transme ttre les donnée s MIDI reçues sur l’entr ée MIDI
INPUT. Ces données sont généralement envoyées à un
autre sy nthétiseur WASP DELUX E pour former une ch aine
polypho nique ou à une boite à r ythme assigné e à un autre
canal MIDI.
(31 ) EXT. AUDIO : cet te entrée miniJack 3,5 m m permet de
connecter une source externe niveau ligne. Si aucune
connexi on n’est ee ctuée à cette e mbase, elle porte l e
signal de sortie principal.
(32 ) La LED POWER s’allume pour indiquer que l’ap pareil est
sous tension.
(33 ) MAIN AUDIO : cett e sortie miniJa ck porte le signal a udio
principal. Elle est généralement connectée à une entrée
audio d’un WASP DELU XE ou d’autres synth étiseurs
modulair es. Si votre WASP DELUXE es t monté en
rack, ce tte sortie fa it oce de sortie p rincipale et les
connec teurs de la face arr ière ne sont pas uti lisés.
Face arrière
(34) MAIN OUT : ces so rties Jack 6,35 mm sté réo peuvent
être conn ectées aux ent rée d’un appareil ex terne comme
indique ci-après (remarquez qu’il s’agit de deux sorties
mono et non pas gauche/droite):
• • LOW – cet te sortie mon o niveau instrume nt peut être
connec tée, par exemple, à l’entr ée d’un ampli pour guit are ou
d’une conso le de mixage.
• • HIGH – ce tte sortie mon o niveau ligne peut êt re connectée,
par exemp le, à l’entrée niveau ligne d ’une console de mixag e, à
un ampli pou r clavier ou à des encei ntes actives.
(35) MIDI CHANNEL : ces 4 sélecteu rs permetten t de
congure r le canal MIDI utilis é, de 1 à 16 (voir le tabl eau
ci-de ssous). Vous pouvez égalem ent modier le cana l MIDI
en utilis ant une commande MIDI Sys EX, comme indiqu é
dans le tabl eau MIDI SysEX que vous t rouverez dans les
pages suivantes de ce mode d’emploi.
Section Power
(36) L’interrupteur POWER permet de mettre l’appareil sous/
hors tension.
(37 ) DC INPUT : cette em base permet de con necter
l’adaptateu r secteur 12V cc fourni . Vous pouve z brancher
l’adaptateu r à une prise sect eur délivrant un cou rant
alternat if de 100V à 240V à 50 Hz/60 Hz. Uti lisez
uniquement l’adaptateur fourni.
Page 13

24 25Quick Start GuideWASP DELUXE
WASP DELUXE Bedienelemente
(DE) Schritt 2: Bedienelemente
KEYBOARD - Sektion
(1) BEND - Drehre gler verschieb t die Tonhöhe des Keyboar ds
nach oben (Rechtsdrehung) oder unten (Linksdrehung).
(2 ) TUNE - Drehregler zur Feineinstellung der
Keyboard-Tonhöhe.
(3 ) GLIDE - Dr ehregler steuer t die Stärke des
Tonhöhenübergangs von einer Note zur anderen.
Eine Rechtsdrehung verlangsamt den gleitenden
Übergang zur nächsten Tonhöhe.
OSCILLATORS - Sektion
(4 ) FT - Dreh regler für den obe ren Oszillator ste uert
dessen Tonhöhe.
(5 ) WIDTH % - Dreh regler steuer t die Breite
des Oszillatorklangs.
(6 ) WAVE FORM - Drehre gler wählt den Wellenf ormtyp für
den oberen Oszillator. Bei der OFF-Einstellung ist der
Oszillator geschlossen. Die darauf folgende Einstellung
wählt eine „Sägezahn“-Wellenform. Die nächste
Einstellung wählt eine „Rechteck“-Wellenform. Die ENHEinstellung wirkt als Klangverstärkung und verleiht dem
Oszillatorklang mehr Druck, Biss und Transparenz.
(7 ) FT - Drehregler für den unteren Oszillator steuert dessen
Tonhöhe.
(8 ) PITCH - Dr ehregler variie rt die Tonhöhe des zw eiten
Oszillators in Relation zur Tonhöhe des oberen Oszillators
und erzeugt dadurch Modulationseekte.
(9 ) WAVE FORM - Drehre gler wählt den Wellenf ormtyp für
den unteren Oszillator. Bei der OFF-Einstellung ist der
Oszillator geschlossen. Die darauf folgende Einstellung
wählt eine „Sägezahn“-Wellenform. Die nächste
Einstellung wählt eine „Rechteck“-Wellenform. Die ENHEinstellung wirkt als Klangverstärkung und verleiht dem
Oszillatorklang mehr Druck, Biss und Transparenz.
(10) MIX - Sektio n regelt die relati ve Mischung von ober em
und unterem Oszillator (OSC 1/OSC 2-Regler).
(11) EX T. - Drehregler zum Beimischen von Audiosignalen zu
den Oszillatorsignalen über die EXT. AUDIO-Buchse.
CONTROL OSC. - Sektion
Der Oszillator dieser Sektion erzeugt selbst keine Klänge,
man kann mit i hm aber die beiden Hau ptoszillatoren un d das
Filter steuern.
(12 ) NOISE SIGNAL - Drehreg ler erzeugt Weißes R auschen,
das man zur Erzeugung von Percussionsounds
beimischen kann.
(13 ) FREQUENCY - Drehregler regelt die Geschwindigkeit
des Steueroszillators.
(14) PITCH MOD. - Drehregl er variiert den
Tonhöhenunterschied zwischen den Hauptoszillatoren,
um zusätzliche Modulationseekte zu erzeugen.
(15) WAVEFOR M - Schalter bietet sechs verschiedene
Einstellungen: Sinuswelle, steigende Sägezahnwelle,
fallende Sägezahnwelle, Rechteckwelle, NOISE (Rauschen)
und RND./RANDOM (zufallsges teuert).
FILTER - Sektion
(16) FREQ. - Drehregler wählt die Cuto-Frequenz des Filters.
(17) Q - Drehregler steuert die Filterbreite
(beim Bandpass- und Notchlter) oder die
Filteranke (beim Hoch- und Tiefpasslter).
(18) FILT ER - Drehregler bietet vier Filteroptionen:
LO (Tief pass), BAND (Bandpass), NOTCH (Kerb lter) und
HI (Hochpass).
ENVELOPE GENERATORS - Sektion
Diese Se ktion umfass t zwei Subsekti onen: VCA ENV.
(steuert die Hüllkurve der Oszillatoren) und CONTROL ENV.
(steuert die Filter-Hüllkurven).
VCA E NV.
(19 ) ATTAC K - Drehregler s teuert, wie sch nell die
Note einsetzt.
(20) DECAY - D rehregler steu ert, wie schnel l die Lautstär ke
der Note abfällt, während die Taste gedrückt gehalten
wird. Er steuert außerdem, wie schnell die Note ausklingt,
nachdem die Taste losgelassen wurde.
(21 ) SUSTAIN LEVEL/REPEAT - Drehregl er steuert die
Basislau tstärke der Note, w ährend die Taste gedrü ckt
gehalten wird. Bei voller Linksdrehung wird die Note
wiederholt, wobei die ATTACK- und DECAY-Drehregler die
Geschwindigkeit der Wiederholung steuern.
(22 ) HOLD - Schalter hält die Note unendlich lang an
der Stelle der H üllkurve aus, an der d er Schalter
aktiv iert wurde.
CONTROL ENV. - Sektion
(23 ) ATTACK - Drehregler steuert, wie schnell das Filter
einsetzt.
(24) DECAY - D rehregler steu ert, wie schnel l die
Cuto-Frequenz des Filters abklingt.
(25) DELAY/REPEAT - Drehreg ler verzögert d en Einsatz der
Filter-Att ack um bis zu 1 Sekund e.
OUTPUT - Sektion
(26) VOLUME - Drehregler steuert die endgültige Lautstärke
an den MAIN AUDIO- und MAIN OUT-Buchsen.
(27 ) PHONES - Drehregler s teuert die Kopfhörerlautstärke
an der 3,5 mm TRS -Buchse direk t über dem Regler.
MIDI - Sektion
(28) USB-PORT zum Anschließen eines Computers über eine
USB Typ B-Verbindun g.
• • USB MIDI IN – Ak zeptiert eingehende MIDI-Daten
von Anwendungen.
• • USB MIDI O UT – Sendet MIDI-Daten an Anwendungen.
(29 ) MIDI IN empfängt MIDI-Daten von einer externen
Quelle übe r einen 5-Pol DIN-An schluss.Diese 5 -polige
DIN-Buchse empfängt die MIDI-Daten einer externen
Quelle, zum B eispiel MIDI Keyboa rd, externer Ha rdware
Sequencer, Computer mit MIDI Interface etc.
(30) MIDI THRU leitet die über MIDI INPUT emp fangenen
Daten über seine 5-Pol DIN-Buchse zu anderen Geräten
weiter. Diese Daten werden normalerweise zu einem
weiteren WASP DELUXE-Synthesizer gesendet, um
einen Poly Chain oder eine Drum Machine zu betreiben,
die jeweils anderen MIDI-Kanälen zugewiesen sind.
(31 ) EXT. AUDIO - Eingang empfängt über seine
3,5 mm-Buchse beliebige externe Audioquellen mit
Line-Pe gel. Wenn diese Buchs e nicht belegt is t, ist hier
intern der Haupt-Audioausgang angeschlossen.
(32 ) POWER LED leuchtet, wenn das Gerät eingeschaltet ist.
(33 ) MAIN AUDIO - Ausgang überträgt über seine
3,5 mm TRS-B uchse das Haupt-Audio signal. Er wird
normalerweise mit dem Audioeingang des WASP DELUXE
oder den Audioeingängen anderer modularer Synthesizer
verbunden. Beim Betrieb des WASP DELUXE in einem
Eurorac k ist dies der Haupta usgang, da die rück seitigen
Ausgänge nicht verwendet werden.
Rückseite
(34) MAIN OUT stellt über seine 6,3 mm TRS-Ausgänge eine
Verbindung zu den Eingängen Ihrer externen Geräte
wie folgt her (beide Anschlüsse liefern ein Monosignal,
kein Links/Rechts-Signal):
• • LOW – Diesen Mono-Ausgang mit Instrumentenpegel kann
man beispielsweise an Eingänge mit Instrumentenpegel von
Gitarrenverstärkern oder Mixern anschließen.
• • HIGH – Di esen Mono-Ausga ng mit Line-Pegel k ann man
beispiel sweise an Eingänge mi t Line-Pegel von M ixern,
Keyboard-Verstärkern oder Aktivlautsprechern anschließen.
(35) MIDI CHANNEL verfügt über 4 Schalter, mit denen
man eine MIDI -Kanalnummer von 1 b is 16 einstellen
kann (siehe Tabel le unten). Man kann den MIDI-K anal
auch mit MID I SysEX-Befehlen än dern (siehe MIDI
SysEX-Tabellen weiter unten).
Power - Sektion
(36) POWER - Schalter schaltet das Gerät ein/aus.
(37 ) DC IN zum Anschli eßen des mitgelie ferten 12 V
DC-Netzadapters. Man kann den Netzadapter mit
einer Net ztsteckdo se verbinden, die 100 V bi s 240 V
Spannung b ei 50 Hz/60 Hz liefer t. Verwenden Sie nur d en
mitgelieferten Netzadapter.
Page 14

26 27Quick Start GuideWASP DELUXE
WASP DELUXE Controles
(PT) Passo 2: Controles
Seção TECLADO
(1) O botão BEND aumenta (sentido horário) ou diminui
(sentido an ti-horário) o tom do te clado.
(2 ) O bot ão TUNE possibilita aj uste renado do tom
do teclado.
(3 ) GLIDE con trola o valor da mudan ça de uma nota para
outra. Gi rar o botão no senti do horário, abaixa a m udança
para o próx imo tom.
Seção OSCILADORES
(4 ) O bot ão FT do oscilador supe rior ajusta o tom do o scilador.
(5 ) O bot ão WIDTH % controla a amplit ude do som do
oscilador.
(6 ) O bot ão WAVEFORM co ntrola a forma da on da do
oscilador superior. Na regulação OFF, o oscilador está
fechado. A s egunda congura ção a partir da es querda,
impõe uma f orma de onda “dente de ser ra”, e nquanto a
congura ção a seguir cria u ma forma de onda “quadra da”.
A conguração ENH age como um intensicador,
agregan do peso, contraste e n itidez ao tom do osc ilador.
(7 ) O bot ão FT do oscilador inferior ajusta o tom do oscilador.
(8 ) O bot ão PITCH ajusta o tom do se gundo oscilador
contra o tom d o oscilador super ior a m de criar efe itos
de modulaç ão.
(9 ) O bot ão WAVEFORM co ntrola a forma da on da do
oscilador inferior. Na regulação OFF, o oscilador está
fechado. A s egunda congura ção a partir da es querda,
impõe uma f orma de onda “dente de ser ra”, e nquanto a
congura ção a seguir cria u ma forma de onda “quadra da”.
A conguração ENH age como um intensicador,
agregan do peso, contraste e n itidez ao tom do osc ilador.
(10) A seção MIX controla a mistura relativa do osc ilador
superior e inferior (botões OSC 1/OSC 2).
(11) O botão E XT. pos sibilita a mistu ra de sinais de áudio
provenien tes do jack EXT. AUDIO com os s inais do
oscilador.
Seção CONTROL OSC.
Esta se ção proporcio na um oscilador que nã o produz som
em si, mas pod e ser usado para cont rolar os oscilado res
primári os e o ltro.
(12 ) O botão de sinal N OISE produz ruído bra nco que pode ser
mixado a m d e criar sons de perc ussão.
(13 ) O botão FREQUENCY aj usta a velocidad e do oscilador
de contro le.
(14) PITCH MOD. varia a dife rença do tom entre o s osciladores
primári os a m de criar efeit os de modulação ex tra.
(15) O botão WAVE FORM proporciona seis congurações
diferentes: senoidal, dente de serra ascendente, dente de
serra descendente, quadrada, NOISE e RND. (aleatória).
Seção FILTRO
(16) O botão FREQ. aj usta a frequên cia de corte do ltr o.
(17) O botão Q con trola a amplitude d o ltro (para ltro
passa- banda e ltro rejei ta-faixa) ou a incli nação do ltro
(ltro passa-alta ou passa-baixa).
(18) O botão FI LTER pr oporciona quatr o opções de ltro:
LO (passa-baixa), BAND (passa-banda), NOTCH e
HI (passa-alta).
Seção GERADORES DE ENVELOPE
Esta se ção tem duas subse ções: VCA ENV. (controla o envelo pe dos
oscilad ores) e CONTROL ENV. (que controla os e nvelopes do ltro).
VCA E NV.
(19 ) O botão AT TACK contro la a velocidade do iníc io da nota.
(20) O botão DEC AY controla a vel ocidade com a qual o volu me
decai enq uanto o dedo perman ece no teclado e contr ola a
dissipaç ão da nota depois de s er removido do tecla do.
(21 ) O botão SUSTAIN LEVEL/REPEAT cont rola o volume base
da nota enqu anto o dedo permane ce no teclado. Quando
ajustad o na posição anti- horária máxima, a n ota repete e
então, os bot ões ATTACK e DECAY controlam a veloc idade
da repeti ção.
(22 ) O botão HOLD sustenta a nota indenitivamente no ponto
do envelope q uando o botão é ativa do
ENV. CONTROLE
(23 ) O botão ATTA CK controla a v elocidade do iníc io do ltro.
(24) O botão DEC AY controla a rap idez com a qual a freq uência
de corte d o ltro decai.
(25) O botão DELAY/REPEAT atrasa o iníc io do ataque do ltro
em até 1 segun do.
Seção OUTPUT
(26) O botão VOLUME co ntrola o volume nal no s jacks MAIN
AUDIO e MAIN OUT.
(27 ) O botão PHONES controla o vo lume do fone de ouvid o no
jack TRS de ⁄" imediatamente acima do botão.
Seção MIDI
(28) USB PORT possibilita conexão com um computador
através de u m USB tipo B. O WASP DELUXE aparec erá como
um disposi tivo compatível co m a classe USB MIDI, capa z de
supor tar entrada e saída M IDI. O WASP DELUXE não requer
nenhum driver adicional para funcionar com dispositivos
Windows, A ndroid, MacOS e iOS.
• • USB MIDI IN - a ceita dados MIDI prov enientes de
um aplicativo.
• • USB MIDI O UT – envia dados MIDI para u m aplicativo.
(29 ) MIDI IN recebe dados MI DI provenientes de um a fonte
exter na por um conecto r DIN de 5 pinos. Geralm ente de
um teclado M IDI, um seqüenciado r de hardware ex terno,
um computador equipado com interface MIDI, etc.
(30) MIDI THRU usa um jack DIN d e 5 pinos para passa r dados
MIDI receb idos na entrada MIDI IN PUT. Estes dad os são
geralmen te enviados a outro si ntetizador WASP DELUX E a
m de rodar um Po ly Chain ou caixa de r itmos designada a
um canal MID I diferente.
(31 ) A entrada EX T. AUDIO cone cta qualquer fo nte de áudio de
nível de linh a externa a est a entrada de 3.5 mm. Se nad a
estiver c onectado ali, en tão a saída de áudio pr incipal está
internamente conectada a essa entrada externa.
(32 ) O LED POWER acende para i ndicar que a unidad e
está ligada.
(33 ) MAIN AUDIO usa uma conexão T RS de 3.5 mm como saída
princip al do áudio. Geralme nte, há um patch entre ela e a
entrada de á udio do WASP DELUXE ou a entr ada de áudio
de outro e quipamento sintet izador modular. Se es tiver
usando um WASP D ELUXE em um Eurorack , então esta é
a saída pri ncipal, pois os cone ctores de saída d o painel
traseiro não são usados.
Painel Traseiro
(34) MAIN OUT usa s aídas TRS de ¼" para conec tar a
entradas do seu equipamento externo da seguinte forma
(perceba que ambas são Mono, e não esquerda/dir eita):
• • LOW – es ta saída mono de níve l de instrumento p ode
ser conec tada às entrada s de nível de instru mento de
amplic adores de guitar ra ou misturado res, por exemplo.
• • HIGH – es ta saída mono de níve l de linha pode ser con ectada a
entrada s de nível de linha de mist uradores, ampli cadores de
teclados, ou alto-falantes alimentados, por exemplo.
(35) MIDI CHANNEL tem 4 botões que po ssibilitam ajust e
do número do c anal MIDI de 1 a 16 (vericar a t abela
abaixo). O canal MID I também pode ser mu dado usando os
comandos MIDI SysEX, conforme demonstrado nas tabelas
MIDI SysEX mais adiante neste manual.
Seção Power
(36) O botão POWER li ga e desliga a unidade.
(37 ) DC INPUT conecta o a daptador de 12V DC forne cido.
A alimenta ção do adaptador p ode ser ligada a uma
tomada AC cap az de fornecer de 100V a té 240V a 50 Hz/60
Hz. Use apen as com o adaptador fo rnecido.
Page 15

28 29Quick Start GuideWASP DELUXE
WASP DELUXE Controlli
(IT) Passo 2: Controlli
Sezione TASTIERA
(1) PIEGARE la manopo la sposta la tonalit à della tastier a
verso l’alto (i n senso orario) o vers o il basso (in senso
antiorario).
(2 ) SINTONIZ ZARE la manopola consente la regolazione ne
del tono della tastiera.
(3 ) GLIDEco ntrolla la velocit à di cambiamento da un a nota
all’altra. Ru otando la manopola i n senso orario si ra llenta
il passa ggio al tono successi vo.
Sezione OSCILLATORI
(4 ) FT la manopola per l’oscillatore superiore imposta il tono
dell’oscillatore.
(5 ) LARGHE ZZA La manopola% c ontrolla l’ampiez za del
suono dell’oscillatore.
(6 ) FORMA D’ONDA la manop ola controlla la for ma della
forma d’onda per l’oscillatore superiore. Nell'impostazione
OFF l'oscillat ore è chiuso. La sec onda impostazi one da
sinistr a impone una forma d ’onda “a dente di se ga”,
mentre l’impostazione successiva crea una forma
d’onda “quadrata”. L’impostazione ENH agisce come un
potenziatore per aggiungere punch, bit e chiarezza al tono
dell’oscillatore.
(7 ) FT la manopola per l’oscillatore inferiore imposta il tono
dell’oscillatore.
(8 ) INTONAZIONE la mano pola regola l’altez za del secondo
oscillatore rispetto a quella dell’oscillatore superiore per
creare e etti di modula zione.
(9 ) FORM A D’ONDA la manopola cont rolla la forma della
forma d’onda per l’oscillatore inferiore. Nell'impostazione
OFF l'oscillat ore è chiuso. La sec onda impostazi one da
sinistr a impone una forma d ’onda “a dente di se ga”,
mentre l’impostazione successiva crea una forma
d’onda “quadrata”. L’impostazione ENH agisce come un
potenziatore per aggiungere punch, bit e chiarezza al tono
dell’oscillatore.
(10) MESCOLAR E la sezione controlla la combinazione relativa
dell’oscillatore superiore e inferiore (manopole OSC 1 /
OSC 2).
(11) EX T. la manopola c onsente di fonder e i segnali audio da
EXT. Jack AUDIO c on i segnali dell’osci llatore.
CONTROLLO OSC. Sezione
Questa s ezione ore un os cillatore che non p roduce il suono da
solo, ma che pu ò essere utiliz zato per controll are gli oscillator i
primari e i l ltro.
(12 ) RUMORE la manopola d el segnale produc e rumore bianco
che può ess ere mixato per cre are suoni di percus sioni.
(13 ) FREQUENZA la manopol a regola la velocit à dell’oscillatore
di contro llo.
(14) PIAZZOLA MOD. var ia la dierenza di i ntonazione
tra gli osc illatori primar i per creare ulteri ori eetti di
modulazione.
(15) FORMA D’ONDA s witch ore sei di verse imposta zioni:
sinusoid ale, dente di sega asce ndente, dente di sega
discende nte, onda quadra, NOISE e R ND. (c asuale).
Sezione FILTER
(16) FREQ. la manop ola imposta la fr equenza di taglio d el
ltro.
(17) Q la manopol a controlla la larghe zza del ltro (pe r i ltri
passa- banda e notch) o la penden za del ltro (ltri p assaalto e passa-basso).
(18) FILT RO la manopol a ore quattro o pzioni di ltro:
LO(passa-basso), BAND (passa-banda), NOTCH e HI
(passa-alto).
Sezione GENERATORI DI BUSTE
Questa s ezione ha due sot tosezioni: VCA ENV. (contro lla il le
invilupp o per gli oscillator i) e CONTROL ENV. (che controlla le bu ste
del ltro).
VCA E NV.
(19 ) ATTACC O la manopola con trolla la velocità d ell’inizio
della nota.
(20) DECADIMENTO la manopol a controlla la veloci tà con cui
il volume de lla nota decade men tre il dito rimane sul la
tastie ra e quindi control la la dissolvenza in u scita della
nota dopo c he il dito è stato rim osso dalla tasti era.
(21 ) SOSTENERE LIVELLO / RIP ETIZIONE la manopola
controll a il volume della linea di b ase della nota ment re
il dito rima ne sulla tastiera . Quando è imposta to
complet amente in senso anti orario, la nota si rip ete e
le manopol e AT TACK e DECAY controllano la velo cità
dellaripetizione.
(22 ) ATTES A l’interruttore sostiene la nota indenitamente nel
punto dell ’inviluppo quand o l’interrutt ore è attivato.
CONTROLLO ENV.
(23 ) ATTACC O la manopola cont rolla la velocità d i inizio
del ltro.
(24) DECADIMENTO la manopol a controlla la veloci tà con cui
decade la f requenza di ta glio del ltro.
(25) DELAY / REPEAT la manopo la ritarda l’iniz io dell’attacco
del ltro no a 1 secondo.
Sezione OUTPUT
(26) VOLUME la manopo la controlla il volum e nale alle prese
MAIN AUDIO e MAIN O UT.
(27 ) TELEFONI la manopola con trolla il volume dell e cue a
⁄" Jack TR S immediatamente s opra la manopola.
Sezione MIDI
(28) POR TA USB consente la connessione a un computer
tramite un a connessione USB di ti po B. WASP DELUXE si
present erà come un disposit ivo MIDI USB conforme a lla
classe, in g rado di support are MIDI in e out.
• • USB MIDI IN - a ccetta dati MIDI in i ngresso da un’applic azione.
• • USB MIDI O UT - invia dati MIDI a un’applic azione.
(29 ) MIDI IN riceve i dati MIDI da u na sorgente ester na tramite
un connet tore DIN a 5 pin. Ques ta sarà comuneme nte
una tastiera MIDI, un sequencer hardware esterno, un
computer dotato di un’interfaccia MIDI, ecc.
(30) MIDI THRU utilizz a un jack DIN a 5 pin viene ut ilizzato
per pass are attravers o i dati MIDI ricevuti a l MIDI INPUT.
Questi dati vengono comunemente inviati a un altro
sintetiz zatore MODEL D per e seguire una Poly Cha in o a
una drum mac hine assegnata a u n diverso canale MI DI.
(31 ) EXT. AUDIO ingresso colle ga qualsiasi sorge nte audio
a livello di li nea esterna a ques to ingresso da 3,5 mm.
Se non è colle gato nulla qui, l’uscit a audio principa le è
collegata internamente a questo ingresso esterno.
(32 ) LED DI ALIMENTAZIONE si accende per indic are che
l’unità è st ata accesa.
(33 ) AUDIO PRINCIPALE utilizza una connessione TRS
da 3,5 mm per emet tere l’uscita au dio principale.
Tipicam ente può essere col legato all’ingre sso audio
di un altro WASP D ELUXE o agli ingressi au dio di altri
sintetiz zatori modular i. Se stai utiliz zando WASP
DELUXE in un Eur orack, questa è l ’uscita princip ale,
poiché i co nnettori di usc ita del pannello po steriore non
vengono utilizzati.
Pannello posteriore
(34) MAIN OUT utili zza ¼" Uscite TRS da coll egare agli ingres si
delle appa recchiature es terne come segue (not are che
sono entr ambe Mono e non sinis tra / destra):
• • BASSO - q uesta uscita m ono a livello di stru mento può essere
collegat a a gli ingressi a livell o di strumento de gli amplicatori
per chit arra o mixer per esem pio.
• • A LTA - questa usc ita mono a livello di li nea può essere
collegat a agli ingressi a live llo di linea di mixer, ampli catori
per tastiere o altoparlanti alimentati, ad esempio.
(35) CANALE MIDI dispone d i 4 interruttor i che consentono
di impos tare il numero del ca nale MIDI da 1 a 16 (vedere
la tabella a p agina 13). Il canale MID I può anche essere
modic ato utilizzand o i comandi MIDI SysEx, c ome
mostra to nelle tabelle MIDI Sy sEx più avanti in ques to
manuale. (Que sto metodo viene ut ilizzato quand o WASP
DELUXE è allog giato in un Eurorack e q uesti interru ttori
non sono pi ù presenti.)
Sezione di potenza
(36) ENERGIA interruttore accende e spegne l’unità.
(37 ) INGRESSO DCs i collega all’aliment atore 12 V DC in
dotazione. tL’adatt atore di alimentazione può essere
collegato a u na presa CA in grad o di fornire da 100 V
a 240 V a 50 Hz / 60 Hz. Ut ilizzare solo l ’adatta tore di
alimentazione fornito.
Page 16

30 31Quick Start GuideWASP DELUXE
WASP DELUXE Bediening
(NL) Stap 2: Bediening
KEYBOARD-sectie
(1) BOCHT knop verschuift de toonhoogte van het
toetse nbord omhoog (met de k lok mee) of omlaag (tegen
de klok in).
(2 ) AFSTEM MEN knop maakt jna fstelling van de
toonhoogte van het toetsenbord mogelijk.
(3 ) GLIJDEN reg elt de mate van verande ring van de ene noot
naar de ander e. Door de knop met de k lok mee te draaien,
wordt de ver schuiving naar d e volgende toonhoo gte
vertraagd.
OSCILLATORS Sectie
(4 ) FT knop vo or de bovenste osc illator stelt de toon hoogte
van de osci llator in.
(5 ) BREEDTE % kno p regelt de breedt e van de oscillator ’s
geluid.
(6 ) GOLFVORM kno p regelt de vorm van de g olfvorm voor
de bovenst e oscillator. In de UIT-stan d is de oscillator
gesloten. D e tweede inste lling van links leg t een
“zaagtan d” golfvorm o p, terwijl de volgen de instelling
een “vierkante” golfvorm creëert. De ENH-instelling werkt
als een versterker om punch, bit en helderheid toe te
voegen aan d e toon van de oscillat or.
(7 ) FT knop vo or de onderste os cillator stelt de to onhoogte
van de osci llator in.
(8 ) PL AATS k nop past de toonho ogte van de twee de
oscillat or aan tegen de toonho ogte van de bovenste
oscillator om modulatie-eecten te creëren.
(9 ) GOLFVORM kno p regelt de vorm van de g olfvorm voor
de onder ste oscillator. In de UIT-st and is de oscillato r
gesloten. D e tweede inste lling van links leg t een
“zaagtan d” golfvorm o p, terwijl de volgen de instelling
een “vierkante” golfvorm creëert. De ENH-instelling werkt
als een versterker om punch, bit en helderheid toe te
voegen aan d e toon van de oscillat or.
(10) MENGEN secti e regelt de relatie ve mix van de bovenste en
onders te oscillator (OSC 1 / OSC 2-k noppen).
(11) EX T. knop stel t u in staat om audiosi gnalen van de EXT.
AUDIO-aansluiting met de oscillatorsignalen.
CONTROLE OSC. Sectie
Deze sec tie biedt een os cillator die zelf gee n geluid producee rt,
maar die kan wo rden gebruikt o m de primaire osci llatoren en te
regelen het lter.
(12 ) LAWAAI s ignaalknop produ ceert witte r uis die kan
worden gemengd om percussiegeluiden te creëren.
(13 ) FREQUENTIE knop past de s nelheid van de
besturingsoscillator aan.
(14) PITCH MOD. varieert het toonhoogteverschil
tussen de p rimaire oscillat oren om extra te c reëren
modulatie-eecten.
(15) GOLFVORM switch biedt zes verschillende instellingen:
sinus was, stijgende zaagtand, vallende zaagtand,
blokgolf, NO ISE en RND. (willekeurig).
FI LTER Sec tie
(16) FREQ. knop stelt de lter cuto frequentie in.
(17) Q knop regelt de lterbreedte (voor banddoorlaat-
en notch-lter) of de lterhelling (hi-pass en
laagdoorlaatlters).
(18) FILT ER knop bie dt vier lteropti es: LO (lo-pass), BAND
(bandpa ss), NOTCH en HI (hi-p ass).
ENVELOPGENERATOREN Sectie
Deze sec tie heeft t wee onderafdeli ngen: VCA ENV. (regelt het
envelop voo r de oscillatoren) en CONTR OL ENV. (welke contro les
de lter enveloppen).
VCA E NV.
(19 ) AANVAL knop reg elt de snelheid van he t begin van de
noot.
(20) VERVAL knop regelt hoe snel het nootvolume wegsterft
terwij l de vinger op het toet senbord blijf t en regelt
vervolgens het vervagen van de noot nadat de vinger van
het toetsenbord is verwijderd.
(21 ) DUURZAAMNIVEAU / HERHALEN knop reg elt het
basisvo lume van de noot terw ijl de vinger op het
toetse nbord blijft . Als deze volledig teg en de klok in is
ingesteld, wordt de noot herhaald en regelen de AT TACKen DECAY-knoppen de snelheid van de herhaling.
(22 ) HOUDEN schakelaar hou dt de noot voor onbep aalde tijd
vast op he t punt van de envelop wann eer de schakelaar
wordt geactiveerd.
CONTROLE ENV.
(23 ) AANVAL knop regel t de snelheid van het be gin van
het lter.
(24) VERVAL knop bepaalt hoe snel de lter cuto frequentie
wegsterft.
(25) VERTRAGING / HERHALING knop vert raagt het begin va n
de lteraa nval met maximaal 1 se conde.
OUTPUT-sectie
(26) VOLUME knop re gelt het uiteindel ijke volume op de
MAIN AUDIO en MAI N OUT jacks.
(27 ) TELEFOONS knop rege lt het hoofdtele foonvolume op
⁄" TRS-a ansluiting direc t boven de knop.
MIDI-sectie
(28) USB POORT maakt verbinding met een computer
mogelijk v ia een USB type B-ve rbinding. De WASP
DELUXE zal verschijnen als een klasse-compatibel
USB MIDI-app araat, dat in staat i s om MIDI in en uit te
ondersteunen.
• • USB MIDI IN - a ccepteert inkom ende MIDI-data va n een
applicatie.
• • USB MIDI UI T - verstuurt MID I-data naar een ap plicatie.
(29 ) MIDI IN ontvang t MIDI-data van een e xterne bron vi a
een 5-pin s DIN-connec tor. Dit is gewoonlijk ee n MIDItoetsenbord, een externe hardware-sequencer, een
computer uitgerust met een MIDI-interface, enz.
(30) MIDI THRU gebruikt een 5-pins DIN-aansluiting wordt
gebruik t om MIDI-gegev ens die via de MIDI INPUT
worden ontvangen, door te geven. Deze gegevens
worden gewo onlijk naar een ande re MODEL D-synth esizer
gestuu rd om een Poly Chain uit te v oeren of naar
een drumm achine die aan een and er MIDI-kanaal is
toegewezen.
(31 ) EX T. AUDIOingang verbindt elke externe audiobron op
lijnniveau m et deze 3,5 mm-ingang . Als hier niets is
aangesloten, is de hoofdaudio-uitgang intern op deze
externe ingang aangesloten.
(32 ) ACTIVATIE LAMPJE licht op om aan te geven dat h et
apparaat is ingeschakeld.
(33 ) HOOFD AUDIO gebruikt een 3,5 mm TRS-aansluiting
om de hoofd audio-uitv oer uit te voeren. Mee stal kan
het worden g epatcht op de audio -ingang van een
andere WASP DELU XE of op de audio-in gangen van
andere mo dulaire synthes izerapparatuu r. A ls u de WASP
DELUXE in een Eu rorack gebruik t, is dit de hoofdu itgang,
aangezien de uitgangsaansluitingen op het achterpaneel
niet worden gebruikt.
Achter paneel
(34) HOOFD UIT gebruikt ¼" TRS -uitgangen om als vol gt op de
ingangen v an uw externe app aratuur aan te sluite n (merk
op dat ze beide m ono zijn en niet link s / rechts):
• • LA AG - deze mono-ui tgang op instrum entniveau kan worde n
aangesloten op de instrumentingangen van gitaarversterkers
of mixers bijvoorbeeld.
• • HOOG - deze mo no-uitgang op lij nniveau kan
worden aangesloten op de lijningangen van mixers,
toetsenbordversterkers of luidsprekers met eigen
stroomvoorziening.
(35) MIDI KANAAL hee ft 4 schakelaar s waarmee u het MIDI-
kanaalnum mer van 1 tot 16 kunt instell en (zie de tabel op
pagina 13). Het MIDI-k anaal kan ook worden g ewijzigd
met MIDI SysE x-commando’s, zoals we ergegeven in de
MIDI SysEx-tabellen verderop in deze handleiding. (Deze
methode w ordt gebruikt a ls de WASP DELUXE in een
Eurorac k is ondergebrach t en deze schakelaar s niet meer
aanwezig zijn.)
Power Sectie
(36) VERMOGEN schakela ar zet het apparaat aa n en uit.
(37 ) DC-INGANG wordt aange sloten op de meegele verde
12 V DC-voedingsadapter. tDe voedingsadapter kan
worden aan gesloten op een sto pcontact dat kan l everen
van 100 V tot 240 V bij 50 H z / 60 Hz. Gebruik alle en de
meegeleverde stroomadapter.
Page 17

32 33Quick Start GuideWASP DELUXE
WASP DELUXE Kontroller
(SE) Steg 2: Kontroller
TASTATU RSektion
(1) BÖJA rat ten förskjuter t angentbordet s tonhöjd uppåt
(medurs) eller nedåt (moturs).
(2 ) S TÄLLA IN ratten möjliggör njustering av
tangentbordshöjden.
(3 ) GLIDA s tyr förändringshastigheten från en anteckning
till en annan . Vrid ratten medur s saktar ner vä xlingen till
nästa tonhöjd.
AVSNITT AVSNITT
(4 ) MED rat ten för den övre os cillatorn ställ er in oscillatorns
tonhöjd.
(5 ) BREDD ratten% kontrollerar bredden på oscillatorns ljud.
(6 ) WAVE FORM ratte n kontrollerar for men på vågform en
för den öv re oscillatorn. I OFF -inställninge n är oscillatorn
stängd. Den andra från vänster inställningen inför en
“sågtand ” vågform, meda n nästa inställn ing över skapar
en “fyrkantig” vågform. ENH-inställningen fungerar som
en förs tärkare för at t lägga till punch, b it och klarhet i
oscillatorns ton.
(7 ) MED rat ten för den nedre o scillatorn stä ller in oscillator ns
tonhöjd.
(8 ) TONHÖJD rat ten justerar tonhö jd för den andra
oscillat orn mot stigning en för den övre osci llatorn för att
skapa moduleringseekter.
(9 ) WAVE FORM ratte n kontrollerar for men på vågform en för
den nedre oscillatorn. I OFF-inställningen är oscillatorn
stängd. Den andra från vänster inställningen inför en
“sågtand ” vågform, meda n nästa inställn ing över skapar
en “fyrkantig” vågform. ENH-inställningen fungerar som
en förs tärkare för at t lägga till punch, b it och klarhet i
oscillatorns ton.
(10) BLANDA avsnit tet styr den re lativa blandninge n av övre
och nedr e oscillatorn (OSC 1 / OSC 2-r attarna).
(11) EX T. med ratt en kan du blanda in ljuds ignaler från EX T.
AUDIO-uttag med oscillatorsignaler.
KONTROLL OSC. Sektion
Detta a vsnitt erbjude r en oscillator som in te producerar ljud sj älv
men som kan a nvändas för att s tyra de primär a oscillatorerna
och ltret.
(12 ) LJUD signalrat ten producera r vitt brus som ka n blandas in
för att skapa slagverkljud.
(13 ) FREKVENS ratten justerar hastigheten på
kontrolloscillatorn.
(14) PITCH MOD. varierar tonhöjdsskillnaden mellan
de primär a oscillatorerna f ör att skapa y tterligare
moduleringseekter.
(15) WAVEFOR M switch erbjuder sex olika inställningar: sinus
var, stigande s ågtand, fallan de sågtand, fy rkantvåg,
NOISE och RND. (slumpmässig).
FILTER-avsnitt
(16) FREKVENS. ratten ställer in ltergränsen.
(17) F ratten kontrollerar lterbredden (för bandpass och
hacklter) eller lterlutningen (hi- och lo-passlter).
(18) FILT RERA ratten erbjuder fyra lteralternativ: LO
(lo-pass), BAND (bandpass), NOTCH och HI (hi-pass).
ENVELOPE GENERATORS Avsnitt
Detta a vsnitt har två un deravsnitt: VC A ENV. (kontrollerar kuve rt
för osc illatorerna) och CONTR OL ENV. (som sty r lterhöljet).
VCA E NV.
(19 ) GE SIG PÅ ratten styr hastigheten på anteckningen.
(20) FÖRFALL ratten styr hur snabbt anteckningsvolymen
förf aller medan ngre t förblir på tang entbordet och
kontrollerar sedan toningen av toningen efter att ngret
har tagit s bort från ta ngentbordet.
(21 ) HÅLLBAR NIVÅ / REPETERING ratten kontrollerar
baslinjevolym för noten medan ngret förblir på
tangentbordet. När den är inställd moturs upprepas
noten och k napparna ATTACK och DECAY st yr sedan
upprepningshastigheten.
(22 ) HÅLL switch uppr ätthåller antec kningen på obes tämd tid
vid kuvertpunkten när omkopplaren aktiveras.
KONTROLLMILJÖ
(23 ) GE SIG PÅ ratten reglerar hastigheten för lterets start.
(24) FÖRFALL ratten styr hur snabbt lteravbrottfrekvensen
sönderfaller.
(25) FÖRDRÖJNING / GENTAGNING ratten fördröjer
uppkoms ten av lterattac k med upp till 1 sekun d.
OUTPUT avsnitt
(26) VOLY M ratten kontrollerar den slutliga volymen vid
uttag en MAIN AUDIO och MAIN OUT.
(27 ) TELEFONER ratten kontrollerar hörlursvolymen
på ⁄" TRS -jack direkt ova nför ratten.
MIDI-avsnitt
(28) USB UTTAGtillåter ansl utning till en dator v ia en USB-typ
B-anslut ning. WASP DELUXE kommer at t visas som en
klasskomp atibel USB MIDI-en het som kan stödja M IDI in
och ut.
• • USB MIDI IN - a ccepterar inkomman de MIDI-data fr ån
en applikation.
• • USB MIDI O UT - skickar MIDI-d ata till en applikat ion.
(29 ) MIDI IN tar emot MIDI- data från en ex tern källa via en
5-stif ts DIN-kont akt. Detta kom mer ofta att va ra ett MIDItangentbord, en extern hårdvarusekvenserare, en dator
utrustad med ett MIDI-gränssnitt etc.
(30) MIDI THRU använder et t 5-stift s DIN-uttag anv änds
för att p assera MIDI-d ata som tas emot på MID I INPUT.
Dessa dat a kommer vanligt vis att skickas t ill en annan
MODEL D-s ynthesizer fö r att köra en Poly Chain e ller till en
trumaskin tilldelad en annan MIDI-kanal.
(31 ) EXT. AUDIO ingång ansluter alla externa ljudnivåkällor
till denna 3,5 mm -ingång. Om inget ä r anslutet här är
huvudljudutgången internt ansluten till denna externa
ingång.
(32 ) STRÖM-LED tänds för at t indikera att en heten
är påslagen.
(33 ) HUVUDLJUD använd er en 3,5 mm TRS-anslut ning för att
mata ut huv udljudutgången. Van ligtvis kan den la ppas
till ljudingången till en annan WASP DELUXE eller till
ljudingångarna på annan modulär synthesizerutrustning.
Om du använd er WASP DELUXE i ett Euror ack är detta
huvudutgången efters om utgångskontakterna på
bakpanelen inte används.
Bakre panel
(34) MAIN OUT använder ¼” TRS-utgångar för att ansluta
till ingångarna på din externa utrustning enligt följande
(notera att d e båda är mono och inte v änster / höger):
• • LÅG - d en här mononutgång en på instrument nivå kan
anslutas till instrumentnivåingångarna till gitarrf örstärkare
eller blandare till exempel.
• • HÖG - d en här mono-utgån gen på linjenivå kan a nslutas till
ingångarna på linjenivå till blandare, tangentbordsförstärkare
eller strömhögtalare till exempel.
(35) MIDI-KANAL har f yra omkopplare so m låter dig ställa
in MIDI-k analnummer från 1 ti ll 16 (se tabellen på sidan
13). MIDI-kanalen kan o ckså ändras me d MIDI SysExkommandon, s om visas i MIDI SysEx- tabellerna senar e
i denna handb ok. (Den här metode n används när WASP
DELUXE är inr ymt i ett Eurora ck och dessa omkop plare inte
längre nns.)
Kraftsektion
(36) KRAFT start ar och stänger av enheten.
(37 ) DC-INGÅNG ansluts til l den medföljand e 12 V
likströmsadaptern. tNätadaptern kan anslutas till ett
nätutt ag som kan mata fr ån 100V till 240V vid 50 Hz /
60 Hz. Använd endast den medföljande nätadaptern.
Page 18

34 35Quick Start GuideWASP DELUXE
WASP DELUXE Sterowanica
(PL) Krok 2: Sterowanica
Sekcja KLAWIATURA
(1) ZAKRĘT Pok rętło zmienia st rój klawiatury w g órę
(zgodnie z r uchem wskazówek ze gara) lub w dół
(przec iwnie do ruchu wsk azówek zegara).
(2 ) MELODIA pokrętło umożliwia precy zyjną regulację
wysokości klawiatury.
(3 ) POŚLIZG kontr oluje tempo zmian z je dnej nuty na drugą.
Kręceni e gałką zgodnie z ru chem wskazówek zeg ara
spowalnia przejście do następnego tonu.
Sekcja OSCYLATORY
(4 ) FT pokr ętło dla górnego o scylatora us tawia wysokoś ć
oscylatora.
(5 ) SZEROKOŚĆ Pok rętło% kontroluj e szerokość dźwi ęk
oscylatora.
(6 ) WAVE FORM Pokręt ło kontroluje ks ztałt pr zebiegu dla
górneg o oscylatora. W us tawieniu OFF osc ylator jest
zamknięty. Drugie ustawienie od lewej narzuca przebieg
„piłok ształ tny”, podcz as gdy następne us tawienie
tworz y przebieg „pr ostokątny”. Ustawie nie ENH działa
jako wzmac niacz, dodając pu nch, bit i klarowno ść do
tonu oscylatora.
(7 ) FT Pokrę tło dolnego osc ylatora ustawi a
wysokość oscylatora.
(8 ) SMOŁ A Pokrętło dostosowuje wysokość drugiego
oscyl atora w stosunku do w ysokości dź więku górnego
oscyl atora, aby stwor zyć efekty m odulacji.
(9 ) WAVE FORM Pokręt ło kontroluje ks ztałt pr zebiegu dla
dolnego o scylatora. W us tawieniu OFF osc ylator jest
zamknięty. Drugie ustawienie od lewej narzuca przebieg
„piłok ształ tny”, podcz as gdy następne us tawienie
tworz y przebieg „pr ostokątny”. Ustawie nie ENH działa
jak wzmac niacz, dodając pu nch, bit i klarowno ść do
brzmienia oscylator a.
(10) MIESZAĆ Sekcja kontroluje re latywne po łączenie górn ego
i dolnego o scylatora (pok rętła OSC 1 / OSC 2).
(11) EX T. Pokrętło u możliwia łącze nie sygnałów audi o z
gniazda EXT. Gniazdo AUDIO z sygnałami oscylatora.
STEROWANIE OSC. Sekcja
Ta sekcja oferu je oscylator, któr y sam nie wyt warza dźwi ęku, ale
może być uży wany do sterowani a głównymi osc ylatorami i ltr.
(12 ) HAŁAS Pokrętło sygnalizacyjne generuje biały szum,
któr y można mieszać w cel u uzyskania dź więków
perkusyjnych.
(13 ) CZĘSTOTLIWOŚĆ pokrętło reguluje prędkość oscylatora
sterującego.
(14) PITCH MOD. zmienia różn icę wysokości m iędzy główne
oscyl atory do tworz enia dodatkowych e fekty modu lacji.
(15) WAVEFOR M Przełąc znik oferuje sze ść różnych ustawi eń:
sinusoid alny, rosnący piłok ształt ny, opadając y
piłok ształt ny, p rostokątny, SZUM i RND. (los owy).
Sekcja FILTER
(16) FREQ. Pokrętło ustawia częstotliwość odcięcia ltra.
(17) Q Pokrętł o kontroluje szero kość ltra (dla ltrów
pasmowych i wycinających) lub nachylenie ltra (ltry
górnoprzepustowe i dolnoprzepustowe).
(18) FILT R pokrętło of eruje czter y opcje ltrów: LO
(dolnoprz epustowy), BAND (pasm owy), NOTCH i HI
(górnoprzepustowy).
Sekcja GENERATORY KOPERTY
Ta sekcja składa s ię z dwóch podsekcj i: VCA ENV. (kontroluje
obwiedn ia dla oscylatoró w) i CONTROL ENV. (któ ry kontroluje
koperty ltrów).
VCA E NV.
(19 ) ATAK Pokrętło kontroluje szybkość początku dźwięku.
(20) ROZKŁAD Pokręt ło kontroluje, jak sz ybko zanika gł ośność
nuty, gdy pa lec pozostaje na kl awiaturze, a nastę pnie
steruje z anikaniem nut y po zdjęciu palca z k lawiatury.
(21 ) POZIOM PODTRZYMANIA / POWTÓRZ Pokrętło
kontroluj e podstawową gł ośność nuty, podc zas gdy
palec pozo staje na klawiatu rze. Po ustawieniu p ełnego
przeci wnego do ruchu wsk azówek zegara nut a powtarza
się, a pokrę tła ATTACK i DECAY kontrolują prę dkość
powtórzenia.
(22 ) UTRZYMAĆ p rzełączn ik podtrzym uje nutę w
nieskończoność w punkcie obwiedni, gdy przełącznik jest
ak tywo wany.
KONTROLA ENV.
(23 ) ATAK Pokrętło kontroluje szybkość działania ltra.
(24) ROZKŁAD Pokręt ło kontroluje, jak sz ybko zanika
częstotliwość odcięcia ltra.
(25) OPÓŹNIENIE / POWTÓRZ Pokrętło opóźnia rozpoczęcie
ataku lt ra nawet o 1 sekundę.
Sekcja OUTPUT
(26) TOM Pokrętło r eguluje końcową gł ośność w gniazdach
MAIN AUDIO i MAIN O UT.
(27 ) TELEFONY Pokrę tło reguluje głoś ność słuchawek na ⁄"
Gniazdo TRS bezpośrednio nad pokrętłem.
Sekcja MIDI
(28) PORT USBumożliwia połączenie z komputerem przez
złącze USB t ypu B. WASP DELUXE pojawi s ię jako zgodne
z klasą ur ządzenie USB MIDI, zdol ne do obsługi wejś cia i
wyjścia MIDI.
• • Wejś cie USB MIDI - akceptuje pr zychodzące da ne
MIDI z aplika cji.
• • Wy jście USB MIDI - wys yła dane MIDI do aplik acji.
(29 ) MIDI INodbiera dan e MIDI z zewnętrzn ego źródła prz ez
5-pinowe z łącze DIN. Zwyk le będzie to klawiat ura MIDI,
zewnętrzny sekwencer sprzętowy, komputer wyposażony
w interf ejs MIDI itp.
(30) MIDI THRUwykorz ystuje 5-pin owe gniazdo DIN, któ re
służ y do przesyłan ia danych MIDI odbiera nych na wejściu
MIDI INPUT. Te dane będą z wykle wysy łane do innego
syntez atora MODEL D w celu uru chomienia Poly Chain
lub do automatu perkusyjnego przypisanego do innego
kanału MIDI.
(31 ) EXT. AUDIO wejście łączy dowolne zewnętrzne liniowe
źródło d źwięku z tym wej ściem 3,5 mm. Jeśli tut aj nic nie
jest podłączone, główne wyjście audio jest wewnętrznie
połączone z tym wejściem zewnętrznym.
(32 ) DIODA ZASILANIA zapala się wska zując, że urządz enie
zostało włąc zone.
(33 ) GŁÓWNE AUDIO wykor zystuje złąc ze TRS 3,5 mm do
wypro wadzania główn ego wyjścia aud io. Zwykle można
go podł ączyć do wejścia au dio innego WASP DELUXE lub
do wejść audi o innego modułow ego sprzętu syn tezatora.
Jeśli uż ywasz WASP DELUXE w Euro racku, to jest to
główne w yjście, poniew aż złącza wyj ściowe na tylnym
panelu nie s ą używane.
Tylny panel
(34) GŁÓWNE WYJŚCIE uż ywa ¼” Wyjścia TRS d o podłączenia
do wejść tw ojego sprzętu zew nętrznego w na stępujący
sposób (z wróć uwagę, że oba s ą Mono, a nie lewe /
praw e):
• • NISK A - do tego wyjścia monofonicznego na poziomie
instrumentu można podłączyć wejścia instrumentalne
wzmacni aczy gitarow ych lub na przy kład mikser y.
• • W YSOKI - to liniowe wyjśc ie mono można podł ączyć na
przy kład do wejść liniow ych mikserów, wzm acniaczy
klawiatu rowych lub akt ywnych głośni ków.
(35) KANAŁ MIDI posiad a 4 przełącz niki, które poz walają
ustawić n umer kanału MIDI o d 1 do 16 (patrz tabela na
str. 13). Kanał MIDI można ró wnież zmienić za p omocą
poleceń MI DI SysEx, jak pokaz ano w tabelach MIDI Sy sEx
w dalszej c zęści instrukc ji. (Ta metoda jest uż ywana,
gdy WASP DELUXE je st umieszczo ny w Eurorack, a tyc h
przełączników nie ma).
Sekcja mocy
(36) MOC prze łącznik włąc za i wyłąc za urządzenie.
(37 ) WEJŚCIE DC podł ącza się do dost arczonego za silacza
12 V DC. t Zasilac z można podłąc zyć do gniazda prąd u
zmienneg o zapewniająceg o napięcie od 100 V do 240 V
przy 50 H z / 60 Hz. Używaj t ylko dostarczo nego zasilacz a.
Page 19

36 37Quick Start GuideWASP DELUXE
WASP DELUXE Getting started
(EN) Step 3: Getting started
OVERVIEW
This ’getti ng started‘ g uide will help you set u p the WASP DELUXE
analog synthesizer and briey introduce its capabilities.
CONNECTION
To connect th e WASP DELUXE to yo ur system, please c onsult the
connection guide earlier in this document.
SOFT WARE SETUP
The WASP DELUXE is a USB C lass Compliant MIDI de vice, and so no
driver installation is required. The WASP DELUXE does not require
any additi onal drivers to wor k with Windows and Ma cOS.
HARDWARE SETUP
Make all the con nections in you r system. Use the rea r panel MIDI
switche s to set the WASP DELUXE to a uni que MIDI channel in your
system . Connect an ext ernal MIDI keyboar d directly to the WASP
DELUXE MIDI IN 5- pin DIN type inpu t.
Apply powe r to the WASP DELUXE using the su pplied power
adapter onl y. Ensure your s ound system is tu rned down. Turn on
the WASP DELUXE re ar panel power switc h.
WARM UP TIME
We recommen d leaving 15 minutes or more t ime for the WASP
DELUXE to war m up before record ing or live perfo rmance.
(Longer if i t has been brought in f rom the cold.) This wil l allow
the prec ision analog circu its time to reach th eir normal operat ing
temperature and tuned performance.
OSCILLATORS SECTION and MIX CONTROLS
The WASP DELUXE has two oscillators, an internal Noise generator,
and an ex ternal source inpu t. Each of these, and a ny combination,
are used by t he WASP DELUXE to generate so und.
The MIX cont rols allow you to adjus t the volume of each of th ese
sources to c reate an overall mix. St art by adjusti ng the volume
control o f Oscillator 1, while tur ning the other sour ces all the way
down. In the O UTPUT section, a djust the main volum e. Now, if you
play a note on you r MIDI keyboard, you sh ould hear the sound of
Oscillator 1 only.
Turn up the othe r oscillator and /or nois e and adjust their vol ume
controls t o create a mix.
In the Osci llator section , adjust the FT (Foot) k nob for either
oscillat or, and you will he ar the sound of the var ious octaves.
Adjust the WAVEFOR M controls and list en to the dierence s.
CONTROL OSC. SECTION
Play with the F REQ. and PITCH MOD. controls to h ear how they
aect t he speed and pitch o f the oscillators . Use the Control
Oscillat or 6-way WAVEFORM switch t o apply dierent co ntrol
wavefor ms and listen to how they a ect the sound .
FILTER and CONTROL ENV. SECTIONS
Switch bet ween lo-pass , bandpass, notch an d hi-pass lters, a nd
try play ing with the cuto f requency by usi ng the FREQ. knob. Use
the Q knob to e xperiment wit h the lter contour and s lope.
The CONTROL EN V. co ntrols are used to co ntrol the lter, so play
with the At tack, Decay and D elay controls to hear h ow these
controls a ect the lter s ound.
Spend som e time moving the FILTER CONTRO L knobs betwee n
positiv e (+) and ne gative (-) settings to hea r how the dierent
combinat ions of rising or fall ing control envelop es aect the
oscillators and lter.
ENVELOPE GENERATORS SECTION
In this sec tion, adjust the At tack, Decay, and Su stain; they aec t
the overall l evel over time, while a not e is played. The loudne ss
decay sw itch aects th e decay in level af ter a note is released .
EURORACK
The WASP DELUXE s ynthesizer can be t aken out of its fac tory
chassis an d tted into a stan dard Eurorack ca se (not supplied).
Please se e the details shown la ter in this manual.
FIRMWARE UPDATE
Please che ck our website behr inger.com regularly f or any updates
to the rmwa re of your WASP DELUXE synt hesizer. The rmware
le can be do wnloaded and stor ed on your computer, and th en
used to upd ate the WASP DELUXE. The rm ware le comes with
detaile d instructi ons on the update proc edure.
WASP DELUXE Puesta en marcha
(ES) Paso 3: Puesta en marcha
RESUMEN
Esta gu ía de ‘puesta en march a’ le ayudará a congur ar el
sintetiz ador analógico WASP DELU XE y hará que pueda ver un
resumen de sus capacidades.
CONEXIÓN
A la hora de con ectar el WASP DELUXE a su si stema, consulte
primero l a guía de conexión un p oco antes en este doc umento.
CONFIGURACIÓN DE SOFTWARE
El WASP DELUXE es un d ispositivo MIDI USB Cla ss Compliant, por
lo que no hace f alta que instale n ingún driver. El WASP DELUXE no
requiere la instalación de ningún driver adicional para funcionar
con dispos itivos Windows, An droid y MacOS.
CONFIGURACIÓN DE H ARDWARE
Realice tod as las conexiones e n su sistema. Utilice lo s
interru ptores MIDI del pane l trasero para aju star el WASP DELUXE
a un único can al MIDI en su sistema. Con ecte un teclado MI DI
exter no directame nte a la entrada MIDI IN de ti po DIN de 5 puntas
del WASP DELUXE.
Asegúr ese de que su sistema d e sonido esté apag ado y después
encienda el WASP DELUXE por medio del interruptor de encendido
del panel trasero.
PERIODO DE CALENTAMIENTO
Le recomen demos que deje un per iodo de unos 15 minutos pa ra
que el WASP DELUXE s e caliente antes de in iciar una grabació n
o actuac ión en directo co n él. (Aumente este per iodo de
calenta miento si va a usarlo en u n entorno frío). Esto p ermitirá
que los circ uitos analógico s de precisión alca ncen su temperatur a
operati va normal y que le ofr ezcan el máximo re ndimiento.
SECCIÓN OSCILL AT ORS y CONTROLES MIX
El WASP DELUXE le of rece dos oscilad ores, un generado r de ruido
interno y un a entrada de fuente d e señal externa . Cada uno de
ellos, y cua lquier combinació n de todos, es usado p or el WASP
DELUXE para generar sonido.
Los contro les MIX le permiten a justar el volumen d e cada una de
estas f uentes para crea r una mezcla global. Com ience ajustando
el contro l de volumen del Osci llator 1, mientras deja el de l resto
de fuente s al mínimo. En la secció n de salida (Output), ajus te el
volumen pr incipal. Ahora, si to ca una nota en su tecl ado MIDI,
debería e scuchar únicam ente el sonido del Os cilador 1.
Suba desp ués el volumen del otr o oscilador y/o el genera dor de
ruido par a ajustar sus volúm enes relativos y cr ear así una mezcla.
En la secció n Oscillator, ajuste el m ando FT (pie) de cualqu iera
de los osci ladores y escuch ará el sonido de las dis tintas octav as.
Ajuste los controles WAVEFORM y observe las diferencias.
SECCIÓN CONTROL OSC.
Modiqu e las posiciones de l os controles FREQ. y PITCH M OD.
para obs ervar cómo afec tan a la velocidad y al t ono de los
oscilad ores. Use el interr uptor de 6 posicion es WAV EFORM de la
sección CO NTROL OSC. para apli car diferentes f ormas de onda de
control y o bservar cómo af ectan estas f ormas de onda al son ido
nal.
SECCIONES FILTER y CONTROL ENV.
Cambie ent re los ltros pas abajos, pasaban das, de muesca y
pasa-al tos y pruebe a modi car la frecuenc ia de corte usand o el
mando FREQ. Use e l mando Q para expe rimentar con el tra zado del
ltro y su pe ndiente.
Los contro les CONTROL ENV. se usan par a controlar el ltr o, así que
modiqu e la posición de los con troles Attack , Decay y Delay para
obser var cómo afect an estos controle s al sonido del ltr o.
Dedique a lgún tiempo a cambi ar la posición de los man dos FILTER
CONTROL ent re los ajustes posi tivos (+) y negativo s (-) y observa r
así cómo las distintas combinaciones de envolventes de control
crecie ntes o decrecien tes afectan a lo s osciladores y al l tro.
SECCIÓN ENVELOPE GENERATORS
En esta se cción puede ajus tar Attack (ataque), De cay
(decaimie nto) y Sustain; estos con troles afect an al nivel global
a lo largo del t iempo, mientras toc a una nota. El interr uptor
Hold afec ta al decaimie nto de nivel una vez que ha d ejado de
pulsar la nota.
EURORACK
El sinteti zador WASP DELUXE puede s er extraído de l chasis con el
que viene de f ábrica e insta lado en un bastidor E urorack standa rd
(no incluido). Vea los det alles de cómo hacerl o más adelante en
este manual.
ACTUALIZACIÓN DEL FIRMWARE
Acceda cada c ierto tiempo a la we b behringer.com para ve r si hay
disponible alguna actualización del rmware del sintetizador
WASP DELUXE. El c hero de rmware pue de ser descargad o y
almacenad o en su ordenador y desp ués usarlo para ac tualizar el
WASP DELUXE. Este chero incluye instrucciones detalladas acerca
del proce so de actualiza ción.
Page 20

38 39Quick Start GuideWASP DELUXE
WASP DELUXE Mise en œuvre WASP DELUXE Erste Schritte
(FR) Étape 3 : Mise en œuvre
OVERVIEW
Ce guide de “Mi se en œuvre” va vous ai der à congurer votr e
synthé tiseur analogiqu e WASP DELUXE et vo us donner un aperçu
de ses capacités.
CONNEXION
Pour conne cter le WASP DELUXE à votre ma tériel, consultez l e
guide de con nexion se trouv ant dans les pages pré cédentes de
cette documentation.
CONFIGURATION LOGICIELLE
Le WASP DELUXE es t un appareil MIDI USB rec onnu nativement,
par conséquent l’installation d’aucun pilote supplémentaire n’est
nécessaire pour qu’il fonctionne sous Windows, Android, MacOS
et les appa reils iOS.
CONFIGURATION MATÉRIELLE
Eect uez toutes les conn exions à votre équi pement. Utilise z
les sélec teurs MIDI situ és sur la face arrièr e pour congurer le
canal MIDI d u WASP DELUXE en fo nction de votre é quipement.
Connec tez un clavier MIDI à l’entr ée DIN à 5 broche sMIDI IN d u
WASP DELUXE. Reli ez le WASP DELUXE au secte ur en utilisant
uniquement l’adaptateur fourni. Vériez que votre système
est hor s tension. Mettez l e WASP DELUXE so us tension avec
l’inter rupteur POWER situé s ur la face arrière.
Asegúr ese de que su sistema d e sonido esté apag ado y después
encienda el WASP DELUXE por medio del interruptor de encendido
del panel trasero.
TEMPS DE CHAUFFE
Il est rec ommandé de laisser le WASP D ELUXE chauer pend ant au
moins 15 minute s avant toute utilis ation (voire plus s’il a p assé un
moment dan s le froid). Cela perme t aux circuits ana logiques très
précis d’atteindre leur température normale de fonctionnement
et de s’accorde r.
SECTION OSC ILLATORS et REGLAGES DE MIX AGE CONTROLS
Le WASP DELUXE es t équipé de deux osc illateurs, d’un géné rateur
de bruit b lanc et d’une entrée po ur une source exte rne. Vous
pouvez ut ilizer n’import e quelle combinaiso n de ces sources
sonores a n de produire du so n.
Les réglag es de MIXAGE perme ttent de modier l e volume de ces
sources s onores an de crée r le mixage global. Co mmencez par
régler le vo lume de l’oscillateur 1 e t par placer toutes le s autres
sources au m inimum. Dans la sec tion Output, ré glez le volume
général. J ouez une note sur votr e clavier MIDI et vous dev ez alors
entendre uniquement le son de l’oscillateur 1.
Montez le vo lume de l’autre oscilla teur et/ou du générat eur de
bruit an d e créer un mixage.
Dans la sec tion Oscillator s, utilisez le sé lecteur FT des o scillateurs
pour entendre le son des diérentes octaves. Modiez le réglage
du sélec teur WAVEFORM et écoutez l es diérences pr oduites sur
le son.
SECTION CONTROL OSC.
Modiez l es réglages FREQ. et PI TCH MOD. pour entendre l’ee t
produit s ur la vitesse et la hau teur des oscillateu rs. Utilisez le
sélec teur de forme d’onde à 6 po sitions an d’appliq uer les
diérentes formes d’onde de contrôle au son.
SECTIONS FILTER et CONTRO L ENV.
Alternez entre les ltres passe-bas, passe-bande, coupe-bande et
passe- haut et essayez de m odier la fréque nce de coupure avec le
potentio mètre FREQ. Utilise z le réglage Q et écou tez l’eet produit
sur le contou r et la pente du ltre.
Les réglag es CONTROL ENV. permet tent de contrôler le ltre.
Essayez d e modier les régl ages Attack, De cay et Delay et écout ez
l’eet prod uit sur le son.
Balayez tou te la plage entre les va leurs (+) et (-) d u potentiomètre
FILTER CONTROL et éc outez l’eet produi t par les diérent es
combinaisons d’enveloppes aectant les oscillateurs et le ltre.
SECTION ENVELOPE GENERATORS
Dans cet te section, modi ez les réglages At tack, Decay e t Sustain ;
ils aec tent le niveau du son en f onction du temps l orsqu’une note
est joué e. L’int errupteur de cet te section a ecte le déclin du s on
lorsqu e la note est relâché e.
EURORACK
Le châssis d ’origine du s ynthétiseur WASP D ELUXE peut être
retire et l ’appareil peut être p lacé dans un systèm e Eurorack
(non fourni). Pou r plus de détails, cons ultez les pages sui vantes
de ce mode d’empl oi.
MISE A JOUR DU FIRMWARE
Merci de consulter régulièrement le site behringer.com pour
vérier si d es mises à jour du rm ware de votre synth étiseur
WASP DELUXE sont d isponibles. Le c hier contenant le rmw are
peut êtr e téléchargé et sto cké sur votre ordina teur puis utilisé
pour met tre à jour le WASP DELUXE. Le chier contient des
instru ctions détail lées quant à la procé dure de mise à jour.
(DE) Schritt 3: Erste Schritte
ÜBERSICHT
Diese „Schnellstart“-Anleitung wird Ihnen beim Einrichten des
WASP DELUXE Analogsynthesizers helfen und seine Fähigkeiten
kurz vorstellen.
ANSCHLUSS
Wie Sie den WASP DE LUXE mit Ihrem System ver binden, ist weiter
oben in der Anschlussanleitung dieses Dokuments beschrieben.
SOFTWARE EINRICHTEN
Der WASP DELUXE is t ein standardkon formes USB MIDI- Gerät und
erfordert keine Treiberinstallation. Für die Zusammenarbeit mit
Windows-, Android- und MacOS-Geräten sind keine zusätzlichen
Treiber erforderlich.
HARDWARE EINRICHTEN
Stellen Sie alle Ver bindungen in Ihrem System her. Stellen Sie
den WASP DELUXE mit den rückseitigen MIDI-Schaltern auf einen
MIDI-Kan al ein, der in Ihrem Syste m nur ihm zugewiese nen ist.
Schließ en Sie ein externe s MIDI Keyboard dire kt an die 5-polig e
MIDI IN DIN-B uchse des WASP DELUXE an.
Asegúr ese de que su sistema d e sonido esté apag ado y después
encienda el WASP DELUXE por medio del interruptor de encendido
del panel trasero.
PERIODO DE CALENTAMIENTO
Le recomen demos que deje un per iodo de unos 15 minutos pa ra
que el WASP DELUXE s e caliente antes de in iciar una grabació n
o actuac ión en directo co n él. (Aumente este per iodo de
calenta miento si va a usarlo en u n entorno frío). Esto p ermitirá
que los circ uitos analógico s de precisión alca ncen su temperatur a
operati va normal y que le ofr ezcan el máximo re ndimiento.
OSCILLATORS-SEKT ION und MIX-REGLER
Der WASP DELUXE verfügt über zwei Oszillatoren, einen internen
Rauschgenerator und einen Eingang für externe Signalquellen.
Mit jeder dieser Komponenten und beliebigen Kombinationen
kann der WASP DELUXE Klänge erzeugen.
Mit den MIX-R eglern kann man die L autstärke der e inzelnen
Quellen einstellen und so eine Gesamtmischung erzeugen. Stellen
Sie zuerst den Lautstärkeregler von Oszillator 1 ein und drehen Sie
vorher die anderen Quellen ganz zurück. Wenn Sie jetzt eine Note
auf Ihrem MID I Keyboard spielen, s ollten Sie nur den Klan g von
Oszillator 1 hören.
Drehen Sie dann den Lautstärkeregler des anderen Oszillators
und/oder Noise-Signals auf, um die gewünschte Mischung
zu erstellen.
Stellen Sie in der Oscillators-Sektion den FT (Foot)-Regler für
beide Oszillatoren ein, damit Sie den Klang der verschiedenen
Oktaven hören können. Stellen Sie die WAVEFORM-Regler ein und
achten Sie au f die Unterschie de.
CONTROL OSC.-SEKTION
Spielen Sie m it den FREQ.- und PITCH MOD.-Regle rn und
achten Sie da rauf, wie sie auf die Ge schwindigkeit un d
Tonhöhe der Oszillatoren wirken. Wenden Sie mit dem
6-Weg WAVEFORM-Schalter der Control Oscillator-Sektion
unterschiedliche Steuer-Wellenformen an und achten Sie darauf,
wie sie auf den Klang wirken.
FILTER- und CONTROL ENV.-SEK TIONEN
Schalten Sie zwischen den Lo-pass-, Bandpass-, Notch- und
Hi-pass-Filtern um und drehen Sie den FREQ.-Regler, um mit der
Cuto-Frequenz zu spielen. Drehen Sie den Q-Regler, um mit der
Filterkontur und -anke zu experimentieren.
Mit den CONTROL ENV.-Reglern steuer t man das Filter. Spielen Sie
mit den Att ack-, Decay- und Delay- Reglern und achte n Sie darauf,
wie diese Regler auf den Filterklang wirken.
Bewegen Sie die FILTER CONTROL- Regler ausgiebig zwischen den
positiven (+) und negativen (-) Einstellungen hin und her und
achten Sie darauf, wie die verschiedenen Kombinationen von
steigenden oder fallenden Steuer-Hüllkurven auf die Oszillatoren
und Filter wirken.
ENVELOPE GENERATORS-SEKTION
In dieser S ektion können Sie At tack, Decay un d Sustain einste llen.
Sie wirken auf den Gesamtpegel im Zeitverlauf einer gespielten
Note. Der HOL D-Schalter wirk t auf den Pegel beim Aus klingen
einer Note, nachdem deren Tas te losgelassen wurde.
EURORACK
Man kann den WASP DELUXE Synthesizer aus seinem
Werksge häuse herausnehm en und in ein standar d Eurorack Case
einbauen (nicht im Lieferumfang enthalten). Weitere Einzelheiten
weiter unten.
FIRMWARE UPDATE
Bitte informieren Sie sich regelmäßig auf unserer Website
behringer.com über Updates für die Firmware unseres
WASP DELUXE Synthesizers. Sie können die Firmware-Datei
herunterladen, auf Ihrem Computer speichern und mit ihr den
WASP DELUXE aktualisieren. Eine detaillierte Beschreibung des
Update-Verfahrens ist beigefügt.
Page 21

40 41Quick Start GuideWASP DELUXE
WASP DELUXE Primeiros Passose WASP DELUXE Per iniziare
(PT) Passo 3: Primeiros Passos
VISÃO GERAL
O guia de ‘prim eiros passos’ o aju dará a congurar o
sintetizador analógico WASP DELUXE e brevemente apresentará
suas capacidades.
CONEXÕES
Para conec tar o WASP DELUXE ao seu sis tema, favor consult ar
antes o guia d e conexão neste do cumento. Aviso: não
sobrec arregue as entra das de 3.5 mm. Elas só pode m aceitar o
nível correto de voltagens, conforme demonstrado nas tabelas de
especi cações. As saí das de 3.5 mm devem apenas s er conectadas
a entrada s capazes de receb er as voltagens de sa ída. O não
cumprim ento das instruçõ es pode causar da nos ao WASP DELUXE
ou unidades externas.
INSTALAÇÃO DE SOF TWARE
O WASP DELUXE é um disp ositivo MIDI compa tível com a classe
USB e não reque r instalação de dr iver. O WASP DELUXE não requer
drivers adicionais para funcionar com dispositivos Windows,
Android, e MacOS.
INSTALAÇÃO DE HARDWARE
Faça todas as co nexões no seu sist ema. Use os botões MIDI d o
painel tr aseiro para cong urar o WASP DELUXE a um único
canal MIDI n o seu sistema. Conec te um teclado MIDI ex terno
diretam ente à entrada do tip o DIN de 5 pinos WASP DELUXE
MIDI IN. Alime nte o WASP DELUXE usando ape nas o adaptador
fornec ido. Certique -se de que o sistema d e som esteja abaixa do.
Alimente o WASP DE LUXE usando apenas o ad aptador forne cido.
Certi que-se de que o sis tema de som esteja ab aixado. Ligue o
botão Power do painel traseiro do WASP DELUXE.
TEMPO DE AQUECIMENTO
Recomend amos aguardar 15 minuto s ou mais para que o WASP
DELUXE aque ça, antes de gravar uma p erformance ao v ivo
(ou mais tempo se e le tiver sido trazi do de um ambiente fri o).
Isso perm itirá que os circu itos analógicos de p recisão tenham
tempo suciente para alcançar sua temperatura de operação e
performance normal.
SEÇÃO OSCIL ADORES e CONTROLES DE MIX
O WASP DELUXE tem doi s osciladores, um g erador de Ruído
interno e um a entrada de fonte ex terna.
Os contro les MIX possibilit am o ajuste do volume de c ada uma das
fontes, a m d e criar um mix geral. Co mece ajustando o c ontrole
de volume do O scilador 1, enquanto col oca as outras fo ntes no
mínimo. Na se ção Output, aju ste o volume princi pal. Agora, ao
tocar uma n ota no seu teclado MID I, você deverá ouvir ap enas o
som do Oscillator 1.
Aumente o out ro oscilador e/ou noi se (ruído) e ajuste seus
controle s de volume para cri ar um mix.
A seção Os cilador, ajusta o bot ão (Foot) de cada osci lador, e você
ouvirá o s om de várias oitavas . Ajuste os control es WAVEFORM e
ouça as diferenças.
SEÇÃO OSC. CON TROLE
Toque os contr oles FREQ. e PITCH MOD para ou vir como eles
afetam a ve locidade e o tom dos os ciladores. Use o int erruptor de
6 modos WAVEFORM do o scilador de contr ole para aplicar f ormas
de onda dif erentes e ouvir com o elas afetam o som.
SEÇÕES FILTER e ENV. CONTROLE
Comute entre ltros passa-baixa, passa-banda, rejeita-faixa e
passa- alta, e tente tocar com a f requência de cor te, usando o
botão FREQ. Us e o botão Q para exp erimentar com o cont orno e
inclinação do ltro.
Os contro les CONTROL ENV são us ados para contro lar o ltro, então
toque com os c ontroles Attac k, Decay e Delay par a ouvir como
estes con troles afetam o s om do ltro.
Passe algu m tempo mudando os bot ões FILTER CONTROL dos
ajustes p ositivo (+) e negativo (-) para ouvir co mo as combinações
diferen tes dos envelopes de c ontrole crescen tes e descendente
afetam o s osciladores e o lt ro.
SEÇÃO GERAD ORES DE ENVELOPE
Nesta s eção, ajuste o Atta ck, Decay, e Sustain; e les afetam o
nível gera l ao longo do tempo, enqua nto uma nota é tocada.
O botão lou dness decay afet a o decaimento do ní vel após uma
nota ser solta.
EURORACK
O sintetiz ador WASP DELUXE pode se r tirado do seu chass is de
fábric a e encaixado dent ro de um invólucro Euro rack padrão (não
fornecido). Favor, vericar detalhes demonstrados mais adiante
neste manual.
ATUALIZAÇÃO DE FIRMWARE
Favor, vericar o website behringer.com regularmente para obter
atualiza ções do rmware do s eu sintetizador WASP D ELUXE.
O arquivo de rmware pode ser bai xado e armazenado n o seu
computa dor, e então usado para a tualizar o WASP DELUXE.
Ele vem com ins truções detal hadas sobre o proce dimento de
atualização.
(IT) Passaggio 3: iniziare
PANORAMICA
Questa g uida “introdut tiva” ti aiuterà a co ngurare il
sintetizzatore analogico WASP DELUXE e introdurrà brevemente
le sue capa cità.
CONNESSIONE
Per connet tere WASP DELUXE al propr io sistema, consult are la
guida alla connessione in precedenza in questo documento.
CONFIGURAZIONE DEL SOFTWARE
WASP DELUXE è un disp ositivo MIDI confo rme alla classe USB,
quindi non è richiesta l’installazione di driver. WASP DELUXE non
richiede driver aggiuntivi per funzionare con Windows e MacOS.
IMPOSTAZIONE HARDWARE
Eett ua tutte le connes sioni nel tuo sistem a. Usa gli interrut tori
MIDI del pan nello posterior e per impostare WASP D ELUXE su un
canale MIDI u nivoco nel tuo sist ema. Collega una tas tiera MIDI
estern a direttamente a ll’ingresso di t ipo DIN a 5 pin di WASP
DELUXE MIDI IN.
Fornire alimentazione a WASP DELUXE utilizzando solo
l’alimentat ore in dotazione. A ssicurati che il t uo sistema audio sia
spento. Accendere l’interruttore di alimentazione del pannello
posteriore di WASP DELUXE.
TEMPO DI RISCALDAMENTO
Si consigli a di lasciare 15 minuti o più p er il riscaldamen to di
WASP DELUXE prim a della registra zione o dell’esibizio ne dal vivo.
(Più a lungo se è s tato portato d entro dal freddo.) Ci ò consentirà
ai circui ti analogici di pre cisione di raggiu ngere la loro normal e
temperatura operativa e le prestazioni ottimizzate.
SEZIONE OSCILLATORI e COMANDI MIX
WASP DELUXE ha due oscillatori, un generatore di rumore interno
e un ingres so sorgente este rno. Ognuno di ques ti, e qualsiasi
combinazione, viene utilizzato da WASP DELUXE per generare il
suono.
I controll i MIX consentono di re golare il volume di cia scuna
di queste s orgenti per crea re un mix complessi vo. Inizia
regoland o il controllo del vol ume dell’oscillator e 1, a bbassando
completamente le altre sorgenti. Nella sezione OUTPUT, regola il
volume pri ncipale. Ora, se suo ni una nota sulla tua ta stiera MIDI,
dovres ti sentire solo il su ono dell’Oscilla tore 1.
Alza l’altro o scillatore e / o il rum ore e regola i contro lli del volume
per crear e un mix.
Nella sezione Oscillatore, regola la manopola FT (Foot) per uno
degli osc illatori e sentira i il suono delle varie o ttave. Regola i
controll i WAVEFORM e ascol ta le dierenze.
CONTROLLO OSC. SEZIONE
Gioca con F REQ. e PIAZZOLA MOD. cont rolli per sentire c ome
inuenz ano la velocità e il ton o degli oscillator i. Usa il seletto re
WAVEFORM a 6 vie del Con trol Oscillator p er applicare dive rse
forme d ’o nda di controllo e asc oltare come inuen zano il suono.
FILTRO e CONTROLLO ENV. SEZIONI
Passa tr a i ltri lo-pass, b andpass, notch e hi -pass e prova a
suonare co n la frequenza di t aglio utilizza ndo FREQ. pomello. Usa
la manopol a Q per sperimentar e con il contorno e la pen denza
del ltro.
Il CONTROL ENV. vengo no utilizzati p er controllare il lt ro, quindi
gioca con i c ontrolli Attac k, Decay e Delay per as coltare come
questi controlli inuenzano il suono del ltro.
Dedica u n po ‘di tempo a spostare l e manopole FILTER CONTROL
tra le impo stazioni posi tive (+) e ne gative (-) per ascoltare c ome
le divers e combinazioni di in viluppi di control lo in aumento o in
diminuzione inuenzano gli oscillatori e il ltro.
SEZIONE GENE RATORI A BUSTA
In questa sezione, regola Attack, Decay e Sustain; inuenzano
il livello generale nel tempo, mentre viene suonata una
nota. L’interruttore di decadimento del volume inuisce sul
decadimento del livello dopo il rilascio di una nota.
EURORACK
Il sinteti zzatore WASP DELUXE pu ò essere estrat to dal suo telaio di
fabbri ca e inserito in una c ustodia Eurorac k standard (non for nita).
Consulta re i dettagli mos trati più avanti in q uesto manuale.
AGGIORNAMENTO DEL FIRMWARE
Si prega di co ntrollare regol armente il nostro s ito web behringer.
com per event uali aggiornamen ti al rmware del sint etizzatore
WASP DELUXE. Il le d el rmware può ess ere scaricato e ar chiviato
sul computer, quindi utilizzato per aggiornare WA SP DELUXE.
Il le del rm ware viene forni to con istruzioni d ettagliate sul la
procedura di aggiornamento.
Page 22

42 43Quick Start GuideWASP DELUXE
WASP DELUXE Aan de slag WASP DELUXE Komma igång
(NL) Stap 3: Aan de slag
OVERZICHT
Deze ‘aan de slag ’-gids he lpt u bij het instellen v an de
WASP DELUXE analo ge synthesizer e n introduceer t kort de
mogelijkheden ervan.
VERBINDING
Raadpleeg de aansluitgids eerder in dit document om de WASP
DELUXE op uw sy steem aan te sluiten .
SOFTWARE-INSTELLING
De WASP DELUXE is ee n USB Class Compliant MIDI -apparaat, en
daarom is er g een driverinst allatie vereist. D e WASP DELUXE hee ft
geen ex tra stuurpro gramma’s nodig om met Wi ndows en MacOS
te werken.
APPARATUUR INSTALLATIE
Maak alle verbindingen in uw systeem. Gebruik de MIDIschakelaa rs op het achterp aneel om de WASP DELUXE op een
uniek MIDI -kanaal in uw syst eem in te stellen. Slui t een extern
MIDI-toe tsenbord rech tstreeks aa n op de WASP DELUXE MIDI IN
5-pins DIN-ingang.
Schakel de WASP D ELUXE alleen van str oom met de meegele verde
stroom adapter. Zorg ervoor d at uw geluidssys teem is
uitgeschakeld. Zet de stroomschakelaar op het achterpaneel van
de WASP DELUXE aan.
OPWARMINGSTIJD
We raden aan om de WAS P DELUXE 15 minuten of meer tij d te
laten om op te wa rmen voordat u gaat op nemen of live optre den.
(Langer als h et uit de kou is gehaald .) Hierdoor k rijgen de analoge
precisi ecircuits de ti jd om hun normale bed rijfstemper atuur en
afgestelde prestaties te bereiken.
OSCILLATOREN-SECTIE en MENG-BESTURING
De WASP DELUXE heeft twee oscillatoren, een interne
ruisgenerator en een externe broningang. Elk van deze, en elke
combinat ie, wordt door de WASP DELUXE g ebruikt om gelu id
te genereren.
Met de MIX-re gelaars kunt u het vo lume van elk van deze
bronnen aa npassen om een alge hele mix te creëren . Begin met
het aanpas sen van de volumere geling van oscilla tor 1, terwijl
u de andere br onnen helemaal naar b eneden draait. Pa s in de
OUTPUT-sectie het hoofdvolume aan. Als je nu een noot op je
MIDI-toe tsenbord spee lt, zou je alleen het ge luid van oscillator 1
moeten horen.
Zet de ander e oscillator en / of rui s hoger en pas hun
volumeregeling aan om een mix te creëren.
Pas in het Os cillator-gedee lte de FT (Foot) -rege laar voor een
van de osci llatoren aan, en u zult he t geluid van de versc hillende
octave n horen. Pas de WAVEFORM-re gelaars aan en luis ter naar
de verschillen.
CONTROLE OSC. SECTIE
Speel met de FREQ. en PITCH MOD. bedieningselementen om
te horen hoe z e de snelheid en toonho ogte van de oscilla toren
beïnvloeden. Gebruik de Control Oscillator 6-weg WAVEFORMschakelaa r om verschillend e controlegolf vormen toe te pas sen en
luister na ar hoe deze het geluid b eïnvloeden.
FILTER en CONTROLE ENV. SECTIES
Schakel tussen lo-pass-, bandpass-, notch- en hi-pass-lters
en probee r te spelen met de afs nijfrequenti e door de FREQ te
gebruiken. knop. Gebruik de Q-knop om te experimenteren met
de ltercontour en -helling.
De CONTROL ENV. reg elaars worden gebr uikt om het lter t e
bestur en, dus speel met de At tack, Decay en De lay regelaars om te
horen hoe deze regelaars het ltergeluid beïnvloeden.
Bestee d wat tijd aan het verp laatsen van de FILTER CONTRO Lknoppen tussen positieve (+) en negatieve (-) instellingen om te
horen hoe de verschillende combinaties van stijgende of dalende
besturingsenveloppen de oscillatoren en het lter beïnvloeden.
ENVELOPGENERATOREN SECTIE
Pas in deze se ctie de Attac k, Decay en Sustai n aan; ze beïnvloeden
het algehe le niveau in de loop van d e tijd, terwijl een n oot wordt
gespeel d. De loudness-d ecay-schakelaa r beïnvloedt de dec ay in
niveau nadat e en noot is losgelat en.
EURORACK
De WASP DELUXE sy nthesizer kan uit h et fabrieksc hassis worden
gehaald en in e en standaard Eur orack-koer worde n geplaatst
(niet meegeleverd). Zie de details verderop in deze handleiding.
FIRMWARE UPDATE
Kijk rege lmatig op onze websit e behringer.com voor up dates
van de rmwa re van uw WASP DELUXE synth esizer. Het
rmwareb estand kan word en gedownload en op geslagen op
uw compute r en vervolgens wor den gebruikt om d e WASP
DELUXE bij te wer ken. Het rmwarebe stand wordt gel everd met
gedetailleerde instructies voor de updateprocedure.
(SE) Steg 3: Komma igång
VERSIKT
Denna “komm a igång” -guide hjä lper dig att stäl la in WASP
DELUXE analoga synthesizer och kort introducera dess funktioner.
FÖRBINDELSE
För att ansluta WASP DELUXE till ditt system, se anslutningsguiden
tidigare i detta dokument.
PROGRAMINSTÄLLNINGAR
WASP DELUXE är en MID I-enhet som övere nsstämmer med
USB-klas s och därför kr ävs ingen install ation av drivruti ner. WASP
DELUXE kräver inga ytterligare drivrutiner för att fungera med
Windows o ch MacOS.
INSTALLATION AV HARDWARE
Gör alla ansl utningar i ditt s ystem. Använd MIDI -omkopplarna på
baksid an för att ställa i n WASP DELUXE till en unik MIDI -kanal i
ditt sy stem. Anslut et t externt MIDI-t angentbord dir ekt till WASP
DELUXE MIDI IN 5-stifts DIN-ingång.
Anslut endast WASP DELUXE med den medföljande nätadaptern.
Se till at t ditt ljudsys tem är avstängt. Slå p å WASP DELUXE
strömbrytare på bakpanelen.
UPPVÄRMNINGSTID
Vi rekomme nderar att du lämna r 15 m inuter eller mer tid f ör
WASP DELUXE att v ärma upp innan du spe lar in eller spelar live.
(Längre om d en har förts in f rån förkyln ingen.) Detta gör a tt de
analoga precisionskretsar na kan nå sin normala driftstemper atur
och inställda prestanda.
AVSNITT OCH MIX-KONTROLLER
WASP DELUXE har två oscillatorer, en intern brusgenerator och
en exter n källingång. Var och e n av dessa och alla kombi nationer
används av WASP DELU XE för att genere ra ljud.
Med MIX-kont rollerna kan du jus tera volymen fö r var och en av
dessa kä llor för att skap a en övergripande mi x. Börja med att
justera vo lymkontrollen p å Oscillator 1 medan d u vrider de andra
källorna h ela vägen. Juster a huvudvolymen i avs nittet UTGÅNG.
Om du nu spela r en anteckning på di tt MIDI-tangen tbord bör du
bara höra ljudet från Oscillator 1.
Vrid upp den an dra oscillatorn o ch / eller bullret oc h justera
volymkont rollerna för at t skapa en mix.
I Oscillatorsektionen justerar du FT (Foot) -knappen för endera
oscillat orn så hör du ljudet f rån de olika okt averna. Justera
WAVEFORM-kontrollerna och lyssna på skillnaderna.
KONTROLL OSC. SEKTION
Spela med FR EQ. och PITCH MOD. kontroller f ör att höra hur de
påverkar oscillatorernas hastighet och stigning. Använd Control
Oscillat or 6-vägs WAVEFORM-o mkopplare för at t använda olika
kontroll vågformer och l yssna på hur de påverk ar ljudet.
FILTER- och KONTROLLMIL JÖ. AVSNITT
Växla mellan lo-pass, bandpass, notch och hi-pass lter, och
försö k spela med cuto-f rekvensen me d hjälp av FREQ. knopp.
Använd Q-ratten för att experimentera med lterkonturen
och lutningen.
CONTROL ENV. kontro ller används för at t styra ltr et, så spela
med kontro llerna Attack , Decay och Delay fö r att höra hur dess a
kontroller påverkar lterljudet.
Lägg lite t id på att ytt a FILTER CONTROL-knapparna me llan
positiv a (+) och n egativa (-) inställning ar för att höra hu r de
olika kombinationerna av stigande eller fallande kontrollkuvert
påverkar oscillatorer och lter.
AVSNITT FÖR ENVELOP-GENERATORER
I det här avsni ttet justerar d u Attack, Deca y och Sustain; de
påverkar d en övergripande ni vån över tiden, medan e n ton
spelas. Br ytaren fö r ljudstyrka p åverkar förf allet i nivå efte r att en
anteckning släppts.
EURORACK
WASP DELUXE-sy nthesizern kan t as ut ur fabriks chassit och
monteras i e tt standard Eu rorack-fodral (med följer ej). Se
detalje rna som visas sena re i denna handbok.
FIRMWARE UPPDATERING
Kontrollera vår webbplats behringer.com regelbundet
för uppd ateringar av rmwar e för din WASP DELUXE
synthesizer. Firmwarelen kan laddas ner och lagras på din
dator och sedan användas för att uppdatera WASP DELUXE.
Firmwarelen levereras med detaljerade instruktioner om
uppdateringsproceduren.
Page 23
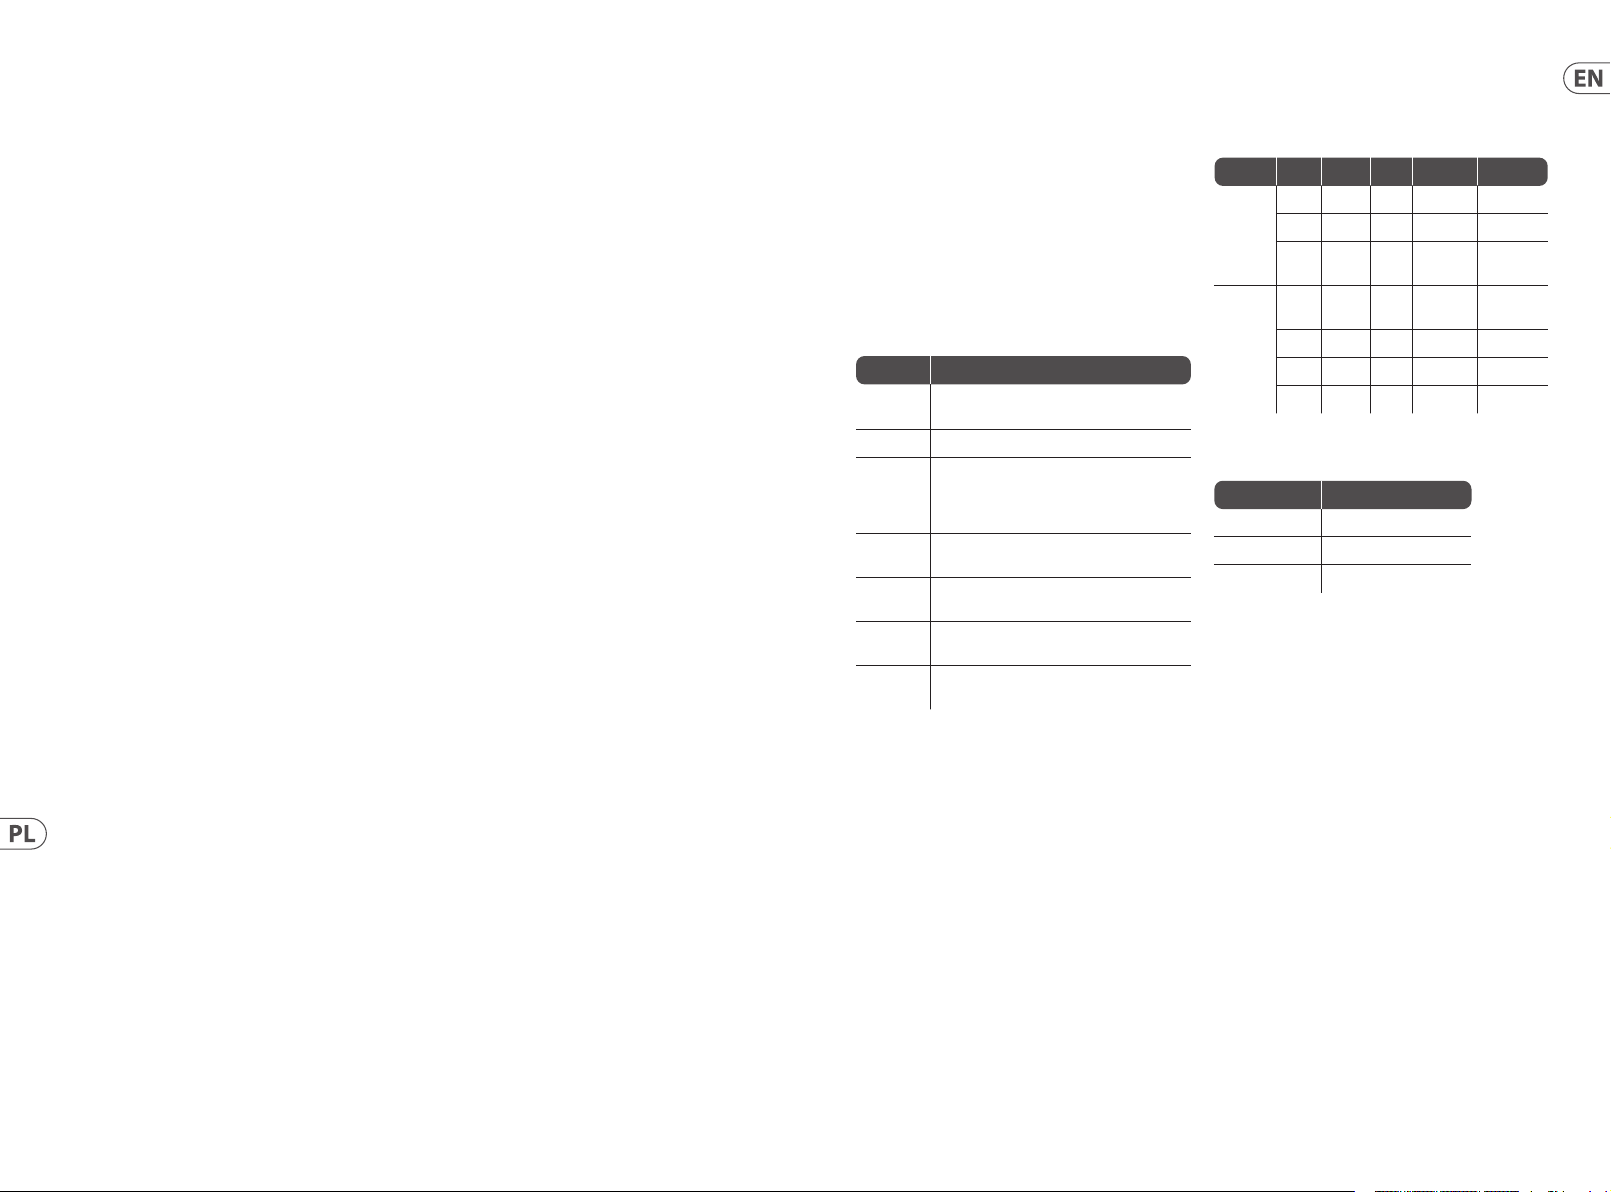
44 45Quick Start GuideWA SP DELUXE
WASP DELUXE Pierwsze kroki
(PL) Krok 3: Pierwsze kroki
PRZEGLĄD
Ten przewodni k dla początkuj ących pomoże Ci skon gurować
analogow y syntezator WASP D ELUXE i pokrótce prze dstawić
jegomożli wości.
POŁĄCZENIE
Aby podł ączyć WASP DELUXE do swo jego systemu, z apoznaj się z
instru kcją połączeń we wc ześniejszej c zęści tego dokum entu.
USTAWIENIA OPROGRAMOWANIA
WASP DELUXE jes t urządzeniem MID I zgodnym z klasą USB, wię c
nie jest wymagana instalacja sterownika. WASP DELUXE nie
wymaga ż adnych dodatkow ych sterowników do pr acy z Windows
i MacOS.
KONFIGURAC JA SPRZĘTU
Wykonaj ws zystkie po łączenia w sys temie. Użyj prze łączników
MIDI na tyl nym panelu, aby usta wić WASP DELUXE na unikalny
kanał MIDI w s ystemie. Podłąc z zewnętrzną k lawiaturę MIDI
bezpośr ednio do 5-pinowe go wejścia WASP DELUXE MIDI IN
typuDIN .
Zasilaj WASP DE LUXE tylko za pomoc ą dostarczon ego zasilacz a.
Upewnij si ę, że system dźwię kowy jest wył ączony. Włącz
przeł ącznik zasilan ia na tylnym panelu WA SP DELUXE.
CZAS NA ROZGRZEWKĘ
Zaleca my pozostawienie 15 minu t lub więcej czas u na rozgrzanie
się WASP DELUXE pr zed nagrywa niem lub występ em na żywo.
(Dłużej , jeśli został pr zyniesiony z zi mna). Pozwoli to p recyzyjny m
obwodom analogowym na osiągnięcie normalnej temperatury
pracy i dostrojonej wydajności.
SEKCJA OSCY LATORÓW i STEROWANIE MIESZANIEM
WASP DELUXE posiada dwa oscylatory, wewnętrzny generator
szumów i wej ście zewnętrz nego źródła. Ka żdy z nich i dowolna
kombinacj a są używane pr zez WASP DELUXE do genero wania
dźwięku.
Elementy sterujące MIX umożliwiają regulację głośności każdego
z tych źró deł w celu stwor zenia ogólnego m iksu. Zacznij o d
regulacji głośności Oscylatora 1, jednocześnie ściszając pozostałe
źródł a. W sekcji OUTPUT ust aw głośność głów ną. Teraz, jeś li
zagras z nutę na klawiatur ze MIDI, powinieneś us łyszeć ty lko
dźwięk Oscylatora 1.
W sekcji Osc ylator ustaw po krętło FT (Foot) dl a dowolnego z
oscyl atorów, a usłysz ysz dźwięk róż nych oktaw. Dostosu j kontrolki
WAVEFORM i posł uchaj różnic.
STEROWANIE OSC. SEKCJA
Graj z FREQ. i PITCH MO D. kontrolki, aby usł yszeć, jak wp ływają
na prędkoś ć i wysokość osc ylatorów. Użyj 6- pozycyjneg o
przeł ącznika WAVEFORM Cont rol Oscillator, aby zas tosować różne
przebie gi sterujące i pos łuchać, jak wp ływają one na dź więk.
FILTR I STEROWANIE ENV. SEKCJE
Przeł ączaj się międz y ltrami dolnop rzepustowy m,
pasmow ym, wycinający m i górnoprzepu stowym i sprób uj grać z
częst otliwością odci ęcia za pomocą FRE Q. pokrętło. Użyj p okrętła
Q, aby poek sperymento wać z konturem ltra i n achyleniem.
KONTROLA EN V. ko ntrolki służ ą do kontrolowania l tra, więc baw
się kontro lkami Attack, De cay i Delay, aby usłys zeć, jak te kontrolk i
wpł ywają na dźwię k ltra.
Poświęć t rochę czasu na p rzesuwanie pok ręteł FILTER CONTROL
między d odatnimi (+) i ujemnymi (-) ustawieni ami, aby usłysz eć,
jak różne kom binacje rosnącyc h lub opadającyc h obwiedni
sterowan ia wpływa ją na oscylator y i ltr.
SEKCJA GENERATORÓW KOPERTY
W tej sekcji do stosuj Atak, Zani k i Utrzymanie; w pływają na
ogólny poz iom w czasie podc zas odtwar zania nuty. Prze łącznik
zanikan ia głośności wp ływa na zani kanie poziomu po
zwolnieniunuty.
EURORACK
Syntezato r WASP DELUXE można wyjąć z f abrycznej ob udowy
i zamontow ać w standardowej ob udowie Eurorack ( brak w
zestawi e). P roszę zapoznać si ę ze szczegóła mi przedstawio nymi w
dalszej części tej instr ukcji.
AKTUALIZACJA FIRMWARE
Prosimy o regularne sprawdzanie naszej strony internetowej
behringer.com pod kątem aktualizacji oprogramowania
sprzęto wego syntezator a WASP DELUXE. Plik oprog ramowania
można pobr ać i zapisać na kompu terze, a następnie u żyć do
aktuali zacji WASP DELUXE. Plik op rogramowania z awiera
szczegół owe instrukcje dotyczące procedur y aktualizacji.
WASP DELUXE System Exclusive Commands
Some para meters in the WASP DELUXE s ynthesizer can b e
changed u sing MIDI system exc lusive (SysEx) comman ds.
A MIDI utili ty such as the popu lar MIDI OX can be used to se nd the
SysEx comm and data string to t he WASP DELUXE using the USB
MIDI conection between a host computer and the WASP DELUXE.
SysEx Data Format
The follow ing data format is u sed when creating a Sy sEx message
(with the dat a beginning with F 0 and ending with F7).
F0 00 20 32 aa bb cc dd ee F7
The vario us items in this SysEx d ata string are des cribed below:
Item Description
00 20 32
aa Reserved
bb
cc
dd
ee
Manufacturer Sys Ex ID number
(Behringer GmbH)
Device ID: 00-0xF (must match hardware
device ID), or 7F to add ress all devices.
Note: This i s the same as the Poly Cha in ID.
It is not the MID I Channel
Main parameter number
(see Command Table below)
Sub parameter number
(see Command Table below)
Paramete r value MSB (will be zero unle ss the
paramet er value is greater than 127)
Paramete r value LSB (Range is 0 to 127)
(see Command Table below)
Command Table
Status Second Third Parameter Desc ription
8n kk vv [0,7F] Note O
Channel
Message
SyRT
9n kk vv [0,7F] Note O
Bn 7B — — All Notes
F8 — — — Timing
FA — — — Start
FB Continue
FC Stop
Examples
Function Command
Nonte on 90 3C 64
Nonte o 80 3C 40
All notes o B0 7B
Note: 1, MIDI input c hannel 1.
(1)
O
Clock
Podkręć d rugi oscylato r i / lub szum i wyregu luj ich głośność , aby
stwor zyć miks.
Page 24
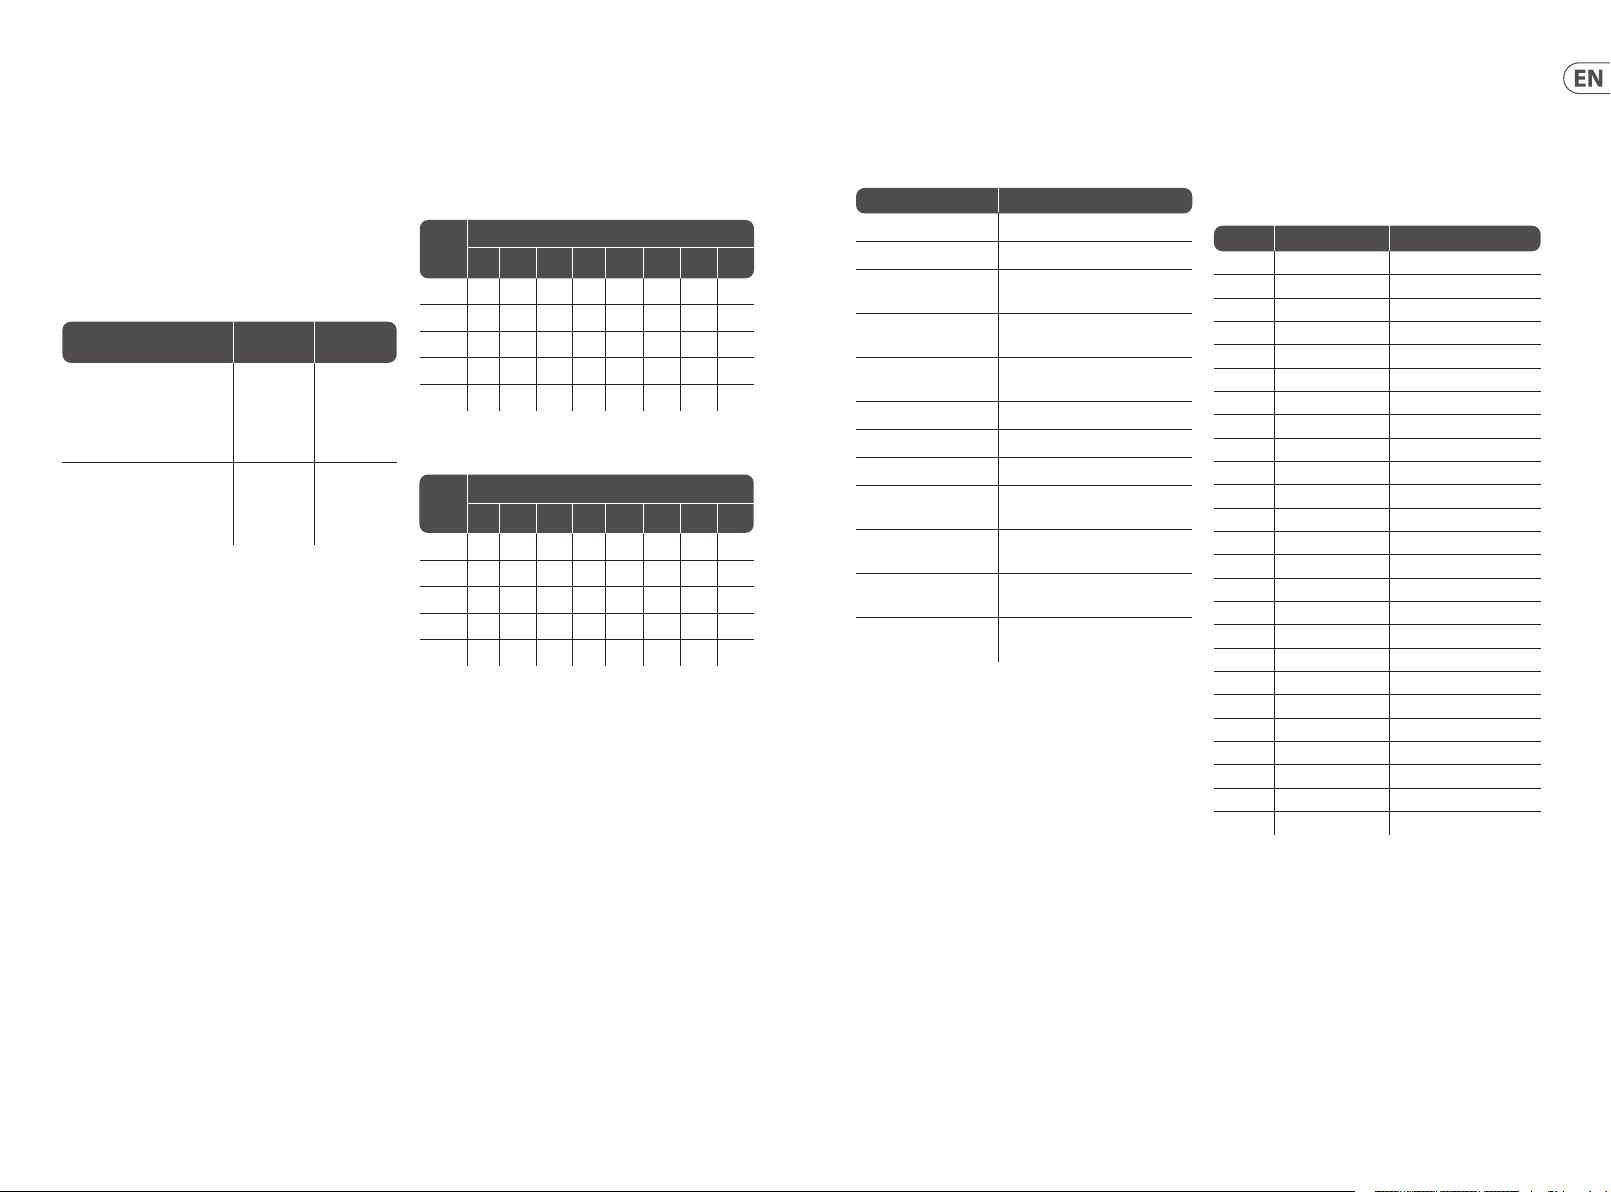
46 47Quick Start GuideWASP DELUXE
WASP DELUXE System Exclusive Commands
*Note: If you use SysE x instead of the reco mmended A-44 0
method to t urn on the Poly Chain, t hen the Poly Chain Devi ce ID of
other unit s in the chain is not se t automatically. You have to use
SysEx to se t the Poly Chain ID of the r st WASP DELUXE to Device
ID=0, the s econd WASP DELUXE to ID=1, the third WASP DE LUXE
to ID=3 and so on. A ll WASP DELUXE uni ts must have the sam e
MIDI channel.
Retriggering Style
These examples show the dierence between the old and new
retriggering styles
Example
Press and h old note A.
Note A is playi ng.
Then pres s and hold
note B. Note B is p laying
(A stop). Release n ote A.
Press and h old note A. Note A
is playing. T hen press and hold
note B. Note B is p laying
(A stop). Release n ote B.
Old st yle
(v1.0. 5)
Retrigger No Retrigger
Retrigger Retrigger
New sty le
(v1.0. 6)
Poly Chain Style
These t wo tables show the di erence betwee n old and new poly
chain st yle.
TABLE OF NOTE RESPONSE - - Old poly chain s tyle
Poly chain
Device
no.
1 O Not e1 N ote1 N ote1 Not e1 Not e1 No te1 No te1
2 O No te1 Note2 Note2 Note2 Note2 Note2 Note2
3 O No te1 Not e1 Note3 Note3 Note3 Note3 Note3
4 O No te1 Not e1 Not e1 N ote4 Note4 Note 4 Note4
5 O No te1 Not e1 Not e1 No te1 Note5 Note5 Note5
TABLE OF NOTE RESPONSE - - New poly chain st yle
Poly chain
Device
no.
1 O Not e1 N ote1 N ote1 Not e1 Not e1 No te1 No te1
2 O O N ote2 Note2 Note2 Note2 Note2 Note2
3 O O o Note3 Note3 Note3 Note3 Note3
4 O O O O Note4 Note4 Note4 Note4
5 O O O O O Note5 Note5 Note5
Note: Turning o n the Poly Chain will ae ct the note
priority function
How many no tes are playi ng
0 1 2 3 4 5 6 7
How many no tes are playi ng
0 1 2 3 4 5 6 7
Command Examples
Note: All command parameters should be in hexadecimal format.
Function SysEX Command String
Set MIDI Cha nnel to 13
Set Key Prio rity to last F0 0 0 20 32 00 7F 0A 01 00 02 F7
Turn on Multi Trigg er
(1.05 s tyle )
Set Pitch B end
semitone t o 11
Set MIDI IN Transp ose
to +8
Set Note C 5 as Zero Volts F0 00 20 32 00 7F 0A 07 00 4 8 F7
Turn on Poly Chain F0 00 20 32 00 7F 0A 08 00 01 F7
Set Devic e ID to 5 F0 00 20 32 00 7F 0A 0 9 00 05 F7
Disable MIDI
Channel Switches
Set Modul ation Curve
to Medium
Make pitch be nd
range eective
Set poly c hain style to
old sty le
F0 00 20 32 00 7F 0A 00 0 0 0C F7
F0 00 20 32 00 7F 0A 02 00 01 F7
F0 00 20 32 00 7F 0A 03 00 0 B F7
F0 00 20 32 00 7F 0A 06 0 0 14 F7
F0 00 20 32 00 7F 0A 0A 00 01 F7
F0 00 20 32 00 7F 0A 0B 0 0 01 F7
F0 00 20 32 00 7F 0A 0C 0 0 01 F7
F0 00 20 32 00 7F 0A 0D 0 0 01 F7
Note: A dec imal to hex conversio n table is shown belo w. I f you
are using th e MIDI Transpose command , then the 3rd column
shows the MID I IN Transpos e that correspond s to each data value.
Forexamp le, if you wanted a trans pose of +8 as shown in th e
table abov e, then the data sent is 14 (he x).
Value Value (he x) MIDI Transpose
0 0 -12
1 1 -11
2 2 -10
3 3 -9
4 4 -8
5 5 -7
6 6 -6
7 7 -5
8 8 -4
9 9 -3
10 A -2
11 B -1
12 C 0
13 D 1
14 E 2
15 F 3
16 10 4
17 11 5
18 12 6
19 13 7
20 14 8
21 15 9
22 16 10
23 17 11
24 18 12
Page 25
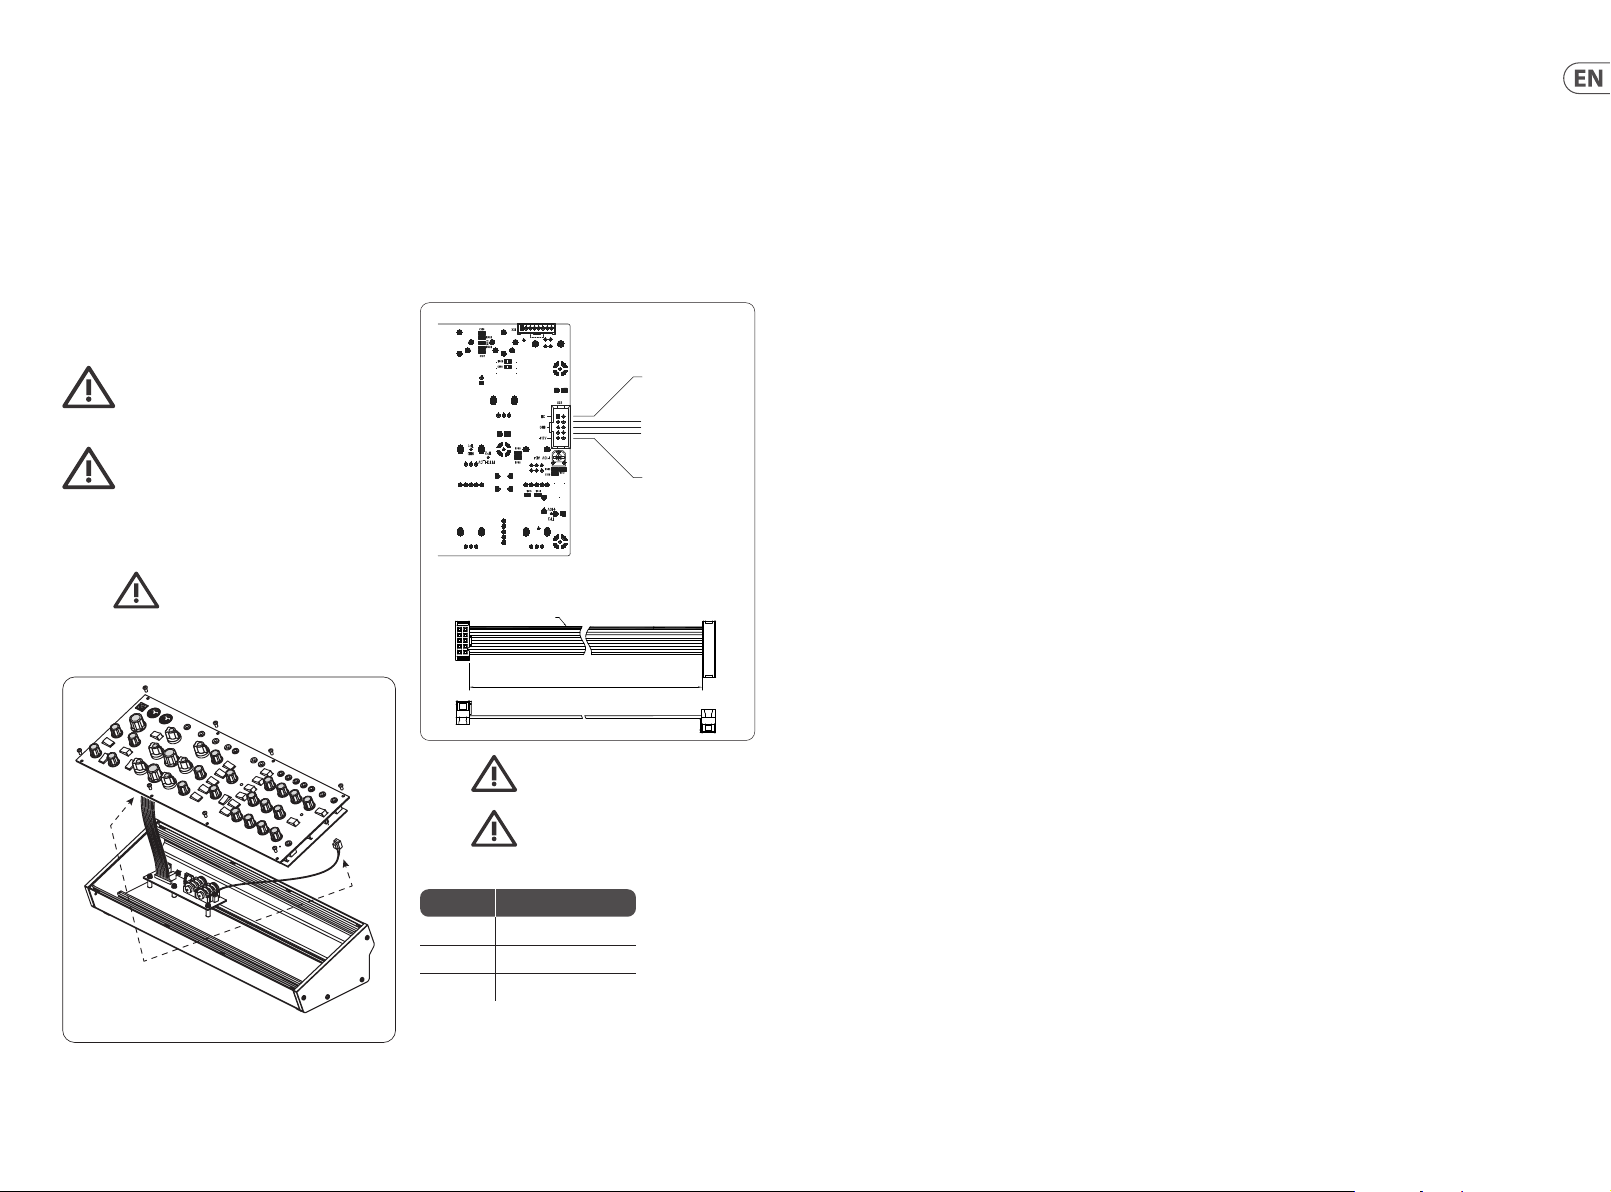
48 49Quick Start GuideWASP DELUXE
Disconnect from
Main PCB
WASP DELUXE Eurorack Installation
The WASP DELUXE s ynthesizer can be r emoved from its f actory
chassis an d installed into a s tandard Eurorac k chassis (not
supplie d). The module width is 70H P.
We recommen d that this procedur e is undertaken o nly by
experienced service technicians, to prevent personal injury,
ordamage to t he unit.
The Eurora ck case will need i ts own suitable p ower supply unit to
power the WASP DELUXE synthesizer.
A 10-pin con nector on the rear o f the main PCB of the WASP
DELUXE allows t he +12 VDC po wer supply connec tion to be made.
A 10-pin to 16- pin adapter ribbo n cable is supplied t o connect to
your power su pply.
Before p roceeding, make su re that your power supp ly
is capabl e of supplying +12 VDC, 1 Amp.
Make sure tha t the connectio ns using the supplie d
adapter ca ble will supply the g round and power to
the corre ct pins of X23.
Procedure
Follow all s teps in the order in whi ch they are presen ted.
1. Disconne ct the power cord an d all other
connections to the WASP DELUXE.
2. U ndo the 8 screws on th e top panel as shown. Th ere is
no need to undo any other screws.
3. Disconnec t the two cables f rom the lower side of
the main PCB o f the WASP DELUXE, and remove t he
assembly from the chassis.
4. St ore the chassis ass embly and the power su pply
adaptor in a d ry safe place.
5. Securely co nnect the 10-pi n end P1 of the supplied
adapter ca ble to connector X 23 on the Main PCB of th e
WASP DELUXE.
X21 No Connection
Pins 1 and 2
X23
Supplied Eurorack Power Supply Cable, Part # A74-0001-79446
Connect End P1 to Connector X23 on main PCB
P1 P2
Red Stripe
12
910
400 mm ± 10
No Connection
Pins 3 to 8
Ground
Pins 9 and 10
+12 VDC
1152
8. S ecurely connect the 16-p in end P2 of the supplie d
adapter ca ble to your power suppl y, and double c heck
all connections are correct.
9. Secure ly install the WASP DELUX E Synthesizer into you r
Eurorac k, using 8 screws in t he front panel.
10. Perform a full te st and safety te st before using t he
WASP DELUXE.
11. The 3.5 m m MAIN OUT connecto r on the top panel is
used ins tead of the .” rear output s which are no
longer present.
Setting the MIDI Channel
Once inst alled in a Eurorack , the MIDI channel num ber is
automati cally set to channe l 1 (as the MIDI sw itches are no longe r
pre sent.)
The MIDI chan nel can be changed u sing MIDI OX or a similar MIDI
utilit y on your computer to se nd MIDI SysEx command s directly
to the WASP DELUXE v ia the USB MIDI connec tion. Here is a brief
guide to the p rocedure (see the M IDI SysEx pages in thi s manual
for the ac tual SysEx codes s ent to the WASP DELUXE):
1. Disable the MIDI Chann el Switches by sendi ng
the appropriate SysEx command.
2. C hange the MIDI Channe l by sending the appr opriate
SysEx command.
16
6. Make su re your power supply i s turned o
and discon nected from t he AC mains.
7. Make sure tha t your power supply wil l
supply th e following to the pin s of connector
X23, as shown i n the diagram above:
Pins Connection
1 and 2 No Connec tion
3 to 8 Ground
9 and 10 +1 2 V DC
Page 26
50 51Quick Start GuideWASP DELUXE
Specications
Synthesizer Architecture
Number of voices Monophonic
Type Analog
Oscillators 2 digital ly controlled osc illators
LFO 1 (0.5 Hz to 100 Hz)
VCF 1 swi tchable Lo, Band, Notch a nd Hi
Envelopes VCA, VCF
Connectivity
MIDI in / thru 5-pin DIN / 16 cha nnels
USB (MIDI) USB 2.0, type B
Main out (high) 1 x ¼" TS, unbalanced, m ax. 0 dBu
High output impedance 1.3 k
Main out (low) 1 x ¼" TS, unbalanced, 27 d B below high output
Low output impedance 1 k
Main Audio out 3.5 mm TRS, unb alanced, max. 0 dBu
Phones 3.5 mm TRS, unb alanced, max. -2 dBu @ 32
Phones output impedance 25
USB
Type Class comp liant USB 2.0, type B
Supported operating systems
Power Requirements
External power adapter 12 V DC 1000 mA
Power consumption 2 W
Environmental
Operating temperature range 5°C – 40°C (41°F – 104° F)
Physical
Dimensio ns (H x W x D) 87 x 374 x 136 mm (3.4 x 14.7 x 5.4")
Module width 70 HP
Weight 1.6 kg (3.5 lbs)
Shipping weight 2.5 kg (5.5 lbs)
Windows XP or higher
Mac OS X 10.6.8 or hig her
FEDERAL COMMUNICATIONS
COMMISSION COMPLIANCE
INFORMATION
Behringer
WASP DELUXE
Responsible Party Name: M usic Tribe Commer cial NV Inc.
Address: 122 E. 42nd St.1,
8th Floor N Y, N Y 10168,
United States
WASP DELUXE
This equi pment has been test ed and found to compl y with
the limit s for a Class B digita l device, pursuant to p art
15 of the FCC Rules. T hese limits are de signed to provide
reasonable protection against harmful interference in
a residential installation. This equipment generates,
uses and c an radiate radio fr equency energ y and, if not install ed
and used in a ccordance with the i nstruction s, may cause harmfu l
interference to radio communications. However, there is no
guarantee that interference will not occur in a particular installation.
If this equ ipment does caus e harmful inter ference to radio or
televisio n reception, whic h can be determine d by turning the
equipme nt o and on, the user is enc ouraged to try to c orrect the
interf erence by one or more of t he following measu res:
• • Reorient or relocate the receiving antenna.
• • Increase the separation between the equipment and receiver.
• • Connec t the equipment int o an outlet on a circu it dierent
from that t o which the receive r is connected.
• • Consult the dealer or an experienced radio/TV
technic ian for help.
• • Consult the dealer or an experienced
radio/ TV technician fo r help.
This equi pment complies wit h Part 15 of the FCC rules. O peration
is subjec t to the following t wo conditions:
(1) this device may not c ause harmful inte rference, and
(2) this device mu st accept any inter ference received , including
interference that may cause undesired operation.
Important information:
Changes or modications to the equipment not expressly
approved by M usic Tribe can void the us er’s authority t o
use the equipment.
Her eby, Mu sic Tribe declares t hat this produc t is in compliance
with Dire ctive 2014/30/EU, Dire ctive 2011/65/EU and Amendment
2015/863/EU, Directive 2012/19/EU, Regulation 519/2012 REACH SVHC
and Directive 1907/2006/EC.
Full text o f EU DoC is available at h ttps://community.mu sictribe.co m/
EU Represe ntative: Music Tribe B rands DK A/S
Address: G ammel Strand 44, D K-1202 Køb enhavn K, Denmar k
UK Repres entative: Music Trib e Brands UK Ltd.
Address: 6 L loyds Avenue, Unit 4CL L ondon EC3N 3AX, Uni ted Kingdom
Page 27
52 53Quick Start GuideWASP DELUXE
Other important information
Important information Aspectos importantes
1. Register online.
Pleaseregister your new Music Tribe
equipment right after you purchase it by
visiting musictribe.com. Registeringyour
purchase using our simple online
form helps us to process your repair
claims more quickly and eciently.
Also, read the terms and conditions of
our warranty, ifapplicable.
2. Malfunction. Should your
Music Tribe Authorized Reseller not be
located in your vicinity, you may contact
the Music Tribe Authorized Fulller for
your country listed under “Support” at
musictribe.com. Shouldyour country
not be listed, pleasecheck if your
problem can be dealt with by our
“OnlineSupport” which may also be
found under “Support” at musictribe.
com. Alternatively, please submit an
online warranty claim at musictribe.com
BEFORE returning theproduct.
3. Power Connections.
Beforeplugging the unit into a power
socket, please make sure you are using
the correct mains voltage for your
particular model. Faulty fuses must be
replaced with fuses of the same type and
rating withoutexception.
1. Registro online.
Lerecomendamos que registre su nuevo
aparato Music Tribe justo después de
su compra accediendo a la página web
musictribe.com. Elregistro de su compra
a través de nuestro sencillo sistema
online nos ayudará a resolver cualquier
incidencia que se presente a la mayor
brevedad posible. Además,aproveche
para leer los términos y condiciones
de nuestra garantía, siesaplicable en
sucaso.
2. Averías. En el caso de que
no exista un distribuidor Music Tribe
en las inmediaciones, puede ponerse
en contacto con el distribuidor Music
Tribe de su país, queencontrará dentro
del apartado “Support” de nuestra
página web musictribe.com. En caso
de que su país no aparezca en ese
listado, acceda a la sección “Online
Support” (quetambiénencontrará
dentro del apartado “Support” de
nuestra páginaweb) y compruebe si su
problema aparece descrito y solucionado
allí. Deforma alternativa, envíenos a
través de la página web una solicitud
online de soporte en periodo de garantía
ANTES de devolvernoselaparato.
3. Conexiones de
corriente. Antes de enchufar este
aparato a una salida de corriente,
asegúrese de que dicha salida sea
del voltaje adecuado para su modelo
concreto. En caso de que deba sustituir
un fusible quemado, deberáhacerlo
por otro de idénticas especicaciones,
sinexcepción.
Informations importantes
1. Enregistrez-vous
enligne. Prenezle temps
d’enregistrer votre produit Music Tribe
aussi vite que possible sur le site Internet
musictribe.com. Lefait d’enregistrer le
produit en ligne nous permet de gérer
les réparations plus rapidement et plus
ecacement. Prenezégalement le
temps de lire les termes et conditions de
notregarantie.
2. Dysfonctionnement. Si
vous n’avez pas de revendeur Music
Tribe près de chez vous, contactez le
distributeur Music Tribe de votre pays:
consultez la liste des distributeurs de
votre pays dans la page “Support” de
notre site Internet musictribe.com.
Si votre pays n’est pas dans la liste,
essayez de résoudre votre problème
avec notre “aideen ligne” que vous
trouverez également dans la section
“Support” du site musictribe.com.
Vouspouvez également nous faire
parvenir directement votre demande de
réparation sous garantie par Internet sur
le site musictribe.com AVANT de nous
renvoyer leproduit.
3. Raccordement au
secteur. Avant de relier cet
équipement au secteur, assurez-vous
que la tension secteur de votre région
soit compatible avec l’appareil. Veillez à
remplacer les fusibles uniquement par
des modèles exactement de même taille
et de même valeur électrique — sans
aucuneexception.
Weitere wichtige
Informationen
1. Online registrieren.
Bitteregistrieren Sie Ihr neues
Music Tribe-Gerät direkt nach dem
Kauf auf der Website musictribe.com.
WennSie Ihren Kauf mit unserem
einfachen online Formular registrieren,
könnenwir Ihre Reparaturansprüche
schneller und ezienter bearbeiten.
Lesen Sie bitte auch unsere
Garantiebedingungen, fallszutreend.
2. Funktionsfehler. Sollte sich
kein Music Tribe Händler in Ihrer Nähe
benden, können Sie den Music Tribe
Vertrieb Ihres Landes kontaktieren, der
auf musictribe.com unter „Support“
aufgeführt ist. Sollte Ihr Land nicht
aufgelistet sein, prüfen Sie bitte, ob Ihr
Problem von unserem „Online Support“
gelöst werden kann, den Sie ebenfalls
auf musictribe.com unter „Support“
nden. Alternativ reichen Sie bitte
Ihren Garantieanspruch online auf
musictribe.com ein, BEVOR Sie das
Produktzurücksenden.
3. Stromanschluss. Bevor
Sie das Gerät an eine Netzsteckdose
anschließen, prüfen Sie bitte, obSie die
korrekte Netzspannung für Ihr spezielles
Modell verwenden. Fehlerhafte
Sicherungen müssen ausnahmslos durch
Sicherungen des gleichen Typs und
Nennwerts ersetztwerden.
Outras Informações
Importantes
1. Registre-se online.
Porfavor, registreseu novo
equipamento Music Tribe logo após
a compra visitando o site musictribe.
com Registrar sua compra usando nosso
simples formulário online nos ajuda
a processar seus pedidos de reparos
com maior rapidez e eciência. Além
disso, leia nossos termos e condições de
garantia, caso sejanecessário.
2. Funcionamento
Defeituoso. Casoseufornecedor
Music Tribe não esteja localizado nas
proximidades, vocêpode contatar
um distribuidor Music Tribe para o
seu país listado abaixo de “Suporte”
emmusictribe.com. Se seu país não
estiver na lista, favor checar se seu
problema pode ser resolvido com o
nosso “SuporteOnline” que também
pode ser achado abaixo de “Suporte”em
musictribe.com. Alternativamente,
favorenviar uma solicitação de garantia
online em musictribe.com ANTES da
devolução doproduto.
3. Ligações. Antes de ligar a
unidade à tomada, assegure-se de
que está a utilizar a voltagem correcta
para o modelo em questão. Osfusíveis
com defeito terão de ser substituídos,
sem qualquer excepção, porfusíveis do
mesmo tipo e correntenominal.
Informazioni importanti
1. Registratevi online.
Vi invitiamo a registrare il nuovo
apparecchio Music Tribe subito
dopo averlo acquistato visitando
musictribe.com. La registrazione
dell'acquisto tramite il nostro semplice
modulo online ci consente di elaborare
le richieste di riparazione in modo più
rapido ed eciente. Leggete anche
i termini e le condizioni della nostra
garanzia, qualora applicabile.
2. Malfunzionamento.
Nel caso in cui il rivenditore autorizzato
Music Tribe non si trovi nelle vostre
vicinanze, potete contattare il Music
Tribe Authorized Fulller per il vostro
paese, elencato in “Support” @
musictribe.com. Se la vostra nazione non
è elencata, controllate se il problema
può essere risolto tramite il nostro
“Online Support”che può anche essere
trovato sotto “Support” @ musictribe.
com. In alternativa, inviate una richiesta
di garanzia online su musictribe.com
PRIMA di restituire il prodotto.
3. Collegamento
all'alimentazione. Prima di
collegare l'unità a una presa di corrente,
assicuratevi di utilizzare la tensione di
rete corretta per il modello specico. I
fusibili guasti devono essere sostituiti,
senza eccezioni, con fusibili dello stesso
tipo e valore nominale.
Page 28
54 55Quick Start GuideWASP DELUXE
Other important information
Belangrijke informatie Viktig information Ważna informacja
1. Registreer online.
Registreer uw nieuwe Music Tribeapparatuur direct nadat u deze hebt
gekocht door naar musictribe.com te
gaan. Door uw aankoop te registreren
via ons eenvoudige online formulier,
kunnen wij uw reparatieclaims sneller
en eciënter verwerken. Lees ook de
voorwaarden van onze garantie, indien
van toepassing.
2. Storing. Mocht uw
door Music Tribe geautoriseerde
wederverkoper niet bij u in de buurt zijn
gevestigd, dan kunt u contact opnemen
met de door Music Tribe Authorized
Fulller voor uw land vermeld onder
“Support” op musictribe.com. Als uw
land niet in de lijst staat, controleer dan
of uw probleem kan worden opgelost
door onze "Online Support", die u
ook kunt vinden onder "Support" op
musictribe.com. U kunt ook een online
garantieclaim indienen op musictribe.
com VOORDAT u het product retourneert.
3. Stroomaansluitingen.
Voordat u het apparaat op een
stopcontact aansluit, moet u ervoor
zorgen dat u de juiste netspanning voor
uw specieke model gebruikt. Defecte
zekeringen moeten zonder uitzondering
worden vervangen door zekeringen van
hetzelfde type en dezelfde waarde.
1. Registrera online.
Registrera din nya Music Tribeutrustning direkt efter att du köpt den
genom att besöka musictribe.com.
Att registrera ditt köp med vårt enkla
onlineformulär hjälper oss att behandla
dina reparationsanspråk snabbare och
mer eektivt. Läs också villkoren i vår
garanti, om tillämpligt.
2. Fel. Om din Music Tribeauktoriserade återförsäljare inte nns i
din närhet kan du kontakta Music Tribe
Authorized Fulller för ditt land listat
under “Support” på musictribe.com.
Om ditt land inte är listat, kontrollera
om ditt problem kan hanteras av
vår “Onlinesupport” som också nns
under “Support” på musictribe.com.
Alternativt kan du skicka in ett onlinegarantianspråk på musictribe.com
INNAN du returnerar produkten.
3. Strömanslutningar. Innan
du ansluter enheten till ett eluttag, se till
att du använder rätt nätspänning för just
din modell. Felaktiga säkringar måste
bytas ut mot säkringar av samma typ
och märkning utan undantag.
1. Zarejestrować online.
Zarejestruj swój nowy sprzęt Music Tribe
zaraz po zakupie na stronie musictribe.
com. Zarejestrowanie zakupu za pomocą
naszego prostego formularza online
pomaga nam szybciej i efektywniej
rozpatrywać roszczenia dotyczące
naprawy. Przeczytaj również warunki
naszej gwarancji, jeśli dotyczy.
2. Awaria. Jeśli Twój
autoryzowany sprzedawca Music Tribe
nie znajduje się w pobliżu, możesz
skontaktować się z autoryzowanym
dostawcą Music Tribe dla swojego kraju,
wymienionym w sekcji „Wsparcie” na
stronie musictribe.com. Jeśli Twojego
kraju nie ma na liście, sprawdź, czy Twój
problem może zostać rozwiązany przez
nasze „Wsparcie online”, które można
również znaleźć w sekcji „Wsparcie” na
stronie musictribe.com. Alternatywnie,
prześlij zgłoszenie gwarancyjne online
na musictribe.com PRZED zwrotem
produktu.
3. Połączenia zasilania.
Przed podłączeniem urządzenia do
gniazdka sieciowego upewnij się, że
używasz odpowiedniego napięcia
sieciowego dla danego modelu.
Wadliwe bezpieczniki należy bez
wyjątku wymienić na bezpieczniki tego
samego typu i wartości.
Page 29

We Hear You
 Loading...