

Page 1

Quick Start Guide
ULTRALINK ULM300USB
High-Performance 2.4 GHz Digital Wireless
System with Handheld Microphone and
Dual-Mode USB Receiver
Page 2
ULTRALINK ULM300USB
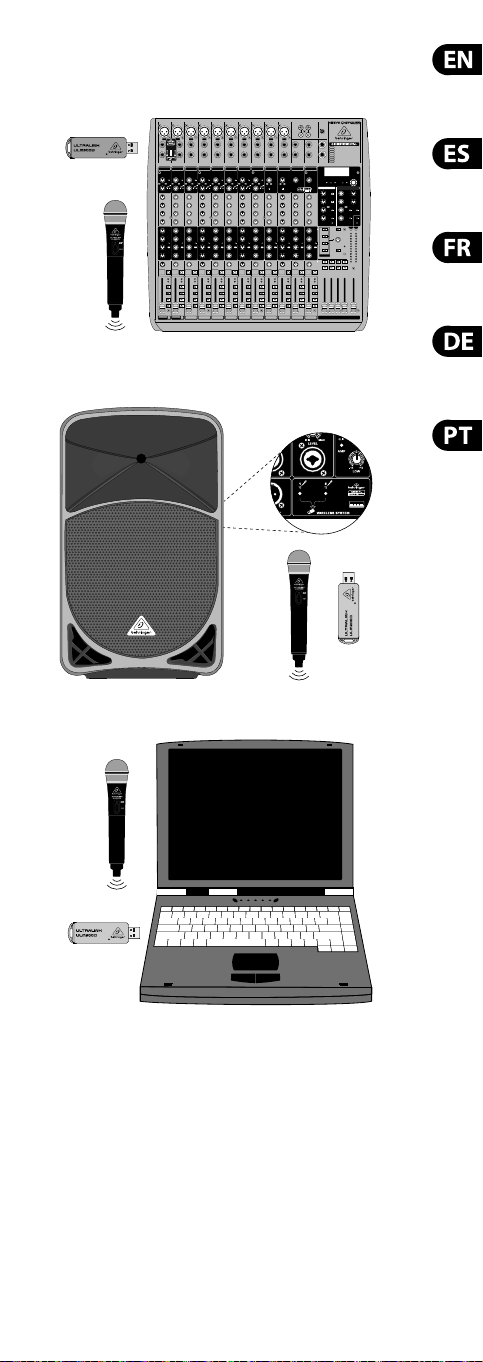
Hook-Up
XENYX QX2442USB
B115MP3
Laptop
Page 3
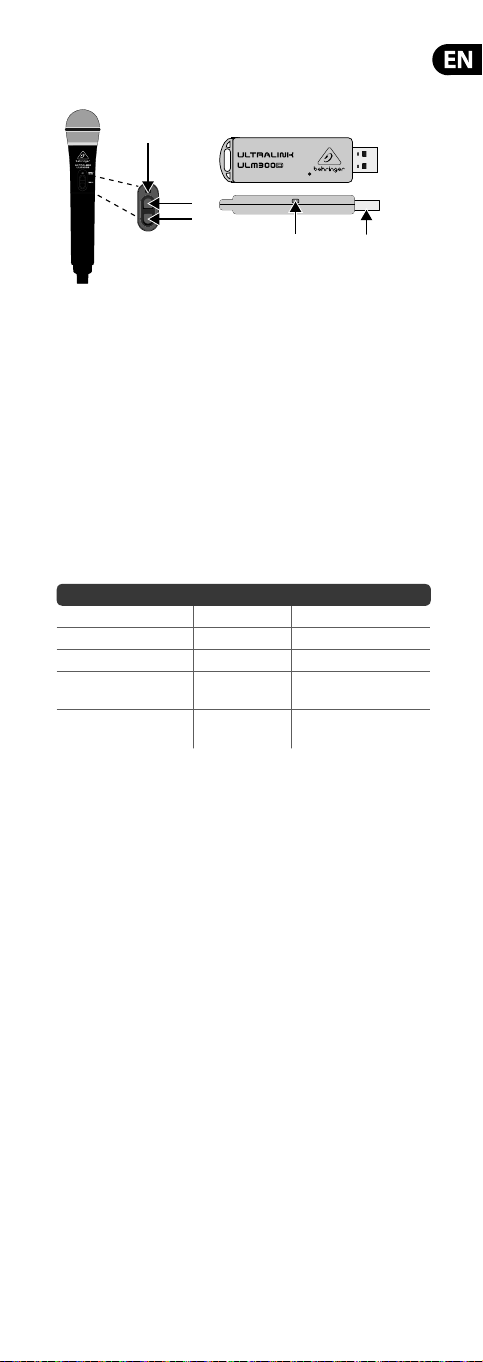
ULTRALINK ULM300USB Controls
Model: ULM300M
(2)
Type of product: Wireless Microphone
ULM300USB Controls
1. USB connector
2. POWER/STATUS LED
3. VOLUME UP Button (—Power on/-Volume up/-Unmute)
4. VOLUME DOWN Butt on (-Volume down /—Mute/
—Power o f rom Mute)
NOTE:“—” (long dash) = long pr ess; “-” (hyphen) = short p ress.
LED Status Key
The follow ing table descr ibes LED behavior on b oth the micropho ne and
the USB wirele ss receiver:
Activity LED Color LED Behavior
No Signal Amber Flashes o n/o sl owly
onnected, Active Green Solid
C
Connec ted, Muted Green Flashes on/o quickl y
Connec ted, Active,
Low Bat tery
Connected, Muted,
Low Bat tery
ULM300USB Getting Started
1. Plug the USB wir eless receiver to th e designated USB socke t on
wireless -enabled BEHRINGER mi xers, powered speaker s or other
compatib le products, o r to a USB port on a compute r. The POWER/
STATUS LED on the receive r will slowly ash amber.
2. Press and h old the VOLUME UP butto n on the wireless mic rophone
to switch i t on and commence tran smission. Both the L EDs on the
wireles s microphone and USB wi reless receiver wi ll light solid green
once connected.
3. Once swi tched on, the wirele ss microphone wi ll be set at its prev ious
operatin g volume level. Use the VOLUME UP an d VOLUME DOWN
button s to adjust the volume.
4. A long pres s of the VOLUME DOWN butto n will put the wirel ess
microph one into mute. The mute co ndition is indic ated by rapid
green ashing of th e LED. If the user does not un mute within
10 minutes, the w ireless microph one will power down to save
batter y life.
5. A furt her long press of the VO LUME DOWN button whe n in mute will
switch o the wire less microphon e.
6. A short p ress of the VOLUME UP but ton will unmute the w ireless
microph one. When the wireles s microphone is unm uted, it will
return to th e previous volume level.
NOTE: The connec tion range bet ween speaker and Blue tooth streaming
device may de crease if Blueto oth streaming and w ireless microp hones are
used simultaneously.
Model: ULM300D
(3)
(4)
(2) (1)
Green/Red Alternating colors
Green/Red
Alterna ting colors , as hes
on/o
Page 4
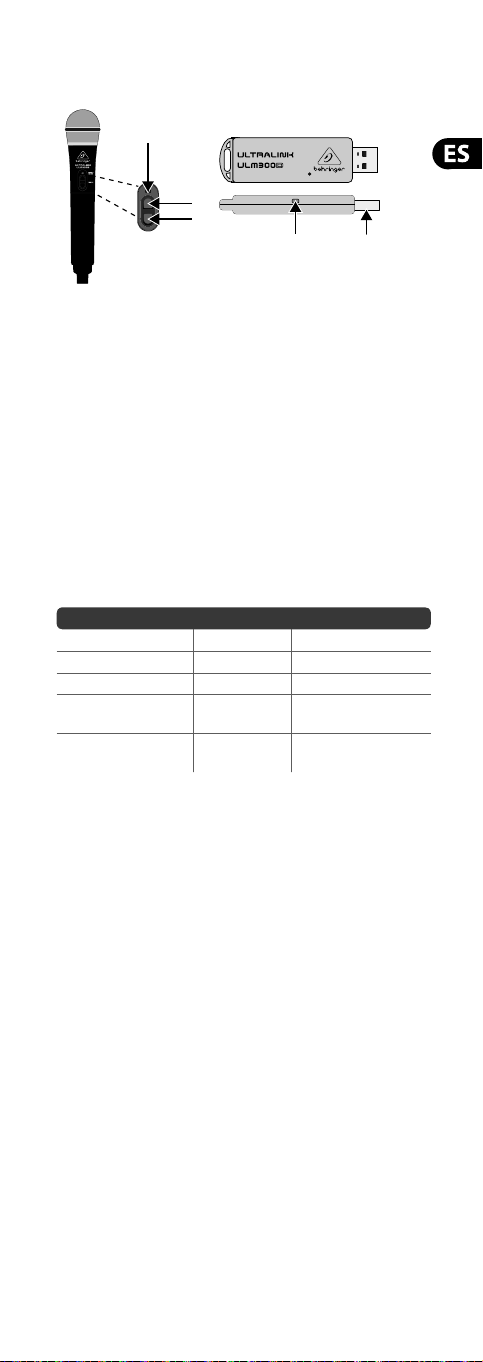
ULM300USB Controles
Model: ULM300M
(3)
(4)
Model: ULM300D
(2) (1)
(2)
Tipo de producto: Micrófono inalámbrico
Controles del ULM300USB
1. Conector USB
2. Piloto POWER/STATUS
3. Botón VO LUME UP (—Ence ndido/-S ubir vo lumen /-Reac tivar )
4. Botón VOLUME DOWN (-Bajar volumen/—Anulación (mute)/
—Apagado d esde mute)
NOTA:“—” (guión largo) = pulsac ión prolongada;
“-” (guión) = pulsa ción breve.
Clave de estado del piloto
La tabla si guiente descri be el comportam iento del piloto tant o en el
micrófo no como en el recepto r inalámbrico USB:
Act ivi dad Color de l piloto
Sin señal Naranja Parpad eo lento
Conectado, activo Verde Iluminado jo
Conectado, anulado (mute) Verde Parpadeo rápido
Conec tado, activ o, batería
casi descargada
Conec tado, anulado (mu te),
batería casi descargada
Verde/rojo Colores alternando
Verde /rojo
Comportamiento del piloto
Colores alternando,
parpadeo
ULM300USB Primeros pasos
1. Conecte e l receptor inalámbr ico USB en la toma USB especi cada de
las mesas d e mezclas, altavoces au toampli cados u otros pro ductos
compatib les y con capacida d inalámbrica BEHRI NGER o en un
puerto USB d e un ordenador. El piloto POW ER/STATUS del receptor
comenza rá a parpadear lent amente en color nara nja.
2. Mantenga pu lsado el botón VOLUME UP de l micrófono inalám brico
para encen derlo y que comience la t ransmisión. Tanto el pil oto
del micró fono inalámbrico co mo el del receptor ina lámbrico USB
se quedará n iluminados jos en color verde una ve z que ambas
unidades estén conectadas.
3. Una vez encend ido, el micrófono ina lámbrico se ajusta rá al último
nivel de volum en jado. Use lo s botones VOLUME UP y VOLUME
DOWN para mod i car es e nivel de volumen.
4. Una pulsac ión prolongada de l botón VOLUME DOWN hará que e l
micrófo no inalámbrico que de anulado (mute). Esta cond ición será
indicada p or un rápido parpa deo del piloto en color ve rde. Si el
usuario no r eactiva el micr o en los 10 minutos siguie ntes, el micro se
apagará au tomáticamente p ara ahorrar bater ía.
5. Una pulsac ión más larga del botó n VOLUME DOWN mientras e stá
desac tivado (mute) hará que el mi crófono inalámb rico se
apague totalmente.
6. Una pulsac ión breve del botón VO LUME UP hará que el micro s e
reacti ve. Cuando el micrófono ina lámbrico sea reac tivado volverá al
nivel de volume n elegido previamen te.
NOTA: El rango de conexió n entre este altavoz y el d ispositivo que es té
enviando dat os Bluetooth pued e disminuir si utiliz a a la vez dispositivos
que envíen da tos Bluetooth y mic ros inalámbricos .
Page 5

ULM300USB Réglages
Model: ULM300M
(2)
Type de produit : micro sans l
ULM300USB Réglages
1. Connecteur USB
2. LED POWER/STATUS
3. Bouton VOLUME UP (— Mise sou s tension/- Monter le volume/
- Quitte r le mode Mute)
4. Bouton VOLUME D OWN (- Baisser le vo lume/—Mode Mute/
— Mise hor s tension à partir d u mode Mute)
Remarque : “—” = pres sion longue ; “-” = pressi on courte.
LED Status
Le tableau c i-dessous dé crit les di érents éta ts de la LED du micro et du
récepteu r USB sans l:
Activ ité Couleur de la LED État de la LED
Pas de sign al Orange Clignote len tement
onnec té, actif Vert Allumée e n continu
C
Connecté, mode Mute Vert Clignote rapidement
Connecté, actif,
batterie faible
Connecté, mode Mute,
batterie faible
ULM300USB Mise en œuvre
1. Connec tez le récepteur USB sans l au por t USB correspondant
sur une cons ole de mixage, enceint e active ou tout aut re produit
BEHRINGER com patible avec les mic ros sans l, ou encore au port
USB d'un ordinate ur. La LED POWER/STATUS du récepteur c lignote
lentement en orange.
2. Maintene z le bouton VOLUME UP du micr o enfoncé a n de le mettre
sous tensi on et de démarrer la tr ansmission. La LED d u micro et celle
du récepteu r USB restent allumée s en vert lorsque la co nnexion
est étab lie.
3. Lorsqu e le micro est acti vé, son volume est au niveau r églé lors de la
précéde nte utilisation. U tilisez les bout ons VOLUME UP et VOLUME
DOWN pour rég ler le volume.
4. Maintene z le bouton VOLUME DOWN enf oncé pour placer le mic ro
en mode Mute. L orsque la fonct ion Mute est act ivée, la LED clignote
rapideme nt en vert. Si le mode Mut e n'est pas dé sactivé au bout de
10 minutes, le mi cro sans l est placé automat iquement hors ten sion
pour économiser la batterie.
5. Une press ion longue sur le bout on VOLUME DOWN lorsque l e micro
est en mod e Mute permet de le me ttre hors tensi on.
6. Une press ion sur le bouton VOLUME UP p ermet de désac tiver le
mode Mute. Lo rsque le mode Mute es t désactivé, le vo lume du micro
revient au de rnier niveau réglé.
REMARQUE: La port ée de la connexion en tre l’enceinte et l’appare il
Bluetoot h peut diminuer si la co nnexion Bluetoo th et un micro sans l
sont utilisés simultanément.
Model: ULM300D
(3)
(4)
(2) (1)
Vert/rouge Alterne di érentes couleurs
Vert /roug e
Alterne di érentes
couleurs, clignote
Page 6

ULM300USB Bedienelemente
Model: ULM300M
(2)
Produkttyp: Drahtlosmikrofon
ULM300USB Bedienelemente
1. USB-Anschluss
2. POWER/STATUS-LED
3. VOLUME PLUS-Taste (—Einschalten/-Volume plus/
-Stummschaltung aus)
4. VOLUME MINUS-Taste (-Volume minus/—Stumm schaltung/
—Ausschalten nach Stummschaltung)
HINWEIS: “—” (langer Stri ch) = lange drücken;
“-” (kurzer St rich) = kurz drücken.
LED Status-Le gende
Die folge nde Tabelle beschreib t das Verhalten der LED am Mi krofon und
am USB-Drahtlosempfänger:
Aktivität LED-Farbe LED-Verhalten
kein Signa l gelb blinkt langs am ein/aus
rbunden, aktiv grün leuchtet
ve
verbun den, stumm grün blink t schnell ein/au s
verbunden, akt iv,
Batterie schwach
verbunden, stumm,
Batterie schwach
ULM300USB Erste Schritte
1. Schließ en Sie den USB-Draht losempfänger an d en für den
Drahtlos empfang vorgesehe nen USB-Port von BEHRINGE R Mixern,
Aktiv lautsprecher n und anderen kompat iblen Produkten o der an
den USB-Por t eines Computers a n. Die POWER/STATUS-LED des
Empfän gers blinkt lang sam gelb.
2. Halten Sie di e VOLUME PLUS-Taste des D rahtlosmikrof ons gedrückt,
um es einzu schalten und die Übe rtragung zu st arten. Sobald d ie
Verbindung h ergestellt ist , leuchten die LEDs de s Drahtlosmikro fons
und USB-Dr ahtlosempfän gers konstant grü n.
3. Nach dem Eins chalten ist das Dra htlosmikrofon au f seine vorherige
Betrie bslautstärke e ingestellt. Sie kön nen den Pegel mit den
VOLUME PLUS- und VOLUM E MINUS-Tasten änd ern.
4. Halten Sie di e VOLUME MINUS-Taste gedrück t, um das
Drahtlosmikrofon stummzuschalten. Die Stummschaltung wird
durch sch nelles grünes Bli nken der LED angezeigt . Wenn die
Stummsch altung nicht inner halb von 10 Minuten aufgeh oben wird,
schalte t sich das Drahtlosm ikrofon aus, um die B atterien zu sch onen.
5. Halten Sie die VOLUME MINUS-Taste nochmals gedrückt, um das
stummgeschaltete Mikrofon auszuschalten.
6. Ein kurze r Druck auf die VOLUME PLUS-Taste he bt die
Stummsch altung des Draht losmikrofons wi eder auf. Danach ist d as
Drahtlos mikrofon wieder a uf seine vorherige L autstärke eing estellt.
HINWEIS:
Der Über tragungsberei ch zwischen La utsprecher un d Bluetooth
Streaming -Gerät kann sich ver ringern, wenn Bluet ooth Streaming
zusamme n mit Drahtlosmik rofonen eingese tzt wird.
Model: ULM300D
(3)
(4)
(2) (1)
grün/rot wechselnde Farben
grün/rot
wechselnde Farben,
blinkt ein/aus
Page 7

ULM300USB Controles
Model: ULM300M
(2)
Tipo do produto: Microfone sem o
Controles ULM300USB
1. Conector USB
2. LED POWER/STATUS
3. Botão VOLUME UP (—Power on/-Volume up/-Unmute)
4. Botão VOLUME DOW N (-Volume d own/—M ute/
—Power o f rom Mute)
NOTA: “—” (traço longo) = pressio nar demoradament e;
“-” (hífen) = pres sionar rapidamen te.
Chave de Statu s de LED
A tabela a se guir descreve o comp ortamento do LED n o receptor do USB
sem o e microfone:
Ativid ade Cor do LED Compor tamento d o LED
Sem sina l Âmbar Pisca on /o v agarosame nte
onectado, Ativo Verde Sólido
C
Conectado, em modo Mute Verde Pisca on/o rapidamente
Conectado, Ativo
Bateria b aixa
Conec tado, em modo
Mute, Bate ria baixa
ULM300USB Primeiros Passos
1. Conect e o receptor USB sem o à soquete USB desig nada em
mistur adores BEHRINGER hab ilitados para us o wireless, alto- falantes
ampli cados ou o utros produtos c ompatíveis, ou a uma p orta
USB no seu compu tador. O LED POWER/STATUS no recept or piscará
vagarosamente em cor âmbar.
2. Aperte e s egure o botão VOLUME UP n o microfone sem o para
ligá-lo e in iciar a transmissã o. Ambos os LEDs no rece ptor USB sem
o e microfone sem o acender ão uma luz verde sólida qu ando
estiverem conectados.
3. Quando liga do, o microfone sem o estar á ajustado ao seu níve l de
volume oper acional anterior. Use os b otões VOLUME UP e
VOLUME DOWN para a justar o volume.
4. Apert ar o botão VOLUME DOWN demo radamente coloc a o microfone
sem o em modo mute. A cond ição mute é indica da por uma luz
verde do LED que p isca rapidament e. Se o usuário não o tirar d o
modo mute em 10 mi nutos, o microfon e sem o ser á colocado em
modo de espera para economizar bateria.
5. Um outro ap erto demorado n o botão VOLUME DOWN enqua nto em
modo mute d esligará o microf one sem o.
6. Um aper to rápido do botão VOLUM E UP retirará o micro fone sem
o do modo mute. Quando o m icrofone sem o é retirad o do modo
mute, ele volta a o nível de volume anterior.
NOTA: O alcance de conex ão entre o alto-fa lante e o aparelho de st reaming
do Blueto oth pode diminuir s e o streaming de Blue tooth e microfon es sem
o forem usados sim ultaneamente.
Model: ULM300D
(3)
(4)
(2) (1)
Verde /Verm elho Core s alter nadas
Verde /Verm elho
Cores alternadas,
pisca on/o
Page 8

Speci cation
RF output < 10 dBm (10 mW)
Operati ng range 60 m (200 ft)*
Dynamic ra nge 93 dB, A-weighted* *
Equivalen t input noise -120 dBu
Freque ncy respons e 10 Hz – 20 kHz, ±1 dB**
(wireless link)
Sampling r ate 48 kHz
Resolution 24-bit
Encoding 4-bit AD PCM (192 kbps)
Latency 14.3 ms
RF freque ncy 2.4 GHz ISM band
USB current c onsumption 70 mA @ 5 VDC
Batter y type 2 x AA (LR6)
Batter y life > 24 hrs
Dimens ions (H x W x D)
Microph one 260 x 53 x 53 mm
Wireles s receiver 8.5 x 76 x 22 mm
Weigh t
Microphone 0.3 kg (0.7 lbs)
Wireless r eceiver 0.01 kg (0.02 lbs)
*Achievab le range will b e dependen t on nearby so urces of RF int erferen ce and/or
line of sigh t obstacl es.
**Measu red from an alog input to a nalog outp ut at maximu m level.
(2.40 4~2.468 G Hz,
17 ch anne ls)
Alkaline cells
(10.2 x 2.1 x 2.1")
(0.3 x 3.0 x 0.9")
Page 9

LEGAL DISCLAIMER
MUSIC Group acc epts no liabilit y for any loss which may b e
su ered by any per son who relies ei ther wholly or in pa rt upon
any descr iption, photogr aph, or statement co ntained herein.
Technical sp eci cations, appea rances and other in formation are
subjec t to change withou t notice. All tradem arks are the pro perty
of their res pective owner s. MIDAS, KLARK TEKNIK , LAB GRUPPEN,
LAKE, TANNOY, TURBOSOU ND, TC ELECTRONIC, TC HELICON,
BEHRINGER, B UGERA and DDA are trad emarks or regi stered
trademar ks of MUSIC Group IP Ltd. © MUSIC Gr oup IP Ltd. 2016
All right s reserved.
LIMITED WARRANTY
For the app licable warrant y terms and condit ions
and additi onal informatio n regarding MUSIC Group ’s
Limited War ranty, please see co mplete details on line at
music-group.com/warranty.
NEGACIÓN LEGAL
MUSIC Group no ad mite ningún tipo de r esponsabilida d por
cualquie r daño o pérdida que pu diera sufrir c ualquier pers ona
por con ar total o pa rcialmente en la des cripciones , fotografías o
a rmaciones co ntenidas en este do cumento. Las esp eci caciones
técnic as, imágenes y otra s informacione s contenidas en es te
documen to están sujeta s a modi caciones sin pr evio aviso.
Todas las marca s comerciales que a parecen aquí son p ropiedad
de sus respe ctivos dueños. MI DAS, KLARK TEKNIK, L AB GRUPPEN,
LAKE, TANNOY, TURBOSOU ND, TC ELECTRONIC, TC HELICON,
BEHRINGER, B UGERA y DDA son marca s comerciales o marc as
regist radas de MUSIC Group IP Ltd. © MUSIC G roup IP Ltd.
2016 Reservado s todos los derecho s.
GARANTÍA LIMITADA
Si quiere co nocer los detalles y c ondiciones apli cables de la
garantía a sí como informaci ón adicional sobr e la Garantía
limitada d e MUSIC Group, consulte on line toda la informac ión
en la web music-group.c om/warranty.
DÉNI LÉGAL
MUSIC Group ne p eut être tenu pour re sponsable pour t oute
perte p ouvant être subi e par toute perso nne se a nt en partie
ou en totali té à toute descrip tion, photograph ie ou a rmation
contenue da ns ce document. Les c aractéris tiques, l’apparen ce
et d’autres i nformations pe uvent faire l’objet d e modi cations
sans noti cat ion. Toutes les marqu es appartien nent à leurs
proprié taires respec tifs. MIDAS, KL ARK TEKNIK, LAB GRUPPEN,
LAKE, TANNOY, TURBOSOU ND, TC ELECTRONIC, TC HELICON,
BEHRINGER, B UGERA et DDA sont des m arques ou marque s
déposée s de MUSIC Group IP Ltd. © MUSIC Grou p IP Ltd.
2016 Tous droits réser vés.
GARANTIE LIMITÉE
Pour connaî tre les termes et co nditions de garant ie applicables,
ainsi que le s informations su pplémentaires e t détaillées sur
la Garanti e Limitée de MUSIC Group, co nsultez le site Inter net
music-group.com/warranty.
Page 10

HAFTUNGSAUSSCHLUSS
MUSIC Group üb ernimmt keine Haf tung für Verluste,
die Perso nen entstanden s ind, die sich ganz oder t eilweise
auf hier ent haltene Beschre ibungen, Fotos ode r Aussagen
verlassen haben. Technische Daten, Erscheinungsbild und
andere Informationen können ohne vorherige Ankündigung
geänder t werden. Alle Warenzeic hen sind Eigentum der
jeweiligen In haber. MIDAS, KLARK TEKNIK, L AB GRUPPEN, LAKE,
TANNOY, TURBOSOUND, TC ELECTRONIC, TC HELICON, BEHRINGER,
BUGERA und D DA sind Warenzeichen o der eingetrage ne
Warenzeiche n der MUSIC Group IP Ltd. © MUSIC Gro up IP Ltd.
2016 Alle Rechte vorbehalten.
BESCHRÄNKTE GAR ANTIE
Die geltenden Garantiebedingungen und zusätzliche
Informat ionen bezüglich de r von MUSIC Group
gewähr ten beschränk ten Garantie nden Sie online u nter
music-group.com/warranty.
LEGAL RENUNCIANTE
O MUSIC Group não s e responsabili za por perda algum a que
possa se r sofrida por qua lquer pessoa que d ependa, seja de
maneira co mpleta ou parcial, d e qualquer descr ição, fotogra a,
ou declar ação aqui contida s. Dados técnico s, aparências e
outras in formações es tão sujeitas a mod i ca ções sem aviso
prévio. Todas as m arcas são propr iedade de seus resp ectivos
donos. MIDAS, K LARK TEKNIK, LAB GR UPPEN, LAKE, TANNOY,
TURBOSOUND, TC ELECTRONIC, TC HELICON, BEHRINGER, BUGERA
e DDA são marca s ou marcas regist radas do MUSIC Group IP Ltd .
© MUSIC Group IP Ltd. 2016 Todos dire itos reservad os.
GARANTIA LIMITADA
Para obter os t ermos de garantia ap licáveis e condições e
informa ções adicionais a r espeito da garanti a limitada do
MUSIC Group, favo r veri c ar detalhes na íntegr a através do
website music-group.com/warranty.
Page 11

FEDERAL COMMUNICATIONS
•
•
•
•
COMMISSION COMPLIANCE
INFORMATION
ULM300D
Responsi ble Party Name: MUSIC Group Services
Address: 5270 Procyon Street
Phone Numb er: +1 702 800 8290
ULM300D
complies w ith the FCC rules as men tioned in the
followingparagraph:
This equi pment has been test ed and found to compl y with
the limit s for a ClassB digita l device, pursuant to p art
15 of the FCC Rules. T heselimits are de signed to provide
reasonab le protection a gainst harmful i nterference in a
resident ial installatio n. This equipment ge nerates, uses and
can radiat e radio frequenc y energy and, if not in stalled and
used in acco rdance with the ins tructions, ma y cause harmful
interf erence to radio communic ations. However, there is
no guarante e that interfer ence will not occur in a p articular
installa tion. Ifthis equip ment does cause ha rmful interf erence
to radio or te levision recepti on, which can be deter mined by
turning t he equipment o and on, the user i s encouraged
to try to co rrect the inter ference by one or m ore of the
followingmeasures:
• Reorient or relocate the receiving antenna
• Increas e the separation b etween the equi pment
andreceiver
• Connect t he equipment into an o utlet on a circuit di erent
from tha t to which the receive r is connected
• Consult the dealer or an experienced radio/TV technician
forhelp
This devic e complies with Par t 15 of the FCC rules. Oper ation is
subjec t to the following t wo conditions:
(1) this device may not c ause harmful inte rference, and
(2) this device mu st accept any inter ference receive d,
includin ginterference t hat may cause undesi redoperation.
NV Inc.
Las Vegas, NV 89118
USA
This devic e complies with FCC rad iation exposur e limits set
forth f or an uncontrolle d environment.
Important information:
Changes or m odi c ations to the equip ment not express ly
approved by MUSI C Group can void the use r’s authority to us e
the equipment.
Operati on in the 2.4 GHz ISM (Industri al, Scienti c, Medical)
freque ncyband may be subje ct to interfe rence from other
transmi tting equipmen t operating in this b and. Inthe
event of such i nterference, plea se verify and rea ssign
the trans mitting channe ls of any potentially in terfering
transmi ttingequipmen t.
Page 12

Dedicate Your Life to Music
 Loading...