


MICROPOWER PS400
(2)
Welcome to Behringer
Thank you f or showing you r condence in us b y purchasing t he
Behringer MICROPOWER PS400. Use this ultra-compact phantom
power sup ply with mixer s and microp hone preampli ers that do no t
include p hantom power s ources. The PS 400:
• • supplie s phantom powe r (+12 V or +48 V) to a ny type of
condenser microphone
• • routes t he micropho ne signal to a mixer o r a microphon e
preamplier
◊ ◊ Please read the safety instructions that appear at the
end of this document.
Connectors and Control Elements
This sec tion illus trates and des cribes eac h PS400 conn ector and
control element.
(1) (3) (4) (5)
Fig. 1: PS4 00 connec tors and c ontrol ele ments
V 1.0

2 3
MICROPOWER PS400 MICROPOWER PS400
(1) 12 V connector:
To connec t the power suppl y unit to the PS4 00, use the 12 V
connec tor. Connect ing the power su pply unit to the m ains
automat ically swit ches the PS4 00 on. To disconne ct the unit
from th e mains, pull out t he main cord plu g.
(2 ) ON LED:
As soon a s the unit is conn ected to the ma ins, the ON LED is
illuminated.
(3 ) MIC INPUT connec tor:
To send a micr ophone signal t o the PS400, yo u need an audio
cable th at includes XL R connector s. Plug:
• • one XLR con nector into t he MIC INPUT conn ector
• • the other XLR connector into the condenser microphone
(4 ) MIC THRU connecto r:
To route the mi crophone si gnal from the P S400 to a mixer o r a
microp hone preampl ier, you need an au dio cable that i ncludes
XLR connectors. Plug:
• • one XLR con nector into t he MIC THRU conne ctor
• • the othe r XLR connect or into the mic inp ut of a mixer or,
alternatively a microphone preamplier
(5 ) +12 V / +48 V PHANTOM VOLTAGE switch:
To select t he voltage tha t you need, push t his switch tow ard
+12 V or, alternativel y +48 V. For details a bout what valu e to
use, ref er to instruc tions from t he micropho ne manufac turer.
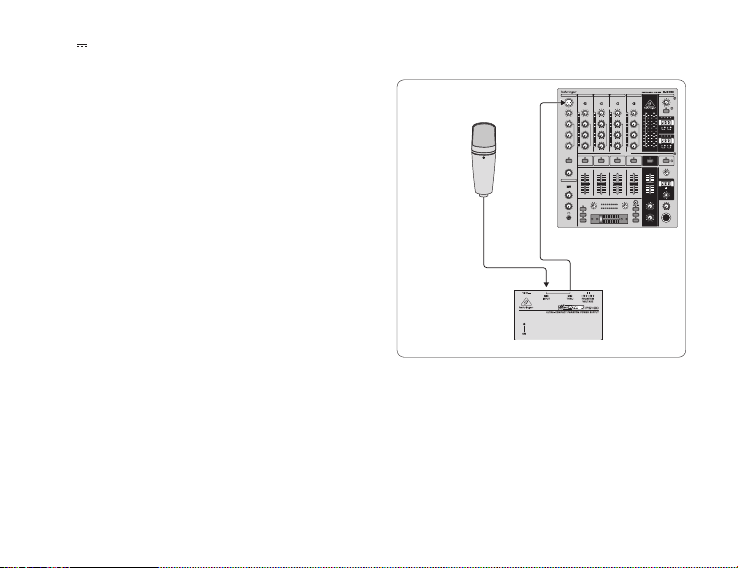
Setup Example
The foll owing is an exam ple of how to set up t he PS400:
STUDIO CONDENSER
MICROPHONE C-1
MIC INPUT
Fig. 2: PS 400 set up exampl e
PROMIXER DJX750
MIC THRU
MICROPOWER PS400
SERIAL NUMBER: To register t he unit, use th e serial numbe r that is
locate d on the botto m of the PS400 .

4
(2)
MICROPOWER PS400
Important Safety
Instructions
1) Read these instructions.
2) Keep these instructions.
3) Heed all wa rnings.
4) Follow all i nstruc tions.
5) Do not us e this appar atus near wa ter.
6) Clean onl y with dry c loth.
7) Do not bl ock any venti lation ope nings. Ins tall in acco rdance wit h the manuf acturer ’s
instructions.
8) Do not ins tall near any h eat source s such as radi ators, hea t registe rs, stove s, or other
apparatus (including amplifiers) that produce heat.
9) Do not def eat the saf ety purp ose of the p olarized o r groundin g-type p lug. A polar ized
plug has t wo blades w ith one wid er than the ot her. A ground ing type p lug has two b lades
and a third g rounding p rong. The w ide blade or t he third pro ng are provi ded for you r safet y.
If the pro vided plug d oes not fi t into your ou tlet, con sult an elec tricia n for replace ment of
the obsolete outlet.
10) Protec t the power c ord from be ing walked o n or pinched p articu larly at plu gs,
convenie nce recept acles, and t he point wh ere they ex it from th e apparatu s.
11) Only use attachment s/accessories specified by the manufacturer.
12) Use only wi th the car t, stand, t ripod, b racket, or t able spec ified by t he manufa cturer, or
sold wit h the appar atus. Whe n a cart is us ed, use cau tion when m oving the c art/app aratus
combina tion to avoid i njury fr om tip-o ver.
13) Unplug this a pparatu s during lig htning sto rms or when u nused fo r long perio ds of time.
14) Refer all s ervici ng to qualif ied serv ice perso nnel. Ser vicing is re quired wh en the
appara tus has bee n damaged in a ny way, such as po wer supply co rd or plug is da maged,
liquid ha s been spill ed or objec ts have fa llen into the a pparatu s, the appar atus has be en
expos ed to rain or m oisture, d oes not op erate norm ally, or has be en dropped .
MICROPOWER PS400
Bienvenido a Behringer
Gracia s por mostrar s u conanza en no sotros al com prar el Behri nger
MICROPOW ER PS400. Ut ilice esta fu ente de aliment ación fant asma
ultracompacta con mezcladores y preamplicadores de micrófono que
no incluy en fuentes de a limentació n fantasma. El P S400:
• • suminis tra aliment ación fanta sma (+12 V o +48 V) a c ualquier
tipo de micrófono de condensador
• • enruta l a señal del micr ófono a un mezc lador o un
preamplicador de micrófono
◊ ◊ Lea las instrucciones de seguridad que aparecen al nal
de este documento.
Conectores y elementos de control
Esta s ección ilust ra y describ e cada conec tor PS400 y e lemento de
control.
(1) (3) (4) (5)
Fig.1: Conect ores y elem entos de cont rol PS4 00
6 7
MICROPOWER PS400 MICROPOWER PS400
(1) 12 V conector:
Para cone ctar la fue nte de alimenta ción a la PS40 0, utilice el
conec tor de 12 V. La conexión d e la fuente de alim entación a la
red enci ende automát icamente la PS 400. Para des conectar l a
unidad de l a red, saque el en chufe del ca ble principa l.
(2 ) EN LED: Tan pr onto como la unid ad está conec tada a la red, e l
LED ON se ilu mina.
(3 ) ENTRADA DE MICRÓFONO conector:
Para envi ar una señal de mic rófono a la PS 400, necesi ta un
cable de a udio que inclu ya conector es XLR. Enchu fe:
• • un conec tor XLR en el con ector MIC INPU T
• • el otro conector XLR en el micrófono de condensador
(4 ) MICRÓFONO A TRAVÉS conector:
Para enru tar la señal de l micrófono de sde el PS40 0 a un
mezclador o un preamplicador de micrófono, necesita un cable
de audio qu e incluya cone ctores XLR . Enchufe:
Ejemplo de conguración
El siguie nte es un ejemplo d e cómo congur ar la PS400:
STUDIO CONDENSER
MICROPHONE C-1
MIC INPUT
PROMIXER DJX750
MIC THRU
• • un conec tor XLR en el con ector MIC THRU
• • el otro co nector XLR en l a entrada de mic rófono de un
mezclador o, alternativamente, un preamplicador de
micrófono
(5 ) +12 V / +48 V VOLTAJE FANTASMA c ambiar:
Para sele ccionar el vol taje que nece sita, presio ne este
interr uptor hacia +12 V o, alternat ivamente, +4 8 V. Para
obtener detalles sobre qué valor usar, consulte las instrucciones
del fabricante del micrófono.
NÚMERO DE SERIE: Para registrar la unidad, utilice el número de serie
que se encuentra en la parte inferior de la PS400.
Fig.2: Ej emplo de con figurac ión de PS4 00
MICROPOWER PS400

8
(2)
MICROPOWER PS400
Instrucciones de
seguridad
1) Lea estas i nstrucc iones.
2) Conserve estas instrucciones.
3) Preste at ención a to das las adver tencias .
4) Siga toda s las instr ucciones .
5) No utili ce este apa rato cerca d el agua.
6) Limpiar s olo con un pa ño seco.
7) No bloq uee las aber turas d e ventilaci ón. Haga la ins talació n conform e a las instr ucciones
del fabricante.
8) No lo inst ale cerca de f uentes de c alor como ra diadore s, rejillas de c alefacc ión, estu fas u
otros aparatos (incluidos amplificadores) que produzcan calor.
9) No anule el p ropósito d e segurid ad del enchu fe polar izado o con co nexión a ti erra. Un
enchuf e polariz ado tiene do s clavijas , una más ancha q ue la otra. Un e nchufe co n conexió n
a tierra t iene dos cl avijas y una te rcera clavi ja de conex ión a tierr a. La hoja anc ha o la
tercera c lavija se pro porcion an para su se guridad. S i el enchufe p rovisto n o encaja en su
tomacorriente, consulte a un electricista para reemplazar el tomacorriente obsoleto.
10) Proteja el c able de alim entació n para que no se p ise ni se pel lizque, esp ecialme nte en
los enchu fes, los re ceptácu los de conven iencia y el pu nto por dond e salen del ap arato.
11) Utilice únicamente los aditamentos / accesorios especific ados por el fabricante.
12) Úselo únic amente con e l carro, sop orte, tr ípode, so porte o me sa espe cificad os por el
fabric ante o vendi dos con el apa rato. Cuand o se utiliz a un carri to, tenga cui dado al mover l a
combina ción de car rito / apar ato para evi tar lesio nes por vue lco.
13) Desench ufe este a parato dur ante torme ntas eléc tricas o c uando no se u tilice dura nte
largos pe ríodos de t iempo.
14) Refier a todo el ser vicio a pe rsonal de s ervici o calific ado. Se requ iere ser vicio cuan do el
aparato s e ha dañado de a lguna mane ra, como el ca ble de alimen tación o el en chufe es tán
dañados , se ha derra mado líquid o o han caído o bjetos den tro del apar ato, el apar ato ha
estad o expues to a la lluvia o la h umedad, no f unciona n ormalmen te, o se ha caíd o.
MICROPOWER PS400
Bienvenue chez Behringer
Merci de n ous avoir témoig né votre cona nce en achetan t le
Behringer MICROPOWER PS400. Utilisez cette alimentation fantôme
ultra- compacte a vec des mixeur s et des préamp licateur s de
microphone qui n'incluent pas de sources d'alimentation fantôme.
Le PS40 0:
• • fourni t une alimenta tion fantôm e (+12 V ou +48 V) à to ut type
de microphone à condensateur
• • achemin e le signal du mic rophone ver s une table de mix age ou
un préamplicateur de microphone
◊ ◊ Veuillez lire les consignes de sécurité qui apparaissent à
la n de ce do cument.
Connecteurs et éléments de contrôle
Cette s ection illu stre et décr it chaque conn ecteur et él ément de
commande PS400.
(1) (3) (4) (5)
Fig.1: Connec teurs et él éments de co mmande PS 400

10 11
MICROPOWER PS400 MICROPOWER PS400
(1) 12 V connecteur:
Pour conn ecter le bloc d 'alimentatio n au PS400, ut ilisez le
connecteur 12 V. La connexion du bloc d'alimentation au
secteur met automatiquement le PS400 sous tension. Pour
débran cher l'apparei l du secteur, déb ranchez la c he du cordon
d'alimentation.
(2 ) AU LED: D ès que l'unité es t connecté e au secteur, la LE D ON
est allumée.
(3 ) ENTRÉE MICRO connecteur:
Pour envoye r un signal de mic rophone au PS 400, vous avez
besoin d 'un câble audio c omprenant de s connecteu rs XLR. Pris e
de courant:
• • un connec teur XLR dans l e connecteu r MIC INPUT
• • l'autre connecteur XLR dans le microphone à condensateur
(4 ) MIC THRU connecteur:
Pour ache miner le signal d u microphon e du PS400 ver s une
table de m ixage ou un préa mplicateu r de micropho ne, vous
avez beso in d'un câble aud io comprenan t des connec teurs XLR.
Prise de courant:
• • un connec teur XLR dans l e connecteu r MIC THRU
Exemple de conguration
Voici un exe mple de congu ration du PS4 00:
STUDIO CONDENSER
MICROPHONE C-1
MIC INPUT
Fig.2: Exemple de configuration PS400
PROMIXER DJX750
MIC THRU
MICROPOWER PS400
• • l'autre co nnecteur XL R dans l'entrée mic ro d'une table d e
mixage ou, en variante, un préamplicateur micro
(5 ) TENS ION PHANTOM +12 V / +48 V changer:
Pour séle ctionner l a tension dont vo us avez besoin, p oussez ce
commut ateur vers +12 V ou, alterna tivement +4 8 V. Pour plus
de détai ls sur la valeur à ut iliser, repor tez-vous aux i nstructi ons
du fabricant du microphone.
NUMÉRO DE SÉRIE: Pour enreg istrer l'unit é, utilisez le nu méro de
série si tué sous le PS4 00.

12
(2)
MICROPOWER PS400
Consignes de sécurité
1) Lisez ces i nstruc tions.
2) Conservez ces instructions.
3) Tenez compte d e tous les ave rtiss ements.
4) Suivez to utes les in struc tions.
5) N'utili sez pas cet a ppareil à pr oximité de l'e au.
6) Nett oyez unique ment avec un c hiffo n sec.
7) Ne bloq uez pas les o uvertu res de venti lation. In staller co nformém ent aux inst ructi ons
du fabricant.
8) Ne pas ins taller à pro ximité de so urces de cha leur telle s que radiate urs, bouc hes de
chaleur, cuisinières ou autres appareils (y compris les amplificateurs) qui produisent de
la chaleur.
9) Ne suppr imez pas la f onction d e sécuri té de la fich e polarisé e ou de mise à la t erre. Une
fiche p olarisé e a deux broc hes dont l'une e st plus lar ge que l'autre . Une fiche d e mise à la
terre a de ux broche s et une troi sième broc he de mise à la te rre. La lame l arge ou la tro isième
broche s ont fourn ies pour vo tre sécur ité. Si la fi che fourn ie ne rentre p as dans votr e prise,
consultez un électricien pour le remplacement de la prise obsolète.
10) Protégez le cordon d'alimentation contre tout piétinement ou pincement, en particulier
au niveau de s fiches , des pris es de couran t et de leur po int de sort ie de l'appar eil.
11) N'utilisez q ue les pièc es jointes / a ccessoir es spéci fiés par le f abrica nt.
12) Utilisez uniquement avec le chariot, le support, le trépied, le support ou la table
spéci fiés par le f abrican t ou vendus ave c l'apparei l. Lorsqu'un c hariot es t utilisé, s oyez
pruden t lorsque v ous déplace z la combina ison chari ot / apparei l pour évit er de vous ble sser
en cas de basculement.
13) Débranc hez cet appa reil penda nt les orag es ou lorsq u'il n'est pas u tilisé pen dant de
longues périodes.
14) Confie z toute répa ration à un p ersonne l qualifié . Un entreti en est néce ssaire
lorsqu e l'appareil a é té endomma gé de quelqu e manière qu e ce soit, com me le cordon
d'aliment ation ou la pr ise est en dommagé, d u liquide a été r enversé o u des objet s sont
tombés d ans l'appare il, l'appareil a é té expos é à la pluie ou à l'hu midité, ne f onctio nne pas
normalement, ou a été abandonné.
MICROPOWER PS400
Willkommen bei Behringer
Vielen Da nk für Ihr Vert rauen in uns bei m Kauf des
Behringer MICROPOWER PS400. Verwenden Sie dieses
ultrakompakte Phantomspeisungsgerät mit Mischpulten und
Mikrofonvorverstärkern, die keine Phantomspeisungsquellen
enthalt en. Die PS40 0:
• • Versorgt jedes Kondensatormikrofon mit Phantomspeisung
(+12 V oder + 48 V)
• • Leitet das Mikrofonsignal an einen Mischer oder einen
Mikrofonvorverstärker
◊ ◊ Bitte lesen Sie die Sicherheitshinweise am Ende dieses
Dokuments.
Anschlüsse und Steuerelemente
In diesem Abschnitt werden die einzelnen PS400-Anschlüsse und Steuerelemente
dargestellt und beschrieben..
(1) (3) (4) (5)
Abb. 1: PS400-Steckverbinder und Steuerelemente
 Loading...