

Quick Start Guide
HC 2000BNC
Wireless Active Noise-Canceling Headphones with
Bluetooth* Connectivity
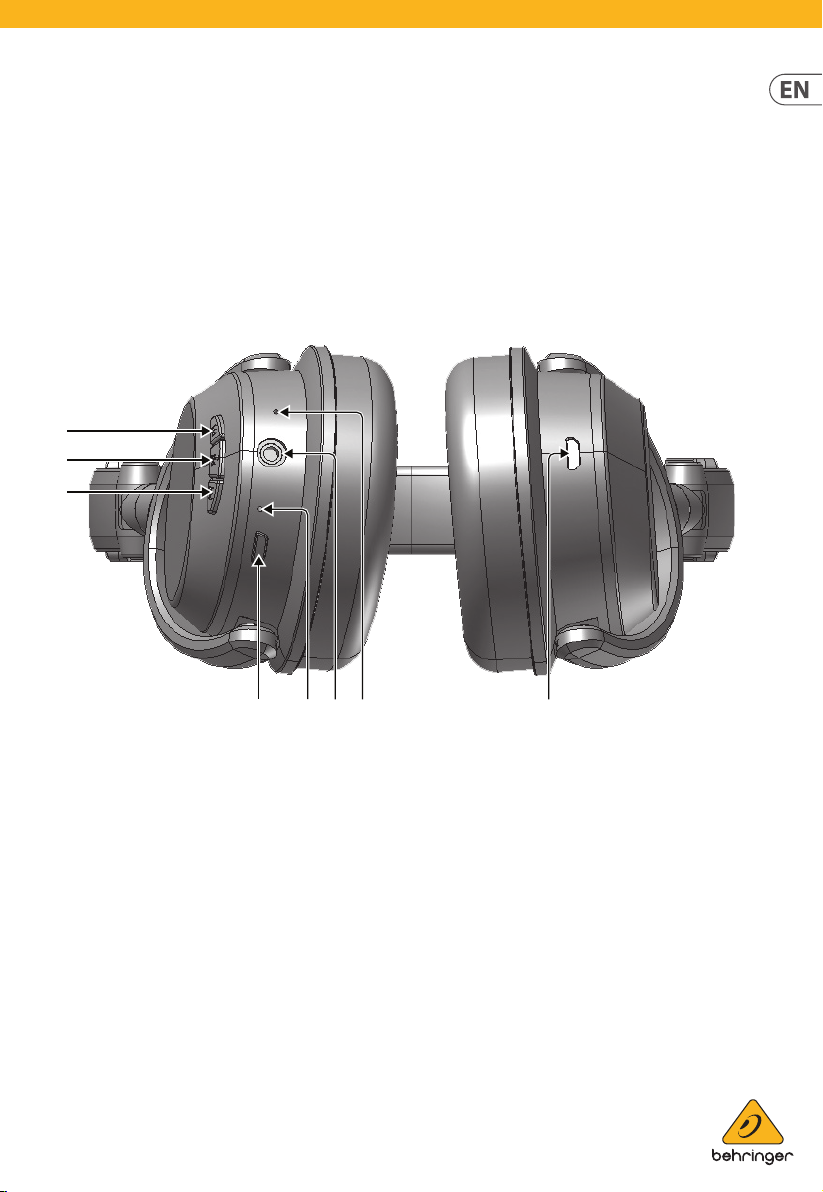
Controls
(2)
(3)
(4)
(1) ANC ON/OFF button switches the ANC (Active Noise
Cancellation) circuit on and o.
(2) FORWARD/VOLUME button can be used to increase
volume (short press), skip to the next song (long
press), or begin/end a phone call on a Bluetoothconnected mobile phone.
(3) POWER/PLAY/PAUSE button switches the
headphones on and o (long press) and begins and
pauses audio playback (short press). Secondary call
functions include Answer Call (press) and End Call/
Reject Call (long press).
(4) BACK/VOLUME button can be used to decrease
volume (short press) or skip to the previous song
(long press).
(5) MICROPHONE can be used for talkback during
phone calls.
(6) AUX IN stereo jack can be used to listen to audio from
external devices as normal wired headphones using
audio cables with 3.5 mm stereo connectors.
(7) INDICATOR LED shows the charging status
(red = charging; blue = fully charged) as well as the
Bluetooth status (blinking blue and red = in pairing
mode; blue = connected; blinking blue = audio
playback underway).
(8) MICRO USB jack is for charging rechargeable
batteries.
Getting started
Turning the unit on/o
Power Supply
The unit is powered by a built-in, lithium-polymer rechargeable
batter y. Charge the built-in battery for at least four hours before
using the device for the rst time.
To charge the internal b attery, follow these steps:
1. Connect the smaller end of the supplied USB cable to the
MICRO USB jack.
2. Conne ct the other end to a powered USB jack on your computer
or an AC power supply (not inc luded).
3. The INDICATOR LED indicator will change color to red
during charging.
4. When fully charged, the INDICATOR LED indicator will
turn blue.
Low Battery Warning
When the bat tery voltage drops below 3.0 V, there will be a
warning beep every 60 seconds.
The headphones will automatically switch o when the battery
voltage drops lower then 2.9 V.
⚠ Warnings:
• Do not throw batteries in re!
• While using the built-in battery, the environmental temperature
should be 5° C (41° F) to 35° C (95° F).
• To get the longest service life for the built-in battery, charge at
room temperature.
• Attention should be drawn the environmental aspects of
battery disposal.
• Battery shall not be exposed to excessive heat such as sunshine,
re or the like.
• The unit will turn o automatically when the battery is too low
to work.
• In order to prolong the battery service life, please charge every
6 months.
• Immediately charge the battery if the headphones are left
unused for a lengthy period.
• The battery is original to the headphones. Please do not attempt
to change the battery by yourself.
1. Long press the POWER/PLAY/PAUSE button to turn ON the unit.
The INDICATOR LED indicator will light on.
2. Long press the POWER/PL AY/PAUSE button again turn OFF the
unit. The INDIC ATOR LED indicator will turn o.
Adjusting volume
Short pre ss the FORWARD/VOLUME and BACK/VOLUME but tons
to increase or reduce the headphone volume. When the volume
reaches maximum, there is a warning tone.
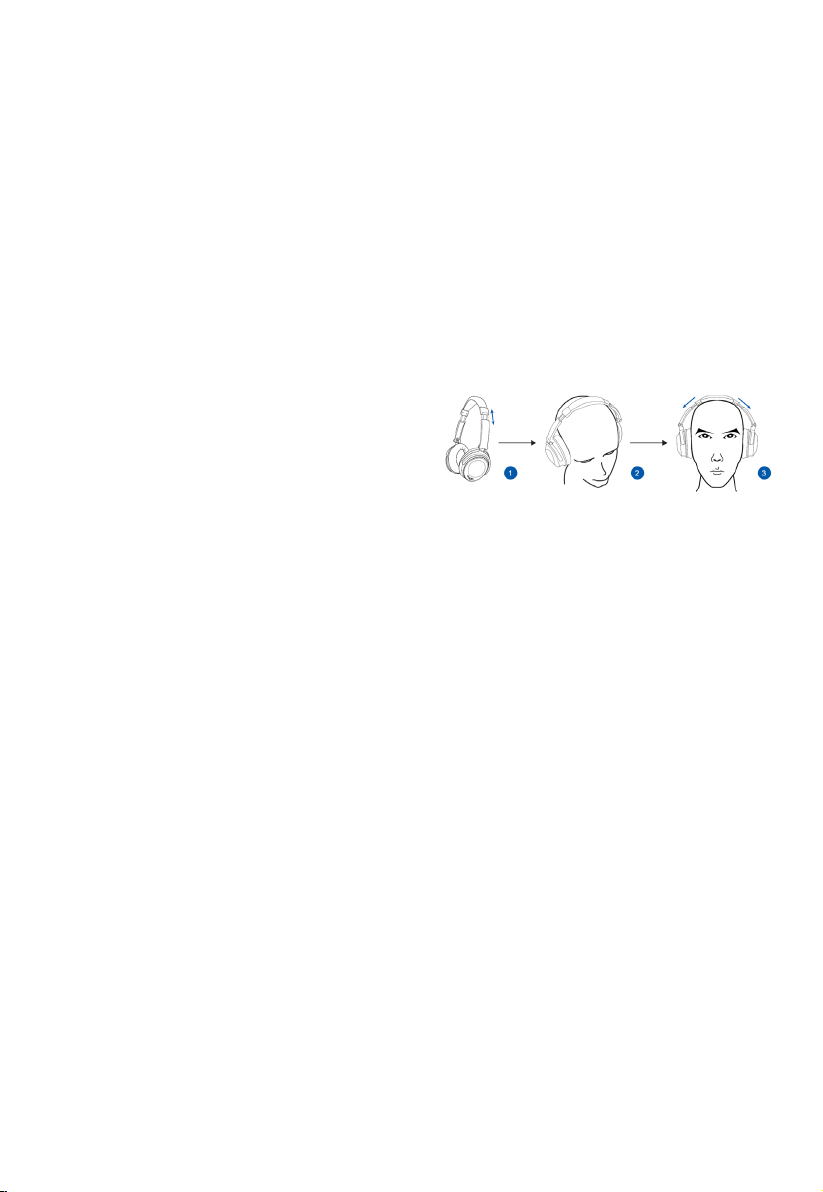
Adjusting t
1. Adjust the headband and arm of the headphones,
exposing 2 – 3 cm.
2. Place the headphones over your ears and head with the
headband in the middle.
3. T ight the headband and arm until the ear cups cover your ears
and the headphones t comfortably on your head.
ANC (Active Noise Cancellation)
The ANC (Active Noise Cancellation) function is available in both
wired and wireless conditions. The ANC circuit must be switched
on/o manually.
To switch on the ANC circuit, press and hold the ANC button for 1
second. The INDICATOR LED will light green.
To switch o the ANC circuit, press and hold the ANC button. The
green LED light will shut o.
Bluetooth pairing
1. To switch on Bluetooth, press and hold the POWER/PLAY/
PAUSE button for about 3 s econds. The INDICATOR LED
indicator will blink blue and red alternately to indicate the unit
is in pairing mode.
2. On the Bluetooth device, enable Bluetooth and select
“HC 2000BNC” f rom the Device List. (Refer to the user manual
of your Bluetooth device for detailed operations.)

3. If the Bluetooth device prompts for a p asscode, use “0000”.
4. When pairing is success ful, the INDICATOR LED will light a
steady blue.
5. To switch o Bluetooth, press and hold the POWER/PLAY/
PAUSE button for about 3 s econds.
Some Bluetooth devices will ask you to accept and conrm
the connection.
If the headphones have previously been paired with a Bluetooth
device, the headphones will automatically connec t with that
device if the device is powered on and within range. If not, the
headphones w ill enter standby mode, and the INDICATOR LED will
light a steady blue.
NOTE: If you want to connect your headphones to another
Bluetooth audio device, you need to disconnect the current device
rst and fo llow the above steps to make a new connec tion.
Using a Bluetooth device
1. When successfully paire d, sound from your Bluetooth device
will be audible through the headphones
2. Press the POWER/PLAY/PAUSE button to pause playback. Press
again to resume playback.
3. Short press the FORWARD/BACK buttons to adjus t the
headphone volume. You can also adjust the volume directly on
your paired Bluetooth device.
4. Long press the FORWARD/BACK buttons to select your desired
audio le.
NOTE: the BLUETOOTH LED indicator will blink blue
during playback.
Using the AUX IN jack
1. Inser t one end of the audio cable into the LINE OUT or
headphone jack on your external audio device.
2. Conne ct the other end of the cable to the AUX IN 3.5 mm stereo
jack on the headphones.
NOTE: If the headphones are in ON mode, the headphones will
automatically turn o once the audio cable is plugged in and will
work as normal, wired headphones.
3. B egin playback on the external device. The ex ternal device’s
sound output will be heard through the headphones.
4. To adjust volume, use the volume control on the external
audio device.
5. When done, stop playback on the ex ternal device and
disconnec t the audio cable from the AUX IN jack on
the headphones.
Receiving a phone call
These headphones are equipped with a built-in microphone,
which allows you to make calls on a Bluetooth-enabled mobile
phone. Make sure your Bluetooth-enabled mobile phone is
paired with the headphones. When a call comes in to the
connecte d mobile phone, you will hear an incoming call alert on
the headphones. Your headphones and mobile phone should be
within 10 m (33 ft) of each ot her.
1. Short press the POWER/PLAY/PAUSE button to answer the
incoming call.
2. Long press the POWER/PL AY/PAUSE button to reject the call.
3. Short press the POWER/PLAY/PAUSE button again to end
the call.
⚠ To prevent possible hearing damage, do not listen at hig h
volume for long periods.
Troubleshooting
•Powerisnoton;Longpress
to turn ON the unit.
No power
•Makesurethebattery
is charged.
•Youhavenotactivatedthe
Bluetooth f unction on your
device. Refer to yo ur device’s
The Bluetooth device
cannot pair or connect
with the headphones.
CAUTION:
• Please turn o the headphones and s tore in the original box
to avoid damage, scratches or bracket deformation when not
in use.
• Please do not bend or twist the bracket to avoid defor mation.
• Please do not tear out the ear cushions or allow to be removed
by unauthorized personnel.
• Do not use the headphones in dangerous areas or areas where
you cannot hear the outside sound.
user manual to activate the
Bluetooth function.
•Theunitisalreadypaired
with another B luetooth
device; disconnect that device
and then try again.

IMPORTANT SAFETY INFORMATION
4. Read these instructions.
5. Keep these instructions.
6. Heed all warnings.
7. Follow all instructions.
8. Do not use this apparatus near water.
9. Clean only with dry clot h.
10. Do not throw this product in the re, to avoid ex plosion.
11. Do not expose this product to bright sunshine for a long time.
12. Do not disassemble or modif y this product.
13. Please store this product in a clean and dry environment.
14. WARNING! To prevent possible hearing damage, do not listen
at high volume levels for long periods.
Specication
Driver unit 40 mm
Impedance 32 Ω
Driver frequency range 20 Hz to 20 kHz
Headset sensitivity 97 dB (±3 dB)
Mic sensitivity -42 dB
ANC (Active Noise
Cancellation)
Rechargeable battery
Battery type
Charge method Computer USB interface
Charging power DC 5 V 300 mA
Operating time Up to 6 hours
Charging time 2+ hou rs
Standby time Up to 200 hours
Bluetooth
Version Version 4.1
Operating
frequency
RF output power 0 dBm
Working distance
Up to 20 – 25 dB @ 100 Hz to
1000 kHz
3.7 V 300 mAh
lithium-polymer battery
2.4 to 2.48 GHz
Up to 10 m measured in open
space (wall and str uctures
may aect range of device)

FEDERAL COMMUNICATIONS COMMISSION COMPLIANCE INFORMATION
SUPPLIER’S DECLARATION OF CONFORMITY (SDoC)
HC 2000BNC
Responsible Party Name: Music Tribe
Address: 5270 Procyon Street
Phone Number: +1 702 800 8290
FC C-I D: QWH-MTHP-01
Commercial NV Inc.
Las Vegas, NV 89118
USA
HC 2000BNC
This equi pment has been test ed and found to compl y with the limits
for a ClassB d igital device, pur suant to part 15 of the FCC Ru les. These
limits ar e designed to provi de reasonable pro tection agains t harmful
interference in a residential installation. This equipment generates, uses
and can rad iate radio frequ ency energy and, i f not installed and u sed in
accordanc e with the instru ctions, may caus e harmful inter ference to radio
communications. However, there is no guarantee that interference will
not occur i n a particular ins tallation. If thi s equipment does c ause harmful
interference to radio or television reception, which can be determined by
turning t he equipment o and o n, the user is encoura ged to try to corre ct
the inter ference by one or mor e of the following me asures:
• Reorient or relocate the receiving antenna.
• Increase the separation between the equipment and receiver.
• Connec t the equipment int o an outlet on a circu it dierent fro m that
to which th e receiver is connec ted.
• Consult th e dealer or an exper ienced radio/T V technician for h elp.
This devic e complies with par t 15 of the FCC Rules. Oper ation is subject
to the follo wing twoconditi ons: (1) This devic e may not cause harmf ul
interf erence, and (2) this device m ust acceptany inter ference receive d,
including interference that may cause undesired operation.
Changes or m odications no t expressly app roved by the part y responsible
for compliance could void the user's authority to operate the equipment.
Caution!
The Music Tribe i s not responsible f or any radio or TV inte rference caus ed
by unauthorized modications to this equipment.
Such modications could void the user authority to operate the
equipment FCC RF Radiation Exposure Statement.
FCC RF Radiation Exposure Statement:
(1) This Transmitter mu st not be co-loc ated or operating i n conjuction
with any oth er antenna or transmi tter.
(2) This equipm ent complies with F CC RF radiation expo sure limits set
forth for an uncontrolled environment.
LEGAL DISCLAIMER
Music Tribe accepts no liability for any loss which may be suered by any person who relies either wholly or in part upon any description,
photograph, or statement contained herein. Technical specications, appearances and other information are subject to change without notice.
All trademarks are the property of their respective owners. Midas, Klark Teknik, Lab Gruppen, Lake, Tannoy, Turbosound, TC Electronic, TC Helicon,
Behringer, Bugera, Auratone and Coolaudio are trademarks or registered trademarks of Music Tribe Global Brands Ltd. © Music Tribe Global
Brands Ltd. 2019 All rights reserved.
LIMITED WARRANTY
For the applicable warranty terms and conditions and additional information regarding Music Tribe’s Limited Warranty, please see complete
details online at musictribe.com/warranty.
 Loading...