

Page 1
Quick Start Guide
HC 2000B
Studio-Quality Wireless Headphones with
Bluetooth® Wireless Technology Connectivity
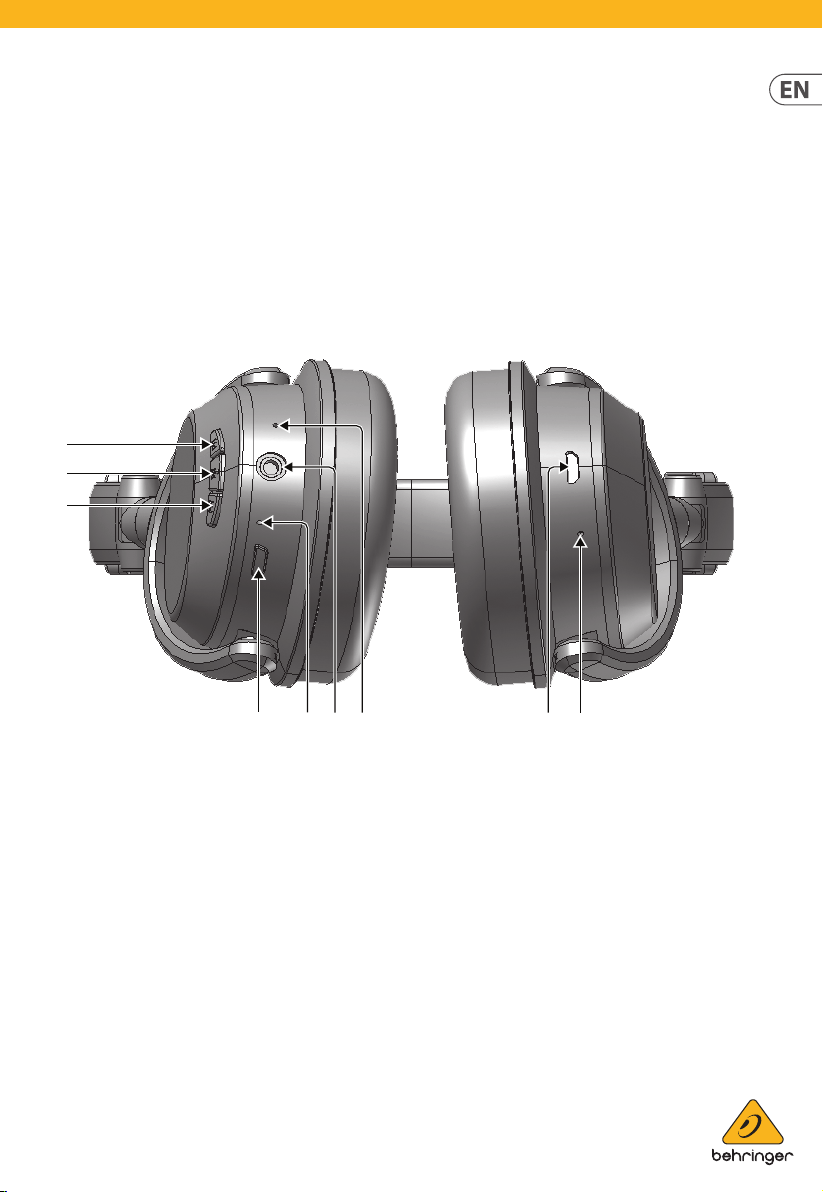
Controls
(8)
(2)
(9)
(1) (6) (5) (4) (3) (7)
(1) POWER button switches the headphones on and off.
(2) PLAY/PAUSE button begins and pauses audio
playback. Secondary call functions include Answer
Call/End Call/Reject Call (press and hold).
(3) MICRO USB jack is for charging rechargeable
batteries.
(4) MICROPHONE can be used for talkback during
phone calls.
(5) AUX IN stereo jack can be used to listen to audio from
external devices as normal wired headphones using
audio cables with 3.5 mm stereo connectors.
(6) BLUETOOTH LED shows the Bluetooth status
(blinking blue and red = in pairing mode;
blue = connected; blinking blue = audio
playback underway).
(7) CHARGE LED shows the charge status
(red = charging; blue = fully charged).
(8) FORWARD/VOLUME button can be used to
increase volume (short press), skip to the next
song (long press), or begin/end a phone call on a
Bluetooth-connected mobile phone.
(9) BACK/VOLUME button can be used to decrease
volume (short press) or skip to the previous song
(long press).
Page 2

Getting started
Power Supply
The unit is powered by a built-in, lithium-polymer rechargeable
batter y. Charge the built-in b attery for at least f our hours before
using the device f or the rst time.
To charge the internal bat tery, follow these steps:
1. Connect the smaller end of the supplied USB cable to the
MICRO USB jack.
2. Conne ct the other end to a powered USB jack on your computer
or an AC power supply (not include d).
3. The CHARGE LED indicator will change color to red
during charging.
4. When f ully charged, the CHARGE LED indicator will turn blue.
⚠ Warnings:
• Do not throw batteries in re!
• While using the built-in bat tery, the environmental
temperature should be 5° C (41° F) to 35° C (95° F).
• To get the longest service life for the built-in battery, charge at
room temperature.
• Attention should be drawn the environmental aspects of
battery disposal.
• Battery shall not be exposed to excessive heat such as
sunshine, re or the like.
• When the battery is low, the unit will beep every 20 se conds.
The unit will turn o automatically when the bat tery is too low
to work.
Turning the unit on/o
1. Long press the POWER button to turn ON the unit. The
BLUETOOTH LED indicator will light on.
2. Long press the POWER button again turn OFF the unit. The
BLUETOOTH LED indicator will turn o .
3. If the Bluetooth device prompts for a passcode, use “0000”.
Some Bluetooth devices will ask you to accept and con rm the
connection. If the units are paired properly, you will hear an
indication sound. If pairing is not success ful within 10 minutes,
the headphones will turn o automatically.
NOTE: If you want to connect your headphones to another
Bluetooth audio device, you need to disconnec t the current device
rst and follow the above steps to make a new connection.
Using A Bluetooth Device
1. When successfully paired, sound from your Bluetooth device
will be audible through the headphones
2. Press the PLAY/PAUSE button to pause playback. Press again to
resume playback.
3. Shor t press the FORWARD/BACK buttons to adjust the
headphone volume. You can also adjust the volume dire ctly on
your paired Bluetooth device.
4. Long press the FORWARD/BACK buttons to select your desired
audio le.
NOTE: The BLUETOOTH LED indicator will blink blue
during playback.
Receiving A Phone Call
These headphones are equipped with a built-in microphone, which
allows you to make calls on a Bluetooth-enabled mobile phone.
Make sure your Bluetooth-enabled mobile phone is paired with the
headphones. When a call comes in to the connected mobile phone,
you will hear an incoming call alert on the headphones.
1. Press the FORWARD button to answer the incoming call.
2. Press the FORWARD button again to end the call.
3. The reject the incoming call, press and hold the BACK but ton.
4. To transfer the sound bet ween the headphones and the mobile
phone, press and hold the PLAY/PAUSE button during the call.
Bluetooth pairing
1. Long press to turn ON the unit. The BLUETOOTH LED indicator
will blink blue and red alternately to indicate the unit is in
pairing mode.
2. On the Bluetooth device, enable Bluetooth and selec t “HC
2000B” from the Device List. (Refer to the user manual of your
Bluetooth device for detailed operations.)
Page 3

Using the AUX IN Jack
1. Inser t one end of the audio cable into the LINE OUT or
headphone jack on your external audio device.
2. Conne ct the other end of the cable to the AUX IN 3.5 mm stereo
jack on the headphones.
NOTE: If the headphones are in ON mode, the headphones will
automatically turn o once the audio cable is plugged in and will
work as normal, wired headphones.
3. Begin playback on the ex ternal device. The external device’s
sound output will be heard through the headphones.
4. To adjust volume, use the volume control on the external
audio device.
5. When done, stop playback on the external device and
disconnec t the audio cable from the AUX IN jack on
the headphones.
⚠ To prevent possible hearing damage, do not listen at high
volume for long periods.
Troubleshooting
•Power is not on; Long press
No power
The Bluetooth device
cannot pair or connect
with the headphones.
to turn ON the unit.
•Make sure the bat tery
is charged.
•You have not activated the
Bluetooth function on your
device. Refer to your device’s
user manual to ac tivate the
Bluetooth function.
•The unit is already paired
with another Bluetooth
device; disconnec t that device
and then try again.
IMPORTANT SAFETY INFORMATION
6. Read these instructions.
7. Keep these instr uctions.
8. Heed all warnings.
9. Follow all instructions.
10. Do not use this apparatus near water.
11. Clean only with dry cloth.
12. Do not throw this product in the re, to avoid explosion.
13. Do not expose this product to bright sunshine for a long time.
14. Do not disass emble or modify this product.
15. Please store this product in a clean and dry environment.
WARNIN G! To prevent possible hearing damage, do not listen at
high volume levels for long periods.
Speci cation
Max. output voltage ≤ 150 mV wide band
Characteristic voltage ≥ 75 mV
Rechargeable battery
Battery type
Charging power DC 5 V 300 mA
Operating time
Charging time Appr. 3 - 4 hours
Bluetooth
Version Version 5.0
Operating
frequency
RF output power 0 dBm
Working distance
3.7 V 185 mAh
lithium-polymer battery
> 10 hours at 60% volume
when fully charged
2.4 to 2.48 GHz
Up to 10 m measured in open
space (wall and struc tures
may a ect range of device)
Page 4

FEDERAL COMMUNICATIONS COMMISSION COMPLIANCE INFORMATION
SUPPLIER’S DECLARATION OF CONFORMITY (SDoC)
HC 2000B
Responsi ble Party Name: Music Tribe
Address: 5270 Procyon Street
Phone Numb er: +1 702 800 8290
FCC-ID: QWH-MTHP-02
Commercial NV Inc.
Las Vegas, NV 89118
USA
HC 2000B
This equi pment has been test ed and found to compl y with the limits
for a ClassB d igital device, pur suant to part 15 of the FCC Ru les. These
limits ar e designed to provi de reasonable pro tection agains t harmful
interf erence in a resident ial installatio n. This equipment ge nerates, uses
and can rad iate radio freque ncy energy and, if n ot installed and us ed in
accordan ce with the instr uctions, may c ause harmful in terference to r adio
communic ations. However, there is no guar antee that interf erence will
not occur i n a particular i nstallation. I f this equipment d oes cause harmf ul
interf erence to radio or tele vision receptio n, which can be deter mined by
turning t he equipment o and on, the user is enco uraged to try to co rrect
the inter ference by one or mor e of the following me asures:
• Reorient or relocate the receiving antenna.
• Increase th e separation bet ween the equipm ent and receiver.
• Connect th e equipment into an ou tlet on a circuit di erent from t hat
to which the r eceiver is connec ted.
• Consult the dealer or an experienced radio/TV technician for help.
This devic e complies with par t 15 of the FCC Rules. Oper ation is subjec t
to the follo wing twoconditi ons: (1) This device m ay not cause harmf ul
interf erence, and (2) this device m ust acceptany inter ference receive d,
includin g interference t hat may cause undesi red operation.
Changes o r modi cations not e xpressly appro ved by the party r esponsible
for compli ance could void the user 's authority to op erate the equipme nt.
Caution!
The Music Tribe i s not responsible f or any radio or TV inte rference caus ed
by unauthorized modi c ations to this equipment.
Such modi c ations could void the us er authority to o perate the
equipme nt FCC RF Radiation Ex posure Statemen t.
FCC RF Radiat ion Exposure St atement:
(1) This Transmitter mu st not be co-loc ated or operating i n conjuction
with any oth er antenna or transmi tter.
(2) This equipm ent complies with F CC RF radiation expo sure limits set
forth f or an uncontrolle d environment.
LEGAL DISCLAIMER
Music Tribe accepts no liability for any loss which may be su ered by any person who relies either wholly or in part upon any description,
photograph, or statement contained herein. Technical speci cations, appearances and other information are subject to change without notice.
All trademarks are the property of their respective owners. Midas, Klark Teknik, Lab Gruppen, Lake, Tannoy, Turbosound, TC Electronic, TC Helicon,
Behringer, Bugera, Auratone and Coolaudio are trademarks or registered trademarks of Music Tribe Global Brands Ltd. © Music Tribe Global
Brands Ltd. 2019 All rights reserved.
LIMITED WARRANTY
For the applicable warranty terms and conditions and additional information regarding Music Tribe’s Limited Warranty, please see complete
details online at musictribe.com/warranty.
 Loading...