

Page 1
Manual | EN
TE1120
TwinCAT 3 | XCAD Interface
2020-12-21 | Version: 1.1
Page 2

Page 3

Table of contents
Table of contents
1 Foreword ....................................................................................................................................................5
1.1 Notes on the documentation..............................................................................................................5
1.2 Safety instructions .............................................................................................................................6
2 Overview.....................................................................................................................................................7
3 Concept ......................................................................................................................................................8
4 Workflow...................................................................................................................................................10
4.1 Importing topology ...........................................................................................................................10
4.2 Enabling/disabling plugins ...............................................................................................................10
4.3 Configuring plugins..........................................................................................................................11
4.4 Sorting plugins.................................................................................................................................12
4.5 Changing the converter rule path ....................................................................................................12
4.6 Changing converter rules ................................................................................................................13
5 Reference user interface.........................................................................................................................16
5.1 Import via XCAD..............................................................................................................................16
5.2 Variable Name Converter Rules......................................................................................................16
5.3 XCAD Interface Options ..................................................................................................................19
5.4 Open XCAD Interface Log (local)... .................................................................................................22
5.5 Find Log...........................................................................................................................................22
5.6 Output window.................................................................................................................................22
6 Reference plugins....................................................................................................................................25
6.1 Create Global Variable List with links ..............................................................................................25
6.2 Convert variable names...................................................................................................................26
TE1120 3Version: 1.1
Page 4

Table of contents
TE11204 Version: 1.1
Page 5

Foreword
1 Foreword
1.1 Notes on the documentation
This description is only intended for the use of trained specialists in control and automation engineering who
are familiar with applicable national standards.
It is essential that the documentation and the following notes and explanations are followed when installing
and commissioning the components.
It is the duty of the technical personnel to use the documentation published at the respective time of each
installation and commissioning.
The responsible staff must ensure that the application or use of the products described satisfy all the
requirements for safety, including all the relevant laws, regulations, guidelines and standards.
Disclaimer
The documentation has been prepared with care. The products described are, however, constantly under
development.
We reserve the right to revise and change the documentation at any time and without prior announcement.
No claims for the modification of products that have already been supplied may be made on the basis of the
data, diagrams and descriptions in this documentation.
Trademarks
Beckhoff®, TwinCAT®, EtherCAT®, EtherCAT G®, EtherCAT G10®, EtherCAT P®, Safety over EtherCAT®,
TwinSAFE®, XFC®, XTS® and XPlanar® are registered trademarks of and licensed by Beckhoff Automation
GmbH.
Other designations used in this publication may be trademarks whose use by third parties for their own
purposes could violate the rights of the owners.
Patent Pending
The EtherCAT Technology is covered, including but not limited to the following patent applications and
patents:
EP1590927, EP1789857, EP1456722, EP2137893, DE102015105702
with corresponding applications or registrations in various other countries.
EtherCAT® is a registered trademark and patented technology, licensed by Beckhoff Automation GmbH,
Germany
Copyright
© Beckhoff Automation GmbH & Co. KG, Germany.
The reproduction, distribution and utilization of this document as well as the communication of its contents to
others without express authorization are prohibited.
Offenders will be held liable for the payment of damages. All rights reserved in the event of the grant of a
patent, utility model or design.
TE1120 5Version: 1.1
Page 6
Foreword
1.2 Safety instructions
Safety regulations
Please note the following safety instructions and explanations!
Product-specific safety instructions can be found on following pages or in the areas mounting, wiring,
commissioning etc.
Exclusion of liability
All the components are supplied in particular hardware and software configurations appropriate for the
application. Modifications to hardware or software configurations other than those described in the
documentation are not permitted, and nullify the liability of Beckhoff Automation GmbH & Co. KG.
Personnel qualification
This description is only intended for trained specialists in control, automation and drive engineering who are
familiar with the applicable national standards.
Description of symbols
In this documentation the following symbols are used with an accompanying safety instruction or note. The
safety instructions must be read carefully and followed without fail!
DANGER
Serious risk of injury!
Failure to follow the safety instructions associated with this symbol directly endangers the life and health of
persons.
WARNING
Risk of injury!
Failure to follow the safety instructions associated with this symbol endangers the life and health of persons.
CAUTION
Personal injuries!
Failure to follow the safety instructions associated with this symbol can lead to injuries to persons.
NOTE
Damage to the environment or devices
Failure to follow the instructions associated with this symbol can lead to damage to the environment or
equipment.
Tip or pointer
This symbol indicates information that contributes to better understanding.
TE11206 Version: 1.1
Page 7

Overview
2 Overview
The new TwinCAT 3 XCAD Interface 2 replaces the old TwinCAT 3 XCAD interface. As described in more
detail in the Concept [}8], it is based on the standardized AML format but still supports the old Beckhoff
XML format. We therefore recommend using the TwinCAT 3 XCAD Interface 2 for planning new projects.
Requirement
• Windows 7 or higher
• Visual Studio 2013, 2015, 2017 and TC XAE Shell
• TwinCAT 3.1 Build 4024 or higher
Installation
The installation is carried out via the separate installer TE1120 – XAD interface. Follow the installation
wizard.
Licensing
The TwinCAT 3 XCAD Interface 2 has its own Engineering license. If no license is available, initial I/O
topologies and up to ten tags can be imported as a test.
Bus systems supported
The current version only supports EtherCAT topologies.
TE1120 7Version: 1.1
Page 8

Concept
3 Concept
An efficient engineering process becomes more and more important as the complexity and level of
automation of machines and plants increases. The manual transfer to a TwinCAT project of an I/O topology
that you have already created within the scope of electrical planning in an ECAD tool leads to high additional
costs and is a potential cause of error, especially with large topologies. The TwinCAT 3 AML data exchange,
on which the new TwinCAT 3 XCAD Interface is based, therefore facilitates automated creation of a topology
by importing data from the ECAD tool, which saves a great deal of time.
The fundamental import and export functionality is based on the standardized exchange format
AutomationML (AML for short), with whose help the topology data can be exchanged bidirectionally between
the ECAD tools and TwinCAT. This is ensured by a simple and universal change management, as you can
adopt changes from both directions into the respective other tool.
The AML format also allows an incremental import. Therefore, you can commence with the implementation
of the software and the first import of the I/O topology into TwinCAT at an early stage of the electrical
planning, because further imports of the updated version are also possible later on. Differences between the
versions from the ECAD tool and from TwinCAT can be compared and managed with the help of the
TwinCAT Project Compare during the import. This allows you to parallelize the electrical planning and
software engineering and to minimize the time required for the entire engineering process. Further
information about TwinCAT 3 AML data exchange can be found in the corresponding documentation.
The new TwinCAT 3 XCAD interface internally uses the TwinCAT 3 AML data exchange and supplements its
function with the help of a plugin concept. This concept allows various plugins for enriching and modifying
the AML file to be executed fully automatically when calling the command Import via XCAD... [}16]. When
importing the AML file, for example, you can use the Create Global Variable List with links [}25] plugin to
automatically create a PLC project with a global variable list whose variables are already linked to the I/O
topology. Time-consuming manual linking is therefore no longer necessary.
All available plugins are listed in the XCAD Interface Options [}19], where they can be activated and set. A
description of the plugins and the plugin concept can be found under the Reference plugins [}25].
Together with the automatic linking, the XCAD interface also offers the possibility to change the names of the
process data objects of the individual devices according to the linked variables. In the XCAD Interface
Options [}19], you can choose between the tag name from the AML file and the variable name from the
GVL and thus adopt either the view from the ECAD tool or from the PLC project. In addition, the tag
comment from the AML file is added to the respective variables in the GVL and the corresponding process
data object of the device.
In addition to the AML format, the XCAD interface also supports the old Beckhoff XML exchange format. In
this way, you can continue to import electrical plans with the XCAD interface without immediately converting
them to the AML format. The XML format is converted internally to AML format and then imported. However,
the advantages of the AML format mentioned at the beginning are not available in this application scenario.
The additional functions of the TwinCAT 3 XCAD Interface compared to TwinCAT 3 AML Data Exchange are
summarized in the following table.
TE11208 Version: 1.1
Page 9
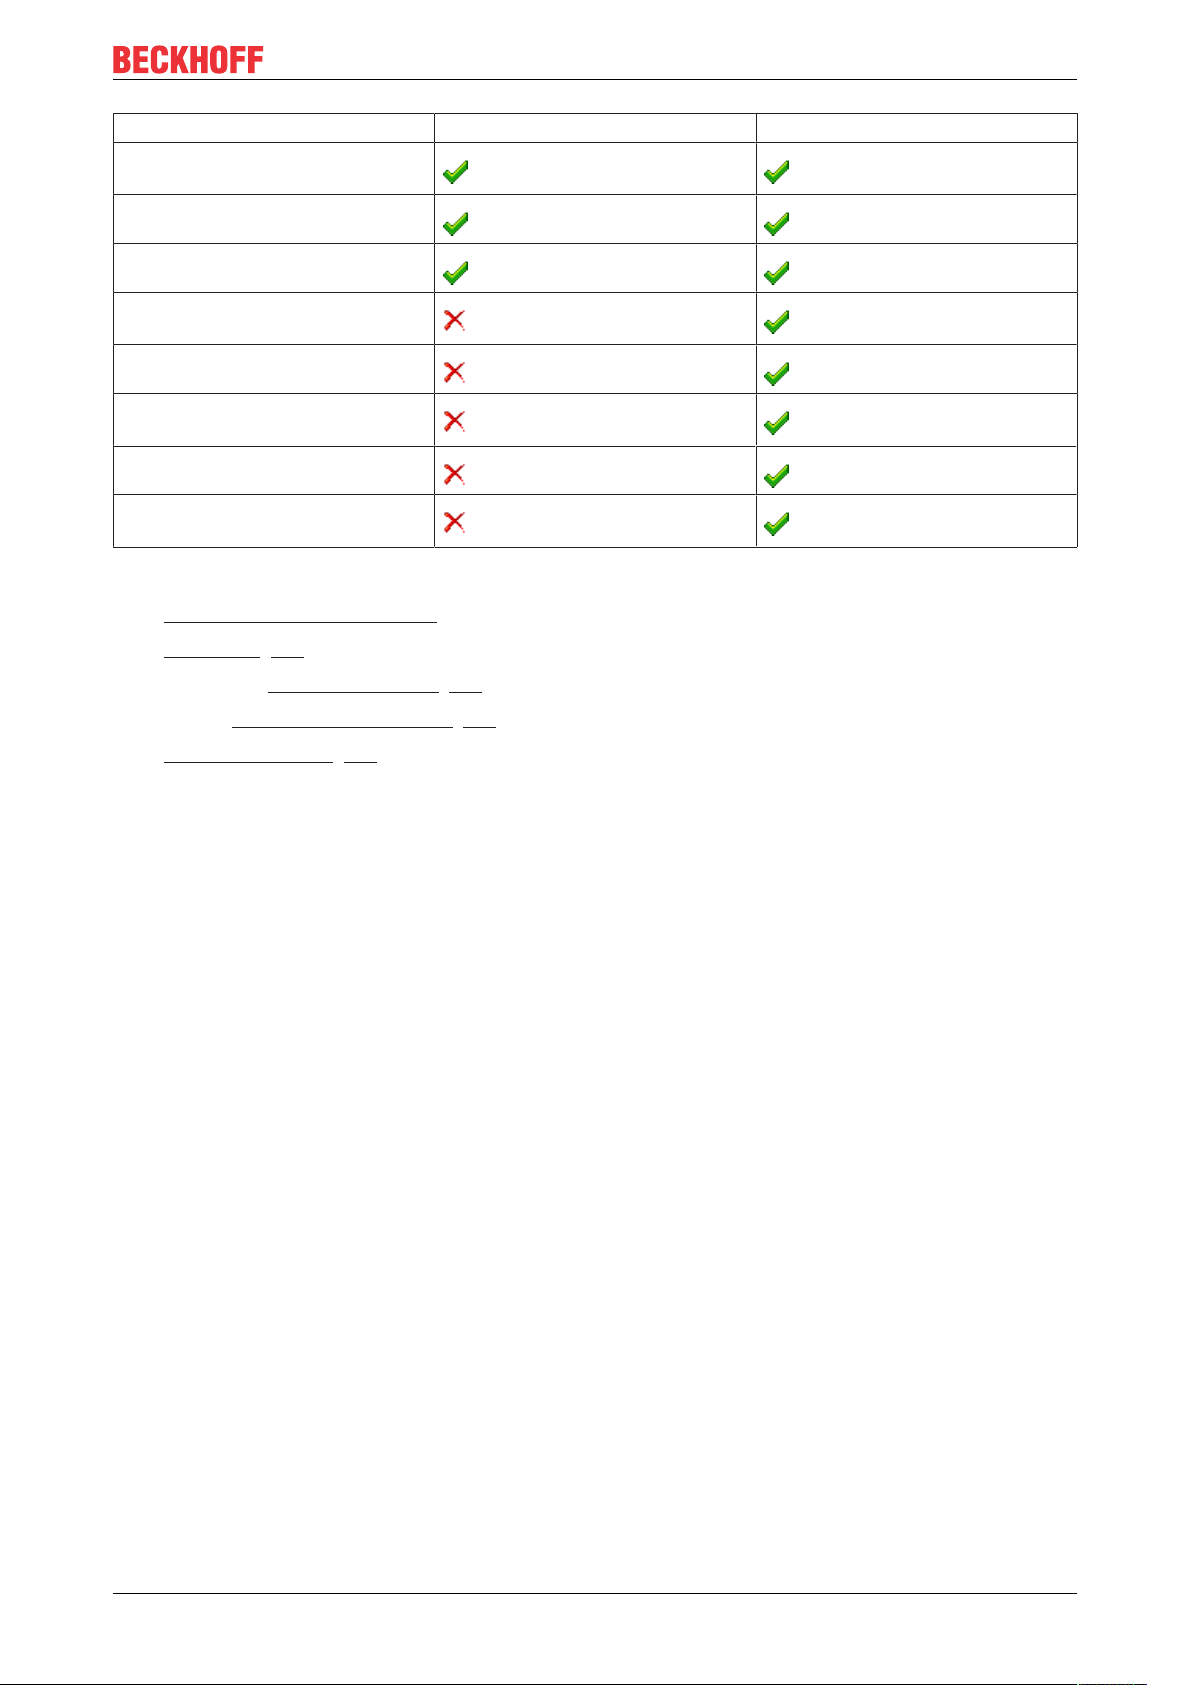
Automatic generation of the I/O
topology
Incremental data update
Bidirectional data exchange
Automatic generation of a linked
GVL
Renaming the channel end points
Transfer of comments for the
channel end points
Enrichment of AML
Addendum: Support for the old
Beckhoff XML format for import
See also
• TwinCAT 3 AML data exchange
Concept
TwinCAT 3 AML Data Exchange TwinCAT 3 XCAD Interface
• Workflow [}10]
• Command: Import via XCAD... [}16]
• Dialog: XCAD Interface Options [}19]
• Reference plugins [}25]
TE1120 9Version: 1.1
Page 10

Workflow
4 Workflow
The workflow of the TwinCAT 3 XCAD interface is based on the enrichment of the information in the AML file
via the plugin Concept [}8] the activated plugins being automatically executed via the command Import via
XCAD... [}16].
See also
• Concept [}8]
• Command: Import via XCAD... [}16]
4.1 Importing topology
1. Create a new TwinCAT project.
2. Right-click the TwinCAT project entry in the Solution Explorer.
3. Select the command Import via XCAD... [}16].
4. In the drop-down menu for the file formats, select one of the two formats AML or Beckhoff-ECAD-XML in
the default browse dialog.
5. Select the desired file in the standard browser dialog.
6. Confirm the dialog with Open.
See also
• Command: Import via XCAD... [}16]
4.2 Enabling/disabling plugins
1. Open the XCAD Interface Options [}19].
2. Switch to the Plugins tab.
3. Find the desired plugin in the list.
TE112010 Version: 1.1
Page 11

4. Enable / disable the plugin via the checkbox.
5. Confirm the dialog with OK to save the setting.
See also
• Dialog: XCAD Interface Options [}19]
4.3 Configuring plugins
Workflow
1. Open the XCAD Interface Options [}19].
2. Switch to the Plugins tab.
3. Find the desired plugin in the list.
4. Expand the plugin settings with the arrow button .
5. Change the desired settings.
6. Confirm the dialog with OK to save the settings.
See also
• Dialog: XCAD Interface Options [}19]
• Reference plugins [}25]
TE1120 11Version: 1.1
Page 12

Workflow
4.4 Sorting plugins
1. Open the XCAD Interface Options [}19].
2. Switch to the Plugins tab.
3. Find the desired plugin in the list.
4. Hold the plugin by the dotted drag-and-drop marker with the left mouse button.
5. Drop the plugin in the desired position of another plugin.
6. Confirm the dialog with OK to save the setting.
See also
• Dialog: XCAD Interface Options [}19]
4.5 Changing the converter rule path
The converter rule path can be changed in the settings of the Convert variable names [}26] plugin and in
the Variable Name Converter Rules [}16] dialog.
TE112012 Version: 1.1
Page 13

Workflow
1. Open the plugin settings or the above-named dialog.
2. Open the default browse dialog with Choose.
3. Select the path to the desired converter rule file.
4. Confirm the dialog with OK to save the settings.
Loading new rules
If the new converter rule file is formatted correctly, the rules are automatically loaded after the new
path is selected and displayed in the dialog.
Saving changes
Any changes you have made to the rules in the dialog are automatically saved to the rule file when
you confirm the dialog.
See also
• Changing converter rules [}13]
• Dialog: Variable Name Converter Rules [}16]
• Plugin: Convert variable names [}26]
4.6 Changing converter rules
The existing converter rules can be changed in the settings of the Convert variable names [}26] plugin and
in the Variable Name Converter Rules [}16] dialog. If you want to add new rules, you can make these
changes directly in the converter rule file.
TE1120 13Version: 1.1
Page 14

Workflow
Changing an existing rule collection
1. Open the plugin settings or the above-named dialog.
2. Open the dialog for changing the name and description of a rule collection with the button.
3. Confirm the dialog with OK to save the settings.
Changing an existing rule collection
1. Open the plugin settings or the above-named dialog.
2. Delete the rule collection with the button.
3. Confirm the dialog with OK to save the settings.
Adding a new rule collection
1. Open the plugin settings or the above-named dialog.
2. Open the dialog to enter the name and description of a new rule collection with the New Rule
Collection button.
3. Confirm this dialog with OK to add the new rule collection.
4. Confirm the dialog with OK to save the settings.
Changing existing converter rules
1. Open the plugin settings or the above-named dialog.
2. Expand the corresponding rule collection.
3. Change the desired rule.
4. Confirm the dialog with OK to save the setting.
TE112014 Version: 1.1
Page 15

Saving changes
Any changes you have made to the rules in the dialog are automatically saved to the rule file when
you confirm the dialog.
Adding converter rules
1. Open the plugin settings or the above-named dialog.
2. Expand the corresponding rule collection.
3. Add a new rule of a desired type [}18] with the New Rule button.
The new rule is added at the end of the rule collection.
4. Confirm the dialog with OK to save the setting.
Copying a converter rule
1. Open the plugin settings or the above-named dialog.
Workflow
2. Expand the corresponding rule collection.
3. Open the context menu of the desired rule with the button.
4. Select the Copy Rule item from the context menu.
The new rule is added at the end of the rule collection.
5. Confirm the dialog with OK to save the setting.
Deleting converter rules
1. Open the plugin settings or the above-named dialog.
2. Expand the corresponding rule collection.
3. Open the context menu of the desired rule with the button.
4. Select the Delete Rule item from the context menu.
5. Confirm the dialog with OK to save the setting.
See also
• Changing the converter rule path [}12]
• Dialog: Variable Name Converter Rules [}16]
• Plugin: Convert variable names [}26]
TE1120 15Version: 1.1
Page 16

Reference user interface
5 Reference user interface
The TwinCAT 3 XCAD Interface offers various commands and dialogs. These are described below.
5.1 Import via XCAD...
Function: The command opens the standard browser dialog, which can be used to search for and import
either a file in AutomationML format or in the old Beckhoff ECAD XML format. The plugins activated in the
XCAD Interface Options are then automatically executed.
Call: The command can be called from the context menu of the TwinCAT project under Import
AutomationML or via the TwinCAT item in the menu bar under AutomationML and Import
AutomationML.
Requirement: The TwinCAT project is selected in the Solution Explorer.
See also
• Importing topology [}10]
• Dialog: XCAD Interface Options [}19]
5.2 Variable Name Converter Rules
Function: The Variable Name Converter Rules dialog displays the rules of the currently selected set of
rules. It can be used to select a path to another set of rules or to make final changes to existing rules before
import. All changes are adopted in the set of rules when the dialog is confirmed. These rules can also be
changed in the Convert variable names [}26] plugin.
Call: The dialog is automatically called when executing the command Import via XCAD... [}16] if the
Convert variable names [}26] plugin and the corresponding setting Always show variable name converter
rules dialog [}27] have been activated.
TE112016 Version: 1.1
Page 17

Reference user interface
Variable name converter rules file path In this section you can select the path to the file with the JSON
format from which the rules for converting variable names will be
loaded.
Note: By default, this path points to the plugin folder in the
directory %USERPROFILE%\Documents\Beckhoff\TE1120 -
TC3 XCAD Interface\Plugins.
Use this checkbox to select whether the Variable Name
/ Always show variable name
converter rules dialog, before executing
Converter Rules dialog is automatically opened before the
plugin is executed.
the plugin
• : The dialog will open automatically.
• : The dialog will not open automatically.
Rule collections
You can add a new rule collection using this button. The new
New Rule Collection
rule collection is automatically added to the end of the list.
Numbering The order in which the individual rule collections are executed is
shown here. The numbering is derived from the position in the
list. You can change the order by dragging and dropping the rule
collection to a new position.
This button allows you to select whether the plugin settings
/
should be displayed or hidden.
• : The plugin settings are collapsed. Pressing the button
expands and displays them.
• : The plugin settings are expanded. Pressing the button
collapses them, so that they are no longer displayed.
Use this checkbox to enable or disable the corresponding rule
/
collection. If it is enabled, your rules will be applied automatically
when the plugin is executed.
• : The rule collection is enabled.
• : The rule collection is disabled.
Name The name of the rule collection is displayed here.
With this button you can open a dialog that allows you to adapt
the name of the rule collection and change the description.
With this button you can delete the rule collection including its
rules.
TE1120 17Version: 1.1
Page 18

Reference user interface
Description Here you will find the short description of the rule collection.
Settings
You can enable the advanced mode with this checkbox. It offers
/ Enable advanced mode
/ The execution of the converter
rules collection is stopped, after one of its
rules is applied.
Rules Here you will find a list of all the rules that have been added to
New Rule
Numbering The order in which the individual rules are executed is shown
further setting options for the rules.
• : Advanced mode is enabled.
• : Advanced mode is disabled.
Use this checkbox to select whether all rules in the rule
collection should always be applied or whether execution of the
rule collection should be stopped once one of the rules has been
applied.
• : Execution is aborted.
• : Execution continues.
the rule collection.
You can add a new rule using this button. The new rule is
automatically added to the end of the list.
here. The numbering is derived from the position in the list. You
can change the order by dragging and dropping the rule to a
new position.
With this button you can open a menu via which a rule can be
deleted or copied. If you copy the rule, the copy will be added to
the end of the list.
Predefined rule collections
Input / Output Prefix The rules of this collection add a defined prefix for inputs and
outputs to the variable name.
Data Type Prefix The rules in this collection add a defined prefix for the variable
data type to the variable name.
Numeric Start The rules of this collection check whether the first character of
the variable name is numeric and, if so, add a defined prefix.
Replace special characters The rules in this collection search for special characters in the
variable name and replace them with defined characters.
Replace double underscores The rules in this collection search for double underscores in the
variable name and replace them with single underscores.
Rule types
Each rule is graphically represented as an If-Then construct. With the condition, you can query various
attributes (name, comment, data type, I/O address) of the tags from the AML file with the help of various rule
types. Depending on the configured condition, you can then influence the name or comment:
• Add: A character string to be defined is added at the start or end.
• Remove: A character string to be defined is deleted at the start or end.
• Find Replace: A search is performed for a character string to be defined, which is then replaced by a
second character string to be defined.
See also
• Command: Import via XCAD... [}16]
• Plugin: Convert variable names [}26]
TE112018 Version: 1.1
Page 19

Reference user interface
5.3 XCAD Interface Options
Function: In the XCAD Interface options you will find all settings of the XCAD interface and the installed
XCAD Interface plugins. They are divided into two tabs, General and Plugins, and are valid across projects
for the entire TwinCAT Engineering environment.
Call: From the Visual Studio menu, choose Tools to open the Options dialog. Navigate to the entry XCAD
Interface via TwinCAT and XAE Environment.
General tab
Function: The General tab displays all the general settings that apply to the XCAD Interface.
Mapping Tool Layout This drop-down menu allows you to change the layout of the
Mapping Tool and whether it opens after executing the Import
AutomationML via XCAD... command.
• None: The Mapping Tool does not open automatically after
the import.
• Column: The Mapping Tool opens automatically after the
import. The two windows are displayed side by side.
• Row: The Mapping Tool opens automatically after the import.
The two windows are displayed below each other.
Rename PDOs Use this drop-down menu to define whether and how the PDOs
of the automatically generated I/O topology are renamed when
the command Import AutomationML via XCAD... is executed.
• None: The PDOs are not renamed.
• AML_TAG: The PDOs are assigned the name of the
respective linked tag that is entered in the AML file.
• PLC_VARIABLE: The PDOs are assigned the name of the
linked PLC variable.
TE1120 19Version: 1.1
Page 20

Reference user interface
Plugins tab
Function: The Plugins tab displays a list of all plugins and their settings. The position of the plugins in the
list corresponds to their execution order, with the topmost plugin being executed first. This order can be
changed by dragging and dropping. A description of the plugins and the plugin concept can be found under
the Reference plugins [}25].
TE112020 Version: 1.1
Page 21

Reference user interface
Numbering The order in which the plugins are executed is shown here. The
numbering is derived from the position in the list. You can
change the order by dragging and dropping the rule collection to
a new position.
Drag & drop marker Use this marker to change the plugin position in the list. To do
this, place the cursor on the front part of the plugin entry and
drag it to the desired position while holding the left mouse
button.
If an error or warning has been found for the plugin, this will be
/
/
indicated here.
• : An error was found.
• : A warning was found.
This button allows you to select whether the plugin settings
should be displayed or hidden.
• : The plugin settings are collapsed. Pressing the button
expands and displays them.
• : The plugin settings are expanded. Pressing the button
collapses them, so that they are no longer displayed.
Use this checkbox to enable or disable the corresponding
/
Plugin Name The name of the plugin is displayed in this section.
Plugin Version The plugin version is displayed in this section.
Developer
Function: Additional information and functions for the development of plugins are available on the
Developer tab.
Global artifacts
/ Plugin development
plugin. If it is enabled, it is automatically called up when the
Import AutomationML via XCAD... command is executed.
• : The plugin is enabled.
• : The plugin is disabled.
Here you can see a list of the artifacts [}25] that are made
available globally by the XCAD interface and can be used within
the plugins.
Here you can unlock the developer mode for the XCAD
interface.
• : The XCAD interface loads the plugins from the folder
%USERPROFILE%\Documents\Beckhoff\TE1120 - TC3
XCAD Interface\PluginTest. At startup, a dialog is additionally
displayed via which the plugins that are subsequently to be
executed can be directly selected.
• : The XCAD interface loads the published plugins from
the folder %USERPROFILE%\Documents\Beckhoff\TE1120 -
TC3 XCAD Interface\Plugins. The plugins activated on the
Plugins tab are executed.
Note: This setting is only active after restarting Visual Studio.
See also
TE1120 21Version: 1.1
Page 22

Reference user interface
• Concept [}8]
• Command: Import via XCAD... [}16]
5.4 Open XCAD Interface Log (local)...
Function: this command opens the log of the last XCAD interface import in the Output window [}22]. If
there has not yet been any import into the open TwinCAT project, a corresponding message is displayed.
Call: The command can be called via the TwinCAT item in the menu bar under AutomationML and Open
Log.
Requirement: The TwinCAT project is selected in the Solution Explorer and an import has already been
carried out via the XCAD interface. In this case, the log in the TwinCAT project path is stored in the _AML
folder.
See also
• Command: Import via XCAD... [}16]
• Dialog: Output window [}22]
5.5 Find Log...
Function: The command opens the standard browse dialog, via which any XCAD interface or AML data
exchange log file can be opened in the Output window [}22].
Call: The command can be called via the TwinCAT item in the menu bar under AutomationML and Open
Log.
See also
• Dialog: Output window [}22]
5.6 Output window
Function: In the output window, the log messages output during import or export are summarized in
sections. When a section is selected, a detail window opens with all the messages in the section.
Call: The output window is called automatically when importing or exporting. It also opens when a log is
called retrospectively via the command Open XCAD Interface Log (local)... [}22] or Find Log... [}22].
TE112022 Version: 1.1
Page 23

Reference user interface
The state of the section is displayed here.
/ /
• : The section has been successfully edited.
• : An error occurred while editing the section.
• : The section is currently being edited.
Name The name of the section is displayed here.
Number of messages The numbers of messages (gray), warnings (orange) and errors
(red) are displayed behind the name. The number of messages
is only visible as long as the mouse pointer is on the section.
"Succeeded" is displayed as long as no error has been output.
Time The time it took to edit the section is displayed here.
Here you can choose whether the XCAD interface should copy
/ Copy log file after closing the
dialog
the log file to the _AML folder in the project directory after
closing the dialog.
TE1120 23Version: 1.1
Page 24

Reference user interface
With this button you can display the selection of other
information.
• / Name: Instance that output the message
• / Date: Date of the message
• / Time: Time of the message
With this button you can open a search box in which you can
enter search terms. You can then search for these search terms
in the section.
See also
• Command: Import via XCAD... [}16]
• Command: Open XCAD Interface Log (local)... [}22]
• Command: Find Log... [}22]
TE112024 Version: 1.1
Page 25

Reference plugins
6 Reference plugins
The TwinCAT 3 XCAD interface is based on a plugin concept. This concept allows various plugins for
enriching and modifying the AML file to be executed before the actual import of the I/O topology. When
importing the AML file, for example, you can use the Create Global Variable List with links [}25] plugin to
automatically create a PLC project with a global variable list whose variables are already linked to the I/O
topology.
All available plugins are listed in the XCAD interface options on the XCAD Interface Options [}20] tab, where
they can be activated and adjusted. The activated plugins are executed fully automatically according to the
order in the list when calling the Import via XCAD... [}16] command. The positions of the plugins in the list
and thus the order of execution can be changed via drag-and-drop. In the following chapters you will find the
description of the plugins.
Artifacts
With the help of so-called artifacts, information can be exchanged between different plugins. Artifacts
represent globally available objects that a plugin can create and other plugins can then use. The Convert
variable names [}26] plugin, for example, generates an artifact with converted variable names, which the
Create Global Variable List with links [}25] plugin continues to use.
Artifacts can be expected either compulsorily or optionally from a plugin. Accordingly, if the artifact has not
been created beforehand, an error or warning is output. In the example of the Create Global Variable List with
links [}25] plugin, the artifact is only optionally expected. If the Convert variable names [}26] plugin is not
inserted and executed beforehand, a corresponding warning is output both in the XCAD Interface Options
[}20] tab offline and in the Output window [}22] during import, because the artifact is not created. The
plugin will continue to be executed.
6.1 Create Global Variable List with links
Function: The plugin "Create Global Variable List with links" searches for a TagTable in the AML file
selected for import. If it contains a TagTable, the plugin adds a new PLC project with a GVL to the TwinCAT
project, in which the command Import via XCAD... [}16] has been executed. Both the PLC project name and
the GVL name can be defined in the plugin settings. An allocated variable is added to the GVL for each tag
of the TagTable. Any comment texts in the AML are included as comments above the declaration. Finally,
the PLC project is compiled automatically and each variable in the process image is linked to the
corresponding terminal channel.
Artifacts:
ConvertedTagDictionary: Dictionary of the tags from the TagTable of the AML file with the associated PLC
variables
Calling up the settings: Open the XCAD Interface Options [}19] dialog and switch to the XCAD Interface
Options [}20] tab.
TE1120 25Version: 1.1
Page 26

Reference plugins
General
Description Here you can find the short description of the plugin.
Used artifacts
Options
PLC Project Name In this section you can define the name of the automatically
GVL Name In this section you can define the name of the automatically
See also
• Concept [}8]
• Dialog: XCAD Interface Options [}19]
• Command: Import via XCAD... [}16]
This is a list of the artifacts [}25] that the plugin uses internally.
generated PLC project.
generated GVL.
6.2 Convert variable names
Function: The plugin "Convert variable names" converts the names of the tags from the TagTable of the
AML file to a valid PLC variable name. This is done using the conversion rules listed under Convert variable
names [}27] which you can adapt there using the built-in editor. The plugin provides a dictionary of the
original tags with the associated PLC variables for global re-use.
Artifacts:
ConvertedTagDictionary: Dictionary of the tags from the TagTable of the AML file with the associated PLC
variables with converted names
Calling up the settings: Open the XCAD Interface Options [}19] dialog and switch to the XCAD Interface
Options [}20] tab.
TE112026 Version: 1.1
Page 27

Reference plugins
General
Description Here you can find the short description of the plugin.
Created artifacts
Options
The variable names derived from the tag names can be automatically adjusted using the integrated variable
name converter. A set of rules is used for the adjustments, which is saved in JSON format by default under
%userprofile%\Documents\Beckhoff\TE1120 - TC3 XCAD Interface\Plugins
\XCADPlugins.CreateGVLWithLinks. The storage location is freely customizable [}12].
The rules contained in the rulebook can be displayed and changed here in the options of the plugin as well
as in the Variable Name Converter Rules [}16] dialog. The rulebook can also be adapted at file level in the
rule file.
This is a list of the artifacts [}25] that the plugin creates and
makes available globally to other plugins.
TE1120 27Version: 1.1
Page 28

Reference plugins
Use this checkbox to select whether the Variable Name
/ Always show variable name
converter rules dialog, before executing
the plugin
Variable name converter rules file path In this section you can select the path to the file with the JSON
See also
• Concept [}8]
• Dialog: XCAD Interface Options [}19]
• Dialog: Variable Name Converter Rules [}16]
• Command: Import via XCAD... [}16]
Converter Rules dialog is automatically opened before the
plugin is executed.
• : The dialog will open automatically.
• : The dialog will not open automatically.
format from which the rules for converting variable names will be
loaded.
Note: By default, this path points to the plugin folder in the
directory %USERPROFILE%\Documents\Beckhoff\TE1120 -
TC3 XCAD Interface\Plugins.
TE112028 Version: 1.1
Page 29

Page 30

More Information:
www.beckhoff.com/te1120
Beckhoff Automation GmbH & Co. KG
Hülshorstweg 20
33415 Verl
Germany
Phone: +49 5246 9630
info@beckhoff.com
www.beckhoff.com
 Loading...