

Page 1
Manual | EN
TE1000
TwinCAT 3 | C++
2020-10-26 | Version: 1.13
Page 2

Page 3

Table of contents
Table of contents
1 Foreword ....................................................................................................................................................9
1.1 Notes on the documentation..............................................................................................................9
1.2 Safety instructions ...........................................................................................................................10
2 Overview...................................................................................................................................................11
3 Introduction..............................................................................................................................................12
3.1 From conventional user mode programming to real-time programming in TwinCAT ......................14
4 Requirements...........................................................................................................................................20
5 Preparation - only once...........................................................................................................................22
5.1 "Microsoft Windows Driver Kit (WDK)" installation (only <= Build 4022) .........................................22
5.2 Visual Studio - TwinCAT XAE Base toolbar ....................................................................................24
5.3 Prepare Visual Studio - Configuration and Platform toolbar............................................................25
5.4 Driver signing...................................................................................................................................25
5.4.1 Operating system............................................................................................................. 26
5.4.2 TwinCAT .......................................................................................................................... 31
6 Modules ....................................................................................................................................................35
6.1 The TwinCAT Component Object Model (TcCOM) concept ...........................................................35
6.1.1 TwinCAT module properties ............................................................................................ 37
6.1.2 TwinCAT module state machine...................................................................................... 44
6.2 Module-to-module communication ..................................................................................................46
7 Modules - Handling..................................................................................................................................49
7.1 Versioned C++ Projects...................................................................................................................49
7.2 Non-versioned C++ projects............................................................................................................49
7.2.1 Export to TwinCAT 3.1 4022.xx ....................................................................................... 50
7.2.2 Import up to TwinCAT 3.1 4022.xx .................................................................................. 51
7.3 Starting Modules..............................................................................................................................52
7.4 TwinCAT Loader..............................................................................................................................53
7.4.1 Test signing ..................................................................................................................... 53
7.4.2 Encrypting Modules ......................................................................................................... 55
7.4.3 Return Codes................................................................................................................... 57
7.4.4 TcSignTool - Storage of the certificate password outside the project.............................. 57
8 TwinCAT C++ development ....................................................................................................................58
9 Quick Start................................................................................................................................................60
9.1 Create TwinCAT 3 project ...............................................................................................................60
9.2 Create TwinCAT 3 C++ project .......................................................................................................62
9.3 TwinCAT 3 Driver ............................................................................................................................63
9.3.1 Creating a TwinCAT 3 C++ module in the TwinCAT Driver Project ................................ 63
9.3.2 Implement TwinCAT 3 C++ project.................................................................................. 66
9.3.3 Create TwinCAT 3 C++ Module instance ........................................................................ 67
9.3.4 Create a TwinCAT task and apply it to the module instance ........................................... 69
9.3.5 Compiling/building a TwinCAT 3 C++ project .................................................................. 71
9.3.6 TwinCAT 3 enable C++ debugger ................................................................................... 72
9.3.7 Activating a TwinCAT 3 project........................................................................................ 73
TE1000 3Version: 1.13
Page 4

Table of contents
9.3.8 Debug TwinCAT 3 C++ project........................................................................................ 74
9.4 TwinCAT 3 Versioned Project .........................................................................................................78
9.4.1 Create TwinCAT 3 C++ project........................................................................................ 78
9.4.2 TwinCAT 3 C++ Configure project................................................................................... 80
9.4.3 Implement TwinCAT 3 C++ project.................................................................................. 81
9.4.4 Publish TwinCAT 3 C++ project in version 0.0.0.1 .......................................................... 83
9.4.5 Implement and publish TwinCAT 3 C++ project version 0.0.0.2...................................... 83
9.4.6 Create TwinCAT 3 C++ Module instance ........................................................................ 85
9.4.7 Activating a TwinCAT 3 project........................................................................................ 87
9.4.8 TwinCAT 3 C++ Implement project Online Change......................................................... 89
10 Debugging ................................................................................................................................................91
10.1 Details of Conditional Breakpoints...................................................................................................94
10.2 Visual Studio tools ...........................................................................................................................96
11 Wizards .....................................................................................................................................................99
11.1 TwinCAT C++ Project Wizard..........................................................................................................99
11.2 TwinCAT Module Class Wizard.....................................................................................................100
11.3 TwinCAT Module Class Editor (TMC)............................................................................................103
11.3.1 Overview........................................................................................................................ 105
11.3.2 Basic Information ........................................................................................................... 106
11.3.3 Data Types .................................................................................................................... 107
11.3.4 Modules ......................................................................................................................... 124
11.4 TwinCAT Module Instance Configurator........................................................................................146
11.4.1 Object ............................................................................................................................ 147
11.4.2 Context .......................................................................................................................... 148
11.4.3 Parameter (Init).............................................................................................................. 148
11.4.4 Data Area....................................................................................................................... 149
11.4.5 Interfaces ....................................................................................................................... 149
11.4.6 Interface Pointer ............................................................................................................ 149
11.4.7 Data Pointer................................................................................................................... 150
11.5 Customer-specific project templates .............................................................................................150
11.5.1 Overview........................................................................................................................ 150
11.5.2 Files involved ................................................................................................................. 151
11.5.3 Transformations............................................................................................................. 152
11.5.4 Notes on handling.......................................................................................................... 153
12 Programming Reference .......................................................................................................................156
12.1 TwinCAT C++ Project properties...................................................................................................157
12.1.1 Tc SDK .......................................................................................................................... 159
12.1.2 Tc Extract Version ......................................................................................................... 160
12.1.3 Tc Publish ...................................................................................................................... 160
12.1.4 Tc Sign........................................................................................................................... 161
12.2 File Description..............................................................................................................................162
12.2.1 Compilation procedure................................................................................................... 164
12.3 Online Change...............................................................................................................................164
12.4 Limitations .....................................................................................................................................166
12.5 Memory Allocation .........................................................................................................................167
TE10004 Version: 1.13
Page 5

Table of contents
12.6 Multi-task data access synchronization .........................................................................................168
12.7 Interfaces.......................................................................................................................................172
12.7.1 Return values................................................................................................................. 173
12.7.2 Interface ITcCyclic ......................................................................................................... 173
12.7.3 Interface ITcCyclicCaller................................................................................................ 174
12.7.4 Interface ITcFileAccess ................................................................................................. 176
12.7.5 Interface ITcFileAccessAsync........................................................................................ 184
12.7.6 Interface ITcIoCyclic ...................................................................................................... 186
12.7.7 Interface ITcIoCyclicCaller............................................................................................. 187
12.7.8 ITComOnlineChange interface ...................................................................................... 189
12.7.9 Interface ITComObject................................................................................................... 190
12.7.10 ITComObject interface (C++ convenience) ................................................................... 195
12.7.11 Interface ITcPostCyclic.................................................................................................. 196
12.7.12 Interface ITcPostCyclicCaller......................................................................................... 197
12.7.13 Interface ITcRTimeTask ................................................................................................ 199
12.7.14 Interface ITcTask........................................................................................................... 200
12.7.15 Interface ITcTaskNotification ......................................................................................... 204
12.7.16 Interface ITcUnknown.................................................................................................... 205
12.8 Runtime Library (RtlR0.h)..............................................................................................................207
12.9 ADS Communication .....................................................................................................................208
12.9.1 AdsReadDeviceInfo ....................................................................................................... 208
12.9.2 AdsRead ........................................................................................................................ 210
12.9.3 AdsWrite ........................................................................................................................ 212
12.9.4 AdsReadWrite................................................................................................................ 214
12.9.5 AdsReadState................................................................................................................ 216
12.9.6 AdsWriteControl............................................................................................................. 218
12.9.7 AdsAddDeviceNotification ............................................................................................. 220
12.9.8 AdsDelDeviceNotification .............................................................................................. 222
12.9.9 AdsDeviceNotification.................................................................................................... 224
12.10 Mathematical Functions.................................................................................................................225
12.11 Time Functions ..............................................................................................................................227
12.12 STL / Containers............................................................................................................................228
12.13 Error messages - understanding ...................................................................................................228
12.14 Module messages for the Engineering (logging / tracing) .............................................................229
13 How to...?................................................................................................................................................233
13.1 Using the Automation Interface .....................................................................................................233
13.2 Windows 10 as target system up to TwinCAT 3.1 Build 4022.2....................................................233
13.3 Publishing of modules ...................................................................................................................233
13.4 Publishing modules on the command line .....................................................................................234
13.5 Clone .............................................................................................................................................234
13.6 Access Variables via ADS .............................................................................................................235
13.7 TcCallAfterOutputUpdate for C++ modules...................................................................................235
13.8 Order determination of the execution in a task..............................................................................235
13.9 Setting version/vendor information ................................................................................................236
13.10 Renaming TwinCAT C++ projects .................................................................................................237
13.11 Delete Module ...............................................................................................................................239
TE1000 5Version: 1.13
Page 6

Table of contents
13.12 Add revision control and Online Change subsequently .................................................................240
13.12.1 C++ Project -> Revision control..................................................................................... 240
13.12.2 C++ Module -> OnlineChange....................................................................................... 243
13.13 Initialization of TMC-member variables .........................................................................................248
13.14 Using PLC strings as method parameters .....................................................................................248
13.15 Third Party Libraries ......................................................................................................................249
13.16 Linking via TMC editor (TcLinkTo).................................................................................................249
14 Troubleshooting ....................................................................................................................................252
14.1 Build - "The target ... does not exist in the project"........................................................................252
14.2 Debug - "Unable to attach" ............................................................................................................252
14.3 Activation – “invalid object id” (1821/0x71d)..................................................................................253
14.4 Error message - VS2010 and LNK1123/COFF .............................................................................254
14.5 Using C++ classes in TwinCAT C++ module ................................................................................254
14.6 Using afxres.h................................................................................................................................254
15 C++-samples ..........................................................................................................................................255
15.1 Sample01: Cyclic module with IO..................................................................................................257
15.2 Sample02: Cyclic C++ logic, which uses IO from the IO Task ......................................................258
15.3 Sample03: C++ as ADS server .....................................................................................................258
15.3.1 Sample03: TC3 ADS Server written in C++................................................................... 259
15.3.2 Sample03: ADS client UI in C#...................................................................................... 263
15.4 Sample05: C++ CoE access via ADS ...........................................................................................267
15.5 Sample06: UI-C#-ADS client uploading the symbolic from module ..............................................268
15.6 Sample07: Receiving ADS Notifications........................................................................................273
15.7 Sample08: provision of ADS-RPC.................................................................................................274
15.8 Sample10: module communication: Using data pointer ................................................................277
15.9 Sample11: module communication: PLC module invokes method of C-module...........................278
15.9.1 TwinCAT 3 C++ module providing methods .................................................................. 279
15.9.2 Calling methods offered by another module via PLC .................................................... 294
15.10 Sample11a: Module communication: C module calls a method of another C module ..................306
15.11 Sample12: module communication: Using IO mapping.................................................................306
15.12 Sample13: Module communication: C-module calls PLC methods ...............................................307
15.13 Sample19: Synchronous File Access ............................................................................................310
15.14 Sample20: FileIO-Write .................................................................................................................311
15.15 Sample20a: FileIO-Cyclic Read / Write .........................................................................................311
15.16 Sample22: Automation Device Driver (ADD): Access DPRAM .....................................................312
15.17 Sample23: Structured Exception Handling (SEH) .........................................................................314
15.18 Sample24: Semaphores ................................................................................................................316
15.19 Sample25: Static Library ...............................................................................................................317
15.20 Sample26: Order of execution in a task ........................................................................................318
15.21 Sample30: Timing Measurement...................................................................................................320
15.22 Sample31: Functionblock TON in TwinCAT3 C++ ........................................................................321
15.23 Sample35: Access Ethernet ..........................................................................................................322
15.24 Sample37: Archive data ................................................................................................................323
15.25 TcCOM samples ............................................................................................................................324
15.25.1 TcCOM_Sample01_PlcToPlc........................................................................................ 324
TE10006 Version: 1.13
Page 7

Table of contents
15.25.2 TcCOM_Sample02_PlcToCpp ...................................................................................... 334
15.25.3 TcCOM_Sample03_PlcCreatesCpp.............................................................................. 338
16 Appendix ................................................................................................................................................343
16.1 ADS Return Codes ........................................................................................................................343
16.2 Retain data ....................................................................................................................................348
16.3 Creating and handling C++ projects and modules ........................................................................350
16.4 Creating and handling TcCOM modules .......................................................................................354
TE1000 7Version: 1.13
Page 8

Table of contents
TE10008 Version: 1.13
Page 9

Foreword
1 Foreword
1.1 Notes on the documentation
This description is only intended for the use of trained specialists in control and automation engineering who
are familiar with applicable national standards.
It is essential that the documentation and the following notes and explanations are followed when installing
and commissioning the components.
It is the duty of the technical personnel to use the documentation published at the respective time of each
installation and commissioning.
The responsible staff must ensure that the application or use of the products described satisfy all the
requirements for safety, including all the relevant laws, regulations, guidelines and standards.
Disclaimer
The documentation has been prepared with care. The products described are, however, constantly under
development.
We reserve the right to revise and change the documentation at any time and without prior announcement.
No claims for the modification of products that have already been supplied may be made on the basis of the
data, diagrams and descriptions in this documentation.
Trademarks
Beckhoff®, TwinCAT®, EtherCAT®, EtherCAT G®, EtherCAT G10®, EtherCAT P®, Safety over EtherCAT®,
TwinSAFE®, XFC®, XTS® and XPlanar® are registered trademarks of and licensed by Beckhoff Automation
GmbH.
Other designations used in this publication may be trademarks whose use by third parties for their own
purposes could violate the rights of the owners.
Patent Pending
The EtherCAT Technology is covered, including but not limited to the following patent applications and
patents:
EP1590927, EP1789857, EP1456722, EP2137893, DE102015105702
with corresponding applications or registrations in various other countries.
EtherCAT® is a registered trademark and patented technology, licensed by Beckhoff Automation GmbH,
Germany
Copyright
© Beckhoff Automation GmbH & Co. KG, Germany.
The reproduction, distribution and utilization of this document as well as the communication of its contents to
others without express authorization are prohibited.
Offenders will be held liable for the payment of damages. All rights reserved in the event of the grant of a
patent, utility model or design.
TE1000 9Version: 1.13
Page 10
Foreword
1.2 Safety instructions
Safety regulations
Please note the following safety instructions and explanations!
Product-specific safety instructions can be found on following pages or in the areas mounting, wiring,
commissioning etc.
Exclusion of liability
All the components are supplied in particular hardware and software configurations appropriate for the
application. Modifications to hardware or software configurations other than those described in the
documentation are not permitted, and nullify the liability of Beckhoff Automation GmbH & Co. KG.
Personnel qualification
This description is only intended for trained specialists in control, automation and drive engineering who are
familiar with the applicable national standards.
Description of symbols
In this documentation the following symbols are used with an accompanying safety instruction or note. The
safety instructions must be read carefully and followed without fail!
DANGER
Serious risk of injury!
Failure to follow the safety instructions associated with this symbol directly endangers the life and health of
persons.
WARNING
Risk of injury!
Failure to follow the safety instructions associated with this symbol endangers the life and health of persons.
CAUTION
Personal injuries!
Failure to follow the safety instructions associated with this symbol can lead to injuries to persons.
NOTE
Damage to the environment or devices
Failure to follow the instructions associated with this symbol can lead to damage to the environment or
equipment.
Tip or pointer
This symbol indicates information that contributes to better understanding.
TE100010 Version: 1.13
Page 11

2 Overview
This chapter is all about TwinCAT 3 implementation in C/C++. The most important chapters are:
• Start from scratch
Which platforms are supported? Additional installations to implement TwinCAT 3 C++ modules?
Find all answers in Requirements [}20] and Preparation [}22]. Limitations are documented here
[}166].
• Quick start [}60]
This is a “less than five minutes sample” to create a simple incrementing counter in C++ being
executed cyclically. Counter value will be monitored and overwritten, debugging capabilities will be
presented etc.
• MODULES [}37]
Modularization the basic philosophy of TwinCAT 3. Especially for C++ Modules it is required to
understand the module concept of TwinCAT 3.
Minimum is to read one article about the architecture of TwinCAT modules.
• Wizards [}99]
Documentation of visual components of the TwinCAT C++ environment.
This includes on the one hand tools for creating projects and on the other hand tools for editing module
and configuring instances of modules.
Overview
• Programming Reference [}156]
This chapter contains detailed information for programming in TwinCAT C++. For Example Interfaces
as well as other TwinCAT provided functions for ADS communication and helper methods are located
here.
• The How to …? [}233] Chapter contains useful hints while working with TwinCAT C++.
• Samples
Some Interfaces and their usage is best described by working code, which is provided as download
including source code and solution.
TE1000 11Version: 1.13
Page 12

Introduction
3 Introduction
The method of emulating classic automation devices such as programmable logic controllers (PLC) and
numerical controllers (NC) as software on powerful standard hardware has been the state of the art for many
years and is now practiced by many manufacturers.
There are many benefits, but the most important is without doubt the fact that the software is mostly
hardware-independent. This means, firstly, that the performance of the hardware can be specially adapted to
the application and, secondly, that you can automatically benefit from its further development.
This particularly applies to PC hardware, whose performance is still increasingly at a dramatically fast rate.
The relative independence from a supplier that results from this separation of software and hardware is also
very important for the user.
Since the PLC and Motion Control – and possibly other automation components – remain independent logic
function blocks with this method, there are only a few changes in the application architecture in comparison
with classic automation technology.
The PLC determines the machine's logical processes and transfers the implementation of certain axis
functions to the Motion Control. On account of the improved performance of the controllers and the
possibility to use higher-level programming languages (IEC 61131-3), even complex machines can be
automated in this way.
Modularization
In order to master the complexity of modern machines and at the same time to reduce the necessary
engineering expenditure, many machine manufacturers have begun to modularize their machines. Individual
functions, assemblies or machine units are thereby regarded as modules, which are as independent as
possible and are embedded into the overall system via uniform interfaces.
Ideally a machine is then structured hierarchically, whereby the lowest modules represent the simplest,
continually reusable basic elements. Joined together they form increasingly complex machine units, up to the
highest level where the entire machine is created. Different approaches are followed when it comes to the
control system aspects of machine modularization. These can be roughly divided into a decentralized and a
centralized approach.
In the local approach, each machine module is given its own controller, which determines the PLC functions
and possibly also the motion functions of the module.
The individual modules can be put into operation and maintained separately from one another and scaled
relatively independently. The necessary interactions between the controllers are coordinated via
communication networks (fieldbuses or Ethernet) and standardized via appropriate profiles.
The central approach concentrates all control functions of all modules in the common controller and uses
only very little pre-processing intelligence in the local I/O devices. The interactions can occur much more
directly within the central control unit, as the communication paths become much shorter. Dead times do not
occur and use of the control hardware is much more balanced, which reduces overall costs.
However, the central method also has the disadvantage that the necessary modularization of the control
software is not automatically specified. At the same time, the possibility of being able to access any
information from other parts of the program in the central controller obstructs the module formation and the
reusability of this control software in other applications. Since no communication channel exists between the
control units, an appropriate profile formation and standardization of the control units frequently fall by the
wayside.
The best of both worlds
The ideal controller for modular machines uses elements from decentralized and centralized control
architecture. A central, powerful computer platform of the most general kind possible serves 'as always' as
the control hardware.
The benefits of centralized control technology:
• low overall costs
• available
TE100012 Version: 1.13
Page 13

Introduction
• fast, modular fieldbus system (keyword: EtherCAT)
• and the possibility to access all information in the system without loss of communication
are decisive arguments.
The above-mentioned benefits of a decentralized approach can be implemented in the centralized control
system by means of suitable modularization of the control software.
Instead of allowing a large, complex PLC program and an NC with many axes to run, many small ‘controllers’
can co-exist in a common runtime on the same hardware with relative independence from one another. The
individual control modules are self-contained and make their functions available to the environment via
standard interfaces, or they use corresponding functions of other modules or the runtime.
A significant profile is created through the definition of these interfaces and the standardization of the
corresponding parameters and process data. Since the individual modules are implemented in a runtime,
direct calls of other modules are also possible – once again via corresponding standard interfaces. In this
way the modularization can take place within sensible limits without communication losses occurring.
During the development or commissioning of individual machine modules, the associated control modules
can be created and tested on any control hardware with the appropriate runtime. Missing connections to
other modules can be emulated during this phase. On the complete machine they are then instanced
together on the central runtime, which only needs to be dimensioned such that the resource requirements of
all instanced modules (memory, tasks and computing power) are fulfilled.
TwinCAT 3 Run-Time
The TwinCAT runtime offers a software environment in which TwinCAT modules are loaded, implemented
and managed. It offers additional basic functions so that the system resources can be used (memory, tasks,
fieldbus and hardware access etc.). The individual modules do not have to be created using the same
compiler and can therefore be independent of one another and can originate from different manufacturers.
A series of system modules is automatically loaded at the start of the runtime, so that their properties are
available to other modules. However, access to the properties of the system modules takes place in the
same way as access to the properties of normal modules, so that it is unimportant to the modules whether
the respective property is made available by a system module or a normal module.
TE1000 13Version: 1.13
Page 14
Introduction
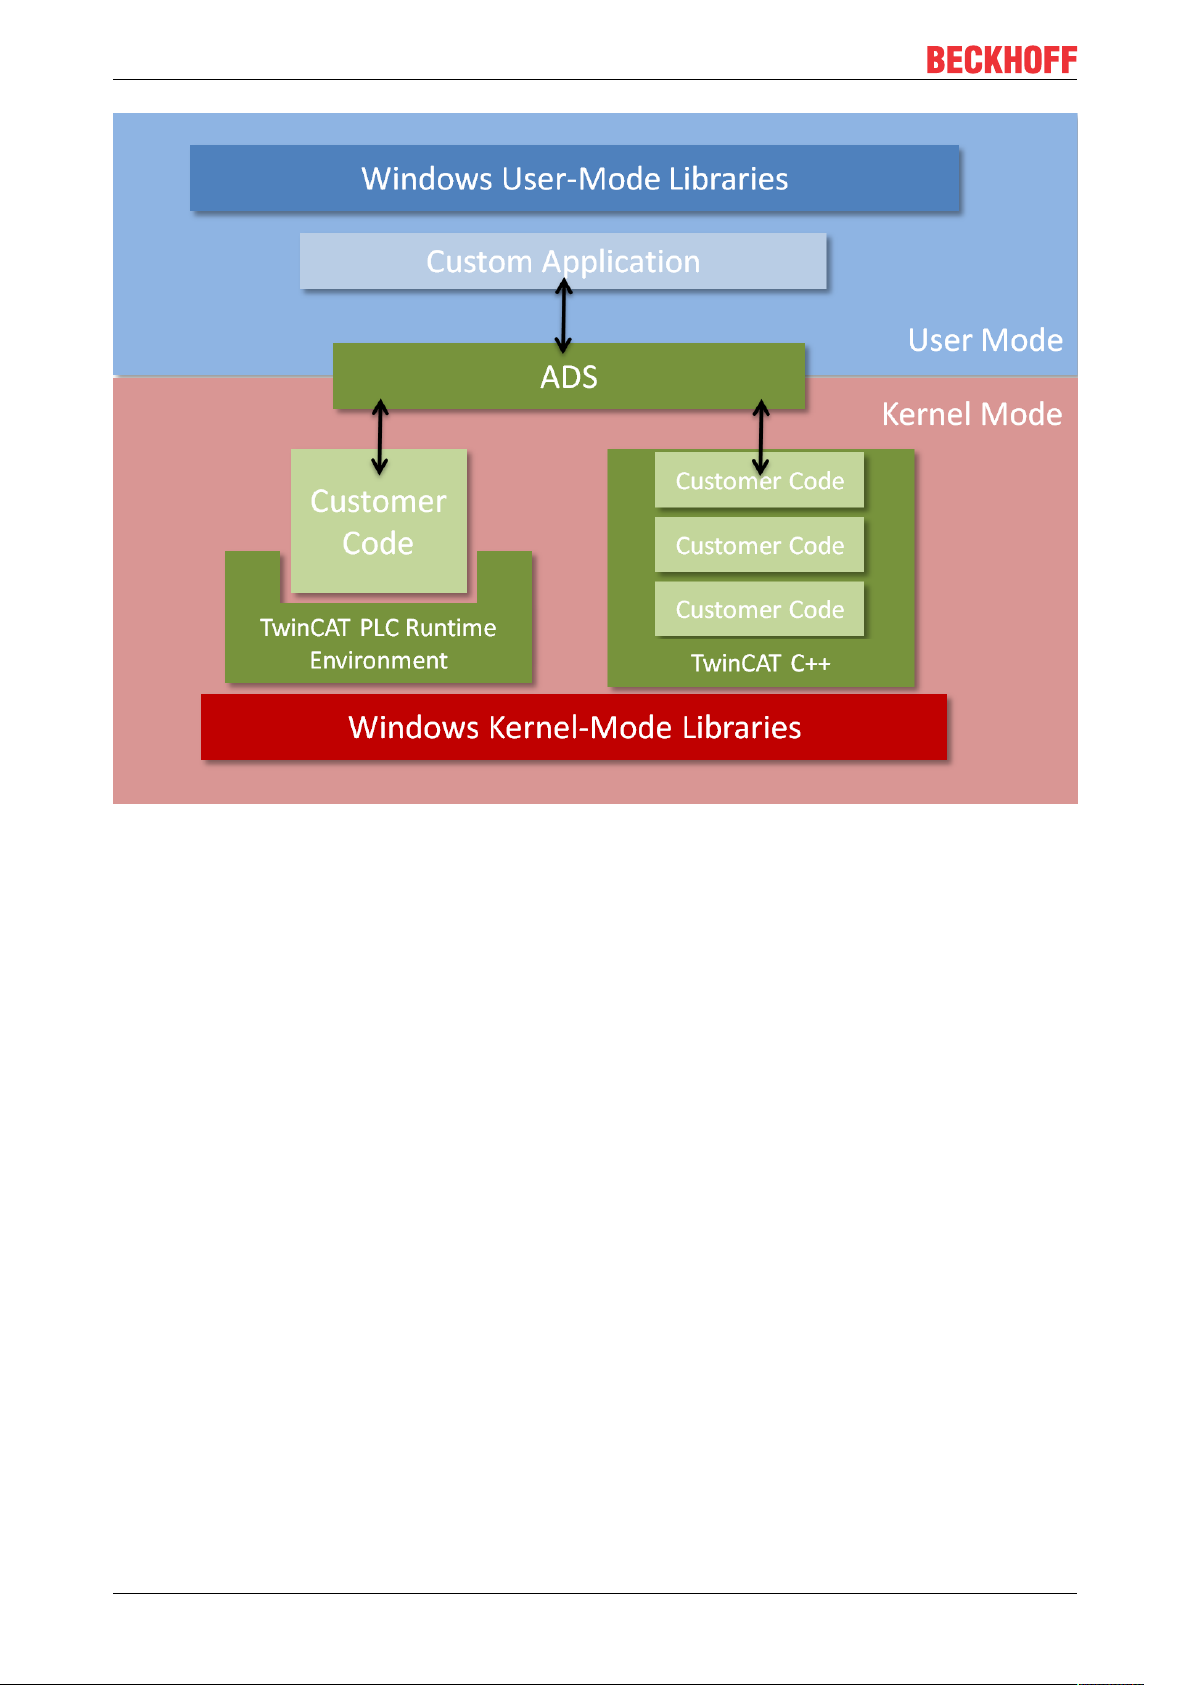
In contrast to the PLC, where customer code is executed within a runtime environment, TwinCAT C++
modules are not within such a hosted environment. As a consequence TwinCAT C++ modules are executed
as Kernel Modules (.sys) – thus they are built with the kernel mode libraries.
3.1 From conventional user mode programming to realtime programming in TwinCAT
This article describes the conceptual differences between standard user mode programming in a
programming language such as C++, C# or Java, and real-time programming in TwinCAT.
The article particularly focuses on real-time programming with TwinCAT C++, because this is where previous
knowledge with C++ programming comes to the fore and the sequence characteristics of the TwinCAT realtime system have to be taken into account.
TE100014 Version: 1.13
Page 15
Introduction
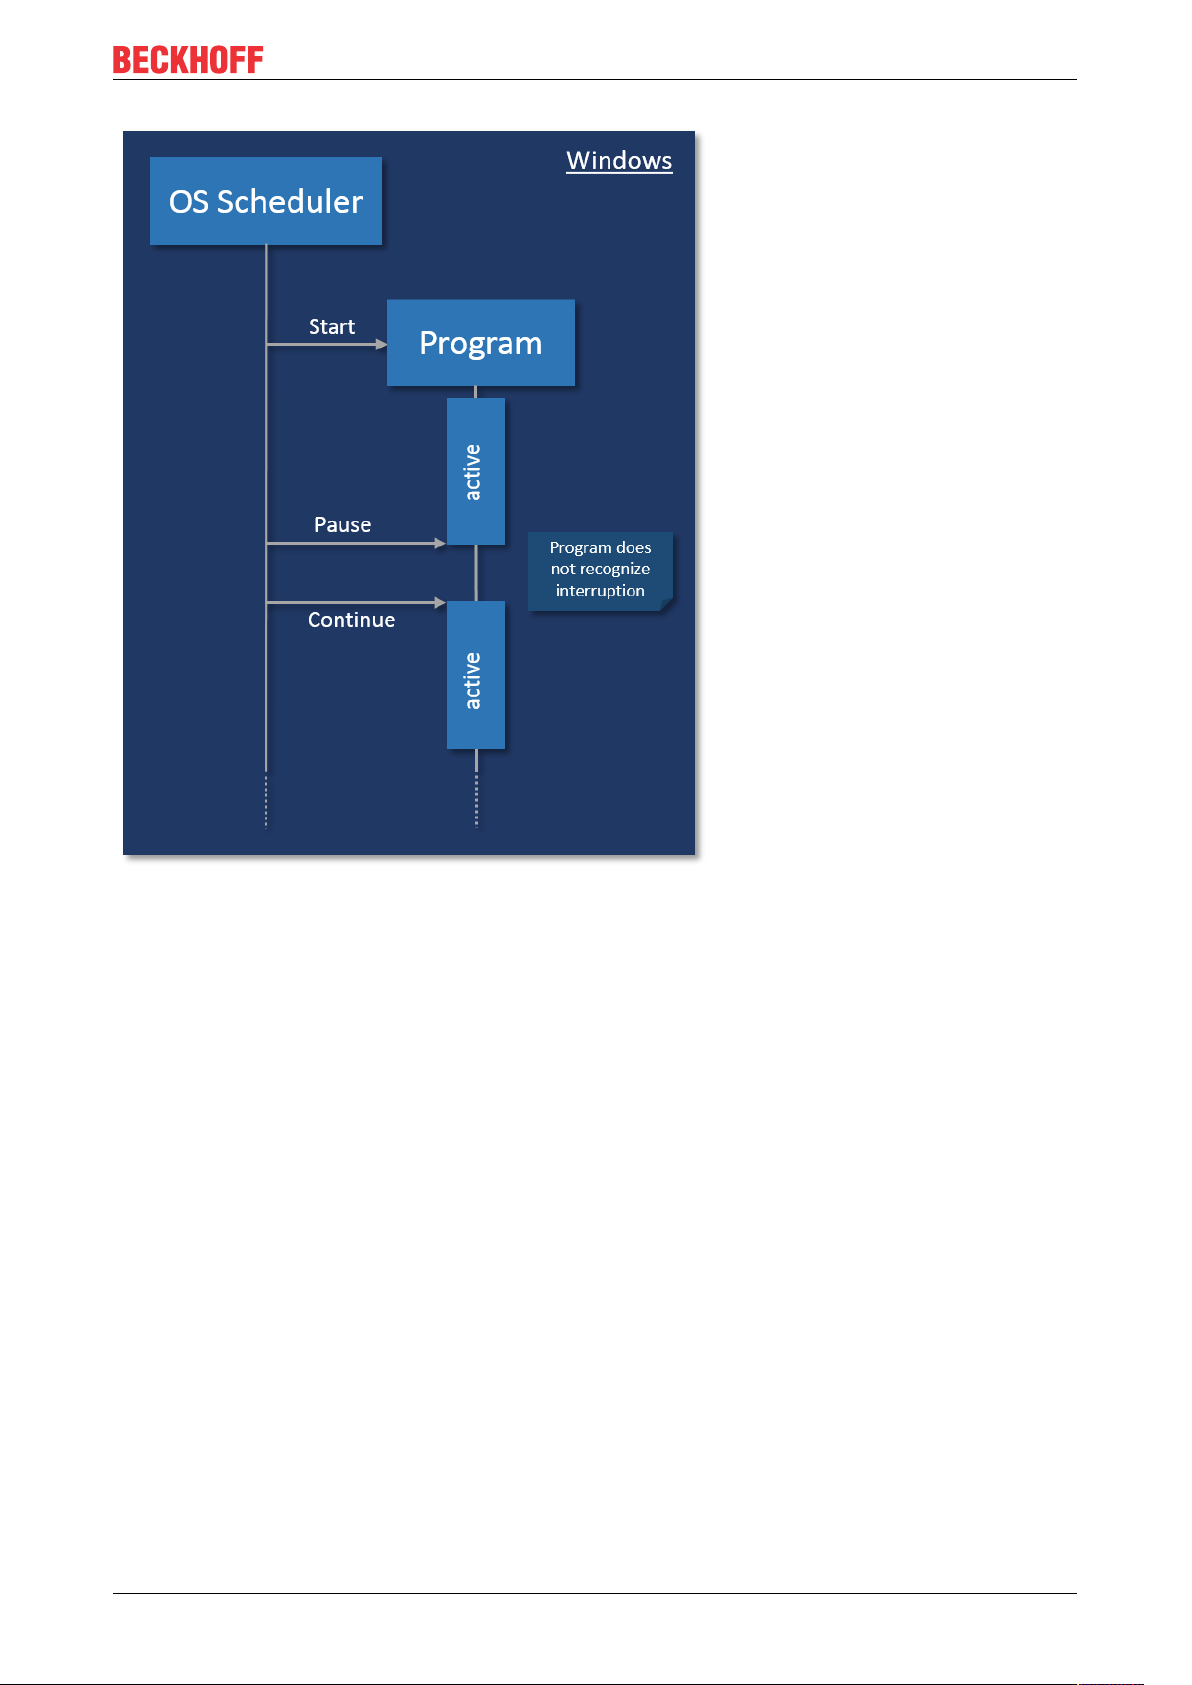
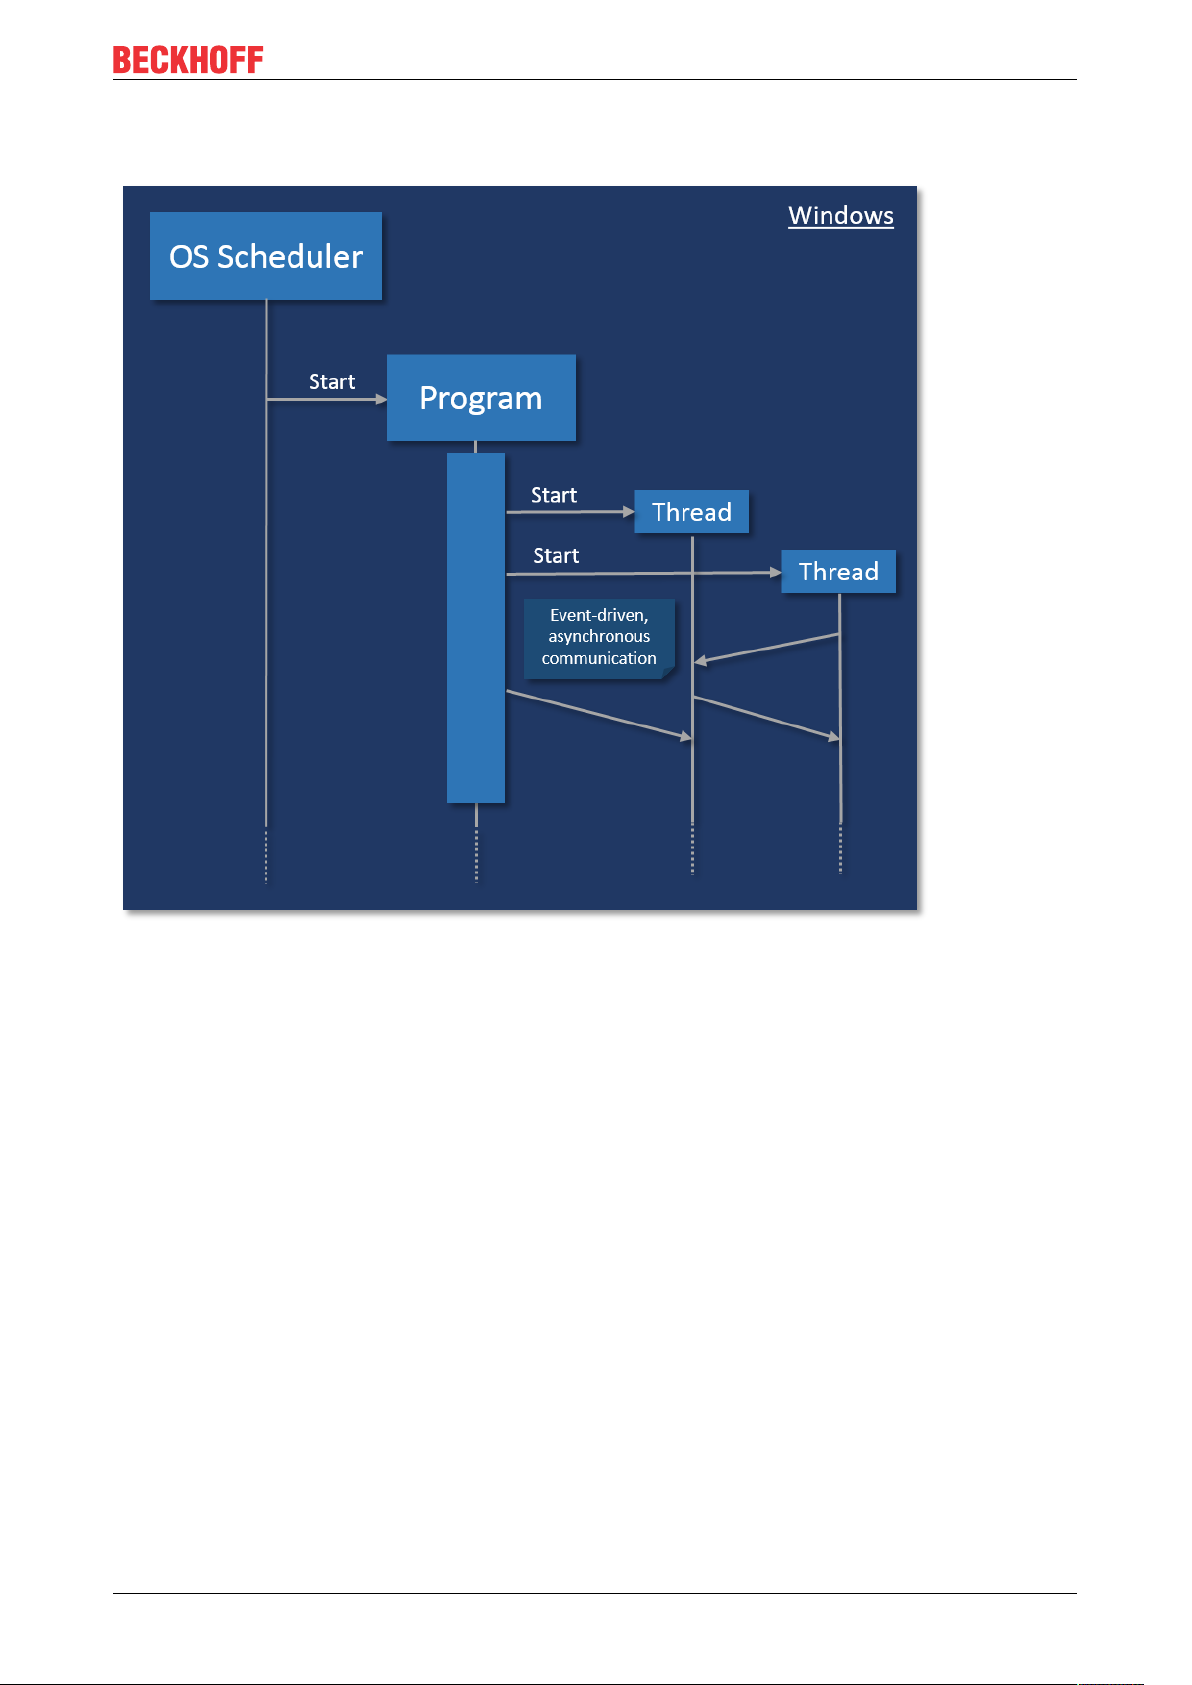
With conventional user mode programming, e.g. in C#, a program is created, which is then executed by an
operating system.
The program is started by the operating system and can run independently, i.e. it has full control over its own
execution, including aspects such as threading and memory management. In order to enable multitasking,
the operating system interrupts such a program at any time and for any period. The program does not
register such an interruption. The operating system must ensure that such interruptions remain unnoticed by
the user. The data exchange between the program and its environment is event-driven, i.e. non-deterministic
and often blocking.
The behavior is not adequate for execution under real-time conditions, because the application itself must be
able to rely on the available resources in order to be able to ensure real-time characteristics (response
guarantees).
TE1000 15Version: 1.13
Page 16

Introduction
The basic idea of PLC is therefore adopted for TwinCAT C++: The TwinCAT real-time system manages the
real-time tasks, handles the scheduling and cyclically calls an entry point in the program code. The program
execution must be completed within the available cycle length and return the control. The TwinCAT system
makes the data from the I/O area available in the process images, so that consistent access can be
guaranteed. This means that the program code itself cannot use mechanisms such as threading.
TE100016 Version: 1.13
Page 17
Concurrency
Introduction
With conventional programming in user mode, concurrency is controlled by the program. This is where
threads are started, which communicate with each other. All these mechanisms require resources, which
have to be allocated and enabled, which can compromise the real-time capability. The communication
between the threads is event-based, so that a calling thread has no control over the processing time in the
called thread.
TE1000 17Version: 1.13
Page 18
Introduction
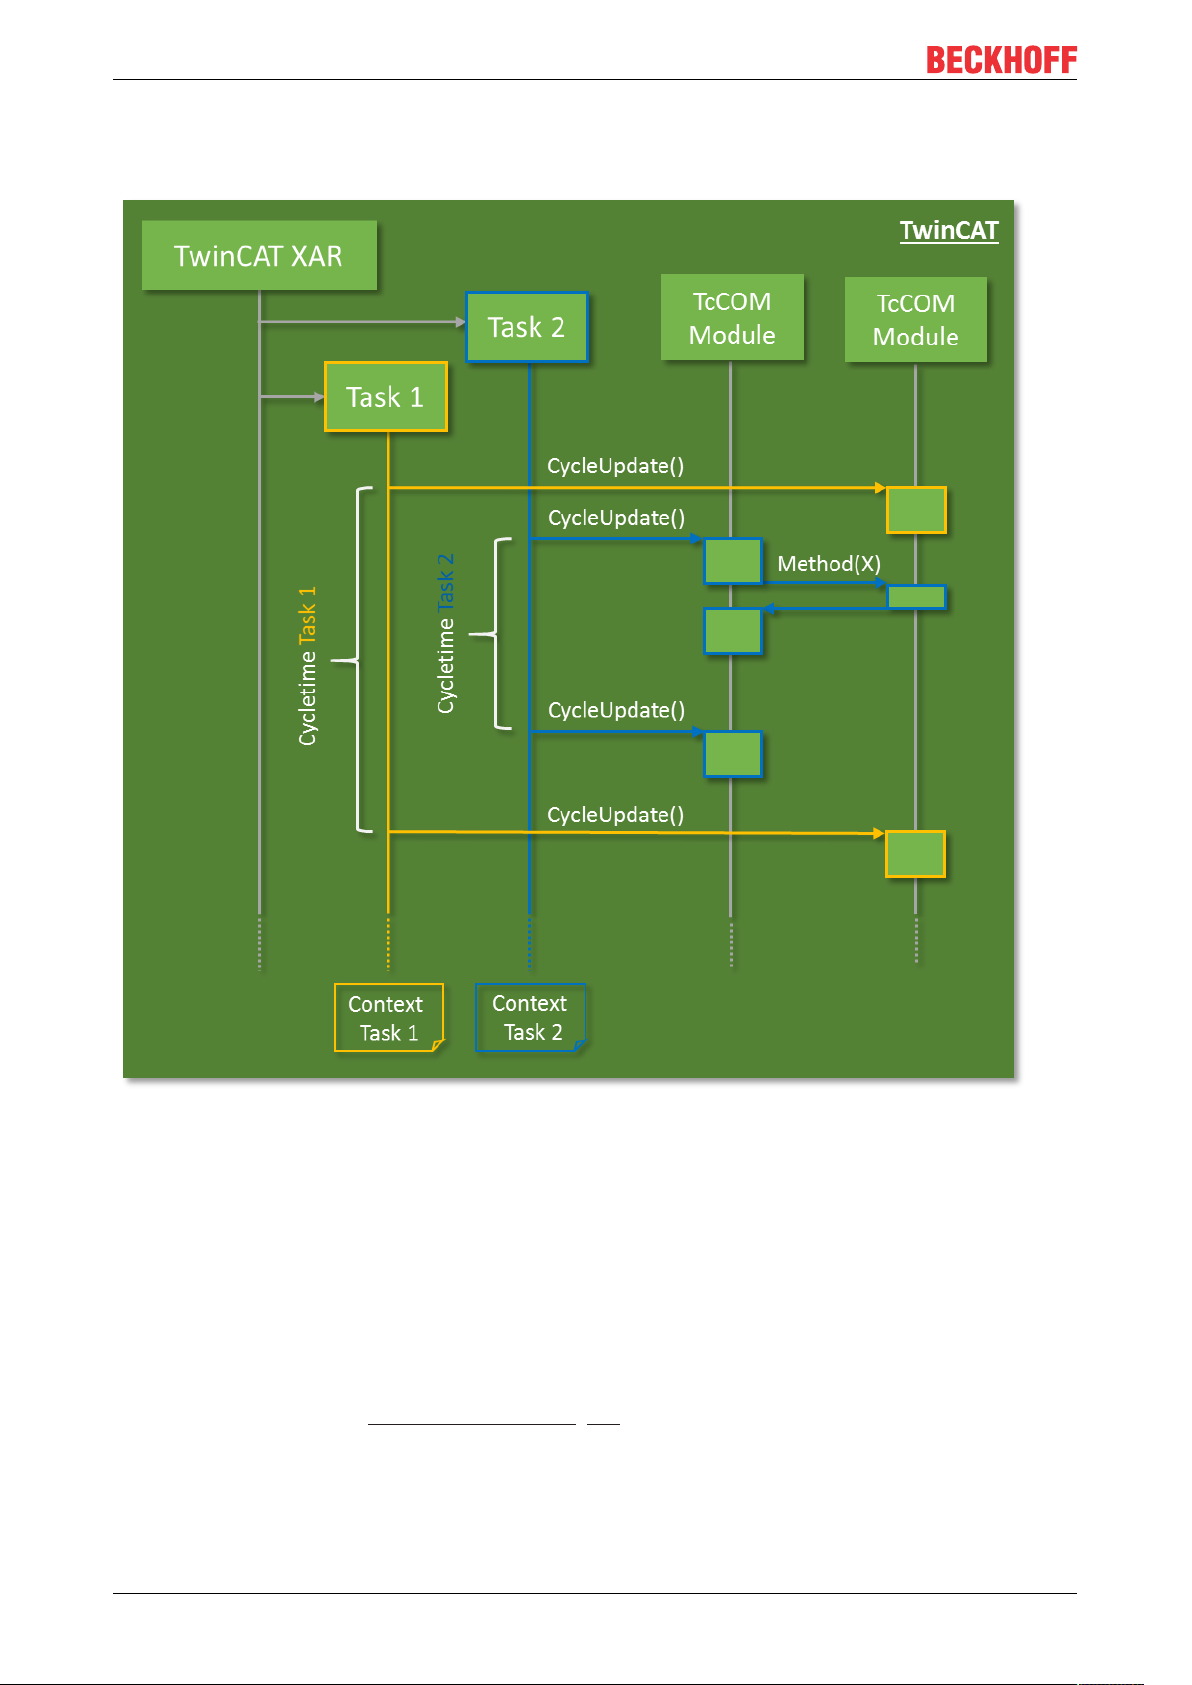
In TwinCAT, tasks are used for calling modules, which therefore represents concurrency. Tasks are
assigned to a core; they have cycle times and priorities, with the result that a higher-priority task can interrupt
a lower-priority task. If several cores are used, tasks are executed concurrently in practice.
Modules can communicate with each other, so that data consistency has to be ensured in concurrency
mode.
Data exchange across task boundaries is enabled through mapping, for example. When direct data access
via methods is used, it must be protected through Critical sections, for example.
Startup/shutdown behavior
The TwinCAT C++ code is executed in the so-called "Windows kernel context" and the "TwinCAT real-time
context", not as a user mode application.
During startup/shutdown of the modules, code for (de)initialization is initially executed in the Windows kernel
context; only the last phase and the cyclic calls are executed in the TwinCAT real-time context.
Details are described in the "Module state machine [}44]" section.
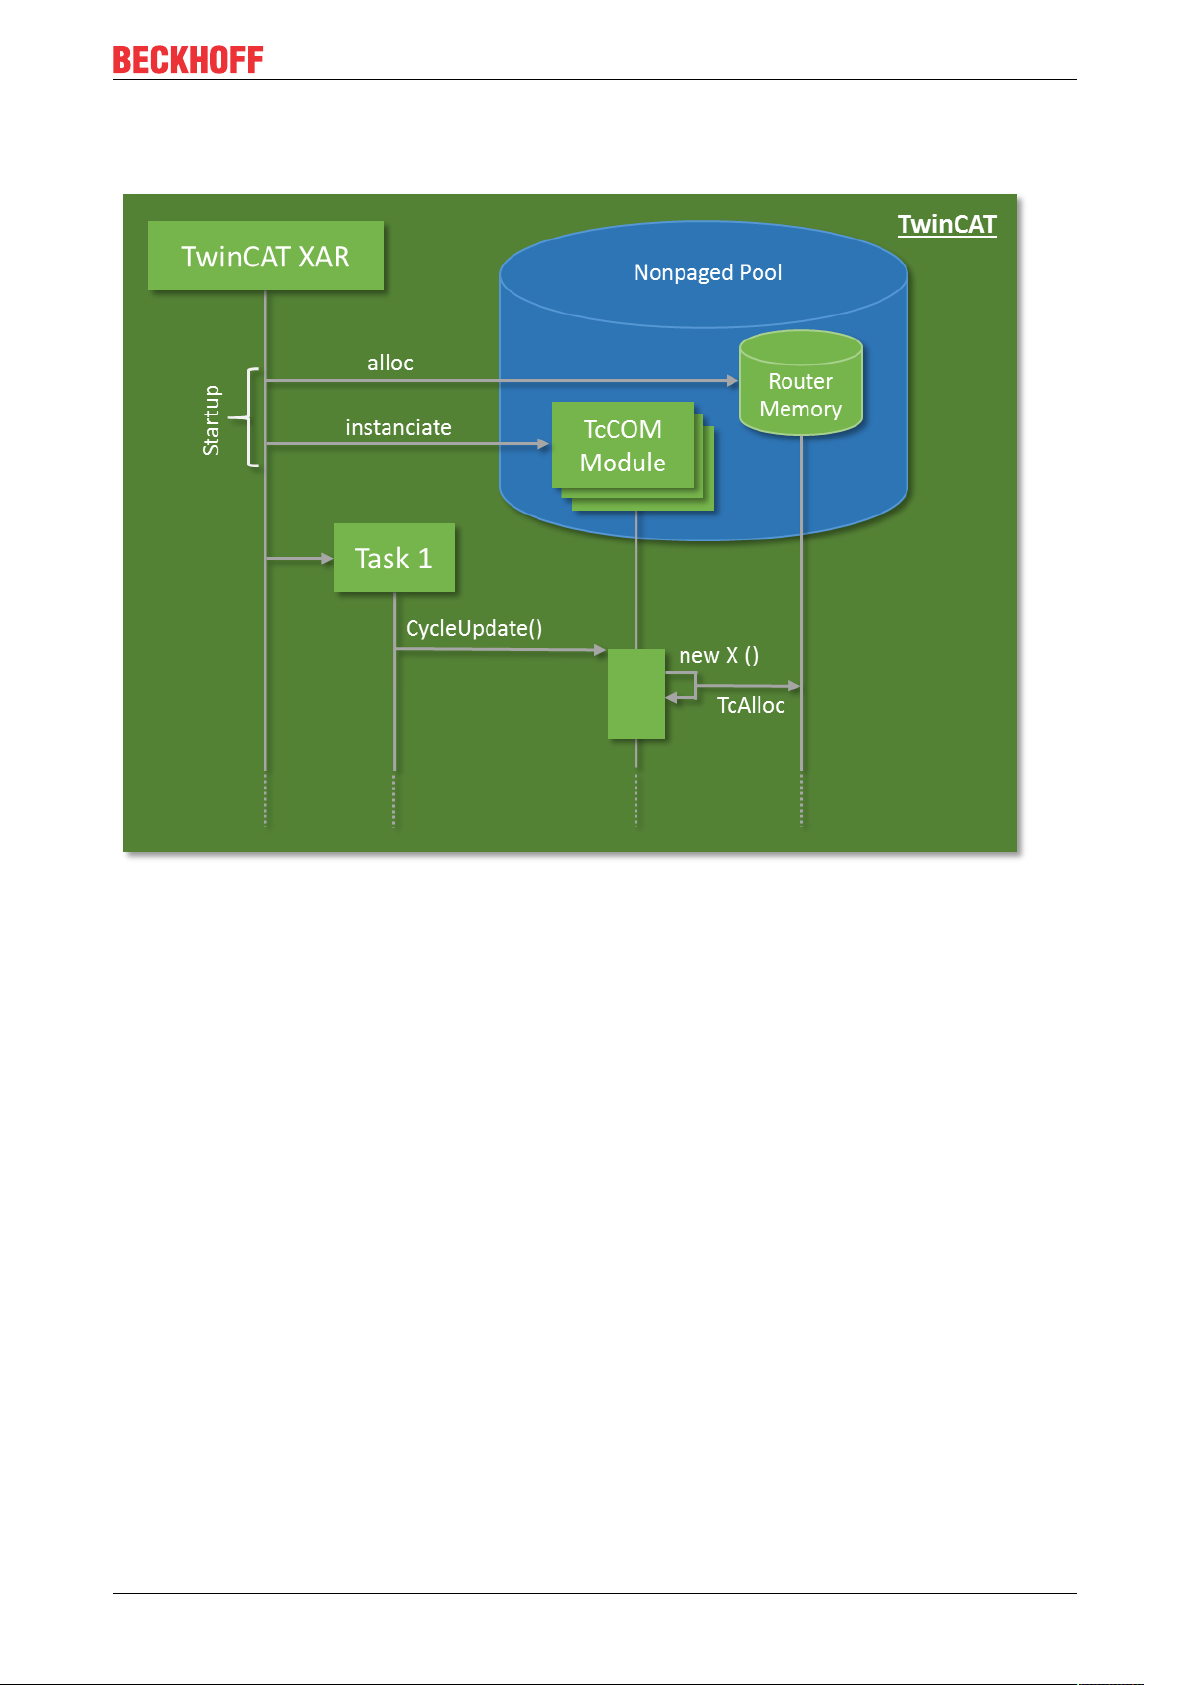
Memory management
TwinCAT has its own memory management, which can also be used in the real-time context. This memory is
obtained from what is referred to as the "non-paged pool", which is provided by the operating system. In this
memory the TcCOM modules are instantiated with their memory requirement.
TE100018 Version: 1.13
Page 19
Introduction
In addition, the so-called "router memory" is provided by TwinCAT in this memory area, from which the
TcCOM modules can allocate memory dynamically in the real-time-context (e.g. with the New operator).
If possible, memory should generally be allocated in advance, not in the cyclic code. During each allocation a
check is required to verify that the memory is actually available. For allocations in the cyclic code, the
execution therefore depends on the memory availability.
TE1000 19Version: 1.13
Page 20

Requirements
4 Requirements
Overview of minimum requirements
The implementation and debugging of TwinCAT 3 C++ modules requires:
The following must be installed on the engineering PC:
• Microsoft Visual Studio 2010 (with Service Pack 1), 2012, 2013 or 2015
Professional, Premium or Ultimate
◦ When installing Visual Studio 2019 or 2017, the Desktop development with C++ option must be
manually selected, as this option is not selected with the automatic installation:
◦
◦ When installing Visual Studio 2015, the Visual C++ development option must be manually
selected, as this option is not selected with the automatic installation:
• TwinCAT 3 installation (XAE engineering)
• XaeShell is sufficient for the integration and use of existing binary C++ modules in a TwinCAT 3 PLC
environment (Visual Studio is not required.)
TE100020 Version: 1.13
Page 21

Requirements
On the runtime PC:
• IPC or Embedded CX PC with Microsoft operating system (Windows 7 / 10).
• Microsoft Visual Studio does not have to be installed.
• TwinCAT 3 installation (XAR runtime)
Limitations on the runtime PC
• TwinCAT 3.0 only supports 32-bit operating systems as target platform (runtime PC).
TC3.0 can be used as engineering platform on x64 PCs. The program can be transferred to a 32bit
(x86) remote PC over the network and executed there.
• TwinCAT 3.1 also supports x64-bit operating systems as target platform (runtime PC). To do this, the
drivers must be signed as documented under Driver signing [}25].
• The runtime PC must be either a Windows 7 or Windows 10 system.
Also see about this
2 "Microsoft Windows Driver Kit (WDK)" installation (only <= Build 4022) [}22]
TE1000 21Version: 1.13
Page 22
Preparation - only once
5 Preparation - only once
A PC for the engineering of TwinCAT C++ modules must be prepared. You only have to carry out these
steps once:
• Install the Microsoft Windows Driver Kit (WDK) [}22].
• Configure the TwinCAT Basis [}24] as well as the configuration and platform [}25] toolbar.
• On x64 PCs, sign modules so that they can be run; see Documentation for the setup of a test signing
[}25].
• If the operating system of the target system requires enhanced validation for drivers, for example,
through a SecureBoot, carry out a corresponding signing [}31] with Microsoft.
5.1 "Microsoft Windows Driver Kit (WDK)" installation (only <= Build 4022)
NOTE
WDK installation only up to TwinCAT 3.1 Build 4022
The installation of the WDK described here is only necessary up to TwinCAT 3.1. Build 4022. From Build
4024.0, either the WDK must be uninstalled or the previously set system variable WINDDK7 must be renamed so that TwinCAT ignores the WDK.
Installation of WDK 7 for TwinCAT 3.1. 4022 and earlier
The installation is only necessary for the TwinCAT 3 engineering environment in order to be able to create
and edit C++ modules. The WDK installation is not required on the target system (XAR).
1. Download the Windows Driver Kit 7.1 from the Microsoft Download Center https://www.microsoft.com/
en-us/download/details.aspx?id=11800
2. Following the download, either burn a CD of the downloaded ISO image or use a virtual (software-based)
CD drive.
3. Start KitSetup.exe of the ISO image that has been downloaded or burnt on CD (on Windows 7 PCs, start
the installation with Run As Administrator...).
TE100022 Version: 1.13
Page 23
Preparation - only once
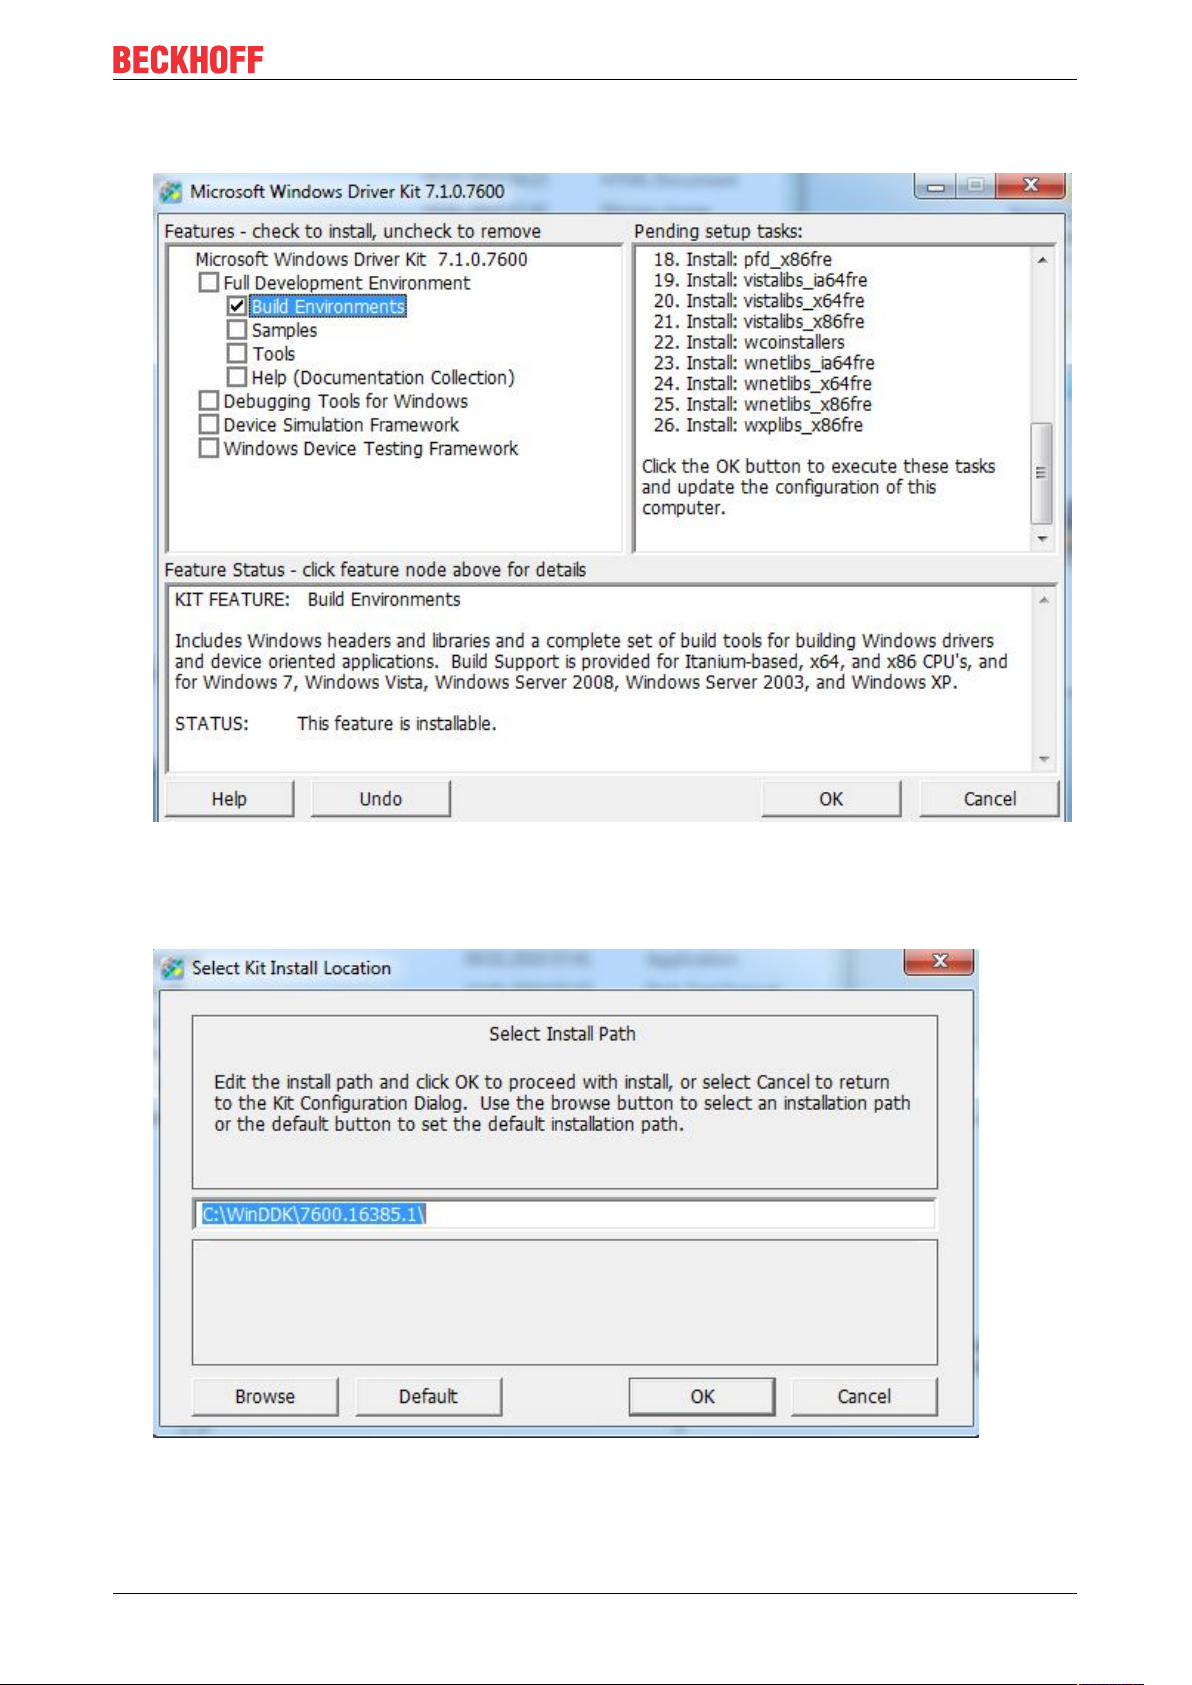
4. Select the option Build Environment – none of the other components are required by TwinCAT 3 – and
click on OK to continue.
5. After accepting the Microsoft EULA license, select the destination folder for the installation.
By default, the root folder "C:\" is selected – i.e. "C:\WinDDK\7600.16385.1" is proposed.
The digits "7600…." may be different in the case of a newer version of the Windows Driver Kit.
6. Start the installation with OK.
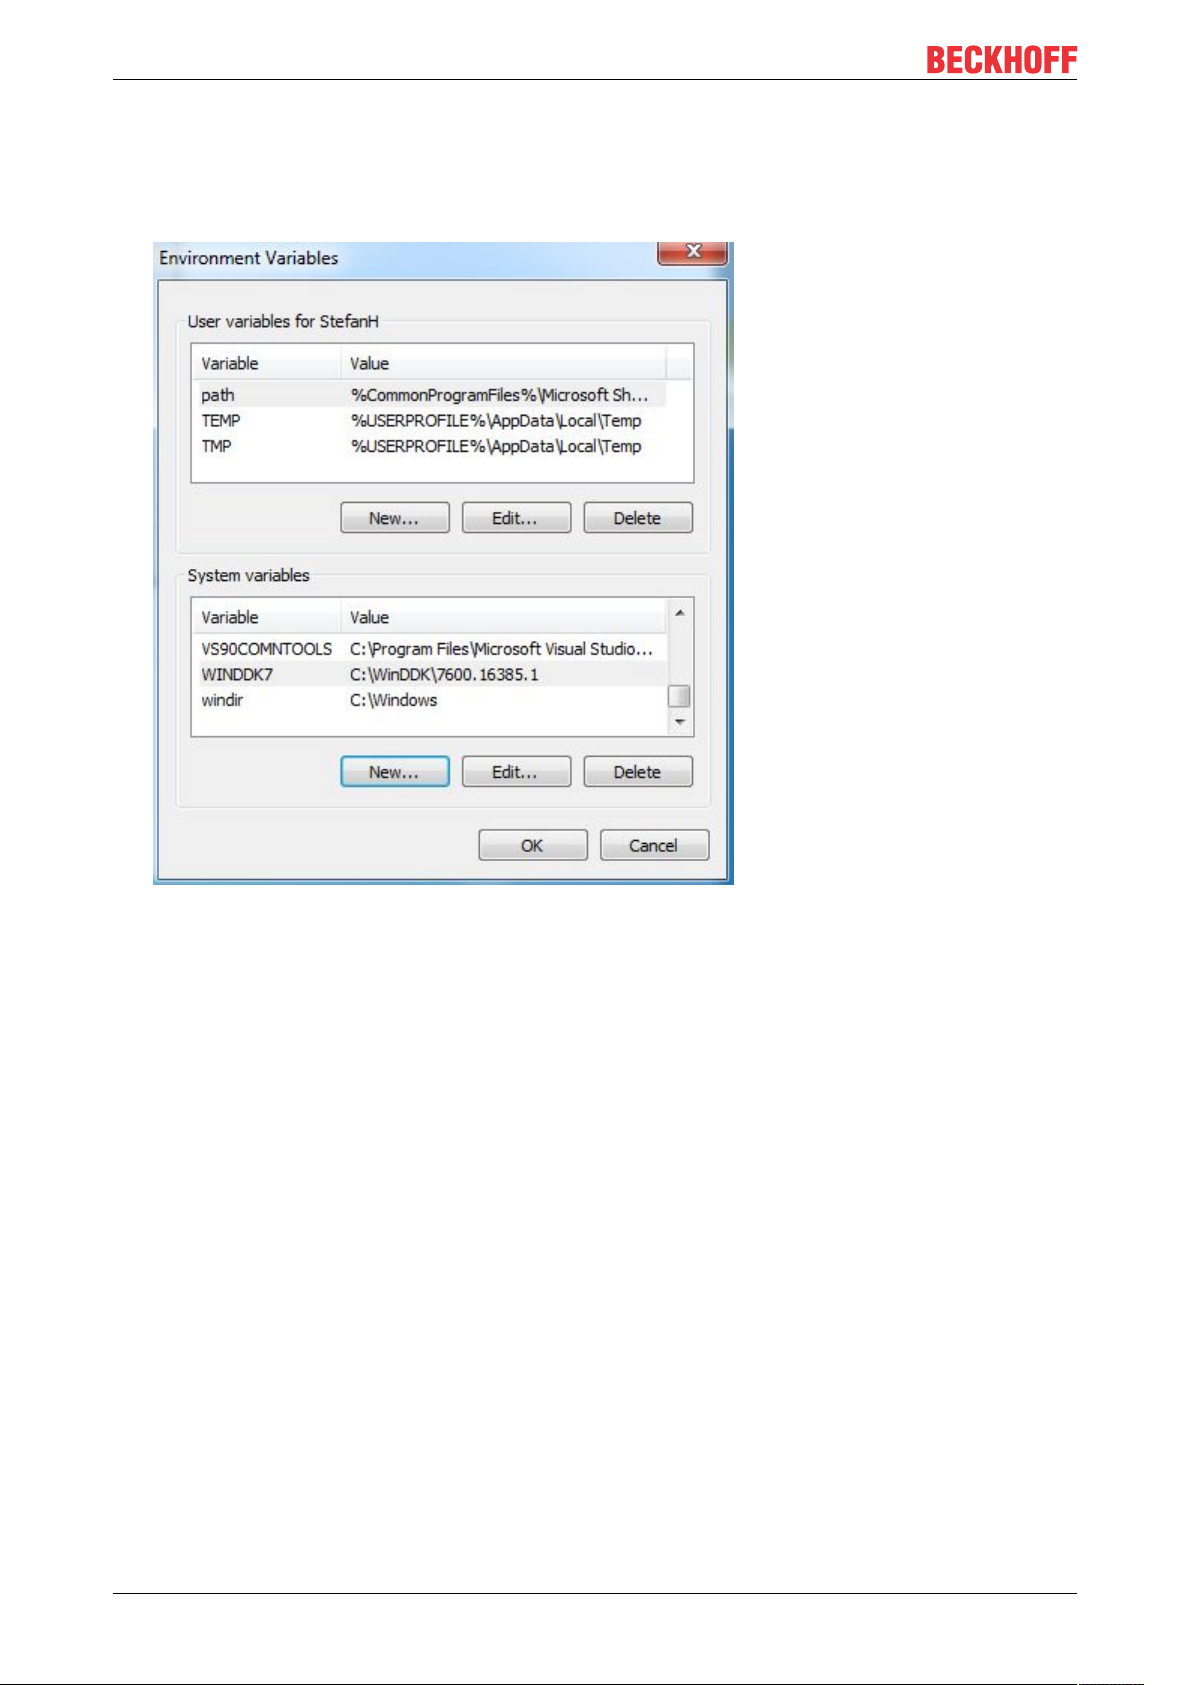
7. In future TwinCAT 3 will take care of the following step, but for now it must be done manually: Navigate
to Start-> Control Panel -> System and select Advanced system settings.
8. Select the Advanced tab and then click on Environment Variables…
TE1000 23Version: 1.13
Page 24
Preparation - only once
9. In the lower area of System variables, select New.. and enter the following information:
Variable name "WINDDK7"
Variable value "C:\WinDDK\7600.16385.1"
The path may differ with a different version of the Windows Driver Kit or if a different installation path is
specified.
10. Following the installation, log in again or restart the PC to confirm the new environment variable settings.
Also see about this
2 Programming Reference [}156]
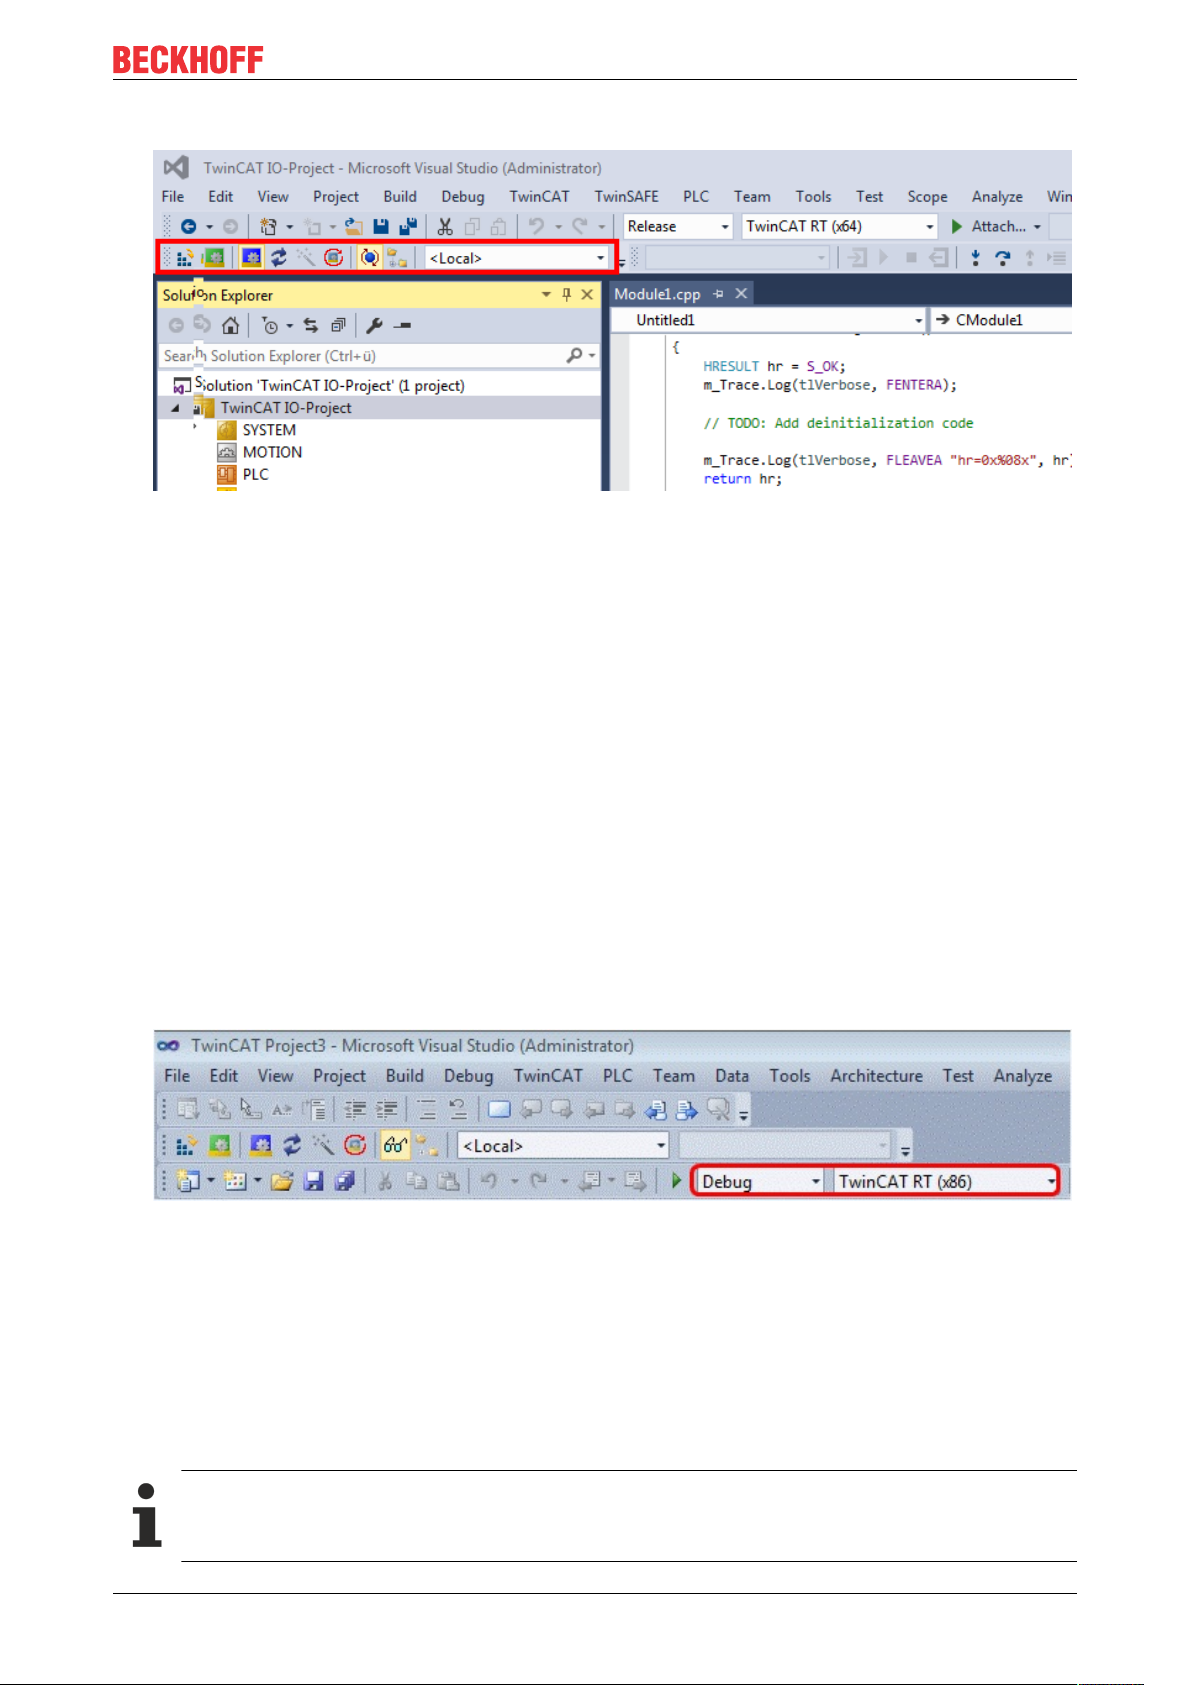
5.2 Visual Studio - TwinCAT XAE Base toolbar
Efficient engineering through TwinCAT XAE base toolbar
TwinCAT 3 integrates its own toolbar in the Visual Studio menu for better efficiency. It assists you in the
creation of C++ projects. This toolbar is automatically added to the Visual Studio menu by the TwinCAT 3
setup. If you wish to add it manually, however, do the following:
1. Open the View menu and select Toolbars\TwinCAT XAE Base
TE100024 Version: 1.13
Page 25
Preparation - only once
ð The selected toolbar appears below the menu.
5.3 Prepare Visual Studio - Configuration and Platform toolbar
Add the toolbar "Solution Configuration and Solution Platform"
With the Configuration and Platform toolbar you can specify the target platform for the creation of your
project. This toolbar is automatically added to the Visual Studio menu by the TwinCAT 3 setup. If you wish to
add it manually, however, do the following:
1. Open the View menu and select Toolbars\Customize.
2. Navigate to the Commands tab.
3. Activate the Toolbar option field and then select the Standard toolbar from the list.
4. Click on Add Command...
5. Select the Build category, select the Solution Configurations command and then click on OK.
6. Repeat the last step for the Solution Platforms command.
7. Click on Close.
ð The two commands now appear below the menu bar.
5.4 Driver signing
TwinCAT C++ modules must be signed with a certificate so that they can be executed.
The signature ensures that only C++ software whose origin can be traced is executed on productive
systems.
For test purposes, certificates that cannot be verified can be used for signing. However, this is only possible
if the operating system is in test mode so that these certificates are not used on productive systems.
Engineering requires no signing
Only the execution requires certificates - the engineering does not.
TE1000 25Version: 1.13
Page 26

Preparation - only once
There are two ways to load modules, different certificates are used for signing:
• Operating system: The C++ modules are loaded as normal kernel drivers and must therefore also have
a signature.
◦ With TwinCAT 3.1. 4022 or earlier, only this procedure is available.
◦ Windows 7 (Embedded) x86 (32bit) does not require signing.
• TwinCAT: The C++ modules are loaded by the TwinCAT runtime system and must be signed with a
TwinCAT user certificate.
◦ With TwinCAT 3.1. 4024 and higher, this method is also available.
◦ This procedure is required to perform new functions such as versioned C++ projects [}49] and
thus also the C++ Online Change [}164].
Since a published module should be executable on various PCs, signing is always necessary for publishing.
Organizational separation of development and production software
Beckhoff recommends working organizationally with (at least) two certificates.
1. A certificate which is not countersigned, thus the test mode is needed for the development process.
This certificate can also be issued individually by each developer.
2. Only the software that has passed the corresponding final tests is signed by a countersigned certificate. This software can thus also be installed on machines and delivered.
Such a separation of development and operation ensures that only tested software runs on productive
systems.
5.4.1 Operating system
For the implementation of TwinCAT 3 C++ modules on x64 platforms, the driver (*.sys file) must be signed
with a certificate if it is to be loaded by the operating system.
The signature, which is automatically executed during the TwinCAT 3 build process, is used by 64-bit
Windows operating systems for the authentication of the drivers.
A certificate is required to sign a driver. This Microsoft documentation describes the process and
background knowledge for obtaining a test and release certificate that is accepted by 64-bit Windows
operating systems.
To use such a certificate in TwinCAT 3, configure the step after compiling your x64 build target as
documented in "Creating a test certificate for test mode [}27]".
Test certificates
For testing purposes, self-signed test certificates can be created and used without technical limitations.
The following tutorials describe how to activate this option.
To create drivers with real certificates for production machines, this option must be disabled.
• Creating a test certificate for test mode [}27]
• Delete (test) certificates [}29]
Further references:
MSDN, test certificates (Windows driver),
http://msdn.microsoft.com/en-us/library/windows/hardware/ff553457(v=vs.85).aspx
MSDN, MakeCert test certificates (Windows driver),
http://msdn.microsoft.com/en-us/library/windows/hardware/ff548693(v=vs.85).aspx
TE100026 Version: 1.13
Page 27
Preparation - only once
5.4.1.1 Test signing
Overview
Implementing TwinCAT 3 C++ modules for x64 platforms requires signing the driver with a certificate.
This article describes how to create and install a test certificate for testing a C++ driver.
Note the procedure when creating test certificates
Developers may have a wide range of tools for creating certificates. Please follow this description
exactly, in order to activate the test certificate mechanism.
The following commands must be executed from a command line that has been opened in either way:
• Visual Studio 2010 / 2012 prompt with administrator rights. (Via: All Programs -> Microsoft
Visual Studio 2010/2012 -> Visual Studio Tools -> Visual Studio Command Prompt, then right-click
Run as administrator)
• Developer Command Prompt of Visual Studio 2017 / 2019 with administrator rights. (Via: All
Programs -> Visual Studio 2017 -> Visual Studio Command Prompt for VS 2017/2019, then right-
click on Run as administrator)
• Only if the WINDDK has been installed:
Normal prompt (Start->Command Prompt) with administrator rights, then change to directory
%WINDDK7%\bin\x86\, which contains the corresponding tools.
1. On XAE:
in the engineering system enter the following command in the Visual Studio 2010 / 2012 prompt with
administrator rights (see note above):
makecert -r -pe -ss PrivateCertStore -n CN=MyTestSigningCert
MyTestSigningCert.cer
(If you do not have access rights to the PrivateCertStore, you can use a different location. This
must also be used in the PostBuild event, as described here. [}30])
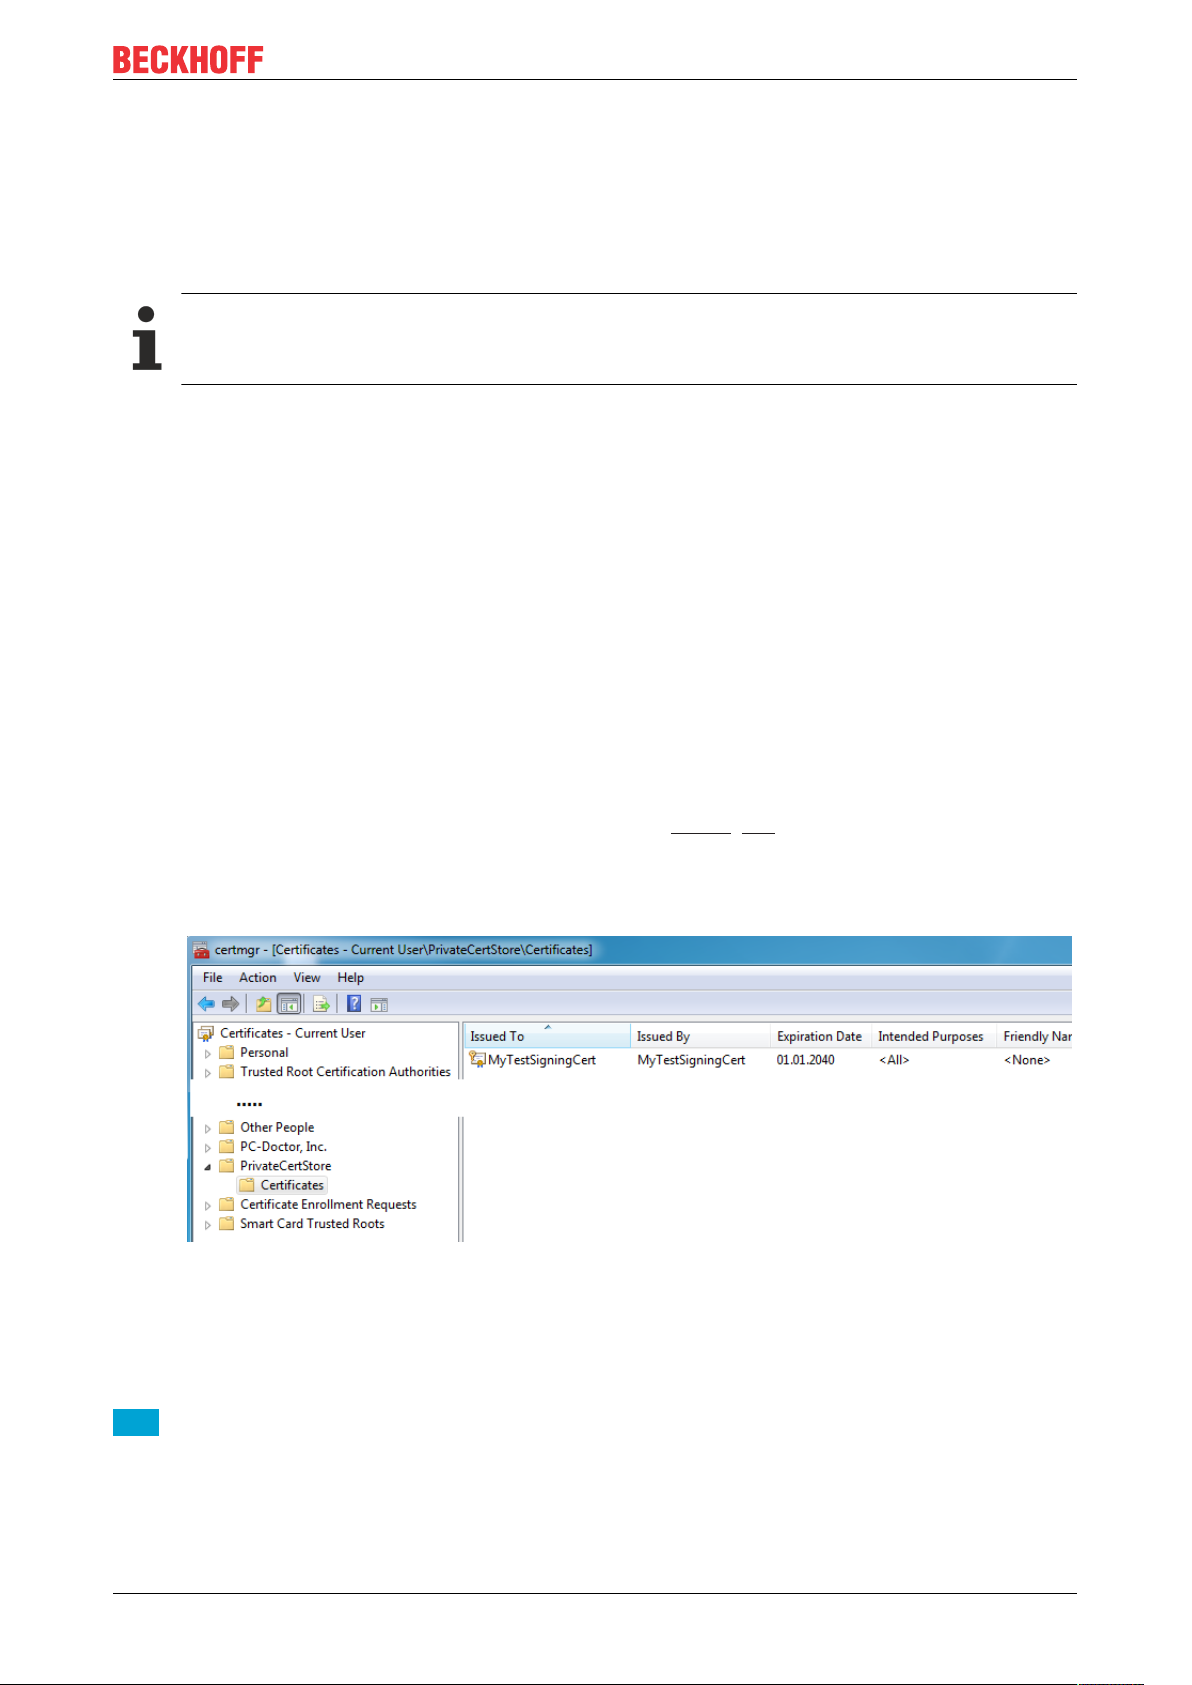
ð This is followed by creation of a self-signed certificate, which is stored in the file
"MyTestSigningCert.cer" and in the Windows Certificate Store.
ð Check the result with mmc (Use File->Add/Remove Snap-in->Certificates):
2. On XAE:
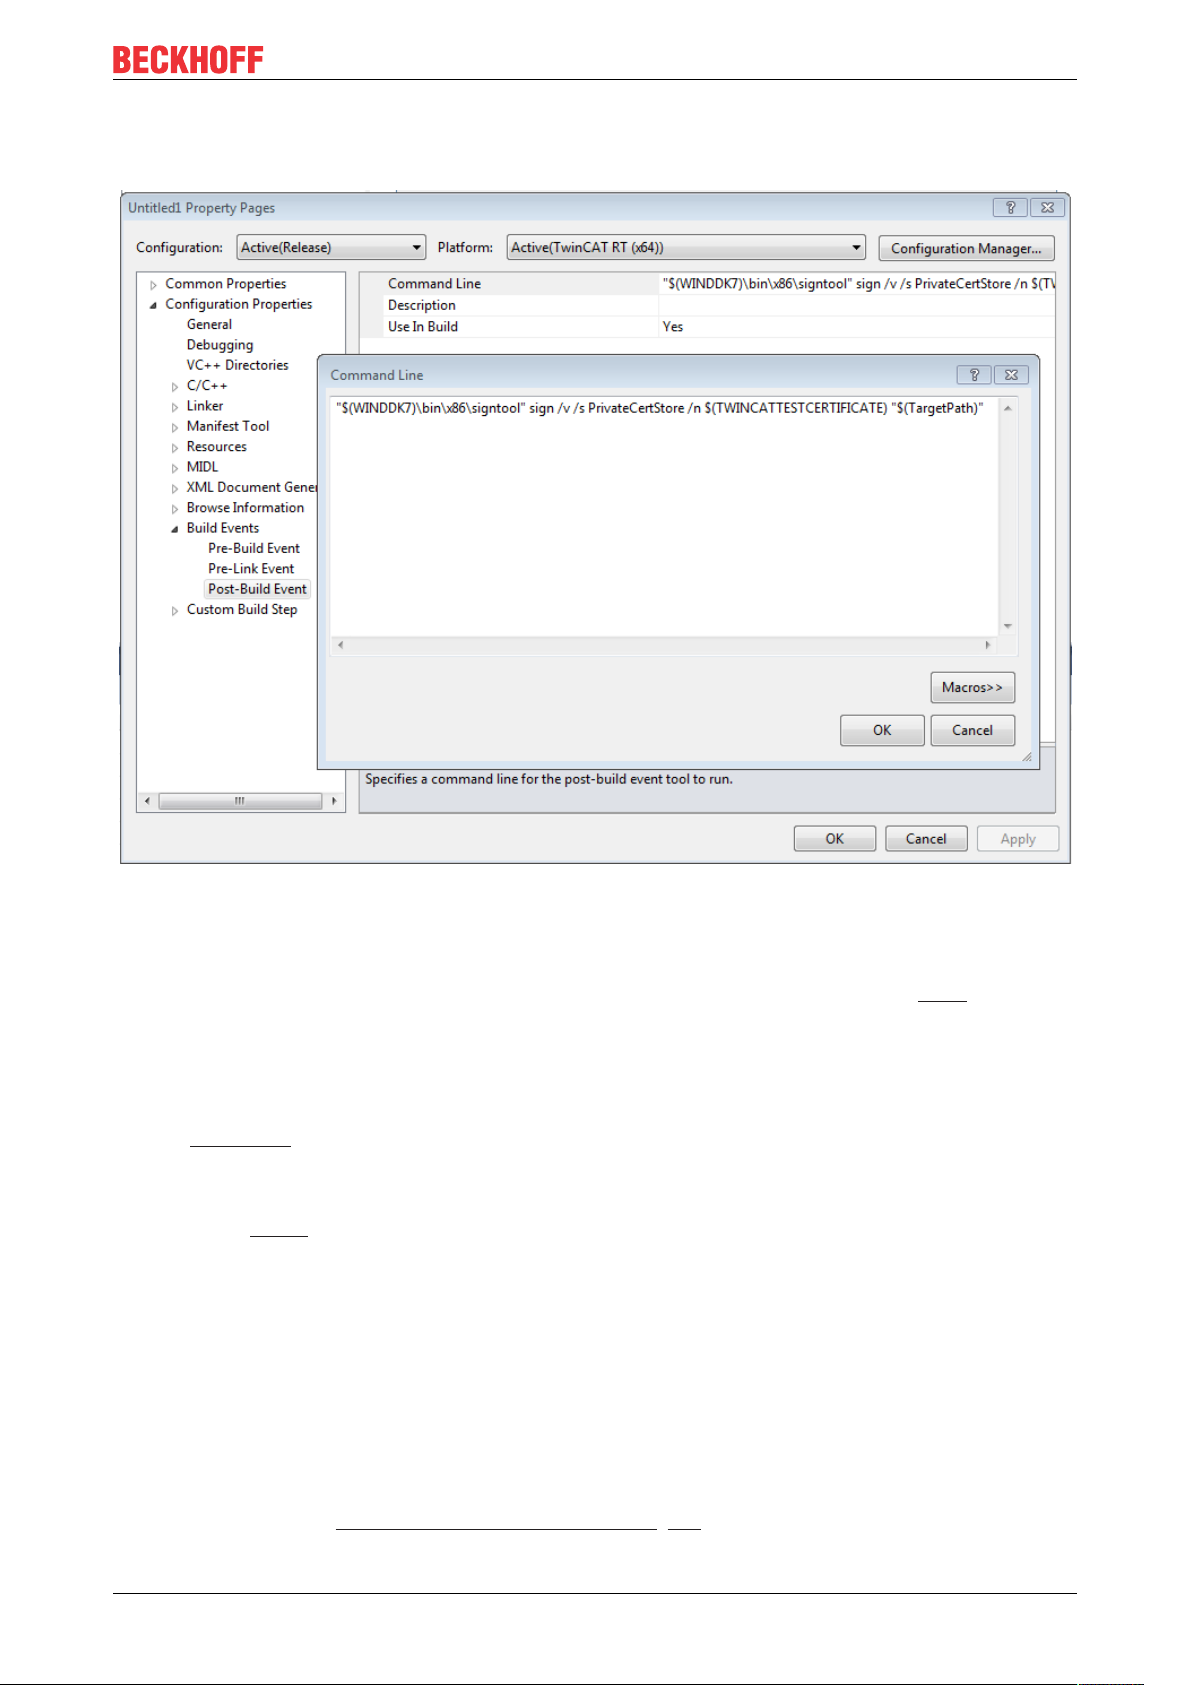
configure the certificate so that it is recognized by TwinCAT XAE on the engineering system.
Set the environment variable TWINCATTESTCERTIFICATE to "MyTestSigningCert" in the engineering
system or edit the post build event of Debug|TwinCAT RT (x64) and Release|TwinCAT RT (x64).
The name of the variable is NOT the name of the certificate file, but the CN name (in this case
MyTestSigningCert).
NoteFrom TwinCAT 3.1 4024.0, the configuration of the certificate to be used is carried out under Tc
Sign in the project properties. To use signing via the operating system, as described here, please
pay attention to the project settings:
TE1000 27Version: 1.13
Page 28
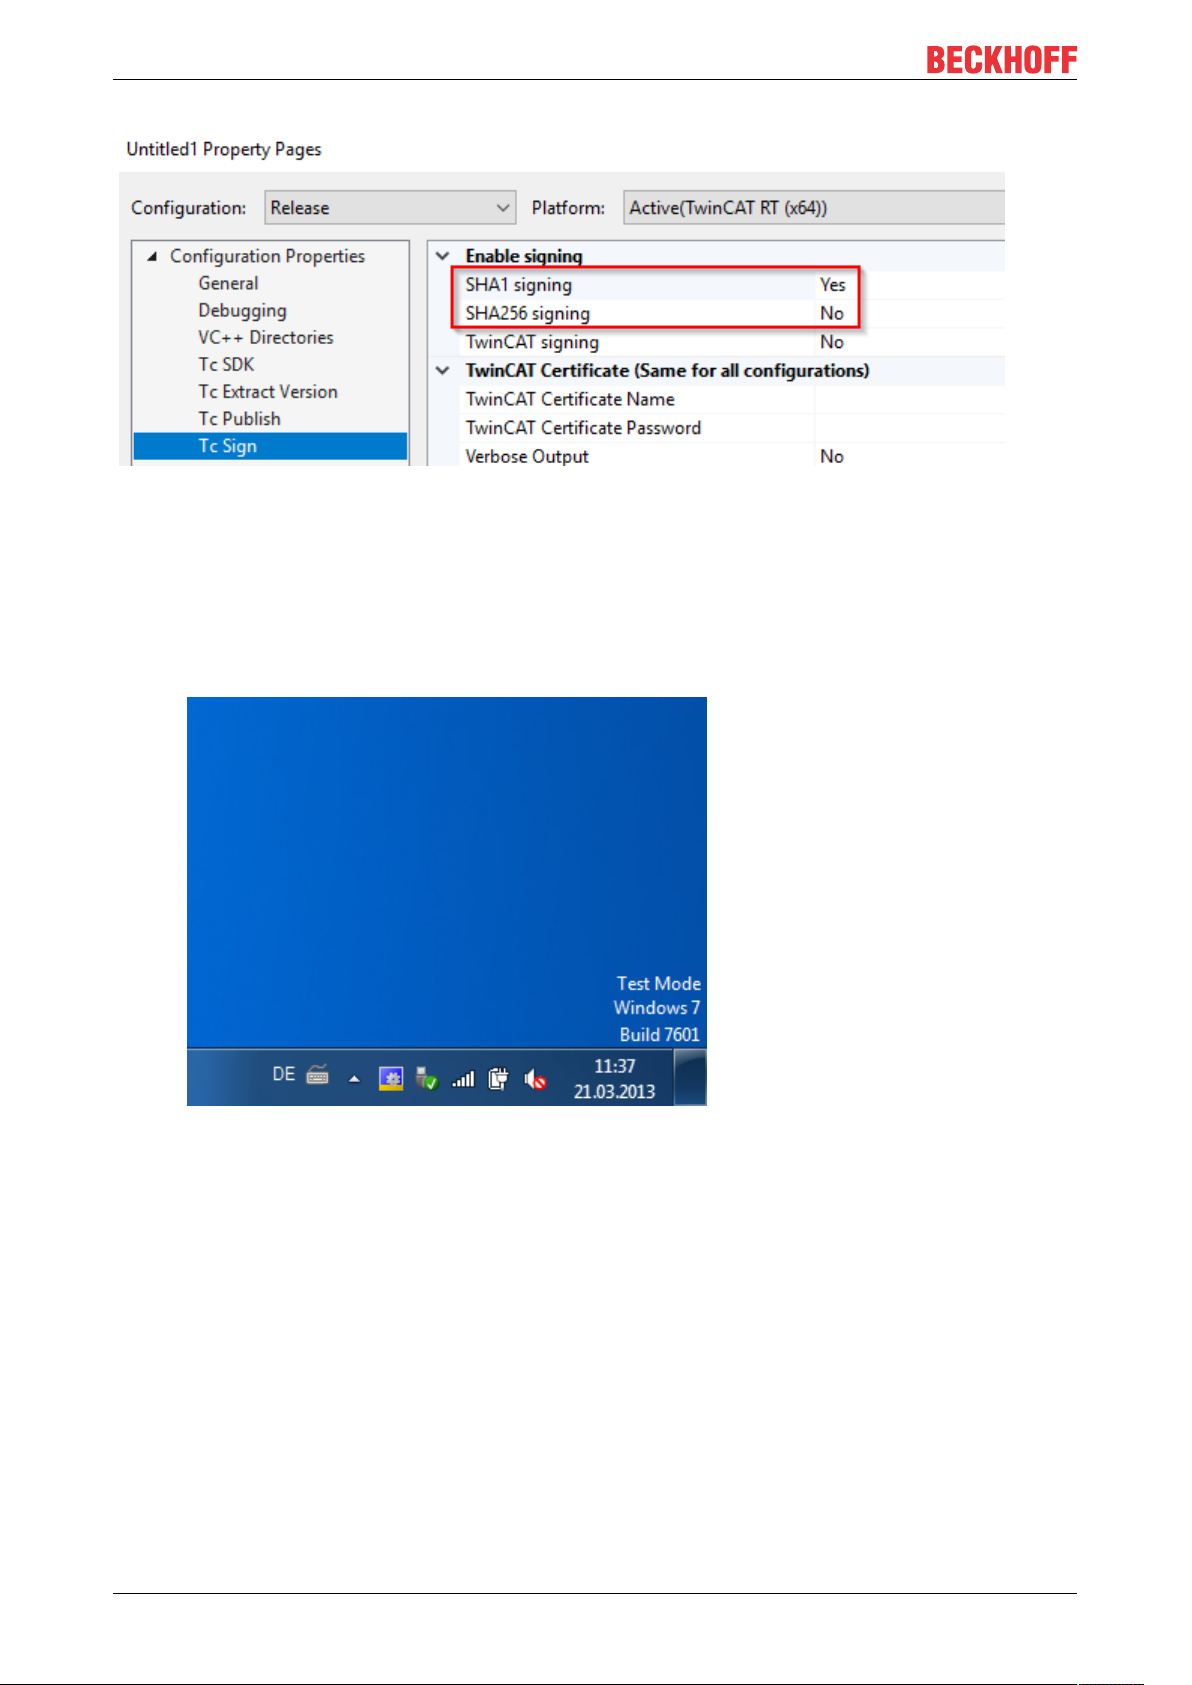
Preparation - only once
3. On XAR (and XAE, if local test)
activate the test mode so that Windows can accept the self-signed certificates. This can be done on both
engineering systems (XAE) and runtime systems (XAR).
4. Execute the following using the "Run as administrator" option:
bcdedit /set testsigning yes
and restart the target system.
ð If test signing mode is enabled, this is displayed at the bottom right of the desktop. The PC now
accepts all signed drivers for execution.
5. You may have to switch off "SecureBoot" for this, which can be done in the bios.
6. Test whether a configuration with a TwinCAT module implemented in a TwinCAT C++ driver can be
enabled and started on the target system.
TE100028 Version: 1.13
Page 29
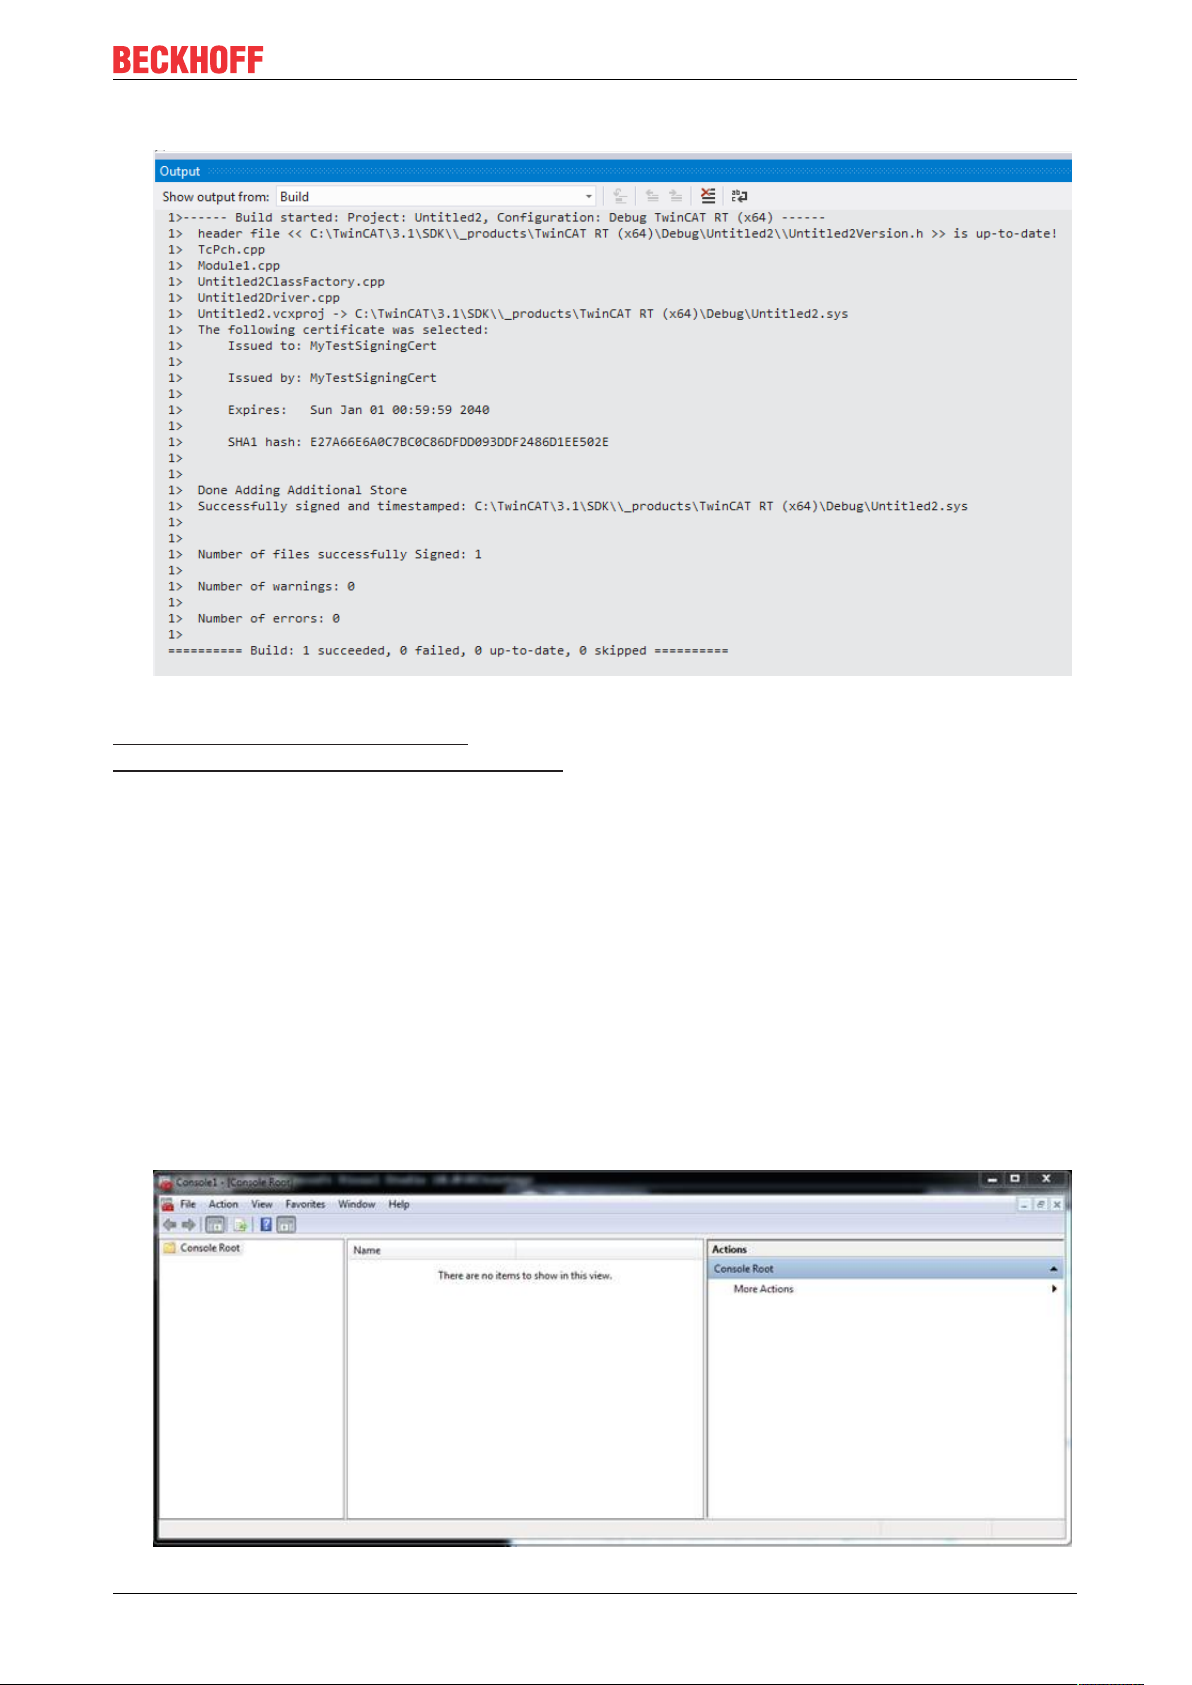
ð Compilation of the x64 driver generates the following output:
Preparation - only once
References:
MSDN, test certificates (Windows driver)
MSDN, MakeCert test certificates (Windows driver),
Also see about this
2 TwinCAT C++ Project properties [}157]
2 Tc Sign [}161]
5.4.1.2 Delete test certificate
This article is about how to delete a test certificate.
Overview
A certificate can be deleted with the Microsoft Management Console:
1. Start the management console MMC.exe via the Start menu or the user interface.
TE1000 29Version: 1.13
Page 30
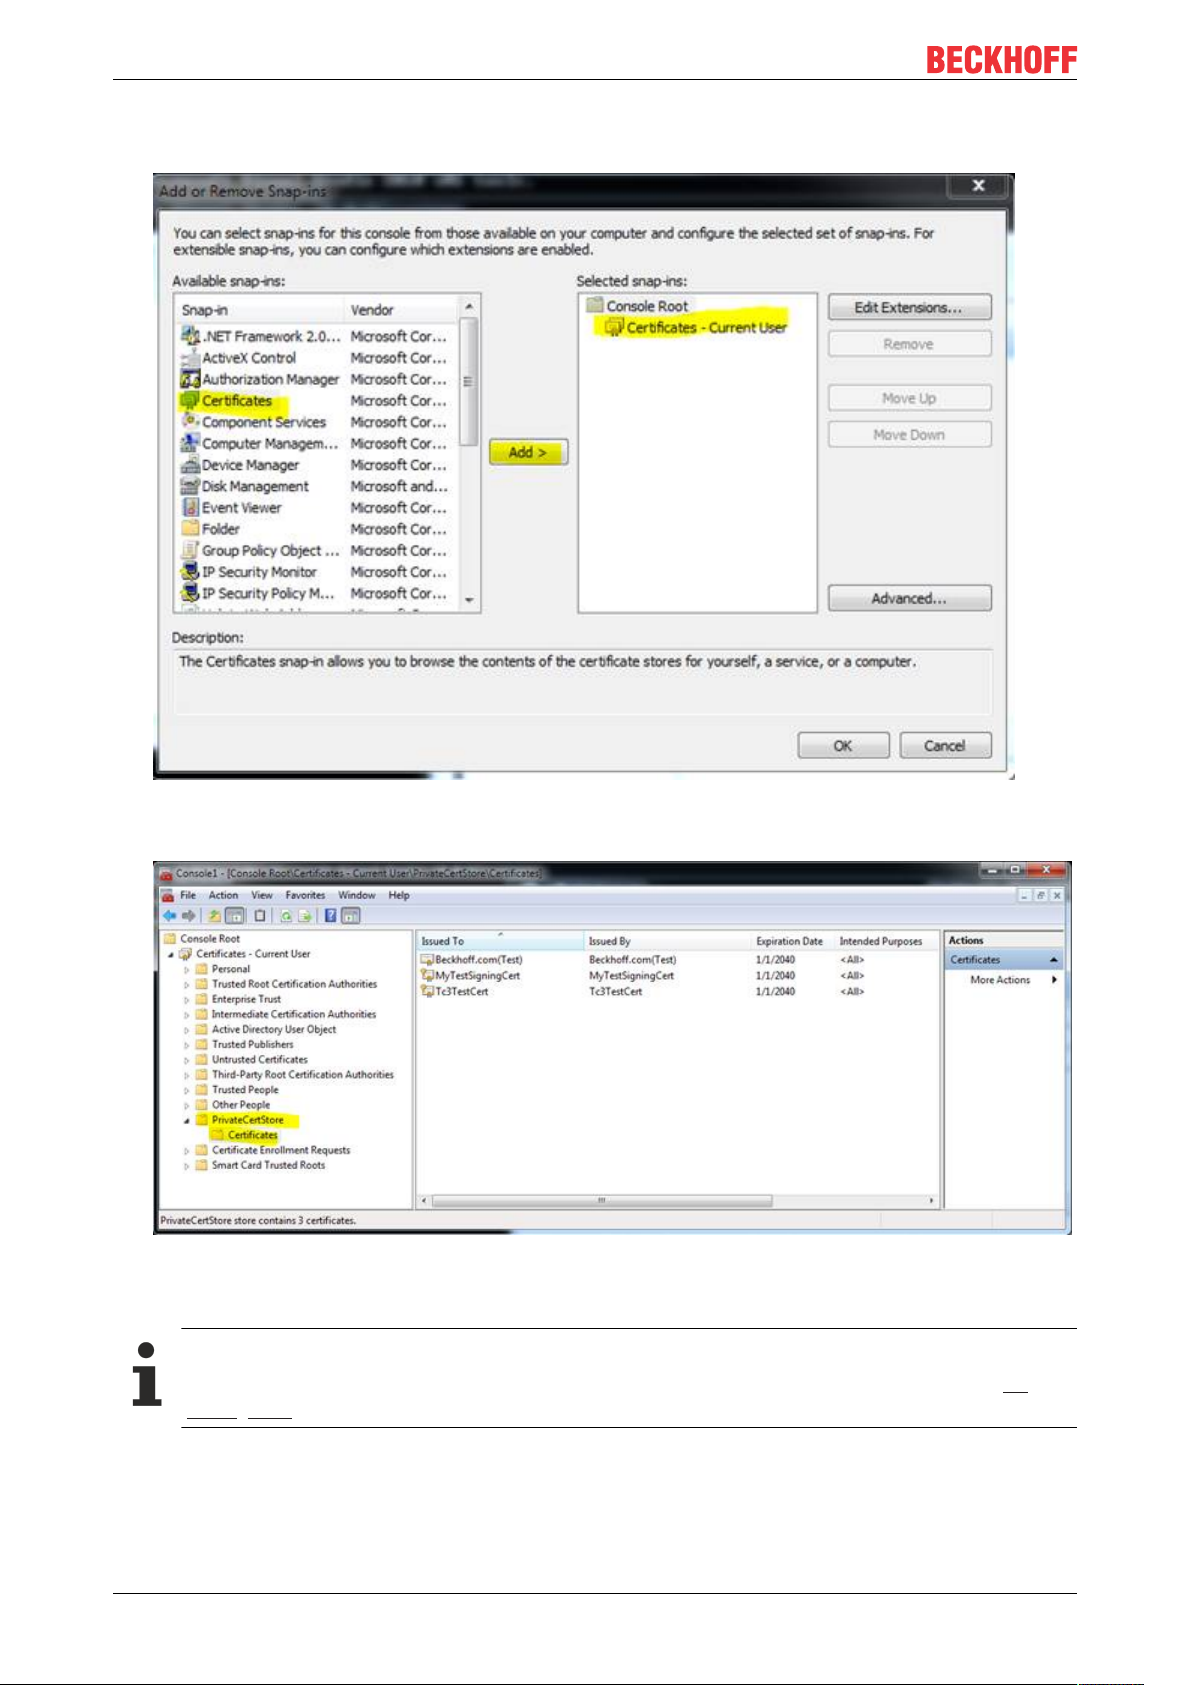
Preparation - only once
2. Click in the menu on File -> Add/Remove Snap-in.. and select the certificate snap-in for the current
user; conclude with OK.
ð The certificates are listed in the node under PrivateCertStore/Certificates.
3. Select the certificate to be deleted.
5.4.1.3 Customer Certificates
Configuration Certificate
From TwinCAT 3.1 4024.0, the configuration of the certificate to be used is carried out under Tc
Sign [}161] in the project properties.
If the TwinCAT C++ class wizard is used, the project is prepared for x64 targets using the test certificate
procedure described above.
This test signing system can be used for the entire engineering and test process.
TE100030 Version: 1.13
Page 31
Preparation - only once
If you want to create an infrastructure and sign the kernel drivers with official "Microsoft trusted" certificates,
the post-build events of the project properties provide the entry point.
The customer can simply replace the value of the environment variable TWINCATTESTCERTIFICATE or
determine another certificate to be used.
The customer can also change the whole signing process with the signing tool.
In this case a CrossSigning is necessary for the Windows drivers. The parameter for the signtool is "/ac".
The certificate provider provides the necessary information. Microsoft provides an overview here.
5.4.1.4 SecureBoot: Driver signing
Systems may require enhanced validation of the Windows drivers. This is usually the case with systems with
enabled SecureBoot.
In this case, the TwinCAT C++ drivers must also be signed by the "Attestation Signing" established by
Microsoft in the same way as all other drivers that the operating system is to load. The procedure for this is
documented in MSDN.
For development purposes, the development process can be simplified on corresponding test systems by
deactivating SecureBoot.
5.4.2 TwinCAT
Versioned C++ projects are stored as binary in a TMX file (TwinCAT Module Executeable).
For the implementation of TwinCAT 3 C++ modules, this compiled, executable TMX file must be signed with
a TwinCAT user certificate if it is to be loaded by the TwinCAT Runtime.
For signing a TMX file, a TwinCAT user certificate is required [}32], which is configured accordingly in the
project for signing.
TE1000 31Version: 1.13
Page 32

Preparation - only once
The TMX file must then be loaded by the TwinCAT Loader [}53], for which corresponding settings are made
in the project during the construction process.
NOTE
Signing on 32bit and 64bit systems
In contrast to the operating system signature, TwinCAT signing is intended for both 32bit and 64bit systems. Thus, the test mode is assumed for a test signature also on 32-bit systems.
NoteIn contrast to the operating system signature, TwinCAT signing is intended for both 32bit and
64bit systems. Thus, the test mode is assumed for a test signature also on 32-bit systems.
Test signing
Just as with the option of loading drivers through the operating system, TwinCAT also provides the test
mode of the operating system for loading.
As soon as the TwinCAT user certificate has been countersigned by Beckhoff [}34], the test mode can be
dispensed with accordingly.
5.4.2.1 Test signing
The test signature for TwinCAT can be carried out with the same TwinCAT user certificate as for the actual
delivery (see Driver signing [}26]).
1. For test operation, e.g. during software development, the creation of a TwinCAT user certificate, as
described here, is sufficient. Make sure that you select the purpose "Sign TwinCAT C++ executable
(*.tmx)". For this the Crypto version 2 is required, a message appears.
TE100032 Version: 1.13
Page 33

Preparation - only once
2. On XAR (and XAE, if local test)
activate the test mode so that Windows can accept the self-signed certificates. This can be done on both
engineering systems (XAE) and runtime systems (XAR).
3. Execute the following using the "Run as administrator" option:
bcdedit /set testsigning yes
and restart the target system.
ð If test signing mode is enabled, this is displayed at the bottom right of the desktop. The PC now
accepts all signed drivers for execution.
4. You may have to switch off "SecureBoot" for this, which can be done in the bios.
5. During the initial activation (Activate Configuration) with a TwinCAT user certificate, the target system will
determine that the certificate is not trusted and the activation process will be aborted:
A local user with administrator rights can trust the certificate through simple running via the created REG
file.
This process only enables modules with a signature from the trusted TwinCAT user certificates to run.
6. Following this process you can use the TwinCAT user certificate for signing with the test mode of the
operating system.
This is configured in the project properties [}161].
Use the TcSignTool [}57] to avoid storing the password of the TwinCAT user certificate in the project,
where it would also end up in version management, for example.
If you have this TwinCAT user certificate countersigned by Beckhoff, you can also use it for delivery without
TestMode.
TE1000 33Version: 1.13
Page 34

Preparation - only once
5.4.2.2 Signing for delivery
If you create TwinCAT driver software for delivery, you should use a countersigned TwinCAT user certificate.
With a countersigned TwinCAT user certificate, the test mode is no longer required.
TE100034 Version: 1.13
Page 35

Modules
6 Modules
The TwinCAT module concept is one of the core elements for the modularization of modern machines. This
chapter describes the modular concept and working with modules.
The modular concept applies to all TwinCAT modules, not just C++ modules, although most details only
relate to the engineering of C++ modules.
6.1 The TwinCAT Component Object Model (TcCOM) concept
The TwinCAT Component Object Model defines the characteristics and the behavior of the modules. The
model derived from the "Component Object Model" COM from Microsoft Windows describes the way in
which various independently developed and compiled software components can co-operate with one
another. To make that possible, a precisely defined mode of behavior and the observation of interfaces of
the module must be defined, so that they can interact. Such an interface is also ideal for facilitating
interaction between modules from different manufacturers, for example.
To some degree TcCOM is based on COM (Component Object Model of the Microsoft Windows world),
although only a subset of COM is used. In comparison with COM, however, TcCOM contains additional
definitions that go beyond COM, for example the state machine module.
Overview and application of TcCOM modules
This introductory overview is intended to make the individual topics easier to understand.
One or several TcCOM modules are consolidated in a driver. This driver is created by TwinCAT Engineering
using the MSVC compiler. The modules and interfaces are described in a TMC (TwinCAT Module Class) file.
The drivers and their TMC file can now be exchanged and combined between the engineering systems.
Instances of these modules are now created using the engineering facility. They are associated with a TMI
file. The instances can be parameterized and linked with each other and with other modules to form the IO. A
corresponding configuration is transferred to the target system, where it is executed.
Corresponding modules are started, which register with the TwinCAT ObjectServer. The TwinCAT XAR also
provides the process images. Modules can query the TwinCAT ObjectServer for a reference to another
object with regard to a particular interface. If such a reference is available, the interface methods can be
called on the module instance.
The following sections substantiate the individual topics.
TE1000 35Version: 1.13
Page 36

Modules
ID Management
Different types of ID are used for the interaction of the modules with each other and also within the modules.
TcCOM uses GUIDs (128 bit) and 32 bit long integers.
TcCOM uses
• GUIDs for: ModulIDs, ClassIDs and InterfaceIDs.
• 32 bit long integers are used for: ParameterIDs, ObjectIDs, ContextIDs, CategoryID.
Interfaces
An important component of COM, and therefore of TcCOM too, is interfaces.
Interfaces define a set of methods that are combined in order to perform a certain task. An interface is
referenced with a unique ID (InterfaceID), which must never be modified as long as the interface does not
change. This ID enables modules to determine whether they can cooperate with other modules. At the same
time the development process can take place independently, if the interfaces are clearly defined.
Modifications of interfaces therefore lead to different IDs. The TcCOM concept is designed such that
InterfaceIDs can superpose other (older) InterfaceIDs ( "Hides" in the TMC description / TMC editor). In this
way, both versions of the interface are available, while on the other hand it is always clear which is the latest
InterfaceID. The same concept also exists for the data types.
TcCOM itself already defines a whole series of interfaces that are prescribed in some cases (e.g.
ITComObject), but are optional in most. Many interfaces only make sense in certain application areas. Other
interfaces are so general that they can often be re-used. Provision is made for customer-defined interfaces,
so that two third-party modules can interact with each other, for example.
• All interfaces are derived from the basic interface ItcUnknown which, like the corresponding interface of
COM, provides the basic services for querying other interfaces of the module (TcQueryInterface) and
for controlling the lifetime of the module (TcAddRef and TcRelease).
• The ITComObject interface, which must be implemented by each module, contains methods for
accessing the name, ObjectID, ObjectID of the parent, parameters and state machine of the module.
Several general interfaces are used by many modules:
• ITcCyclic is implemented by modules, which are called cyclically ("CycleUpdate"). The module can
register via the ITcCyclicCaller interface of a TwinCAT task to obtain cyclic calls.
• The ITcADI interface can be used to access data areas of a module.
• ITcWatchSource is implemented by default; it facilitates ADS device notifications and other features.
• The ITcTask interface, which is implemented by the tasks of the real-time system, provides information
about the cycle time, the priority and other task information.
• The ITComObjectServer interface is implemented by the ObjectServer and referenced by all modules.
A whole series of general interfaces has already been defined. General interfaces have the advantage that
their use supports the exchange and recycling of modules. User-defined interfaces should only be defined if
no suitable general interfaces are available.
Class Factories
"Class Factories" are used for creating modules in C++. All modules contained in a driver have a common
Class Factory. The Class Factory registers once with the ObjectServer and offers its services for the
development of certain module classes. The module classes are identified by the unique ClassID of the
module. When the ObjectServer requests a new module (based on the initialization data of the configurator
or through other modules at runtime), the module selects the right Class Factory based on the ClassID and
triggers creation of the module via its ITcClassFactory interface.
Module service life
Similar to COM, the service life of a module is determined via a reference counter (RefCounter). The
reference counter is incremented whenever a module interface is queried. The counter is decremented when
the interface is released. An interface is also queried when a module logs into the ObjectServer (the
ITComObject interface), so that the reference counter is at least 1. The counter is decremented on logout.
TE100036 Version: 1.13
Page 37

When the counter reaches 0, the module deletes itself automatically, usually after logout from the
ObjectServer. If another module already maintains a reference (has an interface pointer), the module
continues to exist, and the interface pointer remains valid, until this pointer is released.
Modules
6.1.1 TwinCAT module properties
A TcCOM module has a number of formally defined, prescribed and optional properties. The properties are
sufficiently formalized to enable interchangeable application. Each module has a module description, which
describes the module properties. They are used for configuring the modules and their relationships with each
other.
If a module is instantiated in the TwinCAT runtime, it registers itself with a central system instance, the
ObjectServer. This makes it reachable and parameterizable for other modules and also for general tools.
Modules can be compiled independently and can therefore also be developed, tested and updated
independently. Modules can be very simple, e.g. they may only contain a basic function such as low-pass
filter. Or they may be very complex internally and contain the whole control system for a machine
subassembly.
There are a great many applications for modules; all tasks of an automation system can be specified in
modules. Accordingly, no distinction is made between modules, which primarily represent the basic functions
of an automation system, such as real-time tasks, fieldbus drivers or a PLC runtime system, and user- or
application-specific algorithms for controlling a machine unit.
The diagram below shows a common TwinCAT module with his main properties. The dark blue blocks define
prescribed properties, the light blue blocks optional properties.
TE1000 37Version: 1.13
Page 38

Modules
Module description
Each TcCOM module has some general description parameters. These include a ClassID, which
unambiguously references the module class. It is instantiated by the corresponding ClassFactory. Each
module instance has an ObjectID, which is unique in the TwinCAT runtime. In addition there is a parent
ObjectID, which refers to a possible logical parent.
The description, state machine and parameters of the module described below can be reached via the
ITComObject interface (see "Interfaces").
Class description files (*.tmc)
The module classes are described in class description files (TwinCAT Module Class; *.tmc).
These files are used by developers to describe the module properties and interfaces, so that others can use
and embed the module. In addition to general information (vendor data, module class ID etc.), optional
module properties are described.
TE100038 Version: 1.13
Page 39

Modules
• Supported categories
• Implemented interfaces
• Data areas with corresponding symbols
• Parameter
• Interface pointers
• Data pointers, which can be set
The system configurator uses the class description files mainly as a basis for the integration of a module
instance in the configuration, for specifying the parameters and for configuring the links with other modules.
They also include the description of all data types in the modules, which are then adopted by the configurator
in its general data type system. In this way, all interfaces of the TMC descriptions present in the system can
be used by all modules.
More complex configurations involving several modules can also be described in the class description files,
which are preconfigured and linked for a specific application. Accordingly, a module for a complex machine
unit, which internally consists of a number of submodules, can be defined and preconfigured as an entity
during the development phase.
Instance description files (*.tmi)
An instance of a certain module is described in the instance description file (TwinCAT Module Instance;
*.tmi). The instance descriptions are based on a similar format, although in contrast to the class description
files they already contain concrete specifications for the parameters, interface pointers etc. for the special
module instance within a project.
The instance description files are created by TwinCAT Engineering (XAE), when an instance of a class
description is created for a specific project. They are mainly used for the exchange of data between all tools
involved in the configuration. However, the instance descriptions can also be used cross-project, for example
if a specially parameterized module is to be used again in a new project.
State machine
Each module contains a state machine, which describes the initialization state of the module and the means
with which this state can be modified from outside. The state machine describes the states, which occur
during starting and stopping of the module. This relates to module creation, parameterization and production
in conjunction with the other modules.
Application-specific states (e.g. of the fieldbus or driver) can be described in their own state machines. The
state machine of the TcCOM modules defines the states INIT, PREOP, SAFEOP and OP. Although the state
designations are the same as under EtherCAT fieldbus, the actual states differ. When the TcCOM module
implements a fieldbus driver for EtherCAT, it has two state machines (module and fieldbus state machine),
which are passed through sequentially. The module state machine must have reached the operating state
(OP) before the fieldbus state machine can start.
The state machine is described [}44] in detail separately.
TE1000 39Version: 1.13
Page 40

Modules
Parameter
Modules can have parameters, which can be read or written during initialization or later at runtime (OP
state). Each parameter is designated by a parameter ID. The uniqueness of the parameter ID can be global,
limited global or module-specific. Further details can be found in the "ID Management" section. In addition to
the parameter ID, the parameter contains the current data; the data type depends on the parameter and is
defined unambiguously for the respective parameter ID.
Interfaces
TE100040 Version: 1.13
Page 41

Modules
Interfaces consist of a defined set of methods (functions), which offer modules through which they can be
contacted by other modules. Interfaces are characterized by a unique ID, as described above. A module
must support at least the ITComObject interface and may in addition contain as many interfaces as required.
An interface reference can be queried by calling the method "TcQueryInterface" with specification of the
corresponding interface ID.
Interface pointers
Interface pointers behave like the counterpart of interfaces. If a module wants to use an interface of another
module, it must have an interface pointer of the corresponding interface type and ensure that it points to the
other module. The methods of the other module can then be used.
Interface pointers are usually set on startup of the state machine. During the transition from INIT to PREOP
(IP), the module receives the object ID of the other modules with the corresponding interface; during the
transition from PREOP to SAFEOP (PS) or SAFEOP to OP (SO), the instance of the other modules is
searched with the ObjectServer, and the corresponding interface is set with the Method Query interface.
During the state transition in the opposite direction, i.e. from SAFEOP to PREOP (SP) or OP to SAFEOP
(OS), the interface must be enabled again.
Data areas
Modules can contain data areas, which can be used by the environment (e.g. by other modules or the IO
area of TwinCAT). These data areas can contain any data. They are often used for process image data
(inputs and outputs). The structure of the data areas is defined in the device description of the module. If a
module has data areas, which it wants to make accessible for other modules, it implements the ITcADI
interface to enable access to the data. Data areas can contain symbol information, which describes the
structure of the respective data area in more detail.
TE1000 41Version: 1.13
Page 42

Modules
Data area pointer
If a module wants to access the data area of other modules, it can contain data area pointers. These are
normally set during initialization of the state machine to data areas or data area sections of other modules.
The access is directly to the memory area, so that corresponding protection mechanisms for competing
access operations have to be implemented, if necessary. In many cases it is preferable to use a
corresponding interface.
Context
The context should be regarded as real-time task context. Context is required for the configuration of the
modules, for example. Simple modules usually operate in a single time context, which therefore requires no
detailed specification. Other modules may partly be active in several contexts (e.g. an EtherCAT master can
support several independent real-time tasks, or a control loop can process control loops of the layer below in
another cycle time). If a module has more than one time-dependent context, this must be specified the in the
module description.
TE100042 Version: 1.13
Page 43
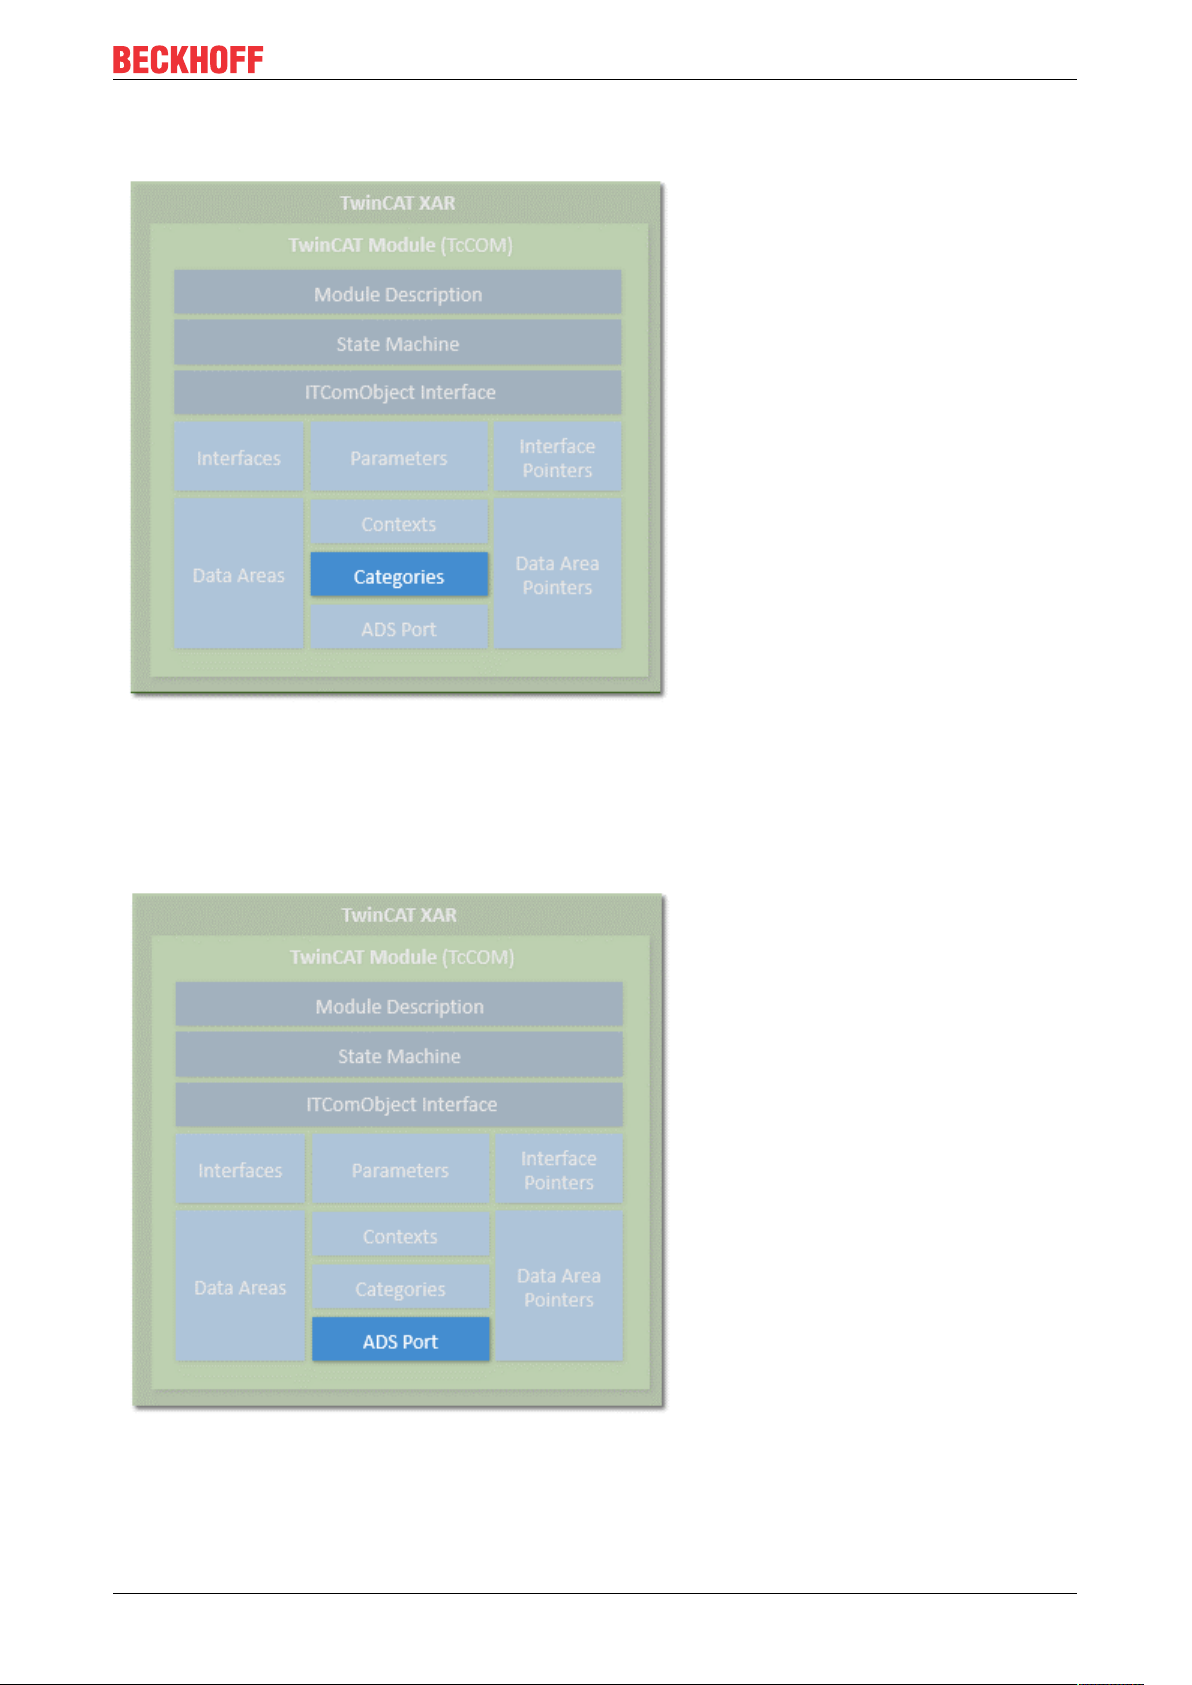
Categories
Modules
Modules can offer categories by implementing the interface ITComObjectCategory. Categories are
enumerated by the ObjectServer, and objects, which use this to associated themselves with categories, can
be queried by the ObjectServer (ITComObjectEnumPtr).
ADS
Each module that is entered in the ObjectServer can be reached via ADS. The ObjectServer uses the
ITComObject interface of the modules in order to read or write parameters or to access the state machine,
for example. In addition, a dedicated ADS port can be implemented, through which dedicated ADS
commands can be received.
TE1000 43Version: 1.13
Page 44

Modules
System module
In addition, the TwinCAT runtime provides a number of system modules, which make the basic runtime
services available for other modules. These system modules have a fixed, constant ObjectID, through which
the other modules can access it. An example for such a system module is the real-time system, which makes
the basic real-time system services, i.e. generation of real-time tasks, available via the ITcRTime interface.
The ADS router is also implemented as a system module, so that other modules can register their ADS port
here.
Creation of modules
Modules can be created both in C++ and in IEC 61131-3. The object-oriented extensions of the TwinCAT
PLC are used for this purpose. Modules from both worlds can interact via interfaces in the same way as pure
C++ modules. The object-oriented extension makes the same interfaces available as in C++.
The PLC modules also register via the ObjectServer and can therefore be reached through it. PLC modules
vary in terms of complexity. It makes no difference whether only a small filter module is generated or a
complete PLC program is packed into a module. Due to the automation, each PLC program is a module
within the meaning of TwinCAT modules. Each conventional PLC program is automatically packed into a
module and registers itself with the ObjectServer and one or several task modules. Access to the process
data of a PLC module (e.g. mapping with regard to a fieldbus driver) is also controlled via the defined data
areas and ITcADI.
This behavior remains transparent and invisible for PLC programmers, as long as they decide to explicitly
define parts of the PLC program as TwinCAT modules, so that they can be used with suitable flexibility.
6.1.2 TwinCAT module state machine
In addition to the states (INIT, PREOP, SAFEOP and OP), there are corresponding state transitions, within
which general or module-specific actions have to be executed or can be executed. The design of the state
machine is very simple. In any case, there are only transitions to the next or previous step,
resulting in the following state transitions: INIT to PREOP (IP), PREOP to SAFEOP (PS) and SAFEOP to OP
(SO). In the opposite direction there are the following state transitions: OP to SAFEOP (OS), SAFEOP to
PREOP (SP) and PREOP to INIT (PI). Up to and including the SAFEOP state, all states and state transitions
take place within the non-real-time context. Only the transition from SAFEOP to OP, the OP state and the
transition from OP to SAFEOP take place in the real-time context. This differentiation is relevant when
resources are allocated or activated, or when modules register or deregister with other modules.
TE100044 Version: 1.13
Page 45

Modules
State: INIT
The INIT state is only a virtual state. Immediately after creation of a module, the module changes from INIT
to PREOP, i.e. the IP state transition is executed. The instantiation and the IP state transition always take
place together, so that the module never remains in INIT state. Only when the module is removed does it
remain in INIT state for a short time.
Transition: INIT to PREOP (IP)
During the IP state transition, the module registers with the ObjectServer with its unique ObjectID. The
initialization parameters, which are also allocated during object creation, are transferred to the module.
During this transition the module cannot establish connections to other modules, because it is not clear
whether the other modules already exist and are registered with the ObjectServer. When the module
requires system resources (e.g. memory), these can be allocated during the state transition. All allocated
resources have to be released again during the transition from PREOP to INIT (PI).
State: PREOP
In PREOP state, module creation is complete and the module is usually fully parameterized, even if further
parameters may be added during the transition from PREOP to SAFEOP. The module is registered in the
ObjectServer, although no connections with other modules have been created yet.
Transition: PREOP to SAFEOP (PS)
In this state transition the module can establish connections with other modules. To this end it has usually
received, among other things, ObjectIDs of other modules with the initialization data, which are now
converted to actual connections with these modules via the ObjectServer.
The transition can generally be triggered by the system according to the configurator, or by another module
(e.g. the parent module). During this state transition further parameters can be transferred. For example, the
parent module can transfer its own parameters to the child module.
State: SAFEOP
The module is still in the non-real-time context and is waiting to be switched to OP state by the system or by
other modules.
TE1000 45Version: 1.13
Page 46

Modules
Transition: SAFEOP to OP (SO)
The state transition from SAFEOP to OP, the state OP, and the transition from OP to SAFEOP take place in
the real-time context. System resources may no longer be allocated. On the other hand, resources can now
be requested by other modules, and modules can register with other modules, e.g. in order to obtain a cyclic
call during tasks.
This transition should not be used for long-running tasks. For example, file operations should be executed
during the PS transition.
State: OP
In OP state the module starts working and is fully active in the meaning of the TwinCAT system.
Transition: OP to SAFEOP (OS)
This state transition takes place in the real-time context. All actions from the SO transition are reversed, and
all resources requested during the SO transition are released again.
Transition: SAFEOP to PREOP (SP)
All actions from the PS transition are reversed, and all resources requested during the PS transition are
released again.
Transition: PREOP to INIT (PI)
All actions from the IP transition are reversed, and all resources requested during the IP transition are
released again. The module signs off from the ObjectServer and usually deletes itself (see "Service life").
6.2 Module-to-module communication
TcCOM modules can communicate with one another. This article is intended to provide an overview of the
various options. There are four methods of module-to-module communication:
• IO Mapping (linking of input/output symbols)
• IO Data Pointer
• Method calls via interface
• ADS
These four methods will now be described.
IO Mapping (linking of input/output symbols)
The inputs and outputs of TcCOM modules can be linked by IO Mapping in the same way as the links to
physical symbols in the fieldbus level. To do this, data areas are created in the TMC editor [}134] that
describe the corresponding inputs/outputs. These are then linked in the TwinCAT solution.
Through mapping, the data are provided or accepted at the task beginning (inputs) or task end (outputs)
respectively. The data consistency is ensured by synchronous or asynchronous mapping.
The implementing language (PLC, C++, Matlab) is unimportant.
TE100046 Version: 1.13
Page 47

Modules
The following sample shows the realization:
Sample12: Module communication: IO mapping used [}306]
IO Data Pointer
Direct memory access is also possible within a task via the Data Area Pointers, which are created in the
TMC Editor.
If several callers of a task or callers from other tasks occur, the user must ensure the data consistency
through appropriate mechanisms. Data pointers are available for C++ and Matlab.
The following sample shows the realization:
Sample10: Module communication: Use of data pointers [}277]
Method calls via interfaces
As already described, TcCOM modules can offer interfaces that are also defined in the TMC editor. If a
module implements them ("Implemented Interfaces" in the TMC editor [}126]), it offers appropriate methods.
A calling module will then have an "Interface Pointer" to this module in order to call the methods.
These are blocking calls, meaning that the caller blocks until the called methods come back and the return
values of the methods can thus be directly used. If several callers of a task or callers from other tasks occur,
the user must ensure the data consistency through appropriate mechanisms.
TE1000 47Version: 1.13
Page 48

Modules
The following samples show the realization:
Sample11: Module communication: PLC module calls a method of a C-module [}278]
Sample11a: Module communication: C-module cites a method in the C-module [}306]
Further samples exist for the communication with the PLC [}324].
ADS
As the internal communication of the TwinCAT system in general, ADS can also be used to communicate
between modules. Communication in this case is acyclic, event-controlled communication.
At the same time ADS can also be used to collect or provide data from the UserMode and communicate with
other controllers (i.e. via the network). ADS can also be used to ensure data-consistent communication, e.g.
between tasks/cores/CPUs. In this case TcCOM modules can be both clients (requesters) and servers
(providers). The implementing language (PLC, C++, Matlab) is unimportant.
The following samples show the realization:
Sample03: C++ as ADS server [}258]
Sample06: UI-C#-ADS client uploads the symbols from the module [}268]
Sample07: reception of ADS notifications [}273]
Sample08: provision of ADS-RPC [}274]
TE100048 Version: 1.13
Page 49

Modules - Handling
7 Modules - Handling
TcCOM modules are implemented and loaded after a build.
This section describes the handling of modules when they are exchanged between systems.
A distinction must be made between the two C++ project types:
• C++ projects [}49] that create a sys file to load them by the operating system.
• Versioned C++ projects [}49] that create a tmx file to load them with the TwinCAT Loader [}53]
(from TwinCAT 3.1 Build 4024).
Beckhoff recommends using versioned C++ projects [}49] as standard. The advantages they offer include
the following:
• Driver signature [}31] via OEM certificates that can be obtained from Beckhoff.
• Versioned storage [}53] of the binaries.
• Online Change capability [}164], if required.
Also see about this
2 Export to TwinCAT 3.1 4022.xx [}50]
2 Import up to TwinCAT 3.1 4022.xx [}51]
7.1 Versioned C++ Projects
From TwinCAT 3.1 Build 4024.0
The functionality described here is available from TwinCAT 3.1. 4024.0.
Versioned TwinCAT C++ projects result in an architecture-dependent TMX file during building and are
loaded via the TwinCAT Loader [}53]. They must be signed by a TwinCAT user certificate.
If a C++ project was created using the template "Versioned C++ Project", the binary files are stored by a
publish in the TwinCAT repository under C:\TwinCAT\3.x\Repository at a vendor- and version-specific
location.
From here required modules are transferred to the target system under C:\TwinCAT\3.1\Boot\Repository, if
they are needed.
This can be either at the time of activation (Activate Configuration) or at the time of the Online Change
[}164].
Additionally, it is possible to create an archive for the transfer between engineering systems of the binary
version of this project, which is configured by the project properties [}160].
7.2 Non-versioned C++ projects
TwinCAT C++ drivers (.sys files) are loaded via the Windows operating system.
These are kernel-mode drivers which are subject to the normal requirements of the operating system with
regard to loading.
If a C++ project has been created using the TwinCAT Driver Project template, the binary files are stored in
the TwinCAT folder under C:\TwinCAT\3.x\CustomConfig\Modules by a publish.
From here the driver is transferred to the target system under C:\TwinCAT\3.x\Driver if it is needed.
Additionally, it is possible to create an archive for the transfer of the binary version of this project, which is
configured by the project properties [}160].
TE1000 49Version: 1.13
Page 50

Modules - Handling
Up to TwinCAT 3.1 4022.xx
Before Release 4024.0, the handling of the export and import functionality was somewhat different, which is
documented on the subpages.
7.2.1 Export to TwinCAT 3.1 4022.xx
This article describes how to export a TwinCAT 3 driver that can run on any other TwinCAT PC.
The following steps have to be carried out
1. Implement a TwinCAT 3 C++ project on an engineering PC equipped with a Visual Studio version, see
quick start sample Create a TwinCAT 3 project [}60]. Implement the TwinCAT modules as described,
compile and test the modules contained in the project before export.
2. Since the result should be able to be used on any machine, TwinCAT generates a 32-bit and a 64-bit
version.
Since x64 drivers must be signed, a certificate must be installed on the machine that exports the module.
See x64: Driver signing [}25], how to generate and install a certificate.
(This step can be omitted on an engineering or 32-bit system)
3. To export a TC 3 C++ project, right-click on the module project in the solution tree and select TwinCAT
Publish Modules.
ð The project is then compiled (rebuild) - the successful export is displayed in the Build output window.
Please note the successful message at the end:
The binary files and the TMC module description are exported to the TempContr folder under C:
\TwinCAT\3.x\CustomConfig\Modules.
TE100050 Version: 1.13
Page 51

Modules - Handling
4. For the import, simply copy the TempContr folder to any other TwinCAT 3 machine.
7.2.2 Import up to TwinCAT 3.1 4022.xx
This article describes how a TC3-C++ driver can be imported and integrated into a PC/IPC controller with
TwinCAT 3 XAE (without full version of Visual Studio).
The binary TC3-C++ driver was previously implemented and exported [}50] on another PC.
The following steps have to be carried out
1. Copy the TC3-C++ driver on the second IPC with TwinCAT XAE without the full version of Visual Studio
into the destination folder ..\TwinCAT\3.x\CustomConfig\Modules. The TestDriver.zip archive is
unpacked in this sample.
TE1000 51Version: 1.13
Page 52

Modules - Handling
ð The TestDriver (in the subfolders RT and UM) and the corresponding TwinCAT module Class *.tmc
file TestDriver.tmc are then available.
2. Start the TwinCAT XAE environment and create a TwinCAT 3 project.
3. Right-click System->TcCOM Objects and select Add New Item....
ð The new CTestModule module is listed in the dialog box that appears.
4. Create a module instance by selecting the module name and continue with OK.
ð The instance of the TestModule module now appears under TcCom Objects.
5. Create a new task.
6. Go to the context of the module instance and link the C++ module instance with the previously added
Task 1.
7. Activate the configuration.
7.3 Starting Modules
TwinCAT C++ modules can be started in two ways:
• Operating system: The operating system starts the TwinCAT module as a normal driver.
◦ On x64bit-PCs the operating system requires a signature, see Driver signing [}25].
TE100052 Version: 1.13
Page 53

Modules - Handling
• TwinCAT Loader: [}53] The TwinCAT Loader starts the TwinCAT module.
◦ The TwinCAT Loader requires a signature [}25] with TwinCAT user certificate.
◦ This option is mandatory for encrypted modules [}55].
◦ The TwinCAT Loader is required for the versioned C++ projects [}99].
Via System -> TcCOM Modules -> Class Factories tab you can see whether the TwinCAT Loader or the
operating system is used:
Also see about this
2 Driver signing [}26]
7.4 TwinCAT Loader
From TwinCAT 3.1 Build 4024.0
The functionality described here is available from TwinCAT 3.1. 4024.0.
TwinCAT 3 has an integrated function for loading modules.
Modules loaded with the TwinCAT Loader
• must be signed: Test signing [}53]
• can be encrypted: Encrypting Modules [}55], for which the TwinCAT software Protection must be
configured with a user DB.
7.4.1 Test signing
The test signature for TwinCAT can be carried out with the same TwinCAT user certificate as for the actual
delivery (see Driver signing [}26]).
TE1000 53Version: 1.13
Page 54

Modules - Handling
1. For test operation, e.g. during software development, the creation of a TwinCAT user certificate, as
described here, is sufficient. Make sure that you select the purpose "Sign TwinCAT C++ executable
(*.tmx)". For this the Crypto version 2 is required, a message appears.
2. On XAR (and XAE, if local test)
activate the test mode so that Windows can accept the self-signed certificates. This can be done on both
engineering systems (XAE) and runtime systems (XAR).
3. Execute the following using the "Run as administrator" option:
bcdedit /set testsigning yes
and restart the target system.
TE100054 Version: 1.13
Page 55

Modules - Handling
ð If test signing mode is enabled, this is displayed at the bottom right of the desktop. The PC now
accepts all signed drivers for execution.
4. You may have to switch off "SecureBoot" for this, which can be done in the bios.
5. During the initial activation (Activate Configuration) with a TwinCAT user certificate, the target system will
determine that the certificate is not trusted and the activation process will be aborted:
A local user with administrator rights can trust the certificate through simple running via the created REG
file.
This process only enables modules with a signature from the trusted TwinCAT user certificates to run.
6. Following this process you can use the TwinCAT user certificate for signing with the test mode of the
operating system.
This is configured in the project properties [}161].
Use the TcSignTool [}57] to avoid storing the password of the TwinCAT user certificate in the project,
where it would also end up in version management, for example.
If you have this TwinCAT user certificate countersigned by Beckhoff, you can also use it for delivery without
TestMode.
7.4.2 Encrypting Modules
TwinCAT C++ modules loaded via the TwinCAT Loader (TMX files) can be encrypted, i.e. a key protects the
content of the driver against manipulation and reverse engineering at file level.
TE1000 55Version: 1.13
Page 56

Modules - Handling
No debugging
Encrypted modules cannot be searched for errors. Encrypted modules are not displayed in the debugger.
Module encryption is enabled as follows:
ü The TwinCAT software protection must be configured.
ü A TwinCAT user certificate with Sign UserDB rights is required.
1. In the system tree, select the Solution User DB Key as the Boot File Encryption Key.
2. Select the C++ project and activate encryption there:
3. To start, an encrypted module must be loaded with the TwinCAT Loader (not the operating system).
ð For non-versioned drivers: The drivers are encrypted during transfer to the _deployment directory of the
project.
ð For versioned TMX: The drivers are stored unencrypted in XAE and encrypted when they are activated
on the target system.
ð If the function is used with versioned C++ projects, the TMX files are stored in the repository [}49] as
usual.
TwinCAT C++ modules can be started in two ways:
• Operating system: The operating system starts the TwinCAT module as a normal driver.
◦ On x64bit-PCs the operating system requires a signature, see Driver signing [}25].
• TwinCAT Loader: [}53] The TwinCAT Loader starts the TwinCAT module.
◦ The TwinCAT Loader requires a signature [}25] with TwinCAT user certificate.
◦ This option is mandatory for encrypted modules [}55].
TE100056 Version: 1.13
Page 57

Modules - Handling
◦ The TwinCAT Loader is required for the versioned C++ projects [}99].
Via System -> TcCOM Modules -> Class Factories tab you can see whether the TwinCAT Loader or the
operating system is used:
Also see about this
2 Driver signing [}26]
7.4.3 Return Codes
Loading a module with the TwinCAT Loader can fail for various reasons.
Here is a list of the return codes:
Hex Dec Description
0xC1 193 File is corrupted; PE file checksum error
0x241 577 Signature error: TwinCAT user certificate does not match the file hash
0x4FB 1275 Signature error: File not signed
0x1772 6002 File is encrypted, but cannot be decoded with known keys.
7.4.4 TcSignTool - Storage of the certificate password outside the project
The TcSignTool can be used to store a password for a TwinCAT user certificate in the registry. Thus, the
password is not needed in the projects, where the passwords would end up unintentionally in version control
systems.
The TcSignTool is a command line program located in the path C:\TwinCAT\3.x\sdk\Bin\.
The storage of the password is carried out with the following parameters:
tcsigntool grant /f "C:\TwinCAT\3.1\CustomConfig\Certificates\MyCertificate.tccert" /p MyPassword
The password is deleted with the following parameters:
tcsigntool grant /f "C:\TwinCAT\3.1\CustomConfig\Certificates\MyCertificate.tccert" /r
The unencrypted password is stored under HKEY_CURRENT_USER\SOFTWARE\Beckhoff\TcSignTool\
TE1000 57Version: 1.13
Page 58

TwinCAT C++ development
8 TwinCAT C++ development
Overview of the development environment
The layout of Visual Studio is flexible and adaptable, so that only a brief overview of a common configuration
can be provided here. The user is free to configure windows and arrangements as required.
1. In the TwinCAT solution, a TwinCAT C++ project can be created by right-clicking on the C++ icon.
This project contains the sources (“Untitled Project”) of perhaps several modules [}35], and module
instances ("Untitled1_Obj1 (CModule1)") can be created. The module instances have inputs/outputs,
which can be linked in the usual way ("Link"). There are further options [}46] for module interaction.
2. The Visual Studio editor for Visual C++ is used for programming. Note in particular the drop-down
boxes for fast navigation within a file. In the lower section the result of the compile process is output.
The user can switch to TwinCAT messages (cf. Module messages for the Engineering (logging / trac-
ing) [}229]).
The usual features such as breakpoints (cf. Debugging [}91]) can be used in the editors.
3. The freely configurable toolbar usually contains the toolbar for TwinCAT XAE Base. Activate Config-
uration, RUN, CONFIG, Choose Target System (in this case <Local>) and several other buttons provide fast access to frequently used functions. The TwinCAT Debugger is the button for establishing a
connection to the target system with regard to C++ modules (the PLC uses an independent debugger). Like in other C++ programs, and in contrast to PLC, in TwinCAT C++ a distinction has to be
made between "Release" and "Debug". In a build process for "Release", the code is optimized to such
an extent that a debugger may no longer reliably reach the breakpoints, and incorrect data may be
displayed.
Procedure
This section describes the processes for programming, compiling and starting a TwinCAT C++ project.
It provides a general overview of the engineering process for TwinCAT C++ projects with reference to the
corresponding detailed documentation. The quick start guide describes the individual common steps.
TE100058 Version: 1.13
Page 59

TwinCAT C++ development
1. Type declaration and module type:
The TwinCAT Module Class Editor (TMC) [}103] and TMC code generator is used for the definition of
data types and interfaces, and also for the modules that use these.
The TMC code generator generates source code based on the processed TMC file and prepares data
types / interfaces for use in other projects (like PLC).
Editing and starting the code generator can take place as often as you like – the code generation pays
attention to programmed user code and saves it.
2. Programming
The familiar Visual Studio C++ programming environment is used for the development and debugging
[}91] of the user-defined code within the code template.
3. Instantiating modules [}35]
The program describes a class, which is instantiated as objects. The TwinCAT Module Instance
Configurator [}146] is used for configuring the instance. General configuration elements are: assign
task, download symbol information for runtime (TwinCAT Module Instance (TMI) file) or define
parameter/interface pointer.
4. Mapping of variables
The input and output variables of an object can be linked with variables of other objects or PLC projects,
using the standard TwinCAT System Manager.
5. Building
During the building (compilation and linking) of the TwinCAT C++ project, all components are compiled
for the selected platform. The platform is determined automatically when the target system is selected.
6. Publishing (see Export to TwinCAT 3.1 4022.xx [}50] / Import up to TwinCAT 3.1 4022.xx [}51])
During publishing of a module, the drivers for all platforms are created, and the module is prepared for
distribution. The created directory can be distributed without the need to transfer the source code. Only
binary code with the interface description is transferred.
7. Signature (see Driver signing [}25])
The TwinCAT drivers must be signed for x64 run times, since 64-bit Windows versions require that
kernel modules are signed. Therefore, this applies both to the x64 creation and to the publication of
modules [}233], because these modules contain the x64 binary codes (if not deactivated).
The signature process can be user-defined [}30].
8. Activation
The TwinCAT C++ driver can be activated like any other TwinCAT project via Activate Configuration.
The dialog then requests to switch TwinCAT to RUN mode.
Debugging [}91] in real-time (which is familiar from IEC61131-based systems) and the setting of
(conditional) breakpoints is possible for TwinCAT C++ modules.
ð The module runs under real-time conditions.
TE1000 59Version: 1.13
Page 60

Quick Start
9 Quick Start
This quick start shows how you can familiarize yourself with the TwinCAT C++ module engineering in a short
time. Each step in the creation of a module that runs in a real-time context is described in detail.
Three different scenarios are discussed:
• TwinCAT driver projects, which were common up to 4022.
These modules are loaded by the operating system and are unversioned in binary form.
• TwinCAT versioned C++ projects, which are recommended for new projects from 4024.0 or higher.
Modules based on such project are loaded by TwinCAT and stored versioned in binary form.
◦ We illustrate how to switch between the different versions via Online Change, using versioned C++
projects as a basis.
Before the quick start, please pay attention to the preparation - just once! Prepare the respective driver
signing.
9.1 Create TwinCAT 3 project
Start the TwinCAT Engineering Environment (XAE)
Microsoft Visual Studio can be started via the TwinCAT SysTray icon.
The Visual Studio versions recognized during the installation and supported by TwinCAT are thereby offered.
Alternatively, Visual Studio can also be started via the Start menu.
TwinCAT 3 C++ - Build Project
Carry out the following steps to create a TwinCAT C++ project:
TE100060 Version: 1.13
Page 61

Quick Start
1. Select New TwinCAT Project … via the Start page.
2. Alternatively, create a project by clicking on: File -> New -> Project.
ð All existing project templates are displayed.
3. Select TwinCAT XAE Project and optionally enter a suitable project name.
4. Click on OK. From now on you cannot select or change the name of the directory. Retain the default
settings (selected option Create directory for solution).
TE1000 61Version: 1.13
Page 62

Quick Start
ð The Visual Studio Solution Explorer then displays the TwinCAT 3 project.
9.2 Create TwinCAT 3 C++ project
After creating a TwinCAT 3 project, open the C++ node and carry out the following steps:
1. Right-click C++ and choose Add New Item....
If the green C++ symbol is not listed, this means that either a target device is selected that doesn't
support TwinCAT C++ or the TwinCAT solution is currently open in a version of Visual Studio that is not
C++-capable (cf. Requirements [}20]).
ð The "TwinCAT C++ Project Wizard [}99]" is shown and all existing project templates are listed.
2. Select one of the quick start options:
• TwinCAT driver project: These modules are loaded by the operating system and are subject to its
signing requirements as described here [}26]. Driver projects were used routinely up to TwinCAT 3
4022. For 4024 or higher they should only be used if there is an extension in an existing environment,
for example. With these modules no Online Change is possible.
The quick start instructions for this project type continue here [}63].
TE100062 Version: 1.13
Page 63

Quick Start
• TwinCAT Versioned Project: These modules are loaded by TwinCAT and are subject to the signing
requirements [}31] described for this purpose. There is a versioned storage of the compilations,
between which - if desired - can be switched as online change.
The quick start instructions for this project type continue here [}78].
• The TwinCAT Static Library Project is not explained as part of the quick start. Sample25: Static Library
[}317]
3. Confirm with OK or double-click.
ð The C++ project has been created and the TwinCAT module wizard starts up.
Also see about this
2 TwinCAT Module Class Wizard [}100]
9.3 TwinCAT 3 Driver
The following sections describe the handling of a TwinCAT 3 Driver Project. They guide you through code
generation, modification and activation of the configuration on a target system.
9.3.1 Creating a TwinCAT 3 C++ module in the TwinCAT Driver Project
Once a TwinCAT 3 C++ project has been created, the TwinCAT module wizard [}100] starts
automatically in order to create a module.
TE1000 63Version: 1.13
Page 64

Quick Start
1. In this case, select TwinCAT Module Class with Cyclic I/O and click on OK. A name is not necessary
and also cannot be entered here.
TE100064 Version: 1.13
Page 65

Quick Start
2. Enter a unique name in the TwinCAT Class Wizard dialog box or continue with the Object1 suggestion.
TE1000 65Version: 1.13
Page 66

Quick Start
ð A TwinCAT 3 C++ project with a driver will then be created on the basis of the selected template:
Also see about this
2 Requirements [}20]
2 TwinCAT C++ Project Wizard [}99]
2 Sample25: Static Library [}317]
9.3.2 Implement TwinCAT 3 C++ project
This article describes how the sample project can be changed.
The implementation begins after creating a TwinCAT C++ project and opening <MyClass>.cpp (Module1.cpp
in this sample).
TE100066 Version: 1.13
Page 67

Quick Start
1. The <MyClass>::CycleUpdate() method is cyclically called – this is the point where the cyclic logic is to
be positioned. The entire cyclic code is inserted at this point. The dropdown menus at the top of the
editor can be used for navigation.
2. In this case a counter is incremented by the value of the "Value" variable in the input image (m_Inputs).
Replace a line in order to increment the counter without dependence on the value of the input image.
Replace this line
m_counter+=m_Inputs.Value;
with this one
m_counter++;
3. Save the modifications.
9.3.3 Create TwinCAT 3 C++ Module instance
An instance of the module must be created in order to execute it. Several instances of a module can exist.
After creating a TwinCAT C++ module, open the C++ Configuration node and follow these steps to create
an instance.
TE1000 67Version: 1.13
Page 68

Quick Start
1. Right-click on the C++ module (in this case "Untitled1") and select Add New Item....
ð All existing C++ modules are listed.
2. Select a C++ module. You can use the default name or alternatively enter a new instance name and
confirm with OK (in this sample the default name was selected).
ð The new instance "Untitled1_Obj2 (CModule1)" becomes part of the TwinCAT 3 solution: the new node
is located precisely under the TwinCAT 3 C++ source "Untitled1 Project".
The module already provides a simple I/O interface with 3 variables in each case:
• Input area: Value, Status, Data
• Output area: Value, Control, Data
The description of these interfaces corresponds in two places:
TE100068 Version: 1.13
Page 69

• "<Classname>Services.h" (in this sample "Untitled1Services.h")
Quick Start
• "TwinCAT Module Configuration".tmc file (in this sample "Untitled1.tmc")
9.3.4 Create a TwinCAT task and apply it to the module instance
This page describes the linking of a module instance to a task, so that the cyclic interface of the module is
called by the TwinCAT real-time system.
This configuration step only has to be carried out once. No new task needs to be configured for subsequent
creations/new compilations of the C++ module in the same project.
TE1000 69Version: 1.13
Page 70

Quick Start
Creating a TwinCAT 3 task
1. Open System, right-click on Tasks and select Add New Item….
2. Enter a unique name for the task (or retain the default name).
In this sample the I/O image interface is provided by a C++ module instance, so that no image is
necessary at the task for triggering the execution of the C++ module instance.
ð The new task with the name "Task 1" has been created.
3. The task can now be configured; double-click on the task to do this.
The most important parameters are Auto start and Priority:
Auto start must be activated in order to automatically start a task that is to be cyclically executed. The
Cycle ticks define the timing of the clock in relation to the basic clock (see real-time settings).
TE100070 Version: 1.13
Page 71

ð
Quick Start
Configuring a TwinCAT 3 C++ module instance that is called from the task
1. Select the C++ module instance in the solution tree.
2. Select the Context tab in the right-hand working area.
3. Select the task for the previously created context in the drop-down task menu.
Select the default Task 1 in the sample.
ð On completion of this step the Interface Pointer is configured as a CyclicCaller. The configuration is
now complete!
9.3.5 Compiling/building a TwinCAT 3 C++ project
This article describes how an already implemented C++ module class is created (compiled).
TE1000 71Version: 1.13
Page 72
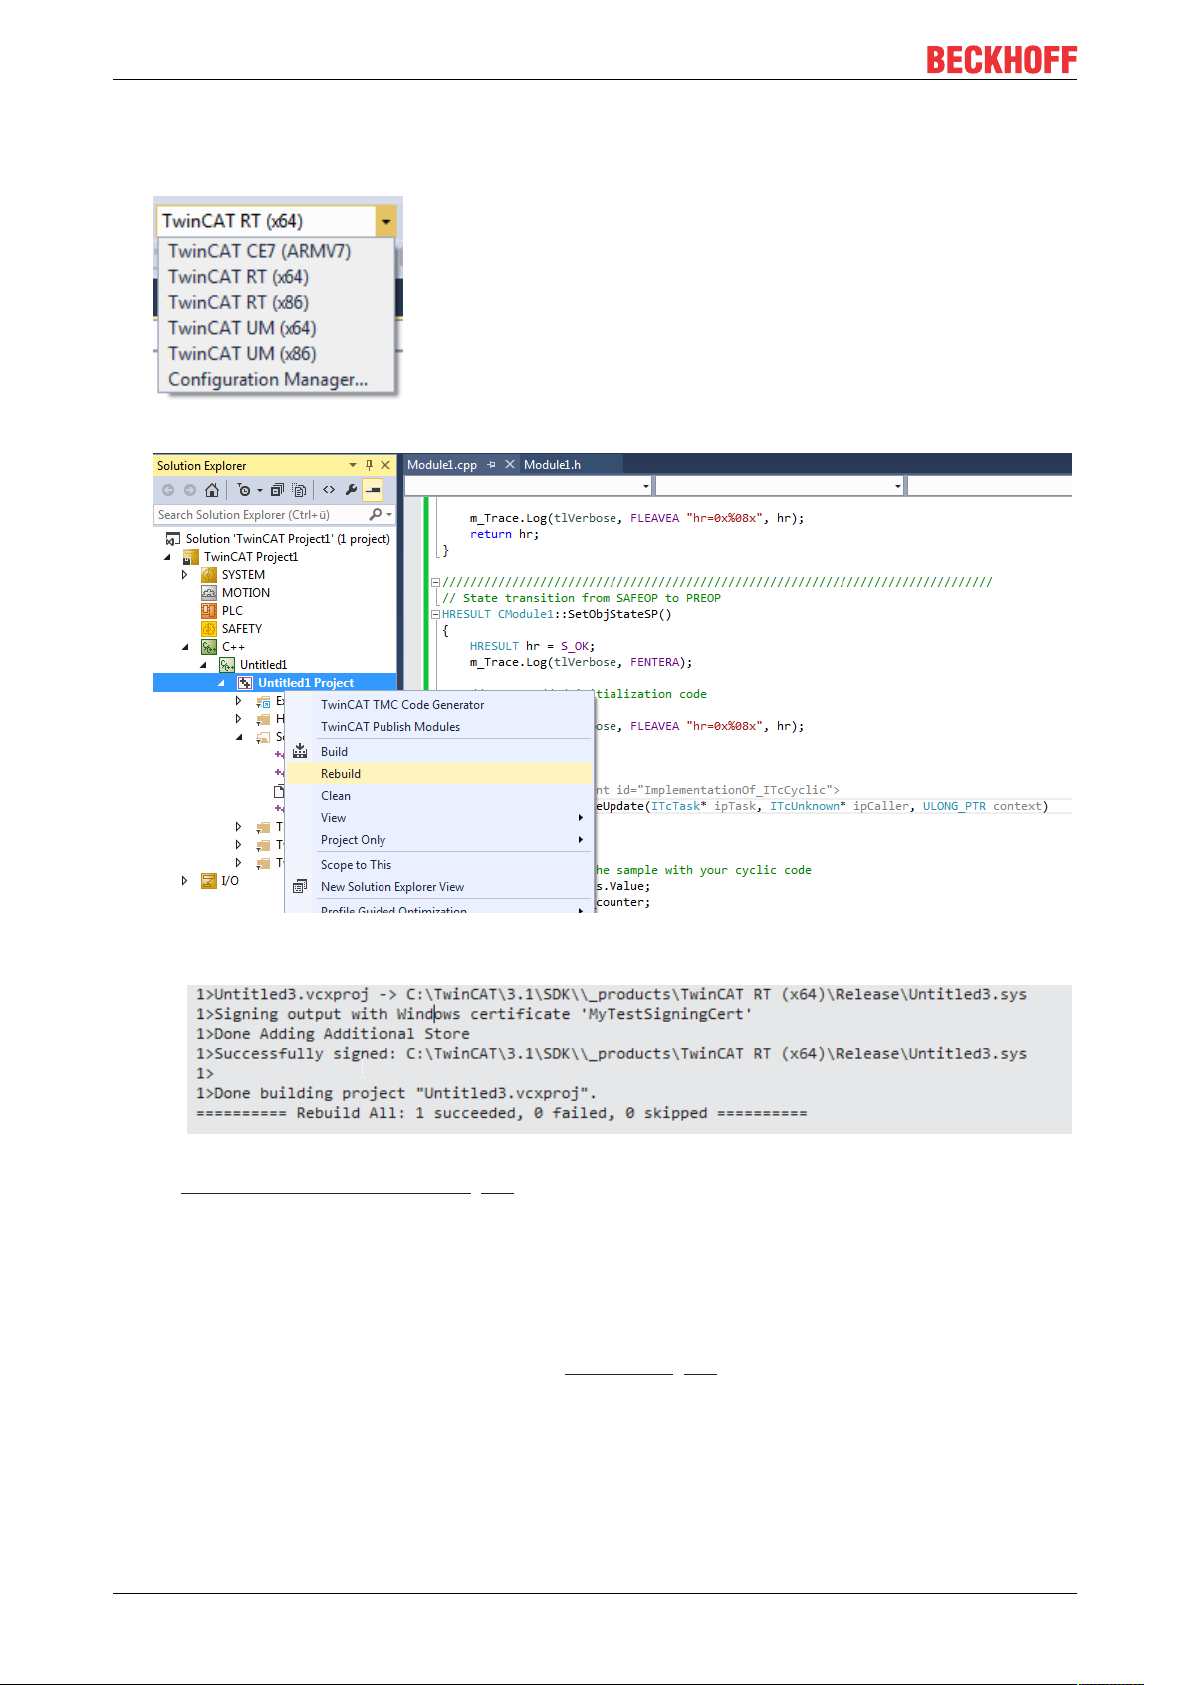
Quick Start
1. Select the target platform according to which the compilation should be carried out. TwinCAT checks this
setting when selecting a target system and changes it if necessary after a prompt. The project is also
deactivated if an unsupported target platform is selected.
2. Right-click on the TwinCAT 3 C++ project and select Build or Rebuild.
ð The compiler output window must look like this if the code has been correctly written (i.e. no syntax
errors):
3. Verify that it was successful, indicated by "Successfully signed". If this message does not appear, check
the operating system driver signing [}26] setting.
ð Following successful compilation/creation, the new TwinCAT C++ module is provided for the specific
target platform in the "_Deployment\" subfolder of the project directory.
9.3.6 TwinCAT 3 enable C++ debugger
To prevent all dependencies from being loaded for debugging [}91], this function is switched off by default
and must be activated once before the activation of the configuration.
1. Select C++ Debugger on the C++ node of the Solution tab.
2. Select Enable C++ Debugger.
TE100072 Version: 1.13
Page 73
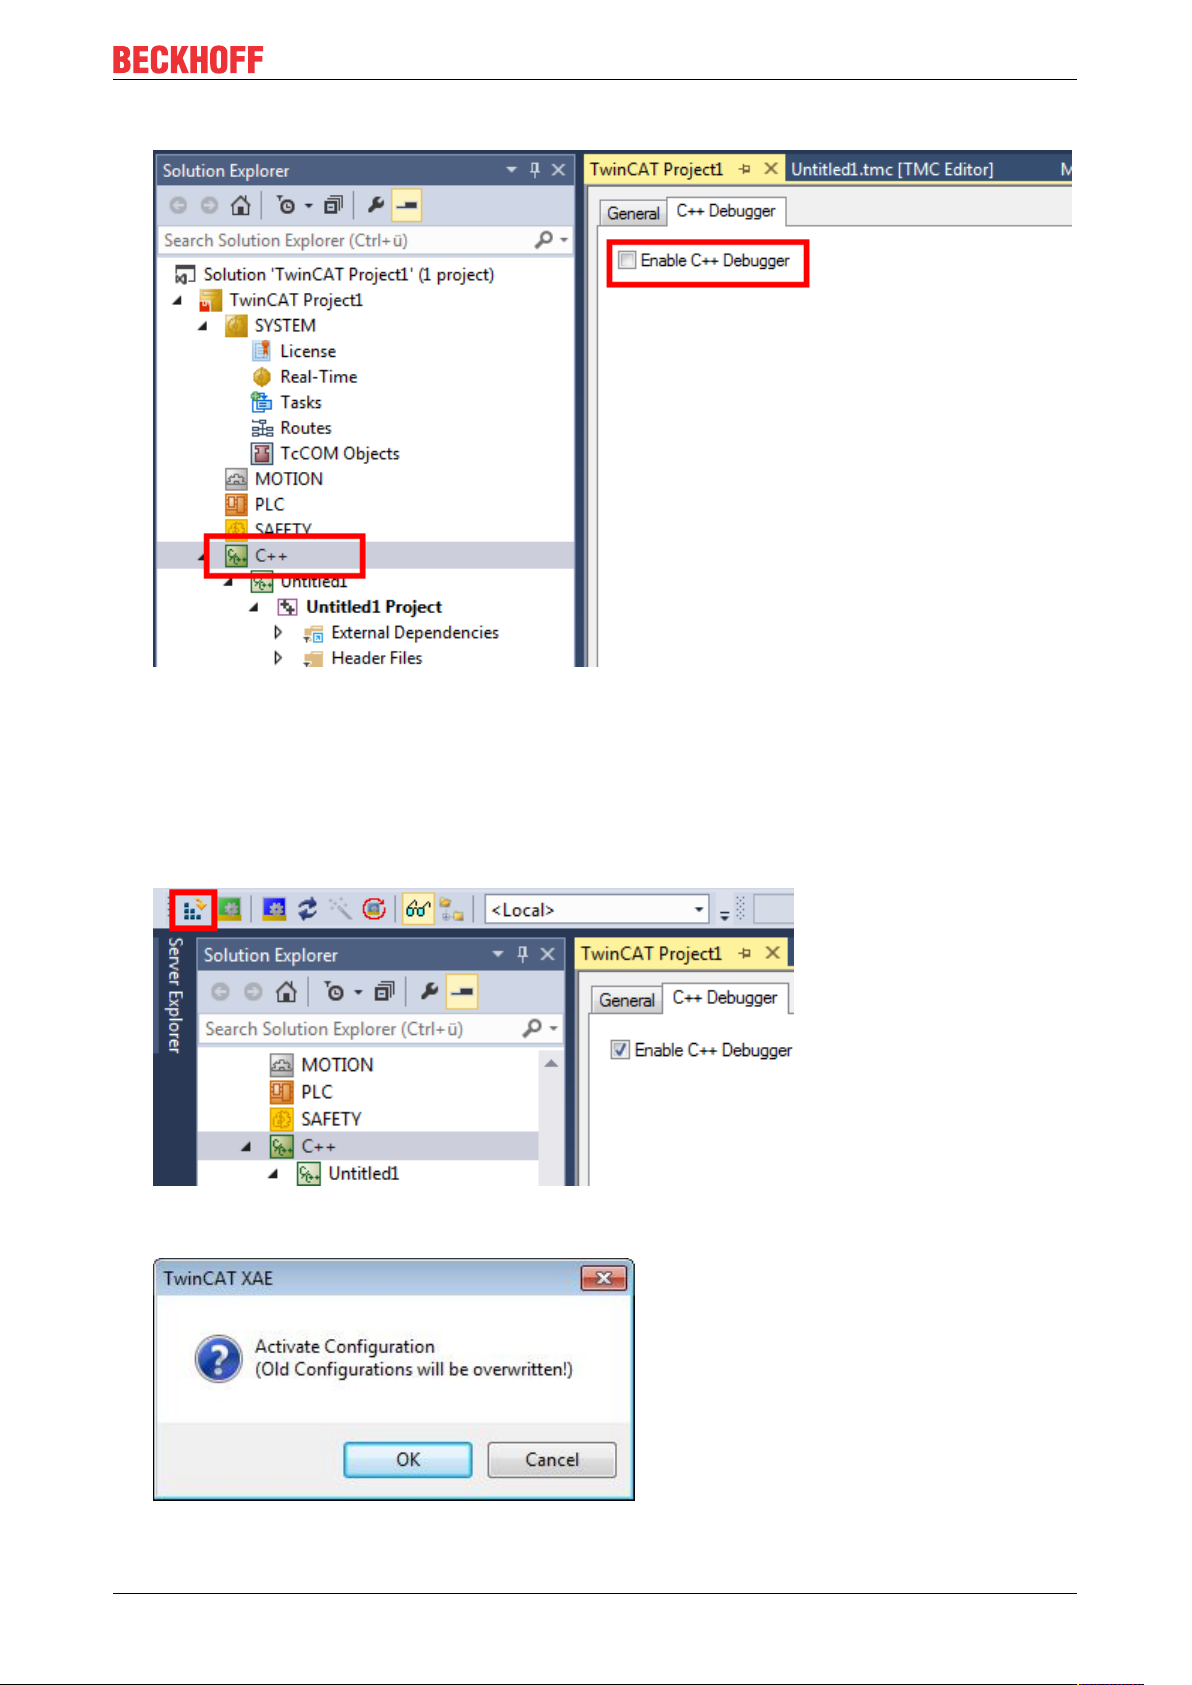
3. Switch Enable C++ Debugger on.
Quick Start
9.3.7 Activating a TwinCAT 3 project
Once a TwinCAT C++ project has been created, compiled and made available, the configuration must be
activated:
1. Click on the symbol Activate Configuration – all required files for the TwinCAT project are transferred
to the target system:
2. In the next step, confirm the activation of the new configuration. The previous old configuration will be
overwritten.
3. If you have no license on the target system, you will be offered the option to create a 7-day trial license.
This can be repeated any number of times.
TE1000 73Version: 1.13
Page 74
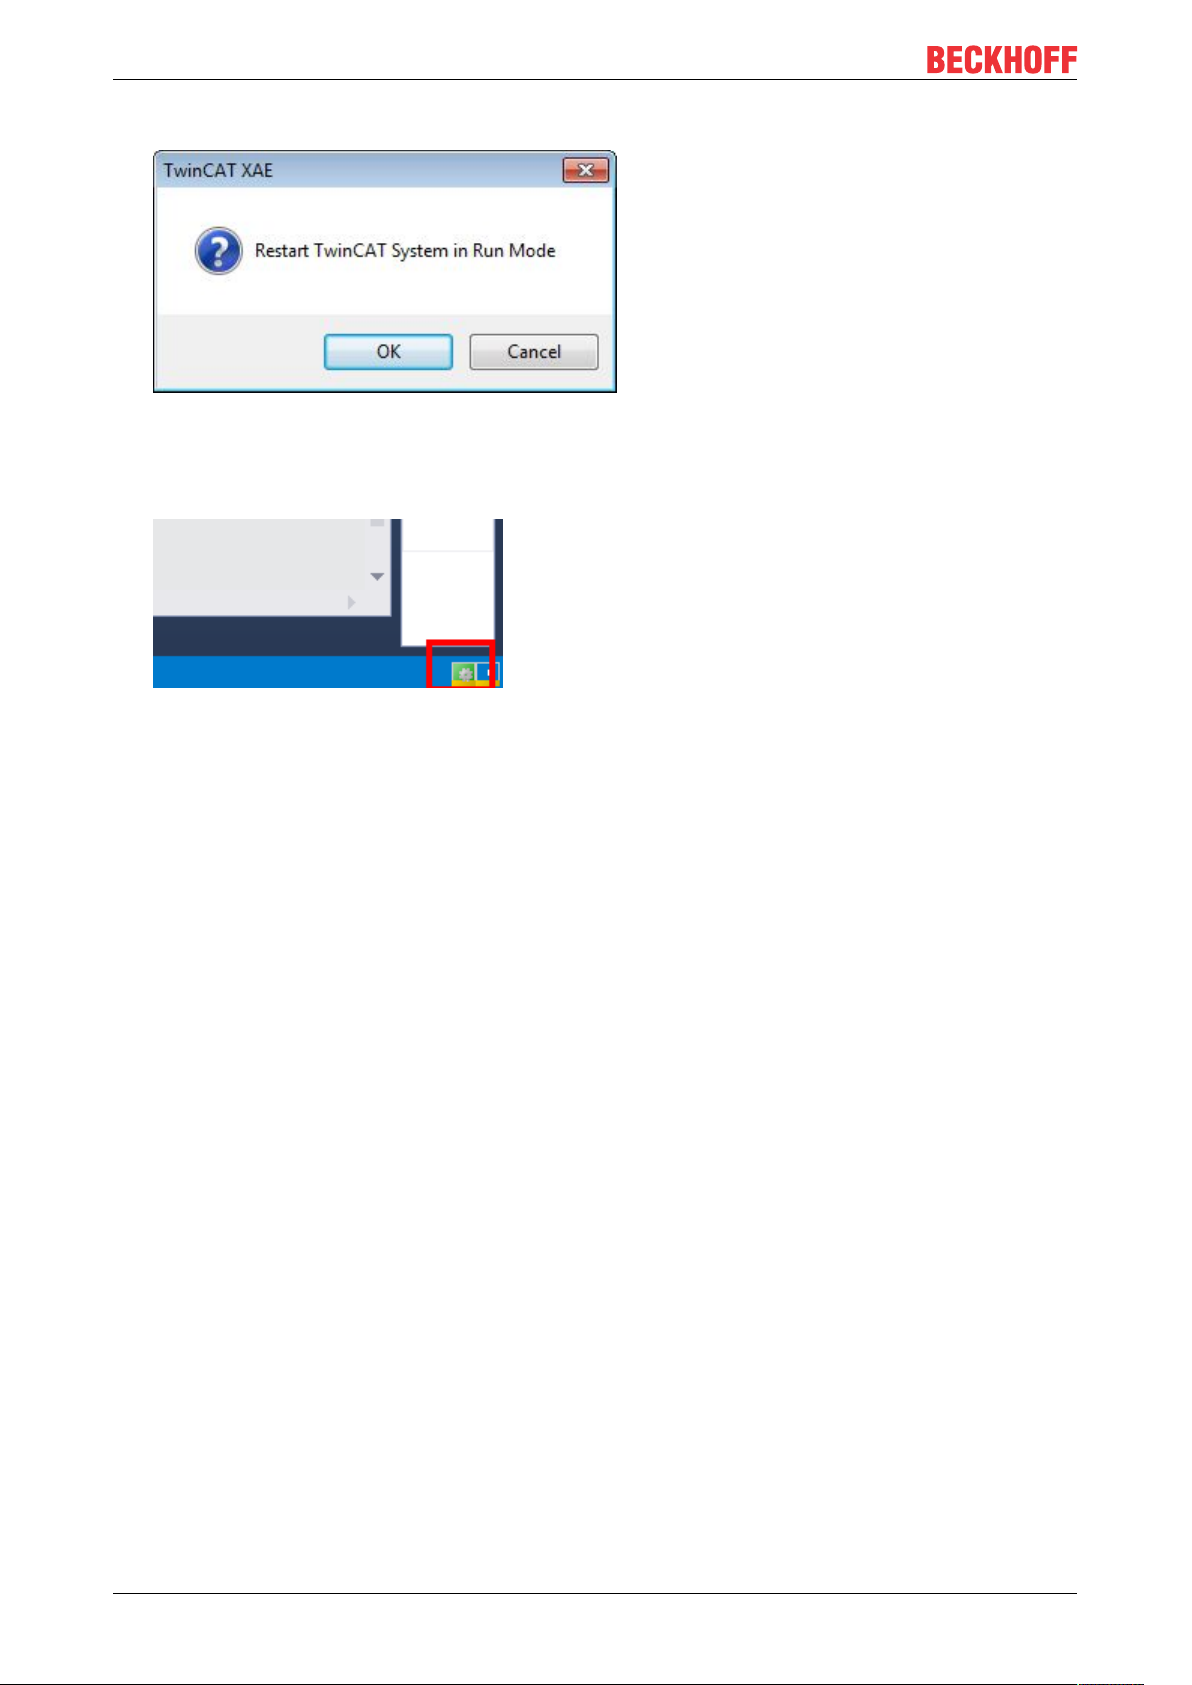
Quick Start
4. TwinCAT 3 automatically asks whether the mode should be switched to Run mode.
ð In the case of OK, the TwinCAT 3 project switches to Run mode.
In the case of Cancel, TwinCAT 3 remains in Config mode.
ð After switching to Run mode, the TwinCAT System Service symbol at the bottom in Visual Studio lights
up green.
9.3.8 Debug TwinCAT 3 C++ project
This article describes the debugging of the TwinCAT 3 C++ example project.
Attachment to the C++ runtime
After switching on the C++ debugging in the TwinCAT project and activating the complete project, the
TwinCAT Engineering (XAE) can now be used to connect to the target system for debugging.
TE100074 Version: 1.13
Page 75
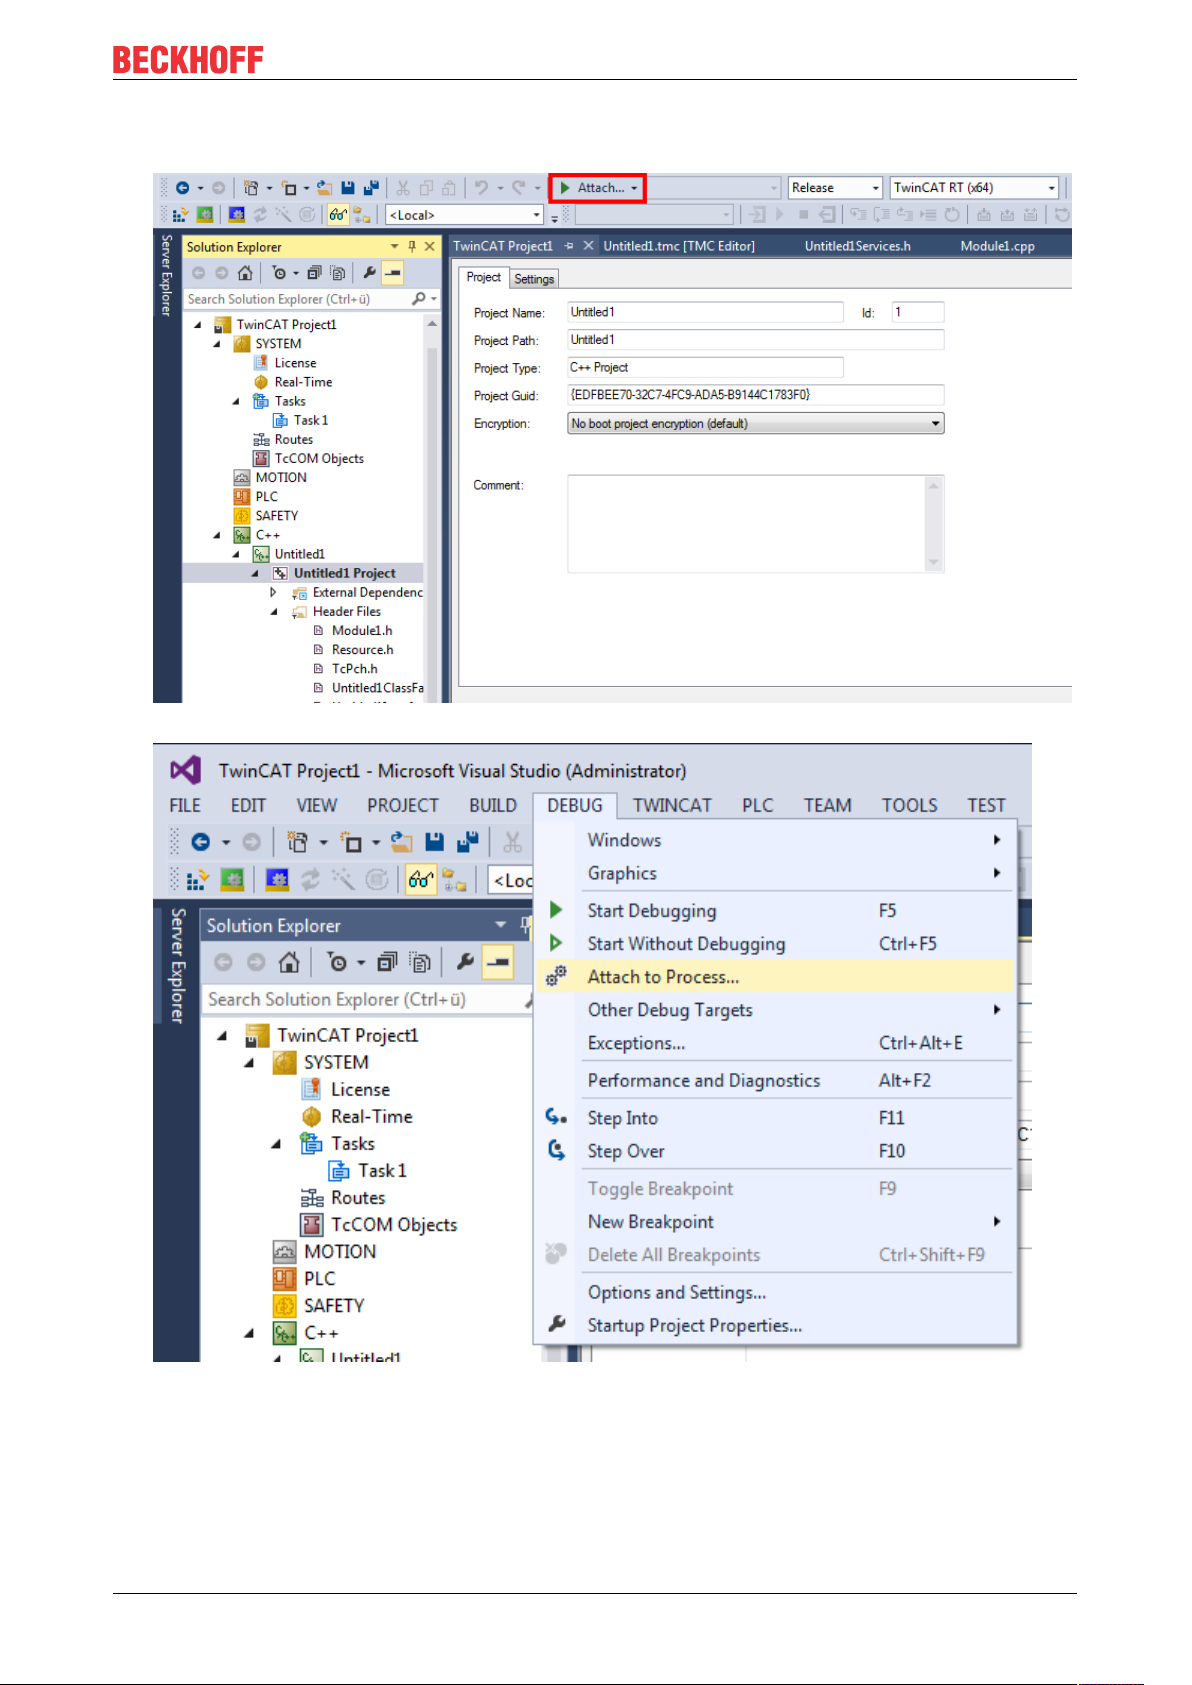
Quick Start
1. A) Click on the Attach... button familiar from Visual Studio in order to connect to the TwinCAT debugger
on the target system:
B) Alternatively, select Debug -> Attach to process... in the Visual Studio environment:
2. Do not select the Default setting of Visual Studio for the transport; use TwinCAT XAE instead. Target
system (or All Routes) as qualifier and connect by Attach.
TE1000 75Version: 1.13
Page 76

Quick Start
ð
Monitoring C++ module member variables (without breakpoints)
The normal Visual Studio debugging mechanism is available – setting of breakpoints, step execution, etc.
Their usage depends on the process to be monitored:
If TwinCAT runs on a real machine with axis movements, the user will probably not wish to set any
breakpoints just for monitoring variables. On reaching a breakpoint the execution of a task would be stopped
and, depending on the configuration, the axis would immediately come to a halt or, perhaps even worse,
would continue to move in an uncontrolled fashion – a very unfavorable situation.
TwinCAT 3 therefore offers the option to monitor process variables without setting breakpoints:
1. Select Debug -> Windows -> TwinCAT Live Watch
ð The TwinCAT Live Watch windows show a list of all the variables in the module. Variables placed in
the watch list by drag & drop are monitored without setting breakpoints.
2. In order to change the value of a monitoring variable, simply enter a new value.
TE100076 Version: 1.13
Page 77

ð The new value is displayed in red and in brackets.
Quick Start
3. Click on the green symbol.
ð The new value is written into the process.
Setting breakpoints
The setting of breakpoints in the conventional way is also possible.
WARNING
Damage to plants and personal injuries due to unexpected behavior of the machine / plant
Breakpoints change the behavior of the machine or plant. Depending on the machine being controlled, the
machine or workpieces may be damaged or the health and life of people may be endangered.
Make sure that the changed behavior of the controlled system does not cause any damage and be sure to
note the plant documentation.
TE1000 77Version: 1.13
Page 78
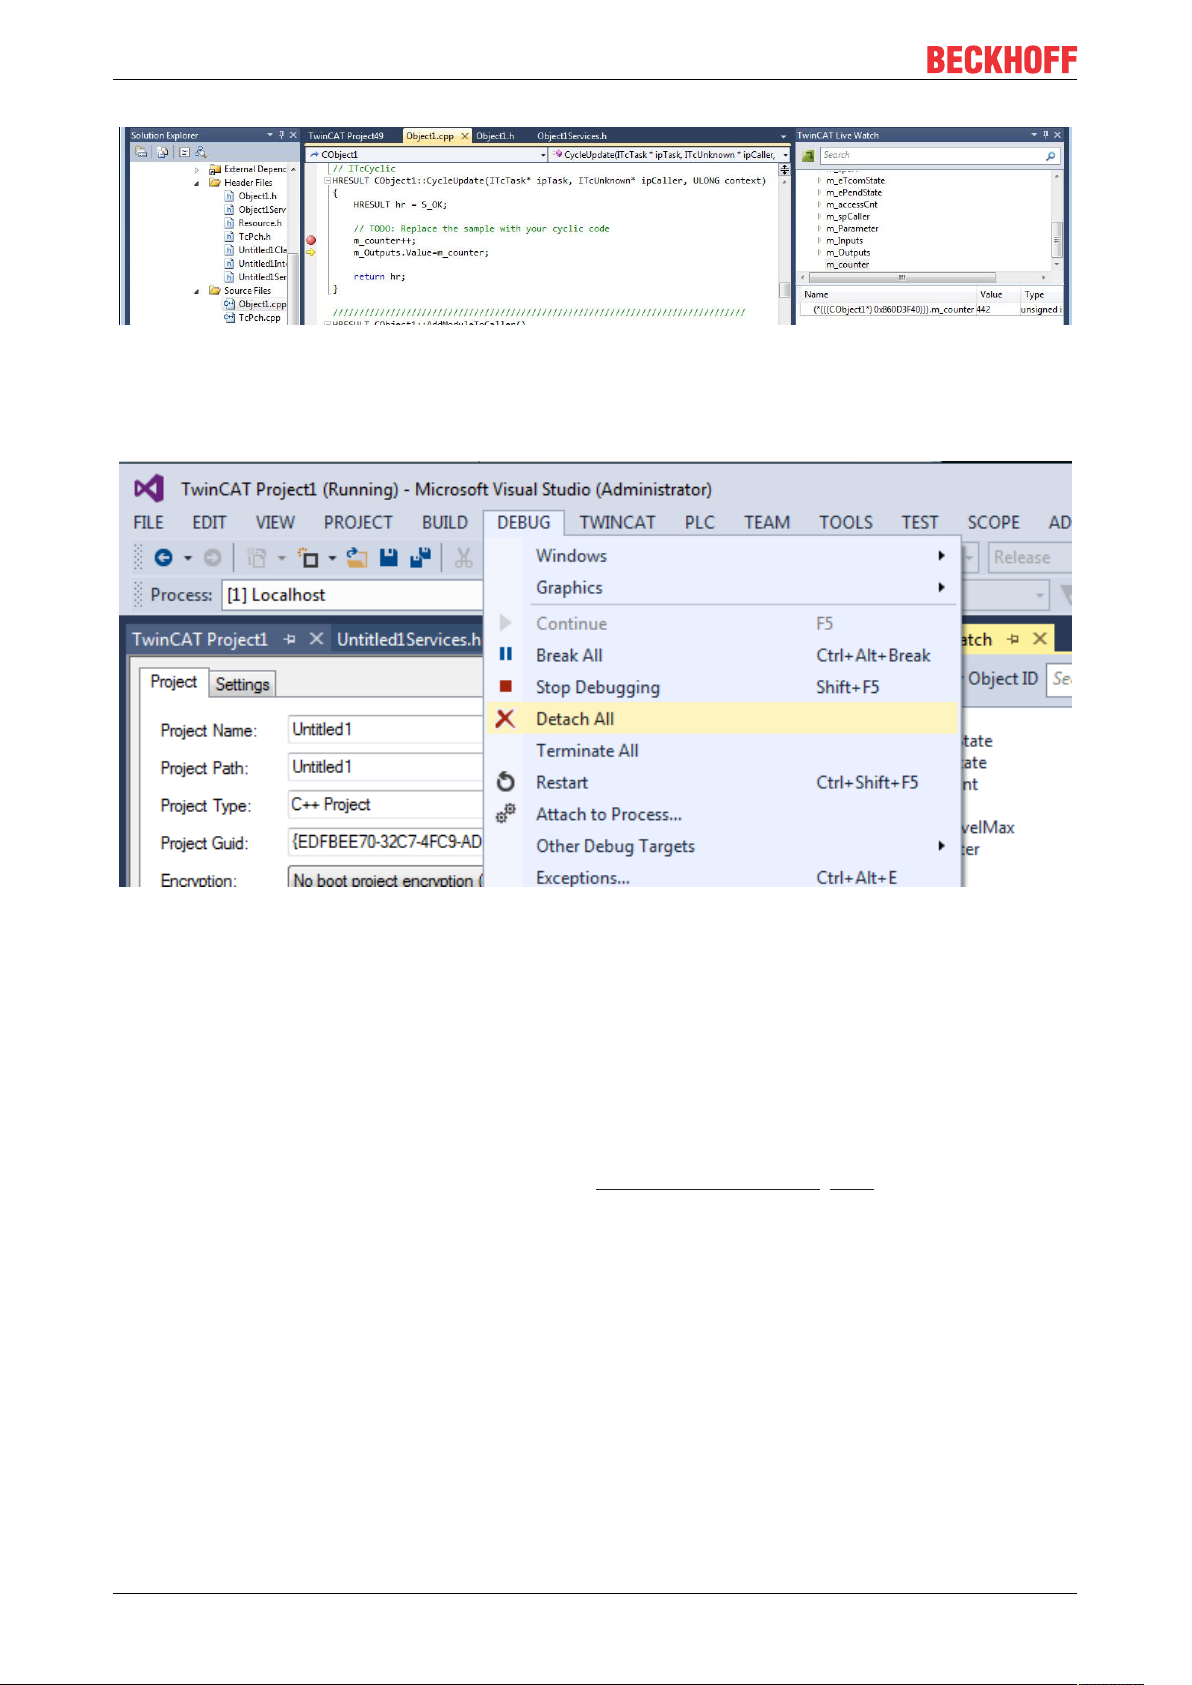
Quick Start
Detaching the debugger from the process
Click on Debug -> Detach All.
9.4 TwinCAT 3 Versioned Project
The following sections describe the handling of a TwinCAT 3 Versioned C++ Project. They guide you
through code generation, modification and activation of the configuration on a target system. The Online
Change can optionally be included in the code and executed.
9.4.1 Create TwinCAT 3 C++ project
Once a TwinCAT 3 C++ project has been created, the TwinCAT module wizard [}100] starts automatically in
order to create a module.
At this point a decision is made as to whether the module should be prepared for an Online Change.
1.
• If Online Change is required, select TwinCAT Module Class Online Changeable and click OK.
• If Online Change is not required, select TwinCAT Module with Cyclic IO
TE100078 Version: 1.13
Page 79
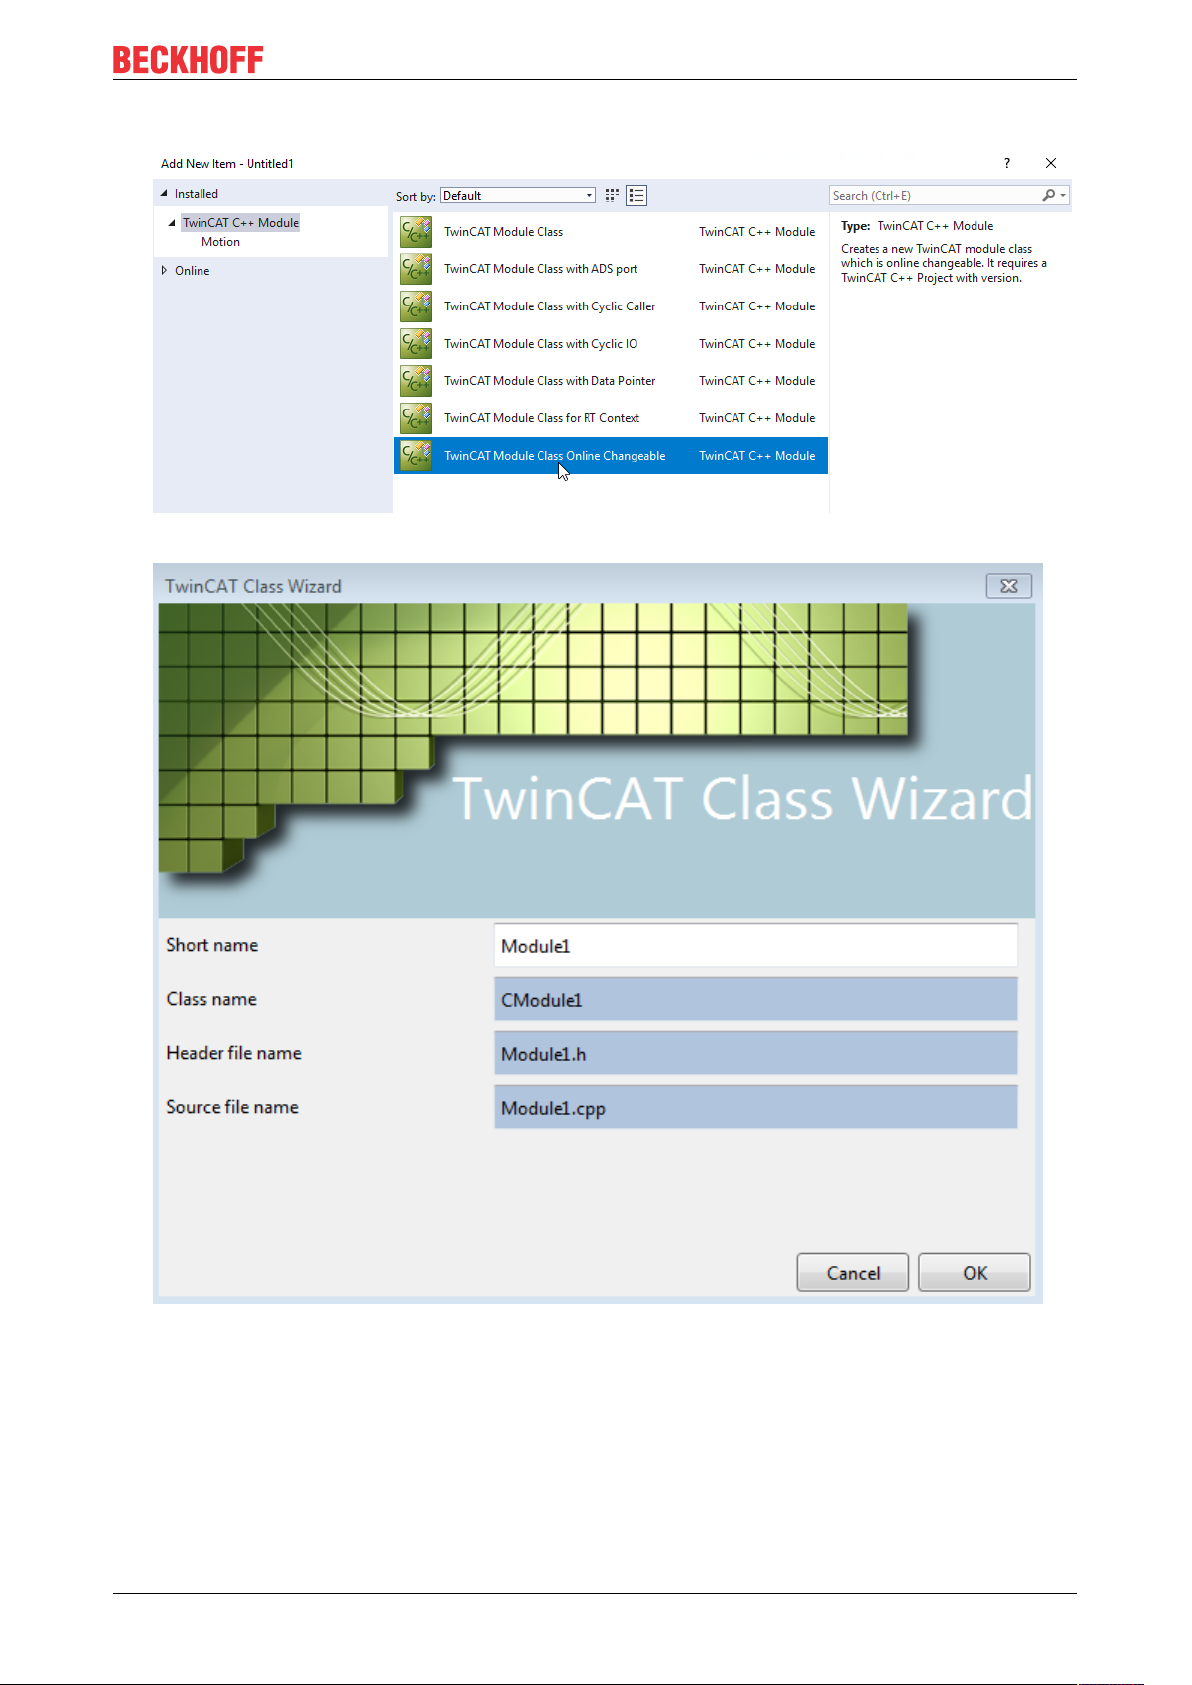
Quick Start
2. A name is not necessary and also cannot be entered here.
3. Enter a unique name in the TwinCAT Class Wizard dialog box or continue with the Object1 suggestion.
TE1000 79Version: 1.13
Page 80

Quick Start
ð A TwinCAT 3 C++ project with a driver will then be created on the basis of the selected template:
Also see about this
2 Requirements [}20]
2 TwinCAT C++ Project Wizard [}99]
2 Sample25: Static Library [}317]
9.4.2 TwinCAT 3 C++ Configure project
ü You have got a created TwinCAT C++ project.
1. Right-click the project to open the properties.
2. Activate TwinCAT Signing.
3. If you have not yet created a TwinCAT user certificate, follow the instructions and observe to select the
Sign TwinCAT C++ executeables.
4. Enter the file name of the TwinCAT user certificate and the password.
(Note that this is stored unencrypted in the solution and is therefore also loaded on servers via version
control, for example. If necessary use the TcSignTool [}57].)
TE100080 Version: 1.13
Page 81

Quick Start
9.4.3 Implement TwinCAT 3 C++ project
This article describes how the sample project can be changed.
The implementation begins after creating a TwinCAT C++ project and opening <MyClass>.cpp (Module1.cpp
in this sample).
TE1000 81Version: 1.13
Page 82

Quick Start
1. The <MyClass>::CycleUpdate() method is cyclically called – this is the point where the cyclic logic is to
be positioned. At this point, add the entire cyclic code. Use the drop-down menu at the top of the editor
for navigation.
2. In this case a counter is incremented by the value of the Value variable in the input image (m_Inputs).
Replace a line in order to increment the counter without dependence on the value of the input image.
Replace this line
m_counter+=m_Inputs.Value;
with this line
m_counter++;
3. Save the modifications.
4. If you have prepared the module for Online Change, please note that version 0.0.0.1 has been
implemented here, as you can see in the TMC editor.
TE100082 Version: 1.13
Page 83

Quick Start
9.4.4 Publish TwinCAT 3 C++ project in version 0.0.0.1
Once a TwinCAT C++ project has been created, compiled and made available, the configuration must be
activated.
1. Click on the symbol Activate Configuration – all required files for the TwinCAT project are transferred
to the target system:
ð The module is published in version 0.0.0.1 with the incremental counter on the engineering device.
9.4.5 Implement and publish TwinCAT 3 C++ project version 0.0.0.2
These steps are only necessary if you have previously prepared the module for Online Change.
This article describes how to change the sample project to create a version 0.0.0.2. This can later be
exchanged on the target system via Online Change
In <MyClass>.cpp (in this sample Module1.cpp) the implementation can be changed.
1. Replace a line to decrement the counter instead of incrementing it.
Replace this line
m_counter++;
2. with this
m_counter--;
3. Save the modifications.
TE1000 83Version: 1.13
Page 84

Quick Start
4. Start the Code Generator to take over any possible changes.
5. Parameterize version 0.0.0.2 in the TMC Editor.
TE100084 Version: 1.13
Page 85

6. Publish this version as well:
Quick Start
ð There are two versions of a module, which can be exchanged during runtime.
9.4.6 Create TwinCAT 3 C++ Module instance
An instance of the module must be created in order to execute it. Several instances of a module can exist.
After creating a TwinCAT C++ module, open the C++ Configuration node and follow these steps to create
an instance.
TE1000 85Version: 1.13
Page 86

Quick Start
1. Right-click on the C++ module (in this case "Untitled1") and select Add New Item....
ð All existing C++ modules are listed.
2. Select a C++ module. You can use the default name or alternatively enter a new instance name and
confirm with OK (in this sample the default name was selected).
ð The new instance "Untitled1_Obj2 (CModule1)" becomes part of the TwinCAT 3 solution: the new node
is located precisely under the TwinCAT 3 C++ source "Untitled1 Project".
The module already provides a simple I/O interface with 3 variables in each case:
• Input area: Value, Status, Data
• Output area: Value, Control, Data
The description of these interfaces corresponds in two places:
TE100086 Version: 1.13
Page 87

• "<Classname>Services.h" (in this sample "Untitled1Services.h")
Quick Start
• "TwinCAT Module Configuration".tmc file (in this sample "Untitled1.tmc")
9.4.7 Activating a TwinCAT 3 project
Once a TwinCAT C++ project has been created, compiled and made available, the configuration must be
activated:
TE1000 87Version: 1.13
Page 88

Quick Start
1. Click on the symbol Activate Configuration – all required files for the TwinCAT project are transferred
to the target system:
2. In the next step, confirm the activation of the new configuration. The previous old configuration will be
overwritten.
3. If you have no license on the target system, you will be offered the option to create a 7-day trial license.
This can be repeated any number of times.
4. TwinCAT 3 automatically asks whether the mode should be switched to Run mode.
ð In the case of OK, the TwinCAT 3 project switches to Run mode.
In the case of Cancel, TwinCAT 3 remains in Config mode.
TE100088 Version: 1.13
Page 89

Quick Start
5. For test operation, e.g. during software development, the creation of a TwinCAT user certificate, as
described here, is sufficient. Make sure that you select the purpose "Sign TwinCAT C++ executable
(*.tmx)". For this the Crypto version 2 is required, a message appears.
ð After switching to Run mode, the TwinCAT System Service symbol at the bottom in Visual Studio lights
up green.
9.4.8 TwinCAT 3 C++ Implement project Online Change
These steps are only necessary if you have previously prepared the module for Online Change.
ü Running TwinCAT C++ project as described above.
1. Switch to the TcCOM Objects overview of the SYSTEM area and there to the Online Changeable
Objects tab.
TE1000 89Version: 1.13
Page 90
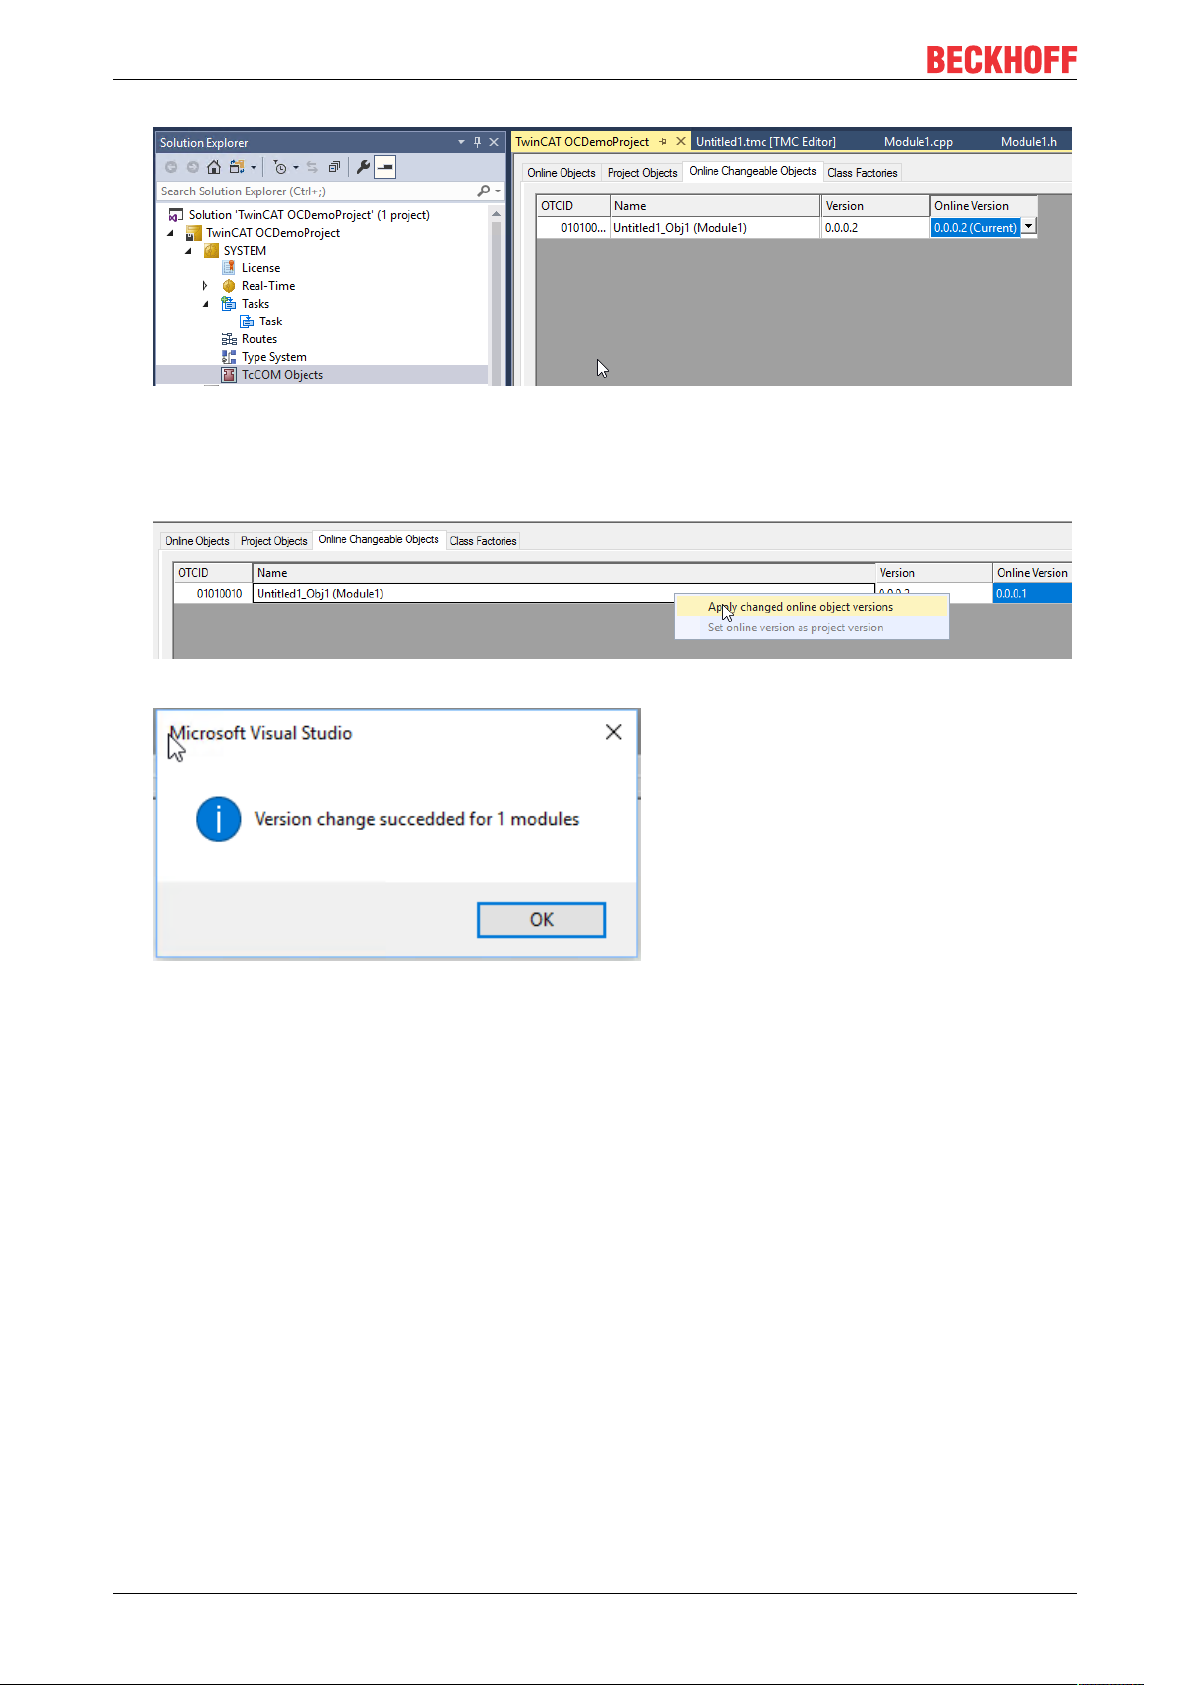
Quick Start
2.
3. In the column Online Version the currently running version is preselected and marked with the
extension (Current).
4. Set a different version.
5. Activate this change by right-clicking and Apply changed online object versions on the target.
ð The version change was made on the target
Also see about this
2 Activating a TwinCAT 3 project [}87]
TE100090 Version: 1.13
Page 91

Debugging
10 Debugging
TwinCAT C++ offers various mechanisms for debugging TwinCAT C++ modules running under real-time
conditions.
Most of them correspond to the mechanisms that are familiar from the normal C++ development
environment. The world of automation requires additional, slightly different debugging mechanisms, which
are documented here.
In addition, we provide an overview of Visual Studio tools that can be used in TwinCAT 3. These were
extended, so that data from the target system are displayed.
Debugging must be enabled.
This is configured via the C++ node of the solution:
1. Double-click on the C++ node and switch to the C++ Debugger tab to access the checkbox.
2. For all debugging in TwinCAT C++, connect the TwinCAT Engineering with the runtime system (XAR) via
the TwinCAT Debugger button.
3.
Breakpoints and step-by-step execution
In most cases when debugging a C++ program, breakpoints are set and the code is then executed step by
step while observing the variables, pointers, etc.
In the context of the Visual Studio debugging environment, TwinCAT offers options to run real-time-executed
code step by step. To set a breakpoint, you can navigate through the code and click on the gray column on
the left adjacent to the code or use the hotkey (normally F9).
WARNING
Damage to plants and personal injuries due to unexpected behavior of the machine / plant
Breakpoints change the behavior of the machine or plant. Depending on the machine being controlled, the
machine or workpieces may be damaged or the health and life of people may be endangered.
Make sure that the changed behavior of the controlled system does not cause any damage and be sure to
note the plant documentation.
TE1000 91Version: 1.13
Page 92

Debugging
On reaching the breakpoint (indicated by an arrow), the execution of the code is stopped.
The code is executed step by step by pressing Step Over (Debug menu, toolbar or hotkey F10). The familiar
Visual Studio functions Step in (F11) and Step out (Shift + F11) are also available.
Conditional breakpoints
A more advanced technology allows the setting of conditional breakpoints – the execution of code is only
stopped at a breakpoint if a condition is fulfilled.
TwinCAT offers the implementation of a conditional breakpoint as part of the Visual Studio Integration. To set
a condition, first set a normal breakpoint and then right-click on the red dot in the breakpoint column.
WARNING
Damage to plants and personal injuries due to unexpected behavior of the machine / plant
Breakpoints change the behavior of the machine or plant. Depending on the machine being controlled, the
machine or workpieces may be damaged or the health and life of people may be endangered.
Make sure that the changed behavior of the controlled system does not cause any damage and be sure to
note the plant documentation.
Select Condition… to open the condition window:
TE100092 Version: 1.13
Page 93
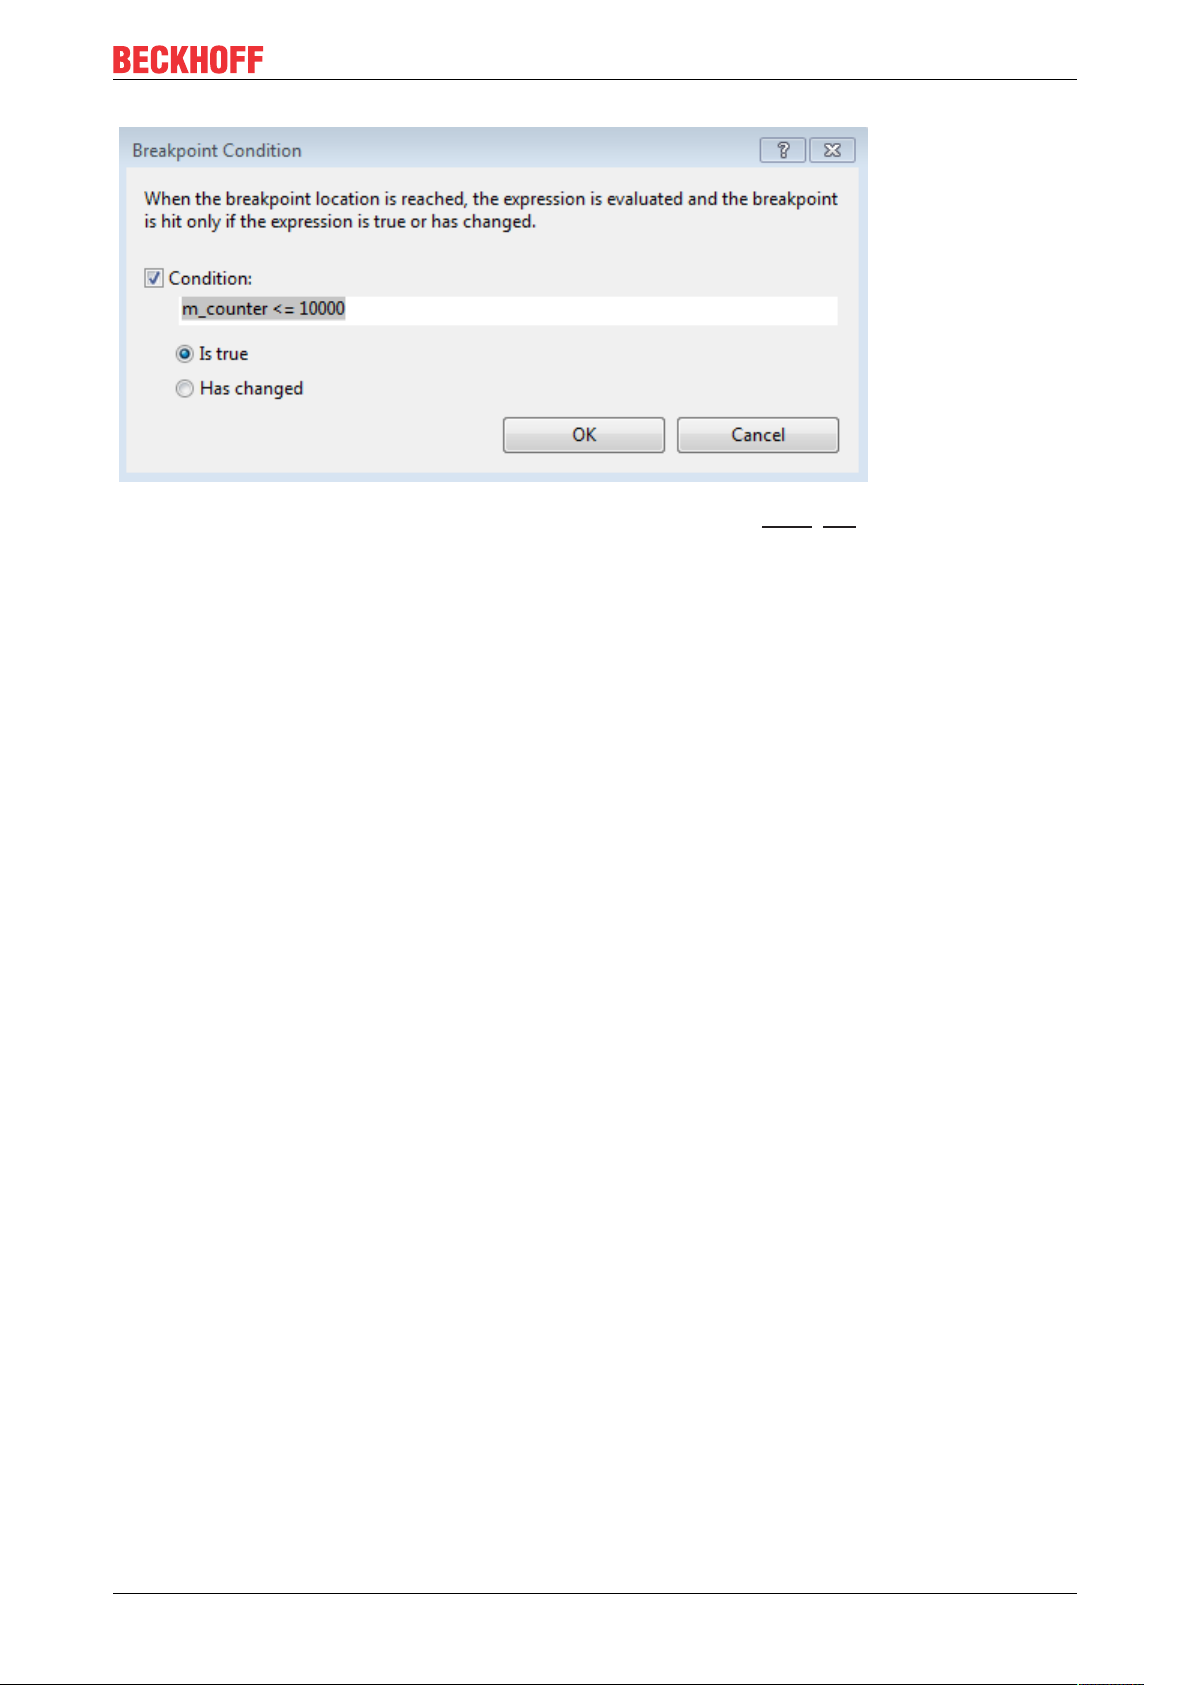
Debugging
Details of the conditions and how they are to be formulated can be found here [}94].
Live Watch
When engineering and developing machines, it is not always advisable to stop the system at a breakpoint
because this will affect the behavior.
The TwinCAT PLC projects offer an online view and handling of the variables in the RUN state, without
having to interrupt the real-time.
TwinCAT C++ projects offer a similar behavior for C++ code via the Live Watch window.
The Live Watch window can be opened via Debug->Windows->TwinCAT Live Watch.
To open the window, first establish a connection with the real-time system (press the TwinCAT Debugger
button), whereupon Visual Studio switches to the debug view, otherwise no data can be provided.
TE1000 93Version: 1.13
Page 94

Debugging
The TwinCAT Live Watch window is divided into two areas.
In the upper area all member variables can be explored. By double-clicking on it they are added to the lower
area, where the current value is then displayed.
You can edit these values by clicking on the value in the Value field. The new value is highlighted in red. To
write the value, press the symbol in the upper left corner (1).
Using the import and export symbols under (2), the selected member variables can be saved and later
restored.
10.1 Details of Conditional Breakpoints
TwinCAT C++ provides conditional breakpoints. Details of the formulation of these conditions can be found
here.
TE100094 Version: 1.13
Page 95
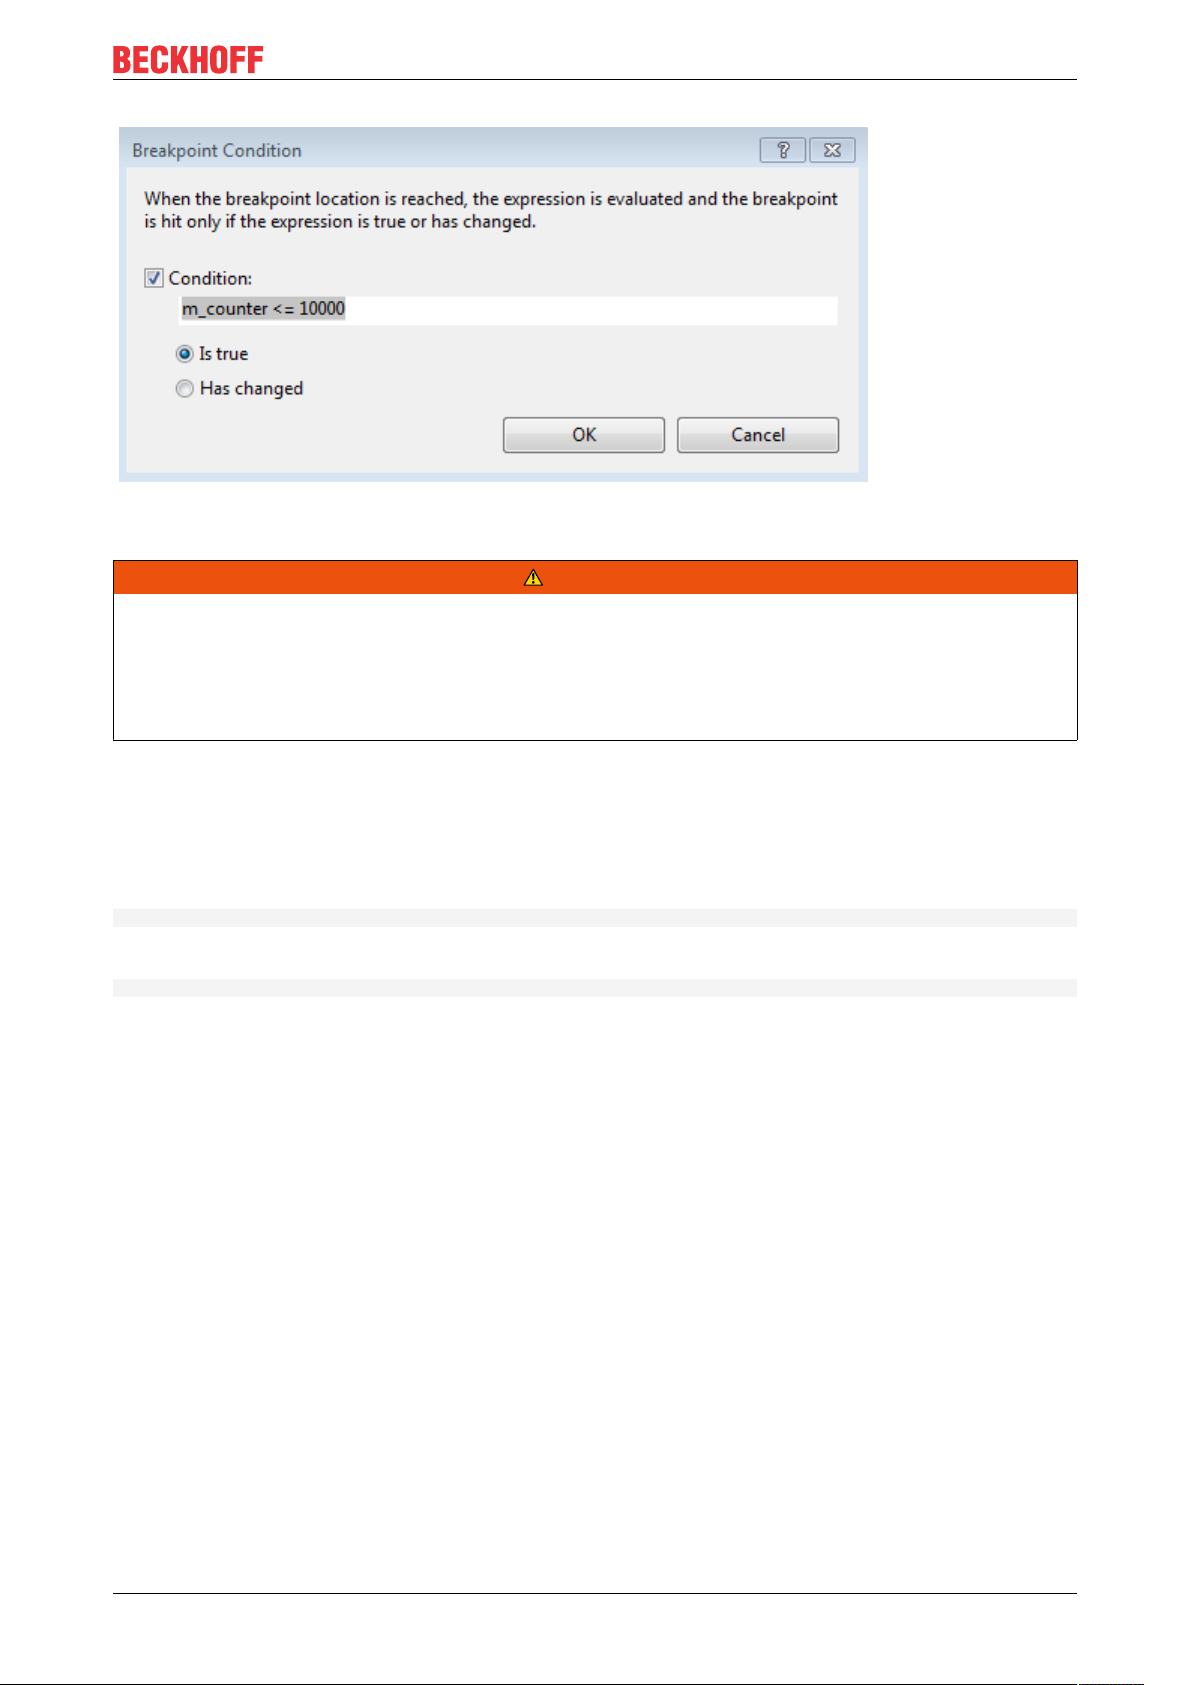
Debugging
Unlike the Visual Studio C++ conditional breakpoints, the TwinCAT conditions are compiled and
subsequently transferred to the target system so that they can be used during short cycle times.
WARNING
Damage to plants and personal injuries due to unexpected behavior of the machine / plant
Breakpoints change the behavior of the machine or plant. Depending on the machine being controlled, the
machine or workpieces may be damaged or the health and life of people may be endangered.
Make sure that the changed behavior of the controlled system does not cause any damage and be sure to
note the plant documentation.
The option buttons offer two options that are described separately.
Option: Is true
Conditions are defined with the help of logical terms, comparable to conjunctive normal forms.
They are formed from a combination of maxterms connected by "&&".
(Maxterm1 && Maxterm2 && ... && MaxtermN)
wherein each Maxterm represents a combination of || associated conditions:
(condition1 ||condition2 || ... || conditionN )
Possible comparison operators: ==,!=, <=, >=, <, >
Observe the Live Watch window for the determination of the available variables. All listed variables can be
used for the formulation of conditions. This includes TMC-defined symbols as well as local member
variables.
Samples:
m_counter == 123 && hr != 0
m_counter == 123 || m_counter2 == 321 && hr == 0
m_counter == 123
Further comments:
• Monitoring module instances:
The OID of the object is stored in m_objId, so the monitoring of the OID can look like this m_objId
== 0x01010010
• Monitoring of tasks:
A special variable #taskId is provided to access the OID of the calling task. E.g. #taskID ==
0x02010010
TE1000 95Version: 1.13
Page 96
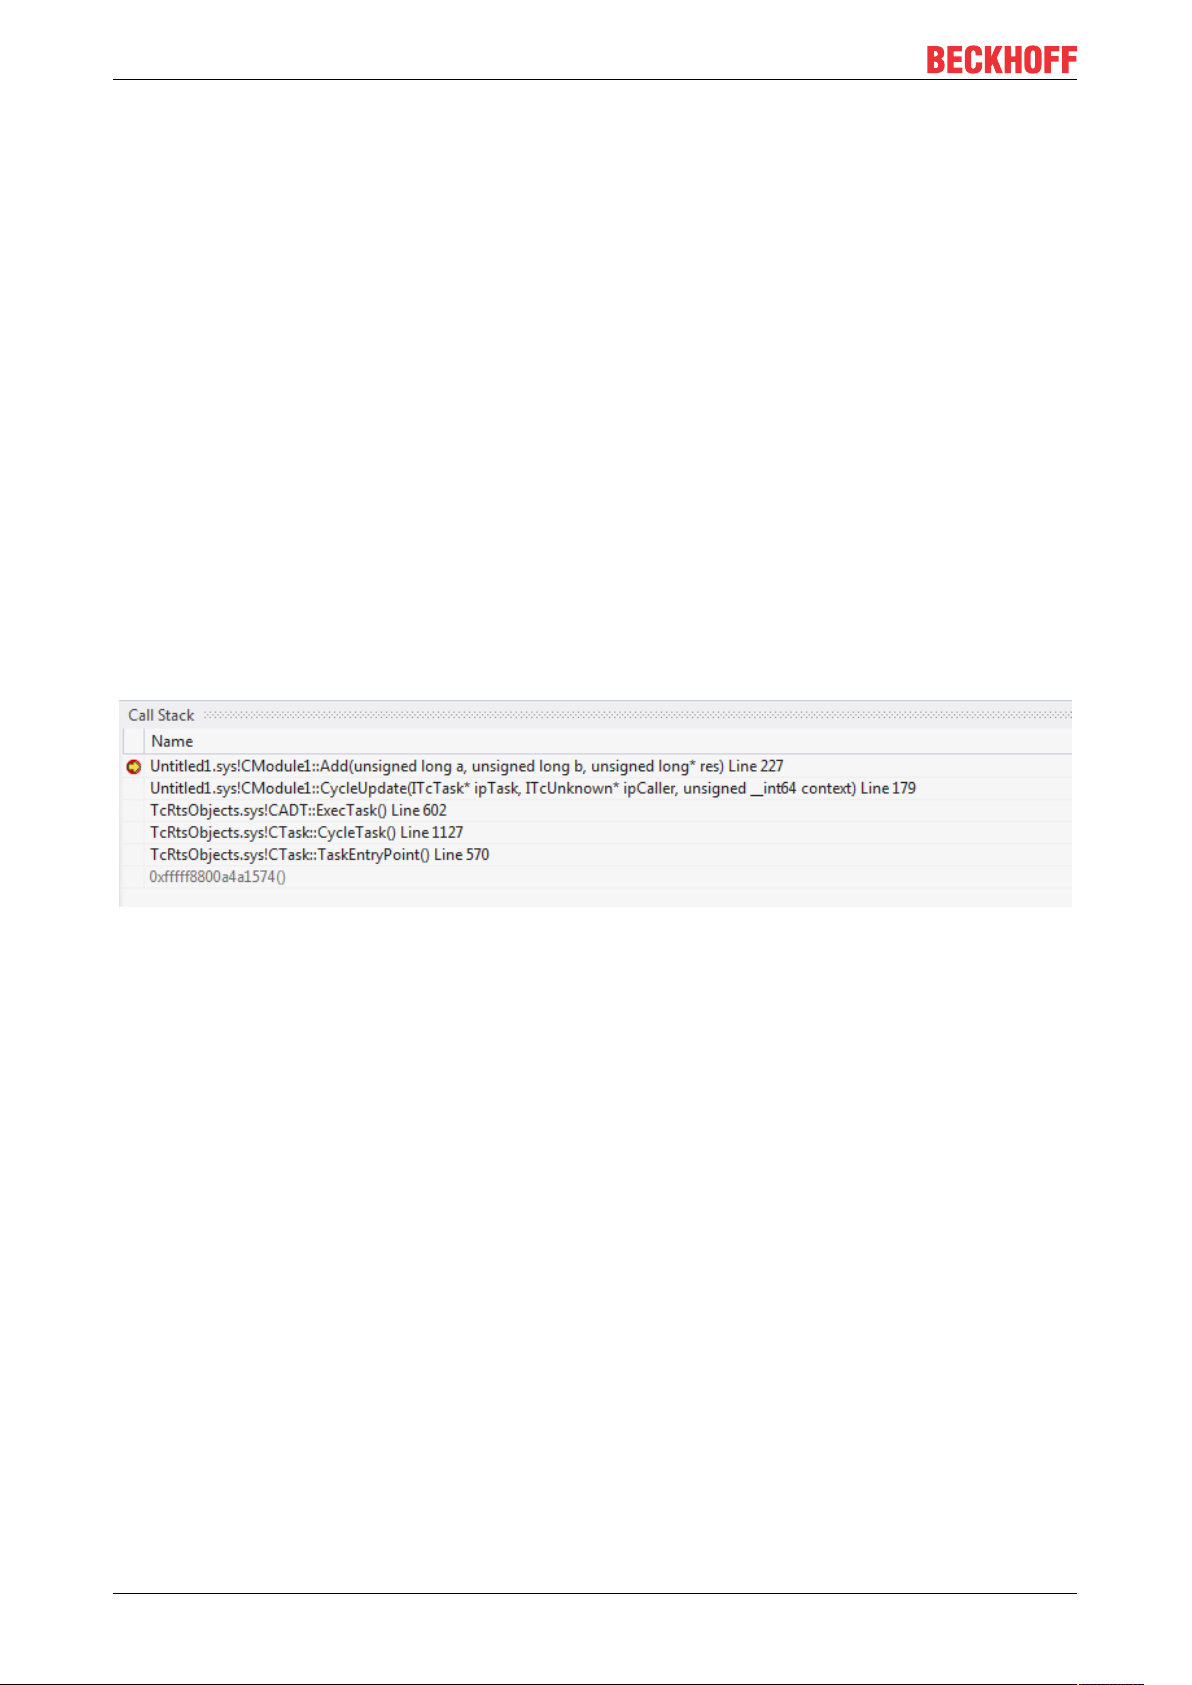
Debugging
Option: Has changed
The option “Has changed“ is simple to understand: By providing variable names, the value will be monitored
and execution will be held, if the value has changed from the cycle before.
Samples:
m_counter
m_counter && m_counter2
10.2 Visual Studio tools
Visual Studio makes the usual development and debugging tools available for C++ developers. TwinCAT 3
extends these Visual Studio tools, so that debugging of C++ code that runs on a target system is also
possible in TwinCAT 3 Engineering with the Visual Studio tools.
The corresponding advanced tools are briefly described here. If the corresponding windows are not visible in
Visual Studio, they can be added via the menu item Debug ->Windows. The menu is context-dependent,
i.e. many of the windows described here only become configurable once a debugger is linked to a target
system.
Call stack
The Call Stack is displayed by the Call Stack tool window when a breakpoint has been reached.
Autos / Locals and Watch
The corresponding variables and values are displayed in the Autos / Locals window when a breakpoint is
reached. Changes are shown in RED.
TE100096 Version: 1.13
Page 97

Debugging
From here, the values can be applied to the Watch windows by right-clicking:
Memory view
The memory can be monitored directly. Changes are shown in RED.
TE1000 97Version: 1.13
Page 98
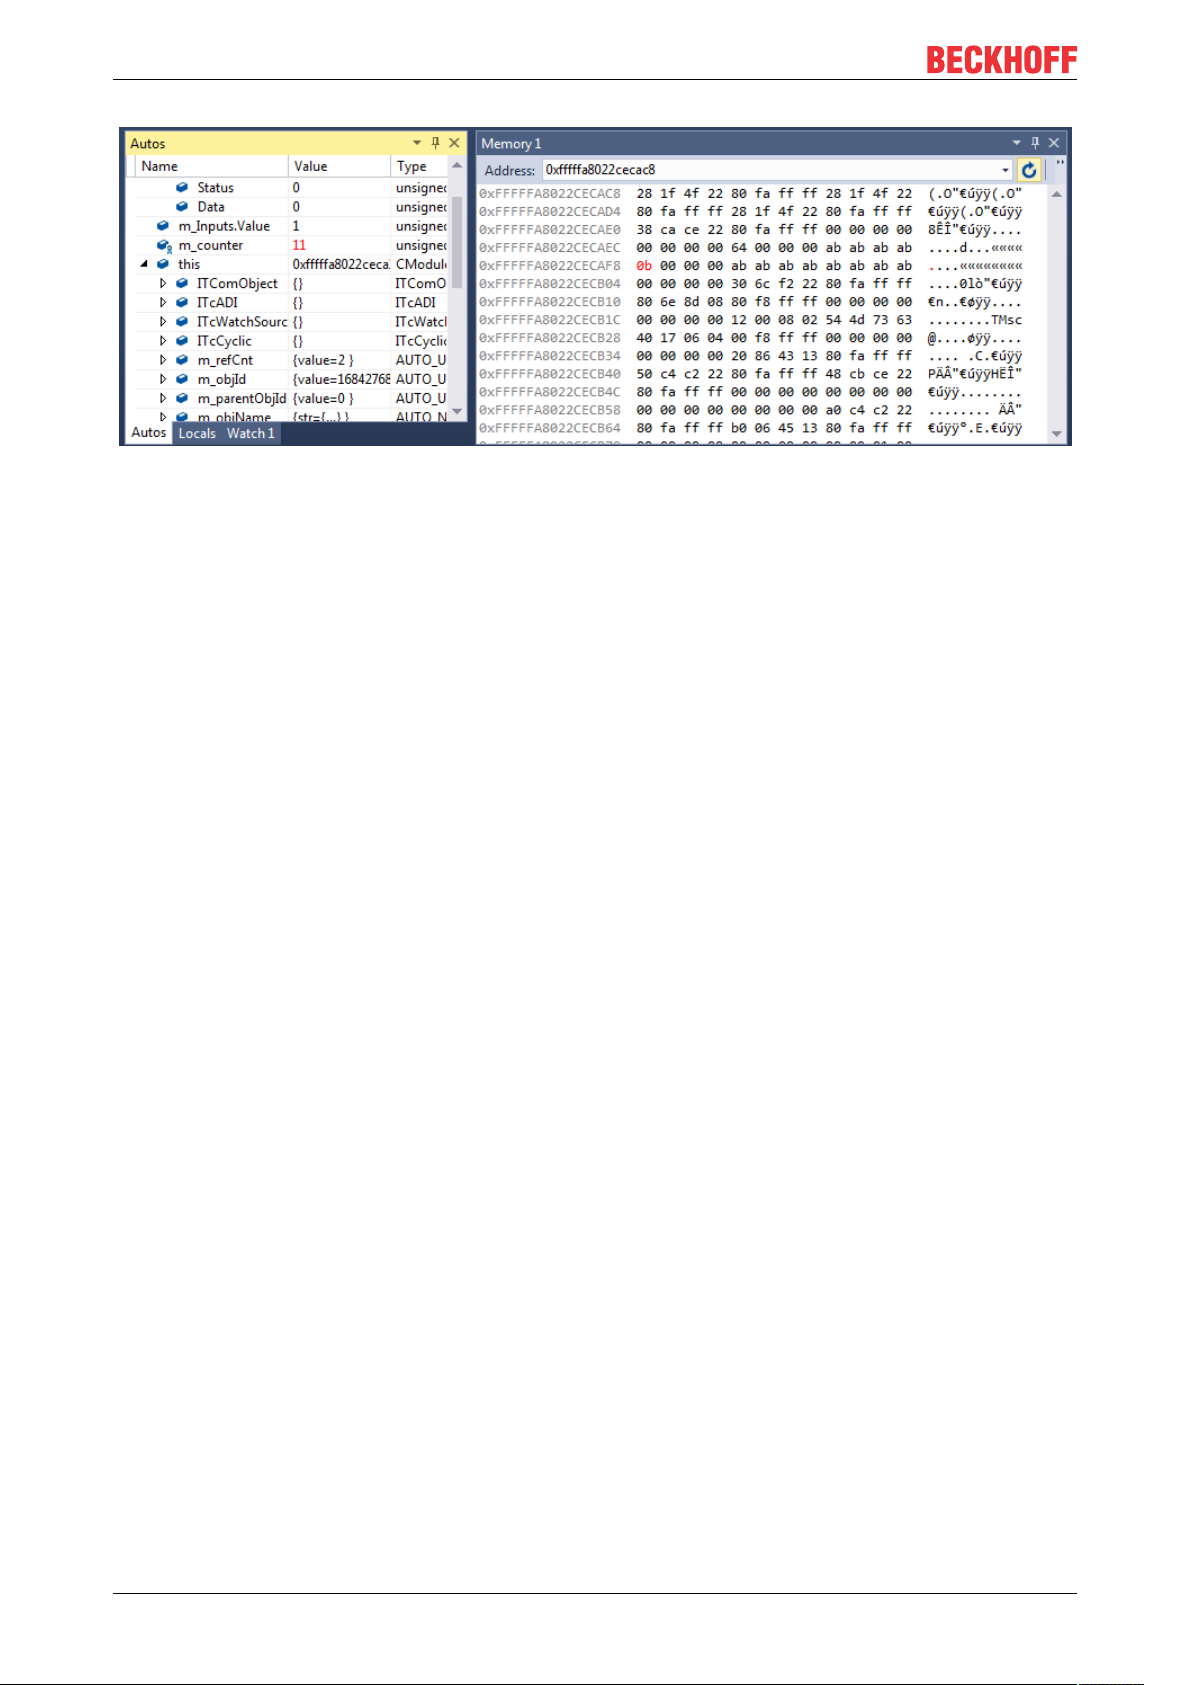
Debugging
TE100098 Version: 1.13
Page 99

Wizards
11 Wizards
For ease of entrance in engineering the TwinCAT C++ system provides Wizards.
• The TwinCAT Project Wizard [}99] creates a TwinCAT C++ project. For Driver projects, the TwinCAT
Class Wizard will be started afterwards.
• The TwinCAT Module Class Wizard [}100] is automatically started during creation of a C++ module.
This wizard provides different “ready to use” projects as entry points for own development.
• The TwinCAT Module Class Editor [}103] (TMC) is a graphical editor for defining the data structures,
parameters, data areas, interfaces and pointers. It generates a TMC file, which will be used by the
TMC Code generator.
• From the defined Classes instances will be generated and could be configured via the TwinCAT
Module Instance Configurator [}146]
11.1 TwinCAT C++ Project Wizard
After the creation of a TwinCAT project you can add a C++ project with the help of the TwinCAT C++
Project Wizard:
1. Right click on the C++ icon and select Add new Item… to start the C++ project wizard.
TwinCAT offers three C++ projects:
- Driver Project: Projects containing one or more executable modules
- Versioned C++ Projects: Projects that involve revision control. So you obtain the opportunity to switch
TE1000 99Version: 1.13
Page 100
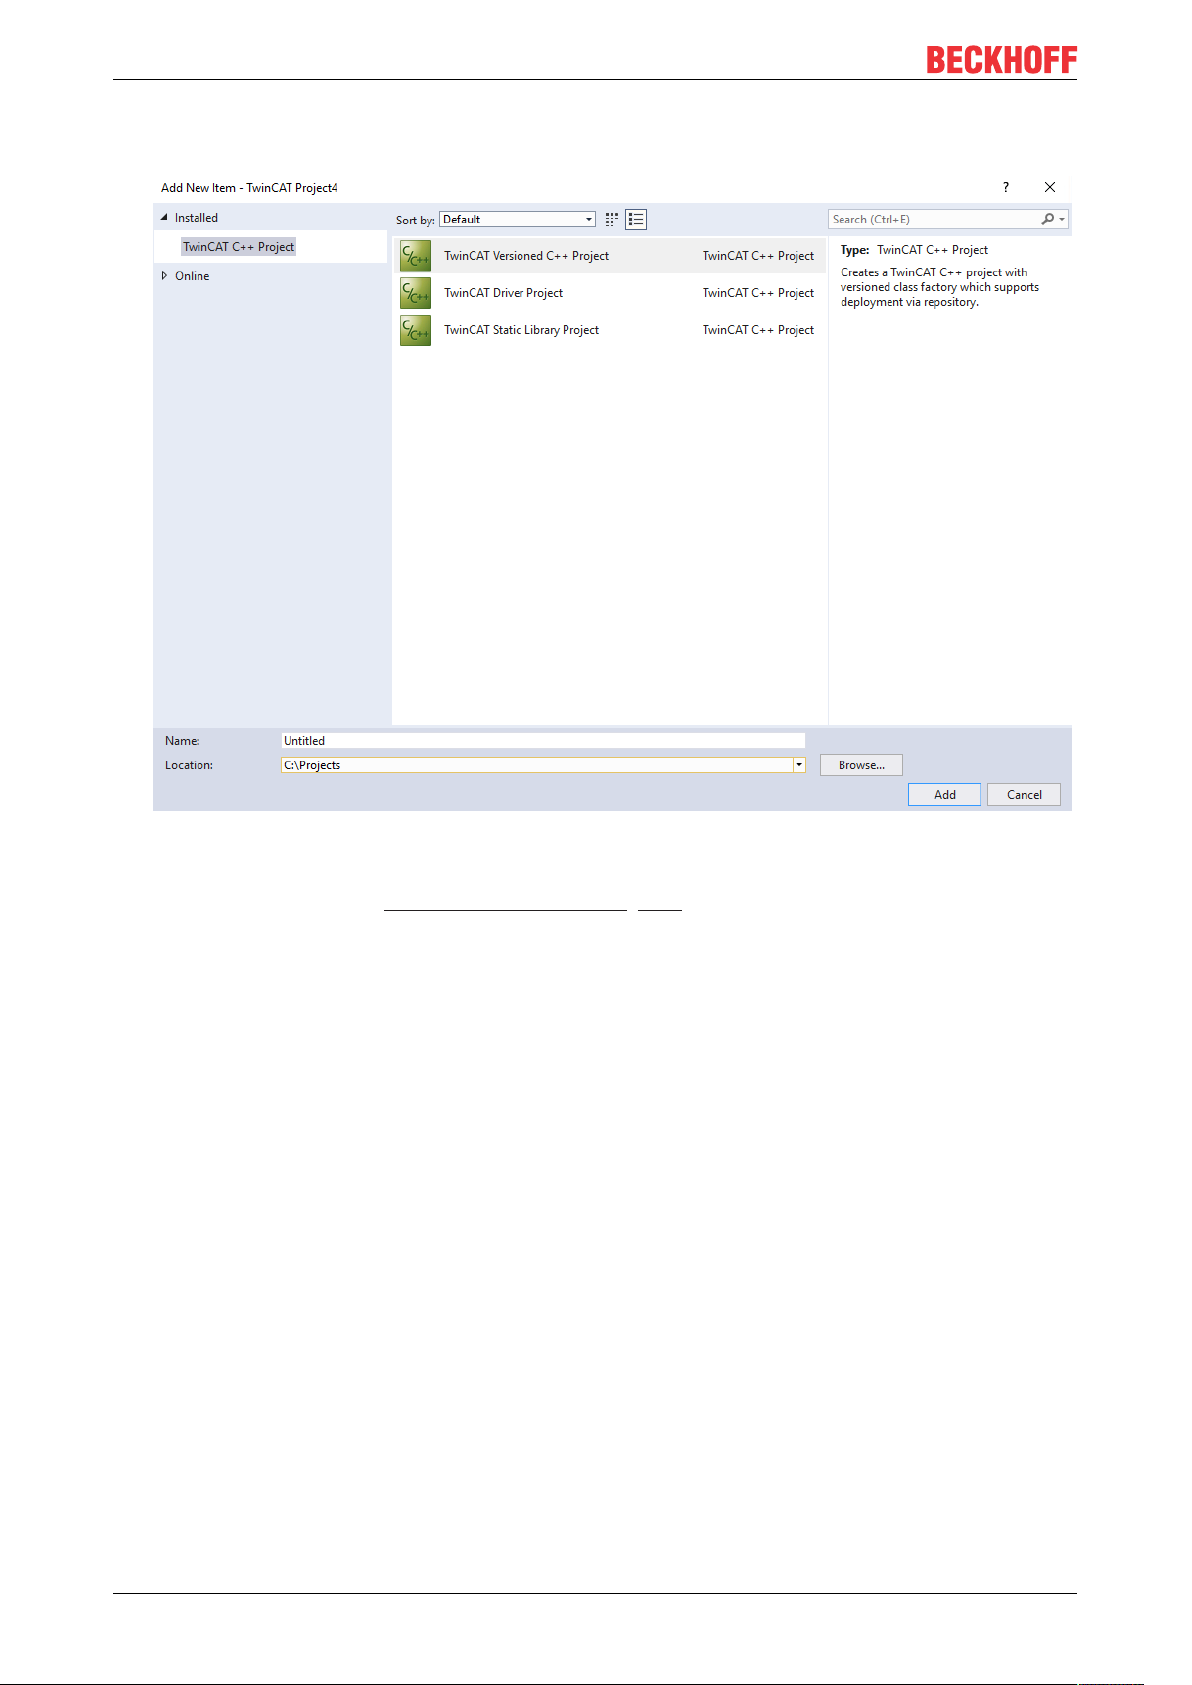
Wizards
between versions at runtime.
- Static library: Projects with C++ functions that are used by (different) TwinCAT C++ drivers.
2. Select one of the project templates and specify a name and location.
ð The TwinCAT C++ project is created
ð In the case of a driver, the TwinCAT C++ class wizard [}100] is started.
11.2 TwinCAT Module Class Wizard
TwinCAT 3 offers various class templates that can be used to create TcCOM object classes:
• TwinCAT Module Class
• TwinCAT Module Class with ADS port
• TwinCAT Module Class with cyclic caller
• TwinCAT Module Class with cyclic input/output
• TwinCAT Module Class with data pointer
• TwinCAT Module Class for real-time context
• TwinCAT Module Class with Online Changeable capability
TE1000100 Version: 1.13
 Loading...