

Page 1
Installation and operating instructions for
Beckhoff onboard SATA-RAID
Version: 1.3
Date: 2009-07-24
Page 2

Page 3

Table of contents
Table of contents
1.
General notes 2
Notes on the documentation 2
Liability conditions 2
Description of safety symbols 2
Basic safety measures 3
2.
Product description 4
RAID overview 4
RAID level 4
RAID 1 (mirroring) 4
Configuration at delivery state 4
3.
Status information 5
Status information from BIOS 5
Display during normal operation 5
Display after the failure of a hard disk 6
Display after the replacement of a defective hard disk 7
Status information under Windows 8
Display during normal operation 8
Display after the failure of a hard disk 8
Exchanging a defective hard disk 9
4.
Rebuilding the RAID system 10
Requirements for a replacement hard disk 10
Resetting a replacement hard disk for the RAID rebuild 10
Resetting a replacement hard disk with the Configuration Utility 11
Resetting a replacement hard disk with the Storage Console 11
RAID rebuild under BIOS 13
Selecting a hard disk for the RAID rebuild 13
RAID rebuild under Windows 15
Selecting a hard disk (drive) for the RAID rebuild 15
Starting the RAID rebuild in the standard view of the Storage Console 15
Starting the RAID rebuild in the extended view of the Storage Console 17
Rebuild process 19
Storage Console is closed 19
Rebuild process from the Storage Console 19
Extended view of the Storage Console 20
5.
RAID diagnosis under TwinCAT 21
TwinCAT RAID diagnosis 21
Querying the information 21
6.
Beckhoff Support & Service 22
Beckhoff's branch offices and representatives 22
Beckhoff headquarters 22
Beckhoff Support 22
Beckhoff Service 22
7.
Appendix 23
System requirements 23
Approvals 23
FCC: Federal Communications Commission 23
Radio Frequency Interference Statement 23
FCC: Canadian Notice 23
1 Beckhoff onboard SATA-RAID
Page 4
General notes
General notes
Notes on the documentation
This description is only intended for the use of trained specialists in control
and automation technology who are familiar with the applicable national
standards. It is essential that the following notes and explanations are
followed when installing and commissioning these components.
Liability conditions
The responsible staff must ensure that the application or use of the
products described satisfy all the requirements for safety, including all the
relevant laws, regulations, guidelines and standards.
The documentation has been prepared with care. The products described
are, however, constantly under development. For this reason, the
documentation may not always be have been fully checked for consistency
with the performance data, standards or other characteristics described.
None of the statements in this manual represent a guarantee for as set out
in § 443 of the German Civil Code or a statement about the assumed use
according to the contract as set out in § 434 para. 1 clause 1 no. 1 of the
German Civil Code. In the event that it contains technical or editorial errors,
we retain the right to make alterations at any time and without warning. No
claims for the modification of products that have already been supplied
may be made on the basis of the data, diagrams and descriptions in this
documentation.
©
This documentation is protected by copyright. Any reproduction or third
party use of this publication, whether in whole or in part, without the written
permission of Beckhoff Automation GmbH, is forbidden.
Description of safety symbols
i
Warning
Note
The following safety symbols are used in this operating manual. They are
intended to alert the reader to the associated safety instructions.
This symbol is intended to highlight risks for equipment, materials or the
environment.
This symbol indicates information that contributes to better understanding.
2 Beckhoff onboard SATA-RAID
Page 5
General notes
Basic safety measures
Only switch the PC off after
closing the software
Warning
Warning
i
Note
Before the Industrial PC is switched off, software that is running
must be properly closed. Otherwise it is possible that data on the
hard disk is lost.
Switch off all parts of the equipment, then uncouple the fieldbus!
Before opening the PC housing, for example to exchange a hard disk, all
system parts must be switched off first and the Industrial PC must then be
uncoupled from the system.
Pulling out the fieldbus connection plug uncouples the PC (optional).
System components that have been switched off must be secured against
being switched on again.
Do not exchange any parts when under power!
When components are being fitted or removed, the supply voltage must be
switched off.
Fitting work on the Industrial PC can result in damage:
• If metal objects such as screws or tools fall onto operating circuit
boards.
• If connecting cables internal to the PC are removed or inserted
during operation.
• If plug-in cards are removed or inserted when the PC is switched
on.
Hard disks in hard drive caddies can also be exchanged whilst the
Industrial PC is in operation.
Beckhoff onboard SATA-RAID 3
Page 6

Product description
Product description
RAID system
(Redundant Array of
Independent Drives)
i
Note
RAID level
RAID 1
RAID overview
A RAID system (Redundant Array of Independent Drives) serves to
organize several physical hard disks in a computer into one logical drive
(array).
The essential aim of RAID systems is to support error tolerance and to
improve the performance of the memory sub-system.
From the point of view of the user or an application program, there is no
distinction between a logical RAID drive and a single hard disk.
RAID level
The RAID level defines how the data within the volume that encompasses
the hard disks in the array is formatted. The Intel(R) Matrix Storage
Manager supports RAID Level 1 (mirroring) amongst others.
RAID 1 (mirroring)
The RAID 1 level combines two or more hard disks so that all data is
written simultaneously to all array members of the RAID 1 volume. In other
words: the data is mirrored and distributed across the hard disks in the
RAID 1 volume. This creates real-time redundancy of all of the data on the
first drive.
Configuration
Due to the increased protection against failure, RAID 1 is normally used for
storing critical data. Besides complete data redundancy, a further
advantage is the increased reading transmission rate.
Configuration at delivery state
Industrial PCs with the CB1051 motherboard, which are delivered with
more than one hard disk (HDD) are equipped with the SATA RAID system
as standard. Two of the hard disks are then combined logically to make a
RAID 1 drive.
The hard disks can be permanently installed inside the computer or also
accessible from outside via hard drive caddies.
4 Beckhoff onboard SATA-RAID
Page 7
Status information
Status information
RAID status
The configuration of the system can be accomplished both in BIOS and
under Windows. Furthermore it is possible to recall the status of the system
in TwinCAT.
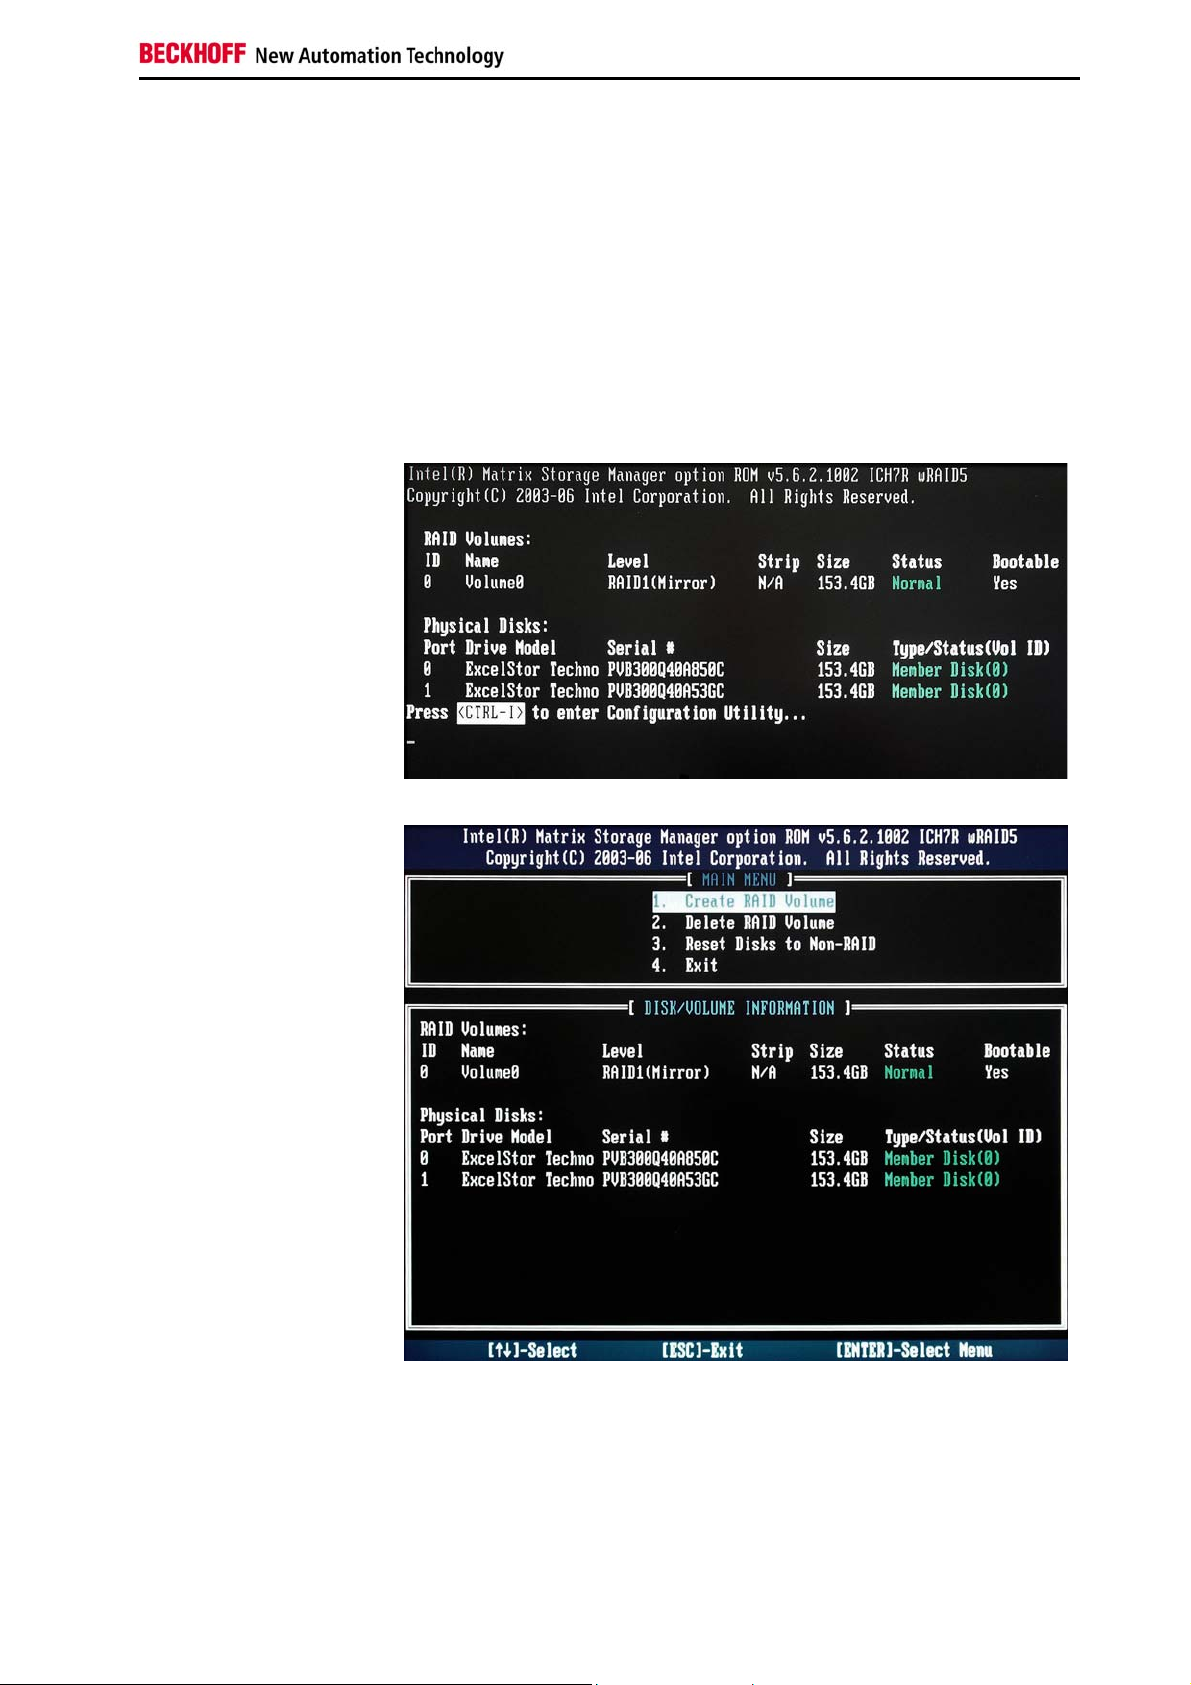
Status information from BIOS
Display during normal operation
The first possibility to obtain information about the RAID status is during
the BIOS boot process. The second boot screen shows a summary of the
RAID status:
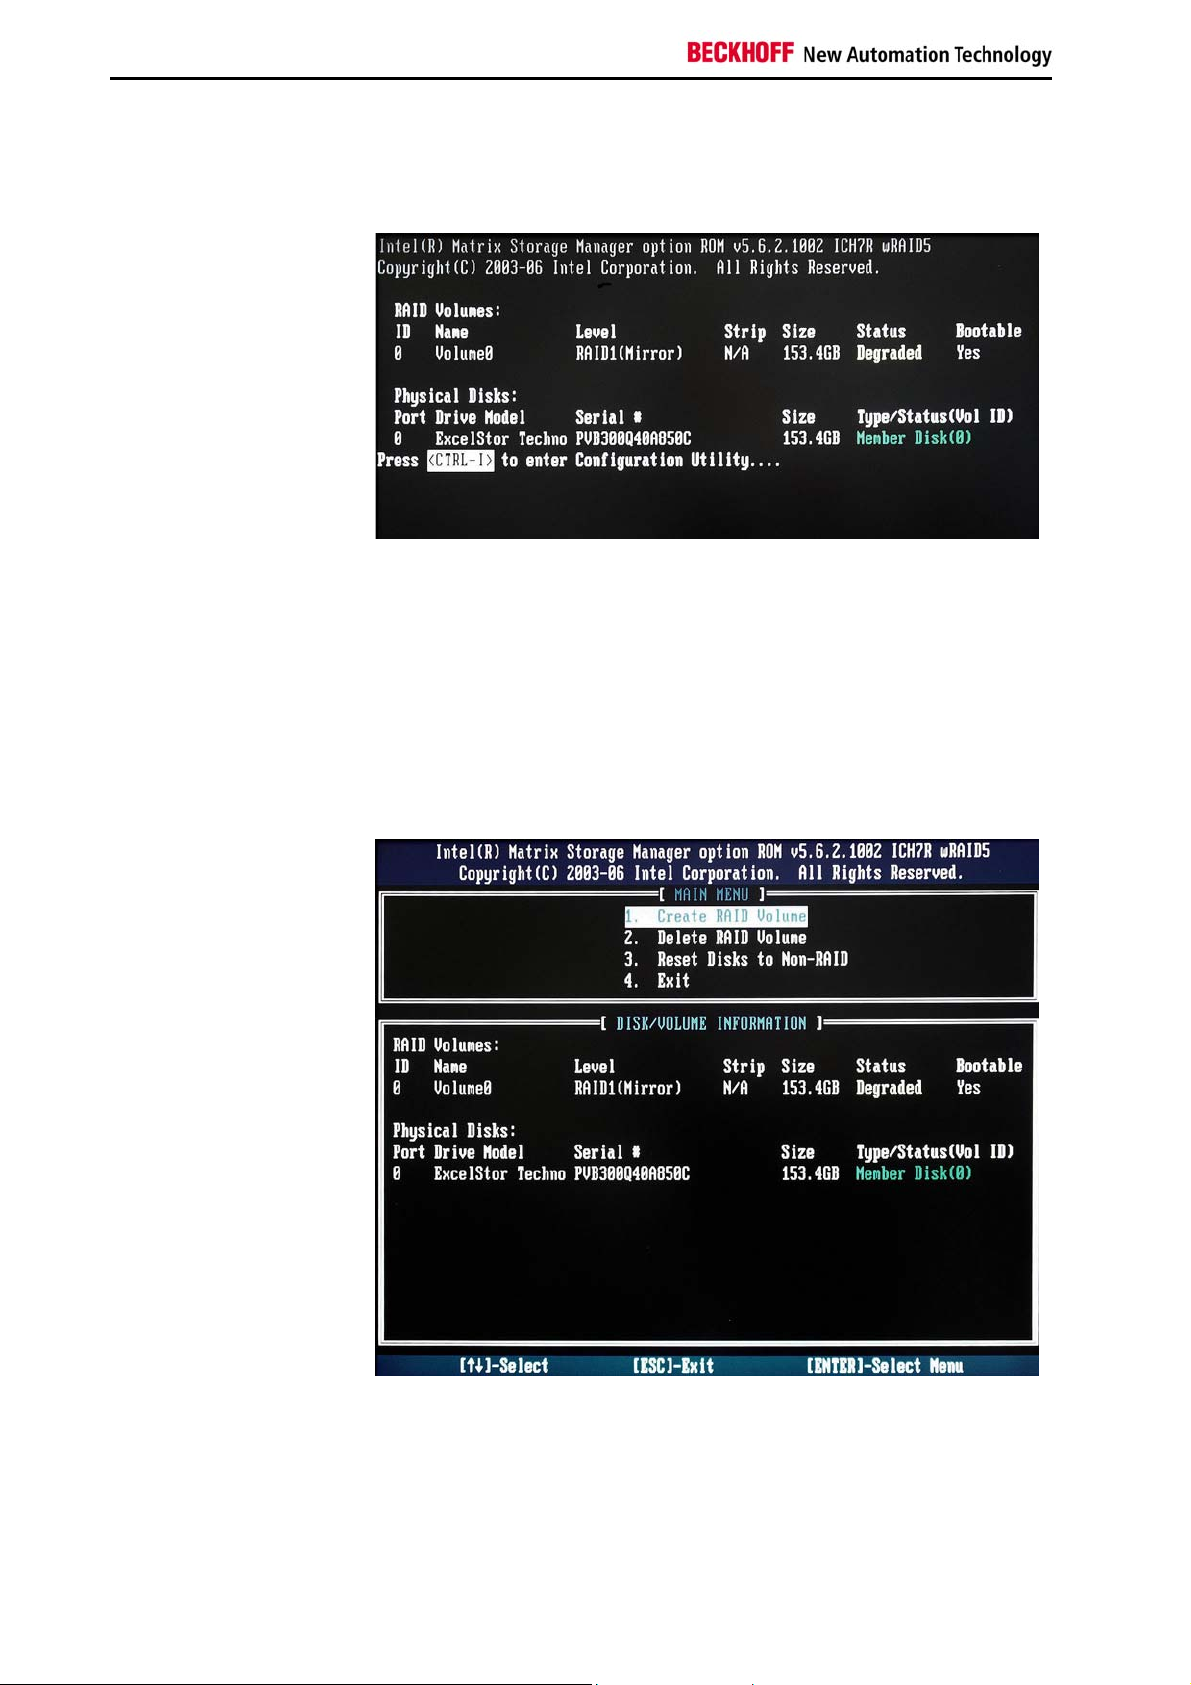
Configuration Utility
In this screen, the Configuration Utility can be opened with Ctrl I:
Beckhoff onboard SATA-RAID 5
Page 8
Status information
Display after the failure of a hard disk
Failure of a hard disk
If the computer is restarted following the failure of a hard disk, the second
boot screen may look like this, for example:
The status of the RAID volume is described here as “Degraded”. The
status of the hard disk on Port 0 can be seen to be okay (green).
If more than 2 SATA hard disks are installed inside the PC and one of the
two hard disks in the RAID volume failes or the hard disk configuration
inside the PC was changed because of other reasons, then at the next
start or reboot of the PC it is required to enter the BIOS Setup. Go to
"Advanced BIOS Features" "Hard Disk Boot Priority" and move the "INTEL
VOLUME0" to the top position by using the cursor down and the picture up
key. Otherway the PC will try to boot from hard disk three or four instead of
booting from the RAID volume.
Configuration Utility
The Configuration Utility does not display any further information:
6 Beckhoff onboard SATA-RAID
Page 9

Status information
Display after the replacement of a defective hard disk
Without rebuilding the RAID
volume
Boot screen
If the defective hard disk was exchanged (please refer to chapter
Requirements for a replacement hard disk) whilst the Industrial PC was
switched off, or if the hard disk was exchanged under Windows during
operation without starting a rebuild of the RAID volume, the second boot
screen will appear as follows at the next PC start-up:
A hard disk is shown on Port 1 that does not belong to any RAID volume.
The new hard disk can be selected in the Configuration Utility for the
rebuild of the RAID volume (see chapter Selecting a hard disk for the RAID
rebuild).
However, it is also possible, without first opening the Configuration Utility,
to boot Windows, where the hard disk can then also be selected for the
rebuild of the RAID volume (see chapter Selecting a hard disk (drive) for
the RAID rebuild).
Beckhoff onboard SATA-RAID 7
Page 10

Status information
Status information under Windows
Display during normal operation
Normal operation
Failure of a hard disk
Under Windows the RAID system works in the background, i.e. under the
operating system the user sees a logical drive that is indistinguishable from
a single hard disk. There is no indication that the system is working
properly.
Display after the failure of a hard disk
Following the failure of a hard disk, a message appears in the task bar at
the bottom right at each restart or new logon.
Example: Port 0 and Port 1 are each connected to a hard disk; the two
disks together form a RAID 1 volume. If the data cable is
unplugged from the hard disk on Port 1, the following message
appears:
Storage Console
Warning
Storage Console: Example
Clicking on the message opens the standard view of the Storage Console.
The opening and usage of the Storage Console can under certain
circumstances lead to impairment of real-time capability!
In this example the hard disk on Port 0 (connection 0) is okay (shown in
green).
The extended view of the Storage Console, which contains further
information, can be opened via the View menu:
8 Beckhoff onboard SATA-RAID
Page 11

Status information
Extended view of the
Storage Console
Exchanging a defective hard disk
The defective hard disk can be exchanged under Windows during
i
Note
If the defective hard disk is exchanged under Windows during operation,
operation without restarting the PC (hot swap). This is particularly easy if
the hard disks are mounted in hard drive caddies (please refer to chapter
Requirements for a replacement hard disk).
the rebuild of the RAID volume can subsequently be started (see chapter
RAID rebuild under Windows).
Beckhoff onboard SATA-RAID 9
Page 12

Rebuilding the RAID system
Rebuilding the RAID system
Requirements for a replacement hard disk
In an ideal case, a replacement hard disk is brand new and must have at
least the same storage capacity as the drive which it is to replace.
i
i
Note
Note
If no brand new hard disk is available, the following points must be
observed:
• All data that was stored on a drive before it was used as a replacement
hard disk will be lost as a result of its use as a replacement hard disk.
• Information about the RAID system is stored on every hard disk that
belongs to a RAID system. Therefore a hard disk from the RAID
system of a different computer must be “reset” with respect to RAID
before it can be used as a replacement hard disk.
Resetting a replacement hard disk for the RAID rebuild
The resetting of a replacement hard disk is only necessary if it comes from
a RAID system.
Hard disks can be reset in the Configuration Utility during the BIOS boot
process or under Windows.
It is not necessary to reset a replacement hard disk with the PC, in which it
will be used later. For example the disk can also be reset in the PC it
comes from.
The hard disks can be identified best via their port numbers.
The hard disks of the PCs with or without hard drive caddies are labeled
with the port numbers.
For each hard disk the port is shown in the Configuration Utility and in the
Storage Console.
10 Beckhoff onboard SATA-RAID
Page 13

Rebuilding the RAID system
Resetting a replacement hard disk with the
Configuration Utility
Warning
The hard disk is reset in the Configuration Utility under menu 3 Reset Disks
to Non-RAID:
Resetting a replacement hard disk with the
Storage Console
The opening and usage of the Storage Console can under certain
circumstances lead to impairment of real-time capability!
With the Storage Console the according volume is reset, not the hard disk.
After the volume that has to be reset was identified in the extended view of
the Storage Console via the port of the according hard disk, Delete Volume
has to be selected from the context menu of the according volume:
Beckhoff onboard SATA-RAID 11
Page 14

Rebuilding the RAID system
Delete RAID Volume
Wizard
The wizard for deleting a RAID volume then appears:
Clicking on Next opens the selection dialogue for the reset volume. The
volume on which you previously right-clicked is already preselected.
Selecting the Volume
Clicking on Next will cause the warning to appear that any data will be lost.
Clicking on Finish then completes the process. The volume (also the hard
disk) will be reset now.
12 Beckhoff onboard SATA-RAID
Page 15

Rebuilding the RAID system
RAID rebuild under BIOS
Selecting a hard disk for the RAID rebuild
If the Configuration Utility is opened, there is a possibility to specify a newly
connected hard disk (theoretically, more than one new hard disk may have
been connected) for rebuilding the RAID volume.
If more than 2 SATA hard disks are installed inside the PC and one of the
two hard disks in the RAID volume failes or the hard disk configuration
inside the PC was changed because of other reasons, then at the next
start or reboot of the PC it is required to enter the BIOS Setup. Go to
"Advanced BIOS Features" "Hard Disk Boot Priority" and move the "INTEL
VOLUME0" to the top position by using the cursor down and the picture up
key. Otherway the PC will try to boot from hard disk three or four instead of
booting from the RAID volume.
Configuration Utility
In the example, only the defective hard disk was replaced:
After a hard disk has been selected, the Configuration Utility shows the
new hard disk as a member of the RAID volume with the ID 0. The status
of the RAID volume was changed from “Degraded” to “Rebuild”.
At the lower edge of the screen there is a notice that the rebuild process
will first be started under the operating system.
Beckhoff onboard SATA-RAID 13
Page 16

Rebuilding the RAID system
Rebuild process starts
under the operating system
i
Note
If a hard disk has been selected in the Configuration Utility for the rebuild,
the rebuild process begins immediately under Windows (see chapter
Storage Console is closed).
14 Beckhoff onboard SATA-RAID
Page 17

Rebuilding the RAID system
RAID rebuild under Windows
Selecting a hard disk (drive) for the RAID rebuild
Exchanging the defective
hard disk
If the replacement of the defective hard disk is carried out under Windows
without having selected a hard disk for the rebuild up to that point, the
following message will be displayed:
Clicking on the message opens the Storage Console.
Starting the RAID rebuild in the standard view of the Storage Console
If a defective hard disk has merely been replaced by a new one, the rebuild
of the RAID system can be started in the standard view.
i
Note
For complicated cases there is a button in the standard view that opens the
extended view (see chapter Starting the RAID rebuild in the extended view
of the Storage Console).
In the case that a hard disk from a RAID volume and a new empty hard
disk are present, the target hard disk will not be queried.
Beckhoff onboard SATA-RAID 15
Page 18

Rebuilding the RAID system
Clicking on the marked icon Restore RAID 1 data protection changes the
view to:
Clicking on the marked icon Rebuild RAID volume now will prompt the final
question to be asked:
After confirming with Yes the rebuild process starts (see chapter Rebuild
process from the Storage Console).
16 Beckhoff onboard SATA-RAID
Page 19

Rebuilding the RAID system
Starting the RAID rebuild in the extended view of the Storage Console
Extended view of the
Storage Console
All RAID volumes and all hard disk connections are shown in the extended
view.
In the following view it can be seen that a hard disk is missing that
previously belonged to a RAID volume and also that a “Non-RAID Hard
Drive” is connected to “Port 1”. Clicking with the right mouse button on this
hard disk enables the option Rebuild to this Hard Drive to be selected:
Rebuild wizard
The wizard for rebuilding a RAID volume then appears:
Clicking on Next opens the selection dialogue for the new RAID hard disk.
The hard disk on which you previously right-clicked is already preselected.
Beckhoff onboard SATA-RAID 17
Page 20

Rebuilding the RAID system
Selecting the hard disk
Clicking on Next will cause the warning to appear that any data existing on
the new hard disk will be lost during rebuilding:
If the rebuild of the RAID volume is started, all data on the selected hard
Warning
disk will be irreversibly deleted!
The rebuild is started by clicking on Finish (see chapter Extended view of
the Storage Console).
18 Beckhoff onboard SATA-RAID
Page 21

Rebuilding the RAID system
Rebuild process
Storage Console is closed
Rebuild message
When the rebuild process starts under Windows, this will be indicated by a
message at the bottom right next to the clock:
The animated icon is displayed throughout the entire rebuild process and
disappears without a further message when the rebuild is complete.
Clicking with the mouse on the message will open the Storage Console
(see chapter Rebuild process from the Storage Console).
Rebuild process from the Storage Console
Clicking on the message RAID Volume Rebuilding opens the Storage
Console, where the progress of the process can be followed:
Storage Console
Beckhoff onboard SATA-RAID 19
Page 22

Rebuilding the RAID system
Once the rebuild process is complete, the Storage Console displays the
following view:
Storage Console
Progress display in the
Console
Extended view of the Storage Console
If the corresponding volume is selected by clicking on it at the left-hand
side during rebuilding, progress can be followed on the right-hand:
20 Beckhoff onboard SATA-RAID
Page 23

RAID diagnosis under TwinCAT
RAID diagnosis under TwinCAT
The RAID system works in the background, i.e. under the operating system
the user sees a logical drive that is indistinguishable from a single hard
disk. The configuration of the system can be accomplished both in BIOS
and under Windows. Furthermore it is possible to check the status of the
system in TwinCAT.
TwinCAT RAID diagnosis
The Storage Console must be installed in order to be able to use TwinCAT
RAID diagnosis!
As an alternative to the user interface of the Intel Matrix Storage Console,
the TwinCAT RAID diagnosis offers a real-time-capable option for querying
the status of the RAID system.
In order to change the RAID system, however, the Storage Console must
still be used.
The information is queried by a standardized interface of the RAID driver.
i
Note
Querying the information
Step 1 Information about the existing RAID controllers
The information query is divided into three steps:
Here, both the number and the IDs of the existing RAID controllers are
displayed.
Step 2 Information about the existing RAID volumes
Step 3 Status of the existing RAID volumes
i
Note
The numbers of existing volumes and hard disks are listed.
The status is queried in each case for a single controller ID and a single set
number:
• RAID type,
• status of the RAID volume (OK, degraded, rebuilding, failed),
• number of hard disks that make up the set,
• serial numbers of the hard disks that make up the set and
• the hardware ports on the motherboard to which the hard disks making
up the set are connected. In the event of a failure it can hence be
determined which hard disk is OK or which one must be replaced. In
the case of delivery with hard drive caddies, these are each identified
by a label showing the port number.
A set is the combination of hard disks to form a RAID system. This is
described as a volume in the operating system.
Beckhoff onboard SATA-RAID 21
Page 24

Beckhoff Support & Service
Beckhoff Support & Service
Quote the project number
Beckhoff and their partners around the world offer comprehensive service
and support, making available fast and competent assistance with all
questions related to Beckhoff products and system solutions.
Beckhoff's branch offices and representatives
Please contact your Beckhoff branch office or representative for local
support and service on Beckhoff products!
The addresses of Beckhoff's branch offices and representatives round the
world can be found on her internet pages:
http://www.beckhoff.com
You will also find further documentation
for Beckhoff components there.
Beckhoff headquarters
Beckhoff Automation GmbH
Eiserstraße 5
D-33415 Verl
Germany
Phone:
Fax: +49(0)5246/963-198
e-mail: info@beckhoff.com
+49(0)5246/963-0
Beckhoff Support
Support offers you comprehensive technical assistance, helping you no
only with the application of individual Beckhoff products, but also with
other, wide-ranging services:
• world-wide support
• design, programming and commissioning of complex automation
systems
• and extensive training program for Beckhoff system components
Hotline:
Fax: +49(0)5246/963-9157
e-mail: support@beckhoff.com
+49(0)5246/963-157
Beckhoff Service
The Beckhoff Service Center supports you in all matters of after-sales
service:
• on-site service
• repair service
• spare parts service
• hotline service
Hotline:
Fax: +49(0)5246/963-479
e-mail: service@beckhoff.com
If servicing is required, please quote the project number of your Industrial
PC.
+49(0)5246/963-460
22 Beckhoff onboard SATA-RAID
Page 25

Appendix
Appendix
Operating system
TwinCAT Version
Hard disk capacity
FCC Approval for USA
System requirements
• Windows XP from Service Pack 2
• Other operating systems after consulting Beckhoff service
• At least TwinCAT version 2.10 build 1313.
• TwinCAT on the D partition: At least version 2.10 build 1313.
• In special cases Beckhoff service must be consulted.
The hard disks in the RAID volume must have the same capacity
Approvals
FCC: Federal Communications Commission
Radio Frequency Interference Statement
This equipment has been tested and found to comply with the limits for a
Class A digital device, pursuant to Part 15 of the FCC Rules. These limits
are designed to provide reasonable protection against harmful interference
when the equipment is operated in a commercial environment. This
equipment generates, uses, and can radiate radio frequency energy and, if
not installed and used in accordance with the instruction manual, may
cause harmful interference to radio communications. Operation of this
equipment in a residential area is likely to cause harmful interference in
which case the user will be required to correct the interference at his own
expense.
FCC: Canadian Notice
FCC Approval for Canada
This equipment does not exceed the Class A limits for radiated emissions
as described in the Radio Interference Regulations of the Canadian
Department of Communications.
Beckhoff onboard SATA-RAID 23
 Loading...