

Page 1
Operation Guide
Manual de usuario
Manual de instruções
Page 2

Contents
Safety instructions 7
Information regarding general
road safety 8
Overview of controls Traffic Pro 9
Overview of controls Traffic Pro
with Bluetooth® 10
General operation 11
Menu basics 11
Fast access function 11
Main menu 11
Status display 12
Options menu 12
How to use the menus 12
Data entry menus 13
Anti-theft device 14
Entering unit code numbers 14
What to do if an incorrect code
number has been entered 14
Removing/Inserting the
control panel 15
Removal 15
Insertion 16
Inserting/Removing the cover 16
Inserting the cover 16
Removing the cover 16
Switching the unit on/off 17
Switching on 17
Switching off 17
Setting the volume 18
Sound settings 18
Calling up the sound settings 18
Setting the equalizer 19
Defining the equalizer setting 19
Setting balance and fader 20
Balance setting 20
Fader setting 20
Switching loudness on/off 20
Becker Surround 21
Subwoofer 21
Crossover 21
Reset settings 22
Mute 22
Navigation mode 24
What is navigation? 24
Navigation CDs 24
Selecting navigation 26
Calling up the Navigation
main menu 26
Entering a destination 27
Selecting a country 28
Entering a destination town 28
Selecting destination via postcode 29
Entering the destination road 30
Entering the destination town centre 31
Entering house number for
destination road 32
Selecting junction for destination road 32
Setting the route options 33
Saving/Deleting route options 34
Saving a destination 34
Navigation fast access 35
Navigating from fast access 35
Protecting an entry 35
Deleting an entry 36
Deleting a list 36
Saving an entry in the address book 36
Creating a new entry 37
Adding data to entries 37
Selecting a destination from the
address book 38
Point of interest 39
Local 40
In country 40
Local area of destination 41
In place 41
Information about points of interest 42
During route guidance 43
Navigation status screen 43
Example navigation displays 44
Options menu 45
Cancelling route guidance 46
Traffic announcements 47
Route list 47
Stopover 47
Blocking a route 49
Modifying route options 49
Switching navigation
announcements on/off 50
2
*Only available for the Traffic Pro with Bluetooth® wireless technology.
Page 3

Contents
Information during route guidance 50
Displaying destination information 50
Displaying/Storing position 51
Displaying traffic announcements 51
Displaying/Changing route settings 52
Information during non-active route
guidance 52
Displaying/Storing a position 52
Displaying TMC messages 52
Dynamic route guidance with
TMC 52
What is dynamic route guidance? 52
Dynamic route guidance 53
Displaying traffic information 54
Settings 55
Traffic announcements 55
Announcing the time of arrival 56
ETA setting 56
Measuring unit 57
Radio mode 58
Switching on radio mode 58
Calling up the Radio main menu 58
Selecting a waveband 59
FM mode 60
Possible settings for FM stations 60
Station list 60
Scan function 61
Manual station tuning 62
Filter function 62
Switching the filter function on/off 62
Filtering stations 63
Filtering stations 63
Cancel filtering 63
Programme type 64
Switching the programme
type function on/off 64
Selecting the programme type 64
Regionalisation 65
Radio text 65
Voice entries 66
Reception optimisation 66
Bandwidth control 67
Traffic programme 67
Switching a traffic programme on/off 68
Selecting a TP station 68
Automatic 68
Manual TP station selection 68
TP volume 69
Cancelling traffic announcements 69
AM mode 69
Possible settings for AM stations 69
Scan search 70
Scan function 70
Station memory 71
Calling up the station memory 71
Storing stations 71
Different waveband set 71
Station already in memory 72
Moving stations 72
Deleting stations 73
Naming stations 73
Creating/Deleting voice entries 74
Create 74
Deleting 74
Reading out voice entries 74
Media mode 75
Activating media mode 75
Media fast access functions 75
Media status display 76
Track jump/Track skip 77
Fast forward/rewind 77
Play mode 78
Calling up the Play Mode menu 78
Track mix (random play function) 78
Scan 79
Repeat track 79
CD mix 79
Repeat CD 80
Directory mix 80
Calling up the Media main menu 80
Switching detailed track
display on/off 81
CD mode 81
Notes on compact discs (CD) 81
Inserting/Ejecting CDs 82
Notes on CD-R and CD-RWs 82
Notes on copy-protected CDs 82
Temperature protection circuit 82
*Only available for the Traffic Pro with Bluetooth® wireless technology.
3
Page 4

Contents
MP3 mode 83
General notes on MP3 83
Creating an MP3 storage medium 83
MP3 CD mode 84
MP3 memory cards/
Micro-drive mode 84
Inserting a micro-drive/
memory card 85
Removing a micro-drive/
memory card 85
CD changer mode 86
Operational readiness of CD changer 86
Loading/Ejecting the CD magazine 86
External units/AUX mode 86
Telephone mode 87
Calling up the telephone 88
Bluetooth not yet switched on 88
Bluetooth mobile phone not yet
connected 88
Calling up the Telephone
main menu 89
Dialling numbers 90
Selecting a number from the
address book 91
Call lists 92
Calling a number from the list 93
Retrieving information about
the entry 93
Deleting a call list 93
Emergency call 93
Settings 94
Automatic call answering 94
Dialogue with call 94
Telephone calls 95
Status display 95
Accepting/ rejecting a call 95
Accepting a call 95
Rejecting a call 96
Ending a call 96
Options menu 96
End call 97
DTMF 97
Private 97
Fast access telephone functions 98
Direct calling 98
Protecting an entry 99
Deleting an entry 99
Deleting a list 99
Saving a number in the address book 100
Creating a new entry 100
Adding data to entries 101
Address book 102
Calling up the address book 102
Calling up the Address Book
main menu 102
Creating an entry 102
Creating an entry which
supports navigation 104
Find entry 105
Setting the search criterion 106
Editing entries 107
Modifying an entry 107
Deleting an entry 108
Creating/Deleting voice entries 108
Create 108
Delete 109
Reading out voice entries 109
Exporting an address book* 109
Exporting an address book
entry* 110
Importing an address book
entry* 110
Navigating to an address book
entry 112
Voice entries 112
Calling an address book entry* 113
Fast access functions 113
Protecting an entry 113
Deleting an entry 114
Deleting a list 114
Settings 115
Calling up general settings 115
Bluetooth* 115
Opening the device list* 115
Always allow connection* 116
Name device* 117
Deleting a device from the list* 117
4
*Only available for the Traffic Pro with Bluetooth® wireless technology.
Page 5

Contents
Connecting and disconnecting
devices* 117
Connecting devices
(Traffic Pro BT)* 118
Connecting a device
(external device)* 119
Disconnecting devices* 121
Calling up Bluetooth settings* 121
Activating/ deactivating Bluetooth* 122
Searching for Bluetooth devices* 122
Making devices visible to others* 123
Device name* 123
Voice mode 123
Calling up voice mode settings 123
Setting the system language 124
Displaying voice settings 125
Volume for voice output 125
Automatic dialogue 126
Voice entries 126
Voice output 126
Extended PTT 127
Repeating a voice announcement 127
System settings 128
Calling up the system settings 129
Audio 129
GAL (speed dependent volume) 129
Settings for left-hand/ right-hand
drive vehicles 129
Volume for acoustic signals 130
Displaying the volume 130
Digital level 130
External device 131
Display brightness 131
Day/ night design 131
Reset function 132
Direction of rotation of the rotary
control/push button 132
Clock 133
Software update 133
Voice mode 135
What is voice mode? 135
Symbols 135
General information about the
voice control system 136
Activating the voice control system 136
Ending voice dialogue
prematurely 137
Voice entries 137
Settings 138
Examples for a voice dialogue 138
Example operation in radio mode 139
Example for entering a
navigation destination 140
Example for entering a telephone
number* 142
General commands 142
Help function (online help) 143
Aborting voice dialogue 143
Navigation in lists 143
Calling up the status display 143
Commands for status displays,
fast access functions and
main menus 144
Commands for radio mode 145
Commands for the radio status
display 145
Commands for radio fast access
mode 147
Commands in the Edit Station
menu 148
Commands for the Radio main
menu 149
Commands in the Waveband menu 150
Commands in the Programme
Type menu 151
Commands in the Filter menu 151
Commands in the TP menu 152
Commands in the Voice Entries
menu 152
Commands in the Reception
Optimisation menu 153
Commands for media mode 153
Commands for the media status
display 154
Commands for media fast access 155
Commands for the Media main menu 156
Commands for the media
Play Mode menu 156
*Only available for the Traffic Pro with Bluetooth® wireless technology.
5
Page 6

Contents
Navigation commands 157
Correction option for incorrect
destination entry 157
Commands for the navigation
status display 158
Commands for navigation fast access 159
Commands in the Fast Access/
Edit Destinations menu 160
Commands for the Navigation
main menu 160
Commands for the Destination menu 161
Commands for the POI menu 162
POI categories (page 39) 163
Commands for the Route Options
menu 163
Commands for the Stopover menu 164
Prompt: Is the new destination a
main destination or a stopover? 165
Commands for telephone mode* 165
Commands for telephone fast
access mode* 165
Commands in the Fast Access/
Edit Telephone Numbers menu* 167
Commands for the Telephone
main menu* 167
Commands in the input menu for
telephone numbers* 168
Commands in the Call Lists menu* 168
Commands in the call lists* 169
Commands in the Settings menu* 170
Commands for the address book 170
Commands for address book fast
access 170
Commands in the Fast Access/Edit
Entries menu 173
Commands in the Edit menu 173
Commands in the Edit Data menu 174
Commands in the menu for
selecting a Bluetooth device
for export* 174
Commands when an entry is open 174
Commands for the Address
Book main menu 174
Commands in the Voice Entries
menu 175
Commands in the Search Criterion
menu 176
Technical terminology 177
Technical data 188
NOTICE 189
6
*Only available for the Traffic Pro with Bluetooth® wireless technology.
Page 7

Safety instructions
G
Operation of the unit is permitted only if traffic conditions are suitable and you are absolutely sure that you, your
passengers or other motorists are not endangered, obstructed or inconvenienced.
In all cases, all applicable road traffic regulations must be obeyed. Destinations may only be entered when the vehicle is
stationary.
The country-specific regulations apply for telephone operations.
The navigation system is only an aid. Errors may occur in individual data items/entries. At all times, the driver must
decide whether or not to heed the information provided. We do not accept liability for erroneous data provided by the
navigation system.
Due to continual changes in traffic routing or deviations in the data, it may occur that imprecise or erroneous information
is given. Therefore, actual road signs and traffic regulations must always be observed. In particular, the navigation system
cannot be used as an orientation aid at times of poor visibility.
The unit may only be used for its intended purpose. The volume of the radio, navigation system and telephone should be
adjusted so that external noise is still audible.
Do not activate the telephone near petrol stations, fuel depots, chemical plants or blasting areas.
In the case of a malfunction (i.e. smoke or other noticeable odours) the unit is to be turned off immediately.
For safety reasons, the unit must only be opened by a trained technician. Please refer to your dealer for repair.
7
Page 8

Information regarding general road safety
This car radio device is intended and approved for installation and operation in passenger cars, commercial vehicles and
buses (vehicle classes M, N and O) whose electric system has a rated voltage of 12V.
Installation and maintenance should only be carried out by specialists. Faulty installation or maintenance can result in
the malfunctioning of the motor vehicle’s electronic systems. The vehicle manufacturer’s safety instructions must be
observed.
The vehicle’s electronics (e.g. speedometer signal) must only be worked on by an authorised service garage. We assume
no liability for any impairment of the vehicle’s electronics.
This device is only intended for installation in the area provided for this purpose by the vehicle manufacturer.
The method of attachment used must ensure that the device will remain properly attached, should the vehicle be involved
in a crash.
The power supply must be properly fused.
Using mobile phones without an external antenna in the proximity of the radio unit may cause interference.
Familiarise yourself with the device and how it works before embarking on your journey. Whilst on the move, only operate
the device in appropriate traffic conditions. The volume of the device should be set at a level that enables external noises
(e.g. police sirens) to be easily heard.
8
Page 9
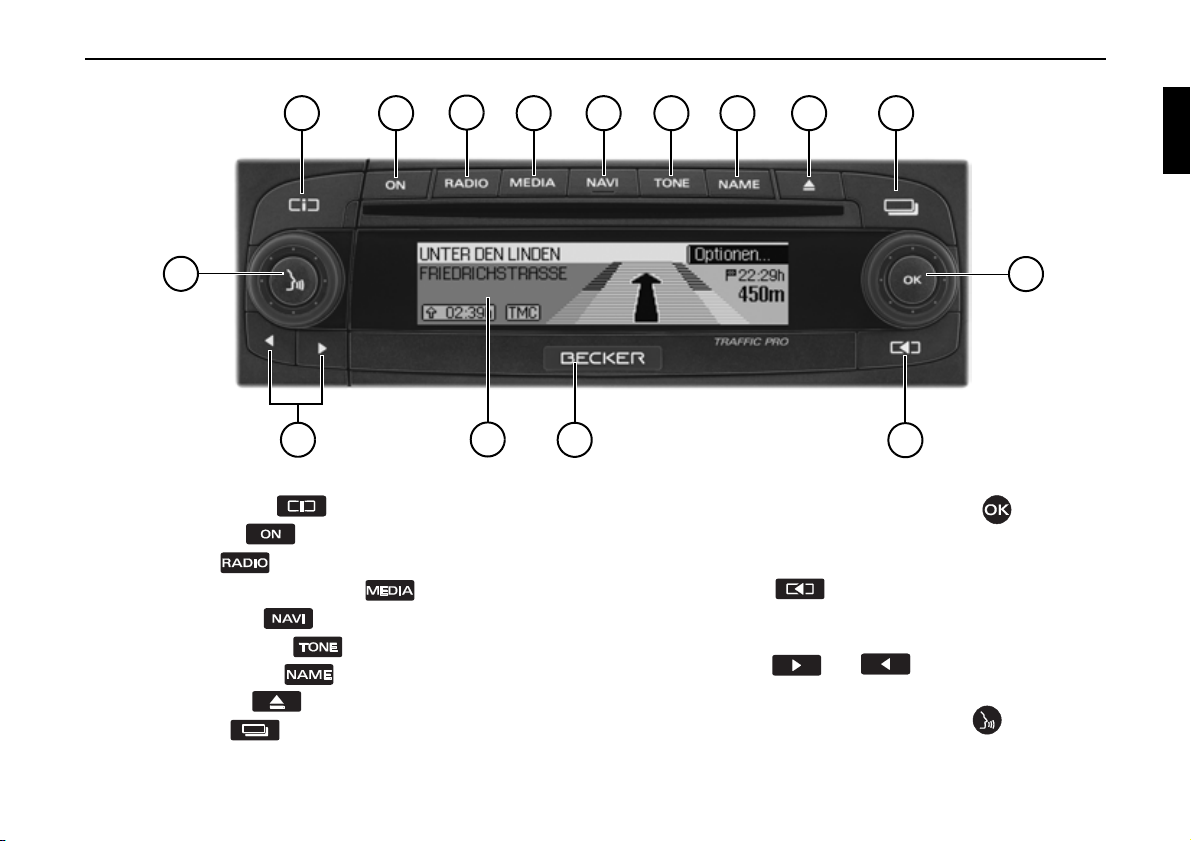
Overview of controls Traffic Pro
1
2
15
14
Overview of controls Traffic Pro
1 Information button ( )
2 On / off switch ( )
3 Select radio ( )
4 Select CD/CDC/memory card ( )
5 Select navigation ( )
6 Select sound settings ( )
7 Select address book ( )
8 CD eject button ( )
9 Status button ( )
3
4
5
6 7
8 9
10
13
12
11
10 Right-hand rotary control/push button ( )
Press = Confirm
Turn = Scroll through lists and menus
11 Back button ( )
12 Button for unlocking removable control panel
13 Display
14 Arrow keys ( and )
Change radio station and audio track
15 Left-hand rotary control/push button ( )
Press = Activate voice dialogue
Turn = Set volume
9
Page 10
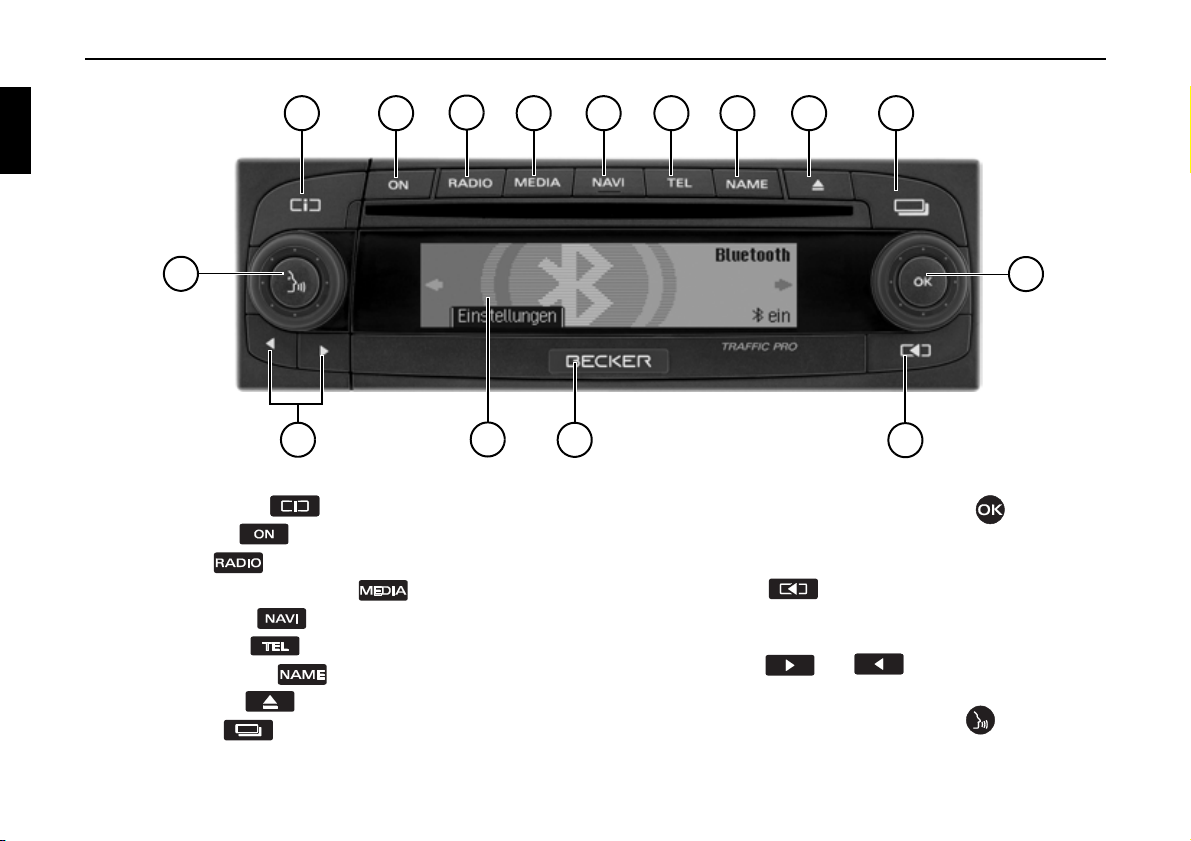
Overview of controls Traffic Pro with Bluetooth®
1
15
14
Overview of controls Traffic Pro with Bluetooth®
1 Information button
2 On / off switch
3 Select radio
4 Select CD/CDC/memory card
5 Select navigation
6 Select telephone
7 Select address book
8 CD eject button
9 Status button
2
3
4
5
6 7
8 9
10
13
12
11
10 Right-hand rotary control/push button
Press = Confirm
Turn = Scroll through lists and menus
11 Back button
12 Release slide for removable control panel
13 Display
14 Arrow keys and
Change radio station and audio track
15 Left-hand rotary control/push button
Press = Activate voice dialogue
Turn = Set volume
10
Page 11
General operation
Menu basics
Note
If an entry in the list is abbreviated
because it is too long (three dots appear
at the end of the text), you can display
the entry in full briefly by pressing and
holding down the button.
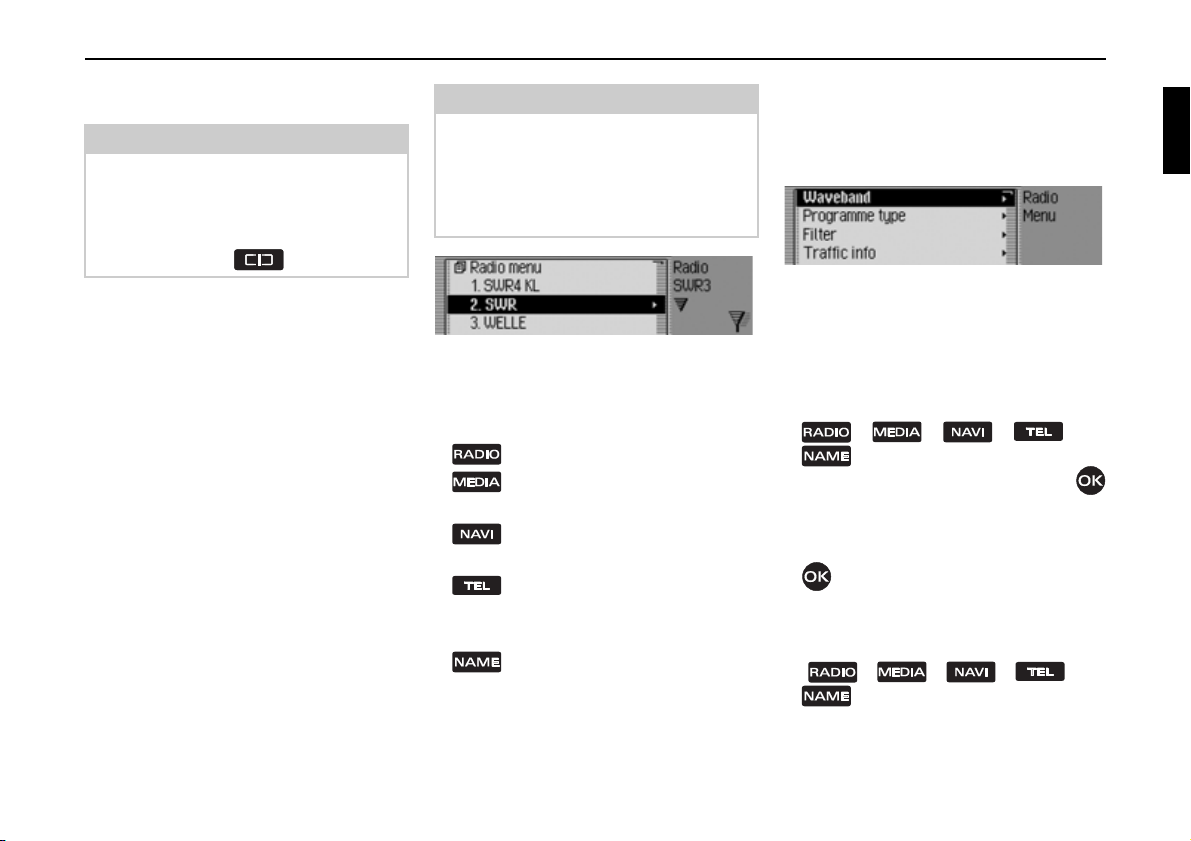
Fast access function
The fast access function provides fast
access to the major functions in the
various operating modes. In most cases,
you may then make selections from lists
(radio stations, navigation destinations,
etc.). Select the first entry in the list to go
to the Operating Mode main menu.
Note
If no selections are made for a short
period of time when the fast access
function is displayed, the display will
automatically switch to the status display for the active operating mode.
1001
The fast access function for the radio is
shown here by way of example.
Press the various operating elements to
access:
• The radio fast access function
• The media fast access function
(CD, CD changer and memory card)
• The navigation fast access
function
• * the telephone fast access function (if Bluetooth is activated and a
telephone is connected).
• The address book fast access
function
General operation
Main menu
The main menu for each operating mode
provides access to the various functions
and possible settings for that mode.
1002
The Radio main menu is shown here by
way of example.
The main menu for the various operating
modes can be called up in two different
ways:
• Activate the fast access function (press
, , , * or
).
X Turn the rotary control/push button
to select the first entry in the fast access
list.
X Press the rotary control/push button
.
or
X Press the button for which you have
called up the fast access function again
( , , , * or
).
*Only available for the Traffic Pro with Bluetooth® wireless technology.
11
Page 12
General operation
1003
1004
Status display
All the information you need about the
current operating mode appears on the
status screen.
Note
The address book does not have a status
display.
If navigation is also active in addition to
the current radio or media operating
mode, a combined display may appear.
The radio status display is shown here
by way of example.
The radio status display with active navigation route guidance is shown here.
The status display can always be accessed
by pressing .
If route guidance is active, you can
toggle between the combined display
and the status display by pressing
repeatedly.
Options menu
You can call up the Options menu in the
status display.
X Press the rotary control/push button
.
The Options menu appears.
You can access the major functions for
the active operating mode directly in the
Options menu. Some of the possible
settings and functions in the Options
menu can also be set/activated via the
main menu.
1005
The Options menu for the radio function
is shown here by way of example.
How to use the menus
The commands are the same for all
menus.
1005
The Options menu for the radio function
is shown here by way of example.
Turn the rotary control/push button
to scroll through the menus.
Once you have made an entry in a menu,
the next menu will appear or you can
select the entry (by turning the rotary
control/push button ) to activate/
deactivate a function.
12
Page 13

General operation
If the menu entry is concealing another
menu, a small triangle will appear after
the menu entry.
or in front of a menu entry indicates that a function can be activated or
deactivated. The symbol stands for
off and the symbol for on.
Note
You can always press to go back
one step in the menu hierarchy.
Data entry menus
If data can be entered, special data entry
menus appear.
6003
The data entry menu for the surname in
an address book entry appears in the
example.
X Turn the rotary control/push button
and then press the rotary control/push
button to select each letter one after the
other.
Note
Select the symbol to delete the last
character in the entry.
If, when selecting the symbol , the
rotary control/push button is
pressed for longer than 2 seconds, the
complete entry is deleted.
You can change the character set for the
available characters by selecting various
symbols.
• Switch to lowercase
• Switch to uppercase
• Switch to numbers
• Switch to special characters
• Switch to lowercase international
• Switch to uppercase international
Accept entry:
X In the data entry menu, select the
symbol.
or
X Press the rotary control/push button
and hold it down for at least 2 seconds.
13
Page 14
General operation
Anti-theft device
Your Traffic Pro features two anti-theft
devices:
• Protection by means of a five-digit
unit code number
• Protection by means of a removable
control panel
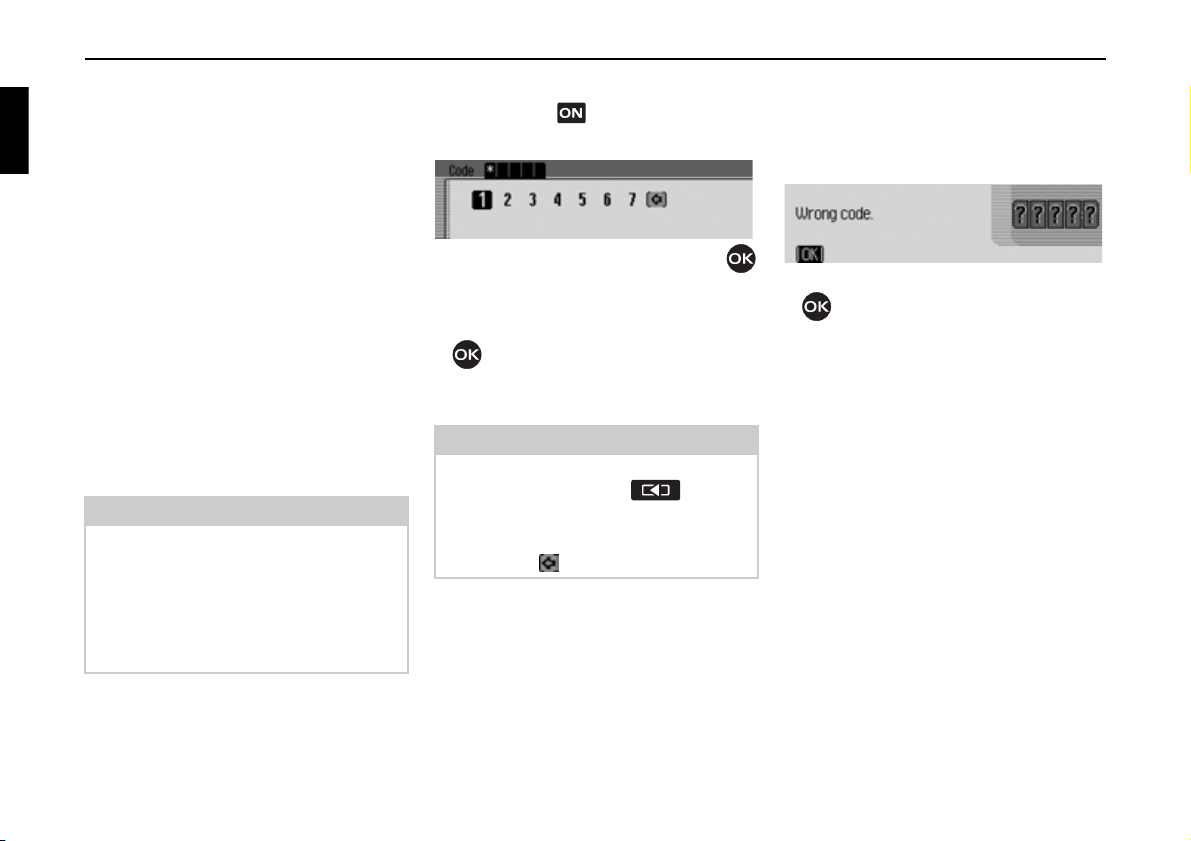
Entering unit code numbers
If the Traffic Pro is disconnected from
the electrical supply source, the antitheft device prevents it against unauthorised use once it has been reconnected.
You need the five-digit code number
printed on the CODE CARD to start up
the Traffic Pro.
Note
It is important to store the CODE
CARD in a safe place outside of the
vehicle. This will prevent unauthorised
use. The window stickers provided can
be attached to the windscreen/windows
inside your vehicle.
Shortly after the unit has been switched
on by pressing , the data entry menu
for the code number will appear.
1006
X Turn the rotary control/push button
to select the first digit of the code
number.
X Press the rotary control/push button
.
X Enter the remaining digits of the code
number in the same way.
Note
If you enter an incorrect number:
X Press the back button to delete
the last number entered.
or
X Select the symbol.
Once you have entered all 5 digits of the
code number correctly, the Traffic Pro
will come on automatically and you can
use all functions.
What to do if an incorrect code number has been entered
The following message appears if an
incorrect code number is entered.
1007
X Press the rotary control/push button
.
The data entry menu for the code number
appears again.
X Enter the correct code number as
described above.
14
Page 15
General operation
1008
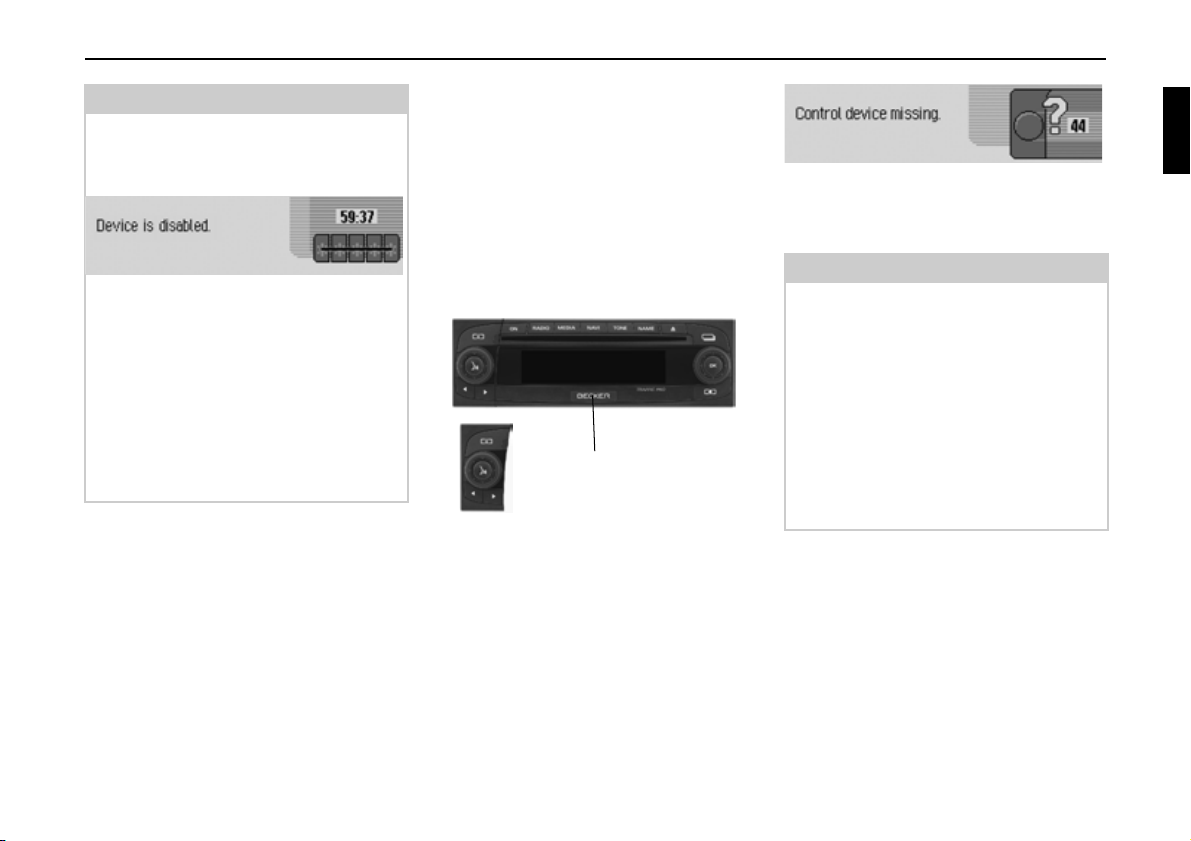
Note
Entering an incorrect code number three
times will disable the unit for approx.
1hour.
The time remaining until another
attempt can be made to enter the code
number is displayed.
X Leave the ignition switched on.
Switching the ignition off resets the
waiting time of one hour to zero.
Once the waiting time has elapsed, the
data entry menu for the code number
appears again.
Removing/Inserting the control panel
Part of the control panel can be removed
to provide additional effective protection
against theft.
The Traffic Pro cannot be switched on
without this removable control panel.
Removal
A
X Push the release slide for the control
panel (A) to the right.
The control panel is released.
X Remove the control panel from the
mount.
If the Traffic Pro is still switched on
when the control panel is removed, it is
switched to mute and disabled.
1009
If the control panel is reinserted within
45 seconds, the Traffic Pro will automatically switch itself back on.
Notes
• Please insert the control panel into the
accompanying protective cover after
removal.
Do not touch the metal contacts on the
control panel or on the Traffic Pro.
• If you move your vehicle once the
control panel has been removed, once
you insert the control panel, it will
take some time for the navigation
system to ascertain your position.
15
Page 16

General operation
Insertion
X Take the control panel out of its pro-
tective cover.
X Insert the left-hand side of the control
panel.
X Push the control panel into place.
The Traffic Pro is now ready for operation and can be switched on, or it will
switch itself on automatically.
Note
If a new control panel or the control panel
for a different Traffic Pro is inserted, the
code number for the Traffic Pro must be
entered as described in “Entering unit
code numbers” on page 14.
Inserting/Removing the cover
The scope of supply of the Traffic Pro
includes a red plastic insert. This plastic
insert can be snapped into the gap which
appears once the control panel has been
removed.
As well as serving as a protective cover
for any CF card/micro-drive, the red colour of the plastic insert clearly indicates
that the control panel has been removed.
Inserting the cover
X Remove the control panel as described
in “Removing/Inserting the control
panel” on page 15.
X Insert the plastic insert into the gap
with the hole at the top and the smooth
side facing outwards.
X Push the lower section of the plastic
insert into the gap until it snaps into
place.
The cover has now been inserted.
X Reinsert the control panel as described
in “Removing/Inserting the control
panel” on page 15.
Removing the cover
X Remove the control panel as described
in “Removing/Inserting the control
panel” on page 15.
X Insert your finger into the hole in the
plastic insert.
X Carefully push the plastic insert down-
wards.
X Pull the plastic insert forwards.
The cover has now been removed.
X Reinsert the control panel as described
in “Removing/Inserting the control
panel” on page 15.
16
Page 17
General operation
1010
Switching the unit on/off
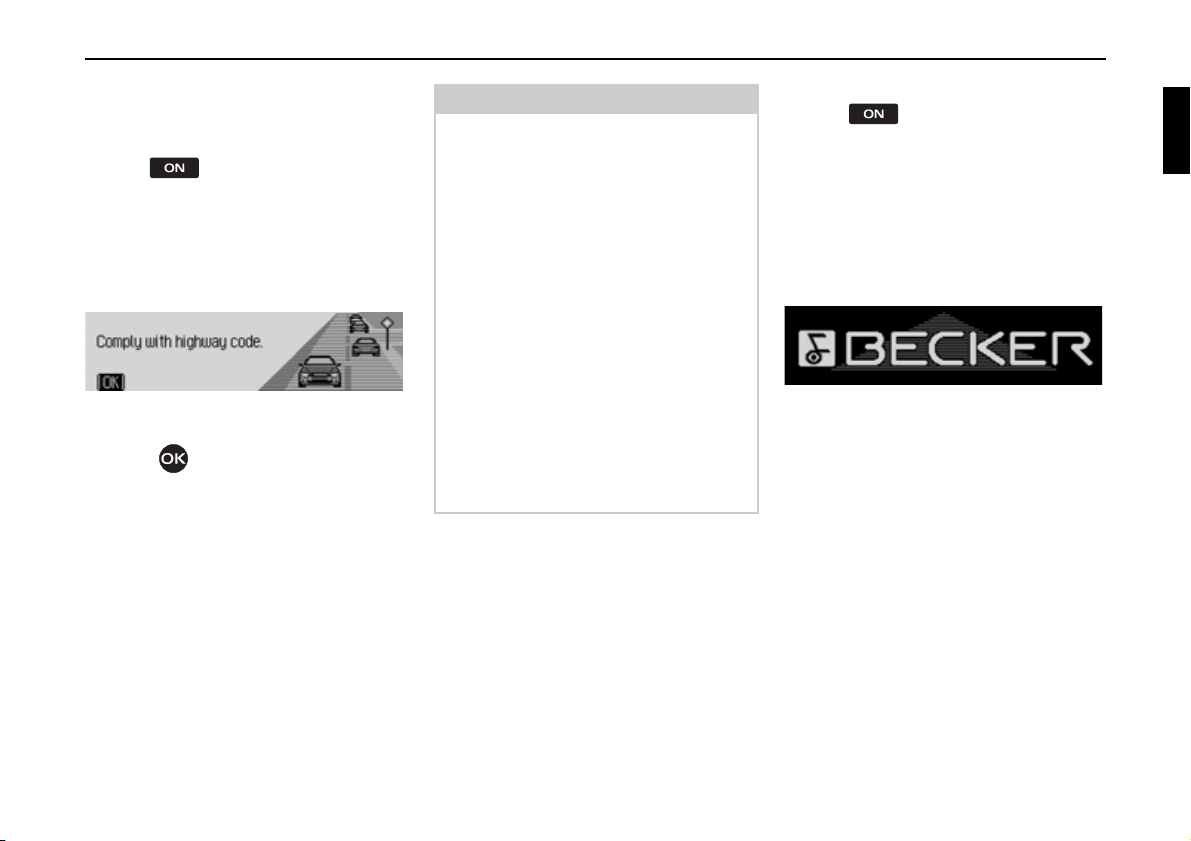
Switching on
X Press .
or
X If the Traffic Pro was switched off via
the ignition, the Traffic Pro will
switch back on once the ignition has
been switched on.
X Confirm the warning which appears
by pressing the rotary control/push
button .
Notes
• Unless the warning message is confirmed, the Traffic Pro will remain
disabled.
• Once it has been switched on, the
Traffic Pro will play back the last
source selected (radio or media). Any
mute or pause function activated will
be cancelled.
• If fewer than approx. 2 hours have
elapsed since the unit was last
switched off, active route guidance
will be restarted.
• If the volume was set to a very loud
value before the unit was last switched
off, it will be reset to setting 26 when
the unit is switched back on.
Switching off
X Press .
If the ignition is switched on, the Traffic
Pro is switched to standby mode. The
display goes dark and the Traffic Pro
sound is switched off.
or
X Switch off the vehicle ignition.
1010
The shutdown display appears for
approx. 5 seconds.
During this period of approx. 5 seconds,
shutdown can be aborted by pressing
one of the buttons on the Traffic Pro or
by switching the ignition back on.
The Traffic Pro then switches itself back
on and plays back the last source
selected (radio or media).
17
Page 18
General operation
1011
Setting the volume
There are 50 volume settings. The volume setting applies to all radio and audio
sources.
You can specify whether changes in volume should be displayed in graphics format or not in “Displaying the volume”
on page 130.
X Turn the rotary control/push button
clockwise/counter clockwise.
X The volume increases or decreases.
Note:
Subsequent sections of the operation
guide describe how to set the volume for:
• Traffic announcements (page Page 69)
• Navigation announcements and other
voice messages (Page 125)
• Acoustic signals (Page 130)
Sound settings
You can configure the sound of your
Traffic Pro to meet your requirements in
the sound settings. The settings are also
valid for all radio/audio sources.
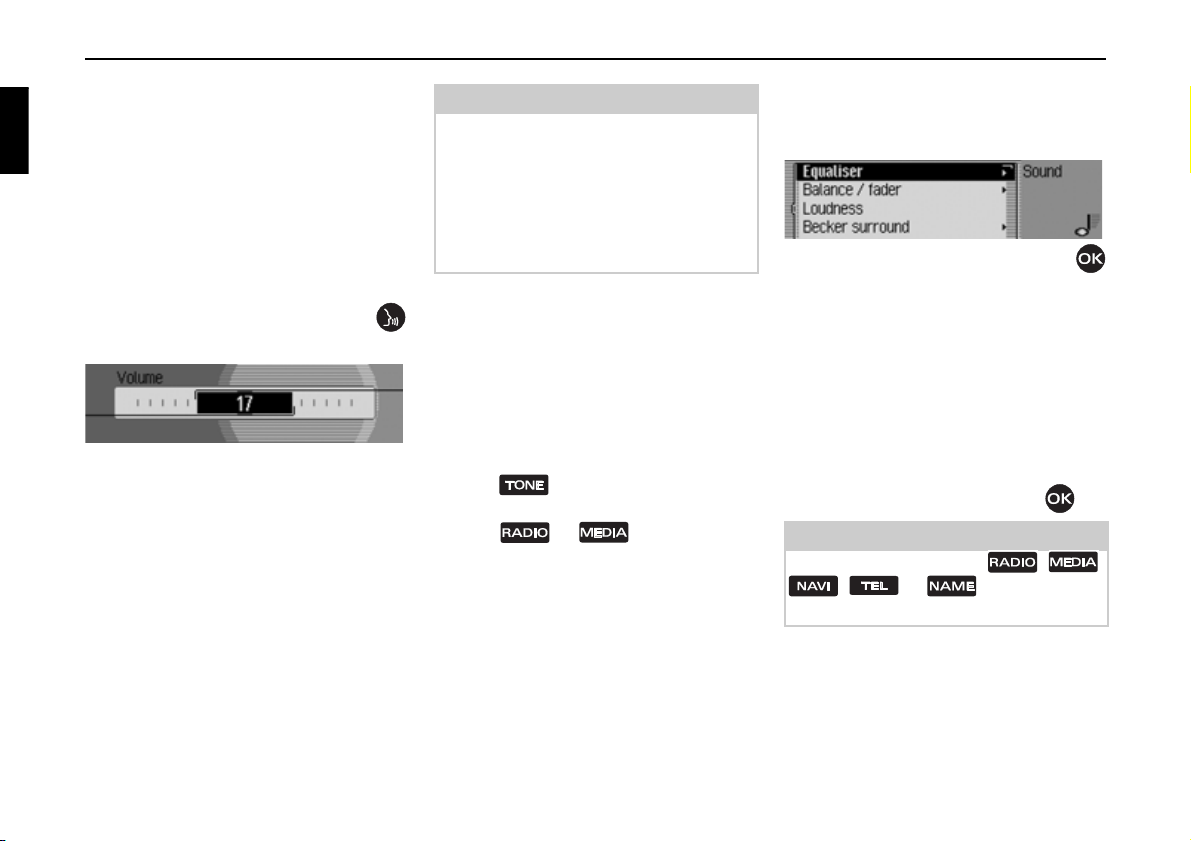
Calling up the sound settings
X Press .*
or
X Press or until the sound
settings appear.
or
X Select 6RXQG in the radio or Audio
main menu (Radio main menu
Page 58/Audio main menu Page 80).
1012
XTurn the rotary control/push button
to select one of the following options:
(TXDOLVHU,
%DODQFHIDGHU,
/RXGQHVV,
%HFNHUVXUURXQG,
&URVVRYHU,
6XEZRRIHU and
5HVHWVHWWLQJV
X Confirm your selection by pressing
the rotary control/push button .
Note:
Press one of the buttons , ,
, or in order to quit
the sound settings.
18
*Only available for the Traffic Pro with Bluetooth® wireless technology.
Page 19
General operation
1013
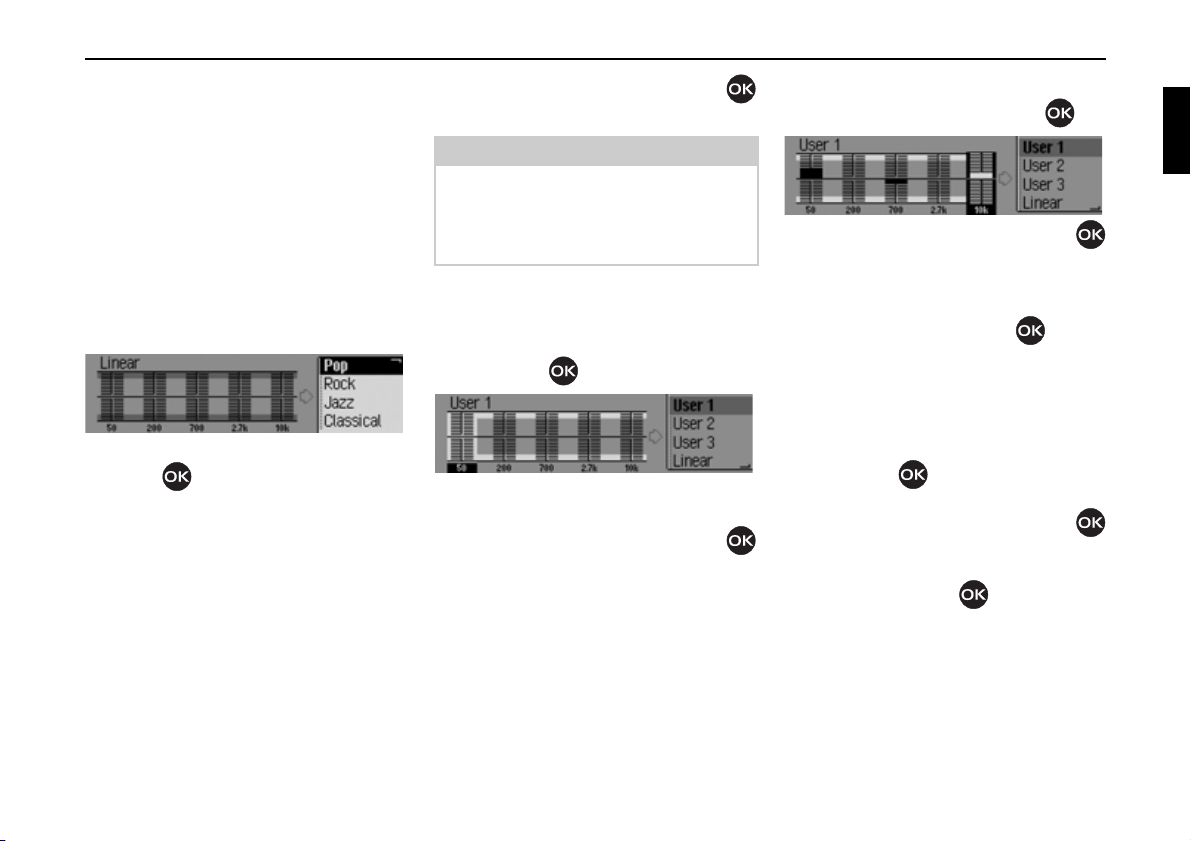
Setting the equalizer
You can switch the acoustic pattern on 5
frequency bands with the equalizer
setting.
4 equalizer presets are also available for
selection. An additional option also
allows you to make another 3 equalizer
settings.
or
X Select (TXDOLVHU in the sound settings.
X Next, turn the rotary control/push
button to select one of the four
equalizer presets (
and &ODVVLFDO) or one of the three userdefined equalizer settings (
or /LQHDU).
5RFN3RS, -D]]0XVLF
8VHU - 8VHU
X Turn the rotary control/push button
to apply the required equalizer setting.
Note:
The equalizer presets (
0XVLF
and &ODVVLFDO) cannot be modified.
Select
/LQHDU to set the equalizer settings
5RFN 3RS, -D]]
to an average value.
Defining the equalizer setting
X Select 8VHU, 8VHU or 8VHU.
X Press and hold down the rotary control/
push button .
1014
The cursor jumps to the first frequency
band.
X Turn the rotary control/push button
to select the frequency band to be
changed.
X Confirm your selection by pressing
the rotary control/push button .
1015
X Turn the rotary control/push button
to select the required setting for the
selected frequency band.
X Confirm the setting by pressing the
rotary control/push button .
You may now change other settings.
Once you have made the required settings:
X Press and hold down the rotary control/
push button .
or
X Turn the rotary control/push button
to select the arrow next to the
frequency bands and press the rotary
control/push button .
You may now make other equalizer
settings or select one of the presets.
19
Page 20
General operation
1016
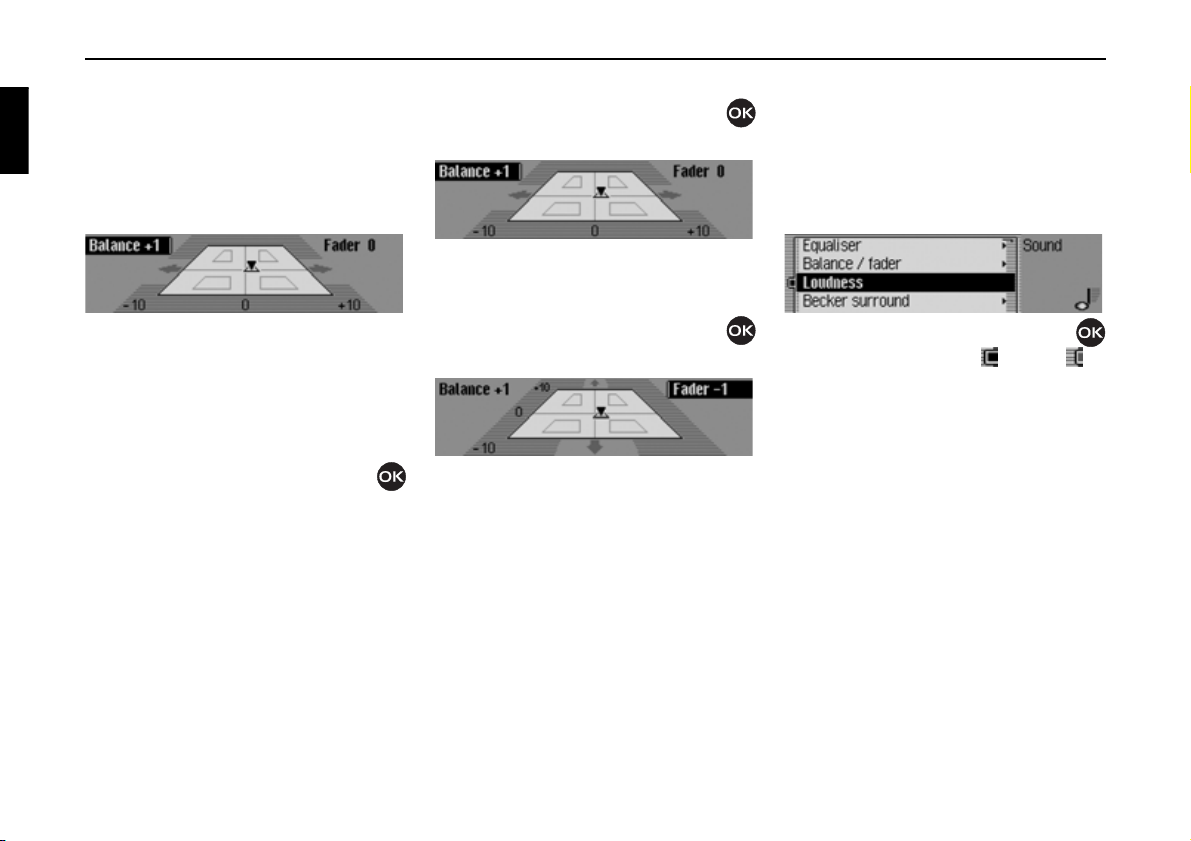
Setting balance and fader
You can shift the tone centre in the vehicle using the balance and fader setting.
X Select %DODQFH IDGHU in the sound
settings.
An image of the vehicle interior in the
direction of travel appears on the display. The small triangle indicates the
current position of the tone centre.
The Balance setting is active.
X Turn the rotary control/push button
to select
%DODQFH or )DGHU.
Balance setting
X Turn the rotary control/push button
clockwise/counter clockwise.
1016
The tone centre moves to the right/left.
Fader setting
X Turn the rotary control/push button
clockwise/counter clockwise.
1017
The tone centre moves forwards/backwards.
Switching loudness on/off
With loudness, the sound is improved by
increasing the bass volumes (especially
suitable for low-volume settings).
X Select /RXGQHVV in the sound settings.
1018
X Press the rotary control/push button
to switch loudness on ( ) or off ( ).
20
Page 21
General operation
1019
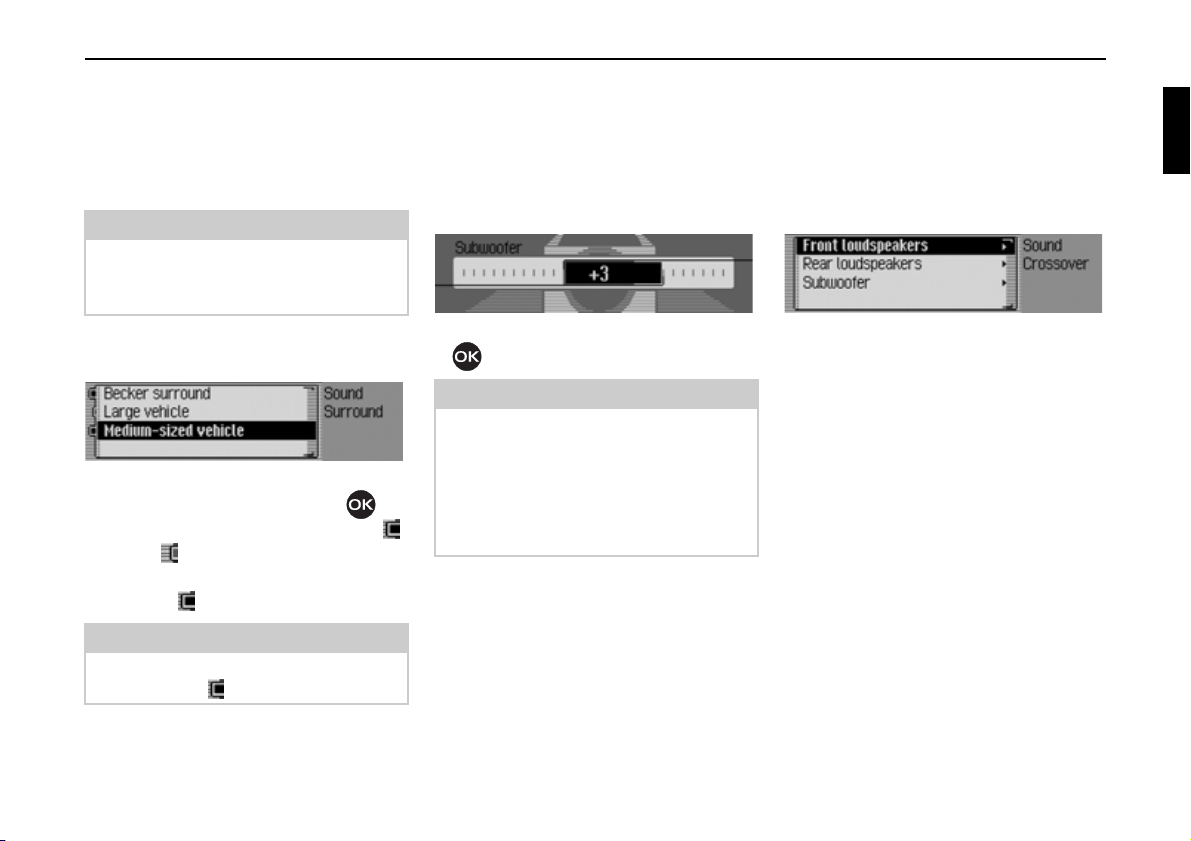
Becker Surround
You can use this function to activate virtual surround sound and select the vehicle size to optimise the surround sound
function.
Note:
The Becker Surround function is not
available for medium wave or short
wave.
X Select %HFNHU VXUURXQG in the sound
settings.
X Select %HFNHU VXUURXQG and press the
rotary control/push button to
switch virtual surround sound on ( )
or off ( ).
X Select /DUJHYHKLFOH or 0HGLXPVL]HGYHKL
FOH
(on = ).
Note:
Only one of the vehicle types in the list
can be active ( ).
Subwoofer
You can set the volume level of the
subwoofer output/ deactivate the
subwoofer output.
X Select 6XEZRRIHU in the sound settings.
Crossover
Use this function to set the threshold
frequencies for the front loudspeakers,
the rear loudspeakers and the subwoofer.
X Select &URVVRYHU in the sound settings.
1024 1025
X Turn the rotary control/push button
to select the required value.
Note:
A setting of "+10" indicates an increase
in the volume of the subwoofer.
Select
RII to deactivate the subwoofer
output.
In addition,
6XEZRRIHU is deactivated
with the crossover setting.
X You may now select )URQWORXGVSHDNHUV,
5HDUORXGVSHDNHUV or 6XEZRRIHU.
•
)URQWORXGVSHDNHUV and 5HDUORXGVSHDNHUV
You can set the lower threshold
frequency of the front and rear
loudspeakers to a value of between 20
and 150 Hz.
•
6XEZRRIHU
You can set the upper threshold
frequency of the subwoofer to a value
of between 50 and 150 Hz.
21
Page 22
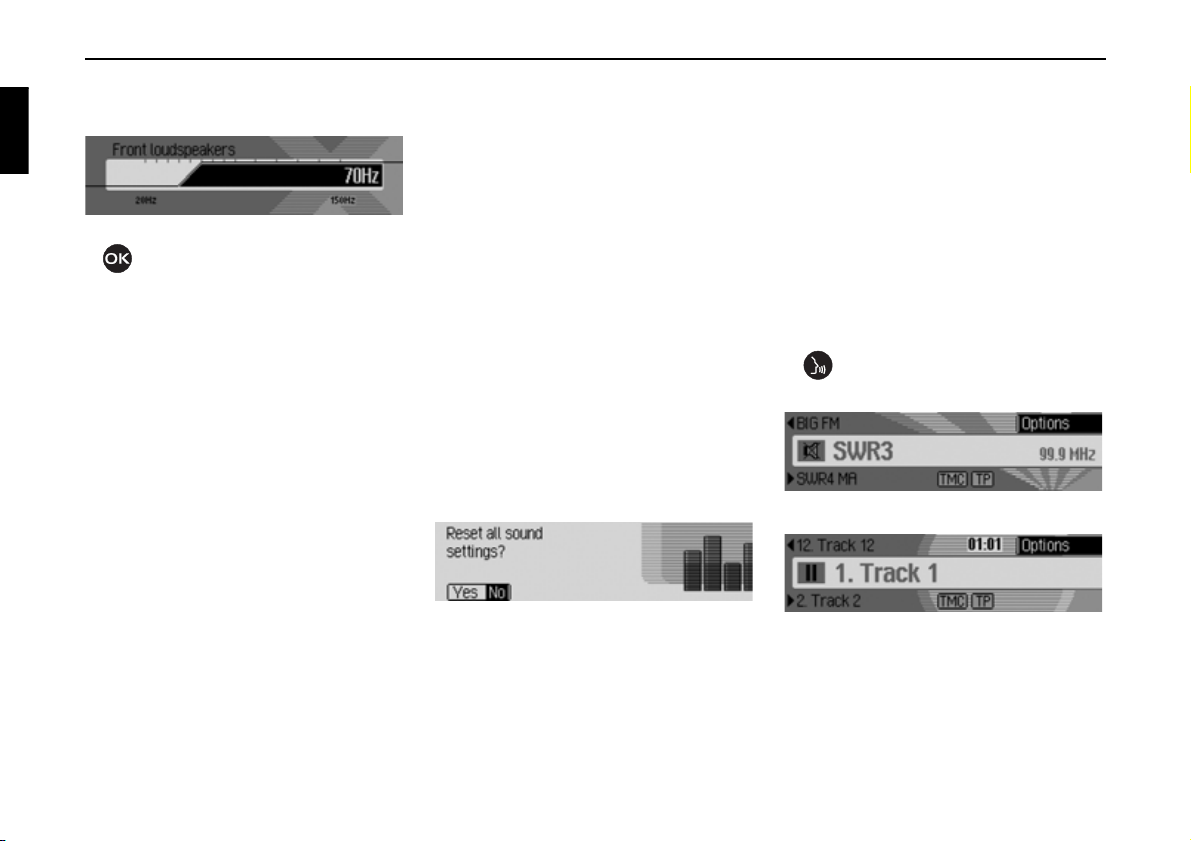
General operation
1026
In this example you can see the settings
for the front loudspeakers.
X Turn the rotary control/push button
to select the required value.
Reset settings
You can reset all sound settings to the
default settings.
The following settings are reset to the
relevant default value:
•
(TXDOLVHU: All default settings are reset
to the initial value. The user-defined
setting is reset to zero.
•
%DODQFHIDGHU to centre setting
•
/RXGQHVV to off
• %HFNHUVXUURXQG to off
•
6XEZRRIHU to 0.
•
&URVVRYHU front and rear loudspeakers
to 50 Hz, subwoofer to 100 Hz.
X Select 5HVHW VHWWLQJV in the sound set-
tings.
1020
X Select <HV to reset the sound settings
or
1R to continue without making any
changes.
Select
<HV to reset the sound settings.
Mute
You can switch your Traffic Pro to mute,
i.e. switch off the sound from the current
radio/media source.
However, navigation announcements,
traffic announcements (if TP has been
activated) and other voice announcements on the Traffic Pro continue to be
transmitted unaffected.
X Press the rotary control/push button
and hold it down for at least
2 seconds.
1021
Example of muted radio mode.
1022
Example of muted media mode.
22
Page 23

You can deactivate the mute function as
follows:
• Press the rotary control/push button
again and hold it down for at least
2 seconds.
• Change the volume by turning the
rotary control/push button .
•Press or .
• Select another station or track.
• Switch the Traffic Pro off and back on
again.
General operation
23
Page 24

Navigation mode
Navigation mode
What is navigation?
The term “navigation” (lat. navigare = to
travel by sea) is generally understood to
mean the location of a vehicle, the determination of the direction and distance
from the desired destination and the
required route. As navigation aids, stars,
prominent landmarks, compass and satellites are used.
With Traffic Pro, location is determined
with the GPS receiver (GPS = Global
Positioning System). The direction and
distance from the destination are determined using a digital road map, a navigation computer and sensors. A speedometer signal and a reverse signal are
additionally used to calculate the route.
For safety reasons, navigation is pre-
dominantly in spoken form supported
by a direction indicator on the display.
Safety instructions
G
• Road traffic regulations always take
priority. The navigation system is
only an aid. Errors may occur in individual data items/entries. At all times,
the driver must decide whether or not
to heed the information provided.
We do not accept liability for erroneous data provided by the navigation
system.
• Observation of traffic signs and local
traffic regulations must always take
priority.
• Traffic guidance is restricted to passenger vehicles only. Special driving
recommendations and regulations for
other vehicles (e.g. commercial vehicles) are not included.
• Destinations may only be entered
when the vehicle is stationary.
Navigation CDs
Two navigation CDs are supplied with
the navigation unit.
These CDs contain a digitised road map.
One CD for Northern/Eastern Europe
(CD no. 1) and one CD for Southern/
Western Europe (CD no. 2) are supplied.
The complete trunk road network in the
digitised area of Northern and Southern
Europe are available on the CDs.
All digitised roads of the northern/eastern countries are also included on the
Northern/Eastern Europe CD. All digitised roads of the southern/western
countries are also included on the Southern/Western Europe CD.
In these detailed areas of the Northern/
Eastern or Southern/Western Europe CD
road map, motorways, regional roads and
unclassified roads as well as country
roads are stored. Larger cities and communities are comprehensively covered.
For smaller towns and communities, the
regional and unclassified roads or access
roads and the town centres are included.
24
Page 25

Navigation mode
One-way streets, pedestrian zones, turn
bans and other traffic regulations are
taken into account as far as possible.
There may be discrepancies between the
data on the navigation CD and the actual
local situation, due to permanent changes
to road systems and their traffic regulations.
Note:
For Norway, Sweden, Finland and Denmark, non-verified data has been used
to achieve a high depth of digitisation;
i.e. with this data, the navigation system
cannot refer to information such as
motorway, trunk road, 30 zone, oneway street or other traffic regulations,
as this is not recorded.
All roads can be used, but optimum
route guidance cannot be guaranteed.
Navigation with two European CDs For example, if you wish to navigate
from a town on the Southern/Western
A
Europe CD (D) to a town on the Northern/Eastern Europe CD (B), enter your
destination address. After entering the
town, you will be prompted to insert
navigation CD 1 by the display
IRU GHWDLOHG QDYLJDWLRQ GDWD /DQG
,QVHUW&'
After
inserting the relevant CD, enter the
town, the road and, if required, the house
B
number or the town centre.
The required map data is loaded and
C
stored internally after route calculation
has started.
D
A Area of Northern/Eastern Europe CD
with all digitised roads.
B For example, a town or an address in
Germany (on the Northern/Eastern
Europe CD).
C Area of Southern/Western Europe CD
with all digitised roads.
D For example, a town or an address in
France (on the Southern/Western
Europe CD).
25
Page 26
Navigation mode
2001
2002
Selecting navigation
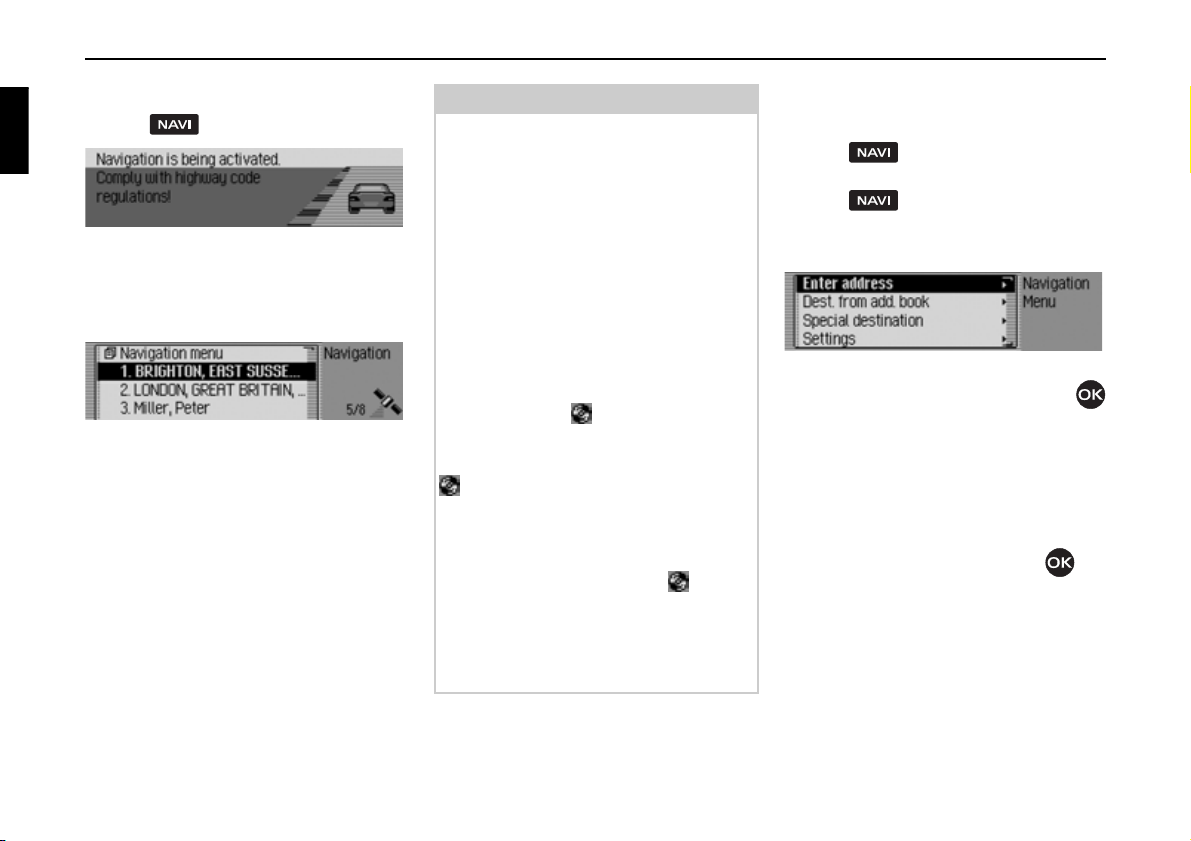
X Press .
Navigation is activated. The display only
appears if navigation has not been activated since the last time the Traffic Pro
was switched on or if it is not yet ready.
The Fast Access menu then appears. The
number of satellites received appears on
the right-hand side of the display (in the
example, 5 of the maximum of 8 receivable satellites are being received).
In fast access mode, you can select and
navigate to the last destinations entered/
the destinations you have stored in fast
access mode.
For more information, see “Navigation
fast access” on page 35.
Note:
The navigation CD must be loaded
when starting navigation mode for the
first time.
If calibration of the navigation system
has not yet been completed, the system
will prompt you to take a drive for calibration (see Installation Guide).
A navigation CD containing the data for
the target country is required for navigation operations.
The navigation CD must be inserted to
start the calculation of a route. During
calculation, the symbol appears on
the right-hand side of the display. Once
the calculation has been completed, the
symbol disappears, the navigation
CD can be removed and an audio CD
may be inserted.
When entering destinations, driving off
should be delayed until the symbol
has disappeared.
For distant destinations, you may be
prompted to re-insert the navigation CD
at a later time.
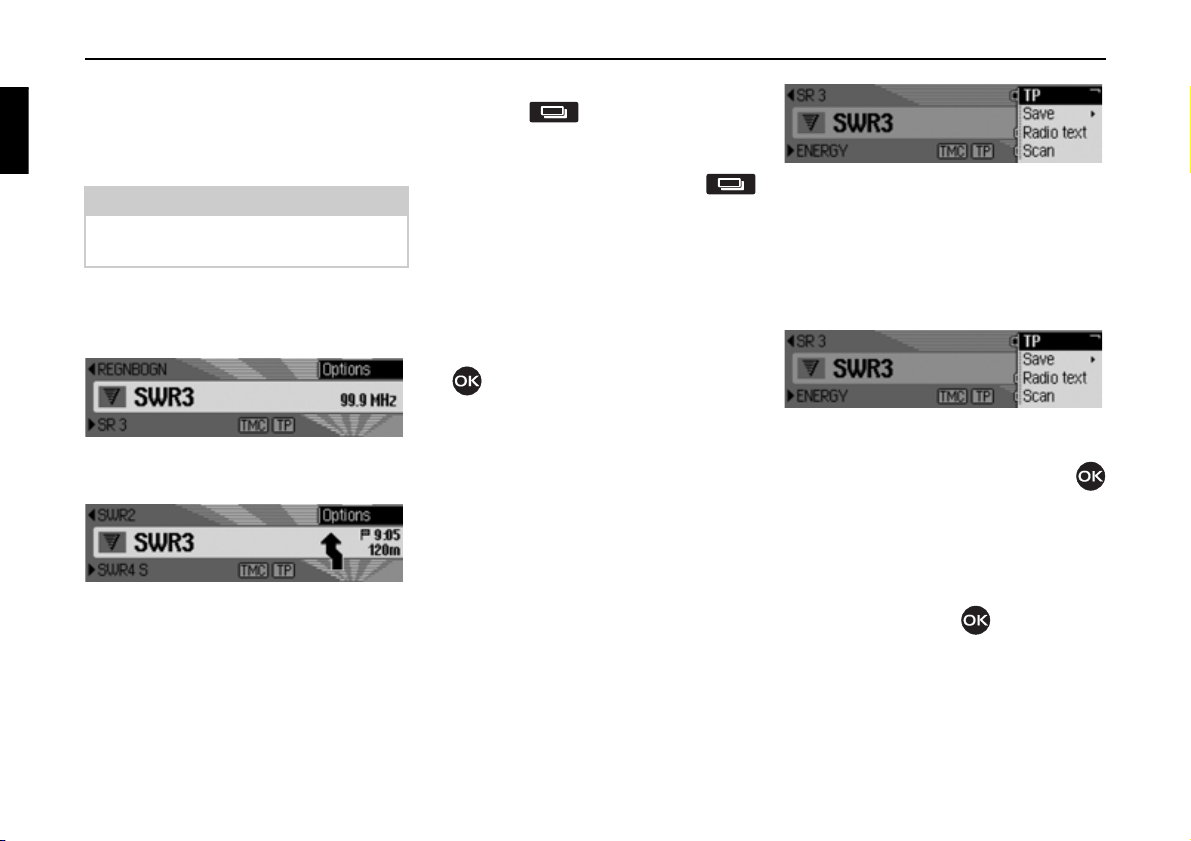
Calling up the Navigation
main menu
X Press twice.
or
X Press .
The Fast Access menu appears.
X Select the 1DYLJDWLRQPHQX entry.
Old
version
The Navigation menu appears.
X Turn the rotary control/push button
to select one of the following options:
(QWHUDGGUHVV,
'HVWIURPDGGERRN,
6SHFLDO'HVW or
6HWWLQJ
X Confirm your selection by pressing
the rotary control/push button .
The required function is called up.
26
Page 27
Navigation mode
• (QWHUDGGUHVV
Accesses the data entry menu for the
destination. See “Entering a destination” on page 27.
•
'HVWIURPDGGERRN
You can select a destination from the
address book. See “Selecting a destination from the address book” on
page 38.
•
6SHFLDO'HVW
Access the POI selection menu. POIs
include petrol stations, airports or hospitals, for example. See “Point of
interest” on page 39.
•
6HWWLQJ
Accesses the Navigation Settings menu.
See “Settings” on page 55.
Note
If route guidance is already active, you
can start to enter another destination by
selecting
ERRN
(QWHU DGGUHVV, 'HVW IURP DGG
and 6SHFLDO'HVW.
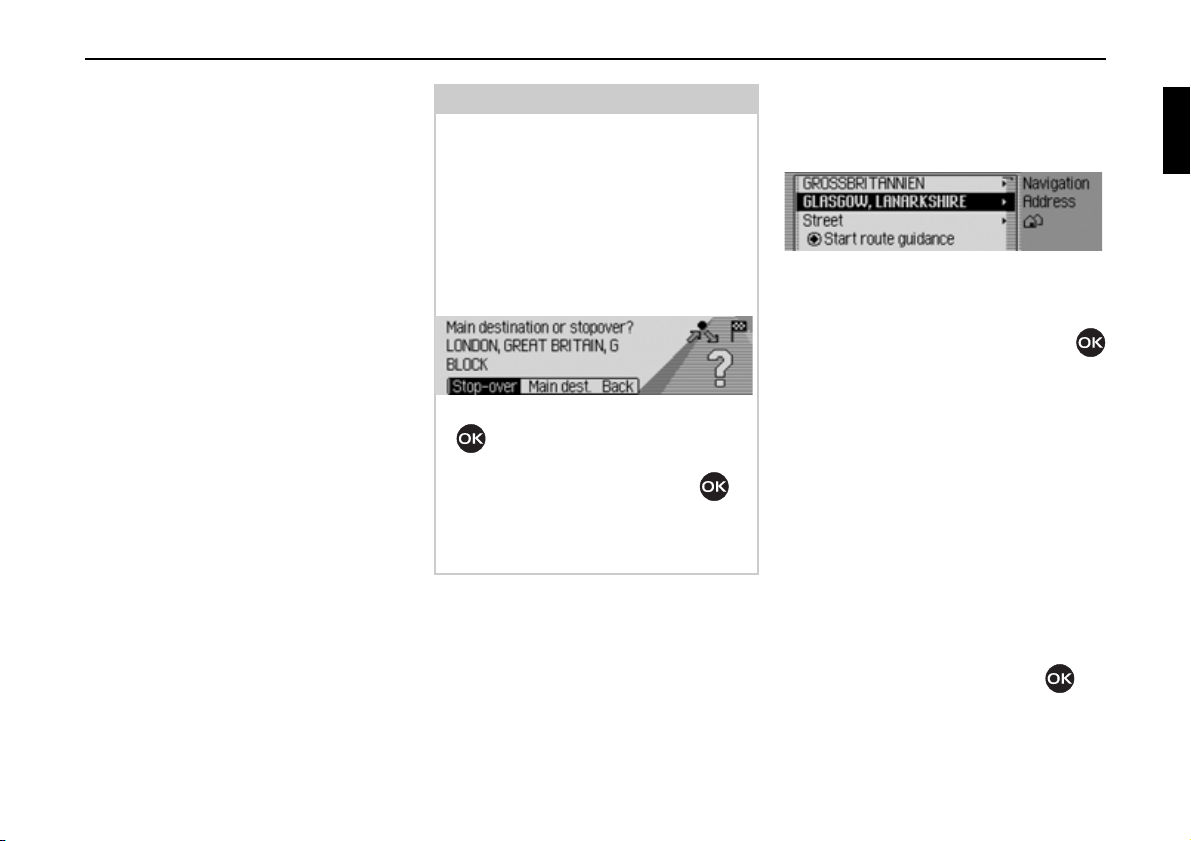
Once the destination has been selected,
the Traffic Pro will prompt you to confirm if the new destination is to be used
as the main destination or a stopover.
2096
X Turn the rotary control/push button
to select
X Confirm your selection by pressing
the rotary control/push button .
Depending on the selection, the new
destination is now used as a stopover or
the new main destination.
6WRSRYHU or 0DLQGHVW.
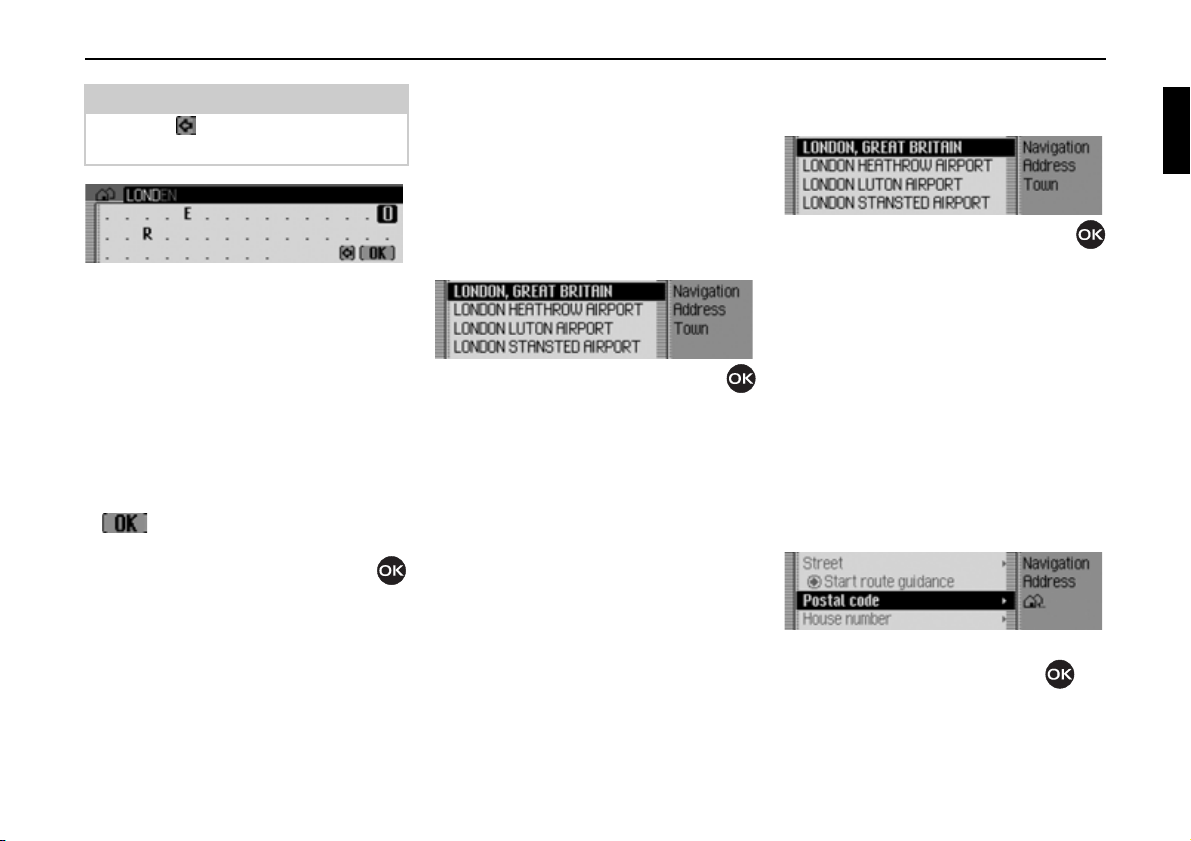
Entering a destination
X In the Navigation main menu, select
the
(QWHUDGGUHVV entry.
2004
The Enter Destination menu appears.
The last country selected and the last
town selected appear first.
X Turn the rotary control/push button
to select one of the following options:
*5($7%5,7$,1(country as example),
*/$6*2:(town as example),
6WUHHW,
6WDUWURXWHJXLGDQFH,
+RXVHQXPEHU,
,QWHUVHFWLRQ,
&HQWUH,
3RVWDOFRGH (postcode),
5RXWHVKRUW/5RXWH IDVW or 5RXWH G\QDPLF
and
6DYHGHVWLQDWLRQ
X Confirm your selection by pressing
the rotary control/push button .
27
Page 28
Navigation mode
The corresponding menu appears or the
required action is initiated.
Note
Some entries in the Enter Destination
menu cannot be selected directly. For
example, a house number cannot be
entered unless the name of a road has
been entered first. These non-selectable
entries are greyed out in the display and
cannot be selected.
The entry will also be greyed out if no
house numbers are available for a
specific road.
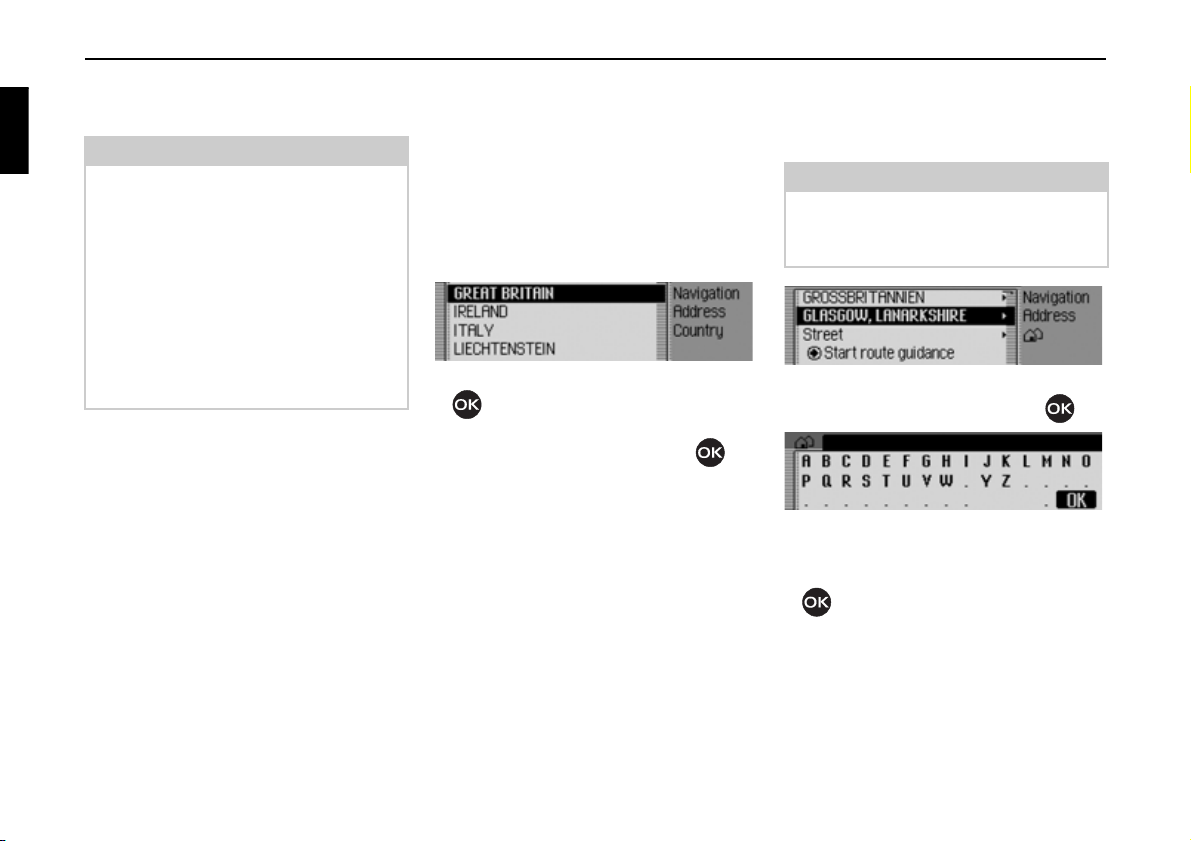
Selecting a country
If your destination is located in a different
country (
*5($7 %5,7$,1 in the example
display) you must first select the required
country.
X In the Enter Destination menu, select
the country (
*5($7%5,7$,1 in the exam-
ple).
2005
X Turn the rotary control/push button
to select your destination country.
X Confirm your selection by pressing
the rotary control/push button .
Entering a destination town
X In the Enter Destination menu, select
the town (
*/$6*2: in the example).
Note
If your destination is in the same town
as that displayed, you can continue
directly with entering the road/centre.
2004
X Confirm your selection by pressing
the rotary control/push button .
2006
The data entry menu for the town
appears.
X Turn the rotary control/push button
and then press the rotary control/
push button to select each letter one
after the other.
28
Page 29
Navigation mode
2007
Note
Select the symbol to delete the last
character in the entry.
The last letter entered is highlighted. To
help, the name of the location closest to
the previous entry appears. The Traffic
Pro offers only the possible remaining
letters for selection. If no other entries
are available, the Traffic Pro completes
the town name automatically.
Accept entry:
X In the data entry menu, select the
symbol.
or
X Press the rotary control/push button
and hold it down for at least 2 seconds.
If the complete town name has already
been entered or completed automatically,
the unit will either switch automatically
to either the town distinguishing list or
you can continue directly with entering
the road/centre.
If an incomplete town entry has been confirmed, the town selection list appears.
2008
X Turn the rotary control/push button
and then press the rotary control/push
button to select the required town.
If the entry made is unambiguous, you
can continue directly with entering the
road/centre.
The town distinguishing list appears if
the selection is ambiguous.
2008
X Turn the rotary control/push button
and then press the rotary control/push
button to select the required town.
You can now continue with entering the
road/centre.
Selecting destination via
postcode
You can also select a destination via its
postcode.
X In the Enter Destination menu, select
3RVWDOFRGH.
2009
X Confirm your selection by pressing
the rotary control/push button .
29
Page 30
Navigation mode
2010
2011
The data entry menu for the postcode
appears.
X Turn the rotary control/push button
and then press the rotary control/
push button to select the numbers and
letters one after the other.
Accept entry:
X In the data entry menu, select the
symbol.
or
X Press the rotary control/push button
and hold it down for at least 2 seconds.
If you have entered an incomplete postcode, the postcode selection list appears.
X Turn the rotary control/push button
and then press the rotary control/
push button to select the required postcode.
The display then shows either the destination corresponding to the postcode in
the Enter Destination menu or, if the
postcode is shared among several towns,
a list containing these towns.
2012
X Turn the rotary control/push button
and then press the rotary control/push
button to select the required town.
You can now continue with entering the
road/centre.
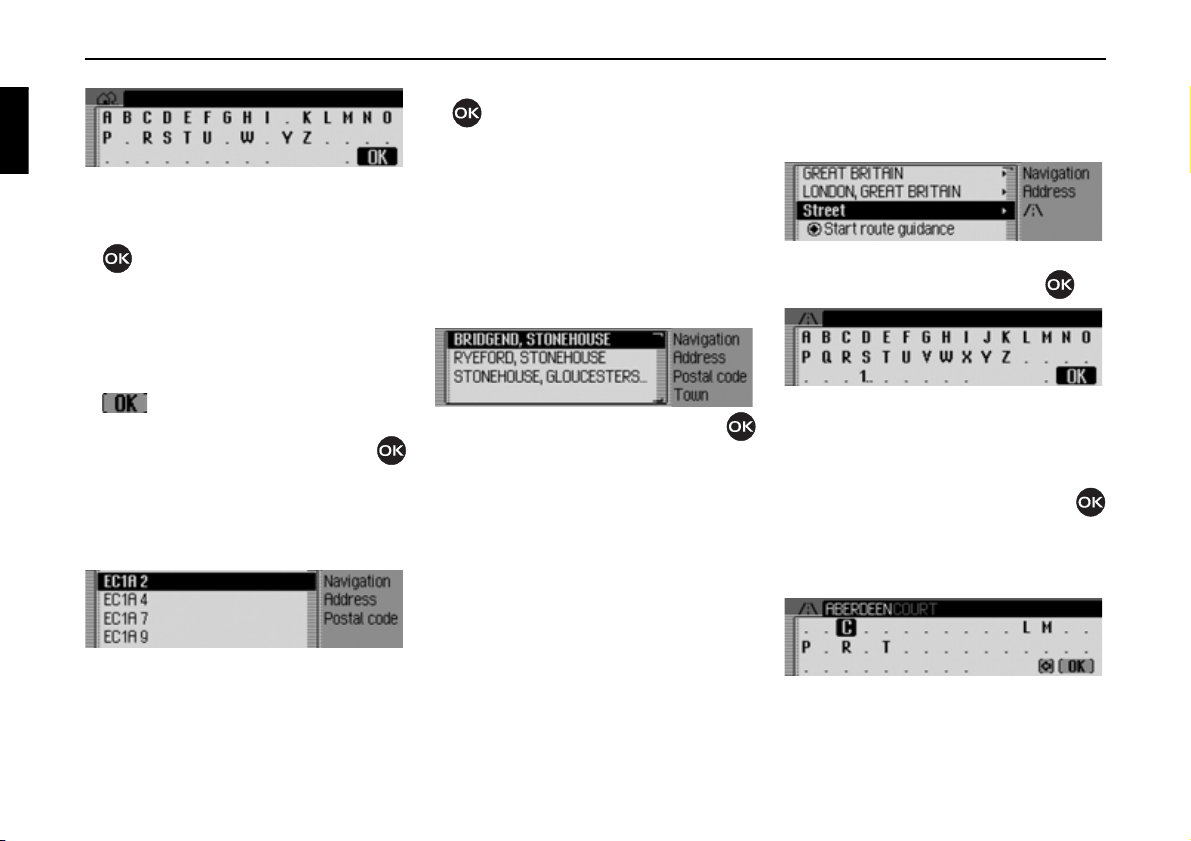
Entering the destination road
X In the Enter Destination menu, select
6WUHHW.
2013
X Confirm your selection by pressing
the rotary control/push button .
2014
The data entry menu for the road appears
or, if fewer than 10 roads are available in
the town, the unit switches directly to the
road list.
X Turn the rotary control/push button
and then press the rotary control/push
button to select each letter one after the
other.
2015
30
Page 31

Navigation mode
2016
The last letter entered is highlighted. To
help, the name of the road closest to the
previous entry is displayed. The Traffic
Pro offers only the possible remaining
letters for selection. If no other entries
are available, the Traffic Pro completes
the road name automatically.
Accept entry:
X In the data entry menu, select the
symbol.
or
X Press the rotary control/push button
and hold it down for at least 2 seconds.
If you have entered an incomplete road
name, the road list appears.
X Turn the rotary control/push button
and then press the rotary control/push
button to select the required road.
You can now start route guidance by
selecting
6WDUW URXWH JXLGDQFH or enter a
house number/junction for the road
entered.
Entering the destination
town centre
Instead of navigating directly to a road,
you can also navigate to a town centre.
X In the Enter Destination menu, select
&HQWUH.
2017
X Confirm your selection by pressing
the rotary control/push button .
2018
The data entry menu for the centre
appears or, if fewer than 10 centres are
available in the town, the unit switches
directly to the centre list.
X Turn the rotary control/push button
and then press the rotary control/push
button to select each letter one after the
other.
31
Page 32

Navigation mode
2019
The last letter entered is highlighted. To
help, the name of the centre closest to
the previous entry is displayed. The
Traffic Pro offers only the possible
remaining letters for selection. If no
other entries are available, the Traffic
Pro completes the centre name automatically.
Accept entry:
X In the data entry menu, select the
symbol.
or
X Press the rotary control/push button
and hold it down for at least 2 seconds.
If you have entered an incomplete centre
name, the centre list appears.
2020
X Turn the rotary control/push button
and then press the rotary control/push
button to select the required centre.
You can now start route guidance by
selecting
6WDUWURXWHJXLGDQFH.
Entering house number for
destination road
Note
A house number can only be selected if
this information is stored on the navigation CD.
X In the Enter Destination menu, select
+RXVHQXPEHU.
2021
X Confirm your selection by pressing
the rotary control/push button .
2022
A list containing ranges of house numbers appears.
X Turn the rotary control/push button
and then press the rotary control/push
button to select the required range.
You can now start route guidance by
selecting
Selecting junction for
destination road
Note
A junction can only be selected if this
information is stored on the navigation
CD.
X In the Enter Destination menu, select
6WDUWURXWHJXLGDQFH.
,QWHUVHFWLRQ.
32
Page 33

Navigation mode
2023
2024
X Confirm your selection by pressing
the rotary control/push button .
A list of junctions appears.
Note
If the destination road entered crosses
more than 9 roads, a data entry menu
corresponding to the data entry menu
for roads appears.
X Turn the rotary control/push button
and then press the rotary control/push
button to select the required junction.
Setting the route options
You can use the route options to specify
how the Traffic Pro calculates the route
to the destination.
X In the Enter Destination menu,
depending on the previous setting,
select
5RXWH VKRUW, 5RXWH IDVW or 5RXWH
G\QDPLF
.
2025
Confirm your selection by pressing the
rotary control/push button .
2026
The Route Options menu appears.
X Turn the rotary control/push button
to select one of the following options:
'\QDPLFURXWH,
4XLFNURXWH,
6KRUWURXWH,
$YRLGPRWRUZD\,
$YRLGWXQQHO,
$YRLGWROO,
$YRLGIHUU\ or
5HDG\
X Turn the rotary control/push button
to switch the required function on ( )
or off ( ).
Note:
Only one of the three settings (
URXWH
,4XLFN URXWH or6KRUWURXWH) may be
'\QDPLF
active ( ) at the same time.
•
'\QDPLFURXWH
The route is calculated taking into
account the traffic announcements
received.
If dynamic route guidance is active,
the routes are calculated on the basis
of the fastest route to the destination.
33
Page 34

Navigation mode
Notes:
• Dynamic route guidance is not possible in all countries at present.
• When new route calculations are
made with active dynamic route guidance, the Traffic Pro may request the
navigation CD (if it is not already
inserted).
• 4XLFNURXWH
With this setting, the route with the
shortest possible travel time to the
destination is calculated.
•
6KRUWURXWH
With this setting, the route with the
shortest possible distance to the destination is calculated.
•
$YRLG PRWRUZD\, $YRLG WXQQHO,$YRLGWROO
and$YRLGIHUU\
You can use these entries for example
to exclude ferries or motorways from
the route calculation. The Traffic Pro
will then attempt to calculate a route
which does not contain any motorways or ferries.
Notes:
• Routes without motorways can only
be calculated for short distances (up
to 200 km depending on digitalisation
density).
•Even if
$YRLGWROO is selected, toll roads
(e.g. in Switzerland or Austria) will
be included in the route calculation.
Saving/Deleting route options
X In the Route Options menu, select
5HDG\.
X Confirm your selection by pressing
the rotary control/push button .
or
X Press .
You can now start route guidance
Saving a destination
Once you have entered a destination,
you can save it in the address book. This
may be useful if you wish to travel to
this destination again at a later date.
X In the Enter Destination menu, select
6DYHGHVWLQDWLRQ.
2027
X Confirm your selection by pressing
the rotary control/push button .
Proceed as described in “Saving an entry
in the address book” on page 36.
34
Page 35

Navigation mode
Navigation fast access
In navigation fast access mode, the last
50 destinations to which the vehicle has
travelled are displayed.
The destinations 1 - 20 are numbered for
selection using the voice control.
You may:
• Start navigation directly to these destinations
• Protect the entries in fast access, i.e.
the entry will not be deleted when the
maximum number of destinations is
reached. The oldest unprotected entry
will be deleted.
• Delete individual fast access entries.
• Delete the entire fast access list.
• Save an entry from the fast access list
to the address book.
X Press .
2002
The navigation fast access function
appears.
Navigating from fast access
X Call up the navigation fast access
function.
X Turn the rotary control/push button
and then press the rotary control/push
button to select the required target from
the list.
Route guidance to this destination will
be started immediately.
Protecting an entry
X Call up the navigation fast access
function.
X Select the entry to be protected.
X Press the rotary control/push button
until a menu appears.
X Select the 3URWHFWHQWU\ entry.
X Switch protection on ( ) or off ( )
by pressing the rotary control/push
button .
Protected entries are identified by the
symbol.
Note:
A protected entry is only protected from
being deleted in fast access mode.
However, you can delete this protected
entry individually, and it will also be
deleted when the complete list is
deleted.
35
Page 36

Navigation mode
Deleting an entry
X Call up the navigation fast access
function.
X Select the entry to be deleted.
X Press the rotary control/push button
until a menu appears.
X Turn the rotary control/push button
and then press the rotary control/push
button to select the
The entry is deleted from the fast access
list.
'HOHWHHQWU\ entry.
Deleting a list
X Call up the navigation fast access
function.
X Press the rotary control/push button
until a menu appears.
X Turn the rotary control/push button
and then press the rotary control/push
button to select the
'HOHWHOLVW entry.
2028
X When the prompt appears, select <HV
to delete the list or 1R to retain it.
If you select
in the fast access function.
<HV, the list will be deleted
Saving an entry in the
address book
X Call up the navigation fast access
function.
X Select the entry to be saved.
X Press the rotary control/push button
until a menu appears.
X Turn the rotary control/push button
and then press the rotary control/push
button to select the
6DYHLQDGGUHVVERRN
entry.
2029
X Turn the rotary control/push button
to select one of the following options:
&UHDWHQHZHQWU\ or
$PHQGHQWU\
X Confirm your selection by pressing
the rotary control/push button .
36
Page 37

Navigation mode
2030
• &UHDWHQHZHQWU\
Select this option to create a new entry
in the address book.
•
$PHQGHQWU\
Select this option to add the current
address to an existing entry in the
address book.
Creating a new entry
X Select the &UHDWHQHZHQWU\ entry.
X Turn the rotary control/push button
and then press the rotary control/push
button to select each letter in the surname one after the other.
Note:
Please also refer to the description in
“Data entry menus” on page 13.
X In the data entry menu, select the
symbol.
or
X Press the rotary control/push button
and hold it down for at least 2 seconds.
The entry is adopted.
2031
X Turn the rotary control/push button
and then press the rotary control/push
button to select each letter in the first
name one after the other.
X In the data entry menu, select the
symbol.
or
X Press the rotary control/push button
and hold it down for at least 2 seconds.
2032
The address book entry appears.
X Turn the rotary control/push button
and then press the rotary control/push
button to select the
6DYH entry.
A confirmation that the entry has been
saved appears.
X Press the rotary control/push button
.
Adding data to entries
X Select the $PHQGHQWU\ entry.
2032
X Turn the rotary control/push button
and then press the rotary control/push
button to select the entry to which you
wish to add data.
Note:
If there are more than 10 entries in the
address book, the data entry menu for
locating the required name appears.
37
Page 38

Navigation mode
2034
The navigation address previously
selected is added to the selected address
book entry.
If the selected address book entry already
contains an address, the following prompt
appears:
X In the prompt, select <HV to overwrite
the existing address or
1R to retain the
address.
If you select
<HV, the existing address
will be overwritten.
Selecting a destination from the
address book
You can find a destination in the address
book and start navigation to it.
X In the Navigation main menu, select
the
'HVWIURPDGGERRN entry.
2035
X Confirm your selection by pressing
the rotary control/push button .
2036
The address book entries which support
navigation appear.
Note:
If there are more than 9 entries in the
address book, the data entry menu for
locating the required name appears.
X Turn the rotary control/push button
and then press the rotary control/push
button to select the required entry.
Route guidance to this destination will
be started immediately.
38
Page 39

Navigation mode
2037
2038
Point of interest
You can select a POI as a main destination or a stopover.
POIs include petrol stations, airports or
hospitals, for example.
X In the Navigation main menu, select
the
6SHFLDO'HVW entry.
X Confirm your selection by pressing
the rotary control/push button .
or if route guidance is already active
X In the navigation status display, press
the rotary control/push button .
The Options menu appears.
X Select the 6WRSRYHU entry.
X Confirm your selection by pressing
the rotary control/push button .
X Select the 6SHFLDO'HVW entry.
2039
X Confirm your selection by pressing
the rotary control/push button .
2040
The POI menu appears.
X Turn the rotary control/push button
to select one of the following options:
,QYLFLQLW\RIORFDWLRQ,
,QFRXQWU\,
,QYLFLQLW\RIGHVWLQDWLRQ or
,QSODFH
X Confirm your selection by pressing
the rotary control/push button .
•
,QYLFLQLW\RIORFDWLRQ
You can select a POI in the vicinity of
the vehicle. When you make your
selection, the unit will tell you in
which direction the POI is located and
how far away it is.
•
,QFRXQWU\
You can select a POI for the selected
country from a range of national POI
categories.
•
,QYLFLQLW\RIGHVWLQDWLRQ
You can select a POI in the vicinity of
the destination.
Note:
The ,QYLFLQLW\RIGHVWLQDWLRQ entry can only
be selected if route guidance is active.
•
,QSODFH
You can select a POI in a specific
town.
39
Page 40

Navigation mode
Old
version
2042
2043
Local
X In the POI menu, select the ,QYLFLQLW\RI
ORFDWLRQ
entry.
X Confirm your selection by pressing
the rotary control/push button .
X Turn the rotary control/push button
and then press the rotary control/push
button to select the required POI category.
The data entry menu for POIs appears
or, if fewer than 10 POIs are available in
the selected category, the unit switches
directly to the POI list.
X Turn the rotary control/push button
and then press the rotary control/push
button to select each letter one after the
other.
Accept entry:
X In the data entry menu, select the
symbol.
or
X Press the rotary control/push button
and hold it down for at least 2 seconds.
2044
X Turn the rotary control/push button
and then press the rotary control/push
button to select the required POI.
Route guidance to the selected point of
interest is initiated.
In country
X In the POI menu, select the ,QFRXQWU\
entry.
2045
X Confirm your selection by pressing
the rotary control/push button .
2046
X Turn the rotary control/push button
and then press the rotary control/push
button to select the country in which
you are looking for a national POI.
2047
X Turn the rotary control/push button
and then press the rotary control/push
button to select the required POI category.
40
Page 41

Navigation mode
2053
2049
The data entry menu for POIs appears
or, if fewer than 10 POIs are available in
the selected category, the unit switches
directly to the POI list.
X Turn the rotary control/push button
and then press the rotary control/push
button to select each letter one after the
other.
Accept entry:
X In the data entry menu, select the
symbol.
or
X Press the rotary control/push button
and hold it down for at least 2 seconds.
X Turn the rotary control/push button
and then press the rotary control/push
button to select the required POI.
Route guidance to the selected point of
interest is initiated.
Local area of destination
X In the POI menu, select the ,QYLFLQLW\RI
GHVWLQDWLRQ
entry.
2055
X Confirm your selection by pressing
the rotary control/push button .
Proceed as described in “Local” on
page 40. If this option is selected, however, no directions or distances will
appear in the POI list.
In place
X In the POI menu, select the ,Q SODFH
entry.
2050
X Confirm your selection by pressing
the rotary control/push button .
2051
X Select the desired country as described
under “Selecting a country” on
page 28.
X Select the required town as described
under “Entering a destination town”
on page 28.
or
X Select the required postcode as
described under “Selecting destination via postcode” on page 29.
41
Page 42

Navigation mode
2052
2053
X Turn the rotary control/push button
and then press the rotary control/push
button to select the required POI category.
The data entry menu for POIs appears
or, if fewer than 10 POIs are available in
the selected category, the unit switches
directly to the POI list.
X Turn the rotary control/push button
and then press the rotary control/push
button to select each letter one after the
other.
Accept entry:
X In the data entry menu, select the
symbol.
or
X Press the rotary control/push button
and hold it down for at least 2 seconds.
2054
X Turn the rotary control/push button
and then press the rotary control/push
button to select the required POI.
Route guidance to the selected point of
interest is initiated.
Information about points of interest
You can call up additional information
about many POIs, e.g. a brief description
or a telephone number. You can then
also call this number directly.
To do this, you must be in the POI list.
2044
X Press and hold it down until the
information appears.
2056
42
*Only available for the Traffic Pro with Bluetooth® wireless technology.
Page 43

Navigation mode
X Turn the rotary control/push button
to scroll through the information.
Note:
To call a displayed number directly,
select the number and press the rotary
control/push button .
X Press to return to the list of POIs.
During route guidance
During route guidance, navigation information is displayed on the status screen
in all operating modes.
However, complete navigation information is only displayed in the navigation
status screen.
Examples:
2057
The navigation status screen.
1004
The radio status screen with active navigation. The display for other sources is
similar. When you are approaching a
turn, the navigation status screen appears
automatically. Once you have completed
the turn, the unit reverts to the previous
status screen.
Navigation status screen
All information relevant to information
is displayed on the navigation status
screen.
2057
The distance to the next turn and the estimated time of arrival are shown on the
right-hand side of the display.
The name of the road the vehicle is turning into appears in the first line on the
upper left of the display. The name of
the road the vehicle is currently travelling along appears in the second line.
Depending on the setting, the current
time, estimated journey time remaining
or distance remaining to be travelled
appear on the bottom left of the display.
43
Page 44

Navigation mode
2057
2058
2059
X Turn the rotary control/push button
to select the various displays in the
status display.
Display with current time.
Display with estimated journey time
remaining.
Display with distance remaining to be
travelled.
Example navigation displays
Warning
GG
Accident hazard
Road traffic regulations always take priority when a vehicle is being driven in
traffic. The navigation system is only an
aid. Errors may occur in individual data
items/entries. At all times, the driver
must decide whether or not to heed the
information provided.
We do not accept liability for erroneous
data provided by the navigation system.
• “If possible, please turn back.”
2060
You are driving in the wrong direction
and should turn around at the earliest
opportunity.
• “Please turn left after 100 metres.”
2061
The name of the road the vehicle is
turning into appears in the first line on
the upper left of the display. The name
of the road the vehicle is currently
travelling along appears in the second
line.
• “Please leave the roundabout at the
third exit on the right.”
2062
This display shows you the exit you
should take on the roundabout.
44
Page 45

Navigation mode
2063
2064
2065
• “Please follow the direction arrows.”
This display tells you that you are currently on a non-digitised road (i.e. car
park, garage, multi-storey car park).
Your location therefore does not
appear on the digitised road map. The
arrow indicates the direction of the
destination as the crow flies.
• Active stopover:
• Block active:
• Recalculating route:
2066
• Destination reached:
2067
Options menu
During route guidance, you can call up
the Options menu in the navigation status
screen.
X Press the rotary control/push button
.
2068
The Options menu appears on the righthand side.
X Turn the rotary control/push button
to select one of the following options:
&DQFHO,
0HVVDJHV,
5RXWHOLVW,
6WRSRYHU (stopover),
%ORFN,
5RXWHRSW or
$QQRXQFH
X Confirm your selection by pressing
the rotary control/push button .
45
Page 46

Navigation mode
• &DQFHO
You can abort the current route guidance. See “Cancelling route guidance”
on page 46.
•
0HVVDJHV
You can display/listen to a list of
traffic announcements relevant to the
route. See “Traffic announcements”
on page 47.
•
5RXWHOLVW
You can display the route planned by
the Traffic Pro. See “Route list” on
page 47.
•
6WRSRYHU
You can enter another destination as a
stopover during active navigation. See
“Stopover” on page 47.
•
%ORFN
You can block a section of the route
still to be travelled. See “Blocking a
route” on page 49.
5RXWHRSW
•
You can modify the route options during navigation. See “Modifying route
options” on page 49.
•
$QQRXQFH
You can switch navigation announcements off and then back on again. See
“Switching navigation announcements
on/off” on page 50.
Cancelling route guidance
You can use this function to cancel route
guidance before reaching the actual destination.
X In the Options menu, select the &DQFHO
entry.
2068
X Select <HV (cancel navigation) or 1R
(continue with navigation).
Note:
If no operator inputs are made, the
menu will automatically disappear after
a few seconds and navigation will continue.
46
Page 47

Navigation mode
2069
Traffic announcements
You can display/listen to a list of traffic
announcements relevant to the route.
X In the Options menu, select the 0HV
VDJHV
entry.
The list of traffic announcements relevant to the route appears.
X To listen to all announcements, select
the
5HDGRXWDOOPHVVDJHV entry.
or
X Select the required announcement.
X Confirm your selection by pressing
the rotary control/push button .
The announcement appears in full.
For more information about traffic
announcements, see “Displaying traffic
information” on page 54.
Route list
You can display the route planned by the
Traffic Pro.
X In the Options menu, select the 5RXWH
OLVW
entry.
2070
A list of the roads to the destination
appears. The distance to be travelled
along each road appears after its name.
X Turn the rotary control/push button
to scroll through the list.
Note:
Once route guidance has started, it
takes a little while for the route list to
appear in full.
If the route list is not available due to
recalculation,
appears. For technical reasons, distance
information cannot be displayed for the
road currently being driven on.
1RURXWHOLVWDYDLODEOH
X Press to exit the route list.
Stopover
You can enter another destination as a
stopover during active navigation.
X In the Options menu, select the 6WRS
RYHU
entry.
2039
X Turn the rotary control/push button
to select one of the following options:
(QWHUDGGUHVV,
$GGERRN,
6SHFLDO'HVW or
5DSLGDFFHVV
X Confirm your selection by pressing
the rotary control/push button .
47
Page 48

Navigation mode
• (QWHUDGGUHVV
You can enter a complete address as a
stopover as described in “Entering a
destination” on page 27.
•
$GGERRN
You can enter an address book entry as
a stopover as described in “Selecting a
destination from the address book” on
page 38.
•
6SHFLDO'HVW
You can enter a POI as a stopover as
described in “Point of interest” on
page 39.
•
5DSLGDFFHVV
You can enter a fast access destination
as a stopover as described in “Navigation fast access” on page 35.
Once the stopover has been selected, the
route is recalculated and route guidance
started to the stopover.
Note:
Once the stopover has been reached, the
following display appears.
2071
Route guidance to the main destination
is started automatically.
Deleting a stopover
If you have entered a stopover, you can
delete it before reaching it.
X In the Options menu, select the 6WRS
RYHU
entry again.
2072
X Select <HV (delete stopover) or 1R
(retain stopover).
Note:
If no operator inputs are made, the
menu will automatically disappear after
a few seconds and the stopover will be
retained.
If
<HV is selected, the stopover is deleted
and route guidance to the main destination started automatically.
48
Page 49

Navigation mode
2073
Blocking a route
You can use this function to block a section of the route still to be travelled when
the next junction is reached. If possible,
the Traffic Pro will then calculate a
diversion route. This may be useful if a
traffic jam or road block lies immediately ahead.
X In the Options menu, select the %ORFN
entry.
X Turn the rotary control/push button
to select the required distance to be
blocked.
X Confirm your selection by pressing
the rotary control/push button .
The route is recalculated.
Unblocking a route
Once a block has been entered, it can be
removed again.
X In the Options menu, select the %ORFN
entry.
2074
X Select <HV (delete block) or 1R (retain
block).
Note:
If no operator inputs are made, the
menu will automatically disappear after
a few seconds and the block will be
retained.
Modifying route options
You can modify the route options during
navigation.
X In the Options menu, select the 5RXWH
RSW
entry.
2075
X Select '\QDPLF URXWH 4XLFN URXWH, 6KRUW
URXWH
or the avoid functions (on = ).
Note:
Only one of the three settings (
URXWH 4XLFN URXWH
, 6KRUW URXWH) may be
active ( ) at the same time.
For more information about route
options, see “Setting the route options”
on page 33.
X In the Route Options menu, select
5HDG\.
The route is calculated with the new
route options.
'\QDPLF
49
Page 50

Navigation mode
Switching navigation announcements on/off
You can switch navigation announcements off and then back on again.
X In the Options menu, select the
$QQRXQFH entry.
X Press the rotary control/push button
to switch navigation announcements on
() or off ().
Information during route
guidance
Displaying destination
information
X Press .
X Turn the rotary control/push button
clockwise until
on the top right of the display.
'HVWLQDWLRQ appears
2076
The following information appears:
• On the top left, the destination town
and destination road.
• To the left underneath the destination
town, the average speed thus far.
• Above the image of the car, the
distance still to be travelled and the
anticipated time of arrival.
• To the left and right of the image of
the car, the distance already travelled
and the journey time thus far.
Notes:
• If a stopover is active, information
about it is displayed. appears on
the display above the car.
• Press the rotary control/push button
to reset the values for the average
speed, distance travelled and journey
time thus far to zero.
• By pressing the button for a
long time you can obtain a display of
all the information concerning the
destination shown.
• Exit the destination information by
pressing the button.
50
Page 51

Navigation mode
2077
Displaying/Storing position
X Press .
X Turn the rotary control/push button
clockwise until
top right of the display.
The following information appears:
• If possible, the town and road/geographical coordinates and height above
sea level (only in the event of sufficient
satellite reception) appear on the lefthand side of the display.
• The number of satellites which have
been/can be received appears above
the image of the car.
3RVLWLRQ appears on the
X Press the rotary control/push button
to store the current position.
2078
The current position was saved in fast
access mode.
Displaying traffic announcements
X Press .
X Turn the rotary control/push button
clockwise until
the top right of the display.
70& appears on
2079
The following information appears:
• The number of TMC messages
received.
• The number of TMC messages relevant to the route.
X Press the rotary control/push button
.
2069
All TMC messages are displayed.
X To listen to all announcements, select
the
5HDGRXWDOOPHVVDJHV entry.
or
X Select the required announcement.
X Confirm your selection by pressing
the rotary control/push button .
The announcement appears in full.
For more information about traffic
announcements, see “Displaying traffic
information” on page 54.
51
Page 52

Navigation mode
2081
2082
Displaying/Changing route settings
X Press .
X Turn the rotary control/push button
clockwise until
right of the display.
The current route settings are displayed.
X Press the rotary control/push button
.
X Select '\QDPLF URXWH 4XLFN URXWH, 6KRUW
or the avoid functions (on = ).
URXWH
5RXWH appears on the top
Note:
Only one of the three settings (
URXWH 4XLFN URXWH
, 6KRUW URXWH) may be
'\QDPLF
active ( ) at the same time.
For more information about route
options, see “Setting the route options”
on page 33.
The route is calculated with the new
route options.
Information during non-active route guidance
Displaying/Storing a position
You can display and store the current
position. See “Displaying/Storing position” on page 51.
Displaying TMC messages
You can display TMC messages as described in “Displaying traffic announcements” on page 51. Of course, no traffic
announcements are displayed for the
route.
Dynamic route guidance
with TMC
Note:
Dynamic route guidance is not possible
in all countries.
When Dynamic Route Guidance is
active, the navigation system may
request the navigation CD for possible
route calculation (if the navigation CD
is not inserted).
What is dynamic route
guidance?
Dynamic route guidance is used to calculate the route, taking current traffic
announcements into account.
The traffic announcements are transmitted by a TMC radio station in addition to
the radio programme and are received
and analysed by the navigation system.
The reception of traffic announcements
is free of charge.
52
Page 53

Navigation mode
Note:
As the traffic announcements are transmitted by radio stations, we cannot
assume responsibility for the completeness or accuracy of the announcements.
Austria: The location and event code
was made available by ASFINAG and
BMVIT.
Dynamic route guidance
You can activate dynamic route guidance by selecting
route options.
If dynamic route guidance has been activated, a continuous check is made for
the presence of relevant announcements
for the selected route. The route is then
calculated using the “fast route” option,
while taking into account current traffic
announcements. If it is determined during these continuous checks that a traffic
announcement is of relevance for the
route guidance, the unit will automatically re-calculate a new route to the destination.
1HZURXWH is shown on the display. There
is also the voice announcement “The
route is being recalculated due to current traffic announcements”.
'\QDPLF URXWH in the
Note:
If no TMC stations are received for
10 minutes,
'\Q URXWH JXLG QRW SRVVLEOH
1R 70& UHFHSWLRQ DW SUHVHQW
is displayed
and a short signal tone sounds.
Your navigation system can receive
TMC information, whether a TMC station is selected or not. However, in order
to guarantee optimal reception of TMC
information, we recommend the selection of a TMC station.
53
Page 54

Navigation mode
Displaying traffic information
Current traffic announcements can be
displayed in text form. There are several
options for requesting current traffic
information.
You can call up traffic announcements
via the navigation Options menu and by
pressing . Please refer to the
description in “Traffic announcements”
on page 47 and “Displaying traffic
announcements” on page 51.
Note:
If no up-to-date traffic information is
available, 1R70& PHVVDJHV and 1R 70&
RQURXWH
are displayed.
In both cases, the Traffic Pro displays a
list of the up-to-date traffic information
currently available.
2069
All TMC messages are displayed.
Note:
Traffic announcements are displayed
sorted according to category and road.
Various symbols appear in front of each
traffic announcement to indicate the
category.
indicates a warning.
indicates building sites and other
obstacles.
indicates traffic jams in general.
X To listen to all announcements, select
the
5HDGRXWDOOPHVVDJHV entry.
or
X Select the required announcement.
X Confirm your selection by pressing
the rotary control/push button .
2084
The announcement appears in full.
X To listen to the announcement, select
the
5HDGRXW entry.
or
X Turn the rotary control/push button
to scroll through the traffic announcement.
Note:
The reading out of traffic announcements can be aborted by pressing the
rotary control/push button .
A typical traffic announcement appears
as follows:
• a motorway or road number
• Approximate direction information
• Detailed location and direction information
• The event
• The cause, if known
54
Page 55

Navigation mode
2085
2086
Settings
You can make various settings for navigation in the settings.
X In the Navigation main menu, select
the
6HWWLQJ entry.
X Confirm your selection by pressing
the rotary control/push button .
The Settings menu appears.
X Turn the rotary control/push button
to select one of the following options:
7UDIILFPHVVDJHV,
$QQRXQFHDUULYDOWLPH,
(7$VHWWLQJ or
8QLWRIPHDVXUH
X Confirm your selection by pressing
the rotary control/push button .
•
7UDIILFPHVVDJHV
You can specify whether or not traffic
announcements should be read out
automatically by the unit and, if so,
which ones.
•
$QQRXQFHDUULYDOWLPH
You can specify whether the calculated
time of arrival should be announced
automatically once the route has been
calculated/recalculated.
•
(7$VHWWLQJ
You can configure the calculation of
the ETA. ETA stands for Estimated
Time of Arrival.
8QLWRIPHDVXUH
•
You can convert the calculation of the
distances from metric (display in metres
and kilometres) to imperial (display in
yards and miles) system and vice versa.
Traffic announcements
You can specify whether or not traffic
announcements should be read out automatically by the Traffic Pro and, if so,
which ones.
X In the Settings menu, select the 7UDIILF
PHVVDJHV
entry.
2086
X Confirm your selection by pressing
the rotary control/push button .
2087
X You may now select $QQRXQFH PHV
VDJHV
, 2QURXWHRQO\ or :DUQLQJVRQO\.
55
Page 56

Navigation mode
• $QQRXQFHPHVVDJHV
If this function is active, all traffic
announcements are made automatically on receipt.
Note:
This setting must be active ( ) in order
to be able to activate the two other
settings.
•
2QURXWHRQO\
If you activate this function ( ),
only the traffic announcements relevant to the route are made.
•
:DUQLQJVRQO\
Activate this function ( ) to have
only warnings announced.
X Turn the rotary control/push button
to switch the required function on ( )
or off ( ).
Announcing the time of arrival
You can specify whether the calculated
time of arrival should be announced
automatically once the route has been
calculated/ recalculated or after pressing
the button.
X In the Settings menu, select the
$QQRXQFHDUULYDOWLPH entry.
2088
X Press the rotary control/push button
to switch the announcement of the time
of arrival on ( ) or off ( ).
ETA setting
You can configure the calculation of the
ETA. ETA stands for Estimated Time
of Arrival.
X In the Settings menu, select the (7$
VHWWLQJ
entry.
2091
X Confirm your selection by pressing
the rotary control/push button .
2092
X You may now select 6SRUWV FDU, &DU,
9DQ or 6HWIUHHO\.
•
6SRUWVFDU
This setting indicates to the Traffic Pro
that you tend to drive rather quickly.
An earlier ETA is calculated.
56
Page 57

Navigation mode
• &DU
This is the default setting. It offers
sufficiently accurate calculation of the
ETA for most drivers.
•
9DQ
This setting indicates to the Traffic Pro
that you will need a little longer for the
planned route. This setting could be
selected, for example, for a slower
vehicle or in dense traffic areas.
•
6HWIUHHO\
Select this option to modify the calculation of the ETA to suit your requirements.
Note:
Only one of the two settings may be
active ( ) at the same time.
X Turn the rotary control/push button
to activate the required setting ( ).
6HWIUHHO\ is selected, you still need to
If
select the required setting. The available
range is between 50% and 200%.
A value of 100% indicates the
&DU set-
ting. A later ETA will be calculated if a
higher percentage value is selected.
2093
X Turn the rotary control/push button
to set the required percentage value.
X Confirm your selection by pressing
the rotary control/push button .
Measuring unit
You can convert the calculation of the
distances from metric (display in metres
and kilometres) to imperial (display in
yards and miles) system and vice versa.
X In the Settings menu, select the 8QLWRI
PHDVXUH
entry.
2094
X Confirm your selection by pressing
the rotary control/push button .
2095
X Select 0HWULF or ,PSHULDO (on = ).
Note:
Only one of the two settings may be
active ( ).
57
Page 58

Radio mode
3001
Radio mode
Switching on radio mode
X Press .
Radio mode is activated. The last waveband selected and the last station selected
are set.
Calling up the Radio main menu
You can make settings for radio mode in
the Radio main menu.
The following description assumes that
you are in the status display.
X Press twice in succession.
or
X Press .
The Fast Access menu appears.
X Select the 5DGLRPHQX entry.
The Radio main menu appears.
The example shows the Radio main
menu for VHF.
X Turn the rotary control/push button
to select one of the following options:
:DYHEDQG,
3URJUDPPHW\SH,
)LOWHU,
7UDIILFLQIR,
6RXQG,
9RLFHHQWULHV,
5HJLRQDOLVDWLRQ,
5HFHSWLRQRSWLPLVDWLRQ or
$GDSWLYHEDQGZLGWKFRQWURO
X Confirm your selection by pressing
the rotary control/push button .
The required function is called up.
•
:DYHEDQG
Accesses the selection menu for the
waveband. See “Selecting a waveband” on page 59.
3URJUDPPHW\SH
•
Accesses the selection menu for the
programme type. See “Programme
type” on page 64.
•
)LOWHU
Accesses the selection menu for the
filter function. See “Filter function”
on page 62.
•
7UDIILFLQIR
Accesses the selection menu for traffic
programmes. See “Traffic programme”
on page 67.
•
6RXQG
Accesses the sound settings. See
“Sound settings” on page 18.
•
9RLFHHQWULHV
Accesses the selection menu for voice
entries. See “Voice entries” on
page 66.
•
5HJLRQDOLVDWLRQ
You can switch regionalisation on/off.
See “Regionalisation” on page 65.
58
Page 59

Radio mode
3002
• 5HFHSWLRQRSWLPLVDWLRQ
Accesses the selection menu for
reception optimisation. See “Reception optimisation” on page 66.
•
$GDSWLYHEDQGZLGWKFRQWURO
You can switch bandwidth control on/
off. See “Bandwidth control” on
page 67.
Selecting a waveband
X In the Radio main menu, select :DYH
EDQG
.
X Turn the rotary control/push button
to select one of the following options:
)0DOSKDEHWLFDOO\,
)0E\TXDOLW\,
6WDWLRQPHPRU\,
$0 or
6KRUWZDYH
X Confirm your selection by pressing
the rotary control/push button .
The selected waveband is set.
)0DOSKDEHWLFDOO\
•
If an FM station was selected previously, it will remain selected or, if an
AM station was selected, the last FM
station selected will be set.
The Fast Access menu appears. All
receivable stations which are not filtered out, appear in the list in alphabetical order.
The waveband set is indicated by the
symbol in the status display.
•
)0E\TXDOLW\
If an FM station was selected previously, it will remain selected or, if an
AM station was selected, the last FM
station selected will be set.
The Fast Access menu appears. All
receivable stations which are not filtered out, appear in the list in order of
quality.
The waveband set is indicated by the
symbol in the status display.
6WDWLRQPHPRU\
•
The last station set is retained.
The station memory, which can store
up to 20 FM and AM waveband stations, is displayed.
The waveband set is indicated by the
symbol in the status display.
See “Station memory” on page 71.
•
$0
The last medium wave station selected
is set.
The status display appears.
The waveband set is indicated by the
symbol in the status display.
•
6KRUWZDYH
The last short wave station selected is
set.
The status display appears.
The waveband set is indicated by the
symbol in the status display.
59
Page 60

Radio mode
FM mode
FM mode combines the two wavebands
)0DOSKDEHWLFDOO\ and )0E\TXDOLW\.
Possible settings for FM stations
A number of possible settings may be
made for selecting stations in FM mode:
• Tuning via station list. See “Station
list” on page 60.
• Scan function. See “Scan function” on
page 61.
• Manual station tuning. See “Manual
station tuning” on page 62.
• Via the station memory. See “Station
memory” on page 71.
Station list
All stations which can be received/identified appear in the station list.
The display sequence is determined by
the selected waveband
)0DOSKDEHWLFDOO\
or )0E\TXDOLW\.
Stations can be selected using the station
list in two ways:
Selection in status display:
X Turn the rotary control/push button
clockwise or counter clockwise.
or
X In the status display, press or
.
3003
Press or turn the rotary control/
push button to the right to select the
next station on the station list. The name
of the station appears underneath the station currently selected.
Press or turn the rotary control/
push button to the left to select the
previous station on the station list. The
name of the station appears above the
station currently selected.
Selection via fast access.
X Press .
3004
The Fast Access menu appears.
X Turn the rotary control/push button
to select the required station and press
the rotary control/push button .
The selected station is set.
60
Page 61

Radio mode
Notes:
• If the selected entry is a station chain,
this is indicated by a small triangle on
the right-hand edge of the list.
Once a station has been selected, a
second list appears from which you
may select the required station from
the station chain.
Press to return to the previous
menu without selecting a station.
• Similarly, if a station transmits a
number of different regional programmes and regionalisation has been
activated as described in “Regionalisation” on page 65, a list will appear
from which you may select the
required station. Stations of this type
are identified in the station list by
5(*.
Scan function
All stations in the station list are scanned
briefly to enable you to select the one
you require.
X In the status display, press and hold
down or .
or
X In the status display, press the rotary
control/push button .
The Options menu appears.
X Select the 6FDQ entry.
X Press the rotary control/push button
to activate the function ( ).
The stations in the station list are
scanned briefly in descending/ascending
order.
Note:
If the station memory is active and an
FM station is selected, then only
stations which have not yet been stored
are played when using the scan
function.
Aborting the scan function
X In the status display, press or
.
or
X Turn the rotary control/ push button
.
or
X In the status display, press the rotary
control/push button .
The Options menu appears.
X Select the 6FDQ entry.
X Press the rotary control/push button
to deactivate the function ( ).
The station currently being scanned is
set and the scan function is aborted.
61
Page 62

Radio mode
3005
Manual station tuning
You can set the required frequency
manually.
X In the status display, press the rotary
control/push button until
or )UHTXHQF\ appears on the display
)UHTXHQF\
instead of the previous/next station.
X Turn the rotary control/push button
to select the required frequency.
To exit manual station tuning, press and
hold down the rotary control/push
button until
disappears.
)UHTXHQF\ or )UHTXHQF\
The selected frequency remains set.
Note:
Press or to initiate the
search for the next receivable station.
Pressing and holding button or
results in a fast frequency search
until the button is released.
Filter function
You can use this function to filter
stations or entire station chains out of the
station list.
X In the Radio main menu, select )LOWHU.
3006
The Filter menu appears.
X Turn the rotary control/push button
to select one of the following options:
)LOWHU,
5HVHW or
the stations and station chains which
can currently be received.
Switching the filter function on/off
X In the Filter menu, select the )LOWHU
entry.
X Turn the rotary control/push button
to switch the function on ( ) or off
().
If the function is active ( ), only the
stations and station chains which have
not been filtered out will appear in the
FM station lists.
Note:
If the function is not active, the filter
settings will continue to be maintained.
62
Page 63

Radio mode
Filtering stations
X In the Filter menu, select the station
chain to be filtered out and press the
rotary control/push button .
X Select the HQWLUHVWDWLRQFKDLQ entry.
X Turn the rotary control/push button
to switch the function on ( ).
or
X Press .
X In the Fast Access menu which
appears, select the station chain to be
filtered.
X Press the rotary control/push button
until a menu appears.
X Select the )LOWHUVWDWLRQFKDLQ entry.
The selected station chain no longer
appears in the station list.
Filtering stations
X In the Filter menu, select the station to
be filtered.
X Turn the rotary control/push button
to activate the filter for this station ( ).
or
X Press .
X In the Fast Access menu which
appears, select the station to be filtered.
X Press the rotary control/push button
until a menu appears.
X Select the )LOWHUVWDWLRQ entry.
or
X To filter the station currently playing,
press the rotary control/push button
in the status display.
X Select the )LOWHU entry.
X Turn the rotary control/push button
to activate the filter for this station ( ).
The selected station no longer appears in
the station list.
Cancel filtering
Cancel all filters
X In the Filter menu, select the 5HVHW
entry.
Deleting station chain filters
X In the Filter menu, select the station
chain to be activated and press the
rotary control/push button .
X Select the HQWLUHVWDWLRQFKDLQ entry.
X Turn the rotary control/push button
to switch the filter off ( ).
Deleting station filters
X In the Filter menu, select the station to
be activated.
X Turn the rotary control/push button
to deactivate the filter for this station
().
63
Page 64

Radio mode
3007
Programme type
Programme type (PTY) is a service
offered by many stations within the
radio data system (RDS). It can be used
to define which specific stations should
be displayed with the corresponding
programme types in the station list.
X In the Radio main menu, select 3UR
JUDPPHW\SH
The Programme Type menu appears.
X Turn the rotary control/push button
to select one of the following options:
3URJUDPPHW\SH,
5HVHW,
1R37< or
the PTY categories displayed.
.
Switching the programme type
function on/off
X In the Programme Type menu, select
the
3URJUDPPHW\SH entry.
X Turn the rotary control/push button
to switch the function on ( ) or off
().
If the function is active ( ), only the
stations with the selected programme
types appear in the FM station lists. The
programme type of the selected station
also appears on the right of the status
display.
Note:
If the function is not active, the settings
will continue to be maintained.
Selecting the programme type
X In the Programme Type menu, select
the entry for the required programme
type.
X Turn the rotary control/push button
to switch the individual programme
types on ( ) or off ( ).
Select
5HVHW in the programme type
menu to reset all programme types to
off.
Note:
Highlighting
5HVHW and subsequently
pressing and holding the rotary control/
push button , all programme types
are reset to on.
All PTY categories are displayed in the
Programme Type menu. A greyed-out
category indicates that no stations in
this category can be received at the
current time. However, the category
can still be activated/deactivated.
Activate the
1R37< entry to add stations
which do no transmit any PTY information to the station list display.
64
Page 65

Radio mode
3008
Regionalisation
During the transmission time, certain
RDS programmes are divided into
regional programmes with different
programme content.
Switching on regionalisation prevents
the Traffic Pro from switching between
regional programmes with different content.
X In the Radio main menu, select the
5HJLRQDOLVDWLRQ entry.
X Turn the rotary control/push button
to switch the function on ( ) or off
().
Note:
Stations with regional programmes are
identified in the station list by 5(*.
If you switch the regional function off
whilst listening to a regional station, the
unit will switch to the associated base
station.
Radio text
FM stations supply additional information, e.g. news or information about the
current programme, via the RDS data
stream. This information can be displayed.
Warning
GG
Accident hazard
Since information transmitted via radio
text display varies constantly, we recommend tuning in the radio text only
when the vehicle is stationary to avoid
unnecessary distraction for the driver.
This is a necessary precaution for accident prevention.
X In the status display, press the rotary
control/push button .
The Options menu appears.
3009
X Select the 5DGLRWH[W entry.
X Press the rotary control/push button
to activate the function ( ).
3010
The radio text for the current FM station
is displayed.
Note:
Unfavourable reception conditions, including interference, can garble or even
block the radio text display.
Deactivating radio text
X In the status display, press the rotary
control/push button .
X Select the 5DGLRWH[W entry.
X Press the rotary control/push button
to deactivate the function ( ).
65
Page 66

Radio mode
3011
Voice entries
You can delete or listen to voice entries
assigned to the station. You can also
activate or deactivate the voice dialogue
for creating new voice entries (see also
page 74).
X In the Radio main menu, select 9RLFH
HQWULHV
.
X Select 5HDGRXWDOOHQWULHV, 'HOHWH DOO
HQWULHV
or 'LDORJXHIRUVDYLQJ.
'HOHWHDOOHQWULHV
•
If 'HOHWHDOOHQWULHV is selected, a prompt
will appear asking you to confirm
whether or not all voice entries should
actually be deleted.
Select
<HV to delete the voice entries or
1R to continue without deletion.
•
'LDORJXHIRUVDYLQJ
If the function is active, when a station
is stored, an automatic dialogue will
appear for assigning a voice entry.
Turn the rotary control/push button
to switch the function on ( ) or off
().
Reception optimisation
You can select one of three settings to
suppress reception-related interference.
Note:
This setting is irrelevant for the waveband medium wave and short wave.
X In the Radio main menu, select 5HFHS
WLRQRSWLPLVDWLRQ
.
3012
X Select $XWRPDWLF, $OZD\VVWHUHR or $OZD\V
PRQR
(on = ).
• 5HDGRXWDOOHQWULHV
Select 5HDGRXWDOOHQWULHV to listen to all
voice entries associated with radio stations.
66
Note:
Only one of the entries in the list can be
active ( ).
Page 67

Radio mode
• $XWRPDWLF
Setting for normal operation, i.e.
depending on reception, the unit
switches back and forth from stereo to
mono (offers the optimum setting for
almost all reception areas).
•
$OZD\VVWHUHR
Setting for exceptional reception conditions - i.e. the unit is constantly set
to stereo.
•
$OZD\VPRQR
Setting for reception situations in
which reflections constantly occur;
i.e. the unit is constantly set to mono.
Bandwidth control
Bandwidth control can be used to improve station reception in difficult reception areas (station A has a neighbouring
station B in its immediate vicinity).
X In the Radio main menu, select the
$GDSWLYHEDQGZLGWKFRQWURO entry.
X Turn the rotary control/push button
to switch the function on ( ) or off
().
Traffic programme
If an RDS station broadcasts traffic
announcements, it is possible to interrupt audio mode (CD, MP3, etc.), AM
mode or mute mode and to switch to the
traffic announcements. Moreover, you
can listen to one FM station while
receiving traffic announcements transmitted by another FM station.
X In the Radio main menu, select 7UDIILF
LQIR
.
3013
The TP menu appears.
X Turn the rotary control/push button
to select one of the following options:
7UDIILFLQIR,
9ROXPH,
6WDWLRQDXWRPDWLF or
the TP stations displayed.
67
Page 68

Radio mode
Switching a traffic programme on/off
X In the TP menu, select the 7UDIILFLQIR
entry.
X Turn the rotary control/push button
to switch the function on ( ) or off
().
X or
X In the status display, press the rotary
control/push button .
X Select the 73 entry.
X Turn the rotary control/push button
to switch the function on ( ) or off
().
If the TP function is active ( ), the
symbol appears in the status display to
indicate this.
Selecting a TP station
You can specify whether or not you wish
to listen to the traffic news on a specific
station.
Automatic
X In the TP menu, select the 6WDWLRQDXWR
PDWLF
entry.
X Turn the rotary control/push button
to switch the function on ( ) or off
().
Note:
When you activate the function, the
Traffic Pro will select the station you
are currently listening to as the TP station. If this station does not transmit
traffic programmes or reception is poor,
another station will be selected from the
station list.
Manual TP station selection
X In the TP menu, select the station on
which you wish to listen to traffic
news.
X Turn the rotary control/push button
to activate the station as the TP station
().
or
X Press .
X In the Fast Access menu which
appears, select the required TP station.
X Press the rotary control/push button
until a menu appears.
X Select the 6HWDV73VWDWLRQ entry.
Note:
If the TP station can no longer be
received, the Traffic Pro will activate
automatic TP station selection.
This will remain active until the selected
TP station becomes available again.
68
Page 69

Radio mode
3014
TP volume
You can use this function to control the
increase in volume for traffic announcements.
X In the TP menu, select the 9ROXPH
entry.
X Turn the rotary control/push button
to select the required value.
Notes:
• A setting of “0” indicates no increase
in volume.
• A setting of “10” indicates a significant increase in volume.
Cancelling traffic
announcements
You can cancel the reception of traffic
announcements.
The following display appears during a
traffic announcement.
3015
X Press the rotary control/push button
.
or
X Press .
Traffic announcements are cancelled.
AM mode
AM mode combines the two wavebands
$0 and 6KRUWZDYH.
Possible settings for
AM stations
A number of possible settings may be
made for selecting stations in AM mode:
• Tuning via scan search. See “Scan
search” on page 70.
• Scan function. See “Scan function” on
page 70.
• Via the station memory. See “Station
memory” on page 71.
69
Page 70

Radio mode
3016
Scan search
X In the status display, press or
.
or
X Turn the rotary control/ push button
.
Press to search for the next station
in ascending frequency order.
Press to search for the next station
in descending frequency order.
Scan function
All stations which can be received are
scanned briefly to enable you to select
the one you require.
X In the status display, press and hold
down or .
or
X In the status display, press the rotary
control/push button .
The Options menu appears.
X Select the 6FDQ entry.
X Press the rotary control/push button
to activate the function ( ).
The stations which can be received are
scanned briefly in descending/ascending
frequency order.
Note:
If the station memory is active and an
AM station is selected, then only
stations which have not yet been stored
are played when using the scan
function.
Aborting the scan function
X In the status display, press or
.
or
X Turn the rotary control/ push button
.
or
X In the status display, press the rotary
control/push button .
The Options menu appears.
X Select the 6FDQ entry.
X Press the rotary control/push button
to deactivate the function ( ).
The station currently being scanned is
set permanently and the scan function is
aborted.
70
Page 71

Radio mode
Station memory
Up to 20 FM, medium wave and short
wave stations can be stored in the station
memory.
Calling up the station memory
X In the Radio main menu, select :DYH
EDQG
.
X In the Waveband menu, select the 6WD
WLRQPHPRU\
The stations stored so far are displayed
in the fast access station memory.
entry.
Storing stations
You can store the current station if you
are already in the station memory or if a
different waveband has been selected.
Notes:
• If all 20 memory slots are occupied
and a new station is added, the 20th
station is deleted from the station
memory without warning.
• If a voice entry has been assigned to a
station, this is indicated by the symbol in front of the name of the station.
• A station can only be stored once in
the memory.
Different waveband set
X In the Fast Access menu (not for AM
waveband), select the station to be
stored.
X Press the rotary control/push button
until a menu appears.
3017
X Select the 6DYHVWDWLRQ entry.
or
X In the status display, press the rotary
control/push button .
The Options menu appears.
X Select the 6DYH entry.
3018
In both cases, the station memory will be
displayed. The station to be stored appears
as the first entry in the list and is identified
by an arrow.
71
Page 72

Radio mode
X Turn the rotary control/push button
to select the required memory position.
X Confirm the memory position by press-
ing the rotary control/push button .
Depending on the setting in “Voice
entries” on page 66, the procedure for
saving a voice entry for the station
stored will now start.
The station is now stored in the station
memory.
Station already in memory
The station to be stored is already set and
you are in station memory fast access
mode.
X Turn the rotary control/push button
to select the position in the memory list
in which the station to be stored is to be
stored.
X Press the rotary control/push button
until a menu appears.
3019
X Select the 6DYH FXUUHQW VWDWLRQ KHUH
entry.
The station is now stored in the station
memory.
Depending on the setting in “Voice
entries” on page 66, the procedure for
saving a voice entry for the station
stored will now start.
Moving stations
You can move the position of a station
stored in the station memory.
X Turn the rotary control/push button
to select the memory to be moved.
X Press the rotary control/push button
until a menu appears.
3020
X Select the 0RYHVWDWLRQ entry.
The station to be moved is marked with
an arrow.
X Turn the rotary control/push button
to select the required memory position.
X Confirm the memory position by press-
ing the rotary control/push button .
72
Page 73

Radio mode
3021
Deleting stations
You can delete a station stored in the
station memory.
Fast access mode
X Turn the rotary control/push button
to select the station to be deleted.
X Press the rotary control/push button
until a menu appears.
X Select the 'HOHWHVWDWLRQ entry.
The selected station is deleted.
Note:
If a voice entry has been assigned to the
deleted station, it will also be deleted.
Status display
X In the status display, press the rotary
control/push button .
The Options menu appears.
X Select the 'HOHWH entry.
The station is deleted from the station
memory.
Naming stations
You can assign a user-defined name of
up to 8 characters in length to a stored
station.
X Turn the rotary control/push button
to select the station to be named.
X Press the rotary control/push button
until a menu appears.
3022
X Select the 1DPHVWDWLRQ entry.
3023
X Select the letters in the required name
one after the other and confirm the
name entered.
Note:
Please also refer to the description in
“Data entry menus” on page 13.
The station named now appears in the
station memory (also in other wavebands) with the name entered.
73
Page 74

Radio mode
3024
Creating/Deleting voice entries
You can create a voice entry/delete an
existing voice entry for a station stored
in the station memory.
Create
Note:
If a voice entry has already been
assigned to this station ( symbol) and
you wish to change it, you must first
delete it before assigning a new entry.
X In fast access mode, turn the rotary
control/push button to select the
station for which you wish to create a
voice entry.
X Press the rotary control/push button
until a menu appears.
X Select the &UHDWHYRLFHHQWU\ entry.
The procedure for saving a voice entry is
launched.
Deleting
X In fast access mode, turn the rotary
control/push button to select the
station for which you wish to delete a
voice entry.
X Press the rotary control/push button
until a menu appears.
3025
X Select the 'HOHWHYRLFHHQWU\ entry.
A prompt appears for you to confirm if
the voice entry should really be deleted.
X Select <HV to delete the voice entry or
1R to continue without deletion.
Reading out voice entries
You can listen to the voice entry for a
station stored in the station memory.
X In fast access mode, turn the rotary
control/push button to select the
station for which you wish to listen to
a voice entry.
X Press the rotary control/push button
until a menu appears.
3026
X Select the 5HDGRXWYRLFHHQWU\ entry.
The voice entry is read out.
74
Page 75

Media mode
Media mode includes all sources on the
Traffic Pro which can be used to play
back audio or MP3 media.
Activating media mode
X Press .
The last source active in media mode is
activated if possible.
or
X Insert an audio CD or MP3 CD.
The Traffic Pro will start to play the
inserted CD.
or
X Insert a micro-drive/memory card
containing audio/MP3 tracks into the
designated slot.
The Traffic Pro will start to play the
tracks on the micro-drive/memory card
inserted.
In all three cases, the media fast access
functions will appear on the display
briefly.
The display will then switch to the status
display.
Media fast access functions
The media fast access function displays
a list of available CDs and directories for
selection.
The following description assumes that
you are in the status display.
X Press .
4001
The media fast access function appears.
X Turn the rotary control/push button
to select the required medium/source
and press the rotary control/push button
.
Media mode
Notes:
• In fast access mode, the individual
CDs, memory cards, sources and
directories available are identified by
the following symbols:
indicates a CD in the internal
drive. SCD stands for Single CD.
indicates memory cards.
indicates a CD in the CD changer.
indicates AUX source.
indicates directories.
• If for example there is only one audio
CD in the internal drive, in fast access
mode, the tracks on that CD are displayed immediately.
• Press and hold down to display
the full names (if available) of the
individual entries in fast access mode.
For a directory, the number of tracks
and total playback time are also displayed.
75
Page 76

Media mode
4002
Note:
Once the last track on a CD/in a directory has been played, if possible, the
next track played by the Traffic Pro will
be the first track in the next directory/on
the next CD. If no other tracks are available, the first track in the current directory/on the current CD is played.
The required CD, micro-drive/memory
card, source or directory is called and, if
available, the name of the track on the
CD or in the directory is displayed.
X Turn the rotary control/push button
to select the required track and press
the rotary control/push button .
The selected track is played.
Notes:
Press and hold to display the full
names (if available) of the track entries
in fast access mode.
The track number and the length of the
track will also be displayed.
Information on the medium on which
the current track is stored will also be
shown. If a CD name or directory name
is available, it will be displayed.
The total number of tracks on the CD/
directory and the total playing time will
also be displayed.
The track lengths of tracks which have
not yet been played back are estimated
on the basis of a bit rate of 128 kbit/s.
Media status display
The media status display is the “standard
display” for audio mode. All relevant
data for audio mode appears in the status
display.
This includes the following information:
• Type of medium (CD, CD changer
and micro-drive/memory card)
• Type of track (audio or MP3)
• Status of scan function, track mix, etc.
• Next and previous track
• Playback time
4003
The example shows the status display
for MP3 media on a memory card.
76
Page 77

Media mode
Track jump/Track skip
X Press to select the next track or
to select the previous track.
or
X Turn the rotary control/push button
to select the required track.
Notes:
• You can also select tracks in fast
access mode. See “Media fast access
functions” on page 75.
• If the current track has only been
playing for approximately 10 seconds
when track jump is selected, the unit
will jump immediately to the previous track.
If the current track has been playing
for longer than 10 seconds, the unit
jumps to the beginning of the current
track.
Note:
If track skip reaches the first or the last
track in a directory or on a CD, the unit
skips to the first or the last track in the
current directory or on the CD.
Fast forward/rewind
You can start audible fast forward/rewind.
Notes:
Forward/ reverse is not audible for MP3
tracks.
Forward
X Press until you reach the re-
quired point.
X Release .
Playback will continue at normal speed.
Rewind
X Press until you reach the re-
quired point.
X Release .
Playback will continue at normal speed.
77
Page 78

Media mode
4004
Play mode
Play mode includes functions such as
track mix (random play function), the
scan function and the repeat function.
Calling up the Play Mode menu
X In the media status display, press the
rotary control/push button .
The Options menu appears.
X Turn the rotary control/push button
to select
control/push button .
3OD\PRGH and press the rotary
4005
The Play Mode menu appears.
Turn the rotary control/push button
to select one of the following options:
QRUPDORUGHU,
7UDFNPL[,
6FDQ,
5HSHDWWUDFN,
if an MP3 CD or a CF card with several
directories is the active source then
'LUHFWRU\PL[,
if the currently active source is the CD
changer:
&'PL[ or
5HSHDW&'
Press the rotary control/push button
to switch the individual functions on ( )
or off ( ).
Notes:
• Only one of the functions can be
switched on ( ).
• Select
QRUPDORUGHU to delete any other
function which might have been activated and play back the tracks in the
normal sequence.
Track mix (random play function)
Activate the function to play back all
tracks in the current directory/on the current CD in random sequence.
X Turn the rotary control/push button
to select the
7UDFNPL[ entry in the Play
Mode menu.
X Press the rotary control/push button
to switch the function on ( ) or off
().
78
Page 79

Media mode
Notes:
Press or to play the next
random track. If the current track has
been playing for longer than 8 seconds
when is pressed, the unit jumps
to the beginning of the current track.
Scan
If the function is activated, all tracks in
the current directory or on the current
CD are played back for approx.
10 seconds.
X Turn the rotary control/push button
to select the
6FDQ entry in the Play
Mode menu.
X Press the rotary control/push button
to switch the function on ( ) or off
().
Notes:
The function is also aborted by pressing
or . The track currently
playing back then continues.
Repeat track
Activate the function to repeat the current track continuously.
X Turn the rotary control/push button
to select the
5HSHDW WUDFN entry in the
Play Mode menu.
X Press the rotary control/push button
to switch the function on ( ) or off
().
Notes:
Press or to play the next
track and deactivate the function. If the
track has been playing for longer than 8
seconds when is pressed, the unit
jumps to the beginning of the track. The
function then remains activated.
CD mix
Notes:
The function is only available if the CD
changer is the active source.
Activate the function to play all tracks
on the various CDs one after the other in
random sequence.
X Turn the rotary control/push button
to select the
5HSHDW&' entry in the Play
Mode menu.
X Press the rotary control/push button
to switch the function on ( ) or off
().
Notes:
Press or to play the next
random track. If the current track has
been playing for longer than 8 seconds
when is pressed, the unit jumps
to the beginning of the current track.
79
Page 80

Media mode
Repeat CD
Notes:
The function is only available if the CD
changer is the active source.
Activate the function to repeat the current CD continuously.
X Turn the rotary control/push button
to select the
5HSHDW&' entry in the Play
Mode menu.
Press the rotary control/push button
to switch the function on ( ) or off ( ).
Directory mix
Notes:
This function is only available if an
MP3 CD or a CF card with directories is
the current audio source.
Activate the function to play all tracks
on the various directories one after the
other in random sequence.
X Turn the rotary control/push button
to select the
'LUHFWRU\PL[ entry in
the Play Mode menu.
Press the rotary control/push button
to switch the function on ( ) or off ( ).
Notes:
Press or to play the next
random track. If the current track has
been playing for longer than 8 seconds
when is pressed, the unit jumps
to the beginning of the current track.
Calling up the Media
main menu
You can make settings for media mode
in the Media main menu.
The following description assumes that
you are in the status display.
X Press twice in succession.
or
X Press .
You are now in media fast access mode.
X Select the 0HGLDPHQX entry.
4006
The Media main menu appears.
80
Page 81

Media mode
4007
Switching detailed track display on/off
If detailed track display is activated, a
previously abbreviated track name/ID3
tag is displayed in full, if possible.
X In the Media main menu, select the
'HWDLOHGWUDFNGLVSOD\ entry.
X Turn the rotary control/push button
to switch the function on ( ) or off
().
CD mode
Notes on compact discs (CD)
Sound interruptions may occur if the CD
is soiled. In order to ensure the highest
tone quality, please note the following:
Correct
Incorrect
• Always touch the CD at the edges
only. Keep the disc clean and never
touch the surface.
• Never stick anything on the CD.
• Protect the CDs against direct sunlight
and from heat sources such as heaters
etc.
Incorrect
Correct
• Before playing the CD, it should be
cleaned with a special, commercially
available cleaning cloth, wiping from
the centre outwards. Solvents such as
benzene, thinners or other commercially available cleaners and antistatic sprays must not be used.
Notes:
• The Traffic Pro cannot play back
DVD-plus media (one side audio CD,
the other DVD).
Due to its increased thickness, inserting a DVD-plus may damage the
Traffic Pro.
• Please note that foreign bodies such
as coins or other objects must not be
inserted into the CD slot on the
Traffic Pro.
Foreign bodies in the unit can damage
the Traffic Pro.
81
Page 82

Media mode
Inserting/Ejecting CDs
Insertion
X Insert the disc into the CD slot with
the printed side up.
The unit pulls in the CD automatically
and begins to play the disc from the first
track.
Ejecting
X Press .
The CD is ejected.
X Remove the CD.
Notes:
• The CD is not ejected when the unit is
switched off but remains in the CD
slot.
• If, once it has been ejected, the CD is
not removed from the CD slot, it will
be pulled back in after a short time.
Notes on CD-R and CD-RWs
You can play CD-Rs (writeable CDs)
and CD-RWs (rewriteable CDs) on this
unit. However, please comply with legal
restrictions. These restrictions may vary
from one country to another.
Depending upon the recording device
used to record the CD-R/CD-RW or the
state of the CD-R/CD-RW itself, it may
not be possible to play some CD-Rs/CDRWs on this unit.
A CD-R/CD-RW must be manufactured
according to the “Red Book” standard
(not applicable for MP3 CDs).
Notes on copy-protected CDs
In some cases, problems may arise when
attempting to play copy-protected CDs,
such as long reading times or a total inability to perform playback.
Temperature protection circuit
A temperature protection circuit in the
Traffic Pro protects the laser diode from
excessive heat.
If this protection circuit is triggered,
a warning message will appear and a
signal tone will sound.
The internal CD drive will then be disabled until a cooling down phase has
elapsed.
82
Page 83

Media mode
MP3 mode
General notes on MP3
The music that can be played when your
unit is in MP3 mode is generally copyright-protected under applicable international and national laws. In several
countries, the reproduction of copyrighted material is not permitted, even if
only for personal use, without the
express prior consent of the copyright
holder. Please check the current copyright laws for your country and comply
with them. These restrictions naturally
do not apply to your own compositions
and recordings, or for recordings for
which authorisation has been obtained
from the copyright holder.
Creating an MP3 storage medium
• A maximum of 63 folders, each of
which can contain up to 50 tracks, can
be stored on a storage medium. However, a maximum of 1000 tracks per
medium are supported. If a folder contains more than 50 tracks, a second
folder will be created automatically
which can also contain up to 50 tracks.
Only folder names with 45 characters
or fewer can be displayed. Only track
names with 63 characters or fewer can
be displayed.
• Only MP3 tracks stored on a storage
medium in compliance with ISO 9660
can be played.
• If the artist’s name and track title are
to be displayed, an ID3 tag must be
added to the MP3 file. This unit supports versions ID3v1 and ID3v2.
The ID3 tag can only be displayed if
the corresponding track is being
played. The file name appears first
(trackname.MP3).
• The display of artist’s name and track
title is restricted to a total maximum
length of 63 characters.
• The MP3 formats MPEG1 and MPEG2
Layer3 are supported by the unit.
Fixed and variable bit rates of 8 - 320
kbps and scan rates of 16-48 kHz are
supported. We recommend the use of
the Fraunhofer MP3 Encoder when
creating MP3 files.
• We recommend a bit rate of at least
160 kbps for compressing MP3 files.
It should be noted that with MP3 files
having a variable bit rate, the display
of the elapsed playing time may
deviate from real time.
• In the case of a mixed-mode medium
(partly conventional audio tracks and
partly data), only the audio tracks are
played back. The data part is not
played back, even if MP3 tracks are
included.
83
Page 84

Media mode
For further information about creating
MP3 files and ID3 tags, please consult
your dealer or check on the Internet.
Note:
Due to the abundance of different kinds
of CD burning software and their associated settings we cannot guarantee the
playback quality of MP3 CDs and/or
micro-drive/storage cards.
MP3 CD mode
The following points, described in “CD
mode” on page 81 apply to MP3 CD
mode:
• “Notes on compact discs (CD)” on
page 81.
• “Inserting/Ejecting CDs” on page 82.
• “Notes on CD-R and CD-RWs” on
page 82.
• “Temperature protection circuit” on
page 82.
MP3 memory cards/ Micro-drive mode
Note:
• Micro-drives with a capacity of up to
4 GB can be used.
• Type 1 and type 2 CF cards can be
used as memory cards. Memory cards
up to a capacity of 4 GB can be used.
• Please note that the storage medium
was formatted with the FAT 16 file
system.
• Short file names are displayed (8
characters and 3 characters for file
extension).
84
Page 85

Media mode
Inserting a micro-drive/memory card
The slot for micro-drive/memory cards is
located underneath the removable control
panel on the Traffic Pro or underneath the
cover.
X Remove the control panel as described
in “Removing/Inserting the control
panel” on page 15.
X Remove the cover as described in
“Inserting/Removing the cover” on
page 16.
X Insert the micro-drive/memory card
into the visible slot on the right-hand
side.
Notes:
The memory card/micro-drive can only
be inserted in one direction. The reverse
of the memory card/micro-drive points
to the left.
X Push the micro-drive/memory card
carefully into the slot.
This pushes the eject button located
above and to the left of the slot outwards.
X Reinsert the cover as described in
“Inserting/Removing the cover” on
page 16.
X Reinsert the control panel as described
in “Removing/Inserting the control
panel” on page 15.
The micro-drive/memory card is now
ready for operation and, if MP3 tracks
appear on the micro-drive/memory card,
the first track in the first directory is
played automatically.
If the content of the micro-drive/memory card has not been changed since it
was last inserted, playback begins with
the last track played.
Removing a micro-drive/memory card
X Remove the control panel as described
in “Removing/Inserting the control
panel” on page 15.
X Remove the cover as described in
“Inserting/Removing the cover” on
page 16.
X Press the eject button located to the
top left of the slot.
X The micro-drive/memory card is
pushed forwards out of the slot.
X Pull the micro-drive/memory card out
of the slot.
X Reinsert the cover as described in
“Inserting/Removing the cover” on
page 16.
X Reinsert the control panel as described
in “Removing/Inserting the control
panel” on page 15.
85
Page 86

Media mode
CD changer mode
The following points, described in “CD
mode” on page 81 apply to CD changer
mode:
• “Notes on compact discs (CD)” on
page 81.
• “Notes on CD-R and CD-RWs” on
page 82.
Operational readiness of
CD changer
If a CD changer is connected to the Traffic
Pro, it will be ready for operation as soon
as the CD magazine, loaded with CDs, is
inserted. Close the sliding cover after
loading. All further operation is performed from the Traffic Pro control panel.
Loading/Ejecting the
CD magazine
To eject the CD magazine, open the sliding cover on the changer and press the
eject button. The magazine is ejected
and can be removed.
When inserting CDs into the magazine,
please note the instructions printed on
the magazine.
Attention:
Incorrectly inserted CDs will not be
played.
Note:
To allow for the fastest possible change
of CDs, the magazine should be loaded
successively, beginning with compartment 1.
External units/AUX mode
You can call up units connected externally to the Traffic Pro as described in
“Media fast access functions” on
page 75.
However, AUX mode must be activated
as described in “External device” on
page 131.
The external unit cannot be operated.
You can only make volume and noise
settings for this source.
86
Page 87

Telephone mode
Below, you will find information on
operating a mobile phone with
Bluetooth® wireless technology,
connected to the Traffic Pro.
Notes:
• The Traffic Pro can operate a mobile
phone equipped with Bluetooth®
wireless technology. We support the
Bluetooth® wireless technology
profile HFP1.0. Mobile phones
without Bluetooth® wireless
technology cannot be operated.
• It is possible that some of the functions described are not available with
some mobile phones equipped with
Bluetooth® wireless technology.
The Internet page www.becker.de
contain additional informations.
• If your mobile telephone is connected
to the Traffic Pro and the Traffic Pro
is switched off (ignition is still
switched on or the ignition key is in
the radio position), the Traffic Pro is
activated by an incoming call.
Notes:
• The call lists and fast access entries
described below always only apply to
the time during which the mobile
phone, equipped with Bluetooth®
wireless technology, was connected
to the Traffic Pro. The entries in the
call lists of the Traffic Pro are not
synchronised with the call lists on the
mobile phone.
• The Traffic Pro cannot access the
mobile phone’s number memory or
the SIM card. However you can
import address book entries from the
mobile phone, as described in
“Importing an address book entry*”
on page 110.
• It is only possible to display the name
of a caller if the caller is listed in the
address book on the Traffic Pro.
Telephone mode*
Warning
GG
Risk of injury
Please ensure that you keep the mobile
phone in an appropriate, safe holder.
Only then can injuries be prevented in
the event of an accident or due to
sudden braking.
*Only available for the Traffic Pro with Bluetooth® wireless technology. 87
Page 88

Telephone mode*
5001
Calling up the telephone
Note:
To call up telephone mode directly, it is
essential that Bluetooth has been
activated and that the device is
connected to a mobile phone with
Bluetooth® wireless technology. This
is described in “Bluetooth*” on
page 115.
X Press .
Telephone mode is activated.
The telephone mode fast access
functions are displayed.
In fast access mode the last 20 numbers
or names which have been dialled,
answered or rejected will be displayed in
chronological order.
Further information on fast access can
be found under “Fast access telephone
functions” on page 98.
Bluetooth not yet switched on
If Bluetooth has not been switched on
when you try to call up telephone mode,
you will be shown the following
message.
5002
X Press the rotary control/push button
.
X Switch on the Bluetooth function as
described in “Activating/ deactivating
Bluetooth*” on page 122.
Bluetooth mobile phone not yet connected
If the mobile phone has not been
connected when you try to call up
telephone mode, the following message
is displayed.
5003
You will see a list containing all the
previously connected devices and the
entry
/RRNIRUWHOHSKRQH.
If
1R%7GHYLFHVis displayed in the list, or
if the device to be connected is not
displayed, select the
entry to search for the device.
This is also described in “Searching for
Bluetooth devices*” on page 122.
/RRN IRU WHOHSKRQH
88 *Only available for the Traffic Pro with Bluetooth® wireless technology.
Page 89

Telephone mode*
5001
X Select the device to be connected from
the list.
X Press the rotary control/push button
.
Then proceed as described in
“Connecting devices (Traffic Pro)*” on
page 118.
The telephone mode fast access
functions are displayed after the mobile
phone has been connected successfully.
Calling up the Telephone main menu
In the Telephone main menu, you can
enter/ select telephone numbers, call up
the call lists, connect a telephone, call
the emergency services and call up the
telephone settings.
Note:
To call up the telephone main menu
directly it is essential that Bluetooth has
been activated and that the mobile
phone is connected to Bluetooth®
wireless technology. This is described
in “Bluetooth*” on page 115.
X Press twice in succession.
or
X Press .
The Fast Access menu appears.
X Select the 7HOHSKRQHPHQX entry.
5004
The Telephone main menu appears.
X Turn the rotary control/push button
to select between
'LDOQXPEHU,
&DOOIURPDGGUHVVERRN,
&DOOOLVWV,
&RQQHFWWHOHSKRQH,
(PHUJHQF\FDOO and
6HWWLQJ.
X Confirm your selection by pressing
the rotary control/push button .
The desired function is called up.
•
'LDOQXPEHU
Accesses the input menu for a
telephone number. See “Dialling
numbers” on page 90.
*Only available for the Traffic Pro with Bluetooth® wireless technology. 89
Page 90

Telephone mode*
• &DOOIURPDGGUHVVERRN
You can select a telephone number
from the address book. See “Selecting
a number from the address book” on
page 91.
•
&DOOOLVWV
You can obtain a display of the call
lists for missed calls, answered calls
and numbers dialled. See “Call lists”
on page 92.
•
&RQQHFWWHOHSKRQH
You can connect a telephone via
Bluetooth® wireless technology or
start a device search. The operating
procedure is the same as described in
“Bluetooth mobile phone not yet
connected” on page 88.
•
(PHUJHQF\FDOO
You can establish a connection to the
“112” emergency number. See
“Emergency call” on page 93.
•
6HWWLQJ
You can select call answering settings
as well as settings for automatic
activation of voice mode. See
“Settings” on page 94.
Dialling numbers
Use this function to enter a telephone
number and to call this number.
X In the Telephone main menu, select
the entry
'LDOQXPEHU.
5005
The input menu for the telephone
number appears.
X Turn the rotary control/push button
and then press the rotary control/
push button to select the digits in the
desired telephone number, one after
the other.
Note
Select the symbol to delete the last
character in the entry.
Please also refer to the description in
“Data entry menus” on page 13.
Establishing a connection:
X In the input menu, select the 'LDO entry.
or
X press the rotary control/push button
and hold for at least 2 seconds.
The Traffic Pro indicates that a
connection is being established by
displaying the following message.
5006
Press the rotary control/push button
to abort the call.
90 *Only available for the Traffic Pro with Bluetooth® wireless technology.
Page 91

Telephone mode*
5007
If the person called answers the
telephone the Traffic Pro switches to the
status display for active telephone calls.
Note:
If the number called is busy, the
following message appears:
X Press the rotary control/push button
.
Selecting a number from the address book
Use this function to select a telephone
number from an address book and to call
this number.
X In the Telephone main menu, select
the entry
&DOOIURPDGGUHVVERRN.
5008
The address book entries which have a
telephone number are displayed.
Note:
If there are more than 9 entries in the
address book, for which one or more
telephone numbers are stored, the data
entry menu for locating the required
name appears.
X Turn the rotary control/push button
and then press the rotary control/
push button to select the desired entry.
If several telephone numbers have been
saved in the address book entry the
following appears on the display.
5009
Note:
Up to three telephone numbers are
displayed and marked with different
symbols:
stands for the mobile number.
stands for the business number.
stands for the private number.
X Turn the rotary control/push button
and then press the rotary control/
push button to select the desired
number.
The connection will be established.
*Only available for the Traffic Pro with Bluetooth® wireless technology. 91
Page 92

Telephone mode*
5010
5007
The Traffic Pro indicates that a
connection is being established by
displaying the following message.
Press the rotary control/push button
to abort the call.
If the person called answers the
telephone the Traffic Pro switches to the
status display for active telephone calls.
Note:
If the number called is busy, the
following message appears:
X Press the rotary control/push button
.
Call lists
You can obtain a display of the call lists
for missed calls, answered calls and
numbers dialled.
Notes:
• The call lists described below always
only apply to the time during which
the mobile phone was connected to
the Bluetooth® wireless technology
with the Traffic Pro. The entries in
the call lists of the Traffic Pro are not
synchronised with the call lists in the
mobile phone.
• It is only possible to display the name
of a caller if the caller is listed in the
address book of the Traffic Pro.
• The lists are limited to a maximum of
20 entries.
• If a number is not known it will
appear in the list as
8QNQRZQ.
X In the Telephone main menu, select
&DOOOLVWV.
5011
X Turn the rotary control/push
button to select between
0LVVHGFDOOV,
'LDOOHGQXPEHUV and
$FFHSWHGFDOOV.
X Confirm your selection by pressing
the rotary control/push button .
The desired list is called up.
•
0LVVHGFDOOV
In this list you will find calls which
you missed or which you rejected.
•
'LDOOHGQXPEHUV
In this list you will find calls which
you made yourself.
• $FFHSWHGFDOOV
In this list you will find calls which
you answered.
92 *Only available for the Traffic Pro with Bluetooth® wireless technology.
Page 93

Telephone mode*
5012
In the right-hand section of the display
you can see the time of the entry for the
various entries in the list.
The date will be displayed if the entries
are older.
Calling a number from the list
X Select the list entry you wish to call.
X Press the rotary control/push button
.
A connection will be established to the
desired number.
Retrieving information about the entry
X Select the list entry on which you wish
to receive more information.
X Press and hold until the
information appears.
X Press to return to the list.
Deleting a call list
You can delete the entire call list.
X Select 'HOHWH OLVW in the call list to be
deleted.
5013
X Select <HV (delete) or 1R (do not
delete).
If you select
deleted.
<HV, the call list will be
Emergency call
The function makes it possible to
establish a connection to the emergency
services number “112”.
Note:
In order to trigger an emergency call,
the mobile phone must be switched on,
connected to the Traffic Pro and the
reception must be adequate.
Harman/ Becker cannot generally be
held liable for the emergency call
function.
X In the Telephone main menu, select
(PHUJHQF\FDOO.
5014
X Select <HV (start emergency call) or 1R
(do not start emergency call).
If you select
be triggered.
<HV, the emergency call will
*Only available for the Traffic Pro with Bluetooth® wireless technology. 93
Page 94

Telephone mode*
5015
Following initiation of the emergency
call, the following information is
displayed in the status bar.
After the emergency call has been made,
you can end the call as described in
“Ending a call” on page 96.
Note:
A query as to whether you wish to start
an emergency call will be shown, even
if you dial the emergency services
number “112” directly.
Settings
In the settings section you can activate/
deactivate the “Automatic call
answering” and “Dialogue with call”
functions.
X In the Telephone main menu, select
6HWWLQJ.
5016
X Turn the rotary control/push
button to select between
$XWRFDOODQVZHULQJ and
'LDORJXHIRUFDOOV.
X Turn the rotary control/push button
to switch the required function on
() or off ().
Automatic call answering
When the function ( ) is active,
incoming calls will automatically be
answered after approx. 5 seconds.
You therefore do not have to answer the
call.
Note:
When the function ( ) is active, the
settings under Dialogue with call will
be ignored.
Dialogue with call
If the function ( ) is active, a voice
mode dialogue will automatically be
activated to answer an incoming call.
Note:
The “Automatic call answering”
function ( ) must be switched off so
that the dialogue can start when the ( )
function has been activated.
94 *Only available for the Traffic Pro with Bluetooth® wireless technology.
Page 95

Telephone mode*
5017
Telephone calls
Below, you can find information on the
operating options available to you
during an active telephone call.
Status display
The status display appears automatically
during an active telephone call.
The status display shows the following
information:
•Top left
Telephone status display is active.
• A telephone symbol will be displayed
in the centre left and, if available, the
name of the caller/ the person you are
calling. If the name is not available the
number will be displayed. If the
number has not been transmitted
8QNQRZQ will be displayed.
*60QHWZ, to indicate that the
• The name of the telephone currently
connected will be displayed at the
bottom left.
• The length of the call will be shown on
the centre right of the display.
• The strength of the received telephone
signal is displayed at the bottom right,
if available.
Press to switch to the status
display for radio mode or media mode.
You can also switch to the navigation
status display if route guidance is active.
Accepting/ rejecting a call
You can accept or reject incoming calls.
Accepting a call
The Traffic Pro announces an incoming
call by means of a signal tone and the
following display.
Note:
If the “Call waiting” function is active
on the mobile phone the same signals
are used to indicate that another call is
waiting if a call is already taking place.
If you accept the call the previous call
will be ended without a query being
made.
5018
X Select the $FFHSW entry and press the
rotary control/push button .
The call will be accepted and the status
display will be shown.
*Only available for the Traffic Pro with Bluetooth® wireless technology. 95
Page 96

Telephone mode*
5019
Note:
Selecting
0XWH deactivates the signal
tone and the previously active source,
radio or media, will be reactivated.
However the call will be indicated until
the caller ends the call.
Rejecting a call
You can reject an incoming call. The
person calling will hear a busy signal.
X Select the 5HMHFW entry and press the
rotary control/push button .
The call will be rejected. The status
display of the previously active radio or
media source will be shown.
Ending a call
Active calls can be terminated. For this
purpose, status display must be first be
accessed.
5017
X Press the rotary control/push button
.
The Options menu appears.
5020
X Select the +DQJXS entry.
X Press the rotary control/push button
.
The call is terminated.
Options menu
The Options menu can be displayed
during an active call. You can end the
call, send DTMF tones or divert the call
to the mobile phone.
X In the Telephone status display, press
the rotary control/push button .
5020
The Options menu appears.
X Turn the rotary control/push button
to select between
+DQJXS,
'70) and
3ULYDWH.
96 *Only available for the Traffic Pro with Bluetooth® wireless technology.
Page 97

Telephone mode*
5028
5021
End call
Select
+DQJ XS in the Options menu to
end the active call. See “Ending a call”
on page 96.
DTMF
So-called DTMF dialling tones can be
transmitted. For example, these tones
are required to retrieve information from
an answering machine.
X Open the Options menu.
X Select the '70) entry.
X Enter the required sequence of
numbers by turning and pressing the
rotary control/push button .
The entries must not be confirmed. The
individual DTMF tones will be sent
immediately after selection.
X Press to exit the input menu.
or
X In the input menu, select the
symbol.
Private
You can divert calls received via Traffic
Pro to the mobile phone. The hands-free
unit is then deactivated.
Notes:
• With some mobile phones, the
connection from the mobile phone to
the Traffic Pro will be interrupted
when this function is activated. If this
is the case you will have to reconnect
the mobile phone to the Traffic Pro as
described in “Connecting and
disconnecting devices*” on
page 117.
• If, at the end of the call, the function
3ULYDWH was activated, it will be
deactivated again for the next call.
X Open the Options menu.
X Select the 3ULYDWH entry.
X Press the rotary control/push button
to switch the function on ( ) or
off ( ).
*Only available for the Traffic Pro with Bluetooth® wireless technology. 97
Page 98

Telephone mode*
Fast access telephone functions
In fast access mode the last 20 numbers
or names which have been dialled,
answered or rejected will be displayed in
chronological order.
Notes:
The fast access entries have been given
symbols (the symbols are displayed in
following order – number not in
memory, mobile phone number,
business number, private number).
• The symbols , , and
stand for answered calls.
• The symbols , , and
stand for rejected calls.
• The symbols , , and
stand for outgoing calls.
You may:
• Call numbers and names listed in fast
access mode directly.
• Protect the fast access entries, i.e. the
entry will not be deleted when the
maximum number of entries is
reached. The oldest unprotected entry
will be deleted.
• Delete individual fast access entries.
• Delete the entire fast access list.
• Save an entry from the fast access list
in the address book.
X Press .
5001
X The telephone fast access function
appears.
Direct calling
X Call up the telephone fast access
function.
X Turn the rotary control/push button
and then press the rotary control/
push button to select the required
number or name from the list.
The call connection to the required
person will be started immediately.
98 *Only available for the Traffic Pro with Bluetooth® wireless technology.
Page 99

Telephone mode*
Protecting an entry
X Call up the telephone fast access
function.
X Select the entry to be protected.
X Press the rotary control/push button
until a menu appears.
X Select the 3URWHFWHQWU\ entry.
X Switch protection on ( ) or off ( )
by pressing the rotary control/push
button .
Protected entries are identified by the
symbol.
Note:
A protected entry is only protected from
being deleted in fast access mode.
However, you can delete this protected
entry individually, and it will also be
deleted when the complete list is
deleted.
Deleting an entry
X Call up the telephone fast access
function.
X Select the entry to be deleted.
X Press the rotary control/push button
until a menu appears.
X Turn the rotary control/push button
and then press the rotary control/
push button to select the
entry.
The entry is deleted from the fast access
list.
'HOHWH HQWU\
Deleting a list
X Call up the telephone fast access
function.
X Press the rotary control/push button
until a menu appears.
X Turn the rotary control/push button
and then press the rotary control/
push button to select the
'HOHWH OLVW
entry.
5022
X When the prompt appears, select <HV
to delete the list or 1R to retain it.
If you select
in the fast access function.
<HV the list will be deleted
*Only available for the Traffic Pro with Bluetooth® wireless technology. 99
Page 100

Telephone mode*
5023
Saving a number in the address book
X Call up the telephone fast access
function.
X Select the entry to be saved.
X Press the rotary control/push button
until a menu appears.
X Turn the rotary control/push button
and then press the rotary control/
push button to select the
ERRN
entry.
6DYHLQDGGUHVV
&UHDWHQHZHQWU\
•
Select this option to create a new entry
in the address book.
•
$PHQGHQWU\
Select this option to add the current
number to an existing entry in the
address book.
Creating a new entry
X Select the &UHDWHQHZHQWU\ entry.
2030
X Turn the rotary control/push button
and then press the rotary control/
push button to select each letter in the
surname one after the other.
Note:
Please also refer to the description in
“Data entry menus” on page 13.
X Select the symbol from the
input menu.
or
X press the rotary control/push button
and hold for at least 2 seconds.
The entry is adopted.
2031
X Turn the rotary control/push button
to select between
&UHDWHQHZHQWU\ and
$PHQGHQWU\.
X Confirm your selection by pressing
the rotary control/push button .
5024
X Turn the rotary control/push button
to select between
0RELOHWHO,
%XVLQHVVWHO and
3ULYDWHWHO.
X Confirm your selection by pressing
the rotary control/push button .
100 *Only available for the Traffic Pro with Bluetooth® wireless technology.
 Loading...