

Page 1
CrŽ atis
Page 2
Créatis
2
FR - Mode d’emploi pages 2 à 19
GB - Instructions for use pages 2 - 19
Page 3

3
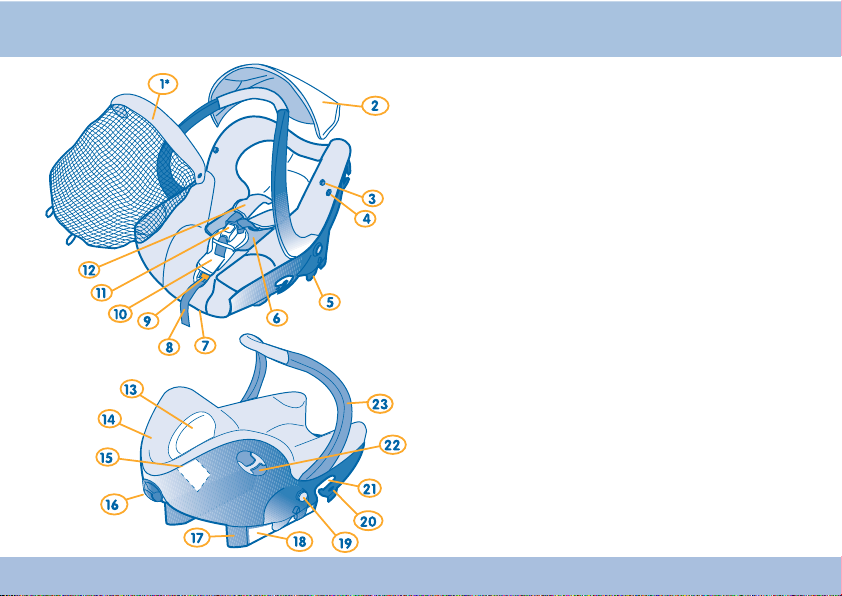
DESCRIPTION
FR
1 - Moustiquaire - *Vendue en accessoire
2 - Pare-soleil
3 - Quatre boutons-pression pour fixation du pare-soleil
4 - Deux boutons-pression pour fixation moustiquaire
5 - Modulo Clip® System (pour fixation sur châssis Bébé Confort)
6 - Coussin premier âge (jusqu’à 3 mois)
7 - Crochets de fixation de la moustiquaire
8 - Sangle de réglage harnais
9 - Loquet de réglage harnais
10 - Protection de boucle
11 - Boucle du harnais
12 - Protections d’épaules
13 - Têtière
14 - Confection
15 - Poche de rangement pour la notice (entre la coque et le polystyrène)
16 - Guide sangle
17 - Pied
18 - Etiquette d’installation (n° d’homologation)
19 - Bouton de déverrouillage poignée
20 - Repère bleu droit (indique le cheminement de la ceinture)
21 - Guide sangle
22 - Guide sangle
23 - Poignée de transport
Page 4
4
DESCRIPTION
GB
1 - Mosquito net - *Sold as an accessory
2 - Sunshade
3 - Four press studs for fastening the sunshade
4 - Two press studs for fastening the mosquito net
5 - Modulo Clip® System (For fastening on the Bébé Confort frame)
6 - Cushion for the newborn (up to 3 months)
7 - Fastening hooks for the mosquito net
8 - Adjusting strap for harness
9 - Adjusting latch for harness
10 - Buckle cover0
11 - Harness buckle
12 - Shoulder pads
13 - Headrest
14 - Fabric
15 - Storage pocket for instructions
(between the shell and the polystyrene)
16 - Strap guide
17 - Base
18 - Installation label (approval no)
19 - Knob for unlocking handle
20 - Right-hand blue marker (Shows the position of the belt)
21 - Strap guide
22 - Strap guide
23 - Carry handle
Page 5
INSTRUCTIONS POUR L’USAGE DU DISPOSITIF
DE RETENUE POUR ENFANTS.
• Nous vous conseillons de lire attentivement cette notice
et de manipuler votre produit avant de l’utiliser.
• Conserver toujours la notice pour une utilisation
ultérieure, une poche de rangement a été prévue à cet
effet sur le dispositif de retenue pour enfants.
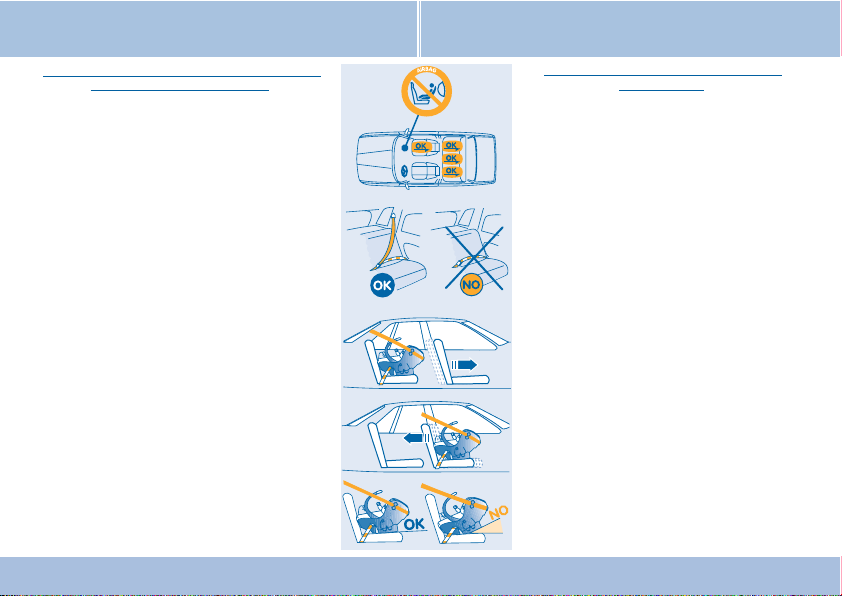
• NE PAS installer de siège pour enfant tourné vers
l’arrière sur un siège avant équipé d’un coussin
gonflable. RISQUE DE MORT OU DE BLESSURE
GRAVE.
• Il est possible d’installer votre dispositif de retenue
pour enfants sur les sièges avant et arrière du
véhicule.
• Le siège peut être utilisé aux places avant (selon la
législation en vigueur) ou aux places arrière. Les
sièges rabattables doivent toujours être verrouillés.Ce
dispositif est seulement utilisable sur les véhicules
approuvés équipés de ceintures de sécurité 3 points /
statiques / à enrouleur, homologuées, conformément
au règlement CEE N°16 / ONU ou d’une norme
équivalente.
• Régler la position des sièges du véhicule pour ne pas
entraver l’installation et l'efficacité du dispositif de
retenue pour enfants:
- Avancer le siège passager avant pour
une installation à l’arrière du véhicule.
- Reculer le siège passager avant pour
une installation à l’avant du véhicule et
ainsi profiter au maximum de la longueur
de la ceinture avant du véhicule.
• Veillez à ce que les pieds de votre dispositif de
retenue pour enfants soient bien posés sur le siège
du véhicule.
INSTR
UCTIONS FOR USE OF THE CHILD
SAFETY SEAT.
• We advise you to read these instructions carefully and
to ensure you are familiar with the product before
using it.
• Always retain the instructions for future use, a storage
pocket for this has been provided on the child's safety
seat.
• DO NOT install the child safety seat facing the rear on
a front seat fitted with an airbag.DANGER OF DEATH
OR SERIOUS INJURY.
• It is possible to install your child safety seat on the
front and rear seats of your vehicle.
• The seat can be used in the front (if allowed by current
legislation) or on the rear seats. Folding seats must
always be locked in place. This device must be used
only on approved vehicles fitted with 3 point seat
belts/static/retractable, approved to ECE/UN
regulation or equivalent standard.
• Adjust the position of the vehicle's seats so as not to
interfere with the correct fitting and effectiveness of
the child safety seat:
- Push the front passenger seat forward
to install the child safety seat in the
rear of the vehicle.
- Push the front passenger seat
backwards when installing in the front
of the vehicle to use the length of the
front seat belt to maximum advantage
• Ensure that the base of the child safety seat is solidly
placed on the seat of the vehicle.
5
IMPORTANT
WARNING
FR - GB
Page 6

6
IMPORTANT
WARNING
• Ne jamais laisser votre enfant sans surveillance.
• Ce dispositif de retenue pour enfants est efficace uniquement lors du
respect des instructions d’utilisation.
• Pour votre sécurité et celle de votre enfant, installez toujours ce
dernier dans le dispositif de retenue pour enfants quel que soit le
trajet que vous avez à effectuer.
• Même minimes, les chocs subits par un véhicule peuvent transformer
l’enfant en un véritable projectile.
• Attachez toujours le dispositif de retenue pour enfants même lorsque
l’enfant n’y est pas installé.
• Modèle approuvé pour le groupe 0+ (enfant d’un poids inférieur à 13 Kg).
• Le dispositif de retenue pour enfants doit être utilisé dos à la route
(groupe 0+) jusqu’à un âge de 13 mois (c’est à dire environ 13 Kg).
• La responsabilité du fabricant ne saurait être engagée, que dans le
cadre de l'attribution du Règlement Européen (R44). Cette
homologation n'exclut pas la prudence et le respect du code de la
route.
• Ne modifiez jamais la construction ou les matériaux du siège et de la
ceinture sans avoir consulté le fabricant.
• Ne placez jamais d’objets lourds sur la tablette arrière, afin d’éviter les
projections en cas d’accident.
• L'utilisateur doit toujours veiller à ce que les bagages et autres objets
susceptibles de causer des blessures à l'occupant du siège en cas de
choc soient solidement arrimés.
• La température à l’intérieur d’un véhicule peut être très élevée,
notamment après une longue exposition au soleil. Il est fortement
recommandé, dans ces conditions, de recouvrir le siège auto d’un
tissu ou autre qui empêchera les fixations du harnais, et plus
particulièrement les pièces métalliques, de chauffer et de brûler
l’enfant.
• Le siège doit impérativement être remplacé après un accident.
• Vérifiez toujours si une partie du siège ou du harnais n’est pas
coincée sous un siège ou dans la porte du véhicule.
• Never leave your child unattended.
• This child safety seat is effective only if the fitting instructions are
followed.
• For your own safety and that of your child, always place your child in
the safety seat no matter how short the journey you are making.
• Even a slight accident can turn your child into a projectile.
• Always keep the child safety seat fitted even when the child is not being
carried.
• Model approved for group 0+ (child weighing less than 13 Kg).
• The child safety seat must be fitted with its back to the direction of
travel (group 0+) up to the age of 13 months (i.e.approximately 13 Kg).
• The manufacturer's liability extends only to what is contained in
European Regulation (R44).This approval does not preclude due care
and observation of the highway code.
• Never change the construction or materials of the seat or belt without
consulting the manufacturer.
• Never place heavy objects on the rear parcel shelf to avoid them being
flung forward in case of an accident.
• The user must always ensure that luggage and other objects which
could injure the occupant of the seat in case of an accident are firmly
fastened down.
• The temperature inside a vehicle can be very high, especially after it
has stood in the sun for a long time. In such conditions, you are
strongly advised to cover the child's seat with a cloth or other suitable
item to to prevent the harness fastenings, in particular the metal parts,
from becoming hot and burning the child.
• A new seat MUST be fitted after an accident.
• Always check that no part of the safety seat or harness is trapped
under a seat or in the door of the vehicle.
• Do not use the child safety seat without its cover. Do not replace the
seat cover with one not recommended by the manufacturer because
the cover is an integral part of the restraint.
FR - GB
Page 7
7
IMPORTANT
WARNING
• Ne pas utiliser le dispositif de retenue pour enfants sans la housse.Ne
pas remplacer la housse du siège par une autre housse que celle
recommandée par le constructeur, car elle intervient directement dans
le comportement du dispositif de retenue.
• Les produits Bébé Confort ont été conçus et testés avec soin pour la
sécurité et le confort de votre bébé. N’utilisez que des accessoires
vendus ou approuvés par Ampafrance. L’utilisation d’autres
accessoires peut s’avérer dangereuse.
• Après avoir installé votre enfant, assurez-vous que la ceinture soit
correctement tendue en tirant sur la sangle. Assurez-vous également
que la sangle ne se vrille pas.
Entretien
• Avant démontage, veillez à bien noter la manière dont les différentes
parties sont montées sur le siège afin de tout remonter correctement.
• Pour une entière satisfaction, le produit dépend d’un entretien régulier.
Confection:
• Avant nettoyage consulter l’étiquette de composition du textile cousue
sur la confection, vous y retrouverez les symboles de lavage propre à
l’élément à laver.
Coque:
• Nettoyer la coque à l’aide d’un chiffon humide.
• Bébé Confort products have been carefully designed and tested to
ensure the complete safety and comfort of your baby. Use only
accessories sold or approved by Ampafrance. The use of other
accessories may be dangerous.
• After having put your baby in the seat, ensure that the belt is correctly
tensioned by pulling the strap. Also ensure that the strap is not
twisted.
Care
• Before removal, ensure you have carefully noted the way which the
various parts are attached to the seat so as to facilitate reassembly.
•
To give perfect satisfaction, the product must be cared for regularly.
Fabric:
• Before cleaning check the label sewn into the fabric, you will find the
wash symbols indicating the method of washing each item.
Shell:
• Clean the shell using a damp cloth.
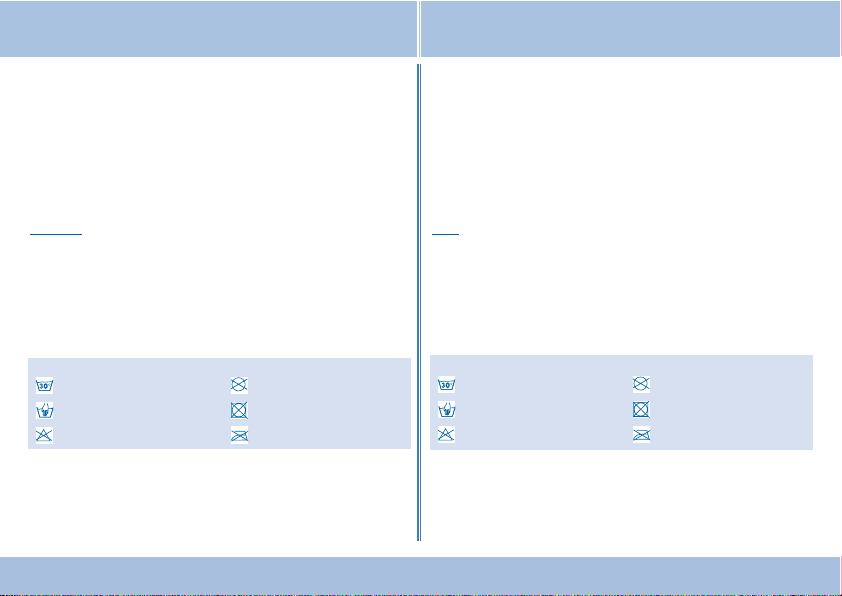
Pictogrammes de lavage :
Lavage en machine 30°
Lavage à la main seulement
Ne pas utiliser de Javel (Chlore)
Aucun nettoyage à sec
Pas de séchage en tambour
Pas de repassage
.
Washing symbols :
Machine wash 30 °
Hand wash only
Do not use bleach (Chlorine)
Do not dry clean
Do not tumble dry
Do not iron
FR - GB
Page 8

ATTENTION :avant de débuter
l'installation lisez l'ensemble des
instructions de ce mode d'emploi. Les
repères bleus sur le Créatis vous indiquent
le cheminement de la ceinture de sécurité.
1 - Bouclez la ceinture et posez votre
Créatis dos à la route sur le siège du
véhicule.
CAUTION: before starting to fit the seat
read through all the instructions provided.
The blue marks on the Créatis indicate the
path of the safety belt.
1 - Fasten the belt and place your Créatis
facing backwards on the seat of the
vehicle.
2’ - Passez la ceinture ventrale dans la fente
inférieure de la coque et positionnez-la
comme indiqué.
ATTENTION :lors du passage de la sangle
ventrale dans la fente de la coque veillez
toujours à ce qu'elle ne se vrille pas.
2’ - Thread the lap belt through the lower slot
in the shell and fasten it as shown.
CAUTION:when passing the lap belt through
the slot in the shell, always ensure that it is
not twisted.
2’’- Passez la ceinture ventrale dans la fente
inférieure de la coque et positionnez-la comme
indiqué.
ATTENTION : lors du passage de la sangle
ventrale dans la fente de la coque veillez
toujours à ce qu'elle ne se vrille pas.
2’’- Thread the lap belt through the lower slot in
the shell and fasten it as shown.
CAUTION: when passing the lap belt through
the slot in the shell, always ensure that it is not
twisted.
8
INTALLATION DANS UN VÉHICULE - FITTING INTO A VEHICLE
FR - GB
Page 9

5
3 - Une fois la ceinture ventrale
passée dans les fentes de la coque,
faites la glisser plusieurs fois de
gauche à droite pour vérifier son
coulissement.
3 - When the lap belt has been
threaded through the slots in the
shell, slide it from left to right several
times to check that it slides freely.
4 - Faites passer la ceinture d'épaule derrière
la coque, puis tirez-la fermement afin de
tendre la ceinture ventrale, et de plaquer le
siège de retenue pour enfants sur l'assise du
siège du véhicule
4 - Slide the diagonal belt behind the shell
and then pull it firmly to tension the lap belt
and to press the safety seat against the
vehicle’s seat squab.
5 - Faites passer la sangle d'épaule dans le bridesangle à l’arrière la coque.
5 - Thread the diagonal belt through the lock-strap
behind the shell.
9
INTALLATION DANS UN VÉHICULE - FITTING INTO A VEHICLE
FR - GB
Page 10

6 - La ceinture d'épaule passée
dans le bride-sangle (5) à
l’arrière du Créatis, tendez-la.
Le siège se stabilisera
automatiquement grâce à
l'autoserreur incorporé dans le
bride-sangle.
6 - Once the diagonal belt is
correctly positioned in the lockstrap (6) behind the Créatis,
tighten it.The seat will position
itself automatically by means of
the auto-tensioner incorporated
into the lock-strap.
7 - Passez la ceinture d'épaule dans
le guide-sangle sur le côté du siège et
tendez-la.
7 - Thread the diagonal strap through
the guide on the side of the seat and
tighten it.
8 - ATTENTION vous avez terminé l'installation de votre Créatis.
•
Vérifiez sa stabilité.
•
Vérifiez que la ceinture du véhicule est bien bouclée (a), et que
tous les points de passages (b - c - d - e) de la ceinture ont
bien étés respectés.
•
Vérifiez que la ceinture du véhicule n'est pas vrillée.
8 - NOTE you have now completed the installation of your Créatis.
•
Check it is positioned firmly.
• Check that the vehicle belt is correctly fastened (a), and that the
belt has been correctly positioned at points b - c - d - e.
• Check that the vehicle's belt is not twisted.
10
INTALLATION DANS UN VÉHICULE - FITTING INTO A VEHICLE
FR - GB
Page 11

9 - Votre dispositif de retenue pour enfants
est équipé d’un coussin réducteur, fixé au
bas de la têtière à l’aide de 2 boutons
pressions situés sous la têtière.
ATTENTION :utilisez le coussin réducteur
de 0 à 3 mois MAXIMUM avec têtière en
position la plus basse UNIQUEMENT.
9 - Your child safety seat is fitted with a
reducing cushion fixed at the base of the
headrest using 2 press studs located
under the headrest.
WARNING: use the reducing cushion from
0 to 3 months maximum ONLY with the
headrest in its lowest position.
10 - Allongez les bretelles du harnais en
appuyant sur le loquet de réglage et en
tirant sur les bretelles.
ATTENTION : ne pas saisir les protections
d’épaules mais les bretelles du harnais.
10 - Lengthen the shoulder straps of the
harness by pressing on the adjustment
latch and pulling on the shoulder straps.
WARNING:do not pull on the shoulder
pads but rather on the shoulder straps of
the harness.
11 - Intallez l’enfant, assemblez les bretelles puis
introduisez l’ensemble dans la boucle du harnais, un
click vous indique le verrouillage.Ajuster le harnais à
l’enfant en tirant sur la sangle de réglage.
ATTENTION :Attachez l’enfant en toutes
circonstances.
11 - Place the child in the seat, arrange the shoulder
straps and then attach them to the harness buckle.A
click will indicate that it is locked.Adjust the harness to
suit the child by pulling on the adjustment strap.
WARNING: Always fasten the child into the seat.
INSTALLATION
DE L’ENFANT -
PLACING THE CHILD IN THE SEAT
11
FR - GB
3 mois - months Maxi
Page 12

12 - Veillez à ce que le réglage des
bretelles soit juste à la hauteur des
épaules de l’enfant.
12 - Check that the shoulder
harness is levelled with the child’s
shoulders.
Réglage de la hauteur des bretelles du harnais
13 - Allongez les bretelles du harnais en appuyant sur le
loquet de réglage et en tirant sur les bretelles (10).
Saisissez (A) le haut de la têtière pour la déverrouiller en
la basculant vers l’avant, puis (B) régler la hauteur des
bretelles du harnais en montant ou descendant la têtière.
Adjusting the height of the shoulder straps of the harness
13 - Lengthen the shoulder straps of the harness by
pressing on the adjustment latch and pulling on the
shoulder straps (10).Take hold of the top of the headrest
(A) to unlock it by folding it forward, then adjust the length
of the harness shoulder straps (B) by raising or lowering
the headrest.
14 - Appuyer sur la têtière vers l’arrière pour
bloquer en position sélectionnée.
14 - Push the headrest to the rear to lock it
into the desired position.
12
FR - GB
REGLAGE DU HARNAIS - ADJUSTING THE SEAT HARNESS
Page 13

AVERTISSEMENT :Il est dangereux d'utiliser ce siège sur une
surface en hauteur.
AVERTISSEMENT :Pour éviter tout risque de chute, votre enfant
doit toujours être attaché.
IMPORTANT :avant de porter le siège vérifiez que la poignée de
transport est correctement verrouillée.
IMPORTANT: pour la sécurité de votre enfant, il est fortement
déconseillé d’installer le Créatis sur un chariot de supermarché.
WARNING: It is dangerous to use or place this seat on a raised
surface.
WARNING:To avoid any risk of a fall, your child should always be
fastened into the seat.
IMPORTANT:Before carrying the seat, check that the carrying
handle is locked in place.
IMPORTANT:For your child’s safety, you are strongly advised not to
place the Créatis on a supermarket trolley.
13
IMPORTANT
WARNING
FR - GB
Page 14

Passez la poignée de position haute de
transport à la position basse de repos.
15 - Appuyer sur le bouton de verrouillage
droit de la poignée jusqu’à l’obtention d’un
(Click!), le bouton reste alors enfoncé.
Move the handle from the upper carrying
position to the lower at-rest position.
15 - Press on the right-hand locking knob
until you hear a click.The button will then
remain depressed.
16 -
Appuyer sur le bouton de verrouillage
gauche de la poignée, tout en maintenant la
pression basculer la poignée vers l’arrière.
16 -
Press on the left-hand locking knob and
keeping it depressed, move the handle to the
rear.
17 - Pousser la poignée au maximum
jusqu’à ce qu’elle se bloque (Click!).
17 - Push the handle as far as it will go until
it locks (Click!).
14
POIGNÉE DE TRANSPORT - CARRYING HANDLE
FR - GB
Page 15

Passez la poignée de la position basse
de repos à la position haute de transport.
18 - Appuyer sur le bouton de verrouillage
droit de la poignée jusqu’à l’obtention d’un
Click, le bouton reste alors enfoncé.
Move the handle from the lower at-rest
position to from the upper carrying
position.
18 - Press on the right-hand locking knob
until you hear a click, the button will then
remain depressed.
19 - Appuyer sur le bouton de verrouillage
gauche de la poignée, tout en maintenant la
pression basculer la poignée vers vous.
19 - Press on the left-hand side locking knob
and, keeping it depressed, fold the handle
towards you.
20 - Lorsque vous entendez le (Click!) du
bouton droit et que celui est revenu en position
initiale, alors la poignée est en position
verrouillée.IMPORTANT :avant de porter le
siège, vérifiez que la poignée de transport est
correctement verrouillée.
20 - When you hear a click from the right-hand
knob and when it has returned to its initial
position, the handle is in the locked position.
IMPORTANT : before carrying the seat, check
that the carry handle is locked in place.
15
POIGNÉE DE TRANSPORT - CARRYING HANDLE
FR - GB
Page 16

Pare-soleil
21 - Fixer le pare-soleil sur la confection à l’aide des 4 boutons-pression.
22 - Le pare-soleil peut être replié sur lui même et ainsi permettre de mieux voir l’enfant.
Sunshade
21 - Attach the sunshade to the fabric by means of the 4 press studs.
22 - The sunshade can be folded back to allow you to see the child better.
Moustiquaire : (vendu en accessoire)
23 - Passer le haut de la moustiquaire dessus
le pare-soleil, fixer-la à l’aide des 2 boutonspression puis accrocher les élastiques sous
l’avant de la coque.
Mosquito net: (sold as an accessory)
23 - Place the top of the mosquito net over the
sunshade, attach it using the 2 press studs
and then hook the elastic attachments under
the front of the shell.
16
FR - GB
ACCESSOIRES - ACCESSORIES
Page 17

17
Compatibilité :
Créatis est adaptable sur les
châssis Bébé Confort suivant:
Loola
High T rek
Trophy
Trophy Air 4
Trophy Air 6
Elite
Twin Club
Compatibility :
Créatis can be used with the
following Bébé Confort frames:
Loola
High T rek
Trophy
Trophy Air 4
Trophy Air 6
Elite
Twin Club
FR - GB
MONTAGE - TO REFIT
DEMONTAGE - TO REMOVE
Page 18

ATTENTION :Avant démontage, veillez à bien
noter la manière dont les différentes parties
sont montées sur le siège afin de tout remonter
correctement. Pour le lavage consulter
l’étiquette d’entretien cousue sur la confection
(voir chapitre entretien p 7).
Coussin premier âge
24 - Après lavage attendre que la mousse
intérieure soit totalement sèche.
WARNING: Before removal, ensure you have
carefully noted the way which the various parts
are attached to the seat so as to facilitate
reassembly.
For washing, check the care label sewn into the
fabric (see care chapter
p 7
).
Cushion for the newborn
24 - After washing, wait until the inner foam is
completely dry.
Têtière
25 - Déhousser la têtière en
commençant par le haut, dégager les
élastiques qui la maintiennent.
Headrest
25 - Remove the head rest cover
starting from the top, unhook the
elastic attachments.
26 - Faire passer les bretelles du harnais à
travers les fentes de la housse.
ATTENTION : ne jamais retirer la mousse
protectrice fixée sur la têtière plastique.
26 - Pass the shoulder straps of the harness
through the slots in the cover.
WARNING:never remove the protective foam
fixed to the plastic head rest.
18
DÉHOUSSAGE - REMOVAL OF COVER
FR - GB
Page 19

DÉHOUSSAGE - REMOVAL OF COVER
Housse
27 - Décrocher l’élastique en haut du siège
puis le crochet situé à l’avant sous la coque.
Cover
27 - Unhook the elastic attachment from the top
of the seat and then the hook located at the
front under the shell.
28 - Déhousser le bas du siège et passer
la boucle du harnais à travers la fente de
la housse.
28 - Remove the cover from the base of
the seat and pass the buckle of the
harness through the slot in the cover.
29 - Déhousser le haut du siège et dégager
les élastiques passant derrière le
polystyrène.
29 - Remove the cover from the top of the
seat and unhook the elastic attachments
from behind the polystyrene.
19
FR - GB
Page 20

Cher client,
Nous vous remercions de la confiance que vous nous accordez en choisissant l’un de nos produits.Nous espérons qu’il vous donne entière
satisfaction. Ce cer tificat vous indique que votre produit a été fabriqué selon les différentes normes de qualité qui lui sont applicables et qu’il a
été soumis à de nombreux contrôles aux différentes étapes de sa fabrication. Si malgré tous nos efforts une anomalie inter venait pendant la
période de validité de ce certificat, nous nous engageons à respecter les conditions de garantie.
CERTIFICAT DE GARANTIE : Bébé Confort vous garantit que ce produit est conforme aux exigences de sécurité telles que définies par la
réglementation en vigueur, et qu’il ne présente aucun défaut de conception et fabrication au moment de son achat par le revendeur. Si après
votre achat, durant une période de 24 mois, ce produit présentait un défaut dans le cas d’une utilisation normale telle que définie dans la notice
d’emploi, Bébé Confort s’engage à vous le réparer ou à vous le changer, hors les cas d’exclusion suivants :
. utilisation et destination autres que celles prévues
dans la notice d’utilisation,
. installation non conforme à la notice,
. réparation effectuée par une personne ou un
revendeur non agréé,
. défaut de retour au fabricant du certificat de
garantie correctement rempli par le propriétaire et
le revendeur en cas d’intervention,
. défaut de présentation d’une preuve d’achat,
. manque d’entretien de votre produit,
. remplacement de toutes pièces d’usure (roues,
parties en frottement ...) en utilisation normale.
A partir de quand ?
A compter de la date d’acquisition du produit.
Pour combien de temps ?
24 mois consécutifs et non transmissibles, seul le premier acheteur en est l’unique bénéficiaire.
Que devez-vous faire ?
Dès l’achat de votre produit, vous devez remplir votre certificat de garantie, y faire apposer le
cachet du revendeur, y attacher votre ticket de caisse et conserver le tout précieusement.
Si un pr
oblème survenait, le produit devra être rapporté chez tout revendeur agréé Bébé Confort
accompagné du certificat de garantie dûment complété comme indiqué ci-dessus. Tout produit
adressé directement au fabricant ne pourra bénéficier de la garantie.
Concernant les parties textiles
Elles doivent être entretenues régulièrement (suivre les indications de la notice d’utilisation), toute
utilisation de produit entraîne une usure normale de celui-ci. La garantie est limitée à une
période de 90 jours.
Cette garantie est conforme à la Directive Européenne n° 1999/44/CE du 25 Mai 1999.
20
G
Page 21

Dear Customer,
Thank you for the confidence you have shown us in choosing one of our products. We hope it will meet all your expectations.This certificate
indicates that this product has been manufactured according to the various applicable quality standards and that it has been subjected to
numerous checks during the different manufacturing stages.If in spite of all our efforts a fault should arise during the validity of this certificate,
we undertake to respect the provisions of this guarantee.
GUARANTEE CERTIFICATE: Bébé Confort guarantees that this product conforms with safety requirements as defined by applicable
regulations, and that it has no design or manufacturing faults when purchased by the retailer. If within 24 months of purchase by you this
product should reveal any fault, subject to normal use as defined in the instructions for use, Bébé Confort under takes to repair it for you or to
replace it, subject to the following exclusions:
. use and purpose other than those indicated in the
instructions for use,
. installation not in accordance with the instructions,
. repair carried out by an unapproved person or
retailer,
. guarantee certificate not correctly filled in by the
owner and retailer and sent to the manufacturer in
the event of repair,
. proof of purchase not presented,
. product not maintained,
. replacement of any parts subject to wear (wheels,
areas which rub, etc.) during normal use.
From when?
From the date the product is purchased.
For how long?
For 24 consecutive months, non-transferable, only the first purchaser benefits from this.
What do you have to do?
As soon as you purchase your product, you must fill in the guarantee certificate, get the
retailer to stamp it, attach the sales receipt and store these documents safely.
If a pr
oblem should arise, the product must be brought back to any approved Bébé Confort
retailer together with the guarantee certificate, duly completed as indicated above. Any
product sent directly to the manufacturer will not be covered by the guarantee.
Regarding the fabric portions
These must be maintained regularly (follow the instructions for use), the use of any use of the
product will result in normal wear. The guarantee is limited to a period of 90 days.
This guarantee conforms with European Directive No. 1999/44/EC dated 25 May 1999.
21
G
GB
Page 22

..0526951
DOREL FRANCE S.A.
Z.I. - 9 bd du Poitou
BP 905
49309 Cholet Cedex
FRANCE
DOREL BELGIUM
Budasteenweg 7
1830 Machelen
België / Belgique
DOREL (U.K).LTD
Hertsmere House,
Shenley Road,
Borehamwood
Hertfordshire WD6 1TE
UNITED KINGDOM
DOREL GERMANY
Augustinusstraße 11 b
D-50226 Frechen-Königsdorf
DEUTSCHLAND
DOREL NETHERLANDS
Postbus 6071
5700 ET HELMOND
NEDERLAND
DOREL ITALIA S.P.A.
a Socio Unico
Via Verdi, 14
24060 Telgate (Bergamo)
DOREL HISPANIA , S.A.
C/Pare Rodés n°.26
Torre A 4°
Edificio Del Llac Center
08208 Sabadell (Barcelona)
DOREL PORTUGAL
Parque Industrial da Varziela
Rua nº 1 - Arvore
4480-109 Vila de Conde
AMPA SUISSE S.A.
77 bis, rue de Genève
1004 LAUSANNE
 Loading...