


Fuze 610Z

150.38
6 V1.0
Fuze 610Z
WASH

ENGLISH
SAFETY INSTRUCTIONS ....................................................................................................................................................................................................................................................................................... 3
UNPACKING INSTRUCTION ................................................................................................................................................................................................................................................................................. 4
POWERSUPPLY ........................................................................................................................................................................................................................................................................................................ 4
RIGGING ......................................................................................................................................................................................................................................................................................................................... 4
DMX512 CONTROL .................................................................................................................................................................................................................................................................................................... 5
RF REMOTE CONTROL........................................................................................................................................................................................................................................................................................... 5
CLEANING .................................................................................................................................................................................................................................................................................................................... 6
REPLACING THE FUSE .......................................................................................................................................................................................................................................................................................... 6
TROUBLE SHOOTING .............................................................................................................................................................................................................................................................................................. 7
NEDERLANDS
VEILIGHEIDSINSTRUCTIES ................................................................................................................................................................................................................................................................................. 8
UITPAKKEN ................................................................................................................................................................................................................................................................................................................. 9
AANSLUITSPANNING ............................................................................................................................................................................................................................................................................................. 9
RIGGING ......................................................................................................................................................................................................................................................................................................................... 9
DMX BEDIENING ..................................................................................................................................................................................................................................................................................................... 10
RF AFSTANDSBEDIENING ................................................................................................................................................................................................................................................................................. 10
REINIGEN ...................................................................................................................................................................................................................................................................................................................... 11
VERVANGEN ZEKERING ....................................................................................................................................................................................................................................................................................... 11
PROBLEMEN OPLOSSEN ....................................................................................................................................................................................................................................................................................12
DEUTSCH
SICHERHEITSHINWEISE..................................................................................................................................................................................................................................................................................... 13
AUSPACKEN .............................................................................................................................................................................................................................................................................................................. 14
NETZANSCHLUSS ................................................................................................................................................................................................................................................................................................... 14
RIGGING ........................................................................................................................................................................................................................................................................................................................ 14
DMX BEDIENUNG ....................................................................................................................................................................................................................................................................................................15
RF-FERNBEDIENUNG ...........................................................................................................................................................................................................................................................................................15
REINIGUNG ................................................................................................................................................................................................................................................................................................................ 16
SICHERUNGWECHSEL ........................................................................................................................................................................................................................................................................................ 16
FEHLERSUCHE ......................................................................................................................................................................................................................................................................................................... 17
ESPAÑOL
INSTRUCCIONES DE SEGURIDAD .................................................................................................................................................................................................................................................................. 18
INSTRUCCIONES DE DESEMBALAJE .......................................................................................................................................................................................................................................................... 19
FUENTE DE ALIMENTACIÓN ............................................................................................................................................................................................................................................................................ 19
INSTALACIÓN ........................................................................................................................................................................................................................................................................................................... 19
CONTROL DMX512 ................................................................................................................................................................................................................................................................................................. 20
RF CONTROL REMOTO ....................................................................................................................................................................................................................................................................................... 20
LIMPIEZA .....................................................................................................................................................................................................................................................................................................................21
CAMBIANDO EL FUSIBLE ....................................................................................................................................................................................................................................................................................21
SOLUCIÓN DE PROBLEMAS ............................................................................................................................................................................................................................................................................. 22

FRANÇAIS
INSTRUCTIONS DE SECURITE ........................................................................................................................................................................................................................................................................ 23
INSTRUCTIONS DE DEBALLAGE ................................................................................................................................................................................................................................................................... 24
ALIMENTATION ...................................................................................................................................................................................................................................................................................................... 24
FIXATION ................................................................................................................................................................................................................................................................................................................... 24
GESTION DMX512 .................................................................................................................................................................................................................................................................................................. 25
TELECOMMANDE RF ........................................................................................................................................................................................................................................................................................... 25
NETTOYAGE ............................................................................................................................................................................................................................................................................................................. 26
REMPLACEMENT DU FUSIBLE ...................................................................................................................................................................................................................................................................... 26
RESOLUTION DE PROBLEMES ....................................................................................................................................................................................................................................................................... 27
POLSKI
INSTRUKCJA BEZPIECZEŃSTWA ................................................................................................................................................................................................................................................................ 28
ROZPAKOWYWANIE INSTRUKCJI ............................................................................................................................................................................................................................................................... 29
ZASILACZ .................................................................................................................................................................................................................................................................................................................. 29
MOCOWANIE............................................................................................................................................................................................................................................................................................................ 29
KONTROLA DMX512.............................................................................................................................................................................................................................................................................................. 30
RF Pilot ....................................................................................................................................................................................................................................................................................................................... 30
CZYSZCZENIE .......................................................................................................................................................................................................................................................................................................... 31
WYMIANA BEZPIECZNIKA ................................................................................................................................................................................................................................................................................ 31
ROZWIAZYWANIE PROBLEMÓW ................................................................................................................................................................................................................................................................. 32
TECHNICAL DET AILS
CONTROL MENU .................................................................................................................................................................................................................................................................................................... 33
DMX CHANNELS ................................................................................................................................................................................................................................................................................................... 34
TECHNICAL SPECIFICATIONS ........................................................................................................................................................................................................................................................................ 35
W ARNING! Before carrying out any operations with the unit, carefully read this instruction manual and keep it with cure for future ref erence. It
contains important information about the installation, usage and maintenance of the unit.
• Unpack and check carefully that there is no transportation damage before using the unit
• Please read these instructions carefully and follow the instructions.
• Observe all safety warnings. Never remove safety warnings or other information from the equipment.
• Be sure that no ventilation slots are blocked; otherwise the unit will overheated.
CAUTION: Before connecting the equipment to the power outlet, first verify that the mains voltage and frequency match the values speci fied on
the equipment. If the equipment has a voltage selection switch, connect the equipment to the power outlet only if the equipment values and the
mains power values match. If the included power cord or power adapter does not fit in your wall outlet, contact your electric ian.
• After connecting the unit, check all cables in order to prevent damage or accidents, e.g., due to tripping hazards.
• Make sure that the power cord is never crimped or damaged. Check the device and the power cord from time to time.
• Always disconnect power from the mains, when device is not used or before cleaning! Only handle the power cord by the plug. Never pull out
the plug by tugging the power cord.
• Unplug the power cord and power adapter from the power outlet if there is a risk of a lightning strike or before extended per iods of disuse.
• Do not switch the unit on and off in short intervals.
• Do not connect the unit to a dimmerpack.
• Install the unit in a well ventilated place.
• Never place any material over the lens.
• Always allow free air space of at least 50 cm around the unit for ventilation.
• Make sure that the area below the installation place is blocked when rigging, derigging or servicing the fixture.
• For mounting height >100 cm, always fix the fixture with an appropriate safety-rope. Fix the safety-rope at the correct fixation points only.
The safety-rope must never be fixed at the transport handles!
• Never look directly at the light beam. Please note that fast changes in lighting, e. g. flashing light, may trigger epileptic seizures in
photosensitive persons or persons with epilepsy.
• This unit is not designed for permanent operation. Consistent operation breaks will ensure that the device will serve you for a long time
without defects.
CAUTION: If the power cord of the device is equipped with an earthing contact, then it must be connected to an outlet with a protective ground.
Never deactivate the protective ground of a power cord.
• Make sure that the unit is not exposed to extreme heat, moisture or dust.
• Clean the unit using a dry cloth.
• Do not touch the fixture bare-handed during its operation (housing becomes very hot). Allow the fixture to cool for at least 5 minutes before
handling.
• This unit is designed exclusively for indoor use, do not use this equipment in the immediate vicinity of fluid (does not appl y to special outdoor
equipment - in this case, observe the special instructions noted below). Do not expose this unit to flammable materials, fluids or gases.
• If the unit has been exposed to drastic temperature fluctuation (e.g. after transportation), do not switch it on immediately. The arising
condensation water might damage your unit. Leave the unit switched off until it has reached room temperature.
• Never attempt to bypass the thermostatic switch or fuses.
• Do not dismantle or modify the unit.
• For replacement use fuses/bulb of same type and rating only.
• Repairs, servicing and electric connection must be carried out by a qualified technician.
• The ambient temperature must always be between -5° C and +45° C.
• If this unit is operated in any other way, than the one described in this manual, the product may suffer damages and the warr anty becomes
void.
• Plastic bags must be kept out of reach of children.
• Unit must be installed out of the reach of children. Never leave the unit running unattended.
This symbol on the product or on its packaging indicates that this product shall not be t reated as household waste. Instead it shall be
handed over to the applicable collection point for the recycling of electrical and electronic equipment.
By ensuring this product is disposed of correctly, you will help prevent potential negative consequences for the environment and human health,
which could otherwise be caused by inappropriate waste handling of this product. The recycling of materials will help to cons erve natural
resources. For more detailed information about recycling of this product, please contact your local Civic Office, your household waste disposal
service or the shop where you purchased the product.
CAUTION! Immediately upon receiving the product, carefully unpack the carton, check the contents to ensure that all parts are present, and have been
received in good condition. Notify the shipper immediately and retain packing material for inspection if any parts appear damage from shipping or the
package itself shows signs of mishandling. Save the package and all packing materials. In the event that the product must be returned to the factory, it
is important that the product be returned in the original factory box and packing.
If the device has been exposed to drastic temperature fluctuation (e.g. after transportation), do not switch it on immediately. The arising condensation
water might damage your device. Leave the device switched off until it has reached room temperature.
On the label on the backside of the product is indicated on this type of power supply must be connected. Check that the mains voltage corresponds to
this, all other voltages than specified, the light effect can be irreparably damaged. The product must also be directly connected to the mains and may
be used. No dimmer or adjustable power supply.
Always connect the device to a protected circuit (circuit breaker or fuse). Make sure the device has an appropriate electrica l ground to avoid
the risk of electrocution or fire.
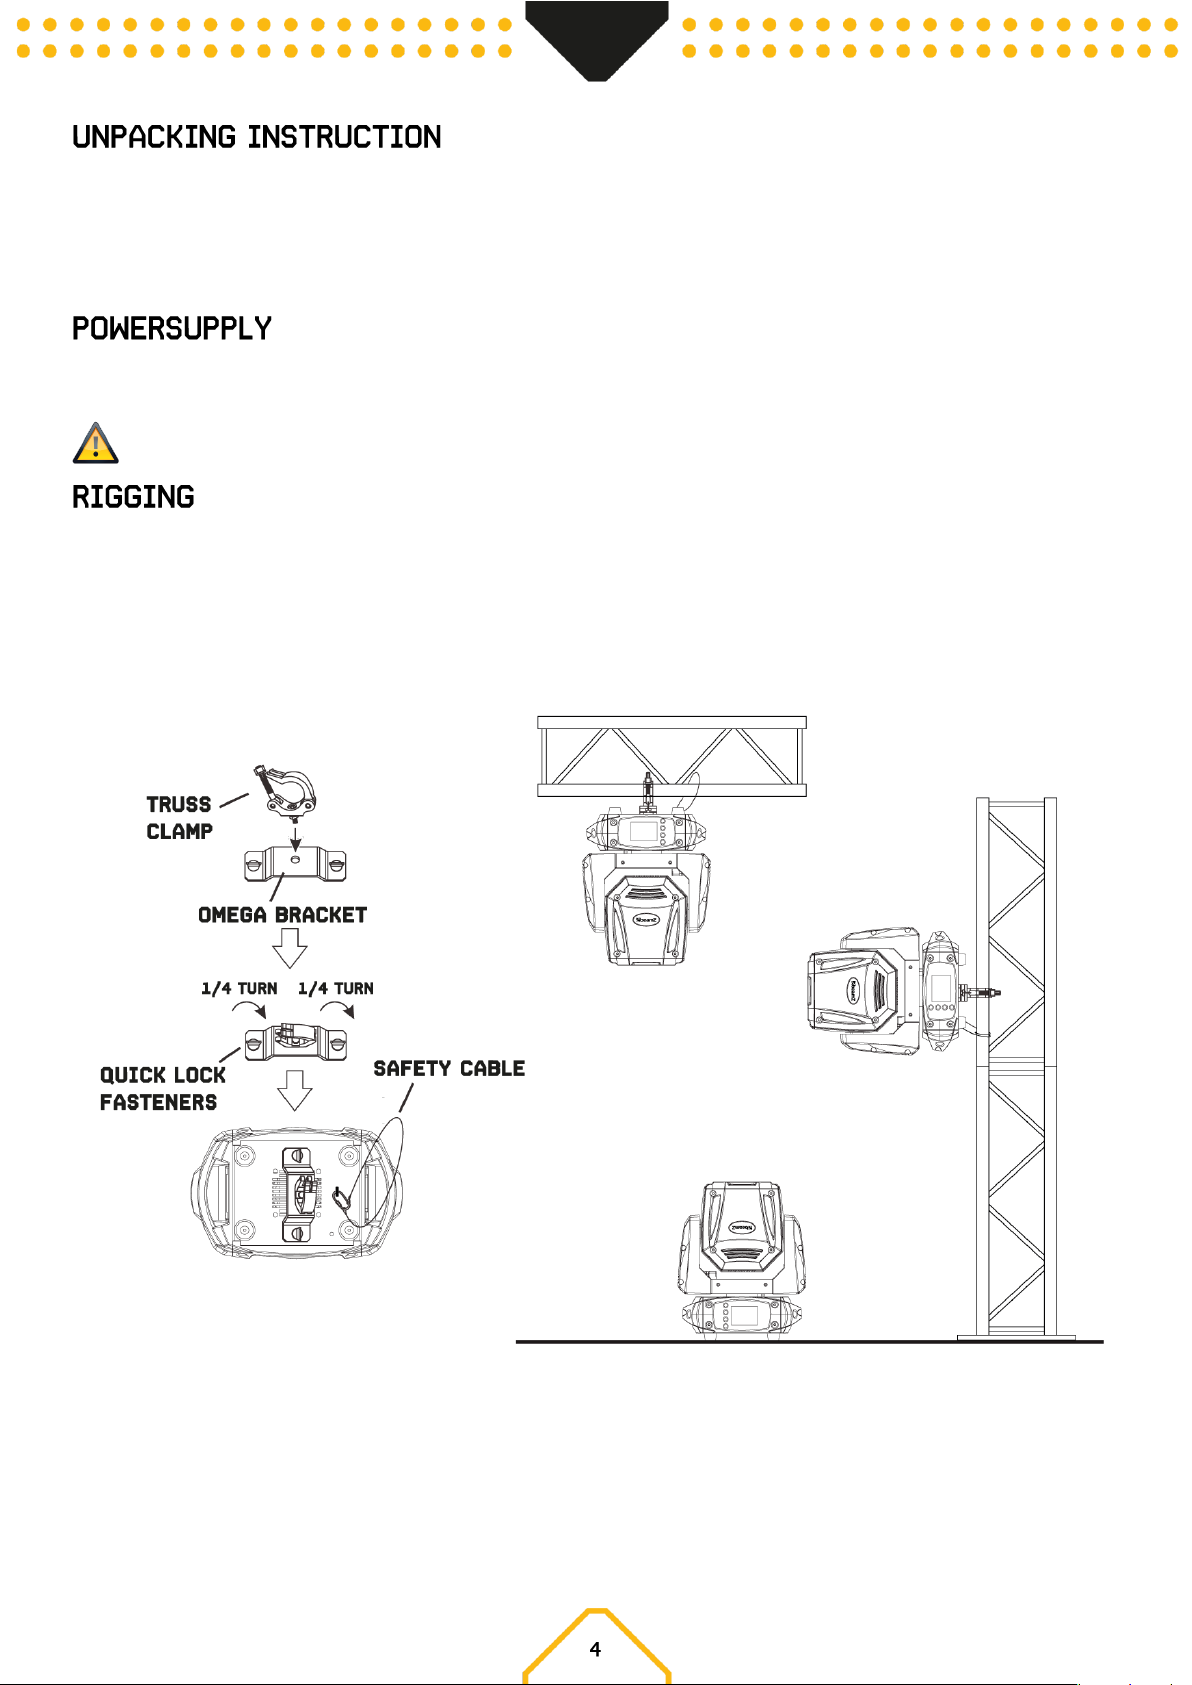
The fixture may be set up on a stable and even surface. By means of the fixing facilities of the baseplate, the unit can also be mounted upside down to a
truss, see below picture. For fixing, certified clamps with correct save working load are required. According to the figure, the quick lock bolts of the
omega brackets are placed into the openings provided in the base plate and turned clockwise until they lock (to the stop). The mounting place must be
of sufficient stability and be able to support a weight of 10 times of the unit’s weight. Secure the fixture with a safety cable so that it cannot fall down.
When carrying out any installation, always comply European and national guidelines concerning rigging, truss and all other safety issues. Always let the
installation checked out by an authorized dealer !
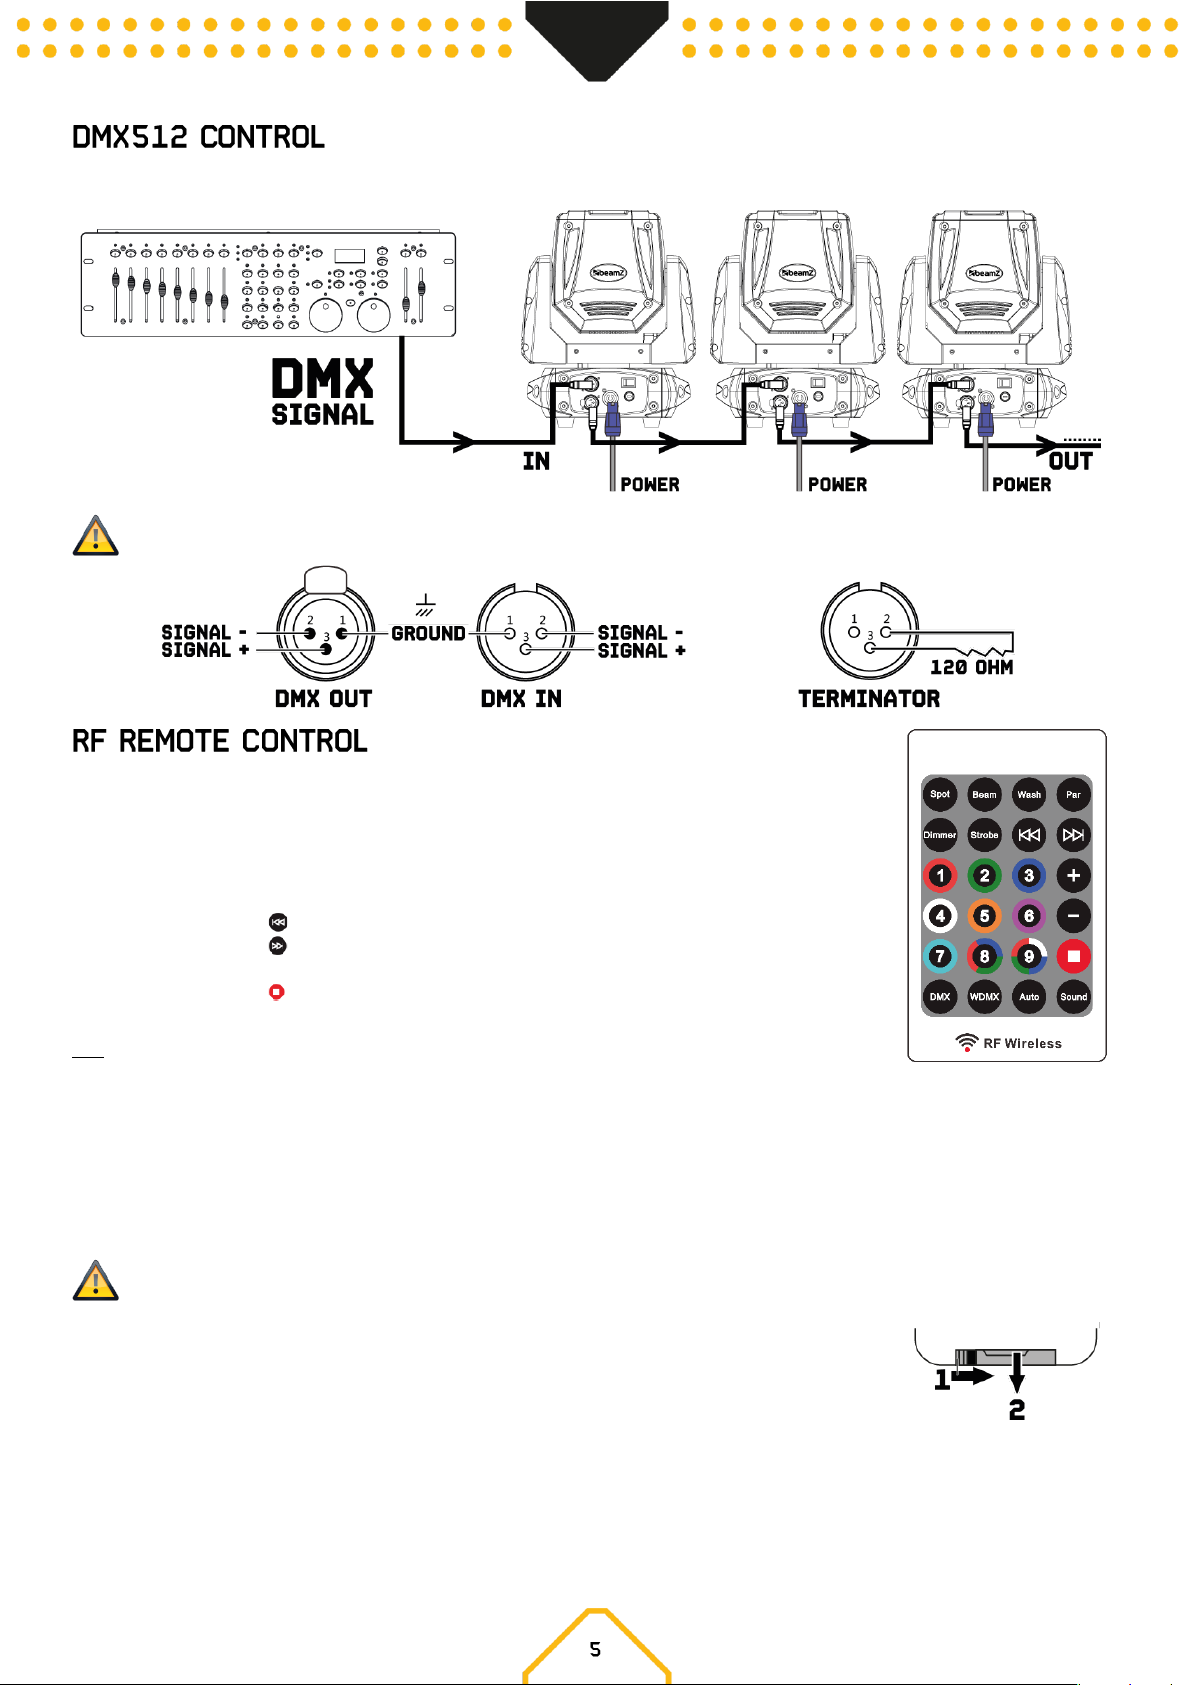
If you are using a standard DMX controller, you can connect the DMX output of the controller directly to the DMX input of the first fixture in a DMX chain.
Always connect the output of one unit with the input of the next fixture until all fixtures are connected.
Caution: At the last fixture, you must close the DMX line with a terminating resistor. Take an XLR connector and solder a 120 Ohm resistor
between signal (-) and signal (+) and connect it to the DMX output of the last fixture in the line.
1. Select the type fixture you will control:
- Press repeatedly 3 times on button “Spot” to activate Fuze Spot Series
- Press repeatedly 3 times on button “Beam” to activate Beam Spot Series
- Press repeatedly 3 times on button “Wash” to activate Wash Spot Series
2. Press the button “Dimmer” to adjust brightness. Press directly on the button “+” or “ -“ for desired settings.
3. Press the button “Strobe” to turn on/off the strobe effect. Press directly on the button “+” or “ -“ for
desired settings.
4. Press the button ” ” to adjust the speed of sound program or adjust the sensitivity of sound control.
5. Press the button ” ” to adjust the speed of chase or adjust the sensitivity of voice control.
6. Press the button “1-9” to select one of the auto or sound activated programs.
7. Press the button “ ” to reset all.
8. Press the button “DMX” to select control via wired DMX signal.
Tips:
1. When activated RF function, the lamp will not control by DMX signal and the lamp is in the RF control
state. Each remote controller can only control a series of fixtures at the same time.
2. When Wash series opens “Dimmer” and “Strobe, it needs to press the number button to brighten the corresponding colour. In thi s mode, the
number button can only switch the colour wheel, but not the corresponding key colour for Spot and Beam series.
3. To turn off RF function, there are the following methods:
a. Select the signal input mode needed, “DMX’ can exit RF function.
b. Switch to other series of fixture “Spot”, “Beam”, “Wash”.
c. Press the menu button of the display panel.
The remote control is supplied with a battery inserted. An insulating foil between the battery and the battery contacts prevents the battery
from being discharged during storage. Prior to the first operation remove the foil from the battery support on the rear side of the remote
control. Otherwise operation of the remote control is not possible.
If the range of the remote control decreases, replace the battery. For this purpose, on the rear side of the remote
control press the small bar with the groove to the right (1) and at the same time remove the battery support (2). For
operation, one 3 V button cell type CR 2025 is required. When inserting, pay attention that the positive pole of the
button cell shows upwards in the support.
The buildup of dust, dirt and other airborne particles will reduce the fixture’s light output. It will also prevent the fixture from cooling correctly, and this
will reduce the fixture’s lifetime. The rate of dirt buildup will vary depending on environmental factors such as airborne dust, use of smoke machines,
airflow from ventilation systems, etc. The fixture’s cooling fans will accelerate buildup, and any smoke particles that are present in the atmosphere will
increase the tendency for dirt to clog.
To get the best performance and lifetime from the fixture, inspect it regularly and clean it as soon as you see signs of dirt buildup.
Assess the operating environment each time you begin to use the fixture. In dusty or smoky conditions, inspect the fixture after a few hours and check
it frequently the fixture may attract dirt faster than you expect. Draw up a cleaning schedule that will make sure that dirt is removed before it can build
up.
Use the following guidelines:
• Disconnect the fixture from power and allow it to cool completely before cleaning.
• Do not use solvents, abrasives or any other aggressive product to clean the fixture.
• Vacuum or use low-pressure compressed air to remove dust and loose particles from surfaces and air vents. Prevent the bl ades of cooling fans
from turning before you aim a vacuum or air jet at the fan, or you may spin the fan too fast and damage it.
• Clean glass components by wiping gently with a soft, clean, lint-free cloth moistened with a weak detergent solution. Put the solution on the
cloth and not on the surface to be cleaned. Avoid rubbing glass surfaces. If particles are stuck to the glass, try to lift them off by dabbing them
repeatedly with a cotton swab or moistened lint-free cloth.
• Dry the fixture with a soft, clean, lint-free cloth or low-pressure compressed air before reapplying power.
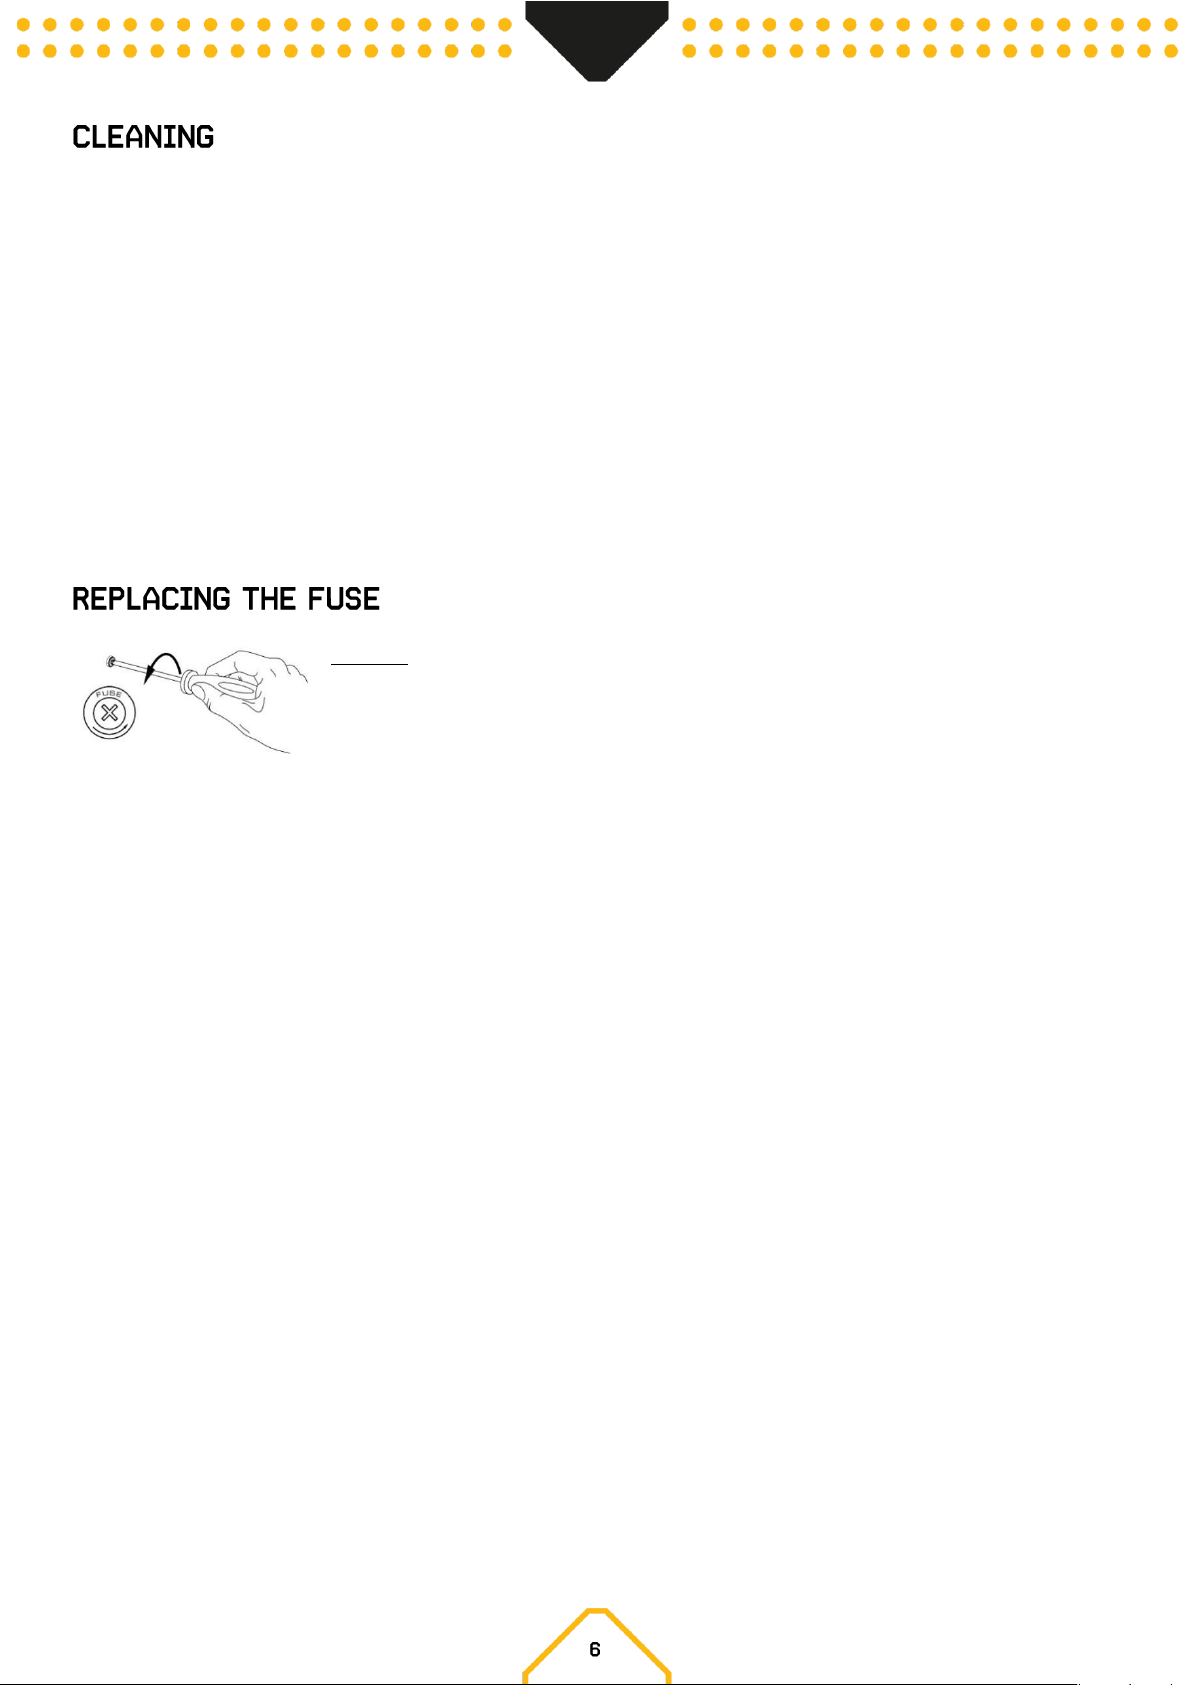
If the fuse is defective, replace the fuse with a fuse of the same type and value. Before replacing the fuse, unplug mains lead.
Procedure:
Step 1: Open the fuse holder on the rear panel with a fitting screwdriver.
Step 2: Remove the old fuse from the fuse holder.
Step 3: Install the new fuse in the fuse holder.
Step 4: Replace the fuse holder in the housing.
The checklist below may help you troubleshoot in the unlikely event that a problem occurs while using the product:
Symptom
Possibl e cause
Suggested action
No response from fixture.
No power to fixture.
Check that power is turned on.
Check cables and connections.
Fuse blown or internal fault.
Replace mean fuse or contact Beamz support
or Beamz authorized service partner. Do not
remove base or yoke covers. Do not attempt to
replace a fuse or carry out any repairs or
service that are not described in this User
Manual unless you have both authorization
from Beamz support or Beamz authorized
service partner.
Fixture resets correctly but does not respond
(or does not respond correctly) to the
controller.
The controller is not connected.
Connect controller.
Bad DMX-line.
Inspect connections and cables. Correct poor
connections. Repair or replace damaged
cables.
DMX-line has no end resistance.
Insert DMX terminator plug in DMX output
socket of last fixture on DMX-line.
Incorrect fixture addressing.
Check fixture address and DMX mode settings.
A fixture is defective and is disturbing data
transmission on the DMX-line.
Unplug DMX IN and OUT connectors and
connect them directly together to bypass one
fixture at a time until normal operation is
regained. Have defective fixture serviced by an
authorized technician.
Pin 2 and 3 are reversed in XLR connection.
Inspect connections and cables. Install a
phase-reversing cable between the fixtures or
swap pin 2 and 3 in the fixture, that behaves
erratically.
Error after fixture reset.
Effect requires mechanical adjustment.
Check fixture’s software version and error
messages for more information. Contact
Beamz support or Beamz authorized service
partner.
Light output cuts out intermittently.
Fixture too hot.
Allow fixture to cool. Reduce ambient
temperature. Ensure free airflow around
fixture. Clean fixture if necessary.
LEDs damaged
Disconnect fixture and contact Beamz support
or Beamz authorized service partner.
The power supply settings do not
match local AC voltage and
frequency.
Disconnect fixture. Check settings and
correct if necessary.
W AARSCHUW ING! Lees deze gebruiksaanwijzing zorgvuldig door voordat u met het apparaat gaat werken en bewaar deze handleiding voor
toekomstig gebruik. Het bevat belangrijke informatie over de installatie, het gebruik en het onderhoud van het apparaat.
• Uitpakken en zorgvuldig controleren of er geen transportschade is voordat u het apparaat gebruikt.
• Lees deze instructies aandachtig door en volg de instructies op.
• Neem alle veiligheidswaarschuwingen in acht. Verwijder nooit veiligheidswaarschuwingen of andere informatie u it de apparatuur.
• Zorg ervoor dat er geen ventilatiesleuven geblokkeerd zijn, anders zal het apparaat oververhit raken.
W AARSCHUW ING: Voordat u het apparaat verbind met een contactdoos, moet u eerst controleren of de netspanning en -frequentie
overeenkomen met de op de apparatuur aangegeven waarden. Als de apparatuur een spanningsselectieschakelaar heeft, sluit de ap paratuur
alleen aan op het stopcontact als de waarden van de apparatuur en de waarden van de netspanning overeenkomen. Als het bijgeleverde netsnoer
of de voedingsadapter niet in uw stopcontact past, neem dan contact op met uw elektricien.
• Controleer na het aansluiten van het apparaat alle kabels om schade of ongevallen, bijv. door struikelgevaar, te voorkomen.
• Zorg ervoor dat het netsnoer nooit gekrompen of beschadigd raakt. Controleer het apparaat en het netsnoer van tijd tot tijd.
• Trek altijd de stekker uit het stopcontact wanneer het apparaat niet wordt gebruikt of voor dat u het apparaat schoonmaakt! Pak het
netsnoer alleen bij de stekker vast en trek nooit aan het netsnoer.
• Haal de stekker van het netsnoer en de voedingsadapter uit het stopcontact als er gevaar bestaat voor blikseminslag of voor langere
perioden van buitengebruikstelling.
• Schakel het apparaat niet snel achter elkaar in en uit.
• Sluit het apparaat niet aan op een dimmerpack.
• Installeer het apparaat op een goed geventileerde plaats.
• Plaats nooit materiaal over de lens.
• Zorg altijd voor een vrije luchtruimte van minstens 50 cm rondom het apparaat voor ventilatie.
• Zorg ervoor dat de ruimte rondom en onder de montageplek wordt afgezet tijdens het (de)monteren of onderhoud van het armatuur.
• Voor gebruik bij montagehoogte >100 cm, bevestig de armatuur altijd met een geschikte veiligheidskabel. Bevestig de veiligheidskabel alleen
op de juiste bevestigingspunten. De veiligheidskabel mag nooit aan de transporthandgrepen worden bevestigd!
• Kijk nooit direct naar de lichtbundel. Houd er rekening mee dat snelle veranderingen in de verlichting, bijv. knipperlicht, epileptische
aanvallen kunnen veroorzaken bij lichtgevoelige personen of personen met epilepsie.
• Dit apparaat is niet ontworpen voor permanent gebruik. Consistente bedieningspauzes zullen ervoor zorgen dat het apparaat lang zonder
defecten van dienst zal zijn.
W AARSCHUW ING: Als het netsnoer van het apparaat is voorzien van een aardingscontact, moet het worden aangesloten op een stopcontact met
een beschermende aarding. Deactiveer nooit de beschermende aarding van een netsnoer.
• Zorg ervoor dat het apparaat niet wordt blootgesteld aan extreme hitte, vocht of stof.
• Reinig het apparaat met een droge doek.
• Raak de armatuur tijdens de werking ervan niet met blote handen aan (de behuizing kan zeer heet worden). Laat de armatuur ten minste 5
minuten afkoelen alvorens deze te hanteren.
• Dit toestel is uitsluitend ontworpen voor gebruik binnenshuis, gebruik deze apparatuur niet in de onmiddellijke nabijheid van vloeistof (niet
van toepassing op speciale buitenapparatuur - in dit geval, neem de speciale instructies hieronder in acht). Stel dit apparaat niet bloot aan
brandbare materialen, vloeistoffen of gassen.
• Als het apparaat is blootgesteld aan drastische temperatuurschommelingen (bijv. na transport), schakel het dan niet onmiddellijk in. Het
ontstane condenswater kan uw apparaat beschadigen. Laat het apparaat uitgeschakeld tot het op kamertemperatuur is.
• Probeer nooit de thermostaatschakelaar of zekeringen te omzeilen.
• Demonteer of wijzig het apparaat niet.
• Gebruik voor vervanging alleen zekeringen/lampen van hetzelfde type en vermogen.
• Reparaties, onderhoud en elektrische aansluiting moeten worden uitgevoerd door een gekwalificeerde technicus.
• De omgevingstemperatuur moet altijd tussen -5° C en +45° C liggen.
• Als dit toestel op een andere manier wordt gebruikt dan beschreven in deze handleiding, kan het product beschadigd raken en v ervalt de
garantie.
• Plastic zakken moeten buiten het bereik van kinderen worden gehouden.
• Het apparaat moet buiten het bereik van kinderen worden geïnstalleerd. Laat het apparaat nooit zonder toezicht draaien.
Dit symbool op het product of op de verpakking geeft aan dat dit product niet als huishoudelijk afval mag worden behandeld. I n plaats
daarvan moet het worden overhandigd aan het toepasselijke inzamelpunt voor de recycling van elektrische en elektronische apparatuur.
Door ervoor te zorgen dat dit product op de juiste wijze wordt afgevoerd, helpt u mogelijke negatieve gevolgen voor het milieu en de menselijke
gezondheid te voorkomen, die anders zouden kunnen worden veroorzaakt door ongepaste afvalverwerking van dit product. Het recyclen van
materialen draagt bij tot het behoud van natuurlijke hulpbronnen. Voor meer gedetailleerde informatie over het recyclen van d it product kunt u
contact opnemen met uw plaatselijke gemeente, uw huisvuildienst of de winkel waar u het product hebt gekocht.
LET OP! Onmiddellijk na ontvangst, zorgvuldig uitpakken van de doos, controleer de inhoud om ervoor te zorgen dat alle onderdelen aanwezig zijn en
zijn in goede staat zijn ontvangen. Bij transportschade of ontbreken van onderdelen onmiddellijk de verkopende partij inlichten. Bewaar de verpakking
en het verpakkingsmateriaal. Indien het product moet worden teruggestuurd, is het belangrijk dat het product in originele verpakking wordt
geretourneerd.
Als het apparaat is blootgesteld aan drastische temperatuurverschillen (bv. na het transport), schakel het apparaat niet onmiddellijk in. De ontstane
condensatie kan het apparaat beschadigen. Zorg ervoor dat het apparaat op kamertemperatuur komt en steek vervolgens de voeding stekker in het
stopcontact.
Op achterzijde van het product staat aangegeven op welke netspanning deze moet worden aangesloten. Controleer of de netspanning hiermee
overeenkomt, bij alle andere netspanningen dan aangegeven kan het apparaat onherstelbaar worden beschadigd. Tevens moet het a pparaat direct op
de netspanning worden aangesloten en mag géén dimmer of regelbare voeding worden gebruikt.
Sluit het apparaat altijd aan op een beschermd circuit (aardlekschakelaar of zekering). Zorg ervoor dat het apparaat voldoend e elektrisch is
geaard om het risico op elektrocutie of brand te vermijden.
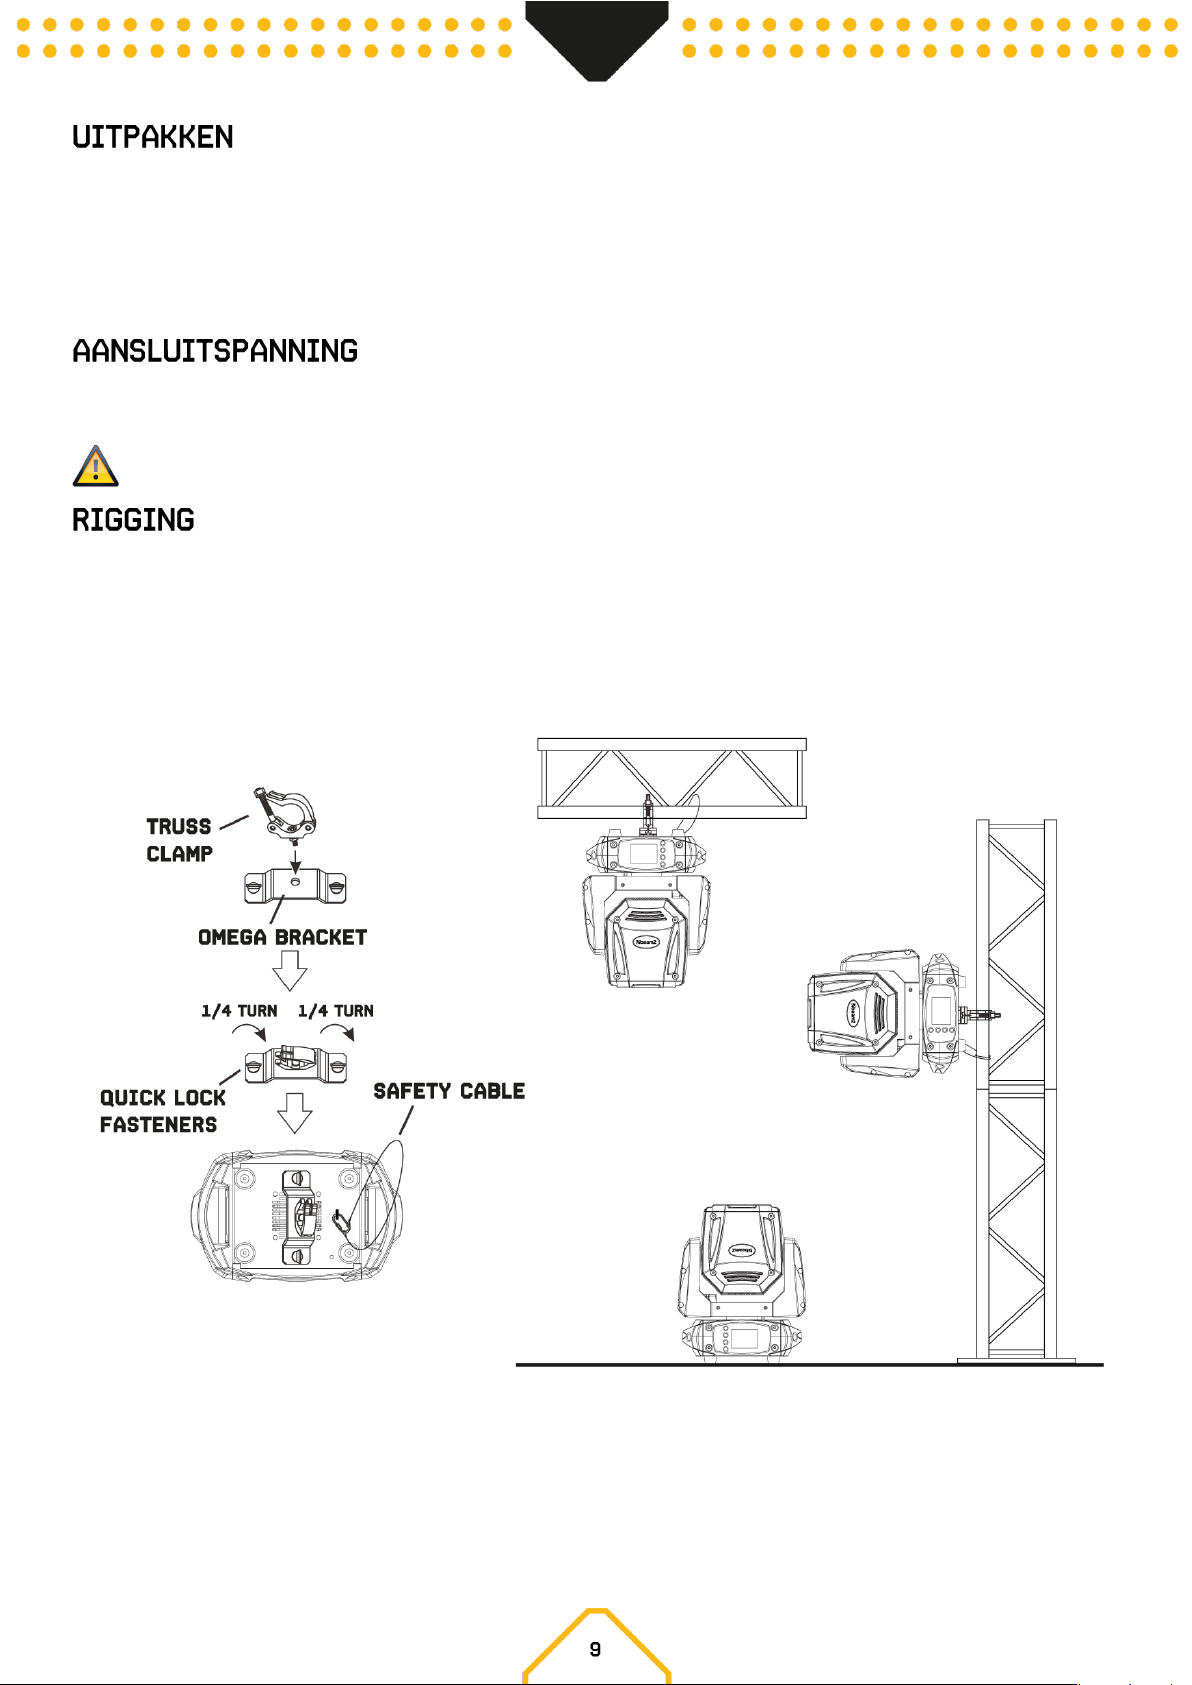
Het armatuur kan op een stabiele en gelijkmatige ondergrond worden opgesteld. Door middel van de bevestigingsmogelijkheden va n de grondplaat kan
het armatuur ook ondersteboven aan een truss gemonteerd worden, zie onderstaande afbeelding. Voor de bevestiging zijn gecertificeerde klemmen
met de juiste werklast vereist. Volgens de figuur worden de quick-lock bouten van de omega beugels in de openingen in de bodemplaat geplaatst en
rechtsom gedraaid tot ze vergrendelen (tot aan de aanslag). De montageplaats moet voldoende stabiel zijn en een gewicht van 10 keer het gewicht van
het armatuur kunnen dragen. Borg het armatuur met een veiligheidskabel, zodat deze niet naar beneden kan vallen.
Volg bij het uitvoeren van een installatie altijd de Europese en nationale richtlijnen met betrekking tot rigging, truss en alle andere veiligheidskwesties.
Laat de installatie altijd controleren door een geautoriseerde dealer!
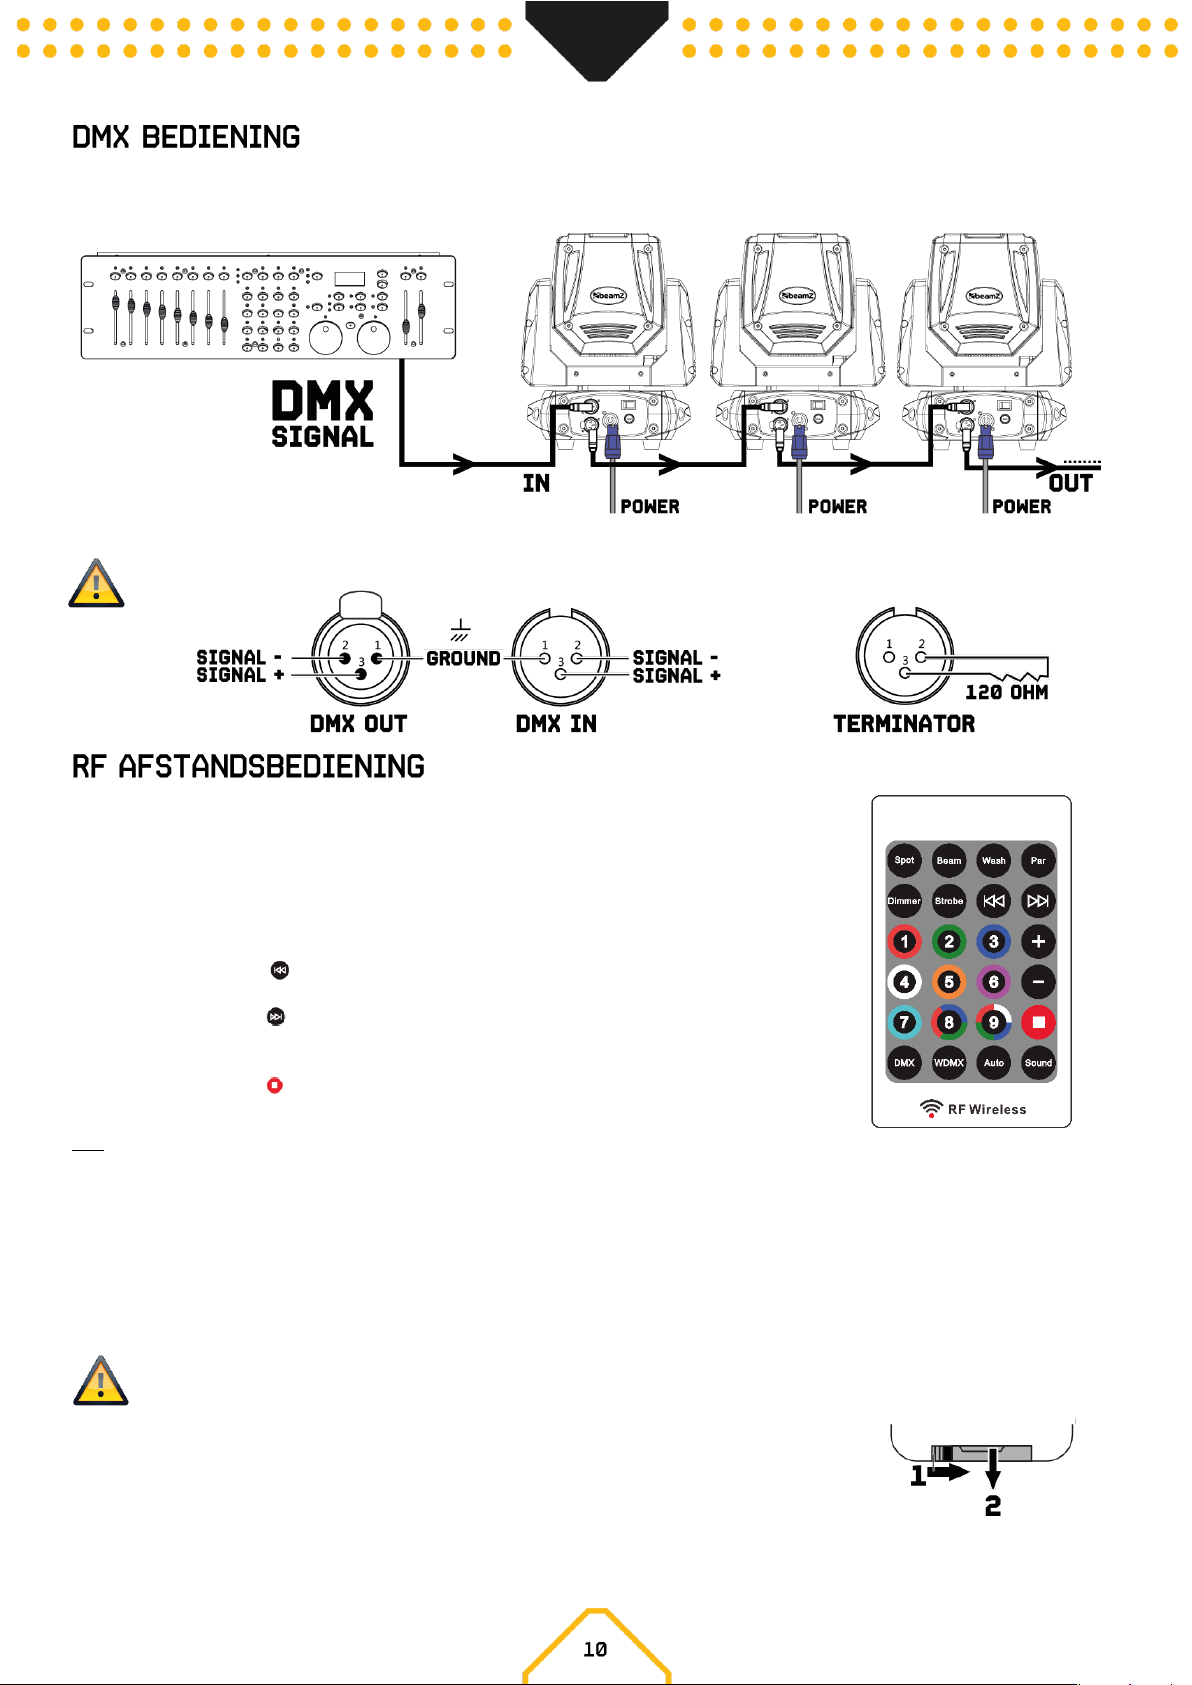
Als u gebruik maakt van een standaard DMX-lichtstuurtafel, kunt u de DMX uitgang van de lichtstuurtafel rechtstreeks aansluiten op de DMX ingang
van het eerste armatuur. Sluit altijd de DMX uitgang aan op de eerst volgende DMX ingang van het volgende armatuur totdat alle armaturen zijn
aangesloten.
Opgelet: Bij het laatste armatuur, dient u de DMX-lijn af te sluiten met een eindweerstand. Neem een XLR connector en soldeer een 120 Ohm
weerstand tussen signaal (-) en signaal (+)en steek deze in de DMX uitgang van het laatste armatuur in de lijn.
1. Selecteer het type armatuur dat u wilt bedienen:
- Druk 3 keer herhaaldelijk op de knop "Spot" om de Fuze Spot Serie te activeren.
- Druk 3 keer herhaaldelijk op de knop "Beam" om de Beam Spot Series te activeren.
- Druk 3 keer herhaaldelijk op de knop "Wash" om de Wash Spot Series te activeren.
2. Druk op de knop "Dimmer" om de helderheid aan te passen. Druk vervolgens direct op de knop "+" of
"-" voor de gewenste instellingen.
3. Druk op de knop "Strobe" om het stroboscoopeffect in/uit te schakelen. Druk vervolgens direct op
de knop "+" of "-" voor de gewenste instellingen.
4. Druk op de knop " " om de snelheid van het geluidsprogramma aan te passen of de gevoeligheid
van de geluidsregeling aan te passen.
5. Druk op de knop " " om de snelheid van de chase in te stellen of de gevoeligheid van de
spraakbesturing aan te passen.
6. Druk op de knop "1-9" om één van de automatische of geluidsgestuurde programma's te selecteren.
7. Druk op de knop " " om alles te resetten.
8. Druk op de knop "DMX" om de bediening via een bedraad DMX-signaal te selecteren.
Tips:
1. Wanneer de RF-functie geactiveerd is, kan men het armatuur niet met een DMX -signaal aansturen en bevindt het armatuur zich in de RF-
besturingsstatus. Elke afstandsbediening kan slechts één serie armaturen tegelijkertijd bedieningen.
2. Wanneer de Wash-serie "Dimmer" en "Strobe" opent, moet op de cijfertoets worden gedrukt om de bijbehorende kleur op te lichten. In deze
modus kan de cijfertoets alleen het kleurenwiel schakelen, maar niet de corresponderende kleur voor de Spot- en Beam-serie.
3. Om de RF-functie uit te schakelen, zijn er de volgende methoden:
a. Selecteer de gewenste signaalinvoermodus, "DMX" kan de RF-functie verlaten.
b. Schakelen naar andere armatuur serie, "Spot", "Beam", "Wash"
c. Druk op de menuknop van het display.
De afstandsbediening is voorzien van een batterij. Een isolerende folie tussen de batterij en de batterij contacten voorkomt dat de batterij
tijdens transport ontlaad. Voorafgaand aan het eerste gebruik, verwijder de folie van de batterijhouder aan de achterzijde van de
afstandsbediening. Anders wordt de werking van de afstandsbediening is niet mogelijk.
Indien het bereik van de afstandsbediening afneemt, vervang dan de batterij. Aan de achterzijde van de
afstandsbediening drukt de schuif met inkeping naar rechts (1) tegelijkertijd verwijdert de batterijhouder (2). Voor
de werking, is een 3V knop cel type CR2025 nodig. Let op, bij de het vervangen van de batterij dat u de positieve
pool van de knoopcel omhoog plaatst.
De opeenhoping van stof, vuil en andere zwevende deeltjes verminderen de lichtopbrengst van het armatuur. Het zal ook voorkomen dat het armatuur
correct koelt, en dit zal de levensduur van het armatuur verkorten. De snelheid van de vuilafzetting zal variëren afhankelijk van omgevingsfactoren
zoals stof in de lucht, gebruik van rookmachines, luchtstroom van ventilatiesystemen, enz. De koelventilatoren van het armatuur zullen de opbouw
versnellen, en alle rookdeeltjes die in de atmosfeer aanwezig zijn, zullen de neiging tot verstopping van vuil vergroten.
Om de beste prestaties en levensduur van het armatuur te krijgen, inspecteer het armatuur regelmatig en maak deze schoon zodra u tekenen van
vuilophoping ziet.
Beoordeel de gebruiksomgeving elke keer dat u het armatuur begint te gebruiken. In stoffige of rokerige omstandigheden, inspecteer het armatuur na
enkele uren en controleer het regelmatig of het armatuur mogelijk sneller vuil aantrekt dan u verwacht. Stel een reinigingsschema op dat ervoor zorgt
dat het vuil wordt verwijderd voordat het zich kan ophopen.
Gebruik de volgende richtlijnen:
• Ontkoppel het armatuur van het stroomnet en laat hem volledig afkoelen voordat u hem schoonmaakt.
• Gebruik geen oplosmiddelen, schuurmiddelen of andere agressieve producten om het armatuur te reinigen.
• Stofzuig of gebruik lage druk perslucht om stof en losse deeltjes van oppervlakken en luchtopeningen te verwijderen. Voorkom dat de bladen
van de koelventilatoren draaien voordat u een vacuüm of luchtstraal op de ventilator richt, anders kunt u de ventilator te snel laten draaien en
deze beschadigen.
• Reinig glazen onderdelen door ze voorzichtig af te vegen met een zachte, schone, pluisvrije doek, bevochti gd met een zwakke reinigingsoplossing.
Leg de oplossing op de doek en niet op het te reinigen oppervlak. Vermijd het wrijven van glazen oppervlakken. Als er deeltjes aan het glas
vastzitten, probeer ze er dan af te tillen door ze herhaaldelijk deppen met een wattenstaafje of een vochtige, pluisvrije doek.
• Droog het armatuur met een zachte, schone, pluisvrije doek of perslucht onder lage druk voordat u het toestel opnieuw van stroom voorziet.
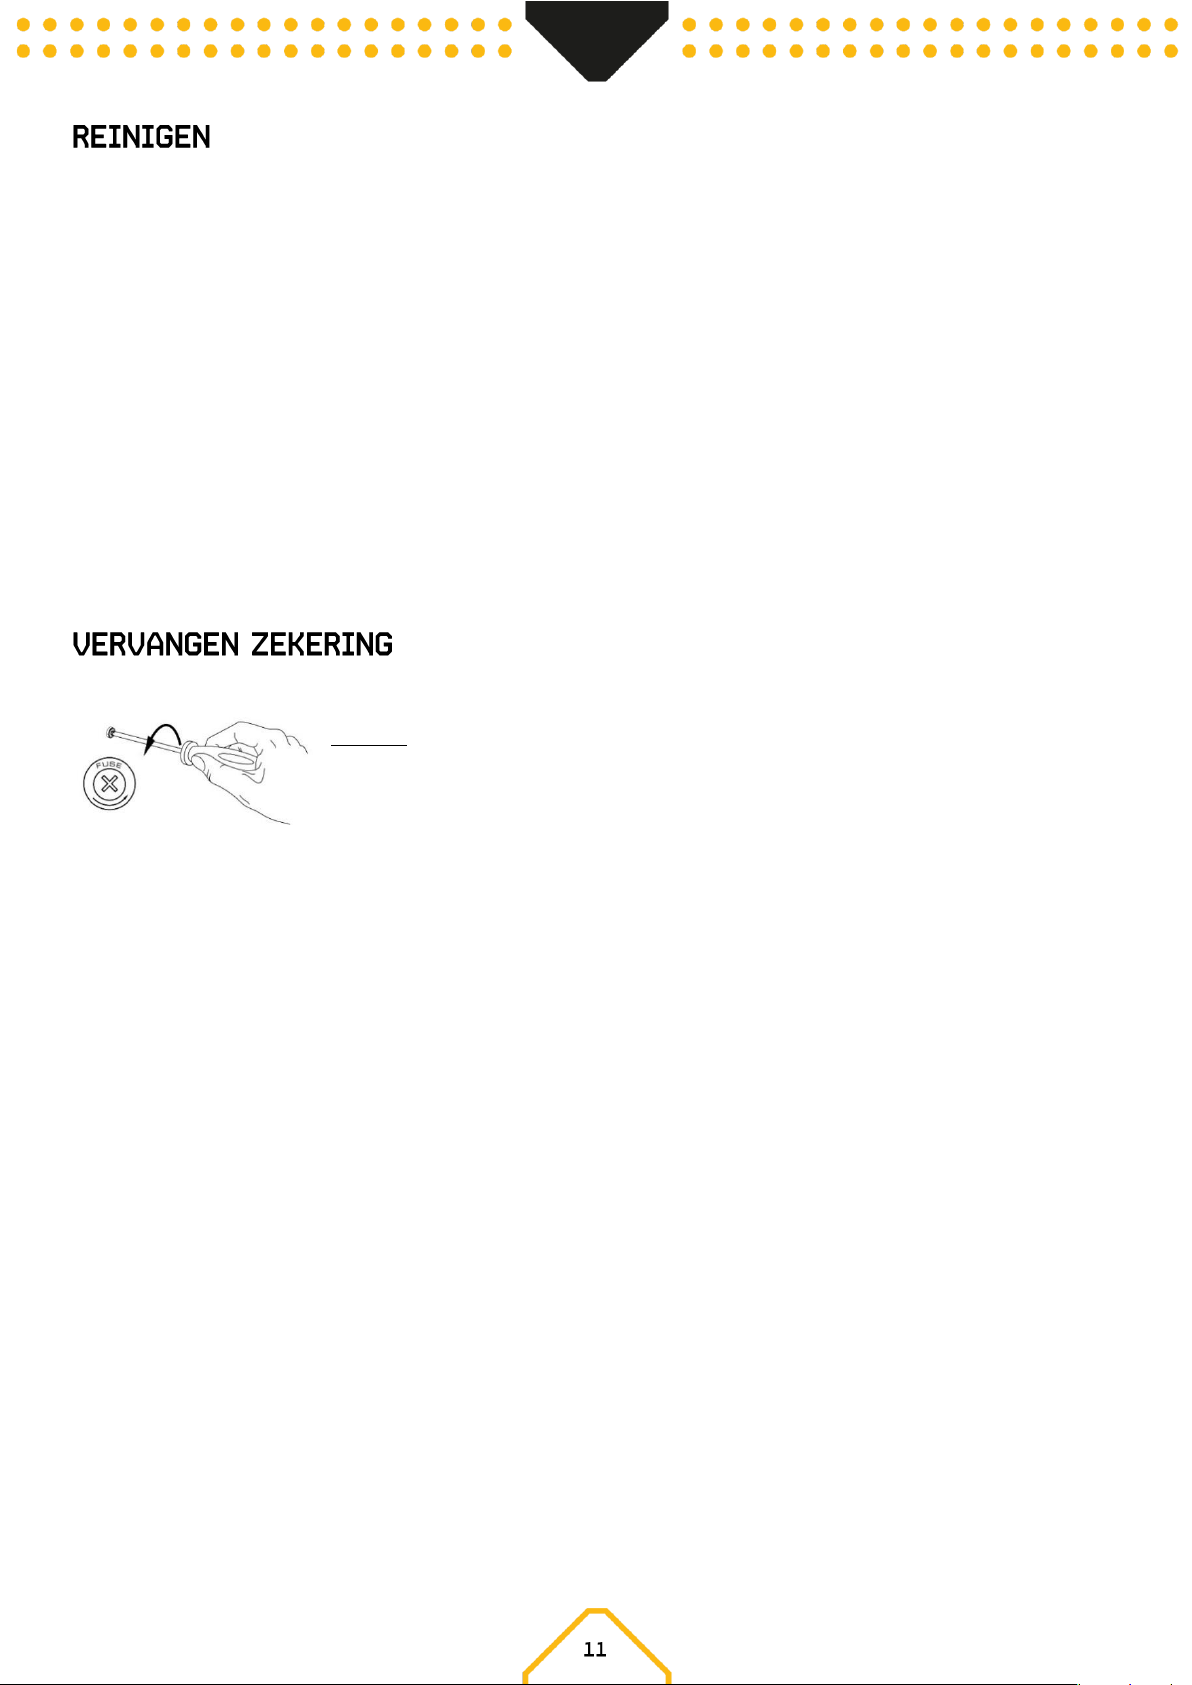
Indien de zekering defect is, dient u de zekering te vervangen door een zekering van hetzelfde type en waarde. Voor het vervangen van de zekering,
schakel eerst de stroom uit en volg de onderstaande stappen.
Procedure:
Stap 1: Open de zekeringhouder op het achterpaneel met een passende platte schroevendraaier.
Stap 2: Verwijder de oude zekering uit de zekeringhouder.
Stap 3: Installeer de nieuwe zekering in de zekeringhouder.
Stap 4: Plaats de zekeringhouder in de behuizing.
 Loading...