


Up&Down bouncer
INSTRUCTIONS DE MONTAGE
Positionner les petits tubes (B) sur le cadre (F). afin d’éviter tout montage incorrect du produit, toujours vérifier que les détrompeurs
sont correctement alignés.
Positionner les coques (C). Toujours vérifier que la coque est positionnée dans le sens du tube et que l’emplacement pour
l’écrou situé sur la coque est orienté vers l’intérieur du transat.
Fixer les coques (C) et les petits tubes (B) au cadre en utilisant les vis (D). Placer l’écrou dans l’emplacement prévu à cet effet.
Tout en maintenant l’écrou en place, visser à l’aide de la clé de montage (J). Avant toute utilisation, toujours vérifier que les vis
sont correctement serrées.
1
2

Positionner les grands tubes (A) en appuyant sur les boutons ressorts et en les emmanchant dans les petits tubes (B). Les 3
trous du grand tube doivent être orientés vers l’intérieur du transat.
Enlever les poignées (E) en appuyant sur le bouton ressort et déplier la structure d’assise (G) en suivant les instructions pour
le réglage de l’inclinaison.
Placer la structure d’assise (G) sur les tubes. Attention ! Toujours s’assurer que la structure d’assise est positionnée dans le
bon sens (assise côté stabilisateur).
Positionner les poignées (E) en appuyant sur les boutons ressorts et en les emmanchant dans les grands tubes (A).
Placer la housse (H) sur la structure d’assise (G). Pour cela, plier la structure d’assise, emmancher le dossier puis l’assise.
Appuyer sur les boutons de déverrouillage situés de chaque côté de la structure d’assise puis relâcher à la position souhaitée.
3
4
5
6

INSTRUCTIONS DE MONTAGE
POUR UTILISATION BASSE
Pour utiliser votre transat en position basse, suivez les instructions de montage ci-dessus sans positionner les grands tubes (A).
Fixer ensuite les poignées (E) sur les petits tubes (B).
Pour régler l’inclinaison du dossier du transat, saisir le haut du dossier et presser le bouton de réglage situé à l’arrière du
dossier. Relâcher le bouton lorsque la position souhaitée est atteinte. Toujours retenir le dossier lors du réglage, notamment si
l’enfant est installé dans le transat.
Pour plier le transat, presser le bouton de réglage et rabattre le dossier sur l’assise.
INSTRUCTIONS POUR LE
RÉGLAGE DE L’INCLINAISON
ET LE PLIAGE
Une fonction balancelle permet de bercer le transat. Pour verrouiller cette position, faire pivoter le stabilisateur jusqu’à ce que
celui-ci touche le sol.
INSTRUCTIONS
POUR VERROUILLER
LA FONCTION BALANCELLE
INSTRUCTIONS POUR
LE RÉGLAGE DE LA HAUTEUR
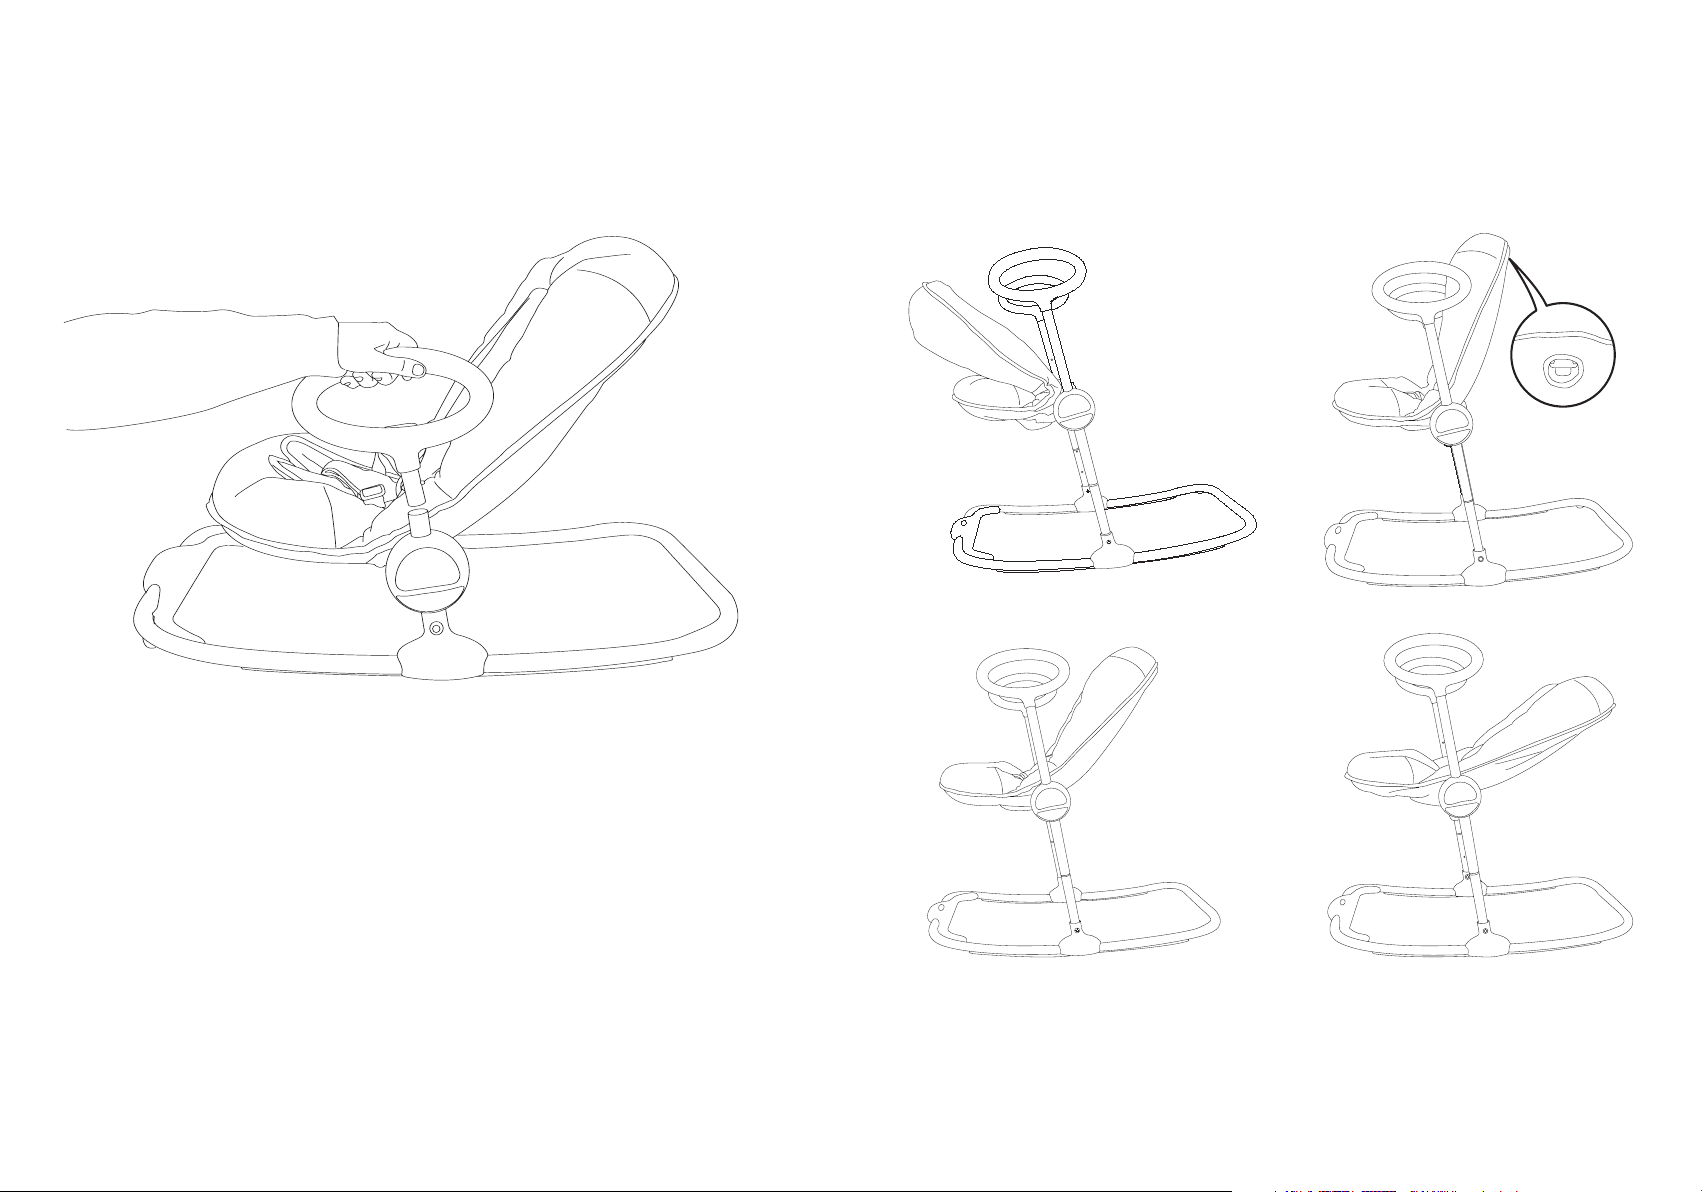
Le transat Up & Down peut se régler selon 4 hauteurs prédéfinies.
Pour régler la hauteur du transat, presser simultanément les boutons de réglage de la structure d’assise (G) et ajuster jusqu’à
la hauteur souhaitée. Relâcher les deux boutons de réglage en s’assurant que la structure d’assise (G) est correctement
verrouillée sur chacun des tubes (A) ou (B).
Attention ! Par mesure de sécurité, ne jamais régler la hauteur avec l’enfant installé dans le transat.
PUSH !
CLIC !
PUSH !
CLIC !
PUSH !
CLIC !
PUSH !
CLIC !
VERROUILLAGE DU SYSTÈME
DE RETENUE
CLIC !
CLIC !
CLIC !
CLIC !
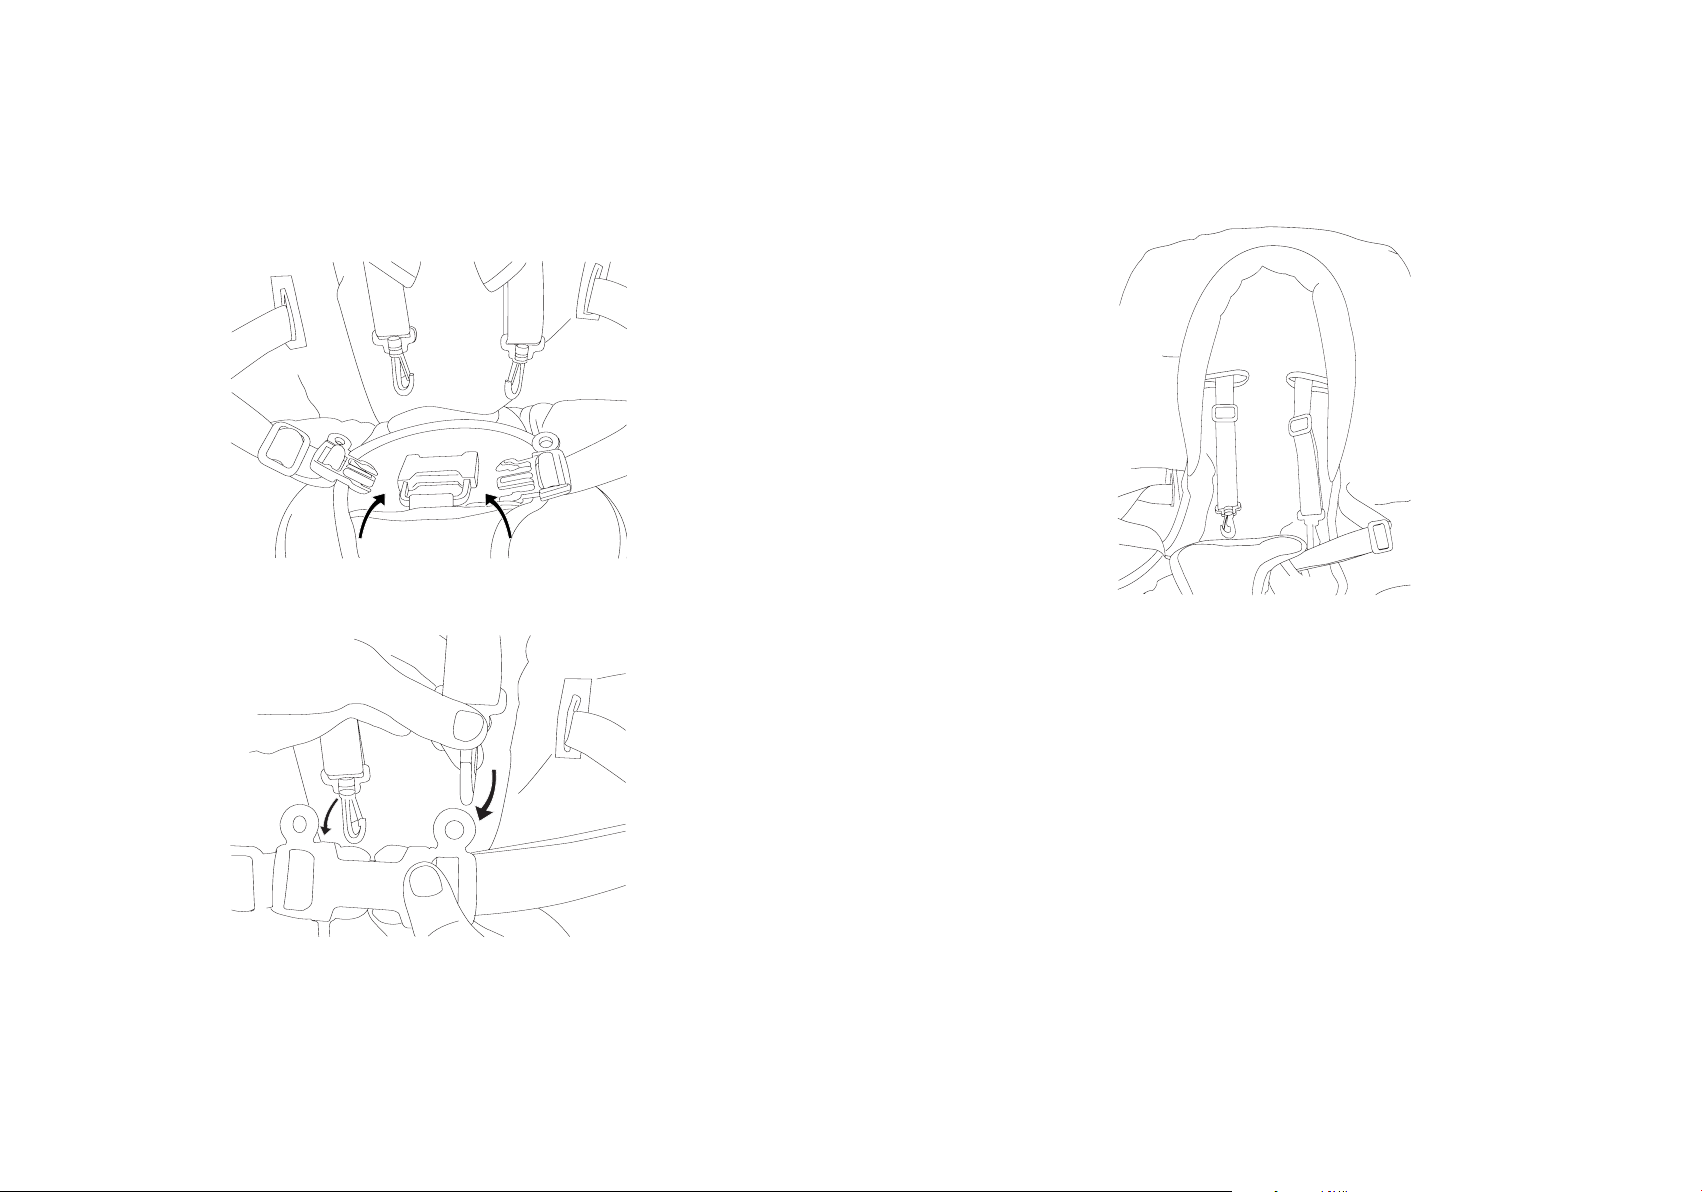
Le transat Up & Down utilise un système de retenue 5 points (entrejambe + ceinture + harnais).
Pour installer l’enfant dans le transat, déverrouiller les 4 points d’attache du système de retenue. Placer l’enfant au centre de
l’assise en veillant à ce que l’entrejambe soit correctement positionné. Fermer les deux boucles au niveau de la ceinture. Fermer
les deux boucles au niveau des harnais.
Régler ensuite les sangles afin que le système de retenue soit adapté à la taille de l’enfant.
UTILISATION DU RÉDUCTEUR
Pour une utilisation du transat dès la naissance, il est conseillé de placer le coussin réducteur (I).
Pour placer le coussin réducteur, retirer les protections tissues des sangles du harnais. Passer les deux sangles du harnais dans les
deux ouvertures du coussin réducteur. Remettre les protections tissues et fermer les boucles des sangles du harnais.
IMPORTANT!
KEEP THIS INSTRUCTION MANUAL
FOR FUTURE REFERENCE
WARNING
• Never leave a child unattended.
• Never use for a child able to sit up unassisted.
• This bouncer is not intended for long periods of sleep.
• This bouncer does not replace a Moses basket or a cot. When baby needs to sleep, place him or her in a suitable Moses basket or cot.
• It is dangerous to place this bouncer on an elevated surface: a table for example.
• Always use the restraint system.
• This bouncer has been designed for a child of 9kg maximum.
• Do not use the bouncer if any of the parts are broken or missing.
• Do not use any accessories or spare parts other than those approved by the manufacturer.
• Never carry the bouncer with your child in it.
• Always ensure that the locking mechanisms are fully secured.
• Always check the state of the product before use.
• Always keep the bouncer away from naked flames and other sources of heat (such as electric or gas heating devices), as well as any objects which the
child may be able to reach.
• This product must be assembled and handled by an adult.
• Use only on a flat and stable surface.
• Never adjust the height of the bouncer with the child in it.
WASHING INSTRUCTIONS FOR THE COVER
AND THE NEWBORN PILLOW
• Clean the plastic parts regularly with a damp cloth and a neutral cleaning product. Never use a solvent or any similar product.
• Always dry the product’s metal parts in order to prevent the formation of rust.
• Protect the product from atmospheric agents (rain, snow, etc.).
• Store the product in a dry place.
• The cover must be hand washed and left to dry flat. The newborn pillow is machine washable at 30°.
ASSEMBLY INSTRUCTIONS
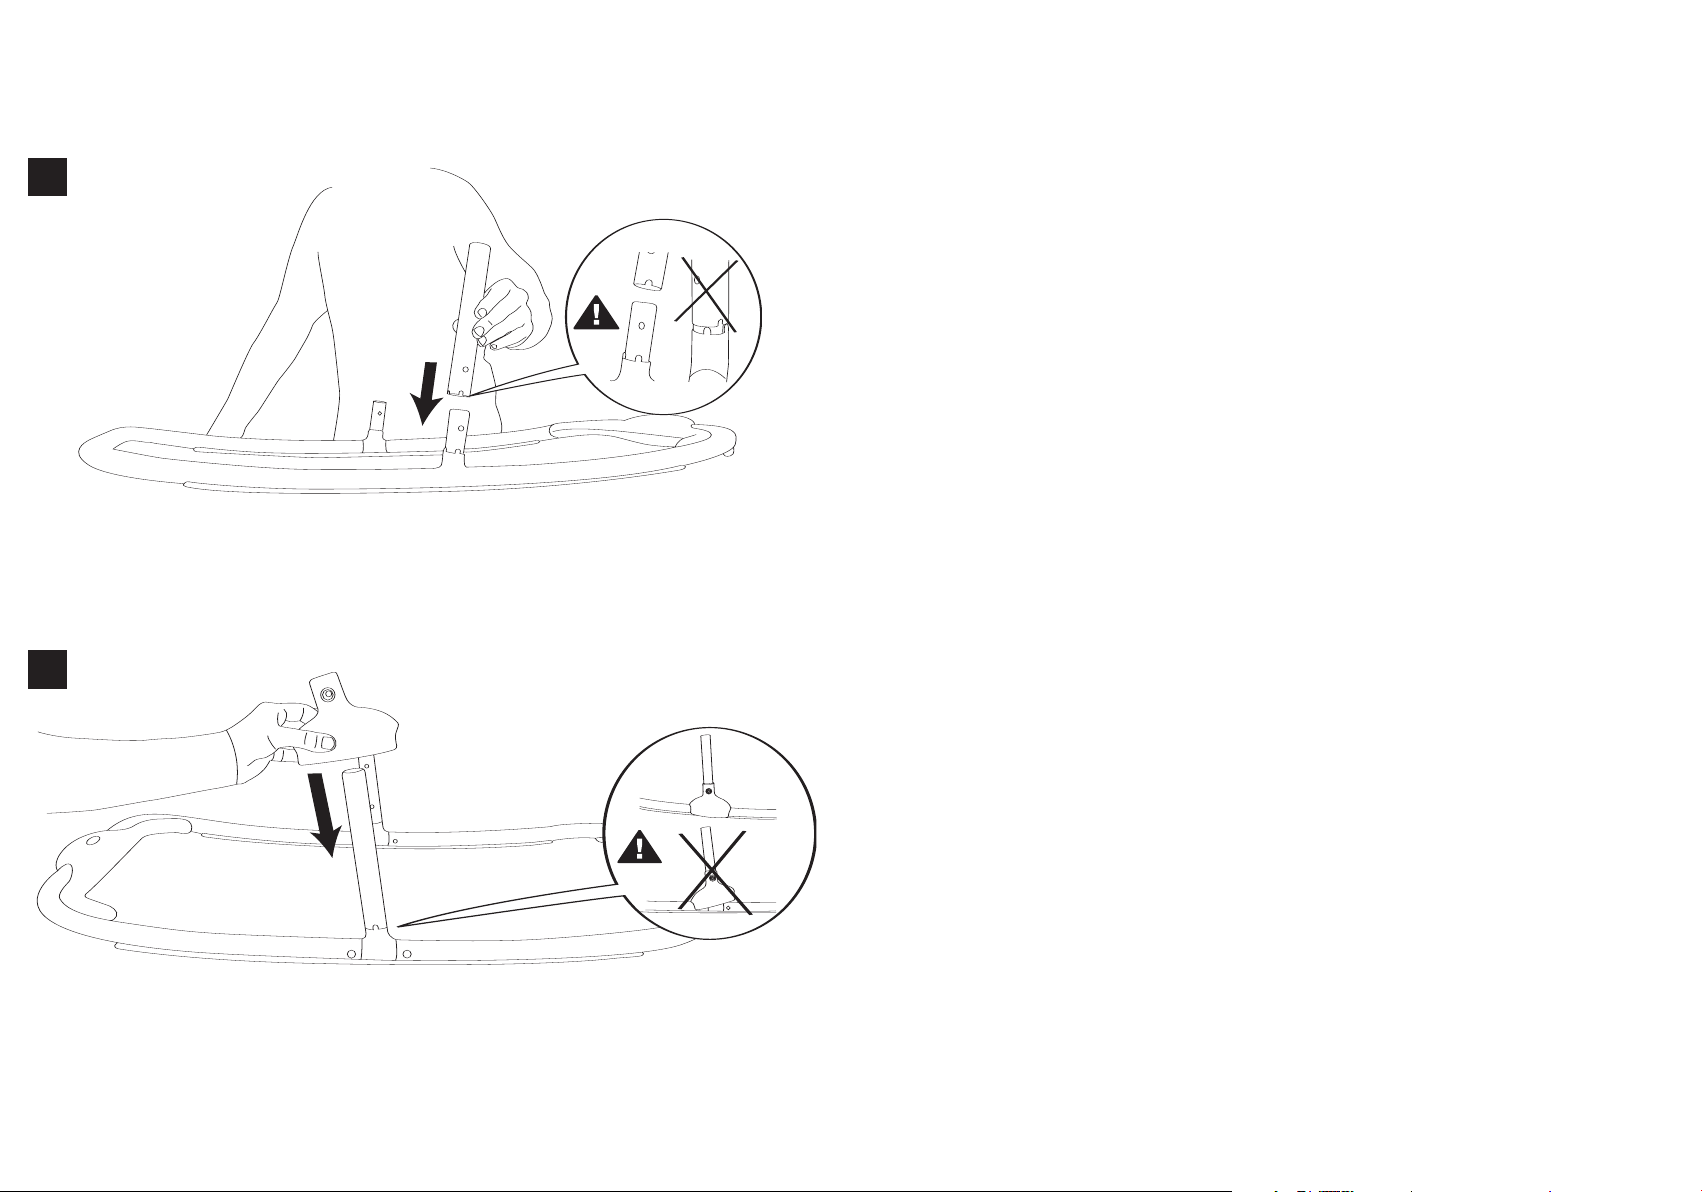
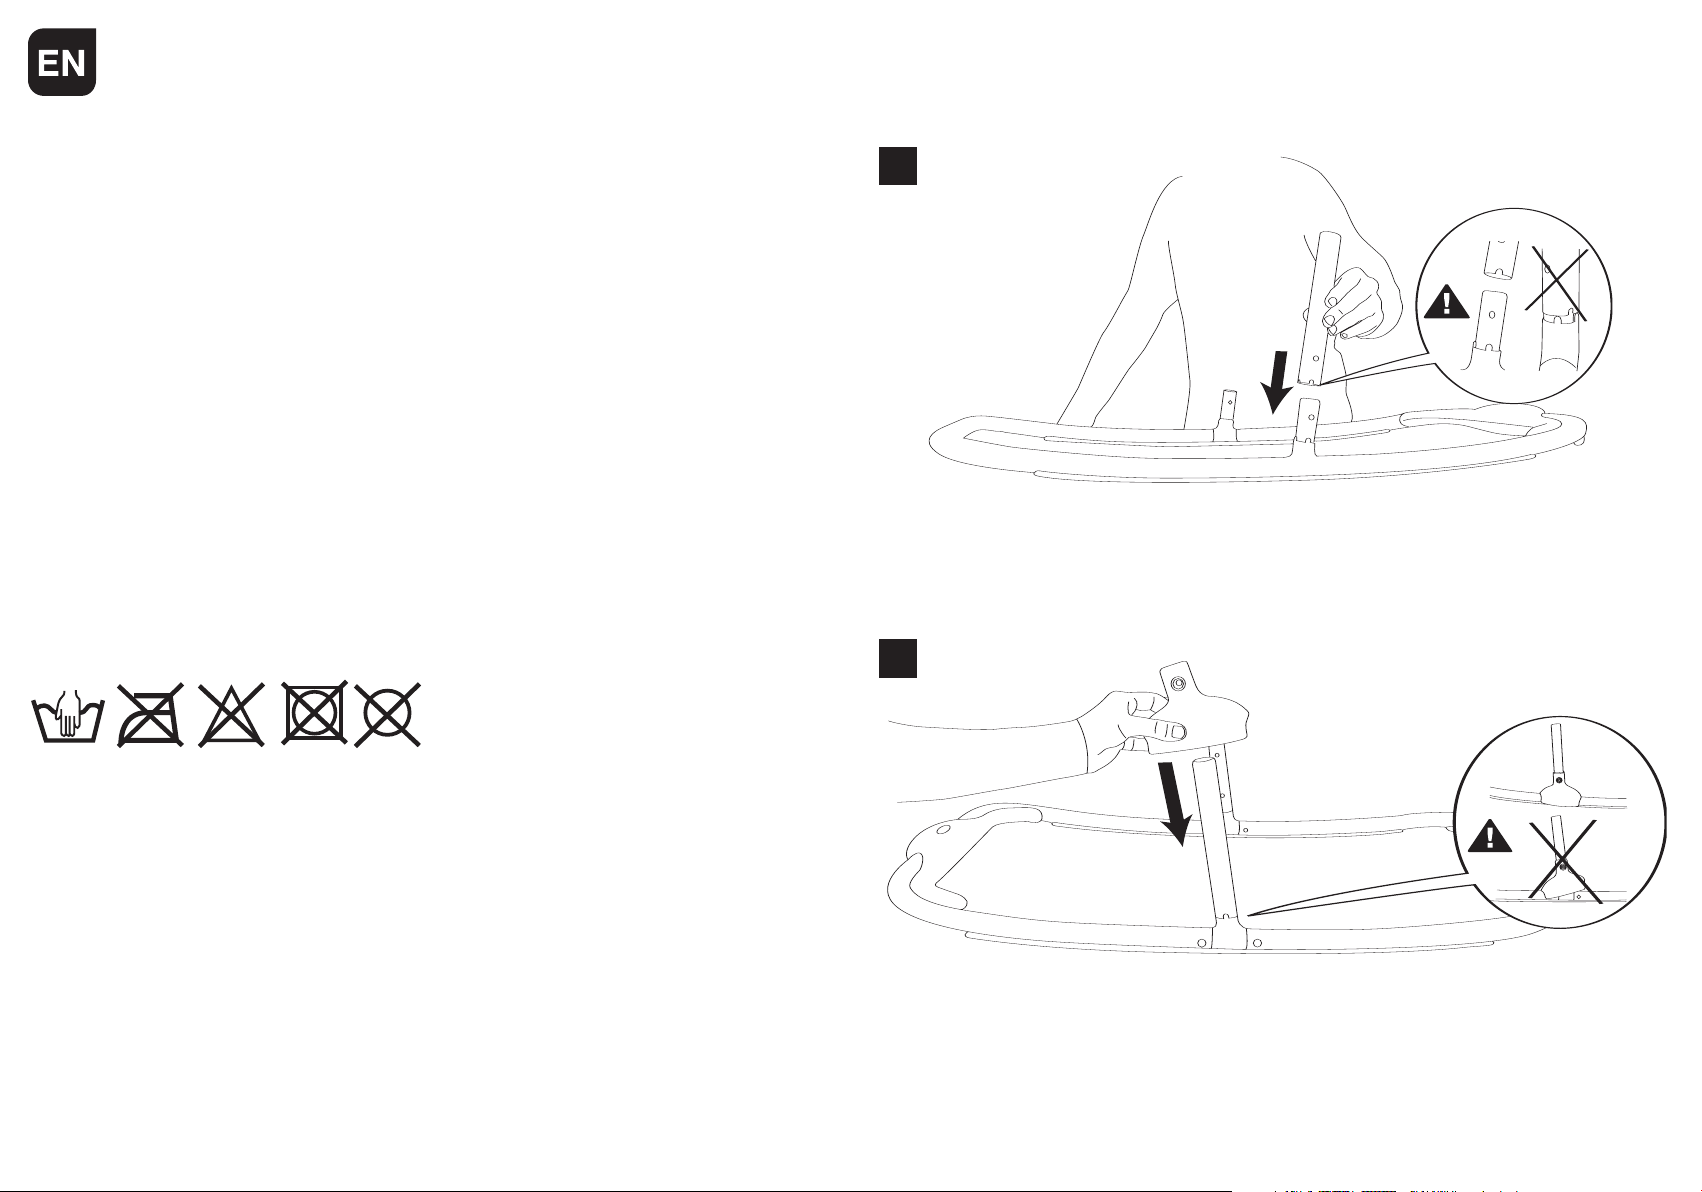
Place the small tubes (B) on the frame (F). In order to avoid assembling the product incorrectly, always ensure that the polarising slots are aligned correctly.
Position the knuckles (C). Always ensure that the knuckle is placed in the same direction as the tube and that the nut hole on
the knuckle is facing towards the inside of the bouncer.
Fasten the knuckles (C) and the small tubes (B) to the frame with the screws (D). Place the nut in the hole designed for this
purpose. Fasten the nut and screw in place with the assembly key (J). Before using, always ensure that the screws are
tightened properly.
1
2
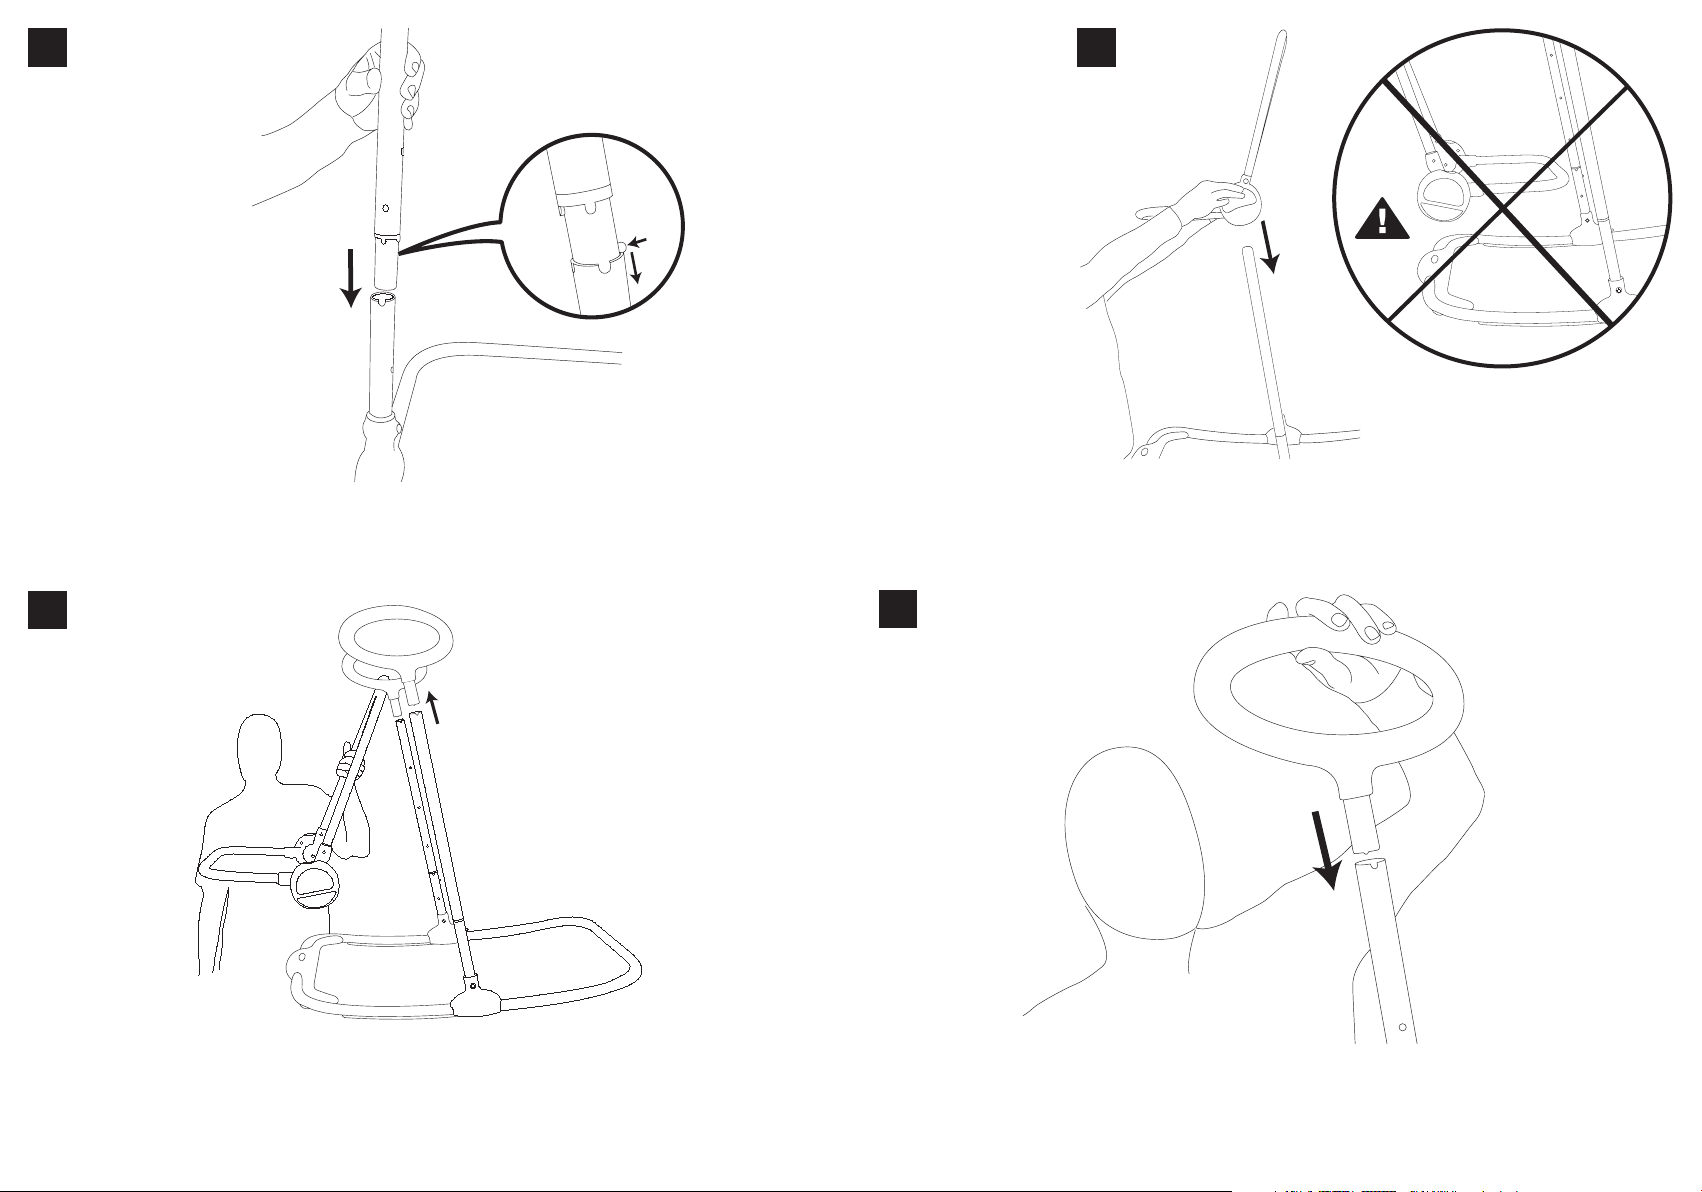
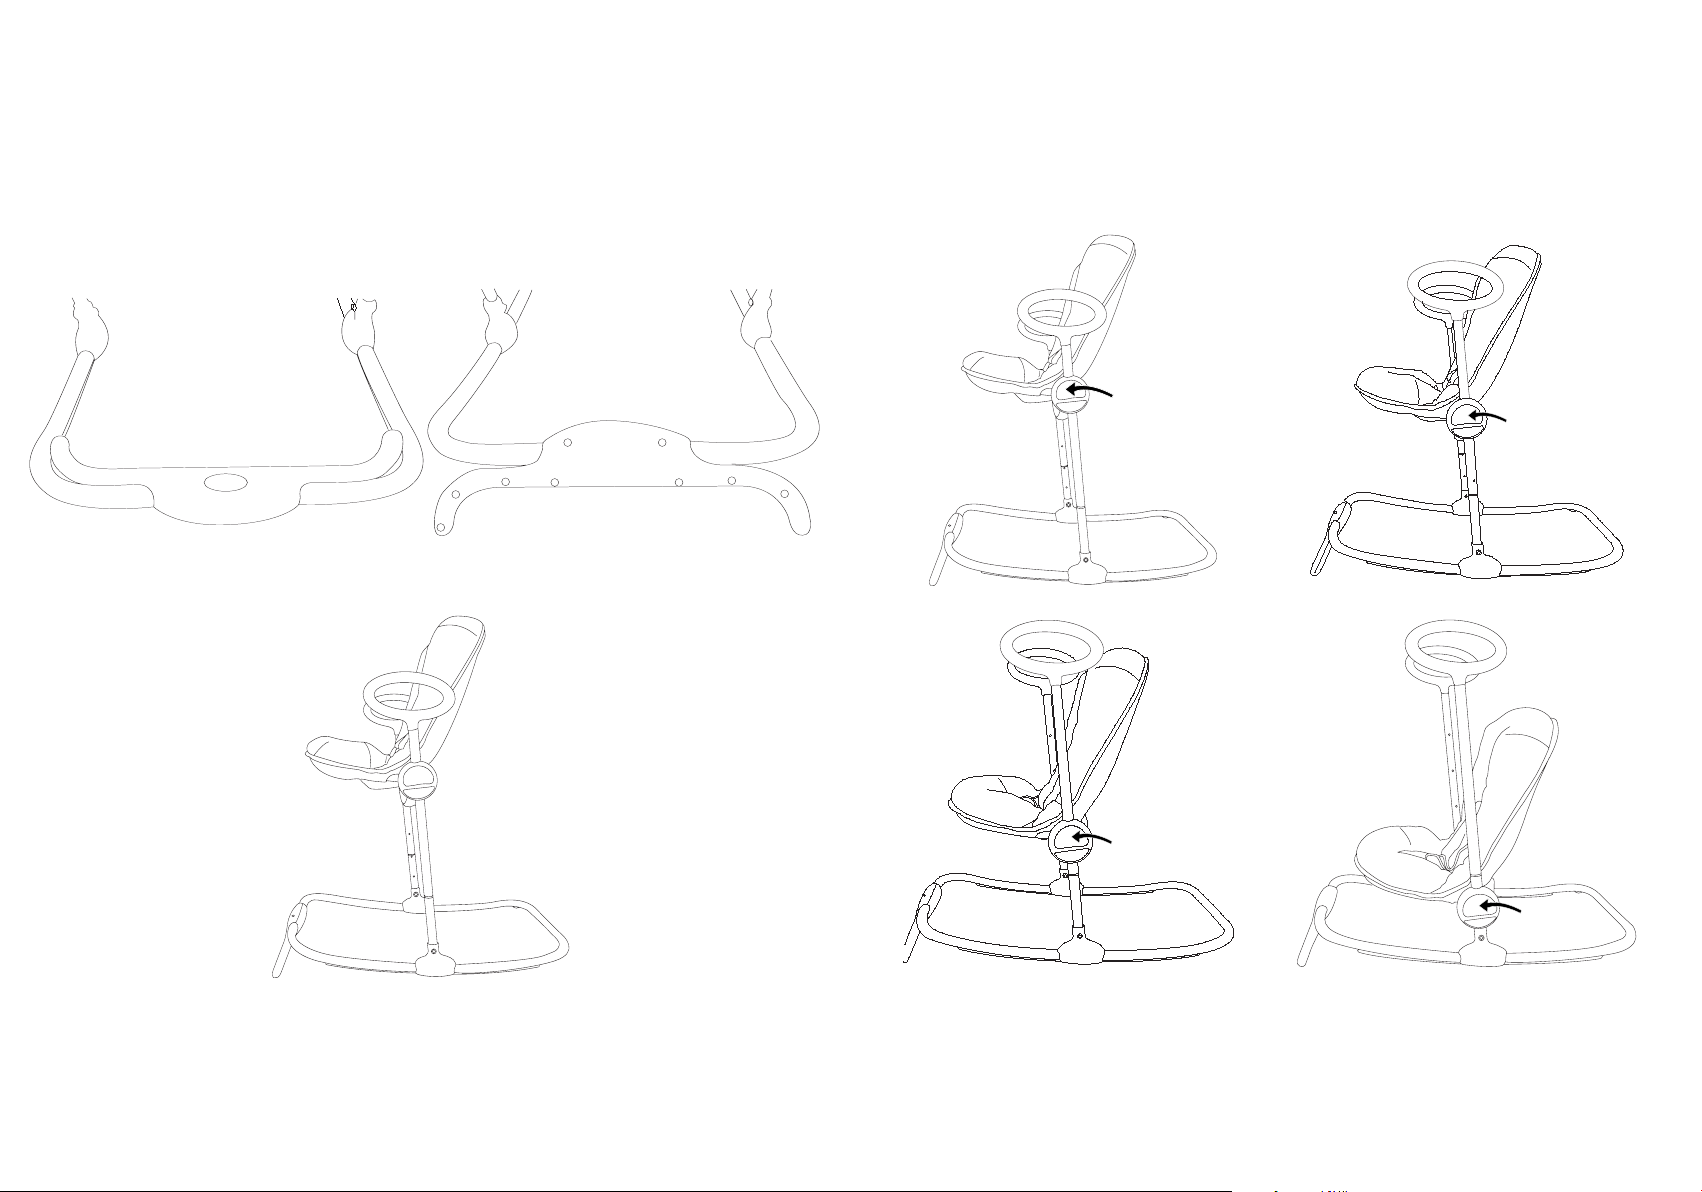
Position the large tubes (A) by pressing on the spring buttons and inserting them in the small tubes (B). The three holes on the
large tube must be facing towards the inside of the bouncer.
Remove the handles (E) by pressing on the spring button and unfold the seat structure (G) following the instructions for setting
the incline.
Place the seat structure (G) on the tubes. Attention! Always ensure that the seat structure is facing the right way (seat on the
same side as the stabiliser).
Position the handles (E) by pressing down on the spring buttons and inserting them in the large tubes (A).
Place the cover (H) on the seat structure (G). To do this, fold the seat structure, place over the back and then over the seat.
Press on the locking buttons on each side of the seat structure and release at the desired position.
3
4
5
6
ASSEMBLY INSTRUCTIONS
FOR LOW POSITION
To use your bouncer in the low position, follow the assembly instructions above without inserting the large tubes (A). Then
fasten the handles (E) to the small tubes (B).
To set the incline of the bouncer seat, place your hand on the top of the seat back and press the button at the rear. Release the
button at the desired position. Always hold the seat back when adjusting, especially if a child is in the bouncer.
To fold the bouncer, press the button and fold the back over the seat.
INSTRUCTIONS FOR SETTING
THE INCLINE AND FOLDING
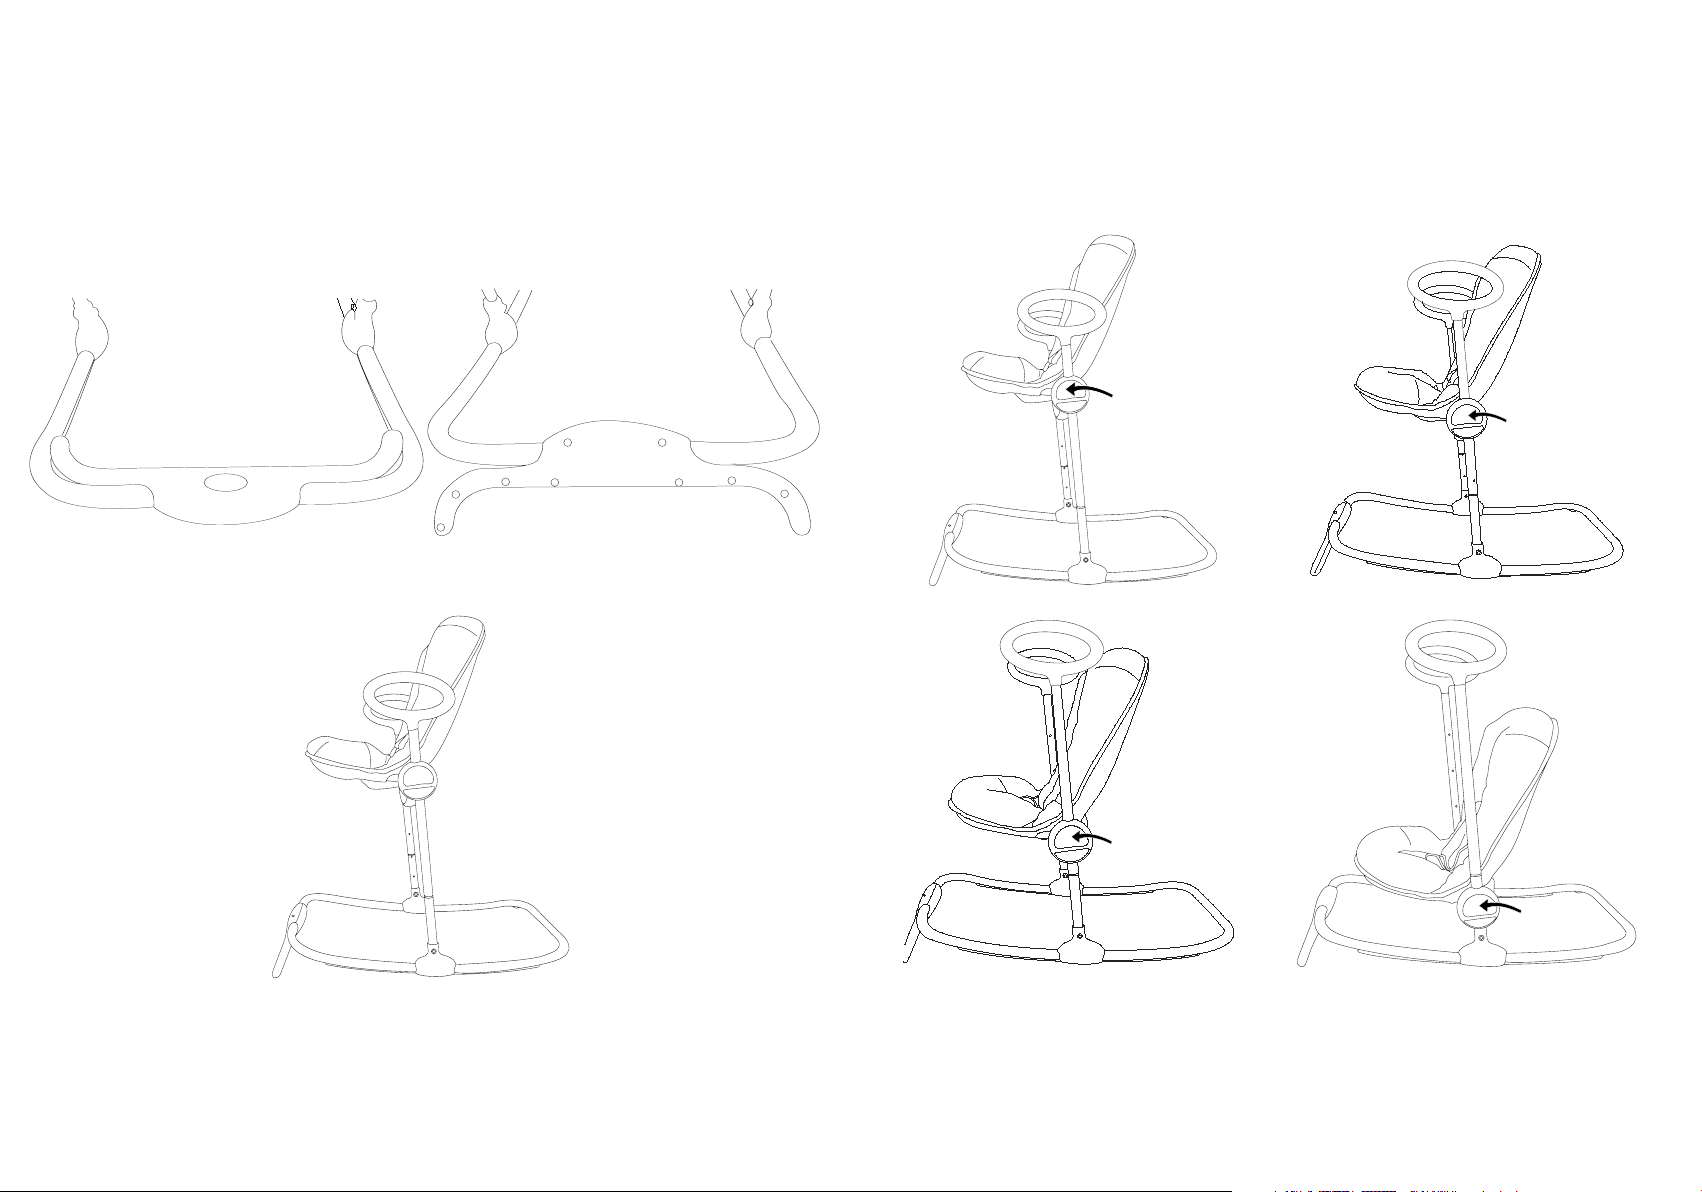
A swing function is available to enable you to rock the bouncer. To lock this position, pivot the stabiliser until it touches the
ground.
INSTRUCTIONS FOR LOCKING
THE SWING FUNCTION
INSTRUCTIONS FOR SETTING
THE HEIGHT
The Up & Down bouncer may be set to 4 predefined heights.
To set the height of the bouncer, press down simultaneously on the buttons of the seat structure (G) and adjust to the desired
height. Release the two buttons ensuring that the seat structure (G) is locked properly on each of the tubes (A) or (B).
Attention! For reasons of security, never adjust the height when the child is in the bouncer.
PUSH !
CLIC !
PUSH !
CLIC !
PUSH !
CLIC !
PUSH !
CLIC !
 Loading...