

BEABA BABYCOOK 912422 User Manual
Babycook® Babycook® plus
a
Couvercle de bol amovible
b
Joint de couvercle
c
Bras de verrouillage
d
Bouton de déverrouillage du bras
e
Zone anti-chaleur
f
Cuve de chauffage
g
Joint / sortie vapeur
h
Bouton de commande
cuisson
mixage
i
Bol
j
Panier de cuisson/réchauffage
k
Spatule
l
Opercule de mixage / ltre à smoothie
m
Couteau de mixage
n
Ecrou couteau
o
Joint couteau
p
Cordon électrique
q
Rangement spatule
a
Couvercle de bol amovible x2
b
Joint de couvercle x2
c
Bras de verrouillage x2
d
Bouton de déverrouillage du bras x2
e
Zone anti-chaleur x2
f
Cuve de chauffage x2
g
Joint / sortie vapeur x2
h
Bouton de commande
cuisson
mixage
i
Bol x2
j
Panier de cuisson/réchauffage x2
k
Spatule
l
Opercule de mixage / ltre à smoothie x2
m
Couteau de mixage x2
n
Ecrou couteau x2
o
Joint couteau x2
p
Cordon électrique
q
Rangement spatule
FR
LISEZ ATTENTIVEMENT LES INSTRUCTIONS DE CETTE NOTICE
AVANT LA PREMIERE UTILISATION DE CET APPAREIL
CONSIGNES DE SECURITE / IMPORTANT:
• Un mauvais usage de l’appareil peut entrainer des risques de blessure : respectez scrupuleusement
les consignes de cette notice.
• ATTENTION, RISQUE DE BRULURE - Cet appareil génère une vapeur d’eau très chaude
(100°C/212°F) pour cuire les aliments.
• Soyez prudent si un liquide chaud est versé dans l’appareil car il peut être éjecté en raison d’un
dégagement de vapeur d’eau soudain.
• Ne vous approchez pas de l’appareil pendant la cuisson.
• N’ouvrez pas le couvercle tant que le cycle de cuisson n’est pas terminé (risque de projection d’eau
chaude).
• ATTENTION, RISQUE DE COUPURE - Les lames du couteau (m) sont extrêmement tranchantes.
• Respectez rigoureusement les instructions de démontage de la lame (entretien)
• Soyez vigilant(e) lorsque vous videz le bol
USAGE :
• Cet appareil ne peut pas être utilisé par des enfants.
• Cet appareil peut être utilisé par des personnes ayant des capacités physiques, sensorielles ou
mentales réduites ou dénuées d’expérience ou de connaissance, s’ils (si elles) sont correctement
surveillé(e)s ou si des instructions relatives à l’utilisation de l’appareil en toute sécurité leur ont été
données et si les risques encourus ont été appréhendés.
• Cet appareil est destiné à être utilisé dans des applications domestiques et analogues telles que: coins
cuisines réservés au personnel dans des magasins, bureaux, autres environnements professionnels,
fermes, utilisation par les clients des hôtels, motels et autres environnements à caractère résidentiel,
environnements du type chambres d’hôtes.
RACCORDEMENT ÉLECTRIQUE:
• N’immergez jamais l’appareil dans l’eau.
• Débranchez l’appareil avant chaque montage, démontage ou nettoyage.
• Débranchez l’appareil si vous le laissez sans surveillance
• N’utilisez pas l’appareil si le câble d’alimentation est endommagé*.
• Débranchez l’appareil s’il ne fonctionne pas correctement*
• Débranchez l’appareil s’il a été endommagé (chute, casse,…)*.
* contactez immédiatement le Service Après-Vente
VIGILANCE / ENFANTS:
• Placez l’appareil et son cordon électrique hors de portée des enfants.
• Refermez systématiquement le couvercle du bol (risque de coupure avec les lames).
• Le nettoyage de l’appareil ne doit pas être effectué par un enfant.
• L’entretien de l’appareil ne doit pas être effectué par un enfant.
• Ne laissez pas un enfant jouer avec l’appareil.
3

Doser 1 à 3 mesures d’eau suivant la quantité à réchauffer puis procéder comme pour le cycle de
cuisson.
Lorsque le signal sonore retenti en n de cycle, extraire le récipient à l’aide d’un linge (
l’eau résiduelle est très chaude en n de cuisson) et brasser le contenu à l’aide de la spatule Béaba
pour obtenir une température homogène.
NOTA : Bien qu’il soit toujours préférable d’utiliser des légumes et des fruits frais dont l’apport en
vitamines est optimal, il est tout à fait possible de cuire des légumes et fruits surgelés, préalablement
décongelés directement dans le bol du BABYCOOK® Solo ou au réfrigérateur (ne jamais décongeler des
aliments à température ambiante).
NETTOYAGE et ENTRETIEN
Débrancher toujours l’appareil avant de procéder à son nettoyage.
Il est recommandé de laver à la main les parties démontables: bol, panier, spatule, opercule de mixage,
couvercle, joints, couteau… Ces éléments passent également au lave-vaisselle. L’utilisation prolongée
du lave-vaisselle peut provoquer un vieillissement accéléré des éléments.
Pour nettoyer le couteau et son joint, suivre les instructions de démontage et remontage :
I
Nous vous remercions et vous félicitons pour votre choix : vous avez acquis un appareil aux performances
uniques. Le BABYCOOK® a été conçu spéciquement pour préparer sainement, simplement et
rapidement les repas de votre bébé. BABYCOOK® cuit, réchauffe et décongèle les aliments à la vapeur
en préservant leurs vitamines et assure un mixage parfait.
MODE D’EMPLOI
• Pour la 1ère utilisation, lancer un cycle de cuisson sans aliment avec le niveau d’eau N°3, puis rincer
le bol et laver les accessoires à l’eau chaude.
• Bien se laver les mains avant de manipuler les produits et nourriture destinés à votre bébé.
ATTENTION
• Toujours utiliser l’appareil sur une surface solide et plane.
• Ne pas poser l’appareil proche d’une source de chaleur, plaque de cuissons…
• Ne pas transporter l’appareil à l’aide de la poignée du bol.
• Ne pas lancer de cycle de cuisson sans eau dans la cuve.
• Ne pas mettre le bol «
i
» du babycook au four micro-onde.
CYCLE DE CUISSON
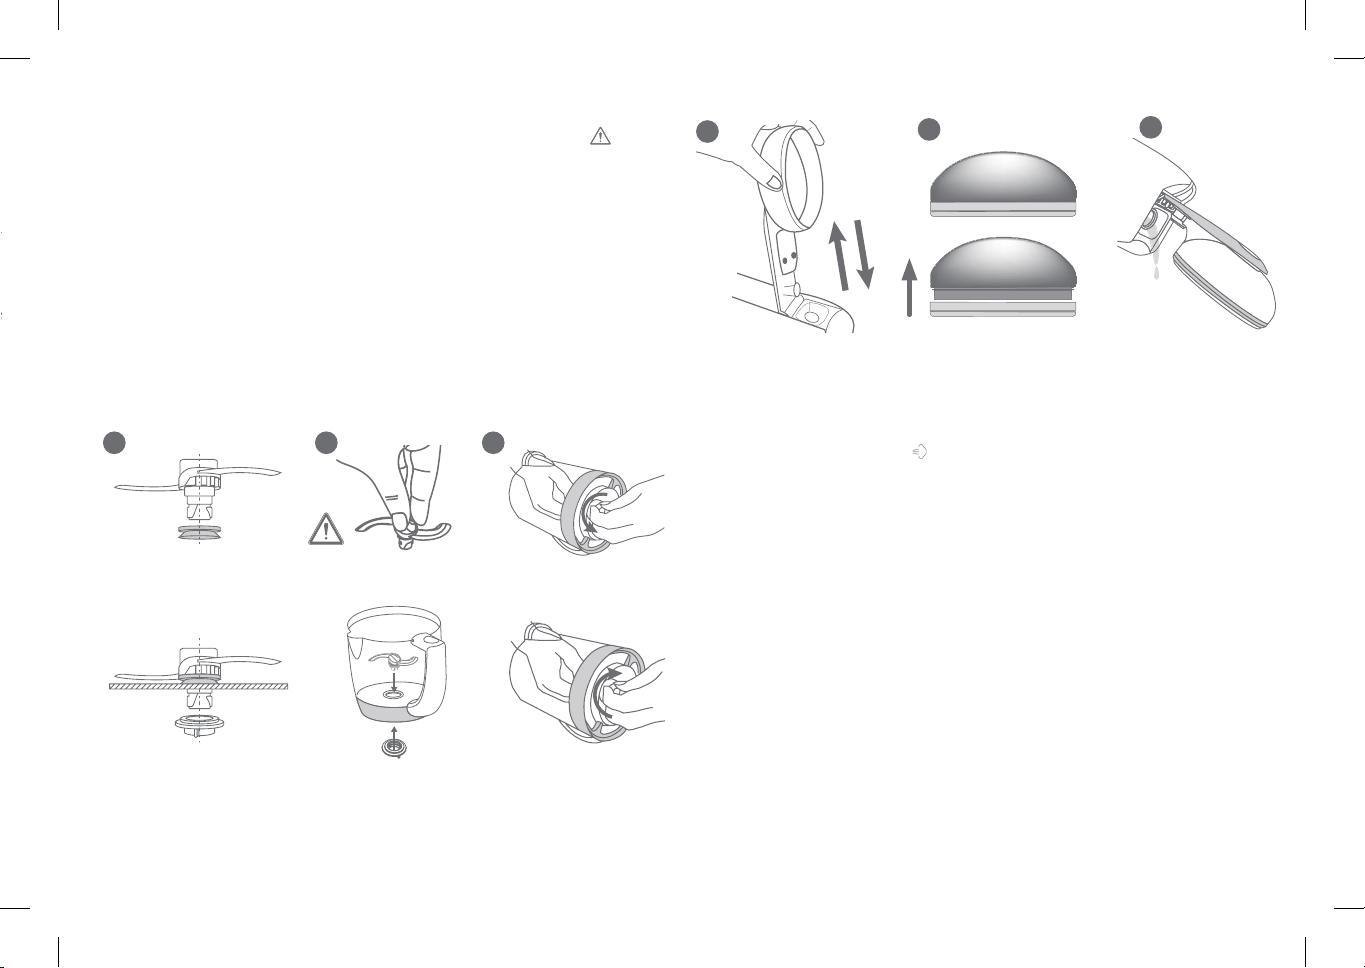
1. Déverrouiller le bras pour accéder au bol et à la cuve de chauffage. Fig 1
2. Couper les aliments en dés d’environ 1cm x 1cm et les placer dans le panier. Pour garantir une
cuisson homogène, il est conseillé de ne pas surcharger le panier. Fig 2
3. Le bol est pourvu de graduations repérées de 1 à 3. Ces graduations permettent de doser les
quantités d’eau à mettre dans la cuve de chauffage et déterminent les temps de cuisson. Se reporter
au guide de cuisson (p 6). Doser l’eau à l’aide du bol en fonction de la recette choisie sans ajouter
d’additif (sel, sucre…) Fig 3
4. Verser l’eau dans la cuve. Fig 4
5. Placer le panier dans le bol en prenant soin de positionner la languette du panier dans le bec verseur
du bol. Fig 5
6. Verrouiller le bol sur l’appareil g 6 et 7
7. Vérier que le joint de sortie vapeur «
8. Fermer le couvercle du bol en appuyant fortement sur le bras. Fig 8
9. Brancher l’appareil sur une prise. Un Bip retenti, le logo Beaba et le bouton de commande clignote
1 fois. Fig 9
10. Appuyer sur le bouton (
et le symbole vapeur s’allument.
11. A la n de la cuisson, l’appareil BIP 3 fois et le logo Beaba s’éteint g 11, le symbole vapeur du
bouton clignote jusqu’à l’arrêt du cycle qui se fera en appuyant à nouveau sur le bouton. Fig 12.
) pour lancer le cycle de cuisson. Fig 10. L’appareil Bip 1 fois, le logo Beaba
g
» n’est pas obstrué
ATTENTION, RISQUE DE BRULURE, pour ouvrir le bol après cuisson, appuyer sur le bouton du
12.
bras en évitant de toucher le couvercle qui est chaud. Fig 13
13. Essuyer l’intérieur du couvercle pour éviter que l’eau de condensation ne tombe dans la cuve.
14. Extraire le panier à l’aide de la spatule. Fig 14
15. Réserver si vous le souhaitez le jus de cuisson récupéré dans le fond du bol pour l’intégrer à la
préparation ou faciliter le mixage.
Babycook plus : La cuisson peut se faire en simultané dans les 2 bols. Pensez à remplir la cuve de droite
si vous utilisez le bol droit et la cuve gauche si vous utilisez le bol gauche.
Eviter l’ouverture simultanée des 2 bras de verrouillage .
Brancher l’appareil et appuyer sur le symbole vapeur droit du bouton si vous utilisez le bol droit ou sur le
symbole vapeur gauche du bouton si vous utilisez le bol gauche.
RECOMMANDATIONS
• Ne pas arrêter la cuisson en cours de cycle pour éviter de laisser de l’eau dans la cuve de chauffe.
• Ne verser que de l’eau propre à la consommation et sans résidus alimentaires ou autres.
• Toujours vérier la température des aliments avant de servir.
• Il est recommandé de ne pas chauffer la nourriture pendant une période trop longue.
CYCLE DE MIXAGE
1. Vérier que la lame est correctement installée dans le fond du bol avec le joint et l’écrou.
2. Après vérication de la cuisson, verser les aliments du panier dans le bol Fig 15.Selon la consistance
souhaitée, ajouter une partie du jus de cuisson avant de lancer le cycle.
3. Placer l’opercule de mixage sur le bol Fig 16
4. Fermer le couvercle du bol en appuyant fortement sur le bras Fig 17
5. Brancher l’appareil et tourner le bouton (
jusqu’à obtention de la consistance souhaitée. Fig 18
6. Ouvrir le bras et retirer l’opercule de mixage à l’aide de la spatule g 19, g 20
7. Mélanger la préparation avec la spatule en évitant de toucher les lames et refaire une impulsion de
mixage si besoin. g 21
Babycook plus : Le mixage se fait exclusivement sur le côté droit de l’appareil, avec l’un ou l’autre des
2 bols.
)sur la droite par impulsion de 10 secondes maximum,
RECHAUFFAGE et DECONGELATION
• Les aliments à réchauffer ou décongeler seront préalablement déposés dans un récipient adapté placé
sans couvercle dans le panier de cuisson. Le récipient ne doit pas obstruer la sortie de vapeur «
4
•
•
•
•
•
g
»

• Doser 1 à 3 mesures d’eau suivant la quantité à réchauffer puis procéder comme pour le cycle de
cuisson.
• Lorsque le signal sonore retenti en n de cycle, extraire le récipient à l’aide d’un linge (
l’eau résiduelle est très chaude en n de cuisson) et brasser le contenu à l’aide de la spatule Béaba
pour obtenir une température homogène.
NOTA : Bien qu’il soit toujours préférable d’utiliser des légumes et des fruits frais dont l’apport en
vitamines est optimal, il est tout à fait possible de cuire des légumes et fruits surgelés, préalablement
décongelés directement dans le bol du BABYCOOK® Solo ou au réfrigérateur (ne jamais décongeler des
aliments à température ambiante).
ATTENTION
• Pour démonter le couvercle et le joint du couvercle :
IV
V
VI
NETTOYAGE et ENTRETIEN
• Débrancher toujours l’appareil avant de procéder à son nettoyage.
• Il est recommandé de laver à la main les parties démontables: bol, panier, spatule, opercule de mixage,
couvercle, joints, couteau… Ces éléments passent également au lave-vaisselle. L’utilisation prolongée
du lave-vaisselle peut provoquer un vieillissement accéléré des éléments.
• Pour nettoyer le couteau et son joint, suivre les instructions de démontage et remontage :
I II III
Montage
Démontage
g
»
• Nettoyer le corps de l’appareil avec une éponge humide et du produit pour vaisselle.
DETARTRAGE
L’appareil est équipé d’un compteur de cycles qui indique quand détartrer votre produit (50 cycles).
• Lorsque le bouton vapeur (
• Utiliser exclusivement du vinaigre d’alcool alimentaire ou le produit d’entretien BEABA pour Babycook.
• Ne jamais utiliser de détartrant chimique ou détartrant à cafetière dans la cuve.
1. Débrancher votre appareil, le détartrage se fait à froid sans cycle de chauffe.
2. Verser un mélange de 110 ml d’eau et 110 ml de vinaigre d’alcool ou le produit d’entretien BEABA
pour Babycook dans la cuve.
3. Laisser reposer une nuit complète avec le couvercle ouvert.
4. Retirer le couvercle du bras (Fig IV)
5. Vider le contenu de la cuve en retournant le produit (Fig. VI)
6. Rincer à l’eau clair la cuve au moins 2 fois en vidant à chaque fois son contenu.
7. Remettre le couvercle en le clippant fortement sur le bras (Fig.IV)
8. Lancer 1 cycle de chauffe avec de l’eau clair dans la cuve (niveau 1 = 100 ml) sans nourriture. Le
bouton de cuisson vapeur s’allumera encore en rouge.
9. Pour réinitialiser l’appareil, remettre de l’eau dans la cuve (niveau 1) et lancer un 2e cycle de chauffe
en maintenant appuyer quelques secondes le bouton vapeur. Le bouton vapeur redevient alors blanc.
10. Bien rincer le bol à l’eau claire avant nouvelle utilisation.
11. En fonction de la nature de l’eau du robinet, vous pouvez avoir à détartrer votre appareil avant la n
du comptage. Voir tableau (question/réponse).
12. Vous pouvez aussi réinitialiser le Babycook sans effectuer ce détartrage. Cependant, nous vous
recommandons vivement de l’effectuer car il permet de prolonger la vie de votre appareil.
5
) de l’appareil devient rouge, il est nécessaire de détartrer la cuve.

INFORMATIONS TECHNIQUES
Removable jug lid
Lid joint
Locking arm
Arm release button
Heat-resistant zone
Heating reservoir
Joint/steam outlet
Control button
Jug
Cooking/heating basket
Spatula
Mixing lid/smoothie lter
Mixing blade
Blade nut
Blade joint
Power cable
Spatula storage
Tension / Puissance : Se référer à la plaque signalétique qui se trouve sous l’appareil.
Température d’usage: 10 à 40°C.
QUESTIONS / REPONSES.
Un tableau à jour et détaillé est présent sur le site internet de BÉABA
Le produit ne
fonctionne pas
Le bol fuit
Mes fruits et
légumes ne sont
pas cuits en n de
cycle
• Assurer vous que l’appareil est bien relié au réseau électrique.
• Vérier que le bol est verrouillé sur la base et que le bras du couvercle est
bien verrouillé.
• Vérier que le joint du couvercle est bien positionné (se reporter au paragraphe
sur la mise en place du joint sur le couvercle)
• Vérier que le couvercle est correctement enclenché sur le bras de verrouillage
• Vérier que le panier est correctement placé dans le bol
• Vérier le montage du joint sur le couteau (se référer au paragraphe Entretien
page 5)
• Vérier l’état du joint du couteau et le remplacer si nécessaire.
• Vérier que l’écrou est monté dans le bon sens (voir picto page 5).
• Il n’y a plus d’eau dans la cuve:
- La quantité d’eau initiale était trop faible. Remplir de nouveau la cuve avec
100 ml d’eau et relancer un cycle.
- Les performances de chauffe diminuent: lancer un ou plusieurs cycles de
détartrage
• Il reste de l’eau dans la cuve: le cycle de cuisson s’est interrompu:
- Relancer un cycle en vous assurant que le bras du couvercle ainsi que le
bol est bien verrouillé.
- Sinon appeler le SAV
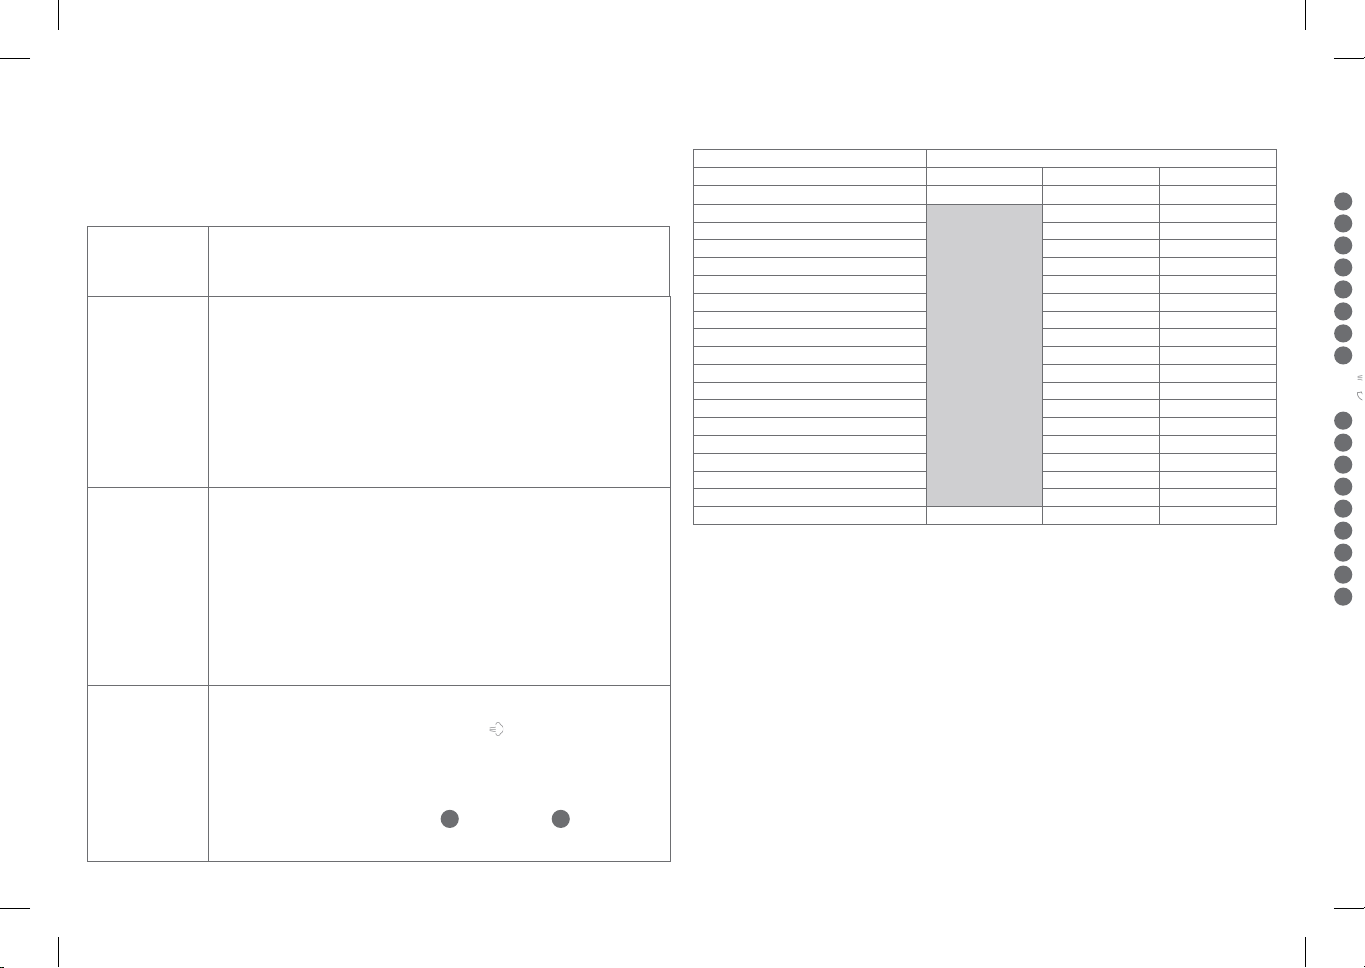
GUIDE DE CUISSON
Aliments Nombre de doses d’eau
Légumes Pommes de terre* •
Carottes* •
Navets* •
Haricots verts •
Courgettes •
Poireaux •
Petits pois •
Courge •
Chou-eur •
Viandes Rouges •
Blanches •
Poissons •
Fruits Pommes •
Poires •
Fraises •
Mandarines •
Ananas •
Temps de cuisson ** env. 12 min env. 17 min env. 21 min
* Coupés en petits dés 1 cm x 1 cm.
** Temps de cuisson approximatifs pour un panier plein de 300 gr.
1 2 3
100 ml 150 ml 200 ml
Pour le réchauffage
a
b
c
d
e
f
g
h
i
j
k
l
m
n
o
p
q
Le Babycook sife
au départ du cycle
de chauffe.
• Le circuit de vapeur est peut être bouché.
• Arrêter immédiatement le cycle en appuyant sur le bouton (
).
• Ne pas ouvrir le couvercle et attendre que l’appareil ne fasse plus de vapeur,
qu’il n’y ait plus de sifement (environ 10 mn).
• Dévérouiller le bras du Babycook.
• Vérier que le trou du couvercle du bol
a
et le joint
g
ne sont pas bouchés.
• Sinon, le déboucher.
6

Babycook® Babycook® plus
a
Removable jug lid
b
Lid joint
c
Locking arm
d
Arm release button
e
Heat-resistant zone
f
Heating reservoir
g
Joint/steam outlet
h
Control button
cooking
mixing
i
Jug
j
Cooking/heating basket
k
Spatula
l
Mixing lid/smoothie lter
m
Mixing blade
n
Blade nut
o
Blade joint
p
Power cable
q
Spatula storage
a
Removable jug lid x2
b
Lid joint x2
c
Locking arm x2
d
Arm release button x2
e
Heat-resistant zone x2
f
Heating reservoir x2
g
Joint/steam outlet x2
h
Control button
cooking
mixing
i
Jug x2
j
Cooking/heating basket x2
k
Spatula
l
Mixing lid/smoothie lter x2
m
Mixing blade x2
n
Blade nut x2
o
Blade joint x2
p
Power cable
q
Spatula storage
EN
READ THESE INSTRUCTIONS CAREFULLY BEFORE USING
THIS APPLICANCE FOR THE FIRST TIME
SAFETY INSTRUCTIONS
IMPORTANT:
• Incorrect use of the appliance may cause injury: always follow these instructions.
• CAUTION, BURN RISK - This appliance generates very hot steam (100°C/212°F) which cooks the
food.
• Be careful if hot liquid is poured into the food processor or blender as it can be ejected out of the
appliance due to a sudden steaming.
• Do not approach the appliance during the cooking cycle.
• Do not open the lid until the cooking cycle has nished (risk of scalding from hot water).
• CAUTION, CUTTING RISK - The blades are extremely sharp.
• Follow the instructions for dismantling the blade carefully (cleaning).
• Be careful when you empty the jug.
USE :
• This appliance shall not be used by children.
• This device may be used by people with reduced physical, sensorial or mental capacities, or without
any experience or knowledge, if they are correctly supervised or if the instructions for using the device
safely have been provided and the risks have been understood.
• This appliance is designed for domestic and other such use, for example: kitchen areas reserved for
staff in shops, ofces and other professional environments, farms, guests staying at hotels, motels
and other residential type environments, environments such as bed and breakfast accommodation.
POWER CONNECTION:
• Never immerse the appliance in water.
• Unplug the appliance before assembling, dismantling or cleaning.
• Unplug the appliance if you leave it unsupervised.
• Do not use your appliance if the power cable is damaged*.
• Unplug the appliance if it is not working properly*.
• Unplug the appliance if it is damaged (fall, breakage, etc.)*
* contact the customer Service immediately.
CAUTION/CHILDREN:
• Keep the appliance and its cord out of the reach of children.
• Always close the jug’s lid (cutting risk with blades).
• The appliance should not be cleaned by a child.
• The appliance should not be maintained by a child.
• Do not let a child play with the appliance.
7

THANK YOU FOR YOUR PURCHASE. Congratulations— you now own a baby food maker appliance that
Measure out 1 to 3 doses of water according to the amount of food to be reheated and then follow the
cooking cycle instructions.
When the sound signals marks the end of the cycle, remove the container with a cloth (
CAUTION
: Although it is always best to use fresh fruit and vegetables which have a high vitamin content, it is
also possible to cook frozen fruit and vegetables which have been defrosted in the BABYCOOK
the fridge (never defrost food at room temperature)..
CLEANING and MAINTENANCE
Always unplug the appliance before cleaning it.
It is advised to wash the removable parts by hand: jug, basket, spatula, mixing cover, lid, joints, blade,
etc. These elements can also be washed in a dishwasher. Dishwasher cleaning may cause parts to
wear faster over time.
To clean the blade and its joint, follow the dismantling and assembly instructions:
I
offers you unique performance. Babycook
your baby, simply and rapidly. Babycook® cooks, reheats and defrosts food by steaming, which locks in
vitamins and nutrients. It also blends food to the perfect consistency.
®
has been specically designed to prepare healthy meals for
INSTRUCTIONS
• When using for the rst time, launch a cooking cycle without any food in the jug and with the water
level at number 3, when done, rinse the jug and the accessories in hot water.
• Wash your hands well with soap and water before handling your baby’s products and food.
CAUTION
• Always use the appliance on a solid and even surface.
• Do not place the appliance near a heat source, hotplates, etc.
• Do not carry the appliance by the jug’s handle.
• Do not launch the cooking cycle if there is no water in the reservoir.
• Do not place Babycook’s jug «
i
» in a microwave.
COOKING CYCLE
1. Release the arm to access the jug and the heating reservoir. Fig 1
2. Cut the food into 1cm x 1cm (1/2 inch) cubes and place them in the basket. To ensure even cooking,
it is advised to not overload the basket. Fig 2
3. The jug has graduations from 1 to 3. These graduations allow you to measure out the amount of
water to pour into in the heating reservoir and determine the cooking time. Refer to the cooking
guide (p 10). Measure out the water using the jug according to the chosen recipe and without added
anything (salt, sugar, etc.) Fig 3
4. Pour the water into the reservoir. Fig 4
5. Place the basket in the jug, taking care to position the tongue of the basket in the lip of the jug. Fig 5
6. Lock the jug onto the appliance g 6 and 7
7. Check that the steam outlet joint «
8. close the jug’s lid by pressing rmly on the arm g 8
9. Plug the appliance into an adapted socket. You will hear a beep, and the Beaba logo and the control
button will ash once. Fig 9
10. Press (
11. At the end of the cooking cycle, the appliance beeps three times and the Beaba logo goes out g 11,
) to start the cooking cycle Fig 10. The appliance beeps once, the Beaba logo and the
steam symbol light up.
the steam symbol on the button ashes until the cycle has been stopped. To stop the cycle, press
on the button again Fig 12.
g
» is not blocked
CAUTION. BURN RISK, to open the jug after cooking, press the button on the arm taking care to
12.
avoid touching the lid which is hot. Fig 13
13. Wipe the lid in order to prevent condensation falling into the reservoir
14. Remove the basket with the spatula. Fig 14
15. If you wish, set aside the cooking juices collected in the bottom of the jug to add to the preparation
or facilitate blending.
Babycook plus : It is possible to cook in both jugs at the same time. Remember to ll the right-hand
heating reservoir if you are using the right-hand jug and the left-hand heating reservoir if you are using
the left-hand jug.
Avoid opening both locking arms at the same time.
Plug in the device and press the right steam button if you are using the right-hand jug, or the left steam
button if you are using the left-hand jug.
RECOMMENDATIONS
• Do not stop the cooking process during the cycle so as to avoid leaving water in the heating reservoir.
• Only use clean drinking water which is free of any food or any other type of residue.
• Always check the temperature of food before serving.
• It is advised to not heat food for a long period of time.
BLENDING CYCLE
1. Check that the blade is correctly installed in the bottom of the jug with the joint and the nut.
2. After checking the cooking time, empty the food into the basket in the jug Fig 15. According to the
desired consistency, add some of the cooking juices before starting the cycle.
3. Place the blending cover on the jug Fig 16
4. Close the jug’s lid by pressing rmly on the arm Fig 17
5. Plug in the appliance and turn the button (
seconds until you have obtained the desired consistency. Fig 18
6. Open the arm and remove the mixing cover using the spatula g 19, g 20
7. Stir with the spatula taking care to avoid touching the blades and, if necessary, blend again. g 21
Babycook plus : Mixing is only possible in the right-hand position with either one of the jugs.
) to the right using pulses lasting a maximum of 10
HEATING and DEFROSTING
• The food to be heated or defrosted should be placed in a suitable container and then placed in the
cooking basket without a lid. The container must not block the steam outlet «
8
g
»
•
•
NB.
•
•
•
• Measure out 1 to 3 doses of water according to the amount of food to be reheated and then follow the
cooking cycle instructions.
• When the sound signals marks the end of the cycle, remove the container with a cloth (
CAUTION
CAUTION
• To dismantle the cover and the cover’s joint:
IV
V
VI
NB.: Although it is always best to use fresh fruit and vegetables which have a high vitamin content, it is
also possible to cook frozen fruit and vegetables which have been defrosted in the BABYCOOK
®
jug or in
the fridge (never defrost food at room temperature)..
CLEANING and MAINTENANCE
• Always unplug the appliance before cleaning it.
• It is advised to wash the removable parts by hand: jug, basket, spatula, mixing cover, lid, joints, blade,
etc. These elements can also be washed in a dishwasher. Dishwasher cleaning may cause parts to
wear faster over time.
• To clean the blade and its joint, follow the dismantling and assembly instructions:
I II III
Assembly
Dismantling
• Clean the body of the appliance with a damp sponge and dish soap.
DESCALING
The appliance is equipped with a cycle counter which indicates when your product requires descaling
(50 cycles).
• When the appliance’s steam button (
• Only use white vinegar or the BEABA cleaning product for Babycook.
• Never use a chemical descaler or a coffee machine descaler in the reservoir.
1. Unplug your appliance, descaling should be done cold and does not require a heating cycle.
2. Pour a mixture of 110 ml (1/2 cup) of water and 110 ml (1/2 cup) of white vinegar or the BEABA
cleaning product for Babycook into the reservoir.
3. Leave to soak overnight with the lid open.
4. Remove the lid from the arm (Fig IV)
5. Empty the contents of the reservoir by turning the product upside down (Fig VI)
6. Rinse the reservoir with water at least twice making sure to empty its contents each time.
7. Replace the lid by clipping it rmly on to the arm (Fig IV)
8. Start a heating cycle with water in the reservoir (level 1 = 100 ml) and without any food. The steam
cooking button will still be red.
9. To reset the appliance, pour water into the reservoir (level 1) and launch a second heating cycle,
pressing down on the steam button for a few seconds. The steam button will turn white.
10. Rinse the jug with water before using it.
11. Depending to the type of water you have, you may have to descale your appliance more often. See
table (troubleshooting)
12. You can also reset Babycook without descaling it. However, we strongly advise you to do so because
it helps to prolong your appliance’s life span.
9
) turns red, it is necessary to descale the heating reservoir.

SPECIFICATIONS
Verwijderbare komdeksel
Afdichting deksel
Vergrendelingsarm
Ontgrendelingsknop arm
Koude zone
Verwarmingsreservoir
Afdichting / stoomuitgang
Bedieningsknop
Kom
Stoom-/Opwarmmand
Spatel
Pureerdeksel / smoothie lter
Mixmes
Moer mixmes
Afdichting mixmes
Snoer
Spatelsteun
Voltage/Power: Refer to the information panel under the appliance.
Temperature for use: 10 to 40°C.
TROUBLESHOOTING
An updated and detailed table can be found on the BEABA website.
The product does
not work
The jug leaks
My food is not
cooked at the end
of the cycle
• Check that the appliance is connected to a electricity supply
• Check that the jug is locked on the base and that the lid is correctly locked.
• Check that the lid’s joint is inserted correctly (refer to the paragraph on
inserting the joint on the lid)
• Check that the lid is connected properly to the locking arm.
• Check that the basket is positioned correctly in the jug
• Check that the joint is mounted correctly on the blade (refer to the Maintenance
paragraph on page 9)
• Check the condition of the blade’s joint and replace it if necessary.
• Check that the nut is mounted the right way round (see picture page 9)
• There is no more water in the reservoir:
- The initial quantity of water was too low. Fill the reservoir again with 100 ml
of water and start the cycle again.
- The heating performance is decreasing: launch one or more descaling cycles
• There is still water in the reservoir: the cooking cycle has been interrupted:
- Relaunch a cycle and make sure that the lid’s arm and the jug are correctly
locked.
- Or call the customer Service
COOKING GUIDE
Food Number of doses of water
Vegetables Potatoes* •
Carrots* •
Turnips* •
Green beans •
Courgettes •
Leeks •
Peas •
Pumpkin •
Cauliower •
Red meat •
White meat •
Fish •
Fruit Apples •
Pears •
Strawberries •
Mandarin •
Pineapple •
Cooking time** about 12 mins about 17 mins about 21 mins
* Cut into small 1 cm x 1 cm (1/2 inch) cubes.
** Approximate cooking time for a full 300 g (10 ounces) basket.
1 2 3
100 ml 150 ml 200 ml
To reheat
a
b
c
d
e
f
g
h
i
j
k
l
m
n
o
p
q
The Babycook
whistles at the
start of the heating
cycle.
• The steam hole may be blocked.
• Stop the cycle immediately by pressing on the button (
).
• Do not open the lid and wait for the appliance to stop producing steam and
stop whistling (about 10 mins)
• Unlock the arm of the Babycook.
• Check that the hole on the lid of the jug
a
and the joint
g
are not blocked.
• If blocked, unblock it.
10
Babycook® Babycook® plus
a
Verwijderbare komdeksel
b
Afdichting deksel
c
Vergrendelingsarm
d
Ontgrendelingsknop arm
e
Koude zone
f
Verwarmingsreservoir
g
Afdichting / stoomuitgang
h
Bedieningsknop
stomen
mixen
i
Kom
j
Stoom-/Opwarmmand
k
Spatel
l
Pureerdeksel / smoothie lter
m
Mixmes
n
Moer mixmes
o
Afdichting mixmes
p
Snoer
q
Spatelsteun
a
Verwijderbare komdeksel x2
b
Afdichting deksel x2
c
Vergrendelingsarm x2
d
Ontgrendelingsknop arm x2
e
Koude zone x2
f
Verwarmingsreservoir x2
g
Afdichting / stoomuitgang x2
h
Bedieningsknop
stomen
mixen
i
Kom x2
j
Stoom-/Opwarmmand x2
k
Spatel
l
Pureerdeksel / smoothie lter x2
m
Mixmes x2
n
Moer mixmes x2
o
Afdichting mixmes x2
p
Snoer
q
Spatelsteun
NL
LEES, VOOR HET EERSTE GEBRUIK VAN DIT APPARAAT,
DE AANWIJZINGEN IN DEZE HANDLEIDING AANDACHTIG DOOR
VEILIGHEIDSINSTRUCTIES
LET OP:
• Een onjuist gebruik van het apparaat kan leiden tot verwondingen: leef de instructies in deze
handleiding nauwlettend op.
• LET OP, RISICO OP BRANDWONDEN - Dit apparaat produceert hete stoom (100°C/212°F) om de
voedingsmiddelen te koken.
• wees voorzichtig bij het gieten van hete vloeistoffen in het apparaat daar deze kunnen opspatten door
het plotseling vrijkomen van stoom.
• Blijf tijdens de bereiding op afstand van het apparaat.
• Open de deksel niet als de kookcyclus niet voltooid is (risico op opspattend heet water).
• LET OP, RISICO OP SNIJWONDEN - Het mixmes (m) is zeer scherp.
• Leef de instructies voor het demonteren van het mes (onderhoud) nauwlettend op.
• Wees voorzichtig bij het legen van de kom.
GEBRUIK :
• Dit apparaat mag niet worden gebruikt door kinderen
• Dit apparaat kan gebruikt worden en door personen met lichamelijke, zintuiglijke of verstandelijke
beperkingen of zonder ervaring of kennis, bij voldoende toezicht en als ze de juiste aanwijzingen en
uitleg met betrekking tot een veilig gebruik verstrekt krijgen en ze de bijbehorende gevaren begrijpen.
• Dit apparaat is bestemd voor huishoudelijk gebruik of soortgelijke omstandigheden zoals:
pauzeruimtes voor het personeel in winkels, kantoren en overige werkplaatsen, boerderijen, gebruik
door klanten in hotels, motels en overige types woonruimtes, accommodaties van het type B&B.
AANSLUITING:
• Dompel het apparaat nooit onder in water.
• Haal de stekker van het apparaat uit het stopcontact voor het monteren, demonteren of het reinigen.
• Haal de stekker van het apparaat uit het stopcontact als u het apparaat zonder toezicht laat.
• Gebruik het apparaat niet als het snoer beschadigd is*.
• Haal de stekker van het apparaat uit het stopcontact als het niet correct werkt*.
• Haal de stekker van het apparaat uit het stopcontact als het beschadigd is geraakt (val, gebroken
onderdelen, ...)*.
* neem direct contact op met de After Sales dienst.
VOORZORGEN / KINDEREN:
• Plaats het apparaat en zijn elektrische snoer altijd buiten bereik van kinderen
• Sluit systematisch de komdeksel (risico op snijwonden door het mixmes).
• Het apparaat mag niet door kinderen gereinigd worden.
• Het onderhoud aan het apparaat mag niet door kinderen uitgevoerd worden.
• Laat kinderen nooit met het apparaat spelen.
11

Wij danken u voor uw aankoop en feliciteren u voor uw keuze voor dit apparaat met unieke eigenschappen.
VERWARMEN en ONTDOOIEN
Doe de te verwarmen of te ontdooien voedingsmiddelen in een geschikt potje en plaats dit zonder
deksel in het stoommandje. Het potje mag de stoomuitgang «
Meet 1 tot 3 streepjes water af naargelang de te verwarmen hoeveelheid en ga vervolgens op dezelfde
manier te werk als bij het koken.
Als het geluidssignaal van de kooktijd weerklinkt, kunt u het potje met een theedoek uit het mandje
halen (
met de Beaba spatel om een homogene temperatuur te verkrijgen.
OPM.: hoewel het altijd beter is om verse groente en fruit te gebruiken omdat die de meeste
vitamines bevatten, kunt u ook diepvriesgroente en -fruit klaarmaken, na deze eerst direct in de kom
van de BABYCOOK
omgevingstemperatuur).
REINIGING EN ONDERHOUD
Haal de stekker van het apparaat uit het stopcontact alvorens het te reinigen.
Wij raden u aan om de demonteerbare onderdelen: kom; mandje, spatel, pureerdeksel, deksel,
afdichtingen, mes... met de hand te wassen. Deze elementen zijn ook geschikt voor de vaatwasmachine.
Het veelvoudig gebruik van de vaatwasmachine kan leiden tot vroegtijdige slijtage van de elementen.
Volg, voor het reinigen van het mixmes en de afdichting, de instructies voor het demonteren en
hermonteren op:
I
De BABYCOOK
klaar te maken. De BABYCOOK® kookt, verwarmt en ontdooit voedingsmiddelen door middel van stoom
waardoor de vitamines optimaal behouden blijven en de ingrediënten goed gemixt kunnen worden.
®
is speciaal ontworpen om eenvoudig, handig en snel gezonde maaltijden voor uw baby
GEBRUIKSAANWIJZING
• Voer vóór het 1ste gebruik, een kookcyclus uit met uitsluitend schoon water op stand 3 en reinig de
kom en de accessoires vervolgens met warm water.
• Was zorgvuldig uw handen alvorens de producten en de voor uw baby bestemde etenswaren aan te
raken.
LET OP
• Gebruik het apparaat altijd op een vlakke en stabiele ondergrond.
• Plaats het apparaat niet in de nabijheid van hittebronnen, kookplaten...
• Verplaats het apparaat niet door het aan het handvat van de kom te dragen.
• Start nooit een kookcyclus op zonder water in het reservoir.
• Zet de kom «
i
» van de Babycook niet in de magnetron.
KOOKCYCLUS
1. Ontgrendel de arm voor toegang tot de kom en het verwarmingsreservoir. Afb. 1
2. Snij de voedingsmiddelen in blokjes van circa 1 cm x 1 cm en leg ze in het mandje. Voor een
gelijkmatig kookproces raden wij u aan het mandje niet overmatig te vullen. Afb. 2
3. De kom heeft een schaalverdeling van 1 t/m 3. Deze schaalverdeling maakt het mogelijk het
benodigde water voor in het verwarmingsreservoir te doseren en de kooktijd te bepalen. Raadpleeg
de kookgids (blz. 14). Meet het water af in de kom naargelang het gewenste recept, zonder
toevoegingen (zout, suiker...) Afb. 3
4. Giet het water in het verwarmingsreservoir. Afb. 4
5. Zet het mandje in de kom er zorg ervoor dat het lipje van het mandje in de schenktuit van de kom
rust. Afb. 5
6. Vergrendel de kom op het apparaat. Afb.6 en 7
7. Controleer of de afdichting van de stoomuitgang «
8. Sluit de komdeksel door stevig op de arm te drukken. Afb. 8
9. Sluit het apparaat aan op een stopcontact van. Het apparaat piept, het Beaba logo en de
bedieningsknop knipperen 1 maal. Afb. 9
10. Druk op de knop (
logo en het stoomsymbool lichten op.
11. Na het koken PIEPT het apparaat 3 maal en gaat het Beaba logo uit. Afb. 11, het stoomsymbool
) om de kookcyclus op te starten. Afb 10. Het apparaat piept 1 maal, het Beaba
g
» niet verstopt is.
knippert tot het einde van de cyclus die voltooid word door nogmaals op de knop te drukken. Afb. 12.
LET OP, RISICO OP BRANDWONDEN, druk om de kom na het stomen te openen, op de knop van
12.
de arm en voorkom de hete deksel aan te raken. Afb. 13
13. Veeg de binnenzijde van de deksel af om te voorkomen dat het condenswater in het reservoir valt.
14. Verwijder de mand met behulp van de spatel. Afb. 14
15. Bewaar indien gewenst het kookvocht onder in de kom om het aan de bereiding toe te voegen of
het mixen te vereenvoudigen.
Babycook plus : U kunt de 2 kommen gelijktijdig gebruiken. Denk eraan het rechter verwarmingsreservoir
te vullen als u de rechter kom gebruikt en het linker verwarmingsreservoir te vullen als u de linker kom
gebruikt.
Voorkom de gelijktijdige opening van de 2 vergrendelingsarmen.
Sluit het apparaat aan en druk op het stoomsymbool van de rechter knop als u de rechter kom gebruikt
en op het stoomsymbool van de linker knop als u de linker kom gebruikt.
AANBEVELINGEN
• Onderbreek het koken niet tijdens de cyclus om te voorkomen dat er water in het verwarmingsreservoir
blijft staan.
• Giet uitsluitend schoon en voor consumptie geschikt water zonder etensresten of overige in het
reservoir.
• Controleer altijd de temperatuur van de voedingsmiddelen alvorens ze aan uw baby te geven.
• Het wordt aangeraden de etenswaren niet langdurig op te warmen.
MIXCYCLUS
1. Controleer of het mes correct met de pakking en de moer op de bodem van de kom geïnstalleerd is.
2. Breng, na gecontroleerd te hebben of de voedingsmiddelen gaar zijn, deze van het mandje over in
de kom Afb. 15. Afhankelijk van de gewenste consistentie kunt u een gedeelte van het kookvocht
toevoegen alvorens de cyclus op te starten.
3. Breng de pureerdeksel op de kom aan. Afb. 16
4. Sluit de komdeksel door stevig op de arm te drukken. Afb. 17
5. Sluit het apparaat aan en zet de knop (
de gewenste consistentie bereikt is. Afb. 18
6. Open de arm en verwijder de pureerdeksel met behulp van de spatel. Afb. 19, Afb. 20
7. Roer de maaltijd door met de spatel en voorkom hierbij het mixmes te raken. Geef indien nodig nog
een extra mix impuls. Afb. 21
Babycook plus : Het mixen kan uitsluitend op de rechterzijde van het apparaat worden uitgevoerd, met
één van de 2 kommen.
12
), per impuls van maximaal 10 seconden, naar rechts tot
•
•
•
•
•
•

VERWARMEN en ONTDOOIEN
• Doe de te verwarmen of te ontdooien voedingsmiddelen in een geschikt potje en plaats dit zonder
deksel in het stoommandje. Het potje mag de stoomuitgang «
• Meet 1 tot 3 streepjes water af naargelang de te verwarmen hoeveelheid en ga vervolgens op dezelfde
manier te werk als bij het koken.
• Als het geluidssignaal van de kooktijd weerklinkt, kunt u het potje met een theedoek uit het mandje
halen (
LET OP het restwater is zeer heet bij het einde van de kooktijd) en de inhoud doorroeren
met de Beaba spatel om een homogene temperatuur te verkrijgen.
OPM.: hoewel het altijd beter is om verse groente en fruit te gebruiken omdat die de meeste
vitamines bevatten, kunt u ook diepvriesgroente en -fruit klaarmaken, na deze eerst direct in de kom
van de BABYCOOK
®
Solo of in de koelkast te hebben ontdooid (ontdooi nooit voedingsmiddelen bij
omgevingstemperatuur).
g
»niet verstoppen
REINIGING EN ONDERHOUD
• Haal de stekker van het apparaat uit het stopcontact alvorens het te reinigen.
• Wij raden u aan om de demonteerbare onderdelen: kom; mandje, spatel, pureerdeksel, deksel,
afdichtingen, mes... met de hand te wassen. Deze elementen zijn ook geschikt voor de vaatwasmachine.
Het veelvoudig gebruik van de vaatwasmachine kan leiden tot vroegtijdige slijtage van de elementen.
• Volg, voor het reinigen van het mixmes en de afdichting, de instructies voor het demonteren en
hermonteren op:
I II III
montage
Demontage
• Demontage van de deksel en de afdichting van de deksel:
IV
V
VI
• Reinig de behuizing van het apparaat met een vochtige spons en afwasmiddel.
ONTKALKEN
Het apparaat is voorzien van een cyclusteller die aangeeft wanneer het ontkalkt moet worden (50 cycli).
• Zodra de stoomknop van het apparaat (
• Gebruik uitsluitend natuurazijn of het specieke Babycook reinigingsmiddel van BEABA.
• Gebruik nooit chemische ontkalkingsmiddelen of ontkalkingsmiddel voor kofezetapparaten in het
reservoir.
1. Schakel het apparaat uit, het ontkalken wordt in een koud apparaat zonder verwarmcyclus uitgevoerd.
2. Giet een mengsel van 110 ml water en 110 ml natuurazijn of het Babycook reinigingsmiddel van
BEABA in het reservoir.
3. Laat dit een hele nacht inwerken met open deksel.
4. Verwijder de deksel van de arm (Afb. IV)
5. Leeg de inhoud van het reservoir door het product om te keren(Afb. VI)
6. Spoel het reservoir minstens 2 maal met schoon water af en gooi de inhoud hierbij telkens weg.
7. Breng de deksel opnieuw aan door het stevig op de arm vast te klemmen (Afb. IV)
8. Start een verwarmcyclus op met schoon water in het reservoir (stand 1 = 100 ml) zonder
voedingsmiddelen. De stoomknop is nog steeds rood.
9. Doe, om het apparaat te resetten, opnieuw water in het reservoir (stand 1) en start een 2e verwarmcyclus
door enkele seconden op de stoomknop te drukken. De stoomknop wordt vervolgens weer wit.
10. Spoel de kom goed schoon met water alvorens het opnieuw te gebruiken.
11. Afhankelijk van het type kraanwater moet u uw apparaat wellicht ontkalken voor het einde van de
telling. Zie (vraag/antwoord) tabel.
12. U kunt de Babycook tevens resetten zonder te ontkalken. Wij raden u echter aan het apparaat te
ontkalken voor een verlengde levensduur ervan.
13
) rood wordt, moet u het reservoir ontkalken.
TECHNISCHE GEGEVENS
Abnehmbarer Deckel der Schüssel
Deckeldichtung
Verriegelungsarm
Entriegelungsknopf des Arms
Anti-Hitze-Bereich
Heizbehälter
Dichtung / Dampfauslass
Bedienknopf
Schüssel
Garkorb/Korb zum Aufwärmen
Schaber
Mixdeckel / Smoothielter
Mixmesser
Messermutter
Messerdichtung
Stromkabel
Schaberfach
Spanning / Vermogen: Raadpleeg het typeplaatje onder het apparaat.
Gebruikstemperatuur: 10 tot 40°C
VRAGEN/ANTWOORDEN
Op de website van BEABA kunt u een bijgewerkte en gedetailleerde tabel raadplegen
Het product werkt
niet
De kom lekt
Het fruit en de
groente zijn niet
gaar aan het einde
van de kooktijd
• Controleer of het apparaat is aangesloten op een voeding van.
• Controleer of de kom op de basis vergrendeld is en of de arm van de deksel
vergrendeld is.
• Controleer of de afdichting van de deksel correct is aangebracht (raadpleeg de
paragraaf voor het aanbrengen van de afdichting op de deksel).
• Controleer of de deksel correct op de vergrendelingsarm is bevestigd.
• Controleer of het mandje correct in de kom is geplaatst.
• Controleer de montage van de afdichting op het mes (raadpleeg de paragraaf
Onderhoud blz. 13).
• Controleer de staat van de afdichting van het mes en vervang indien nodig.
• Controleer of de moer in de juiste richting gemonteerd is (zie afbeelding blz. 13).
• Er zit geen water meer in het reservoir:
- De hoeveelheid water bij het starten is ontoereikend. Vul het reservoir
opnieuw met 100 ml water en start een nieuwe cyclus op.
- Het apparaat wordt niet warm genoeg: voer één of meerdere ontkalkingscycli
uit.
• Er blijft water in het reservoir staan: de kookcyclus werd onderbroken:
- Start een nieuwe cyclus op en controleer of de arm van de deksel en de kom
goed vergrendeld zijn.
- Neem anders contact op met de After Sales dienst.
KOOKGIDS
Voedingsmiddelen Hoeveelheid water
Groenten Aardappelen* •
Wortelen * •
Witte knolletjes * •
Sperziebonen •
Courgettes •
Prei •
Doperwtjes •
Pompoen •
Bloemkool •
Vlees Rood vlees •
Wit vlees •
Vis •
Fruit Appels •
Peren •
Aardbeien •
Mandarijnen •
Ananas •
Kooktijd ** Circa 12 min. Circa 17 min. Circa 21 min.
* Gesneden in blokjes van 1 cm x 1 cm.
** Gemiddelde kooktijd voor een vol mandje van 300 gr.
1 2 3
100 ml 150 ml 200 ml
Om op te warmen
a
b
c
d
e
f
g
h
i
j
k
l
m
n
o
p
q
De Babycook uit
bij het starten van
een verwarmcyclus
• Het stoomcircuit is wellicht verstopt.
• Schakel de cyclus onmiddellijk uit door op de (
) knop te drukken.
• Open niet de deksel maar wacht tot het apparaat geen stoom meer afgeeft en
tot het uiten ophoudt (circa 10 min.).
• Ontgrendel de arm van de Babycook.
• Controleer of het gat van de komdeksel a en de afdichting
g
niet verstopt zijn.
• Ontstop deze anders.
14

Babycook® Babycook® plus
a
Abnehmbarer Deckel der Schüssel
b
Deckeldichtung
c
Verriegelungsarm
d
Entriegelungsknopf des Arms
e
Anti-Hitze-Bereich
f
Heizbehälter
g
Dichtung / Dampfauslass
h
Bedienknopf
Garen
Mixen
i
Schüssel
j
Garkorb/Korb zum Aufwärmen
k
Schaber
l
Mixdeckel / Smoothielter
m
Mixmesser
n
Messermutter
o
Messerdichtung
p
Stromkabel
q
Schaberfach
a
Abnehmbarer Deckel der Schüssel x2
b
Deckeldichtung x2
c
Verriegelungsarm x2
d
Entriegelungsknopf des Arms x2
e
Anti-Hitze-Bereich x2
f
Heizbehälter x2
g
Dichtung / Dampfauslass x2
h
Bedienknopf
Garen
Mixen
i
Schüssel x2
j
Garkorb/Korb zum Aufwärmen x2
k
Schaber
l
Mixdeckel / Smoothielter x2
m
Mixmesser x2
n
Messermutter x2
o
Messerdichtung x2
p
Stromkabel
q
Schaberfach
LESEN SIE DIESE GEBRAUCHSANWEISUNG VOR DER ERSTEN
DE
VERWENDUNG DES GERÄTS AUFMERKSAM
WICHTIGE SICHERHEITSHINWEISE:
• Falscher Gebrauch des Geräts kann zu Verletzungsrisiken führen: Beachten Sie die Hinweise dieser
Gebrauchsanweisung genau.
• VORSICHT VOR VERBRENNUNGEN - Dieses Gerät produziert zum Garen der Lebensmittel äußerst
heißen Wasserdampf (100°C/212°F).
• Seien Sie vorsichtig, wenn heiße Flüssigkeit in das Gerät geschüttet wird. Durch plötzlich
entweichenden Wasserdampf kann sie herausspritzen.
• Kommen Sie dem Gerät beim Garen nicht zu nahe.
• Öffnen Sie den Deckel nicht, solange der Garvorgang nicht beendet ist (Gefahr von heißen
Wasserspritzern).
• VORSICHT VOR SCHNITTVERLETZUNGEN - Die Messerklingen (m) sind extrem scharf.
• Beachten Sie die Anweisungen zur Demontage der Klinge (bei der Wartung) genau.
• Seien Sie vorsichtig, wenn Sie die Schüssel leeren.
VERWENDUNG:
• Dieses Gerät soll nicht durch Kinder verwendet werden
• Dieses Gerät kann von Personen mit verringerten physischen, sensorischen oder geistigen Fähigkeiten
oder unzureichenden Erfahrungen oder Kenntnissen verwendet werden, wenn sie entsprechend
überwacht werden oder zuvor hinsichtlich des sicheren Gebrauchs des Geräts unterwiesen wurden
und die möglichen Gefahren verstanden haben.
• Dieses Gerät ist für den Hausgebrauch und ähnliche Verwendungszwecke bestimmt wie: Kochnischen
für Personal in Geschäften, Büros und anderer Berufsumgebung, Bauernhöfe, Verwendung durch
Kunden von Hotels, Motels und anderen Unterkünften, Gästezimmern und ähnlichem.
STROMANSCHLUSS:
• Tauchen Sie das Gerät niemals in Wasser.
• Stecken Sie das Gerät vor jeder Montage, Demontage oder Reinigung ab.
• Stecken Sie das Gerät ab, wenn Sie es unbeaufsichtigt lassen.
• Verwenden Sie das Gerät nicht, wenn das Stromkabel beschädigt ist*.
• Stecken Sie das Gerät ab, wenn es nicht richtig funktioniert*.
• Stecken Sie das Gerät ab, wenn es beschädigt wurde (Fallen, Bruch,...)*.
* Kontaktieren Sie umgehend den Kundendienst.
WACHSAMKEIT / KINDER:
• Stellen Sie das Gerät außerhalb und seine elektrische Kabel der Reichweite von Kindern auf.
• Schließen Sie stets den Deckel der Schüssel wieder (Gefahr von Schnittverletzungen durch die
Klingen).
• Die Reinigung des Geräts darf nicht durch ein Kind erfolgen.
• Die Wartung des Geräts darf nicht durch ein Kind erfolgen.
• Lassen Sie kein Kind mit dem Gerät spielen.
15

Wir danken Ihnen und gratulieren Ihnen zu Ihrer Wahl: Sie haben ein Gerät mit einzigartiger Leistung
ERHITZEN und AUFTAUEN
Die zu erwärmenden oder aufzutauenden Lebensmittel werden zuvor in einen geeigneten Behälter
gelegt, der ohne Deckel in den Garkorb gestellt wird. Der Behälter darf den Dampfauslass «
nicht verschließen
Messen Sie je nach zu erhitzender Menge 1 bis 3 Dosiereinheiten Wasser ab, gehen Sie dann wie für
den Garvorgang beschrieben vor.
Wenn das Tonsignal am Ende des Vorgangs ertönt, entnehmen Sie den Behälter mit einem Lappen.
Béaba- Schaber um, um eine homogene Temperatur zu erhalten.
ANMERKUNG: Obwohl es immer vorzuziehen ist, frisches Gemüse und frische Früchte zu verwenden,
deren Vitamingehalt optimal ist, ist es absolut möglich, gefrorenes Gemüse und gefrorene Früchte zu
garen, die zuvor direkt in der Schüssel des BABYCOOK
(Lebensmittel niemals bei Umgebungstemperatur auftauen).
REINIGUNG und INSTANDHALTUNG
Stecken Sie das Gerät vor der Reinigung immer ab.
Es wird empfohlen, die abnehmbaren Teile (Schüssel, Korb, Schaber, Mixdeckel, Deckel, Dichtungen,
Messer usw.) per Hand zu spülen. Diese Teile sind auch spülmaschinenfest. Häuges Waschen in der
Spülmaschine kann aber zu einer vorzeitigen Alterung der Teile führen.
Um das Messer und seine Dichtung zu reinigen, folgen Sie den Anweisungen zum Entfernen und
erneuten Einsetzen:
I
erworben. Der BABYCOOK
Babymahlzeiten entwickelt. Der BABYCOOK® verwendet Dampf, um Lebensmittel zu garen, aufzuwärmen
und aufzutauen. Dabei bewahrt er die Vitamine und mixt perfekt.
®
wurde speziell zur gesunden, einfachen und schnellen Zubereitung von
BEDIENUNGSANLEITUNG
• Starten Sie vor dem 1. Gebrauch einen Garvorgang ohne Lebensmittel mit dem Wasserstand Nr. 3.
Spülen Sie dann die Schüssel aus und waschen Sie das Zubehör mit heißem Wasser.
• Waschen Sie sich sorgfältig die Hände, bevor Sie Produkte und Nahrung für Ihr Baby berühren.
ACHTUNG
• Verwenden Sie das Gerät immer auf einer stabilen und ebenen Fläche.
• Halten Sie das Gerät von Hitzequellen, Kochplatten usw. fern.
• Transportieren Sie das Gerät nicht am Schüsselgriff.
• Starten Sie keinen Garvorgang, wenn sich kein Wasser im Behälter bendet.
• Stellen Sie die Schüssel«
i
» des Babycook nicht in die Mikrowelle.
GARVORGANG
1. Entriegeln Sie den Arm, um an die Schüssel und den Heizbehälter zu gelangen. Abb. 1
2. Schneiden Sie die Lebensmittel in etwa 1 cm x 1 cm große Würfel und geben Sie sie in den Korb. Um
ein homogenes Garen sicherzustellen, raten wir Ihnen, den Korb nicht zu überladen. Abb. 2
3. Die Schüssel besitzt eine Skala von 1 bis 3. Die Skala ermöglicht es, die in den Heizbehälter
zu gebenden Wassermengen zu dosieren und legt die Garzeit fest. Beziehen Sie sich auf den
Kochleitfaden (S. 18). Dosieren Sie das Wasser mit Hilfe der Schüssel entsprechend dem gewählten
Rezept, ohne Zusätze (Salz, Zucker usw.) hinzuzufügen. Abb. 3
4. Geben Sie das Wasser in den Heizbehälter. Abb. 4
5. Stellen Sie den Korb in die Schüssel. Achten Sie dabei darauf, die Lasche des Korbs im Ausgießer
der Schüssel zu platzieren. Abb. 5
6. Verriegeln Sie die Schüssel auf dem Gerät. Abb. 6 und 7
7. Überprüfen Sie, ob die Dichtung des Dampfauslasses « » nicht verstopft ist.
8. Schließen Sie den Deckel der Schüssel, indem Sie fest auf den Arm drücken. Abb. 8
9. Stecken Sie das Gerät an eine Steckdose an. Ein Piepton ist zu hören, das Beaba-Logo und der
Bedienknopf blinken 1 Mal. Abb. 9
10. Drücken Sie auf den Knopf ),um den Garvorgang zu starten. Abb. 10 Das Gerät piepst 1 Mal, das
Beaba-Logo und das Dampfsymbol leuchten auf.
11. Nach dem Garen piepst das Gerät 3 Mal und das Beaba-Logo erlischt. Abb. 11. Das Dampfsymbol
des Knopfs blinkt, bis Sie das Programm durch erneutes Drücken auf den Knopf abschalten. Abb
VORSICHT VOR VERBRENNUNGEN: Drücken Sie auf den Knopf des Arms, um die Schüssel nach
12.
dem Garen zu öffnen; vermeiden Sie dabei, den heißen Deckel zu berühren. Abb. 13
13. Trocknen Sie die Deckelinnenseite ab, um zu vermeiden, dass Kondenswasser in den Behälter tropft.
14. Entfernen Sie den Korb mit dem Schaber. Abb. 14
15. Wenn Sie möchten, können Sie den auf dem Schüsselboden aufgefangenen Garsaft aufbewahren, um ihn
zum Gericht zu geben oder das Mixen zu erleichtern.
Babycook plus : Der Kochvorgang kann gleichzeitig in den beiden Krügen erfolgen. Vergessen Sie nicht
in den rechten Heiztank Wasser zu geben, wenn Sie den rechten Krug benützen und in den Linken wenn
Sie den linken Krug benützen.
Vermeiden Sie es, die beiden Verriegelungsarme gleichzeitig zu öffnen.
Stecken Sie das Gerät an und drücken Sie auf das rechte Dampfsymbol des Knopfes, wenn Sie den
rechten Behälter verwenden, oder auf das linke Dampfsymbol des Knopfes, wenn Sie den linken Behälter
verwenden.
EMPFEHLUNGEN
• Stoppen Sie das Garen nicht während eines Garvorgangs, um zu vermeiden, Wasser im Heizbehälter
zu lassen.
• Verwenden Sie nur Trinkwasser ohne Lebensmittelreste oder andere Zusätze.
• Überprüfen Sie stets die Temperatur der Lebensmittel, bevor Sie sie servieren. Es wird empfohlen, die
Nahrung nicht zu lange zu erhitzen.
MIXVORGANG
1. Cberprüfen Sie, ob die Klinge richtig am Boden der Schüssel mit dem Dichtring und der Mutter
installiert ist.
2. Geben Sie die Lebensmittel des Korbs, nachdem Sie überprüft haben, ob sie richtig gegart sind, in
die Schüssel. Abb. 15 Fügen Sie je nach gewünschter Konsistenz einen Teil des Garsafts hinzu, bevor
Sie zu mixen beginnen.
3. Setzen Sie den Mixdeckel auf die Schüssel. Abb. 16.
4. Schließen Sie den Deckel der Schüssel, indem Sie fest auf den Arm drücken. Abb. 17
5. Stecken Sie das Gerät an und drehen Sie den Knopf (
rechts, bis Sie die gewünschte Konsistenz erhalten. Abb. 18
6. Öffnen Sie den Arm und entfernen Sie den Mixdeckel mit Hilfe des Schabers. Abb. 19 Abb. 20
7. Mischen Sie das Gericht mit dem Schaber. Vermeiden Sie dabei, die Klingen zu berühren und mixen
Sie erneut kurz, wenn dies nötig ist. Abb. 21
Babycook plus : Das Mixen ist nur auf der rechten Geräteseite mit einem der beiden Behälter möglich.
16
) für jeweils maximal 10 Sekunden nach
•
•
•
(
•
•
•

ERHITZEN und AUFTAUEN
• Die zu erwärmenden oder aufzutauenden Lebensmittel werden zuvor in einen geeigneten Behälter
gelegt, der ohne Deckel in den Garkorb gestellt wird. Der Behälter darf den Dampfauslass «
nicht verschließen
• Messen Sie je nach zu erhitzender Menge 1 bis 3 Dosiereinheiten Wasser ab, gehen Sie dann wie für
den Garvorgang beschrieben vor.
• Wenn das Tonsignal am Ende des Vorgangs ertönt, entnehmen Sie den Behälter mit einem Lappen.
(
ACHTUNG Das Restwasser ist nach dem Garen sehr heiß) und rühren Sie den Inhalt mit dem
Béaba- Schaber um, um eine homogene Temperatur zu erhalten.
ANMERKUNG: Obwohl es immer vorzuziehen ist, frisches Gemüse und frische Früchte zu verwenden,
deren Vitamingehalt optimal ist, ist es absolut möglich, gefrorenes Gemüse und gefrorene Früchte zu
garen, die zuvor direkt in der Schüssel des BABYCOOK
®
Solo oder im Kühlschrank aufgetaut werden
(Lebensmittel niemals bei Umgebungstemperatur auftauen).
g
»
REINIGUNG und INSTANDHALTUNG
• Stecken Sie das Gerät vor der Reinigung immer ab.
• Es wird empfohlen, die abnehmbaren Teile (Schüssel, Korb, Schaber, Mixdeckel, Deckel, Dichtungen,
Messer usw.) per Hand zu spülen. Diese Teile sind auch spülmaschinenfest. Häuges Waschen in der
Spülmaschine kann aber zu einer vorzeitigen Alterung der Teile führen.
• Um das Messer und seine Dichtung zu reinigen, folgen Sie den Anweisungen zum Entfernen und
erneuten Einsetzen:
I II III
montage
Demontage
• Um den Deckel und die Dichtung des Deckels zu entfernen:
IV
V
VI
• Reinigen Sie den Gerätekörper mit einem feuchten Schwamm und Spülmittel.
ENTKALKEN
• Das Gerät besitzt einen Betriebszähler, der angibt, wann es entkalkt werden muss (50 Verwendungen).
• Wenn der Dampfknopf (
• Verwenden Sie nur lebensmittelechte Essigessenz oder das Wartungsprodukt von BEABA für den Babycook.
• Verwenden Sie im Behälter niemals chemische Entkalker oder Kaffeemaschinen-Entkalker.
1. Stecken Sie Ihr Gerät aus. Das Entkalken erfolgt kalt ohne Heizvorgang.
2. Geben Sie eine Mischung aus 110 ml Wasser und 110 ml Essigessenz oder das Wartungsprodukt
von BEABA für den Babycook in den Heizbehälter.
3. Lassen Sie es eine komplette Nacht bei offenem Deckel einwirken.
4. Entfernen Sie die Abdeckung des Arms. (Abb. IV)
5. Leeren Sie den Inhalt des Behälters aus, indem Sie das Produkt umdrehen (Abb. VI)
6. Spülen Sie den Behälter mindestens 2 Mal mit klarem Wasser aus und leeren Sie ihn jedes Mal aus.
7. Setzen Sie den Deckel wieder darauf, indem Sie ihn fest auf den Arm klipsen (Abb. IV).
8. Starten Sie einen Heizvorgang mit klarem Wasser im Behälter (Wasserstand 1 = 100 ml) und ohne
Nahrung. Der Dampfgarknopf leuchtet noch rot.
9. Um das Gerät zurückzusetzen, geben Sie erneut Wasser in den Heizbehälter (Wasserstand 1) und
starten Sie einen 2. Heizvorgang. Halten Sie dabei den Dampfknopf einige Sekunden gedrückt. Der
Dampfknopf wird dann weiß.
10. Waschen Sie die Schüssel gut mit klarem Wasser aus, bevor Sie sie erneut verwenden.
11. Je nach Härte des Leitungswassers kann es sein, dass Sie Ihr Gerät entkalken müssen, bevor der
Zähler abgelaufen ist. Siehe (Fragen/Antworten) Tabelle.
12. Sie können den Babycook auch zurücksetzen, ohne ihn zu entkalken. Wir empfehlen Ihnen jedoch
sehr, dies zu tun, da dadurch die Lebensdauer Ihres Geräts verlängert wird.
17
) des Geräts rot wird, muss der Heizbehälter entkalkt werden.

TECHNISCHE DATEN
Tapadera de bol móvil
unta de tapadera
Brazo debloqueo
Botón de desbloqueo del brazo
Zonaanti-calor
Recipiente de calentamientog
Junta Salida/vapor
Botón de mando
Bol
Recipiente de cocción/calentamiento
Espátula
Tapa de mezclas / ltro de batidos
Cuchilla de mezclas
Tuerca cuchillo
Junta chuchillo
Cable eléctrico
Espacio espátula
Spannung / Leistung: Beziehen Sie sich auf das Typenschild unter dem Gerät.
Gebrauchstemperatur: 10 bis 40°C.
FRAGEN / ANTWORTEN
Eine aktuelle und detaillierte Tabelle nden Sie auf der Internetseite von BÉABA
Das Gerät
funktioniert nicht.
Die Schüssel leckt.
Meine Früchte
und mein Gemüse
sind nach dem
Garvorgang nicht
gegart.
• Stellen Sie sicher, dass das Gerät richtig an ein Stromnetz angeschlossen ist.
• Überprüfen Sie, ob die Schüssel auf der Basis und der Arm des Deckels richtig
verriegelt sind.
• Überprüfen Sie, ob die Dichtung des Deckels richtig platziert ist (beziehen Sie sich hierzu
auf den Absatz zum Einsetzen der Deckeldichtung)
• Überprüfen Sie, ob der Deckel richtig auf dem Verriegelungsarm eingerastet ist.
• Überprüfen Sie, ob der Korb richtig in der Schüssel platziert ist.
• Überprüfen Sie, ob die Dichtung richtig auf dem Messer angebracht ist (beziehen Sie
sich
• hierfür auf den Absatz Instandhaltung auf Seite 17)
• Überprüfen Sie den Zustand der Messerdichtung und ersetzen Sie sie, falls erforderlich.
• Überprüfen Sie, ob die Mutter richtig herum montiert ist (siehe Bild Seite 17).
• Es bendet sich kein Wasser mehr im Heizbehälter:
- Die ursprüngliche Wassermenge war zu gering. Füllen Sie den Heizbehälter
erneut mit 100 ml Wasser und starten Sie den Vorgang neu.
- Die Heizleistung sinkt: Entkalken Sie das Gerät einmal oder mehrmals.
• Es bleibt Wasser im Heizbehälter: Der Garvorgang wurde unterbrochen.
- Starten Sie ihn erneut und stellen Sie sicher, dass der Arm des Deckels
sowie die Schüssel richtig verriegelt sind.
- Rufen Sie ansonsten den Kundendienst an.
KOOKGIDS
Nahrungsmittel Anzahl der Dosiermengen Wasser
Gemüse Kartoffeln* •
Karotten* •
Rüben* •
Grüne Bohnen •
Zucchini •
Porree •
Erbsen •
Kürbis •
Blumenkohl •
Rotes Fleisch •
Weißes Fleisch •
Fisch •
Früchte Äpfel •
Birnen •
Erdbeeren •
Mandarinen •
Ananas •
Garzeit ** ca 12 min. ca 17 min. ca 21 min.
* In 1 cm x 1 cm große Würfel geschnitten
** Ungefähre Garzeit für einen Korb mit 300 g
1 2 3
100 ml 150 ml 200 ml
Zum Aufwärmen
a
b
c
d
e
f
g
h
i
j
k
l
m
n
o
p
q
Der Babycook
pfeift zu Beginn
des Heizvorgangs.
• Der Dampfkreislauf kann verstopft sein.
• Schalten Sie das Gerät sofort ab, indem Sie auf den Knopf ( ) drücken.
• Öffnen Sie den Deckel nicht. Warten Sie, bis das Gerät keinen Dampf mehr
produziert, bis es nicht mehr pfeift (etwa 10 Min.).
• Entriegeln Sie den Arm des Babycook.
• Überprüfen Sie, ob das Loch des Schüsseldeckels «
g
» verstopft sind
a
» und die Dichtung «
• Entfernen Sie gegebenenfalls die Verstopfung.
18

Babycook® Babycook® plus
a
Tapadera de bol móvil
b
unta de tapadera
c
Brazo debloqueo
d
Botón de desbloqueo del brazo
e
Zonaanti-calor
f
Recipiente de calentamientog
g
Junta Salida/vapor
h
Botón de mando
Cocción
mezcla
i
Bol
j
Recipiente de cocción/calentamiento
k
Espátula
l
Tapa de mezclas / ltro de batidos
m
Cuchilla de mezclas
n
Tuerca cuchillo
o
Junta chuchillo
p
Cable eléctrico
q
Espacio espátula
a
Tapadera de bol móvil x2
b
unta de tapadera x2
c
Brazo debloqueo x2
d
Botón de desbloqueo del brazo x2
e
Zonaanti-calor x2
f
Recipiente de calentamientog x2
g
Junta Salida/vapor x2
h
Botón de mando
Cocción
mezcla
i
Bol x2
j
Recipiente de cocción/calentamiento x2
k
Espátula
l
Tapa de mezclas / ltro de batidos x2
m
Cuchilla de mezclas x2
n
Tuerca cuchillo x2
o
Junta chuchillo x2
p
Cable eléctrico
q
Espacio espátula
ES
LEA ATENTAMENTE ESTE FOLLETO DE INSTRUCCIONES
ANTES DE UTILIZAR POR PRIMERA VEZ EL APARATO
CONSIGNAS DE SEGURIDAD / IMPORTANTE:
• Unmal uso del aparato puede acarrear riesgos de lesiones:siga escrupulosamente las consignas
indicadas.
• CUIDADO, PELIGRO DE QUEMADURAS–Este aparato genera un vapor de agua muy caliente
(100°C/212°F)para cocer los alimentos.
• Tenga cuidado si cae un líquido caliente en el aparato ya que se podría deber a una salida repentina
de vapor de agua.
• No se aproxime demasiado al aparato durante la cocción.
• No abra la tapadera hasta que termine el ciclo de cocción (peligro de proyección de agua caliente).
• CUIDADO,PELIGRO DE CORTE-Lashojas de la cuchilla(m)son muy cortantes.
• Siga rigurosamente las instrucciones de desmontaje de la cuchilla (mantenimiento)
• Esté atento(a) cuando vacíe el bol
USO :
• Esta Aplicación no será usada por niños
• Este aparto es apto para ser utilizado personas con capacidades físicas, sensoriales o mentales
reducidas o sin experiencia o conocimiento, siempre que estén bien vigiladas o si se les dan
instrucciones relativas al uso del aparato con total seguridad.
• Este aparato se puede utilizar en aplicaciones domésticas y análogas como rincones de cocina
reservadas al personal en tiendas, ocinas, otras áreas profesionales, granjas, utilización por clientes
de hoteles, moteles y otras áreas de carácter residencial, tipo habitaciones de hotel.
CONEXIÓN ELÉCTRICA:
• No sumerja nunca el aparatoen agua.
• Desenchufeel aparato antes de cada montaje, desmontaje o limpieza.
• Desenchufeel aparato silo va a dejar sin vigilar
• No utilice el aparato si el cable de alimentación está dañado*.
• Desenchufeel aparato si no funciona correctamente.*
• Desenchufeel aparato si se ha dañado (caída,rotura,…)*
* póngase inmediatamente en contacto con el Servicio Post-Venta
VIGILANCIA/NIÑOS:
• Ponga el aparato y su cable eléctrico fuera del alcance de los niños
• Cierre sistemáticamente la tapadera delbol(peligro de cortarse con las cuchillas).
• Los niños no deben limpiar el aparato.
• Los niños no se deben ocupar del mantenimiento del aparato.
• No deje que los niños jueguen con el aparato.
19

Le agradecemos su elección y le felicitamos por ella:acaba de adquirir un aparato de prestaciones
CALENTAMIENTO y DESCONGELACIÓN
Los alimentos a calentar o descongelar se deberán poner previamente en un recipiente adaptado
metido destapado en la cesta de cocción. El recipiente no deberá obstruir la salida de vapor la junta
de salida de vapor «
Dosique de1a3medidasde agua dependiendo de la cantidad a calentar y proceda igual que en el
ciclo de cocción.
Cuando suele la señal al nal del ciclo, saque el recipiente con un trapo (
está muy caliente al nal de la cocción) y agite el contenido con la espátula Béaba para conseguir una
temperatura homogénea.
NOTA: Aunque siempre sea mejor utilizar fruta y verdura frescas con un aporte óptimo de vitamina,
también se puede cocer fruta y verdura congelada, después de descongelarla directamente en el bol
del BABYCOOK
LIMPIEZA y MANTENIMIENTO
Desenchufe siempre el aparato antes de limpiarlo.
Se recomienda lavar a mano las parte desmontables:bol,cesta,espátula, tapadera de mezcla, tapadera,
juntas, cuchilla…Esos elementos también se pueden meter en el lavavajillas.La utilización prologada
del lava-vajillas puede provocar un envejecimiento acelerado de los elementos.
Para limpiar la cuchilla y su junta, siga las instrucciones de desmontaje y montaje:
I
únicas. El BABYCOOK
comidas de su bebé. BABYCOOK® cuece, calienta y descongela los alimentos al vapor conservando sus
vitaminas y garantiza una mezcla perfecta.
®
ha sido diseñado especícamente para preparar de forma sana, fácil y rápidalas
MODO DE EMPLEO
• En la 1ª utilización, lance un ciclo de cocción sin alimentos con el nivel de agua N°3,aclare el bol y lave
los accesorios con agua caliente.
• Lávese bien las manos antes de manipular los productos y alimentos destinados al bebé.
CUIDADO
• Utilice siempre el aparato sobre una supercie sólida y plana.
• No ponga el aparato cerca de una fuente de calor, placa de cocción…
• Notransporte el aparato cogiéndolo del asa del bol.
• No lance un ciclo de cocción sin agua en el recipiente.
• No meta el bol «
i
» del babycook dentro del microondas.
CICLO DE COCCIÓN
1. Desbloquee el brazo para acceder al bol y al recipiente de calentamiento.Fig1
2. Cortelosalimentosencuadraditos de aproximadamente1 x1cmy métalos en la cesta.
Paragarantizarunacocción homogénea se recomienda no cargar en exceso la cesta.Fig2
3. El bol incluye unas marcas graduadas del 1 al 3. Esas marcas permiten dosicar las cantidades de
agua a echar en el recipiente de calentamiento y determinan los tiempos de cocción. Consulte la
guía de cocción (p22).Dosique el agua utilizando el bol en función de la receta elegida sin añadir
aditivos (sal, azúcar…)Fig3
4. Vierta agua en el recipiente.Fig4
5. Meta el recipiente en el bol teniendo cuidado en colocar la lengüeta de la cesta en el pitorro de
salida del bol.Fig5
6. Bloquee el bol en el aparato. Fig 6 y 7.
7. Compruebe que la junta de salda «
8. Cierre la tapadera del bol pulsando con fuerza en el brazo.Fig8
9. Enchufe el aparato en una toma. Suena un Bip, el logotipo Beaba y el botón de mando parpadean.
Fig 9
10. Pulse el botón (
y el símbolo de vapor se encienden.
11. Al nal de la cocción, el aparato emite 3 BIP y el logotipo Beaba se apaga. Fig. 11, el símbolo del
botón de vapor parpadea hasta que se para el ciclo pulsando otra vez el botón. Fig. 12.
)para lanzar el ciclo de cocción.Fig10.El aparato emite un Bip, el logotipo Beaba
g
» de vapor no está obstruida
CUIDADO. RIESGO DE QUEMADURAS, para abrir el bol después de la cocción, pulse el botón del
12.
brazo evitando tocar la tapadera que está caliente.Fig13
13. Seque la cara interior de la tapadera para evitar que el agua de condensación caiga en el recipiente.
14. Saque la cesta utilizando la espátula.Fig14
15. Si lo desea, reserve el agua de cocción recuperada en el fondo del bol para añadirla a la preparación
o facilitar la mezcla.
Babycook plus : La cocción se realizar hacer simultáneamente en los 2 boles. No olvide llenar la cubeta
de la derecha si utiliza el bol de la derecha y la cubeta de la izquierda si utiliza el bol de la izquierda.
Evite que los 2 brazos de cierre automático se abran al mismo tiempo.
Enchufar el aparato y pulsar el símbolo vapor derecho si utiliza la jarra derecha o el símbolo vapor
izquierdo del mando si utiliza la jarra izquierda.
RECOMENDACIONES
• No detenga la cocción durante el ciclo para evitar que quede agua en el recipiente de calentamiento.
• Vierta únicamente agua apta para el consumo y sin residuos alimenticios u otros.
• Compruebe siempre la temperatura de los alimentos antes deservir.
• Se recomienda no calentar la comida durante un período demasiado largo.
CICLO DE MEZCLA
1. Compruebe que la cuchilla está bien instalada en el fondo del bol con la junta y la tuerca.
2. Después de comprobar que al agua hierve, eche los alimentos de la cesta en el bol Fig15. Según su
consistencia deseada, añada parte del agua de cocción antes de lanzar el ciclo.
3. Ponga la tapadera de mezcla en el bol Fig 16
4. Cierre la tapadera del bol pulsando con fuerza en el brazoFig17
5. Enchufe el aparato y gire el botón (
hasta obtener la consistencia deseada. Fig18
6. Abra el brazo y retire la tapadera de mezcla utilizando la espátula Fig 19, g 20
7. Mezcle la comida con la espátula evitando tocar las cuchillas y repita un impulso de mezcla si resulta
necesario.Fig 21
Babycook plus : La mezcla se hace exclusivamente en la parte derecha del aparato, con uno de los 2
boles.
20
) hacia la derecha por impulsos de un máximo de 10 segundos
•
•
•
•
•
•
•

CALENTAMIENTO y DESCONGELACIÓN
• Los alimentos a calentar o descongelar se deberán poner previamente en un recipiente adaptado
metido destapado en la cesta de cocción. El recipiente no deberá obstruir la salida de vapor la junta
g
de salida de vapor «
»
• Dosique de1a3medidasde agua dependiendo de la cantidad a calentar y proceda igual que en el
ciclo de cocción.
• Cuando suele la señal al nal del ciclo, saque el recipiente con un trapo (
CUIDADO agua residual
está muy caliente al nal de la cocción) y agite el contenido con la espátula Béaba para conseguir una
temperatura homogénea.
• NOTA: Aunque siempre sea mejor utilizar fruta y verdura frescas con un aporte óptimo de vitamina,
también se puede cocer fruta y verdura congelada, después de descongelarla directamente en el bol
del BABYCOOK
®
Solo en la nevera (no descongele nunca alimentos a temperatura ambiente).
LIMPIEZA y MANTENIMIENTO
• Desenchufe siempre el aparato antes de limpiarlo.
• Se recomienda lavar a mano las parte desmontables:bol,cesta,espátula, tapadera de mezcla, tapadera,
juntas, cuchilla…Esos elementos también se pueden meter en el lavavajillas.La utilización prologada
del lava-vajillas puede provocar un envejecimiento acelerado de los elementos.
• Para limpiar la cuchilla y su junta, siga las instrucciones de desmontaje y montaje:
I II III
Assembly
Dismantling
• Para desmontar la tapadera y la junta de la tapadera:
IV
V
VI
• Limpie el cuerpo de los aparatos con una esponja mojada y producto para limpiar vajillas.
DESCALCIFICACION
El aparto dispone de un contador de ciclos que indica cuándo hay que descalcicar el producto (50 ciclos).
• Cuando el botón de vapor (
• Utilice únicamente vinagre de alcohol alimentario o el producto de mantenimiento BEABA para Babycook.
• No utilice nunca en el recipiente un descalcicador químico o un descalcicador de cafetera.
1. Desenchufe el aparato, la descalcicación se realiza en frío sin ciclo de calentamiento.
2. Eche en el recipiente una mezclade110mlde agua y110mldevinagrede alcoholo el producto de
mantenimiento BEABA para Babycook en el recipiente.
3. Deje reposar una noche entera con la tapadera abierta.
4. Retire la tapadera del brazo (Fig. IV)
5. Vacíe el contenido del recipiente dando la vuelta al producto (Fig. VI).
6. Aclare el recipiente con agua limpia al menos 2 veces vaciando el contenido.
7. Vuelva a poner la tapadera sujetándolo bien en el brazo (Fig. IV).
8. Lance1ciclo de calentamiento con agua limpia en el recipiente (nivel1=100ml)sin alimentos. El
botón de cocción se volverá a encender con luz roja.
9. Para reiniciar el aparato, vuelva a echar agua el recipiente (nivel 1) y lance un 2º ciclo de calentamiento
manteniendo pulsado unos segundos el botón de vapor. El botón de vapor se pone otra vez blanco.
10. Aclare bien elbolcon agua limpia antes de volver a utilizarlo.
11. Enfunción de la naturaleza del agua del grifo, tendrá que descalcicar el aparato antes de la fecha
indicada. Véase tabla (preguntas/respuestas).
12. También puede reiniciar el Babycook sin hacer una descalcicación. No obstante, le recomendamos
encarecidamente que lo realice ya que así prolongará la vida de su aparato.
) del aparato se ilumine en rojo, es necesario descalcicar el recipiente.
21

FICHA TÉCNICA
Coperchio della ciotola rimovibile
Giunto del coperchio
Braccio di chiusura
Pulsante di sblocco del braccio
Zona anti-calore
Serbatoio di riscaldamento
Joint/steam outlet
Pulsante di comando
Ciotola
Cestello di cottura/riscaldo
Spatola
Opercolo di miscelazione / ltro per smoothie
Coltello di miscelazione
Dado coltello
Giunto coltello
Cavo elettrico
Contenitore spatola
Tensión / Potencia: Véase la placa de características técnicas que hay debajo del aparato.
Temperaturade utilización: de 10 a 40°C.
PREGUNTAS / RESPUESTAS
En la página web de BEABA encontrará una tabla actualizada y detallada.
El producto
no funciona
Elbolpierde agua
La fruta y verdura
no está cocida al
terminar el ciclo
El Babycook emite
silbidos al principio
del ciclo de
calentamiento.
• Asegúrese de que el aparato está conectado correctamente a la red eléctrica.
• Compruebe que elbolestá jado a la base y que el brazo de la tapa está bien
bloqueado.
• Compruebe que la junta de la tapadera está bien colocada (lea el apartado
sobre la instalación de la junta en la tapadera)
• Compruebe que la tapadera está bien enganchada al brazo de bloqueo
• Compruebe quela cesta está bien instalada en el bol
• Compruebe elmontajede la junta en la cuchilla (lea el apartado Mantenimiento
página 21)
• Compruebe el estado de la junta de la cuchilla y cámbielo si hace falta.
• Compruebe que la tuerca está montada en la dirección correcta(véase
pictograma página 21).
• No queda agua en el recipiente:
- Lacantidad inicial de agua es demasiado escasa. Vuelva a llenar el recipiente
con 100mlde agua y lance otro ciclo.
- Las prestaciones de calentamiento disminuyen: lance uno o más ciclos de
descalcicación.
• Queda agua en el recipiente:se interrumpe el ciclo de cocción:
- Vuelva a lanzar un ciclo asegurándose de que el brazo de la tapadera está
bien bloqueado.
- En caso contrario, llame al SAV
• Elcircuitodevapor puede estar taponado.
• Detenga inmediatamente el ciclo pulsando el botón (
).
• No abra la tapadera y espere hasta que el aparato deje de soltar vapor y de
emitir silbidos (unos10mn).
• Desbloquee el brazo del Babycook.
• Compruebe que el agujero de la tapadera del bol
a
y la junta
taponados
• En caso contrario, destapónelas.
g
no estén
GUÍA DE COCCIÓN
Alimentos Número de dosis de agua
Verdura Patatas* •
Zanahorias** •
Nabos** •
Judías verdes •
Calabacines •
Puerros •
Guisantes •
Calabaza •
Colior •
Carne roja •
Blanca •
Pescado •
Fruta Manzanas •
Peras •
Fresas •
Mandarinas •
Piña •
Tiempo de cocción ** unos 12 min unos 17 min unos 21 min
* Cortar en cuadraditos.de 1 x 1 cm
** Tiempo de cocción aproximado para una cesta llena de 300 gr.
22
1 2 3
100 ml 150 ml 200 ml
Para el calentamiento
a
b
c
d
e
f
g
h
i
j
k
l
m
n
o
p
q
Babycook® Babycook® plus
a
Coperchio della ciotola rimovibile
b
Giunto del coperchio
c
Braccio di chiusura
d
Pulsante di sblocco del braccio
e
Zona anti-calore
f
Serbatoio di riscaldamento
g
Joint/steam outlet
h
Pulsante di comando
Cottura
Miscela
i
Ciotola
j
Cestello di cottura/riscaldo
k
Spatola
l
Opercolo di miscelazione / ltro per smoothie
m
Coltello di miscelazione
n
Dado coltello
o
Giunto coltello
p
Cavo elettrico
q
Contenitore spatola
a
Coperchio della ciotola rimovibile x2
b
Giunto del coperchio x2
c
Braccio di chiusura x2
d
Pulsante di sblocco del braccio x2
e
Zona anti-calore x2
f
Serbatoio di riscaldamento x2
g
Joint/steam outlet x2
h
Pulsante di comando
Cottura
Miscela
i
Ciotola x2
j
Cestello di cottura/riscaldo x2
k
Spatola
l
Opercolo di miscelazione /
ltro per smoothie x2
m
Coltello di miscelazione x2
n
Dado coltello x2
o
Giunto coltello x2
p
Cavo elettrico
q
Contenitore spatola
LEGGERE ATTENTAMENTE LE ISTRUZIONI DI QUESTO MANUALE
IT
PRIMA DI UTILIZZARE PER LA PRIMA VOLTA QUESTO APPARECCHIO
ISTRUZIONI DI SICUREZZA / IMPORTANTI:
• Un uso scorretto dell’apparecchio può comportare rischi di ferite: rispettare scrupolosamente le
istruzioni del presente manuale.
• ATTENZIONE, RISCHIO DI USTIONE - Questo apparecchio genera un vapore acqueo molto caldo
(100°C/212°F) per cuocere gli alimenti.
• Fare attenzione se un liquido caldo è versato nell’apparecchio perché esso può fuoriuscire a causa di
un’improvvisa emissione di vapore acqueo.
• Non avvicinarsi all’apparecchio durante la cottura.
• Non aprire il coperchio no a quando il ciclo di cottura non è terminato (rischio di proiezione di acqua calda).
• ATTENZIONE, RISCHIO DI FERITE DA TAGLIO - Le lame del coltello (m) sono estremamente aflate.
• Rispettare rigorosamente le istruzioni di smontaggio della lama (pulizia)
• Prestare attenzione durante lo svuotamento della ciotola.
USO :
• Questo Apparecchio non sarà usato da bambini
• Questo apparecchio può essere utilizzato da persone aventi capacità siche, sensoriali o mentali ridotte
o prive di esperienza o di conoscenza, se questi ultimi (ultime) sono correttamente sorvegliati(e) o se
delle istruzioni relative all’utilizzo dell’apparecchio in tutta sicurezza sono state loro fornite e se i rischi
corsi sono stati compresi.
• Questo apparecchio è destinato a essere utilizzato in applicazioni domestiche e analoghe come:
angoli cucina riservati al personale all’interno di negozi, ufci, altri ambienti professionali, aziende
agricole, utilizzo da parte di clienti di hotel, motel e altri ambienti a carattere residenziale, ambienti
del tipo camere in aftto.
COLLEGAMENTO ELETTRICO:
• Non immergere per nessun motivo l’apparecchio nell’acqua.
• Scollegare l’apparecchio prima di qualsiasi montaggio, smontaggio o pulizia.
• Scollegare l’apparecchio se lo si lascia incustodito
• Non utilizzare l’apparecchio se il cavo di alimentazione è danneggiato*.
• Scollegare l’apparecchio se quest’ultimo non funziona correttamente*
• Scollegare l’apparecchio se è stato danneggiato (caduta, rottura ecc...)*.
* contattare immediatamente il Servizio Post-Vendita
VIGILANZA / BAMBINI:
• Posizionare l’apparecchio e il suo cavo elettrico al di fuori della portata dei bambini
• Chiudere sistematicamente il coperchio del recipiente (rischio di taglio con le lame).
• La pulizia dell’apparecchio non deve essere effettuata da un bambino.
• La manutenzione dell’apparecchio non deve essere effettuata da un bambino.
• Non lasciare che un bambino giochi con l’apparecchio.
23

Vi ringraziamo e vi facciamo le congratulazioni per la vostra scelta: avete acquistato un apparecchio
RISCALDAMENTO E SCONGELAMENTO
Gli alimenti da scaldare o da scongelare saranno preventivamente disposti all’interno del recipiente
adatto posizionato senza coperchio all’interno del cestello di cottura. Il recipiente non deve ostruire
l’uscita del vapore «
Dosare da 1 a 3 misurini a seconda della quantità da scaldare quindi procedere come per il ciclo di
cottura.
Quando si sente un segnale sonoro alla ne del ciclo, estrarre il recipiente con l’aiuta di un panno (
della spatola Beaba per ottenete una temperatura omogenea.
NOTA: Benché sia sempre preferibile utilizzare delle verdure e della frutta freschi il cui apporto in vitamine
è ottimale, è tuttavia possibile cuocere verdura e frutta surgelate, previamente scongelate direttamente
all’interno del recipiente del BABYCOOK
temperatura ambiente).
PULIZIA e MANUTENZIONE
Scollegare sempre l’apparecchio prima di procedere alla sua pulizia.
Si raccomanda di lavare a mano le parti smontabili: recipiente, cestello, spatola, opercolo di
miscelazione, coperchio, giunti, coltello ... Questi elementi possono ugualmente essere lavati in
lavastoviglie. L’utilizzo prolungato della lavastoviglie può provocare un invecchiamento accelerato degli
elementi.
Per pulire il coltello e il suo giunto, seguire le istruzioni di smontaggio e rimontaggio:
I
dalle performance uniche. Il BABYCOOK
semplice e rapido i pasti del vostro neonato. BABYCOOK® cuoce, riscalda e scongela gli alimenti a vapore
preservando le loro vitamine e garantisce una miscelazione perfetta.
®
è stato appositamente concepito per preparare in modo sano,
MODO D’USO
• Per il primo utilizzo, lanciare un ciclo di cottura senza alimenti con il livello dell’acqua N.3, quindi
sciacquare il recipiente e lavare gli accessori con acqua calda.
• Lavarsi bene le mani prima di manipolare i prodotti e gli alimenti destinati al vostro bambino.
ATTENZIONE
• Utilizzare sempre l’apparecchio su una supercie solida e piana.
• Non posizionare l’apparecchio vicino a una fonte di calore, piastre di cottura...
• Non trasportare l’apparecchio con l’aiuto del manico del recipiente.
• Non lanciare un ciclo di cottura senza acqua all’interno della vaschetta.
• Non mettere il recipiente «
i
» del babycook all’interno del forno a microonde.
CICLO DI COTTURA
1. Sbloccare il braccio per accedere al recipiente e alla vaschetta di riscaldamento. Fig 1
2. Tagliare gli alimenti in dadini di circa 1cm x 1cm e posizionarli nel cestello. Per garantire una cottura
omogenea, si consiglia di non sovraccaricare il cestello. Fig 2
3. Il recipiente è dotato di graduazioni identicate con numeri da 1 a 3. Queste graduazioni consentono
di dosare le quantità di acqua da mettere nella vaschetta di riscaldamento e determinano i tempi
di cottura. Fare riferimento alla guida di cottura (p 26). Dosare l’acqua con l’aiuto del recipiente
selezionato senza aggiungere additivi (sale, zucchero...) Fig. 3
4. Versare l’acqua nella vaschetta. Fig 4
5. Posizionare il cestello nel recipiente prestando attenzione a posizionare la linguetta del cestello nel
becco del beccuccio del recipiente. Fig 5
6. Agganciare il recipiente sull’apparecchio 6 e 7
7. Vericare che il giunto di uscita vapore «
8. Chiudere il coperchio del recipiente premendo con forza sul braccio. Fig 8
9. Collegare l’apparecchio a una presa elettrica. Si sente un «bip», il logo Beaba e il pulsante di
comando lampeggiano una volta. Fig 9
10. Premere il pulsante (
Beaba e il simbolo del vapore si illuminano.
11. Al termine della cottura, l’apparecchio emette un BIP per 3 volte e il logo Beaba si spegne g 11, il
simbolo vapore del pulsante lampeggia no all’arresto del ciclo che si realizzerà premendo di nuovo
sul pulsante. Fig 12
) per lanciare il ciclo di cottura. Fig 10 L’apparecchio emette un «Bip», il logo
g
» non sia ostruito
ATTENZIONE, RISCHIO DI USTIONE, per aprire il recipiente dopo la cottura, premere il pulsante
12.
del braccio evitando di toccare il coperchio che è molto caldo. Fig 13
13. Asciugare l’interno del coperchio per evitare che l’acqua di condensa cada all’interno della vaschetta.
14. Estrarre il cestello con l’aiuto della spatola. Fig 14
15. Mettere da parte, se lo si desidera, il sugo di cottura recuperato nel fondo del recipiente per integrarlo
alla preparazione o facilitare la miscelazione.
Babycook plus : La cottura può essere eseguita contemporaneamente nei 2 bicchieri. Provvedete a riempire
la vaschetta di destra se usate il bicchiere destro e la vaschetta di sinistra se usate il bicchiere sinistro.
Evitare di aprire contemporaneamente i 2 braccetti di blocco.
Collegare l’apparecchio e premere sul simbolo vapore destro del pulsante se usate il bicchiere destro o
sul simbolo vapore sinistro del pulsante se usate il bicchiere sinistro.
RACCOMANDAZIONI
• Non arrestare la cottura mentre il ciclo è in corso per evitare di lasciare dell’acqua nel serbatoio di
riscaldamento.
• Versare solo acqua idonea al consumo e senza residui alimentari o di altro tipo.
• Vericare sempre la temperatura degli alimenti prima di servirli.
• Si raccomanda di non scaldare gli alimenti per un periodo di tempo troppo lungo.
CICLO DI MISCELAZIONE
1. Vericare che la lama sia correttamente installata sul fondo del recipiente con il giunto e il dado.
2. Dopo la verica della cottura, versare gli alimenti del cestello all’interno del recipiente Fig. 15
Secondo la consistenza Secondo la consistenza desiderata, aggiungere una parte di sugo di cottura
prima di lanciare il ciclo.
3. Posizionare l’opercolo di miscelazione sul recipiente Fig. 16
4. Chiudere il coperchio del recipiente premendo con forza sul braccio Fig. 17
5. Collegare l’apparecchio e ruotare il pulsante (
massimo, no a ottenere la consistenza desiderata. Fig 18
6. Aprire il braccio e rimuovere il coperchio di miscelazione con l’aiuto della spatola g. 19 e g. 20.
7. Miscelare la preparazione con la spatola evitando di toccare le lame e ripetere un impulso di
miscelazione in caso di necessità. g. 21
Babycook plus : La frullatura può essere fatta esclusivamente nel vano destro dell’apparecchio, con uno
dei 2 bicchieri.
24
) sulla destra mediante impulsi di 10 secondo
•
•
•
•
•
•
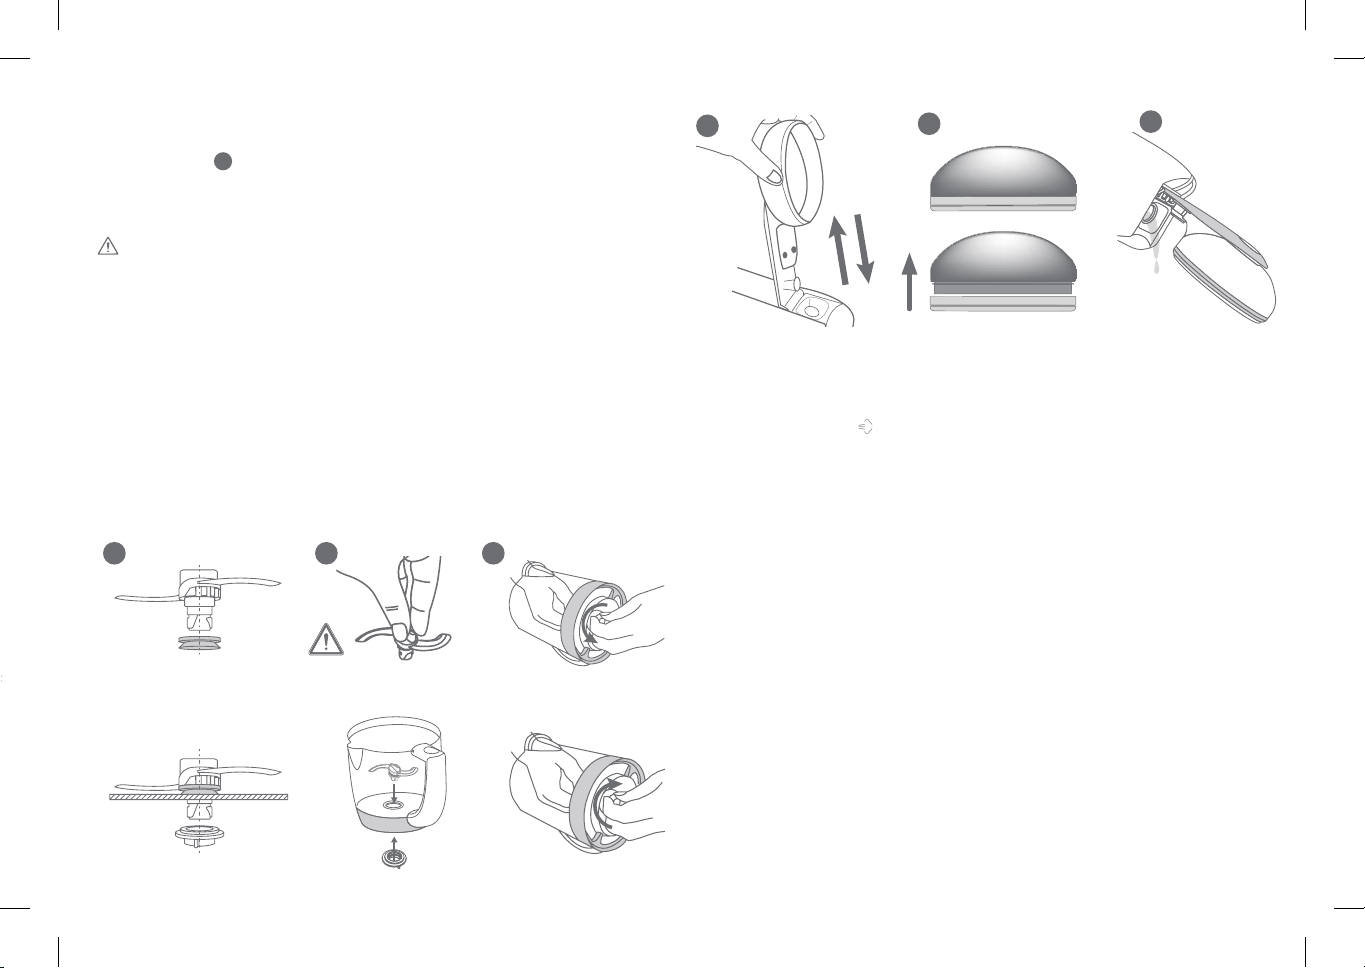
RISCALDAMENTO E SCONGELAMENTO
• Gli alimenti da scaldare o da scongelare saranno preventivamente disposti all’interno del recipiente
adatto posizionato senza coperchio all’interno del cestello di cottura. Il recipiente non deve ostruire
g
l’uscita del vapore «
»
• Dosare da 1 a 3 misurini a seconda della quantità da scaldare quindi procedere come per il ciclo di
cottura.
• Quando si sente un segnale sonoro alla ne del ciclo, estrarre il recipiente con l’aiuta di un panno (
CAUTION l’acqua residua è molto calda alla ne della cottura) e mescolare il contenuto con l’aiuto
della spatola Beaba per ottenete una temperatura omogenea.
NOTA: Benché sia sempre preferibile utilizzare delle verdure e della frutta freschi il cui apporto in vitamine
è ottimale, è tuttavia possibile cuocere verdura e frutta surgelate, previamente scongelate direttamente
all’interno del recipiente del BABYCOOK
®
Solo o nel frigorifero (non scongelare mai degli alimenti a
temperatura ambiente).
PULIZIA e MANUTENZIONE
• Scollegare sempre l’apparecchio prima di procedere alla sua pulizia.
• Si raccomanda di lavare a mano le parti smontabili: recipiente, cestello, spatola, opercolo di
miscelazione, coperchio, giunti, coltello ... Questi elementi possono ugualmente essere lavati in
lavastoviglie. L’utilizzo prolungato della lavastoviglie può provocare un invecchiamento accelerato degli
elementi.
• Per pulire il coltello e il suo giunto, seguire le istruzioni di smontaggio e rimontaggio:
I II III
Montaggio
Smontaggio
• Per smontare il coperchio e il giunto del coperchio:
IV
V
VI
• Pulire il corpo dell’apparecchio con una spugna umida e detergente per stoviglie.
DISINCROSTAZIONE
L’apparecchio è dotato di un conta-cicli che indica quando occorre disincrostare il vostro prodotto (50 cicli).
• Quando il pulsante vapore ( ) dell’apparecchio diventa rosso, è necessario disincrostare la vaschetta.
• Utilizzare esclusivamente dell’aceto di alcol alimentare o il prodotto di pulizia BEABA per Babycook.
• Non utilizzare mai un disincrostante chimico o un disincrostante per caffettiera all’interno della vaschetta.
1. Scollegare l’apparecchio, la disincrostazione si esegue a freddo senza ciclo di riscaldamento.
2. Versare una miscela di 110 ml di acqua e 110 ml di aceto di alcol o il prodotto di pulizia BEABA per
Babycook all’interno della vaschetta.
3. Lasciare riposare una notte completa con il coperchio aperto.
4. Rimuovere il coperchio dal braccio (Fg. IV)
5. Svuotare il contenuto della vaschetta rovesciando il prodotto (Fig VI)
6. Sciacquare con acqua di rubinetto la vaschetta almeno 2 volte svuotando ogni volta il suo contenuto.
7. Riposizionare il coperchio agganciandolo saldamente sul braccio (Fig. IV)
8. Lanciare 1 ciclo di riscaldamento con acqua pulita nella vaschetta (livello 1 = 100 ml) senza alimenti.
Il pulsante di cottura a vapore si accenderà diventando rosso.
9. Per reinizializzare l’apparecchio, rimettere dell’acqua nella vaschetta (livello 1) e lanciare un 2° ciclo
di riscaldamento tenendo premuto per qualche secondo il pulsante vapore. Il pulsante vapore torna
di colore bianco.
10. Sciacquare bene il recipiente con acqua corrente prima di un nuovo utilizzo.
11. In funzione della natura dell’acqua di rubinetto, potreste dover disincrostare il vostro apparecchio
prima della ne del conteggio. Vedere tabella (domanda/risposta).
12. Potete anche reinizialzizare il Babycook senza effettuare la disincrostazione. Tuttavia vi raccomandiamo
vivamente di effettuarla in quanto consente di prolugare la vita del vostro apparecchio.
25

INFORMAZIONI TECNICHE
Крышка съемной чаши
Уплотнитель крышки
Фиксатор
Кнопка разблокировки фиксатора
Зона предотвращения перегревания
Нагревательная емкость
Уплотнитель / выпуск пара
Кнопка управления
Чаша
Контейнер для приготовления/разогревания
Лопатка
Заслонка для смешивания / фильтр для смузи
Нож для смешивания
Гайка ножа
Уплотнитель ножа
Электрический шнур
Фиксатор для хранения
Tensione / Potenza: Fare riferimento alla targhetta identicativa che si trova sotto l’apparecchio.
Temperatura d’esercizio: da 10 a 40°C.
DOMANDE / RISPOSTE
Una tabella aggiornata è presente sul suto Internet di BÉABA
Il prodotto non
funziona
Il recipiente perde
La mia frutta e
verdura non è
cotta alla ne del
ciclo
Il Babycook schia
all’avvio del ciclo di
riscaldamento.
• Accertarsi che l’apparecchio sia correttamente collegato a una rete elettrica.
• Vericare che il recipiente sia agganciato sulla base e che il braccio del coperchio
sia ben chiuso.
• Vericare che il giunto del coperchio sia ben posizionato (fare riferimento al
paragrafo sull’installazione del giunto sul coperchio)
• Vericare che il coperchio sia correttamente agganciato sul braccio di chiusura
• Vericare che il cestello sia correttamente posizionato all’interno del recipiente
• Vericare il montaggio del giunto sul coltello (fare riferimento al paragrafo
Manutenzione pagina 25)
• Vericare lo stato del giunto del coltello e sostituirlo se necessario.
• Vericare che il dado sia montato nel senso corretto (vedere pittogramma pagina 25).
• Non c’è acqua nella vaschetta:
- La quantità di acqua iniziale era insufciente. Riempire di nuovo la vaschetta
con 100 cl di acqua e rilanciare un ciclo.
- Le performance di riscaldamento diminuiscono: lanciare uno o più cicli di
disincrostazione
• Rimane dell’acqua all’interno della vaschetta: il ciclo di cottura si è interrotto:
- Rilanciare un ciclo accertandosi che il braccio del coperchio e il recipiente
siano ben agganciati in posizione
- In caso contrario contattare il SAV
• Il circuito del vapore potrebbe essere ostruito.
• Arrestare immediatamente il ciclo premendo il pulsante (
).
• Non aprire il coperchio e attendere che l’apparecchio non emetta più vapore,
che non vi sia più alcun sibilo (circa 10 min).
• Sbloccare il braccio del Babycook
• Vericare che il foro del coperchio del recipiente
a
e il giunto
g
• In caso contrario, rimuovere l’ostruzione.
GUIDA DI COTTURA
Alimenti Numero di dosi di acqua
Verdure Patate* •
Carote* •
Navoni* •
Fagiolini •
Zucchine •
Porri •
Piselli •
Zucca •
Cavolore •
Carni Rosse •
Bianche •
Pesce •
Frutta Mele •
Pere •
Fragole •
Mandarini •
Ananas •
Tempi di cottura** circa 12 min circa 17 min circa 21 min
* Tagliati in pezzetti di 1 cm x 1 cm
* Tempi di cottura approssimativi per un cestello pieno di 300 gr.
1 2 3
100 ml 150 ml 200 ml
Per il riscaldamento
a
b
c
d
e
f
g
h
i
j
k
l
m
n
o
p
q
26

Babycook® Babycook® plus
a
Крышка съемной чаши
b
Уплотнитель крышки
c
Фиксатор
d
Кнопка разблокировки фиксатора
e
Зона предотвращения перегревания
f
Нагревательная емкость
g
Уплотнитель / выпуск пара
h
Кнопка управления
Кнопка управления
приготовление смешивание
i
Чаша
j
Контейнер для приготовления/разогревания
k
Лопатка
l
Заслонка для смешивания / фильтр для смузи
m
Нож для смешивания
n
Гайка ножа
o
Уплотнитель ножа
p
Электрический шнур
q
Фиксатор для хранения
a
Крышка съемной чаши x2
b
Уплотнитель крышки x2
c
Фиксатор x2
d
Кнопка разблокировки фиксатора x2
e
Зона предотвращения перегревания x2
f
Нагревательная емкость x2
g
Уплотнитель / выпуск пара x2
h
Кнопка управления
Кнопка управления
приготовление смешивание
i
Чаша x2
j
Контейнер для приготовления/разогревания x2
k
Лопатка
l
Заслонка для смешивания / фильтр для смузи x2
m
Нож для смешивания x2
n
Гайка ножа x2
o
Уплотнитель ножа x2
p
Электрический шнур
q
Фиксатор для хранения
RU
ПЕРЕД ПЕРВЫМ ИСПОЛЬЗОВАНИЕМ УСТРОЙСТВА ВНИМАТЕЛЬНО
ПРОЧИТАЙТЕ ЭТУ ИНСТРУКЦИЮ
ПРАВИЛА ТЕХНИКИ БЕЗОПАСНОСТИ. / ВАЖНО!
• При неправильном использовании устройства существует риск травмирования: строго соблюдайте правила,
указанные в этой инструкции.
• ВНИМАНИЕ! СУЩЕСТВУЕТ РИСК ПОЛУЧЕНИЯ ОЖОГОВ. Это устройство производит очень горячий водяной пар
(> 100 °C/212 °F) для приготовления пищи.
• Будьте осторожны при наполнении устройства горячей жидкостью, поскольку она может выплеснуться
наружу вследствие внезапного парообразования.
• Не приближайтесь слишком близко к устройству во время приготовления пищи.
• Не открывайте крышку, пока не закончится цикл приготовления (существует риск разбрызгивания горячей
воды).
• ВНИМАНИЕ! СУЩЕСТВУЕТ РИСК ПОРЕЗОВ. Лезвия ножа (m) очень острые.
• Точно соблюдайте инструкции по снятию лезвия (при техническом обслуживании)
• Будьте внимательны во время опустошения чаши
ИСПОЛЬЗОВАНИЕ.
• Этот Прибор не будет использоваться детьми
• Это устройство может использоваться людьми с ограниченными физическими, сенсорными или
умственными способностями. Возможность использования аппарата для последней категории лиц
возможна исключительно под присмотром или после проведения инструктажа относительно безопасности
и возможных рисков.
• Устройство предназначено для домашнего и аналогичного использования, например, в кухонных уголках,
предназначенных исключительно для персонала, в магазинах, офисах, других местах профессиональной
деятельности, на фермах, а также может использоваться постояльцами гостиниц, мотелей и других
заведений, предоставляющих жилье гостиничного типа.
ПОДКЛЮЧЕНИЕ ЭЛЕКТРИЧЕСТВА.
• Не допускайте попадания воды внутрь устройства через технологические отверстия, это может вызвать
повреждение устройства или короткое замыкание.
• Отключайте устройство от сети перед каждой сборкой, разборкой и очисткой.
• Отключайте устройство от сети, если оставляете его без присмотра.
• Не пользуйтесь устройством, если кабель питания поврежден*.
• Отключите устройство от сети, если оно работает неправильно*.
• Отключайте устройство от сети, если оно повреждено (упало, треснуло и т. п.)*.
* немедленно обратитесь в сервисную службу.
БДИТЕЛЬНОСТЬ ПО ОТНОШЕНИЮ К ДЕТЯМ.
• Размещайте устройство и его электрический шнурв недоступном для детей месте.
• Всегда закрывайте крышку чаши (существует риск порезов лезвиями).
• Очистка устройства не должна выполняться ребенком.
• Техническое обслуживание устройства не должно выполняться ребенком.
• Не разрешайте ребенку играть с устройством.
27

Поздравляем Вас с покупкой и благодарим за сделанный выбор: вы приобрели устройство с уникальными
Отмерьте необходимое количество воды (по отметкам от 1 до 3), в зависимости, от того, сколько продуктов
нужно разморозить, а затем выполните действия, как для цикла готовки.
Когда в конце цикла прозвучит звуковой сигнал, извлеките емкость с помощью полотенца и перемешайте
содержимое лопаткой Béaba, чтобы температура продукта была равномерной.
ВНИМАНИЕ! Оставшаяся в конце готовки вода очень горячая.
ПРИМЕЧАНИЕ. ХДля оптимального содержания витаминов всегда лучше использовать свежие овощи и
фрукты. Вы также можете приготовить замороженные овощи и фрукты, предварительно разморозив их в чаше
BABYCOOK® Solo или холодильнике (никогда не размораживайте продукты при комнатной температуре).
ОЧИСТКА И ТЕХНИЧЕСКОЕ ОБСЛУЖИВАНИЕ.
сегда отключайте устройство от питания перед началом очистки.
Рекомендуется вручную мыть съемные части: чашу, контейнер, лопатку, заслонку для смешивания,
крышку, уплотнители, нож... Эти элементы также можно мыть в посудомоечной машине. Продолжительное
использование посудомоечной машины может ускорить износ элементов.
Для очистки ножа и его уплотнителя соблюдайте инструкции по разборке и сборке:
I
функциями. Устройство BABYCOOK® разработано специально для простого и быстрого приготовления здоровой
пищи для маленьких детей. BABYCOOK® готовит на пару, разогревает и размораживает продукты, сохраняя
витамины, а также обеспечивает их идеальное регулируемое измельчение.
INSTRUCTIONS
• При первом использовании необходимо запустить цикл приготовления пищи без продуктов, заполнив
емкость водой до отметки № 3, а затем прополоснуть чашу и помыть аксессуары теплой водой.
• Тщательно мойте руки перед тем, как начинать работу с продуктами, предназначенными для питания ребенка.
ВНИМАНИЕ!
• При использовании устройс тва всегда располагайте его на устойчивой и ровной поверхности.
• Не ставьте устройство рядом с источником тепла, варочной поверхностью и т. п.
• При переноске устройства не держите его за ручку чаши.
• Не запускайте цикл приготовления пищи, если в емкости нет воды.
• Не ставьте чашу «
» устройства Babycook в микроволновую печь.
i
ЦИКЛ ГОТОВКИ
1. Разблокируйте фиксатор, чтобы получить доступ к чаше и нагревательной емкости (рис. 1).
2. Порежьте продукты кубиками размером приблизительно 1x1 см и положите их в контейнер. Чтобы
гарантировать равномерность приготовления, рекомендуется не перегружать контейнер (рис. 2).
3. На чашу нанесены отметки от 1 до 3. Эти отметки позволяют отмерить необходимое количество воды для
налива в нагревательную емкость, от этого зависит время приготовления. См. инструкцию по приготовлению
пищи (стр. 30). Отмерьте воду при помощи чаши в соответствии с выбранным рецептом, не добавляя
никаких приправ (соли, сахара и пр.) (рис. 3).
4. Налейте воду в чашу (рис. 4).
5. Поместите контейнер в чашу так, чтобы выступ контейнера совпал с носиком на чаше (рисунок 5).
6. Зафиксируйте чашу на предусмотренном месте в устройстве (рис. 6, 7).
7. Убедитесь, что уплотнитель «
g
» на отверстии для выпуска пара не забит.
8. Закройте крышку чаши, с усилием нажав на рычаг (рис 8).
9. Включите устройство в розетку. Прозвучит длинный звуковой сигнал, а логотип Beaba и кнопка управления
мигнут 1 раз (рис. 9).
10. Нажмите кнопку (
), чтобы запустить цикл готовки (рис. 10). Устройство издаст 1 звуковой сигнал,
загорятся логотип Beaba и значок пара.
11. По окончанию готовки устройство издаст 3 звуковых сигнала, логотип Beaba погаснет (рис. 11), а значок
пара на кнопке будет мигать до выключения цикла (для этого нужно снова нажать кнопку) (рис. 12).
12.
ВНИМАНИЕ! СУЩЕСТВУЕТ РИСК ПОЛУЧЕНИЯ ОЖОГОВ. Чтобы открыть крышку после приготовления пищи,
нажмите расположенную на рычаге кнопку, не касаясь крышки (она горячая) (рис. 13).
13. Вытирайте внутреннюю поверхность крышки, чтобы конденсат не капал в емкость.
14. Для извлечения контейнера пользуйтесь лопаткой (рис. 14).
15. При желании можно оставить выделившуюся при готовке жидкость на дне чаши, чтобы добавить ее в
готовое блюдо или использовать для облегчения смешивания.
Babycook plus : Две чаши могут быть одновременно использованы для приготовления продуктов. если Вы
используете правую чашу блендера, наполните водой правый резервуар, если Вы используете левую чашу, то
наполните левый резервуар.
Избегать одновременного открытия двух съёмных крышек.
Подключите изделие к сети и нажмите на правую кнопку со значком пара, если вы используете правую чашу, или
на левую кнопку со значком пара, если вы используете левую чашу.
РЕКОМЕНДАЦИИ
• Не прерывайте готовку посреди цикла, чтобы в нагревательной емкости не оставалась вода.
• Наливайте только питьевую воду без остатков пищи или других примесей.
• Перед подачей всегда проверяйте температуру пищи.
• Не рекомендуется слишком долго разогревать еду.
ЦИКЛ СМЕШИВАНИЯ
1. Убедитесь, что лезвие правильно установлено на дне чаши с помощью уплотнителя и гайки.
2. После проверки степени приготовления пересыпьте продукты из контейнера в чашу (рис. 15). Перед
запуском цикла, в зависимости от того, какая консистенция необходима, добавьте соответствующую часть
выделившейся при готовке жидкости.
3. Поместите заслонку для смешивания на чашу (рис. 16).
4. Закройте крышку чаши, с усилием нажав на рычаг (рис. 17).
5. Подключите устройство и импульсами продолжительностью не более 10 секунд поворачивайте кнопку (
направо, по часовой стрелке, справа, до получения необходимой консистенции (рис.18).
6. Поднимите рычаг и лопаткой извлеките заслонку для смешивания (рис. 19 и 20).
7. Перемешайте смесь лопаткой, не касаясь лезвий, и при необходимости повторите импульс смешивания
(рис. 21).
Babycook plus : Измельчение продуктов возможно в одной из двух чаш, но только справа от резервуара.
HEATING AND DEFROSTING
• Продукты, которые нужно разогреть или разморозить, необходимо предварительно положить в специальную
емкость, а ее без крышки поместить в контейнер для готовки. Емкость не должа заграждать отверстие для
выпуска пара «
g
»
28
•
• В
•
•
)
 Loading...