

Benutzer- und Wartungshandbuch
User and maintenance manual
Manuel d’utilisation et d’entretien
Handleiding voor gebruik en onderhoud
Manual de uso y mantenimiento
Manual de uso e manutenção
Manuale d’uso e manutenzione
Εγχειρίδιο χρήσης και συντήρησης
GR
I
P
E
NL
F
GB
D

WICHTIGE SICHERHEITSHINWEISE
Diese Hinweise stehen auch auf folgender Website zur Verfügung: www.whirlpool.eu.
IHRE EIGENE SICHERHEIT UND DIE DER ANDEREN IST SEHR WICHTIG.
Diese Anweisungen sowie das Gerät beinhalten wichtige Sicherheitshinweise, die Sie durchlesen und stets beachten sollten.
Dieses Symbol warnt vor möglichen Gefahren für die Sicherheit des Benutzers und anderer Personen.
Alle Warnhinweise beginnen mit diesem Warnsymbol und enthalten einen der folgenden Begrie
Weist auf eine Gefahrensituation hin, die zu schweren Verletzungen führt, wenn sie nicht vermieden wird.
Weist auf eine Gefahrensituation hin, die zu schweren Verletzungen führen kann, wenn sie nicht vermieden
wird.
Alle Warnhinweise nennen das mögliche Sicherheitsrisiko und geben an, wie die Gefahr von Verletzungen, Schäden und Stromschlägen durch
bestimmungsfremden Gebrauch des Gerätes vermieden werden kann. Beachten Sie bitte folgende Anweisungen:
• Installation und Wartung müssen von einer Fachkraft gemäß den Herstelleranweisungen und gültigen örtlichen Bestimmungen ausgeführt werden.
Reparieren Sie das Gerät nicht selbst und tauschen Sie keine Teile aus, wenn dies im Benutzerhandbuch nicht ausdrücklich so vorgegeben ist.
• Halten Sie das Gerät von der Stromversorgung getrennt, bis der Einbau durchgeführt wurde.
• Das Gerät muss vorschriftsmäßig geerdet werden. Dies ist nicht erforderlich für Dunstabzugshauben der Klasse II, erkennbar am Symbol auf dem
Typenschild.
• Das Netzkabel muss lang genug sein, um das Gerät an das Stromnetz anzuschließen.
• Ziehen Sie nicht am Netzkabel des Geräts, um den Stecker aus der Steckdose zu ziehen.
• Nach der Installation dürfen Strom führende Teile nicht mehr zugänglich sein.
• Berühren Sie das Gerät nicht mit feuchten Händen und benutzen Sie es nicht, wenn Sie barfuß sind.
• Das Gerät darf von Kindern ab 8 Jahren und Personen mit eingeschränkten physischen, sensorischen oder geistigen Fähigkeiten bzw. Mangel an Erfahrung
und Kenntnissen nur unter Aufsicht oder nach ausreichender Einweisung durch eine für ihre Sicherheit verantwortliche Person benutzt werden. Kinder
dürfen nicht mit dem Gerät spielen. Die Reinigung und Bedienung dieses Geräts darf nur dann durch Kinder erfolgen, wenn diese durch Erwachsene
beaufsichtigt werden.
• Reparieren oder ersetzen Sie keine Teile des Geräts, wenn dies nicht ausdrücklich im Benutzerhandbuch empfohlen wird. Defekte Teile dürfen nur gegen
Originalersatzteile ausgetauscht werden. Alle anderen Wartungsarbeiten müssen durch einen Fachmann durchgeführt werden.
• Kinder sind zu überwachen, um sicherzustellen, dass sie nicht mit dem Gerät spielen.
• Achten Sie beim Bohren in eine Wand oder Decke darauf, keine elektrischen Verbindungen und/oder Leitungen zu beschädigen.
• Sämtliche Abluftkanäle müssen ins Freie führen.
• Die angesaugte Luft darf nicht in ein Abluftrohr geleitet werden, in das die Abluft von mit Gas oder anderen Brennstoen betriebenen Geräten abgeleitet
wird, sondern muss einen separaten Abzug haben. Dabei sind alle nationalen Vorschriften zur Abluftableitung einzuhalten.
• Wird die Abzugshaube zusammen mit anderen nicht mit Strom betriebenen Geräten benutzt, darf der Unterdruck im Raum 4 Pa (4 x 10 -5 bar) nicht
überschreiten. Sorgen Sie daher für eine angemessene Raumbelüftung.
• Der Hersteller haftet nicht bei unsachgemäßem Gebrauch oder fehlerhafter Bedienung.
• Konstante Pege und Reinigung gewährleisten den einwandfreien Betrieb und die Leistungstüchtigkeit des Geräts. Alle verschmutzten Flächen sollten
regelmäßig von Ablagerungen gesäubert werden, um Fettansammlungen zu vermeiden. Reinigen oder ersetzen Sie die Filter regelmäßig.
• Das Nichtbeachten der Reinigungsvorschriften für die Dunstabzugshaube sowie für das Auswechseln und Reinigen der Filter führt zu Brandgefahr.
• Die Dunstabzugshaube darf nicht ohne Fettlter geönet werden und darf nicht unbeaufsichtigt laufen.
• Die Brennstellen von Gasherden dürfen unter der Dunstabzugshaube nur mit Kochgefäßen darauf benutzt werden.
• Werden mehr als drei Gasbrennstellen auf einmal benutzt, muss die Dunstabzugshaube mindestens auf Stufe 2 gestellt werden. Dadurch wird ein Hitzestau
im Gerät vermieden.
• Vergewissern Sie sich vor dem Berühren der Lampen, dass diese abgekühlt sind.
• Benutzen oder belassen Sie die Haube nicht ohne korrekt montierte Lampen. Andernfalls besteht die Gefahr eines elektrischen Schlags.
• Tragen Sie bei allen Installations- und Instandhaltungsarbeiten Schutzhandschuhe.
• Das Gerät ist nicht für den Betrieb im Freien geeignet.
• Wenn das Kochfeld in Betrieb ist, können die erreichbaren Teile der Dunstabzugshaube heiß werden.
HEBEN SIE DIESE ANLEITUNG ZUM SPÄTEREN NACHSCHLAGEN GUT AUF.
WARNUNG:
GEFAHR:
D1

Kontrollieren Sie das Gerät nach dem Auspacken auf eventuelle Transportschäden. Bei Problemen wenden Sie sich bitte an Ihren Händler oder die nächste
Kundendienststelle. Um eventuellen Schäden vorzubeugen, sollten Sie das Gerät erst unmittelbar vor der Installation von der Polystyrolunterlage nehmen.
VORBEREITUNG DES EINBAUS
Das ist ein schweres Produkt. Zum Transport und zur Installation der Haube sind zwei oder mehr Personen
erforderlich.
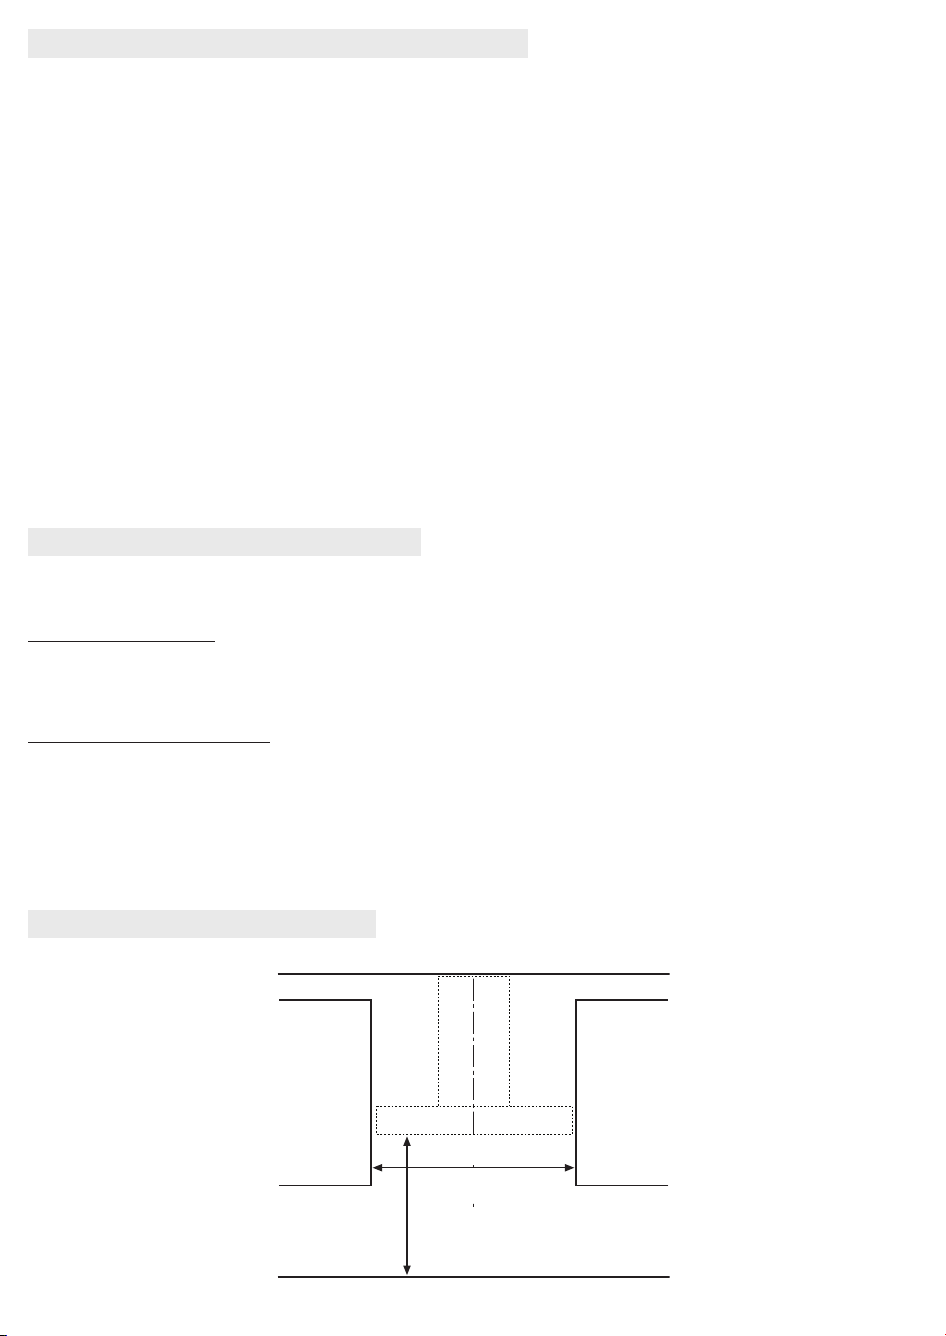
Der Mindestabstand zwischen der Abstelläche der Behälter auf dem Herd und der unteren Kante der Dunstabzugshaube muss bei Elektroherden 50 cm und bei
Gasherden oder kombinierten Elektro-/Gasherden 65 cm betragen. Überprüfen Sie vor der Installation auch die im Handbuch des Kochfeldes angegebenen
Mindestabstände. Schreiben die Installationsanweisungen des Kochfelds einen größeren Abstand vor, ist dieser natürlich zu beachten.
ELEKTRISCHER ANSCHLUS
Die Spannung auf dem Typenschild des Gerätes muss der Spannung des Stromnetzes entsprechen. Diese Information nden Sie im Inneren der Abzugshaube
unter dem Fettlter. Das Netzkabel (Typ H05 VV-F 3 x 0,75 mm²) darf nur durch qualiziertes Fachpersonal ersetzt werden. Wenden Sie sich an eine autorisierte
Kundendienststelle. Der Stecker der Dunstabzugshaube (falls vorhanden) muss an eine normgerechte und gut zugängliche Steckdose angeschlossen werden.
Sollte die Abzugshaube nicht mit Stecker versehen sein, sondern direkt mit dem Stromnetz verbunden und die Steckdose unzugänglich sein, müssen Sie einen
normgerechten zweipoligen Schalter verwenden, der eine totale Isolierung vom Stromnetz im Falle von gemäß Klasse 3 auftretenden Überspannungen
gewährleistet und normgerecht verdrahtet ist.
ALLGEMEINE EMPFEHLUNGEN
Vor Inbetriebnahme
Entfernen Sie Kartonteile, Schutzfolien und Klebeetiketten von den Zubehörteilen. Kontrollieren Sie das Gerät auf eventuelle Transportschäden.
Während des Betriebs
Stellen Sie keine Gegenstände auf dem Gerät ab, um Beschädigungen zu vermeiden. Schützen Sie das Gerät vor Witterungseinüssen.
WARNUNG:
INSTALLATION
Konformitätserklärung
• Dieses Gerät wurde gemäß folgender Richtlinien entworfen, hergestellt und in den Handel eingeführt:
- Sicherheitsanforderungen der “Niederspannungsrichtlinie” 2006/95/CE (die 73/23/CEE und nachfolgende Änderungen ersetzt).
- Ökodesign-Verordnungen (EU) Nr. 65/2014 und 66/2014 gemäß der EU-Norm EN 61591
- Schutzvorschriften der EMV-Richtlinie 2004/108/EG.
Die elektrische Sicherheit des Gerätes ist nur dann gewährleistet, wenn es korrekt an eine funktionstüchtige und den gesetzlichen Bestimmungen
entsprechende Erdung angeschlossen ist.
Energiespartipp
• Schalten Sie die Dunstabzugshaube auf niedrigster Stufe ein, wenn Sie zu kochen beginnen, und lassen Sie sie nach dem Ende des Kochvorgangs noch einige
Minuten laufen.
• Stellen Sie nur bei starker Rauch- oder Dampfentwicklung eine höhere Stufe ein und verwenden Sie die Booster-Funktion(en) nur in Extremsituationen.
• Tauschen Sie den/die Aktivkohlefilter bei Bedarf aus, damit das Gerät unangenehmen Gerüchen effektiv entgegenwirken kann.
• Tauschen Sie den/die Fettfilter bei Bedarf aus, damit das Gerät Fettablagerungen effektiv entgegenwirken kann.
• Eine optimale Wirkung bei minimaler Geräuschentwicklung erzielen Sie mit Abluftkanälen, die den in diesem Handbuch angegebenen Höchstdurchmesser
aufweisen.
D2
Entsorgung von Verpackungsmaterialien
Das Verpackungsmaterial ist zu 100 % wiederverwertbar und trägt das Recycling-Symbol . Werfen Sie das Verpackungsmaterial deshalb nicht einfach fort,
sondern entsorgen Sie es auf die von den verantwortlichen Stellen festgelegte Weise.
Entsorgung von Altgeräten
- Dieses Gerät ist gemäß der Europäischen Richtlinie 2002/96/EG für Elektro- und Elektronik-Altgeräte (WEEE) gekennzeichnet.
- Durch eine angemessene Entsorgung des Geräts trägt der Nutzer dazu bei, potenziell schädliche Auswirkungen für Umwelt und Gesundheit zu vermeiden,
die durch eine nachlässige Beseitigung dieses Produkts verursacht würden.
- Das Symbol auf dem Gerät bzw. auf dem beiliegenden Informationsmaterial weist darauf hin, dass dieses Gerät kein normaler Haushaltsabfall ist,
sondern in einer Sammelstelle für Elektro- und Elektronik-Altgeräte entsorgt werden muss.
Entsorgung von Haushaltsgeräte
• Dieses Gerät wurde aus recycelbaren oder wiederverwendbaren Werkstoffen hergestellt. Beachten Sie bei der Entsorgung die örtlichen Verordnungen zur
Abfallbeseitigung. Schneiden Sie das Netzkabel durch, bevor Sie das Gerät verschrotten.
• Genauere Informationen zu Behandlung, Entsorgung und Recycling von elektrischen Haushaltsgeräten erhalten Sie bei Ihrer örtlichen Verwaltungsstelle,
der Müllabfuhr oder dem Händler, bei dem Sie das Gerät gekauft haben.
HINWEISE ZUM UMWELTSCHUTZ
Das Gerät funktioniert nicht:
• Prüfen Sie, ob das Stromnetz Strom führt und das Gerät an das Stromnetz angeschlossen ist
• Schalten Sie das Gerät aus und wieder ein, um zu prüfen, ob die Störung immer noch vorliegt.
Zu schwache Absaugleistung:
• Prüfen Sie die Absauggeschwindigkeit und passen Sie diese bei Bedarf an.
• Prüfen Sie, ob die Filter sauber sind
• Prüfen Sie, ob die Belüftungsöffnungen blockiert sind.
Die Beleuchtung funktioniert nicht:
• Kontrollieren Sie die Lampe und tauschen Sie sie bei Bedarf aus
• Prüfen Sie, ob die Lampe korrekt eingesetzt wurde.
Bevor Sie den Kundendienst rufen:
1. Prüfen Sie erst, ob Sie die Störung anhand der Hinweise unter “Störung – was tun?” selbst beheben können.
2. Schalten Sie das Gerät aus und wieder ein, um zu prüfen, ob die Störung immer noch vorliegt.
Falls die Störung danach fortbesteht oder erneut auftritt, kontaktieren Sie bitte den nächstgelegenen Kundendienst.
Geben Sie dabei bitte Folgendes an:
• Eine kurze Beschreibung der Störung
• Den genauen Typ und das Modell des Gerät
• Die Servicenummer (die Zahl nach dem Wort “Service” auf dem Typenschild) im Gerät. Die Servicenummer finden Sie auch im Garantieheft
• Ihre vollständige Anschrif
• Ihre Telefonnummer
Im Reparaturfall wenden Sie sich bitte an eine vom Hersteller autorisierte Kundendienststelle. Nur so ist gewährleistet, dass Originalersatzteile verwendet
werden und die Reparatur fachgerecht durchgeführt wird.
STÖRUNG – WAS TUN?
KUNDENDIENST
- Verwenden Sie keine Dampfreiniger.
- Trennen Sie das Gerät vom Stromnetz.
WICHTIG: Verwenden Sie keine aggressiven Reinigungs- oder Scheuermittel. Falls ein solches Mittel doch mit dem Gerät in Kontakt kommt,
reinigen Sie es sofort mit einem feuchten Tuch.
WICHTIG: Die Stahlflächen der Dunstabzugshaube sind mit einer iXelium-Versiegelung versehen.
Tipps zum Reinigen:
• Feuchten Sie ein weiches Tuch (vorzugsweise ein Mikrofasertuch) mit Wasser oder einem normalen Glasreiniger an.
• Verwenden Sie keine Zellstofftücher, denn diese könnten Verfärbungen oder Zellstoffpartikel auf der Dunstabzugshaube hinterlassen.
• Verwenden Sie keine aggressiven Reinigungs- oder Scheuermittel, keine chlorhaltigen Mittel und keine Stahlwolle.
• Verwenden Sie keine Dampfreiniger.
• Verwenden Sie keine brennbaren Produkte.
• Stellen Sie keine säurehaltigen oder alkalischen Substanzen wie Essig, Senf, Salz, Zucker oder Zitronensaft auf die Dunstabzugshaube.
Verwenden Sie zur Reinigung geeignete Reinigungsmittel und beachten Sie die Herstelleranweisungen.
WICHTIG: Reinigen Sie die Filter mindestens einmal monatlich und entfernen Sie alle Öl- und Fettrückstände.
WARNUNG:
REINIGUNG VON GERÄTEN MIT IXELIUM-OBERFLÄCHEN
D3
D4
- Verwenden Sie Schutzhandschuhe.
- Trennen Sie das Gerät vom Stromnetz.
FETTFILTER
Der Metall-Fettfilter hat eine unbegrenzte Lebensdauer und ist ein Mal im Monat mit der Hand oder im
Geschirrspüler bei Niedrigtemperaturen und im Schnellspülgang zu reinigen. Obwohl der Spülgang dem
Fettfilter einen matten Aspekt verleihen könnte, wird die Filtrierleistung dadurch keineswegs beeinträchtigt.
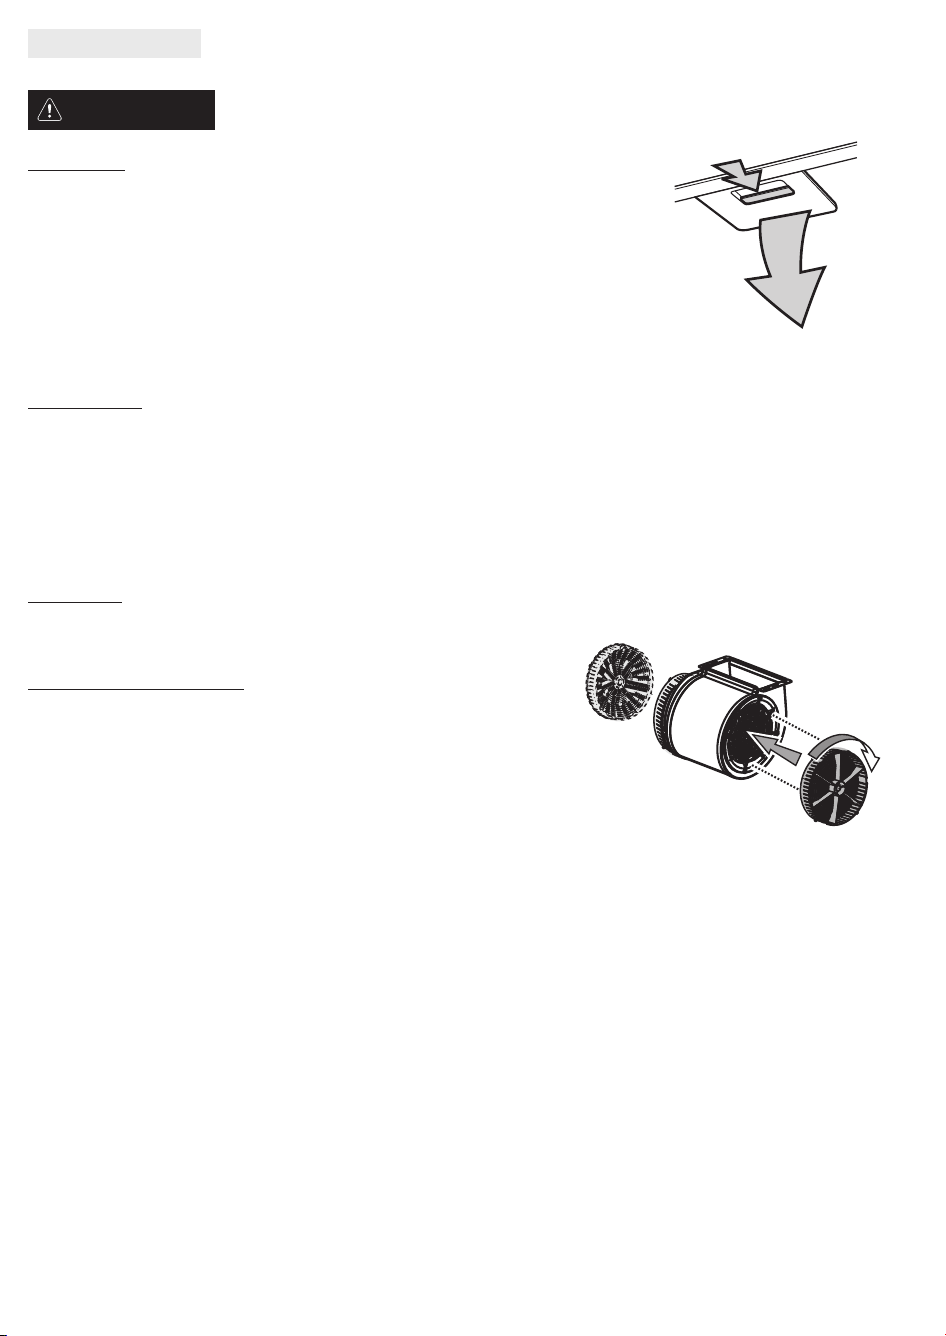
Ziehen Sie den Griff heraus, um den Filter zu entnehmen.
Lassen Sie den gereinigten Filter trocknen und gehen Sie zum Wiedereinbau in umgekehrter Reihenfolge vor.
AUSWECHSELN DER LAMPEN
Die Dunstabzugshaube verfügt über ein Beleuchtungssystem mit LED-Technologie.
Die LED-Lampen garantieren eine optimale Beleuchtung, eine bis zu 10 Mal längere Lebensdauer als herkömmliche Lampen und eine Stromersparnis von 90%.
Wenden Sie sich für den Austausch bitte an den Kundendienst.
AKTIVKOHLEFILTER
(nur für Modelle mit Umluftbetrieb)
Der Aktivkohlefilter nimmt die Küchendünste auf.
Ersetzen Sie den Aktivkohlefilter alle 4 Monate.
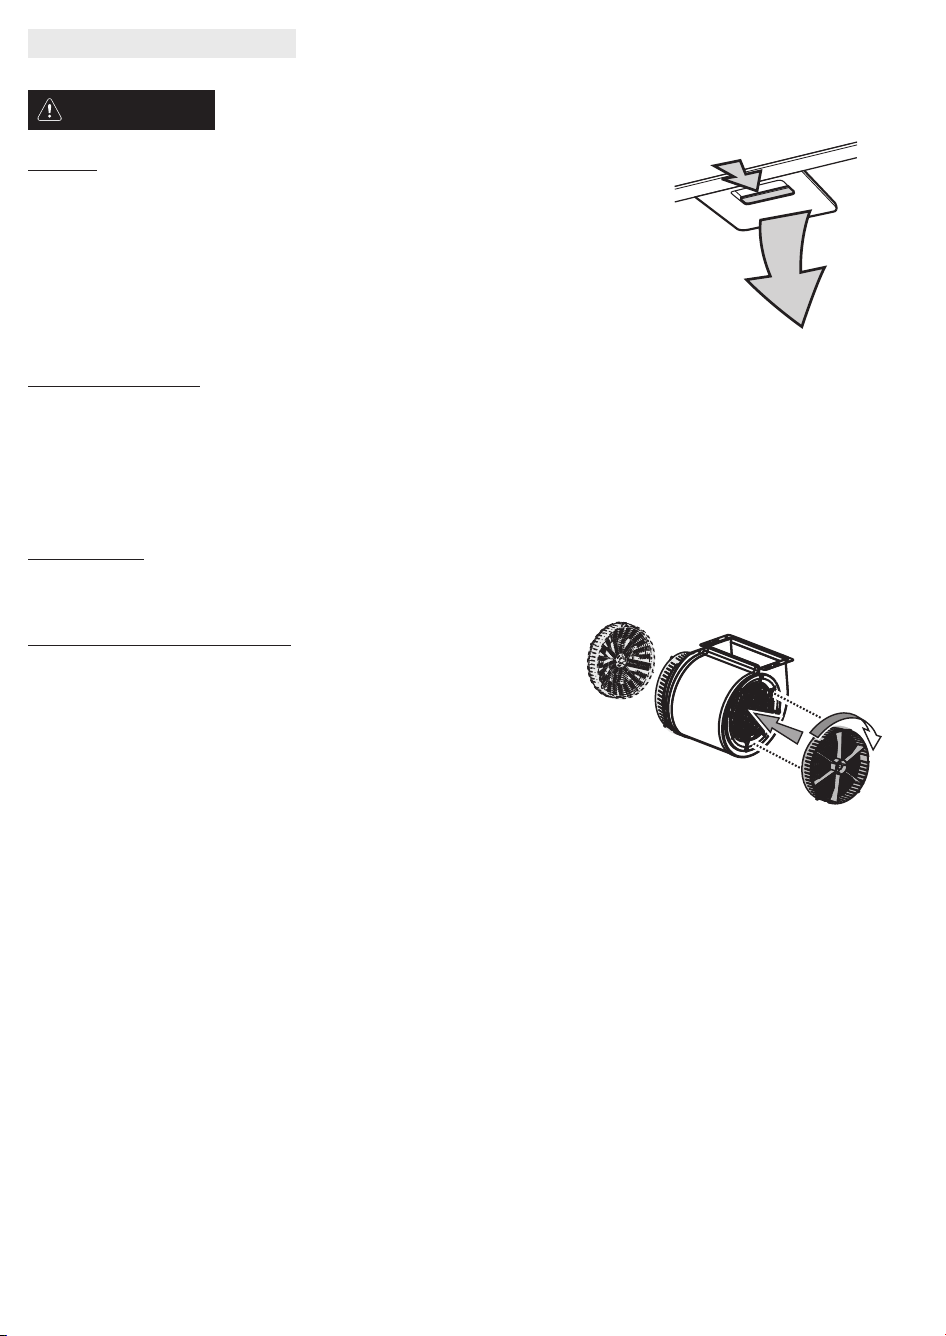
Einbau oder Austausch des Aktivkohlefilters
1. Trennen Sie die Abzugshaube vom Stromnetz.
2. Öffnen Sie das Absaugpaneel und nehmen Sie es aus der Halterung.
3. Entfernen Sie die Fettfilter.
4. Bringen Sie einen Aktivkohlefilter pro Seite zur Abdeckung beider Schutzgitter des
Motorlaufrads an. Drehen Sie die Filter im Uhrzeigersinn, um sie an den zentralen
Bolzen zu sperren.
Gehen Sie beim Filterausbau in umgekehrter Reihenfolge vor.
Setzen Sie die Fettfilter und das Absaugpaneel wieder ein.
WARNUNG:
WARTUNG UND PFLEGE
D5
Die Dunstabzugshaube ist für den Betrieb in "Abluftversion" oder in "Umluftversion" konzipiert.
Hinweis: Das Modell mit Elektroventil lässt sich nur in "Abluftbetrieb" betreiben, das Abluftrohr ist an eine externe Ablufteinheit anzuschließen.
Ausführung mit Abluftbetrieb
Die Schwaden werden angesaugt und über das am Verbindungsstück der Abzugshaube befestigte (nicht mitgelieferte) Abluftrohr nach außen geleitet.
Je nach gekauftem Abluftrohr ist ein geeignetes System zur Befestigung am Verbindungsstück vorzusehen.
WICHTIG: Entfernen Sie die eventuell bereits installierten Kohlefilter.
Ausführung mit Umluft+Filter-Betrieb
Die Luft wird beim Durchgang durch einen Kohlefilter gefiltert und im Raum umgewälzt.
WICHTIG: Vergewissern Sie sich, dass die Luft ungehindert umgewälzt wird.
Hat die Dunstabzugshaube keine/n Kohlefilter, so sind diese zu bestellen und vor der Inbetriebnahme zu montieren.
Die Abzugshaube ist fern von stark verschmutzten Bereichen, Fenstern, Türen und Wärmequellen zu installieren.
Im Lieferumfang der Dunstabzugshaube sind sämtliche erforderlichen Materialien für die Installation an den meisten Wänden/Decken enthalten. Sie sollten aber
trotzdem einen qualifizierten Techniker zu Rate ziehen, um sicherzustellen, dass die Materialien für die spezifische Wand-/Deckenausführung geeignet sind.
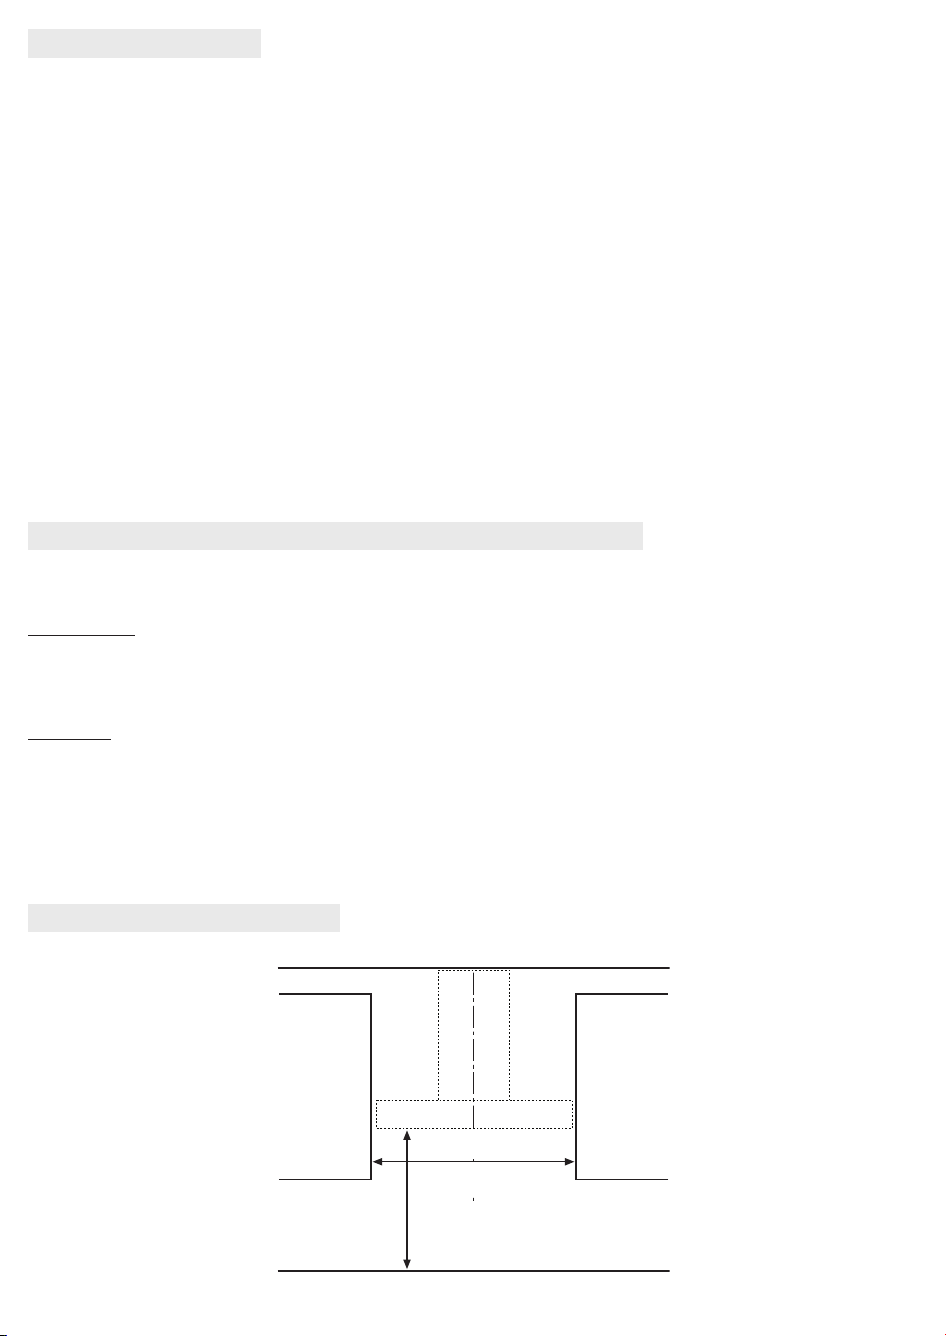
Seitliche
Hängeschränke
Seitliche
Hängeschränke
Mittellinie
65 cm (Gas- oder kombinierte Kochfelder)
50 cm (Elektroherde)
Oberfläche Kochfeld
Min. 1200 mm (120 cm breites Modell)
Min. 900 mm (90 cm breites Modell)
Min. 700 mm (70 cm breites Modell)
Min. 600 mm (60 cm breites Modell)
IM LIEFERUMFANG INBEGRIFFENES MATERIAL
INSTALLATION - VOR DER MONTAGE
INSTALLATIONSABMESSUNGEN
Nehmen Sie alle Teile aus den Verpackungen. Vergewissern Sie sich, dass alle Teile mitgeliefert wurden.
• Montierte Abzugshaube mit Motor, Lampen und Fettltern.
• Montage- und Gebrauchsanleitungen
• Teleskopkamine
• 1 Bohrschablone
• 6 Wanddübel Ø 8 mm
• 6 Schrauben Ø 5x45
• 4 Schrauben Ø 3,5x9,5
• Montagebügel für Kamine
• 1 Umlenkstück (für Umluftversion)
• 2 Schrauben Ø 2,9x6,5
• 4 Schrauben Ø 4x8
• 4 Schrauben Ø 3,5x6,5
• 2 Schrauben Ø 2,9x6,5
• 2 Unterlegscheiben
• 1 Montagebügel für Dunstabzugshaube

D6
Die folgenden in nummerierter Reihenfolge aufgezählten Anweisungen beziehen sich auf die mit Nummern versehenen Zeichnungen auf den letzten Seiten des
vorliegenden Handbuchs.
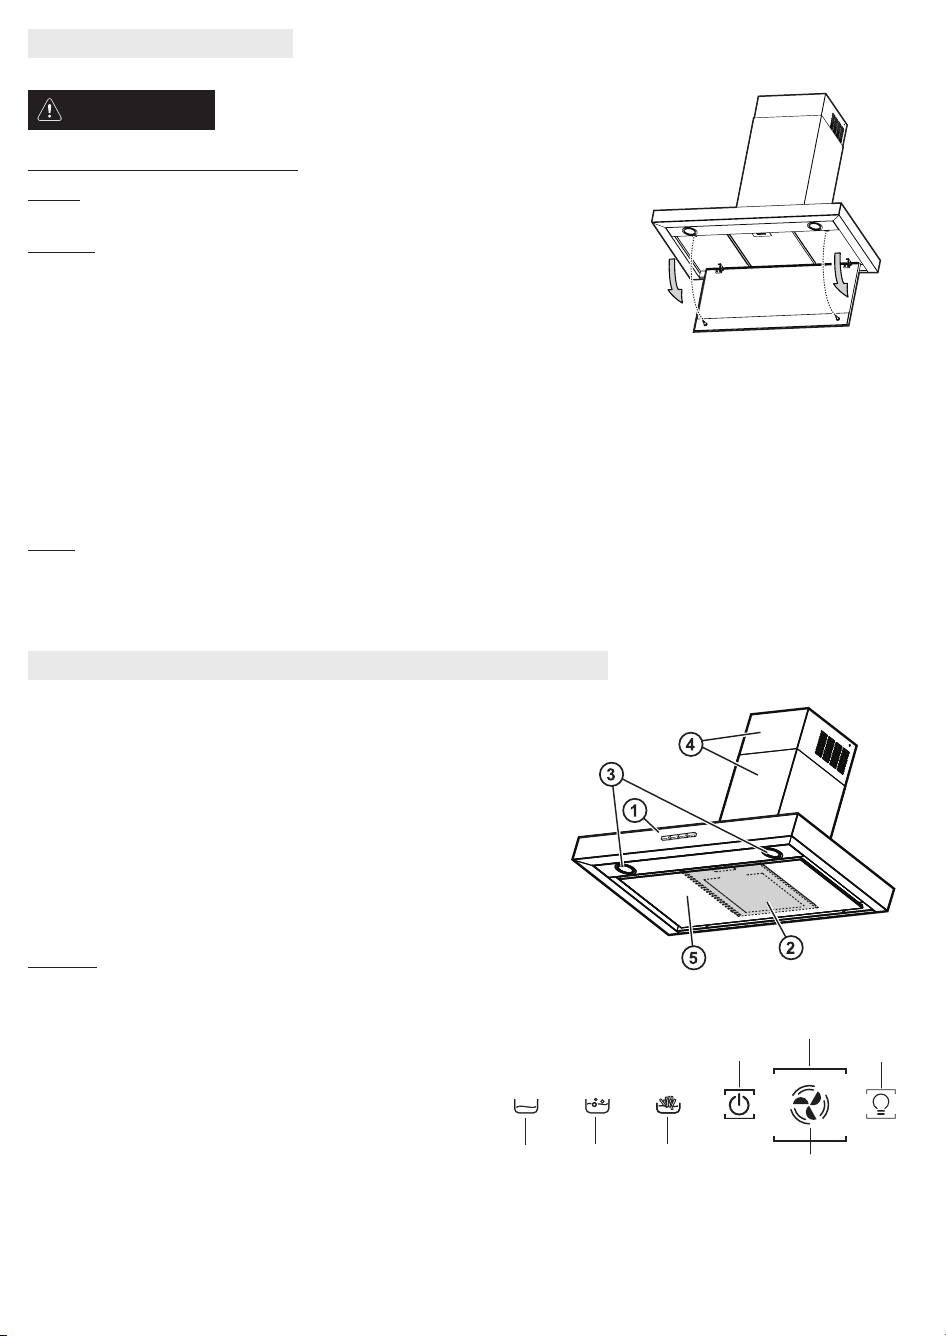
Vorbereitungen für die Installation:
- Entfernen Sie die Abdeckplatte für die Randabsaugung „A”.
- Drücken Sie den Hebel im unteren Teil der Platte nach links.
- Rasten Sie die Platte aus den Halterungen aus.
- Entfernen Sie den/die Fettlter.
Anschließend:
- Entfernen Sie das Band, mit dem das Gehäuse der elektronischen Steuerung „S” am Motorgehäuse befestigt ist.
- Ziehen Sie die vormontierten Schrauben fest, mit denen das Gehäuse der elektronischen Steuerung „S” am Motorgehäuse befestigt ist.
Hinweis: Das Gehäuse „S” könnte provisorisch auf dem oder seitlich am Motorgehäuse befestigt sein, die Abbildung hat lediglich Beispielcharakter.
1. Ziehen Sie mit einem Bleistift auf der Wand eine Mittellinie bis zur Decke, die Ihnen die Montage erleichtern wird.
2. Bringen Sie Bohrschablone so an der Wand an, dass die aufgedruckte Mittellinie der Schablone mit der zuvor gezogenen Mittellinie auf der Wand
übereinstimmt. Zudem entspricht der untere Rand der Bohrschablone der unteren Kante der Dunstabzugshaube.
3. Setzen Sie den unteren Montagebügel genau auf dem vorgezeichneten Rechteck auf der Bohrschablone an der Wand an. Markieren Sie die beiden äußeren
Bohrstellen und führen Sie die Bohrungen aus.
Hinweis: Führen Sie alle auf der Schablone eingezeichneten Bohrungen aus: An den zwei oberen wird die Dunstabzugshaube an die Wand gehängt, während
die unteren Löcher (in der Regel ein mittiges oder mehrere seitliche) zur endgültigen und Sicherheitsmontage dienen.
Entfernen Sie die Schablone, setzen Sie die Wanddübel ein und befestigen Sie den Montagebügel der Dunstabzugshaube mit 2 Schrauben 5 x 45 mm.
4. Legen Sie den Montagebügel für die Kamine „G” direkt unter der Decke an die Wand an. Benutzen Sie ihn als Schablone (falls vorhanden, muss der kleine
Schlitz auf dem Bügel genau über der zuvor auf der Wand gezogenen Mittellinie liegen) und markieren Sie mit einem Bleistift 2 Bohrlöcher. Führen Sie die
Bohrungen (Ø 8 mm) aus und setzen Sie 2 Wanddübel ein.
5. Befestigen Sie den Kaminbügel mit 2 Schrauben 5x45 mm an der Wand.
6. Haken Sie die Dunstabzugshaube auf dem unteren Bügel ein.
7. Regulieren Sie den Abstand zwischen der Haube und der Wand.
8. Richten Sie die Dunstabzugshaube waagrecht aus.
9. Befestigen Sie die Dunstabzugshaube endgültig an der Wand (OBLIGATORISCH!!).
10.
Verbinden Sie einen Abluftschlauch (Schlauch und Befestigungsschellen sind nicht im Lieferumfang enthalten und müssen gesondert erworben werden) mit
dem Anschlussring auf dem Gehäuse des Absaugaggregats. Bei Abluftbetrieb muss das andere Schlauchende an einen nach außen führenden
Lüftungsschacht angeschlossen werden. Wird die Dunstabzugshaube in der Umluftversion eingesetzt, entfernen Sie das Wrasenrückschlagventil „E” und
befestigen das Umlenkstück „F” am Kaminträgerbügel „G”. Schließen Sie anschließend das andere Schlauchende an den Anschlussring auf dem Umlenkstück
„F” an.
11. Nehmen Sie den elektrischen Anschluss vor. Schließen Sie das Netzkabel an der vorgesehenen Buchse an und sichern Sie es mit der Kabelklemme (11a).
12. Bringen Sie die Kaminteile an und befestigen Sie den oberen Rand mit 2 Schrauben (12a) am Montagebügel „G” (12b).
13. Schieben Sie die untere Kaminhälfte, die das Ansaugaggregat komplett abdecken soll, in ihre Aufnahme an der Oberseite der Dunstabzugshaube.
Setzen Sie den/die Fettlter wieder ein.
Bringen Sie die Abdeckplatte für die Randabsaugung wieder an.
WICHTIG: Achten Sie immer darauf, dass das Paneel sicher an seinem Platz befestigt ist.
Den Betrieb der Dunstabzugshaube überprüfen; siehe hierzu den Abschnitt Beschreibung und Gebrauch der Abzugshaube.
INSTALLATION - MONTAGEANLEITUNGEN
D7
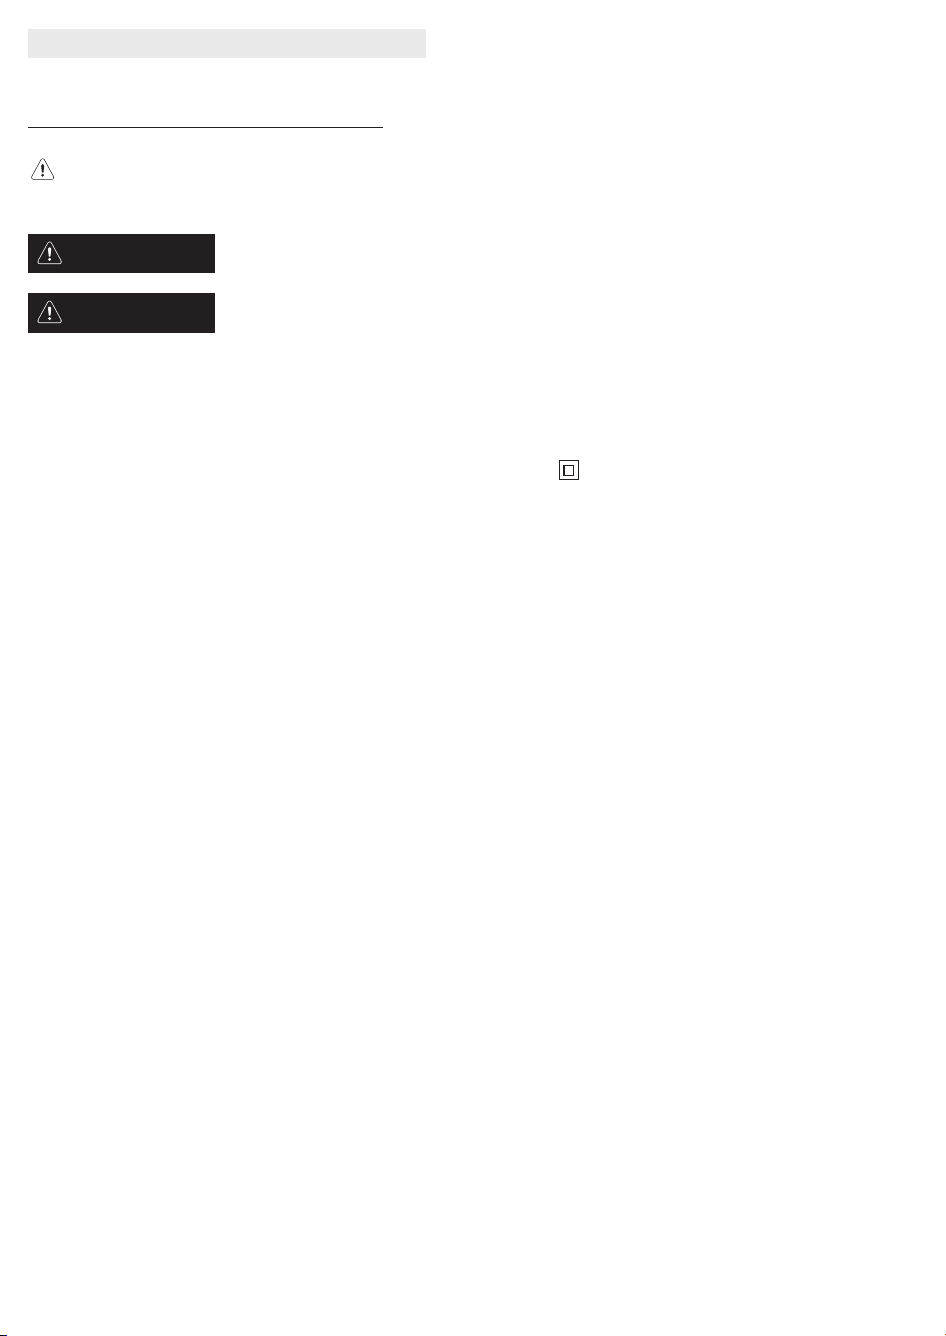
1. Bedienfeld.
2. Fettfilter (über dem ansaugaktiven Randpaneel).
3. Lampen.
4. Teleskopkamin.
5. Ansaugaktives Randpaneel.
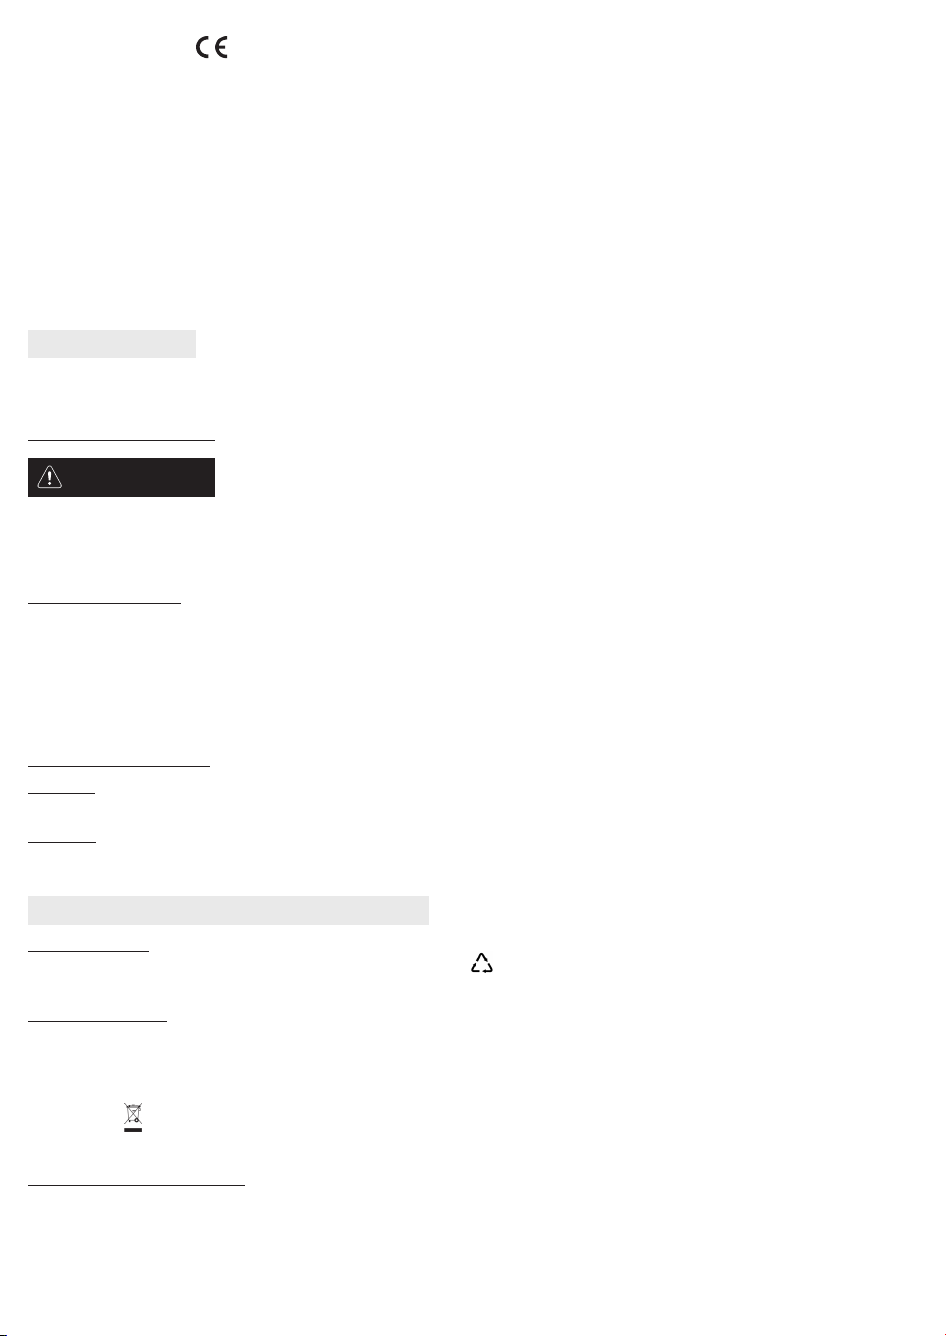
Bedienfeld
1. Motor EIN/AUS
2. Wahl der Geschwindigkeitsstufe (Steigern/Verringern)
Anzeigeleuchten:
a. kleinste Absauggeschwindigkeit eingeschaltet
b. mittlere Absauggeschwindigkeit eingeschaltet
c. höchste Absauggeschwindigkeit eingeschaltet
d. intensive Absauggeschwindigkeit eingeschaltet
NB = Die intensive Geschwindigkeitsstufe ist zeitgesteuert und auf fünf
Minuten beschränkt; anschließend schaltet die Dunstabzugshaube wieder auf
mittlere Geschwindigkeit zurück.
3. EIN/AUS-Taste Beleuchtung
Hinweis = Bei eingeschalteter Funktion ist die Hinterleuchtung der Bedienelemente stärker.
BESCHREIBUNG UND GEBRAUCH DER ABZUGSHAUBE
- Trennen Sie das Gerät vom Stromnetz.
Reinigung des ansaugaktiven Randpaneels
Ausbau:
Ziehen Sie das Paneel (VORDERSEITE) energisch nach unten.
Reinigung:
Das ansaugaktive Paneel ist ebenso häufig wie der Fettfilter zu reinigen.
Der Stahl des ansaugaktiven Paneels ist mit dem speziellen iXelium-Oberflächenschutz behandelt.
Reinigung:
• Stahl mit iXelium-Versiegelung einfach mit einem feuchten Tuch abwischen (besonders geeignet
sind Mikrofasertücher) oder einen handelsüblichen Glasreiniger verwenden.
• Nach Möglichkeit keine Papiertücher verwenden, da sie Rückstände und Schlieren auf dem Paneel hinterlassen können.
• Keine scheuernden, ätzenden oder chlorhaltigen Mittel und keine Metallschwämme verwenden.
• Keine Dampfreiniger verwenden.
• Keine entzündlichen Mittel verwenden.
• Lassen Sie Rückstände saurer oder alkalischer Lebensmittel wie Essig, Senf, Salz, Zucker oder Zitronensaft nicht auf dem Paneel antrocknen, sondern
wischen Sie sie umgehend ab.
KEINEN ALKOHOL VERWENDEN!
Einbau:
Das Paneel mit der Vorderseite in die zu diesem Zweck an der Haubenfläche angebrachten Stifte einrasten lassen.
WICHTIG: Achten Sie immer darauf, dass das Paneel sicher an seinem Platz befestigt ist.
WARNUNG:
WARTUNG UND PFLEGE
1
2
3
ab
c
d
IMPORTANT SAFETY INSTRUCTIONS
These instructions shall also be available on website: www.whirlpool.eu.
YOUR SAFETY AND THAT OF OTHERS IS HIGHLY IMPORTANT.
This manual and the appliance itself provide important safety warnings, to be read and observed at all times.
This is the attention symbol, pertaining to safety, which alerts users to potential risks to themselves and others.
All safety warnings are preceded by the attention symbol and the following terms:
indicates a hazardous situation which, if not avoided, will cause serious injury.
indicates a hazardous situation which, if not avoided, could cause serious injury.
All safety warnings specify the potential danger/warning to which they refer and indicate how to reduce the risk of injury, damage and electrical shock resulting
from incorrect use of the appliance. Comply with the following instructions:
• Installation or maintenance must be carried out by a specialized technician, in compliance with the manufacturer’s instructions and local safety regulations.
Do not repair or replace any part of the appliance unless specifically requested in the user manual.
• The appliance must be disconnected from the power supply before carrying out any installation work.
• Earthing of the appliance is compulsory. (Not necessary for class II hoods identified by the symbol on the specifications label).
• The power supply cable must be long enough to permit connecting the appliance to the mains socket outlet.
• Do not pull the power supply cable in order to unplug the appliance.
• The electrical components must no longer be accessible to the user after installation.
• Do not touch the appliance with any wet part of the body and do not operate it when barefoot.
• This appliance may be used by children older than 8 years of age and by persons with reduced physical, sensory or mental capacities or with inadequate
experience and knowledge only if they are supervised or if they have been taught how to use the appliance in conditions of safety and if they are aware of
the dangers involved. Children must not play with the appliance. Cleaning and maintenance must not be carried out by children, unless they are supervised
by adults.
• Do not repair or replace any part of the appliance unless specifically indicated in the manual. Defective parts must be replaced using genuine parts. All
other maintenance services must be carried out by a specialized technician.
• Children must be supervised to ensure they do not play with the appliance.
• When drilling through a wall or the ceiling, pay attention not to damage electric connections and/or pipes.
• The ventilation ducts must always discharge to the outside.
• Exhaust air must not be vented through a flue used for removal of fumes produced by appliances burning gas or other fuels, but must have a separate
outlet. All national regulations governing extraction of fumes must be observed.
• If the hood is used together with other appliances operating on gas or other fuels, the negative pressure in the room must not exceed 4 Pa (4 x 10⁻⁵ bar).
For this reason, make sure the room is adequately ventilated.
• The Manufacturer declines any liability for improper use or incorrect setting of the controls.
• Regular cleaning and maintenance is essential to correct functioning and good performance of the appliance. Frequently clean all encrustations from dirty
surfaces to prevent the accumulation of grease. Regularly clean or replace the filters.
• Failure to observe the instructions for cleaning the hood and replacing the filters may result in a fire.
• The fume extractor hood must never be opened without the grease filters installed and it should be kept under constant supervision.
• Gas appliances must be used under the extractor hood only with pans resting.
• When using more than three gas cooking points, the hood should be operating at power level 2 or greater. This will eliminate heat congestion in the
appliance.
• Before touching the bulbs, first ensure that they are cold.
• Do not use or leave the hood without its lamps correctly installed - risk of electric shock.
• Wear work gloves for all installation and maintenance operations.
• The product is not suitable for outdoor use.
• When the hob is in use, accessible parts of the hood may become hot.
KEEP THIS BOOKLET FOR FUTURE CONSULTATION.
WARNING:
DANGER:
GB8
After unpacking the appliance, check for any transport damage. In the event of problems, contact the dealer or your nearest After-sales Service. To prevent any
damage, only remove the appliance from its polystyrene foam packaging at the time of installation.
PREPARING FOR INSTALLATION
this is a heavy product; the hood should only be lifted and installed by two or more people.
The minimum distance between the support of the cooking pans on top of the cooker and the bottom of the hood must not be less than 50 cm for electric
cookers and 65 cm for gas or mixed cookers. Before installation also check the minimum distances stated in the manual of the cooker.
If the installation instructions for the cooker specify a greater distance between cooker and hood, this distance must be observed.
ELECTRICAL CONNECTION
Make sure the power voltage specified on the appliance rating plate is the same as the mains voltage.
This information may be found on the inside of the hood, under the grease filter.
Power cable replacement (type H05 VV-F 3 x 0,75 mm²) must be carried out by a qualified electrician. Contact an authorized service centre.
If the hood is fitted with an electric plug, connect the plug to a socket complying with current regulations, located in an accessible place after installation. If no
plug is fitted (direct wiring to the mains), or if the socket is not located in an accessible place, install a standardised double pole power switch that will enable
complete isolation from the mains in case of category III overvoltage conditions, in accordance with installation rules.
GENERAL RECOMMENDATIONS
Before use
Remove cardboard protection pieces, protective film and adhesive labels from accessories. Check the appliance for any transport damage.
During use
To avoid any damage do not place any weights on the appliance. Do not expose the appliance to atmospheric agents.
WARNING:
INSTALLATION
Declaration of conformity
• This appliance has been designed, manufactured and marketed in compliance with:
- safety objectives of the “Low Voltage” Directive 2006/95/EC (which replaces 73/23/EEC and subsequent amendments);
- the ecodesign requirements of european regulations n. 65/2014, and n. 66/2014 in conformity to the european standard EN 61591
- the protection requirements of Directive “EMC” 2004/108/EC.
Electrical safety of the appliance can only be guaranteed if it is correctly connected to an approved earthing system.
Energy saving tips
• Switch ON the hood at minimum speed when you start cooking and kept it running for few minutes after cooking is finished.
• Increase the speed only in case of large amount of smoke and vapour and use boost speed(s) only in extreme situations.
• Replace the charcoal filter(s) when necessary to maintain a good odour reduction efficiency.
• Clean the grease filter(s) when necessary to maintain a good grease filter efficiency.
• Use the maximum diameter of the ducting system indicated in this manual to optimize efficiency and minimize noise.
GB9
Disposal of packing
The packing material is 100% recyclable and is marked with the recycle symbol . The various parts of the packing must therefore be disposed of responsibly
and in full compliance with local authority regulations governing waste disposal.
Scrapping the product
- This appliance is marked in compliance with European Directive 2002/96/EC, Waste Electrical and Electronic Equipment (WEEE).
- By ensuring this product is disposed of correctly, you will help prevent potential negative consequences for the environment and human health, which
could otherwise be caused by inappropriate waste handling of this product.
- The symbol on the product or on the accompanying documentation indicates that it should not be treated as domestic waste but must be taken to an
appropriate collection centre for the recycling of electrical and electronic equipment.
Scrapping of household appliances
• This appliance is manufactured with recyclable or reusable materials. Dispose of it in accordance with local waste disposal regulations. Before scrapping, cut
off the power supply cable.
• For further information on the treatment, recovery and recycling of household electrical appliances, contact your competent local authority, the collection
service for household waste or the store where you purchased the appliance.
SAFEGUARDING THE ENVIRONMENT
GB10
The appliance does not work:
• Check for the presence of mains electrical power and if the appliance is connected to the electrical supply;
• Turn off the appliance and restart it to see if the fault persists.
The hood's suction level is not sufficient:
• Check the suction speed and adjust as necessary;
• Check that the filters are clean;
• Check the air vents for any obstructions.
The light does not work;
• Check the light bulb and replace if necessary;
• Check that the light bulb has been correctly fitted.
Before calling the After-Sales Service:
1. See if you can solve the problem yourself with the help of the suggestions given in the "Troubleshooting guide".
2. Switch the appliance off and back on again it to see if the fault persists.
If after the above checks the fault still occurs, get in touch with the nearest After-Sales Service.
Always specify:
• A brief description of the fault;
• The exact type and model of the appliance;
• The service number (number after the word "Service" on the rating plate), located on the inside of the appliance. The service number is also indicated on
the guarantee booklet;
• Your full address;
• Your telephone number.
If any repairs are required, please contact an authorised After-sales Service (to guarantee that original spare parts will be used and repairs carried out
correctly).
- Do not use steam cleaners.
- Disconnect the appliance from the power supply.
IMPORTANT: Do not use corrosive or abrasive detergents. If any of these products accidentally comes into contact with the appliance, clean it
immediately with a damp cloth.
IMPORTANT: The steel of the hood has iXelium surface treatment.
To clean it, proceed as follows:
• Use a soft cloth (preferably microfiber) wetted with water or with a normal glass cleaner.
• Do not use paper towels, as they may leave marks and bits of paper on the hood.
• Do not use abrasive, corrosive or chlorine-based products, or steel wool.
• Do not use steam equipment.
• Do not use flammable products.
• Do not leave acid or alkaline substances such as vinegar, mustard, salt, sugar or lemon juice on the hood.
Use specific detergents to clean the appliance and follow the Manufacturer's instructions.
IMPORTANT: Clean the filters at least once a month to remove oil and grease residuals.
ATTENTION
TROUBLESHOOTING GUIDE
AFTER-SALES SERVICE
IXELIUM CLEANING
GB11
- Use protective gloves.
- Disconnect the appliance from the power supply.
GREASE FILTERS
The metal grease filter has an unlimited life and should be cleaned once a month by hand or in a
dishwasher at low temperature and with a short cycle. Cleaning in a dishwasher may cause discolouring
of the grease filter, but its filtering efficiency is unaffected.
Pull out the handle to remove the filter.
Wash the filter and leave it to dry, proceeding in reverse order to refit it.
REPLACING LAMPS
The hood lighting system is based on LED technology.
The LEDs provide optimal illumination, with a lifetime up to ten times longer than traditional lamps but with 90% less energy consumption.
Contact the technical support service for replacements.
CARBON FILTER
(filter hoods only)
It retains the unpleasant odors produced during cooking.
Change the carbon filter every 4 months
Fitting or changing the carbon filter
1. Disconnect the hood from the power supply.
2. Open the extraction panel and remove it.
3. Remove the grease filters.
4. Fit one carbon filter each side, covering both protection grilles of the motor
impeller. Turn the filters clockwise to secure them to the middle pins.
Proceed in reverse order to remove.
Re-fit the grease filters and extraction panel.
ATTENTION
MAINTENANCE
GB12
The hood is designed for installation and use in "Extractor version" or in "Filter version".
Note: The model with electric shutter can only be used in "Extractor version" and the exhaust pipe must be connected to a peripheral extraction unit.
Extractor Version
Fumes are extracted and expelled to the outside through an exhaust pipe (not supplied) fixed to the hood exhaust pipe connector.
Depending on the exhaust pipe purchased, provide for suitable fixing to the exhaust pipe connector.
IMPORTANT: If already installed, remove the carbon filter/s.
Filter Version
Air is filtered through the carbon filter/s and recycled into the surrounding environment.
IMPORTANT: check that air recirculation is facilitated.
If the hood does not have a carbon filter/s, order one/them and fit it/them before use.
Install the hood away from very dirty locations, windows, doors and sources of heat.
The hood comes supplied with all the materials required for installation on most walls/ceilings. However, a qualified technician is needed to make sure that the
plugs are suitable for your ceiling.
Adjacent wall units
Adjacent wall units
central line
65 cm (gas or combi cookers)
50 cm (electric cookers)
cooktop surface
1200 mm min (120 cm wide model)
900 mm min (90 cm wide model)
700 mm min (70 cm wide model)
600 mm min (60 cm wide model)
MATERIAL SUPPLIED
INSTALLATION - PRELIMINARY ASSEMBLY INSTRUCTIONS
INSTALLATION DIMENSIONS
Remove all the components from the packets. Check that all the components are included.
• Hood assembled with motor, lamps and grease lters installed.
• Instructions for assembly and use
• Telescopic ues
• 1 Assembly template
• 6 wall plugs Ø 8mm
• 6 screws Ø 5x45
• 4 screws Ø 3.5x9.5
• Flue support bracket
• 1 deector (for lter version)
• 2 screws Ø 2.9x6.5
• 4 screws Ø 4x8
• 4 screws Ø 3.5x6.5
• 2 screws Ø 2.9x6.5
• 2 washers
• 1 hood support bracket

GB13
The instructions below, to be carried out in the order in which they are numbered, refer to the gures (with the same step numbers) given on the last pages of
this manual.
Before starting the installation steps:
- remove the perimeter extraction panel “A”;
- push the lever (located at the bottom of the panel) to the left
- release the panel from the supports
- remove the grease lters
then
- remove the tape xing the control electronics box “S” to the motor body;
- fully tighten the screws, already partially tightened, that x the electronics box “S” to the motor body.
Note: the box “S” may be temporarily xed to the top or sides of the motor body, the image is only for reference.
1. Using a pencil, draw the center line on the wall up to the ceiling to facilitate installation operations.
2. Place the drilling template against the wall: the vertical center line printed on the template must match the center line drawn on the wall, and the bottom
edge of the drilling template must match the bottom edge of the hood.
3. Place the lower support bracket on the hole diagram so that it matches the dotted rectangle, mark the two external holes and drill.
Note: Always perform all the holes indicated on the template: the top 2 holes are for hanging the hood and the bottom holes (generally 1 central or more side
holes) are for xing it securely to the wall.
Remove the hole diagram, insert the wall plugs and x the hood support bracket with two 5 x 45 mm screws.
4. Fit the ue support bracket “G” to the wall and against the ceiling, use the support bracket as a hole diagram (if present, the small slot on the support must
match the line drawn on the wall ), mark 2 holes with the pencil then drill the holes (Ø 8 mm) and nally insert 2 plugs.
5. Fix the ue support bracket to the wall with two 5x45 mm screws.
6. Hook the hood to the lower bracket.
7. Adjust the distance between the hood and the wall.
8. Adjust the hood horizontally.
9. Fix the hood securely to the wall (ABSOLUTELY NECESSARY!!).
10. Connect an exhaust pipe (pipe and clamps are not supplied and must be bought separately) to the collar located above the extraction motor unit. For
extractor operation, connect the other end of the exhaust pipe to the home discharge device. For lter operation,remove the fumes non-return valve “E”, x
the deector "F" to the ue support bracket "G" adjusting it according to the ue width and connect the other end of the exhaust pipe to the deector
collar "F".
11. Carry out the electrical connection. Position the power cable in its housing and secure the cable to the cable clamp (11a).
12. Apply the ues and x them with two 2 screws (12a) to the ue support bracket“G” (12b).
13. Slide the bottom section of the ue all the way over the extraction unit until it engages the seat above the hood.
Ret the grease lter(s).
Re-t the perimeter extraction panel
IMPORTANT: Always make sure the panel is rmly xed in place.
Check the hood operation, referring to the hood description and use section.
INSTALLATION - ASSEMBLY INSTRUCTIONS

GB14
1. Control panel.
2. Grease filters (over the perimeter extraction panel).
3. lamps.
4. Telescopic flue.
5. Perimeter extraction panel.
Control panel
1. Motor ON/OFF
2. Speed selection (increase/decrease)
Indicator lights:
a. running at minimum extraction speed
b. running at medium extraction speed
c. running at maximum extraction speed
d. running at intensive extraction speed
NB = the intensive extraction speed is timed for 5 minutes, after which the
motor will revert to medium speed.
3. Light ON/OFF
NB = control backlighting brightness increases when the function is in use.
DESCRIPTION AND USE OF HOOD
- Disconnect the appliance from the power supply
Cleaning the perimeter extraction panel
Removal:
pull the panel (FRONT) firmly downwards.
Cleaning:
Clean the extraction panel as often as the grease filter.
The steel of the extraction panel has iXelium surface treatment.
To clean it, proceed as follows:
• Use a soft cloth (preferably microfiber) wetted with water or with a normal glass cleaner.
• Do not use paper towels, as they may leave marks and bits of paper on the panel.
• Do not use abrasive, corrosive or chlorine-based products, or steel wool.
• Do not use steam equipment.
• Do not use flammable products.
• Do not leave acid or alkaline substances such as vinegar, mustard, salt, sugar or lemon juice on the panel.
DO NOT USE ALCOHOL!
Fitting:
The panel must be fixed at the front, fitted in the special pins on the hood.
IMPORTANT: Always make sure the panel is firmly fixed in place.
ATTENTION
MAINTENANCE
1
2
3
ab
c
d
F15
CONSIGNES DE SÉCURITÉ IMPORTANTES
Ces instructions sont également disponibles sur le site web : www.whirlpool.eu.
ACCORDEZ TOUJOURS LA PRIORITÉ À LA SÉCURITÉ.
D’importants messages relatifs à la sécurité gurent dans le présent manuel et sur l’appareil. Nous vous invitons à les lire attentivement et à les observer en
toute circonstance.
Ceci est le symbole de précaution sécuritaire. Il met en garde l’utilisateur et toute autre personne contre les risques potentiels dérivant de l’utilisation de
cet appareil.
Tous les avertissements concernant la sécurité sont précédés par le symbole de précaution et les termes suivants :
Indique une situation dangereuse qui, si elle n’est pas évitée, provoque des blessures graves.
Indique une situation dangereuse qui, si elle n’est pas évitée, est susceptible de provoquer des
blessures graves.
Tous les avertissements précisent le risque/danger auquel il est fait référence et indiquent comment réduire le risque de blessures, de dommages et de choc
électrique résultant d’une utilisation incorrecte de l’appareil. Conformez-vous aux instructions suivantes :
• L’installation ou la maintenance doit être réalisée par un technicien spécialisé, conformément aux instructions du fabricant et dans le respect des normes de
sécurité en vigueur dans le pays d’installation. Ne procédez à aucune réparation ni aucun remplacement de pièce sur l’appareil autres que ceux
spéciquement exigés dans le manuel d’utilisation.
• Débranchez l’appareil de l’alimentation électrique avant de procéder à l’installation.
• La mise à la terre de l’appareil est obligatoire. (Pas nécessaire pour les hottes aspirantes de classe II identiées par le symbole sur l’étiquette des
caractéristiques techniques.)
• Le cordon d’alimentation doit être assez long pour permettre le branchement de l’appareil sur la prise secteur.
• Ne tirez jamais sur le cordon d’alimentation pour débrancher l’appareil de la prise secteur.
• Une fois l’installation terminée, l’utilisateur ne devra plus pouvoir accéder aux composants électriques.
• Évitez de toucher l’appareil avec les mains mouillées et ne l’utilisez pas lorsque vous êtes pieds nus.
• Cet appareil peut être utilisé par des enfants âgés de 8 ans minimum ainsi que par des personnes aux capacités physiques, sensorielles ou mentales réduites
ou manquant d’expérience et de connaissances, à condition d’être surveillés ou instruits sur l’utilisation de l’appareil en toute sécurité et d’être conscients
des dangers encourus pendant l’utilisation. Les enfants ne doivent pas jouer avec l’appareil. Le nettoyage et la maintenance ne doivent pas être conés à
des enfants, sauf s‘ils sont surveillés par un adulte.
• Pour toute réparation ou tout remplacement de pièces, procédez uniquement aux opérations spéciées dans le manuel. Les pièces défectueuses doivent
être remplacées par des pièces authentiques. Toutes les autres opérations d’entretien sont du ressort exclusif d’un technicien spécialisé.
• Pour éviter que les enfants ne jouent avec l’appareil, ne les laissez pas sans surveillance à proximité de ce dernier.
• Lorsque vous devez percer dans un mur ou le plafond, prenez garde de ne pas endommager les raccordements électriques et/ou la tuyauterie.
• Les conduits d’évacuation doivent toujours acheminer les vapeurs/fumées vers l’extérieur.
• L’air évacué ne doit pas être acheminé via un conduit servant à l’évacuation des fumées d’appareils à gaz ou autres combustibles, mais doit être dirigé vers
une sortie indépendante. Respectez toutes les réglementations nationales relatives à l’évacuation des fumées.
Si la hotte est utilisée en même temps que des appareils alimentés au gaz ou autres combustibles, la dépression dans la pièce ne doit pas dépasser 4 Pa (4 x
10-5 bars). Pour cette raison, veillez à vous assurer que la pièce est correctement ventilée.
• Le fabricant décline toute responsabilité en cas de dommages résultant d’une utilisation impropre ou d’un réglage erroné des commandes.
• Un entretien et un nettoyage réguliers sont une garantie de bon fonctionnement et de bon rendement de l’appareil. Nettoyez régulièrement tous les dépôts
présents sur les surfaces sales pour éviter que les graisses ne s’accumulent. Enlevez et nettoyez ou remplacez fréquemment les ltres.
• Un non-respect des instructions de nettoyage de la hotte et de remplacement des ltres peut être à l’origine d’un incendie.
• La hotte aspirante ne doit jamais être ouverte sans que les ltres à graisse soient installés et elle doit être sous surveillance constante.
• Les appareils à gaz doivent être utilisés sous la hotte uniquement avec les casseroles posées dessus.
• Lorsque vous utilisez trois points de cuisson au gaz, la hotte doit fonctionner au niveau de puissance 2 ou plus. Ceci éliminera l’accumulation de chaleur
dans l’appareil.
• Assurez-vous que les ampoules sont froides avant de les toucher.
• N’utilisez pas ou ne laissez pas la hotte sans ampoules correctement montées, an d’éviter les risques de choc électrique.
• Munissez-vous de gants de travail avant d’eectuer toute opération d’installation et d’entretien.
• Cet appareil n’est pas conçu pour une utilisation à l’extérieur.
• Lorsque la table de cuisson est en cours d’utilisation, les parties accessibles de la hotte peuvent devenir très chaudes.
CONSERVEZ LE PRÉSENT LIVRET POUR TOUTE CONSULTATION FUTURE.
AVERTISSEMENT:
DANGER:
Déclaration de conformité
• Cet appareil a été conçu, fabriqué et commercialisé en conformité avec :
- les objectifs sécurité de la directive « Basse Tension » 2006/95/CE (en remplacement de la directive 73/23/CEE et amendements ultérieurs) ;
- les exigences d’écodesign des réglementations européennes 65/2014 et 66/2014, conformément à la norme européenne EN 61591
- les exigences de protection de la directive “CEM” 2004/108/EC.
La sécurité électrique de l’appareil est garantie uniquement lorsqu’il est correctement raccordé à une installation de mise à la terre approuvée.
Astuces d’économies d’énergi
•
Mettez la hotte en marche à la vitesse minimum quand vous commencez à faire cuire et laissez-la en marche pendant quelques minutes après la fin de la cuisson.
• Augmentez la vitesse uniquement en présence de grandes quantités de fumées et de vapeurs et réservez la ou les vitesses d’appoint aux cas extrêmes.
• Remplacez le ou les filtres de charbon si nécessaire pour maximiser la réduction des odeurs.
• Remplacez le ou les filtres à graisse si nécessaire pour maximiser la capture des graisses.
• Utilisez le diamètre maximum de canalisation indiqué dans ce manuel pour optimiser l’efficacité et minimiser le bruit.
F16
Après le déballage de l’appareil, vériez qu’il n’a pas été endommagé pendant le transport. En cas de problème, contactez le revendeur ou le service après-vente.
Pour éviter tout endommagement, attendez le moment de l’installation pour extraire l’appareil de son emballage en polystyrène.
PRÉPARATION EN VUE DE L’INSTALLATION
En raison de son poids élevé, la hotte doit être soulevée et installée par deux personnes au moins.
La distance minimum entre le support des ustensiles de cuisson placés sur la cuisinière et la partie inférieure de la hotte ne doit pas être inférieure à 50 cm pour
les cuisinières électriques et 65 cm pour les cuisinières au gaz ou mixtes. Avant de procéder à l’installation, vériez également les distances minimum spéciées
dans le manuel de la cuisinière. Si les instructions d’installation de la cuisinière spécient une distance supérieure entre la cuisinière et la hotte, cette distance
doit être observée.
RACCORDEMENT ÉLECTRIQU
Vériez que la tension électrique spéciée sur la plaque signalétique de l’appareil correspond à la tension de secteur. Cette information gure sur la partie
intérieure de la hotte, sous le ltre à graisses. Le remplacement du câble électrique (type H05 VV-F 3 x 0,75 mm²) doit être eectué par un électricien qualié.
Contactez un centre d’entretien agréé. Si la hotte est équipée d’une che électrique, branchez cette che sur une prise conforme aux réglementations en vigueur
et située à un emplacement accessible après l’installation. En l’absence de che (câblage direct sur le réseau électrique) ou si la prise n’est pas située à un
emplacement accessible, installez un interrupteur bipolaire normalisé permettant une coupure complète du réseau électrique en cas de surtension de
catégorie III, conformément aux réglementations sur le câblage.
RECOMMANDATIONS GÉNÉRALES
Avant utilisation
Retirez les protections en carton, les lms transparents et les étiquettes autocollantes présentes sur les accessoires. Vériez que l’appareil n’a pas été
endommagé pendant le transport.
Durant l’utilisation
Pour éviter tout endommagement, ne placez aucun poids sur l’appareil. Évitez d’exposer l’appareil aux agents atmosphériques.
AVERTISSEMENT:
Mise au rebut de l’emballage
Les matériaux d’emballage sont entièrement recyclables et portent le symbole de recyclage . L’emballage doit par conséquent être mis au rebut de façon
responsable et en conformité avec les réglementations locales en vigueur en matière d’élimination des déchets.
Mise au rebut de l’appareil
- Cet appareil porte le symbole du recyclage conformément à la Directive Européenne 2002/96/CE relative aux Déchets d’Équipements Électriques et
Électroniques (DEEE ou WEEE).
- En procédant correctement à la mise au rebut de cet appareil, vous contribuerez à éviter des conséquences nuisibles pour l’environnement et la santé de
l’homme.
- Le symbole apposé sur le produit ou sur la documentation qui l’accompagne indique que cet appareil ne doit pas être traité comme une ordure
ménagère mais doit être remis à un centre de collecte spécialisé dans le recyclage des appareils électriques et électroniques.
Mise au rebut des appareils ménagers usagé
• Cet appareil est fabriqué à partir de matériaux recyclables ou réutilisables. Mettez-le au rebut en vous conformant aux prescriptions locales en matière
d’élimination des déchets. Avant de mettre votre appareil au rebut, coupez le cordon d’alimentation.
• Pour toute information sur le traitement, la récupération et le recyclage des appareils électroménagers, contactez le service municipal compétent, le service
de collecte des déchets ménagers ou le revendeur de l’appareil.
MONTAGE
CONSEILS POUR LA PROTECTION DE L’ENVIRONNEMENT

F17
L'appareil ne fonctionne pas :
• Vérifiez qu'il n'y a pas de coupure de courant et que l'appareil est correctement branché.
• Éteignez puis rallumez l'appareil pour voir si le problème a été éliminé.
La hotte n'aspire pas suffisamment :
• Vérifiez que la vitesse d'aspiration est celle désirée ;
• Vérifiez que les filtres sont propres ;
• Vérifiez que les sorties de l'air ne sont pas obstruées.
L'ampoule ne fonctionne pas :
• Vérifiez s'il est nécessaire de remplacer l'ampoule ;
• Vérifiez si l'ampoule a été montée correctement.
Avant de faire appel au Service Après-vente :
1. Vérifiez d'abord s'il n'est pas possible de remédier par vous-même au défaut en suivant les points décrits au chapitre «Diagnostic des pannes».
2. Éteignez puis rallumez la hotte pour voir si le problème a été éliminé.
Si, après ces contrôles, le problème persiste, adressez-vous à votre Service Après-vente.
Veuillez toujours spécifier :
• une brève description du défaut;
• le type et le modèle exact de l'appareil;
• le code service (numéro suivant le mot «Service» sur la plaque signalétique), placé à l'intérieur de l'appareil. Le code service est également indiqué dans le
livret de garantie;
• votre adresse complète;
• votre numéro de téléphone;
Si l'appareil doit être réparé, adressez-vous à un Service Après-vente agréé (vous aurez ainsi la garantie que les pièces défectueuses seront remplacées par des
pièces d'origine et que la réparation de votre appareil sera effectuée correctement).
- Ne pas utiliser de dispositif à jets de vapeur.
- Débranchez l'appareil du secteur.
IMPORTANT : n'utilisez ni produits corrosifs ni détergents abrasifs. En cas de contact accidentel d'un tel produit avec l'appareil, essuyez-le
immédiatement à l'aide d'un chiffon humidifié.
IMPORTANT : L'acier de la hotte a subi un traitement de surface iXelium.
Pour le nettoyage procédez comme suit :
• Utilisez un linge doux (en microfibres si possible) mouillé d'eau ou d'un détergent normal pour vitres.
• Ne pas utiliser de mouchoirs en papier susceptibles de laisser des résidus ou des traces sur la hotte.
• Ne pas utiliser de produits abrasifs ou corrosifs, de produits à base de chlore ou de la paille de fer.
• Ne pas utiliser d'appareils de nettoyage à vapeur.
• Ne pas utiliser de produits inflammables.
• Evitez de laisser sur la hotte des substances acides ou alcalines comme le vinaigre, la moutarde, du sel, du sucre ou du jus de citron.
Utilisez des détergents spécifiques de nettoyage de l'appareil et respecter les instructions du fabricant
IMPORTANT : nettoyer les filtres au moins une fois par mois pour éliminer les résidus d'huile et de graisses.
AVERTISSEMENT:
DIAGNOSTIC DES PANNES
SERVICE APRÈS-VENTE
NETTOYAGE IXELIUM

F18
- munissez-vous de gants de travail.
- Débranchez l'appareil.
FILTRES À GRAISSES
Le filtre métallique à graisses a une durée illimitée et doit être lavé une fois par mois à la main ou au lavevaisselle à basse température et en sélectionnant un cycle court. Le lavage en lave-vaisselle peut opacifier
le filtre à graisses, mais son pouvoir filtrant n'en est pas pour autant altéré.
Sortez la poignée pour retirer le filtre.
Après l'avoir lavé et séché, procédez dans le sens contraire pour le remonter.
REMPLACER LES AMPOULES
La hotte est dotée d'un système d'éclairage basé sur la technologie LED.
Les LED garantissent un éclairage optimal, une durée de vie jusqu'à 10 fois supérieure aux ampoules traditionnelles et permettent d'économiser 90% d'énergie
électrique.
Pour le remplacement des ampoules, adressez-vous au Service Après-vente.
FILTRE À CHARBON
(seulement pour les modèles avec installation de filtration)
Il absorbe les odeurs désagréables issues de la cuisson.
Remplacez le filtre à charbon tous les 4 mois
Montage et remplacement du filtre à charbon
1. Débranchez la hotte du secteur.
2. Ouvrez et déposer le panneau d'aspiration.
3. Retirez les filtres à graisse.
4. Appliquez un filtre à charbon de chaque côté de façon à couvrir les grilles de
protection de l'hélice du moteur. Tournez les filtres dans le sens des aiguilles
d'une montre de façon à les bloquer sur les butées centrales.
Pour le démontage, procédez dans l'ordre inverse.
Remontez les filtres à graisse et le panneau d'aspiration.
AVERTISSEMENT:
ENTRETIEN

F19
La hotte est conçue pour être utilisée en "Version Aspiration" ou "Version Recyclage".
Remarque : le modèle avec valve électrique peut fonctionner uniquement en version "Aspirante" et le tuyau d'échappement doit être connecté à une unité
périphérique d'aspiration.
Version aspiration
Les vapeurs sont aspirées et rejetées à l'extérieur par un conduit d'évacuation (non fourni) fixé au raccord de sortie d'air de la hotte.
Prévoyez un système de fixation au raccord de sortie d'air adapté à votre tuyau d'évacuation.
REMARQUE IMPORTANTE : S'il(s) est/sont déjà installé/s, retirez le(s) filtre(s) au charbon.
Version Recyclage
L'air est filtré en passant à travers un/des filtre(s) à charbon, puis recyclé dans la pièce.
REMARQUE IMPORTANTE : Vérifiez que le recyclage de l'air s'effectue de façon aisée.
Si la hotte n'est pas dotée de filtre(s) au charbon, commandez-le(s) et montez-le(s) avant d'utiliser la hotte.
N'installez pas la hotte à proximité d'une zone très sale, d'une fenêtre, d'une porte ou d'une source de chaleur.
La hotte est équipée de tout le matériel nécessaire pour une installation sur la majeure partie des cloisons/plafonds. Il est nécessaire de s'adresser à un
technicien qualifié afin de s'assurer que le matériel est approprié au type de mur/plafond.
Suspensions latérales
Suspensions latérales
ligne centrale
65 cm (cuisinières à gaz ou mixtes)
50 cm (cuisinières électriques)
surface de la table de cuisson
1200 mm min (grand modèle 120cm)
900 mm min (grand modèle 90cm)
700 mm min (grand modèle 70cm)
600 mm min (grand modèle 60cm)
MATÉRIEL FOURNI AVEC L'APPAREIL
INSTALLATION - INSTRUCTIONS PRÉLIMINAIRES DE MONTAGE
DIMENSIONS D’INSTALLATION
Déballez tous les composants. Vériez qu’ils sont au complet.
• Hotte assemblée avec moteur, ampoules et ltres à graisses installés.
• Instructions de montage et d’utilisation
• Cheminées télescopiques
• 1 gabarit de montage
• 6 chevilles murales Ø 8mm
• 6 vis Ø 5x45
• 4 vis Ø 3,5x9,5
• Étrier de support des colonnes de hotte ou cheminées
• 1 déecteur (version recyclage)
• 2 vis Ø 2,9x6,5
• 4 vis Ø 4x8
• 4 vis Ø 3,5x6,5
• 2 vis Ø 2,9x6,5
• 2 rondelles
• 1 étrier de support de hotte

F20
Les instructions numérotées ci-dessous correspondent aux schémas numérotés que vous trouverez à la n de ce manuel.
Avant de procéder au montage :
- déposez le panneau d’aspiration “A” ;
- poussez vers la gauche le levier situé en bas du panneau
- décrochez le panneau des supports
- déposez le(s) ltre(s) à graisses
puis
- retirez le ruban de xation du boîtier de commande électronique “S” sur le capotage du moteur ;
- Serrez à fond les vis, déjà partiellement serrées, de xation du boîtier de commande électronique “S”sur le capotage du moteur.
Remarque : le boîtier “S” pourrait être temporairement xé sur le capotage du moteur. L’image est purement indicative.
1. Pour faciliter l’installation, tracez une ligne sur le mur jusqu’au plafond correspondant à l’axe de symétrie de la hotte.
2. Appliquez le schéma de perçage sur le mur : la ligne verticale de centrage imprimée sur le schéma de perçage doit correspondre à la ligne de centrage
dessinée sur le mur. En outre, le bord inférieur du schéma de perçage doit correspondre au bord inférieur de la hotte.
3. Posez le support de xation inférieur sur le schéma de perçage de sorte qu’il coïncide avec le rectangle en traitillés, marquez les deux trous extérieurs et
percez.
Remarque : Eectuez toujours tous les trous indiqués sur le gabarit : les 2 supérieurs servent à accrocher la hotte alors que ceux inférieurs (généralement 1
central ou plusieurs latéraux) servent à la xation dénitive et de sûreté.
Retirez le schéma de perçage, introduisez les chevilles murales et xez la patte d’accrochage de la hotte avec 2 vis de 5 x 45 mm.
4. Appliquez l’étrier de support des colonnes de hotte ou cheminées “G“ sur le mur en contact avec le plafond, en suivant le schéma de perçage (la petite fente
sur le support doit être en face de la ligne de centrage précédemment tracée sur le mur). Marquez au crayon l’emplacement des 2 trous, percez les trous (Ø
8 mm) et introduisez 2 chevilles.
5. Fixez l’étrier de support des colonnes de hotte ou cheminées sur le mur à l’aide de 2 vis 5x45 mm.
6. Accrochez la hotte à l’étrier de support inférieur.
7. Réglez la distance entre la hotte et le mur.
8. Redressez la hotte de manière à ce qu’elle soit bien à l’horizontale.
9. Fixez dénitivement la hotte au mur (OBLIGATOIRE !).
10. Eectuez le raccordement d'un conduit d'évacuation des fumées (le conduit et les colliers de xation ne sont pas fournis et doivent donc être achetés
séparément) à la buse de raccordement située au-dessus du groupe moteur d'aspiration. En cas d'utilisation de la hotte en version aspiration, raccordez
l'autre extrémité du conduit à un système d'évacuation des fumées vers l'extérieur. Si vous souhaitez utiliser la hotte en version recyclage, déposez le clapet
anti-refouleur "E", xez le déecteur “F”(à régler en fonction de la largeur de la cheminée) à l'étrier de support des colonnes de hotte ou cheminées “G” et
raccordez l'autre extrémité du conduit à la buse de raccordement située sur le déecteur “F”.
11. Eectuez le branchement électrique. Passez le cordon d’alimentation dans son logement et retenez-le à l’aide du serre-ls (11a).
12. Installez les colonnes de hotte ou cheminées et xez-les à l’aide de 2 vis (12a) à l’étrier de support des colonnes de hotte ou cheminées G (12b).
13. Faites glisser la partie inférieure de la colonne de hotte ou cheminée sur le groupe d’aspiration jusqu’à le recouvrir complètement et introduisez-le dans le
logement prévu à cet eet, au-dessus de la hotte.
Remontez le(s) ltre(s) à graisses.
Remontez le panneau d’aspiration.
IMPORTANT : vériez toujours que le panneau est correctement xé dans sa position dénitive.
Vériez le fonctionnement de la hotte dans le paragraphe Description et utilisation de la hotte.
INSTALLATION - INSTRUCTIONS DE MONTAGE

F21
1. Bandeau de commandes.
2. Filtres antigraisse (au-dessus du panneau d'aspiration périmétral).
3. Ampoules.
4. Cheminée télescopique.
5. Panneau d'aspiration périmétral.
Bandeau de commande
1. ON/FF moteur
2. Sélection de la vitesse (augmentation/diminution)
Voyants lumineux
a. Vitesse d’aspiration minimale courante
b. Vitesse d’aspiration moyenne courante
c. Vitesse d’aspiration maximale courante
d. Vitesse d’aspiration intensive courante
NB = la vitesse d’aspiration intensive est temporisée et réglée sur 5 minutes,
ensuite le moteur revient à la vitesse moyenne.
3. Interrupteur d’éclairage
NB = l’intensité du rétroéclairage des commandes augmente quand la fonction est utilisée.
DESCRIPTION ET UTILISATION DE LA HOTTE
- Débranchez l'appareil du secteur
Nettoyage du panneau d'aspiration périmétral
Démontage :
tirez le panneau (CÔTÉ AVANT) fortement vers le bas.
Nettoyage :
Nettoyez le panneau d'aspiration périmétral aussi souvent que le filtre à graisses.
L'acier du panneau d'aspiration a subi un traitement de surface iXelium.
Pour le nettoyage procédez comme suit :
• Utilisez un linge doux (en microfibres si possible) mouillé d'eau ou d'un détergent normal pour
vitres.
• Ne pas utiliser de mouchoirs en papier susceptibles de laisser des résidus ou des traces sur le panneau.
• Ne pas utiliser de produits abrasifs ou corrosifs, de produits à base de chlore ou de la paille de fer.
• Ne pas utiliser d'appareils de nettoyage à vapeur.
• Ne pas utiliser de produits inflammables.
• Evitez de laisser sur le panneau des substances acides ou alcalines comme le vinaigre, la moutarde, du sel, du sucre ou du jus de citron.
L'ALCOOL EST À EXCLURE ABSOLUMENT !
Montage :
Le panneau doit être fixé à l'avant en l'encastrant sur les goujons prévus à cet effet sur la surface de la hotte.
IMPORTANT : Vérifiez toujours que le panneau est correctement fixé dans sa position définitive.
AVERTISSEMENT:
ENTRETIEN
1
2
3
ab
c
d

BELANGRIJKE VEILIGHEIDSINSTRUCTIES
Deze instructies zijn ook beschikbaar op de website: www.whirlpool.eu.
UW VEILIGHEID EN DIE VAN ANDEREN IS UITERST BELANGRIJK.
Deze handleiding en het apparaat zelf zijn voorzien van belangrijke veiligheidsaanwijzingen, die te allen tijde moeten worden gelezen en opgevolgd.
Dit is het waarschuwingssymbool waarmee mogelijke risico’s voor de gebruiker en voor anderen worden aangegeven.
Alle veiligheidswaarschuwingen komen na het waarschuwingssymbool en de volgende tekst:
geeft een gevaarlijke situatie aan, die ernstig letsel veroorzaakt als deze niet wordt vermeden.
geeft een gevaarlijke situatie aan, die ernstig letsel zou kunnen veroorzaken als deze niet wordt
vermeden.
Alle veiligheidswaarschuwingen speciceren het mogelijke gevaar/risico dat aanwezig is en geven aan hoe het risico op letsel, schade en elektrische schokken
voortvloeiend uit het onjuiste gebruik van het apparaat beperkt kan worden. Houd u aan de volgende instructies:
• De installatie moet worden uitgevoerd door een gespecialiseerde monteur volgens de instructies van de fabrikant en in overeenstemming met de
plaatselijke veiligheidsvoorschriften. Repareer of vervang geen enkel onderdeel van het apparaat, behalve als dit expliciet aangegeven wordt in de
gebruikershandleiding.
• Het apparaat moet worden losgekoppeld van het elektriciteitsnet voordat u installatiewerkzaamheden uitvoert.
• Dit apparaat moet worden geaard. (Niet noodzakelijk voor afzuigkappen van klasse II geïdenticeerd door het symbool op het etiket met specicaties).
• De voedingskabel moet lang genoeg zijn om het apparaat aan te kunnen sluiten op het stopcontact.
• Trek niet aan de voedingskabel om de stekker uit het stopcontact te halen.
• Na de installatie mogen de elektrische onderdelen niet meer toegankelijk zijn voor de gebruiker.
• Raak het apparaat niet aan met vochtige lichaamsdelen en gebruik het niet op als u op blote voeten loopt.
• Dit apparaat mag uitsluitend gebruikt worden door kinderen ouder dan 8 jaar en personen met beperkte lichamelijke, zintuiglijke of verstandelijke
vermogens of met onvoldoende ervaring en kennis indien zij onder toezicht staan of geleerd hebben hoe het apparaat veilig gebruikt moet worden en zij
zich bewust zijn van de gevaren die het met zich meebrengt. Kinderen mogen niet met het apparaat spelen. Reiniging en onderhoud mogen niet
uitgevoerd worden door kinderen, tenzij zij onder toezicht staan van volwassenen.
• Repareer of vervang geen enkel onderdeel van het apparaat, tenzij dit speciek wordt aangegeven in de handleiding. Defecte onderdelen moeten
vervangen worden door originele onderdelen. Alle andere onderhoudswerkzaamheden moeten worden uitgevoerd door een gespecialiseerde monteur.
• Kinderen moeten in de gaten gehouden worden, om te voorkomen dat ze met het apparaat gaan spelen.
• Let er bij het boren van gaten in de muur op dat u geen elektrische aansluitingen of leidingen beschadigt.
• De ventilatiekanalen moeten altijd naar buiten gericht zijn.
• De afgevoerde lucht mag niet worden geloosd in een kanaal dat wordt gebruikt voor de afvoer van rookgassen afkomstig van toestellen op verbranding van
gas of andere brandstoen, maar moet een eigen uitgang hebben. Alle landelijke voorschriften inzake rookafvoer moeten worden nageleefd.
• Wanneer de afzuigkap tegelijk wordt gebruikt met toestellen die op gas of andere brandstoen werken, mag de onderdruk in het vertrek 4 Pa (4 x 10⁻⁵
bar) niet overschreden worden. Zorg er daarom voor dat de ruimte voldoende geventileerd is.
• De fabrikant wijst elke aansprakelijkheid af voor oneigenlijk gebruik van het apparaat of verkeerde instellingen van de bedieningselementen.
• Regelmatig onderhoud en reiniging van het apparaat is de beste garantie voor een goede werking en optimale prestaties. Reinig regelmatig het
aangekoekte vuil van de oppervlakken om vetophoping te vermijden. Reinig of vervang de lters regelmatig.
• Als de aanwijzingen voor het schoonmaken van de afzuigkap, en voor het vervangen van de lters niet worden opgevolgd, kan dat brand veroorzaken.
• De afzuigkap mag nooit geopend worden als de vetlters niet geïnstalleerd zijn en moet constant in de gaten gehouden worden.
• Gasapparaten mogen uitsluitend onder de afzuigkap gebruikt worden als er pannen op staan.
• Bij het gebruik van meer dan drie gasbranders moet het vermogensniveau 2 of hoger zijn. Zo wordt oververhitting in het apparaat afgevoerd.
• Controleer of de lampjes voldoende afgekoeld zijn, voordat u ze aanraakt.
• De kap mag niet zonder correct gemonteerde lampjes worden gebruikt of achtergelaten - gevaar voor een elektrische schok.
• Draag bij alle installatie- en onderhoudswerkzaamheden werkhandschoenen.
• Het product is niet geschikt voor gebruik buitenshuis.
• Wanneer de kookplaat in gebruik is, kunnen de toegankelijke delen van de afzuigkap heet worden.
BEWAAR DIT BOEKJE, ZODAT U HET LATER NOG EENS KUNT RAADPLEGEN.
WAARSCHUWING:
GEVAAR:
NL22

NL23
Controleer het apparaat, nadat u het hebt uitgepakt, op eventuele transportschade. Neem in geval van problemen contact op met de dealer of de dichtstbijzijnde
Klantenservice. Om eventuele schade te voorkomen wordt geadviseerd om de oven pas vlak voor de installatie van de piepschuim bodem te halen.
VOORBEREIDING VOOR DE INSTALLATIE
dit is een zwaar product; de afzuigkap mag alleen door twee of meer personen worden opgetild en
geïnstalleerd.
De minimumafstand tussen de pannen op de kookplaat en de onderkant van de afzuigkap mag niet minder dan 50 cm bedragen bij elektrische kookplaten en
65 cm voor kookplaten op gas of gemengde kookplaten. Controleer bovendien de afstanden die in de handleiding van de kookplaat zijn vermeld, voordat u de
kap installeert. Indien de installatie-instructies van de kookplaat een grotere afstand voorschrijven, dan dient u zich daar aan te houden.
ELEKTRISCHE AANSLUITIN
Controleer of de elektrische spanning die aangegeven staat op het typeplaatje van het apparaat overeenkomt met de voedingsspanning van uw woning.
U kunt deze informatie vinden op de binnenkant van de kap, onder het vetlter. Vervanging van de voedingskabel (type H05 VV-F 3 x 0,75 mm²) moet
uitgevoerd worden door een erkend elektricien. Wendt u tot een erkend servicecentrum. Indien de kap is voorzien van een stekker, dan moet deze na de
installatie worden aangesloten op een toegankelijk stopcontact dat aan de geldende voorschriften voldoet. Als de kap geen stekker heeft (directe aansluiting op
het elektriciteitsnet) of als de stekker zich niet op een toegankelijke plek bevindt, dient u een tweepolige schakelaar te installeren die aan de geldende
voorschriften voldoet en die de volledige loskoppeling van het elektriciteitsnet in de overspanningscategorie III garandeert, in overeenstemming met de
installatievoorschriften.
ALGEMENE AANBEVELINGEN
Vóór het gebruik
Verwijder de kartonnen beschermingen, transparante folie en stickers van de accessoires. Controleer het apparaat op eventuele transportschade.
Tijdens het gebruik
Zet geen zware dingen op het apparaat om beschadiging te voorkomen. Stel het apparaat niet bloot aan weersinvloeden.
WAARSCHUWING:
Weggooien van de verpakking
Het verpakkingsmateriaal is 100% recyclebaar, zoals aangegeven wordt door het recyclingsymbool . De diverse onderdelen van de verpakking mogen
daarom niet bij het gewone huisvuil worden weggegooid, maar moeten worden afgevoerd volgens de plaatselijke voorschriften.
Afvalverwerking van het product
- Dit apparaat is voorzien van het merkteken volgens de Europese richtlijn 2002/96/EG inzake Afgedankte Elektrische en Elektronische Apparatuur (AEEA).
- Door ervoor te zorgen dat dit product op de juiste manier als afval wordt verwerkt, helpt u mogelijk schadelijke gevolgen voor het milieu en de gezondheid
te voorkomen, die veroorzaakt zouden kunnen worden door onjuiste verwerking van dit product als afval.
- Het symbool op het product of op de begeleidende documentatie geeft aan dat dit apparaat niet als huishoudelijk afval behandeld mag worden,
maar naar een speciaal verzamelpunt voor recycling van elektrische en elektronische apparatuur moet worden gebracht.
Afdanken van huishoudelijke apparate
• Dit product is vervaardigd van recyclebare of herbruikbare materialen. Dank het apparaat af in overeenstemming met plaatselijke milieuvoorschriften voor
afvalverwerking. Snij de voedingskabel door voordat u het apparaat afdankt.
• Voor meer informatie over behandeling, terugwinning en recycling van dit apparaat kunt u contact opnemen met uw plaatselijke instantie, de
vuilnisophaaldienst of de winkel waar u dit product hebt gekocht.
INSTALLATIE
MILIEUTIPS
verklaring van overeenstemming
• Dit apparaat is ontwikkeld, geproduceerd en in de handel gebracht in overeenstemming met:
- veiligheidsvoorschriften van de “Laagspanningsrichtlijn” 2006/95/EG (die de richtlijn 73/23/EEG en latere verordeningen vervangt);
- de vereisten voor ecologisch ontwerp van de Europese voorschriften nr. 65/2014, en nr. 66/2014 in overeenstemming met de Europese norm EN 61591;
- de beschermingsvereisten van de Richtlijn “EMC” 2004/108/EC.
De elektrische veiligheid van het apparaat is alleen gegarandeerd wanneer het op de juiste wijze op een efficiënt werkende installatie is aangesloten, die
volgens de wettelijke voorschriften is geaard.
Tips om energie te bespare
• Schakel de afzuigkap in op de minimumsnelheid wanneer u met koken begint en laat hem nog enkele minuten na het beëindigen van het koken werken.
• Verhoog de snelheid alleen in geval van grote hoeveelheden rook en damp en gebruik de hoogste snelheid (snelheden) alleen in extreme omstandigheden.
• Vervang het/de koolstoffilter(s) wanneer dat nodig is om onaangename luchtjes efficiënt te laten afvoeren.
• Maak de/het vetfilter(s) schoon wanneer dat nodig is om de efficiënte van het vetfilter te behouden.
• Gebruik voor de buizen van het afvoersysteem de maximale diameter zoals aangegeven in deze handleiding om de efficiëntie te optimaliseren en het lawaai
te minimaliseren.

NL24
- Gebruik geen stoomreinigers.
- Koppel het apparaat los van het elektriciteitsnet.
BELANGRIJK: gebruik geen bijtende of schurende reinigingsmiddelen. Als een dergelijk product per ongeluk in contact komt met het
apparaat, verwijder het dan onmiddellijk met een vochtig doekje.
BELANGRIJK: Het staal van de kap heeft een oppervlaktebewerking ondergaan met iXelium.
Ga voor het reinigen ervan dus als volgt te werk:
• Gebruik een zachte doek (het best is een doek van microvezels) nat gemaakt met water of met een normale glasreiniger.
• Het gebruik van papieren doekjes wordt afgeraden omdat deze papierresten en strepen op het paneel kunnen achterlaten.
• Gebruik geen schurende of corrosieve producten, producten op basis van chloor of schuursponsjes.
• Gebruik geen stoomreinigers.
• Gebruik geen ontvlambare producten.
• Laat geen zure of alkalische substanties zoals azijn, mosterd, zout, suiker of citroensap achter op de kap.
Gebruik specifieke reinigingsmiddelen om het apparaat schoon te maken en houd u aan de aanwijzingen van de Fabrikant
BELANGRIJK: reinig de filters minstens eenmaal per maand om restanten olie en vet te verwijderen.
WAARSCHUWING:
REINIGING IXELIUM
Het apparaat werkt niet:
• Controleer de hoofdstroomtoevoer en of het apparaat op de elektrische voeding is aangesloten.
• Schakel het apparaat uit en weer in om te zien of de storing zich voor blijft doen.
Het afzuigvermogen van de kap is onvoldoende:
• Controleer de afzuigsnelheid en pas deze zo nodig aan.
• Controleer of de filters schoon zijn.
• Controleer de ventilatieopeningen op eventuele verstoppingen.
De verlichting werkt niet;
• Controleer het lampje en vervang dit indien nodig.
• Controleer of het lampje correct gemonteerd is.
Alvorens de Klantenservice in te schakelen:
1. Probeer het probleem zelf op te lossen aan de hand van de suggesties in de “Gids voor het oplossen van problemen”.
2. Schakel het apparaat uit en weer in om te zien of de storing zich voor blijft doen.
Neem, als de storing zich na bovenvermelde suggesties voor blijft doen, contact op het de dichtstbijzijnde Klantenservice.
Geef daarbij altijd het volgende aan:
• Een korte omschrijving van de storing;
• Het exacte type en model van het apparaat;
• Het servicenummer (nummer na het woord “Service” op het typeplaatje), dat zich op de binnenkant van het apparaat bevindt. Het servicenummer is ook
aangegeven in het garantieboekje;
• Uw volledige adres;
• Uw telefoonnummer.
Neem, indien reparaties noodzakelijk zijn, contact op met een erkende Klantenservice (om er zeker van te zijn dat er originele vervangingsonderdelen
worden gebruikt en de reparatie correct wordt uitgevoerd).
OPSPOREN VAN STORINGEN
KLANTENSERVICE

NL25
- draag beschermende handschoenen.
- koppel het apparaat los van het elektriciteitsnet.
VETFILTERS
Het metalen vetfilter heeft een onbeperkte levensduur en moet eens per maand met de hand of in de
afwasmachine (kort programma met lage temperatuur) afgewassen worden. Het kan zijn dat het vetfilter
in de afwasmachine glans verliest en mat wordt, maar dit heeft beslist geen nadelige invloed op het
filtervermogen.
Trek aan de handgreep om het filter eruit te halen.
Voer bovenstaande handelingen in omgekeerde volgorde uit om het schoongemaakte en goed
afgedroogde filter opnieuw te monteren.
VERVANGEN VAN DE LAMPJES
De afzuigkap is uitgerust met een verlichtingssysteem met ledtechnologie.
De ledlampjes zorgen voor een optimale verlichting, gaan tien keer langer mee dan gewone lampjes en zorgen voor 90% energiebesparing.
Neem contact op met de klantenservice voor vervanging van de lampjes.
KOOLSTOFFILTER
(uitsluitend voor modellen met luchtcirculatie)
houdt onaangename bereidingsluchtjes vast.
Vervang het koolstoffilter om de 4 maanden
Montage of vervangen van het koolstoffilter
1. Koppel de afzuigkap los van het elektriciteitsnet.
2. Open het afzuigpaneel en verwijder het uit zijn zitting.
3. Verwijder het vetfilter.
4. Breng aan beide kanten een koolstoffilter aan, zodat beide beschermingsroosters
van de rotor van de motor afgedekt zijn. Draai de filters naar rechts om ze aan de
centrale pennen te vergrendelen.
Ga voor demontage in omgekeerde volgorde te werk.
Monteer het vetfilter en het afzuigpaneel weer.
WAARSCHUWING:
ONDERHOUD

NL26
De afzuigkap is ontworpen om als "model met luchtafvoer naar buiten" of als "model met luchtcirculatie" geïnstalleerd en gebruikt te worden.
Opmerking: het model met elektrische klep kan alleen als "model met luchtafvoer naar buiten" werken en de afvoerpijp moet op een randafzuigapparaat
worden aangesloten.
Model met luchtafvoer naar buiten
Damp en stoom worden naar buiten afgezogen door een (niet-bijgeleverde) afvoerpijp die op het verbindingsstuk van de luchtuitlaat van de kap wordt
bevestigd.
Op basis van de aangeschafte afvoerpijp moet voor een goed bevestigingssysteem aan het verbindingsstuk van de luchtuitlaat worden gezorgd.
BELANGRIJK: Als het/de koolstoffilter(s) al geïnstalleerd is/zijn moet(en) dit/ze worden verwijderd.
Model met luchtcirculatie
De lucht wordt door het/de koolstoffilter(s) gefilterd en in de omliggende ruimte gerecycled.
BELANGRIJK: Controleer of de recirculatie van de lucht goed verloopt.
Als de kap geen koolstoffilter(s) heeft, dient dit/dienen ze te worden besteld; pas nadat het/de filter(s) is/zijn gemonteerd mag de kap in
gebruik worden genomen.
De installatie van de afzuigkap moet uit de buurt van zeer vuile plaatsen, ramen, deuren en warmtebronnen uitgevoerd worden.
Bij de afzuigkap is al het benodigde materiaal voor installatie op de meeste gangbare wanden/plafonds bijgeleverd. Er moet echter contact opgenomen worden
met een gekwalificeerd technicus om u ervan te verzekeren dat de materialen geschikt zijn voor het type wand/plafond.
Hangkastjes aan de
zijkant
Hangkastjes aan de
zijkant
middellijn
65 cm (kooktoestellen op gas of gemengd)
50 cm (elektrische kooktoestellen)
oppervlak van de kookplaat
min. 1200 mm (groot model 120 cm)
min. 900 mm (groot model 90 cm)
min. 700 mm (groot model 70 cm)
min. 600 mm (groot model 60 cm)
BIJGELEVERD MATERIAAL
INSTALLATIE - VOORBEREIDENDE MONTAGE-INSTRUCTIES
INSTALLATIE-AFMETINGEN
Haal alle onderdelen uit de verpakkingen. Controleer of alle onderdelen aanwezig zijn.
• Gemonteerde afzuigkap met motor, lampjes en vetlters geïnstalleerd.
• Montage- en gebruiksinstructies
• Uitschuifbare schouw
• 1 Montageschema
• 6 wandpluggen Ø 8 mm
• 6 schroeven Ø 5x45
• 4 schroeven Ø 3,5 x 9,5
• Steunproel voor de schouw
• 1 luchtstroomrichter (voor uitvoering met recirculatie)
• 2 schroeven Ø 2,9 x 6,5
• 4 schroeven Ø 4 x 8
• 4 schroeven Ø 3,5 x 9,5
• 2 schroeven Ø 2,9 x 6,5
• 2 ringen
• 1 steunproel voor de kap

NL27
De genummerde instructies hieronder hebben betrekking op de tekeningen op de laatste bladzijden van deze handleiding, waarin u de nummers terugvindt.
Alvorens met de fasen van installatie te beginnen:
- verwijder het afzuigpaneel langs de omtrek “A”;
- duw het hendeltje dat op het onderste deel van het paneel zit naar links
- maak het paneel los van de steunen
- verwijder de vetlter(s)
vervolgens
- verwijder de band waarmee het doosje met elektronica “S op de motorbehuizing is bevestigd;
- haal de eerder gedeeltelijk vastgedraaide schroeven, waarmee het doosje met de elektronica “S” bevestigd is aan de motorbehuizing, volledig aan.
Opmerking: het doosje “S” zou tijdelijk vastgemaakt kunnen zijn boven of aan de zijkanten van de motorbehuizing, de afbeelding is zuiver indicatief bedoeld.
1. Trek met een potlood een lijn op de wand, tot aan het plafond, die overeenkomt met de middellijn van de kap; dit vergemakkelijkt de installatie
2. Breng het boorschema aan op de muur: de verticale middenlijn op het boorschema moet gelijk lopen met de middenlijn die u op de wand hebt getekend.
Bovendien moet de onderste rand van het boorschema samenvallen met de onderste rand van de afzuigkap.
3. Breng het steunproel aan op het boorschema waarbij u het laat samenvallen met de rechthoek van de stippellijn, teken de twee buitenste gaten en boor
ze.
Opmerking: Boor altijd alle op het schema aangegeven gate”: de 2 bovenste gaten dienen voor het ophangen van de kap, terwijl de onderste gaten (over het
algemeen 1 in het midden of meer aan de zijkanten) dienen voor de denitieve bevestiging en de beveiliging.
Verwijder het boorschema, steek de pluggen in de gaten in de muur en bevestig het steunproel van de afzuigkap met 2 schroeven van 5 x 45 mm.
4. Breng het steunproel voor de schouw “G” tegen het plafond op de wand aan. Gebruik het steunproel als boorschema (het kleine gaatje in het
steunproel, indien aanwezig, moet samenvallen met de lijn die u eerder op de wand getekend hebt) en teken met het potlood 2 gaten. Boor de gaten (Ø 8
mm), steek er 2 pluggen in.
5. Bevestig het steunproel voor de schouw aan de wand met 2 schroeven van 5x45 mm.
6. Hang de kap op aan de het onderste proel
7. Regel de afstand van de afzuigkap tot de muur.
8. Stel de horizontale ophanging van de kap bij.
9. Bevestig de kap denitief aan de wand (VERPLICHT!!).
10. Sluit een afvoerbuis aan op de koppelingsring boven de afzuigmotor (buis en bevestigingsringen niet bijgeleverd, moeten apart aangeschaft worden). Bij
een afzuigende werking moet het andere uiteinde van de afvoerbuis op de afvoerinrichting naar buiten worden aangesloten. In het geval dat u de kap met
luchtcirculatie wilt gebruiken, moet de terugslagklep voor de dampen 'E' worden verwijderd, het steunproel van de schouw 'G' worden bevestigd aan de
luchtstroomrichter 'F' die op basis van de breedte van de schouw moet worden afgesteld en moet aan het andere uiteinde van de buis de koppelingsring op
de luchtstroomrichter 'F' worden bevestigd.
11. Breng de elektrische aansluiting tot stand Voer de voedingskabel door de daarvoor bedoelde zitting en zet hem vast met de kabelklem (11a).
12. Breng de schouw aan en bevestig deze aan de bovenkant met 2 schroeven (12a) aan het steunproel van de schouw G (12b).
13. Laat het onderste gedeelte van de schouw volledig over het afzuigelement glijden, totdat het op zijn plaats boven de kap zit.
Monteer het/ de vetlter(s) weer.
Monteer het afzuigpaneel rond de omtrek weer
BELANGRIJK: controleer altijd of het paneel goed op zijn plaats is bevestigd.
Controleer of de afzuigkap goed werkt aan de hand van de paragraaf Beschrijving en gebruik van de afzuigkap.
INSTALLATIE - MONTAGE-INSTRUCTIES

NL28
1. Bedieningspaneel.
2. Vetfilter (boven het afzuigpaneel om de kap heen).
3. Lampjes.
4. Uitschuifbare schouw.
5. Afzuigpaneel om de kap heen.
Bedieningspaneel
1. ON/FF motor
2. snelheidsselectie (toe- of afname)
lampjes:
a. laagste afzuigsnelheid aan
b. normale afzuigsnelheid aan
c. hoogste afzuigsnelheid aan
d. intensieve afzuigsnelheid aan
NB = de intensieve afzuigsnelheid is ingesteld op 5 minuten. Daarna keert de
motor terug naar de normale snelheid.
3. ON/OFF verlichting
NB = de achtergrondverlichting van de bedieningen wordt sterker wanneer de functie in gebruik is.
BESCHRIJVING EN GEBRUIK VAN DE AFZUIGKAP
- Koppel het apparaat los van de netvoeding
Reiniging van het afzuigpaneel om de kap heen
Demontage:
trek het paneel (VOORKANT) krachtig omlaag.
Reiniging:
Het afzuigpaneel moet net zo vaak schoongemaakt worden als het vetfilter.
Het staal van het afzuigpaneel heeft een oppervlaktebewerking ondergaan met iXelium.
Ga voor het reinigen ervan dus als volgt te werk:
• Gebruik een zachte doek (het best is een doek van microvezels) nat gemaakt met water of met een
normale glasreiniger.
• Het gebruik van papieren doekjes wordt afgeraden omdat deze papierresten en strepen op het paneel kunnen achterlaten.
• Gebruik geen schurende of corrosieve producten, producten op basis van chloor of schuursponsjes.
• Gebruik geen stoomreinigers.
• Gebruik geen ontvlambare producten.
• Laat geen zure of alkalische substanties zoals azijn, mosterd, zout, suiker of citroensap achter op de kap.
GEBRUIK GEEN ALCOHOL!
Montage :
Het paneel moet aan de voorkant worden bevestigd door het op de pinnen op de afzuigkap te drukken.
BELANGRIJK: Controleer altijd of het paneel goed op zijn plaats bevestigd is.
WAARSCHUWING:
ONDERHOUD
1
2
3
ab
c
d

INSTRUCCIONES DE SEGURIDAD IMPORTANTES
Estas instrucciones también estarán disponibles en el sitio web: www.whirlpool.eu.
SU SEGURIDAD Y LA DE LOS DEMÁS ES MUY IMPORTANTE.
Este manual y el propio aparato contienen advertencias de seguridad, que se deben leer y seguir en todo momento.
Este símbolo de atención, relacionado con la seguridad, alerta a los usuarios sobre peligros potenciales para el usuario y para los demás.
Todas las advertencias de seguridad van precedidas del símbolo de alerta y el texto siguiente:
Indica una situación peligrosa que, si no se evita, provoca lesiones graves.
Indica una situación peligrosa que, si no se evita, podría provocar lesiones graves.
Todos los mensajes relativos a la seguridad especican el potencial peligro/aviso al que se reeren e indican cómo disminuir el riesgo de lesiones, daños y
descargas eléctricas derivados de un uso incorrecto del aparato. Respete las siguientes instrucciones:
• La instalación debe ser efectuada por un técnico especializado, según las instrucciones del fabricante y respetando las normas locales vigentes. No realice
reparaciones ni la sustitución de piezas del aparato que no se solicite especícamente en el manual de usuario.
• El aparato ha de desconectarse de la red eléctrica antes de efectuar cualquier trabajo de instalación.
• La puesta a tierra del aparato es obligatoria. No es necesaria para las campanas de clase II, identicadas con el símbolo en la etiqueta de
especicaciones.
• El cable de alimentación ha de ser lo sucientemente largo para poder conectar el aparato a la toma de corriente.
• No tire del cable de alimentación del aparato para desenchufarlo de la corriente.
• Una vez concluida la instalación, los componentes eléctricos deben quedar fuera del alcance del usuario.
• No toque el aparato con partes del cuerpo húmedas y no lo utilice con los pies descalzos.
• Este aparato puede ser utilizado por niños de más de 8 años y por personas con minusvalía física, sensorial o mental, o sin la experiencia y los
conocimientos necesarios, salvo que estén supervisados o hayan recibido instrucciones acerca del uso del aparato en condiciones seguras y conozcan los
peligros que conlleva su uso. No permita que los niños jueguen con el aparato. La limpieza y el mantenimiento no deben ser efectuados por niños, a menos
que estén supervisados por adultos.
• No repare ni cambie ningún componente del aparato salvo que se indique expresamente en el manual. Sustituya las piezas defectuosas con piezas de
recambio originales. Todos los otros servicios de mantenimientos deben ser realizados por un técnico especializado.
• Hay que vigilar a los niños para asegurarse de que no jueguen con el aparato.
• Al taladrar la pared o el techo, tenga cuidado para no dañar las conexiones eléctricas y/o tuberías.
• Los canales para la ventilación deben evacuar siempre al aire libre.
• El aire de salida no deberá ser expulsado por un conducto para la salida de humos producidos por aparatos de gas u otros materiales combustibles, sino que
deberá tener una salida diferente. Se deberá respetar todas las normativas nacionales referentes a la extracción de humos.
• Si la campana se utiliza junto con otros aparatos que emplean gas u otros combustibles, la presión negativa del local no ha de ser superior a 4 Pa (4 x 10⁻⁵
bares). Por esta razón, asegúrese de que el local dispone de ventilación adecuada.
• El fabricante declina cualquier responsabilidad por el uso indebido o por una programación incorrecta de los mandos.
• El mantenimiento y la limpieza constantes garantizan el correcto funcionamiento y las mejores prestaciones del aparato. Elimine con frecuencia las
incrustaciones de suciedad en las supercies para evitar la acumulación de grasa. Quite y limpie el ltro a menudo y cámbielo con frecuencia.
• Si no se respetan las instrucciones para limpiar la campana y cambiar los ltros, se puede provocar un incendio.
• No abra nunca el extractor si no están instalados los ltros antigrasa y supervisado en todo momento.
• Los aparatos de gas solo deben utilizarse debajo de una campana extractora con ollas encima.
• Cuando se usan más de tres quemadores de gas, la campana extractora debe utilizarse con el nivel de potencia 2. De este modo se elimina la acumulación
de calor en el aparato.
• Antes de tocar las bombillas, compruebe que estén frías.
• Asegúrese de que las bombillas estén correctamente montadas; de lo contrario no utilice la campana ya que existe el riesgo de descarga eléctrica.
• Todas las operaciones de instalación y mantenimiento se deben realizar utilizando guantes de trabajo.
• El producto no está previsto para ser utilizado al aire libre.
• Cuando se utiliza la placa, es posible que las partes accesibles de la campana se pongan calientes.
GUARDE ESTE GUÍA PARA FUTURAS CONSULTAS.
ADVERTENCIA:
PELIGRO:
E29

Tras desembalar, compruebe si se ha dañado el aparato durante el transporte. Si hubiera problemas, póngase en contacto con el comerciante o el Servicio de
Asistencia Técnica. Para evitar daños, extraiga el aparato de su embalaje solo en el momento de la instalación.
PREPARACIÓN PARA LA INSTALACIÓN
este producto es pesado; sólo se debe levantar e instalar la campana entre dos o más personas.
La distancia mínima entre los recipientes de cocción situados encima de la placa de cocción y la parte más baja de la campana no debe ser inferior a 50 cm en las
cocinas eléctricas y de 65 cm en las cocinas a gas o mixtas. Antes de la instalación, compruebe también las distancias mínimas indicadas en el manual de la
cocina. Si en las instrucciones de instalación de la placa de cocción se especica una distancia mayor, es necesario respetarla.
CONEXIÓN ELÉCTRIC
Asegúrese de que la tensión de alimentación especicada en la placa de características coincide con el voltaje de la red eléctrica.
Esta información se encuentra en el interior de la campana, detrás del ltro antigrasa. La sustitución del cable eléctrico (tipo H05 VV-F 3 x 0,75 mm²) debe
efectuarla un electricista cualicado. Póngase en contacto con un centro de mantenimiento autorizado.
Si la campana incluye un enchufe, conecte el enchufe a una toma que cumpla con la normativa vigente y que se encuentre en un lugar accesible después de la
instalación. Si no hay ningún enchufe (conexión directa a la red eléctrica) o si el enchufe que hay no está en un lugar al que se pueda acceder fácilmente, instale
un interruptor bipolar homologado que garantice la total desconexión de la red en el caso de producirse sobretensión de categoría III, de acuerdo con la
normativa sobre cableados.
RECOMENDACIONES GENERALES
Antes de usar
Retire las protecciones de cartón, la película protectora y las etiquetas adhesivas de los accesorios. Compruebe si se ha dañado el aparato durante el transporte.
Durante el uso
Para evitar daños, no coloque objetos pesados sobre la campana. No exponga el aparato a los elementos atmosféricos.
ADVERTENCIA:
Eliminación del embalaje
El material de embalaje es 100% reciclable y está marcado con el símbolo del reciclaje . No arroje el material de embalaje en el medio ambiente, elimínelo
de acuerdo con la normativa local vigente.
Eliminación del producto
- Este aparato ha sido marcado de acuerdo con la Normativa Europea 2002/96/CE, Reciclaje de Aparatos Eléctricos y Electrónicos (RAEE).
- Al asegurarse de la correcta eliminación de este producto, ayudará a evitar posibles consecuencias negativas para el medio ambiente y la salud.
- El símbolo en el aparato o en la documentación que lo acompaña indica que no se puede tratar como desecho doméstico, sino que debe entregarse en
un punto de recogida para el reciclaje de aparatos eléctricos y electrónicos.
Eliminación del electrodoméstic
• Este aparato ha sido fabricado con materiales reciclables o reutilizables. Elimínelo de acuerdo con la normativa local sobre eliminación de residuos. Antes de
desecharlo, corte el cable de alimentación.
• Para más información sobre el tratamiento, recuperación y reciclaje de los electrodomésticos, póngase en contacto con la autoridad local competente, el
servicio de recogida de basuras domésticas o la tienda donde adquirió el aparato.
INSTALACIÓN
CONSEJOS PARA PRESERVAR EL MEDIO AMBIENTE
Declaración de conformidad
• Este aparato ha sido diseñado, fabricado y comercializado de acuerdo con:
- Los objetivos de seguridad de la Directiva 2006/95/EC “Baja Tensión” (que sustituye a 73/23/CEE y posteriores enmiendas);
- Los requisitos de ecodiseño de los reglamentos delegados (UE) nº 65/2014 y nº 66/2014 en conformidad con la norma UNE 61591
- Los requisitos de protección de la Directiva “CEM” 2004/108/CE.
El aparato posee una toma de tierra que cumple las normas de seguridad establecidas por la ley.
Consejos para ahorrar energí
• Ponga en marcha la campana con la potencia mínima cuando empiece a cocinar y déjelo en marcha durante unos minutos después de que haya terminado de cocinar.
• Aumente la velocidad en caso de que haya mucho humo o vapor y utilice la potencia máxima (turbo) solo en situaciones extremas.
• Sustituya el filtro de carbón cuando sea necesario para mantener la eficiencia de eliminación de malos olores.
• Sustituya el filtro antigrasa cuando sea necesario para mantener su eficiencia.
• Utilice el diámetro máximo del sistema de canalización indicado en este manual para optimizar la eficiencia y reducir al máximo el ruido.
E30

- No utilice limpiadores de vapor.
- Desconecte el aparato del suministro eléctrico.
IMPORTANTE: no utilice detergentes corrosivos o abrasivos. Si uno de estos productos entra accidentalmente en contacto con el aparato,
límpielo de inmediato con un paño húmedo.
IMPORTANTE: La superficie de acero de la campana tiene un tratamiento de iXelium.
Para limpiarlo, realice lo siguiente:
• Use un paño suave (preferiblemente de microfibra) humedecido en agua o con un limpiacristales normal.
• No utilice papel de cocina porque pueden dejar marcas y trozos de papel en la campana.
• No utilice productos abrasivos, corrosivos o a base de cloro o estropajos de acero.
• No utilice aparatos de vapor.
• No utilice productos inflamables.
• No deje ácido o sustancias alcalinas como vinagre, mostaza, sal, azúcar o zumo de limón en la campana.
Use detergentes específicamente diseñados para limpiar el aparato y siga las instrucciones del fabricante.
IMPORTANTE: Limpie los filtros al menos una vez al mes para eliminar residuos de aceite o grasa.
ADVERTENCIA
Antes de llamar al Servicio de Asistencia Técnica:
1. Compruebe si puede solucionar el problema con la ayuda de la “Guía de solución de problemas”.
2. Apague y encienda el aparato para ver si el fallo continúa.
Si a pesar de las comprobaciones anteriores se mantiene el fallo, consulte al Servicio de Asistencia Técnica más cercano.
Indique siempre:
• Una breve descripción del fallo.
• Tipo y modelo exacto del aparato
• El número de servicio (aparece después de la palabra “Service” en la placa de características), dentro del aparato.
El número de servicio también aparece en el folleto de garantía
• Su dirección completa
• Su numero de teléfono.
Si fuera necesario reparar el aparato, póngase en contacto con el Servicio de Asistencia Técnica (para garantizar el uso de piezas originales y que la reparación
se realiza correctamente).
E31
El aparato no funciona:
• Compruebe si hay corriente eléctrica y si el aparato está conectado al suministro eléctrico
• Apague y encienda el aparato para comprobar si persiste el problema.
La potencia de aspiración de la campana no es suficiente:
• Compruebe la velocidad de aspiración y ajústela si es necesario.
• Compruebe que los filtros están limpios
• Asegúrese de que las salidas de aire no están obstruidas.
La luz no funciona:
• Compruebe la bombilla y sustitúyala si es necesario
• Compruebe que la bombilla se ha instalado correctamente.
GUÍA DE SOLUCIÓN DE PROBLEMAS
SERVICIO DE ASISTENCIA TÉCNICA
LIMPIEZA DE LA SUPERFICIE DE IXELIUM

E32
- Utilice guantes de seguridad.
- Desconecte el aparato de la red eléctrica.
FILTROS ANTIGRASA
El filtro metálico antigrasa tiene una duración ilimitada y debe lavarse una vez al mes a mano o en el
lavavajillas a baja temperatura y con ciclo corto. Al lavarlo en el lavavajillas, el filtro antigrasa podría
perder su brillo, pero no varía su poder de filtrado.
Retire la manilla para sacar el filtro.
Tras lavar y dejar secar el filtro, vuelva a montarlo siguiendo la secuencia inversa al desmontaje.
SUSTITUCIÓN DE LAS BOMBILLAS
La campana cuenta con un sistema de iluminación con tecnología LED.
Los LEDs garantizan una iluminación óptima, una duración hasta 10 veces mayor respecto a las bombillas tradicionales y permiten ahorrar el 90% de energía
eléctrica.
Para la sustitución, diríjase al Servicio de Asistencia Técnica.
FILTRO DE CARBÓN
(sólo para modelos con instalación filtrante)
Retiene los olores desagradables de la cocción.
Cambiar el filtro de carbón cada 4 meses.
Montaje o sustitución del filtro de carbón
1. Desconectar la campana de la red eléctrica.
2. Abrir y sacar el panel de aspiración de su alojamiento.
3. Quitar los filtros de grasa.
4. Colocar un filtro de carbón a cada lado para cubrir las dos rejillas que protegen el
rotor del motor. Girar los filtros en sentido horario, para bloquearlos con los pernos
centrales.
Para el desmontaje, ejecutar la secuencia inversa al montaje.
Montar los filtros de grasa y el panel de aspiración.
ADVERTENCIA:
MANTENIMIENTO

E33
La campana ha sido diseñada para ser instalada y utilizada en "Versión Aspirante" o en "Versión Filtrante".
Advertencia: el modelo con válvula eléctrica sólo puede funcionar en "Versión Aspirante" y el tubo de evacuación debe estar conectado a una unidad periférica
de aspiración.
Versión aspirante
Los vapores son aspirados y trasladados hacia el exterior a través de un tubo de evacuación (no suministrado) que debe fijarse al racor de salida del aire de la
campana.
En función del tipo de tubo de extracción adquirido, deberá aplicarse un sistema adecuado de fijación al racor de salida aire.
IMPORTANTE: Desmonte el o los filtros de carbón ya instalados.
Versión filtrante
El aire se filtra pasando por uno o varios filtros de carbón y se recicla en el ambiente.
IMPORTANTE: Compruebe que la recirculación del aire se produzca correctamente.
Si la campana no está dotada de uno o varios filtros de carbón, será preciso pedirlo/s e instalarlo/s antes de utilizarla.
La instalación de la campana deberá efectuarse lejos de áreas demasiado sucias, así como de ventanas, puertas y fuentes de calor.
La campana incluye todo el material necesario para su instalación en la mayor parte de paredes y techos. De cualquier modo, conviene consultar a un técnico
cualificado para tener la certeza de que los materiales son adecuados a su techo.
Muebles laterales de
pared
Muebles laterales de
pared
Línea central
65 cm (cocinas de gas o mixtas)
50 cm (cocinas eléctricas)
superficie de la placa de cocción
1200 mm mín. (modelo de 120 cm de ancho)
900 mm mín. (modelo de 90 cm de ancho)
700 mm mín. (modelo de 70 cm de ancho)
600 mm mín. (modelo de 60 cm de ancho)
MATERIAL SUMINISTRADO ADJUNTO
INSTALACIÓN - INSTRUCCIONES PREVIAS DE MONTAJE
DIMENSIONES DE INSTALACIÓN
Extraer todos los componentes de los paquetes. Comprobar que estén incluidos todos los componentes previstos.
• Campana ensamblada con motor, bombillas y ltros de grasa instalados.
• Instrucciones de montaje y uso
• Chimeneas telescópicas
• 1 plantilla de montaje
• 6 tacos de pared Ø 8mm
• 6 tornillos Ø 5 x 45
• 4 tornillos Ø 3,5 x 9,5
• Soporte para chimeneas
• 1 deector (para versión ltrante)
• 2 tornillos Ø 2,9 x 6,5
• 4 tornillos de Ø 4 x 8
• 4 tornillos Ø 3,5 x 6,5
• 2 tornillos Ø 2,9 x 6,5
• 2 arandelas
• 1 soporte para chimeneas

E34
Las instrucciones siguientes hacen referencia a las guras y a los números que aparecen en las últimas páginas de este manual.
Antes de proceder con la instalación:
- Quite el panel de aspiración perimetral “A”;
- Empuje hacia la izquierda la pequeña palanca de la parte derecha del panel.
- Desenganche el panel de los soportes.
- Quite los ltros antigrasas.
A continuación
- Quite la cinta adhesiva que ja la caja de la parte electrónica “S” a la caja del motor.
- Apriete por completo los tornillos parcialmente apretados que jan la caja de la parte electrónica “S” a la caja del motor.
Nota: la caja “S” se puede jar temporalmente en la parte superior o en los laterales de la caja del motor (la imagen solo es orientativa).
1. Con un lápiz, dibuje una línea en la pared hasta el techo, como línea central para facilitar la instalación.
2. Aplique el esquema de perforación a la pared: la línea vertical central dibujada en el esquema de perforación debe coincidir con la línea central dibujada en
la pared; además, el borde inferior del esquema de perforación debe coincidir con el borde inferior de la campana.
3. Coloque el gancho de soporte inferior en el esquema de perforación de manera que coincida con el rectángulo, señale los dos oricios externos y perfore.
Nota: realice todos los oricios indicados en la plantilla: los 2 superiores sirven para enganchar la campana mientras que los oricios inferiores (normalmente 1
central o varios laterales) sirven para la jación denitiva y de seguridad.
Retire el esquema de perforación, introduzca 2 tacos en la pared y je el gancho de soporte de la campana con 2 tornillos de 5 x 45 mm.
4. Fije el gancho de soporte de la chimenea “G” en la pared debajo del techo, utilice el gancho de soporte como esquema de perforación (la pequeña ranura
del soporte debe coincidir con la línea dibujada en la pared), marque con un lápiz el punto para los 2 oricios, perfore los oricios (Ø 8 mm) e introduzca los
2 tacos.
5. Fije a la pared los ganchos de soporte de la campana con 2 tornillos de 5 x 45 mm.
6. Cuelgue la campana en el gancho inferior.
7. Regule la distancia de la campana a la pared.
8. Regule la disposición horizontal de la campana.
9. Fije la campana denitivamente a la pared (OBLIGATORIO)
10. Conecte el tubo (el tubo de evacuación y la abrazadera no están incluidas) de evacuación de humos al anillo de conexión situado sobre la unidad del motor
aspirante. En caso de funcionamiento aspirante, el otro extremo del tubo debe conectarse a un dispositivo de evacuación de humos hacia el exterior. Si
desea utilizar la campana en su versión ltrante, quite la válvula de retención de humos "E", je en el gancho de soporte "G" el deector "F", que debe
regularse en función a la longitud de la chimenea y conecte el otro extremo del tubo al anillo de conexión del deector "F".
11. Realizar la conexión eléctrica. Pase el cable de alimentación por su alojamiento y asegure el cable con la abrazadera (11a).
12. Coloque las chimeneas y fíjelas con 2 tornillos (12a) al soporte de la campana “G” (12b)
13. Deslice la sección inferior de la chimenea de manera que cubra completamente la unidad aspirante hasta introducirla por completo en el alojamiento
correspondiente situado sobre la campana.
Monte los ltros antigrasa.
Vuelva a montar el panel de aspiración perimetral.
IMPORTANTE: Comprobar siempre que el panel quede bien sujeto.
Comprobar el funcionamiento de la campana como se indica en el apartado “Descripción y uso de la campana”.
INSTALACIÓN - INSTRUCCIONES DE MONTAJE

E35
1. Panel de mandos.
2. Filtros antigrasa (sobre el panel de aspiración perimetral).
3. Bombillas.
4. Chimenea telescópica.
5. Panel de aspiración perimetral.
Panel de mandos
1. ENCENDIDO/APAGADO del motor
2. Selección de la velocidad (aumentar/disminuir)
Indicadores luminosos:
a. velocidad de aspiración mínima en uso
b. velocidad de aspiración media en uso
c. velocidad de aspiración máxima en uso
d. velocidad de aspiración intensiva en uso
NB = la velocidad de aspiración intensiva se mantiene durante 5 minutos y
después vuelve a la velocidad media.
3. Encendido/Apagado luces
NB = la intensidad de la retroiluminación de los comandos es mayor cuando se utiliza la función.
DESCRIPCIÓN Y USO DE LA CAMPANA
- Desconectar el aparato de la red eléctrica
Limpieza del panel de aspiración perimetral
Desmontaje:
Tirar del panel (LADO DELANTERO) con firmeza hacia abajo.
Limpieza:
Limpiar el panel de aspiración perimetral con la misma frecuencia con la que se limpia el filtro de grasa.
El panel de aspiración es de acero con tratamiento superficial iXelium.
Para la limpieza:
• Utilizar un paño suave (en lo posible de microfibra) mojado con agua o con un detergente común
para vidrios.
• No utilizar paños de papel, ya que podrían dejar residuos de papel y aureolas en el panel.
• No utilizar productos abrasivos o corrosivos, productos a base de cloro o lana de acero.
• No utilizar aparatos de limpieza con vapor.
• No utilizar productos inflamables.
• No dejar sobre el panel sustancias ácidas o alcalinas, como vinagre, mostaza, sal, azúcar o zumo de limón.
NO UTILIZAR ALCOHOL
Montaje:
El panel se fija a presión, por la parte delantera, con los pernos situados en la superficie de la campana.
IMPORTANTE: Comprobar que el panel quede bien fijado en su lugar.
ADVERTENCIA:
MANTENIMIENTO
1
2
3
ab
c
d

INSTRUÇÕES DE SEGURANÇA IMPORTANTES
Estas instruções estarão também disponíveis no website: www.whirlpool.eu.
A SUA SEGURANÇA E A DOS OUTROS SÃO IMPORTANTES.
Este manual e o próprio aparelho incluem avisos de segurança importantes, os quais deverá ler e cumprir em todas as situações.
Este é o símbolo de atenção, relativo à segurança, que alerta os utilizadores para possíveis riscos para eles e terceiros.
Todos os avisos de segurança são precedidos por este símbolo de atenção e os seguintes termos:
indica uma situação perigosa que, caso não seja evitada, provocará uma lesão grave.
indica uma situação perigosa que, se não for evitada, pode provocar lesões graves.
Todos os avisos de segurança especicam o eventual risco a que se referem e indicam a forma de reduzir esse risco de lesões, danos ou choques eléctricos
resultantes do uso incorrecto do aparelho. Cumpra as seguintes instruções:
• A instalação ou manutenção deve ser efectuada por um técnico qualicado, em conformidade com as instruções do fabricante e de acordo com as normas
locais vigentes em matéria de segurança. Não repare nem substitua nenhuma peça do aparelho a não ser que especicamente solicitado no manual de
utilização.
• Antes de realizar os trabalhos de instalação desligue o aparelho da corrente eléctrica.
• É obrigatório ligar o aparelho à terra. (Não necessário para exaustores de classe II identicados pelo símbolo na etiqueta de especicações).
• O cabo de alimentação tem de ter comprimento suciente para permitir ligar o aparelho tomada eléctrica.
• Não puxe o aparelho pelo cabo de alimentação quando o desligar da tomada eléctrica.
• Quando a instalação estiver concluída, os componentes eléctricos não deverão car acessíveis ao utilizador.
• Não toque no aparelho com as partes do corpo húmidas e não o utilize com os pés descalços.
• Este aparelho pode ser utilizado por crianças a partir dos 8 anos de idade e por pessoas com capacidades físicas, sensoriais ou mentais reduzidas ou com
pouca experiência ou conhecimentos desde que tenham supervisão ou tenham recebido instruções relativas à utilização do aparelho em condições de
segurança e compreendam os riscos inerentes. Não deixe as crianças brincarem com o aparelho. A limpeza e manutenção não podem ser realizadas por
crianças salvo se tiverem a supervisão de adultos.
• Não repare ou substitua qualquer parte do aparelho, salvo se especicamente indicado no manual. As peças com defeito têm de ser substituídas por peças
genuínas. Todos os restantes serviços de manutenção deverão ser realizados por um técnico especializado.
• As crianças devem ser vigiadas para garantir que não brincam com o aparelho.
• Quando zer furos numa parede ou num tecto, tenha atenção para não danicar ligações eléctricas e/ou tubos.
• Os canais de ventilação devem descarregar sempre para o exterior.
• O ar de escape não pode ser ventilado pelo tubo utilizado para evacuar os fumos produzidos pelos aparelhos de combustão de gás ou outros combustíveis,
deve ter uma saída independente. Devem ser respeitadas todas as normas nacionais relativas à extracção de fumos.
• Se o exaustor for utilizado juntamente com outros aparelhos que utilizem gás ou outros combustíveis, a pressão negativa do local não deve ser superior a 4
Pa (4 x 10⁻⁵ bar). Por este motivo, verique se o ambiente é ventilado de forma adequada.
• O fabricante declina qualquer responsabilidade pela utilização incorrecta ou pela conguração incorrecta dos comandos.
• Uma manutenção e limpeza constantes garantem o bom funcionamento e o máximo desempenho do aparelho. Limpe com frequência toda a sujidade das
superfícies do exaustor para evitar a acumulação de gorduras. Limpe ou substitua o ltro frequentemente.
• O incumprimento das instruções de limpeza do exaustor e de substituição dos ltros pode resultar num incêndio.
• O exaustor de fumos nunca deve ser aberto sem os ltros de gordura instalados e deve ser mantido sob supervisão constante.
• Os aparelhos a gás devem ser usados por baixo do exaustor apenas com as panelas assentes.
• Quando usar mais de três pontos de cozedura a gás, o exaustor deve ser operado no nível de potência 2 ou superior. Isso irá eliminar o congestionamento de
calor no aparelho.
• Antes de tocar nas lâmpadas, verique se estas estão frias.
• Não utilize nem deixe o exaustor sem ter as lâmpadas correctamente montadas, devido ao possível risco de choque eléctrico.
• Para todas as operações de instalação e manutenção, utilizar luvas de trabalho.
• O aparelho não é adequado para ser utilizado no exterior.
• Quando a placa estiver em funcionamento, as partes acessíveis do exaustor podem car quentes.
GUARDE ESTE MANUAL PARA FUTURAS CONSULTAS.
ADVERTÊNCIA:
PERIGO:
P36

Depois de desembalar o aparelho, verique se este apresenta quaisquer danos de transporte. Caso surjam problemas, contacte o revendedor ou o Serviço de
Assistência Técnica mais próximo. Para evitar danos, retire o aparelho da sua embalagem de espuma de poliestireno na altura da instalação.
PREPARAÇÃO DA INSTALAÇÃO
trata-se de um produto pesado; o exaustor só deve ser elevado e instalado por duas ou mais pessoas.
A distância mínima entre o suporte das panelas em cima da placa e a parte inferior do exaustor não deve ser inferior a 50 cm, no caso de fogões eléctricos, e a 65
cm, no caso de fogões a gás ou mistos. Antes da instalação, verique também as distâncias mínimas indicadas no manual do fogão.
Se as instruções de instalação do fogão especicarem uma distância maior entre este e o exaustor, esta deverá ser respeitada.
LIGAÇÃO ELÉCTRIC
Verique se a tensão eléctrica especicada na chapa de características do aparelho corresponde à tensão da rede eléctrica.
Esta informação pode ser encontrada no interior do exaustor, por baixo do ltro de gordura. A substituição do cabo de alimentação (tipo H05 VV-F 3 x 0,75 mm²)
deve ser efectuada por um electricista qualicado. Contacte um centro de assistência autorizado. Se o exaustor estiver equipado com uma cha eléctrica, ligue a
cha a uma tomada que cumpra os regulamentos em vigor, situada num local acessível após a instalação. Se não existir qualquer cha (ligação directa à corrente
eléctrica) ou se a tomada não estiver situada num local acessível, instale um interruptor de alimentação de dois pólos padrão, que irá permitir o isolamento total
da corrente eléctrica no caso de condições de sobretensão de categoria III, de acordo com os regulamentos de instalação.
RECOMENDAÇÕES GERAIS
Antes da utilização
Retire as protecções de cartão, a película de protecção e as etiquetas adesivas dos acessórios. Verique se o aparelho apresenta quaisquer danos de transporte.
Durante a utilização
Para evitar quaisquer danos, não coloque pesos sobre o aparelho. Não exponha o aparelho aos agentes atmosféricos.
ADVERTÊNCIA:
Eliminação da embalagem
O material da embalagem é 100% reciclável, conforme confirmado pelo símbolo de reciclagem . As várias partes da embalagem devem ser eliminadas de
forma responsável e em total conformidade com os regulamentos estabelecidos pelas autoridades locais relativos à eliminação de resíduos.
Eliminação do produto
- Este aparelho está em conformidade com a Directiva Europeia 2002/96/CE, Resíduos de equipamentos eléctricos e electrónicos (REEE).
- Ao garantir a eliminação adequada deste produto, estará a ajudar a evitar potenciais consequências negativas para o ambiente e para a saúde pública, que
poderiam derivar de um manuseamento de desperdícios inadequado deste produto.
- O símbolo no aparelho ou na documentação que o acompanha indica que este produto não deve ser tratado como um resíduo doméstico, mas sim
depositado nos devidos locais de recolha para a reciclagem de aparelhos eléctricos e electrónicos.
Eliminação de electrodoméstico
• Este aparelho foi fabricado com materiais recicláveis ou reutilizáveis. Elimine-o de acordo com os regulamentos locais. Antes de eliminar o aparelho, corte o
respectivo cabo eléctrico.
• Para obter mais informações sobre o tratamento, recuperação e reciclagem de electrodomésticos, contacte as autoridades locais competentes, o serviço de
recolhas de desperdícios domésticos ou a loja onde adquiriu o aparelho.
INSTALAÇÃO
INFORMAÇÕES DE PROTECÇÃO AMBIENTAL
Declaração de conformidade
• Este aparelho foi concebido, fabricado e distribuído em conformidade com:
- os objectivos de segurança da Directiva “Baixa Tensão” 2006/95/CE (que substitui a 73/23/CEE e subsequentes correcções);
- os requisitos de ecodesign dos regulamento europeus n.º 65/2014 e n.º 66/2014 em conformidade com a norma europeia EN 61591
- os requisitos de protecção da Directiva “CEM” 2004/108/CE.
A segurança eléctrica do aparelho só é assegurada quando estiver correctamente ligado à terra segundo as normas legais.
Dicas de poupança de energi
• Ligue o exaustor na velocidade mínima quando iniciar a cozinhar e mantenha-o a funcionar durante alguns minutos depois de acabar de cozinhar.
• Aumente a velocidade apenas em caso de uma grande quantidade de fumo e vapor e utilize a(s) velocidade(s) boost apenas em situações extremas.
• Substitua o(s) filtro(s) de carvão quando necessário para manter uma boa eficácia na redução de odores.
• Limpe o(s) filtro(s) de carvão quando necessário para manter uma boa eficácia na filtragem de gorduras.
• Use o diâmetro máximo do sistema de condutas indicado neste manual para optimizar a eficiência e minimizar o ruído.
P37

O aparelho não funciona:
• Verifique a presença de corrente eléctrica e se o aparelho está ligado à alimentação eléctrica
• Desligue o aparelho e reinicie-o para ver se a falha persiste.
O nível de extracção do exaustor não é suficiente:
• Verifique a velocidade de extracção e ajuste, se necessário;
• Verifique se os filtros estão limpos
• Verifique se as aberturas de ventilação estão obstruídas.
A luz não funciona;
• Verifique a lâmpada e substitua-a, se necessário
• Verifique se a lâmpada foi instalada correctamente.
Antes de contactar o Serviço Pós-Venda:
1. Tente resolver o problema com a ajuda das sugestões fornecidas na secção “Resolução de problemas”.
2. Desligue o aparelho e volte a ligá-lo para verificar se a falha persiste.
Se, após efectuar estas verificações, a falha persistir, contacte o Serviço Pós-Venda mais próximo.
Indique sempre:
• Uma breve descrição da avaria;
• O tipo e o modelo exacto do aparelho
• O número “service” (o número situado após a palavra “Service” na chapa de características), localizado no interior do aparelho.
O número “service” também está indicado no livro de garantia
• O seu endereço completo
• O seu número de telefone.
Se for necessário efectuar alguma reparação, contacte um centro de assistência técnica autorizado (terá a garantia da utilização de peças sobresselentes
originais e de uma reparação correcta).
RESOLUÇÃO DE PROBLEMAS
SERVIÇO PÓS-VENDA
- Não utilize produtos de limpeza a vapor.
- Desligue o aparelho da corrente eléctrica.
IMPORTANTE: Não utilize detergentes corrosivos ou abrasivos. Se algum desses produtos entrar em contacto acidental com o aparelho, limpe
imediatamente com um pano húmido.
IMPORTANTE: O aço do exaustor tem tratamento de iXelium na superfície.
Para limpar, proceda da seguinte forma:
• Utilize um pano macio (de preferência de microfibras) humedecido com água ou com um limpa vidros normal.
• Não utilize toalhetes de papel, pois este podem deixar marcas e pedaços de papel no exaustor.
• Não utilize produtos abrasivos, corrosivos, produtos de limpeza à base de cloro ou palha-d’aço.
• Não utilize aparelhos de limpeza a vapor.
• Não utilize produtos inflamáveis.
• Não deixe substâncias ácidas ou alcalinas, tais como vinagre, mostarda, sal, açúcar ou sumo de limão sobre a placa.
Utilize detergentes específicos para a limpeza do aparelho e siga as instruções do fabricante.
IMPORTANTE: Limpe os filtros pelo menos uma vez por mês para eliminar os resíduos de óleo e gordura.
ADVERTÊNCIA:
LIMPEZA IXELIUM
P38

P39
- utilize luvas de protecção.
- desligue o aparelho da rede eléctrica.
FILTROS DE GORDURA
O filtro de gordura metálico tem uma duração ilimitada e deve ser lavado uma vez por mês, à mão ou na
máquina de lavar loiça, a baixa temperatura e num ciclo de curta duração. Com a lavagem na máquina de
lavar loiça, o filtro de gordura poderá ficar opaco, mas o seu poder de filtragem mantém-se inalterado.
Extraia a pega para retirar o filtro.
Depois de lavado e seco, proceda na ordem inversa para o montar.
SUBSTITUIÇÃO DAS LÂMPADAS
O exaustor está equipado com um sistema de iluminação baseado na tecnologia LED.
Os LEDs garantem uma óptima iluminação, uma duração até 10 vezes superior à das lâmpadas tradicionais e permitem poupar 90% de energia eléctrica.
Para a substituição, contacte o serviço de assistência técnica.
FILTRO DE CARBONO
(apenas para os modelos com instalação de filtragem)
Retém os odores desagradáveis resultantes da cozedura.
Substitua o filtro de carbono a cada 4 meses.
Montagem ou substituição do filtro de carbono
1. Desligue o exaustor da corrente eléctrica.
2. Abra e remova o painel de aspiração da sua sede.
3. Retire os filtros de gordura.
4. Coloque um filtro de carbono nas partes laterais, de coberturas de ambas as grelhas
de protecção do rotor do motor. Rode os filtros para a direita, para bloqueá-los aos
pernos centrais.
Para desmontar, siga a ordem inversa.
Volte a montar os filtros de gordura e o painel de aspiração.
ADVERTÊNCIA:
MANUTENÇÃO

P40
O exaustor foi concebido para ser instalado e utilizado na "Versão de aspiração" ou na "Versão de filtragem".
Advertência: o modelo com válvula eléctrica pode funcionar apenas na "Versão de aspiração" e o tubo de escape deve ser ligado a uma unidade periférica de
aspiração.
Versão de aspiração
Os vapores são aspirados e conduzidos para o exterior através de um tubo de descarga [não fornecido] fixo à junção de saída de ar do exaustor.
Com base no tubo de descarga adquirido, efectuar um sistema adequado de fixação à junção de saída de ar.
IMPORTANTE: Se tiver já sido instalado, retire o/s filtro/s de carbono.
Versão de filtragem
O ar é filtrado passando através de um/uns filtro/s de carbono e, depois, volta a circular no ambiente em redor.
IMPORTANTE: Certifique-se de que a recirculação do ar é feita com facilidade.
Se o exaustor não estiver equipado com o filtro/s de carbono, este/s deve/m ser encomendado/s e montado/s antes do uso.
A instalação do exaustor deverá ser realizada longe de áreas muito sujas, janelas, portas e fontes de calor.
O exaustor é dotado de todo o material necessário para uma instalação na maioria das paredes/tectos. Contudo, é necessário contactar um técnico qualificado
para verificar se os materiais são adequados ao tipo de parede/tecto.
Móveis suspensos
laterais
Móveis suspensos
laterais
linha central
65 cm (fogões a gás ou mistos)
50 cm (fogões eléctricos)
superfície da placa de cozedura
1200 mm mín (modelo com largura de 120cm)
900 mm mín (modelo com largurade 90cm)
700 mm mín (modelo om largura de 70cm)
600 mm mín (modelo com largura de 60cm)
MATERIAL FORNECIDO
INSTALAÇÃO - INSTRUÇÕES PRELIMINARES DE MONTAGEM
DIMENSÕES DA INSTALAÇÃO
Extraia todos os componentes das embalagens. Verique se estão incluídos todos os componentes.
• Exaustor montado com motor, lâmpadas e ltros de gordura instalados.
• Instruções de montagem e utilização
• Chaminés telescópicas
• 1 gabarito de montagem
• 6 buchas de parede de Ø 8mm
• 6 parafusos Ø 5x45
• 4 parafusos Ø 3,5x9,5
• Presilha de suporte da chaminé
• 1 deector (para versão de ltragem)
• 2 parafusos Ø 2,9x6,5
• 4 parafusos Ø 4x8
• 4 parafusos Ø 3,5x6,5
• 2 parafusos Ø 2,9x6,5
• 2 anilhas
• 1 suporte de exaustor

P41
As instruções em sequência numérica indicadas de seguida referem-se aos desenhos que pode encontrar nas últimas páginas deste manual, contendo a
respectiva numeração.
Antes de proceder às fases de instalação:
- retire o painel de aspiração perimetral “A”;
- empurre para a esquerda a alavanca que se encontra na parte inferior do painel
- desengate o painel dos suportes
- retire o(s) ltro(s) de gordura
de seguida
- retire a ta que xa a caixa do sistema electrónico de controlo “S” à caixa do motor;
- aperte completamente os parafusos, já apertados parcialmente, que xam a caixa do sistema electrónico “S”, à caixa do motor.
Nota: a caixa “S” pode ser temporariamente xada por cima ou nos lados da caixa do motor, a imagem destina-se apenas a ns indicativos.
1. Com um lápis, trace uma linha na parede, até ao tecto, na correspondência com a linha do meio, para facilitar as operações de instalação.
2. Aplique o esquema de perfuração na parede: a linha central vertical impressa no esquema de perfuração deverá corresponder à linha central desenhada na
parede. Além disso, o rebordo inferior do esquema de perfuração corresponde ao rebordo inferior do exaustor.
3. Apoie a presilha de suporte inferior no esquema de perfuração, fazendo-a coincidir com o rectângulo a tracejado, marque os dois furos externos e fure.
Nota: Realize sempre todos os orifícios indicados no molde: os 2 orifícios superiores destinam-se a pendurar o exaustor e os orifícios inferiores (geralmente 1
central ou vários laterais) servem para a xação denitiva e de segurança.
Retire o esquema de perfuração, introduza as buchas na parede e xe o suporte do exaustor com 2 parafusos de 5 x 45 mm.
4. Aplique a presilha de suporte da chaminé “G” na parede aderente ao tecto, utilize a presilha de suporte tal como o esquema de perfuração (a pequena
anilha que se encontra no suporte deve coincidir com a linha anteriormente traçada na parede) e marque com o lápis 2 furos, execute depois os furos (Ø 8
mm), introduza as 2 buchas.
5. Fixe a presilha de suporte da chaminé à parede com 2 parafusos 5x45 mm.
6. Pendure o exaustor na presilha inferior.
7. Regule a distância do exaustor da parede.
8. Regule a posição horizontal do exaustor.
9. Fixe denitivamente o exaustor à parede (OBRIGATÓRIO!!).
10. Execute a ligação de um tubo (tubo e tiras para a xação não fornecidas, devem ser compradas) para a descarga ao anel de ligação colocado por cima da
unidade do motor de aspiração. A outra extremidade do tubo deverá ser ligada a um dispositivo de expulsão dos fumos para o exterior em caso de
utilização do exaustor na versão de aspiração. Caso se deseje utilizar o exaustor na versão por ltragem, retire a válvula de não retorno de fumo "E", prenda
à presilha de suporte da chaminé "G" o deector "F" a regular com base na largura da chaminé e ligue a outra extremidade do tubo ao anel de ligação
situado no deector "F".
11. Efectue a ligação eléctrica. Passe o cabo de alimentação na respectiva sede e prenda o cabo ao xa-cabo (11a).
12. Aplique as chaminés e prenda-as em cima com 2 parafusos (12a) ao suporte da chaminé “G” (12b).
13. Deslize a secção inferior da chaminé de modo a cobrir completamente o grupo de aspiração e até introduzi-la no lugar, por cima do exaustor.
Volte a montar o(s) ltro(s) de gordura.
Volte a montar o painel de aspiração perimetral
IMPORTANTE: certique-se sempre de que o painel está bem xo no lugar.
Verique o funcionamento do exaustor, consultando o parágrafo relativo à descrição e utilização do exaustor.
INSTALAÇÃO - INSTRUÇÕES DE MONTAGEM

P42
1. Painel de controlo.
2. Filtros de gordura (por cima do painel de aspiração perimetral).
3. Lâmpadas.
4. Chaminé telescópica.
5. Painel de aspiração perimetral.
Painel de controlo
1. ON/FF motor
2. selecção (incremento/decremento) da velocidade
indicadores luminosos:
a. velocidade de aspiração mínima em utilização
b. velocidade de aspiração média em utilização
c. velocidade de aspiração máxima em utilização
d. velocidade de aspiração intensiva em utilização
NB = a velocidade de aspiração intensiva está temporizada para 5 minutos,
após o que o motor voltará à velocidade média.
3. Tecla ON/OFF luzes
NB = a retroiluminação dos comandos aumenta de intensidade quando a função está a ser utilizada.
DESCRIÇÃO E UTILIZAÇÃO DO EXAUSTOR
- Desligue o aparelho da corrente eléctrica
Limpeza do painel de aspiração perimetral
Desmontagem:
puxe o painel (PARTE FRONTAL) firmemente para baixo.
Limpeza:
Limpe o painel de aspiração com a mesma frequência do filtro de gordura.
O painel de aspiração possui aço com tratamento superficial iXelium.
Proceda como se segue para a limpeza:
• Utilize um pano (preferível em microfibra) humedecido em água ou com detergente normal para
vidros.
• Não se recomenda utilizar papel de cozinha, que poderá deixar resíduos de papel e manchas no painel.
• Não utilize produtos abrasivos ou corrosivos, produtos à base de cloro ou esfregões.
• Não utilize aparelhos de limpeza a vapor.
• Não utilize produtos inflamáveis.
• Evite colocar no painel substâncias ácidas ou alcalinas como vinagre, mostarda, sal, açúcar ou sumo de limão.
NÃO UTILIZE ÁLCOOL!
Montagem:
O painel deve ser fixado na parte frontal por encaixe nos pernos existentes para o efeito na superfície do exaustor.
IMPORTANTE: Certifique-se sempre de que o painel está bem fixo no lugar.
ADVERTÊNCIA:
MANUTENÇÃO
1
2
3
ab
c
d

IT43
ISTRUZIONI IMPORTANTI PER LA SICUREZZA
Queste istruzioni sono inoltre disponibili nel sito Web all'indirizzo: www.whirlpool.eu
LA SICUREZZA VOSTRA E DEGLI ALTRI È MOLTO IMPORTANTE.
Il presente manuale e l'apparecchio stesso sono corredati da importanti messaggi relativi alla sicurezza, da leggere ed osservare sempre.
Questo è il simbolo di allerta, relativo alla sicurezza, il quale avverte dei potenziali rischi per l'utilizzatore e per gli altri.
Tutti i messaggi relativi alla sicurezza saranno preceduti dal simbolo di allerta e dai seguenti termini:
indica una situazione pericolosa che, se non evitata, provoca lesioni gravi.
indica una situazione pericolosa che, se non evitata, potrebbe provocare lesioni gravi.
Tutti i messaggi relativi alla sicurezza specificano il potenziale pericolo/avvertenza a cui si riferiscono ed indicano come ridurre il rischio di lesioni, danni e scosse
elettriche conseguenti ad un non corretto uso dell'apparecchio. Attenersi scrupolosamente alle seguenti istruzioni:
• L'installazione o la manutenzione deve essere eseguita da un tecnico specializzato, in conformità alle istruzioni del fabbricante e nel rispetto delle norme
locali vigenti in materia di sicurezza. Non riparare o sostituire qualsiasi parte dell'apparecchio se non specificatamente richiesto nel manuale d'uso.
• L'apparecchio deve essere scollegato dalla rete elettrica prima di effettuare qualunque intervento d'installazione.
• La messa a terra dell'apparecchio è obbligatoria. (Non è necessaria per le cappe in classe II identificate col simbolo nell'etichetta caratteristiche).
• Il cavo di alimentazione deve essere sufficientemente lungo da permettere il collegamento dell'apparecchio alla presa di rete.
• Non tirare il cavo di alimentazione dell'apparecchio per staccarlo dalla presa di corrente.
• Una volta terminata l'installazione, i componenti elettrici non dovranno più essere accessibili dall'utilizzatore.
• Non toccare l'apparecchio con parti del corpo umide e non utilizzarlo a piedi nudi.
• Questo apparecchio può essere usato da bambini di età superiore a 8 anni e da persone con capacità fisiche, sensoriali o mentali ridotte o con esperienza e
conoscenza inadeguate, solo se sono sorvegliati o se è stato loro insegnato come usare l’apparecchio in condizioni di sicurezza e se sono a conoscenza dei
pericoli che può comportare. I bambini non devono giocare con l’apparecchio. La pulizia e la manutenzione non devono essere effettuate da bambini, a
meno che non siano sorvegliati da adulti.
• Non riparare o sostituire qualsiasi parte dell'apparecchio se non specificamente raccomandato nel manuale. Le parti difettose devono essere sostituite
utilizzando elementi originali. Tutti gli altri servizi di manutenzione devono essere eseguiti da un tecnico specializzato.
• I bambini devono essere sorvegliati per sincerarsi che non giochino con l'apparecchio.
• Quando si fora la parete o il soffitto, fare attenzione a non danneggiare collegamenti elettrici e/o tubature.
• I canali per la ventilazione devono essere sempre scaricati all'aperto.
• L'aria di scarico non deve essere scaricata in un condotto utilizzato per evacuare i fumi prodotti da apparecchi a combustione di gas o di altri combustibili,
ma deve avere l'uscita indipendente. Devono essere rispettate tutte le normative nazionali relative allo scarico dell'aria.
• Se la cappa è utilizzata insieme ad altri apparecchi che impiegano gas o altri combustibili, la pressione negativa del locale non deve essere superiore a 4 Pa
(4 x 10⁻⁵ bar). Per questo motivo, assicuratevi che il locale sia adeguatamente arieggiato.
• Il fabbricante declina ogni responsabilità per usi non appropriati o per errate impostazioni dei comandi.
• Una manutenzione e pulizia costante garantiscono il buon funzionamento e le buone prestazioni dell'apparecchio. Pulire spesso tutte le incrostazioni dalle
superfici sporche per evitare l'accumulo di grassi. Togliere, pulire o cambiare i filtri con frequenza.
• L'inosservanza delle norme di pulizia della cappa e della sostituzione e pulizia dei filtri comporta rischi di incendi.
• La cappa d'aspirazione vapore non deve essere mai aperta senza i filtri antigrasso installati e dovrebbe essere tenuta costantemente sotto vigilanza.
• Gli apparecchi a gas devono essere utilizzati sotto la cappa d'aspirazione esclusivamente con pentole appoggiate.
• In caso di utilizzo di oltre tre punti cottura a gas, la cappa dovrebbe operare a livello di potenza 2 o maggiore. In tal modo si eliminano congestioni di calore
nell'apparecchio.
• Prima di toccare le lampade sincerarsi che siano fredde.
• Non utilizzare o lasciare la cappa priva di lampade correttamente montate per possibile rischio di scossa elettrica.
• Per tutte le operazioni di installazione e manutenzione utilizzare guanti da lavoro.
• Il prodotto non è idoneo all'utilizzo in esterno.
• Quando il piano cottura è in funzione le parti accessibili della cappa possono diventare calde.
CONSERVARE QUESTE ISTRUZIONI
AVVERTENZA:
PERICOLO:

IT44
Dopo aver disimballato l'apparecchio verificare che non si sia danneggiato durante il trasporto. In caso di problemi, contattare il rivenditore o il Servizio
Assistenza Clienti. Per eventuali danni, si consiglia di rimuovere l'apparecchio dalla base di polistirolo soltanto prima dell'installazione.
PREDISPOSIZIONE PER L'INSTALLAZIONE
questo apparecchio è pesante; la cappa deve essere sollevata e installata solo da due o più persone.
La distanza minima fra il supporto delle padelle sul piano di cottura e la base della cappa non deve essere inferiore a 50 cm in caso di fuochi elettrici e a 65 cm in
caso di fuochi a gas o misti.
Prima dell'installazione controllare anche le distanze minime indicate nel manuale del piano di cottura.
Se nelle istruzioni di installazione del piano di cottura è specificata una distanza maggiore, occorre rispettare questa distanza.
COLLEGAMENTO ELETTRICO
Controllare che la tensione indicata sulla targhetta del prodotto sia la stessa della rete elettrica.
Queste informazioni sono indicate all'interno della cappa, sotto il filtro antigrasso.
Il cavo di alimentazione (tipo H05 VV-F 3 x 0,75 mm²) deve essere sostituito soltanto da un elettricista autorizzato. Contattare un Centro Assistenza autorizzato.
Se la cappa è provvista di spina, collegare l'apparecchio ad una presa conforme alle norme vigenti, posta in zona accessibile. Se non è provvista di spina
(cablaggio diretto alla rete elettrica), o se la presa non è in una zona accessibile, installare un interruttore bipolare normalizzato che permetta un isolamento
completo dalla rete in caso di sovratensione di categoria III, in conformità alle norme di cablaggio.
RACCOMANDAZIONI GENERALI
Prima dell'utilizzo
Rimuovere protezioni di cartone, pellicole trasparenti ed etichette adesive dagli accessori. Verificare che l'apparecchio non abbia subito danni durante il trasporto.
Durante l'utilizzo
Non appoggiare pesi sull'apparecchio in quanto essi potrebbero danneggiarlo. Non esporre l'apparecchio agli agenti atmosferici.
AVVERTENZA:
Smaltimento imballaggio
il materiale di imballaggio è riciclabile al 100% ed è contrassegnato dal simbolo di riciclaggio . Le diverse parti dell'imballaggio non devono essere disperse
nell'ambiente, ma smaltite in conformità alle norme stabilite dalle autorità locali.
Smaltimento prodotto
- Questo apparecchio è contrassegnato in conformità alla Direttiva Europea 2002/96/EC, Waste Electrical and Electronic Equipment (WEEE).
- Assicurandosi che questo prodotto sia smaltito in modo corretto, l'utente contribuisce a prevenire le potenziali conseguenze negative per l'ambiente e la salute.
- Il simbolo sul prodotto o sulla documentazione di accompagnamento indica che questo prodotto non deve essere trattato come rifiuto domestico, ma
deve essere consegnato presso l'idoneo punto di raccolta per il riciclaggio di apparecchiature elettriche ed elettroniche.
Smaltimento elettrodomestici
• Questo prodotto è stato fabbricato con materiale riciclabile o riutilizzabile. Rottamarlo seguendo le normative locali per lo smaltimento dei rifiuti. Prima di
disfarsene, renderlo inutilizzabile tagliando il cavo di alimentazione.
• Per ulteriori informazioni sul trattamento, recupero e riciclaggio degli elettrodomestici, contattare l'idoneo ufficio locale, il servizio di raccolta dei rifiuti
domestici o il negozio presso il quale il prodotto è stato acquistato.
INSTALLAZIONE
CONSIGLI PER LA SALVAGUARDIA DELL'AMBIENTE
Dichiarazione di conformità
• Questo apparecchio è stato progettato, fabbricato e commercializzato in conformità a:
- obiettivi di sicurezza della Direttiva "Bassa Tensione" 2006/95/CEE (che sostituisce la 73/23/CEE e successivi emendamenti);
- requisiti di ecodesign dei regolamenti europei n. 65/2014 e n. 66/2014 in conformità alla norma europea EN 61591;
- requisiti di protezione della Direttiva "EMC" 2004/108/CE.
La sicurezza elettrica è garantita soltanto quando l'apparecchio è correttamente collegato ad un impianto di messa a terra a norma di legge.
Consigli per il risparmio energetico
• Accendere la cappa alla velocità minima quando si inizia a cucinare e mantenerla in funzione per alcuni minuti dopo aver terminato di cucinare.
• Aumentare la velocità solo in presenza di molto fumo e vapore e usare la/e velocità "Boost" solo in situazioni estreme.
• Sostituire il/i filtro/i al carbone quando necessario per mantenere una buona efficienza di riduzione degli odori.
• Pulire il/i filtro/i antigrasso quando necessario per mantenerne l'efficienza.
• Utilizzare un tubo dal diametro massimo indicato in questo manuale per ottimizzare l'efficienza e ridurre al minimo la rumorosità.

IT45
L'apparecchio non funziona:
• Verificare che ci sia tensione in rete e che l'apparecchio sia connesso elettricamente.
• Spegnere e riaccendere l'apparecchio per accertare che l'inconveniente sia stato ovviato.
La cappa non aspira a sufficienza:
• Verificare che la velocità di aspirazione sia quella desiderata;
• Verificare che i filtri siano puliti;
• Verificare che le uscite dell'aria non siano ostruite;
La lampada non funziona:
• Verificare se è necessario sosituire la lampadina;
• verificare se la lampadina è stata montata correttamente;
Prima di contattare il Servizio Assistenza:
1. Verificare che non sia possibile risolvere da soli il problema sulla base dei punti descritti in "Guida ricerca guasti".
2. Spegnere e riaccendere l'apparecchio per accertarsi che l'inconveniente sia stato ovviato.
Se dopo suddetti controlli l'inconveniente permane, contattare il Servizio Assistenza più vicino.
Indicare sempre:
• una breve descrizione del guasto;
• il tipo ed il modello esatto dell'apparecchio;
• Il numero Assistenza (è il numero che si trova dopo la parola SERVICE sulla targhetta matricola), posto all'interno dell'apparecchio. Il numero Assistenza è
anche riportato sul libretto di garanzia;
• Il Vostro indirizzo completo;
• Il Vostro numero telefonico;
qualora si renda necessaria una riparazione, rivolgersi ad un Centro Assistenza Tecnica autorizzato (a garanzia dell'utilizzo di pezzi di ricambio originali e di
una corretta riparazione).
GUIDA RICERCA GUASTI
SERVIZIO ASSISTENZA
- Non usare pulitrici a getto di vapore.
- Scollegare l'apparecchio dalla rete elettrica.
IMPORTANTE: non usare detergenti corrosivi o abrasivi. Se, inavvertitamente, uno di questi prodotti dovesse venire a contatto con
l'apparecchio, pulirlo subito con panno umido.
IMPORTANTE. La cappa presenta l'acciaio con trattamento superficiale iXelium.
Quindi per la sua pulizia procedere come segue:
• Utilizzare un panno morbido (meglio se in microfibra) bagnato con acqua o con un normale detergente per vetri.
• Si sconsiglia l’utilizzo di panni carta, i quali potrebbero lasciare residui di carta ed aloni sulla cappa.
• Non utilizzare prodotti abrasivi o corrosivi, prodotti a base di cloro o pagliette.
• Non utilizzare apparecchi di pulizia a vapore.
• Non utilizzare prodotti infiammabili.
• Evitare di lasciare sulla cappa sostanze acide o alcaline come aceto, mostarda, sale, zucchero o succo di limone.
Usare detergenti specifici per la pulizia dell'apparecchio ed attenersi alle indicazioni del Fabbricante
IMPORTANTE: pulire i filtri almeno una volta al mese per eliminare i residui di oli e grassi.
AVVERTENZA:
PULIZIA IXELIUM

IT46
- utilizzare guanti protettivi.
- scollegare l'apparecchio dalla rete elettrica.
FILTRI ANTIGRASSO
Il filtro metallico antigrasso ha una durata illimitata e deve essere lavato una volta al mese a mano od in
lavastoviglie a basse temperature ed a ciclo breve. Con il lavaggio in lavastoviglie il filtro grassi potrebbe
opacizzarsi, ma il suo potere filtrante non cambia assolutamente.
Estrarre la maniglia per togliere il filtro.
Dopo aver lavato e lasciato asciugare procedere nel senso inverso per il rimontaggio.
SOSTITUZIONE DELLE LAMPADE
La cappa è dotata di un sistema di illuminazione basato sulla tecnologia LED.
I LED garantiscono una illuminazione ottimale, una durata fino a 10 volte maggiore
delle lampade tradizionali e consentono di risparmiare il 90% di energia elettrica.
Per la sostituzione rivolgersi al servizio assistenza tecnica.
FILTRO AL CARBONE
(solo per modelli ad installazione filtrante)
Trattiene gli odori sgradevoli derivanti dalla cottura.
Sostituire il filtro a carbone ogni 4 mesi.
Montaggio o sostituzione del filtro a carbone
1. Scollegare la cappa dalla rete elettrica.
2. Aprire e rimuovere dalla sua sede il pannello di aspirazione.
3. Togliere i filtri antigrasso.
4. Applicare un filtro carbone per lato, a copertura di entrambe le griglie di protezione della
girante del motore. Girare i filtri in senso orario, per bloccarli ai perni centrali.
Per lo smontaggio procedere in senso inverso.
Rimontare i filtri antigrasso ed il pannello di aspirazione.
AVVERTENZA:
MANUTENZIONE

IT47
La cappa è progettata per essere installata ed utilizzata in "Versione Aspirante" o in "Versione Filtrante".
Nota: il modello con valvola elettrica può funzionare solo in "Versione Aspirante" e il tubo di scarico va collegato ad una unità periferica di aspirazione.
Versione Aspirante
I vapori vengono aspirati ed inviati all'esterno tramite un tubo di scarico (non fornito) che viene fissato al raccordo di uscita aria della cappa.
In base al tubo di scarico acquistato, prevedere un sistema idoneo di fissaggio al raccordo di uscita aria.
IMPORTANTE: Se già installato/i rimuovere il/i filtro/i al carbone.
Versione Filtrante
L'aria viene filtrata passando attraverso un/dei filtro/i al carbone e riciclata nell'ambiente circostante.
IMPORTANTE: Verificare che la ricircolazione dell'aria avvenga in modo agevole.
Se la cappa non è provvista di filtro/i al carbone, questo/i deve/ono essere ordinato/i e montato/i prima dell'uso.
L'installazione della cappa dovrebbe essere eseguita lontano da aree fortemente sporche, finestre, porte e fonti di calore.
La cappa ha in dotazione tutto il materiale necessario per una installazione sulla maggior parte delle pareti/soffitti. È tuttavia necessario interpellare un tecnico
qualificato per verificare l'idoneità dei materiali in base al tipo di parete/soffitto.
Pensili laterali
Pensili laterali
linea centrale
65 cm (cucine a gas o miste)
50 cm (cucine elettriche)
superficie piano di cottura
1200 mm min (modello largo 120cm)
900 mm min (modello largo 90cm)
700 mm min (modello largo 70cm)
600 mm min (modello largo 60cm)
MATERIALE A CORREDO
INSTALLAZIONE - ISTRUZIONI PRELIMINARI DI MONTAGGIO
DIMENSIONI DI INSTALLAZIONE
Estrarre tutti i componenti dai pacchetti. Controllare che tutti i componenti siano inclusi.
• Cappa assemblata con motore, lampadine e filtri antigrasso installati.
• Istruzioni di montaggio ed uso
• Camini telescopici
• 1 Dima di montaggio
• 6 tasselli a muro Ø 8mm
• 6 viti Ø 5x45
• 4 viti da Ø 3,5x9,5
• Staffa di supporto camini
• 1 deflettore (per versione filtrante)
• 2 viti Ø 2,9x6,5
• 4 viti da Ø 4x8
• 4 viti da Ø 3,5x6,5
• 2 viti Ø 2,9x6,5
• 2 rondelle
• 1 staffa di supporto cappa

IT48
Le istruzioni in sequenza numerica di seguito riportate, fanno riferimento ai disegni che troverete nella ultime pagine di questo manuale, contenente la
rispettiva numerazione.
Prima di procedere con le fasi di installazione:
- rimuovere il pannello di aspirazione perimatrale "A";
- spingere verso sinistra la leva presente nella parte inferiore del pannello
- sganciare il pannello dai supporti
- rimuovere i filtro/i grassi
poi
- rimuovere il nastro che fissa la scatola dell’elettronica “S” al cassone motore;
- stringere completamente le viti, già serrate parzialmente, che fissano la scatola dell'elettronica “S”, al cassone motore.
Nota: la scatola “S” potrebbe essere temporaneamente fissata sopra o ai lati del cassone motore, l’immagine è al solo scopo indicativo.
1. Con una matita, eseguire una linea sulla parete, sino al soffitto, corrispondente alla linea di mezzeria, faciliterà le operazioni di installazione.
2. Applicare lo schema di foratura al muro: la linea verticale di mezzeria stampata sullo schema di foratura dovrà corrispondere alla linea di mezzeria
disegnata sul muro, inoltre il bordo inferiore dello schema di foratura corrisponde al bordo inferiore della cappa.
3. Appoggiare la staffa di supporto inferiore sullo schema di foratura facendolo coincidere con il rettangolo tratteggiato, segnare i due fori esterni e forare.
Nota: Eseguire sempre tutti i fori indicati sulla dima: i 2 superiori servono per agganciare la cappa mentre i fori inferiori (generalmente 1 centrale o più laterali)
servono per il fissaggio definitivo e di sicurezza.
Togliere lo schema di foratura, inserire i tasselli a muro e fissare con 2 viti 5 x 45 mm la staffa di supporto della cappa.
4. Applicare la staffa di supporto camini “G” alla parete aderente al soffitto, utilizzare la staffa di supporto camini come schema di foratura (se presente, la
piccola asola ricavata sul supporto deve coincidere con la linea precedentemente tracciata sul muro) e segnare con la matita 2 fori, eseguire i fori (Ø 8 mm),
inserire 2 tasselli.
5. Fissare la staffa di supporto camini alla parete con 2 viti 5x45 mm.
6. Appendere la cappa alla staffa inferiore.
7. Regolare la distanza della cappa dalla parete.
8. Regolare l’assetto orizzontale della cappa.
9. Fissare definitivamente la cappa alla parete (OBBLIGATORIO!!).
10. Eseguire la connessione di un tubo (tubo e fascette per il fissaggio non fornite, da acquistare) per lo scarico dei fumi all’anello di connessione posto sopra
l’unità motore aspirante.
L’altra estremità del tubo dovrà essere collegata ad un dispositivo di espulsione fumi verso l’esterno in caso di utilizzo della cappa in versione aspirante.
Nel caso si voglia utilizzare la cappa in versione filtrante, togliere la valvola di non ritorno fumi “E”, fissare alla staffa di supporto camini “G” il deflettore “F”
da regolare in base alla larghezza del camino e collegare l’altra estremità del tubo all’anello di connessione posto sul deflettore “F”.
11. Eseguire la connessione elettrica. Passare il cavo di alimentazione nella sede apposita e assicurare il cavo al bloccacavo (11a).
12. Applicare i camini e fissarli sopra con 2 viti (12a) alla staffa di supporto camini “G” (12b).
13. Far scivolare la sezione inferiore del camino a copertura completa del gruppo aspirante sino ad inserirlo nella apposita sede sopra la cappa.
Rimontare il filtro/i grassi.
Rimontare il pannello di aspirazione perimetrale
IMPORTANTE: verificare sempre che il pannello sia ben fissato al suo posto.
Verificare il funzionamento della cappa, facendo riferimento al paragrafo descrizione ed uso della cappa.
INSTALLAZIONE - ISTRUZIONI DI MONTAGGIO

IT49
1. Pannello comandi.
2. Filtri antigrasso (sopra il pannello di aspirazione perimetrale).
3. Lampade.
4. Camino telescopico.
5. Pannello di aspirazione perimetrale.
Pannello comandi
1. ON/FF motore
2. selezione (incremento/decremento) velocità
indicatori luminosi:
a. velocità di aspirazione minima in uso
b. velocità di aspirazione media in uso
c. velocità di aspirazione massima in uso
d. velocità di aspirazione intensiva in uso
NB = la velocità di aspirazione intensiva viene temporizzata per 5 minuti,
dopodichè il motore tornerà alla velocità media.
3. ON/OFF luci
NB = la retroilluminazione dei comandi aumenta di intensità quando la funzione è in uso.
DESCRIZIONE E USO DELLA CAPPA
- Scollegare l’apparecchio dalla rete elettrica
Pulizia del pannello di aspirazione perimetrale
Smontaggio:
tirare il pannello (LATO ANTERIORE) con decisione verso il basso.
Pulizia:
Il pannello di aspirazione va pulito con la stessa frequenza del filtro grassi.
Il pannello di aspirazione, presenta l'acciaio con trattamento superficiale iXelium.
Quindi per la sua pulizia procedere comse segue:
• Utilizzare un panno morbido (meglio se in microfibra) bagnato con acqua o con un normale
detergente per vetri.
• Si sconsiglia l'utilizzo di panni carta, i quali potrebbero lasciare residui di carta ed aloni sul pannello.
• Non utilizzare prodotti abrasivi o corrosivi, prodotti a base di cloro o pagliette.
• Non utilizzare apparecchi di pulizia a vapore.
• Non utilizzare prodotti infiammabili.
• Evitare di lasciare sul pannello sostanze acide o alcaline come aceto, mostarda, sale, zucchero o succo di limone.
NON UTILIZZARE ALCOOL!
Montaggio:
Il pannello deve essere fissato anteriormente ad incastro nei perni posti allo scopo sulla superfice della cappa.
IMPORTANTE: Verificare sempre che il pannello sia ben fissato al suo posto.
AVVERTENZA:
MANUTENZIONE
1
2
3
ab
c
d

ΣΗΜΑΝΤΙΚΕΣ ΟΔΗΓΙΕΣ ΓΙΑ ΤΗΝ ΑΣΦΑΛΕΙΑ
Αυτές οι οδηγίες θα είναι επίσης διαθέσιμες στον ιστότοπο: www.whirlpool.eu.
Η ΠΡΟΣΩΠΙΚΗ ΣΑΣ ΑΣΦΑΛΕΙΑ ΚΑΙ Η ΑΣΦΑΛΕΙΑ ΑΛΛΩΝ ΑΤΟΜΩΝ ΕΙΝΑΙ ΠΟΛΥ ΣΗΜΑΝΤΙΚΗ.
Το παρόν εγχειρίδιο και η συσκευή περιλαμβάνουν σημαντικές προειδοποιήσεις σχετικά με την ασφάλεια, τις οποίες πρέπει να διαβάζετε και να τηρείτε σε κάθε
περίπτωση.
Αυτό είναι το σύμβολο προσοχής, που αφορά την ασφάλεια και υποδεικνύει πιθανούς κινδύνους για το χρήστη και άλλα άτομα.
Όλες οι προειδοποιήσεις που αφορούν την ασφάλεια συνοδεύονται από το σύμβολο προσοχής και τις παρακάτω επισημάνσεις:
Υποδεικνύει μια επικίνδυνη κατάσταση, η οποία εάν δεν αποφευχθεί, θα οδηγήσει σε σοβαρούς
τραυματισμούς.
Υποδεικνύει μια επικίνδυνη κατάσταση, η οποία εάν δεν αποφευχθεί, μπορεί να οδηγήσει σε σοβαρούς
τραυματισμούς.
Όλες οι προειδοποιήσεις που αφορούν την ασφάλεια καθορίζουν τον πιθανό κίνδυνο/προειδοποίηση στον οποίο αναφέρονται και υποδεικνύουν τον τρόπο
μείωσης του κινδύνου τραυματισμού, βλάβης και ηλεκτροπληξίας λόγω εσφαλμένης χρήσης της συσκευής. Συμμορφωθείτε με τις ακόλουθες οδηγίες:
Η εγκατάσταση ή συντήρηση πρέπει να εκτελείται από εξειδικευμένο τεχνικό, σύμφωνα με τις οδηγίες του κατασκευαστή και τους τοπικούς κανονισμούς
ασφαλείας. Μην επισκευάζετε και μην αντικαθιστάτε κανένα εξάρτημα της συσκευής, εκτός εάν αναφέρεται ρητά στο εγχειρίδιο χρήσης.
• Η συσκευή πρέπει να αποσυνδέεται από την τροφοδοσία πριν από κάθε εργασία εγκατάστασης.
• Η γείωση της συσκευής είναι υποχρεωτική. (Δεν απαιτείται για απορροφητήρες τάξης II που αναγνωρίζονται από το σύμβολο στην ετικέτα
προδιαγραφών).
• Το καλώδιο τροφοδοσίας πρέπει να είναι αρκετά μακρύ για να επιτρέπει τη σύνδεση της συσκευής με την πρίζα κεντρικής παροχής.
• Μην τραβάτε το καλώδιο τροφοδοσίας για να αποσυνδέσετε τη συσκευή.
• Μετά την ολοκλήρωση της εγκατάστασης, δεν πρέπει να είναι δυνατή η πρόσβαση στα ηλεκτρικά εξαρτήματα.
• Μην αγγίζετε τη συσκευή με βρεγμένα μέρη του σώματος και μην την χρησιμοποιείτε όταν έχετε γυμνά πόδια.
• Η συσκευή αυτή μπορεί να χρησιμοποιηθεί από παιδιά άνω των 8 ετών και από άτομα με μειωμένη σωματική, αισθητήρια ή διανοητική ικανότητα ή με
ανεπαρκή εμπειρία και γνώσεις μόνο εάν έχουν εκπαιδευτεί στη χρήση της συσκευής υπό συνθήκες ασφαλείας και εάν γνωρίζουν τους εμπλεκόμενους
κινδύνους. Τα παιδιά δεν πρέπει να παίζουν με τη συσκευή. Ο καθαρισμός και η συντήρηση δεν πρέπει να διεξάγονται από παιδιά, εκτός εάν τα επιβλέπει
κάποιος ενήλικας.
• Μην επισκευάζετε και μην αντικαθιστάτε κανένα εξάρτημα της συσκευής, εκτός εάν αναφέρεται ρητά στο εγχειρίδιο. Τα ελαττωματικά μέρη πρέπει να
αντικαθιστώνται με γνήσια ανταλλακτικά. Όλες οι υπόλοιπες εργασίες συντήρησης πρέπει να εκτελούνται από εξειδικευμένο τεχνικό.
• Τα παιδιά πρέπει να βρίσκονται υπό επιτήρηση, ώστε να μην παίζουν με τη συσκευή.
• Κατά τη διάνοιξη οπών σε τοίχο ή οροφή, φροντίστε να μην προκαλέσετε ζημιά στις ηλεκτρικές συνδέσεις ή/και στους σωλήνες.
• Τα κανάλια εξαερισμού πρέπει να καταλήγουν πάντα σε εξωτερικό χώρο.
• Ο αέρας απαγωγής δεν πρέπει να καταλήγει σε αγωγό που χρησιμοποιείται για την εκκένωση των αναθυμιάσεων που παράγουν συσκευές καύσης αερίου ή
άλλων καυσίμων, αλλά πρέπει να διατίθεται ανεξάρτητη έξοδος. Πρέπει να τηρούνται όλοι οι ισχύοντες τοπικοί κανονισμοί για την απαγωγή αερίων.
• Εάν ο απορροφητήρας χρησιμοποιείται μαζί με άλλες συσκευές που καταναλώνουν αέριο ή άλλα καύσιμα, η αρνητική πίεση στο χώρο δεν πρέπει να
υπερβαίνει τα 4Pa (4 x 10⁻⁵ bar). Για το λόγο αυτό βεβαιωθείτε ότι το δωμάτιο αερίζεται επαρκώς.
• Ο κατασκευαστής δεν φέρει καμία ευθύνη για ακατάλληλες χρήσεις ή εσφαλμένες ρυθμίσεις των διακοπτών.
• Η τακτική συντήρηση και ο καθαρισμός εξασφαλίζει την καλή λειτουργία και απόδοση της συσκευής. Καθαρίζετε συχνά όλες τις κρούστες από τις βρώμικες
επιφάνειες για την αποφυγή συσσώρευσης λιπαρών ουσιών. Καθαρίζετε ή αντικαθιστάτε συχνά το φίλτρο.
• Σε περίπτωση μη τήρησης των οδηγιών καθαρισμού του απορροφητήρα και αντικατάστασης των φίλτρων υπάρχει κίνδυνος πυρκαγιάς.
• Ο απορροφητήρας απαγωγής αερίων δεν πρέπει να ανοιχθεί ποτέ χωρίς να είναι τοποθετημένα τα φίλτρα γράσου και θα πρέπει να παραμένει υπό συνεχή
επίβλεψη.
• Οι συσκευές αερίου πρέπει να χρησιμοποιούνται μόνο κάτω από τον απορροφητήρα απαγωγής με τα μαγειρικά σκεύη σε ηρεμία.
• Όταν χρησιμοποιείτε περισσότερα από τρία σημεία μαγειρέματος με αέριο, ο απορροφητήρας θα πρέπει να λειτουργεί σε επίπεδο ισχύος 2 ή μεγαλύτερο.
Έτσι θα εξαλειφθεί η συμφόρηση θερμότητας στη συσκευή.
• Πριν αγγίξετε τους λαμπτήρες, βεβαιωθείτε ότι έχουν κρυώσει.
• Μη χρησιμοποιείτε και μην αφήνετε τον απορροφητήρα χωρίς τους λαμπτήρες σωστά τοποθετημένους. Κίνδυνος ηλεκτροπληξίας.
• Για όλες τις εργασίες εγκατάστασης και συντήρησης χρησιμοποιείτε γάντια εργασίας.
• Το προϊόν δεν προορίζεται για χρήση σε εξωτερικό χώρο.
• Όταν χρησιμοποιείται η μονάδα εστιών, τα προσβάσιμα μέρη του απορροφητήρα μπορεί να ζεσταθούν.
ΦΥΛΑΞΤΕ ΤΟ ΕΓΧΕΙΡΙΔΙΟ ΑΥΤΟ ΓΙΑ ΜΕΛΛΟΝΤΙΚΗ ΑΝΑΦΟΡΑ.
ΠΡΟΕΙΔΟΠΟΙΗΣΗ:
ΚΙΝΔΥΝΟΣ:
GR50

Μετά την αποσυσκευασία, ελέγξτε τη συσκευή για τυχόν ζημιές κατά τη μεταφορά. Εάν υπάρχει κάποιο πρόβλημα, επικοινωνήστε με τον αντιπρόσωπο ή με το
πλησιέστερο κέντρο εξυπηρέτησης πελατών. Για να αποφευχθούν τυχόν ζημιές, αφαιρείτε τη συσκευή από τη συσκευασία φελιζόλ μόνο κατά τη στιγμή της
εγκατάστασης.
ΠΡΟΕΤΟΙΜΑΣΙΑ ΓΙΑ ΕΓΚΑΤΑΣΤΑΣΗ
το προϊόν αυτό έχει μεγάλο βάρος. Η ανύψωση και η εγκατάσταση του απορροφητήρα πρέπει να
πραγματοποιείται από δύο ή περισσότερα άτομα.
Η ελάχιστη απόσταση μεταξύ του στηρίγματος των μαγειρικών σκευών πάνω στην κουζίνα και του κάτω μέρους του απορροφητήρα δεν πρέπει να είναι μικρότερη
από 50 cm για ηλεκτρικές κουζίνες και 65 cm για κουζίνες αερίου ή μεικτές. Πριν από την εγκατάσταση, ελέγξτε επίσης τις ελάχιστες αποστάσεις που αναφέρονται
στο εγχειρίδιο της κουζίνας.
Εάν στις οδηγίες εγκατάστασης της κουζίνας συνιστάται μεγαλύτερη απόσταση μεταξύ της κουζίνας και του απορροφητήρα, ακολουθήστε τις σχετικές οδηγίες.
ΗΛΕΚΤΡΙΚΗ ΣΥΝΔΕΣ
Βεβαιωθείτε ότι η τάση που αναγράφεται στην πινακίδα ονομαστικών χαρακτηριστικών της συσκευής αντιστοιχεί στην τάση του δικτύου. Οι πληροφορίες αυτές
μπορεί να αναγράφονται στο εσωτερικό του απορροφητήρα, κάτω από το φίλτρο για λίπη. Η αντικατάσταση του καλωδίου τροφοδοσίας (τύπου H05 VV-F 3 x 0,75
mm²) πρέπει να πραγματοποιείται από εξειδικευμένο ηλεκτρολόγο. Επικοινωνήστε με ένα εξουσιοδοτημένο κέντρο σέρβις. Εάν ο απορροφητήρας διαθέτει φις,
συνδέστε το σε μια πρίζα που πληροί τους ισχύοντες κανονισμούς και βρίσκεται σε σημείο με εύκολη πρόσβαση μετά την εγκατάσταση. Εάν δεν υπάρχει φις
(απευθείας σύνδεση στο δίκτυο) ή εάν η πρίζα δεν βρίσκεται σε σημείο με εύκολη πρόσβαση, πρέπει να εγκατασταθεί ένας τυπικός διπολικός διακόπτης που
παρέχει τη δυνατότητα πλήρους απομόνωσης από το δίκτυο στις συνθήκες της κατηγορίας υπέρτασης ΙΙΙ σύμφωνα με τους κανονισμούς εγκατάστασης.
ΓΕΝΙΚΕΣ ΣΥΣΤΑΣΕΙΣ
Πριν τη χρήση
Αφαιρέστε τα προστατευτικά από χαρτόνι, την προστατευτική μεμβράνη και τις αυτοκόλλητες ετικέτες από τα εξαρτήματα. Ελέγξτε τη συσκευή για τυχόν ζημιές
κατά τη μεταφορά.
Κατά τη διάρκεια της χρήσης
Για να αποφευχθούν τυχόν ζημιές, μην τοποθετείτε βάρος πάνω στη συσκευή. Μην εκθέτετε τη συσκευή σε ατμοσφαιρικούς παράγοντες.
ΠΡΟΕΙΔΟΠΟΙΗΣΗ:
Απόρριψη συσκευασίας
Το υλικό συσκευασίας είναι 100% ανακυκλώσιμο, όπως δείχνει το σύμβολο ανακύκλωσης . Συνεπώς, τα διάφορα μέρη της συσκευασίας πρέπει να
απορρίπτονται κατάλληλα και σύμφωνα με τους τοπικούς κανονισμούς για την απόρριψη αποβλήτων.
Απόρριψη του προϊόντος
-
Αυτή η συσκευή φέρει σήμανση σύμφωνα με την ευρωπαϊκή οδηγία 2002/96/ΕΚ σχετικά με τα απόβλητα ειδών ηλεκτρικού και ηλεκτρονικού εξοπλισμού (ΑΗΗΕ).
- Η σωστή απόρριψη αυτού του προϊόντος συμβάλλει στην αποτροπή πιθανών επιβλαβών επιπτώσεων για το περιβάλλον και την ανθρώπινη υγεία λόγω
ακατάλληλου χειρισμού των αποβλήτων του προϊόντος αυτού.
- Το σύμβολο στο προϊόν ή στα συνοδευτικά έγγραφα υποδεικνύει ότι το προϊόν αυτό δεν πρέπει να υποβάλλεται σε επεξεργασία όπως τα οικιακά
απόβλητα, αλλά να παραδίδεται στο ειδικό κέντρο συλλογής για την ανακύκλωση ειδών ηλεκτρικού και ηλεκτρονικού εξοπλισμού.
Απόρριψη οικιακών συσκευώ
• Η συσκευή αυτή έχει κατασκευαστεί από ανακυκλώσιμα ή επαναχρησιμοποιούμενα υλικά. Η απόρριψη της συσκευής πρέπει να γίνεται σύμφωνα με τους
τοπικούς κανονισμούς απόρριψης αποβλήτων. Πριν από την απόρριψη, κόψτε το καλώδιο τροφοδοσίας.
• Για περαιτέρω πληροφορίες σχετικά με την επεξεργασία, τη συλλογή και την ανακύκλωση οικιακών ηλεκτρικών συσκευών, επικοινωνήστε με τις αρμόδιες
τοπικές αρχές, την υπηρεσία αποκομιδής οικιακών απορριμμάτων ή το κατάστημα πώλησης της συσκευής.
ΕΓΚΑΤΑΣΤΑΣΗ
ΣΥΜΒΟΥΛΕΣ ΓΙΑ ΤΗΝ ΠΡΟΣΤΑΣΙΑ ΤΟΥ ΠΕΡΙΒΑΛΛΟΝΤΟΣ
Δήλωση συμμόρφωσης
• Η συσκευή αυτή έχει σχεδιαστεί, κατασκευαστεί και διατεθεί στην αγορά σύμφωνα με:
- τις προδιαγραφές ασφαλείας της οδηγίας 2006/95/ΕΚ για τη «Χαμηλή τάση» (η οποία αντικαθιστά την οδηγία 73/23/ΕΟΚ και τις μετέπειτα τροποποιήσεις της),
-
οι απαιτήσεις οικολογικού σχεδιασμού των ευρωπαϊκών κανονισμών υπ’ αριθμ. 65/2014, και υπ’ αριθμ. 66/2014 σε συμμόρφωση με το ευρωπαϊκό πρότυπο EN 61591
- οι απαιτήσεις προστασίας της οδηγίας 2004/108/ΕΚ για την «ΗΜΣ».
Η ηλεκτρική ασφάλεια της συσκευής εξασφαλίζεται μόνο όταν η συσκευή είναι συνδεδεμένη σωστά σε εγκεκριμένο σύστημα γείωσης.
Συμβουλές εξοικονόμησης ενέργεια
•
Ενεργοποιήστε τον απορροφητήρα σε ελάχιστη ταχύτητα όταν αρχίσετε το μαγείρεμα και διατηρήστε τον σε λειτουργία για λίγα λεπτά αφού τελειώσετε το μαγείρεμα.
• Αυξήστε την ταχύτητα μόνο στην περίπτωση μεγάλης ποσότητας καπνού και ατμών και χρησιμοποιήστε τις ταχύτητες ενίσχυσης μόνο σε ακραίες καταστάσεις.
• Αντικαταστήστε τα φίλτρα άνθρακα όταν απαιτείται για να διατηρηθεί η καλή αποδοτικότητα μείωσης των οσμών.
• Καθαρίστε τα φίλτρα γράσου όταν απαιτείται για να διατηρηθεί η καλή αποδοτικότητα του φίλτρου γράσου.
• Χρησιμοποιήστε τη μέγιστη διάμετρο του συστήματος σωλήνων που υποδεικνύεται στο παρόν εγχειρίδιο για να βελτιστοποιήσετε την αποδοτικότητα και να
ελαχιστοποιήσετε το θόρυβο.
GR51

Η συσκευή δεν λειτουργεί:
• Ελέγξτε εάν υπάρχει κεντρική ηλεκτρική παροχή και εάν η συσκευή είναι συνδεδεμένη στην ηλεκτρική παροχή
• Απενεργοποιήστε τη συσκευή και εκκινήστε την ξανά για να δείτε εάν η βλάβη επιμένει.
Το επίπεδο αναρρόφησης του απορροφητήρα δεν είναι επαρκές:
• Ελέγξτε την ταχύτητα αναρρόφησης και ρυθμίστε την, εάν απαιτείται.
• Ελέγξτε ότι τα φίλτρα είναι καθαρά
• Ελέγξτε εάν οι αεραγωγοί είναι φραγμένοι.
Το φως δεν λειτουργεί.
• Ελέγξτε τον λαμπτήρα και αντικαταστήστε τον εάν απαιτείται
• Ελέγξτε ότι ο λαμπτήρας έχει τοποθετηθεί σωστά.
Πριν καλέσετε το Σέρβις:
1. Δείτε εάν μπορείτε να επιλύσετε το πρόβλημα μόνοι σας με τη βοήθεια των υποδείξεων που παρέχονται στον «Οδηγό ανεύρεσης βλαβών».
2. Απενεργοποιήστε και ενεργοποιήστε ξανά τη συσκευή για να διαπιστώσετε εάν η βλάβη παραμένει.
Εάν μετά τους παραπάνω ελέγχους η βλάβη ακόμη υπάρχει, επικοινωνήστε με το πλησιέστερο Σέρβις.
Πάντα να αναφέρετε:
• Μια σύντομη περιγραφή της βλάβης.
• Τον ακριβή τύπο και μοντέλο της συσκευής
• τον αριθμό Service (ο αριθμός μετά την ένδειξη «Service» στην πινακίδα τεχνικών στοιχείων) που βρίσκεται στο εσωτερικό της συσκευής.
Ο αριθμός Service υποδεικνύεται και στο φυλλάδιο της εγγύησης
• Την πλήρη διεύθυνσή σας
• Τον τηλεφωνικό αριθμό σας.
Εάν απαιτούνται οποιεσδήποτε επισκευές, επικοινωνήστε με εξουσιοδοτημένο κέντρο εξυπηρέτησης πελατών (για εγγύηση ότι θα χρησιμοποιηθούν γνήσια
ανταλλακτικά και οι επισκευές θα διεξαχθούν σωστά).
ΟΔΗΓΟΣ ΑΝΕΥΡΕΣΗΣ ΒΛΑΒΩΝ
ΣΕΡΒΙΣ
- Μην χρησιμοποιείτε ατμοκαθαριστές.
- Αποσυνδέετε τη συσκευή από την τροφοδοσία.
ΣΗΜΑΝΤΙΚΟ: Μη χρησιμοποιείτε διαβρωτικά ή λειαντικά καθαριστικά. Σε περίπτωση τυχαίας επαφής των προϊόντων αυτών με τη συσκευή,
καθαρίστε αμέσως με ένα υγρό πανί.
ΣΗΜΑΝΤΙΚΟ: Ο χάλυβας του απορροφητήρα έχει υποστεί επιφανειακή επεξεργασία με iXelium.
Για να το καθαρίσετε, συνεχίστε ως εξής:
• Χρησιμοποιήστε ένα μαλακό πανί (κατά προτίμηση μικροΐνες) υγραμένο με νερό ή συνηθισμένο καθαριστικό για τζάμια.
• Μην χρησιμοποιείτε χαρτοπετσέτες, επειδή μπορεί να αφήνουν σημάδια και κομματάκια χαρτιού στον απορροφητήρα.
• Μη χρησιμοποιείτε λειαντικά ή διαβρωτικά προϊόντα ή προϊόντα με βάσει τη χλωρίνη ή σύρμα καθαρισμού.
• Μην χρησιμοποιείτε εξοπλισμό ατμού.
• Μην χρησιμοποιείτε εύφλεκτα προϊόντα.
• Μην αφήνετε όξινες ή αλκαλικές ουσίες, όπως ξύδι, μουστάρδα, αλάτι, ζάχαρη ή χυμό λεμονιού επάνω στον απορροφητήρα.
Χρησιμοποιείτε ειδικά απορρυπαντικά για τον καθαρισμό της συσκευής και ακολουθείτε τις οδηγίες του κατασκευαστή.
ΣΗΜΑΝΤΙΚΟ: Καθαρίστε τα φίλτρα τουλάχιστον μία φορά τον μήνα για να αφαιρέσετε τα υπολείμματα λαδιού και γράσου.
ΠΡΟΕΙΔΟΠΟΙΗΣΗ:
ΚΑΘΑΡΙΣΜΟΣ IXELIUM
GR52

GR53
- χρησιμοποιείτε προστατευτικά γάντια.
- αποσυνδέστε τη συσκευή από το ηλεκτρικό δίκτυο.
ΦΙΛΤΡΑ ΓΙΑ ΛΙΠΗ
Το μεταλλικό φίλτρο για λίπη έχει απεριόριστη διάρκεια και πρέπει να πλένεται μία φορά το μήνα στο χέρι
ή στο πλυντήριο πιάτων σε χαμηλές θερμοκρασίες και σε σύντομο κύκλο. Μετά το πλύσιμο στο πλυντήριο
πιάτων, το φίλτρο για λίπη μπορεί να θαμπώσει, χωρίς ωστόσο να μειωθεί η αποτελεσματικότητά του.
Αφαιρέστε τη λαβή για να βγάλετε το φίλτρο.
Μετά το πλύσιμο και το στέγνωμα του φίλτρου, ακολουθήστε την αντίστροφη διαδικασία για να το
τοποθετήσετε ξανά.
SOSTITUZIONE DELLE LAMPADE
La cappa è dotata di un sistema di illuminazione basato sulla tecnologia LED.
I LED garantiscono una illuminazione ottimale, una durata fino a 10 volte maggiore delle lampade tradizionali e consentono di risparmiare il 90% di energia
elettrica.
Per la sostituzione rivolgersi al servizio assistenza tecnica.
ΦΙΛΤΡΟ ΕΝΕΡΓΟΥ ΑΝΘΡΑΚΑ
(μόνο για μοντέλα με λειτουργία φιλτραρίσματος)
Συγκρατεί τις δυσάρεστες οσμές από το μαγείρεμα.
Αντικαθιστάτε το φίλτρο ενεργού άνθρακα κάθε 4 μήνες
Τοποθέτηση ή αντικατάσταση του φίλτρου ενεργού άνθρακα
1. Αποσυνδέστε τον απορροφητήρα από το ηλεκτρικό δίκτυο.
2. Ανοίξτε και αφαιρέστε από τη θέση του τον πίνακα αναρρόφησης.
3. Αφαιρέστε τα φίλτρα για λίπη.
4. Τοποθετήστε ένα φίλτρο ενεργού άνθρακα σε κάθε πλευρά, καλύπτοντας και τις δύο
προστατευτικές σχάρες της φτερωτής του μοτέρ. Περιστρέψτε δεξιόστροφα τα
φίλτρα, ώστε να τα ασφαλίσετε στους κεντρικούς πείρους.
Για την αφαίρεση, ακολουθήστε την ίδια διαδικασία με αντίστροφη σειρά.
Τοποθετήστε ξανά τα φίλτρα για λίπη και τον πίνακα αναρρόφησης.
ΠΡΟΕΙΔΟΠΟΙΗΣΗ:
ΣΥΝΤΗΡΗΣΗ

GR54
Ο απορροφητήρας έχει σχεδιαστεί για να τοποθετείται και να λειτουργεί ως "Έκδοση απαγωγής" ή ως "Έκδοση φιλτραρισματος αέρα".
Σημείωση: το μοντέλο με ηλεκτρική βαλβίδα μπορεί να λειτουργήσει μόνο στην "Έκδοση απαγωγής" και ο σωλήνας εξαγωγής πρέπει να συνδέεται σε μια
περιφερική μονάδα αναρρόφησης.
Λειτουργία απαγωγής
Οι υδρατμοί αναρροφώνται και διοχετεύονται προς το εξωτερικό μέσω ενός σωλήνα απαγωγής (δεν παρέχεται) που συνδέεται στο ρακόρ εξόδου αέρα του
απορροφητήρα.
Ανάλογα με το σωλήνα απαγωγής, χρησιμοποιήστε την κατάλληλη μέθοδο στερέωσης του σωλήνα στο ρακόρ εξόδου αέρα.
ΣΗΜΑΝΤΙΚΟ: Εάν το φίλτρο ενεργού άνθρακα είναι ήδη τοποθετημένο, πρέπει να το αφαιρέσετε.
Λειτουργία φιλτραρίσματος αέρα
Ο αέρας διέρχεται από ένα ή περισσότερα φίλτρα ενεργού άνθρακα, φιλτράρεται και ανακυκλώνεται στο χώρο.
ΣΗΜΑΝΤΙΚΟ: Βεβαιωθείτε ότι η ανακύκλωση του αέρα εκτελείται σωστά.
Εάν ο απορροφητήρας δεν διαθέτει φίλτρο ενεργού άνθρακα, πρέπει να το παραγγείλετε και να το τοποθετήσετε πριν από τη χρήση.
Η εγκατάσταση του απορροφητήρα πρέπει να εκτελείται σε καθαρό χώρο, μακριά από παράθυρα, πόρτες και πηγές θερμότητας.
Ο απορροφητήρας παρέχεται με όλα τα απαραίτητα υλικά για την εγκατάσταση στους περισσότερους τοίχους/οροφές. Παρόλα αυτά είναι απαραίτητο να
απευθυνθείτε σε έναν έμπειρο τεχνίτη ώστε να βεβαιωθείτε για την καταλληλότητα των υλικών ανάλογα με τον τύπο τοίχου/οροφής.
Πλαϊνά ντουλάπια
Πλαϊνά ντουλάπια
κεντρική γραμμή
65 cm (κουζίνες αερίου ή μικτές)
50 cm (ηλεκτρικές κουζίνες)
επιφάνεια εστιών
1200 mm min (φαρδύ μοντέλο 120cm)
900 mm min (φαρδύ μοντέλο 90cm)
700 mm min (φαρδύ μοντέλο 70cm)
600 mm min (φαρδύ μοντέλο 60cm)
ΠΑΡΕΧΟΜΕΝΑ ΥΛΙΚΑ
ΕΓΚΑΤΑΣΤΑΣΗ - ΠΡΟΚΑΤΑΡΚΤΙΚΕΣ ΟΔΗΓΙΕΣ ΤΟΠΟΘΕΤΗΣΗΣ
ΔΙΑΣΤΑΣΕΙΣ ΕΓΚΑΤΑΣΤΑΣΗΣ
Αφαιρέστε όλα τα εξαρτήματα από τις συσκευασίες. Ελέγξτε εάν περιλαμβάνονται όλα τα εξαρτήματα.
• Συναρμολογημένος απορροφητήρας με μοτέρ, λαμπτήρες και τοποθετημένα φίλτρα για λίπη.
• Οδηγίες τοποθέτησης και χρήσης
• Τηλεσκοπικοί απαγωγοί
• 1 οδηγός διάτρησης
• 6 ούπα τοίχου Ø 8mm
• 6 βίδες Ø 5x45
• 4 βίδες Ø 3,5x9,5
• Βάση στερέωσης απαγωγών
• 1 εκτροπέας (για λειτουργία φιλτραρίσματος)
• 2 βίδες Ø 2,9x6,5
• 4 βίδες Ø 4x8
• 4 βίδες Ø 3,5x6,5
• 2 βίδες Ø 2,9x6,5
• 2 ροδέλες
• 1 βάση στερέωσης απορροφητήρα

GR55
Οι αριθμοί των παρακάτω οδηγιών αναφέρονται στα σχέδια που παρέχονται στις τελευταίες σελίδες του παρόντος εγχειριδίου με την αντίστοιχη αρίθμηση.
Πριν προχωρήσετε στην εγκατάσταση:
- αφαιρέστε το περιμετρικό πλαίσιο αναρρόφησης «A»
- πιέστε προς τα αριστερά το μοχλό που υπάρχει στο κάτω μέρος του πλαισίου
- αποσυνδέστε το πλαίσιο από τα στηρίγματα
- αφαιρέστε το(α) φίλτρο(α) για λίπη
στη συνέχεια
- αφαιρέστε την ταινία στερέωσης του κουτιού της ηλεκτρονικής μονάδας «S» στο κιβώτιο του μοτέρ
- σφίξτε πλήρως τις ήδη εν μέρει σφιγμένες βίδες, οι οποίες στερεώνουν το κουτί της ηλεκτρονικής μονάδας «S» στο κιβώτιο του μοτέρ.
Σημείωση: το κουτί «S» μπορεί να στερεωθεί προσωρινά πάνω ή στο πλάι του κιβωτίου του μοτέρ. Η εικόνα είναι απλώς ενδεικτική.
1. Με ένα μολύβι, σχεδιάστε μια κεντρική γραμμή στον τοίχο έως την οροφή για διευκόλυνση της εγκατάστασης.
2. Τοποθετήστε τον οδηγό διάτρησης στον τοίχο: η κατακόρυφη κεντρική γραμμή στον οδηγό διάτρησης πρέπει να αντιστοιχεί στην κεντρική γραμμή που
σχεδιάσατε στον τοίχο. Επίσης, το κάτω άκρο του οδηγού διάτρησης αντιστοιχεί στο κάτω άκρο του απορροφητήρα.
3. Τοποθετήστε την κάτω βάση στερέωσης στον οδηγό διάτρησης με τέτοιο τρόπο, ώστε να συμπίπτει με το ορθογώνιο που έχει σχεδιαστεί. Σημειώστε τις δύο
εξωτερικές οπές και ανοίξτε τις.
Σημείωση: Ανοίγετε πάντα όλες τις οπές που υπάρχουν στον οδηγό διάτρησης: οι 2 άνω οπές χρησιμοποιούνται για την τοποθέτηση του απορροφητήρα, ενώ οι
κάτω οπές (συνήθως 1 κεντρική ή πολλές πλαϊνές) χρησιμοποιούνται για την οριστική στερέωση και ασφάλιση.
Αφαιρέστε τον οδηγό διάτρησης, τοποθετήστε τα ούπα στον τοίχο και στερεώστε με 2 βίδες 5 x 45 mm τη βάση στερέωσης του απορροφητήρα.
4. Τοποθετήστε τη βάση στερέωσης απαγωγών «G» στον τοίχο που εφάπτεται με την οροφή, χρησιμοποιήστε τη βάση στερέωσης απαγωγών ως οδηγό
διάτρησης (το μικρό άνοιγμα στη βάση στερέωσης, εάν υπάρχει, πρέπει να συμπίπτει με την κατακόρυφη γραμμή που σχεδιάσατε προηγουμένως στον
τοίχο), σχεδιάστε με το μολύβι 2 οπές, ανοίξτε τις (Ø 8 mm) και τοποθετήστε 2 ούπα.
5. Τοποθετήστε τη βάση στερέωσης απαγωγών στον τοίχο με 2 βίδες 5x45 mm.
6. Κρεμάστε τον απορροφητήρα στην κάτω βάση στερέωσης.
7. Ρυθμίστε την απόσταση του απορροφητήρα από τον τοίχο.
8. Προσαρμόστε την οριζόντια θέση του απορροφητήρα.
9. Στερεώστε οριστικά τον απορροφητήρα στον τοίχο (ΥΠΟΧΡΕΩΤΙΚΟ!!).
10. Συνδέστε ένα σωλήνα (ο σωλήνας και τα κολάρα στερέωσης δεν παρέχονται, πρέπει να τα προμηθευτείτε ξεχωριστά) για την εξαγωγή των αερίων στο
δακτύλιο σύνδεσης που υπάρχει πάνω από τη μονάδα του μοτέρ αναρρόφησης. Στην περίπτωση που χρησιμοποιείτε απορροφητήρα με λειτουργία
αναρρόφησης, το άλλο άκρο του σωλήνα πρέπει να συνδεθεί σε ένα σύστημα εξαγωγής αερίων προς τα έξω. Εάν θέλετε να χρησιμοποιήσετε τον
απορροφητήρα στη λειτουργία φιλτραρίσματος, αφαιρέστε τη βαλβίδα αντεπιστροφής αερίων «Ε», τοποθετήστε στη βάση στερέωσης απαγωγών «G» τον
εκτροπέα «F» που πρέπει να ρυθμίσετε ανάλογα με το πλάτος του απαγωγού και συνδέστε το άλλο άκρο του σωλήνα στο δακτύλιο σύνδεσης που υπάρχει
στον εκτροπέα «F».
11. Εκτελέστε την ηλεκτρική σύνδεση. Τοποθετήστε το καλώδιο τροφοδοσίας στην ειδική υποδοχή και ασφαλίστε το με το σφιγκτήρα καλωδίου (11a).
12. Τοποθετήστε τους απαγωγούς και στερεώστε τους στο πάνω μέρος με 2 βίδες (12a) στη βάση στερέωσης απαγωγών «G» (12b).
13. Μετακινήστε το κάτω τμήμα του απαγωγού στην ειδική υποδοχή πάνω από τον απορροφητήρα καλύπτοντας πλήρως το σύστημα αναρρόφησης.
Τοποθετήστε ξανά το(α) φίλτρο(α) για λίπη.
Αφαιρέστε το περιμετρικό πλαίσιο αναρρόφησης
ΣΗΜΑΝΤΙΚΟ: ελέγχετε πάντα εάν το πλαίσιο έχει στερεωθεί καλά στη θέση του.
Ελέγξτε εάν ο απορροφητήρας λειτουργεί ανατρέχοντας στην παράγραφο «Περιγραφή και χρήση του απορροφητήρα».
ΕΓΚΑΤΑΣΤΑΣΗ - ΟΔΗΓΙΕΣ ΤΟΠΟΘΕΤΗΣΗΣ

GR56
1. Πίνακας διακοπτών.
2. Φίλτρα για λίπη (πάνω από το περιμετρικό πλαίσιο αναρρόφησης).
3. Λαμπτήρες.
4. Τηλεσκοπικός απαγωγός.
5. Περιμετρικό πλαίσιο αναρρόφησης.
Πίνακας διακοπτών
1. Ενεργοποίηση/απενεργοποίηση κινητήρα
2. επιλογή (αύξηση/μείωση) ταχύτητας
ενδεικτικές λυχνίες:
α. ταχύτητα ελάχιστης αναρρόφησης που χρησιμοποιείται
β. ταχύτητα μέσης αναρρόφησης που χρησιμοποιείται
γ. ταχύτητα μέγιστης αναρρόφησης που χρησιμοποιείται
δ. ταχύτητα εντατικής αναρρόφησης που χρησιμοποιείται
ΣΗΜ. = η ταχύτητα εντατικής αναρρόφησης ελέγχεται από χρονοδιακόπτη και
διαρκεί 5 λεπτά. Στη συνέχεια, ο απορροφητήρας επιστρέφει στη μέση ταχύτητα.
3. Ενεργοποίηση/Απενεργοποίηση φώτων
ΣΗΜ. = η ένταση του οπίσθιου φωτισμού των διακοπτών αυξάνεται όταν χρησιμοποιείται η λειτουργία.
ΠΕΡΙΓΡΑΦΗ ΚΑΙ ΧΡΗΣΗ ΤΟΥ ΑΠΟΡΡΟΦΗΤΗΡΑ
- Αποσυνδέστε τη συσκευή από το ηλεκτρικό δίκτυο
Καθαρισμός του περιμετρικού πλαισίου αναρρόφησης
Αποσυναρμολόγηση:
τραβήξτε το πλαίσιο (ΜΠΡΟΣΤΙΝΗ ΠΛΕΥΡΑ) με δύναμη προς τα κάτω.
Καθαρισμός:
Το πλαίσιο αναρρόφησης πρέπει να καθαρίζεται με την ίδια συχνότητα όπως το φίλτρο για λίπη.
Το πλαίσιο αναρρόφησης είναι κατασκευασμένο από χάλυβα με επιφανειακή επεξεργασία iXelium.
Συνεπώς, για τον καθαρισμό του, ακολουθήστε την παρακάτω διαδικασία:
• Χρησιμοποιείτε μαλακό πανί (καλύτερα από μικροΐνες) και νερό ή καθαριστικό για τα τζάμια.
• Δεν συνιστάται να χρησιμοποιείτε χαρτί που μπορεί να αφήσει υπολείμματα και δακτυλίους στο πλαίσιο.
• Μη χρησιμοποιείτε αποξεστικά ή διαβρωτικά προϊόντα, προϊόντα με βάση το χλώριο ή σύρματα.
• Μη χρησιμοποιείτε συσκευές καθαρισμού με ατμό.
• Μη χρησιμοποιείτε εύφλεκτα προϊόντα.
• Μην αφήνετε πάνω στο πλαίσιο όξινες ή αλκαλικές ουσίες, όπως ξίδι, μουστάρδα, αλάτι, ζάχαρη ή χυμό λεμονιού.
ΜΗ ΧΡΗΣΙΜΟΠΟΙΕΙΤΕ ΟΙΝΟΠΝΕΥΜΑ!
Συναρμολόγηση:
Το πλαίσιο πρέπει να στερεωθεί στο μπροστινό μέρος στους πείρους που υπάρχουν για το σκοπό αυτό στην επιφάνεια του απορροφητήρα.
ΣΗΜΑΝΤΙΚΟ: Ελέγχετε πάντα εάν το πλαίσιο έχει στερεωθεί καλά στη θέση του.
ΠΡΟΕΙΔΟΠΟΙΗΣΗ:
ΣΥΝΤΗΡΗΣΗ
1
2
3
ab
c
d

X2
11a
S

n
400010747946/B
D GB F NL
E P I GR
Bauknecht
®
Registered trademark/TM Trademark of Whirlpool group of companies - © Copyright Whirlpool Europe s.r.l. 2014. All rights reserved - http://www.bauknecht.eu
Printed in Italy
01/2015
 Loading...