

Barska AX11648 User Manual
User’s Manual for
Biometric/Key Pad Safe
Read all instructions before using this safe.
WARNING
- Safe can be opened by either Fingerprint, PIN code,
and/or Emergency Keys.
- If user resets the safe to Factory Default mode: ANY
fingerprint and Factory Default PIN code can open
the safe.
- Register both Fingerprint and PIN code to disable
Factory Default mode.
- Register at least two different fingerprints and test a few
times before closing the safe door.
- Test with a non-registered fingerprint. If the safe opens,
the safe is still in Factory Default mode.
- Avoid leaving safe door open and unattended; it will allow
unauthorized individuals to add their fingerprints and/or
reprogram the safe, gaining full access to the safe and
the contents.
- Test the Emergency Keys and store them in a secure
place, NOT inside of the safe.
- To maximize the security and performance of the safe,
test registered fingerprints every 6 months.
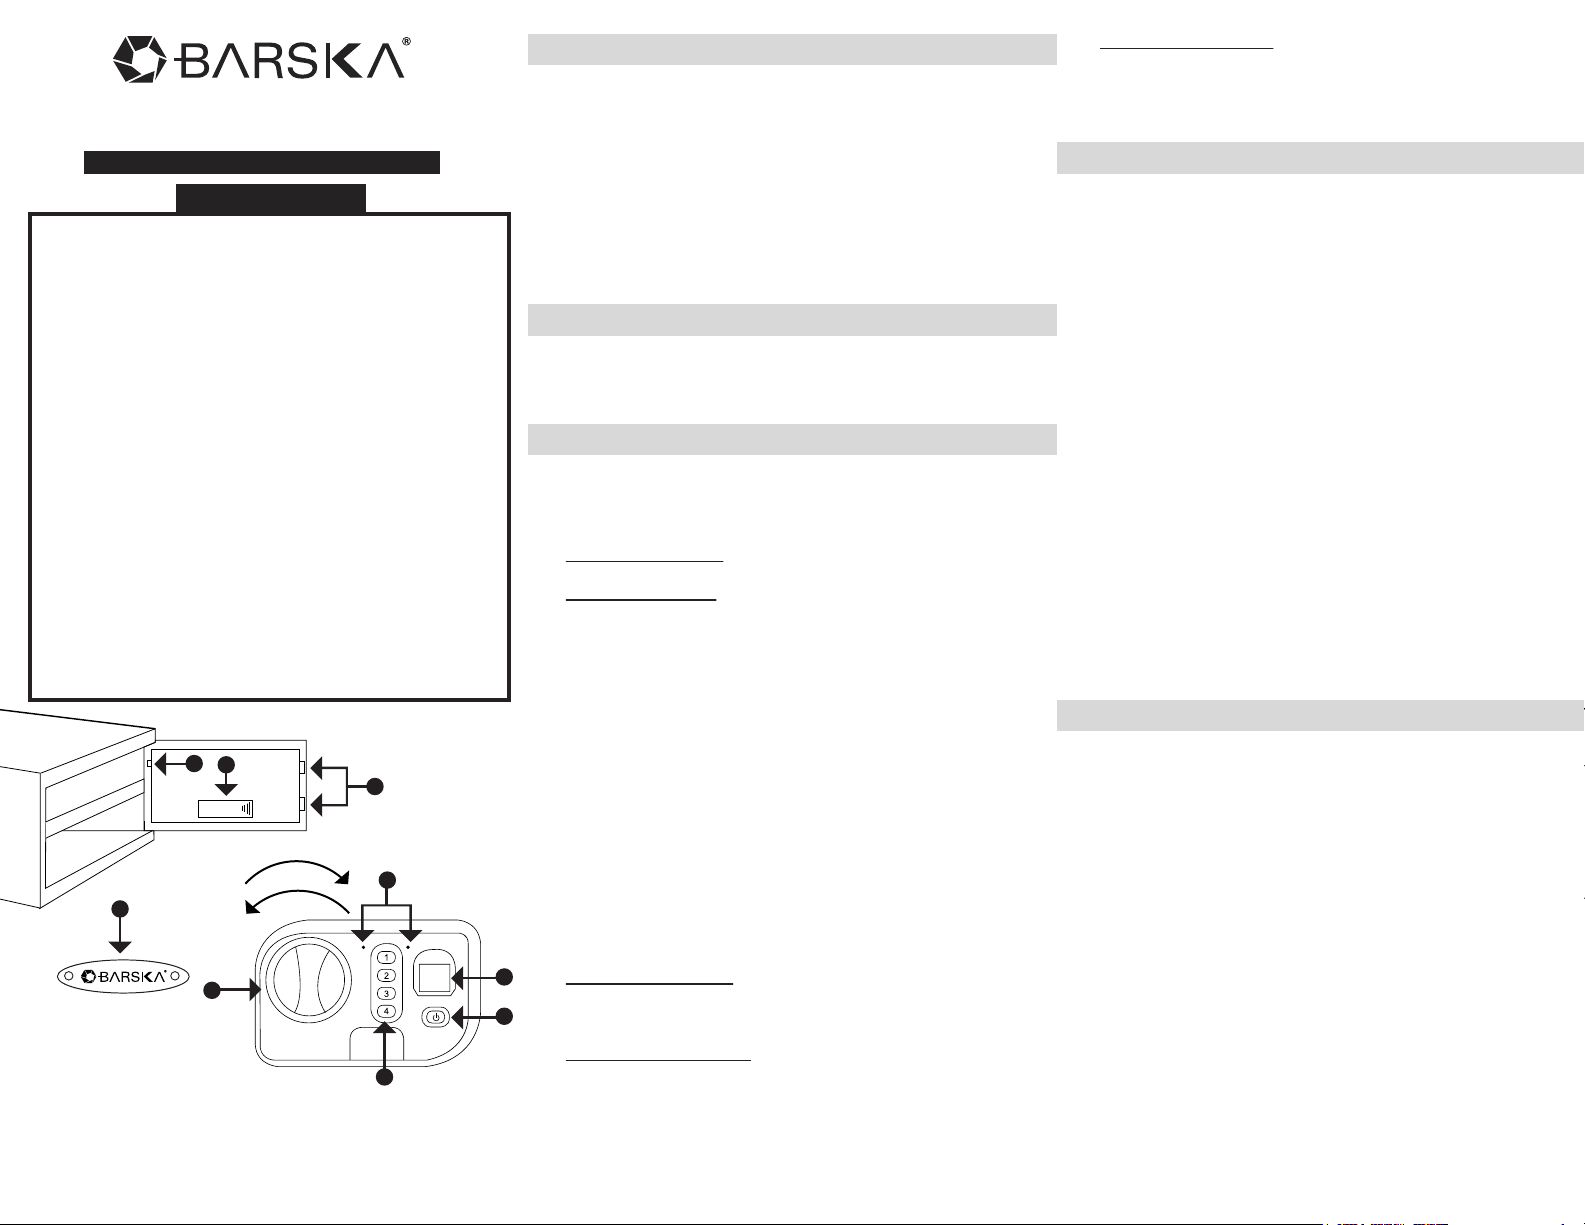
A
B
C
o
l
n
c
k
U
E
G
I
* Actual model may vary
A. Initialization Button
B. Battery Compartment
C. Bolts
D. Fingerprint Scanner
E. Indicator Lights
c
o
k
L
H
F. Enter Button
G. Key Pad
H. Knob
I. Logo Plate and
Emergency Key Access
GETTING STARTED
1. Remove Emergency Keys from accessory package
- To expose the Emergency Key Access, remove Logo Plate
(I) screws with provided tool
- Insert Emergency Key into key access, push and turn
counter-clockwise
- Turn the Knob (H) clockwise to open
Note: Store Emergency Keys in a secure place, NOT inside of
the safe
2. Continue with INSTALL BATTERIES
INSTALL BATTERIES
1. With safe door open, remove Battery Compartment (B) cover
- Insert 4 AA batteries and restore battery cover
- Continue with FINGERPRINT REGISTRATION
FINGERPRINT REGISTRATION
IMPORTANT: The safe is in either Factory Default mode or
Pre-registered mode, test safe to determine factory settings
below
Factory Default mode: Safe can be opened with ANY
fingerprint(s)
Pre-registered mode: Safe can NOT open with any fingerprint(s)
During registration the door must remain open and Bolts (C)
must be in the retracted position. Otherwise, the fingerprint will
not be saved
To retract bolts:
- Insert Emergency Key into key access, push and turn
counter-clockwise
- Turn the Knob (H) clockwise to retract bolts
1. Press and release Initialization Button (A)
2. Immediately place a finger on the Fingerprint Scanner (D)
- Hold finger still
- Two beeps will be heard recognizing the fingerprint; followed
by one long beep
- Remove finger
- Registration is complete
D
F
Successful Registration
Registration is successful when two short beeps are heard,
followed by one long beep
Unsuccessful Registration
Registration failed if two short beeps are heard, followed by
three short beeps
3. To register another fingerprint, repeat steps 1 - 2
4. Continue with TEST A (NON) REGISTERED FINGERPRINT
Fingerprint Memory Full
If the Indicator Lights (E) flash and beep twice followed by a few
green flashes, it indicates the memory is full. Refer to DELETE
STORED FINGERPRINTS AND PIN CODE / RESET TO
FACTORY DEFAULT MODE for more options
TEST A (NON) REGISTERED FINGERPRINT
1. Test multiple Non-Registered fingerprints
- Close safe door and lock by turning the Knob (H) counter clockwise
- To begin the testing process, press and release Enter
Button (F)
- Place a non-registered finger on the Fingerprint Scanner (D)
- Door should NOT open; three short beeps will be heard
- If the door opens with a non-registered fingerprint,
registration was unsuccessful; the safe remains in Factory
Default mode
IMPORTANT: If registration was unsuccessful repeat steps
under FINGERPRINT REGISTRATION, and test non-registered
fingerprint
2. Test Registered fingerprint
- Close safe door and lock by turning the Knob (H) counter clockwise
- To begin the testing process, press and release Enter
Button (F)
- Place a registered finger on the Fingerprint Scanner (D)
- Door should OPEN, one long beep will be heard, turn the
Knob (H) clockwise to open the safe
- Fingerprint registration was successful
3. Continue with PIN CODE REGISTRATION
PIN CODE REGISTRATION
IMPORTANT: Safe only retains one PIN code; Factory Default
PIN code is 1234
1. Press and HOLD number “1” key until the green Indicator
Light (E) turns on, release button
- Enter Factory Default PIN code 1234, press Enter Button
(F), one long beep will be heard
- Enter new PIN code (four to eight digits), press Enter Button
(F), two short beeps will be heard
- Re-enter new PIN code, press Enter Button (F), one long
beep will be heard
- Registration is complete
2. If you hear three short beeps with red/green Indicator Lights
(E) flashing, it indicates the new PIN code registration was
unsuccessful, repeat step 1
3. Continue with TEST A (NON) REGISTERED PIN CODE
10/12
See reverse side for more information
BC256

TEST A (NON) REGISTERED PIN CODE
1. Test Factory Default PIN code 1234
- Close safe door and lock by turning the Knob (H) counter clockwise
- To begin the testing process, enter PIN code 1234, press
and release Enter Button (F)
- Door should NOT open; three short beeps will be heard
indicating PIN entry was incorrect
- If Factory Default PIN code 1234 opens the safe door, PIN
code registration was unsuccessful; and safe remains in
Factory Default PIN code mode
IMPORTANT: If registration was unsuccessful repeat steps
under PIN CODE REGISTRATION, and test Factory Default
PIN code
2. Test Registered PIN code
- Close safe door and lock by turning the Knob (H) counter clockwise
- To begin the testing process, enter new registered PIN code,
press and release Enter Button (F)
- Door should OPEN, one long beep will be heard indicating
PIN entry was correct, turn the Knob (H) clockwise to open
the safe
- PIN code registration was successful
CHANGE PIN CODE
1. Press and HOLD number “1” key until the green Indicator
Light (E) turns on, release button
- Enter current PIN code, press Enter Button (F), one long
beep will be heard
- Enter new PIN code (four to eight digits), press Enter Button
(F), two short beeps will be heard
- Re-enter new PIN code, press Enter Button (F), one long
beep will be heard
- PIN code has been changed
2. If you hear three short beeps with red/green Indicator Lights
(E) flashing, it indicates the new PIN code registration was
unsuccessful, repeat steps under CHANGE PIN CODE
3. Continue with TEST A (NON) REGISTERED PIN CODE
CLOSE/OPEN SAFE DOOR
CLOSE: Close the safe door and turn the Knob (H) counterclockwise to lock the safe
OPEN WITH FINGERPRINT:
- Press and release Enter Button (F)
- Place a registered finger on the Fingerprint Scanner (D)
- One long beep will be heard and the green Indicator Light
(E) turns on
- Turn the Knob (H) clockwise to open the safe
OPEN WITH PIN CODE:
- Enter PIN code, press Enter Button (F)
- One long beep will be heard and the green Indicator Light
(E) turns on
- Turn the Knob (H) clockwise to open the safe
DOOR OPEN ALARM
The door alarm is activated ONLY when the safe door is left
open and the Bolts (C) are retracted
1. Within 1 minute, the green Indicator Light (E) will start
flashing, followed by one beep
- It will beep every 3-5 seconds
- Close the safe door, and turn the Knob (H) counter clockwise to cease the alarm
2. With the safe door open and the Bolts (C) extended, no
Indicator Lights (E) or beeps will be heard
LOW BATTERY WARNING
1. When the door is closed and the Indicator Light (E) displays
red, this indicates batteries are low. Replace batteries
immediately
2. Use Emergency Key to open safe
- To expose the Emergency Key Access, remove Logo Plate
(I) screws with tool provided
- Insert Emergency Key into key access, push and turn
counter-clockwise
- Turn the Knob (H) clockwise to open
3. Replace batteries
- Remove Battery Compartment (B) cover and all
4 AA batteries
- Insert 4 new AA batteries and restore Battery
Compartment (B) cover
Note: All registered fingerprints and PIN code remain stored
DELETE STORED FINGERPRINTS AND PIN CODE /
RESET TO FACTORY DEFAULT MODE
1. Open the safe door
- Press and HOLD the Initialization Button (A)
- The green Indicator Light (E) will flash approximately fifteen
times, followed by one long beep
- RELEASE Initialization Button (A)
2. If the green Indicator Light (E) did not flash and one long
beep was not heard, repeat step 1
3. All fingerprints and the PIN code stored in the safe have
been deleted
Note: The safe is in Factory Default mode. ANY fingerprint and
Factory Default PIN code 1234 can open the safe
CARE AND MAINTENANCE
- To maximize the security and performance of the safe, keep
Fingerprint Scanner (D) clean; use a dry cloth to remove any
smudges or prints off the Fingerprint Scanner after each use
- Test registered fingerprints and PIN code every 6 months
- Keep liquids away from the control panel. Spills on the control
panel will cause damage and possibly electric shock
- Secure safe in a proper area to prevent from falling and
causing damage or injury
- DO NOT disassemble the product. For all repairs, contact
BARSKA Customer Service
- DO NOT use chemicals or cleaning agents to clean the safe
MOUNTING INSTRUCTIONS
The safe may be mounted to a wall or floor. Be aware of the
load bearing. Failure to do so can result in personal injury
and/or damage to property. Use
appropriate tools when
performing work and always
use eye protection
Wall Mounting
Do not mount the safe without
anchoring to the wall
- Find the studs in the wall, at
your desired location. Most
studs are 16 inches or 24
inches apart
- Check the wall for concealed wires or pipes
- Measure the location of the pre-set drill holes; mark their exact
position onto the wall ensuring that the studs or anything else
behind will not interfere
- Drill the appropriate size holes for the anchors you are using
- Carefully press the anchor into the holes at this time
- Mount the safe by running screws from inside of the safe and
securing to anchors; ensure the safe is mounted securely
Floor Mounting
- Use proper drill tools depending on the type of floor you are
mounting the safe (wood, tile, or concrete)
- Measure the location of the pre-set drill holes; mark their exact
position onto the floor
- Drill the appropriate size holes for the anchors you are using
- Carefully press the anchor into the holes at this time
- Mount the safe by running screws from inside of the safe and
securing to anchors; ensure the safe is mounted securely
Mounting Holes
* Actual model may vary
 Loading...