

Page 1
NVX200
Night Vision Monocular
www.barska.com
Page 2
NVX200 NVX200
Contents
Parts of the Monocular 3
Menu Buttons 4
Quick Start 5
Batteries 5
SD Card (For Photo And Video Taking) 5
Turn On The Monocular 6
Take A Picture 7
Take A Video 7
Digital Zoom 7
Playback 7
Display Information 8
Menu Settings 10
Trouble Shooting 11
Specications 12
Warranty 13
CAUTION: DIRECTLY VIEWING THE SUN OR ANY LIGHT SOURCE
WITH THIS OPTICAL DEVICE CAN CAUSE PERMANENT EYE DAMAGE.
2
3
1
4
5
6
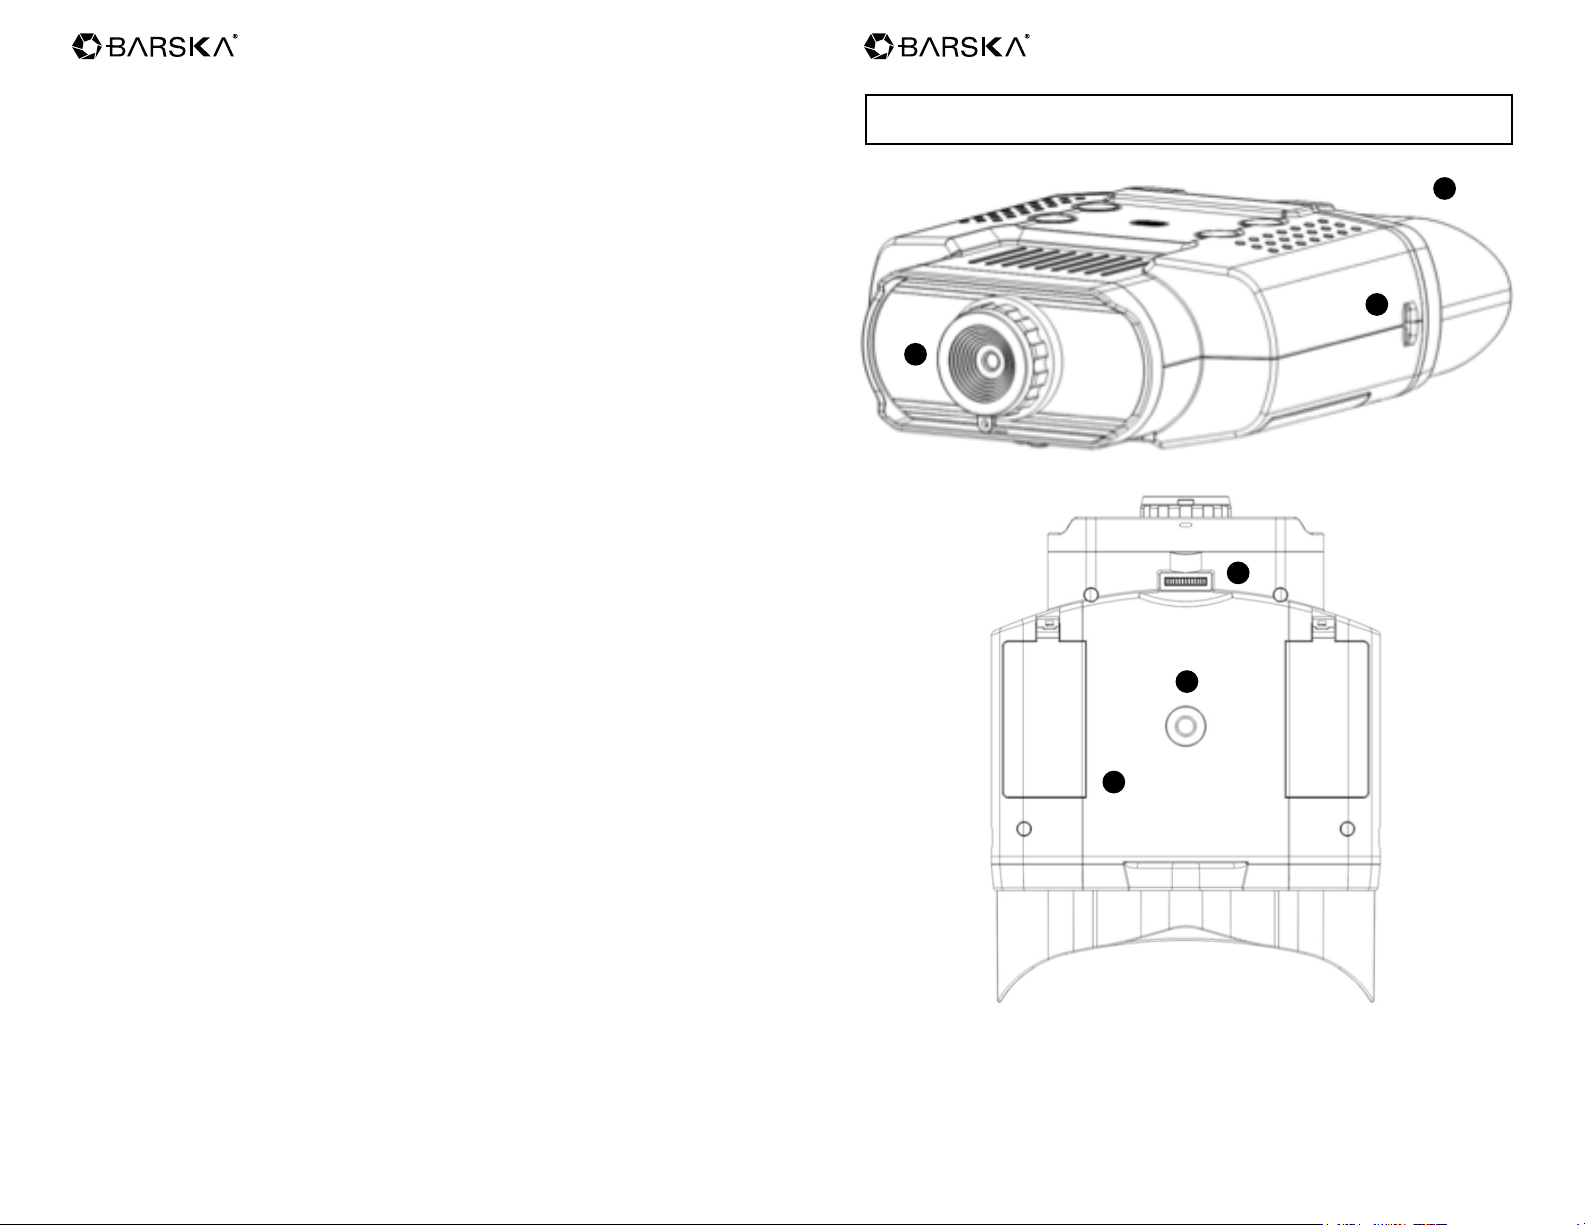
Parts of the Monocular
1 Objective with Ocular Lid 4 Focus Wheel
2 Eyepiece 5 Tripod Adapter
3 Neck Strap Eyelet 6 Battery Compartment
2 3
www.barska.com www.barska.com
Page 3
NVX200 NVX200
Quick Start
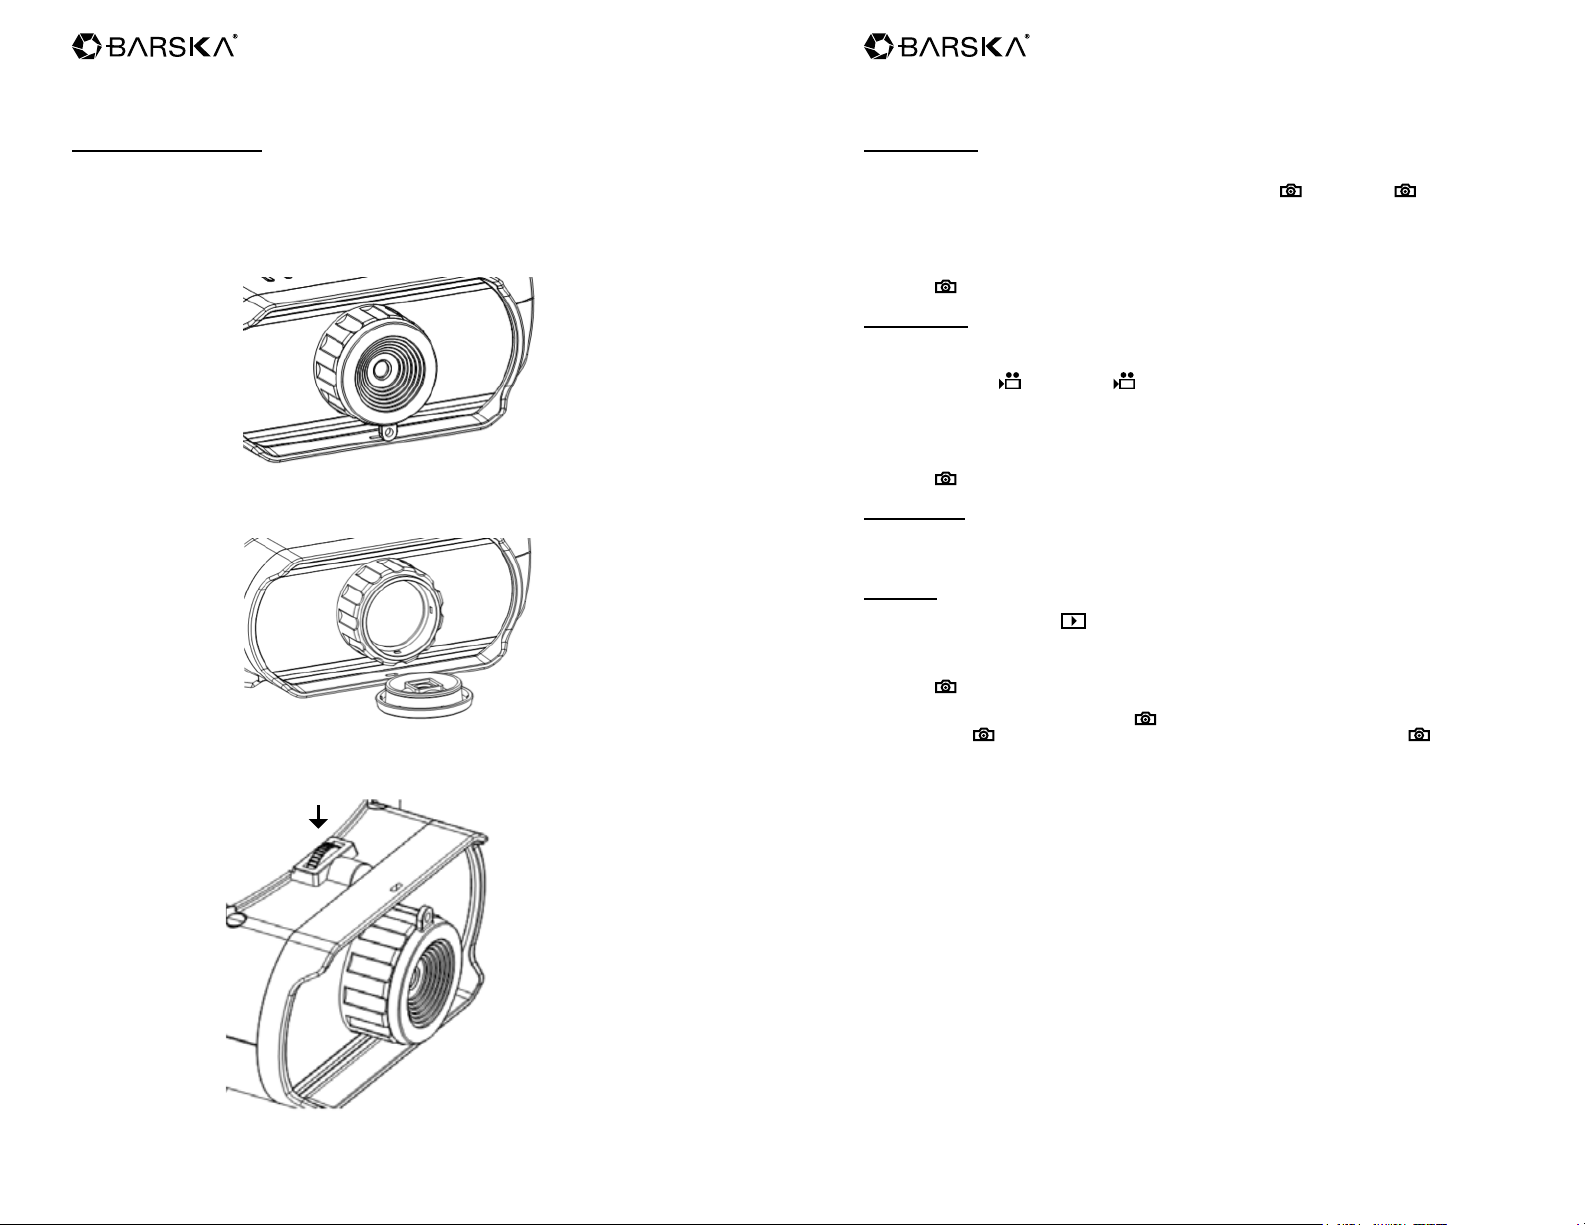
Batteries
1
4
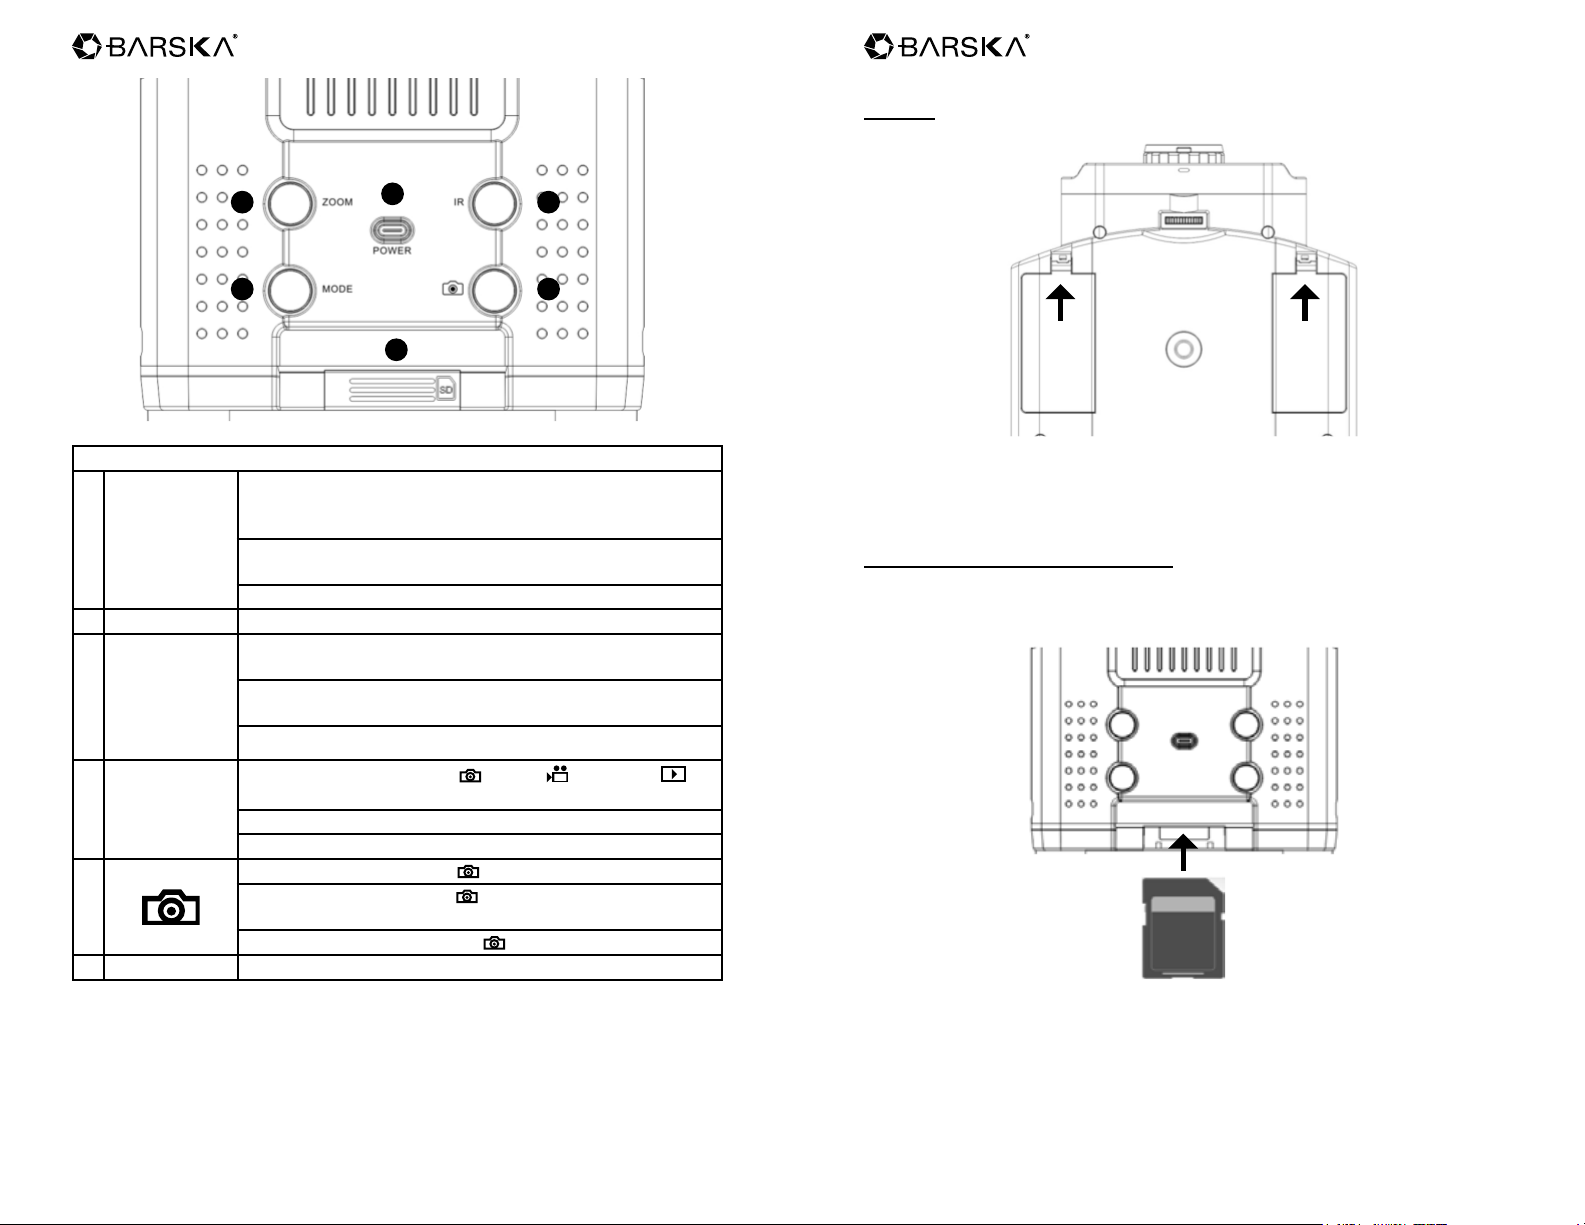
Menu Buttons
Under Photo and Video Mode, press Zoom to zoom in at
multiple levels. The maximum zoom is 2X. Once reaching
1 Zoom
2 Power Long press for power on and off
3 IR
2X, keep pressing to go back to 1X.
Under Playback mode: Press Zoom to playback to the
next le.
Under Menu mode: Press Zoom to go up.
Under Photo and Video Mode: Press IR for 8 levels of
brightness (0->1->2->3->4->5->6->7->0…)
Under Playback mode: Press IR to playback to the
previous le.
Under Menu mode: Press IR to go down.
2
6
3
5
1. Open the covers.
2. Put in 4 AA Alkaline batteries in each compartment in the directions of + and –.
3. Close the battery compartments.
Note: Remove battery when not in use
SD Card (For Photo And Video Taking)
1. First make sure the power is off.
2. Then insert the card in the direction as shown. Push the card into the slot to
lock it.
There are 4 modes: Photo
4 Mode
5
6 SD Card Slot Not to delete all the les in SD card
4 5
Menu (in a loop).
When the power is on, the default mode is Photo.
Press Mode to change to the next mode.
Under Photo mode: Press to take photos.
Under Video mode: Press
press one more time to stop recording.
Under Playback mode: Press
www.barska.com www.barska.com
/ Video / Playback /
to start video recording, and
to enter selected item.
3. To remove the card, rst turn off device then push it in to release. When the
card is partially ejected, pull it out.
Note:
When using a card with previous les saved, it is recommended to save the les
to your computer rst, and format the card before use. To format the card, press
Mode several times to reach menu, and select “Format SD”.
Page 4
NVX200 NVX200
If the “Memory Full” warning message appears on the LCD screen, the SD card
is full. Please transfer all the les to your computer and delete the les on the
card. Then the card can be used again.
Turn On The Monocular
1. For day use, rst cover the lens with the lid. For night use, take off the lid.
(Note: Uncovering the lid during the day time will NOT damage the lens, but it
will affect the image quality.)
Lid ON for day use
Lid OFF for night use
2. Long press the Power button to turn on the binocular. Once the power is on,
look into the LCD screen inside for preview.
3. Adjust the focus by turning the focus wheel at the front bottom.
4. For night use, turn on the IR by pressing the IR button. Increase the brightness
by pressing the button repeatedly. It has 7 levels of brightness.
5. Long press the Power button to shut down the binocular.
Take A Picture
1. When the power is on, the binocular is automatically under the picture mode.
2. Check the left bottom corner of the screen for the
showing, press Mode multiple times until the icon shows up.
3. Adjust the focus by turning the focus wheel. (see “Turn on the Binocular”
section for details)
4. If at night, adjust the brightness by pressing IR. (see “Turn on the Binocular”
section for details)
5. Press
Take A Video
1. Turn on the Binocular.
2. Press Mode to enter video-recording mode. Check the left bottom corner of the
screen for the
shows up.
3. Adjust the focus by turning the focus wheel. (see “Turn on the Binocular”
section for details)
4. If at night, adjust the brightness by pressing IR. (see “Turn on the Binocular”
section for details)
5. Press
Digital Zoom
Press Zoom to zoom in at multiple levels up to 2X. Once reaching 2X, keep
pressing to go back to 1X.
Playback
1. Press Mode until icon
2. The LCD Screen will show the last le saved. If it was a photo, the photo will
show on the screen, with “JPG” wording on the left bottom corner. If it was a
video, wording “AVI” will show on the left bottom corner.
3. Press
4. Press IR to go to the previous le, and press Zoom to go to the next le.
5. To delete photo or video, press
then press
to delete.
to take pictures.
icon. If the icon is not showing, press Mode until the icon
to start video recording, and press it again to stop recording.
shows on the top left corner of the screen.
to play, delete, delete all, or exit.
move down by pressing IR button,
to select. Screen will ask you if you are sure, press on yes
icon. If the icon is not
6 7
www.barska.com www.barska.com
Page 5
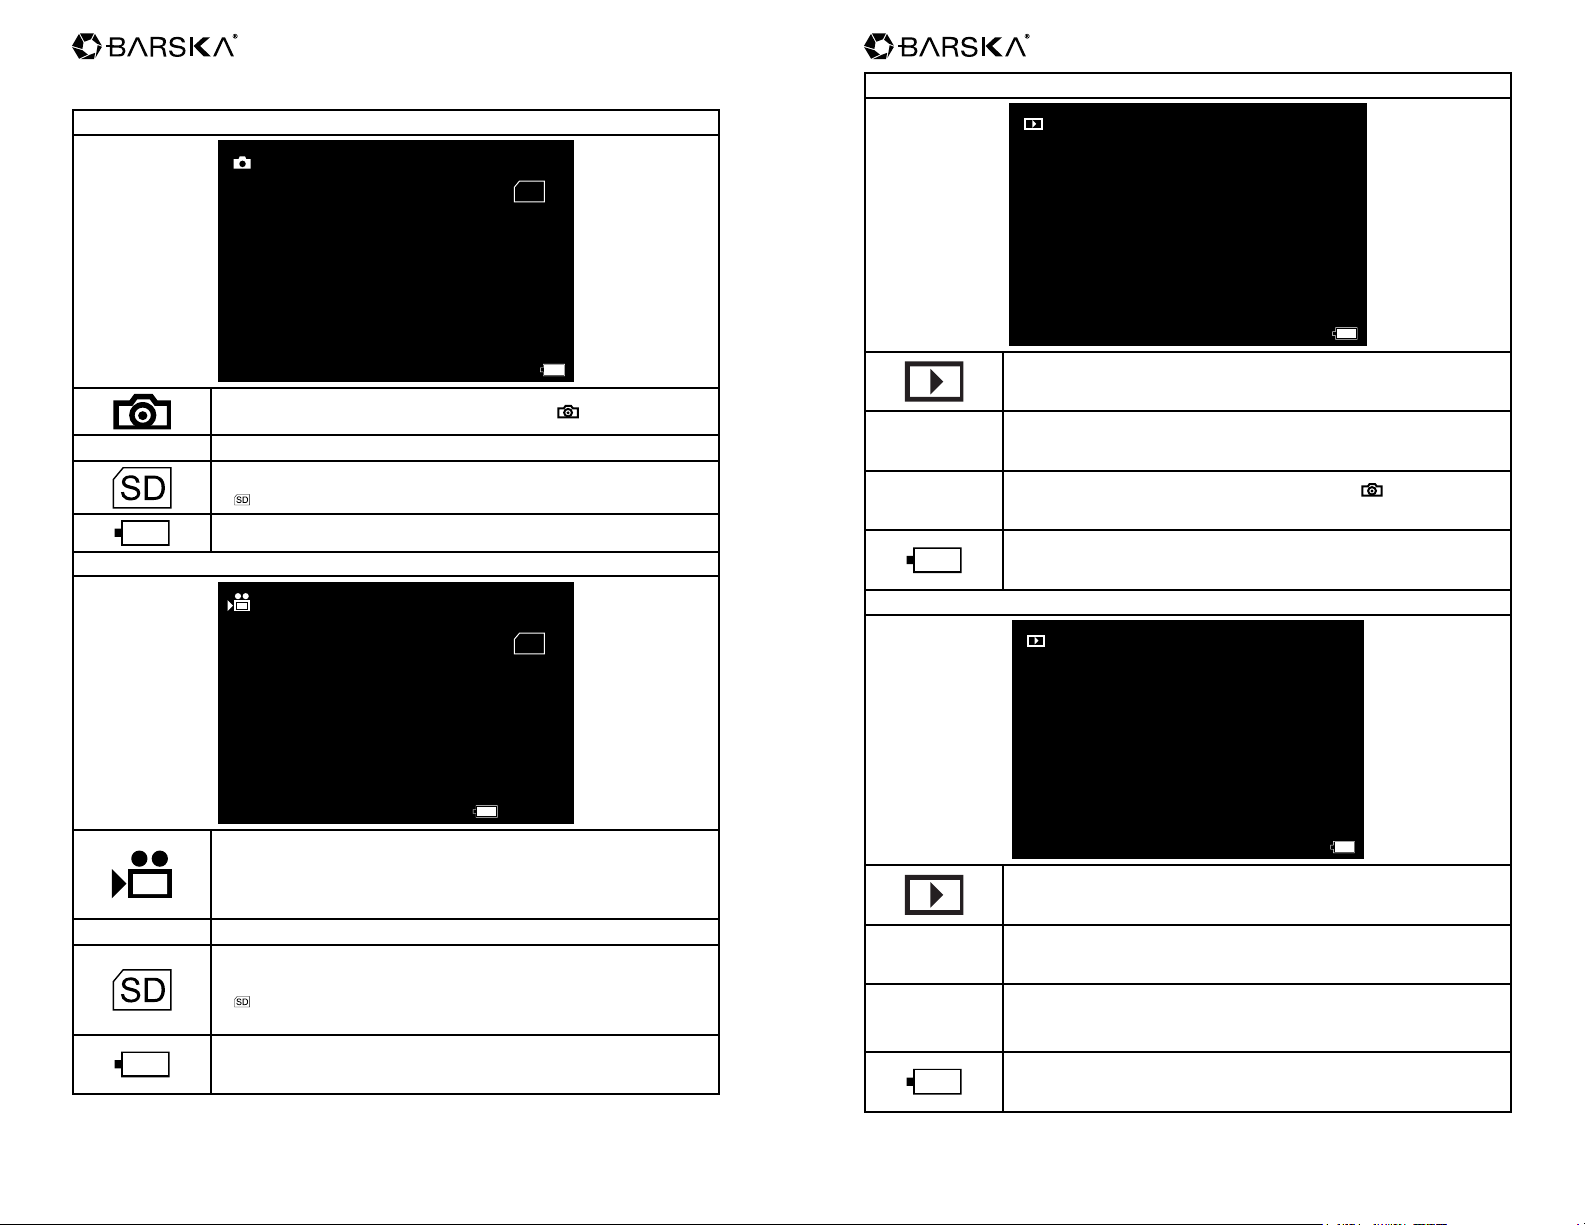
Display Information
NVX200 NVX200
Playback Mode Video
Photo Mode
00038
Video Mode
00038
SD
LCD Screen
Photo Mode: Ready to take picture. Press to take pictures.
Number of les (including photos and videos) taken
SD Card installed and ready for photos.
If is showing, power off and then insert the SD
Battery Status
00:45:00
SD
LCD Screen
AVI
Playback Mode
38/38
AVI
Playback Mode Image
This means current le is the 38th among 38 taken (including
photos and videos).
This means the le shown is a video. Press to view. To go
to the previous le, press IR.
Battery Status
38/38
LCD Screen
37/38
LCD Screen
JPG
Video Mode: Ready to take videos. When pressing to
record, the time starts running. Press again to stop recording
00:45:00
Minutes of videos taken
37/38
SD Card installed and ready for photos.
If is showing, power off and then insert the SD
JPG
Battery Status
8 9
www.barska.com www.barska.com
Playback Mode
This means current le is the 38th among 38 taken (including
photos and videos).
This means the le shown is a photo. To go to the previous
le, press IR.
Battery Status
Page 6
NVX200 NVX200
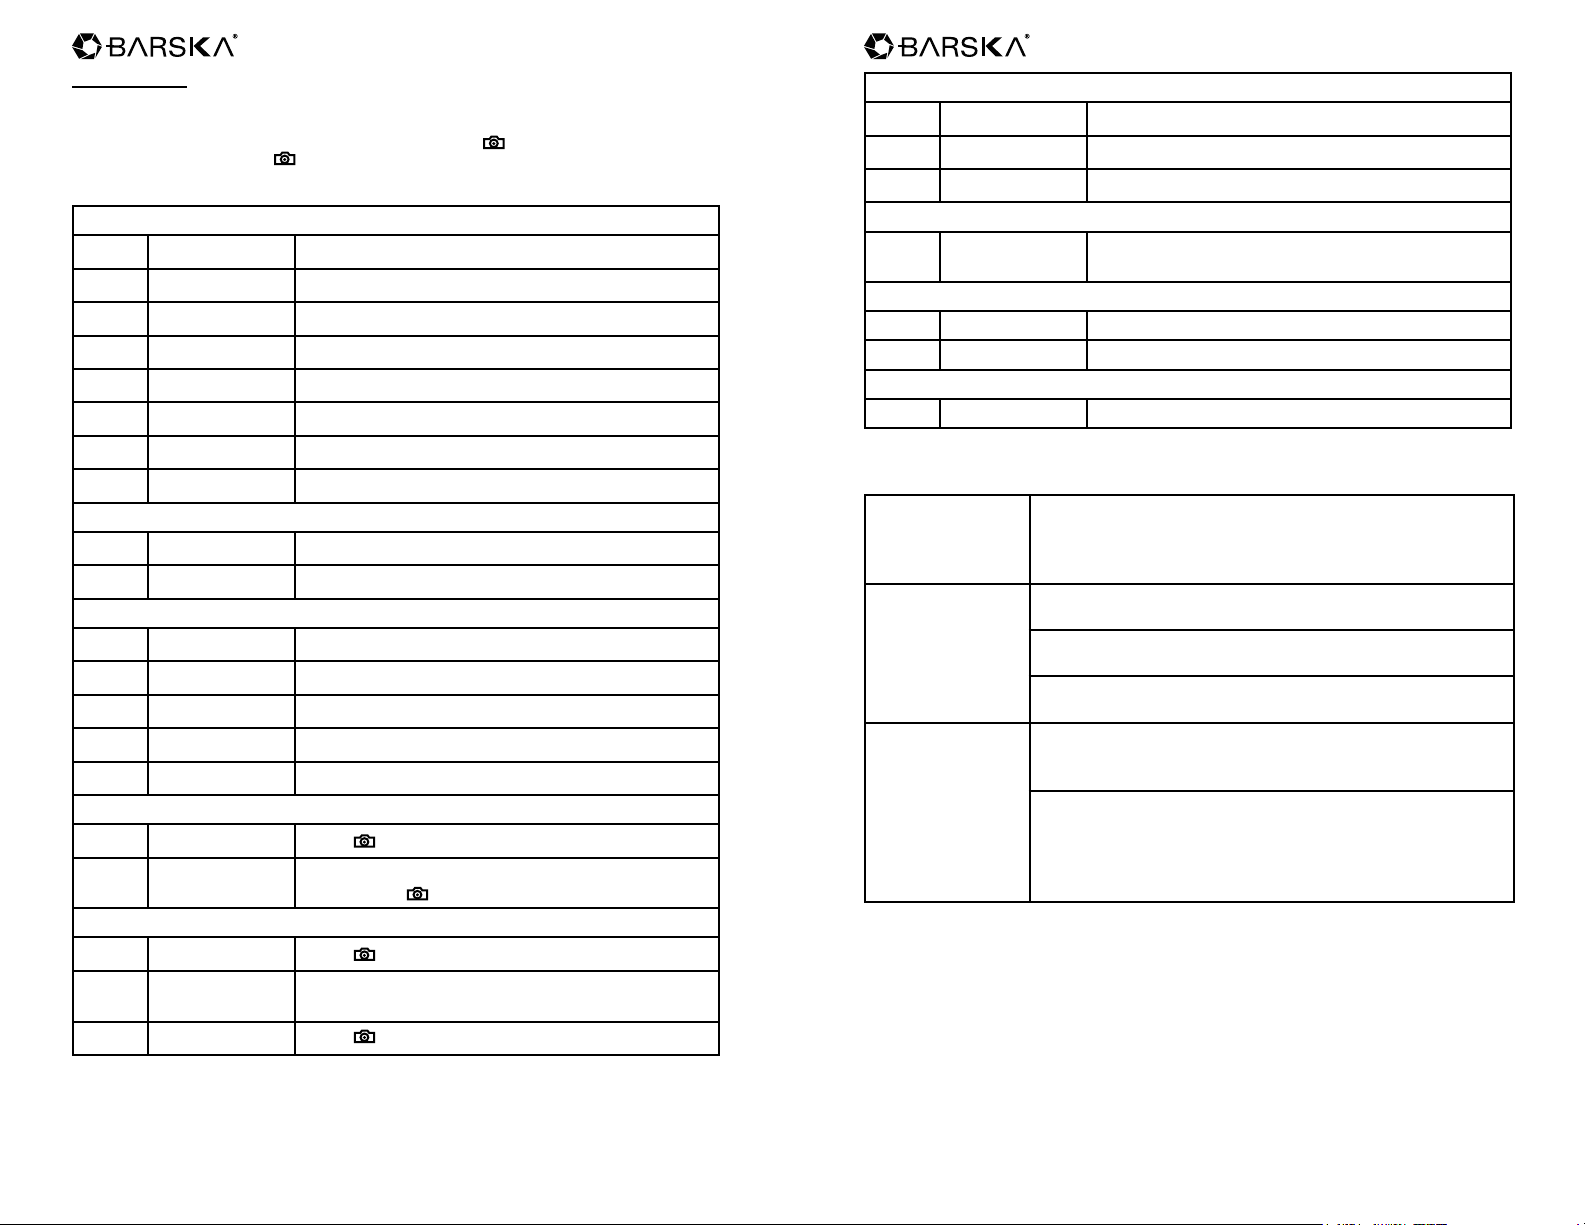
Menu Settings
This is to set up parameters for the binocular if you wish to change default
settings. Press Mode multiple times until the Menu shows up. Press IR to go
down the menu, or Zoom to go up the menu. Press
setting is selected, press
mode.
to save it. Press Mode to exit back to the photo
to enter. Once the desired
Flicker
50Hz Default setting for EU
60Hz Default setting for U.S. and Japan
Menu
Format SD
Power Save
Date
Time
Format SD To delete all the les in SD card
Power Save To set up auto power off
Date To set up the date
Time To set up the time
Flicker 50Hz (Default setting for EU)
LCD Backlight 60Hz (Default setting for U.S. and Japan)
Date/Time Tag To select the brightness level of the LCD screen
Version To show date and time on the photos
Yes To delete all the les in SD card
No Not to delete all the les in SD card
Off No auto power off (Default Setting)
5 min Auto power off in 5 mins without actions
10 min Auto power off in 10 mins without actions
15 min Auto power off in 15 mins without actions
30 min Auto power off in 30 mins without actions
YY/ MM/ DD
hr / min / sec
Press
Press Zoom and IR to go left and right, up and
down, Press
Press
Press Zoom and IR to go left and right, up and
down
Press
to enter
to saved settings
to enter
to saved settings
LCD Backlight
Date / Time Tag
Off Default setting is off
On
Version
Trouble Shooting
Binocular Power
Off
Poor Image
Why is “Please
insert SD Card”
message showing
on the screen
while the SD
card has been
inserted?
Default setting is 10
Slide Bar in 16 levels (0-15) of brightness
Version of the Firmware for reference only
If the binocular fails to activate, check for defective,
missing or improperly-installed batteries. Replace or install
batteries correctly. Please make sure to use Alkaline
batteries.
If you wear glasses, please keep them on while using the
binocular.
If at day, make sure the protection lid is on. If at night,
make sure the protection lid is off.
Adjust the focus by slowing turning the Focus Wheel at the
front bottom of the binocular. Make sure it is focused.
Please turn off the power, insert the card, and check
again. The SD card needs to be inserted when the power
is off.
If the issue persists, please check the SD card
compatibility. In some cases, SD card holders that hold
micro SD cards may have minor differences than regular
SD cards, causing the failure for the card to be read. In
this case, try inserting another SD card.
10 11
www.barska.com www.barska.com
Page 7
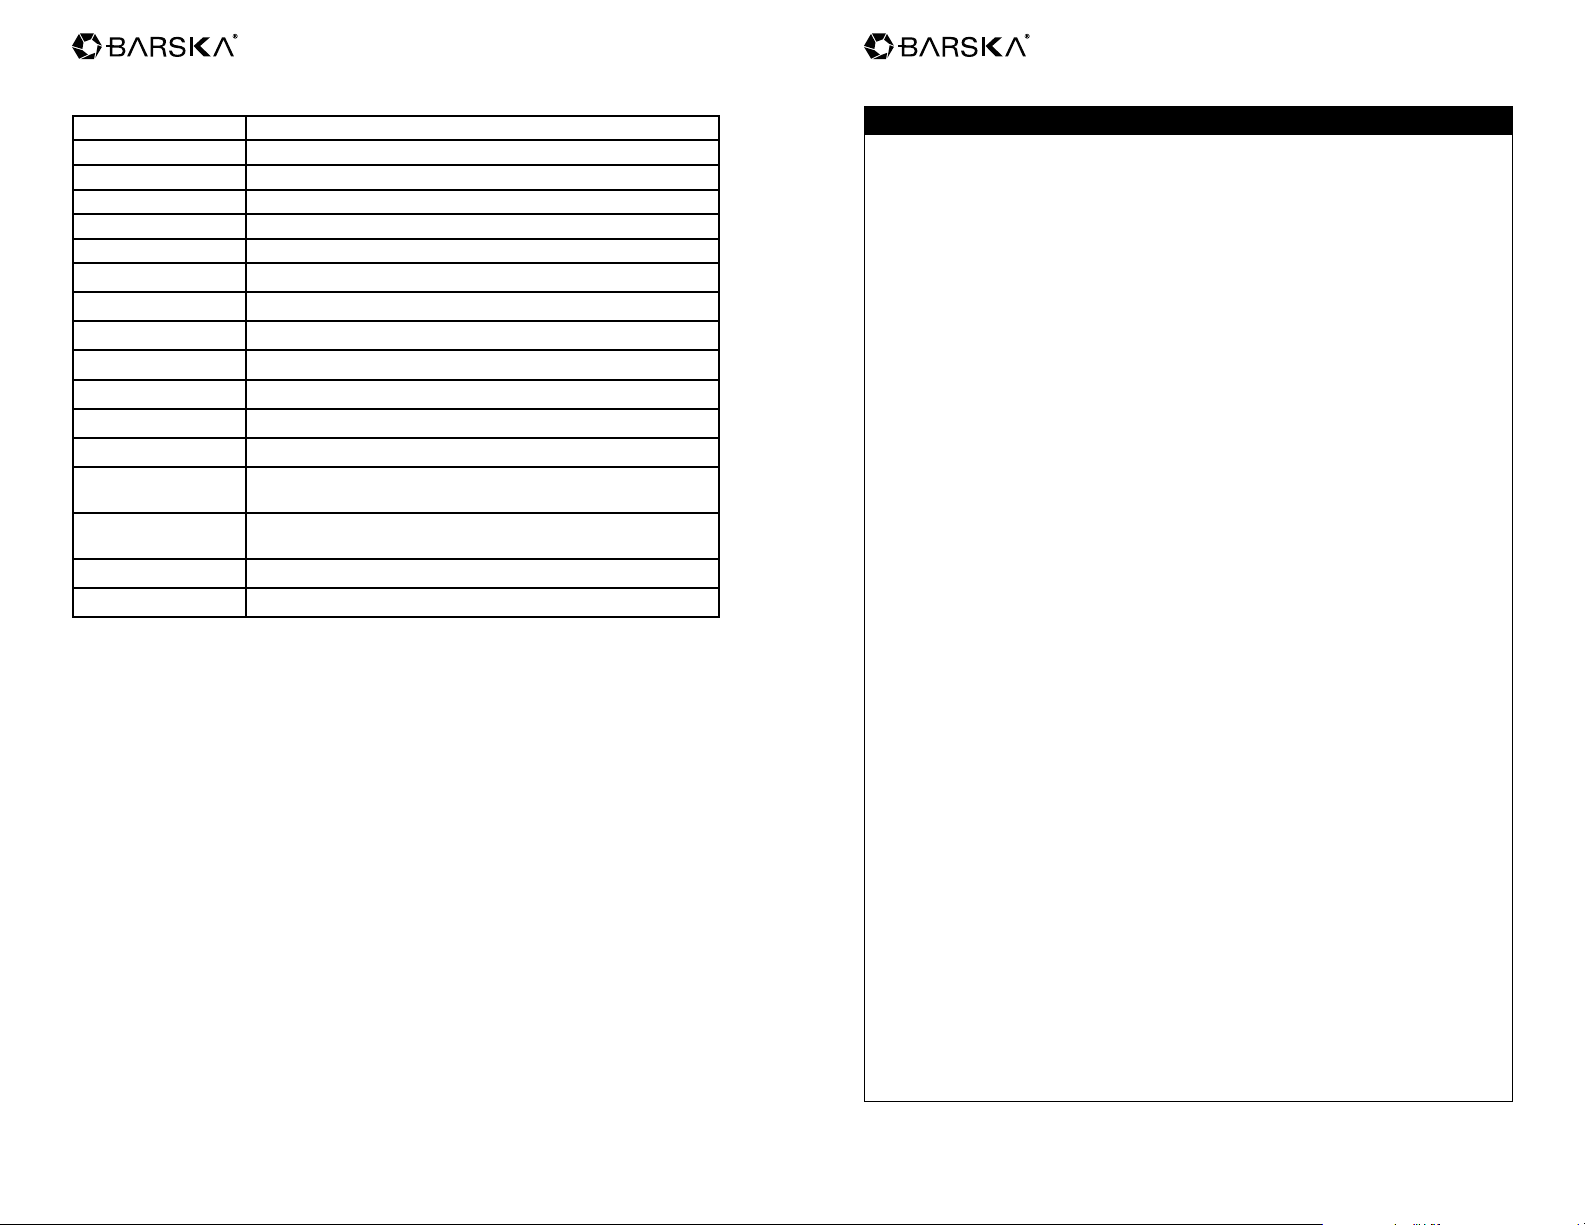
Specications
NVX200 NVX200
Viewnder EVF mode
Aspect Ratio 4:3
Aperture 1.4 with adjustable aperture Day and Night dual mode
Operation Preview / Photo Play back
Visual Distance 100M (110 yards) at Night, 400M (440 yards) at Day
Zoom Up to 2X
Object Lens Focus Manually adjust
Visual Angle 10° degrees
Photo Taking 10° degrees
Video Taking Yes
Luminance IR LED / total 2W
External Memory Up to 32GB SD card
Power Supply Alkaline AA battery x 8
Power
Consumption
Size
2.5W with IR LED fully on
18.5cm X 14.5cm X 5.5cm (approx..)/
7.28” X 5.70” X 2.16” (approx..)
Net Weight 603g (approx.)/ 1.33lbs (approx.)
Color Black
1 YEAR LIMITED WARRANTY
NIGHT VISION MONOCULAR
BARSKA® Optics, as manufacturer, warrants this new precision optical product to be
free of original defects in materials and/or workmanship for the length of time specied
by this warranty. This warranty does not include damage caused by abuse, improper
handling, installation, maintenance, normal wear-and-tear, unauthorized repairs or
modications and tampering in anyway.
This warranty is limited to the original purchaser and is not transferable. This warranty
applies only to products purchased in the United States of America and Canada.
In the event of a defect within 30 days, the consumer must return the defective unit to
the BARSKA dealer (the place of purchase) at his/her own expense.
Beyond 30 days, BARSKA products should be sent to the following address for
warranty repairs. Products must be packed carefully and sturdily to prevent damage in
transit, and returned freight prepaid to:
BARSKA® OPTICS
Repair Department
855 Towne Center Drive
Pomona, CA 91767
For additional and updated information
please visit our website at www.barska.com
Please email [email protected] or call 1-888-666-6769 for Return Merchandise
Number (RMA#) before any returns.
NOTE: All merchandise received without a valid RMA # will be returned to shipper at
his/her own expense.
Please include all of the following when returning BARSKA products for service and/
or replacement:
1. Please write your complete details (Name, Address, Telephone #, E-mail address,
RMA#, etc.)
2. Purchase receipt or Proof of Purchase. (Original/Copy)
3. A brief explanation of the defect.
4. A Check/Money Order of $25.00 to cover inspection, shipping and handling.
*Please allow 6-8 weeks for delivery.
This product will either be replaced or repaired at the discretion of the warrantor. If it’s
a discontinued item, we will replace the product with an equivalent product. Should
the repair not be covered by this warranty, an estimate will be sent for your approval.
Non-warranty repairs or refurbishing of your optical products are always provided at a
reasonable cost.
BARSKA® Optics shall not be liable for any consequential, incidental and/or
contingent damages whatsoever. We will not pay shipping, insurance or transportation
charges from you to us, or any import fees, duties and or taxes. This warranty
supersedes all previous BARSKA® Optics warranties.
BC381
12 13
www.barska.com www.barska.com
 Loading...