

Page 1

Page 2

[EN] Go to barbecook.com, register your Barbecook and your Barbecook experience
will be further improved!
[NL] Ga naar barbecook.com, registreer uw Barbecook om uw Barbecook-ervaring
nog meer te verbeteren!
[FR] Rendez-vous sur barbecook.com et enregistrez votre appareil Barbecook pour
nous aider à améliorer votre expérience Barbecook.
[DE] Registrieren Sie Ihren Barbecook auf barbecook.com, damit Sie ein noch
umfangreicheres Barbecook-Erlebnis genießen können!
[ES] Visite barbecook.com, registre su Barbecook y su experiencia con el producto
será aún mejor.
[IT] Visita il sito barbecook.com , registra il tuo Barbecook e sarai ancora più vicino al
mondo Barbecook!
[PT] Aceda a barbecook.com, registe o seu Barbecook e a sua experiência com a
Barbecook será continuamente melhorada!
[SE] Gå till barbecook.com, registrera din Barbecook och din upplevelse med
Barbecook kommer att bli ännu bättre!”
[DK] Gå til barbecook.com, tilmeld din Barbecook for en endnu bedre Barbecook-
oplevelse!
[FI] Rekisteröi Barbecook-grillisi osoitteessa barbecook.com ja pääset nauttimaan
täydellisestä Barbecook-käyttökokemuksesta!
[NO] Gå til barbecook.com, registrer din Barbecook og din Barbecook opplevelse vil bli
enda bedre!
[HU] Látogasson el a barbecook.com oldalra, regisztrálja a Barbecook-ját, és még több
Barbecook élményben lehet része!
[RO] Accesaţi barbecook.com, înregistraţi grătarul Barbecook, iar experienţa dvs.
Barbecook va fi mult îmbunătăţită!
[CS] Navštivte stránky barbecook.com, zaregistrujte si svůj gril Barbecook a vaše
zážitky s produkty Barbecook budou ještě lepší!
[GR] Μεταβείτε στον ιστότοπο barbecook.com και δηλώστε το Barbecook που έχετε
αγοράσει, για να βελτιώσετε ακόμη περισσότερο την εμπειρία Barbecook!
[SK] Prejdite na barbecook.com, zaregistrujte svoj gril Barbecook a vaše zážitky s
Barbecook budú ešte lepšie!
[ET] Minge aadressile barbecook.com, registreerige oma Barbecook ja teil avaneb
võimalus kasutada oma Barbecooki veelgi paremini!
[LT] Eikite į barbecook.com, užregistruokite savo „Barbecook“ kepsninę ir patirsite dar
geresnių įspūdžių ją naudodami!
[LV] Atveriet vietni www.barbecook.com, reģistrējiet savu Barbecook un izmantojiet
Barbecook vēl pilnvērtīgāk!
[PL] Przejdź na stronę barbecook.com, zarejestruj swój produkt Barbecook w celu
umożliwienia stałego udoskonalania produktów Barbecook!
[BG] Посетете barbecook.com, регистрирайте своя Barbecook, за да получите още
по-голямо удовлетворение от Barbecook!
[SL] Pojdite na spletno stran barbecook.com, registrirajte vašo napravo Barbecook in
vaša izkušnja Barbecook bo še boljša!
[HR] Posjetite stranicu barbecook.com, registrirajte Vaš proizvod Barbecook i još više
uživajte u korištenju proizvoda Barbecook.
Page 3

EN - User guide ...................................................5
SI – Priročnik za uporabo............................... 271
NL - Gebruiksaanwijzing ..................................19
FR - Mode d’emploi...........................................33
DE – Bedienungsanleitung ...............................47
CZ - Uživatelská příručka.................................61
BG - Ръководство за потребителя ...............75
DA - Brugervejledning ......................................89
EL - Οδηγίες χρήσης .......................................103
ES – Guía del usuario......................................117
SV - Bruksanvisning ....................................... 285
NO - Brukerhåndbok ...................................... 299
HR - Korisnički priručnik................................ 313
ET – Kasutusjuhend ........................................131
FI - Käyttöopas................................................145
HU - Használati utasítás.................................159
IT - Guida all’uso .............................................173
LT – Naudotojo vadovas.................................187
LV – Lietošanas pamācība .............................201
PL – Instrukcja użytkownika ..........................215
PT - Manual do utilizador ...............................229
RO - Ghid de utilizare......................................243
SK – Návod na používanie..............................257
www.barbecook.com 3
Page 4

4 www.barbecook.com
Page 5

EN - USER GUIDE
1 Register your appliance................................................ 6
2 About this manual ........................................................ 6
3 Important safety instructions........................................ 6
• Read and follow the instructions ............................. 6
• Be cautious with gas................................................ 6
• Select an appropriate location................................. 6
• Use your common sense......................................... 6
4 Recurrent concepts...................................................... 6
• Venturis.................................................................... 6
• Burner hoods ........................................................... 7
• Enamel ..................................................................... 7
• Flare-ups.................................................................. 7
5 Assembling the appliance ............................................ 7
• Safety instructions ................................................... 7
• To assemble the appliance ...................................... 7
6 Connecting gas to the appliance ................................. 7
• Which cylinder, hose and regulator?........................ 7
• Safety instructions ................................................... 7
• Connecting the hose to the appliance..................... 7
• Connecting the hose and cylinder to the regulator.. 8
• Replacing the cylinder ............................................. 9
7 Checking for gas leaks................................................. 9
• Why check for gas leaks?........................................ 9
• When check for gas leaks?...................................... 9
• Safety instructions ................................................... 9
• Which materials do I need? ..................................... 9
• To check for gas leaks ............................................. 9
• In case of a gas leak ................................................ 9
10 Useful tips and tricks.................................................. 12
• Preheating the appliance....................................... 12
• Preventing food from sticking................................ 12
• Direct and indirect grilling...................................... 12
• Grilling with closed lid............................................ 12
• Watching the temperature ..................................... 12
• Taking advantage of the heat zones...................... 12
• Avoiding flare-ups.................................................. 12
11 Maintaining the appliance .......................................... 13
• Cleaning the grill .................................................... 13
• Cleaning the bowl .................................................. 13
• Cleaning the burners and venturis......................... 13
• Maintaining enamel, stainless steel, chrome and
powder coated parts.............................................. 14
• Storing the appliance............................................. 14
• Storing gas cylinders ............................................. 14
• Ordering spare parts.............................................. 14
12 Warranty..................................................................... 14
Covered ................................................................. 14
•
• Not covered ........................................................... 14
13 Technical specifications............................................. 15
• Type label............................................................... 15
• Injector diameters .................................................. 15
14 Troubleshooting ......................................................... 16
8 Getting the appliance ready for use ........................... 10
• Before each use..................................................... 10
• Before first use (in a long time) .............................. 10
• Burning in the appliance ........................................ 10
9 Lighting the burners ................................................... 10
• Safety instructions ................................................. 10
• Lighting the main burners ...................................... 10
• Lighting the side burner......................................... 11
• Switching the burners off....................................... 11
• Relighting the burners............................................ 11
• Checking the flames .............................................. 11
www.barbecook.com 5
Page 6

1 REGISTER YOUR APPLIANCE
Thank you for purchasing a Barbecook appliance! We are sure it
will bring you lots of happy barbecue moments.
To optimize your experience, register your appliance at
www.barbecook.com. It takes only a few minutes and yields
some major benefits:
• You get access to our personalized after sales service. This
allows you, for example, to quickly find spare parts for your
appliance or to profit from an optimal warranty service.
• We can inform you about interesting product updates and
direct you to the product information and specifications that
are relevant for your appliance.
For more information about registering your appliance,
2
refer to www.barbecook.com.
Barbecook respects your privacy. Your data will not be
0
sold, distributed or shared with third parties.
2 ABOUT THIS MANUAL
This manual is composed of two parts:
• The first part is the part that you are reading now. It includes
instructions for the assembly, use and maintenance of your
appliance.
• The second part starts on page 327. It includes all kinds of
illustrations (exploded views, assembly drawings, type
labels) of the appliances that are described in this manual.
3 IMPORTANT SAFETY
INSTRUCTIONS
3.1 Read and follow the instructions
Read the instructions before using the appliance . Always follow
the instructions carefully. Assembling or using the appliance
differently can cause fires and material damage.
Damages caused by not following the instructions
1
(improper assembly, misuse, inadequate maintenance...)
are not covered by the warranty.
3.2 Be cautious with gas
Working with gas is perfectly safe, but requires some extra
caution:
• Always store gas cylinders outdoors, in a well-ventilated
area. Make sure they are not exposed to excessive heat or
direct sunlight.
• Never store your gas cylinder or spare gas cylinder in the
cabinet of your appliance.
• Never store your spare gas cylinder near a gas appliance in
use.
• Always turn off the gas supply at the gas cylinder after use.
• Never smoke near a gas appliance in use or near a gas
cylinder (full/empty).
If you smell gas, immediately close the gas supply,
1
extinguish all flames and open the lid of the appliance. If
the smell lasts, call your gas supplier or the fire
department.
3.3 Select an appropriate location
Use the appliance outdoors only. Using it indoors, even in a
garage or shed, can cause carbon monoxide poisoning.
When selecting an outdoor location, always:
• Place the appliance at least three meters away from any
building, in an open and well-ventilated area.
• Make sure there is a free air flow to the burners and the vent
holes in the cabinet at all times.
• Make sure the appliance is not under an overhanging
structure (a porch, a shelter...) or under foliage.
• Put the appliance on a firm and stable surface. Never put it
on a moving vehicle (a boat, a trailer...).
To prevent formation of rust on stainless steel, avoid
1
contact with chlorine, salt and iron. We recommend not
using the appliance near the coast, near railways or near
swimming pools.
3.4 Use your common sense
Always use your common sense when using the appliance:
• Use outdoors only.
• Do not move the appliance during use.
• Do not leave the appliance unattended during use,
especially in the presence of children and animals.
• WARNING! Some accessible parts may become very hot.
Keep young children away.
• Use appropriate protection when handling hot parts (lid,
grill...).
• The appliance must be kept away from flammable materials
during use.
• Keep flammable materials, flammable liquids and dissoluble
objects away from an appliance in use.
• Do not use wood, charcoal, lava rocks or ceramic briquettes
on a gas appliance.
• Do not use the appliance when you have consumed alcohol
or taken drugs.
• Do not modify the appliance.
4 RECURRENT CONCEPTS
This part includes definitions of some less familiar concepts.
These concepts are used in several topics of the manual.
4.1 Venturis
The venturis are the small tubes attached to the entrance of the
burners. At the side of the venturis, there is a hole. This is visible
on the main burners and on the side burner:
When the gas is on its way to the burners, it passes through the
venturis. Thanks to the holes at the sides, the gas is then mixed
with air and - as a result - with oxygen. This is necessary for a
good ignition in the burners: only the correct mixture of gas and
oxygen will ignite properly and will result in nice flames.
6 www.barbecook.com
Page 7

4.2 Burner hoods
The burner hoods are the hoods that you mount above the
burners of your appliance. They protect the burners from
dripping fat. The holes at the sides of the hoods also distribute
the heat over the grill, so it is heated much faster and more
evenly.
4.3 Enamel
Some parts of the appliance are covered in a layer of melted
glass, called enamel. This enamel protects the underlying metal
from corrosion. Enamel is a high-quality material: it is resistant to
rust, does not fade under the influence of high temperatures and
is very easy to maintain.
Because the enamel is less flexible than the metal which
1
it covers, pieces of enamel can chip off when you handle
the appliance incorrectly. To avoid problems, be careful
when assembling enamelled parts and always maintain
the enamel as described further in this manual.
4.4 Flare-ups
Flare-ups are sudden flames that spark from the bowl when you
are grilling. They are usually caused by dripping fat or marinade.
5 ASSEMBLING THE APPLIANCE
5.1 Safety instructions
• Do not modify the appliance when assembling it. It is very
dangerous and not allowed to alter parts that are
pre-assembled and/or sealed by the manufacturer.
• Always follow the assembly instructions carefully.
• The user is responsible for the correct assembly of the
appliance. Damages caused by improper assembly are not
covered by the warranty.
5.2 To assemble the appliance
You need a cross-slotted screwdriver, a flat-slotted screwdriver
and an AA battery (electrical igniter). There are no batteries
supplied with the appliance.
The table below shows you which cylinder, hose and regulator
you have to use. In Belgium (BE), for example, you have to use a
propane cylinder with a hose and regulator for 37 mbar or a
butane cylinder with a hose and regulator for 28-30 mbar.
Country Cylinder, hose and regulator
DK, GR, NO, SE,
EE, LT, LV, CZ, PL,
MT, HU, SI, SK, NL
ES, GB, IE, PT, BE,
FR, LU, IT, CY
We recommend connecting the appliance to propane.
2
Propane offers a high-quality combustion and is less
sensitive to frost.
Buy your pressure regulator and gas cylinder together.
2
Not all regulators fit all cylinders.
Propane, 30 mbar / Butane, 30 mbar
Propane, 37 mbar / Butane, 28-30 mbar
6.2 Safety instructions
• Never connect the cylinder directly to the appliance. Always
mount a pressure regulator on the cylinder first.
• Never modify pre-assembled or sealed parts of the cylinder,
the hose or the pressure regulator.
• Keep the hose as short as possible (1,5 m maximum) to
prevent it from dragging on the ground.
• While connecting the cylinder, hose and pressure regulator:
• Never distort the hose.
• Always keep the cylinder in an upright position.
• Never open the gas supply.
• Check for leaks each time you make changes to the gas
connection. See “7 Checking for gas leaks”.
6.3 Connecting the hose to the
appliance
To connect the gas hose to the appliance, you have to mount a
coupling on the gas tube of the appliance. The appliance comes
with two couplings, both intended for particular countries:
1 Put the appliance on a flat and clean surface.
2 Assemble the appliance as shown on the assembly
drawings. You find them in the second part of this manual,
after the exploded view of your appliance.
Be careful when assembling enamelled parts. The tools
1
and screws may damage the enamel. Use the provided
fiber washers to protect the enamel around the screws.
The blister packs can contain more screws than
0
necessary. Screws can be left over after the assembly.
The package includes an emergency kit with spare
0
assembly parts (screws, bolts, fiber washers...) You can
use them in case you lost or broke some parts.
6 CONNECTING GAS TO THE
APPLIANCE
6.1 Which cylinder, hose and regulator?
Before you can connect gas to the appliance, you have to buy a
gas cylinder, hose and pressure regulator. Always buy materials
that comply with all national standards and with the gas type(s)
and nominal pressure(s) mentioned on the appliance.
Country Coupling
BE, CH, CZ, DK, ES, FI, GB, IE, IT, PT, SI Coupling A
FR Coupling B
www.barbecook.com 7
Page 8

If your country is not in the table, use the coupling that
2
complies with your national standards.
6.3.2 COUPLING B
You need a 22 mm spanner and an adjustable spanner.
1 Screw the coupling on the gas tube of the appliance (A) and
tighten it with a 22 mm spanner (B).
AB
6.3.1 COUPLING A
You need a 19 mm spanner and a cross-slotted screwdriver.
1 Screw the coupling on the gas tube of the appliance (A) and
tighten it with a 19 mm spanner (B).
A
B
A
2 Screw the gas hose on the coupling (C) and tighten it with
two spanners. Hold the coupling with a 22 mm spanner,
while turning the hose with an adjustable spanner (D).
C
B
D
6.4 Connecting the hose and cylinder to
the regulator
Depending on the type of pressure regulator you use, you need a
cross-slotted screwdriver and/or an adjustable spanner.
2 Slide the hose over the coupling (C) and tighten the
clamping ring with a cross-slotted screwdriver (D).
C
D
1 Connect the hose to the pressure regulator. Do one of the
following:
• If the hose has a clamping ring, slide the hose over the
regulator and tighten the clamping ring with a
cross-slotted screwdriver (A).
• If the hose has a nut, screw the hose on the regulator and
tighten the nut with an adjustable spanner (B).
A B
2 Connect the pressure regulator to the gas cylinder. Do one of
the following:
• If the regulator has a nut, screw the regulator clockwise
on the cylinder and tighten the nut with an adjustable
spanner (C).
8 www.barbecook.com
Page 9

• If the regulator has a screw thread, screw the regulator
counter-clockwise on the cylinder (D).
C D
6.5 Replacing the cylinder
7.5 To check for gas leaks
You check for gas leaks by applying a testing liquid to all gas
components and connections. If the bubbles on a particular
component or connection grow, there is gas leak:
✔✖
1 Close the gas supply and set all control knobs to OFF.
2 Disconnect the empty cylinder and connect the full cylinder.
3 Check the cylinder, the hose and all gas connections for
leaks. See “7 Checking for gas leaks”.
7 CHECKING FOR GAS LEAKS
7.1 Why check for gas leaks?
Propane and butane are heavier than air. As a result, they do not
float away when leaking from the appliance. Especially on
windless days, a leak can cause the gas to collect in and around
the appliance. That accumulated gas can then ignite and
explode.
7.2 When check for gas leaks?
• Before the first use or before the first use after a long period
of non-use.
Also check for gas leaks if your appliance was assembled
1
by your dealer.
• Each time you replace a gas component.
• At least once a year, preferably at the beginning of the
season.
7.3 Safety instructions
To check for gas leaks, proceed as follows:
1 Put the appliance outside.
2 Get your leak test tool and testing liquid (leak spray or
water/soap mixture).
3 Open the lid and set all control knobs to OFF.
4 Open the gas supply slightly. Turn the valve of the gas
cylinder only once.
5 Suck up some testing liquid with the leak test tool and apply
it to the area that you want to check. You have to check:
• The welds of the gas cylinder (A)
• The hose (B)
• The connections between the cylinder and the pressure
regulator and between the pressure regulator and the
hose (C)
• The connection between the hose and the appliance (D)
A
B
• Put the appliance outdoors, in a well-ventilated area. Make
sure there are no flames or heat sources near the appliance.
• Never use a lighter or match to check for gas leaks.
• Do not smoke and do not light the burners when checking
for gas leaks.
7.4 Which materials do I need?
To check for gas leaks, you need:
• A testing liquid. You can use a ready-made leak spray or a
mixture of water (50%) and dish-washing soap (50%).
• The leak test tool that came with your appliance. You use it
to suck up the testing liquid and apply it to the gas
component or connection that you want to check.
C D
Your pressure regulator and coupling may be different
0
from the ones in the illustrations.
6 Do one of the following:
• If you detect a leak, continue as described in “ In case of
a gas leak”.
• If there are no leaks, close the gas supply, rinse all
components thoroughly with water and dry them well.
7.6 In case of a gas leak
1 Close the gas supply and do one of the following:
• If you detected a leak on one of the connections, tighten
that connection.
www.barbecook.com 9
Page 10

• If you detected a leak on the cylinder or hose, replace the
cylinder or hose.
2 Recheck the connection or component on which you
detected the leak.
3 If the leak is not repaired, contact a Barbecook dealer. Do
not use the appliance until the leak is repaired.
For a list of nearby Barbecook dealers, refer to
2
www.barbecook.com.
8 GETTING THE APPLIANCE READY
FOR USE
8.1 Before each use
Each time you use the appliance, make sure that:
• The appliance is in an appropriate location. See “3.3 Select
an appropriate location”.
• The gas hose does not drag on the ground and cannot come
into contact with a hot surface or with dripping fat.
• The bowl is clean. We recommend cleaning the bowl after
each use. See “11.2 Cleaning the bowl”.
• The burners and venturis are not blocked by insect nests or
spider webs. See “11.3 Cleaning the burners and venturis”.
• The burners are assembled correctly. The venturis have to
be placed over the openings of the gas valves.
If you want to be absolutely sure that your gas connection
2
is okay, you can check your appliance on gas leaks before
each use. See “7 Checking for gas leaks”.
8.2 Before first use (in a long time)
3 After 15 minutes, open the lid and let the appliance burn for
another 5 minutes (control knobs still set to HIGH).
4 After 5 minutes, the appliance is ready for use. You can now
put food on the grill.
9 LIGHTING THE BURNERS
To light the burners with the electrical igniter, you have to
0
install an AA battery in the igniter. That battery is not
supplied with the appliance. You find the battery case of
the igniter on the control panel of your appliance.
9.1 Safety instructions
• Before you light the appliance, execute all checks listed in
“8 Getting the appliance ready for use”.
• Make sure the lid is always open when you light a burner.
• Never bend directly over a burner when lighting it.
9.2 Lighting the main burners
9.2.1 USING THE IGNITER
1 Open the lid and set the control knobs of the main burners to
OFF.
2 If no other burner is lit yet, open the gas supply and wait ten
seconds. This allows the gas to stabilize.
3 Press the igniter until you hear sparks.
4 While holding the igniter, set the control knob of the middle
burner to HIGH. Always light the middle burner first, never
try to lit all main burners at the same time.
5 If the burner does not light after three attempts, set its
control knob to OFF, close the gas supply and wait 5
minutes. This allows any accumulated gas to escape.
6 Retry lighting the burner. If it still does not light, try lighting it
with a match or refer to “14 Troubleshooting” to determine
the cause of the problem.
7 Once one burner is lit, light the other burners by setting their
control knobs to HIGH.
If you use the appliance for the first time or for the first time after
a long period of non-use, you have to execute some extra
checks:
• Make sure that you have read, understood and checked all
the instructions in this manual (only before first use).
• Check the appliance for gas leaks. See “7 Checking for gas
leaks”.
Also check for gas leaks if your appliance was assembled
1
by your dealer.
• Clean the burners and venturis (only before first use in a long
time). See “11.3 Cleaning the burners and venturis”.
• Burn in the appliance before you put any food on it (only
before first use). See “8.3 Burning in the appliance”.
8.3 Burning in the appliance
By burning in the appliance before the first use, you remove
remaining manufacturing greases from the appliance. Proceed
as follows:
1 Light the main burners and set their control knobs to HIGH.
See “9.2 Lighting the main burners”.
2 Close the lid and let the appliance burn for 15 minutes. Do
not put any food on the grill yet.
9.2.2 USING A MATCH
1 Place a match in the match holder.
2 Open the lid and set the control knobs of the main burners to
OFF.
3 If no other burner is lit yet, open the gas supply and wait ten
seconds. This allows the gas to stabilize.
10 www.barbecook.com
Page 11

4 Light the match and hold it about 13 mm from the burner.
5 Set the control knob of one burner to HIGH.
Always light one main burner to start with. Never light all
1
main burners at the same time.
6 If the burner does not light within 5 seconds, set its control
knob to OFF, close the gas supply and wait 5 minutes. This
allows any accumulated gas to escape.
7 Retry lighting the burner. If it still does not light, refer to
“14 Troubleshooting” to determine the cause of the problem.
8 Once one burner is lit, light the other burners by setting their
control knobs to HIGH.
9.3 Lighting the side burner
This information does not apply to the Spring 300. That appliance
is not equipped with a side burner.
The side burner can only carry vessels with a maximum
1
weight of 9 kg and a maximum diameter of 220 mm.
9.3.1 USING THE IGNITER
1 Open the lid and set the control knob of the side burner to
OFF.
2 If no other burner is lit yet, open the gas supply and wait ten
seconds. This allows the gas to stabilize.
3 Press the igniter until you hear sparks.
4 While holding the igniter, set the control knob of the side
burner to HIGH.
5 If the burner does not light after three attempts, set its
control knob to OFF, close the gas supply and wait 5
minutes. This allows any accumulated gas to escape.
6 Retry lighting the side burner. If it still does not light, try
lighting it with a match or refer to “14 Troubleshooting” to
determine the cause of the problem.
4 Light the match and hold it about 13 mm from the side
burner.
5 Set the control knob of the side burner to HIGH.
6 If the side burner does not light within 5 seconds, set its
control knob to OFF, close the gas supply and wait 5
minutes. This allows any accumulated gas to escape.
7 Retry lighting the side burner. If it still does not light, refer to
“14 Troubleshooting” to determine the cause of the problem.
9.4 Switching the burners off
If you no longer use the burners, you have to switch them off.
Proceed as follows:
1 Close the gas supply.
2 Set the control knobs of the burners to OFF.
By closing the gas supply first, you make sure there is no
2
gas left in the appliance.
9.5 Relighting the burners
If a burner goes out while in use, proceed as follows:
1 Open the lid and close the gas supply.
2 Set all control knobs to OFF and wait 5 minutes. This allows
any accumulated gas to escape.
3 Relight the burner(s).
9.6 Checking the flames
Each time you light a burner, you have to check its flames. A
perfect flame is almost completely blue, with some yellow at the
top. Sporadic yellow flames are normal and not harmful.
If there is something wrong with the flames, do one of the
following to solve the problem:
9.3.2 USING A MATCH
1 Place a match in the match holder.
2 Open the lid and set the control knob of the side burner to
OFF.
3 If no other burner is lit yet, open the gas supply and wait ten
seconds. This allows the gas to stabilize.
www.barbecook.com 11
Page 12

If the flames are... Do the following...
Low and entirely yellow
Higher than the bowl
1 Immediately close the gas supply and
set all control knobs to OFF.
2 Refer to “14 Troubleshooting” to
determine the cause of the problem.
Most likely, the venturis are blocked.
1 Immediately close the gas supply and
set all control knobs to OFF.
2 Wait 5 minutes to allow any
accumulated gas to escape.
3 Relight the burner(s).
4 If the problem persists, refer to
“14 Troubleshooting” to determine
the cause of the problem.
Method Description Use
Indirect Put your food next to a lit
When grilling under a closed lid, always keep an eye on
1
the lid thermometer to make sure the appliance does not
get too hot. See “10.5 Watching the temperature”.
burner, set that burner to a
medium/low position and close
the lid.
To further cook
seared meat
10.4 Grilling with closed lid
Closing the lid while grilling has some important advantages:
• The temperature of the grill is higher and remains more
constant.
• You reduce the cooking time of your food and keep your
food more moist.
• You reduce flare-ups and save gas.
When grilling under a closed lid, always keep an eye on
1
the lid thermometer to make sure the appliance does not
get too hot. See “10.5 Watching the temperature”.
LOW HIGH
10 USEFUL TIPS AND TRICKS
10.1 Preheating the appliance
By preheating your appliance, you make sure the grill is hot
enough by the time you put food on it. Proceed as follows:
1 Light the burner(s) and set their control knob(s) to HIGH.
2 Close the lid and leave the appliance for ten minutes.
3 After ten minutes, open the lid and put your food on the grill.
4 If you need less heat now, set the control knob(s) to a lower
position.
10.2 Preventing food from sticking
To prevent your food from sticking to the grill:
• Oil the food lightly with a brush before you put it on the grill.
You can also oil the grill itself.
• Preheat the appliance. The warmer the grill when you put
food on it, the less the food will stick.
• Do not turn the food too quickly. Let it catch some heat first.
10.3 Direct and indirect grilling
Depending on the type of food you are preparing and on how you
want to prepare it, you can grill directly or indirectly:
Method Description Use
Direct Put your food directly above a
lit burner, set that burner to a
high position and keep the lid
open.
To sear meat
and vegetables
10.5 Watching the temperature
Your appliance is equipped with powerful burners, so it heats up
rapidly and you can keep the temperature steady. When grilling
under a closed lid, however, you have to make sure that the
appliance does not get too hot. Keep an eye on the lid
thermometer and take into account the following guidelines:
• A normal cooking temperature is about 210 °C. At higher
temperatures, dripping and accumulated fat can ignite.
• The temperature should never be over 300 °C for more than
five minutes. This can damage and deform the appliance.
If the appliance gets too hot, cool it down by opening the
1
lid and setting the burners to a lower position.
10.6 Taking advantage of the heat zones
When all burners are lit, the burner hoods distribute the heat as
evenly as possible over the grill. Despite this even heating, some
zones are still hotter than others. You can take advantage of
these heat zones to grill your food to perfection:
Zone Hot? Use to...
Front Hot Grill delicate food (prawns, fish...)
Centre Hotter Prepare food that needs some time to
Back Hottest Sear meat and vegetables
You can also create heat zones by playing with the power
2
of the burners. You can, for example, set a burner to a
lower position and use the zone above that burner for
delicate food or food that needs some time to cook.
cook (e.g. sausages, chicken ties...)
10.7 Avoiding flare-ups
During grilling, some flare-ups are normal. Too many flare-ups,
however, increase the temperature in the appliance and can
ignite accumulated fat. To avoid flare-ups:
• Make sure the bowl is clean when you start grilling. We
recommend cleaning the bowl after each use. See
“11.2 Cleaning the bowl”.
12 www.barbecook.com
Page 13

• Regularly check if the fat drain hole is not blocked and if the
fat drip tray or cup is not full yet.
• When grilling fatty meat, trim excess fat, close the lid and set
the burners to a medium or low position.
11 MAINTAINING THE APPLIANCE
11.1 Cleaning the grill
We recommend cleaning the grill after each use, with the
Barbecook cleaner. Proceed as follows:
1 Spray the foam on the grill and let it act for a while.
The foam discolours, as it soaks off the dirt and greases.
2 Remove the foam with a soft sponge and water and rinse the
grill thoroughly.
3 Dry the grill well and store it in a dry place. This prevents
formation of rust.
You can also clean the grill with a soft detergent or with
2
sodium bicarbonate. Never use oven cleaners on the grill.
11.2 Cleaning the bowl
We recommend cleaning the bowl after each use, with the
Barbecook cleaner. Use it the same way you do on the grill.
11.3 Cleaning the burners and venturis
A
B
11.3.1 WHY CLEAN THE BURNERS AND VENTURIS?
Spiders and insects can make webs and nests in the burners and
venturis. This may block the gas supply to the burners. As a
result:
• You cannot light the burners. If you manage to light them
anyway, they will only produce smoky and yellow flames.
• The gas can start burning outside the venturis, at the control
knobs. These fires are called flash-backs and can result in
serious injuries and material damage.
Damages caused by blocked burners and venturis are
0
regarded as inadequate maintenance and are not
covered by the warranty.
11.3.2 WHEN CLEAN THE BURNERS AND VENTURIS?
You have to clean the burners and venturis of your appliance:
• Before the first use after a long period of non-use.
• At least twice a year, of which once at the beginning of the
season.
11.3.3 TO CLEAN THE BURNERS AND VENTURIS
C
1 Remove the burners from the appliance as shown on the
illustrations. If you notice that a burner is damaged, you have
to replace it.
2 Clean the burners and venturis with a small brush or a
homemade pipe cleaner (an unfolded paperclip, a pipe
brush...).
3 Put the burners back. Make sure to place the venturis over
the openings of the gas valves.
www.barbecook.com 13
Page 14

11.4 Maintaining enamel, stainless steel,
chrome and powder coated parts
The appliance is composed of enamelled, stainless steel,
chromed and powder coated parts. Each material has to be
maintained differently:
Material How to maintain this material
Enamel
Stainless steel
and chrome
Powder
coated
• Do not use sharp objects and do not knock
against a hard surface.
• Avoid contact with cold liquids while still hot.
• You can use metal sponges and abrasive
detergents.
• Do not use aggressive, abrasive or metal
detergents.
• Use soft detergents and let them act on the
steel.
• Use a soft sponge or cloth.
• Rinse thoroughly after cleaning and dry well
before storing.
• Do not use sharp objects. Use soft detergents
and a soft sponge or cloth.
• Rinse thoroughly after cleaning and dry well
before storing.
• Always store gas cylinders outdoors, in a well-ventilated
area. Make sure they are not exposed to excessive heat or
direct sunlight.
• Never store a gas cylinder in an area that can become very
hot (in a car, on a boat...).
• Never store your gas cylinder or spare gas cylinder in the
cabinet of your appliance.
• Never store your spare gas cylinder near a gas appliance in
use.
• Always store gas cylinders outside the reach of children.
• Always store and transport gas cylinders in upright position.
11.7 Ordering spare parts
Parts that are directly exposed to fire or intense heat have to be
replaced from time to time. To order a spare part:
1 Look up the reference number of the part you need. You find
a list of all reference numbers below the exploded views in
the second part of this manual and on www.barbecook.com.
If you registered your appliance online, you will
2
automatically be guided to the correct list.
2 Order the spare part at your point of sale. You can order
parts both under and outside warranty.
To prevent formation of rust on stainless steel, avoid
1
contact with chlorine, salt and iron. We recommend not
using the appliance near the coast, near railways or near
swimming pools.
Damages caused by not following these instructions are
1
regarded as inadequate maintenance and are not
covered by the warranty.
Below the exploded view of your appliance (second part of the
manual), you find a list with all parts of which the appliance is
composed. This list includes a symbol that specifies the material
of each part, so you can use it to check how you have to maintain
a particular part. The parts lists use the following symbols:
Symbol Material
Enamel
Chrome
Stainless steel
Powder coated
11.5 Storing the appliance
If you do not use your appliance for a longer period of time, store
it in a dry place. Before you store the appliance:
• Disconnect the gas cylinder. Never store your appliance
indoors (not even in a garage or shed) as long as it is
connected to the gas cylinder.
• Clean the burners and the grills, rub them with oil and wrap
them in paper.
• Cover your appliance with a Barbecook cover. Register your
appliance at www.barbecook.com to find out which cover
you need.
11.6 Storing gas cylinders
These instructions apply to both empty and full gas cylinders.
12 WARRANTY
12.1 Covered
Your appliance comes with a warranty of two years, starting from
the date of purchase. This warranty covers all manufacturing
defects, provided that:
• You used, assembled and maintained your appliance
according to the instructions in this manual. Damages
caused by misuse, incorrect assembly or inadequate
maintenance are not regarded as manufacturing defects.
• You can present the receipt and the unique serial number of
your appliance. This serial number starts with a G, followed
by 15 digits. You can find it:
• On this manual and on the starter pack that included the
manual.
• On the packaging of the appliance.
• On the type label on the inside of the cabinet door
(Quisson, Siesta 4 and Siesta 6) or on the inside of the
bottom front panel (Spring, Siesta 2 and Siesta 3).
• The Barbecook quality department confirms that the parts
are defective and that they proved defective under normal
use, correct assembly and adequate maintenance.
If one of the above conditions is not met, you cannot claim any
form of contribution. In all cases, the warranty is limited to the
repair or replacement of the defective part(s).
12.2 Not covered
The following damages and defects are not covered by the
warranty:
• Normal wear and tear (rusting, distortion, discolouration...) of
parts that are directly exposed to fire or intense heat. It is
normal to replace these parts from time to time.
• Visual irregularities that are inherent to the manufacturing
process. These irregularities are not regarded as
manufacturing defects.
• All damages caused by inadequate maintenance, incorrect
storage, improper assembly or modifications made to
pre-assembled parts.
14 www.barbecook.com
Page 15

• All damages caused by misuse and abuse of the appliance
(not using it according to the instructions in this manual,
using it for commercial purposes...).
• All consequential damages caused by careless or
non-compliant use of the appliance.
• Rust or discolouration caused by external influences, the use
of aggressive detergents, exposure to chlorine... These
damages are not regarded as manufacturing defects.
13 TECHNICAL SPECIFICATIONS
13.1 Type label
The type label lists all the technical specifications of your
appliance. You can find it:
• In the second part of this manual.
• On the inside of the bottom front panel.
13.2 Injector diameters
• Main burner: 1,00 mm
• Side burner: 0,75 mm
www.barbecook.com 15
Page 16

14 TROUBLESHOOTING
Problem Probable cause(s) Solution(s)
Not enough heat
Excessive heat and/or flare-ups
Heat not distributed evenly
over grill surface
Yellow flames
Incomplete flame Burner blocked, pierced or rusted Clean or replace burner
Flash-backs (flames outside
venturis/at control knobs)
Flames higher than edge of
bowl
Pressure regulator hums
• Gas supply not open
• Venturis not placed over openings of gas valves
• Burner openings blocked
• Gas cylinder (almost) empty
• Pressure regulator not connected correctly to
cylinder and/or hose
• Food too fatty
• Fat drain hole blocked, fat in bowl and/or fat on
burners
• Temperature too high
Some heat differences are normal, see “1.7 Making
optimal use of the heat” and “10.6 Taking advantage
of the heat zones”. Probable cause(s) for big heat
differences:
• Appliance not preheated
• Burners or venturis blocked
• Salt on burners
• Appliance connected to butane
Burners or venturis blocked
• Lots of wind
• Gas cylinder (almost) empty
• Fat in bowl and/or on burners
• Hot weather
• New (full) gas cylinder
• Open gas supply
• Place venturis over openings of gas valves
• Clean burner openings or replace burners
• Replace gas cylinder
• Reconnect pressure regulator to cylinder and/or
hose
• Trim excess fat or set burners to a low position
• Clean fat drain hole, bowl and burners
• Set burners to a lower temperature and/or grill
food indirectly
• Preheat appliance
• Clean burners and venturis
• Clean burners
• Connect appliance to propane, using an
appropriate pressure regulator
1 Close gas supply and set burners to OFF.
2 Let appliance cool down.
3 Clean burners and venturis.
• Put appliance with rear side towards wind
• Replace gas cylinder
• Clean bowl and burners
Not a hazard or defect. Should stop automatically
after a while.
Burner whistles when set to
LOW
Impossible to light burner
(using either igniter or match)
Impossible to light burner with
igniter
No sparks nor sound when
pressing igniter
Only sound (no sparks) when
pressing igniter
Sparks present that do not
originate from burners
Gas injector, venturi and/or burner dirty Clean gas injector, venturi and burner
• Burner or venturi blocked
• No gas supply
• No battery installed or battery not installed
correctly
• Middle burner not lit first
• Igniter wiring not mounted correctly
• Electrode damaged
• Faulty ground
• Faulty igniter
• No battery installed or battery not installed
correctly
• Empty battery
• Igniter button not assembled correctly
• Faulty spark generator
• Faulty ground
• Burner and electrode too far apart
Faulty wiring Replace wiring
• Clean burner and venturi
• Open gas supply and press safety knob on
pressure regulator (not present on all regulators)
• (Re)install battery, with terminals positioned
correctly
• Light the middle burner first
• Check and re-assemble all igniter connections
• Replace electrode
• Check and re-assemble electrodes, burners and
igniter
• Replace igniter
• (Re)install battery, with terminals positioned
correctly
• Replace battery
• Re-assemble igniter button
• Replace spark generator
• Reconnect spark generator and electrodes
• Slightly bend electrode to bring it closer to the
burner
16 www.barbecook.com
Page 17

Problem Probable cause(s) Solution(s)
Sparks present, but not on all
electrodes and/or not powerful
enough
• Faulty ground
• Low battery
• Wet or broken electrodes
• Reconnect spark generator and electrodes
• Replace battery
• Dry electrodes with paper towels or replace
electrodes
www.barbecook.com 17
Page 18

18 www.barbecook.com
Page 19

NL - GEBRUIKSAANWIJZING
1 Uw barbecue registreren............................................ 20
2 Over deze handleiding................................................ 20
3 Belangrijke veiligheidsinstructies ............................... 20
• De instructies lezen en opvolgen........................... 20
• Voorzichtig omspringen met gas ........................... 20
• Een geschikte locatie kiezen.................................. 20
• Uw gezond verstand gebruiken............................. 20
4 Terugkerende concepten ........................................... 20
• Venturibuizen ......................................................... 20
• Branderkappen ...................................................... 21
• Email ...................................................................... 21
• Opflakkeringen....................................................... 21
5 De barbecue monteren............................................... 21
• Veiligheidsinstructies ............................................. 21
• De barbecue monteren .......................................... 21
6 De barbecue van gas voorzien................................... 21
• Welke gasfles, slang en regelaar? ......................... 21
• Veiligheidsinstructies ............................................. 21
• De slang aansluiten op de barbecue ..................... 22
• De slang en gasfles aansluiten op de regelaar ...... 22
• De gasfles vervangen............................................. 23
7 Controleren op gaslekken .......................................... 23
• Waarom controleren op gaslekken? ...................... 23
• Wanneer controleren op gaslekken? ..................... 23
• Veiligheidsinstructies ............................................. 23
• Welke materialen heb ik nodig?............................. 23
• Controleren op gaslekken...................................... 23
• In geval van een gaslek.......................................... 24
10 Handige tips ............................................................... 26
• De barbecue voorverwarmen ................................ 26
• Voorkomen dat voedsel aankleeft ......................... 26
• Rechtstreeks en onrechtstreeks grillen.................. 26
• Grillen met gesloten deksel ................................... 26
• De temperatuur controleren................................... 26
• De warmtezones benutten..................................... 27
• Opflakkeringen vermijden...................................... 27
11 De barbecue onderhouden ........................................ 27
• Het rooster reinigen ............................................... 27
• De kuip reinigen..................................................... 27
• De branders en venturibuizen schoonmaken ........ 27
• Geëmailleerde, roestvaststalen, verchroomde en
gepoederlakte onderdelen onderhouden .............. 28
• De barbecue opbergen.......................................... 28
• Gasflessen bewaren .............................................. 28
• Reserveonderdelen bestellen ................................ 29
12 Garantie...................................................................... 29
• Gedekt ................................................................... 29
• Niet gedekt ............................................................ 29
13 Technische gegevens................................................. 29
• Typelabel................................................................ 29
• Diameters van de injectoren .................................. 29
14 Problemen oplossen .................................................. 30
8 De barbecue klaarmaken voor gebruik ...................... 24
• Voor elk gebruik..................................................... 24
• Voor het eerste gebruik (of na een lange periode van
ongebruik) .............................................................. 24
• De barbecue inbranden ......................................... 24
9 De branders ontsteken............................................... 24
• Veiligheidsinstructies ............................................. 24
• De hoofdbranders ontsteken ................................. 24
• De zijbrander ontsteken......................................... 25
• De branders uitschakelen ...................................... 26
• De branders opnieuw ontsteken............................ 26
• De vlammen controleren........................................ 26
www.barbecook.com 19
Page 20

1 UW BARBECUE REGISTREREN
3.3 Een geschikte locatie kiezen
Bedankt voor uw aankoop van een Barbecook-barbecue! We
wensen u veel barbecueplezier.
Om optimaal van uw barbecue te genieten, kunt u uw barbecue
registreren op www.barbecook.com. Dit duurt slechts enkele
minuten en biedt belangrijke voordelen:
• U kunt een beroep doen op onze gepersonaliseerde
naverkoopdienst. Op die manier kunt u bijvoorbeeld snel
reserveonderdelen voor uw barbecue vinden of genieten van
een optimale garantieservice.
• Wij houden u op de hoogte van interessante productupdates
en verwijzen u naar productinformatie en -specificaties die
relevant zijn voor uw barbecue.
Voor meer informatie over het registreren van uw
2
barbecue gaat u naar www.barbecook.com.
Barbecook respecteert uw privacy. Uw gegevens worden
0
niet verkocht, verspreid of doorgegeven aan derden.
2 OVER DEZE HANDLEIDING
Deze handleiding bestaat uit twee delen:
• Het eerste deel is het deel dat u momenteel leest. Hier vindt
u instructies om uw barbecue te monteren, te gebruiken en
te onderhouden.
• Het tweede deel begint op pagina 327. Daarin vindt u
diverse illustraties (explosietekeningen, montagetekeningen,
typelabels) van de barbecues die in deze handleiding
beschreven zijn.
3 BELANGRIJKE
VEILIGHEIDSINSTRUCTIES
3.1 De instructies lezen en opvolgen
Lees de instructies voor u de barbecue in gebruik neemt. Volg de
instructies altijd zorgvuldig. Als de barbecue op een andere wijze
wordt gemonteerd of gebruikt, kan dit brand en materiële schade
tot gevolg hebben.
Schade wegens het niet opvolgen van de instructies
1
(verkeerde montage, misbruik, verkeerd onderhoud enz.)
wordt niet gedekt door de garantie.
3.2 Voorzichtig omspringen met gas
Werken met gas is erg veilig, maar u dient enkele
voorzorgsmaatregelen in acht te nemen:
• Bewaar gasflessen altijd buitenshuis in een goed
geventileerde ruimte. Zorg ervoor dat de flessen niet
blootgesteld worden aan hoge temperaturen of direct
zonlicht.
• Bewaar uw gasfles of reservegasfles nooit in de kast van de
barbecue.
• Bewaar uw reservegasfles nooit in de buurt van een toestel
op gas dat in gebruik is.
• Draai na het gebruik altijd de gastoevoer aan de gasfles
dicht.
• Rook nooit in de buurt van een toestel op gas dat in gebruik
is of in de buurt van een gasfles (vol/leeg).
Als u gas ruikt, draait u onmiddellijk de gastoever dicht,
1
dooft u alle vlammen en opent u het deksel van de
barbecue. Als de geur aanhoudt, belt u naar uw
gasleverancier of de brandweer.
Gebruik de barbecue alleen buitenshuis. Als u de barbecue
binnenshuis gebruikt, zelfs in een garage of schuur, bestaat er
gevaar voor vergiftiging door koolmonoxide.
Let op het volgende wanneer u een locatie kiest:
• Plaats de barbecue op minstens drie meter van een gebouw,
op een open en goed geventileerde plaats.
• Zorg ervoor dat er altijd voldoende vrije lucht naar de
branders en naar de ventilatiegaten in de kast kan stromen.
• Plaats de barbecue niet onder een overhangende structuur
(veranda, afdak ...) of onder gebladerte.
• Plaats de barbecue op een stevige en stabiele ondergrond.
Plaats de barbecue nooit op een bewegend voertuig (boot,
oplegger ...).
Om roestvorming op onderdelen uit roestvast staal te
1
voorkomen, vermijdt u best ieder contact met chloor, zout
of ijzer. Wij raden u aan de barbecue niet te gebruiken in
kuststreken, nabij spoorwegen of in de buurt van een
zwembad.
3.4 Uw gezond verstand gebruiken
Gebruik steeds uw gezond verstand wanneer u de barbecue
gebruikt:
• Gebruik de barbecue alleen buitenshuis.
• Verplaats de barbecue niet tijdens het gebruik.
• Laat de barbecue niet alleen achter terwijl deze in gebruik is,
en dit zeker niet als er kinderen of dieren aanwezig zijn.
• WAARSCHUWING! Sommige bereikbare delen kunnen erg
heet worden. Houd jonge kinderen dus uit de buurt van de
barbecue.
• Gebruik geschikte bescherming wanneer u hete onderdelen
(deksel, rooster enz.) moet vastnemen.
• Houd de barbecue tijdens het gebruik uit de buurt van
ontvlambare materialen.
• Houd brandbare materialen, brandbare vloeistoffen en
oplosbare objecten op een veilige afstand van de barbecue
wanneer deze in gebruik is.
• Gebruik geen hout, houtskool, lavastenen of keramische
briketten in een gasbarbecue.
• Gebruik de barbecue niet als u alcohol hebt gedronken of
drugs hebt gebruikt.
• Breng geen wijzigingen aan de barbecue aan.
4 TERUGKERENDE CONCEPTEN
Dit deel omvat definities van een aantal minder vertrouwde
concepten. Deze concepten worden gebruikt in verschillende
onderwerpen van de handleiding.
4.1 Venturibuizen
De venturibuizen zijn de kleine buizen die aan de ingang van de
branders bevestigd zijn. Aan de zijkant van de venturibuizen is er
20 www.barbecook.com
Page 21

een opening voorzien. Deze is zichtbaar op de hoofdbranders en
op de zijbrander:
Op weg naar de branders passeert het gas door de
venturibuizen. Via de openingen in de zijkanten wordt het gas
gemengd met lucht, en dus ook met zuurstof. Dit is nodig voor
een goede ontbranding in de branders: alleen een correct
gas-zuurstofmengsel zal goed ontbranden en mooie vlammen
opleveren.
4.2 Branderkappen
5.2 De barbecue monteren
U hebt een kruisschroevendraaier, een platte schroevendraaier
en een AA-batterij (elektrische ontsteker) nodig. Er zijn geen
batterijen bij de barbecue geleverd.
1 Plaats de barbecue op een effen en schone ondergrond.
2 Monteer de barbecue zoals aangegeven in de
montagetekeningen. U vindt deze in het tweede deel van
deze handleiding, na de explosietekening van uw barbecue.
Wees voorzichtig bij het monteren van emailonderdelen.
1
Het gereedschap en de schroeven kunnen het email
beschadigen. Gebruik de bijgeleverde vezelringen om het
email rond de schroeven te beschermen.
Het is mogelijk dat de blisterverpakkingen meer
0
schroeven dan nodig bevatten, en dat er dus schroeven
overblijven na de montage.
Het pakket omvat een noodkit met reserveonderdelen
0
(schroeven, bouten, vezelringen enz.) die u kunt
gebruiken als u een onderdeel verloren bent of
stukgemaakt hebt.
6 DE BARBECUE VAN GAS VOORZIEN
De branderkappen zijn de kappen die gemonteerd worden boven
de branders van de barbecue. Ze beschermen de branders tegen
druipend vet. De openingen aan de zijkanten van de kappen
verdelen de warmte over het rooster, zodat het veel sneller en
gelijkmatiger opgewarmd wordt.
4.3 Email
Sommige delen van de barbecue zijn bekleed met een laag
gesmolten glas, zogenaamd email. Dit email beschermt het
onderliggende metaal tegen corrosie. Email is een kwaliteitsvol
materiaal: het is bestand tegen roest, het verzwakt niet onder
invloed van hoge temperaturen en het is zeer eenvoudig te
onderhouden.
Omdat het email minder flexibel is dan het metaal waarop
1
het is aangebracht, kunnen stukjes email loskomen
wanneer u de barbecue niet correct gebruikt. Om
problemen te vermijden, dient u voorzichtig te zijn
wanneer u geëmailleerde onderdelen monteert en dient u
het email altijd te onderhouden zoals beschreven in deze
handleiding.
4.4 Opflakkeringen
Opflakkeringen zijn vlammen die plots uit de kuip springen
tijdens het grillen. Ze worden meestal veroorzaakt door druipend
vet of druipende marinade.
5 DE BARBECUE MONTEREN
5.1 Veiligheidsinstructies
• Breng geen wijzigingen aan de barbecue aan wanneer u
deze in elkaar zet. Onderdelen die door de fabrikant werden
voorgemonteerd en/of afgedicht, mogen niet worden
gewijzigd, want dit is zeer gevaarlijk.
• Volg de montage-instructies altijd zorgvuldig.
• De gebruiker is verantwoordelijk voor de correcte montage
van de barbecue. Schade veroorzaakt door een foutieve
montage wordt niet gedekt door de garantie.
6.1 Welke gasfles, slang en regelaar?
Voor u de barbecue van gas kunt voorzien, moet u eerst een
gasfles, een slang en een drukregelaar kopen. Koop steeds
materialen die beantwoorden aan alle nationale richtlijnen en aan
de gastypes en nominale drukwaarden die op de barbecue
vermeld staan.
In de onderstaande tabel ziet u welke gasfles, slang en regelaar
u moet gebruiken. In België (BE) moet u bijvoorbeeld een
propaanfles gebruiken met een slang en regelaar voor 37 mbar,
of een butaanfles met een slang en regelaar voor 28-30 mbar.
Land Gasfles, slang en regelaar
DK, GR, NO, SE,
EE, LT, LV, CZ, PL,
MT, HU, SI, SK, NL
ES, GB, IE, PT, BE,
FR, LU, IT, CY
Wij raden u aan propaan te gebruiken voor de barbecue.
2
Propaan levert een kwaliteitsvolle verbranding en is
minder vorstgevoelig.
Koop uw drukregelaar en gasfles altijd samen. Niet alle
2
regelaars passen op alle gasflessen.
Propaan, 30 mbar / butaan, 30 mbar
Propaan, 37 mbar / butaan, 28-30 mbar
6.2 Veiligheidsinstructies
• Sluit de gasfles nooit rechtstreeks aan op de barbecue.
Monteer altijd eerst een drukregelaar op de gasfles.
• Pas voorgemonteerde of verzegelde onderdelen van de
gasfles, slang of drukregelaar nooit aan.
• Zorg voor een zo kort mogelijke slang (maximaal 1,5 m) om
te verhinderen dat deze over de grond sleept.
• Neem het volgende in acht bij het aansluiten van de gasfles,
slang en drukregelaar:
• Vervorm de slang niet.
• Zet de gasfles altijd rechtop.
• Open nooit de gastoevoer.
www.barbecook.com 21
Page 22

• Telkens wanneer u wijzigingen aanbrengt aan de
gasverbindingen, moet u controleren of er gaslekken zijn. Zie
“7 Controleren op gaslekken”.
6.3 De slang aansluiten op de barbecue
Om de gasslang te kunnen aansluiten op de barbecue, moet u
een koppeling monteren op de gasbuis van de barbecue. De
barbecue wordt geleverd met twee verschillende koppelingen
die bestemd zijn voor gebruik in verschillende landen:
Land Koppeling
2 Schuif de slang over de koppeling (C) en span de spanring
aan met een kruisschroevendraaier (D).
C
D
BE, CH, CZ, DK, ES, FI, GB, IE, IT, PT, SI Koppeling A
FR Koppeling B
Als uw land niet vermeld staat in de tabel, gebruikt u de
2
koppeling die beantwoordt aan de normen die gelden in
uw land.
AB
6.3.2 KOPPELING B
U hebt een moersleutel van 22 mm en een Engelse sleutel nodig.
1 Schroef de koppeling op de gasbuis van de barbecue (A) en
draai deze vast met een moersleutel van 22 mm (B).
A
2 Schroef de gasslang op de koppeling (C) en draai deze aan
met twee moersleutels. Houd de koppeling vast met een
moersleutel van 22 mm en draai terwijl de slang vast met een
Engelse sleutel (D).
C
B
D
6.3.1 KOPPELING A
U hebt een moersleutel van 19 mm en een kruisschroevendraaier
nodig.
1 Schroef de koppeling op de gasbuis van de barbecue (A) en
draai deze vast met een moersleutel van 19 mm (B).
A
B
6.4 De slang en gasfles aansluiten op de
regelaar
Afhankelijk van het gebruikte type drukregelaar hebt u een
kruisschroevendraaier en/of een Engelse sleutel nodig.
1 Sluit de slang aan op de drukregelaar. Ga als volgt te werk:
• Als de slang uitgerust is met een spanring, schuift u de
slang over de regelaar en spant u de spanring aan met
een kruisschroevendraaier (A).
• Als de slang uitgerust is met een moer, schroeft u de
slang op de regelaar en draait u de moer aan met een
Engelse sleutel (B).
A B
22 www.barbecook.com
Page 23

2 Sluit de drukregelaar aan op de gasfles. Ga als volgt te werk:
• Als de regelaar uitgerust is met een moer, schroeft u de
regelaar rechtsom op de gasfles en draait u de moer aan
met een Engelse sleutel (C).
• Als de regelaar voorzien is van schroefdraad, schroeft u
de regelaar linksom op de gasfles (D).
C D
6.5 De gasfles vervangen
1 Draai de gastoever dicht en zet alle regelknoppen op OFF.
2 Koppel de lege gasfles los en sluit de volle gasfles aan.
3 Controleer de gasfles, de slang en alle gasverbindingen op
lekken. Zie “7 Controleren op gaslekken”.
7 CONTROLEREN OP GASLEKKEN
aan te brengen op de gasonderdelen of gasverbindingen die
u wilt controleren.
7.5 Controleren op gaslekken
U kunt controleren of er gaslekken zijn door op alle
gasonderdelen en -verbindingen een testvloeistof aan te
brengen. Als er grotere bellen gevormd worden op een bepaald
onderdeel of een bepaalde verbinding, is er sprake van een
gaslek:
✔✖
7.1 Waarom controleren op gaslekken?
Propaan en butaan zijn zwaarder dan lucht. Dit betekent dat deze
gassen niet wegdrijven als ze uit de barbecue lekken. Met name
op windstille dagen kan het gas zich in geval van een gaslek gaan
opstapelen in en rond de barbecue, en vervolgens ontsteken en
ontploffen.
7.2 Wanneer controleren op gaslekken?
• Voor het eerste gebruik of na een lange periode van
ongebruik.
Controleer of er geen gaslekken zijn als de barbecue
1
gemonteerd werd door de leverancier.
• Telkens wanneer u een gasonderdeel vervangt.
• Minstens één keer per jaar, bij voorkeur aan het begin van
het seizoen.
7.3 Veiligheidsinstructies
• Plaats de barbecue buitenshuis op een goed geventileerde
plaats. Zorg ervoor dat er geen vlammen of warmtebronnen
in de buurt van de barbecue zijn.
• Gebruik nooit een aansteker of lucifer om te controleren op
gaslekken.
• Rook niet en ontsteek de branders niet wanneer u
controleert op gaslekken.
Ga als volgt te werk om te controleren of er gaslekken zijn:
1 Zet de barbecue buitenshuis.
2 Neem uw lektestgereedschap en testvloeistof (lekspray of
water-zeepmengsel).
3 Open het deksel en zet alle regelknoppen op OFF.
4 Zet de gastoevoer iets open. Draai hiervoor slechts één keer
aan het ventiel van de gasfles.
5 Zuig wat testvloeistof op met het lektestgereedschap en
breng het aan op de zone die u wilt controleren. De volgende
onderdelen moeten gecontroleerd worden:
• De lasnaden van de gasfles (A)
• De slang (B)
• De verbindingen tussen de gasfles en de drukregelaar en
tussen de drukregelaar en de slang (C)
• De verbinding tussen de slang en de barbecue (D)
A
B
7.4 Welke materialen heb ik nodig?
Om te controleren of er gaslekken zijn, hebt u het volgende
nodig:
• Een testvloeistof. U kunt hiervoor een kant-en-klare lekspray
of een mengsel van water (50%) en afwasmiddel (50%)
gebruiken.
• Het lektestgereedschap dat geleverd is bij de barbecue. U
gebruikt dit gereedschap om de testvloeistof op te zuigen en
C D
www.barbecook.com 23
Page 24

De drukregelaar en koppeling van uw barbecue kunnen
0
verschillen van de voorbeelden op de afbeeldingen.
6 Ga als volgt te werk:
• Als u een lek vaststelt, volgt u de instructies onder “ In
geval van een gaslek”.
• Als er geen lekken zijn, draait u de gastoevoer dicht,
spoelt u alle onderdelen grondig met water en droogt u
deze goed af.
7.6 In geval van een gaslek
1 Draai de gastoevoer dicht en ga als volgt te werk:
• Als u een lek vastgesteld hebt aan een van de
verbindingen, draait u de betreffende verbinding vast.
• Als u een lek vastgesteld hebt aan de gasfles of slang,
vervangt u de gasfles of slang.
2 Controleer de verbinding of het onderdeel waar u het lek
hebt vastgesteld opnieuw.
3 Als het lek niet hersteld is, neemt u contact op met een
Barbecook-verdeler. Gebruik de barbecue pas opnieuw als
het lek hersteld is.
Raadpleeg www.barbecook.com voor een lijst met
2
Barbecook-verdelers bij u in de buurt.
8 DE BARBECUE KLAARMAKEN
VOOR GEBRUIK
8.1 Voor elk gebruik
Telkens als u de barbecue gebruikt, dient u ervoor te zorgen dat:
• de barbecue op een geschikte plaats opgesteld is. Zie
“3.3 Een geschikte locatie kiezen”.
• de gasslang niet over de grond sleept en niet in aanraking
kan komen met een heet oppervlak of druipend vet.
• de kuip schoongemaakt is. Het is aan te bevelen de kuip na
elk gebruik te reinigen. Zie “11.2 De kuip reinigen”.
• de branders en venturibuizen niet verstopt zijn door
insectennesten of spinnenwebben. Zie “11.3 De branders en
venturibuizen schoonmaken”.
• de branders correct gemonteerd zijn. De venturibuizen
moeten boven de openingen van de gasventielen geplaatst
zijn.
• Controleer de barbecue op gaslekken. Zie “7 Controleren op
gaslekken”.
Controleer of er geen gaslekken zijn als de barbecue
1
gemonteerd werd door de leverancier.
• Maak de branders en de venturibuizen schoon (alleen na een
lange periode van ongebruik). Zie “11.3 De branders en
venturibuizen schoonmaken”.
• Laat de barbecue inbranden voor u er voedsel op legt (alleen
voor het eerste gebruik). Zie “8.3 De barbecue inbranden”.
8.3 De barbecue inbranden
Door de barbecue voor het eerste gebruik in te branden,
verwijdert u achtergebleven fabricagevetten. Ga als volgt te
werk:
1 Ontsteek de hoofdbranders en zet de regelknoppen op
HIGH. Zie “9.2 De hoofdbranders ontsteken”.
2 Sluit het deksel en laat de barbecue gedurende 15 minuten
branden. Plaats nog geen voedsel op het rooster.
3 Na 15 minuten opent u het deksel en laat u de barbecue nog
5 minuten branden (regelknoppen nog steeds op HIGH).
4 Na deze 5 minuten is de barbecue klaar voor gebruik en kunt
u voedsel op het rooster leggen.
9 DE BRANDERS ONTSTEKEN
Om de branders te ontsteken met de elektrische
0
ontsteker, moet u een AA-batterij in de ontsteker
plaatsen. Deze batterij is niet bij de barbecue geleverd.
Het batterijvak van de ontsteker vindt u terug op het
bedieningspaneel van de barbecue.
9.1 Veiligheidsinstructies
• Voor u de barbecue ontsteekt, voert u alle controles uit die
vermeld worden onder “8 De barbecue klaarmaken voor
gebruik”.
• Zorg ervoor dat het deksel altijd geopend is wanneer u een
brander ontsteekt.
• Buig u nooit rechtstreeks over een brander wanneer u deze
ontsteekt.
9.2 De hoofdbranders ontsteken
9.2.1 DE ONTSTEKER GEBRUIKEN
Als u er absoluut zeker van wilt zijn dat de
2
gasverbindingen in orde zijn, kunt u de barbecue voor elk
gebruik op gaslekken controleren. Zie “7 Controleren op
gaslekken”.
8.2 Voor het eerste gebruik (of na een
lange periode van ongebruik)
Als u de barbecue voor het eerst of na een lange periode van
ongebruik opnieuw gebruikt, moet u enkele extra controles
uitvoeren:
• Zorg ervoor dat u alle instructies in deze handleiding
gelezen, begrepen en gecontroleerd hebt (alleen voor het
eerste gebruik).
24 www.barbecook.com
1 Open het deksel en zet de regelknoppen van de
hoofdbranders op OFF.
2 Als er nog geen andere brander ontstoken is, opent u de
gastoevoer en wacht u tien seconden zodat het gas zich kan
stabiliseren.
3 Druk op de ontsteker tot u vonken hoort.
4 Blijf de ontsteker indrukken en zet de regelknop van de
middelste brander op HIGH. Ontsteek altijd eerst de
middelste brander. Probeer nooit om alle hoofdbranders
tegelijk te ontsteken.
5 Als de brander na drie pogingen nog niet ontstoken is, zet u
de regelknop ervan op OFF, draait u de gastoevoer dicht en
wacht u 5 minuten om het opgestapelde gas te laten
ontsnappen.
Page 25

6 Probeer de brander opnieuw te ontsteken. Als dit nog steeds
niet lukt, probeert u de brander met een lucifer te ontsteken
of raadpleegt u “14 Problemen oplossen” om de oorzaak
van het probleem te achterhalen.
7 Als één brander ontstoken is, ontsteekt u de andere
branders door de regelknoppen ervan op HIGH te zetten.
9.2.2 EEN LUCIFER GEBRUIKEN
1 Plaats een lucifer in de luciferhouder.
2 Open het deksel en zet de regelknoppen van de
hoofdbranders op OFF.
3 Als er nog geen andere brander ontstoken is, opent u de
gastoevoer en wacht u tien seconden zodat het gas zich kan
stabiliseren.
4 Strijk de lucifer aan en houd deze ongeveer 13 mm van de
brander verwijderd.
De zijbrander kan potten dragen die maximaal 9 kg zwaar
1
zijn en een maximale diameter van 220 mm hebben.
9.3.1 DE ONTSTEKER GEBRUIKEN
1 Open het deksel en zet de regelknop van de zijbrander op
OFF.
2 Als er nog geen andere brander ontstoken is, opent u de
gastoevoer en wacht u tien seconden zodat het gas zich kan
stabiliseren.
3 Druk op de ontsteker tot u vonken hoort.
4 Blijf de ontsteker indrukken en zet de regelknop van de
zijbrander op HIGH.
5 Als de brander na drie pogingen nog niet ontstoken is, zet u
de regelknop ervan op OFF, draait u de gastoevoer dicht en
wacht u 5 minuten om het opgestapelde gas te laten
ontsnappen.
6 Probeer de zijbrander opnieuw te ontsteken. Als dit nog
steeds niet lukt, probeert u de brander met een lucifer te
ontsteken of raadpleegt u “14 Problemen oplossen” om de
oorzaak van het probleem te achterhalen.
9.3.2 EEN LUCIFER GEBRUIKEN
1 Plaats een lucifer in de luciferhouder.
2 Open het deksel en zet de regelknop van de zijbrander op
OFF.
3 Als er nog geen andere brander ontstoken is, opent u de
gastoevoer en wacht u tien seconden zodat het gas zich kan
stabiliseren.
4 Strijk de lucifer aan en houd deze ongeveer 13 mm van de
zijbrander verwijderd.
5 Zet de regelknop van één brander op HIGH.
Ontsteek om te beginnen altijd eerst één hoofdbrander.
1
Ontsteek nooit alle hoofdbranders tegelijk.
6 Als de brander niet binnen 5 seconden ontsteekt, zet u de
regelknop ervan op OFF, draait u de gastoevoer dicht en
wacht u 5 minuten om het opgestapelde gas te laten
ontsnappen.
7 Probeer de brander opnieuw te ontsteken. Als dit nog steeds
niet lukt, raadpleegt u “14 Problemen oplossen” om de
oorzaak van het probleem te achterhalen.
8 Als één brander ontstoken is, ontsteekt u de andere
branders door de regelknoppen ervan op HIGH te zetten.
9.3 De zijbrander ontsteken
Deze informatie is niet van toepassing voor de Spring 300. Die
barbecue is niet uitgerust met een zijbrander.
5 Zet de regelknop van de zijbrander op HIGH.
6 Als de zijbrander niet binnen 5 seconden ontsteekt, zet u de
regelknop ervan op OFF, draait u de gastoevoer dicht en
wacht u 5 minuten om het opgestapelde gas te laten
ontsnappen.
7 Probeer de zijbrander opnieuw te ontsteken. Als dit nog
steeds niet lukt, raadpleegt u “14 Problemen oplossen” om
de oorzaak van het probleem te achterhalen.
www.barbecook.com 25
Page 26

9.4 De branders uitschakelen
Als u de branders niet langer gebruikt, moet u deze uitschakelen.
Ga als volgt te werk:
1 Draai de gastoevoer dicht.
2 Zet de regelknoppen van de branders op OFF.
Door eerst de gastoevoer dicht te draaien, zorgt u ervoor
2
dat er geen gas meer aanwezig is in de barbecue.
9.5 De branders opnieuw ontsteken
Als een brander tijdens het gebruik dooft, gaat u als volgt te werk:
1 Open het deksel en draai de gastoevoer dicht.
2 Zet alle regelknoppen op OFF en wacht 5 minuten om het
opgestapelde gas te laten ontsnappen.
3 Ontsteek de brander(s) opnieuw.
9.6 De vlammen controleren
Telkens als u een brander ontsteekt, moet u de vlammen ervan
controleren. Een perfect vlam is nagenoeg volledig blauw, met
een klein stukje geel aan de bovenkant. Sporadische gele
vlammen zijn normaal en niet gevaarlijk.
Als er een probleem is met de vlammen, onderneemt u een van
de volgende acties om dit op te lossen:
2 Sluit het deksel en laat de barbecue gedurende tien minuten
branden.
3 Open na deze tien minuten het deksel en leg het voedsel op
het rooster.
4 Als u nu minder warmte wilt, zet u de regelknop(pen) op een
lagere stand.
10.2 Voorkomen dat voedsel aankleeft
Houd rekening met het volgende om te voorkomen dat voedsel
aan het rooster kleeft:
• Smeer met behulp van een borstel wat olie op het voedsel
voor u het op het rooster plaatst . U kunt ook het rooster zelf
insmeren.
• Verwarm de barbecue voor. Hoe warmer het rooster
wanneer u het voedsel erop plaatst, hoe kleiner de kans dat
het voedsel zal aankleven.
• Draai het voedsel niet te snel om. Laat het eerst goed warm
worden.
10.3 Rechtstreeks en onrechtstreeks
grillen
Afhankelijk van het type voedsel dat u wilt bereiden en de manier
waarop u dat wilt doen, kunt u rechtstreeks of onrechtstreeks
gaan grillen:
De vlammen zijn... Ga als volgt te werk...
Laag en volledig geel
Hoger dan de kuip
1 Draai onmiddellijk de gastoever dicht
en zet alle regelknoppen op OFF.
2 Raadpleeg “14 Problemen oplossen”
om de oorzaak van het probleem te
achterhalen. Waarschijnlijk zijn de
venturibuizen geblokkeerd.
1 Draai onmiddellijk de gastoever dicht
en zet alle regelknoppen op OFF.
2 Wacht gedurende 5 minuten om
eventueel opgestapeld gas te laten
ontsnappen.
3 Ontsteek de brander(s) opnieuw.
4 Als het probleem niet opgelost raakt,
raadpleegt u “14 Problemen
oplossen” om de oorzaak ervan te
achterhalen.
LOW HIGH
Methode Beschrijving Gebruik
Rechtstreeks Plaats het voedsel
Onrechtstreeks Plaats het voedsel naast een
Wanneer u met een gesloten deksel grilt, dient u steeds
1
de dekselthermometer in de gaten te houden om er zeker
van te zijn dat de barbecue niet te heet wordt. Zie
“10.5 De temperatuur controleren”.
rechtstreeks boven een
ontstoken brander, kies een
hoge stand voor de brander
en laat het deksel open.
ontstoken brander, kies een
gemiddelde/lage stand voor
de brander en sluit het deksel.
Vlees en
groenten
dichtschroeien
Dichtgeschroeid
vlees verder
garen
10.4 Grillen met gesloten deksel
Grillen met een gesloten deksel levert een aantal voordelen op:
• De temperatuur van het rooster is hoger en blijft constanter.
• Het voedsel moet minder lang garen en blijft sappiger.
• Er zijn minder opflakkeringen en het gasverbruik ligt lager.
Wanneer u met een gesloten deksel grilt, dient u steeds
1
de dekselthermometer in de gaten te houden om er zeker
van te zijn dat de barbecue niet te heet wordt. Zie
“10.5 De temperatuur controleren”.
10 HANDIGE TIPS
10.1 De barbecue voorverwarmen
Door de barbecue voor te verwarmen, zorgt u ervoor dat het
rooster warm genoeg is als u het voedsel erop legt. Ga als volgt
te werk:
1 Ontsteek de brander(s) en zet de regelknop(pen) op HIGH.
26 www.barbecook.com
10.5 De temperatuur controleren
De barbecue is uitgerust met krachtige branders, wat betekent
dat u deze snel kunt opwarmen en u de temperatuur constant
kunt houden. Als u echter grilt met een gesloten deksel, moet u
ervoor zorgen dat de barbecue niet te heet wordt. Controleer dus
regelmatig de dekselthermometer en neem de volgende
richtlijnen in acht:
• Een normale gaartemperatuur bedraagt ongeveer 210 °C. Bij
een hogere temperatuur kunnen druipend en aangekoekt vet
echter ontbranden.
Page 27

• De temperatuur mag nooit langer dan vijf minuten hoger zijn
dan 300 °C. Is dit wel het geval, dan kan de barbecue
beschadigd en vervormd raken.
Als de barbecue te heet wordt, laat u deze afkoelen door
1
het deksel te openen en een lagere stand te kiezen voor
de branders.
10.6 De warmtezones benutten
11.2 De kuip reinigen
Het is aan te bevelen de kuip na elk gebruik te reinigen met de
Barbecook cleaner. Gebruik deze op dezelfde manier als voor
het rooster.
11.3 De branders en venturibuizen
schoonmaken
Wanneer alle branders ontstoken zijn, verspreiden de
branderkappen de warmte zo gelijkmatig mogelijk over het
rooster. Niettegenstaande deze gelijkmatige verwarming, zijn
sommige zones toch warmer dan andere. U kunt deze
warmtezones benutten om uw voedsel perfect te gaan grillen:
Zone Warm? Gebruiken voor...
Voor Warm Grillen van delicaat voedsel (garnalen,
Midden Warmer Bereiden van voedsel dat een tijdje
Achter Warmst Vlees en groenten dichtschroeien
U kunt ook warmtezones creëren door te spelen met de
2
kracht van de branders. U kunt bijvoorbeeld een brander
op een lagere stand zetten en de zone boven die brander
gebruiken voor delicaat voedsel of voedsel dat een tijdje
moet garen.
vis enz.)
moet garen (bv. worst, kippenbillen
enz.)
10.7 Opflakkeringen vermijden
Tijdens het grillen kunnen er opflakkeringen voorkomen. Dit is
normaal. Te veel opflakkeringen verhogen echter de temperatuur
in de barbecue en kunnen opgehoopt vet doen ontbranden.
Opflakkeringen vermijden:
• Zorg ervoor dat de kuip schoon is wanneer u begint te
grillen. Het is aan te bevelen de kuip na elk gebruik te
reinigen. Zie “11.2 De kuip reinigen”.
• Controleer regelmatig of de vetafvoeropening vrij is en of de
vetdruipschaal of -kop nog niet vol is.
• Snijd bij het grillen van vet vlees overtollig vet weg, sluit het
deksel en zet de branders op een gemiddelde of lage stand.
11 DE BARBECUE ONDERHOUDEN
11.3.1 WAAROM DE BRANDERS EN VENTURIBUIZEN
SCHOONMAKEN
Spinnen en insecten kunnen webben en nesten maken in de
branders en venturibuizen, waardoor de gastoevoer naar de
branders geblokkeerd kan raken. Gevolg:
• U kunt de branders niet ontsteken. Als u er toch in slaagt ze
te ontsteken, worden er alleen rokerige, gele vlammen
geproduceerd.
• Het gas kan ontbranden buiten de venturibuizen, ter hoogte
van de regelknoppen. Deze vlammen worden flashbacks
genoemd en kunnen ernstige verwondingen en
materiaalschade veroorzaken.
Schade als gevolg van geblokkeerde branders en
0
venturibuizen wordt beschouwd als gebrekkig onderhoud
en is niet gedekt door de garantie.
?
11.3.2 WANNEER DE BRANDERS EN VENTURIBUIZEN
SCHOONMAKEN
Maak de branders en venturibuizen van de barbecue op de
volgende momenten schoon:
• Voor het eerste gebruik na een lange periode van ongebruik.
• Minstens twee keer per jaar, waarvan één keer aan het begin
van het seizoen.
?
11.3.3 DE BRANDERS EN VENTURIBUIZEN
SCHOONMAKEN
1 Verwijder de branders van de barbecue zoals aangegeven
op de afbeeldingen. Als u merkt dat een brander beschadigd
is, moet u deze vervangen.
11.1 Het rooster reinigen
Het is aan te bevelen het rooster na elk gebruik te reinigen met
de Barbecook cleaner. Ga als volgt te werk:
1 Spuit het schuim op het rooster en laat het even inwerken.
Het schuim verandert van kleur terwijl vuil en vet worden
losgeweekt.
2 Verwijder het schuim met een zachte spons en water en
spoel het rooster grondig.
3 Droog het rooster goed en bewaar het op een droge plaats.
Dit voorkomt roestvorming.
U kunt het rooster ook reinigen met een zacht
2
reinigingsmiddel of met natriumbicarbonaat. Gebruik
nooit ovenreinigers om het rooster te reinigen.
A
www.barbecook.com 27
Page 28

Materiaal Onderhoud van dit materiaal
B
C
Roestvast
staal en
chroom
Gepoederlakt
Om roestvorming op onderdelen uit roestvast staal te
1
voorkomen, vermijdt u best ieder contact met chloor, zout
of ijzer. Wij raden u aan de barbecue niet te gebruiken in
kuststreken, nabij spoorwegen of in de buurt van een
zwembad.
Schade wegens het niet opvolgen van deze instructies
1
wordt beschouwd als gebrekkig onderhoud en is niet
gedekt door de garantie.
Onder de explosietekening van uw barbecue (tweede deel van
de handleiding) vindt u een lijst van alle onderdelen waaruit de
barbecue is samengesteld. Deze lijst omvat een symbool dat het
materiaal van elk onderdeel aangeeft, zodat u kunt nagaan hoe u
een bepaald onderdeel dient te onderhouden. In de
onderdelenlijsten worden de volgende symbolen gebruikt:
• Gebruik geen agressieve, schurende of
metaalreinigingsmiddelen.
• Gebruik niet-agressieve reinigingsmiddelen en
laat ze inwerken op het staal.
• Gebruik een zachte spons of doek.
• Spoel de barbecue na het reinigen grondig en
laat de barbecue zeer goed drogen voor u deze
opbergt.
• Gebruik geen scherpe voorwerpen. Gebruik
niet-agressieve reinigingsmiddelen en een
zachte spons of doek.
• Spoel de barbecue na het reinigen grondig en
laat de barbecue zeer goed drogen voor u deze
opbergt.
2 Maak de branders en venturibuizen schoon met een kleine
borstel of een zelfgemaakte buizenreiniger (een
opengeplooide paperclip, buizenborstel enz.).
3 Plaats de branders terug. Zorg ervoor dat de venturibuizen
boven de openingen van de gasventielen geplaatst zijn.
11.4 Geëmailleerde, roestvaststalen,
verchroomde en gepoederlakte
onderdelen onderhouden
De barbecue bestaat uit geëmailleerde, roestvaststalen,
verchroomde en gepoederlakte onderdelen. Elk materiaal moet
op een specifieke wijze worden onderhouden:
Materiaal Onderhoud van dit materiaal
Email
• Gebruik geen scherpe voorwerpen en stoot de
barbecue niet tegen een hard oppervlak.
• Vermijd contact met koude vloeistoffen terwijl
de barbecue nog heet is.
• Metalen sponsjes en schurende
reinigingsmiddelen kunnen worden gebruikt.
Symbool Materiaal
Email
Chroom
Roestvast staal
Gepoederlakt
11.5 De barbecue opbergen
Als u de barbecue gedurende een lange periode niet zult
gebruiken, bewaart u deze op een droge plaats. Voor u de
barbecue opbergt:
• Koppel de gasfles los. Bewaar de barbecue nooit
binnenshuis (zelfs niet in een garage of schuur) als deze nog
aangesloten is op de gasfles.
• Maak de branders en de roosters schoon, wrijf ze in met olie
en wikkel ze in papier.
• Bedek uw apparaat met een Barbecook-hoes. Registreer uw
barbecue op www.barbecook.com om na te gaan welke
hoes u nodig hebt.
11.6 Gasflessen bewaren
Deze instructies zijn zowel voor lege als volle gasflessen van
toepassing.
• Bewaar gasflessen altijd buitenshuis in een goed
geventileerde ruimte. Zorg ervoor dat de flessen niet
blootgesteld worden aan hoge temperaturen of direct
zonlicht.
• Bewaar een gasfles nooit op een plaats waar het erg warm
kan worden (in een auto, op een boot enz.).
28 www.barbecook.com
Page 29

• Bewaar uw gasfles of reservegasfles nooit in de kast van de
barbecue.
• Bewaar uw reservegasfles nooit in de buurt van een toestel
op gas dat in gebruik is.
• Bewaar gasflessen altijd buiten het bereik van kinderen.
• Bewaar en transporteer gasflessen altijd rechtopstaand.
• Alle gevolgschade wegens nalatigheid of
niet-voorgeschreven gebruik van het toestel.
• Roest of verkleuring ten gevolge van externe invloeden,
gebruik van agressieve reinigingsmiddelen, blootstelling aan
chloor enz. Deze schade wordt niet als een fabricagefout
beschouwd.
11.7 Reserveonderdelen bestellen
Onderdelen die blootstaan aan vuur of intense hitte moeten van
tijd tot tijd worden vervangen. Reserveonderdelen bestellen:
1 Zoek het referentienummer op van het gewenste onderdeel.
U vindt een lijst met alle referentienummers onder de
explosietekeningen in het tweede deel van deze handleiding
en op www.barbecook.com.
Als u uw barbecue online hebt geregistreerd, verschijnt
2
automatisch de correcte lijst.
2 Bestel het reserveonderdeel bij uw verkoper. U kunt
onderdelen bestellen die binnen of buiten de garantie vallen.
12 GARANTIE
12.1 Gedekt
Uw barbecue heeft een garantie van twee jaar vanaf de
aankoopdatum. Deze garantie dekt alle fabricagefouten op
voorwaarde dat:
• u uw barbecue hebt gebruikt, gemonteerd en onderhouden
overeenkomstig de instructies in deze handleiding. Schade
ten gevolge van misbruik, verkeerde montage of foutief
onderhoud wordt niet als een fabricagefout beschouwd.
• u het aankoopbewijs en het unieke serienummer van uw
toestel kunt overhandigen. Dit serienummer begint met een
G, gevolg door 15 cijfers. U vindt dit:
• op deze handleiding en op het startpakket dat bij de
handleiding is gevoegd.
• op de verpakking van de barbecue.
• op het typelabel aan de binnenzijde van de kastdeur
(Quisson, Siesta 4 en Siesta 6) of aan de binnenzijde van
het onderste voorpaneel (Spring, Siesta 2 en Siesta 3).
• De Barbecook-kwaliteitsafdeling gaat na of de onderdelen
defect zijn en of het defect zich heeft voorgedaan bij normaal
gebruik, correcte montage en juist onderhoud.
Als aan een van deze voorwaarden niet is voldaan, kunt u niet
van de garantie genieten. In elk geval blijft de garantie beperkt tot
het herstellen of vervangen van de defecte onderdelen.
13 TECHNISCHE GEGEVENS
13.1 Typelabel
Op het typelabel staan alle technische gegevens van de
barbecue vermeld. U vindt dit:
• in het tweede deel van deze handleiding.
• aan de binnenzijde van het onderste voorpaneel.
13.2 Diameters van de injectoren
• Hoofdbrander: 1,00 mm
• Zijbrander: 0,75 mm
12.2 Niet gedekt
De volgende schade en gebreken worden niet door de garantie
gedekt:
• Normale slijtage (roestvorming, vervorming, verkleuring enz.)
van onderdelen die rechtstreeks blootstaan aan vuur of
intense hitte. Deze onderdelen moeten van tijd tot tijd
worden vervangen.
• Visuele onregelmatigheden die inherent zijn aan het
fabricageproces. Deze onregelmatigheden worden niet als
fabricagefouten beschouwd.
• Alle schade veroorzaakt door gebrekkig onderhoud, foutieve
opberging, verkeerde montage of wijzigingen aan
voorgemonteerde onderdelen.
• Alle schade ten gevolge van misbruik van de barbecue (niet
gebruikt volgens de instructies in deze handleiding, gebruikt
voor commerciële doeleinden enz.).
www.barbecook.com 29
Page 30

14 PROBLEMEN OPLOSSEN
Probleem Mogelijke oorzaken Oplossingen
Onvoldoende warmte
Te warm en/of opflakkeringen
Warmte niet gelijkmatig
verspreid over
roosteroppervlak
Gele vlammen
Onvolledige vlam Brander geblokkeerd, doorboord of verroest Brander schoonmaken of vervangen
Flashbacks (vlammen buiten
venturibuizen / bij
regelknoppen)
Vlammen hoger dan rand van
kuip
Drukregelaar zoemt
• Gastoevoer niet geopend
• Venturibuizen niet boven openingen van
gasventielen geplaatst
• Branderopeningen geblokkeerd
• Gasfles (bijna) leeg
• Drukregelaar niet correct aangesloten op fles
en/of slang
• Voedsel te vet
• Vetafvoeropening geblokkeerd, vet in kuip en/of
op branders
• Temperatuur te hoog
Sommige warmteverschillen zijn normaal; zie
“1.7 De warmte optimaal gebruiken” en “10.6 De
warmtezones benutten”. Mogelijke oorzaken voor
aanzienlijke warmteverschillen:
• Barbecue niet voorverwarmd
• Branders of venturibuizen geblokkeerd
• Zout op branders
• Barbecue aangesloten op butaan
Branders of venturibuizen geblokkeerd
• Veel wind
• Gasfles (bijna) leeg
• Vet in kuip en/of op branders
• Warm weer
• Nieuwe (volle) gasfles
• Gastoevoer openen
• Venturibuizen boven openingen van gasventielen
plaatsen
• Branderopeningen schoonmaken of branders
vervangen
• Gasfles vervangen
• Drukregelaar opnieuw aansluiten op fles en/of
slang
• Overtollig vet wegsnijden of een lage stand
kiezen voor de branders
• Vetafvoeropening, kuip en branders
schoonmaken
• Een lagere stand kiezen voor de branders en/of
voedsel onrechtstreeks grillen
• Barbecue voorverwarmen
• Branders en venturibuizen schoonmaken
• Branders schoonmaken
• Barbecue aansluiten op propaan en een
geschikte drukregelaar gebruiken
1 Draai de gastoevoer dicht en zet de branders op
OFF.
2 Laat de barbecue afkoelen.
3 Maak de branders en venturibuizen schoon.
• Barbecue met achterkant naar de wind richten
• Gasfles vervangen
• Kuip en branders schoonmaken
Geen gevaar of defect; stopt automatisch na een
tijdje.
Brander fluit wanneer ingesteld
op LOW
Brander ontsteken lukt niet
(noch met ontsteker, noch met
lucifer)
Brander ontsteken lukt niet met
ontsteker
Geen vonken of geluid bij
indrukken van ontsteker
Alleen geluid (geen vonken) bij
indrukken ontsteker
30 www.barbecook.com
Gasinjector, venturibuis en/of brander vuil Gasinjector, venturibuis en brander reinigen
• Brander of venturibuis geblokkeerd
• Geen gastoevoer
• Geen batterij geplaatst of batterij niet correct
geplaatst
• Middelste brander niet eerst ontstoken
• Ontstekerbekabeling niet correct aangesloten
• Elektrode beschadigd
• Foute aarding
• Defecte ontsteker
• Geen batterij geplaatst of batterij niet correct
geplaatst
• Lege batterij
• Ontstekerknop niet correct gemonteerd
• Defecte vonkgenerator
• Foute aarding
• Brander en elektrode te ver uit elkaar
• Brander en venturibuis schoonmaken
• Gastoevoer opendraaien en op veiligheidsknop
op drukregelaar drukken (niet aanwezig op alle
regelaars)
• Batterij (opnieuw) plaatsen met de polen correct
georiënteerd
• De middelste brander eerst ontsteken
• Alle ontstekeraansluitingen controleren en
opnieuw uitvoeren
• Elektrode vervangen
• Elektrodes, branders en ontsteker controleren en
opnieuw monteren
• Ontsteker vervangen
• Batterij (opnieuw) plaatsen met de polen correct
georiënteerd
• Batterij vervangen
• Ontstekerknop opnieuw monteren
• Vonkgenerator vervangen
• Vonkgenerator en elektrodes opnieuw aansluiten
• Elektrode wat buigen om deze dichter bij de
brander te brengen
Page 31

Probleem Mogelijke oorzaken Oplossingen
Vonken zichtbaar die niet aan
de branders ontspringen
Vonken zichtbaar, maar niet op
alle elektrodes en/of niet
krachtig genoeg
Defecte bekabeling Bekabeling vervangen
• Foute aarding
• Batterij bijna leeg
• Natte of defecte elektrodes
• Vonkgenerator en elektrodes opnieuw aansluiten
• Batterij vervangen
• Elektrodes drogen met keukenpapier of
elektrodes vervangen
www.barbecook.com 31
Page 32

32 www.barbecook.com
Page 33

FR - MODE D’EMPLOI
1 Enregistrement de votre appareil ............................... 34
2 À propos de ce mode d’emploi.................................. 34
3 Consignes de sécurité importantes............................ 34
• Lire et suivre les instructions ................................. 34
• Faire preuve de prudence avec le gaz ................... 34
• Sélection de l’emplacement adéquat .................... 34
• Appel au bon sens ................................................. 34
4 Concepts récurrents................................................... 34
• Venturis.................................................................. 35
• Les chapeaux de brûleurs...................................... 35
• Émail ...................................................................... 35
• Flammes vives ....................................................... 35
5 Assemblage de l’appareil ........................................... 35
• Consignes de sécurité ........................................... 35
• Pour assembler l’appareil ...................................... 35
6 Raccorder le gaz à l’appareil...................................... 35
• Quels bonbonne, tuyau et détendeur utiliser ?...... 35
• Consignes de sécurité ........................................... 35
• Raccorder le tuyau à l’appareil .............................. 36
• Raccorder le tuyau et la bonbonne au détendeur . 36
• Remplacement de la bonbonne............................. 37
7 Vérification de l’étanchéité au gaz ............................. 37
• Pourquoi vérifier l’étanchéité au gaz ?................... 37
• Quand vérifier l’étanchéité au gaz ? ...................... 37
• Consignes de sécurité ........................................... 37
• De quels produits ai-je besoin ? ............................ 37
• Vérifier l’étanchéité au gaz..................................... 37
• En cas de fuite de gaz ........................................... 38
10 Conseils pratiques et astuces .................................... 40
• Préchauffer l’appareil............................................. 40
• Empêcher que les aliments ne collent................... 40
• Griller directement et indirectement....................... 40
• Faire griller avec le couvercle fermé ...................... 41
• Visualiser la température........................................ 41
• Tirer profit des zones de chaleur ........................... 41
• Éviter les flammes vives......................................... 41
11 Entretien de l’appareil ................................................ 41
• Nettoyage de la grille............................................. 41
• Nettoyage de la cuve............................................. 41
• Nettoyage des brûleurs et des venturis................. 41
• Entretenir les éléments en émail, en acier inoxydable,
en acier chromé et les revêtements de peinture en
poudre.................................................................... 42
• Ranger l’appareil.................................................... 43
• Rangement des bonbonnes de gaz....................... 43
• Commander des pièces de rechange.................... 43
12 Garantie...................................................................... 43
• Ce qu’elle couvre................................................... 43
• Ce qu’elle ne couvre pas ....................................... 43
13 Spécifications techniques .......................................... 44
• Étiquette-type ........................................................ 44
• Diamètre des injecteurs ......................................... 44
14 Dépannage ................................................................. 45
8 Préparation avant d’utiliser l’appareil......................... 38
• Avant chaque utilisation......................................... 38
• Avant une nouvelle utilisation (après une longue
période d’interruption) ........................................... 38
• Brûler les résidus de fabrication de l’appareil........ 38
9 Allumage des brûleurs................................................ 38
• Consignes de sécurité ........................................... 38
• Allumage des brûleurs principaux ......................... 39
• Allumage du brûleur latéral.................................... 39
• Éteindre les brûleurs .............................................. 40
• Rallumage des brûleurs ......................................... 40
• Vérifier les flammes................................................ 40
www.barbecook.com 33
Page 34

1 ENREGISTREMENT DE VOTRE
APPAREIL
Nous vous remercions pour votre achat d’un appareil Barbecook
! Nous sommes convaincus qu’il apportera joie et bonne humeur
à vos barbecues.
Afin d’améliorer votre expérience, nous vous invitons à
enregistrer votre appareil sur www.barbecook.com. Cela ne
prendra que quelques minutes mais vous permettra de
bénéficier d’avantages considérables :
• Vous aurez accès à notre service après-vente personnalisé.
Par exemple, cela vous permet de trouver rapidement des
pièces de rechange pour votre appareil ou de bénéficier d’un
service de garantie optimal.
• Nous pouvons vous informer des intéressantes mises à jour
produit et vous orienter vers les informations et les
spécifications produit les plus pertinentes pour votre
appareil.
Pour obtenir plus d’informations concernant
2
l’enregistrement de votre appareil, veuillez consulter
www.barbecook.com.
Barbecook respecte votre vie privée. Vos informations
0
personnelles ne seront pas vendues, ni distribuées ni
communiquées à des tiers.
2 À PROPOS DE CE MODE D’EMPLOI
Ce mode d’emploi se compose de deux parties :
• La première partie correspond à celle que vous êtes
actuellement en train de lire. Elle fournit les instructions
d’assemblage, d’utilisation et d’entretien de votre appareil.
• La seconde partie débute à la page 327. Elle inclut tous les
types d’illustrations (vues éclatées, dessins d’assemblage,
étiquettes-types) des appareils qui sont décrits dans ce
mode d’emploi.
3 CONSIGNES DE SÉCURITÉ
IMPORTANTES
3.1 Lire et suivre les instructions
Lisez les instructions avant d’utiliser l’appareil. Suivez toujours
attentivement les instructions. L’assemblage et l’utilisation non
conformes aux instructions peuvent causer des incendies ou
endommager le matériel.
Les dommages résultant du non respect des instructions
1
suivantes (assemblage incorrect, mauvaise utilisation,
entretien inadéquat...) ne sont pas couverts par la
garantie.
3.2 Faire preuve de prudence avec le
gaz
Utiliser du gaz est sûr, mais cela nécessite quelques précautions
:
• Rangez toujours les bonbonnes de gaz à l’extérieur, dans un
endroit bien ventilé. Assurez-vous de ne pas les exposer à
une chaleur excessive ou les laisser en plein soleil.
• Ne rangez jamais votre bonbonne de gaz ou la bonbonne de
gaz de rechange dans le meuble de votre appareil.
• Ne rangez jamais votre bonbonne de gaz de rechange près
d’un appareil au gaz allumé.
• Après utilisation, fermez toujours l’alimentation en gaz de la
bonbonne.
• Ne fumez jamais à proximité d’un appareil allumé ou près
d’une bonbonne de gaz qu’elle soit vide ou pleine.
Si vous détectez une odeur de gaz, fermez
1
immédiatement l’alimentation en gaz, éteignez toutes les
flammes et ouvrez le couvercle de l’appareil. Si l’odeur
persiste, appelez votre fournisseur de gaz ou les
pompiers.
3.3 Sélection de l’emplacement adéquat
Utilisez l’appareil à l’extérieur uniquement. Son utilisation à
l’intérieur, même dans un garage ou un abri de jardin, peut
entraîner une intoxication au monoxyde de carbone.
Lors de la sélection d’un emplacement à l’extérieur, il faut
toujours :
• Placer l’appareil à 3 mètres au moins de toute construction,
dans un endroit ouvert et bien ventilé.
• S’assurer que l’air circule bien au niveau des brûleurs et des
trous d’aération du meuble à tout moment.
• S’assurer que l’appareil n’est pas sous une structure
couverte (un porche, un abri...) ou sous le feuillage.
• Poser l’appareil sur une surface ferme et stable. Ne jamais le
placer dans un véhicule en mouvement (un bateau, une
caravane...).
Pour empêcher la formation de rouille sur l’acier
1
inoxydable, évitez tout contact avec le chlore, le sel ou le
fer. Nous ne recommandons pas l’utilisation de l’appareil
à proximité des côtes, des chemins de fer ou des
piscines.
3.4 Appel au bon sens
Faites toujours appel à votre bon sens lorsque vous utilisez
l’appareil :
• Utilisez-le toujours à l’extérieur.
• Ne déplacez pas l’appareil en cours d’utilisation.
• Ne laissez pas l’appareil sans surveillance lorsqu’il est
allumé, spécialement en présence d’enfants ou d’animaux
de compagnie.
• AVERTISSEMENT ! Certaines parties accessibles peuvent
devenir très chaudes. Gardez les enfants à distance.
• Protégez-vous de façon adéquate lorsque vous manipulez
des éléments chauds (couvercle, gril, etc.).
• Lorsque l’appareil est allumé, éloignez toute matière
inflammable.
• Conservez les matières et les liquides inflammables ainsi
que les objets solubles à l’écart de l’appareil en cours
d’utilisation.
• N’utilisez pas de bois, de charbon, de pierres de lave ou de
briquettes en céramique dans un appareil au gaz.
• N’utilisez pas l’appareil si vous êtes sous l’influence de
l’alcool ou de drogues.
• Ne modifiez pas l’appareil.
4 CONCEPTS RÉCURRENTS
Cette partie définit des concepts moins courants. Ces concepts
sont utilisés dans plusieurs sections de ce mode d’emploi.
34 www.barbecook.com
Page 35

4.1 Venturis
5.2 Pour assembler l’appareil
Les venturis sont des petits tubes fixés à l’entrée des brûleurs. À
coté des venturis, il y a un trou. Cela est visible sur les brûleurs
principaux et sur le brûleur latéral :
Lorsque le gaz se fraye un passage vers les brûleurs, il passe à
travers les venturis. Grâce aux trous sur les côtés, le gaz se
mélange à l’air, et par conséquent à l’oxygène. Cela est
nécessaire pour que les brûleurs s’allument de façon adéquate :
seul un bon dosage de gaz et d’oxygène permettra un allumage
adéquat et de belles flammes.
4.2 Les chapeaux de brûleurs
Les chapeaux de brûleurs sont les pièces que vous avez placez
sur les brûleurs de votre appareil. Ils protègent les brûleurs des
écoulements de graisse. Les trous de chaque côté des chapeaux
distribuent la chaleur sur le gril qui ainsi chauffe plus rapidement
et de manière plus uniforme.
4.3 Émail
Certains éléments de l’appareil sont couverts d’une couche de
matière vitrifiée appliquée par fusion, appelée émail. Cet émail
protège de la corrosion le métal sous-jacent. L’émail est une
matière de grande qualité : il résiste à la rouille, ne s’altère pas
sous l’influence des hautes températures et est très facile à
entretenir.
Étant donné que l’émail est moins flexible que le métal
1
qu’il recouvre, il est possible que l’émail s’écaille si vous
ne manipulez pas l’appareil correctement. Pour éviter tout
problème, faites attention lors de l’assemblage des
éléments en émail et entretenez toujours l’émail comme
indiqué un peu plus loin dans ce mode d’emploi.
4.4 Flammes vives
Les flammes vives sont des flammes soudaines qui surgissent
de la cuve lorsque vous grillez. Elles sont généralement causées
par des écoulements de graisse ou de marinade.
Vous avez besoin d’un tournevis cruciforme, d’un tournevis plat
et d’une pile AA (pour l’allumeur électrique). L’appareil est fourni
sans les piles.
1 Posez l’appareil sur une surface plane et propre.
2 Assemblez l’appareil comme indiqué sur les dessins
d’assemblage. Vous les trouverez dans la deuxième partie
de ce mode d’emploi, après la vue éclatée de votre appareil.
Faites attention lors de l’assemblage des éléments en
1
émail. Les outils et les vis peuvent endommager l’émail.
Utilisez des bagues en fibre pour protéger l’émail autour
des vis.
Les blisters peuvent contenir plus de vis que nécessaire.
0
Il peut rester des vis après l’assemblage.
Le paquet inclut une trousse de premiers secours et des
0
pièces de rechange et d’assemblage (vis, boulons,
bagues en fibre...) Vous pouvez les utiliser si vous avez
perdu ou cassé certains éléments.
6 RACCORDER LE GAZ À L’APPAREIL
6.1 Quels bonbonne, tuyau et détendeur
utiliser ?
Avant de pouvoir raccorder le gaz à l’appareil, vous devez
acheter une bonbonne, un tuyau et un détendeur de pression.
Achetez toujours des produits conformes à toutes les normes
nationales, aux types de gaz et aux pressions nominales
indiqués sur l’appareil.
Le tableau indique quels bonbonne, tuyau et détendeur vous
devez utiliser. Par exemple, en Belgique (BE), vous pouvez
utiliser une bonbonne de gaz propane avec un tuyau et un
détendeur de 37 mbar ou une bonbonne de gaz butane avec un
tuyau et un détendeur de 28 à 30 mbar.
Pays Bonbonne, tuyau et détendeur
DK, GR, NO, SE,
EE, LT, LV, CZ, PL,
MT, HU, SI, SK, NL
ES, GB, IE, PT, BE,
FR, LU, IT, CY
Nous recommandons de raccorder l’appareil au gaz
2
propane. Le gaz propane offre une combustion de grande
qualité et est moins sensible au gel.
Achetez votre détendeur de pression et votre bonbonne
2
de gaz en même temps. Les détendeurs ne s’adaptent
pas à toutes les bonbonnes.
Propane, 30 mbar / butane, 30 mbar
Propane, 37 mbar / butane, de 28 à 30 mbar
5 ASSEMBLAGE DE L’APPAREIL
5.1 Consignes de sécurité
• Ne modifiez pas l’appareil lors de son assemblage. Il est
interdit car très dangereux de modifier des éléments
pré-assemblés et/ou scellés par le fabricant.
• Suivez toujours attentivement les instructions d’assemblage.
• L’utilisateur est tenu responsable de l’assemblage adéquat
de l’appareil. Les dommages résultant d’un assemblage
incorrect ne sont pas couverts par la garantie.
6.2 Consignes de sécurité
• Ne raccordes jamais la bonbonne directement à l’appareil.
Fixez toujours un détendeur de pression sur la bonbonne en
premier.
• Ne modifiez jamais des éléments de la bonbonne, du tuyau
ou du détendeur de pression qui sont pré-assemblés ou
scellés.
• Faites en sorte que le tuyau soit le plus court possible (1,5 m
maximum) pour éviter qu’il me traîne sur le sol.
• Lorsque vous raccordez la bonbonne, le tuyau et le
détendeur de pression :
www.barbecook.com 35
Page 36

• Ne déformez jamais le tuyau.
• Conservez toujours la bonbonne en position verticale.
• N’ouvrez jamais l’alimentation en gaz.
• Vérifiez l’étanchéité à chaque fois que vos effectuez des
changements sur le raccord de gaz. Veuillez consulter
“7 Vérification de l’étanchéité au gaz”.
6.3 Raccorder le tuyau à l’appareil
Pour raccorder le tuyau à gaz à l’appareil, vous devez fixer un
manchon sur le tube à gaz de l’appareil. L’appareil vient avec
deux manchons et tous deux sont destinés à des pays
spécifiques :
Pays Manchon
BE, CH, CZ, DK, ES, FI, GB, IE, IT, PT, SI Manchon A
FR Manchon B
2 Faite glisser le tuyau par-dessus le manchon (C) et fixez la
bague de serrage avec un tournevis cruciforme (D).
C
D
6.3.2 MANCHON B
Vous avez besoin d’une clé de 22 mm et d’une clé anglaise.
1 Vissez le manchon sur le tube à gaz de l’appareil (A) et
serrez-le avec une clé de 22 mm (B).
Si votre pays n’apparaît pas dans le tableau, veuillez
2
utiliser le manchon conforme aux normes nationales.
AB
6.3.1 MANCHON A
Vous avez besoin d’une clé de 19 mm et d’un tournis cruciforme.
1 Vissez le manchon sur le tube à gaz de l’appareil (A) et
serrez-le avec une clé de 19 mm (B).
A
B
A
2 Vissez le tuyau à gaz sur le manchon (C) et serez-le avec les
deux clés. Maintenez le manchon avec la clé de 22 mm, tout
en tournant le tuyau avec une clé anglaise (D).
C
B
D
6.4 Raccorder le tuyau et la bonbonne
au détendeur
Selon le type de détendeur de pression que vous utilisez, vous
avez besoin d’un tournevis cruciforme et/ou d’une clé anglaise.
1 Raccorder le tuyau au détendeur de pression. Effectuez
l’une des actions suivantes :
• Si le tuyau a une bague de serrage, glissez le tuyau
par-dessus le détendeur et fixez la bague de serrage
avec un tournevis cruciforme (A).
• Si le tuyau a un écrou, vissez le tuyau sur le détendeur et
serrez l’écrou avec une clé anglaise (B).
36 www.barbecook.com
A B
Page 37

2 Raccordez le détendeur de pression à la bonbonne de gaz.
Effectuez l’une des actions suivantes :
• Si le tuyau a un écrou, vissez le détendeur sur la
bonbonne dans le sens des aiguilles d’une montre et
serrez l’écrou avec une clé anglaise (C).
• Si le détendeur a une vis filetée, vissez le détendeur sur
la bonbonne dans le sens contraire des aiguilles d’une
montre (D).
C D
6.5 Remplacement de la bonbonne
1 Fermez l’alimentation en gaz et placez tous les boutons de
réglage sur OFF.
2 Retirez la bonbonne vide et placez une bonbonne pleine.
3 Vérifiez la bonbonne, ainsi que l’étanchéité du tuyau et de
tous les raccords de gaz. Veuillez consulter “7 Vérification de
l’étanchéité au gaz”.
• D’un liquide d’essai. Vous pouvez utiliser un spray de
détection des fuites prêt à l’emploi ou un mélange d’eau (50
%) et de liquide vaisselle (50 %).
• De l’outil d’essai fourni avec votre appareil. Vous pouvez
l’utiliser pour aspirer le liquide d’essai et pour l’appliquer sur
les éléments et le raccord en contact avec le gaz que vous
souhaitez vérifier.
7.5 Vérifier l’étanchéité au gaz
Vous devez vérifier l’étanchéité au gaz en appliquant un liquide
d’essai sur tous les éléments et les raccords en contact avec le
gaz. Si des bulles se gonflent sur un élément ou un raccord en
particulier, il y a une fuite de gaz :
✔✖
7 VÉRIFICATION DE L’ÉTANCHÉITÉ
AU GAZ
7.1 Pourquoi vérifier l’étanchéité au gaz
?
Les gaz propane et butane sont plus lourd que l’air. Par
conséquent, ils ne se disperseront pas en cas de fuite de
l’appareil. Cela est particulièrement le cas par temps non
venteux car une fuite peut créer une accumulation de gaz autour
de l’appareil. Avec une telle accumulation, le gaz peut
s’enflammer ou exploser.
7.2 Quand vérifier l’étanchéité au gaz ?
• Avant une première utilisation ou une nouvelle utilisation
après une longue période d’interruption.
Vérifiez l’étanchéité au gaz même si votre appareil a été
1
assemblé par votre distributeur.
• À chaque fois que vous remplacez un élément en contact
avec le gaz.
• Au moins une fois par an, de préférence au début de la belle
saison.
7.3 Consignes de sécurité
• Placez l’appareil à l’extérieur, dans un endroit bien ventilé.
Assurez-vous qu’il n’y a aucune flamme ou source de
chaleur à proximité de l’appareil.
• N’utilisez jamais un briquet ou une allumette pour vérifier de
potentielles fuites de gaz.
• Ne fumez pas et n’allumez pas les brûleurs lorsque vous
êtes en train de vérifier l’étanchéité.
Pour vérifier l’étanchéité au gaz, procédez comme suit :
1 Placez l’appareil à l’extérieur.
2 Munissez-vous de votre outil de contrôle et de votre liquide
d’essai (spray de détection des fuites ou un mélange d’eau
et de liquide vaisselle).
3 Ouvrez le couvercle et placez tous les boutons de réglage
sur OFF.
4 Ouvrez légèrement l’alimentation en gaz. Tournez la vanne
de la bonbonne de gaz une fois seulement.
5 Aspirez un peu de liquide d’essai avec l’outil de contrôle et
appliquez le liquide sur la zone que vous voulez vérifier. Vous
devez vérifier :
• Les soudures de la bonbonne de gaz (A)
• Le tuyau (B)
• Les raccords entre la bonbonne et le détendeur de
pression, et entre le détendeur de pression et le tuyau (C)
7.4 De quels produits ai-je besoin ?
Pour détecter les fuites de gaz, vous avez besoin :
www.barbecook.com 37
Page 38

• Le raccord entre le tuyau et l’appareil (D)
A
B
C D
Votre détendeur de pression et le manchon peuvent être
0
différents de ceux représentés sur les illustrations.
6 Effectuez l’une des actions suivantes :
• Si vous détectez une fuite, continuez en procédant
comme indiqué dans la section “ En cas de fuite de gaz”.
• Si vous n’avez pas détecté de fuite, fermez l’alimentation
en gaz, rincez minutieusement tous les éléments à l’eau
et essuyez-les bien.
7.6 En cas de fuite de gaz
1 Fermez l’alimentation en gaz et effectuez une des actions
suivantes :
• Si vous détectez une fuite sur un des raccords, serrez ce
raccord.
• Si vous détectez une fuite sur la bonbonne ou le tuyau,
remplacez la bonbonne ou le tuyau.
2 Revérifiez le raccord et l’élément sur lequel vous détectez la
fuite.
3 Si la fuite n’est pas réparée, veuillez contacter un distributeur
Barbecook. N’utilisez pas l’appareil tant que la fuite n’est
pas réparée.
Pour voir la liste des distributeurs proches de Barbecook
2
chez vous, veuillez visiter www.barbecook.com.
8 PRÉPARATION AVANT D’UTILISER
L’APPAREIL
8.1 Avant chaque utilisation
À chaque utilisation, assurez-vous que :
• L’appareil est placé à un endroit adéquat. Veuillez consulter
“3.3 Sélection de l’emplacement adéquat”.
• Le tuyau à gaz ne traîne pas au sol et qu’il ne peut pas entrer
en contact avec une surface chaude ou un écoulement de
graisse.
• La cuve est propre. Nous recommandons le nettoyage de la
cuve après chaque utilisation. Veuillez consulter
“11.2 Nettoyage de la cuve”.
• Les brûleurs et les venturis ne sont pas obstrués par des
nids d’insecte ou des toiles d’araignées. Veuillez consulter
“11.3 Nettoyage des brûleurs et des venturis”.
• Les brûleurs sont assemblés correctement. Les venturis
doivent être placés sur les ouvertures des vannes de gaz.
Si vous voulez être absolument certain que votre raccord
2
de gaz est sûr, vous pouvez vérifier l’étanchéité au gaz de
votre appareil avant chaque utilisation. Veuillez consulter
“7 Vérification de l’étanchéité au gaz”.
8.2 Avant une nouvelle utilisation (après
une longue période d’interruption)
Si vous utilisez l’appareil pour la première fois ou si vous le
réutilisé après une longue période d’interruption, vous devez
effectuer les vérifications suivantes :
• Assurez-vous d’avoir lu, compris et vérifié toutes les
instructions de ce mode d’emploi (avant la toute première
utilisation).
• Vérifiez l’étanchéité au gaz de l’appareil. Veuillez consulter
“7 Vérification de l’étanchéité au gaz”.
Vérifiez l’étanchéité au gaz même si votre appareil a été
1
assemblé par votre distributeur.
• Nettoyez les brûleurs et les venturis (avant une nouvelle
utilisation après une longue période d’interruption). Veuillez
consulter “11.3 Nettoyage des brûleurs et des venturis”.
• Faites brûler les résidus de fabrication avant de déposer vos
aliments (avant la toute première utilisation). Veuillez
consulter “8.3 Brûler les résidus de fabrication de l’appareil”.
8.3 Brûler les résidus de fabrication de
l’appareil
En faisant brûler les résidus avant la première utilisation, vous
éliminez de l’appareil toutes les graisses de fabrication restantes.
Procédez comme suit :
1 Allumez les brûleurs principaux et placez leurs boutons de
réglage sur HIGH. Veuillez consulter “9.2 Allumage des
brûleurs principaux”.
2 Fermez le couvercle et faites brûler les résidus de fabrication
de l’appareil pendant 15 minutes. Ne placez pas encore les
aliments sur le gril.
3 Au bout de 15 minutes, ouvrez le couvercle et laissez les
résidus de fabrication de l’appareil brûler pendant 5 minutes
supplémentaires (avec les boutons de réglage toujours sur
HIGH).
4 Au bout de 5 minutes, l’appareil est prêt à être utilisé. Vous
pouvez maintenant placer les aliments sur le gril.
9 ALLUMAGE DES BRÛLEURS
Pour allumer les brûleurs avec l’allumeur électrique, vous
0
devez placer une pile AA dans l’allumeur. La pile n’est pas
fournie avec l’appareil. Vous trouverez l’emplacement
pour la pile de l’allumeur au niveau du panneau de
contrôle de votre appareil.
9.1 Consignes de sécurité
• Avant d’allumer l’appareil, effectuez toutes les vérifications
listées dans “8 Préparation avant d’utiliser l’appareil”.
38 www.barbecook.com
Page 39

• Assurez-vous que le couvercle est toujours ouvert lorsque
vous allumez un brûleur.
• Ne vous penchez jamais au-dessus d’un brûleur lorsque
vous l’allumez.
9.2 Allumage des brûleurs principaux
9.2.1 UTILISATION DE L’ALLUMEUR
1 Ouvrez le couvercle et placez les boutons de réglage des
brûleurs principaux sur OFF.
2 Si aucun autre brûleur n’est allumé, ouvrez l’alimentation en
gaz et attendez 10 secondes. Cela permet au gaz de se
stabiliser.
3 Appuyez sur l’allumeur jusqu’à ce que vous entendiez le
bruit produit par les étincelles.
4 Maintenez l’allumeur enfoncé et placez le bouton de réglage
du brûleur du milieu sur HIGH. Allumez toujours le brûleur du
milieu en premier et n’essayez jamais d’allumer les brûleurs
principaux en même temps.
5 Si le brûleur ne s’allume pas après trois tentatives, placez
son bouton de réglage sur OFF, fermez l’alimentation en gaz
et attendez 5 minutes. Cela permet au gaz accumulé de se
dissiper.
6 Essayez d’allumer le brûleur à nouveau. S’il ne s’allume
toujours pas, essayez de l’allumer avec une allumette ou
consultez “14 Dépannage” pour déterminer la cause du
problème.
7 Après avoir allumé un brûleur, allumez les autres en plaçant
leurs boutons de réglage sur HIGH.
9.2.2 UTILISATION D’UNE ALLUMETTE
1 Placez une allumette dans le support à allumette.
4 Allumez l’allumette et maintenez-la à environ 13 mm du
brûleur.
5 Placez le bouton de réglage d’un brûleur sur HIGH.
Commencez toujours par l’allumage d’un des brûleurs
1
principaux. N’allumez jamais tous les brûleurs principaux
en même temps.
6 Si le brûleur ne s’allume pas dans les 5 secondes, placez
son bouton de réglage sur OFF, fermez l’alimentation en gaz
et attendez 5 minutes. Cela permet au gaz accumulé de se
dissiper.
7 Essayez d’allumer le brûleur à nouveau. S’il ne s’allume
toujours pas, veuillez consulter “14 Dépannage” pour
déterminer la cause du problème.
8 Après avoir allumé un brûleur, allumez les autres en plaçant
leurs boutons de réglage sur HIGH.
2 Ouvrez le couvercle et placez les boutons de réglage des
brûleurs principaux sur OFF.
3 Si aucun autre brûleur n’est allumé, ouvrez l’alimentation en
gaz et attendez 10 secondes. Cela permet au gaz de se
stabiliser.
9.3 Allumage du brûleur latéral
Ces informations ne concernent pas le modèle Spring 300. Cet
appareil n’est pas équipé d’un brûleur latéral.
Le brûleur latéral ne peut pas supporter des récipients de
1
cuisson dépassant 9 kg et 220 mm de diamètre.
9.3.1 UTILISATION DE L’ALLUMEUR
1 Ouvrez le couvercle et placez le bouton de réglage du
brûleur latéral sur OFF.
2 Si aucun autre brûleur n’est allumé, ouvrez l’alimentation en
gaz et attendez 10 secondes. Cela permet au gaz de se
stabiliser.
3 Appuyez sur l’allumeur jusqu’à ce que vous entendiez le
bruit produit par les étincelles.
4 Maintenez l’allumeur enfoncé et placez le bouton de réglage
du brûleur latéral sur HIGH.
5 Si le brûleur ne s’allume pas après trois tentatives, placez
son bouton de réglage sur OFF, fermez l’alimentation en gaz
et attendez 5 minutes. Cela permet au gaz accumulé de se
dissiper.
6 Réessayez d’allumer le brûleur latéral. S’il ne s’allume
toujours pas, essayez de l’allumer avec une allumette ou
consultez “14 Dépannage” pour déterminer la cause du
problème.
www.barbecook.com 39
Page 40
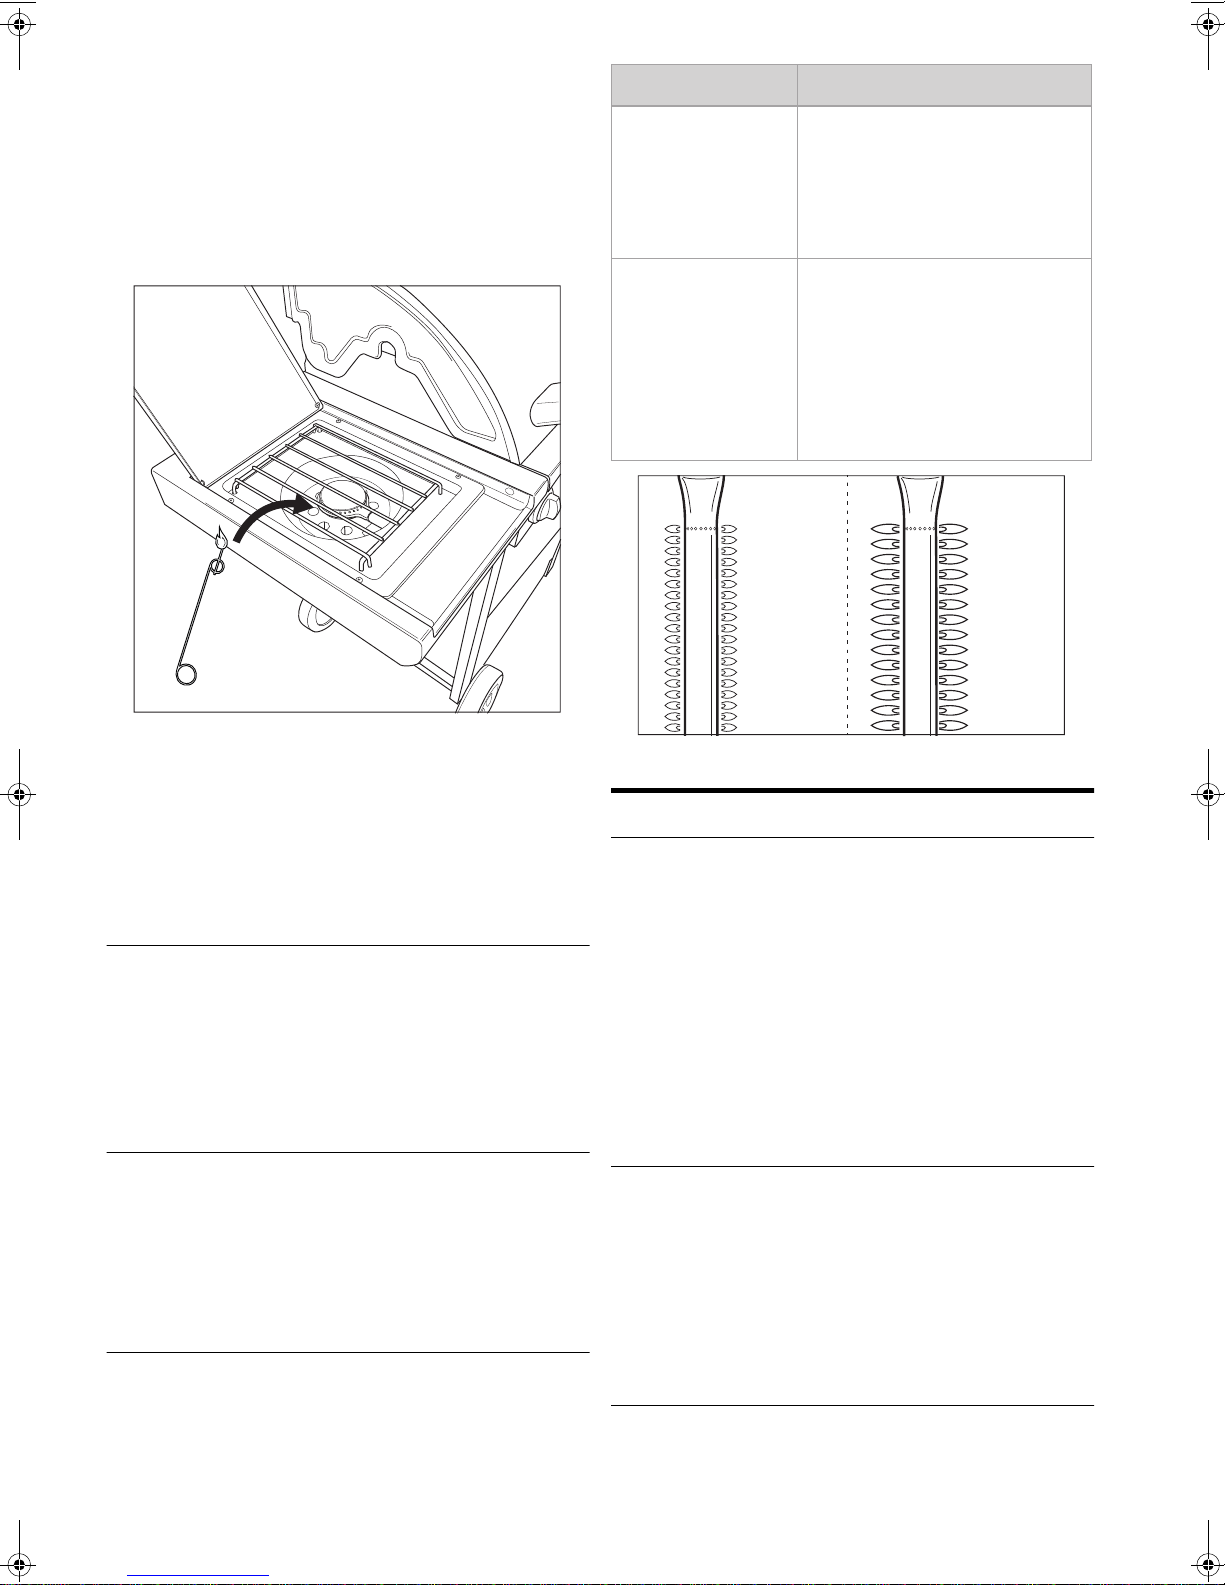
9.3.2 UTILISATION D’UNE ALLUMETTE
1 Placez une allumette dans le support à allumette.
2 Ouvrez le couvercle et placez le bouton de réglage du
brûleur latéral sur OFF.
3 Si aucun autre brûleur n’est allumé, ouvrez l’alimentation en
gaz et attendez 10 secondes. Cela permet au gaz de se
stabiliser.
4 Allumez l’allumette et maintenez-la à environ 13 mm du
brûleur latéral.
Si les flammes sont... Effectuez l’action suivante...
Faibles et entièrement
jaunes
Dépassent de la cuve
1 Fermez immédiatement
l’alimentation en gaz et placez tous
les boutons de réglage sur OFF.
2 Veuillez consulter “14 Dépannage”
pour déterminer la cause du
problème. Il est possible que les
venturis soient obstrués.
1 Fermez immédiatement
l’alimentation en gaz et placez tous
les boutons de réglage sur OFF.
2 Attendez 5 minutes pour que le gaz
accumulé se dissipe.
3 Rallumez le(s) brûleur(s).
4 Si le problème persiste, veuillez
consulter “14 Dépannage” pour
déterminer la cause du problème.
LOW HIGH
5 Placez le bouton de réglage du brûleur latéral sur HIGH.
6 Si le brûleur latéral ne s’allume pas dans les 5 secondes,
placez son bouton de réglage sur OFF, fermez l’alimentation
en gaz et attendez 5 minutes. Cela permet au gaz accumulé
de se dissiper.
7 Réessayez d’allumer le brûleur latéral. S’il ne s’allume
toujours pas, veuillez consulter “14 Dépannage” pour
déterminer la cause du problème.
9.4 Éteindre les brûleurs
Si vous n’utilisez plus les brûleurs, vous devez les éteindre.
Procédez comme suit :
1 Fermez l’alimentation en gaz.
2 Placez les boutons de réglage des brûleurs sur OFF.
En fermant d’abord l’alimentation en gaz, vous vous
2
assurez qu’il n’y a plus de gaz qui circule dans l’appareil.
9.5 Rallumage des brûleurs
Si un brûleur s’éteint en cours d’utilisation, procédez comme suit
:
1 Ouvrez le couvercle et fermez l’alimentation en gaz.
2 Placez les boutons de réglage sur OFF et attendez 5
minutes. Cela permet au gaz accumulé de se dissiper.
3 Rallumez le(s) brûleur(s).
9.6 Vérifier les flammes
À chaque fois que vous allumez un brûleur, vous devez vérifier
ses flammes. Une flamme parfaite est presque entièrement bleue
et un peu jaune sur le dessus. Il est normal et sans danger que
de façon sporadique les flammes sont jaunes.
Si les flammes semblent anormales, effectuez une des actions
suivantes pour résoudre le problème :
10 CONSEILS PRATIQUES ET ASTUCES
10.1 Préchauffer l’appareil
En préchauffant votre appareil, vous vous assurez que le gril est
assez chaud avant de mettre les aliments dessus. Procédez
comme suit :
1 Allumez le(s) brûleur(s) et placez le(s) bouton(s) de réglage
sur HIGH.
2 Fermez le couvercle et laissez l’appareil ainsi pendant dix
minutes.
3 Après dix minutes, ouvrez le couvercle et déposez vos
aliments sur le gril.
4 Si vous avez ensuite besoin de moins de chaleur, placez le(s)
bouton(s) de réglage sur une position inférieure.
10.2 Empêcher que les aliments ne
collent
Pour empêcher que les aliments ne collent à la grille :
• Huilez légèrement les aliments avec un pinceau avant de les
placer sur la grille. Vous pouvez également enduire le gril
d’huile.
• Préchauffez l’appareil. Plus la grille sera chaude lorsque
vous y placerez les aliments, moins les aliments colleront.
• Ne retournez pas les aliments trop rapidement. Laissez-les
d’abord emmagasiner de la chaleur.
10.3 Griller directement et indirectement
Selon les types d’aliments que vous préparez et la manière dont
vous souhaitez les préparer, vous pouvez les griller directement
ou indirectement :
40 www.barbecook.com
Page 41

Méthode Description Utilisation
Directement Placez les aliments
Indirectement Placez les aliments à côté d’un
Lorsque vous faites griller des aliments avec le couvercle
1
fermé, surveillez le thermomètre du couvercle et
assurez-vous que l’appareil ne surchauffe pas. Veuillez
consulter “10.5 Visualiser la température”.
directement au-dessus d’un
brûleur allumé, réglez le brûleur
concerné sur la position High
et ouvrez le couvercle.
brûleur allumé, réglez le brûleur
concerné sur la position
Medium/Low et ouvrez le
couvercle.
Pour saisir la
viande et les
légumes
Pour cuire
davantage une
viande saisie
10.4 Faire griller avec le couvercle fermé
Fermer le couvercle pour faire griller comportent un certain
nombre d’avantages :
• La température du gril est plus élevée et reste constante.
• Vous réduisez le temps de cuisson de vos aliments et ces
derniers sont plus juteux.
• Vous réduisez les flammes vives et économisez du gaz.
Lorsque vous faites griller des aliments avec le couvercle
1
fermé, surveillez le thermomètre du couvercle et
assurez-vous que l’appareil ne surchauffe pas. Veuillez
consulter “10.5 Visualiser la température”.
Zone
Arrière Chaleur
Vous pouvez également créer des zones de chaleur en
2
régulant la puissance des brûleurs. Par exemple, vous
pouvez régler un brûleur sur une position moins élevée et
utiliser la zone au-dessus du brûleur concerné pour les
aliments délicats ou ceux qui nécessitent un certain
temps de cuisson.
Niveau de
chaleur
max.
À utiliser pour...
Pour saisir la viande et les légumes
10.7 Éviter les flammes vives
Lorsque vous grillez, il est normal que quelques flammes vives
apparaissent. Cependant, un trop grand nombre de flammes
vives augmentent la température dans l’appareil et peuvent
enflammer la graisse accumulée. Pour éviter les flammes vives :
• Assurez-vous que la cuve est propre avant de commencer à
griller. Nous recommandons le nettoyage de la cuve après
chaque utilisation. Veuillez consulter “11.2 Nettoyage de la
cuve”.
• Vérifiez régulièrement que le trou d’évacuation de la graisse
n’est pas obstrué et que le plateau ou la coupe de
récupération de graisse ne sont pas pleins.
• Lorsque vous faites griller des viandes grasses, coupez
l’excédent de gras, fermez le couvercle et placez les brûleurs
en position moyenne ou faible.
11 ENTRETIEN DE L’APPAREIL
10.5 Visualiser la température
Votre appareil est équipé de brûleurs puissants, par conséquent
il chauffe rapidement et vous pouvez garder la température
constante. Lorsque vous grillez sous un couvercle fermé, vous
devez vous assurer que l’appareil ne surchauffe pas. Surveillez le
thermomètre du couvercle et suivez les recommandations
suivantes :
• Une température de cuisson normale se situe autour de
210 °C. À des températures plus élevées, la graisse qui
s’écoule et s’accumule peut s’enflammer.
• La température ne devrait jamais dépasser les 300 °C plus
de 5 minutes. Cela peut endommager et déformer l’appareil.
Si l’appareil surchauffe, refroidissez-le en ouvrant le
1
couvercle et en réglant les brûleurs sur une position
moins élevée.
10.6 Tirer profit des zones de chaleur
Lorsque les brûleurs sont allumés, leurs chapeaux distribuent la
chaleur sur le gril le plus uniformément possible. Mais malgré ce
chauffage uniforme, certaines zones restent plus chaudes que
d’autres. Vous pouvez tirer profit de ces zones de chaleur pour
faire griller vos aliments de manière optimale :
Zone
Avant Chaud Faire griller les aliments délicats
Centre Plus chaud Pour préparer les aliments qui
Niveau de
chaleur À utiliser pour...
(crevettes, poissons...)
nécessitent une cuisson plus longue
(ex : saucisses, cuisses de poulet...)
11.1 Nettoyage de la grille
Nous recommandons le nettoyage de la grille après chaque
utilisation, avec Barbecook cleaner. Procédez comme suit :
1 Pulvérisez la mousse sur la grille et laissez-la agir un petit
moment.
La mousse se colore car elle absorbe la poussière et les
graisses.
2 Essuyez la mousse avec une éponge douce et de l’eau, puis
rincez minutieusement la grille.
3 Séchez la grille et rangez-la au sec. Cela évitera la formation
de rouille.
Vous pouvez également nettoyer la grille avec un
2
détergent doux ou du bicarbonate de soude. N’utilisez
jamais de décapants four pour nettoyer la grille.
11.2 Nettoyage de la cuve
Nous recommandons le nettoyage de la cuve après chaque
utilisation, avec Barbecook cleaner. Utilisez le produit de la
même façon que pour le gril.
11.3 Nettoyage des brûleurs et des
venturis
11.3.1 POURQUOI NETTOYER LES BRÛLEURS ET LES
VENTURIS
Il est possible que des araignées et des insectes tissent des
toiles ou fassent des nids dans les brûleurs et les venturis. Cela
peut obstruer l’alimentation des brûleurs en gaz. De ce fait :
• Vous ne pouvez pas allumer les brûleurs. Si vous parvenez
malgré tout à les allumer, ils ne produiront que des flammes
fumeuses et jaunes.
?
www.barbecook.com 41
Page 42

• Le gaz peut commencer à brûler en dehors des venturis, au
niveau des boutons de réglage. Ces combustions sont
appelées des retours de flamme et ces derniers peuvent
causer des blessures graves et endommager le matériel.
Les dommages résultant de brûleurs et de venturis
0
obstrués sont considérés comme étant la conséquence
d’un entretien inadéquat et ne sont pas couverts par la
garantie.
11.3.2 QUAND NETTOYER LES BRÛLEURS ET LES
VENTURIS
Vous devez nettoyer les brûleurs et les venturis de votre appareil
:
• Avant une nouvelle utilisation après une longue période
d’interruption.
• Au moins deux fois par an, dont une au début de la belle
saison.
?
11.3.3 NETTOYER LES BRÛLEURS ET LES VENTURIS
1 Retirez les brûleurs de l’appareil comme indiqué sur les
illustrations. Si vous constatez qu’un brûleur est
endommagé, vous devez le replacer.
B
C
A
2 Nettoyez les brûleurs et les venturis avec une petite brosse
ou un cure-pipe fabriqué maison (un trombone déplié, un
petit goupillon...).
3 Replacez les brûleurs. Veillez à placer les venturis sur les
ouvertures des vannes de gaz.
11.4 Entretenir les éléments en émail, en
acier inoxydable, en acier chromé et
les revêtements de peinture en
poudre
L’appareil est constitué d’éléments en émail, en acier
inoxydable, en acier chromé et de revêtements de peinture en
poudre. Chaque matière doit être entretenue différemment :
Matière Comment entretenir cette matière
42 www.barbecook.com
Émail
• N’utilisez pas d’objets pointus et éviter tout
choc contre une surface dure.
• Évitez tout contact avec des liquides froids
lorsque l’appareil est encore chaud.
• Vous pouvez utilisez des éponges métalliques
et des détergents abrasifs.
Page 43

Matière Comment entretenir cette matière
Acier
inoxydable et
acier chromé
Revêtements
de peinture en
poudre
Pour empêcher la formation de rouille sur l’acier
1
inoxydable, évitez tout contact avec le chlore, le sel ou le
fer. Nous ne recommandons pas l’utilisation de l’appareil
à proximité des côtes, des chemins de fer ou des
piscines.
Les dommages résultant du non respect des instructions
1
suivantes comme l’entretien inadéquat ne sont pas
couverts par la garantie.
Ci-dessous une vue éclatée de votre appareil (deuxième partie
du mode d’emploi), vous trouverez une liste de toutes les pièces
composant l’appareil. Cette liste inclut un symbole qui spécifie la
matière de chaque pièce, ainsi vous pouvez l’utilisez pour vérifier
la manière dont vous devez entretenir une pièce en particulier.
Les listes de pièces utilisent les symboles suivants :
Symbole Matière
• N’utilisez pas de détergents corrosifs, abrasifs
ou pour métaux.
• Utilisez des détergents doux et laissez-les agir
sur l’acier.
• Utilisez une éponge ou un tissu doux.
• Rincez minutieusement après le nettoyage et
bien séchez bien avant de ranger.
• N’utilisez pas d’objets pointus. Utilisez des
détergents non-abrasifs ainsi qu’une éponge
ou un tissu doux.
• Rincez minutieusement après le nettoyage et
bien séchez bien avant de ranger.
Émail
Acier chromé
Acier inoxydable
Revêtements de peinture en poudre
11.5 Ranger l’appareil
Si vous n’utilisez pas votre appareil pendant une période
prolongée, rangez-le dans un endroit sec. Avant de ranger
l’appareil :
• Déconnectez la bonbonne de gaz. Ne rangez jamais
l’appareil à l’extérieur (pas même dans un garage ni un abri)
tant que ce dernier est raccordé à la bonbonne de gaz.
• Nettoyez les brûleurs et les grils, essuyez-les avec un peu
d’huile et enveloppez-les dans du papier.
• Couvrez votre appareil avec une housse Barbecook.
Enregistrez votre appareil sur www.barbecook.com et
trouvez la housse adaptée à ce dernier.
11.6 Rangement des bonbonnes de gaz
Ces instructions s’appliquent à la fois aux bonbonnes vides et
pleines.
• Rangez toujours les bonbonnes de gaz à l’extérieur, dans un
endroit bien ventilé. Assurez-vous de ne pas les exposer à
une chaleur excessive ou les laisser en plein soleil.
• Ne rangez jamais une bonbonne de gaz dans un endroit qui
peut devenir très chaud (une voiture, un bateau, etc.).
• Ne rangez jamais votre bonbonne de gaz ou la bonbonne de
gaz de rechange dans le meuble de votre appareil.
• Ne rangez jamais votre bonbonne de gaz de rechange près
d’un appareil au gaz allumé.
• Rangez toujours les bondonnes de gaz dans un endroit hors
de la portée des enfants.
• Rangez et transportez toujours les bonbonnes de gaz en
position verticale.
11.7 Commander des pièces de rechange
Les pièces en contact direct avec le feu ou une chaleur intense
doivent être remplacées de temps en temps. Pour commander
une pièce de rechange :
1 Cherchez le numéro de référence de la pièce dont vous avez
besoin. Vous trouverez une liste avec tous les numéros de
référence sous les vues éclatées dans la deuxième partie de
ce mode d’emploi mais également sur
www.barbecook.com.
Si vous avez enregistré votre appareil en ligne, vous serez
2
automatiquement dirigé vers la liste adéquate.
2 Commandez une pièce de rechange dans votre point de
vente. Vous pouvez commander des pièces aussi bien
pendant qu’après la période de garantie.
12 GARANTIE
12.1 Ce qu’elle couvre
Votre appareil vient avec une garantie de deux ans à partir de la
date d’achat. La garantie couvre tous les défauts de fabrication,
à condition que :
• Vous utilisiez, assembliez, et entreteniez votre appareil
conformément aux instructions contenues dans ce mode
d’emploi. Les dommages résultant d’une mauvaise
utilisation, d’un assemblage incorrect ou d’un entretien
inadéquat ne sont pas considérés comme des défauts de
fabrication.
• Vous pouvez présenter le ticket de caisse et le numéro de
série unique de votre appareil. Le numéro de série
commerce par un « G » suivi de 15 chiffres. Vous pouvez le
trouver :
• Dans ce mode d’emploi et sur le kit de démarrage qui
inclut ce mode d’emploi.
• Sur l’emballage de l’appareil.
• Sur la plaque signalétique à l’intérieur de la porte du
meuble (Quisson, Siesta 4 et Siesta 6) ou en bas à
l’intérieur du panneau avant (Spring, Siesta 2 et Siesta 3).
• Le service qualité Barbecook confirme que les pièces sont
défectueuses et cela malgré une utilisation normale, un
assemblage correct et un entretien adéquat.
Si les conditions citées précédemment ne sont pas respectées,
vous ne pourrez pas être couvert. Dans tous les cas, la garantie
se limite à la réparation et au remplacement de la ou des pièces
défectueuses.
12.2 Ce qu’elle ne couvre pas
Les dommages et les défauts suivants ne sont pas couverts par
la garantie :
• L’usure normale (rouille, déformation, décoloration...) des
pièces directement exposées au feu ou à une chaleur
intense. Il est normal de remplacer ces pièces au fil du
temps.
• Les irrégularités visuelles sont inhérentes au processus de
fabrication. Ces irrégularités ne sont pas considérées
comme des défauts de fabrication.
www.barbecook.com 43
Page 44

• Tous les dommages résultant d’un entretien inadéquat, du
rangement incorrect, d’un mauvais assemblage ou de
modifications effectuées sur des pièces pré-assemblées.
• Tous les dommages résultant d’une utilisation abusive ou à
mauvais escient de l’appareil (utilisation non conforme aux
instructions de ce mode d’emploi, utilisation
professionnelle...).
• Tous les dommages consécutifs résultant d’une utilisation
inadaptée ou non conforme de l’appareil.
• La rouille ou la décoloration résultant d’influences externes,
de l’utilisation de détergents corrosifs, de l’exposition au
chlore... Ces dommages ne sont pas considérés comme des
défauts de fabrication.
13 SPÉCIFICATIONS TECHNIQUES
13.1 Étiquette-type
L’étiquette-type énumère toutes les spécifications techniques de
votre appareil. Vous pouvez la trouver :
• Dans la deuxième partie de ce mode d’emploi.
• Derrière le panneau avant inférieur.
13.2 Diamètre des injecteurs
• Brûleur principal : 1,00 mm
• Brûleur latéral : 0,75 mm
44 www.barbecook.com
Page 45

14 DÉPANNAGE
Problème Cause(s) probable(s) Solution(s)
Chaleur insuffisante
Chaleur excessive et/ou
flammes vives
La chaleur n’est pas distribuée
uniformément sur la surface du
gril
Flammes jaunes
Flamme partielle Brûleur obstrué, percé ou rouillé Nettoyez ou remplacez le brûleur
• L’alimentation en gaz est fermée
• Les venturis ne sont pas placés sur les
ouvertures des vannes de gaz
• Les ouvertures des brûleurs sont obstruées
• La bonbonne de gaz est (presque) vide
• Le détendeur de pression n’est pas raccordé
correctement à la bonbonne et/ou au tuyau
• Aliments trop gras
• Trou d’évacuation de la graisse obstrué,
présence de graisse dans la cuve et/ou sur les
brûleurs
• Température trop élevée
Certaines différences de température sont normales,
veuillez consulter “1.7 Utilisation optimale de la
chaleur” et “10.6 Tirer profit des zones de chaleur”.
Cause(s) probable(s) d’importantes différences de
température :
• L’appareil n’est pas préchauffé
• Brûleurs et venturis obstrués
• Présence de sel sur les brûleurs
• Appareil raccordé au gaz butane
• L’alimentation en gaz est ouverte
• Placez les venturis sur les ouvertures des vannes
de gaz
• Nettoyez les ouvertures des brûleurs ou
remplacez les brûleurs
• Remplacez la bonbonne de gaz
• Raccordez à nouveau le détendeur de pression à
la bonbonne et/ou au tuyau
• Coupez l’excédent de gras ou réglez les brûleurs
sur une position moins élevée
• Nettoyez le trou d’évacuation de la graisse, la
cuve et les brûleurs
• Réglez les brûleurs sur une température moins
élevée et/ou faites griller les aliments
indirectement
• Préchauffez l’appareil
• Nettoyez les brûleurs et les venturis
• Nettoyez les brûleurs
• Raccordez l’appareil au gaz butane en utilisant
un détendeur de pression adapté
Retours de flammes (flammes
en dehors des venturis/au
niveau des boutons de réglage)
Flammes dépassant le bord de
la cuve
Le détendeur de pression
bourdonne
Les brûleurs émettent un
sifflement lorsqu’ils sont réglés
sur LOW
Impossible d’allumer le brûleur
(ni avec l’allumeur, ni avec une
allumette)
Impossible d’allumer le brûleur
avec l’allumeur
L’allumeur ne produit aucune
étincelle et n’émet aucun bruit
Brûleurs et venturis obstrués
• Temps venteux
• La bonbonne de gaz est (presque) vide
• Présence de graisse dans la cuve et/ou sur les
brûleurs
• Temps chaud
• Nouvelle bonbonne de gaz (pleine)
Injecteur de gaz, venturi et/ou brûleur encrassés Nettoyez l’injecteur de gaz, le venturi et le brûleur
• Brûleur ou venturi obstrués
• Pas d’alimentation en gaz
• Absence de pile ou pile mal placée
• Le brûleur du milieu ne s’allume pas en premier
• Câblage de l’allumeur mal branché
• Électrode endommagée
• Mauvaise mise à la terre
• Allumeur défectueux
• Absence de pile ou pile mal placée
• Pile déchargée
• Bouton de l’allumeur mal assemblé
• Générateur d’étincelles défectueux
1 Fermez l’alimentation en gaz et réglez les brûleurs
sur OFF.
2 Laissez refroidir l’appareil.
3 Nettoyez les brûleurs et les venturis.
• Placez l’appareil dos au vent
• Remplacez la bonbonne de gaz
• Nettoyez la cuve et les brûleurs
Cela ne représente ni un danger ni un défaut. Cela
devrait cesser automatiquement après un certain
temps.
• Nettoyez le brûleur et le venturi
• Ouvrez l’alimentation en gaz et enfoncez le
bouton de sécurité sur détendeur de pression
(pas présent sur tous les détendeurs)
• (Re)placez la batterie, en respectant les bornes
• Allumez l’allumeur du milieu en premier
• Vérifiez et ré-assemblez tous les fils de l’allumeur
• Replacez l’électrode
• Vérifiez et ré-assemblez les électrodes, les
brûleurs et l’allumeur
• Remplacez l’allumeur
• (Re)placez la batterie, en respectant les bornes
• Remplacez la pile
• Ré-assemblez le bouton de l’allumeur
• Remplacez le générateur d’étincelles
www.barbecook.com 45
Page 46

Problème Cause(s) probable(s) Solution(s)
L’allumeur émet un bruit mais
ne produit pas d’étincelles
Production d’étincelles ne
provenant pas des brûleurs
Production d’étincelles, mais
pas sur toutes les électrodes
et/ou trop faibles
• Mauvaise mise à la terre
• Le brûleur et l’électrode sont trop espacés
Câblage défectueux Remplacez le câblage
• Mauvaise mise à la terre
• Pile presque déchargée
• Électrodes mouillées ou cassées
• Raccordez le générateur d’étincelles et les
électrodes
• Recourbez légèrement l’électrode pour la
rapprocher du brûleur
• Raccordez le générateur d’étincelles et les
électrodes
• Remplacez la pile
• Séchez les électrodes avec une serviette en
papier ou remplacez les électrodes
46 www.barbecook.com
Page 47

DE – BEDIENUNGSANLEITUNG
1 Registrieren Ihres Geräts............................................ 48
2 Informationen zu diesem Handbuch .......................... 48
3 Wichtige Sicherheitshinweise..................................... 48
• Lesen und Befolgen der Anweisungen .................. 48
• Vorsicht im Umgang mit Gas................................. 48
• Wahl eines geeigneten Standorts.......................... 48
• Gesunder Menschenverstand................................ 48
4 Wiederkehrende Konzepte......................................... 48
• Venturirohre............................................................ 48
• Brennerdeckel........................................................ 49
• Emaille.................................................................... 49
• Stichflammen......................................................... 49
5 Montieren des Geräts................................................. 49
• Sicherheitshinweise ............................................... 49
• Montage des Geräts .............................................. 49
6 Anschließen von Gas an das Gerät............................ 49
• Welche Flasche, welcher Schlauch und welches
Ventil? .................................................................... 49
• Sicherheitshinweise ............................................... 49
• Anschließen des Schlauchs an das Gerät ............. 50
• Anschließen des Schlauchs und der Flasche an das
Ventil ...................................................................... 50
• Austauschen der Gasflasche................................. 51
7 Prüfen auf Gaslecks ................................................... 51
• Warum sollte auf Gaslecks geprüft werden?......... 51
• Wann sollte auf Gaslecks geprüft werden?........... 51
• Sicherheitshinweise ............................................... 51
• Welche Materialien werden benötigt?.................... 51
• So prüfen Sie auf Gaslecks ................................... 51
• Im Fall eines Gaslecks ........................................... 52
10 Hilfreiche Tipps und Tricks......................................... 54
• Vorheizen des Geräts............................................. 54
• Verhindern des Anhaftens von Speisen................. 54
• Direktes und indirektes Grillen............................... 55
• Grillen mit geschlossenem Deckel......................... 55
• Beobachten der Temperatur.................................. 55
• Nutzen der Heizzonen............................................ 55
• Vermeiden von Stichflammen................................ 55
11 Pflege des Geräts....................................................... 55
• Reinigen des Grillrosts........................................... 55
• Reinigen der Schale............................................... 55
• Reinigen der Brenner und Venturirohre.................. 56
• Pflegen von Emaille, Edelstahl, Chrom und
pulverbeschichteten Teilen .................................... 56
• Lagern des Geräts ................................................. 57
• Lagern von Gasflaschen ........................................ 57
Bestellen von Ersatzteilen...................................... 57
•
12 Gewährleistung .......................................................... 57
• Abgedeckt.............................................................. 57
• Nicht abgedeckt .................................................... 57
13 Technische Daten....................................................... 58
• Typenschild............................................................ 58
• Durchmesser der Einspritzdüsen........................... 58
14 Fehlerbehebung ......................................................... 59
8 Vorbereiten des Geräts für die Verwendung .............. 52
• Vor jeder Verwendung............................................ 52
• Vor der ersten Inbetriebnahme (vor der erstmaligen
Benutzung nach einem längeren Zeitraum) ........... 52
• Einbrennen des Geräts .......................................... 52
9 Entzünden der Brenner .............................................. 52
• Sicherheitshinweise ............................................... 52
• Entzünden der Hauptbrenner................................. 53
• Entzünden des seitlichen Brenners ....................... 53
• Ausschalten der Brenner........................................ 54
• Erneutes Entzünden der Brenner........................... 54
• Prüfen der Flammen .............................................. 54
www.barbecook.com 47
Page 48

1 REGISTRIEREN IHRES GERÄTS
3.3 Wahl eines geeigneten Standorts
Vielen Dank für den Kauf eines Barbecook-Geräts! Wir sind uns
sicher, dass Sie damit einige glückliche Grillabende veranstalten
werden.
Für ein noch besseres Erlebnis können Sie Ihr Gerät auf
www.barbecook.com registrieren. Das dauert nur einige
Minuten, bringt aber einige Vorteile:
• Sie erhalten Zugriff auf Ihren persönlichen Kundendienst. So
können Sie beispielsweise schnell Ersatzteile für Ihr Gerät
finden oder von einem optimalen Garantieservice profitieren.
• Wir können Sie über interessante Produktneuheiten
informieren und Sie auf Produktinformationen und
technische Daten hinweisen, die für Ihr Gerät relevant sind.
Weitere Informationen zum Registrieren Ihres Geräts
2
finden Sie auf www.barbecook.com.
Barbecook respektiert Ihre Privatsphäre. Ihre Daten
0
werden weder verkauft noch verteilt oder mit Dritten
geteilt.
2 INFORMATIONEN ZU DIESEM
HANDBUCH
Dieses Handbuch besteht aus zwei Teilen:
• Den ersten Teil lesen Sie gerade. Er enthält Anweisungen zur
Montage, Verwendung und Pflege des Geräts.
• Der zweite Teil beginnt auf Seite 327. Er umfasst
verschiedene Zeichnungen (Explosionsansichten,
Montagezeichnungen, Typenschilder) der Gerät, die in
diesem Handbuch beschrieben sind.
3 WICHTIGE SICHERHEITSHINWEISE
3.1 Lesen und Befolgen der
Anweisungen
Lesen Sie die Anweisungen, bevor Sie das Gerät verwenden.
Befolgen Sie die Anweisungen stets genau. Abweichende
Montage oder Verwendung des Geräts kann zu einem Brand
oder zu Materialschäden führen.
Schäden aufgrund von Nichtbeachtung der Anweisungen
1
(falsche Montage, unsachgemäß Verwendung,
ungeeignete Pflege...) fallen nicht unter die
Gewährleistung.
3.2 Vorsicht im Umgang mit Gas
Das Gerät darf nur im Freien verwendet werden. Die Verwendung
in Räumen, auch in einer Garage oder Hütte, kann zur
Kohlenmonoxidvergiftung führen.
Beachten Sie bei der Wahl eines Standorts im Freien Folgendes:
• Stellen Sie das Gerät in mindestens drei Meter Entfernung
von Gebäuden an einem offenen und gut belüfteten Ort auf.
• Vergewissern Sie sich, dass die Luft jederzeit ungehindert zu
den Brennern und durch die Luftlöcher im Unterschrank
strömen kann.
• Vergewissern Sie sich, dass das Gerät nicht unter einem
Überhang (z. B. Balkon oder Schutzdach) oder unter einem
Baum steht.
• Stellen Sie das Gerät auf eine gerade und stabile Fläche.
Stellen Sie es unter keinen Umständen auf ein sich
bewegendes Fahrzeug (z. B. Boot oder Anhänger).
Um zu verhindern, dass sich Rost an den Edelstahlteilen
1
bildet, vermeiden Sie den Kontakt mit Chlor, Salz und
Eisen. Wir empfehlen, das Gerät nicht in Küstennähe, in
der Nähe von Bahngleisen oder Swimmingpools zu
verwenden.
3.4 Gesunder Menschenverstand
Verwenden Sie stets Ihren gesunden Menschenverstand, wenn
Sie das Gerät verwenden:
• Nur im Freien zu verwenden.
• Bewegen Sie das Gerät während der Benutzung nicht.
• Lassen Sie das Gerät während der Verwendung nicht
unbeaufsichtigt, insbesondere wenn Kinder und Tiere
anwesend sind.
• WARNUNG! Einige zugängliche Teile können sehr heiß
werden. Halten Sie Kinder davon fern.
• Verwenden Sie einen geeigneten Schutz, wenn Sie mit
heißen Teilen (Deckel, Grillrost...) arbeiten.
• Das Gerät muss während der Verwendung von
entzündlichen Materialien fern gehalten werden.
• Halten Sie flammbare Materialien, entzündliche Flüssigkeiten
und lösliche Gegenstände vom Gerät fern, wenn es
verwendet wird.
• Verwenden Sie kein Holz, keine Kohle, keine Lavasteine oder
Keramikbriketts im Gasgerät.
• Verwenden Sie das Gerät nicht, wenn Sie Alkohol getrunken
oder Drogen zu sich genommen haben.
• Ändern Sie das Gerät nicht.
Die Arbeit mit Gas ist sicher, erfordert jedoch einige zusätzliche
Vorsichtsmaßnahmen:
• Lagern Sie Gasflaschen immer an einem gut belüfteten Ort
im Freien. Vergewissern Sie sich, dass sie nicht übermäßiger
Wärme oder direktem Sonnenlicht ausgesetzt sind.
• Lagern Sie die Gasflasche oder Ersatzflaschen nie im
Unterschrank Ihres Geräts.
• Lagern Sie Ersatzgasflaschen nie in der Nähe eines
verwendeten Gasgeräts.
• Schalten Sie die Gaszufuhr an der Gasflasche nach jeder
Verwendung ab.
• Rauchen Sie nie in der Nähe eines Gasgeräts oder in der
Nähe von Gasflaschen (voll/leer).
Wenn Sie Gas riechen, schließen Sie die Gaszufuhr
1
umgehend, löschen Sie alle Flammen und öffnen Sie den
Deckel des Geräts. Falls der Geruch anhält, wenden Sie
sich an Ihren Gaslieferanten oder die Feuerwehr.
48 www.barbecook.com
4 WIEDERKEHRENDE KONZEPTE
Dieser Teil umfasst Definitionen einiger weniger bekannter
Konzepte. Diese Konzepte werden in verschiedenen Themen
dieses Handbuchs verwendet.
4.1 Venturirohre
Die Venturirohre sind kleine Schläuche, die an den Eingängen
der Brenner befestigt sind. Seitlich an den Venturirohren befindet
Page 49

sich ein Loch, das an den Hauptbrennern und am seitlichen
Brenner sichtbar ist:
Auf dem Weg zu den Brennern wird das Gas durch die
Venturirohre geleitet. Über die seitlichen Löcher wird das Gas mit
Luft und somit mit Sauerstoff gemischt. Das ist für eine
problemlose Zündung der Brenner erforderlich: nur das korrekte
Gemisch aus Gas und Sauerstoff ermöglicht eine richtige
Zündung und Flammenbildung.
4.2 Brennerdeckel
Bei den Brennerdeckeln handelt es sich um Abdeckungen, die
Sie über den Brennern Ihres Geräts montieren. Sie schützen die
Brenner vor herabtropfendem Fett. Die seitlichen Öffnungen der
Deckel verteilen die Wärme über den Grill, sodass eine
schnellere und gleichmäßigere Erwärmung gewährleistet wird.
4.3 Emaille
Einige Teile des Geräts sind mit geschmolzenem Glas, so
genanntem Emaille überzogen. Diese Emaille schützt das
darunterliegende Material vor Korrosion. Emaille ist ein
hochwertiges Material: Es rostet nicht, hält hohen Temperaturen
stand und ist leicht zu pflegen.
Da die Emaille weniger flexibel ist als das davon
1
umgebene Metall, kann die Emaille abblättern, wenn Sie
das Gerät unsachgemäß handhaben. Um derartige
Probleme zu vermeiden, sollten Sie bei der Montage
emaillierter Teile vorsichtig vorgehen und darauf achten,
dass die Emaille erhalten bleibt. Beachten Sie dazu die
Beschreibungen in diesem Handbuch.
4.4 Stichflammen
Stichflammen sind beim Grillen plötzlich auftretende Flammen.
Diese entstehen, wenn Fett oder Marinade heruntertropfen.
5 MONTIEREN DES GERÄTS
5.1 Sicherheitshinweise
• Ändern Sie das Gerät beim Zusammenbau nicht. Es ist
überaus gefährlich und untersagt, Teile, die vom Hersteller
vormontiert und/oder versiegelt wurden, zu ändern.
• Befolgen Sie die Montageanweisungen stets genau.
• Der Benutzer ist für die korrekte Montage des Geräts
verantwortlich. Schäden, die durch falsche Montage
verursacht werden, fallen nicht unter die Gewährleistung.
5.2 Montage des Geräts
Sie benötigen einen Kreuzschlitzschraubendreher, einen
Flachkopfschraubendreher und eine AA-Batterie (elektrischer
Zünder). Im Lieferumfang des Geräts sind keine Batterien
enthalten.
1 Stellen Sie das Gerät auf eine gerade und saubere Fläche.
2 Bauen Sie das Gerät wie auf den Montagezeichnungen
gezeigt zusammen. Sie finden sie im zweiten Teil dieses
Handbuchs, hinter den Explosionsansichten Ihres Geräts.
Gehen Sie bei der Montage der emaillierten Teile
1
besonders sorgfältig vor. Die Werkzeuge und Schrauben
können die Emaille beschädigen. Verwenden Sie die
mitgelieferten Unterlegscheiben, um die Emaille um die
Schrauben herum zu schützen.
Die Blisterpackungen können mehr Schrauben als nötig
0
enthalten. Nach der Montage können Schrauben übrig
sein.
Die Verpackung enthält ein Notfallkit mit Ersatzteilen
0
(Schrauben, Muttern, Unterlegscheiben...). Diese können
verwendet werden, falls Teile verloren gehen oder
beschädigt werden.
6 ANSCHLIEßEN VON GAS AN DAS
GERÄT
6.1 Welche Flasche, welcher Schlauch
und welches Ventil?
Bevor Sie das Gerät mit Gas versorgen können, müssen Sie eine
Gasflasche, einen Schlauch und ein Druckminderventil kaufen.
Kaufen Sie immer Material, das den nationalen Standards sowie
den Gasarten und dem Nenndruck, die auf dem Gerät
angegeben sind entspricht.
Die nachfolgende Tabelle zeigt, welche Flasche, welcher
Schlauch und welches Ventil verwendet werden müssen. In
Belgien (BE) müssen Sie beispielsweise eine Propangasflasche
mit einem Schlauch und einem Ventil für 37 mbar oder eine
Butangasflasche mit einem Schlauch und Ventil für 28-30 mbar
verwenden.
Land Flasche, Schlauch und Ventil
DK, GR, NO, SE,
EE, LT, LV, CZ, PL,
MT, HU, SI, SK, NL
ES, GB, IE, PT, BE,
FR, LU, IT, CY
Wir empfehlen die Verwendung von Propangas.
2
Propangas ermöglicht eine hochwertige Verbrennung
und ist weniger anfällig für Frost.
Kaufen Sie das Druckminderventil und die Gasflasche
2
zusammen. Nicht alle Ventile passen auf alle Flaschen.
Propangas, 30 mbar / Butangas, 30 mbar
Propangas, 37 mbar / Butangas, 28-30 mbar
6.2 Sicherheitshinweise
• Schließen Sie die Flasche nie direkt an das Gerät an.
Montieren Sie zunächst ein Druckminderventil an der
Flasche.
• Ändern Sie die vormontierten oder versiegelten Teile an der
Flasche, am Schlauch oder am Druckminderventil unter
keinen Umständen.
• Halten Sie den Schlauch so kurz wie möglich (maximal
1,5 m), um zu verhindern, dass er auf dem Boden schleift.
• Beim Verbinden von Flasche, Schlauch und
Druckminderventil:
www.barbecook.com 49
Page 50

• Den Schlauch nicht verbiegen.
• Die Flasche stets aufrecht halten.
• Die Gaszufuhr nicht öffnen.
• Wenn Veränderungen am Gasanschluss vorgenommen
wurden, stets auf Lecks prüfen. Siehe “7 Prüfen auf
Gaslecks”.
6.3 Anschließen des Schlauchs an das
Gerät
Um den Gasschlauch an das Gerät anzuschließen, müssen Sie
einen Anschluss am Gasschlauch des Geräts anbringen. Im
Lieferumfang des Geräts sind zwei Anschlüsse für bestimmte
Länder enthalten:
Land Anschluss
BE, CH, CZ, DK, ES, FI, GB, IE, IT, PT, SI Anschluss A
FR Anschluss B
Wenn Ihr Land nicht in der Tabelle aufgeführt ist,
2
verwenden Sie den Anschluss, der den nationalen
Standards entspricht.
2 Schieben Sie den Schlauch über den Anschluss (C) und
ziehen Sie den Klemmring mit einem
Kreuzschlitzschraubendreher (D) fest.
C
D
6.3.2 ANSCHLUSS B
Sie benötigen einen 22-mm-Schraubenschlüssel und einen
Universalschraubenschlüssel.
1 Schrauben Sie den Anschluss auf den Gasschlauch des
Geräts (A) und ziehen Sie ihn mit einem
22-mm-Schraubenschlüssel (B) fest.
A
B
AB
6.3.1 ANSCHLUSS A
Sie benötigen einen 19-mm-Schraubenschlüssel und einen
Kreuzschlitzschraubendreher.
1 Schrauben Sie den Anschluss auf den Gasschlauch des
Geräts (A) und ziehen Sie ihn mit einem
19-mm-Schraubenschlüssel (B) fest.
A
B
2 Schrauben Sie den Gasschlauch auf den Anschluss (C) und
ziehen Sie ihn mit zwei Schraubenschlüsseln fest. Halten Sie
den Anschluss mit einem 22-mm-Schraubenschlüssel und
drehen Sie den Schlauch mit einem
Universalschraubenschlüssel (D) fest.
C
D
6.4 Anschließen des Schlauchs und der
Flasche an das Ventil
Je nach Typ des verwendeten Druckminderventils benötigen Sie
einen Kreuzschlitzschraubendreher und/oder einen
Universalschraubenschlüssel.
1 Schließen Sie den Schlauch an das Druckminderventil an.
Führen Sie eine der folgenden Aufgaben durch:
• Wenn der Schlauch einen Klemmring hat, schieben Sie
den Schlauch über das Ventil und ziehen Sie den
Klemmring mit einem Kreuzschlitzschraubendreher fest
(A).
50 www.barbecook.com
Page 51

• Wenn der Schlauch eine Mutter hat, schrauben Sie den
Schlauch auf das Ventil und ziehen Sie die Mutter mit
einem Universalschraubenschlüssel fest (B).
A B
7.3 Sicherheitshinweise
• Stellen Sie das Gerät im Freien an einem gut belüfteten Ort
auf. Vergewissern Sie sich, dass es in der Nähe des Geräts
keine Flammen oder Wärmequellen gibt.
• Verwenden Sie unter keinen Umständen ein Feuerzeug oder
ein Streichholz, um auf Gaslecks zu prüfen.
• Rauchen Sie nicht und zünden Sie die Brenner nicht an,
wenn Sie auf Gaslecks prüfen.
7.4 Welche Materialien werden
benötigt?
2 Schließen Sie das Druckminderventil an die Gasflasche an.
Führen Sie eine der folgenden Aufgaben durch:
• Wenn das Ventil eine Mutter hat, schrauben Sie das
Ventil im Uhrzeigersinn auf die Flasche und ziehen Sie
die Mutter mit einem Universalschraubenschlüssel fest
(B).
• Wenn das Ventil ein Schraubengewinde hat, schrauben
Sie das Ventil gegen den Uhrzeigersinn auf die Flasche
(D).
C D
6.5 Austauschen der Gasflasche
1 Schließen Sie die Gaszufuhr und stellen Sie alle Regler auf
OFF.
2 Trennen Sie die leere Flasche und schließen Sie die volle
Flasche an.
3 Prüfen Sie die Flasche, den Schlauch und alle
Gasanschlüsse auf Lecks. Siehe “7 Prüfen auf Gaslecks”.
Um auf Gaslecks zu prüfen, wird folgendes benötigt:
• Eine Testflüssigkeit. Sie können ein gebrauchsfertiges
Leckspray oder eine Mischung aus Wasser (50 %) und
Spülmittel (50 %) verwenden.
• Das Lecktestwerkzeug, das im Lieferumfang des Geräts
enthalten ist. Verwenden Sie es, um die Testflüssigkeit
aufzunehmen und auf die Gaskomponenten oder
Verbindungen aufzutragen, die geprüft werden sollen.
7.5 So prüfen Sie auf Gaslecks
Zum Prüfen auf Gaslecks verwenden Sie eine Testflüssigkeit, die
auf alle Gaskomponenten und Verbindungen angewendet wird.
Wenn die Blasenbildung an einer speziellen Komponenten oder
Verbindung zunimmt, tritt Gas aus:
✔✖
7 PRÜFEN AUF GASLECKS
7.1 Warum sollte auf Gaslecks geprüft
werden?
Propan und Butan sind schwerer als Luft. Daher werden Sie nicht
vom Gerät weggetragen. Insbesondere an windstillen Tagen
kann ein Leck dazu führen, dass sich Gas im Gerät und darum
herum ansammelt. Dieses angesammelte Gas kann sich
entzünden und explodieren.
7.2 Wann sollte auf Gaslecks geprüft
werden?
• Vor der ersten Inbetriebnahme oder vor der erstmaligen
Benutzung nach einem längeren Zeitraum.
Prüfen Sie auch auf Gaslecks, wenn das Gerät von Ihrem
1
Händler montiert wurde.
• Immer dann, wenn eine Gaskomponente ausgetauscht
wurde.
• Mindestens einmal pro Jahr, vorzugsweise zu Beginn der
Grillsaison.
Gehen Sie folgendermaßen vor, um auf Gaslecks zu prüfen:
1 Stellen Sie das Gerät ins Freie.
2 Halten Sie das Lecktestwerkzeug und die Testflüssigkeit
(Leckspray oder Seifenlauge) bereit.
3 Öffnen Sie den Deckel und stellen Sie alle Regler auf OFF.
4 Öffnen Sie die Gaszufuhr leicht. Drehen Sie das Ventil der
Gasflasche nur einmal.
5 Ziehen Sie mit dem Lecktestwerkzeug etwas Testflüssigkeit
auf und tragen Sie sie auf den Bereich auf, der geprüft
werden soll. Folgendes muss geprüft werden:
• Die Schweißnähte an der Flasche (A)
• Der Schlauch (B)
• Die Verbindungen zwischen Flasche und
Druckminderventil und zwischen Druckminderventil und
Schlauch (C)
www.barbecook.com 51
Page 52

• Die Verbindung zwischen dem Schlauch und dem Gerät
(D)
A
B
• Dass die Brenner und Venturirohre nicht von Insektennestern
oder Spinnweben blockiert werden. Siehe “11.3 Reinigen
der Brenner und Venturirohre”.
• Dass die Brenner korrekt montiert sind. Die Venturirohre
müssen sich über den Öffnungen der Gasventile befinden.
C D
Das Druckminderventil Ihres Geräts und die Anschlüsse
0
können von den dargestellten abweichen.
6 Führen Sie eine der folgenden Aufgaben durch:
• Wenn Sie ein Leck erkennen, fahren Sie wie unter “ Im
Fall eines Gaslecks” beschrieben fort.
• Wenn keine Lecks vorhanden sind, schließen Sie die
Gaszufuhr, spülen Sie alle Komponenten gründlich mit
Wasser und trocknen Sie sie gut.
7.6 Im Fall eines Gaslecks
1 Schließen Sie die Gaszufuhr und gehen Sie folgendermaßen
vor:
• Wenn Sie ein Gasleck an einer der Verbindungen
entdecken, ziehen Sie diese Verbindung fest.
• Wenn Sie ein leck an der Flasche oder am Schlauch
entdecken, tauschen Sie die Flasche oder den Schlauch
aus.
2 Prüfen Sie die Verbindung oder Komponente, bei der das
Leck entdeckt wurde, erneut.
3 Wenn das Leck nicht beseitigt werden kann, wenden Sie
sich an einen Barbecook-Händler. Verwenden Sie das Gerät
erst wieder, nachdem das Leck behoben wurde.
Eine Liste mit Barbecook-Händlern in Ihrer Nähe finden
2
Sie auf www.barbecook.com.
8 VORBEREITEN DES GERÄTS FÜR
DIE VERWENDUNG
Wenn Sie sicherstellen wollen, dass die Gasverbindung in
2
Ordnung ist, können Sie Ihr Gerät vor jeder Verwendung
auf Gaslecks prüfen. Siehe “7 Prüfen auf Gaslecks”.
8.2 Vor der ersten Inbetriebnahme (vor
der erstmaligen Benutzung nach
einem längeren Zeitraum)
Wenn Sie das Gerät zum ersten Mal oder nach langer Zeit wieder
verwenden, müssen Sie einige zusätzliche Prüfungen
durchführen.
• Lesen Sie alle Anweisungen in diesem Handbuch sorgfältig
durch (nur vor der ersten Inbetriebnahme).
• Prüfen Sie das Gerät auf Gaslecks. Siehe “7 Prüfen auf
Gaslecks”.
Prüfen Sie auch auf Gaslecks, wenn das Gerät von Ihrem
1
Händler montiert wurde.
• Reinigen Sie die Brenner und Venturirohre (nur vor der
erstmaligen Benutzung nach einem längeren Zeitraum).
Siehe “11.3 Reinigen der Brenner und Venturirohre”.
• Brennen Sie das Gerät ein, bevor Sie Speisen darauf legen
(nur vor der ersten Inbetriebnahme). Siehe “8.3 Einbrennen
des Geräts”.
8.3 Einbrennen des Geräts
Durch das Einbrennen des Geräts vor der ersten Verwendung
entfernen Sie Fette, die durch die Fertigung am Gerät verblieben
sind. Gehen Sie folgendermaßen vor:
1 Entzünden Sie die Hauptbrenner und stellen Sie die Regler
auf HIGH. Siehe “9.2 Entzünden der Hauptbrenner”.
2 Schließen Sie den Deckel und lassen Sie das Gerät
15 Minuten lang brennen. Legen Sie noch keine Speisen auf
das Gerät.
3 Öffnen Sie nach 15 Minuten den Deckel und lassen Sie das
Gerät weitere 5 Minuten brennen (wobei die Regler weiterhin
auf HIGH stehen).
4 Nach 5 Minuten kann das Gerät verwendet werden. Jetzt
können Sie Speisen auf den Grill legen.
8.1 Vor jeder Verwendung
Stellen Sie vor jeder Verwendung des Geräts Folgendes sicher:
• Dass das Gerät an einem geeigneten Ort aufgestellt ist.
Siehe “3.3 Wahl eines geeigneten Standorts”.
• Dass der Gasschlauch nicht auf dem Boden schleift und
nicht mit heißen Flächen oder tropfendem Fett in Berührung
kommen kann.
• Dass die Schale sauber ist. Wir empfehlen, die Schale nach
jeder Verwendung zu reinigen. Siehe “11.2 Reinigen der
Schale”.
52 www.barbecook.com
9 ENTZÜNDEN DER BRENNER
Um die Brenner mit dem elektrischen Zünder entzünden
0
zu können, müssen Sie eine AA-Batterie in den Zünder
einlegen. Diese Batterie ist im Lieferumfang des Geräts
nicht enthalten. Das Batteriefach des Zünders befindet
sich an der Steuertafel des Geräts.
9.1 Sicherheitshinweise
• Führen Sie vor dem Entzünden des Geräts alle Überprüfen
aus, die in “8 Vorbereiten des Geräts für die Verwendung”
aufgeführt sind.
Page 53

• Vergewissern Sie sich, dass der Deckel immer geöffnet ist,
wenn Sie einen Brenner entzünden.
• Beugen Sie sich nie direkt über einen Brennen, wenn Sie ihn
entzünden.
9.2 Entzünden der Hauptbrenner
9.2.1 VERWENDEN DES ZÜNDERS
1 Öffnen Sie den Deckel und stellen Sie die Regler der
Hauptbrenner auf OFF.
2 Wenn noch kein anderer Brenner entzündet ist, öffnen Sie
die Gaszufuhr und warten Sie zehn Sekunden. Dadurch kann
sich das Gas stabilisieren.
3 Drücken Sie den Zünder, bis Sie Funken hören.
4 Halten Sie den Zünder gedrückt und stellen Sie den Regler
des mittleren Brenners auf HIGH. Zünden Sie den mittleren
Brenner immer als erstes, entzünden Sie nie alle Brenner
gleichzeitig.
5 Wenn sich der Brenner nach drei versuchen nicht entzündet,
stellen Sie die Regler auf OFF, schließen Sie die Gaszufuhr
und warten Sie 5 Minuten. Dadurch kann das angesammelte
Gas entweichen.
6 Versuchen Sie erneut, den Brenner zu entzünden. Wenn er
sich noch immer nicht entzündet, versuchen Sie, ihn mit
einem Streichholz zu entzünden. Lesen Sie auch
“14 Fehlerbehebung”, um die Ursache des Problems zu
lokalisieren.
7 Nachdem ein Brenner entzündet ist, zünden Sie die anderen,
indem Sie die Regler auf HIGH stellen.
9.2.2 VERWENDEN EINES STREICHHOLZES
1 Legen Sie ein Streichholz in den Streichholzhalter.
4 Entzünden Sie das Streichholz und halten Sie es etwa
13 mm vom Brenner entfernt.
5 Stellen Sie den Regler eines Brenners auf HIGH.
Zünden Sie zunächst immer einen Hauptbrenner. Zünden
1
Sie nie alle Hauptbrenner gleichzeitig.
6 Wenn sich der Brenner innerhalb von 5 Sekunden nicht
entzündet, stellen Sie den Regler auf OFF, schließen Sie die
Gaszufuhr und warten Sie 5 Minuten. Dadurch kann das
angesammelte Gas entweichen.
7 Versuchen Sie erneut, den Brenner zu entzünden. Wenn er
sich noch immer nicht entzündet, lesen Sie
“14 Fehlerbehebung”, um die Ursache des Problems zu
lokalisieren.
8 Nachdem ein Brenner entzündet ist, zünden Sie die anderen,
indem Sie die Regler auf HIGH stellen.
2 Öffnen Sie den Deckel und stellen Sie die Regler der
Hauptbrenner auf OFF.
3 Wenn noch kein anderer Brenner entzündet ist, öffnen Sie
die Gaszufuhr und warten Sie zehn Sekunden. Dadurch kann
sich das Gas stabilisieren.
9.3 Entzünden des seitlichen Brenners
Diese Informationen gelten nicht für den Spring 300. Dieses
Gerät ist nicht mit einem seitlichen Brenner ausgestattet.
Der seitliche Brenner ist nur für Gefäße mit einem
1
Höchstgewicht von 9 kg und einem maximalen
Durchmesser von 220 mm ausgelegt.
9.3.1 VERWENDEN DES ZÜNDERS
1 Öffnen Sie den Deckel und stellen Sie den Regler des
seitlichen Brenners auf OFF.
2 Wenn noch kein anderer Brenner entzündet ist, öffnen Sie
die Gaszufuhr und warten Sie zehn Sekunden. Dadurch kann
sich das Gas stabilisieren.
3 Drücken Sie den Zünder, bis Sie Funken hören.
4 Halten Sie den Zünder gedrückt und stellen Sie den Regler
des seitlichen Brenners auf HIGH.
5 Wenn sich der Brenner nach drei versuchen nicht entzündet,
stellen Sie die Regler auf OFF, schließen Sie die Gaszufuhr
und warten Sie 5 Minuten. Dadurch kann das angesammelte
Gas entweichen.
6 Versuchen Sie erneut, den seitlichen Brenner zu entzünden.
Wenn er sich noch immer nicht entzündet, versuchen Sie,
ihn mit einem Streichholz zu entzünden. Lesen Sie auch
“14 Fehlerbehebung”, um die Ursache des Problems zu
lokalisieren.
www.barbecook.com 53
Page 54

9.3.2 VERWENDEN EINES STREICHHOLZES
1 Legen Sie ein Streichholz in den Streichholzhalter.
2 Öffnen Sie den Deckel und stellen Sie den Regler des
seitlichen Brenners auf OFF.
3 Wenn noch kein anderer Brenner entzündet ist, öffnen Sie
die Gaszufuhr und warten Sie zehn Sekunden. Dadurch kann
sich das Gas stabilisieren.
4 Entzünden Sie das Streichholz und halten Sie es etwa
13 mm vom seitlichen Brenner entfernt.
Sollte es Probleme mit den Flammen geben, gehen Sie
folgendermaßen vor, um das Problem zu lösen:
Wenn die Flammen... Dann...
Niedrig und vollkommen
gelb sind
Höher als die Schale
sind
1 Schließen Sie umgehend die
Gaszufuhr und stellen Sie alle Regler
auf OFF.
2 Siehe “14 Fehlerbehebung”, um die
Ursache des Problems zu
bestimmen. Wahrscheinlich sind die
Venturirohre verstopft.
1 Schließen Sie umgehend die
Gaszufuhr und stellen Sie alle Regler
auf OFF.
2 Warten Sie 5 Minuten, damit
angesammeltes Gas entweichen
kann.
3 Zünden Sie den/die Brenner erneut
an.
4 Wenn das Problem weiterhin besteht,
siehe “14 Fehlerbehebung”, um die
Ursache des Problems zu
bestimmen.
5 Stellen Sie den Regler des seitlichen Brenners auf HIGH.
6 Wenn sich der seitliche Brenner innerhalb von 5 Sekunden
nicht entzündet, stellen Sie den Regler auf OFF, schließen
Sie die Gaszufuhr und warten Sie 5 Minuten. Dadurch kann
das angesammelte Gas entweichen.
7 Versuchen Sie erneut, den seitlichen Brenner zu entzünden.
Wenn er sich noch immer nicht entzündet, lesen Sie
“14 Fehlerbehebung”, um die Ursache des Problems zu
lokalisieren.
9.4 Ausschalten der Brenner
Wenn Sie die Brenner nicht mehr verwenden, müssen Sie
ausgeschaltet werden. Gehen Sie folgendermaßen vor:
1 Schließen Sie die Gaszufuhr.
2 Stellen Sie die Regler der Brenners auf HIGH.
Wenn Sie zuerst die Gaszufuhr schließen, stellen Sie
2
sicher, dass im Gerät kein Gas mehr vorhanden ist.
9.5 Erneutes Entzünden der Brenner
Wenn ein Brenner während der Verwendung ausgeht, gehen Sie
folgendermaßen vor:
1 Öffnen Sie den Deckel und schließen Sie die Gaszufuhr.
2 Stellen Sie alle Regler auf OFF und warten Sie 5 Minuten.
Dadurch kann das angesammelte Gas entweichen.
3 Zünden Sie den/die Brenner erneut an.
9.6 Prüfen der Flammen
Wenn Sie einen Brenner anzünden, müssen Sie seine Flammen
prüfen. Eine perfekte Flamme ist fast vollkommen blau, mit
einigen gelben Spitzen. Sporadische gelbe Flammen sind normal
und nicht schädlich.
LOW HIGH
10 HILFREICHE TIPPS UND TRICKS
10.1 Vorheizen des Geräts
Durch das Vorheizen des Geräts stellen Sie sicher, dass der Grill
ausreichend heiß ist, wenn Sie Speisen darauf legen. Gehen Sie
folgendermaßen vor:
1 Entzünden den/die Brenner und stellen Sie den/die Regler
auf HIGH.
2 Schließen Sie den Deckel und lassen Sie das Gerät zehn
Minuten lang brennen.
3 Öffnen Sie den Deckel nach zehn Minuten und legen Sie
Speisen auf den Grill.
4 Wenn Sie nun weniger Hitze benötigen, stellen Sie den/die
Regler auf eine niedrigere Position.
10.2 Verhindern des Anhaftens von
Speisen
So verhindern Sie, dass Speisen am Grill anhaften:
• Bestreichen Sie die Speisen mithilfe eines Pinsels leicht mit
Öl, bevor Sie sie auf den Grill legen. Auch der Grill kann geölt
werden.
• Heizen Sie das Gerät vor. Je wärmer der Grill ist, wenn Sie
die Speisen auflegen, umso weniger haften sie an.
• Drehen Sie die Speisen nicht zu schnell. Warten Sie, bis sie
sich erwärmt haben.
54 www.barbecook.com
Page 55

10.3 Direktes und indirektes Grillen
Je nach Art der Speisen, die Sie zubereiten, und
Zubereitungsweise können Sie entweder direkt oder indirekt
grillen:
Zone Heiß? Verwendung...
Vorn Heiß Grillen empfindlicher Speisen
(Garnelen, Fisch...)
Methode Beschreibung Verwendung
Direkt Legen Sie Ihre Speisen direkt
Indirekt Legen Sie Ihre Speisen neben
Achten Sie beim Grillen mit geschlossenem Deckel stets
1
auf das Thermometer, um sicherzustellen, dass das Gerät
nicht zu heiß wird. Siehe “10.5 Beobachten der
Temperatur”.
über einen angezündeten
Brenner, stellen Sie eine hohe
Brennerposition ein und lassen
Sie den Deckel geöffnet.
einen angezündeten Brenner,
stellen Sie eine
mittlere/niedrige
Brennerposition ein und
schließen Sie den Deckel.
Zum Anbraten
von Fleisch und
Gemüse
Zum weiteren
Garen von
angebratenem
Fleisch
10.4 Grillen mit geschlossenem Deckel
Das Schließen des Deckels beim Grillen bietet einige wichtige
Vorteile:
• Die Temperatur des Grills ist höher und bleibt konstanter.
• Sie reduzieren die Garzeit der Speisen und sie bleiben
saftiger.
• Sie reduzieren Stichflammen und sparen Gas.
Achten Sie beim Grillen mit geschlossenem Deckel stets
1
auf das Thermometer, um sicherzustellen, dass das Gerät
nicht zu heiß wird. Siehe “10.5 Beobachten der
Temperatur”.
Mitte Heißer Zubereiten von Speisen, die eine
Hinten Am
2
heißesten
Sie können auch Heizzonen erschaffen, indem Sie mit der
Leistung der Brenner experimentieren. So können Sie
beispielsweise einen Brenner auf eine niedrige Position
einstellen und die Zone über dem Brenner für
empfindliche Speisen oder Speisen verwenden, die eine
längere Garzeit benötigen.
längere Garzeit benötigen (z. B.
Würstchen, Hähnchenschenkel...)
Anbraten von Fleisch und Gemüse
10.7 Vermeiden von Stichflammen
Während des Grillens sind einige Stichflammen normal. Zu viele
Stichflammen erhöhen jedoch die Temperatur im Gerät und
können zur Entzündung von angesammeltem Fett führen. So
vermeiden Sie Stichflammen:
• Vergewissern Sie sich vor dem Grillen, dass die Schale
sauber ist. Wir empfehlen, die Schale nach jeder
Verwendung zu reinigen. Siehe “11.2 Reinigen der Schale”.
• Überprüfen Sie regelmäßig, dass die Öffnung für
ablaufendes Fett nicht verstopft ist und dass der Fettbehälter
nicht voll ist.
• Entfernen Sie überschüssiges Fett von fettigem Fleisch,
schließen Sie den Deckel und stellen Sie die Brenner auf
eine möglichst niedrige Temperatur ein.
11 PFLEGE DES GERÄTS
10.5 Beobachten der Temperatur
Ihr Gerät ist mit leistungsstarken Brenner ausgestattet. Das
heißt, es erwärmt sich schnell und Sie können die Temperatur
konstant halten. Stellen Sie beim Grillen mit geschlossenem
Deckel sicher, dass das Gerät nicht zu heiß wird. Beobachten Sie
das Thermometer am Deckel und beachten Sie dabei folgende
Richtlinien:
• Die normale Gartemperatur beträgt etwa 210 °C. Bei
höheren Temperaturen können sich tropfendes und
angesammeltes Fett entzünden.
• Die Temperatur sollte nie länger als fünf Minuten über 300 °C
liegen. Andernfalls kann das Gerät beschädigt werden und
sich verformen.
Wenn das Gerät zu warm wird, lassen Sie es abkühlen,
1
indem Sie den Deckel öffnen und die Brenner auf eine
geringere Position regeln.
10.6 Nutzen der Heizzonen
Wenn alle Brenner entzündet sind, verteilen die Brennerdeckel
die Wärme möglichst gleichmäßig über den Grill. Trotz dieser
gleichmäßigen Erwärmung sind einige Zonen heißer als andere.
Diese Heizzonen können Sie nutzen, um Ihre Speisen perfekt zu
grillen:
11.1 Reinigen des Grillrosts
Wir empfehlen, den Grillrost nach jeder Verwendung mit dem
Barbecook cleaner zu reinigen. Gehen Sie folgendermaßen vor:
1 Sprühen Sie den Schaum auf den Grillrost und lassen Sie ihn
eine Weile einwirken.
Der Schaum verfärbt sich, während er Schmutz und Fett
aufsaugt.
2 Entfernen Sie den Schaum mit einem weichen Schwamm
und Wasser und spülen Sie den Grillrost gründlich ab.
3 Trocken Sie den Grillrost sorgfältig und lagern Sie ihn an
einem trockenen Ort. Das verhindert die Rostbildung.
Sie können den Grillrost auch mit einem sanften
2
Reinigungsmittel oder mit Natriumkarbonat reinigen.
Verwenden Sie unter keinen Umständen Ofenreiniger für
den Grillrost.
11.2 Reinigen der Schale
Wir empfehlen, die Schale nach jeder Verwendung mit dem
Barbecook cleaner zu reinigen. Verwenden Sie ihn wie auf den
Grillrosten.
www.barbecook.com 55
Page 56

11.3 Reinigen der Brenner und
Venturirohre
11.3.1 WARUM MÜSSEN DIE BRENNER UND
VENTURIROHRE GEREINIGT WERDEN?
Spinnen und Insekten können Weben und Nester in den
Brennern und Venturirohren anlegen. Dadurch kann die
Gaszufuhr zu den Brennern blockiert werden. Dadurch:
• Können Sie die Brenner nicht entzünden. Wenn Sie trotzdem
entzündet werden können, produzieren Sie lediglich
qualmende und gelbe Flammen.
• Kann sich das Gas außerhalb der Venturirohre entzünden, an
den Reglern. Diese Feuer werden als Flammenrückschlag
bezeichnet und können zu ernsten Verletzungen und
Materialschäden führen.
Schäden aufgrund von verstopften Brennern und
0
Venturirohren werden als unsachgemäße Wartung
betrachtet und fallen nicht unter die Gewährleistung.
11.3.2 WANN MÜSSEN DIE BRENNER UND
VENTURIROHRE GEREINIGT WERDEN?
Sie müssen die Brenner und Venturirohre Ihres Geräts reinigen:
• Vor der erstmaligen Benutzung nach einem längeren
Zeitraum.
• Mindestens zweimal pro Jahr, einmal zu Beginn der
Grillsaison.
B
C
11.3.3 SO REINIGEN SIE DIE BRENNER UND
VENTURIROHRE
1 Entfernen Sie die Brennen wie in den Zeichnungen gezeigt
vom Gerät. Wenn Sie bemerken, dass ein Brenner
beschädigt ist, müssen Sie ihn austauschen.
A
2 Reinigen Sie die Brenner und Venturirohre mit einer kleinen
Bürste oder einem Pfeifenreiniger (auch mit einer gerade
gebogenen Büroklammer, einer Pfeifenbürste...).
3 Setzen Sie die Brenner wieder ein. Vergewissern Sie sich,
dass sich die Venturirohre über den Öffnungen der
Gasventile befinden.
11.4 Pflegen von Emaille, Edelstahl,
Chrom und pulverbeschichteten
Teilen
Das Gerät besteht aus Emaille-, Edelstahl-, Chrom- und
pulverbeschichteten Teilen. Jedes dieser Materialien muss
unterschiedlich gepflegt werden:
Material Materialpflege
Emaille
• Keine scharfkantigen Objekte verwenden und
nicht gegen harte Flächen schlagen.
• Kontakt mit kalten Flüssigkeiten vermeiden,
wenn die Fläche noch warm ist.
• Es können Metallkratzer und Scheuermittel
verwendet werden.
56 www.barbecook.com
Page 57

Material Materialpflege
Edelstahl und
Chrom
Pulverbeschic
htet
Um zu verhindern, dass sich Rost an den Edelstahlteilen
1
bildet, vermeiden Sie den Kontakt mit Chlor, Salz und
Eisen. Wir empfehlen, das Gerät nicht in Küstennähe, in
der Nähe von Bahngleisen oder Swimmingpools zu
verwenden.
Schäden aufgrund von Nichtbeachtung dieser
1
Anweisungen werden als unsachgemäße Wartung
betrachtet und fallen nicht unter die Gewährleistung.
Unter der Explosionsansicht Ihres Geräts (zweiter Teil des
Handbuchs) finden Sie eine Liste mit allen Teilen. Diese Liste
verwendet auch Symbole für das Material jedes Teils, sodass Sie
hier nachschlagen können, wie ein bestimmtes Teil zu pflegen
ist. Folgende Symbole werden in der Teileliste verwendet:
Symbol Material
• Keine aggressiven, scheuernden oder
metallischen Reiniger verwenden.
• Weiche Reinigungsmittel verwenden, die
Verschmutzungen selbstständig lösen.
• Einen weichen Schwamm oder ein weiches
Tuch verwenden.
• Nach der Reinigung gründlich spülen und vor
der Lagerung gut trocknen lassen.
• Keine scharfkantigen Objekte verwenden.
Sanfte Reinigungsmittel und einen weichen
Schwamm oder ein weiches Tuch verwenden.
• Nach der Reinigung gründlich spülen und vor
der Lagerung gut trocknen lassen.
Emaille
Chrom
Edelstahl
Pulverbeschichtet
11.5 Lagern des Geräts
Wenn Sie das Gerät über einen längeren Zeitraum nicht
benutzen, lagern Sie es an einem trockenen Ort. Vor dem Lagern
des Geräts:
• Trennen Sie die Gasflaschen. Lagern Sie das Gerät nicht in
geschlossenen Räumen (auch nicht in einer Garage oder
einem Schuppen), solange die Gasflasche angeschlossen
ist.
• Reinigen Sie die Brenner und Grillroste, reiben Sie sie mit Öl
ein und wickeln Sie sie in Papier.
• Decken Sie das Gerät mit einer Barbecook-Abdeckung ab.
Registrieren Sie Ihr Gerät auf www.barbecook.com, um
herauszufinden, welche Abdeckung Sie benötigen.
• Lagern Sie Ersatzgasflaschen nie in der Nähe eines
verwendeten Gasgeräts.
• Lagern Sie Gasflaschen stets außerhalb der Reichweite von
Kindern.
• Lagern und transportieren Sie Gasflaschen immer aufrecht.
11.7 Bestellen von Ersatzteilen
Teile, die direkt Feuer oder intensiver Hitze ausgesetzt sind,
müssen von Zeit zu Zeit ausgetauscht werden. So bestellen Sie
ein Ersatzteil:
1 Schlagen Sie die Referenznummer des gewünschten Teils
nach. Sie finden eine Liste aller Referenznummern unter den
Explosionsansichten im zweiten Teil dieses Handbuchs und
auf www.barbecook.com.
Wenn Sie Ihr Gerät online registriert haben, werden Sie
2
automatisch auf die korrekte Liste geleitet.
2 Bestellen Sie das Ersatzteil an Ihrem Verkaufsort. Sie können
Ersatzteile sowohl mit als auch ohne Gewährleistung
bestellen.
12 GEWÄHRLEISTUNG
12.1 Abgedeckt
Ihr Gerät umfasst eine Gewährleistung von zwei Jahren ab
Beginn des Kaufdatums. Diese Gewährleistung deckt alle
Herstellungsfehler ab, vorausgesetzt:
• Sie haben Ihr Gerät entsprechend den Anweisungen in
diesem Handbuch verwendet, zusammengebaut und
gepflegt. Schäden, die durch unsachgemäße Verwendung,
falsche Montage oder ungeeignete Pflege entstehen, werden
nicht als Herstellungsfehler betrachtet.
• Sie können den Kaufbeleg und die eindeutige Seriennummer
Ihres Geräts vorlegen. Diese Seriennummer setzt sich aus
dem Buchstaben G und 15 Ziffern zusammen. Sie befindet
sich:
• In diesem Handbuch und im Startpaket, das in diesem
Handbuch enthalten ist.
• Auf der Verpackung des Geräts.
• Auf dem Typenschild an der Innenseite der
Unterschranktür (Quisson, Siesta 4 und Siesta 6) oder an
der Innenseite der unteren Verkleidung vorn (Spring,
Siesta 2 und Siesta 3).
• Die Qualitätsabteilung von Barbecook prüft, ob die Teile
defekt sind und dass sie bei normaler Verwendung, korrekter
Montage und geeigneter Pflege beschädigt wurden.
Wird eine der oben genannten Bedingungen nicht erfüllt, haben
Sie keinen Anspruch auf Wiedergutmachung. In allen Fällen ist
die Gewährleistung auf die Reparatur oder den Austausch der
defekten Teile beschränkt.
12.2 Nicht abgedeckt
11.6 Lagern von Gasflaschen
Diese Anweisungen gelten für leere und volle Flaschen.
• Lagern Sie Gasflaschen immer an einem gut belüfteten Ort
im Freien. Vergewissern Sie sich, dass sie nicht übermäßiger
Wärme oder direktem Sonnenlicht ausgesetzt sind.
• Lagern Sie Gasflaschen nie an einem Ort, der sehr heiß
werden kann (in einem Auto, auf einem Boot...).
• Lagern Sie die Gasflasche oder Ersatzflaschen nie im
Unterschrank Ihres Geräts.
Folgende Schäden oder Defekte sind von der Gewährleistung
nicht abgedeckt:
• Normale Abnutzung (Rost, Verformung, Verfärbung...) von
Teilen, die Feuer oder intensiver Hitze direkt ausgesetzt sind.
Es ist normal, dass diese Teile von Zeit zu Zeit ausgetauscht
werden müssen.
• Optische Unregelmäßigkeiten, die auf den
Fertigungsprozess zurückzuführen sind. Diese
Unregelmäßigkeiten werden nicht als Herstellungsfehler
betrachtet.
www.barbecook.com 57
Page 58

• Alle Schäden, die durch ungeeignete Pflege, falsche
Lagerung, unsachgemäße Montage oder Änderungen an
vormontierten Teilen entstehen.
• Alle Schäden, die durch unsachgemäße Verwendung des
Geräts (nicht entsprechend den Anweisungen in diesem
Handbuch, für kommerzielle Zwecke...) verursacht werden.
• Alle Folgeschäden aufgrund von Nachlässigkeit oder nicht
bestimmungsgemäßer Verwendung des Geräts.
• Rost oder Verfärbung aufgrund äußerer Einflüsse, durch die
Verwendung aggressiver Reinigungsmittel, Kontakt mit
Chlor... Diese Schäden werden nicht als Herstellungsfehler
betrachtet.
13 TECHNISCHE DATEN
13.1 Typenschild
Das Typenschild führt alle technischen Daten Ihres Geräts auf.
Es befindet sich:
• Im zweiten Teil dieses Handbuchs.
• An der Innenseite der unteren Verkleidung.
13.2 Durchmesser der Einspritzdüsen
• Hauptbrenner: 1,00 mm
• Seitlicher Brenner: 0,75 mm
58 www.barbecook.com
Page 59

14 FEHLERBEHEBUNG
Problem Mögliche Ursache(n) Lösung(en)
Nicht ausreichend Wärme
Übermäßige Wärme und/oder
Stickflammen
Wärme wird nicht gleichmäßig
über Grillfläche verteilt
Gelbe Flammen
Unvollständige Flamme Brenner verstopft, gelöchert oder verrostet Brenner reinigen oder austauschen
Flammenrückschlag (Flammen
außerhalb der Venturirohre/an
Reglern)
Flammen höher als
Schalenrand
Druckminderventil summt
• Gaszufuhr nicht geöffnet
• Venturirohre nicht über den Öffnungen der
Gasventile platziert
• Brenneröffnungen verstopft
• Gasflasche (fast) leer
• Druckminderventil nicht korrekt an die Flasche
und/oder den Schlauch angeschlossen
• Speisen zu fettig
• Öffnung für ablaufendes Fett verstopft, Fett in
Schale und/oder Fett auf Brennern
• Temperatur zu hoch
Gewisse Wärmeunterschiede sind normal, siehe
“1.7 Optimale Wärmenutzung” und “10.6 Nutzen der
Heizzonen”. Mögliche Ursache(n) für große
Wärmeunterschiede:
• Gerät nicht vorgeheizt
• Brenner oder Venturirohre verstopft
• Salz auf Brennern
• Gerät an Butangasflasche angeschlossen
Brenner oder Venturirohre verstopft
• Viel Wind
• Gasflasche (fast) leer
• Fett in Schale und/oder auf Brenner geben
• Heißes Wetter
• Neue (volle) Gasflasche
• Gaszufuhr öffnen
• Venturirohre über den Öffnungen der Gasventile
platzieren
• Brenneröffnungen reinigen oder Brenner
austauschen
• Gasflasche austauschen
• Druckminderventil erneut an Flasche und/oder
Schlauch anschließen
• Überschüssiges Fett abschneiden oder Brenner
auf niedrigere Position einstellen
• Öffnung für ablaufendes Fett, Schale und
Brenner reinigen
• Brenner auf niedrigere Temperatur einstellen
und/oder Speisen direkt grillen
• Gerät vorheizen
• Brenner und Venturirohre reinigen
• Brenner reinigen
• Gerät mit einem geeigneten Druckminderventil
an Propangasflasche anschließen
1 Gaszufuhr schließen und Brenner auf OFF stellen.
2 Gerät abkühlen lassen.
3 Brenner und Venturirohre reinigen.
• Gerät mit Rückseite zum Wind aufstellen
• Gasflasche austauschen
• Schale und Brenner reinigen
Keine Gefahr und kein Defekt. Sollte nach einer
Weile von selbst aufhören.
Brenner pfeift, wenn er auf
LOW gestellt ist
Brenner kann nicht entzündet
werden (mit Zünder oder
Streichholz)
Brenner kann nicht mit Zünder
entzündet werden
Keine Funken und kein
Geräusch beim Betätigen des
Zünders
Beim Betätigen des Zünders
nur Ton (keine Funken)
Gaseinspritzdüse, Venturirohr und/oder Brenner
verschmutzt
• Brenner oder Venturirohr verstopft
• Keine Gaszufuhr
• Keine Batterie eingelegt oder Batterie nicht
korrekt eingelegt
• Mittlerer Brenner wurde nicht als erster entzündet
• Zünderkabel nicht korrekt montiert
• Elektrode beschädigt
• Falsche Erdung
• Fehlerhafter Zünder
• Keine Batterie eingelegt oder Batterie nicht
korrekt eingelegt
• Batterie leer
• Zündknopf nicht korrekt montiert
• Fehlerhafter Funkenerzeuger
• Falsche Erdung
• Brenner und Elektrode zu weit von einander
entfernt
Gaseinspritzdüse, Venturirohr und Brenner reinigen
• Brenner und Venturirohr reinigen
• Gaszufuhr öffnen und Sicherheitsknopf an
Druckminderventil drücken (nicht bei allen
Reglern vorhanden)
• Batterie (neu) einlegen, auf richtige Ausrichtung
der Anschlüsse achten
• Mittleren Brenner zuerst entzünden
• Alle Zünderverbindungen prüfen und neu
montieren
• Elektrode austauschen
• Elektroden, Brenner und Zünder prüfen und neu
montieren
• Zünder austauschen
• Batterie (neu) einlegen, auf richtige Ausrichtung
der Anschlüsse achten
• Batterie austauschen
• Zündknopf neu montieren
• Funkenerzeuger austauschen
• Funkenerzeuger und Elektroden neu anschließen
• Elektrode leicht biegen, um sie näher an den
Brenner zu bringen
www.barbecook.com 59
Page 60

Problem Mögliche Ursache(n) Lösung(en)
Funken vorhanden, die nicht
von Brennern stammen
Funken vorhanden, aber nicht
an allen Elektroden und/oder
nicht ausreichend stark
Falsche Verkabelung Verkabelung austauschen
• Falsche Erdung
• Batterie fast leer
• Feuchte oder beschädigte Elektroden
• Funkenerzeuger und Elektroden neu anschließen
• Batterie austauschen
• Elektroden mit Papiertüchern trocknen oder
Elektroden austauschen
60 www.barbecook.com
Page 61

CZ - UŽIVATELSKÁ PŘÍRUČKA
1 Registrujte svůj spotřebič........................................... 62
2 O této příručce ........................................................... 62
3 Důležité bezpečnostní pokyny ................................... 62
• Prostudujte si pokyny a dodržujte je...................... 62
• Při práci s plynem buďte opatrní............................ 62
• Vyberte vhodné umístění ....................................... 62
• Používejte zdravý rozum ........................................ 62
4 Opakované koncepty ................................................. 62
• Venturiho trubice.................................................... 62
• Kryty hořáku........................................................... 63
• Smalt...................................................................... 63
• Prudká vzplanutí .................................................... 63
5 Montáž spotřebiče...................................................... 63
• Bezpečnostní pokyny ............................................ 63
• Sestavení spotřebiče ............................................. 63
6 Připojení plynu ke spotřebiči ...................................... 63
• Která plynová nádoba, hadice a regulátor?........... 63
• Bezpečnostní pokyny ............................................ 63
• Připojení hadice ke spotřebiči................................ 63
• Připojení hadice a plynové nádoby k regulátoru.... 64
• Výměna plynové nádoby........................................ 65
7 Kontrola úniků plynu................................................... 65
• Proč je nutné provádět kontrolu úniků plynu? ....... 65
• Kdy je nutné provádět kontrolu úniků plynu? ........ 65
• Bezpečnostní pokyny ............................................ 65
• Které materiály budu potřebovat? ......................... 65
• Kontrola úniků plynu .............................................. 65
• V případě úniku plynu ............................................ 66
10 Užitečné tipy a triky.................................................... 68
• Předehřívání spotřebiče......................................... 68
• Jak zabránit ulpívání pokrmů................................. 68
• Přímé a nepřímé grilování ...................................... 68
• Grilování s uzavřeným víkem ................................. 68
• Sledování teploty ................................................... 68
• Využití výhod topných zón..................................... 69
• Jak zabránit prudkým vzplanutím.......................... 69
11 Údržba spotřebiče...................................................... 69
• Čištění grilu ............................................................ 69
• Čištění mísy............................................................ 69
• Čištění hořáků a Venturiho trubic........................... 69
• Údržba součástí opatřených ochrannou vrstvou
emailu, chromu nebo práškového laku nebo z
nerezové oceli........................................................ 70
• Uskladnění spotřebiče ........................................... 70
• Uložení plynových nádob....................................... 70
• Objednávání náhradních součástí ......................... 71
12 Záruka ........................................................................ 71
Co je kryto.............................................................. 71
•
• Co není kryto.......................................................... 71
13 Technické údaje ......................................................... 71
• Typový štítek.......................................................... 71
• Průměry trysek....................................................... 71
14 Odstraňování poruch.................................................. 72
8 Příprava spotřebiče na použití.................................... 66
• Před každým použitím ........................................... 66
• Před prvním použitím (po dlouhé době)................. 66
• Zahoření spotřebiče............................................... 66
9 Zažehnutí hořáků........................................................ 66
• Bezpečnostní pokyny ............................................ 66
• Zapálení hlavních hořáků....................................... 67
• Zapálení bočního hořáku ....................................... 67
• Vypnutí hořáků....................................................... 68
• Znovuzažehnutí hořáků.......................................... 68
• Kontrola plamenů................................................... 68
www.barbecook.com 61
Page 62

1 REGISTRUJTE SVŮJ SPOTŘEBIČ
Děkujeme vám za zakoupení spotřebiče Barbecook! Jsme si jistí,
že vám přinese mnoho příjemných okamžiků při grilování.
Chcete-li dosáhnout optimálních zážitků s naším spotřebičem,
zaregistrujte si jej na webu www.barbecook.com. Trvá to jenom
několik minut a přinese vám to některé rozsáhlé výhody.
• Získáte přístup k přizpůsobeným poprodejním službám. To
vám například umožní rychle najít náhradní součásti pro svůj
spotřebič nebo využívat optimální záruční služby
• Můžeme vás informovat o zajímavých inovací našich
produktů a poskytnout vám informace o produktech a
specifikace, které jsou relevantní pro váš spotřebič.
Další informace o registrování vašeho spotřebiče
2
naleznete na webu www.barbecook.com.
Barbecook respektuje vaše soukromí. Vaše údaje
0
nebudou prodávány, distribuovány ani sdíleny se třetími
stranami.
2 O TÉTO PŘÍRUČCE
Tato příručka je tvořena dvěma částmi:
• První část je tak, kterou čtete právě nyní. Patří sem pokyny
pro montáž, použití a údržbu spotřebiče.
• Druhá část začíná na straně 327. Obsahuje všechny obrázky
(rozložené pohledy, montážní výkresy, typové štítky)
spotřebiče, které jsou v této příručce popsány.
3 DŮLEŽITÉ BEZPEČNOSTNÍ POKYNY
3.1 Prostudujte si pokyny a dodržujte je
Před použitím spotřebiče si prostudujte veškeré pokyny. Vždy
pečlivě dodržujte pokyny. Montáž nebo použití spotřebiče jiným
způsobem může způsobit požár a poškození materiálu.
Škody způsobené nedodržením následujících pokynů
1
(nesprávná montáž, zneužití, nepřiměřená údržba) nejsou
kryty zárukou.
3.2 Při práci s plynem buďte opatrní
Práce s plynem je dokonale bezpečná, vyžaduje však zvýšenou
opatrnost:
• Plynové nádoby vždy skladujte venku, v dobře větraném
prostředí. Ujistěte se, že nejsou vystaveny působení
nadměrného tepla nebo přímému slunečnímu světlu.
• Nikdy neukládejte plynovou nádobu do skříně vašeho
spotřebiče.
• Nikdy náhradní plynovou nádobu neumísťujte do blízkosti
používaného spotřebiče.
• Po použití vždy uzavřete přívod plynu na plynové nádobě.
• Při používání plynového zařízení a v blízkosti plynové nádoby
(prázdné/plné) nikdy nekuřte.
Pokud ucítíte plyn, ihned uzavřete přívod plynu, uhaste
1
všechny plameny a otevřete víko spotřebiče. Pokud
zápach plynu trvá, vyhledejte pomoc svého dodavatele
plynu nebo hasičského sboru.
• Umístěte spotřebič alespoň 3 metry od budovy, na
otevřeném a dobře větraném místě.
• Ujistěte se, že do hořáků a odvětrávacích otvorů ve skříni
spotřebiče může neustále proudit volně vzduch.
• Zkontrolujte, zda spotřebič není umístěn pod převislou
konstrukcí (přístřešek, kryt atd.) nebo pod listím.
• Umístěte spotřebič na pevný a stabilní povrch. Nikdy jej
neumísťuje na pohybující se vozidlo (loď, přívěs atd.).
Zabraňte kontaktu s chlórem, solí nebo železem, vyhnete
1
se tak vytváření rzi na nerezové oceli. Doporučujeme
nepoužívat spotřebič v blízkosti pobřeží, železničních tratí
nebo bazénů.
3.4 Používejte zdravý rozum
Při práci se spotřebičem vždy používejte zdravý rozum:
• Používejte spotřebič pouze ve venkovním prostředí.
• Během používání spotřebič nepřesouvejte.
• Neponechávejte spotřebič během používání bez dozoru,
obzvláště v přítomnosti dětí nebo domácích zvířat.
• VÝSTRAHA! Některé volně přístupné součásti mohou být
velmi horké. Udržujte malé děti mimo dosah.
• Při manipulaci s horkými součástmi (víko, gril, ...) používejte
vhodnou ochranu.
• Spotřebič musí být během používání držen mimo dosah
hořlavých materiálů.
• Udržujte hořlavé materiály, hořlavé kapaliny a nerozpustné
předměty mimo dosah používaného spotřebiče.
• Pro plynový spotřebič nepoužívejte dřevo, dřevěné uhlí,
lávové kameny ani keramické brikety.
• Nepoužívejte spotřebič, pokud jste požívali alkoholické
nápoje nebo návykové látky.
• Nemodifikujte spotřebič.
4 OPAKOVANÉ KONCEPTY
Tato část zahrnuje definice některých méně známých konceptů.
Tyto koncepty jsou používány v několika tématech v této
příručce.
4.1 Venturiho trubice
Venturiho trubice jsou malé trubky upevněné ke vstupu do
hořáků. Na boku Venturiho trubic je otvor. Toto je viditelné na
hlavních hořácích a na bočním hořáku:
3.3 Vyberte vhodné umístění
Používejte spotřebič pouze ve venkovním prostředí. Pokud jej
použijete uvnitř, například v garáži nebo pod přístřeškem, může
to způsobit otravu oxidem uhelnatým.
Při výběru venkovního umístění vždy postupujte takto:
62 www.barbecook.com
Když plyn prochází do hořáků, musí projít Venturiho trubicemi.
Díky otvorům na bocích se plyn směšuje se vzduchem a díky
tomu s kyslíkem. To je nutné pro dobré zažehnutí hořáků: pouze
Page 63

správná směs plynu s kyslíkem zajistí správné zažehnutí hořáku
a zajistí dobrý plamen.
4.2 Kryty hořáku
Kryty hořáku představují krycí panely, které se montují nad
hořáky spotřebiče. Chrání hořáky před odkapávajícím tukem.
Otvory po stranách krytu rovněž rozvádějí teplo do grilu, takže se
prohřívá mnohem rychleji a rovnoměrněji.
4.3 Smalt
Některé části spotřebiče jsou pokryty vrstvou roztaveného skla,
která se nazývá smalt. Tento smalt chrání spodní vrstvu kovu
před korozí. Smalt je vysoce kvalitní materiál: je odolný vůči
korozi, nebledne pod vlivem vysokých teplot a velmi snadno se
udržuje.
Protože smalt je méně pružný než kov, který chrání,
1
mohou se kusy smaltu odštípnout, pokud se spotřebičem
nebudete zacházet opatrně. Chcete-li se vyhnout
problémům, buďte při montáži smaltovaných součástí
opatrní a vždy udržujte smalt způsobem popsaným v této
příručce.
6 PŘIPOJENÍ PLYNU KE SPOTŘEBIČI
6.1 Která plynová nádoba, hadice a
regulátor?
Než můžete ke spotřebiči připojit plyn, musíte si koupit plynovou
nádobu, hadici a regulátor tlaku. Vždy si kupujte takové součásti,
které splňují všechny národní standardy a jsou určeny pro typ
plynu a jmenovité tlaky uvedené na spotřebiči.
Tabulka níže ukazuje, kterou plynovou nádobu, hadici a regulátor
musíte používat. Například v Belgii musíte používat nádobu na
propan s hadicí a regulátorem pro tlak 37 mbar nebo butanovou
nádobu s hadicí a regulátorem pro tlak 28-30 mbar.
Země Plynová nádoba, hadice a regulátor
DK, GR, NO, SE,
EE, LT, LV, CZ, PL,
MT, HU, SI, SK, NL
ES, GB, IE, PT, BE,
FR, LU, IT, CY
Propan, 30 mbar / Butan, 30 mbar
Propan, 37 mbar / Butan, 28-30 mbar
4.4 Prudká vzplanutí
Prudká vzplanutí jsou náhlé plameny, které vylétnou z mísy, když
grilujete. Obvykle jsou způsobeny odkapávající tukem nebo
marinádou.
5 MONTÁŽ SPOTŘEBIČE
5.1 Bezpečnostní pokyny
• Při montáži spotřebič neměňte. Je velmi nebezpečné a proto
zakázané měnit součásti, které byly předem sestavy nebo
utěsněny výrobcem.
• Vždy pečlivě dodržujte pokyny montáže.
• Uživatel je odpovědný za správnou montáž spotřebiče.
Poškození způsobená nesprávnou montáží nejsou kryta
zárukou.
5.2 Sestavení spotřebiče
Budete potřebovat křížový šroubovák, plochý šroubovák a baterii
AA (elektrický zapalovač). Baterie nejsou součástí dodávky
spotřebiče.
1 Umístěte spotřebič na rovný a čistý povrch.
2 Sestavte spotřebič způsobem znázorněným na montážních
výkresech. Naleznete je v druhé části této příručky, za
rozloženým pohledem na spotřebič.
Při montáži smaltovaných součástí buďte velmi opatrní.
1
Nástroje a šrouby mohou poškodit smalt. K ochraně
smaltu okolo šroubů použijte dodané fíbrové podložky.
Blistrové balení může obsahovat více šroubů, než je
0
potřebné. Některé šrouby mohou po montáži zbýt.
Balení obsahuje nouzovou sadu s náhradními součástmi
0
(šrouby, svorníky, fíbrové podložky ....). Můžete je použít
v případě, že je ztratíte nebo se některé součásti poškodí.
Doporučujeme spotřebič připojovat k propanu. Propan
2
nabízí nejvyšší kvalitu spalování a je méně citlivý na
zamrznutí.
Kupte si regulátor tlaku a plynovou nádobu společně.
2
Všechny regulátory tlaku není možné nasadit na všechny
plynové nádoby.
6.2 Bezpečnostní pokyny
• Nikdy plynovou nádobu nepřipojujte přímo ke spotřebiči.
Vždy na plynovou nádobu namontujte nejprve regulátor
tlaku.
• Nikdy nemodifikujte předem sestavené nebo utěsněné
součásti nádoby, hadice nebo regulátoru tlaku.
• Udržujte hadici co nejkratší (maximálně 1,5 m), abyste
zabránili jejímu odírání o povrch země.
• Během připojování nádoby, hadice a regulátoru tlaku:
• Nikdy hadici nedeformujte.
• Vždy nádobu udržujte ve vzpřímené poloze.
• Nikdy neotevírejte přívod plynu.
• Při každé změně připojení plynu zkontrolujte vždy případné
netěsnosti. Viz “7 Kontrola úniků plynu”.
6.3 Připojení hadice ke spotřebiči
Chcete-li připojit plynovou hadici ke spotřebiči, musíte
namontovat spojku na plynovou trubku spotřebiče. Spotřebič se
dodává se dvěma spojkami, obě jsou určeny pro určité země:
Země Spojka
BE, CH, CZ, DK, ES, FI, GB, IE, IT, PT, SI Spojka A
FR Spojka B
www.barbecook.com 63
Page 64

Pokud vaše země není v tabulce uvedena, použijte spojku
2
splňující požadavky vašich národních norem.
6.3.2 SPOJKA B
Budete potřebovat klíč 22 mm a nastavitelný klíč.
1 Našroubujte spojku na plynovou hadici spotřebiče (A) a
dotáhněte ji klíčem 22 mm (B).
AB
6.3.1 SPOJKA A
Budete potřebovat klíč 19 mm a křížový šroubovák.
1 Našroubujte spojku na plynovou hadici spotřebiče (A) a
dotáhněte ji klíčem 19 mm (B).
A
B
A
2 Našroubujte plynovou hadici na spojku (C) a dotáhněte ji
dvěma klíči. Podržte spojku klíčem 22 mm a otáčejte hadicí
nastavitelným klíčem (D).
C
B
D
6.4 Připojení hadice a plynové nádoby k
regulátoru
V závislosti na typu používaného regulátoru tlaku budete
potřebovat křížový šroubovák nebo nastavitelný klíč.
2 Nasuňte hadici na spojku (C) a dotáhněte sponu křížovým
šroubovákem (D).
C
D
1 Připojte hadice k regulátoru tlaku. Postupujte jedním z
následujících způsobů:
• Pokud je hadice vybavena sponami, nasuňte hadici na
regulátor a dotáhněte sponu křížovým šroubovákem (A).
• Pokud je hadice vybavena šroubovací maticí,
našroubujte hadici na regulátor a dotáhněte matici
nastavitelným klíčem (B).
A B
2 Připojte regulátor tlaku k plynové nádobě. Postupujte jedním
z následujících způsobů:
• Pokud je regulátor vybaven šroubovací maticí,
našroubujte jej otáčením po směru hodinových ručiček
na plynovou nádobu a dotáhněte matici nastavitelným
klíčem (C).
64 www.barbecook.com
Page 65

• Pokud je regulátor vybaven šroubovacím závitem,
našroubujte regulátor otáčením proti směru hodinových
ručiček na plynovou nádobu (D).
C D
6.5 Výměna plynové nádoby
1 Uzavřete přívod plynu a nastavte všechny ovladače do
polohy OFF (Vypnuto).
2 Odpojte prázdnou plynovou nádobu a připojte plnou
nádobu.
3 Zkontrolujte nádobu, hadici a všechny přípojky, zda
nedochází k úniku plynu. Viz “7 Kontrola úniků plynu”.
7 KONTROLA ÚNIKŮ PLYNU
7.1 Proč je nutné provádět kontrolu
úniků plynu?
nanesení na plynovou součást nebo spojení, které chcete
zkontrolovat.
7.5 Kontrola úniků plynu
Pomocí testovací kapaliny nanesené na všechny plynové
součásti a přípojky zkontrolujte případné úniky plynu. Pokud se
na specifické součásti nebo přípojce vytvářejí bubliny, dochází k
úniku plynu:
✔✖
Propan a butan jsou plyny těžší než vzduch. V důsledku toho při
úniku ze spotřebiče nestoupají výše. Obzvláště v bezvětrných
dnech může netěsnosti způsobit shromažďování plynu ve
spotřebiči a v jeho okolí. Takto nashromážděný plyn se může
zažehnout a explodovat.
7.2 Kdy je nutné provádět kontrolu úniků
plynu?
• Před prvním použitím nebo před použitím po dlouhodobém
odstavení.
Pokud vám spotřebič sestavoval váš prodejce,
1
zkontrolujte rovněž možné úniky plynu.
• Při každé výměně součásti plynového systému.
• Alespoň jednou ročně, přednostně na počátku sezóny.
7.3 Bezpečnostní pokyny
• Umístěte spotřebič ve venkovním, dobře větraném prostředí.
Zkontrolujte, zda v blízkosti spotřebiče nejsou žádné
plameny nebo zdroje tepla.
• Nikdy nepoužívejte pro stanovení úniků plynu zapalovač
nebo zápalky.
• Při kontrole úniků plynu nekuřte a nezapalujte hořáky.
7.4 Které materiály budu potřebovat?
Pro kontrolu úniků plynu budete potřebovat následující:
• Testovací kapalinu. Můžete použít již průmyslově vyráběný
sprej na testování netěsností, nebo směs vody (50 %) a
mýdla na nádobí (50 %).
• Nástroj pro testování netěsností, který se dodává se
spotřebičem. Použijte jej pro nasátí testovací kapaliny a její
Chcete-li zkontrolovat případné úniky plyny, postupujte
následujícím způsobem:
1 Umístěte spotřebič do venkovního prostoru.
2 Připravte si nástroj na testování netěsnosti a testovací
kapalinu (sprej nebo směs vody/mýdla).
3 Otevřete víko a nastavte všechny ovladače do polohy OFF
(Vypnuto).
4 Mírně otevřete přívod plynu. Jednou otočte ventil plynové
nádoby.
5 Odsajte malé množství testovací kapaliny pomocí
testovacího nástroje a naneste ji na plochu, kterou chcete
zkontrolovat. Musíte zkontrolovat následující:
• Svary plynové nádoby (A)
• Hadice (B)
• Spojení mezi tlakovou nádobou a regulátorem tlaku a
mezi regulátorem tlaku a hadicí (C)
www.barbecook.com 65
Page 66

• Spojení mezi hadicí a spotřebičem (D)
A
B
C D
Regulátor tlaku a spojka se mohou odlišovat od těch,
0
které jsou na obrázku.
6 Postupujte jedním z následujících způsobů:
• Pokud zjistíte netěsnost, pokračujte způsobem
popsaným v “ V případě úniku plynu”.
• Pokud žádný únik nezjistíte, uzavřete přívod plynu,
opláchněte všechny součásti důkladně vodou a dobře je
vysušte.
7.6 V případě úniku plynu
1 Uzavřete přívod plynu a proveďte jeden z následujících
kroků:
• Pokud zjistíte únik plynu z jednoho ze spojů, dotáhněte
jej.
• Pokud zjistíte únik plynu z plynové nádoby nebo hadice,
vyměňte tuto nádobu nebo hadici.
2 Znovu zkontrolujte spojení nebo součást, u které jste zjistili
únik.
3 Pokud únik nebyl odstraněn, kontaktujte prodejce
Barbecook. Nepoužívejte spotřebič, dokud není únik
odstraněn.
Seznam nejbližších prodejců Barbecook naleznete na
2
webu www.barbecook.com.
• Hořáky jsou sestaveny správně. Venturiho trubice musí být
umístěny nad otvory plynových ventilů.
Pokud si chcete být naprosto jisti, že plynové spojení je
2
správné, musíte před každým použitím zkontrolovat
spotřebič, zda z něj neuchází plyn. Viz “7 Kontrola úniků
plynu”.
8.2 Před prvním použitím (po dlouhé
době)
Pokud používáte spotřebič poprvé, nebo po dlouhé době
odstavení, musíte provést několik dodatečných kontrol:
• Ujistěte se, že jste si důkladně prostudovali všechny pokyny
uvedené v této příručce (pouze před prvním použitím),
porozuměli jim a provedli podle nich příslušné kontroly.
• Zkontrolujte spotřebič, zda z něj neuniká plyn. Viz
“7 Kontrola úniků plynu”.
Pokud vám spotřebič sestavoval váš prodejce,
1
zkontrolujte rovněž možné úniky plynu.
• Vyčistěte hořáky a Venturiho trubice (pouze před použitím po
dlouhodobém odstavení). Viz “11.3 Čištění hořáků a
Venturiho trubic”.
• Nechte spotřebič zahořet, než do něj vložíte první kousky
potravin (pouze před prvním použitím). Viz “8.3 Zahoření
spotřebiče”.
8.3 Zahoření spotřebiče
Zahořením spotřebiče před prvním použitím z něj odstraníte
zbývající mastnotu. Postupujte následujícím způsobem:
1 Zapalte hlavní hořáky a nastavte jejich ovladače do polohy
HIGH (Vysoký). Viz “9.2 Zapálení hlavních hořáků”.
2 Uzavřete víko a nechte spotřebič 15 minut hořet. Na
spotřebič ještě nepokládejte žádné potraviny.
3 Po 15 minutách otevřete víko a ponechte spotřebič hořet
dalších 5 minut (ovladač je stále nastaven do polohy HIGH
(Vysoký)).
4 Po 5 minutách je spotřebič připraven k použití. Nyní můžete
na gril položit potraviny.
8 PŘÍPRAVA SPOTŘEBIČE NA
POUŽITÍ
8.1 Před každým použitím
Před každým použitím spotřebiče se ujistěte o následujícím:
• Spotřebič je umístěn na vhodném místě. Viz “3.3 Vyberte
vhodné umístění”.
• Plynová hadice nezadrhává o zem a nemůže se dostat do
kontaktu s horkým povrchem nebo odkapávajícím tukem.
• Miska je čistá. Doporučujeme mísu po každém použití
vyčistit. Viz “11.2 Čištění mísy”.
• Hořák a Venturiho trubice nejsou ucpány hnízdy hmyzu nebo
pavučinami. Viz “11.3 Čištění hořáků a Venturiho trubic”.
66 www.barbecook.com
9 ZAŽEHNUTÍ HOŘÁKŮ
Chcete-li zapálit hořáky elektrickým zapalovačem, musíte
0
do něj vložit baterii AA. Tato baterie není součástí
dodávky zařízení. Pouzdro pro baterii zapalovače
naleznete na ovládacím panelu spotřebiče.
9.1 Bezpečnostní pokyny
• Před zapálením spotřebiče proveďte všechny kontroly
uvedené v “8 Příprava spotřebiče na použití”.
• Zkontrolujte, zda je víko při zapálení hořáku vždy otevřené.
• Při zapalování se nikdy neohýbejte přímo nad hořákem.
Page 67

9.2 Zapálení hlavních hořáků
9.2.1 POUŽITÍ ZAPALOVAČE
1 Otevřete víko a nastavte ovladače hlavních hořáků do polohy
OFF (Vypnuto).
2 Pokud není zapálen žádný jiný hořák, otevřete přívod plynu a
vyčkejte deset sekund. To umožní stabilizaci plynu.
3 Stiskněte tlačítko zapalovače, dokud neuslyšíte jiskry.
4 Podržte zapalovač a nastavte ovladač středního hořáku do
polohy HIGH (Vysoký). Vždy zapalujte jako první střední
hořák, nikdy současně nezapalujte všechny hlavní hořáky.
5 Pokud se hořák po třech pokusech nezapálí, nastavte jeho
ovladač do polohy OFF (Vypnuto), uzavřete přívod plynu a
vyčkejte 5 minut. To umožňuje nashromážděnému plynu
uniknout.
6 Zkuste hořák znovu zapálit. Pokud se znovu nezapálí, zkuste
jej zapálit zápalkami nebo se informujte v “14 Odstraňování
poruch” a stanovte příčinu problému.
7 Jakmile je hořák zapálen, zapalte všechny ostatní hořáky
nastavením jejich ovladačů do polohy HIGH (Vysoký).
9.2.2 POUŽÍVÁNÍ ZÁPALEK
1 Umístěte jednu zápalku do držáku.
6 Pokud se hořák do 5 sekund nezapálí, nastavte jeho ovladač
do polohy OFF (Vypnuto), uzavřete přívod plynu a vyčkejte 5
minut. To umožňuje nashromážděnému plynu uniknout.
7 Zkuste hořák znovu zapálit. Pokud se znovu nezapálí,
informujte se v “14 Odstraňování poruch” a stanovte příčinu
problému.
8 Jakmile je hořák zapálen, zapalte všechny ostatní hořáky
nastavením jejich ovladačů do polohy HIGH (Vysoký).
9.3 Zapálení bočního hořáku
Tato informace neplatí pro Spring 300. Tento spotřebič není
vybaven bočním hořákem.
Boční hořák může možné použít pouze s tlakovými
1
nádobami o maximální hmotnosti 9 kg a maximálním
průměrem 220 mm.
9.3.1 POUŽITÍ ZAPALOVAČE
1 Otevřete víko a nastavte ovladač bočního hořáku do polohy
OFF (Vypnuto).
2 Pokud není zapálen žádný jiný hořák, otevřete přívod plynu a
vyčkejte deset sekund. To umožní stabilizaci plynu.
3 Stiskněte tlačítko zapalovače, dokud neuslyšíte jiskry.
4 Podržte zapalovač a nastavte ovladač bočního hořáku do
polohy HIGH (Vysoký).
5 Pokud se hořák po třech pokusech nezapálí, nastavte jeho
ovladač do polohy OFF (Vypnuto), uzavřete přívod plynu a
vyčkejte 5 minut. To umožňuje nashromážděnému plynu
uniknout.
6 Zkuste boční hořák znovu zapálit. Pokud se znovu nezapálí,
zkuste jej zapálit zápalkami nebo se informujte v
“14 Odstraňování poruch” a stanovte příčinu problému.
2 Otevřete víko a nastavte ovladače hlavních hořáků do polohy
OFF (Vypnuto).
3 Pokud není zapálen žádný jiný hořák, otevřete přívod plynu a
vyčkejte deset sekund. To umožní stabilizaci plynu.
4 Zažehněte zápalku a podržte ji asi 13 mm od hořáku.
9.3.2 POUŽÍVÁNÍ ZÁPALEK
1 Umístěte jednu zápalku do držáku.
2 Otevřete víko a nastavte ovladač bočního hořáku do polohy
OFF (Vypnuto).
3 Pokud není zapálen žádný jiný hořák, otevřete přívod plynu a
vyčkejte deset sekund. To umožní stabilizaci plynu.
4 Zažehněte zápalku a podržte ji asi 13 mm od bočního
hořáku.
5 Nastavte ovladač jednoho hořáku do polohy HIGH (Vysoký).
Na začátku vždy zažehněte pouze jeden hlavní hořák.
1
Nikdy současně nezapalujte všechny hlavní hořáky.
5 Nastavte ovladač bočního hořáku do polohy HIGH (Vysoký).
www.barbecook.com 67
Page 68

6 Pokud se boční hořák do 5 sekund nezapálí, nastavte jeho
ovladač do polohy OFF (Vypnuto), uzavřete přívod plynu a
vyčkejte 5 minut. To umožňuje nashromážděnému plynu
uniknout.
7 Zkuste boční hořák znovu zapálit. Pokud se znovu nezapálí,
informujte se v “14 Odstraňování poruch” a stanovte příčinu
problému.
9.4 Vypnutí hořáků
Pokud již hořáky nebudete používat, můžete je vypnout.
Postupujte následujícím způsobem:
1 Uzavřete přívod plynu.
2 Nastavte ovladače hořáků do polohy HIGH (Vysoký).
Nejprve se uzavřením přívodu plynu ujistěte, že ve
2
spotřebiči nezbyl žádný plyn.
10 UŽITEČNÉ TIPY A TRIKY
10.1 Předehřívání spotřebiče
Předehřátím spotřebiče zajišťujete, aby gril byl v okamžiku
položení pokrmů na rošt dostatečně horký. Postupujte
následujícím způsobem:
1 Zapalte hořáky a nastavte jejich ovladače do polohy HIGH
(Vysoký).
2 Uzavřete víko a nechte spotřebič 10 minut v klidu.
3 Po 10 minutách otevře víko a položte pokrmy na grilovací
rošt.
4 Pokud nyní potřebujete pouze méně žáru, nastavte ovladače
na nižší výkon.
10.2 Jak zabránit ulpívání pokrmů
9.5 Znovuzažehnutí hořáků
Pokud hořák během používání zhasne, postupujte následujícím
způsobem:
1 Otevřete víko a uzavřete přívod plynu.
2 Nastavte všechny ovladač do polohy OFF (Vypnuto) a
vyčkejte 5 minut. To umožňuje nashromážděnému plynu
uniknout.
3 Znovu zažehněte hořáky.
9.6 Kontrola plamenů
Při každém zažehnutí hořáku musíte zkontrolovat plameny.
Dokonalý plamen je téměř úplně modrý, se žlutou špičkou.
Občasné žluté plameny jsou normální a nejsou nijak škodlivé.
Pokud s plamenem není něco v nepořádku, vyřešte problém
jedním z následujících způsobů:
Pokud jsou plameny... Postupujte následujícím způsobem...
Nízký a úplně žlutý
Vyšší než mísa
1 Ihned uzavřete přívod plynu a
nastavte všechny ovladače do polohy
OFF (Vypnuto).
2 Příčinu problému stanovte podle
pokynů v “14 Odstraňování poruch”.
S největší pravděpodobností jsou
ucpané Venturiho trubice.
1 Ihned uzavřete přívod plynu a
nastavte všechny ovladače do polohy
OFF (Vypnuto).
2 Vyčkejte 5 minut a ponechte
nashromážděný plyn uniknout.
3 Znovu zažehněte hořáky.
4 Pokud problém přetrvává, příčinu
problému stanovte podle pokynů v
“14 Odstraňování poruch”.
Chcete-li zabránit pokrmům, aby ulpívaly ke grilu:
• Lehce potřete pokrm olejem, než jej položíte na gril. Můžete
také potřít olejem samotný gril.
• Spotřebič předehřejte. Čím teplejší bude gril, když na něj
položíte pokrm, tím méně bude pokrm ulpívat.
• Pokrmy neotáčejte příliš často. Nechte jej nejprve trochu
prohřát.
10.3 Přímé a nepřímé grilování
V závislosti na typu pokrmu, který budete připravovat a na
způsobu přípravy můžete grilovat přímo nebo nepřímo:
Metoda Popis Použití
Přímé Umístěte pokrm přímo nad
Nepřímé Umístěte pokrm vedle
Při grilování pod uzavřeným víkem vždy sledujte teploměr
1
a ujistěte se, že spotřebič není příliš horký. Viz
“10.5 Sledování teploty”.
zapálený hořák, nastavte jej na
velký plamen a ponechte víko
otevřené.
zapáleného hořáku, nastavte
jej na střední/malý plamen a
uzavřete víko.
Prudké opékání
masa a
zeleniny
Další grilování
již zprudka
opečeného
masa
10.4 Grilování s uzavřeným víkem
Uzavření víka při grilování má některé důležité výhody:
• Teplota grilu je vyšší a zůstává stálejší.
• Zkrátíte čas přípravy pokrmu a udržíte jej šťavnatější.
• Snížíte počet výskytů prudkého vzplanutí a uspoříte plyn.
Při grilování pod uzavřeným víkem vždy sledujte teploměr
1
a ujistěte se, že spotřebič není příliš horký. Viz
“10.5 Sledování teploty”.
LOW HIGH
68 www.barbecook.com
10.5 Sledování teploty
Váš spotřebič je vybaven výkonnými hořáky, takže se může
rychle zahřát a udržovat teplotu na stálé hodnotě. Při grilování s
uzavřeným víkem je nutné se ujistit, že spotřebič se příliš
nerozžhaví. Sledujte teploměr na víku a vezměte v úvahu
následující pokyny:
• Normální teplota přípravy pokrmů je asi 210 °C. Při vyšších
teplotách se může vznítit odkapávající a nashromážděný tuk.
Page 69

• Teplota by nikdy neměla překročit hodnotu 300 °C po dobu
delší než pět minut. Mohlo by dojít k poškození a
deformování spotřebiče.
Pokud bude spotřebič příliš horký, nechte jej vychladnout
1
otevřením víka a nastavením hořáků na nižší výkon.
10.6 Využití výhod topných zón
11.2 Čištění mísy
Doporučujeme mísu po každém použití vyčistit pomocí
prostředku Barbecook cleaner. Použijte jej stejným způsobem,
jako na gril.
11.3 Čištění hořáků a Venturiho trubic
Když jsou všechny hořáky zapáleny, kryty rozvádějí teplot
rovnoměrně po celém grilu. Navzdory rovnoměrnému zahřívání
jsou některé zóny žhavější než jiné. Těchto topných zón můžete
využít pro dokonalé grilování pokrmů:
Zóna Horká? Použití pro...
Přední Horká Grilování jemných potravin (krevety,
Střed Žhavější Příprava pokrmů vyžadujících delší
Zadní Nejžhavější Prudké opékání masa a zeleniny
Topné zóny můžete také vytvořit tak, že budete
2
experimentovat s výkonem jednotlivých hořáků. Můžete
například nastavit hořák na nejnižší výkon a použít zónu
nad tímto hořákem pro jemné potraviny nebo takové,
jejichž příprava vyžaduje delší dobu.
ryby....)
dobu přípravy (například klobásy,
kuřecí stehýnka...)
10.7 Jak zabránit prudkým vzplanutím
Během grilování je občasné prudké vzplanutí normální. Příliš
časté prudké vzplanutí však zvyšuje teplotu spotřebiče a může
způsobit zažehnutí nashromážděného tuku. Jak zabránit
prudkým vzplanutím:
• Před grilováním zkontrolujte, zda je miska čistá.
Doporučujeme mísu po každém použití vyčistit. Viz
“11.2 Čištění mísy”.
• Pravidelně kontrolujte, zda není ucpaný vypouštěcí otvor pro
odvod tuku a zda není naplněný odkapový tác nebo miska
tuku.
• Při grilování tučného masa odřízněte nadbytečný tuk,
uzavřete víko a nastavte hořáky na střední nebo nízký
plamen.
11 ÚDRŽBA SPOTŘEBIČE
11.3.1 PROČ MUSÍTE ČISTIT HOŘÁKY A VENTURIHO
TRUBICE
V hořácích a Venturiho trubicích mohou pavouci a hmyz vytvořit
sítě nebo hnízda. To může ucpat přívod plynu do hořáků. V
důsledku toho:
• Nemůžete hořáky zažehnout. Pokud se vám podaří je přesto
zažehnout, budou produkovat pouze žluté, kouřivé plameny.
• Plyn může začít hořet vně Venturiho trubic, u ovladačů.
Takové plameny se nazývají zpětné záblesky a mohou
způsobit těžká zranění a poškození majetku.
Škody způsobené ucpanými hořáky a Venturiho trubicemi
0
jsou považovány za neodpovídající údržbu a nejsou proto
kryty zárukou.
?
11.3.2 KDY MUSÍTE ČISTIT HOŘÁKY A VENTURIHO
TRUBICE
Hořáky a Venturiho trubice svého spotřebiče musíte čistit v
následujících případech:
• Před prvním použitím po dlouhodobém odstavení.
• Alespoň dvakrát ročně, z čehož jednou na počátku sezóny.
?
11.3.3 ČIŠTĚNÍ HOŘÁKŮ A VENTURIHO TRUBIC
1 Demontujte hořáky ze spotřebiče, jak je znázorněno na
obrázcích. Pokud si povšimnete, že je hořák poškozen,
musíte jej vyměnit.
A
11.1 Čištění grilu
Doporučujeme gril po každém použití vyčistit pomocí prostředku
Barbecook cleaner. Postupujte následujícím způsobem:
1 Nastříkejte pěnu na gril a ponechte ji chvíli působit.
Pěna se zabarví, jak bude postupně nasákat nečistoty a tuk.
2 Odstraňte pěnu měkkou houbou a vodou a důkladně gril
opláchněte.
3 Vysušte důkladně gril a uložte jej na suchém místě. To
zabrání vytváření koroze.
Gril můžete rovněž vyčistit jemným čisticím prostředkem
2
nebo jedlou sodou. Nikdy na gril nepoužívejte čističe na
pečící trouby.
www.barbecook.com 69
Page 70

Materiál Jak udržovat tento materiál
B
C
Nerezová ocel
a chrom
Práškový lak
Zabraňte kontaktu s chlórem, solí nebo železem, vyhnete
1
se tak vytváření rzi na nerezové oceli. Doporučujeme
nepoužívat spotřebič v blízkosti pobřeží, železničních tratí
nebo bazénů.
Škody způsobené nedodržením následujících pokynů
1
jsou považovány za neodpovídající údržbu a nejsou proto
kryty zárukou.
Pod rozloženým pohledem na spotřebič (druhá část příručky)
naleznete seznam všech součástí, ze kterých je zařízení
sestaveno. Tento seznam zahrnuje symbol stanovující materiál
každé součásti, takže jej můžete použít k ověření způsobu
údržby specifické součásti. Seznam součástí používá následující
symboly:
• Nepoužívejte agresivní, abrazivní nebo kov
obsahující čisticí prostředky.
• Používejte jemné čisticí prostředky a nechte je
na oceli nějakou dobu působit.
• Používejte měkkou houbu nebo tkaninu.
• Po čištění důkladně opláchněte a před
uskladněním vysušte.
• Nepoužívejte ostré předměty. Používejte
jemný čisticí prostředek, měkkou houbu nebo
tkaninu.
• Po čištění důkladně opláchněte a před
uskladněním vysušte.
2 Vyčistěte hořáky a Venturiho trubice malým kartáčem nebo
po domácku zhotoveným čističem trubky (rozložená
kancelářská sponka, kartáč na trubky...).
3 Hořáky uložte zpět. Zkontrolujte, zda jsou Venturiho trubice
umístěny nad otvory plynových ventilů.
11.4 Údržba součástí opatřených
ochrannou vrstvou emailu, chromu
nebo práškového laku nebo z
nerezové oceli
Spotřebič je tvořen smaltovanými součástmi, součástmi z
nerezové oceli, chromovanými nebo práškovým lakem
chráněnými součástmi. Každý materiál musí být udržován
odlišným způsobem:
Materiál Jak udržovat tento materiál
Smalt
• Nepoužívejte ostré předměty a neklepejte na
tvrdý povrch.
• Zabraňte kontaktu se studenými kapalinami,
dokud je spotřebič stále horký.
• Používejte kovové houby a abrazivní čisticí
prostředky.
Symbol Materiál
Smalt
Chrom
Nerezová ocel
Práškový lak
11.5 Uskladnění spotřebiče
Pokud nepoužíváte spotřebič po delší dobu, uložte jej na suchém
místě. Před uložením spotřebiče:
• Odpojte plynovou nádobu. Nikdy neskladujte spotřebič ve
vnitřním prostředí (ani v garáži nebo přístřešku), pokud je
připojen k plynové nádobě.
• Vyčistěte hořáky a grily, otřete je olejem a zabalte je do
papíru.
• Zakryjte spotřebič krytem Barbecook. Zaregistrujte svůj
spotřebič na webu www.barbecook.com, kde jsou také
informace o tom, který kryt budete potřebovat.
11.6 Uložení plynových nádob
Tyto pokyny platí pro prázdné i plné plynové nádoby.
• Plynové nádoby vždy skladujte venku, v dobře větraném
prostředí. Ujistěte se, že nejsou vystaveny působení
nadměrného tepla nebo přímému slunečnímu světlu.
• Nikdy plynovou nádobu v neskladujte na místě, které by
mohlo být velmi horké (například ve vozidle, na lodi atd....).
• Nikdy neukládejte plynovou nádobu do skříně vašeho
spotřebiče.
• Nikdy náhradní plynovou nádobu neumísťujte do blízkosti
používaného spotřebiče.
• Plynové nádoby vždy skladujte mimo dosah dětí.
70 www.barbecook.com
Page 71

• Plynové nádoby vždy skladujte a přepravujte ve vzpřímené
poloze.
11.7 Objednávání náhradních součástí
Součásti, které jsou přímo vystaveny působení ohně nebo
intenzivního žáru musí být občas vyměněny. Objednávání
náhradních součástí:
1 Vyhledejte referenční číslo potřebné součásti. Seznam všech
referenčních čísel naleznete pod rozloženými pohledy v
druhé části této příručky a na webu www.barbecook.com.
Pokud si zaregistrujete svůj spotřebič online, automaticky
2
budete odkázáni na správný seznam.
2 Objednejte si náhradní součásti v místě prodeje spotřebiče.
Náhradní součásti si můžete objednávat během záruční
doby i po jejím uplynutí.
12 ZÁRUKA
12.1 Co je kryto
Váš spotřebič se dodává se zárukou po dobu dvou let, počínaje
dnem nákupu. Tato záruka kryje všechny výrobní závady za
následujících předpokladů:
• Spotřebič jste používali, smontovali a udržovali podle
pokynů v této příručce. Poškození způsobené zneužitím,
nesprávnou montáží nebo nepřiměřenou údržbou nejsou
považovány za výrobní vady.
• Můžete předložit stvrzenkou o koupi a jedinečné sériové
číslo svého spotřebiče. Toto sériové číslo začíná písmenem
G, které je následované 15 číslicemi. Naleznete jej na tomto
místě:
• V této příručce a v přiložené stručné referenční příručce.
• Na obalu spotřebiče.
• Na typovém štítku uvnitř dveří skříně (Quisson, Siesta 4 a
Siesta 6) nebo na vnitřku spodního předního panelu
(Spring, Siesta 2 a Siesta 3).
• Oddělení kvality Barbecook ověřuje, že součásti jsou vadné
a že se ukázaly vadnými při normálním použití, správné
montáži a přiměřené údržbě.
Pokud jedna z výše uvedených podmínek není splněna, nemůže
si jakoukoliv záruku nárokovat. Ve všech případech je záruka
omezena na opravu nebo výměnu vadné součásti.
13 TECHNICKÉ ÚDAJE
13.1 Typový štítek
Typový štítek uvádí všechny technické údaje vašeho spotřebiče.
Naleznete jej na tomto místě:
• V druhé části této příručky.
• Na vnitřní straně dolního předního panelu.
13.2 Průměry trysek
• Hlavní hořák: 1,00 mm
• Boční hořák: 0,75 mm
12.2 Co není kryto
Následující škody a vady nejsou záruku kryty:
• Normální opotřebování (koroze, deformace, odbarvení...)
součástí, které jsou přímo vystaveny působení ohně nebo
intenzivního tepla. Je normální, že tyto součásti budou
občas potřebovat výměnu.
• Vizuální nepravidelnosti jsou běžné v důsledku výrobního
procesu. Tyto nepravidelnosti nejsou považovány za výrobní
vady.
• Všechny škody způsobené nepřiměřenou údržbou,
nesprávným skladováním, montáží nebo změnami
provedenými na předem sestavených součástech.
• Všechny škody způsobené zneužitím a nesprávným použitím
spotřebiče (nepoužívání podle pokynů této příručky,
používání pro komerční účely...).
• Všechny následné škody způsobené neopatrným nebo
nesprávným použitím spotřebiče.
• Koroze nebo odbarvení způsobené externími vlivy, použití
agresivních čisticích prostředků, působení chlóru.... Tato
poškození nejsou považovány za výrobní vady.
www.barbecook.com 71
Page 72

14 ODSTRAŇOVÁNÍ PORUCH
Problém Pravděpodobná příčina Řešení
Nedostatečný žár
Nadměrné teplot nebo náhlá
vzplanutí
Žár není rozdělen rovnoměrně
po povrchu grilu
Žluté plameny
Neúplný plamen Hořák je ucpaný, propíchnutý nebo zkorodovaný Vyčistěte nebo vyměňte hořák
Zpětné záblesky (plameny vně
Venturiho trubic/na ovladačích
hořáku)
Plameny jsou vyšší než okraj
mísy
Regulátor tlaku hučí
• Přívod plynu není otevřen
• Venturiho trubice nejsou umístěny na otvorech
plynových ventilů
• Otvory hořáků jsou ucpané
• Plynová nádoba je (téměř) prázdná
• Regulátor tlaku není připojen přímo k tlakové
nádobě nebo hadici
• Potraviny jsou příliš tučné
• Vypouštěcí otvor tuku je ucpaný, tuk v míse nebo
tuk na hořácích
• Příliš vysoká teplota
Jisté teplotní rozdíly jsou normální, viz
“1.7 Optimální využití žáru” a “10.6 Využití výhod
topných zón”. Pravděpodobné příčiny pro vysoké
teplotní rozdíly:
• Spotřebič není předehřát
• Hořáky nebo Venturiho trubice jsou ucpané
• Sůl na hořácích
• Spotřebič je připojen k butanu
Hořáky nebo Venturiho trubice jsou ucpané
• Příliš prudký vítr
• Plynová nádoba je (téměř) prázdná
• Tuk v míse nebo na hořácích
• Horké počasí
• Nová (plná) plynová nádoba
• Otevřete přívod plynu
• Umístěte Venturiho trubice na otvory plynových
ventilů
• Vyčistěte otvory hořáku nebo horáky vyměňte
• Vyměňte plynové hořáky
• Znovu připojte regulátor tlaku k nádobě nebo
hadici
• Odřízněte nadbytečný tuk nebo nastavte hořáky
na nízký výkon
• Vyčistěte vypouštěcí otvory tuku, misky a hořáky
• Nastavte hořáky na nižší teplotu nebo grilujte
pokrmy nepřímo
• Předehřejte spotřebič
• Vyčistěte hořáky a Venturiho trubice
• Vyčistěte hořáky
• Připojte spotřebič k propanu pomocí vhodného
regulátoru tlaku
1 Uzavřete přívod plynu a nastavte hořáky do
polohy OFF (Vypnuto).
2 Ponechte spotřebiče vychladnout.
3 Vyčistěte hořáky a Venturiho trubice.
• Nasměrujte spotřebič zadní stranou proti větru
• Vyměňte plynové hořáky
• Vyčistěte mísu a hořáky
Nejedná se o nebezpečí nebo závadu. Po chvíli by
se mělo automaticky zastavit.
Hořák píská, když je nastaven
na LOW (Nízký výkon).
Nelze zapálit hořák (pomocí
zapalovače nebo zápalek)
Nelze zapálit hořák pomocí
zapalovače
Při stisknutí zapalovače
nevznikají žádné jiskry ani
zvuky
Při stisknutí zapalovače je
slyšet pouze zvuk (žádné jiskry)
Plynová tryska, Venturiho trubice nebo hořák jsou
znečištěny
• Hořák nebo Venturiho trubice je ucpaná
• Chybí přívod plynu
• Není nainstalovaná baterie, nebo je
nainstalovaná nesprávně
• Střední hořák není zapálen jako první
• Kabeláž zapalovače není správně namontována
• Elektroda poškozena
• Vadné uzemnění
• Vadný zapalovač
• Není nainstalovaná baterie, nebo je
nainstalovaná nesprávně
• Vybitá baterie
• Tlačítko zapalovače není sestaveno správně
• Vadný generátor jisker
• Vadné uzemnění
• Hořák a elektroda jsou příliš daleko od sebe
Vyčistěte plynovou trysku, Venturiho trubice a hořák
• Vyčistěte hořák a Venturiho trubici
• Otevřete přívod plynu a stiskněte bezpečnostní
ovladač na regulátoru tlaku (není k dispozici na
všech regulátorech tlaku)
• (Znovu)nainstalujte baterii, se správně
umístěnými svorkami
• Jako první zapalte střední hořák
• Zkontrolujte a znovu sestavte všechna spojení
zapalovače
• Vyměňte elektrodu
• Zkontrolujte a znovu sestavte elektrody, hořáky a
zapalovač
• Vyměňte zapalovač
• (Znovu)nainstalujte baterii, se správně
umístěnými svorkami
• Vyměňte baterii
• Znovu sestavte tlačítko zapalovače
• Vyměňte generátor jisker
• Připojte generátor jisker a elektrody
• Mírně ohněte elektrodu a přisuňte ji blíže k hořáku
72 www.barbecook.com
Page 73

Problém Pravděpodobná příčina Řešení
Vyskytují se jiskry, které
nepocházejí z hořáků
Jiskry jsou generovány, avšak
nikoliv na všech elektrodách
nebo nejsou dostatečně
výkonné
Vadná kabeláž Vyměňte kabeláž
• Vadné uzemnění
• Téměř vybitá baterie
• Mokré nebo prasklé elektrody
• Připojte generátor jisker a elektrody
• Vyměňte baterii
• Vysušte elektrody papírovými utěrkami nebo je
vyměňte
www.barbecook.com 73
Page 74

74 www.barbecook.com
Page 75

BG - РЪКОВОДСТВО ЗА ПОТРЕБИТЕЛЯ
1 Регистрирайте своя уред......................................... 76
2 За това ръководство................................................ 76
3 Важни инструкции за безопасност......................... 76
• Прочетете и следвайте инструкциите ................ 76
• Бъдете внимателни с газта.................................. 76
• Изберете подходящо място ................................ 76
• Бъдете разумни.................................................... 76
4 Повтарящи се концепции......................................... 76
• Тръби на Вентури................................................. 77
• Козирки на горелката.......................................... 77
• Емайл .................................................................... 77
• Внезапни пламъци ............................................... 77
5 Сглобяване на уреда................................................ 77
• Инструкции за безопасност................................ 77
• За да сглобите уреда ........................................... 77
6 Свързване на газта с уреда..................................... 77
• Каква бутилка, маркуч и регулатор?.................. 77
• Инструкции за безопасност................................ 77
• Свързване на маркуча към уреда ...................... 78
• Свързване на маркуча и бутилката към
регулатора............................................................ 78
• Подмяна на бутилката ......................................... 79
7 Проверка за течове на газ....................................... 79
• Защо да проверявате за течове на газ?............ 79
• Кога да проверите за течове на газ? ................. 79
• Инструкции за безопасност................................ 79
• Какъв материал ми е необходим?...................... 79
• За да проверите за течове на газ....................... 79
• В случай на теч на газ.......................................... 80
10 Полезни съвети и препоръки .................................. 82
• Предварително затопляне на уреда................... 82
• Предотвратяване на залепването на храната... 82
• Директно и недиректно печене на скара........... 83
• Печене на скара със затворен капак................. 83
• Следене на температурата.................................. 83
• Извличане на полза от зоните на топлина......... 83
• Избягване на внезапни пламъци ........................ 83
11 Поддръжка на уреда................................................ 83
• Почистване на скарата........................................ 83
• Почистване на купата.......................................... 84
• Почистване на горелките и тръбите на Вентури84
• Поддръжка на части с покритие от емайл,
неръждаема стомана, хром и части с прахово
покритие ............................................................... 84
• Съхранение на уреда........................................... 85
• Съхраняване на газови бутилки......................... 85
• Поръчка на резервни части ................................ 85
12 Гаранция.................................................................... 85
• Какво се покрива от гаранцията ........................ 85
• Какво не се покрива от гаранцията.................... 85
13 Технически спецификации ...................................... 86
• Етикет за тип ........................................................ 86
• Диаметри на инжекторите................................... 86
14 Откриване и отстраняване на неизправности....... 87
8 Подготовка на уреда за използване....................... 80
• Преди всяка употреба ......................................... 80
• Преди първата употреба (след дълъг период на
съхранение) .......................................................... 80
• Обгаряне на уреда............................................... 80
9 Запалване на горелките........................................... 80
• Инструкции за безопасност................................ 80
• Запалване на главните горелки .......................... 81
• Запалване на страничната горелка.................... 81
• Изключване на горелките.................................... 82
• Повторно запалване на горелките ..................... 82
• Проверка на пламъците ...................................... 82
www.barbecook.com 75
Page 76

1 РЕГИСТРИРАЙТЕ СВОЯ УРЕД
Благодарим ви за покупката на уреда Barbecook! Сигурни
сме, че той ще ви донесе много приятни моменти край
барбекюто.
За да оптимизирате своето изживяване, регистрирайте
уреда на www.barbecook.com. Това отнема само няколко
минути и носи някои големи предимства:
• Можете да получите достъп до нашата персонализирана
следпродажбена услуга. Това ви позволява например
бързо да намерите резервни части за своя уред или да
се възползвате от оптимална гаранционна услуга.
• Можем да ви информираме за интересни продуктови
актуализации и да ви насочим към продуктова
информация и спецификации, които засягат вашия уред.
За повече информация относно регистрирането на
2
вашия уред посетете www.barbecook.com.
Barbecook зачита поверителността на вашите лични
0
данни. Вашите лични данни няма да бъдат продадени,
разпространени или споделени с трети страни.
2 ЗА ТОВА РЪКОВОДСТВО
Това ръководство се състои от две части:
• Първата част е частта, която четете в момента. Тя
включва инструкции за сглобяването, използването и
поддръжката на вашия уред.
• Втората част започва на страница 327. Тя включва
всички видове илюстрации (разгърнати чертежи,
монтажни чертежи, етикети за тип) на уреда, които са
описани в това ръководство.
3 ВАЖНИ ИНСТРУКЦИИ ЗА
БЕЗОПАСНОСТ
3.1 Прочетете и следвайте
инструкциите
Прочетете инструкциите, преди да използвате уреда. Винаги
следвайте внимателно инструкциите. Сглобяването или
използването на уреда по различен начин, може да причини
пожар и повреда на материала.
Повредите, причинени от неспазване на инструкциите
1
(неправилно сглобяване, неправилна употреба,
недостатъчна поддръжка и др.) не се покриват от
гаранцията.
отворете капака на уреда. Ако миризмата на газ
продължава, се свържете с доставчика си на газ или
с противопожарната служба.
3.3 Изберете подходящо място
Използвайте уреда само на открито. Използването му на
закрито, дори в гараж или навес, може да причини
натравяне с въглероден окис.
Когато избирате местоположение на открито, винаги:
• Поставяйте уреда на поне три метра от каквито и да е
сгради, на отворено и проветриво място.
• Осигурявайте свободен приток на въздух до горелките и
вентилационните отвори в шкафа по всяко време.
• Избягвайте поставянето на уреда под надвесена
структура (веранда, навес и др.) или под растителност.
• Поставяйте уреда на твърда и стабилна повърхност.
Никога не го поставяйте в движещо се превозно
средство (лодка, каравана и др.).
За да предотвратите образуването на ръжда по
1
неръждаемата стомана, избягвайте контакта с хлор,
сол и желязо. Препоръчваме ви да не използвате
уреда близо до брега, близо до железопътни релси
или близо до плувни басейни.
3.4 Бъдете разумни
Бъдете разумни винаги, когато работите с уреда:
• Използвайте само на открито.
• Не местете уреда по време на употреба.
• Не оставяйте уреда без надзор по време на употреба,
особено в присъствието на деца и животни.
• ПРЕДУПРЕЖДЕНИЕ! Някои принадлежности могат да
станат много горещи. Не позволявайте достъпа на деца.
• Използвайте подходяща защита, когато боравите с
горещи части (капак, скара и др.).
• Уредът трябва да бъде държан настрани от запалими
материали по време на употреба.
• Не допускайте уред, който се използва, да има контакт
със запалими материали, запалими течности или
разтворими предмети.
• Не използвайте дърво, въглища, вулканични камъни или
керамични брикети при газови уреди.
• Не използвайте уреда, когато сте консумирали алкохол
или сте взимали наркотици.
• Не променяйте структурата на уреда.
3.2 Бъдете внимателни с газта
Работата с газ е съвсем безопасна, но изисква известна
степен на повишено внимание:
• Винаги съхранявайте газовите бутилки на открито
проветриво място. Уверете се, че не са изложени на
прекалена горещина и директна слънчева светлина.
• Никога не съхранявайте газовата бутилка или
резервната газова бутилка в шкафа на вашия уред.
• Никога не съхранявайте вашата резервна газова
бутилка близо до газов уред, който се използва.
• Винаги изключвайте газоподаването при газовата
бутилка след употреба.
• Никога не пушете близо до газов уред, който се
използва, или близо до газова бутилка (пълна/празна).
Ако усетите газ, незабавно изключете
1
газоподаването, като угасите всички пламъци, и
76 www.barbecook.com
4 ПОВТАРЯЩИ СЕ КОНЦЕПЦИИ
Тази част включва дефиниции на някои по-непознати
концепции. Тези концепции се използват в няколко теми от
това ръководство.
Page 77

4.1 Тръби на Вентури
Тръбите на Вентури са малки тръбички, закрепени за входа
на горелките. Отстрани на тръбите има отвор. Това е видимо
на главните горелки и страничната горелка:
Когато газта протича към горелките, тя преминава през
тръбите. Благодарение на отворите отстрани, газта се
смесва с въздух и в резултат на това - с кислород. Това е
необходимо за доброто запалване в горелките: само
правилната смес от газ и кислород ще се запали правилно и
ще се получат хубави пламъци.
• Потребителят носи отговорност за правилното
сглобяване на уреда. Повредите, причинени от
неправилно сглобяване, не се покриват от гаранцията.
5.2 За да сглобите уреда
Необходима ви е кръстата отвертка, права отвертка и АА
батерия (електрически запалител). С уреда не се доставят
батерии.
1 Поставете уреда на равна и чиста повърхност.
2 Сглобете уреда, както е показано на чертежите за
сглобяване. Можете да ги намерите във втората част на
това ръководство след разглобеният изглед на уреда.
Внимавайте при сглобяване на емайлираните части.
1
Инструментите и винтовете могат да повредят
емайла. Използвайте предоставените влакнести
шайби, за да предпазите емайла около винтовете.
Пакетчето с винтове може да съдържа повече
0
винтове, отколкото са необходими. След сглобяване
може да останат винтове.
Пакетът съдържа комплект за спешни случаи с
0
резервни части (винтове, болтове, фиброви шайби и
др.). Можете да ги използвате в случай, че изгубите
или счупите някои части.
4.2 Козирки на горелката
Козирките на горелката са козирките, които се монтират над
горелките на вашия уред. Те предпазват горелките от
капеща мазнина. Отворите отстрани на козирките също така
разпределят топлината по скарата, което позволява много
по-бързо и по-равномерно нагряване.
4.3 Емайл
Някои части на уреда са покрити с пласт разтопено стъкло,
наречено емайл. Този емайл предпазва метала под него от
корозия. Емайлът е висококачествен материал: той е
устойчив на ръжда, не избледнява под влиянието на високи
температури и е лесен за поддръжка.
Тъй като емайлът не е толкова гъвкав, колкото
1
метала, който покрива, парчета от емайла могат да се
откъснат при неправилно боравене с уреда. За да
избегнете проблеми, бъдете внимателни при
сглобяване на емайлираните части и винаги
поддържайте емайла, както е описано в това
ръководство.
4.4 Внезапни пламъци
Искрите са внезапни пламъци, които излизат от купата,
когато печете на скара. Те обикновено са причинени от
капеща мазнина или марината.
5 СГЛОБЯВАНЕ НА УРЕДА
5.1 Инструкции за безопасност
• Не модифицирайте уреда при сглобяването му. Много
опасно е и не е позволено да се променят частите, които
са предварително сглобени и/или запечатани от
производителя.
• Винаги следвайте внимателно инструкциите за
сглобяване.
6 СВЪРЗВАНЕ НА ГАЗТА С УРЕДА
6.1 Каква бутилка, маркуч и
регулатор?
Преди да свържете газта към уреда, трябва да купите газова
бутилка, маркуч и регулатор на налягането. Винаги
купувайте материал, който отговаря на всички национални
стандарти на типа(овете) газ и номинално налягане, указани
по уреда.
Таблицата по-долу показва кои бутилки, маркучи и
регулатори трябва да използвате. В Белгия (BE) например
трябва да използвате пропанова бутилка с маркуч и
регулатор за 37 mbar или бутанова бутилка с маркуч и
регулатор за 28-30 mbar.
Държава Бутилка, маркуч и регулатор
DK, GR, NO, SE,
EE, LT, LV, CZ, PL,
MT, HU, SI, SK, NL
ES, GB, IE, PT, BE,
FR, LU, IT, CY
Препоръчваме ви да свържете уреда към пропан.
2
Пропанът предлага висококачествено запалване и е
по-слабо чувствителен на скреж.
Купете регулатор и газова бутилка заедно. Не всички
2
регулатори пасват на всички бутилки.
Пропан, 30 mbar / Бутан, 30 mbar
Пропан, 37 mbar / Бутан, 28-30 mbar
6.2 Инструкции за безопасност
• Никога не свързвайте бутилката директно към уреда.
Винаги първо монтирайте регулатор на налягането на
бутилката.
• Никога не променяйте предварително сглобени или
запечатени части на бутилката, маркуча или регулатора
на налягането.
www.barbecook.com 77
Page 78

• Поддържайте маркуча възможно най-къс (максимум 1,5
м), за да предотвратите влаченето му по земята.
• Докато свързвате бутилката, маркуча и регулатора на
налягането:
• Никога не изкривявайте маркуча.
• Винаги дръжте бутилката в изправено положение.
• Никога не отваряйте газоподаването.
• Проверявайте за течове на газ винаги, когато правите
промени по свързването на газта. Вижте “7 Проверка за
течове на газ”.
6.3 Свързване на маркуча към уреда
За да свържете маркуча за газта към уреда, трябва да
монтирате куплунг на тръбата за газта на уреда. Уредът се
доставя с два куплунга, които са предназначени за
определени държави:
Държава Куплунг
2 Плъзнете маркуча над куплунга (C) и затегнете стягащия
пръстен с кръстата отвертка (D).
C
D
6.3.2 КУПЛУНГ B
Необходим ви е 22-мм гаечен ключ и регулируем гаечен
ключ.
1 Завинтете куплунга към газовата тръба на уреда (А) и го
затегнете с 22-мм гаечен ключ (B).
BE, CH, CZ, DK, ES, FI, GB, IE, IT, PT, SI Куплунг А
FR Куплунг B
Ако вашата държава не е в списъка, използвайте
2
куплунга, който отговаря на вашите национални
стандарти.
AB
A
2 Завинтете маркуча за газта за куплунга (C) и го
затегнете с двата гаечни ключа. Задръжте куплунга с
22-мм гаечен ключ, докато завъртате маркуча с
регулируемия гаечен ключ (D).
C
B
D
6.4 Свързване на маркуча и бутилката
към регулатора
6.3.1 КУПЛУНГ А
Необходим ви е 19-мм гаечен ключ и кръстата отвертка.
1 Завинтете куплунга към газовата тръба на уреда (А) и го
затегнете с 19-мм гаечен ключ (B).
A
78 www.barbecook.com
B
В зависимост от типа на регулатора на налягането, който
използвате, са ви необходими кръстата отвертка и/или
регулируем гаечен ключ.
1 Свържете маркуча към регулатора на налягането.
Извършете едно от следните действия:
• Ако маркучът има стягащ пръстен, плъзнете маркуча
над регулатора и затегнете стягащия пръстен с
кръстата отвертка (А).
Page 79

• Ако маркучът има гайка, завинтете маркуча за
регулатора и затегнете гайката с регулируем гаечен
ключ (B).
A B
2 Свържете регулатора на налягането към газовата
бутилка. Извършете едно от следните действия:
• Ако регулаторът има гайка, завинтете регулатора за
бутилката по посока на часовниковата стрелка и
затегнете гайката с регулируем гаечен ключ (C).
• Ако регулаторът има винтова резба, завинтете
регулатора за бутилката по посока, обратна на
часовниковата стрелка (D).
C D
7.3 Инструкции за безопасност
• Поставете уреда на открито проветриво място. Уверете
се, че покрай уреда няма пламъци или източници на
топлина.
• Никога не използвайте запалка или кибрит за проверка
за течове на газ.
• Не пушете и не запалвайте горелките, когато
проверявате за течове на газ.
7.4 Какъв материал ми е необходим?
За да проверите за течове на газ, се нуждаете от:
• Течност за тестове. Можете да използвате готов спрей
за течове или смес от вода (50%) и препарат за миене на
чинии (50%).
• Инструментът за проверка за течове, доставен с вашия
уред. Той се използва за засмукване на течност за
тестове и прилагането й към газовия компонент или
връзка, които искате да проверите.
6.5 Подмяна на бутилката
1 Прекъснете газоподаването и поставете всички
контролни копчета в положение OFF (Изкл.).
2 Разкачете празната бутилка и свържете пълната
бутилка.
3 Проверете бутилката, маркуча и всички газови връзки за
течове. Вижте “7 Проверка за течове на газ”.
7 ПРОВЕРКА ЗА ТЕЧОВЕ НА ГАЗ
7.1 Защо да проверявате за течове на
газ?
Пропанът и бутанът са по-тежки от въздуха. В резултат на
това те не се разсейват при изтичане от уреда. Особено в
безветрени дни течът може да причини събиране на газ в
уреда и около него. Тази натрупана газ може да се запали и
да се взриви.
7.2 Кога да проверите за течове на
газ?
• Преди първата употреба или преди първата употреба
след продължителен период на неизползване.
Проверете също за течове на газ ако уредът е бил
1
сглобен от търговеца.
• Всеки път, когато подмените газов компонент.
• Поне веднъж годишно, за предпочитане в началото на
сезона.
7.5 За да проверите за течове на газ
Проверката за теч на газ се осъществява чрез прилагане на
течност за тест по всички газови компоненти и конектори.
Ако мехурчетата по определен компонент или конектор
нараснат, има теч на газ:
✔✖
За да проверите за течове на газ, направете следното:
1 Поставете уреда на открито.
2 Вземете своя инструмент за тестване на течове и
течност за тестване (спрей за теч или смес от
вода/сапун).
3 Отворете капака и настройте всички контролни копчета
до положение OFF (Изкл.).
4 Отворете леко газоподаването. Завъртете клапана на
газовата бутилка само веднъж.
5 Засмучете малко течност за тестване с инструмента за
тестване на течове и я приложете към областта, която
искате да проверите. Трябва да проверите:
• Заварките на газовата бутилка (А)
• Маркуча (B)
• Връзките между бутилката и регулатора на
налягането и между регулатора на налягането и
маркуча (C)
www.barbecook.com 79
Page 80

• Връзката между маркуча и уреда (D)
A
B
C D
Вашият регулатор на налягането и куплунгът може да
0
са различни от показаните на илюстрациите.
6 Извършете едно от следните действия:
• Ако забележите теч, продължете според
инструкциите в “ В случай на теч на газ”.
• Ако няма течове, прекъснете газоподаването,
изплакнете всички компоненти обилно с вода и ги
изсушете добре.
7.6 В случай на теч на газ
1 Прекъснете газоподаването и предприемете едно от
следните действия:
• Ако сте открили теч на газ от някоя от връзките,
затегнете тази връзка.
• Ако сте открили теч на газ от бутилката или маркуча,
подменете бутилката или маркуча.
2 Проверете отново връзката или компонентите, от които
сте открили теч на газ.
3 Ако не сте в състояние да коригирате теча, се свържете
с търговец на Barbecook. Не използвайте уреда, докато
течът не бъде коригиран.
За списък на търговци на Barbecook посетете
2
www.barbecook.com.
8 ПОДГОТОВКА НА УРЕДА ЗА
ИЗПОЛЗВАНЕ
8.1 Преди всяка употреба
При всяка употреба на уреда, проверявайте за следното:
• Уредът е на подходящо място. Вижте “3.3 Изберете
подходящо място”.
• Маркучът за газ не се влачи по земята и не влиза в
контакт с гореща повърхност или капеща мазнина.
• Купата е чиста. Препоръчваме ви да почиствате купата
след всяко използване. Вижте “11.2 Почистване на
купата”.
• Горелките и тръбите на Вентури не са запушени от
гнезда на насекоми или паяжини. Вижте
“11.3 Почистване на горелките и тръбите на Вентури”.
• Горелките са правилно сглобени. Тръбите на Вентури
трябва да са поставени над отворите на клапаните за
газ.
Ако искате да сте абсолютно сигурни, че газта е
2
правилно свързана, можете да проверявате уреда за
течове на газ преди всяка употреба. Вижте
“7 Проверка за течове на газ”.
8.2 Преди първата употреба (след
дълъг период на съхранение)
Ако използвате уреда за пръв път или за пръв път след
дълъг период на неупотреба, трябва да направите няколко
допълнителни проверки:
• Задължително прочетете, вникнете и проверете всички
инструкции в това ръководство (само преди първата
употреба).
• Проверете уреда за течове на газ. Вижте “7 Проверка за
течове на газ”.
Проверете също за течове на газ ако уредът е бил
1
сглобен от търговеца.
• Почистете горелките и тръбите на Вентури (само преди
първата употреба след дълъг период на съхранение).
Вижте “11.3 Почистване на горелките и тръбите на
Вентури”.
• Нагрейте уреда, преди да слагате храна върху него
(само преди първата употреба). Вижте “8.3 Обгаряне на
уреда”.
8.3 Обгаряне на уреда
Чрез обгаряне на уреда преди първата му употреба ще
отстраните останалите производствени мазнини от уреда.
Направете следното:
1 Запалете главните горелки и настройте контролните им
копчета на HIGH (Високо). Вижте “9.2 Запалване на
главните горелки”.
2 Затворете капака и оставете уреда да гори 15 минути.
Все още не поставяйте храна върху скарата.
3 След 15 минути отворете капака и оставете уреда да
гори още 5 минути (с контролното копче все още в
позиция HIGH).
4 След 5 минути уредът е готов за употреба. Сега можете
да поставите храна върху скарата.
9 ЗАПАЛВАНЕ НА ГОРЕЛКИТЕ
За да запалите горелките с електрическия запалител,
0
трябва да поставите АА батерия в запалителя. Тази
батерия не се доставя с уреда. Ще намерите кутията
за батерия на запалителя на контролното табло на
вашия уред.
9.1 Инструкции за безопасност
• Преди да запалите уреда, извършете всички проверки,
изброени в “8 Подготовка на уреда за използване”.
80 www.barbecook.com
Page 81

• Капакът трябва винаги да е отворен, когато запалвате
горелка.
• Никога не се навеждайте директно над горелка, когато я
запалвате.
9.2 Запалване на главните горелки
9.2.1 ИЗПОЛЗВАНЕ НА ЗАПАЛИТЕЛЯ
1 Отворете капака и поставете контролните копчета на
главните горелки в положение OFF (Изкл.).
2 Ако все още не е запалена друга горелка, отворете
газоподаването и изчакайте десет секунди. Това
позволява стабилизирането на газта.
3 Натиснете запалителя, докато чуете искри.
4 Докато държите запалителя, поставете контролното
копче на средната горелка в положение HIGH (Високо).
Винаги запалвайте първо средната горелка и никога не
опитвайте да запалите всички главни горелки
едновременно.
5 Ако горелката не се запали след три опита, настройте
контролното й копче на положение OFF (Изкл.),
прекъснете газоподаването и изчакайте 5 минути. Това
позволява на натрупаната газ да се изпари.
6 Опитайте отново да запалите горелката. Ако горелката
все още не може да се запали, опитайте да я запалите с
кибрит или вижте “14 Откриване и отстраняване на
неизправности”, за да определите причината за
проблема.
7 След запалване на една горелка запалете другите
горелки, като настроите контролните им копчета до
положение HIGH (Високо).
9.2.2 ИЗПОЛЗВАНЕ НА КИБРИТ
1 Поставете клечка кибрит в стойката за кибрит.
4 Запалете клечката кибрит и я задръжте на около 13 мм
от горелката.
5 Настройте контролното копче на горелката до
положение HIGH (Високо).
Винаги запалвайте първо една главна горелка.
1
Никога не запалвайте всички главни горелки
едновременно.
6 Ако горелката не се запали в рамките на 5 секунди,
настройте контролното й копче на положение OFF
(Изкл.), прекъснете газоподаването и изчакайте 5
минути. Това позволява на натрупаната газ да се изпари.
7 Опитайте отново да запалите горелката. Ако все още не
се пали, вижте “14 Откриване и отстраняване на
неизправности”, за да определите причината за
проблема.
8 След запалване на една горелка запалете другите
горелки, като настроите контролните им копчета до
положение HIGH (Високо).
2 Отворете капака и поставете контролните копчета на
главните горелки в положение OFF (Изкл.).
3 Ако все още не е запалена друга горелка, отворете
газоподаването и изчакайте десет секунди. Това
позволява стабилизирането на газта.
9.3 Запалване на страничната горелка
Тази информация не се отнася за Spring 300. Този уред не е
снабден със странична горелка.
Страничната горелка може да издържи съдове с
1
максимално тегло 9 кг и максимален диаметър 220
мм.
9.3.1 ИЗПОЛЗВАНЕ НА ЗАПАЛИТЕЛЯ
1 Отворете капака и поставете контролното копче на
страничната горелка в положение OFF (Изкл.).
2 Ако все още не е запалена друга горелка, отворете
газоподаването и изчакайте десет секунди. Това
позволява стабилизирането на газта.
3 Натиснете запалителя, докато чуете искри.
4 Докато държите запалителя, поставете контролното
копче на страничната горелка в положение HIGH
(Високо).
5 Ако горелката не се запали след три опита, настройте
контролното й копче на положение OFF (Изкл.),
прекъснете газоподаването и изчакайте 5 минути. Това
позволява на натрупаната газ да се изпари.
6 Опитайте отново да запалите страничната горелка. Ако
горелката все още не може да се запали, опитайте да я
запалите с кибрит или вижте “14 Откриване и
www.barbecook.com 81
Page 82

отстраняване на неизправности”, за да определите
причината за проблема.
9.3.2 ИЗПОЛЗВАНЕ НА КИБРИТ
1 Поставете клечка кибрит в стойката за кибрит.
2 Отворете капака и поставете контролното копче на
страничната горелка в положение OFF (Изкл.).
3 Ако все още не е запалена друга горелка, отворете
газоподаването и изчакайте десет секунди. Това
позволява стабилизирането на газта.
4 Запалете клечката кибрит и я задръжте на около 13 мм
от страничната горелка.
9.6 Проверка на пламъците
При всяко запалване на горелка трябва да проверите
нейните пламъци. Идеалният пламък е почти напълно син с
малко жълто отгоре. Случайните жълти пламъци са
нормални и не са вредни.
Ако има нещо нередно с пламъците, извършете едно от
следните действия, за да разрешите проблема:
Ако пламъците са... Направете следното...
Ниски и изцяло жълти
По-високи от купата
1 Незабавно прекъснете
газоподаването и настройте
всички контролни копчета в
положение OFF (Изкл.).
2 Вижте “14 Откриване и
отстраняване на неизправности”,
за да определите причината за
проблема. Най-вероятно тръбите
на Вентури са запушени.
1 Незабавно прекъснете
газоподаването и настройте
всички контролни копчета в
положение OFF (Изкл.).
2 Изчакайте 5 минути, за да
позволите на натрупаната газ да се
изпари.
3 Запалете отново горелката(ите)
4 Ако проблемът продължава, вижте
“14 Откриване и отстраняване на
неизправности”, за да определите
причината за проблема.
5 Настройте контролното копче на страничната горелка
до положение HIGH (Високо).
6 Ако страничната горелка не се запали в рамките на 5
секунди, настройте контролното й копче на положение
OFF (Изкл.), прекъснете газоподаването и изчакайте 5
минути. Това позволява на натрупаната газ да се изпари.
7 Опитайте отново да запалите страничната горелка. Ако
все още не се пали, вижте “14 Откриване и отстраняване
на неизправности”, за да определите причината за
проблема.
9.4 Изключване на горелките
Ако вече не използвате горелките, трябва да ги изключите.
Направете следното:
1 Прекъснете газоподаването.
2 Настройте контролните копчета на горелките до
положение OFF (Изкл.).
Чрез прекъсването на газоподаването първо,
2
осигурявате липсата на останала газ в уреда.
9.5 Повторно запалване на горелките
Ако някоя горелка изгасне по време на използване,
направете следното:
1 Отворете капака и прекъснете газоподаването.
2 Настройте контролните копчета до положение OFF
(Изкл.) и изчакайте 5 минути. Това позволява на
натрупаната газ да се изпари.
3 Запалете отново горелката(ите)
LOW HIGH
10 ПОЛЕЗНИ СЪВЕТИ И ПРЕПОРЪКИ
10.1 Предварително затопляне на
уреда
Чрез предварителното затопляне на уреда осигурявате
достатъчното нагряване на скарата в момента, в който
поставите храна върху нея. Направете следното:
1 Запалете главната(ите) горелка(и) и настройте
контролното(ите) копче(та) на HIGH (Високо).
2 Затворете капака и оставете уреда десет минути.
3 След десет минути отворете капака и поставете храната
върху скарата.
4 Ако сега желаете по-малко топлина, настройте
контролното(ите) копче(та) до по-ниско положение.
10.2 Предотвратяване на залепването
на храната
За да предотвратите залепването на храната към скарата:
82 www.barbecook.com
Page 83

• Намажете по храната малко мазнина с четка, преди да я
поставите на скарата. Можете също да намажете самата
скара.
• Затоплете предварително уреда. Колкото по-топла е
скарата, когато поставите храна върху нея, толкова
по-малко ще залепва храната.
• Не обръщайте храната прекалено бързо. Първо я
оставете да се затопли.
10.3 Директно и недиректно печене на
скара
10.6 Извличане на полза от зоните на
топлина
Когато всички горелки са запалени, козирките на горелките
разпределят топлината възможно най-равномерно по
скарата. Въпреки това, равномерно затопляне, някои зони
са по-горещи от други. Можете да се възползвате от тези
зони на топлина, за да сготвите храната си до
съвършенство:
Зона Гореща? Използвайте, за да...
В зависимост от типа на храната, която приготвяте, и това
как искате да я приготвите, можете да печете на скара
директно и недиректно:
Метод Описание Използване
Директно Поставете храната директно
Недиректно Поставете храната до
Когато печете на скара под затворен капак, винаги
1
следете термометъра на капака, за да сте сигурни, че
уредът няма да прегрее. Вижте “10.5 Следене на
температурата”.
над запалена горелка,
настройте горелката на
високо положение и
оставете капака отворен.
запалена горелка, настройте
горелката на средно/ниско
положение и затворете
капака.
За обжарване
на месо и
зеленчуци
За
допълнително
готвене на
обжарено
месо
10.4 Печене на скара със затворен
капак
Затварянето на капака, докато печете на скара, има някои
важни предимства:
• Температурата на скарата е по-висока и остава
по-постоянна.
• Намалявате времето за готвене на храната и
поддържате храната по-сочна.
• Намалявате внезапните пламъци и спестявате газ.
Когато печете на скара под затворен капак, винаги
1
следете термометъра на капака, за да сте сигурни, че
уредът няма да прегрее. Вижте “10.5 Следене на
температурата”.
Отпред Гореща Печете фина храна (скариди, риба
В центъра По-гореща Пригответе храна, която се нуждае
Отзад Най-горещаОбжарете месо и зеленчуци
Можете също да създадете зони на топлина, като
2
настроите силата на горелките. Например можете да
настроите горелка на ниска позиция и да използвате
зоната над тази горелка за фина храна или храна,
която се нуждае от известно време за готвене.
и др.)
от известно време за готвене
(например наденички, пилешки
кълки и др.)
10.7 Избягване на внезапни пламъци
По време на печене на скара е нормално да се появят
внезапни пламъци. Прекалено многото внезапни пламъци,
обаче, увеличават температурата в уреда и могат да запалят
натрупаната мазнина. За да избегнете внезапните пламъци:
• Проверявайте дали купата е чиста, когато започвате да
печете на скара. Препоръчваме ви да почиствате купата
след всяко използване. Вижте “11.2 Почистване на
купата”.
• Проверявайте редовно дали отворът за изтичане на
мазнина не е запушен и дали тавата или чашката за
капеща мазнина не е пълна.
• Когато печете мазно месо, изрежете излишната
мазнина, затворете капака и настройте горелките на
средно или ниско положение.
11 ПОДДРЪЖКА НА УРЕДА
11.1 Почистване на скарата
10.5 Следене на температурата
Вашият уред е снабден с мощни горелки и затова се нагрява
бързо и можете да поддържате температурата постоянна.
Когато печете на скара под затворен капак, обаче, трябва да
следите уредът да не се нагрее прекалено много.
Наблюдавайте термометъра на капака и вземете под
внимание следните указания:
• Нормалната температура на готвене е около 210 °C. При
по-висока температура капещата и натрупаната мазнина
могат да се запалят.
• Температурата никога не трябва да превишава 300 °C за
повече от пет минути. Това може да повреди или
деформира уреда.
Ако уредът се нагрее прекалено, го охладете, като
1
отворите капака и настроите горелките на по-ниска
мощност.
Препоръчваме ви да почиствате скарата след всяко
използване с Barbecook cleaner. Направете следното:
1 Разпръскайте пяната по скарата и я оставете да действа
известно време.
Пяната се обезцветява, тъй като всмуква
замърсяванията и мазнините.
2 Отстранете пяната с мека гъба и вода и изплакнете
скарата обилно.
3 Изсушете скарата добре и я съхранете на сухо място.
Това предотвратява образуването на ръжда.
Можете също да почистите скарата с мек миещ
2
препарат или със сода бикарбонат. Никога не
използвайте препарати за почистване на фурни върху
скарата.
www.barbecook.com 83
Page 84

11.2 Почистване на купата
Препоръчваме ви да почиствате купата след всяко
използване с Barbecook cleaner. Използвайте го по същия
начин, както за почистване на скарата.
11.3 Почистване на горелките и
тръбите на Вентури
11.3.1 ЗАЩО ТРЯБВА ДА ПОЧИСТВАТЕ ГОРЕЛКИТЕ И
ТРЪБИТЕ НА
Паяците и насекомите може да си направят паяжини и
гнезда в горелките и тръбите на Вентури. Това може да
запуши газоподаването към горелките. В резултат на това:
• Няма да можете да запалите горелките. Ако все пак
успеете да ги запалите, те ще произведат само димни и
жълти пламъци.
• Газта може да започне да гори извън тръбите на
Вентури при контролните копчета. Тези огньове се
наричат обратни пламъци и могат да доведат до
сериозни наранявания и повреда на материала.
Повредите, причинени от запушени горелки и тръби
0
на Вентури, се считат за недостатъчна поддръжка и
не се покриват от гаранцията.
ВЕНТУРИ?
B
C
11.3.2 КОГА ТРЯБВА ДА ПОЧИСТВАТЕ ГОРЕЛКИТЕ И
ТРЪБИТЕ НА
Трябва да почиствате горелките и тръбите на Вентури на
вашия уред:
• Преди първата употреба след продължителен период на
неизползване.
• Поне два пъти годишно, от които единият в началото на
сезона.
ВЕНТУРИ?
11.3.3 ЗА ДА ПОЧИСТИТЕ ГОРЕЛКИТЕ И ТРЪБИТЕ НА
ВЕНТУРИ
1 Отстранете горелките от уреда, както е показано на
илюстрациите. Ако забележите, че някоя горелка е
повредена, трябва да я подмените.
A
2 Почистете горелките и тръбите на Вентури с малка четка
или домашно направен почистващ уред за тръби
(разгънат кламер, четка за тръби и др.)
3 Поставете горелката обратно. Трябва да поставите
тръбите над отворите на клапаните за газ.
11.4 Поддръжка на части с покритие от
емайл, неръждаема стомана, хром
и части с прахово покритие
Уредът е съставен от части с покритие от емайл,
неръждаема стомана, хром и части с прахово покритие
Всеки материал трябва да се поддържа по различен начин:
Материал Как да поддържате този материал
84 www.barbecook.com
Емайл
• Не използвайте остри предмети и не
удряйте в твърда повърхност.
• Избягвайте контакта със студени течности,
докато уредът все още е горещ.
• Можете да използвате метални гъби и
абразивни миещи препарати.
Page 85

Материал Как да поддържате този материал
Неръждаема
стомана и
хром
Прахово
покритие
За да предотвратите образуването на ръжда по
1
неръждаемата стомана, избягвайте контакта с хлор,
сол и желязо. Препоръчваме ви да не използвате
уреда близо до брега, близо до железопътни релси
или близо до плувни басейни.
Повредите, причинени от неспазване на тези
1
инструкции, се считат за недостатъчна поддръжка и
не се покриват от гаранцията.
Под разглобения вид на вашия уред (втората част на
ръководството) ще намерите списък с всички части,
съставляващи уреда. Този списък включва символ, който
посочва материала на всяка част, така че можете да го
използвате, за да проверите как да поддържате определена
част. Списъците с части използват следните символи:
Символ Материал
• Не използвайте агресивни, абразивни или
метални миещи препарати.
• Използвайте меки миещи препарати и ги
оставете да действат по стоманата.
• Използвайте мека гъба или кърпа.
• Изплакнете обилно след почистване и
изсушете добре преди съхранение.
• Не използвайте остри предмети.
Използвайте меки почистващи препарати и
мека гъба или кърпа.
• Изплакнете обилно след почистване и
изсушете добре преди съхранение.
Емайл
Хром
Неръждаема стомана
Прахово покритие
11.5 Съхранение на уреда
Ако не използвате уреда дълъг период от време, го
съхранете на сухо място. Преди да съхраните уреда:
• Разкачете газовата бутилка. Никога не съхранявайте
уреда на закрито (дори в гараж или навес), докато е
свързан с газовата бутилка.
• Почистете горелките и гриловете, намажете ги с масло и
ги обвийте в хартия.
• Покрийте уреда с Barbecook капак. Регистрирайте своя
уред на www.barbecook.com, за да разберете какъв
капак ви е необходим.
11.6 Съхраняване на газови бутилки
• Никога не съхранявайте вашата резервна газова
бутилка близо до газов уред, който се използва.
• Винаги съхранявайте газовите бутилки далеч от достъпа
на деца.
• Винаги съхранявайте и транспортирайте газовите
бутилки в изправено положение.
11.7 Поръчка на резервни части
Частите, директно изложени на огън или силна топлина,
трябва от време на време да се заменят. За да поръчате
резервна част:
1 Вижте справочния номер на необходимата част. Списък
с всички справочни номера можете да намерите под
разглобените изгледи във втората част на това
ръководство или на www.barbecook.com.
Ако регистрирате своя уред онлайн, автоматично ще
2
бъдете насочени към правилния списък.
2 Поръчайте резервната част на избраното място за
покупка. Можете да поръчвате резервни части както в
гаранционни, така и в извънгаранционни условия.
12 ГАРАНЦИЯ
12.1 Какво се покрива от гаранцията
Вашият уред се продава с двегодишна гаранция от датата на
покупка. Тази гаранция включва всички производствени
дефекти, при условие, че:
• Сте използвали, сглобили и поддържали своя уред в
съответствие с инструкциите в това ръководство.
Повредите, причинени от неправилна употреба,
неправилно сглобяване или недостатъчна поддръжка не
се считат за производствени дефекти.
• Можете да предоставите квитанцията и уникалния
сериен номер на вашия уред. Този сериен номер
започва с G, последвано от 15 цифри. Можете да го
намерите:
• В това ръководство и в краткото упътване, включено
в ръководството.
• На опаковката на уреда.
• На етикета за типа на продукта от вътрешната страна
на вратата на шкафа (Quisson, Siesta 4 и Siesta 6) или
от вътрешната страна на долния преден панел (Spring,
Siesta 2 и Siesta 3).
• Barbecook Отделът по качеството потвърди, че частите
са дефектни и са дефектирали при нормалната
употреба, правилно сглобяване и достатъчна
поддръжка.
Ако едно от горните условия не е изпълнено, не можете да
претендирате за каквато и да е форма на компенсация. Във
всички случаи гаранцията е ограничена до ремонта или
подмяната на дефектната(ите) част(и).
Тези инструкции се отнасят както за празни, така и за пълни
газови бутилки.
• Винаги съхранявайте газовите бутилки на открито
проветриво място. Уверете се, че не са изложени на
прекалена горещина и директна слънчева светлина.
• Никога не съхранявайте газова бутилка на място, където
може да стане много горещо (в автомобил, на лодка и
др.).
• Никога не съхранявайте газовата бутилка или
резервната газова бутилка в шкафа на вашия уред.
12.2 Какво не се покрива от гаранцията
Следните повреди и дефекти не се покриват от гаранцията:
• Нормално износване (ръждясване, изкривяване,
обезцветяване и др.) на частите, които са директно
изложени на огън или силна топлина. Подмяната на тези
части от време на време е нормална.
• Визуални несъответствия, които са присъщи за
производствения процес. Тези несъответствия не се
считат за производствени дефекти.
www.barbecook.com 85
Page 86

• Всички повреди, причинени от недостатъчна поддръжка,
неправилно съхранение, неправилно сглобяване или
модификации, направени по предварително сглобените
части.
• Всички повреди, причинени от неправилно използване
или злоупотреба с уреда (ако не се използва според
инструкциите в това ръководство, ако се използва за
търговски цели и др.).
• Всички повреди вследствие на невнимателно
използване или използване на уреда не по
предназначение.
• Ръжда или обезцветяване, причинени от външни
влияния, използването на агресивни миещи препарати,
излагането на хлор и др. Тези повреди не се считат за
производствени дефекти.
13 ТЕХНИЧЕСКИ СПЕЦИФИКАЦИИ
13.1 Етикет за тип
Етикетът за тип изброява всички технически спецификации
на вашия уред. Можете да го намерите:
• Във втората част на това ръководство.
• На вътрешната страна на долния преден панел.
13.2 Диаметри на инжекторите
• Главна горелка: 1,00 мм
• Странична горелка: 0,75 мм
86 www.barbecook.com
Page 87

14 ОТКРИВАНЕ И ОТСТРАНЯВАНЕ НА
НЕИЗПРАВНОСТИ
Проблем Вероятна(и) причина(и) Решение(я)
Няма достатъчно топлина
Прекалена топлина и/или
внезапни пламъци
Топлината не е разпределена
равномерно по повърхността
на скарата
Жълти пламъци
Непълен пламък Запушена, пробита или ръждясала горелка Почистете или подменете горелката
• Газоподаването не е отворено
• Тръбите на Вентури не са поставени над
отворите на клапаните за газта
• Отворите на горелките са запушени
• Газовата бутилка е (почти) празна
• Регулаторът на налягането не е свързан
правилно към бутилката и/или маркуча
• Храната е прекалено мазна
• Отворът за изтичане на мазнината е запушен,
мазнина в купата и/или мазнина по горелките
• Температурата е твърде висока
Нормално е да има известна разлика в
топлината; вижте “1.7 Оптимално възползване от
топлината” и “10.6 Извличане на полза от зоните
на топлина”. Вероятна(и) причина(и) за големи
разлики в топлината:
• Уредът не е предварително нагрят
• Горелките или тръбите на Вентури са
запушени
• Сол по горелките
• Уредът е свързан към бутан
• Отворете газоподаването
• Поставете тръбите на Вентури над отворите
на клапаните за газта
• Почистете отворите на горелките или
подменете горелките
• Подменете газовата бутилка
• Свържете отново регулатора на налягането
към бутилката и/или маркуча
• Изрежете излишната мазнина или настройте
горелките на ниско положение
• Почистете отвора за изтичане на мазнината,
купата и горелките
• Настройте горелките на по-ниска
температура и/или печете храната недиректно
върху скарата
• Нагрейте уреда предварително
• Почистете горелките и тръбите на Вентури
• Почистете горелките
• Свържете уреда към пропан, използвайки
подходящия регулатор на налягането
Обратни пламъци (пламъци
извън тръбите на
Вентури/при контролните
копчета)
Пламъците са по-високи от
ръба на купата
Регулаторът на налягането
бръмчи
Горелката свисти, когато е в
положение LOW (Ниско)
Горелката не може да се
запали (нито със запалител,
нито с кибрит)
Горелката не може да се
запали със запалител
Горелките или тръбите на Вентури са запушени
• Силен вятър
• Газовата бутилка е (почти) празна
• Мазнина в купата и/или по горелките
• Горещо време
• Нова (пълна) газова бутилка
Замърсен газов инжектор, тръба на Вентури
и/или горелка
• Запушена горелка или тръба на Вентури
• Няма газоподаване
• Не е поставена батерията или батерията е
поставена неправилно
• Средната горелка не е била запалена първо
• Запалителят не е окабелен правилно
• Повреден електрод
• Грешно заземяване
• Повреден запалител
1 Прекъснете газоподаването и настройте
горелките в положение OFF (Изкл.).
2 Оставете уреда да се охлади.
3 Почистете горелките и тръбите на Вентури.
• Поставете уред със задната страна към
вятъра
• Подменете газовата бутилка
• Почистете купата и горелките
Това не е опасност или дефект. Би трябвало
автоматично да спре след известно време.
Почистете газовия инжектор, тръбата на
Вентури и горелката
• Почистете горелката и тръбата на Вентури
• Отворете газоподаването и натиснете
копчето за безопасност на регулатора на
налягането (не присъства на всички
регулатори)
• Поставете (отново) батерията, като
позиционирате правилно клемите
• Запалете първо средната горелка
• Проверете и осъществете отново всички
връзки на запалителя
• Подменете електрода
• Проверете и сглобете отново електродите,
горелките и запалителя
• Подменете запалителя
www.barbecook.com 87
Page 88

Проблем Вероятна(и) причина(и) Решение(я)
При натискане на запалителя
не излизат искри и не се чува
звук
При натискане на запалителя
се чува само звук (не се
виждат искри)
Има искри, които не излизат
от горелките
Има искри, но не при всички
електроди и/или не са
достатъчно силни
• Не е поставена батерията или батерията е
поставена неправилно
• Изчерпана батерия
• Бутонът на запалителя не е сглобен правилно
• Повреден искрогенератор
• Грешно заземяване
• Твърде отдалечени един от друг горелка и
електрод
Грешно окабеляване Подменете окабеляването
• Грешно заземяване
• Изтощена батерия
• Мокри или счупени електроди
• Поставете (отново) батерията, като
позиционирате правилно клемите
• Подменете батерията
• Сглобете отново бутона на запалителя
• Подменете искрогенератора
• Свържете отново искрогенератора и
електродите
• Леко огънете електрода, за да го приближите
до горелката
• Свържете отново искрогенератора и
електродите
• Подменете батерията
• Изсушете електродите с хартиена кърпа или
ги подменете
88 www.barbecook.com
Page 89

DA - BRUGERVEJLEDNING
1 Registrering af din grill................................................ 90
2 Om denne vejledning.................................................. 90
3 Vigtige sikkerhedsanvisninger.................................... 90
• Læs og følg vejledningen....................................... 90
• Vær forsigtig med gas............................................ 90
• Vælg en passende placering.................................. 90
• Brug almindelig sund fornuft.................................. 90
4 Tilbagevendende koncepter....................................... 90
• Venturirør................................................................ 90
• Brænderlåg ............................................................ 91
• Emalje .................................................................... 91
• Opblusninger ......................................................... 91
5 Samling af grillen........................................................ 91
• Sikkerhedsanvisninger........................................... 91
• For at samle grillen................................................. 91
6 Tilslutning af gas til grillen .......................................... 91
• Hvilken cylinder, slange og regulator? ................... 91
• Sikkerhedsanvisninger........................................... 91
• Tilslutning af slangen til grillen............................... 91
• Tilslutning af slangen og cylinderen til regulatoren 92
• Udskiftning af cylinderen ....................................... 93
7 Efterse for gaslækager ............................................... 93
• Hvorfor skal der efterses for gaslækager?............. 93
• Hvornår skal der efterses for gaslækager?............ 93
• Sikkerhedsanvisninger........................................... 93
• Hvilke materialer skal jeg bruge?........................... 93
• For at efterse for gaslækager................................. 93
• I tilfælde af en gaslækage...................................... 94
10 Nyttige tips og tricks .................................................. 96
• Forvarmning af grillen ............................................ 96
• Undgå, at mad sidder fast ..................................... 96
• Direkte og indirekte grillning .................................. 96
• Grilning med lukket låg .......................................... 96
• Hold øje med temperaturen................................... 96
• Udnyttelse af varmezonerne.................................. 96
• Undgåelse af opblusninger.................................... 97
11 Vedligeholdelse af grillen............................................ 97
• Rengøring af risten................................................. 97
• Rengøring af skålen ............................................... 97
• Rengøring af brændere og venturirør..................... 97
• Vedligeholdelse af emalje, rustfrit stål, krom og
pulvermalede dele.................................................. 98
• Opbevaring af grillen.............................................. 98
• Opbevaring af gascylindere................................... 98
• Bestilling af reservedele......................................... 98
12 Garanti........................................................................ 98
Dækket................................................................... 98
•
• Ikke dækket ........................................................... 99
13 Tekniske specifikationer............................................. 99
• Typeetiket............................................................... 99
• Injektordiameter..................................................... 99
14 Fejlfinding ................................................................. 100
8 Klargøring af grillen .................................................... 94
• Før hver brug.......................................................... 94
• Før første brug (efter lang tid) ................................ 94
• Afbrænding af grillen.............................................. 94
9 Tænding af brænderne............................................... 94
• Sikkerhedsanvisninger........................................... 94
• Tænding af hovedbrænderne................................. 94
• Tænding af sidebrænderen.................................... 95
• Slukning af brænderne........................................... 95
• Tænding af brænderne igen................................... 96
• Kontrol af flammerne.............................................. 96
www.barbecook.com 89
Page 90

1 REGISTRERING AF DIN GRILL
Tak, fordi du har købt en Barbecook-grill! Vi er sikre på, at du får
mange gode grilloplevelser.
For at optimere din oplevelse kan du registrere din gril på
www.barbecook.com. Det tager kun et par minutter og giver
nogle store fordele:
• Du får adgang til vores personlige eftersalgsservice. Dette
giver dig f.eks. mulighed for hurtigt at finde reservedele til
din grill eller nyde godt af en optimal garantiservice.
• Vi kan oplyse dig om spændende produktopdateringer og
videresende dig til produktoplysninger og specifikationer,
der er relevante for din grill.
Se www.barbecook.com for at få flere oplysninger om
2
registrering af din grill.
Barbecook respekterer dit privatliv. Dine oplysninger
0
bliver ikke solgt, distribueret eller delt med tredje parter.
2 OM DENNE VEJLEDNING
Denne vejledning består af to dele:
• Den første del er den, du læser lige nu. Den indeholder
instruktioner til samling, brug og vedligeholdelse af din grill.
• Den anden del starter på side 327. Den omfatter alle
illustrationer (sprængtegninger, samletegninger,
typeetiketter) for griller, der er beskrevet i denne vejledning.
3 VIGTIGE
SIKKERHEDSANVISNINGER
3.1 Læs og følg vejledningen
Læs vejledningen inden brug af grillen. Følg altid vejledningen
omhyggeligt. Forkert samling eller brug af grillen kan forårsage
brand og materiel beskadigelse.
Beskadigelser som følge af, at vejledningen ikke er blevet
1
fulgt (forkert samling, misbrug, utilstrækkelig
vedligeholdelse), dækkes ikke af garantien.
• Placere grillen mindst tre meter væk fra bygninger og på et
åbent og godt ventileret sted.
• Sørge for, at der er en fri lufttilførsel til brænderne og
lufthullerne i kabinettet på alle tidspunkter.
• Sørge for, at grillen ikke er under en overhængende struktur
(en veranda, et halvtag...) eller under nedfalden løv.
• Placere grillen på et fast og stabilt underlag. Placér aldrig
grillen i et køretøj i bevægelse (en båd, en trailer...)
Undgå kontakt med klor, salt og jern for at forhindre
1
rustdannelse på rustfrit stål. Vi anbefaler, at grillen ikke
bruges i nærheden af kystområder, jernbanespor eller
swimming pools.
3.4 Brug almindelig sund fornuft
Brug altid din sunde fornuft, når du bruger grillen:
• Brug den kun udendørs.
• Flyt ikke grillen under brug.
• Lad ikke grillen være uden opsyn under brug, især hvis der
er børn og dyr til stede.
• ADVARSEL! Nogle tilgængelige dele kan blive meget varme.
Hold børn væk.
• Brug passende beskyttelse ved håndtering af varme dele
(låg, rist...).
• Grillen skal holdes væk fra brændbare materialer under brug.
• Opbevar brændbare materialer, væsker og opløselige
genstande væk fra en grill i brug.
• Brug ikke træ, lavasten eller keramiske briketter på en
gasgrill.
• Brug ikke grillen, hvis du har indtaget alkohol eller taget
stoffer.
• Modificer ikke grillen.
4 TILBAGEVENDENDE KONCEPTER
Denne del omfatter definitioner af nogle mindre kendte
koncepter. Disse koncepter bruges i flere emner i denne
vejledning.
3.2 Vær forsigtig med gas
Det er helt sikkert at arbejde med gas, men det kræver nogle
ekstra sikkerhedsforanstaltninger:
• Opbevar altid gascylindere udendørs på et område med god
ventilation. Sørg for, at de ikke eksponeres for høj varme
eller direkte sollys.
• Opbevar aldrig din gascylinder eller reservegascylinder i
grillens kabinet.
• Opbevar aldrig din reservegascylinder i nærheden af et
tændt gasapparat.
• Sluk altid for gasforsyningen på gascylinderen efter brug,
• Ryg aldrig i nærheden af en gasgrill eller i nærheden af en
gascylinder (fuld/tom)
Hvis du kan lugte gas, skal du øjeblikkeligt lukke for
1
gasforsyningen, slukke alle flammer og åbne låget på
grillen. Hvis lugten varer ved, skal du ringe til din
gasleverandør eller brandvæsenet.
3.3 Vælg en passende placering
Brug kun grillen udendørs. Brug af grillen indendørs selv i en
garage eller et skur kan føre til kulilteforgiftning.
Når du vælger en udendørs placering, skal du altid:
4.1 Venturirør
Venturirørene er små rør, der er fastgjort til indgangen på
brænderne. Der er et hul på siden af venturirørene. Dette er kun
synligt på hovedbrænderne og på sidebrænderen:
Når gas er på vej til brænderne, passerer det gennem
venturirørene. Takket være hullerne i siderne blandes gassen
med luft og som et resultat deraf med oxygen. Dette er
nødvendigt for en god tænding i brænderne: Kun den korrekte
90 www.barbecook.com
Page 91

blanding af gas og oxygen tænder ordentligt og resulterer i gode
flammer.
4.2 Brænderlåg
Brænderlågene er låg, som du monterer over din grills brændere.
De beskytter brænderne med dryppende fedt. Hullerne i siden af
lågene fordeler også varmen over risten, så den opvarmes meget
hurtigere og mere jævnt.
4.3 Emalje
Nogle af grillens dele er dækket af et lag af smeltet glas, der
kaldes emalje. Denne emalje beskytter det underliggende metal
mod korrosion. Emalje er et højkvalitetsmateriale, der er
modstandsdygtig over for rust, falmer ikke i høje temperaturer og
er meget nemt at vedligeholde.
Da emaljen er mindre fleksibel end det metal, den
1
dækker, kan stykker af emalje falde af, hvis du håndterer
grillen forkert. For at undgå problemer skal du være
forsigtig, når du samler emaljerede dele, og altid
vedligeholde emaljen som beskrevet senere i denne
vejledning.
6 TILSLUTNING AF GAS TIL GRILLEN
6.1 Hvilken cylinder, slange og
regulator?
Inden du kan tilslutte gas til grillen, skal du købe en gascylinder,
slange og trykregulator. Køb altid materialer, der overholder alle
nationale standarder og med den eller de gastyper og nominelle
tryk, der er anført på grillen.
På nedenstående tabel kan du se, hvilken cylinder, slange og
regulator du skal bruge. I Belgien (BE) skal du f.eks. bruge en
propancylinder med en slange og regulator på 37 mbar eller en
butancylinder med en slange og regulator på 28-30 mbar.
Land Cylinder, slange og regulator
DK, GR, NO, SE,
EE, LT, LV, CZ, PL,
MT, HU, SI, SK, NL
ES, GB, IE, PT, BE,
FR, LU, IT, CY
Propan, 30 mbar/butan, 30 mbar
Propan, 37 mbar/butan, 28-30 mbar
4.4 Opblusninger
Opblusninger er pludselige flammer, der opstår fra skålen, når du
griller. De forårsages normalt af dryppende fedt eller marinade.
5 SAMLING AF GRILLEN
5.1 Sikkerhedsanvisninger
• Foretag aldrig ændringer på grillen, når du samler den. Det er
meget farligt og ikke tilladt at ændre dele, der er samlet på
forhånd og/eller forseglet fra producentens side.
• Følg altid samlevejledningen omhyggeligt.
• Brugeren er ansvarlig for, at grillen samles korrekt.
Beskadigelser som følge af forkert samling dækkes ikke af
garantien.
5.2 For at samle grillen
Du skal bruge en stjerneskruetrækker, en flad skruetrækker og et
AA-batteri (elektrisk tænder). Batterier leveres ikke sammen med
grillen.
1 Placér grillen på en flad og ren overflade.
2 Saml grillen i henhold til samletegningerne. Du kan finde
dem i den anden del af denne vejledning efter
sprængbilledet af din grill.
Vær forsigtig, når de emaljerede dele samles. Værktøjerne
1
og skruerne kan beskadige emaljen. Brug de
medfølgende fiberspændskiver til at beskytte emaljen
omkring skruerne.
Vi anbefaler at tilslutte grillen til propan. Propan har god
2
forbrændingsevne og er mindre følsom over for frost.
Køb din trykregulator og gascylinder sammen. Ikke alle
2
regulatorer passer til alle cylindere.
6.2 Sikkerhedsanvisninger
• Tilslut altid cylinderen direkte til grillen. Monter altid en
trykregulator på cylinderen først.
• Modificer aldrig allerede samlede eller forseglede dele på
cylinderen, slangen eller trykregulatoren.
• Hold slangen så kort som muligt (maks. 1,5 m) for, at undgå
at den slæber hen ad jorden.
• Ved tilslutning af cylinderen, slangen og trykregulatoren:
• Forvrid aldrig slangen.
• Hold altid cylinderen i en opret stående position.
• Åbn aldrig gasforsyningen.
• Efterse for lækager, hver gang du foretager ændringer til
gastilslutningen. Se “7 Efterse for gaslækager”.
6.3 Tilslutning af slangen til grillen
For at tilslutte slangen til grillen skal du montere en
sammenkobling på grillens gasrør. Grillen leveres med to
sammenkoblinger, der begge er beregnet til specifikke lande:
Land Sammenkobling
BE, CH, CZ, DK, ES, FI, GB, IE, IT, PT, SI Sammenkobling
A
Boblepakningen kan indeholde ekstra skruer. Skruerne
0
kan gemmes efter samlingen.
Pakken indeholder en nødpakke med ekstra reservedele
0
(skruer, møtrikker, fiberskiver...). Du kan bruge dem i
tilfælde af mistede eller ødelagte dele.
FR Sammenkobling
B
www.barbecook.com 91
Page 92

Hvis dit land ikke er angivet i tabellen, skal du bruge den
2
sammenkobling, der overholder dine nationale
standarder.
6.3.2 SAMMENKOBLING B
Du skal bruge en 22 mm skruenøgle og en justerbar skruenøgle.
1 Skru sammenkoblingen på grillens gasrør (A), og stram den
med en 22 mm skruenøgle (B).
AB
6.3.1 SAMMENKOBLING A
Du skal bruge en 19 mm skruenøgle og en stjerneskruetrækker.
1 Skru sammenkoblingen på grillens gasrør (A), og stram den
med en 19 mm skruenøgle (B).
A
B
A
2 Skru gasslangen på sammenkoblingen (C), og stram dem
med to skruenøgler. Hold sammenkoblingen med en 22 mm
skruenøgle, men du drejer slangen med en justerbar
skruenøgle (D).
C
B
D
6.4 Tilslutning af slangen og cylinderen
til regulatoren
Afhængig af den type trykregulator du bruger, skal du bruge en
stjerneskruetrækker og/eller en justerbar skruenøgle.
2 Skub slangen over sammenkoblingen (C), og stram
klemringen med en stjerneskruetrækker (D).
C
D
1 Tilslut slangen til trykregulatoren. Gør et af følgende:
• Hvis slangen har en klemring, skal du skubbe slangen
over regulatoren og stamme klemringen med en
stjerneskruetrækker (A).
• Hvis slangen har en møtrik, skal du skrue slangen på
regulatoren og stramme møtrikken med en justerbar
skruenøgle (B).
A B
2 Tilslut trykregulatoren til gascylinderen. Gør et af følgende:
• Hvis regulatoren har en møtrik, skal du skrue regulatoren
på cylinderen i urets retning og stramme møtrikken med
en justerbar skruenøgle (C).
92 www.barbecook.com
Page 93

• Hvis regulatoren har et skruegevind, skal du skrue
regulatoren på cylinderen imod urets retning (D).
C D
6.5 Udskiftning af cylinderen
1 Luk for gasforsyningen, og indstil alle kontrolknapper til OFF.
2 Frakobl den tomme cylinder, og tilkobl den fulde cylinder.
3 Efterse cylinderen, slangen og alle gastilslutninger for
lækager. Se “7 Efterse for gaslækager”.
• Værktøjet til test for lækage, der fulgte med din grill. Du skal
bruge det til at opsuge testvæsken, og påføre det på den
gaskomponent eller tilslutning, som du vil undersøge.
7.5 For at efterse for gaslækager
Du kan teste for gaslækager ved at anvende en testvæske på alle
gaskomponenter og forbindelser. Hvis der fremkommer bobler
på en bestemt komponent eller forbindelse, er der en gaslækage.
7 EFTERSE FOR GASLÆKAGER
7.1 Hvorfor skal der efterses for
gaslækager?
Propan og butan er tungere end luft. Som et resultat flyder de
ikke væk ved lækage fra grillen. Særligt på vindstille dage kan en
lækage forårsage, at gas samles omkring grillen. Den opsamlede
gas kan derefter antændes og eksplodere.
7.2 Hvornår skal der efterses for
gaslækager?
• Inden den første brug eller inden brug første gang efter
længere tids opbevaring.
Efterse også for gaslækage, hvis din grill blev samlet af
1
din forhandler.
• Hver gang du udskifter en gaskomponent.
• Mindst en gang om året, helst i begyndelsen af sæsonen.
7.3 Sikkerhedsanvisninger
• Placer grillen udendørs i et godt ventileret område. Sørg for,
at der ikke er flammer eller varmekilder i nærheden af grillen.
• Brug aldrig en lighter eller tændstik til at efterse for
gaslækager.
• Ryg ikke, og tænd ikke brænderne ved eftersyn for
gaslækager.
✔✖
Fortsæt på følgende måde for at efterse for gaslækager:
1 Sæt grillen udenfor.
2 Hent dit værktøj til test for gaslækage og testvæske
(lækagespray eller vand/sæbeblanding).
3 Åbn låget, og indstil alle kontrolknapper til OFF.
4 Åbn let for gasforsyningen. Drej en enkelt gang på
gascylinderens ventiler.
5 Opsug noget testvæske med værktøjet til test for
gaslækage, og påfør det på det område, som du vil
undersøge. Du skal undersøge:
• Svejsningerne på gascylinderen (A).
• Slangen (B)
• Forbindelserne mellem cylinderen og trykregulatoren og
mellem trykregulatoren og slangen (C).
• Forbindelsen mellem slangen og grillen (D).
A
B
7.4 Hvilke materialer skal jeg bruge?
For at efterse for gaslækager skal du bruge:
• En testvæske. Du kan bruge en lækagespray, der er klar til
brug, eller en blanding af vand (50 %) og opvaskesæbe (50
%).
C D
www.barbecook.com 93
Page 94

Din trykregulator og sammenkobling kan afvige fra de
0
viste i illustrationen.
• Brænd grillen af, inden du lægger mad på den (kun før første
brug). Se “8.3 Afbrænding af grillen”.
6 Gør et af følgende:
• Hvis du finder en lækage, skal du fortsætte som
beskrevet i “ I tilfælde af en gaslækage”.
• Hvis der ikke er lækager, skal du lukke for
gasforsyningen, skylle alle komponenter grundigt med
vand og tørre dem godt.
7.6 I tilfælde af en gaslækage
1 Luk for gasforsyningen, og gør et af følgende:
• Hvis du har fundet en lækage i en af tilslutningerne, skal
du stramme tilslutningen.
• Hvis du har fundet en lækage i cylinderen eller slangen,
skal du udskifte cylinderen eller slangen.
2 Kontroller den tilslutning eller komponent, hvor du fandt
lækagen, igen.
3 Hvis lækagen ikke er udbedret, skal du kontakte en
Barbecook-forhandler. Brug ikke grillen, før lækagen er
udbedret.
Se www.barbecook.com for en liste over
2
Barbecook-forhandlere i nærheden af dig.
8 KLARGØRING AF GRILLEN
8.1 Før hver brug
Hver gang du bruger grillen, skal du sørge for, at:
• Grillen er placeret på et passende sted. Se “3.3 Vælg en
passende placering”.
• Gasslangen ikke slæber hen ad jorden og ikke kan komme i
kontakt med en varm overflade eller med dryppende fedt.
• Skålen er ren. Vi anbefaler, at rengøre skålen efter hver brug.
Se “11.2 Rengøring af skålen”.
• Brænderne og venturirørene ikke er blokeret af insektreder
eller spindelvæv. Se “11.3 Rengøring af brændere og
venturirør”.
• Brænderne er samlet korrekt. Venturirørene skal placeres
over gasventilernes åbninger.
Hvis du vil være helt sikker på, at din gastilslutning er i
2
orden, kan du efterse grillen for gaslækager før hver brug.
Se “7 Efterse for gaslækager”.
8.2 Før første brug (efter lang tid)
8.3 Afbrænding af grillen
Ved at afbrænde grillen inden den tages i brug første gang,
fjerner du resterende produktionsfedt fra grillen. Fortsæt på
følgende måde:
1 Tænd hovedbrænderne, og indstil deres kontrolknapper til
HIGH. Se “9.2 Tænding af hovedbrænderne”.
2 Luk låget, og lad grillen brænde i 15 minutter. Læg ikke mad
på risten endnu.
3 Åbn låget efter 15 minutter, og lad grillen brænde i yderligere
5 minutter (kontrolknapper er stadig indstillet til HIGH).
4 Efter 5 minutter er grillen klar til brug. Du kan nu lægge mad
på risten.
9 TÆNDING AF BRÆNDERNE
For at tænde brænderne med den elektriske tænder skal
0
du isætte et AA-batteri i tænderen. Batteriet leveres ikke
sammen med grillen. Du kan finde tænderens
batteriindsats på din grills kontrolpanel.
9.1 Sikkerhedsanvisninger
• Inden du tænder grillen, skal du udføre alle kontroller angivet
i “8 Klargøring af grillen”.
• Sørg for, at låget altid er åbent, når du tænder en brænder.
• Bøj dig aldrig direkte ind over en brænder, når du tænder
den.
9.2 Tænding af hovedbrænderne
9.2.1 BRUG AF TÆNDEREN
1 Åbn låget, og indstil hovedbrændernes kontrolknapper til
OFF.
2 Hvis der endnu ikke er tændt en brænder, skal du åbne for
gasforsyningen og vente i 10 sekunder. Dette giver gassen
mulighed for at stabilisere sig.
3 Tryk på tænderen, indtil du hører gnister.
4 Mens du holder tænderen, skal du indstille kontrolknappen
for den midterste brænder til HIGH. Tænd altid den midterste
brænder først, prøv aldrig at tænde alle hovedbrænder på
samme tid.
5 Hvis brænderen ikke tænder efter 3 forsøg, skal du indstille
kontrolknappen til OFF, lukke for gasforsyningen og vente i 5
minutter. Dette giver mulighed for at fjerne opsamlet gas.
6 Prøv at tænde for brænderen igen. Hvis den stadig ikke
tænder, kan du prøve at tænde den med en tændstik, eller
se “14 Fejlfinding” for at finde årsagen til problemet.
7 Når brænderen er tændt, kan du tænde de andre brændere
ved at indstille deres kontrolknapper til HIGH.
Hvis du bruger grillen for første gang eller for første gang i lang
tid, skal du udføre nogle ekstra kontroller:
• Sørg for, at du har læst, forstået og kontrolleret alle
instruktionerne i denne manuel (kun før første brug).
• Efterse grillen for gaslækager. Se “7 Efterse for gaslækager”.
Efterse også for gaslækage, hvis din grill blev samlet af
1
din forhandler.
• Rengør brænderne og venturirørene (kun efter første brug i
lang tid) Se “11.3 Rengøring af brændere og venturirør”.
94 www.barbecook.com
Page 95

9.2.2 BRUG AF EN TÆNDSTIK
1 Sæt en tændstik i tændstikholderen.
2 Hvis der endnu ikke er tændt en brænder, skal du åbne for
gasforsyningen og vente i 10 sekunder. Dette giver gassen
mulighed for at stabilisere sig.
3 Tryk på tænderen, indtil du hører gnister.
4 Mens du holder tænderen, skal du indstille kontrolknappen
for sidebrænderen til HIGH.
5 Hvis brænderen ikke tænder efter 3 forsøg, skal du indstille
kontrolknappen til OFF, lukke for gasforsyningen og vente i 5
minutter. Dette giver mulighed for at fjerne opsamlet gas.
6 Prøv at tænde sidebrænderen igen. Hvis den stadig ikke
tænder, kan du prøve at tænde den med en tændstik, eller
se “14 Fejlfinding” for at finde årsagen til problemet.
2 Åbn låget, og indstil hovedbrændernes kontrolknapper til
OFF.
3 Hvis der endnu ikke er tændt en brænder, skal du åbne for
gasforsyningen og vente i 10 sekunder. Dette giver gassen
mulighed for at stabilisere sig.
4 Tænd tændstikken, og hold den ca. 13 mm fra brænderen.
9.3.2 BRUG AF EN TÆNDSTIK
1 Sæt en tændstik i tændstikholderen.
2 Åbn låget, og indstil sidebrænderens kontrolknap til OFF.
3 Hvis der endnu ikke er tændt en brænder, skal du åbne for
gasforsyningen og vente i 10 sekunder. Dette giver gassen
mulighed for at stabilisere sig.
4 Tænd tændstikken, og hold den ca. 13 mm fra
sidebrænderen.
5 Indstil kontrolknappen for en brænder til HIGH.
Tænd altid kun en hovedbrænder først. Tænd aldrig alle
1
hovedbrænderne på samme tid.
6 Hvis brænderen ikke tænder inden for 5 sekunder, skal du
indstille kontrolknappen til OFF, lukke for gasforsyningen og
vente i 5 minutter. Dette giver mulighed for at fjerne
opsamlet gas.
7 Prøv at tænde for brænderen igen. Hvis den stadig ikke
tænder, kan du se “14 Fejlfinding” for at finde årsagen til
problemet.
8 Når brænderen er tændt, kan du tænde de andre brændere
ved at indstille deres kontrolknapper til HIGH.
9.3 Tænding af sidebrænderen
Disse oplysninger gælder ikke for Spring 300. Denne grill er ikke
udstyret med en sidebrænder.
Sidebrænderen kan kun bære beholdere med en
1
maksimal vægt på 9 kg og en maksimal diameter på 220
mm.
9.3.1 BRUG AF TÆNDEREN
1 Åbn låget, og indstil sidebrænderens kontrolknap til OFF.
5 Indstil kontrolknappen for sidebrænderen til HIGH.
6 Hvis sidebrænderen ikke tænder inden for 5 sekunder, skal
du indstille kontrolknappen til OFF, lukke for gasforsyningen
og vente i 5 minutter. Dette giver mulighed for at fjerne
opsamlet gas.
7 Prøv at tænde sidebrænderen igen. Hvis den stadig ikke
tænder, kan du se “14 Fejlfinding” for at finde årsagen til
problemet.
9.4 Slukning af brænderne
Hvis du ikke længere bruger brænderne, skal du slukke dem.
Fortsæt på følgende måde:
1 Luk for gasforsyningen.
2 Indstil kontrolknapperne for brænderne til OFF.
Ved at lukke for gasforsyningen først sørger du for, at der
2
ikke er gas tilbage i grillen.
www.barbecook.com 95
Page 96

9.5 Tænding af brænderne igen
Fortsæt på følgende måde, hvis en brænder går ud, mens den er
i brug:
1 Åbn låget, og luk for gasforsyningen.
2 Indstil alle kontrolknapper til OFF, og vent i 5 minutter. Dette
giver mulighed for at fjerne opsamlet gas.
3 Tænd brænderen eller brænderne igen.
9.6 Kontrol af flammerne
Hver gang du tænder en brænder, skal du kontrollere flammerne.
En perfekt flamme er næsten helt blå med lidt gult øverst.
Sporadiske gule flammer er normalt og ikke farligt.
Hvis der er noget galt med flammerne, skal du gøre et af følgende
for at løse problemet:
Hvis flammerne er... Gør følgende...
Lave og helt gule
Højere end skålen
1 Luk øjeblikkeligt for gasforsyningen,
og indstil alle kontrolknapper til OFF.
2 Se “14 Fejlfinding” for at finde
årsagen til problemet. Venturirørene
er sandsynligvis blokerede.
1 Luk øjeblikkeligt for gasforsyningen,
og indstil alle kontrolknapper til OFF.
2 Vent 5 minutter for at lade opsamlet
gas forsvinde.
3 Tænd brænderen eller brænderne
igen.
4 Hvis problemet varer ved skal du se
“14 Fejlfinding” for at finde årsagen til
problemet.
• Forvarm grillen. Jo varmere risten er, når du lægger maden
på den, jo mindre sidder maden fast.
• Vend ikke maden for hurtigt. Lad den først få noget varme.
10.3 Direkte og indirekte grillning
Afhængig af den type mad du tilbereder, og hvordan du vil
tilberede den, kan du grille direkte eller indirekte:
Metode Beskrivelse Brug
Direkte Læg din mad direkte over en
Indirekte Læg din mad ved siden af en
Når du griller under lukket låg, skal du altid holde øje med
1
termometeret på låget for at sikre, at grillen ikke bliver for
varm. Se “10.5 Hold øje med temperaturen”.
tændt brænder, indstil
brænderen til en høj position,
og hold låget åbent.
tændt brænder, indstil
brænderen til en mellem/lav
position, og luk låget.
For at svitse
kød eller
grøntsager
For yderligere
tilberedning af
svitset mad
10.4 Grilning med lukket låg
Det har nogle vigtige fordele at grille med lukket låg:
• Grillens temperatur er højere og forbliver mere konstant.
• Du mindsker tilberedningstiden for din mad og holder din
mad mere saftig.
• Du mindsker opblusninger og sparer gas.
Når du griller under lukket låg, skal du altid holde øje med
1
termometeret på låget for at sikre, at grillen ikke bliver for
varm. Se “10.5 Hold øje med temperaturen”.
LOW HIGH
10 NYTTIGE TIPS OG TRICKS
10.1 Forvarmning af grillen
Ved at forvarme grillen sørger du for, at risten er varm nok, når du
lægger mad på den. Fortsæt på følgende måde:
1 Tænd for brænderen/brænderne, og indstil deres
kontrolknapper til HIGH.
2 Luk låget, og lad grillen stå i 10 minutter.
3 Åbn låget efter 10 minutter, og læg din mad på risten.
4 Hvis du nu skal bruge mindre varme, indstiller du
kontrolknapperne til en lavere position.
10.2 Undgå, at mad sidder fast
For at undgå at mad sidder fast på risten:
• Pensel maden med lidt olie, inden du lægger det på risten.
Du kan også pensle olie på selve risten.
10.5 Hold øje med temperaturen
Din grill er udstyret med kraftfulde brændere, så den varmes op
hurtigt, og du kan holde temperaturen jævn. Når du griller under
et lukket låg, skal du imidlertid sørge for, at grillen ikke bliver for
varm. Hold øje med termometeret på låget, og husk følgende
retningslinjer:
• En normal tilberedningstemperatur er på ca. 210 °C. Ved
højere temperaturer kan dryppende og opsamlet fedt
antændes.
• Temperaturen bør aldrig være over 300 °C i mere end fem
minutter. Dette kan beskadige og deformere grillen.
Hvis grillen bliver for varm, kan du køle den ned ved at
1
åbne låget og indstille brænderne på en lavere position.
10.6 Udnyttelse af varmezonerne
Når alle brændere er tændte, fordeler brænderlågene varmen så
jævnt som muligt over grillen. På trods af denne jævne varme er
nogle zoner stadig varmere end andre. Du kan udnytte disse
varmezoner til at grille din mad perfekt:
Zone Varm? Brug til...
Forrest Varm Grill delikat mad (rejer, fisk...)
Midt Varmere Tilbered mad, som det tager noget tid
Bagest Varmest Svits kød og grøntsager
at tilberede (f.eks. pølser, kyllingelår...)
96 www.barbecook.com
Page 97

Du kan også skabe varmezoner ved at lege med varmen
2
fra brænderne. Du kan eksempelvis indstille en brænder
til en lavere position og bruge zonen over brænderen til
delikat mad, eller mad som det tager noget tid at
tilberede.
10.7 Undgåelse af opblusninger
Opblusninger er normalt, når der grilles. For mange opblusninger
kan dog øge temperaturen i grillen og antænde ophobet fedt. For
at undgå opblusninger:
• Sørg for, at skålen er ren, inden du starter med at grille. Vi
anbefaler, at rengøre skålen efter hver brug. Se
“11.2 Rengøring af skålen”.
• Kontroller med jævne mellemrum, at fedtafløbshullet ikke er
blokeret, og at fedtdrypbakken eller -koppen ikke er fuld
endnu.
• Når du griller kød med højt fedtindhold, skal du lukke låget
og indstille brænderne til en middel eller lav position.
11 VEDLIGEHOLDELSE AF GRILLEN
11.1 Rengøring af risten
Vi anbefaler, at risten rengøres efter hver brug med Barbecook
cleaner. Fortsæt på følgende måde:
1 Sprøjt skummet på risten, og lad det virke i et par minutter.
Skummet bliver misfarvet, når det opsuger skidt og fedt.
2 Fjern skummet med en blød svamp og vand, og skyl risten
grundigt.
3 Tør risten godt, og opbevar den på et tørt sted. Dette
forhindrer rustdannelse.
Du kan også rengøre risten med et mildt
2
rengøringsmiddel eller med natron. Brug aldrig ovnrens
på risten.
11.3.2 HVORNÅR SKAL BRÆNDERE OG VENTURIRØR
RENGØRES
Du skal rengøre din grills brændere og venturirør:
• Inden den første brug efter længere tids opbevaring.
• Mindst to gange om året, hvoraf den ene skal være i
begyndelsen af sæsonen.
?
11.3.3 FOR AT RENGØRE BRÆNDERE OG VENTURIRØR
1 Fjern brænderne fra grillen som vist på illustrationen. Hvis du
lægger mærke til, at en brænder er beskadiget, skal du
udskifte den.
A
B
11.2 Rengøring af skålen
Vi anbefaler, at skålen rengøres efter hver brug med Barbecook
cleaner. Brug det på samme måde som på risten.
11.3 Rengøring af brændere og venturirør
11.3.1 HVORFOR SKAL BRÆNDERE OG VENTURIRØR
RENGØRES
Edderkopper og insekter kan lave spindelvæv og reder i
brænderne og venturirørene. Dette kan blokere gasforsyningen
til brænderne. Som et resultat:
• Du kan ikke tænde brænderne. Hvis det lykkes dig at tænde
dem, producerer de kun rygende og gule flammer.
• Gassen kan begynde at brænde uden for venturirørene ved
kontrolknapperne. Disse bål kaldes for stikflammer og kan
resultere i alvorlig personskade og materiel beskadigelse.
Beskadigelser som følge af blokerede brændere og
0
venturirør anses som utilstrækkelig vedligeholdelse og
dækkes ikke af garantien.
?
www.barbecook.com 97
Page 98

Symbol Materiale
C
2 Rengør brændere og venturirør med en lille børste eller en
hjemmelavet piberenser (en udfoldet papirclips, en
pibebørste...).
3 Sæt brænderne på igen. Sørg for at placere venturirørene
over gasventilernes åbninger.
11.4 Vedligeholdelse af emalje, rustfrit
stål, krom og pulvermalede dele
Grillen består af emaljerede og pulvermalede dele samt dele i
rustfrit stål ogkrom. Hvert materiale skal vedligeholdes
forskelligt:
Materiale Sådan vedligeholdes dette materiale
Emalje
Rustfrit stål og
krom
Pulvermalet
Undgå kontakt med klor, salt og jern for at forhindre
1
rustdannelse på rustfrit stål. Vi anbefaler, at grillen ikke
bruges i nærheden af kystområder, jernbanespor eller
swimming pools.
Beskadigelser som følge af, at denne vejledning ikke er
1
blevet fulgt, anses som utilstrækkelig vedligeholdelse og
dækkes ikke af garantien.
Under sprængbilledet af din grill (den anden del af vejledningen)
kan du se en liste over alle de dele, som grillen består af. Denne
liste indeholder et symbol, der specificerer hver dels materiale,
så du kan bruge listen til at undersøge, hvordan du vedligeholder
den bestemte del. Listen over dele bruger følgende symboler:
• Brug ikke skarpe genstande, og stød ikke
grillen mod en hård overflade.
• Undgå kontakt med kolde væsker, mens grillen
er varm.
• Du kan bruge metalsvampe og slibende
rengøringsmidler.
• Brug ikke hårde eller slibende rengøringsmidler
eller rengøringsmidler til metal.
• Brug blide rengøringsmidler, og lad dem virke
på stålet.
• Brug en blød svamp eller klud.
• Skyl grundigt efter rengøring, og tør helt inden
opbevaring.
• Brug ikke skarpe genstande. Brug et blidt
rengøringsmiddel og en blød svamp eller klud.
• Skyl grundigt efter rengøring, og tør helt inden
opbevaring.
Emalje
Krom
Rustfrit stål
Pulvermalet
11.5 Opbevaring af grillen
Hvis du ikke bruger grillen i en længere tidsperiode, skal du
opbevare den på et tørt sted. Inden du opbevarer grillen:
• Afbryd gascylinderen. Opbevar aldrig din grill indendørs
(heller ikke i en garage eller et skur), så længe den er sluttet
til gascylinderen.
• Rengør brænderne og ristene, smør dem med olie, og pak
dem ind i papir.
• Dæk din grill med et Barbecook betræk. Registrer din grill på
www.barbecook.com for at finde ud af, hvilket betræk du
skal bruge.
11.6 Opbevaring af gascylindere
Disse instruktioner gælder for både tomme og fulde gascylindere.
• Opbevar altid gascylindere udendørs på et område med god
ventilation. Sørg for, at de ikke eksponeres for høj varme
eller direkte sollys.
• Opbevar aldrig en gascylinder på et område, der kan blive
meget varmt (i en bil, på en båd...).
• Opbevar aldrig din gascylinder eller reservegascylinder i
grillens kabinet.
• Opbevar aldrig din reservegascylinder i nærheden af et
tændt gasapparat.
• Opbevar altid gascylindere uden for børns rækkevidde.
• Opbevar og transporter altid gascylindere i et en
opretstående position.
11.7 Bestilling af reservedele
Dele, der udsættes for direkte ild eller høj varme, skal udskiftes
fra tid til anden. For at bestille en reservedel:
1 Slå referencenummeret op på den del, du skal bruge. Du kan
finde en liste over alle referencenumre under
sprængbillederne i den anden del af denne vejledning og på
www.barbecook.com.
Hvis du har registreret din grill online, sendes du
2
automatisk til den rigtige liste.
2 Bestil reservedelen på dit salgssted. Du kan bestille
reservedele både under og uden for garantien.
12 GARANTI
12.1 Dækket
Din grill leveres med 2 års garanti fra købsdatoen. Denne garanti
dækker alle produktionsfejl forudsat at:
• Du har brugt, samlet og vedligeholdt grillen i henhold til
instruktionerne i denne vejledning. Beskadigelser forårsaget
af misbrug, forkert samling eller utilstrækkelig
vedligeholdelse anses ikke som produktionsfejl.
98 www.barbecook.com
Page 99

• Du kan fremvise kvitteringen og det unikke serienummer på
din grill. Serienummeret starter med et G efterfulgt af 15
cifre. Du kan finde det:
• På denne vejledning og på startpakken, der indeholdt
vejledningen.
• På grillens emballage.
• På typeetiketten på indersiden af kabinetdøren (Quisson,
Siesta 4 og Siesta 6) eller nederst på indersiden af det
forreste panel (Spring, Siesta 2 og Siesta 3).
• Barbecook-kvalitetsafdelingen bekræfter, at delene er
fejlbehæftede, og at de viste sig at være fejlbehæftede under
normal brug, korrekt samling og tilstrækkelig
vedligeholdelse.
Hvis en af ovenstående betingelser ikke overholdes, kan du ikke
gøre krav på nogen form for erstatning. Garantien er i alle tilfælde
begrænset til reparation eller erstatning af fejlbehæftede dele.
12.2 Ikke dækket
Følgende beskadigelser og defekter er ikke dækket af garantien:
• Normal slidtage (rust, skævhed, misfarvning...) af dele, der er
direkte udsat for ild eller høj varme. Det er normalt at udskifte
disse dele fra tid til anden.
• Visuelle uregelmæssigheder, der skyldes
produktionsprocessen. Disse uregelmæssigheder anses ikke
som værende produktionsfejl.
• Alle beskadigelser forårsaget af utilstrækkelig
vedligeholdelse, forkert opbevaring, forkert samling eller
ændringer foretaget på dele, der er samlet på forhånd.
• Alle beskadigelser forårsaget af forkert brug og misbrug af
grillen (brug, der ikke er i henhold til instruktionerne i denne
vejledning, brug til kommercielle formål...).
• Alle følgeskader forårsaget af skødesløs eller ikke føjelig
brug af grillen.
• Rust eller misfarvning forårsaget af eksterne kilder, brug af
hårde rengøringsmidler, brug af klorin... Disse beskadigelser
anses ikke som værende produktionsfejl.
13 TEKNISKE SPECIFIKATIONER
13.1 Typeetiket
Typeetiketten angiver alle tekniske specifikationer for din grill. Du
kan finde den:
• I den anden del af denne vejledning.
• På indersiden af det nederste frontpanel.
13.2 Injektordiameter
• Hovedbrænder: 1,00 mm
• Sidebrænder: 0,75 mm
www.barbecook.com 99
Page 100

14 FEJLFINDING
Problem Mulige årsager Løsninger
Ikke tilstrækkelig varme
For meget varme og/eller
opblusninger
Varme fordeles ikke jævne over
grilloverfladen
Gule flammer
Dårlig flamme Brænder blokeret, lækker eller rusten Rengør eller udskift brænderen
Stikflammer (flammer uden for
venturirør/ved kontrolknapper)
Flammer højere end kanten af
skålen
Trykregulatoren brummer
• Gasforsyning ikke åben
• Venturirør ikke placeret over gasventilernes
åbninger
• Brænderåbninger blokeret
• Gascylinder (næsten) tom
• Trykregulator ikke sluttet korrekt til cylinderen
og/eller slangen
• Mad for fedtholdig
• Fedtafløbshul blokeret, fedt i skålen og/eller på
brænderne
• Temperatur for høj
Nogen varmeforskel er normalt, se “1.7 Optimal
udnyttelse af varmen” og “10.6 Udnyttelse af
varmezonerne”. Mulige årsager til store
varmeforskelle:
• Grillen ikke forvarmet
• Brændere eller venturirør blokeret
• Salt på brænderne
• Grill sluttet til butan
Brændere eller venturirør blokeret
• For meget vind
• Gascylinder (næsten) tom
• Fedt i skålen og/eller på brænderne
• Varmt vejr
• Ny (fuld) gascylinder
• Åbn gasforsyningen
• Placer venturirør over gasventilernes åbninger
• Rengør brænderåbningerne eller udskift
brænderne
• Udskift gascylinderen
• Slut trykregulatoren til cylinderen og/eller slangen
igen
• Fjern overskydende fedt, eller indstil brænderne
på en lavere position
• Rengør fedtafløbshullet, skålen og brænderne
• Indstil brænderne på en lavere temperatur,
og/eller grill maden indirekte
• Forvarm grillen
• Rengør brændere og venturirør
• Rengør brændere
• Slut grillen til propan vha. en passende
trykregulator
1 Luk for gasforsyningen, og indstil brænderne til
OFF.
2 Lad grillen køle ned.
3 Rengør brændere og venturirør.
• Placer grillen med bagsiden i vindretningen
• Udskift gascylinderen
• Rengør skålen og brænderne
Ikke en fare eller defekt. Bør stoppe automatisk efter
et stykke tid.
Brænder fløjter, når den er
indstillet på LOW
Umuligt at tænde brænder
(vha. enten tænder eller
tændstik)
Umuligt at tænde brænder med
tænder
Ingen gnist eller lyd ved tryk på
tænderen
Kun lyd (ingen gnist) ved tryk
på tænderen
Gnister til stede, som ikke
kommer fra brænderne
Gasinjektor, venturirør og/eller brænder snavset Rengør gasinjektor, Venturirør og brænder
• Brænder eller venturirør blokeret
• Ingen gasforsyning
• Intet batteri monteret, eller batteriet er ikke
monteret korrekt
• Midterste brænder tændes ikke først
• Tænderledning ikke monteret korrekt
• Elektrode beskadiget
• Defekt jordforbindelse
• Defekt tænder
• Intet batteri monteret, eller batteriet er ikke
monteret korrekt
• Tomt batteri
• Tænderknap ikke samlet korrekt
• Defekt gnistgenerator
• Defekt jordforbindelse
• Brænder og elektrode er for langt fra hinanden
Defekt ledningsføring Udskift ledningsføringen
• Rengør brænder og venturirør
• Åbn gasforsyningen, og tryk på
sikkerhedsknappen på trykregulatoren (findes
ikke på alle regulatorer)
• Monter batteriet igen med terminalerne placeret
korrekt
• Tænd den midterste brænder først
• Kontroller og saml alle tænderforbindelser igen
• Udskift elektroden
• Kontroller og saml elektroderne, brænderne og
tænderen igen
• Udskift tænderen
• Monter batteriet igen med terminalerne placeret
korrekt
• Udskift batteriet
• Saml tænderknappen igen
• Udskift gnistgeneratoren
• Tilslut gnistgeneratoren og elektroderne igen
• Bøj elektroden lidt for at føre den tættere på
brænderen
100 www.barbecook.com
 Loading...