

Barbecook Quisson 4000, 223.9420.000 User Manual

[EN] Go to barbecook.com, register your Barbecook and your Barbecook experience
will be further improved!
[NL] Ga naar barbecook.com, registreer uw Barbecook om uw Barbecook-ervaring
nog meer te verbeteren!
[FR] Rendez-vous sur barbecook.com et enregistrez votre appareil Barbecook pour
nous aider à améliorer votre expérience Barbecook.
[DE] Registrieren Sie Ihren Barbecook auf barbecook.com, damit Sie ein noch
umfangreicheres Barbecook-Erlebnis genießen können!
[ES] Visite barbecook.com, registre su Barbecook y su experiencia con el producto
será aún mejor.
[IT] Visita il sito barbecook.com , registra il tuo Barbecook e sarai ancora più vicino al
mondo Barbecook!
[PT] Aceda a barbecook.com, registe o seu Barbecook e a sua experiência com a
Barbecook será continuamente melhorada!
[SE] Gå till barbecook.com, registrera din Barbecook och din upplevelse med
Barbecook kommer att bli ännu bättre!”
[DK] Gå til barbecook.com, tilmeld din Barbecook for en endnu bedre Barbecook-
oplevelse!
[FI] Rekisteröi Barbecook-grillisi osoitteessa barbecook.com ja pääset nauttimaan
täydellisestä Barbecook-käyttökokemuksesta!
[NO] Gå til barbecook.com, registrer din Barbecook og din Barbecook opplevelse vil bli
enda bedre!
[HU] Látogasson el a barbecook.com oldalra, regisztrálja a Barbecook-ját, és még több
Barbecook élményben lehet része!
[RO] Accesaţi barbecook.com, înregistraţi grătarul Barbecook, iar experienţa dvs.
Barbecook va fi mult îmbunătăţită!
[CS] Navštivte stránky barbecook.com, zaregistrujte si svůj gril Barbecook a vaše
zážitky s produkty Barbecook budou ještě lepší!
[GR] Μεταβείτε στον ιστότοπο barbecook.com και δηλώστε το Barbecook που έχετε
αγοράσει, για να βελτιώσετε ακόμη περισσότερο την εμπειρία Barbecook!
[SK] Prejdite na barbecook.com, zaregistrujte svoj gril Barbecook a vaše zážitky s
Barbecook budú ešte lepšie!
[ET] Minge aadressile barbecook.com, registreerige oma Barbecook ja teil avaneb
võimalus kasutada oma Barbecooki veelgi paremini!
[LT] Eikite į barbecook.com, užregistruokite savo „Barbecook“ kepsninę ir patirsite dar
geresnių įspūdžių ją naudodami!
[LV] Atveriet vietni www.barbecook.com, reģistrējiet savu Barbecook un izmantojiet
Barbecook vēl pilnvērtīgāk!
[PL] Przejdź na stronę barbecook.com, zarejestruj swój produkt Barbecook w celu
umożliwienia stałego udoskonalania produktów Barbecook!
[BG] Посетете barbecook.com, регистрирайте своя Barbecook, за да получите още
по-голямо удовлетворение от Barbecook!
[SL] Pojdite na spletno stran barbecook.com, registrirajte vašo napravo Barbecook in
vaša izkušnja Barbecook bo še boljša!
[HR] Posjetite stranicu barbecook.com, registrirajte Vaš proizvod Barbecook i još više
uživajte u korištenju proizvoda Barbecook.

EN - User guide ...................................................5
SI – Priročnik za uporabo............................... 309
NL - Gebruiksaanwijzing ..................................21
FR - Mode d’emploi...........................................37
DE – Bedienungsanleitung ...............................53
CZ - Uživatelská příručka.................................69
BG - Ръководство за потребителя ...............85
DA - Brugervejledning ....................................101
EL - Οδηγίες χρήσης .......................................117
ES – Guía del usuario......................................133
SV - Bruksanvisning ....................................... 325
NO - Brukerhåndbok ...................................... 341
HR - Korisnički priručnik................................ 357
ET – Kasutusjuhend ........................................149
FI - Käyttöopas................................................165
HU - Használati utasítás.................................181
IT - Guida all’uso .............................................197
LT – Naudotojo vadovas.................................213
LV – Lietošanas pamācība .............................229
PL – Instrukcja użytkownika ..........................245
PT - Manual do utilizador ...............................261
RO - Ghid de utilizare......................................277
SK – Návod na používanie..............................293
www.barbecook.com 3

4 www.barbecook.com

EN - USER GUIDE
1 Register your appliance................................................ 6
2 About this manual ........................................................ 6
3 Important safety instructions........................................ 6
• Read and follow the instructions ............................. 6
• Be cautious with gas................................................ 6
• Select an appropriate location................................. 6
• Use your common sense......................................... 6
4 Recurrent concepts...................................................... 6
• Venturis.................................................................... 6
• Burner hoods ........................................................... 7
• Enamel ..................................................................... 7
• Flare-ups.................................................................. 7
5 Assembling the appliance ............................................ 7
• Safety instructions ................................................... 7
• To assemble the appliance ...................................... 7
6 Connecting gas to the appliance ................................. 7
• Which cylinder, hose and regulator?........................ 7
• Safety instructions ................................................... 8
• Connecting the hose to the appliance..................... 8
• Connecting the hose and cylinder to the regulator.. 8
• Replacing the cylinder ............................................. 9
7 Checking for gas leaks................................................. 9
• Why check for gas leaks?........................................ 9
• When check for gas leaks?...................................... 9
• Safety instructions ................................................... 9
• Which materials do I need? ..................................... 9
• To check for gas leaks ............................................. 9
• In case of a gas leak .............................................. 10
8 Getting the appliance ready for use ........................... 10
• Before each use..................................................... 10
• Before first use (in a long time) .............................. 10
• Burning in the appliance ........................................ 10
10 Using the timer and thermometer .............................. 12
• Icons and control buttons...................................... 13
• Setting the timer alarm .......................................... 13
• Setting the thermometer alarm.............................. 13
• Clearing an alarm................................................... 13
• Checking the food temperature............................. 13
• Temperature guidelines.......................................... 13
11 Useful tips and tricks.................................................. 13
• Preheating the appliance....................................... 13
• Preventing food from sticking................................ 13
• Direct and indirect grilling...................................... 13
• Grilling with closed lid............................................ 14
• Watching the temperature ..................................... 14
• Making optimal use of the heat ............................. 14
• Taking advantage of the heat zones...................... 14
• Roasting food on the spit ...................................... 14
Avoiding flare-ups.................................................. 14
•
12 Maintaining the appliance .......................................... 14
• Cleaning the grill .................................................... 14
• Cleaning the bowl .................................................. 15
• Cleaning the burners and venturis......................... 15
• Maintaining enamel, stainless steel and powder
coated parts........................................................... 16
• Storing the appliance............................................. 16
• Storing gas cylinders ............................................. 16
• Ordering spare parts.............................................. 16
13 Warranty..................................................................... 16
• Covered ................................................................. 16
• Not covered ........................................................... 16
14 Technical specifications............................................. 17
• Type label............................................................... 17
• Injector diameters .................................................. 17
15 Troubleshooting ......................................................... 18
9 Lighting the burners ................................................... 10
• Safety instructions ................................................. 10
• Lighting the main burners ...................................... 10
• Lighting the side burner......................................... 11
• Lighting the spit burner.......................................... 11
• Switching the burners off....................................... 12
• Relighting the burners............................................ 12
• Checking the flames .............................................. 12
www.barbecook.com 5
1 REGISTER YOUR APPLIANCE
3.3 Select an appropriate location
Thank you for purchasing a Barbecook appliance! We are sure it
will bring you lots of happy barbecue moments.
To optimize your experience, register your appliance at
www.barbecook.com. It takes only a few minutes and yields
some major benefits:
• You get access to our personalized after sales service. This
allows you, for example, to quickly find spare parts for your
appliance or to profit from an optimal warranty service.
• We can inform you about interesting product updates and
direct you to the product information and specifications that
are relevant for your appliance.
For more information about registering your appliance,
2
refer to www.barbecook.com.
Barbecook respects your privacy. Your data will not be
0
sold, distributed or shared with third parties.
2 ABOUT THIS MANUAL
This manual is composed of two parts:
• The first part is the part that you are reading now. It includes
instructions for the assembly, use and maintenance of your
appliance.
• The second part starts on page 373. It includes all kinds of
illustrations (exploded views, assembly drawings, type
labels) of the appliances that are described in this manual.
3 IMPORTANT SAFETY
INSTRUCTIONS
3.1 Read and follow the instructions
Read the instructions before using the appliance . Always follow
the instructions carefully. Assembling or using the appliance
differently can cause fires and material damage.
Damages caused by not following the instructions
1
(improper assembly, misuse, inadequate maintenance...)
are not covered by the warranty.
3.2 Be cautious with gas
Working with gas is perfectly safe, but requires some extra
caution:
• Always store gas cylinders outdoors, in a well-ventilated
area. Make sure they are not exposed to excessive heat or
direct sunlight.
• Never store your gas cylinder or spare gas cylinder in the
cabinet of your appliance.
• While in use, put your gas cylinder in the cylinder cart at the
side of the appliance.
• Never store your spare gas cylinder near a gas appliance in
use.
• Always turn off the gas supply at the gas cylinder after use.
• Never smoke near a gas appliance in use or near a gas
cylinder (full/empty).
If you smell gas, immediately close the gas supply,
1
extinguish all flames and open the lid of the appliance. If
the smell lasts, call your gas supplier or the fire
department.
Use the appliance outdoors only. Using it indoors, even in a
garage or shed, can cause carbon monoxide poisoning.
When selecting an outdoor location, always:
• Place the appliance at least three meters away from any
building, in an open and well-ventilated area.
• Make sure there is a free air flow to the burners and the vent
holes in the cabinet at all times.
• Make sure the appliance is not under an overhanging
structure (a porch, a shelter...) or under foliage.
• Put the appliance on a firm and stable surface. Never put it
on a moving vehicle (a boat, a trailer...).
To prevent formation of rust on stainless steel, avoid
1
contact with chlorine, salt and iron. We recommend not
using the appliance near the coast, near railways or near
swimming pools.
3.4 Use your common sense
Always use your common sense when using the appliance:
• Use outdoors only.
• Do not move the appliance during use.
• Do not leave the appliance unattended during use,
especially in the presence of children and animals.
• WARNING! Some accessible parts may become very hot.
Keep young children away.
• Use appropriate protection when handling hot parts (lid,
grill...).
• The appliance must be kept away from flammable materials
during use.
• Keep flammable materials, flammable liquids and dissoluble
objects away from an appliance in use.
• Do not use wood, charcoal, lava rocks or ceramic briquettes
on a gas appliance.
• Do not use the appliance when you have consumed alcohol
or taken drugs.
• Do not modify the appliance.
4 RECURRENT CONCEPTS
This part includes definitions of some less familiar concepts.
These concepts are used in several topics of the manual.
4.1 Venturis
The venturis are the small tubes attached to the entrance of the
burners. At the side of the venturis, there is a hole. This is visible
on the main burners and on the side burner:
6 www.barbecook.com
When the gas is on its way to the burners, it passes through the
venturis. Thanks to the holes at the sides, the gas is then mixed
with air and - as a result - with oxygen. This is necessary for a
good ignition in the burners: only the correct mixture of gas and
oxygen will ignite properly and will result in nice flames.
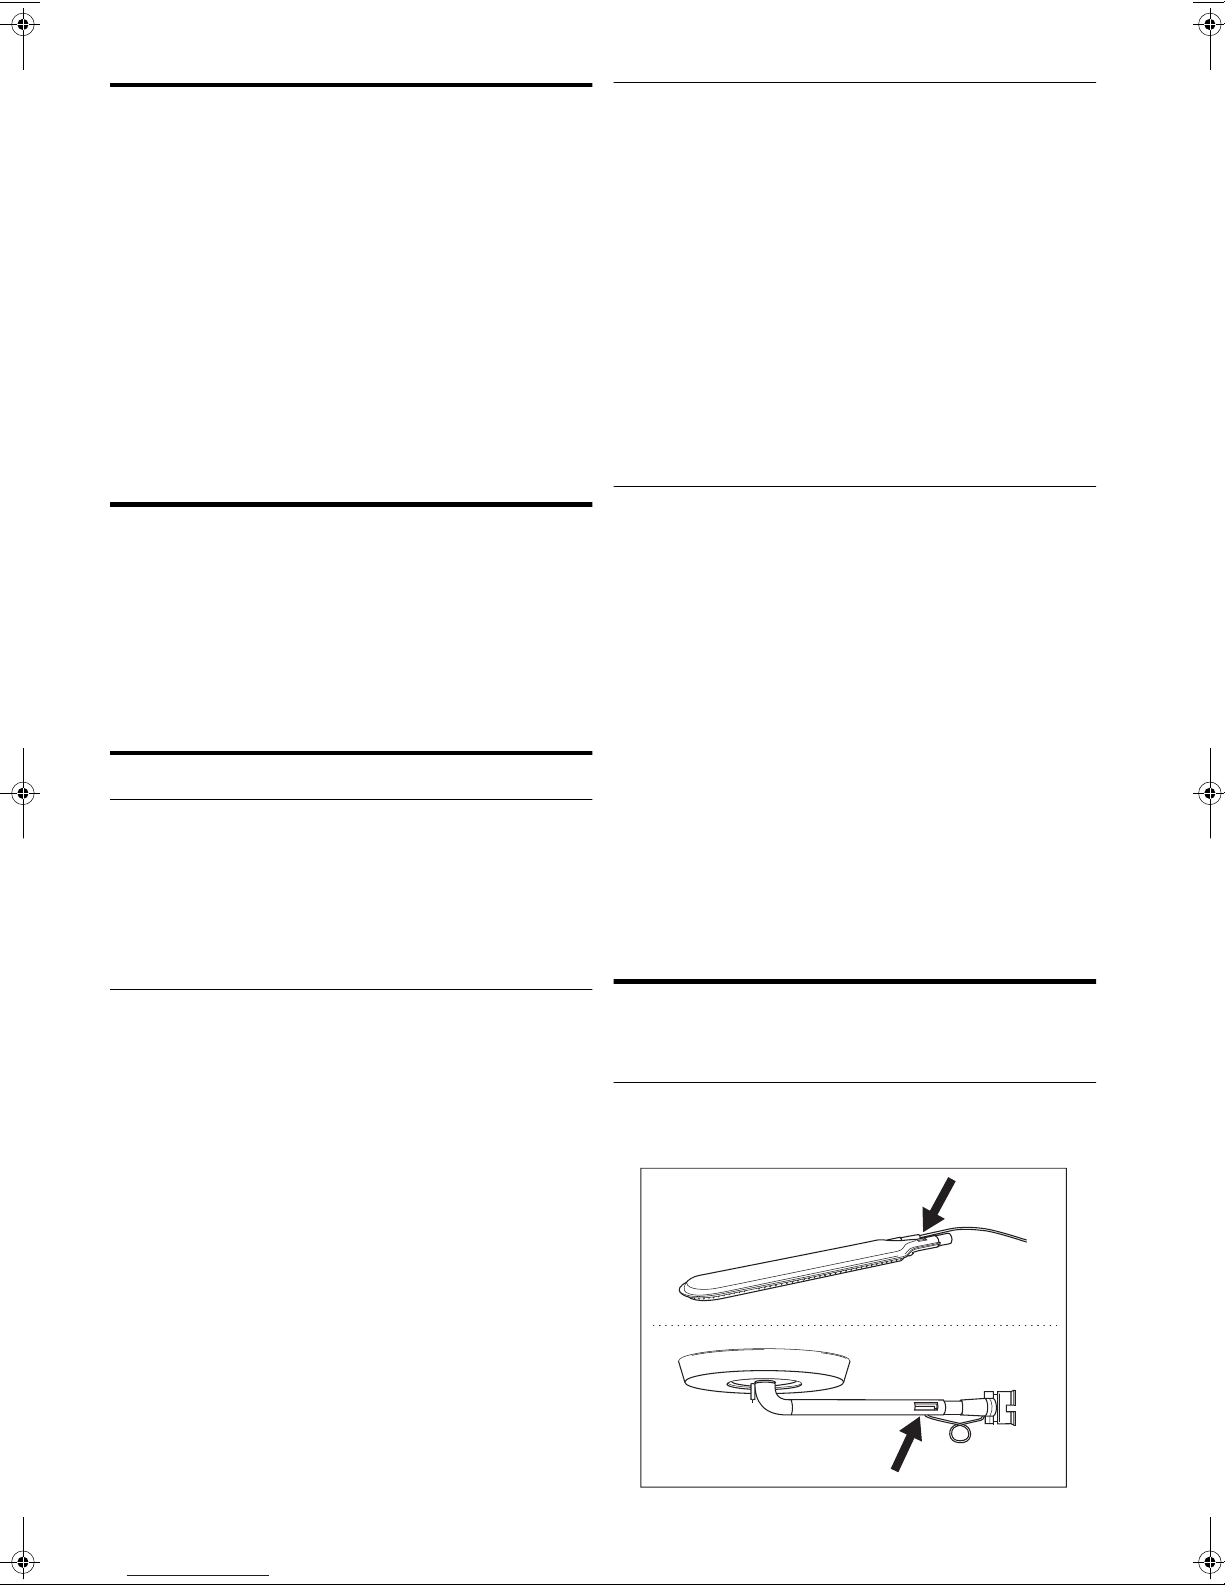
4.2 Burner hoods
The burner hoods are the hoods that you mount above the
burners of your appliance. They protect the burners from
dripping fat and play a crucial role in the Turbo Heating System.
The roofed holes at the sides of the hoods distribute the heat
over the grill, so it is heated much faster and more evenly.
Pay special attention to the burner hoods when
2
assembling your appliance. The Turbo Heating System
can only function properly if each hood is mounted above
the correct burner.
5 ASSEMBLING THE APPLIANCE
5.1 Safety instructions
• Do not modify the appliance when assembling it. It is very
dangerous and not allowed to alter parts that are
pre-assembled and/or sealed by the manufacturer.
• Always follow the assembly instructions carefully.
• The user is responsible for the correct assembly of the
appliance. Damages caused by improper assembly are not
covered by the warranty.
5.2 To assemble the appliance
You need a cross-slotted screwdriver, a flat-slotted screwdriver
and an AA battery (electrical igniter). If your appliance comes with
a spit burner, you also need two D batteries (spit burner engine).
There are no batteries supplied with the appliance.
1 Put the appliance on a flat and clean surface.
2 Assemble the appliance as shown on the assembly
drawings. You find them in the second part of this manual,
after the exploded view of your appliance.
Be careful when assembling enamelled parts. The tools
1
and screws may damage the enamel. Use the provided
fiber washers to protect the enamel around the screws.
The blister packs can contain more screws than
0
necessary. Screws can be left over after the assembly.
4.3 Enamel
Some parts of the appliance are covered in a layer of melted
glass, called enamel. This enamel protects the underlying metal
from corrosion. Enamel is a high-quality material: it is resistant to
rust, does not fade under the influence of high temperatures and
is very easy to maintain.
Because the enamel is less flexible than the metal which
1
it covers, pieces of enamel can chip off when you handle
the appliance incorrectly. To avoid problems, be careful
when assembling enamelled parts and always maintain
the enamel as described further in this manual.
4.4 Flare-ups
6 CONNECTING GAS TO THE
APPLIANCE
6.1 Which cylinder, hose and regulator?
Before you can connect gas to the appliance, you have to buy a
gas cylinder, hose and pressure regulator. Always buy materials
that comply with all national standards and with the gas type(s)
and nominal pressure(s) mentioned on the appliance.
The table below shows you which cylinder, hose and regulator
you have to use. In Belgium (BE), for example, you have to use a
propane cylinder with a hose and regulator for 37 mbar or a
butane cylinder with a hose and regulator for 28-30 mbar.
Country Cylinder, hose and regulator
DK, GR, NO, SE,
EE, LT, LV, CZ, PL,
MT, HU, SI, SK
ES, GB, IE, PT, BE,
FR, LU, IT
NL Propane, 30 or 50 mbar / Butane, 30 mbar
CY Propane, 30 or 37 mbar / Butane, 28-30
We recommend connecting the appliance to propane.
2
Propane offers a high-quality combustion and is less
sensitive to frost.
Buy your pressure regulator and gas cylinder together.
2
Not all regulators fit all cylinders.
Propane, 30 mbar / Butane, 30 mbar
Propane, 37 mbar / Butane, 28-30 mbar
mbar
Flare-ups are sudden flames that spark from the bowl when you
are grilling. They are usually caused by dripping fat or marinade.
www.barbecook.com 7
6.2 Safety instructions
• Never connect the cylinder directly to the appliance. Always
mount a pressure regulator on the cylinder first.
• Never modify pre-assembled or sealed parts of the cylinder,
the hose or the pressure regulator.
• Keep the hose as short as possible (1,5 m maximum) to
prevent it from dragging on the ground.
• While connecting the cylinder, hose and pressure regulator:
• Never distort the hose.
• Always keep the cylinder in an upright position.
• Never open the gas supply.
• Check for leaks each time you make changes to the gas
connection. See “7 Checking for gas leaks”.
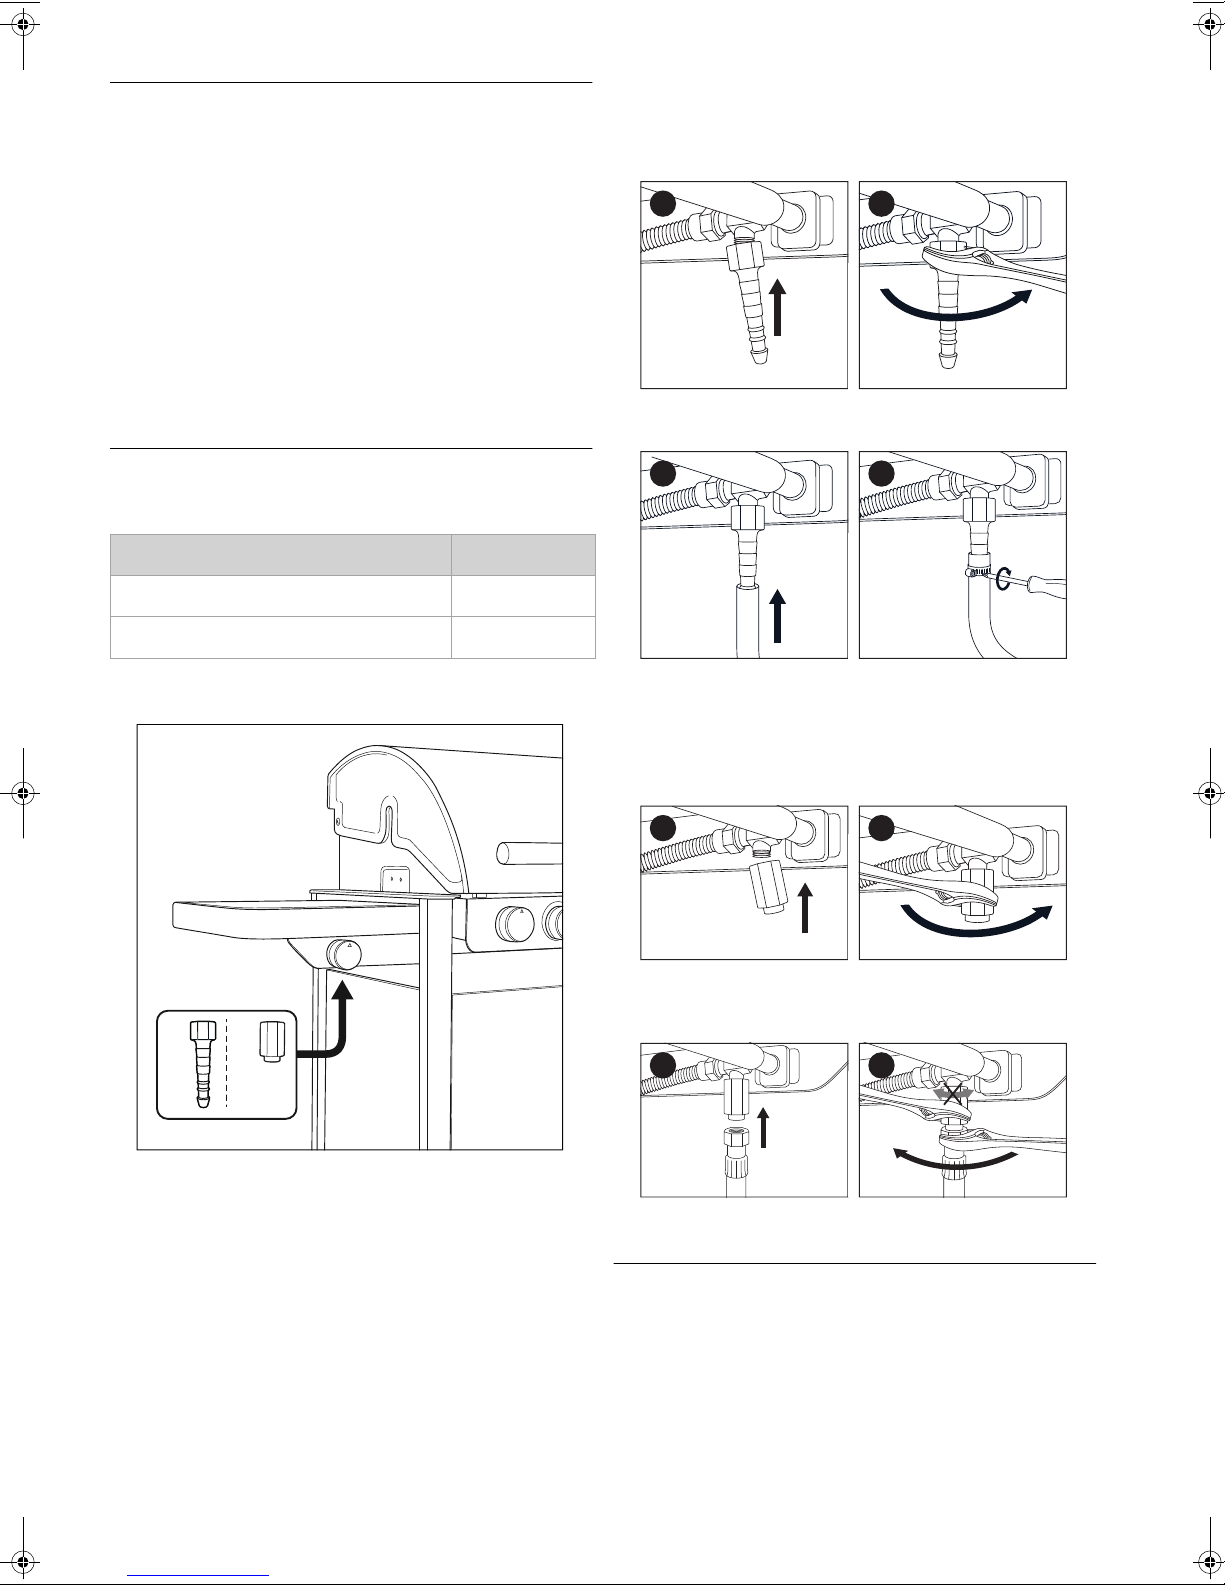
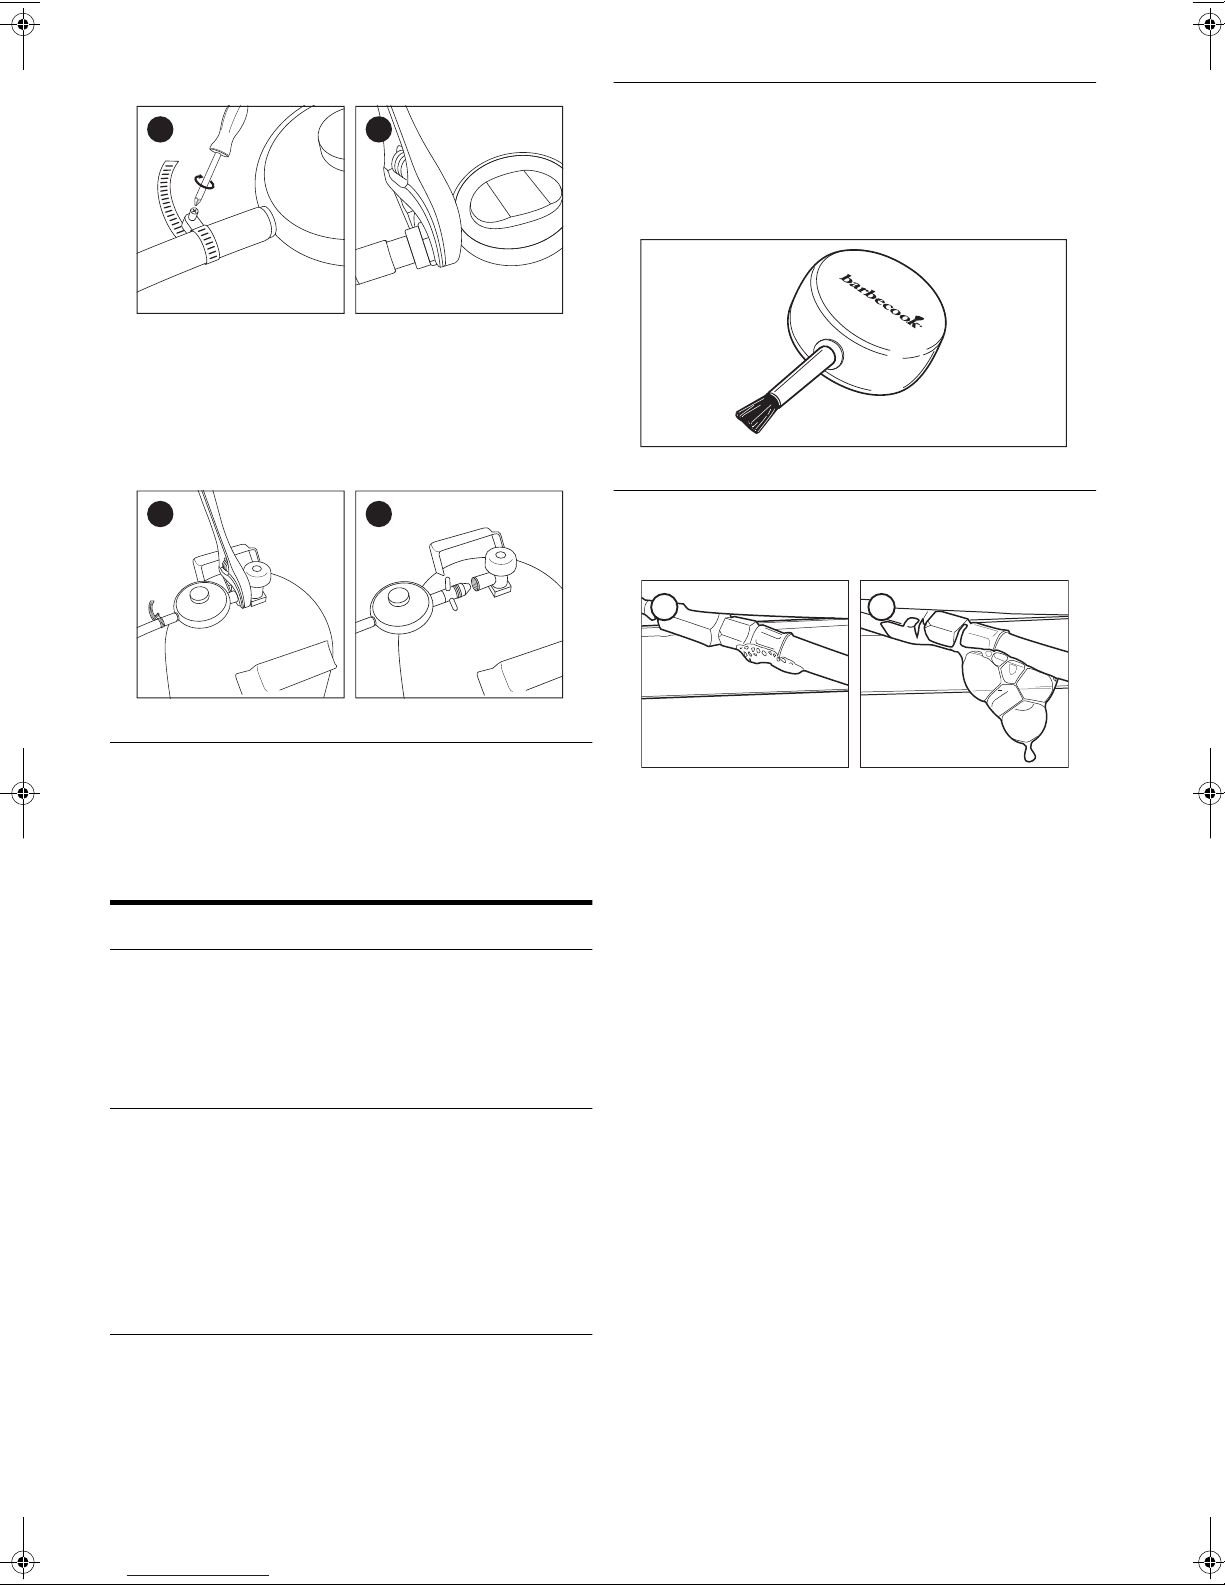
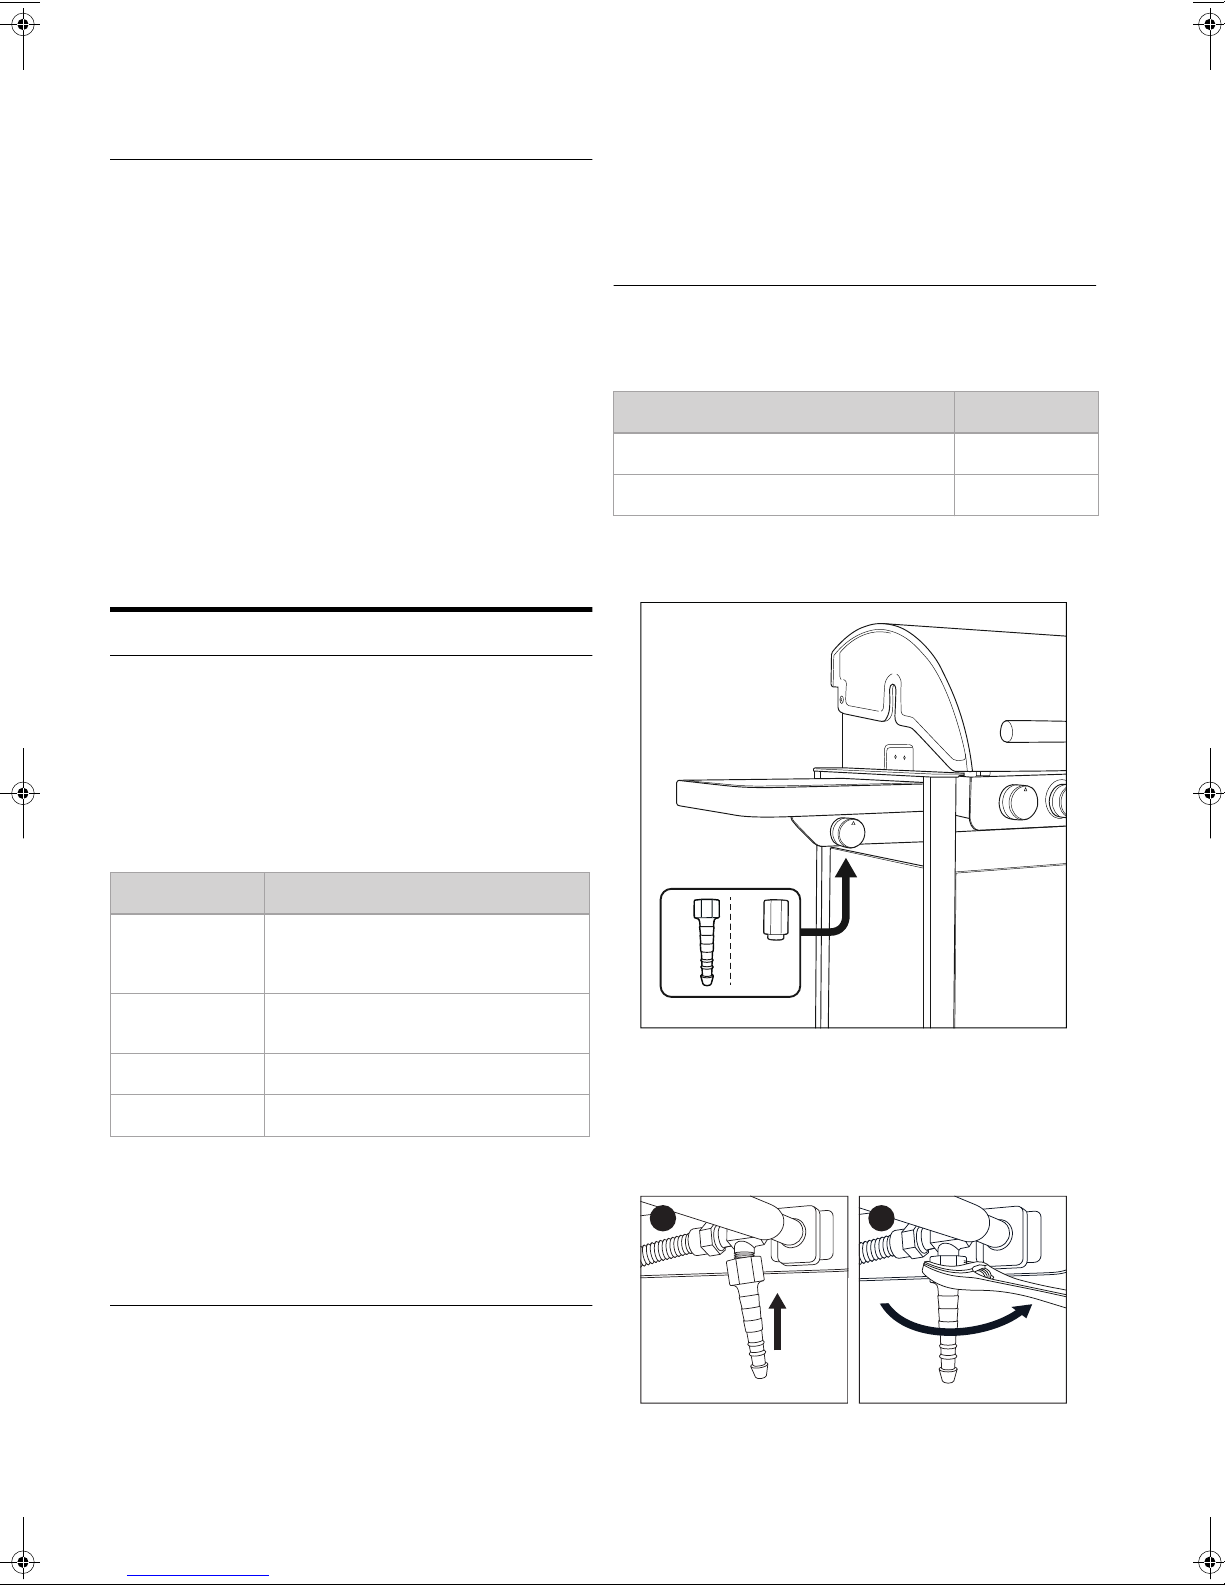
6.3.1 COUPLING A
You need a 19 mm spanner and a cross-slotted screwdriver.
1 Screw the coupling on the gas tube of the appliance (A) and
tighten it with a 19 mm spanner (B).
A
B
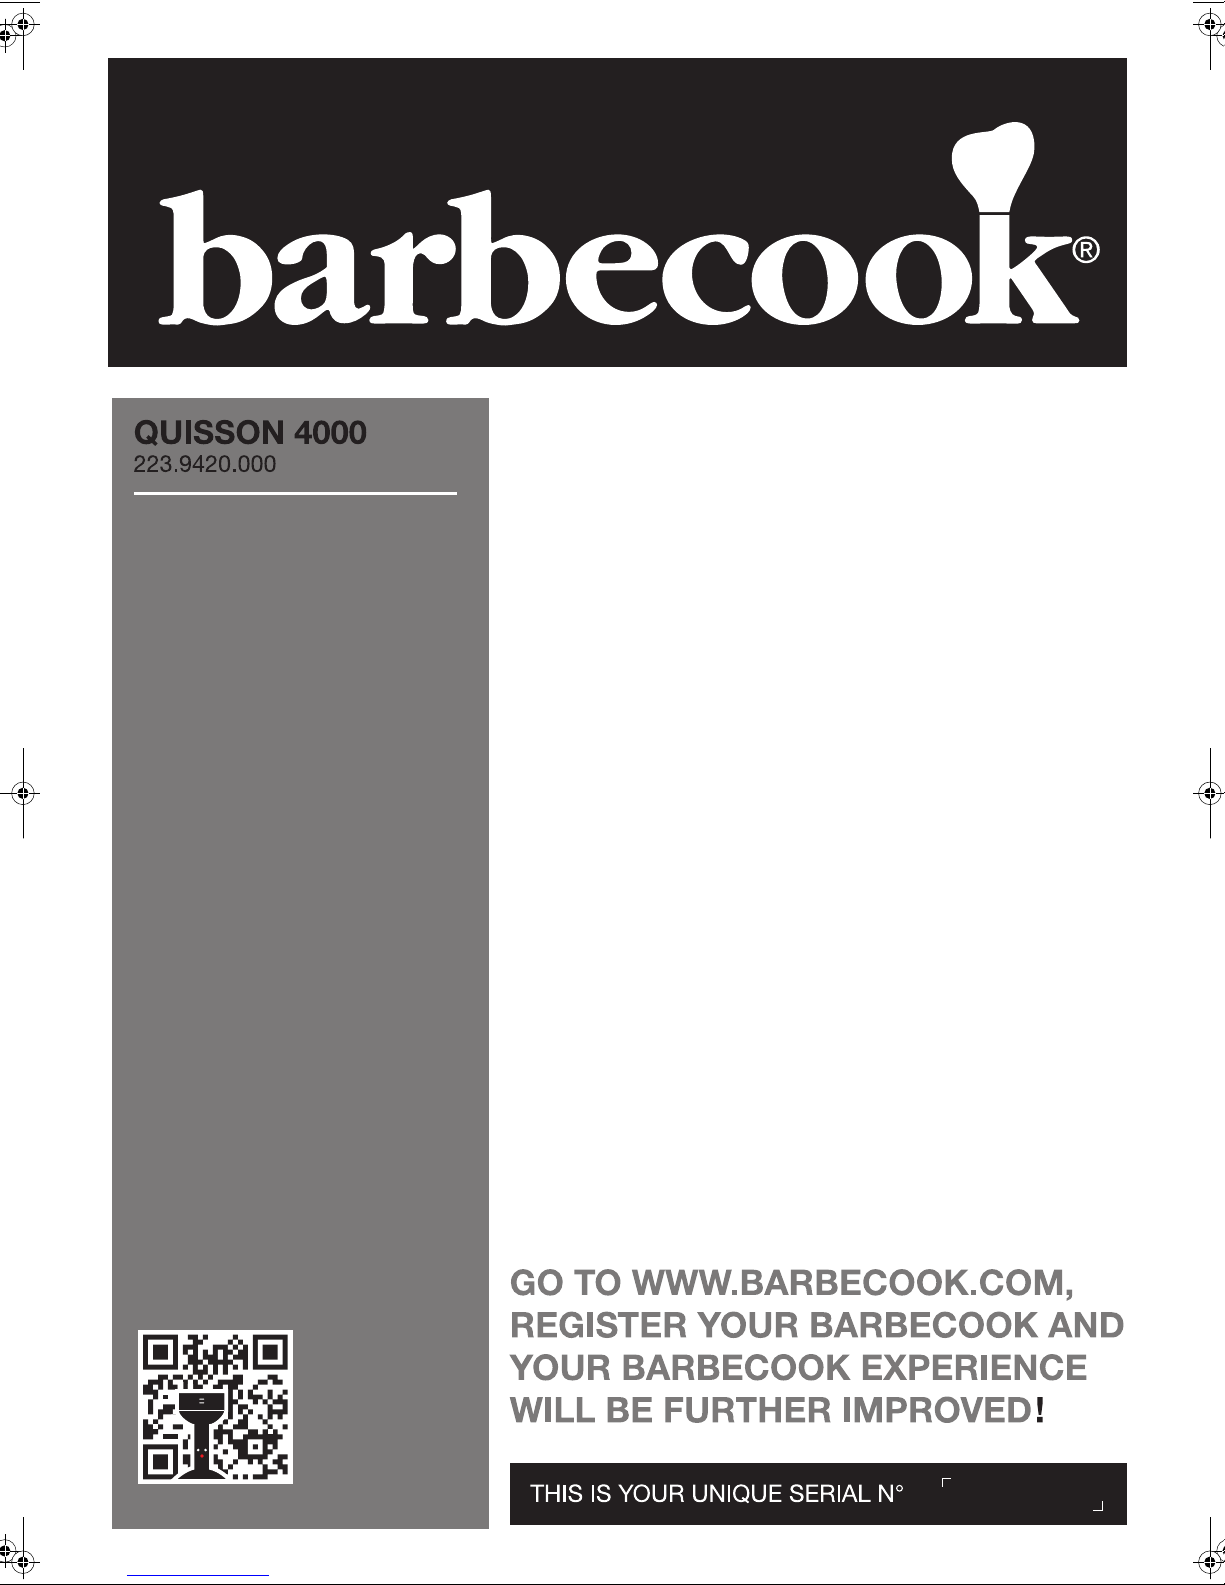
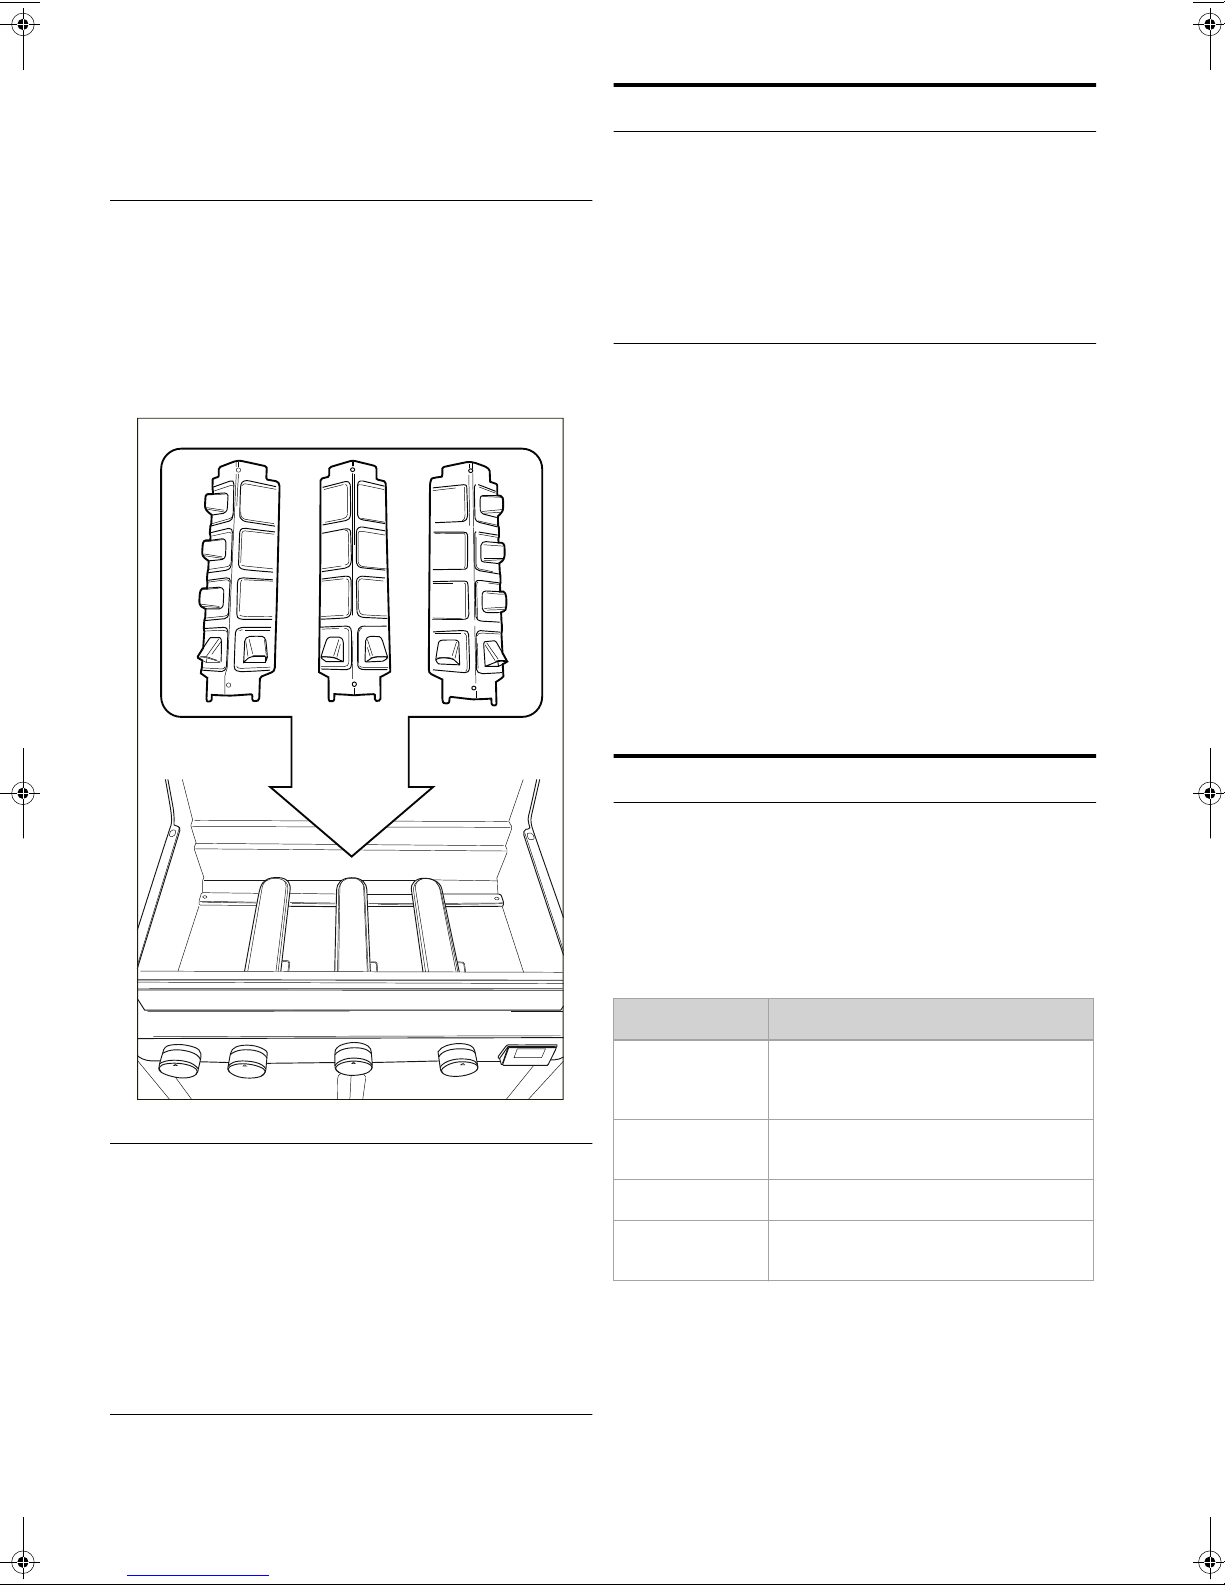
6.3 Connecting the hose to the
appliance
To connect the gas hose to the appliance, you have to mount a
coupling on the gas tube of the appliance. The appliance comes
with two couplings, both intended for particular countries:
Country Coupling
BE, CH, CZ, DK, ES, FI, GB, IE, IT, PT, SI Coupling A
FR Coupling B
If your country is not in the table, use the coupling that
2
complies with your national standards.
AB
2 Slide the hose over the coupling (C) and tighten the
clamping ring with a cross-slotted screwdriver (D).
C
D
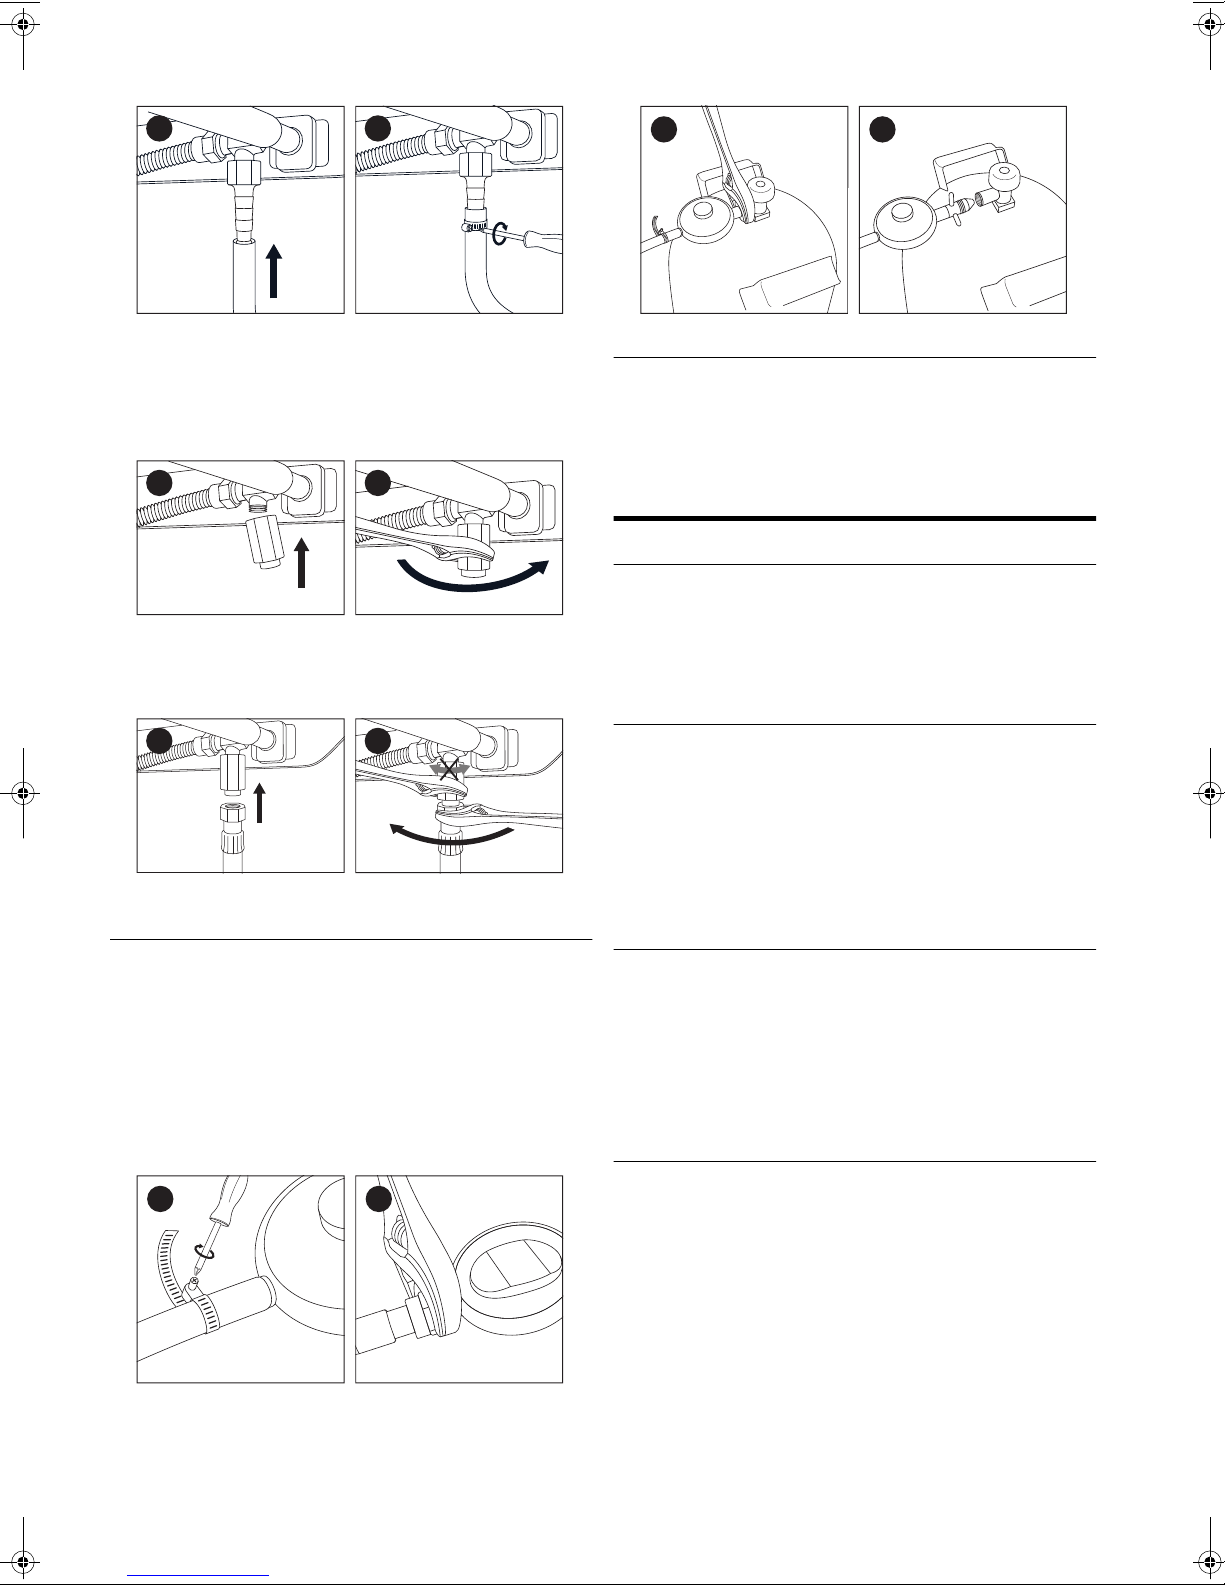
6.3.2 COUPLING B
You need a 22 mm spanner and an adjustable spanner.
1 Screw the coupling on the gas tube of the appliance (A) and
tighten it with a 22 mm spanner (B).
A
2 Screw the gas hose on the coupling (C) and tighten it with
two spanners. Hold the coupling with a 22 mm spanner,
while turning the hose with an adjustable spanner (D).
C
B
D
8 www.barbecook.com
6.4 Connecting the hose and cylinder to
the regulator
Depending on the type of pressure regulator you use, you need a
cross-slotted screwdriver and/or an adjustable spanner.
1 Connect the hose to the pressure regulator. Do one of the
following:
• If the hose has a clamping ring, slide the hose over the
regulator and tighten the clamping ring with a
cross-slotted screwdriver (A).
• If the hose has a nut, screw the hose on the regulator and
tighten the nut with an adjustable spanner (B).
A
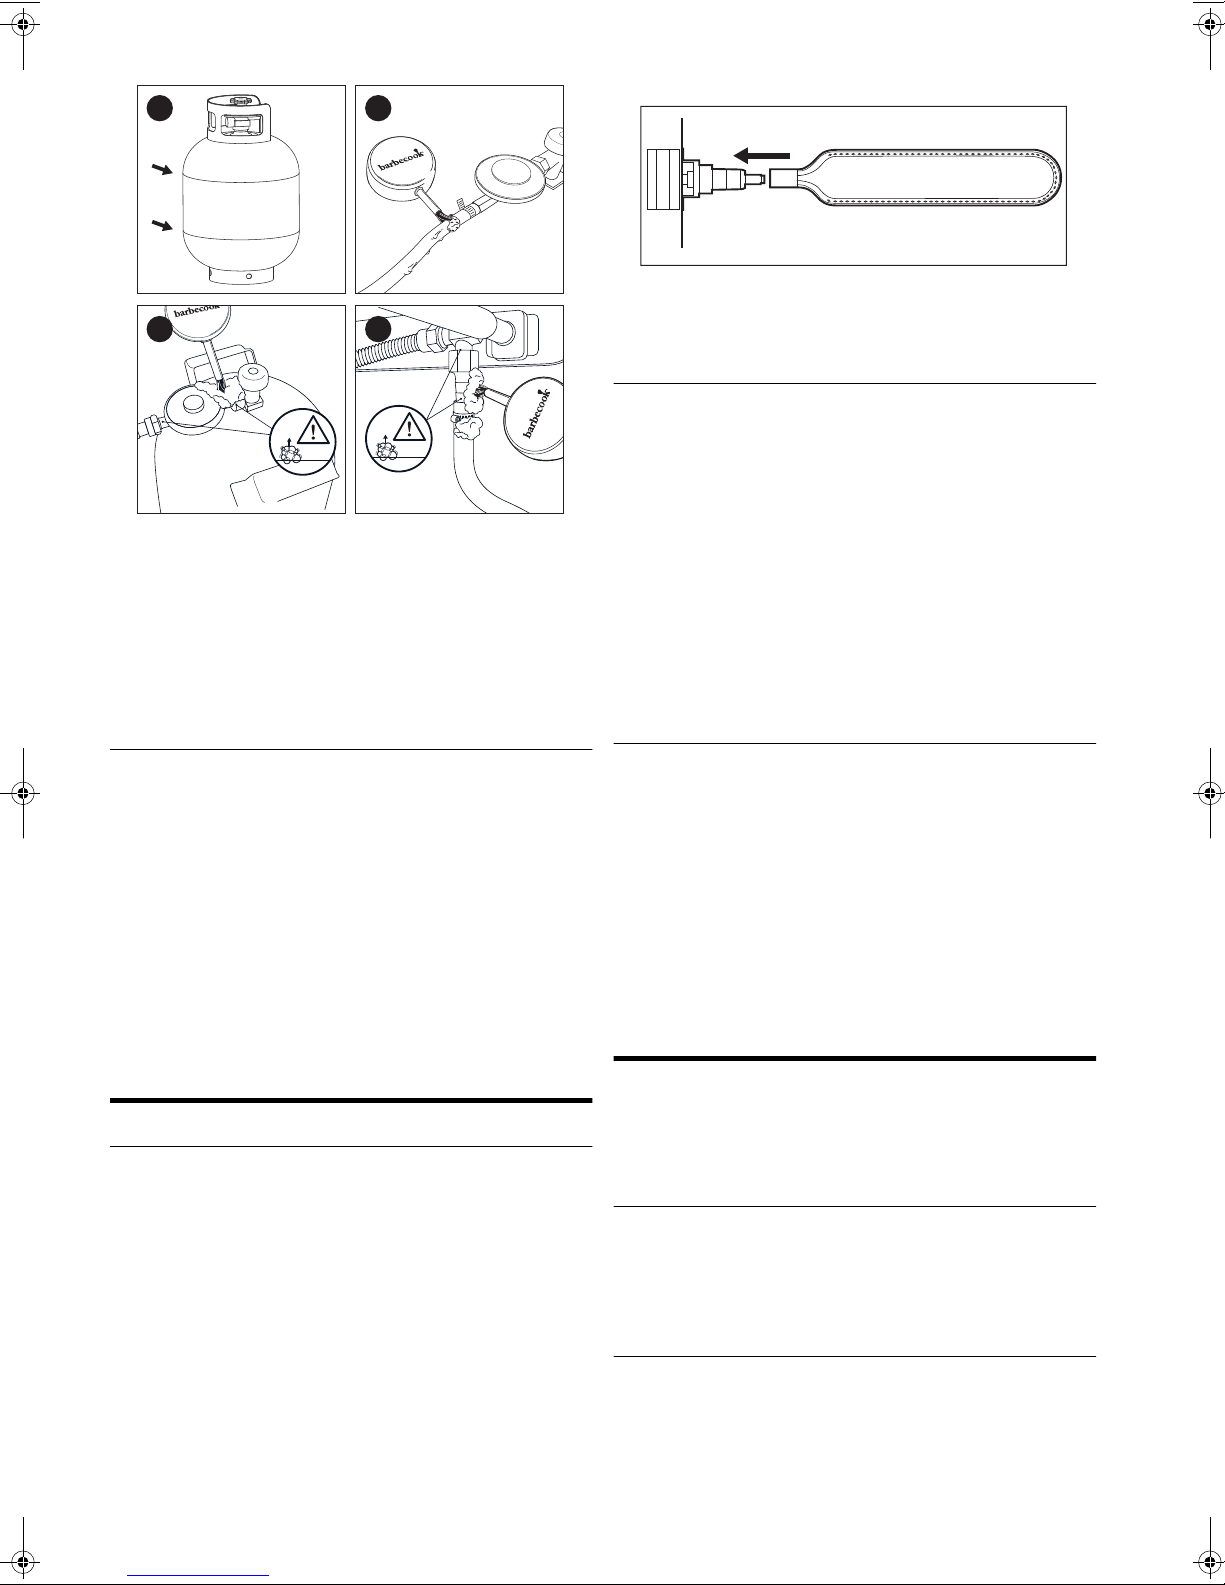
2 Connect the pressure regulator to the gas cylinder. Do one of
the following:
• If the regulator has a nut, screw the regulator clockwise
on the cylinder and tighten the nut with an adjustable
spanner (C).
• If the regulator has a screw thread, screw the regulator
counter-clockwise on the cylinder (D).
B
7.4 Which materials do I need?
To check for gas leaks, you need:
• A testing liquid. You can use a ready-made leak spray or a
mixture of water (50%) and dish-washing soap (50%).
• The leak test tool that came with your appliance. You use it
to suck up the testing liquid and apply it to the gas
component or connection that you want to check.
7.5 To check for gas leaks
C D
6.5 Replacing the cylinder
1 Close the gas supply and set all control knobs to OFF.
2 Disconnect the empty cylinder and connect the full cylinder.
3 Check the cylinder, the hose and all gas connections for
leaks. See “7 Checking for gas leaks”.
7 CHECKING FOR GAS LEAKS
7.1 Why check for gas leaks?
Propane and butane are heavier than air. As a result, they do not
float away when leaking from the appliance. Especially on
windless days, a leak can cause the gas to collect in and around
the appliance. That accumulated gas can then ignite and
explode.
7.2 When check for gas leaks?
• Before the first use or before the first use after a long period
of non-use.
Also check for gas leaks if your appliance was assembled
1
by your dealer.
• Each time you replace a gas component.
• At least once a year, preferably at the beginning of the
season.
You check for gas leaks by applying a testing liquid to all gas
components and connections. If the bubbles on a particular
component or connection grow, there is gas leak:
✔✖
To check for gas leaks, proceed as follows:
1 Put the appliance outside.
2 Get your leak test tool and testing liquid (leak spray or
water/soap mixture).
3 Open the lid and set all control knobs to OFF.
4 Open the gas supply slightly. Turn the valve of the gas
cylinder only once.
5 Suck up some testing liquid with the leak test tool and apply
it to the area that you want to check. You have to check:
• The welds of the gas cylinder (A)
• The hose (B)
• The connections between the cylinder and the pressure
regulator and between the pressure regulator and the
hose (C)
7.3 Safety instructions
• Put the appliance outdoors, in a well-ventilated area. Make
sure there are no flames or heat sources near the appliance.
• Never use a lighter or match to check for gas leaks.
• Do not smoke and do not light the burners when checking
for gas leaks.
www.barbecook.com 9
• The connection between the hose and the appliance (D)
A
C
Your pressure regulator and coupling may be different
0
from the ones in the illustrations.
6 Do one of the following:
• If you detect a leak, continue as described in “ In case of
a gas leak”.
• If there are no leaks, close the gas supply, rinse all
components thoroughly with water and dry them well.
B
D
• The venturis of the burners. They have to be placed over
the openings of the gas valves.
If you want to be absolutely sure that your gas connection
2
is okay, you can check your appliance on gas leaks before
each use. See “7 Checking for gas leaks”.
8.2 Before first use (in a long time)
If you use the appliance for the first time or for the first time after
a long period of non-use, you have to execute some extra
checks:
• Make sure that you have read, understood and checked all
the instructions in this manual (only before first use).
• Check the appliance for gas leaks. See “7 Checking for gas
leaks”.
Also check for gas leaks if your appliance was assembled
1
by your dealer.
• Clean the burners and venturis (only before first use in a long
time). See “12.3 Cleaning the burners and venturis”.
• Burn in the appliance before you put any food on it (only
before first use). See “8.3 Burning in the appliance”.
7.6 In case of a gas leak
1 Close the gas supply and do one of the following:
• If you detected a leak on one of the connections, tighten
that connection.
• If you detected a leak on the cylinder or hose, replace the
cylinder or hose.
2 Recheck the connection or component on which you
detected the leak.
3 If the leak is not repaired, contact a Barbecook dealer. Do
not use the appliance until the leak is repaired.
For a list of nearby Barbecook dealers, refer to
2
www.barbecook.com.
8 GETTING THE APPLIANCE READY
FOR USE
8.1 Before each use
Each time you use the appliance, make sure that:
• The appliance is in an appropriate location. See “3.3 Select
an appropriate location”.
• The gas hose does not drag on the ground and cannot come
into contact with a hot surface or with dripping fat.
• The bowl is clean. We recommend putting a new Leaf
bowl before each use. See “12.2 Cleaning the bowl”.
• The burners and venturis are not blocked by insect nests or
spider webs. See “12.3 Cleaning the burners and venturis”.
• The appliance is assembled correctly. Pay special attention
to:
• The burner hoods. Each hood has to be placed above the
correct burner. See “4.2 Burner hoods”.
®
in the
8.3 Burning in the appliance
By burning in the appliance before the first use, you remove
remaining manufacturing greases from the appliance. Proceed
as follows:
1 Light the main burners and set their control knobs to HIGH.
See “9.2 Lighting the main burners”.
2 Close the lid and let the appliance burn for 15 minutes. Do
not put any food on the grill yet.
3 After 15 minutes, open the lid and let the appliance burn for
another 5 minutes (control knobs still set to HIGH).
4 After 5 minutes, the appliance is ready for use. You can now
put food on the grill.
9 LIGHTING THE BURNERS
To light the burners with the electrical igniter, you have to
0
install an AA battery in the igniter. That battery is not
supplied with the appliance. You find the battery case of
the igniter inside the cabinet of your appliance.
9.1 Safety instructions
• Before you light the appliance, execute all checks listed in
“8 Getting the appliance ready for use”.
• Make sure the lid is always open when you light a burner.
• Never bend directly over a burner when lighting it.
9.2 Lighting the main burners
9.2.1 USING THE IGNITER
1 Open the lid and set the control knobs of the main burners to
OFF.
10 www.barbecook.com

2 If no other burner is lit yet, open the gas supply and wait ten
seconds. This allows the gas to stabilize.
3 Push in the control knob of one burner, set it to HIGH and
hold it for a moment. The build-in igniter will cause sparks,
which will light the burner.
Always light one main burner to start with. Never light all
1
main burners at the same time.
4 If the burner does not light after three attempts, set its
control knob to OFF, close the gas supply and wait 5
minutes. This allows any accumulated gas to escape.
5 Retry lighting the burner. If it still does not light, try lighting it
with a match or refer to “15 Troubleshooting” to determine
the cause of the problem.
9.2.2 USING A MATCH
1 Place a match in the match holder.
2 Open the lid and set the control knobs of the main burners to
OFF.
3 If no other burner is lit yet, open the gas supply and wait ten
seconds. This allows the gas to stabilize.
4 Light the match and hold it about 13 mm from the burner.
9.3 Lighting the side burner
The side burner can only carry vessels with a maximum
1
weight of 9 kg and a maximum diameter of 220 mm.
9.3.1 USING THE IGNITER
1 Open the lid and set the control knob of the side burner to
OFF.
2 If no other burner is lit yet, open the gas supply and wait ten
seconds. This allows the gas to stabilize.
3 Push in the control knob of the side burner, set it to HIGH
and hold it for a moment. The build-in igniter will cause
sparks, which will light the side burner.
4 If the burner does not light after three attempts, set its
control knob to OFF, close the gas supply and wait 5
minutes. This allows any accumulated gas to escape.
5 Retry lighting the side burner. If it still does not light, try
lighting it with a match or refer to “15 Troubleshooting” to
determine the cause of the problem.
9.3.2 USING A MATCH
1 Place a match in the match holder.
2 Open the lid and set the control knob of the side burner to
OFF.
3 If no other burner is lit yet, open the gas supply and wait ten
seconds. This allows the gas to stabilize.
4 Light the match and hold it about 13 mm from the side
burner.
5 Set the control knob of one burner to HIGH.
Always light one main burner to start with. Never light all
1
main burners at the same time.
6 If the burner does not light within 5 seconds, set its control
knob to OFF, close the gas supply and wait 5 minutes. This
allows any accumulated gas to escape.
7 Retry lighting the burner. If it still does not light, refer to
“15 Troubleshooting” to determine the cause of the problem.
5 Set the control knob of the side burner to HIGH.
6 If the side burner does not light within 5 seconds, set its
control knob to OFF, close the gas supply and wait 5
minutes. This allows any accumulated gas to escape.
7 Retry lighting the side burner. If it still does not light, refer to
“15 Troubleshooting” to determine the cause of the problem.
9.4 Lighting the spit burner
Before you can use the spit burner, you have to install two
0
D batteries in the spit burner engine. These batteries are
not supplied with the appliance.
www.barbecook.com 11
9.4.1 USING THE IGNITER
1 Open the lid and set the control knob of the spit burner to
OFF.
2 Remove the grills and warming rack from the appliance and
put them aside.
3 If no other burner is lit yet, open the gas supply and wait ten
seconds. This allows the gas to stabilize.
4 Push in the control knob of the spit burner, set it to HIGH
and hold it for a moment. The build-in igniter will cause
sparks, which will light the spit burner.
5 If the burner does not light after three attempts, set its
control knob to OFF, close the gas supply and wait 5
minutes. This allows any accumulated gas to escape.
6 Retry lighting the spit burner. If it still does not light, try
lighting it with a match or refer to “15 Troubleshooting” to
determine the cause of the problem.
9.6 Relighting the burners
If a burner goes out while in use, proceed as follows:
1 Open the lid and close the gas supply.
2 Set all control knobs to OFF and wait 5 minutes. This allows
any accumulated gas to escape.
3 Relight the burner(s).
9.7 Checking the flames
Each time you light a burner, you have to check its flames. A
perfect flame is almost completely blue, with some yellow at the
top. Sporadic yellow flames are normal and not harmful.
If there is something wrong with the flames, do one of the
following to solve the problem:
If the flames are... Do the following...
9.4.2 USING A MATCH
1 Place a match in the match holder.
2 Open the lid and set the control knob of the spit burner to
OFF.
3 If no other burner is lit yet, open the gas supply and wait ten
seconds. This allows the gas to stabilize.
4 Light the match and hold it to the left of the spit burner.
Low and entirely yellow
Higher than the bowl
LOW HIGH
1 Immediately close the gas supply and
set all control knobs to OFF.
2 Refer to “15 Troubleshooting” to
determine the cause of the problem.
Most likely, the venturis are blocked.
1 Immediately close the gas supply and
set all control knobs to OFF.
2 Wait 5 minutes to allow any
accumulated gas to escape.
3 Relight the burner(s).
4 If the problem persists, refer to
“15 Troubleshooting” to determine
the cause of the problem.
5 Set the control knob of the spit burner to HIGH.
6 If the burner does not light within 5 seconds, set its control
knob to OFF, close the gas supply and wait 5 minutes. This
allows any accumulated gas to escape.
7 Retry lighting the spit burner. If it still does not light, refer to
“15 Troubleshooting” to determine the cause of the problem.
9.5 Switching the burners off
If you no longer use the burners, you have to switch them off.
Proceed as follows:
1 Close the gas supply.
2 Set the control knobs of the burners to OFF.
By closing the gas supply first, you make sure there is no
2
gas left in the appliance.
12 www.barbecook.com
10 USING THE TIMER AND
THERMOMETER
The appliance is equipped with a timer and thermometer. You
can use them to set an alarm, which can either go off after a
certain amount of time or when the food reached a certain
temperature. You can also use the thermometer to check and
follow up the temperature of your food.
If you do not use the thermometer, we recommend
2
storing the thermometer probe and cable indoors.
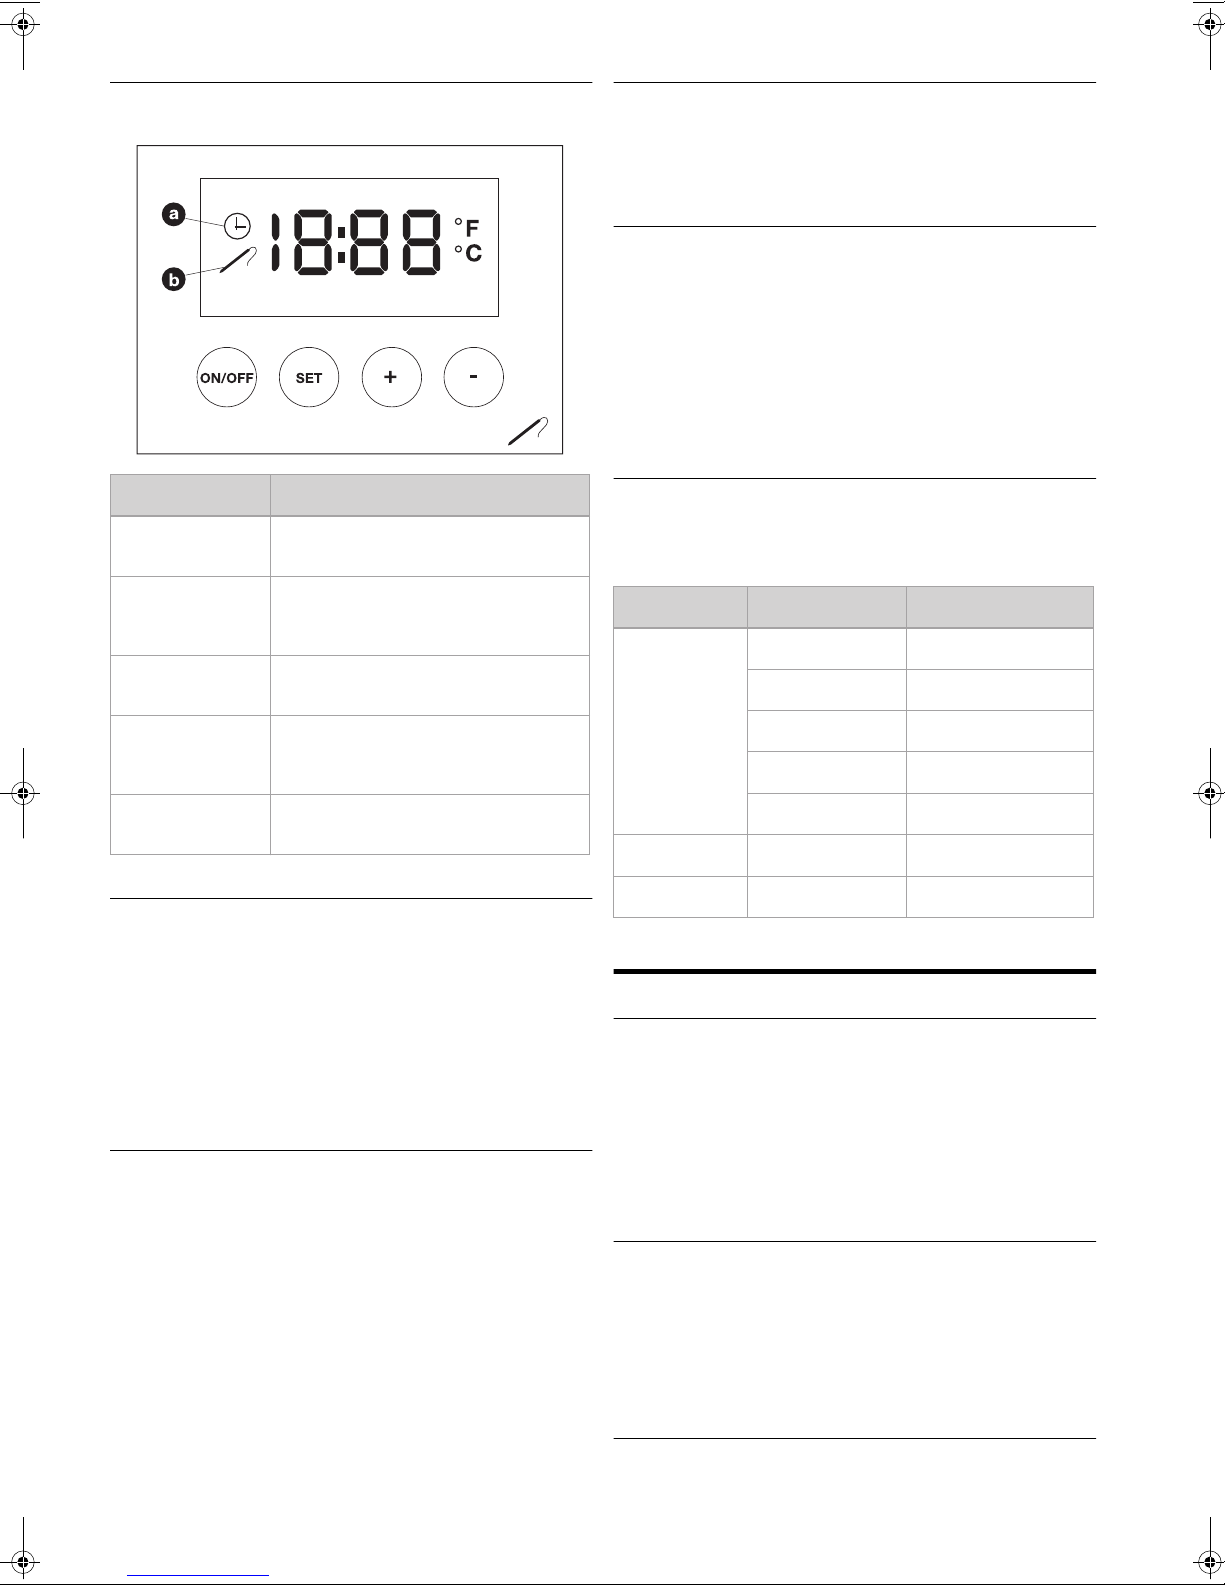
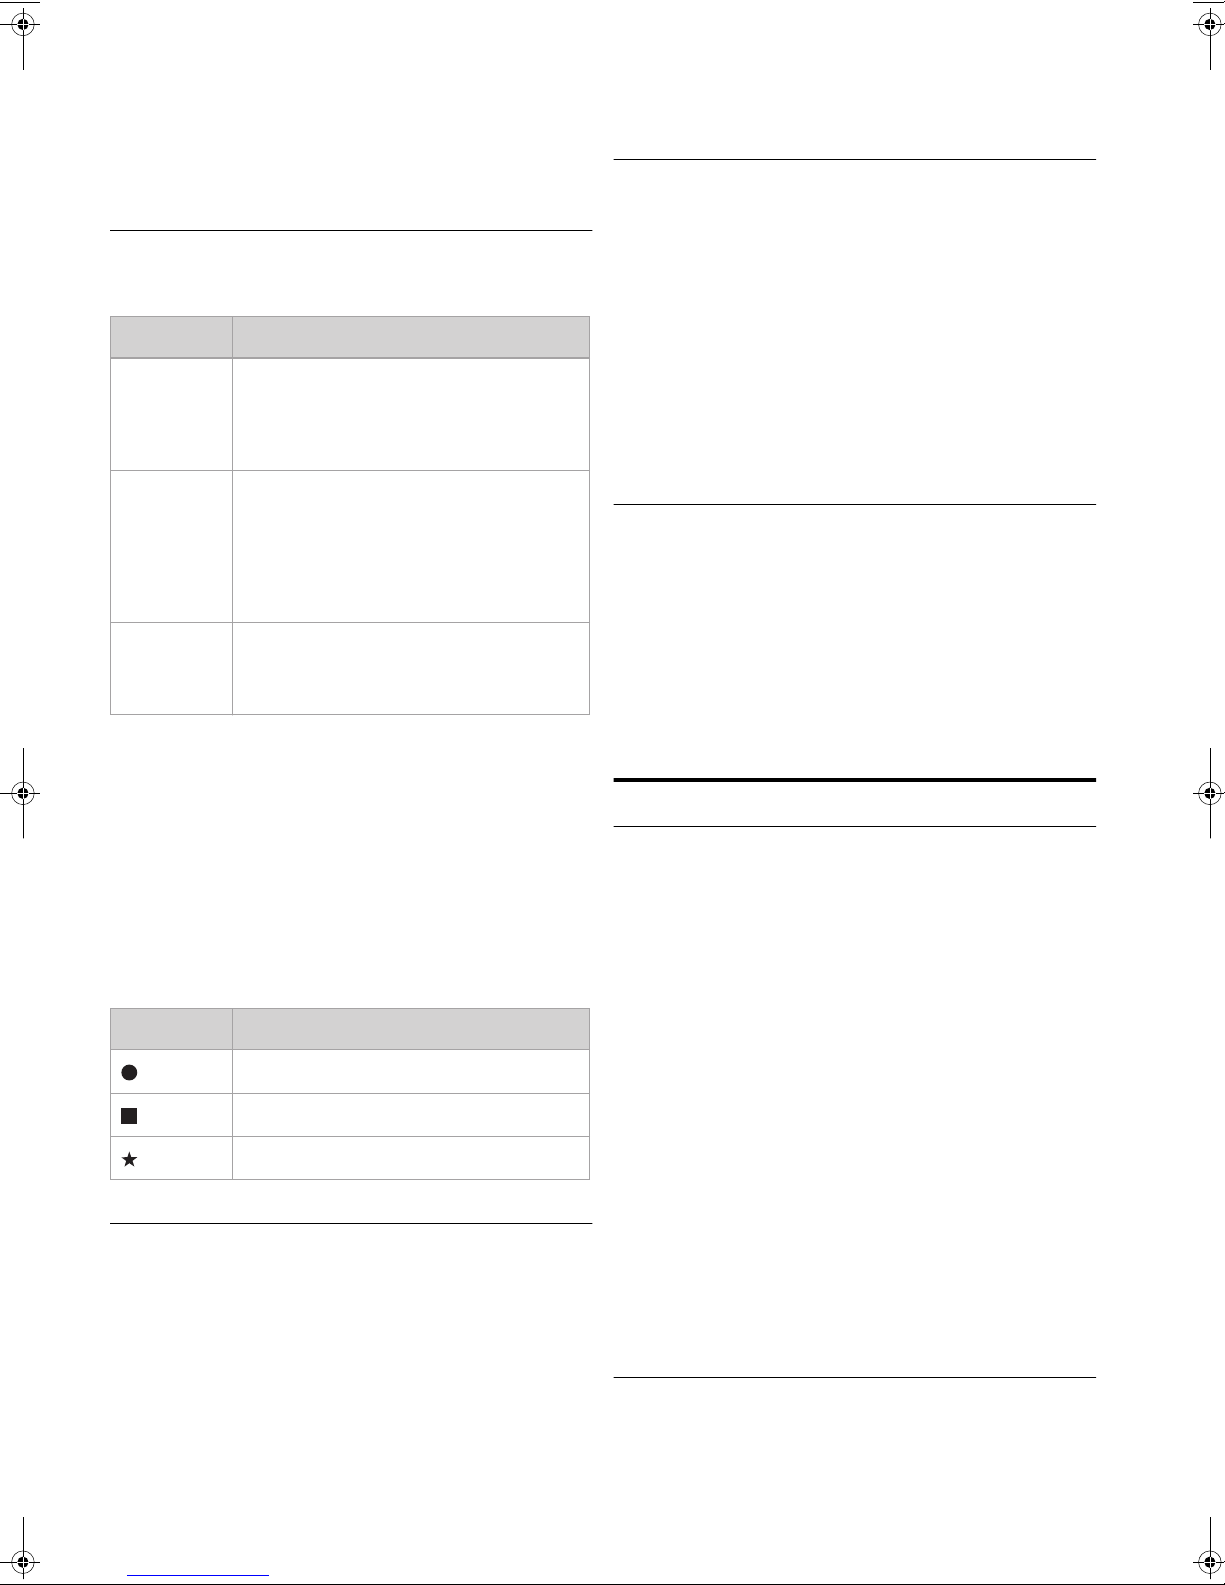
10.1 Icons and control buttons
10.4 Clearing an alarm
On the timer and thermometer, you find the following icons and
control buttons:
Icon/button Description
Clock icon (A) Displayed when you are setting the timer
alarm and when the timer alarm is set.
Probe icon (B) Displayed when you are setting the
thermometer alarm and when the
thermometer alarm is set.
ON/OFF button Allows you to switch the timer/thermometer
on and off and to switch between °C and °F.
1 Press the SET button once or twice, until the display shows
the alarm that you want to clear.
2 To clear the alarm, press the SET button again and hold it for
a few moments.
10.5 Checking the food temperature
1 Switch on the thermometer by pressing the ON/OFF button.
2 Plug the thermometer probe into your food.
After a few moments, the thermometer shows the current
temperature of the food.
3 If you want to follow up the temperature of your food, leave
the probe plugged in.
4 When finished, remove the probe from the food and switch
off the thermometer by pressing the ON/OFF button.
10.6 Temperature guidelines
The thermometer alarm is especially helpful to prepare meat. If
you plug the probe into the center of your meat, you can make
the alarm go off when the meat is cooked to your liking. This table
indicates to which temperature you should set the alarm:
Meat How done? Temperature
Red meat Very rare 45 - 49,5 °C
Rare 50 - 54,5 °C
SET button Allows you to enter the setting mode, in
which you can set the timer and/or
thermometer alarm.
+ and - buttons Allow you to set the timer or thermometer
alarm to the correct time or temperature.
10.2 Setting the timer alarm
1 Switch on the timer and thermometer by pressing the
ON/OFF button.
2 Press the SET button once or twice, until the display shows
the clock icon and the default setting 0:00.
3 Use the + and - buttons to set the correct time.
4 When finished, do not press any buttons for five seconds.
The timer automatically quits the setting mode. The alarm will
go off after the set amount of time.
10.3 Setting the thermometer alarm
1 Switch on the timer and thermometer by pressing the
ON/OFF button.
2 Plug the thermometer probe into the food.
After a few moments, the thermometer shows the current
temperature of the food.
3 Press the SET button once or twice, until the display shows
the probe icon and the default setting ---.
4 Switch between degrees Fahrenheit (°F) and Celsius (°C) by
pressing the ON/OFF button.
5 Use the + and - buttons to set the correct temperature.
6 When finished, do not press any buttons for five seconds.
The thermometer automatically quits the setting mode. The
alarm will go off when the food reached the set temperature.
Medium 55 - 59,5 °C
Medium well 60 - 64,5 °C
Well 65 - 69,5 °C
Pork Not applicable 79 - 100 °C
Poultry Not applicable 79 - 100 °C
11 USEFUL TIPS AND TRICKS
11.1 Preheating the appliance
By preheating your appliance, you make sure the grill is hot
enough by the time you put food on it. Proceed as follows:
1 Light the burner(s) and set their control knob(s) to HIGH.
2 Close the lid and leave the appliance for ten minutes.
3 After ten minutes, open the lid and put your food on the grill.
4 If you need less heat now, set the control knob(s) to a lower
position.
11.2 Preventing food from sticking
To prevent your food from sticking to the grill:
• Oil the food lightly with a brush before you put it on the grill.
You can also oil the grill itself.
• Preheat the appliance. The warmer the grill when you put
food on it, the less the food will stick.
• Do not turn the food too quickly. Let it catch some heat first.
11.3 Direct and indirect grilling
Depending on the type of food you are preparing and on how you
want to prepare it, you can grill directly or indirectly:
www.barbecook.com 13

Method Description Use
zones are still hotter than others. You can take advantage of
these heat zones to grill your food to perfection:
Direct Put your food directly above a
Indirect Put your food next to a lit
When grilling under a closed lid, always keep an eye on
1
the lid thermometer to make sure the appliance does not
get too hot. See “11.5 Watching the temperature”.
lit burner, set that burner to a
high position and keep the lid
open.
burner, set that burner to a
medium/low position and close
the lid.
To sear meat
and vegetables
To further cook
seared meat
11.4 Grilling with closed lid
Closing the lid while grilling has some important advantages:
• The temperature of the grill is higher and remains more
constant.
• You reduce the cooking time of your food and keep your
food more moist.
• You reduce flare-ups and save gas.
When grilling under a closed lid, always keep an eye on
1
the lid thermometer to make sure the appliance does not
get too hot. See “11.5 Watching the temperature”.
11.5 Watching the temperature
Your appliance is equipped with powerful burners, so it heats up
rapidly and you can keep the temperature steady. When grilling
under a closed lid, however, you have to make sure that the
appliance does not get too hot. Keep an eye on the lid
thermometer and take into account the following guidelines:
• A normal cooking temperature is about 210 °C. At higher
temperatures, dripping and accumulated fat can ignite.
• The temperature should never be over 300 °C for more than
five minutes. This can damage and deform the appliance.
If the appliance gets too hot, cool it down by opening the
1
lid and setting the burners to a lower position.
11.6 Making optimal use of the heat
The central part of the bowl is hotter than the sides. To allow you
to use that hottest part to its full potential, the appliance is
equipped with grills of different sizes. It comes with:
• One large grill, to be placed in the centre of the bowl.
• Two smaller grills, to be placed at the sides of the bowl.
If you place the grills correctly in the bowl and light all the
burners, the entire central grill will be heated to the maximum.
Like that, you expand the hottest part of the bowl and you can
make optimal use of the grill surface of your appliance.
Zone Hot? Use to...
Front Hot Grill delicate food (prawns, fish...)
Centre Hotter Prepare food that needs some time to
Back Hottest Sear meat and vegetables
You can also create heat zones by playing with the power
2
of the burners. You can, for example, set a burner to a
lower position and use the zone above that burner for
delicate food or food that needs some time to cook.
cook (e.g. sausages, chicken ties...)
11.8 Roasting food on the spit
To roast food on the spit, you have to make the main burners and
spit burner act together. To prepare a spit-roasted chicken, for
example, proceed as follows:
1 Remove the grills and warming rack from the appliance and
put them aside.
2 Light the main burners and close the lid to preheat the
appliance. In the meantime, put the chicken on the spit.
3 After ten minutes, open the lid, switch off the middle burner
and set the side burners to LOW. You can put a dish on the
middle burner to catch dripping fat.
4 Put the spit above the burners and close the lid. The hot air
will now cook the chicken, just like in a traditional oven.
5 When the chicken is partially cooked, light the spit burner to
crisp the chicken skin. Open the lid when lighting the burner
and close it afterwards.
6 Keep an eye on the chicken to make sure the skin does not
burn. Switch the spit burner off once the skin is crisp
enough.
When grilling under a closed lid, always keep an eye on
1
the lid thermometer to make sure the appliance does not
get too hot. See “11.5 Watching the temperature”.
11.9 Avoiding flare-ups
During grilling, some flare-ups are normal. Too many flare-ups,
however, increase the temperature in the appliance and can
ignite accumulated fat. To avoid flare-ups:
• Make sure the bowl is clean when you start grilling. We
recommend putting a new Leaf
use. See “12.2 Cleaning the bowl”.
• Regularly check if the fat drain hole is not blocked and if the
fat drip tray or cup is not full yet.
• When grilling fatty meat, trim excess fat, close the lid and set
the burners to a medium or low position.
®
in the bowl before each
11.7 Taking advantage of the heat zones
When all burners are lit, the burner hoods distribute the heat as
evenly as possible over the grill. Despite this even heating, some
14 www.barbecook.com
12 MAINTAINING THE APPLIANCE
12.1 Cleaning the grill
We recommend cleaning the grill after each use, with the
Barbecook cleaner. Proceed as follows:
1 Spray the foam on the grill and let it act for a while.
The foam discolours, as it soaks off the dirt and greases.
2 Remove the foam with a soft sponge and water and rinse the
grill thoroughly.
3 Dry the grill well and store it in a dry place. This prevents
formation of rust.
You can also clean the grill with a soft detergent or with
2
sodium bicarbonate. Never use oven cleaners on the grill.
12.2 Cleaning the bowl
A
We recommend cleaning the bowl after each use. The easiest
way to do this is by putting a Leaf
grilling. The Leaf
catches all residues and greases. When the appliance cooled
down, just remove the Leaf
Register your appliance at www.barbecook.com to find
2
out which type of Leaf
®
is a foil that fits the bowl perfectly and that
®
in the bowl before you start
®
and the bowl is clean.
®
you need.
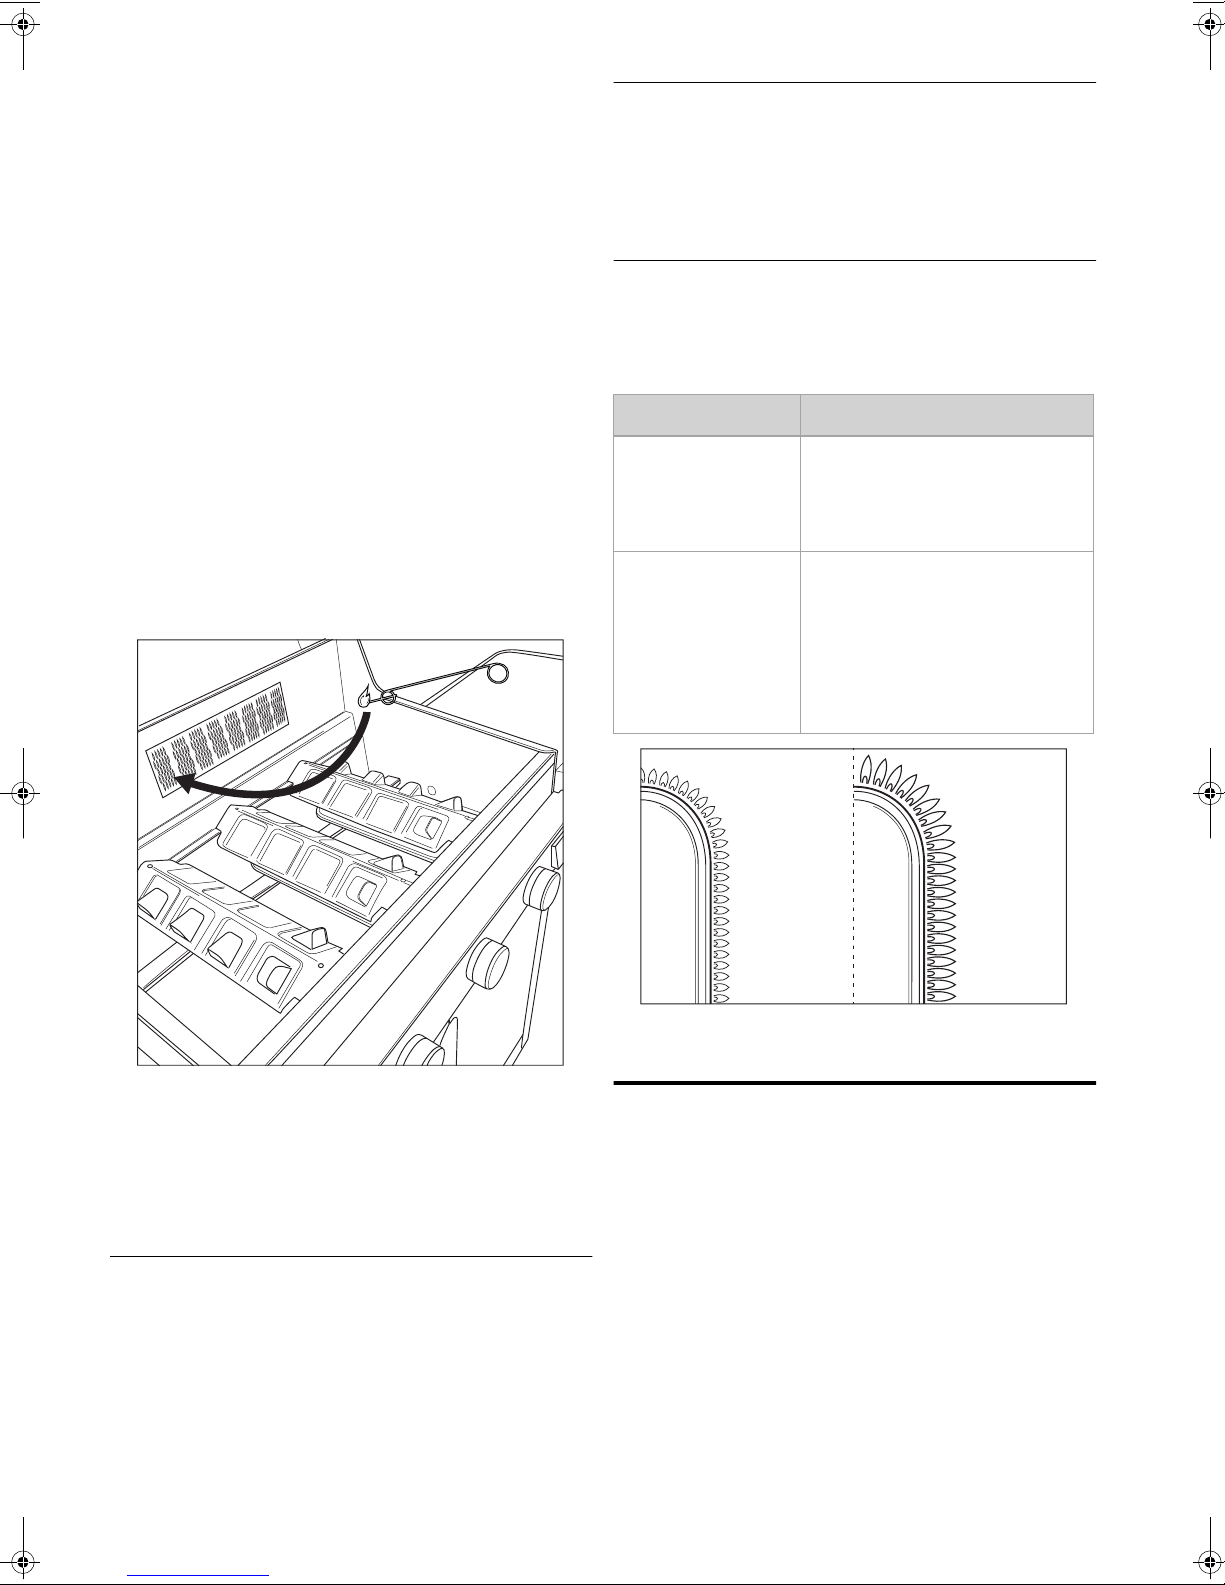
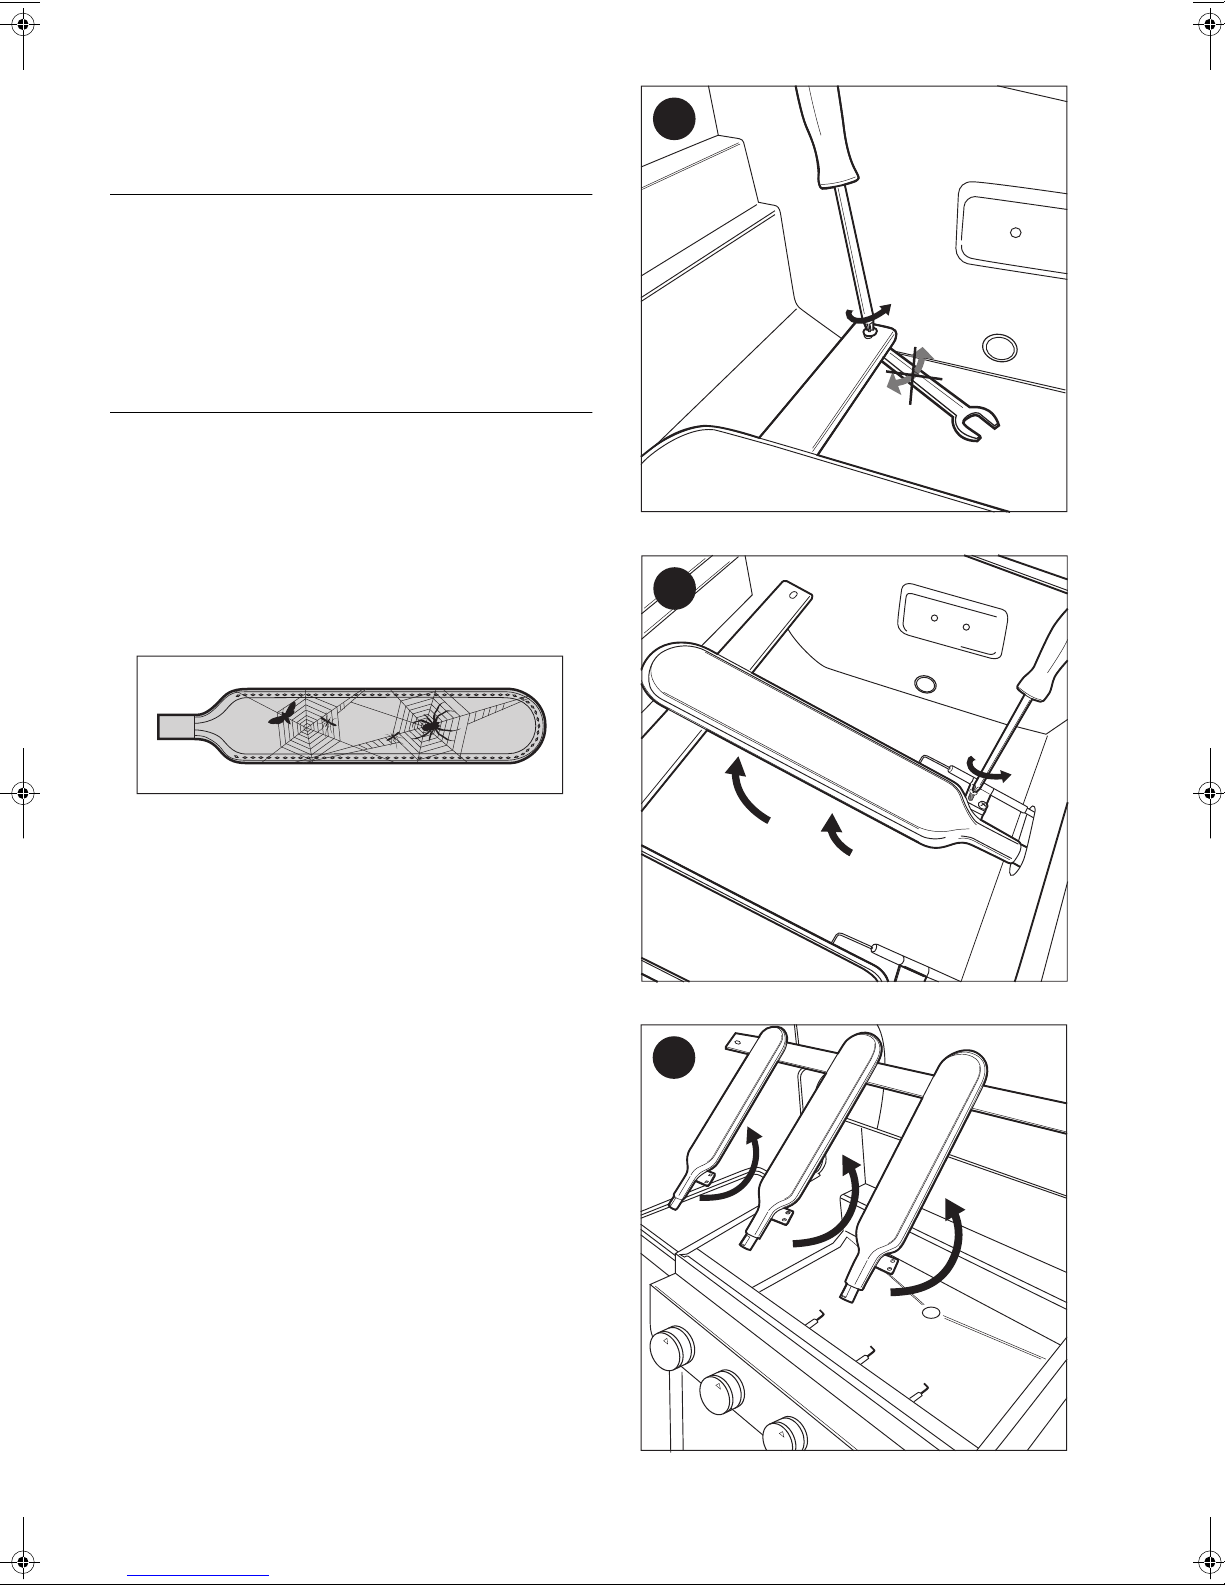
12.3 Cleaning the burners and venturis
12.3.1 WHY CLEAN THE BURNERS AND VENTURIS?
Spiders and insects can make webs and nests in the burners and
venturis. This may block the gas supply to the burners. As a
result:
• You cannot light the burners. If you manage to light them
anyway, they will only produce smoky and yellow flames.
• The gas can start burning outside the venturis, at the control
knobs. These fires are called flash-backs and can result in
serious injuries and material damage.
B
Damages caused by blocked burners and venturis are
0
regarded as inadequate maintenance and are not
covered by the warranty.
12.3.2 WHEN CLEAN THE BURNERS AND VENTURIS?
You have to clean the burners and venturis of your appliance:
• Before the first use after a long period of non-use.
• At least twice a year, of which once at the beginning of the
season.
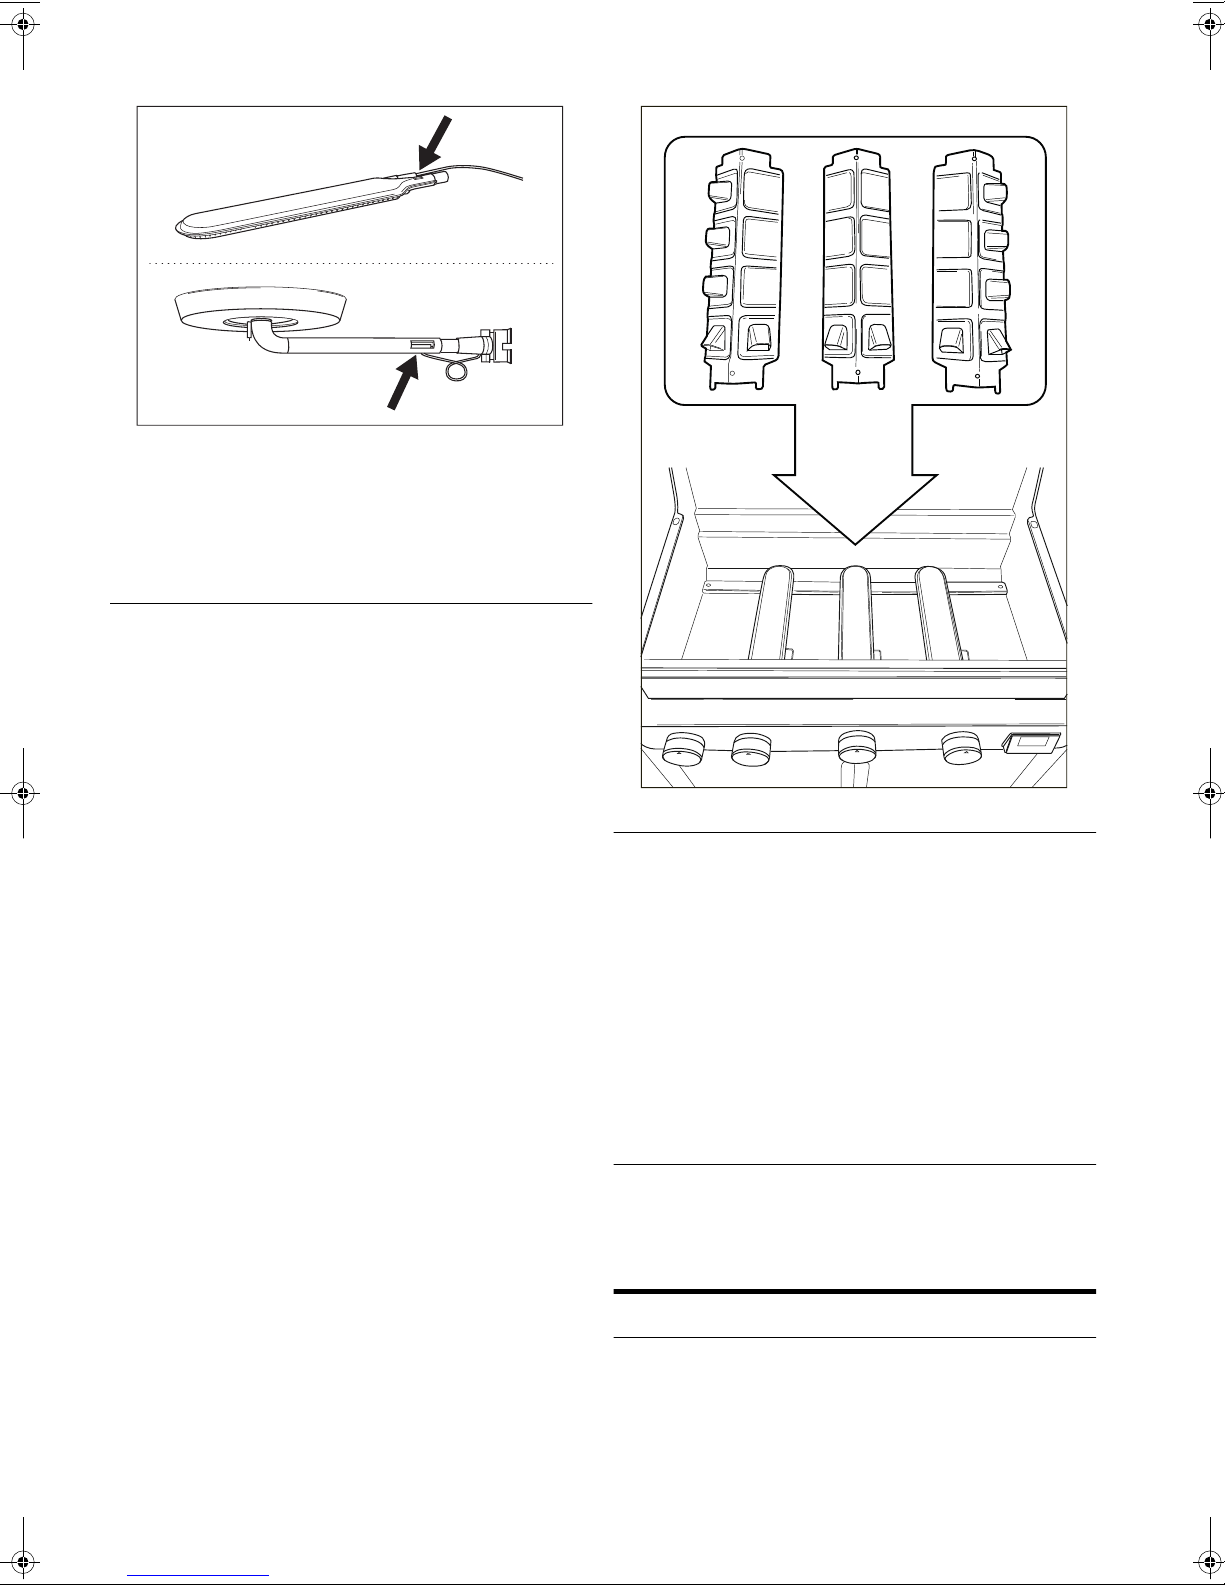
12.3.3 TO CLEAN THE BURNERS AND VENTURIS
1 Remove the burners from the appliance as shown on the
illustrations. If you notice that a burner is damaged, you have
to replace it.
C
www.barbecook.com 15
2 Clean the burners and venturis with a small brush or a
homemade pipe cleaner (an unfolded paperclip, a pipe
brush...).
3 Put the burners back. Make sure to place the venturis over
the openings of the gas valves.
12.4 Maintaining enamel, stainless steel
and powder coated parts
The appliance is composed of enamelled, stainless steel and
powder coated parts. Each material has to be maintained
differently:
Material How to maintain this material
Enamel
Stainless steel
Powder
coated
To prevent formation of rust on stainless steel, avoid
1
contact with chlorine, salt and iron. We recommend not
using the appliance near the coast, near railways or near
swimming pools.
Damages caused by not following these instructions are
1
regarded as inadequate maintenance and are not
covered by the warranty.
Below the exploded view of your appliance (second part of the
manual), you find a list with all parts of which the appliance is
composed. This list includes a symbol that specifies the material
of each part, so you can use it to check how you have to maintain
a particular part. The parts lists use the following symbols:
Symbol Material
• Do not use sharp objects and do not knock
against a hard surface.
• Avoid contact with cold liquids while still hot.
• You can use metal sponges and abrasive
detergents.
• Do not use aggressive, abrasive or metal
detergents.
• Use soft detergents and let them act on the
steel.
• Use a soft sponge or cloth.
• Rinse thoroughly after cleaning and dry well
before storing.
• Do not use sharp objects. Use soft detergents
and a soft sponge or cloth.
• Rinse thoroughly after cleaning and dry well
before storing.
Enamel
Stainless steel
Powder coated
12.5 Storing the appliance
If you do not use your appliance for a longer period of time, store
it in a dry place. Before you store the appliance:
• Disconnect the gas cylinder. Never store your appliance
indoors (not even in a garage or shed) as long as it is
connected to the gas cylinder.
• Clean the burners and the grills, rub them with oil and wrap
them in paper.
• If your appliance is equipped with a spit burner, remove the
spit burner engine and store it in a dry place.
• Cover your appliance with a Barbecook cover. Register your
appliance at www.barbecook.com to find out which cover
you need.
12.6 Storing gas cylinders
These instructions apply to both empty and full gas cylinders.
• Always store gas cylinders outdoors, in a well-ventilated
area. Make sure they are not exposed to excessive heat or
direct sunlight.
• Never store a gas cylinder in an area that can become very
hot (in a car, on a boat...).
• Never store your gas cylinder or spare gas cylinder in the
cabinet of your appliance.
• Never store your spare gas cylinder near a gas appliance in
use.
• Always store gas cylinders outside the reach of children.
• Always store and transport gas cylinders in upright position.
12.7 Ordering spare parts
Parts that are directly exposed to fire or intense heat have to be
replaced from time to time. To order a spare part:
1 Look up the reference number of the part you need. You find
a list of all reference numbers below the exploded views in
the second part of this manual and on www.barbecook.com.
If you registered your appliance online, you will
2
automatically be guided to the correct list.
2 Order the spare part at your point of sale. You can order
parts both under and outside warranty.
13 WARRANTY
13.1 Covered
Your appliance comes with a warranty of two years, starting from
the date of purchase. This warranty covers all manufacturing
defects, provided that:
• You used, assembled and maintained your appliance
according to the instructions in this manual. Damages
caused by misuse, incorrect assembly or inadequate
maintenance are not regarded as manufacturing defects.
• You can present the receipt and the unique serial number of
your appliance. This serial number starts with a G, followed
by 15 digits. You can find it:
• On this manual and on the starter pack that included the
manual.
• On the packaging of the appliance.
• On the type label on the inside of the cabinet door
(Quisson, Siesta 4 and Siesta 6) or on the inside of the
bottom front panel (Spring, Siesta 2 and Siesta 3).
• The Barbecook quality department confirms that the parts
are defective and that they proved defective under normal
use, correct assembly and adequate maintenance.
If one of the above conditions is not met, you cannot claim any
form of contribution. In all cases, the warranty is limited to the
repair or replacement of the defective part(s).
13.2 Not covered
The following damages and defects are not covered by the
warranty:
16 www.barbecook.com

• Normal wear and tear (rusting, distortion, discolouration...) of
parts that are directly exposed to fire or intense heat. It is
normal to replace these parts from time to time.
• Visual irregularities that are inherent to the manufacturing
process. These irregularities are not regarded as
manufacturing defects.
• All damages caused by inadequate maintenance, incorrect
storage, improper assembly or modifications made to
pre-assembled parts.
• All damages caused by misuse and abuse of the appliance
(not using it according to the instructions in this manual,
using it for commercial purposes...).
• All consequential damages caused by careless or
non-compliant use of the appliance.
• Rust or discolouration caused by external influences, the use
of aggressive detergents, exposure to chlorine... These
damages are not regarded as manufacturing defects.
14 TECHNICAL SPECIFICATIONS
14.1 Type label
The type label lists all the technical specifications of your
appliance. You can find it:
• In the second part of this manual.
• On the inside of the cabinet door.
14.2 Injector diameters
• Main burner: 0,99 mm
• Side burner: 0,65 mm
• Spit burner 0,82 mm
www.barbecook.com 17
15 TROUBLESHOOTING
Problem Probable cause(s) Solution(s)
Not enough heat
Excessive heat and/or flare-ups
Heat not distributed evenly
over grill surface
Yellow flames
Incomplete flame Burner blocked, pierced or rusted Clean or replace burner
Flash-backs (flames outside
venturis/at control knobs)
Flames higher than edge of
bowl
Pressure regulator hums
• Gas supply not open
• Venturis not placed over openings of gas valves
• Burner openings blocked
• Gas cylinder (almost) empty
• Pressure regulator not connected correctly to
cylinder and/or hose
• Food too fatty
• Fat drain hole blocked, fat in bowl and/or fat on
burners
• Burner hoods not mounted correctly
• Temperature too high
Some heat differences are normal, see “11.6 Making
optimal use of the heat” and “11.7 Taking advantage
of the heat zones”. Probable cause(s) for big heat
differences:
• Burners hoods not mounted correctly
• Appliance not preheated
• Burners or venturis blocked
• Salt on burners
• Appliance connected to butane
Burners or venturis blocked
• Lots of wind
• Gas cylinder (almost) empty
• Fat in bowl and/or on burners
• Hot weather
• New (full) gas cylinder
• Open gas supply
• Place venturis over openings of gas valves
• Clean burner openings or replace burners
• Replace gas cylinder
• Reconnect pressure regulator to cylinder and/or
hose
• Trim excess fat or set burners to a low position
• Clean fat drain hole, bowl and burners
• Mount burner hoods correctly
• Set burners to a lower temperature and/or grill
food indirectly
• Mount burner hoods correctly
• Preheat appliance
• Clean burners and venturis
• Clean burners
• Connect appliance to propane, using an
appropriate pressure regulator
1 Close gas supply and set burners to OFF.
2 Let appliance cool down.
3 Clean burners and venturis.
• Put appliance with rear side towards wind
• Replace gas cylinder
• Clean bowl, clean burners and replace Leaf
Not a hazard or defect. Should stop automatically
after a while.
®
Burner whistles when set to
LOW
Impossible to light burner
(using either igniter or match)
Impossible to light burner with
igniter
No sparks nor sound when
pressing igniter
Only sound (no sparks) when
pressing igniter
Sparks present that do not
originate from burners
Gas injector, venturi and/or burner dirty Clean gas injector, venturi and burner
• Burner or venturi blocked
• No gas supply
• No battery installed or battery not installed
correctly
• Igniter wiring not mounted correctly
• Electrode damaged
• Faulty ground
• Faulty igniter
• No battery installed or battery not installed
correctly
• Empty battery
• Igniter button not assembled correctly
• Faulty spark generator
• Faulty ground
• Burner and electrode too far apart
Faulty wiring Replace wiring
• Clean burner and venturi
• Open gas supply and press safety knob on
pressure regulator (not present on all regulators)
• (Re)install battery, with terminals positioned
correctly
• Check and re-assemble all igniter connections
• Replace electrode
• Check and re-assemble electrodes, burners and
igniter
• Replace igniter
• (Re)install battery, with terminals positioned
correctly
• Replace battery
• Re-assemble igniter button
• Replace spark generator
• Reconnect spark generator and electrodes
• Slightly bend electrode to bring it closer to the
burner
18 www.barbecook.com

Problem Probable cause(s) Solution(s)
Sparks present, but not on all
electrodes and/or not powerful
enough
• Faulty ground
• Low battery
• Wet or broken electrodes
• Reconnect spark generator and electrodes
• Replace battery
• Dry electrodes with paper towels or replace
electrodes
www.barbecook.com 19

20 www.barbecook.com

NL - GEBRUIKSAANWIJZING
1 Uw barbecue registreren............................................ 22
2 Over deze handleiding................................................ 22
3 Belangrijke veiligheidsinstructies ............................... 22
• De instructies lezen en opvolgen........................... 22
• Voorzichtig omspringen met gas ........................... 22
• Een geschikte locatie kiezen.................................. 22
• Uw gezond verstand gebruiken............................. 22
4 Terugkerende concepten ........................................... 22
• Venturibuizen ......................................................... 22
• Branderkappen ...................................................... 23
• Email ...................................................................... 23
• Opflakkeringen....................................................... 23
5 De barbecue monteren............................................... 23
• Veiligheidsinstructies ............................................. 23
• De barbecue monteren .......................................... 24
6 De barbecue van gas voorzien................................... 24
• Welke gasfles, slang en regelaar? ......................... 24
• Veiligheidsinstructies ............................................. 24
• De slang aansluiten op de barbecue ..................... 24
• De slang en gasfles aansluiten op de regelaar ...... 25
• De gasfles vervangen............................................. 25
7 Controleren op gaslekken .......................................... 25
• Waarom controleren op gaslekken? ...................... 25
• Wanneer controleren op gaslekken? ..................... 25
• Veiligheidsinstructies ............................................. 25
• Welke materialen heb ik nodig?............................. 25
• Controleren op gaslekken...................................... 26
• In geval van een gaslek.......................................... 26
8 De barbecue klaarmaken voor gebruik ...................... 26
• Voor elk gebruik..................................................... 26
• Voor het eerste gebruik (of na een lange periode van
ongebruik) .............................................................. 27
• De barbecue inbranden ......................................... 27
10 De timer en thermometer gebruiken .......................... 29
• Pictogrammen en regelknoppen............................ 29
• Het timeralarm instellen ......................................... 29
• Het thermometeralarm instellen............................. 29
• Een alarm wissen................................................... 30
• De temperatuur van het voedsel controleren......... 30
• Temperatuurrichtlijnen ........................................... 30
11 Handige tips ............................................................... 30
• De barbecue voorverwarmen ................................ 30
• Voorkomen dat voedsel aankleeft ......................... 30
• Rechtstreeks en onrechtstreeks grillen.................. 30
• Grillen met gesloten deksel ................................... 30
• De temperatuur controleren................................... 30
• De warmte optimaal gebruiken.............................. 31
• De warmtezones benutten..................................... 31
• Voedsel roosteren aan het spit .............................. 31
• Opflakkeringen vermijden...................................... 31
12 De barbecue onderhouden ........................................ 31
• Het rooster reinigen ............................................... 31
• De kuip reinigen..................................................... 31
• De branders en venturibuizen schoonmaken ........ 32
• Geëmailleerde, roestvaststalen, en gepoederlakte
onderdelen onderhouden ...................................... 32
• De barbecue opbergen.......................................... 33
• Gasflessen bewaren .............................................. 33
• Reserveonderdelen bestellen ................................ 33
13 Garantie...................................................................... 33
• Gedekt ................................................................... 33
• Niet gedekt ............................................................ 33
14 Technische gegevens................................................. 34
• Typelabel................................................................ 34
• Diameters van de injectoren .................................. 34
15 Problemen oplossen .................................................. 35
9 De branders ontsteken............................................... 27
• Veiligheidsinstructies ............................................. 27
• De hoofdbranders ontsteken ................................. 27
• De zijbrander ontsteken......................................... 27
• De spitbrander ontsteken ...................................... 28
• De branders uitschakelen ...................................... 28
• De branders opnieuw ontsteken............................ 29
• De vlammen controleren........................................ 29
www.barbecook.com 21

1 UW BARBECUE REGISTREREN
Bedankt voor uw aankoop van een Barbecook-barbecue! We
wensen u veel barbecueplezier.
Om optimaal van uw barbecue te genieten, kunt u uw barbecue
registreren op www.barbecook.com. Dit duurt slechts enkele
minuten en biedt belangrijke voordelen:
• U kunt een beroep doen op onze gepersonaliseerde
naverkoopdienst. Op die manier kunt u bijvoorbeeld snel
reserveonderdelen voor uw barbecue vinden of genieten van
een optimale garantieservice.
• Wij houden u op de hoogte van interessante productupdates
en verwijzen u naar productinformatie en -specificaties die
relevant zijn voor uw barbecue.
Voor meer informatie over het registreren van uw
2
barbecue gaat u naar www.barbecook.com.
Barbecook respecteert uw privacy. Uw gegevens worden
0
niet verkocht, verspreid of doorgegeven aan derden.
2 OVER DEZE HANDLEIDING
Deze handleiding bestaat uit twee delen:
• Het eerste deel is het deel dat u momenteel leest. Hier vindt
u instructies om uw barbecue te monteren, te gebruiken en
te onderhouden.
• Het tweede deel begint op pagina 373. Daarin vindt u
diverse illustraties (explosietekeningen, montagetekeningen,
typelabels) van de barbecues die in deze handleiding
beschreven zijn.
3 BELANGRIJKE
VEILIGHEIDSINSTRUCTIES
3.1 De instructies lezen en opvolgen
Lees de instructies voor u de barbecue in gebruik neemt. Volg de
instructies altijd zorgvuldig. Als de barbecue op een andere wijze
wordt gemonteerd of gebruikt, kan dit brand en materiële schade
tot gevolg hebben.
Schade wegens het niet opvolgen van de instructies
1
(verkeerde montage, misbruik, verkeerd onderhoud enz.)
wordt niet gedekt door de garantie.
3.2 Voorzichtig omspringen met gas
Werken met gas is erg veilig, maar u dient enkele
voorzorgsmaatregelen in acht te nemen:
• Bewaar gasflessen altijd buitenshuis in een goed
geventileerde ruimte. Zorg ervoor dat de flessen niet
blootgesteld worden aan hoge temperaturen of direct
zonlicht.
• Bewaar uw gasfles of reservegasfles nooit in de kast van de
barbecue.
• Plaats de gasfles tijdens het gebruik in de flessenwagen aan
de zijkant van de barbecue.
• Bewaar uw reservegasfles nooit in de buurt van een toestel
op gas dat in gebruik is.
• Draai na het gebruik altijd de gastoevoer aan de gasfles
dicht.
• Rook nooit in de buurt van een toestel op gas dat in gebruik
is of in de buurt van een gasfles (vol/leeg).
Als u gas ruikt, draait u onmiddellijk de gastoever dicht,
1
dooft u alle vlammen en opent u het deksel van de
barbecue. Als de geur aanhoudt, belt u naar uw
gasleverancier of de brandweer.
3.3 Een geschikte locatie kiezen
Gebruik de barbecue alleen buitenshuis. Als u de barbecue
binnenshuis gebruikt, zelfs in een garage of schuur, bestaat er
gevaar voor vergiftiging door koolmonoxide.
Let op het volgende wanneer u een locatie kiest:
• Plaats de barbecue op minstens drie meter van een gebouw,
op een open en goed geventileerde plaats.
• Zorg ervoor dat er altijd voldoende vrije lucht naar de
branders en naar de ventilatiegaten in de kast kan stromen.
• Plaats de barbecue niet onder een overhangende structuur
(veranda, afdak ...) of onder gebladerte.
• Plaats de barbecue op een stevige en stabiele ondergrond.
Plaats de barbecue nooit op een bewegend voertuig (boot,
oplegger ...).
Om roestvorming op onderdelen uit roestvast staal te
1
voorkomen, vermijdt u best ieder contact met chloor, zout
of ijzer. Wij raden u aan de barbecue niet te gebruiken in
kuststreken, nabij spoorwegen of in de buurt van een
zwembad.
3.4 Uw gezond verstand gebruiken
Gebruik steeds uw gezond verstand wanneer u de barbecue
gebruikt:
• Gebruik de barbecue alleen buitenshuis.
• Verplaats de barbecue niet tijdens het gebruik.
• Laat de barbecue niet alleen achter terwijl deze in gebruik is,
en dit zeker niet als er kinderen of dieren aanwezig zijn.
• WAARSCHUWING! Sommige bereikbare delen kunnen erg
heet worden. Houd jonge kinderen dus uit de buurt van de
barbecue.
• Gebruik geschikte bescherming wanneer u hete onderdelen
(deksel, rooster enz.) moet vastnemen.
• Houd de barbecue tijdens het gebruik uit de buurt van
ontvlambare materialen.
• Houd brandbare materialen, brandbare vloeistoffen en
oplosbare objecten op een veilige afstand van de barbecue
wanneer deze in gebruik is.
• Gebruik geen hout, houtskool, lavastenen of keramische
briketten in een gasbarbecue.
• Gebruik de barbecue niet als u alcohol hebt gedronken of
drugs hebt gebruikt.
• Breng geen wijzigingen aan de barbecue aan.
4 TERUGKERENDE CONCEPTEN
Dit deel omvat definities van een aantal minder vertrouwde
concepten. Deze concepten worden gebruikt in verschillende
onderwerpen van de handleiding.
4.1 Venturibuizen
De venturibuizen zijn de kleine buizen die aan de ingang van de
branders bevestigd zijn. Aan de zijkant van de venturibuizen is er
22 www.barbecook.com
een opening voorzien. Deze is zichtbaar op de hoofdbranders en
op de zijbrander:
Op weg naar de branders passeert het gas door de
venturibuizen. Via de openingen in de zijkanten wordt het gas
gemengd met lucht, en dus ook met zuurstof. Dit is nodig voor
een goede ontbranding in de branders: alleen een correct
gas-zuurstofmengsel zal goed ontbranden en mooie vlammen
opleveren.
4.2 Branderkappen
De branderkappen zijn de kappen die gemonteerd worden boven
de branders van de barbecue. Ze beschermen de branders tegen
druipend vet en spelen een cruciale rol bij gebruik van het Turbo
Heating System. De overdekte openingen aan de zijkanten van
de kappen verdelen de warmte over het rooster, zodat het veel
sneller en gelijkmatiger opgewarmd wordt.
Besteed dus extra aandacht aan de branderkappen bij
2
het monteren van de barbecue. Het Turbo Heating
System werkt alleen correct als elke kap boven de juiste
brander aangebracht is.
4.3 Email
Sommige delen van de barbecue zijn bekleed met een laag
gesmolten glas, zogenaamd email. Dit email beschermt het
onderliggende metaal tegen corrosie. Email is een kwaliteitsvol
materiaal: het is bestand tegen roest, het verzwakt niet onder
invloed van hoge temperaturen en het is zeer eenvoudig te
onderhouden.
Omdat het email minder flexibel is dan het metaal waarop
1
het is aangebracht, kunnen stukjes email loskomen
wanneer u de barbecue niet correct gebruikt. Om
problemen te vermijden, dient u voorzichtig te zijn
wanneer u geëmailleerde onderdelen monteert en dient u
het email altijd te onderhouden zoals beschreven in deze
handleiding.
4.4 Opflakkeringen
Opflakkeringen zijn vlammen die plots uit de kuip springen
tijdens het grillen. Ze worden meestal veroorzaakt door druipend
vet of druipende marinade.
5 DE BARBECUE MONTEREN
5.1 Veiligheidsinstructies
• Breng geen wijzigingen aan de barbecue aan wanneer u
deze in elkaar zet. Onderdelen die door de fabrikant werden
voorgemonteerd en/of afgedicht, mogen niet worden
gewijzigd, want dit is zeer gevaarlijk.
• Volg de montage-instructies altijd zorgvuldig.
www.barbecook.com 23
• De gebruiker is verantwoordelijk voor de correcte montage
van de barbecue. Schade veroorzaakt door een foutieve
montage wordt niet gedekt door de garantie.
5.2 De barbecue monteren
U hebt een kruisschroevendraaier, een platte schroevendraaier
en een AA-batterij (elektrische ontsteker) nodig. Als uw barbecue
uitgerust is met een spitbrander, hebt u daarnaast twee
D-batterijen (motor spitbrander) nodig. Er zijn geen batterijen bij
de barbecue geleverd.
1 Plaats de barbecue op een effen en schone ondergrond.
2 Monteer de barbecue zoals aangegeven in de
montagetekeningen. U vindt deze in het tweede deel van
deze handleiding, na de explosietekening van uw barbecue.
Wees voorzichtig bij het monteren van emailonderdelen.
1
Het gereedschap en de schroeven kunnen het email
beschadigen. Gebruik de bijgeleverde vezelringen om het
email rond de schroeven te beschermen.
• Neem het volgende in acht bij het aansluiten van de gasfles,
slang en drukregelaar:
• Vervorm de slang niet.
• Zet de gasfles altijd rechtop.
• Open nooit de gastoevoer.
• Telkens wanneer u wijzigingen aanbrengt aan de
gasverbindingen, moet u controleren of er gaslekken zijn. Zie
“7 Controleren op gaslekken”.
6.3 De slang aansluiten op de barbecue
Om de gasslang te kunnen aansluiten op de barbecue, moet u
een koppeling monteren op de gasbuis van de barbecue. De
barbecue wordt geleverd met twee verschillende koppelingen
die bestemd zijn voor gebruik in verschillende landen:
Land Koppeling
BE, CH, CZ, DK, ES, FI, GB, IE, IT, PT, SI Koppeling A
Het is mogelijk dat de blisterverpakkingen meer
0
schroeven dan nodig bevatten, en dat er dus schroeven
overblijven na de montage.
6 DE BARBECUE VAN GAS VOORZIEN
6.1 Welke gasfles, slang en regelaar?
Voor u de barbecue van gas kunt voorzien, moet u eerst een
gasfles, een slang en een drukregelaar kopen. Koop steeds
materialen die beantwoorden aan alle nationale richtlijnen en aan
de gastypes en nominale drukwaarden die op de barbecue
vermeld staan.
In de onderstaande tabel ziet u welke gasfles, slang en regelaar
u moet gebruiken. In België (BE) moet u bijvoorbeeld een
propaanfles gebruiken met een slang en regelaar voor 37 mbar,
of een butaanfles met een slang en regelaar voor 28-30 mbar.
Land Gasfles, slang en regelaar
DK, GR, NO, SE,
EE, LT, LV, CZ, PL,
MT, HU, SI, SK
ES, GB, IE, PT, BE,
FR, LU, IT
NL Propaan, 30 of 50 mbar / butaan, 30 mbar
CY Propaan, 30 of 37 mbar / butaan, 28-30 mbar
Propaan, 30 mbar / butaan, 30 mbar
Propaan, 37 mbar / butaan, 28-30 mbar
FR Koppeling B
Als uw land niet vermeld staat in de tabel, gebruikt u de
2
koppeling die beantwoordt aan de normen die gelden in
uw land.
AB
6.3.1 KOPPELING A
U hebt een moersleutel van 19 mm en een kruisschroevendraaier
nodig.
Wij raden u aan propaan te gebruiken voor de barbecue.
2
Propaan levert een kwaliteitsvolle verbranding en is
minder vorstgevoelig.
Koop uw drukregelaar en gasfles altijd samen. Niet alle
2
regelaars passen op alle gasflessen.
6.2 Veiligheidsinstructies
• Sluit de gasfles nooit rechtstreeks aan op de barbecue.
Monteer altijd eerst een drukregelaar op de gasfles.
• Pas voorgemonteerde of verzegelde onderdelen van de
gasfles, slang of drukregelaar nooit aan.
• Zorg voor een zo kort mogelijke slang (maximaal 1,5 m) om
te verhinderen dat deze over de grond sleept.
24 www.barbecook.com
1 Schroef de koppeling op de gasbuis van de barbecue (A) en
draai deze vast met een moersleutel van 19 mm (B).
A
B
2 Schuif de slang over de koppeling (C) en span de spanring
aan met een kruisschroevendraaier (D).
• Als de regelaar voorzien is van schroefdraad, schroeft u
de regelaar linksom op de gasfles (D).
C
D
6.3.2 KOPPELING B
U hebt een moersleutel van 22 mm en een Engelse sleutel nodig.
1 Schroef de koppeling op de gasbuis van de barbecue (A) en
draai deze vast met een moersleutel van 22 mm (B).
A
2 Schroef de gasslang op de koppeling (C) en draai deze aan
met twee moersleutels. Houd de koppeling vast met een
moersleutel van 22 mm en draai terwijl de slang vast met een
Engelse sleutel (D).
C
B
D
6.4 De slang en gasfles aansluiten op de
regelaar
Afhankelijk van het gebruikte type drukregelaar hebt u een
kruisschroevendraaier en/of een Engelse sleutel nodig.
1 Sluit de slang aan op de drukregelaar. Ga als volgt te werk:
• Als de slang uitgerust is met een spanring, schuift u de
slang over de regelaar en spant u de spanring aan met
een kruisschroevendraaier (A).
• Als de slang uitgerust is met een moer, schroeft u de
slang op de regelaar en draait u de moer aan met een
Engelse sleutel (B).
A B
C D
6.5 De gasfles vervangen
1 Draai de gastoever dicht en zet alle regelknoppen op OFF.
2 Koppel de lege gasfles los en sluit de volle gasfles aan.
3 Controleer de gasfles, de slang en alle gasverbindingen op
lekken. Zie “7 Controleren op gaslekken”.
7 CONTROLEREN OP GASLEKKEN
7.1 Waarom controleren op gaslekken?
Propaan en butaan zijn zwaarder dan lucht. Dit betekent dat deze
gassen niet wegdrijven als ze uit de barbecue lekken. Met name
op windstille dagen kan het gas zich in geval van een gaslek gaan
opstapelen in en rond de barbecue, en vervolgens ontsteken en
ontploffen.
7.2 Wanneer controleren op gaslekken?
• Voor het eerste gebruik of na een lange periode van
ongebruik.
Controleer of er geen gaslekken zijn als de barbecue
1
gemonteerd werd door de leverancier.
• Telkens wanneer u een gasonderdeel vervangt.
• Minstens één keer per jaar, bij voorkeur aan het begin van
het seizoen.
7.3 Veiligheidsinstructies
• Plaats de barbecue buitenshuis op een goed geventileerde
plaats. Zorg ervoor dat er geen vlammen of warmtebronnen
in de buurt van de barbecue zijn.
• Gebruik nooit een aansteker of lucifer om te controleren op
gaslekken.
• Rook niet en ontsteek de branders niet wanneer u
controleert op gaslekken.
7.4 Welke materialen heb ik nodig?
Om te controleren of er gaslekken zijn, hebt u het volgende
nodig:
• Een testvloeistof. U kunt hiervoor een kant-en-klare lekspray
of een mengsel van water (50%) en afwasmiddel (50%)
gebruiken.
• Het lektestgereedschap dat geleverd is bij de barbecue. U
gebruikt dit gereedschap om de testvloeistof op te zuigen en
2 Sluit de drukregelaar aan op de gasfles. Ga als volgt te werk:
• Als de regelaar uitgerust is met een moer, schroeft u de
regelaar rechtsom op de gasfles en draait u de moer aan
met een Engelse sleutel (C).
www.barbecook.com 25
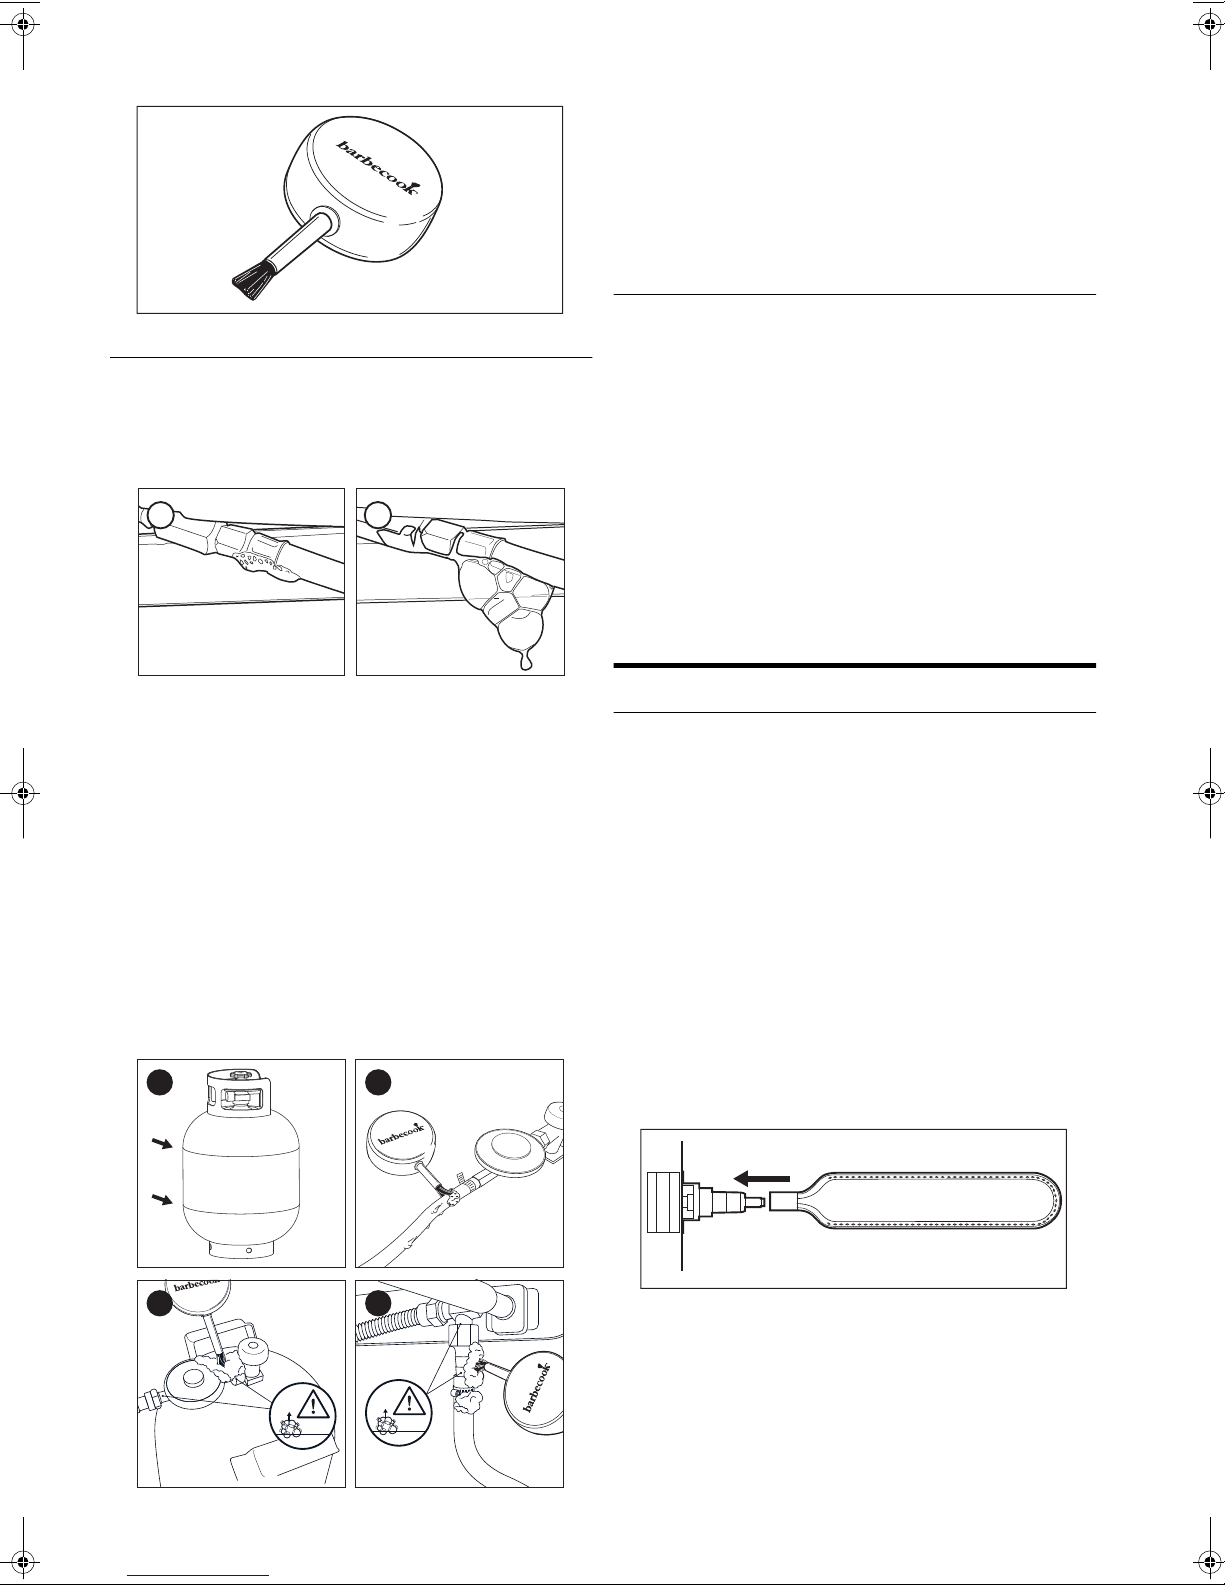
aan te brengen op de gasonderdelen of gasverbindingen die
u wilt controleren.
7.5 Controleren op gaslekken
U kunt controleren of er gaslekken zijn door op alle
gasonderdelen en -verbindingen een testvloeistof aan te
brengen. Als er grotere bellen gevormd worden op een bepaald
onderdeel of een bepaalde verbinding, is er sprake van een
gaslek:
✔✖
De drukregelaar en koppeling van uw barbecue kunnen
0
verschillen van de voorbeelden op de afbeeldingen.
6 Ga als volgt te werk:
• Als u een lek vaststelt, volgt u de instructies onder “ In
geval van een gaslek”.
• Als er geen lekken zijn, draait u de gastoevoer dicht,
spoelt u alle onderdelen grondig met water en droogt u
deze goed af.
7.6 In geval van een gaslek
1 Draai de gastoevoer dicht en ga als volgt te werk:
• Als u een lek vastgesteld hebt aan een van de
verbindingen, draait u de betreffende verbinding vast.
• Als u een lek vastgesteld hebt aan de gasfles of slang,
vervangt u de gasfles of slang.
2 Controleer de verbinding of het onderdeel waar u het lek
hebt vastgesteld opnieuw.
3 Als het lek niet hersteld is, neemt u contact op met een
Barbecook-verdeler. Gebruik de barbecue pas opnieuw als
het lek hersteld is.
Raadpleeg www.barbecook.com voor een lijst met
2
Barbecook-verdelers bij u in de buurt.
8 DE BARBECUE KLAARMAKEN
VOOR GEBRUIK
Ga als volgt te werk om te controleren of er gaslekken zijn:
1 Zet de barbecue buitenshuis.
2 Neem uw lektestgereedschap en testvloeistof (lekspray of
water-zeepmengsel).
3 Open het deksel en zet alle regelknoppen op OFF.
4 Zet de gastoevoer iets open. Draai hiervoor slechts één keer
aan het ventiel van de gasfles.
5 Zuig wat testvloeistof op met het lektestgereedschap en
breng het aan op de zone die u wilt controleren. De volgende
onderdelen moeten gecontroleerd worden:
• De lasnaden van de gasfles (A)
• De slang (B)
• De verbindingen tussen de gasfles en de drukregelaar en
tussen de drukregelaar en de slang (C)
• De verbinding tussen de slang en de barbecue (D)
A
B
8.1 Voor elk gebruik
Telkens als u de barbecue gebruikt, dient u ervoor te zorgen dat:
• de barbecue op een geschikte plaats opgesteld is. Zie
“3.3 Een geschikte locatie kiezen”.
• de gasslang niet over de grond sleept en niet in aanraking
kan komen met een heet oppervlak of druipend vet.
• de kuip schoongemaakt is. Wij raden u aan voor elk gebruik
een nieuwe Leaf
reinigen”.
• de branders en venturibuizen niet verstopt zijn door
insectennesten of spinnenwebben. Zie “12.3 De branders en
venturibuizen schoonmaken”.
• de barbecue correct gemonteerd is. Besteed extra aandacht
aan:
• de branderkappen. Elke kap moet boven de juiste
brander aangebracht zijn. Zie “4.2 Branderkappen”.
• de venturibuizen van de branders. Deze moeten boven de
openingen van de gasventielen geplaatst zijn.
®
in de kuip te plaatsen. Zie “12.2 De kuip
C
26 www.barbecook.com
D
Als u er absoluut zeker van wilt zijn dat de
2
gasverbindingen in orde zijn, kunt u de barbecue voor elk
gebruik op gaslekken controleren. Zie “7 Controleren op
gaslekken”.
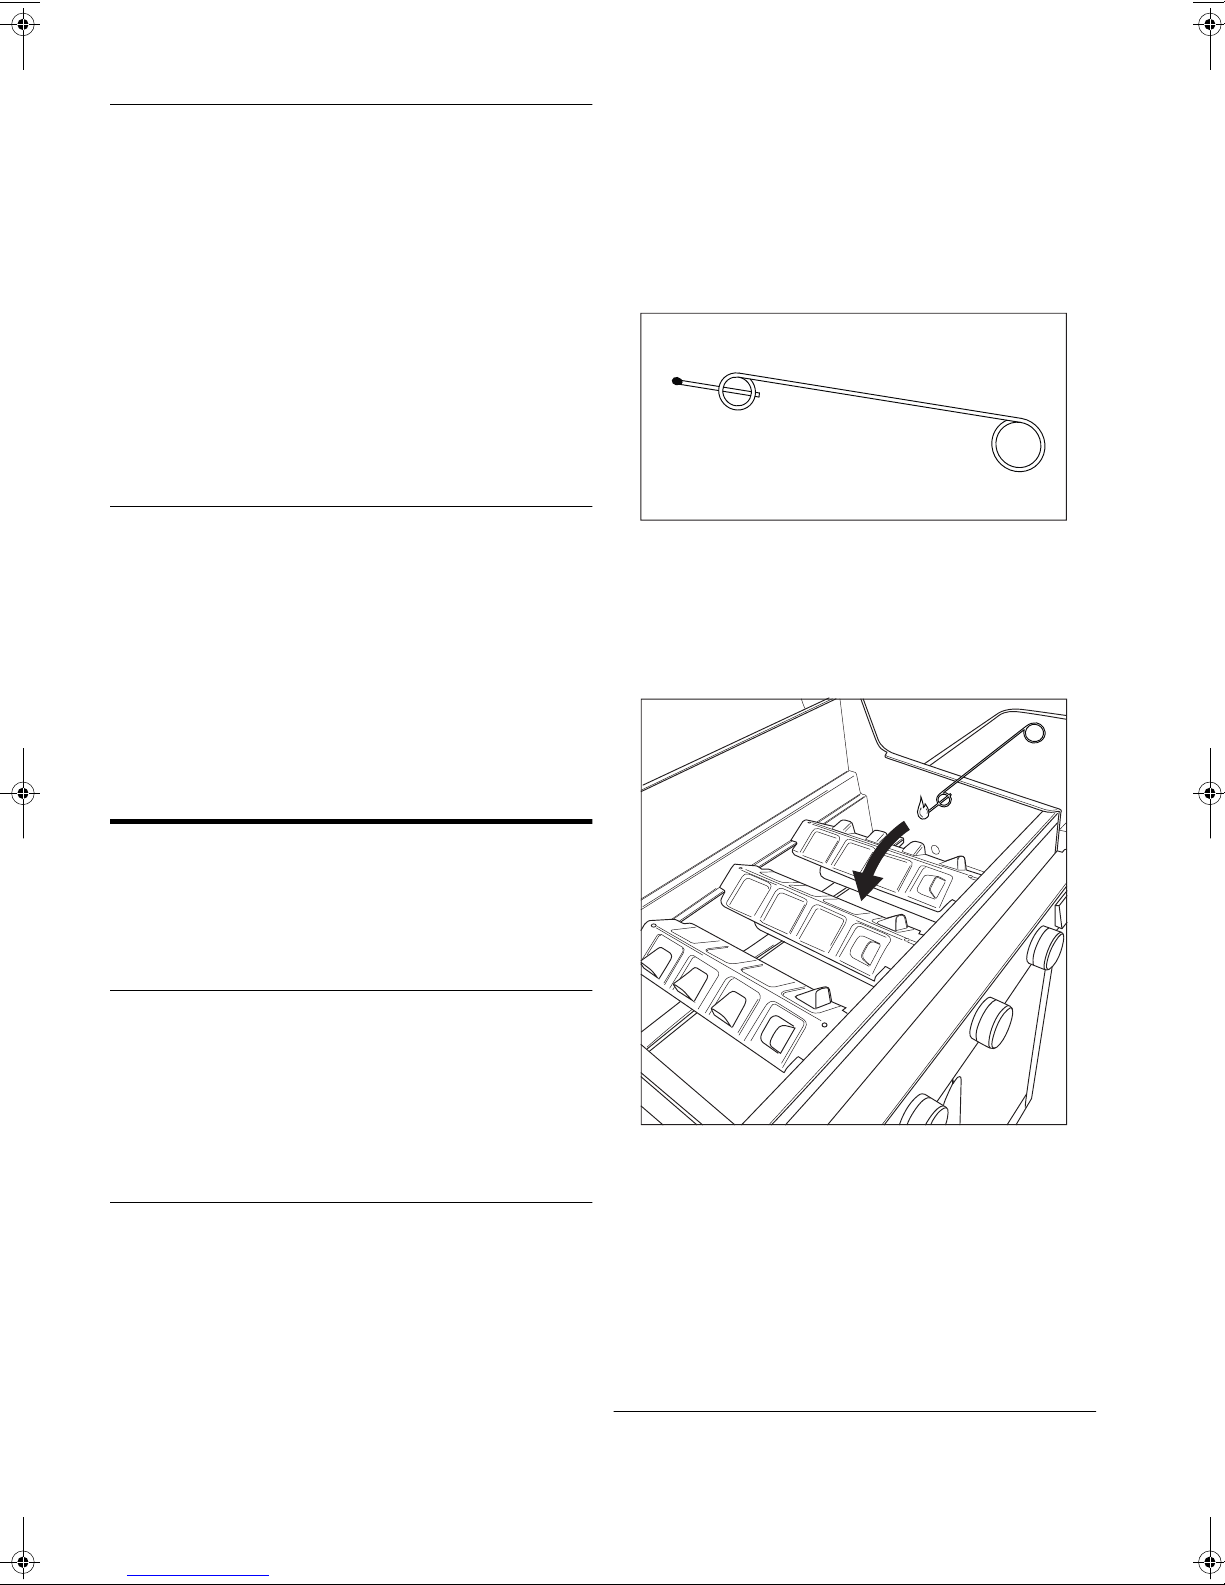
8.2 Voor het eerste gebruik (of na een
lange periode van ongebruik)
Als u de barbecue voor het eerst of na een lange periode van
ongebruik opnieuw gebruikt, moet u enkele extra controles
uitvoeren:
• Zorg ervoor dat u alle instructies in deze handleiding
gelezen, begrepen en gecontroleerd hebt (alleen voor het
eerste gebruik).
• Controleer de barbecue op gaslekken. Zie “7 Controleren op
gaslekken”.
Controleer of er geen gaslekken zijn als de barbecue
1
gemonteerd werd door de leverancier.
• Maak de branders en de venturibuizen schoon (alleen na een
lange periode van ongebruik). Zie “12.3 De branders en
venturibuizen schoonmaken”.
• Laat de barbecue inbranden voor u er voedsel op legt (alleen
voor het eerste gebruik). Zie “8.3 De barbecue inbranden”.
8.3 De barbecue inbranden
4 Als de brander na drie pogingen nog niet ontstoken is, zet u
de regelknop ervan op OFF, draait u de gastoevoer dicht en
wacht u 5 minuten om het opgestapelde gas te laten
ontsnappen.
5 Probeer de brander opnieuw te ontsteken. Als dit nog steeds
niet lukt, probeert u de brander met een lucifer te ontsteken
of raadpleegt u “15 Problemen oplossen” om de oorzaak
van het probleem te achterhalen.
9.2.2 EEN LUCIFER GEBRUIKEN
1 Plaats een lucifer in de luciferhouder.
Door de barbecue voor het eerste gebruik in te branden,
verwijdert u achtergebleven fabricagevetten. Ga als volgt te
werk:
1 Ontsteek de hoofdbranders en zet de regelknoppen op
HIGH. Zie “9.2 De hoofdbranders ontsteken”.
2 Sluit het deksel en laat de barbecue gedurende 15 minuten
branden. Plaats nog geen voedsel op het rooster.
3 Na 15 minuten opent u het deksel en laat u de barbecue nog
5 minuten branden (regelknoppen nog steeds op HIGH).
4 Na deze 5 minuten is de barbecue klaar voor gebruik en kunt
u voedsel op het rooster leggen.
9 DE BRANDERS ONTSTEKEN
Om de branders te ontsteken met de elektrische
0
ontsteker, moet u een AA-batterij in de ontsteker
plaatsen. Deze batterij is niet bij de barbecue geleverd.
Het batterijvak van de ontsteker vindt u terug in de kast
van de barbecue.
9.1 Veiligheidsinstructies
• Voor u de barbecue ontsteekt, voert u alle controles uit die
vermeld worden onder “8 De barbecue klaarmaken voor
gebruik”.
• Zorg ervoor dat het deksel altijd geopend is wanneer u een
brander ontsteekt.
• Buig u nooit rechtstreeks over een brander wanneer u deze
ontsteekt.
9.2 De hoofdbranders ontsteken
9.2.1 DE ONTSTEKER GEBRUIKEN
1 Open het deksel en zet de regelknoppen van de
hoofdbranders op OFF.
2 Als er nog geen andere brander ontstoken is, opent u de
gastoevoer en wacht u tien seconden zodat het gas zich kan
stabiliseren.
3 Druk op de regelknop van een brander, zet deze op HIGH en
houd deze even vast. De ingebouwde ontsteker zal vonken
maken, waardoor de brander ontstoken wordt.
Ontsteek om te beginnen altijd eerst één hoofdbrander.
1
Ontsteek nooit alle hoofdbranders tegelijk.
2 Open het deksel en zet de regelknoppen van de
hoofdbranders op OFF.
3 Als er nog geen andere brander ontstoken is, opent u de
gastoevoer en wacht u tien seconden zodat het gas zich kan
stabiliseren.
4 Strijk de lucifer aan en houd deze ongeveer 13 mm van de
brander verwijderd.
5 Zet de regelknop van één brander op HIGH.
Ontsteek om te beginnen altijd eerst één hoofdbrander.
1
Ontsteek nooit alle hoofdbranders tegelijk.
6 Als de brander niet binnen 5 seconden ontsteekt, zet u de
regelknop ervan op OFF, draait u de gastoevoer dicht en
wacht u 5 minuten om het opgestapelde gas te laten
ontsnappen.
7 Probeer de brander opnieuw te ontsteken. Als dit nog steeds
niet lukt, raadpleegt u “15 Problemen oplossen” om de
oorzaak van het probleem te achterhalen.
9.3 De zijbrander ontsteken
De zijbrander kan potten dragen die maximaal 9 kg zwaar
1
zijn en een maximale diameter van 220 mm hebben.
www.barbecook.com 27
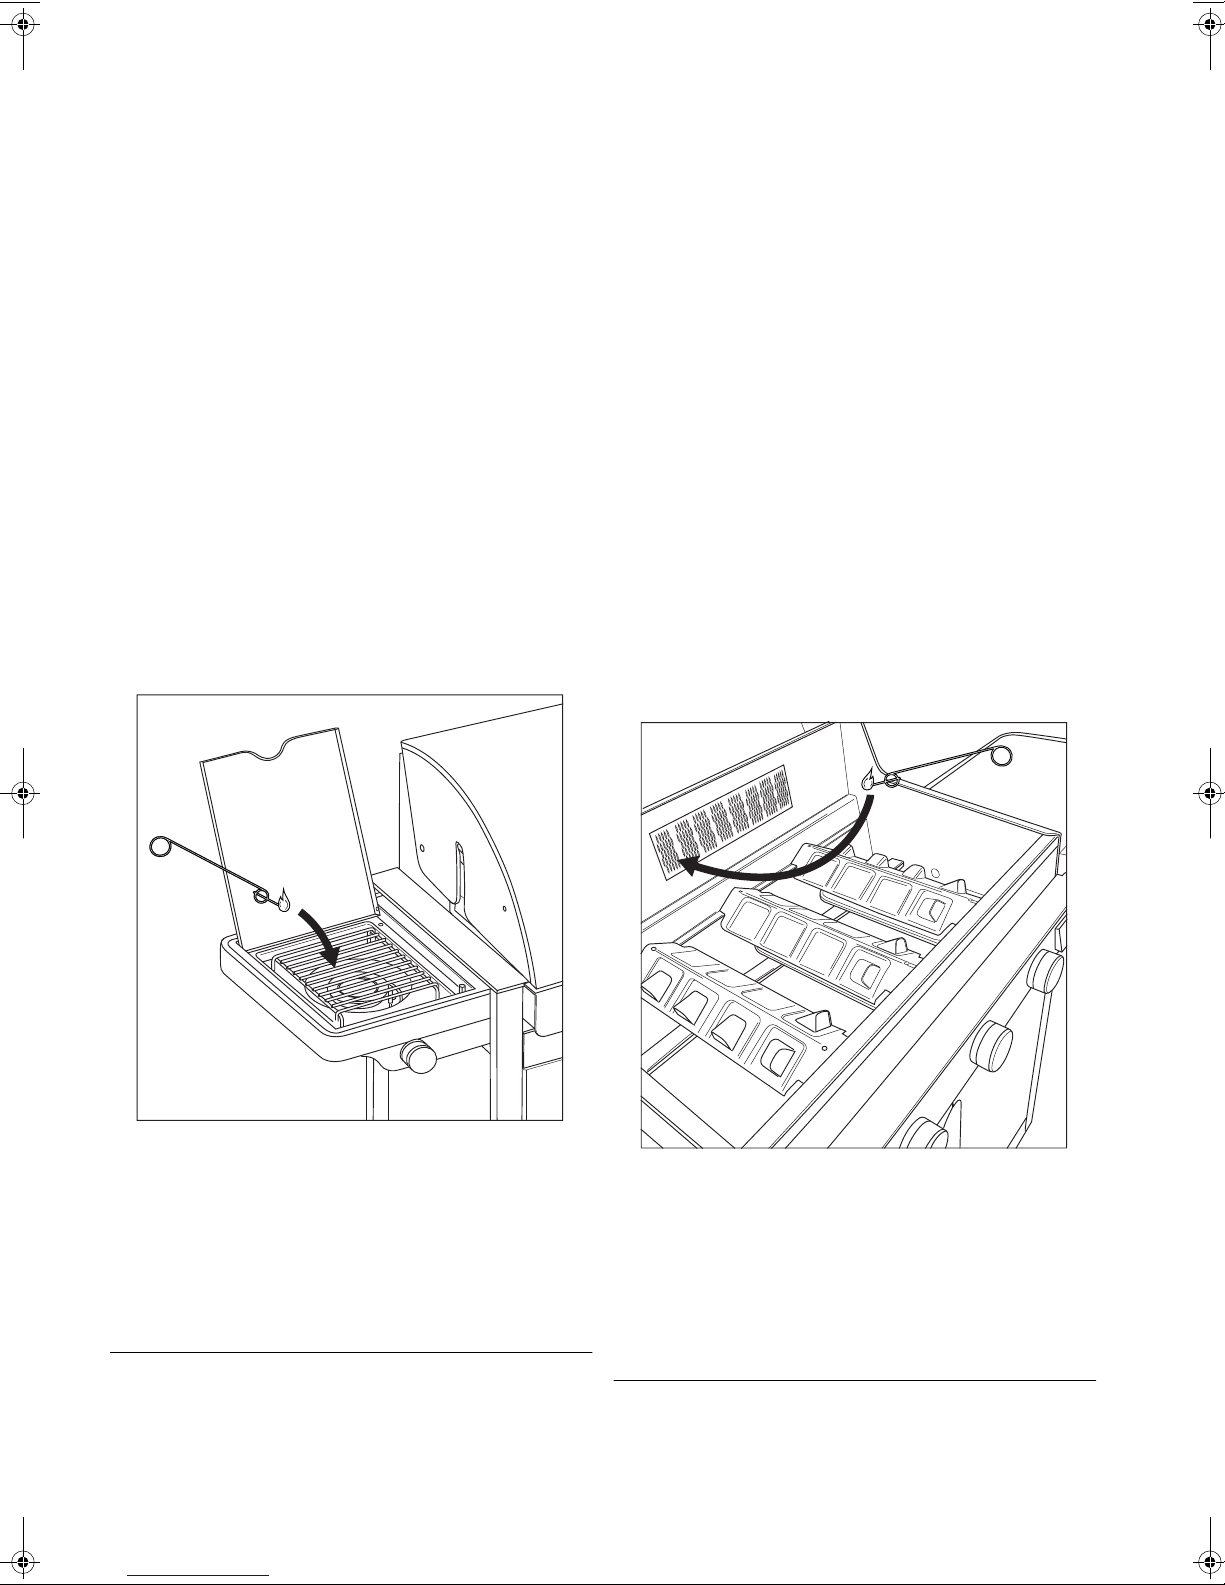
9.3.1 DE ONTSTEKER GEBRUIKEN
9.4.1 DE ONTSTEKER GEBRUIKEN
1 Open het deksel en zet de regelknop van de zijbrander op
OFF.
2 Als er nog geen andere brander ontstoken is, opent u de
gastoevoer en wacht u tien seconden zodat het gas zich kan
stabiliseren.
3 Druk op de regelknop van de zijbrander, zet deze op HIGH
en houd deze even vast. De ingebouwde ontsteker zal
vonken maken, waardoor de zijbrander ontstoken wordt.
4 Als de brander na drie pogingen nog niet ontstoken is, zet u
de regelknop ervan op OFF, draait u de gastoevoer dicht en
wacht u 5 minuten om het opgestapelde gas te laten
ontsnappen.
5 Probeer de zijbrander opnieuw te ontsteken. Als dit nog
steeds niet lukt, probeert u de brander met een lucifer te
ontsteken of raadpleegt u “15 Problemen oplossen” om de
oorzaak van het probleem te achterhalen.
9.3.2 EEN LUCIFER GEBRUIKEN
1 Plaats een lucifer in de luciferhouder.
2 Open het deksel en zet de regelknop van de zijbrander op
OFF.
3 Als er nog geen andere brander ontstoken is, opent u de
gastoevoer en wacht u tien seconden zodat het gas zich kan
stabiliseren.
4 Strijk de lucifer aan en houd deze ongeveer 13 mm van de
zijbrander verwijderd.
1 Open het deksel en zet de regelknop van de spitbrander op
OFF.
2 Verwijder de roosters en het warmrek van de barbecue en
leg ze opzij.
3 Als er nog geen andere brander ontstoken is, opent u de
gastoevoer en wacht u tien seconden zodat het gas zich kan
stabiliseren.
4 Druk op de regelknop van de spitbrander, zet deze op HIGH
en houd deze even vast. De ingebouwde ontsteker zal
vonken maken, waardoor de spitbrander ontstoken wordt.
5 Als de brander na drie pogingen nog niet ontstoken is, zet u
de regelknop ervan op OFF, draait u de gastoevoer dicht en
wacht u 5 minuten om het opgestapelde gas te laten
ontsnappen.
6 Probeer de spitbrander opnieuw te ontsteken. Als dit nog
steeds niet lukt, probeert u de brander met een lucifer te
ontsteken of raadpleegt u “15 Problemen oplossen” om de
oorzaak van het probleem te achterhalen.
9.4.2 EEN LUCIFER GEBRUIKEN
1 Plaats een lucifer in de luciferhouder.
2 Open het deksel en zet de regelknop van de spitbrander op
OFF.
3 Als er nog geen andere brander ontstoken is, opent u de
gastoevoer en wacht u tien seconden zodat het gas zich kan
stabiliseren.
4 Strijk de lucifer aan en houd deze links van de spitbrander.
5 Zet de regelknop van de zijbrander op HIGH.
6 Als de zijbrander niet binnen 5 seconden ontsteekt, zet u de
regelknop ervan op OFF, draait u de gastoevoer dicht en
wacht u 5 minuten om het opgestapelde gas te laten
ontsnappen.
7 Probeer de zijbrander opnieuw te ontsteken. Als dit nog
steeds niet lukt, raadpleegt u “15 Problemen oplossen” om
de oorzaak van het probleem te achterhalen.
9.4 De spitbrander ontsteken
Voor u de spitbrander kunt gebruiken, moet u twee
0
D-batterijen in de motor van de spitbrander plaatsen.
Deze batterijen zijn niet bij de barbecue geleverd.
28 www.barbecook.com
5 Zet de regelknop van de spitbrander op HIGH.
6 Als de brander niet binnen 5 seconden ontsteekt, zet u de
regelknop ervan op OFF, draait u de gastoevoer dicht en
wacht u 5 minuten om het opgestapelde gas te laten
ontsnappen.
7 Probeer de spitbrander opnieuw te ontsteken. Als dit nog
steeds niet lukt, raadpleegt u “15 Problemen oplossen” om
de oorzaak van het probleem te achterhalen.
9.5 De branders uitschakelen
Als u de branders niet langer gebruikt, moet u deze uitschakelen.
Ga als volgt te werk:
1 Draai de gastoevoer dicht.
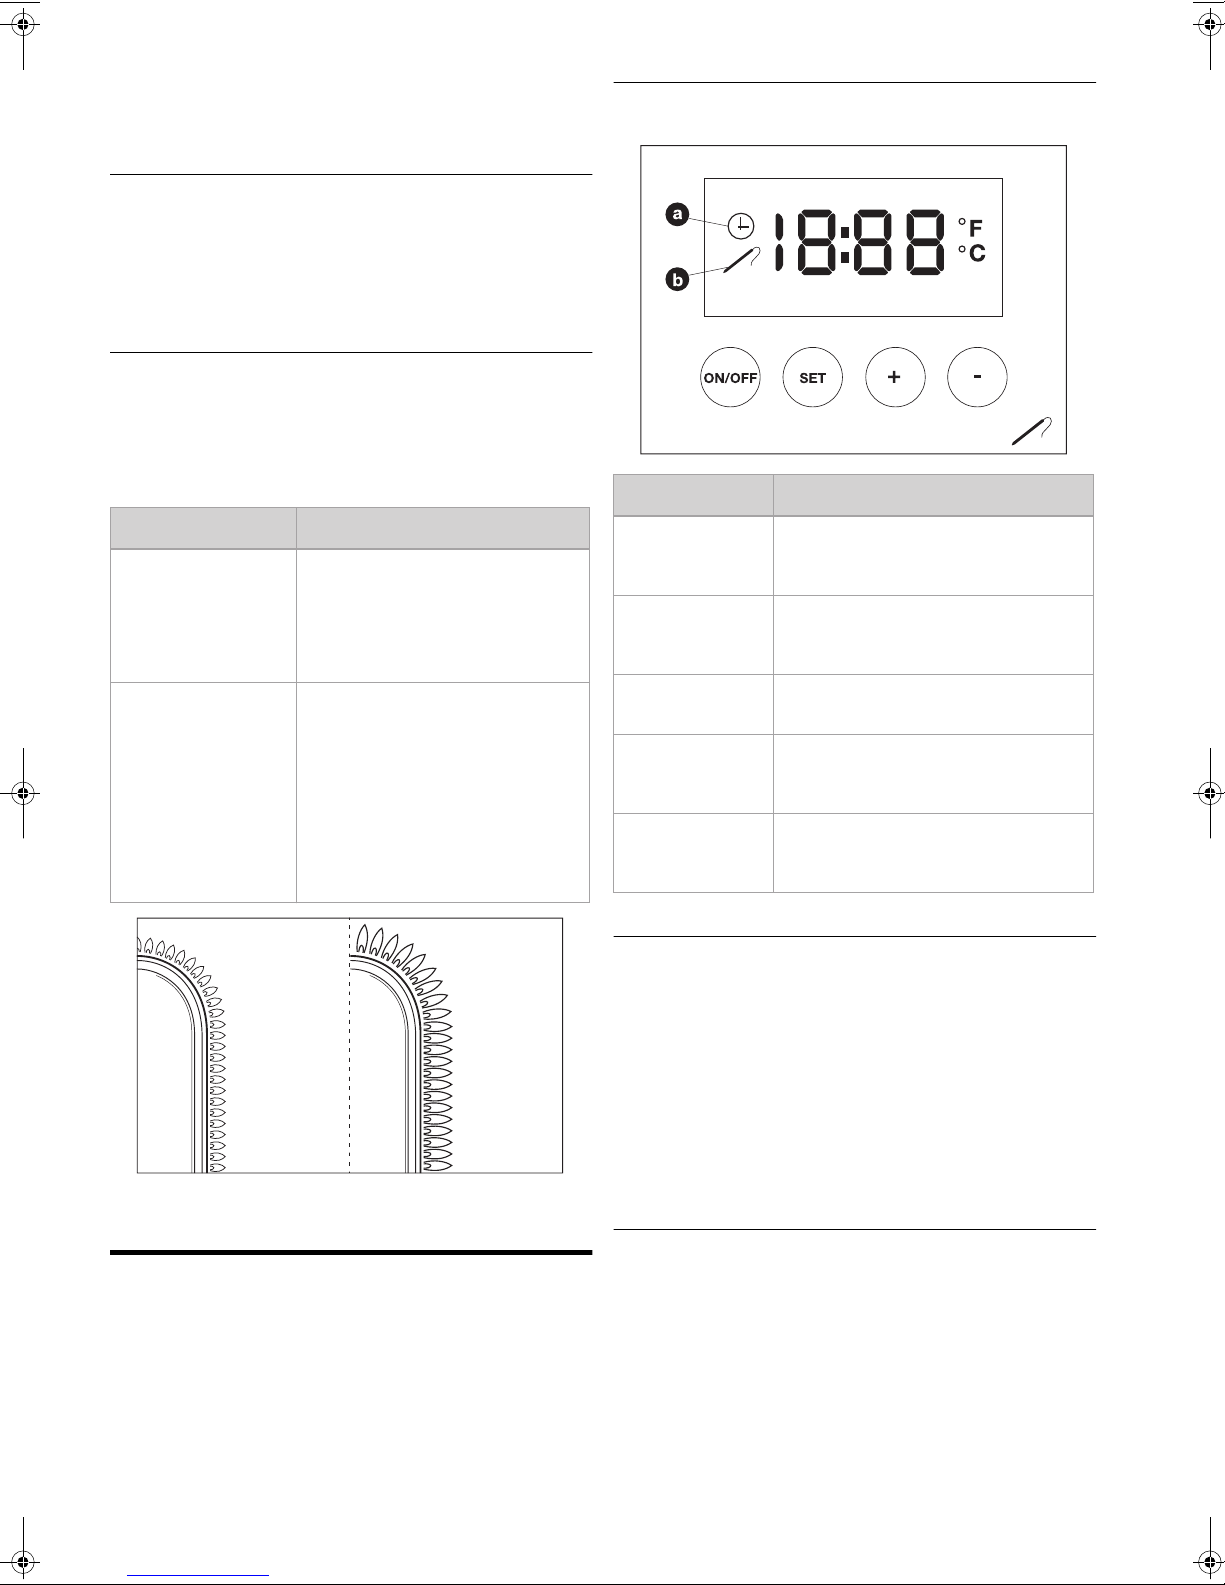
2 Zet de regelknoppen van de branders op OFF.
Door eerst de gastoevoer dicht te draaien, zorgt u ervoor
2
dat er geen gas meer aanwezig is in de barbecue.
9.6 De branders opnieuw ontsteken
Als een brander tijdens het gebruik dooft, gaat u als volgt te werk:
1 Open het deksel en draai de gastoevoer dicht.
2 Zet alle regelknoppen op OFF en wacht 5 minuten om het
opgestapelde gas te laten ontsnappen.
3 Ontsteek de brander(s) opnieuw.
9.7 De vlammen controleren
Telkens als u een brander ontsteekt, moet u de vlammen ervan
controleren. Een perfect vlam is nagenoeg volledig blauw, met
een klein stukje geel aan de bovenkant. Sporadische gele
vlammen zijn normaal en niet gevaarlijk.
Als er een probleem is met de vlammen, onderneemt u een van
de volgende acties om dit op te lossen:
De vlammen zijn... Ga als volgt te werk...
Laag en volledig geel
Hoger dan de kuip
1 Draai onmiddellijk de gastoever dicht
en zet alle regelknoppen op OFF.
2 Raadpleeg “15 Problemen oplossen”
om de oorzaak van het probleem te
achterhalen. Waarschijnlijk zijn de
venturibuizen geblokkeerd.
1 Draai onmiddellijk de gastoever dicht
en zet alle regelknoppen op OFF.
2 Wacht gedurende 5 minuten om
eventueel opgestapeld gas te laten
ontsnappen.
3 Ontsteek de brander(s) opnieuw.
4 Als het probleem niet opgelost raakt,
raadpleegt u “15 Problemen
oplossen” om de oorzaak ervan te
achterhalen.
10.1 Pictogrammen en regelknoppen
Op de timer en thermometer vindt u de volgende pictogrammen
en knoppen terug:
Pictogram/knop Beschrijving
Klokpictogram (A) Wordt weergegeven tijdens het instellen van
het timeralarm en wanneer dit alarm
daadwerkelijk ingesteld is.
Sondepictogram (B) Wordt weergegeven tijdens het instellen van
het thermometeralarm en wanneer dit alarm
daadwerkelijk ingesteld is.
ON/OFF-knop Hiermee kunt u de timer/thermometer in- en
uitschakelen, en schakelen tussen °C en °F.
SET-knop Hiermee kunt u de stand voor het instellen
van het timer- en/of thermometeralarm
activeren.
Knoppen + en - Hiermee kunt u de correcte tijd of
temperatuur instellen voor het timer- of
thermometeralarm.
LOW HIGH
10 DE TIMER EN THERMOMETER
GEBRUIKEN
De barbecue is uitgerust met een timer en een thermometer. U
kunt deze gebruiken om een alarm in te stellen dat u kunt laten
weerklinken na het verstrijken van een bepaalde tijd of wanneer
het voedsel een bepaalde temperatuur heeft bereikt. U kunt de
thermometer ook gebruiken om de temperatuur van het voedsel
te controleren en te volgen.
Als u de thermometer niet gebruikt, raden wij u aan de
2
thermometersonde en -kabel binnenshuis te bewaren.
10.2 Het timeralarm instellen
1 Schakel de timer en thermometer in door op de
ON/OFF-knop te drukken.
2 Druk een of twee keer op de SET-knop tot het klokpictogram
en de standaardinstelling 0:00 weergegeven worden op het
scherm.
3 Gebruik de knoppen + en - om de gewenste tijd in te stellen.
4 Wanneer u klaar bent, drukt u gedurende vijf seconden op
geen enkele knop.
De timer verlaat automatisch de instelstand. Het alarm zal
weerklinken na de ingestelde tijd.
10.3 Het thermometeralarm instellen
1 Schakel de timer en thermometer in door op de
ON/OFF-knop te drukken.
2 Steek de thermometersonde in het voedsel.
Na enkele ogenblikken toont de thermometer de huidige
temperatuur van het voedsel.
3 Druk een of twee keer op de SET-knop tot het
sondepictogram en de standaardinstelling --- weergegeven
worden op het scherm.
4 U kunt schakelen tussen graden Fahrenheit (°F) en graden
Celsius (°C) door op de ON/OFF-knop te drukken.
www.barbecook.com 29
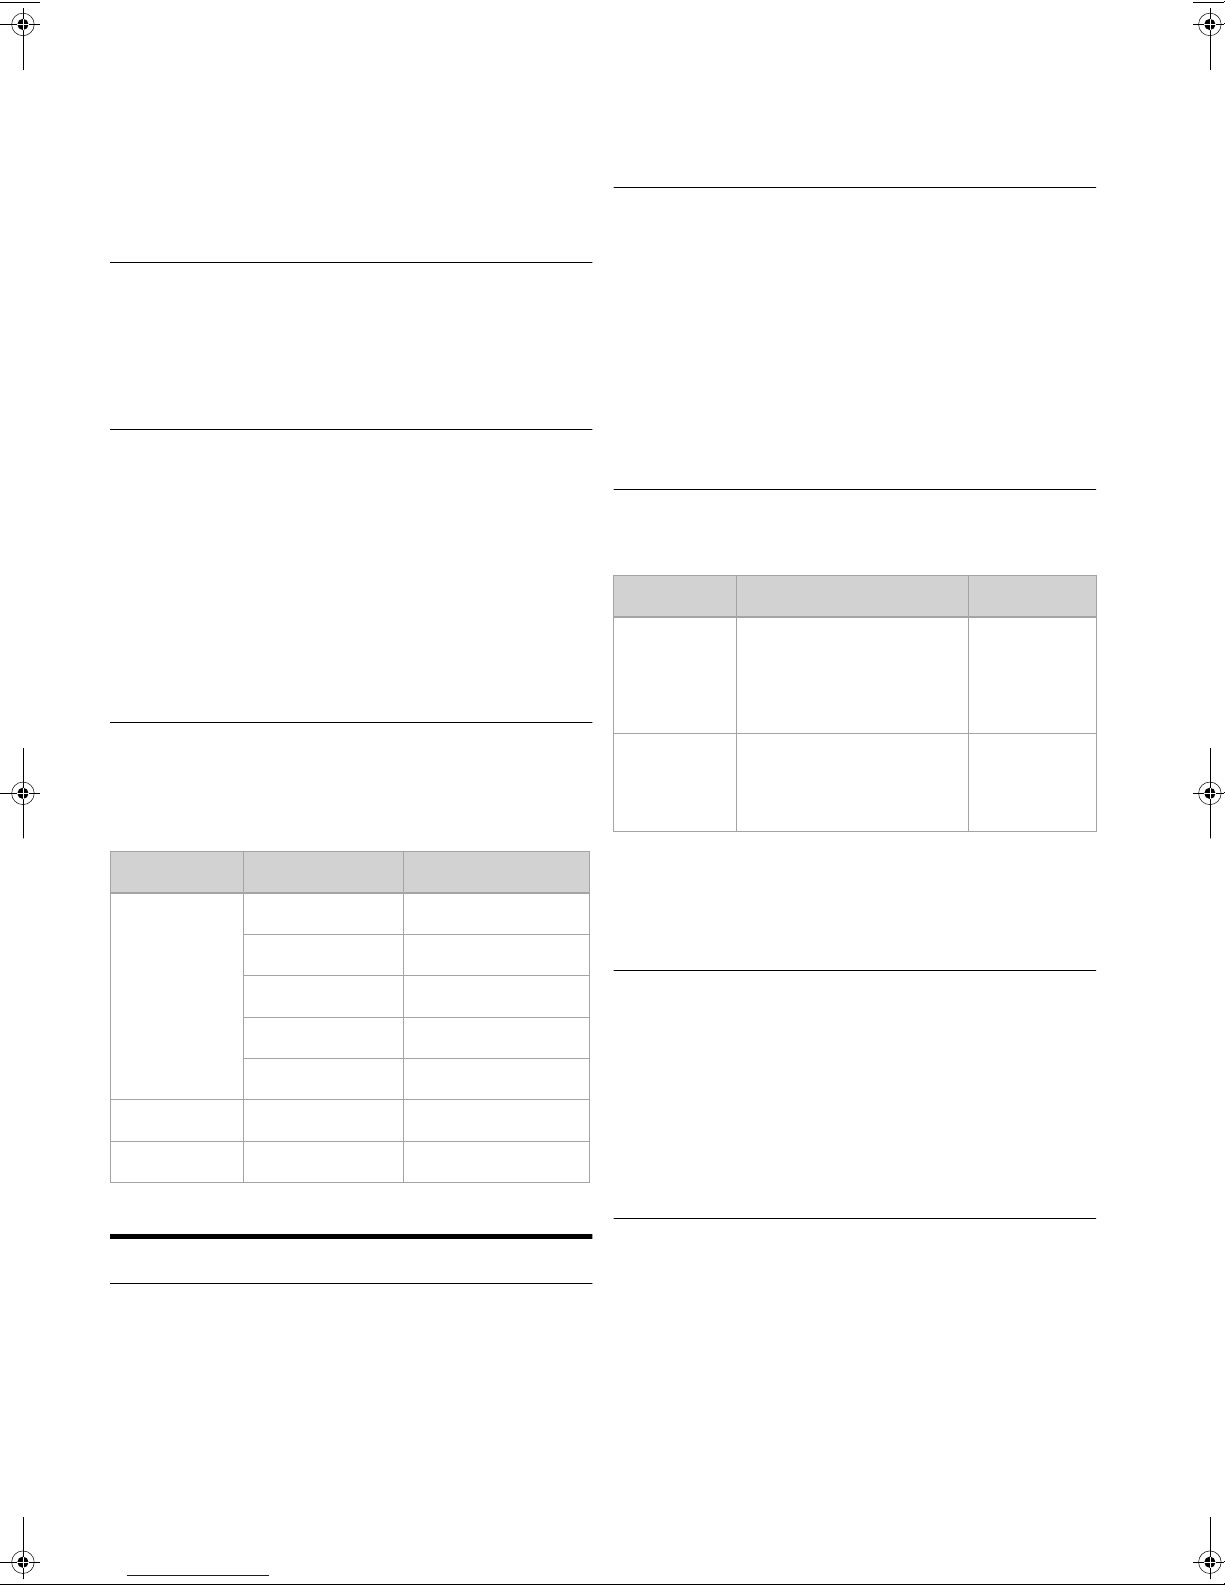
5 Gebruik de knoppen + en - om de gewenste temperatuur in
te stellen.
6 Wanneer u klaar bent, drukt u gedurende vijf seconden op
geen enkele knop.
De thermometer verlaat automatisch de instelstand. Het
alarm zal weerklinken wanneer het voedsel de ingestelde
temperatuur bereikt heeft.
10.4 Een alarm wissen
1 Druk een of twee keer op de SET-knop tot het te wissen
alarm weergegeven wordt op het scherm.
2 Om het alarm te wissen, drukt u nogmaals op de SET-knop
en houdt u de knop enkele ogenblikken ingedrukt.
10.5 De temperatuur van het voedsel
controleren
3 Open na deze tien minuten het deksel en leg het voedsel op
het rooster.
4 Als u nu minder warmte wilt, zet u de regelknop(pen) op een
lagere stand.
11.2 Voorkomen dat voedsel aankleeft
Houd rekening met het volgende om te voorkomen dat voedsel
aan het rooster kleeft:
• Smeer met behulp van een borstel wat olie op het voedsel
voor u het op het rooster plaatst . U kunt ook het rooster zelf
insmeren.
• Verwarm de barbecue voor. Hoe warmer het rooster
wanneer u het voedsel erop plaatst, hoe kleiner de kans dat
het voedsel zal aankleven.
• Draai het voedsel niet te snel om. Laat het eerst goed warm
worden.
1 Schakel de thermometer in door op de ON/OFF-knop te
drukken.
2 Steek de thermometersonde in het voedsel.
Na enkele ogenblikken toont de thermometer de huidige
temperatuur van het voedsel.
3 Als u de temperatuur van het voedsel wilt volgen, laat u de
sonde zitten.
4 Wanneer het voedsel klaar is, verwijdert u de sonde en
schakelt u de thermometer uit door op de ON/OFF-knop te
drukken.
10.6 Temperatuurrichtlijnen
Het thermometeralarm is erg handig om vlees te bereiden. Als u
de sonde in het midden van het vlees steekt, kunt u het alarm
laten weerklinken wanneer het vlees perfect gaar is. In de
onderstaande tabel vindt u welke temperatuur u moet kiezen
voor het instellen van het alarm:
Vlees Hoe bereid? Temperatuur
Rood vlees Bleu 45 - 49,5 °C
Saignant 50 - 54,5 °C
Medium 55 - 59,5 °C
À point 60 - 64,5 °C
Bien cuit 65 - 69,5 °C
Varkensvlees Niet van toepassing 79 - 100 °C
Gevogelte Niet van toepassing 79 - 100 °C
11.3 Rechtstreeks en onrechtstreeks
grillen
Afhankelijk van het type voedsel dat u wilt bereiden en de manier
waarop u dat wilt doen, kunt u rechtstreeks of onrechtstreeks
gaan grillen:
Methode Beschrijving Gebruik
Rechtstreeks Plaats het voedsel rechtstreeks
Onrechtstreeks
Wanneer u met een gesloten deksel grilt, dient u steeds
1
de dekselthermometer in de gaten te houden om er zeker
van te zijn dat de barbecue niet te heet wordt. Zie
“11.5 De temperatuur controleren”.
boven een ontstoken brander,
kies een hoge stand voor de
brander en laat het deksel
open.
Plaats het voedsel naast een
ontstoken brander, kies een
gemiddelde/lage stand voor de
brander en sluit het deksel.
Vlees en groenten dichtschroeien
Dichtgeschroeid vlees
verder garen
11.4 Grillen met gesloten deksel
Grillen met een gesloten deksel levert een aantal voordelen op:
• De temperatuur van het rooster is hoger en blijft constanter.
• Het voedsel moet minder lang garen en blijft sappiger.
• Er zijn minder opflakkeringen en het gasverbruik ligt lager.
Wanneer u met een gesloten deksel grilt, dient u steeds
1
de dekselthermometer in de gaten te houden om er zeker
van te zijn dat de barbecue niet te heet wordt. Zie
“11.5 De temperatuur controleren”.
11 HANDIGE TIPS
11.1 De barbecue voorverwarmen
Door de barbecue voor te verwarmen, zorgt u ervoor dat het
rooster warm genoeg is als u het voedsel erop legt. Ga als volgt
te werk:
1 Ontsteek de brander(s) en zet de regelknop(pen) op HIGH.
2 Sluit het deksel en laat de barbecue gedurende tien minuten
branden.
30 www.barbecook.com
11.5 De temperatuur controleren
De barbecue is uitgerust met krachtige branders, wat betekent
dat u deze snel kunt opwarmen en u de temperatuur constant
kunt houden. Als u echter grilt met een gesloten deksel, moet u
ervoor zorgen dat de barbecue niet te heet wordt. Controleer dus
regelmatig de dekselthermometer en neem de volgende
richtlijnen in acht:
• Een normale gaartemperatuur bedraagt ongeveer 210 °C. Bij
een hogere temperatuur kunnen druipend en aangekoekt vet
echter ontbranden.
• De temperatuur mag nooit langer dan vijf minuten hoger zijn
dan 300 °C. Is dit wel het geval, dan kan de barbecue
beschadigd en vervormd raken.
 Loading...